

#binancep2pantoan
binancep2pantoan
1.8M views
8,344 Discussing
Hot
Latest
·
--
Article
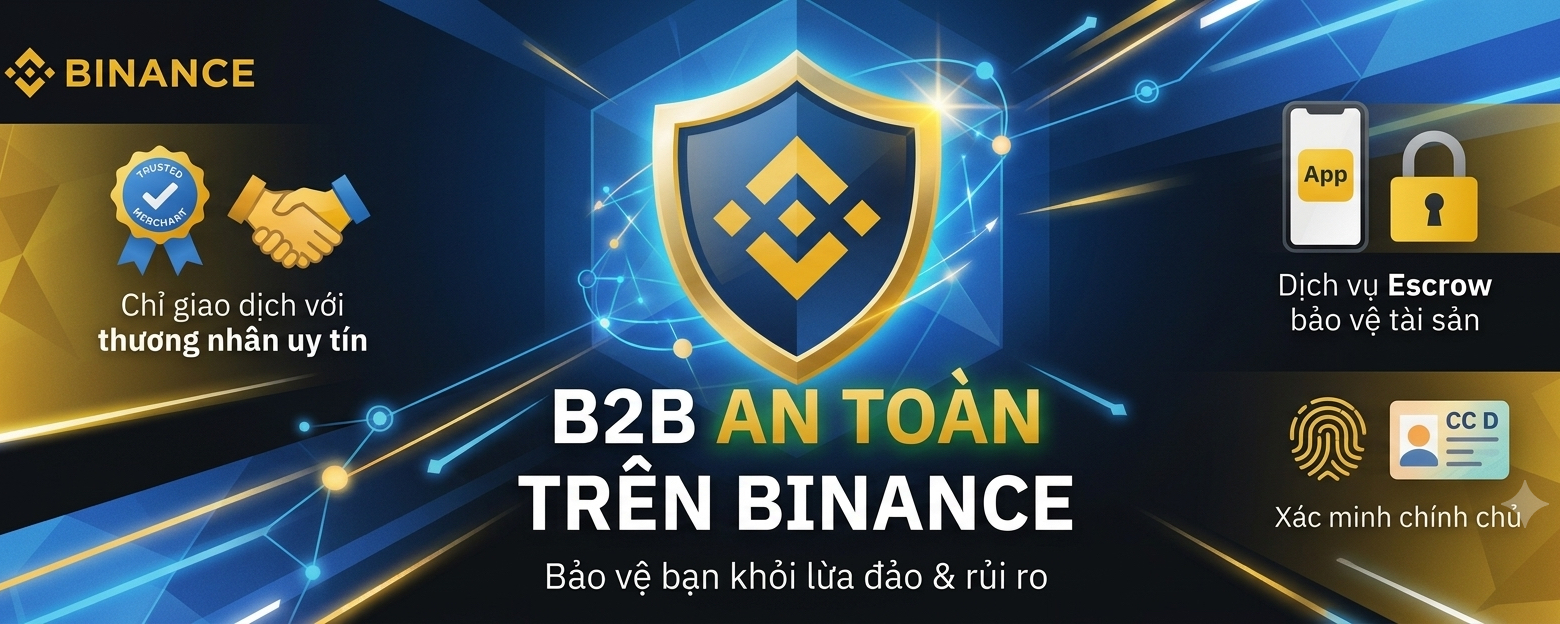
7 "Blood and Sweat" Rules for Safe Binance P2P Trading and Never Losing MoneyP2P (Peer-to-Peer) trading on Binance is currently the most popular and convenient channel for depositing/withdrawing fiat currency (VND). However, convenience also comes with many risks, such as getting involved with "dirty money," which can lead to bank account freezes, or being scammed by malicious opponents.
Whether you are a newbie or a long-time investor, mastering the safety rules when trading P2P is a must to protect your own assets.
7 "Blood and Sweat" Rules for Safe Binance P2P Trading and Never Losing Money
P2P (Peer-to-Peer) trading on Binance is currently the most popular and convenient channel for depositing/withdrawing fiat currency (VND). However, convenience also comes with many risks, such as getting involved with "dirty money," which can lead to bank account freezes, or being scammed by malicious opponents.
Whether you are a newbie or a long-time investor, mastering the safety rules when trading P2P is a must to protect your own assets.
Whether you are a newbie or a long-time investor, mastering the safety rules when trading P2P is a must to protect your own assets.
1
149
💡 Dealing with Binance P2P Transaction Issues: What Should You Do?
When trading P2P, if you encounter unexpected situations, stay calm and handle them according to the safe instructions below:
❓ Situation 1: The buyer has clicked “Paid”, but your bank hasn’t reported receiving the funds?
👉 How to handle: Under no circumstances should you release the coins. Message the buyer to request a screenshot of the transaction receipt. Check your banking app carefully. If the countdown time passes and you still haven’t received the money, click Appeal and submit evidence for Binance to investigate.
❓ Situation 2: You transferred too much/too little, or you entered the transfer content incorrectly?
👉 How to handle: Message your counterparty directly through the chat box in the Binance app to agree on a solution. If the counterparty doesn’t cooperate for a refund or doesn’t release the coins, click Appeal and upload the bank transfer invoice.
🔒 Always trade 100% on the Binance app and follow the safety guidelines from @Bi
#BinanceP2PAnToan
@Binance_Vietnam
💡 Dealing with Binance P2P Transaction Issues: What Should You Do?
When trading P2P, if you encounter unexpected situations, stay calm and handle them according to the safe instructions below:
❓ Situation 1: The buyer has clicked “Paid”, but your bank hasn’t reported receiving the funds?
👉 How to handle: Under no circumstances should you release the coins. Message the buyer to request a screenshot of the transaction receipt. Check your banking app carefully. If the countdown time passes and you still haven’t received the money, click Appeal and submit evidence for Binance to investigate.
❓ Situation 2: You transferred too much/too little, or you entered the transfer content incorrectly?
👉 How to handle: Message your counterparty directly through the chat box in the Binance app to agree on a solution. If the counterparty doesn’t cooperate for a refund or doesn’t release the coins, click Appeal and upload the bank transfer invoice.
🔒 Always trade 100% on the Binance app and follow the safety guidelines from @Bi
#BinanceP2PAnToan
@Binance Vietnam
When trading P2P, if you encounter unexpected situations, stay calm and handle them according to the safe instructions below:
❓ Situation 1: The buyer has clicked “Paid”, but your bank hasn’t reported receiving the funds?
👉 How to handle: Under no circumstances should you release the coins. Message the buyer to request a screenshot of the transaction receipt. Check your banking app carefully. If the countdown time passes and you still haven’t received the money, click Appeal and submit evidence for Binance to investigate.
❓ Situation 2: You transferred too much/too little, or you entered the transfer content incorrectly?
👉 How to handle: Message your counterparty directly through the chat box in the Binance app to agree on a solution. If the counterparty doesn’t cooperate for a refund or doesn’t release the coins, click Appeal and upload the bank transfer invoice.
🔒 Always trade 100% on the Binance app and follow the safety guidelines from @Bi
#BinanceP2PAnToan
@Binance Vietnam
112
·
--
Traders integrate QR codes directly into P2P orders: convenient, but there’s one special thing to note ⚠️
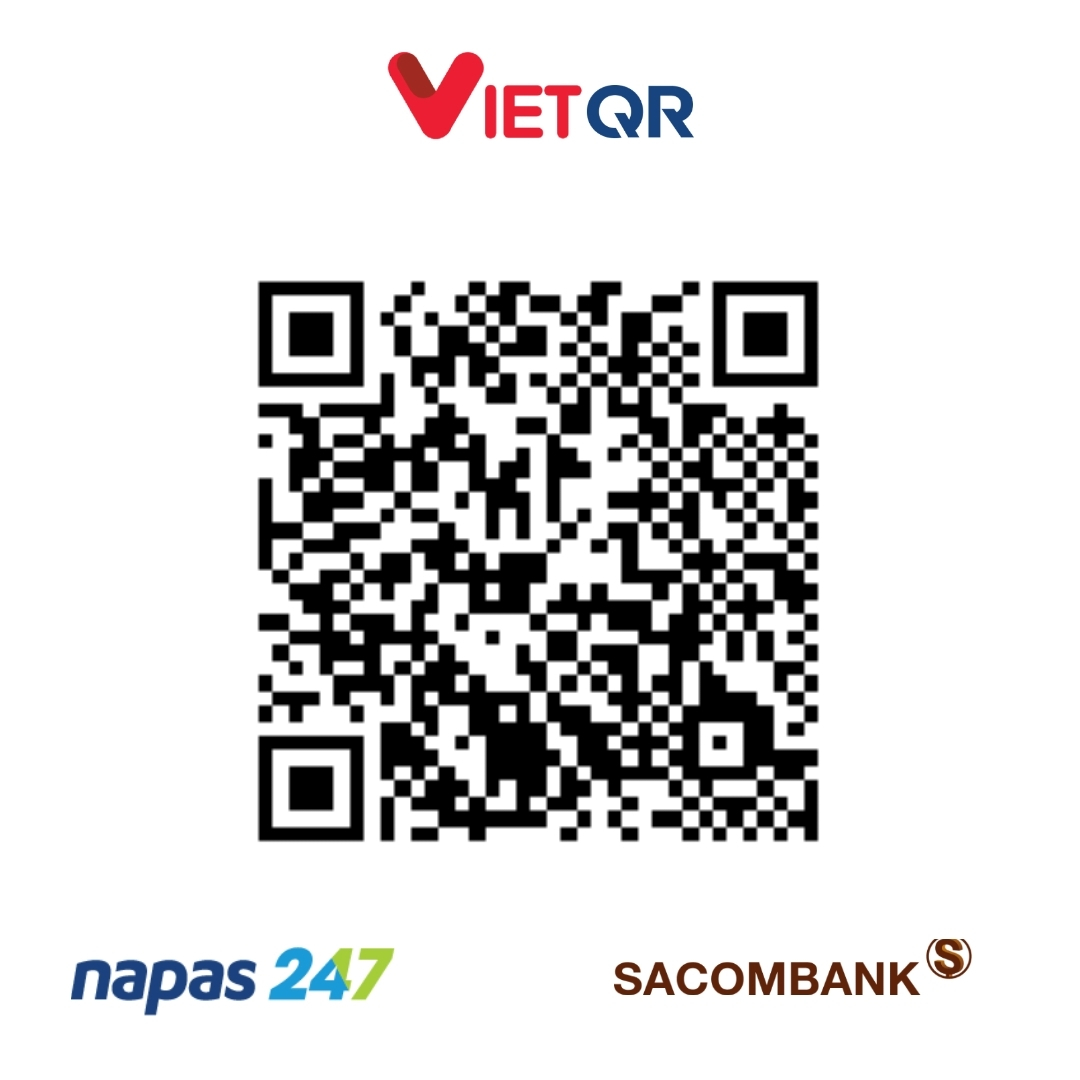
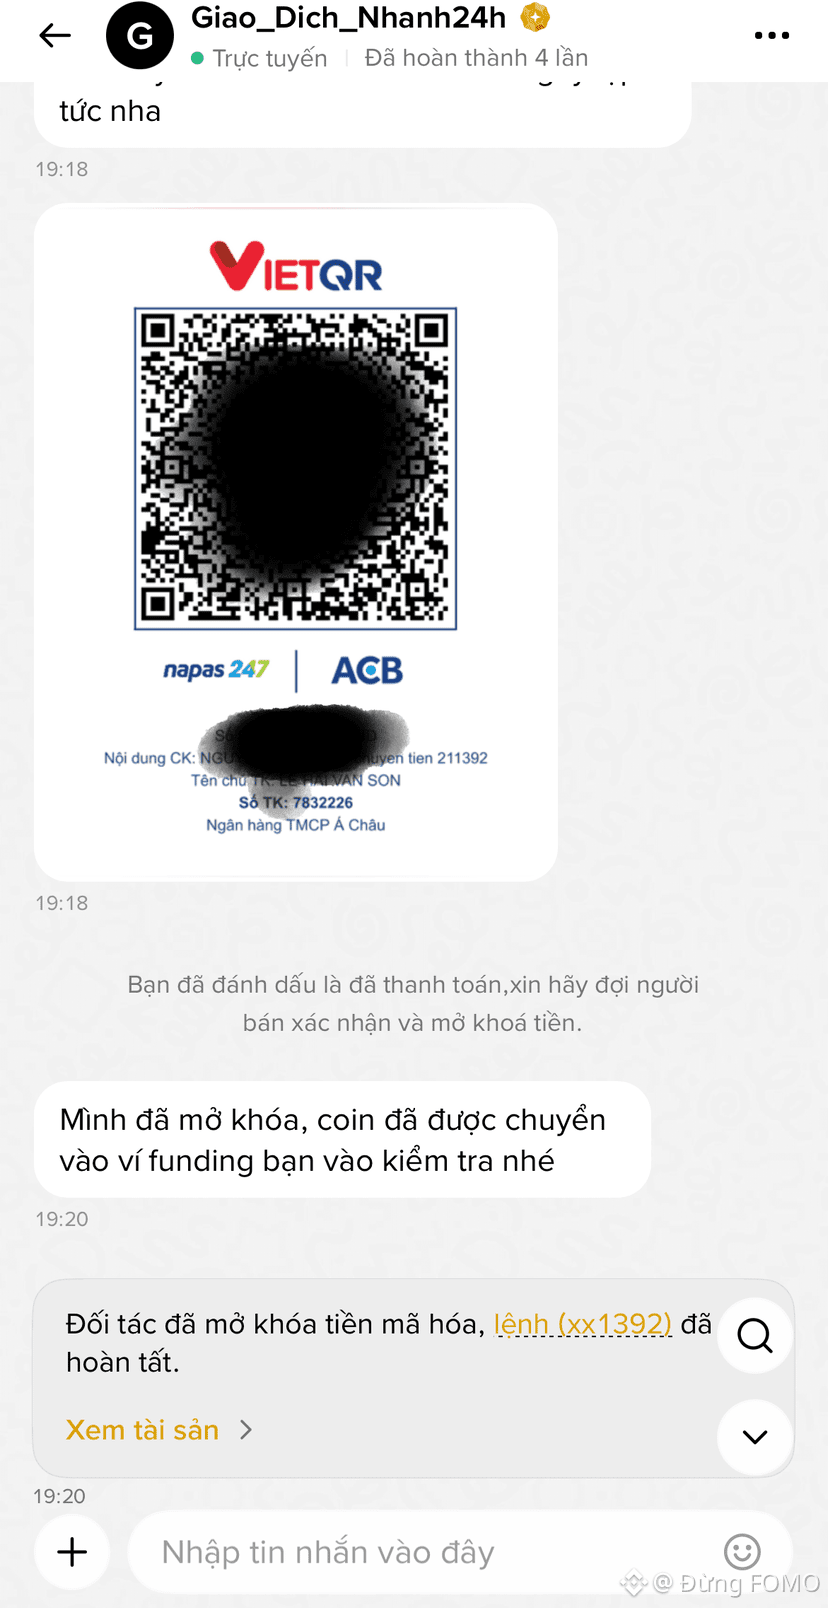
Recently I encountered a case where a trader had QR payment codes already built into the P2P order. Buyers only need to scan the QR to transfer money—no need to manually enter the bank account number or the amount.
Advantages:
* ✅ Faster payments, reducing mistakes entering the account number.
* ✅ The amount is filled in automatically, minimizing amount mix-ups.
* ✅ A more convenient trading experience, especially for newcomers.
* ✅ Transfer information is standardized, saving time otherwise spent exchanging details.
Disadvantages/Risks:
* ⚠️ Buyers may develop a mindset of “just scan the QR and you’re done,” but they still must carefully check the recipient account holder’s name before confirming.
* ⚠️ QR codes can make users overconfident, causing them to skip verifying the recipient’s information.
* ⚠️ If the QR is generated from account information that doesn’t match the seller/trader, a dispute may arise.
* ⚠️ Especially for P2P, don’t assume it’s automatically safe just because you see the bank’s QR.
👉 A QR code only makes payments more convenient—it does not replace the step of checking transaction details.
Scan the QR quickly, but still double-check before hitting the transfer button.
#BinanceP2PAnToan @Binance_Vietnam
$BTC
{future}(BTCUSDT)
Traders integrate QR codes directly into P2P orders: convenient, but there’s one special thing to note ⚠️
Recently I encountered a case where a trader had QR payment codes already built into the P2P order. Buyers only need to scan the QR to transfer money—no need to manually enter the bank account number or the amount.
Advantages:
* ✅ Faster payments, reducing mistakes entering the account number.
* ✅ The amount is filled in automatically, minimizing amount mix-ups.
* ✅ A more convenient trading experience, especially for newcomers.
* ✅ Transfer information is standardized, saving time otherwise spent exchanging details.
Disadvantages/Risks:
* ⚠️ Buyers may develop a mindset of “just scan the QR and you’re done,” but they still must carefully check the recipient account holder’s name before confirming.
* ⚠️ QR codes can make users overconfident, causing them to skip verifying the recipient’s information.
* ⚠️ If the QR is generated from account information that doesn’t match the seller/trader, a dispute may arise.
* ⚠️ Especially for P2P, don’t assume it’s automatically safe just because you see the bank’s QR.
👉 A QR code only makes payments more convenient—it does not replace the step of checking transaction details.
Scan the QR quickly, but still double-check before hitting the transfer button.
#BinanceP2PAnToan @Binance Vietnam
$BTC
Recently I encountered a case where a trader had QR payment codes already built into the P2P order. Buyers only need to scan the QR to transfer money—no need to manually enter the bank account number or the amount.
Advantages:
* ✅ Faster payments, reducing mistakes entering the account number.
* ✅ The amount is filled in automatically, minimizing amount mix-ups.
* ✅ A more convenient trading experience, especially for newcomers.
* ✅ Transfer information is standardized, saving time otherwise spent exchanging details.
Disadvantages/Risks:
* ⚠️ Buyers may develop a mindset of “just scan the QR and you’re done,” but they still must carefully check the recipient account holder’s name before confirming.
* ⚠️ QR codes can make users overconfident, causing them to skip verifying the recipient’s information.
* ⚠️ If the QR is generated from account information that doesn’t match the seller/trader, a dispute may arise.
* ⚠️ Especially for P2P, don’t assume it’s automatically safe just because you see the bank’s QR.
👉 A QR code only makes payments more convenient—it does not replace the step of checking transaction details.
Scan the QR quickly, but still double-check before hitting the transfer button.
#BinanceP2PAnToan @Binance Vietnam
$BTC
3
3
439

·
--
#binancep2pantoan @Binance_Vietnam
My account was frozen due to suspicious transactions 😲
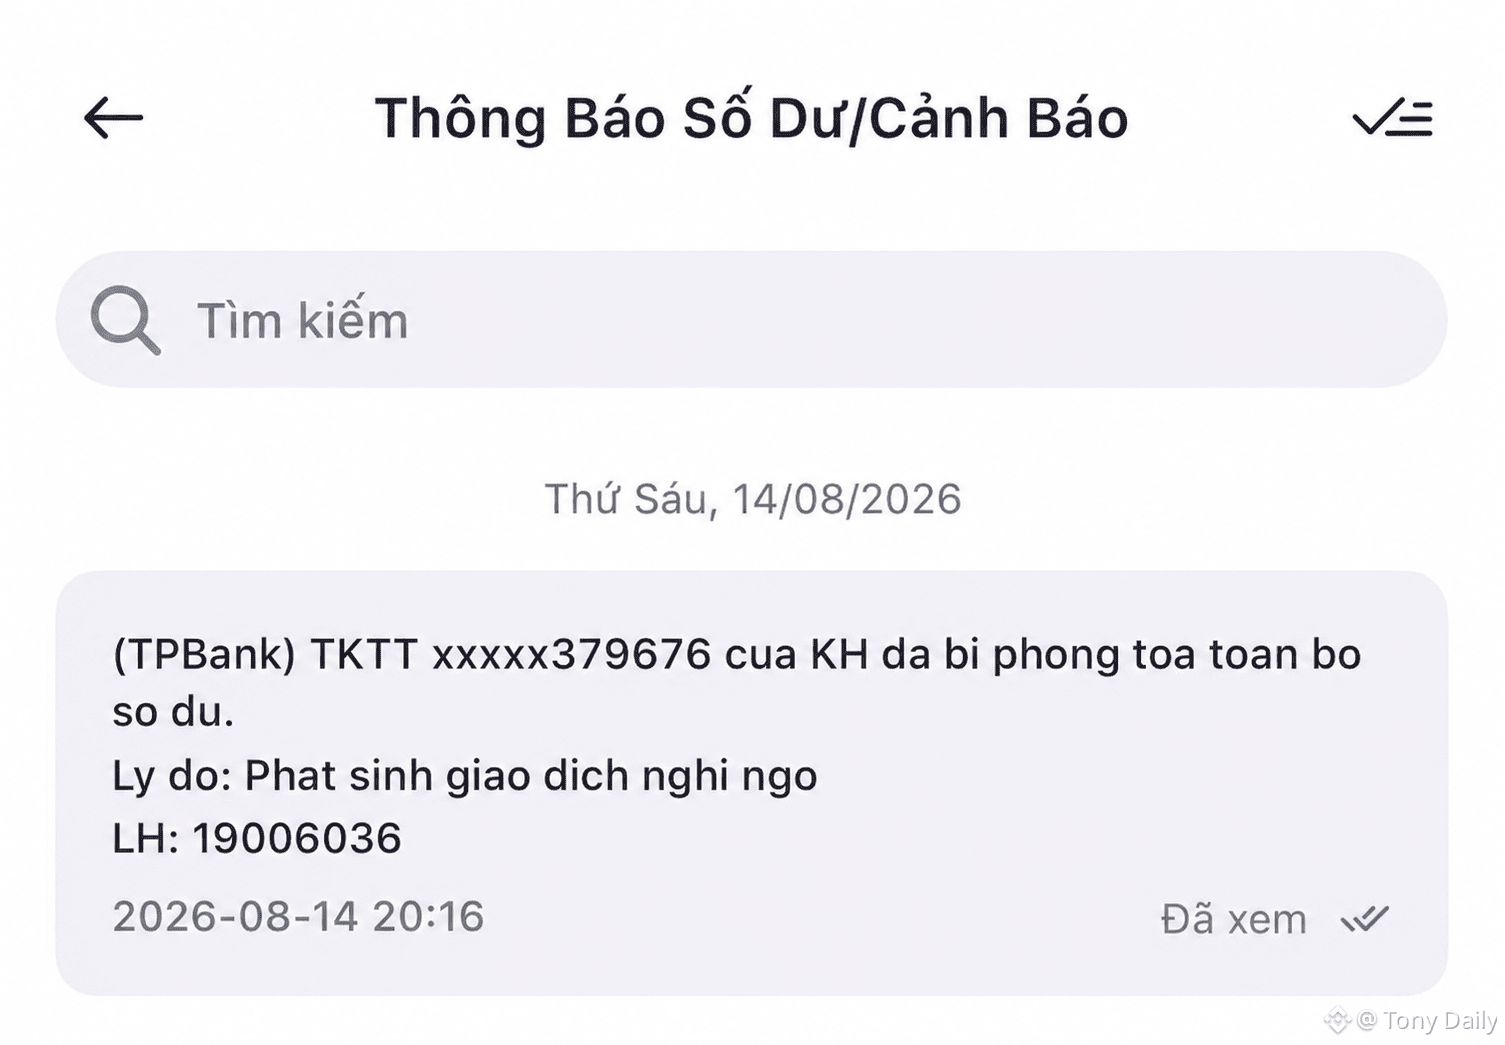
At first, everything happened completely normally. The buyer transferred money into my bank account. I checked that the received amount matched the order exactly, then completed the transaction. At that time, I didn’t think anything was wrong, because the funds were in my account and the P2P transaction was already marked as completed.
But a few days later, the bank sent me a notification that really surprised me: my account had generated a suspicious transaction, and the entire balance in the account was frozen.
What’s worth noting is that the money in the account was not only affected by that particular P2P transaction. All balances were impacted, making it almost impossible to use the account.
I reviewed my transaction history again and realized the issue is not as simple as “once the money arrives in the account, it’s done.” When selling USDT P2P, I was receiving money from someone whose source of funds I don’t truly know. If that source is related to an abnormal transaction, the recipient may also have to explain themselves even if they weren’t aware of what happened.
From this case, I learned a pretty clear lesson: P2P doesn’t only involve the risk of losing crypto—it also carries risks related to the flow of money through the bank.
So from now on, I will be much more careful when receiving P2P payments—especially checking the buyer’s information, the transfer details, and keeping complete evidence for each transaction.
$TUT $ACE $GPS
#binancep2pantoan @Binance Vietnam
My account was frozen due to suspicious transactions 😲
At first, everything happened completely normally. The buyer transferred money into my bank account. I checked that the received amount matched the order exactly, then completed the transaction. At that time, I didn’t think anything was wrong, because the funds were in my account and the P2P transaction was already marked as completed.
But a few days later, the bank sent me a notification that really surprised me: my account had generated a suspicious transaction, and the entire balance in the account was frozen.
What’s worth noting is that the money in the account was not only affected by that particular P2P transaction. All balances were impacted, making it almost impossible to use the account.
I reviewed my transaction history again and realized the issue is not as simple as “once the money arrives in the account, it’s done.” When selling USDT P2P, I was receiving money from someone whose source of funds I don’t truly know. If that source is related to an abnormal transaction, the recipient may also have to explain themselves even if they weren’t aware of what happened.
From this case, I learned a pretty clear lesson: P2P doesn’t only involve the risk of losing crypto—it also carries risks related to the flow of money through the bank.
So from now on, I will be much more careful when receiving P2P payments—especially checking the buyer’s information, the transfer details, and keeping complete evidence for each transaction.
$TUT $ACE $GPS
My account was frozen due to suspicious transactions 😲
At first, everything happened completely normally. The buyer transferred money into my bank account. I checked that the received amount matched the order exactly, then completed the transaction. At that time, I didn’t think anything was wrong, because the funds were in my account and the P2P transaction was already marked as completed.
But a few days later, the bank sent me a notification that really surprised me: my account had generated a suspicious transaction, and the entire balance in the account was frozen.
What’s worth noting is that the money in the account was not only affected by that particular P2P transaction. All balances were impacted, making it almost impossible to use the account.
I reviewed my transaction history again and realized the issue is not as simple as “once the money arrives in the account, it’s done.” When selling USDT P2P, I was receiving money from someone whose source of funds I don’t truly know. If that source is related to an abnormal transaction, the recipient may also have to explain themselves even if they weren’t aware of what happened.
From this case, I learned a pretty clear lesson: P2P doesn’t only involve the risk of losing crypto—it also carries risks related to the flow of money through the bank.
So from now on, I will be much more careful when receiving P2P payments—especially checking the buyer’s information, the transfer details, and keeping complete evidence for each transaction.
$TUT $ACE $GPS
250

#binancep2pantoan @Binance_Vietnam
858 USDT is the amount I bought to hold BTC back in January 2026. I transferred the full 22.551 million VND to the seller’s MB Bank account. The bank reported the transaction as successful, the money was sent. But it was pretty tense: Fiat had gone through, while the USDT was still stuck.
At first I thought it was just a delayed transaction. Until the seller messaged on Binance P2P that the bank had sent a warning and locked the account. I also had no idea what was actually happening on their side. So I stopped guessing and just focused on what I had.
I paid directly in the order, all communication stayed on Binance P2P and the documents were kept in full. When Support needed to cross-check, they asked for the original PDF statement from Internet Banking, matching the exact time period.
At first I felt a bit tense. But thinking about it, it made sense: a screenshot only proves that there was a transaction, while the PDF from the bank helps Support check the amount, time and account more clearly, while also avoiding edited files.
After this, I realized that a P2P transaction shouldn’t be looked at through screenshots alone. The Order ID, chat and bank statement placed side by side will tell the whole process: when the money went out, how much was sent and what happened. Keeping the whole set is still more solid than a single image.
I submitted everything Support needed and after the review was completed, the USDT finally came through. I didn’t go deeper into what the seller was dealing with. What I needed to know was that the transaction had been processed based on what I provided.
In the end, what I took away was pretty interesting: Good proof isn’t about how “trustworthy” it looks, but whether it has a clear origin and other people can check it again when things go sideways.
Since then, I’ve kept the Order ID, P2P chat and original PDF for every order. Now I see saving proof as the final step before closing a transaction, not something I do just for the sake of it.
#binancep2pantoan @Binance Vietnam
858 USDT is the amount I bought to hold BTC back in January 2026. I transferred the full 22.551 million VND to the seller’s MB Bank account. The bank reported the transaction as successful, the money was sent. But it was pretty tense: Fiat had gone through, while the USDT was still stuck.
At first I thought it was just a delayed transaction. Until the seller messaged on Binance P2P that the bank had sent a warning and locked the account. I also had no idea what was actually happening on their side. So I stopped guessing and just focused on what I had.
I paid directly in the order, all communication stayed on Binance P2P and the documents were kept in full. When Support needed to cross-check, they asked for the original PDF statement from Internet Banking, matching the exact time period.
At first I felt a bit tense. But thinking about it, it made sense: a screenshot only proves that there was a transaction, while the PDF from the bank helps Support check the amount, time and account more clearly, while also avoiding edited files.
After this, I realized that a P2P transaction shouldn’t be looked at through screenshots alone. The Order ID, chat and bank statement placed side by side will tell the whole process: when the money went out, how much was sent and what happened. Keeping the whole set is still more solid than a single image.
I submitted everything Support needed and after the review was completed, the USDT finally came through. I didn’t go deeper into what the seller was dealing with. What I needed to know was that the transaction had been processed based on what I provided.
In the end, what I took away was pretty interesting: Good proof isn’t about how “trustworthy” it looks, but whether it has a clear origin and other people can check it again when things go sideways.
Since then, I’ve kept the Order ID, P2P chat and original PDF for every order. Now I see saving proof as the final step before closing a transaction, not something I do just for the sake of it.
858 USDT is the amount I bought to hold BTC back in January 2026. I transferred the full 22.551 million VND to the seller’s MB Bank account. The bank reported the transaction as successful, the money was sent. But it was pretty tense: Fiat had gone through, while the USDT was still stuck.
At first I thought it was just a delayed transaction. Until the seller messaged on Binance P2P that the bank had sent a warning and locked the account. I also had no idea what was actually happening on their side. So I stopped guessing and just focused on what I had.
I paid directly in the order, all communication stayed on Binance P2P and the documents were kept in full. When Support needed to cross-check, they asked for the original PDF statement from Internet Banking, matching the exact time period.
At first I felt a bit tense. But thinking about it, it made sense: a screenshot only proves that there was a transaction, while the PDF from the bank helps Support check the amount, time and account more clearly, while also avoiding edited files.
After this, I realized that a P2P transaction shouldn’t be looked at through screenshots alone. The Order ID, chat and bank statement placed side by side will tell the whole process: when the money went out, how much was sent and what happened. Keeping the whole set is still more solid than a single image.
I submitted everything Support needed and after the review was completed, the USDT finally came through. I didn’t go deeper into what the seller was dealing with. What I needed to know was that the transaction had been processed based on what I provided.
In the end, what I took away was pretty interesting: Good proof isn’t about how “trustworthy” it looks, but whether it has a clear origin and other people can check it again when things go sideways.
Since then, I’ve kept the Order ID, P2P chat and original PDF for every order. Now I see saving proof as the final step before closing a transaction, not something I do just for the sake of it.
3
2
4.7k

#binancep2pantoan @Binance_Vietnam
Want smooth Binance P2P transactions without getting into “drama”? Here are a few tricks to keep things safe.
First up is the name—everything must be correct and 100% in your own name. If the name on your banking app doesn’t match the KYC name on Binance by even a tiny bit, don’t trade at all. Absolutely no transactions through a third party. When receiving money, do the same: open your banking app fully, check that the balance is actually credited, and only then press the button to unlock the coins. Screenshots or SMS notifications that there’s money involved can sometimes be nothing more than a “high-tech scam.”
If you’re the buyer, after the payment is made, remember to press the confirm button—don’t fiddle around by pressing cancel or the coin won’t come back. If you have any questions or something goes wrong, use the Binance system chat to communicate so later there will be proof for the platform to support you.
Follow the rules and you’ll be both safe and at ease while picking up the cash!
#binancep2pantoan @Binance Vietnam
Want smooth Binance P2P transactions without getting into “drama”? Here are a few tricks to keep things safe.
First up is the name—everything must be correct and 100% in your own name. If the name on your banking app doesn’t match the KYC name on Binance by even a tiny bit, don’t trade at all. Absolutely no transactions through a third party. When receiving money, do the same: open your banking app fully, check that the balance is actually credited, and only then press the button to unlock the coins. Screenshots or SMS notifications that there’s money involved can sometimes be nothing more than a “high-tech scam.”
If you’re the buyer, after the payment is made, remember to press the confirm button—don’t fiddle around by pressing cancel or the coin won’t come back. If you have any questions or something goes wrong, use the Binance system chat to communicate so later there will be proof for the platform to support you.
Follow the rules and you’ll be both safe and at ease while picking up the cash!
Want smooth Binance P2P transactions without getting into “drama”? Here are a few tricks to keep things safe.
First up is the name—everything must be correct and 100% in your own name. If the name on your banking app doesn’t match the KYC name on Binance by even a tiny bit, don’t trade at all. Absolutely no transactions through a third party. When receiving money, do the same: open your banking app fully, check that the balance is actually credited, and only then press the button to unlock the coins. Screenshots or SMS notifications that there’s money involved can sometimes be nothing more than a “high-tech scam.”
If you’re the buyer, after the payment is made, remember to press the confirm button—don’t fiddle around by pressing cancel or the coin won’t come back. If you have any questions or something goes wrong, use the Binance system chat to communicate so later there will be proof for the platform to support you.
Follow the rules and you’ll be both safe and at ease while picking up the cash!
79

·
--
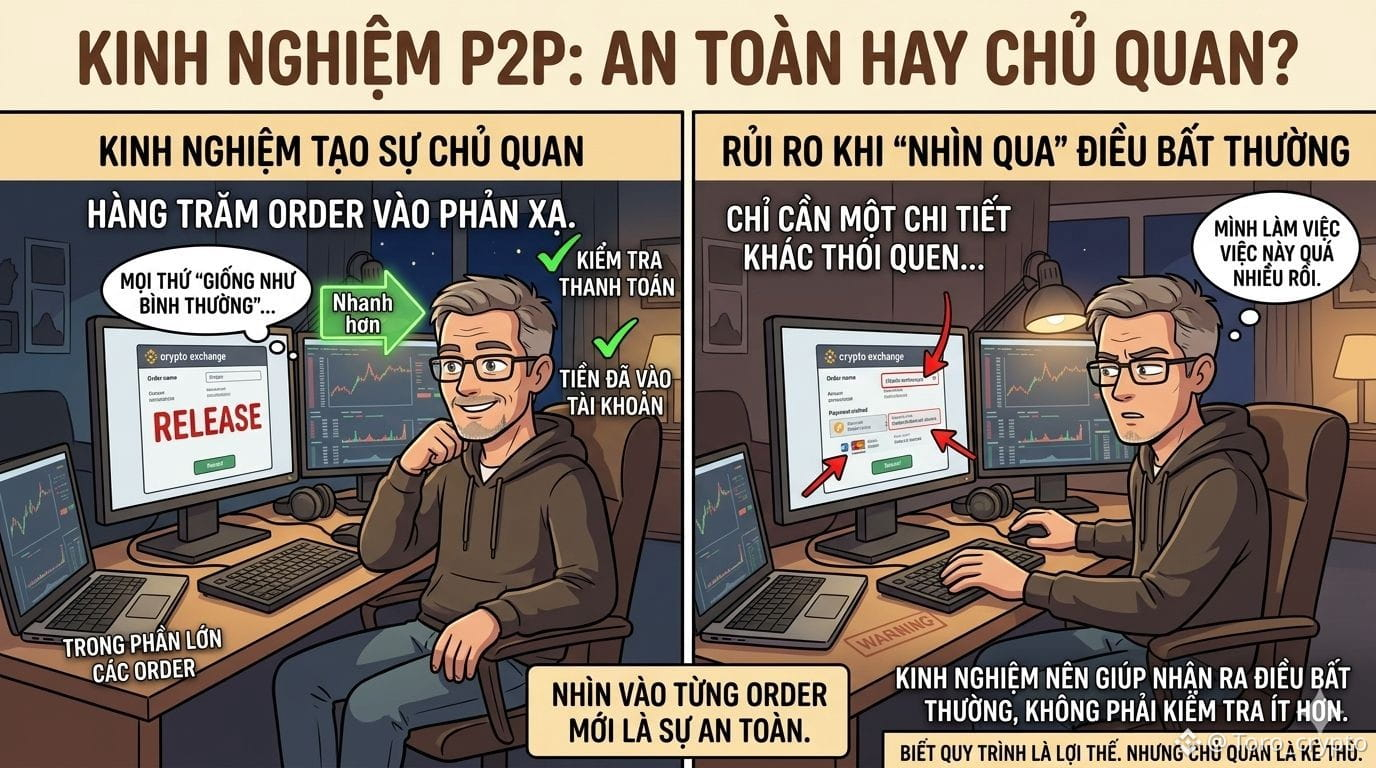
Experience is not always what makes you safer.
Sometimes it makes you more complacent.
Try imagining someone who has traded on P2P hundreds of times.
They know exactly where to open the Order.
They know how to check the payment.
They know when not to release.
Those steps become so familiar they turn into something like reflex.
And that—this—is what’s worth thinking about.
When you do something enough times, the brain starts finding ways to do it faster.
You no longer read every detail.
You skim a few familiar pieces of information, see everything looks normal, then move on.
In most Orders, that might not cause any issues.
But just one Order with a detail that differs from your usual pattern can cause that old reflex to make you overlook it.
A different payment method.
A different payment account.
Or simply a condition in the Order that doesn’t look like the ones from before.
What’s scary is that experienced people don’t always realize they’ve become complacent.
Because they don’t think:
“I’m skipping the verification step.”
They think:
“I’ve done this so many times.”
So I have a pretty simple rule when trading P2P:
Experience should help me spot abnormalities faster—not help me verify less.
Each Order still has its own conditions.
Each payment still needs to be matched.
And each release must still be based on the information from that specific transaction.
Perhaps the hardest part of long-term trading isn’t learning an additional rule.
It’s knowing when experience is helping you—and when it has turned into a habit.
Knowing the process is an advantage.
But truly looking at every new Order is what keeps you safe.
@Binance_Vietnam #BinanceP2PAnToan
Experience is not always what makes you safer.
Sometimes it makes you more complacent.
Try imagining someone who has traded on P2P hundreds of times.
They know exactly where to open the Order.
They know how to check the payment.
They know when not to release.
Those steps become so familiar they turn into something like reflex.
And that—this—is what’s worth thinking about.
When you do something enough times, the brain starts finding ways to do it faster.
You no longer read every detail.
You skim a few familiar pieces of information, see everything looks normal, then move on.
In most Orders, that might not cause any issues.
But just one Order with a detail that differs from your usual pattern can cause that old reflex to make you overlook it.
A different payment method.
A different payment account.
Or simply a condition in the Order that doesn’t look like the ones from before.
What’s scary is that experienced people don’t always realize they’ve become complacent.
Because they don’t think:
“I’m skipping the verification step.”
They think:
“I’ve done this so many times.”
So I have a pretty simple rule when trading P2P:
Experience should help me spot abnormalities faster—not help me verify less.
Each Order still has its own conditions.
Each payment still needs to be matched.
And each release must still be based on the information from that specific transaction.
Perhaps the hardest part of long-term trading isn’t learning an additional rule.
It’s knowing when experience is helping you—and when it has turned into a habit.
Knowing the process is an advantage.
But truly looking at every new Order is what keeps you safe.
@Binance Vietnam #BinanceP2PAnToan
Sometimes it makes you more complacent.
Try imagining someone who has traded on P2P hundreds of times.
They know exactly where to open the Order.
They know how to check the payment.
They know when not to release.
Those steps become so familiar they turn into something like reflex.
And that—this—is what’s worth thinking about.
When you do something enough times, the brain starts finding ways to do it faster.
You no longer read every detail.
You skim a few familiar pieces of information, see everything looks normal, then move on.
In most Orders, that might not cause any issues.
But just one Order with a detail that differs from your usual pattern can cause that old reflex to make you overlook it.
A different payment method.
A different payment account.
Or simply a condition in the Order that doesn’t look like the ones from before.
What’s scary is that experienced people don’t always realize they’ve become complacent.
Because they don’t think:
“I’m skipping the verification step.”
They think:
“I’ve done this so many times.”
So I have a pretty simple rule when trading P2P:
Experience should help me spot abnormalities faster—not help me verify less.
Each Order still has its own conditions.
Each payment still needs to be matched.
And each release must still be based on the information from that specific transaction.
Perhaps the hardest part of long-term trading isn’t learning an additional rule.
It’s knowing when experience is helping you—and when it has turned into a habit.
Knowing the process is an advantage.
But truly looking at every new Order is what keeps you safe.
@Binance Vietnam #BinanceP2PAnToan
12
7
237

·
--
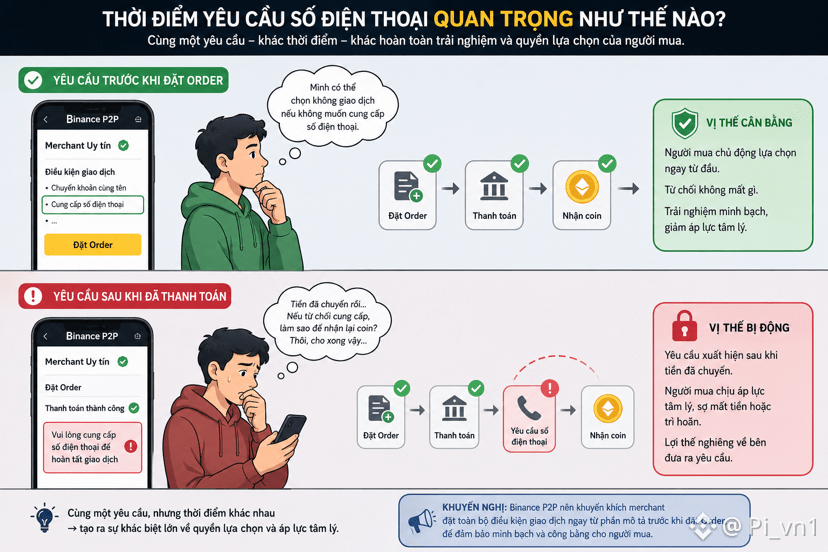
I realized something when I tried asking questions: why does the request for a phone number appear at exactly the moment the transaction is nearing its end—after payment—rather than right at the beginning, before placing an Order on Binance P2P?
If a phone number is truly needed for the merchant to decide whether to accept the transaction, the reasonable logic would be to request it first, as a prerequisite. But requesting it after payment completely changes the nature of it—the buyer is in a much weaker position; the money has already been transferred, and what they need is to finish quickly, not to carefully consider whether they should provide additional personal information.
This is the point that makes me think the timing of the request is just as important as the content of the request itself. When the condition appears before committing, the buyer can freely refuse without losing anything. With the same condition appearing after the commitment, it creates an entirely different kind of psychological pressure—the feeling of “I’ve already come halfway, I might as well just finish” can easily overpower the initial careful consideration.
This doesn’t necessarily mean the intent is manipulation— it could simply be an internal process that places verification steps after payment for operational reasons. But regardless of the motive, the objective structure of this timing creates a psychological advantage for the party making the request.
Counterargument to myself: this is a general observation about timing structure, not evidence that the merchant in this specific situation intentionally arranged things to create psychological pressure.
I’m waiting to see whether Binance P2P encourages merchants to place all transaction conditions upfront in the description before placing an Order, instead of having them appear sporadically throughout the transaction.
#binancep2pantoan @Binance_Vietnam $BTC $ETH
I realized something when I tried asking questions: why does the request for a phone number appear at exactly the moment the transaction is nearing its end—after payment—rather than right at the beginning, before placing an Order on Binance P2P?
If a phone number is truly needed for the merchant to decide whether to accept the transaction, the reasonable logic would be to request it first, as a prerequisite. But requesting it after payment completely changes the nature of it—the buyer is in a much weaker position; the money has already been transferred, and what they need is to finish quickly, not to carefully consider whether they should provide additional personal information.
This is the point that makes me think the timing of the request is just as important as the content of the request itself. When the condition appears before committing, the buyer can freely refuse without losing anything. With the same condition appearing after the commitment, it creates an entirely different kind of psychological pressure—the feeling of “I’ve already come halfway, I might as well just finish” can easily overpower the initial careful consideration.
This doesn’t necessarily mean the intent is manipulation— it could simply be an internal process that places verification steps after payment for operational reasons. But regardless of the motive, the objective structure of this timing creates a psychological advantage for the party making the request.
Counterargument to myself: this is a general observation about timing structure, not evidence that the merchant in this specific situation intentionally arranged things to create psychological pressure.
I’m waiting to see whether Binance P2P encourages merchants to place all transaction conditions upfront in the description before placing an Order, instead of having them appear sporadically throughout the transaction.
#binancep2pantoan @Binance Vietnam $BTC $ETH
If a phone number is truly needed for the merchant to decide whether to accept the transaction, the reasonable logic would be to request it first, as a prerequisite. But requesting it after payment completely changes the nature of it—the buyer is in a much weaker position; the money has already been transferred, and what they need is to finish quickly, not to carefully consider whether they should provide additional personal information.
This is the point that makes me think the timing of the request is just as important as the content of the request itself. When the condition appears before committing, the buyer can freely refuse without losing anything. With the same condition appearing after the commitment, it creates an entirely different kind of psychological pressure—the feeling of “I’ve already come halfway, I might as well just finish” can easily overpower the initial careful consideration.
This doesn’t necessarily mean the intent is manipulation— it could simply be an internal process that places verification steps after payment for operational reasons. But regardless of the motive, the objective structure of this timing creates a psychological advantage for the party making the request.
Counterargument to myself: this is a general observation about timing structure, not evidence that the merchant in this specific situation intentionally arranged things to create psychological pressure.
I’m waiting to see whether Binance P2P encourages merchants to place all transaction conditions upfront in the description before placing an Order, instead of having them appear sporadically throughout the transaction.
#binancep2pantoan @Binance Vietnam $BTC $ETH
192

·
--
Bullish
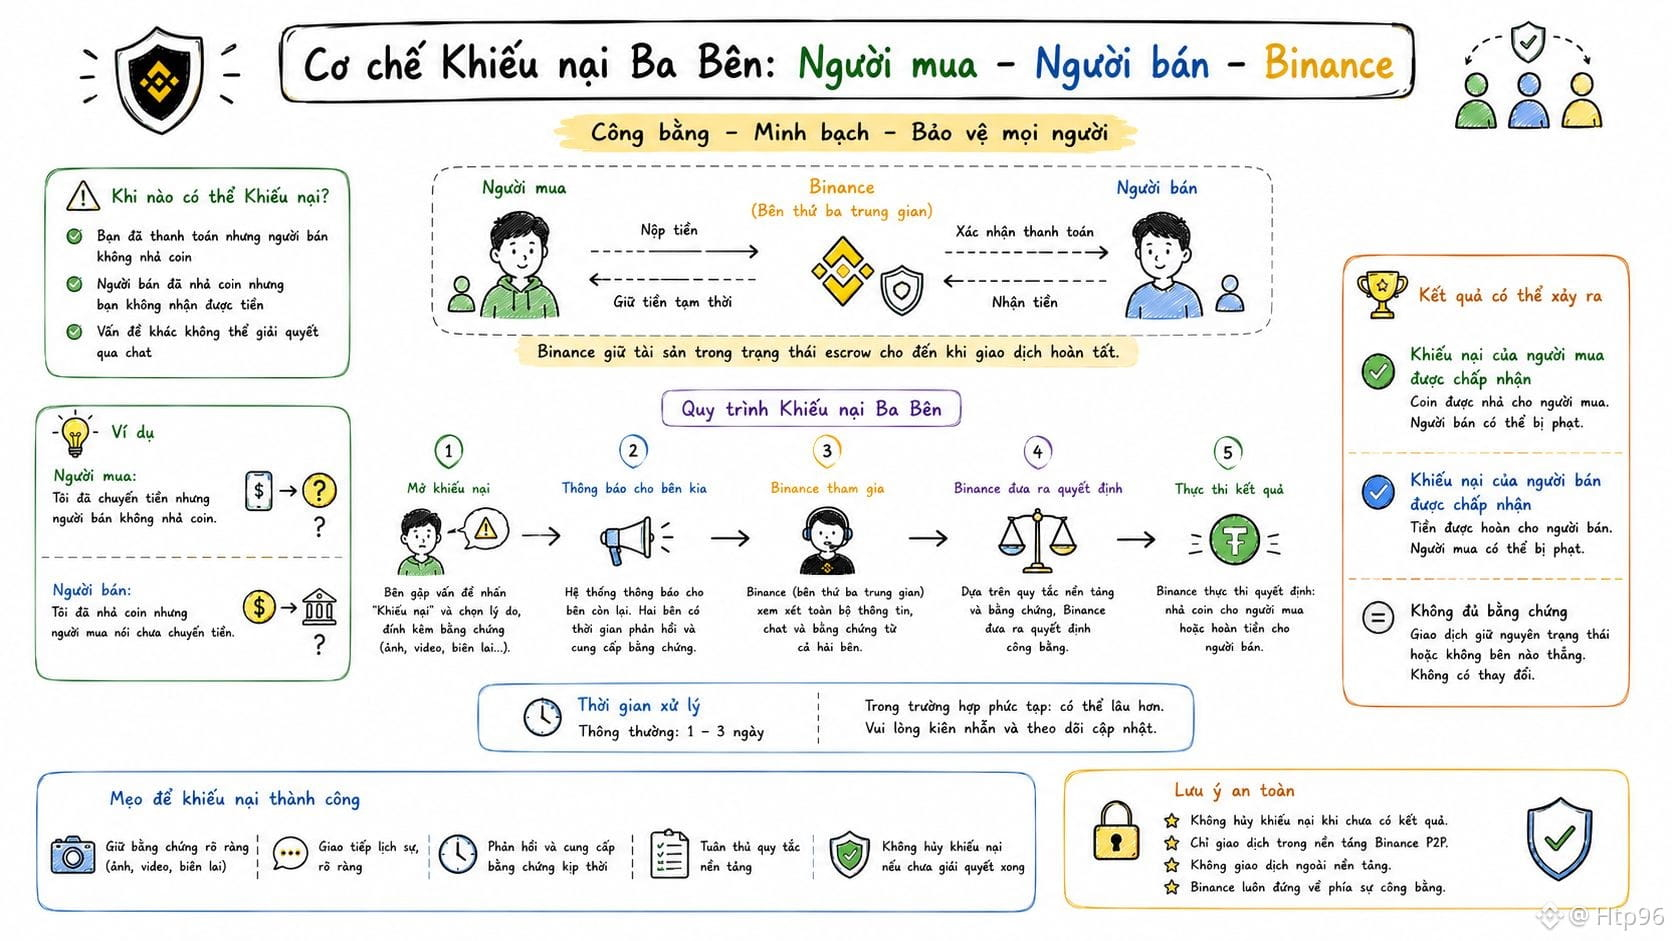
I noticed that the P2P dispute mechanism is not simply “Binance decides,” but in reality a clear three-party process with an ordered sequence, where each party has a specific role before the exchange intervenes deeply.
The first step is always for the two parties to exchange messages in the Binance order chat. This is a required show of good faith. Opening an appeal immediately without having previously communicated is often judged as less favorable when reviewing the case.
When an appeal is opened, the other party has exactly 10 minutes to respond before the system changes the status to waiting for the Binance team to intervene directly. This is based entirely on the evidence already available: Order ID, chat history, and screenshots of account statements.
In my view, this three-party mechanism is fair in that Binance does not automatically side with either party; the side that provides more convincing evidence wins. Therefore, proactively saving and preparing evidence from the start matters more than arguing at length.
#binancep2pantoan @Binance_Vietnam
I noticed that the P2P dispute mechanism is not simply “Binance decides,” but in reality a clear three-party process with an ordered sequence, where each party has a specific role before the exchange intervenes deeply.
The first step is always for the two parties to exchange messages in the Binance order chat. This is a required show of good faith. Opening an appeal immediately without having previously communicated is often judged as less favorable when reviewing the case.
When an appeal is opened, the other party has exactly 10 minutes to respond before the system changes the status to waiting for the Binance team to intervene directly. This is based entirely on the evidence already available: Order ID, chat history, and screenshots of account statements.
In my view, this three-party mechanism is fair in that Binance does not automatically side with either party; the side that provides more convincing evidence wins. Therefore, proactively saving and preparing evidence from the start matters more than arguing at length.
#binancep2pantoan @Binance Vietnam
The first step is always for the two parties to exchange messages in the Binance order chat. This is a required show of good faith. Opening an appeal immediately without having previously communicated is often judged as less favorable when reviewing the case.
When an appeal is opened, the other party has exactly 10 minutes to respond before the system changes the status to waiting for the Binance team to intervene directly. This is based entirely on the evidence already available: Order ID, chat history, and screenshots of account statements.
In my view, this three-party mechanism is fair in that Binance does not automatically side with either party; the side that provides more convincing evidence wins. Therefore, proactively saving and preparing evidence from the start matters more than arguing at length.
#binancep2pantoan @Binance Vietnam
1
1
1.6k

When my younger cousin started looking into crypto and asked whether he should try trading on Binance P2P, I spent an entire evening explaining everything in detail before letting him place his first order himself.
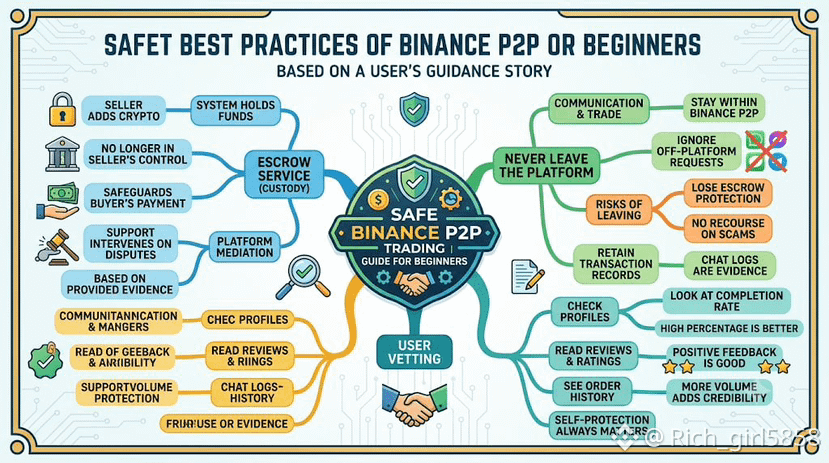
The first thing I emphasized was the escrow mechanism. I explained that when a seller places an order, the corresponding amount of crypto is held by the Binance P2P system and is no longer under the seller’s control until the transaction is completed. Thanks to this, buyers can feel reassured when making a bank transfer without worrying about losing money by mistake, because if the seller doesn’t release as promised, the support team will step in to resolve the issue based on the evidence provided by both sides.
The second thing I stressed was to absolutely not leave the platform during the transaction, no matter what excuse the other party gives—whether it’s offering a better price or trying to save on trading fees. I told him that all protections from escrow, chat history, all the way to dispute/appeal capabilities are only valid when the transaction takes place on Binance P2P. Once you step outside the platform, all those layers of protection completely disappear.
My younger cousin placed his first buy order with a small amount to get familiar with the process, and everything went smoothly. Seeing him become more confident after that made me realize even more that spending time explaining from the start is essential, instead of letting a newcomer figure things out on their own and run unnecessary risks.
After that, I guided him on how to quickly review a counterparty’s profile before placing an order, so he understood that even though the platform has protective mechanisms, being careful when choosing who to trade with is still a step that should never be skipped.
@Binance_Vietnam #BinanceP2PAnToan
$BOME $PNUT
When my younger cousin started looking into crypto and asked whether he should try trading on Binance P2P, I spent an entire evening explaining everything in detail before letting him place his first order himself.
The first thing I emphasized was the escrow mechanism. I explained that when a seller places an order, the corresponding amount of crypto is held by the Binance P2P system and is no longer under the seller’s control until the transaction is completed. Thanks to this, buyers can feel reassured when making a bank transfer without worrying about losing money by mistake, because if the seller doesn’t release as promised, the support team will step in to resolve the issue based on the evidence provided by both sides.
The second thing I stressed was to absolutely not leave the platform during the transaction, no matter what excuse the other party gives—whether it’s offering a better price or trying to save on trading fees. I told him that all protections from escrow, chat history, all the way to dispute/appeal capabilities are only valid when the transaction takes place on Binance P2P. Once you step outside the platform, all those layers of protection completely disappear.
My younger cousin placed his first buy order with a small amount to get familiar with the process, and everything went smoothly. Seeing him become more confident after that made me realize even more that spending time explaining from the start is essential, instead of letting a newcomer figure things out on their own and run unnecessary risks.
After that, I guided him on how to quickly review a counterparty’s profile before placing an order, so he understood that even though the platform has protective mechanisms, being careful when choosing who to trade with is still a step that should never be skipped.
@Binance Vietnam #BinanceP2PAnToan
$BOME $PNUT
The first thing I emphasized was the escrow mechanism. I explained that when a seller places an order, the corresponding amount of crypto is held by the Binance P2P system and is no longer under the seller’s control until the transaction is completed. Thanks to this, buyers can feel reassured when making a bank transfer without worrying about losing money by mistake, because if the seller doesn’t release as promised, the support team will step in to resolve the issue based on the evidence provided by both sides.
The second thing I stressed was to absolutely not leave the platform during the transaction, no matter what excuse the other party gives—whether it’s offering a better price or trying to save on trading fees. I told him that all protections from escrow, chat history, all the way to dispute/appeal capabilities are only valid when the transaction takes place on Binance P2P. Once you step outside the platform, all those layers of protection completely disappear.
My younger cousin placed his first buy order with a small amount to get familiar with the process, and everything went smoothly. Seeing him become more confident after that made me realize even more that spending time explaining from the start is essential, instead of letting a newcomer figure things out on their own and run unnecessary risks.
After that, I guided him on how to quickly review a counterparty’s profile before placing an order, so he understood that even though the platform has protective mechanisms, being careful when choosing who to trade with is still a step that should never be skipped.
@Binance Vietnam #BinanceP2PAnToan
$BOME $PNUT
237

·
--
#binancep2pantoan
Partner sends a request for "pre-confirmation"
@Binance_Vietnam
You are buying USDT on Binance P2P. After you transfer the money, the seller says their system hasn’t been updated and asks you to click “Paid” or confirm some step before they check the transaction.
It may sound like a minor action, but this is the time to slow down.
Recheck the order status, the amount you transferred, and the recipient information. If you have paid correctly according to the order, keep the proof of transfer and the conversation in the transaction chat.
Don’t carry out another transaction just because your counterparty keeps urging you, send more money, or follow instructions outside the P2P process.
If there is a dispute, use Appeal and provide complete evidence instead of trying to resolve it yourself by transferring money back and forth.
P2P isn’t hard, but the key principle is:
If you don’t understand the operation, don’t click. If you can’t verify it, don’t confirm.
A safe transaction isn’t about finishing as fast as possible—it’s about always knowing what you are confirming.
$BTC $ETH
#binancep2pantoan
Partner sends a request for "pre-confirmation"
@Binance Vietnam
You are buying USDT on Binance P2P. After you transfer the money, the seller says their system hasn’t been updated and asks you to click “Paid” or confirm some step before they check the transaction.
It may sound like a minor action, but this is the time to slow down.
Recheck the order status, the amount you transferred, and the recipient information. If you have paid correctly according to the order, keep the proof of transfer and the conversation in the transaction chat.
Don’t carry out another transaction just because your counterparty keeps urging you, send more money, or follow instructions outside the P2P process.
If there is a dispute, use Appeal and provide complete evidence instead of trying to resolve it yourself by transferring money back and forth.
P2P isn’t hard, but the key principle is:
If you don’t understand the operation, don’t click. If you can’t verify it, don’t confirm.
A safe transaction isn’t about finishing as fast as possible—it’s about always knowing what you are confirming.
$BTC $ETH
Partner sends a request for "pre-confirmation"
@Binance Vietnam
You are buying USDT on Binance P2P. After you transfer the money, the seller says their system hasn’t been updated and asks you to click “Paid” or confirm some step before they check the transaction.
It may sound like a minor action, but this is the time to slow down.
Recheck the order status, the amount you transferred, and the recipient information. If you have paid correctly according to the order, keep the proof of transfer and the conversation in the transaction chat.
Don’t carry out another transaction just because your counterparty keeps urging you, send more money, or follow instructions outside the P2P process.
If there is a dispute, use Appeal and provide complete evidence instead of trying to resolve it yourself by transferring money back and forth.
P2P isn’t hard, but the key principle is:
If you don’t understand the operation, don’t click. If you can’t verify it, don’t confirm.
A safe transaction isn’t about finishing as fast as possible—it’s about always knowing what you are confirming.
$BTC $ETH
1
2
236
·
--
Bullish
#binancep2pantoan @Binance_Vietnam 💰 Safe P2P transactions start with understanding who you’re trading with.
I usually check my partner’s ratings, number of transactions, and completion rate before I choose to proceed. Only when everything is clear do I make the payment. In particular, I never release crypto just because the other party sends a payment confirmation screenshot. Money must be verified in real life first.
@Binance_Vietnam #BinanceP2PAnToan
#binancep2pantoan @Binance Vietnam 💰 Safe P2P transactions start with understanding who you’re trading with.
I usually check my partner’s ratings, number of transactions, and completion rate before I choose to proceed. Only when everything is clear do I make the payment. In particular, I never release crypto just because the other party sends a payment confirmation screenshot. Money must be verified in real life first.
@Binance Vietnam #BinanceP2PAnToan
I usually check my partner’s ratings, number of transactions, and completion rate before I choose to proceed. Only when everything is clear do I make the payment. In particular, I never release crypto just because the other party sends a payment confirmation screenshot. Money must be verified in real life first.
@Binance Vietnam #BinanceP2PAnToan
92
·
--
Bearish
#binancep2pantoan @Binance_Vietnam 🔐 Double-check before confirming P2P
@Binance_Vietnam #BinanceP2PAnToan
I always review all order details before completing: the amount, payment method, and transaction status. If anything is unclear, I’ll pause to check instead of rushing through. With P2P, accuracy matters more than speed.
#binancep2pantoan @Binance Vietnam 🔐 Double-check before confirming P2P
@Binance Vietnam #BinanceP2PAnToan
I always review all order details before completing: the amount, payment method, and transaction status. If anything is unclear, I’ll pause to check instead of rushing through. With P2P, accuracy matters more than speed.
@Binance Vietnam #BinanceP2PAnToan
I always review all order details before completing: the amount, payment method, and transaction status. If anything is unclear, I’ll pause to check instead of rushing through. With P2P, accuracy matters more than speed.
91

·
--
#binancep2pantoan @Binance_Vietnam
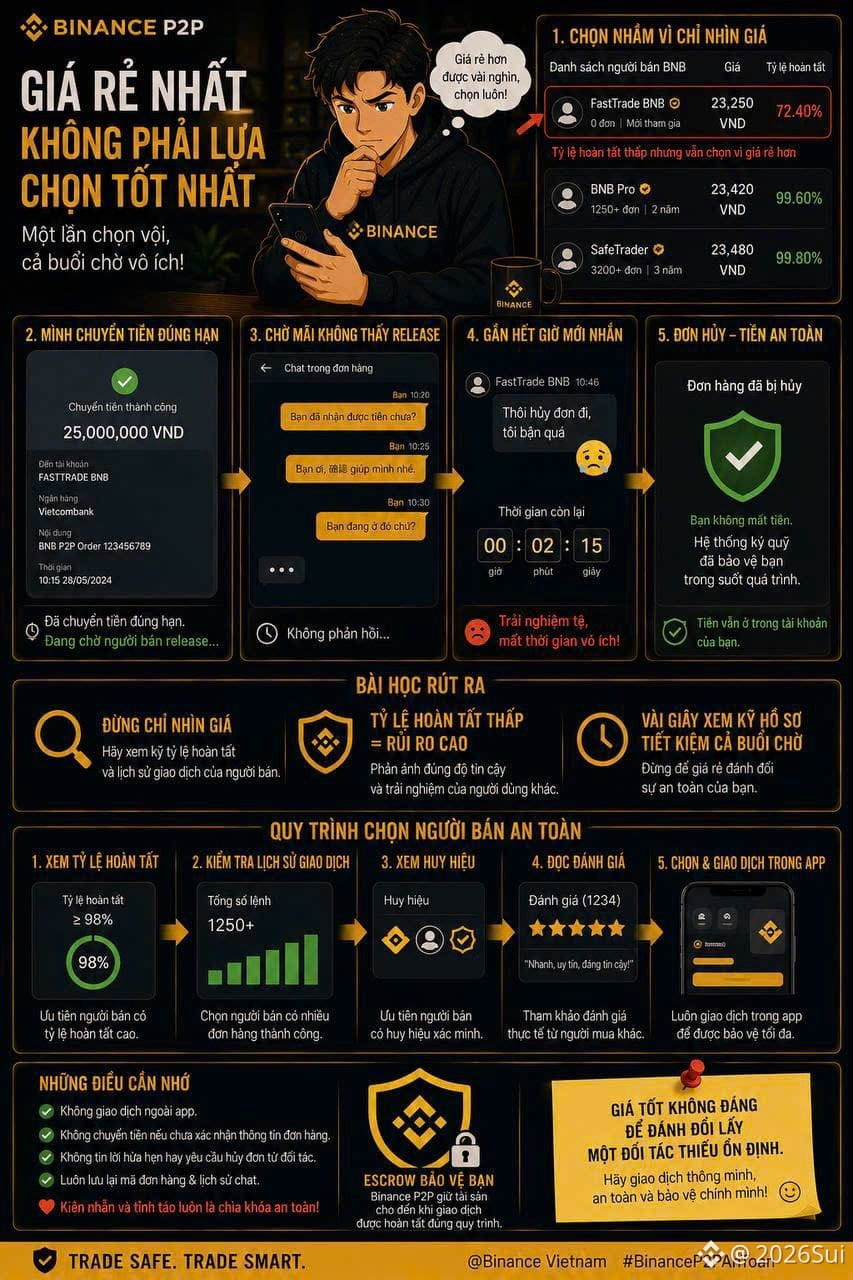
There was a time when I chose the wrong seller just because I saw a lower price and forgot to check the order completion rate.
That day, I urgently needed to buy a certain amount of BNB. I found a seller with a lower price than a few others, so I picked them right away. I only glanced at the badge and didn’t notice that their completion rate was quite low compared to the general average. After placing the order, I transferred the payment on time, but then I waited and waited and still didn’t see the release. I also messaged them, but they didn’t respond. With the allowed time almost up, this person finally messaged: "Cancel the order, I’m too busy"—with no further explanation.
That’s when I realized the low completion rate wasn’t meaningless numbers—it reflected exactly what I just went through. Luckily, I kept the transaction within the platform and never transferred money through any other channel. So when the order was canceled, my money never left my account, because nothing had been confirmed as incorrect—the margin system protected me throughout the entire waiting period.
I saved the whole chat history and the order ID out of habit, even though this time I didn’t end up needing them. After learning my lesson, the next time, I always check both the completion rate and the badge before choosing a partner—not just the price.
The lesson I took away: a good price isn’t worth trading away for an unstable partner. A few seconds spent reviewing the profile more carefully helped me avoid an entire pointless wait.
#binancep2pantoan @Binance Vietnam
There was a time when I chose the wrong seller just because I saw a lower price and forgot to check the order completion rate.
That day, I urgently needed to buy a certain amount of BNB. I found a seller with a lower price than a few others, so I picked them right away. I only glanced at the badge and didn’t notice that their completion rate was quite low compared to the general average. After placing the order, I transferred the payment on time, but then I waited and waited and still didn’t see the release. I also messaged them, but they didn’t respond. With the allowed time almost up, this person finally messaged: "Cancel the order, I’m too busy"—with no further explanation.
That’s when I realized the low completion rate wasn’t meaningless numbers—it reflected exactly what I just went through. Luckily, I kept the transaction within the platform and never transferred money through any other channel. So when the order was canceled, my money never left my account, because nothing had been confirmed as incorrect—the margin system protected me throughout the entire waiting period.
I saved the whole chat history and the order ID out of habit, even though this time I didn’t end up needing them. After learning my lesson, the next time, I always check both the completion rate and the badge before choosing a partner—not just the price.
The lesson I took away: a good price isn’t worth trading away for an unstable partner. A few seconds spent reviewing the profile more carefully helped me avoid an entire pointless wait.
There was a time when I chose the wrong seller just because I saw a lower price and forgot to check the order completion rate.
That day, I urgently needed to buy a certain amount of BNB. I found a seller with a lower price than a few others, so I picked them right away. I only glanced at the badge and didn’t notice that their completion rate was quite low compared to the general average. After placing the order, I transferred the payment on time, but then I waited and waited and still didn’t see the release. I also messaged them, but they didn’t respond. With the allowed time almost up, this person finally messaged: "Cancel the order, I’m too busy"—with no further explanation.
That’s when I realized the low completion rate wasn’t meaningless numbers—it reflected exactly what I just went through. Luckily, I kept the transaction within the platform and never transferred money through any other channel. So when the order was canceled, my money never left my account, because nothing had been confirmed as incorrect—the margin system protected me throughout the entire waiting period.
I saved the whole chat history and the order ID out of habit, even though this time I didn’t end up needing them. After learning my lesson, the next time, I always check both the completion rate and the badge before choosing a partner—not just the price.
The lesson I took away: a good price isn’t worth trading away for an unstable partner. A few seconds spent reviewing the profile more carefully helped me avoid an entire pointless wait.
123

·
--
#binancep2pantoan @Binance_Vietnam
🔥 Are you trading on Binance P2P, but have you known these 5 principles?
1️⃣ Always carefully check the buyer/seller information.
2️⃣ Only trade and communicate within the Binance system.
3️⃣ Never under any circumstances share OTPs, passwords, or verification codes with anyone else.
4️⃣ Do not click on strange links or follow requests to transfer money outside the platform.
5️⃣ Before completing a transaction, double-check the amount and the receiving account.
Fast or slow P2P doesn’t matter as much as safety. One minute of checking can help you avoid many risks. 🛡️
Do you have any tips for trading P2P? 👇
@Binance Vietnam
#BinanceP2PAnToan #BinanceP2P #Binance
#binancep2pantoan @Binance Vietnam
🔥 Are you trading on Binance P2P, but have you known these 5 principles?
1️⃣ Always carefully check the buyer/seller information.
2️⃣ Only trade and communicate within the Binance system.
3️⃣ Never under any circumstances share OTPs, passwords, or verification codes with anyone else.
4️⃣ Do not click on strange links or follow requests to transfer money outside the platform.
5️⃣ Before completing a transaction, double-check the amount and the receiving account.
Fast or slow P2P doesn’t matter as much as safety. One minute of checking can help you avoid many risks. 🛡️
Do you have any tips for trading P2P? 👇
@Binance Vietnam
#BinanceP2PAnToan #BinanceP2P #Binance
🔥 Are you trading on Binance P2P, but have you known these 5 principles?
1️⃣ Always carefully check the buyer/seller information.
2️⃣ Only trade and communicate within the Binance system.
3️⃣ Never under any circumstances share OTPs, passwords, or verification codes with anyone else.
4️⃣ Do not click on strange links or follow requests to transfer money outside the platform.
5️⃣ Before completing a transaction, double-check the amount and the receiving account.
Fast or slow P2P doesn’t matter as much as safety. One minute of checking can help you avoid many risks. 🛡️
Do you have any tips for trading P2P? 👇
@Binance Vietnam
#BinanceP2PAnToan #BinanceP2P #Binance
1
77

BINANCE P2P TRADING SAFETY GUIDE FOR EVERY TRADER
P2P trading is extremely fast and convenient, but to protect your account absolutely, always remember these 3 golden rules:
1️⃣ Trade only from your own account: The bank account name MUST match 100% with the KYC-verified name on Binance. Absolutely do not transfer to or receive money from any third party!
2️⃣ Check your actual balance: Log directly into your Bank App to see whether the money has arrived in your account before clicking "Release USDT". Absolutely DO NOT rely on screenshots or SMS notifications that money has been received.
3️⃣ Use the correct transfer details: Only enter the correct Order ID. Avoid writing sensitive terms like "Crypto", "USDT", "BTC" or "Binance".
Be proactive in improving your security knowledge so you can trade with peace of mind. Let’s learn more useful lessons from @Binance Vietnam!
#BinanceP2PAnToan
@Binance_Vietnam
BINANCE P2P TRADING SAFETY GUIDE FOR EVERY TRADER
P2P trading is extremely fast and convenient, but to protect your account absolutely, always remember these 3 golden rules:
1️⃣ Trade only from your own account: The bank account name MUST match 100% with the KYC-verified name on Binance. Absolutely do not transfer to or receive money from any third party!
2️⃣ Check your actual balance: Log directly into your Bank App to see whether the money has arrived in your account before clicking "Release USDT". Absolutely DO NOT rely on screenshots or SMS notifications that money has been received.
3️⃣ Use the correct transfer details: Only enter the correct Order ID. Avoid writing sensitive terms like "Crypto", "USDT", "BTC" or "Binance".
Be proactive in improving your security knowledge so you can trade with peace of mind. Let’s learn more useful lessons from @Binance Vietnam!
#BinanceP2PAnToan
@Binance Vietnam
P2P trading is extremely fast and convenient, but to protect your account absolutely, always remember these 3 golden rules:
1️⃣ Trade only from your own account: The bank account name MUST match 100% with the KYC-verified name on Binance. Absolutely do not transfer to or receive money from any third party!
2️⃣ Check your actual balance: Log directly into your Bank App to see whether the money has arrived in your account before clicking "Release USDT". Absolutely DO NOT rely on screenshots or SMS notifications that money has been received.
3️⃣ Use the correct transfer details: Only enter the correct Order ID. Avoid writing sensitive terms like "Crypto", "USDT", "BTC" or "Binance".
Be proactive in improving your security knowledge so you can trade with peace of mind. Let’s learn more useful lessons from @Binance Vietnam!
#BinanceP2PAnToan
@Binance Vietnam
1
74

·
--
#binancep2pantoan @Binance_Vietnam Check the actual balance: If you are a seller, only unlock crypto (release) when you open the banking app and see that the money has arrived in your actual wallet. Don’t trust any transfer receipt images (or screenshots), as editing technology or AI today can create very sophisticated forgeries
#binancep2pantoan @Binance Vietnam Check the actual balance: If you are a seller, only unlock crypto (release) when you open the banking app and see that the money has arrived in your actual wallet. Don’t trust any transfer receipt images (or screenshots), as editing technology or AI today can create very sophisticated forgeries
74
·
--
🚀 Secrets to Optimize P2P Transaction Speed: Fast, Smooth & Safe
Do you want your crypto buy/sell orders on Binance P2P to be completed within just a few minutes while still ensuring absolute safety? Apply the optimization tips below right away:
1. Prepare your payment method in advance:
Link your official, in-your-name bank accounts that support fast transfer features 24/7 (NAPAS). This helps money transfer instantly, without getting stuck due to network congestion or delays on weekends/peak hours.
2. Choose the right time and trading window:
Prioritize trading during office hours or when the banking system is operating most stably. Avoid your bank’s regular maintenance windows (often late at night) so your funds won’t get stuck midway.
3. Maintain your connection and respond quickly via chat:
Once the order is matched, focus on completing the transaction within the allowed time (usually 15 minutes). Responding to messages promptly with your trading partner will help both sides proceed smoothly and avoid wasting each other’s time.
4. Complete advanced identity verification (Plus KYC):
Make sure your Binance account has finished the advanced identity verification steps to unlock full trading limits and gain higher trust from the community.
Smart trading is not only about safety—it’s also about knowing how to save yourself the most time!
#binancep2pantoan @Binance_Vietnam
🚀 Secrets to Optimize P2P Transaction Speed: Fast, Smooth & Safe
Do you want your crypto buy/sell orders on Binance P2P to be completed within just a few minutes while still ensuring absolute safety? Apply the optimization tips below right away:
1. Prepare your payment method in advance:
Link your official, in-your-name bank accounts that support fast transfer features 24/7 (NAPAS). This helps money transfer instantly, without getting stuck due to network congestion or delays on weekends/peak hours.
2. Choose the right time and trading window:
Prioritize trading during office hours or when the banking system is operating most stably. Avoid your bank’s regular maintenance windows (often late at night) so your funds won’t get stuck midway.
3. Maintain your connection and respond quickly via chat:
Once the order is matched, focus on completing the transaction within the allowed time (usually 15 minutes). Responding to messages promptly with your trading partner will help both sides proceed smoothly and avoid wasting each other’s time.
4. Complete advanced identity verification (Plus KYC):
Make sure your Binance account has finished the advanced identity verification steps to unlock full trading limits and gain higher trust from the community.
Smart trading is not only about safety—it’s also about knowing how to save yourself the most time!
#binancep2pantoan @Binance Vietnam
Do you want your crypto buy/sell orders on Binance P2P to be completed within just a few minutes while still ensuring absolute safety? Apply the optimization tips below right away:
1. Prepare your payment method in advance:
Link your official, in-your-name bank accounts that support fast transfer features 24/7 (NAPAS). This helps money transfer instantly, without getting stuck due to network congestion or delays on weekends/peak hours.
2. Choose the right time and trading window:
Prioritize trading during office hours or when the banking system is operating most stably. Avoid your bank’s regular maintenance windows (often late at night) so your funds won’t get stuck midway.
3. Maintain your connection and respond quickly via chat:
Once the order is matched, focus on completing the transaction within the allowed time (usually 15 minutes). Responding to messages promptly with your trading partner will help both sides proceed smoothly and avoid wasting each other’s time.
4. Complete advanced identity verification (Plus KYC):
Make sure your Binance account has finished the advanced identity verification steps to unlock full trading limits and gain higher trust from the community.
Smart trading is not only about safety—it’s also about knowing how to save yourself the most time!
#binancep2pantoan @Binance Vietnam
2

The Math Every Trader Learns The Hard Way
3 minutes checking a counterparty's profile, or 3 days stuck in an appeal chasing your own money. That's not a rhetorical question. That's the actual trade you're making every time you rush a P2P deal. I've watched newbies lose hours, sometimes their whole weekend, because they wouldn't spend the time upfront. Let me break down the arithmetic nobody teaches you.
Verifying a counterparty costs you almost nothing. Glance at their completion rate. Look at trade volume, are they a ghost account or someone with history. Check if the name on the bank transfer actually matches their verified ID. That's maybe ninety seconds of your life. Skip it, and you're gambling with counterparty risk blind.
Payment verification is the same story. Open your actual bank app. Confirm the funds landed, real balance, not a fake slip, not a doctored screenshot somebody rushed you into believing. Panic release under pressure is how people get cleaned out in under a minute. That minute of checking your real balance is the cheapest insurance you'll ever buy in this game.
Now flip the equation. Skip verification, hit release on a fake payment, and you're not looking at minutes anymore. You're filing an Appeal, dumping your chat logs and transaction screenshots into escrow's dispute system, and waiting on Binance Support to untangle what happened. That's hours bleeding into days. Documentation you didn't bother saving becomes the difference between winning that appeal and eating the loss.
Escrow exists to protect you, but it protects the prepared. The trader who screenshots everything, keeps live chat records, matches every name and bank detail before clicking confirm, that trader recovers fast when something goes sideways. The one who skipped the math pays for it in stress and lost time.
Front-load the caution. It's always cheaper than the cleanup. And when something feels off, don't gamble on being right. Pause and hit Binance Support immediately.
@Binance_Vietnam #BinanceP2PAnToan
The Math Every Trader Learns The Hard Way
3 minutes checking a counterparty's profile, or 3 days stuck in an appeal chasing your own money. That's not a rhetorical question. That's the actual trade you're making every time you rush a P2P deal. I've watched newbies lose hours, sometimes their whole weekend, because they wouldn't spend the time upfront. Let me break down the arithmetic nobody teaches you.
Verifying a counterparty costs you almost nothing. Glance at their completion rate. Look at trade volume, are they a ghost account or someone with history. Check if the name on the bank transfer actually matches their verified ID. That's maybe ninety seconds of your life. Skip it, and you're gambling with counterparty risk blind.
Payment verification is the same story. Open your actual bank app. Confirm the funds landed, real balance, not a fake slip, not a doctored screenshot somebody rushed you into believing. Panic release under pressure is how people get cleaned out in under a minute. That minute of checking your real balance is the cheapest insurance you'll ever buy in this game.
Now flip the equation. Skip verification, hit release on a fake payment, and you're not looking at minutes anymore. You're filing an Appeal, dumping your chat logs and transaction screenshots into escrow's dispute system, and waiting on Binance Support to untangle what happened. That's hours bleeding into days. Documentation you didn't bother saving becomes the difference between winning that appeal and eating the loss.
Escrow exists to protect you, but it protects the prepared. The trader who screenshots everything, keeps live chat records, matches every name and bank detail before clicking confirm, that trader recovers fast when something goes sideways. The one who skipped the math pays for it in stress and lost time.
Front-load the caution. It's always cheaper than the cleanup. And when something feels off, don't gamble on being right. Pause and hit Binance Support immediately.
@Binance Vietnam #BinanceP2PAnToan
3 minutes checking a counterparty's profile, or 3 days stuck in an appeal chasing your own money. That's not a rhetorical question. That's the actual trade you're making every time you rush a P2P deal. I've watched newbies lose hours, sometimes their whole weekend, because they wouldn't spend the time upfront. Let me break down the arithmetic nobody teaches you.
Verifying a counterparty costs you almost nothing. Glance at their completion rate. Look at trade volume, are they a ghost account or someone with history. Check if the name on the bank transfer actually matches their verified ID. That's maybe ninety seconds of your life. Skip it, and you're gambling with counterparty risk blind.
Payment verification is the same story. Open your actual bank app. Confirm the funds landed, real balance, not a fake slip, not a doctored screenshot somebody rushed you into believing. Panic release under pressure is how people get cleaned out in under a minute. That minute of checking your real balance is the cheapest insurance you'll ever buy in this game.
Now flip the equation. Skip verification, hit release on a fake payment, and you're not looking at minutes anymore. You're filing an Appeal, dumping your chat logs and transaction screenshots into escrow's dispute system, and waiting on Binance Support to untangle what happened. That's hours bleeding into days. Documentation you didn't bother saving becomes the difference between winning that appeal and eating the loss.
Escrow exists to protect you, but it protects the prepared. The trader who screenshots everything, keeps live chat records, matches every name and bank detail before clicking confirm, that trader recovers fast when something goes sideways. The one who skipped the math pays for it in stress and lost time.
Front-load the caution. It's always cheaper than the cleanup. And when something feels off, don't gamble on being right. Pause and hit Binance Support immediately.
@Binance Vietnam #BinanceP2PAnToan
76

#binancep2pantoan @Binance_Vietnam
🚨 WARNING: DON’T LOSE MONEY IN ONE MINUTE OF CARELESSNESS ON P2P! 🚨
The arbitrage spread may look small and the price may seem cheaper for a moment, but the result can be “gone in the blink of an eye”—your bank account could be wiped out or you could lose your coins completely. This story isn’t unique to anyone!
P2P transactions safely with @Binance Vietnam—brothers, remember these 3 unbreakable rules:
1. If you haven’t seen the account balance update = ABSOLUTELY DO NOT tap to release coins. Ignore all kinds of transfer bills with screenshots or SMS notifications, because they’re extremely easy to fake.
2. Wrong bank account holder name = CANCEL THE ORDER IMMEDIATELY. Only trade with the verified account whose name matches 100% with the name on your Binance account.
3. All exchanges must stay in the P2P Chat section: don’t move to Zalo/Telegram to “get help,” so you have proof in case a dispute arises.
Have any of you encountered scam tactics that are really sophisticated on P2P? Share them below so we can prevent them together! 👇
#binancep2pantoan @Binance Vietnam
🚨 WARNING: DON’T LOSE MONEY IN ONE MINUTE OF CARELESSNESS ON P2P! 🚨
The arbitrage spread may look small and the price may seem cheaper for a moment, but the result can be “gone in the blink of an eye”—your bank account could be wiped out or you could lose your coins completely. This story isn’t unique to anyone!
P2P transactions safely with @Binance Vietnam—brothers, remember these 3 unbreakable rules:
1. If you haven’t seen the account balance update = ABSOLUTELY DO NOT tap to release coins. Ignore all kinds of transfer bills with screenshots or SMS notifications, because they’re extremely easy to fake.
2. Wrong bank account holder name = CANCEL THE ORDER IMMEDIATELY. Only trade with the verified account whose name matches 100% with the name on your Binance account.
3. All exchanges must stay in the P2P Chat section: don’t move to Zalo/Telegram to “get help,” so you have proof in case a dispute arises.
Have any of you encountered scam tactics that are really sophisticated on P2P? Share them below so we can prevent them together! 👇
🚨 WARNING: DON’T LOSE MONEY IN ONE MINUTE OF CARELESSNESS ON P2P! 🚨
The arbitrage spread may look small and the price may seem cheaper for a moment, but the result can be “gone in the blink of an eye”—your bank account could be wiped out or you could lose your coins completely. This story isn’t unique to anyone!
P2P transactions safely with @Binance Vietnam—brothers, remember these 3 unbreakable rules:
1. If you haven’t seen the account balance update = ABSOLUTELY DO NOT tap to release coins. Ignore all kinds of transfer bills with screenshots or SMS notifications, because they’re extremely easy to fake.
2. Wrong bank account holder name = CANCEL THE ORDER IMMEDIATELY. Only trade with the verified account whose name matches 100% with the name on your Binance account.
3. All exchanges must stay in the P2P Chat section: don’t move to Zalo/Telegram to “get help,” so you have proof in case a dispute arises.
Have any of you encountered scam tactics that are really sophisticated on P2P? Share them below so we can prevent them together! 👇
70
Log in to explore more content
Join global crypto users on Binance Square
⚡️ Get latest and useful information about crypto.
💬 Trusted by the world’s largest crypto exchange.
👍 Discover real insights from verified creators.
Email / Phone number
Trending Topics
1
#BitwiseFilesFinalNEARSpotETFProspectus
89,704 views
1,455 Discussing
2
#BitgetHackerMoves$83MStolenXRP
33,185 views
164 Discussing
3
#SOLSpotETFWeeklyInflow$188M
22,099 views
133 Discussing
4
#DogecoinETFsPostBiggestWeekSinceLaunch
54,989 views
995 Discussing
5
#StrategyStriveAdd2305BitcoinThisWeek
145,778 views
2,186 Discussing
6
#TrumpRejectsIranHormuzReopening
125,481 views
1,652 Discussing
7
#CircleTetherFreezeBitgetHackerWallet
108,584 views
1,526 Discussing
8
#SECSaysTokenBuybacksNotAutoSecurities
73,051 views
907 Discussing
9
#ChinaUSAgreeOn$30BTariffCut
5,611 views
47 Discussing
10
#CoinMarketCapCompletesCoinglassAcquisition
74,720 views
983 Discussing