

income crypto
2.4k ໂພສ

income crypto
ລາຍງານ
ບລັອກຜູ້ໃຊ້
Prakash here- Crypto Enthusiast & Day trading Pro,Passionate about Price Action and sharing crypto market Insights as a proud Binance KOL || X - @INCOMECRYPTO24
68 ກໍາລັງຕິດຕາມ
26.3K+ ຜູ້ຕິດຕາມ
16.5K+ Liked
ໂພສ
Portfolio
ທັງໝົດ
ວົງຢືມ
ວີດີໂອ
ຖ່າຍທອດສົດ
·
--
ບົດຄວາມ
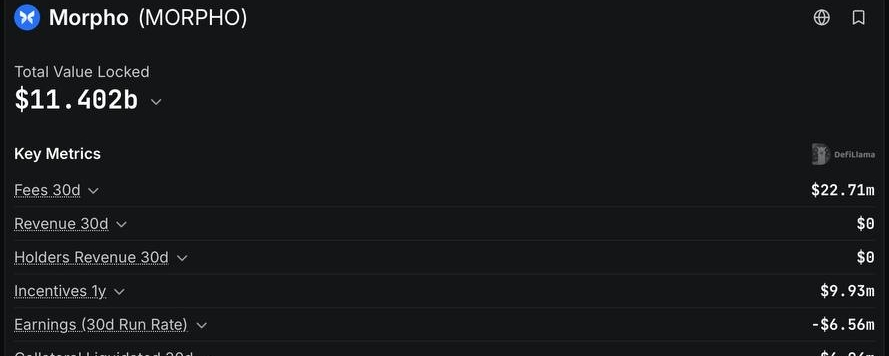
Morpho Generated $22.71M in Fees. So Why Is Its Revenue $0?Morpho has billions in locked assets, millions in fees, and one number that deserves investors’ attention: $0 in recorded protocol revenue.
According to the DeFiLlama
• TVL: $11.402B
• Active loans: $5.819B
• 30-day fees: $22.71M
• 30-day protocol revenue: $0
• MORPHO price: $2.01
• Market cap: $1.416B
• FDV: $2.014B
So, what’s happening?
Fees and revenue are not the same thing. Morpho Blue’s fee configuration allows the protocol to facilitate lending activity without currently recording protocol revenue under the displayed metric.
That doesn’t mean Morpho generates no fees. It means investors must understand who captures the economic value.
Is MORPHO undervalued?
Its market cap is approximately 12.4% of TVL, but that ratio alone proves nothing. TVL is not profit, and gross fees do not automatically belong to token holders.
MORPHO is a governance token. Any potential benefit from protocol fees depends on actual governance decisions and implemented mechanisms, not assumptions.
My take: Morpho’s adoption is impressive, but its token valuation needs more than a TVL comparison. Watch fee-switch decisions, sustainable lending demand, and token unlocks before drawing conclusions.
Because a successful protocol and a valuable token are two different investment theses.
$MORPHO #Morpho #DeFi
Morpho Generated $22.71M in Fees. So Why Is Its Revenue $0?
Morpho has billions in locked assets, millions in fees, and one number that deserves investors’ attention: $0 in recorded protocol revenue.
According to the DeFiLlama
• TVL: $11.402B
• Active loans: $5.819B
• 30-day fees: $22.71M
• 30-day protocol revenue: $0
• MORPHO price: $2.01
• Market cap: $1.416B
• FDV: $2.014B
So, what’s happening?
Fees and revenue are not the same thing. Morpho Blue’s fee configuration allows the protocol to facilitate lending activity without currently recording protocol revenue under the displayed metric.
That doesn’t mean Morpho generates no fees. It means investors must understand who captures the economic value.
Is MORPHO undervalued?
Its market cap is approximately 12.4% of TVL, but that ratio alone proves nothing. TVL is not profit, and gross fees do not automatically belong to token holders.
MORPHO is a governance token. Any potential benefit from protocol fees depends on actual governance decisions and implemented mechanisms, not assumptions.
My take: Morpho’s adoption is impressive, but its token valuation needs more than a TVL comparison. Watch fee-switch decisions, sustainable lending demand, and token unlocks before drawing conclusions.
Because a successful protocol and a valuable token are two different investment theses.
$MORPHO #Morpho #DeFi
According to the DeFiLlama
• TVL: $11.402B
• Active loans: $5.819B
• 30-day fees: $22.71M
• 30-day protocol revenue: $0
• MORPHO price: $2.01
• Market cap: $1.416B
• FDV: $2.014B
So, what’s happening?
Fees and revenue are not the same thing. Morpho Blue’s fee configuration allows the protocol to facilitate lending activity without currently recording protocol revenue under the displayed metric.
That doesn’t mean Morpho generates no fees. It means investors must understand who captures the economic value.
Is MORPHO undervalued?
Its market cap is approximately 12.4% of TVL, but that ratio alone proves nothing. TVL is not profit, and gross fees do not automatically belong to token holders.
MORPHO is a governance token. Any potential benefit from protocol fees depends on actual governance decisions and implemented mechanisms, not assumptions.
My take: Morpho’s adoption is impressive, but its token valuation needs more than a TVL comparison. Watch fee-switch decisions, sustainable lending demand, and token unlocks before drawing conclusions.
Because a successful protocol and a valuable token are two different investment theses.
$MORPHO #Morpho #DeFi
2
197
·
--
ສັນຍານໝີ
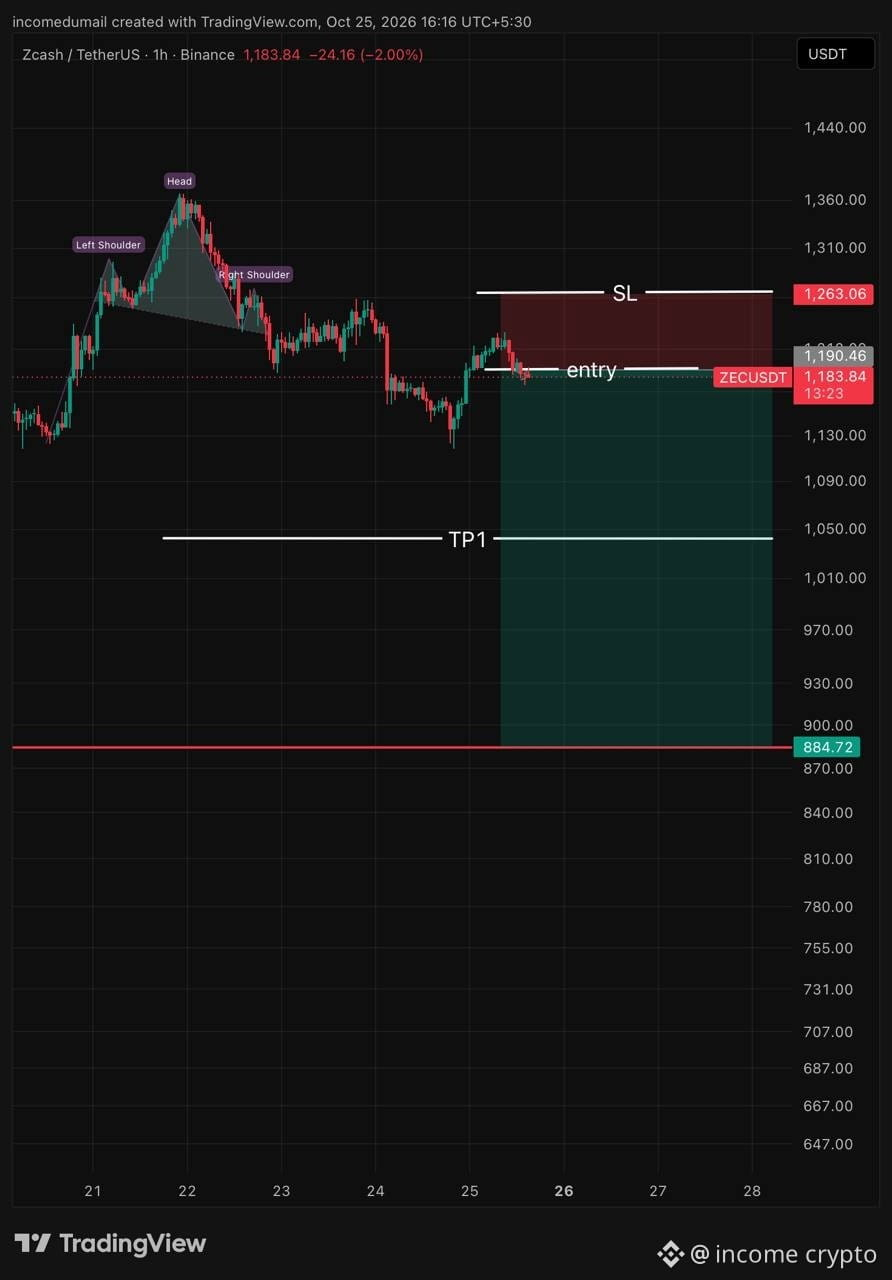
🔴 ZEC/USDT | SHORT | 1H
Bias: Bearish continuation
📍 Entry: 1,190.46
🛑 Stop Loss: 1,263.06
🎯 TP1: 1,042.00
🎯 Final Target: 884.72
Rationale: Head & Shoulders structure, lower highs, and bearish price action support a potential downside move.
#EarningsSeason #ZECUSDT #TradeSignal
{future}(ZECUSDT)
🔴 ZEC/USDT | SHORT | 1H
Bias: Bearish continuation
📍 Entry: 1,190.46
🛑 Stop Loss: 1,263.06
🎯 TP1: 1,042.00
🎯 Final Target: 884.72
Rationale: Head & Shoulders structure, lower highs, and bearish price action support a potential downside move.
#EarningsSeason #ZECUSDT #TradeSignal
Bias: Bearish continuation
📍 Entry: 1,190.46
🛑 Stop Loss: 1,263.06
🎯 TP1: 1,042.00
🎯 Final Target: 884.72
Rationale: Head & Shoulders structure, lower highs, and bearish price action support a potential downside move.
#EarningsSeason #ZECUSDT #TradeSignal
2
357
·
--
ສັນຍານກະທິງ
income crypto
·
--
ສັນຍານກະທິງSolana’s Biggest Upgrade Is Coming on October 21. Is $SOL Ready?
Solana is preparing for a major network upgrade, and this time, the headline is about speed, finality and the network’s long-term competitiveness.
On October 21, Solana is scheduled to activate Alpenglow, a consensus upgrade targeting transaction finality of approximately 150 milliseconds, compared with roughly 12.8 seconds today.
But what does that actually mean for solana holders?
What Is Changing?
Alpenglow replaces Solana’s existing TowerBFT consensus mechanism with a new system called Votor. Instead of processing validator votes as regular transactions, validators will communicate votes directly and use certificates to reach consensus faster.
The upgrade also removes vote transactions from blocks, which could cause reported transaction counts and TPS figures to fall without a corresponding drop in real user activity.
One important detail: the separate Rotor upgrade, designed to improve block-data propagation, is planned for a later release.
Is This Bullish for $SOL?
Faster finality could improve Solana’s appeal for trading applications, payments and other use cases where confirmation speed matters.
However, better technology does not guarantee immediate price appreciation. Market conditions, liquidity, demand and expectations already priced into $SOL will still matter.
My approach would be to watch how the market behaves before and after activation rather than buy purely on the upgrade narrative.
The real question is whether improved infrastructure translates into stronger adoption and sustained demand for SOL.
Will Alpenglow become a major catalyst for Solana’s next growth phase, or has the market already priced it in?
#Solana #Alpenglow
#SolanaAlpenglowUpgradeToActivateOnOct21
Solana is preparing for a major network upgrade, and this time, the headline is about speed, finality and the network’s long-term competitiveness.
On October 21, Solana is scheduled to activate Alpenglow, a consensus upgrade targeting transaction finality of approximately 150 milliseconds, compared with roughly 12.8 seconds today.
But what does that actually mean for solana holders?
What Is Changing?
Alpenglow replaces Solana’s existing TowerBFT consensus mechanism with a new system called Votor. Instead of processing validator votes as regular transactions, validators will communicate votes directly and use certificates to reach consensus faster.
The upgrade also removes vote transactions from blocks, which could cause reported transaction counts and TPS figures to fall without a corresponding drop in real user activity.
One important detail: the separate Rotor upgrade, designed to improve block-data propagation, is planned for a later release.
Is This Bullish for $SOL?
Faster finality could improve Solana’s appeal for trading applications, payments and other use cases where confirmation speed matters.
However, better technology does not guarantee immediate price appreciation. Market conditions, liquidity, demand and expectations already priced into $SOL will still matter.
My approach would be to watch how the market behaves before and after activation rather than buy purely on the upgrade narrative.
The real question is whether improved infrastructure translates into stronger adoption and sustained demand for SOL.
Will Alpenglow become a major catalyst for Solana’s next growth phase, or has the market already priced it in?
#Solana #Alpenglow
#SolanaAlpenglowUpgradeToActivateOnOct21
3
370
·
--
Six Blockchain Groups Want the SEC to Make Crypto Rules Harder to Reverse
Six major blockchain organizations are pushing the US SEC to make its digital commodity definition part of binding regulation.
The group includes Chainlink, Hedera, Aptos, Avalanche, Stellar and Cardano.
Their argument is straightforward: crypto projects need more than regulatory guidance that future leadership could change. They want clearer rules defining when a digital asset is not itself a security.
Why does this matter?
• Clearer classifications could reduce regulatory uncertainty for blockchain projects and exchanges. • More predictable rules could support institutional participation. • Tokens associated with these networks could benefit from greater regulatory clarity if the requested language is adopted.
But there is one important distinction: a token being classified as a digital commodity does not automatically make every transaction involving it exempt from securities laws.
My take: This is a push for regulatory certainty, not a guarantee of a crypto rally. The real catalyst will be the SEC's response and the final wording of any binding rules.
#CryptoRegulationReport #SEC. #blockchain. #SIXBLOCKCHAINGroupsWanttheSECtoMakeCryptoRulesHardertoReverse
Six Blockchain Groups Want the SEC to Make Crypto Rules Harder to Reverse
Six major blockchain organizations are pushing the US SEC to make its digital commodity definition part of binding regulation.
The group includes Chainlink, Hedera, Aptos, Avalanche, Stellar and Cardano.
Their argument is straightforward: crypto projects need more than regulatory guidance that future leadership could change. They want clearer rules defining when a digital asset is not itself a security.
Why does this matter?
• Clearer classifications could reduce regulatory uncertainty for blockchain projects and exchanges. • More predictable rules could support institutional participation. • Tokens associated with these networks could benefit from greater regulatory clarity if the requested language is adopted.
But there is one important distinction: a token being classified as a digital commodity does not automatically make every transaction involving it exempt from securities laws.
My take: This is a push for regulatory certainty, not a guarantee of a crypto rally. The real catalyst will be the SEC's response and the final wording of any binding rules.
#CryptoRegulationReport #SEC. #blockchain. #SIXBLOCKCHAINGroupsWanttheSECtoMakeCryptoRulesHardertoReverse
Six major blockchain organizations are pushing the US SEC to make its digital commodity definition part of binding regulation.
The group includes Chainlink, Hedera, Aptos, Avalanche, Stellar and Cardano.
Their argument is straightforward: crypto projects need more than regulatory guidance that future leadership could change. They want clearer rules defining when a digital asset is not itself a security.
Why does this matter?
• Clearer classifications could reduce regulatory uncertainty for blockchain projects and exchanges. • More predictable rules could support institutional participation. • Tokens associated with these networks could benefit from greater regulatory clarity if the requested language is adopted.
But there is one important distinction: a token being classified as a digital commodity does not automatically make every transaction involving it exempt from securities laws.
My take: This is a push for regulatory certainty, not a guarantee of a crypto rally. The real catalyst will be the SEC's response and the final wording of any binding rules.
#CryptoRegulationReport #SEC. #blockchain. #SIXBLOCKCHAINGroupsWanttheSECtoMakeCryptoRulesHardertoReverse
2
360
·
--
ຢືນຢັນແລ້ວ
Meta's AI Bill Is Growing. When Do We See the Return?
I'm not worried about Meta spending money on AI just because the number looks huge. Big investments can make sense when they help a business earn more.
What I want to know is whether the returns can keep up with the spending.
Wall Street is expecting roughly $63.3 billion in Q3 revenue, according to analyst consensus. But revenue alone won't tell us the full story. Source: S&P Global
Here are the three things I'm watching when $META reports:
• Ad revenue: Is Meta's core business still growing strongly, with AI helping advertisers get better results?
• AI spending: Is the company investing more without giving investors a clearer picture of future returns?
• Margins and guidance: Can Meta keep growing profits while building out its AI infrastructure?
My take is cautiously bullish on the business, but I wouldn't blindly buy the stock just because everyone is excited about AI.
If advertising growth stays strong and management gives a convincing outlook, the bullish case gets stronger. If costs rise faster than the business can absorb them, even a revenue beat might not be enough to push the stock higher.
That's the tricky part of earnings trading: the company can deliver good results and the stock can still fall if expectations were too high.
I'll be watching the numbers and management's guidance before deciding whether the market reaction makes sense.
What's your bigger concern with Meta: missing the AI opportunity or spending too much trying to win it?
$META
#EarningsSeason
Meta's AI Bill Is Growing. When Do We See the Return?
I'm not worried about Meta spending money on AI just because the number looks huge. Big investments can make sense when they help a business earn more.
What I want to know is whether the returns can keep up with the spending.
Wall Street is expecting roughly $63.3 billion in Q3 revenue, according to analyst consensus. But revenue alone won't tell us the full story. Source: S&P Global
Here are the three things I'm watching when $META reports:
• Ad revenue: Is Meta's core business still growing strongly, with AI helping advertisers get better results?
• AI spending: Is the company investing more without giving investors a clearer picture of future returns?
• Margins and guidance: Can Meta keep growing profits while building out its AI infrastructure?
My take is cautiously bullish on the business, but I wouldn't blindly buy the stock just because everyone is excited about AI.
If advertising growth stays strong and management gives a convincing outlook, the bullish case gets stronger. If costs rise faster than the business can absorb them, even a revenue beat might not be enough to push the stock higher.
That's the tricky part of earnings trading: the company can deliver good results and the stock can still fall if expectations were too high.
I'll be watching the numbers and management's guidance before deciding whether the market reaction makes sense.
What's your bigger concern with Meta: missing the AI opportunity or spending too much trying to win it?
$META
#EarningsSeason
I'm not worried about Meta spending money on AI just because the number looks huge. Big investments can make sense when they help a business earn more.
What I want to know is whether the returns can keep up with the spending.
Wall Street is expecting roughly $63.3 billion in Q3 revenue, according to analyst consensus. But revenue alone won't tell us the full story. Source: S&P Global
Here are the three things I'm watching when $META reports:
• Ad revenue: Is Meta's core business still growing strongly, with AI helping advertisers get better results?
• AI spending: Is the company investing more without giving investors a clearer picture of future returns?
• Margins and guidance: Can Meta keep growing profits while building out its AI infrastructure?
My take is cautiously bullish on the business, but I wouldn't blindly buy the stock just because everyone is excited about AI.
If advertising growth stays strong and management gives a convincing outlook, the bullish case gets stronger. If costs rise faster than the business can absorb them, even a revenue beat might not be enough to push the stock higher.
That's the tricky part of earnings trading: the company can deliver good results and the stock can still fall if expectations were too high.
I'll be watching the numbers and management's guidance before deciding whether the market reaction makes sense.
What's your bigger concern with Meta: missing the AI opportunity or spending too much trying to win it?
$META
#EarningsSeason
2
932
·
--
You know what I find interesting about crypto? We talk so much about making transactions faster and cheaper, but we don't talk enough about what information we're exposing along the way.
That's one reason I'm curious about what @nillionnetwork is building with Covenants. I want to see how far this idea can go beyond the theory and become something developers actually use.
On a public blockchain, your transaction is not the only thing that can reveal information. Your order, trading conditions, or strategy may expose clues before you even get the chance to act. This is the problem that makes Nillion's Covenants worth watching.
A Covenant is an encrypted instruction designed to remain sealed until a specified condition is met. The idea is simple, but the potential applications are interesting, especially for onchain trading and automated finance.
Now look at Nillion's seven-era roadmap.
Dusk establishes Covenants on Ethereum.
Darkfall aims to expand them across EVM chains.
Skyglow targets cross-chain conditions and settlement.
Nightside expands the types of conditions developers can use.
Neon targets stronger privacy and developer safeguards.
Aurora focuses on post-quantum security.
Moonshine aims to reduce costs and make Covenants more practical at scale. privacy that protects sensitive instructions without abandoning transparent blockchain settlement.
Imagine a trading instruction that stays encrypted until its predefined condition is met. That could create new possibilities for strategy execution, automated payments, and other applications.
But a roadmap is not proof of success. Security, real developer adoption, execution reliability, and costs will determine whether this vision becomes useful infrastructure or remains an interesting idea.
My biggest question is not how far $NIL can pump. It is whether developers will build something people genuinely need with Covenants. That is the progress I would watch.
What matters more for the future of onchain markets: private trading instructions or cheaper cross-chain execution?
#nil $NIL @nillionnetwork
You know what I find interesting about crypto? We talk so much about making transactions faster and cheaper, but we don't talk enough about what information we're exposing along the way.
That's one reason I'm curious about what @Nillion is building with Covenants. I want to see how far this idea can go beyond the theory and become something developers actually use.
On a public blockchain, your transaction is not the only thing that can reveal information. Your order, trading conditions, or strategy may expose clues before you even get the chance to act. This is the problem that makes Nillion's Covenants worth watching.
A Covenant is an encrypted instruction designed to remain sealed until a specified condition is met. The idea is simple, but the potential applications are interesting, especially for onchain trading and automated finance.
Now look at Nillion's seven-era roadmap.
Dusk establishes Covenants on Ethereum.
Darkfall aims to expand them across EVM chains.
Skyglow targets cross-chain conditions and settlement.
Nightside expands the types of conditions developers can use.
Neon targets stronger privacy and developer safeguards.
Aurora focuses on post-quantum security.
Moonshine aims to reduce costs and make Covenants more practical at scale. privacy that protects sensitive instructions without abandoning transparent blockchain settlement.
Imagine a trading instruction that stays encrypted until its predefined condition is met. That could create new possibilities for strategy execution, automated payments, and other applications.
But a roadmap is not proof of success. Security, real developer adoption, execution reliability, and costs will determine whether this vision becomes useful infrastructure or remains an interesting idea.
My biggest question is not how far $NIL can pump. It is whether developers will build something people genuinely need with Covenants. That is the progress I would watch.
What matters more for the future of onchain markets: private trading instructions or cheaper cross-chain execution?
#nil $NIL @Nillion
That's one reason I'm curious about what @Nillion is building with Covenants. I want to see how far this idea can go beyond the theory and become something developers actually use.
On a public blockchain, your transaction is not the only thing that can reveal information. Your order, trading conditions, or strategy may expose clues before you even get the chance to act. This is the problem that makes Nillion's Covenants worth watching.
A Covenant is an encrypted instruction designed to remain sealed until a specified condition is met. The idea is simple, but the potential applications are interesting, especially for onchain trading and automated finance.
Now look at Nillion's seven-era roadmap.
Dusk establishes Covenants on Ethereum.
Darkfall aims to expand them across EVM chains.
Skyglow targets cross-chain conditions and settlement.
Nightside expands the types of conditions developers can use.
Neon targets stronger privacy and developer safeguards.
Aurora focuses on post-quantum security.
Moonshine aims to reduce costs and make Covenants more practical at scale. privacy that protects sensitive instructions without abandoning transparent blockchain settlement.
Imagine a trading instruction that stays encrypted until its predefined condition is met. That could create new possibilities for strategy execution, automated payments, and other applications.
But a roadmap is not proof of success. Security, real developer adoption, execution reliability, and costs will determine whether this vision becomes useful infrastructure or remains an interesting idea.
My biggest question is not how far $NIL can pump. It is whether developers will build something people genuinely need with Covenants. That is the progress I would watch.
What matters more for the future of onchain markets: private trading instructions or cheaper cross-chain execution?
#nil $NIL @Nillion
4
1
3
1.2k
·
--
ຢືນຢັນແລ້ວ
USD1 Lost $400M in Two Weeks. But Is It Actually in Trouble?
World Liberty Financial's USD1 stablecoin has lost around $401 million in market capitalization since October 6, falling from $4.43 billion to roughly $4.02 billion by October 19.
But here is the detail many headlines might miss: USD1 did not experience a sustained depeg.
According to on-chain research, the decline came mainly from redemptions on two networks:
Ethereum: $184.6 million in net redemptions.
BNB Chain: $200.43 million in net redemptions. Almost $200 million of the BNB Chain redemptions originated from one unidentified address. Researchers could not establish who controlled it or why the funds were redeemed.
USD1 continued trading between $0.998 and $1.00 during the period studied.
So what does this mean?
A falling market cap does not automatically mean a stablecoin is failing. In this case, the evidence points to a shrinking circulating supply rather than a sustained loss of its dollar peg.
However, the concentrated redemptions raise an important question: how dependent is USD1's supply on a small number of large holders?
My takeaway: Watch the redemption trend, new issuance, reserve transparency and whether the dollar peg holds. One headline does not prove a crisis, but large outflows deserve attention.
{spot}(USD1USDT)
#USD1 #USD1StablecoinLoses$400MMarketCapInTwoWeeks #WorldLibertyFinancial
USD1 Lost $400M in Two Weeks. But Is It Actually in Trouble?
World Liberty Financial's USD1 stablecoin has lost around $401 million in market capitalization since October 6, falling from $4.43 billion to roughly $4.02 billion by October 19.
But here is the detail many headlines might miss: USD1 did not experience a sustained depeg.
According to on-chain research, the decline came mainly from redemptions on two networks:
Ethereum: $184.6 million in net redemptions.
BNB Chain: $200.43 million in net redemptions. Almost $200 million of the BNB Chain redemptions originated from one unidentified address. Researchers could not establish who controlled it or why the funds were redeemed.
USD1 continued trading between $0.998 and $1.00 during the period studied.
So what does this mean?
A falling market cap does not automatically mean a stablecoin is failing. In this case, the evidence points to a shrinking circulating supply rather than a sustained loss of its dollar peg.
However, the concentrated redemptions raise an important question: how dependent is USD1's supply on a small number of large holders?
My takeaway: Watch the redemption trend, new issuance, reserve transparency and whether the dollar peg holds. One headline does not prove a crisis, but large outflows deserve attention.
#USD1 #USD1StablecoinLoses$400MMarketCapInTwoWeeks #WorldLibertyFinancial
World Liberty Financial's USD1 stablecoin has lost around $401 million in market capitalization since October 6, falling from $4.43 billion to roughly $4.02 billion by October 19.
But here is the detail many headlines might miss: USD1 did not experience a sustained depeg.
According to on-chain research, the decline came mainly from redemptions on two networks:
Ethereum: $184.6 million in net redemptions.
BNB Chain: $200.43 million in net redemptions. Almost $200 million of the BNB Chain redemptions originated from one unidentified address. Researchers could not establish who controlled it or why the funds were redeemed.
USD1 continued trading between $0.998 and $1.00 during the period studied.
So what does this mean?
A falling market cap does not automatically mean a stablecoin is failing. In this case, the evidence points to a shrinking circulating supply rather than a sustained loss of its dollar peg.
However, the concentrated redemptions raise an important question: how dependent is USD1's supply on a small number of large holders?
My takeaway: Watch the redemption trend, new issuance, reserve transparency and whether the dollar peg holds. One headline does not prove a crisis, but large outflows deserve attention.
#USD1 #USD1StablecoinLoses$400MMarketCapInTwoWeeks #WorldLibertyFinancial
1
2
229
·
--
Japan Is Preparing Its Financial System for the On-Chain Era
Japan's Financial Services Agency (FSA) has published the minutes of its first On-Chain Finance Forum for the AI Era, held on September 30, 2026.
The discussion focused on how blockchain could become part of the country's financial infrastructure, not just a tool for crypto trading.
Here are three developments worth notice
1. Tokenized assets: Japan is exploring how assets such as government bonds could work within blockchain-based financial systems.
2. Stablecoin and tokenized deposits: Officials discussed their potential use in payments, cross-border transfers and even government benefit distribution.
3. AI-powered finance: As AI agents become more capable of carrying out transactions, reliable identity verification, security and fraud prevention will become increasingly important.
The FSA also highlighted the need to combine on-chain systems with traditional financial infrastructure rather than assume blockchain can replace everything. The forum aims to develop an interim assessment and a public-private roadmap in early 2027.
The important signal is not a sudden change in crypto regulation. It is Japan's effort to prepare its financial infrastructure for tokenization, programmable payments and AI-driven transactions.
For the crypto market, the long-term opportunity may extend beyond token prices to the infrastructure supporting digital finance.
#japanfsapublishesonchainfinanceforumminutes $BTC
Japan Is Preparing Its Financial System for the On-Chain Era
Japan's Financial Services Agency (FSA) has published the minutes of its first On-Chain Finance Forum for the AI Era, held on September 30, 2026.
The discussion focused on how blockchain could become part of the country's financial infrastructure, not just a tool for crypto trading.
Here are three developments worth notice
1. Tokenized assets: Japan is exploring how assets such as government bonds could work within blockchain-based financial systems.
2. Stablecoin and tokenized deposits: Officials discussed their potential use in payments, cross-border transfers and even government benefit distribution.
3. AI-powered finance: As AI agents become more capable of carrying out transactions, reliable identity verification, security and fraud prevention will become increasingly important.
The FSA also highlighted the need to combine on-chain systems with traditional financial infrastructure rather than assume blockchain can replace everything. The forum aims to develop an interim assessment and a public-private roadmap in early 2027.
The important signal is not a sudden change in crypto regulation. It is Japan's effort to prepare its financial infrastructure for tokenization, programmable payments and AI-driven transactions.
For the crypto market, the long-term opportunity may extend beyond token prices to the infrastructure supporting digital finance.
#japanfsapublishesonchainfinanceforumminutes $BTC
Japan's Financial Services Agency (FSA) has published the minutes of its first On-Chain Finance Forum for the AI Era, held on September 30, 2026.
The discussion focused on how blockchain could become part of the country's financial infrastructure, not just a tool for crypto trading.
Here are three developments worth notice
1. Tokenized assets: Japan is exploring how assets such as government bonds could work within blockchain-based financial systems.
2. Stablecoin and tokenized deposits: Officials discussed their potential use in payments, cross-border transfers and even government benefit distribution.
3. AI-powered finance: As AI agents become more capable of carrying out transactions, reliable identity verification, security and fraud prevention will become increasingly important.
The FSA also highlighted the need to combine on-chain systems with traditional financial infrastructure rather than assume blockchain can replace everything. The forum aims to develop an interim assessment and a public-private roadmap in early 2027.
The important signal is not a sudden change in crypto regulation. It is Japan's effort to prepare its financial infrastructure for tokenization, programmable payments and AI-driven transactions.
For the crypto market, the long-term opportunity may extend beyond token prices to the infrastructure supporting digital finance.
#japanfsapublishesonchainfinanceforumminutes $BTC
6
9.4k
·
--
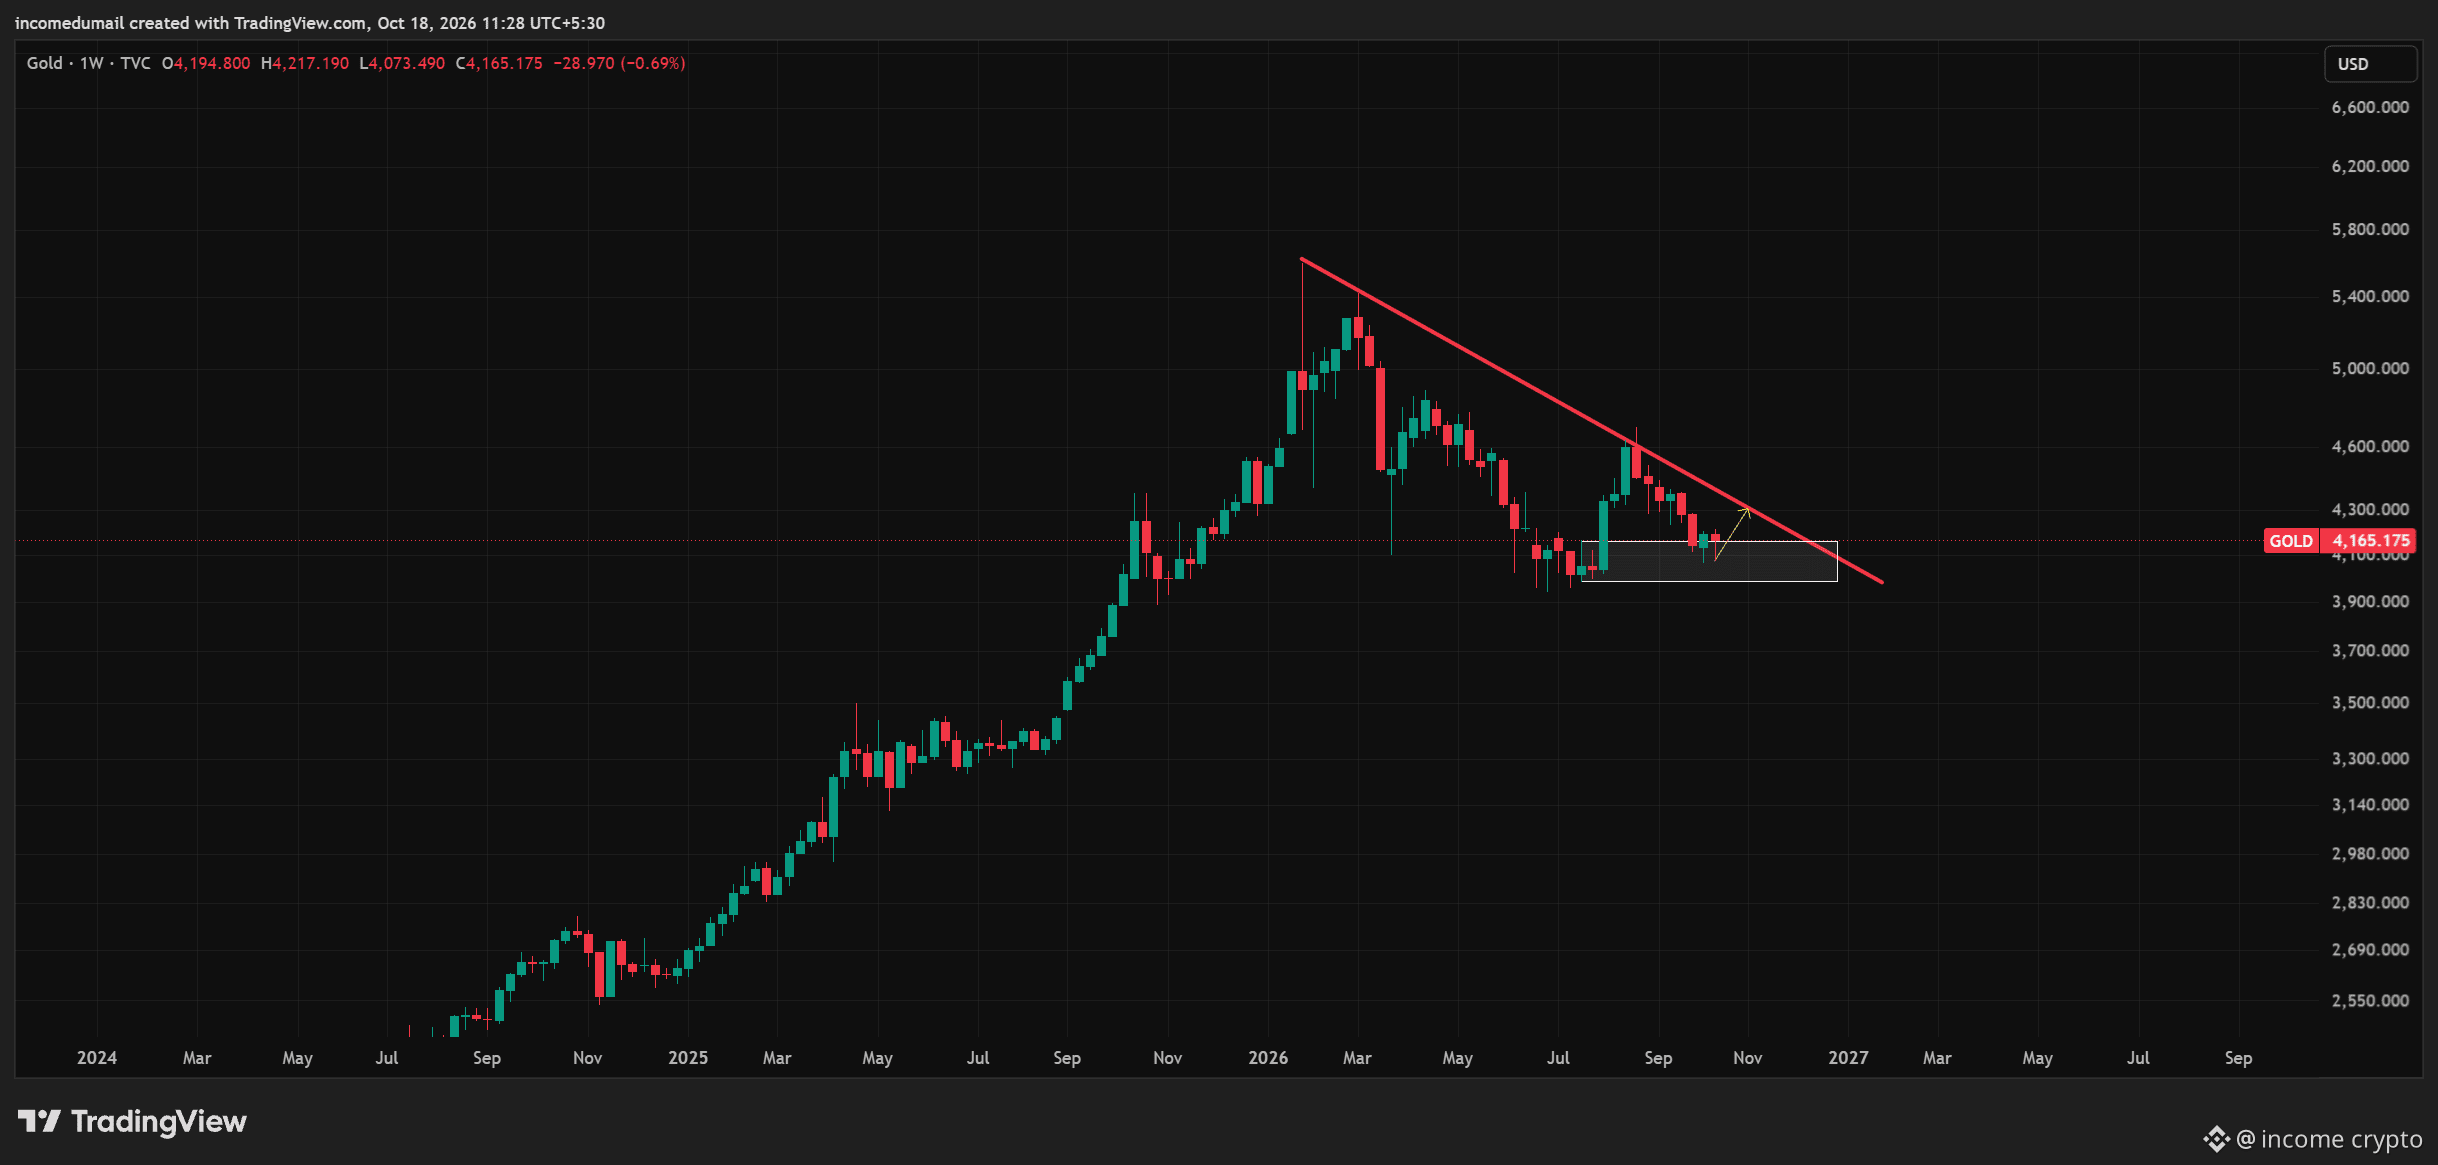
$XAUT GOLD WEEKLY ANALYSIS: Sellers Still Have Control
Gold is trading near $4,165 on the weekly chart, down around 24% from its peak near $5,500.
Each major rally has struggled to reach the previous high.
Descending trendline: Price remains below the falling resistance line, keeping the broader correction intact.
Support zone: The $4,000–$4,100 area is the key zone currently holding price.
The recent recovery failed to break the descending trendline, suggesting buyers have not regained control.
Gold remains bearish on the weekly timeframe while price stays below descending resistance and continues to form lower highs.
A sustained weekly close below the $4,000 support zone would strengthen the bearish case and expose lower levels. The first sign of a meaningful shift would be a strong break above the trendline, followed by a higher high. Until then, buying simply because Gold has reached support is risky. Trend first. Confirmation second. Entry last.
#Gold #XAUUSD #TechnicalAnalysis #Trading
{future}(XAUTUSDT)
$XAUT GOLD WEEKLY ANALYSIS: Sellers Still Have Control
Gold is trading near $4,165 on the weekly chart, down around 24% from its peak near $5,500.
Each major rally has struggled to reach the previous high.
Descending trendline: Price remains below the falling resistance line, keeping the broader correction intact.
Support zone: The $4,000–$4,100 area is the key zone currently holding price.
The recent recovery failed to break the descending trendline, suggesting buyers have not regained control.
Gold remains bearish on the weekly timeframe while price stays below descending resistance and continues to form lower highs.
A sustained weekly close below the $4,000 support zone would strengthen the bearish case and expose lower levels. The first sign of a meaningful shift would be a strong break above the trendline, followed by a higher high. Until then, buying simply because Gold has reached support is risky. Trend first. Confirmation second. Entry last.
#Gold #XAUUSD #TechnicalAnalysis #Trading
Gold is trading near $4,165 on the weekly chart, down around 24% from its peak near $5,500.
Each major rally has struggled to reach the previous high.
Descending trendline: Price remains below the falling resistance line, keeping the broader correction intact.
Support zone: The $4,000–$4,100 area is the key zone currently holding price.
The recent recovery failed to break the descending trendline, suggesting buyers have not regained control.
Gold remains bearish on the weekly timeframe while price stays below descending resistance and continues to form lower highs.
A sustained weekly close below the $4,000 support zone would strengthen the bearish case and expose lower levels. The first sign of a meaningful shift would be a strong break above the trendline, followed by a higher high. Until then, buying simply because Gold has reached support is risky. Trend first. Confirmation second. Entry last.
#Gold #XAUUSD #TechnicalAnalysis #Trading
2
393
·
--
ສັນຍານກະທິງ
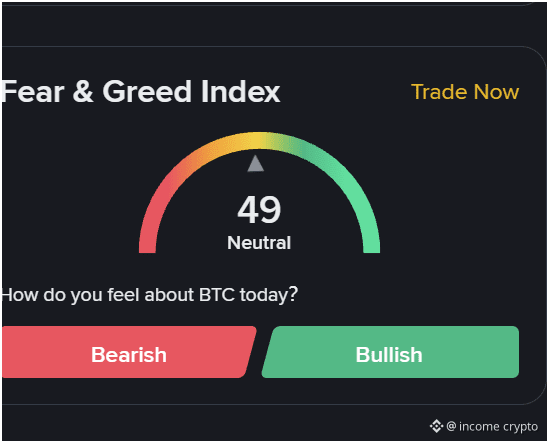
BTC Fear & Greed Index at 49. Is the market ready to move?
The index is sitting at 49, which means market sentiment is almost neutral. Neither fear nor greed is clearly in control.
But as a trader, I don't use this number alone to decide whether to buy or sell BTC.
Here's why.
When fear rises, people may sell in panic. When greed takes over, people start buying because they don't want to miss the rally.
Both can lead to bad entries.
#BitcoinSurpasses$82K
{future}(BTCUSDT)
BTC Fear & Greed Index at 49. Is the market ready to move?
The index is sitting at 49, which means market sentiment is almost neutral. Neither fear nor greed is clearly in control.
But as a trader, I don't use this number alone to decide whether to buy or sell BTC.
Here's why.
When fear rises, people may sell in panic. When greed takes over, people start buying because they don't want to miss the rally.
Both can lead to bad entries.
#BitcoinSurpasses$82K
The index is sitting at 49, which means market sentiment is almost neutral. Neither fear nor greed is clearly in control.
But as a trader, I don't use this number alone to decide whether to buy or sell BTC.
Here's why.
When fear rises, people may sell in panic. When greed takes over, people start buying because they don't want to miss the rally.
Both can lead to bad entries.
#BitcoinSurpasses$82K
1
2
258
·
--
ETH Below $2,400 AND NOW TRADING AT 2436 IS This Breakdown or Bear Trap?
Ethereum has slipped below the psychologically important $2,400 level, adding to pressure on an already cautious crypto market. Recent reports point to inflation concerns, persistent ETF outflows and weakness across broader risk assets as potential headwinds.
But here is what traders should focus on: the reaction after the breakdown matters more than the headline itself.
Bearish scenario: ETH fails to reclaim $2,400, and sellers continue to control the price structure.
Recovery scenario: ETH reclaims the level with strong bullish displacement and confirms a market structure shift.
My approach is simple: no blind dip-buying and no chasing breakdowns. I want to see how price reacts around key liquidity zones before committing capital.
A level breaking is information. Confirmation is what turns that information into a trade setup.
#Ethereum $ETH
{spot}(ETHUSDT)
#ETHDropsBelow2400USDT
ETH Below $2,400 AND NOW TRADING AT 2436 IS This Breakdown or Bear Trap?
Ethereum has slipped below the psychologically important $2,400 level, adding to pressure on an already cautious crypto market. Recent reports point to inflation concerns, persistent ETF outflows and weakness across broader risk assets as potential headwinds.
But here is what traders should focus on: the reaction after the breakdown matters more than the headline itself.
Bearish scenario: ETH fails to reclaim $2,400, and sellers continue to control the price structure.
Recovery scenario: ETH reclaims the level with strong bullish displacement and confirms a market structure shift.
My approach is simple: no blind dip-buying and no chasing breakdowns. I want to see how price reacts around key liquidity zones before committing capital.
A level breaking is information. Confirmation is what turns that information into a trade setup.
#Ethereum $ETH
#ETHDropsBelow2400USDT
Ethereum has slipped below the psychologically important $2,400 level, adding to pressure on an already cautious crypto market. Recent reports point to inflation concerns, persistent ETF outflows and weakness across broader risk assets as potential headwinds.
But here is what traders should focus on: the reaction after the breakdown matters more than the headline itself.
Bearish scenario: ETH fails to reclaim $2,400, and sellers continue to control the price structure.
Recovery scenario: ETH reclaims the level with strong bullish displacement and confirms a market structure shift.
My approach is simple: no blind dip-buying and no chasing breakdowns. I want to see how price reacts around key liquidity zones before committing capital.
A level breaking is information. Confirmation is what turns that information into a trade setup.
#Ethereum $ETH
#ETHDropsBelow2400USDT
1
2
251
·
--
Nasdaq-100 Just Had Its Worst Week in 18 Months. Is the AI Trade Losing Momentum?
The Nasdaq-100 dropped approximately 5.5% during the week ending October 16, marking its steepest weekly decline in around 18 months. The pressure came largely from technology, semiconductor and AI-related stocks as investors questioned whether the AI investment boom can justify its massive spending and valuations. Rising oil prices and inflation concerns added another layer of uncertainty. Source: Financial Times
Here is what matters for traders:
Tech stocks: Further weakness could expose overextended positions.
Bitcoin and crypto: A broader risk-off move could pressure speculative assets, although correlation is not guaranteed.
The next signal: Watch upcoming tech earnings, inflation expectations and Federal Reserve guidance.
My take: one brutal week does not confirm a bear market, but it does challenge the assumption that AI-linked stocks can keep climbing without interruption.
I would focus on price structure, liquidity and confirmation rather than blindly buying the dip. When market sentiment shifts, protecting capital matters more than proving a bullish thesis right.
Is this a healthy correction or the beginning of a deeper risk-off phase?
#Nasdaq100
#Nasdaq100Falls5.5%InWorstWeekIn18Months
Nasdaq-100 Just Had Its Worst Week in 18 Months. Is the AI Trade Losing Momentum?
The Nasdaq-100 dropped approximately 5.5% during the week ending October 16, marking its steepest weekly decline in around 18 months. The pressure came largely from technology, semiconductor and AI-related stocks as investors questioned whether the AI investment boom can justify its massive spending and valuations. Rising oil prices and inflation concerns added another layer of uncertainty. Source: Financial Times
Here is what matters for traders:
Tech stocks: Further weakness could expose overextended positions.
Bitcoin and crypto: A broader risk-off move could pressure speculative assets, although correlation is not guaranteed.
The next signal: Watch upcoming tech earnings, inflation expectations and Federal Reserve guidance.
My take: one brutal week does not confirm a bear market, but it does challenge the assumption that AI-linked stocks can keep climbing without interruption.
I would focus on price structure, liquidity and confirmation rather than blindly buying the dip. When market sentiment shifts, protecting capital matters more than proving a bullish thesis right.
Is this a healthy correction or the beginning of a deeper risk-off phase?
#Nasdaq100
#Nasdaq100Falls5.5%InWorstWeekIn18Months
The Nasdaq-100 dropped approximately 5.5% during the week ending October 16, marking its steepest weekly decline in around 18 months. The pressure came largely from technology, semiconductor and AI-related stocks as investors questioned whether the AI investment boom can justify its massive spending and valuations. Rising oil prices and inflation concerns added another layer of uncertainty. Source: Financial Times
Here is what matters for traders:
Tech stocks: Further weakness could expose overextended positions.
Bitcoin and crypto: A broader risk-off move could pressure speculative assets, although correlation is not guaranteed.
The next signal: Watch upcoming tech earnings, inflation expectations and Federal Reserve guidance.
My take: one brutal week does not confirm a bear market, but it does challenge the assumption that AI-linked stocks can keep climbing without interruption.
I would focus on price structure, liquidity and confirmation rather than blindly buying the dip. When market sentiment shifts, protecting capital matters more than proving a bullish thesis right.
Is this a healthy correction or the beginning of a deeper risk-off phase?
#Nasdaq100
#Nasdaq100Falls5.5%InWorstWeekIn18Months
1
2
3.5k
·
--
ຢືນຢັນແລ້ວ
ບົດຄວາມ
NEAR Lets SOL Earn Yield Without Exposing Your WalletYour crypto wallet is public. Your balance, transactions, and sometimes your trading strategy are just a few clicks away from anyone curious enough to look.
NEAR Protocol wants to change part of that equation.
On October 15, NEAR introduced Confidential SOL Yield, allowing users to earn yield on SOL through a Gauntlet-curated vault on Kamino Finance without exposing their wallet address directly to the vault.
How does it actually work?
Three players are involved:
• NEAR Protocol: Provides the confidential transaction infrastructure through near.com.
• Kamino Finance: Supplies the lending-market infrastructure where SOL generates yield.
• Gauntlet: Curates the vault strategy and manages its market exposure.
The reported launch APY was around 5.12%, but that number can change with lending-market conditions. It is not a fixed return.
The product was also advertised without a lockup, allowing users to swap or spend their assets while earning yield, subject to the product's operational conditions.
Why should DeFi users care?
Because blockchain transparency comes with a trade-off.
Anyone can inspect public wallet activity. For active traders, that can expose positions, transaction history, and potentially valuable clues about their strategies.
NEAR's confidential infrastructure aims to reduce that exposure while letting users access existing DeFi opportunities.
One important distinction: confidential does not mean completely anonymous. The feature conceals the depositor's wallet address from the vault, but it does not make every transaction or every part of the underlying process invisible.
And privacy does not eliminate smart-contract, market, or protocol risk. The deposited SOL still interacts with third-party DeFi infrastructure.
My take
The interesting part isn't the 5.12% APY. Lending yields fluctuate, and another protocol can offer a more attractive rate tomorrow.
The bigger opportunity is making financial privacy available without forcing users to abandon the DeFi applications they already use.
If NEAR can deliver that experience securely and attract sustained deposits, confidential execution could become a meaningful advantage for its ecosystem.
But don't confuse a useful product launch with an automatic bullish catalyst for $NEAR or $SOL. Adoption, capital flows, and token demand still need to prove themselves.
Yield gets users through the door. Privacy might give them a reason to stay.
$NEAR #solana #DeFi #NEARRisesNearly10%
{future}(NEARUSDT)
NEAR Lets SOL Earn Yield Without Exposing Your Wallet
Your crypto wallet is public. Your balance, transactions, and sometimes your trading strategy are just a few clicks away from anyone curious enough to look.
NEAR Protocol wants to change part of that equation.
On October 15, NEAR introduced Confidential SOL Yield, allowing users to earn yield on SOL through a Gauntlet-curated vault on Kamino Finance without exposing their wallet address directly to the vault.
How does it actually work?
Three players are involved:
• NEAR Protocol: Provides the confidential transaction infrastructure through near.com.
• Kamino Finance: Supplies the lending-market infrastructure where SOL generates yield.
• Gauntlet: Curates the vault strategy and manages its market exposure.
The reported launch APY was around 5.12%, but that number can change with lending-market conditions. It is not a fixed return.
The product was also advertised without a lockup, allowing users to swap or spend their assets while earning yield, subject to the product's operational conditions.
Why should DeFi users care?
Because blockchain transparency comes with a trade-off.
Anyone can inspect public wallet activity. For active traders, that can expose positions, transaction history, and potentially valuable clues about their strategies.
NEAR's confidential infrastructure aims to reduce that exposure while letting users access existing DeFi opportunities.
One important distinction: confidential does not mean completely anonymous. The feature conceals the depositor's wallet address from the vault, but it does not make every transaction or every part of the underlying process invisible.
And privacy does not eliminate smart-contract, market, or protocol risk. The deposited SOL still interacts with third-party DeFi infrastructure.
My take
The interesting part isn't the 5.12% APY. Lending yields fluctuate, and another protocol can offer a more attractive rate tomorrow.
The bigger opportunity is making financial privacy available without forcing users to abandon the DeFi applications they already use.
If NEAR can deliver that experience securely and attract sustained deposits, confidential execution could become a meaningful advantage for its ecosystem.
But don't confuse a useful product launch with an automatic bullish catalyst for $NEAR or $SOL. Adoption, capital flows, and token demand still need to prove themselves.
Yield gets users through the door. Privacy might give them a reason to stay.
$NEAR #solana #DeFi #NEARRisesNearly10%
NEAR Protocol wants to change part of that equation.
On October 15, NEAR introduced Confidential SOL Yield, allowing users to earn yield on SOL through a Gauntlet-curated vault on Kamino Finance without exposing their wallet address directly to the vault.
How does it actually work?
Three players are involved:
• NEAR Protocol: Provides the confidential transaction infrastructure through near.com.
• Kamino Finance: Supplies the lending-market infrastructure where SOL generates yield.
• Gauntlet: Curates the vault strategy and manages its market exposure.
The reported launch APY was around 5.12%, but that number can change with lending-market conditions. It is not a fixed return.
The product was also advertised without a lockup, allowing users to swap or spend their assets while earning yield, subject to the product's operational conditions.
Why should DeFi users care?
Because blockchain transparency comes with a trade-off.
Anyone can inspect public wallet activity. For active traders, that can expose positions, transaction history, and potentially valuable clues about their strategies.
NEAR's confidential infrastructure aims to reduce that exposure while letting users access existing DeFi opportunities.
One important distinction: confidential does not mean completely anonymous. The feature conceals the depositor's wallet address from the vault, but it does not make every transaction or every part of the underlying process invisible.
And privacy does not eliminate smart-contract, market, or protocol risk. The deposited SOL still interacts with third-party DeFi infrastructure.
My take
The interesting part isn't the 5.12% APY. Lending yields fluctuate, and another protocol can offer a more attractive rate tomorrow.
The bigger opportunity is making financial privacy available without forcing users to abandon the DeFi applications they already use.
If NEAR can deliver that experience securely and attract sustained deposits, confidential execution could become a meaningful advantage for its ecosystem.
But don't confuse a useful product launch with an automatic bullish catalyst for $NEAR or $SOL. Adoption, capital flows, and token demand still need to prove themselves.
Yield gets users through the door. Privacy might give them a reason to stay.
$NEAR #solana #DeFi #NEARRisesNearly10%
2
347
·
--
ສັນຍານກະທິງ
ຢືນຢັນແລ້ວ
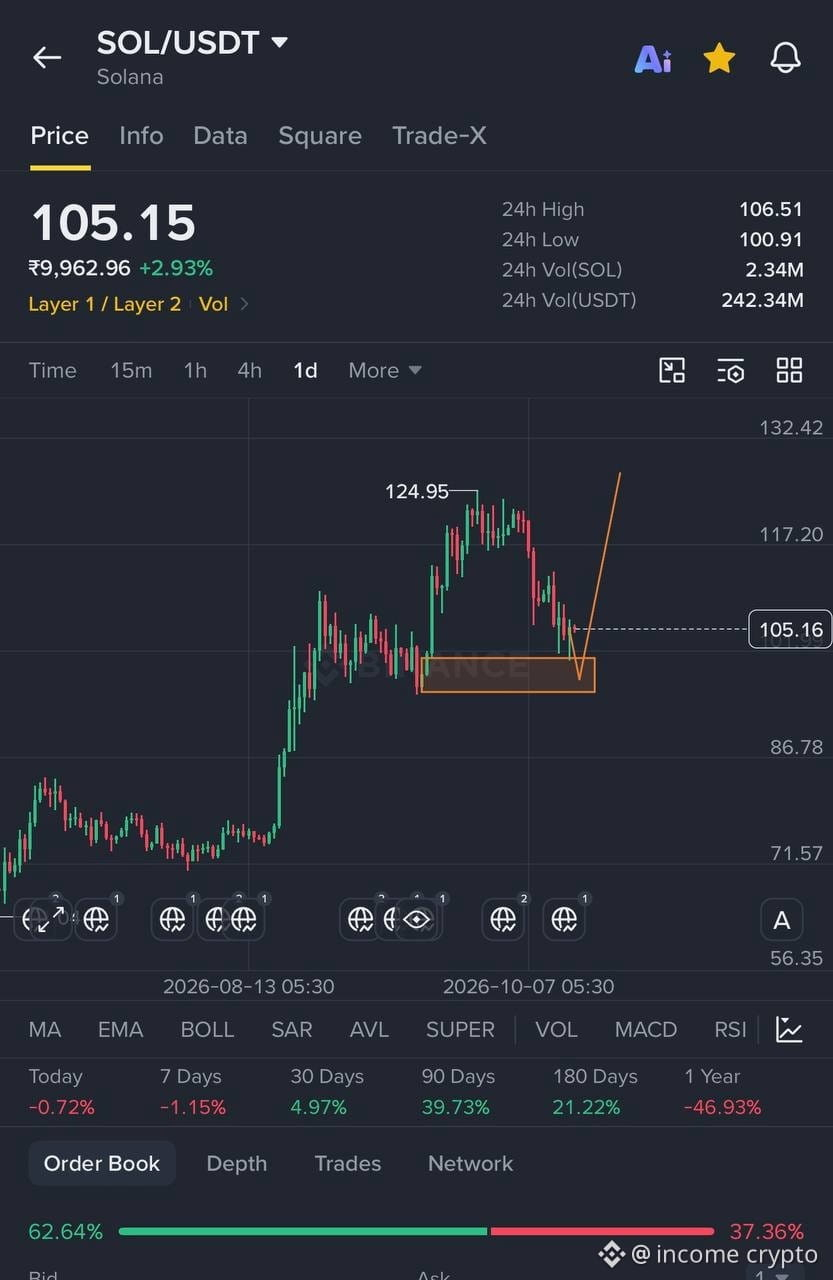
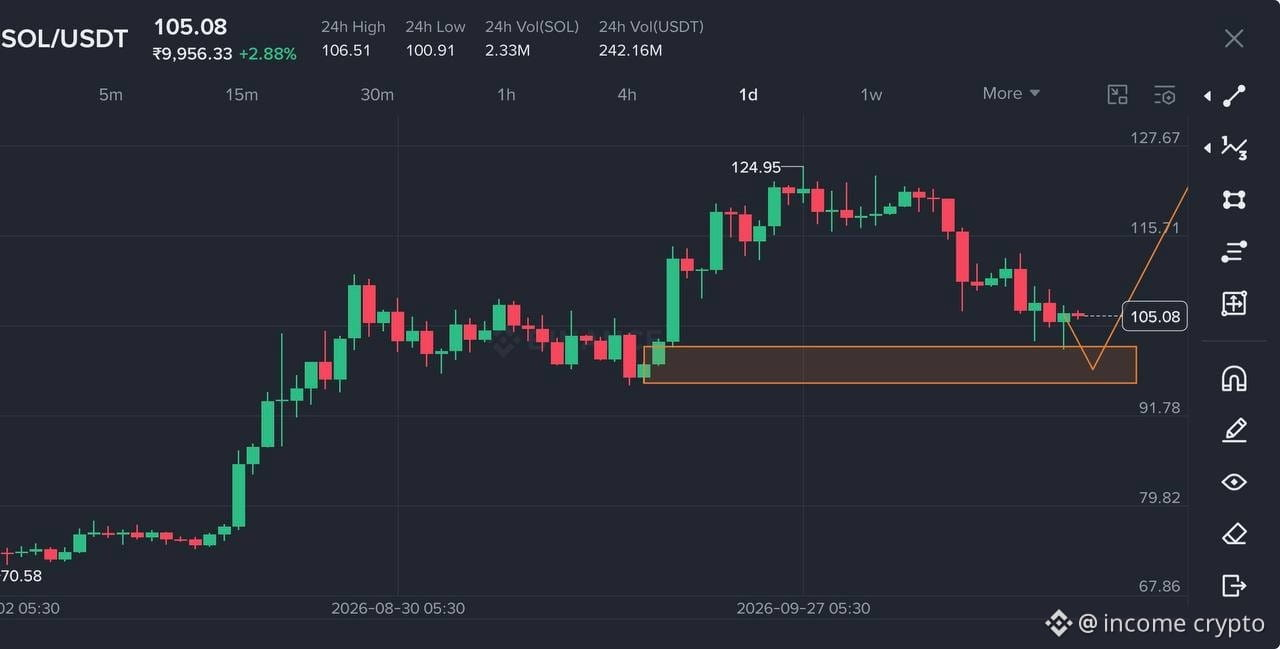
Solana’s Biggest Upgrade Is Coming on October 21. Is $SOL Ready?
Solana is preparing for a major network upgrade, and this time, the headline is about speed, finality and the network’s long-term competitiveness.
On October 21, Solana is scheduled to activate Alpenglow, a consensus upgrade targeting transaction finality of approximately 150 milliseconds, compared with roughly 12.8 seconds today.
But what does that actually mean for solana holders?
What Is Changing?
Alpenglow replaces Solana’s existing TowerBFT consensus mechanism with a new system called Votor. Instead of processing validator votes as regular transactions, validators will communicate votes directly and use certificates to reach consensus faster.
The upgrade also removes vote transactions from blocks, which could cause reported transaction counts and TPS figures to fall without a corresponding drop in real user activity.
One important detail: the separate Rotor upgrade, designed to improve block-data propagation, is planned for a later release.
Is This Bullish for $SOL?
Faster finality could improve Solana’s appeal for trading applications, payments and other use cases where confirmation speed matters.
However, better technology does not guarantee immediate price appreciation. Market conditions, liquidity, demand and expectations already priced into $SOL will still matter.
My approach would be to watch how the market behaves before and after activation rather than buy purely on the upgrade narrative.
The real question is whether improved infrastructure translates into stronger adoption and sustained demand for SOL.
Will Alpenglow become a major catalyst for Solana’s next growth phase, or has the market already priced it in?
#Solana #Alpenglow
{spot}(SOLUSDT)
#SolanaAlpenglowUpgradeToActivateOnOct21
Solana’s Biggest Upgrade Is Coming on October 21. Is $SOL Ready?
Solana is preparing for a major network upgrade, and this time, the headline is about speed, finality and the network’s long-term competitiveness.
On October 21, Solana is scheduled to activate Alpenglow, a consensus upgrade targeting transaction finality of approximately 150 milliseconds, compared with roughly 12.8 seconds today.
But what does that actually mean for solana holders?
What Is Changing?
Alpenglow replaces Solana’s existing TowerBFT consensus mechanism with a new system called Votor. Instead of processing validator votes as regular transactions, validators will communicate votes directly and use certificates to reach consensus faster.
The upgrade also removes vote transactions from blocks, which could cause reported transaction counts and TPS figures to fall without a corresponding drop in real user activity.
One important detail: the separate Rotor upgrade, designed to improve block-data propagation, is planned for a later release.
Is This Bullish for $SOL ?
Faster finality could improve Solana’s appeal for trading applications, payments and other use cases where confirmation speed matters.
However, better technology does not guarantee immediate price appreciation. Market conditions, liquidity, demand and expectations already priced into $SOL will still matter.
My approach would be to watch how the market behaves before and after activation rather than buy purely on the upgrade narrative.
The real question is whether improved infrastructure translates into stronger adoption and sustained demand for SOL.
Will Alpenglow become a major catalyst for Solana’s next growth phase, or has the market already priced it in?
#Solana #Alpenglow
#SolanaAlpenglowUpgradeToActivateOnOct21
Solana is preparing for a major network upgrade, and this time, the headline is about speed, finality and the network’s long-term competitiveness.
On October 21, Solana is scheduled to activate Alpenglow, a consensus upgrade targeting transaction finality of approximately 150 milliseconds, compared with roughly 12.8 seconds today.
But what does that actually mean for solana holders?
What Is Changing?
Alpenglow replaces Solana’s existing TowerBFT consensus mechanism with a new system called Votor. Instead of processing validator votes as regular transactions, validators will communicate votes directly and use certificates to reach consensus faster.
The upgrade also removes vote transactions from blocks, which could cause reported transaction counts and TPS figures to fall without a corresponding drop in real user activity.
One important detail: the separate Rotor upgrade, designed to improve block-data propagation, is planned for a later release.
Is This Bullish for $SOL ?
Faster finality could improve Solana’s appeal for trading applications, payments and other use cases where confirmation speed matters.
However, better technology does not guarantee immediate price appreciation. Market conditions, liquidity, demand and expectations already priced into $SOL will still matter.
My approach would be to watch how the market behaves before and after activation rather than buy purely on the upgrade narrative.
The real question is whether improved infrastructure translates into stronger adoption and sustained demand for SOL.
Will Alpenglow become a major catalyst for Solana’s next growth phase, or has the market already priced it in?
#Solana #Alpenglow
#SolanaAlpenglowUpgradeToActivateOnOct21
1
1
2
955
·
--
ຢືນຢັນແລ້ວ
TheThe Fed Wants to Stop Giving Markets Clues. Is Bitcoin Ready?The Federal Reserve may be changing how it communicates, and we traders should pay attention.
Fed Chair Kevin Warsh wants to scale back forward guidance and reconsider the dot plot, which shows policymakers’ interest-rate projections. His goal is to make markets focus more on economic data than the Fed’s hints about future decisions.
But less guidance could mean more surprises, and surprises create volatility.
Why we Traders Should Care
Bitcoin reacts to more than crypto-specific news. Interest-rate expectations, Treasury yields, the US dollar and global liquidity can all influence market sentiment.
Here are three scenarios to watch:
Inflation stays hot: Higher-for-longer rates could pressure risk assets, including BTC and altcoins.
Inflation cools: Expectations of easier monetary policy could support risk appetite.
Data surprise markets: Sudden changes in rate expectations could trigger sharp moves and failed breakouts.
None of these outcomes is guaranteed. Markets often price in expectations before the actual announcement.
My Trading Approach
I would watch US inflation data, Treasury yields, the dollar and Bitcoin’s higher-timeframe structure. Then I would wait for a liquidity sweep, displacement and market structure confirmation before considering an entry.
The headline alone is not a trading signal.
The bottom line: If the Fed provides fewer clues, economic data may matter even more. Traders who understand the macro backdrop and wait for price confirmation may be better positioned to manage the uncertainty.
Will less Fed guidance make Bitcoin more volatile, or force traders to become more data-driven?
#WarshPushesToScaleBackForwardGuidanceAndDotPlot $BTC #CPIWatch
TheThe Fed Wants to Stop Giving Markets Clues. Is Bitcoin Ready?
The Federal Reserve may be changing how it communicates, and we traders should pay attention.
Fed Chair Kevin Warsh wants to scale back forward guidance and reconsider the dot plot, which shows policymakers’ interest-rate projections. His goal is to make markets focus more on economic data than the Fed’s hints about future decisions.
But less guidance could mean more surprises, and surprises create volatility.
Why we Traders Should Care
Bitcoin reacts to more than crypto-specific news. Interest-rate expectations, Treasury yields, the US dollar and global liquidity can all influence market sentiment.
Here are three scenarios to watch:
Inflation stays hot: Higher-for-longer rates could pressure risk assets, including BTC and altcoins.
Inflation cools: Expectations of easier monetary policy could support risk appetite.
Data surprise markets: Sudden changes in rate expectations could trigger sharp moves and failed breakouts.
None of these outcomes is guaranteed. Markets often price in expectations before the actual announcement.
My Trading Approach
I would watch US inflation data, Treasury yields, the dollar and Bitcoin’s higher-timeframe structure. Then I would wait for a liquidity sweep, displacement and market structure confirmation before considering an entry.
The headline alone is not a trading signal.
The bottom line: If the Fed provides fewer clues, economic data may matter even more. Traders who understand the macro backdrop and wait for price confirmation may be better positioned to manage the uncertainty.
Will less Fed guidance make Bitcoin more volatile, or force traders to become more data-driven?
#WarshPushesToScaleBackForwardGuidanceAndDotPlot $BTC #CPIWatch
Fed Chair Kevin Warsh wants to scale back forward guidance and reconsider the dot plot, which shows policymakers’ interest-rate projections. His goal is to make markets focus more on economic data than the Fed’s hints about future decisions.
But less guidance could mean more surprises, and surprises create volatility.
Why we Traders Should Care
Bitcoin reacts to more than crypto-specific news. Interest-rate expectations, Treasury yields, the US dollar and global liquidity can all influence market sentiment.
Here are three scenarios to watch:
Inflation stays hot: Higher-for-longer rates could pressure risk assets, including BTC and altcoins.
Inflation cools: Expectations of easier monetary policy could support risk appetite.
Data surprise markets: Sudden changes in rate expectations could trigger sharp moves and failed breakouts.
None of these outcomes is guaranteed. Markets often price in expectations before the actual announcement.
My Trading Approach
I would watch US inflation data, Treasury yields, the dollar and Bitcoin’s higher-timeframe structure. Then I would wait for a liquidity sweep, displacement and market structure confirmation before considering an entry.
The headline alone is not a trading signal.
The bottom line: If the Fed provides fewer clues, economic data may matter even more. Traders who understand the macro backdrop and wait for price confirmation may be better positioned to manage the uncertainty.
Will less Fed guidance make Bitcoin more volatile, or force traders to become more data-driven?
#WarshPushesToScaleBackForwardGuidanceAndDotPlot $BTC #CPIWatch
2
2
9.5k
·
--
ຢືນຢັນແລ້ວ
ບົດຄວາມ
Most crypto investors see a $30 million investment Will the token PUMP??the more interesting question is what Sui is trying to build with that money.
On October 11, reports revealed that the Sui Foundation is investing $30 million in DATA Network, a protocol focused on AI training data. The deal also brings a major change: DATA Network plans to retire its independent blockchain and operate natively on Sui.
This is bigger than a funding headline. It is a strategic move to bring more AI-related infrastructure into the Sui ecosystem.
Let's break down why it matters.
What exactly is Sui buying into?
DATA Network, formerly associated with Story Protocol, is shifting its focus toward AI training data and the ability to verify where that data came from and how it can legally be used.
Think about the problem AI companies face.
AI models need enormous amounts of data. But where did that data originate? Who owns it? Was permission granted to use it? And how can contributors receive payment when their data is used?
These questions become increasingly important as AI adoption grows.
DATA Network is building infrastructure to track data provenance, usage rights, and payments to contributors.
Its Trace registry reportedly recorded more than 250 million contributions after launching in June, processing over 3 million receipts per day on average.
Those figures suggest meaningful activity, although the real test will be whether the network can turn that activity into sustainable demand and revenue.
Why is Sui investing $30 million?
The investment comes with three important developments.
1. DATA Network moves onto Sui
DATA Network will transition from its independent chain to a protocol running natively on Sui. Its existing DATA tokens are expected to migrate on a one-to-one basis, with a detailed transition timeline to be announced.
This is an important distinction: the project is not simply launching another application on Sui. It is retiring its own chain and making Sui its underlying blockchain infrastructure.
2. Walrus becomes part of the picture
The partnership also connects DATA Network with Walrus, the decentralized data-storage platform in the Sui ecosystem.
The intended combination is straightforward: Trace can help establish where data came from and how it is used, while Walrus provides a storage layer for applications operated by the DATA Foundation.
In other words, the ambition is to connect data verification with data storage.
3. Sui strengthens its AI infrastructure strategy
Sui is competing in a crowded Layer-1 market. Better transaction performance alone is not enough to guarantee long-term adoption.
By attracting infrastructure focused on AI training data, Sui is attempting to make its ecosystem useful for applications beyond conventional DeFi, gaming, and token trading.
If developers and AI companies actually adopt these tools, the partnership could strengthen Sui's long-term ecosystem position.
But a strategic investment is not proof that mass adoption is already here.
What does this mean for $SUI holders?
Here is where I would separate the fundamental opportunity from the market hype.
The bullish case is that DATA Network brings developers, data-related activity, and potential new applications into Sui. Walrus may also benefit from increased demand for decentralized storage.
More useful applications could improve the ecosystem's competitiveness.
However, there is a critical question: How much of this activity will translate into economic value for the $SUI token?
More applications do not automatically mean higher token prices. We still need to see sustained adoption, meaningful network activity, and stronger demand for the underlying ecosystem.
The $30 million investment is a commitment to the project and its integration. It should not be interpreted as $30 million of direct buying pressure on the open market for $SUI.
That difference matters.
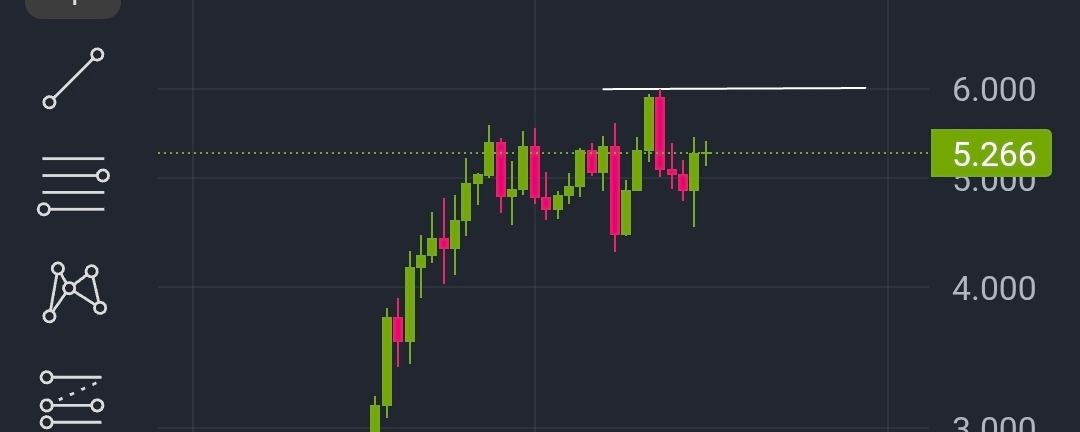
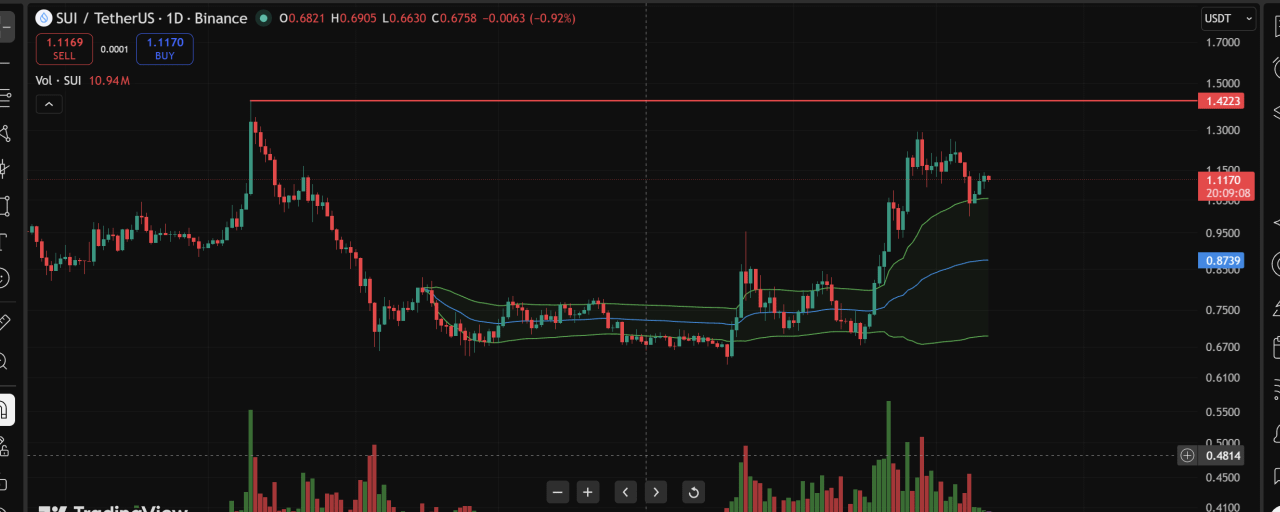
SUI/USDT: What is the chart telling us?
SUI is trading around $1.117. The recent rally carried price from the $0.70 region toward $1.25 before a pullback.
The chart also shows a marked resistance level around $1.4223.
Here are the areas I would monitor.
Immediate recovery zone: $1.15–$1.25
Price needs to reclaim and hold the recent local highs to show that buyers are regaining control. A brief move above resistance without follow-through would not be enough.
Major resistance: $1.42
This is the marked level on the chart. A sustained breakout and successful retest could improve the bullish setup and create room for a continuation move.
Potential support: $1.00–$1.05
This is a preliminary area to watch if price pulls back. I would look for a liquidity sweep, bullish displacement, and a market structure shift before considering an entry.
Deeper support: $0.85–$0.90
If the current recovery fails, this lower region is worth monitoring for a possible reaction. A breakdown in that area would require reassessing the bullish structure.
These are approximate technical zones based on the screenshot, not guaranteed targets or confirmed live-market levels.
My plan as a spot trader
I would not buy $SUI just because the headline contains $30 million.
I would watch two possible setups:
Breakout setup: Wait for price to reclaim the recent highs, then look for a successful retest with strong buying pressure.
Pullback setup: Let price return to a potential support area and wait for lower-timeframe confirmation before entering.
In both cases, define the invalidation level first. If price fails to confirm either setup, there is no reason to force a trade.
A strong narrative can put a token on your watchlist. It cannot replace an entry plan.
The bigger picture
The interesting part of this announcement is not the headline number alone.
Sui is positioning itself as infrastructure for a broader digital economy, while DATA Network is focusing on a problem that AI companies will increasingly need to solve: trustworthy data provenance, usage rights, and contributor compensation.
The integration with Walrus adds another piece to that strategy.
If the products gain real adoption, the partnership could strengthen Sui's ecosystem over time. If adoption remains limited, the investment may have less impact than the market initially expects.
For $SUI traders, I would watch both sides of the equation: ecosystem growth and price confirmation.
My takeaway: $30 million makes this partnership worth watching. Sustainable usage will determine whether it becomes more than a bullish headline.
And for the chart, $1.42 is the level I would keep on my radar. A confirmed breakout would be more convincing than another round of social-media excitement.
#SuiFoundationInvests$30MInDATANetwork #SUI
{future}(SUIUSDT)
{spot}(SUIUSDT)
Most crypto investors see a $30 million investment Will the token PUMP??
the more interesting question is what Sui is trying to build with that money.
On October 11, reports revealed that the Sui Foundation is investing $30 million in DATA Network, a protocol focused on AI training data. The deal also brings a major change: DATA Network plans to retire its independent blockchain and operate natively on Sui.
This is bigger than a funding headline. It is a strategic move to bring more AI-related infrastructure into the Sui ecosystem.
Let's break down why it matters.
What exactly is Sui buying into?
DATA Network, formerly associated with Story Protocol, is shifting its focus toward AI training data and the ability to verify where that data came from and how it can legally be used.
Think about the problem AI companies face.
AI models need enormous amounts of data. But where did that data originate? Who owns it? Was permission granted to use it? And how can contributors receive payment when their data is used?
These questions become increasingly important as AI adoption grows.
DATA Network is building infrastructure to track data provenance, usage rights, and payments to contributors.
Its Trace registry reportedly recorded more than 250 million contributions after launching in June, processing over 3 million receipts per day on average.
Those figures suggest meaningful activity, although the real test will be whether the network can turn that activity into sustainable demand and revenue.
Why is Sui investing $30 million?
The investment comes with three important developments.
1. DATA Network moves onto Sui
DATA Network will transition from its independent chain to a protocol running natively on Sui. Its existing DATA tokens are expected to migrate on a one-to-one basis, with a detailed transition timeline to be announced.
This is an important distinction: the project is not simply launching another application on Sui. It is retiring its own chain and making Sui its underlying blockchain infrastructure.
2. Walrus becomes part of the picture
The partnership also connects DATA Network with Walrus, the decentralized data-storage platform in the Sui ecosystem.
The intended combination is straightforward: Trace can help establish where data came from and how it is used, while Walrus provides a storage layer for applications operated by the DATA Foundation.
In other words, the ambition is to connect data verification with data storage.
3. Sui strengthens its AI infrastructure strategy
Sui is competing in a crowded Layer-1 market. Better transaction performance alone is not enough to guarantee long-term adoption.
By attracting infrastructure focused on AI training data, Sui is attempting to make its ecosystem useful for applications beyond conventional DeFi, gaming, and token trading.
If developers and AI companies actually adopt these tools, the partnership could strengthen Sui's long-term ecosystem position.
But a strategic investment is not proof that mass adoption is already here.
What does this mean for $SUI holders?
Here is where I would separate the fundamental opportunity from the market hype.
The bullish case is that DATA Network brings developers, data-related activity, and potential new applications into Sui. Walrus may also benefit from increased demand for decentralized storage.
More useful applications could improve the ecosystem's competitiveness.
However, there is a critical question: How much of this activity will translate into economic value for the $SUI token?
More applications do not automatically mean higher token prices. We still need to see sustained adoption, meaningful network activity, and stronger demand for the underlying ecosystem.
The $30 million investment is a commitment to the project and its integration. It should not be interpreted as $30 million of direct buying pressure on the open market for $SUI.
That difference matters.
SUI/USDT: What is the chart telling us?
SUI is trading around $1.117. The recent rally carried price from the $0.70 region toward $1.25 before a pullback.
The chart also shows a marked resistance level around $1.4223.
Here are the areas I would monitor.
Immediate recovery zone: $1.15–$1.25
Price needs to reclaim and hold the recent local highs to show that buyers are regaining control. A brief move above resistance without follow-through would not be enough.
Major resistance: $1.42
This is the marked level on the chart. A sustained breakout and successful retest could improve the bullish setup and create room for a continuation move.
Potential support: $1.00–$1.05
This is a preliminary area to watch if price pulls back. I would look for a liquidity sweep, bullish displacement, and a market structure shift before considering an entry.
Deeper support: $0.85–$0.90
If the current recovery fails, this lower region is worth monitoring for a possible reaction. A breakdown in that area would require reassessing the bullish structure.
These are approximate technical zones based on the screenshot, not guaranteed targets or confirmed live-market levels.
My plan as a spot trader
I would not buy $SUI just because the headline contains $30 million.
I would watch two possible setups:
Breakout setup: Wait for price to reclaim the recent highs, then look for a successful retest with strong buying pressure.
Pullback setup: Let price return to a potential support area and wait for lower-timeframe confirmation before entering.
In both cases, define the invalidation level first. If price fails to confirm either setup, there is no reason to force a trade.
A strong narrative can put a token on your watchlist. It cannot replace an entry plan.
The bigger picture
The interesting part of this announcement is not the headline number alone.
Sui is positioning itself as infrastructure for a broader digital economy, while DATA Network is focusing on a problem that AI companies will increasingly need to solve: trustworthy data provenance, usage rights, and contributor compensation.
The integration with Walrus adds another piece to that strategy.
If the products gain real adoption, the partnership could strengthen Sui's ecosystem over time. If adoption remains limited, the investment may have less impact than the market initially expects.
For $SUI traders, I would watch both sides of the equation: ecosystem growth and price confirmation.
My takeaway: $30 million makes this partnership worth watching. Sustainable usage will determine whether it becomes more than a bullish headline.
And for the chart, $1.42 is the level I would keep on my radar. A confirmed breakout would be more convincing than another round of social-media excitement.
#SuiFoundationInvests$30MInDATANetwork #SUI
On October 11, reports revealed that the Sui Foundation is investing $30 million in DATA Network, a protocol focused on AI training data. The deal also brings a major change: DATA Network plans to retire its independent blockchain and operate natively on Sui.
This is bigger than a funding headline. It is a strategic move to bring more AI-related infrastructure into the Sui ecosystem.
Let's break down why it matters.
What exactly is Sui buying into?
DATA Network, formerly associated with Story Protocol, is shifting its focus toward AI training data and the ability to verify where that data came from and how it can legally be used.
Think about the problem AI companies face.
AI models need enormous amounts of data. But where did that data originate? Who owns it? Was permission granted to use it? And how can contributors receive payment when their data is used?
These questions become increasingly important as AI adoption grows.
DATA Network is building infrastructure to track data provenance, usage rights, and payments to contributors.
Its Trace registry reportedly recorded more than 250 million contributions after launching in June, processing over 3 million receipts per day on average.
Those figures suggest meaningful activity, although the real test will be whether the network can turn that activity into sustainable demand and revenue.
Why is Sui investing $30 million?
The investment comes with three important developments.
1. DATA Network moves onto Sui
DATA Network will transition from its independent chain to a protocol running natively on Sui. Its existing DATA tokens are expected to migrate on a one-to-one basis, with a detailed transition timeline to be announced.
This is an important distinction: the project is not simply launching another application on Sui. It is retiring its own chain and making Sui its underlying blockchain infrastructure.
2. Walrus becomes part of the picture
The partnership also connects DATA Network with Walrus, the decentralized data-storage platform in the Sui ecosystem.
The intended combination is straightforward: Trace can help establish where data came from and how it is used, while Walrus provides a storage layer for applications operated by the DATA Foundation.
In other words, the ambition is to connect data verification with data storage.
3. Sui strengthens its AI infrastructure strategy
Sui is competing in a crowded Layer-1 market. Better transaction performance alone is not enough to guarantee long-term adoption.
By attracting infrastructure focused on AI training data, Sui is attempting to make its ecosystem useful for applications beyond conventional DeFi, gaming, and token trading.
If developers and AI companies actually adopt these tools, the partnership could strengthen Sui's long-term ecosystem position.
But a strategic investment is not proof that mass adoption is already here.
What does this mean for $SUI holders?
Here is where I would separate the fundamental opportunity from the market hype.
The bullish case is that DATA Network brings developers, data-related activity, and potential new applications into Sui. Walrus may also benefit from increased demand for decentralized storage.
More useful applications could improve the ecosystem's competitiveness.
However, there is a critical question: How much of this activity will translate into economic value for the $SUI token?
More applications do not automatically mean higher token prices. We still need to see sustained adoption, meaningful network activity, and stronger demand for the underlying ecosystem.
The $30 million investment is a commitment to the project and its integration. It should not be interpreted as $30 million of direct buying pressure on the open market for $SUI.
That difference matters.
SUI/USDT: What is the chart telling us?
SUI is trading around $1.117. The recent rally carried price from the $0.70 region toward $1.25 before a pullback.
The chart also shows a marked resistance level around $1.4223.
Here are the areas I would monitor.
Immediate recovery zone: $1.15–$1.25
Price needs to reclaim and hold the recent local highs to show that buyers are regaining control. A brief move above resistance without follow-through would not be enough.
Major resistance: $1.42
This is the marked level on the chart. A sustained breakout and successful retest could improve the bullish setup and create room for a continuation move.
Potential support: $1.00–$1.05
This is a preliminary area to watch if price pulls back. I would look for a liquidity sweep, bullish displacement, and a market structure shift before considering an entry.
Deeper support: $0.85–$0.90
If the current recovery fails, this lower region is worth monitoring for a possible reaction. A breakdown in that area would require reassessing the bullish structure.
These are approximate technical zones based on the screenshot, not guaranteed targets or confirmed live-market levels.
My plan as a spot trader
I would not buy $SUI just because the headline contains $30 million.
I would watch two possible setups:
Breakout setup: Wait for price to reclaim the recent highs, then look for a successful retest with strong buying pressure.
Pullback setup: Let price return to a potential support area and wait for lower-timeframe confirmation before entering.
In both cases, define the invalidation level first. If price fails to confirm either setup, there is no reason to force a trade.
A strong narrative can put a token on your watchlist. It cannot replace an entry plan.
The bigger picture
The interesting part of this announcement is not the headline number alone.
Sui is positioning itself as infrastructure for a broader digital economy, while DATA Network is focusing on a problem that AI companies will increasingly need to solve: trustworthy data provenance, usage rights, and contributor compensation.
The integration with Walrus adds another piece to that strategy.
If the products gain real adoption, the partnership could strengthen Sui's ecosystem over time. If adoption remains limited, the investment may have less impact than the market initially expects.
For $SUI traders, I would watch both sides of the equation: ecosystem growth and price confirmation.
My takeaway: $30 million makes this partnership worth watching. Sustainable usage will determine whether it becomes more than a bullish headline.
And for the chart, $1.42 is the level I would keep on my radar. A confirmed breakout would be more convincing than another round of social-media excitement.
#SuiFoundationInvests$30MInDATANetwork #SUI
3
1.2k
·
--
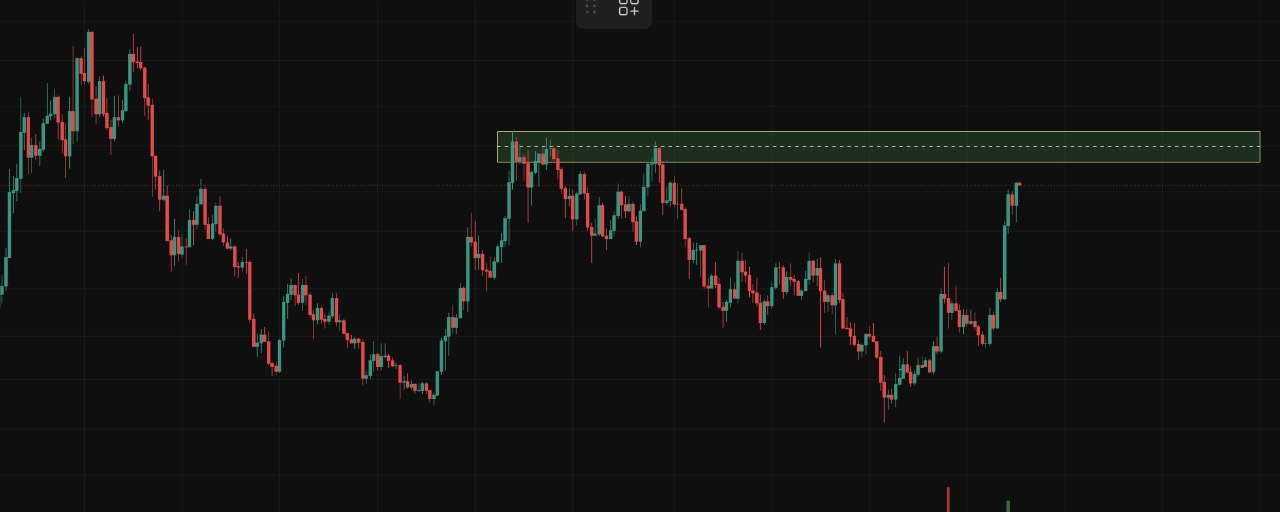
ບົດຄວາມ
NEAR Is Up 180% in a Month. Is $8 Next, or Are Late Buyers Taking the Risk? Are Late Buyers Taking the Risk?
NEAR delivered an approximately 183% gain it is into the spotlight for AI-related crypto projects. here is the question I care about as a trader
Does NEAR have a real reason to keep rising, or is the market already pricing in the story?
What is NEAR Protocol actually building?
NEAR is a Layer-1 blockchain designed to support scalable applications. Its technology uses sharding to distribute transaction processing rather than forcing the entire network to handle every operation in the same way.
But the more interesting part of its current strategy is the combination of AI and cross-chain infrastructure.
NEAR Intents aims to simplify crypto transactions across different blockchains. Instead of making users manage every bridge, network, and transaction separately, it helps abstract away much of that complexity.
The project is also building infrastructure for AI agents that can interact with digital assets and execute tasks.
Think about the bigger picture.
If AI agents eventually become active participants in the digital economy, they will need ways to move money, access liquidity, and execute transactions. NEAR wants to provide some of that infrastructure.
That is an interesting business opportunity. It is not proof that every AI-related token will succeed, but it gives NEAR a narrative connected to an emerging market rather than just another promise of faster transactions.
Why is NEAR outperforming many crypto projects?
Three factors deserve attention.
1. The AI narrative is attracting capital.
NEAR is being positioned around AI agents, private computing, and blockchain-based financial activity. As investors search for exposure to the intersection of AI and crypto, projects with a credible product strategy can attract disproportionate attention.
2. There is an actual product behind the story.
NEAR Intents has reported more than $33 billion in cumulative transaction volume across 36 chains on its official website. That demonstrates meaningful reported activity.
However, cumulative volume is not the same as revenue, and product usage does not automatically translate into higher token value. Investors need to watch how the ecosystem converts adoption into sustainable economic demand.
3. Price momentum is reinforcing the narrative.
When a token breaks out after a prolonged decline, momentum traders notice. New buyers arrive, short sellers may cover, and the move can accelerate.
This creates a feedback loop: rising prices attract attention, and attention can bring more buyers.
But momentum works in both directions.
NEAR versus other AI and Layer-1 tokens
NEAR should not be compared with every cryptocurrency as if they all serve the same purpose.
For the AI narrative, projects such as Bittensor ($TAO) and Worldcoin ($WLD) provide relevant comparisons. For Layer-1 competition, Solana ($SOL), Avalanche ($AVAX), and Sui ($SUI) are more useful benchmarks.
NEAR's recent rally has been particularly strong relative to several AI-related tokens. But short-term outperformance does not establish long-term superiority.
The real questions are whether NEAR can sustain user demand, grow its ecosystem, improve token value capture, and defend its position against competing networks.
A strong narrative gets attention. Sustainable adoption is what makes that attention matter.
NEAR/USDT: What are the next levels?
Immediate hurdle: $6.00 to $6.20
The latest weekly candle has a high near $5.96. A sustained move above this area would be an early sign that buyers are willing to push higher.
A brief wick above $6 is not enough. I would want to see a convincing close and a successful retest.
First major objective: $7.00 to $8.00
This is where the price approaches the lower portion of the resistance zone marked on the weekly chart. Sellers may become active here, particularly after such a strong rally.
Major resistance: $8.00 to $9.00
This is the key overhead zone from the chart. A decisive breakout followed by a successful retest could open the door to further upside.
Until that happens, I would treat this area as potential selling pressure rather than assume price will move straight through it.
What about a pullback?
The $4.80 to $5.20 region is a preliminary area to watch for a possible retest. I would not buy it blindly. A liquidity sweep followed by bullish displacement and a market structure shift on the lower timeframe would provide better evidence that buyers are defending the move.
These are conditional technical scenarios, not guaranteed targets.
My spot-trading plan
I see two sensible approaches.
Plan A: Wait for the breakout.
Let price clear the $6.00 to $6.20 area, then watch for a successful retest. If the breakout fails and price loses the reclaimed level, I would avoid forcing the trade.
Plan B: Wait for the pullback.
Monitor the $4.80 to $5.20 region, but enter only if the market confirms a bullish setup. Define the invalidation level first and calculate position size according to the risk you can afford.
My key level is $6.00 to $6.20 for initial breakout confirmation, followed by the $7.00 to $9.00 resistance zone.
{spot}(NEARUSDT)
$NEAR #Near
NEAR Is Up 180% in a Month. Is $8 Next, or Are Late Buyers Taking the Risk?
Are Late Buyers Taking the Risk?
NEAR delivered an approximately 183% gain it is into the spotlight for AI-related crypto projects. here is the question I care about as a trader
Does NEAR have a real reason to keep rising, or is the market already pricing in the story?
What is NEAR Protocol actually building?
NEAR is a Layer-1 blockchain designed to support scalable applications. Its technology uses sharding to distribute transaction processing rather than forcing the entire network to handle every operation in the same way.
But the more interesting part of its current strategy is the combination of AI and cross-chain infrastructure.
NEAR Intents aims to simplify crypto transactions across different blockchains. Instead of making users manage every bridge, network, and transaction separately, it helps abstract away much of that complexity.
The project is also building infrastructure for AI agents that can interact with digital assets and execute tasks.
Think about the bigger picture.
If AI agents eventually become active participants in the digital economy, they will need ways to move money, access liquidity, and execute transactions. NEAR wants to provide some of that infrastructure.
That is an interesting business opportunity. It is not proof that every AI-related token will succeed, but it gives NEAR a narrative connected to an emerging market rather than just another promise of faster transactions.
Why is NEAR outperforming many crypto projects?
Three factors deserve attention.
1. The AI narrative is attracting capital.
NEAR is being positioned around AI agents, private computing, and blockchain-based financial activity. As investors search for exposure to the intersection of AI and crypto, projects with a credible product strategy can attract disproportionate attention.
2. There is an actual product behind the story.
NEAR Intents has reported more than $33 billion in cumulative transaction volume across 36 chains on its official website. That demonstrates meaningful reported activity.
However, cumulative volume is not the same as revenue, and product usage does not automatically translate into higher token value. Investors need to watch how the ecosystem converts adoption into sustainable economic demand.
3. Price momentum is reinforcing the narrative.
When a token breaks out after a prolonged decline, momentum traders notice. New buyers arrive, short sellers may cover, and the move can accelerate.
This creates a feedback loop: rising prices attract attention, and attention can bring more buyers.
But momentum works in both directions.
NEAR versus other AI and Layer-1 tokens
NEAR should not be compared with every cryptocurrency as if they all serve the same purpose.
For the AI narrative, projects such as Bittensor ($TAO) and Worldcoin ($WLD) provide relevant comparisons. For Layer-1 competition, Solana ($SOL), Avalanche ($AVAX), and Sui ($SUI) are more useful benchmarks.
NEAR's recent rally has been particularly strong relative to several AI-related tokens. But short-term outperformance does not establish long-term superiority.
The real questions are whether NEAR can sustain user demand, grow its ecosystem, improve token value capture, and defend its position against competing networks.
A strong narrative gets attention. Sustainable adoption is what makes that attention matter.
NEAR/USDT: What are the next levels?
Immediate hurdle: $6.00 to $6.20
The latest weekly candle has a high near $5.96. A sustained move above this area would be an early sign that buyers are willing to push higher.
A brief wick above $6 is not enough. I would want to see a convincing close and a successful retest.
First major objective: $7.00 to $8.00
This is where the price approaches the lower portion of the resistance zone marked on the weekly chart. Sellers may become active here, particularly after such a strong rally.
Major resistance: $8.00 to $9.00
This is the key overhead zone from the chart. A decisive breakout followed by a successful retest could open the door to further upside.
Until that happens, I would treat this area as potential selling pressure rather than assume price will move straight through it.
What about a pullback?
The $4.80 to $5.20 region is a preliminary area to watch for a possible retest. I would not buy it blindly. A liquidity sweep followed by bullish displacement and a market structure shift on the lower timeframe would provide better evidence that buyers are defending the move.
These are conditional technical scenarios, not guaranteed targets.
My spot-trading plan
I see two sensible approaches.
Plan A: Wait for the breakout.
Let price clear the $6.00 to $6.20 area, then watch for a successful retest. If the breakout fails and price loses the reclaimed level, I would avoid forcing the trade.
Plan B: Wait for the pullback.
Monitor the $4.80 to $5.20 region, but enter only if the market confirms a bullish setup. Define the invalidation level first and calculate position size according to the risk you can afford.
My key level is $6.00 to $6.20 for initial breakout confirmation, followed by the $7.00 to $9.00 resistance zone.
$NEAR #Near
NEAR delivered an approximately 183% gain it is into the spotlight for AI-related crypto projects. here is the question I care about as a trader
Does NEAR have a real reason to keep rising, or is the market already pricing in the story?
What is NEAR Protocol actually building?
NEAR is a Layer-1 blockchain designed to support scalable applications. Its technology uses sharding to distribute transaction processing rather than forcing the entire network to handle every operation in the same way.
But the more interesting part of its current strategy is the combination of AI and cross-chain infrastructure.
NEAR Intents aims to simplify crypto transactions across different blockchains. Instead of making users manage every bridge, network, and transaction separately, it helps abstract away much of that complexity.
The project is also building infrastructure for AI agents that can interact with digital assets and execute tasks.
Think about the bigger picture.
If AI agents eventually become active participants in the digital economy, they will need ways to move money, access liquidity, and execute transactions. NEAR wants to provide some of that infrastructure.
That is an interesting business opportunity. It is not proof that every AI-related token will succeed, but it gives NEAR a narrative connected to an emerging market rather than just another promise of faster transactions.
Why is NEAR outperforming many crypto projects?
Three factors deserve attention.
1. The AI narrative is attracting capital.
NEAR is being positioned around AI agents, private computing, and blockchain-based financial activity. As investors search for exposure to the intersection of AI and crypto, projects with a credible product strategy can attract disproportionate attention.
2. There is an actual product behind the story.
NEAR Intents has reported more than $33 billion in cumulative transaction volume across 36 chains on its official website. That demonstrates meaningful reported activity.
However, cumulative volume is not the same as revenue, and product usage does not automatically translate into higher token value. Investors need to watch how the ecosystem converts adoption into sustainable economic demand.
3. Price momentum is reinforcing the narrative.
When a token breaks out after a prolonged decline, momentum traders notice. New buyers arrive, short sellers may cover, and the move can accelerate.
This creates a feedback loop: rising prices attract attention, and attention can bring more buyers.
But momentum works in both directions.
NEAR versus other AI and Layer-1 tokens
NEAR should not be compared with every cryptocurrency as if they all serve the same purpose.
For the AI narrative, projects such as Bittensor ($TAO) and Worldcoin ($WLD) provide relevant comparisons. For Layer-1 competition, Solana ($SOL), Avalanche ($AVAX), and Sui ($SUI) are more useful benchmarks.
NEAR's recent rally has been particularly strong relative to several AI-related tokens. But short-term outperformance does not establish long-term superiority.
The real questions are whether NEAR can sustain user demand, grow its ecosystem, improve token value capture, and defend its position against competing networks.
A strong narrative gets attention. Sustainable adoption is what makes that attention matter.
NEAR/USDT: What are the next levels?
Immediate hurdle: $6.00 to $6.20
The latest weekly candle has a high near $5.96. A sustained move above this area would be an early sign that buyers are willing to push higher.
A brief wick above $6 is not enough. I would want to see a convincing close and a successful retest.
First major objective: $7.00 to $8.00
This is where the price approaches the lower portion of the resistance zone marked on the weekly chart. Sellers may become active here, particularly after such a strong rally.
Major resistance: $8.00 to $9.00
This is the key overhead zone from the chart. A decisive breakout followed by a successful retest could open the door to further upside.
Until that happens, I would treat this area as potential selling pressure rather than assume price will move straight through it.
What about a pullback?
The $4.80 to $5.20 region is a preliminary area to watch for a possible retest. I would not buy it blindly. A liquidity sweep followed by bullish displacement and a market structure shift on the lower timeframe would provide better evidence that buyers are defending the move.
These are conditional technical scenarios, not guaranteed targets.
My spot-trading plan
I see two sensible approaches.
Plan A: Wait for the breakout.
Let price clear the $6.00 to $6.20 area, then watch for a successful retest. If the breakout fails and price loses the reclaimed level, I would avoid forcing the trade.
Plan B: Wait for the pullback.
Monitor the $4.80 to $5.20 region, but enter only if the market confirms a bullish setup. Define the invalidation level first and calculate position size according to the risk you can afford.
My key level is $6.00 to $6.20 for initial breakout confirmation, followed by the $7.00 to $9.00 resistance zone.
$NEAR #Near
3
910
·
--
ບົດຄວາມ
I Stopped Investing in Alts. Here's Why.And no, I haven't suddenly become bearish on crypto.
One important thing,because the article discusses investment decisions, keep the rest framed as your market observation and strategy, not as “you should stop buying alts.
Altcoins Are Down 30–40%. Is This the Accumulation Zone?
I've been watching one thing closely lately.
Gold has corrected hard, oil has pulled back from its highs, and a lot of altcoins are already 30–40% below their recent highs.
So naturally, the question is:
Are we getting an opportunity to accumulate before the next big altcoin move?
I think it's worth watching.
But I'm not going all-in just because something is down 40%.
Because, well... crypto has taught us that “down 40%” can sometimes be the warm-up.
Here's what makes this interesting
Gold fell about 6.6% in September, while oil recently pulled back from its monthly highs. At the same time, parts of the crypto market have already started showing stronger altcoin rotation.
But here's the important part:
This isn't a clean, confirmed altseason yet.
Current altcoin indicators are giving mixed signals. One index shows strong 30-day altcoin performance, while its 90-day reading remains below the traditional 75% threshold for a broad altseason.
And honestly, I prefer this kind of market.
Why?
Because you can still find opportunities before everyone starts screaming “ALTSEASON!”
What would make me more confident?
I'd watch four things:
BTC stays stable.
ETH starts outperforming.
$BTC dominance keeps falling.
Altcoin volume expands across multiple sectors.
If those pieces start lining up while quality altcoins are still sitting 30–40% below their highs...
That's when the setup becomes really interesting.
Not because every altcoin deserves to be bought.
But because capital may be starting to rotate.
My approach?
I wouldn't throw the whole bag in at once.
I'd rather build positions gradually:
Initial entry → confirmation → add on strength.
That keeps some dry powder available if the market decides to give us another nasty discount.
Because in crypto, patience is basically a superpower nobody wants to talk about.
My takeaway
I'm not saying:
“Altseason is coming. Buy everything.”
I'm saying:
The conditions are becoming interesting enough to start paying attention.
$PAXG is correcting. Oil has pulled back from its highs. Parts of the altcoin market are already showing rotation, while broader confirmation is still developing.
So instead of chasing after the move...
I'm more interested in positioning before the crowd decides the move is obvious.
#Altcoin #BitcoinRejectedAt$87K #MarketAnalysis
I Stopped Investing in Alts. Here's Why.
And no, I haven't suddenly become bearish on crypto.
One important thing,because the article discusses investment decisions, keep the rest framed as your market observation and strategy, not as “you should stop buying alts.
Altcoins Are Down 30–40%. Is This the Accumulation Zone?
I've been watching one thing closely lately.
Gold has corrected hard, oil has pulled back from its highs, and a lot of altcoins are already 30–40% below their recent highs.
So naturally, the question is:
Are we getting an opportunity to accumulate before the next big altcoin move?
I think it's worth watching.
But I'm not going all-in just because something is down 40%.
Because, well... crypto has taught us that “down 40%” can sometimes be the warm-up.
Here's what makes this interesting
Gold fell about 6.6% in September, while oil recently pulled back from its monthly highs. At the same time, parts of the crypto market have already started showing stronger altcoin rotation.
But here's the important part:
This isn't a clean, confirmed altseason yet.
Current altcoin indicators are giving mixed signals. One index shows strong 30-day altcoin performance, while its 90-day reading remains below the traditional 75% threshold for a broad altseason.
And honestly, I prefer this kind of market.
Why?
Because you can still find opportunities before everyone starts screaming “ALTSEASON!”
What would make me more confident?
I'd watch four things:
BTC stays stable.
ETH starts outperforming.
$BTC dominance keeps falling.
Altcoin volume expands across multiple sectors.
If those pieces start lining up while quality altcoins are still sitting 30–40% below their highs...
That's when the setup becomes really interesting.
Not because every altcoin deserves to be bought.
But because capital may be starting to rotate.
My approach?
I wouldn't throw the whole bag in at once.
I'd rather build positions gradually:
Initial entry → confirmation → add on strength.
That keeps some dry powder available if the market decides to give us another nasty discount.
Because in crypto, patience is basically a superpower nobody wants to talk about.
My takeaway
I'm not saying:
“Altseason is coming. Buy everything.”
I'm saying:
The conditions are becoming interesting enough to start paying attention.
$PAXG is correcting. Oil has pulled back from its highs. Parts of the altcoin market are already showing rotation, while broader confirmation is still developing.
So instead of chasing after the move...
I'm more interested in positioning before the crowd decides the move is obvious.
#Altcoin #BitcoinRejectedAt$87K #MarketAnalysis
One important thing,because the article discusses investment decisions, keep the rest framed as your market observation and strategy, not as “you should stop buying alts.
Altcoins Are Down 30–40%. Is This the Accumulation Zone?
I've been watching one thing closely lately.
Gold has corrected hard, oil has pulled back from its highs, and a lot of altcoins are already 30–40% below their recent highs.
So naturally, the question is:
Are we getting an opportunity to accumulate before the next big altcoin move?
I think it's worth watching.
But I'm not going all-in just because something is down 40%.
Because, well... crypto has taught us that “down 40%” can sometimes be the warm-up.
Here's what makes this interesting
Gold fell about 6.6% in September, while oil recently pulled back from its monthly highs. At the same time, parts of the crypto market have already started showing stronger altcoin rotation.
But here's the important part:
This isn't a clean, confirmed altseason yet.
Current altcoin indicators are giving mixed signals. One index shows strong 30-day altcoin performance, while its 90-day reading remains below the traditional 75% threshold for a broad altseason.
And honestly, I prefer this kind of market.
Why?
Because you can still find opportunities before everyone starts screaming “ALTSEASON!”
What would make me more confident?
I'd watch four things:
BTC stays stable.
ETH starts outperforming.
$BTC dominance keeps falling.
Altcoin volume expands across multiple sectors.
If those pieces start lining up while quality altcoins are still sitting 30–40% below their highs...
That's when the setup becomes really interesting.
Not because every altcoin deserves to be bought.
But because capital may be starting to rotate.
My approach?
I wouldn't throw the whole bag in at once.
I'd rather build positions gradually:
Initial entry → confirmation → add on strength.
That keeps some dry powder available if the market decides to give us another nasty discount.
Because in crypto, patience is basically a superpower nobody wants to talk about.
My takeaway
I'm not saying:
“Altseason is coming. Buy everything.”
I'm saying:
The conditions are becoming interesting enough to start paying attention.
$PAXG is correcting. Oil has pulled back from its highs. Parts of the altcoin market are already showing rotation, while broader confirmation is still developing.
So instead of chasing after the move...
I'm more interested in positioning before the crowd decides the move is obvious.
#Altcoin #BitcoinRejectedAt$87K #MarketAnalysis
2
3
630
·
--
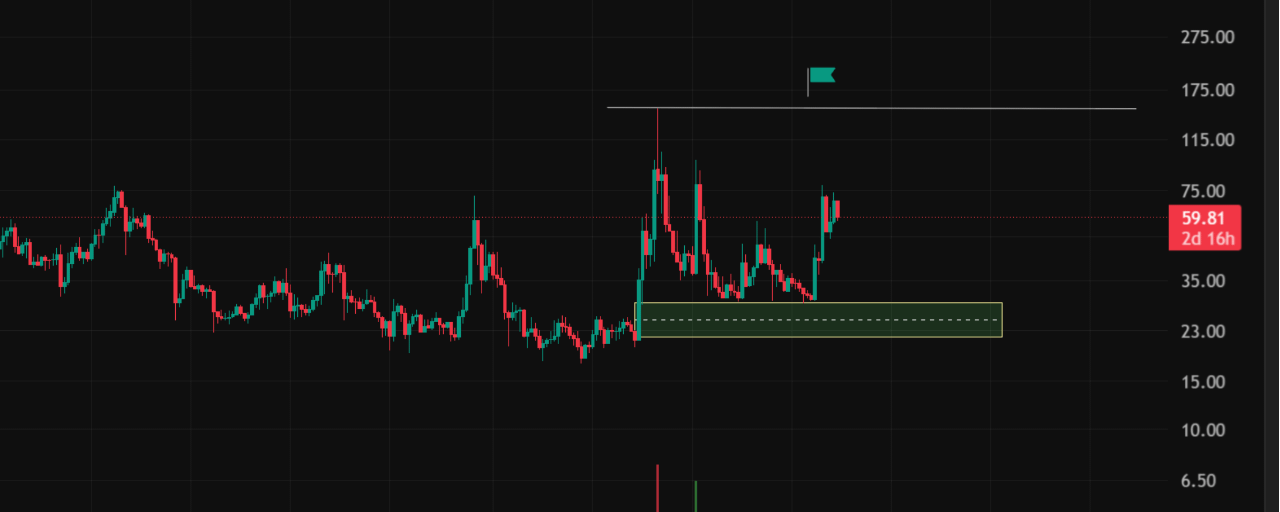
ບົດຄວາມ
ZEC IS Flying. So What About XMR and DASH? Something interesting is happening$ZEC Is Flying. So What About XMR and DASH?
Something interesting is happening in the privacy-coin sector.
But here's the mistake:
Just because three coins belong to the same sector doesn't mean they will perform the same way.
Why is ZEC leading?
ZEC currently has a powerful combination:
Privacy + Zero-Knowledge technology + scalability narrative + market momentum.
The market isn't treating ZEC simply as another privacy coin.
It is increasingly being viewed as a bet on the future of privacy-focused ZK technology.
And crypto loves a strong narrative.
Price attracts attention.
Attention brings volume.
Volume creates more attention.
The machine feeds itself.
Then why is XMR lagging?
$XMR has one major advantage:
It already has a mature privacy ecosystem.
Privacy is fundamental to XMR, with technologies designed to hide transaction details and improve fungibility.
But XMR also faces a different market environment.
Its mandatory privacy characteristics create more regulatory and exchange-access challenges, while its tail-emission model doesn't provide the same fixed-supply narrative that some traders chase.
So XMR's story is less about a shiny new narrative and more about established privacy utility.
And what about DASH?
DASH $DASH is particularly interesting.
It isn't simply a privacy coin. Its broader thesis includes payments, master nodes and the Evolution ecosystem.
More importantly, DASH has now introduced shielded transactions using ZECcash's Orchard technology.
That gives DASH a new privacy angle while keeping its broader ecosystem thesis intact.
So DASH could eventually become a different kind of privacy play rather than simply trying to copy XMR or ZEC.
Does this mean XMR and DASH will “catch up”?
Not necessarily.
This is where traders often get trapped.
“ZEC pumped, XMR hasn't. Therefore XMR must pump next.”
That's not a trading strategy. That's wishful thinking wearing a suit.
The important thing is capital rotation.
Watch:
• XMR/ZEC relative strength
• DASH/ZEC relative strength
• Spot volume
• Privacy-sector market cap
• On-chain activity
• Exchange liquidity
• New privacy catalysts
If ZEC begins consolidating while XMR or DASH starts gaining relative strength with rising spot volume, that could indicate capital is rotating within the sector.
That's far more meaningful than simply saying:
“This coin hasn't pumped yet.”
My takeaway
I wouldn't treat these three as identical assets.
$ZEC: ZK privacy + scalability + strong current narrative.
$XMR: Established privacy + fungibility + real network utility.
$DASH Payments + Evolution + newly strengthened ZK privacy.
So yes, XMR and DASH still have potential.
But their next major move will likely require their own catalyst or meaningful capital rotation.
Don't trade the price gap. Watch the rotation.
#Crypto #PrivacyCoins #ZEC #XMR #DASH
ZEC IS Flying. So What About XMR and DASH? Something interesting is happening
$ZEC Is Flying. So What About XMR and DASH?
Something interesting is happening in the privacy-coin sector.
But here's the mistake:
Just because three coins belong to the same sector doesn't mean they will perform the same way.
Why is ZEC leading?
ZEC currently has a powerful combination:
Privacy + Zero-Knowledge technology + scalability narrative + market momentum.
The market isn't treating ZEC simply as another privacy coin.
It is increasingly being viewed as a bet on the future of privacy-focused ZK technology.
And crypto loves a strong narrative.
Price attracts attention.
Attention brings volume.
Volume creates more attention.
The machine feeds itself.
Then why is XMR lagging?
$XMR has one major advantage:
It already has a mature privacy ecosystem.
Privacy is fundamental to XMR, with technologies designed to hide transaction details and improve fungibility.
But XMR also faces a different market environment.
Its mandatory privacy characteristics create more regulatory and exchange-access challenges, while its tail-emission model doesn't provide the same fixed-supply narrative that some traders chase.
So XMR's story is less about a shiny new narrative and more about established privacy utility.
And what about DASH?
DASH $DASH is particularly interesting.
It isn't simply a privacy coin. Its broader thesis includes payments, master nodes and the Evolution ecosystem.
More importantly, DASH has now introduced shielded transactions using ZECcash's Orchard technology.
That gives DASH a new privacy angle while keeping its broader ecosystem thesis intact.
So DASH could eventually become a different kind of privacy play rather than simply trying to copy XMR or ZEC.
Does this mean XMR and DASH will “catch up”?
Not necessarily.
This is where traders often get trapped.
“ZEC pumped, XMR hasn't. Therefore XMR must pump next.”
That's not a trading strategy. That's wishful thinking wearing a suit.
The important thing is capital rotation.
Watch:
• XMR/ZEC relative strength
• DASH/ZEC relative strength
• Spot volume
• Privacy-sector market cap
• On-chain activity
• Exchange liquidity
• New privacy catalysts
If ZEC begins consolidating while XMR or DASH starts gaining relative strength with rising spot volume, that could indicate capital is rotating within the sector.
That's far more meaningful than simply saying:
“This coin hasn't pumped yet.”
My takeaway
I wouldn't treat these three as identical assets.
$ZEC : ZK privacy + scalability + strong current narrative.
$XMR: Established privacy + fungibility + real network utility.
$DASH Payments + Evolution + newly strengthened ZK privacy.
So yes, XMR and DASH still have potential.
But their next major move will likely require their own catalyst or meaningful capital rotation.
Don't trade the price gap. Watch the rotation.
#Crypto #PrivacyCoins #ZEC #XMR #DASH
Something interesting is happening in the privacy-coin sector.
But here's the mistake:
Just because three coins belong to the same sector doesn't mean they will perform the same way.
Why is ZEC leading?
ZEC currently has a powerful combination:
Privacy + Zero-Knowledge technology + scalability narrative + market momentum.
The market isn't treating ZEC simply as another privacy coin.
It is increasingly being viewed as a bet on the future of privacy-focused ZK technology.
And crypto loves a strong narrative.
Price attracts attention.
Attention brings volume.
Volume creates more attention.
The machine feeds itself.
Then why is XMR lagging?
$XMR has one major advantage:
It already has a mature privacy ecosystem.
Privacy is fundamental to XMR, with technologies designed to hide transaction details and improve fungibility.
But XMR also faces a different market environment.
Its mandatory privacy characteristics create more regulatory and exchange-access challenges, while its tail-emission model doesn't provide the same fixed-supply narrative that some traders chase.
So XMR's story is less about a shiny new narrative and more about established privacy utility.
And what about DASH?
DASH $DASH is particularly interesting.
It isn't simply a privacy coin. Its broader thesis includes payments, master nodes and the Evolution ecosystem.
More importantly, DASH has now introduced shielded transactions using ZECcash's Orchard technology.
That gives DASH a new privacy angle while keeping its broader ecosystem thesis intact.
So DASH could eventually become a different kind of privacy play rather than simply trying to copy XMR or ZEC.
Does this mean XMR and DASH will “catch up”?
Not necessarily.
This is where traders often get trapped.
“ZEC pumped, XMR hasn't. Therefore XMR must pump next.”
That's not a trading strategy. That's wishful thinking wearing a suit.
The important thing is capital rotation.
Watch:
• XMR/ZEC relative strength
• DASH/ZEC relative strength
• Spot volume
• Privacy-sector market cap
• On-chain activity
• Exchange liquidity
• New privacy catalysts
If ZEC begins consolidating while XMR or DASH starts gaining relative strength with rising spot volume, that could indicate capital is rotating within the sector.
That's far more meaningful than simply saying:
“This coin hasn't pumped yet.”
My takeaway
I wouldn't treat these three as identical assets.
$ZEC : ZK privacy + scalability + strong current narrative.
$XMR: Established privacy + fungibility + real network utility.
$DASH Payments + Evolution + newly strengthened ZK privacy.
So yes, XMR and DASH still have potential.
But their next major move will likely require their own catalyst or meaningful capital rotation.
Don't trade the price gap. Watch the rotation.
#Crypto #PrivacyCoins #ZEC #XMR #DASH
3
3
1.2k
·
--
🚨 MetaMask Is Exiting $LDO Validators After a Security Incident
MetaMask has confirmed that it is responding to an ongoing security incident affecting part of its infrastructure.
MetaMask says it has identified no immediate threat to MetaMask wallets. Instead, the company is taking a precautionary step by proactively exiting affected Ethereum validators from its non-custodial staking operations.
What happened?
Meta Mask Staking, formerly known as Consensys Staking, has started exiting Ethereum validators operated through the Lido protocol.
Lido says the final affected validators are expected to complete the exit process by October 7, 2026. However, exiting a validator is only one part of the process.
The ETH must then go through withdrawal and potentially re-entry into staking. Because Ethereum currently has an extended validator entry queue, Lido estimates the full cycle could take up to around 45 days.
What does this mean for stETH holders?
For now, Lido says stETH holders do not need to take any action.
The affected ETH is expected to return gradually as validators complete the exit and withdrawal process. Lido also noted that the affected operations could experience foregone staking rewards and possible downtime penalties during the transition.
What we still don't know
This is where traders should avoid filling the information gap with imagination.
MetaMask has not disclosed the exact nature, scope or entry point of the security incident. It is working with external partners and security advisers while the investigation continues.
So the confirmed picture right now is:
Security incident → precautionary validator exits → no immediate wallet threat identified → Lido validator exits targeted for completion by Oct. 7 → full staking cycle may take up to ~45 days.
For $ETH and $LDO watchers, the next major catalyst is not the headline itself, but what Mask reveals about the incident and whether additional validators or infrastructure are affected.
#MetaMaskExitsLidoValidatorsAfterSecurityIncident #Ethereum #CryptoSecurity #EthereumStaking
🚨 MetaMask Is Exiting $LDO Validators After a Security Incident
MetaMask has confirmed that it is responding to an ongoing security incident affecting part of its infrastructure.
MetaMask says it has identified no immediate threat to MetaMask wallets. Instead, the company is taking a precautionary step by proactively exiting affected Ethereum validators from its non-custodial staking operations.
What happened?
Meta Mask Staking, formerly known as Consensys Staking, has started exiting Ethereum validators operated through the Lido protocol.
Lido says the final affected validators are expected to complete the exit process by October 7, 2026. However, exiting a validator is only one part of the process.
The ETH must then go through withdrawal and potentially re-entry into staking. Because Ethereum currently has an extended validator entry queue, Lido estimates the full cycle could take up to around 45 days.
What does this mean for stETH holders?
For now, Lido says stETH holders do not need to take any action.
The affected ETH is expected to return gradually as validators complete the exit and withdrawal process. Lido also noted that the affected operations could experience foregone staking rewards and possible downtime penalties during the transition.
What we still don't know
This is where traders should avoid filling the information gap with imagination.
MetaMask has not disclosed the exact nature, scope or entry point of the security incident. It is working with external partners and security advisers while the investigation continues.
So the confirmed picture right now is:
Security incident → precautionary validator exits → no immediate wallet threat identified → Lido validator exits targeted for completion by Oct. 7 → full staking cycle may take up to ~45 days.
For $ETH and $LDO watchers, the next major catalyst is not the headline itself, but what Mask reveals about the incident and whether additional validators or infrastructure are affected.
#MetaMaskExitsLidoValidatorsAfterSecurityIncident #Ethereum #CryptoSecurity #EthereumStaking
MetaMask has confirmed that it is responding to an ongoing security incident affecting part of its infrastructure.
MetaMask says it has identified no immediate threat to MetaMask wallets. Instead, the company is taking a precautionary step by proactively exiting affected Ethereum validators from its non-custodial staking operations.
What happened?
Meta Mask Staking, formerly known as Consensys Staking, has started exiting Ethereum validators operated through the Lido protocol.
Lido says the final affected validators are expected to complete the exit process by October 7, 2026. However, exiting a validator is only one part of the process.
The ETH must then go through withdrawal and potentially re-entry into staking. Because Ethereum currently has an extended validator entry queue, Lido estimates the full cycle could take up to around 45 days.
What does this mean for stETH holders?
For now, Lido says stETH holders do not need to take any action.
The affected ETH is expected to return gradually as validators complete the exit and withdrawal process. Lido also noted that the affected operations could experience foregone staking rewards and possible downtime penalties during the transition.
What we still don't know
This is where traders should avoid filling the information gap with imagination.
MetaMask has not disclosed the exact nature, scope or entry point of the security incident. It is working with external partners and security advisers while the investigation continues.
So the confirmed picture right now is:
Security incident → precautionary validator exits → no immediate wallet threat identified → Lido validator exits targeted for completion by Oct. 7 → full staking cycle may take up to ~45 days.
For $ETH and $LDO watchers, the next major catalyst is not the headline itself, but what Mask reveals about the incident and whether additional validators or infrastructure are affected.
#MetaMaskExitsLidoValidatorsAfterSecurityIncident #Ethereum #CryptoSecurity #EthereumStaking

1
174
ເຂົ້າສູ່ລະບົບເພື່ອສຳຫຼວດເນື້ອຫາເພີ່ມເຕີມ
ເຂົ້າຮ່ວມກຸ່ມຜູ້ໃຊ້ຄຣິບໂຕທົ່ວໂລກໃນ Binance Square.
⚡️ ໄດ້ຮັບຂໍ້ມູນຫຼ້າສຸດ ແລະ ທີ່ມີປະໂຫຍດກ່ຽວກັບຄຣິບໂຕ.
💬 ໄດ້ຮັບຄວາມໄວ້ວາງໃຈຈາກຕະຫຼາດແລກປ່ຽນຄຣິບໂຕທີ່ໃຫຍ່ທີ່ສຸດໃນໂລກ.
👍 ຄົ້ນຫາຂໍ້ມູນເຊີງເລິກທີ່ແທ້ຈາກນັກສ້າງທີ່ໄດ້ຮັບການຢືນຢັນ.
ອີເມວ / ເບີໂທລະສັບ
ຫົວຂໍ້ທີ່ກໍາລັງນິຍົມ
BinancePick
2.9M ຄັ້ງທີ່ເບິ່ງ
150,513 ກຳລັງສົນທະນາ
Join #EarningsSeason: Predict Earnings on Binance Pick, Share Your Take on Binance Square!
Binance Square Official
·407 ຖືກໃຈ
·341.8k ຄັ້ງທີ່ເບິ່ງ
EarningsSeason
5.2M ຄັ້ງທີ່ເບິ່ງ
25,662 ກຳລັງສົນທະນາ
AnthropicTTMRevenueGrewAbout1200%
12,328 ຄັ້ງທີ່ເບິ່ງ
288 ກຳລັງສົນທະນາ