

FINNEAS
26.5k Publications

FINNEAS
 Compte Square Vérifié+
Signaler
Bloquer l’utilisateur
Binance KOL & Crypto Mentor Crypto Expert - Trader - Sharing Market Insights, Trends X:@FINNEAS
Ouvert au trading
Trade régulièrement
1.8 an(s)
1.4K+ Suivis
33.9K+ Abonnés
20.4K+ J’aime
Publications
Portefeuille
Tous
Citations
Direct
·
--
Haussier
$ETH
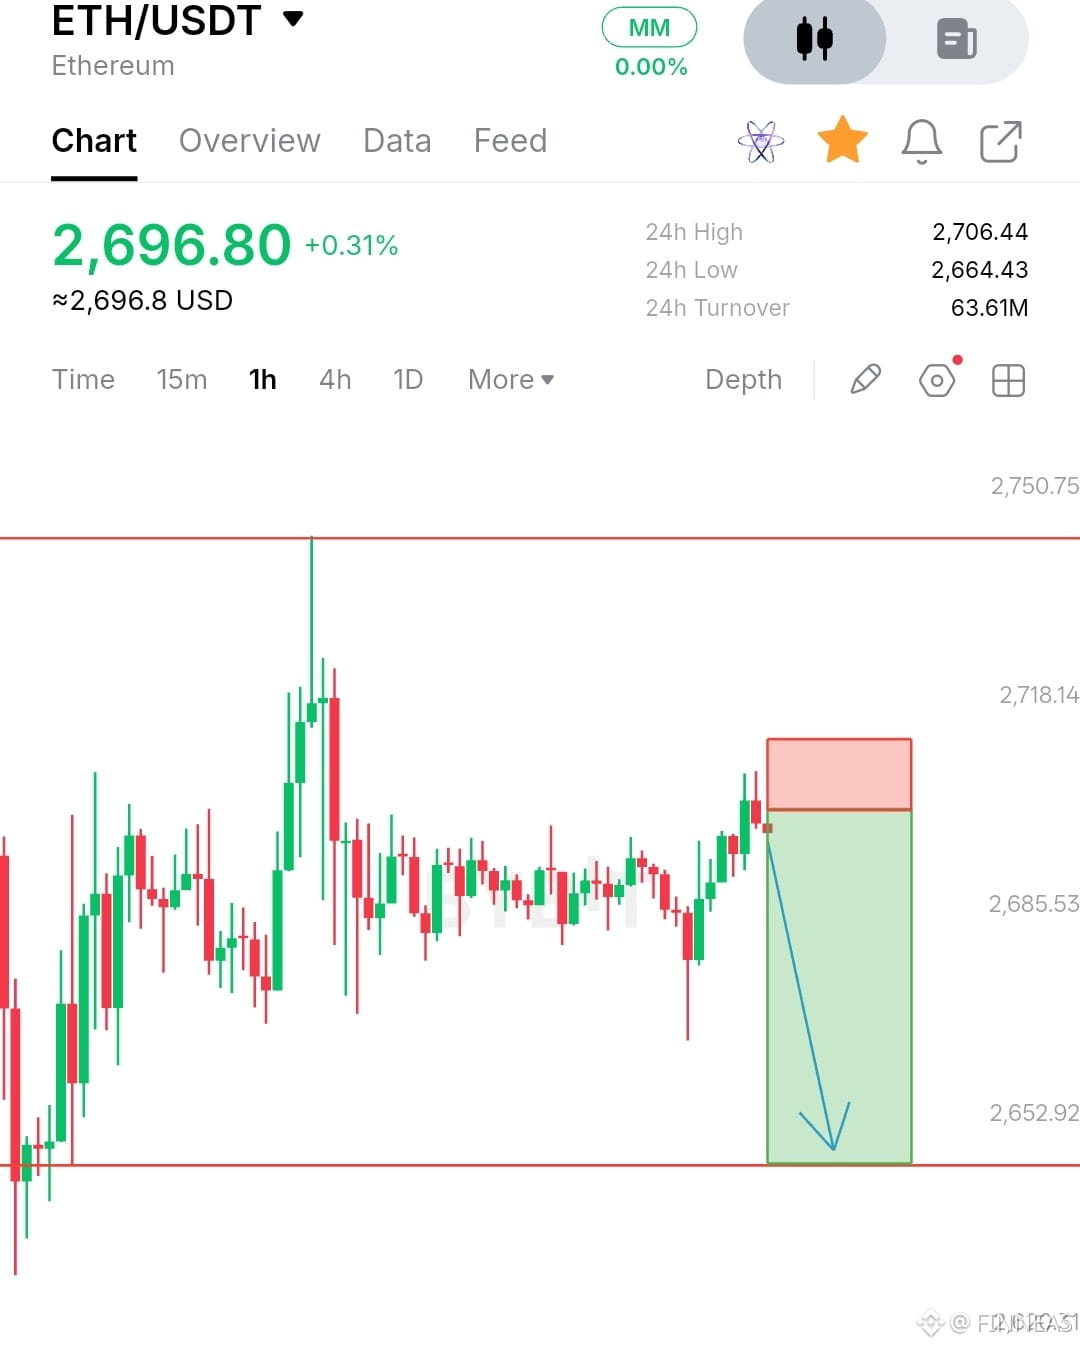
1H structure shows a clear rejection from the $2,706 to $2,718 resistance and supply zone. Price is now testing the upper part of this zone after a short recovery, making this area important for a bearish continuation setup.
The recent upside move lacks a confirmed breakout above resistance, while the broader structure remains range bound with sellers defending the upper liquidity area. A rejection here can push price back toward the lower support and liquidity zone.
EP: $2,698 to $2,706
TP1: $2,685
TP2: $2,665
TP3: $2,645
SL: $2,720
Momentum is weakening near resistance, with the $2,706 to $2,718 area acting as the key supply zone.
A sustained rejection below $2,706 keeps the short term structure bearish and opens room toward $2,685, followed by $2,665 and the major support near $2,645.
The setup is invalidated if ETH breaks and holds above $2,720, as that would indicate the resistance zone has been reclaimed.
$ETH
{spot}(ETHUSDT)
$ETH
1H structure shows a clear rejection from the $2,706 to $2,718 resistance and supply zone. Price is now testing the upper part of this zone after a short recovery, making this area important for a bearish continuation setup.
The recent upside move lacks a confirmed breakout above resistance, while the broader structure remains range bound with sellers defending the upper liquidity area. A rejection here can push price back toward the lower support and liquidity zone.
EP: $2,698 to $2,706
TP1: $2,685
TP2: $2,665
TP3: $2,645
SL: $2,720
Momentum is weakening near resistance, with the $2,706 to $2,718 area acting as the key supply zone.
A sustained rejection below $2,706 keeps the short term structure bearish and opens room toward $2,685, followed by $2,665 and the major support near $2,645.
The setup is invalidated if ETH breaks and holds above $2,720, as that would indicate the resistance zone has been reclaimed.
$ETH
1H structure shows a clear rejection from the $2,706 to $2,718 resistance and supply zone. Price is now testing the upper part of this zone after a short recovery, making this area important for a bearish continuation setup.
The recent upside move lacks a confirmed breakout above resistance, while the broader structure remains range bound with sellers defending the upper liquidity area. A rejection here can push price back toward the lower support and liquidity zone.
EP: $2,698 to $2,706
TP1: $2,685
TP2: $2,665
TP3: $2,645
SL: $2,720
Momentum is weakening near resistance, with the $2,706 to $2,718 area acting as the key supply zone.
A sustained rejection below $2,706 keeps the short term structure bearish and opens room toward $2,685, followed by $2,665 and the major support near $2,645.
The setup is invalidated if ETH breaks and holds above $2,720, as that would indicate the resistance zone has been reclaimed.
$ETH
1
127
·
--
Baissier
$BNB
4H MARKET SIGNAL
Direction: SHORT
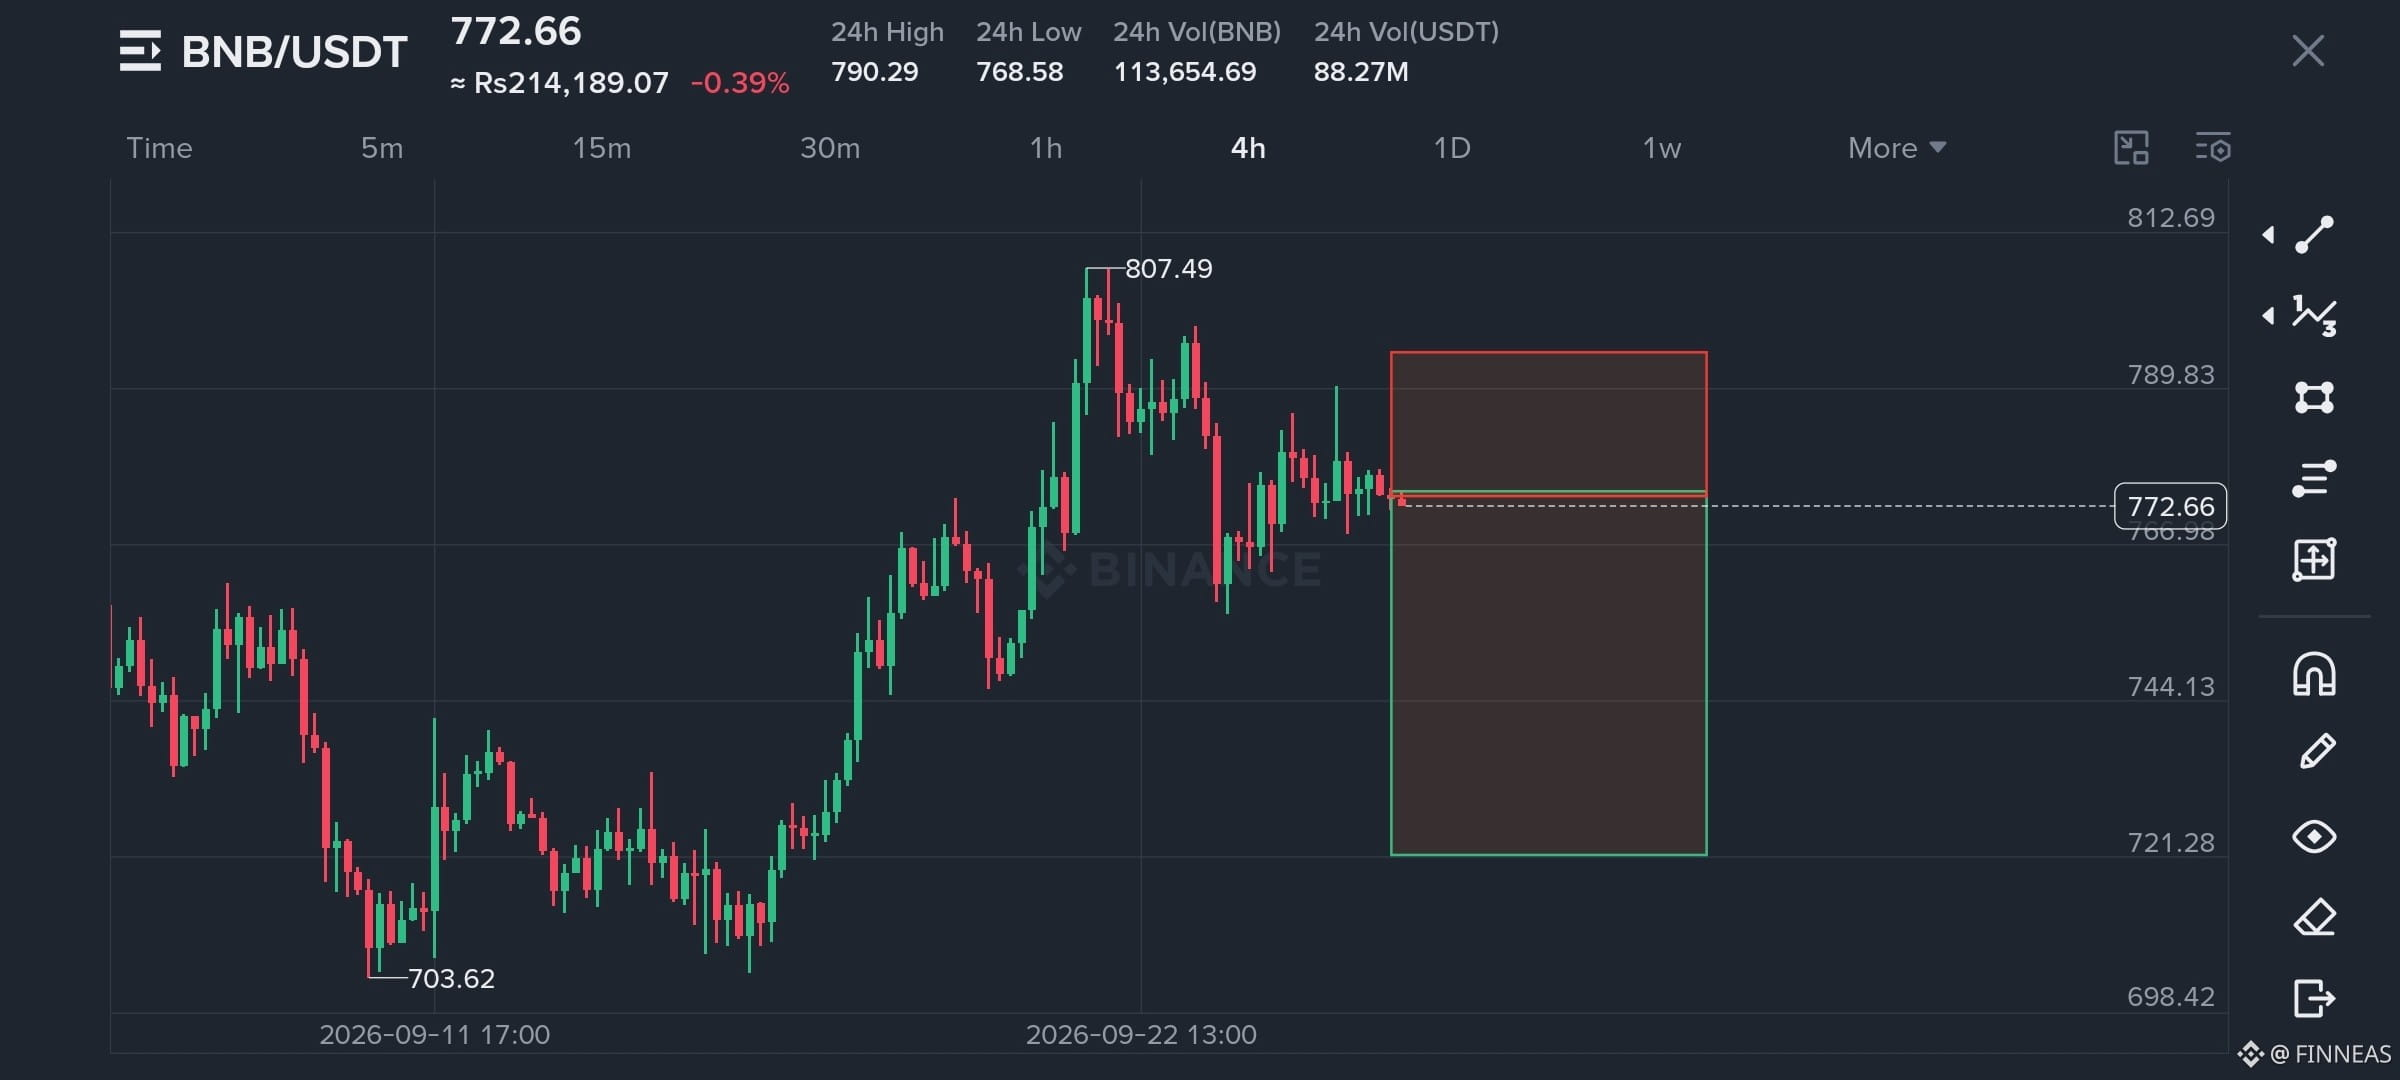
EP: $772 to $776
TP1: $760
TP2: $744
TP3: $721
SL: $794
Current trend strength: BNB remains below the recent $807.49 swing high and is consolidating under the $790 resistance zone. The recovery has lost momentum, while repeated rejection near the upper range keeps the short term structure vulnerable to downside continuation.
Momentum and structure bias: The 4H structure favors bearish continuation while price remains below $790. The $768 to $760 area is the first downside liquidity zone, and a clean break below it can open the path toward $744.
Why price is likely to move toward the targets: Sellers have repeatedly defended the upper range, while the current price is trading close to the lower side of the consolidation. A confirmed break below $768 would strengthen the downside setup and expose $744 followed by $721. A 4H close above $794 invalidates the short structure.
$BNB
{spot}(BNBUSDT)
$BNB
4H MARKET SIGNAL
Direction: SHORT
EP: $772 to $776
TP1: $760
TP2: $744
TP3: $721
SL: $794
Current trend strength: BNB remains below the recent $807.49 swing high and is consolidating under the $790 resistance zone. The recovery has lost momentum, while repeated rejection near the upper range keeps the short term structure vulnerable to downside continuation.
Momentum and structure bias: The 4H structure favors bearish continuation while price remains below $790. The $768 to $760 area is the first downside liquidity zone, and a clean break below it can open the path toward $744.
Why price is likely to move toward the targets: Sellers have repeatedly defended the upper range, while the current price is trading close to the lower side of the consolidation. A confirmed break below $768 would strengthen the downside setup and expose $744 followed by $721. A 4H close above $794 invalidates the short structure.
$BNB
4H MARKET SIGNAL
Direction: SHORT
EP: $772 to $776
TP1: $760
TP2: $744
TP3: $721
SL: $794
Current trend strength: BNB remains below the recent $807.49 swing high and is consolidating under the $790 resistance zone. The recovery has lost momentum, while repeated rejection near the upper range keeps the short term structure vulnerable to downside continuation.
Momentum and structure bias: The 4H structure favors bearish continuation while price remains below $790. The $768 to $760 area is the first downside liquidity zone, and a clean break below it can open the path toward $744.
Why price is likely to move toward the targets: Sellers have repeatedly defended the upper range, while the current price is trading close to the lower side of the consolidation. A confirmed break below $768 would strengthen the downside setup and expose $744 followed by $721. A 4H close above $794 invalidates the short structure.
$BNB
83
·
--
Haussier
$MPLX
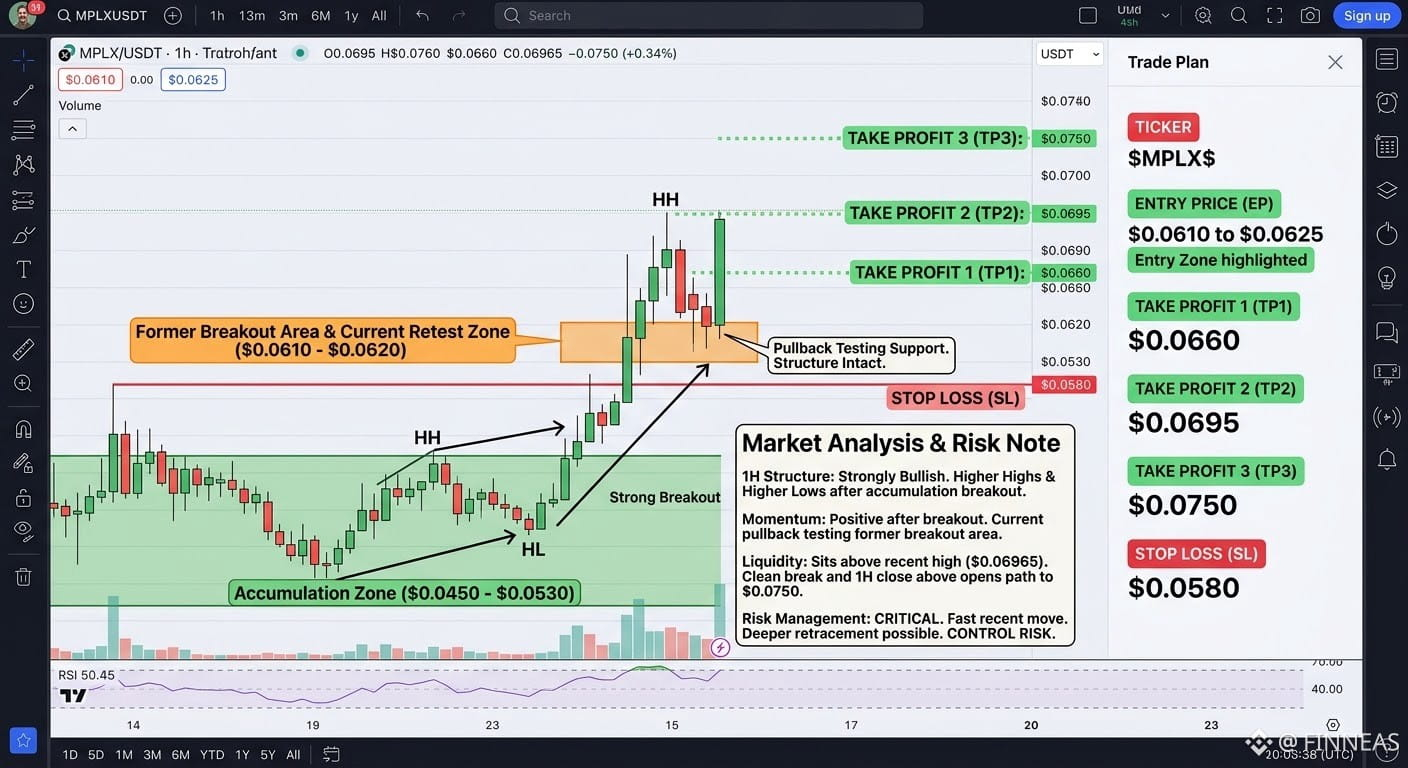
EP: $0.0610 to $0.0625
TP1: $0.0660
TP2: $0.0695
TP3: $0.0750
SL: $0.0580
The 1H structure is strongly bullish, with a sharp breakout from the $0.0450 to $0.0530 accumulation zone followed by higher highs and higher lows.
Momentum remains positive after the breakout, while the current pullback is testing the former breakout area around $0.0610 to $0.0620. Holding this zone keeps the bullish structure intact.
Liquidity sits above the recent $0.06965 high. A clean break and 1H close above that level would open the path toward $0.0750, while losing $0.0580 would weaken the continuation setup.
Risk should remain controlled because the recent move has been fast and a deeper retracement is possible.
$MPLX
{alpha}(560x75a5863a19af60ec0098d62ed8c34cc594fb470f)
$MPLX
EP: $0.0610 to $0.0625
TP1: $0.0660
TP2: $0.0695
TP3: $0.0750
SL: $0.0580
The 1H structure is strongly bullish, with a sharp breakout from the $0.0450 to $0.0530 accumulation zone followed by higher highs and higher lows.
Momentum remains positive after the breakout, while the current pullback is testing the former breakout area around $0.0610 to $0.0620. Holding this zone keeps the bullish structure intact.
Liquidity sits above the recent $0.06965 high. A clean break and 1H close above that level would open the path toward $0.0750, while losing $0.0580 would weaken the continuation setup.
Risk should remain controlled because the recent move has been fast and a deeper retracement is possible.
$MPLX
EP: $0.0610 to $0.0625
TP1: $0.0660
TP2: $0.0695
TP3: $0.0750
SL: $0.0580
The 1H structure is strongly bullish, with a sharp breakout from the $0.0450 to $0.0530 accumulation zone followed by higher highs and higher lows.
Momentum remains positive after the breakout, while the current pullback is testing the former breakout area around $0.0610 to $0.0620. Holding this zone keeps the bullish structure intact.
Liquidity sits above the recent $0.06965 high. A clean break and 1H close above that level would open the path toward $0.0750, while losing $0.0580 would weaken the continuation setup.
Risk should remain controlled because the recent move has been fast and a deeper retracement is possible.
$MPLX
104
·
--
Baissier
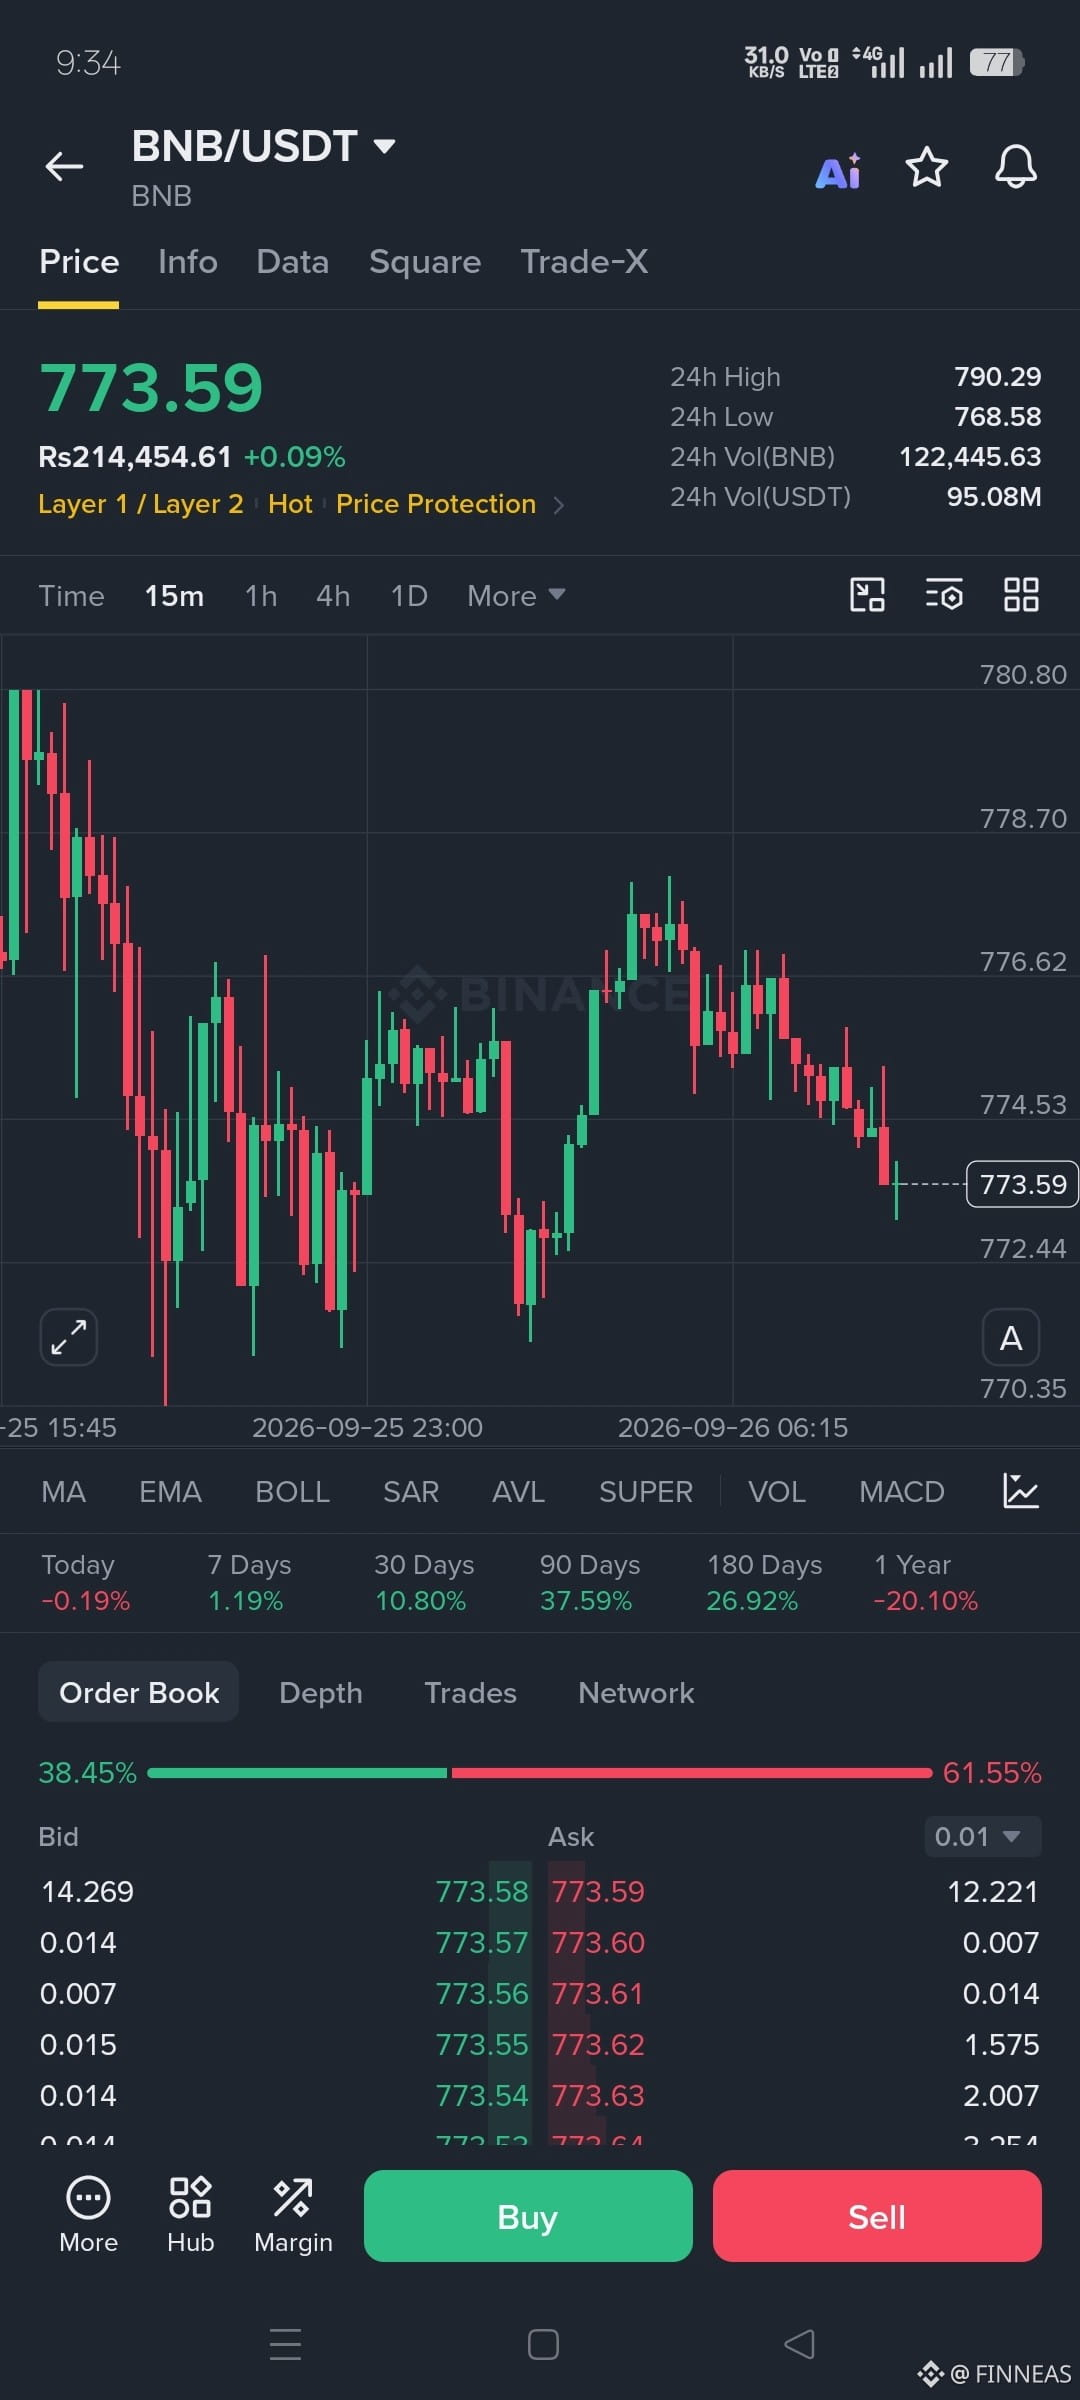
$BNB
15M MARKET SIGNAL
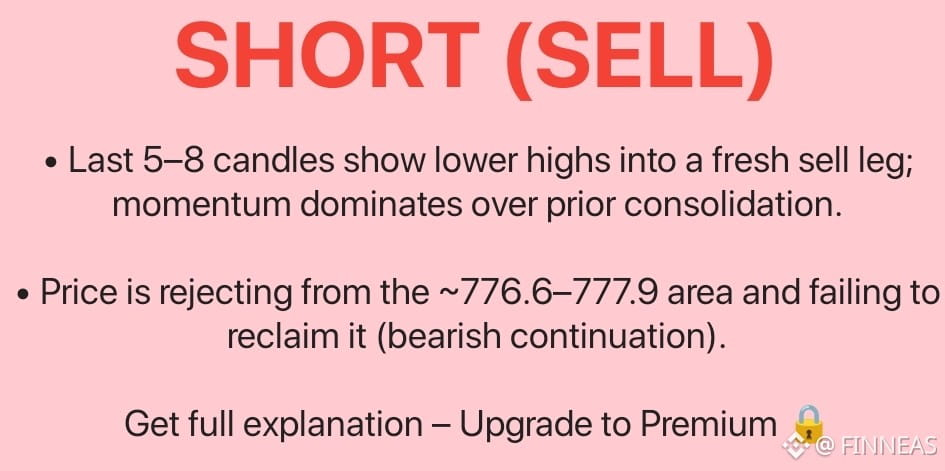
Direction: Short
EP: $773.50 to $774.50
TP1: $772.40
TP2: $770.35
TP3: $768.60
SL: $776.80
Trend strength: The short term structure is bearish, with price forming lower highs after rejection around $776.60 to $777.00. The recent move back toward $773.50 shows sellers are still active.
Momentum and structure bias: Momentum remains tilted to the downside while BNB stays below $774.53 and especially $776.62. The order book shown also has heavier ask liquidity, supporting near term selling pressure.
Why price can reach the targets: A clean break below $772.40 would expose $770.35, followed by the 24H low near $768.60. The bearish setup becomes invalid if price reclaims $776.80 with sustained 15M strength.
Risk should remain controlled, and the setup should be reassessed if market structure changes.
$BNB
{spot}(BNBUSDT)
$BNB
15M MARKET SIGNAL
Direction: Short
EP: $773.50 to $774.50
TP1: $772.40
TP2: $770.35
TP3: $768.60
SL: $776.80
Trend strength: The short term structure is bearish, with price forming lower highs after rejection around $776.60 to $777.00. The recent move back toward $773.50 shows sellers are still active.
Momentum and structure bias: Momentum remains tilted to the downside while BNB stays below $774.53 and especially $776.62. The order book shown also has heavier ask liquidity, supporting near term selling pressure.
Why price can reach the targets: A clean break below $772.40 would expose $770.35, followed by the 24H low near $768.60. The bearish setup becomes invalid if price reclaims $776.80 with sustained 15M strength.
Risk should remain controlled, and the setup should be reassessed if market structure changes.
$BNB
15M MARKET SIGNAL
Direction: Short
EP: $773.50 to $774.50
TP1: $772.40
TP2: $770.35
TP3: $768.60
SL: $776.80
Trend strength: The short term structure is bearish, with price forming lower highs after rejection around $776.60 to $777.00. The recent move back toward $773.50 shows sellers are still active.
Momentum and structure bias: Momentum remains tilted to the downside while BNB stays below $774.53 and especially $776.62. The order book shown also has heavier ask liquidity, supporting near term selling pressure.
Why price can reach the targets: A clean break below $772.40 would expose $770.35, followed by the 24H low near $768.60. The bearish setup becomes invalid if price reclaims $776.80 with sustained 15M strength.
Risk should remain controlled, and the setup should be reassessed if market structure changes.
$BNB
110
·
--
Baissier
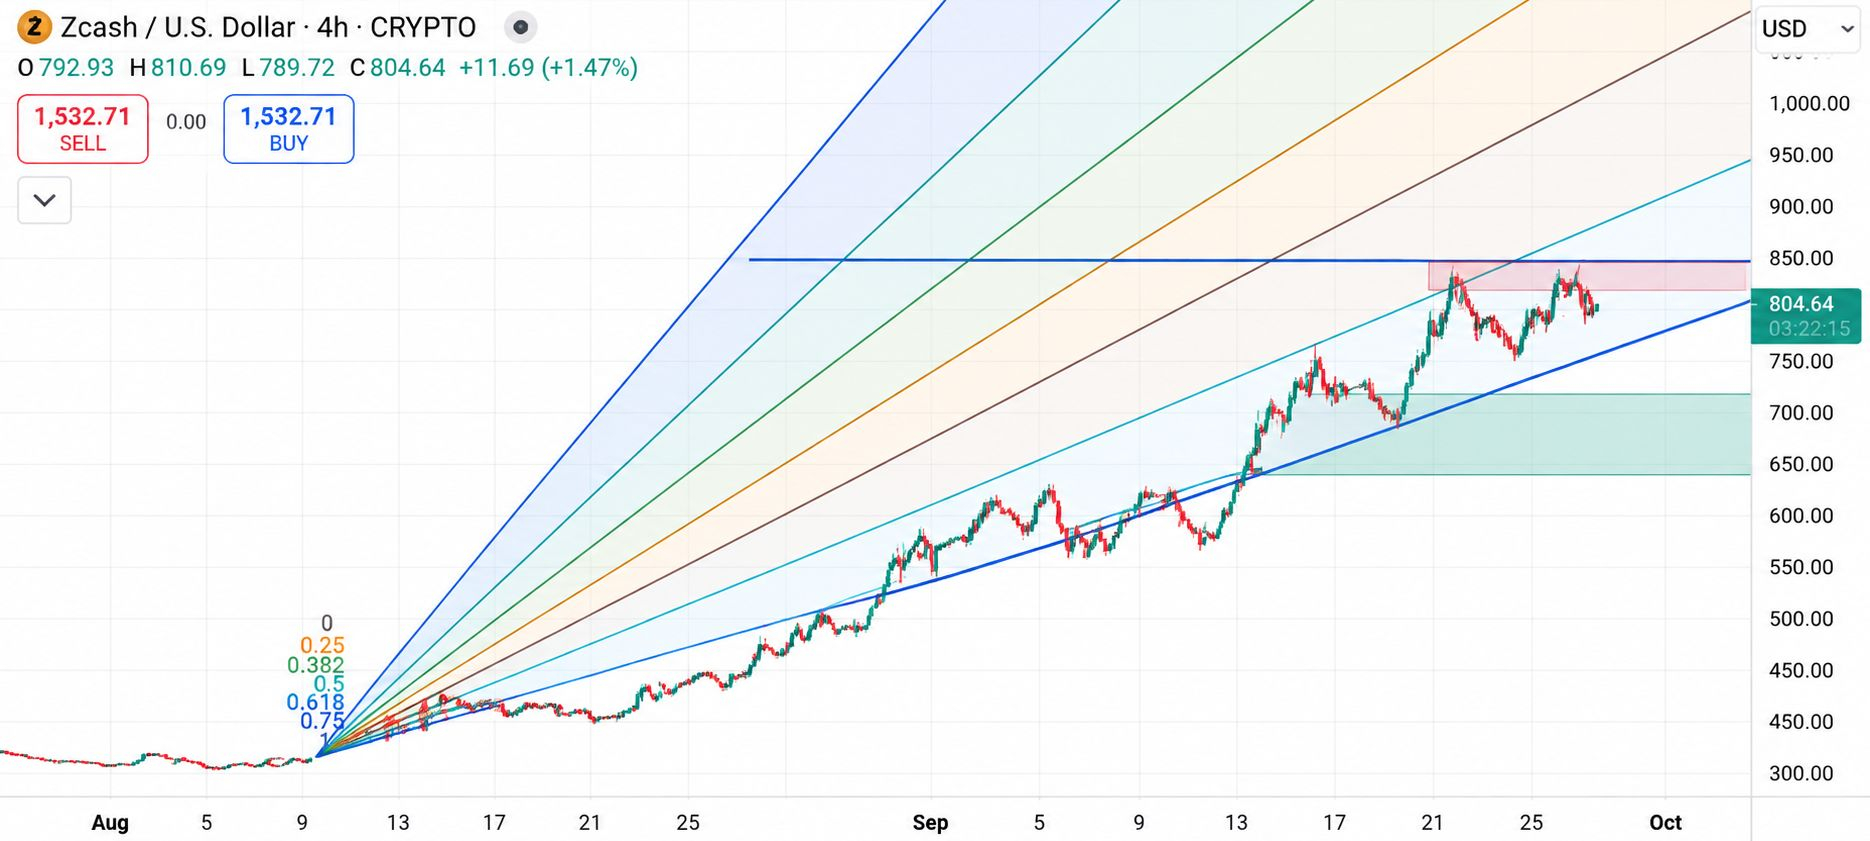
$ZEC
EP: $790 to $800
TP1: $810
TP2: $825
TP3: $840
SL: $770
The 4H structure remains bullish, with ZEC recovering strongly from the lower range and maintaining a sequence of higher lows. The rising trendline continues to support the current structure, while $780 to $790 is the key demand zone.
Momentum is positive after the sharp expansion toward $810, but price is now consolidating, which gives buyers an opportunity to defend the breakout area rather than chase the move.
Liquidity is concentrated above $810. A clean 4H break and hold above $810 can open the path toward $825 and $840. The bullish setup remains valid while $770 holds.
$ZEC
{spot}(ZECUSDT)
$ZEC
EP: $790 to $800
TP1: $810
TP2: $825
TP3: $840
SL: $770
The 4H structure remains bullish, with ZEC recovering strongly from the lower range and maintaining a sequence of higher lows. The rising trendline continues to support the current structure, while $780 to $790 is the key demand zone.
Momentum is positive after the sharp expansion toward $810, but price is now consolidating, which gives buyers an opportunity to defend the breakout area rather than chase the move.
Liquidity is concentrated above $810. A clean 4H break and hold above $810 can open the path toward $825 and $840. The bullish setup remains valid while $770 holds.
$ZEC
EP: $790 to $800
TP1: $810
TP2: $825
TP3: $840
SL: $770
The 4H structure remains bullish, with ZEC recovering strongly from the lower range and maintaining a sequence of higher lows. The rising trendline continues to support the current structure, while $780 to $790 is the key demand zone.
Momentum is positive after the sharp expansion toward $810, but price is now consolidating, which gives buyers an opportunity to defend the breakout area rather than chase the move.
Liquidity is concentrated above $810. A clean 4H break and hold above $810 can open the path toward $825 and $840. The bullish setup remains valid while $770 holds.
$ZEC
256
·
--
Baissier
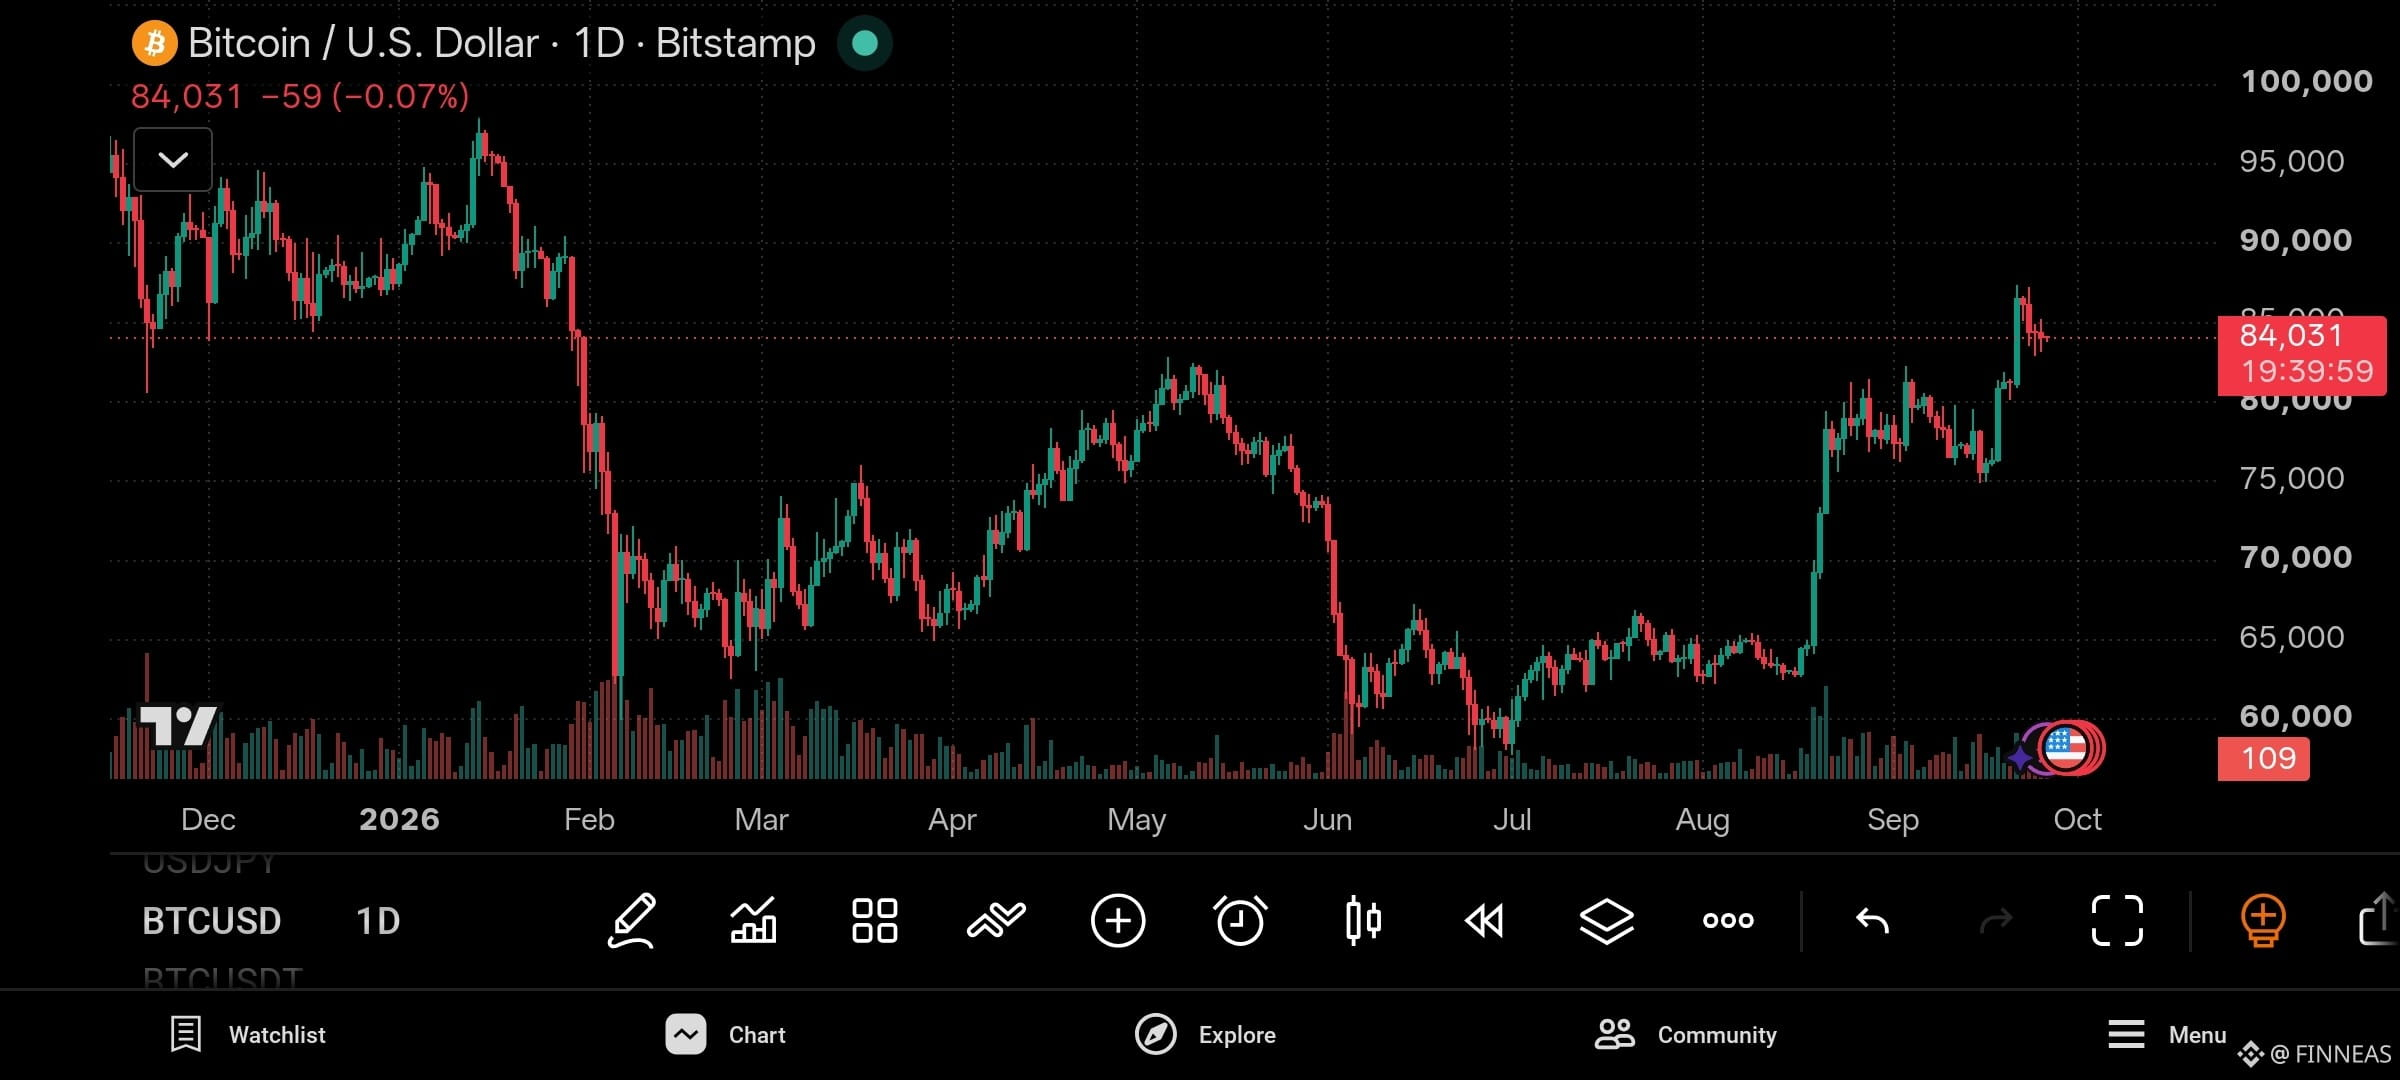
$BTC
EP: $83,500 to $84,500
TP1: $87,000
TP2: $90,000
TP3: $95,000
SL: $79,200
The daily structure is bullish, with BTC breaking above the previous $80,000 area and holding near $84,000 after the breakout. Trend strength remains positive as price continues to form higher highs and higher lows.
Momentum favors continuation while $80,000 remains protected. The breakout volume and strong displacement from the $76,000 to $80,000 zone show clear buyer participation.
Liquidity above $87,000 is the next important target. A clean break through that area can expose $90,000 and then the larger $95,000 resistance zone.
If BTC loses $79,200 on a daily closing basis, this bullish setup is invalidated.
$BTC
{spot}(BTCUSDT)
$BTC
EP: $83,500 to $84,500
TP1: $87,000
TP2: $90,000
TP3: $95,000
SL: $79,200
The daily structure is bullish, with BTC breaking above the previous $80,000 area and holding near $84,000 after the breakout. Trend strength remains positive as price continues to form higher highs and higher lows.
Momentum favors continuation while $80,000 remains protected. The breakout volume and strong displacement from the $76,000 to $80,000 zone show clear buyer participation.
Liquidity above $87,000 is the next important target. A clean break through that area can expose $90,000 and then the larger $95,000 resistance zone.
If BTC loses $79,200 on a daily closing basis, this bullish setup is invalidated.
$BTC
EP: $83,500 to $84,500
TP1: $87,000
TP2: $90,000
TP3: $95,000
SL: $79,200
The daily structure is bullish, with BTC breaking above the previous $80,000 area and holding near $84,000 after the breakout. Trend strength remains positive as price continues to form higher highs and higher lows.
Momentum favors continuation while $80,000 remains protected. The breakout volume and strong displacement from the $76,000 to $80,000 zone show clear buyer participation.
Liquidity above $87,000 is the next important target. A clean break through that area can expose $90,000 and then the larger $95,000 resistance zone.
If BTC loses $79,200 on a daily closing basis, this bullish setup is invalidated.
$BTC
128
·
--
Baissier
🔥 $ENA — I've been watching the liquidation pressure closely, and this long flush could give us an important short-term reaction zone.
$ENA is currently around $0.209, with approximately $98.5K in long positions liquidated. That's meaningful liquidation pressure for the current price area.
📊 Market Analysis
The heavy long liquidation suggests leveraged buyers were forced out as ENA moved lower. The important question now is whether sellers continue pressing the market or whether buyers use the liquidation zone to rebuild positions.
The immediate support area is around $0.205–$0.209. If this zone holds and buying volume starts returning, ENA could attempt a recovery.
For confirmation, I want to see price reclaim approximately $0.215–$0.218. Above that region, momentum could potentially push toward the next resistance levels around $0.225 and $0.235.
A decisive breakdown below $0.200 would invalidate the bullish scenario and increase downside risk.
🎯 TRADE SETUP — LONG
Entry Point (EP): $0.205–$0.210
TP1: $0.218
TP2: $0.228
TP3: $0.240
SL: $0.198
⚠️ Risk Tip: ENA can move quickly, so keep the position size smaller than usual and consider moving SL toward entry after TP1.
I'm watching the $0.205–$0.210 zone closely. If buyers step in and volume confirms the move, this liquidation flush could turn into a recovery setup.
Not financial advice. Always do your own research.
$ENA
{spot}(ENAUSDT)
🔥 $ENA — I've been watching the liquidation pressure closely, and this long flush could give us an important short-term reaction zone.
$ENA is currently around $0.209, with approximately $98.5K in long positions liquidated. That's meaningful liquidation pressure for the current price area.
📊 Market Analysis
The heavy long liquidation suggests leveraged buyers were forced out as ENA moved lower. The important question now is whether sellers continue pressing the market or whether buyers use the liquidation zone to rebuild positions.
The immediate support area is around $0.205–$0.209. If this zone holds and buying volume starts returning, ENA could attempt a recovery.
For confirmation, I want to see price reclaim approximately $0.215–$0.218. Above that region, momentum could potentially push toward the next resistance levels around $0.225 and $0.235.
A decisive breakdown below $0.200 would invalidate the bullish scenario and increase downside risk.
🎯 TRADE SETUP — LONG
Entry Point (EP): $0.205–$0.210
TP1: $0.218
TP2: $0.228
TP3: $0.240
SL: $0.198
⚠️ Risk Tip: ENA can move quickly, so keep the position size smaller than usual and consider moving SL toward entry after TP1.
I'm watching the $0.205–$0.210 zone closely. If buyers step in and volume confirms the move, this liquidation flush could turn into a recovery setup.
Not financial advice. Always do your own research.
$ENA
$ENA is currently around $0.209, with approximately $98.5K in long positions liquidated. That's meaningful liquidation pressure for the current price area.
📊 Market Analysis
The heavy long liquidation suggests leveraged buyers were forced out as ENA moved lower. The important question now is whether sellers continue pressing the market or whether buyers use the liquidation zone to rebuild positions.
The immediate support area is around $0.205–$0.209. If this zone holds and buying volume starts returning, ENA could attempt a recovery.
For confirmation, I want to see price reclaim approximately $0.215–$0.218. Above that region, momentum could potentially push toward the next resistance levels around $0.225 and $0.235.
A decisive breakdown below $0.200 would invalidate the bullish scenario and increase downside risk.
🎯 TRADE SETUP — LONG
Entry Point (EP): $0.205–$0.210
TP1: $0.218
TP2: $0.228
TP3: $0.240
SL: $0.198
⚠️ Risk Tip: ENA can move quickly, so keep the position size smaller than usual and consider moving SL toward entry after TP1.
I'm watching the $0.205–$0.210 zone closely. If buyers step in and volume confirms the move, this liquidation flush could turn into a recovery setup.
Not financial advice. Always do your own research.
$ENA
1
336
·
--
Haussier
🔥 $BTC — I've been watching the leverage around Bitcoin, and this liquidation is a reminder that the next support reaction could be very important.
$BTC is currently around $85,660.80, with approximately $60.2K in long positions liquidated.
📊 Market Analysis
The liquidation of long positions shows that leveraged buyers were forced out as price moved against them. That kind of flush can temporarily remove weak positions from the market, but BTC still needs confirmation before any aggressive entry.
The immediate support zone I'm watching is around $85,300–$85,700. If Bitcoin holds this region and buying volume starts increasing, a rebound toward the $86K–$87K area becomes possible.
The first resistance is around $86,500, with another important area near $87,200–$87,500. A strong breakout through resistance would provide better confirmation for the long setup.
🎯 TRADE SETUP — LONG
Entry Point (EP): $85,400–$85,800
TP1: $86,500
TP2: $87,200
TP3: $88,000
SL: $84,700
⚠️ Risk Tip: Keep leverage low and position size disciplined. After TP1, consider moving SL toward entry if momentum remains strong.
I'm not interested in chasing BTC after a large candle — I want to see buyers defend the support zone and confirm the reaction.
Not financial advice. Always do your own research.
$BTC
{spot}(BTCUSDT)
🔥 $BTC — I've been watching the leverage around Bitcoin, and this liquidation is a reminder that the next support reaction could be very important.
$BTC is currently around $85,660.80, with approximately $60.2K in long positions liquidated.
📊 Market Analysis
The liquidation of long positions shows that leveraged buyers were forced out as price moved against them. That kind of flush can temporarily remove weak positions from the market, but BTC still needs confirmation before any aggressive entry.
The immediate support zone I'm watching is around $85,300–$85,700. If Bitcoin holds this region and buying volume starts increasing, a rebound toward the $86K–$87K area becomes possible.
The first resistance is around $86,500, with another important area near $87,200–$87,500. A strong breakout through resistance would provide better confirmation for the long setup.
🎯 TRADE SETUP — LONG
Entry Point (EP): $85,400–$85,800
TP1: $86,500
TP2: $87,200
TP3: $88,000
SL: $84,700
⚠️ Risk Tip: Keep leverage low and position size disciplined. After TP1, consider moving SL toward entry if momentum remains strong.
I'm not interested in chasing BTC after a large candle — I want to see buyers defend the support zone and confirm the reaction.
Not financial advice. Always do your own research.
$BTC
$BTC is currently around $85,660.80, with approximately $60.2K in long positions liquidated.
📊 Market Analysis
The liquidation of long positions shows that leveraged buyers were forced out as price moved against them. That kind of flush can temporarily remove weak positions from the market, but BTC still needs confirmation before any aggressive entry.
The immediate support zone I'm watching is around $85,300–$85,700. If Bitcoin holds this region and buying volume starts increasing, a rebound toward the $86K–$87K area becomes possible.
The first resistance is around $86,500, with another important area near $87,200–$87,500. A strong breakout through resistance would provide better confirmation for the long setup.
🎯 TRADE SETUP — LONG
Entry Point (EP): $85,400–$85,800
TP1: $86,500
TP2: $87,200
TP3: $88,000
SL: $84,700
⚠️ Risk Tip: Keep leverage low and position size disciplined. After TP1, consider moving SL toward entry if momentum remains strong.
I'm not interested in chasing BTC after a large candle — I want to see buyers defend the support zone and confirm the reaction.
Not financial advice. Always do your own research.
$BTC
38
·
--
Haussier
🔥 $ETH — I've been watching the leverage buildup closely, and this liquidation flush is exactly the kind of move that can create a new trading opportunity.
$ETH is currently around $2,733.08, with approximately $166K in long positions liquidated. That tells me leveraged buyers have already taken a hit, so the next reaction from this area is important.
📊 Market Analysis
The long liquidation indicates strong short-term selling pressure, but liquidation itself does not automatically mean the trend must continue lower. I want to see whether ETH can hold the nearby support zone and attract fresh spot buying.
The first support area is around $2,700–$2,730. If buyers defend this region and volume begins increasing, ETH could attempt a recovery toward the next resistance zones.
Initial resistance sits around $2,800, followed by the $2,850–$2,900 area. A sustained move through those levels would improve the bullish setup.
🎯 TRADE SETUP — LONG
Entry Point (EP): $2,710–$2,750
TP1: $2,800
TP2: $2,860
TP3: $2,950
SL: $2,650
⚠️ Risk Tip: Don't chase a breakout candle. If TP1 hits, protect the position by reducing risk or moving SL closer to entry.
The key for me is simple: if ETH holds the liquidation zone and buyers return with volume, the recovery setup becomes much more attractive.
Not financial advice. Always do your own research.
$ETH
{spot}(ETHUSDT)
🔥 $ETH — I've been watching the leverage buildup closely, and this liquidation flush is exactly the kind of move that can create a new trading opportunity.
$ETH is currently around $2,733.08, with approximately $166K in long positions liquidated. That tells me leveraged buyers have already taken a hit, so the next reaction from this area is important.
📊 Market Analysis
The long liquidation indicates strong short-term selling pressure, but liquidation itself does not automatically mean the trend must continue lower. I want to see whether ETH can hold the nearby support zone and attract fresh spot buying.
The first support area is around $2,700–$2,730. If buyers defend this region and volume begins increasing, ETH could attempt a recovery toward the next resistance zones.
Initial resistance sits around $2,800, followed by the $2,850–$2,900 area. A sustained move through those levels would improve the bullish setup.
🎯 TRADE SETUP — LONG
Entry Point (EP): $2,710–$2,750
TP1: $2,800
TP2: $2,860
TP3: $2,950
SL: $2,650
⚠️ Risk Tip: Don't chase a breakout candle. If TP1 hits, protect the position by reducing risk or moving SL closer to entry.
The key for me is simple: if ETH holds the liquidation zone and buyers return with volume, the recovery setup becomes much more attractive.
Not financial advice. Always do your own research.
$ETH
$ETH is currently around $2,733.08, with approximately $166K in long positions liquidated. That tells me leveraged buyers have already taken a hit, so the next reaction from this area is important.
📊 Market Analysis
The long liquidation indicates strong short-term selling pressure, but liquidation itself does not automatically mean the trend must continue lower. I want to see whether ETH can hold the nearby support zone and attract fresh spot buying.
The first support area is around $2,700–$2,730. If buyers defend this region and volume begins increasing, ETH could attempt a recovery toward the next resistance zones.
Initial resistance sits around $2,800, followed by the $2,850–$2,900 area. A sustained move through those levels would improve the bullish setup.
🎯 TRADE SETUP — LONG
Entry Point (EP): $2,710–$2,750
TP1: $2,800
TP2: $2,860
TP3: $2,950
SL: $2,650
⚠️ Risk Tip: Don't chase a breakout candle. If TP1 hits, protect the position by reducing risk or moving SL closer to entry.
The key for me is simple: if ETH holds the liquidation zone and buyers return with volume, the recovery setup becomes much more attractive.
Not financial advice. Always do your own research.
$ETH
296
·
--
Baissier
🔥 $CL — I've been watching this move closely, and the fresh long liquidations are giving me a setup worth paying attention to.
$CL is currently around $90.59, where approximately $251K in long positions were liquidated. That is a significant flush of leveraged buyers and can create an important short-term reaction zone.
📊 Market Analysis
The liquidation event suggests aggressive longs were caught on the wrong side of the move. After a flush like this, I want to see whether price can stabilize around $90.50–$90.60 and start building buying volume.
For the bullish setup, the first important resistance area is around $91.20–$91.50. A clean break above that zone with stronger volume would indicate that buyers are regaining control.
On the downside, $90.00 is the key psychological support. Losing that level with strong momentum would weaken the bullish setup and could trigger another round of liquidations.
🎯 TRADE SETUP — LONG
Entry Point (EP): $90.35–$90.75
TP1: $91.30
TP2: $92.00
TP3: $93.00
SL: $89.70
⚠️ Risk Tip: Keep position size controlled, and after TP1 is reached, consider moving your SL toward entry to protect the trade.
I'm watching the reaction around $90.00–$90.60 closely — if buyers defend this zone, the recovery can become interesting.
Not financial advice. Always do your own research.
$CL
{future}(CLUSDT)
🔥 $CL — I've been watching this move closely, and the fresh long liquidations are giving me a setup worth paying attention to.
$CL is currently around $90.59, where approximately $251K in long positions were liquidated. That is a significant flush of leveraged buyers and can create an important short-term reaction zone.
📊 Market Analysis
The liquidation event suggests aggressive longs were caught on the wrong side of the move. After a flush like this, I want to see whether price can stabilize around $90.50–$90.60 and start building buying volume.
For the bullish setup, the first important resistance area is around $91.20–$91.50. A clean break above that zone with stronger volume would indicate that buyers are regaining control.
On the downside, $90.00 is the key psychological support. Losing that level with strong momentum would weaken the bullish setup and could trigger another round of liquidations.
🎯 TRADE SETUP — LONG
Entry Point (EP): $90.35–$90.75
TP1: $91.30
TP2: $92.00
TP3: $93.00
SL: $89.70
⚠️ Risk Tip: Keep position size controlled, and after TP1 is reached, consider moving your SL toward entry to protect the trade.
I'm watching the reaction around $90.00–$90.60 closely — if buyers defend this zone, the recovery can become interesting.
Not financial advice. Always do your own research.
$CL
$CL is currently around $90.59, where approximately $251K in long positions were liquidated. That is a significant flush of leveraged buyers and can create an important short-term reaction zone.
📊 Market Analysis
The liquidation event suggests aggressive longs were caught on the wrong side of the move. After a flush like this, I want to see whether price can stabilize around $90.50–$90.60 and start building buying volume.
For the bullish setup, the first important resistance area is around $91.20–$91.50. A clean break above that zone with stronger volume would indicate that buyers are regaining control.
On the downside, $90.00 is the key psychological support. Losing that level with strong momentum would weaken the bullish setup and could trigger another round of liquidations.
🎯 TRADE SETUP — LONG
Entry Point (EP): $90.35–$90.75
TP1: $91.30
TP2: $92.00
TP3: $93.00
SL: $89.70
⚠️ Risk Tip: Keep position size controlled, and after TP1 is reached, consider moving your SL toward entry to protect the trade.
I'm watching the reaction around $90.00–$90.60 closely — if buyers defend this zone, the recovery can become interesting.
Not financial advice. Always do your own research.
$CL
162
·
--
Baissier
$UNI
I've been watching the recent $UNI move closely, and the liquidation data is telling me that leverage has been getting aggressively flushed from the market.
💰 Current Price: ~$9.04
The important signal here is the $9.04–$8.75 area. Around $8.7488, more than $9K in long positions were liquidated, showing that sellers were able to force leveraged longs out of the market. At the same time, UNI has been trading with elevated volume during its recent advance, so I don't want to chase a breakout blindly.
📊 MARKET ANALYSIS
remains structurally strong after a significant move higher, but the recent long liquidation shows that short-term volatility is high. The $8.70–$8.80 region becomes an important support/retest area.
If buyers defend that zone and price begins printing higher lows, momentum can shift back toward the upside. The first major resistance area is around $9.20–$9.30, followed by the psychological $9.50 level.
Volume confirmation is important here. I want to see buyers returning during the recovery rather than entering during a weak bounce.
🟢 TRADE DIRECTION: LONG
📍 Entry Point (EP): $8.85 – $9.05
🎯 Take Profit:
TP1: $9.25
TP2: $9.50
TP3: $9.85
🛑 Stop Loss (SL): $8.55
⚠️ Risk Tip: Keep position size controlled and consider moving SL toward entry after TP1 is reached.
The liquidation flush has created a much cleaner area to watch. If holds the support zone and volume comes back in, I'll be watching for continuation rather than chasing random candles.
Not financial advice. Always do your own research.
$UNI
{spot}(UNIUSDT)
$UNI
I've been watching the recent $UNI move closely, and the liquidation data is telling me that leverage has been getting aggressively flushed from the market.
💰 Current Price: ~$9.04
The important signal here is the $9.04–$8.75 area. Around $8.7488, more than $9K in long positions were liquidated, showing that sellers were able to force leveraged longs out of the market. At the same time, UNI has been trading with elevated volume during its recent advance, so I don't want to chase a breakout blindly.
📊 MARKET ANALYSIS
remains structurally strong after a significant move higher, but the recent long liquidation shows that short-term volatility is high. The $8.70–$8.80 region becomes an important support/retest area.
If buyers defend that zone and price begins printing higher lows, momentum can shift back toward the upside. The first major resistance area is around $9.20–$9.30, followed by the psychological $9.50 level.
Volume confirmation is important here. I want to see buyers returning during the recovery rather than entering during a weak bounce.
🟢 TRADE DIRECTION: LONG
📍 Entry Point (EP): $8.85 – $9.05
🎯 Take Profit:
TP1: $9.25
TP2: $9.50
TP3: $9.85
🛑 Stop Loss (SL): $8.55
⚠️ Risk Tip: Keep position size controlled and consider moving SL toward entry after TP1 is reached.
The liquidation flush has created a much cleaner area to watch. If holds the support zone and volume comes back in, I'll be watching for continuation rather than chasing random candles.
Not financial advice. Always do your own research.
$UNI
I've been watching the recent $UNI move closely, and the liquidation data is telling me that leverage has been getting aggressively flushed from the market.
💰 Current Price: ~$9.04
The important signal here is the $9.04–$8.75 area. Around $8.7488, more than $9K in long positions were liquidated, showing that sellers were able to force leveraged longs out of the market. At the same time, UNI has been trading with elevated volume during its recent advance, so I don't want to chase a breakout blindly.
📊 MARKET ANALYSIS
remains structurally strong after a significant move higher, but the recent long liquidation shows that short-term volatility is high. The $8.70–$8.80 region becomes an important support/retest area.
If buyers defend that zone and price begins printing higher lows, momentum can shift back toward the upside. The first major resistance area is around $9.20–$9.30, followed by the psychological $9.50 level.
Volume confirmation is important here. I want to see buyers returning during the recovery rather than entering during a weak bounce.
🟢 TRADE DIRECTION: LONG
📍 Entry Point (EP): $8.85 – $9.05
🎯 Take Profit:
TP1: $9.25
TP2: $9.50
TP3: $9.85
🛑 Stop Loss (SL): $8.55
⚠️ Risk Tip: Keep position size controlled and consider moving SL toward entry after TP1 is reached.
The liquidation flush has created a much cleaner area to watch. If holds the support zone and volume comes back in, I'll be watching for continuation rather than chasing random candles.
Not financial advice. Always do your own research.
$UNI
158
·
--
Haussier
$GRASS
I've been watching $GRASS closely because the latest move has the kind of momentum that can create both opportunity and dangerous late entries.
💰 Current Price: ~$0.424
The liquidation data shows approximately $9.79K in long positions liquidated around $0.45617. That matters because recently pushed sharply higher before experiencing a leverage flush. Current market data also shows GRASS up strongly over the recent period, with elevated trading activity and the price near the upper end of its recent range.
📊 MARKET ANALYSIS
The broader short-term structure is bullish, but the key question now is whether buyers can defend the pullback.
The $0.400–$0.415 area is the first support zone I would watch. If buyers step in there and volume increases, can attempt another move toward $0.45 and then higher resistance.
However, chasing after a strong vertical move is risky. I prefer a controlled entry on a retest rather than buying directly into resistance.
🟢 TRADE DIRECTION: LONG
📍 Entry Point (EP): $0.405 – $0.425
🎯 Take Profit:
TP1: $0.450
TP2: $0.480
TP3: $0.520
🛑 Stop Loss (SL): $0.385
⚠️ Risk Tip: After TP1, consider taking partial profit and moving SL closer to entry to protect capital.
The key for me is simple: support must hold, volume must confirm the bounce, and buyers need to reclaim the recent high area. If those conditions appear, remains interesting for continuation.
Not financial advice. Always do your own research.
$GRASS
{future}(GRASSUSDT)
$GRASS
I've been watching $GRASS closely because the latest move has the kind of momentum that can create both opportunity and dangerous late entries.
💰 Current Price: ~$0.424
The liquidation data shows approximately $9.79K in long positions liquidated around $0.45617. That matters because recently pushed sharply higher before experiencing a leverage flush. Current market data also shows GRASS up strongly over the recent period, with elevated trading activity and the price near the upper end of its recent range.
📊 MARKET ANALYSIS
The broader short-term structure is bullish, but the key question now is whether buyers can defend the pullback.
The $0.400–$0.415 area is the first support zone I would watch. If buyers step in there and volume increases, can attempt another move toward $0.45 and then higher resistance.
However, chasing after a strong vertical move is risky. I prefer a controlled entry on a retest rather than buying directly into resistance.
🟢 TRADE DIRECTION: LONG
📍 Entry Point (EP): $0.405 – $0.425
🎯 Take Profit:
TP1: $0.450
TP2: $0.480
TP3: $0.520
🛑 Stop Loss (SL): $0.385
⚠️ Risk Tip: After TP1, consider taking partial profit and moving SL closer to entry to protect capital.
The key for me is simple: support must hold, volume must confirm the bounce, and buyers need to reclaim the recent high area. If those conditions appear, remains interesting for continuation.
Not financial advice. Always do your own research.
$GRASS
I've been watching $GRASS closely because the latest move has the kind of momentum that can create both opportunity and dangerous late entries.
💰 Current Price: ~$0.424
The liquidation data shows approximately $9.79K in long positions liquidated around $0.45617. That matters because recently pushed sharply higher before experiencing a leverage flush. Current market data also shows GRASS up strongly over the recent period, with elevated trading activity and the price near the upper end of its recent range.
📊 MARKET ANALYSIS
The broader short-term structure is bullish, but the key question now is whether buyers can defend the pullback.
The $0.400–$0.415 area is the first support zone I would watch. If buyers step in there and volume increases, can attempt another move toward $0.45 and then higher resistance.
However, chasing after a strong vertical move is risky. I prefer a controlled entry on a retest rather than buying directly into resistance.
🟢 TRADE DIRECTION: LONG
📍 Entry Point (EP): $0.405 – $0.425
🎯 Take Profit:
TP1: $0.450
TP2: $0.480
TP3: $0.520
🛑 Stop Loss (SL): $0.385
⚠️ Risk Tip: After TP1, consider taking partial profit and moving SL closer to entry to protect capital.
The key for me is simple: support must hold, volume must confirm the bounce, and buyers need to reclaim the recent high area. If those conditions appear, remains interesting for continuation.
Not financial advice. Always do your own research.
$GRASS
128
·
--
Haussier
$KERNEL
I've been watching the $KERNEL liquidation side closely, and this is the kind of setup where the direction of the liquidation matters just as much as the size.
💰 Current Reference Price: ~$0.06537
(Reference based on the liquidation price supplied in your feed.)
The latest data shows approximately $1.00K in short positions liquidated around $0.06537. Unlike a long liquidation, a short liquidation means sellers were forced out as price moved upward through their positions.
📊 MARKET ANALYSIS
That gives us an important clue: buyers were strong enough around the liquidation zone to pressure leveraged shorts.
The $0.064–$0.065 area becomes an important support region. If stays above that zone and volume remains healthy, another upside push becomes possible.
The first resistance area is around $0.068–$0.070. A clean breakout above that region could bring additional momentum and potentially trigger more short covering.
I would not chase a sudden candle. The better setup is a controlled retest followed by confirmation from buyers.
🟢 TRADE DIRECTION: LONG
📍 Entry Point (EP): $0.0655 – $0.0670
🎯 Take Profit:
TP1: $0.0690
TP2: $0.0720
TP3: $0.0760
🛑 Stop Loss (SL): $0.0625
⚠️ Risk Tip: Keep leverage low and consider moving SL to entry once TP1 is reached, especially because small-cap tokens can move extremely quickly.
The short liquidation gives us an interesting momentum clue, but confirmation is everything. If holds support and breaks resistance with volume, I'll be watching the upside continuation closely.
Not financial advice. Always do your own research.
$KERNEL
{spot}(KERNELUSDT)
$KERNEL
I've been watching the $KERNEL liquidation side closely, and this is the kind of setup where the direction of the liquidation matters just as much as the size.
💰 Current Reference Price: ~$0.06537
(Reference based on the liquidation price supplied in your feed.)
The latest data shows approximately $1.00K in short positions liquidated around $0.06537. Unlike a long liquidation, a short liquidation means sellers were forced out as price moved upward through their positions.
📊 MARKET ANALYSIS
That gives us an important clue: buyers were strong enough around the liquidation zone to pressure leveraged shorts.
The $0.064–$0.065 area becomes an important support region. If stays above that zone and volume remains healthy, another upside push becomes possible.
The first resistance area is around $0.068–$0.070. A clean breakout above that region could bring additional momentum and potentially trigger more short covering.
I would not chase a sudden candle. The better setup is a controlled retest followed by confirmation from buyers.
🟢 TRADE DIRECTION: LONG
📍 Entry Point (EP): $0.0655 – $0.0670
🎯 Take Profit:
TP1: $0.0690
TP2: $0.0720
TP3: $0.0760
🛑 Stop Loss (SL): $0.0625
⚠️ Risk Tip: Keep leverage low and consider moving SL to entry once TP1 is reached, especially because small-cap tokens can move extremely quickly.
The short liquidation gives us an interesting momentum clue, but confirmation is everything. If holds support and breaks resistance with volume, I'll be watching the upside continuation closely.
Not financial advice. Always do your own research.
$KERNEL
I've been watching the $KERNEL liquidation side closely, and this is the kind of setup where the direction of the liquidation matters just as much as the size.
💰 Current Reference Price: ~$0.06537
(Reference based on the liquidation price supplied in your feed.)
The latest data shows approximately $1.00K in short positions liquidated around $0.06537. Unlike a long liquidation, a short liquidation means sellers were forced out as price moved upward through their positions.
📊 MARKET ANALYSIS
That gives us an important clue: buyers were strong enough around the liquidation zone to pressure leveraged shorts.
The $0.064–$0.065 area becomes an important support region. If stays above that zone and volume remains healthy, another upside push becomes possible.
The first resistance area is around $0.068–$0.070. A clean breakout above that region could bring additional momentum and potentially trigger more short covering.
I would not chase a sudden candle. The better setup is a controlled retest followed by confirmation from buyers.
🟢 TRADE DIRECTION: LONG
📍 Entry Point (EP): $0.0655 – $0.0670
🎯 Take Profit:
TP1: $0.0690
TP2: $0.0720
TP3: $0.0760
🛑 Stop Loss (SL): $0.0625
⚠️ Risk Tip: Keep leverage low and consider moving SL to entry once TP1 is reached, especially because small-cap tokens can move extremely quickly.
The short liquidation gives us an interesting momentum clue, but confirmation is everything. If holds support and breaks resistance with volume, I'll be watching the upside continuation closely.
Not financial advice. Always do your own research.
$KERNEL
138

·
--
Haussier
🔴 $ZEC LONG LIQUIDATION ALERT
💥 Liquidated: $75.6K
💵 Price: $1,145.02
⚠️ Heavy long liquidation activity detected.
📊 Watch volatility and market momentum closely.
🔔 Follow for more real-time crypto liquidation alerts.
#ZEC #Zcash #Crypto #cryptosignals #Altcoins
{spot}(ZECUSDT)
🔴 $ZEC LONG LIQUIDATION ALERT
💥 Liquidated: $75.6K
💵 Price: $1,145.02
⚠️ Heavy long liquidation activity detected.
📊 Watch volatility and market momentum closely.
🔔 Follow for more real-time crypto liquidation alerts.
#ZEC #Zcash #Crypto #cryptosignals #Altcoins
💥 Liquidated: $75.6K
💵 Price: $1,145.02
⚠️ Heavy long liquidation activity detected.
📊 Watch volatility and market momentum closely.
🔔 Follow for more real-time crypto liquidation alerts.
#ZEC #Zcash #Crypto #cryptosignals #Altcoins

119
·
--
Haussier
🔴 $HYPE LONG LIQUIDATION ALERT
💥 Liquidated: $82.7K
💵 Price: $78.68
⚠️ Significant long liquidation detected.
📊 Stay alert for increased volatility and sudden moves.
🔔 Follow for more real-time crypto liquidation alerts.
#hype #Hyperliquid #crypto #cryptosignals #Altcoins
{future}(HYPEUSDT)
🔴 $HYPE LONG LIQUIDATION ALERT
💥 Liquidated: $82.7K
💵 Price: $78.68
⚠️ Significant long liquidation detected.
📊 Stay alert for increased volatility and sudden moves.
🔔 Follow for more real-time crypto liquidation alerts.
#hype #Hyperliquid #crypto #cryptosignals #Altcoins
💥 Liquidated: $82.7K
💵 Price: $78.68
⚠️ Significant long liquidation detected.
📊 Stay alert for increased volatility and sudden moves.
🔔 Follow for more real-time crypto liquidation alerts.
#hype #Hyperliquid #crypto #cryptosignals #Altcoins

80
·
--
Haussier
🔴$ETH LONG LIQUIDATION ALERT
💥 Liquidated: $55.7K
💵 Price: $2,510.40
⚠️ Ethereum is seeing notable long liquidation activity.
📊 Monitor price action, volume & open interest.
🔔 Follow for more real-time crypto liquidation alerts.
#ETH #Ethereum #crypto #cryptosignals #EthereumTrading
{spot}(ETHUSDT)
🔴$ETH LONG LIQUIDATION ALERT
💥 Liquidated: $55.7K
💵 Price: $2,510.40
⚠️ Ethereum is seeing notable long liquidation activity.
📊 Monitor price action, volume & open interest.
🔔 Follow for more real-time crypto liquidation alerts.
#ETH #Ethereum #crypto #cryptosignals #EthereumTrading
💥 Liquidated: $55.7K
💵 Price: $2,510.40
⚠️ Ethereum is seeing notable long liquidation activity.
📊 Monitor price action, volume & open interest.
🔔 Follow for more real-time crypto liquidation alerts.
#ETH #Ethereum #crypto #cryptosignals #EthereumTrading

70
·
--
Baissier
🔴 $NEAR LONG LIQUIDATION ALERT
💥 Liquidated: $58K
💵 Price: $2.405
⚠️ Leverage is being flushed from the market.
📊 Keep an eye on volatility and price action.
🔔 Follow for more real-time crypto liquidation alerts.
#NEAR #NEARProtocol #crypto #CryptoSignals
{spot}(NEARUSDT)
🔴 $NEAR LONG LIQUIDATION ALERT
💥 Liquidated: $58K
💵 Price: $2.405
⚠️ Leverage is being flushed from the market.
📊 Keep an eye on volatility and price action.
🔔 Follow for more real-time crypto liquidation alerts.
#NEAR #NEARProtocol #crypto #CryptoSignals
💥 Liquidated: $58K
💵 Price: $2.405
⚠️ Leverage is being flushed from the market.
📊 Keep an eye on volatility and price action.
🔔 Follow for more real-time crypto liquidation alerts.
#NEAR #NEARProtocol #crypto #CryptoSignals

139
·
--
Haussier
$BTC LONG LIQUIDATION ALERT
💥 Liquidated: $231K
💵 Price: $76,958.70
⚠️ Strong liquidation activity detected on BTC.
📊 Watch volatility, volume & open interest closely.
🔔 Follow for more real-time crypto liquidation alerts.
#BTC #BitcoinTrading #Liquidation #FuturesTrading #CryptoMarket
{spot}(BTCUSDT)
$BTC LONG LIQUIDATION ALERT
💥 Liquidated: $231K
💵 Price: $76,958.70
⚠️ Strong liquidation activity detected on BTC.
📊 Watch volatility, volume & open interest closely.
🔔 Follow for more real-time crypto liquidation alerts.
#BTC #BitcoinTrading #Liquidation #FuturesTrading #CryptoMarket
💥 Liquidated: $231K
💵 Price: $76,958.70
⚠️ Strong liquidation activity detected on BTC.
📊 Watch volatility, volume & open interest closely.
🔔 Follow for more real-time crypto liquidation alerts.
#BTC #BitcoinTrading #Liquidation #FuturesTrading #CryptoMarket

170
·
--
Haussier
🚀 I’M BACK ON BINANCE! 🔥
After taking a break, I’m officially making my comeback to Binance. 💪📈
A fresh start, a sharper mindset, and a stronger focus on learning, discipline, and smart trading. This time, the goal isn’t to chase the market it’s to understand it, manage risk, and stay consistent.
The journey starts again. 🚀
New chapter. New opportunities. Same determination.
Let’s see what the market has in store. 📊🔥
#Binance #crypto #cryptotrading #trading #CryptoCommunity
🚀 I’M BACK ON BINANCE! 🔥
After taking a break, I’m officially making my comeback to Binance. 💪📈
A fresh start, a sharper mindset, and a stronger focus on learning, discipline, and smart trading. This time, the goal isn’t to chase the market it’s to understand it, manage risk, and stay consistent.
The journey starts again. 🚀
New chapter. New opportunities. Same determination.
Let’s see what the market has in store. 📊🔥
#Binance #crypto #cryptotrading #trading #CryptoCommunity
After taking a break, I’m officially making my comeback to Binance. 💪📈
A fresh start, a sharper mindset, and a stronger focus on learning, discipline, and smart trading. This time, the goal isn’t to chase the market it’s to understand it, manage risk, and stay consistent.
The journey starts again. 🚀
New chapter. New opportunities. Same determination.
Let’s see what the market has in store. 📊🔥
#Binance #crypto #cryptotrading #trading #CryptoCommunity
104
Connectez-vous pour découvrir plus de contenu
Rejoignez la communauté mondiale des adeptes de cryptomonnaies sur Binance Square
⚡️ Suviez les dernières informations importantes sur les cryptomonnaies.
💬 Jugé digne de confiance par la plus grande plateforme d’échange de cryptomonnaies au monde.
👍 Découvrez les connaissances que partagent les créateurs vérifiés.
Adresse e-mail/Nº de téléphone