Step-by-Step Guide to Binance Web3 Wallet $80,000 MAV Airdrop Activity
Activity Period: 2024/01/16 00:00:00 - 2024/01/29 23:59:59 (UTC)
Activity Rules
The Tasks
1. Swap Task: Complete a swap of at least $10 equivalent between any of the following tokens on Maverick Protocol: USDT, USDC, ETH, BNB
2. Liquidity Provision Task: Provide at least $10 equivalent of liquidity to the USDC-USDT Boosted Position #11
Guideline to Swap Task Completion:
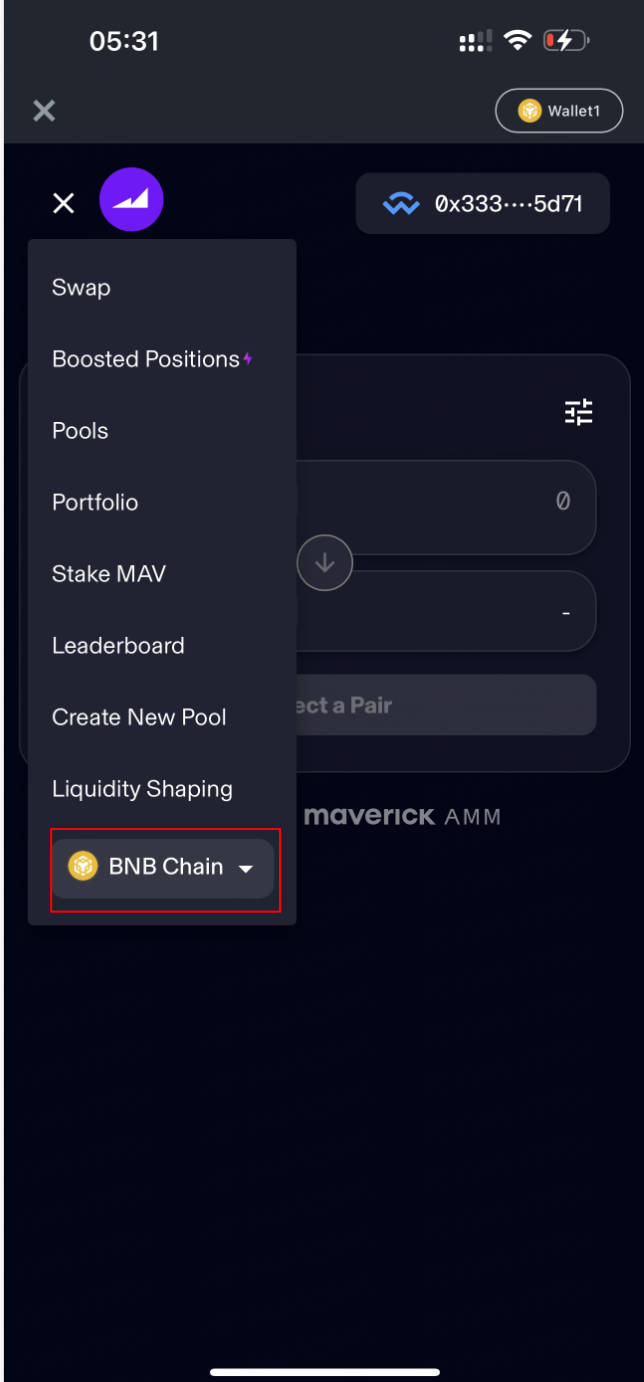
Navigate to Maverick in Web3 Wallet
Connect Binance Web3 Wallet:
Click on the upper button labeled Collect Wallet. And then choose the WalletConnect on the pop-up.
Search Binance on the WalletConnect pop-up, and click Binance.
Sign the connection on your Wallet.


Make sure you’re connected to BNB Smart Chain: to qualify, all tasks must be completed on BNB Smart Chain.
Navigate to Swap page: By default, Maverick dAPP loads the Swap page, but you can navigate there by choosing Swap in the top menu.
Choose input token: Click on the upper button labeled Add Token. This will open a drop-down menu, from which you will choose the input token for your swap. For this task, the token must be USDC, USDT, ETH, or BNB. This token must be in your Web3 Wallet already.
Choose output token: Click on the lower button labeled Add Token. This will open a drop-down menu, from which you will choose the output token for your swap. For this task, the token must be USDC, USDT, ETH, or BNB, and different from the token you chose as input token. This is the token you will receive in exchange for the input token.
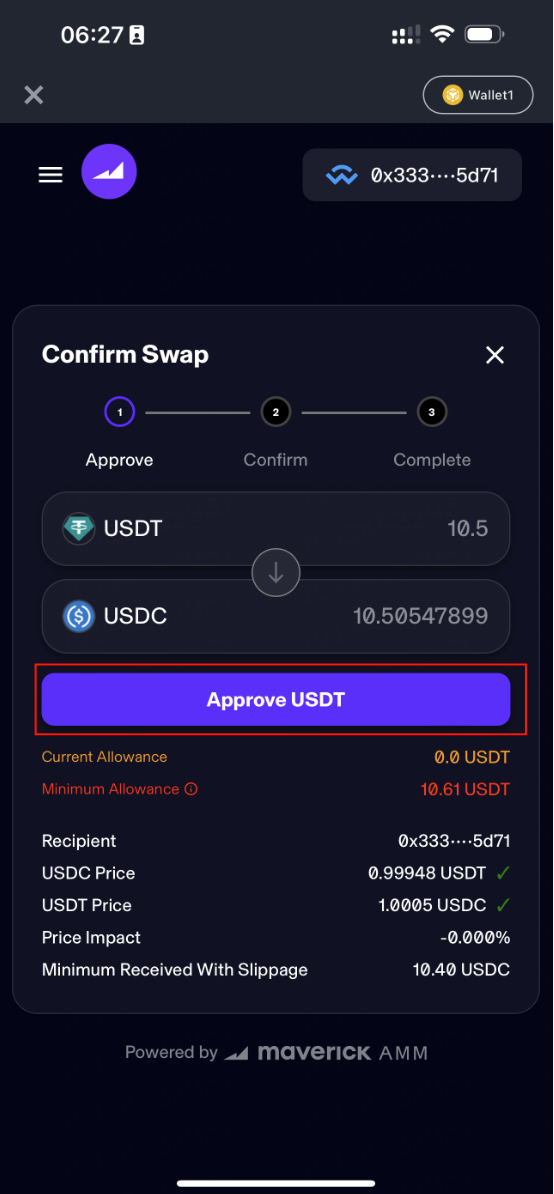
Choose swap amount: Click on the numeric field to the right of the input token select. This will let you edit the amount of input token you are swapping. To qualify for this task, the input amount must have a minimum USD value of $10; to make sure your swap qualifies, you are advised to pad the amount slightly (e.g., $10.50).
Check swap details: Maverick will compute the amount of output token you will receive for your swap. Check over all the details, including price and minimum amount received. If everything looks good, you can proceed to the next step.
Initiate swap: Click the purple button labeled Swap [input token] to [output token]. The input token and output token should be the tokens you chose above.
Approve tokens: If this is your first time using the input token on Maverick, your wallet will ask you to approve it. To make sure your transaction goes through, you are advised to approve more than the value of your swap. Maverick will show you the minimum allowance required in red. Click Approve [input token] and confirm the approval in your wallet.
Confirm swap: Review the transaction details one more time then click the purple button labeled Confirm Swap. Confirm the transaction in your wallet.


Guideline to Liquidity Provision Task Completion:
Navigate to Maverick in Web3 Wallet.Connect Binance Web3 Wallet: Click on the upper button labeled Collect Wallet. And then choose the WalletConnect on the pop-up. Search Binance on the WalletConnect pop-up, and click Binance.Sign the connection on your Wallet.

Make sure you’re connected to BNB Smart Chain: to qualify, all tasks must be completed on BNB Smart Chain.
Navigate to Boosted Positions page: Click on the Boosted Positions link in the top menu.
Select Boosted Position #11: Search the list on this page for the Boosted Position labeled USDT-USDC #11 and click on it. You must add liquidity to this Boosted Position for your task to qualify. Liquidity added to other Boosted Positions will not qualify.
Choose how much liquidity to add: Use the numeric inputs in the USDC and USDT token bubbles to choose how much liquidity to add to this Boosted Position. Three important points:
The total combined value of the liquidity you add must be $10 USD or higher to qualify for the campaign rewards.
You are advised to pad the value slightly to make sure your add qualifies.You will need to have these tokens in your Web3 Wallet already in order to add them to the Boosted Position.
The amount of each token required will change over time. The balances in this Boosted Position change as other users make swaps with it. You will have to add tokens in the same ratio that currently exists in the Boosted Position. Read the UI carefully: the Maverick dAPP will help you see how to balance your inputs correctly.
Initiate add liquidity: Once you have balanced your inputs and ensured the total amount to be added has a USD value of $10 or higher, click the button labeled Add Liquidity and Stake.
Verify pool tokens: If this is your first time adding liquidity to Maverick, the dAPP will prompt you to verify the pool tokens. Click the button labeled “Verify Tokens.”
Approve tokens: If this is your first time using either token on Maverick, your wallet will ask you to approve it. To make sure your transaction goes through, you are advised to approve more than the value needed for this add. Maverick will show you the minimum allowance required in red. Click Approve [input token] and confirm the approval in your wallet. Do this for both tokens if necessary.
Confirm add liquidity: Review the transaction one last time to make sure the combined total to be added has a USD value of more than $10. Once you are satisfied, click the button labeled Confirm Amount and then confirm the transaction in your wallet.
Disclaimer: Binance Web3 Wallet is an optional product. It is your responsibility to determine if this product is suitable for you. Binance is not responsible for your access or use of third-party applications (including functionality embedded within the Binance Web3 Wallet) and shall have no liability whatsoever in connection with your use of such third-party applications, including, without limitation, any transactions you dispute. Please carefully review the Binance Web3 Wallet Terms of Use and always do your own research.


