

WJHF
2.6k Posts

WJHF
Report
Block User
Daily Crypto Updates | Market Insights
Open Trade
High-Frequency Trader
2.3 Years
22 Following
334 Followers
1.4K+ Liked
Posts
Portfolio
All
Quotes
Videos
Live
·
--
Bearish
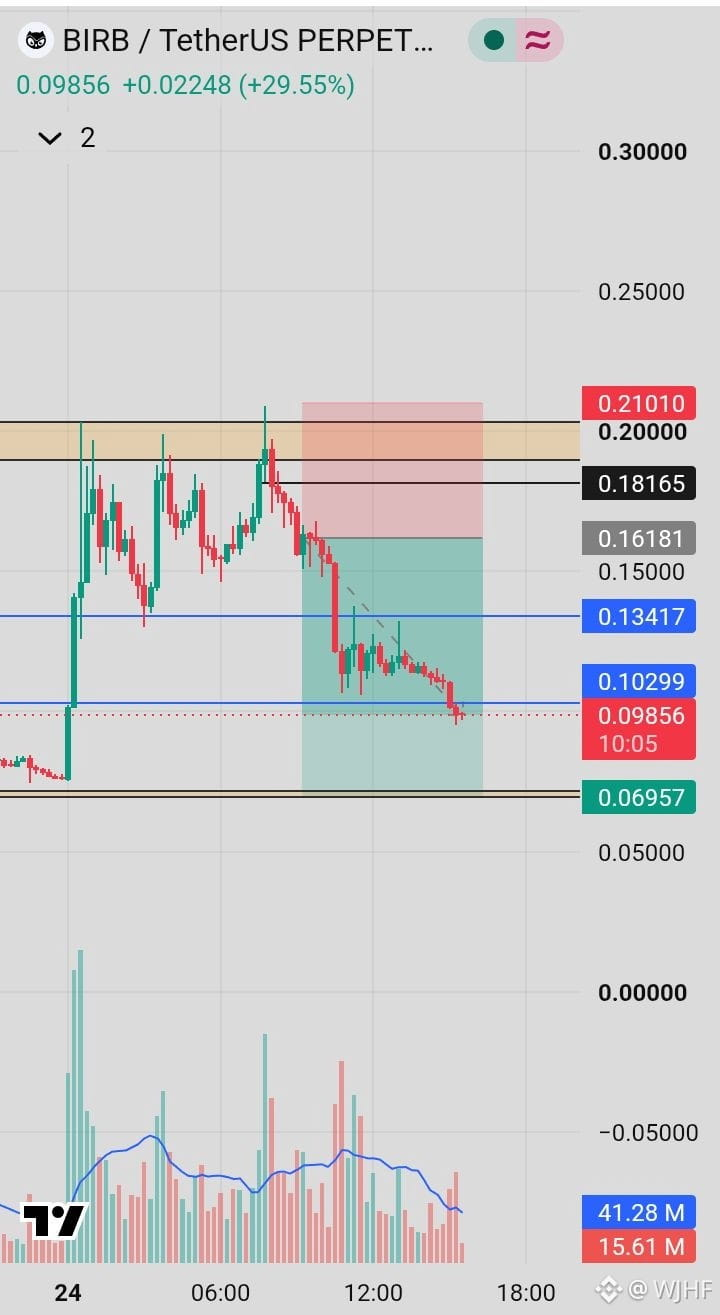
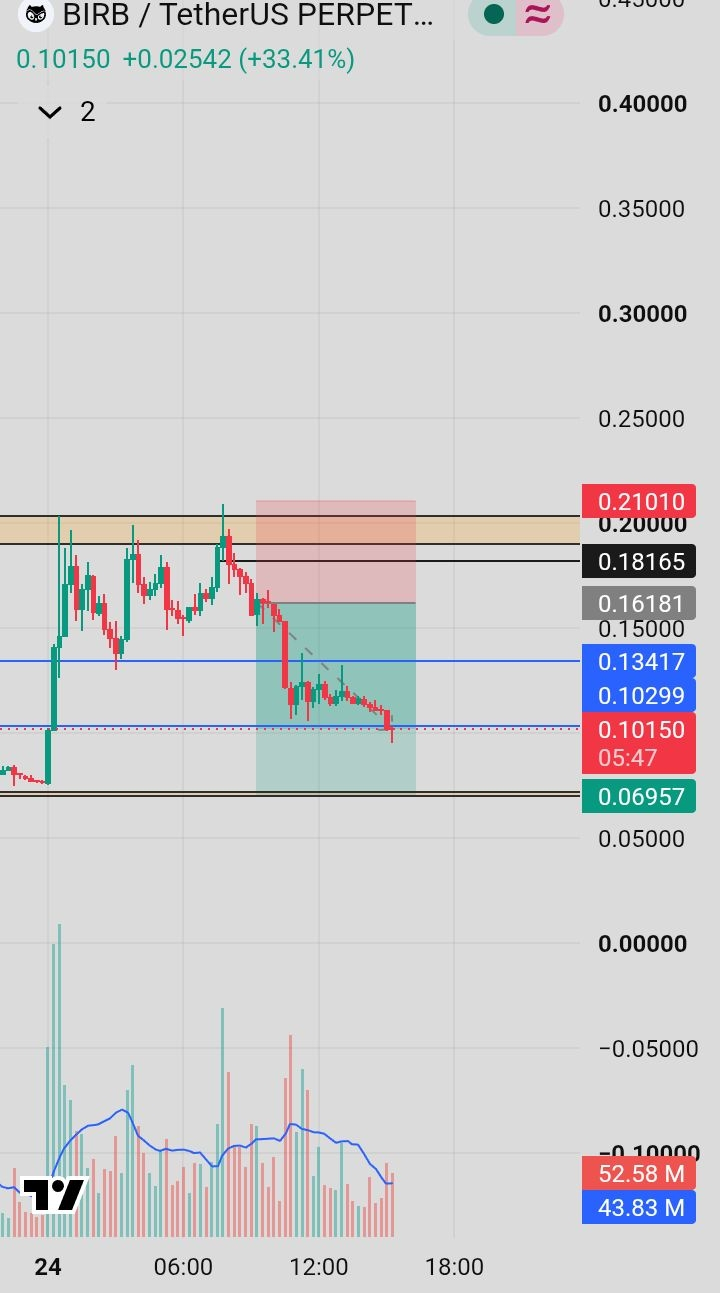
$BIRB SHORT — TP2 ACHIEVED, TP3 IN SIGHT
Another successful move in our BIRB SHORT signal!
Entry 1: 0.18165 Entry 2: 0.16181
TP1: HIT ✅ TP2: HIT ✅
Final Target (TP3): 0.06957
Current Price: 0.09856
Price has moved below our TP2 level of 0.10299 and is now trading around 0.09856. The bearish momentum continues, bringing the final target at 0.06957 closer.
Secure profits and manage your remaining position wisely.
Two targets achieved. Eyes on TP3!
$ORDER $BMT #BinancePick #EarningsSeason
$BIRB SHORT — TP2 ACHIEVED, TP3 IN SIGHT
Another successful move in our BIRB SHORT signal!
Entry 1: 0.18165 Entry 2: 0.16181
TP1: HIT ✅ TP2: HIT ✅
Final Target (TP3): 0.06957
Current Price: 0.09856
Price has moved below our TP2 level of 0.10299 and is now trading around 0.09856. The bearish momentum continues, bringing the final target at 0.06957 closer.
Secure profits and manage your remaining position wisely.
Two targets achieved. Eyes on TP3!
$ORDER $BMT #BinancePick #EarningsSeason
Another successful move in our BIRB SHORT signal!
Entry 1: 0.18165 Entry 2: 0.16181
TP1: HIT ✅ TP2: HIT ✅
Final Target (TP3): 0.06957
Current Price: 0.09856
Price has moved below our TP2 level of 0.10299 and is now trading around 0.09856. The bearish momentum continues, bringing the final target at 0.06957 closer.
Secure profits and manage your remaining position wisely.
Two targets achieved. Eyes on TP3!
$ORDER $BMT #BinancePick #EarningsSeason
WJHF
·
--
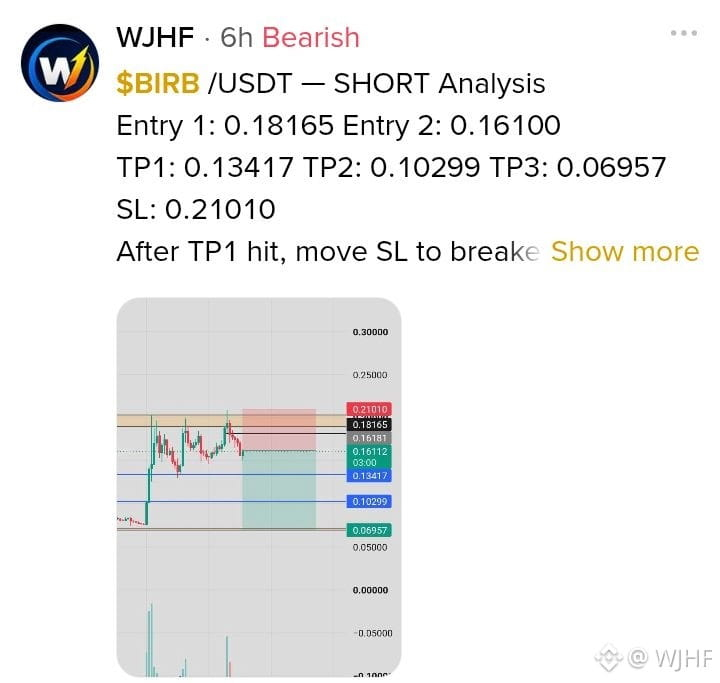
Bearish$BIRB /USDT — SHORT Analysis
Entry 1: 0.18165 Entry 2: 0.16100
TP1: 0.13417 TP2: 0.10299 TP3: 0.06957
SL: 0.21010
After TP1 hit, move SL to breakeven.
Analysis: Price is facing resistance around 0.18165–0.21010 after a sharp pump. If the price fails to reclaim this resistance zone, bearish continuation toward the lower support levels is possible.
#BinancePick #EarningsSeason #OCCRemovesStablecoinSevenDayRedemptionExtension #USConsumerSentimentHoldsAtSecondLowestOnRecord #PepeJumps14%ToLeadAltcoinRebound
Entry 1: 0.18165 Entry 2: 0.16100
TP1: 0.13417 TP2: 0.10299 TP3: 0.06957
SL: 0.21010
After TP1 hit, move SL to breakeven.
Analysis: Price is facing resistance around 0.18165–0.21010 after a sharp pump. If the price fails to reclaim this resistance zone, bearish continuation toward the lower support levels is possible.
#BinancePick #EarningsSeason #OCCRemovesStablecoinSevenDayRedemptionExtension #USConsumerSentimentHoldsAtSecondLowestOnRecord #PepeJumps14%ToLeadAltcoinRebound
171
·
--
Bearish
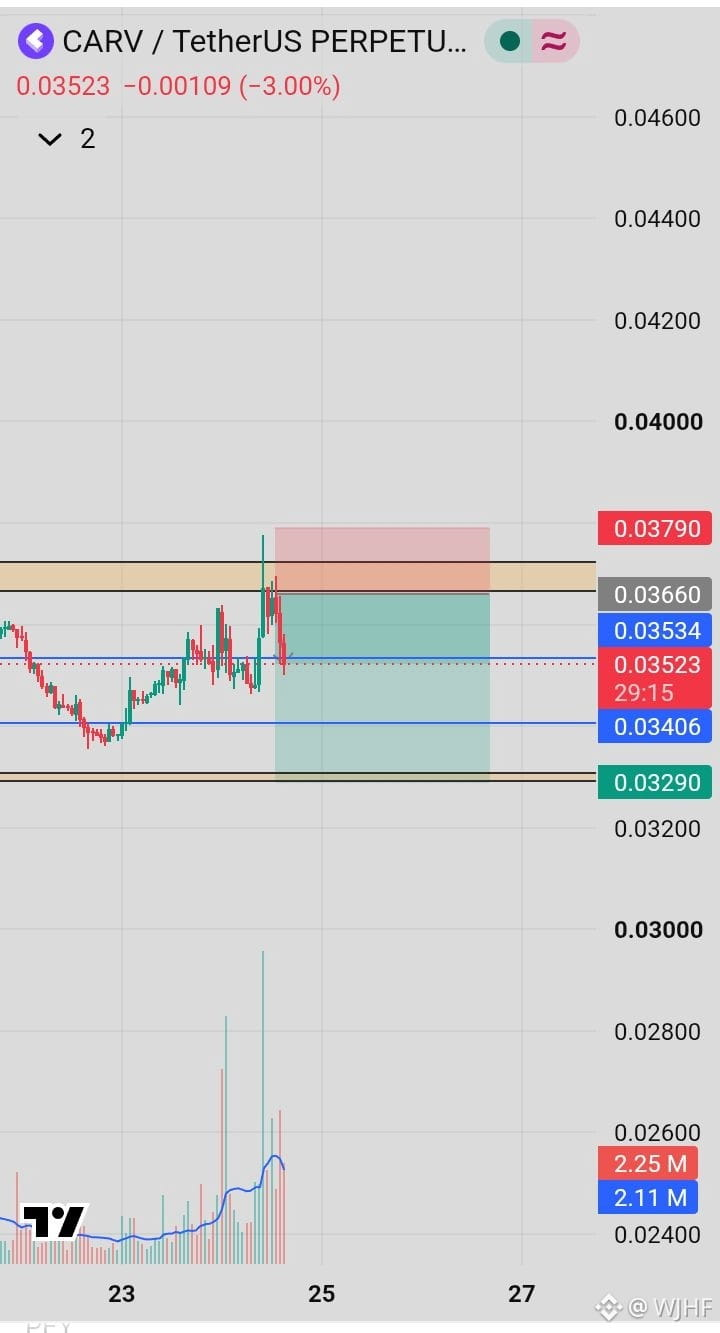
$CARV /USDT — TP1 HIT
Our short setup has successfully hit TP1 at 0.03534.
Price rejected the resistance zone as expected and moved toward our first target.
TP1 Hit: 0.03534
Next Targets: TP2: 0.03406 TP3: 0.03290
Manage risk carefully and keep an eye on the remaining targets.
#BinancePick #EarningsSeason #DowDrops653Points #OCCRemovesStablecoinSevenDayRedemptionExtension #USConsumerSentimentHoldsAtSecondLowestOnRecord
$CARV /USDT — TP1 HIT
Our short setup has successfully hit TP1 at 0.03534.
Price rejected the resistance zone as expected and moved toward our first target.
TP1 Hit: 0.03534
Next Targets: TP2: 0.03406 TP3: 0.03290
Manage risk carefully and keep an eye on the remaining targets.
#BinancePick #EarningsSeason #DowDrops653Points #OCCRemovesStablecoinSevenDayRedemptionExtension #USConsumerSentimentHoldsAtSecondLowestOnRecord
Our short setup has successfully hit TP1 at 0.03534.
Price rejected the resistance zone as expected and moved toward our first target.
TP1 Hit: 0.03534
Next Targets: TP2: 0.03406 TP3: 0.03290
Manage risk carefully and keep an eye on the remaining targets.
#BinancePick #EarningsSeason #DowDrops653Points #OCCRemovesStablecoinSevenDayRedemptionExtension #USConsumerSentimentHoldsAtSecondLowestOnRecord
WJHF
·
--
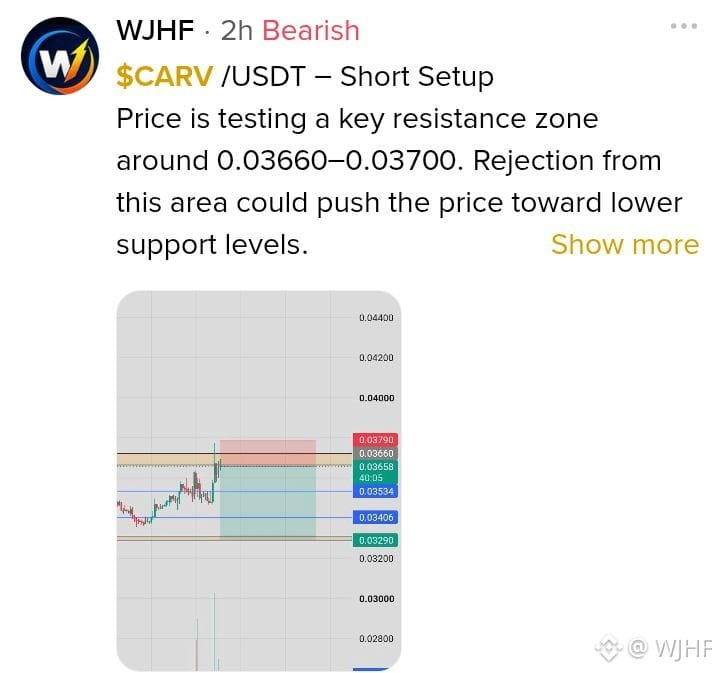
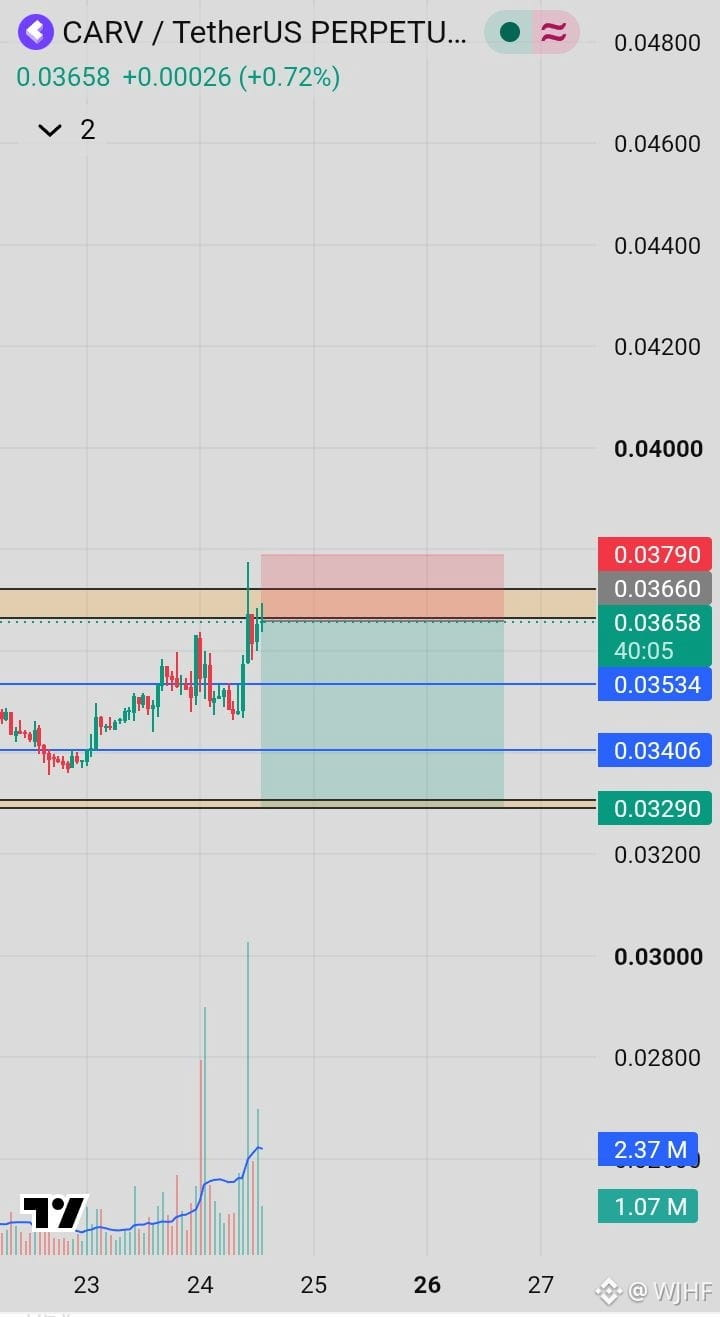
Bearish$CARV /USDT – Short Setup
Price is testing a key resistance zone around 0.03660–0.03700. Rejection from this area could push the price toward lower support levels.
Entry Zone: 0.03660–0.03700
Stop Loss: 0.03790
TP1: 0.03534
TP2: 0.03406
TP3: 0.03290
The key level to watch is the resistance zone. A strong rejection could favor the downside, while a breakout above resistance may invalidate the short setup.
Trade with proper risk management.
#BinancePick #EarningsSeason #DowDrops653Points #MarketsPriceJust10%ChanceOfFedHikeNextWeek #OCCRemovesStablecoinSevenDayRedemptionExtension
Price is testing a key resistance zone around 0.03660–0.03700. Rejection from this area could push the price toward lower support levels.
Entry Zone: 0.03660–0.03700
Stop Loss: 0.03790
TP1: 0.03534
TP2: 0.03406
TP3: 0.03290
The key level to watch is the resistance zone. A strong rejection could favor the downside, while a breakout above resistance may invalidate the short setup.
Trade with proper risk management.
#BinancePick #EarningsSeason #DowDrops653Points #MarketsPriceJust10%ChanceOfFedHikeNextWeek #OCCRemovesStablecoinSevenDayRedemptionExtension
1
115
·
--
Bearish
$BIRB — TP2 HIT SUCCESSFULLY
Another target achieved! Price has reached our TP2 at 0.10299.
TP1: HIT
TP2: HIT
Final Target:
TP3: 0.06957
Two targets achieved in our SHORT trade. Secure your profits and keep SL at breakeven to protect your remaining position.
Waiting for the final target!
#BinancePick #EarningsSeason #DowDrops653Points #MarketsPriceJust10%ChanceOfFedHikeNextWeek #USConsumerSentimentHoldsAtSecondLowestOnRecord
$BIRB — TP2 HIT SUCCESSFULLY
Another target achieved! Price has reached our TP2 at 0.10299.
TP1: HIT
TP2: HIT
Final Target:
TP3: 0.06957
Two targets achieved in our SHORT trade. Secure your profits and keep SL at breakeven to protect your remaining position.
Waiting for the final target!
#BinancePick #EarningsSeason #DowDrops653Points #MarketsPriceJust10%ChanceOfFedHikeNextWeek #USConsumerSentimentHoldsAtSecondLowestOnRecord
Another target achieved! Price has reached our TP2 at 0.10299.
TP1: HIT
TP2: HIT
Final Target:
TP3: 0.06957
Two targets achieved in our SHORT trade. Secure your profits and keep SL at breakeven to protect your remaining position.
Waiting for the final target!
#BinancePick #EarningsSeason #DowDrops653Points #MarketsPriceJust10%ChanceOfFedHikeNextWeek #USConsumerSentimentHoldsAtSecondLowestOnRecord
WJHF
·
--
Bearish$BIRB /USDT — SHORT Analysis
Entry 1: 0.18165 Entry 2: 0.16100
TP1: 0.13417 TP2: 0.10299 TP3: 0.06957
SL: 0.21010
After TP1 hit, move SL to breakeven.
Analysis: Price is facing resistance around 0.18165–0.21010 after a sharp pump. If the price fails to reclaim this resistance zone, bearish continuation toward the lower support levels is possible.
#BinancePick #EarningsSeason #OCCRemovesStablecoinSevenDayRedemptionExtension #USConsumerSentimentHoldsAtSecondLowestOnRecord #PepeJumps14%ToLeadAltcoinRebound
Entry 1: 0.18165 Entry 2: 0.16100
TP1: 0.13417 TP2: 0.10299 TP3: 0.06957
SL: 0.21010
After TP1 hit, move SL to breakeven.
Analysis: Price is facing resistance around 0.18165–0.21010 after a sharp pump. If the price fails to reclaim this resistance zone, bearish continuation toward the lower support levels is possible.
#BinancePick #EarningsSeason #OCCRemovesStablecoinSevenDayRedemptionExtension #USConsumerSentimentHoldsAtSecondLowestOnRecord #PepeJumps14%ToLeadAltcoinRebound
47
·
--
Bearish
$CARV /USDT – Short Setup
Price is testing a key resistance zone around 0.03660–0.03700. Rejection from this area could push the price toward lower support levels.
Entry Zone: 0.03660–0.03700
Stop Loss: 0.03790
TP1: 0.03534
TP2: 0.03406
TP3: 0.03290
The key level to watch is the resistance zone. A strong rejection could favor the downside, while a breakout above resistance may invalidate the short setup.
Trade with proper risk management.
#BinancePick #EarningsSeason #DowDrops653Points #MarketsPriceJust10%ChanceOfFedHikeNextWeek #OCCRemovesStablecoinSevenDayRedemptionExtension
$CARV /USDT – Short Setup
Price is testing a key resistance zone around 0.03660–0.03700. Rejection from this area could push the price toward lower support levels.
Entry Zone: 0.03660–0.03700
Stop Loss: 0.03790
TP1: 0.03534
TP2: 0.03406
TP3: 0.03290
The key level to watch is the resistance zone. A strong rejection could favor the downside, while a breakout above resistance may invalidate the short setup.
Trade with proper risk management.
#BinancePick #EarningsSeason #DowDrops653Points #MarketsPriceJust10%ChanceOfFedHikeNextWeek #OCCRemovesStablecoinSevenDayRedemptionExtension
Price is testing a key resistance zone around 0.03660–0.03700. Rejection from this area could push the price toward lower support levels.
Entry Zone: 0.03660–0.03700
Stop Loss: 0.03790
TP1: 0.03534
TP2: 0.03406
TP3: 0.03290
The key level to watch is the resistance zone. A strong rejection could favor the downside, while a breakout above resistance may invalidate the short setup.
Trade with proper risk management.
#BinancePick #EarningsSeason #DowDrops653Points #MarketsPriceJust10%ChanceOfFedHikeNextWeek #OCCRemovesStablecoinSevenDayRedemptionExtension
1
128
·
--
Bearish
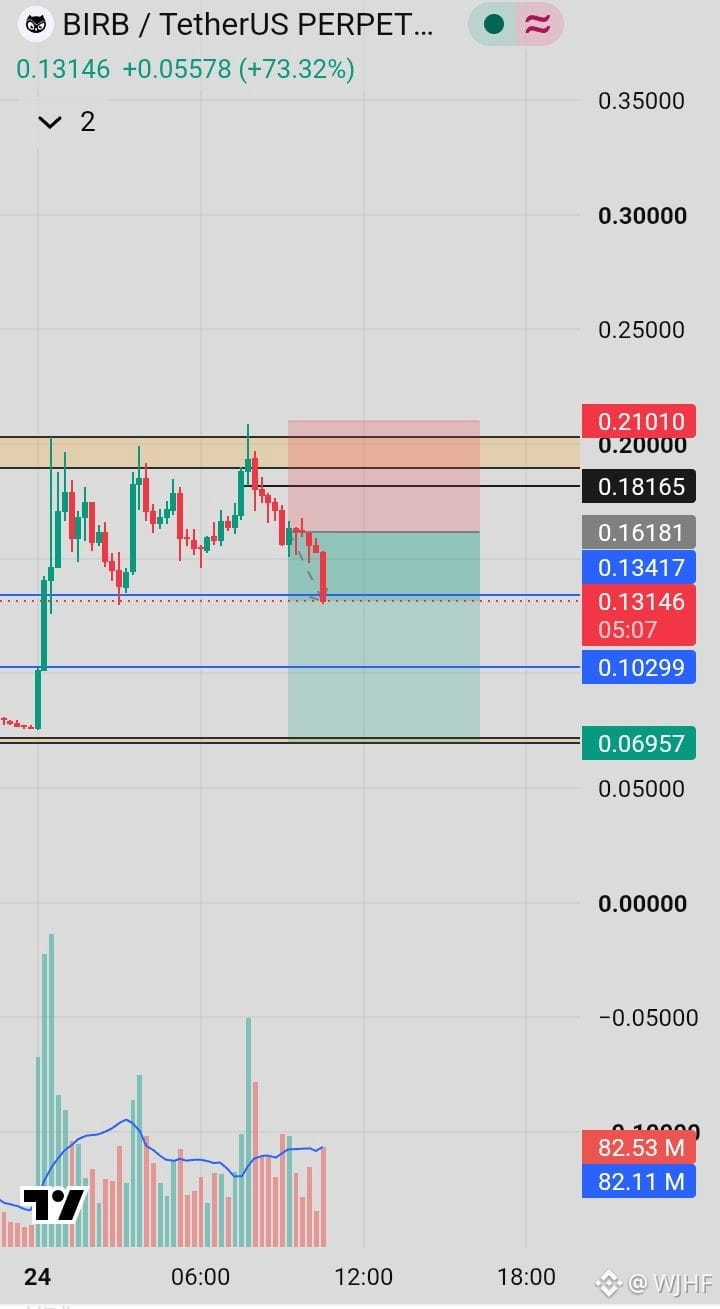
$BIRB — TP1 HIT SUCCESSFULLY
TP1 Hit: 0.13417
Price has reached our first target. Congratulations to everyone who caught this move.
Remaining Targets: TP2: 0.10299 TP3: 0.06957
Secure partial profits and move SL to breakeven to protect your trade.
The bearish move is progressing toward the next targets.
#BinancePick #EarningsSeason #DowDrops653Points #MarketsPriceJust10%ChanceOfFedHikeNextWeek #USConsumerSentimentHoldsAtSecondLowestOnRecord
$BIRB — TP1 HIT SUCCESSFULLY
TP1 Hit: 0.13417
Price has reached our first target. Congratulations to everyone who caught this move.
Remaining Targets: TP2: 0.10299 TP3: 0.06957
Secure partial profits and move SL to breakeven to protect your trade.
The bearish move is progressing toward the next targets.
#BinancePick #EarningsSeason #DowDrops653Points #MarketsPriceJust10%ChanceOfFedHikeNextWeek #USConsumerSentimentHoldsAtSecondLowestOnRecord
TP1 Hit: 0.13417
Price has reached our first target. Congratulations to everyone who caught this move.
Remaining Targets: TP2: 0.10299 TP3: 0.06957
Secure partial profits and move SL to breakeven to protect your trade.
The bearish move is progressing toward the next targets.
#BinancePick #EarningsSeason #DowDrops653Points #MarketsPriceJust10%ChanceOfFedHikeNextWeek #USConsumerSentimentHoldsAtSecondLowestOnRecord
WJHF
·
--
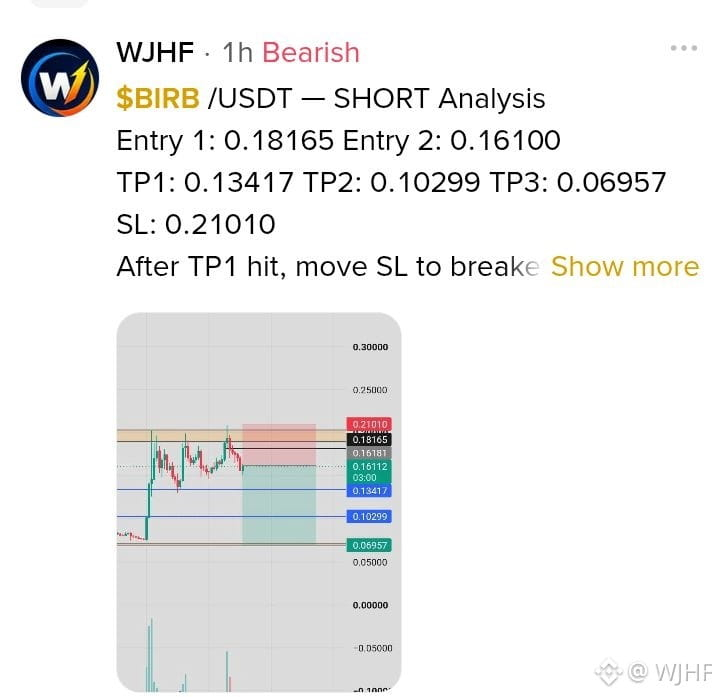
Bearish$BIRB /USDT — SHORT Analysis
Entry 1: 0.18165 Entry 2: 0.16100
TP1: 0.13417 TP2: 0.10299 TP3: 0.06957
SL: 0.21010
After TP1 hit, move SL to breakeven.
Analysis: Price is facing resistance around 0.18165–0.21010 after a sharp pump. If the price fails to reclaim this resistance zone, bearish continuation toward the lower support levels is possible.
#BinancePick #EarningsSeason #OCCRemovesStablecoinSevenDayRedemptionExtension #USConsumerSentimentHoldsAtSecondLowestOnRecord #PepeJumps14%ToLeadAltcoinRebound
Entry 1: 0.18165 Entry 2: 0.16100
TP1: 0.13417 TP2: 0.10299 TP3: 0.06957
SL: 0.21010
After TP1 hit, move SL to breakeven.
Analysis: Price is facing resistance around 0.18165–0.21010 after a sharp pump. If the price fails to reclaim this resistance zone, bearish continuation toward the lower support levels is possible.
#BinancePick #EarningsSeason #OCCRemovesStablecoinSevenDayRedemptionExtension #USConsumerSentimentHoldsAtSecondLowestOnRecord #PepeJumps14%ToLeadAltcoinRebound
334
·
--
Bearish
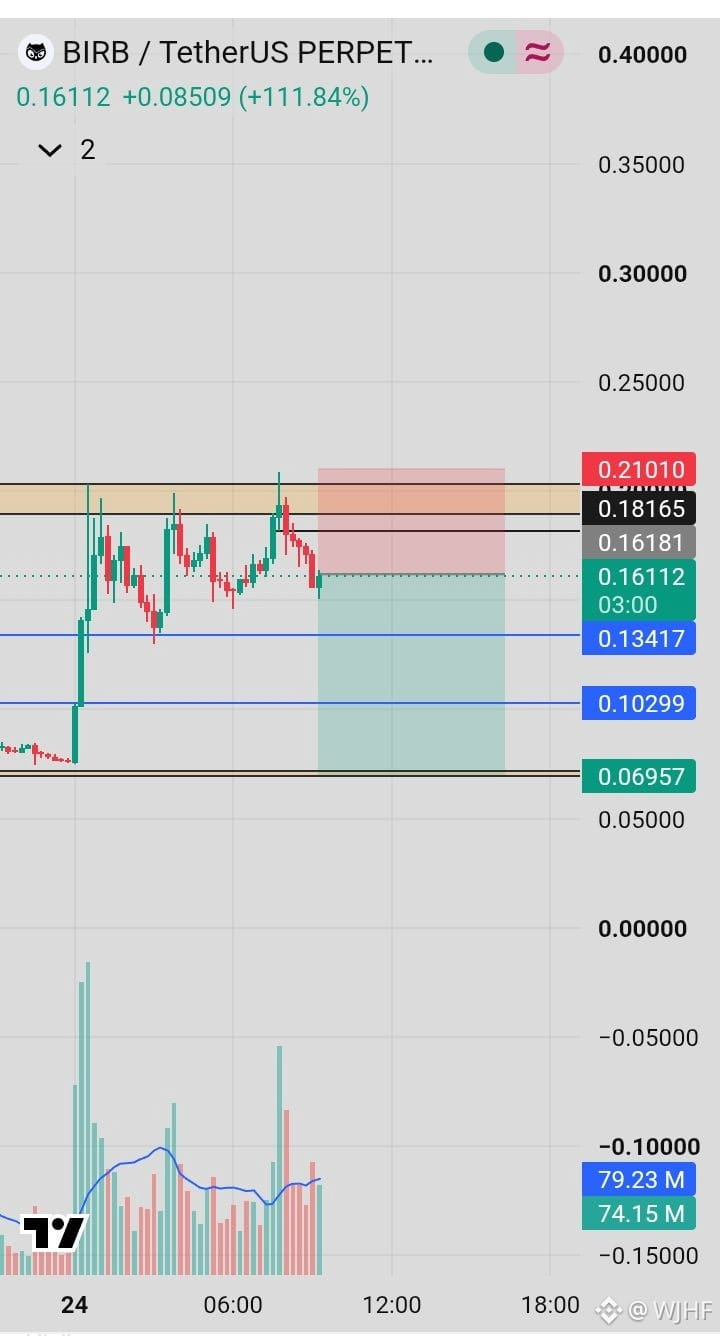
$BIRB /USDT — SHORT Analysis
Entry 1: 0.18165 Entry 2: 0.16100
TP1: 0.13417 TP2: 0.10299 TP3: 0.06957
SL: 0.21010
After TP1 hit, move SL to breakeven.
Analysis: Price is facing resistance around 0.18165–0.21010 after a sharp pump. If the price fails to reclaim this resistance zone, bearish continuation toward the lower support levels is possible.
#BinancePick #EarningsSeason #OCCRemovesStablecoinSevenDayRedemptionExtension #USConsumerSentimentHoldsAtSecondLowestOnRecord #PepeJumps14%ToLeadAltcoinRebound
$BIRB /USDT — SHORT Analysis
Entry 1: 0.18165 Entry 2: 0.16100
TP1: 0.13417 TP2: 0.10299 TP3: 0.06957
SL: 0.21010
After TP1 hit, move SL to breakeven.
Analysis: Price is facing resistance around 0.18165–0.21010 after a sharp pump. If the price fails to reclaim this resistance zone, bearish continuation toward the lower support levels is possible.
#BinancePick #EarningsSeason #OCCRemovesStablecoinSevenDayRedemptionExtension #USConsumerSentimentHoldsAtSecondLowestOnRecord #PepeJumps14%ToLeadAltcoinRebound
Entry 1: 0.18165 Entry 2: 0.16100
TP1: 0.13417 TP2: 0.10299 TP3: 0.06957
SL: 0.21010
After TP1 hit, move SL to breakeven.
Analysis: Price is facing resistance around 0.18165–0.21010 after a sharp pump. If the price fails to reclaim this resistance zone, bearish continuation toward the lower support levels is possible.
#BinancePick #EarningsSeason #OCCRemovesStablecoinSevenDayRedemptionExtension #USConsumerSentimentHoldsAtSecondLowestOnRecord #PepeJumps14%ToLeadAltcoinRebound
3
232
·
--
Bullish
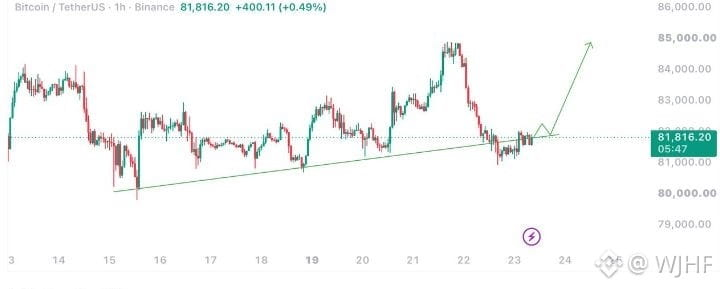
$BTC /USDT 1H UPDATE 🚀
BTC is holding rising trendline support near 81,500–81,800. A breakout above 82,500 could push the price toward 83,500–85,000.
📍 Support: 81,000–81,500
🎯 Targets: 82,500 • 83,500 • 85,000
Bias: Bullish if support holds and resistance breaks.#EarningsSeason #BinancePick #BitcoinHashrateHitsSevenMonthHigh #EthereumHoodiTestnetGlamsterdamHardForkDelayed #HSBCBeginsPhasedRolloutOfHKDStablecoinRedCoin $NVDAB $AAPLB
$BTC /USDT 1H UPDATE 🚀
BTC is holding rising trendline support near 81,500–81,800. A breakout above 82,500 could push the price toward 83,500–85,000.
📍 Support: 81,000–81,500
🎯 Targets: 82,500 • 83,500 • 85,000
Bias: Bullish if support holds and resistance breaks.#EarningsSeason #BinancePick #BitcoinHashrateHitsSevenMonthHigh #EthereumHoodiTestnetGlamsterdamHardForkDelayed #HSBCBeginsPhasedRolloutOfHKDStablecoinRedCoin $NVDAB $AAPLB
BTC is holding rising trendline support near 81,500–81,800. A breakout above 82,500 could push the price toward 83,500–85,000.
📍 Support: 81,000–81,500
🎯 Targets: 82,500 • 83,500 • 85,000
Bias: Bullish if support holds and resistance breaks.#EarningsSeason #BinancePick #BitcoinHashrateHitsSevenMonthHigh #EthereumHoodiTestnetGlamsterdamHardForkDelayed #HSBCBeginsPhasedRolloutOfHKDStablecoinRedCoin $NVDAB $AAPLB
49
·
--
Bullish
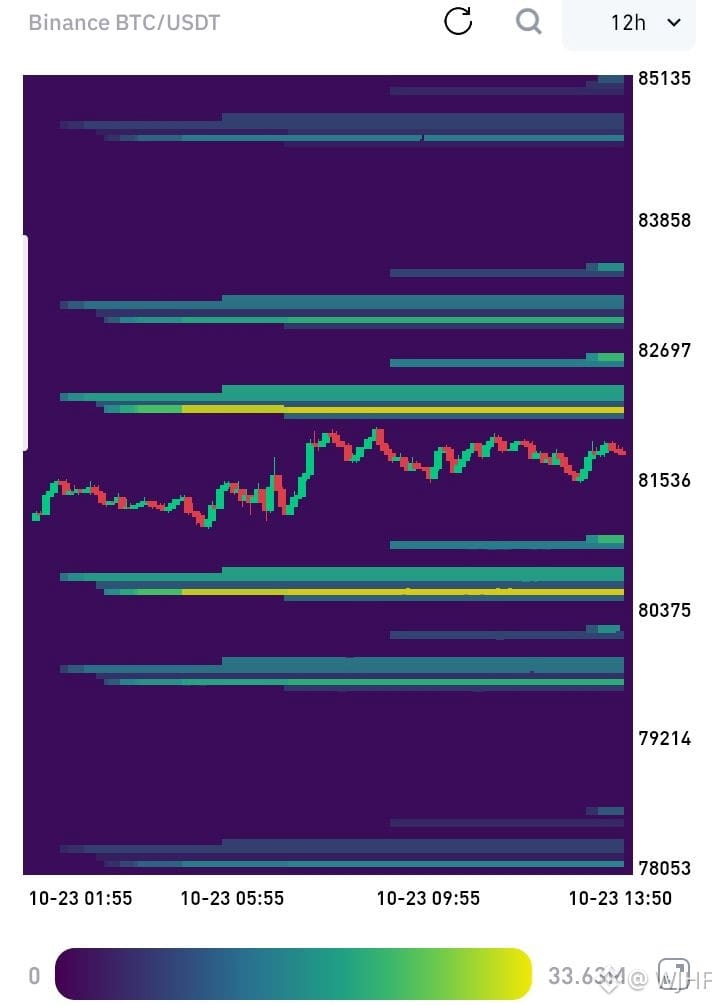
$BTC : Will the Next Target Be Upside or Downside Liquidity?
According to the Bitcoin liquidity heatmap, significant liquidity is visible above the current price in the $82,200–$82,700 zone, while the $80,500–$80,700 zone remains an important area below.
In my view, the liquidity above the current price appears more prominent, making an upside liquidity hunt toward $82,200–$82,700 worth watching.
However, price action and market structure will be important in confirming the next move.
What do you think? Will BTC hunt upside liquidity first or sweep the downside liquidity?
#BTC #Bitcoin #liquidity #BinancePick #EarningsSeason $ETH $SOL
$BTC : Will the Next Target Be Upside or Downside Liquidity?
According to the Bitcoin liquidity heatmap, significant liquidity is visible above the current price in the $82,200–$82,700 zone, while the $80,500–$80,700 zone remains an important area below.
In my view, the liquidity above the current price appears more prominent, making an upside liquidity hunt toward $82,200–$82,700 worth watching.
However, price action and market structure will be important in confirming the next move.
What do you think? Will BTC hunt upside liquidity first or sweep the downside liquidity?
#BTC #Bitcoin #liquidity #BinancePick #EarningsSeason $ETH $SOL
According to the Bitcoin liquidity heatmap, significant liquidity is visible above the current price in the $82,200–$82,700 zone, while the $80,500–$80,700 zone remains an important area below.
In my view, the liquidity above the current price appears more prominent, making an upside liquidity hunt toward $82,200–$82,700 worth watching.
However, price action and market structure will be important in confirming the next move.
What do you think? Will BTC hunt upside liquidity first or sweep the downside liquidity?
#BTC #Bitcoin #liquidity #BinancePick #EarningsSeason $ETH $SOL
79
·
--
⚡️ NOW: CZ Says AI Hacking Fears Around Crypto Are Overblown
CZ believes fears about AI breaking crypto security are exaggerated, pointing out that the internet and banking systems rely on encryption that may be less robust.
However, he warns that AI doesn’t need to break Bitcoin’s cryptography to cause damage. Leaked data can already fuel phishing attacks, social engineering, and other cyber threats.
The real risk may not be breaking Bitcoin’s encryption, but exploiting human vulnerabilities.
#EarningsSeason #BinancePick #SouthKoreaPushesFXLawRevisionToRegulateStablecoins $BNB $BTC $ETH
⚡️ NOW: CZ Says AI Hacking Fears Around Crypto Are Overblown
CZ believes fears about AI breaking crypto security are exaggerated, pointing out that the internet and banking systems rely on encryption that may be less robust.
However, he warns that AI doesn’t need to break Bitcoin’s cryptography to cause damage. Leaked data can already fuel phishing attacks, social engineering, and other cyber threats.
The real risk may not be breaking Bitcoin’s encryption, but exploiting human vulnerabilities.
#EarningsSeason #BinancePick #SouthKoreaPushesFXLawRevisionToRegulateStablecoins $BNB $BTC $ETH
CZ believes fears about AI breaking crypto security are exaggerated, pointing out that the internet and banking systems rely on encryption that may be less robust.
However, he warns that AI doesn’t need to break Bitcoin’s cryptography to cause damage. Leaked data can already fuel phishing attacks, social engineering, and other cyber threats.
The real risk may not be breaking Bitcoin’s encryption, but exploiting human vulnerabilities.
#EarningsSeason #BinancePick #SouthKoreaPushesFXLawRevisionToRegulateStablecoins $BNB $BTC $ETH

85
·
--
Bullish
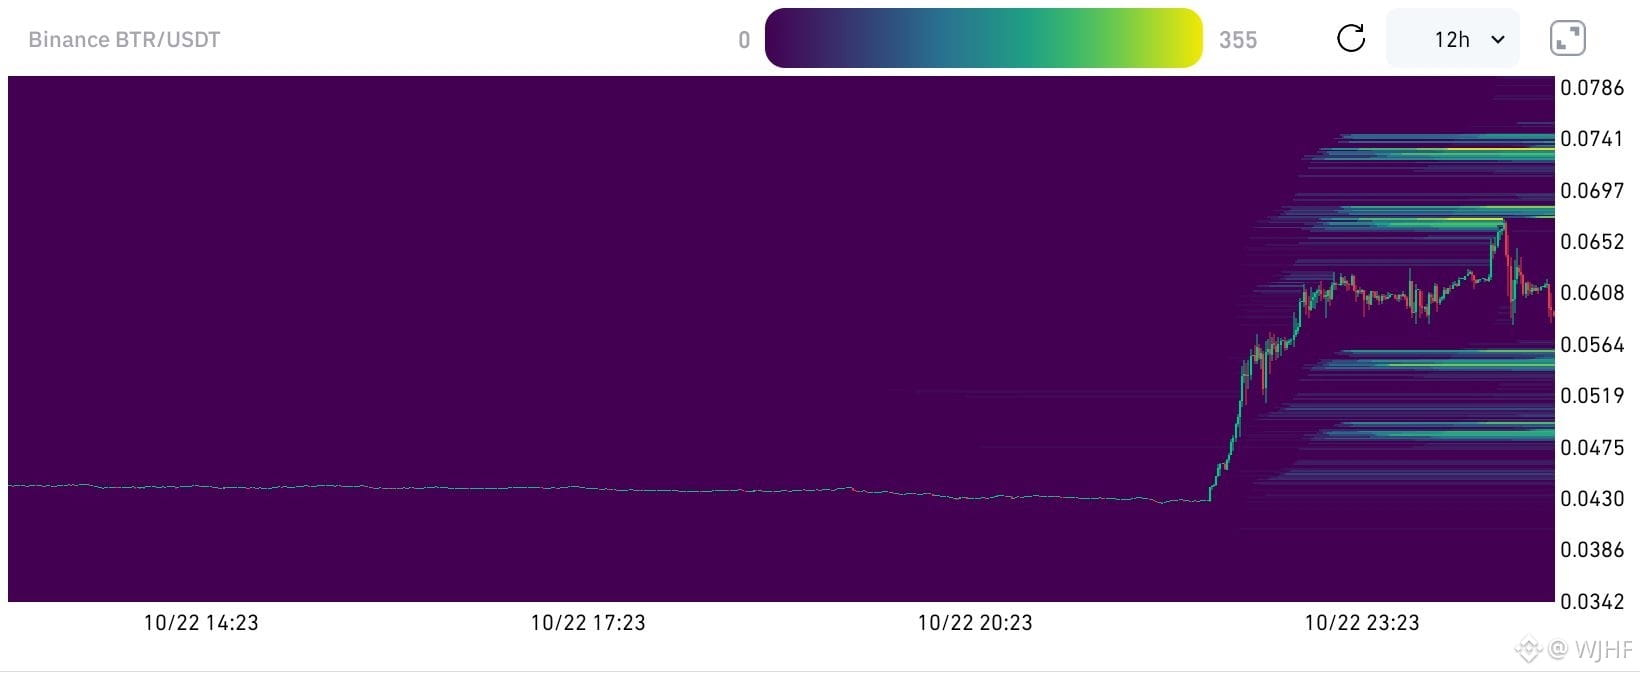
$BTR /USDT — Liquidity Heatmap Analysis
The 12H liquidity heatmap highlights important liquidity zones above and below the current price. These levels could play a key role in determining BTR’s next move.
Key Liquidity Zones
Upside Liquidity:
0.0650–0.0670
0.0730–0.0741 — Major Liquidity Zone
Downside Liquidity:
0.0560–0.0540
Around 0.0480
Which Direction Has a Higher Probability?
The 0.0730–0.0741 zone appears to be an important upside liquidity target. If BTR maintains stability around the current price and buying pressure returns, the price could first move toward 0.0650–0.0670, followed by a potential move toward 0.0730–0.0741.
However, the heatmap alone cannot confirm the direction. If the 0.0560–0.0540 support zone breaks, the probability of a move toward lower liquidity zones may increase.
My View: The 0.0730–0.0741 zone is a key potential upside target. However, confirmation from price action is necessary before concluding that an upward move has a higher probability.
#BTR #BTRUSDT #LiquidityHeatmap #CryptoAnalysis #Binance
$BTR /USDT — Liquidity Heatmap Analysis
The 12H liquidity heatmap highlights important liquidity zones above and below the current price. These levels could play a key role in determining BTR’s next move.
Key Liquidity Zones
Upside Liquidity:
0.0650–0.0670
0.0730–0.0741 — Major Liquidity Zone
Downside Liquidity:
0.0560–0.0540
Around 0.0480
Which Direction Has a Higher Probability?
The 0.0730–0.0741 zone appears to be an important upside liquidity target. If BTR maintains stability around the current price and buying pressure returns, the price could first move toward 0.0650–0.0670, followed by a potential move toward 0.0730–0.0741.
However, the heatmap alone cannot confirm the direction. If the 0.0560–0.0540 support zone breaks, the probability of a move toward lower liquidity zones may increase.
My View: The 0.0730–0.0741 zone is a key potential upside target. However, confirmation from price action is necessary before concluding that an upward move has a higher probability.
#BTR #BTRUSDT #LiquidityHeatmap #CryptoAnalysis #Binance
The 12H liquidity heatmap highlights important liquidity zones above and below the current price. These levels could play a key role in determining BTR’s next move.
Key Liquidity Zones
Upside Liquidity:
0.0650–0.0670
0.0730–0.0741 — Major Liquidity Zone
Downside Liquidity:
0.0560–0.0540
Around 0.0480
Which Direction Has a Higher Probability?
The 0.0730–0.0741 zone appears to be an important upside liquidity target. If BTR maintains stability around the current price and buying pressure returns, the price could first move toward 0.0650–0.0670, followed by a potential move toward 0.0730–0.0741.
However, the heatmap alone cannot confirm the direction. If the 0.0560–0.0540 support zone breaks, the probability of a move toward lower liquidity zones may increase.
My View: The 0.0730–0.0741 zone is a key potential upside target. However, confirmation from price action is necessary before concluding that an upward move has a higher probability.
#BTR #BTRUSDT #LiquidityHeatmap #CryptoAnalysis #Binance
377
·
--
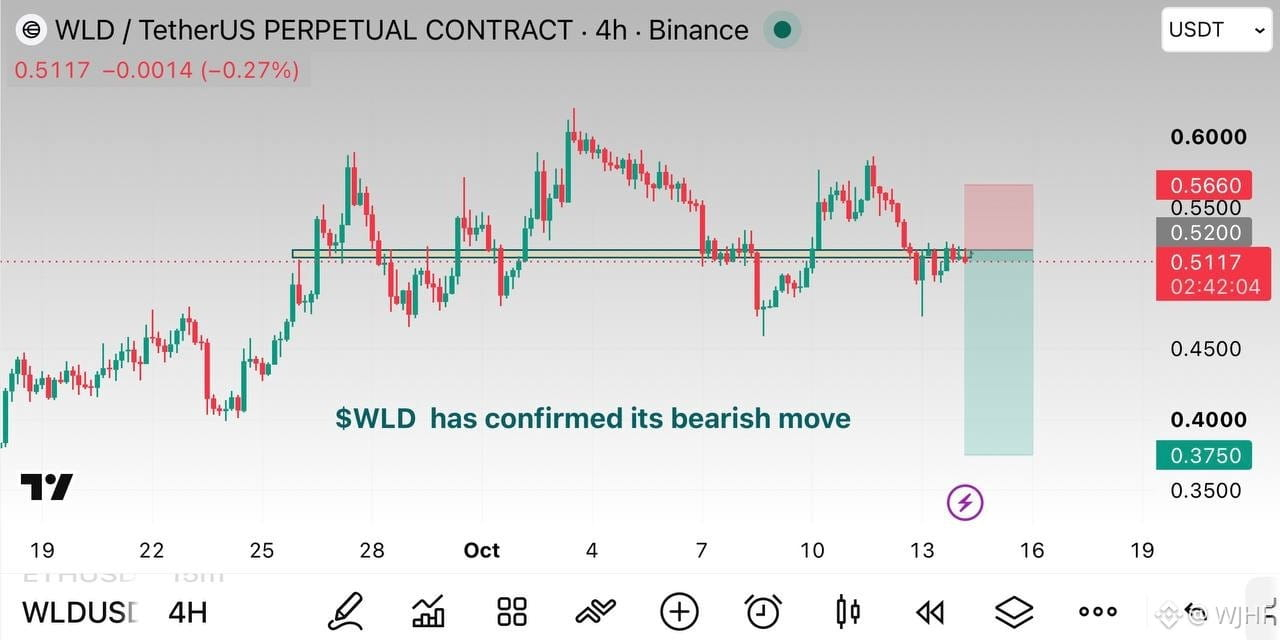
$WLD SHORT TRADE 📉
Analysis: Price is facing strong resistance around the 0.5143–0.5200 zone, with bearish rejection indicating selling pressure. A downside move toward the lower support levels is possible.
Entry: 0.5200 – 0.5143
TP1: 0.4670
TP2: 0.4250
TP3: 0.3750
SL: 0.5660
#CPIWatch #OptimismOPRises19.98% #LedgerAsksSoutheastAsiaHKResellersToHaltSales
$WLD SHORT TRADE 📉
Analysis: Price is facing strong resistance around the 0.5143–0.5200 zone, with bearish rejection indicating selling pressure. A downside move toward the lower support levels is possible.
Entry: 0.5200 – 0.5143
TP1: 0.4670
TP2: 0.4250
TP3: 0.3750
SL: 0.5660
#CPIWatch #OptimismOPRises19.98% #LedgerAsksSoutheastAsiaHKResellersToHaltSales
Analysis: Price is facing strong resistance around the 0.5143–0.5200 zone, with bearish rejection indicating selling pressure. A downside move toward the lower support levels is possible.
Entry: 0.5200 – 0.5143
TP1: 0.4670
TP2: 0.4250
TP3: 0.3750
SL: 0.5660
#CPIWatch #OptimismOPRises19.98% #LedgerAsksSoutheastAsiaHKResellersToHaltSales
229
·
--
Bullish
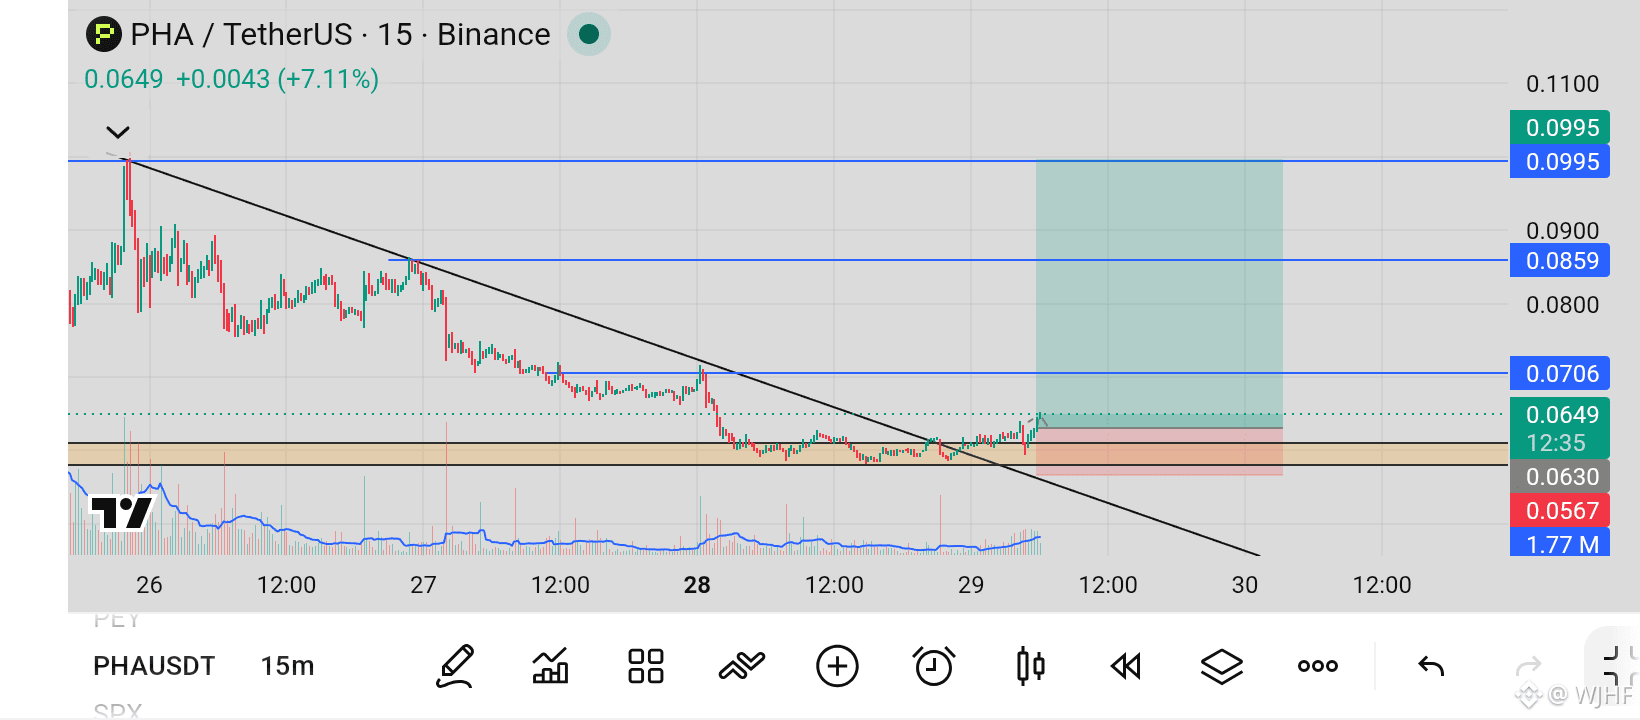
$PHA /USDT — LONG TRADE
Trend Direction: Bullish
Analysis: The downtrend line has been broken, while price has shown a strong reaction from the support zone. Volume is also improving after the breakout, confirming increased buyer interest. If the support holds, price may continue moving toward the next resistance levels.
Entry Zone: 0.0630 – 0.0650
TP1: 0.0706
TP2: 0.0859
TP3: 0.0995
SL: 0.0567
$MARSCOIN $HARD #OpenAIDelaysGPT6.1OverSafetyIssues #HackersDrainOver12.4MXRPFromDCENTWallets #UKFCAWinsCourtOrderToRecover851400Pounds #ChainlinkLaunchesCCIP2WithEnterpriseVerification #QNTFallsOver40%FromMorningHigh
$PHA /USDT — LONG TRADE
Trend Direction: Bullish
Analysis: The downtrend line has been broken, while price has shown a strong reaction from the support zone. Volume is also improving after the breakout, confirming increased buyer interest. If the support holds, price may continue moving toward the next resistance levels.
Entry Zone: 0.0630 – 0.0650
TP1: 0.0706
TP2: 0.0859
TP3: 0.0995
SL: 0.0567
$MARSCOIN $HARD #OpenAIDelaysGPT6.1OverSafetyIssues #HackersDrainOver12.4MXRPFromDCENTWallets #UKFCAWinsCourtOrderToRecover851400Pounds #ChainlinkLaunchesCCIP2WithEnterpriseVerification #QNTFallsOver40%FromMorningHigh
Trend Direction: Bullish
Analysis: The downtrend line has been broken, while price has shown a strong reaction from the support zone. Volume is also improving after the breakout, confirming increased buyer interest. If the support holds, price may continue moving toward the next resistance levels.
Entry Zone: 0.0630 – 0.0650
TP1: 0.0706
TP2: 0.0859
TP3: 0.0995
SL: 0.0567
$MARSCOIN $HARD #OpenAIDelaysGPT6.1OverSafetyIssues #HackersDrainOver12.4MXRPFromDCENTWallets #UKFCAWinsCourtOrderToRecover851400Pounds #ChainlinkLaunchesCCIP2WithEnterpriseVerification #QNTFallsOver40%FromMorningHigh
464
·
--
Bullish
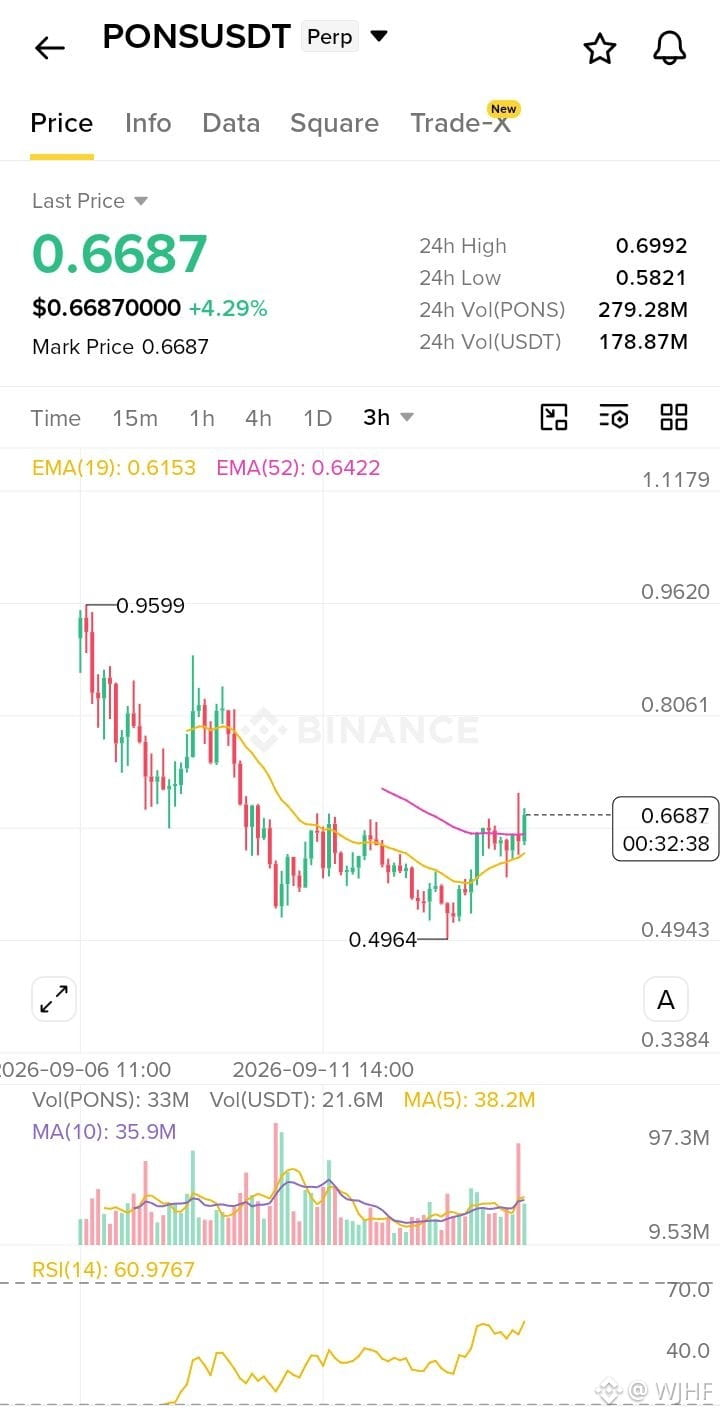
$PONS is showing strong bullish momentum, with price holding above the key moving averages and buying activity improving. The current structure favors further upside as long as momentum remains intact.
Entry: 0.650 – 0.665
SL: 0.600
TP1: 0.700
TP2: 0.750
TP3: 0.800
#FedRateWatch #StrategyMarketCapPassesFord #ClarityActOddsHalveOnPolymarket #US30YTreasuryYieldTops5.40% #BessentEndorsesFinalClarityActDraft
$PONS is showing strong bullish momentum, with price holding above the key moving averages and buying activity improving. The current structure favors further upside as long as momentum remains intact.
Entry: 0.650 – 0.665
SL: 0.600
TP1: 0.700
TP2: 0.750
TP3: 0.800
#FedRateWatch #StrategyMarketCapPassesFord #ClarityActOddsHalveOnPolymarket #US30YTreasuryYieldTops5.40% #BessentEndorsesFinalClarityActDraft
Entry: 0.650 – 0.665
SL: 0.600
TP1: 0.700
TP2: 0.750
TP3: 0.800
#FedRateWatch #StrategyMarketCapPassesFord #ClarityActOddsHalveOnPolymarket #US30YTreasuryYieldTops5.40% #BessentEndorsesFinalClarityActDraft
263
·
--
Bullish
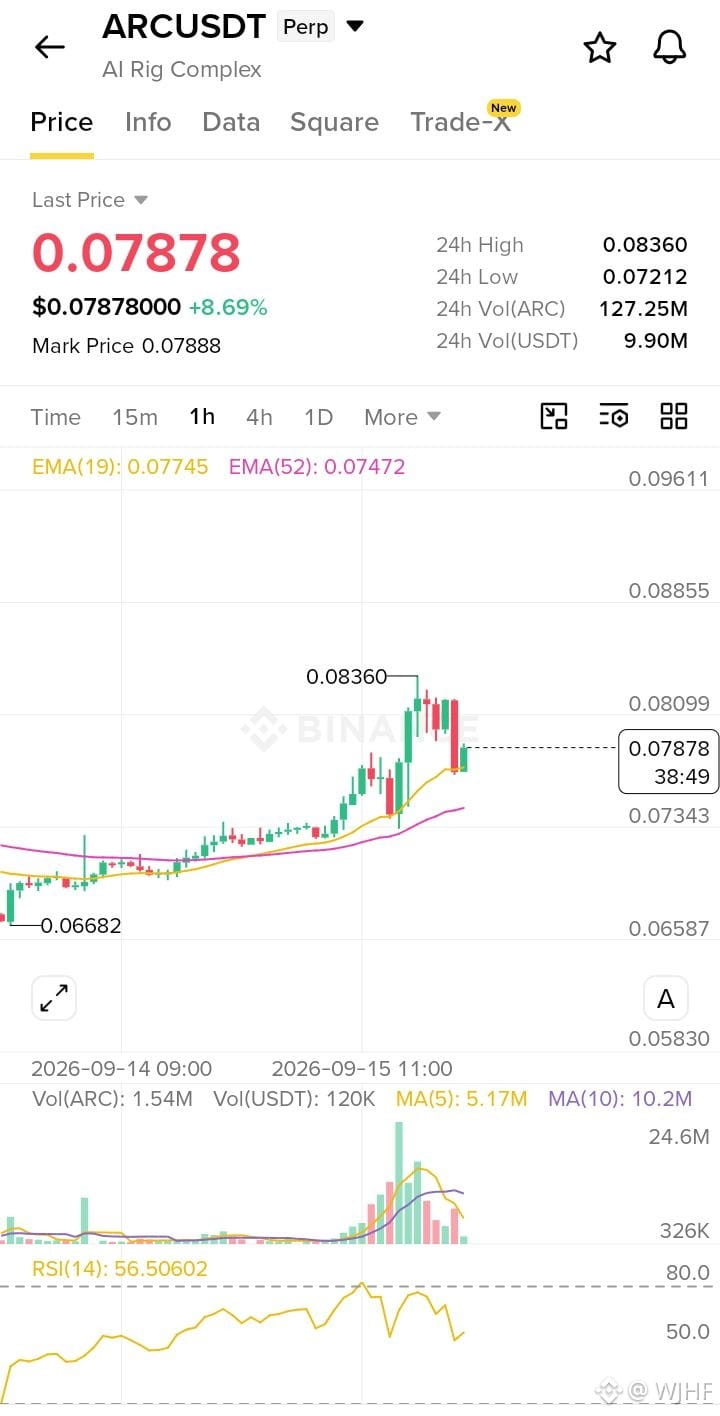
$ARC
Entry: 0.0775 – 0.0785
SL: 0.0710
TP1: 0.0835
TP2: 0.0885
TP3: 0.0940
Analysis: The 1H structure remains bullish, with price holding above the EMA zone. The pullback is creating a potential continuation setup toward the upside.
#FedRateWatch #StrategyMarketCapPassesFord #ClarityActOddsHalveOnPolymarket #US30YTreasuryYieldTops5.40% #BessentEndorsesFinalClarityActDraft
$ARC
Entry: 0.0775 – 0.0785
SL: 0.0710
TP1: 0.0835
TP2: 0.0885
TP3: 0.0940
Analysis: The 1H structure remains bullish, with price holding above the EMA zone. The pullback is creating a potential continuation setup toward the upside.
#FedRateWatch #StrategyMarketCapPassesFord #ClarityActOddsHalveOnPolymarket #US30YTreasuryYieldTops5.40% #BessentEndorsesFinalClarityActDraft
Entry: 0.0775 – 0.0785
SL: 0.0710
TP1: 0.0835
TP2: 0.0885
TP3: 0.0940
Analysis: The 1H structure remains bullish, with price holding above the EMA zone. The pullback is creating a potential continuation setup toward the upside.
#FedRateWatch #StrategyMarketCapPassesFord #ClarityActOddsHalveOnPolymarket #US30YTreasuryYieldTops5.40% #BessentEndorsesFinalClarityActDraft
147
·
--
Bearish
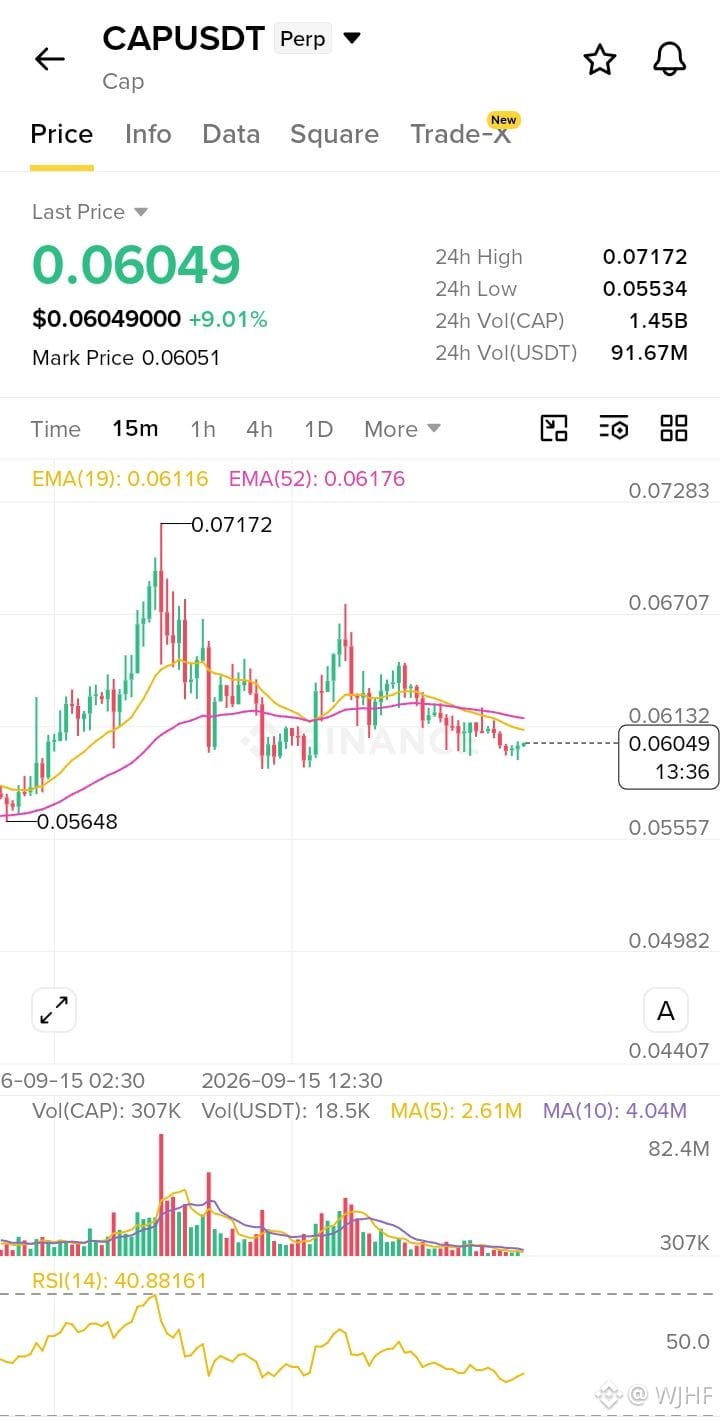
$CAP
Entry: 0.0610 – 0.0625
SL: 0.0646
TP1: 0.0585
TP2: 0.0568
TP3: 0.0556
Analysis: Price is trading below the 19 & 52 EMA, while RSI is below 50, showing bearish momentum. A pullback toward the EMA zone can provide a better short opportunity.
#FedRateWatch #StrategyMarketCapPassesFord #ClarityActOddsHalveOnPolymarket #US30YTreasuryYieldTops5.40% #BessentEndorsesFinalClarityActDraft
$CAP
Entry: 0.0610 – 0.0625
SL: 0.0646
TP1: 0.0585
TP2: 0.0568
TP3: 0.0556
Analysis: Price is trading below the 19 & 52 EMA, while RSI is below 50, showing bearish momentum. A pullback toward the EMA zone can provide a better short opportunity.
#FedRateWatch #StrategyMarketCapPassesFord #ClarityActOddsHalveOnPolymarket #US30YTreasuryYieldTops5.40% #BessentEndorsesFinalClarityActDraft
Entry: 0.0610 – 0.0625
SL: 0.0646
TP1: 0.0585
TP2: 0.0568
TP3: 0.0556
Analysis: Price is trading below the 19 & 52 EMA, while RSI is below 50, showing bearish momentum. A pullback toward the EMA zone can provide a better short opportunity.
#FedRateWatch #StrategyMarketCapPassesFord #ClarityActOddsHalveOnPolymarket #US30YTreasuryYieldTops5.40% #BessentEndorsesFinalClarityActDraft
118
·
--
Bearish
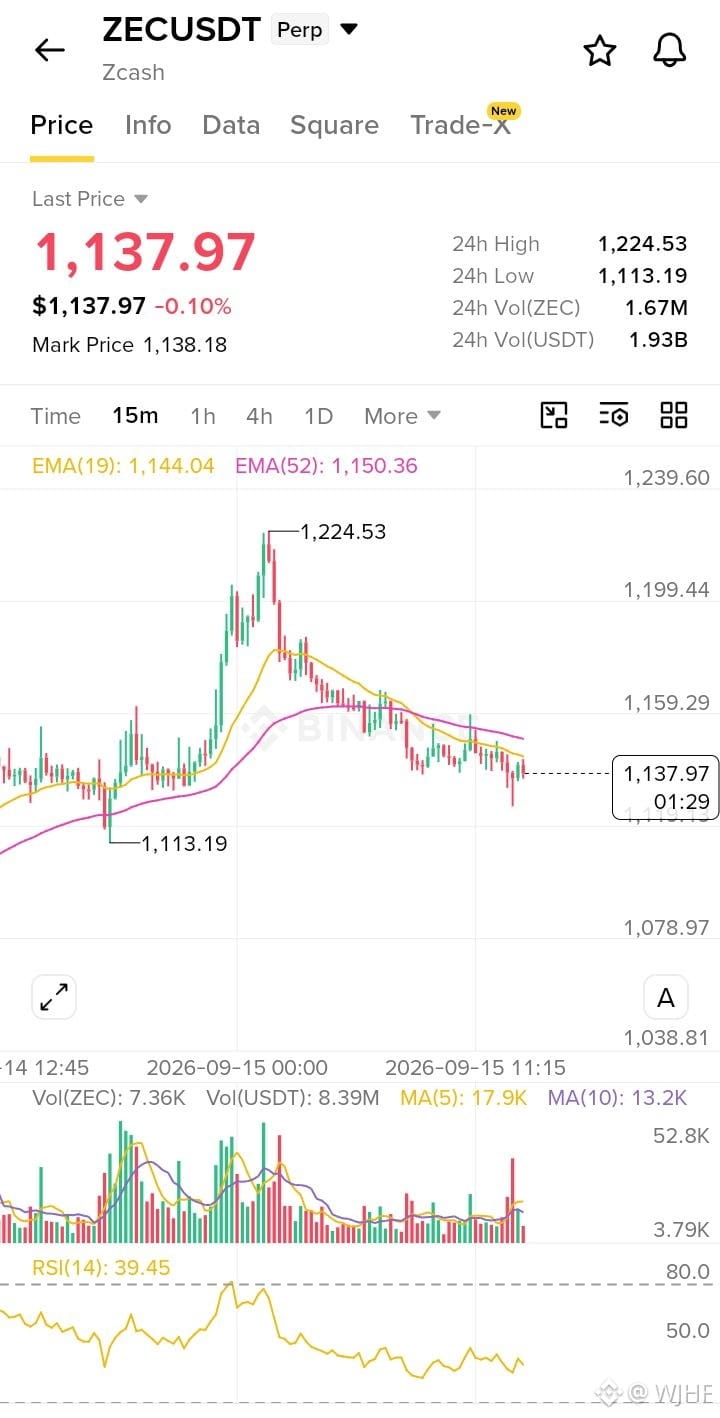
$ZEC
Entry: 1,144–1,150
SL: 1,168
TP1: 1,115
TP2: 1,085
Analysis: The trend is bearish. Price is trading below both EMAs, while RSI is also near 40, indicating selling pressure. A rejection from the EMA resistance zone could provide a good short setup.
#SouthKoreaCryptoTaxDelayPetitionTops50000 #SolanaTransactionV1GoesLiveOnMainnet #RussianCentralBankFlagsCryptoAsFinancialRisk #GrayscalePutsXRPAt26.11%InAdvisorPortfolio #PhiladelphiaSemiconductorIndexFalls5.9%
$ZEC
Entry: 1,144–1,150
SL: 1,168
TP1: 1,115
TP2: 1,085
Analysis: The trend is bearish. Price is trading below both EMAs, while RSI is also near 40, indicating selling pressure. A rejection from the EMA resistance zone could provide a good short setup.
#SouthKoreaCryptoTaxDelayPetitionTops50000 #SolanaTransactionV1GoesLiveOnMainnet #RussianCentralBankFlagsCryptoAsFinancialRisk #GrayscalePutsXRPAt26.11%InAdvisorPortfolio #PhiladelphiaSemiconductorIndexFalls5.9%
Entry: 1,144–1,150
SL: 1,168
TP1: 1,115
TP2: 1,085
Analysis: The trend is bearish. Price is trading below both EMAs, while RSI is also near 40, indicating selling pressure. A rejection from the EMA resistance zone could provide a good short setup.
#SouthKoreaCryptoTaxDelayPetitionTops50000 #SolanaTransactionV1GoesLiveOnMainnet #RussianCentralBankFlagsCryptoAsFinancialRisk #GrayscalePutsXRPAt26.11%InAdvisorPortfolio #PhiladelphiaSemiconductorIndexFalls5.9%
189
·
--
Bearish
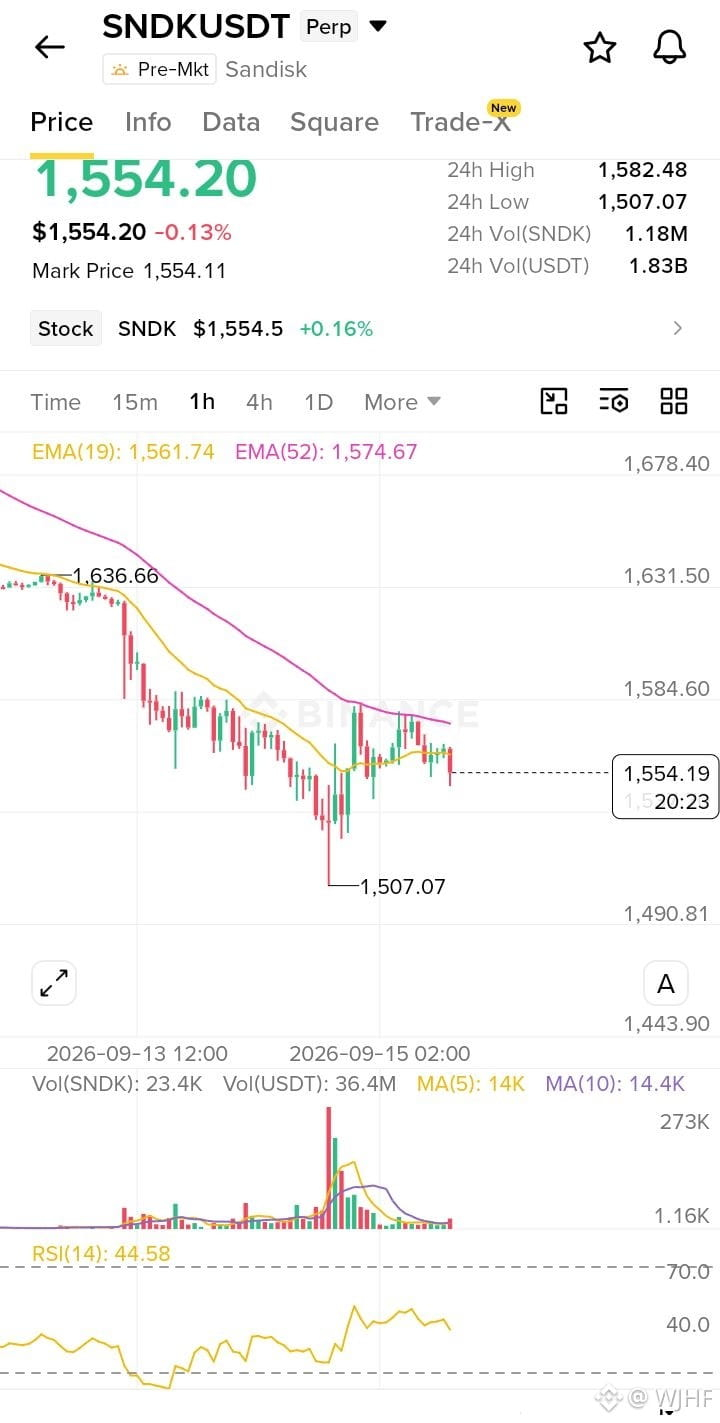
$SNDK
Entry: 1,560 – 1,575
SL: 1,595
TP1: 1,520
TP2: 1,507
TP3: 1,485
Analysis: The 1H structure remains bearish, with price trading below both EMAs. The recent recovery was rejected near the EMA-52, while RSI remains below 50. A short on a pullback offers a better risk-to-reward setup.
#SouthKoreaCryptoTaxDelayPetitionTops50000 #SolanaTransactionV1GoesLiveOnMainnet #RussianCentralBankFlagsCryptoAsFinancialRisk #GrayscalePutsXRPAt26.11%InAdvisorPortfolio #FedHikeOddsRiseTo89%
$SNDK
Entry: 1,560 – 1,575
SL: 1,595
TP1: 1,520
TP2: 1,507
TP3: 1,485
Analysis: The 1H structure remains bearish, with price trading below both EMAs. The recent recovery was rejected near the EMA-52, while RSI remains below 50. A short on a pullback offers a better risk-to-reward setup.
#SouthKoreaCryptoTaxDelayPetitionTops50000 #SolanaTransactionV1GoesLiveOnMainnet #RussianCentralBankFlagsCryptoAsFinancialRisk #GrayscalePutsXRPAt26.11%InAdvisorPortfolio #FedHikeOddsRiseTo89%
Entry: 1,560 – 1,575
SL: 1,595
TP1: 1,520
TP2: 1,507
TP3: 1,485
Analysis: The 1H structure remains bearish, with price trading below both EMAs. The recent recovery was rejected near the EMA-52, while RSI remains below 50. A short on a pullback offers a better risk-to-reward setup.
#SouthKoreaCryptoTaxDelayPetitionTops50000 #SolanaTransactionV1GoesLiveOnMainnet #RussianCentralBankFlagsCryptoAsFinancialRisk #GrayscalePutsXRPAt26.11%InAdvisorPortfolio #FedHikeOddsRiseTo89%
251
·
--
Bullish
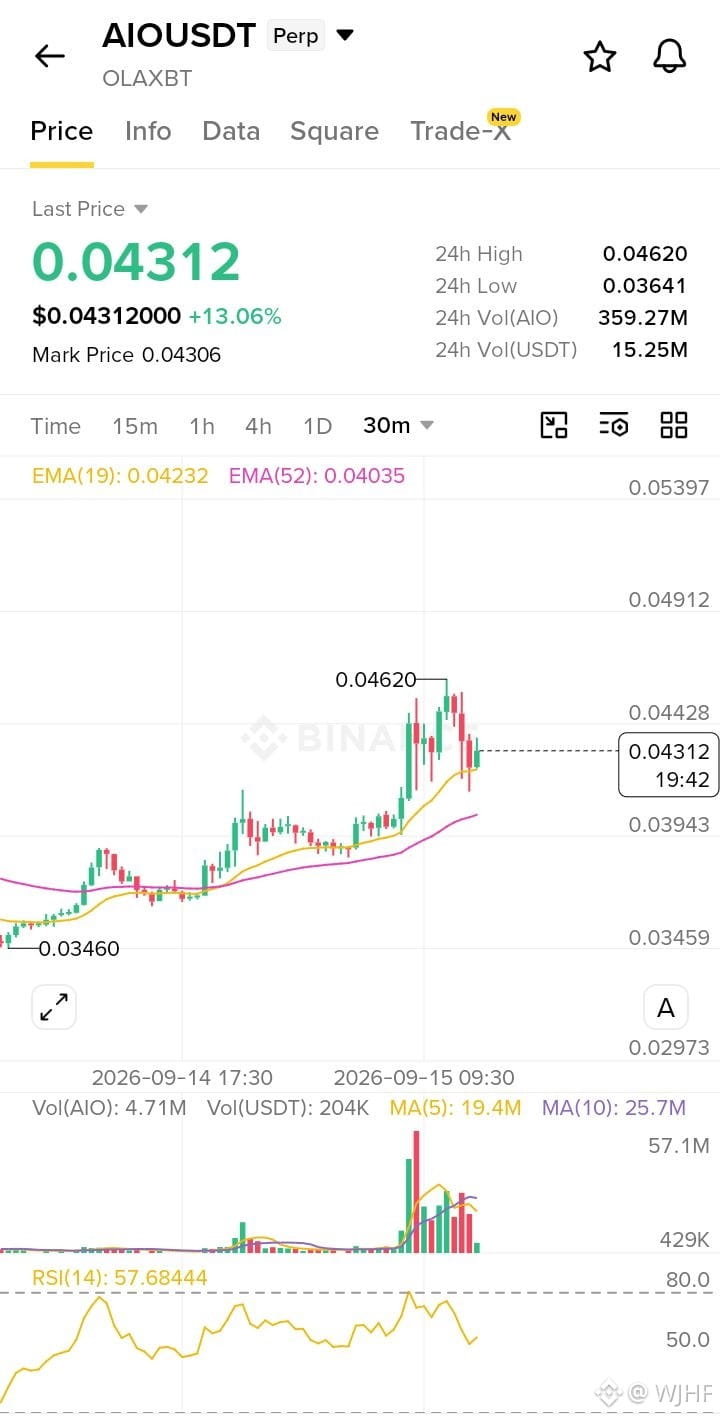
$AIO
Entry: 0.04230 – 0.04270
SL: 0.03920
TP1: 0.04430
TP2: 0.04620
TP3: 0.04910
Analysis: Price is pulling back after a strong bullish move while remaining above the 19/52 EMA structure. RSI is around 58, keeping momentum bullish. Best risk/reward is to wait for a pullback into the entry zone rather than chasing the current price.
#SouthKoreaCryptoTaxDelayPetitionTops50000 #SolanaTransactionV1GoesLiveOnMainnet #RussianCentralBankFlagsCryptoAsFinancialRisk #GrayscalePutsXRPAt26.11%InAdvisorPortfolio #SECChairUrgesCongressToAdvanceClarityAct
$AIO
Entry: 0.04230 – 0.04270
SL: 0.03920
TP1: 0.04430
TP2: 0.04620
TP3: 0.04910
Analysis: Price is pulling back after a strong bullish move while remaining above the 19/52 EMA structure. RSI is around 58, keeping momentum bullish. Best risk/reward is to wait for a pullback into the entry zone rather than chasing the current price.
#SouthKoreaCryptoTaxDelayPetitionTops50000 #SolanaTransactionV1GoesLiveOnMainnet #RussianCentralBankFlagsCryptoAsFinancialRisk #GrayscalePutsXRPAt26.11%InAdvisorPortfolio #SECChairUrgesCongressToAdvanceClarityAct
Entry: 0.04230 – 0.04270
SL: 0.03920
TP1: 0.04430
TP2: 0.04620
TP3: 0.04910
Analysis: Price is pulling back after a strong bullish move while remaining above the 19/52 EMA structure. RSI is around 58, keeping momentum bullish. Best risk/reward is to wait for a pullback into the entry zone rather than chasing the current price.
#SouthKoreaCryptoTaxDelayPetitionTops50000 #SolanaTransactionV1GoesLiveOnMainnet #RussianCentralBankFlagsCryptoAsFinancialRisk #GrayscalePutsXRPAt26.11%InAdvisorPortfolio #SECChairUrgesCongressToAdvanceClarityAct
201
·
--
Bullish
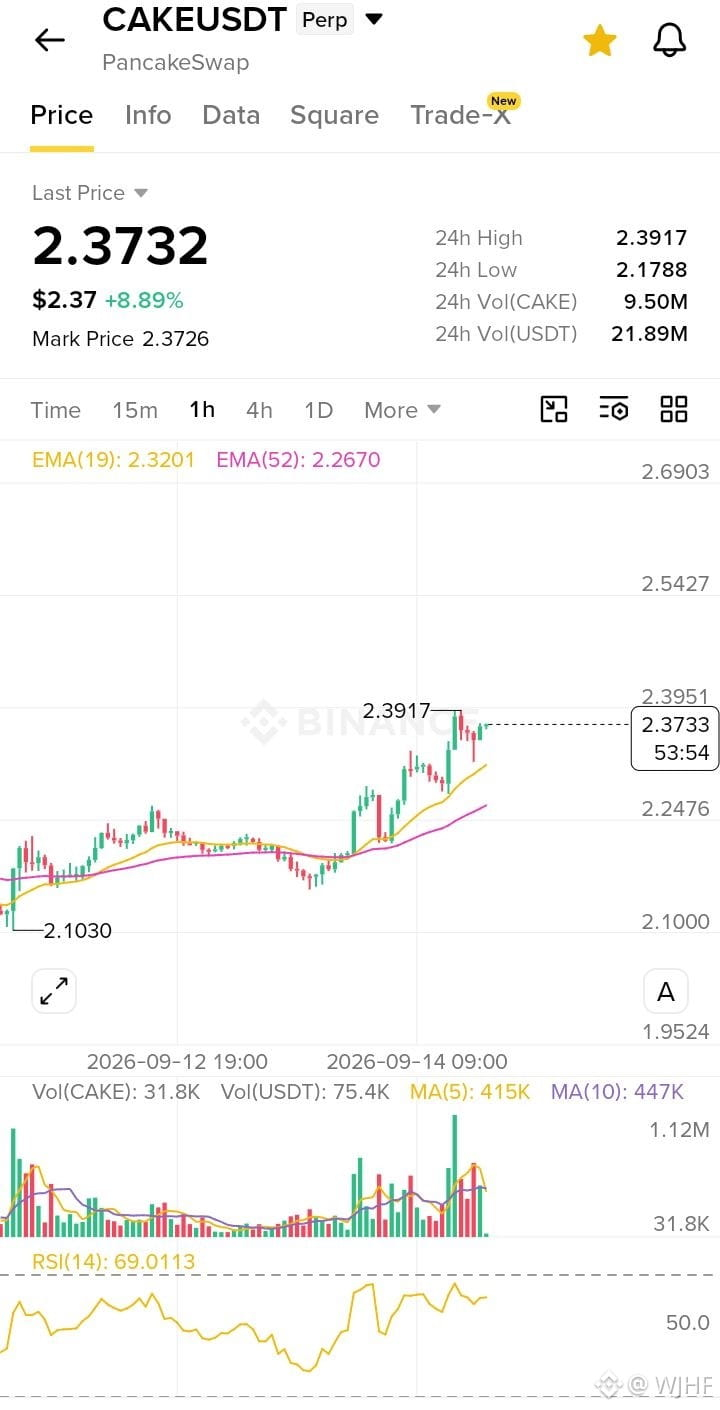
$CAKE
Entry: 2.32–2.34
SL: 2.24
TP1: 2.47
TP2: 2.54
TP3: 2.62
Analysis: The 1H trend is clearly bullish, with price trading above both the 19 EMA and 52 EMA while maintaining a bullish structure. A pullback toward the entry zone offers a better long opportunity, with further upside possible if the resistance above is cleared.#FedHikeOddsRiseTo89% #AvalancheIntegratesIntoUAEPassDigitalVault #UKSeeksViewsOnTokenizingGold #AnthropicCEOCallsForAISlowdown #BitcoinThirdSingleBlockReorgInFourWeeks
$CAKE
Entry: 2.32–2.34
SL: 2.24
TP1: 2.47
TP2: 2.54
TP3: 2.62
Analysis: The 1H trend is clearly bullish, with price trading above both the 19 EMA and 52 EMA while maintaining a bullish structure. A pullback toward the entry zone offers a better long opportunity, with further upside possible if the resistance above is cleared.#FedHikeOddsRiseTo89% #AvalancheIntegratesIntoUAEPassDigitalVault #UKSeeksViewsOnTokenizingGold #AnthropicCEOCallsForAISlowdown #BitcoinThirdSingleBlockReorgInFourWeeks
Entry: 2.32–2.34
SL: 2.24
TP1: 2.47
TP2: 2.54
TP3: 2.62
Analysis: The 1H trend is clearly bullish, with price trading above both the 19 EMA and 52 EMA while maintaining a bullish structure. A pullback toward the entry zone offers a better long opportunity, with further upside possible if the resistance above is cleared.#FedHikeOddsRiseTo89% #AvalancheIntegratesIntoUAEPassDigitalVault #UKSeeksViewsOnTokenizingGold #AnthropicCEOCallsForAISlowdown #BitcoinThirdSingleBlockReorgInFourWeeks
188
Log in to explore more content
Join global crypto users on Binance Square
⚡️ Get latest and useful information about crypto.
💬 Trusted by the world’s largest crypto exchange.
👍 Discover real insights from verified creators.
Email / Phone number