

Crypto Setups ZR
10.3k Posts

Crypto Setups ZR
Report
Block User
توكلنا على الله أخوكم في الله أشارككم أفضل ما أجد Best setups take if fits you Follow FREE ورزقكم على الله دائما Zora_x
2 Following
2.8K+ Followers
21.9K+ Liked
Posts
All
Quotes
·
--
Bullish
See translation
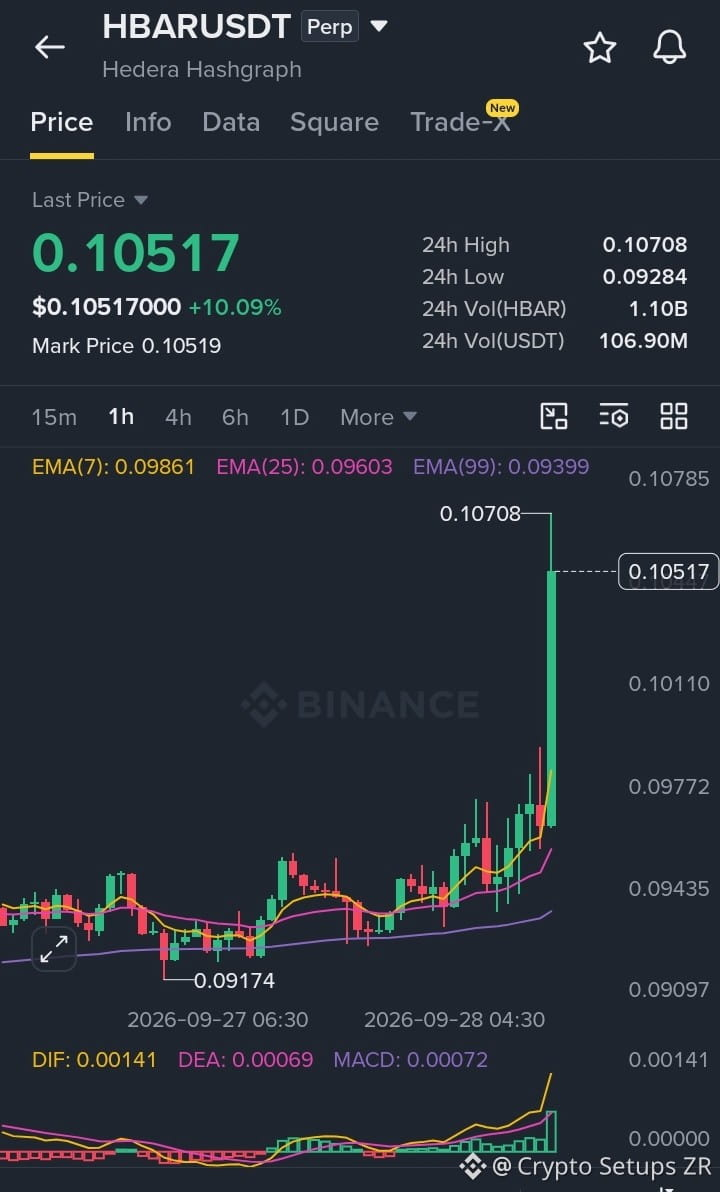
$HBAR massive vertical impulse ripping through resistance… buyers in control and momentum expanding for continuation...
Long setup.
Entry: 0.10450 – 0.10540
TP: 0.10780 – 0.11080 – 0.11520
SL: 0.10150
Bullish Above: 0.10280
Breakout strength + spot demand = long active...
{future}(HBARUSDT)
$QNT
{future}(QNTUSDT)
$BTW
{future}(BTWUSDT)
#FedProposesPaymentStablecoinRules #ChinaMayLetAlibabaByteDanceBuyNvidiaChips #SKoreaFSCConsidersVirtualAssetMarketMaker #ChinaIndustrialProfitGrowthSlowsFourthMonth #BitwiseFilesFinalNEARSpotETFProspectus
$HBAR massive vertical impulse ripping through resistance… buyers in control and momentum expanding for continuation...
Long setup.
Entry: 0.10450 – 0.10540
TP: 0.10780 – 0.11080 – 0.11520
SL: 0.10150
Bullish Above: 0.10280
Breakout strength + spot demand = long active...
$QNT
$BTW
#FedProposesPaymentStablecoinRules #ChinaMayLetAlibabaByteDanceBuyNvidiaChips #SKoreaFSCConsidersVirtualAssetMarketMaker #ChinaIndustrialProfitGrowthSlowsFourthMonth #BitwiseFilesFinalNEARSpotETFProspectus
Long setup.
Entry: 0.10450 – 0.10540
TP: 0.10780 – 0.11080 – 0.11520
SL: 0.10150
Bullish Above: 0.10280
Breakout strength + spot demand = long active...
$QNT
$BTW
#FedProposesPaymentStablecoinRules #ChinaMayLetAlibabaByteDanceBuyNvidiaChips #SKoreaFSCConsidersVirtualAssetMarketMaker #ChinaIndustrialProfitGrowthSlowsFourthMonth #BitwiseFilesFinalNEARSpotETFProspectus
3
426
·
--
Bullish
See translation
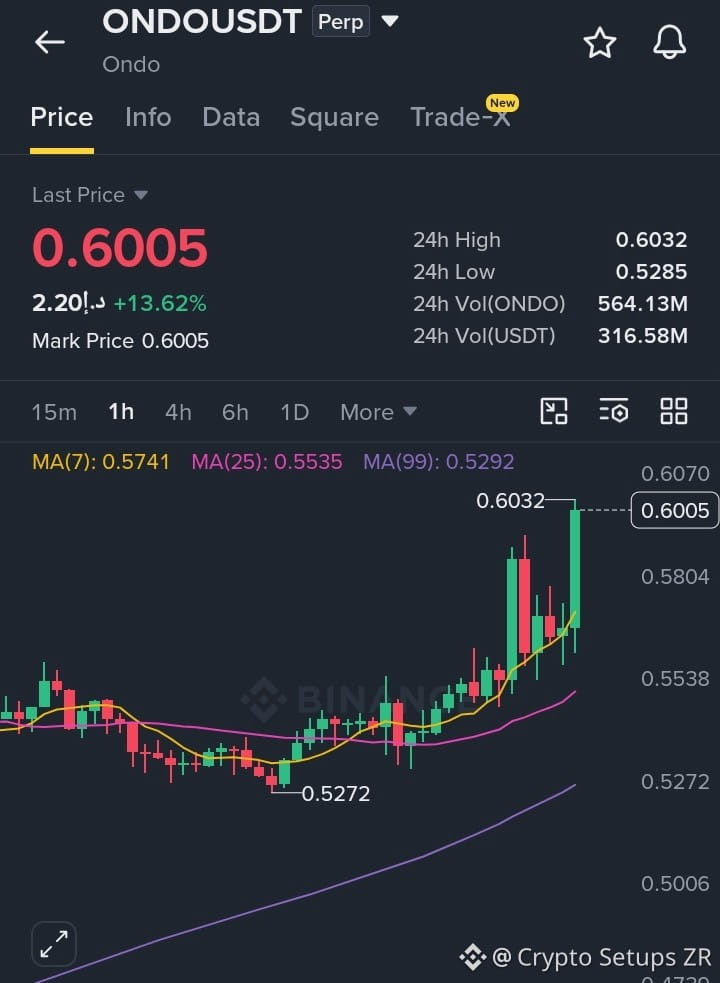
$ONDO strong breakout drive clearing resistance on heavy volume… buyers staying active while continuation strength builds higher...
Long setup.
Entry: 0.5970 – 0.6015
TP: 0.6160 – 0.6340 – 0.6620
SL: 0.5800
Bullish Above: 0.5860
Breakout hold + aggressive momentum = long active...
{future}(ONDOUSDT)
$QNT
{future}(QNTUSDT)
$BTW
{future}(BTWUSDT)
$ONDO strong breakout drive clearing resistance on heavy volume… buyers staying active while continuation strength builds higher...
Long setup.
Entry: 0.5970 – 0.6015
TP: 0.6160 – 0.6340 – 0.6620
SL: 0.5800
Bullish Above: 0.5860
Breakout hold + aggressive momentum = long active...
$QNT
$BTW
Long setup.
Entry: 0.5970 – 0.6015
TP: 0.6160 – 0.6340 – 0.6620
SL: 0.5800
Bullish Above: 0.5860
Breakout hold + aggressive momentum = long active...
$QNT
$BTW
3
328
·
--
Bullish
See translation
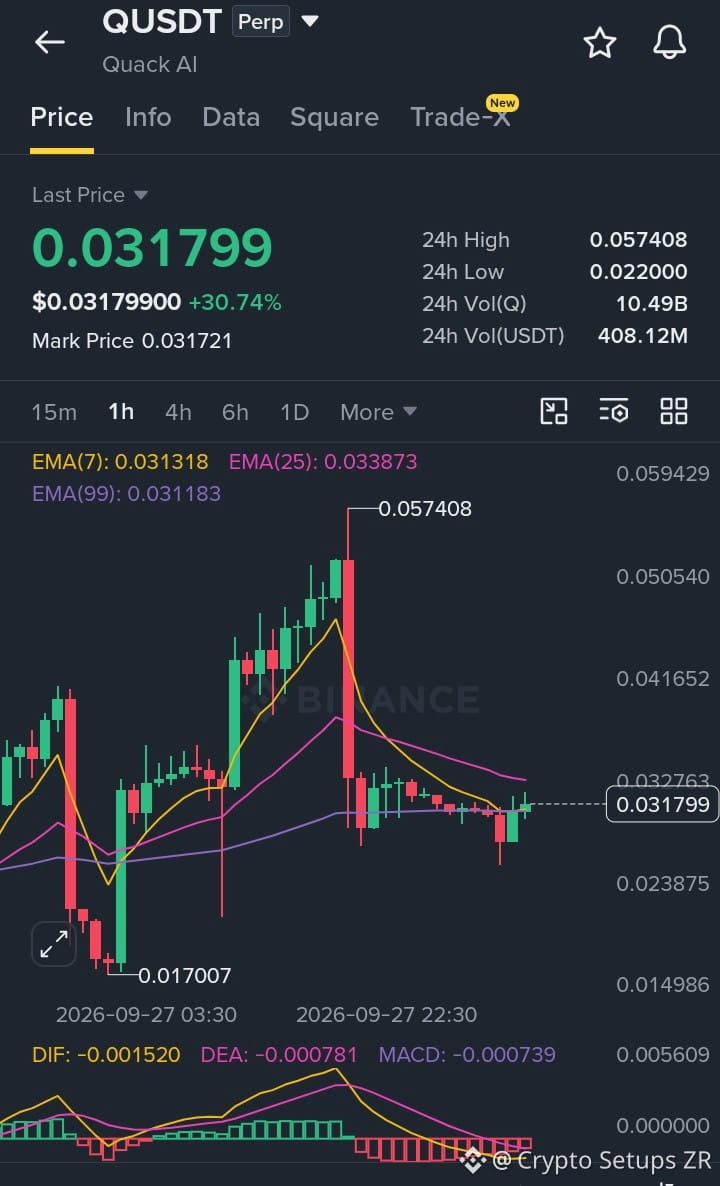
$Q solid base defense after support flush… buyers stepping in aggressively while recovery momentum keeps building...
Long setup.
Entry: 0.031450 – 0.031950
TP: 0.032800 – 0.033900 – 0.035500
SL: 0.030450
Bullish Above: 0.031200
Demand hold + recovery momentum = long active...
{future}(QUSDT)
$QNT
{future}(QNTUSDT)
$BTW
{future}(BTWUSDT)
$Q solid base defense after support flush… buyers stepping in aggressively while recovery momentum keeps building...
Long setup.
Entry: 0.031450 – 0.031950
TP: 0.032800 – 0.033900 – 0.035500
SL: 0.030450
Bullish Above: 0.031200
Demand hold + recovery momentum = long active...
$QNT
$BTW
Long setup.
Entry: 0.031450 – 0.031950
TP: 0.032800 – 0.033900 – 0.035500
SL: 0.030450
Bullish Above: 0.031200
Demand hold + recovery momentum = long active...
$QNT
$BTW
2
481
·
--
Bullish
See translation
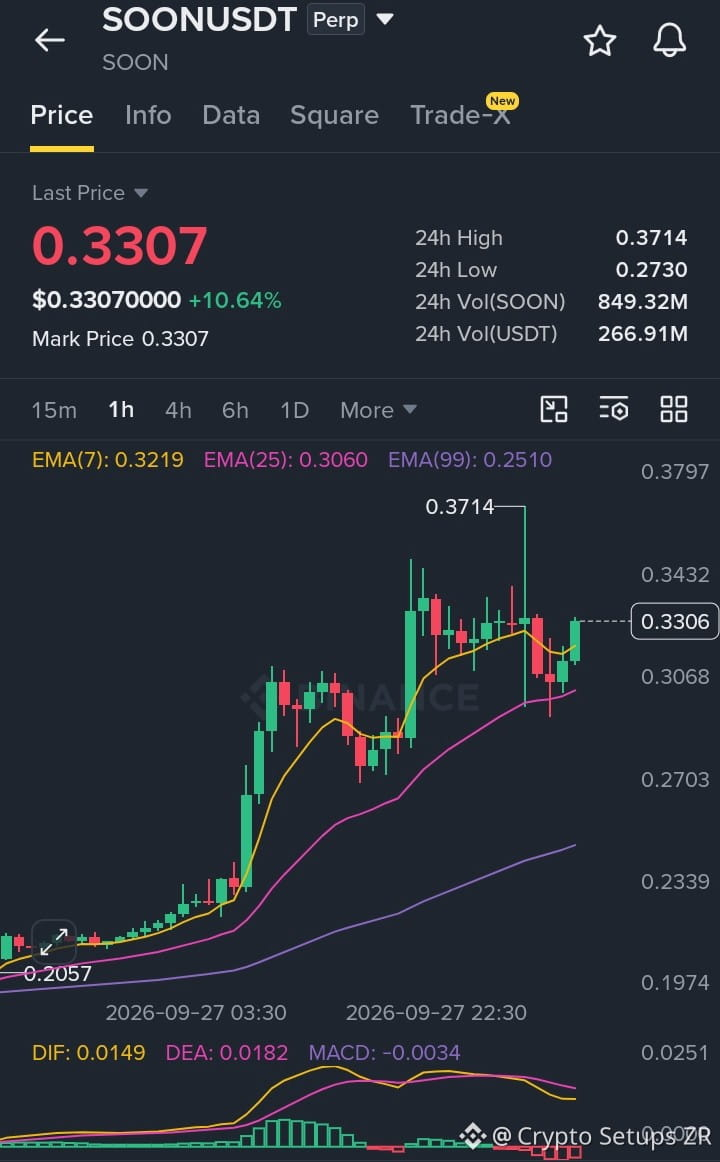
$SOON strong bounce from dynamic support, price reclaiming higher levels… buyers in control, continuation push active...
Long setup.
Entry: 0.3275 – 0.3315
TP: 0.3400 – 0.3500 – 0.3650
SL: 0.3185
Bullish Above: 0.3240
Support defense + bullish continuation = long active...
{future}(SOONUSDT)
$QNT
{future}(QNTUSDT)
$BTW
{future}(BTWUSDT)
$SOON strong bounce from dynamic support, price reclaiming higher levels… buyers in control, continuation push active...
Long setup.
Entry: 0.3275 – 0.3315
TP: 0.3400 – 0.3500 – 0.3650
SL: 0.3185
Bullish Above: 0.3240
Support defense + bullish continuation = long active...
$QNT
$BTW
Long setup.
Entry: 0.3275 – 0.3315
TP: 0.3400 – 0.3500 – 0.3650
SL: 0.3185
Bullish Above: 0.3240
Support defense + bullish continuation = long active...
$QNT
$BTW
2
480
·
--
Bullish
See translation
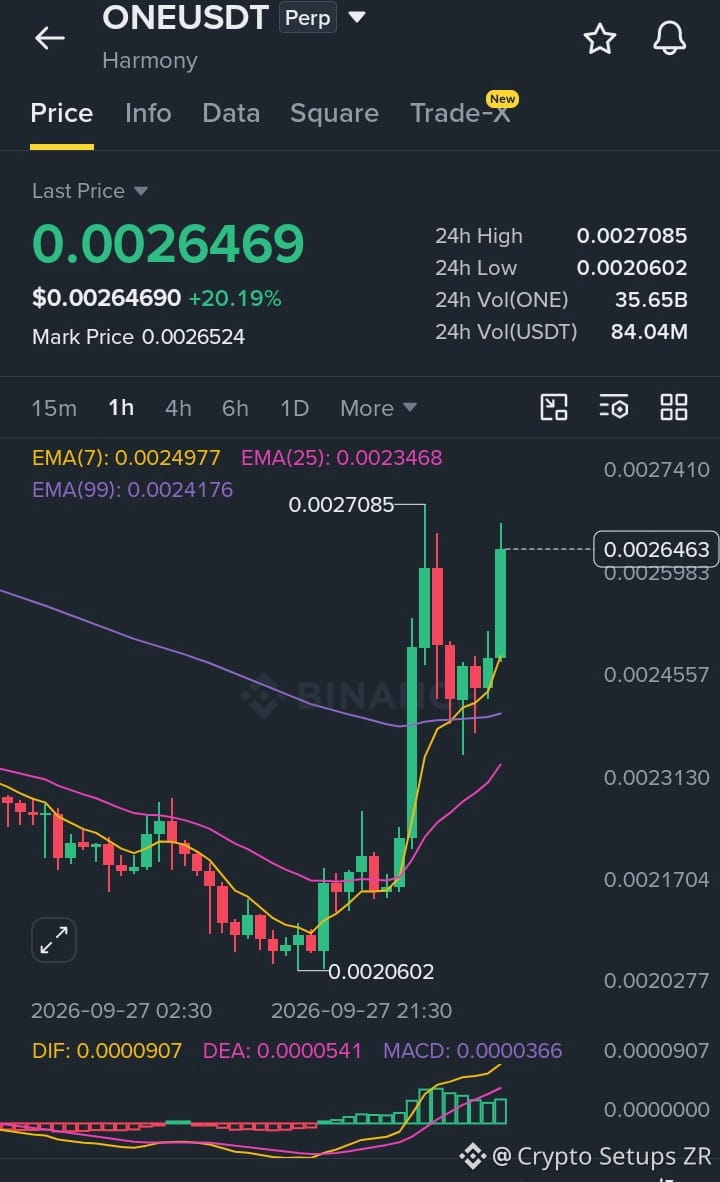
$ONE strong rebound from dynamic support, price reclaiming higher levels… buyers staying active while momentum keeps building...
Long setup.
Entry: 0.0026200 – 0.0026550
TP: 0.0027200 – 0.0028000 – 0.0029250
SL: 0.0025400
Bullish Above: 0.0025800
Dip vacuum + continuation strength = long active...
{future}(ONEUSDT)
$QNT
{future}(QNTUSDT)
$BTW
{future}(BTWUSDT)
$ONE strong rebound from dynamic support, price reclaiming higher levels… buyers staying active while momentum keeps building...
Long setup.
Entry: 0.0026200 – 0.0026550
TP: 0.0027200 – 0.0028000 – 0.0029250
SL: 0.0025400
Bullish Above: 0.0025800
Dip vacuum + continuation strength = long active...
$QNT
$BTW
Long setup.
Entry: 0.0026200 – 0.0026550
TP: 0.0027200 – 0.0028000 – 0.0029250
SL: 0.0025400
Bullish Above: 0.0025800
Dip vacuum + continuation strength = long active...
$QNT
$BTW
3
460
·
--
Bullish
See translation
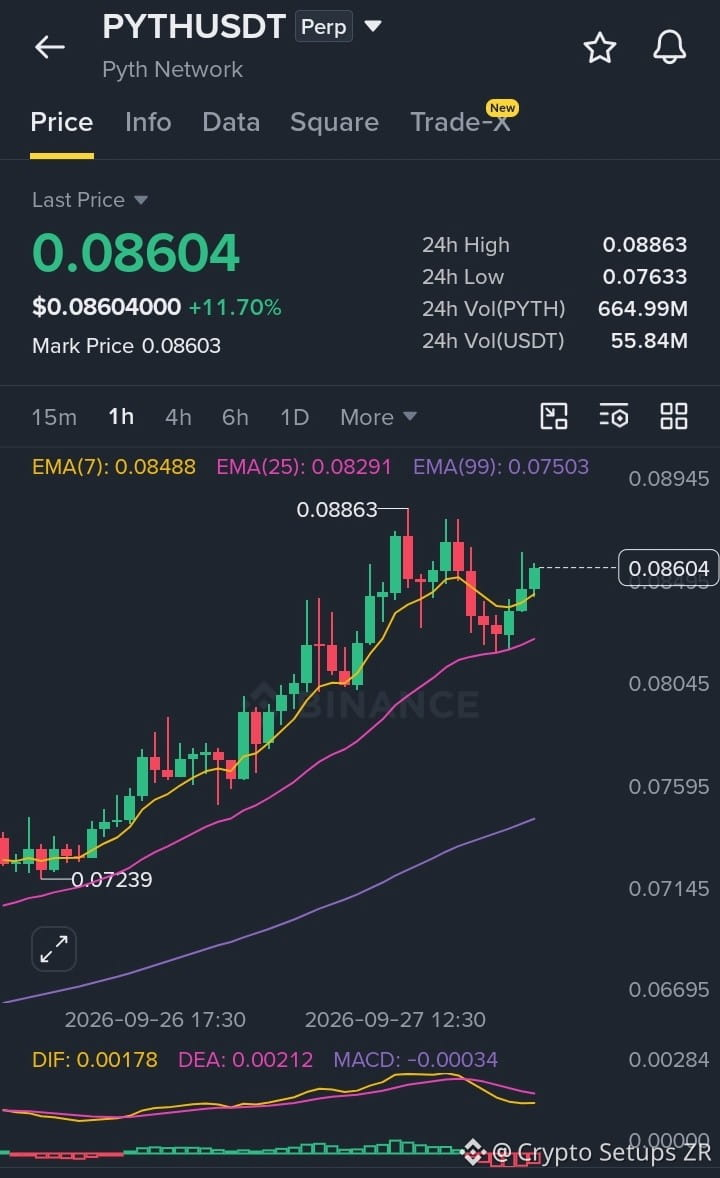
$PYTH strong bounce from dynamic support… buyers stepping in aggressively while continuation strength keeps building higher...
Long setup.
Entry: 0.08550 – 0.08620
TP: 0.08840 – 0.09100 – 0.09520
SL: 0.08300
Bullish Above: 0.08450
Support defense + breakout continuation = long active...
{future}(PYTHUSDT)
$QNT
{future}(QNTUSDT)
$Q
{future}(QUSDT)
$PYTH strong bounce from dynamic support… buyers stepping in aggressively while continuation strength keeps building higher...
Long setup.
Entry: 0.08550 – 0.08620
TP: 0.08840 – 0.09100 – 0.09520
SL: 0.08300
Bullish Above: 0.08450
Support defense + breakout continuation = long active...
$QNT
$Q
Long setup.
Entry: 0.08550 – 0.08620
TP: 0.08840 – 0.09100 – 0.09520
SL: 0.08300
Bullish Above: 0.08450
Support defense + breakout continuation = long active...
$QNT
$Q
2
313
·
--
Bullish
See translation
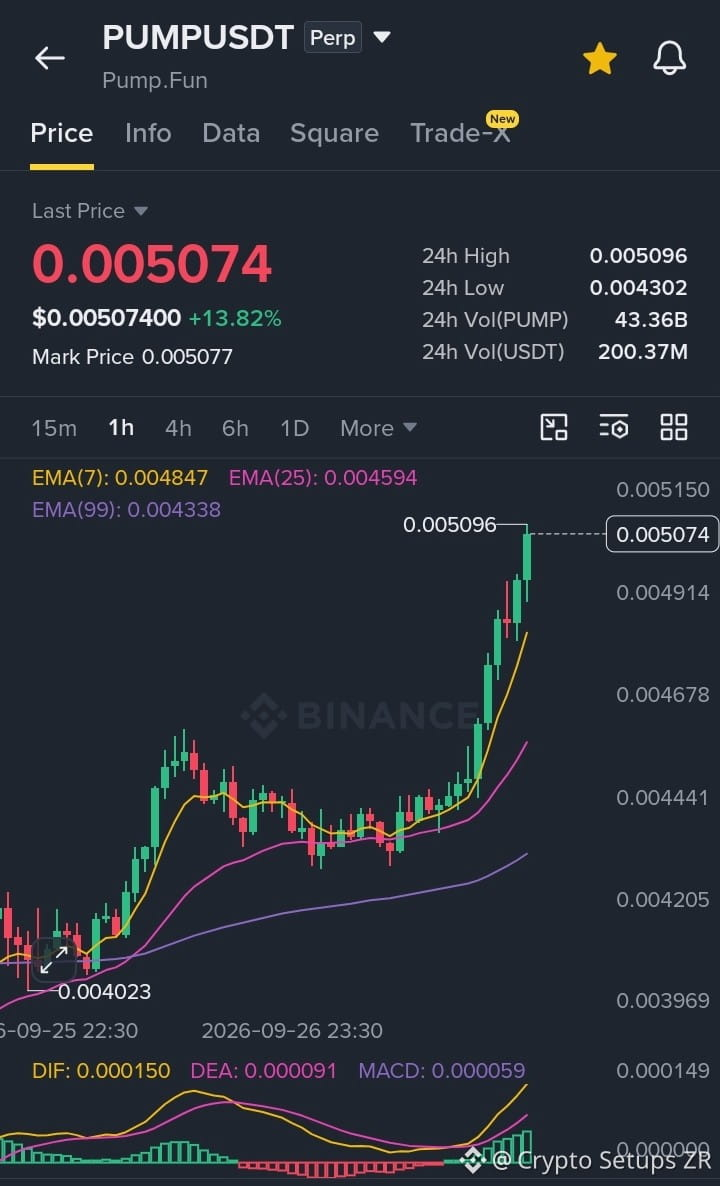
$PUMP massive volume surge lifting price above structure… buyers staying active while continuation strength keeps building...
Long setup.
Entry: 0.005030 – 0.005085
TP: 0.005220 – 0.005380 – 0.005650
SL: 0.004880
Bullish Above: 0.004940
Breakout hold + aggressive momentum = long active...
{future}(PUMPUSDT)
$QNT
{future}(QNTUSDT)
$Q
{future}(QUSDT)
$PUMP massive volume surge lifting price above structure… buyers staying active while continuation strength keeps building...
Long setup.
Entry: 0.005030 – 0.005085
TP: 0.005220 – 0.005380 – 0.005650
SL: 0.004880
Bullish Above: 0.004940
Breakout hold + aggressive momentum = long active...
$QNT
$Q
Long setup.
Entry: 0.005030 – 0.005085
TP: 0.005220 – 0.005380 – 0.005650
SL: 0.004880
Bullish Above: 0.004940
Breakout hold + aggressive momentum = long active...
$QNT
$Q
3
424
·
--
Bullish
See translation
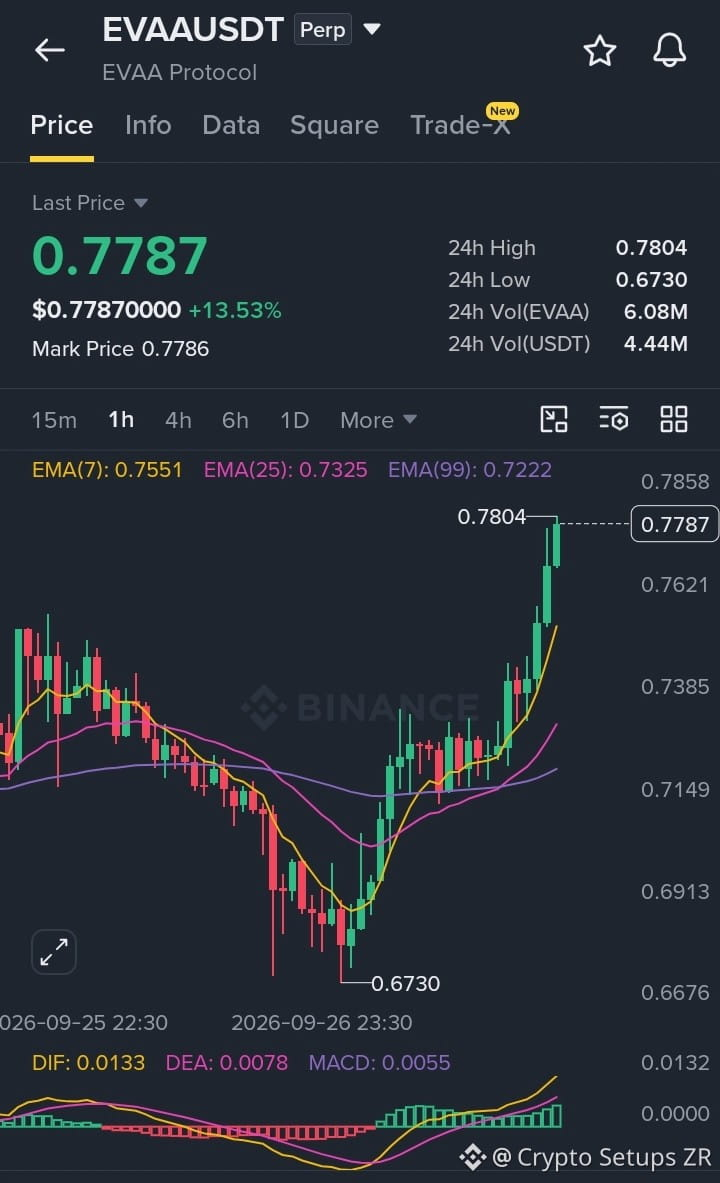
$EVAA strong breakout drive clearing overhead structure… buyers in full control and momentum building for continuation...
Long setup.
Entry: 0.7740 – 0.7800
TP: 0.7990 – 0.8220 – 0.8610
SL: 0.7510
Bullish Above: 0.7580
Breakout strength + momentum expansion = long active...
{future}(EVAAUSDT)
$QNT
{future}(QNTUSDT)
$Q
{future}(QUSDT)
$EVAA strong breakout drive clearing overhead structure… buyers in full control and momentum building for continuation...
Long setup.
Entry: 0.7740 – 0.7800
TP: 0.7990 – 0.8220 – 0.8610
SL: 0.7510
Bullish Above: 0.7580
Breakout strength + momentum expansion = long active...
$QNT
$Q
Long setup.
Entry: 0.7740 – 0.7800
TP: 0.7990 – 0.8220 – 0.8610
SL: 0.7510
Bullish Above: 0.7580
Breakout strength + momentum expansion = long active...
$QNT
$Q
1
3
234
·
--
Bullish
See translation
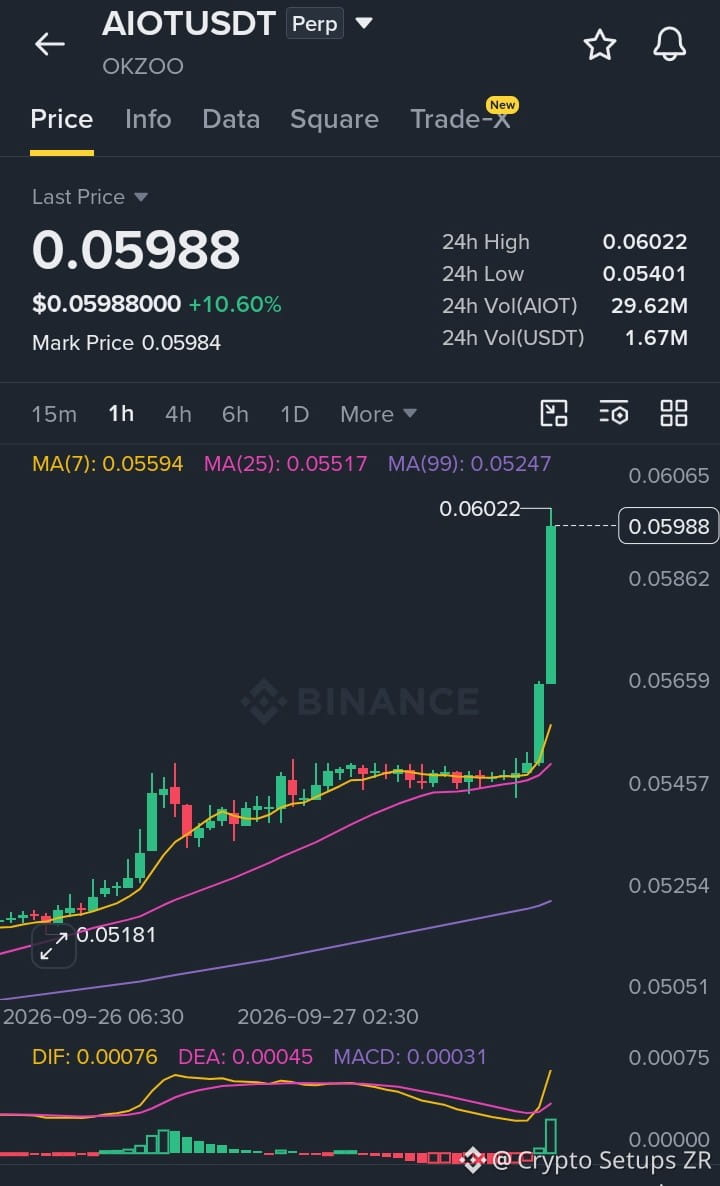
$AIOT just broke out hard
One clean vertical candle from 0.054 straight to 0.060.
+10% and still sitting right at the high with strong momentum.
$QNT remains the heavyweight, back above 186 and still up 56%.
$ZEC is consolidating after the earlier push to 1699, currently around 1582.
Quiet name suddenly showing strength while the bigger ones hold their gains.
You already caught this move or still watching from the sidelines?
{future}(AIOTUSDT)
{future}(QNTUSDT)
{future}(ZECUSDT)
#QNT
#AIOT
#zec
#BitwiseFilesFinalNEARSpotETFProspectus #DogecoinETFsPostBiggestWeekSinceLaunch
$AIOT just broke out hard
One clean vertical candle from 0.054 straight to 0.060.
+10% and still sitting right at the high with strong momentum.
$QNT remains the heavyweight, back above 186 and still up 56%.
$ZEC is consolidating after the earlier push to 1699, currently around 1582.
Quiet name suddenly showing strength while the bigger ones hold their gains.
You already caught this move or still watching from the sidelines?
#QNT
#AIOT
#zec
#BitwiseFilesFinalNEARSpotETFProspectus #DogecoinETFsPostBiggestWeekSinceLaunch
One clean vertical candle from 0.054 straight to 0.060.
+10% and still sitting right at the high with strong momentum.
$QNT remains the heavyweight, back above 186 and still up 56%.
$ZEC is consolidating after the earlier push to 1699, currently around 1582.
Quiet name suddenly showing strength while the bigger ones hold their gains.
You already caught this move or still watching from the sidelines?
#QNT
#AIOT
#zec
#BitwiseFilesFinalNEARSpotETFProspectus #DogecoinETFsPostBiggestWeekSinceLaunch
4
445
·
--
Bullish
See translation
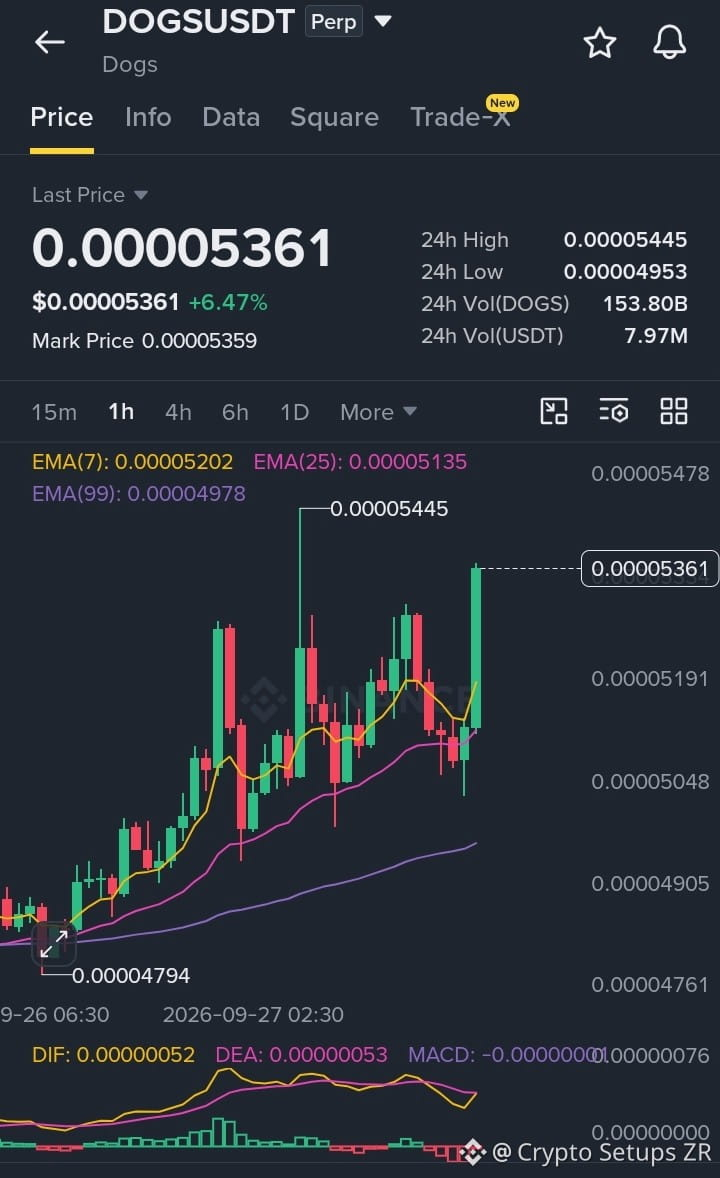
$DOGS just printed a clean bounce
After sitting quiet for a while, it pushed back above 0.000053 with a solid green candle.
Still early, but the structure is starting to look better.
$SOON is still on fire, up almost 60% and holding near the highs.
$QNT continues its strong run, back above 183 after the earlier cool-off.
While the big names keep running, DOGS is slowly waking up.
Anyone else watching this one for the next leg?
{future}(DOGSUSDT)
{future}(SOONUSDT)
{future}(QNTUSDT)
#Dogs
#Soon
#QNT
#BitwiseFilesFinalNEARSpotETFProspectus #DogecoinETFsPostBiggestWeekSinceLaunch
$DOGS just printed a clean bounce
After sitting quiet for a while, it pushed back above 0.000053 with a solid green candle.
Still early, but the structure is starting to look better.
$SOON is still on fire, up almost 60% and holding near the highs.
$QNT continues its strong run, back above 183 after the earlier cool-off.
While the big names keep running, DOGS is slowly waking up.
Anyone else watching this one for the next leg?
#Dogs
#Soon
#QNT
#BitwiseFilesFinalNEARSpotETFProspectus #DogecoinETFsPostBiggestWeekSinceLaunch
After sitting quiet for a while, it pushed back above 0.000053 with a solid green candle.
Still early, but the structure is starting to look better.
$SOON is still on fire, up almost 60% and holding near the highs.
$QNT continues its strong run, back above 183 after the earlier cool-off.
While the big names keep running, DOGS is slowly waking up.
Anyone else watching this one for the next leg?
#Dogs
#Soon
#QNT
#BitwiseFilesFinalNEARSpotETFProspectus #DogecoinETFsPostBiggestWeekSinceLaunch
2
461
·
--
Bullish
See translation
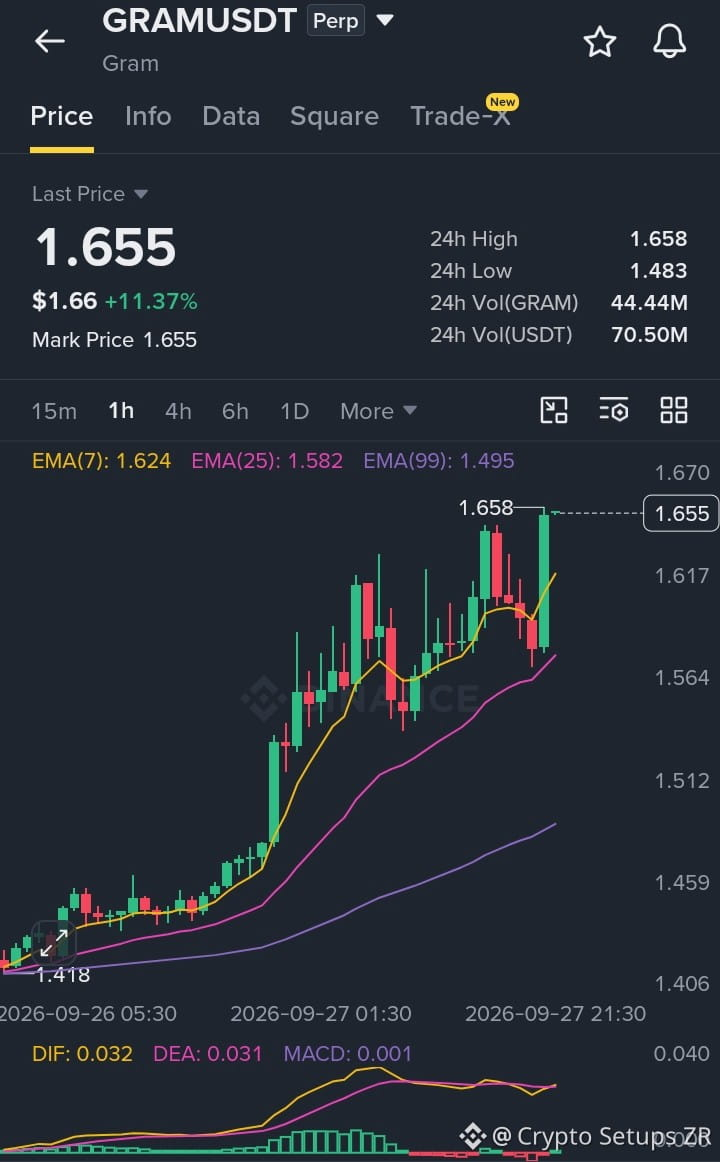
$GRAM strong breakout push attacking resistance on rising volume… buyers in control, continuation move still active...
Long setup.
Entry: 1.645 – 1.658
TP: 1.695 – 1.742 – 1.815
SL: 1.605
Bullish Above: 1.620
Breakout strength + rising demand = long active...
{future}(GRAMUSDT)
$QNT
{future}(QNTUSDT)
$ZEC
{future}(ZECUSDT)
$GRAM strong breakout push attacking resistance on rising volume… buyers in control, continuation move still active...
Long setup.
Entry: 1.645 – 1.658
TP: 1.695 – 1.742 – 1.815
SL: 1.605
Bullish Above: 1.620
Breakout strength + rising demand = long active...
$QNT
$ZEC
Long setup.
Entry: 1.645 – 1.658
TP: 1.695 – 1.742 – 1.815
SL: 1.605
Bullish Above: 1.620
Breakout strength + rising demand = long active...
$QNT
$ZEC
5
386
·
--
Bullish
See translation
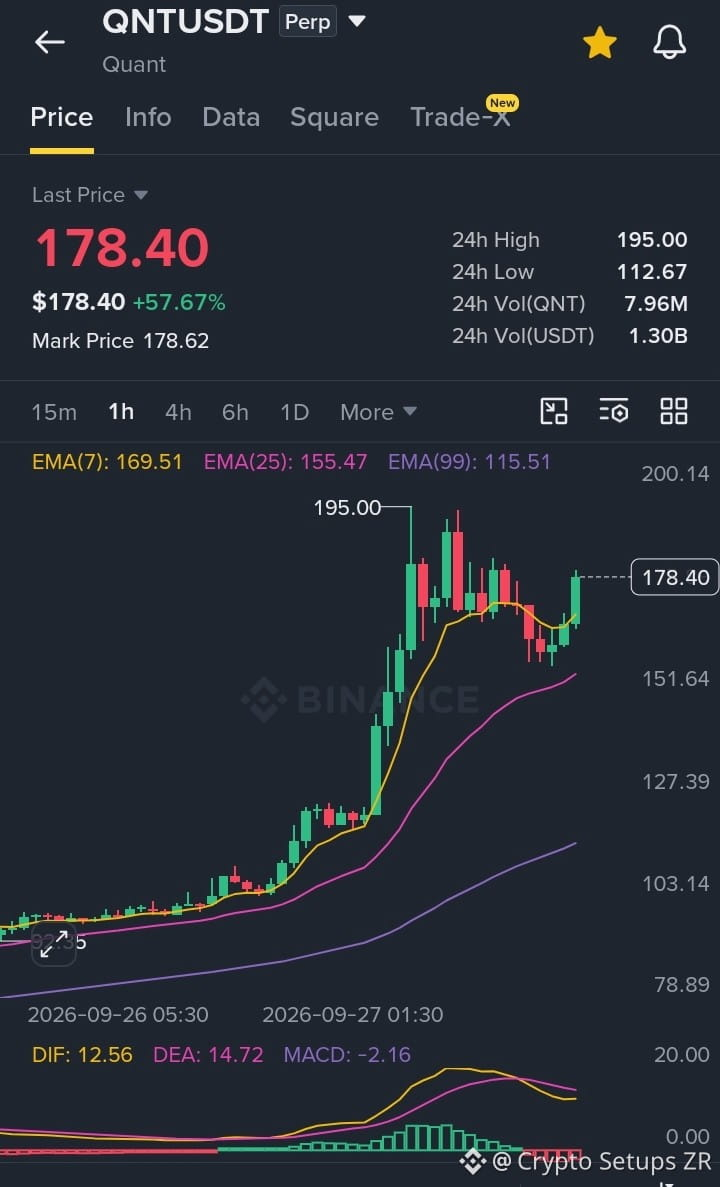
$QNT strong bullish rebound after support defense… buyers reclaiming structure while momentum expands back toward highs...
Long setup.
Entry: 177.20 – 178.80
TP: 183.50 – 188.20 – 194.80
SL: 173.20
Bullish Above: 174.50
Structure reclaim + buyers active = long active...
{future}(QNTUSDT)
$Q
{future}(QUSDT)
$ZEC
{future}(ZECUSDT)
$QNT strong bullish rebound after support defense… buyers reclaiming structure while momentum expands back toward highs...
Long setup.
Entry: 177.20 – 178.80
TP: 183.50 – 188.20 – 194.80
SL: 173.20
Bullish Above: 174.50
Structure reclaim + buyers active = long active...
$Q
$ZEC
Long setup.
Entry: 177.20 – 178.80
TP: 183.50 – 188.20 – 194.80
SL: 173.20
Bullish Above: 174.50
Structure reclaim + buyers active = long active...
$Q
$ZEC
4
796
·
--
Bullish
See translation
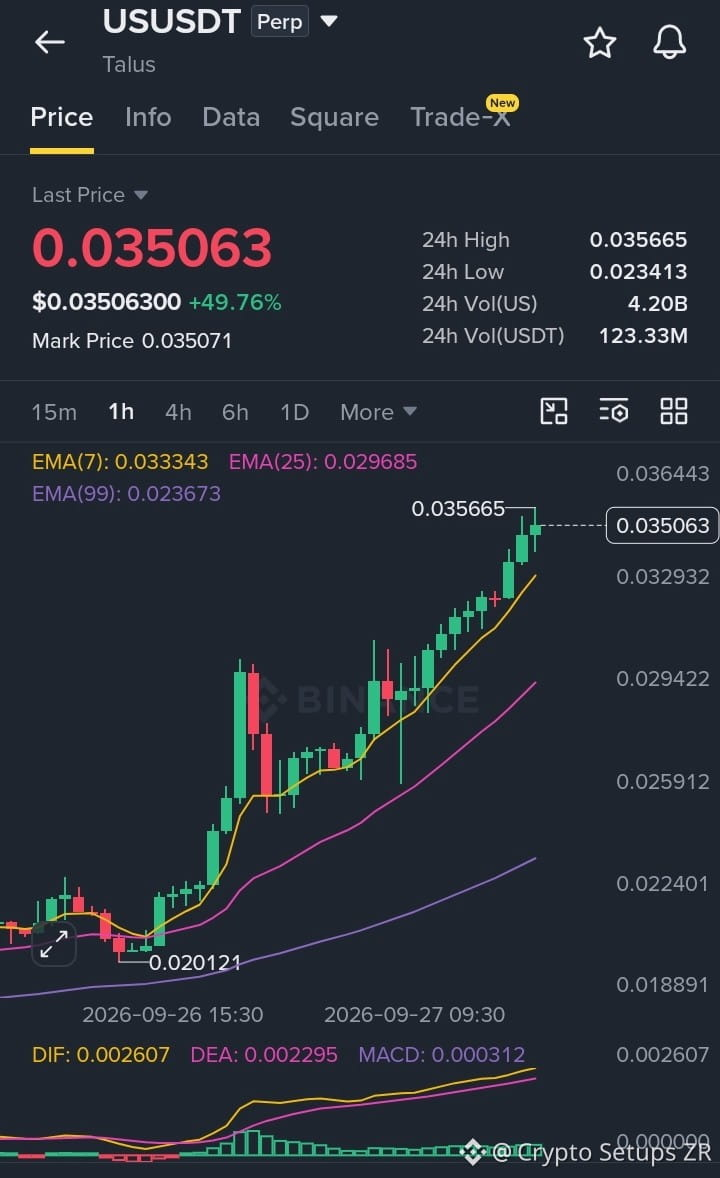
$US strong staircase trend climbing along dynamic support… buyers staying active while continuation strength keeps building higher...
Long setup.
Entry: 0.034750 – 0.035150
TP: 0.036100 – 0.037150 – 0.038800
SL: 0.033650
Bullish Above: 0.034100
Higher lows hold + upside flow = long active...
{future}(USUSDT)
$Q is also flying, up nearly 40% and holding strong near 0.052.
$QNT cooled a bit from the 195 peak but remains one of the biggest movers with +52%.
{future}(QUSDT)
{future}(QNTUSDT)
#QNT
#US
#q
#StrategyStriveAdd2305BitcoinThisWeek #TrumpRejectsIranHormuzReopening
$US strong staircase trend climbing along dynamic support… buyers staying active while continuation strength keeps building higher...
Long setup.
Entry: 0.034750 – 0.035150
TP: 0.036100 – 0.037150 – 0.038800
SL: 0.033650
Bullish Above: 0.034100
Higher lows hold + upside flow = long active...
$Q is also flying, up nearly 40% and holding strong near 0.052.
$QNT cooled a bit from the 195 peak but remains one of the biggest movers with +52%.
#QNT
#US
#q
#StrategyStriveAdd2305BitcoinThisWeek #TrumpRejectsIranHormuzReopening
Long setup.
Entry: 0.034750 – 0.035150
TP: 0.036100 – 0.037150 – 0.038800
SL: 0.033650
Bullish Above: 0.034100
Higher lows hold + upside flow = long active...
$Q is also flying, up nearly 40% and holding strong near 0.052.
$QNT cooled a bit from the 195 peak but remains one of the biggest movers with +52%.
#QNT
#US
#q
#StrategyStriveAdd2305BitcoinThisWeek #TrumpRejectsIranHormuzReopening
2
410
·
--
Bullish
See translation
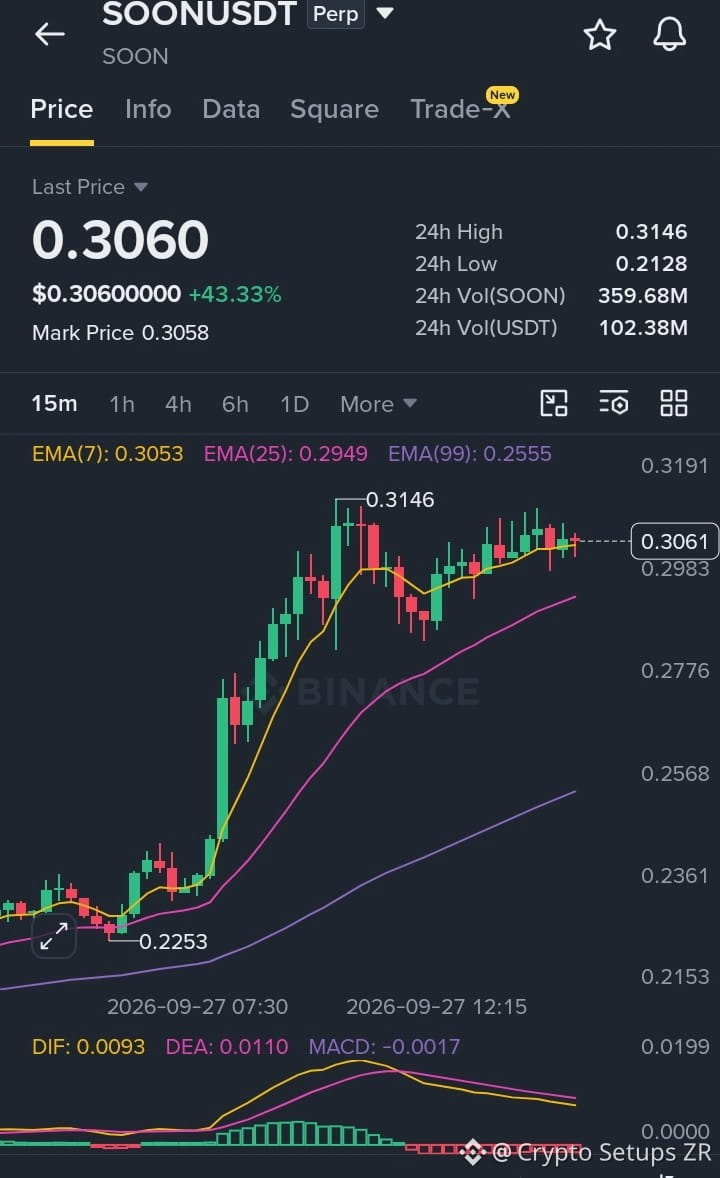
$SOON price holding tight consolidation above dynamic support… buyers defending the base while breakout momentum builds...
Long setup.
Entry: 0.3035 – 0.3060
TP: 0.3130 – 0.3190 – 0.3270
SL: 0.2975
Bullish Above: 0.3000
Base hold + momentum compression = long active...
{future}(SOONUSDT)
$QNT
{future}(QNTUSDT)
$Q
{future}(QUSDT)
$SOON price holding tight consolidation above dynamic support… buyers defending the base while breakout momentum builds...
Long setup.
Entry: 0.3035 – 0.3060
TP: 0.3130 – 0.3190 – 0.3270
SL: 0.2975
Bullish Above: 0.3000
Base hold + momentum compression = long active...
$QNT
$Q
Long setup.
Entry: 0.3035 – 0.3060
TP: 0.3130 – 0.3190 – 0.3270
SL: 0.2975
Bullish Above: 0.3000
Base hold + momentum compression = long active...
$QNT
$Q
3
464
·
--
Bullish
See translation
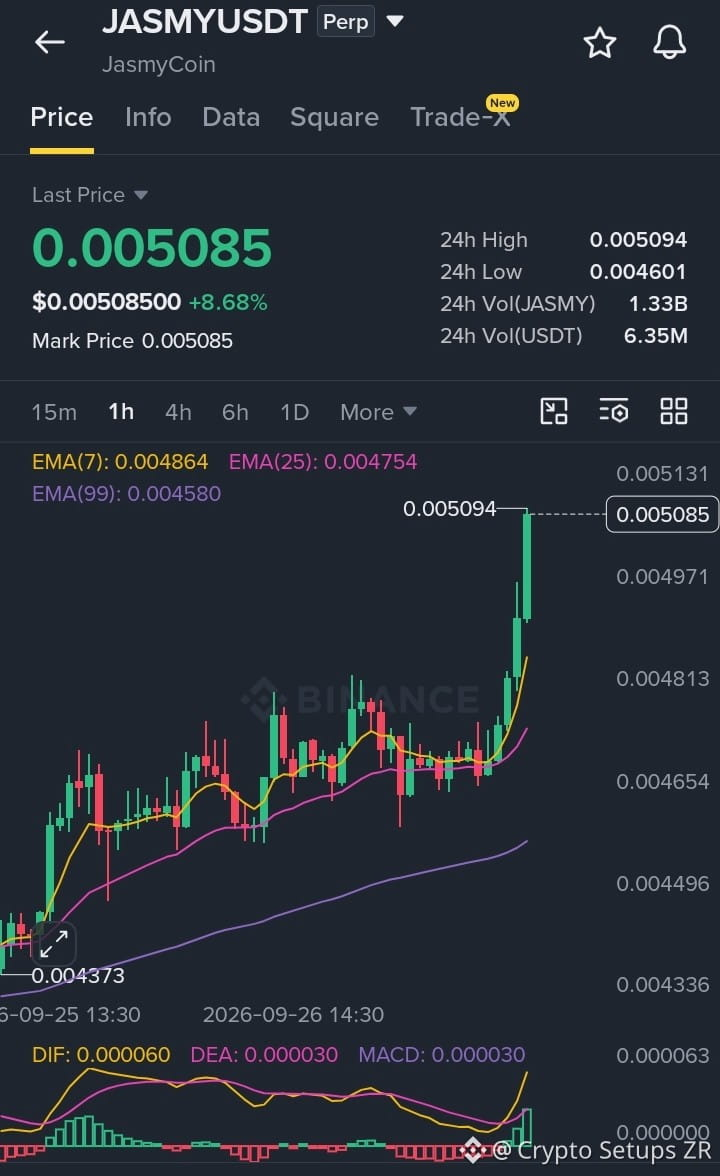
$JASMY breakout push with rising volume, price holding above structure… buyers staying active while momentum expands higher...
Long setup.
Entry: 0.005040 – 0.005090
TP: 0.005230 – 0.005420 – 0.005720
SL: 0.004890
Bullish Above: 0.004950
Base hold + momentum expansion = long active...
{future}(JASMYUSDT)
$QNT
{future}(QNTUSDT)
$Q
{future}(QUSDT)
$JASMY breakout push with rising volume, price holding above structure… buyers staying active while momentum expands higher...
Long setup.
Entry: 0.005040 – 0.005090
TP: 0.005230 – 0.005420 – 0.005720
SL: 0.004890
Bullish Above: 0.004950
Base hold + momentum expansion = long active...
$QNT
$Q
Long setup.
Entry: 0.005040 – 0.005090
TP: 0.005230 – 0.005420 – 0.005720
SL: 0.004890
Bullish Above: 0.004950
Base hold + momentum expansion = long active...
$QNT
$Q
3
308
·
--
Bullish
See translation
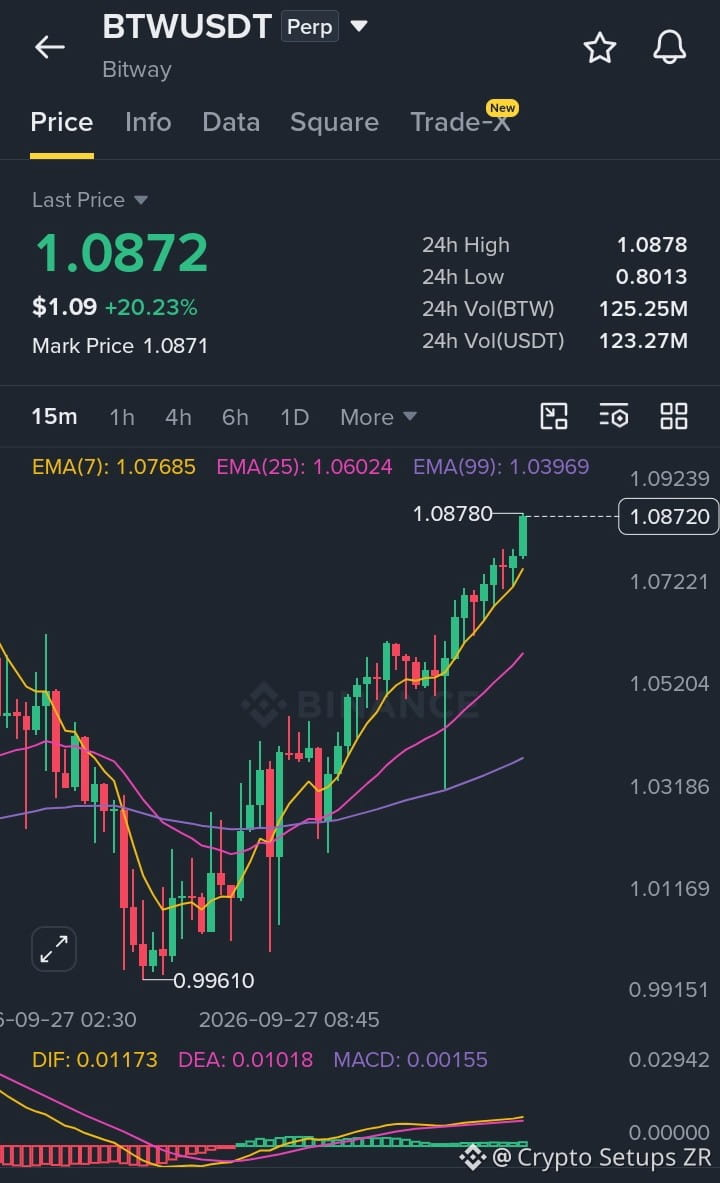
$BTW aggressive breakout push climbing step by step… buyers staying active while continuation strength keeps building higher...
Long setup.
Entry: 1.0810 – 1.0880
TP: 1.1180 – 1.1580 – 1.2230
SL: 1.0490
Bullish Above: 1.0650
Higher lows hold + upside flow = long active...
{future}(BTWUSDT)
$QNT
{future}(QNTUSDT)
$Q
{future}(QUSDT)
$BTW aggressive breakout push climbing step by step… buyers staying active while continuation strength keeps building higher...
Long setup.
Entry: 1.0810 – 1.0880
TP: 1.1180 – 1.1580 – 1.2230
SL: 1.0490
Bullish Above: 1.0650
Higher lows hold + upside flow = long active...
$QNT
$Q
Long setup.
Entry: 1.0810 – 1.0880
TP: 1.1180 – 1.1580 – 1.2230
SL: 1.0490
Bullish Above: 1.0650
Higher lows hold + upside flow = long active...
$QNT
$Q
3
491
·
--
Bullish
See translation
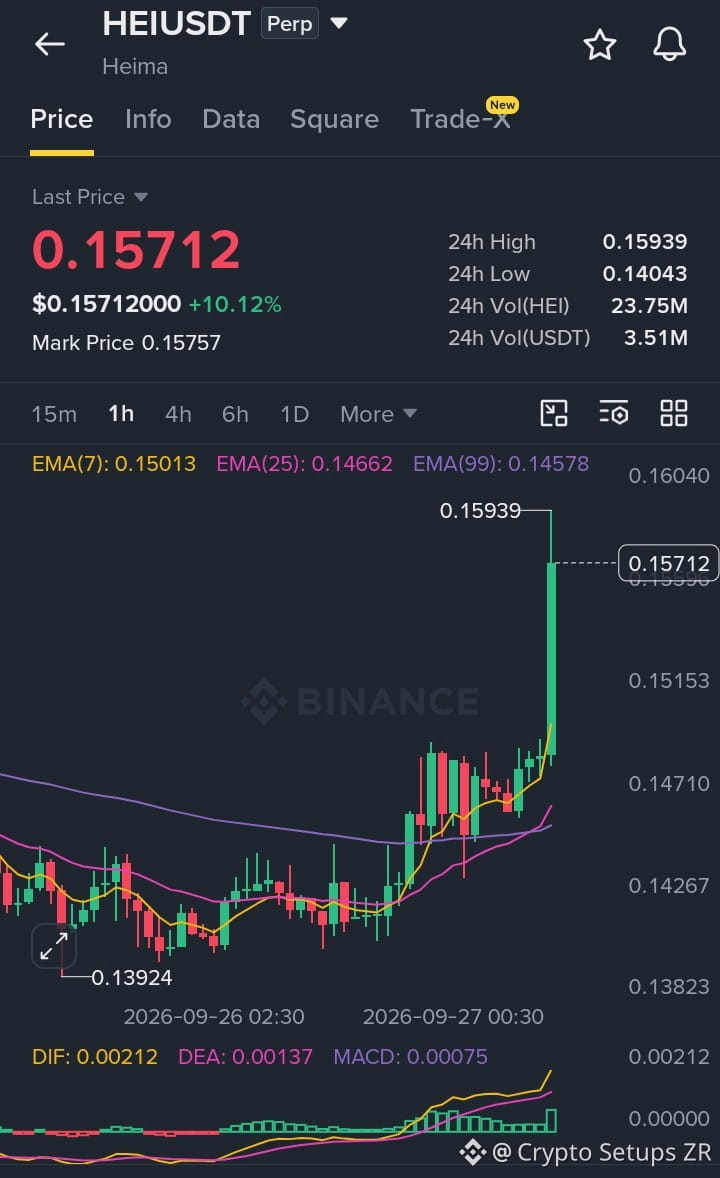
$HEI explosive push with strong volume expansion, price breaking cleanly above structure… buyers in control and momentum building, continuation move still active so upside likely...
Entry: 0.15580 – 0.15750
SL: 0.15080
TP1: 0.16180
TP2: 0.16750
TP3: 0.17800
Bullish Above: 0.15250
Breakout hold + bullish momentum = long active...
{future}(HEIUSDT)
$QNT
{future}(QNTUSDT)
$RARE
{future}(RAREUSDT)
$HEI explosive push with strong volume expansion, price breaking cleanly above structure… buyers in control and momentum building, continuation move still active so upside likely...
Entry: 0.15580 – 0.15750
SL: 0.15080
TP1: 0.16180
TP2: 0.16750
TP3: 0.17800
Bullish Above: 0.15250
Breakout hold + bullish momentum = long active...
$QNT
$RARE
Entry: 0.15580 – 0.15750
SL: 0.15080
TP1: 0.16180
TP2: 0.16750
TP3: 0.17800
Bullish Above: 0.15250
Breakout hold + bullish momentum = long active...
$QNT
$RARE
2
188
·
--
Bullish
See translation
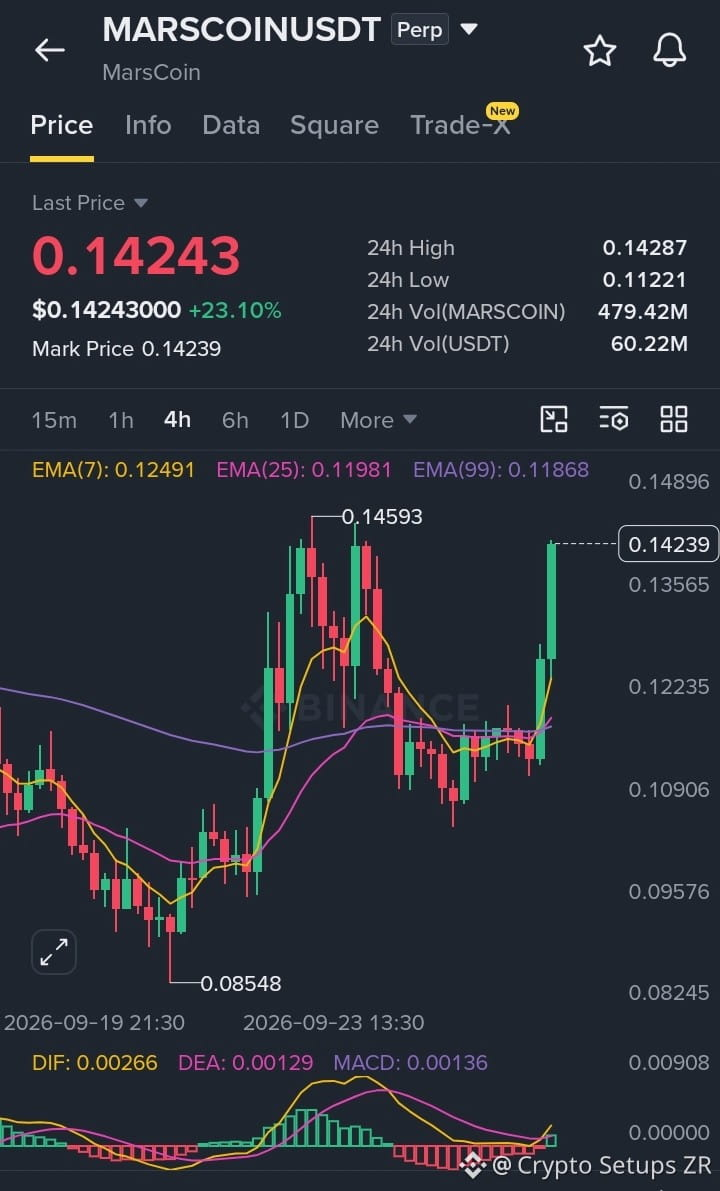
$MARSCOIN breakout push with strong buying pressure, price reclaiming higher levels cleanly… momentum building and buyers keeping control, continuation move still active so upside likely...
Entry: 0.14150 – 0.14270
SL: 0.13620
TP1: 0.14750
TP2: 0.15400
TP3: 0.16500
Bullish Above: 0.13850
Breakout hold + aggressive momentum = long active...
{future}(MARSCOINUSDT)
$RARE
{future}(RAREUSDT)
$DASH
{future}(DASHUSDT)
#marscoin #CircleMints500MUSDCOnSolana #PolymarketBankFailureBetsDrawFDICConcern #BlackRockBuildsTokenizedPortfoliosForOndo #BitwiseFilesToListNEARETFOnNYSEArca
$MARSCOIN breakout push with strong buying pressure, price reclaiming higher levels cleanly… momentum building and buyers keeping control, continuation move still active so upside likely...
Entry: 0.14150 – 0.14270
SL: 0.13620
TP1: 0.14750
TP2: 0.15400
TP3: 0.16500
Bullish Above: 0.13850
Breakout hold + aggressive momentum = long active...
$RARE
$DASH
#marscoin #CircleMints500MUSDCOnSolana #PolymarketBankFailureBetsDrawFDICConcern #BlackRockBuildsTokenizedPortfoliosForOndo #BitwiseFilesToListNEARETFOnNYSEArca
Entry: 0.14150 – 0.14270
SL: 0.13620
TP1: 0.14750
TP2: 0.15400
TP3: 0.16500
Bullish Above: 0.13850
Breakout hold + aggressive momentum = long active...
$RARE
$DASH
#marscoin #CircleMints500MUSDCOnSolana #PolymarketBankFailureBetsDrawFDICConcern #BlackRockBuildsTokenizedPortfoliosForOndo #BitwiseFilesToListNEARETFOnNYSEArca
3
429
·
--
Bullish
See translation
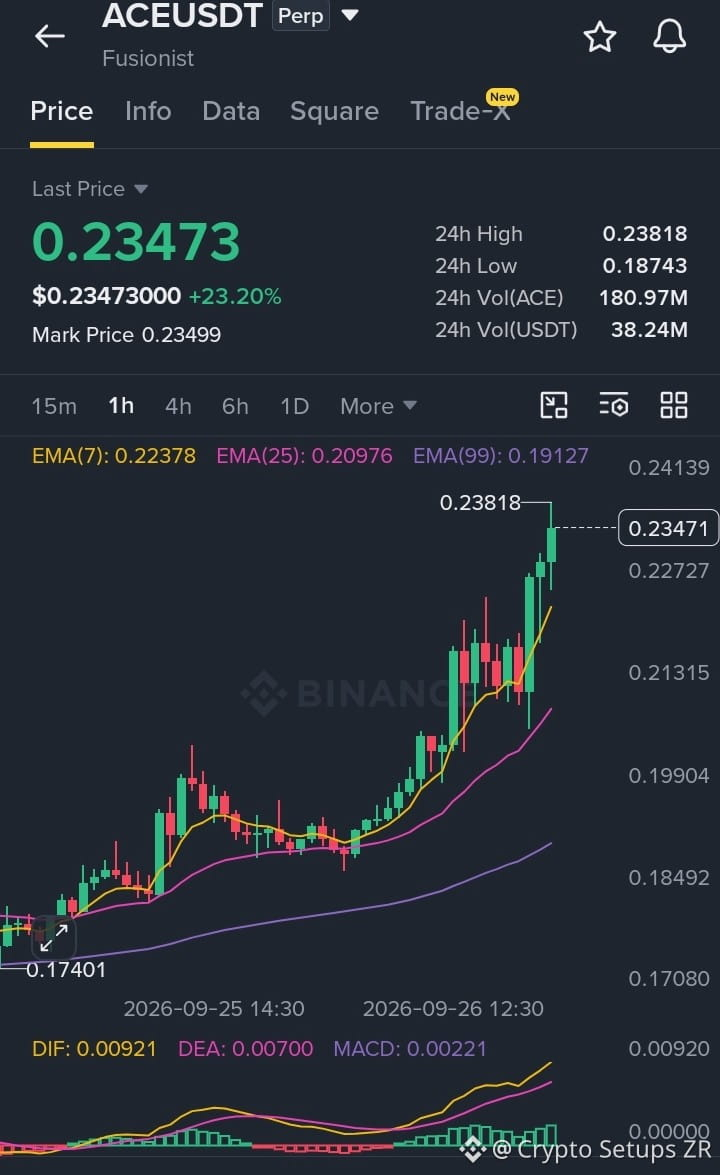
$ACE aggressive buying drive climbing step by step and attacking resistance… momentum expanding fast while bullish structure stays fully intact...
Long setup.
Entry: 0.23300 – 0.23520
TP: 0.24250 – 0.25200 – 0.26800
SL: 0.22500
Bullish Above: 0.22900
Higher lows hold + upside flow = long active...
{future}(ACEUSDT)
$RARE
{future}(RAREUSDT)
$Q
{future}(QUSDT)
#AcePriceAnalysis
$ACE aggressive buying drive climbing step by step and attacking resistance… momentum expanding fast while bullish structure stays fully intact...
Long setup.
Entry: 0.23300 – 0.23520
TP: 0.24250 – 0.25200 – 0.26800
SL: 0.22500
Bullish Above: 0.22900
Higher lows hold + upside flow = long active...
$RARE
$Q
#AcePriceAnalysis
Long setup.
Entry: 0.23300 – 0.23520
TP: 0.24250 – 0.25200 – 0.26800
SL: 0.22500
Bullish Above: 0.22900
Higher lows hold + upside flow = long active...
$RARE
$Q
#AcePriceAnalysis
2
366
·
--
Bullish
See translation
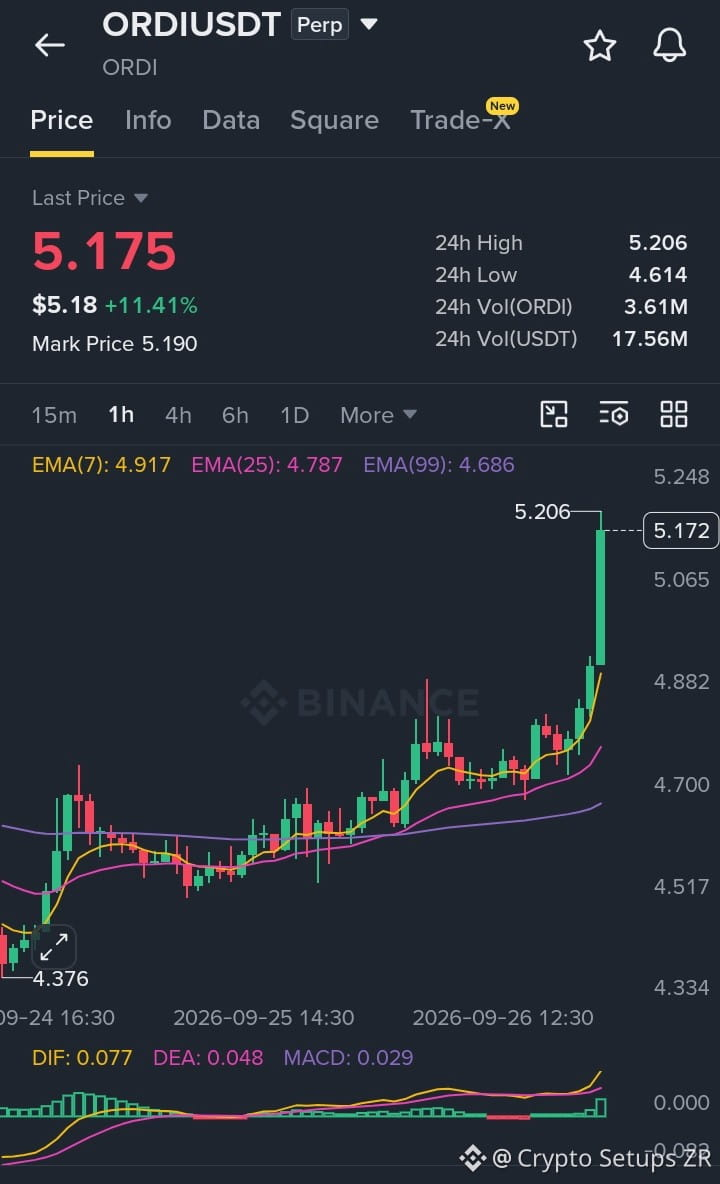
$ORDI breakout thrust tearing through resistance on rising spot volume, price holding strong near highs while buyers keep aggressive control for further continuation...
Long setup.
Entry: 5.140 – 5.185
TP: 5.300 – 5.460 – 5.720
SL: 4.980
Bullish Above: 5.050
Breakout strength + rising demand = long active...
{future}(ORDIUSDT)
$RARE
{future}(RAREUSDT)
$Q
{future}(QUSDT)
#ordipriceanalysis
$ORDI breakout thrust tearing through resistance on rising spot volume, price holding strong near highs while buyers keep aggressive control for further continuation...
Long setup.
Entry: 5.140 – 5.185
TP: 5.300 – 5.460 – 5.720
SL: 4.980
Bullish Above: 5.050
Breakout strength + rising demand = long active...
$RARE
$Q
#ordipriceanalysis
Long setup.
Entry: 5.140 – 5.185
TP: 5.300 – 5.460 – 5.720
SL: 4.980
Bullish Above: 5.050
Breakout strength + rising demand = long active...
$RARE
$Q
#ordipriceanalysis
3
426
Log in to explore more content
Join global crypto users on Binance Square
⚡️ Get latest and useful information about crypto.
💬 Trusted by the world’s largest crypto exchange.
👍 Discover real insights from verified creators.
Email / Phone number
Trending Topics
BTCFallsBelow$83000
2,952 views
59 Discussing
🚀 *BTC/USDT — LONG*
💎 75X Cross
📍 *Entry:* 83000 – 82400
🎯 *TP:* 83600 • 84200 • 84800 • 85400
🛑 *SL:* 81388
⚠️ *Risk:* Max 3–5% per trade.
$BTC
jinifer
·3 Likes
·2.5k views
BitcoinSpotETFs$2.39BWeeklyNetInflow
45 views
7 Discussing
FedProposesPaymentStablecoinRules
14,534 views
338 Discussing