

SAPP ACADEMY
228 貼文

SAPP ACADEMY
舉報
封鎖用戶
crypto focused education. Risk-first. Crypto trading psychology, market insight and market structure. www.sappacademy.com
低頻交易者
2.9 年
11 關注
21 粉絲
63 點讚數
貼文
全部
引用
影片
·
--
多時間框架短線策略:4H 供給區 + 1H 流動性掃除
對稱三角形每天都在困住散戶交易者。下面是我們如何運用多時間框架分析,把一次假突破轉化爲一筆 1:4.15 風險回報比的做空交易:
多時間框架短線策略:4H 供給區 + 1H 流動性掃除
對稱三角形每天都在困住散戶交易者。下面是我們如何運用多時間框架分析,把一次假突破轉化爲一筆 1:4.15 風險回報比的做空交易:
對稱三角形每天都在困住散戶交易者。下面是我們如何運用多時間框架分析,把一次假突破轉化爲一筆 1:4.15 風險回報比的做空交易:
1
581
·
--
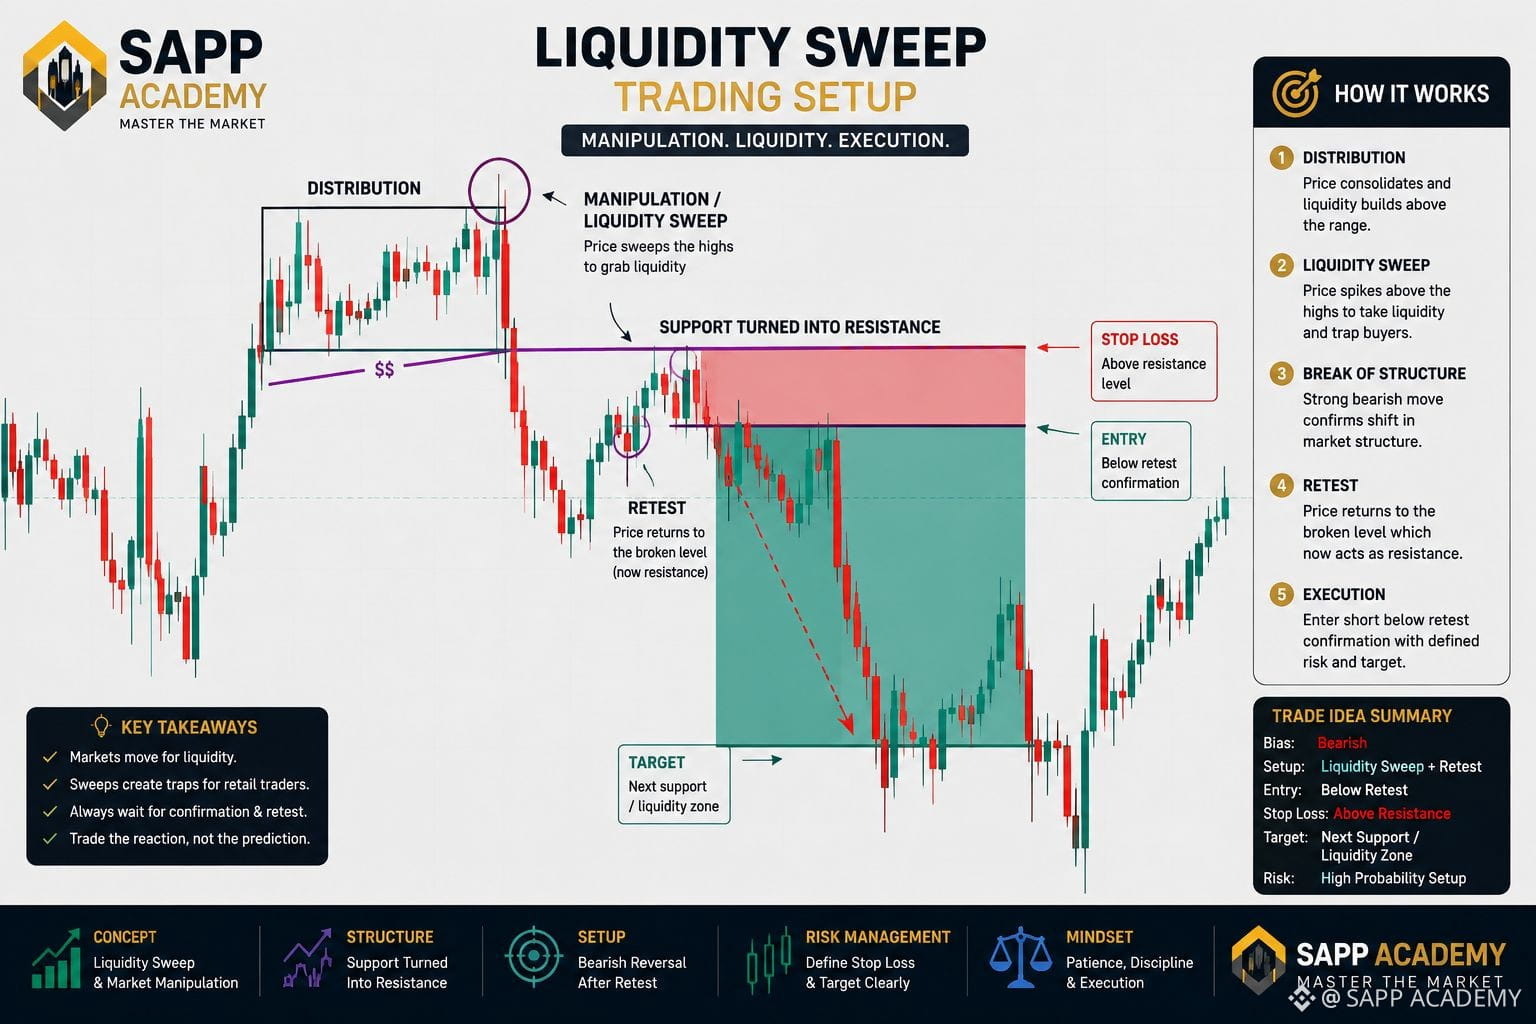
流動性掃單交易設置:支撐變爲阻力 + 回測
流動性掃單只是開始。👀
價格掃掉高點、打破結構,然後在下跌之前將先前被突破的支撐回測爲阻力。
我要確認的是這次回測,而不是第一步動作。
你會在掃單時進場,還是等回測?👇
{future}(XAUUSDT)
{future}(ETHUSDT)
{future}(BTCUSDT)
#LiquiditySweep #smc #priceaction #TradingSetup #SAPPAcademy
流動性掃單交易設置:支撐變爲阻力 + 回測
流動性掃單只是開始。👀
價格掃掉高點、打破結構,然後在下跌之前將先前被突破的支撐回測爲阻力。
我要確認的是這次回測,而不是第一步動作。
你會在掃單時進場,還是等回測?👇
#LiquiditySweep #smc #priceaction #TradingSetup #SAPPAcademy
流動性掃單只是開始。👀
價格掃掉高點、打破結構,然後在下跌之前將先前被突破的支撐回測爲阻力。
我要確認的是這次回測,而不是第一步動作。
你會在掃單時進場,還是等回測?👇
#LiquiditySweep #smc #priceaction #TradingSetup #SAPPAcademy
130
·
--
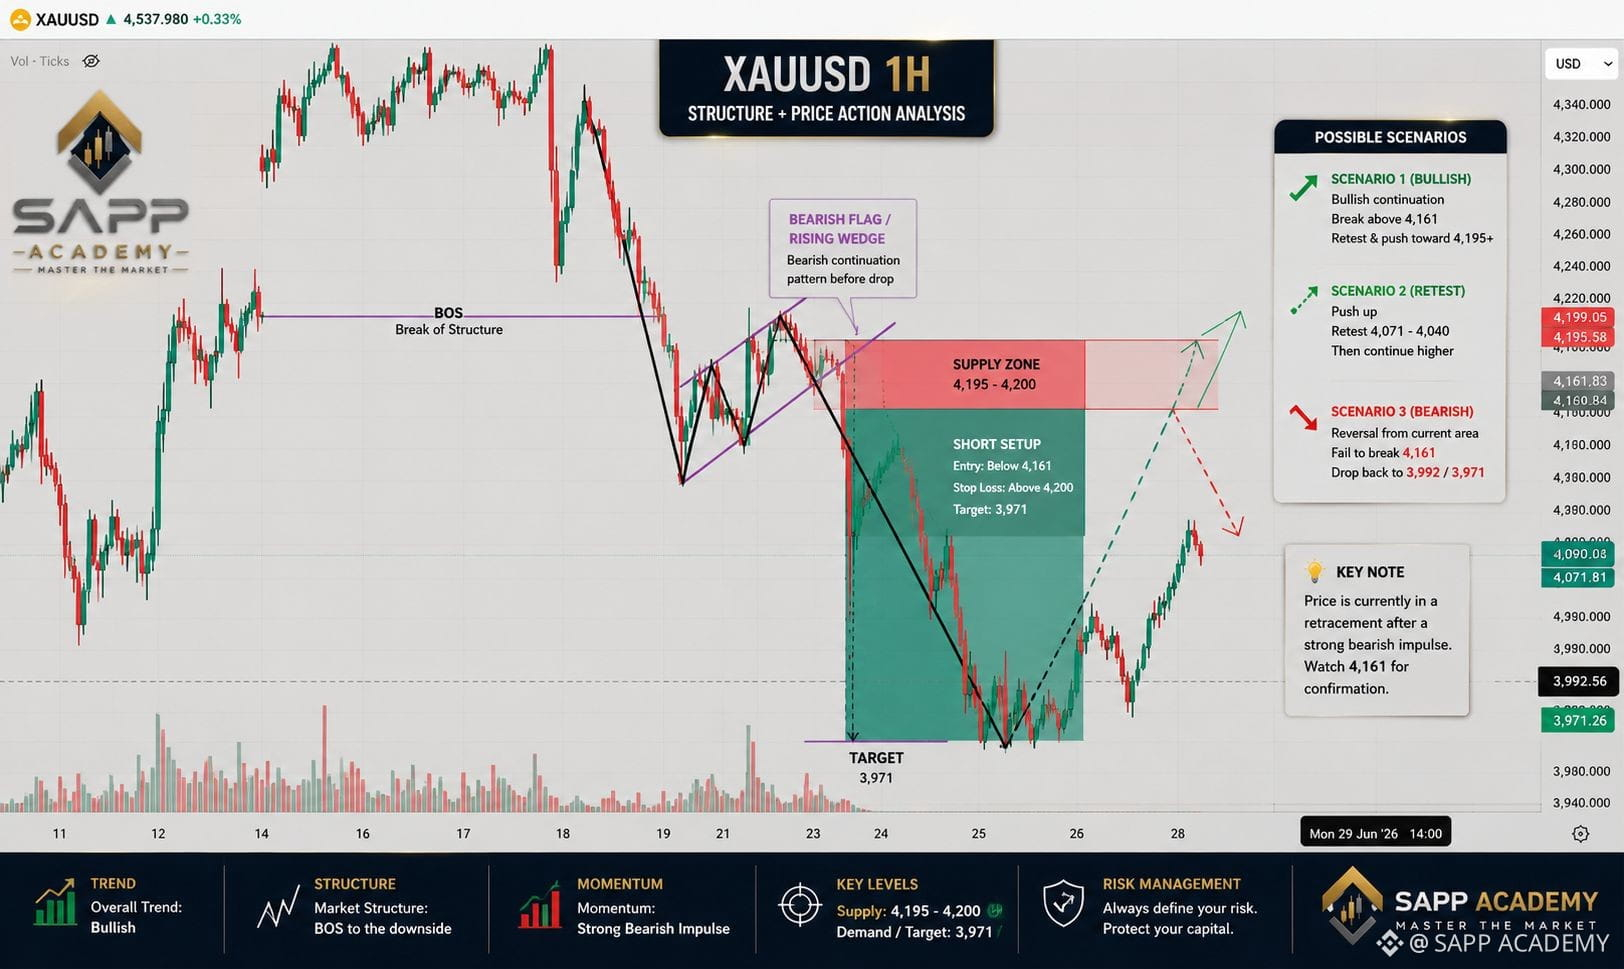
XAUUSD 1小時黃金分析:看跌旗形,供應區與關鍵價格水平
{future}(XAUUSDT)
{future}(BTCUSDT)
黃金正處於決策點。👀
XAUUSD 1小時顯示出清晰的看跌結構,價格從 4,195–4,200 供應區反應。
關鍵問題:價格會拒絕下跌並繼續走低,還是收復 4,161 並推動上行?
我不會追單。我正在等待確認 + 回測後,再考慮進場。
🎯 關鍵位:3,971
⚠️ 失效條件:4,200 上方
你會在這裏做空,還是等待回測?把你的分析發在下面。👇
#XAUUSD #goldanalysis #TechnicalAnalysis #SAPPAcademy
XAUUSD 1小時黃金分析:看跌旗形,供應區與關鍵價格水平
黃金正處於決策點。👀
XAUUSD 1小時顯示出清晰的看跌結構,價格從 4,195–4,200 供應區反應。
關鍵問題:價格會拒絕下跌並繼續走低,還是收復 4,161 並推動上行?
我不會追單。我正在等待確認 + 回測後,再考慮進場。
🎯 關鍵位:3,971
⚠️ 失效條件:4,200 上方
你會在這裏做空,還是等待回測?把你的分析發在下面。👇
#XAUUSD #goldanalysis #TechnicalAnalysis #SAPPAcademy
黃金正處於決策點。👀
XAUUSD 1小時顯示出清晰的看跌結構,價格從 4,195–4,200 供應區反應。
關鍵問題:價格會拒絕下跌並繼續走低,還是收復 4,161 並推動上行?
我不會追單。我正在等待確認 + 回測後,再考慮進場。
🎯 關鍵位:3,971
⚠️ 失效條件:4,200 上方
你會在這裏做空,還是等待回測?把你的分析發在下面。👇
#XAUUSD #goldanalysis #TechnicalAnalysis #SAPPAcademy
115
·
--
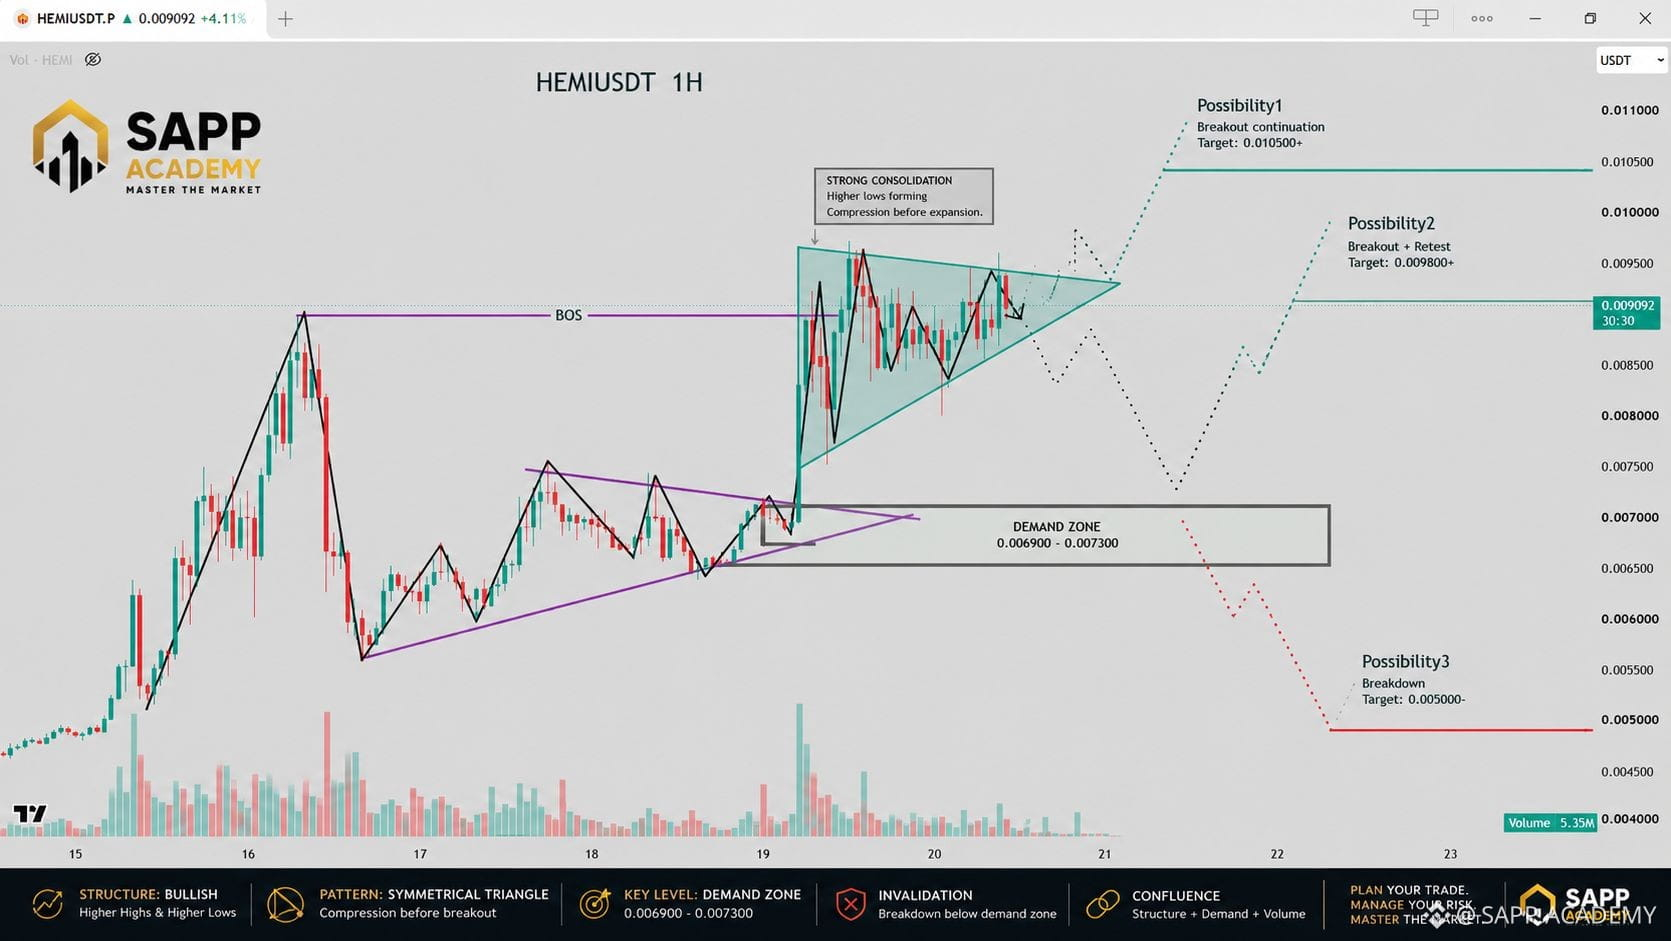
$HEMI HEMIUSDT 價格分析:對稱三角形突破,需求區與關鍵價位
在看漲 BOS 之後,價格進一步上行,目前正處於對稱三角形內部盤整。
我重點關注的關鍵區域是 0.0069–0.0073 需求區。
共有 3 種可能情景:
🟢 看漲:三角形突破 → 繼續向下一個流動性區域推進。
🟡 突破 + 回踩:先突破,再回踩後繼續。
🔴 看跌:跌破 → 需求區將成爲關鍵失效(無效)區域。
我不想預測下一根K線。
我想看看價格最終會確認哪一種情景。
你認爲先發生突破,還是先出現更深的回撤?👇
{future}(HEMIUSDT)
#CryptoAnalysis #cryptotrading #TechnicalAnalysis #TradingSetup #SAPPAcademy
$HEMI HEMIUSDT 價格分析:對稱三角形突破,需求區與關鍵價位
在看漲 BOS 之後,價格進一步上行,目前正處於對稱三角形內部盤整。
我重點關注的關鍵區域是 0.0069–0.0073 需求區。
共有 3 種可能情景:
🟢 看漲:三角形突破 → 繼續向下一個流動性區域推進。
🟡 突破 + 回踩:先突破,再回踩後繼續。
🔴 看跌:跌破 → 需求區將成爲關鍵失效(無效)區域。
我不想預測下一根K線。
我想看看價格最終會確認哪一種情景。
你認爲先發生突破,還是先出現更深的回撤?👇
#CryptoAnalysis #cryptotrading #TechnicalAnalysis #TradingSetup #SAPPAcademy
在看漲 BOS 之後,價格進一步上行,目前正處於對稱三角形內部盤整。
我重點關注的關鍵區域是 0.0069–0.0073 需求區。
共有 3 種可能情景:
🟢 看漲:三角形突破 → 繼續向下一個流動性區域推進。
🟡 突破 + 回踩:先突破,再回踩後繼續。
🔴 看跌:跌破 → 需求區將成爲關鍵失效(無效)區域。
我不想預測下一根K線。
我想看看價格最終會確認哪一種情景。
你認爲先發生突破,還是先出現更深的回撤?👇
#CryptoAnalysis #cryptotrading #TechnicalAnalysis #TradingSetup #SAPPAcademy
180
·
--
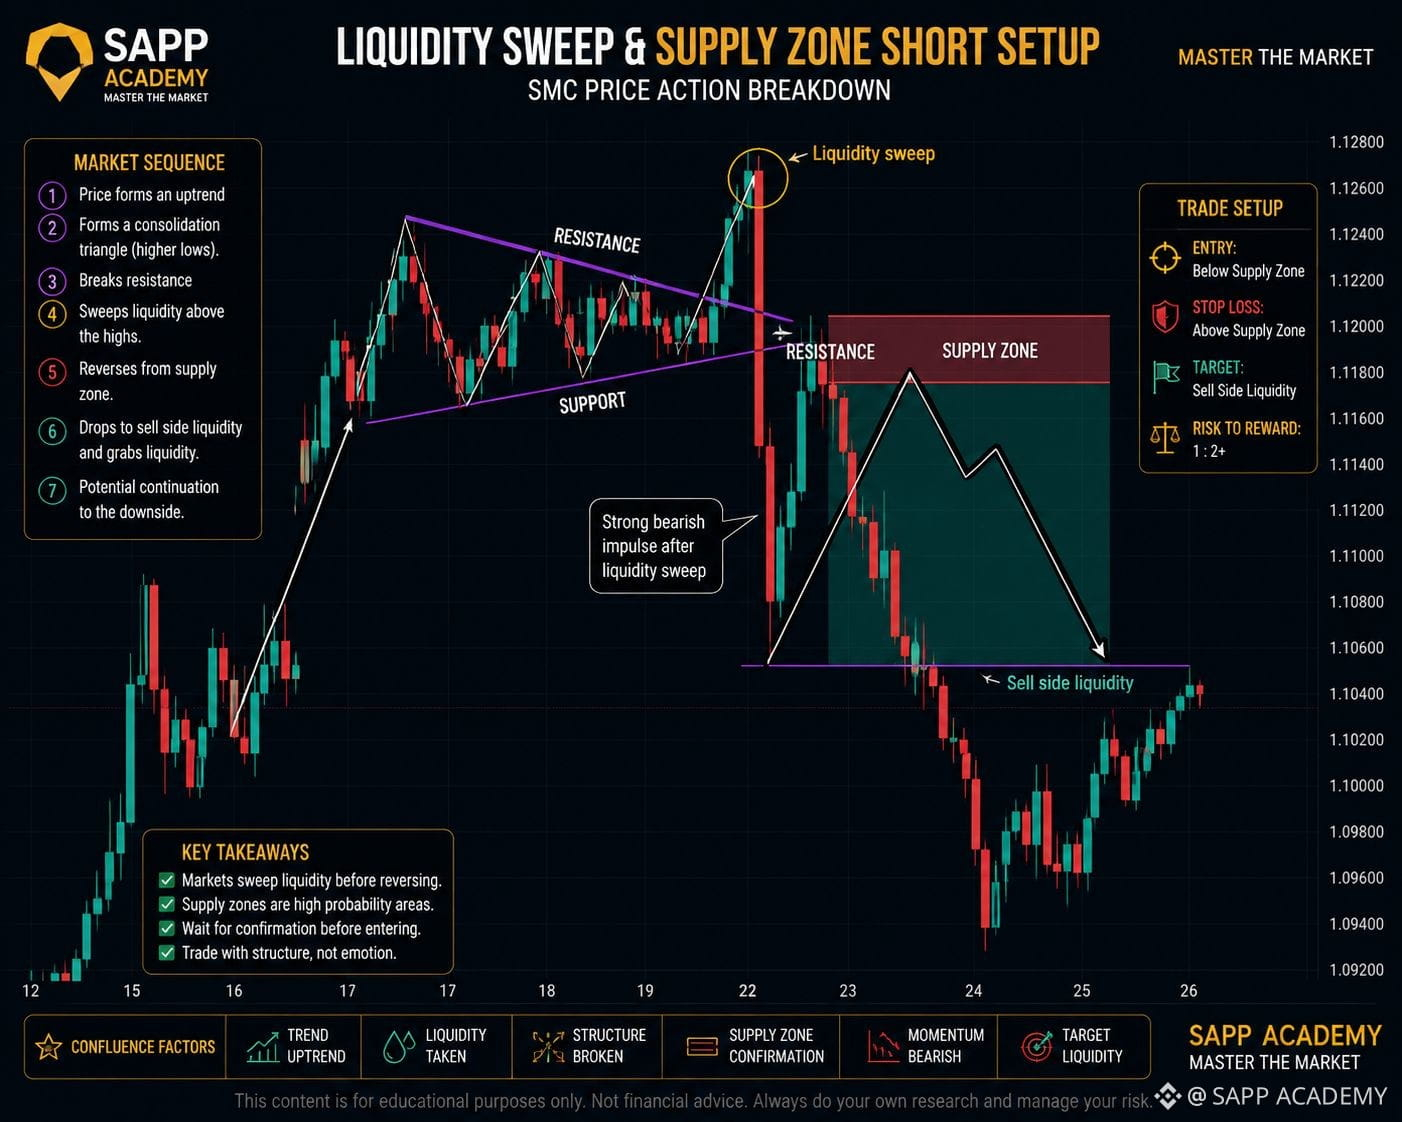
流動性掃掠與供給區空單設置 | SMC 市場結構
短標題
價格掃到買方流動性,在供給區被拒絕,並轉爲看跌,朝向賣方流動性。
流動性 → 結構 → 確認 → 進場。
{future}(ETHUSDT)
{future}(BTCUSDT)
{future}(XAUUSDT)
流動性掃掠與供給區空單設置 | SMC 市場結構
短標題
價格掃到買方流動性,在供給區被拒絕,並轉爲看跌,朝向賣方流動性。
流動性 → 結構 → 確認 → 進場。
短標題
價格掃到買方流動性,在供給區被拒絕,並轉爲看跌,朝向賣方流動性。
流動性 → 結構 → 確認 → 進場。
144
·
--
$XAU $BTC $ETH
爲什麼我在進入交易前等待回測 | SMC交易策略
第一步就能證明方向。
回測給我確認,並且是帶有明確風險定義的進場。
我寧願錯過一次行情,也不願在沒有確認的情況下追逐。
等待回測。然後執行
#smc #smartmoneyconcepts #retest #BreakoutTrading #Marketstructure #priceaction #cryptotrading #tradingeducation #SAPPAcademy
$XAU $BTC $ETH
爲什麼我在進入交易前等待回測 | SMC交易策略
第一步就能證明方向。
回測給我確認,並且是帶有明確風險定義的進場。
我寧願錯過一次行情,也不願在沒有確認的情況下追逐。
等待回測。然後執行
#smc #smartmoneyconcepts #retest #BreakoutTrading #Marketstructure #priceaction #cryptotrading #tradingeducation #SAPPAcademy
爲什麼我在進入交易前等待回測 | SMC交易策略
第一步就能證明方向。
回測給我確認,並且是帶有明確風險定義的進場。
我寧願錯過一次行情,也不願在沒有確認的情況下追逐。
等待回測。然後執行
#smc #smartmoneyconcepts #retest #BreakoutTrading #Marketstructure #priceaction #cryptotrading #tradingeducation #SAPPAcademy
2
186
·
--
流動性掃除 & CHOCH 短線設置詳解 | 供應區 + 賣方流動性
{future}(BTCUSDT)
{future}(XAUTUSDT)
流動性掃除 & CHOCH 短線設置詳解 | 供應區 + 賣方流動性
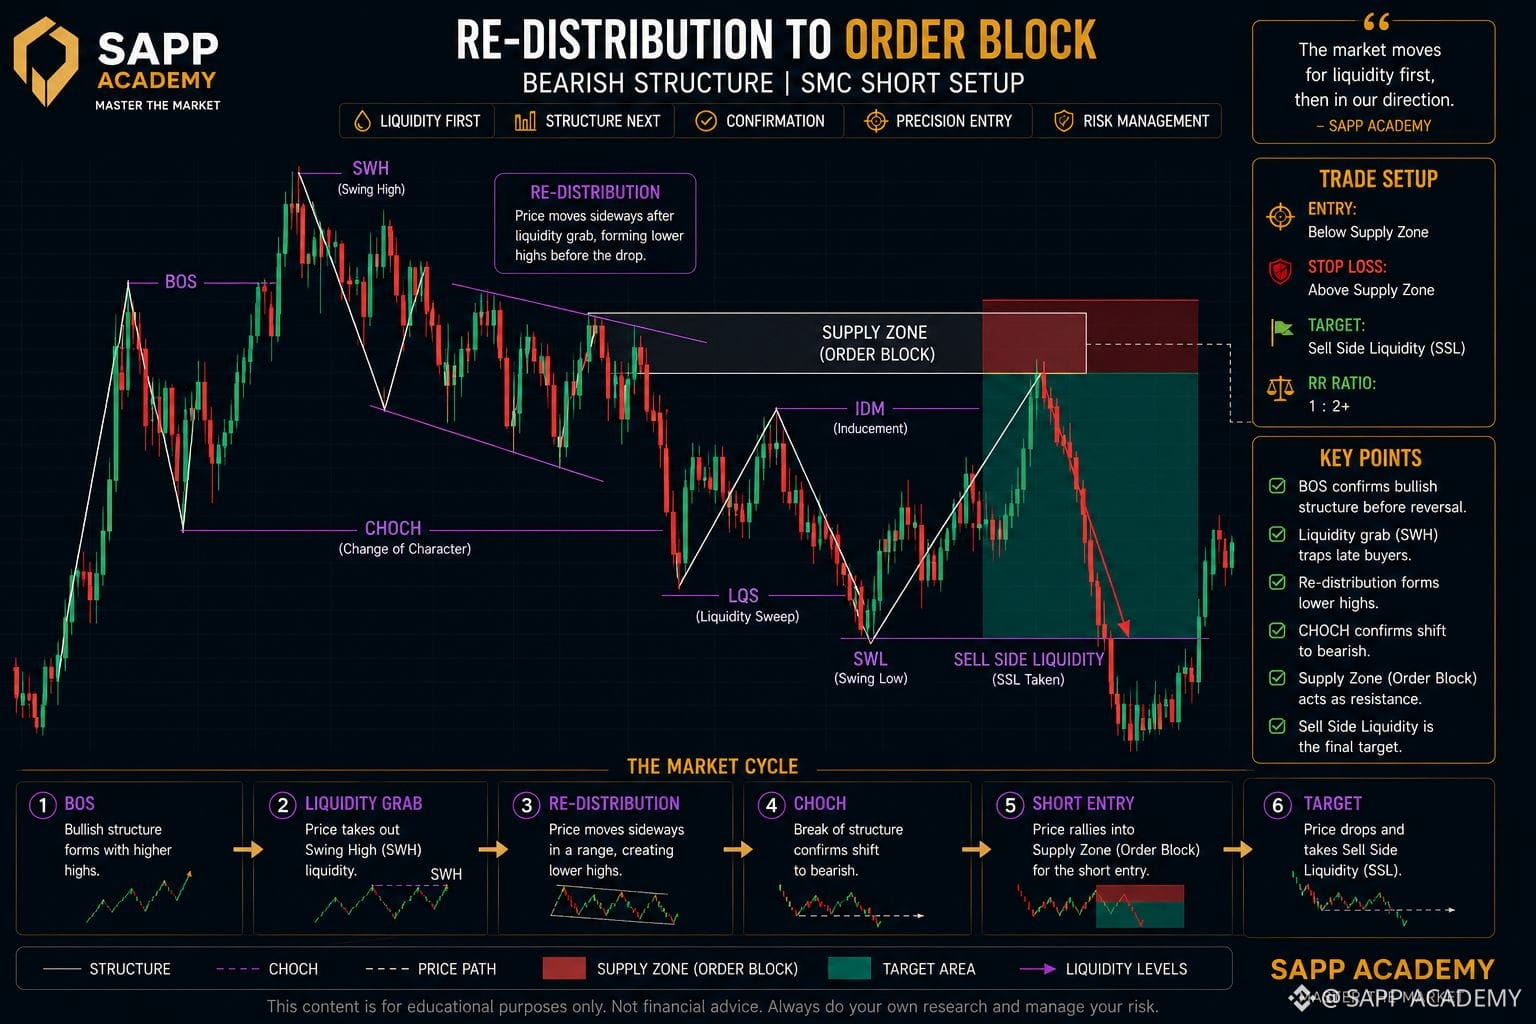
71
·
--
流動性掃蕩 & CHOCH 空單設置解析 | 供應區 + 賣方流動性
$BTC $ETH $XAU
流動性掃蕩 & CHOCH 空單設置解析 | 供應區 + 賣方流動性
$BTC $ETH $XAU
$BTC $ETH $XAU
113
·
--
策略:整合突破交易策略:需求區、BOS & 買方流動性
整合形成、流動性累積,隨後價格以位移(displacement)突破。
關鍵不在於追逐行情——要等待確認,辨識需求區,並以目標為上方的流動性。
結構 → 流動性 → 確認 → 進場。
#tradingStrategy #priceaction #smc #SmartMoneyConcepts #BreakoutTrading #DemandZone #bos #liquidity #ForexTrading #cryptotrading #SAPPAcademy
策略:整合突破交易策略:需求區、BOS & 買方流動性
整合形成、流動性累積,隨後價格以位移(displacement)突破。
關鍵不在於追逐行情——要等待確認,辨識需求區,並以目標為上方的流動性。
結構 → 流動性 → 確認 → 進場。
#tradingStrategy #priceaction #smc #SmartMoneyConcepts #BreakoutTrading #DemandZone #bos #liquidity #ForexTrading #cryptotrading #SAPPAcademy
整合形成、流動性累積,隨後價格以位移(displacement)突破。
關鍵不在於追逐行情——要等待確認,辨識需求區,並以目標為上方的流動性。
結構 → 流動性 → 確認 → 進場。
#tradingStrategy #priceaction #smc #SmartMoneyConcepts #BreakoutTrading #DemandZone #bos #liquidity #ForexTrading #cryptotrading #SAPPAcademy
92
·
--
BOS + 二次回踩交易策略:如何辨識高勝率的多單進場
BOS 已確認轉勢。
回踩確認了機會。
我沒有追逐突破,而是等價格回到已被突破的阻力處,並將其視為支撐。
結構 → BOS → 回踩 → 確認 → 延伸。
這就是設置。不只是死背K線圖——而是理解價格為什麼會移動。
#tradingStrategy #ForexTradingEducation #cryptotrading #SAPPAcademy
BOS + 二次回踩交易策略:如何辨識高勝率的多單進場
BOS 已確認轉勢。
回踩確認了機會。
我沒有追逐突破,而是等價格回到已被突破的阻力處,並將其視為支撐。
結構 → BOS → 回踩 → 確認 → 延伸。
這就是設置。不只是死背K線圖——而是理解價格為什麼會移動。
#tradingStrategy #ForexTradingEducation #cryptotrading #SAPPAcademy
BOS 已確認轉勢。
回踩確認了機會。
我沒有追逐突破,而是等價格回到已被突破的阻力處,並將其視為支撐。
結構 → BOS → 回踩 → 確認 → 延伸。
這就是設置。不只是死背K線圖——而是理解價格為什麼會移動。
#tradingStrategy #ForexTradingEducation #cryptotrading #SAPPAcademy
1
1
749
登入以探索更多內容
加入幣安廣場中的全球加密貨幣用戶
⚡️ 獲取加密貨幣的最新和實用資訊。
💬 受到全球最大加密貨幣交易所的信任。
👍 發掘來自經過驗證創作者的真實見解。
電子郵件 / 電話號碼