
Queen_DoLL
11.2k Публикации

Queen_DoLL
Отправить жалобу
Заблокировать пользователя
Crypto Trader | Market Analyst Spot & Futures Trading Sharing signals | Write to earn and Compaign expert
940 подписок(и/а)
10.1K+ подписчиков(а)
6.8K+ понравилось
Посты
Все
Цитирования
Видео
Активно
PINNED
·
--
Рост
🚨 $SUI BOUNCE SETUP IS LIVE 🚨
SUI is defending the support zone nicely, and buyers are starting to step back in. 👀
📍 Entry: $0.7950 – $0.7986
🎯 TP1: $0.8058
🎯 TP2: $0.8130
🎯 TP3: $0.8250
🛑 SL: $0.7842
The key here is how SUI reacts around this support. If buyers push through the nearby resistance, I’m expecting a move toward the targets above.
Trade smart, manage your risk, and don’t over-leverage. ⚠️
#SUI #SUIUSDT #CryptoTrading #Binance #altcoins
🚨 $SUI BOUNCE SETUP IS LIVE 🚨
SUI is defending the support zone nicely, and buyers are starting to step back in. 👀
📍 Entry: $0.7950 – $0.7986
🎯 TP1: $0.8058
🎯 TP2: $0.8130
🎯 TP3: $0.8250
🛑 SL: $0.7842
The key here is how SUI reacts around this support. If buyers push through the nearby resistance, I’m expecting a move toward the targets above.
Trade smart, manage your risk, and don’t over-leverage. ⚠️
#SUI #SUIUSDT #CryptoTrading #Binance #altcoins
SUI is defending the support zone nicely, and buyers are starting to step back in. 👀
📍 Entry: $0.7950 – $0.7986
🎯 TP1: $0.8058
🎯 TP2: $0.8130
🎯 TP3: $0.8250
🛑 SL: $0.7842
The key here is how SUI reacts around this support. If buyers push through the nearby resistance, I’m expecting a move toward the targets above.
Trade smart, manage your risk, and don’t over-leverage. ⚠️
#SUI #SUIUSDT #CryptoTrading #Binance #altcoins
23
5
31
28.3k
·
--
Рост
🚨 $GRASS /USDT BULLISH LONG SIGNAL 🚨
Signal: LONG / BUY 🟢
Entry Zone: $0.355 – $0.365
TP1: $0.375
TP2: $0.390
TP3: $0.410
TP4: $0.440
Stop Loss: $0.335
Analysis:
GRASS is showing renewed bullish momentum after recovering strongly from the $0.32 area. Binance futures data shows price around $0.346 with a 24H high near $0.351, while other current market data has GRASS trading higher after a strong daily move. The $0.355–$0.365 zone is the key area for continuation. A clean breakout above $0.375 could open the way toward $0.390, $0.410 and $0.440.
⚠️ Risk Management: GRASS is highly volatile. Avoid chasing a sudden pump; wait for confirmation and always use a proper stop loss.
{future}(GRASSUSDT)
#GRASS #GRASSUSDT #CryptoSignal #altcoins #Binance
🚨 $GRASS /USDT BULLISH LONG SIGNAL 🚨
Signal: LONG / BUY 🟢
Entry Zone: $0.355 – $0.365
TP1: $0.375
TP2: $0.390
TP3: $0.410
TP4: $0.440
Stop Loss: $0.335
Analysis:
GRASS is showing renewed bullish momentum after recovering strongly from the $0.32 area. Binance futures data shows price around $0.346 with a 24H high near $0.351, while other current market data has GRASS trading higher after a strong daily move. The $0.355–$0.365 zone is the key area for continuation. A clean breakout above $0.375 could open the way toward $0.390, $0.410 and $0.440.
⚠️ Risk Management: GRASS is highly volatile. Avoid chasing a sudden pump; wait for confirmation and always use a proper stop loss.
#GRASS #GRASSUSDT #CryptoSignal #altcoins #Binance
Signal: LONG / BUY 🟢
Entry Zone: $0.355 – $0.365
TP1: $0.375
TP2: $0.390
TP3: $0.410
TP4: $0.440
Stop Loss: $0.335
Analysis:
GRASS is showing renewed bullish momentum after recovering strongly from the $0.32 area. Binance futures data shows price around $0.346 with a 24H high near $0.351, while other current market data has GRASS trading higher after a strong daily move. The $0.355–$0.365 zone is the key area for continuation. A clean breakout above $0.375 could open the way toward $0.390, $0.410 and $0.440.
⚠️ Risk Management: GRASS is highly volatile. Avoid chasing a sudden pump; wait for confirmation and always use a proper stop loss.
#GRASS #GRASSUSDT #CryptoSignal #altcoins #Binance
2
134
·
--
Рост
🚨 $ZEC /USDT BULLISH LONG SIGNAL 🚨
Signal: LONG / BUY 🟢
Entry Zone: $1,220 – $1,250
TP1: $1,280
TP2: $1,330
TP3: $1,400
TP4: $1,500
Stop Loss: $1,165
Analysis:
ZEC is showing strong bullish momentum, currently trading around the $1,240–$1,275 area on Binance. The coin is up strongly over the last 24 hours and roughly 50%+ over the past week, showing powerful buyer participation.
The $1,220–$1,250 zone is the key area to watch for a healthy retest. If buyers defend this zone and price breaks above the recent $1,296 high, the next upside targets could be $1,330, $1,400 and $1,500.
⚠️ Risk Management: ZEC has already made a massive move, so avoid chasing green candles. Wait for a proper retest or breakout confirmation and always use a stop loss.
{future}(ZECUSDT)
#ZEC #ZECUSDT #Zcash #CryptoSignal #Binance
🚨 $ZEC /USDT BULLISH LONG SIGNAL 🚨
Signal: LONG / BUY 🟢
Entry Zone: $1,220 – $1,250
TP1: $1,280
TP2: $1,330
TP3: $1,400
TP4: $1,500
Stop Loss: $1,165
Analysis:
ZEC is showing strong bullish momentum, currently trading around the $1,240–$1,275 area on Binance. The coin is up strongly over the last 24 hours and roughly 50%+ over the past week, showing powerful buyer participation.
The $1,220–$1,250 zone is the key area to watch for a healthy retest. If buyers defend this zone and price breaks above the recent $1,296 high, the next upside targets could be $1,330, $1,400 and $1,500.
⚠️ Risk Management: ZEC has already made a massive move, so avoid chasing green candles. Wait for a proper retest or breakout confirmation and always use a stop loss.
#ZEC #ZECUSDT #Zcash #CryptoSignal #Binance
Signal: LONG / BUY 🟢
Entry Zone: $1,220 – $1,250
TP1: $1,280
TP2: $1,330
TP3: $1,400
TP4: $1,500
Stop Loss: $1,165
Analysis:
ZEC is showing strong bullish momentum, currently trading around the $1,240–$1,275 area on Binance. The coin is up strongly over the last 24 hours and roughly 50%+ over the past week, showing powerful buyer participation.
The $1,220–$1,250 zone is the key area to watch for a healthy retest. If buyers defend this zone and price breaks above the recent $1,296 high, the next upside targets could be $1,330, $1,400 and $1,500.
⚠️ Risk Management: ZEC has already made a massive move, so avoid chasing green candles. Wait for a proper retest or breakout confirmation and always use a stop loss.
#ZEC #ZECUSDT #Zcash #CryptoSignal #Binance
2
208
·
--
Рост
🚨 $ATOM /USDT BULLISH LONG SIGNAL 🚨
Signal: LONG / BUY 🟢
Entry Zone: $1.88 – $1.94
TP1: $2.00
TP2: $2.05
TP3: $2.15
TP4: $2.30
Stop Loss: $1.78
Analysis:
ATOM is showing strong bullish momentum, with Binance currently showing around $1.93 and a +15.83% 24H move, while the 24H high is near $2.03. The $1.88–$1.94 zone is the key area to watch for a healthy retest. If buyers defend this zone and ATOM breaks above $2.03 with strong volume, the next upside targets could come into focus around $2.15–$2.30. Current technical data also points toward strong-buy conditions on shorter timeframes.
⚠️ Risk Management: ATOM has already made a strong move, so avoid chasing green candles. Wait for a proper retest or breakout confirmation and always use a stop loss.
{future}(ATOMUSDT)
#ATOM #ATOMUSDT #Cosmos #cryptosignal #Binance
🚨 $ATOM /USDT BULLISH LONG SIGNAL 🚨
Signal: LONG / BUY 🟢
Entry Zone: $1.88 – $1.94
TP1: $2.00
TP2: $2.05
TP3: $2.15
TP4: $2.30
Stop Loss: $1.78
Analysis:
ATOM is showing strong bullish momentum, with Binance currently showing around $1.93 and a +15.83% 24H move, while the 24H high is near $2.03. The $1.88–$1.94 zone is the key area to watch for a healthy retest. If buyers defend this zone and ATOM breaks above $2.03 with strong volume, the next upside targets could come into focus around $2.15–$2.30. Current technical data also points toward strong-buy conditions on shorter timeframes.
⚠️ Risk Management: ATOM has already made a strong move, so avoid chasing green candles. Wait for a proper retest or breakout confirmation and always use a stop loss.
#ATOM #ATOMUSDT #Cosmos #cryptosignal #Binance
Signal: LONG / BUY 🟢
Entry Zone: $1.88 – $1.94
TP1: $2.00
TP2: $2.05
TP3: $2.15
TP4: $2.30
Stop Loss: $1.78
Analysis:
ATOM is showing strong bullish momentum, with Binance currently showing around $1.93 and a +15.83% 24H move, while the 24H high is near $2.03. The $1.88–$1.94 zone is the key area to watch for a healthy retest. If buyers defend this zone and ATOM breaks above $2.03 with strong volume, the next upside targets could come into focus around $2.15–$2.30. Current technical data also points toward strong-buy conditions on shorter timeframes.
⚠️ Risk Management: ATOM has already made a strong move, so avoid chasing green candles. Wait for a proper retest or breakout confirmation and always use a stop loss.
#ATOM #ATOMUSDT #Cosmos #cryptosignal #Binance
133
·
--
Рост
🚨 $NEAR /USDT BULLISH LONG SIGNAL 🚨
Signal: LONG / BUY 🟢
Entry Zone: $2.55 – $2.62
TP1: $2.70
TP2: $2.85
TP3: $3.00
TP4: $3.20
Stop Loss: $2.40
Analysis:
NEAR is showing strong bullish momentum, trading around the $2.60 area with a 24H high near $2.635 and gains of more than 14% on Binance data. The recent move has pushed NEAR significantly higher, while the broader 7-day performance is also strongly positive.
The $2.55–$2.62 zone is the key area to watch for a continuation. If buyers defend this zone and price breaks above $2.635, the next targets could be $2.70, $2.85 and eventually $3.00+. A rejection and loss of $2.40 would weaken the bullish setup.
⚠️ Risk Management: NEAR has already made a strong move, so avoid chasing the pump. Wait for a clean retest or confirmation before entering and always use a proper stop loss.
{future}(NEARUSDT)
#NEAR #NEARUSDT #CryptoSignal #altcoins #Binance
🚨 $NEAR /USDT BULLISH LONG SIGNAL 🚨
Signal: LONG / BUY 🟢
Entry Zone: $2.55 – $2.62
TP1: $2.70
TP2: $2.85
TP3: $3.00
TP4: $3.20
Stop Loss: $2.40
Analysis:
NEAR is showing strong bullish momentum, trading around the $2.60 area with a 24H high near $2.635 and gains of more than 14% on Binance data. The recent move has pushed NEAR significantly higher, while the broader 7-day performance is also strongly positive.
The $2.55–$2.62 zone is the key area to watch for a continuation. If buyers defend this zone and price breaks above $2.635, the next targets could be $2.70, $2.85 and eventually $3.00+. A rejection and loss of $2.40 would weaken the bullish setup.
⚠️ Risk Management: NEAR has already made a strong move, so avoid chasing the pump. Wait for a clean retest or confirmation before entering and always use a proper stop loss.
#NEAR #NEARUSDT #CryptoSignal #altcoins #Binance
Signal: LONG / BUY 🟢
Entry Zone: $2.55 – $2.62
TP1: $2.70
TP2: $2.85
TP3: $3.00
TP4: $3.20
Stop Loss: $2.40
Analysis:
NEAR is showing strong bullish momentum, trading around the $2.60 area with a 24H high near $2.635 and gains of more than 14% on Binance data. The recent move has pushed NEAR significantly higher, while the broader 7-day performance is also strongly positive.
The $2.55–$2.62 zone is the key area to watch for a continuation. If buyers defend this zone and price breaks above $2.635, the next targets could be $2.70, $2.85 and eventually $3.00+. A rejection and loss of $2.40 would weaken the bullish setup.
⚠️ Risk Management: NEAR has already made a strong move, so avoid chasing the pump. Wait for a clean retest or confirmation before entering and always use a proper stop loss.
#NEAR #NEARUSDT #CryptoSignal #altcoins #Binance
202
·
--
Рост
🚨 $SC /USDT BULLISH LONG SIGNAL 🚨
Signal: LONG / BUY 🟢
Entry Zone: $0.000735 – $0.000750
TP1: $0.000780
TP2: $0.000820
TP3: $0.000900
TP4: $0.000950
Stop Loss: $0.000705
Analysis:
SC is showing strong momentum after its recent breakout, with significant volume supporting the move. The $0.000735–$0.000750 zone is the key area to defend. If buyers hold this support and price reclaims $0.000780 with strength, the next upside targets come into focus around $0.000820, $0.000900 and $0.000950. Binance’s current market data also places SC among the stronger gainers.
⚠️ Risk Management: SC is highly volatile after the recent pump, so avoid chasing green candles. Wait for a pullback or confirmation around the entry zone and always use a proper stop loss.
{spot}(SCUSDT)
#SC #SCUSDT #Siacoin #CryptoSignal #Binance
🚨 $SC /USDT BULLISH LONG SIGNAL 🚨
Signal: LONG / BUY 🟢
Entry Zone: $0.000735 – $0.000750
TP1: $0.000780
TP2: $0.000820
TP3: $0.000900
TP4: $0.000950
Stop Loss: $0.000705
Analysis:
SC is showing strong momentum after its recent breakout, with significant volume supporting the move. The $0.000735–$0.000750 zone is the key area to defend. If buyers hold this support and price reclaims $0.000780 with strength, the next upside targets come into focus around $0.000820, $0.000900 and $0.000950. Binance’s current market data also places SC among the stronger gainers.
⚠️ Risk Management: SC is highly volatile after the recent pump, so avoid chasing green candles. Wait for a pullback or confirmation around the entry zone and always use a proper stop loss.
#SC #SCUSDT #Siacoin #CryptoSignal #Binance
Signal: LONG / BUY 🟢
Entry Zone: $0.000735 – $0.000750
TP1: $0.000780
TP2: $0.000820
TP3: $0.000900
TP4: $0.000950
Stop Loss: $0.000705
Analysis:
SC is showing strong momentum after its recent breakout, with significant volume supporting the move. The $0.000735–$0.000750 zone is the key area to defend. If buyers hold this support and price reclaims $0.000780 with strength, the next upside targets come into focus around $0.000820, $0.000900 and $0.000950. Binance’s current market data also places SC among the stronger gainers.
⚠️ Risk Management: SC is highly volatile after the recent pump, so avoid chasing green candles. Wait for a pullback or confirmation around the entry zone and always use a proper stop loss.
#SC #SCUSDT #Siacoin #CryptoSignal #Binance
64
·
--
Рост
🚨 $RAY /USDT BULLISH LONG SIGNAL 🚨
Signal: LONG / BUY 🟢
Entry Zone: $1.28 – $1.32
TP1: $1.38
TP2: $1.47
TP3: $1.60
TP4: $1.75
Stop Loss: $1.18
Analysis:
RAY is showing strong bullish momentum, with the latest market data showing the token up more than 20% over 24 hours and trading around the $1.31 area. The recent move has established $1.17–$1.20 as an important support zone, while $1.47 is the key resistance/high to watch. A clean breakout above $1.47 with strong volume could open the way toward $1.60 and $1.75.
⚠️ Risk Management: RAY has already made a strong move, so avoid chasing a sudden pump. Wait for a pullback or confirmation around the entry zone and always use a proper stop loss.
{spot}(RAYUSDT)
#RAY #RAYUSDT #Raydium #CryptoSignal #Binance
🚨 $RAY /USDT BULLISH LONG SIGNAL 🚨
Signal: LONG / BUY 🟢
Entry Zone: $1.28 – $1.32
TP1: $1.38
TP2: $1.47
TP3: $1.60
TP4: $1.75
Stop Loss: $1.18
Analysis:
RAY is showing strong bullish momentum, with the latest market data showing the token up more than 20% over 24 hours and trading around the $1.31 area. The recent move has established $1.17–$1.20 as an important support zone, while $1.47 is the key resistance/high to watch. A clean breakout above $1.47 with strong volume could open the way toward $1.60 and $1.75.
⚠️ Risk Management: RAY has already made a strong move, so avoid chasing a sudden pump. Wait for a pullback or confirmation around the entry zone and always use a proper stop loss.
#RAY #RAYUSDT #Raydium #CryptoSignal #Binance
Signal: LONG / BUY 🟢
Entry Zone: $1.28 – $1.32
TP1: $1.38
TP2: $1.47
TP3: $1.60
TP4: $1.75
Stop Loss: $1.18
Analysis:
RAY is showing strong bullish momentum, with the latest market data showing the token up more than 20% over 24 hours and trading around the $1.31 area. The recent move has established $1.17–$1.20 as an important support zone, while $1.47 is the key resistance/high to watch. A clean breakout above $1.47 with strong volume could open the way toward $1.60 and $1.75.
⚠️ Risk Management: RAY has already made a strong move, so avoid chasing a sudden pump. Wait for a pullback or confirmation around the entry zone and always use a proper stop loss.
#RAY #RAYUSDT #Raydium #CryptoSignal #Binance
144
·
--
Падение
🚨 $ETH /USDT BEARISH SHORT SIGNAL 🚨
Signal: SHORT / SELL 🔴
Entry Zone: $2,465 – $2,480
TP1: $2,450
TP2: $2,442
TP3: $2,420
TP4: $2,400
Stop Loss: $2,505
Analysis:
ETH is showing clear bearish pressure on the 1H chart after rejecting the $2,523.30 high. Price is trading below MA(25) at $2,490 and MA(99) at $2,491, while the order book shows strong sell-side pressure. The key support is $2,442.44; a confirmed break below this level could accelerate the downside toward $2,420 and $2,400. A strong reclaim above $2,490 would weaken the bearish setup.
⚠️ Risk Management: Avoid chasing the move near support. Wait for confirmation and always use a proper stop loss.
{future}(ETHUSDT)
#ETH #ETHUSDT #CryptoSignal #Ethereum #Binance
🚨 $ETH /USDT BEARISH SHORT SIGNAL 🚨
Signal: SHORT / SELL 🔴
Entry Zone: $2,465 – $2,480
TP1: $2,450
TP2: $2,442
TP3: $2,420
TP4: $2,400
Stop Loss: $2,505
Analysis:
ETH is showing clear bearish pressure on the 1H chart after rejecting the $2,523.30 high. Price is trading below MA(25) at $2,490 and MA(99) at $2,491, while the order book shows strong sell-side pressure. The key support is $2,442.44; a confirmed break below this level could accelerate the downside toward $2,420 and $2,400. A strong reclaim above $2,490 would weaken the bearish setup.
⚠️ Risk Management: Avoid chasing the move near support. Wait for confirmation and always use a proper stop loss.
#ETH #ETHUSDT #CryptoSignal #Ethereum #Binance
Signal: SHORT / SELL 🔴
Entry Zone: $2,465 – $2,480
TP1: $2,450
TP2: $2,442
TP3: $2,420
TP4: $2,400
Stop Loss: $2,505
Analysis:
ETH is showing clear bearish pressure on the 1H chart after rejecting the $2,523.30 high. Price is trading below MA(25) at $2,490 and MA(99) at $2,491, while the order book shows strong sell-side pressure. The key support is $2,442.44; a confirmed break below this level could accelerate the downside toward $2,420 and $2,400. A strong reclaim above $2,490 would weaken the bearish setup.
⚠️ Risk Management: Avoid chasing the move near support. Wait for confirmation and always use a proper stop loss.
#ETH #ETHUSDT #CryptoSignal #Ethereum #Binance
117
·
--
Падение
🚨 $BTC /USDT BEARISH SHORT SIGNAL 🚨
Signal: SHORT / SELL 🔴
Entry Zone: $78,150 – $78,450
TP1: $77,770
TP2: $77,400
TP3: $77,000
TP4: $76,500
Stop Loss: $79,050
Analysis:
BTC is showing bearish momentum on the 1H chart after rejecting the $79,760 resistance area. Price is trading below MA(25) at $78,794 and MA(99) at $79,187, keeping the short-term structure under seller control. The key support is $77,770; a clean breakdown below this level could trigger another move toward $77,400, $77,000 and lower liquidity zones. A recovery above $78,800 would weaken the bearish setup.
⚠️ Risk Management: Avoid chasing the move near support. Wait for confirmation and use a proper stop loss.
{future}(BTCUSDT)
#BTC #BTCUSDT #CryptoSignal #Bitcoin #Binance
🚨 $BTC /USDT BEARISH SHORT SIGNAL 🚨
Signal: SHORT / SELL 🔴
Entry Zone: $78,150 – $78,450
TP1: $77,770
TP2: $77,400
TP3: $77,000
TP4: $76,500
Stop Loss: $79,050
Analysis:
BTC is showing bearish momentum on the 1H chart after rejecting the $79,760 resistance area. Price is trading below MA(25) at $78,794 and MA(99) at $79,187, keeping the short-term structure under seller control. The key support is $77,770; a clean breakdown below this level could trigger another move toward $77,400, $77,000 and lower liquidity zones. A recovery above $78,800 would weaken the bearish setup.
⚠️ Risk Management: Avoid chasing the move near support. Wait for confirmation and use a proper stop loss.
#BTC #BTCUSDT #CryptoSignal #Bitcoin #Binance
Signal: SHORT / SELL 🔴
Entry Zone: $78,150 – $78,450
TP1: $77,770
TP2: $77,400
TP3: $77,000
TP4: $76,500
Stop Loss: $79,050
Analysis:
BTC is showing bearish momentum on the 1H chart after rejecting the $79,760 resistance area. Price is trading below MA(25) at $78,794 and MA(99) at $79,187, keeping the short-term structure under seller control. The key support is $77,770; a clean breakdown below this level could trigger another move toward $77,400, $77,000 and lower liquidity zones. A recovery above $78,800 would weaken the bearish setup.
⚠️ Risk Management: Avoid chasing the move near support. Wait for confirmation and use a proper stop loss.
#BTC #BTCUSDT #CryptoSignal #Bitcoin #Binance
140
·
--
Падение
🚨 $BNB /USDT BEARISH SHORT SIGNAL 🚨
Signal: SHORT / SELL 🔴
Entry Zone: $722 – $726
TP1: $718
TP2: $713
TP3: $708
TP4: $700
Stop Loss: $734
Analysis:
BNB is showing strong bearish pressure on the 1H chart after a sharp rejection from $757.78. Price is trading below MA(7), MA(25), and MA(99), confirming that sellers currently have control. The recent low at $717.61 is the key support; a clean break below it could accelerate the downside toward $713 and $708. Any recovery toward the entry zone should be watched for rejection before entering.
⚠️ Risk Management: Avoid chasing the move after a large drop. Wait for confirmation and always use a proper stop loss.
{future}(BNBUSDT)
#BNB #BNBUSDT #CryptoSignal #ShortSignal #Binance
🚨 $BNB /USDT BEARISH SHORT SIGNAL 🚨
Signal: SHORT / SELL 🔴
Entry Zone: $722 – $726
TP1: $718
TP2: $713
TP3: $708
TP4: $700
Stop Loss: $734
Analysis:
BNB is showing strong bearish pressure on the 1H chart after a sharp rejection from $757.78. Price is trading below MA(7), MA(25), and MA(99), confirming that sellers currently have control. The recent low at $717.61 is the key support; a clean break below it could accelerate the downside toward $713 and $708. Any recovery toward the entry zone should be watched for rejection before entering.
⚠️ Risk Management: Avoid chasing the move after a large drop. Wait for confirmation and always use a proper stop loss.
#BNB #BNBUSDT #CryptoSignal #ShortSignal #Binance
Signal: SHORT / SELL 🔴
Entry Zone: $722 – $726
TP1: $718
TP2: $713
TP3: $708
TP4: $700
Stop Loss: $734
Analysis:
BNB is showing strong bearish pressure on the 1H chart after a sharp rejection from $757.78. Price is trading below MA(7), MA(25), and MA(99), confirming that sellers currently have control. The recent low at $717.61 is the key support; a clean break below it could accelerate the downside toward $713 and $708. Any recovery toward the entry zone should be watched for rejection before entering.
⚠️ Risk Management: Avoid chasing the move after a large drop. Wait for confirmation and always use a proper stop loss.
#BNB #BNBUSDT #CryptoSignal #ShortSignal #Binance
2
203
·
--
Рост
🚨 $KAT /USDT BULLISH LONG SIGNAL 🚨
Signal: LONG / BUY 🟢
Entry Zone: $0.00615 – $0.00625
TP1: $0.00645
TP2: $0.00664
TP3: $0.00690
TP4: $0.00720
Stop Loss: $0.00575
Analysis:
KAT is holding strong above the MA(7) and remains well above the MA(25), showing that buyers are still in control. The price is consolidating near $0.00623 after touching $0.00664, while the order book shows strong bid pressure around 74%. If the $0.00615–$0.00625 zone holds, a retest of $0.00664 is likely. A clean breakout above $0.00664 could trigger another bullish leg toward $0.00690–$0.00720.
⚠️ Risk Management: Wait for confirmation and avoid chasing a sudden pump. Always use a stop loss and manage your position carefully.
{future}(KATUSDT)
#KATA #KATUSDT #CryptoSignal #altcoins #Binance
🚨 $KAT /USDT BULLISH LONG SIGNAL 🚨
Signal: LONG / BUY 🟢
Entry Zone: $0.00615 – $0.00625
TP1: $0.00645
TP2: $0.00664
TP3: $0.00690
TP4: $0.00720
Stop Loss: $0.00575
Analysis:
KAT is holding strong above the MA(7) and remains well above the MA(25), showing that buyers are still in control. The price is consolidating near $0.00623 after touching $0.00664, while the order book shows strong bid pressure around 74%. If the $0.00615–$0.00625 zone holds, a retest of $0.00664 is likely. A clean breakout above $0.00664 could trigger another bullish leg toward $0.00690–$0.00720.
⚠️ Risk Management: Wait for confirmation and avoid chasing a sudden pump. Always use a stop loss and manage your position carefully.
#KATA #KATUSDT #CryptoSignal #altcoins #Binance
Signal: LONG / BUY 🟢
Entry Zone: $0.00615 – $0.00625
TP1: $0.00645
TP2: $0.00664
TP3: $0.00690
TP4: $0.00720
Stop Loss: $0.00575
Analysis:
KAT is holding strong above the MA(7) and remains well above the MA(25), showing that buyers are still in control. The price is consolidating near $0.00623 after touching $0.00664, while the order book shows strong bid pressure around 74%. If the $0.00615–$0.00625 zone holds, a retest of $0.00664 is likely. A clean breakout above $0.00664 could trigger another bullish leg toward $0.00690–$0.00720.
⚠️ Risk Management: Wait for confirmation and avoid chasing a sudden pump. Always use a stop loss and manage your position carefully.
#KATA #KATUSDT #CryptoSignal #altcoins #Binance
2
261
·
--
Рост
🚨 $IOST /USDT BULLISH LONG SIGNAL 🚨
Signal: LONG / BUY 🟢
Entry Zone: $0.00170 – $0.00178
TP1: $0.00190
TP2: $0.00205
TP3: $0.00225
TP4: $0.00244
Stop Loss: $0.00145
Analysis:
IOST has delivered a massive breakout and is currently consolidating after reaching a 24H high of $0.002448. The price is still holding above the key MA(25) around $0.001462, while the order book shows stronger buying pressure. If $0.00170–$0.00178 holds as support, bulls could attempt another move toward $0.00190 and then the previous high at $0.002448. A clean breakout above $0.002448 could open the door for further upside.
⚠️ Risk Management: Do not chase sudden pumps. Wait for confirmation around the entry zone and always use a proper stop loss.
{future}(IOSTUSDT)
#IOST #IOSTUSDT #CryptoSignal #altcoins #Binance
🚨 $IOST /USDT BULLISH LONG SIGNAL 🚨
Signal: LONG / BUY 🟢
Entry Zone: $0.00170 – $0.00178
TP1: $0.00190
TP2: $0.00205
TP3: $0.00225
TP4: $0.00244
Stop Loss: $0.00145
Analysis:
IOST has delivered a massive breakout and is currently consolidating after reaching a 24H high of $0.002448. The price is still holding above the key MA(25) around $0.001462, while the order book shows stronger buying pressure. If $0.00170–$0.00178 holds as support, bulls could attempt another move toward $0.00190 and then the previous high at $0.002448. A clean breakout above $0.002448 could open the door for further upside.
⚠️ Risk Management: Do not chase sudden pumps. Wait for confirmation around the entry zone and always use a proper stop loss.
#IOST #IOSTUSDT #CryptoSignal #altcoins #Binance
Signal: LONG / BUY 🟢
Entry Zone: $0.00170 – $0.00178
TP1: $0.00190
TP2: $0.00205
TP3: $0.00225
TP4: $0.00244
Stop Loss: $0.00145
Analysis:
IOST has delivered a massive breakout and is currently consolidating after reaching a 24H high of $0.002448. The price is still holding above the key MA(25) around $0.001462, while the order book shows stronger buying pressure. If $0.00170–$0.00178 holds as support, bulls could attempt another move toward $0.00190 and then the previous high at $0.002448. A clean breakout above $0.002448 could open the door for further upside.
⚠️ Risk Management: Do not chase sudden pumps. Wait for confirmation around the entry zone and always use a proper stop loss.
#IOST #IOSTUSDT #CryptoSignal #altcoins #Binance
2
1
375
·
--
Рост
🚨 $ETH /USDT BULLISH SETUP — BUY SIGNAL 🚨
📊 Signal: LONG / BUY
💰 Entry Zone: $2,495 – $2,505
🎯 TP1: $2,515
🎯 TP2: $2,523
🎯 TP3: $2,550
🛑 Stop Loss: $2,475
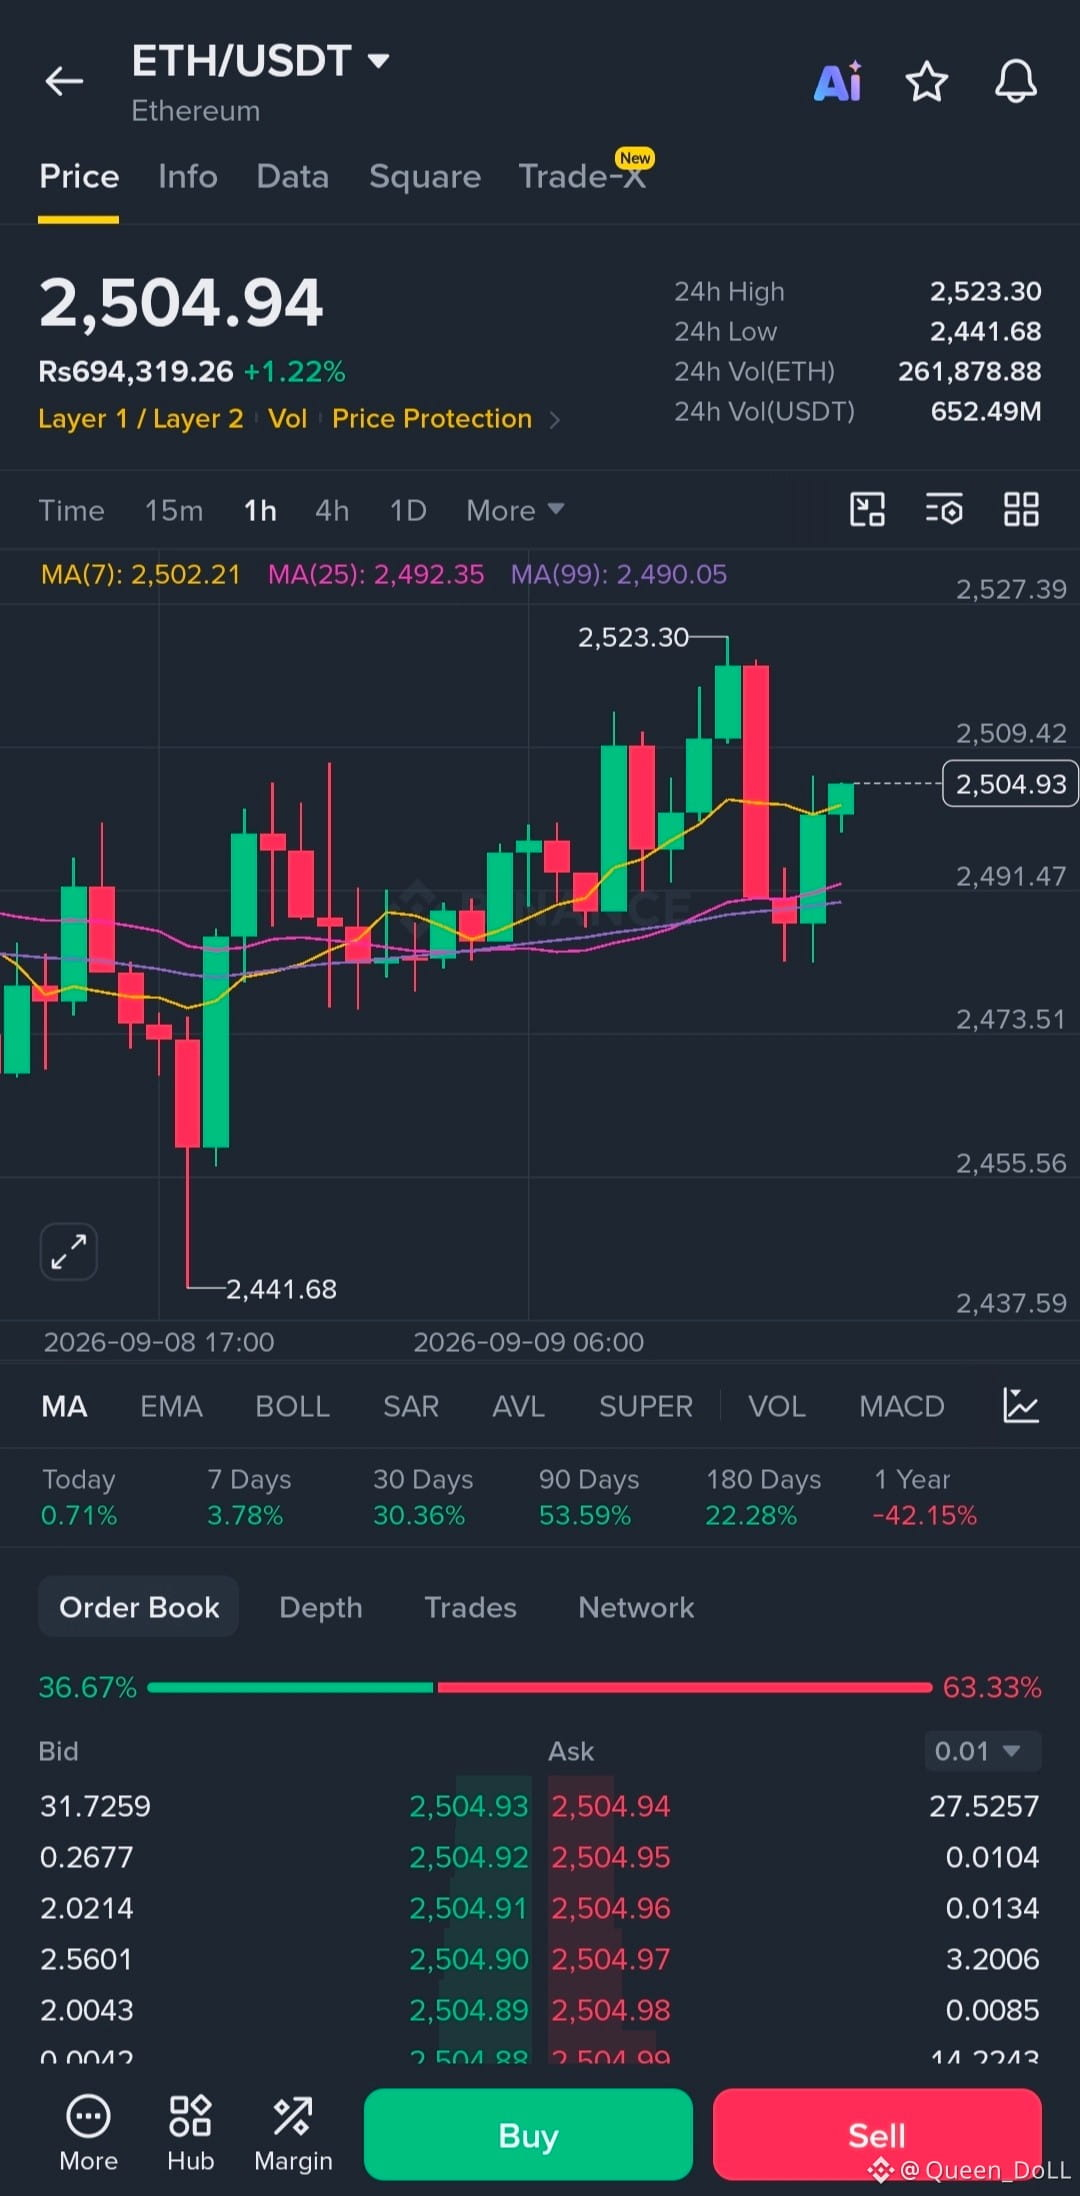
ETH is holding above the MA(7), MA(25), and MA(99) on the 1H chart, showing a bullish structure. Price is recovering after the recent pullback and is again testing the $2,509 resistance area. A clean breakout above $2,523 could open the way toward $2,550.
⚠️ Use proper risk management and wait for confirmation before entering. Avoid chasing sudden pumps.
#ETH #ETHUSDT #Ethereum #cryptotrading #Binance
🚨 $ETH /USDT BULLISH SETUP — BUY SIGNAL 🚨
📊 Signal: LONG / BUY
💰 Entry Zone: $2,495 – $2,505
🎯 TP1: $2,515
🎯 TP2: $2,523
🎯 TP3: $2,550
🛑 Stop Loss: $2,475
ETH is holding above the MA(7), MA(25), and MA(99) on the 1H chart, showing a bullish structure. Price is recovering after the recent pullback and is again testing the $2,509 resistance area. A clean breakout above $2,523 could open the way toward $2,550.
⚠️ Use proper risk management and wait for confirmation before entering. Avoid chasing sudden pumps.
#ETH #ETHUSDT #Ethereum #cryptotrading #Binance
📊 Signal: LONG / BUY
💰 Entry Zone: $2,495 – $2,505
🎯 TP1: $2,515
🎯 TP2: $2,523
🎯 TP3: $2,550
🛑 Stop Loss: $2,475
ETH is holding above the MA(7), MA(25), and MA(99) on the 1H chart, showing a bullish structure. Price is recovering after the recent pullback and is again testing the $2,509 resistance area. A clean breakout above $2,523 could open the way toward $2,550.
⚠️ Use proper risk management and wait for confirmation before entering. Avoid chasing sudden pumps.
#ETH #ETHUSDT #Ethereum #cryptotrading #Binance
2
2
90
·
--
Рост
🚨 $BTC /USDT BULLISH SETUP — BUY SIGNAL 🚨
📊 Signal: LONG / BUY
💰 Entry Zone: $79,250 – $79,350
🎯 TP1: $79,500
🎯 TP2: $79,760
🎯 TP3: $80,200
🛑 Stop Loss: $78,900
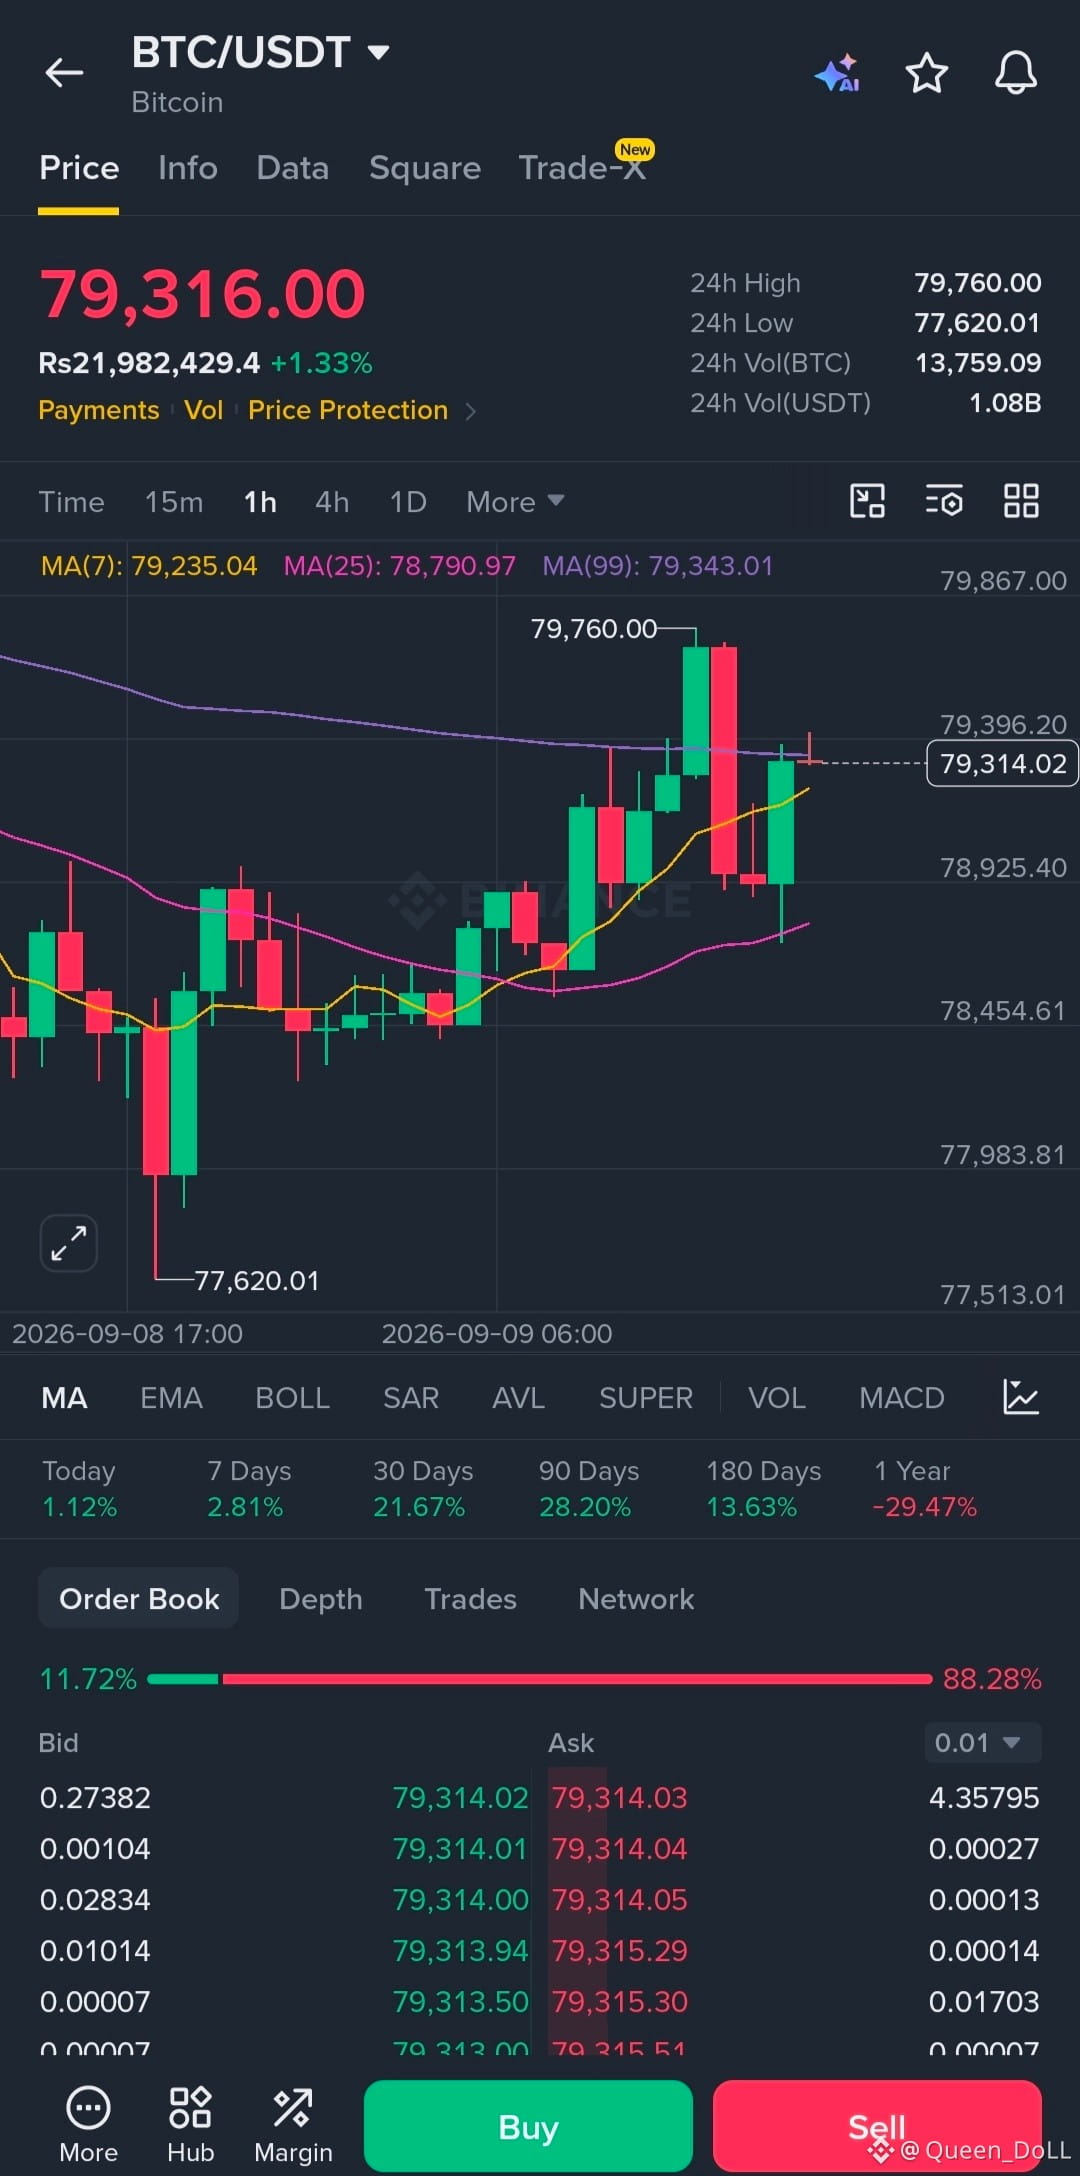
BTC is showing bullish momentum on the 1H chart, holding above the MA(7) and MA(25) with buyers pushing price back toward the $79,760 resistance. A clean breakout above this level could open the way toward $80K+. Wait for confirmation and avoid chasing a sudden pump.
⚠️ Trade with proper risk management and never risk more than you can afford to lose.
{future}(BTCUSDT)
#BTC #BTCUSDT #Bitcoin #cryptotrading #Binance
🚨 $BTC /USDT BULLISH SETUP — BUY SIGNAL 🚨
📊 Signal: LONG / BUY
💰 Entry Zone: $79,250 – $79,350
🎯 TP1: $79,500
🎯 TP2: $79,760
🎯 TP3: $80,200
🛑 Stop Loss: $78,900
BTC is showing bullish momentum on the 1H chart, holding above the MA(7) and MA(25) with buyers pushing price back toward the $79,760 resistance. A clean breakout above this level could open the way toward $80K+. Wait for confirmation and avoid chasing a sudden pump.
⚠️ Trade with proper risk management and never risk more than you can afford to lose.
#BTC #BTCUSDT #Bitcoin #cryptotrading #Binance
📊 Signal: LONG / BUY
💰 Entry Zone: $79,250 – $79,350
🎯 TP1: $79,500
🎯 TP2: $79,760
🎯 TP3: $80,200
🛑 Stop Loss: $78,900
BTC is showing bullish momentum on the 1H chart, holding above the MA(7) and MA(25) with buyers pushing price back toward the $79,760 resistance. A clean breakout above this level could open the way toward $80K+. Wait for confirmation and avoid chasing a sudden pump.
⚠️ Trade with proper risk management and never risk more than you can afford to lose.
#BTC #BTCUSDT #Bitcoin #cryptotrading #Binance
2
1
202
·
--
Рост
🚨 $FF /USDC BULLISH BREAKOUT SIGNAL 🚀
LONG / BUY
Entry Zone: $0.1490–$0.1520
TP1: $0.1595
TP2: $0.1650
TP3: $0.1720
Stop Loss: $0.1430
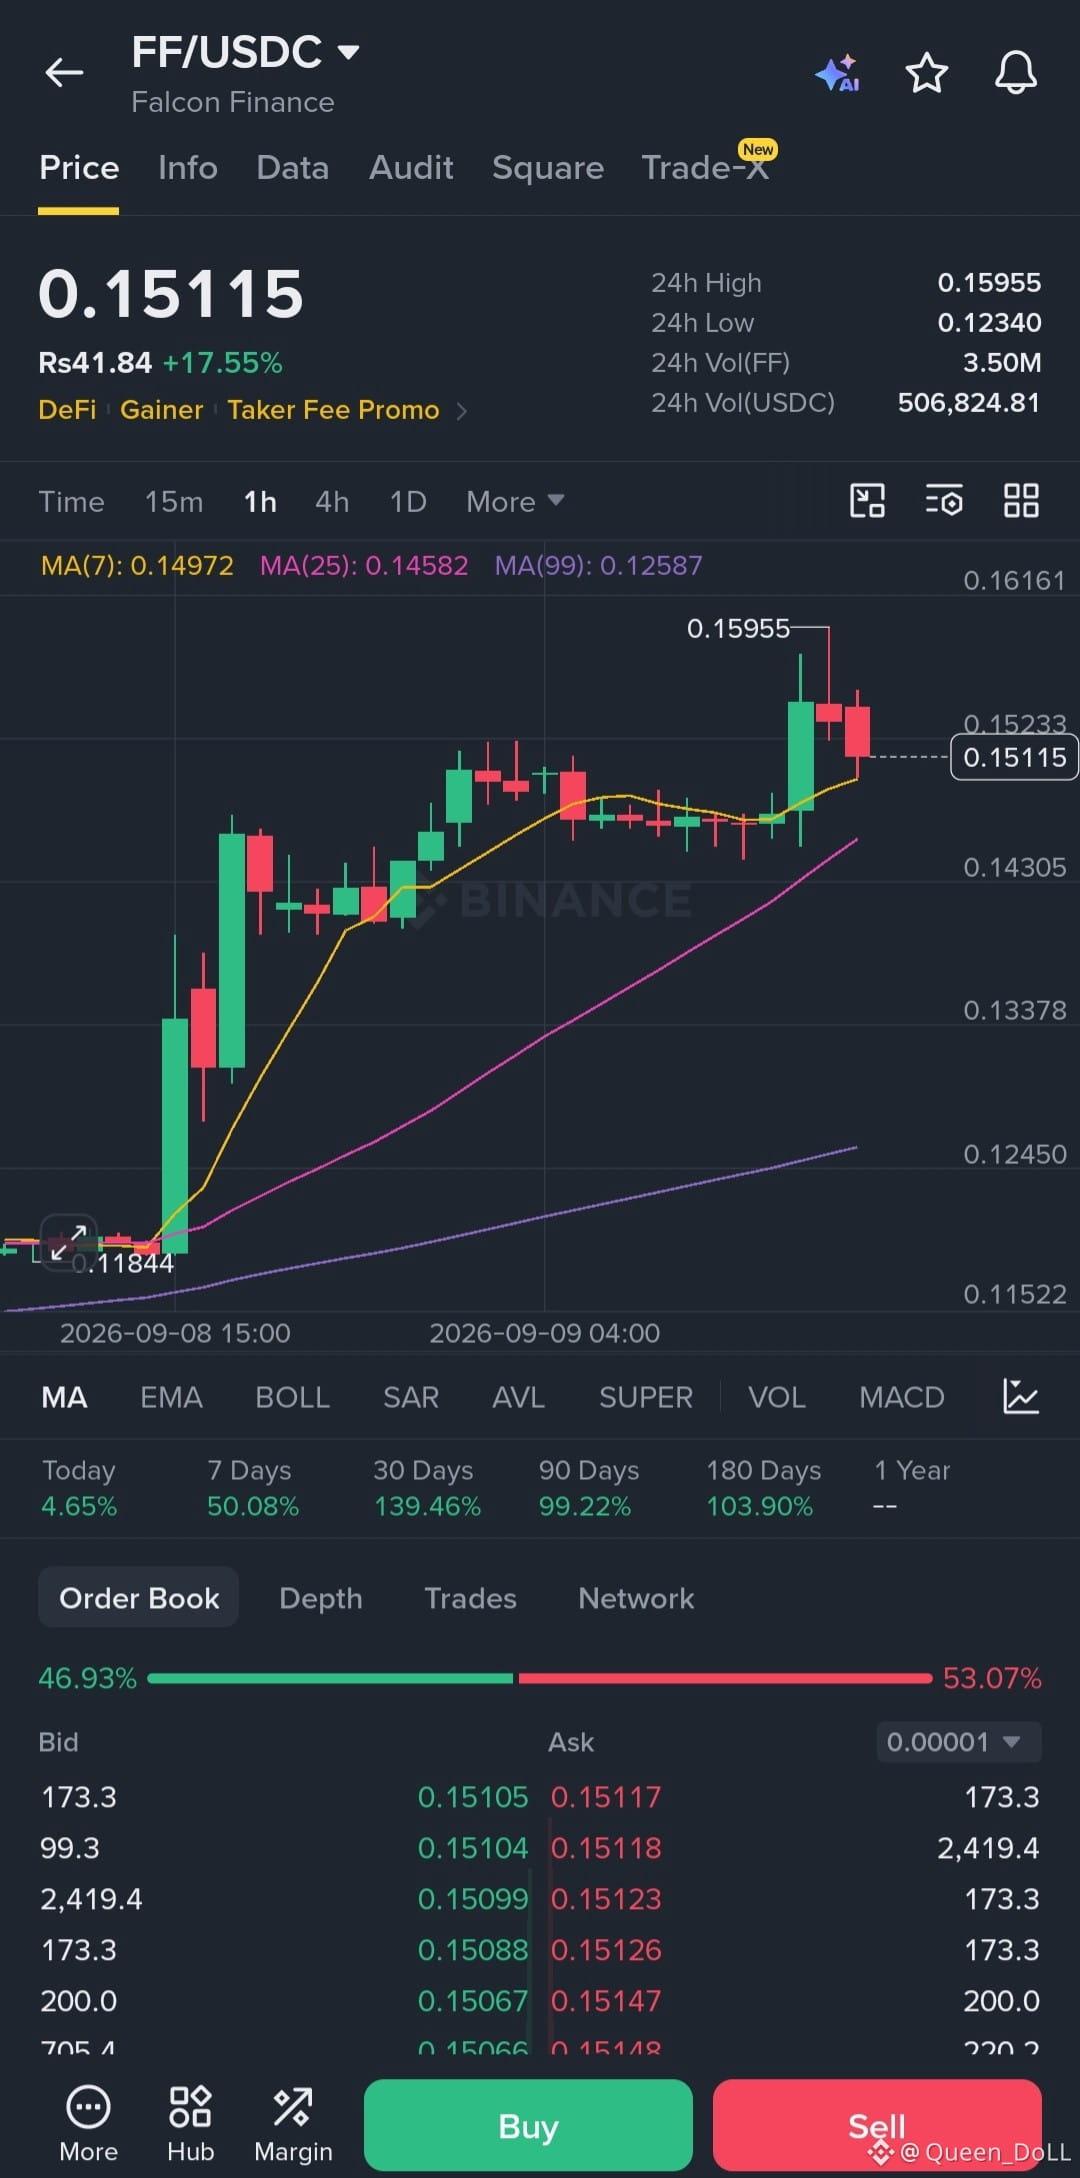
$FF is holding above the key MA(7) and MA(25) on the 1H chart after a strong breakout from the $0.1184 area. Price recently tested $0.15955 and is now pulling back slightly while remaining above the short-term moving averages. A clean break above $0.15955 could open the way toward $0.165 and $0.172. Prefer a controlled entry on the pullback rather than chasing the move. Manage risk carefully
{future}(FFUSDT)
#FF #FFUSDC #cryptosignal #Altcoins #Binance
🚨 $FF /USDC BULLISH BREAKOUT SIGNAL 🚀
LONG / BUY
Entry Zone: $0.1490–$0.1520
TP1: $0.1595
TP2: $0.1650
TP3: $0.1720
Stop Loss: $0.1430
$FF is holding above the key MA(7) and MA(25) on the 1H chart after a strong breakout from the $0.1184 area. Price recently tested $0.15955 and is now pulling back slightly while remaining above the short-term moving averages. A clean break above $0.15955 could open the way toward $0.165 and $0.172. Prefer a controlled entry on the pullback rather than chasing the move. Manage risk carefully
#FF #FFUSDC #cryptosignal #Altcoins #Binance
LONG / BUY
Entry Zone: $0.1490–$0.1520
TP1: $0.1595
TP2: $0.1650
TP3: $0.1720
Stop Loss: $0.1430
$FF is holding above the key MA(7) and MA(25) on the 1H chart after a strong breakout from the $0.1184 area. Price recently tested $0.15955 and is now pulling back slightly while remaining above the short-term moving averages. A clean break above $0.15955 could open the way toward $0.165 and $0.172. Prefer a controlled entry on the pullback rather than chasing the move. Manage risk carefully
#FF #FFUSDC #cryptosignal #Altcoins #Binance
2
1
231
·
--
Рост
🚨 $RAY /USDC BULLISH RECOVERY SIGNAL 🚀
LONG / BUY
Entry Zone: $1.285–$1.305
TP1: $1.350
TP2: $1.405
TP3: $1.475
Stop Loss: $1.245
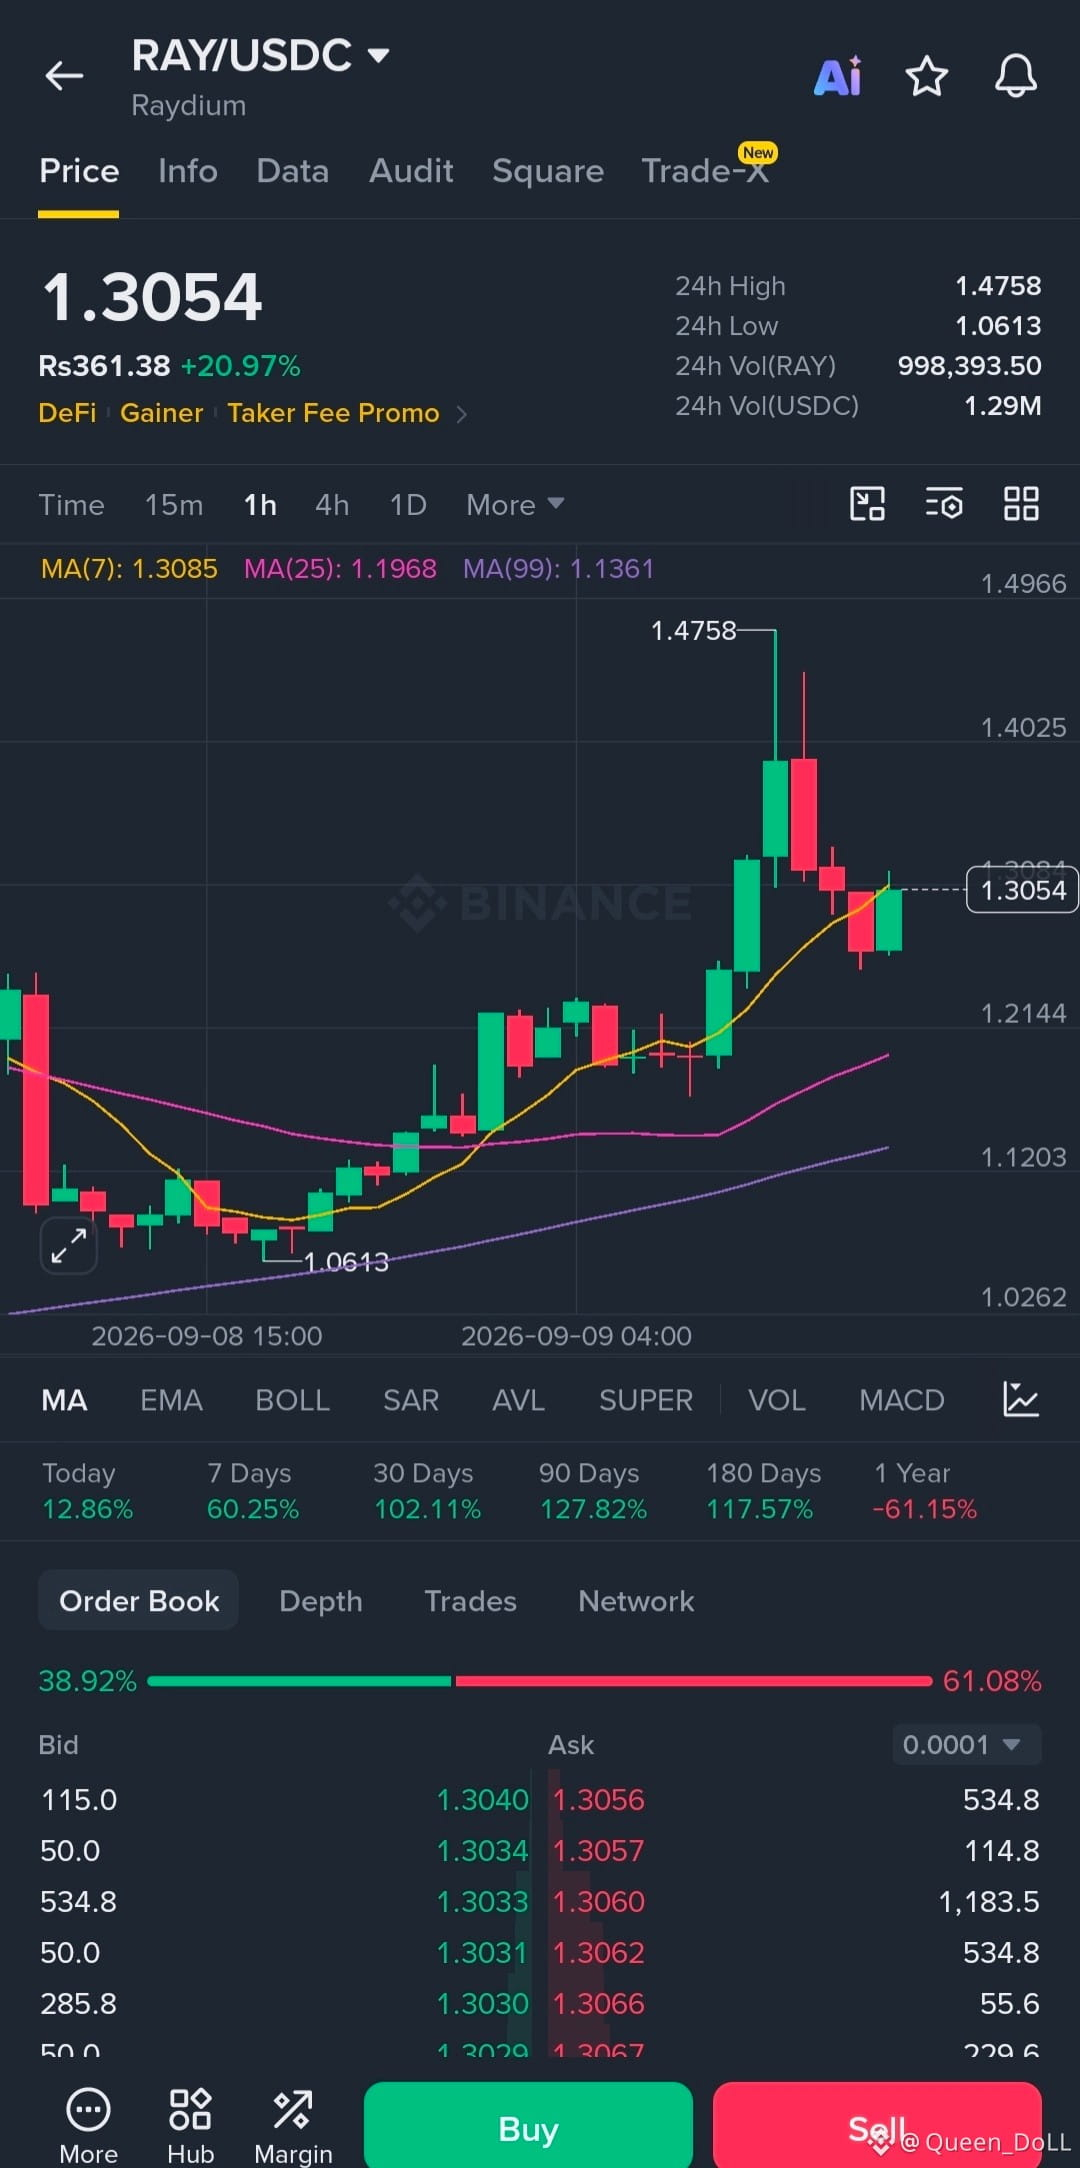
$RAY is showing strong bullish structure on the 1H chart after a powerful move from the $1.06 area toward $1.475. Price is now consolidating around $1.30 while holding above the key MA(25) and MA(99), suggesting buyers are still defending the trend. A reclaim of $1.35 could push RAY toward $1.40 and potentially retest the $1.475 resistance. Avoid chasing a sudden pump and manage risk carefully.
{spot}(RAYUSDT)
#Ray #RAYUSDC #CryptoSignal #Altcoins #Binance
🚨 $RAY /USDC BULLISH RECOVERY SIGNAL 🚀
LONG / BUY
Entry Zone: $1.285–$1.305
TP1: $1.350
TP2: $1.405
TP3: $1.475
Stop Loss: $1.245
$RAY is showing strong bullish structure on the 1H chart after a powerful move from the $1.06 area toward $1.475. Price is now consolidating around $1.30 while holding above the key MA(25) and MA(99), suggesting buyers are still defending the trend. A reclaim of $1.35 could push RAY toward $1.40 and potentially retest the $1.475 resistance. Avoid chasing a sudden pump and manage risk carefully.
#Ray #RAYUSDC #CryptoSignal #Altcoins #Binance
LONG / BUY
Entry Zone: $1.285–$1.305
TP1: $1.350
TP2: $1.405
TP3: $1.475
Stop Loss: $1.245
$RAY is showing strong bullish structure on the 1H chart after a powerful move from the $1.06 area toward $1.475. Price is now consolidating around $1.30 while holding above the key MA(25) and MA(99), suggesting buyers are still defending the trend. A reclaim of $1.35 could push RAY toward $1.40 and potentially retest the $1.475 resistance. Avoid chasing a sudden pump and manage risk carefully.
#Ray #RAYUSDC #CryptoSignal #Altcoins #Binance
2
202
·
--
Рост
🚨 $IOST /USDT BULLISH BREAKOUT SIGNAL 🚀
LONG / BUY
Entry Zone: $0.001240–$0.001275
TP1: $0.001326
TP2: $0.001400
TP3: $0.001500
Stop Loss: $0.001180
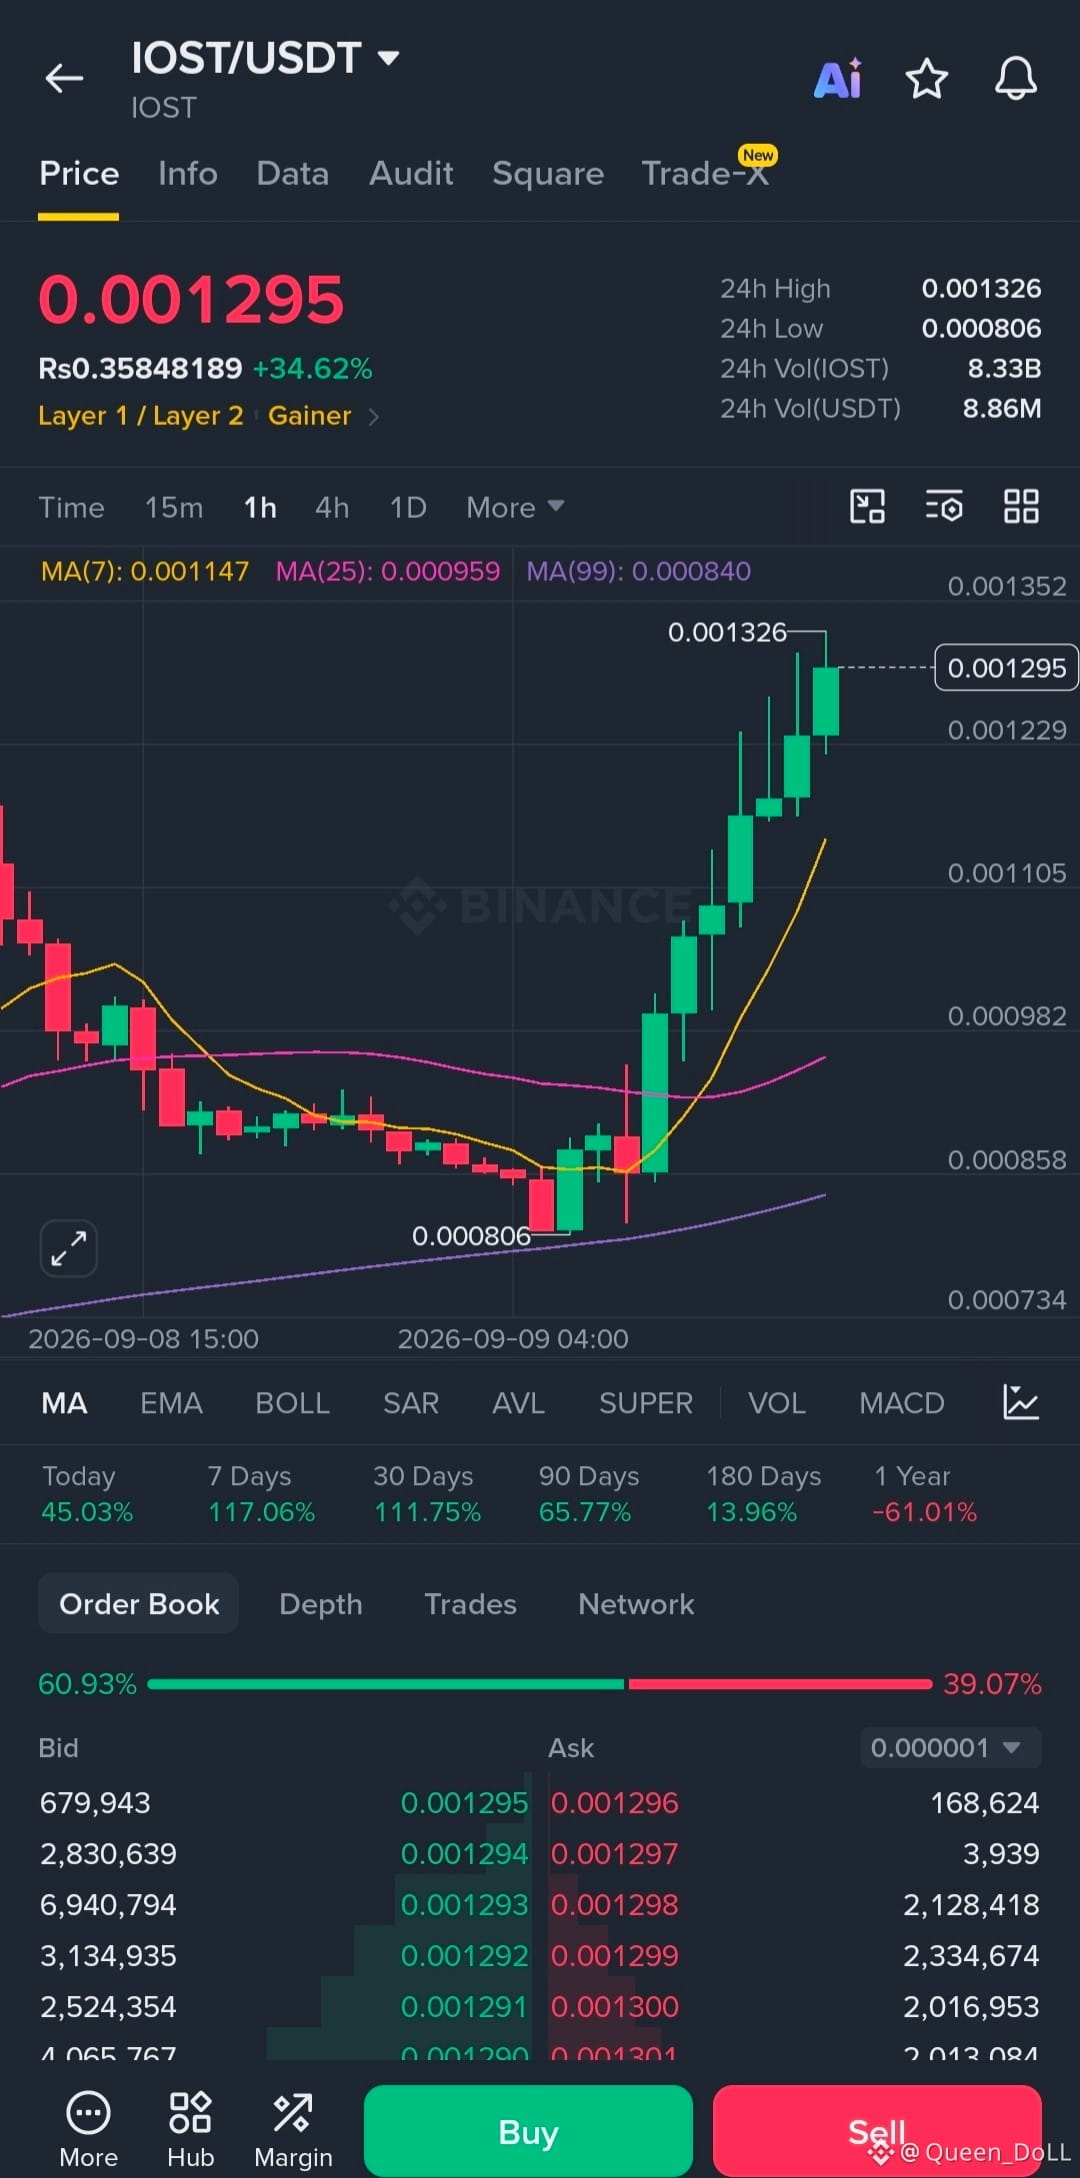
$IOST is showing strong bullish momentum on the 1H chart after breaking above key moving averages. Price is holding well near $0.001295 after pushing toward the $0.001326 resistance, while buying pressure remains strong. A clean breakout above $0.001326 could open the way toward $0.00140 and $0.00150. Prefer entries on a small pullback instead of chasing a vertical candle. Manage risk carefully and protect your capital.
{future}(IOSTUSDT)
#IOST #IOSTUSDT #CryptoSignal #altcoins #Binance
🚨 $IOST /USDT BULLISH BREAKOUT SIGNAL 🚀
LONG / BUY
Entry Zone: $0.001240–$0.001275
TP1: $0.001326
TP2: $0.001400
TP3: $0.001500
Stop Loss: $0.001180
$IOST is showing strong bullish momentum on the 1H chart after breaking above key moving averages. Price is holding well near $0.001295 after pushing toward the $0.001326 resistance, while buying pressure remains strong. A clean breakout above $0.001326 could open the way toward $0.00140 and $0.00150. Prefer entries on a small pullback instead of chasing a vertical candle. Manage risk carefully and protect your capital.
#IOST #IOSTUSDT #CryptoSignal #altcoins #Binance
LONG / BUY
Entry Zone: $0.001240–$0.001275
TP1: $0.001326
TP2: $0.001400
TP3: $0.001500
Stop Loss: $0.001180
$IOST is showing strong bullish momentum on the 1H chart after breaking above key moving averages. Price is holding well near $0.001295 after pushing toward the $0.001326 resistance, while buying pressure remains strong. A clean breakout above $0.001326 could open the way toward $0.00140 and $0.00150. Prefer entries on a small pullback instead of chasing a vertical candle. Manage risk carefully and protect your capital.
#IOST #IOSTUSDT #CryptoSignal #altcoins #Binance
2
1
499
·
--
Рост
🚨 $SAHARA BULLS ARE STEPPING IN‼️
Entry Zone: $0.009700–$0.009730
TP1: $0.009850
TP2: $0.009980
TP3: $0.010250
Stop Loss: $0.009440
SAHARA is holding above the $0.0094 support floor, showing signs that the recent selling pressure may be starting to cool down. Buyers are gradually trying to regain control, and if the current support continues to hold, I’m looking for a move toward $0.009850 and $0.009980 first. A clean break above the $0.010 psychological level could open the way toward $0.010250.
I’d wait for confirmation and keep the risk controlled below the stop-loss level.
{future}(SAHARAUSDT)
#SAHARA #SAHARAUSDT #CryptoTrading #altcoins #Binance
🚨 $SAHARA BULLS ARE STEPPING IN‼️
Entry Zone: $0.009700–$0.009730
TP1: $0.009850
TP2: $0.009980
TP3: $0.010250
Stop Loss: $0.009440
SAHARA is holding above the $0.0094 support floor, showing signs that the recent selling pressure may be starting to cool down. Buyers are gradually trying to regain control, and if the current support continues to hold, I’m looking for a move toward $0.009850 and $0.009980 first. A clean break above the $0.010 psychological level could open the way toward $0.010250.
I’d wait for confirmation and keep the risk controlled below the stop-loss level.
#SAHARA #SAHARAUSDT #CryptoTrading #altcoins #Binance
Entry Zone: $0.009700–$0.009730
TP1: $0.009850
TP2: $0.009980
TP3: $0.010250
Stop Loss: $0.009440
SAHARA is holding above the $0.0094 support floor, showing signs that the recent selling pressure may be starting to cool down. Buyers are gradually trying to regain control, and if the current support continues to hold, I’m looking for a move toward $0.009850 and $0.009980 first. A clean break above the $0.010 psychological level could open the way toward $0.010250.
I’d wait for confirmation and keep the risk controlled below the stop-loss level.
#SAHARA #SAHARAUSDT #CryptoTrading #altcoins #Binance
2
109
·
--
Рост
🚨 $FET BULLS ARE DEFENDING SUPPORT‼️
Entry Zone: $0.1797–$0.1810
TP1: $0.1835
TP2: $0.1873
TP3: $0.1911
Stop Loss: $0.1759
FET is starting to stabilize around the current support zone, with buyers gradually stepping in and absorbing the selling pressure. If this area holds, I’m looking for a move toward $0.1835 first, followed by $0.1873 and potentially $0.1911 if momentum continues to build. The key confirmation will be stronger buying volume and a clean hold above the entry zone.
I’d keep the risk controlled and avoid chasing if price runs too far from the entry.
{future}(FETUSDT)
#FET #FETUSDT #CryptoTrading #Altcoins #Binance
🚨 $FET BULLS ARE DEFENDING SUPPORT‼️
Entry Zone: $0.1797–$0.1810
TP1: $0.1835
TP2: $0.1873
TP3: $0.1911
Stop Loss: $0.1759
FET is starting to stabilize around the current support zone, with buyers gradually stepping in and absorbing the selling pressure. If this area holds, I’m looking for a move toward $0.1835 first, followed by $0.1873 and potentially $0.1911 if momentum continues to build. The key confirmation will be stronger buying volume and a clean hold above the entry zone.
I’d keep the risk controlled and avoid chasing if price runs too far from the entry.
#FET #FETUSDT #CryptoTrading #Altcoins #Binance
Entry Zone: $0.1797–$0.1810
TP1: $0.1835
TP2: $0.1873
TP3: $0.1911
Stop Loss: $0.1759
FET is starting to stabilize around the current support zone, with buyers gradually stepping in and absorbing the selling pressure. If this area holds, I’m looking for a move toward $0.1835 first, followed by $0.1873 and potentially $0.1911 if momentum continues to build. The key confirmation will be stronger buying volume and a clean hold above the entry zone.
I’d keep the risk controlled and avoid chasing if price runs too far from the entry.
#FET #FETUSDT #CryptoTrading #Altcoins #Binance
2
1
164
·
--
Рост
🚨 $LTC BOUNCE SETUP IS LOOKING STRONG‼️
Entry Zone: $54.40–$54.60
TP1: $55.10
TP2: $55.80
TP3: $56.50
Stop Loss: $53.30
LTC is holding firmly around the $54.50 support zone, where buyers are starting to show interest after the recent pressure. If this area continues to hold, I’m expecting a gradual move toward $55.10 and $55.80, with $56.50 as the bigger upside target. The key here is a clean defense of support followed by stronger buying volume.
I’d avoid chasing a sudden spike and keep the risk controlled below the invalidation level.
{future}(LTCUSDT)
#LTC #LTCUSDT #CryptoTrading #Altcoins #Binance
🚨 $LTC BOUNCE SETUP IS LOOKING STRONG‼️
Entry Zone: $54.40–$54.60
TP1: $55.10
TP2: $55.80
TP3: $56.50
Stop Loss: $53.30
LTC is holding firmly around the $54.50 support zone, where buyers are starting to show interest after the recent pressure. If this area continues to hold, I’m expecting a gradual move toward $55.10 and $55.80, with $56.50 as the bigger upside target. The key here is a clean defense of support followed by stronger buying volume.
I’d avoid chasing a sudden spike and keep the risk controlled below the invalidation level.
#LTC #LTCUSDT #CryptoTrading #Altcoins #Binance
Entry Zone: $54.40–$54.60
TP1: $55.10
TP2: $55.80
TP3: $56.50
Stop Loss: $53.30
LTC is holding firmly around the $54.50 support zone, where buyers are starting to show interest after the recent pressure. If this area continues to hold, I’m expecting a gradual move toward $55.10 and $55.80, with $56.50 as the bigger upside target. The key here is a clean defense of support followed by stronger buying volume.
I’d avoid chasing a sudden spike and keep the risk controlled below the invalidation level.
#LTC #LTCUSDT #CryptoTrading #Altcoins #Binance
2
112
Войдите, чтобы посмотреть больше материала
Присоединяйтесь к пользователям криптовалют по всему миру на Binance Square
⚡️ Получайте новейшую и полезную информацию о криптоактивах.
💬 Нам доверяет крупнейшая в мире криптобиржа.
👍 Получите достоверные аналитические данные от верифицированных создателей контента.
Эл. почта/номер телефона
В тренде
AppleDebutsFoldablePhone
Просмотров: 21,058
433 обсуждают
Apple just dropped the foldable iPhone — and the market is paying attention. This isn't just another product cycle; it's a new product category, a new CEO on stage, and a $1,999 price tag that pushes $AAPL further into ultra-premium territory. Foldables are the narrative, and Apple is now the headline.
#appledebutsfoldablephone #EUExtendsCentralContactPointToCASPs #US10YTreasuryYieldHitsHighestSinceNov2023 #BrentCrudeTops$100 #USTreasuryToBuyBackUpTo$6BLongDatedDebt
KimHotbae
·Лайков: 2
·Просмотров: 2.6k
IranSaysReadyToEscalateWarWithUS
Просмотров: 1,071
54 обсуждают
EUExtendsCentralContactPointToCASPs
Просмотров: 5,167
155 обсуждают