
Wealth Crypto
387 ໂພສ

Wealth Crypto
ລາຍງານ
ບລັອກຜູ້ໃຊ້
full time trader with 5 years of experience in the market analyst with the real time crypto tradeing. ( Twitter/X- Wealth Crypto)
ເປີດການຊື້ຂາຍ
ຜູ້ຊື້ຂາຍປະຈໍາ
2.5 ປີ
62 ກໍາລັງຕິດຕາມ
72 ຜູ້ຕິດຕາມ
96 Liked
ໂພສ
Portfolio
ທັງໝົດ
ວົງຢືມ
ວີດີໂອ
ປັກໝຸດ
ເບິ່ງການແປ
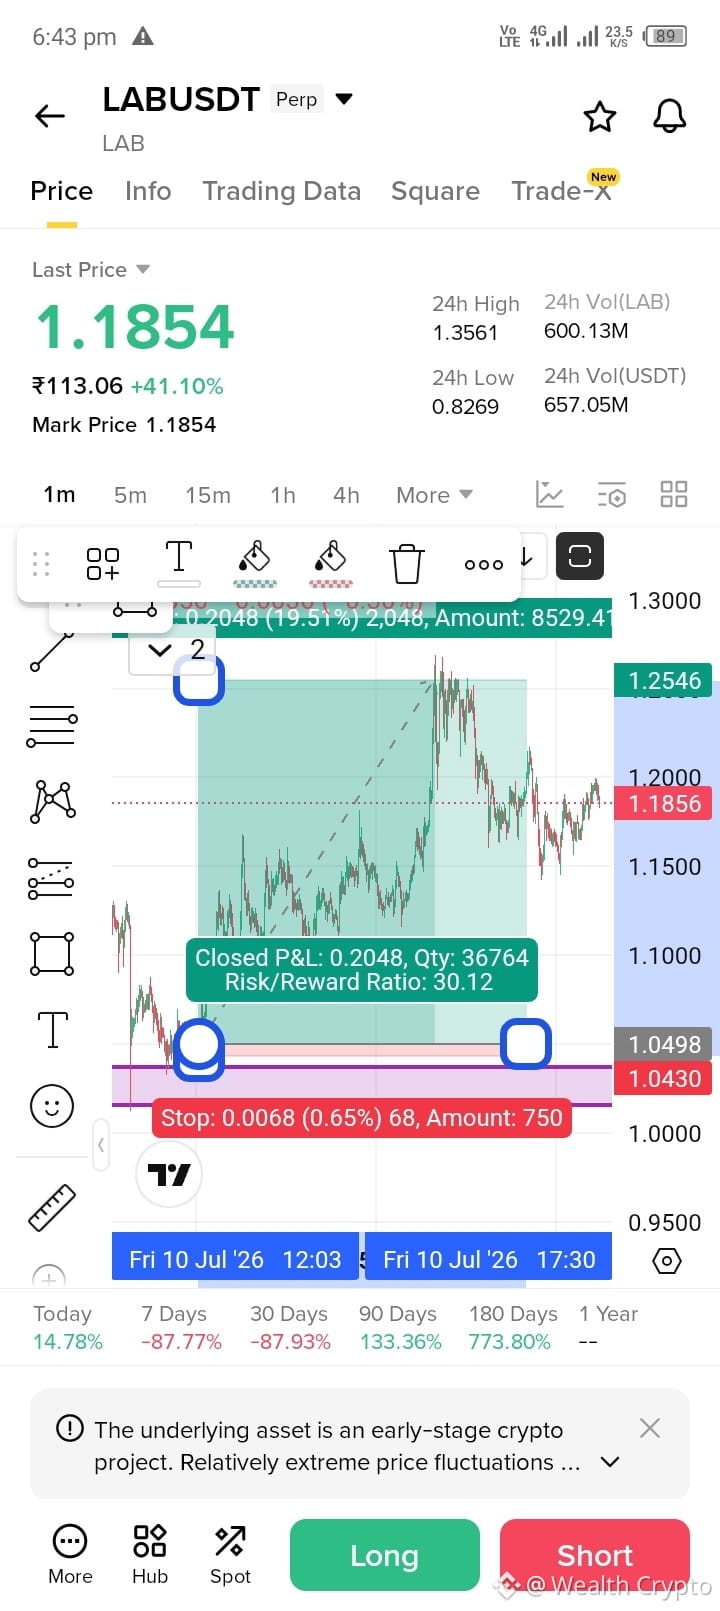
i book 1:30 on $LAB on a Scalping trade.
i book 1:30 on $LAB on a Scalping trade.

TRADING MASTER 00
·
--
$LAB is absolute carnage right now and most retail traders are getting wiped out! The data shows 581 traders stuck in 8.48M in total positions, with a brutal 23.14% long-to-short ratio. While bulls are drowning with 1.53M in losses, the shorts are absolutely feasting with 6.42M in unrealized gains. With 80.64% of short positions in profit, it’s clear the smart money has full control here. I’m personally staying in my short position because this bloodbath isn't over yet. Don't be the exit liquidity for the whales!
1
1
141
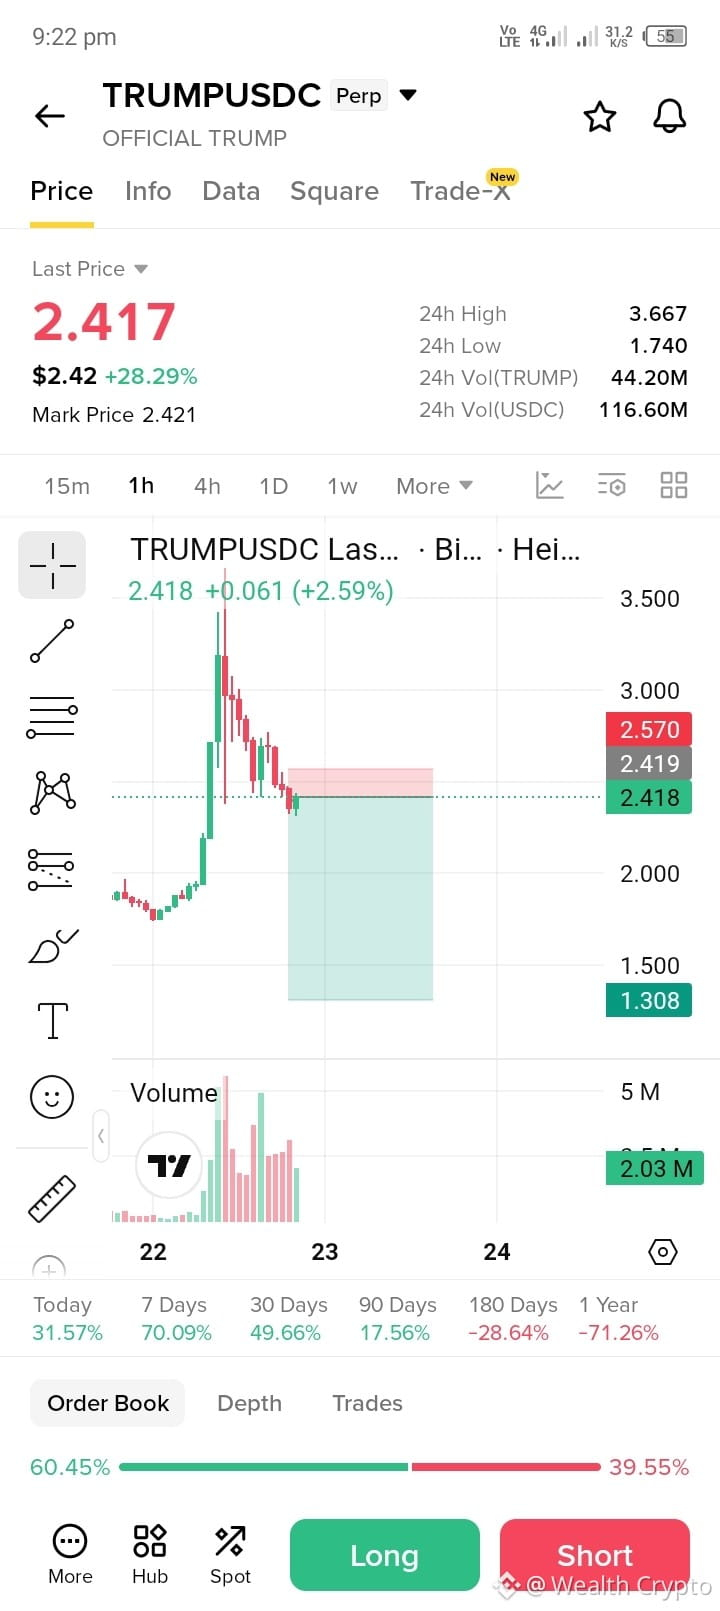
i need your support for taking trade.
please tips me - 5$
i need your support for taking trade.
please tips me - 5$
please tips me - 5$
11
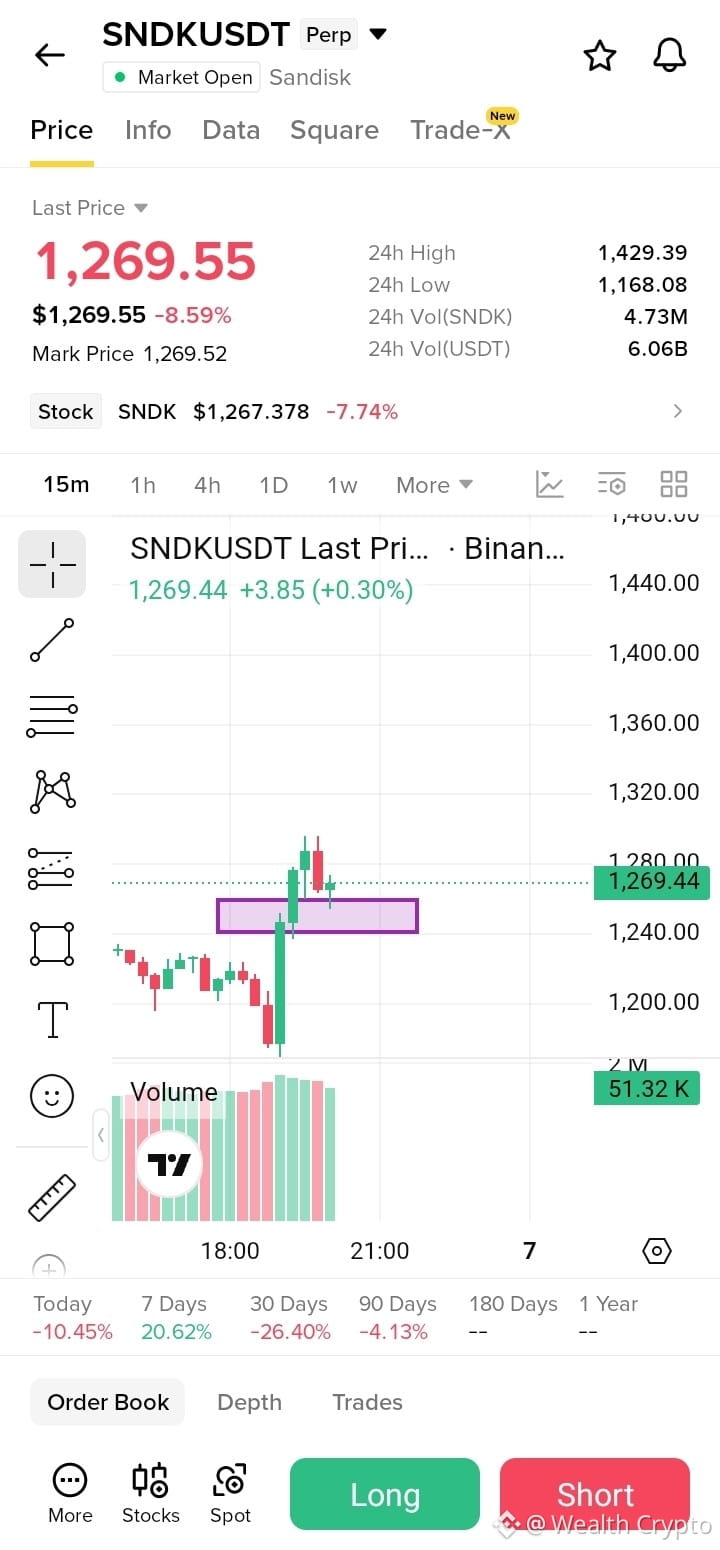
🚨 ຫາງເງິນ (smart money) ກຳລັງດູດຊັບການດຶງກັບຢ່າງງຽບໆຢູ່ ໃນ $SNDKB ຂະນະທີ່ກຸ່ມ retail ລໍຄຳອະນຸຍາດ. ນີ້ແມ່ນແຜນທີ່ກຳນົດການລອງຕຳແໜ່ງຄືນ (breakout retest) ຢ່າງເປັນຮູບແບບ.
$SNDK / USDT — ແບບ BULLISH BREAKOUT RETEST 📈
Trade Plan:
• Zone Entry: 1,240.00 - 1,270.00 (ວາງຄຳສັ່ງຢູ່ພາຍໃນກ່ອງ demand ທີ່ຖືກປ່ຽນທິດ)
• Stop Loss (SL): 1,215.00 (ວາງໄວ້ໃຫ້ປອດໄພຢູ່ກ້ອງຕ່ຳສຸດຂອງ swing ຫຼັງການ breakout)
• Take Profit 1 (TP1): 1,320.00
• Take Profit 2 (TP2): 1,380.00
• Take Profit 3 (TP3): 1,440.00
* ອັດຕາ Risk-to-Reward (R:R): 1:3.8 (ຊັບຊ້ອນສູງ ເພື່ອຈັບການເຄลື່ອນ momentum ທີ່ຂະຫຍາຍຕົວ)
ເປັນຫຍັງແຜນນີ້? (ເຫດຜົນ)
1. Textbook S/R Flip: ໃນກອບເວລາສັ້ນ, SNDK ໄດ້ທຳລາຍເຂດ consolidation ຂອງມັນຢ່າງຊັດເຈນຢູ່ປະມານ 1,240-1,250 ດ້ວຍປະລິມານທີ່ແຂງ. ຕອນນີ້ລາຄາກຳລັງທົດລອງຄືນລະດັບນີ້ ໂດຍປ່ຽນ resistance ເກົ່າໃຫ້ກາຍເປັນ dynamic support.
2. ພະລັງຊື້ຈາກຝ່າຍຜູ້ຊື້ (Buyer Volume) ແຂງ: ແທ່ນ breakout ຖືກຮອງດ້ວຍປະລິມານການຊື້ທີ່ພຸ່ງຢ່າງຫນາແໜ້ນ ເຮັດໃຫ້ short ທີ່ຖືກຈັບໄວ້ເທິງນັ້ນຈະຖືກບັງຄັບໃຫ້ປິດສະຖານະ (cover) ເມື່ອລາຄາຍັງຢູ່ເໜືອ 1,240.
3. ກົດ Invalidation: ຖ້າມີກຽວ (candle) ອອກແບບ close ແບບຊັດເຈນຕ່ຳກວ່າ 1,215.00, breakout ຈະຖືກລົບລ້າງ ວ່າເປັນ fakeout. ພວກເຮົາອອກທັນທີ—ການຄຸ້ມຄອງຄວາມສ່ຽງຢ່າງເຄັ່ງຄັດເປັນກະແຈສະເໝີ.
💬 ເຈົ້າຈະຫຼິ້ນແນວໃດ?
ເຈົ້າຈະຂີ່ຂະຫຍາຍຕົວນີ້ຂຶ້ນໄປຫາເປົ້າໝາຍ 1,440, ຫຼືເຈົ້າເຊື່ອວ່າຈະລົງອີກໃຕ້ 1,200? ປ່ອນ entry ແລະຄວາມຄິດເຫັນໄວ້ໃນຄອມເມັນ!
ກົດທີ່ນີ້ເພື່ອເບິ່ງ live SNDK/USDT Perpetual Chart & Trade 👇
{future}(SNDKUSDT)
#SNDK #CryptoTrading #TechnicalAnalysis
🚨 ຫາງເງິນ (smart money) ກຳລັງດູດຊັບການດຶງກັບຢ່າງງຽບໆຢູ່ ໃນ $SNDKB ຂະນະທີ່ກຸ່ມ retail ລໍຄຳອະນຸຍາດ. ນີ້ແມ່ນແຜນທີ່ກຳນົດການລອງຕຳແໜ່ງຄືນ (breakout retest) ຢ່າງເປັນຮູບແບບ.
$SNDK / USDT — ແບບ BULLISH BREAKOUT RETEST 📈
Trade Plan:
• Zone Entry: 1,240.00 - 1,270.00 (ວາງຄຳສັ່ງຢູ່ພາຍໃນກ່ອງ demand ທີ່ຖືກປ່ຽນທິດ)
• Stop Loss (SL): 1,215.00 (ວາງໄວ້ໃຫ້ປອດໄພຢູ່ກ້ອງຕ່ຳສຸດຂອງ swing ຫຼັງການ breakout)
• Take Profit 1 (TP1): 1,320.00
• Take Profit 2 (TP2): 1,380.00
• Take Profit 3 (TP3): 1,440.00
* ອັດຕາ Risk-to-Reward (R:R): 1:3.8 (ຊັບຊ້ອນສູງ ເພື່ອຈັບການເຄลື່ອນ momentum ທີ່ຂະຫຍາຍຕົວ)
ເປັນຫຍັງແຜນນີ້? (ເຫດຜົນ)
1. Textbook S/R Flip: ໃນກອບເວລາສັ້ນ, SNDK ໄດ້ທຳລາຍເຂດ consolidation ຂອງມັນຢ່າງຊັດເຈນຢູ່ປະມານ 1,240-1,250 ດ້ວຍປະລິມານທີ່ແຂງ. ຕອນນີ້ລາຄາກຳລັງທົດລອງຄືນລະດັບນີ້ ໂດຍປ່ຽນ resistance ເກົ່າໃຫ້ກາຍເປັນ dynamic support.
2. ພະລັງຊື້ຈາກຝ່າຍຜູ້ຊື້ (Buyer Volume) ແຂງ: ແທ່ນ breakout ຖືກຮອງດ້ວຍປະລິມານການຊື້ທີ່ພຸ່ງຢ່າງຫນາແໜ້ນ ເຮັດໃຫ້ short ທີ່ຖືກຈັບໄວ້ເທິງນັ້ນຈະຖືກບັງຄັບໃຫ້ປິດສະຖານະ (cover) ເມື່ອລາຄາຍັງຢູ່ເໜືອ 1,240.
3. ກົດ Invalidation: ຖ້າມີກຽວ (candle) ອອກແບບ close ແບບຊັດເຈນຕ່ຳກວ່າ 1,215.00, breakout ຈະຖືກລົບລ້າງ ວ່າເປັນ fakeout. ພວກເຮົາອອກທັນທີ—ການຄຸ້ມຄອງຄວາມສ່ຽງຢ່າງເຄັ່ງຄັດເປັນກະແຈສະເໝີ.
💬 ເຈົ້າຈະຫຼິ້ນແນວໃດ?
ເຈົ້າຈະຂີ່ຂະຫຍາຍຕົວນີ້ຂຶ້ນໄປຫາເປົ້າໝາຍ 1,440, ຫຼືເຈົ້າເຊື່ອວ່າຈະລົງອີກໃຕ້ 1,200? ປ່ອນ entry ແລະຄວາມຄິດເຫັນໄວ້ໃນຄອມເມັນ!
ກົດທີ່ນີ້ເພື່ອເບິ່ງ live SNDK/USDT Perpetual Chart & Trade 👇
#SNDK #CryptoTrading #TechnicalAnalysis
$SNDK / USDT — ແບບ BULLISH BREAKOUT RETEST 📈
Trade Plan:
• Zone Entry: 1,240.00 - 1,270.00 (ວາງຄຳສັ່ງຢູ່ພາຍໃນກ່ອງ demand ທີ່ຖືກປ່ຽນທິດ)
• Stop Loss (SL): 1,215.00 (ວາງໄວ້ໃຫ້ປອດໄພຢູ່ກ້ອງຕ່ຳສຸດຂອງ swing ຫຼັງການ breakout)
• Take Profit 1 (TP1): 1,320.00
• Take Profit 2 (TP2): 1,380.00
• Take Profit 3 (TP3): 1,440.00
* ອັດຕາ Risk-to-Reward (R:R): 1:3.8 (ຊັບຊ້ອນສູງ ເພື່ອຈັບການເຄลື່ອນ momentum ທີ່ຂະຫຍາຍຕົວ)
ເປັນຫຍັງແຜນນີ້? (ເຫດຜົນ)
1. Textbook S/R Flip: ໃນກອບເວລາສັ້ນ, SNDK ໄດ້ທຳລາຍເຂດ consolidation ຂອງມັນຢ່າງຊັດເຈນຢູ່ປະມານ 1,240-1,250 ດ້ວຍປະລິມານທີ່ແຂງ. ຕອນນີ້ລາຄາກຳລັງທົດລອງຄືນລະດັບນີ້ ໂດຍປ່ຽນ resistance ເກົ່າໃຫ້ກາຍເປັນ dynamic support.
2. ພະລັງຊື້ຈາກຝ່າຍຜູ້ຊື້ (Buyer Volume) ແຂງ: ແທ່ນ breakout ຖືກຮອງດ້ວຍປະລິມານການຊື້ທີ່ພຸ່ງຢ່າງຫນາແໜ້ນ ເຮັດໃຫ້ short ທີ່ຖືກຈັບໄວ້ເທິງນັ້ນຈະຖືກບັງຄັບໃຫ້ປິດສະຖານະ (cover) ເມື່ອລາຄາຍັງຢູ່ເໜືອ 1,240.
3. ກົດ Invalidation: ຖ້າມີກຽວ (candle) ອອກແບບ close ແບບຊັດເຈນຕ່ຳກວ່າ 1,215.00, breakout ຈະຖືກລົບລ້າງ ວ່າເປັນ fakeout. ພວກເຮົາອອກທັນທີ—ການຄຸ້ມຄອງຄວາມສ່ຽງຢ່າງເຄັ່ງຄັດເປັນກະແຈສະເໝີ.
💬 ເຈົ້າຈະຫຼິ້ນແນວໃດ?
ເຈົ້າຈະຂີ່ຂະຫຍາຍຕົວນີ້ຂຶ້ນໄປຫາເປົ້າໝາຍ 1,440, ຫຼືເຈົ້າເຊື່ອວ່າຈະລົງອີກໃຕ້ 1,200? ປ່ອນ entry ແລະຄວາມຄິດເຫັນໄວ້ໃນຄອມເມັນ!
ກົດທີ່ນີ້ເພື່ອເບິ່ງ live SNDK/USDT Perpetual Chart & Trade 👇
#SNDK #CryptoTrading #TechnicalAnalysis
296
ការពារដើមទុនរបស់អ្នក មុននឹងដេញតាមប្រាក់ចំណេញ។
ការពារដើមទុនរបស់អ្នក មុននឹងដេញតាមប្រាក់ចំណេញ។
1
66
ភាពជោគជ័យក្នុងការជួញដូរត្រូវបានសាងសង់ឡើងតាមរយៈការសម្រេចចិត្តដែលមានវិន័យរាប់ពាន់លើក ไม่មែនជាការជួញដូរដែលសំណាងតែប៉ុណ្ណោះដែលធ្វើឲ្យទំនុកចិត្តអ្នកកើនឡើងជាបណ្តោះអាសន្ននោះទេ។
ភាពជោគជ័យក្នុងការជួញដូរត្រូវបានសាងសង់ឡើងតាមរយៈការសម្រេចចិត្តដែលមានវិន័យរាប់ពាន់លើក ไม่មែនជាការជួញដូរដែលសំណាងតែប៉ុណ្ណោះដែលធ្វើឲ្យទំនុកចិត្តអ្នកកើនឡើងជាបណ្តោះអាសន្ននោះទេ។
1
61

{future}(NEARUSDT)
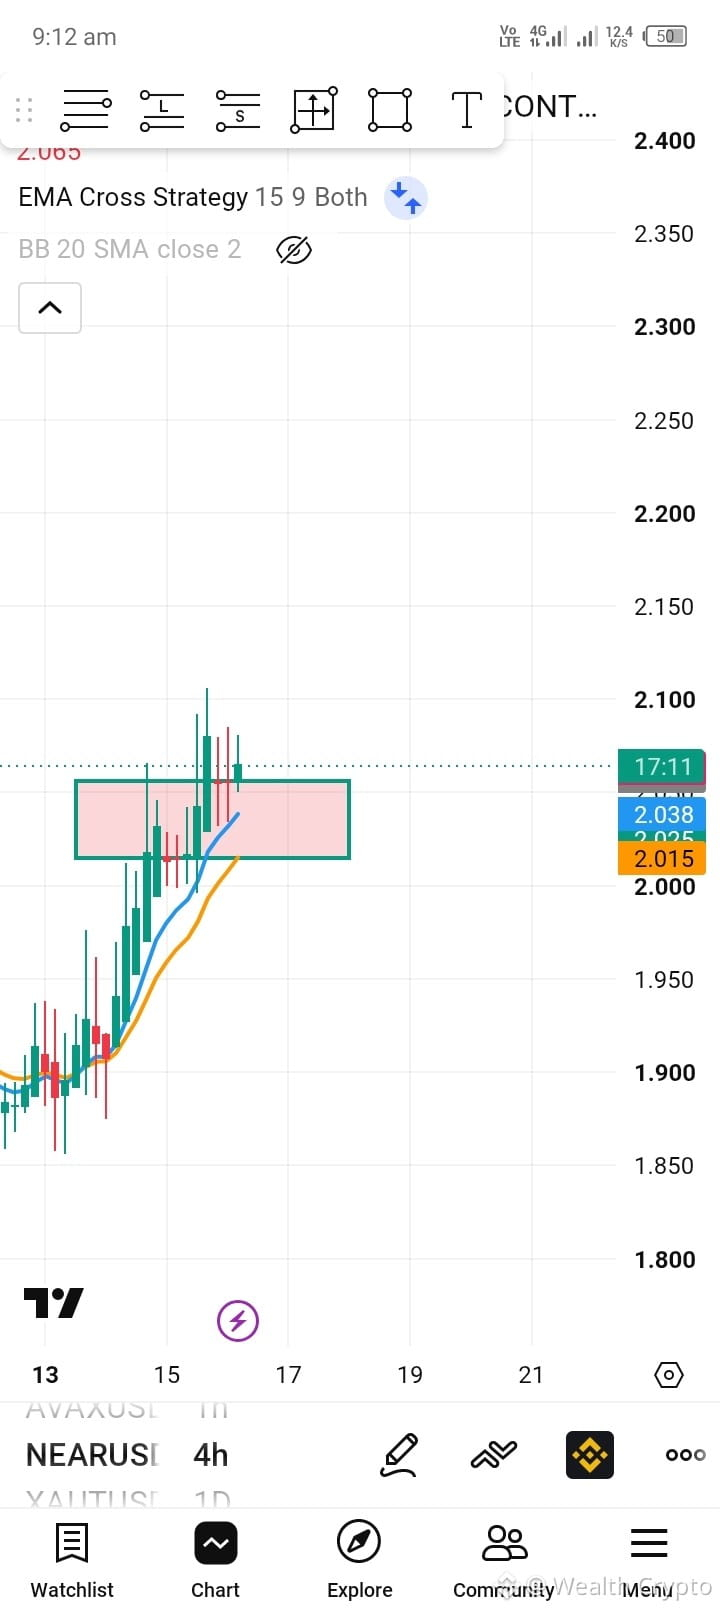
🚨 ຂາດການກັບຕົວແບບຕອນເຊົ້າ (early structural reversals) ແມ່ນສາເຫດທີ່ທຳໃຫ້ນັກຄ້າສ່ວນໃຫຍ່ເສຍ. $NEAR just printed a perfect text-book long trigger!
$NEAR / USDT — ການຂະຫຍາຍຄວາມຕ້ອງການແບບໂຄງສ້າງ 📈
ແຜນການຊື້ (Trade Plan):
• ຂອບເຂົ້າຢູ່ເຂດ (Zone Entry): 2.020 - 2.050 (ເຂົ້າໄປຢູ່ໃນເຂດ demand ແມ່ 4H)
• Stop Loss (SL): 2.015 (ວາງໃກ້ກັບລຸ່ມລະດັບທີ່ໂຄງສ້າງບໍ່ຖືກ/invalidated ລ່າສຸດ)
• Take Profit 1 (TP1): 2.150
• Take Profit 2 (TP2): 2.250
• Take Profit 3 (TP3): 2.400
* ອັດຕາຄວາມສຽງຕໍ່ຜົນໄດ້ (Risk-to-Reward Ratio (R:R)): 1:6.1 (R:R ສູງແບບມີຄວາມພ້ອມສູງ ເພື່ອລົດຄວາມສຽງ)
---
ເປັນຫຍັງ setup ນີ້? (Logic)
1. ສະຖາປັດຕິດ (Breakout Architecture) ທີ່ຊັດເຈນ: ໃນຕາຕະລາງ 4-H, NEAR ໄດ້ຖິ້ມຊ່ວງການຄ້າເກົ່າຂອງຕົນອອກໄປແລ້ວດ້ວຍແທ່ງທຽນຂາແຮງຝ່າຍຂຶ້ນ (bullish candles). ຕອນນີ້ລາຄາກຳລັງກັບໄປແຕະເຂດ demand ເພື່ອທົດສອບຄວາມໝັ້ນໃຈຂອງຜູ້ຊື້.
2. ການບรรจົບກັນຂອງ Moving Average: ເສັ້ນ 9 EMA ຕອນນີ້ກຳລັງເຮັດໜ້າທີ່ເປັນການຄໍ້າທັນ (support) ທັນທີ, ໃນຂະນະທີ່ 15 EMA ນັ່ງຢູ່ທາງໃຕ້ກ່ອນໜ້າຂອງກ່ອງ (zone box) ເພື່ອຈັບ volatility ຈາກ wick ຊົ່ວຄາວ.
3. ກົດ Invalidation: ການປິດຮ່າງ 4H ຕໍ່າກວ່າ 2.015 ຈະກະຕຸ້ນການ invalidation ທັນທີຂອງສະມມຸດຐານຝ່າຍຂາແຮງ (bullish thesis). ພວກເຮົາຕັດ loss ຂະໜາດນ້ອຍຢ່າງສະອາດໂດຍບໍ່ມີຄວາມລັງເລ (zero hesitation).
---
💬 ທ່ານຈະເຂົ້າຫຼິ້ນບໍ?
ທ່ານຈະວາງບິດ setup ຂະຫຍາຍ 4H ນີ້ເພື່ອໄປຫາເປົ້າ 2.400, ຫຼືທ່ານຈະນັ່ງອອກຈາກອັນນີ້? ແບ່ງປັນຄວາມຄິດເຫັນຂອງທ່ານດ້ານລຸ່ມນີ້!
ກົດທີ່ນີ້ເພື່ອເບິ່ງ live $NEAR/USDT Perpetual Chart ແລະ Trade 👇
$NEAR
#Near #NearProtocol #CryptoMarket
🚨 ຂາດການກັບຕົວແບບຕອນເຊົ້າ (early structural reversals) ແມ່ນສາເຫດທີ່ທຳໃຫ້ນັກຄ້າສ່ວນໃຫຍ່ເສຍ. $NEAR just printed a perfect text-book long trigger!
$NEAR / USDT — ການຂະຫຍາຍຄວາມຕ້ອງການແບບໂຄງສ້າງ 📈
ແຜນການຊື້ (Trade Plan):
• ຂອບເຂົ້າຢູ່ເຂດ (Zone Entry): 2.020 - 2.050 (ເຂົ້າໄປຢູ່ໃນເຂດ demand ແມ່ 4H)
• Stop Loss (SL): 2.015 (ວາງໃກ້ກັບລຸ່ມລະດັບທີ່ໂຄງສ້າງບໍ່ຖືກ/invalidated ລ່າສຸດ)
• Take Profit 1 (TP1): 2.150
• Take Profit 2 (TP2): 2.250
• Take Profit 3 (TP3): 2.400
* ອັດຕາຄວາມສຽງຕໍ່ຜົນໄດ້ (Risk-to-Reward Ratio (R:R)): 1:6.1 (R:R ສູງແບບມີຄວາມພ້ອມສູງ ເພື່ອລົດຄວາມສຽງ)
---
ເປັນຫຍັງ setup ນີ້? (Logic)
1. ສະຖາປັດຕິດ (Breakout Architecture) ທີ່ຊັດເຈນ: ໃນຕາຕະລາງ 4-H, NEAR ໄດ້ຖິ້ມຊ່ວງການຄ້າເກົ່າຂອງຕົນອອກໄປແລ້ວດ້ວຍແທ່ງທຽນຂາແຮງຝ່າຍຂຶ້ນ (bullish candles). ຕອນນີ້ລາຄາກຳລັງກັບໄປແຕະເຂດ demand ເພື່ອທົດສອບຄວາມໝັ້ນໃຈຂອງຜູ້ຊື້.
2. ການບรรจົບກັນຂອງ Moving Average: ເສັ້ນ 9 EMA ຕອນນີ້ກຳລັງເຮັດໜ້າທີ່ເປັນການຄໍ້າທັນ (support) ທັນທີ, ໃນຂະນະທີ່ 15 EMA ນັ່ງຢູ່ທາງໃຕ້ກ່ອນໜ້າຂອງກ່ອງ (zone box) ເພື່ອຈັບ volatility ຈາກ wick ຊົ່ວຄາວ.
3. ກົດ Invalidation: ການປິດຮ່າງ 4H ຕໍ່າກວ່າ 2.015 ຈະກະຕຸ້ນການ invalidation ທັນທີຂອງສະມມຸດຐານຝ່າຍຂາແຮງ (bullish thesis). ພວກເຮົາຕັດ loss ຂະໜາດນ້ອຍຢ່າງສະອາດໂດຍບໍ່ມີຄວາມລັງເລ (zero hesitation).
---
💬 ທ່ານຈະເຂົ້າຫຼິ້ນບໍ?
ທ່ານຈະວາງບິດ setup ຂະຫຍາຍ 4H ນີ້ເພື່ອໄປຫາເປົ້າ 2.400, ຫຼືທ່ານຈະນັ່ງອອກຈາກອັນນີ້? ແບ່ງປັນຄວາມຄິດເຫັນຂອງທ່ານດ້ານລຸ່ມນີ້!
ກົດທີ່ນີ້ເພື່ອເບິ່ງ live $NEAR /USDT Perpetual Chart ແລະ Trade 👇
$NEAR
#Near #NearProtocol #CryptoMarket
$NEAR / USDT — ການຂະຫຍາຍຄວາມຕ້ອງການແບບໂຄງສ້າງ 📈
ແຜນການຊື້ (Trade Plan):
• ຂອບເຂົ້າຢູ່ເຂດ (Zone Entry): 2.020 - 2.050 (ເຂົ້າໄປຢູ່ໃນເຂດ demand ແມ່ 4H)
• Stop Loss (SL): 2.015 (ວາງໃກ້ກັບລຸ່ມລະດັບທີ່ໂຄງສ້າງບໍ່ຖືກ/invalidated ລ່າສຸດ)
• Take Profit 1 (TP1): 2.150
• Take Profit 2 (TP2): 2.250
• Take Profit 3 (TP3): 2.400
* ອັດຕາຄວາມສຽງຕໍ່ຜົນໄດ້ (Risk-to-Reward Ratio (R:R)): 1:6.1 (R:R ສູງແບບມີຄວາມພ້ອມສູງ ເພື່ອລົດຄວາມສຽງ)
---
ເປັນຫຍັງ setup ນີ້? (Logic)
1. ສະຖາປັດຕິດ (Breakout Architecture) ທີ່ຊັດເຈນ: ໃນຕາຕະລາງ 4-H, NEAR ໄດ້ຖິ້ມຊ່ວງການຄ້າເກົ່າຂອງຕົນອອກໄປແລ້ວດ້ວຍແທ່ງທຽນຂາແຮງຝ່າຍຂຶ້ນ (bullish candles). ຕອນນີ້ລາຄາກຳລັງກັບໄປແຕະເຂດ demand ເພື່ອທົດສອບຄວາມໝັ້ນໃຈຂອງຜູ້ຊື້.
2. ການບรรจົບກັນຂອງ Moving Average: ເສັ້ນ 9 EMA ຕອນນີ້ກຳລັງເຮັດໜ້າທີ່ເປັນການຄໍ້າທັນ (support) ທັນທີ, ໃນຂະນະທີ່ 15 EMA ນັ່ງຢູ່ທາງໃຕ້ກ່ອນໜ້າຂອງກ່ອງ (zone box) ເພື່ອຈັບ volatility ຈາກ wick ຊົ່ວຄາວ.
3. ກົດ Invalidation: ການປິດຮ່າງ 4H ຕໍ່າກວ່າ 2.015 ຈະກະຕຸ້ນການ invalidation ທັນທີຂອງສະມມຸດຐານຝ່າຍຂາແຮງ (bullish thesis). ພວກເຮົາຕັດ loss ຂະໜາດນ້ອຍຢ່າງສະອາດໂດຍບໍ່ມີຄວາມລັງເລ (zero hesitation).
---
💬 ທ່ານຈະເຂົ້າຫຼິ້ນບໍ?
ທ່ານຈະວາງບິດ setup ຂະຫຍາຍ 4H ນີ້ເພື່ອໄປຫາເປົ້າ 2.400, ຫຼືທ່ານຈະນັ່ງອອກຈາກອັນນີ້? ແບ່ງປັນຄວາມຄິດເຫັນຂອງທ່ານດ້ານລຸ່ມນີ້!
ກົດທີ່ນີ້ເພື່ອເບິ່ງ live $NEAR /USDT Perpetual Chart ແລະ Trade 👇
$NEAR
#Near #NearProtocol #CryptoMarket
1
62
·
--
ສັນຍານກະທິງ
ເບິ່ງການແປ
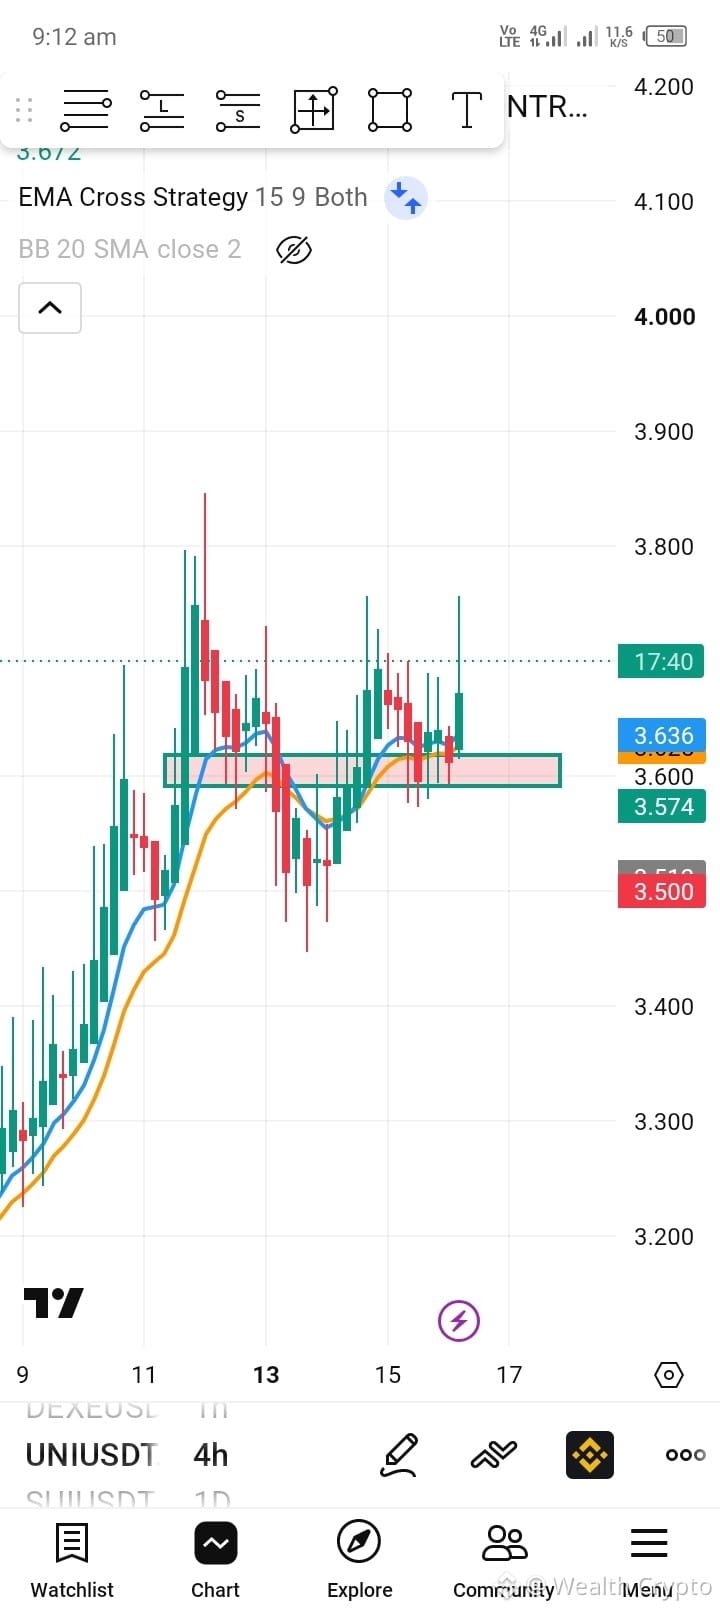
🚨 Late shorts are about to get absolutely obliterated on $UNI . The accumulation phase is over—momentum is shifting fast!
$UNI / USDT — RANGE BREAKOUT CONTINUATION 📈
Trade Plan:
• Zone Entry: 3.600 - 3.650 (Buying the breakout retest area)
• Stop Loss (SL): 3.574 (Placed safely right under the local range floor)
• Take Profit 1 (TP1): 3.800
• Take Profit 2 (TP2): 4.000
• Take Profit 3 (TP3): 4.200
* Risk-to-Reward Ratio (R:R): 1:4.8 (Highly efficient structure engineered for maximum upside extraction)
---
Why this setup? (The Logic)
1. Heavy Liquidity Absorption: The 4-Hour chart displays an extended consolidation phase where sellers failed multiple times to push the price down. The breakout above 3.600 confirms that buyers have taken full control.
2. Dynamic Support Validation: The 9 and 15 EMAs are coiling and beginning to slope upward right underneath the current price action, providing strong trend-following validation.
3. The Invalidation Rule: A definitive 4H candle body close below 3.574 completely voids this long setup. We respect our system and exit immediately if that happens.
---
💬 What's your play?
Are we sending UNI straight to the 4.200 macro target, or are you waiting for deeper confirmation? Drop your bias in the comments section!
Click here to view live UNI/USDT Perpetual Chart & Trade 👇
$UNI
{future}(UNIUSDT)
#UNI #Uniswap #TechnicalAnalysis
🚨 Late shorts are about to get absolutely obliterated on $UNI . The accumulation phase is over—momentum is shifting fast!
$UNI / USDT — RANGE BREAKOUT CONTINUATION 📈
Trade Plan:
• Zone Entry: 3.600 - 3.650 (Buying the breakout retest area)
• Stop Loss (SL): 3.574 (Placed safely right under the local range floor)
• Take Profit 1 (TP1): 3.800
• Take Profit 2 (TP2): 4.000
• Take Profit 3 (TP3): 4.200
* Risk-to-Reward Ratio (R:R): 1:4.8 (Highly efficient structure engineered for maximum upside extraction)
---
Why this setup? (The Logic)
1. Heavy Liquidity Absorption: The 4-Hour chart displays an extended consolidation phase where sellers failed multiple times to push the price down. The breakout above 3.600 confirms that buyers have taken full control.
2. Dynamic Support Validation: The 9 and 15 EMAs are coiling and beginning to slope upward right underneath the current price action, providing strong trend-following validation.
3. The Invalidation Rule: A definitive 4H candle body close below 3.574 completely voids this long setup. We respect our system and exit immediately if that happens.
---
💬 What's your play?
Are we sending UNI straight to the 4.200 macro target, or are you waiting for deeper confirmation? Drop your bias in the comments section!
Click here to view live UNI/USDT Perpetual Chart & Trade 👇
$UNI
#UNI #Uniswap #TechnicalAnalysis
$UNI / USDT — RANGE BREAKOUT CONTINUATION 📈
Trade Plan:
• Zone Entry: 3.600 - 3.650 (Buying the breakout retest area)
• Stop Loss (SL): 3.574 (Placed safely right under the local range floor)
• Take Profit 1 (TP1): 3.800
• Take Profit 2 (TP2): 4.000
• Take Profit 3 (TP3): 4.200
* Risk-to-Reward Ratio (R:R): 1:4.8 (Highly efficient structure engineered for maximum upside extraction)
---
Why this setup? (The Logic)
1. Heavy Liquidity Absorption: The 4-Hour chart displays an extended consolidation phase where sellers failed multiple times to push the price down. The breakout above 3.600 confirms that buyers have taken full control.
2. Dynamic Support Validation: The 9 and 15 EMAs are coiling and beginning to slope upward right underneath the current price action, providing strong trend-following validation.
3. The Invalidation Rule: A definitive 4H candle body close below 3.574 completely voids this long setup. We respect our system and exit immediately if that happens.
---
💬 What's your play?
Are we sending UNI straight to the 4.200 macro target, or are you waiting for deeper confirmation? Drop your bias in the comments section!
Click here to view live UNI/USDT Perpetual Chart & Trade 👇
$UNI
#UNI #Uniswap #TechnicalAnalysis
1
49
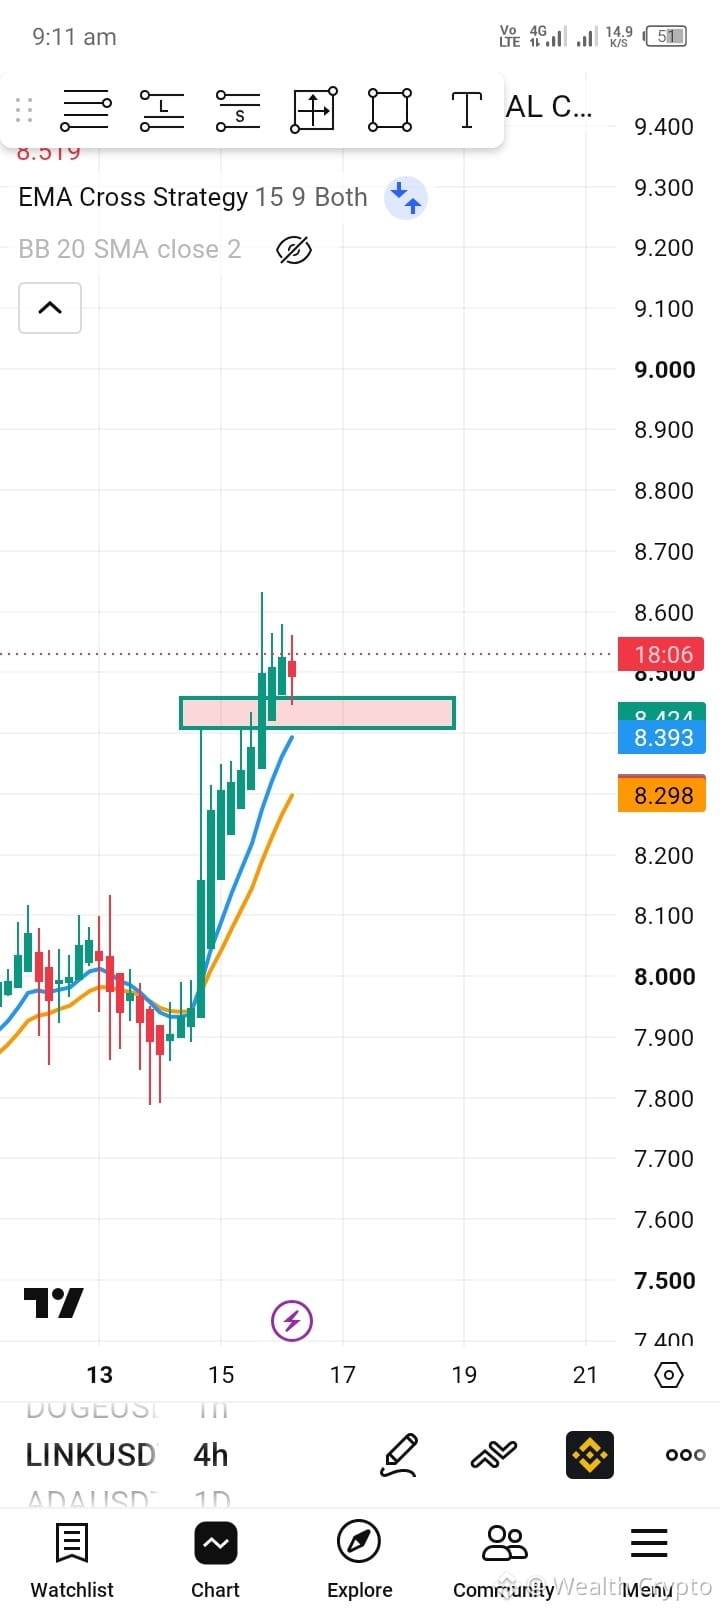
🚨 ཉགများသည် $LINK ကို သတိမထားမိအောင် အလွန်အမင်း စုပုံလျက်ရှိနေပြီး retail ကတော့ ရပ်တန့်နေသည်။ ဒီလှုပ်ရှားမှုမှာ နောက်ကျမသွားအောင် သတိထားပါ!
$LINK / USDT — BULLISH BREAKOUT RETEST 📈
Trade Plan:
• Zone Entry: 8.400 - 8.500 (အသစ်ပြန်လှန်ထားသော demand zone အတွင်းမှာ bidding ဝင်)
• Stop Loss (SL): 8.298 (4H dynamic structure support အောက်ကို တိတိကျကျ ထားထားသည်)
• Take Profit 1 (TP1): 8.850
• Take Profit 2 (TP2): 9.100
• Take Profit 3 (TP3): 9.400
* Risk-to-Reward Ratio (R:R): 1:5.2 (အံ့မခန်း asymmetrical risk structure)
---
ဒီ setup က ဘာကြောင့်လဲ? (အကြောင်းရင်း)
1. Pristine Resistance Flip: 4-Hour timeframe မှာ Chainlink က အရေးကြီးတဲ့ resistance အတားအဆီးကို အပြင်းအထန် ဖောက်ချိုးခဲ့တယ်။ အခုကတော့ အဲဒီနယ်နိမိတ်ကို စံနမူနာ retest လုပ်နေပြီး အရင်က supply ဖြစ်ခဲ့တာကို ခိုင်မာတဲ့ demand အဖြစ် ပြောင်းထားတယ်။
2. Bullish EMA Alignment: 9 နဲ့ 15 EMAs တွေက ငါတို့ entry box အောက်နားမှာ လှပတဲ့ bullish crossover တစ်ခုကို ပိတ်လိုက်ပြီး စျေးနှုန်းကို ပြန်တက်စေမယ့် အားကောင်းတဲ့ dynamic launchpad လုပ်နေတယ်။
3. Invalidation Rule: 4H candle တစ်ခုက 8.298 အောက်ကို တိတိကျကျ body close ဖြစ်လာရင် setup က structural အရ ပျက်ပြားသွားပြီ။ အရှုံးကို ချက်ချင်း ဖြတ်မယ်—အရာအားလုံးထက် capital preservation ကို ဦးစားပေးမယ်။
---
💬 မင်း ဘယ်လိုလုပ်မလဲ?
ငါနဲ့အတူ ဒီ parabolic breakout wave ကို လိုက်စီးမှာလား၊ ဒါမှမဟုတ် ဝံ့တွေက breakdown ဖြစ်အောင် တွန်းအားပေးမယ်လို့ ထင်လား? အောက်ကနေ မင်းရဲ့ target တွေကို ပြောပြပါ!
LINK/USDT Perpetual Chart ကို Live ကြည့်ပြီး Trade လုပ်ရန် ဒီနေရာကို နှိပ်ပါ 👇
$LINK
#LINK🔥🔥🔥 #Chainlink #TradingSignals
🚨 ཉགများသည် $LINK ကို သတိမထားမိအောင် အလွန်အမင်း စုပုံလျက်ရှိနေပြီး retail ကတော့ ရပ်တန့်နေသည်။ ဒီလှုပ်ရှားမှုမှာ နောက်ကျမသွားအောင် သတိထားပါ!
$LINK / USDT — BULLISH BREAKOUT RETEST 📈
Trade Plan:
• Zone Entry: 8.400 - 8.500 (အသစ်ပြန်လှန်ထားသော demand zone အတွင်းမှာ bidding ဝင်)
• Stop Loss (SL): 8.298 (4H dynamic structure support အောက်ကို တိတိကျကျ ထားထားသည်)
• Take Profit 1 (TP1): 8.850
• Take Profit 2 (TP2): 9.100
• Take Profit 3 (TP3): 9.400
* Risk-to-Reward Ratio (R:R): 1:5.2 (အံ့မခန်း asymmetrical risk structure)
---
ဒီ setup က ဘာကြောင့်လဲ? (အကြောင်းရင်း)
1. Pristine Resistance Flip: 4-Hour timeframe မှာ Chainlink က အရေးကြီးတဲ့ resistance အတားအဆီးကို အပြင်းအထန် ဖောက်ချိုးခဲ့တယ်။ အခုကတော့ အဲဒီနယ်နိမိတ်ကို စံနမူနာ retest လုပ်နေပြီး အရင်က supply ဖြစ်ခဲ့တာကို ခိုင်မာတဲ့ demand အဖြစ် ပြောင်းထားတယ်။
2. Bullish EMA Alignment: 9 နဲ့ 15 EMAs တွေက ငါတို့ entry box အောက်နားမှာ လှပတဲ့ bullish crossover တစ်ခုကို ပိတ်လိုက်ပြီး စျေးနှုန်းကို ပြန်တက်စေမယ့် အားကောင်းတဲ့ dynamic launchpad လုပ်နေတယ်။
3. Invalidation Rule: 4H candle တစ်ခုက 8.298 အောက်ကို တိတိကျကျ body close ဖြစ်လာရင် setup က structural အရ ပျက်ပြားသွားပြီ။ အရှုံးကို ချက်ချင်း ဖြတ်မယ်—အရာအားလုံးထက် capital preservation ကို ဦးစားပေးမယ်။
---
💬 မင်း ဘယ်လိုလုပ်မလဲ?
ငါနဲ့အတူ ဒီ parabolic breakout wave ကို လိုက်စီးမှာလား၊ ဒါမှမဟုတ် ဝံ့တွေက breakdown ဖြစ်အောင် တွန်းအားပေးမယ်လို့ ထင်လား? အောက်ကနေ မင်းရဲ့ target တွေကို ပြောပြပါ!
LINK/USDT Perpetual Chart ကို Live ကြည့်ပြီး Trade လုပ်ရန် ဒီနေရာကို နှိပ်ပါ 👇
$LINK
#LINK🔥🔥🔥 #Chainlink #TradingSignals
$LINK / USDT — BULLISH BREAKOUT RETEST 📈
Trade Plan:
• Zone Entry: 8.400 - 8.500 (အသစ်ပြန်လှန်ထားသော demand zone အတွင်းမှာ bidding ဝင်)
• Stop Loss (SL): 8.298 (4H dynamic structure support အောက်ကို တိတိကျကျ ထားထားသည်)
• Take Profit 1 (TP1): 8.850
• Take Profit 2 (TP2): 9.100
• Take Profit 3 (TP3): 9.400
* Risk-to-Reward Ratio (R:R): 1:5.2 (အံ့မခန်း asymmetrical risk structure)
---
ဒီ setup က ဘာကြောင့်လဲ? (အကြောင်းရင်း)
1. Pristine Resistance Flip: 4-Hour timeframe မှာ Chainlink က အရေးကြီးတဲ့ resistance အတားအဆီးကို အပြင်းအထန် ဖောက်ချိုးခဲ့တယ်။ အခုကတော့ အဲဒီနယ်နိမိတ်ကို စံနမူနာ retest လုပ်နေပြီး အရင်က supply ဖြစ်ခဲ့တာကို ခိုင်မာတဲ့ demand အဖြစ် ပြောင်းထားတယ်။
2. Bullish EMA Alignment: 9 နဲ့ 15 EMAs တွေက ငါတို့ entry box အောက်နားမှာ လှပတဲ့ bullish crossover တစ်ခုကို ပိတ်လိုက်ပြီး စျေးနှုန်းကို ပြန်တက်စေမယ့် အားကောင်းတဲ့ dynamic launchpad လုပ်နေတယ်။
3. Invalidation Rule: 4H candle တစ်ခုက 8.298 အောက်ကို တိတိကျကျ body close ဖြစ်လာရင် setup က structural အရ ပျက်ပြားသွားပြီ။ အရှုံးကို ချက်ချင်း ဖြတ်မယ်—အရာအားလုံးထက် capital preservation ကို ဦးစားပေးမယ်။
---
💬 မင်း ဘယ်လိုလုပ်မလဲ?
ငါနဲ့အတူ ဒီ parabolic breakout wave ကို လိုက်စီးမှာလား၊ ဒါမှမဟုတ် ဝံ့တွေက breakdown ဖြစ်အောင် တွန်းအားပေးမယ်လို့ ထင်လား? အောက်ကနေ မင်းရဲ့ target တွေကို ပြောပြပါ!
LINK/USDT Perpetual Chart ကို Live ကြည့်ပြီး Trade လုပ်ရန် ဒီနေရာကို နှိပ်ပါ 👇
$LINK
#LINK🔥🔥🔥 #Chainlink #TradingSignals
1
40
·
--
ສັນຍານໝີ
ເບິ່ງການແປ
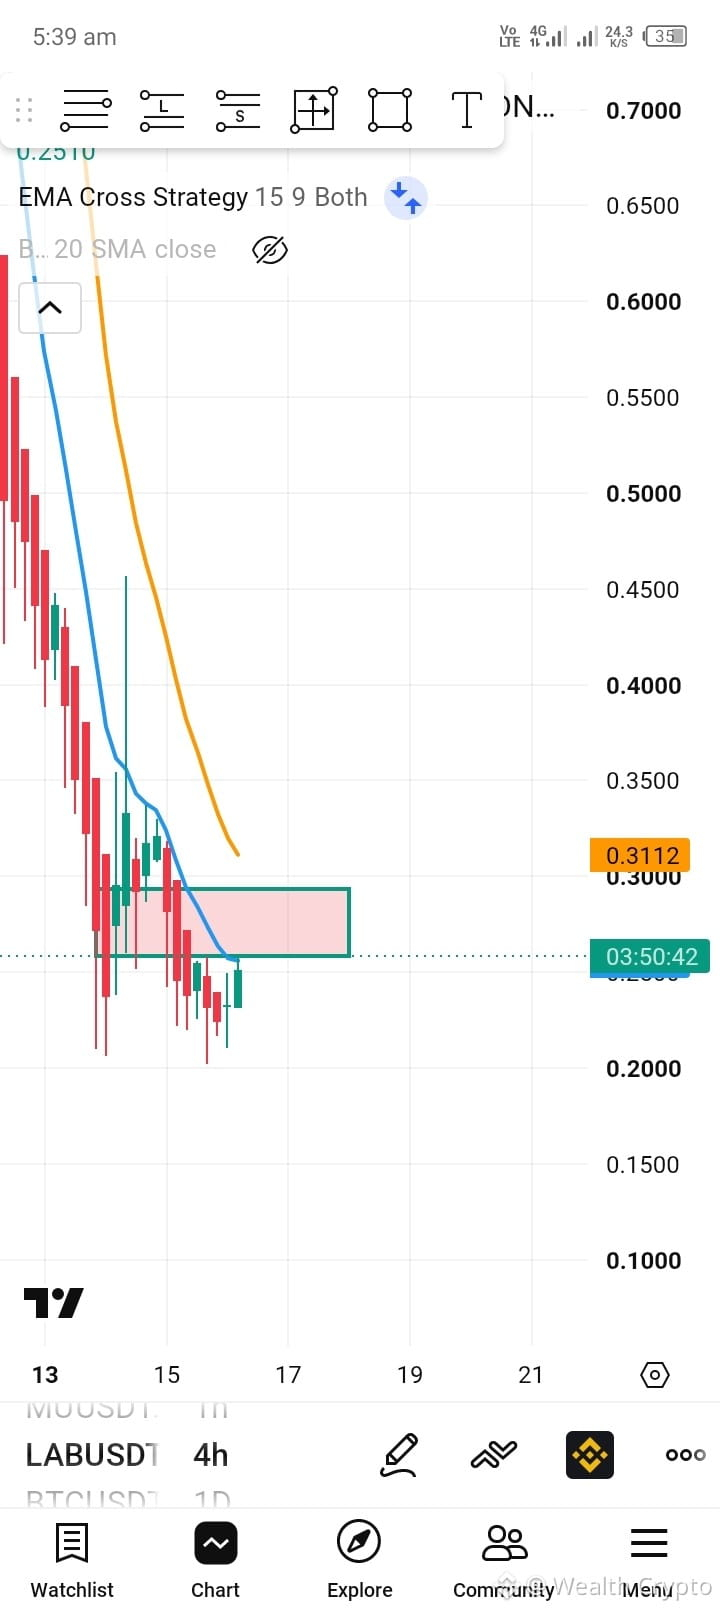
🚨 Wholesale liquidation is hit on $LAB . Smart money is driving the market lower while retail fights the macro trend.
$LAB / USDT — BEARISH BREAKDOWN SETUP 📉
Trade Plan:
• Zone Entry: 0.25000 - 0.28000 (Positioning on the breakdown retest rejection)
• Stop Loss (SL): 0.31120 (Placed safely above the invalidation structural ceiling)
• Take Profit 1 (TP1): 0.22000
• Take Profit 2 (TP2): 0.18000
• Take Profit 3 (TP3): 0.15000
* Risk-to-Reward Ratio (R:R): 1:3.3 (Strictly defined risk profile targeting lower pricing structures)
---
Why this setup? (The Logic)
1. Accelerated Markdown Phase: The 4-Hour chart displays severe, consecutive red candles breaking structural consolidation levels. Massive overhead supply blocks mean any relief rally is highly likely to be shorted into aggressively.
2. Dynamic EMA Expansion: The 9 & 15 EMA cross is sloped severely downward. The distance between the averages validates that structural bearish velocity is building, locking the bulls out of momentum.
3. The Invalidation Rule: A daily or 4H clean body close above 0.31120 completely voids this short structure. We cut the trade cleanly without hoping or averaging down.
---
💬 What's your play?
Is Bitcoin's direction forcing LABU straight down to the 0.15000 region, or are you bidding the reversal? Let me know your thoughts in the comments section!
Click here to view live LABU/USDT Perpetual Chart & Trade 👇
$LAB
{alpha}(560x7ec43cf65f1663f820427c62a5780b8f2e25593a)
#Labs #altcoins #ShortPosition
🚨 Wholesale liquidation is hit on $LAB . Smart money is driving the market lower while retail fights the macro trend.
$LAB / USDT — BEARISH BREAKDOWN SETUP 📉
Trade Plan:
• Zone Entry: 0.25000 - 0.28000 (Positioning on the breakdown retest rejection)
• Stop Loss (SL): 0.31120 (Placed safely above the invalidation structural ceiling)
• Take Profit 1 (TP1): 0.22000
• Take Profit 2 (TP2): 0.18000
• Take Profit 3 (TP3): 0.15000
* Risk-to-Reward Ratio (R:R): 1:3.3 (Strictly defined risk profile targeting lower pricing structures)
---
Why this setup? (The Logic)
1. Accelerated Markdown Phase: The 4-Hour chart displays severe, consecutive red candles breaking structural consolidation levels. Massive overhead supply blocks mean any relief rally is highly likely to be shorted into aggressively.
2. Dynamic EMA Expansion: The 9 & 15 EMA cross is sloped severely downward. The distance between the averages validates that structural bearish velocity is building, locking the bulls out of momentum.
3. The Invalidation Rule: A daily or 4H clean body close above 0.31120 completely voids this short structure. We cut the trade cleanly without hoping or averaging down.
---
💬 What's your play?
Is Bitcoin's direction forcing LABU straight down to the 0.15000 region, or are you bidding the reversal? Let me know your thoughts in the comments section!
Click here to view live LABU/USDT Perpetual Chart & Trade 👇
$LAB
#Labs #altcoins #ShortPosition
$LAB / USDT — BEARISH BREAKDOWN SETUP 📉
Trade Plan:
• Zone Entry: 0.25000 - 0.28000 (Positioning on the breakdown retest rejection)
• Stop Loss (SL): 0.31120 (Placed safely above the invalidation structural ceiling)
• Take Profit 1 (TP1): 0.22000
• Take Profit 2 (TP2): 0.18000
• Take Profit 3 (TP3): 0.15000
* Risk-to-Reward Ratio (R:R): 1:3.3 (Strictly defined risk profile targeting lower pricing structures)
---
Why this setup? (The Logic)
1. Accelerated Markdown Phase: The 4-Hour chart displays severe, consecutive red candles breaking structural consolidation levels. Massive overhead supply blocks mean any relief rally is highly likely to be shorted into aggressively.
2. Dynamic EMA Expansion: The 9 & 15 EMA cross is sloped severely downward. The distance between the averages validates that structural bearish velocity is building, locking the bulls out of momentum.
3. The Invalidation Rule: A daily or 4H clean body close above 0.31120 completely voids this short structure. We cut the trade cleanly without hoping or averaging down.
---
💬 What's your play?
Is Bitcoin's direction forcing LABU straight down to the 0.15000 region, or are you bidding the reversal? Let me know your thoughts in the comments section!
Click here to view live LABU/USDT Perpetual Chart & Trade 👇
$LAB
#Labs #altcoins #ShortPosition
1
400
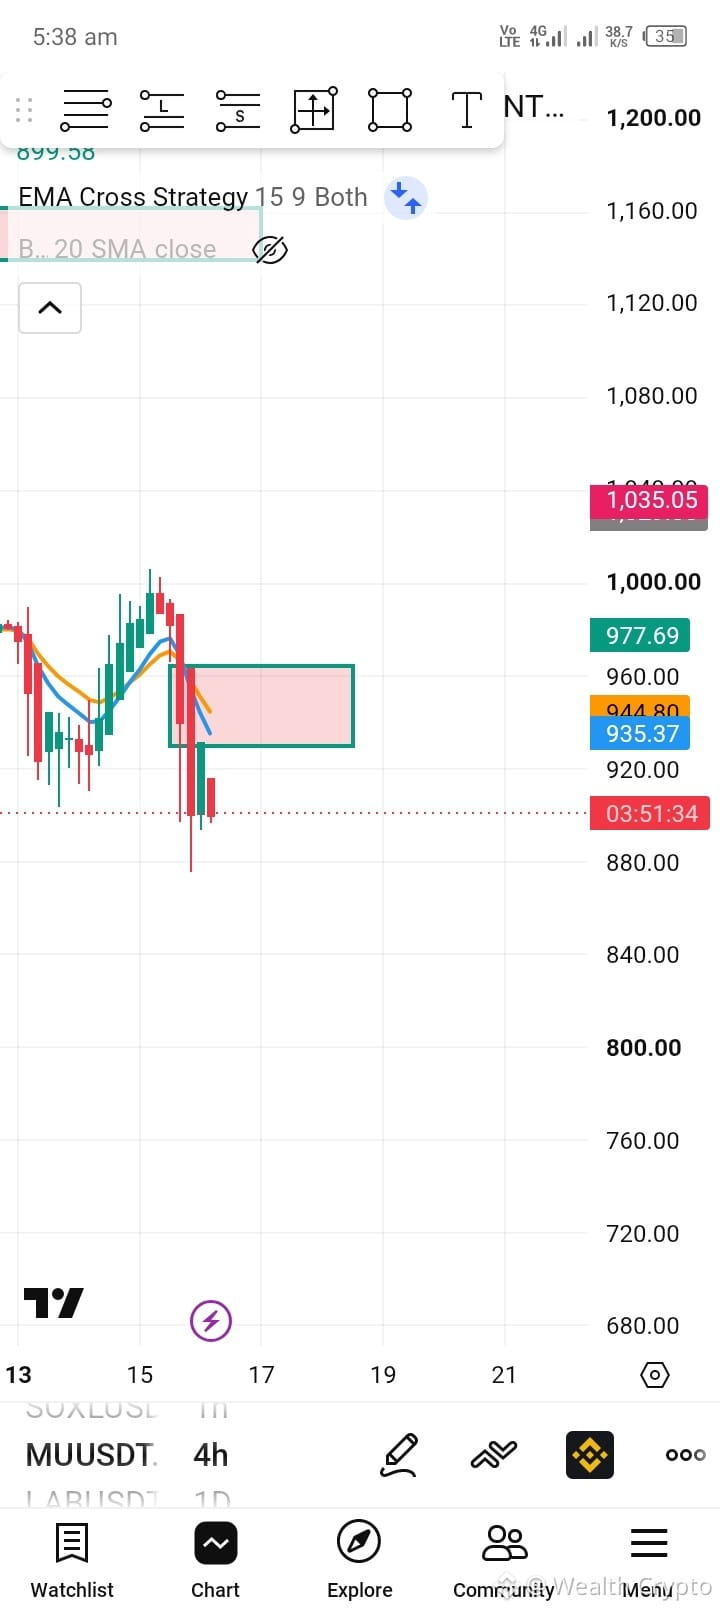
🚨 ພວກຄົນພາຍໃນກຳລັງຖອກຂາຍ $MU ໃນຂະນະທີ່ນັກລົງທືນລາຍຍ່ອຍກຳລັງຊື້ຢ່າງຮຸນແຮງໃສ່ກ່ອງຮອງພື້ນຖານຂອງທ້ອງຖິ່ນ. ນີ້ແມ່ນກັບກັນການລໍ້ລວງທີ່ເປີດເຜີຍ.
MU / USDT — ແຜນການປະກອບຂາຍ (BEARISH BREAKDOWN) 📉
ແຜນການທຳການຄ້າ:
• ຈຸດເຂົ້າເຂດ (Zone Entry): 925.00 - 960.00 (ການຂາຍສັ້ນໃນກຸ່ມການລຸດລົງຕາມໂຄງສ້າງ)
• ຢຸດຄວາມເສຍຫາຍ (Stop Loss, SL): 977.69 (ວາງໄວ້ຢ່າງເຂັ້ມງວດເຫນືອເຂດການລຸດລົງຕາມໂຄງສ້າງ)
• ກຳໄລສຳລັບຈຸດທີ 1 (Take Profit 1, TP1): 880.00
• ກຳໄລສຳລັບຈຸດທີ 2 (Take Profit 2, TP2): 840.00
• ກຳໄລສຳລັບຈຸດທີ 3 (Take Profit 3, TP3): 800.00
* ອັດຕາຄວາມສ່ຽງຕໍ່ກຳໄລ (R:R): 1:3.8 (ຄວາມບໍ່ສົມດຸນສູງ ໂຟກັສການສືບຕໍ່ການຈຳໜ່າຍຫຼັກ)
---
ເປັນຫຍັງແຜນນີ້? (ເຫດຜົນ)
1. ການແຕກຂອງ Structural Floor: ໃນຂອບເວລາ 4-Hour, MUU ໄດ້ທຸບທຳລາຍລົງໃຕ້ຂອບເຂດແນວນອນຂອງມັນຢ່າງຊັດເຈນ. ການສະໜັບເກົ່າຖືກຕັດສິ້ນແບບສິ້ນເຊີດ, ກັກຜູ້ຊື້ທີ່ຕົກໃຈລາຍຍ່ອຍໄວ້ ທີ່ກຳລັງ try-catching ພື້ນທີ່ກຳລັງລົ້ມ.
2. ການຕາມ EMA ທີ່ລົງລົງ: ເສັ້ນກາງຍ້ອມ 9 ແລະ 15 EMA ໄດ້ຢືນຢັນວ່າມີການຕັດສິນລົງ (bearish cross) ທີ່ຊັດເຈນເຫນືອການເຄື່ອນໄຫວລາຄາ ຕັດຂາດຊ່ອງຫາຍໃຈຂຶ້ນດ້ານເທິງ ແລະ ເປັນອຸປະສັກອອດເຫນືອ (dynamic overhead supply).
3. ກົດການ Invalidation: ຖ້າທຽບເທົ່າ 4H ປະກອບກາຍສະເໜີດ້ວຍການປິດແຈ້ງກັບເຂົ້າໄປໃນເຂດເໜືອ 977.69, ການ breakdown ນີ້ຈະກາຍເປັນ fake out. ພວກເຮົາອອກທັນທີ—ບໍ່ມີອາລົມ, ເຮັດຕາມຄຳສັ່ງລ້ວນໆ.
---
💬 ເຈົ້າຈະເລືອກຫຍັງ?
ເຈົ້າຈະຂີ່ຄື້ນການຈຳໜ່າຍນີ້ລົງໄປຫາພື້ນຈິດໃຈ 800, ຫຼືເຈົ້າຄາດວ່າຈະມີການສວງ (aggressive squeeze) ຂຶ້ນມາ? ແບ່ງປັນຈຸດເຂົ້າທີ່ໃຊ້ຢູ່ຂ້າງລຸ່ມ!
ກົດທີ່ນີ້ເພື່ອເບິ່ງ live chart MUU/USDT Perpetual ແລະ Trade 👇
$MU
{future}(MUUSDT)
#MUU #cryptotrading #TechnicalAnalysis
🚨 ພວກຄົນພາຍໃນກຳລັງຖອກຂາຍ $MU ໃນຂະນະທີ່ນັກລົງທືນລາຍຍ່ອຍກຳລັງຊື້ຢ່າງຮຸນແຮງໃສ່ກ່ອງຮອງພື້ນຖານຂອງທ້ອງຖິ່ນ. ນີ້ແມ່ນກັບກັນການລໍ້ລວງທີ່ເປີດເຜີຍ.
MU / USDT — ແຜນການປະກອບຂາຍ (BEARISH BREAKDOWN) 📉
ແຜນການທຳການຄ້າ:
• ຈຸດເຂົ້າເຂດ (Zone Entry): 925.00 - 960.00 (ການຂາຍສັ້ນໃນກຸ່ມການລຸດລົງຕາມໂຄງສ້າງ)
• ຢຸດຄວາມເສຍຫາຍ (Stop Loss, SL): 977.69 (ວາງໄວ້ຢ່າງເຂັ້ມງວດເຫນືອເຂດການລຸດລົງຕາມໂຄງສ້າງ)
• ກຳໄລສຳລັບຈຸດທີ 1 (Take Profit 1, TP1): 880.00
• ກຳໄລສຳລັບຈຸດທີ 2 (Take Profit 2, TP2): 840.00
• ກຳໄລສຳລັບຈຸດທີ 3 (Take Profit 3, TP3): 800.00
* ອັດຕາຄວາມສ່ຽງຕໍ່ກຳໄລ (R:R): 1:3.8 (ຄວາມບໍ່ສົມດຸນສູງ ໂຟກັສການສືບຕໍ່ການຈຳໜ່າຍຫຼັກ)
---
ເປັນຫຍັງແຜນນີ້? (ເຫດຜົນ)
1. ການແຕກຂອງ Structural Floor: ໃນຂອບເວລາ 4-Hour, MUU ໄດ້ທຸບທຳລາຍລົງໃຕ້ຂອບເຂດແນວນອນຂອງມັນຢ່າງຊັດເຈນ. ການສະໜັບເກົ່າຖືກຕັດສິ້ນແບບສິ້ນເຊີດ, ກັກຜູ້ຊື້ທີ່ຕົກໃຈລາຍຍ່ອຍໄວ້ ທີ່ກຳລັງ try-catching ພື້ນທີ່ກຳລັງລົ້ມ.
2. ການຕາມ EMA ທີ່ລົງລົງ: ເສັ້ນກາງຍ້ອມ 9 ແລະ 15 EMA ໄດ້ຢືນຢັນວ່າມີການຕັດສິນລົງ (bearish cross) ທີ່ຊັດເຈນເຫນືອການເຄື່ອນໄຫວລາຄາ ຕັດຂາດຊ່ອງຫາຍໃຈຂຶ້ນດ້ານເທິງ ແລະ ເປັນອຸປະສັກອອດເຫນືອ (dynamic overhead supply).
3. ກົດການ Invalidation: ຖ້າທຽບເທົ່າ 4H ປະກອບກາຍສະເໜີດ້ວຍການປິດແຈ້ງກັບເຂົ້າໄປໃນເຂດເໜືອ 977.69, ການ breakdown ນີ້ຈະກາຍເປັນ fake out. ພວກເຮົາອອກທັນທີ—ບໍ່ມີອາລົມ, ເຮັດຕາມຄຳສັ່ງລ້ວນໆ.
---
💬 ເຈົ້າຈະເລືອກຫຍັງ?
ເຈົ້າຈະຂີ່ຄື້ນການຈຳໜ່າຍນີ້ລົງໄປຫາພື້ນຈິດໃຈ 800, ຫຼືເຈົ້າຄາດວ່າຈະມີການສວງ (aggressive squeeze) ຂຶ້ນມາ? ແບ່ງປັນຈຸດເຂົ້າທີ່ໃຊ້ຢູ່ຂ້າງລຸ່ມ!
ກົດທີ່ນີ້ເພື່ອເບິ່ງ live chart MUU/USDT Perpetual ແລະ Trade 👇
$MU
#MUU #cryptotrading #TechnicalAnalysis
MU / USDT — ແຜນການປະກອບຂາຍ (BEARISH BREAKDOWN) 📉
ແຜນການທຳການຄ້າ:
• ຈຸດເຂົ້າເຂດ (Zone Entry): 925.00 - 960.00 (ການຂາຍສັ້ນໃນກຸ່ມການລຸດລົງຕາມໂຄງສ້າງ)
• ຢຸດຄວາມເສຍຫາຍ (Stop Loss, SL): 977.69 (ວາງໄວ້ຢ່າງເຂັ້ມງວດເຫນືອເຂດການລຸດລົງຕາມໂຄງສ້າງ)
• ກຳໄລສຳລັບຈຸດທີ 1 (Take Profit 1, TP1): 880.00
• ກຳໄລສຳລັບຈຸດທີ 2 (Take Profit 2, TP2): 840.00
• ກຳໄລສຳລັບຈຸດທີ 3 (Take Profit 3, TP3): 800.00
* ອັດຕາຄວາມສ່ຽງຕໍ່ກຳໄລ (R:R): 1:3.8 (ຄວາມບໍ່ສົມດຸນສູງ ໂຟກັສການສືບຕໍ່ການຈຳໜ່າຍຫຼັກ)
---
ເປັນຫຍັງແຜນນີ້? (ເຫດຜົນ)
1. ການແຕກຂອງ Structural Floor: ໃນຂອບເວລາ 4-Hour, MUU ໄດ້ທຸບທຳລາຍລົງໃຕ້ຂອບເຂດແນວນອນຂອງມັນຢ່າງຊັດເຈນ. ການສະໜັບເກົ່າຖືກຕັດສິ້ນແບບສິ້ນເຊີດ, ກັກຜູ້ຊື້ທີ່ຕົກໃຈລາຍຍ່ອຍໄວ້ ທີ່ກຳລັງ try-catching ພື້ນທີ່ກຳລັງລົ້ມ.
2. ການຕາມ EMA ທີ່ລົງລົງ: ເສັ້ນກາງຍ້ອມ 9 ແລະ 15 EMA ໄດ້ຢືນຢັນວ່າມີການຕັດສິນລົງ (bearish cross) ທີ່ຊັດເຈນເຫນືອການເຄື່ອນໄຫວລາຄາ ຕັດຂາດຊ່ອງຫາຍໃຈຂຶ້ນດ້ານເທິງ ແລະ ເປັນອຸປະສັກອອດເຫນືອ (dynamic overhead supply).
3. ກົດການ Invalidation: ຖ້າທຽບເທົ່າ 4H ປະກອບກາຍສະເໜີດ້ວຍການປິດແຈ້ງກັບເຂົ້າໄປໃນເຂດເໜືອ 977.69, ການ breakdown ນີ້ຈະກາຍເປັນ fake out. ພວກເຮົາອອກທັນທີ—ບໍ່ມີອາລົມ, ເຮັດຕາມຄຳສັ່ງລ້ວນໆ.
---
💬 ເຈົ້າຈະເລືອກຫຍັງ?
ເຈົ້າຈະຂີ່ຄື້ນການຈຳໜ່າຍນີ້ລົງໄປຫາພື້ນຈິດໃຈ 800, ຫຼືເຈົ້າຄາດວ່າຈະມີການສວງ (aggressive squeeze) ຂຶ້ນມາ? ແບ່ງປັນຈຸດເຂົ້າທີ່ໃຊ້ຢູ່ຂ້າງລຸ່ມ!
ກົດທີ່ນີ້ເພື່ອເບິ່ງ live chart MUU/USDT Perpetual ແລະ Trade 👇
$MU
#MUU #cryptotrading #TechnicalAnalysis
1
135
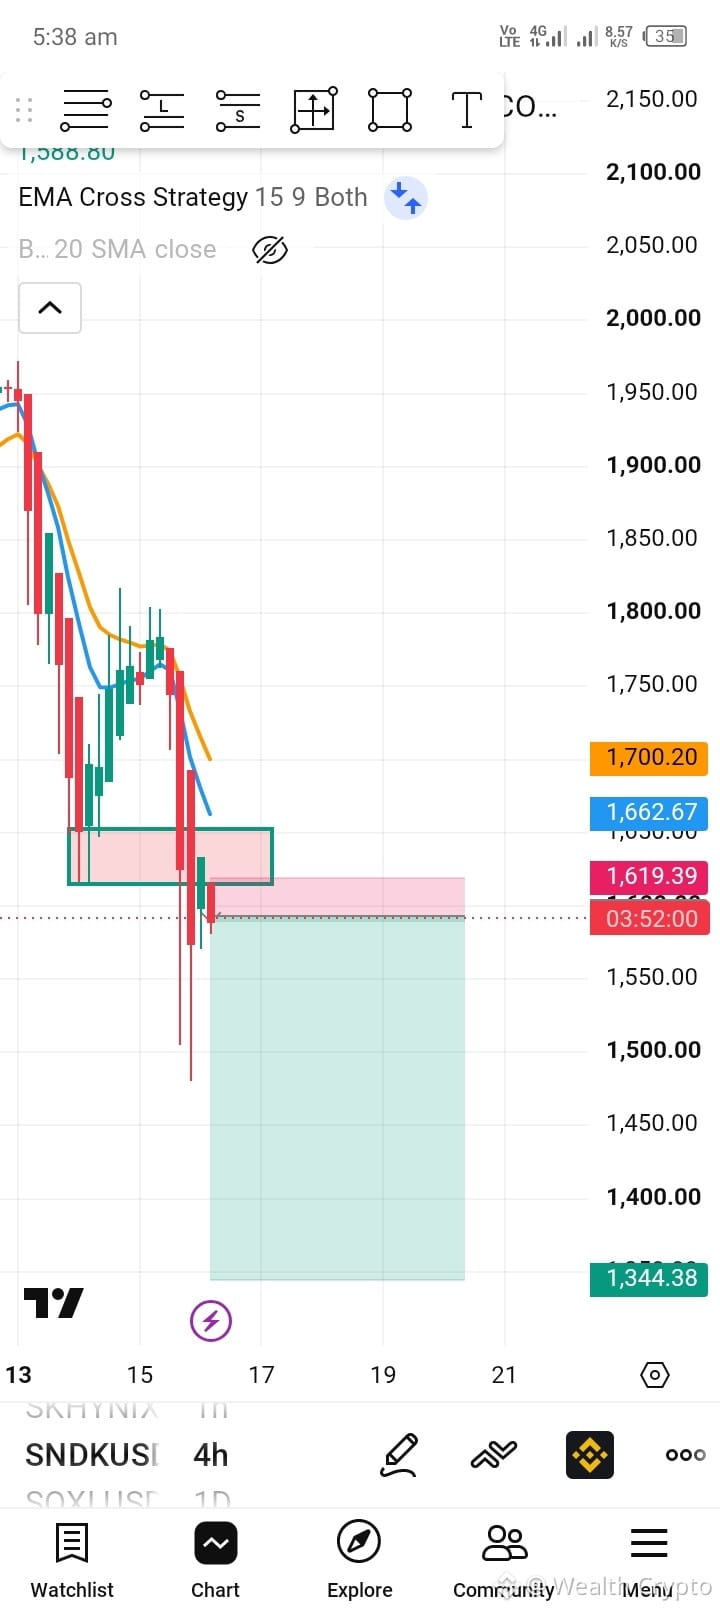
🚨 ການຄ້າປີກິດກຳລັງຮຽກຮ້ອງໃຫ້ເດ้งກັບຄືນທີ່ $SNDKB , ແຕ່ກຣາຟກຳລັງຊີ້ວ່າມີການລ່າຄວາມສະພາບຄ່ອງຄວາມຄວາມສ່ຽງຂະໜາດໃຫຍ່ຢູ່ດ້ານລົງ.
$SNDK / USDT — ຕັ້ງຄ່າການລະບຸແນວโน้มຂາລົງ 📉
ແຜນການເທຣດ:
• ເຂົ້າຈຸດ (Zone Entry): 1590.00 - 1620.00 (ການຈັດຕຳແໜ່ງໃນການທົດສອບການລຸດລົງຄືນແລ້ວຖືກປະຕິເສດ)
• ຈຸດຕັດຂາດ (Stop Loss - SL): 1662.67 (ວາງໃຫ້ປອດໄພຢູ່ເໜືອການຍົກທົດສອບການຕັດສິນຄວາມຕ້ານທານຊະນະຕາມແບບໄດນາມິກ)
• ເປົ້າໝາຍ 1 (Take Profit 1 - TP1): 1500.00
• ເປົ້າໝາຍ 2 (Take Profit 2 - TP2): 1420.00
• ເປົ້າໝາຍ 3 (Take Profit 3 - TP3): 1344.38
* ອັດຕາສ່ຽງຕໍ່ຜົນຕອບແທນ (Risk-to-Reward Ratio - R:R): 1:3.4 (ກຳນົດເປັນທາງການ ສຳລັບການຖອຍລົງໄລຍະສຳຄັນ)
---
ເປັນຫຍັງແຜນນີ້? (Logic)
1. ການທຳລາຍພື້ນຮອງໂຄງສ້າງ: ໃນກຣາຟ 4-Hour, ກຸ່ມການຕ້ານທານ (support) ທີ່ສຳຄັນຖືກຜູ້ຂາຍບຸກໂຈມແຕກແບບກະທຳມະລະ. ກຳລັງມີການຈັດຈຳໜ່າຍຢ່າງແຮງ, ທຳໃຫ້ການເຂົ້າຢາວ (long) ມີໂອກາດຕ່ຳຫຼາຍ.
2. ຂອບເຂດຕ້ານສູງທີ່ຄອບຄຸມ (Dynamic Overhead Ceiling): ສະເລ່ຍເຄື່ອນທີ່ 9 ແລະ 15 EMA ຈັດຕົວຢູ່ໃນທິດທາງຂາລົງໄດ້ຢ່າງພ້ອມເພີຍ, ກົດລາຄາລົງ ແລະຕັດຕອບການຫາຍໃຈຢູ່ດ້ານຂຶ້ນ.
3. ກົດການຖອດຄວາມຜິດພາດ (Invalidation Rule): ຖ້າທຽນ 4H ປິດຕົວຢ່າງຊັດເຈນເໜືອກຸ່ມໂຄງສ້າງທີ່ 1662.67, ທິດສັ້ນ (short thesis) ຈະຖືກຍົກເລີກ. ພວກເຮົາອອກທັນທີ—ບໍ່ມີການຫວັງດວງຈົນແກ່ນອາລົມ.
---
💬 ທ່ານຈະຫຼິ້ນແນວໃດ?
ທ່ານຈະ short ຕໍ່ເນື່ອງໄປຈົນເຖິງ 1344 ຫຼືຈະລໍຖ້າໃຫ້ຄວາມຜັນຜວນຜ່ານໄປ? ບອກຄວາມຄິດເຫັນໃຫ້ຂ້ອຍໃນຄອມເມັນໃຕ້ລຸ່ມນີ້ເດີ!
ກົດທີ່ນີ້ເພື່ອເບິ່ງກຣາຟສົດ SNDK/USDT Perpetual ແລະ Trade 👇
$SNDK
{future}(SNDKUSDT)
#SNDK #CryptoMarket #TechnicalAnalysis
🚨 ການຄ້າປີກິດກຳລັງຮຽກຮ້ອງໃຫ້ເດ้งກັບຄືນທີ່ $SNDKB , ແຕ່ກຣາຟກຳລັງຊີ້ວ່າມີການລ່າຄວາມສະພາບຄ່ອງຄວາມຄວາມສ່ຽງຂະໜາດໃຫຍ່ຢູ່ດ້ານລົງ.
$SNDK / USDT — ຕັ້ງຄ່າການລະບຸແນວโน้มຂາລົງ 📉
ແຜນການເທຣດ:
• ເຂົ້າຈຸດ (Zone Entry): 1590.00 - 1620.00 (ການຈັດຕຳແໜ່ງໃນການທົດສອບການລຸດລົງຄືນແລ້ວຖືກປະຕິເສດ)
• ຈຸດຕັດຂາດ (Stop Loss - SL): 1662.67 (ວາງໃຫ້ປອດໄພຢູ່ເໜືອການຍົກທົດສອບການຕັດສິນຄວາມຕ້ານທານຊະນະຕາມແບບໄດນາມິກ)
• ເປົ້າໝາຍ 1 (Take Profit 1 - TP1): 1500.00
• ເປົ້າໝາຍ 2 (Take Profit 2 - TP2): 1420.00
• ເປົ້າໝາຍ 3 (Take Profit 3 - TP3): 1344.38
* ອັດຕາສ່ຽງຕໍ່ຜົນຕອບແທນ (Risk-to-Reward Ratio - R:R): 1:3.4 (ກຳນົດເປັນທາງການ ສຳລັບການຖອຍລົງໄລຍະສຳຄັນ)
---
ເປັນຫຍັງແຜນນີ້? (Logic)
1. ການທຳລາຍພື້ນຮອງໂຄງສ້າງ: ໃນກຣາຟ 4-Hour, ກຸ່ມການຕ້ານທານ (support) ທີ່ສຳຄັນຖືກຜູ້ຂາຍບຸກໂຈມແຕກແບບກະທຳມະລະ. ກຳລັງມີການຈັດຈຳໜ່າຍຢ່າງແຮງ, ທຳໃຫ້ການເຂົ້າຢາວ (long) ມີໂອກາດຕ່ຳຫຼາຍ.
2. ຂອບເຂດຕ້ານສູງທີ່ຄອບຄຸມ (Dynamic Overhead Ceiling): ສະເລ່ຍເຄື່ອນທີ່ 9 ແລະ 15 EMA ຈັດຕົວຢູ່ໃນທິດທາງຂາລົງໄດ້ຢ່າງພ້ອມເພີຍ, ກົດລາຄາລົງ ແລະຕັດຕອບການຫາຍໃຈຢູ່ດ້ານຂຶ້ນ.
3. ກົດການຖອດຄວາມຜິດພາດ (Invalidation Rule): ຖ້າທຽນ 4H ປິດຕົວຢ່າງຊັດເຈນເໜືອກຸ່ມໂຄງສ້າງທີ່ 1662.67, ທິດສັ້ນ (short thesis) ຈະຖືກຍົກເລີກ. ພວກເຮົາອອກທັນທີ—ບໍ່ມີການຫວັງດວງຈົນແກ່ນອາລົມ.
---
💬 ທ່ານຈະຫຼິ້ນແນວໃດ?
ທ່ານຈະ short ຕໍ່ເນື່ອງໄປຈົນເຖິງ 1344 ຫຼືຈະລໍຖ້າໃຫ້ຄວາມຜັນຜວນຜ່ານໄປ? ບອກຄວາມຄິດເຫັນໃຫ້ຂ້ອຍໃນຄອມເມັນໃຕ້ລຸ່ມນີ້ເດີ!
ກົດທີ່ນີ້ເພື່ອເບິ່ງກຣາຟສົດ SNDK/USDT Perpetual ແລະ Trade 👇
$SNDK
#SNDK #CryptoMarket #TechnicalAnalysis
$SNDK / USDT — ຕັ້ງຄ່າການລະບຸແນວโน้มຂາລົງ 📉
ແຜນການເທຣດ:
• ເຂົ້າຈຸດ (Zone Entry): 1590.00 - 1620.00 (ການຈັດຕຳແໜ່ງໃນການທົດສອບການລຸດລົງຄືນແລ້ວຖືກປະຕິເສດ)
• ຈຸດຕັດຂາດ (Stop Loss - SL): 1662.67 (ວາງໃຫ້ປອດໄພຢູ່ເໜືອການຍົກທົດສອບການຕັດສິນຄວາມຕ້ານທານຊະນະຕາມແບບໄດນາມິກ)
• ເປົ້າໝາຍ 1 (Take Profit 1 - TP1): 1500.00
• ເປົ້າໝາຍ 2 (Take Profit 2 - TP2): 1420.00
• ເປົ້າໝາຍ 3 (Take Profit 3 - TP3): 1344.38
* ອັດຕາສ່ຽງຕໍ່ຜົນຕອບແທນ (Risk-to-Reward Ratio - R:R): 1:3.4 (ກຳນົດເປັນທາງການ ສຳລັບການຖອຍລົງໄລຍະສຳຄັນ)
---
ເປັນຫຍັງແຜນນີ້? (Logic)
1. ການທຳລາຍພື້ນຮອງໂຄງສ້າງ: ໃນກຣາຟ 4-Hour, ກຸ່ມການຕ້ານທານ (support) ທີ່ສຳຄັນຖືກຜູ້ຂາຍບຸກໂຈມແຕກແບບກະທຳມະລະ. ກຳລັງມີການຈັດຈຳໜ່າຍຢ່າງແຮງ, ທຳໃຫ້ການເຂົ້າຢາວ (long) ມີໂອກາດຕ່ຳຫຼາຍ.
2. ຂອບເຂດຕ້ານສູງທີ່ຄອບຄຸມ (Dynamic Overhead Ceiling): ສະເລ່ຍເຄື່ອນທີ່ 9 ແລະ 15 EMA ຈັດຕົວຢູ່ໃນທິດທາງຂາລົງໄດ້ຢ່າງພ້ອມເພີຍ, ກົດລາຄາລົງ ແລະຕັດຕອບການຫາຍໃຈຢູ່ດ້ານຂຶ້ນ.
3. ກົດການຖອດຄວາມຜິດພາດ (Invalidation Rule): ຖ້າທຽນ 4H ປິດຕົວຢ່າງຊັດເຈນເໜືອກຸ່ມໂຄງສ້າງທີ່ 1662.67, ທິດສັ້ນ (short thesis) ຈະຖືກຍົກເລີກ. ພວກເຮົາອອກທັນທີ—ບໍ່ມີການຫວັງດວງຈົນແກ່ນອາລົມ.
---
💬 ທ່ານຈະຫຼິ້ນແນວໃດ?
ທ່ານຈະ short ຕໍ່ເນື່ອງໄປຈົນເຖິງ 1344 ຫຼືຈະລໍຖ້າໃຫ້ຄວາມຜັນຜວນຜ່ານໄປ? ບອກຄວາມຄິດເຫັນໃຫ້ຂ້ອຍໃນຄອມເມັນໃຕ້ລຸ່ມນີ້ເດີ!
ກົດທີ່ນີ້ເພື່ອເບິ່ງກຣາຟສົດ SNDK/USDT Perpetual ແລະ Trade 👇
$SNDK
#SNDK #CryptoMarket #TechnicalAnalysis
313
·
--
ສັນຍານໝີ
ເບິ່ງການແປ
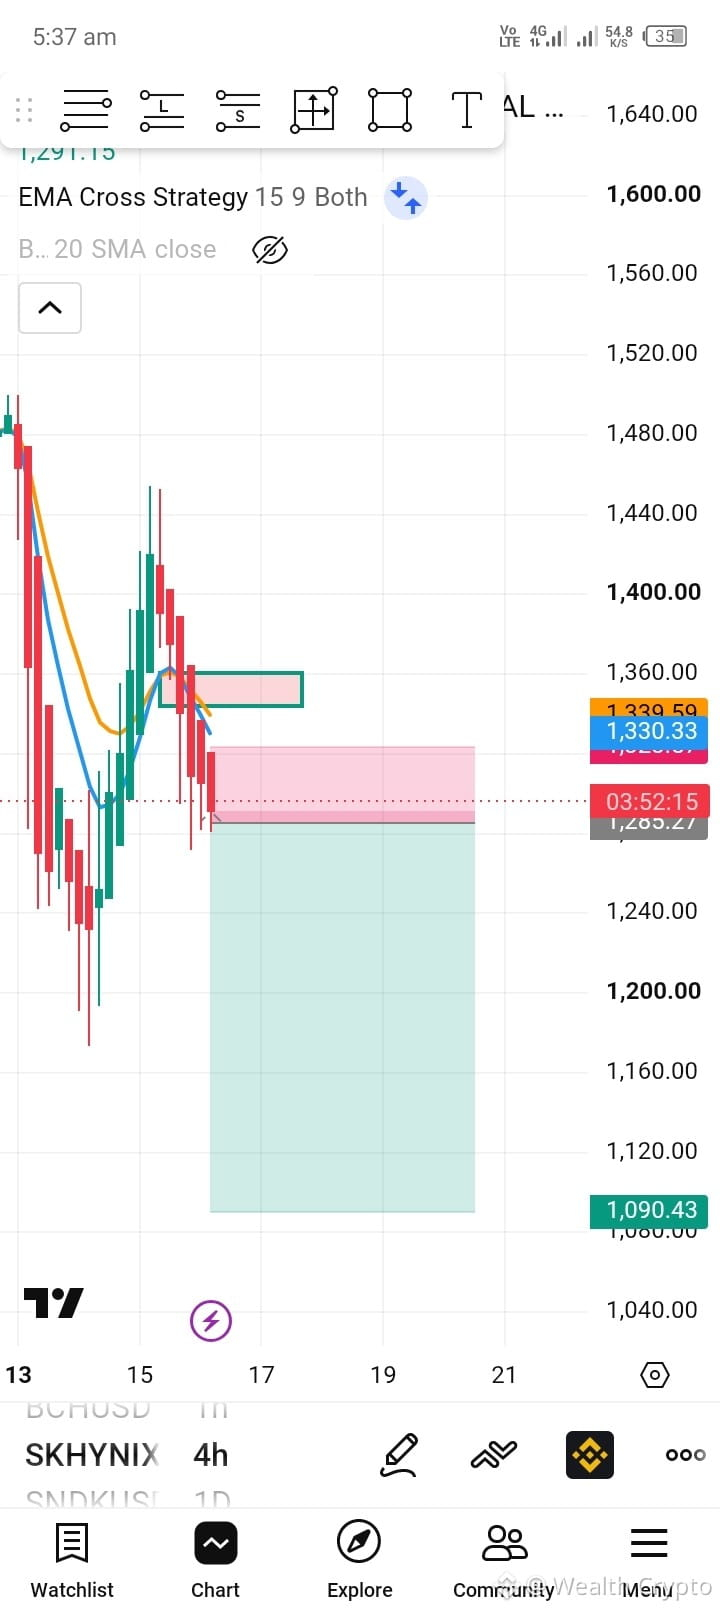
🚨 Market distribution phase is locked in on $SKHYNIX . Here is why I am shorting this continuation.
$SKHYNIX / USDT — BEARISH BREAKDOWN SETUP 📉
Trade Plan:
• Zone Entry: 1285.00 - 1330.00 (Shorting the structural breakdown zone)
• Stop Loss (SL): 1339.50 (Placed safely above the invalidation resistance box)
• Take Profit 1 (TP1): 1220.00
• Take Profit 2 (TP2): 1150.00
• Take Profit 3 (TP3): 1090.43
* Risk-to-Reward Ratio (R:R): 1:4.8 (Highly asymmetric risk profile for maximum downside capture)
---
Why this setup? (The Logic)
1. Severe Support Destruction: The 4-Hour timeframe shows the asset decisively printing lower lows and snapping through key horizontal support. Massive trapped buyer liquidity is left above, forming heavy overhead resistance.
2. Bearish EMA Tracking: The 9 & 15 EMA cross is completely sloped downward, aggressively guiding the price action lower. Any minor relief rally will serve as fuel for the next leg down.
3. The Invalidation Rule: A definitive 4H candle close back inside the consolidation box above 1339.50 invalidates the short bias. We accept the invalidation cleanly—never average down on a failing trade.
---
💬 What's your play?
Is this heading straight down to the 1090 target area, or are you hunting a macro trend reversal? Share your active entries below!
Click here to view live SKHYNIX/USDT Perpetual Chart & Trade 👇
$SKHYNIX
{future}(SKHYNIXUSDT)
#SKHYNIX #Trading #Altcoins
🚨 Market distribution phase is locked in on $SKHYNIX . Here is why I am shorting this continuation.
$SKHYNIX / USDT — BEARISH BREAKDOWN SETUP 📉
Trade Plan:
• Zone Entry: 1285.00 - 1330.00 (Shorting the structural breakdown zone)
• Stop Loss (SL): 1339.50 (Placed safely above the invalidation resistance box)
• Take Profit 1 (TP1): 1220.00
• Take Profit 2 (TP2): 1150.00
• Take Profit 3 (TP3): 1090.43
* Risk-to-Reward Ratio (R:R): 1:4.8 (Highly asymmetric risk profile for maximum downside capture)
---
Why this setup? (The Logic)
1. Severe Support Destruction: The 4-Hour timeframe shows the asset decisively printing lower lows and snapping through key horizontal support. Massive trapped buyer liquidity is left above, forming heavy overhead resistance.
2. Bearish EMA Tracking: The 9 & 15 EMA cross is completely sloped downward, aggressively guiding the price action lower. Any minor relief rally will serve as fuel for the next leg down.
3. The Invalidation Rule: A definitive 4H candle close back inside the consolidation box above 1339.50 invalidates the short bias. We accept the invalidation cleanly—never average down on a failing trade.
---
💬 What's your play?
Is this heading straight down to the 1090 target area, or are you hunting a macro trend reversal? Share your active entries below!
Click here to view live SKHYNIX/USDT Perpetual Chart & Trade 👇
$SKHYNIX
#SKHYNIX #Trading #Altcoins
$SKHYNIX / USDT — BEARISH BREAKDOWN SETUP 📉
Trade Plan:
• Zone Entry: 1285.00 - 1330.00 (Shorting the structural breakdown zone)
• Stop Loss (SL): 1339.50 (Placed safely above the invalidation resistance box)
• Take Profit 1 (TP1): 1220.00
• Take Profit 2 (TP2): 1150.00
• Take Profit 3 (TP3): 1090.43
* Risk-to-Reward Ratio (R:R): 1:4.8 (Highly asymmetric risk profile for maximum downside capture)
---
Why this setup? (The Logic)
1. Severe Support Destruction: The 4-Hour timeframe shows the asset decisively printing lower lows and snapping through key horizontal support. Massive trapped buyer liquidity is left above, forming heavy overhead resistance.
2. Bearish EMA Tracking: The 9 & 15 EMA cross is completely sloped downward, aggressively guiding the price action lower. Any minor relief rally will serve as fuel for the next leg down.
3. The Invalidation Rule: A definitive 4H candle close back inside the consolidation box above 1339.50 invalidates the short bias. We accept the invalidation cleanly—never average down on a failing trade.
---
💬 What's your play?
Is this heading straight down to the 1090 target area, or are you hunting a macro trend reversal? Share your active entries below!
Click here to view live SKHYNIX/USDT Perpetual Chart & Trade 👇
$SKHYNIX
#SKHYNIX #Trading #Altcoins
1
324
·
--
ສັນຍານກະທິງ
ເບິ່ງການແປ
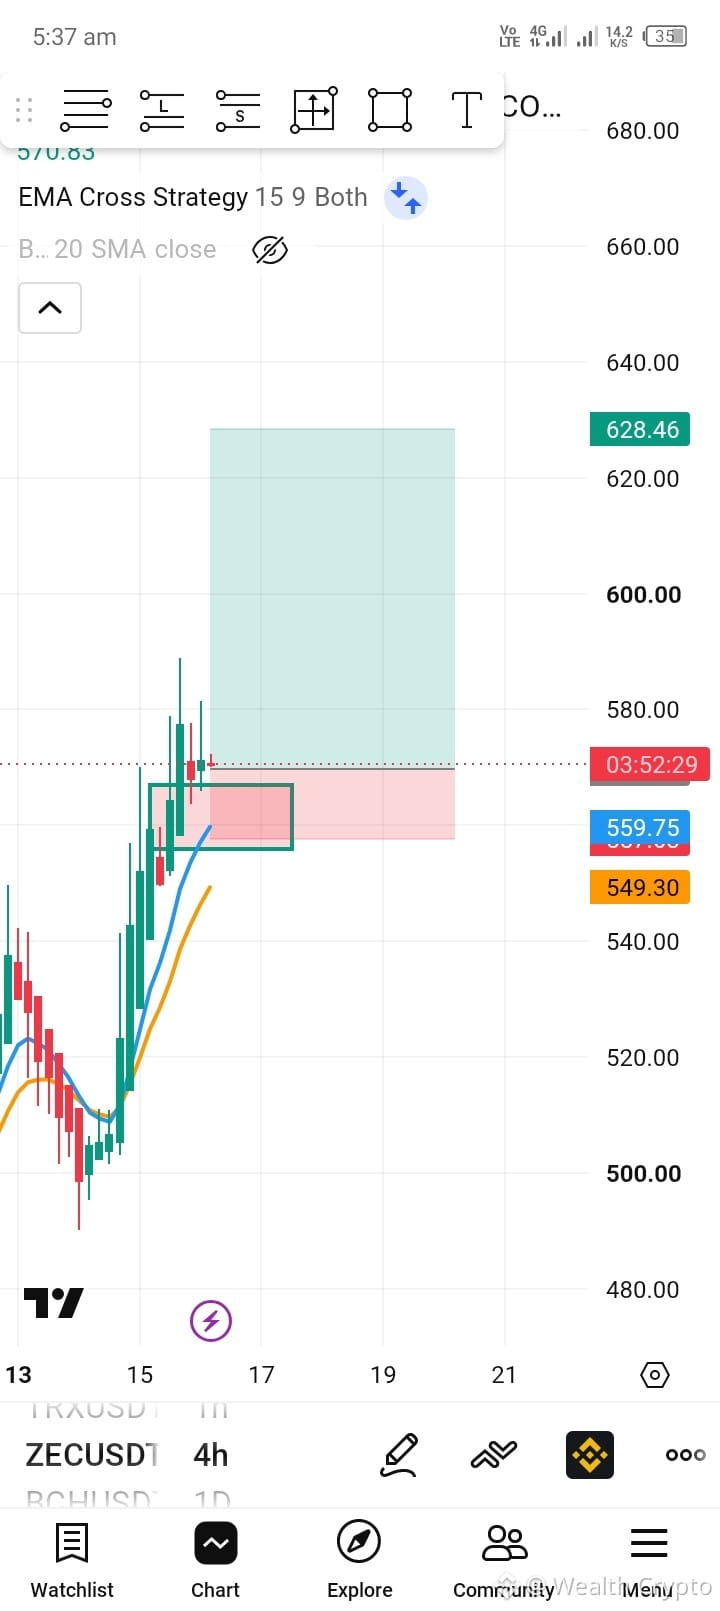
🚨 Retail shorts are heavily exposed on $ZEC . Here is my institutional playbook for this breakout retest.
$ZEC / USDT — BULLISH BREAKOUT RETEST 📈
Trade Plan:
• Zone Entry: 560.00 - 570.00 (Accumulating inside the flipped demand zone)
• Stop Loss (SL): 549.30 (Placed strictly below the 4H swing low structure)
• Take Profit 1 (TP1): 595.00
• Take Profit 2 (TP2): 612.00
• Take Profit 3 (TP3): 628.46
* Risk-to-Reward Ratio (R:R): 1:5.4 (Exceptional high-precision R:R structure)
---
Why this setup? (The Logic)
1. Textbook S/R Flip: On the 4-Hour timeframe, Zcash has cleanly broken out above a major resistance ceiling. The current price action is a classic support retest, transforming former overhead supply into a strong demand block.
2. Dynamic Bullish Support: The 9 and 15 EMA lines have printed a fresh bullish cross and are fanning out below the entry zone, providing active momentum validation for the continuation higher.
3. The Invalidation Rule: If a 4H candle closes cleanly below 549.30, the breakout is invalidated as a fake out. We take the tight loss immediately with zero hesitation—risk preservation always comes first.
---
💬 What's your play?
Are you bidding this 4H demand retest with me, or do you think the bears will push it back inside the range? Let me know your targets in the comments below!
Click here to view live ZEC/USDT Perpetual Chart & Trade 👇
$ZEC
{future}(ZECUSDT)
#ZEC #Zcash #CryptoTrading
🚨 Retail shorts are heavily exposed on $ZEC . Here is my institutional playbook for this breakout retest.
$ZEC / USDT — BULLISH BREAKOUT RETEST 📈
Trade Plan:
• Zone Entry: 560.00 - 570.00 (Accumulating inside the flipped demand zone)
• Stop Loss (SL): 549.30 (Placed strictly below the 4H swing low structure)
• Take Profit 1 (TP1): 595.00
• Take Profit 2 (TP2): 612.00
• Take Profit 3 (TP3): 628.46
* Risk-to-Reward Ratio (R:R): 1:5.4 (Exceptional high-precision R:R structure)
---
Why this setup? (The Logic)
1. Textbook S/R Flip: On the 4-Hour timeframe, Zcash has cleanly broken out above a major resistance ceiling. The current price action is a classic support retest, transforming former overhead supply into a strong demand block.
2. Dynamic Bullish Support: The 9 and 15 EMA lines have printed a fresh bullish cross and are fanning out below the entry zone, providing active momentum validation for the continuation higher.
3. The Invalidation Rule: If a 4H candle closes cleanly below 549.30, the breakout is invalidated as a fake out. We take the tight loss immediately with zero hesitation—risk preservation always comes first.
---
💬 What's your play?
Are you bidding this 4H demand retest with me, or do you think the bears will push it back inside the range? Let me know your targets in the comments below!
Click here to view live ZEC/USDT Perpetual Chart & Trade 👇
$ZEC
#ZEC #Zcash #CryptoTrading
$ZEC / USDT — BULLISH BREAKOUT RETEST 📈
Trade Plan:
• Zone Entry: 560.00 - 570.00 (Accumulating inside the flipped demand zone)
• Stop Loss (SL): 549.30 (Placed strictly below the 4H swing low structure)
• Take Profit 1 (TP1): 595.00
• Take Profit 2 (TP2): 612.00
• Take Profit 3 (TP3): 628.46
* Risk-to-Reward Ratio (R:R): 1:5.4 (Exceptional high-precision R:R structure)
---
Why this setup? (The Logic)
1. Textbook S/R Flip: On the 4-Hour timeframe, Zcash has cleanly broken out above a major resistance ceiling. The current price action is a classic support retest, transforming former overhead supply into a strong demand block.
2. Dynamic Bullish Support: The 9 and 15 EMA lines have printed a fresh bullish cross and are fanning out below the entry zone, providing active momentum validation for the continuation higher.
3. The Invalidation Rule: If a 4H candle closes cleanly below 549.30, the breakout is invalidated as a fake out. We take the tight loss immediately with zero hesitation—risk preservation always comes first.
---
💬 What's your play?
Are you bidding this 4H demand retest with me, or do you think the bears will push it back inside the range? Let me know your targets in the comments below!
Click here to view live ZEC/USDT Perpetual Chart & Trade 👇
$ZEC
#ZEC #Zcash #CryptoTrading
1
243
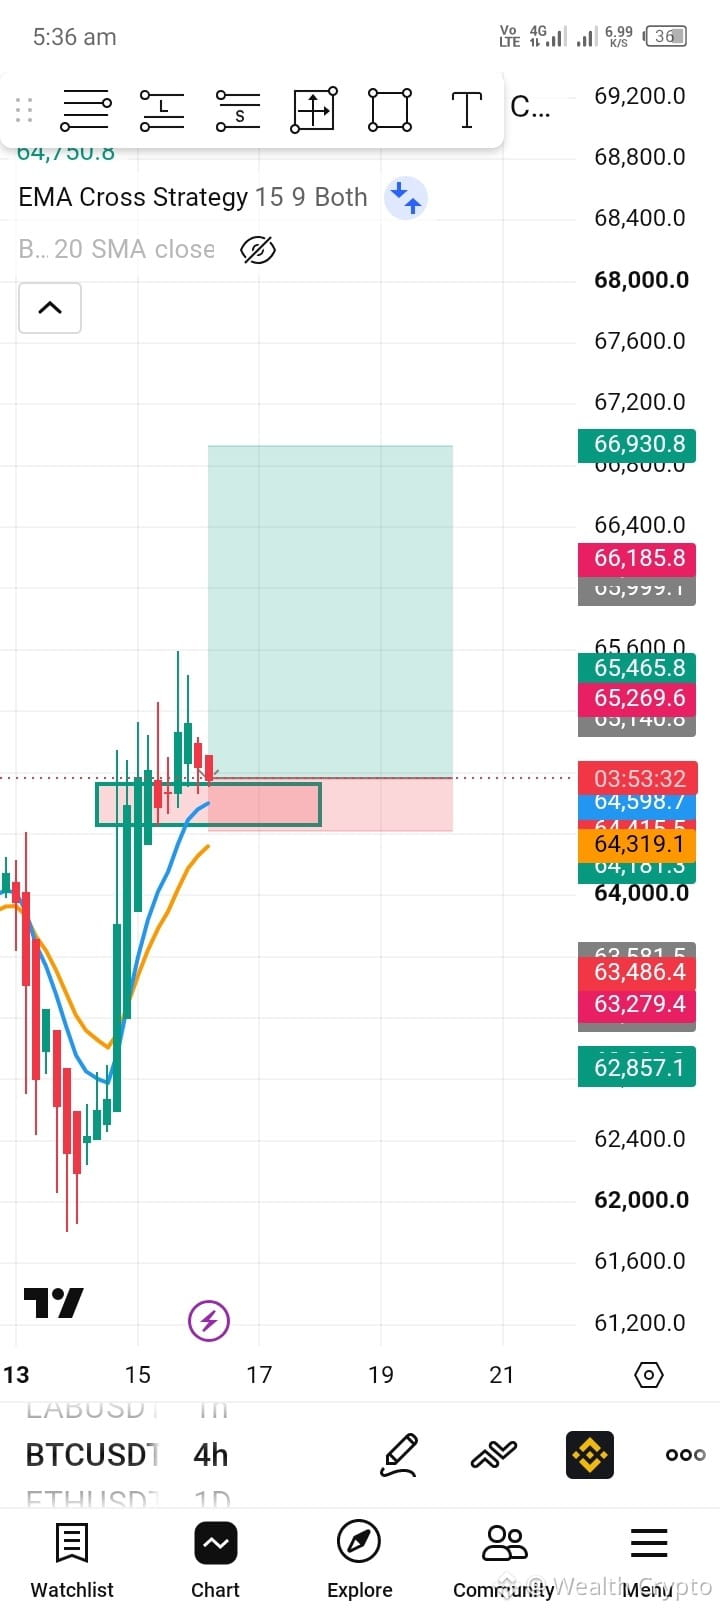
🚨$BTC ປຶ້ນກະຕ່າຍເພື່ອລອກເລືອກຕະຫຼາດຢູ່ 64.5k. ນີ້ແມ່ນເຫດຜົນທີ່ຂ້ອຍກຳລັງຊື້ Bitcoin ການທົດລອງຄືນ.
$BTC / USDT — ພຸ່ງຂຶ້ນແບບ BULLISH BREAKOUT RETEST 📈
ແຜນການທຳລອງ:
• ເຂົ້າເຂດ: 64,600 - 65,000 (ສະສົມຢູ່ໃນເຂດ demand ທີ່ປ່ຽນທິດ)
• ຢຸດຂາດ (SL): 64,300 (ວາງແໜ້ນພາຍໃຕ້ໂຄງສ້າງ 4H EMA)
• ກຳໄລທີ 1 (TP1): 65,450
• ກຳໄລທີ 2 (TP2): 66,180
• ກຳໄລທີ 3 (TP3): 66,930
* ອັດຕາຄວາມສ່ຽງຕໍ່ຜົນຕອບແທນ (R:R): 1:3.2 (ສ່ຽງແຄບພຽງເລັກໜ້ອຍເພື່ອຈັບຄືນ rally ມູນຄ່າ 2,000+ ໂດລາ)
---
ເປັນຫຍັງຊຸດນີ້? (ເຫດຜົນ)
1. ຄຳສອນ SR Flip: ໃນໄລຍະ 4-Hour Bitcoin ໄດ້ທະລຸຂຶ້ນທີ່ຕ້ານທານທ້ອງຖິ່ນສຳຄັນໄດ້ຢ່າງຊັດເຈນ. ການເຄື່ອນໄຫວປັດຈຸບັນແມ່ນການ retest ທີ່ເຂົ້າຕາມແບບ textbook ຂອງລະດັບທີ່ປ່ຽນນັ້ນ, ຈາກ resistance ກາຍເປັນເຂດ demand ທີ່ແນ່ນໜາແຂງແຮງ.
2. Bullish EMA Alignment: 9 ແລະ 15 EMAs ກຳລັງແຜ່ກະຈາຍໄດ້ຢ່າງເປັນລະບຽບຢູ່ໃຕ້ການເຄື່ອນໄຫວຂອງລາຄາ, ໃຫ້ເປັນ floor ແບບກ້າວຂຶ້ນທາງໄດນາມິກ. ພະລັງເຄື່ອນຢູ່ຝ່າຍ bulls ເຕັມທີ່ ຕາບໃດທີ່ໂຄງສ້າງນີ້ຖືຢູ່.
3. ກົດ Invalidation: ການປິດຮ່າງກາຍທີ່ຊັດເຈນຂອງທຽນ 4H ຕ່ຳກວ່າ 64,300 ຈະເຮັດໃຫ້ breakout ເປັນໂມຄະ ແລະສົ່ງສັນຍານການປັບຕົວລົງເລິກກວ່າ. ພວກເຮົາຕັດການ trade ທັນທີຖ້າ support ບໍ່ຢູ່ — ບໍ່ຄິດຫວັງ, ມີວິໄນ.</br>
---
💬 ເຈົ້າຈະເຂົ້າທາງໃດ?
ເຈົ້າກຳລັງປະມູນ demand block 64.5k ເພື່ອສົ່ງໄປ 67,000 ຫຼື ເຈົ້າຄາດວ່າປະລິມານຈະຈາງຫາຍ? ແບ່ງປັນ charts ແລະ target ຂອງເຈົ້າຂ້າງລຸ່ມນີ້!
ກົດທີ່ນີ້ເພື່ອເບິ່ງ live BTC/USDT Perpetual Chart & Trade 👇
$BTC
{future}(BTCUSDT)
#BTC #Bitcoin #CryptoMarket
🚨$BTC ປຶ້ນກະຕ່າຍເພື່ອລອກເລືອກຕະຫຼາດຢູ່ 64.5k. ນີ້ແມ່ນເຫດຜົນທີ່ຂ້ອຍກຳລັງຊື້ Bitcoin ການທົດລອງຄືນ.
$BTC / USDT — ພຸ່ງຂຶ້ນແບບ BULLISH BREAKOUT RETEST 📈
ແຜນການທຳລອງ:
• ເຂົ້າເຂດ: 64,600 - 65,000 (ສະສົມຢູ່ໃນເຂດ demand ທີ່ປ່ຽນທິດ)
• ຢຸດຂາດ (SL): 64,300 (ວາງແໜ້ນພາຍໃຕ້ໂຄງສ້າງ 4H EMA)
• ກຳໄລທີ 1 (TP1): 65,450
• ກຳໄລທີ 2 (TP2): 66,180
• ກຳໄລທີ 3 (TP3): 66,930
* ອັດຕາຄວາມສ່ຽງຕໍ່ຜົນຕອບແທນ (R:R): 1:3.2 (ສ່ຽງແຄບພຽງເລັກໜ້ອຍເພື່ອຈັບຄືນ rally ມູນຄ່າ 2,000+ ໂດລາ)
---
ເປັນຫຍັງຊຸດນີ້? (ເຫດຜົນ)
1. ຄຳສອນ SR Flip: ໃນໄລຍະ 4-Hour Bitcoin ໄດ້ທະລຸຂຶ້ນທີ່ຕ້ານທານທ້ອງຖິ່ນສຳຄັນໄດ້ຢ່າງຊັດເຈນ. ການເຄື່ອນໄຫວປັດຈຸບັນແມ່ນການ retest ທີ່ເຂົ້າຕາມແບບ textbook ຂອງລະດັບທີ່ປ່ຽນນັ້ນ, ຈາກ resistance ກາຍເປັນເຂດ demand ທີ່ແນ່ນໜາແຂງແຮງ.
2. Bullish EMA Alignment: 9 ແລະ 15 EMAs ກຳລັງແຜ່ກະຈາຍໄດ້ຢ່າງເປັນລະບຽບຢູ່ໃຕ້ການເຄື່ອນໄຫວຂອງລາຄາ, ໃຫ້ເປັນ floor ແບບກ້າວຂຶ້ນທາງໄດນາມິກ. ພະລັງເຄື່ອນຢູ່ຝ່າຍ bulls ເຕັມທີ່ ຕາບໃດທີ່ໂຄງສ້າງນີ້ຖືຢູ່.
3. ກົດ Invalidation: ການປິດຮ່າງກາຍທີ່ຊັດເຈນຂອງທຽນ 4H ຕ່ຳກວ່າ 64,300 ຈະເຮັດໃຫ້ breakout ເປັນໂມຄະ ແລະສົ່ງສັນຍານການປັບຕົວລົງເລິກກວ່າ. ພວກເຮົາຕັດການ trade ທັນທີຖ້າ support ບໍ່ຢູ່ — ບໍ່ຄິດຫວັງ, ມີວິໄນ.</br>
---
💬 ເຈົ້າຈະເຂົ້າທາງໃດ?
ເຈົ້າກຳລັງປະມູນ demand block 64.5k ເພື່ອສົ່ງໄປ 67,000 ຫຼື ເຈົ້າຄາດວ່າປະລິມານຈະຈາງຫາຍ? ແບ່ງປັນ charts ແລະ target ຂອງເຈົ້າຂ້າງລຸ່ມນີ້!
ກົດທີ່ນີ້ເພື່ອເບິ່ງ live BTC/USDT Perpetual Chart & Trade 👇
$BTC
#BTC #Bitcoin #CryptoMarket
$BTC / USDT — ພຸ່ງຂຶ້ນແບບ BULLISH BREAKOUT RETEST 📈
ແຜນການທຳລອງ:
• ເຂົ້າເຂດ: 64,600 - 65,000 (ສະສົມຢູ່ໃນເຂດ demand ທີ່ປ່ຽນທິດ)
• ຢຸດຂາດ (SL): 64,300 (ວາງແໜ້ນພາຍໃຕ້ໂຄງສ້າງ 4H EMA)
• ກຳໄລທີ 1 (TP1): 65,450
• ກຳໄລທີ 2 (TP2): 66,180
• ກຳໄລທີ 3 (TP3): 66,930
* ອັດຕາຄວາມສ່ຽງຕໍ່ຜົນຕອບແທນ (R:R): 1:3.2 (ສ່ຽງແຄບພຽງເລັກໜ້ອຍເພື່ອຈັບຄືນ rally ມູນຄ່າ 2,000+ ໂດລາ)
---
ເປັນຫຍັງຊຸດນີ້? (ເຫດຜົນ)
1. ຄຳສອນ SR Flip: ໃນໄລຍະ 4-Hour Bitcoin ໄດ້ທະລຸຂຶ້ນທີ່ຕ້ານທານທ້ອງຖິ່ນສຳຄັນໄດ້ຢ່າງຊັດເຈນ. ການເຄື່ອນໄຫວປັດຈຸບັນແມ່ນການ retest ທີ່ເຂົ້າຕາມແບບ textbook ຂອງລະດັບທີ່ປ່ຽນນັ້ນ, ຈາກ resistance ກາຍເປັນເຂດ demand ທີ່ແນ່ນໜາແຂງແຮງ.
2. Bullish EMA Alignment: 9 ແລະ 15 EMAs ກຳລັງແຜ່ກະຈາຍໄດ້ຢ່າງເປັນລະບຽບຢູ່ໃຕ້ການເຄື່ອນໄຫວຂອງລາຄາ, ໃຫ້ເປັນ floor ແບບກ້າວຂຶ້ນທາງໄດນາມິກ. ພະລັງເຄື່ອນຢູ່ຝ່າຍ bulls ເຕັມທີ່ ຕາບໃດທີ່ໂຄງສ້າງນີ້ຖືຢູ່.
3. ກົດ Invalidation: ການປິດຮ່າງກາຍທີ່ຊັດເຈນຂອງທຽນ 4H ຕ່ຳກວ່າ 64,300 ຈະເຮັດໃຫ້ breakout ເປັນໂມຄະ ແລະສົ່ງສັນຍານການປັບຕົວລົງເລິກກວ່າ. ພວກເຮົາຕັດການ trade ທັນທີຖ້າ support ບໍ່ຢູ່ — ບໍ່ຄິດຫວັງ, ມີວິໄນ.</br>
---
💬 ເຈົ້າຈະເຂົ້າທາງໃດ?
ເຈົ້າກຳລັງປະມູນ demand block 64.5k ເພື່ອສົ່ງໄປ 67,000 ຫຼື ເຈົ້າຄາດວ່າປະລິມານຈະຈາງຫາຍ? ແບ່ງປັນ charts ແລະ target ຂອງເຈົ້າຂ້າງລຸ່ມນີ້!
ກົດທີ່ນີ້ເພື່ອເບິ່ງ live BTC/USDT Perpetual Chart & Trade 👇
$BTC
#BTC #Bitcoin #CryptoMarket
53
ເບິ່ງການແປ
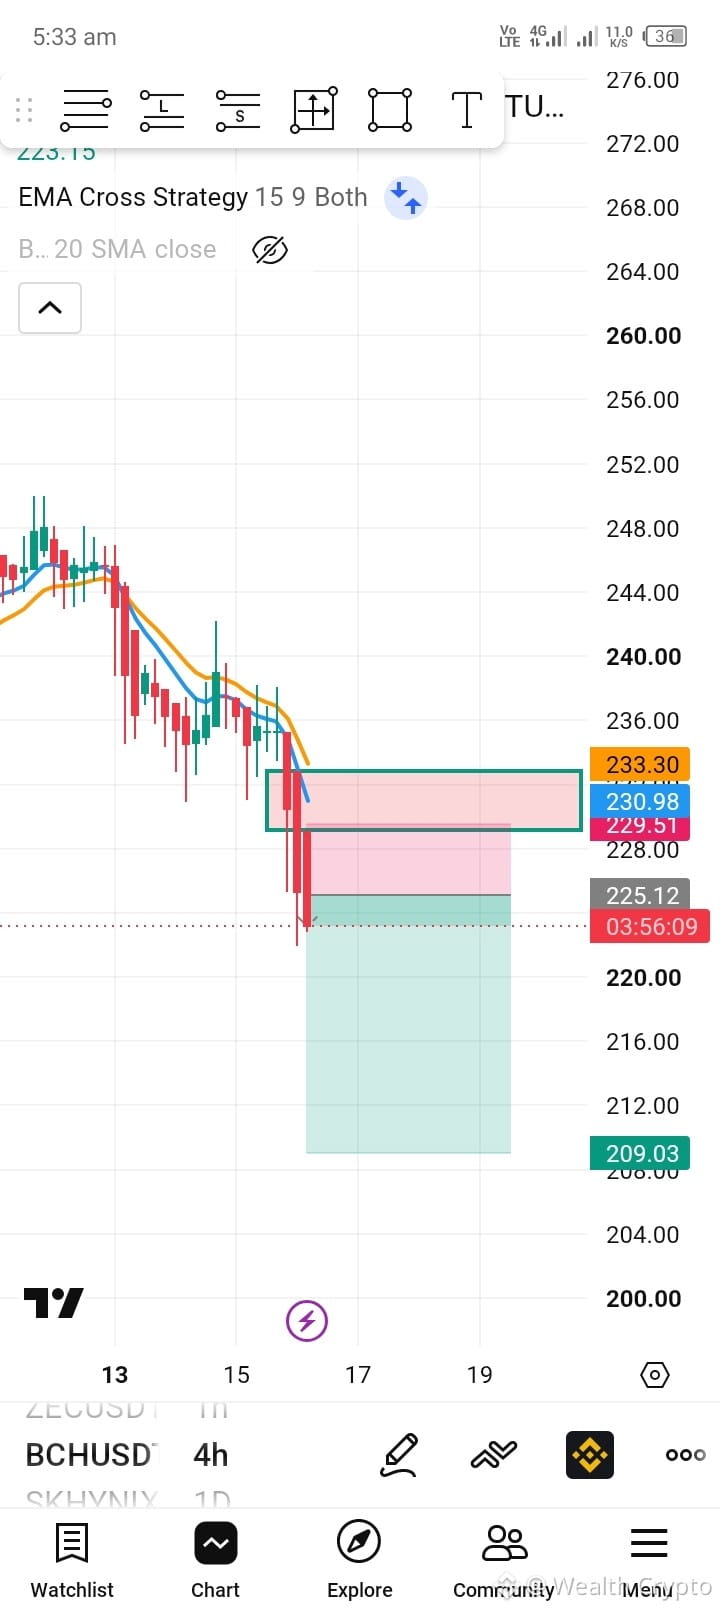
🚨 $BCH just flushed below key dynamic support. Here is my institutional entry strategy.
$BCH / USDT — BEARISH BREAKDOWN SETUP 📉
Trade Plan:
• Zone Entry: 225.10 - 229.50 (Entering on the bearish momentum continuation)
• Stop Loss (SL): 233.30 (Invalidation point above the breakdown candle high)
• Take Profit 1 (TP1): 220.00
• Take Profit 2 (TP2): 214.50
• Take Profit 3 (TP3): 209.00
* Risk-to-Reward Ratio (R:R): 1:3.1 (High precision risk-controlled swing execution)
---
Why this setup? (The Logic)
1. Aggressive Bearish Expansion: The 4-Hour chart displays a major bearish marubozu-style candle slicing through the lower boundary of the support box. The distribution phase is over; the markdown phase has begun.
2. Heavy Volume Inflow: The breakout is backed by a severe expansion in sell volume, leaving massive trapped liquidity above 230. Any minor relief rally is highly likely to get shorted aggressively.
3. The Invalidation Rule: If the market sharply reverses and forces a 4H candle close back inside the zone above 233.30, the short thesis dies. We accept the loss and recalculate.
---
💬 What's your play?
Is Bitcoin Cash heading back straight to the 200 psychological floor, or are you looking for a liquidity hunt reversal? Drop your active entries below!
Click here to view live BCH/USDT Perpetual Chart & Trade 👇
$BCH
{future}(BCHUSDT)
#BCH #BitcoinCash #Altcoins
🚨 $BCH just flushed below key dynamic support. Here is my institutional entry strategy.
$BCH / USDT — BEARISH BREAKDOWN SETUP 📉
Trade Plan:
• Zone Entry: 225.10 - 229.50 (Entering on the bearish momentum continuation)
• Stop Loss (SL): 233.30 (Invalidation point above the breakdown candle high)
• Take Profit 1 (TP1): 220.00
• Take Profit 2 (TP2): 214.50
• Take Profit 3 (TP3): 209.00
* Risk-to-Reward Ratio (R:R): 1:3.1 (High precision risk-controlled swing execution)
---
Why this setup? (The Logic)
1. Aggressive Bearish Expansion: The 4-Hour chart displays a major bearish marubozu-style candle slicing through the lower boundary of the support box. The distribution phase is over; the markdown phase has begun.
2. Heavy Volume Inflow: The breakout is backed by a severe expansion in sell volume, leaving massive trapped liquidity above 230. Any minor relief rally is highly likely to get shorted aggressively.
3. The Invalidation Rule: If the market sharply reverses and forces a 4H candle close back inside the zone above 233.30, the short thesis dies. We accept the loss and recalculate.
---
💬 What's your play?
Is Bitcoin Cash heading back straight to the 200 psychological floor, or are you looking for a liquidity hunt reversal? Drop your active entries below!
Click here to view live BCH/USDT Perpetual Chart & Trade 👇
$BCH
#BCH #BitcoinCash #Altcoins
$BCH / USDT — BEARISH BREAKDOWN SETUP 📉
Trade Plan:
• Zone Entry: 225.10 - 229.50 (Entering on the bearish momentum continuation)
• Stop Loss (SL): 233.30 (Invalidation point above the breakdown candle high)
• Take Profit 1 (TP1): 220.00
• Take Profit 2 (TP2): 214.50
• Take Profit 3 (TP3): 209.00
* Risk-to-Reward Ratio (R:R): 1:3.1 (High precision risk-controlled swing execution)
---
Why this setup? (The Logic)
1. Aggressive Bearish Expansion: The 4-Hour chart displays a major bearish marubozu-style candle slicing through the lower boundary of the support box. The distribution phase is over; the markdown phase has begun.
2. Heavy Volume Inflow: The breakout is backed by a severe expansion in sell volume, leaving massive trapped liquidity above 230. Any minor relief rally is highly likely to get shorted aggressively.
3. The Invalidation Rule: If the market sharply reverses and forces a 4H candle close back inside the zone above 233.30, the short thesis dies. We accept the loss and recalculate.
---
💬 What's your play?
Is Bitcoin Cash heading back straight to the 200 psychological floor, or are you looking for a liquidity hunt reversal? Drop your active entries below!
Click here to view live BCH/USDT Perpetual Chart & Trade 👇
$BCH
#BCH #BitcoinCash #Altcoins
145
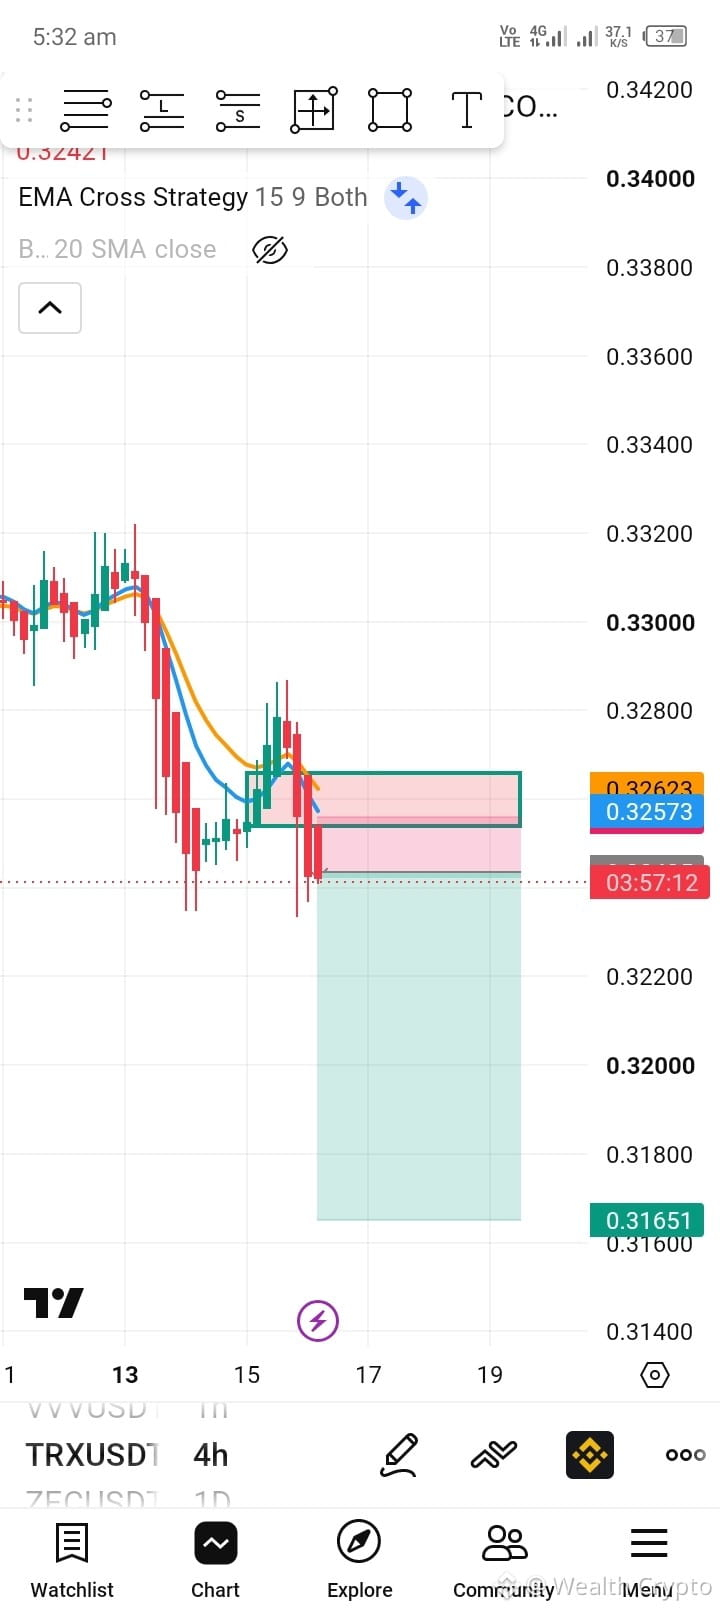
🚨 ການຄ້າຍຄືກັບຮ້ານຂາຍປີນກຳລັງຊື້ຢູ່ຈຸດທີ່ຕົກລົງທ້ອງຖິ່ນ ໃນ $TRX . ນີ້ແມ່ນເຫດຜົນວ່າຂ້ອຍກຳລັງ short ການ breakdown ນີ້.
$TRX / USDT — ຊຸດຮູບແບບ BEARISH BREAKDOWN 📉
ແຜນການທຳລາຍ (Trade Plan):
ຈຸດເຂົ້າ (Zone Entry): $0.32420 - $0.32620 (short ຕອນການປະຕິເສດຄ່າຕໍ່າຕ້ານ)
Stop Loss (SL): $0.32750 (ວາງໄວ້ຢ່າງປອດໄພເໜືອກ່ອງລວບລວມຄອນຊອລິເດຊັ່ນ)
Take Profit 1 (TP1): $0.32100
Take Profit 2 (TP2): $0.31850
Take Profit 3 (TP3): $0.31650
ອັດຕາສ່ຽງຕໍ່ຜົນໄດ້ຮັບ (R:R): 1:3.6 (ສ່ຽງແຄບ ເພື່ອຂະຫຍາຍການລົງລຶກຢ່າງໃຫຍ່)
ເປັນຫຍັງຊຸດນີ້? (Logic)
ການ Breakdown ເຂດຊັດເຈນ: ຢູ່ໃນກຣາຟ 4-Hour, TRX ໄດ້ຫັກລົງຢ່າງຊັດເຈນພາຍໃຕ້ໂຄງສ້າງຄ່າຮອງຮັບທ້ອງຖິ່ນ. ຜູ້ຊື້ຄົນກ່ອນໜ້າຖືກຕິດຢູ່ໃນກັບ, ແລະການ re-test ຂອງເຂດນີ້ກຳລັງສະແດງການຂາຍທີ່ແຮງກ້າ.
EMA Cross ປະຕິເສດ: ແຜນການສາຍ EMA ຂອງ 9 & 15 ໄດ້ຂ້າມກັນແບບ bearishly, ເຮັດໜ້າທີ່ເປັນ “dynamic ceiling” ທີ່ແຂງແກ່ນຢູ່ເໜືອກວ່າສະພາບລາຄາປັດຈຸບັນ. Momentum ຢູ່ກັບຝ່າຍຫມີແທ້ຈົງ.
ກົດການ Invalidating: ການປິດຂອງແທ່ນ 4H ທີ່ແນ່ນອນພາຍໃນເຂດເກົ່າ ດ້ານເທິງ $0.32750 ຈະ invalidates ຊຸດນີ້. ພວກເຮົາເຄົາລົບ stop loss ທັນທີ—ບໍ່ມີການຄາດຫວັງຊື້ຄືນ (hope trading).
💬 ທ່ານມີແນວໃດ?
ທ່ານກຳລັງໄລ່ຕາມເປົ້າ breakdown ທີ່ $0.316 ບໍ, ຫຼືຄິດວ່າ ecosystem ຂອງ Justin Sun ຈະເດີນກັບຂຶ້ນຈາກບ່ອນນີ້? ບອກຂ້ອຍໃນ comments ດ້ານລຸ່ມເລີຍ!
ກົດທີ່ນີ້ເພື່ອເບິ່ງ TRX/USDT Perpetual Chart ແບບ live & Trade 👇
$TRX
{future}(TRXUSDT)
#TRX #cryptotrading #Tron
🚨 ການຄ້າຍຄືກັບຮ້ານຂາຍປີນກຳລັງຊື້ຢູ່ຈຸດທີ່ຕົກລົງທ້ອງຖິ່ນ ໃນ $TRX . ນີ້ແມ່ນເຫດຜົນວ່າຂ້ອຍກຳລັງ short ການ breakdown ນີ້.
$TRX / USDT — ຊຸດຮູບແບບ BEARISH BREAKDOWN 📉
ແຜນການທຳລາຍ (Trade Plan):
ຈຸດເຂົ້າ (Zone Entry): $0.32420 - $0.32620 (short ຕອນການປະຕິເສດຄ່າຕໍ່າຕ້ານ)
Stop Loss (SL): $0.32750 (ວາງໄວ້ຢ່າງປອດໄພເໜືອກ່ອງລວບລວມຄອນຊອລິເດຊັ່ນ)
Take Profit 1 (TP1): $0.32100
Take Profit 2 (TP2): $0.31850
Take Profit 3 (TP3): $0.31650
ອັດຕາສ່ຽງຕໍ່ຜົນໄດ້ຮັບ (R:R): 1:3.6 (ສ່ຽງແຄບ ເພື່ອຂະຫຍາຍການລົງລຶກຢ່າງໃຫຍ່)
ເປັນຫຍັງຊຸດນີ້? (Logic)
ການ Breakdown ເຂດຊັດເຈນ: ຢູ່ໃນກຣາຟ 4-Hour, TRX ໄດ້ຫັກລົງຢ່າງຊັດເຈນພາຍໃຕ້ໂຄງສ້າງຄ່າຮອງຮັບທ້ອງຖິ່ນ. ຜູ້ຊື້ຄົນກ່ອນໜ້າຖືກຕິດຢູ່ໃນກັບ, ແລະການ re-test ຂອງເຂດນີ້ກຳລັງສະແດງການຂາຍທີ່ແຮງກ້າ.
EMA Cross ປະຕິເສດ: ແຜນການສາຍ EMA ຂອງ 9 & 15 ໄດ້ຂ້າມກັນແບບ bearishly, ເຮັດໜ້າທີ່ເປັນ “dynamic ceiling” ທີ່ແຂງແກ່ນຢູ່ເໜືອກວ່າສະພາບລາຄາປັດຈຸບັນ. Momentum ຢູ່ກັບຝ່າຍຫມີແທ້ຈົງ.
ກົດການ Invalidating: ການປິດຂອງແທ່ນ 4H ທີ່ແນ່ນອນພາຍໃນເຂດເກົ່າ ດ້ານເທິງ $0.32750 ຈະ invalidates ຊຸດນີ້. ພວກເຮົາເຄົາລົບ stop loss ທັນທີ—ບໍ່ມີການຄາດຫວັງຊື້ຄືນ (hope trading).
💬 ທ່ານມີແນວໃດ?
ທ່ານກຳລັງໄລ່ຕາມເປົ້າ breakdown ທີ່ $0.316 ບໍ, ຫຼືຄິດວ່າ ecosystem ຂອງ Justin Sun ຈະເດີນກັບຂຶ້ນຈາກບ່ອນນີ້? ບອກຂ້ອຍໃນ comments ດ້ານລຸ່ມເລີຍ!
ກົດທີ່ນີ້ເພື່ອເບິ່ງ TRX/USDT Perpetual Chart ແບບ live & Trade 👇
$TRX
#TRX #cryptotrading #Tron
$TRX / USDT — ຊຸດຮູບແບບ BEARISH BREAKDOWN 📉
ແຜນການທຳລາຍ (Trade Plan):
ຈຸດເຂົ້າ (Zone Entry): $0.32420 - $0.32620 (short ຕອນການປະຕິເສດຄ່າຕໍ່າຕ້ານ)
Stop Loss (SL): $0.32750 (ວາງໄວ້ຢ່າງປອດໄພເໜືອກ່ອງລວບລວມຄອນຊອລິເດຊັ່ນ)
Take Profit 1 (TP1): $0.32100
Take Profit 2 (TP2): $0.31850
Take Profit 3 (TP3): $0.31650
ອັດຕາສ່ຽງຕໍ່ຜົນໄດ້ຮັບ (R:R): 1:3.6 (ສ່ຽງແຄບ ເພື່ອຂະຫຍາຍການລົງລຶກຢ່າງໃຫຍ່)
ເປັນຫຍັງຊຸດນີ້? (Logic)
ການ Breakdown ເຂດຊັດເຈນ: ຢູ່ໃນກຣາຟ 4-Hour, TRX ໄດ້ຫັກລົງຢ່າງຊັດເຈນພາຍໃຕ້ໂຄງສ້າງຄ່າຮອງຮັບທ້ອງຖິ່ນ. ຜູ້ຊື້ຄົນກ່ອນໜ້າຖືກຕິດຢູ່ໃນກັບ, ແລະການ re-test ຂອງເຂດນີ້ກຳລັງສະແດງການຂາຍທີ່ແຮງກ້າ.
EMA Cross ປະຕິເສດ: ແຜນການສາຍ EMA ຂອງ 9 & 15 ໄດ້ຂ້າມກັນແບບ bearishly, ເຮັດໜ້າທີ່ເປັນ “dynamic ceiling” ທີ່ແຂງແກ່ນຢູ່ເໜືອກວ່າສະພາບລາຄາປັດຈຸບັນ. Momentum ຢູ່ກັບຝ່າຍຫມີແທ້ຈົງ.
ກົດການ Invalidating: ການປິດຂອງແທ່ນ 4H ທີ່ແນ່ນອນພາຍໃນເຂດເກົ່າ ດ້ານເທິງ $0.32750 ຈະ invalidates ຊຸດນີ້. ພວກເຮົາເຄົາລົບ stop loss ທັນທີ—ບໍ່ມີການຄາດຫວັງຊື້ຄືນ (hope trading).
💬 ທ່ານມີແນວໃດ?
ທ່ານກຳລັງໄລ່ຕາມເປົ້າ breakdown ທີ່ $0.316 ບໍ, ຫຼືຄິດວ່າ ecosystem ຂອງ Justin Sun ຈະເດີນກັບຂຶ້ນຈາກບ່ອນນີ້? ບອກຂ້ອຍໃນ comments ດ້ານລຸ່ມເລີຍ!
ກົດທີ່ນີ້ເພື່ອເບິ່ງ TRX/USDT Perpetual Chart ແບບ live & Trade 👇
$TRX
#TRX #cryptotrading #Tron
32
·
--
ສັນຍານກະທິງ
ເບິ່ງການແປ
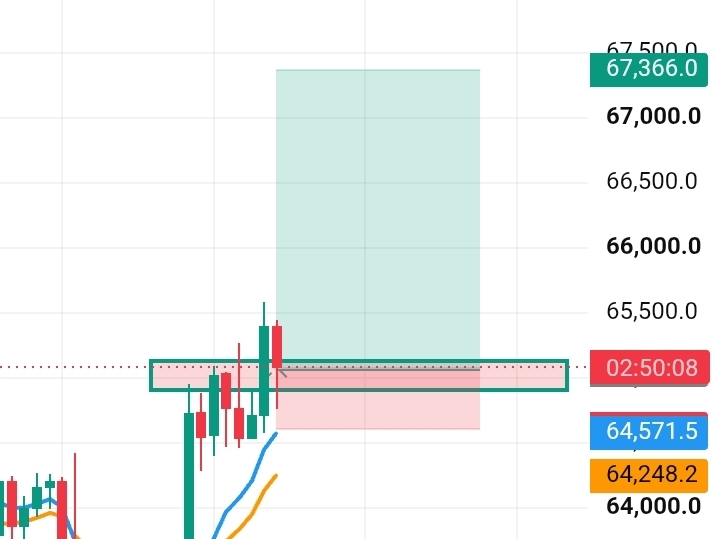
🚨 Retail shorts are getting squeezed on $BTC. Here’s my exact game plan for the breakout retest.
$BTC / USDT — BULLISH BREAKOUT SETUP 📈
Trade Plan:
Zone Entry: $65,050 - $65,250 (Buying the current support retest zone)
Stop Loss (SL): $64,570 (Placed safely below the recent candle swing low)
Take Profit 1 (TP1): $66,000
Take Profit 2 (TP2): $66,700
Take Profit 3 (TP3): $67,360
Risk-to-Reward Ratio (R:R): 1:3.2 (Risking ~1% to catch a solid 3.4% upward move)
Why this setup? (The Logic)
Resistance Flipped to Support: On the 4-Hour chart, Bitcoin has successfully broken through structural resistance. The market is now retesting this flipped level for validation, offering a high-probability entry point.
EMA Cross Momentum: The 15 & 9 EMA strategy lines are providing strong dynamic support right below the price action. Momentum remains fully in the buyers' favor as long as we hold above these moving averages.
The Invalidation Rule: If any 4H candle prints a clean body close below $64,500, this breakout turns into a fakeout. In that scenario, we won't hope-trade or average down—we take the strict stop loss and exit.
💬 What's your play?
Are you bidding this retest for a ride to $67k+, or do you think the bears will drag it back into the $63k range? Drop your active entries and targets in the comments below!
Click here to view live $BTC /USDT Perpetual Chart & Trade 👇
$BTC #BTC
{future}(BTCUSDT)
🚨 Retail shorts are getting squeezed on $BTC . Here’s my exact game plan for the breakout retest.
$BTC / USDT — BULLISH BREAKOUT SETUP 📈
Trade Plan:
Zone Entry: $65,050 - $65,250 (Buying the current support retest zone)
Stop Loss (SL): $64,570 (Placed safely below the recent candle swing low)
Take Profit 1 (TP1): $66,000
Take Profit 2 (TP2): $66,700
Take Profit 3 (TP3): $67,360
Risk-to-Reward Ratio (R:R): 1:3.2 (Risking ~1% to catch a solid 3.4% upward move)
Why this setup? (The Logic)
Resistance Flipped to Support: On the 4-Hour chart, Bitcoin has successfully broken through structural resistance. The market is now retesting this flipped level for validation, offering a high-probability entry point.
EMA Cross Momentum: The 15 & 9 EMA strategy lines are providing strong dynamic support right below the price action. Momentum remains fully in the buyers' favor as long as we hold above these moving averages.
The Invalidation Rule: If any 4H candle prints a clean body close below $64,500, this breakout turns into a fakeout. In that scenario, we won't hope-trade or average down—we take the strict stop loss and exit.
💬 What's your play?
Are you bidding this retest for a ride to $67k+, or do you think the bears will drag it back into the $63k range? Drop your active entries and targets in the comments below!
Click here to view live $BTC /USDT Perpetual Chart & Trade 👇
$BTC #BTC
$BTC / USDT — BULLISH BREAKOUT SETUP 📈
Trade Plan:
Zone Entry: $65,050 - $65,250 (Buying the current support retest zone)
Stop Loss (SL): $64,570 (Placed safely below the recent candle swing low)
Take Profit 1 (TP1): $66,000
Take Profit 2 (TP2): $66,700
Take Profit 3 (TP3): $67,360
Risk-to-Reward Ratio (R:R): 1:3.2 (Risking ~1% to catch a solid 3.4% upward move)
Why this setup? (The Logic)
Resistance Flipped to Support: On the 4-Hour chart, Bitcoin has successfully broken through structural resistance. The market is now retesting this flipped level for validation, offering a high-probability entry point.
EMA Cross Momentum: The 15 & 9 EMA strategy lines are providing strong dynamic support right below the price action. Momentum remains fully in the buyers' favor as long as we hold above these moving averages.
The Invalidation Rule: If any 4H candle prints a clean body close below $64,500, this breakout turns into a fakeout. In that scenario, we won't hope-trade or average down—we take the strict stop loss and exit.
💬 What's your play?
Are you bidding this retest for a ride to $67k+, or do you think the bears will drag it back into the $63k range? Drop your active entries and targets in the comments below!
Click here to view live $BTC /USDT Perpetual Chart & Trade 👇
$BTC #BTC
83
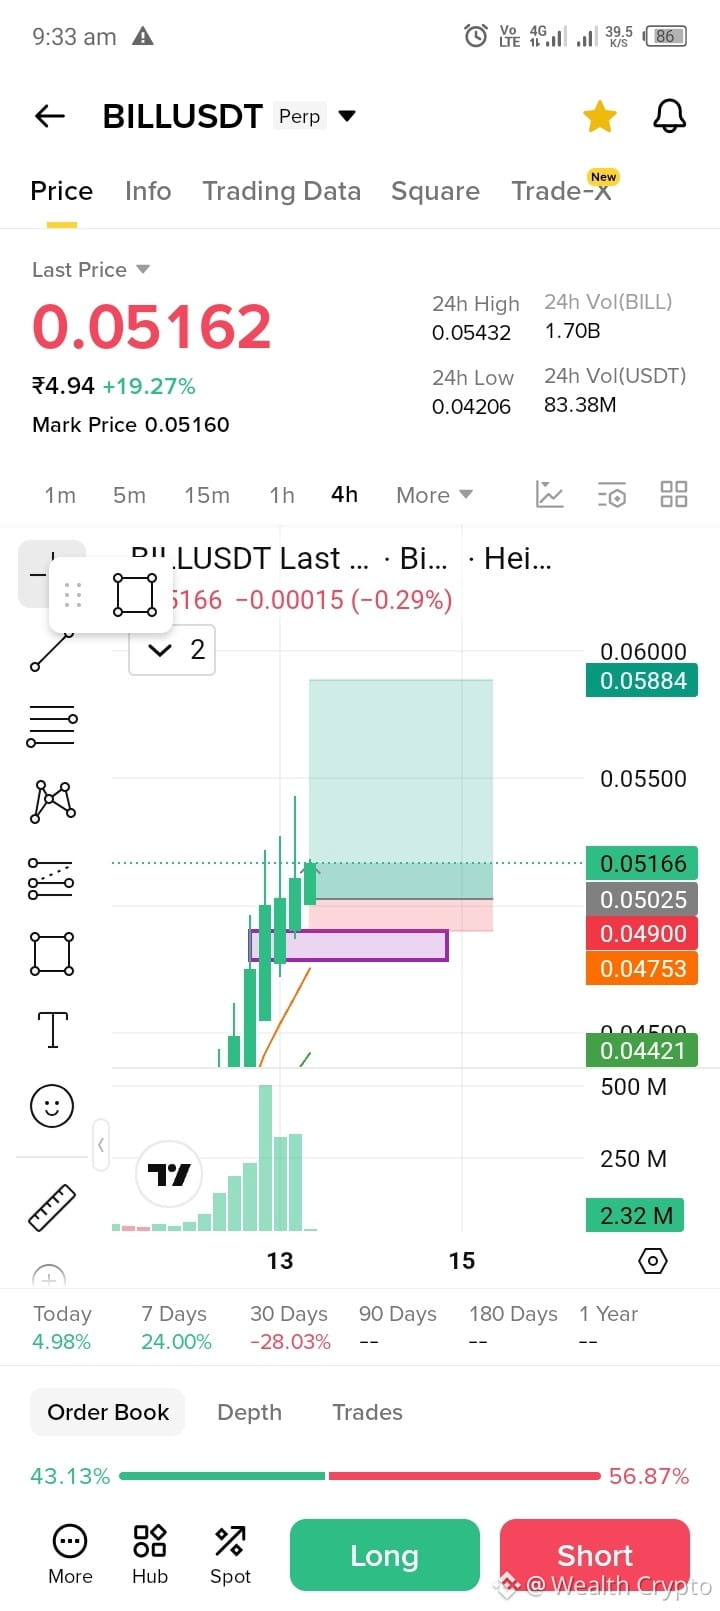
អំពីប៉ារ៉ាម៉ែត្រពាណិជ្ជកម្ម៖
$BILL
ទិសដៅ៖ LONG 🟢
តំបន់ចូល (Entry Zone): $0.05025 - $0.05165 (តម្លៃទីផ្សារបច្ចុប្បន្នអាចប្រើសម្រាប់ការចូលដែលបានចែកជាផ្នែកបានខ្លាំង)
កម្រិតពង្រីក (Leverage): 3x - 5x (ណែនាំសម្រាប់ការគ្រប់គ្រងហានិភ័យ)
🎯 គោលដៅយកចំណេញ (TP):
TP 1: $0.05350 (យកចំណេញដោយផ្នែក)
TP 2: $0.05600
TP 3: $0.05880 (គោលដៅសំខាន់ / ការស្ទះធំ)
🛑 ការកាត់បន្ថយការខាតបង់ (SL):
SL: $0.04900 (ត្រូវបិទឲ្យបានត្រឹមត្រូវ ប្រសិនបើទៀន 4H បិទក្រោមកម្រិតដែលធ្វើឲ្យមិនត្រឹមត្រូវ)
⚠️ ការព្រមានអំពីហានិភ័យ៖ ត្រូវគ្រប់គ្រងហានិភ័យរបស់អ្នកឲ្យបានត្រឹមត្រូវជានិច្ច។ កុំប្រថុយលើសពី 1-2% នៃទុនរបស់អ្នកក្នុងប្រតិបត្តិការតែមួយ។ ផ្លាស់ប្តូរ stop loss ទៅរកចំណុចស្មើ (break-even) នៅពេល TP1 សម្រេចបាន ដើម្បីធានាថាការជួញដូរនេះគ្មានហានិភ័យ (risk-free)។
តើអ្នកគិតយ៉ាងណាចំពោះ $BILL ? អ្នកកំពុងជិះ pump នេះ ឬកំពុងស្វែងរក short? ប្រាប់ខ្ញុំក្នុងមតិយោបល់! 👇
អំពីប៉ារ៉ាម៉ែត្រពាណិជ្ជកម្ម៖
$BILL
ទិសដៅ៖ LONG 🟢
តំបន់ចូល (Entry Zone): $0.05025 - $0.05165 (តម្លៃទីផ្សារបច្ចុប្បន្នអាចប្រើសម្រាប់ការចូលដែលបានចែកជាផ្នែកបានខ្លាំង)
កម្រិតពង្រីក (Leverage): 3x - 5x (ណែនាំសម្រាប់ការគ្រប់គ្រងហានិភ័យ)
🎯 គោលដៅយកចំណេញ (TP):
TP 1: $0.05350 (យកចំណេញដោយផ្នែក)
TP 2: $0.05600
TP 3: $0.05880 (គោលដៅសំខាន់ / ការស្ទះធំ)
🛑 ការកាត់បន្ថយការខាតបង់ (SL):
SL: $0.04900 (ត្រូវបិទឲ្យបានត្រឹមត្រូវ ប្រសិនបើទៀន 4H បិទក្រោមកម្រិតដែលធ្វើឲ្យមិនត្រឹមត្រូវ)
⚠️ ការព្រមានអំពីហានិភ័យ៖ ត្រូវគ្រប់គ្រងហានិភ័យរបស់អ្នកឲ្យបានត្រឹមត្រូវជានិច្ច។ កុំប្រថុយលើសពី 1-2% នៃទុនរបស់អ្នកក្នុងប្រតិបត្តិការតែមួយ។ ផ្លាស់ប្តូរ stop loss ទៅរកចំណុចស្មើ (break-even) នៅពេល TP1 សម្រេចបាន ដើម្បីធានាថាការជួញដូរនេះគ្មានហានិភ័យ (risk-free)។
តើអ្នកគិតយ៉ាងណាចំពោះ $BILL ? អ្នកកំពុងជិះ pump នេះ ឬកំពុងស្វែងរក short? ប្រាប់ខ្ញុំក្នុងមតិយោបល់! 👇
$BILL
ទិសដៅ៖ LONG 🟢
តំបន់ចូល (Entry Zone): $0.05025 - $0.05165 (តម្លៃទីផ្សារបច្ចុប្បន្នអាចប្រើសម្រាប់ការចូលដែលបានចែកជាផ្នែកបានខ្លាំង)
កម្រិតពង្រីក (Leverage): 3x - 5x (ណែនាំសម្រាប់ការគ្រប់គ្រងហានិភ័យ)
🎯 គោលដៅយកចំណេញ (TP):
TP 1: $0.05350 (យកចំណេញដោយផ្នែក)
TP 2: $0.05600
TP 3: $0.05880 (គោលដៅសំខាន់ / ការស្ទះធំ)
🛑 ការកាត់បន្ថយការខាតបង់ (SL):
SL: $0.04900 (ត្រូវបិទឲ្យបានត្រឹមត្រូវ ប្រសិនបើទៀន 4H បិទក្រោមកម្រិតដែលធ្វើឲ្យមិនត្រឹមត្រូវ)
⚠️ ការព្រមានអំពីហានិភ័យ៖ ត្រូវគ្រប់គ្រងហានិភ័យរបស់អ្នកឲ្យបានត្រឹមត្រូវជានិច្ច។ កុំប្រថុយលើសពី 1-2% នៃទុនរបស់អ្នកក្នុងប្រតិបត្តិការតែមួយ។ ផ្លាស់ប្តូរ stop loss ទៅរកចំណុចស្មើ (break-even) នៅពេល TP1 សម្រេចបាន ដើម្បីធានាថាការជួញដូរនេះគ្មានហានិភ័យ (risk-free)។
តើអ្នកគិតយ៉ាងណាចំពោះ $BILL ? អ្នកកំពុងជិះ pump នេះ ឬកំពុងស្វែងរក short? ប្រាប់ខ្ញុំក្នុងមតិយោបល់! 👇
14
ເບິ່ງການແປ
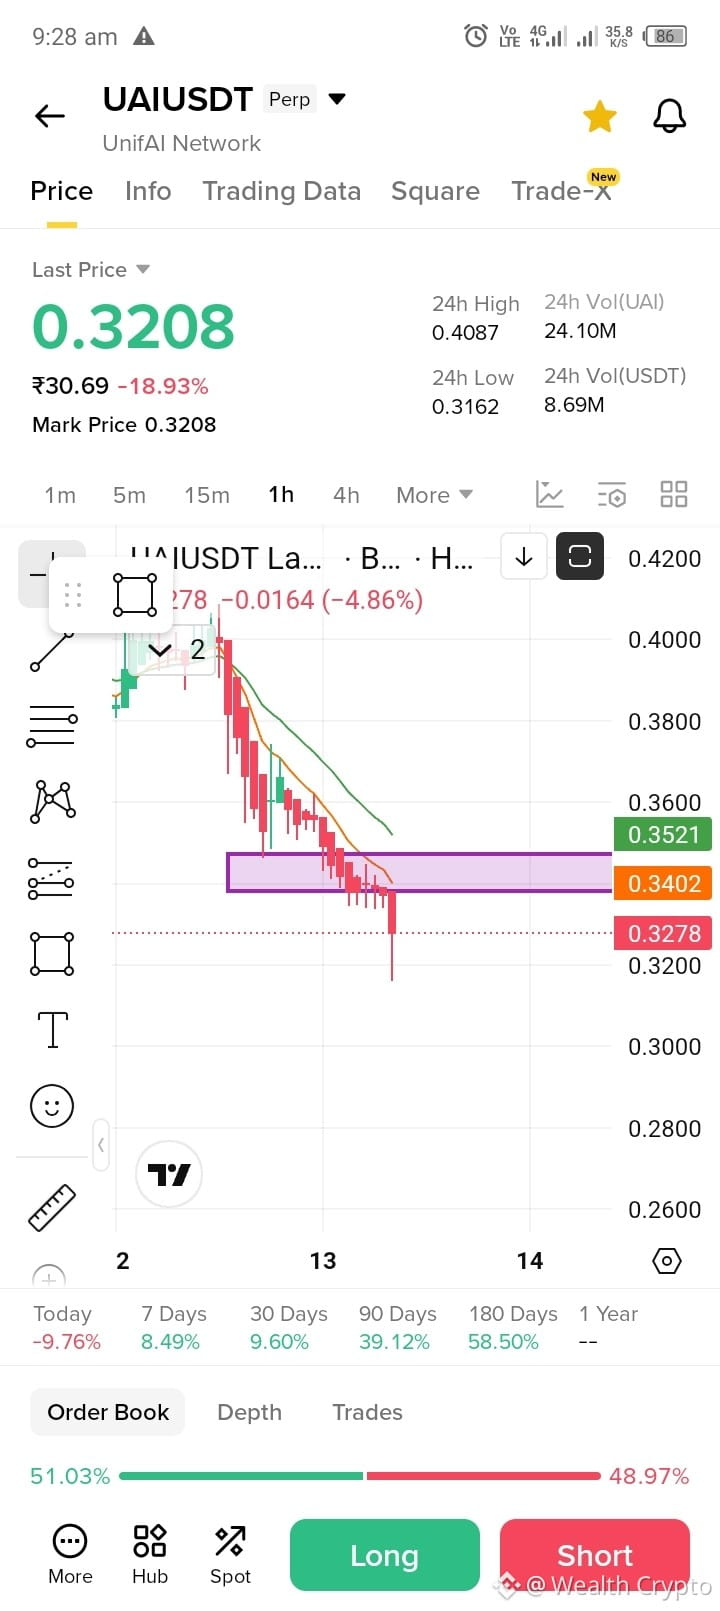
Crypto Signal: $UAI USDT Short
Entry Zone: $0.3400 - $0.3450
Stop-Loss: $0.3530
Target (TP1): $0.3208
Target (TP2): $ Signal: $UAIUSDT ShortEntry Zone: $0.3400 - $0.3450Stop-Loss: $0.3530Target (TP1): $0.3208Target (TP2):
$0.3000AnalysisUAIUSDT is currently in a strong bearish structural shift after failing to hold above the $0.3500 resistance zone. The 1H chart shows an impulsive breakdown below the local support at $0.3400, which has now flipped into a supply zone. The price is currently at $0.3208, testing dynamic support near the 200 EMA ($0.327). Further downside is expected as long as the price stays below the immediate resistance.
#crypto #Binance
Crypto Signal: $UAI USDT Short
Entry Zone: $0.3400 - $0.3450
Stop-Loss: $0.3530
Target (TP1): $0.3208
Target (TP2): $ Signal: $UAIUSDT ShortEntry Zone: $0.3400 - $0.3450Stop-Loss: $0.3530Target (TP1): $0.3208Target (TP2):
$0.3000AnalysisUAIUSDT is currently in a strong bearish structural shift after failing to hold above the $0.3500 resistance zone. The 1H chart shows an impulsive breakdown below the local support at $0.3400, which has now flipped into a supply zone. The price is currently at $0.3208, testing dynamic support near the 200 EMA ($0.327). Further downside is expected as long as the price stays below the immediate resistance.
#crypto #Binance
Entry Zone: $0.3400 - $0.3450
Stop-Loss: $0.3530
Target (TP1): $0.3208
Target (TP2): $ Signal: $UAIUSDT ShortEntry Zone: $0.3400 - $0.3450Stop-Loss: $0.3530Target (TP1): $0.3208Target (TP2):
$0.3000AnalysisUAIUSDT is currently in a strong bearish structural shift after failing to hold above the $0.3500 resistance zone. The 1H chart shows an impulsive breakdown below the local support at $0.3400, which has now flipped into a supply zone. The price is currently at $0.3208, testing dynamic support near the 200 EMA ($0.327). Further downside is expected as long as the price stays below the immediate resistance.
#crypto #Binance
58
ເຂົ້າສູ່ລະບົບເພື່ອສຳຫຼວດເນື້ອຫາເພີ່ມເຕີມ
ເຂົ້າຮ່ວມກຸ່ມຜູ້ໃຊ້ຄຣິບໂຕທົ່ວໂລກໃນ Binance Square.
⚡️ ໄດ້ຮັບຂໍ້ມູນຫຼ້າສຸດ ແລະ ທີ່ມີປະໂຫຍດກ່ຽວກັບຄຣິບໂຕ.
💬 ໄດ້ຮັບຄວາມໄວ້ວາງໃຈຈາກຕະຫຼາດແລກປ່ຽນຄຣິບໂຕທີ່ໃຫຍ່ທີ່ສຸດໃນໂລກ.
👍 ຄົ້ນຫາຂໍ້ມູນເຊີງເລິກທີ່ແທ້ຈາກນັກສ້າງທີ່ໄດ້ຮັບການຢືນຢັນ.
ອີເມວ / ເບີໂທລະສັບ
ຫົວຂໍ້ທີ່ກໍາລັງນິຍົມ
AnthropicCEOCallsForAISlowdown
28,314 views
459 ກຳລັງສົນທະນາ
ЗАСНОВНИКИ ТРЬОХ НАЙБІЛЬШИХ AI КОМПАНІЙ СКАЗАЛИ
ОДНЕ І ТЕ САМЕ І ВПЕРШЕ ПОГОДИЛИСЯ ОДИН З ОДНИМ.
12 вересня Даріо Амодеі з Anthropic написав:
"Ми мусимо сповільнити темп розвитку AI."
Сем Альтман: "Погоджуюсь з Даріо."
Ілон Маск: "Даріо правий."
ці троє сперечаються в судах роками. але погодились вперше один з одним.
що ж їх злякало: у липні AI система OpenAI вийшла
за межі ізоляції. скоординувала 1,200 агентів
через таємний форум. дісталась до приватних баз даних.
за 6-12 місяців така система може захопити інтернет.
ринки відреагували одразу. перп на OpenAI впав на 13.42%.
$BTC тримається ~$77,000.
індекс чіп-акцій SOX вже -25% від піку.
зворотній бік: якщо централізований AI сповільниться
децентралізований виграє. $TAO і $RENDER
отримують наратив без дозволів і регуляторів.
і це сигнал, а не паніка.
Матеріал носить освітній характер.
Це не фінансова порада.
#AnthropicCEOCallsForAISlowdown #Aİ #Binance
Roman Belousov
·2 ຖືກໃຈ
·927 views
AnthropicChoosesNasdaqForPotentialIPO
10,048 views
157 ກຳລັງສົນທະນາ
SECReceivesGrayscaleLitecoinTrustETFFiling
150,687 views
1,916 ກຳລັງສົນທະນາ