
BLOCK BEST
17.2k ໂພສ

BLOCK BEST
ລາຍງານ
ບລັອກຜູ້ໃຊ້
ເປີດການຊື້ຂາຍ
ຜູ້ຊື້ຂາຍປະຈໍາ
1 ປີ
1.1K+ ກໍາລັງຕິດຕາມ
34.3K+ ຜູ້ຕິດຕາມ
31.1K+ Liked
ໂພສ
Portfolio
ທັງໝົດ
ວີດີໂອ
ຖ່າຍທອດສົດ
·
--

ບົດຄວາມ
ເບິ່ງການແປ
FOMC September: One Rate Hike or the Start of Something Bigger? 🔥📊#FedRateWatch
I’ve been thinking about this September FOMC meeting more than I expected. What caught my attention wasn’t just the rate decision itself, but how quickly expectations seem to have shifted around it.
August core CPI coming in at 0.3% month-over-month makes the inflation picture feel less comfortable. At the same time, the market is reportedly pricing a very high probability of a 25bp hike this week. That makes me wonder whether this is simply a one-off response to sticky inflation, or whether we are looking at the beginning of a longer period of tighter policy.
What interests me most is how differently the same decision could affect markets. A hike could initially pressure BTC and tech stocks because higher rates generally make risk assets less attractive. Gold feels more complicated to me. Persistent inflation can support the gold narrative, but higher yields and a stronger dollar can work in the opposite direction.
I also don’t think the first reaction will necessarily tell the whole story. FOMC events can create sharp moves, liquidity sweeps, and reversals before the market settles on a direction. For me, the reaction after the announcement may be more informative than the headline itself.
I’m still unsure whether this is the start of a longer hiking cycle. I’d want to see how inflation develops, how the Fed communicates its next steps, and whether financial conditions actually tighten further.
For now, I’m watching the reaction rather than trying to force a prediction. The uncertainty itself is what keeps this FOMC meeting interesting to me.
#FedRateWatch
$AKE
{future}(AKEUSDT)
$AIN
{future}(AINUSDT)
$POWER
{future}(POWERUSDT)
FOMC September: One Rate Hike or the Start of Something Bigger? 🔥📊
#FedRateWatch
I’ve been thinking about this September FOMC meeting more than I expected. What caught my attention wasn’t just the rate decision itself, but how quickly expectations seem to have shifted around it.
August core CPI coming in at 0.3% month-over-month makes the inflation picture feel less comfortable. At the same time, the market is reportedly pricing a very high probability of a 25bp hike this week. That makes me wonder whether this is simply a one-off response to sticky inflation, or whether we are looking at the beginning of a longer period of tighter policy.
What interests me most is how differently the same decision could affect markets. A hike could initially pressure BTC and tech stocks because higher rates generally make risk assets less attractive. Gold feels more complicated to me. Persistent inflation can support the gold narrative, but higher yields and a stronger dollar can work in the opposite direction.
I also don’t think the first reaction will necessarily tell the whole story. FOMC events can create sharp moves, liquidity sweeps, and reversals before the market settles on a direction. For me, the reaction after the announcement may be more informative than the headline itself.
I’m still unsure whether this is the start of a longer hiking cycle. I’d want to see how inflation develops, how the Fed communicates its next steps, and whether financial conditions actually tighten further.
For now, I’m watching the reaction rather than trying to force a prediction. The uncertainty itself is what keeps this FOMC meeting interesting to me.
#FedRateWatch
$AKE
$AIN
$POWER
I’ve been thinking about this September FOMC meeting more than I expected. What caught my attention wasn’t just the rate decision itself, but how quickly expectations seem to have shifted around it.
August core CPI coming in at 0.3% month-over-month makes the inflation picture feel less comfortable. At the same time, the market is reportedly pricing a very high probability of a 25bp hike this week. That makes me wonder whether this is simply a one-off response to sticky inflation, or whether we are looking at the beginning of a longer period of tighter policy.
What interests me most is how differently the same decision could affect markets. A hike could initially pressure BTC and tech stocks because higher rates generally make risk assets less attractive. Gold feels more complicated to me. Persistent inflation can support the gold narrative, but higher yields and a stronger dollar can work in the opposite direction.
I also don’t think the first reaction will necessarily tell the whole story. FOMC events can create sharp moves, liquidity sweeps, and reversals before the market settles on a direction. For me, the reaction after the announcement may be more informative than the headline itself.
I’m still unsure whether this is the start of a longer hiking cycle. I’d want to see how inflation develops, how the Fed communicates its next steps, and whether financial conditions actually tighten further.
For now, I’m watching the reaction rather than trying to force a prediction. The uncertainty itself is what keeps this FOMC meeting interesting to me.
#FedRateWatch
$AKE
$AIN
$POWER
1
48
·
--
ເບິ່ງການແປ
🔥 FOMC SEPTEMBER: WHAT’S THE FED’S NEXT MOVE?
The Fed is heading into the September 15–16 meeting with markets on high alert.
🔥 Hike or Hold?
Recent inflation data has strengthened the hawkish case, with August CPI rising 0.4% and core CPI up 0.3%. Markets are now heavily watching for a possible 25 bps rate hike.
A hike could push USD and Treasury yields higher, creating short-term pressure on crypto, stocks and gold. But if the Fed signals that this is a one-off move rather than the start of aggressive tightening, risk assets could quickly rebound.
👀 The real market mover won’t just be the rate decision — it will be Powell/Warsh’s forward guidance.
⚡ My view: Expect volatility, fake breakouts and liquidity sweeps around the announcement. Trade the confirmed reaction, not the headline.
FOMC = Volatility Loading… 🚨
#FedRateWatch
🔥 FOMC SEPTEMBER: WHAT’S THE FED’S NEXT MOVE?
The Fed is heading into the September 15–16 meeting with markets on high alert.
🔥 Hike or Hold?
Recent inflation data has strengthened the hawkish case, with August CPI rising 0.4% and core CPI up 0.3%. Markets are now heavily watching for a possible 25 bps rate hike.
A hike could push USD and Treasury yields higher, creating short-term pressure on crypto, stocks and gold. But if the Fed signals that this is a one-off move rather than the start of aggressive tightening, risk assets could quickly rebound.
👀 The real market mover won’t just be the rate decision — it will be Powell/Warsh’s forward guidance.
⚡ My view: Expect volatility, fake breakouts and liquidity sweeps around the announcement. Trade the confirmed reaction, not the headline.
FOMC = Volatility Loading… 🚨
#FedRateWatch
The Fed is heading into the September 15–16 meeting with markets on high alert.
🔥 Hike or Hold?
Recent inflation data has strengthened the hawkish case, with August CPI rising 0.4% and core CPI up 0.3%. Markets are now heavily watching for a possible 25 bps rate hike.
A hike could push USD and Treasury yields higher, creating short-term pressure on crypto, stocks and gold. But if the Fed signals that this is a one-off move rather than the start of aggressive tightening, risk assets could quickly rebound.
👀 The real market mover won’t just be the rate decision — it will be Powell/Warsh’s forward guidance.
⚡ My view: Expect volatility, fake breakouts and liquidity sweeps around the announcement. Trade the confirmed reaction, not the headline.
FOMC = Volatility Loading… 🚨
#FedRateWatch

10
12
70
·
--
ເບິ່ງການແປ
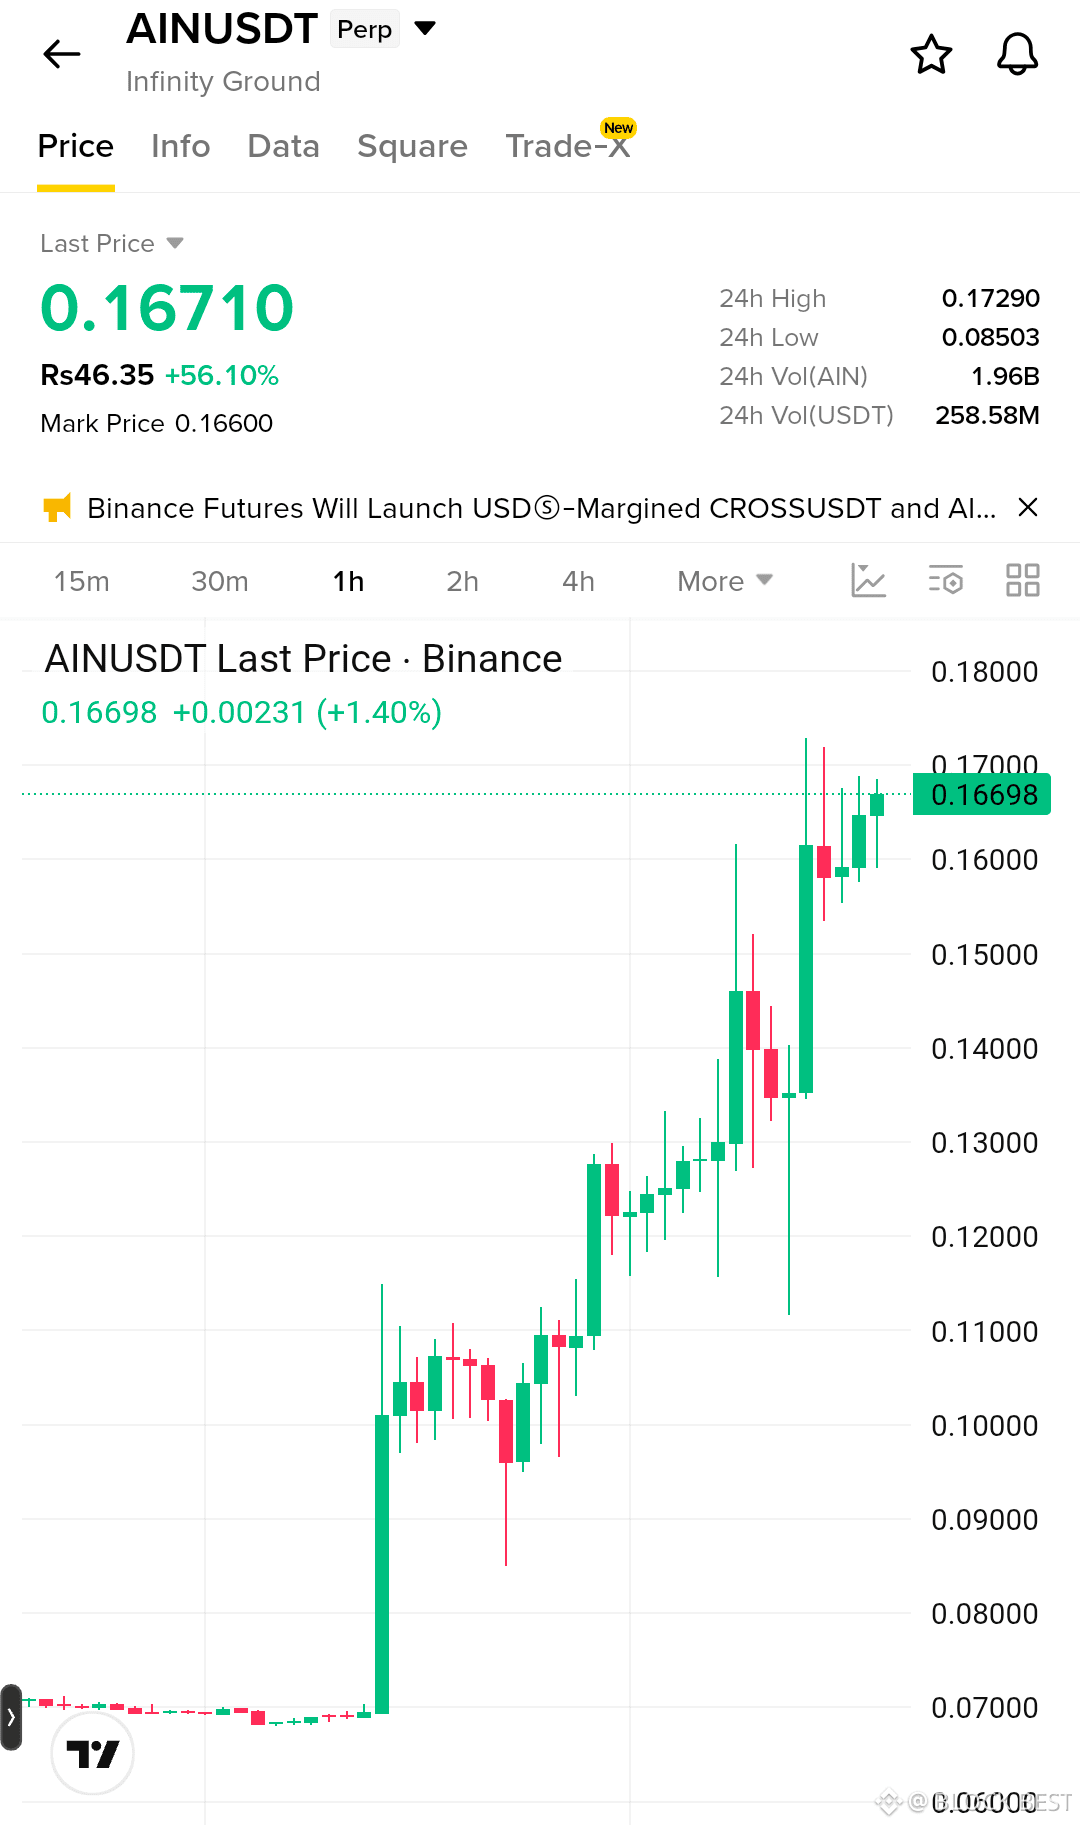
$AIN is holding a powerful bullish structure on the 1H chart after a major breakout from the $0.1300–$0.1350 demand area. Price has climbed toward $0.1700 with strong momentum and is forming higher lows near the breakout zone. Buyers remain in control, and a clean break above the $0.1730 resistance could unlock the next liquidity move.
Trade Setup
Entry: $0.1600–$0.1660
Target 1: $0.1730
Target 2: $0.1800
Target 3: $0.1900
Stop Loss: $0.1530
How it's possible
The sharp expansion from $0.1350 confirms strong buying pressure, while the recent consolidation above $0.1600 shows buyers are defending the breakout. Volume should remain strong for continuation, especially on a clean break above $0.1730. Holding $0.1600 keeps the bullish structure intact and leaves room for another liquidity push. If price closes below $0.1530, the setup fails and the trade should be exited to protect capital.
Trade and now $AIN
{future}(AINUSDT)
$AIN is holding a powerful bullish structure on the 1H chart after a major breakout from the $0.1300–$0.1350 demand area. Price has climbed toward $0.1700 with strong momentum and is forming higher lows near the breakout zone. Buyers remain in control, and a clean break above the $0.1730 resistance could unlock the next liquidity move.
Trade Setup
Entry: $0.1600–$0.1660
Target 1: $0.1730
Target 2: $0.1800
Target 3: $0.1900
Stop Loss: $0.1530
How it's possible
The sharp expansion from $0.1350 confirms strong buying pressure, while the recent consolidation above $0.1600 shows buyers are defending the breakout. Volume should remain strong for continuation, especially on a clean break above $0.1730. Holding $0.1600 keeps the bullish structure intact and leaves room for another liquidity push. If price closes below $0.1530, the setup fails and the trade should be exited to protect capital.
Trade and now $AIN
Trade Setup
Entry: $0.1600–$0.1660
Target 1: $0.1730
Target 2: $0.1800
Target 3: $0.1900
Stop Loss: $0.1530
How it's possible
The sharp expansion from $0.1350 confirms strong buying pressure, while the recent consolidation above $0.1600 shows buyers are defending the breakout. Volume should remain strong for continuation, especially on a clean break above $0.1730. Holding $0.1600 keeps the bullish structure intact and leaves room for another liquidity push. If price closes below $0.1530, the setup fails and the trade should be exited to protect capital.
Trade and now $AIN
40
·
--
ເບິ່ງການແປ
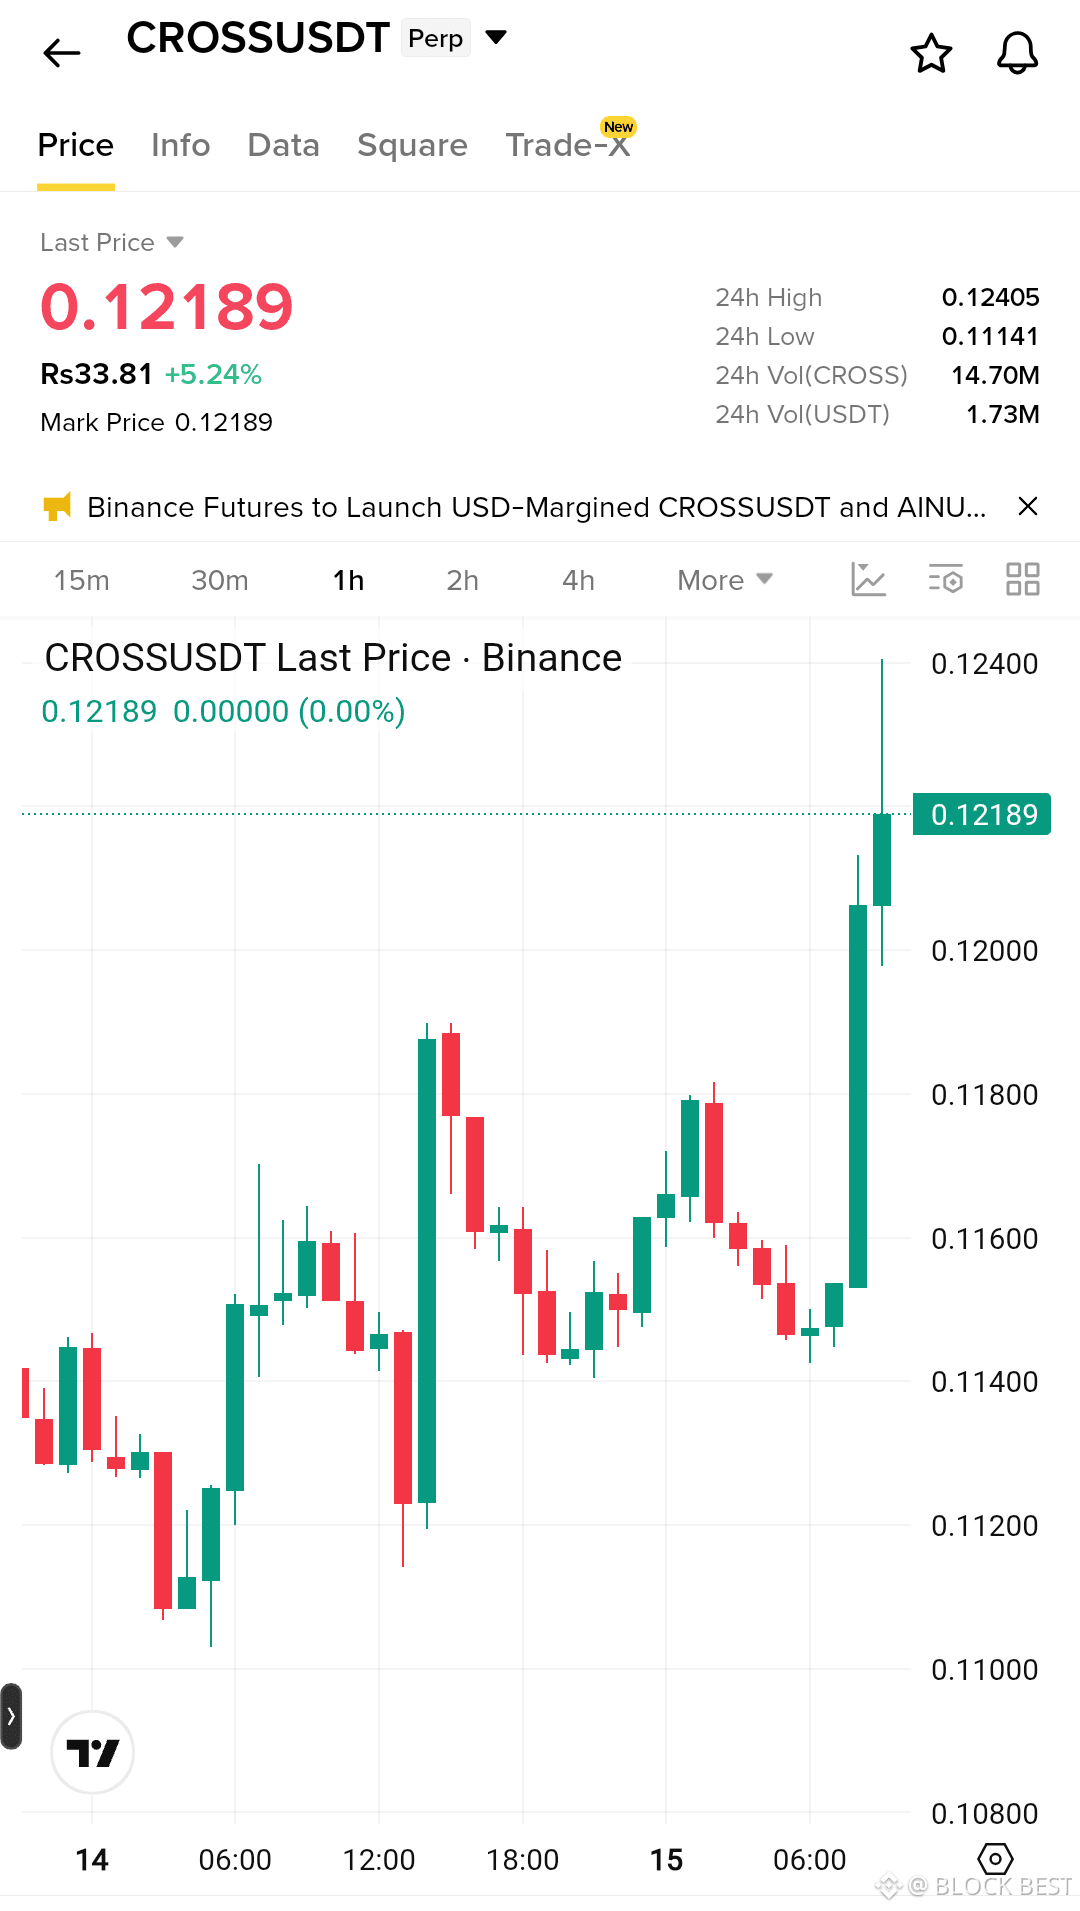
$CROSS is showing a strong bullish breakout on the 1H chart after buyers defended the $0.1140–$0.1160 demand zone. Price has surged through $0.1200 and is now testing the $0.1240 resistance area with strong momentum. The sharp expansion suggests buyers are targeting the liquidity above the recent high, but a clean hold above $0.1200 is important for continuation.
Trade Setup
Entry: $0.1200–$0.1220
Target 1: $0.1245
Target 2: $0.1270
Target 3: $0.1300
Stop Loss: $0.1175
How it's possible
The breakout from the $0.1160 area comes with strong upward momentum and expanding price action. Volume confirmation would strengthen the move, while holding above $0.1200 keeps the breakout structure intact. A decisive break above $0.1240 could trigger the next liquidity push toward $0.1270 and $0.1300. If price closes below $0.1175, the setup fails and the trade should be exited to protect capital.
Trade and now $CROSS
{future}(CROSSUSDT)
$CROSS is showing a strong bullish breakout on the 1H chart after buyers defended the $0.1140–$0.1160 demand zone. Price has surged through $0.1200 and is now testing the $0.1240 resistance area with strong momentum. The sharp expansion suggests buyers are targeting the liquidity above the recent high, but a clean hold above $0.1200 is important for continuation.
Trade Setup
Entry: $0.1200–$0.1220
Target 1: $0.1245
Target 2: $0.1270
Target 3: $0.1300
Stop Loss: $0.1175
How it's possible
The breakout from the $0.1160 area comes with strong upward momentum and expanding price action. Volume confirmation would strengthen the move, while holding above $0.1200 keeps the breakout structure intact. A decisive break above $0.1240 could trigger the next liquidity push toward $0.1270 and $0.1300. If price closes below $0.1175, the setup fails and the trade should be exited to protect capital.
Trade and now $CROSS
Trade Setup
Entry: $0.1200–$0.1220
Target 1: $0.1245
Target 2: $0.1270
Target 3: $0.1300
Stop Loss: $0.1175
How it's possible
The breakout from the $0.1160 area comes with strong upward momentum and expanding price action. Volume confirmation would strengthen the move, while holding above $0.1200 keeps the breakout structure intact. A decisive break above $0.1240 could trigger the next liquidity push toward $0.1270 and $0.1300. If price closes below $0.1175, the setup fails and the trade should be exited to protect capital.
Trade and now $CROSS
29
·
--
ເບິ່ງການແປ
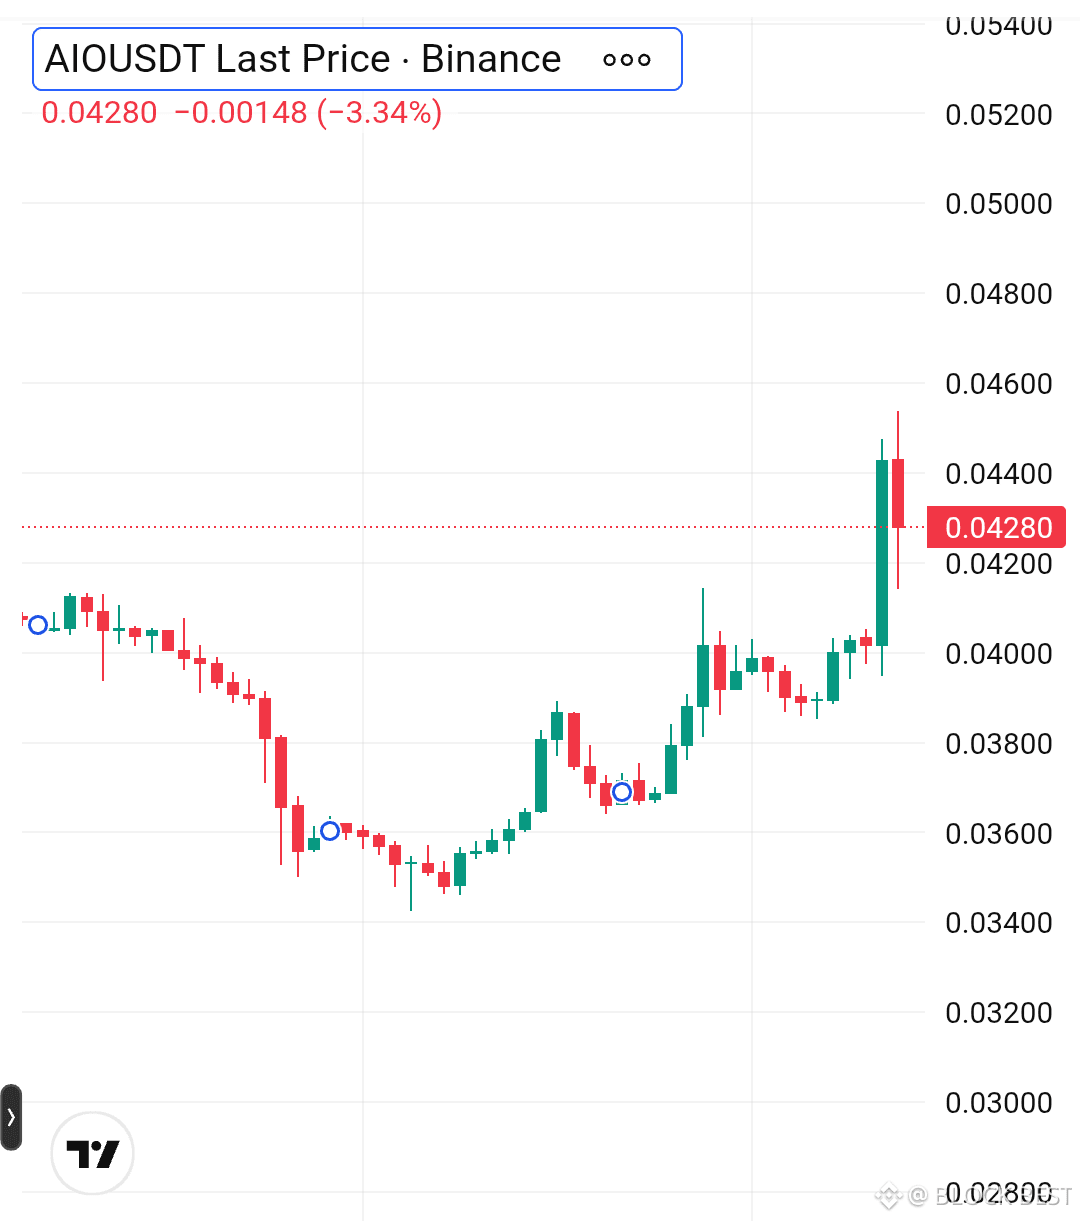
$AIO is showing a bullish breakout setup after reclaiming the $0.0400 resistance zone. Price pushed sharply into $0.0440–$0.0450 before a small rejection, suggesting a possible retest rather than a full reversal. The structure has shifted into higher highs and higher lows, with buyers still holding the key breakout area. A successful hold above $0.0420 could attract fresh liquidity toward the next resistance levels.
Trade Setup
Entry: $0.0420–$0.0428
Target 1: $0.0445
Target 2: $0.0460
Target 3: $0.0480
Stop Loss: $0.0405
How it's possible
The breakout above $0.0400 shows improving momentum after a prolonged recovery from the $0.0350 area. Buyers need to defend $0.0420–$0.0400 while volume remains supportive of the move. A strong reclaim of $0.0445 would confirm continuation toward higher liquidity. If price closes below $0.0405, the setup fails and the trade should be exited to protect capital.
Trade and now $AIO
{future}(AIOUSDT)
$AIO is showing a bullish breakout setup after reclaiming the $0.0400 resistance zone. Price pushed sharply into $0.0440–$0.0450 before a small rejection, suggesting a possible retest rather than a full reversal. The structure has shifted into higher highs and higher lows, with buyers still holding the key breakout area. A successful hold above $0.0420 could attract fresh liquidity toward the next resistance levels.
Trade Setup
Entry: $0.0420–$0.0428
Target 1: $0.0445
Target 2: $0.0460
Target 3: $0.0480
Stop Loss: $0.0405
How it's possible
The breakout above $0.0400 shows improving momentum after a prolonged recovery from the $0.0350 area. Buyers need to defend $0.0420–$0.0400 while volume remains supportive of the move. A strong reclaim of $0.0445 would confirm continuation toward higher liquidity. If price closes below $0.0405, the setup fails and the trade should be exited to protect capital.
Trade and now $AIO
Trade Setup
Entry: $0.0420–$0.0428
Target 1: $0.0445
Target 2: $0.0460
Target 3: $0.0480
Stop Loss: $0.0405
How it's possible
The breakout above $0.0400 shows improving momentum after a prolonged recovery from the $0.0350 area. Buyers need to defend $0.0420–$0.0400 while volume remains supportive of the move. A strong reclaim of $0.0445 would confirm continuation toward higher liquidity. If price closes below $0.0405, the setup fails and the trade should be exited to protect capital.
Trade and now $AIO
60
·
--
ເບິ່ງການແປ
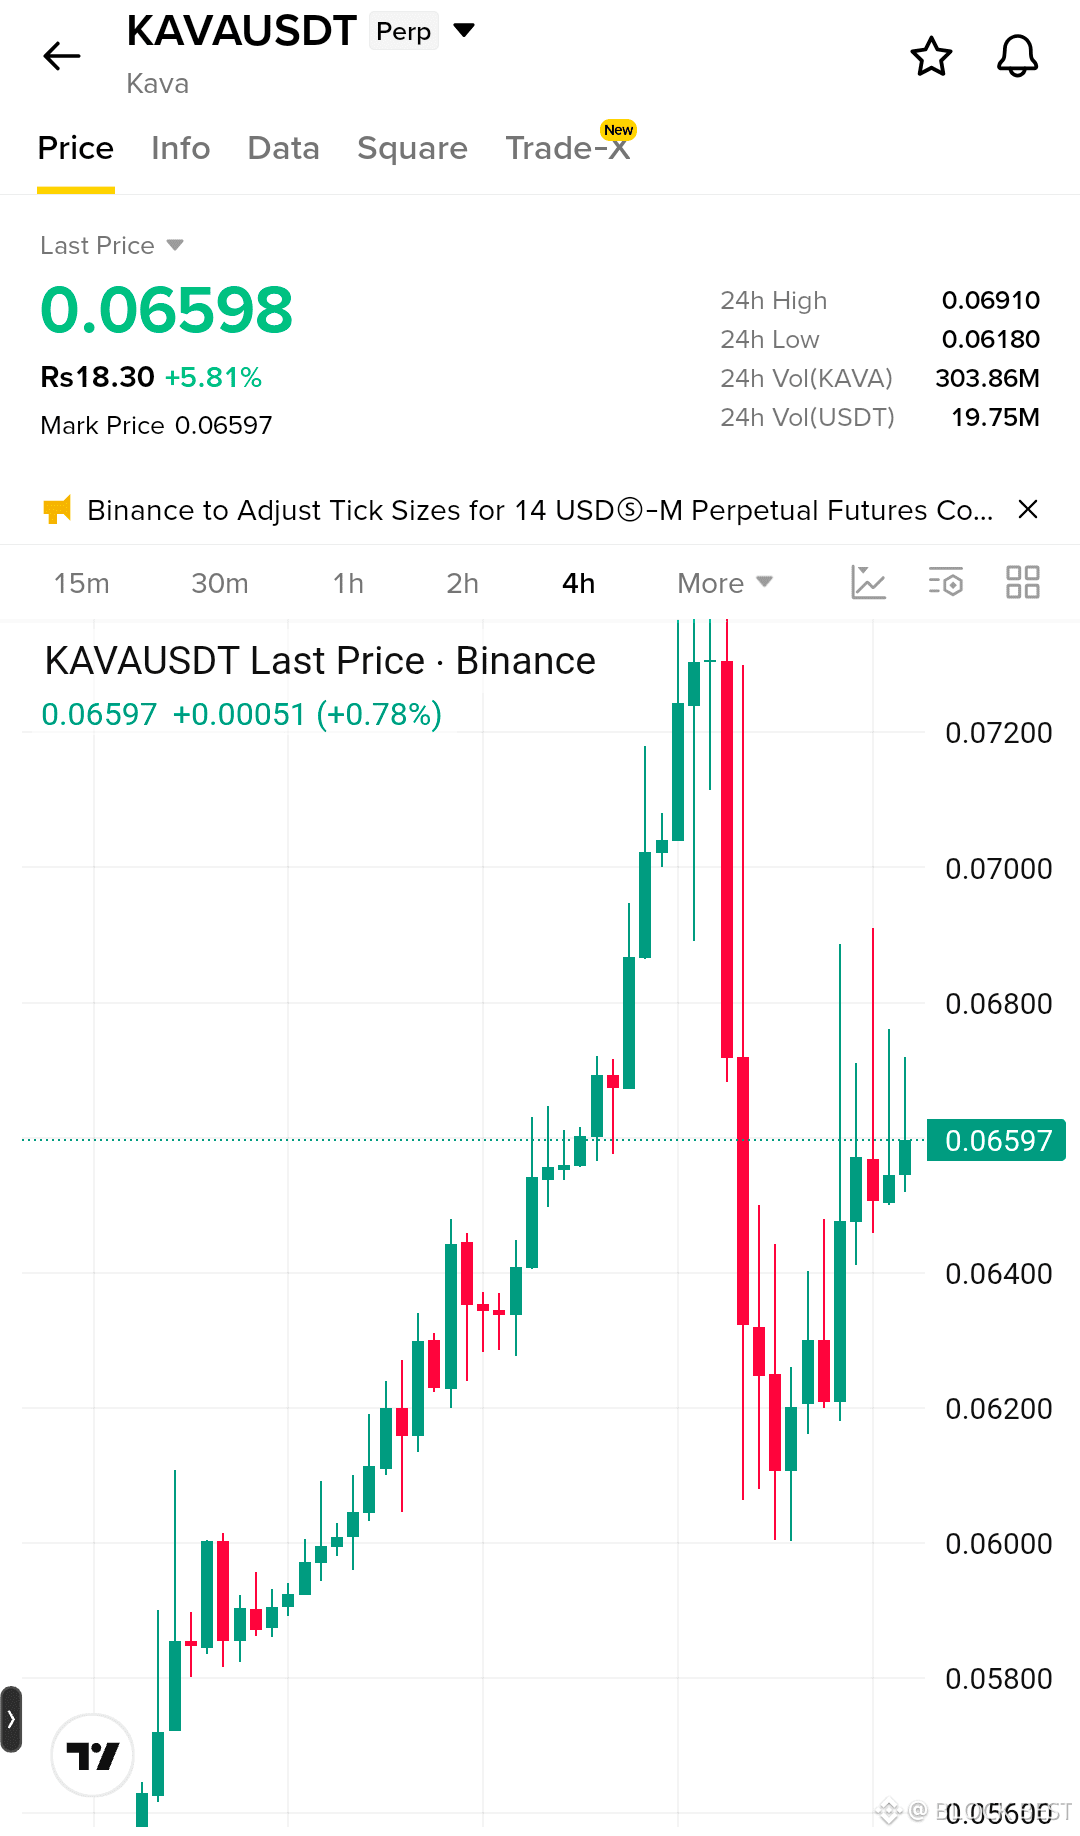
$KAVA is showing a bullish recovery on the 4H chart after strong demand around $0.0600–$0.0620. Buyers have stepped back in with higher lows, reclaiming the $0.0650 area and pushing price toward the $0.0685–$0.0691 resistance zone. Momentum is improving, and a clean breakout above this resistance could open the way toward the next liquidity levels around $0.0710–$0.0730.
Trade Setup
Entry: $0.0650–$0.0662
Target 1: $0.0685
Target 2: $0.0710
Target 3: $0.0730
Stop Loss: $0.0628
How it's possible
The rebound from the $0.0600–$0.0620 demand zone shows buyers are defending lower levels aggressively. Rising momentum and strong trading activity support the recovery, while holding above $0.0650 keeps the short-term structure bullish. A volume-backed breakout through $0.0691 would strengthen the continuation toward higher liquidity. If price rejects and closes below the $0.0628 stop loss, exit the trade to protect capital.
Trade and now $KAVA
{spot}(KAVAUSDT)
$KAVA is showing a bullish recovery on the 4H chart after strong demand around $0.0600–$0.0620. Buyers have stepped back in with higher lows, reclaiming the $0.0650 area and pushing price toward the $0.0685–$0.0691 resistance zone. Momentum is improving, and a clean breakout above this resistance could open the way toward the next liquidity levels around $0.0710–$0.0730.
Trade Setup
Entry: $0.0650–$0.0662
Target 1: $0.0685
Target 2: $0.0710
Target 3: $0.0730
Stop Loss: $0.0628
How it's possible
The rebound from the $0.0600–$0.0620 demand zone shows buyers are defending lower levels aggressively. Rising momentum and strong trading activity support the recovery, while holding above $0.0650 keeps the short-term structure bullish. A volume-backed breakout through $0.0691 would strengthen the continuation toward higher liquidity. If price rejects and closes below the $0.0628 stop loss, exit the trade to protect capital.
Trade and now $KAVA
Trade Setup
Entry: $0.0650–$0.0662
Target 1: $0.0685
Target 2: $0.0710
Target 3: $0.0730
Stop Loss: $0.0628
How it's possible
The rebound from the $0.0600–$0.0620 demand zone shows buyers are defending lower levels aggressively. Rising momentum and strong trading activity support the recovery, while holding above $0.0650 keeps the short-term structure bullish. A volume-backed breakout through $0.0691 would strengthen the continuation toward higher liquidity. If price rejects and closes below the $0.0628 stop loss, exit the trade to protect capital.
Trade and now $KAVA
68
·
--
ເບິ່ງການແປ
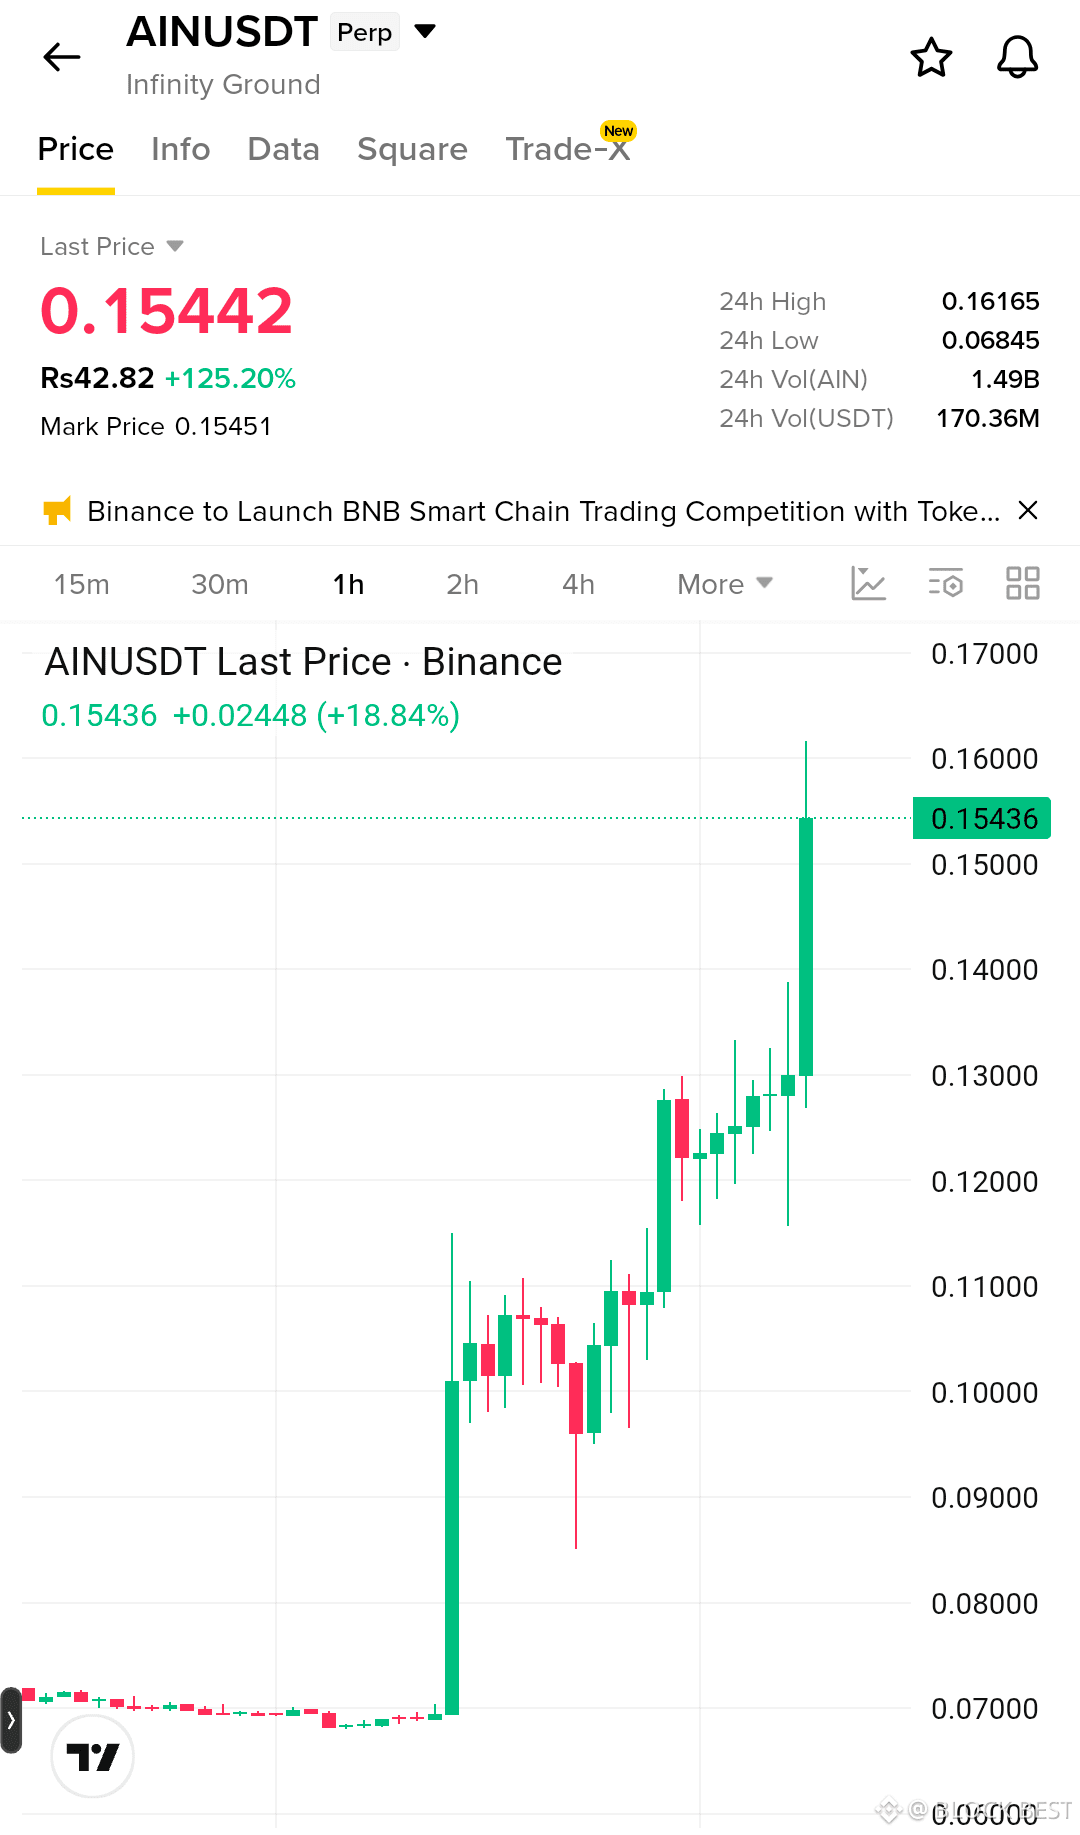
$AIN USDT is showing a powerful bullish breakout on the 1H chart after buyers defended the $0.12–$0.13 demand zone. Price has pushed through the $0.14 resistance with strong momentum, creating fresh higher highs and targeting liquidity above the recent $0.1616 high. A hold above $0.15 could keep the continuation move alive toward the next resistance zones.
Trade Setup
Entry: $0.148–$0.154
Target 1: $0.162
Target 2: $0.175
Target 3: $0.190
Stop Loss: $0.138
How it's possible
The 1H structure remains strongly bullish, with consecutive higher lows followed by an aggressive breakout candle. Strong volume and momentum support the move, while $0.14–$0.15 is now the key area for buyers to defend. A sustained move above $0.162 can trigger another liquidity expansion toward the higher targets. If price closes below the stop loss, the setup has failed and the trade should be exited to protect capital.
Trade and now $AIN USDT.
{future}(AINUSDT)
$AIN USDT is showing a powerful bullish breakout on the 1H chart after buyers defended the $0.12–$0.13 demand zone. Price has pushed through the $0.14 resistance with strong momentum, creating fresh higher highs and targeting liquidity above the recent $0.1616 high. A hold above $0.15 could keep the continuation move alive toward the next resistance zones.
Trade Setup
Entry: $0.148–$0.154
Target 1: $0.162
Target 2: $0.175
Target 3: $0.190
Stop Loss: $0.138
How it's possible
The 1H structure remains strongly bullish, with consecutive higher lows followed by an aggressive breakout candle. Strong volume and momentum support the move, while $0.14–$0.15 is now the key area for buyers to defend. A sustained move above $0.162 can trigger another liquidity expansion toward the higher targets. If price closes below the stop loss, the setup has failed and the trade should be exited to protect capital.
Trade and now $AIN USDT.
Trade Setup
Entry: $0.148–$0.154
Target 1: $0.162
Target 2: $0.175
Target 3: $0.190
Stop Loss: $0.138
How it's possible
The 1H structure remains strongly bullish, with consecutive higher lows followed by an aggressive breakout candle. Strong volume and momentum support the move, while $0.14–$0.15 is now the key area for buyers to defend. A sustained move above $0.162 can trigger another liquidity expansion toward the higher targets. If price closes below the stop loss, the setup has failed and the trade should be exited to protect capital.
Trade and now $AIN USDT.
1
175
·
--
ເບິ່ງການແປ
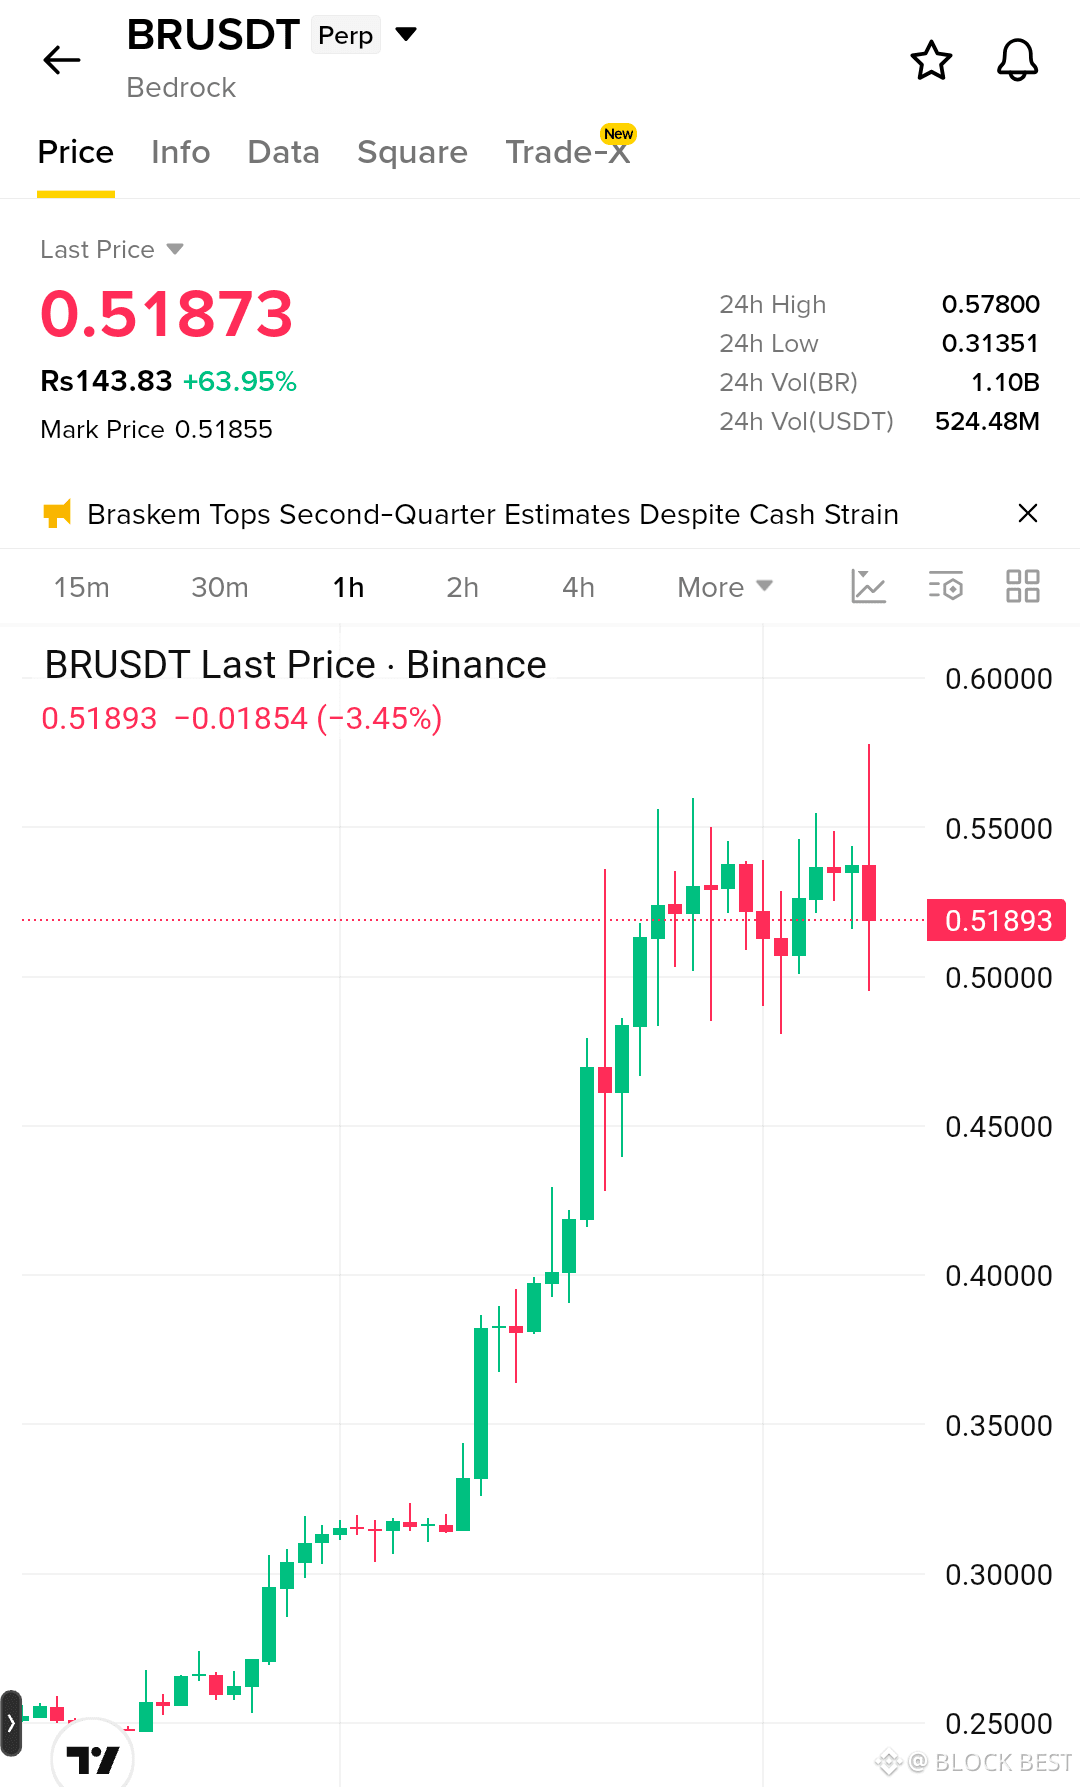
$BR USDT is holding a strong bullish structure on the 1H chart after a powerful rally from the $0.30 area. Price is consolidating above the $0.50 support zone while buyers continue defending higher levels. A clean reclaim of $0.54–$0.55 could open the way toward the recent $0.578 resistance and fresh upside liquidity.
Trade Setup
Entry: $0.510–$0.522
Target 1: $0.550
Target 2: $0.578
Target 3: $0.620
Stop Loss: $0.495
How it's possible
The overall 1H structure remains bullish, with strong higher highs and higher lows after the major breakout. The $0.50–$0.51 area is the key demand zone, and holding it keeps buyers in control. A volume-backed breakout above $0.55 would confirm momentum and target the $0.578 high before the next liquidity zone. If price loses $0.50 with strong selling pressure, the setup weakens; if it closes beyond the stop loss, exit the trade to protect capital.
Trade now $BR USDT
{future}(BRUSDT)
$BR USDT is holding a strong bullish structure on the 1H chart after a powerful rally from the $0.30 area. Price is consolidating above the $0.50 support zone while buyers continue defending higher levels. A clean reclaim of $0.54–$0.55 could open the way toward the recent $0.578 resistance and fresh upside liquidity.
Trade Setup
Entry: $0.510–$0.522
Target 1: $0.550
Target 2: $0.578
Target 3: $0.620
Stop Loss: $0.495
How it's possible
The overall 1H structure remains bullish, with strong higher highs and higher lows after the major breakout. The $0.50–$0.51 area is the key demand zone, and holding it keeps buyers in control. A volume-backed breakout above $0.55 would confirm momentum and target the $0.578 high before the next liquidity zone. If price loses $0.50 with strong selling pressure, the setup weakens; if it closes beyond the stop loss, exit the trade to protect capital.
Trade now $BR USDT
Trade Setup
Entry: $0.510–$0.522
Target 1: $0.550
Target 2: $0.578
Target 3: $0.620
Stop Loss: $0.495
How it's possible
The overall 1H structure remains bullish, with strong higher highs and higher lows after the major breakout. The $0.50–$0.51 area is the key demand zone, and holding it keeps buyers in control. A volume-backed breakout above $0.55 would confirm momentum and target the $0.578 high before the next liquidity zone. If price loses $0.50 with strong selling pressure, the setup weakens; if it closes beyond the stop loss, exit the trade to protect capital.
Trade now $BR USDT
153
·
--
ເບິ່ງການແປ
$FIL
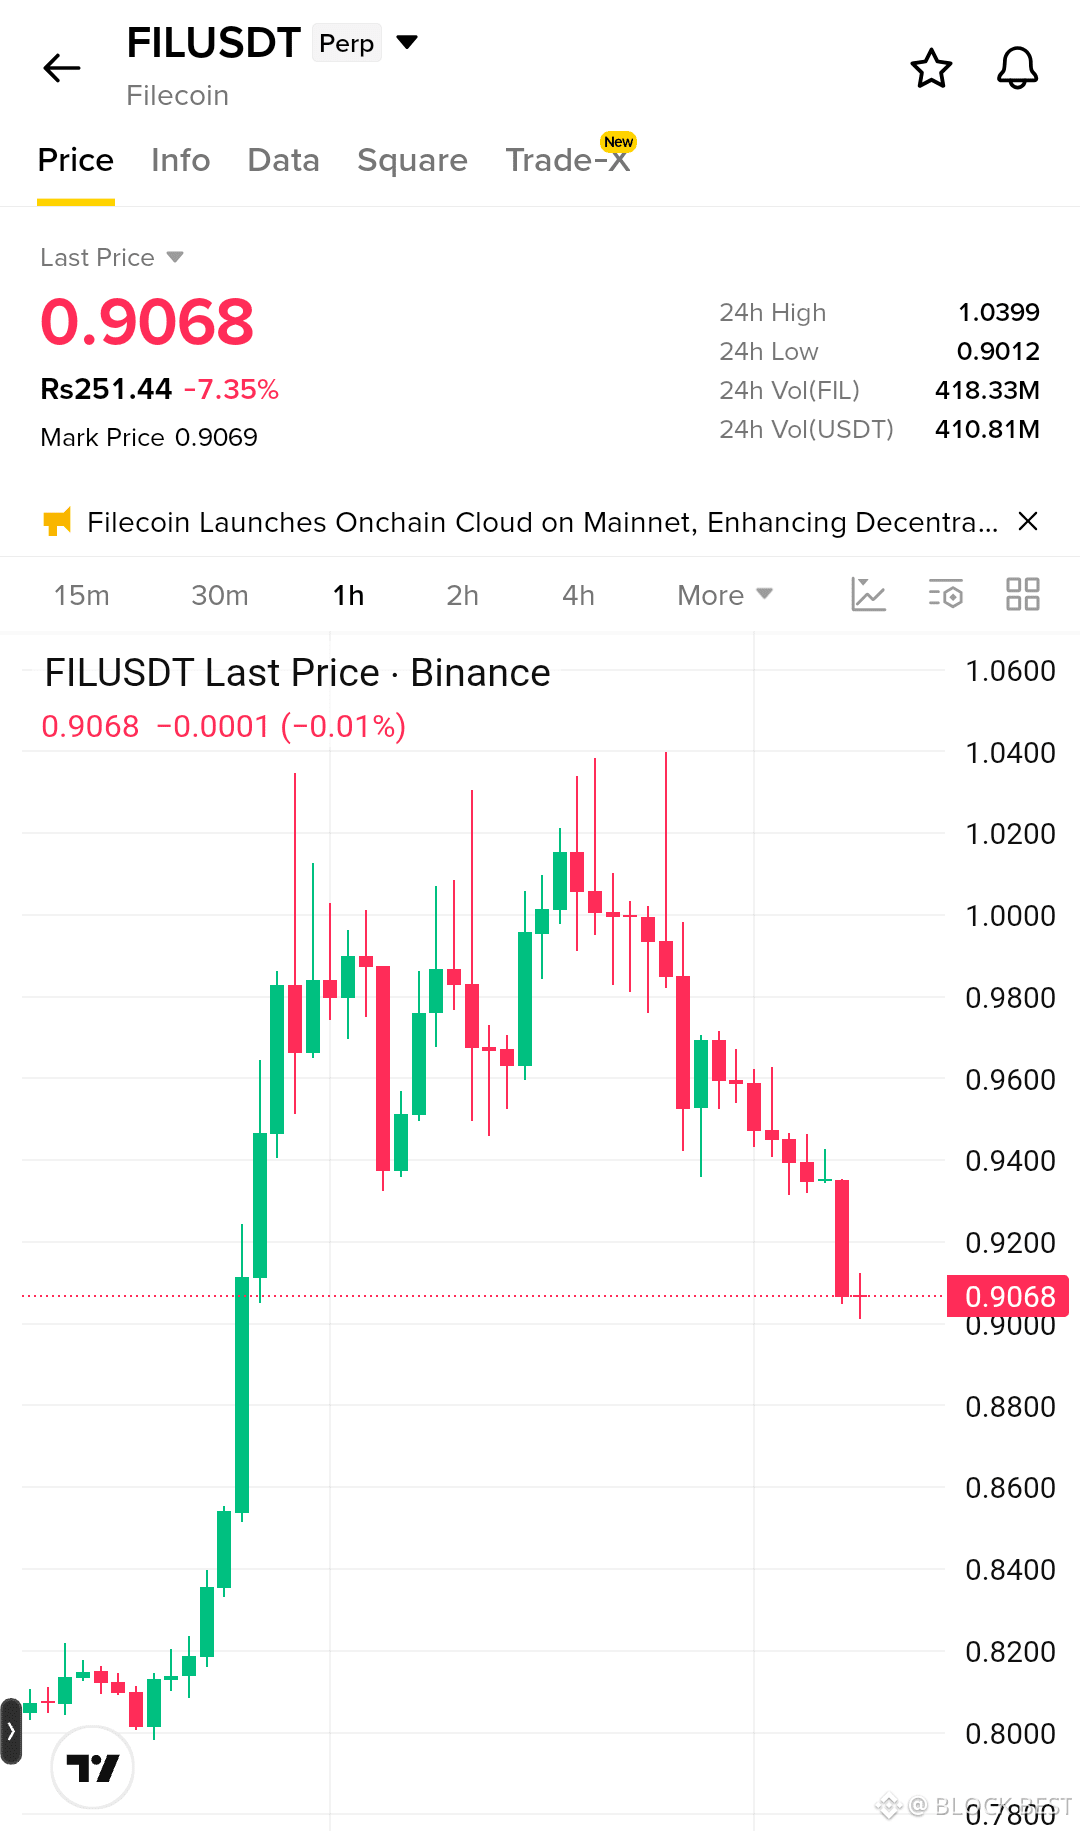
High-conviction bearish continuation setup on the 1H chart. Price has reversed sharply from the $1.04 resistance area and formed a clear sequence of lower highs and lower lows. The breakdown through $0.94 has increased selling pressure, with price now testing the $0.90 support zone and showing weak recovery attempts.
EP: $0.915–$0.930
TP1: $0.880
TP2: $0.850
TP3: $0.820
SL: $0.950
Trend strength is bearish, with sellers maintaining control below the $0.94–$0.95 resistance zone and momentum continuing to weaken.
The $0.90 area is the immediate support and liquidity zone; a clean breakdown and 1H close below it would confirm further downside continuation.
A failed reclaim of $0.915–$0.930 can provide the next short opportunity, targeting $0.880, $0.850 and potentially $0.820.
$FIL
{spot}(FILUSDT)
$FIL
High-conviction bearish continuation setup on the 1H chart. Price has reversed sharply from the $1.04 resistance area and formed a clear sequence of lower highs and lower lows. The breakdown through $0.94 has increased selling pressure, with price now testing the $0.90 support zone and showing weak recovery attempts.
EP: $0.915–$0.930
TP1: $0.880
TP2: $0.850
TP3: $0.820
SL: $0.950
Trend strength is bearish, with sellers maintaining control below the $0.94–$0.95 resistance zone and momentum continuing to weaken.
The $0.90 area is the immediate support and liquidity zone; a clean breakdown and 1H close below it would confirm further downside continuation.
A failed reclaim of $0.915–$0.930 can provide the next short opportunity, targeting $0.880, $0.850 and potentially $0.820.
$FIL
High-conviction bearish continuation setup on the 1H chart. Price has reversed sharply from the $1.04 resistance area and formed a clear sequence of lower highs and lower lows. The breakdown through $0.94 has increased selling pressure, with price now testing the $0.90 support zone and showing weak recovery attempts.
EP: $0.915–$0.930
TP1: $0.880
TP2: $0.850
TP3: $0.820
SL: $0.950
Trend strength is bearish, with sellers maintaining control below the $0.94–$0.95 resistance zone and momentum continuing to weaken.
The $0.90 area is the immediate support and liquidity zone; a clean breakdown and 1H close below it would confirm further downside continuation.
A failed reclaim of $0.915–$0.930 can provide the next short opportunity, targeting $0.880, $0.850 and potentially $0.820.
$FIL
216
·
--
ເບິ່ງການແປ
$CAP
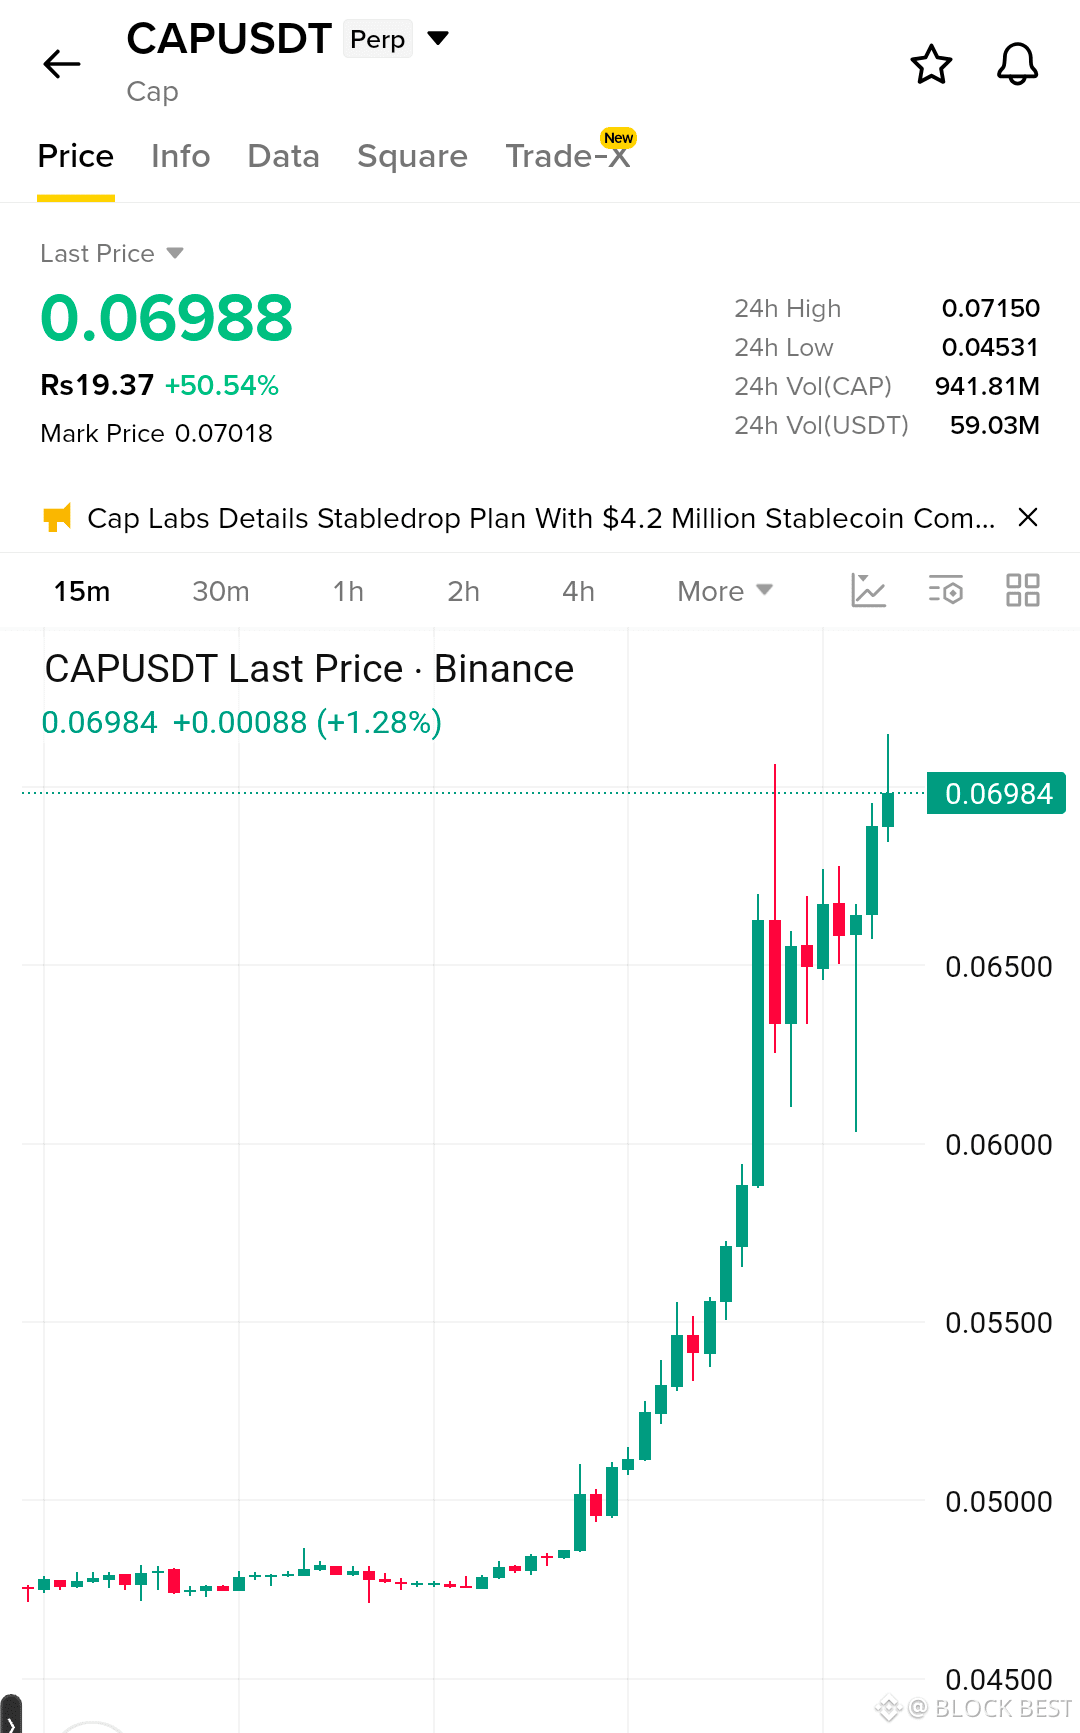
High-conviction bullish continuation setup on the 15M chart. Price has delivered a powerful breakout from the $0.04700–$0.05000 base and is now consolidating near $0.07000 after reaching the $0.07150 24H high. The pullbacks are holding higher lows around $0.06500, showing buyers remain in control while liquidity above $0.07150 is the immediate target zone.
EP: $0.06750–$0.06950
TP1: $0.07150
TP2: $0.07450
TP3: $0.07800
SL: $0.06400
Trend strength remains strongly bullish, with a clear sequence of higher highs and higher lows following the breakout.
Momentum remains positive as price holds above the $0.06500 support area and continues pressing toward the $0.07150 resistance.
A clean break and hold above $0.07150 would likely trigger the next liquidity expansion toward $0.07450 and $0.07800, while a loss of $0.06400 invalidates the continuation setup.
$CAP
{future}(CAPUSDT)
$CAP
High-conviction bullish continuation setup on the 15M chart. Price has delivered a powerful breakout from the $0.04700–$0.05000 base and is now consolidating near $0.07000 after reaching the $0.07150 24H high. The pullbacks are holding higher lows around $0.06500, showing buyers remain in control while liquidity above $0.07150 is the immediate target zone.
EP: $0.06750–$0.06950
TP1: $0.07150
TP2: $0.07450
TP3: $0.07800
SL: $0.06400
Trend strength remains strongly bullish, with a clear sequence of higher highs and higher lows following the breakout.
Momentum remains positive as price holds above the $0.06500 support area and continues pressing toward the $0.07150 resistance.
A clean break and hold above $0.07150 would likely trigger the next liquidity expansion toward $0.07450 and $0.07800, while a loss of $0.06400 invalidates the continuation setup.
$CAP
High-conviction bullish continuation setup on the 15M chart. Price has delivered a powerful breakout from the $0.04700–$0.05000 base and is now consolidating near $0.07000 after reaching the $0.07150 24H high. The pullbacks are holding higher lows around $0.06500, showing buyers remain in control while liquidity above $0.07150 is the immediate target zone.
EP: $0.06750–$0.06950
TP1: $0.07150
TP2: $0.07450
TP3: $0.07800
SL: $0.06400
Trend strength remains strongly bullish, with a clear sequence of higher highs and higher lows following the breakout.
Momentum remains positive as price holds above the $0.06500 support area and continues pressing toward the $0.07150 resistance.
A clean break and hold above $0.07150 would likely trigger the next liquidity expansion toward $0.07450 and $0.07800, while a loss of $0.06400 invalidates the continuation setup.
$CAP
16
·
--
ເບິ່ງການແປ
$POWER
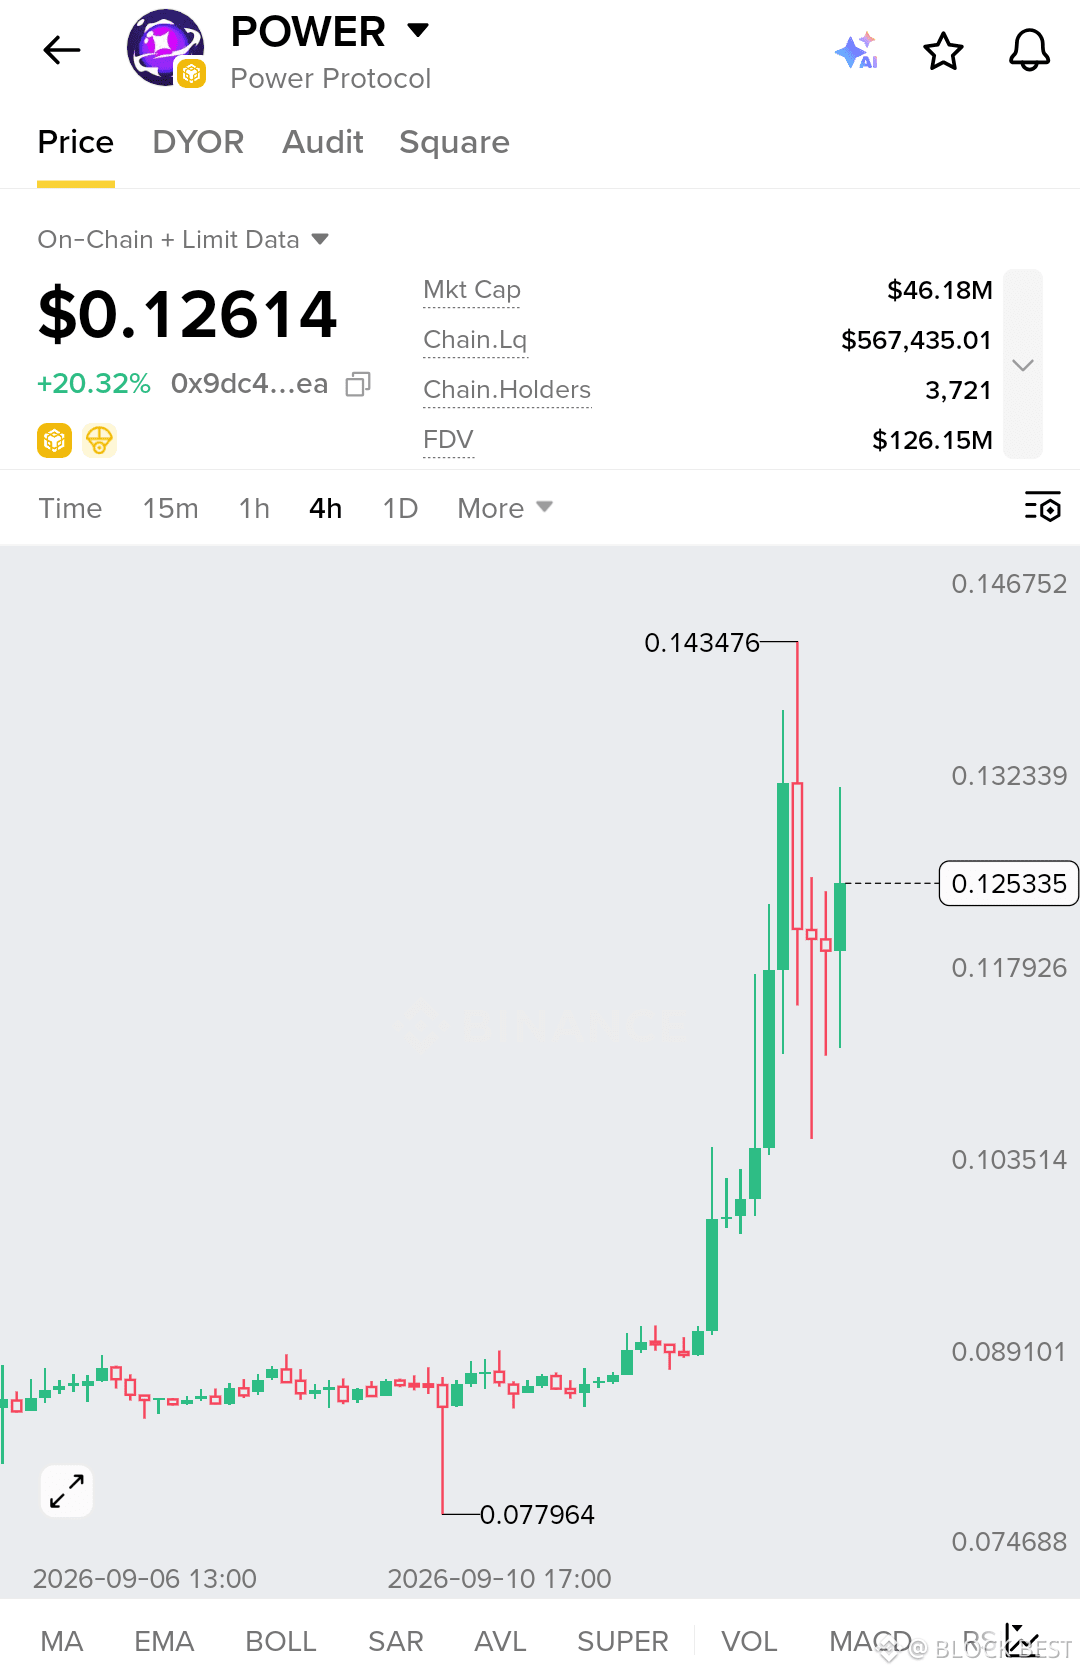
Bullish continuation setup on the 4H chart. Price has broken decisively above the long consolidation around $0.0890 and expanded toward the $0.1435 high. After the initial rejection, price held the $0.1179 area and is now pushing back toward $0.1323, showing that buyers are still defending the breakout structure.
EP: $0.12100–$0.12600
TP1: $0.13230
TP2: $0.14350
TP3: $0.15200
SL: $0.11400
Trend strength remains bullish, with the breakout producing clear higher highs and higher lows on the 4H structure. Momentum has recovered after the pullback, while $0.1179 is acting as the key short-term demand zone. A sustained move above $0.1323 would expose the previous $0.1435 high as the next major liquidity target, with further continuation possible toward $0.1520.
$POWER
{future}(POWERUSDT)
$POWER
Bullish continuation setup on the 4H chart. Price has broken decisively above the long consolidation around $0.0890 and expanded toward the $0.1435 high. After the initial rejection, price held the $0.1179 area and is now pushing back toward $0.1323, showing that buyers are still defending the breakout structure.
EP: $0.12100–$0.12600
TP1: $0.13230
TP2: $0.14350
TP3: $0.15200
SL: $0.11400
Trend strength remains bullish, with the breakout producing clear higher highs and higher lows on the 4H structure. Momentum has recovered after the pullback, while $0.1179 is acting as the key short-term demand zone. A sustained move above $0.1323 would expose the previous $0.1435 high as the next major liquidity target, with further continuation possible toward $0.1520.
$POWER
Bullish continuation setup on the 4H chart. Price has broken decisively above the long consolidation around $0.0890 and expanded toward the $0.1435 high. After the initial rejection, price held the $0.1179 area and is now pushing back toward $0.1323, showing that buyers are still defending the breakout structure.
EP: $0.12100–$0.12600
TP1: $0.13230
TP2: $0.14350
TP3: $0.15200
SL: $0.11400
Trend strength remains bullish, with the breakout producing clear higher highs and higher lows on the 4H structure. Momentum has recovered after the pullback, while $0.1179 is acting as the key short-term demand zone. A sustained move above $0.1323 would expose the previous $0.1435 high as the next major liquidity target, with further continuation possible toward $0.1520.
$POWER
109
·
--
ເບິ່ງການແປ
$DEBIT
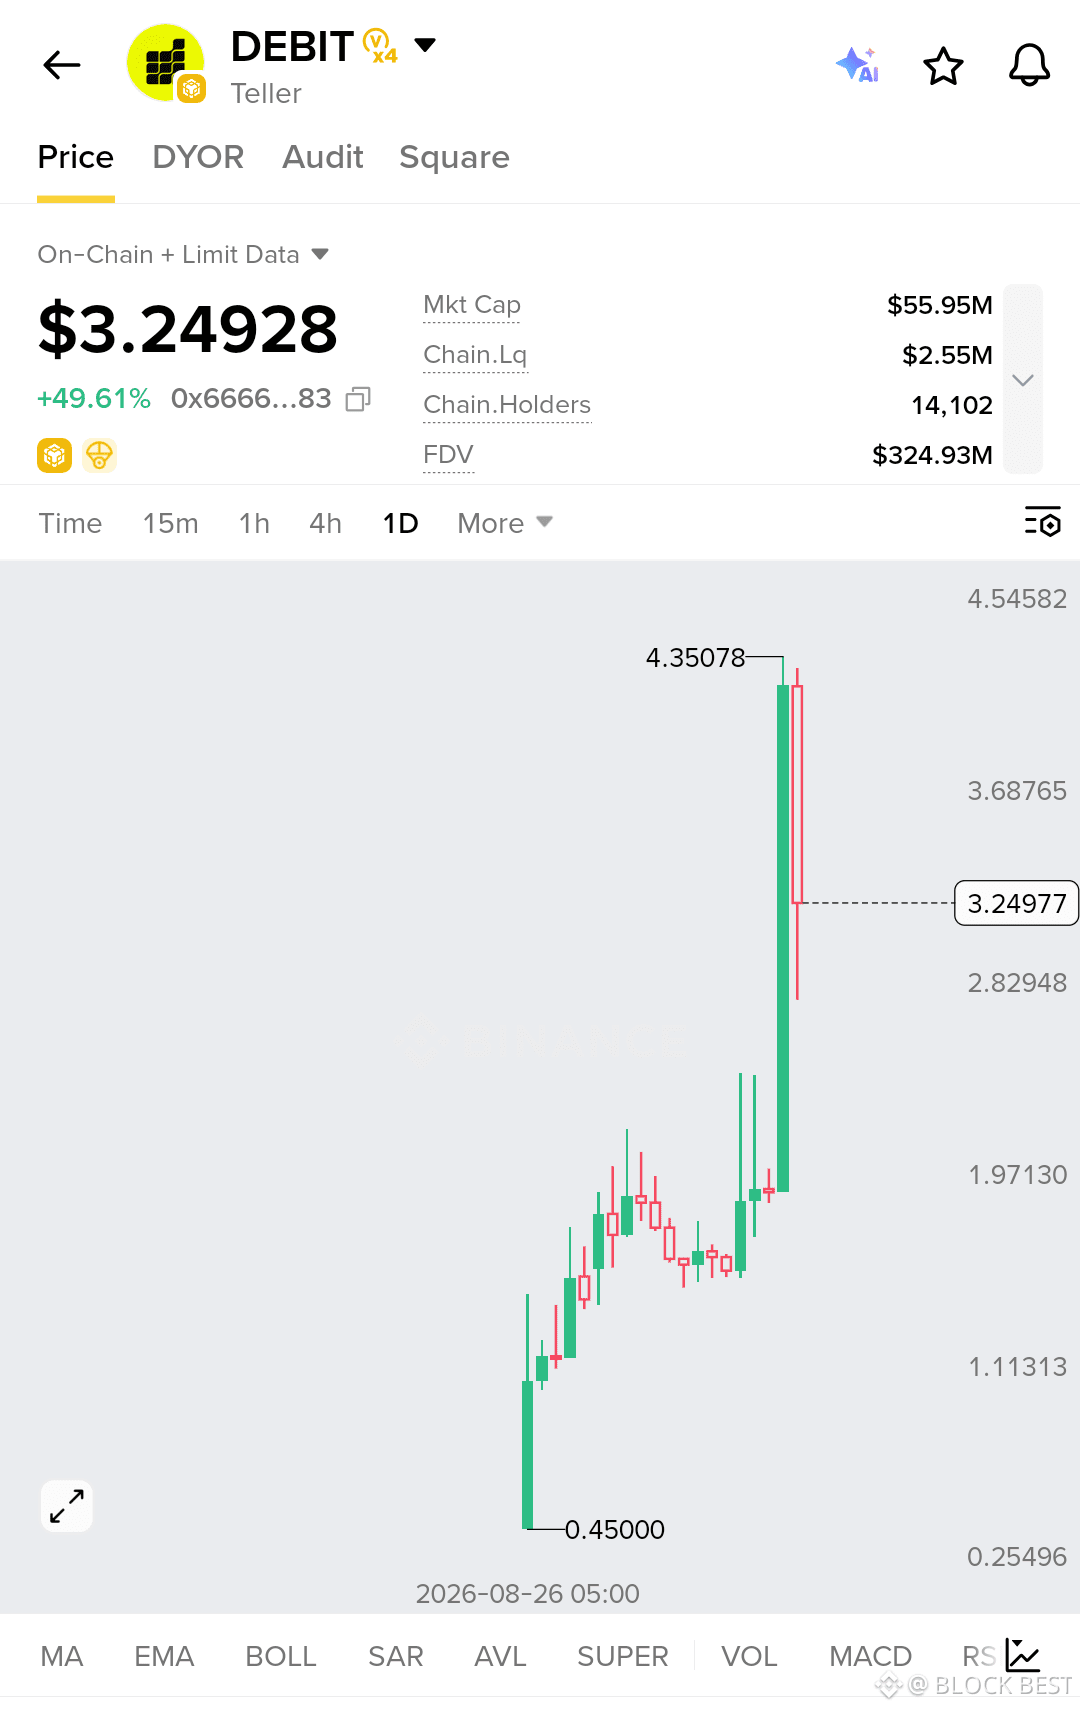
Strong bullish continuation setup on the 1D chart. Price has broken out of a prolonged accumulation range and expanded sharply from the $1.97 area, reaching a new high near $4.35. The current pullback toward $3.25 is showing rejection from the highs, but the broader structure remains bullish as long as the breakout zone holds.
EP: $3.05–$3.30
TP1: $3.70
TP2: $4.35
TP3: $4.90
SL: $2.75
Trend strength remains firmly bullish, with a clear sequence of higher highs and higher lows following the breakout above $1.97. Momentum is strong, but the large daily expansion makes a controlled retest of $3.05–$3.30 preferable to chasing the move. Holding this demand area would keep buyers in control and open the path toward the $4.35 liquidity zone and potentially $4.90.
$DEBIT
{alpha}(560x66661c7229901f568f16bd1551b3ba826f83ce49)
$DEBIT
Strong bullish continuation setup on the 1D chart. Price has broken out of a prolonged accumulation range and expanded sharply from the $1.97 area, reaching a new high near $4.35. The current pullback toward $3.25 is showing rejection from the highs, but the broader structure remains bullish as long as the breakout zone holds.
EP: $3.05–$3.30
TP1: $3.70
TP2: $4.35
TP3: $4.90
SL: $2.75
Trend strength remains firmly bullish, with a clear sequence of higher highs and higher lows following the breakout above $1.97. Momentum is strong, but the large daily expansion makes a controlled retest of $3.05–$3.30 preferable to chasing the move. Holding this demand area would keep buyers in control and open the path toward the $4.35 liquidity zone and potentially $4.90.
$DEBIT
Strong bullish continuation setup on the 1D chart. Price has broken out of a prolonged accumulation range and expanded sharply from the $1.97 area, reaching a new high near $4.35. The current pullback toward $3.25 is showing rejection from the highs, but the broader structure remains bullish as long as the breakout zone holds.
EP: $3.05–$3.30
TP1: $3.70
TP2: $4.35
TP3: $4.90
SL: $2.75
Trend strength remains firmly bullish, with a clear sequence of higher highs and higher lows following the breakout above $1.97. Momentum is strong, but the large daily expansion makes a controlled retest of $3.05–$3.30 preferable to chasing the move. Holding this demand area would keep buyers in control and open the path toward the $4.35 liquidity zone and potentially $4.90.
$DEBIT
143
·
--
ເບິ່ງການແປ
$CAP
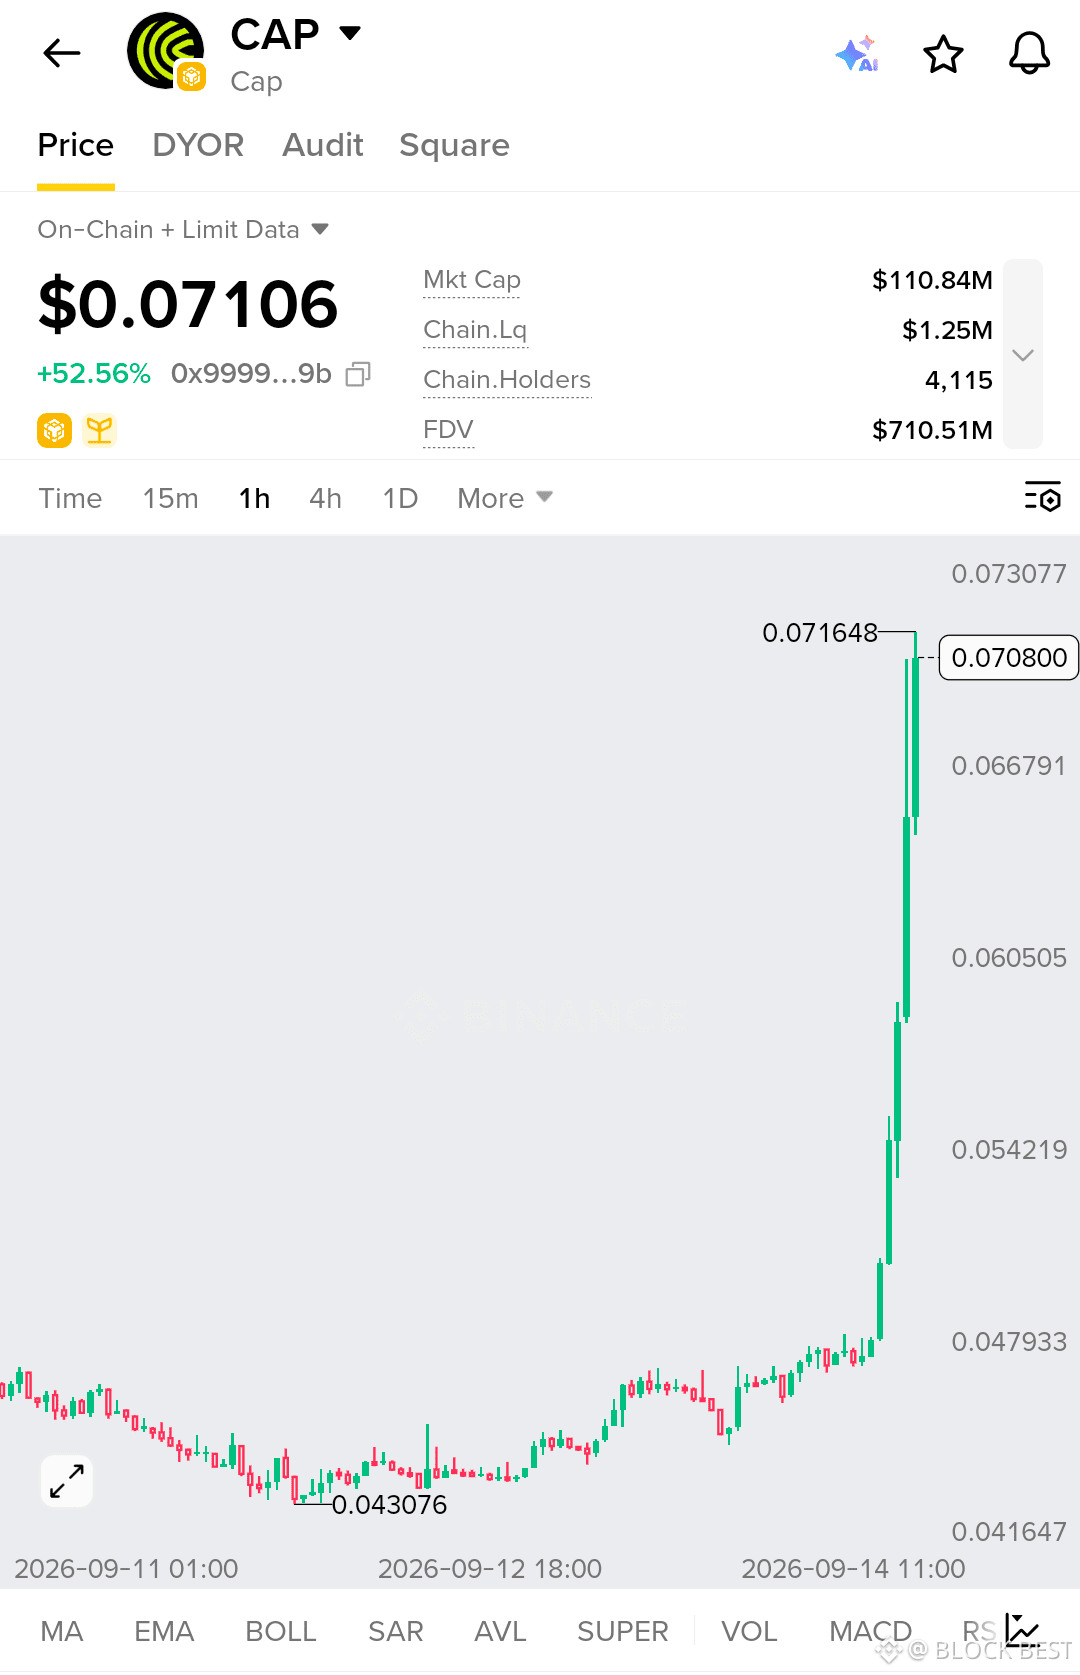
Bullish continuation setup on the 1H chart. Price has broken aggressively above the previous consolidation range near $0.0480 and pushed through $0.0605 and $0.0668, confirming strong buyer control. The move reached a fresh local high around $0.07165, with momentum still favoring the upside.
EP: $0.06850–$0.07020
TP1: $0.07300
TP2: $0.07650
TP3: $0.08100
SL: $0.06520
Trend strength remains strongly bullish, supported by consecutive higher highs and a decisive breakout from the prior range. Momentum is extended, so the preferred entry is on a controlled pullback that holds the $0.0668–$0.0685 area rather than chasing the vertical move. If buyers defend this breakout zone, the next liquidity above $0.07165 can attract continuation toward $0.0730, $0.0765 and $0.0810.
$CAP
{future}(CAPUSDT)
$CAP
Bullish continuation setup on the 1H chart. Price has broken aggressively above the previous consolidation range near $0.0480 and pushed through $0.0605 and $0.0668, confirming strong buyer control. The move reached a fresh local high around $0.07165, with momentum still favoring the upside.
EP: $0.06850–$0.07020
TP1: $0.07300
TP2: $0.07650
TP3: $0.08100
SL: $0.06520
Trend strength remains strongly bullish, supported by consecutive higher highs and a decisive breakout from the prior range. Momentum is extended, so the preferred entry is on a controlled pullback that holds the $0.0668–$0.0685 area rather than chasing the vertical move. If buyers defend this breakout zone, the next liquidity above $0.07165 can attract continuation toward $0.0730, $0.0765 and $0.0810.
$CAP
Bullish continuation setup on the 1H chart. Price has broken aggressively above the previous consolidation range near $0.0480 and pushed through $0.0605 and $0.0668, confirming strong buyer control. The move reached a fresh local high around $0.07165, with momentum still favoring the upside.
EP: $0.06850–$0.07020
TP1: $0.07300
TP2: $0.07650
TP3: $0.08100
SL: $0.06520
Trend strength remains strongly bullish, supported by consecutive higher highs and a decisive breakout from the prior range. Momentum is extended, so the preferred entry is on a controlled pullback that holds the $0.0668–$0.0685 area rather than chasing the vertical move. If buyers defend this breakout zone, the next liquidity above $0.07165 can attract continuation toward $0.0730, $0.0765 and $0.0810.
$CAP
98
·
--
ເບິ່ງການແປ
$RONIN USDT — BULLISH SETUP 🚀
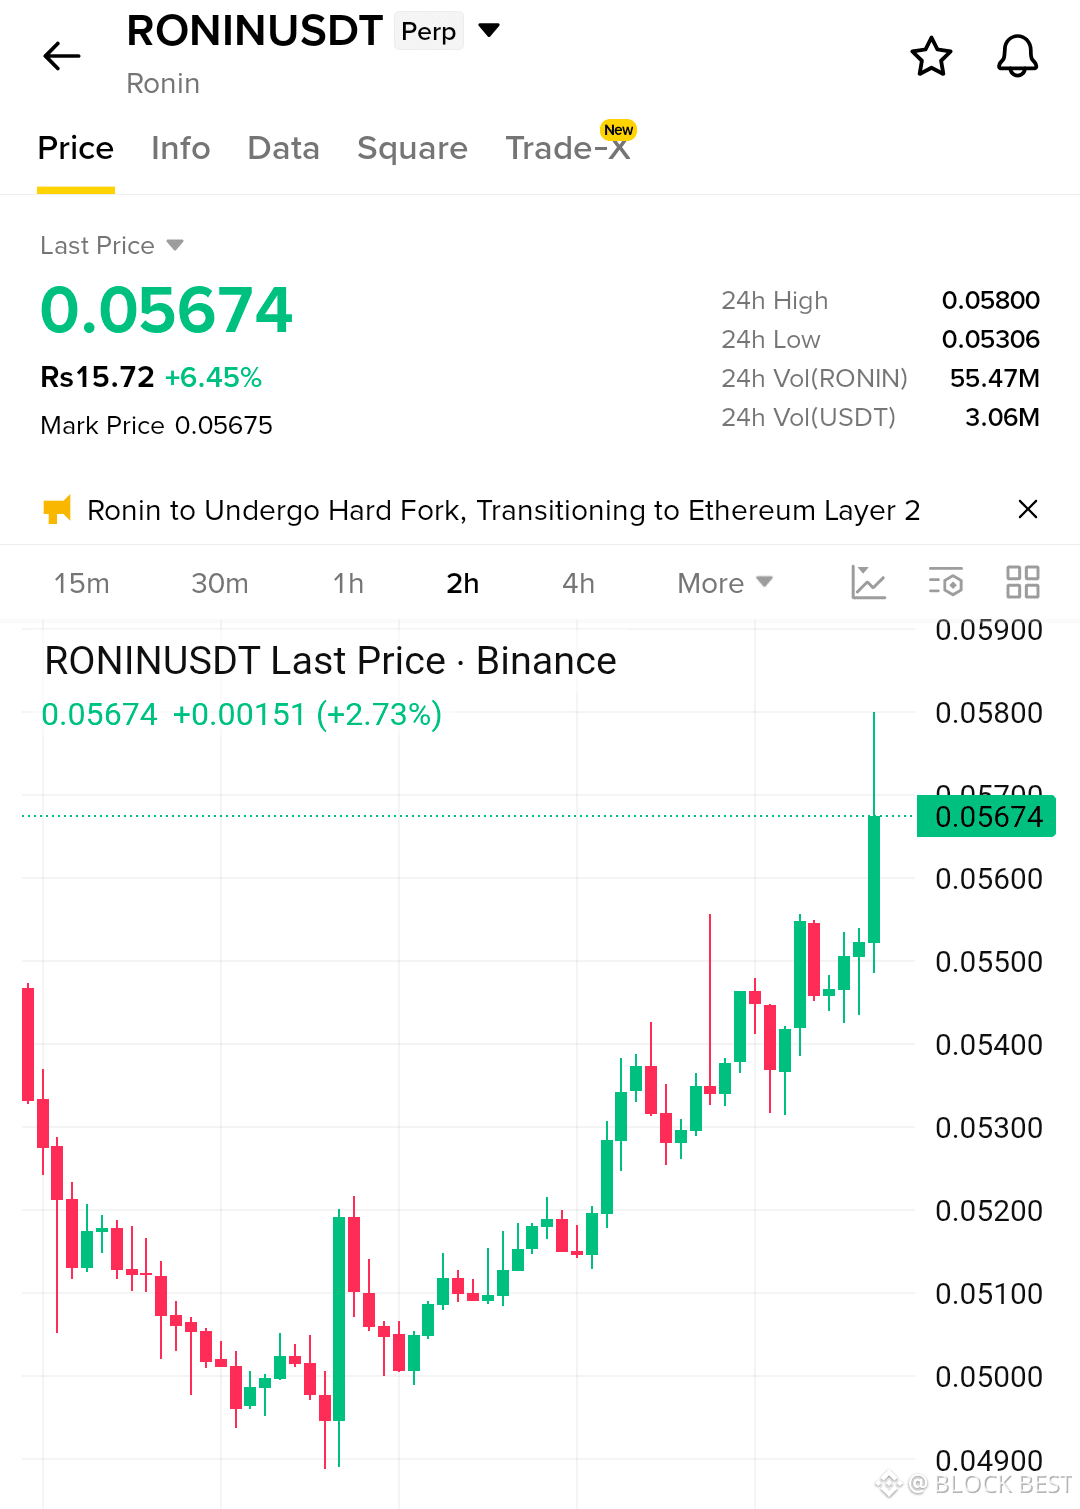
$RONIN USDT is building a bullish setup on the 2H chart after holding the $0.0530–$0.0540 demand zone. Price has formed higher highs and higher lows, breaking toward the $0.0580 resistance with buyers in control.
Entry: $0.0555–$0.0568
TP1: $0.0580
TP2: $0.0600
TP3: $0.0620
SL: $0.0538
Momentum is strong, but $0.0580 is the immediate resistance/liquidity zone. A clean 2H close above $0.0580 and a successful retest can confirm continuation. Losing $0.0538 would weaken the bullish structure.
Buy and Trade
{spot}(RONINUSDT)
$RONIN USDT — BULLISH SETUP 🚀
$RONIN USDT is building a bullish setup on the 2H chart after holding the $0.0530–$0.0540 demand zone. Price has formed higher highs and higher lows, breaking toward the $0.0580 resistance with buyers in control.
Entry: $0.0555–$0.0568
TP1: $0.0580
TP2: $0.0600
TP3: $0.0620
SL: $0.0538
Momentum is strong, but $0.0580 is the immediate resistance/liquidity zone. A clean 2H close above $0.0580 and a successful retest can confirm continuation. Losing $0.0538 would weaken the bullish structure.
Buy and Trade
$RONIN USDT is building a bullish setup on the 2H chart after holding the $0.0530–$0.0540 demand zone. Price has formed higher highs and higher lows, breaking toward the $0.0580 resistance with buyers in control.
Entry: $0.0555–$0.0568
TP1: $0.0580
TP2: $0.0600
TP3: $0.0620
SL: $0.0538
Momentum is strong, but $0.0580 is the immediate resistance/liquidity zone. A clean 2H close above $0.0580 and a successful retest can confirm continuation. Losing $0.0538 would weaken the bullish structure.
Buy and Trade
63
·
--
ເບິ່ງການແປ
$MINA USDT — BEARISH SETUP ⚠️
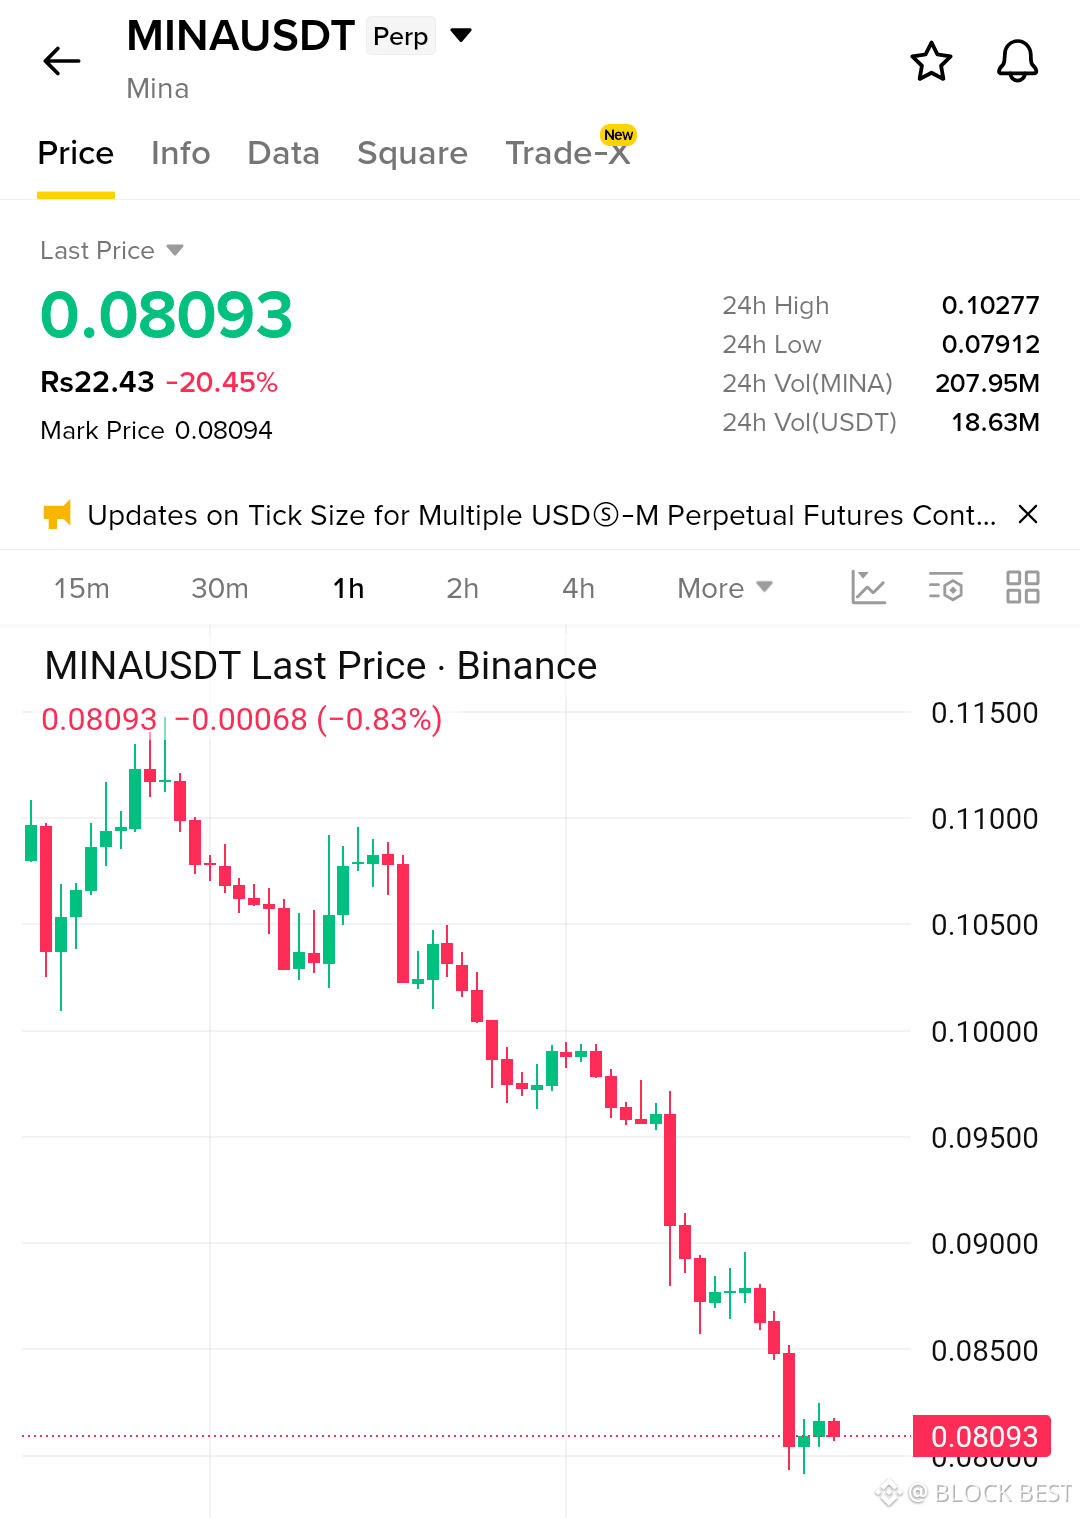
$MINA USDT is building a bearish setup on the 1H chart after a strong rejection from the $0.095–$0.100 resistance/supply zone. Price is making clear lower highs and lower lows, now testing the $0.079–$0.081 support area with sellers in control.
Entry: $0.0815–$0.0835
TP1: $0.0790
TP2: $0.0770
TP3: $0.0745
SL: $0.0860
Momentum remains weak after the sharp breakdown. A clean 1H close below $0.0790 can trigger further downside liquidity, while reclaiming $0.0860 would weaken the bearish setup. Watch for a rejection/retest of the entry zone before continuation.
Sell and Trade
{spot}(MINAUSDT)
$MINA USDT — BEARISH SETUP ⚠️
$MINA USDT is building a bearish setup on the 1H chart after a strong rejection from the $0.095–$0.100 resistance/supply zone. Price is making clear lower highs and lower lows, now testing the $0.079–$0.081 support area with sellers in control.
Entry: $0.0815–$0.0835
TP1: $0.0790
TP2: $0.0770
TP3: $0.0745
SL: $0.0860
Momentum remains weak after the sharp breakdown. A clean 1H close below $0.0790 can trigger further downside liquidity, while reclaiming $0.0860 would weaken the bearish setup. Watch for a rejection/retest of the entry zone before continuation.
Sell and Trade
$MINA USDT is building a bearish setup on the 1H chart after a strong rejection from the $0.095–$0.100 resistance/supply zone. Price is making clear lower highs and lower lows, now testing the $0.079–$0.081 support area with sellers in control.
Entry: $0.0815–$0.0835
TP1: $0.0790
TP2: $0.0770
TP3: $0.0745
SL: $0.0860
Momentum remains weak after the sharp breakdown. A clean 1H close below $0.0790 can trigger further downside liquidity, while reclaiming $0.0860 would weaken the bearish setup. Watch for a rejection/retest of the entry zone before continuation.
Sell and Trade
8
·
--
$MINA USDT — ການຕັ້ງຄ້າຂາລົງ ⚠️
$MINA USDT ກຳລັງສ້າງຮູບແບບຂາລົງໃນກຣາຟ 1H ຫຼັງຈາກຖືກປະຕິເສດແຮງຈາກເຂດຄວາມຕ້ານທານ/ອຸປະທານ $0.095–$0.100. ລາຄາກຳລັງສ້າງ lower highs ແລະ lower lows ຢ່າງຊັດເຈນ, ຕອນນີ້ກຳລັງທົດສອບເຂດຮັບຮອງ $0.079–$0.081 ດ້ວຍຜູ້ຂາຍຄຸມການຄ້າ.
Entry: $0.0815–$0.0835
TP1: $0.0790
TP2: $0.0770
TP3: $0.0745
SL: $0.0860
ແຮງແບບ/โมເມນຕັມຍັງອ່ອນແອຫຼັງຈາກການພັງລົງຢ່າງແຮງ. ການປິດ 1H ທີ່ຊັດເຈນຕໍ່າກວ່າ $0.0790 ສາມາດກະຕຸ້ນຄວາມເຂັ້ມຂອງສະພາບລົງລຶກເພີ່ມ, ໃນຂະນະທີ່ການກັບຄືນຂຶ້ນ $0.0860 ຈະທຳໃຫ້ຮູບແບບຂາລົງອ່ອນລົງ. ຈົ່ງລະວັງການປະຕິເສດ/ການທົດຄືນເຂດ entry ກ່ອນການສືບຕໍ່.
Sell and Trade
{spot}(MINAUSDT)
$MINA USDT — ການຕັ້ງຄ້າຂາລົງ ⚠️
$MINA USDT ກຳລັງສ້າງຮູບແບບຂາລົງໃນກຣາຟ 1H ຫຼັງຈາກຖືກປະຕິເສດແຮງຈາກເຂດຄວາມຕ້ານທານ/ອຸປະທານ $0.095–$0.100. ລາຄາກຳລັງສ້າງ lower highs ແລະ lower lows ຢ່າງຊັດເຈນ, ຕອນນີ້ກຳລັງທົດສອບເຂດຮັບຮອງ $0.079–$0.081 ດ້ວຍຜູ້ຂາຍຄຸມການຄ້າ.
Entry: $0.0815–$0.0835
TP1: $0.0790
TP2: $0.0770
TP3: $0.0745
SL: $0.0860
ແຮງແບບ/โมເມນຕັມຍັງອ່ອນແອຫຼັງຈາກການພັງລົງຢ່າງແຮງ. ການປິດ 1H ທີ່ຊັດເຈນຕໍ່າກວ່າ $0.0790 ສາມາດກະຕຸ້ນຄວາມເຂັ້ມຂອງສະພາບລົງລຶກເພີ່ມ, ໃນຂະນະທີ່ການກັບຄືນຂຶ້ນ $0.0860 ຈະທຳໃຫ້ຮູບແບບຂາລົງອ່ອນລົງ. ຈົ່ງລະວັງການປະຕິເສດ/ການທົດຄືນເຂດ entry ກ່ອນການສືບຕໍ່.
Sell and Trade
$MINA USDT ກຳລັງສ້າງຮູບແບບຂາລົງໃນກຣາຟ 1H ຫຼັງຈາກຖືກປະຕິເສດແຮງຈາກເຂດຄວາມຕ້ານທານ/ອຸປະທານ $0.095–$0.100. ລາຄາກຳລັງສ້າງ lower highs ແລະ lower lows ຢ່າງຊັດເຈນ, ຕອນນີ້ກຳລັງທົດສອບເຂດຮັບຮອງ $0.079–$0.081 ດ້ວຍຜູ້ຂາຍຄຸມການຄ້າ.
Entry: $0.0815–$0.0835
TP1: $0.0790
TP2: $0.0770
TP3: $0.0745
SL: $0.0860
ແຮງແບບ/โมເມນຕັມຍັງອ່ອນແອຫຼັງຈາກການພັງລົງຢ່າງແຮງ. ການປິດ 1H ທີ່ຊັດເຈນຕໍ່າກວ່າ $0.0790 ສາມາດກະຕຸ້ນຄວາມເຂັ້ມຂອງສະພາບລົງລຶກເພີ່ມ, ໃນຂະນະທີ່ການກັບຄືນຂຶ້ນ $0.0860 ຈະທຳໃຫ້ຮູບແບບຂາລົງອ່ອນລົງ. ຈົ່ງລະວັງການປະຕິເສດ/ການທົດຄືນເຂດ entry ກ່ອນການສືບຕໍ່.
Sell and Trade
39
·
--
ເບິ່ງການແປ
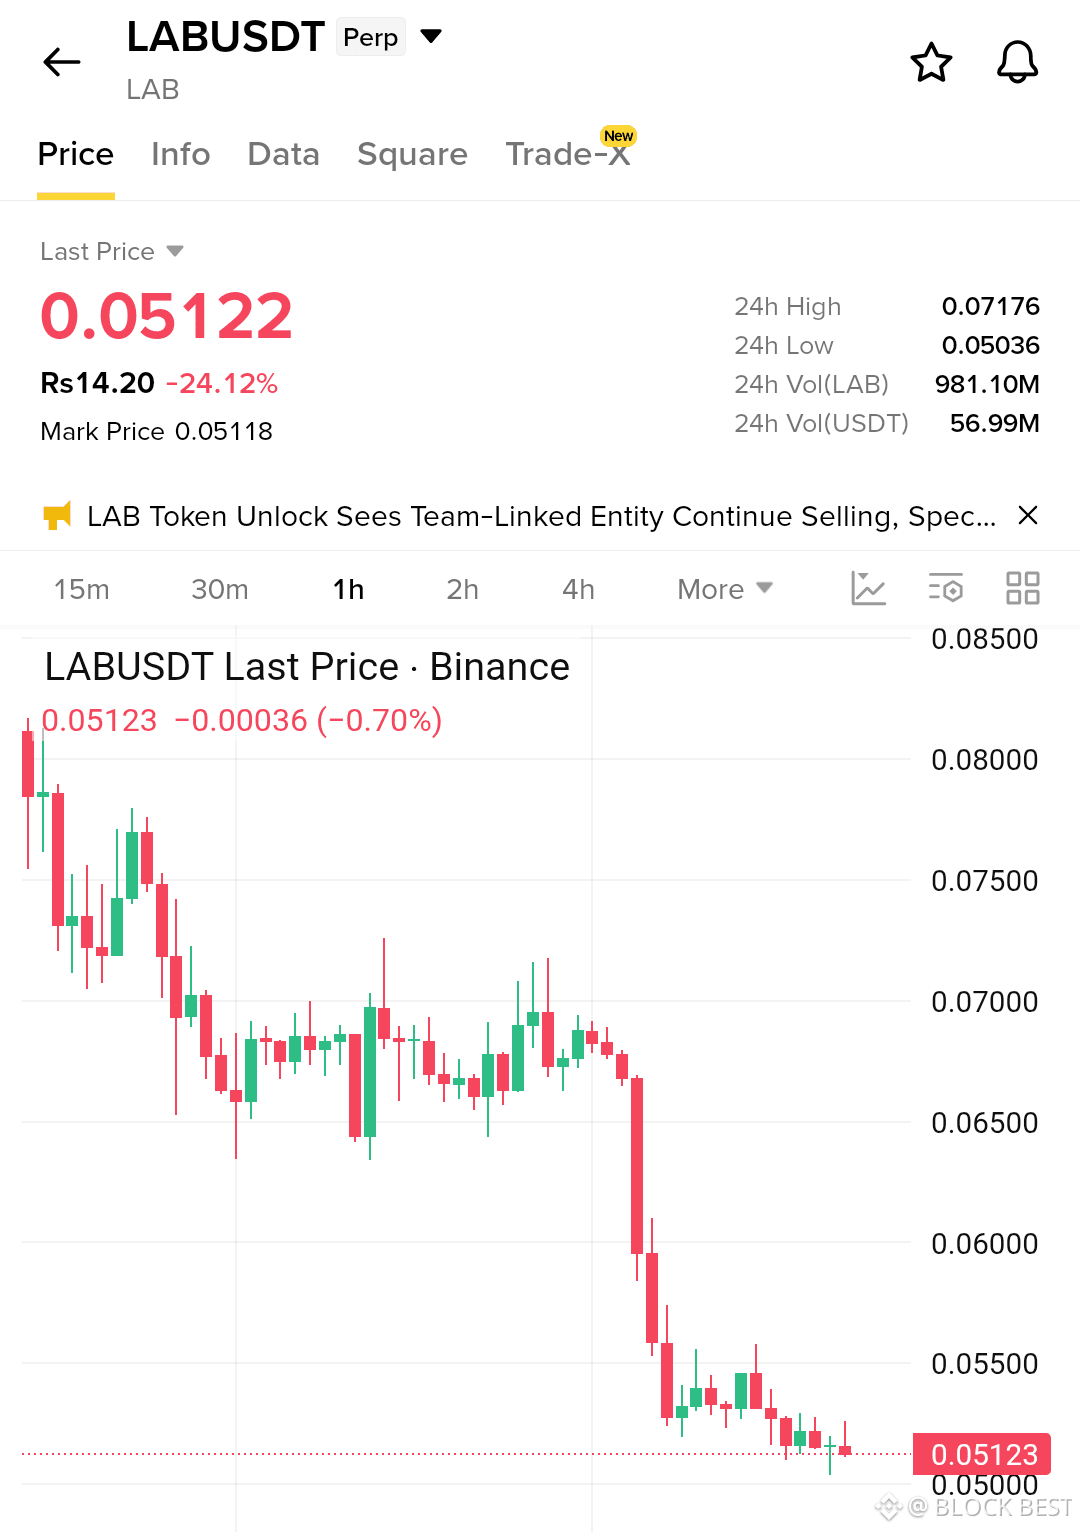
$LAB BUSDT is building a bearish setup on the 1H chart after a sharp breakdown from the $0.065–$0.070 resistance/supply zone. Price is making lower highs and trading near $0.0512, with sellers clearly controlling momentum.
Entry: $0.0520–$0.0535
TP1: $0.0505
TP2: $0.0490
TP3: $0.0475
SL: $0.0555
The $0.0500–$0.0505 area is the immediate support/liquidity zone. A clean 1H close below $0.0500 can open further downside, while a reclaim above $0.0555 would weaken the bearish setup.
Sell and Trade
{future}(LABUSDT)
$LAB BUSDT is building a bearish setup on the 1H chart after a sharp breakdown from the $0.065–$0.070 resistance/supply zone. Price is making lower highs and trading near $0.0512, with sellers clearly controlling momentum.
Entry: $0.0520–$0.0535
TP1: $0.0505
TP2: $0.0490
TP3: $0.0475
SL: $0.0555
The $0.0500–$0.0505 area is the immediate support/liquidity zone. A clean 1H close below $0.0500 can open further downside, while a reclaim above $0.0555 would weaken the bearish setup.
Sell and Trade
Entry: $0.0520–$0.0535
TP1: $0.0505
TP2: $0.0490
TP3: $0.0475
SL: $0.0555
The $0.0500–$0.0505 area is the immediate support/liquidity zone. A clean 1H close below $0.0500 can open further downside, while a reclaim above $0.0555 would weaken the bearish setup.
Sell and Trade
68
·
--
ເບິ່ງການແປ
$LSK USDT — BEARISH SETUP ⚠️
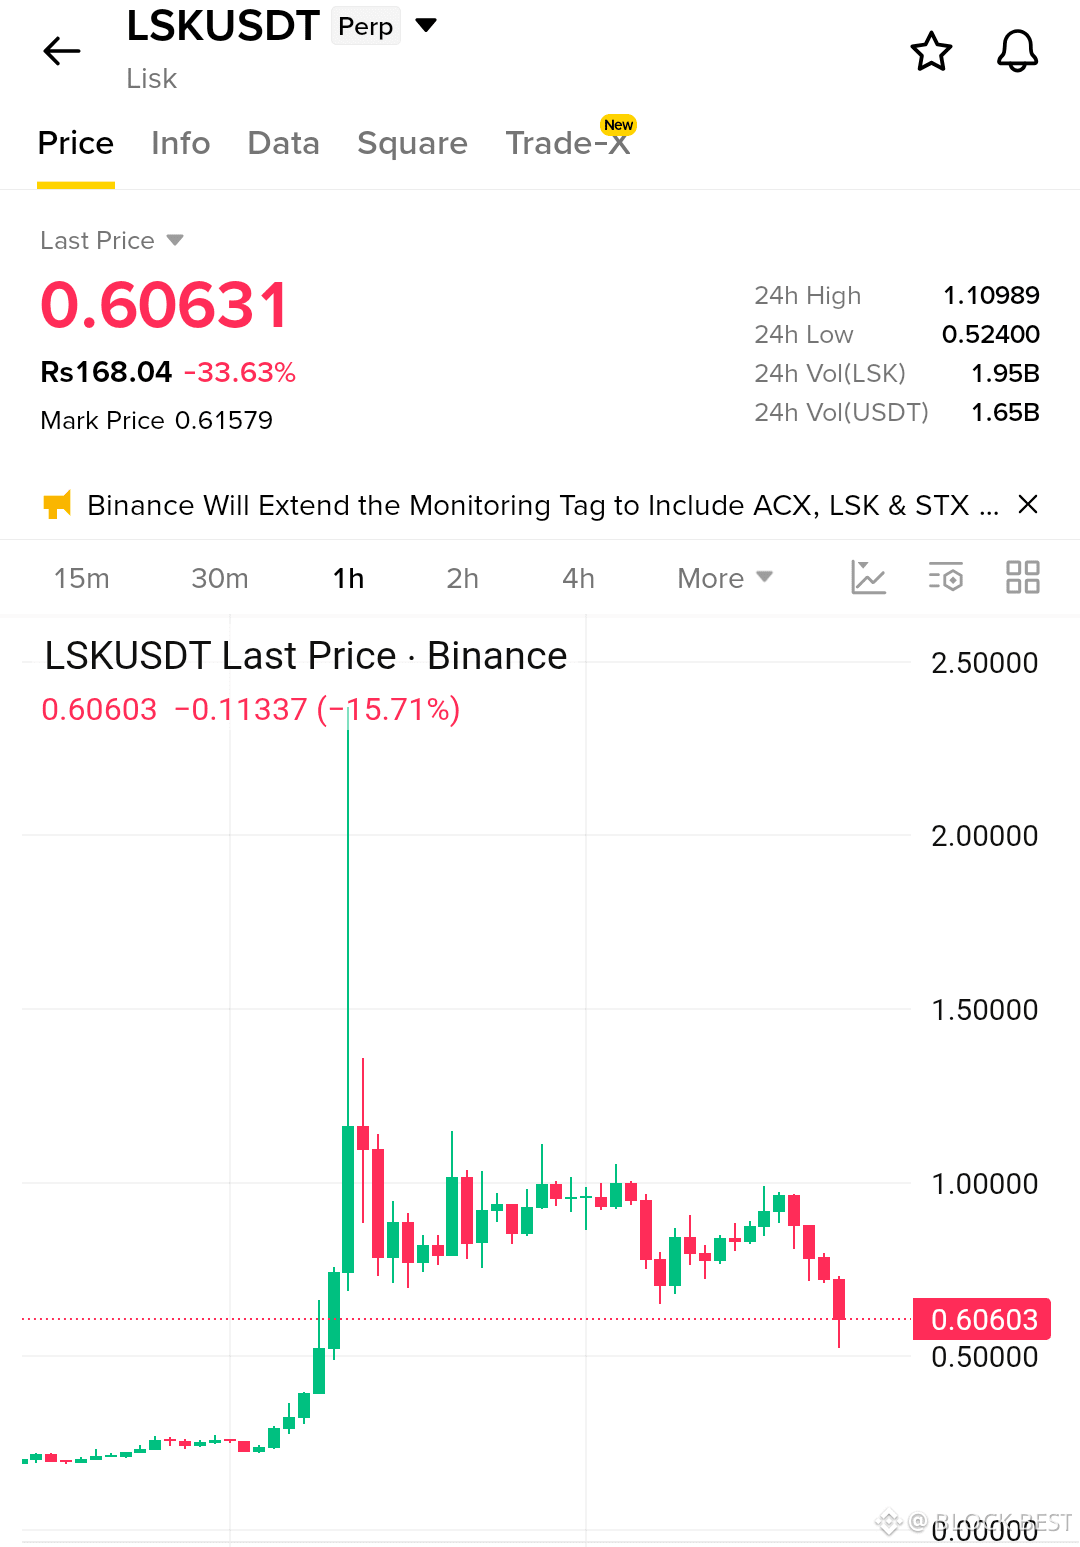
$LSKUSDT is showing a bearish setup on the 1H chart after rejection from the $0.90–$1.00 resistance/supply zone. Price has formed lower highs and is now pressing toward the $0.524–$0.55 support area, with sellers in control.
Entry: $0.600–$0.625
TP1: $0.570
TP2: $0.545
TP3: $0.525
SL: $0.660
Momentum remains weak, and a clean break below $0.55 could expose the next liquidity around $0.525. For continuation, watch for a confirmed 1H close below support; reclaiming $0.66 would weaken the bearish setup.
Sell and Trade
{spot}(LSKUSDT)
$LSK USDT — BEARISH SETUP ⚠️
$LSKUSDT is showing a bearish setup on the 1H chart after rejection from the $0.90–$1.00 resistance/supply zone. Price has formed lower highs and is now pressing toward the $0.524–$0.55 support area, with sellers in control.
Entry: $0.600–$0.625
TP1: $0.570
TP2: $0.545
TP3: $0.525
SL: $0.660
Momentum remains weak, and a clean break below $0.55 could expose the next liquidity around $0.525. For continuation, watch for a confirmed 1H close below support; reclaiming $0.66 would weaken the bearish setup.
Sell and Trade
$LSKUSDT is showing a bearish setup on the 1H chart after rejection from the $0.90–$1.00 resistance/supply zone. Price has formed lower highs and is now pressing toward the $0.524–$0.55 support area, with sellers in control.
Entry: $0.600–$0.625
TP1: $0.570
TP2: $0.545
TP3: $0.525
SL: $0.660
Momentum remains weak, and a clean break below $0.55 could expose the next liquidity around $0.525. For continuation, watch for a confirmed 1H close below support; reclaiming $0.66 would weaken the bearish setup.
Sell and Trade
161
·
--
ເບິ່ງການແປ
$FIL USDC — BULLISH SETUP 📈
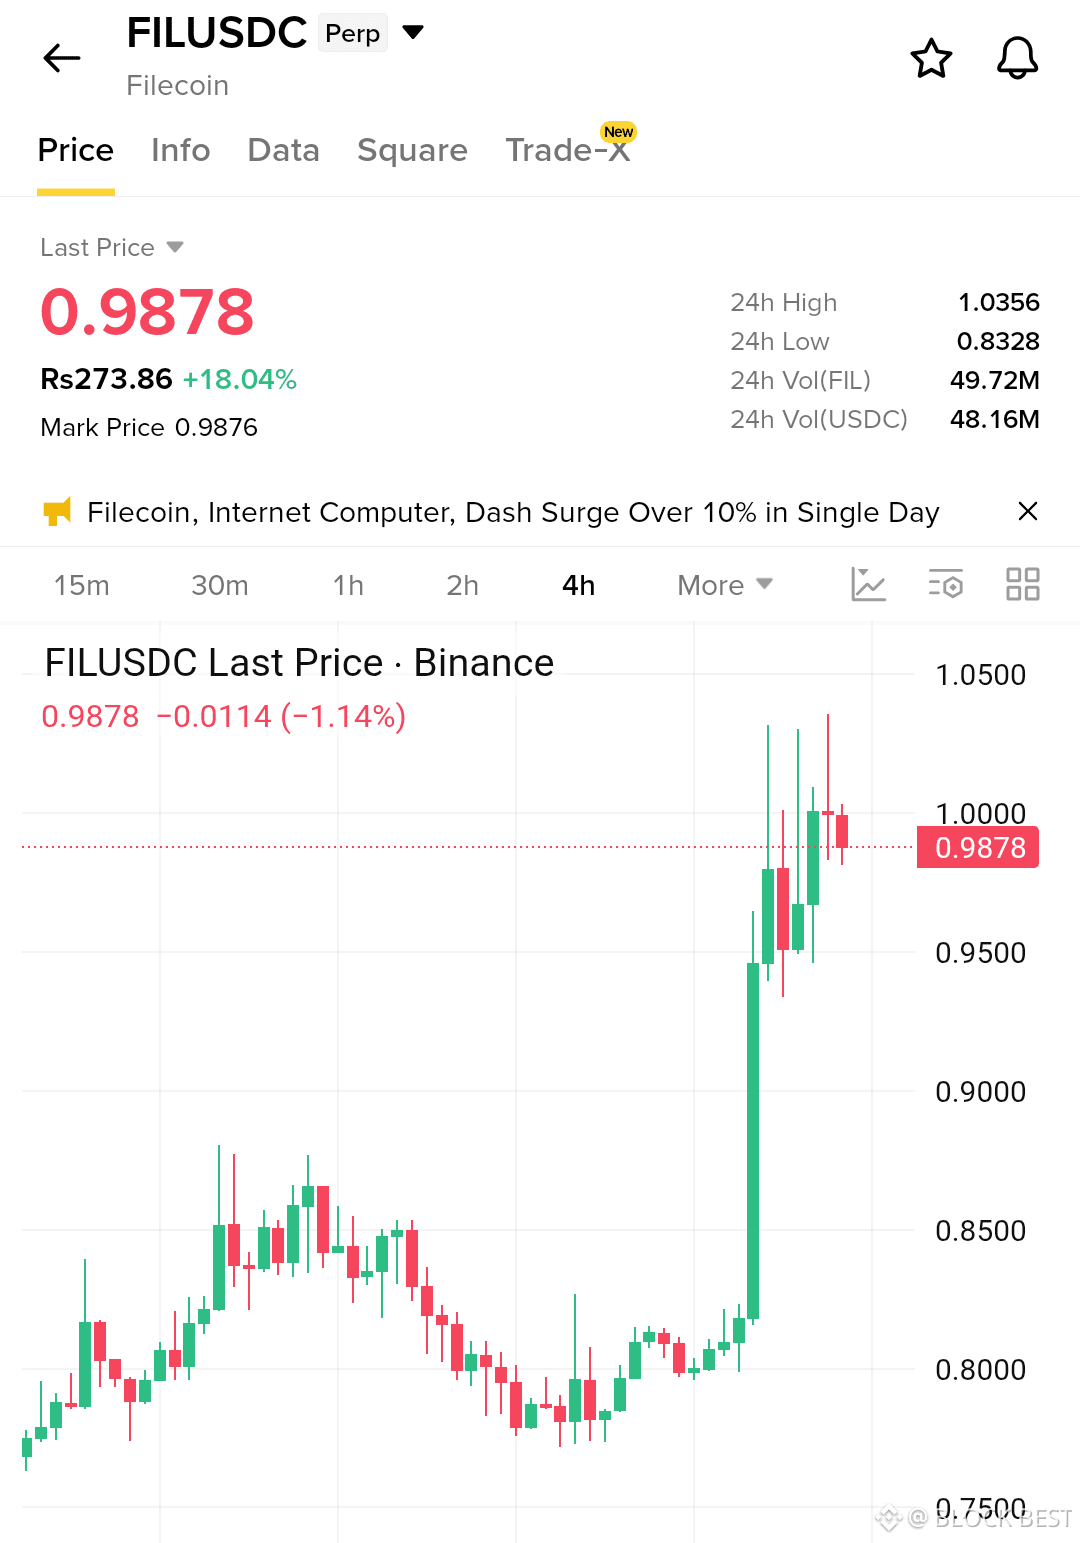
$FILUSDC is showing positive momentum near $0.9917, with a +18.67% 24h gain. Buyers have the short-term advantage while price remains around the current momentum zone.
Entry: $0.9850–$0.9950
TP1: $1.015
TP2: $1.040
TP3: $1.075
SL: $0.960
Key zone: $0.985–$0.995. A hold here supports continuation, while a clean move above $1.00 would strengthen the bullish case. Watch for sustained buying before entry.
Buy and Trade
{spot}(FILUSDT)
$FIL USDC — BULLISH SETUP 📈
$FILUSDC is showing positive momentum near $0.9917, with a +18.67% 24h gain. Buyers have the short-term advantage while price remains around the current momentum zone.
Entry: $0.9850–$0.9950
TP1: $1.015
TP2: $1.040
TP3: $1.075
SL: $0.960
Key zone: $0.985–$0.995. A hold here supports continuation, while a clean move above $1.00 would strengthen the bullish case. Watch for sustained buying before entry.
Buy and Trade
$FILUSDC is showing positive momentum near $0.9917, with a +18.67% 24h gain. Buyers have the short-term advantage while price remains around the current momentum zone.
Entry: $0.9850–$0.9950
TP1: $1.015
TP2: $1.040
TP3: $1.075
SL: $0.960
Key zone: $0.985–$0.995. A hold here supports continuation, while a clean move above $1.00 would strengthen the bullish case. Watch for sustained buying before entry.
Buy and Trade
71
·
--
ເບິ່ງການແປ
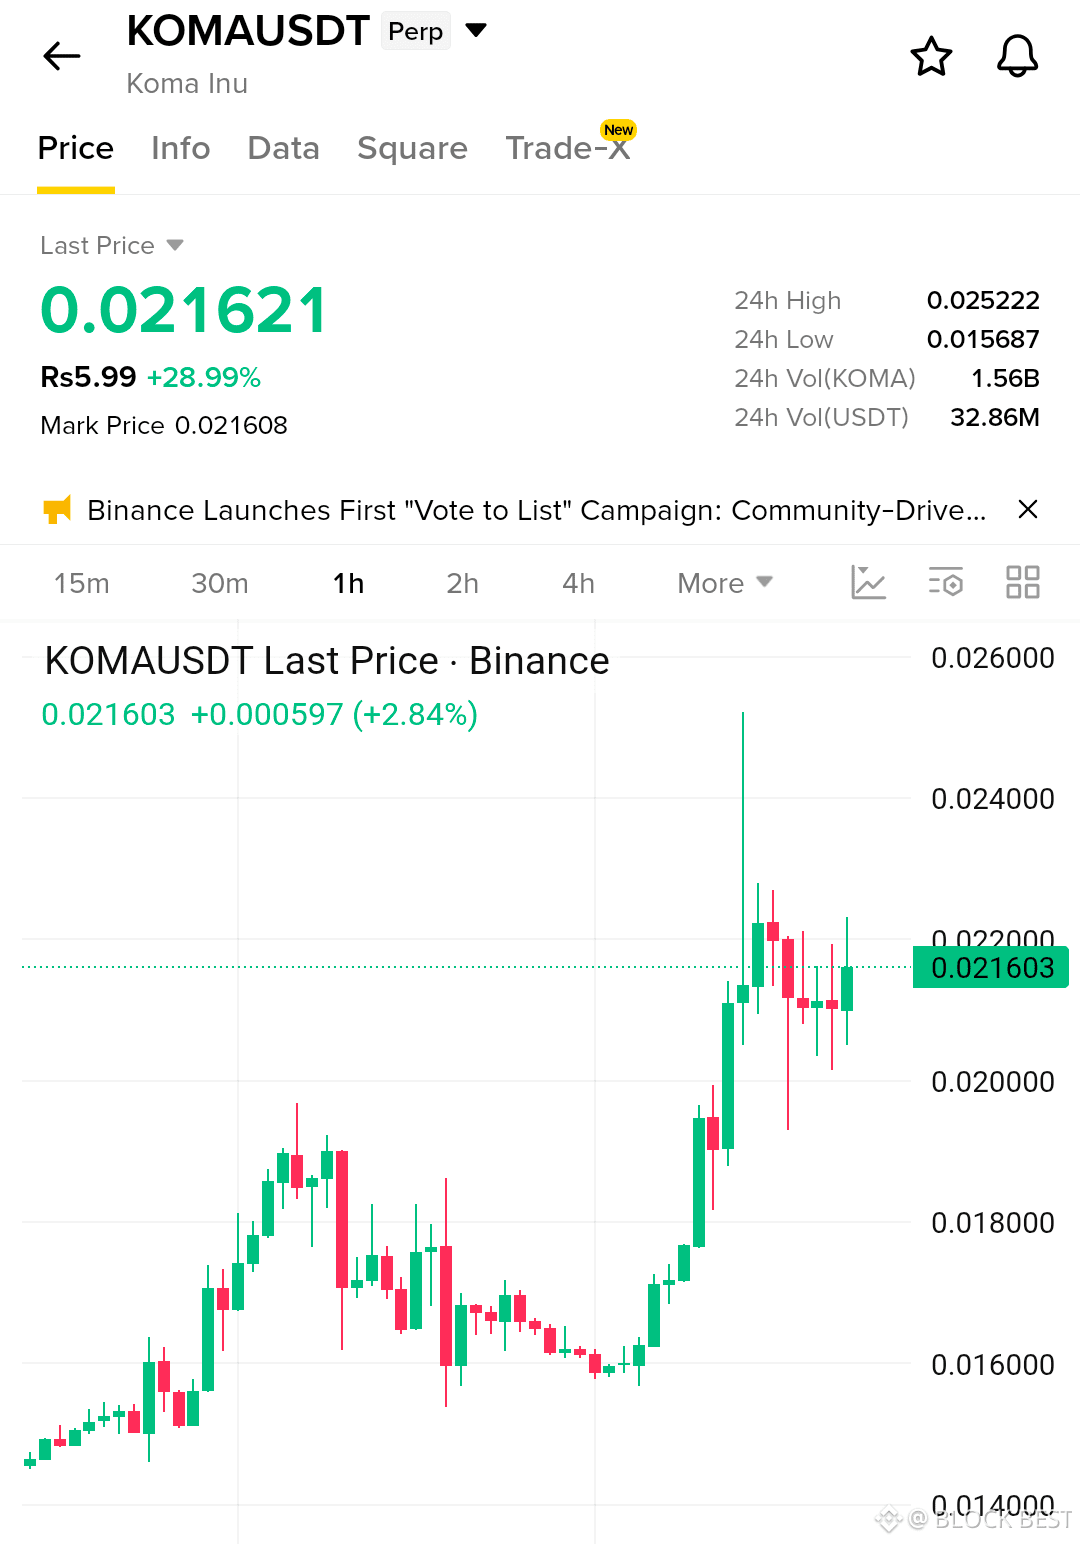
$KOMA USDT — BULLISH SETUP 🚀
$KOMAUSDT is pushing higher around $0.021531, up +29.15% in 24h. Momentum favors buyers, with the current price acting as the key area to defend.
Entry: $0.0212–$0.0216
TP1: $0.0223
TP2: $0.0230
TP3: $0.0240
SL: $0.0204
Key zone: $0.0212–$0.0215. Holding this zone can keep the upside momentum active. Look for continued buying and a clean push above the current level for confirmation.
Buy and Trade
{future}(KOMAUSDT)
$KOMA USDT — BULLISH SETUP 🚀
$KOMAUSDT is pushing higher around $0.021531, up +29.15% in 24h. Momentum favors buyers, with the current price acting as the key area to defend.
Entry: $0.0212–$0.0216
TP1: $0.0223
TP2: $0.0230
TP3: $0.0240
SL: $0.0204
Key zone: $0.0212–$0.0215. Holding this zone can keep the upside momentum active. Look for continued buying and a clean push above the current level for confirmation.
Buy and Trade
$KOMAUSDT is pushing higher around $0.021531, up +29.15% in 24h. Momentum favors buyers, with the current price acting as the key area to defend.
Entry: $0.0212–$0.0216
TP1: $0.0223
TP2: $0.0230
TP3: $0.0240
SL: $0.0204
Key zone: $0.0212–$0.0215. Holding this zone can keep the upside momentum active. Look for continued buying and a clean push above the current level for confirmation.
Buy and Trade
106
ເຂົ້າສູ່ລະບົບເພື່ອສຳຫຼວດເນື້ອຫາເພີ່ມເຕີມ
ເຂົ້າຮ່ວມກຸ່ມຜູ້ໃຊ້ຄຣິບໂຕທົ່ວໂລກໃນ Binance Square.
⚡️ ໄດ້ຮັບຂໍ້ມູນຫຼ້າສຸດ ແລະ ທີ່ມີປະໂຫຍດກ່ຽວກັບຄຣິບໂຕ.
💬 ໄດ້ຮັບຄວາມໄວ້ວາງໃຈຈາກຕະຫຼາດແລກປ່ຽນຄຣິບໂຕທີ່ໃຫຍ່ທີ່ສຸດໃນໂລກ.
👍 ຄົ້ນຫາຂໍ້ມູນເຊີງເລິກທີ່ແທ້ຈາກນັກສ້າງທີ່ໄດ້ຮັບການຢືນຢັນ.
ອີເມວ / ເບີໂທລະສັບ
ຫົວຂໍ້ທີ່ກໍາລັງນິຍົມ
FedRateWatch
1.5M views
6,880 ກຳລັງສົນທະນາ
Patawe & Win Traffic Reward i la Campanya de Tendència Hashtag
✨Tema: FOMC setembre, Què serà el següent moviment de la Fed?
👉Com unir-te:
Publica una publicació o article breu amb l’hashtag #FedRateWatch
Crea contingut basat en els angles següents:
- L’IPC bàsic d’agost va pujar 0,3% mes a mes, i les probabilitats d’una pujada de 25 pb aquesta setmana ara estan a prop del 90%. Creus que hi haurà una pujada de tipus aquesta setmana? És un fet puntual o l’inici d’un cicle de pujades més llarg?
- Si la pujada s’implementa, com es desenvolupa per a BTC, accions tecnològiques i or? Alcista o baixista?
- Com planeges negociar després? Comparteix les teves operacions d’BTC, accions o or/participacions amb el nostre giny per compartir operacions.
⏰Període de la campanya:
- 2026-09-15 11:00 - 2026-09-17 3:00 UTC
🎁Recompensa:
- Les publicacions qualificades que compleixin les directrius anteriors i tinguin més de 100 paraules es revisaran i poden rebre un impuls aleatori de trànsit de 500 a 3.000 visualitzacions. Rebràs una notificació del teu secretari del feed si la teva publicació es selecciona.
- Tens l’oportunitat que el teu article aparegui a Binance Square Official
Necessites idees per a la teva publicació? Visita la pàgina del tema #FedRateWatch o la Square Guide on How to Post for Better Reach.
Binance Square Official
·654 ຖືກໃຈ
·1.7M views
ZcashRises6%
62,969 views
713 ກຳລັງສົນທະນາ
XRPSinks10%
41,420 views
470 ກຳລັງສົນທະນາ