

Woowsites
92 Posts
Woowsites
Report
Block User
"noticias cripto explicadas para principiantes", "análisis técnico diario de BTC", "airdrops verificados", "tutoriales de Binance Earn".
Open Trade

BTC Holder
Frequent Trader
4.2 Years
706 Following
250 Followers
208 Liked
Posts
Portfolio
All
Quotes

·
--
Bullish
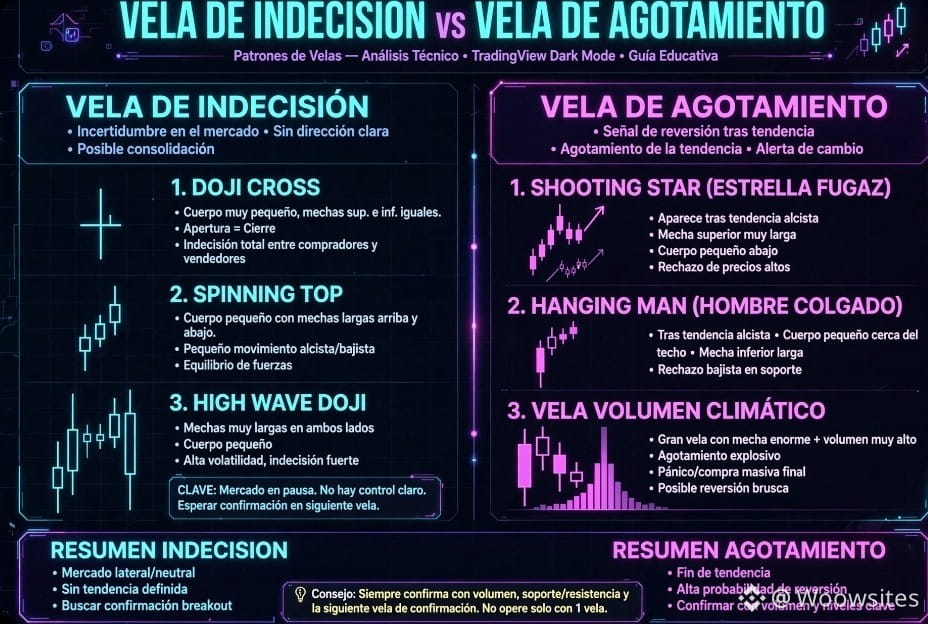
Look, these are two totally different things and this image makes it crystal clear:
INDECISION CANDLE (left) — The market is unsure
This is when nobody can agree. Price goes back and forth but it closes almost where it opened.
• Doji Cross: Open = Close. Perfect cross. Total indecision. • Spinning Top: Small body, wicks above and below. There’s a fight but it ends in a tie. • High Wave Doji: Extremely long wicks on both sides. Lots of volatility, but in the end nobody wins.
What to do: Don’t trade. It’s a yellow light. Wait for the next candle to confirm which way it breaks. If you’re in the middle of nowhere, it’s noise. If it’s at support/resistance, it’s a warning of a potential reversal.
FATIGUE CANDLE (right) — It ran out of fuel
This shows up AT THE END of a strong trend and it screams “we’re done.”
• Shooting Star: After going up a lot, it leaves a huge upper wick and a small lower body. They tried to keep pushing higher and got blown out. • Hanging Man: Also at the end of an upswing, long lower wick. It looks bullish but it’s a trap if it confirms with the next red candle. • Climactic Volume Candle: The most obvious one. Huge candle + record volume. It’s the last breath—panic or final euphoria. A sharp reversal always follows afterward.
Key difference so you don’t get confused:
Indecision = can happen on either side; the market is sideways.
Fatigue = ONLY counts if it comes after a long, clear trend. If there wasn’t a trend before, it’s not fatigue.
$BTC
Look, these are two totally different things and this image makes it crystal clear:
INDECISION CANDLE (left) — The market is unsure
This is when nobody can agree. Price goes back and forth but it closes almost where it opened.
• Doji Cross: Open = Close. Perfect cross. Total indecision. • Spinning Top: Small body, wicks above and below. There’s a fight but it ends in a tie. • High Wave Doji: Extremely long wicks on both sides. Lots of volatility, but in the end nobody wins.
What to do: Don’t trade. It’s a yellow light. Wait for the next candle to confirm which way it breaks. If you’re in the middle of nowhere, it’s noise. If it’s at support/resistance, it’s a warning of a potential reversal.
FATIGUE CANDLE (right) — It ran out of fuel
This shows up AT THE END of a strong trend and it screams “we’re done.”
• Shooting Star: After going up a lot, it leaves a huge upper wick and a small lower body. They tried to keep pushing higher and got blown out. • Hanging Man: Also at the end of an upswing, long lower wick. It looks bullish but it’s a trap if it confirms with the next red candle. • Climactic Volume Candle: The most obvious one. Huge candle + record volume. It’s the last breath—panic or final euphoria. A sharp reversal always follows afterward.
Key difference so you don’t get confused:
Indecision = can happen on either side; the market is sideways.
Fatigue = ONLY counts if it comes after a long, clear trend. If there wasn’t a trend before, it’s not fatigue.
$BTC
INDECISION CANDLE (left) — The market is unsure
This is when nobody can agree. Price goes back and forth but it closes almost where it opened.
• Doji Cross: Open = Close. Perfect cross. Total indecision. • Spinning Top: Small body, wicks above and below. There’s a fight but it ends in a tie. • High Wave Doji: Extremely long wicks on both sides. Lots of volatility, but in the end nobody wins.
What to do: Don’t trade. It’s a yellow light. Wait for the next candle to confirm which way it breaks. If you’re in the middle of nowhere, it’s noise. If it’s at support/resistance, it’s a warning of a potential reversal.
FATIGUE CANDLE (right) — It ran out of fuel
This shows up AT THE END of a strong trend and it screams “we’re done.”
• Shooting Star: After going up a lot, it leaves a huge upper wick and a small lower body. They tried to keep pushing higher and got blown out. • Hanging Man: Also at the end of an upswing, long lower wick. It looks bullish but it’s a trap if it confirms with the next red candle. • Climactic Volume Candle: The most obvious one. Huge candle + record volume. It’s the last breath—panic or final euphoria. A sharp reversal always follows afterward.
Key difference so you don’t get confused:
Indecision = can happen on either side; the market is sideways.
Fatigue = ONLY counts if it comes after a long, clear trend. If there wasn’t a trend before, it’s not fatigue.
$BTC
1
237
·
--
Bullish
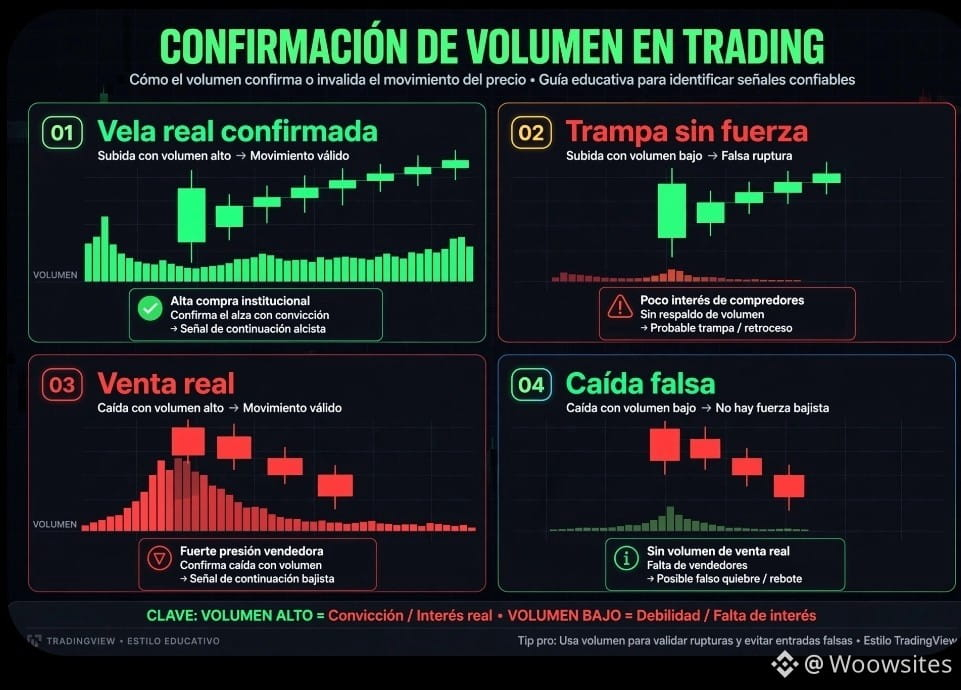
Volume is the amount of money that moved during that candle. It’s the lie detector:
Golden rule: Big candle + Big volume = REAL movement. Big candle + Small volume = TRAP.
As you can see in the image:
1. Real bullish green candle: a large green body + a huge green volume bar below. There’s conviction—real money came in. That’s when you can trust it.
2. Bullish trap: an enormous green candle but extremely low volume, almost invisible. Nobody is backing it up. It’s the typical one that makes you buy at the top and then, right away, it drops. In crypto, this happens all the time.
3. Real sell-off: a big red candle + a huge red volume bar. Real panic—take the drop seriously.
4. False drop: a red candle but without volume. There are no real sellers—it’s just a scare. Many times it bounces right there.
How to use it on TradingView in 2 seconds:
1. Add the "Volume" indicator. 2. Look at the average of the last 20 bars. 3. If the candle breaks resistance and the volume is 2x higher than the average, it’s a real breakout. If the volume is equal to or lower, it’s fake.
$BTC #BTC☀
Volume is the amount of money that moved during that candle. It’s the lie detector:
Golden rule: Big candle + Big volume = REAL movement. Big candle + Small volume = TRAP.
As you can see in the image:
1. Real bullish green candle: a large green body + a huge green volume bar below. There’s conviction—real money came in. That’s when you can trust it.
2. Bullish trap: an enormous green candle but extremely low volume, almost invisible. Nobody is backing it up. It’s the typical one that makes you buy at the top and then, right away, it drops. In crypto, this happens all the time.
3. Real sell-off: a big red candle + a huge red volume bar. Real panic—take the drop seriously.
4. False drop: a red candle but without volume. There are no real sellers—it’s just a scare. Many times it bounces right there.
How to use it on TradingView in 2 seconds:
1. Add the "Volume" indicator. 2. Look at the average of the last 20 bars. 3. If the candle breaks resistance and the volume is 2x higher than the average, it’s a real breakout. If the volume is equal to or lower, it’s fake.
$BTC #BTC☀
Golden rule: Big candle + Big volume = REAL movement. Big candle + Small volume = TRAP.
As you can see in the image:
1. Real bullish green candle: a large green body + a huge green volume bar below. There’s conviction—real money came in. That’s when you can trust it.
2. Bullish trap: an enormous green candle but extremely low volume, almost invisible. Nobody is backing it up. It’s the typical one that makes you buy at the top and then, right away, it drops. In crypto, this happens all the time.
3. Real sell-off: a big red candle + a huge red volume bar. Real panic—take the drop seriously.
4. False drop: a red candle but without volume. There are no real sellers—it’s just a scare. Many times it bounces right there.
How to use it on TradingView in 2 seconds:
1. Add the "Volume" indicator. 2. Look at the average of the last 20 bars. 3. If the candle breaks resistance and the volume is 2x higher than the average, it’s a real breakout. If the volume is equal to or lower, it’s fake.
$BTC #BTC☀
1
210
·
--
Bullish
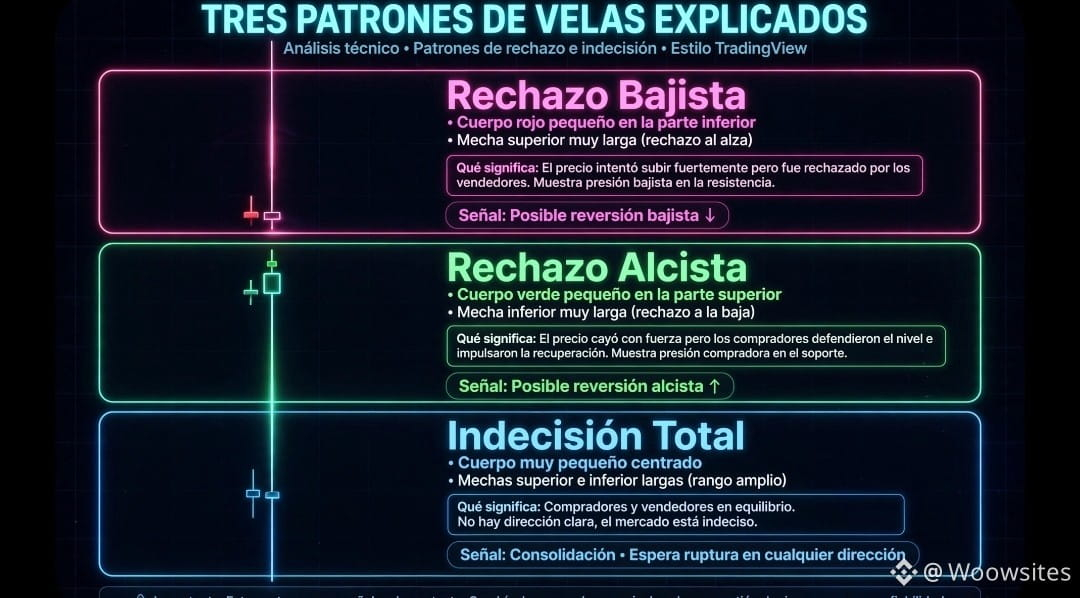
1. Long upper wick + small body at the bottom = Bearish rejection
They tried to push it up, but huge sellers showed up and pinned it down. In plain language: "we tried to go up and got beaten up". If you see it at a resistance level, it’s a major warning sign of a possible drop. Don’t go long.
2. Long lower wick + small body at the top = Bullish rejection
They tried to push it down, but the buyers defended it and shoved it back up. This is the famous hammer. If you see it at a support level, it’s where many people look to buy. Sign of a possible bounce.
3. Tiny body in the middle + long wicks on both sides = Total indecision
There was volatility, but in the end it ended in a draw. Neither buyers nor sellers won. The market is saying: "I don’t know where to go". Don’t trade there. Wait for the next candle to break.
Indicator-free trick: if the wick is 2 or 3 times bigger than the body, it’s not a normal candle—it’s a rejection message.$BTC
{spot}(BTCUSDT)
1. Long upper wick + small body at the bottom = Bearish rejection
They tried to push it up, but huge sellers showed up and pinned it down. In plain language: "we tried to go up and got beaten up". If you see it at a resistance level, it’s a major warning sign of a possible drop. Don’t go long.
2. Long lower wick + small body at the top = Bullish rejection
They tried to push it down, but the buyers defended it and shoved it back up. This is the famous hammer. If you see it at a support level, it’s where many people look to buy. Sign of a possible bounce.
3. Tiny body in the middle + long wicks on both sides = Total indecision
There was volatility, but in the end it ended in a draw. Neither buyers nor sellers won. The market is saying: "I don’t know where to go". Don’t trade there. Wait for the next candle to break.
Indicator-free trick: if the wick is 2 or 3 times bigger than the body, it’s not a normal candle—it’s a rejection message.$BTC
They tried to push it up, but huge sellers showed up and pinned it down. In plain language: "we tried to go up and got beaten up". If you see it at a resistance level, it’s a major warning sign of a possible drop. Don’t go long.
2. Long lower wick + small body at the top = Bullish rejection
They tried to push it down, but the buyers defended it and shoved it back up. This is the famous hammer. If you see it at a support level, it’s where many people look to buy. Sign of a possible bounce.
3. Tiny body in the middle + long wicks on both sides = Total indecision
There was volatility, but in the end it ended in a draw. Neither buyers nor sellers won. The market is saying: "I don’t know where to go". Don’t trade there. Wait for the next candle to break.
Indicator-free trick: if the wick is 2 or 3 times bigger than the body, it’s not a normal candle—it’s a rejection message.$BTC
1
413
·
--
Bullish
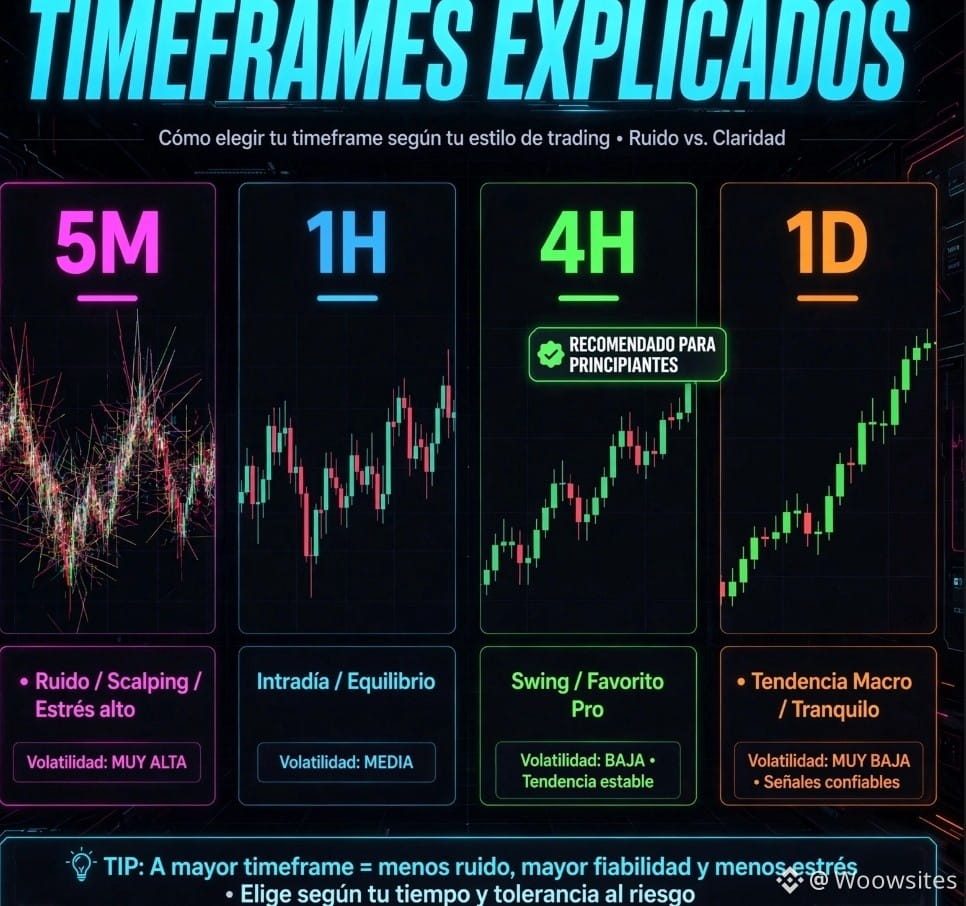
Well, this is where most beginners get lost and start losing money.
You know what a candle is. The timeframe is how long it takes for THAT candle to form.
It’s not another indicator. It’s the same story told in a different zoom.
The real difference, no smoke:
1. 5m - Each candle = 5 minutes. The microscope.
You see everything. Every wick, every scare, every manipulation.
• Pro: Lots of “opportunities,” fast moves. • Con: 90% is noise. It’s the timeframe that gives you the most false signals. It makes you enter out of anxiety, you end up paying more commissions, and you have to stay glued to the screen. This is for scalping. If you’re just starting, they’ll mentally liquidate you here.
2. 1H - Each candle = 1 hour. The magnifying glass for intraday.
Much cleaner than 5m. A hammer in 1H has weight.
• Pro: Good balance between detail and clarity. It lets you do day trading without losing your mind. • Con: It can still give you scares. In crypto, news can move the price by 2 1H candles and take out your stop.
3. 4H - Each candle = 4 hours. The favorite to start.
This is the one I’ve been having you look at on purpose.
• Pro: It removes 70% of the noise from 5m and 1H. A support or a Hammer / Engulfing on 4H is respected by institutional traders and bots. It gives you 2 to 3 good trades per week, not 20 per day. It lets you have a life. • Con: You need more patience. The candle takes 4 hours to close.
4. 1D - Each candle = 1 day. The macro map.
Here you see the real trend. If BTC is bearish on the Daily, don’t go looking for longs on 5m.
• Pro: It’s the truth of the market. Zero stress. You see 1 candle per day, and you make decisions calmly. Ideal if you work or study. • Con: Stops are wider and it takes days to get an entry. It’s not for you if you want adrenaline.
So which one do you use when you’re just starting?
Use the 3-screen strategy—the one profitable traders use:
1D to know WHERE I am. 4H to decide WHAT I’m going to do. 1H to see WHEN I enter precisely.
$BTC
Well, this is where most beginners get lost and start losing money.
You know what a candle is. The timeframe is how long it takes for THAT candle to form.
It’s not another indicator. It’s the same story told in a different zoom.
The real difference, no smoke:
1. 5m - Each candle = 5 minutes. The microscope.
You see everything. Every wick, every scare, every manipulation.
• Pro: Lots of “opportunities,” fast moves. • Con: 90% is noise. It’s the timeframe that gives you the most false signals. It makes you enter out of anxiety, you end up paying more commissions, and you have to stay glued to the screen. This is for scalping. If you’re just starting, they’ll mentally liquidate you here.
2. 1H - Each candle = 1 hour. The magnifying glass for intraday.
Much cleaner than 5m. A hammer in 1H has weight.
• Pro: Good balance between detail and clarity. It lets you do day trading without losing your mind. • Con: It can still give you scares. In crypto, news can move the price by 2 1H candles and take out your stop.
3. 4H - Each candle = 4 hours. The favorite to start.
This is the one I’ve been having you look at on purpose.
• Pro: It removes 70% of the noise from 5m and 1H. A support or a Hammer / Engulfing on 4H is respected by institutional traders and bots. It gives you 2 to 3 good trades per week, not 20 per day. It lets you have a life. • Con: You need more patience. The candle takes 4 hours to close.
4. 1D - Each candle = 1 day. The macro map.
Here you see the real trend. If BTC is bearish on the Daily, don’t go looking for longs on 5m.
• Pro: It’s the truth of the market. Zero stress. You see 1 candle per day, and you make decisions calmly. Ideal if you work or study. • Con: Stops are wider and it takes days to get an entry. It’s not for you if you want adrenaline.
So which one do you use when you’re just starting?
Use the 3-screen strategy—the one profitable traders use:
1D to know WHERE I am. 4H to decide WHAT I’m going to do. 1H to see WHEN I enter precisely.
$BTC
You know what a candle is. The timeframe is how long it takes for THAT candle to form.
It’s not another indicator. It’s the same story told in a different zoom.
The real difference, no smoke:
1. 5m - Each candle = 5 minutes. The microscope.
You see everything. Every wick, every scare, every manipulation.
• Pro: Lots of “opportunities,” fast moves. • Con: 90% is noise. It’s the timeframe that gives you the most false signals. It makes you enter out of anxiety, you end up paying more commissions, and you have to stay glued to the screen. This is for scalping. If you’re just starting, they’ll mentally liquidate you here.
2. 1H - Each candle = 1 hour. The magnifying glass for intraday.
Much cleaner than 5m. A hammer in 1H has weight.
• Pro: Good balance between detail and clarity. It lets you do day trading without losing your mind. • Con: It can still give you scares. In crypto, news can move the price by 2 1H candles and take out your stop.
3. 4H - Each candle = 4 hours. The favorite to start.
This is the one I’ve been having you look at on purpose.
• Pro: It removes 70% of the noise from 5m and 1H. A support or a Hammer / Engulfing on 4H is respected by institutional traders and bots. It gives you 2 to 3 good trades per week, not 20 per day. It lets you have a life. • Con: You need more patience. The candle takes 4 hours to close.
4. 1D - Each candle = 1 day. The macro map.
Here you see the real trend. If BTC is bearish on the Daily, don’t go looking for longs on 5m.
• Pro: It’s the truth of the market. Zero stress. You see 1 candle per day, and you make decisions calmly. Ideal if you work or study. • Con: Stops are wider and it takes days to get an entry. It’s not for you if you want adrenaline.
So which one do you use when you’re just starting?
Use the 3-screen strategy—the one profitable traders use:
1D to know WHERE I am. 4H to decide WHAT I’m going to do. 1H to see WHEN I enter precisely.
$BTC
5
1k
·
--
Bearish
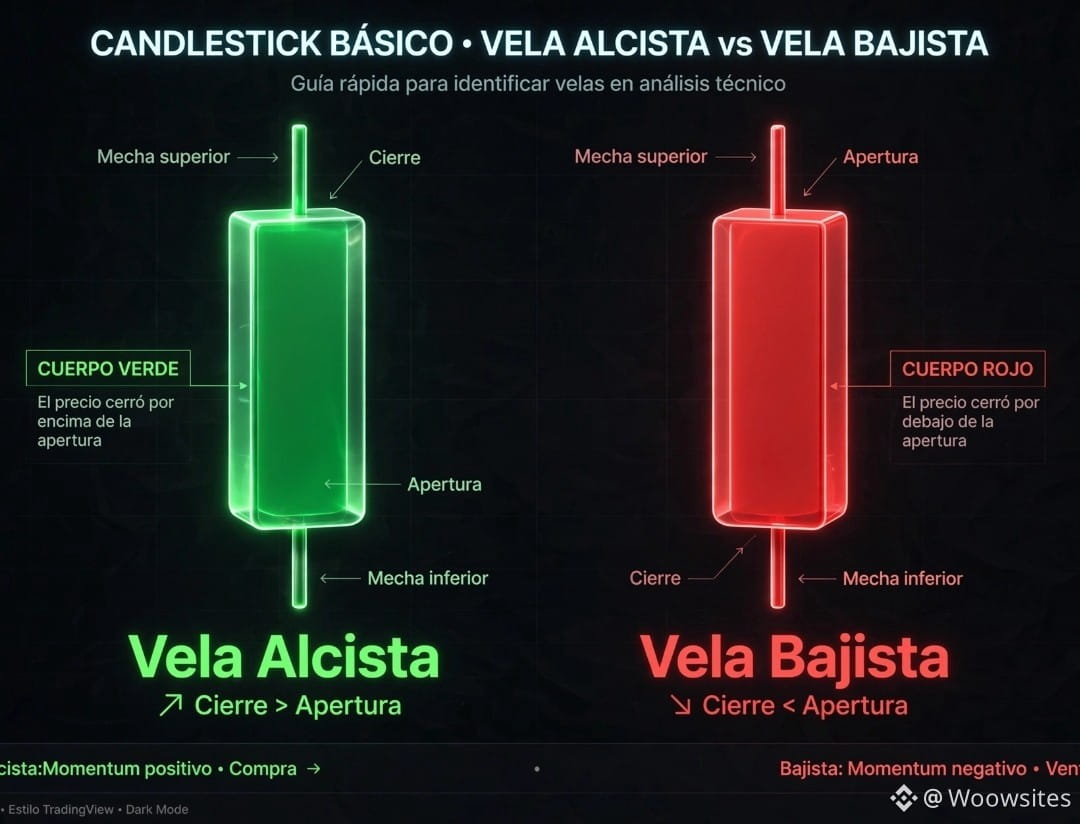
I’ll show it to you the way I show it to someone who’s starting from zero on my team.
There it is crystal clear—just like in the picture: green is bullish, it closes above where it opened, buyers won. Red is bearish, it closes below, sellers won.
On TradingView in 2 seconds: green = bullish, red = bearish. You don’t need to read numbers. Just look at where the Close is versus the Open, as in the diagram. If on your chart you see hollow/white and black candles, it’s the same: hollow/white = bullish, filled/black = bearish.
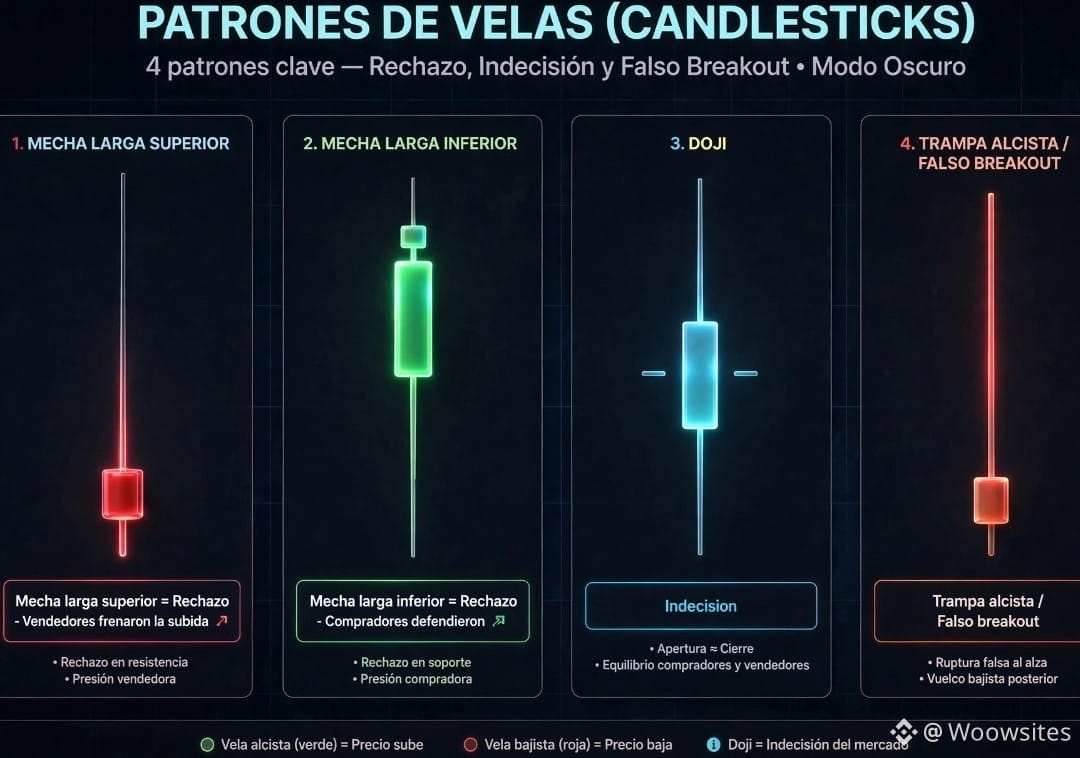
1. Upper long wick: it went up a lot but they pushed it back down. Rejection. If this happens at a resistance level, it’s a sign that sellers came in strong. Don’t buy there.
2. Lower long wick: it dropped a lot but they bought it all and closed it above. Bullish rejection. If it happens at a support, buyers are defending.
3. Doji (open ≈ close): nobody won. Total indecision. When you see this after a big move up, the market is hesitating.
4. Bull trap / False breakout: the classic one that liquidates everyone in crypto. It breaks upward with a huge wick and then closes slightly lower. It makes you think it’s going to keep rising and then it collapses.
2-second rule: long wick = price rejection in that zone.
$BTC
I’ll show it to you the way I show it to someone who’s starting from zero on my team.
There it is crystal clear—just like in the picture: green is bullish, it closes above where it opened, buyers won. Red is bearish, it closes below, sellers won.
On TradingView in 2 seconds: green = bullish, red = bearish. You don’t need to read numbers. Just look at where the Close is versus the Open, as in the diagram. If on your chart you see hollow/white and black candles, it’s the same: hollow/white = bullish, filled/black = bearish.
1. Upper long wick: it went up a lot but they pushed it back down. Rejection. If this happens at a resistance level, it’s a sign that sellers came in strong. Don’t buy there.
2. Lower long wick: it dropped a lot but they bought it all and closed it above. Bullish rejection. If it happens at a support, buyers are defending.
3. Doji (open ≈ close): nobody won. Total indecision. When you see this after a big move up, the market is hesitating.
4. Bull trap / False breakout: the classic one that liquidates everyone in crypto. It breaks upward with a huge wick and then closes slightly lower. It makes you think it’s going to keep rising and then it collapses.
2-second rule: long wick = price rejection in that zone.
$BTC
There it is crystal clear—just like in the picture: green is bullish, it closes above where it opened, buyers won. Red is bearish, it closes below, sellers won.
On TradingView in 2 seconds: green = bullish, red = bearish. You don’t need to read numbers. Just look at where the Close is versus the Open, as in the diagram. If on your chart you see hollow/white and black candles, it’s the same: hollow/white = bullish, filled/black = bearish.
1. Upper long wick: it went up a lot but they pushed it back down. Rejection. If this happens at a resistance level, it’s a sign that sellers came in strong. Don’t buy there.
2. Lower long wick: it dropped a lot but they bought it all and closed it above. Bullish rejection. If it happens at a support, buyers are defending.
3. Doji (open ≈ close): nobody won. Total indecision. When you see this after a big move up, the market is hesitating.
4. Bull trap / False breakout: the classic one that liquidates everyone in crypto. It breaks upward with a huge wick and then closes slightly lower. It makes you think it’s going to keep rising and then it collapses.
2-second rule: long wick = price rejection in that zone.
$BTC
1
3
1.3k
·
--
Bullish
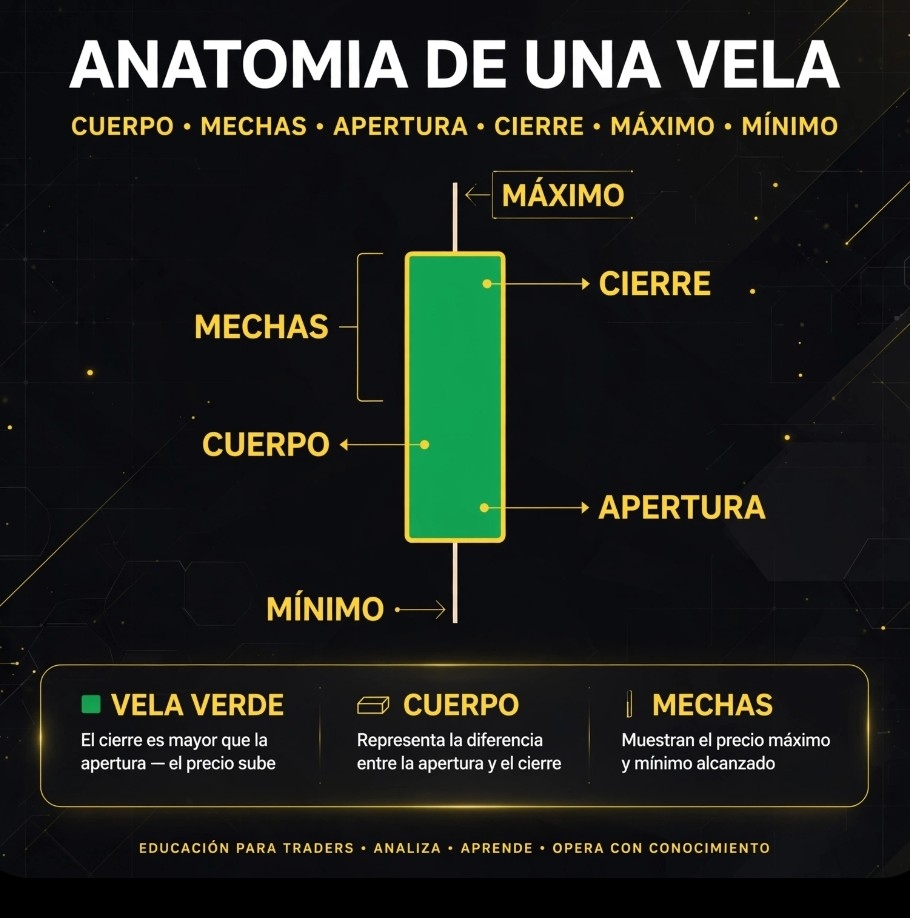
I’ll show it to you the way I show it to someone who’s starting from scratch on my team. Let’s build it together, not memorize it.
Imagine the price of Bitcoin is a person walking for 1 hour. You can only see 4 photos of that walk. With those 4 photos, we draw the candle.
Let’s add numbers so it’s clear.
Example: 1-hour candle of BTC
BTC starts the hour at $65,000, rises to $65,800, falls to $64,900, and ends the hour at $65,600.
With those 4 data points, we build everything:
1. OPENING and CLOSING — Where it starts and where it ends
These are the 2 most important pieces of information.
• Opening: $65,000. Where the hour began. • Closing: $65,600. Where the hour ended.
The distance between those two prices forms the BODY of the candle.
Since the Closing ($65,600) was HIGHER than the Opening ($65,000), the body is colored GREEN. It means: during that hour, the buyers won.
If it had ended lower than where it started, it would be RED, and the sellers would win.
Golden rule you never forget: Green = Close above Open. Red = Close below Open.
### 2. HIGH and LOW — How far it stretched
• High: $65,800. The highest it reached during that hour. • Low: $64,900. The lowest it reached.
That move up and down leaves a mark. That mark is the WICKS, also called shadows.
• Upper wick: Goes from the top of the body to the High. In our example: from $65,600 to $65,800. It tells you: “it wanted to go higher, but they stopped it.” • Lower wick: Goes from the bottom of the body to the Low. From $65,000 to $64,900. It tells you: “it wanted to go lower, but they bought it and defended it.”
So, to read any candle in 2 seconds:
You look at the candle and ask yourself:
1. What color is the body? Green = it rose during that period. Red = it fell. 2. How big is the body? Large body = lots of conviction. Small body = doubt, nobody’s willing to act. 3. How long are the wicks? Long wick at the top = they rejected the price above. Long wick at the bottom = they defended the price below. If it almost doesn’t have wicks.$BTC
I’ll show it to you the way I show it to someone who’s starting from scratch on my team. Let’s build it together, not memorize it.
Imagine the price of Bitcoin is a person walking for 1 hour. You can only see 4 photos of that walk. With those 4 photos, we draw the candle.
Let’s add numbers so it’s clear.
Example: 1-hour candle of BTC
BTC starts the hour at $65,000, rises to $65,800, falls to $64,900, and ends the hour at $65,600.
With those 4 data points, we build everything:
1. OPENING and CLOSING — Where it starts and where it ends
These are the 2 most important pieces of information.
• Opening: $65,000. Where the hour began. • Closing: $65,600. Where the hour ended.
The distance between those two prices forms the BODY of the candle.
Since the Closing ($65,600) was HIGHER than the Opening ($65,000), the body is colored GREEN. It means: during that hour, the buyers won.
If it had ended lower than where it started, it would be RED, and the sellers would win.
Golden rule you never forget: Green = Close above Open. Red = Close below Open.
### 2. HIGH and LOW — How far it stretched
• High: $65,800. The highest it reached during that hour. • Low: $64,900. The lowest it reached.
That move up and down leaves a mark. That mark is the WICKS, also called shadows.
• Upper wick: Goes from the top of the body to the High. In our example: from $65,600 to $65,800. It tells you: “it wanted to go higher, but they stopped it.” • Lower wick: Goes from the bottom of the body to the Low. From $65,000 to $64,900. It tells you: “it wanted to go lower, but they bought it and defended it.”
So, to read any candle in 2 seconds:
You look at the candle and ask yourself:
1. What color is the body? Green = it rose during that period. Red = it fell. 2. How big is the body? Large body = lots of conviction. Small body = doubt, nobody’s willing to act. 3. How long are the wicks? Long wick at the top = they rejected the price above. Long wick at the bottom = they defended the price below. If it almost doesn’t have wicks.$BTC
Imagine the price of Bitcoin is a person walking for 1 hour. You can only see 4 photos of that walk. With those 4 photos, we draw the candle.
Let’s add numbers so it’s clear.
Example: 1-hour candle of BTC
BTC starts the hour at $65,000, rises to $65,800, falls to $64,900, and ends the hour at $65,600.
With those 4 data points, we build everything:
1. OPENING and CLOSING — Where it starts and where it ends
These are the 2 most important pieces of information.
• Opening: $65,000. Where the hour began. • Closing: $65,600. Where the hour ended.
The distance between those two prices forms the BODY of the candle.
Since the Closing ($65,600) was HIGHER than the Opening ($65,000), the body is colored GREEN. It means: during that hour, the buyers won.
If it had ended lower than where it started, it would be RED, and the sellers would win.
Golden rule you never forget: Green = Close above Open. Red = Close below Open.
### 2. HIGH and LOW — How far it stretched
• High: $65,800. The highest it reached during that hour. • Low: $64,900. The lowest it reached.
That move up and down leaves a mark. That mark is the WICKS, also called shadows.
• Upper wick: Goes from the top of the body to the High. In our example: from $65,600 to $65,800. It tells you: “it wanted to go higher, but they stopped it.” • Lower wick: Goes from the bottom of the body to the Low. From $65,000 to $64,900. It tells you: “it wanted to go lower, but they bought it and defended it.”
So, to read any candle in 2 seconds:
You look at the candle and ask yourself:
1. What color is the body? Green = it rose during that period. Red = it fell. 2. How big is the body? Large body = lots of conviction. Small body = doubt, nobody’s willing to act. 3. How long are the wicks? Long wick at the top = they rejected the price above. Long wick at the bottom = they defended the price below. If it almost doesn’t have wicks.$BTC
6
11
3.6k
·
--
Article
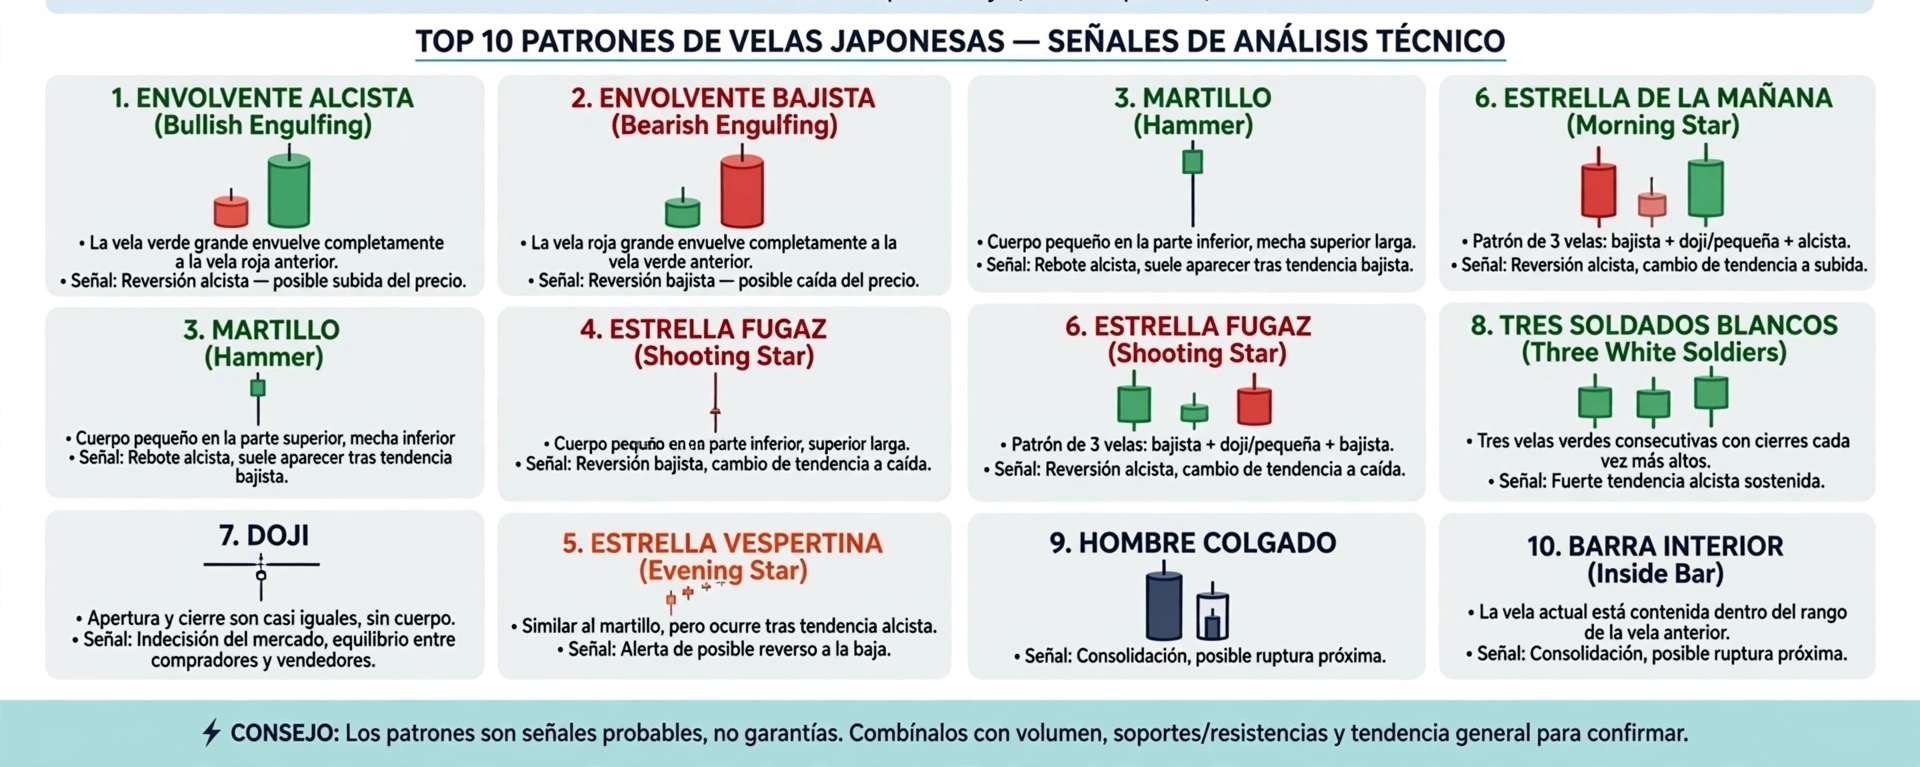
JAPANESE CANDLESTICKSHere’s the exact class I use. Save the image because it’s your machete.
CLASS 1: THE ANATOMY (90% of people get this part wrong)
A candle is not "green = goes up". A candle tells you a battle of 4 data points over time X:
1. Body: the distance between OPEN and CLOSE.
• Green/White: Close > Open. Buyers win. • Red/Black: Close @ Open. Sellers win. • The bigger the body, the more strength.
2. Wicks (shadows):
• Upper wick: The highest price it reached and was REJECTED. • Lower wick: The lowest it fell to and was REJECTED. • Long wick = strong rejection. It’s the key.
JAPANESE CANDLESTICKS
Here’s the exact class I use. Save the image because it’s your machete.
CLASS 1: THE ANATOMY (90% of people get this part wrong)
A candle is not "green = goes up". A candle tells you a battle of 4 data points over time X:
1. Body: the distance between OPEN and CLOSE.
• Green/White: Close > Open. Buyers win. • Red/Black: Close @ Open. Sellers win. • The bigger the body, the more strength.
2. Wicks (shadows):
• Upper wick: The highest price it reached and was REJECTED. • Lower wick: The lowest it fell to and was REJECTED. • Long wick = strong rejection. It’s the key.
CLASS 1: THE ANATOMY (90% of people get this part wrong)
A candle is not "green = goes up". A candle tells you a battle of 4 data points over time X:
1. Body: the distance between OPEN and CLOSE.
• Green/White: Close > Open. Buyers win. • Red/Black: Close @ Open. Sellers win. • The bigger the body, the more strength.
2. Wicks (shadows):
• Upper wick: The highest price it reached and was REJECTED. • Lower wick: The lowest it fell to and was REJECTED. • Long wick = strong rejection. It’s the key.
1
289
·
--
Bullish
The 5 mistakes that cost me $50 when I started on Binance (so you don’t get burned) 👇
1. Futures with x50 - With a 2% move against you, you get liquidated. Start with x3 max.
2. Not using Stop-Loss - "It’s going to go up" leaves you -70%. Always use an OCO order.
3. Using Convert - It charges a hidden 1-2%. Use Spot > Limit.
4. Sending on the wrong network - Sending USDT on a different network = money lost forever. Send $2 as a test first.
5. Only 2FA via SMS - It can be cloned. Enable Google Authenticator + a withdrawal whitelist.
I made mistakes #2 and #4. Which one did you make?
If you want me to make a step-by-step tutorial for OCO, leave "OCO" in the comments and follow me. I’ll post it tomorrow.
$BTC $BNB #BinanceSquareFamily #trading #CryptoParaPrincipiantes
The 5 mistakes that cost me $50 when I started on Binance (so you don’t get burned) 👇
1. Futures with x50 - With a 2% move against you, you get liquidated. Start with x3 max.
2. Not using Stop-Loss - "It’s going to go up" leaves you -70%. Always use an OCO order.
3. Using Convert - It charges a hidden 1-2%. Use Spot > Limit.
4. Sending on the wrong network - Sending USDT on a different network = money lost forever. Send $2 as a test first.
5. Only 2FA via SMS - It can be cloned. Enable Google Authenticator + a withdrawal whitelist.
I made mistakes #2 and #4. Which one did you make?
If you want me to make a step-by-step tutorial for OCO, leave "OCO" in the comments and follow me. I’ll post it tomorrow.
$BTC $BNB #BinanceSquareFamily #trading #CryptoParaPrincipiantes
1. Futures with x50 - With a 2% move against you, you get liquidated. Start with x3 max.
2. Not using Stop-Loss - "It’s going to go up" leaves you -70%. Always use an OCO order.
3. Using Convert - It charges a hidden 1-2%. Use Spot > Limit.
4. Sending on the wrong network - Sending USDT on a different network = money lost forever. Send $2 as a test first.
5. Only 2FA via SMS - It can be cloned. Enable Google Authenticator + a withdrawal whitelist.
I made mistakes #2 and #4. Which one did you make?
If you want me to make a step-by-step tutorial for OCO, leave "OCO" in the comments and follow me. I’ll post it tomorrow.
$BTC $BNB #BinanceSquareFamily #trading #CryptoParaPrincipiantes
98
·
--
Bullish
Do you only have $100 and want to be profitable on SPOT? I’ll give you my exact plan
Many people think you can’t do it with $100. That’s a lie. You won’t become a millionaire, but it’s the perfect capital to learn how to NOT lose and start growing. I don’t trade futures with small accounts.
This is how I started:
1. The foundation: 100% SPOT
I buy the real coin. If it goes down, I still hold it. No liquidations, no leverage. With a small account, futures is basically giving away your money.
2. How I load the $100 in Argentina
P2P on Binance -> Buy USDT with ARS (Mercado Pago) -> seller with +98% reputation. I move those 100 USDT to my Spot wallet. Done—I trade in dollars.
3. My aggressive split of $100 (I don’t do 50% BTC)
• $30 Core: SOL + BTC. If the market goes up, SOL takes off. • $50 Attack: maximum 2 altcoins from a hot narrative. I look at AI (RNDR, FET) and L2 (ARB, OP). Not 10 little $10 coins. • $20 Ammunition in USDT: Only to buy fear/panic. Don’t touch it because of FOMO.
4. My profitable strategy: I don’t buy green candles
I wait for a good alt to drop -15% to -20% in a day due to market panic, while BTC holds support. I enter in 2 parts.
Mandatory exit:
+12% -> Sell 50% and place SL at my entry.
+20% -> Sell another 25%.
I leave 25% in case it explodes.
Stop Loss: -10% / -12%. I cut without hesitation. In aggressive mode, the one who doesn’t cut gets wiped.
5. The golden rule for $100 accounts
Max 1 trade per day. If you do 10 trades, fees will eat you alive. Write everything down: why you entered, where you exited. Your logbook is worth more than any indicator.
Aggressive realistic goal: 20–35% per month IF the market cooperates. It’s not magic, it’s management.
With $100, the goal isn’t just the money—it’s making you profitable. Then you scale up.
#CriptoArgentina #Altcoins👀🚀
Do you only have $100 and want to be profitable on SPOT? I’ll give you my exact plan
Many people think you can’t do it with $100. That’s a lie. You won’t become a millionaire, but it’s the perfect capital to learn how to NOT lose and start growing. I don’t trade futures with small accounts.
This is how I started:
1. The foundation: 100% SPOT
I buy the real coin. If it goes down, I still hold it. No liquidations, no leverage. With a small account, futures is basically giving away your money.
2. How I load the $100 in Argentina
P2P on Binance -> Buy USDT with ARS (Mercado Pago) -> seller with +98% reputation. I move those 100 USDT to my Spot wallet. Done—I trade in dollars.
3. My aggressive split of $100 (I don’t do 50% BTC)
• $30 Core: SOL + BTC. If the market goes up, SOL takes off. • $50 Attack: maximum 2 altcoins from a hot narrative. I look at AI (RNDR, FET) and L2 (ARB, OP). Not 10 little $10 coins. • $20 Ammunition in USDT: Only to buy fear/panic. Don’t touch it because of FOMO.
4. My profitable strategy: I don’t buy green candles
I wait for a good alt to drop -15% to -20% in a day due to market panic, while BTC holds support. I enter in 2 parts.
Mandatory exit:
+12% -> Sell 50% and place SL at my entry.
+20% -> Sell another 25%.
I leave 25% in case it explodes.
Stop Loss: -10% / -12%. I cut without hesitation. In aggressive mode, the one who doesn’t cut gets wiped.
5. The golden rule for $100 accounts
Max 1 trade per day. If you do 10 trades, fees will eat you alive. Write everything down: why you entered, where you exited. Your logbook is worth more than any indicator.
Aggressive realistic goal: 20–35% per month IF the market cooperates. It’s not magic, it’s management.
With $100, the goal isn’t just the money—it’s making you profitable. Then you scale up.
#CriptoArgentina #Altcoins👀🚀
Many people think you can’t do it with $100. That’s a lie. You won’t become a millionaire, but it’s the perfect capital to learn how to NOT lose and start growing. I don’t trade futures with small accounts.
This is how I started:
1. The foundation: 100% SPOT
I buy the real coin. If it goes down, I still hold it. No liquidations, no leverage. With a small account, futures is basically giving away your money.
2. How I load the $100 in Argentina
P2P on Binance -> Buy USDT with ARS (Mercado Pago) -> seller with +98% reputation. I move those 100 USDT to my Spot wallet. Done—I trade in dollars.
3. My aggressive split of $100 (I don’t do 50% BTC)
• $30 Core: SOL + BTC. If the market goes up, SOL takes off. • $50 Attack: maximum 2 altcoins from a hot narrative. I look at AI (RNDR, FET) and L2 (ARB, OP). Not 10 little $10 coins. • $20 Ammunition in USDT: Only to buy fear/panic. Don’t touch it because of FOMO.
4. My profitable strategy: I don’t buy green candles
I wait for a good alt to drop -15% to -20% in a day due to market panic, while BTC holds support. I enter in 2 parts.
Mandatory exit:
+12% -> Sell 50% and place SL at my entry.
+20% -> Sell another 25%.
I leave 25% in case it explodes.
Stop Loss: -10% / -12%. I cut without hesitation. In aggressive mode, the one who doesn’t cut gets wiped.
5. The golden rule for $100 accounts
Max 1 trade per day. If you do 10 trades, fees will eat you alive. Write everything down: why you entered, where you exited. Your logbook is worth more than any indicator.
Aggressive realistic goal: 20–35% per month IF the market cooperates. It’s not magic, it’s management.
With $100, the goal isn’t just the money—it’s making you profitable. Then you scale up.
#CriptoArgentina #Altcoins👀🚀
7
1.2k
·
--
Bullish
Holding $BTC 441.5 USDT
A staggered order is buying or selling at multiple price levels instead of all at once. On Binance it doesn’t show up as "staggered order"; you do it in 3 ways. I’ll leave you the most used one for Spot:
METHOD 1: Manual - The one 90% use (more control)
This is the one that helps you the most if you want to buy $BTC between 60k and 58k, for example.
In the Binance App:
1. Go to Trade > Spot 2. Choose the pair, e.g., BTC/USDT 3. Under where it says Limit / Market, set it to Limit 4. Turn on the switch that says **** or the list icon. In some versions it says Create multiple orders [Lot]. 5. If you don’t see that switch, do it like this: • Buy in parts: • Order 1: Limit Buy -> Price 60,000 -> Quantity 25% of what you want • Order 2: Limit Buy -> Price 59,000 -> Quantity 25% • Order 3: Limit Buy -> Price 58,500 -> Quantity 25% • Order 4: Limit Buy -> Price 58,000 -> Quantity 25% 6. Tap Buy BTC on each one. They’ll all remain open under Open Orders. Tip: Use round numbers for the total quantity. If you want to buy 100 USDT, set 4 orders of 25 $USDT
This is also ideal for selling. Example: you want to sell your ETH in a staggered way at 3500, 3700, 4000.
A staggered order is buying or selling at multiple price levels instead of all at once. On Binance it doesn’t show up as "staggered order"; you do it in 3 ways. I’ll leave you the most used one for Spot:
METHOD 1: Manual - The one 90% use (more control)
This is the one that helps you the most if you want to buy $BTC between 60k and 58k, for example.
In the Binance App:
1. Go to Trade > Spot 2. Choose the pair, e.g., BTC/USDT 3. Under where it says Limit / Market, set it to Limit 4. Turn on the switch that says **** or the list icon. In some versions it says Create multiple orders [Lot]. 5. If you don’t see that switch, do it like this: • Buy in parts: • Order 1: Limit Buy -> Price 60,000 -> Quantity 25% of what you want • Order 2: Limit Buy -> Price 59,000 -> Quantity 25% • Order 3: Limit Buy -> Price 58,500 -> Quantity 25% • Order 4: Limit Buy -> Price 58,000 -> Quantity 25% 6. Tap Buy BTC on each one. They’ll all remain open under Open Orders. Tip: Use round numbers for the total quantity. If you want to buy 100 USDT, set 4 orders of 25 $USDT
This is also ideal for selling. Example: you want to sell your ETH in a staggered way at 3500, 3700, 4000.
METHOD 1: Manual - The one 90% use (more control)
This is the one that helps you the most if you want to buy $BTC between 60k and 58k, for example.
In the Binance App:
1. Go to Trade > Spot 2. Choose the pair, e.g., BTC/USDT 3. Under where it says Limit / Market, set it to Limit 4. Turn on the switch that says **** or the list icon. In some versions it says Create multiple orders [Lot]. 5. If you don’t see that switch, do it like this: • Buy in parts: • Order 1: Limit Buy -> Price 60,000 -> Quantity 25% of what you want • Order 2: Limit Buy -> Price 59,000 -> Quantity 25% • Order 3: Limit Buy -> Price 58,500 -> Quantity 25% • Order 4: Limit Buy -> Price 58,000 -> Quantity 25% 6. Tap Buy BTC on each one. They’ll all remain open under Open Orders. Tip: Use round numbers for the total quantity. If you want to buy 100 USDT, set 4 orders of 25 $USDT
This is also ideal for selling. Example: you want to sell your ETH in a staggered way at 3500, 3700, 4000.
183
·
--
Bearish
👉TYPES OF ORDERS
On Binance, TWAP = Time-Weighted Average Price / Time-Weighted Average Price.
It’s an algorithmic order, not a common Limit or Market order. It’s designed to enter or exit with a lot of money without moving the price against you.
How does it work?
You tell it: "I want to buy 10 BNB, but not all at once".
The bot splits that large order into 50 small orders and executes them every X minutes during the time period you define.
Official Binance example: Buy 10 $BNB in 4 hours: Execute 0.42 BNB every 10 minutes.
That way you get an entry price that’s the average market price over those 4 hours, not the price of a spike.
It’s very similar to an iceberg order: it tries to enter/exit a large position without significantly changing the asset’s price.
The idea is to minimize the market impact of large orders by breaking them into smaller amounts and executing them gradually at regular intervals.
❤️When is it convenient to use? • You’re a whale / you have a large position: You don’t want your own buy to push the price up. • You want automatic DCA: You want to buy at the day’s average without looking at the chart. • Low-liquidity market: A Market order would fill you very poorly.
When it’s NOT convenient: if there’s news and you need to enter/exit NOW. TWAP is intentionally slow.
👉TYPES OF ORDERS
On Binance, TWAP = Time-Weighted Average Price / Time-Weighted Average Price.
It’s an algorithmic order, not a common Limit or Market order. It’s designed to enter or exit with a lot of money without moving the price against you.
How does it work?
You tell it: "I want to buy 10 BNB, but not all at once".
The bot splits that large order into 50 small orders and executes them every X minutes during the time period you define.
Official Binance example: Buy 10 $BNB in 4 hours: Execute 0.42 BNB every 10 minutes.
That way you get an entry price that’s the average market price over those 4 hours, not the price of a spike.
It’s very similar to an iceberg order: it tries to enter/exit a large position without significantly changing the asset’s price.
The idea is to minimize the market impact of large orders by breaking them into smaller amounts and executing them gradually at regular intervals.
❤️When is it convenient to use? • You’re a whale / you have a large position: You don’t want your own buy to push the price up. • You want automatic DCA: You want to buy at the day’s average without looking at the chart. • Low-liquidity market: A Market order would fill you very poorly.
When it’s NOT convenient: if there’s news and you need to enter/exit NOW. TWAP is intentionally slow.
On Binance, TWAP = Time-Weighted Average Price / Time-Weighted Average Price.
It’s an algorithmic order, not a common Limit or Market order. It’s designed to enter or exit with a lot of money without moving the price against you.
How does it work?
You tell it: "I want to buy 10 BNB, but not all at once".
The bot splits that large order into 50 small orders and executes them every X minutes during the time period you define.
Official Binance example: Buy 10 $BNB in 4 hours: Execute 0.42 BNB every 10 minutes.
That way you get an entry price that’s the average market price over those 4 hours, not the price of a spike.
It’s very similar to an iceberg order: it tries to enter/exit a large position without significantly changing the asset’s price.
The idea is to minimize the market impact of large orders by breaking them into smaller amounts and executing them gradually at regular intervals.
❤️When is it convenient to use? • You’re a whale / you have a large position: You don’t want your own buy to push the price up. • You want automatic DCA: You want to buy at the day’s average without looking at the chart. • Low-liquidity market: A Market order would fill you very poorly.
When it’s NOT convenient: if there’s news and you need to enter/exit NOW. TWAP is intentionally slow.
358
·
--
OCO
Imagine that $BTC is currently at $67,000 and you have not bought anything.
You want to do this:
• If it drops to $60,000, you buy it cheap. • If it breaks upward to $70,000, you buy it because it’s going to spike.
With a buy OCO, you place both at the same time.
In the app: Trade > Spot > OCO > Buy tab
It asks for the same thing but reversed:
• Limit Price: $60,000 > your cheap buy (it has to be BELOW the current price) • Activation Price (Stop): $70,000 > the trigger if it rises • Price (Stop Limit): $70,200 > what price you buy at if it activates. Always a little bit HIGHER than the Stop, so it enters safely if it’s rising fast.
Golden rule for buying (the opposite of selling):
Limit Price (cheap buy) < current price < Stop Price (expensive buy)
If it hits $60,000, it buys cheap and cancels the $70,000 order.
If it hits $70,000, it buys during the rise and cancels the $60,000 one.
When to use each one:
• SELL OCO: You already have the coin. This is the one you use 90% of the time to set Take Profit + Stop Loss. • BUY OCO: You don’t have the coin yet and you’re waiting. It’s used so you don’t miss the entry while you’re working and not watching the chart.
OCO
Imagine that $BTC is currently at $67,000 and you have not bought anything.
You want to do this:
• If it drops to $60,000, you buy it cheap. • If it breaks upward to $70,000, you buy it because it’s going to spike.
With a buy OCO, you place both at the same time.
In the app: Trade > Spot > OCO > Buy tab
It asks for the same thing but reversed:
• Limit Price: $60,000 > your cheap buy (it has to be BELOW the current price) • Activation Price (Stop): $70,000 > the trigger if it rises • Price (Stop Limit): $70,200 > what price you buy at if it activates. Always a little bit HIGHER than the Stop, so it enters safely if it’s rising fast.
Golden rule for buying (the opposite of selling):
Limit Price (cheap buy) < current price < Stop Price (expensive buy)
If it hits $60,000, it buys cheap and cancels the $70,000 order.
If it hits $70,000, it buys during the rise and cancels the $60,000 one.
When to use each one:
• SELL OCO: You already have the coin. This is the one you use 90% of the time to set Take Profit + Stop Loss. • BUY OCO: You don’t have the coin yet and you’re waiting. It’s used so you don’t miss the entry while you’re working and not watching the chart.
Imagine that $BTC is currently at $67,000 and you have not bought anything.
You want to do this:
• If it drops to $60,000, you buy it cheap. • If it breaks upward to $70,000, you buy it because it’s going to spike.
With a buy OCO, you place both at the same time.
In the app: Trade > Spot > OCO > Buy tab
It asks for the same thing but reversed:
• Limit Price: $60,000 > your cheap buy (it has to be BELOW the current price) • Activation Price (Stop): $70,000 > the trigger if it rises • Price (Stop Limit): $70,200 > what price you buy at if it activates. Always a little bit HIGHER than the Stop, so it enters safely if it’s rising fast.
Golden rule for buying (the opposite of selling):
Limit Price (cheap buy) < current price < Stop Price (expensive buy)
If it hits $60,000, it buys cheap and cancels the $70,000 order.
If it hits $70,000, it buys during the rise and cancels the $60,000 one.
When to use each one:
• SELL OCO: You already have the coin. This is the one you use 90% of the time to set Take Profit + Stop Loss. • BUY OCO: You don’t have the coin yet and you’re waiting. It’s used so you don’t miss the entry while you’re working and not watching the chart.
1
7
8.8k
·
--
Bearish
👉 TYPES OF ORDERS
🪙OCO
is the most used order on Binance so you don’t have to keep watching the chart all day.
OCO = One-Cancels-the-Other = One cancels the other.
It literally consists of 2 orders in 1. You place one, and if it gets executed, the other one is automatically canceled.
It’s made up of:
1. A Limit order: your profit target (Take Profit). 2. A Stop-Limit order: your safety in case things go wrong (Stop Loss).
The most common example: You already bought and want to sell.
Imagine you bought BTC at $65,000 and now it’s at $67,000.
You want to do two things at the same time:
• If it rises to $70,000, sell and take your profit. • If it drops to $64,000, sell so you don’t lose more.
With OCO you put both together. If it reaches $70,000, it sells and cancels the $64,000 order. If it drops to $64,000, it sells and cancels the $70,000 one. You can sleep peacefully.
The rule Binance asks for for SELL is:
Limit Price (your profit) > current price > Stop price (your loss)
The inverse case: You want to BUY.
$BTC $BNB
BTC is at $67,000.
• If it drops to $60,000 you want to buy cheap (Limit order). • If it breaks upward to $70,000 you want to buy because it’s going to shoot up (Stop-Limit order).
If one executes, the other is canceled. Rule for BUY:
Limit Price < current price < Stop price
How to set it up in the Binance app:
1. Go to Trade > Spot
2. In order type, choose OCO
3. It will ask for 4 details (using the selling example):
• Limit: 70000 -> your sell price with profit
• Stop: 64000 -> the price that triggers your stop
• Limit (stop limit): 63900 -> at what real price it sells if the stop is triggered. Always set it a little bit below the Stop so it triggers and executes safely.
• Quantity: how much you want to sell
4. Tap Sell and you’re done. You’ll see it in Open Orders.
👉 TYPES OF ORDERS
🪙OCO
is the most used order on Binance so you don’t have to keep watching the chart all day.
OCO = One-Cancels-the-Other = One cancels the other.
It literally consists of 2 orders in 1. You place one, and if it gets executed, the other one is automatically canceled.
It’s made up of:
1. A Limit order: your profit target (Take Profit). 2. A Stop-Limit order: your safety in case things go wrong (Stop Loss).
The most common example: You already bought and want to sell.
Imagine you bought BTC at $65,000 and now it’s at $67,000.
You want to do two things at the same time:
• If it rises to $70,000, sell and take your profit. • If it drops to $64,000, sell so you don’t lose more.
With OCO you put both together. If it reaches $70,000, it sells and cancels the $64,000 order. If it drops to $64,000, it sells and cancels the $70,000 one. You can sleep peacefully.
The rule Binance asks for for SELL is:
Limit Price (your profit) > current price > Stop price (your loss)
The inverse case: You want to BUY.
$BTC $BNB
BTC is at $67,000.
• If it drops to $60,000 you want to buy cheap (Limit order). • If it breaks upward to $70,000 you want to buy because it’s going to shoot up (Stop-Limit order).
If one executes, the other is canceled. Rule for BUY:
Limit Price < current price < Stop price
How to set it up in the Binance app:
1. Go to Trade > Spot
2. In order type, choose OCO
3. It will ask for 4 details (using the selling example):
• Limit: 70000 -> your sell price with profit
• Stop: 64000 -> the price that triggers your stop
• Limit (stop limit): 63900 -> at what real price it sells if the stop is triggered. Always set it a little bit below the Stop so it triggers and executes safely.
• Quantity: how much you want to sell
4. Tap Sell and you’re done. You’ll see it in Open Orders.
🪙OCO
is the most used order on Binance so you don’t have to keep watching the chart all day.
OCO = One-Cancels-the-Other = One cancels the other.
It literally consists of 2 orders in 1. You place one, and if it gets executed, the other one is automatically canceled.
It’s made up of:
1. A Limit order: your profit target (Take Profit). 2. A Stop-Limit order: your safety in case things go wrong (Stop Loss).
The most common example: You already bought and want to sell.
Imagine you bought BTC at $65,000 and now it’s at $67,000.
You want to do two things at the same time:
• If it rises to $70,000, sell and take your profit. • If it drops to $64,000, sell so you don’t lose more.
With OCO you put both together. If it reaches $70,000, it sells and cancels the $64,000 order. If it drops to $64,000, it sells and cancels the $70,000 one. You can sleep peacefully.
The rule Binance asks for for SELL is:
Limit Price (your profit) > current price > Stop price (your loss)
The inverse case: You want to BUY.
$BTC $BNB
BTC is at $67,000.
• If it drops to $60,000 you want to buy cheap (Limit order). • If it breaks upward to $70,000 you want to buy because it’s going to shoot up (Stop-Limit order).
If one executes, the other is canceled. Rule for BUY:
Limit Price < current price < Stop price
How to set it up in the Binance app:
1. Go to Trade > Spot
2. In order type, choose OCO
3. It will ask for 4 details (using the selling example):
• Limit: 70000 -> your sell price with profit
• Stop: 64000 -> the price that triggers your stop
• Limit (stop limit): 63900 -> at what real price it sells if the stop is triggered. Always set it a little bit below the Stop so it triggers and executes safely.
• Quantity: how much you want to sell
4. Tap Sell and you’re done. You’ll see it in Open Orders.
188
·
--
💥TRAILiNG SPOT
On Binance, "Trailing Spot" is a smart Stop Loss that follows you as you go into profit.
Ideal if you’re new and don’t want to be stuck staring at the chart all day.
I’ll explain it simply:
1. What does it do?
Imagine you bought a coin.
Common Stop Loss: You say "if it drops to $90, sell". It stays fixed at $90. If the coin rises to $150, your stop is still at $90.
Trailing Stop: You say "follow the price, but at a 2% distance".
If the coin rises, the stop rises with it. If the coin drops 2%, it sells automatically.
It’s meant to secure profits without cutting off the upward move.
There are two ways to use it:
• For selling (the most used): You have the coin and want to sell it when it’s expensive if it rises, but protect yourself if it falls. It’s a trailing upward. • For buying: You want to buy cheaper after a drop. The trailing follows the price downward and buys when it bounces. 2. A real example of selling, the one you’ll use
You bought 1 SOL for $100.
You want to set a Trailing Stop with a 2% callback.
1. SOL rises to $110. Your sell order moves automatically to $107.8 (110 - 2%) 2. SOL rises to $130. Your order moves to $127.4 (130 - 2%) 3. SOL falls to $127.4. BOOM! Binance sells automatically at market.
You earned $27.4 instead of watching it drop back to $100.
If SOL had dropped straight from $100 to $98, it would have sold there and limited the loss.
3. How to set it up in the Binance App
On Spot, when you go to sell:
1. Go to Trade > Spot 2. Choose the pair, e.g., SOL/USDT 3. In order type, choose Trailing Stop (sometimes it’s inside Stop-Limit; tap the arrow) 4. It asks for 3 things:
- Quantity: How much you want to sell. Put 100% if you want to sell everything.
- Activation Price: From what price do you want it to start following?
If SOL is at $100 and you set activation at $105, the trailing won’t do anything until it reaches $105. If you leave it blank, it starts following right away. To start, leave it blank or set the current price.
$SOL
💥TRAILiNG SPOT
On Binance, "Trailing Spot" is a smart Stop Loss that follows you as you go into profit.
Ideal if you’re new and don’t want to be stuck staring at the chart all day.
I’ll explain it simply:
1. What does it do?
Imagine you bought a coin.
Common Stop Loss: You say "if it drops to $90, sell". It stays fixed at $90. If the coin rises to $150, your stop is still at $90.
Trailing Stop: You say "follow the price, but at a 2% distance".
If the coin rises, the stop rises with it. If the coin drops 2%, it sells automatically.
It’s meant to secure profits without cutting off the upward move.
There are two ways to use it:
• For selling (the most used): You have the coin and want to sell it when it’s expensive if it rises, but protect yourself if it falls. It’s a trailing upward. • For buying: You want to buy cheaper after a drop. The trailing follows the price downward and buys when it bounces. 2. A real example of selling, the one you’ll use
You bought 1 SOL for $100.
You want to set a Trailing Stop with a 2% callback.
1. SOL rises to $110. Your sell order moves automatically to $107.8 (110 - 2%) 2. SOL rises to $130. Your order moves to $127.4 (130 - 2%) 3. SOL falls to $127.4. BOOM! Binance sells automatically at market.
You earned $27.4 instead of watching it drop back to $100.
If SOL had dropped straight from $100 to $98, it would have sold there and limited the loss.
3. How to set it up in the Binance App
On Spot, when you go to sell:
1. Go to Trade > Spot 2. Choose the pair, e.g., SOL/USDT 3. In order type, choose Trailing Stop (sometimes it’s inside Stop-Limit; tap the arrow) 4. It asks for 3 things:
- Quantity: How much you want to sell. Put 100% if you want to sell everything.
- Activation Price: From what price do you want it to start following?
If SOL is at $100 and you set activation at $105, the trailing won’t do anything until it reaches $105. If you leave it blank, it starts following right away. To start, leave it blank or set the current price.
$SOL
On Binance, "Trailing Spot" is a smart Stop Loss that follows you as you go into profit.
Ideal if you’re new and don’t want to be stuck staring at the chart all day.
I’ll explain it simply:
1. What does it do?
Imagine you bought a coin.
Common Stop Loss: You say "if it drops to $90, sell". It stays fixed at $90. If the coin rises to $150, your stop is still at $90.
Trailing Stop: You say "follow the price, but at a 2% distance".
If the coin rises, the stop rises with it. If the coin drops 2%, it sells automatically.
It’s meant to secure profits without cutting off the upward move.
There are two ways to use it:
• For selling (the most used): You have the coin and want to sell it when it’s expensive if it rises, but protect yourself if it falls. It’s a trailing upward. • For buying: You want to buy cheaper after a drop. The trailing follows the price downward and buys when it bounces. 2. A real example of selling, the one you’ll use
You bought 1 SOL for $100.
You want to set a Trailing Stop with a 2% callback.
1. SOL rises to $110. Your sell order moves automatically to $107.8 (110 - 2%) 2. SOL rises to $130. Your order moves to $127.4 (130 - 2%) 3. SOL falls to $127.4. BOOM! Binance sells automatically at market.
You earned $27.4 instead of watching it drop back to $100.
If SOL had dropped straight from $100 to $98, it would have sold there and limited the loss.
3. How to set it up in the Binance App
On Spot, when you go to sell:
1. Go to Trade > Spot 2. Choose the pair, e.g., SOL/USDT 3. In order type, choose Trailing Stop (sometimes it’s inside Stop-Limit; tap the arrow) 4. It asks for 3 things:
- Quantity: How much you want to sell. Put 100% if you want to sell everything.
- Activation Price: From what price do you want it to start following?
If SOL is at $100 and you set activation at $105, the trailing won’t do anything until it reaches $105. If you leave it blank, it starts following right away. To start, leave it blank or set the current price.
$SOL
3
7
2.1k
·
--
Bullish
The Stop Market is a “exit insurance.”
You tell Binance: “If the price reaches X, sell it to me NOW, at whatever price is in the market.”
It’s used for 2 things:
1. Limit losses: If you bought and the price drops, you exit automatically. 2. Protect profits: If you’re already in profit, you make sure you don’t lose everything if things turn around.
Key difference:
• Limit: You set an exact price. Example: “Sell at 70,000”. If it doesn’t reach 70k, it will never be sold. • Stop Limit: “If it reaches 69,000, place a Limit order at 68,900”. If the market drops very fast, it might not sell. • Stop Market: “If it reaches 69,000, sell NOW at the best price available.” It executes no matter what. That’s why it’s the most used for stop loss.
It has one risk: in a very violent drop it may sell you a little cheaper due to slippage, but it will get you out.
2. Practical example
You bought 1 BTC at $67,000.
You don’t want to lose more than $2,000.
You set a Stop Market at $65,000.
If BTC touches $65,000, Binance will automatically sell you in the market and you won’t be left watching it go down to $60,000.
3. How to do it in the Binance App (step by step)
This works for both SPOT and FUTURES—only a button changes.
A) On SPOT (what you have in your wallet)
1. Open the Binance App → at the bottom go to Markets → search for BTC/USDT (or whichever you want) 2. Tap Buy/Sell 3. Above the green/red button, where it says “Limit”, tap it and change to Stop Limit. 4. Now you’ll see 3 options. Choose Stop Market or Stop Loss. In some versions it appears as SL. 5. Fill in: ◦ Stop: The price that triggers the sale. Example: 65,000 ◦ Quantity: How much you want to sell. Set 100% if you want to sell everything. 6. Tap Sell #BTC70K✈️
Done. It’s activated. You can see it in “Open Orders”.
$BNB
The Stop Market is a “exit insurance.”
You tell Binance: “If the price reaches X, sell it to me NOW, at whatever price is in the market.”
It’s used for 2 things:
1. Limit losses: If you bought and the price drops, you exit automatically. 2. Protect profits: If you’re already in profit, you make sure you don’t lose everything if things turn around.
Key difference:
• Limit: You set an exact price. Example: “Sell at 70,000”. If it doesn’t reach 70k, it will never be sold. • Stop Limit: “If it reaches 69,000, place a Limit order at 68,900”. If the market drops very fast, it might not sell. • Stop Market: “If it reaches 69,000, sell NOW at the best price available.” It executes no matter what. That’s why it’s the most used for stop loss.
It has one risk: in a very violent drop it may sell you a little cheaper due to slippage, but it will get you out.
2. Practical example
You bought 1 BTC at $67,000.
You don’t want to lose more than $2,000.
You set a Stop Market at $65,000.
If BTC touches $65,000, Binance will automatically sell you in the market and you won’t be left watching it go down to $60,000.
3. How to do it in the Binance App (step by step)
This works for both SPOT and FUTURES—only a button changes.
A) On SPOT (what you have in your wallet)
1. Open the Binance App → at the bottom go to Markets → search for BTC/USDT (or whichever you want) 2. Tap Buy/Sell 3. Above the green/red button, where it says “Limit”, tap it and change to Stop Limit. 4. Now you’ll see 3 options. Choose Stop Market or Stop Loss. In some versions it appears as SL. 5. Fill in: ◦ Stop: The price that triggers the sale. Example: 65,000 ◦ Quantity: How much you want to sell. Set 100% if you want to sell everything. 6. Tap Sell #BTC70K✈️
Done. It’s activated. You can see it in “Open Orders”.
$BNB
You tell Binance: “If the price reaches X, sell it to me NOW, at whatever price is in the market.”
It’s used for 2 things:
1. Limit losses: If you bought and the price drops, you exit automatically. 2. Protect profits: If you’re already in profit, you make sure you don’t lose everything if things turn around.
Key difference:
• Limit: You set an exact price. Example: “Sell at 70,000”. If it doesn’t reach 70k, it will never be sold. • Stop Limit: “If it reaches 69,000, place a Limit order at 68,900”. If the market drops very fast, it might not sell. • Stop Market: “If it reaches 69,000, sell NOW at the best price available.” It executes no matter what. That’s why it’s the most used for stop loss.
It has one risk: in a very violent drop it may sell you a little cheaper due to slippage, but it will get you out.
2. Practical example
You bought 1 BTC at $67,000.
You don’t want to lose more than $2,000.
You set a Stop Market at $65,000.
If BTC touches $65,000, Binance will automatically sell you in the market and you won’t be left watching it go down to $60,000.
3. How to do it in the Binance App (step by step)
This works for both SPOT and FUTURES—only a button changes.
A) On SPOT (what you have in your wallet)
1. Open the Binance App → at the bottom go to Markets → search for BTC/USDT (or whichever you want) 2. Tap Buy/Sell 3. Above the green/red button, where it says “Limit”, tap it and change to Stop Limit. 4. Now you’ll see 3 options. Choose Stop Market or Stop Loss. In some versions it appears as SL. 5. Fill in: ◦ Stop: The price that triggers the sale. Example: 65,000 ◦ Quantity: How much you want to sell. Set 100% if you want to sell everything. 6. Tap Sell #BTC70K✈️
Done. It’s activated. You can see it in “Open Orders”.
$BNB
1
348
·
--
Bullish
MARKET ORDER
The idea in 5 seconds:
Market Order = "Give it to me, at whatever price it is".
You don’t debate the price. You enter, pay what it’s worth at that moment, and you’re done.
Limit Order = "I’ll only take it if it’s at $1000".
You set the price and wait. If it never reaches $1000, you don’t buy.
To start, you have to use Market. It’s the one that doesn’t fail.
On Binance, it’s done like this, with 3 taps:
Imagine you have 50 USDT and you want to buy Bitcoin.
1. Go to buy:
Binance app > Down, tap Trade > Spot > Up, search BTC/USDT
2. Tap where it says Limit and change it to Market
Binance always sets it to Limit. You have to tap it and set it to Market. If you don’t do this, it’s not a Market order.
3. Tell it how much you want to spend and buy
Where it says Total, enter 50. Tap the green button Buy BTC. Slide to confirm.
Done. You don’t have to choose what price you want for Bitcoin. Binance grabs the cheapest price available in that second and gives it to you. In 1 second, you already have the Bitcoin in your wallet.
If you want to sell, it’s the other way around:
BTC/USDT > Market > instead of Total, enter how much Bitcoin you want to sell > Red Sell BTC button.
Why do I sometimes get a different price?
Because the price moves. If you saw BTC at 67,000 and you tapped buy, it might end up charging you 67,005. That $5 difference is called slippage. In big coins like BTC or ETH it’s almost nothing—you barely notice.
Beginner trick: Use Market ONLY on big coins (BTC, ETH, SOL, BNB). Never on small, weird coins, because then they might charge you anything.
$BTC #BTC
MARKET ORDER
The idea in 5 seconds:
Market Order = "Give it to me, at whatever price it is".
You don’t debate the price. You enter, pay what it’s worth at that moment, and you’re done.
Limit Order = "I’ll only take it if it’s at $1000".
You set the price and wait. If it never reaches $1000, you don’t buy.
To start, you have to use Market. It’s the one that doesn’t fail.
On Binance, it’s done like this, with 3 taps:
Imagine you have 50 USDT and you want to buy Bitcoin.
1. Go to buy:
Binance app > Down, tap Trade > Spot > Up, search BTC/USDT
2. Tap where it says Limit and change it to Market
Binance always sets it to Limit. You have to tap it and set it to Market. If you don’t do this, it’s not a Market order.
3. Tell it how much you want to spend and buy
Where it says Total, enter 50. Tap the green button Buy BTC. Slide to confirm.
Done. You don’t have to choose what price you want for Bitcoin. Binance grabs the cheapest price available in that second and gives it to you. In 1 second, you already have the Bitcoin in your wallet.
If you want to sell, it’s the other way around:
BTC/USDT > Market > instead of Total, enter how much Bitcoin you want to sell > Red Sell BTC button.
Why do I sometimes get a different price?
Because the price moves. If you saw BTC at 67,000 and you tapped buy, it might end up charging you 67,005. That $5 difference is called slippage. In big coins like BTC or ETH it’s almost nothing—you barely notice.
Beginner trick: Use Market ONLY on big coins (BTC, ETH, SOL, BNB). Never on small, weird coins, because then they might charge you anything.
$BTC #BTC
The idea in 5 seconds:
Market Order = "Give it to me, at whatever price it is".
You don’t debate the price. You enter, pay what it’s worth at that moment, and you’re done.
Limit Order = "I’ll only take it if it’s at $1000".
You set the price and wait. If it never reaches $1000, you don’t buy.
To start, you have to use Market. It’s the one that doesn’t fail.
On Binance, it’s done like this, with 3 taps:
Imagine you have 50 USDT and you want to buy Bitcoin.
1. Go to buy:
Binance app > Down, tap Trade > Spot > Up, search BTC/USDT
2. Tap where it says Limit and change it to Market
Binance always sets it to Limit. You have to tap it and set it to Market. If you don’t do this, it’s not a Market order.
3. Tell it how much you want to spend and buy
Where it says Total, enter 50. Tap the green button Buy BTC. Slide to confirm.
Done. You don’t have to choose what price you want for Bitcoin. Binance grabs the cheapest price available in that second and gives it to you. In 1 second, you already have the Bitcoin in your wallet.
If you want to sell, it’s the other way around:
BTC/USDT > Market > instead of Total, enter how much Bitcoin you want to sell > Red Sell BTC button.
Why do I sometimes get a different price?
Because the price moves. If you saw BTC at 67,000 and you tapped buy, it might end up charging you 67,005. That $5 difference is called slippage. In big coins like BTC or ETH it’s almost nothing—you barely notice.
Beginner trick: Use Market ONLY on big coins (BTC, ETH, SOL, BNB). Never on small, weird coins, because then they might charge you anything.
$BTC #BTC
1
1
632
·
--
Bearish
The Limit Order is the most used order in spot, and it’s the one you should start with if you want to trade without overpaying.
Think of Binance Spot like a fair: you set the price you want to buy or sell at, and Binance waits for someone to show up and accept that price.
1. What it is and why it’s good to start
Market Order: you buy or sell NOW, at whatever price is available at that moment. It’s fast, but you pay the price they give you.
Limit Order: you set the price. Example: $BTC is at 67,000 USDT, but you only want to buy if it drops to 65,000. You place a buy Limit order at 65,000 and you leave. If it reaches that price, it executes automatically. If it doesn’t reach that price, nothing gets bought.
Advantages for you when you’re starting:
• You don’t buy out of FOMO • You pay less fees than with Market • You can leave everything set up and not be glued to the chart
2. How to place a Limit Order on Binance, step by step
In the app, where most people in Argentina trade:
1. Go to Spot: Down below tap Trade > and make sure it says Spot. Not Futures.
2. Choose the pair: Top left, tap BTC/USDT and search for what you want to trade. If you’re starting out, use pairs against USDT like BTC/USDT, ETH/USDT.
3. Select Limit: In the buy/sell section you’ll see three options: Limit, Market, Stop-Limit. Choose Limit.
4. Fill in the order:
You’ll see 2 fields:
• Price: the price you want to buy/sell at. • Amount: how much you want to buy.
You also have the percentage bar 25% 50% 75% 100% to use part of your balance.
A real BUY example:
BTC is at 67,000. You want to buy 50 USDT worth of BTC, but only if it drops to 65,000.
You set:
Price: 65000
Amount: it will calculate automatically, about 0.00076 BTC
Tap Buy BTC. Done—it's left open.
Where do you see if it executed? Down in Open Orders and Order History.
#BTC 🤔
The Limit Order is the most used order in spot, and it’s the one you should start with if you want to trade without overpaying.
Think of Binance Spot like a fair: you set the price you want to buy or sell at, and Binance waits for someone to show up and accept that price.
1. What it is and why it’s good to start
Market Order: you buy or sell NOW, at whatever price is available at that moment. It’s fast, but you pay the price they give you.
Limit Order: you set the price. Example: $BTC is at 67,000 USDT, but you only want to buy if it drops to 65,000. You place a buy Limit order at 65,000 and you leave. If it reaches that price, it executes automatically. If it doesn’t reach that price, nothing gets bought.
Advantages for you when you’re starting:
• You don’t buy out of FOMO • You pay less fees than with Market • You can leave everything set up and not be glued to the chart
2. How to place a Limit Order on Binance, step by step
In the app, where most people in Argentina trade:
1. Go to Spot: Down below tap Trade > and make sure it says Spot. Not Futures.
2. Choose the pair: Top left, tap BTC/USDT and search for what you want to trade. If you’re starting out, use pairs against USDT like BTC/USDT, ETH/USDT.
3. Select Limit: In the buy/sell section you’ll see three options: Limit, Market, Stop-Limit. Choose Limit.
4. Fill in the order:
You’ll see 2 fields:
• Price: the price you want to buy/sell at. • Amount: how much you want to buy.
You also have the percentage bar 25% 50% 75% 100% to use part of your balance.
A real BUY example:
BTC is at 67,000. You want to buy 50 USDT worth of BTC, but only if it drops to 65,000.
You set:
Price: 65000
Amount: it will calculate automatically, about 0.00076 BTC
Tap Buy BTC. Done—it's left open.
Where do you see if it executed? Down in Open Orders and Order History.
#BTC 🤔
Think of Binance Spot like a fair: you set the price you want to buy or sell at, and Binance waits for someone to show up and accept that price.
1. What it is and why it’s good to start
Market Order: you buy or sell NOW, at whatever price is available at that moment. It’s fast, but you pay the price they give you.
Limit Order: you set the price. Example: $BTC is at 67,000 USDT, but you only want to buy if it drops to 65,000. You place a buy Limit order at 65,000 and you leave. If it reaches that price, it executes automatically. If it doesn’t reach that price, nothing gets bought.
Advantages for you when you’re starting:
• You don’t buy out of FOMO • You pay less fees than with Market • You can leave everything set up and not be glued to the chart
2. How to place a Limit Order on Binance, step by step
In the app, where most people in Argentina trade:
1. Go to Spot: Down below tap Trade > and make sure it says Spot. Not Futures.
2. Choose the pair: Top left, tap BTC/USDT and search for what you want to trade. If you’re starting out, use pairs against USDT like BTC/USDT, ETH/USDT.
3. Select Limit: In the buy/sell section you’ll see three options: Limit, Market, Stop-Limit. Choose Limit.
4. Fill in the order:
You’ll see 2 fields:
• Price: the price you want to buy/sell at. • Amount: how much you want to buy.
You also have the percentage bar 25% 50% 75% 100% to use part of your balance.
A real BUY example:
BTC is at 67,000. You want to buy 50 USDT worth of BTC, but only if it drops to 65,000.
You set:
Price: 65000
Amount: it will calculate automatically, about 0.00076 BTC
Tap Buy BTC. Done—it's left open.
Where do you see if it executed? Down in Open Orders and Order History.
#BTC 🤔
2
1.5k
·
--
Bullish
I’m telling you clearly: $XPL isn’t hype, it’s infrastructure. We’re building the base layer for stablecoins and global payments, with fast utility and almost zero fees.
You should buy #XPL because you’re getting in early to an ecosystem backed by top-tier investors, with proprietary PlasmaBFT technology and real demand. You’re not buying a meme—you’re buying utility, scalability, and future adoption. It’s positioning yourself before the explosion.
Their offering is limited, their vision is long-term, and their community grows every day with unstoppable momentum across the world. This is your chance to never watch from the outside again.
I’m telling you clearly: $XPL isn’t hype, it’s infrastructure. We’re building the base layer for stablecoins and global payments, with fast utility and almost zero fees.
You should buy #XPL because you’re getting in early to an ecosystem backed by top-tier investors, with proprietary PlasmaBFT technology and real demand. You’re not buying a meme—you’re buying utility, scalability, and future adoption. It’s positioning yourself before the explosion.
Their offering is limited, their vision is long-term, and their community grows every day with unstoppable momentum across the world. This is your chance to never watch from the outside again.
You should buy #XPL because you’re getting in early to an ecosystem backed by top-tier investors, with proprietary PlasmaBFT technology and real demand. You’re not buying a meme—you’re buying utility, scalability, and future adoption. It’s positioning yourself before the explosion.
Their offering is limited, their vision is long-term, and their community grows every day with unstoppable momentum across the world. This is your chance to never watch from the outside again.

1
343
Log in to explore more content
Join global crypto users on Binance Square
⚡️ Get latest and useful information about crypto.
💬 Trusted by the world’s largest crypto exchange.
👍 Discover real insights from verified creators.
Email / Phone number
Trending Topics
ADAGains10%Above$0.27
11,808 views
164 Discussing
$ADA is making a strong move today jumping over 10 percent to around 027 and breaking into a new 90 day high
Trading volume has also surged above 1 billion showing strong market activity
The move comes as $ADA continues its recovery from the June lows while its recent technical structure has turned more bullish
The 027 to 028 zone is now the key area to watch A sustained breakout could open the door toward higher resistance levels
But after such a sharp daily move volatility could remain high
#ADAGains10%Above$0.27 #crypto #ADA #Cardano #crypto #Write2Earn
AbdullahAbid_7
·0 Likes
·339 views
ETHUp70%InQ3ButLiquidityFalls
132,803 views
974 Discussing
EthStakingExitQueueHits2026High
47,058 views
707 Discussing