

Pak-Traderes
39 Posts

Pak-Traderes
Report
Block User
Pakistan Best Trader All In One
Open Trade
2 Days
24 Following
1 Followers
0 Liked
Posts
Portfolio
·
--
Bullish
$BTC Main Topics For Trading
{spot}(BTCUSDT)
$BTC
Basics → S/R → Structure → Indicators → Breakouts → Liquidity → OB/FVG → Risk Management → Psychology → Journal → MTF → Candlesticks → Trendlines → Fibonacci → Divergence → Volume Profile → Sessions → Advanced Entries → Complete Setup → Checklist
$BTC Main Topics For Trading
$BTC
Basics → S/R → Structure → Indicators → Breakouts → Liquidity → OB/FVG → Risk Management → Psychology → Journal → MTF → Candlesticks → Trendlines → Fibonacci → Divergence → Volume Profile → Sessions → Advanced Entries → Complete Setup → Checklist
$BTC
Basics → S/R → Structure → Indicators → Breakouts → Liquidity → OB/FVG → Risk Management → Psychology → Journal → MTF → Candlesticks → Trendlines → Fibonacci → Divergence → Volume Profile → Sessions → Advanced Entries → Complete Setup → Checklist
9
·
--
Bullish
$BTC TRADING SESSIONS
BTC trades 24/7, but market activity can change during major global sessions.
ASIA
Often useful for identifying an initial range.
LONDON
Can bring increased volatility and breakouts.
NEW YORK
Often brings strong volatility, especially when major U.S. economic events occur.
Important: Session behavior is not guaranteed. Always confirm with the actual price action.
LIQUIDITY + MARKET STRUCTURE
Look for obvious liquidity around:
Equal Highs → Buy-Side Liquidity
Equal Lows → Sell-Side Liquidity
A common sequence is:
LIQUIDITY SWEEP → STRUCTURE SHIFT → RETEST → CONFIRMATION → ENTRY
Don't assume every liquidity sweep will reverse the market.
COMPLETE BTC TRADE SETUP
🟢 LONG
Higher-Timeframe Uptrend
↓
Support / Demand Zone
↓
Liquidity Sweep
↓
Fib Confluence
↓
Bullish Structure Shift
↓
Bullish Candle + Volume
↓
ENTRY
↓
SL Below Invalidation
↓
TP At Logical Resistance
🔴 SHORT
Higher-Timeframe Downtrend
↓
Resistance / Supply Zone
↓
Liquidity Sweep
↓
Fib Confluence
↓
Bearish Structure Shift
↓
Bearish Candle + Volume
↓
ENTRY
↓
SL Above Invalidation
↓
TP At Logical Support
COMMON TRADING MISTAKES
❌ Entering because of FOMO
❌ Chasing candles
❌ No Stop Loss
❌ Risking too much on one trade
❌ Using too much leverage
❌ Trading every small movement
❌ Ignoring higher-timeframe structure
❌ Using one indicator as the entire strategy
❌ Moving the Stop Loss because of fear
❌ Revenge trading after a loss
❌ Taking profit without a plan
❌ Changing strategy after every losing trade
FINAL BTC TRADING CHECKLIST
Before entering, ask:
TREND?
MARKET STRUCTURE?
KEY ZONE?
LIQUIDITY?
FIB?
CANDLE CONFIRMATION?
VOLUME?
ENTRY?
STOP LOSS?
TAKE PROFIT?
RISK/REWARD?
AM I FOLLOWING MY PLAN?
🧠 FINAL RULE
PLAN → WAIT → CONFIRM → ENTER → MANAGE RISK → EXIT → JOURNAL → IMPROVE#BitcoinClears$85200
{spot}(BTCUSDT)
$BTC TRADING SESSIONS
BTC trades 24/7, but market activity can change during major global sessions.
ASIA
Often useful for identifying an initial range.
LONDON
Can bring increased volatility and breakouts.
NEW YORK
Often brings strong volatility, especially when major U.S. economic events occur.
Important: Session behavior is not guaranteed. Always confirm with the actual price action.
LIQUIDITY + MARKET STRUCTURE
Look for obvious liquidity around:
Equal Highs → Buy-Side Liquidity
Equal Lows → Sell-Side Liquidity
A common sequence is:
LIQUIDITY SWEEP → STRUCTURE SHIFT → RETEST → CONFIRMATION → ENTRY
Don't assume every liquidity sweep will reverse the market.
COMPLETE BTC TRADE SETUP
🟢 LONG
Higher-Timeframe Uptrend
↓
Support / Demand Zone
↓
Liquidity Sweep
↓
Fib Confluence
↓
Bullish Structure Shift
↓
Bullish Candle + Volume
↓
ENTRY
↓
SL Below Invalidation
↓
TP At Logical Resistance
🔴 SHORT
Higher-Timeframe Downtrend
↓
Resistance / Supply Zone
↓
Liquidity Sweep
↓
Fib Confluence
↓
Bearish Structure Shift
↓
Bearish Candle + Volume
↓
ENTRY
↓
SL Above Invalidation
↓
TP At Logical Support
COMMON TRADING MISTAKES
❌ Entering because of FOMO
❌ Chasing candles
❌ No Stop Loss
❌ Risking too much on one trade
❌ Using too much leverage
❌ Trading every small movement
❌ Ignoring higher-timeframe structure
❌ Using one indicator as the entire strategy
❌ Moving the Stop Loss because of fear
❌ Revenge trading after a loss
❌ Taking profit without a plan
❌ Changing strategy after every losing trade
FINAL BTC TRADING CHECKLIST
Before entering, ask:
TREND?
MARKET STRUCTURE?
KEY ZONE?
LIQUIDITY?
FIB?
CANDLE CONFIRMATION?
VOLUME?
ENTRY?
STOP LOSS?
TAKE PROFIT?
RISK/REWARD?
AM I FOLLOWING MY PLAN?
🧠 FINAL RULE
PLAN → WAIT → CONFIRM → ENTER → MANAGE RISK → EXIT → JOURNAL → IMPROVE#BitcoinClears$85200
BTC trades 24/7, but market activity can change during major global sessions.
ASIA
Often useful for identifying an initial range.
LONDON
Can bring increased volatility and breakouts.
NEW YORK
Often brings strong volatility, especially when major U.S. economic events occur.
Important: Session behavior is not guaranteed. Always confirm with the actual price action.
LIQUIDITY + MARKET STRUCTURE
Look for obvious liquidity around:
Equal Highs → Buy-Side Liquidity
Equal Lows → Sell-Side Liquidity
A common sequence is:
LIQUIDITY SWEEP → STRUCTURE SHIFT → RETEST → CONFIRMATION → ENTRY
Don't assume every liquidity sweep will reverse the market.
COMPLETE BTC TRADE SETUP
🟢 LONG
Higher-Timeframe Uptrend
↓
Support / Demand Zone
↓
Liquidity Sweep
↓
Fib Confluence
↓
Bullish Structure Shift
↓
Bullish Candle + Volume
↓
ENTRY
↓
SL Below Invalidation
↓
TP At Logical Resistance
🔴 SHORT
Higher-Timeframe Downtrend
↓
Resistance / Supply Zone
↓
Liquidity Sweep
↓
Fib Confluence
↓
Bearish Structure Shift
↓
Bearish Candle + Volume
↓
ENTRY
↓
SL Above Invalidation
↓
TP At Logical Support
COMMON TRADING MISTAKES
❌ Entering because of FOMO
❌ Chasing candles
❌ No Stop Loss
❌ Risking too much on one trade
❌ Using too much leverage
❌ Trading every small movement
❌ Ignoring higher-timeframe structure
❌ Using one indicator as the entire strategy
❌ Moving the Stop Loss because of fear
❌ Revenge trading after a loss
❌ Taking profit without a plan
❌ Changing strategy after every losing trade
FINAL BTC TRADING CHECKLIST
Before entering, ask:
TREND?
MARKET STRUCTURE?
KEY ZONE?
LIQUIDITY?
FIB?
CANDLE CONFIRMATION?
VOLUME?
ENTRY?
STOP LOSS?
TAKE PROFIT?
RISK/REWARD?
AM I FOLLOWING MY PLAN?
🧠 FINAL RULE
PLAN → WAIT → CONFIRM → ENTER → MANAGE RISK → EXIT → JOURNAL → IMPROVE#BitcoinClears$85200
14
·
--
$BTC DIVERGENCE
Divergence happens when price and an indicator move differently.
Bullish Divergence:
Price makes Lower Low, while RSI makes Higher Low → selling momentum may be weakening.
Bearish Divergence:
Price makes Higher High, while RSI makes Lower High → buying momentum may be weakening.
Important: Divergence is a warning/confirmation tool, not an automatic entry.
ADVANCED ENTRY CONFIRMATION
Before entering a BTC trade, combine several signals:
Market Structure → Key Zone → Liquidity Sweep → Fib Level → Candlestick Confirmation → Volume → Entry
For a LONG, look for bullish structure and confirmation.
For a SHORT, look for bearish structure and confirmation.
The more independent confirmations agree, the more clearly defined the setup becomes.
VOLUME PROFILE
Volume Profile shows how much trading activity occurred around different price levels.
POC
Point of Control = price level with the highest traded volume in the selected range.
HVN
High Volume Node = area where significant trading occurred.
LVN
Low Volume Node = area with relatively little trading activity.
Use these areas together with support, resistance and market structure rather than trading them alone.#BitcoinClears$85200
{spot}(BTCUSDT)
$BTC DIVERGENCE
Divergence happens when price and an indicator move differently.
Bullish Divergence:
Price makes Lower Low, while RSI makes Higher Low → selling momentum may be weakening.
Bearish Divergence:
Price makes Higher High, while RSI makes Lower High → buying momentum may be weakening.
Important: Divergence is a warning/confirmation tool, not an automatic entry.
ADVANCED ENTRY CONFIRMATION
Before entering a BTC trade, combine several signals:
Market Structure → Key Zone → Liquidity Sweep → Fib Level → Candlestick Confirmation → Volume → Entry
For a LONG, look for bullish structure and confirmation.
For a SHORT, look for bearish structure and confirmation.
The more independent confirmations agree, the more clearly defined the setup becomes.
VOLUME PROFILE
Volume Profile shows how much trading activity occurred around different price levels.
POC
Point of Control = price level with the highest traded volume in the selected range.
HVN
High Volume Node = area where significant trading occurred.
LVN
Low Volume Node = area with relatively little trading activity.
Use these areas together with support, resistance and market structure rather than trading them alone.#BitcoinClears$85200
Divergence happens when price and an indicator move differently.
Bullish Divergence:
Price makes Lower Low, while RSI makes Higher Low → selling momentum may be weakening.
Bearish Divergence:
Price makes Higher High, while RSI makes Lower High → buying momentum may be weakening.
Important: Divergence is a warning/confirmation tool, not an automatic entry.
ADVANCED ENTRY CONFIRMATION
Before entering a BTC trade, combine several signals:
Market Structure → Key Zone → Liquidity Sweep → Fib Level → Candlestick Confirmation → Volume → Entry
For a LONG, look for bullish structure and confirmation.
For a SHORT, look for bearish structure and confirmation.
The more independent confirmations agree, the more clearly defined the setup becomes.
VOLUME PROFILE
Volume Profile shows how much trading activity occurred around different price levels.
POC
Point of Control = price level with the highest traded volume in the selected range.
HVN
High Volume Node = area where significant trading occurred.
LVN
Low Volume Node = area with relatively little trading activity.
Use these areas together with support, resistance and market structure rather than trading them alone.#BitcoinClears$85200
17
·
--
$BTC FIBONACCI + MARKET STRUCTURE
First identify the market direction.
🟢 UPTREND
Higher High → Higher Low → Higher High
Draw Fibonacci from Swing Low → Swing High.
During the pullback, watch the 38.2%, 50%, and 61.8% areas.
If price reaches a Fib area and forms a Higher Low + bullish confirmation, it can become a potential long setup.
🔴 DOWNTREND
Lower Low → Lower High → Lower Low
Draw Fibonacci from Swing High → Swing Low.
During the pullback, watch the 38.2%, 50%, and 61.8% areas.
If price reaches a Fib area and forms a Lower High + bearish confirmation, it can become a potential short setup.
GOLDEN RULE
STRUCTURE → FIB LEVEL → REACTION → CONFIRMATION → ENTRY#BitcoinClears$85200
{spot}(BTCUSDT)
$BTC FIBONACCI + MARKET STRUCTURE
First identify the market direction.
🟢 UPTREND
Higher High → Higher Low → Higher High
Draw Fibonacci from Swing Low → Swing High.
During the pullback, watch the 38.2%, 50%, and 61.8% areas.
If price reaches a Fib area and forms a Higher Low + bullish confirmation, it can become a potential long setup.
🔴 DOWNTREND
Lower Low → Lower High → Lower Low
Draw Fibonacci from Swing High → Swing Low.
During the pullback, watch the 38.2%, 50%, and 61.8% areas.
If price reaches a Fib area and forms a Lower High + bearish confirmation, it can become a potential short setup.
GOLDEN RULE
STRUCTURE → FIB LEVEL → REACTION → CONFIRMATION → ENTRY#BitcoinClears$85200
First identify the market direction.
🟢 UPTREND
Higher High → Higher Low → Higher High
Draw Fibonacci from Swing Low → Swing High.
During the pullback, watch the 38.2%, 50%, and 61.8% areas.
If price reaches a Fib area and forms a Higher Low + bullish confirmation, it can become a potential long setup.
🔴 DOWNTREND
Lower Low → Lower High → Lower Low
Draw Fibonacci from Swing High → Swing Low.
During the pullback, watch the 38.2%, 50%, and 61.8% areas.
If price reaches a Fib area and forms a Lower High + bearish confirmation, it can become a potential short setup.
GOLDEN RULE
STRUCTURE → FIB LEVEL → REACTION → CONFIRMATION → ENTRY#BitcoinClears$85200
20
·
--
$BTC FIBONACCI + SUPPORT & RESISTANCE
Fibonacci works better when its levels overlap with important market zones.
🟢 BULLISH SETUP
Strong move up → Fib drawn Low to High → Price pulls back → 38.2% / 50% / 61.8% zone → Support reaction → Bullish candle → BUY confirmation.
🔴 BEARISH SETUP
Strong move down → Fib drawn High to Low → Price pulls back → 38.2% / 50% / 61.8% zone → Resistance reaction → Bearish candle → SELL confirmation.
🔥 STRONGER CONFLUENCE
Fib Level + Support/Resistance + Market Structure + Candle + Volume
More confluence = stronger confirmation, but no setup is guaranteed.
GOLDEN RULE
FIB LEVEL IS AN AREA TO WATCH — NOT AN AUTOMATIC ENTRY SIGNAL.#BitcoinClears$85200
{spot}(BTCUSDT)
$BTC FIBONACCI + SUPPORT & RESISTANCE
Fibonacci works better when its levels overlap with important market zones.
🟢 BULLISH SETUP
Strong move up → Fib drawn Low to High → Price pulls back → 38.2% / 50% / 61.8% zone → Support reaction → Bullish candle → BUY confirmation.
🔴 BEARISH SETUP
Strong move down → Fib drawn High to Low → Price pulls back → 38.2% / 50% / 61.8% zone → Resistance reaction → Bearish candle → SELL confirmation.
🔥 STRONGER CONFLUENCE
Fib Level + Support/Resistance + Market Structure + Candle + Volume
More confluence = stronger confirmation, but no setup is guaranteed.
GOLDEN RULE
FIB LEVEL IS AN AREA TO WATCH — NOT AN AUTOMATIC ENTRY SIGNAL.#BitcoinClears$85200
Fibonacci works better when its levels overlap with important market zones.
🟢 BULLISH SETUP
Strong move up → Fib drawn Low to High → Price pulls back → 38.2% / 50% / 61.8% zone → Support reaction → Bullish candle → BUY confirmation.
🔴 BEARISH SETUP
Strong move down → Fib drawn High to Low → Price pulls back → 38.2% / 50% / 61.8% zone → Resistance reaction → Bearish candle → SELL confirmation.
🔥 STRONGER CONFLUENCE
Fib Level + Support/Resistance + Market Structure + Candle + Volume
More confluence = stronger confirmation, but no setup is guaranteed.
GOLDEN RULE
FIB LEVEL IS AN AREA TO WATCH — NOT AN AUTOMATIC ENTRY SIGNAL.#BitcoinClears$85200
11
·
--
$BTC
{spot}(BTCUSDT)
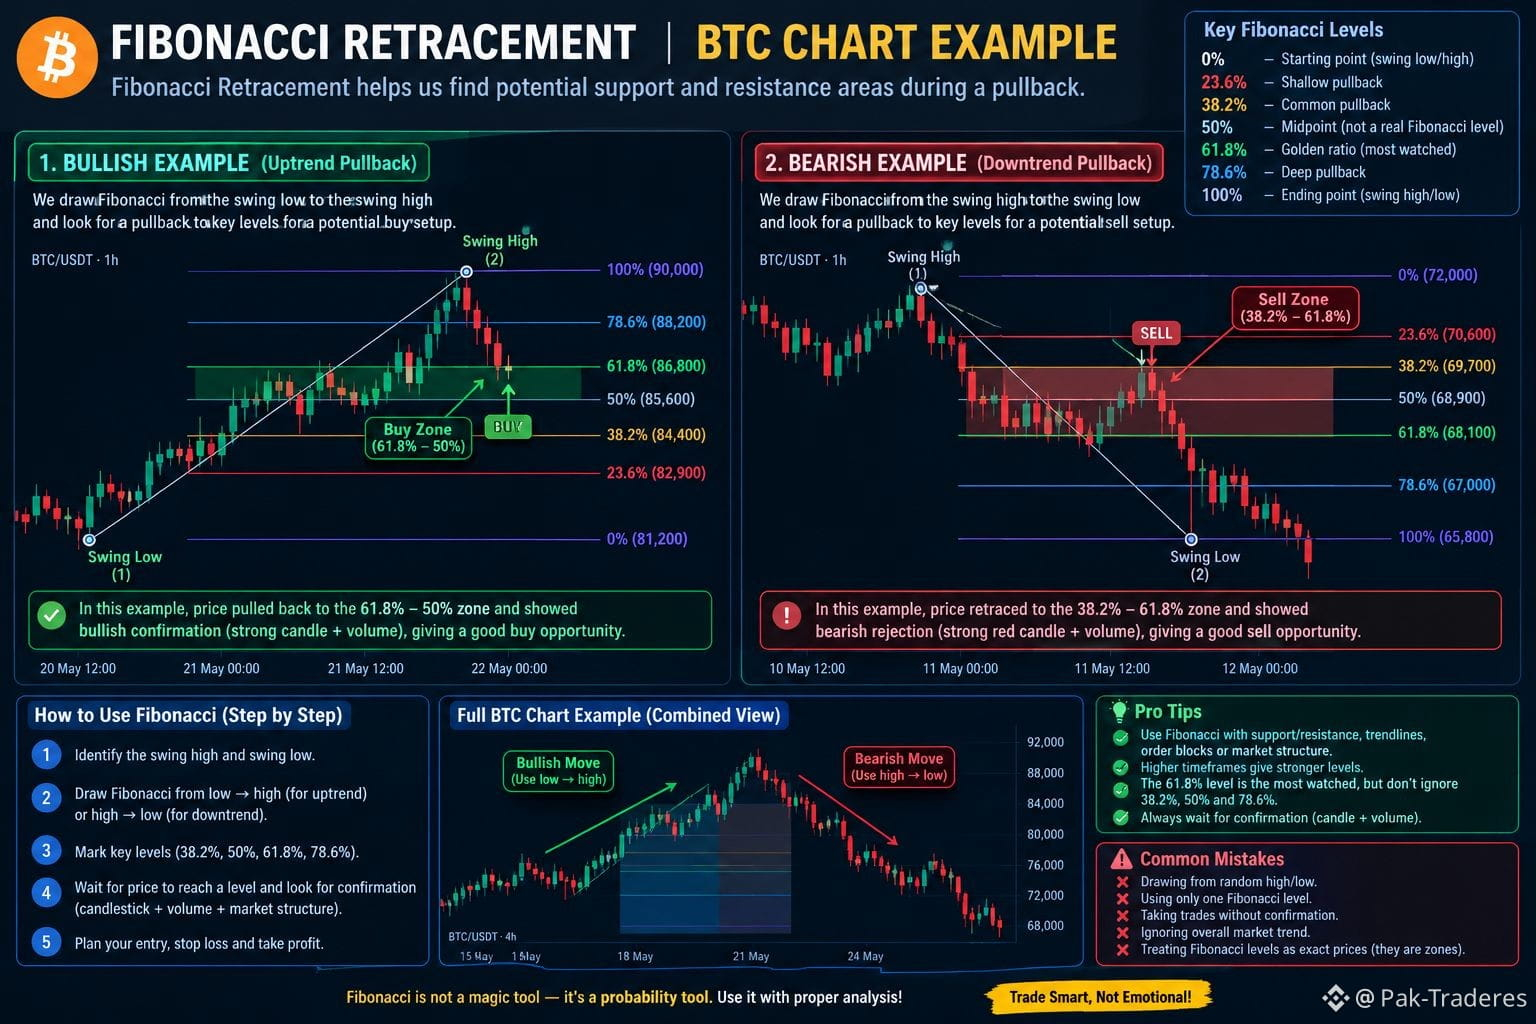
FIBONACCI RETRACEMENT
Fibonacci Retracement ka main purpose hai pullback ke possible support/resistance areas identify karna.
🔢 IMPORTANT FIBONACCI LEVELS
0% → Starting point
23.6% → Shallow pullback
38.2% → Common pullback
50% → Midpoint (technically Fibonacci ratio nahi, but traders commonly use it)
61.8% → ⭐ Golden Ratio
78.6% → Deep pullback
100% → Original swing point
🟢 BULLISH MOVE
Agar BTC:
LOW → STRONG UP MOVE → HIGH
to Fibonacci ko LOW se HIGH draw karo.
Phir price agar retrace kare:
38.2% → 50% → 61.8%
in areas par potential reaction dekho.
Example:
BTC LOW = $80,000
BTC HIGH = $90,000
Price $90K se pullback karta hai.
Fib levels potential reaction areas provide karte hain — automatic BUY signals nahi.
FIB LEVEL → SUPPORT/ZONE → CANDLE CONFIRMATION → VOLUME → ENTRY
🔴 BEARISH MOVE
Agar BTC:
HIGH → STRONG DOWN MOVE → LOW
to Fibonacci ko HIGH se LOW draw karo.
Price upar retrace kare to:
38.2% → 50% → 61.8%
possible resistance areas ke taur par watch kiye ja sakte hain.
FIB LEVEL → RESISTANCE/ZONE → BEARISH CONFIRMATION → ENTRY
🔥 FIBONACCI KO AKELA USE MAT KARO
Best practice:
FIB + SUPPORT/RESISTANCE + MARKET STRUCTURE + CANDLE + VOLUME
Agar 61.8% Fib aur old support same area mein aa rahe hain, to woh area zyada attention deserve karta hai than Fib level alone.
⚠️ COMMON MISTAKES
❌ Random high/low se Fib draw karna
❌ Har Fib level par trade lena
❌ Sirf 61.8% dekh kar BUY/SELL karna
❌ Market structure ignore karna
❌ Confirmation ke bina entry lena
🧠 GOLDEN RULE
SWING HIGH/LOW → FIB DRAW → KEY LEVEL → CONFIRMATION → ENTRY → SL → TP
📚 Fibonacci Series
#24 — Fibonacci Retracement Basics
#25 — 38.2%, 50%, 61.8%, 78.6% ka practical use
#26 — Fibonacci + Support/Resistance + Market Structure#BitcoinClears$85200
$BTC
FIBONACCI RETRACEMENT
Fibonacci Retracement ka main purpose hai pullback ke possible support/resistance areas identify karna.
🔢 IMPORTANT FIBONACCI LEVELS
0% → Starting point
23.6% → Shallow pullback
38.2% → Common pullback
50% → Midpoint (technically Fibonacci ratio nahi, but traders commonly use it)
61.8% → ⭐ Golden Ratio
78.6% → Deep pullback
100% → Original swing point
🟢 BULLISH MOVE
Agar BTC:
LOW → STRONG UP MOVE → HIGH
to Fibonacci ko LOW se HIGH draw karo.
Phir price agar retrace kare:
38.2% → 50% → 61.8%
in areas par potential reaction dekho.
Example:
BTC LOW = $80,000
BTC HIGH = $90,000
Price $90K se pullback karta hai.
Fib levels potential reaction areas provide karte hain — automatic BUY signals nahi.
FIB LEVEL → SUPPORT/ZONE → CANDLE CONFIRMATION → VOLUME → ENTRY
🔴 BEARISH MOVE
Agar BTC:
HIGH → STRONG DOWN MOVE → LOW
to Fibonacci ko HIGH se LOW draw karo.
Price upar retrace kare to:
38.2% → 50% → 61.8%
possible resistance areas ke taur par watch kiye ja sakte hain.
FIB LEVEL → RESISTANCE/ZONE → BEARISH CONFIRMATION → ENTRY
🔥 FIBONACCI KO AKELA USE MAT KARO
Best practice:
FIB + SUPPORT/RESISTANCE + MARKET STRUCTURE + CANDLE + VOLUME
Agar 61.8% Fib aur old support same area mein aa rahe hain, to woh area zyada attention deserve karta hai than Fib level alone.
⚠️ COMMON MISTAKES
❌ Random high/low se Fib draw karna
❌ Har Fib level par trade lena
❌ Sirf 61.8% dekh kar BUY/SELL karna
❌ Market structure ignore karna
❌ Confirmation ke bina entry lena
🧠 GOLDEN RULE
SWING HIGH/LOW → FIB DRAW → KEY LEVEL → CONFIRMATION → ENTRY → SL → TP
📚 Fibonacci Series
#24 — Fibonacci Retracement Basics
#25 — 38.2%, 50%, 61.8%, 78.6% ka practical use
#26 — Fibonacci + Support/Resistance + Market Structure#BitcoinClears$85200
FIBONACCI RETRACEMENT
Fibonacci Retracement ka main purpose hai pullback ke possible support/resistance areas identify karna.
🔢 IMPORTANT FIBONACCI LEVELS
0% → Starting point
23.6% → Shallow pullback
38.2% → Common pullback
50% → Midpoint (technically Fibonacci ratio nahi, but traders commonly use it)
61.8% → ⭐ Golden Ratio
78.6% → Deep pullback
100% → Original swing point
🟢 BULLISH MOVE
Agar BTC:
LOW → STRONG UP MOVE → HIGH
to Fibonacci ko LOW se HIGH draw karo.
Phir price agar retrace kare:
38.2% → 50% → 61.8%
in areas par potential reaction dekho.
Example:
BTC LOW = $80,000
BTC HIGH = $90,000
Price $90K se pullback karta hai.
Fib levels potential reaction areas provide karte hain — automatic BUY signals nahi.
FIB LEVEL → SUPPORT/ZONE → CANDLE CONFIRMATION → VOLUME → ENTRY
🔴 BEARISH MOVE
Agar BTC:
HIGH → STRONG DOWN MOVE → LOW
to Fibonacci ko HIGH se LOW draw karo.
Price upar retrace kare to:
38.2% → 50% → 61.8%
possible resistance areas ke taur par watch kiye ja sakte hain.
FIB LEVEL → RESISTANCE/ZONE → BEARISH CONFIRMATION → ENTRY
🔥 FIBONACCI KO AKELA USE MAT KARO
Best practice:
FIB + SUPPORT/RESISTANCE + MARKET STRUCTURE + CANDLE + VOLUME
Agar 61.8% Fib aur old support same area mein aa rahe hain, to woh area zyada attention deserve karta hai than Fib level alone.
⚠️ COMMON MISTAKES
❌ Random high/low se Fib draw karna
❌ Har Fib level par trade lena
❌ Sirf 61.8% dekh kar BUY/SELL karna
❌ Market structure ignore karna
❌ Confirmation ke bina entry lena
🧠 GOLDEN RULE
SWING HIGH/LOW → FIB DRAW → KEY LEVEL → CONFIRMATION → ENTRY → SL → TP
📚 Fibonacci Series
#24 — Fibonacci Retracement Basics
#25 — 38.2%, 50%, 61.8%, 78.6% ka practical use
#26 — Fibonacci + Support/Resistance + Market Structure#BitcoinClears$85200
16
·
--
$BTC TRENDLINES & CHANNELS
📈 TRENDLINE
A trendline connects important swing highs or swing lows to show the market direction.
🟢 UPTREND TRENDLINE
Price makes:
Higher High → Higher Low → Higher High → Higher Low
Connect the important higher lows.
When price returns to the trendline and gives bullish confirmation, traders may look for a LONG/BUY setup.
FLOW:
UPTREND → PULLBACK → TRENDLINE SUPPORT → CONFIRMATION → BUY
🔴 DOWNTREND TRENDLINE
Price makes:
Lower Low → Lower High → Lower Low → Lower High
Connect the important lower highs.
When price reaches the trendline and gets rejected, traders may look for a SHORT/SELL setup.
FLOW:
DOWNTREND → PULLBACK → TRENDLINE RESISTANCE → CONFIRMATION → SELL
📊 CHANNELS
A channel is basically two parallel trendlines containing price.
🟢 ASCENDING CHANNEL
Lower line = Support
Upper line = Resistance
Price often moves:
LOWER CHANNEL → BOUNCE → UPPER CHANNEL → REJECTION → LOWER CHANNEL
🔴 DESCENDING CHANNEL
Upper line = Resistance
Lower line = Support
Price often moves:
UPPER CHANNEL → REJECTION → LOWER CHANNEL → BOUNCE → UPPER CHANNEL
🚨 TRENDLINE BREAK
If price breaks a trendline, don't immediately enter.
Wait for:
BREAK → CLOSE → RETEST → CONFIRMATION → ENTRY
A fake break can happen, so candle close and market structure matter.
⚠️ COMMON MISTAKES
❌ Forcing a trendline through random candles
❌ Using only one touch
❌ Entering immediately after a wick breaks the line
❌ Ignoring higher-timeframe structure
❌ Treating every trendline break as a reversal
🧠 GOLDEN RULE
TRENDLINE = DIRECTION
CHANNEL = RANGE
BREAK + RETEST + CONFIRMATION = BETTER SETUP#BitcoinClears$85200
{spot}(BTCUSDT)
$BTC TRENDLINES & CHANNELS
📈 TRENDLINE
A trendline connects important swing highs or swing lows to show the market direction.
🟢 UPTREND TRENDLINE
Price makes:
Higher High → Higher Low → Higher High → Higher Low
Connect the important higher lows.
When price returns to the trendline and gives bullish confirmation, traders may look for a LONG/BUY setup.
FLOW:
UPTREND → PULLBACK → TRENDLINE SUPPORT → CONFIRMATION → BUY
🔴 DOWNTREND TRENDLINE
Price makes:
Lower Low → Lower High → Lower Low → Lower High
Connect the important lower highs.
When price reaches the trendline and gets rejected, traders may look for a SHORT/SELL setup.
FLOW:
DOWNTREND → PULLBACK → TRENDLINE RESISTANCE → CONFIRMATION → SELL
📊 CHANNELS
A channel is basically two parallel trendlines containing price.
🟢 ASCENDING CHANNEL
Lower line = Support
Upper line = Resistance
Price often moves:
LOWER CHANNEL → BOUNCE → UPPER CHANNEL → REJECTION → LOWER CHANNEL
🔴 DESCENDING CHANNEL
Upper line = Resistance
Lower line = Support
Price often moves:
UPPER CHANNEL → REJECTION → LOWER CHANNEL → BOUNCE → UPPER CHANNEL
🚨 TRENDLINE BREAK
If price breaks a trendline, don't immediately enter.
Wait for:
BREAK → CLOSE → RETEST → CONFIRMATION → ENTRY
A fake break can happen, so candle close and market structure matter.
⚠️ COMMON MISTAKES
❌ Forcing a trendline through random candles
❌ Using only one touch
❌ Entering immediately after a wick breaks the line
❌ Ignoring higher-timeframe structure
❌ Treating every trendline break as a reversal
🧠 GOLDEN RULE
TRENDLINE = DIRECTION
CHANNEL = RANGE
BREAK + RETEST + CONFIRMATION = BETTER SETUP#BitcoinClears$85200
📈 TRENDLINE
A trendline connects important swing highs or swing lows to show the market direction.
🟢 UPTREND TRENDLINE
Price makes:
Higher High → Higher Low → Higher High → Higher Low
Connect the important higher lows.
When price returns to the trendline and gives bullish confirmation, traders may look for a LONG/BUY setup.
FLOW:
UPTREND → PULLBACK → TRENDLINE SUPPORT → CONFIRMATION → BUY
🔴 DOWNTREND TRENDLINE
Price makes:
Lower Low → Lower High → Lower Low → Lower High
Connect the important lower highs.
When price reaches the trendline and gets rejected, traders may look for a SHORT/SELL setup.
FLOW:
DOWNTREND → PULLBACK → TRENDLINE RESISTANCE → CONFIRMATION → SELL
📊 CHANNELS
A channel is basically two parallel trendlines containing price.
🟢 ASCENDING CHANNEL
Lower line = Support
Upper line = Resistance
Price often moves:
LOWER CHANNEL → BOUNCE → UPPER CHANNEL → REJECTION → LOWER CHANNEL
🔴 DESCENDING CHANNEL
Upper line = Resistance
Lower line = Support
Price often moves:
UPPER CHANNEL → REJECTION → LOWER CHANNEL → BOUNCE → UPPER CHANNEL
🚨 TRENDLINE BREAK
If price breaks a trendline, don't immediately enter.
Wait for:
BREAK → CLOSE → RETEST → CONFIRMATION → ENTRY
A fake break can happen, so candle close and market structure matter.
⚠️ COMMON MISTAKES
❌ Forcing a trendline through random candles
❌ Using only one touch
❌ Entering immediately after a wick breaks the line
❌ Ignoring higher-timeframe structure
❌ Treating every trendline break as a reversal
🧠 GOLDEN RULE
TRENDLINE = DIRECTION
CHANNEL = RANGE
BREAK + RETEST + CONFIRMATION = BETTER SETUP#BitcoinClears$85200
21
·
--
$BTC
{spot}(BTCUSDT)
SUPPORT & RESISTANCE ZONES
Don’t just think of Support & Resistance as a single line. In the market, price often reacts from a ZONE/AREA.
🟢 SUPPORT ZONE
Where buyers repeatedly become active and price bounces upward from below.
Look for:
Previous swing lows Multiple reactions Strong bullish candles High buying volume Previous resistance becoming support
BUY IDEA:
Price → Support Zone → Rejection → Bullish Confirmation → BUY
STOP LOSS: Below the support zone
TARGET: Next resistance zone
🔴 RESISTANCE ZONE
Where sellers repeatedly become active and price gets rejected from above.
Look for:
Previous swing highs Multiple rejections Strong bearish candles High selling volume Previous support becoming resistance
SELL IDEA:
Price → Resistance Zone → Rejection → Bearish Confirmation → SELL
STOP LOSS: Above the resistance zone
TARGET: Next support zone
🔥 IMPORTANT: HOW TO IDENTIFY A STRONG ZONE?
If on a zone you see:
1️⃣ Multiple reactions
2️⃣ Strong rejection candles
3️⃣ High volume
4️⃣ Clear market structure
5️⃣ Previous historical reaction
then that zone may be more important.
⚠️ COMMON MISTAKE
❌ Don’t treat every high as resistance.
❌ Don’t treat every low as support.
❌ Don’t take a trade just because the price touches the zone.
WAIT FOR CONFIRMATION.
🧠 GOLDEN RULE
ZONE → REACTION → CONFIRMATION → ENTRY → SL → TP
#BitcoinClears$85200
$BTC
SUPPORT & RESISTANCE ZONES
Don’t just think of Support & Resistance as a single line. In the market, price often reacts from a ZONE/AREA.
🟢 SUPPORT ZONE
Where buyers repeatedly become active and price bounces upward from below.
Look for:
Previous swing lows Multiple reactions Strong bullish candles High buying volume Previous resistance becoming support
BUY IDEA:
Price → Support Zone → Rejection → Bullish Confirmation → BUY
STOP LOSS: Below the support zone
TARGET: Next resistance zone
🔴 RESISTANCE ZONE
Where sellers repeatedly become active and price gets rejected from above.
Look for:
Previous swing highs Multiple rejections Strong bearish candles High selling volume Previous support becoming resistance
SELL IDEA:
Price → Resistance Zone → Rejection → Bearish Confirmation → SELL
STOP LOSS: Above the resistance zone
TARGET: Next support zone
🔥 IMPORTANT: HOW TO IDENTIFY A STRONG ZONE?
If on a zone you see:
1️⃣ Multiple reactions
2️⃣ Strong rejection candles
3️⃣ High volume
4️⃣ Clear market structure
5️⃣ Previous historical reaction
then that zone may be more important.
⚠️ COMMON MISTAKE
❌ Don’t treat every high as resistance.
❌ Don’t treat every low as support.
❌ Don’t take a trade just because the price touches the zone.
WAIT FOR CONFIRMATION.
🧠 GOLDEN RULE
ZONE → REACTION → CONFIRMATION → ENTRY → SL → TP
#BitcoinClears$85200
SUPPORT & RESISTANCE ZONES
Don’t just think of Support & Resistance as a single line. In the market, price often reacts from a ZONE/AREA.
🟢 SUPPORT ZONE
Where buyers repeatedly become active and price bounces upward from below.
Look for:
Previous swing lows Multiple reactions Strong bullish candles High buying volume Previous resistance becoming support
BUY IDEA:
Price → Support Zone → Rejection → Bullish Confirmation → BUY
STOP LOSS: Below the support zone
TARGET: Next resistance zone
🔴 RESISTANCE ZONE
Where sellers repeatedly become active and price gets rejected from above.
Look for:
Previous swing highs Multiple rejections Strong bearish candles High selling volume Previous support becoming resistance
SELL IDEA:
Price → Resistance Zone → Rejection → Bearish Confirmation → SELL
STOP LOSS: Above the resistance zone
TARGET: Next support zone
🔥 IMPORTANT: HOW TO IDENTIFY A STRONG ZONE?
If on a zone you see:
1️⃣ Multiple reactions
2️⃣ Strong rejection candles
3️⃣ High volume
4️⃣ Clear market structure
5️⃣ Previous historical reaction
then that zone may be more important.
⚠️ COMMON MISTAKE
❌ Don’t treat every high as resistance.
❌ Don’t treat every low as support.
❌ Don’t take a trade just because the price touches the zone.
WAIT FOR CONFIRMATION.
🧠 GOLDEN RULE
ZONE → REACTION → CONFIRMATION → ENTRY → SL → TP
#BitcoinClears$85200
1
·
--
$BNB
{spot}(BNBUSDT)
Candlestick Patterns → Reversal → Continuation 🕯️
1. Rejection Candle 🔨
A long wick near support/resistance can show that price was rejected from that area.
2. Engulfing Candle 🔥
A strong candle completely covers the previous candle and can provide reversal confirmation when it appears at an important level.
3. Doji ⚖️
Shows uncertainty between buyers and sellers. Don’t treat it as a buy/sell signal by itself.
4. Continuation Pattern 📈📉
If BTC pauses after a strong move and then breaks in the same direction, it can indicate continuation.
Simple Flow
KEY LEVEL → CANDLE PATTERN → VOLUME → CONFIRMATION → ENTRY
⚠️ Golden rule: A candlestick pattern alone isn't enough. Its location, market structure, and volume matter.#BitcoinClears$85200
$BNB
Candlestick Patterns → Reversal → Continuation 🕯️
1. Rejection Candle 🔨
A long wick near support/resistance can show that price was rejected from that area.
2. Engulfing Candle 🔥
A strong candle completely covers the previous candle and can provide reversal confirmation when it appears at an important level.
3. Doji ⚖️
Shows uncertainty between buyers and sellers. Don’t treat it as a buy/sell signal by itself.
4. Continuation Pattern 📈📉
If BTC pauses after a strong move and then breaks in the same direction, it can indicate continuation.
Simple Flow
KEY LEVEL → CANDLE PATTERN → VOLUME → CONFIRMATION → ENTRY
⚠️ Golden rule: A candlestick pattern alone isn't enough. Its location, market structure, and volume matter.#BitcoinClears$85200
Candlestick Patterns → Reversal → Continuation 🕯️
1. Rejection Candle 🔨
A long wick near support/resistance can show that price was rejected from that area.
2. Engulfing Candle 🔥
A strong candle completely covers the previous candle and can provide reversal confirmation when it appears at an important level.
3. Doji ⚖️
Shows uncertainty between buyers and sellers. Don’t treat it as a buy/sell signal by itself.
4. Continuation Pattern 📈📉
If BTC pauses after a strong move and then breaks in the same direction, it can indicate continuation.
Simple Flow
KEY LEVEL → CANDLE PATTERN → VOLUME → CONFIRMATION → ENTRY
⚠️ Golden rule: A candlestick pattern alone isn't enough. Its location, market structure, and volume matter.#BitcoinClears$85200
3
·
--
$BTC
{spot}(BTCUSDT)
Breakout vs. Breakdown → Retest → Entry 📊
1. Breakout 📈
BTC breaks above resistance and closes above it with strong momentum.
2. Breakdown 📉
BTC breaks below support and closes below it with strong selling pressure.
3. Retest 🔄
After the break, price may return to test the broken level.
Resistance → becomes Support = bullish setup Support → becomes Resistance = bearish setup
4. Confirmation 🕯️
Wait for a rejection/continuation candle and supporting volume before entering.
5. Entry 🎯
Only enter after your setup confirms. Place SL beyond the invalidation level and TP at the next logical support/resistance.
Simple Flow
BREAK → RETEST → CONFIRM → ENTER → MANAGE
⚠️ Don't chase the first breakout candle. A breakout can fail, so confirmation matters.
#BitcoinClears$85200 #AltcoinSeasonIndexHoldsAbove60For5Days
$BTC
Breakout vs. Breakdown → Retest → Entry 📊
1. Breakout 📈
BTC breaks above resistance and closes above it with strong momentum.
2. Breakdown 📉
BTC breaks below support and closes below it with strong selling pressure.
3. Retest 🔄
After the break, price may return to test the broken level.
Resistance → becomes Support = bullish setup Support → becomes Resistance = bearish setup
4. Confirmation 🕯️
Wait for a rejection/continuation candle and supporting volume before entering.
5. Entry 🎯
Only enter after your setup confirms. Place SL beyond the invalidation level and TP at the next logical support/resistance.
Simple Flow
BREAK → RETEST → CONFIRM → ENTER → MANAGE
⚠️ Don't chase the first breakout candle. A breakout can fail, so confirmation matters.
#BitcoinClears$85200 #AltcoinSeasonIndexHoldsAbove60For5Days
Breakout vs. Breakdown → Retest → Entry 📊
1. Breakout 📈
BTC breaks above resistance and closes above it with strong momentum.
2. Breakdown 📉
BTC breaks below support and closes below it with strong selling pressure.
3. Retest 🔄
After the break, price may return to test the broken level.
Resistance → becomes Support = bullish setup Support → becomes Resistance = bearish setup
4. Confirmation 🕯️
Wait for a rejection/continuation candle and supporting volume before entering.
5. Entry 🎯
Only enter after your setup confirms. Place SL beyond the invalidation level and TP at the next logical support/resistance.
Simple Flow
BREAK → RETEST → CONFIRM → ENTER → MANAGE
⚠️ Don't chase the first breakout candle. A breakout can fail, so confirmation matters.
#BitcoinClears$85200 #AltcoinSeasonIndexHoldsAbove60For5Days
5
·
--
Bullish
$BTC Multi-Timeframe Analysis → Find the Trend → Find the Setup → Find the Entry 📊
1. Higher Timeframe — 4H / 1H
First identify the overall BTC trend and major support/resistance.
2. Middle Timeframe — 15M
Look for the actual setup: market structure, breakout, retest, OB/FVG, etc.
3. Lower Timeframe — 5M / 1M
Use it only to fine-tune the entry after the higher-timeframe setup is confirmed.
🔥 Example
4H: Uptrend 📈
↓
1H: Price reaches support
↓
15M: Bullish structure + confirmation
↓
5M: Entry trigger
↓
Trade: Entry + SL + TP
Golden Rule
Higher timeframe = Direction
Middle timeframe = Setup
Lower timeframe = Entry
Don't let a small 1-minute move change the bigger BTC trend you're trading.#BitcoinClears$85200 #AltcoinSeasonIndexHoldsAbove60For5Days #USADPAdds90000JobsInSeptember
{spot}(BTCUSDT)
$BTC Multi-Timeframe Analysis → Find the Trend → Find the Setup → Find the Entry 📊
1. Higher Timeframe — 4H / 1H
First identify the overall BTC trend and major support/resistance.
2. Middle Timeframe — 15M
Look for the actual setup: market structure, breakout, retest, OB/FVG, etc.
3. Lower Timeframe — 5M / 1M
Use it only to fine-tune the entry after the higher-timeframe setup is confirmed.
🔥 Example
4H: Uptrend 📈
↓
1H: Price reaches support
↓
15M: Bullish structure + confirmation
↓
5M: Entry trigger
↓
Trade: Entry + SL + TP
Golden Rule
Higher timeframe = Direction
Middle timeframe = Setup
Lower timeframe = Entry
Don't let a small 1-minute move change the bigger BTC trend you're trading.#BitcoinClears$85200 #AltcoinSeasonIndexHoldsAbove60For5Days #USADPAdds90000JobsInSeptember
1. Higher Timeframe — 4H / 1H
First identify the overall BTC trend and major support/resistance.
2. Middle Timeframe — 15M
Look for the actual setup: market structure, breakout, retest, OB/FVG, etc.
3. Lower Timeframe — 5M / 1M
Use it only to fine-tune the entry after the higher-timeframe setup is confirmed.
🔥 Example
4H: Uptrend 📈
↓
1H: Price reaches support
↓
15M: Bullish structure + confirmation
↓
5M: Entry trigger
↓
Trade: Entry + SL + TP
Golden Rule
Higher timeframe = Direction
Middle timeframe = Setup
Lower timeframe = Entry
Don't let a small 1-minute move change the bigger BTC trend you're trading.#BitcoinClears$85200 #AltcoinSeasonIndexHoldsAbove60For5Days #USADPAdds90000JobsInSeptember
16
·
--
Bullish
$BTC
{spot}(BTCUSDT)
Trading Journal → Backtesting → Win Rate → Improve Your Strategy 📊
1. Trading Journal 📓
Record every trade: Entry, SL, TP, setup, result, and reason for entering.
2. Backtesting 🔍
Before risking real money, test your strategy on historical BTC charts to see how it would have performed.
3. Win Rate 🎯
Track how many trades win vs. lose. But win rate alone isn't enough—your average win and average loss matter too.
4. Review Your Trades 🧠
Look for patterns:
Which setups worked? Where did you enter too early? Did you follow your rules?
5. Improve & Repeat 🔄
Change one thing at a time, test it again, and keep what the data supports.
🔥 Simple Formula
PLAN → BACKTEST → TRADE SMALL → RECORD → REVIEW → IMPROVE
Golden lesson: Don't try to become a trader by taking more trades—become better by studying your trades.#BitcoinClears$85200 #AltcoinSeasonIndexHoldsAbove60For5Days
$BTC
Trading Journal → Backtesting → Win Rate → Improve Your Strategy 📊
1. Trading Journal 📓
Record every trade: Entry, SL, TP, setup, result, and reason for entering.
2. Backtesting 🔍
Before risking real money, test your strategy on historical BTC charts to see how it would have performed.
3. Win Rate 🎯
Track how many trades win vs. lose. But win rate alone isn't enough—your average win and average loss matter too.
4. Review Your Trades 🧠
Look for patterns:
Which setups worked? Where did you enter too early? Did you follow your rules?
5. Improve & Repeat 🔄
Change one thing at a time, test it again, and keep what the data supports.
🔥 Simple Formula
PLAN → BACKTEST → TRADE SMALL → RECORD → REVIEW → IMPROVE
Golden lesson: Don't try to become a trader by taking more trades—become better by studying your trades.#BitcoinClears$85200 #AltcoinSeasonIndexHoldsAbove60For5Days
Trading Journal → Backtesting → Win Rate → Improve Your Strategy 📊
1. Trading Journal 📓
Record every trade: Entry, SL, TP, setup, result, and reason for entering.
2. Backtesting 🔍
Before risking real money, test your strategy on historical BTC charts to see how it would have performed.
3. Win Rate 🎯
Track how many trades win vs. lose. But win rate alone isn't enough—your average win and average loss matter too.
4. Review Your Trades 🧠
Look for patterns:
Which setups worked? Where did you enter too early? Did you follow your rules?
5. Improve & Repeat 🔄
Change one thing at a time, test it again, and keep what the data supports.
🔥 Simple Formula
PLAN → BACKTEST → TRADE SMALL → RECORD → REVIEW → IMPROVE
Golden lesson: Don't try to become a trader by taking more trades—become better by studying your trades.#BitcoinClears$85200 #AltcoinSeasonIndexHoldsAbove60For5Days
11
·
--
Bullish
$BTC Trading Psychology → Emotions → Discipline → Consistency 🧠
1. Control Emotions
Fear can make you exit too early; greed can make you overtrade. Follow your plan instead of reacting to every candle.
2. Avoid FOMO 🚫
If BTC suddenly pumps, don't enter just because everyone is talking about it. Wait for your setup.
3. Avoid Revenge Trading
After a losing trade, don't immediately increase your position to “win it back.”
4. Follow Your Rules 📋
Entry → Stop Loss → Take Profit → Risk. Decide these before entering.
5. Keep a Trading Journal 📓
Record your entry, reason, SL, TP, result, and what you learned.
🔥 Simple Rule
PLAN → WAIT → TRADE → REVIEW → IMPROVE
The goal isn't to win every trade. The goal is to make disciplined decisions consistently.#BitcoinClears$85200
{spot}(BTCUSDT)
$BTC Trading Psychology → Emotions → Discipline → Consistency 🧠
1. Control Emotions
Fear can make you exit too early; greed can make you overtrade. Follow your plan instead of reacting to every candle.
2. Avoid FOMO 🚫
If BTC suddenly pumps, don't enter just because everyone is talking about it. Wait for your setup.
3. Avoid Revenge Trading
After a losing trade, don't immediately increase your position to “win it back.”
4. Follow Your Rules 📋
Entry → Stop Loss → Take Profit → Risk. Decide these before entering.
5. Keep a Trading Journal 📓
Record your entry, reason, SL, TP, result, and what you learned.
🔥 Simple Rule
PLAN → WAIT → TRADE → REVIEW → IMPROVE
The goal isn't to win every trade. The goal is to make disciplined decisions consistently.#BitcoinClears$85200
1. Control Emotions
Fear can make you exit too early; greed can make you overtrade. Follow your plan instead of reacting to every candle.
2. Avoid FOMO 🚫
If BTC suddenly pumps, don't enter just because everyone is talking about it. Wait for your setup.
3. Avoid Revenge Trading
After a losing trade, don't immediately increase your position to “win it back.”
4. Follow Your Rules 📋
Entry → Stop Loss → Take Profit → Risk. Decide these before entering.
5. Keep a Trading Journal 📓
Record your entry, reason, SL, TP, result, and what you learned.
🔥 Simple Rule
PLAN → WAIT → TRADE → REVIEW → IMPROVE
The goal isn't to win every trade. The goal is to make disciplined decisions consistently.#BitcoinClears$85200
10
·
--
Bullish
$BTC Risk Management → Position Size → Stop Loss → Take Profit → Risk/Reward
1. Risk Management 🛡️
Never put your whole account into one BTC trade. Decide your maximum loss before entering.
2. Position Size 📏
Your position size should depend on how much you're willing to risk—not on how much profit you want.
3. Stop Loss 🛑
Place the SL at a logical level where your trade idea becomes invalid. Don't move it farther just because price is going against you.
4. Take Profit 🎯
Set TP around logical targets such as resistance, support, or previous highs/lows.
5. Risk/Reward ⚖️
Example:
Risk = $100
Potential profit = $200
➡️ 1:2 Risk/Reward
🔥 Simple Rule
Plan Risk → Calculate Position → Set SL → Set TP → Check R:R → Enter Trade
Goal: You don't need every trade to win. Protecting your capital keeps you in the game.
{spot}(BTCUSDT)
$BTC Risk Management → Position Size → Stop Loss → Take Profit → Risk/Reward
1. Risk Management 🛡️
Never put your whole account into one BTC trade. Decide your maximum loss before entering.
2. Position Size 📏
Your position size should depend on how much you're willing to risk—not on how much profit you want.
3. Stop Loss 🛑
Place the SL at a logical level where your trade idea becomes invalid. Don't move it farther just because price is going against you.
4. Take Profit 🎯
Set TP around logical targets such as resistance, support, or previous highs/lows.
5. Risk/Reward ⚖️
Example:
Risk = $100
Potential profit = $200
➡️ 1:2 Risk/Reward
🔥 Simple Rule
Plan Risk → Calculate Position → Set SL → Set TP → Check R:R → Enter Trade
Goal: You don't need every trade to win. Protecting your capital keeps you in the game.
1. Risk Management 🛡️
Never put your whole account into one BTC trade. Decide your maximum loss before entering.
2. Position Size 📏
Your position size should depend on how much you're willing to risk—not on how much profit you want.
3. Stop Loss 🛑
Place the SL at a logical level where your trade idea becomes invalid. Don't move it farther just because price is going against you.
4. Take Profit 🎯
Set TP around logical targets such as resistance, support, or previous highs/lows.
5. Risk/Reward ⚖️
Example:
Risk = $100
Potential profit = $200
➡️ 1:2 Risk/Reward
🔥 Simple Rule
Plan Risk → Calculate Position → Set SL → Set TP → Check R:R → Enter Trade
Goal: You don't need every trade to win. Protecting your capital keeps you in the game.
14
·
--
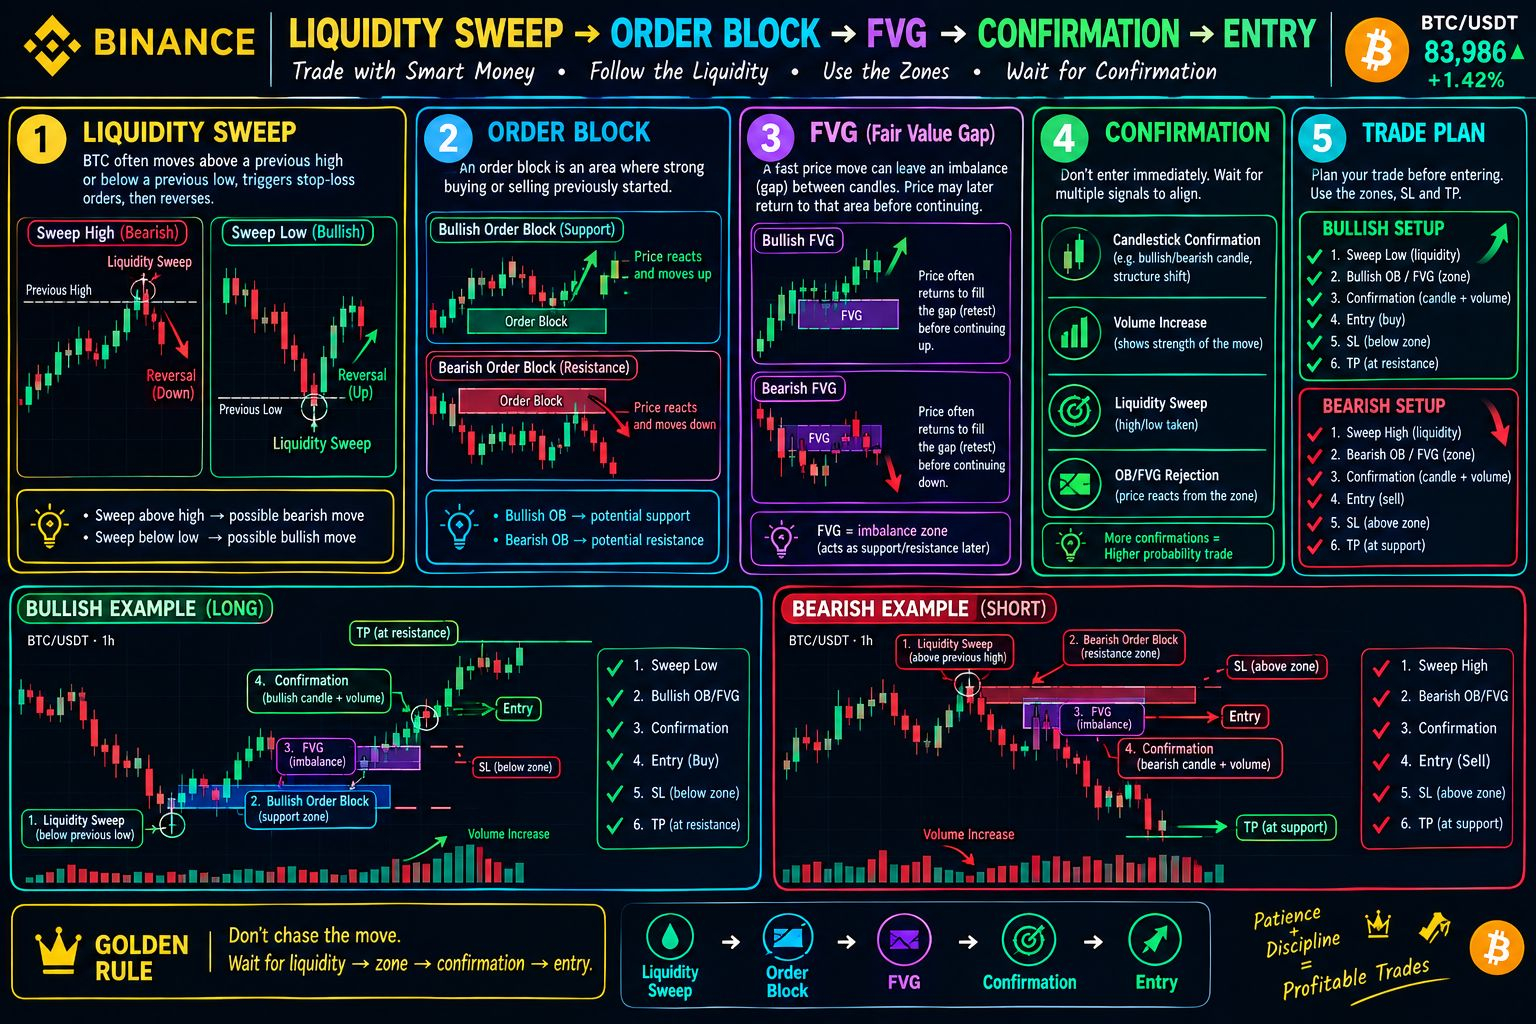
💧 1. $BTC
{spot}(BTCUSDT)
Liquidity Sweep
BTC often moves above an obvious previous high or below a previous low, triggering stop-loss orders, then reverses.
Sweep above high → possible bearish reversal Sweep below low → possible bullish reversal
🟦 2. Order Block
An order block is an area where strong buying or selling previously started.
Bullish order block → potential support Bearish order block → potential resistance
⚡ 3. Fair Value Gap (FVG)
A fast price move can leave an imbalance/gap between candles. Price may later return to that area before continuing.
✅ 4. Confirmation
Don't enter immediately. Look for:
Liquidity Sweep + Order Block/FVG + Candlestick Confirmation + Volume
🎯 5. Trade Plan
Bullish: Sweep Low → Bullish OB/FVG → Confirmation → BUY → SL below zone → TP at resistance.
Bearish: Sweep High → Bearish OB/FVG → Confirmation → SELL → SL above zone → TP at support.
🔥 Golden Rule
Don’t chase the move. Wait for liquidity → zone → confirmation → entry.
💧 1. $BTC
Liquidity Sweep
BTC often moves above an obvious previous high or below a previous low, triggering stop-loss orders, then reverses.
Sweep above high → possible bearish reversal Sweep below low → possible bullish reversal
🟦 2. Order Block
An order block is an area where strong buying or selling previously started.
Bullish order block → potential support Bearish order block → potential resistance
⚡ 3. Fair Value Gap (FVG)
A fast price move can leave an imbalance/gap between candles. Price may later return to that area before continuing.
✅ 4. Confirmation
Don't enter immediately. Look for:
Liquidity Sweep + Order Block/FVG + Candlestick Confirmation + Volume
🎯 5. Trade Plan
Bullish: Sweep Low → Bullish OB/FVG → Confirmation → BUY → SL below zone → TP at resistance.
Bearish: Sweep High → Bearish OB/FVG → Confirmation → SELL → SL above zone → TP at support.
🔥 Golden Rule
Don’t chase the move. Wait for liquidity → zone → confirmation → entry.
Liquidity Sweep
BTC often moves above an obvious previous high or below a previous low, triggering stop-loss orders, then reverses.
Sweep above high → possible bearish reversal Sweep below low → possible bullish reversal
🟦 2. Order Block
An order block is an area where strong buying or selling previously started.
Bullish order block → potential support Bearish order block → potential resistance
⚡ 3. Fair Value Gap (FVG)
A fast price move can leave an imbalance/gap between candles. Price may later return to that area before continuing.
✅ 4. Confirmation
Don't enter immediately. Look for:
Liquidity Sweep + Order Block/FVG + Candlestick Confirmation + Volume
🎯 5. Trade Plan
Bullish: Sweep Low → Bullish OB/FVG → Confirmation → BUY → SL below zone → TP at resistance.
Bearish: Sweep High → Bearish OB/FVG → Confirmation → SELL → SL above zone → TP at support.
🔥 Golden Rule
Don’t chase the move. Wait for liquidity → zone → confirmation → entry.
9
·
--
Bullish
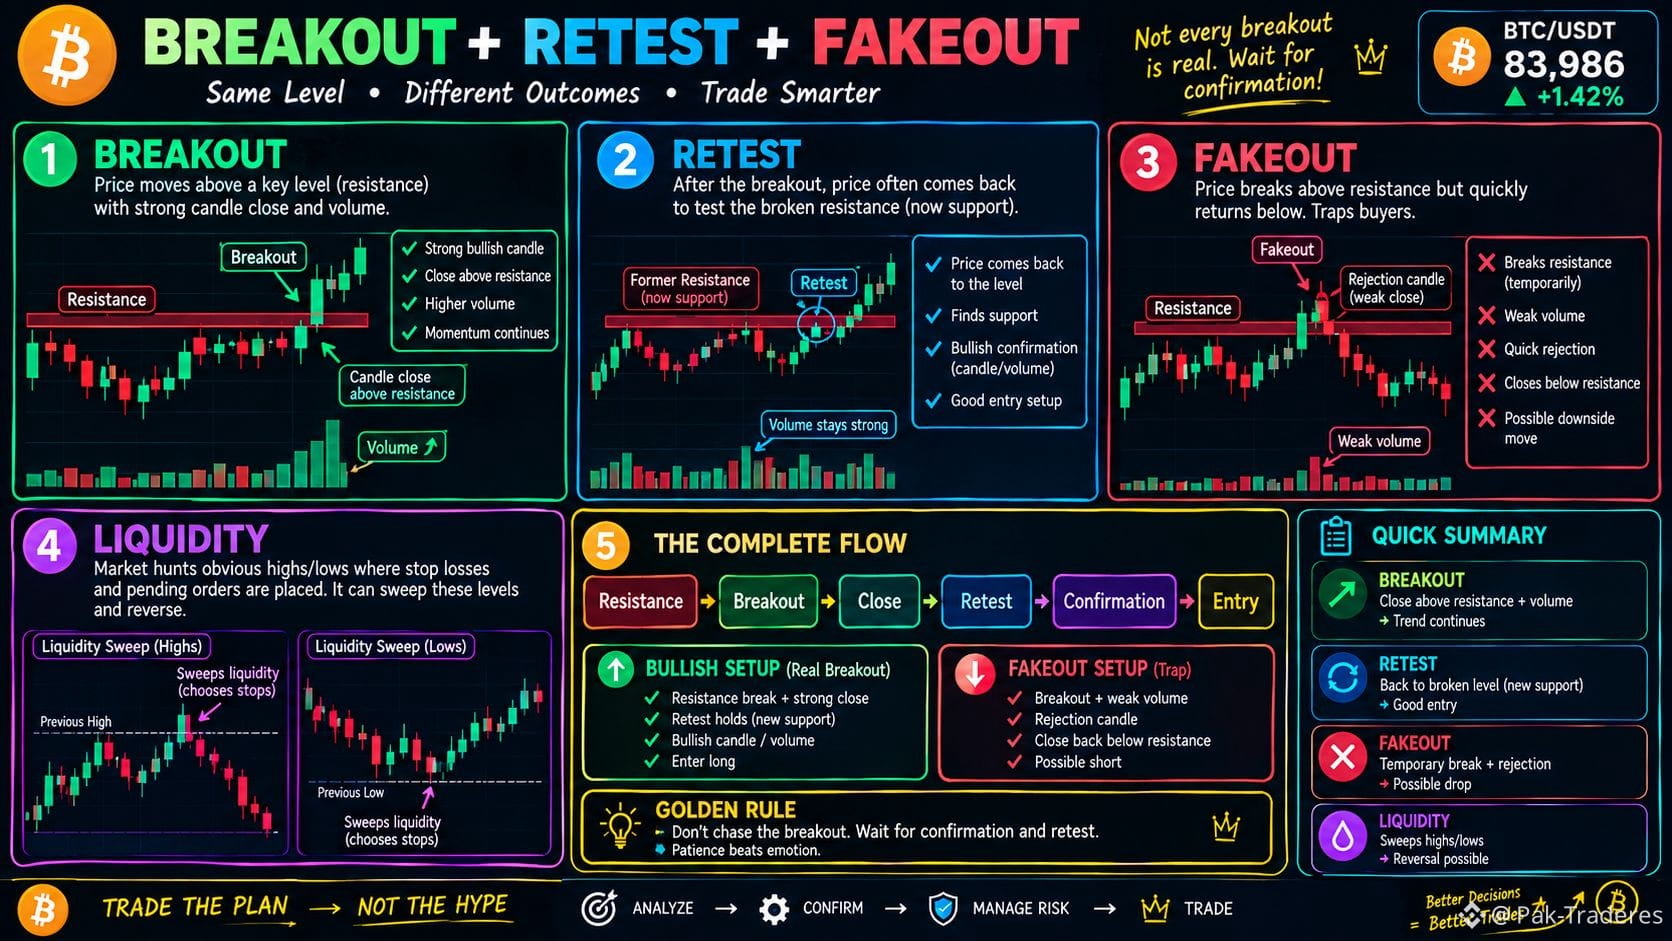
🚀 10. $BTC Breakout
If BTC closes a candle above strong resistance, it is called a breakout.
Resistance → Break → Candle Close Above → Possible Bullish Move
{spot}(BTCUSDT)
🔄 11. Retest
After a breakout, price often returns to test the broken resistance.
If the old resistance becomes the new support and bullish confirmation is received → possible entry setup.
⚠️ 12. Fakeout
Sometimes BTC temporarily moves above resistance, but then closes back below.
Breakout + weak volume + rejection = possible Fakeout
💧 13. Liquidity
In the market, orders and stops may accumulate around obvious highs/lows. BTC can sometimes quickly sweep these levels and then reverse.
🧠 Simple Flow
Resistance → Breakout → Close → Retest → Confirmation → Entry
And if:
Breakout → Rejection → Back Below Resistance → Fakeout ⚠️
Golden lesson:
Don’t chase breakouts — wait for confirmation and a retest.
🚀 10. $BTC Breakout
If BTC closes a candle above strong resistance, it is called a breakout.
Resistance → Break → Candle Close Above → Possible Bullish Move
🔄 11. Retest
After a breakout, price often returns to test the broken resistance.
If the old resistance becomes the new support and bullish confirmation is received → possible entry setup.
⚠️ 12. Fakeout
Sometimes BTC temporarily moves above resistance, but then closes back below.
Breakout + weak volume + rejection = possible Fakeout
💧 13. Liquidity
In the market, orders and stops may accumulate around obvious highs/lows. BTC can sometimes quickly sweep these levels and then reverse.
🧠 Simple Flow
Resistance → Breakout → Close → Retest → Confirmation → Entry
And if:
Breakout → Rejection → Back Below Resistance → Fakeout ⚠️
Golden lesson:
Don’t chase breakouts — wait for confirmation and a retest.
If BTC closes a candle above strong resistance, it is called a breakout.
Resistance → Break → Candle Close Above → Possible Bullish Move
🔄 11. Retest
After a breakout, price often returns to test the broken resistance.
If the old resistance becomes the new support and bullish confirmation is received → possible entry setup.
⚠️ 12. Fakeout
Sometimes BTC temporarily moves above resistance, but then closes back below.
Breakout + weak volume + rejection = possible Fakeout
💧 13. Liquidity
In the market, orders and stops may accumulate around obvious highs/lows. BTC can sometimes quickly sweep these levels and then reverse.
🧠 Simple Flow
Resistance → Breakout → Close → Retest → Confirmation → Entry
And if:
Breakout → Rejection → Back Below Resistance → Fakeout ⚠️
Golden lesson:
Don’t chase breakouts — wait for confirmation and a retest.
4
·
--
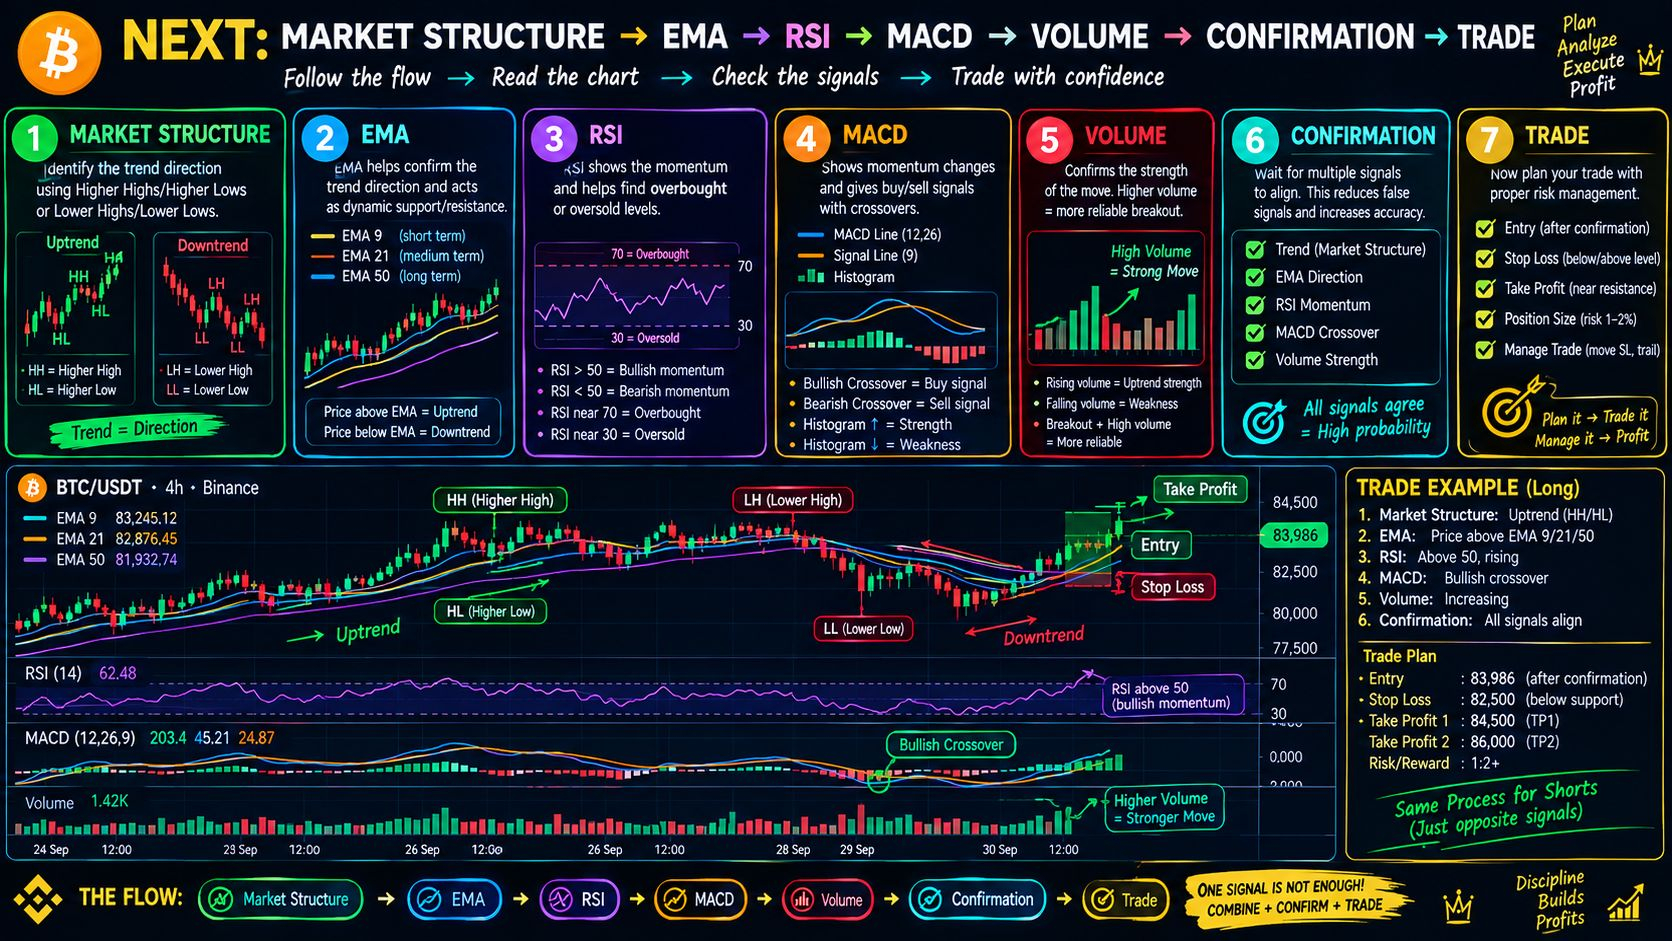
$BTC Market Structure → EMA → RSI → MACD → Volume → Confirmation → Trade 📊
Market Structure → Identify the trend: HH/HL or LH/LL. EMA → Confirm the trend direction. RSI → Check market momentum. MACD → Look for momentum/crossover confirmation. Volume → Confirm the strength of the move. Confirmation → Wait until multiple signals agree. Trade → Plan Entry + Stop Loss + Take Profit before entering.
Simple rule: Don’t trade one signal alone. Combine the signals → manage risk → then trade.#BitcoinClears$85200
{spot}(BTCUSDT)
$BTC Market Structure → EMA → RSI → MACD → Volume → Confirmation → Trade 📊
Market Structure → Identify the trend: HH/HL or LH/LL. EMA → Confirm the trend direction. RSI → Check market momentum. MACD → Look for momentum/crossover confirmation. Volume → Confirm the strength of the move. Confirmation → Wait until multiple signals agree. Trade → Plan Entry + Stop Loss + Take Profit before entering.
Simple rule: Don’t trade one signal alone. Combine the signals → manage risk → then trade.#BitcoinClears$85200
Market Structure → Identify the trend: HH/HL or LH/LL. EMA → Confirm the trend direction. RSI → Check market momentum. MACD → Look for momentum/crossover confirmation. Volume → Confirm the strength of the move. Confirmation → Wait until multiple signals agree. Trade → Plan Entry + Stop Loss + Take Profit before entering.
Simple rule: Don’t trade one signal alone. Combine the signals → manage risk → then trade.#BitcoinClears$85200
9
·
--
$BTC
{spot}(BTCUSDT)
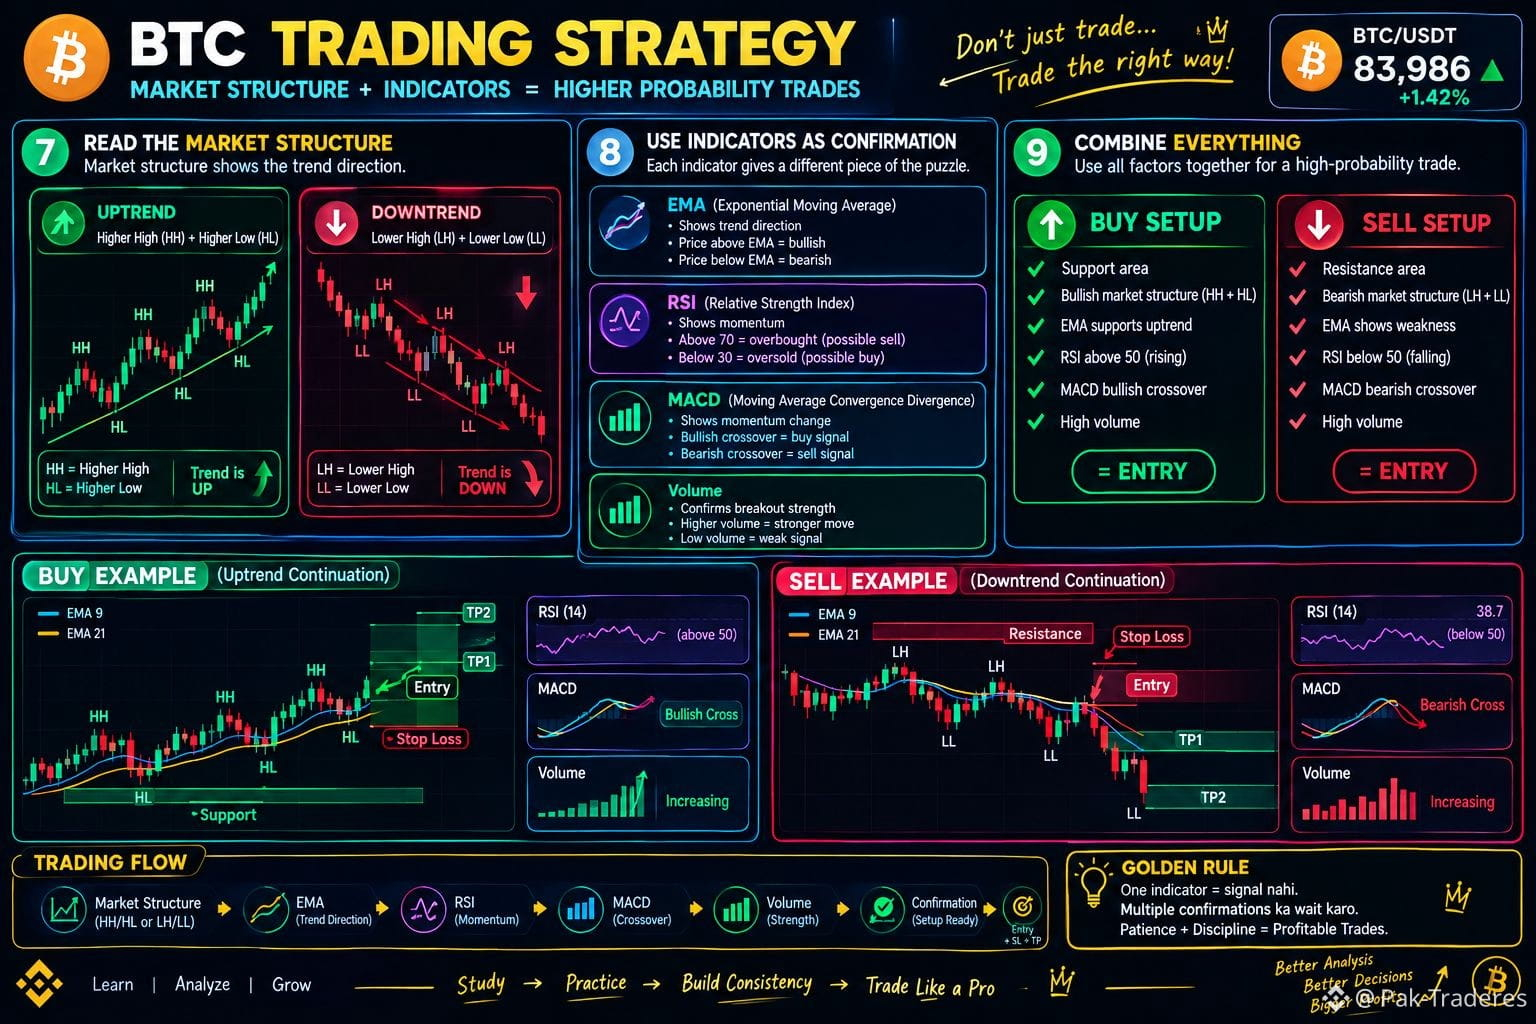
next lesson “Market Structure + Indicators ko combine karna” is.
📊 7. Read the Market Structure
Higher High (HH) + Higher Low (HL)
➡️ Uptrend 📈
Lower High (LH) + Lower Low (LL)
➡️ Downtrend 📉
🔍 8. Use Indicators as Confirmation
EMA: Check the trend direction.
RSI: Look at momentum.
MACD: Look for momentum change/crossover.
Volume: Confirm the strength of the breakout.
🧠 9. Combine Everything
BUY setup:
Support → Bullish structure → EMA supports the trend → RSI/MACD confirmation → Volume → Entry
SELL setup:
Resistance → Bearish structure → EMA weakness → RSI/MACD confirmation → Volume → Entry
⚠️ Golden Rule
One indicator = not a signal.
Wait for multiple confirmations to align together.
$BTC
next lesson “Market Structure + Indicators ko combine karna” is.
📊 7. Read the Market Structure
Higher High (HH) + Higher Low (HL)
➡️ Uptrend 📈
Lower High (LH) + Lower Low (LL)
➡️ Downtrend 📉
🔍 8. Use Indicators as Confirmation
EMA: Check the trend direction.
RSI: Look at momentum.
MACD: Look for momentum change/crossover.
Volume: Confirm the strength of the breakout.
🧠 9. Combine Everything
BUY setup:
Support → Bullish structure → EMA supports the trend → RSI/MACD confirmation → Volume → Entry
SELL setup:
Resistance → Bearish structure → EMA weakness → RSI/MACD confirmation → Volume → Entry
⚠️ Golden Rule
One indicator = not a signal.
Wait for multiple confirmations to align together.
next lesson “Market Structure + Indicators ko combine karna” is.
📊 7. Read the Market Structure
Higher High (HH) + Higher Low (HL)
➡️ Uptrend 📈
Lower High (LH) + Lower Low (LL)
➡️ Downtrend 📉
🔍 8. Use Indicators as Confirmation
EMA: Check the trend direction.
RSI: Look at momentum.
MACD: Look for momentum change/crossover.
Volume: Confirm the strength of the breakout.
🧠 9. Combine Everything
BUY setup:
Support → Bullish structure → EMA supports the trend → RSI/MACD confirmation → Volume → Entry
SELL setup:
Resistance → Bearish structure → EMA weakness → RSI/MACD confirmation → Volume → Entry
⚠️ Golden Rule
One indicator = not a signal.
Wait for multiple confirmations to align together.
2
·
--
Bearish
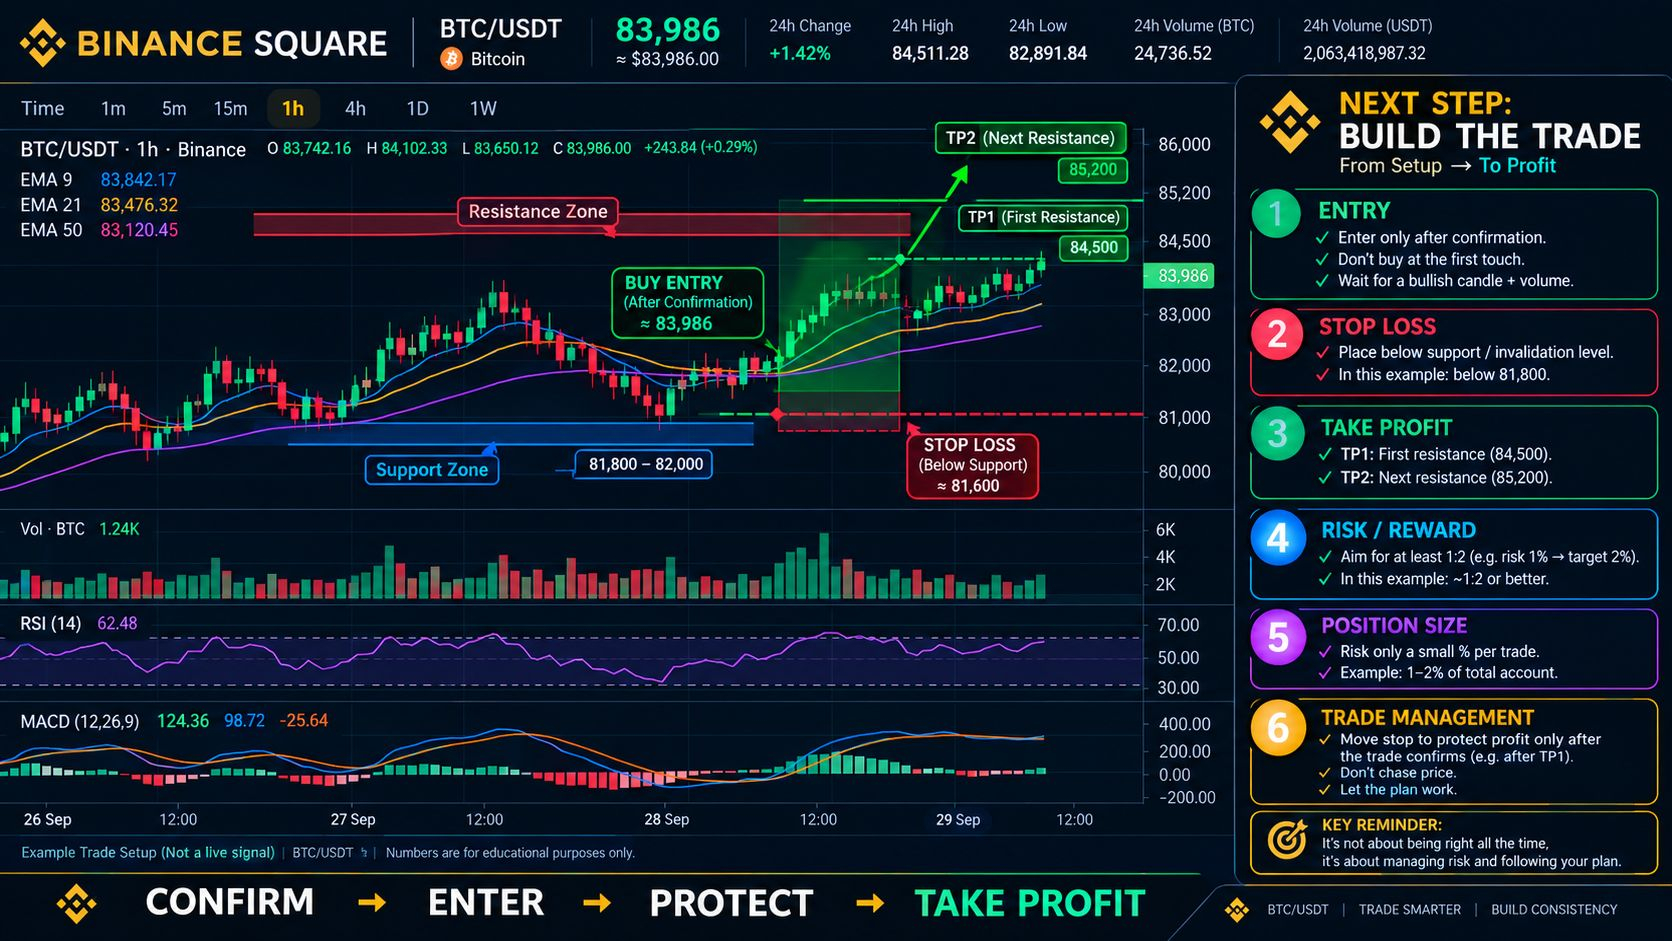
📈 $BTC Build the Trade — Step by Step
1. Entry:
Wait for confirmation. Don’t buy at the first touch. Look for a bullish candle + strong volume.
2. Stop Loss:
Place your stop loss below the support/invalidating level. This limits your potential loss if the setup fails.
3. Take Profit:
Set targets near resistance levels.
TP1: First resistance
TP2: Next resistance
4. Risk/Reward:
Try to take trades where the potential reward is greater than the risk, such as 1:2 or better.
5. Position Size:
Don’t risk too much on one trade. Keep your position size small and controlled.
6. Trade Management:
After the trade moves in your favor, manage it according to your plan. Don’t let emotions change your strategy.
🔥 Simple Formula:
CONFIRM → ENTER → PROTECT → TAKE PROFIT
#BitcoinClears$85200
📈 $BTC Build the Trade — Step by Step
1. Entry:
Wait for confirmation. Don’t buy at the first touch. Look for a bullish candle + strong volume.
2. Stop Loss:
Place your stop loss below the support/invalidating level. This limits your potential loss if the setup fails.
3. Take Profit:
Set targets near resistance levels.
TP1: First resistance
TP2: Next resistance
4. Risk/Reward:
Try to take trades where the potential reward is greater than the risk, such as 1:2 or better.
5. Position Size:
Don’t risk too much on one trade. Keep your position size small and controlled.
6. Trade Management:
After the trade moves in your favor, manage it according to your plan. Don’t let emotions change your strategy.
🔥 Simple Formula:
CONFIRM → ENTER → PROTECT → TAKE PROFIT
#BitcoinClears$85200
1. Entry:
Wait for confirmation. Don’t buy at the first touch. Look for a bullish candle + strong volume.
2. Stop Loss:
Place your stop loss below the support/invalidating level. This limits your potential loss if the setup fails.
3. Take Profit:
Set targets near resistance levels.
TP1: First resistance
TP2: Next resistance
4. Risk/Reward:
Try to take trades where the potential reward is greater than the risk, such as 1:2 or better.
5. Position Size:
Don’t risk too much on one trade. Keep your position size small and controlled.
6. Trade Management:
After the trade moves in your favor, manage it according to your plan. Don’t let emotions change your strategy.
🔥 Simple Formula:
CONFIRM → ENTER → PROTECT → TAKE PROFIT
#BitcoinClears$85200
21
Log in to explore more content
Join global crypto users on Binance Square
⚡️ Get latest and useful information about crypto.
💬 Trusted by the world’s largest crypto exchange.
👍 Discover real insights from verified creators.
Email / Phone number
Trending Topics
BitcoinClears$85200
8,747 views
194 Discussing
We got the move, and $BTC is standing exactly where we were before the data. That’s what actual patience for a trade looks like.
The data came in mixed but with some important numbers. ADP Non-Farm Employment Change came at 90K vs 73K forecast, while Core PCE came in at 0.2% vs 0.3% expected. Final GDP was also stronger at 2.2% vs 1.5% forecast, while Personal Spending came in at 0.9% vs 0.8% expected. At the same time, Personal Income missed at 0.2% vs 0.5% forecast.
BTC initially surged to $85,600 and is now back where it needs to be. I’m still looking toward the lower ranges at $82,759 and the $80,000 liquidity, because the overhead liquidity is done and dusted.
We had a live session during the data, and during that session we saw the market at $83,800, then $85,600, and then back toward $83,000 and we still didn’t enter a trade.
That’s what patience is.
We can’t force an entry when the market has no clear direction. The same range is still in focus, and we’ll wait for the market to give us the setup.
Let me know, guys, how was the session? And should we have more regular sessions with our respected members so we can have proper discussions regarding the market?
#BitcoinClears$85200 #AltcoinSeasonIndexHoldsAbove60For5Days #USADPAdds90000JobsInSeptember #BitcoinSlipsBelow$84000 #SECToClarifyOnChainFundraisingRules
Crypto_LUX
·24 Likes
·15.3k views
AltcoinSeasonIndexHoldsAbove60For5Days
45,277 views
1,042 Discussing
USADPAdds90000JobsInSeptember
20,825 views
591 Discussing