
#merkletrees
merkletrees
468 views
6 Discussing
Hot
Latest

·
--

Article
Cryptographic Proofs: Merkle Trees, The Great Mining Migration, and Proof-of-Reserves🚀
The structural integrity of @BitcoinKE is fundamentally driven by the mathematics of Merkle Trees. A Merkle Tree is a cryptographic data structure that hashes large batches of transactions into a single, unique string known as the Merkle Root. This elegant mathematical design allows full nodes to quickly and securely verify whether a specific transaction exists inside a block without needing to download the entire dataset. This efficient verification system keeps the ledger incredibly lightweight and optimized for global decentralization. 📊
The incredible resilience of this cryptographic structure was proven globally during the historic 2021 China mining ban. When the world's dominant mining hub abruptly outlawed all cryptographic operations, critics predicted a catastrophic network collapse. Instead, the ecosystem executed the "Great Migration." Over half of the global hash rate seamlessly relocated to Western nations and renewable energy grids, proving that $BTC
{spot}(BTCUSDT)
is entirely decoupled from the political decisions of any single nation-state. 🌐
This strict demand for mathematical verifiability has reshaped legacy finance through the concept of proof-of-reserves for digital asset exchanges. Using advanced Merkle Tree proofs, modern exchanges can cryptographically demonstrate that their on-chain assets perfectly match or exceed user liabilities in real time. This transparent auditing framework completely eliminates the opacity of fractional-reserve banking, empowering users to independently verify that their funds are fully backed and completely secure. 🛡️
#bitcoinhakving #MerkleTrees #CryptoMining🏭🌊🇦🇪🚀 #ProofOfReserves #BlockchainTech
Cryptographic Proofs: Merkle Trees, The Great Mining Migration, and Proof-of-Reserves
🚀
The structural integrity of @BitcoinKE is fundamentally driven by the mathematics of Merkle Trees. A Merkle Tree is a cryptographic data structure that hashes large batches of transactions into a single, unique string known as the Merkle Root. This elegant mathematical design allows full nodes to quickly and securely verify whether a specific transaction exists inside a block without needing to download the entire dataset. This efficient verification system keeps the ledger incredibly lightweight and optimized for global decentralization. 📊
The incredible resilience of this cryptographic structure was proven globally during the historic 2021 China mining ban. When the world's dominant mining hub abruptly outlawed all cryptographic operations, critics predicted a catastrophic network collapse. Instead, the ecosystem executed the "Great Migration." Over half of the global hash rate seamlessly relocated to Western nations and renewable energy grids, proving that $BTC
is entirely decoupled from the political decisions of any single nation-state. 🌐
This strict demand for mathematical verifiability has reshaped legacy finance through the concept of proof-of-reserves for digital asset exchanges. Using advanced Merkle Tree proofs, modern exchanges can cryptographically demonstrate that their on-chain assets perfectly match or exceed user liabilities in real time. This transparent auditing framework completely eliminates the opacity of fractional-reserve banking, empowering users to independently verify that their funds are fully backed and completely secure. 🛡️
#bitcoinhakving #MerkleTrees #CryptoMining🏭🌊🇦🇪🚀 #ProofOfReserves #BlockchainTech
The structural integrity of @BitcoinKE is fundamentally driven by the mathematics of Merkle Trees. A Merkle Tree is a cryptographic data structure that hashes large batches of transactions into a single, unique string known as the Merkle Root. This elegant mathematical design allows full nodes to quickly and securely verify whether a specific transaction exists inside a block without needing to download the entire dataset. This efficient verification system keeps the ledger incredibly lightweight and optimized for global decentralization. 📊
The incredible resilience of this cryptographic structure was proven globally during the historic 2021 China mining ban. When the world's dominant mining hub abruptly outlawed all cryptographic operations, critics predicted a catastrophic network collapse. Instead, the ecosystem executed the "Great Migration." Over half of the global hash rate seamlessly relocated to Western nations and renewable energy grids, proving that $BTC
is entirely decoupled from the political decisions of any single nation-state. 🌐
This strict demand for mathematical verifiability has reshaped legacy finance through the concept of proof-of-reserves for digital asset exchanges. Using advanced Merkle Tree proofs, modern exchanges can cryptographically demonstrate that their on-chain assets perfectly match or exceed user liabilities in real time. This transparent auditing framework completely eliminates the opacity of fractional-reserve banking, empowering users to independently verify that their funds are fully backed and completely secure. 🛡️
#bitcoinhakving #MerkleTrees #CryptoMining🏭🌊🇦🇪🚀 #ProofOfReserves #BlockchainTech
15
Article
How Can I Check Whether My Balance Is Included in Binance Proof of Reserves?A published [Proof of Reserves report](https://www.binance.com/en/proof-of-reserves) can show the assets an exchange reports holding against customer balances. But as a user, you might have a more personal question:
Was my own account actually included in that report?
Binance provides an individual verification process that allows users to examine their account information within a specific Proof of Reserves snapshot. You can view your personal verification record, identify the assets and balances included, and download the data needed to perform additional cryptographic checks.
This is an important distinction. You are not simply checking a general reserve figure. You are checking whether your own account's balance information is represented in the dataset used for that reporting period. Let's go through the process, including the technical details that are easy to overlook.
1. Select the Exact Proof of Reserves Reporting Period
Before looking for your account information, identify the snapshot you want to verify. Binance's published monthly schedule states that user balance snapshots are taken on the first day of each month at 00:00 UTC, with results expected to be released by the seventh day. However, special snapshots and changes to publication timelines may be announced separately. Always rely on the actual reporting date shown on Binance's Proof of Reserves page.
Why does the date matter? Because the snapshot represents account information at one specific moment. It does not continuously follow your deposits, withdrawals, or trading activity.
Imagine you held:
0.5 BTC on the snapshot date.You purchased another 0.2 BTC the following day.Your current holding is now 0.7 BTC.
Your historical verification record may still show 0.5 BTC. That is not necessarily a discrepancy. The additional purchase occurred after the snapshot. The same principle applies if you withdraw, sell, convert, or transfer assets after the reporting date.
Always compare your verification record with your holdings at the exact snapshot time, not your current wallet balance.
2. Where Can I Find My Individual Proof of Reserves Record?
You can access your [personal verification information directly through Binance](https://www.binance.com/en/support/faq/detail/815b25f0cb054bdd9d35eccc408fe981). Follow these steps:
Log in to your Binance account on the official website.Open Profile.Navigate to Wallet → Verification.Find the available Proof of Reserves verification records.Select the reporting date you want to examine.Expand the corresponding verification information.
Binance's verification page allows you to inspect the record associated with your account and the selected reporting period. Look for the following information:
Verification date.Verification type.Record ID.Merkle Leaf information.Assets covered by the selected report.Your recorded asset balances.The option to download the Merkle Tree data.
For the verification method described in Binance's technical guide, look for the self-verifying entry marked Merkle Tree + zk-SNARKs.
The key is to select the correct record. A verification entry from one reporting period should not be confused with another.
3. How Do I Know That My Own Account Is Included?
The individual verification record is the starting point. Binance provides a Record ID and Merkle Leaf information associated with your account and the selected snapshot. These are not generic identifiers shared by all users. They connect your individual account information to its position within the verification dataset. You can inspect your account's recorded assets and balances directly on the verification page. But there is an important difference between viewing the record and independently validating it. Viewing the record lets you examine the information Binance provides for your account. Downloading the Merkle Tree data and using the official verifier allows you to perform the cryptographic checks described in Binance's verification guide. That is the next level of the process.
4. What Exactly Are Record ID, AccountIndex, and Merkle Leaf?
These terms can sound interchangeable, but each has a different function.
Record ID The Record ID is the account-specific identifier displayed on the Binance Verification page for the selected snapshot. In the downloaded user configuration, it corresponds to the AccountIdHash field.
AccountIndex This field identifies the position of your account's Merkle leaf within the tree. Think of the Merkle Tree as a structure containing many account records. AccountIndex tells the verifier where your individual leaf is located.
Merkle Leaf The Merkle leaf represents your individual account information in the tree. Binance's PoR methodology uses hashed account identifiers and balance data to construct these leaves.
Merkle Root The Merkle Root is the final hash that summarizes the entire tree. If the underlying account information changes, the corresponding cryptographic hashes change, resulting in a different root. Your individual Merkle proof provides the path connecting your account's leaf to that root. This is what makes individual inclusion verification possible without exposing the account information of every other Binance user.
5. How to Download Your Individual Verification Data
Once you have selected the correct reporting period, you can download the data required for independent verification.
On the Binance Verification page:
Locate the self-verifying Merkle Tree entry.Confirm that the verification type is Merkle Tree + zk-SNARKs.Select Download Merkle Tree.Save the downloaded package to your computer.Extract the files.
The package contains the information required for the verification process, including your account-specific user_config.json file. This file is particularly important because it is generated using your account data from the selected snapshot. Keep all files together and make sure you do not mix information from different reporting periods.
6. How to Independently Verify Your Account With the Binance Verifier
Binance provides a verifier tool through its official GitHub repository. The tool allows users to perform cryptographic checks on the downloaded Proof of Reserves information.
Step 1: Download the correct verifier version
Visit Binance's official GitHub repository and download the version corresponding to the reporting period you want to verify.
According to Binance's published version mapping:
Always check the official repository for the appropriate release and any updated instructions before running the tool.
Step 2: Prepare the root verification files
Extract the verifier package and locate its config directory. Binance's instructions identify three important files required for root-level verification:
config.jsonproof.csvzkpor864.vk.save
Place the required files in the verifier's configuration directory. You should also check that the configuration references the correct proof data and verifying key. Three configuration elements are especially important:
ProofTable: Identifies the zk-SNARK proof data file.
ZkKeyName: Points to the verifying key included in the package.
CexAssetInfo: Represents total customer balance information for the listed Binance tokens, including verifiable and non-verifiable assets.
Binance explains that this information can be checked using the zk-SNARK proof and cross-checked against the verifiable assets shown on its Proof of Reserves portal.
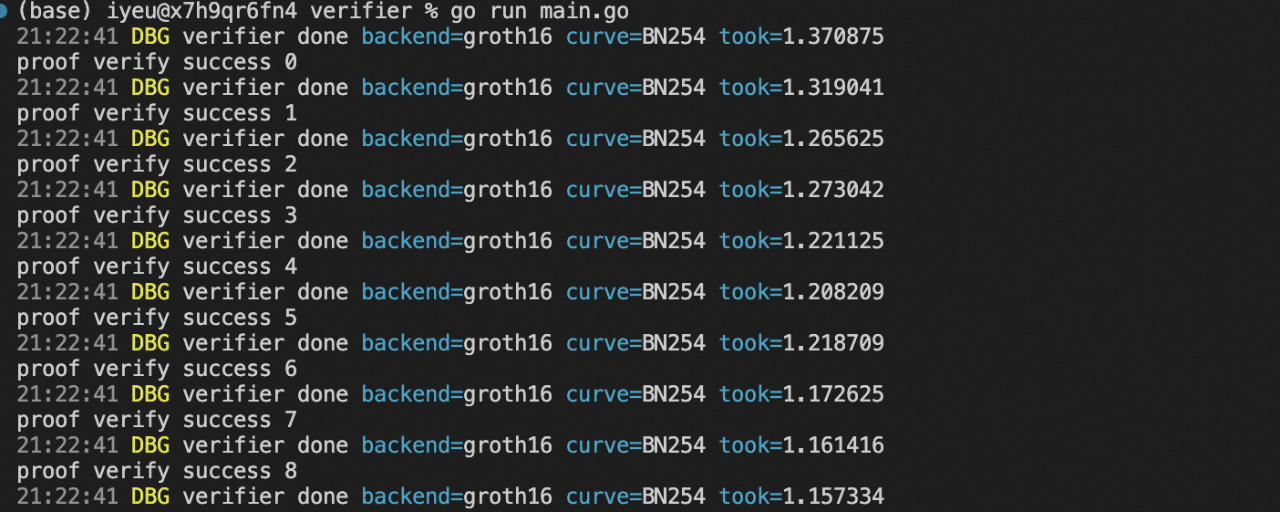
Step 3: Run the root-level verification
Open a terminal in the verifier directory and use the command corresponding to your operating system.
macOS ./verifier_darwin
Linux ./verifier_linux
Windows ./verifier_windows
This performs the root-level verification using the supplied proof and configuration data. Follow the setup instructions for the specific verifier release you downloaded.
Step 4: Run your individual account verification
Now you can move from checking the overall verification data to checking your own account.
Locate user_config.json in the downloaded verification package.
This file is generated using your account information at the snapshot time. Place it in the verifier's config directory, following Binance's instructions. Then run the individual verification command.
macOS ./verifier_darwin -user
Linux ./verifier_linux -user
Windows ./verifier_windows -user
The -user option tells the verifier to check your individual account information using the personal configuration file and its associated Merkle proof. This is the step that connects your own account data to the cryptographic verification process.
7. How to Read Your user_config.json File
The user_config.json file is where the individual verification data becomes more interesting. Instead of showing a simple wallet overview, it contains structured fields that allow the verifier to check your account's position and balance information. Here is what each field means:
TotalEquity, TotalDebt, and TotalCollateral
These fields provide information about the value and financial position of your account within the verification dataset.
TotalEquity represents the total USD value of your holdings.TotalDebt represents the total USD value of your borrowing.TotalCollateral represents the value of assets placed as collateral.
Binance's documentation specifies that these values use a scale of 10¹⁶. This means that the raw values in the configuration file are not necessarily displayed as ordinary USD figures. The scaling factor must be considered when interpreting them.
How to identify the assets in the Assets field
The Assets field contains the individual cryptocurrency balances included in your snapshot. However, the information may be represented through indexes rather than familiar token symbols. To identify the corresponding cryptocurrencies, use the Asset_List.csv file included in the downloaded package. Each index corresponds to an asset in that list. There is another detail worth remembering: asset balances generally use a scaling factor of 10⁸, while the following tokens use 10² according to Binance's documentation: BTTC, SHIB, LUNC, XEC, WIN, BIDR, SPELL, HOT, DOGE, PEPE, FLOKI, IDRT, BONK, DOGS, 1000SATS, and NEIRO. Do not compare the raw numbers directly with your normal wallet display without applying the appropriate scaling factor.
Why Root and Proof matter
-The Root and Proof fields are central to the individual verification.
-The Root is the Merkle Root hash associated with the selected dataset.
-The Proof is your account's Merkle path, which provides the information required to connect your leaf to that root.
The verifier uses these values to check whether your individual account information is cryptographically consistent with the published verification data.
8. What Do Merkle Trees and zk-SNARKs Actually Verify?
You do not need to understand every mathematical detail to follow the process, but knowing the role of each technology makes the result easier to interpret.
Merkle Trees verify individual inclusion.
A Merkle Tree organizes account data into a hierarchy of cryptographic hashes. Each account is represented by a leaf, and the hashes are combined until a single Merkle Root is produced. Your Merkle proof allows you to check whether your account's leaf belongs to that tree.
zk-SNARKs verify conditions across the larger dataset.
zk-SNARKs stands for Zero-Knowledge Succinct Non-Interactive Argument of Knowledge. In Binance's PoR system, the zk-SNARK proof is designed to check conditions such as:
User account balance sets are included in the calculation of total net account balances.Individual account net balances are non-negative.The Merkle Root is updated correctly when account information is incorporated into the leaf.
The important distinction is that Merkle Trees provide a way to verify your individual inclusion, while zk-SNARKs provide additional cryptographic checks on the broader balance dataset. Together, they provide a way to examine individual account inclusion and the integrity conditions applied to the larger dataset.
9. What Does Successful Verification Actually Mean?
A successful individual verification means that your account information is cryptographically consistent with the selected Merkle Tree and its associated proof. It provides evidence that your account was included in the dataset represented by that particular Merkle Root. The broader zk-SNARK verification provides additional evidence that the specified conditions applied to the dataset have been satisfied. However, there are some important limitations. A successful verification does not mean:
Your displayed balance is a live balance.Every cryptocurrency available on Binance is necessarily included in that snapshot.Every possible off-chain liability or financial obligation has been independently examined.The exchange is guaranteed to be free from all financial, operational, or security risks.A Proof of Reserves report is equivalent to a complete independent financial audit.
The snapshot date, asset coverage, and scope of the verification all matter.
10. What If Your Account Record Is Missing or Verification Fails?
If something does not look right, identify the issue before drawing conclusions.
You cannot find a verification record: Check whether you selected the correct reporting period and whether the results for that snapshot have been published.
Your asset does not appear in the record: Check the asset coverage for that particular reporting cycle. Not every report necessarily covers the same list of cryptocurrencies.
Your balance differs from your current wallet: Compare the record with your holdings at the snapshot date, not your current balance.
The verifier cannot find the required files: Check that you extracted the downloaded package correctly and placed the files in the expected configuration directory.
The verifier produces an error: Confirm that you downloaded the correct verifier version and that the configuration files belong to the same snapshot.
Your Record ID or asset information appears inconsistent: Compare the Verification page with your downloaded user_config.json and asset list. If the discrepancy remains, contact Binance Support through the official website.
⚠️Never use third-party downloads claiming to fix your verification files, and never share your account password, 2FA codes, or API credentials.
My Take: Transparency Is More Valuable When Users Can Verify It
I have been using Binance since 2019, and one thing I appreciate about the development of crypto platforms is the growing importance of giving users access to information rather than asking them to rely on statements alone. For me, Proof of Reserves becomes more meaningful when users can move beyond looking at a published number and examine the information associated with their own accounts. The technical side might seem intimidating at first. Record IDs, Merkle leaves, hashes, configuration files, and zero-knowledge proofs are not exactly everyday terms for most crypto users. But the idea is relatively simple: you should be able to check whether your account was included in a specific reporting snapshot and use the available tools to validate that information. You do not have to become a cryptography expert. You just need to understand what you are checking, use the official tools, and know the limitations of the result.
FAQ
1. How can I check whether my Binance account is included in Proof of Reserves? Log in to Binance, open Wallet → Verification, select the reporting date, and inspect your individual verification record.
2. Where can I find my Record ID? Your Record ID is displayed in the verification information associated with your account and the selected snapshot.
3. Is the Record ID the same as AccountIndex? No. The Record ID is associated with your account identifier, while AccountIndex indicates the position of your account's leaf in the Merkle Tree.
4. Can I check my balance without downloading the verifier? Yes. You can view your personal verification record, covered assets, and snapshot balances directly through Binance. The verifier is for additional independent cryptographic checks.
5. Why does the balance in my verification record differ from my current balance? Because the record represents a historical snapshot. Transactions made after that date are not reflected in the same snapshot.
6. Does Binance Proof of Reserves include every cryptocurrency? You should check the asset list for the reporting period you selected. Asset coverage can differ between snapshots.
7. What does a successful Merkle Tree verification prove? It provides cryptographic evidence that your individual account information is included in the dataset represented by the corresponding Merkle Root.
8. Does successful verification guarantee that all my funds are completely risk-free? No. It provides evidence within the scope of the selected Proof of Reserves system and snapshot. It does not eliminate all exchange-related risks or replace a comprehensive financial audit.
Final takeaway: You should not have to rely only on a general reserve figure to understand whether your own account was included in a Proof of Reserves report. Binance provides individual verification records and cryptographic tools that allow you to inspect your snapshot data and independently check your account's inclusion. The most important part is understanding the reporting date, the assets covered, and what the verification actually establishes.
#Binance #ProofOfReserves #CryptoTransparency #MerkleTrees #CryptoSecurity
How Can I Check Whether My Balance Is Included in Binance Proof of Reserves?
A published Proof of Reserves report can show the assets an exchange reports holding against customer balances. But as a user, you might have a more personal question:
Was my own account actually included in that report?
Binance provides an individual verification process that allows users to examine their account information within a specific Proof of Reserves snapshot. You can view your personal verification record, identify the assets and balances included, and download the data needed to perform additional cryptographic checks.
This is an important distinction. You are not simply checking a general reserve figure. You are checking whether your own account's balance information is represented in the dataset used for that reporting period. Let's go through the process, including the technical details that are easy to overlook.
1. Select the Exact Proof of Reserves Reporting Period
Before looking for your account information, identify the snapshot you want to verify. Binance's published monthly schedule states that user balance snapshots are taken on the first day of each month at 00:00 UTC, with results expected to be released by the seventh day. However, special snapshots and changes to publication timelines may be announced separately. Always rely on the actual reporting date shown on Binance's Proof of Reserves page.
Why does the date matter? Because the snapshot represents account information at one specific moment. It does not continuously follow your deposits, withdrawals, or trading activity.
Imagine you held:
0.5 BTC on the snapshot date.You purchased another 0.2 BTC the following day.Your current holding is now 0.7 BTC.
Your historical verification record may still show 0.5 BTC. That is not necessarily a discrepancy. The additional purchase occurred after the snapshot. The same principle applies if you withdraw, sell, convert, or transfer assets after the reporting date.
Always compare your verification record with your holdings at the exact snapshot time, not your current wallet balance.
2. Where Can I Find My Individual Proof of Reserves Record?
You can access your personal verification information directly through Binance. Follow these steps:
Log in to your Binance account on the official website.Open Profile.Navigate to Wallet → Verification.Find the available Proof of Reserves verification records.Select the reporting date you want to examine.Expand the corresponding verification information.
Binance's verification page allows you to inspect the record associated with your account and the selected reporting period. Look for the following information:
Verification date.Verification type.Record ID.Merkle Leaf information.Assets covered by the selected report.Your recorded asset balances.The option to download the Merkle Tree data.
For the verification method described in Binance's technical guide, look for the self-verifying entry marked Merkle Tree + zk-SNARKs.
The key is to select the correct record. A verification entry from one reporting period should not be confused with another.
3. How Do I Know That My Own Account Is Included?
The individual verification record is the starting point. Binance provides a Record ID and Merkle Leaf information associated with your account and the selected snapshot. These are not generic identifiers shared by all users. They connect your individual account information to its position within the verification dataset. You can inspect your account's recorded assets and balances directly on the verification page. But there is an important difference between viewing the record and independently validating it. Viewing the record lets you examine the information Binance provides for your account. Downloading the Merkle Tree data and using the official verifier allows you to perform the cryptographic checks described in Binance's verification guide. That is the next level of the process.
4. What Exactly Are Record ID, AccountIndex, and Merkle Leaf?
These terms can sound interchangeable, but each has a different function.
Record ID The Record ID is the account-specific identifier displayed on the Binance Verification page for the selected snapshot. In the downloaded user configuration, it corresponds to the AccountIdHash field.
AccountIndex This field identifies the position of your account's Merkle leaf within the tree. Think of the Merkle Tree as a structure containing many account records. AccountIndex tells the verifier where your individual leaf is located.
Merkle Leaf The Merkle leaf represents your individual account information in the tree. Binance's PoR methodology uses hashed account identifiers and balance data to construct these leaves.
Merkle Root The Merkle Root is the final hash that summarizes the entire tree. If the underlying account information changes, the corresponding cryptographic hashes change, resulting in a different root. Your individual Merkle proof provides the path connecting your account's leaf to that root. This is what makes individual inclusion verification possible without exposing the account information of every other Binance user.
5. How to Download Your Individual Verification Data
Once you have selected the correct reporting period, you can download the data required for independent verification.
On the Binance Verification page:
Locate the self-verifying Merkle Tree entry.Confirm that the verification type is Merkle Tree + zk-SNARKs.Select Download Merkle Tree.Save the downloaded package to your computer.Extract the files.
The package contains the information required for the verification process, including your account-specific user_config.json file. This file is particularly important because it is generated using your account data from the selected snapshot. Keep all files together and make sure you do not mix information from different reporting periods.
6. How to Independently Verify Your Account With the Binance Verifier
Binance provides a verifier tool through its official GitHub repository. The tool allows users to perform cryptographic checks on the downloaded Proof of Reserves information.
Step 1: Download the correct verifier version
Visit Binance's official GitHub repository and download the version corresponding to the reporting period you want to verify.
According to Binance's published version mapping:
Always check the official repository for the appropriate release and any updated instructions before running the tool.
Step 2: Prepare the root verification files
Extract the verifier package and locate its config directory. Binance's instructions identify three important files required for root-level verification:
config.jsonproof.csvzkpor864.vk.save
Place the required files in the verifier's configuration directory. You should also check that the configuration references the correct proof data and verifying key. Three configuration elements are especially important:
ProofTable: Identifies the zk-SNARK proof data file.
ZkKeyName: Points to the verifying key included in the package.
CexAssetInfo: Represents total customer balance information for the listed Binance tokens, including verifiable and non-verifiable assets.
Binance explains that this information can be checked using the zk-SNARK proof and cross-checked against the verifiable assets shown on its Proof of Reserves portal.
Step 3: Run the root-level verification
Open a terminal in the verifier directory and use the command corresponding to your operating system.
macOS ./verifier_darwin
Linux ./verifier_linux
Windows ./verifier_windows
This performs the root-level verification using the supplied proof and configuration data. Follow the setup instructions for the specific verifier release you downloaded.
Step 4: Run your individual account verification
Now you can move from checking the overall verification data to checking your own account.
Locate user_config.json in the downloaded verification package.
This file is generated using your account information at the snapshot time. Place it in the verifier's config directory, following Binance's instructions. Then run the individual verification command.
macOS ./verifier_darwin -user
Linux ./verifier_linux -user
Windows ./verifier_windows -user
The -user option tells the verifier to check your individual account information using the personal configuration file and its associated Merkle proof. This is the step that connects your own account data to the cryptographic verification process.
7. How to Read Your user_config.json File
The user_config.json file is where the individual verification data becomes more interesting. Instead of showing a simple wallet overview, it contains structured fields that allow the verifier to check your account's position and balance information. Here is what each field means:
TotalEquity, TotalDebt, and TotalCollateral
These fields provide information about the value and financial position of your account within the verification dataset.
TotalEquity represents the total USD value of your holdings.TotalDebt represents the total USD value of your borrowing.TotalCollateral represents the value of assets placed as collateral.
Binance's documentation specifies that these values use a scale of 10¹⁶. This means that the raw values in the configuration file are not necessarily displayed as ordinary USD figures. The scaling factor must be considered when interpreting them.
How to identify the assets in the Assets field
The Assets field contains the individual cryptocurrency balances included in your snapshot. However, the information may be represented through indexes rather than familiar token symbols. To identify the corresponding cryptocurrencies, use the Asset_List.csv file included in the downloaded package. Each index corresponds to an asset in that list. There is another detail worth remembering: asset balances generally use a scaling factor of 10⁸, while the following tokens use 10² according to Binance's documentation: BTTC, SHIB, LUNC, XEC, WIN, BIDR, SPELL, HOT, DOGE, PEPE, FLOKI, IDRT, BONK, DOGS, 1000SATS, and NEIRO. Do not compare the raw numbers directly with your normal wallet display without applying the appropriate scaling factor.
Why Root and Proof matter
-The Root and Proof fields are central to the individual verification.
-The Root is the Merkle Root hash associated with the selected dataset.
-The Proof is your account's Merkle path, which provides the information required to connect your leaf to that root.
The verifier uses these values to check whether your individual account information is cryptographically consistent with the published verification data.
8. What Do Merkle Trees and zk-SNARKs Actually Verify?
You do not need to understand every mathematical detail to follow the process, but knowing the role of each technology makes the result easier to interpret.
Merkle Trees verify individual inclusion.
A Merkle Tree organizes account data into a hierarchy of cryptographic hashes. Each account is represented by a leaf, and the hashes are combined until a single Merkle Root is produced. Your Merkle proof allows you to check whether your account's leaf belongs to that tree.
zk-SNARKs verify conditions across the larger dataset.
zk-SNARKs stands for Zero-Knowledge Succinct Non-Interactive Argument of Knowledge. In Binance's PoR system, the zk-SNARK proof is designed to check conditions such as:
User account balance sets are included in the calculation of total net account balances.Individual account net balances are non-negative.The Merkle Root is updated correctly when account information is incorporated into the leaf.
The important distinction is that Merkle Trees provide a way to verify your individual inclusion, while zk-SNARKs provide additional cryptographic checks on the broader balance dataset. Together, they provide a way to examine individual account inclusion and the integrity conditions applied to the larger dataset.
9. What Does Successful Verification Actually Mean?
A successful individual verification means that your account information is cryptographically consistent with the selected Merkle Tree and its associated proof. It provides evidence that your account was included in the dataset represented by that particular Merkle Root. The broader zk-SNARK verification provides additional evidence that the specified conditions applied to the dataset have been satisfied. However, there are some important limitations. A successful verification does not mean:
Your displayed balance is a live balance.Every cryptocurrency available on Binance is necessarily included in that snapshot.Every possible off-chain liability or financial obligation has been independently examined.The exchange is guaranteed to be free from all financial, operational, or security risks.A Proof of Reserves report is equivalent to a complete independent financial audit.
The snapshot date, asset coverage, and scope of the verification all matter.
10. What If Your Account Record Is Missing or Verification Fails?
If something does not look right, identify the issue before drawing conclusions.
You cannot find a verification record: Check whether you selected the correct reporting period and whether the results for that snapshot have been published.
Your asset does not appear in the record: Check the asset coverage for that particular reporting cycle. Not every report necessarily covers the same list of cryptocurrencies.
Your balance differs from your current wallet: Compare the record with your holdings at the snapshot date, not your current balance.
The verifier cannot find the required files: Check that you extracted the downloaded package correctly and placed the files in the expected configuration directory.
The verifier produces an error: Confirm that you downloaded the correct verifier version and that the configuration files belong to the same snapshot.
Your Record ID or asset information appears inconsistent: Compare the Verification page with your downloaded user_config.json and asset list. If the discrepancy remains, contact Binance Support through the official website.
⚠️Never use third-party downloads claiming to fix your verification files, and never share your account password, 2FA codes, or API credentials.
My Take: Transparency Is More Valuable When Users Can Verify It
I have been using Binance since 2019, and one thing I appreciate about the development of crypto platforms is the growing importance of giving users access to information rather than asking them to rely on statements alone. For me, Proof of Reserves becomes more meaningful when users can move beyond looking at a published number and examine the information associated with their own accounts. The technical side might seem intimidating at first. Record IDs, Merkle leaves, hashes, configuration files, and zero-knowledge proofs are not exactly everyday terms for most crypto users. But the idea is relatively simple: you should be able to check whether your account was included in a specific reporting snapshot and use the available tools to validate that information. You do not have to become a cryptography expert. You just need to understand what you are checking, use the official tools, and know the limitations of the result.
FAQ
1. How can I check whether my Binance account is included in Proof of Reserves? Log in to Binance, open Wallet → Verification, select the reporting date, and inspect your individual verification record.
2. Where can I find my Record ID? Your Record ID is displayed in the verification information associated with your account and the selected snapshot.
3. Is the Record ID the same as AccountIndex? No. The Record ID is associated with your account identifier, while AccountIndex indicates the position of your account's leaf in the Merkle Tree.
4. Can I check my balance without downloading the verifier? Yes. You can view your personal verification record, covered assets, and snapshot balances directly through Binance. The verifier is for additional independent cryptographic checks.
5. Why does the balance in my verification record differ from my current balance? Because the record represents a historical snapshot. Transactions made after that date are not reflected in the same snapshot.
6. Does Binance Proof of Reserves include every cryptocurrency? You should check the asset list for the reporting period you selected. Asset coverage can differ between snapshots.
7. What does a successful Merkle Tree verification prove? It provides cryptographic evidence that your individual account information is included in the dataset represented by the corresponding Merkle Root.
8. Does successful verification guarantee that all my funds are completely risk-free? No. It provides evidence within the scope of the selected Proof of Reserves system and snapshot. It does not eliminate all exchange-related risks or replace a comprehensive financial audit.
Final takeaway: You should not have to rely only on a general reserve figure to understand whether your own account was included in a Proof of Reserves report. Binance provides individual verification records and cryptographic tools that allow you to inspect your snapshot data and independently check your account's inclusion. The most important part is understanding the reporting date, the assets covered, and what the verification actually establishes.
#Binance #ProofOfReserves #CryptoTransparency #MerkleTrees #CryptoSecurity
Was my own account actually included in that report?
Binance provides an individual verification process that allows users to examine their account information within a specific Proof of Reserves snapshot. You can view your personal verification record, identify the assets and balances included, and download the data needed to perform additional cryptographic checks.
This is an important distinction. You are not simply checking a general reserve figure. You are checking whether your own account's balance information is represented in the dataset used for that reporting period. Let's go through the process, including the technical details that are easy to overlook.
1. Select the Exact Proof of Reserves Reporting Period
Before looking for your account information, identify the snapshot you want to verify. Binance's published monthly schedule states that user balance snapshots are taken on the first day of each month at 00:00 UTC, with results expected to be released by the seventh day. However, special snapshots and changes to publication timelines may be announced separately. Always rely on the actual reporting date shown on Binance's Proof of Reserves page.
Why does the date matter? Because the snapshot represents account information at one specific moment. It does not continuously follow your deposits, withdrawals, or trading activity.
Imagine you held:
0.5 BTC on the snapshot date.You purchased another 0.2 BTC the following day.Your current holding is now 0.7 BTC.
Your historical verification record may still show 0.5 BTC. That is not necessarily a discrepancy. The additional purchase occurred after the snapshot. The same principle applies if you withdraw, sell, convert, or transfer assets after the reporting date.
Always compare your verification record with your holdings at the exact snapshot time, not your current wallet balance.
2. Where Can I Find My Individual Proof of Reserves Record?
You can access your personal verification information directly through Binance. Follow these steps:
Log in to your Binance account on the official website.Open Profile.Navigate to Wallet → Verification.Find the available Proof of Reserves verification records.Select the reporting date you want to examine.Expand the corresponding verification information.
Binance's verification page allows you to inspect the record associated with your account and the selected reporting period. Look for the following information:
Verification date.Verification type.Record ID.Merkle Leaf information.Assets covered by the selected report.Your recorded asset balances.The option to download the Merkle Tree data.
For the verification method described in Binance's technical guide, look for the self-verifying entry marked Merkle Tree + zk-SNARKs.
The key is to select the correct record. A verification entry from one reporting period should not be confused with another.
3. How Do I Know That My Own Account Is Included?
The individual verification record is the starting point. Binance provides a Record ID and Merkle Leaf information associated with your account and the selected snapshot. These are not generic identifiers shared by all users. They connect your individual account information to its position within the verification dataset. You can inspect your account's recorded assets and balances directly on the verification page. But there is an important difference between viewing the record and independently validating it. Viewing the record lets you examine the information Binance provides for your account. Downloading the Merkle Tree data and using the official verifier allows you to perform the cryptographic checks described in Binance's verification guide. That is the next level of the process.
4. What Exactly Are Record ID, AccountIndex, and Merkle Leaf?
These terms can sound interchangeable, but each has a different function.
Record ID The Record ID is the account-specific identifier displayed on the Binance Verification page for the selected snapshot. In the downloaded user configuration, it corresponds to the AccountIdHash field.
AccountIndex This field identifies the position of your account's Merkle leaf within the tree. Think of the Merkle Tree as a structure containing many account records. AccountIndex tells the verifier where your individual leaf is located.
Merkle Leaf The Merkle leaf represents your individual account information in the tree. Binance's PoR methodology uses hashed account identifiers and balance data to construct these leaves.
Merkle Root The Merkle Root is the final hash that summarizes the entire tree. If the underlying account information changes, the corresponding cryptographic hashes change, resulting in a different root. Your individual Merkle proof provides the path connecting your account's leaf to that root. This is what makes individual inclusion verification possible without exposing the account information of every other Binance user.
5. How to Download Your Individual Verification Data
Once you have selected the correct reporting period, you can download the data required for independent verification.
On the Binance Verification page:
Locate the self-verifying Merkle Tree entry.Confirm that the verification type is Merkle Tree + zk-SNARKs.Select Download Merkle Tree.Save the downloaded package to your computer.Extract the files.
The package contains the information required for the verification process, including your account-specific user_config.json file. This file is particularly important because it is generated using your account data from the selected snapshot. Keep all files together and make sure you do not mix information from different reporting periods.
6. How to Independently Verify Your Account With the Binance Verifier
Binance provides a verifier tool through its official GitHub repository. The tool allows users to perform cryptographic checks on the downloaded Proof of Reserves information.
Step 1: Download the correct verifier version
Visit Binance's official GitHub repository and download the version corresponding to the reporting period you want to verify.
According to Binance's published version mapping:
Always check the official repository for the appropriate release and any updated instructions before running the tool.
Step 2: Prepare the root verification files
Extract the verifier package and locate its config directory. Binance's instructions identify three important files required for root-level verification:
config.jsonproof.csvzkpor864.vk.save
Place the required files in the verifier's configuration directory. You should also check that the configuration references the correct proof data and verifying key. Three configuration elements are especially important:
ProofTable: Identifies the zk-SNARK proof data file.
ZkKeyName: Points to the verifying key included in the package.
CexAssetInfo: Represents total customer balance information for the listed Binance tokens, including verifiable and non-verifiable assets.
Binance explains that this information can be checked using the zk-SNARK proof and cross-checked against the verifiable assets shown on its Proof of Reserves portal.
Step 3: Run the root-level verification
Open a terminal in the verifier directory and use the command corresponding to your operating system.
macOS ./verifier_darwin
Linux ./verifier_linux
Windows ./verifier_windows
This performs the root-level verification using the supplied proof and configuration data. Follow the setup instructions for the specific verifier release you downloaded.
Step 4: Run your individual account verification
Now you can move from checking the overall verification data to checking your own account.
Locate user_config.json in the downloaded verification package.
This file is generated using your account information at the snapshot time. Place it in the verifier's config directory, following Binance's instructions. Then run the individual verification command.
macOS ./verifier_darwin -user
Linux ./verifier_linux -user
Windows ./verifier_windows -user
The -user option tells the verifier to check your individual account information using the personal configuration file and its associated Merkle proof. This is the step that connects your own account data to the cryptographic verification process.
7. How to Read Your user_config.json File
The user_config.json file is where the individual verification data becomes more interesting. Instead of showing a simple wallet overview, it contains structured fields that allow the verifier to check your account's position and balance information. Here is what each field means:
TotalEquity, TotalDebt, and TotalCollateral
These fields provide information about the value and financial position of your account within the verification dataset.
TotalEquity represents the total USD value of your holdings.TotalDebt represents the total USD value of your borrowing.TotalCollateral represents the value of assets placed as collateral.
Binance's documentation specifies that these values use a scale of 10¹⁶. This means that the raw values in the configuration file are not necessarily displayed as ordinary USD figures. The scaling factor must be considered when interpreting them.
How to identify the assets in the Assets field
The Assets field contains the individual cryptocurrency balances included in your snapshot. However, the information may be represented through indexes rather than familiar token symbols. To identify the corresponding cryptocurrencies, use the Asset_List.csv file included in the downloaded package. Each index corresponds to an asset in that list. There is another detail worth remembering: asset balances generally use a scaling factor of 10⁸, while the following tokens use 10² according to Binance's documentation: BTTC, SHIB, LUNC, XEC, WIN, BIDR, SPELL, HOT, DOGE, PEPE, FLOKI, IDRT, BONK, DOGS, 1000SATS, and NEIRO. Do not compare the raw numbers directly with your normal wallet display without applying the appropriate scaling factor.
Why Root and Proof matter
-The Root and Proof fields are central to the individual verification.
-The Root is the Merkle Root hash associated with the selected dataset.
-The Proof is your account's Merkle path, which provides the information required to connect your leaf to that root.
The verifier uses these values to check whether your individual account information is cryptographically consistent with the published verification data.
8. What Do Merkle Trees and zk-SNARKs Actually Verify?
You do not need to understand every mathematical detail to follow the process, but knowing the role of each technology makes the result easier to interpret.
Merkle Trees verify individual inclusion.
A Merkle Tree organizes account data into a hierarchy of cryptographic hashes. Each account is represented by a leaf, and the hashes are combined until a single Merkle Root is produced. Your Merkle proof allows you to check whether your account's leaf belongs to that tree.
zk-SNARKs verify conditions across the larger dataset.
zk-SNARKs stands for Zero-Knowledge Succinct Non-Interactive Argument of Knowledge. In Binance's PoR system, the zk-SNARK proof is designed to check conditions such as:
User account balance sets are included in the calculation of total net account balances.Individual account net balances are non-negative.The Merkle Root is updated correctly when account information is incorporated into the leaf.
The important distinction is that Merkle Trees provide a way to verify your individual inclusion, while zk-SNARKs provide additional cryptographic checks on the broader balance dataset. Together, they provide a way to examine individual account inclusion and the integrity conditions applied to the larger dataset.
9. What Does Successful Verification Actually Mean?
A successful individual verification means that your account information is cryptographically consistent with the selected Merkle Tree and its associated proof. It provides evidence that your account was included in the dataset represented by that particular Merkle Root. The broader zk-SNARK verification provides additional evidence that the specified conditions applied to the dataset have been satisfied. However, there are some important limitations. A successful verification does not mean:
Your displayed balance is a live balance.Every cryptocurrency available on Binance is necessarily included in that snapshot.Every possible off-chain liability or financial obligation has been independently examined.The exchange is guaranteed to be free from all financial, operational, or security risks.A Proof of Reserves report is equivalent to a complete independent financial audit.
The snapshot date, asset coverage, and scope of the verification all matter.
10. What If Your Account Record Is Missing or Verification Fails?
If something does not look right, identify the issue before drawing conclusions.
You cannot find a verification record: Check whether you selected the correct reporting period and whether the results for that snapshot have been published.
Your asset does not appear in the record: Check the asset coverage for that particular reporting cycle. Not every report necessarily covers the same list of cryptocurrencies.
Your balance differs from your current wallet: Compare the record with your holdings at the snapshot date, not your current balance.
The verifier cannot find the required files: Check that you extracted the downloaded package correctly and placed the files in the expected configuration directory.
The verifier produces an error: Confirm that you downloaded the correct verifier version and that the configuration files belong to the same snapshot.
Your Record ID or asset information appears inconsistent: Compare the Verification page with your downloaded user_config.json and asset list. If the discrepancy remains, contact Binance Support through the official website.
⚠️Never use third-party downloads claiming to fix your verification files, and never share your account password, 2FA codes, or API credentials.
My Take: Transparency Is More Valuable When Users Can Verify It
I have been using Binance since 2019, and one thing I appreciate about the development of crypto platforms is the growing importance of giving users access to information rather than asking them to rely on statements alone. For me, Proof of Reserves becomes more meaningful when users can move beyond looking at a published number and examine the information associated with their own accounts. The technical side might seem intimidating at first. Record IDs, Merkle leaves, hashes, configuration files, and zero-knowledge proofs are not exactly everyday terms for most crypto users. But the idea is relatively simple: you should be able to check whether your account was included in a specific reporting snapshot and use the available tools to validate that information. You do not have to become a cryptography expert. You just need to understand what you are checking, use the official tools, and know the limitations of the result.
FAQ
1. How can I check whether my Binance account is included in Proof of Reserves? Log in to Binance, open Wallet → Verification, select the reporting date, and inspect your individual verification record.
2. Where can I find my Record ID? Your Record ID is displayed in the verification information associated with your account and the selected snapshot.
3. Is the Record ID the same as AccountIndex? No. The Record ID is associated with your account identifier, while AccountIndex indicates the position of your account's leaf in the Merkle Tree.
4. Can I check my balance without downloading the verifier? Yes. You can view your personal verification record, covered assets, and snapshot balances directly through Binance. The verifier is for additional independent cryptographic checks.
5. Why does the balance in my verification record differ from my current balance? Because the record represents a historical snapshot. Transactions made after that date are not reflected in the same snapshot.
6. Does Binance Proof of Reserves include every cryptocurrency? You should check the asset list for the reporting period you selected. Asset coverage can differ between snapshots.
7. What does a successful Merkle Tree verification prove? It provides cryptographic evidence that your individual account information is included in the dataset represented by the corresponding Merkle Root.
8. Does successful verification guarantee that all my funds are completely risk-free? No. It provides evidence within the scope of the selected Proof of Reserves system and snapshot. It does not eliminate all exchange-related risks or replace a comprehensive financial audit.
Final takeaway: You should not have to rely only on a general reserve figure to understand whether your own account was included in a Proof of Reserves report. Binance provides individual verification records and cryptographic tools that allow you to inspect your snapshot data and independently check your account's inclusion. The most important part is understanding the reporting date, the assets covered, and what the verification actually establishes.
#Binance #ProofOfReserves #CryptoTransparency #MerkleTrees #CryptoSecurity
احمد a:
اي كيف فينا نعرف
1
2
503

·
--
How Merkle Trees Make Blockchain Verification Efficient 🌳🔗
A blockchain block can contain thousands of transactions.
So how can a network verify that a specific transaction belongs to a block without repeatedly checking the entire transaction list?
One important answer is the Merkle Tree.
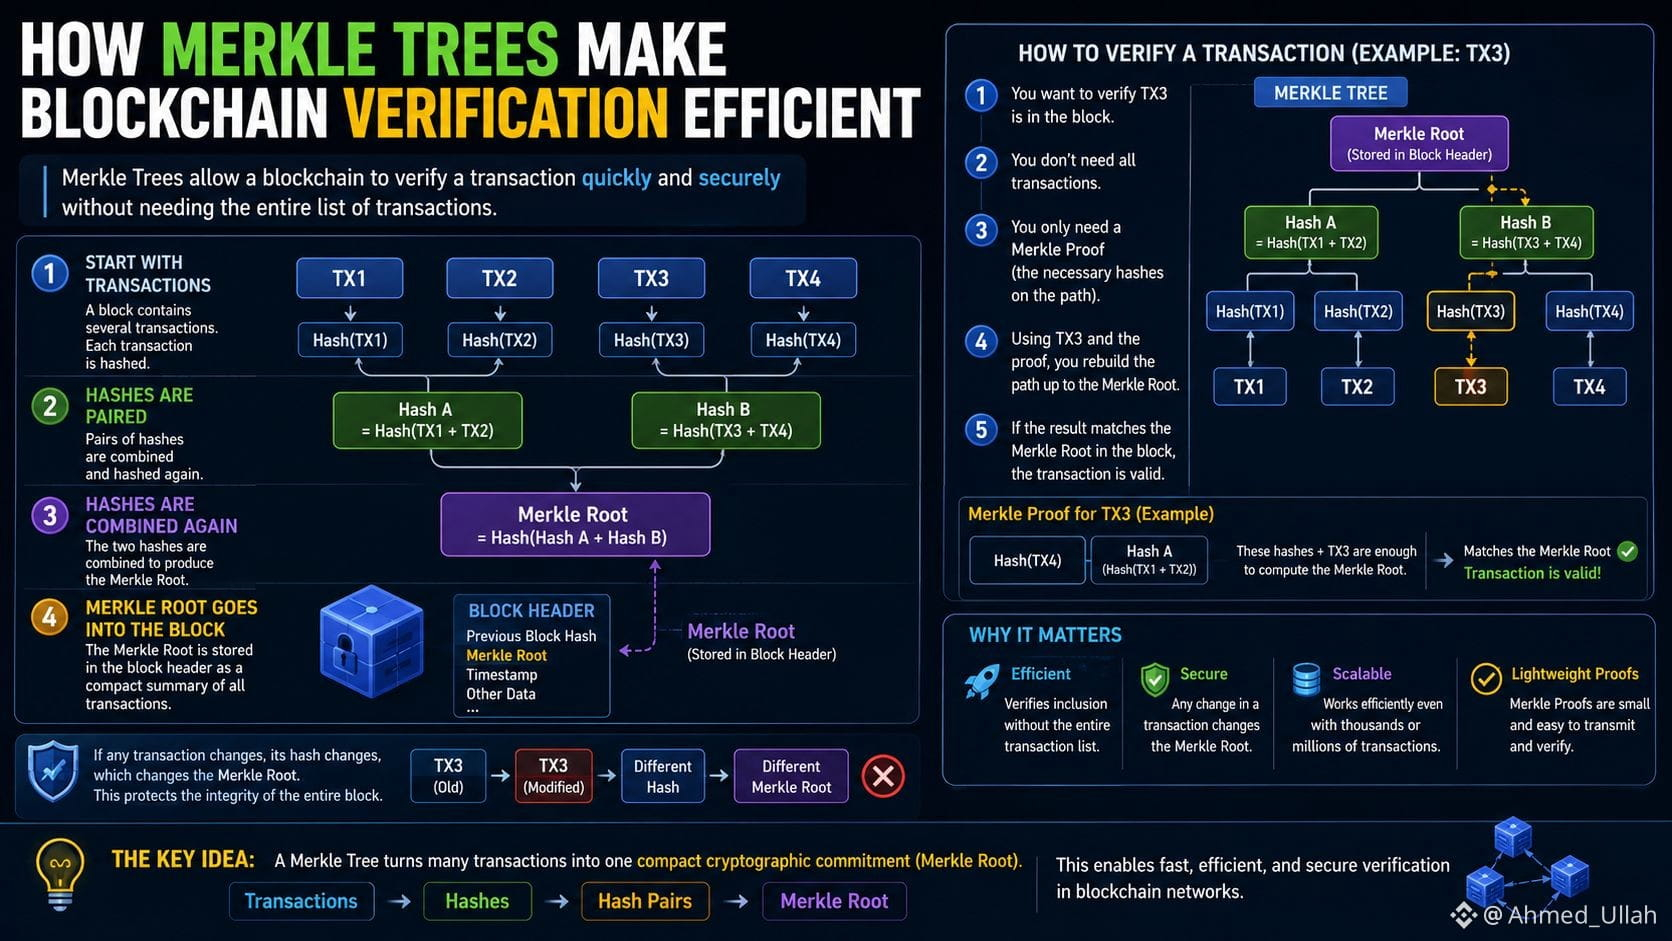
1️⃣ Start with transactions
Imagine a block contains four transactions:
TX1 | TX2 | TX3 | TX4
Each transaction is converted into a cryptographic hash.
2️⃣ Hashes are paired
The network combines pairs of transaction hashes:
Hash(TX1) + Hash(TX2) → Hash A
Hash(TX3) + Hash(TX4) → Hash B
3️⃣ Hashes are combined again
Then:
Hash A + Hash B → Merkle Root
The final hash at the top is called the Merkle Root.
4️⃣ The Merkle Root goes into the block
The Merkle Root acts as a compact cryptographic summary of the transactions.
If even one transaction changes, its hash changes.
That change propagates upward through the tree and ultimately changes the Merkle Root.
5️⃣ Why is this useful?
Suppose you want to prove that TX3 belongs to a particular block.
You don't necessarily need the complete transaction list.
A Merkle Proof can provide the relevant hashes needed to reconstruct the path to the Merkle Root.
If the calculated result matches the Merkle Root recorded in the block, the transaction's inclusion can be verified.
🧠 The key idea
A Merkle Tree turns many pieces of transaction data into one compact cryptographic commitment.
Transactions → Hashes → Hash Pairs → Merkle Root
This helps blockchain systems verify transaction inclusion efficiently while preserving the integrity of the block's transaction data.
Next: Why does blockchain need a consensus mechanism in the first place? ⚙️
#blockchain #MerkleTrees #Cryptography #BlockchainTechnology #Web3
$BTC $BNB $BTTC
How Merkle Trees Make Blockchain Verification Efficient 🌳🔗
A blockchain block can contain thousands of transactions.
So how can a network verify that a specific transaction belongs to a block without repeatedly checking the entire transaction list?
One important answer is the Merkle Tree.
1️⃣ Start with transactions
Imagine a block contains four transactions:
TX1 | TX2 | TX3 | TX4
Each transaction is converted into a cryptographic hash.
2️⃣ Hashes are paired
The network combines pairs of transaction hashes:
Hash(TX1) + Hash(TX2) → Hash A
Hash(TX3) + Hash(TX4) → Hash B
3️⃣ Hashes are combined again
Then:
Hash A + Hash B → Merkle Root
The final hash at the top is called the Merkle Root.
4️⃣ The Merkle Root goes into the block
The Merkle Root acts as a compact cryptographic summary of the transactions.
If even one transaction changes, its hash changes.
That change propagates upward through the tree and ultimately changes the Merkle Root.
5️⃣ Why is this useful?
Suppose you want to prove that TX3 belongs to a particular block.
You don't necessarily need the complete transaction list.
A Merkle Proof can provide the relevant hashes needed to reconstruct the path to the Merkle Root.
If the calculated result matches the Merkle Root recorded in the block, the transaction's inclusion can be verified.
🧠 The key idea
A Merkle Tree turns many pieces of transaction data into one compact cryptographic commitment.
Transactions → Hashes → Hash Pairs → Merkle Root
This helps blockchain systems verify transaction inclusion efficiently while preserving the integrity of the block's transaction data.
Next: Why does blockchain need a consensus mechanism in the first place? ⚙️
#blockchain #MerkleTrees #Cryptography #BlockchainTechnology #Web3
$BTC $BNB $BTTC
A blockchain block can contain thousands of transactions.
So how can a network verify that a specific transaction belongs to a block without repeatedly checking the entire transaction list?
One important answer is the Merkle Tree.
1️⃣ Start with transactions
Imagine a block contains four transactions:
TX1 | TX2 | TX3 | TX4
Each transaction is converted into a cryptographic hash.
2️⃣ Hashes are paired
The network combines pairs of transaction hashes:
Hash(TX1) + Hash(TX2) → Hash A
Hash(TX3) + Hash(TX4) → Hash B
3️⃣ Hashes are combined again
Then:
Hash A + Hash B → Merkle Root
The final hash at the top is called the Merkle Root.
4️⃣ The Merkle Root goes into the block
The Merkle Root acts as a compact cryptographic summary of the transactions.
If even one transaction changes, its hash changes.
That change propagates upward through the tree and ultimately changes the Merkle Root.
5️⃣ Why is this useful?
Suppose you want to prove that TX3 belongs to a particular block.
You don't necessarily need the complete transaction list.
A Merkle Proof can provide the relevant hashes needed to reconstruct the path to the Merkle Root.
If the calculated result matches the Merkle Root recorded in the block, the transaction's inclusion can be verified.
🧠 The key idea
A Merkle Tree turns many pieces of transaction data into one compact cryptographic commitment.
Transactions → Hashes → Hash Pairs → Merkle Root
This helps blockchain systems verify transaction inclusion efficiently while preserving the integrity of the block's transaction data.
Next: Why does blockchain need a consensus mechanism in the first place? ⚙️
#blockchain #MerkleTrees #Cryptography #BlockchainTechnology #Web3
$BTC $BNB $BTTC
27
1
2
365
Log in to explore more content
Join global crypto users on Binance Square
⚡️ Get latest and useful information about crypto.
💬 Trusted by the world’s largest crypto exchange.
👍 Discover real insights from verified creators.
Email / Phone number
Trending Topics
1
#BinanceReopensWithdrawalsForMoreAssets
780,583 views
4,371 Discussing
2
#Binance98PercentReplenished
147,454 views
1,719 Discussing
3
#USStocksSlipandCryptoMarketUnderBroadPressure
1,215 views
148 Discussing
4
#StrategySTRCResumesIssuanceAfterOver170Days
14,680 views
368 Discussing
5
#ADPUSPrivateEmployersAdd86000JobsInOctober
30,166 views
518 Discussing
6
#KazakhstanReportedlyInvests$100MInCryptoFunds
1,297 views
48 Discussing
7
#SouthKoreaSeeksCryptoTaxDelayUntil2029
17,748 views
233 Discussing
8
#USMidterms-WhatAreMarketsExpecting?
585,996 views
2,852 Discussing
9
#US10YearTreasuryYieldFallsTo4.845%
20,422 views
178 Discussing
10
#ZcashExpectsNU7ToMake$16MSproutZECInaccessible
1,271 views
21 Discussing