

DCA-HUNTER
1.1k Posts

DCA-HUNTER
Report
Block User
Precision Price Action & Liquidity Sweeps.Fading emotional retail. Hunting high-probability setups.📈 Spot & Futures Alpha
Open Trade
High-Frequency Trader
3 Years
273 Following
1.7K+ Followers
2.6K+ Liked
Posts
Portfolio
All
Quotes
Videos
Live
PINNED
·
--

Article
🛡️ Portfolio Architecture: Professional Position Sizing & Risk ManagementCapital preservation is the ultimate luxury in trading. Without a strict, mathematical framework for position sizing, execution becomes indistinguishable from gambling. The Entry Hunter strategy relies entirely on calculated precision to protect wealth and extract consistent market value unemotionally.
Here is the structural blueprint for professional risk management:
1. The 1% to 2% Rule (Absolute Risk)
Never risk more than 1% to 2% of your total portfolio equity on a single setup. This refers strictly to the capital lost if your invalidation level (stop-loss) is triggered, not the margin allocated to the trade. This mathematical buffer ensures that even a string of invalidated setups cannot meaningfully draw down your net worth.
2. The Position Sizing Formula
Eliminate emotional leverage. Calculate trade volume mathematically prior to execution:
Position Size = (Capital Risk Amount) / (Distance to Stop-Loss Percentage)
For example, in a $100,000 portfolio, a 1% risk allocation is $1,000. If your structural invalidation is 5% below your entry limit, your total position size must be $20,000. Leverage merely adjusts margin efficiency, it does not dictate absolute risk.
3. Correlation Mitigation
Holding multiple digital assets does not equal diversification if their price action is inherently tied to Bitcoin's liquidity flow. Holding long exposure on multiple correlated Layer-1 assets equates to a single, over-leveraged directional bet. Manage portfolio risk by segmenting narratives or utilizing delta-neutral hedging.
4. Capital Segmentation (The 80/20 Rule)
High-net-worth portfolio management requires structural segmentation.
80% Macro Spot Accumulation: Capital deployed patiently into high-timeframe liquidity pools for long-term holding.20% Tactical Execution (Derivatives): Capital utilized strictly for hedging and exploiting lower-timeframe liquidity sweeps.
Risk Application: Current Market Movers
In a choppy, contraction-focused market, strict position sizing is your primary defense against volatility spikes. As of mid-August 2026, note the structural action on these trending assets (Note: Always verify real-time price action and order book depth on your exchange terminal before executing, as live market conditions fluctuate rapidly):
$ACE (Fusionist): Displaying significant high-percentage volatility. Extreme volatility demands a wider structural invalidation level, which mathematically requires you to deploy a smaller position size to maintain the 1% risk rule.$BICO (Biconomy): Pushing aggressive volume on lower timeframes. Retain emotional discipline; never expand risk parameters just to chase momentum.$BNB (BNB): Operating as a high-tier defensive asset in the $600–$640 range. Ideal for patient, macro spot accumulation rather than over-leveraged intraday scalping.
🔔 Follow for the next briefing: Mapping Institutional Accumulation Schematics.
#writetoearn #CryptoTrading #RiskManagement #EntryHunter #BinanceSquare
🛡️ Portfolio Architecture: Professional Position Sizing & Risk Management
Capital preservation is the ultimate luxury in trading. Without a strict, mathematical framework for position sizing, execution becomes indistinguishable from gambling. The Entry Hunter strategy relies entirely on calculated precision to protect wealth and extract consistent market value unemotionally.
Here is the structural blueprint for professional risk management:
1. The 1% to 2% Rule (Absolute Risk)
Never risk more than 1% to 2% of your total portfolio equity on a single setup. This refers strictly to the capital lost if your invalidation level (stop-loss) is triggered, not the margin allocated to the trade. This mathematical buffer ensures that even a string of invalidated setups cannot meaningfully draw down your net worth.
2. The Position Sizing Formula
Eliminate emotional leverage. Calculate trade volume mathematically prior to execution:
Position Size = (Capital Risk Amount) / (Distance to Stop-Loss Percentage)
For example, in a $100,000 portfolio, a 1% risk allocation is $1,000. If your structural invalidation is 5% below your entry limit, your total position size must be $20,000. Leverage merely adjusts margin efficiency, it does not dictate absolute risk.
3. Correlation Mitigation
Holding multiple digital assets does not equal diversification if their price action is inherently tied to Bitcoin's liquidity flow. Holding long exposure on multiple correlated Layer-1 assets equates to a single, over-leveraged directional bet. Manage portfolio risk by segmenting narratives or utilizing delta-neutral hedging.
4. Capital Segmentation (The 80/20 Rule)
High-net-worth portfolio management requires structural segmentation.
80% Macro Spot Accumulation: Capital deployed patiently into high-timeframe liquidity pools for long-term holding.20% Tactical Execution (Derivatives): Capital utilized strictly for hedging and exploiting lower-timeframe liquidity sweeps.
Risk Application: Current Market Movers
In a choppy, contraction-focused market, strict position sizing is your primary defense against volatility spikes. As of mid-August 2026, note the structural action on these trending assets (Note: Always verify real-time price action and order book depth on your exchange terminal before executing, as live market conditions fluctuate rapidly):
$ACE (Fusionist): Displaying significant high-percentage volatility. Extreme volatility demands a wider structural invalidation level, which mathematically requires you to deploy a smaller position size to maintain the 1% risk rule.$BICO (Biconomy): Pushing aggressive volume on lower timeframes. Retain emotional discipline; never expand risk parameters just to chase momentum.$BNB (BNB): Operating as a high-tier defensive asset in the $600–$640 range. Ideal for patient, macro spot accumulation rather than over-leveraged intraday scalping.
🔔 Follow for the next briefing: Mapping Institutional Accumulation Schematics.
#writetoearn #CryptoTrading #RiskManagement #EntryHunter #BinanceSquare
Here is the structural blueprint for professional risk management:
1. The 1% to 2% Rule (Absolute Risk)
Never risk more than 1% to 2% of your total portfolio equity on a single setup. This refers strictly to the capital lost if your invalidation level (stop-loss) is triggered, not the margin allocated to the trade. This mathematical buffer ensures that even a string of invalidated setups cannot meaningfully draw down your net worth.
2. The Position Sizing Formula
Eliminate emotional leverage. Calculate trade volume mathematically prior to execution:
Position Size = (Capital Risk Amount) / (Distance to Stop-Loss Percentage)
For example, in a $100,000 portfolio, a 1% risk allocation is $1,000. If your structural invalidation is 5% below your entry limit, your total position size must be $20,000. Leverage merely adjusts margin efficiency, it does not dictate absolute risk.
3. Correlation Mitigation
Holding multiple digital assets does not equal diversification if their price action is inherently tied to Bitcoin's liquidity flow. Holding long exposure on multiple correlated Layer-1 assets equates to a single, over-leveraged directional bet. Manage portfolio risk by segmenting narratives or utilizing delta-neutral hedging.
4. Capital Segmentation (The 80/20 Rule)
High-net-worth portfolio management requires structural segmentation.
80% Macro Spot Accumulation: Capital deployed patiently into high-timeframe liquidity pools for long-term holding.20% Tactical Execution (Derivatives): Capital utilized strictly for hedging and exploiting lower-timeframe liquidity sweeps.
Risk Application: Current Market Movers
In a choppy, contraction-focused market, strict position sizing is your primary defense against volatility spikes. As of mid-August 2026, note the structural action on these trending assets (Note: Always verify real-time price action and order book depth on your exchange terminal before executing, as live market conditions fluctuate rapidly):
$ACE (Fusionist): Displaying significant high-percentage volatility. Extreme volatility demands a wider structural invalidation level, which mathematically requires you to deploy a smaller position size to maintain the 1% risk rule.$BICO (Biconomy): Pushing aggressive volume on lower timeframes. Retain emotional discipline; never expand risk parameters just to chase momentum.$BNB (BNB): Operating as a high-tier defensive asset in the $600–$640 range. Ideal for patient, macro spot accumulation rather than over-leveraged intraday scalping.
🔔 Follow for the next briefing: Mapping Institutional Accumulation Schematics.
#writetoearn #CryptoTrading #RiskManagement #EntryHunter #BinanceSquare
1
11
456
PINNED
·
--
Article
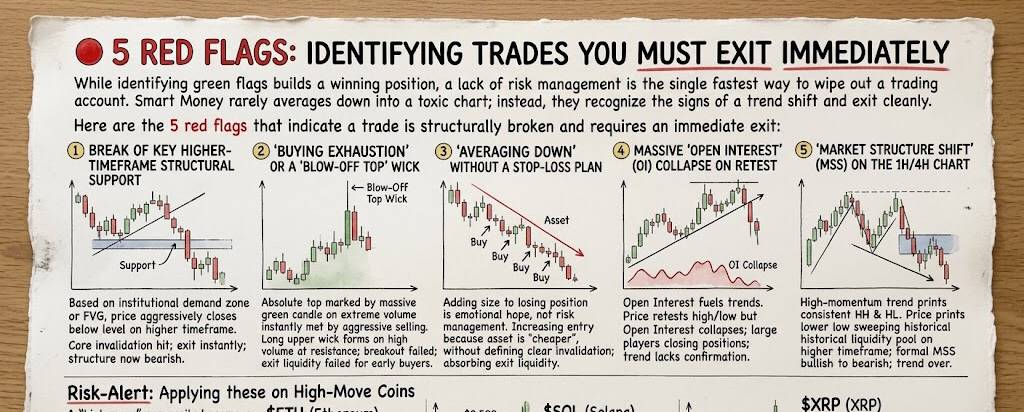
🔴 5 Red Flags: Identifying Trades You Must Exit ImmediatelyWhile identifying green flags helps you build a winning position, a lack of risk management is the single fastest way to wipe out a trading account. Smart Money rarely averages down into a toxic chart; instead, they recognize the signs of a trend shift and exit cleanly.
Here are the 5 red flags that indicate a trade is structurally broken and requires an immediate exit:
1. Break of Key Higher-Timeframe Structural Support
When a trade is based on an institutional demand zone or a Fair Value Gap (FVG), and price aggressively closes below that level on a higher timeframe, the trade’s core invalidation has been hit. Exit instantly; the structure is now bearish.
2. 'Buying Exhaustion' or a 'Blow-Off Top' wick
The absolute top is often marked by a final, massive green impulse candle on extreme volume that is instantly met by aggressive selling. If you see a long upper wick (2x to 3x the body) forming on high volume at a resistance level, the breakout has failed, and it is exit liquidity for early buyers.
3. 'Averaging Down' Without a Stop-Loss Plan
Adding more size to a losing position is not risk management; it is emotional hope. If you find yourself increasing your entry size strictly because the asset is 'cheaper' than before, without defining a clear invalidation, you are absorbing someone else's exit liquidity.
4. Massive 'Open Interest' (OI) Collapse on Retest
Open Interest tells you if fresh capital is fueling a trend. If price is retesting a key high/low but Open Interest is actively collapsing, it signals that large players are closing their positions rather than opening new ones. The trend lacks confirmation.
5. 'Market Structure Shift' (MSS) on the 1H/4H Chart
A high-momentum trend must print consistent higher highs and higher lows. When price prints a lower low that sweeps a key historical liquidity pool on the higher timeframe, it marks a formal Market Structure Shift from bullish to bearish. The trend is over.
Risk-Alert: Applying these on High-Move Coins
A "high move" can easily become a "sharp sweep" if you are not tracking these red flags. Look at these three major assets from the last 24H and consider how you would define your structural invalidation today:
$ONT (Ethereum): Strong volume inflow (+6.73%) pushing $2,500. A red flag would be a failure to hold acceptance above this newly reclaimed level.$SOL (Solana): +5.37% gain to $93.27. Tracking higher lows is critical here, as a collapse on high-range wicks would signal distribution.$XRP (XRP): Intraday volatile leader with +11.81% gains to $1.42. High derivatives volume means sharp sweeps can hit. A red flag would be an aggressive re-entry inside the range it just broke out of.
🔔 Follow for the next post: Mastering The Entry Hunter Execution Strategy!
#writetoearn #cryptotrading #priceaction #TradingSetups #TechnicalAnalysis #BinanceSquare
🔴 5 Red Flags: Identifying Trades You Must Exit Immediately
While identifying green flags helps you build a winning position, a lack of risk management is the single fastest way to wipe out a trading account. Smart Money rarely averages down into a toxic chart; instead, they recognize the signs of a trend shift and exit cleanly.
Here are the 5 red flags that indicate a trade is structurally broken and requires an immediate exit:
1. Break of Key Higher-Timeframe Structural Support
When a trade is based on an institutional demand zone or a Fair Value Gap (FVG), and price aggressively closes below that level on a higher timeframe, the trade’s core invalidation has been hit. Exit instantly; the structure is now bearish.
2. 'Buying Exhaustion' or a 'Blow-Off Top' wick
The absolute top is often marked by a final, massive green impulse candle on extreme volume that is instantly met by aggressive selling. If you see a long upper wick (2x to 3x the body) forming on high volume at a resistance level, the breakout has failed, and it is exit liquidity for early buyers.
3. 'Averaging Down' Without a Stop-Loss Plan
Adding more size to a losing position is not risk management; it is emotional hope. If you find yourself increasing your entry size strictly because the asset is 'cheaper' than before, without defining a clear invalidation, you are absorbing someone else's exit liquidity.
4. Massive 'Open Interest' (OI) Collapse on Retest
Open Interest tells you if fresh capital is fueling a trend. If price is retesting a key high/low but Open Interest is actively collapsing, it signals that large players are closing their positions rather than opening new ones. The trend lacks confirmation.
5. 'Market Structure Shift' (MSS) on the 1H/4H Chart
A high-momentum trend must print consistent higher highs and higher lows. When price prints a lower low that sweeps a key historical liquidity pool on the higher timeframe, it marks a formal Market Structure Shift from bullish to bearish. The trend is over.
Risk-Alert: Applying these on High-Move Coins
A "high move" can easily become a "sharp sweep" if you are not tracking these red flags. Look at these three major assets from the last 24H and consider how you would define your structural invalidation today:
$ONT (Ethereum): Strong volume inflow (+6.73%) pushing $2,500. A red flag would be a failure to hold acceptance above this newly reclaimed level.$SOL (Solana): +5.37% gain to $93.27. Tracking higher lows is critical here, as a collapse on high-range wicks would signal distribution.$XRP (XRP): Intraday volatile leader with +11.81% gains to $1.42. High derivatives volume means sharp sweeps can hit. A red flag would be an aggressive re-entry inside the range it just broke out of.
🔔 Follow for the next post: Mastering The Entry Hunter Execution Strategy!
#writetoearn #cryptotrading #priceaction #TradingSetups #TechnicalAnalysis #BinanceSquare
Here are the 5 red flags that indicate a trade is structurally broken and requires an immediate exit:
1. Break of Key Higher-Timeframe Structural Support
When a trade is based on an institutional demand zone or a Fair Value Gap (FVG), and price aggressively closes below that level on a higher timeframe, the trade’s core invalidation has been hit. Exit instantly; the structure is now bearish.
2. 'Buying Exhaustion' or a 'Blow-Off Top' wick
The absolute top is often marked by a final, massive green impulse candle on extreme volume that is instantly met by aggressive selling. If you see a long upper wick (2x to 3x the body) forming on high volume at a resistance level, the breakout has failed, and it is exit liquidity for early buyers.
3. 'Averaging Down' Without a Stop-Loss Plan
Adding more size to a losing position is not risk management; it is emotional hope. If you find yourself increasing your entry size strictly because the asset is 'cheaper' than before, without defining a clear invalidation, you are absorbing someone else's exit liquidity.
4. Massive 'Open Interest' (OI) Collapse on Retest
Open Interest tells you if fresh capital is fueling a trend. If price is retesting a key high/low but Open Interest is actively collapsing, it signals that large players are closing their positions rather than opening new ones. The trend lacks confirmation.
5. 'Market Structure Shift' (MSS) on the 1H/4H Chart
A high-momentum trend must print consistent higher highs and higher lows. When price prints a lower low that sweeps a key historical liquidity pool on the higher timeframe, it marks a formal Market Structure Shift from bullish to bearish. The trend is over.
Risk-Alert: Applying these on High-Move Coins
A "high move" can easily become a "sharp sweep" if you are not tracking these red flags. Look at these three major assets from the last 24H and consider how you would define your structural invalidation today:
$ONT (Ethereum): Strong volume inflow (+6.73%) pushing $2,500. A red flag would be a failure to hold acceptance above this newly reclaimed level.$SOL (Solana): +5.37% gain to $93.27. Tracking higher lows is critical here, as a collapse on high-range wicks would signal distribution.$XRP (XRP): Intraday volatile leader with +11.81% gains to $1.42. High derivatives volume means sharp sweeps can hit. A red flag would be an aggressive re-entry inside the range it just broke out of.
🔔 Follow for the next post: Mastering The Entry Hunter Execution Strategy!
#writetoearn #cryptotrading #priceaction #TradingSetups #TechnicalAnalysis #BinanceSquare
16
265
·
--
Bullish
30D trade $NEAR 16.5K USDT
$WLD LONG TP 0.53-0.54 $ADA $NEAR
{future}(WLDUSDT)
$WLD LONG TP 0.53-0.54 $ADA $NEAR
3
159
·
--
Bullish
30D trade $TIA 1.5K USDT
The "Market Maker" Myth vs. Reality 🧠📊
We’ve all been there: The second you open a long position or enter a trade, the market instantly dumps. It feels so personal, like someone in a dark room is watching your screen and moving the price against you. 📉👀
Plot twist: The market maker doesn't even know you exist.
Major institutional market makers handle billions in volume across global exchanges. They aren't tracking your individual account or your position size. So what's actually happening?
1️⃣ Liquidity Pools, Not Personal Attacks: Thousands of retail traders place their stop-losses and liquidations at the exact same technical levels (obvious support and resistance lines). Large automated algorithms sweep those zones because that’s where the liquidity is to fill massive orders.
2️⃣ FOMO Timing: Human psychology dictates that we usually pull the trigger on a trade after a massive pump or dump—right when a natural market pullback or consolidation phase is already due.
3️⃣ Leverage Amplifies the Noise: When you use high leverage, normal, everyday micro-fluctuations look like violent crashes on your screen, making standard market breathing room feel like a direct attack.
$XNY $TIA $ZEC
Stop fighting invisible villains. Master your risk management, use proper stop-losses, and focus on your strategy instead of emotion! 🚀💡
#cryptotrading #BinanceSquare #tradingpsychology #CryptoEducation
{future}(ZECUSDT)
The "Market Maker" Myth vs. Reality 🧠📊
We’ve all been there: The second you open a long position or enter a trade, the market instantly dumps. It feels so personal, like someone in a dark room is watching your screen and moving the price against you. 📉👀
Plot twist: The market maker doesn't even know you exist.
Major institutional market makers handle billions in volume across global exchanges. They aren't tracking your individual account or your position size. So what's actually happening?
1️⃣ Liquidity Pools, Not Personal Attacks: Thousands of retail traders place their stop-losses and liquidations at the exact same technical levels (obvious support and resistance lines). Large automated algorithms sweep those zones because that’s where the liquidity is to fill massive orders.
2️⃣ FOMO Timing: Human psychology dictates that we usually pull the trigger on a trade after a massive pump or dump—right when a natural market pullback or consolidation phase is already due.
3️⃣ Leverage Amplifies the Noise: When you use high leverage, normal, everyday micro-fluctuations look like violent crashes on your screen, making standard market breathing room feel like a direct attack.
$XNY $TIA $ZEC
Stop fighting invisible villains. Master your risk management, use proper stop-losses, and focus on your strategy instead of emotion! 🚀💡
#cryptotrading #BinanceSquare #tradingpsychology #CryptoEducation
We’ve all been there: The second you open a long position or enter a trade, the market instantly dumps. It feels so personal, like someone in a dark room is watching your screen and moving the price against you. 📉👀
Plot twist: The market maker doesn't even know you exist.
Major institutional market makers handle billions in volume across global exchanges. They aren't tracking your individual account or your position size. So what's actually happening?
1️⃣ Liquidity Pools, Not Personal Attacks: Thousands of retail traders place their stop-losses and liquidations at the exact same technical levels (obvious support and resistance lines). Large automated algorithms sweep those zones because that’s where the liquidity is to fill massive orders.
2️⃣ FOMO Timing: Human psychology dictates that we usually pull the trigger on a trade after a massive pump or dump—right when a natural market pullback or consolidation phase is already due.
3️⃣ Leverage Amplifies the Noise: When you use high leverage, normal, everyday micro-fluctuations look like violent crashes on your screen, making standard market breathing room feel like a direct attack.
$XNY $TIA $ZEC
Stop fighting invisible villains. Master your risk management, use proper stop-losses, and focus on your strategy instead of emotion! 🚀💡
#cryptotrading #BinanceSquare #tradingpsychology #CryptoEducation

2
1.1k
·
--
Bullish
guys small long tp 1300-1250$ sl 1140$
{future}(ZECUSDT)
$ZEC
guys small long tp 1300-1250$ sl 1140$
$ZEC
$ZEC
3
283
·
--
30D trade $ADA 1.3K USDT
$ADA Entry Zones (DCA Allocation)
Zone 2 ($0.21 - $0.22): 40% allocation near major support.
Zone 3 ($0.17 - $0.18): 30% allocation for deep dip buys.
Target Average Entry: ~$0.215
🎯 2. Profit Targets (TP Levels)
Target 1 (5x): $1.08 (Take 30% profit — secure initial capital)
Target 2 (7.5x): $1.61 (Take 40% profit)
Target 3 (10x): $2.15 (Take 30% profit)
⚠️ Risk Management Note
Leverage Warning: Avoid high leverage (5x–10x futures) for long-term DCA to eliminate liquidation risk. Spot DCA or ultra-low leverage is best for multi-fold growth goals!
What’s your price prediction for $ADA this cycle? Let me know in the comments! 👇
#ADABullish #Cardano #crypto #trading #strategy
$ADA Entry Zones (DCA Allocation)
Zone 2 ($0.21 - $0.22): 40% allocation near major support.
Zone 3 ($0.17 - $0.18): 30% allocation for deep dip buys.
Target Average Entry: ~$0.215
🎯 2. Profit Targets (TP Levels)
Target 1 (5x): $1.08 (Take 30% profit — secure initial capital)
Target 2 (7.5x): $1.61 (Take 40% profit)
Target 3 (10x): $2.15 (Take 30% profit)
⚠️ Risk Management Note
Leverage Warning: Avoid high leverage (5x–10x futures) for long-term DCA to eliminate liquidation risk. Spot DCA or ultra-low leverage is best for multi-fold growth goals!
What’s your price prediction for $ADA this cycle? Let me know in the comments! 👇
#ADABullish #Cardano #crypto #trading #strategy
Zone 2 ($0.21 - $0.22): 40% allocation near major support.
Zone 3 ($0.17 - $0.18): 30% allocation for deep dip buys.
Target Average Entry: ~$0.215
🎯 2. Profit Targets (TP Levels)
Target 1 (5x): $1.08 (Take 30% profit — secure initial capital)
Target 2 (7.5x): $1.61 (Take 40% profit)
Target 3 (10x): $2.15 (Take 30% profit)
⚠️ Risk Management Note
Leverage Warning: Avoid high leverage (5x–10x futures) for long-term DCA to eliminate liquidation risk. Spot DCA or ultra-low leverage is best for multi-fold growth goals!
What’s your price prediction for $ADA this cycle? Let me know in the comments! 👇
#ADABullish #Cardano #crypto #trading #strategy
3
359
·
--
Bullish
$SNDK Nicholas Mugalli, chief executive officer of World Trade Securities, said SanDisk shares could rise about 102% to $3,000 within the next two years. According to Sina Finance, he said that even at that level, the stock would still trade at less than 9 times expected earnings.
$SNDK Nicholas Mugalli, chief executive officer of World Trade Securities, said SanDisk shares could rise about 102% to $3,000 within the next two years. According to Sina Finance, he said that even at that level, the stock would still trade at less than 9 times expected earnings.
1
117
·
--
Bullish
30D trade $BTC 3K USDT
$BTC You know what’s more funny when you break the 90k wish you have a plan after this lossy week $ZEC $ETH
Lost 10% this week on each one (about 7k two months hold profits im still hold trust the long term)
$BTC You know what’s more funny when you break the 90k wish you have a plan after this lossy week $ZEC $ETH
Lost 10% this week on each one (about 7k two months hold profits im still hold trust the long term)
Lost 10% this week on each one (about 7k two months hold profits im still hold trust the long term)
1
480
·
--
Bullish
Where does $RLC head next weeks?
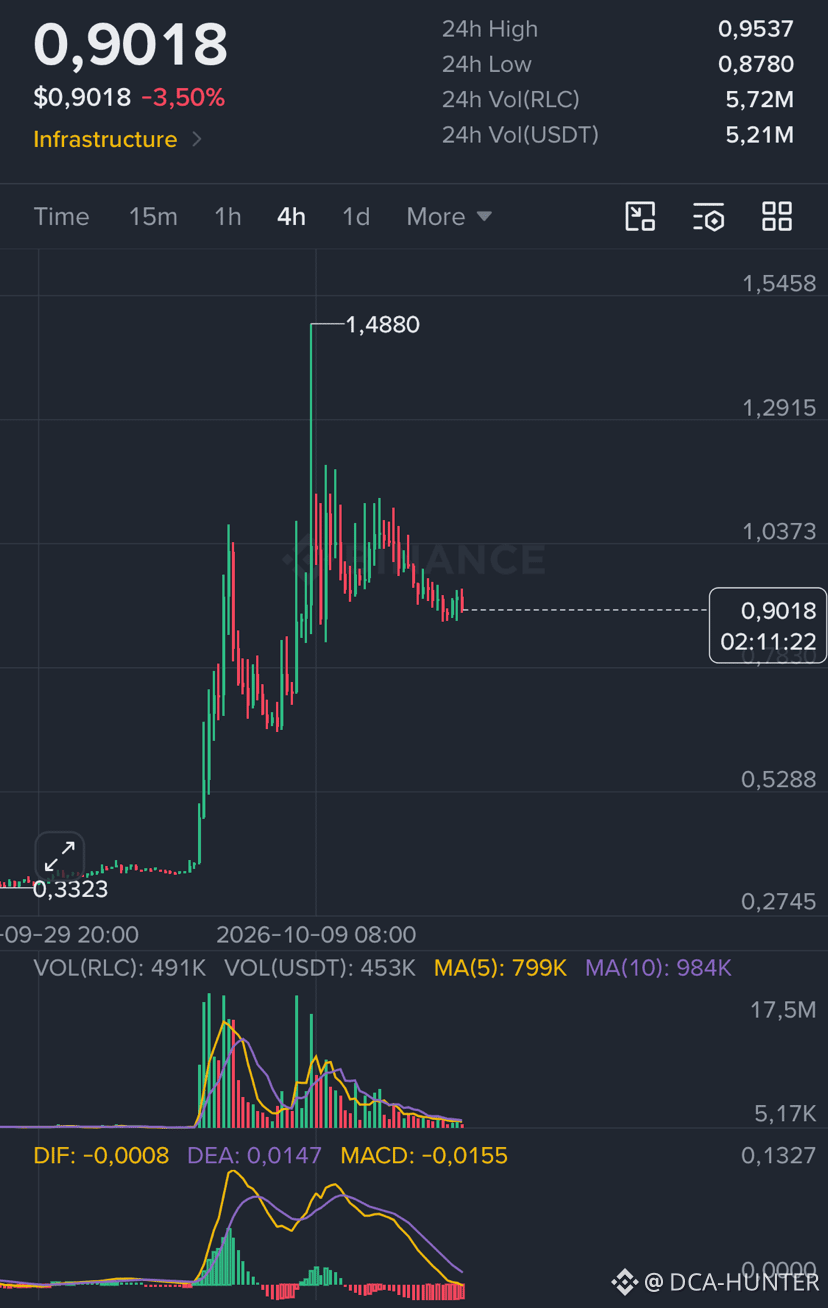
Following an aggressive breakout to $1.48, $RLC is consolidating near $0.90. Price action is sitting between upper overhead resistance and key daily demand zones.
What is your main scenario for $RLC over the next session?
Where does $RLC head next weeks?
Following an aggressive breakout to $1.48, $RLC is consolidating near $0.90. Price action is sitting between upper overhead resistance and key daily demand zones.
What is your main scenario for $RLC over the next session?
Following an aggressive breakout to $1.48, $RLC is consolidating near $0.90. Price action is sitting between upper overhead resistance and key daily demand zones.
What is your main scenario for $RLC over the next session?
🟢 Rebound to $1.00+
59%
🟡 Sideways Range $0.82 - $0.98
15%
🔴 Pullback to $0.68
26%
68 votes • Voting closed
2
1.6k
·
--
Bullish
30D trade $NEAR 14.5K USDT
The Gambler’s Mindset vs. The Trader’s Architecture
When you sit through a ±20% drawdown without breaking a sweat, you feel like you've mastered emotional discipline.
Gamblers rely on hope waiting for a price reversal no matter how long it takes. Professional traders rely on calculated execution knowing whether that -20% dip is part of a planned volatility strategy or a fundamental failure of the thesis.
Check Trader’s Architecture pinned post🏹
{future}(BTWUSDT)
$NEAR $BTW $TRUTH
{future}(TRUTHUSDT)
The Gambler’s Mindset vs. The Trader’s Architecture
When you sit through a ±20% drawdown without breaking a sweat, you feel like you've mastered emotional discipline.
Gamblers rely on hope waiting for a price reversal no matter how long it takes. Professional traders rely on calculated execution knowing whether that -20% dip is part of a planned volatility strategy or a fundamental failure of the thesis.
Check Trader’s Architecture pinned post🏹
$NEAR $BTW $TRUTH
When you sit through a ±20% drawdown without breaking a sweat, you feel like you've mastered emotional discipline.
Gamblers rely on hope waiting for a price reversal no matter how long it takes. Professional traders rely on calculated execution knowing whether that -20% dip is part of a planned volatility strategy or a fundamental failure of the thesis.
Check Trader’s Architecture pinned post🏹
$NEAR $BTW $TRUTH
1
395
·
--
Bullish
$RLC Strategic DCA Execution Plan
For traders seeking exposure after a major move without catching a falling knife, a phased Dollar-Cost Averaging (DCA) strategy spreads risk across key technical demand clusters:
1. Entry Zones (Tranche Allocation)
Initial Tranche ($0.850 – $0.900): Allocate 30% near current levels ($0.9018). This area serves as psychological support near $0.8780 (24h low).
Secondary Tranche ($0.680 – $0.720): Allocate 40% at the mid-range structural pull-back level, aligning with previous high-volume consolidation nodes.
Deep Dip Tranche ($0.500 – $0.530): Reserve 30% near the primary horizontal support line around $0.5288 to capitalize on high-volatility liquidity sweeps.
Estimated Average Entry: ~$0.725
2. Scaling Out (Profit Targets)
Target 1 ($1.050 – $1.100): Realize 30% profit at immediate resistance to de-risk and recoup capital.
Target 2 ($1.300 – $1.350): Realize 40% profit as momentum retests the upper supply cluster.
Target 3 ($1.480+): Realize remaining 30% profit on a full retest or breakout past the local high ($1.4880).
3. Risk & Position Management
Invalidation Level: A daily close below $0.480 invalidates the higher-low structural integrity, requiring stop-loss execution on remaining spot holdings.
Futures Caution: Due to high volatility following the initial 4x move, derivative traders should limit leverage to under 3x or stick purely to spot DCA to avoid liquidation during intraday wicks.
What is your mid-term outlook on RLC? Share your entry targets in the comments below.
#RLC #iExecRLC #cryptotrading #DCA #TechnicalAnalysis
$RLC Strategic DCA Execution Plan
For traders seeking exposure after a major move without catching a falling knife, a phased Dollar-Cost Averaging (DCA) strategy spreads risk across key technical demand clusters:
1. Entry Zones (Tranche Allocation)
Initial Tranche ($0.850 – $0.900): Allocate 30% near current levels ($0.9018). This area serves as psychological support near $0.8780 (24h low).
Secondary Tranche ($0.680 – $0.720): Allocate 40% at the mid-range structural pull-back level, aligning with previous high-volume consolidation nodes.
Deep Dip Tranche ($0.500 – $0.530): Reserve 30% near the primary horizontal support line around $0.5288 to capitalize on high-volatility liquidity sweeps.
Estimated Average Entry: ~$0.725
2. Scaling Out (Profit Targets)
Target 1 ($1.050 – $1.100): Realize 30% profit at immediate resistance to de-risk and recoup capital.
Target 2 ($1.300 – $1.350): Realize 40% profit as momentum retests the upper supply cluster.
Target 3 ($1.480+): Realize remaining 30% profit on a full retest or breakout past the local high ($1.4880).
3. Risk & Position Management
Invalidation Level: A daily close below $0.480 invalidates the higher-low structural integrity, requiring stop-loss execution on remaining spot holdings.
Futures Caution: Due to high volatility following the initial 4x move, derivative traders should limit leverage to under 3x or stick purely to spot DCA to avoid liquidation during intraday wicks.
What is your mid-term outlook on RLC? Share your entry targets in the comments below.
#RLC #iExecRLC #cryptotrading #DCA #TechnicalAnalysis
For traders seeking exposure after a major move without catching a falling knife, a phased Dollar-Cost Averaging (DCA) strategy spreads risk across key technical demand clusters:
1. Entry Zones (Tranche Allocation)
Initial Tranche ($0.850 – $0.900): Allocate 30% near current levels ($0.9018). This area serves as psychological support near $0.8780 (24h low).
Secondary Tranche ($0.680 – $0.720): Allocate 40% at the mid-range structural pull-back level, aligning with previous high-volume consolidation nodes.
Deep Dip Tranche ($0.500 – $0.530): Reserve 30% near the primary horizontal support line around $0.5288 to capitalize on high-volatility liquidity sweeps.
Estimated Average Entry: ~$0.725
2. Scaling Out (Profit Targets)
Target 1 ($1.050 – $1.100): Realize 30% profit at immediate resistance to de-risk and recoup capital.
Target 2 ($1.300 – $1.350): Realize 40% profit as momentum retests the upper supply cluster.
Target 3 ($1.480+): Realize remaining 30% profit on a full retest or breakout past the local high ($1.4880).
3. Risk & Position Management
Invalidation Level: A daily close below $0.480 invalidates the higher-low structural integrity, requiring stop-loss execution on remaining spot holdings.
Futures Caution: Due to high volatility following the initial 4x move, derivative traders should limit leverage to under 3x or stick purely to spot DCA to avoid liquidation during intraday wicks.
What is your mid-term outlook on RLC? Share your entry targets in the comments below.
#RLC #iExecRLC #cryptotrading #DCA #TechnicalAnalysis
1
454
·
--
Bullish
30D trade $ZEC 14.7K USDT
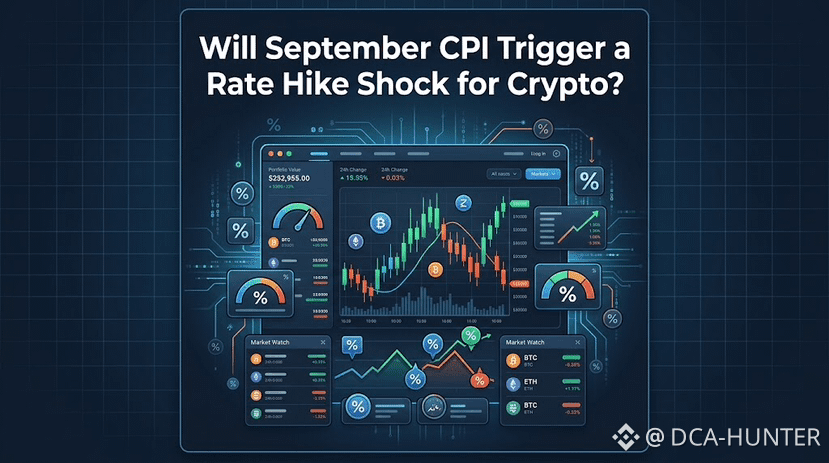
Will September CPI Trigger a Rate Hike Shock for Crypto?
With Middle East tensions pushing crude oil higher and driving up US energy costs, all eyes are on the upcoming September CPI report. A hotter-than-expected inflation reading could revive expectations of another Fed rate hike before year-end, putting upward pressure on Treasury yields and tightening liquidity across crypto markets.
Here is how major assets are positioned ahead of the data:
Bitcoin ($BTC ): Testing Macro Support
• Structure: Consolidating near $83,500 after liquidations.
• CPI Impact: A hot CPI print risks testing primary support at $80,000–$81,500. A cooler print could spark a rally toward $87,000+.
JPG
Ethereum ($ETH ): Range-Bound
• Structure: Trading near $2,500 amid cautious sentiment and ETF outflows.
• CPI Impact: High interest rate expectations keep pressure on major L1s. A break above $2,580 requires broader macro relief, while weakness could mean retesting $2,420.
Zcash ($ZEC ): Independent Privacy Momentum
• Structure: Holding strong near $1,200.
• CPI Impact: While altcoins face macro headwinds, privacy-centric assets like zec often display decorrelated price action during market volatility.
Positioning Strategy:
Ahead of CPI data, managing leverage and keeping cash reserves ready for volatility sweeps is key.
Do you expect CPI to come in hotter than expected? How are you positioning your portfolio?
#CPIWatch #BTC #ETH #ZEC #CryptoTrading
{spot}(BTCUSDT)
Will September CPI Trigger a Rate Hike Shock for Crypto?
With Middle East tensions pushing crude oil higher and driving up US energy costs, all eyes are on the upcoming September CPI report. A hotter-than-expected inflation reading could revive expectations of another Fed rate hike before year-end, putting upward pressure on Treasury yields and tightening liquidity across crypto markets.
Here is how major assets are positioned ahead of the data:
Bitcoin ($BTC ): Testing Macro Support
• Structure: Consolidating near $83,500 after liquidations.
• CPI Impact: A hot CPI print risks testing primary support at $80,000–$81,500. A cooler print could spark a rally toward $87,000+.
JPG
Ethereum ($ETH ): Range-Bound
• Structure: Trading near $2,500 amid cautious sentiment and ETF outflows.
• CPI Impact: High interest rate expectations keep pressure on major L1s. A break above $2,580 requires broader macro relief, while weakness could mean retesting $2,420.
Zcash ($ZEC ): Independent Privacy Momentum
• Structure: Holding strong near $1,200.
• CPI Impact: While altcoins face macro headwinds, privacy-centric assets like zec often display decorrelated price action during market volatility.
Positioning Strategy:
Ahead of CPI data, managing leverage and keeping cash reserves ready for volatility sweeps is key.
Do you expect CPI to come in hotter than expected? How are you positioning your portfolio?
#CPIWatch #BTC #ETH #ZEC #CryptoTrading
With Middle East tensions pushing crude oil higher and driving up US energy costs, all eyes are on the upcoming September CPI report. A hotter-than-expected inflation reading could revive expectations of another Fed rate hike before year-end, putting upward pressure on Treasury yields and tightening liquidity across crypto markets.
Here is how major assets are positioned ahead of the data:
Bitcoin ($BTC ): Testing Macro Support
• Structure: Consolidating near $83,500 after liquidations.
• CPI Impact: A hot CPI print risks testing primary support at $80,000–$81,500. A cooler print could spark a rally toward $87,000+.
JPG
Ethereum ($ETH ): Range-Bound
• Structure: Trading near $2,500 amid cautious sentiment and ETF outflows.
• CPI Impact: High interest rate expectations keep pressure on major L1s. A break above $2,580 requires broader macro relief, while weakness could mean retesting $2,420.
Zcash ($ZEC ): Independent Privacy Momentum
• Structure: Holding strong near $1,200.
• CPI Impact: While altcoins face macro headwinds, privacy-centric assets like zec often display decorrelated price action during market volatility.
Positioning Strategy:
Ahead of CPI data, managing leverage and keeping cash reserves ready for volatility sweeps is key.
Do you expect CPI to come in hotter than expected? How are you positioning your portfolio?
#CPIWatch #BTC #ETH #ZEC #CryptoTrading
1
326
·
--
Bullish
30D trade $NEAR 14.1K USDT
10 Reasons Behind Today's Crypto Market Dip
1. Hawkish Macro Policy: Fed rate cut delays and elevated US Treasury yields are keeping risk-off sentiment high.
2. $1B+ Liquidation Cascade: Overleveraged long positions were forcibly cleared out, triggering automatic sell pressure.
3. ETF Outflows: US Spot BTC and ETH ETFs saw net outflows, reducing structural spot demand.
4. Altcoin Capital Flight: High FDV categories like Modular Chains (-13.15%), Account Abstraction (-12.56%), and Data Availability (-12.53%) are seeing major pullbacks.
5. Energy Price Spike: Rising geopolitical tensions drove crude oil higher, reviving broader inflation fears.
6. Technical Rejection: Bitcoin failed to break the $85k–$87k resistance level, triggering automated stop-losses down to $80k support.
7. Thin Order Book Liquidity: Low liquidity in altcoin markets caused double-digit price slips across Layer 2s, AI, and meme ecosystems.
8. Panic Selling: Short-term holders sent coins to exchanges at a loss during the initial dip.
9. Seasonal Disappointment: The failure to break out early in the month triggered a unwinding of bullish bets.
10. Regulatory Delays: Legislative delays surrounding crypto framework bills created temporary institutional hesitancy.
#crypto #bitcoin #CryptoMarket #trading #Altcoins $NEAR $BTC $ZEC
10 Reasons Behind Today's Crypto Market Dip
1. Hawkish Macro Policy: Fed rate cut delays and elevated US Treasury yields are keeping risk-off sentiment high.
2. $1B+ Liquidation Cascade: Overleveraged long positions were forcibly cleared out, triggering automatic sell pressure.
3. ETF Outflows: US Spot BTC and ETH ETFs saw net outflows, reducing structural spot demand.
4. Altcoin Capital Flight: High FDV categories like Modular Chains (-13.15%), Account Abstraction (-12.56%), and Data Availability (-12.53%) are seeing major pullbacks.
5. Energy Price Spike: Rising geopolitical tensions drove crude oil higher, reviving broader inflation fears.
6. Technical Rejection: Bitcoin failed to break the $85k–$87k resistance level, triggering automated stop-losses down to $80k support.
7. Thin Order Book Liquidity: Low liquidity in altcoin markets caused double-digit price slips across Layer 2s, AI, and meme ecosystems.
8. Panic Selling: Short-term holders sent coins to exchanges at a loss during the initial dip.
9. Seasonal Disappointment: The failure to break out early in the month triggered a unwinding of bullish bets.
10. Regulatory Delays: Legislative delays surrounding crypto framework bills created temporary institutional hesitancy.
#crypto #bitcoin #CryptoMarket #trading #Altcoins $NEAR $BTC $ZEC
1. Hawkish Macro Policy: Fed rate cut delays and elevated US Treasury yields are keeping risk-off sentiment high.
2. $1B+ Liquidation Cascade: Overleveraged long positions were forcibly cleared out, triggering automatic sell pressure.
3. ETF Outflows: US Spot BTC and ETH ETFs saw net outflows, reducing structural spot demand.
4. Altcoin Capital Flight: High FDV categories like Modular Chains (-13.15%), Account Abstraction (-12.56%), and Data Availability (-12.53%) are seeing major pullbacks.
5. Energy Price Spike: Rising geopolitical tensions drove crude oil higher, reviving broader inflation fears.
6. Technical Rejection: Bitcoin failed to break the $85k–$87k resistance level, triggering automated stop-losses down to $80k support.
7. Thin Order Book Liquidity: Low liquidity in altcoin markets caused double-digit price slips across Layer 2s, AI, and meme ecosystems.
8. Panic Selling: Short-term holders sent coins to exchanges at a loss during the initial dip.
9. Seasonal Disappointment: The failure to break out early in the month triggered a unwinding of bullish bets.
10. Regulatory Delays: Legislative delays surrounding crypto framework bills created temporary institutional hesitancy.
#crypto #bitcoin #CryptoMarket #trading #Altcoins $NEAR $BTC $ZEC
2
440
·
--
Bullish
30D trade $NEAR 13.3K USDT
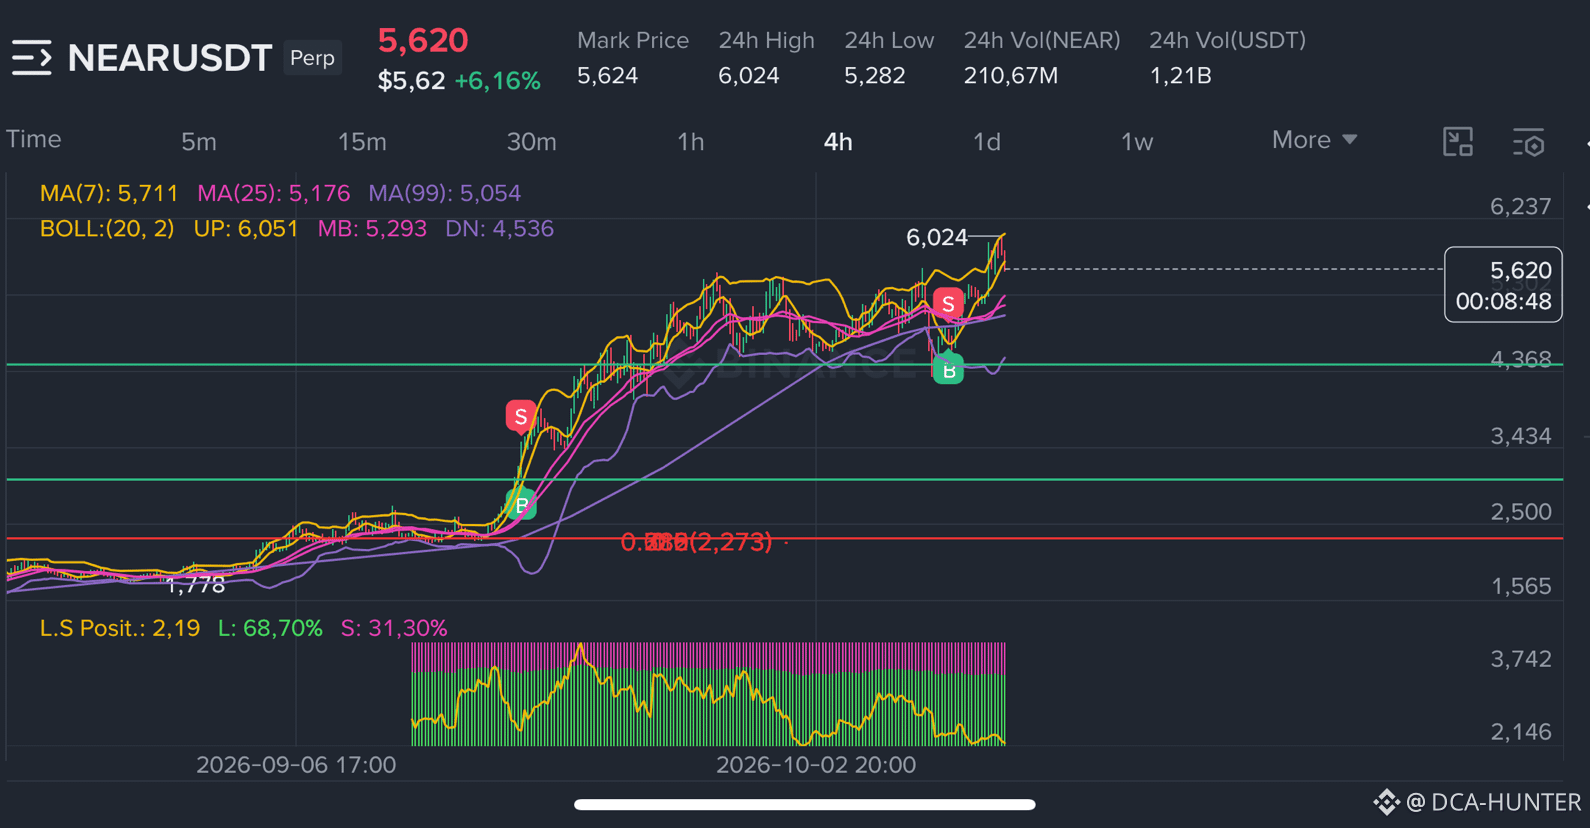
$NEAR Protocol DCA Strategy: Capitalizing on the $6 Breakout Level
$NEAR is trading at $5.62, consolidating right under the $6.02 local high. The 4-hour chart demonstrates clear bullish momentum with price trading above key moving averages, backed by strong buyer bias (68.70% Long position ratio).
For those looking to build or scale into a position using a Dollar-Cost Averaging (DCA) approach, here is a structured strategy based on current technical levels:
Entry Strategy (DCA Tranches)
Initial Entry ($5.50 - $5.62): Deploy 30% of allocated capital at current levels while price holds above the middle Bollinger Band ($5.29).
Secondary Entry ($5.00 - $5.17): Deploy 40% near key support and the MA(25) / MA(99) confluence ($5.05 - $5.17).
Deep Dip Strike ($4.35 - $4.53): Reserve 30% near the lower Bollinger Band ($4.53) and lower structural support ($4.368).
Estimated Average Entry: ~$5.08
Profit Targets (Scaling Out)
Target 1 ($6.00 - $6.23): Realize 30% profit upon breaking local resistance ($6.024 - $6.237).
Target 2 ($7.50): Realize 40% profit as momentum pushes toward mid-term structural expansion targets.
Target 3 ($10.00): Realize remaining 30% profit upon reaching key psychological macro resistance.
Risk Management
Maintain strict risk limits. A daily close below the $4.35 support level invalidates the short-term bullish structure. Avoid over-leveraging derivatives to prevent forced liquidations during sudden market volatility.
What is your price target for NEAR this month? Share your outlook in the comments below.
#Near #nearprotocol #cryptotrading #DCA #TechnicalAnalysis
$NEAR Protocol DCA Strategy: Capitalizing on the $6 Breakout Level
$NEAR is trading at $5.62, consolidating right under the $6.02 local high. The 4-hour chart demonstrates clear bullish momentum with price trading above key moving averages, backed by strong buyer bias (68.70% Long position ratio).
For those looking to build or scale into a position using a Dollar-Cost Averaging (DCA) approach, here is a structured strategy based on current technical levels:
Entry Strategy (DCA Tranches)
Initial Entry ($5.50 - $5.62): Deploy 30% of allocated capital at current levels while price holds above the middle Bollinger Band ($5.29).
Secondary Entry ($5.00 - $5.17): Deploy 40% near key support and the MA(25) / MA(99) confluence ($5.05 - $5.17).
Deep Dip Strike ($4.35 - $4.53): Reserve 30% near the lower Bollinger Band ($4.53) and lower structural support ($4.368).
Estimated Average Entry: ~$5.08
Profit Targets (Scaling Out)
Target 1 ($6.00 - $6.23): Realize 30% profit upon breaking local resistance ($6.024 - $6.237).
Target 2 ($7.50): Realize 40% profit as momentum pushes toward mid-term structural expansion targets.
Target 3 ($10.00): Realize remaining 30% profit upon reaching key psychological macro resistance.
Risk Management
Maintain strict risk limits. A daily close below the $4.35 support level invalidates the short-term bullish structure. Avoid over-leveraging derivatives to prevent forced liquidations during sudden market volatility.
What is your price target for NEAR this month? Share your outlook in the comments below.
#Near #nearprotocol #cryptotrading #DCA #TechnicalAnalysis
$NEAR is trading at $5.62, consolidating right under the $6.02 local high. The 4-hour chart demonstrates clear bullish momentum with price trading above key moving averages, backed by strong buyer bias (68.70% Long position ratio).
For those looking to build or scale into a position using a Dollar-Cost Averaging (DCA) approach, here is a structured strategy based on current technical levels:
Entry Strategy (DCA Tranches)
Initial Entry ($5.50 - $5.62): Deploy 30% of allocated capital at current levels while price holds above the middle Bollinger Band ($5.29).
Secondary Entry ($5.00 - $5.17): Deploy 40% near key support and the MA(25) / MA(99) confluence ($5.05 - $5.17).
Deep Dip Strike ($4.35 - $4.53): Reserve 30% near the lower Bollinger Band ($4.53) and lower structural support ($4.368).
Estimated Average Entry: ~$5.08
Profit Targets (Scaling Out)
Target 1 ($6.00 - $6.23): Realize 30% profit upon breaking local resistance ($6.024 - $6.237).
Target 2 ($7.50): Realize 40% profit as momentum pushes toward mid-term structural expansion targets.
Target 3 ($10.00): Realize remaining 30% profit upon reaching key psychological macro resistance.
Risk Management
Maintain strict risk limits. A daily close below the $4.35 support level invalidates the short-term bullish structure. Avoid over-leveraging derivatives to prevent forced liquidations during sudden market volatility.
What is your price target for NEAR this month? Share your outlook in the comments below.
#Near #nearprotocol #cryptotrading #DCA #TechnicalAnalysis
2
544
·
--
Bullish
30D trade $ADA 743.2 USDT
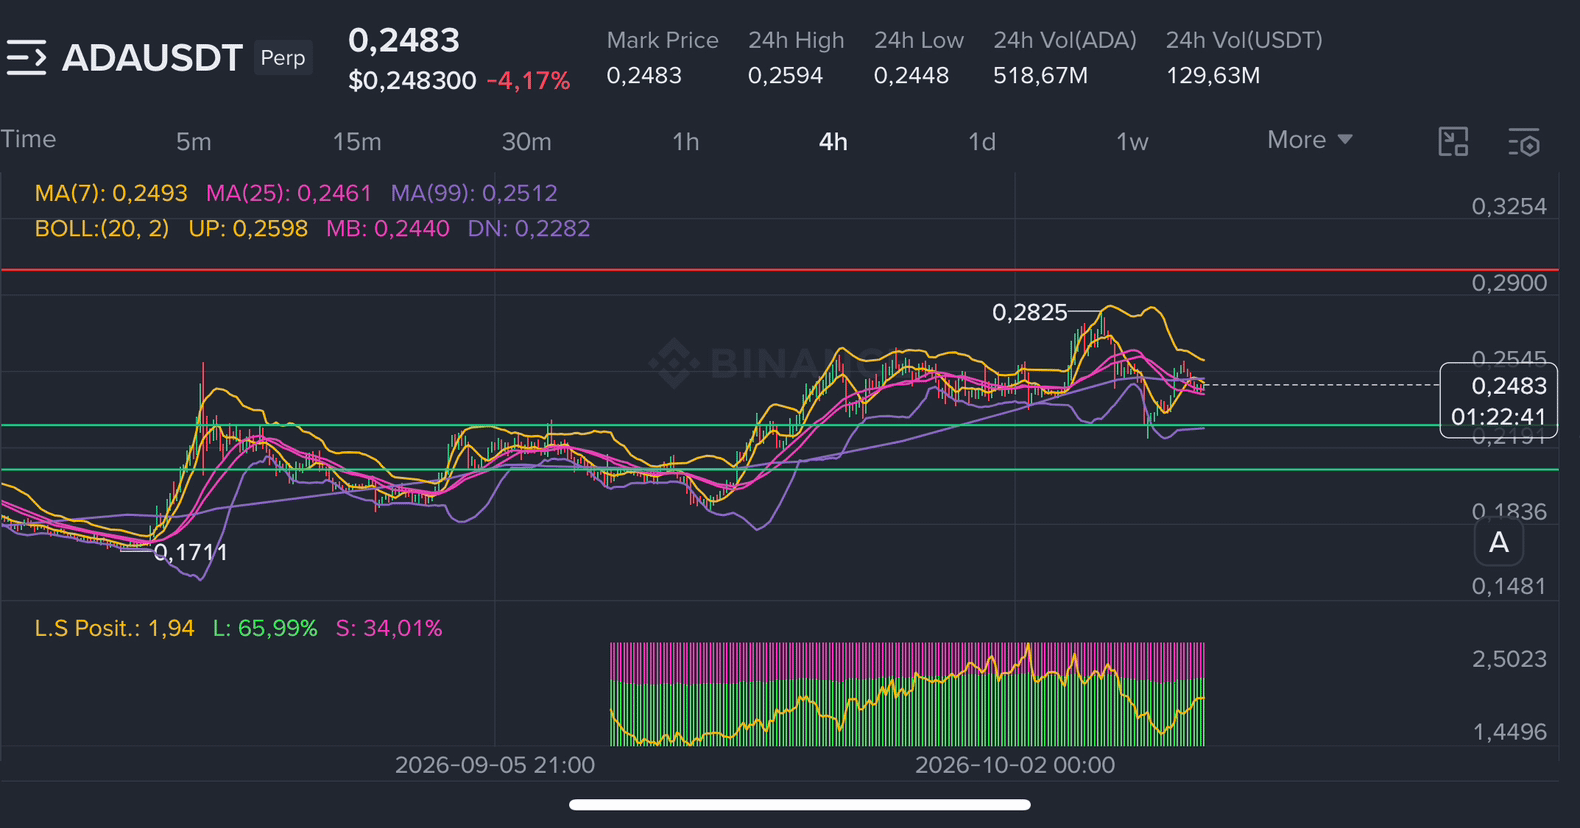
🚀 $ADA DCA Strategy: Targeting 5x to 10x Gains!
Cardano ($ADA ) is currently trading at $0.248, holding steady around key support levels. Here is how to structure a DCA (Dollar-Cost Averaging) plan for maximum upside while managing risk:
📥 1. Entry Zones (DCA Allocation)
Zone 1 ($0.24 - $0.25): 30% allocation at current levels.
Zone 2 ($0.21 - $0.22): 40% allocation near major support.
Zone 3 ($0.17 - $0.18): 30% allocation for deep dip buys.
Target Average Entry: ~$0.215
🎯 2. Profit Targets (TP Levels)
Target 1 (5x): $1.08 (Take 30% profit — secure initial capital)
Target 2 (7.5x): $1.61 (Take 40% profit)
Target 3 (10x): $2.15 (Take 30% profit)
⚠️ Risk Management Note
Leverage Warning: Avoid high leverage (5x–10x futures) for long-term DCA to eliminate liquidation risk. Spot DCA or ultra-low leverage is best for multi-fold growth goals!
What’s your price prediction for $ADA this cycle? Let me know in the comments! 👇
#ADA #Cardano #crypto #trading #Strategy
{future}(ADAUSDT)
🚀 $ADA DCA Strategy: Targeting 5x to 10x Gains!
Cardano ($ADA ) is currently trading at $0.248, holding steady around key support levels. Here is how to structure a DCA (Dollar-Cost Averaging) plan for maximum upside while managing risk:
📥 1. Entry Zones (DCA Allocation)
Zone 1 ($0.24 - $0.25): 30% allocation at current levels.
Zone 2 ($0.21 - $0.22): 40% allocation near major support.
Zone 3 ($0.17 - $0.18): 30% allocation for deep dip buys.
Target Average Entry: ~$0.215
🎯 2. Profit Targets (TP Levels)
Target 1 (5x): $1.08 (Take 30% profit — secure initial capital)
Target 2 (7.5x): $1.61 (Take 40% profit)
Target 3 (10x): $2.15 (Take 30% profit)
⚠️ Risk Management Note
Leverage Warning: Avoid high leverage (5x–10x futures) for long-term DCA to eliminate liquidation risk. Spot DCA or ultra-low leverage is best for multi-fold growth goals!
What’s your price prediction for $ADA this cycle? Let me know in the comments! 👇
#ADA #Cardano #crypto #trading #Strategy
Cardano ($ADA ) is currently trading at $0.248, holding steady around key support levels. Here is how to structure a DCA (Dollar-Cost Averaging) plan for maximum upside while managing risk:
📥 1. Entry Zones (DCA Allocation)
Zone 1 ($0.24 - $0.25): 30% allocation at current levels.
Zone 2 ($0.21 - $0.22): 40% allocation near major support.
Zone 3 ($0.17 - $0.18): 30% allocation for deep dip buys.
Target Average Entry: ~$0.215
🎯 2. Profit Targets (TP Levels)
Target 1 (5x): $1.08 (Take 30% profit — secure initial capital)
Target 2 (7.5x): $1.61 (Take 40% profit)
Target 3 (10x): $2.15 (Take 30% profit)
⚠️ Risk Management Note
Leverage Warning: Avoid high leverage (5x–10x futures) for long-term DCA to eliminate liquidation risk. Spot DCA or ultra-low leverage is best for multi-fold growth goals!
What’s your price prediction for $ADA this cycle? Let me know in the comments! 👇
#ADA #Cardano #crypto #trading #Strategy
3
1.1k
·
--
Bullish
30D trade $NEAR 12.2K USDT
Congrats to all $NEAR holders! 🎉
What's your next target? Do you think NEAR will keep pumping up to $6, or are we looking at a pull back to $4 first? Let me know in the poll below!
Congrats to all $NEAR holders! 🎉
What's your next target? Do you think NEAR will keep pumping up to $6, or are we looking at a pull back to $4 first? Let me know in the poll below!
What's your next target? Do you think NEAR will keep pumping up to $6, or are we looking at a pull back to $4 first? Let me know in the poll below!
Bullish to $6! 🚀
66%
Correction to $4 📉
34%
35 votes • Voting closed
2
321
·
--
Bearish
30D trade $NEAR 8.5K USDT
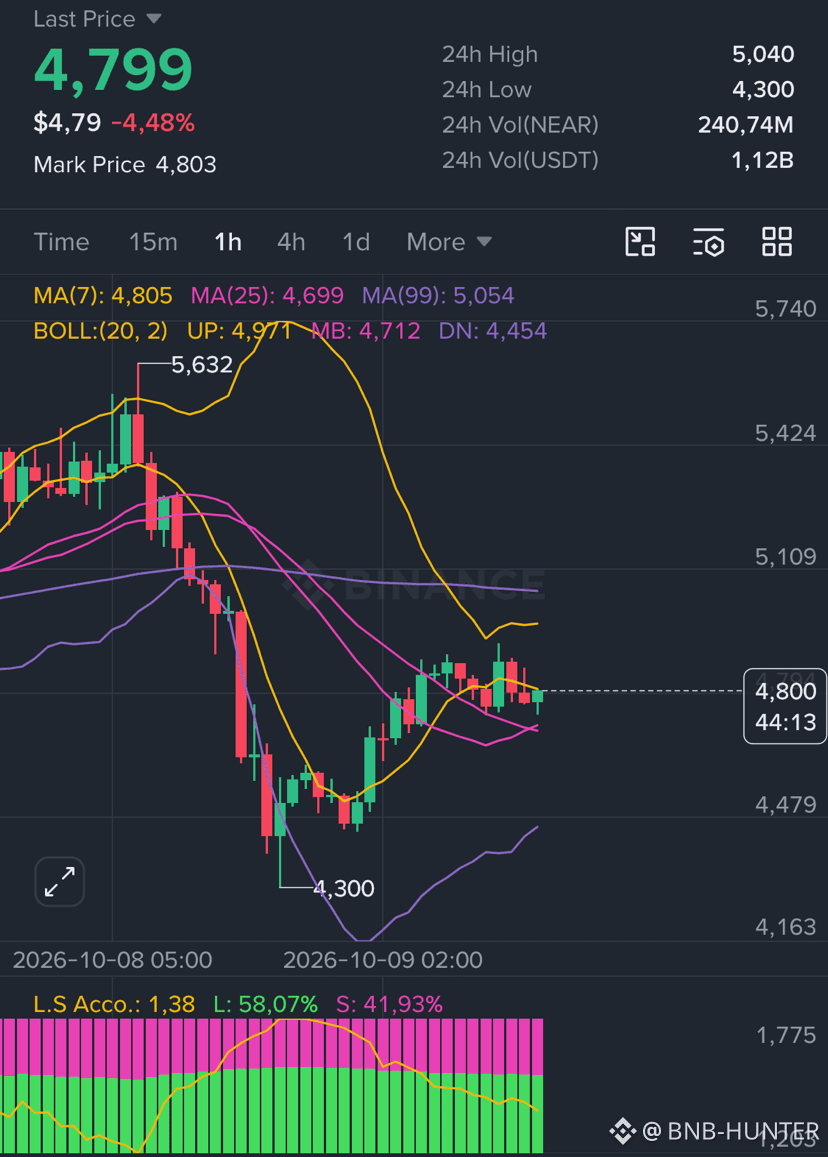
$NEAR Honestly, that sudden wick down to $4.300 tested my nerves! Panic was definitely in the air, but instead of folding
I just watched how the market reacted The bounce was undeniable.
Seeing $NEAR recover and hold steady around $4.799 shows serious buyer conviction. With Longs dominating at 58%, the worst looks like it's behind us. The bullish momentum is roaring back.
$NEAR #NEARUSDT #CryptoTrading #BinanceSquare
$NEAR Honestly, that sudden wick down to $4.300 tested my nerves! Panic was definitely in the air, but instead of folding
I just watched how the market reacted The bounce was undeniable.
Seeing $NEAR recover and hold steady around $4.799 shows serious buyer conviction. With Longs dominating at 58%, the worst looks like it's behind us. The bullish momentum is roaring back.
$NEAR #NEARUSDT #CryptoTrading #BinanceSquare
I just watched how the market reacted The bounce was undeniable.
Seeing $NEAR recover and hold steady around $4.799 shows serious buyer conviction. With Longs dominating at 58%, the worst looks like it's behind us. The bullish momentum is roaring back.
$NEAR #NEARUSDT #CryptoTrading #BinanceSquare
4
1.1k
·
--
30D trade $ADA 246.5 USDT
$ADA 🚨 Volatility Alert! 📉
$ADA took a steep plunge down to the 0.2237 level but is currently attempting a relief bounce, trading around 0.2337. Despite the aggressive drop, retail sentiment remains heavily skewed, with the Long/Short account ratio showing 73.03% Longs. The order book also reflects strong buy pressure at 62.91%.
+
With the moving averages still trending sharply downward overhead, the bulls need to step up quickly to sustain this recovery. Stay cautious and manage your risk!
+
#ADAUSDT #Cardano #cryptotrading #BinanceSquare #TechnicalAnalysi
$ADA 🚨 Volatility Alert! 📉
$ADA took a steep plunge down to the 0.2237 level but is currently attempting a relief bounce, trading around 0.2337. Despite the aggressive drop, retail sentiment remains heavily skewed, with the Long/Short account ratio showing 73.03% Longs. The order book also reflects strong buy pressure at 62.91%.
+
With the moving averages still trending sharply downward overhead, the bulls need to step up quickly to sustain this recovery. Stay cautious and manage your risk!
+
#ADAUSDT #Cardano #cryptotrading #BinanceSquare #TechnicalAnalysi
$ADA took a steep plunge down to the 0.2237 level but is currently attempting a relief bounce, trading around 0.2337. Despite the aggressive drop, retail sentiment remains heavily skewed, with the Long/Short account ratio showing 73.03% Longs. The order book also reflects strong buy pressure at 62.91%.
+
With the moving averages still trending sharply downward overhead, the bulls need to step up quickly to sustain this recovery. Stay cautious and manage your risk!
+
#ADAUSDT #Cardano #cryptotrading #BinanceSquare #TechnicalAnalysi
3
1.1k
·
--
Bullish
30D trade $NEAR 5.2K USDT
🚨 $NEAR Printing a Strong Reversal! 🚀
A quick look at the 15m chart shows $NEAR making an impressive recovery. After sweeping the lows near 4.900, we’ve seen a textbook rounding bottom formation (highlighted in blue) followed by an aggressive breakout past the 5.400 resistance level.
Currently consolidating around 5.297, the price is holding its ground beautifully. The clear spike in green volume during the climb confirms that buyers have stepped in with conviction. 📈
The Setup:
If $NEAR can maintain this current support zone without breaking market structure, the bullish momentum looks primed to continue. This presents an interesting setup for those looking to build a long position, provided stop-losses are kept tight.
#NEARUSDT #CryptoAnalysis #TechnicalAnalysis #BinanceSquare #TradingSignals
🚨 $NEAR Printing a Strong Reversal! 🚀
A quick look at the 15m chart shows $NEAR making an impressive recovery. After sweeping the lows near 4.900, we’ve seen a textbook rounding bottom formation (highlighted in blue) followed by an aggressive breakout past the 5.400 resistance level.
Currently consolidating around 5.297, the price is holding its ground beautifully. The clear spike in green volume during the climb confirms that buyers have stepped in with conviction. 📈
The Setup:
If $NEAR can maintain this current support zone without breaking market structure, the bullish momentum looks primed to continue. This presents an interesting setup for those looking to build a long position, provided stop-losses are kept tight.
#NEARUSDT #CryptoAnalysis #TechnicalAnalysis #BinanceSquare #TradingSignals
A quick look at the 15m chart shows $NEAR making an impressive recovery. After sweeping the lows near 4.900, we’ve seen a textbook rounding bottom formation (highlighted in blue) followed by an aggressive breakout past the 5.400 resistance level.
Currently consolidating around 5.297, the price is holding its ground beautifully. The clear spike in green volume during the climb confirms that buyers have stepped in with conviction. 📈
The Setup:
If $NEAR can maintain this current support zone without breaking market structure, the bullish momentum looks primed to continue. This presents an interesting setup for those looking to build a long position, provided stop-losses are kept tight.
#NEARUSDT #CryptoAnalysis #TechnicalAnalysis #BinanceSquare #TradingSignals
4
1.7k
Log in to explore more content
Join global crypto users on Binance Square
⚡️ Get latest and useful information about crypto.
💬 Trusted by the world’s largest crypto exchange.
👍 Discover real insights from verified creators.
Email / Phone number
Trending Topics
BinancePick
2.5M views
137,927 Discussing
Join #EarningsSeason: Predict Earnings on Binance Pick, Share Your Take on Binance Square!
Binance Square Official
·400 Likes
·337.1k views
EarningsSeason
4.9M views
23,915 Discussing
ElectrumWalletBugLetRogueServersStealFunds
2,613 views
137 Discussing