

ALtcoinWolF
486 Posts

ALtcoinWolF
Report
Block User
Crypto Analysis | 🎯 Signals | 🐺 AltcoinWolF
40 Following
199 Followers
825 Liked
Posts
All
Quotes
Videos
·
--
Article
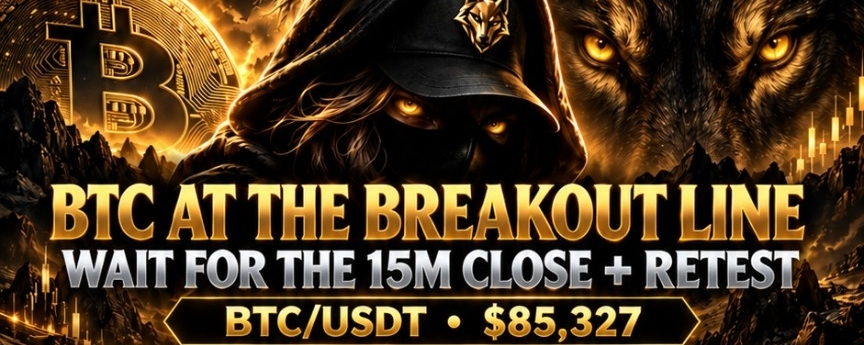
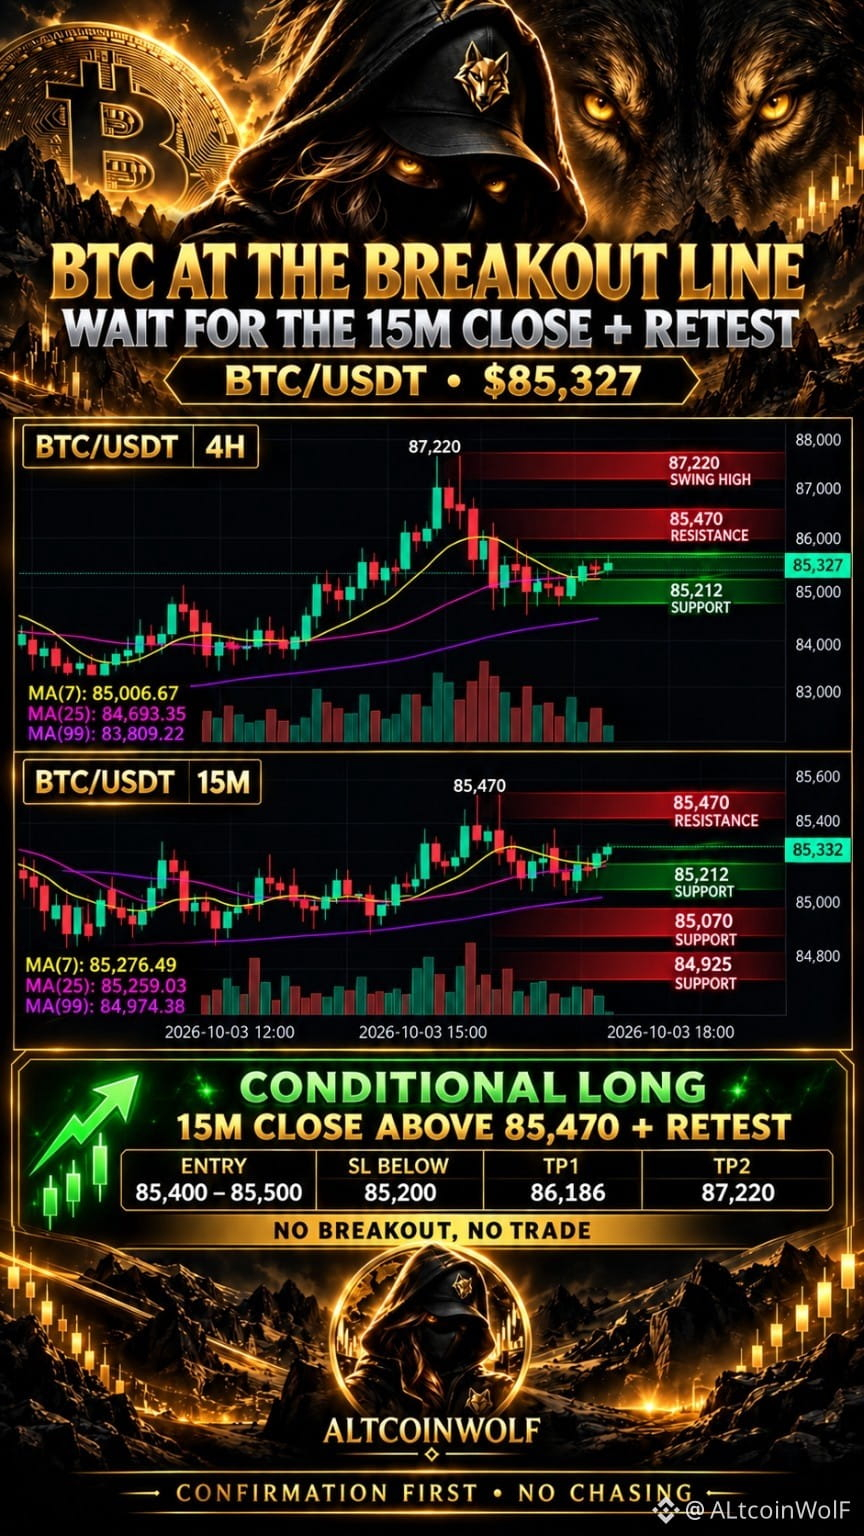
Bitcoin Near $85,470: Why Confirmation Matters More Than the Green CandleBitcoin is holding above its displayed 4H moving averages, but that alone does not settle the next move. On the 15M chart, price is approaching resistance near $85,470. Recent volume is below its averages, which means buyers have not yet confirmed a convincing breakout.
The disciplined response is to wait for two things: a 15M close above resistance, followed by a retest that holds. That sequence gives traders a clearer point to define risk. If price rejects the level and returns below $85,212, the short-term bullish idea weakens.
The chart offers upside references at $86,186 and the recent 4H high near $87,220. These are planning levels, not guarantees. A stop belongs where the setup is invalidated, and position size should be based on that stop distance.
If BTC remains between $85,212 and $85,470, there is no need to force a trade. A no-trade decision protects both capital and discipline.
Trade smarter with confirmation, defined risk, and a plan. Follow AltcoinWolF for evidence-led market analysis.
#AltcoinWolF #BTC #SECHaltsCryptoETFReviewsAmidFundingLapse #GreekPoliceBustCryptoScamRingArrest17 #ZcashETFPostsFirstWeeklyOutflow$93.6M $BTC
{spot}(BTCUSDT)
Bitcoin Near $85,470: Why Confirmation Matters More Than the Green Candle
Bitcoin is holding above its displayed 4H moving averages, but that alone does not settle the next move. On the 15M chart, price is approaching resistance near $85,470. Recent volume is below its averages, which means buyers have not yet confirmed a convincing breakout.
The disciplined response is to wait for two things: a 15M close above resistance, followed by a retest that holds. That sequence gives traders a clearer point to define risk. If price rejects the level and returns below $85,212, the short-term bullish idea weakens.
The chart offers upside references at $86,186 and the recent 4H high near $87,220. These are planning levels, not guarantees. A stop belongs where the setup is invalidated, and position size should be based on that stop distance.
If BTC remains between $85,212 and $85,470, there is no need to force a trade. A no-trade decision protects both capital and discipline.
Trade smarter with confirmation, defined risk, and a plan. Follow AltcoinWolF for evidence-led market analysis.
#AltcoinWolF #BTC #SECHaltsCryptoETFReviewsAmidFundingLapse #GreekPoliceBustCryptoScamRingArrest17 #ZcashETFPostsFirstWeeklyOutflow$93.6M $BTC
The disciplined response is to wait for two things: a 15M close above resistance, followed by a retest that holds. That sequence gives traders a clearer point to define risk. If price rejects the level and returns below $85,212, the short-term bullish idea weakens.
The chart offers upside references at $86,186 and the recent 4H high near $87,220. These are planning levels, not guarantees. A stop belongs where the setup is invalidated, and position size should be based on that stop distance.
If BTC remains between $85,212 and $85,470, there is no need to force a trade. A no-trade decision protects both capital and discipline.
Trade smarter with confirmation, defined risk, and a plan. Follow AltcoinWolF for evidence-led market analysis.
#AltcoinWolF #BTC #SECHaltsCryptoETFReviewsAmidFundingLapse #GreekPoliceBustCryptoScamRingArrest17 #ZcashETFPostsFirstWeeklyOutflow$93.6M $BTC
1
108
·
--
BTC is testing $85,470—but the breakout still needs proof.
The 4H chart is holding above its displayed MA(7/25/99), while 15M price remains inside a range. Recent 15M volume is below its averages.
Plan: Wait for a 15M close above $85,470 and a successful retest before considering a long. Chart references: $86,186 and $87,220. A move below $85,212 weakens the bullish setup.
No confirmation, no entry. Would you wait for the retest?
#AltcoinWolF #BTC #FedOctoberRateHikeOddsFallTo17% #SECHaltsCryptoETFReviewsAmidFundingLapse #GreekPoliceBustCryptoScamRingArrest17 $BTC
{spot}(BTCUSDT)
BTC is testing $85,470—but the breakout still needs proof.
The 4H chart is holding above its displayed MA(7/25/99), while 15M price remains inside a range. Recent 15M volume is below its averages.
Plan: Wait for a 15M close above $85,470 and a successful retest before considering a long. Chart references: $86,186 and $87,220. A move below $85,212 weakens the bullish setup.
No confirmation, no entry. Would you wait for the retest?
#AltcoinWolF #BTC #FedOctoberRateHikeOddsFallTo17% #SECHaltsCryptoETFReviewsAmidFundingLapse #GreekPoliceBustCryptoScamRingArrest17 $BTC
The 4H chart is holding above its displayed MA(7/25/99), while 15M price remains inside a range. Recent 15M volume is below its averages.
Plan: Wait for a 15M close above $85,470 and a successful retest before considering a long. Chart references: $86,186 and $87,220. A move below $85,212 weakens the bullish setup.
No confirmation, no entry. Would you wait for the retest?
#AltcoinWolF #BTC #FedOctoberRateHikeOddsFallTo17% #SECHaltsCryptoETFReviewsAmidFundingLapse #GreekPoliceBustCryptoScamRingArrest17 $BTC
1
97
·
--
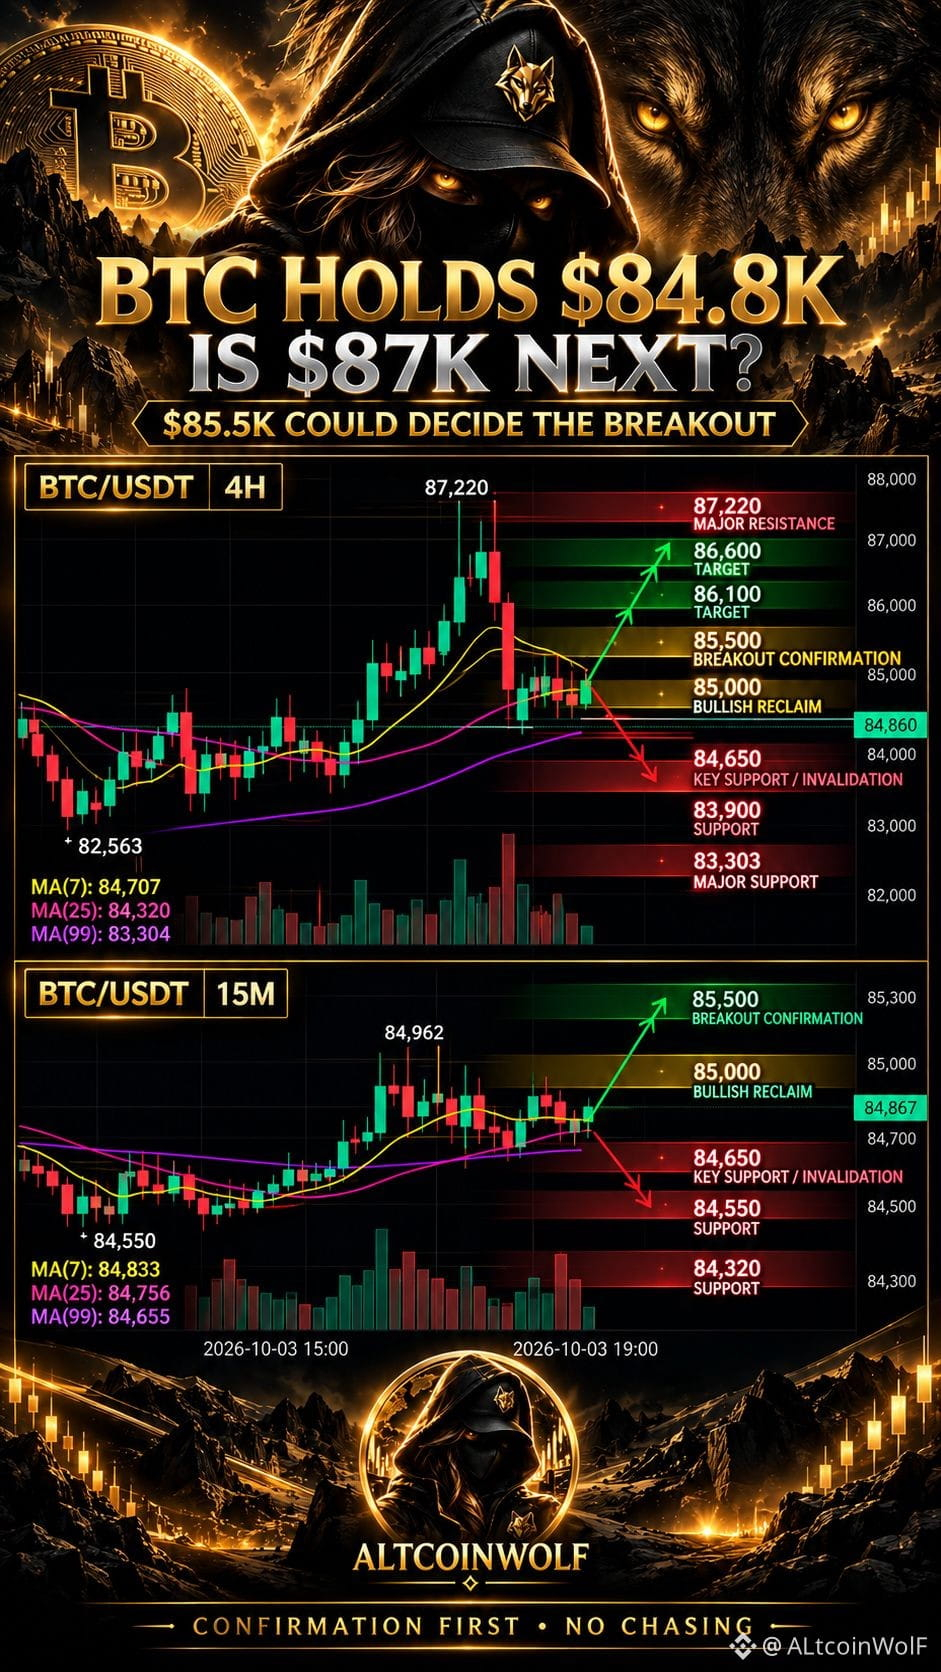
BTC Is Holding $84.8K — Here's the Level That Could Unlock $87K Again
Bitcoin is trading near $84.86K after recently rejecting from $87,220.
The interesting part?
BTC remains above its major 4H moving averages:
MA7: $84,707
MA25: $84,320
MA99: $83,304
The 15m chart is also showing:
MA7 > MA25 > MA99
That gives BTC a constructive structure—but resistance is directly ahead.
🐺 My BTC roadmap:
🟢 First trigger: $84,950–$85,050
🔥 Major confirmation: $85,500
🎯 TP1: $85,850
🎯 TP2: $86,100
🎯 TP3: $86,600
🚀 Major target: $87,220
⚠️ Weakness below: $84,650
Macro conditions have also become more supportive after September U.S. payroll growth slowed sharply, while spot Bitcoin ETFs have returned to positive daily inflows. �
Reuters +1
But the rule remains unchanged:
Don't buy the headline. Don't chase the candle. Trade the confirmation. 🐺
Would you enter after the $85K reclaim—or wait for $85.5K confirmation?
#SECProposesCryptoCustodyRules #BTC☀ #BTC #AltcoinWolF #FedOctoberRateHikeOddsFallTo17% $BTC
{spot}(BTCUSDT)
BTC Is Holding $84.8K — Here's the Level That Could Unlock $87K Again
Bitcoin is trading near $84.86K after recently rejecting from $87,220.
The interesting part?
BTC remains above its major 4H moving averages:
MA7: $84,707
MA25: $84,320
MA99: $83,304
The 15m chart is also showing:
MA7 > MA25 > MA99
That gives BTC a constructive structure—but resistance is directly ahead.
🐺 My BTC roadmap:
🟢 First trigger: $84,950–$85,050
🔥 Major confirmation: $85,500
🎯 TP1: $85,850
🎯 TP2: $86,100
🎯 TP3: $86,600
🚀 Major target: $87,220
⚠️ Weakness below: $84,650
Macro conditions have also become more supportive after September U.S. payroll growth slowed sharply, while spot Bitcoin ETFs have returned to positive daily inflows. �
Reuters +1
But the rule remains unchanged:
Don't buy the headline. Don't chase the candle. Trade the confirmation. 🐺
Would you enter after the $85K reclaim—or wait for $85.5K confirmation?
#SECProposesCryptoCustodyRules #BTC☀ #BTC #AltcoinWolF #FedOctoberRateHikeOddsFallTo17% $BTC
Bitcoin is trading near $84.86K after recently rejecting from $87,220.
The interesting part?
BTC remains above its major 4H moving averages:
MA7: $84,707
MA25: $84,320
MA99: $83,304
The 15m chart is also showing:
MA7 > MA25 > MA99
That gives BTC a constructive structure—but resistance is directly ahead.
🐺 My BTC roadmap:
🟢 First trigger: $84,950–$85,050
🔥 Major confirmation: $85,500
🎯 TP1: $85,850
🎯 TP2: $86,100
🎯 TP3: $86,600
🚀 Major target: $87,220
⚠️ Weakness below: $84,650
Macro conditions have also become more supportive after September U.S. payroll growth slowed sharply, while spot Bitcoin ETFs have returned to positive daily inflows. �
Reuters +1
But the rule remains unchanged:
Don't buy the headline. Don't chase the candle. Trade the confirmation. 🐺
Would you enter after the $85K reclaim—or wait for $85.5K confirmation?
#SECProposesCryptoCustodyRules #BTC☀ #BTC #AltcoinWolF #FedOctoberRateHikeOddsFallTo17% $BTC
1
93
·
--
Article
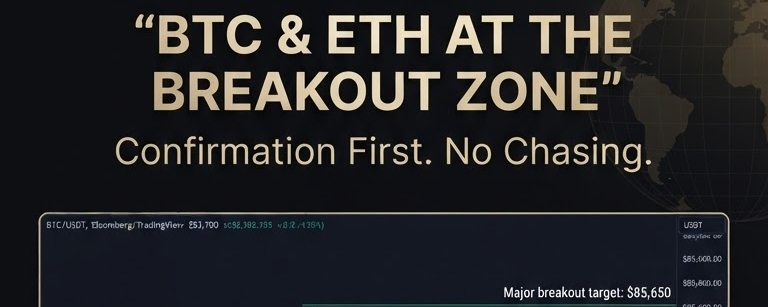
Wall Street Turns Bullish on Bitcoin — But Can BTC & ETH Break Their Resistance Walls?Citigroup has raised its 12-month Bitcoin forecast to $113,000 from $82,000 and its Ether forecast to $3,028 from $2,240, citing stronger crypto activity, improved macro conditions and renewed ETF inflows. These are Citi's forecasts—not guaranteed market targets. �
Reuters +1
At the same time, Bitcoin remains trapped around the $82K–$85K region. BTC briefly moved above $85,000 after softer U.S. inflation data, but the move faded as Treasury yields remained elevated. �
CoinDesk +1
That creates an important distinction:
Institutional sentiment is improving — but price still needs confirmation.
₿ BTC Technical Outlook
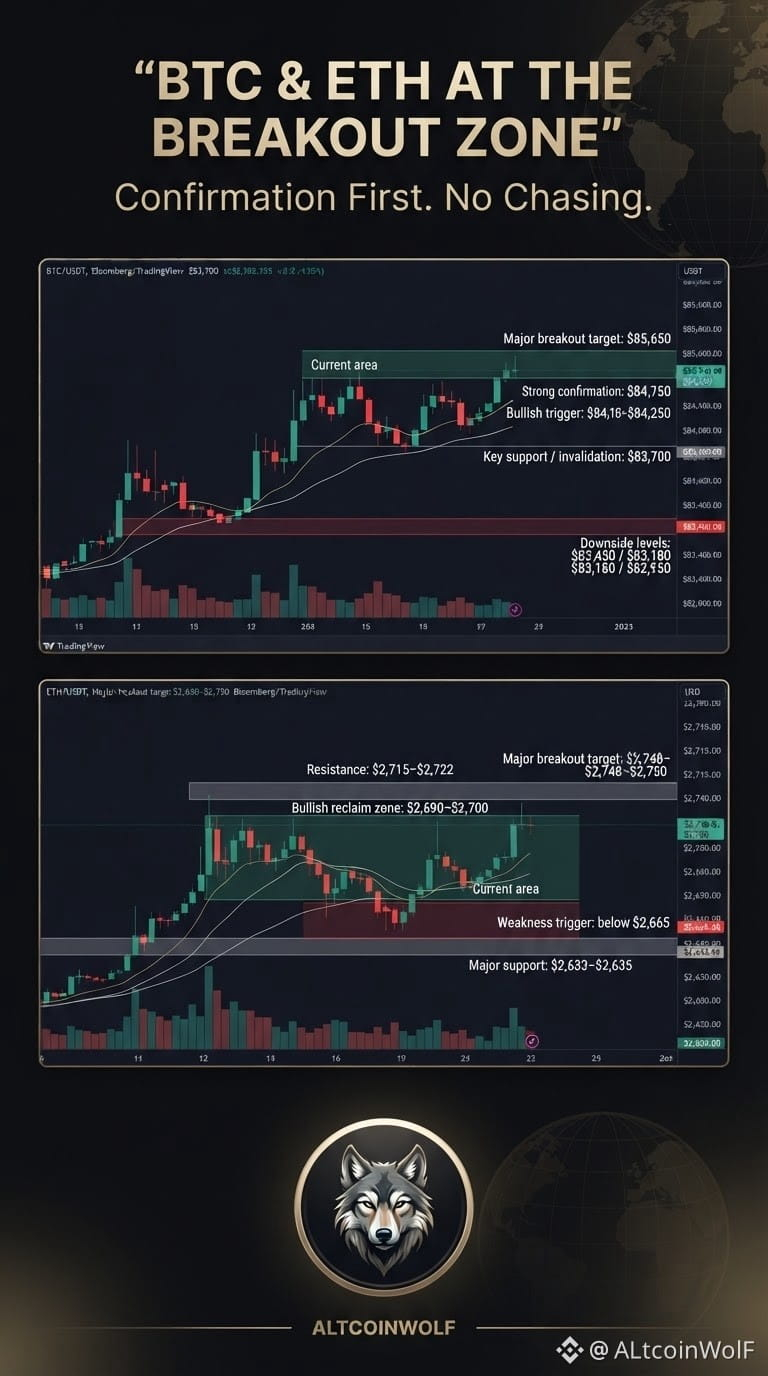
Price in your charts: ~$83,960
4H Structure
BTC remains above:
MA7: $83,774
MA25: $83,680
MA99: $82,231
That keeps the broader structure bullish-neutral, but BTC still hasn't cleared its major resistance.
Key BTC Levels
Resistance:
$84,150–$84,250
$84,600–$84,750
$85,200
$85,650 major breakout level
Support:
$83,700
$83,450
$83,180
$82,950
$82,550
🟢 BTC Long Scenario
I would want to see a 15m close/reclaim around $84,150–$84,250 with volume.
Entry zone: $84,150–$84,250
TP1: $84,480
TP2: $84,740
TP3: $85,200
Extended: $85,650
Invalidation: sustained move below approximately $83,700.
🔴 BTC Bearish Scenario
If BTC loses $83,700 and starts accepting below it:
Targets:
$83,450 → $83,180 → $82,950 → $82,550
For now, $83.7K–$84.2K is the decision zone.
Ξ ETH Technical Outlook
Current screenshot price: $2,677.79
4H Moving Averages
MA7: $2,685.32
MA25: $2,682.76
MA99: $2,633.28
ETH sitting below MA7/MA25 shows short-term hesitation, while staying above MA99 keeps the bigger structure intact.
The chart is effectively compressing between $2,633 support and ~$2,715 resistance.
🟢 ETH Bullish Confirmation
I would prefer ETH to reclaim approximately $2,690–$2,700.
Then:
TP1: $2,715
TP2: $2,722
TP3: $2,748–$2,750
A decisive break above $2,750 would materially improve the 4H structure.
🔴 ETH Weakness Trigger
Watch $2,665–$2,668.
If that area fails:
TP1: $2,650
TP2: $2,635
TP3: $2,600
The $2,633–$2,635 area is especially important because ETH's MA99 and recent swing-low region are sitting there.
🐺 AltcoinWolF Market Scorecard
Factor
BTC
ETH
Higher-Timeframe Structure
Constructive
Constructive
Short-Term Momentum
Neutral/Bullish
Neutral/Weak
Major Support Holding
✅
✅
Breakout Confirmed
❌
❌
Best Approach
Wait for reclaim
Wait for reclaim
Overall Market Condition
Confirmation market — not chasing market.
BTC needs $84.2K → $84.75K.
ETH needs $2.69K → $2.72K.
Until then, both remain inside resistance-heavy ranges.
🎓 Premium Education — Institutional Target ≠ Trade Signal
A major bank raising a Bitcoin or Ethereum forecast can improve sentiment, but traders should never treat a 12-month forecast as an immediate entry signal.
A professional process separates:
Fundamental catalyst → Technical confirmation → Entry → Invalidation → Risk management
Today is a perfect example.
Citi's longer-term outlook has improved. �
Reuters
But BTC has already shown that even favorable inflation news wasn't enough to sustain a move above $85K while bond yields remained high. �
CoinDesk
Narrative creates attention. Price action determines execution.
⚡ AltcoinWolF Final Call
BTC
Bullish trigger: $84,150–$84,250
Strong confirmation: $84,750
Major breakout: $85,650
Weakness: below $83,700
ETH
Bullish trigger: $2,690–$2,700
Confirmation: $2,715–$2,722
Major breakout: ~$2,750
Weakness: below $2,665
Current Action
NO CHASE. WAIT FOR CONFIRMATION.
The structure isn't bad—but both assets are sitting close to resistance rather than offering a clean asymmetric entry.
#BTC走势分析 #ETH #US10YearYieldNears5.3% #MetaMaskExitsLidoValidatorsAfterSecurityIncident #BitcoinETFsTake$6.34BillionInQ3 $BTC
{spot}(BTCUSDT)
$ETH
Wall Street Turns Bullish on Bitcoin — But Can BTC & ETH Break Their Resistance Walls?
Citigroup has raised its 12-month Bitcoin forecast to $113,000 from $82,000 and its Ether forecast to $3,028 from $2,240, citing stronger crypto activity, improved macro conditions and renewed ETF inflows. These are Citi's forecasts—not guaranteed market targets. �
Reuters +1
At the same time, Bitcoin remains trapped around the $82K–$85K region. BTC briefly moved above $85,000 after softer U.S. inflation data, but the move faded as Treasury yields remained elevated. �
CoinDesk +1
That creates an important distinction:
Institutional sentiment is improving — but price still needs confirmation.
₿ BTC Technical Outlook
Price in your charts: ~$83,960
4H Structure
BTC remains above:
MA7: $83,774
MA25: $83,680
MA99: $82,231
That keeps the broader structure bullish-neutral, but BTC still hasn't cleared its major resistance.
Key BTC Levels
Resistance:
$84,150–$84,250
$84,600–$84,750
$85,200
$85,650 major breakout level
Support:
$83,700
$83,450
$83,180
$82,950
$82,550
🟢 BTC Long Scenario
I would want to see a 15m close/reclaim around $84,150–$84,250 with volume.
Entry zone: $84,150–$84,250
TP1: $84,480
TP2: $84,740
TP3: $85,200
Extended: $85,650
Invalidation: sustained move below approximately $83,700.
🔴 BTC Bearish Scenario
If BTC loses $83,700 and starts accepting below it:
Targets:
$83,450 → $83,180 → $82,950 → $82,550
For now, $83.7K–$84.2K is the decision zone.
Ξ ETH Technical Outlook
Current screenshot price: $2,677.79
4H Moving Averages
MA7: $2,685.32
MA25: $2,682.76
MA99: $2,633.28
ETH sitting below MA7/MA25 shows short-term hesitation, while staying above MA99 keeps the bigger structure intact.
The chart is effectively compressing between $2,633 support and ~$2,715 resistance.
🟢 ETH Bullish Confirmation
I would prefer ETH to reclaim approximately $2,690–$2,700.
Then:
TP1: $2,715
TP2: $2,722
TP3: $2,748–$2,750
A decisive break above $2,750 would materially improve the 4H structure.
🔴 ETH Weakness Trigger
Watch $2,665–$2,668.
If that area fails:
TP1: $2,650
TP2: $2,635
TP3: $2,600
The $2,633–$2,635 area is especially important because ETH's MA99 and recent swing-low region are sitting there.
🐺 AltcoinWolF Market Scorecard
Factor
BTC
ETH
Higher-Timeframe Structure
Constructive
Constructive
Short-Term Momentum
Neutral/Bullish
Neutral/Weak
Major Support Holding
✅
✅
Breakout Confirmed
❌
❌
Best Approach
Wait for reclaim
Wait for reclaim
Overall Market Condition
Confirmation market — not chasing market.
BTC needs $84.2K → $84.75K.
ETH needs $2.69K → $2.72K.
Until then, both remain inside resistance-heavy ranges.
🎓 Premium Education — Institutional Target ≠ Trade Signal
A major bank raising a Bitcoin or Ethereum forecast can improve sentiment, but traders should never treat a 12-month forecast as an immediate entry signal.
A professional process separates:
Fundamental catalyst → Technical confirmation → Entry → Invalidation → Risk management
Today is a perfect example.
Citi's longer-term outlook has improved. �
Reuters
But BTC has already shown that even favorable inflation news wasn't enough to sustain a move above $85K while bond yields remained high. �
CoinDesk
Narrative creates attention. Price action determines execution.
⚡ AltcoinWolF Final Call
BTC
Bullish trigger: $84,150–$84,250
Strong confirmation: $84,750
Major breakout: $85,650
Weakness: below $83,700
ETH
Bullish trigger: $2,690–$2,700
Confirmation: $2,715–$2,722
Major breakout: ~$2,750
Weakness: below $2,665
Current Action
NO CHASE. WAIT FOR CONFIRMATION.
The structure isn't bad—but both assets are sitting close to resistance rather than offering a clean asymmetric entry.
#BTC走势分析 #ETH #US10YearYieldNears5.3% #MetaMaskExitsLidoValidatorsAfterSecurityIncident #BitcoinETFsTake$6.34BillionInQ3 $BTC
$ETH
Reuters +1
At the same time, Bitcoin remains trapped around the $82K–$85K region. BTC briefly moved above $85,000 after softer U.S. inflation data, but the move faded as Treasury yields remained elevated. �
CoinDesk +1
That creates an important distinction:
Institutional sentiment is improving — but price still needs confirmation.
₿ BTC Technical Outlook
Price in your charts: ~$83,960
4H Structure
BTC remains above:
MA7: $83,774
MA25: $83,680
MA99: $82,231
That keeps the broader structure bullish-neutral, but BTC still hasn't cleared its major resistance.
Key BTC Levels
Resistance:
$84,150–$84,250
$84,600–$84,750
$85,200
$85,650 major breakout level
Support:
$83,700
$83,450
$83,180
$82,950
$82,550
🟢 BTC Long Scenario
I would want to see a 15m close/reclaim around $84,150–$84,250 with volume.
Entry zone: $84,150–$84,250
TP1: $84,480
TP2: $84,740
TP3: $85,200
Extended: $85,650
Invalidation: sustained move below approximately $83,700.
🔴 BTC Bearish Scenario
If BTC loses $83,700 and starts accepting below it:
Targets:
$83,450 → $83,180 → $82,950 → $82,550
For now, $83.7K–$84.2K is the decision zone.
Ξ ETH Technical Outlook
Current screenshot price: $2,677.79
4H Moving Averages
MA7: $2,685.32
MA25: $2,682.76
MA99: $2,633.28
ETH sitting below MA7/MA25 shows short-term hesitation, while staying above MA99 keeps the bigger structure intact.
The chart is effectively compressing between $2,633 support and ~$2,715 resistance.
🟢 ETH Bullish Confirmation
I would prefer ETH to reclaim approximately $2,690–$2,700.
Then:
TP1: $2,715
TP2: $2,722
TP3: $2,748–$2,750
A decisive break above $2,750 would materially improve the 4H structure.
🔴 ETH Weakness Trigger
Watch $2,665–$2,668.
If that area fails:
TP1: $2,650
TP2: $2,635
TP3: $2,600
The $2,633–$2,635 area is especially important because ETH's MA99 and recent swing-low region are sitting there.
🐺 AltcoinWolF Market Scorecard
Factor
BTC
ETH
Higher-Timeframe Structure
Constructive
Constructive
Short-Term Momentum
Neutral/Bullish
Neutral/Weak
Major Support Holding
✅
✅
Breakout Confirmed
❌
❌
Best Approach
Wait for reclaim
Wait for reclaim
Overall Market Condition
Confirmation market — not chasing market.
BTC needs $84.2K → $84.75K.
ETH needs $2.69K → $2.72K.
Until then, both remain inside resistance-heavy ranges.
🎓 Premium Education — Institutional Target ≠ Trade Signal
A major bank raising a Bitcoin or Ethereum forecast can improve sentiment, but traders should never treat a 12-month forecast as an immediate entry signal.
A professional process separates:
Fundamental catalyst → Technical confirmation → Entry → Invalidation → Risk management
Today is a perfect example.
Citi's longer-term outlook has improved. �
Reuters
But BTC has already shown that even favorable inflation news wasn't enough to sustain a move above $85K while bond yields remained high. �
CoinDesk
Narrative creates attention. Price action determines execution.
⚡ AltcoinWolF Final Call
BTC
Bullish trigger: $84,150–$84,250
Strong confirmation: $84,750
Major breakout: $85,650
Weakness: below $83,700
ETH
Bullish trigger: $2,690–$2,700
Confirmation: $2,715–$2,722
Major breakout: ~$2,750
Weakness: below $2,665
Current Action
NO CHASE. WAIT FOR CONFIRMATION.
The structure isn't bad—but both assets are sitting close to resistance rather than offering a clean asymmetric entry.
#BTC走势分析 #ETH #US10YearYieldNears5.3% #MetaMaskExitsLidoValidatorsAfterSecurityIncident #BitcoinETFsTake$6.34BillionInQ3 $BTC
$ETH
104
·
--
BTC $113K Forecast Makes Headlines — But Here's the Level Traders Should Actually Watch
Citigroup has raised its 12-month Bitcoin forecast to $113K and Ethereum to $3,028, supported by improving crypto activity, macro conditions and renewed ETF demand. �
Reuters
But the short-term charts are giving us a much more important message:
BTC
Price: ~$83.9K
🟢 Bullish trigger: $84.2K
🔥 Confirmation: $84.75K
🎯 Major breakout level: $85.65K
🔴 Weakness: below $83.7K
ETH
Price: ~$2,678
🟢 Bullish reclaim: $2.69K–$2.70K
🎯 Resistance: $2.715K → $2.75K
🔴 Weakness: below $2.665K
🛡️ Major support: ~$2.633K
Institutional forecasts can change sentiment—but they don't replace technical confirmation.
AltcoinWolF approach: Don't chase the headline. Trade the confirmation. 🐺
Which level do you think breaks first: BTC $84.75K or ETH $2.75K?
#BTC #Ethereum #ETH #MetaMaskExitsLidoValidatorsAfterSecurityIncident #CFTCSubmitsTwoEventContractRulesToWhiteHouse $BTC
{spot}(BTCUSDT)
$ETH
{spot}(ETHUSDT)
BTC $113K Forecast Makes Headlines — But Here's the Level Traders Should Actually Watch
Citigroup has raised its 12-month Bitcoin forecast to $113K and Ethereum to $3,028, supported by improving crypto activity, macro conditions and renewed ETF demand. �
Reuters
But the short-term charts are giving us a much more important message:
BTC
Price: ~$83.9K
🟢 Bullish trigger: $84.2K
🔥 Confirmation: $84.75K
🎯 Major breakout level: $85.65K
🔴 Weakness: below $83.7K
ETH
Price: ~$2,678
🟢 Bullish reclaim: $2.69K–$2.70K
🎯 Resistance: $2.715K → $2.75K
🔴 Weakness: below $2.665K
🛡️ Major support: ~$2.633K
Institutional forecasts can change sentiment—but they don't replace technical confirmation.
AltcoinWolF approach: Don't chase the headline. Trade the confirmation. 🐺
Which level do you think breaks first: BTC $84.75K or ETH $2.75K?
#BTC #Ethereum #ETH #MetaMaskExitsLidoValidatorsAfterSecurityIncident #CFTCSubmitsTwoEventContractRulesToWhiteHouse $BTC
$ETH
Citigroup has raised its 12-month Bitcoin forecast to $113K and Ethereum to $3,028, supported by improving crypto activity, macro conditions and renewed ETF demand. �
Reuters
But the short-term charts are giving us a much more important message:
BTC
Price: ~$83.9K
🟢 Bullish trigger: $84.2K
🔥 Confirmation: $84.75K
🎯 Major breakout level: $85.65K
🔴 Weakness: below $83.7K
ETH
Price: ~$2,678
🟢 Bullish reclaim: $2.69K–$2.70K
🎯 Resistance: $2.715K → $2.75K
🔴 Weakness: below $2.665K
🛡️ Major support: ~$2.633K
Institutional forecasts can change sentiment—but they don't replace technical confirmation.
AltcoinWolF approach: Don't chase the headline. Trade the confirmation. 🐺
Which level do you think breaks first: BTC $84.75K or ETH $2.75K?
#BTC #Ethereum #ETH #MetaMaskExitsLidoValidatorsAfterSecurityIncident #CFTCSubmitsTwoEventContractRulesToWhiteHouse $BTC
$ETH
1
111
·
--
Article
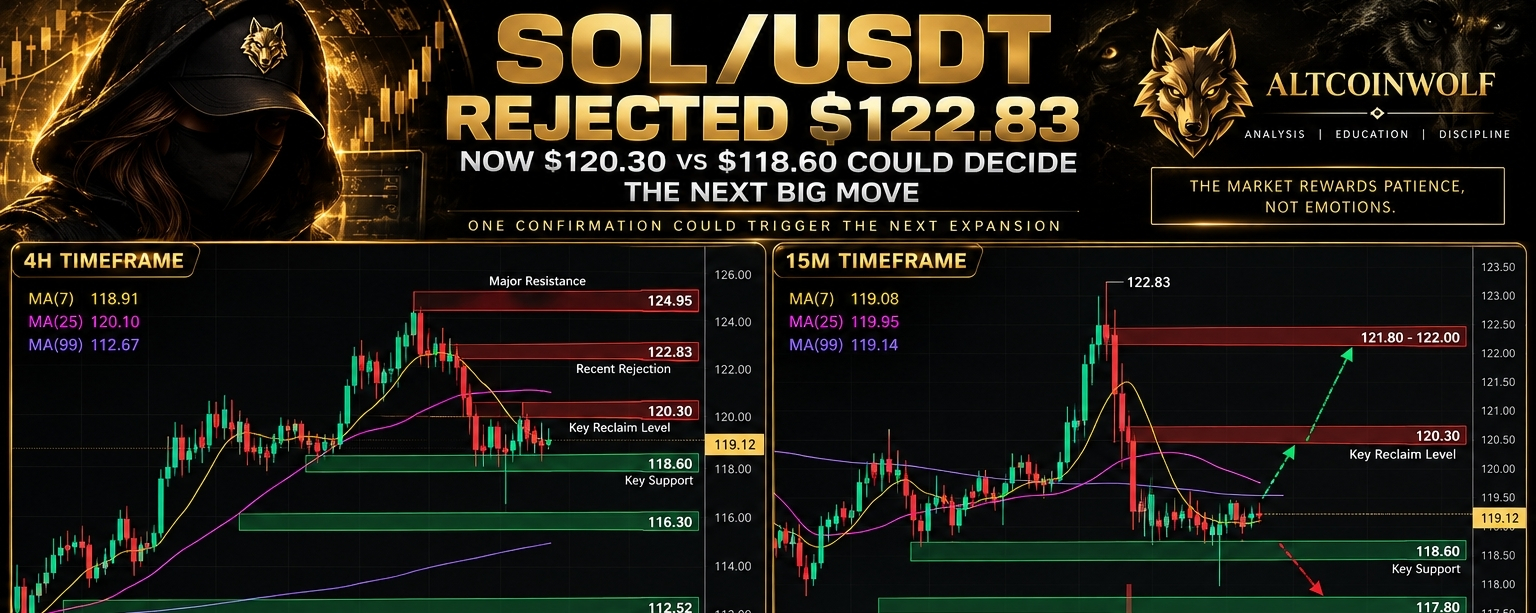
SOL Just Rejected $122.83 — Now $120.30 vs $118.60 Could Decide the Next Big MoveSOL/USDT is trading near $119.12 after a sharp rejection from $122.83. The market is now compressed between two important levels, and the next confirmed break could define the short-term direction.
Solana is back in a decision zone.
After pushing aggressively toward $122.83, SOL failed to hold the breakout and quickly slipped back toward the $119 area. That rejection changed the short-term structure and created a clear battle between buyers and sellers.
For traders, the important levels are now simple:
$120.30 = bullish confirmation
$118.60 = bearish confirmation
Between those levels, the risk of getting trapped increases.
The better approach is not to predict the next candle. It is to wait for the market to confirm which side is actually taking control.
SOL/USDT Market Snapshot
At the time of this analysis, SOL is trading around $119.12.
The broader 4-hour structure remains relatively constructive, but short-term momentum has weakened following the rejection from $122.83.
That creates an interesting situation:
Higher-timeframe structure has not fully broken.
Short-term momentum is no longer strongly bullish.
Price is sitting between nearby support and resistance.
Both long and short opportunities exist, but neither should be taken blindly.
This is exactly the type of environment where confirmation matters more than prediction.
4-Hour Analysis: The Bigger Trend Is Still Holding
The 4H chart shows that SOL previously rallied from approximately $112.52 to a local high near $124.95.
That move established a stronger higher-timeframe recovery structure.
However, price has since cooled and moved back toward the $119 region.
4H Moving Averages
MA(7): $118.91
MA(25): $120.10
MA(99): $112.67
The current price is sitting close to the MA7 but remains around the MA25 resistance area.
This suggests that short-term momentum has weakened without completely destroying the broader recovery structure.
The MA99 remains considerably below current price, which is important because it shows that SOL is still trading above a major higher-timeframe dynamic support.
Key 4H Support
The first important support region sits around:
$117.30–$118.00
If this area fails, the next important level is around:
$116.30
A much deeper correction would bring the $112.50–$112.70 area back into focus.
Key 4H Resistance
The first resistance zone is:
$120.10–$120.50
Above that, traders should watch:
$121.50–$122.83
The major higher-timeframe breakout level remains near:
$124.95
4H Conclusion
The 4H picture is best described as neutral to mildly bullish, but momentum needs to improve.
SOL has not broken down structurally, yet buyers still need to prove that they can reclaim the $120 area.
1-Hour Analysis: The Real Battle Is Around $120
The 1H chart gives us the clearest view of the current conflict.
SOL pushed toward $122.83, failed to hold above the breakout area, and then sold off sharply.
That failure matters because strong breakouts should usually show acceptance above resistance.
Instead, price returned toward the previous trading range.
1H Moving Averages
MA(7): $119.94
MA(25): $119.11
MA(99): $120.13
The three moving averages are compressed around current price.
That usually tells us the market is in a transition phase.
There is no clean directional advantage yet.
What Buyers Need
For buyers to regain control, SOL needs to reclaim:
$119.90–$120.30
A strong close and hold above this zone would improve the probability of continuation toward:
$121.20 → $122.83 → $124.95
What Sellers Need
For sellers to gain control, SOL needs to break below:
$118.60
That would expose:
$117.80 → $116.30
A failure to defend those levels could eventually lead to a deeper higher-timeframe pullback.
15-Minute Analysis: Where Execution Matters
The 15M chart is where the trade setup becomes more actionable.
After the rejection from $122.83, SOL dropped sharply and attempted to stabilize near the high-$118 region.
Price is now bouncing, but the recovery is still incomplete.
15M Moving Averages
MA(7): $119.08
MA(25): $119.95
MA(99): $119.14
Price is hovering near MA7 and MA99, while MA25 remains overhead.
This creates a simple message:
buyers are trying to recover, but they have not yet regained control.
A bounce alone is not confirmation.
The market needs to reclaim resistance and hold above it.
Volume: Why the Next Expansion Could Matter
Volume increased during both the move toward $122.83 and the selloff that followed.
After that volatility spike, participation began to cool as price moved back toward the $119 region.
This often happens when the market transitions from expansion into compression.
The implication is important:
The next high-volume move away from the current range could carry more information than the small candles forming inside it.
That is why forcing a trade in the middle of the range is unnecessarEducation: A Rejection Is Not Automatically Bearish
One of the most common trading mistakes is assuming that every rejection means the market must now collapse.
That is not how professional market analysis works.
A rejection simply tells us that buyers failed to maintain control at a particular level.
The next question is:
Can price reclaim the lost level?
If SOL recovers above $120.30 and holds it, the rejection becomes less important.
If price continues failing below $120.30 and later loses $118.60, then the rejection becomes more meaningful.
This is why professional traders focus on confirmation and invalidation, rather than emotional prediction.
AltcoinWolF Premium Trade Setup
Long Setup 1: Confirmation Reclaim
This is the cleaner bullish scenario.
Entry
Wait for SOL to reclaim $120.30 and hold above it.
Preferred entry area:
$120.15–$120.35
Stop Loss
$119.30
Targets
TP1: $121.50
TP2: $122.83
TP3: $124.80–$124.95
Why This Trade?
This setup avoids buying directly into resistance.
Instead, it asks buyers to prove control first.
A successful reclaim followed by a retest gives the trade a clearer invalidation point and a more professional execution structure.
Long Setup 2: Support-Reclaim Entry
This setup is more aggressive.
If SOL sweeps below the $118.30–$118.60 area but quickly reclaims support, a reversal entry may become attractive.
Entry
$118.65–$118.90
Stop Loss
$117.70
Targets
TP1: $120.00
TP2: $121.20
TP3: $122.80
Confirmation Needed
Do not simply buy because price touches support.
Look for:
rejection wick
bullish reclaim candle
buyers defending the zone
improving volume
No confirmation means no trade.
Short Setup 1: Breakdown Confirmation
The bearish scenario becomes stronger if SOL loses $118.60 and then fails to reclaim it.
Entry
$118.40–$118.60
Stop Loss
$119.30
Targets
TP1: $117.60–$117.80
TP2: $116.30
TP3: $114.80
Why This Trade?
A clean break below support would weaken the current recovery structure and could open the door to lower liquidity zones.
The best version of this setup is not the first wick below support.
It is the breakdown followed by a failed retest.
Short Setup 2: Resistance Rejection
If SOL rallies back toward the $120 area but fails again, a rejection setup may appear.
Entry
$119.90–$120.20
Stop Loss
$120.70
Targets
TP1: $118.80
TP2: $117.80
TP3: $116.30
This setup becomes stronger if the rejection is supported by clear selling volume and a strong bearish candle.
The No-Trade Zone
The most important zone today is:
$118.60–$120.30
This is where many traders are likely to force bad entries.
Buying here means buying directly below resistance.
Shorting here means shorting directly above support.
Neither side has a clean structural advantage.
AltcoinWolF rule:
No confirmation = no forced trade.
Sometimes the best trade is the one you do not take.
Confirmation vs Invalidation
Bullish Confirmation
The bullish case becomes stronger if:
SOL closes above $120.30
resistance turns into support
volume improves
the 1H structure begins forming higher highs again
Bullish Invalidation
The bullish idea weakens if price fails to reclaim $120.30 and loses $118.60.
Bearish Confirmation
The bearish case becomes stronger if:
SOL closes below $118.60
the retest fails
lower highs continue forming
selling volume remains elevated
Bearish Invalidation
The bearish idea weakens if SOL reclaims and holds above $120.30.
AltcoinWolF Market Scorecard
Asset: SOL/USDT
Current Price: ~$119.12
4H Structure: Constructive but cooling
1H Structure: Compressed / neutral
15M Momentum: Recovery attempt
Bullish Trigger: $120.30
Bearish Trigger: $118.60
Major Resistance: $122.83 / $124.95
Major Support: $117.80 / $116.30
Current Trade Quality: Weak inside the middle of the range
Preferred Strategy: Confirmation → Retest → Execution
Final Call
SOL does not need a prediction right now.
It needs proof.
The rejection from $122.83 weakened short-term momentum, but the broader structure has not yet broken.
That leaves traders with a very clear map:
Above $120.30: buyers begin regaining control.
Below $118.60: sellers gain a stronger structural advantage.
Between those levels: patience remains the better decision.
The goal is not to enter every move.
The goal is to enter when structure, confirmation, and risk all align.
AltcoinWolF Premium Education Takeaway
Good traders do not ask:
“Will SOL go up or down?”
They ask:
“What needs to happen before I have an edge?”
That small change in thinking can completely change trading behavior.
Instead of predicting:
Plan.
Instead of chasing:
Confirm.
Instead of hoping:
Define invalidation.
That is how a trading process becomes repeatable.
Full trade analysis is now live on AltcoinWolF Insights. Entry • TP • SL included. Read it before your next move. 🐺
The market rewards patience, not emotions. Wait for confirmation, protect your capital, and let the charts lead the way. — AltcoinWolF
#AltcoinWolF #QNTRises287% #TrumpRejectsAIRulesForVoluntaryAudits #Altcoin #sol $SOL
{spot}(SOLUSDT)
SOL Just Rejected $122.83 — Now $120.30 vs $118.60 Could Decide the Next Big Move
SOL/USDT is trading near $119.12 after a sharp rejection from $122.83. The market is now compressed between two important levels, and the next confirmed break could define the short-term direction.
Solana is back in a decision zone.
After pushing aggressively toward $122.83, SOL failed to hold the breakout and quickly slipped back toward the $119 area. That rejection changed the short-term structure and created a clear battle between buyers and sellers.
For traders, the important levels are now simple:
$120.30 = bullish confirmation
$118.60 = bearish confirmation
Between those levels, the risk of getting trapped increases.
The better approach is not to predict the next candle. It is to wait for the market to confirm which side is actually taking control.
SOL/USDT Market Snapshot
At the time of this analysis, SOL is trading around $119.12.
The broader 4-hour structure remains relatively constructive, but short-term momentum has weakened following the rejection from $122.83.
That creates an interesting situation:
Higher-timeframe structure has not fully broken.
Short-term momentum is no longer strongly bullish.
Price is sitting between nearby support and resistance.
Both long and short opportunities exist, but neither should be taken blindly.
This is exactly the type of environment where confirmation matters more than prediction.
4-Hour Analysis: The Bigger Trend Is Still Holding
The 4H chart shows that SOL previously rallied from approximately $112.52 to a local high near $124.95.
That move established a stronger higher-timeframe recovery structure.
However, price has since cooled and moved back toward the $119 region.
4H Moving Averages
MA(7): $118.91
MA(25): $120.10
MA(99): $112.67
The current price is sitting close to the MA7 but remains around the MA25 resistance area.
This suggests that short-term momentum has weakened without completely destroying the broader recovery structure.
The MA99 remains considerably below current price, which is important because it shows that SOL is still trading above a major higher-timeframe dynamic support.
Key 4H Support
The first important support region sits around:
$117.30–$118.00
If this area fails, the next important level is around:
$116.30
A much deeper correction would bring the $112.50–$112.70 area back into focus.
Key 4H Resistance
The first resistance zone is:
$120.10–$120.50
Above that, traders should watch:
$121.50–$122.83
The major higher-timeframe breakout level remains near:
$124.95
4H Conclusion
The 4H picture is best described as neutral to mildly bullish, but momentum needs to improve.
SOL has not broken down structurally, yet buyers still need to prove that they can reclaim the $120 area.
1-Hour Analysis: The Real Battle Is Around $120
The 1H chart gives us the clearest view of the current conflict.
SOL pushed toward $122.83, failed to hold above the breakout area, and then sold off sharply.
That failure matters because strong breakouts should usually show acceptance above resistance.
Instead, price returned toward the previous trading range.
1H Moving Averages
MA(7): $119.94
MA(25): $119.11
MA(99): $120.13
The three moving averages are compressed around current price.
That usually tells us the market is in a transition phase.
There is no clean directional advantage yet.
What Buyers Need
For buyers to regain control, SOL needs to reclaim:
$119.90–$120.30
A strong close and hold above this zone would improve the probability of continuation toward:
$121.20 → $122.83 → $124.95
What Sellers Need
For sellers to gain control, SOL needs to break below:
$118.60
That would expose:
$117.80 → $116.30
A failure to defend those levels could eventually lead to a deeper higher-timeframe pullback.
15-Minute Analysis: Where Execution Matters
The 15M chart is where the trade setup becomes more actionable.
After the rejection from $122.83, SOL dropped sharply and attempted to stabilize near the high-$118 region.
Price is now bouncing, but the recovery is still incomplete.
15M Moving Averages
MA(7): $119.08
MA(25): $119.95
MA(99): $119.14
Price is hovering near MA7 and MA99, while MA25 remains overhead.
This creates a simple message:
buyers are trying to recover, but they have not yet regained control.
A bounce alone is not confirmation.
The market needs to reclaim resistance and hold above it.
Volume: Why the Next Expansion Could Matter
Volume increased during both the move toward $122.83 and the selloff that followed.
After that volatility spike, participation began to cool as price moved back toward the $119 region.
This often happens when the market transitions from expansion into compression.
The implication is important:
The next high-volume move away from the current range could carry more information than the small candles forming inside it.
That is why forcing a trade in the middle of the range is unnecessarEducation: A Rejection Is Not Automatically Bearish
One of the most common trading mistakes is assuming that every rejection means the market must now collapse.
That is not how professional market analysis works.
A rejection simply tells us that buyers failed to maintain control at a particular level.
The next question is:
Can price reclaim the lost level?
If SOL recovers above $120.30 and holds it, the rejection becomes less important.
If price continues failing below $120.30 and later loses $118.60, then the rejection becomes more meaningful.
This is why professional traders focus on confirmation and invalidation, rather than emotional prediction.
AltcoinWolF Premium Trade Setup
Long Setup 1: Confirmation Reclaim
This is the cleaner bullish scenario.
Entry
Wait for SOL to reclaim $120.30 and hold above it.
Preferred entry area:
$120.15–$120.35
Stop Loss
$119.30
Targets
TP1: $121.50
TP2: $122.83
TP3: $124.80–$124.95
Why This Trade?
This setup avoids buying directly into resistance.
Instead, it asks buyers to prove control first.
A successful reclaim followed by a retest gives the trade a clearer invalidation point and a more professional execution structure.
Long Setup 2: Support-Reclaim Entry
This setup is more aggressive.
If SOL sweeps below the $118.30–$118.60 area but quickly reclaims support, a reversal entry may become attractive.
Entry
$118.65–$118.90
Stop Loss
$117.70
Targets
TP1: $120.00
TP2: $121.20
TP3: $122.80
Confirmation Needed
Do not simply buy because price touches support.
Look for:
rejection wick
bullish reclaim candle
buyers defending the zone
improving volume
No confirmation means no trade.
Short Setup 1: Breakdown Confirmation
The bearish scenario becomes stronger if SOL loses $118.60 and then fails to reclaim it.
Entry
$118.40–$118.60
Stop Loss
$119.30
Targets
TP1: $117.60–$117.80
TP2: $116.30
TP3: $114.80
Why This Trade?
A clean break below support would weaken the current recovery structure and could open the door to lower liquidity zones.
The best version of this setup is not the first wick below support.
It is the breakdown followed by a failed retest.
Short Setup 2: Resistance Rejection
If SOL rallies back toward the $120 area but fails again, a rejection setup may appear.
Entry
$119.90–$120.20
Stop Loss
$120.70
Targets
TP1: $118.80
TP2: $117.80
TP3: $116.30
This setup becomes stronger if the rejection is supported by clear selling volume and a strong bearish candle.
The No-Trade Zone
The most important zone today is:
$118.60–$120.30
This is where many traders are likely to force bad entries.
Buying here means buying directly below resistance.
Shorting here means shorting directly above support.
Neither side has a clean structural advantage.
AltcoinWolF rule:
No confirmation = no forced trade.
Sometimes the best trade is the one you do not take.
Confirmation vs Invalidation
Bullish Confirmation
The bullish case becomes stronger if:
SOL closes above $120.30
resistance turns into support
volume improves
the 1H structure begins forming higher highs again
Bullish Invalidation
The bullish idea weakens if price fails to reclaim $120.30 and loses $118.60.
Bearish Confirmation
The bearish case becomes stronger if:
SOL closes below $118.60
the retest fails
lower highs continue forming
selling volume remains elevated
Bearish Invalidation
The bearish idea weakens if SOL reclaims and holds above $120.30.
AltcoinWolF Market Scorecard
Asset: SOL/USDT
Current Price: ~$119.12
4H Structure: Constructive but cooling
1H Structure: Compressed / neutral
15M Momentum: Recovery attempt
Bullish Trigger: $120.30
Bearish Trigger: $118.60
Major Resistance: $122.83 / $124.95
Major Support: $117.80 / $116.30
Current Trade Quality: Weak inside the middle of the range
Preferred Strategy: Confirmation → Retest → Execution
Final Call
SOL does not need a prediction right now.
It needs proof.
The rejection from $122.83 weakened short-term momentum, but the broader structure has not yet broken.
That leaves traders with a very clear map:
Above $120.30: buyers begin regaining control.
Below $118.60: sellers gain a stronger structural advantage.
Between those levels: patience remains the better decision.
The goal is not to enter every move.
The goal is to enter when structure, confirmation, and risk all align.
AltcoinWolF Premium Education Takeaway
Good traders do not ask:
“Will SOL go up or down?”
They ask:
“What needs to happen before I have an edge?”
That small change in thinking can completely change trading behavior.
Instead of predicting:
Plan.
Instead of chasing:
Confirm.
Instead of hoping:
Define invalidation.
That is how a trading process becomes repeatable.
Full trade analysis is now live on AltcoinWolF Insights. Entry • TP • SL included. Read it before your next move. 🐺
The market rewards patience, not emotions. Wait for confirmation, protect your capital, and let the charts lead the way. — AltcoinWolF
#AltcoinWolF #QNTRises287% #TrumpRejectsAIRulesForVoluntaryAudits #Altcoin #sol $SOL
Solana is back in a decision zone.
After pushing aggressively toward $122.83, SOL failed to hold the breakout and quickly slipped back toward the $119 area. That rejection changed the short-term structure and created a clear battle between buyers and sellers.
For traders, the important levels are now simple:
$120.30 = bullish confirmation
$118.60 = bearish confirmation
Between those levels, the risk of getting trapped increases.
The better approach is not to predict the next candle. It is to wait for the market to confirm which side is actually taking control.
SOL/USDT Market Snapshot
At the time of this analysis, SOL is trading around $119.12.
The broader 4-hour structure remains relatively constructive, but short-term momentum has weakened following the rejection from $122.83.
That creates an interesting situation:
Higher-timeframe structure has not fully broken.
Short-term momentum is no longer strongly bullish.
Price is sitting between nearby support and resistance.
Both long and short opportunities exist, but neither should be taken blindly.
This is exactly the type of environment where confirmation matters more than prediction.
4-Hour Analysis: The Bigger Trend Is Still Holding
The 4H chart shows that SOL previously rallied from approximately $112.52 to a local high near $124.95.
That move established a stronger higher-timeframe recovery structure.
However, price has since cooled and moved back toward the $119 region.
4H Moving Averages
MA(7): $118.91
MA(25): $120.10
MA(99): $112.67
The current price is sitting close to the MA7 but remains around the MA25 resistance area.
This suggests that short-term momentum has weakened without completely destroying the broader recovery structure.
The MA99 remains considerably below current price, which is important because it shows that SOL is still trading above a major higher-timeframe dynamic support.
Key 4H Support
The first important support region sits around:
$117.30–$118.00
If this area fails, the next important level is around:
$116.30
A much deeper correction would bring the $112.50–$112.70 area back into focus.
Key 4H Resistance
The first resistance zone is:
$120.10–$120.50
Above that, traders should watch:
$121.50–$122.83
The major higher-timeframe breakout level remains near:
$124.95
4H Conclusion
The 4H picture is best described as neutral to mildly bullish, but momentum needs to improve.
SOL has not broken down structurally, yet buyers still need to prove that they can reclaim the $120 area.
1-Hour Analysis: The Real Battle Is Around $120
The 1H chart gives us the clearest view of the current conflict.
SOL pushed toward $122.83, failed to hold above the breakout area, and then sold off sharply.
That failure matters because strong breakouts should usually show acceptance above resistance.
Instead, price returned toward the previous trading range.
1H Moving Averages
MA(7): $119.94
MA(25): $119.11
MA(99): $120.13
The three moving averages are compressed around current price.
That usually tells us the market is in a transition phase.
There is no clean directional advantage yet.
What Buyers Need
For buyers to regain control, SOL needs to reclaim:
$119.90–$120.30
A strong close and hold above this zone would improve the probability of continuation toward:
$121.20 → $122.83 → $124.95
What Sellers Need
For sellers to gain control, SOL needs to break below:
$118.60
That would expose:
$117.80 → $116.30
A failure to defend those levels could eventually lead to a deeper higher-timeframe pullback.
15-Minute Analysis: Where Execution Matters
The 15M chart is where the trade setup becomes more actionable.
After the rejection from $122.83, SOL dropped sharply and attempted to stabilize near the high-$118 region.
Price is now bouncing, but the recovery is still incomplete.
15M Moving Averages
MA(7): $119.08
MA(25): $119.95
MA(99): $119.14
Price is hovering near MA7 and MA99, while MA25 remains overhead.
This creates a simple message:
buyers are trying to recover, but they have not yet regained control.
A bounce alone is not confirmation.
The market needs to reclaim resistance and hold above it.
Volume: Why the Next Expansion Could Matter
Volume increased during both the move toward $122.83 and the selloff that followed.
After that volatility spike, participation began to cool as price moved back toward the $119 region.
This often happens when the market transitions from expansion into compression.
The implication is important:
The next high-volume move away from the current range could carry more information than the small candles forming inside it.
That is why forcing a trade in the middle of the range is unnecessarEducation: A Rejection Is Not Automatically Bearish
One of the most common trading mistakes is assuming that every rejection means the market must now collapse.
That is not how professional market analysis works.
A rejection simply tells us that buyers failed to maintain control at a particular level.
The next question is:
Can price reclaim the lost level?
If SOL recovers above $120.30 and holds it, the rejection becomes less important.
If price continues failing below $120.30 and later loses $118.60, then the rejection becomes more meaningful.
This is why professional traders focus on confirmation and invalidation, rather than emotional prediction.
AltcoinWolF Premium Trade Setup
Long Setup 1: Confirmation Reclaim
This is the cleaner bullish scenario.
Entry
Wait for SOL to reclaim $120.30 and hold above it.
Preferred entry area:
$120.15–$120.35
Stop Loss
$119.30
Targets
TP1: $121.50
TP2: $122.83
TP3: $124.80–$124.95
Why This Trade?
This setup avoids buying directly into resistance.
Instead, it asks buyers to prove control first.
A successful reclaim followed by a retest gives the trade a clearer invalidation point and a more professional execution structure.
Long Setup 2: Support-Reclaim Entry
This setup is more aggressive.
If SOL sweeps below the $118.30–$118.60 area but quickly reclaims support, a reversal entry may become attractive.
Entry
$118.65–$118.90
Stop Loss
$117.70
Targets
TP1: $120.00
TP2: $121.20
TP3: $122.80
Confirmation Needed
Do not simply buy because price touches support.
Look for:
rejection wick
bullish reclaim candle
buyers defending the zone
improving volume
No confirmation means no trade.
Short Setup 1: Breakdown Confirmation
The bearish scenario becomes stronger if SOL loses $118.60 and then fails to reclaim it.
Entry
$118.40–$118.60
Stop Loss
$119.30
Targets
TP1: $117.60–$117.80
TP2: $116.30
TP3: $114.80
Why This Trade?
A clean break below support would weaken the current recovery structure and could open the door to lower liquidity zones.
The best version of this setup is not the first wick below support.
It is the breakdown followed by a failed retest.
Short Setup 2: Resistance Rejection
If SOL rallies back toward the $120 area but fails again, a rejection setup may appear.
Entry
$119.90–$120.20
Stop Loss
$120.70
Targets
TP1: $118.80
TP2: $117.80
TP3: $116.30
This setup becomes stronger if the rejection is supported by clear selling volume and a strong bearish candle.
The No-Trade Zone
The most important zone today is:
$118.60–$120.30
This is where many traders are likely to force bad entries.
Buying here means buying directly below resistance.
Shorting here means shorting directly above support.
Neither side has a clean structural advantage.
AltcoinWolF rule:
No confirmation = no forced trade.
Sometimes the best trade is the one you do not take.
Confirmation vs Invalidation
Bullish Confirmation
The bullish case becomes stronger if:
SOL closes above $120.30
resistance turns into support
volume improves
the 1H structure begins forming higher highs again
Bullish Invalidation
The bullish idea weakens if price fails to reclaim $120.30 and loses $118.60.
Bearish Confirmation
The bearish case becomes stronger if:
SOL closes below $118.60
the retest fails
lower highs continue forming
selling volume remains elevated
Bearish Invalidation
The bearish idea weakens if SOL reclaims and holds above $120.30.
AltcoinWolF Market Scorecard
Asset: SOL/USDT
Current Price: ~$119.12
4H Structure: Constructive but cooling
1H Structure: Compressed / neutral
15M Momentum: Recovery attempt
Bullish Trigger: $120.30
Bearish Trigger: $118.60
Major Resistance: $122.83 / $124.95
Major Support: $117.80 / $116.30
Current Trade Quality: Weak inside the middle of the range
Preferred Strategy: Confirmation → Retest → Execution
Final Call
SOL does not need a prediction right now.
It needs proof.
The rejection from $122.83 weakened short-term momentum, but the broader structure has not yet broken.
That leaves traders with a very clear map:
Above $120.30: buyers begin regaining control.
Below $118.60: sellers gain a stronger structural advantage.
Between those levels: patience remains the better decision.
The goal is not to enter every move.
The goal is to enter when structure, confirmation, and risk all align.
AltcoinWolF Premium Education Takeaway
Good traders do not ask:
“Will SOL go up or down?”
They ask:
“What needs to happen before I have an edge?”
That small change in thinking can completely change trading behavior.
Instead of predicting:
Plan.
Instead of chasing:
Confirm.
Instead of hoping:
Define invalidation.
That is how a trading process becomes repeatable.
Full trade analysis is now live on AltcoinWolF Insights. Entry • TP • SL included. Read it before your next move. 🐺
The market rewards patience, not emotions. Wait for confirmation, protect your capital, and let the charts lead the way. — AltcoinWolF
#AltcoinWolF #QNTRises287% #TrumpRejectsAIRulesForVoluntaryAudits #Altcoin #sol $SOL
93
·
--
SOL/USDT at a Critical Decision Zone 👀
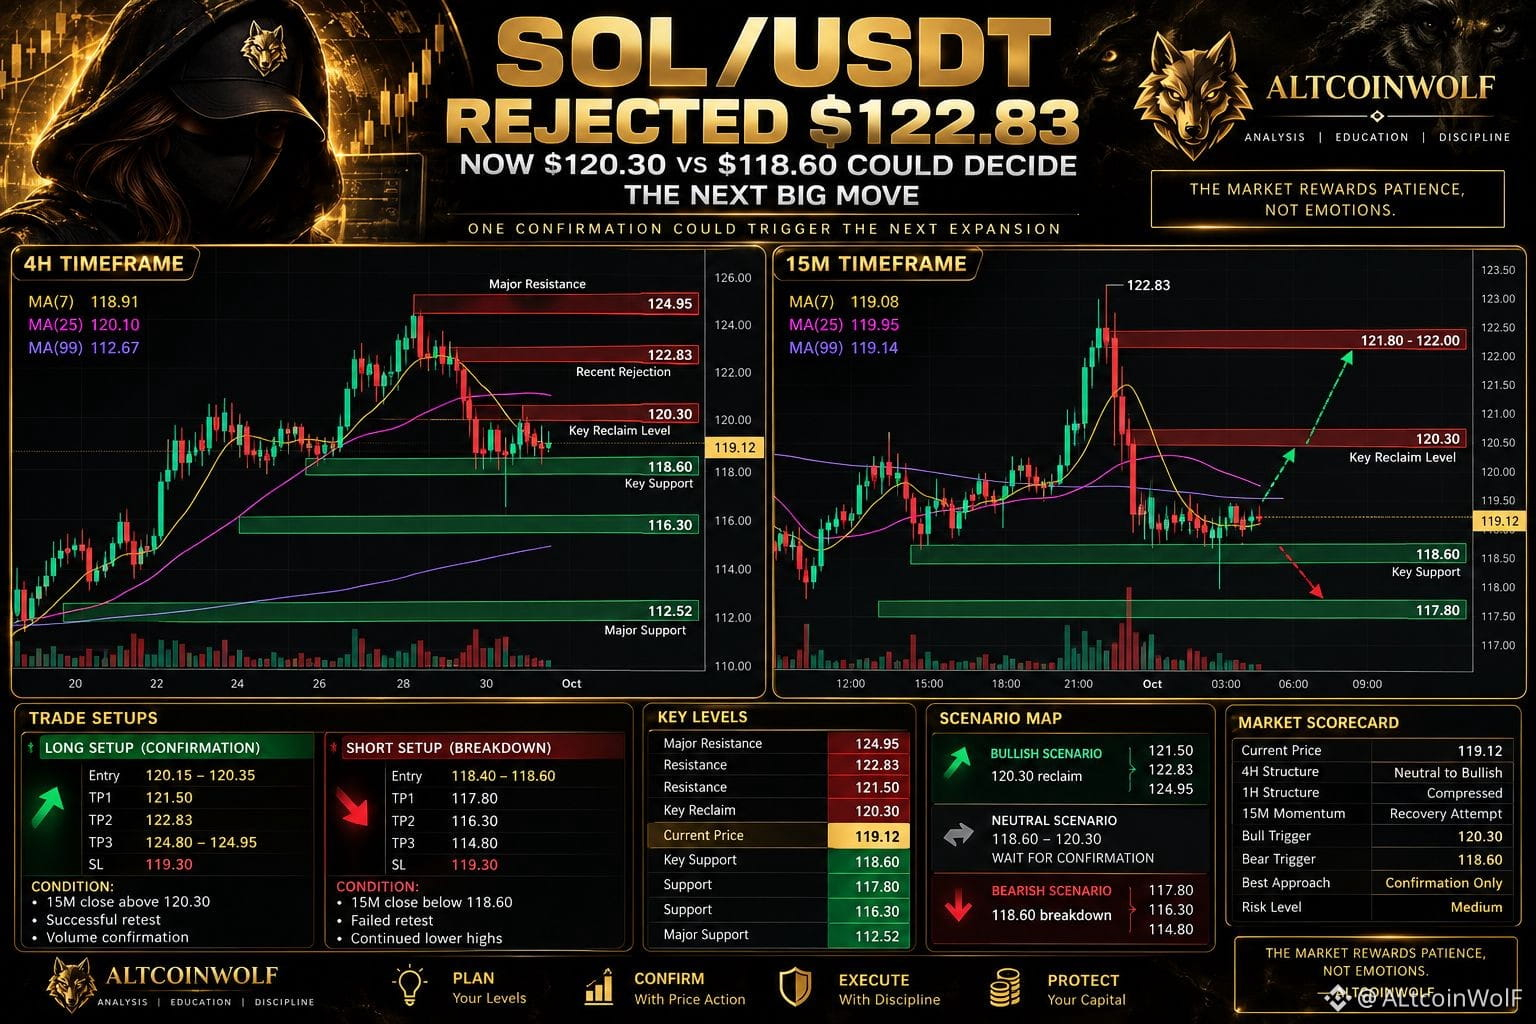
SOL is currently trading around $119.12, and price is now sitting in a key decision area after rejecting from $122.83.
What the chart says
4H structure: still neutral to mildly bullish
1H structure: compressed and indecisive
15M structure: bounce attempt, but confirmation still pending
Key Bullish Trigger
A reclaim and hold above $120.30 could open the door toward:
$121.20
$122.83
$124.95
Key Bearish Trigger
A breakdown below $118.60 could shift momentum toward:
$117.80
$116.30
lower support retests
My Trading View
This is not a chase setup.
This is a wait-for-confirmation setup.
Premium Trade Setups
Long idea: above $120.30 confirmation
Short idea: below $118.60 breakdown
The cleanest trades usually come after the market proves direction — not before.
Full trade analysis is now live on AltcoinWolF Insights. Entry • TP • SL included. Read it before your next move. 🐺
Do you think SOL reclaims $120.30 first, or breaks below $118.60?
#AltcoinWolF #QNTRises287% #SolanaUSTD #TrumpRejectsAIRulesForVoluntaryAudits #UKFCAOpensCryptoFirmAuthorization $SOL
{spot}(SOLUSDT)
SOL/USDT at a Critical Decision Zone 👀
SOL is currently trading around $119.12, and price is now sitting in a key decision area after rejecting from $122.83.
What the chart says
4H structure: still neutral to mildly bullish
1H structure: compressed and indecisive
15M structure: bounce attempt, but confirmation still pending
Key Bullish Trigger
A reclaim and hold above $120.30 could open the door toward:
$121.20
$122.83
$124.95
Key Bearish Trigger
A breakdown below $118.60 could shift momentum toward:
$117.80
$116.30
lower support retests
My Trading View
This is not a chase setup.
This is a wait-for-confirmation setup.
Premium Trade Setups
Long idea: above $120.30 confirmation
Short idea: below $118.60 breakdown
The cleanest trades usually come after the market proves direction — not before.
Full trade analysis is now live on AltcoinWolF Insights. Entry • TP • SL included. Read it before your next move. 🐺
Do you think SOL reclaims $120.30 first, or breaks below $118.60?
#AltcoinWolF #QNTRises287% #SolanaUSTD #TrumpRejectsAIRulesForVoluntaryAudits #UKFCAOpensCryptoFirmAuthorization $SOL
SOL is currently trading around $119.12, and price is now sitting in a key decision area after rejecting from $122.83.
What the chart says
4H structure: still neutral to mildly bullish
1H structure: compressed and indecisive
15M structure: bounce attempt, but confirmation still pending
Key Bullish Trigger
A reclaim and hold above $120.30 could open the door toward:
$121.20
$122.83
$124.95
Key Bearish Trigger
A breakdown below $118.60 could shift momentum toward:
$117.80
$116.30
lower support retests
My Trading View
This is not a chase setup.
This is a wait-for-confirmation setup.
Premium Trade Setups
Long idea: above $120.30 confirmation
Short idea: below $118.60 breakdown
The cleanest trades usually come after the market proves direction — not before.
Full trade analysis is now live on AltcoinWolF Insights. Entry • TP • SL included. Read it before your next move. 🐺
Do you think SOL reclaims $120.30 first, or breaks below $118.60?
#AltcoinWolF #QNTRises287% #SolanaUSTD #TrumpRejectsAIRulesForVoluntaryAudits #UKFCAOpensCryptoFirmAuthorization $SOL
2
143
·
--
Article
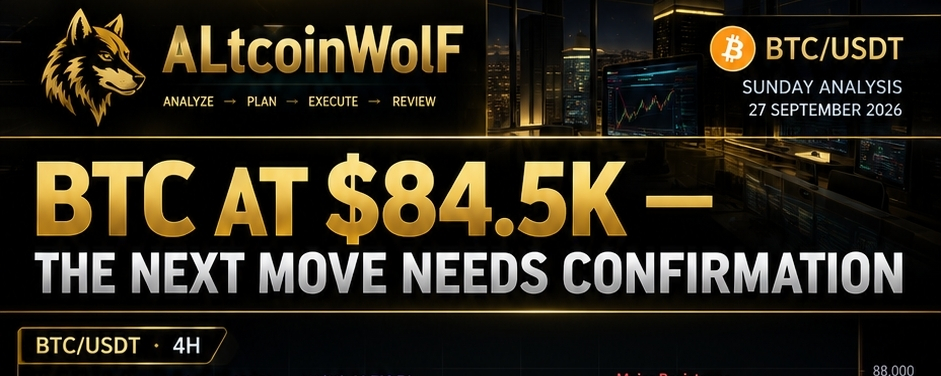
Bitcoin at $84.5K: Consolidation Before the Next Move?Bitcoin is ending the week around $84,500, after a strong recovery that pushed price above $85K and briefly toward the $87K area earlier in the week.
Now the market is doing something much less exciting—but much more important for traders:
It is consolidating.
And this is exactly where patience becomes more valuable than prediction.
The BTC/USDT charts I’m watching show a clear difference between the higher timeframe and the short-term structure.
On the 4H chart, BTC remains above its key moving averages:
MA7: $84,457
MA25: $84,253
MA99: $80,734
Recent swing high: $87,395
Recent swing low: $82,875
Meanwhile, the 15M chart shows BTC pulling back from the $85,159 area toward approximately $84,364 before attempting a small recovery.
So the question isn't simply:
“Is Bitcoin bullish?”
The better question is:
“Where does Bitcoin need to confirm before the next long becomes attractive?”
📊 1. The 4H Structure
The bigger picture remains constructive.
BTC recovered strongly from the $82,875 region and is now trading around the $84.5K area.
Price is currently above both the 7-period and 25-period moving averages, while the 99-period MA sits significantly lower near $80.7K.
That tells us something important:
The broader structure has not broken down.
But there is still overhead resistance.
Key 4H levels
Resistance 1: $85,150–$85,200
Resistance 2: $85,800–$85,900
Major resistance: $87,395
Support 1: $84,250–$84,000
Support 2: $82,875
Major support: ~$82,200
The market is therefore sitting between support and resistance rather than offering a clean breakout entry right now.
🔎 2. What the 15M Chart Is Telling Us
The 15M chart gives us the short-term picture.
BTC recently reached:
$85,159
before sellers pushed price down toward:
$84,364
The current price is around $84,530.
The short-term moving averages are:
MA7: $84,664
MA25: $84,837
MA99: $84,455
This creates an interesting situation.
BTC is currently around the MA99 but remains below the MA7 and MA25.
In simple terms:
Short-term momentum needs to recover before chasing a long.
That's why confirmation matters.
🎯 3. AltcoinWolF Premium Long Setup
Setup A — Support Reclaim
Entry Zone: $84,450–$84,650
But don't enter simply because price reaches the zone.
Confirmation
Wait for:
BTC to hold approximately $84,400–$84,450
A 15M bullish reaction
A candle close back above approximately $84,650–$84,700
Preferably increasing volume during the reclaim
Targets
TP1: $85,000
TP2: $85,150–$85,200
TP3: $85,750–$85,850
Invalidation: Below approximately $84,150
The idea is simple:
Support → confirmation → reclaim → continuation.
Not:
Support → FOMO → hope.
🚀 4. Breakout Setup
The cleaner momentum setup comes if BTC breaks the $85,200 resistance.
Breakout Long
Entry: $85,200–$85,350 after confirmed breakout/retest
TP1: $85,800
TP2: $86,500
TP3: $87,300–$87,400
SL: Around $84,850
The key word is retest.
A temporary wick above $85.2K isn't enough.
We want to see price reclaim the level and demonstrate that former resistance can become support.
🚫 5. Where I Would NOT Chase BTC
The middle of the range is where traders can get trapped.
Between roughly:
$84,650 → $85,150
BTC can easily chop between buyers and sellers.
That means there may be no meaningful risk/reward advantage.
Sometimes the best trade is:
No trade.
Waiting for the market to reveal direction is part of the strategy—not a failure to trade.
⚠️ 6. What Would Invalidate the Bullish Setup?
The important short-term level is approximately:
$84,150
A decisive breakdown below this area would weaken the immediate long thesis.
If BTC loses the broader $82,875 swing low, the structure would require a much deeper reassessment.
This is why stop-loss placement matters.
A good setup isn't defined only by where we enter.
It's also defined by:
Where we're wrong.
🧠 7. The Bigger Market Context
The latest market data also shows Bitcoin holding around $84K after gaining roughly 5% over the week and briefly moving above $87K. �
CryptoTicker.io +1
Recent reporting also points to strong U.S. spot Bitcoin ETF inflows, with approximately $2.39 billion of weekly inflows reported through September 25. At the same time, supply around the $84K–$85K region has been identified as an area where BTC may face overhead selling pressure. �
CryptoRank +1
For a trader, the takeaway isn't that these flows guarantee another rally.
It's that fundamental demand and technical resistance are currently meeting in the same area.
And that's why confirmation matters.
📋 AltcoinWolF Market Scorecard
Factor
Current Reading
4H Structure
🟢 Constructive
Price vs MA25
🟢 Above
Price vs MA99
🟢 Above
15M Momentum
🟡 Cooling
$84K Support
🟢 Important
$85.2K Resistance
🔴 Key Breakout
$87.4K
🔴 Major Resistance
Long Entry
🟡 Confirmation Required
FOMO Entry
🔴 Avoid
🔮 8. Three Scenarios for the Coming Sessions
🟢 Scenario 1 — Bullish Continuation
BTC holds $84.4K–$84.6K, reclaims $85K and breaks $85.2K.
Potential path:
$85.2K → $85.8K → $86.5K → $87.3K–$87.4K
🟡 Scenario 2 — Continued Consolidation
BTC remains trapped between approximately:
$84K–$85.2K
In this scenario, patience is the trade.
Wait for the range to resolve.
🔴 Scenario 3 — Support Breakdown
BTC loses $84.15K and fails to reclaim it.
The immediate long setup becomes invalid.
A deeper move toward the $82.9K region would then become relevant.
🐺 Final Call
Bitcoin doesn't need another prediction.
It needs confirmation.
The 4H structure remains constructive, while the 15M chart is showing short-term weakness around $85K.
For AltcoinWolF, the important levels are:
$84.4K–$84.6K → support/reclaim zone
$85.2K → breakout confirmation
$87.4K → major upside resistance
$84.15K → short-term setup invalidation
The plan is simple:
Analyze → Wait → Confirm → Execute → Manage Risk → Review.
Don't chase the candle.
Let the market come to your level.
🐺 AltcoinWolF Closing
🚀 Trade smarter. Move faster. Stay ahead.
📊 Follow AltcoinWolF for high-conviction setups, precision entries, and market-leading crypto insights. 🐺⚡
The market rewards patience, not emotions. Wait for confirmation, protect your capital, and let the charts lead the way.
#CircleTetherFreezeBitgetHackerWallet #TrumpRejectsIranHormuzReopening #AltcoinWolF #BTC走势分析 #StrategyStriveAdd2305BitcoinThisWeek $BTC
{spot}(BTCUSDT)
Bitcoin at $84.5K: Consolidation Before the Next Move?
Bitcoin is ending the week around $84,500, after a strong recovery that pushed price above $85K and briefly toward the $87K area earlier in the week.
Now the market is doing something much less exciting—but much more important for traders:
It is consolidating.
And this is exactly where patience becomes more valuable than prediction.
The BTC/USDT charts I’m watching show a clear difference between the higher timeframe and the short-term structure.
On the 4H chart, BTC remains above its key moving averages:
MA7: $84,457
MA25: $84,253
MA99: $80,734
Recent swing high: $87,395
Recent swing low: $82,875
Meanwhile, the 15M chart shows BTC pulling back from the $85,159 area toward approximately $84,364 before attempting a small recovery.
So the question isn't simply:
“Is Bitcoin bullish?”
The better question is:
“Where does Bitcoin need to confirm before the next long becomes attractive?”
📊 1. The 4H Structure
The bigger picture remains constructive.
BTC recovered strongly from the $82,875 region and is now trading around the $84.5K area.
Price is currently above both the 7-period and 25-period moving averages, while the 99-period MA sits significantly lower near $80.7K.
That tells us something important:
The broader structure has not broken down.
But there is still overhead resistance.
Key 4H levels
Resistance 1: $85,150–$85,200
Resistance 2: $85,800–$85,900
Major resistance: $87,395
Support 1: $84,250–$84,000
Support 2: $82,875
Major support: ~$82,200
The market is therefore sitting between support and resistance rather than offering a clean breakout entry right now.
🔎 2. What the 15M Chart Is Telling Us
The 15M chart gives us the short-term picture.
BTC recently reached:
$85,159
before sellers pushed price down toward:
$84,364
The current price is around $84,530.
The short-term moving averages are:
MA7: $84,664
MA25: $84,837
MA99: $84,455
This creates an interesting situation.
BTC is currently around the MA99 but remains below the MA7 and MA25.
In simple terms:
Short-term momentum needs to recover before chasing a long.
That's why confirmation matters.
🎯 3. AltcoinWolF Premium Long Setup
Setup A — Support Reclaim
Entry Zone: $84,450–$84,650
But don't enter simply because price reaches the zone.
Confirmation
Wait for:
BTC to hold approximately $84,400–$84,450
A 15M bullish reaction
A candle close back above approximately $84,650–$84,700
Preferably increasing volume during the reclaim
Targets
TP1: $85,000
TP2: $85,150–$85,200
TP3: $85,750–$85,850
Invalidation: Below approximately $84,150
The idea is simple:
Support → confirmation → reclaim → continuation.
Not:
Support → FOMO → hope.
🚀 4. Breakout Setup
The cleaner momentum setup comes if BTC breaks the $85,200 resistance.
Breakout Long
Entry: $85,200–$85,350 after confirmed breakout/retest
TP1: $85,800
TP2: $86,500
TP3: $87,300–$87,400
SL: Around $84,850
The key word is retest.
A temporary wick above $85.2K isn't enough.
We want to see price reclaim the level and demonstrate that former resistance can become support.
🚫 5. Where I Would NOT Chase BTC
The middle of the range is where traders can get trapped.
Between roughly:
$84,650 → $85,150
BTC can easily chop between buyers and sellers.
That means there may be no meaningful risk/reward advantage.
Sometimes the best trade is:
No trade.
Waiting for the market to reveal direction is part of the strategy—not a failure to trade.
⚠️ 6. What Would Invalidate the Bullish Setup?
The important short-term level is approximately:
$84,150
A decisive breakdown below this area would weaken the immediate long thesis.
If BTC loses the broader $82,875 swing low, the structure would require a much deeper reassessment.
This is why stop-loss placement matters.
A good setup isn't defined only by where we enter.
It's also defined by:
Where we're wrong.
🧠 7. The Bigger Market Context
The latest market data also shows Bitcoin holding around $84K after gaining roughly 5% over the week and briefly moving above $87K. �
CryptoTicker.io +1
Recent reporting also points to strong U.S. spot Bitcoin ETF inflows, with approximately $2.39 billion of weekly inflows reported through September 25. At the same time, supply around the $84K–$85K region has been identified as an area where BTC may face overhead selling pressure. �
CryptoRank +1
For a trader, the takeaway isn't that these flows guarantee another rally.
It's that fundamental demand and technical resistance are currently meeting in the same area.
And that's why confirmation matters.
📋 AltcoinWolF Market Scorecard
Factor
Current Reading
4H Structure
🟢 Constructive
Price vs MA25
🟢 Above
Price vs MA99
🟢 Above
15M Momentum
🟡 Cooling
$84K Support
🟢 Important
$85.2K Resistance
🔴 Key Breakout
$87.4K
🔴 Major Resistance
Long Entry
🟡 Confirmation Required
FOMO Entry
🔴 Avoid
🔮 8. Three Scenarios for the Coming Sessions
🟢 Scenario 1 — Bullish Continuation
BTC holds $84.4K–$84.6K, reclaims $85K and breaks $85.2K.
Potential path:
$85.2K → $85.8K → $86.5K → $87.3K–$87.4K
🟡 Scenario 2 — Continued Consolidation
BTC remains trapped between approximately:
$84K–$85.2K
In this scenario, patience is the trade.
Wait for the range to resolve.
🔴 Scenario 3 — Support Breakdown
BTC loses $84.15K and fails to reclaim it.
The immediate long setup becomes invalid.
A deeper move toward the $82.9K region would then become relevant.
🐺 Final Call
Bitcoin doesn't need another prediction.
It needs confirmation.
The 4H structure remains constructive, while the 15M chart is showing short-term weakness around $85K.
For AltcoinWolF, the important levels are:
$84.4K–$84.6K → support/reclaim zone
$85.2K → breakout confirmation
$87.4K → major upside resistance
$84.15K → short-term setup invalidation
The plan is simple:
Analyze → Wait → Confirm → Execute → Manage Risk → Review.
Don't chase the candle.
Let the market come to your level.
🐺 AltcoinWolF Closing
🚀 Trade smarter. Move faster. Stay ahead.
📊 Follow AltcoinWolF for high-conviction setups, precision entries, and market-leading crypto insights. 🐺⚡
The market rewards patience, not emotions. Wait for confirmation, protect your capital, and let the charts lead the way.
#CircleTetherFreezeBitgetHackerWallet #TrumpRejectsIranHormuzReopening #AltcoinWolF #BTC走势分析 #StrategyStriveAdd2305BitcoinThisWeek $BTC
Now the market is doing something much less exciting—but much more important for traders:
It is consolidating.
And this is exactly where patience becomes more valuable than prediction.
The BTC/USDT charts I’m watching show a clear difference between the higher timeframe and the short-term structure.
On the 4H chart, BTC remains above its key moving averages:
MA7: $84,457
MA25: $84,253
MA99: $80,734
Recent swing high: $87,395
Recent swing low: $82,875
Meanwhile, the 15M chart shows BTC pulling back from the $85,159 area toward approximately $84,364 before attempting a small recovery.
So the question isn't simply:
“Is Bitcoin bullish?”
The better question is:
“Where does Bitcoin need to confirm before the next long becomes attractive?”
📊 1. The 4H Structure
The bigger picture remains constructive.
BTC recovered strongly from the $82,875 region and is now trading around the $84.5K area.
Price is currently above both the 7-period and 25-period moving averages, while the 99-period MA sits significantly lower near $80.7K.
That tells us something important:
The broader structure has not broken down.
But there is still overhead resistance.
Key 4H levels
Resistance 1: $85,150–$85,200
Resistance 2: $85,800–$85,900
Major resistance: $87,395
Support 1: $84,250–$84,000
Support 2: $82,875
Major support: ~$82,200
The market is therefore sitting between support and resistance rather than offering a clean breakout entry right now.
🔎 2. What the 15M Chart Is Telling Us
The 15M chart gives us the short-term picture.
BTC recently reached:
$85,159
before sellers pushed price down toward:
$84,364
The current price is around $84,530.
The short-term moving averages are:
MA7: $84,664
MA25: $84,837
MA99: $84,455
This creates an interesting situation.
BTC is currently around the MA99 but remains below the MA7 and MA25.
In simple terms:
Short-term momentum needs to recover before chasing a long.
That's why confirmation matters.
🎯 3. AltcoinWolF Premium Long Setup
Setup A — Support Reclaim
Entry Zone: $84,450–$84,650
But don't enter simply because price reaches the zone.
Confirmation
Wait for:
BTC to hold approximately $84,400–$84,450
A 15M bullish reaction
A candle close back above approximately $84,650–$84,700
Preferably increasing volume during the reclaim
Targets
TP1: $85,000
TP2: $85,150–$85,200
TP3: $85,750–$85,850
Invalidation: Below approximately $84,150
The idea is simple:
Support → confirmation → reclaim → continuation.
Not:
Support → FOMO → hope.
🚀 4. Breakout Setup
The cleaner momentum setup comes if BTC breaks the $85,200 resistance.
Breakout Long
Entry: $85,200–$85,350 after confirmed breakout/retest
TP1: $85,800
TP2: $86,500
TP3: $87,300–$87,400
SL: Around $84,850
The key word is retest.
A temporary wick above $85.2K isn't enough.
We want to see price reclaim the level and demonstrate that former resistance can become support.
🚫 5. Where I Would NOT Chase BTC
The middle of the range is where traders can get trapped.
Between roughly:
$84,650 → $85,150
BTC can easily chop between buyers and sellers.
That means there may be no meaningful risk/reward advantage.
Sometimes the best trade is:
No trade.
Waiting for the market to reveal direction is part of the strategy—not a failure to trade.
⚠️ 6. What Would Invalidate the Bullish Setup?
The important short-term level is approximately:
$84,150
A decisive breakdown below this area would weaken the immediate long thesis.
If BTC loses the broader $82,875 swing low, the structure would require a much deeper reassessment.
This is why stop-loss placement matters.
A good setup isn't defined only by where we enter.
It's also defined by:
Where we're wrong.
🧠 7. The Bigger Market Context
The latest market data also shows Bitcoin holding around $84K after gaining roughly 5% over the week and briefly moving above $87K. �
CryptoTicker.io +1
Recent reporting also points to strong U.S. spot Bitcoin ETF inflows, with approximately $2.39 billion of weekly inflows reported through September 25. At the same time, supply around the $84K–$85K region has been identified as an area where BTC may face overhead selling pressure. �
CryptoRank +1
For a trader, the takeaway isn't that these flows guarantee another rally.
It's that fundamental demand and technical resistance are currently meeting in the same area.
And that's why confirmation matters.
📋 AltcoinWolF Market Scorecard
Factor
Current Reading
4H Structure
🟢 Constructive
Price vs MA25
🟢 Above
Price vs MA99
🟢 Above
15M Momentum
🟡 Cooling
$84K Support
🟢 Important
$85.2K Resistance
🔴 Key Breakout
$87.4K
🔴 Major Resistance
Long Entry
🟡 Confirmation Required
FOMO Entry
🔴 Avoid
🔮 8. Three Scenarios for the Coming Sessions
🟢 Scenario 1 — Bullish Continuation
BTC holds $84.4K–$84.6K, reclaims $85K and breaks $85.2K.
Potential path:
$85.2K → $85.8K → $86.5K → $87.3K–$87.4K
🟡 Scenario 2 — Continued Consolidation
BTC remains trapped between approximately:
$84K–$85.2K
In this scenario, patience is the trade.
Wait for the range to resolve.
🔴 Scenario 3 — Support Breakdown
BTC loses $84.15K and fails to reclaim it.
The immediate long setup becomes invalid.
A deeper move toward the $82.9K region would then become relevant.
🐺 Final Call
Bitcoin doesn't need another prediction.
It needs confirmation.
The 4H structure remains constructive, while the 15M chart is showing short-term weakness around $85K.
For AltcoinWolF, the important levels are:
$84.4K–$84.6K → support/reclaim zone
$85.2K → breakout confirmation
$87.4K → major upside resistance
$84.15K → short-term setup invalidation
The plan is simple:
Analyze → Wait → Confirm → Execute → Manage Risk → Review.
Don't chase the candle.
Let the market come to your level.
🐺 AltcoinWolF Closing
🚀 Trade smarter. Move faster. Stay ahead.
📊 Follow AltcoinWolF for high-conviction setups, precision entries, and market-leading crypto insights. 🐺⚡
The market rewards patience, not emotions. Wait for confirmation, protect your capital, and let the charts lead the way.
#CircleTetherFreezeBitgetHackerWallet #TrumpRejectsIranHormuzReopening #AltcoinWolF #BTC走势分析 #StrategyStriveAdd2305BitcoinThisWeek $BTC
1
124
·
--
BTC at $84.5K — The Level I'm Watching Before the Next Long 🐺
Bitcoin is consolidating after recovering from the $82.8K area.
Key levels:
🟢 Support: $84,400–$84,600
🚀 Breakout: $85,200
🎯 TP1: $85,800
🎯 TP2: $86,500
🎯 TP3: $87,300–$87,400
Invalidation for the immediate setup: ~$84,150
The 4H structure remains constructive, but 15M momentum is currently cooling.
No blind entry.
Wait for the reclaim and confirmation.
The market doesn't reward impatience.
🐺 Analyze → Plan → Execute → Review
#BTC☀ #Bitcoin #Crypto #TradingSignals #AltcoinWolF $BTC
{spot}(BTCUSDT)
BTC at $84.5K — The Level I'm Watching Before the Next Long 🐺
Bitcoin is consolidating after recovering from the $82.8K area.
Key levels:
🟢 Support: $84,400–$84,600
🚀 Breakout: $85,200
🎯 TP1: $85,800
🎯 TP2: $86,500
🎯 TP3: $87,300–$87,400
Invalidation for the immediate setup: ~$84,150
The 4H structure remains constructive, but 15M momentum is currently cooling.
No blind entry.
Wait for the reclaim and confirmation.
The market doesn't reward impatience.
🐺 Analyze → Plan → Execute → Review
#BTC☀ #Bitcoin #Crypto #TradingSignals #AltcoinWolF $BTC
Bitcoin is consolidating after recovering from the $82.8K area.
Key levels:
🟢 Support: $84,400–$84,600
🚀 Breakout: $85,200
🎯 TP1: $85,800
🎯 TP2: $86,500
🎯 TP3: $87,300–$87,400
Invalidation for the immediate setup: ~$84,150
The 4H structure remains constructive, but 15M momentum is currently cooling.
No blind entry.
Wait for the reclaim and confirmation.
The market doesn't reward impatience.
🐺 Analyze → Plan → Execute → Review
#BTC☀ #Bitcoin #Crypto #TradingSignals #AltcoinWolF $BTC
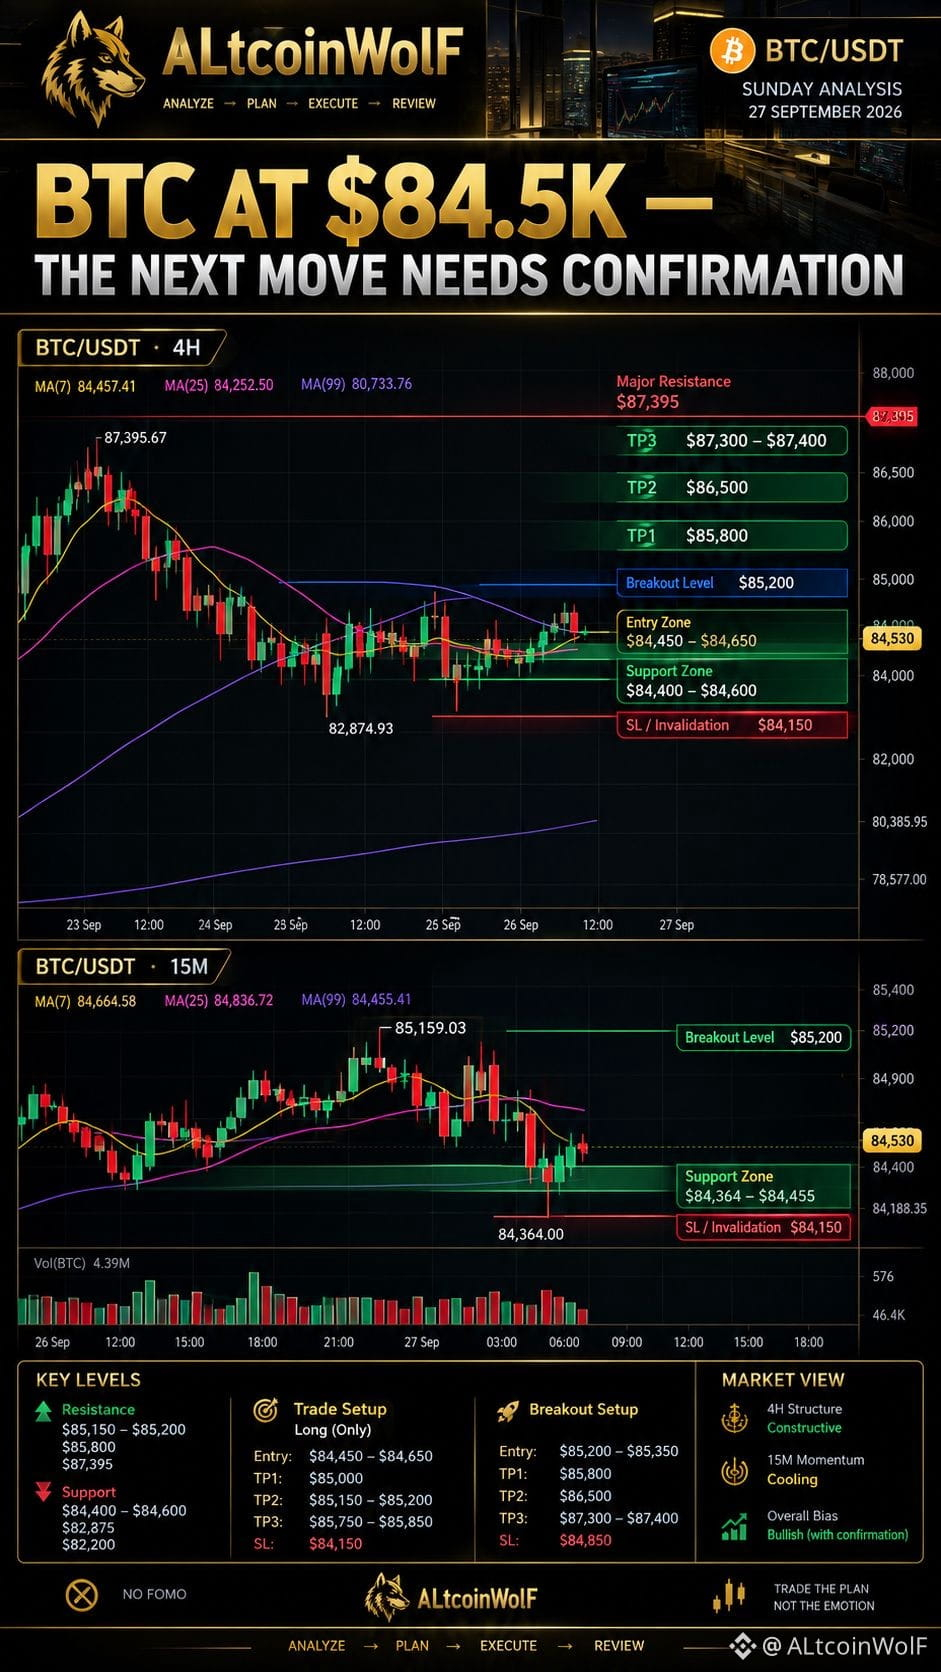
114
·
--
Article
XRP Is Holding the Line — Can Bulls Turn $1.60 Into the Next Launchpad?XRP has made the kind of move that immediately attracts attention.
After recovering from the lower $1.46–$1.47 area, XRP pushed aggressively higher and reached approximately $1.6581 on the 4-hour chart.
Now the market is doing something much more interesting than simply going up.
It is pausing.
At the time of the chart analysis, XRP/USDT is trading around $1.578, with price sitting between short-term moving averages on the 15-minute chart while remaining above the major moving averages on the 4-hour timeframe.
That creates an important weekend question:
Will XRP use this consolidation as a base for another move higher, or will resistance around $1.60–$1.65 force a deeper pullback?
For AltcoinWolF, the answer isn't about predicting the next candle.
It's about identifying the levels that tell us when the market is actually confirming its intention.
📊 XRP Market Structure: What the 4H Chart Is Telling Us
The 4-hour chart remains constructive.
XRP moved from approximately $1.3680 into a strong recovery and eventually printed a high near $1.6581.
More importantly, the current price remains above:
MA7: ~$1.5539
MA25: ~$1.5408
MA99: ~$1.4128
That is an important structural observation.
Price is not simply above one moving average.
It is positioned above all three shown on the 4H chart.
This keeps the broader short-term structure bullish while the market remains above the $1.54–$1.55 region.
But bullish structure does not mean price must immediately continue higher.
Markets often pause after a strong impulse.
And XRP is currently doing exactly that.
🔍 The 15M Chart: Where the Entry Becomes Interesting
The 15-minute chart gives us a more precise picture.
XRP is trading around $1.578, while:
MA7 ≈ $1.5807
MA25 ≈ $1.5827
MA99 ≈ $1.5467
Notice the difference.
The 15M structure is much less aggressively bullish than the 4H structure.
Price is currently hovering around the short-term MA7/MA25 area.
That means we don't need to chase the move.
Instead, we're watching whether buyers can defend the lower support area and regain short-term momentum.
The key zone:
$1.555–$1.570
This is the area I want to watch for a potential pullback-long setup.
But there's one condition:
Confirmation.
A support zone is not automatically an entry.
We want to see price interact with the zone and then demonstrate that buyers are actually stepping back in.
🎯 XRP Long Setup
Primary Pullback Setup
Entry Zone:
🟢 $1.555 – $1.570
Confirmation:
15M bullish reaction/reclaim from the zone.
TP1: $1.600
TP2: $1.630
TP3: $1.658
Invalidation / SL:
🔴 Below ~$1.535
The objective isn't to predict that XRP will reach every target.
The objective is to create a structured trade where the invalidation point is known before entering.
🚀 Breakout Setup
There is another scenario.
XRP is approaching the psychologically important $1.60 area, while the recent chart high sits around $1.6581.
A clean move above approximately $1.605–$1.610 followed by a successful retest could provide another long-entry opportunity.
Breakout sequence:
Break → Retest → Hold → Continuation
Potential upside levels:
$1.630 → $1.658
The important part is the retest.
A sudden candle above resistance is not enough for me to call it a confirmed breakout.
🧠 Why I'm Not Chasing XRP at $1.578
This is probably the most important lesson from today's setup.
XRP has already experienced a significant move.
The 4H chart shows a move from roughly $1.47 to above $1.65.
After a strong impulse, traders often make one of two mistakes:
Mistake #1: FOMO
Price moves quickly.
Trader enters late.
Price pulls back.
Trader panics.
Mistake #2: Blind breakout
Price crosses resistance for a few minutes.
Trader assumes continuation is guaranteed.
The breakout fails.
The better approach is simple:
Let the market prove the setup.
🛡️ Risk Management Comes First
A good setup is not simply:
Entry + Targets
It is:
Entry + Invalidation + Position Size + Confirmation
If XRP loses the $1.535 area with convincing downside momentum, the bullish setup described here loses its technical basis.
That doesn't mean XRP must collapse.
It simply means this particular long thesis is no longer valid.
And that distinction matters.
You don't need to be right about the market.
You need to know when your idea is wrong.
📈 Weekend Scenario Map
🟢 Scenario 1 — Bullish Continuation
XRP holds $1.555–$1.570.
15M structure turns bullish.
Price reclaims $1.60.
Potential path:
$1.60 → $1.63 → $1.658
🟡 Scenario 2 — Deeper Pullback
XRP loses the immediate support zone.
Price moves toward the lower $1.54–$1.55 region.
Rather than entering immediately, traders can wait for a new bullish reaction.
🔴 Scenario 3 — Setup Invalidated
A decisive move below approximately $1.535 weakens the long thesis from this setup.
The correct response isn't to average down emotionally.
It's to reassess the structure.
🐺 AltcoinWolF Market Scorecard
Factor
Reading
4H Structure
🟢 Bullish
15M Momentum
🟡 Consolidating
Major Support
🟢 $1.54–$1.57
Resistance
🔴 $1.60–$1.658
Pullback Opportunity
🟢 Yes, with confirmation
Breakout Opportunity
🟢 Above $1.605–$1.610 + retest
FOMO Entry
🔴 Avoid
Risk/Reward Focus
🟢 Required
🏁 Final Call
XRP's chart currently presents an interesting bullish continuation setup, but the market is sitting close enough to resistance that patience matters.
The 4H structure remains constructive.
The 15M chart is consolidating.
And the $1.555–$1.570 area is the key zone I'm watching for a potential long reaction.
Above $1.60–$1.61, confirmation becomes increasingly important because XRP is approaching the recent $1.6581 high.
So the plan is simple:
Don't chase.
Wait for confirmation.
Protect the invalidation.
Let XRP show the next move.
The market rewards patience, not emotions.
Wait for confirmation, protect your capital, and let the charts lead the way.
— AltcoinWolF 🐺⚡
🚀 Trade smarter. Move faster. Stay ahead.
📊 Follow AltcoinWolF for high-conviction setups, precision entries, and market-leading crypto insights.
Educational market analysis only. Crypto markets are volatile. Always manage risk and make decisions based on your own analysis.
#QNTRises39% #Xrp🔥🔥 #BinanceWillListHyperliquid(HYPE) #AltcoinWolF #BTC走势分析 $XRP
{spot}(XRPUSDT)
XRP Is Holding the Line — Can Bulls Turn $1.60 Into the Next Launchpad?
XRP has made the kind of move that immediately attracts attention.
After recovering from the lower $1.46–$1.47 area, XRP pushed aggressively higher and reached approximately $1.6581 on the 4-hour chart.
Now the market is doing something much more interesting than simply going up.
It is pausing.
At the time of the chart analysis, XRP/USDT is trading around $1.578, with price sitting between short-term moving averages on the 15-minute chart while remaining above the major moving averages on the 4-hour timeframe.
That creates an important weekend question:
Will XRP use this consolidation as a base for another move higher, or will resistance around $1.60–$1.65 force a deeper pullback?
For AltcoinWolF, the answer isn't about predicting the next candle.
It's about identifying the levels that tell us when the market is actually confirming its intention.
📊 XRP Market Structure: What the 4H Chart Is Telling Us
The 4-hour chart remains constructive.
XRP moved from approximately $1.3680 into a strong recovery and eventually printed a high near $1.6581.
More importantly, the current price remains above:
MA7: ~$1.5539
MA25: ~$1.5408
MA99: ~$1.4128
That is an important structural observation.
Price is not simply above one moving average.
It is positioned above all three shown on the 4H chart.
This keeps the broader short-term structure bullish while the market remains above the $1.54–$1.55 region.
But bullish structure does not mean price must immediately continue higher.
Markets often pause after a strong impulse.
And XRP is currently doing exactly that.
🔍 The 15M Chart: Where the Entry Becomes Interesting
The 15-minute chart gives us a more precise picture.
XRP is trading around $1.578, while:
MA7 ≈ $1.5807
MA25 ≈ $1.5827
MA99 ≈ $1.5467
Notice the difference.
The 15M structure is much less aggressively bullish than the 4H structure.
Price is currently hovering around the short-term MA7/MA25 area.
That means we don't need to chase the move.
Instead, we're watching whether buyers can defend the lower support area and regain short-term momentum.
The key zone:
$1.555–$1.570
This is the area I want to watch for a potential pullback-long setup.
But there's one condition:
Confirmation.
A support zone is not automatically an entry.
We want to see price interact with the zone and then demonstrate that buyers are actually stepping back in.
🎯 XRP Long Setup
Primary Pullback Setup
Entry Zone:
🟢 $1.555 – $1.570
Confirmation:
15M bullish reaction/reclaim from the zone.
TP1: $1.600
TP2: $1.630
TP3: $1.658
Invalidation / SL:
🔴 Below ~$1.535
The objective isn't to predict that XRP will reach every target.
The objective is to create a structured trade where the invalidation point is known before entering.
🚀 Breakout Setup
There is another scenario.
XRP is approaching the psychologically important $1.60 area, while the recent chart high sits around $1.6581.
A clean move above approximately $1.605–$1.610 followed by a successful retest could provide another long-entry opportunity.
Breakout sequence:
Break → Retest → Hold → Continuation
Potential upside levels:
$1.630 → $1.658
The important part is the retest.
A sudden candle above resistance is not enough for me to call it a confirmed breakout.
🧠 Why I'm Not Chasing XRP at $1.578
This is probably the most important lesson from today's setup.
XRP has already experienced a significant move.
The 4H chart shows a move from roughly $1.47 to above $1.65.
After a strong impulse, traders often make one of two mistakes:
Mistake #1: FOMO
Price moves quickly.
Trader enters late.
Price pulls back.
Trader panics.
Mistake #2: Blind breakout
Price crosses resistance for a few minutes.
Trader assumes continuation is guaranteed.
The breakout fails.
The better approach is simple:
Let the market prove the setup.
🛡️ Risk Management Comes First
A good setup is not simply:
Entry + Targets
It is:
Entry + Invalidation + Position Size + Confirmation
If XRP loses the $1.535 area with convincing downside momentum, the bullish setup described here loses its technical basis.
That doesn't mean XRP must collapse.
It simply means this particular long thesis is no longer valid.
And that distinction matters.
You don't need to be right about the market.
You need to know when your idea is wrong.
📈 Weekend Scenario Map
🟢 Scenario 1 — Bullish Continuation
XRP holds $1.555–$1.570.
15M structure turns bullish.
Price reclaims $1.60.
Potential path:
$1.60 → $1.63 → $1.658
🟡 Scenario 2 — Deeper Pullback
XRP loses the immediate support zone.
Price moves toward the lower $1.54–$1.55 region.
Rather than entering immediately, traders can wait for a new bullish reaction.
🔴 Scenario 3 — Setup Invalidated
A decisive move below approximately $1.535 weakens the long thesis from this setup.
The correct response isn't to average down emotionally.
It's to reassess the structure.
🐺 AltcoinWolF Market Scorecard
Factor
Reading
4H Structure
🟢 Bullish
15M Momentum
🟡 Consolidating
Major Support
🟢 $1.54–$1.57
Resistance
🔴 $1.60–$1.658
Pullback Opportunity
🟢 Yes, with confirmation
Breakout Opportunity
🟢 Above $1.605–$1.610 + retest
FOMO Entry
🔴 Avoid
Risk/Reward Focus
🟢 Required
🏁 Final Call
XRP's chart currently presents an interesting bullish continuation setup, but the market is sitting close enough to resistance that patience matters.
The 4H structure remains constructive.
The 15M chart is consolidating.
And the $1.555–$1.570 area is the key zone I'm watching for a potential long reaction.
Above $1.60–$1.61, confirmation becomes increasingly important because XRP is approaching the recent $1.6581 high.
So the plan is simple:
Don't chase.
Wait for confirmation.
Protect the invalidation.
Let XRP show the next move.
The market rewards patience, not emotions.
Wait for confirmation, protect your capital, and let the charts lead the way.
— AltcoinWolF 🐺⚡
🚀 Trade smarter. Move faster. Stay ahead.
📊 Follow AltcoinWolF for high-conviction setups, precision entries, and market-leading crypto insights.
Educational market analysis only. Crypto markets are volatile. Always manage risk and make decisions based on your own analysis.
#QNTRises39% #Xrp🔥🔥 #BinanceWillListHyperliquid(HYPE) #AltcoinWolF #BTC走势分析 $XRP
After recovering from the lower $1.46–$1.47 area, XRP pushed aggressively higher and reached approximately $1.6581 on the 4-hour chart.
Now the market is doing something much more interesting than simply going up.
It is pausing.
At the time of the chart analysis, XRP/USDT is trading around $1.578, with price sitting between short-term moving averages on the 15-minute chart while remaining above the major moving averages on the 4-hour timeframe.
That creates an important weekend question:
Will XRP use this consolidation as a base for another move higher, or will resistance around $1.60–$1.65 force a deeper pullback?
For AltcoinWolF, the answer isn't about predicting the next candle.
It's about identifying the levels that tell us when the market is actually confirming its intention.
📊 XRP Market Structure: What the 4H Chart Is Telling Us
The 4-hour chart remains constructive.
XRP moved from approximately $1.3680 into a strong recovery and eventually printed a high near $1.6581.
More importantly, the current price remains above:
MA7: ~$1.5539
MA25: ~$1.5408
MA99: ~$1.4128
That is an important structural observation.
Price is not simply above one moving average.
It is positioned above all three shown on the 4H chart.
This keeps the broader short-term structure bullish while the market remains above the $1.54–$1.55 region.
But bullish structure does not mean price must immediately continue higher.
Markets often pause after a strong impulse.
And XRP is currently doing exactly that.
🔍 The 15M Chart: Where the Entry Becomes Interesting
The 15-minute chart gives us a more precise picture.
XRP is trading around $1.578, while:
MA7 ≈ $1.5807
MA25 ≈ $1.5827
MA99 ≈ $1.5467
Notice the difference.
The 15M structure is much less aggressively bullish than the 4H structure.
Price is currently hovering around the short-term MA7/MA25 area.
That means we don't need to chase the move.
Instead, we're watching whether buyers can defend the lower support area and regain short-term momentum.
The key zone:
$1.555–$1.570
This is the area I want to watch for a potential pullback-long setup.
But there's one condition:
Confirmation.
A support zone is not automatically an entry.
We want to see price interact with the zone and then demonstrate that buyers are actually stepping back in.
🎯 XRP Long Setup
Primary Pullback Setup
Entry Zone:
🟢 $1.555 – $1.570
Confirmation:
15M bullish reaction/reclaim from the zone.
TP1: $1.600
TP2: $1.630
TP3: $1.658
Invalidation / SL:
🔴 Below ~$1.535
The objective isn't to predict that XRP will reach every target.
The objective is to create a structured trade where the invalidation point is known before entering.
🚀 Breakout Setup
There is another scenario.
XRP is approaching the psychologically important $1.60 area, while the recent chart high sits around $1.6581.
A clean move above approximately $1.605–$1.610 followed by a successful retest could provide another long-entry opportunity.
Breakout sequence:
Break → Retest → Hold → Continuation
Potential upside levels:
$1.630 → $1.658
The important part is the retest.
A sudden candle above resistance is not enough for me to call it a confirmed breakout.
🧠 Why I'm Not Chasing XRP at $1.578
This is probably the most important lesson from today's setup.
XRP has already experienced a significant move.
The 4H chart shows a move from roughly $1.47 to above $1.65.
After a strong impulse, traders often make one of two mistakes:
Mistake #1: FOMO
Price moves quickly.
Trader enters late.
Price pulls back.
Trader panics.
Mistake #2: Blind breakout
Price crosses resistance for a few minutes.
Trader assumes continuation is guaranteed.
The breakout fails.
The better approach is simple:
Let the market prove the setup.
🛡️ Risk Management Comes First
A good setup is not simply:
Entry + Targets
It is:
Entry + Invalidation + Position Size + Confirmation
If XRP loses the $1.535 area with convincing downside momentum, the bullish setup described here loses its technical basis.
That doesn't mean XRP must collapse.
It simply means this particular long thesis is no longer valid.
And that distinction matters.
You don't need to be right about the market.
You need to know when your idea is wrong.
📈 Weekend Scenario Map
🟢 Scenario 1 — Bullish Continuation
XRP holds $1.555–$1.570.
15M structure turns bullish.
Price reclaims $1.60.
Potential path:
$1.60 → $1.63 → $1.658
🟡 Scenario 2 — Deeper Pullback
XRP loses the immediate support zone.
Price moves toward the lower $1.54–$1.55 region.
Rather than entering immediately, traders can wait for a new bullish reaction.
🔴 Scenario 3 — Setup Invalidated
A decisive move below approximately $1.535 weakens the long thesis from this setup.
The correct response isn't to average down emotionally.
It's to reassess the structure.
🐺 AltcoinWolF Market Scorecard
Factor
Reading
4H Structure
🟢 Bullish
15M Momentum
🟡 Consolidating
Major Support
🟢 $1.54–$1.57
Resistance
🔴 $1.60–$1.658
Pullback Opportunity
🟢 Yes, with confirmation
Breakout Opportunity
🟢 Above $1.605–$1.610 + retest
FOMO Entry
🔴 Avoid
Risk/Reward Focus
🟢 Required
🏁 Final Call
XRP's chart currently presents an interesting bullish continuation setup, but the market is sitting close enough to resistance that patience matters.
The 4H structure remains constructive.
The 15M chart is consolidating.
And the $1.555–$1.570 area is the key zone I'm watching for a potential long reaction.
Above $1.60–$1.61, confirmation becomes increasingly important because XRP is approaching the recent $1.6581 high.
So the plan is simple:
Don't chase.
Wait for confirmation.
Protect the invalidation.
Let XRP show the next move.
The market rewards patience, not emotions.
Wait for confirmation, protect your capital, and let the charts lead the way.
— AltcoinWolF 🐺⚡
🚀 Trade smarter. Move faster. Stay ahead.
📊 Follow AltcoinWolF for high-conviction setups, precision entries, and market-leading crypto insights.
Educational market analysis only. Crypto markets are volatile. Always manage risk and make decisions based on your own analysis.
#QNTRises39% #Xrp🔥🔥 #BinanceWillListHyperliquid(HYPE) #AltcoinWolF #BTC走势分析 $XRP
105
·
--
🐺 XRP/USDT Weekend Setup — Bulls vs $1.60
XRP is consolidating around $1.578 after a strong 4H recovery.
📊 Key Levels
🟢 Pullback zone: $1.555–$1.570
🎯 TP1: $1.600
🎯 TP2: $1.630
🎯 TP3: $1.658
🔴 Invalidation: below ~$1.535
🚀 Breakout Plan
If XRP breaks $1.605–$1.610 and successfully retests the zone as support, continuation toward $1.630–$1.658 becomes the setup to monitor.
But I'm not chasing.
Wait → Confirm → Enter → Manage Risk
The strongest trade is sometimes the trade you wait for.
🐺 AltcoinWolF
#Xrp🔥🔥 #XRPUSDT #CryptoTradingTip #TechnicalAnalysiss #Binance
$XRP
{spot}(XRPUSDT)
🐺 XRP/USDT Weekend Setup — Bulls vs $1.60
XRP is consolidating around $1.578 after a strong 4H recovery.
📊 Key Levels
🟢 Pullback zone: $1.555–$1.570
🎯 TP1: $1.600
🎯 TP2: $1.630
🎯 TP3: $1.658
🔴 Invalidation: below ~$1.535
🚀 Breakout Plan
If XRP breaks $1.605–$1.610 and successfully retests the zone as support, continuation toward $1.630–$1.658 becomes the setup to monitor.
But I'm not chasing.
Wait → Confirm → Enter → Manage Risk
The strongest trade is sometimes the trade you wait for.
🐺 AltcoinWolF
#Xrp🔥🔥 #XRPUSDT #CryptoTradingTip #TechnicalAnalysiss #Binance
$XRP
XRP is consolidating around $1.578 after a strong 4H recovery.
📊 Key Levels
🟢 Pullback zone: $1.555–$1.570
🎯 TP1: $1.600
🎯 TP2: $1.630
🎯 TP3: $1.658
🔴 Invalidation: below ~$1.535
🚀 Breakout Plan
If XRP breaks $1.605–$1.610 and successfully retests the zone as support, continuation toward $1.630–$1.658 becomes the setup to monitor.
But I'm not chasing.
Wait → Confirm → Enter → Manage Risk
The strongest trade is sometimes the trade you wait for.
🐺 AltcoinWolF
#Xrp🔥🔥 #XRPUSDT #CryptoTradingTip #TechnicalAnalysiss #Binance
$XRP
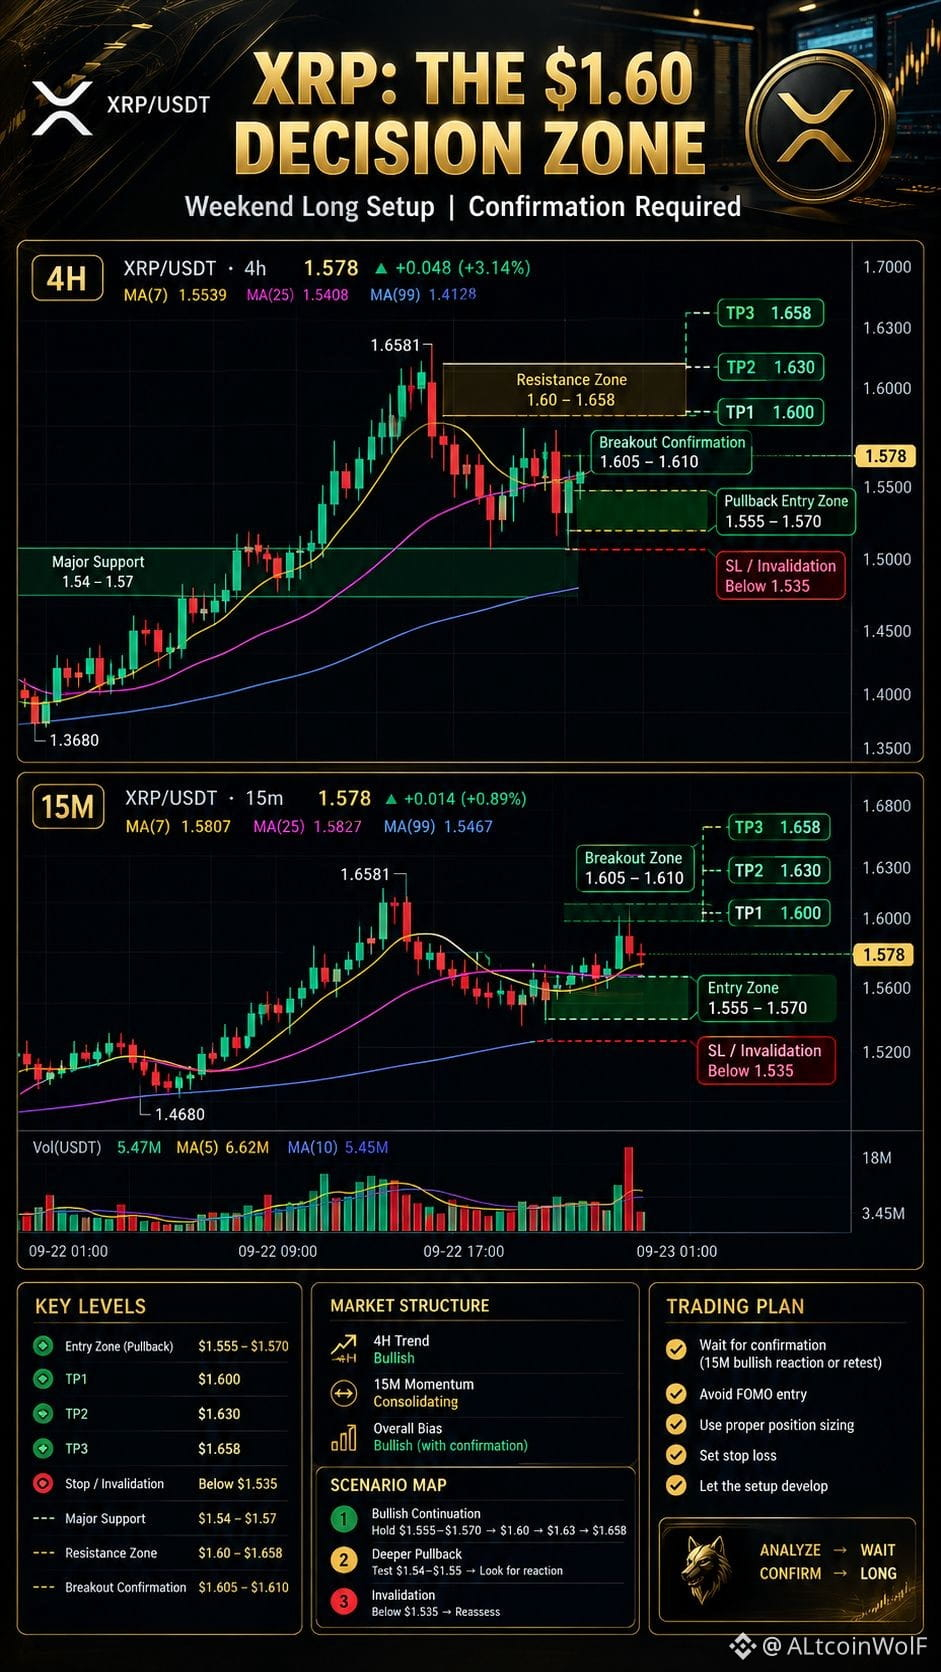
128
·
--
Article
ETH/USDT — ETH Is at the Decision Zone: Bullish Recovery or Another Rejection?📊 Chart Analysis
4H structure
Current price: ~$2,672
Recent high: $2,807.34
Reaction low: $2,600.15
MA7: $2,672.92
MA25: $2,706.05
MA99: $2,552.17
ETH has recovered from $2,600, but it is still below the 4H MA25 around $2,706. So the market is currently between support and resistance, not in a confirmed breakout.
15M structure
MA7: $2,672.32
MA25: $2,655.73
MA99: $2,671.79
The short-term recovery is constructive, but the $2,685–$2,706 area remains the key test.
🎯 Premium Long Setup
Long watch zone: $2,650–$2,670
Confirmation: 15M close above $2,685 + successful retest
TP1: $2,715
TP2: $2,775
TP3: $2,805–$2,825
SL: $2,585
Structural invalidation: sustained weakness below $2,550–$2,560.
Bullish sequence
$2,650–$2,670 hold → $2,685 reclaim → $2,706 break → $2,715 → $2,775 → $2,805–$2,825
No confirmation = no trade.
🧠 Premium Education Post
Ethereum's recent move is a good reminder that a strong recovery does not automatically mean a breakout.
ETH pushed to $2,807.34, rejected, and eventually swept down toward $2,600.15. Buyers then stepped back in, bringing price toward $2,672.
Now the market is approaching a much more important question:
Can ETH reclaim $2,685–$2,706 and turn that resistance into support?
That's the level I'm watching.
A clean reclaim followed by a retest would strengthen the bullish continuation case. If ETH repeatedly fails there, patience becomes more valuable than prediction.
This is why I don't want to chase ETH simply because the chart is recovering.
Analyze → Plan → Execute → Review.
📈 Scenario Analysis
🟢 Bullish
ETH holds $2,650–$2,670 → reclaims $2,685 → breaks $2,706 → targets $2,715, $2,775 and potentially $2,805–$2,825.
🟡 Range
ETH remains between roughly $2,600 and $2,706.
No clean breakout means no reason to force an entry.
🔴 Weakness
ETH loses $2,600 and fails to recover.
A sustained move toward $2,550–$2,560 would materially weaken the current long thesis.
📊 AltcoinWolF Market Scorecard
Factor
Reading
Trend
🟢 Bullish recovery
Short-term momentum
🟡 Recovering
4H structure
🟢 Above MA99
Immediate resistance
🔴 $2,685–$2,706
Major resistance
🔴 $2,775
Support
🟢 $2,600–$2,650
Bias
🟢 Long only
Confirmation
15M reclaim + retest
Risk
🟡 Elevated
🏁 Final Call
ETH is not a blind buy at $2,672.
The opportunity is conditional:
Hold support → reclaim resistance → confirm → enter.
If ETH cannot reclaim $2,685–$2,706, patience wins.
The market rewards patience, not emotions. Wait for confirmation, protect your capital, and let the charts lead the way.
— AltcoinWolF 🐺⚡
ETH/USDT — ETH Is at the Decision Zone: Bullish Recovery or Another Rejection?
📊 Chart Analysis
4H structure
Current price: ~$2,672
Recent high: $2,807.34
Reaction low: $2,600.15
MA7: $2,672.92
MA25: $2,706.05
MA99: $2,552.17
ETH has recovered from $2,600, but it is still below the 4H MA25 around $2,706. So the market is currently between support and resistance, not in a confirmed breakout.
15M structure
MA7: $2,672.32
MA25: $2,655.73
MA99: $2,671.79
The short-term recovery is constructive, but the $2,685–$2,706 area remains the key test.
🎯 Premium Long Setup
Long watch zone: $2,650–$2,670
Confirmation: 15M close above $2,685 + successful retest
TP1: $2,715
TP2: $2,775
TP3: $2,805–$2,825
SL: $2,585
Structural invalidation: sustained weakness below $2,550–$2,560.
Bullish sequence
$2,650–$2,670 hold → $2,685 reclaim → $2,706 break → $2,715 → $2,775 → $2,805–$2,825
No confirmation = no trade.
🧠 Premium Education Post
Ethereum's recent move is a good reminder that a strong recovery does not automatically mean a breakout.
ETH pushed to $2,807.34, rejected, and eventually swept down toward $2,600.15. Buyers then stepped back in, bringing price toward $2,672.
Now the market is approaching a much more important question:
Can ETH reclaim $2,685–$2,706 and turn that resistance into support?
That's the level I'm watching.
A clean reclaim followed by a retest would strengthen the bullish continuation case. If ETH repeatedly fails there, patience becomes more valuable than prediction.
This is why I don't want to chase ETH simply because the chart is recovering.
Analyze → Plan → Execute → Review.
📈 Scenario Analysis
🟢 Bullish
ETH holds $2,650–$2,670 → reclaims $2,685 → breaks $2,706 → targets $2,715, $2,775 and potentially $2,805–$2,825.
🟡 Range
ETH remains between roughly $2,600 and $2,706.
No clean breakout means no reason to force an entry.
🔴 Weakness
ETH loses $2,600 and fails to recover.
A sustained move toward $2,550–$2,560 would materially weaken the current long thesis.
📊 AltcoinWolF Market Scorecard
Factor
Reading
Trend
🟢 Bullish recovery
Short-term momentum
🟡 Recovering
4H structure
🟢 Above MA99
Immediate resistance
🔴 $2,685–$2,706
Major resistance
🔴 $2,775
Support
🟢 $2,600–$2,650
Bias
🟢 Long only
Confirmation
15M reclaim + retest
Risk
🟡 Elevated
🏁 Final Call
ETH is not a blind buy at $2,672.
The opportunity is conditional:
Hold support → reclaim resistance → confirm → enter.
If ETH cannot reclaim $2,685–$2,706, patience wins.
The market rewards patience, not emotions. Wait for confirmation, protect your capital, and let the charts lead the way.
— AltcoinWolF 🐺⚡
4H structure
Current price: ~$2,672
Recent high: $2,807.34
Reaction low: $2,600.15
MA7: $2,672.92
MA25: $2,706.05
MA99: $2,552.17
ETH has recovered from $2,600, but it is still below the 4H MA25 around $2,706. So the market is currently between support and resistance, not in a confirmed breakout.
15M structure
MA7: $2,672.32
MA25: $2,655.73
MA99: $2,671.79
The short-term recovery is constructive, but the $2,685–$2,706 area remains the key test.
🎯 Premium Long Setup
Long watch zone: $2,650–$2,670
Confirmation: 15M close above $2,685 + successful retest
TP1: $2,715
TP2: $2,775
TP3: $2,805–$2,825
SL: $2,585
Structural invalidation: sustained weakness below $2,550–$2,560.
Bullish sequence
$2,650–$2,670 hold → $2,685 reclaim → $2,706 break → $2,715 → $2,775 → $2,805–$2,825
No confirmation = no trade.
🧠 Premium Education Post
Ethereum's recent move is a good reminder that a strong recovery does not automatically mean a breakout.
ETH pushed to $2,807.34, rejected, and eventually swept down toward $2,600.15. Buyers then stepped back in, bringing price toward $2,672.
Now the market is approaching a much more important question:
Can ETH reclaim $2,685–$2,706 and turn that resistance into support?
That's the level I'm watching.
A clean reclaim followed by a retest would strengthen the bullish continuation case. If ETH repeatedly fails there, patience becomes more valuable than prediction.
This is why I don't want to chase ETH simply because the chart is recovering.
Analyze → Plan → Execute → Review.
📈 Scenario Analysis
🟢 Bullish
ETH holds $2,650–$2,670 → reclaims $2,685 → breaks $2,706 → targets $2,715, $2,775 and potentially $2,805–$2,825.
🟡 Range
ETH remains between roughly $2,600 and $2,706.
No clean breakout means no reason to force an entry.
🔴 Weakness
ETH loses $2,600 and fails to recover.
A sustained move toward $2,550–$2,560 would materially weaken the current long thesis.
📊 AltcoinWolF Market Scorecard
Factor
Reading
Trend
🟢 Bullish recovery
Short-term momentum
🟡 Recovering
4H structure
🟢 Above MA99
Immediate resistance
🔴 $2,685–$2,706
Major resistance
🔴 $2,775
Support
🟢 $2,600–$2,650
Bias
🟢 Long only
Confirmation
15M reclaim + retest
Risk
🟡 Elevated
🏁 Final Call
ETH is not a blind buy at $2,672.
The opportunity is conditional:
Hold support → reclaim resistance → confirm → enter.
If ETH cannot reclaim $2,685–$2,706, patience wins.
The market rewards patience, not emotions. Wait for confirmation, protect your capital, and let the charts lead the way.
— AltcoinWolF 🐺⚡
3
641
·
--
ETH/USDT: The $2,700 Battle Is Back 🐺
ETH recovered from $2,600.15 and is now around $2,672.
The key zone:
🔥 $2,685–$2,706
Above it with confirmation:
🎯 $2,715
🎯 $2,775
🎯 $2,805–$2,825
Support:
🟢 $2,650–$2,670
🟢 $2,600
Structural invalidation:
🔴 $2,550–$2,560
Long only with confirmation. No breakout = no chase.
#BinanceWillListHyperliquid(HYPE) #USWeighsPromotingDollarStablecoinsAbroad #US10YTreasuryYieldHits19YearHigh #AltcoinWolF #Ethereum $ETH
{spot}(ETHUSDT)
ETH/USDT: The $2,700 Battle Is Back 🐺
ETH recovered from $2,600.15 and is now around $2,672.
The key zone:
🔥 $2,685–$2,706
Above it with confirmation:
🎯 $2,715
🎯 $2,775
🎯 $2,805–$2,825
Support:
🟢 $2,650–$2,670
🟢 $2,600
Structural invalidation:
🔴 $2,550–$2,560
Long only with confirmation. No breakout = no chase.
#BinanceWillListHyperliquid(HYPE) #USWeighsPromotingDollarStablecoinsAbroad #US10YTreasuryYieldHits19YearHigh #AltcoinWolF #Ethereum $ETH
ETH recovered from $2,600.15 and is now around $2,672.
The key zone:
🔥 $2,685–$2,706
Above it with confirmation:
🎯 $2,715
🎯 $2,775
🎯 $2,805–$2,825
Support:
🟢 $2,650–$2,670
🟢 $2,600
Structural invalidation:
🔴 $2,550–$2,560
Long only with confirmation. No breakout = no chase.
#BinanceWillListHyperliquid(HYPE) #USWeighsPromotingDollarStablecoinsAbroad #US10YTreasuryYieldHits19YearHigh #AltcoinWolF #Ethereum $ETH
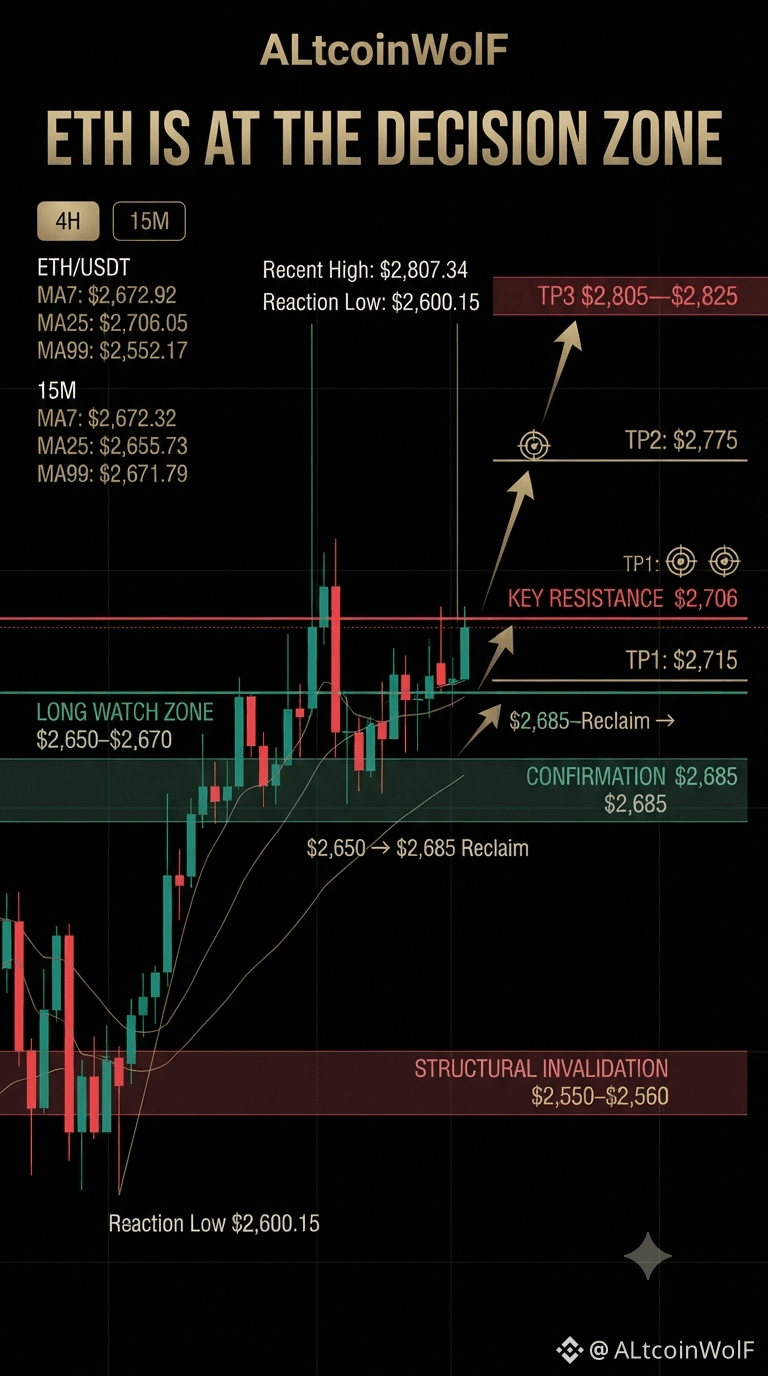
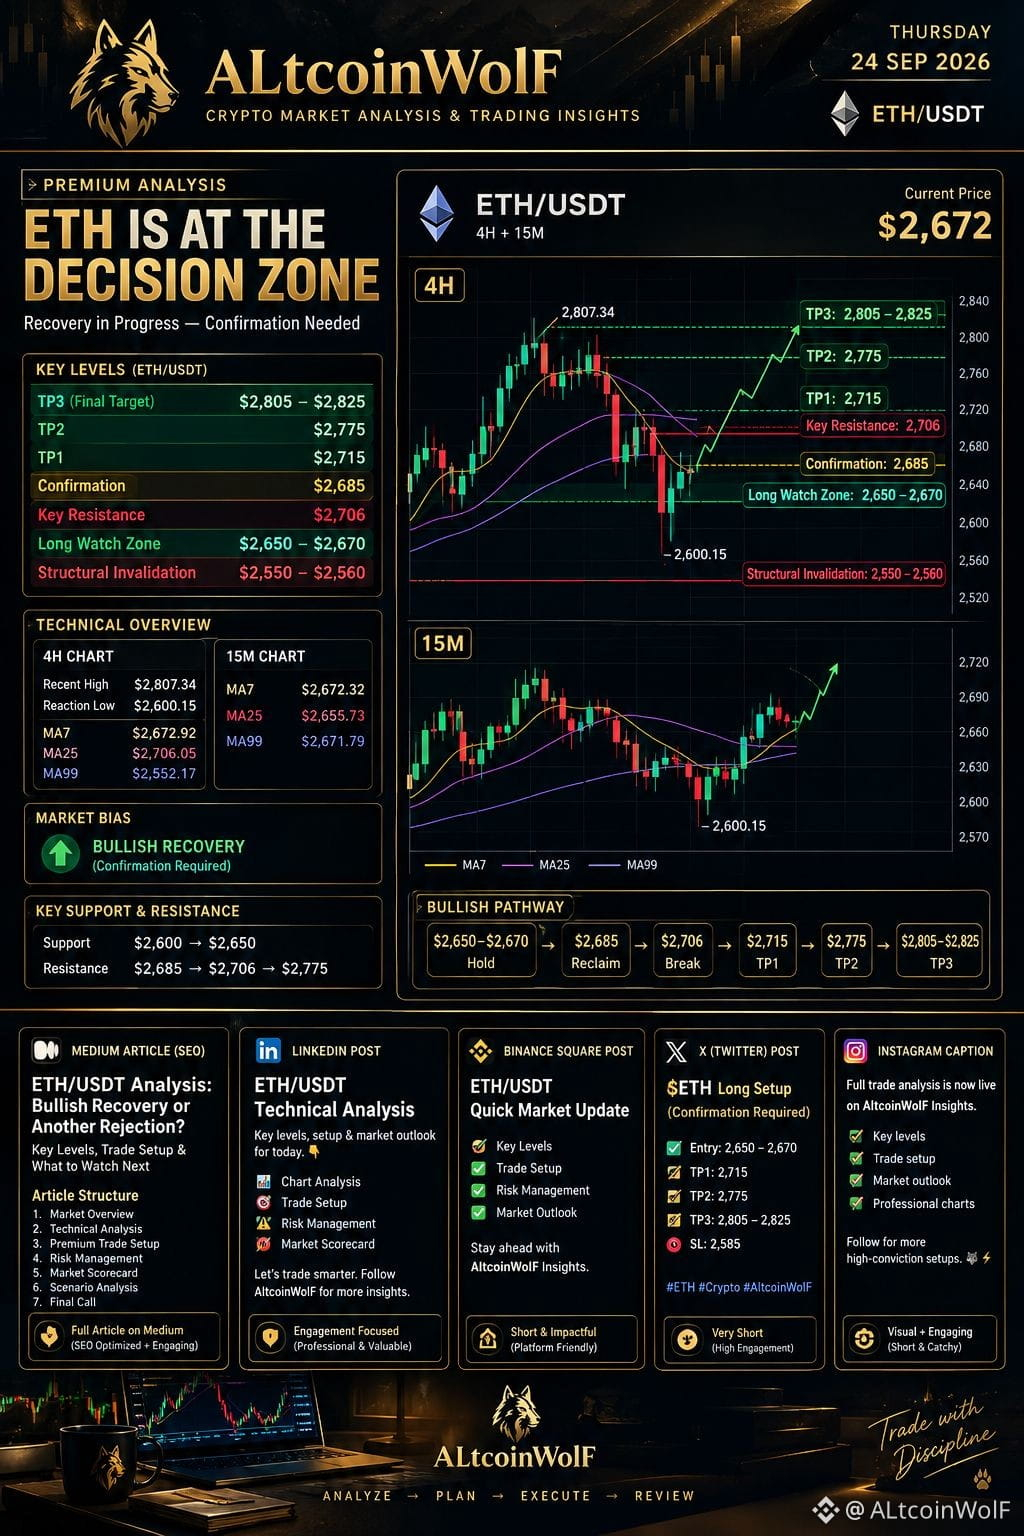
1
570
·
--
Article
SOL Just Got Hit With a Sharp Dump — Is $113 the Reversal Zone?Solana has been showing strong momentum recently, but today's 15-minute chart tells a different short-term story.
SOL dropped sharply from the $116–$117 area toward $113, producing a clear volume spike before buyers stepped in and pushed price back toward $115.
Now comes the important part.
Is this simply a temporary relief bounce?
Or is SOL building the foundation for another move higher?
For AltcoinWolF, the answer isn't about predicting the next candle.
It's about waiting for price to prove the setup.
🐺 Premium Education Post: Don't Confuse a Bounce With a Reversal.
One of the most common mistakes traders make after a sharp crypto sell-off is assuming that the first green candles automatically mean a trend reversal.
They don't.
A sharp drop followed by a bounce can represent:
Short-term profit taking
Liquidity sweeping
Oversold reaction
Short covering
Genuine accumulation
Or simply a temporary relief rally
The difference becomes visible through structure and confirmation.
That's exactly what we're watching on SOL.
📊 SOL/USDT Technical Market Analysis
1. The 15-Minute Structure
SOL was trading around $114.92 on the supplied chart after falling to an intraday low of $113.00.
The important sequence was:
$116+ → sharp breakdown → $113 sweep → aggressive bounce → rejection around $115.45 → $114.92
That sequence gives us two very important areas:
Support
$113.00–$114.40
Resistance
$115.45–$116.40
The $113 level is particularly important because it produced an immediate reaction.
But a reaction is not yet a confirmed reversal.
📈 Moving Average Structure
The 15M chart currently shows:
MA7: $114.78
MA25: $116.41
MA99: $117.83
Price has recovered back around the MA7, but remains below the MA25 and MA99.
That means the short-term recovery is still facing overhead resistance.
For the bulls, reclaiming $116.40 would be much more meaningful than simply moving from $114.90 to $115.20.
Why?
Because $116.40 is approximately where the MA25 sits, while the $117.80 area represents the MA99 and a stronger resistance region.
📊 Volume Tells an Important Story
The biggest volume expansion happened during the sharp sell-off toward $113.
That's important.
When price falls aggressively while volume expands, it tells us that the move attracted significant participation.
But the subsequent bounce also produced meaningful buying volume.
So instead of asking:
"Did SOL bounce?"
The better question is:
"Can buyers continue defending the bounce?"
That's what the next few candles need to answer.
🎯 AltcoinWolF Premium Trade Setup
🟢 LONG SETUP — Confirmation Based
Setup A: Support Reaction
Potential Entry Zone:
$114.10 – $114.40
But this is not a blind buy zone.
A long becomes more interesting only if SOL shows:
Bullish rejection from the zone
Higher low on the 15M chart
Strong green confirmation candle
Improving volume
Price reclaiming $114.80–$115.00
Targets
TP1: $115.45
TP2: $116.40
TP3: $117.00–$117.80
Invalidation
Below $113.75
The key structural invalidation is the loss of the $113.00 low.
🚀 Setup B: Breakout Confirmation
For traders who don't want to catch a falling knife, there is another approach.
Entry Trigger:
$115.50–$115.75
Only after SOL:
Breaks above $115.45
Closes a 15M candle above the level
Holds the breakout on a retest
Shows supportive buying volume
Then the upside levels become:
TP1: $116.40
TP2: $117.00
TP3: $117.80–$118.20
This setup sacrifices some entry price for additional confirmation.
❌ When NOT to Take the Long
This is just as important as the entry.
Avoid the setup if:
SOL remains trapped below $115.45
The bounce happens on weak volume
Price repeatedly rejects $115.45
$114 support breaks with strong selling volume
$113.00 breaks decisively
If $113 fails, the current long thesis is no longer valid.
No trade is also a trade decision.
🧠 Why This Setup Matters
The bigger Solana picture has recently been constructive, with broader market analysis identifying the $114 area as an important support level and $119–$120 as significant resistance. �
CoinMarketCap
But short-term traders need to respect the chart in front of them.
That's why today's AltcoinWolF approach is not:
"SOL is bullish, so buy."
It's:
"SOL has reacted from $113. Now let the market prove whether buyers can reclaim resistance."
That's the difference between prediction and process.
🐺 AltcoinWolF Market Scorecard
Factor
Reading
15M Structure
🔴 Bearish/Recovery
MA7
🟢 Reclaimed
MA25
🔴 Resistance
MA99
🔴 Resistance
Volume
⚠️ Elevated
$113 Support
🟢 Important
$115.45 Resistance
🔴 Key
Long Setup
🟡 Confirmation Required
Risk/Reward
🟡 Depends on Entry
Overall Intraday Bias
🟡 Neutral → Bullish Above Confirmation
AltcoinWolF Market Score: 5.5/10
Not a blind bullish call.
The setup improves significantly if SOL reclaims $115.45 and holds.
🔮 Scenario Analysis
🟢 Bullish Scenario
SOL holds above the $114.10–$114.40 reaction area.
Then:
$115.45 → $116.40 → $117.00 → $117.80+
A sustained reclaim of $116.40 would strengthen the short-term recovery structure.
🟡 Neutral Scenario
SOL continues moving between:
$114 – $115.45
This would indicate consolidation after the dump.
In this situation, patience is preferable to forcing an entry.
🔴 Bearish Scenario
SOL loses $114, followed by a decisive break of $113.00.
That would invalidate the current support-based long thesis and indicate that sellers remain in control of the short-term structure.
🎯 The Levels That Matter Most
$113.00
The critical intraday low.
$114.10–$114.40
Potential reaction zone.
$115.45
First major confirmation level.
$116.40
MA25 + important reclaim zone.
$117.00
Next upside target.
$117.80–$118.20
Major resistance/MA99 area.
🏁 Final Call
SOL has already shown that buyers are willing to defend the $113 area.
But the first bounce isn't enough.
For AltcoinWolF, the cleanest approach is to watch two things:
Support reaction around $114.10–$114.40
or
Breakout + retest above $115.45.
Until one of those confirmations appears, chasing SOL around $114.92 carries unnecessary uncertainty.
Let price come to the setup. Don't force the setup onto the chart.
The market rewards patience, not emotions.
Wait for confirmation. Protect your capital. Let the chart lead.
🚀 AltcoinWolF Closing CTA
🚀 Trade smarter. Move faster. Stay ahead.
📊 Follow AltcoinWolF for high-conviction setups, precision entries, and market-leading crypto insights.
🐺⚡
The market rewards patience, not emotions. Wait for confirmation, protect your capital, and let the charts lead the way.
— AltcoinWolF
#AIStocksWhatNext #BitwiseNEARStakingETPAssetsTop$100M #solana #AltcoinWolF #21SharesLaunchesEuropesFirstZcashETP $SOL
{spot}(SOLUSDT)
SOL Just Got Hit With a Sharp Dump — Is $113 the Reversal Zone?
Solana has been showing strong momentum recently, but today's 15-minute chart tells a different short-term story.
SOL dropped sharply from the $116–$117 area toward $113, producing a clear volume spike before buyers stepped in and pushed price back toward $115.
Now comes the important part.
Is this simply a temporary relief bounce?
Or is SOL building the foundation for another move higher?
For AltcoinWolF, the answer isn't about predicting the next candle.
It's about waiting for price to prove the setup.
🐺 Premium Education Post: Don't Confuse a Bounce With a Reversal.
One of the most common mistakes traders make after a sharp crypto sell-off is assuming that the first green candles automatically mean a trend reversal.
They don't.
A sharp drop followed by a bounce can represent:
Short-term profit taking
Liquidity sweeping
Oversold reaction
Short covering
Genuine accumulation
Or simply a temporary relief rally
The difference becomes visible through structure and confirmation.
That's exactly what we're watching on SOL.
📊 SOL/USDT Technical Market Analysis
1. The 15-Minute Structure
SOL was trading around $114.92 on the supplied chart after falling to an intraday low of $113.00.
The important sequence was:
$116+ → sharp breakdown → $113 sweep → aggressive bounce → rejection around $115.45 → $114.92
That sequence gives us two very important areas:
Support
$113.00–$114.40
Resistance
$115.45–$116.40
The $113 level is particularly important because it produced an immediate reaction.
But a reaction is not yet a confirmed reversal.
📈 Moving Average Structure
The 15M chart currently shows:
MA7: $114.78
MA25: $116.41
MA99: $117.83
Price has recovered back around the MA7, but remains below the MA25 and MA99.
That means the short-term recovery is still facing overhead resistance.
For the bulls, reclaiming $116.40 would be much more meaningful than simply moving from $114.90 to $115.20.
Why?
Because $116.40 is approximately where the MA25 sits, while the $117.80 area represents the MA99 and a stronger resistance region.
📊 Volume Tells an Important Story
The biggest volume expansion happened during the sharp sell-off toward $113.
That's important.
When price falls aggressively while volume expands, it tells us that the move attracted significant participation.
But the subsequent bounce also produced meaningful buying volume.
So instead of asking:
"Did SOL bounce?"
The better question is:
"Can buyers continue defending the bounce?"
That's what the next few candles need to answer.
🎯 AltcoinWolF Premium Trade Setup
🟢 LONG SETUP — Confirmation Based
Setup A: Support Reaction
Potential Entry Zone:
$114.10 – $114.40
But this is not a blind buy zone.
A long becomes more interesting only if SOL shows:
Bullish rejection from the zone
Higher low on the 15M chart
Strong green confirmation candle
Improving volume
Price reclaiming $114.80–$115.00
Targets
TP1: $115.45
TP2: $116.40
TP3: $117.00–$117.80
Invalidation
Below $113.75
The key structural invalidation is the loss of the $113.00 low.
🚀 Setup B: Breakout Confirmation
For traders who don't want to catch a falling knife, there is another approach.
Entry Trigger:
$115.50–$115.75
Only after SOL:
Breaks above $115.45
Closes a 15M candle above the level
Holds the breakout on a retest
Shows supportive buying volume
Then the upside levels become:
TP1: $116.40
TP2: $117.00
TP3: $117.80–$118.20
This setup sacrifices some entry price for additional confirmation.
❌ When NOT to Take the Long
This is just as important as the entry.
Avoid the setup if:
SOL remains trapped below $115.45
The bounce happens on weak volume
Price repeatedly rejects $115.45
$114 support breaks with strong selling volume
$113.00 breaks decisively
If $113 fails, the current long thesis is no longer valid.
No trade is also a trade decision.
🧠 Why This Setup Matters
The bigger Solana picture has recently been constructive, with broader market analysis identifying the $114 area as an important support level and $119–$120 as significant resistance. �
CoinMarketCap
But short-term traders need to respect the chart in front of them.
That's why today's AltcoinWolF approach is not:
"SOL is bullish, so buy."
It's:
"SOL has reacted from $113. Now let the market prove whether buyers can reclaim resistance."
That's the difference between prediction and process.
🐺 AltcoinWolF Market Scorecard
Factor
Reading
15M Structure
🔴 Bearish/Recovery
MA7
🟢 Reclaimed
MA25
🔴 Resistance
MA99
🔴 Resistance
Volume
⚠️ Elevated
$113 Support
🟢 Important
$115.45 Resistance
🔴 Key
Long Setup
🟡 Confirmation Required
Risk/Reward
🟡 Depends on Entry
Overall Intraday Bias
🟡 Neutral → Bullish Above Confirmation
AltcoinWolF Market Score: 5.5/10
Not a blind bullish call.
The setup improves significantly if SOL reclaims $115.45 and holds.
🔮 Scenario Analysis
🟢 Bullish Scenario
SOL holds above the $114.10–$114.40 reaction area.
Then:
$115.45 → $116.40 → $117.00 → $117.80+
A sustained reclaim of $116.40 would strengthen the short-term recovery structure.
🟡 Neutral Scenario
SOL continues moving between:
$114 – $115.45
This would indicate consolidation after the dump.
In this situation, patience is preferable to forcing an entry.
🔴 Bearish Scenario
SOL loses $114, followed by a decisive break of $113.00.
That would invalidate the current support-based long thesis and indicate that sellers remain in control of the short-term structure.
🎯 The Levels That Matter Most
$113.00
The critical intraday low.
$114.10–$114.40
Potential reaction zone.
$115.45
First major confirmation level.
$116.40
MA25 + important reclaim zone.
$117.00
Next upside target.
$117.80–$118.20
Major resistance/MA99 area.
🏁 Final Call
SOL has already shown that buyers are willing to defend the $113 area.
But the first bounce isn't enough.
For AltcoinWolF, the cleanest approach is to watch two things:
Support reaction around $114.10–$114.40
or
Breakout + retest above $115.45.
Until one of those confirmations appears, chasing SOL around $114.92 carries unnecessary uncertainty.
Let price come to the setup. Don't force the setup onto the chart.
The market rewards patience, not emotions.
Wait for confirmation. Protect your capital. Let the chart lead.
🚀 AltcoinWolF Closing CTA
🚀 Trade smarter. Move faster. Stay ahead.
📊 Follow AltcoinWolF for high-conviction setups, precision entries, and market-leading crypto insights.
🐺⚡
The market rewards patience, not emotions. Wait for confirmation, protect your capital, and let the charts lead the way.
— AltcoinWolF
#AIStocksWhatNext #BitwiseNEARStakingETPAssetsTop$100M #solana #AltcoinWolF #21SharesLaunchesEuropesFirstZcashETP $SOL
SOL dropped sharply from the $116–$117 area toward $113, producing a clear volume spike before buyers stepped in and pushed price back toward $115.
Now comes the important part.
Is this simply a temporary relief bounce?
Or is SOL building the foundation for another move higher?
For AltcoinWolF, the answer isn't about predicting the next candle.
It's about waiting for price to prove the setup.
🐺 Premium Education Post: Don't Confuse a Bounce With a Reversal.
One of the most common mistakes traders make after a sharp crypto sell-off is assuming that the first green candles automatically mean a trend reversal.
They don't.
A sharp drop followed by a bounce can represent:
Short-term profit taking
Liquidity sweeping
Oversold reaction
Short covering
Genuine accumulation
Or simply a temporary relief rally
The difference becomes visible through structure and confirmation.
That's exactly what we're watching on SOL.
📊 SOL/USDT Technical Market Analysis
1. The 15-Minute Structure
SOL was trading around $114.92 on the supplied chart after falling to an intraday low of $113.00.
The important sequence was:
$116+ → sharp breakdown → $113 sweep → aggressive bounce → rejection around $115.45 → $114.92
That sequence gives us two very important areas:
Support
$113.00–$114.40
Resistance
$115.45–$116.40
The $113 level is particularly important because it produced an immediate reaction.
But a reaction is not yet a confirmed reversal.
📈 Moving Average Structure
The 15M chart currently shows:
MA7: $114.78
MA25: $116.41
MA99: $117.83
Price has recovered back around the MA7, but remains below the MA25 and MA99.
That means the short-term recovery is still facing overhead resistance.
For the bulls, reclaiming $116.40 would be much more meaningful than simply moving from $114.90 to $115.20.
Why?
Because $116.40 is approximately where the MA25 sits, while the $117.80 area represents the MA99 and a stronger resistance region.
📊 Volume Tells an Important Story
The biggest volume expansion happened during the sharp sell-off toward $113.
That's important.
When price falls aggressively while volume expands, it tells us that the move attracted significant participation.
But the subsequent bounce also produced meaningful buying volume.
So instead of asking:
"Did SOL bounce?"
The better question is:
"Can buyers continue defending the bounce?"
That's what the next few candles need to answer.
🎯 AltcoinWolF Premium Trade Setup
🟢 LONG SETUP — Confirmation Based
Setup A: Support Reaction
Potential Entry Zone:
$114.10 – $114.40
But this is not a blind buy zone.
A long becomes more interesting only if SOL shows:
Bullish rejection from the zone
Higher low on the 15M chart
Strong green confirmation candle
Improving volume
Price reclaiming $114.80–$115.00
Targets
TP1: $115.45
TP2: $116.40
TP3: $117.00–$117.80
Invalidation
Below $113.75
The key structural invalidation is the loss of the $113.00 low.
🚀 Setup B: Breakout Confirmation
For traders who don't want to catch a falling knife, there is another approach.
Entry Trigger:
$115.50–$115.75
Only after SOL:
Breaks above $115.45
Closes a 15M candle above the level
Holds the breakout on a retest
Shows supportive buying volume
Then the upside levels become:
TP1: $116.40
TP2: $117.00
TP3: $117.80–$118.20
This setup sacrifices some entry price for additional confirmation.
❌ When NOT to Take the Long
This is just as important as the entry.
Avoid the setup if:
SOL remains trapped below $115.45
The bounce happens on weak volume
Price repeatedly rejects $115.45
$114 support breaks with strong selling volume
$113.00 breaks decisively
If $113 fails, the current long thesis is no longer valid.
No trade is also a trade decision.
🧠 Why This Setup Matters
The bigger Solana picture has recently been constructive, with broader market analysis identifying the $114 area as an important support level and $119–$120 as significant resistance. �
CoinMarketCap
But short-term traders need to respect the chart in front of them.
That's why today's AltcoinWolF approach is not:
"SOL is bullish, so buy."
It's:
"SOL has reacted from $113. Now let the market prove whether buyers can reclaim resistance."
That's the difference between prediction and process.
🐺 AltcoinWolF Market Scorecard
Factor
Reading
15M Structure
🔴 Bearish/Recovery
MA7
🟢 Reclaimed
MA25
🔴 Resistance
MA99
🔴 Resistance
Volume
⚠️ Elevated
$113 Support
🟢 Important
$115.45 Resistance
🔴 Key
Long Setup
🟡 Confirmation Required
Risk/Reward
🟡 Depends on Entry
Overall Intraday Bias
🟡 Neutral → Bullish Above Confirmation
AltcoinWolF Market Score: 5.5/10
Not a blind bullish call.
The setup improves significantly if SOL reclaims $115.45 and holds.
🔮 Scenario Analysis
🟢 Bullish Scenario
SOL holds above the $114.10–$114.40 reaction area.
Then:
$115.45 → $116.40 → $117.00 → $117.80+
A sustained reclaim of $116.40 would strengthen the short-term recovery structure.
🟡 Neutral Scenario
SOL continues moving between:
$114 – $115.45
This would indicate consolidation after the dump.
In this situation, patience is preferable to forcing an entry.
🔴 Bearish Scenario
SOL loses $114, followed by a decisive break of $113.00.
That would invalidate the current support-based long thesis and indicate that sellers remain in control of the short-term structure.
🎯 The Levels That Matter Most
$113.00
The critical intraday low.
$114.10–$114.40
Potential reaction zone.
$115.45
First major confirmation level.
$116.40
MA25 + important reclaim zone.
$117.00
Next upside target.
$117.80–$118.20
Major resistance/MA99 area.
🏁 Final Call
SOL has already shown that buyers are willing to defend the $113 area.
But the first bounce isn't enough.
For AltcoinWolF, the cleanest approach is to watch two things:
Support reaction around $114.10–$114.40
or
Breakout + retest above $115.45.
Until one of those confirmations appears, chasing SOL around $114.92 carries unnecessary uncertainty.
Let price come to the setup. Don't force the setup onto the chart.
The market rewards patience, not emotions.
Wait for confirmation. Protect your capital. Let the chart lead.
🚀 AltcoinWolF Closing CTA
🚀 Trade smarter. Move faster. Stay ahead.
📊 Follow AltcoinWolF for high-conviction setups, precision entries, and market-leading crypto insights.
🐺⚡
The market rewards patience, not emotions. Wait for confirmation, protect your capital, and let the charts lead the way.
— AltcoinWolF
#AIStocksWhatNext #BitwiseNEARStakingETPAssetsTop$100M #solana #AltcoinWolF #21SharesLaunchesEuropesFirstZcashETP $SOL
1
930
·
--
🐺 SOL/USDT: $113 Is The Level Bulls Need To Defend
SOL just experienced a sharp 15M sell-off toward $113, followed by a strong recovery.
Now the market is at a decision point.
Key Levels:
🟢 Support: $113.00
🟢 Long reaction zone: $114.10–$114.40
🔴 Resistance: $115.45
🔴 MA25: $116.40
🔴 MA99: $117.83
Long plan:
Aggressive: $114.10–$114.40 after bullish confirmation
Safer: $115.50–$115.75 after breakout + retest
🎯 TP1: $115.45
🎯 TP2: $116.40
🎯 TP3: $117.00–$117.80
🛑 Invalidation: below $113.75 / structural loss of $113
The key lesson:
Don't buy the bounce. Trade the confirmation.
Would you wait for $114 support or the $115.45 breakout?
🐺 AltcoinWolF
#SOL #solana #Crypto #trading #TechnicalAnalysis $SOL
{spot}(SOLUSDT)
🐺 SOL/USDT: $113 Is The Level Bulls Need To Defend
SOL just experienced a sharp 15M sell-off toward $113, followed by a strong recovery.
Now the market is at a decision point.
Key Levels:
🟢 Support: $113.00
🟢 Long reaction zone: $114.10–$114.40
🔴 Resistance: $115.45
🔴 MA25: $116.40
🔴 MA99: $117.83
Long plan:
Aggressive: $114.10–$114.40 after bullish confirmation
Safer: $115.50–$115.75 after breakout + retest
🎯 TP1: $115.45
🎯 TP2: $116.40
🎯 TP3: $117.00–$117.80
🛑 Invalidation: below $113.75 / structural loss of $113
The key lesson:
Don't buy the bounce. Trade the confirmation.
Would you wait for $114 support or the $115.45 breakout?
🐺 AltcoinWolF
#SOL #solana #Crypto #trading #TechnicalAnalysis $SOL
SOL just experienced a sharp 15M sell-off toward $113, followed by a strong recovery.
Now the market is at a decision point.
Key Levels:
🟢 Support: $113.00
🟢 Long reaction zone: $114.10–$114.40
🔴 Resistance: $115.45
🔴 MA25: $116.40
🔴 MA99: $117.83
Long plan:
Aggressive: $114.10–$114.40 after bullish confirmation
Safer: $115.50–$115.75 after breakout + retest
🎯 TP1: $115.45
🎯 TP2: $116.40
🎯 TP3: $117.00–$117.80
🛑 Invalidation: below $113.75 / structural loss of $113
The key lesson:
Don't buy the bounce. Trade the confirmation.
Would you wait for $114 support or the $115.45 breakout?
🐺 AltcoinWolF
#SOL #solana #Crypto #trading #TechnicalAnalysis $SOL
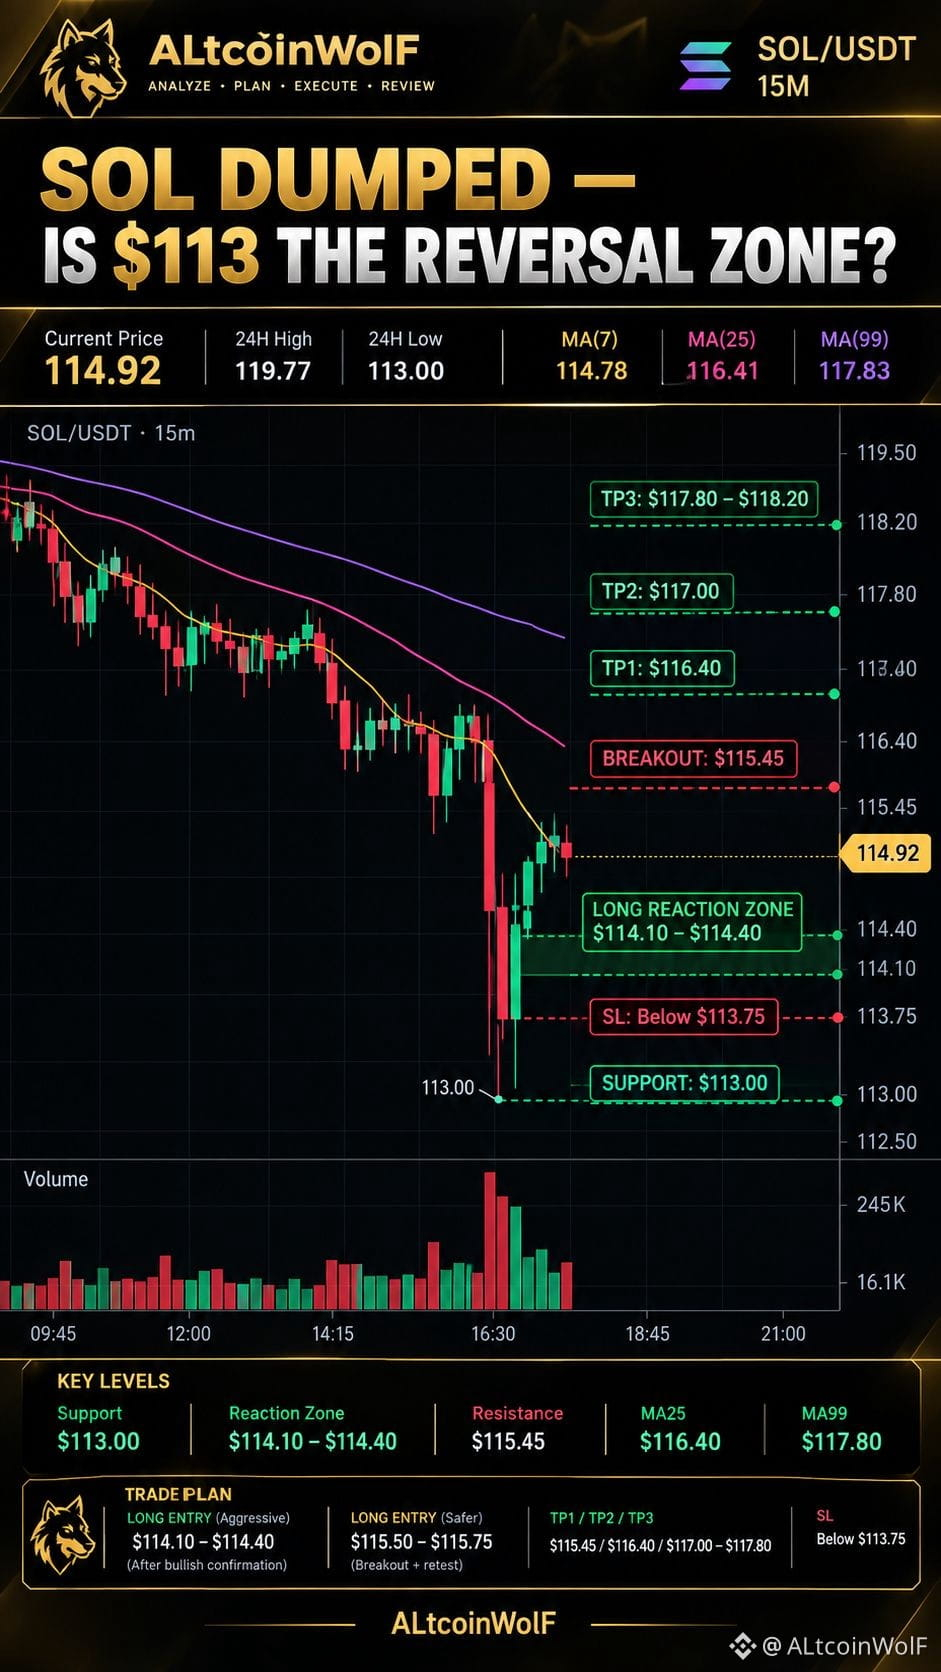
184
·
--
🔥 ETH/USDT: BREAKOUT OR PULLBACK?
Ethereum is sitting at a critical decision zone after rallying from ~$2,369 to $2,807.
Now the question is whether ETH can reclaim the immediate resistance cluster or needs another support retest.
📊 KEY LEVELS:
🟢 Support: $2,715–$2,716
🟢 Major support: $2,662
🔴 Resistance: $2,750–$2,760
🔴 Major resistance: $2,807
🐺 LONG PLAN:
A) Breakout Long
Wait for a confirmed 15M/1H close above $2,750–$2,760 + volume + successful retest.
Potential targets:
🎯 TP1: $2,780
🎯 TP2: $2,807
🎯 TP3: $2,830+
B) Pullback Long
If ETH returns to $2,715–$2,716, wait for a bullish reaction before considering a long.
⚠️ If $2,715 breaks decisively, attention shifts toward $2,662.
Don't chase the middle of the range.
Confirmation first. Entry second. Risk management always.
Full analysis → AltcoinWolF Insights
🐺⚡ Trade smarter. Move faster. Stay ahead.
#AIStocksWhatNext #Ethereum #ETH🔥🔥🔥🔥🔥🔥 #AltcoinWolF #CardanoAddedToX402KitForADAPayments $ETH
{spot}(ETHUSDT)
🔥 ETH/USDT: BREAKOUT OR PULLBACK?
Ethereum is sitting at a critical decision zone after rallying from ~$2,369 to $2,807.
Now the question is whether ETH can reclaim the immediate resistance cluster or needs another support retest.
📊 KEY LEVELS:
🟢 Support: $2,715–$2,716
🟢 Major support: $2,662
🔴 Resistance: $2,750–$2,760
🔴 Major resistance: $2,807
🐺 LONG PLAN:
A) Breakout Long
Wait for a confirmed 15M/1H close above $2,750–$2,760 + volume + successful retest.
Potential targets:
🎯 TP1: $2,780
🎯 TP2: $2,807
🎯 TP3: $2,830+
B) Pullback Long
If ETH returns to $2,715–$2,716, wait for a bullish reaction before considering a long.
⚠️ If $2,715 breaks decisively, attention shifts toward $2,662.
Don't chase the middle of the range.
Confirmation first. Entry second. Risk management always.
Full analysis → AltcoinWolF Insights
🐺⚡ Trade smarter. Move faster. Stay ahead.
#AIStocksWhatNext #Ethereum #ETH🔥🔥🔥🔥🔥🔥 #AltcoinWolF #CardanoAddedToX402KitForADAPayments $ETH
Ethereum is sitting at a critical decision zone after rallying from ~$2,369 to $2,807.
Now the question is whether ETH can reclaim the immediate resistance cluster or needs another support retest.
📊 KEY LEVELS:
🟢 Support: $2,715–$2,716
🟢 Major support: $2,662
🔴 Resistance: $2,750–$2,760
🔴 Major resistance: $2,807
🐺 LONG PLAN:
A) Breakout Long
Wait for a confirmed 15M/1H close above $2,750–$2,760 + volume + successful retest.
Potential targets:
🎯 TP1: $2,780
🎯 TP2: $2,807
🎯 TP3: $2,830+
B) Pullback Long
If ETH returns to $2,715–$2,716, wait for a bullish reaction before considering a long.
⚠️ If $2,715 breaks decisively, attention shifts toward $2,662.
Don't chase the middle of the range.
Confirmation first. Entry second. Risk management always.
Full analysis → AltcoinWolF Insights
🐺⚡ Trade smarter. Move faster. Stay ahead.
#AIStocksWhatNext #Ethereum #ETH🔥🔥🔥🔥🔥🔥 #AltcoinWolF #CardanoAddedToX402KitForADAPayments $ETH
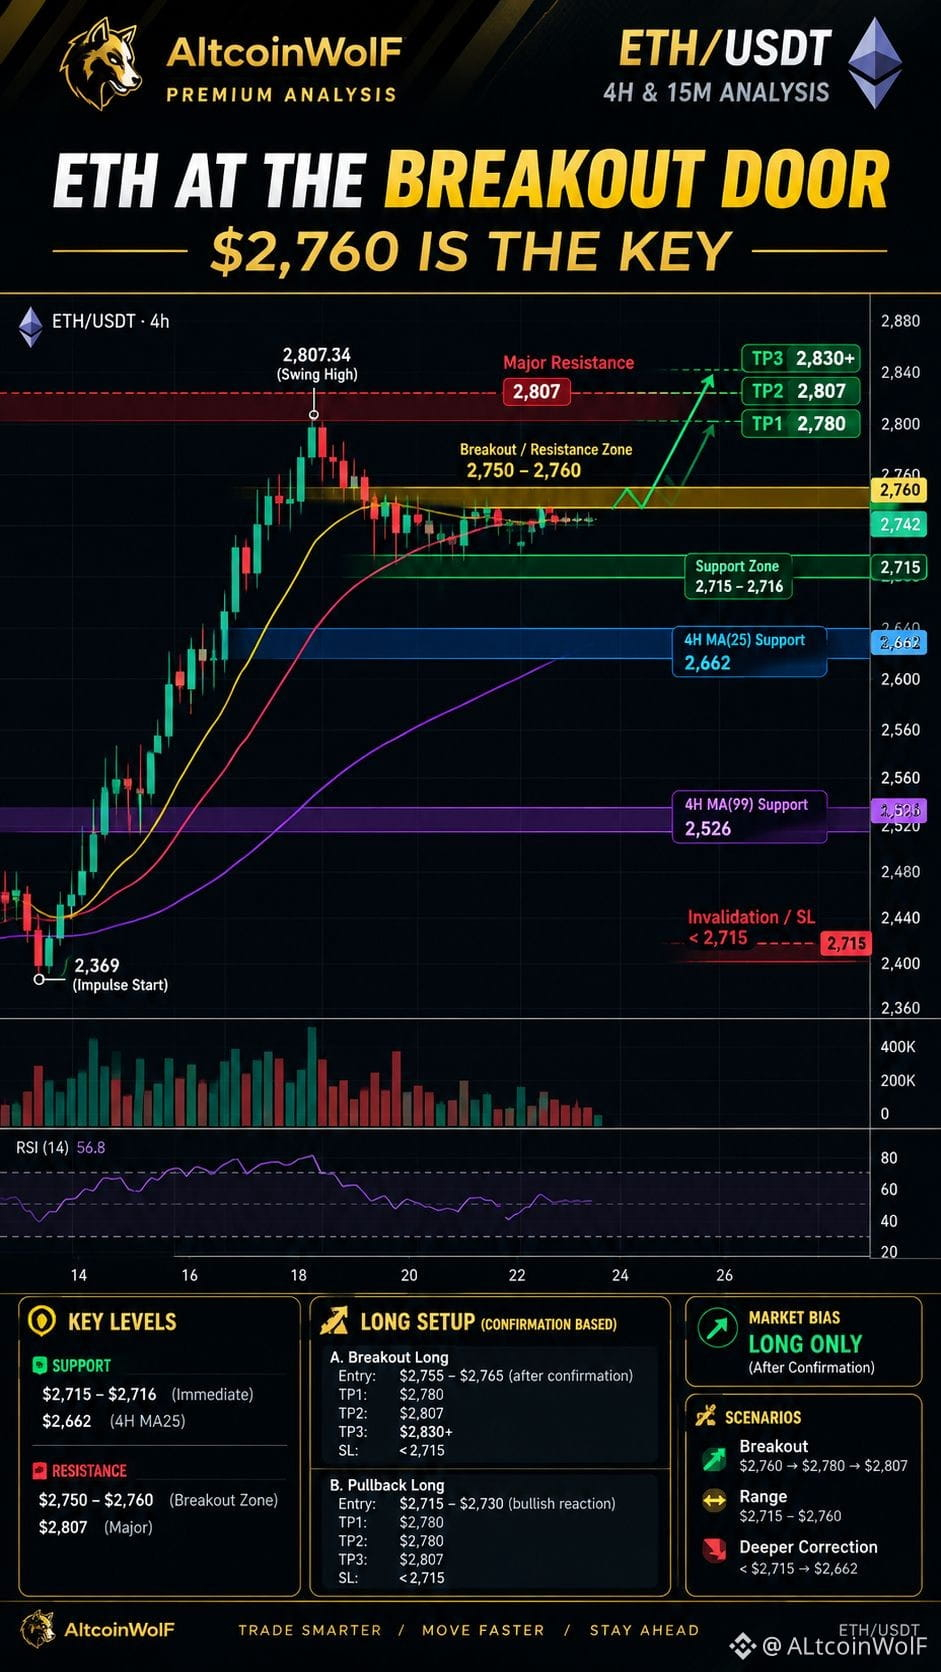
1
234
·
--
Article
Bitcoin Bullish Structure Is Intact — But Should You Buy the Pullback or Chase the Breakout?Bitcoin has delivered the kind of move that immediately attracts attention.
BTC climbed from the $80K area toward $86,344, while both the 4H and 15M charts continue to show a strong bullish structure.
But this is exactly where traders need to slow down.
A strong move does not automatically mean a strong entry.
When price is already near a fresh local high, the key question is no longer “Is Bitcoin bullish?”
The better question is:
Where can a long position be entered with controlled risk?
Today’s AltcoinWolF analysis focuses on that question.
Premium Education Post: Why Patience Beats FOMO
One of the biggest mistakes traders make during strong rallies is buying simply because candles are moving quickly.
The market can remain bullish while still producing a short-term pullback.
That distinction matters.
A disciplined trader separates:
Market direction
from
Entry timing.
Bitcoin's current structure is bullish, but the better opportunity may come from either:
A controlled pullback into support, or
A confirmed breakout above the current high followed by a retest.
The goal is not to predict every candle.
The goal is to wait for the market to provide evidence.
📊 Bitcoin Technical Market Analysis
4H Timeframe — Strong Bullish Breakout
The 4H chart remains clearly constructive.
Current price is around $86,160, while the moving averages are:
MA7: $82,494
MA25: $80,495
MA99: $78,579
Price is trading significantly above all three averages.
More importantly, the recent structure shows:
Higher highs
Higher lows
Strong bullish candles
Breakout from the previous consolidation
Noticeable volume expansion
The $81.9K–$82.5K region has now become an important structural area to monitor.
As long as the broader structure remains intact, the 4H trend continues to favor the upside.
15M Timeframe — Momentum Remains Bullish
The short-term chart is also aligned with the higher timeframe.
Current moving averages:
MA7: $85,965
MA25: $85,189
MA99: $82,442
The alignment remains bullish:
MA7 > MA25 > MA99
Price is also holding above the short-term averages.
However, BTC is currently close to the $86,344.70 high, meaning immediate resistance is nearby.
This makes chasing the current candle less attractive than waiting for confirmation.
🎯 Premium Trade Setup
🟢 Setup A — Pullback Long
Preferred setup
Entry Zone: $85,600–$85,950
The setup becomes more attractive if BTC returns to this area and produces:
Bullish rejection
Higher low
15M bullish candle confirmation
MA7 support/reclaim
Trade Levels
Entry: $85,600–$85,950
Stop Loss: $84,950
TP1: $86,350
TP2: $87,200
TP3: $88,000
After TP1, traders can consider reducing risk and protecting the position rather than allowing a profitable trade to turn into a loss.
🚀 Setup B — Breakout Long
The second possibility is continuation.
If BTC produces a confirmed 15M close above $86,350 and successfully retests the breakout zone:
Entry: $86,350–$86,550
SL: $85,650
Targets
TP1: $87,200
TP2: $88,000
TP3: $89,000
The key word here is confirmed.
A temporary wick above $86,350 is not enough.
We want:
Breakout → Close → Retest → Hold → Continuation
🛡️ Confirmation & Invalidation
Confirmation
A long setup becomes stronger when:
15M candle confirms the level
BTC forms a higher low
Volume supports the move
Price maintains short-term MA structure
Previous resistance turns into support
Invalidation
The immediate bullish setup becomes weaker if:
15M closes decisively below $85,450.
A deeper loss of the $84,400–$84,600 support zone would further weaken the short-term bullish structure.
The major 4H structural area remains around $81,900–$82,500.
🧭 Key BTC Levels
Support
S1: $85,400–$85,700
S2: $84,400–$84,600
S3: $81,900–$82,500
Resistance
R1: $86,350
R2: $86,900–$87,000
R3: $88,000
R4: $89,000+
🔮 Scenario Analysis
🟢 Bullish Scenario
BTC holds above the $85.4K area and either:
A) Pulls back → forms higher low → resumes upward
or
B) Breaks $86,350 → confirms above it → retests → continues higher.
Potential upside areas:
$87,200 → $88,000 → $89,000
🔴 Bearish / Invalidated Scenario
If BTC loses $85,450 with decisive 15M weakness, the immediate long setup loses strength.
A deeper move through $84,400–$84,600 would suggest that the market needs a larger reset before another continuation attempt.
This does not automatically mean a trend reversal; it means the current long thesis requires reassessment.
📊 AltcoinWolF Market Scorecard
Factor
Reading
4H Trend
🟢 Bullish
15M Trend
🟢 Bullish
Moving Averages
🟢 Bullish
Breakout Structure
🟢 Positive
Volume
🟢 Expanded
Immediate Resistance
🟡 $86,350
Entry Risk
🟡 Avoid FOMO
Long Bias
🟢 Active
🎯 Final Call
Bitcoin's structure remains bullish across both analyzed timeframes.
But the strongest lesson from today's chart is simple:
Don't confuse bullish momentum with an invitation to chase.
The preferred approach is to wait for either:
$85,600–$85,950 pullback + bullish confirmation
or
$86,350 breakout + 15M close + successful retest.
The market does not reward the trader who enters first.
It rewards the trader who manages risk when the setup appears.
Trade smarter. Move faster. Stay ahead.
📊 Follow AltcoinWolF for high-conviction setups, precision entries, and market-leading crypto insights. 🐺⚡
The market rewards patience, not emotions. Wait for confirmation, protect your capital, and let the charts lead the way.
— AltcoinWolF
Educational market analysis only. No setup guarantees profit. Always manage position size and risk according to your own strategy.
#BitcoinHits$85K #BTC走势分析 #BTC☀️ #bitcoin #AltcoinWolF $BTC
{spot}(BTCUSDT)
Bitcoin Bullish Structure Is Intact — But Should You Buy the Pullback or Chase the Breakout?
Bitcoin has delivered the kind of move that immediately attracts attention.
BTC climbed from the $80K area toward $86,344, while both the 4H and 15M charts continue to show a strong bullish structure.
But this is exactly where traders need to slow down.
A strong move does not automatically mean a strong entry.
When price is already near a fresh local high, the key question is no longer “Is Bitcoin bullish?”
The better question is:
Where can a long position be entered with controlled risk?
Today’s AltcoinWolF analysis focuses on that question.
Premium Education Post: Why Patience Beats FOMO
One of the biggest mistakes traders make during strong rallies is buying simply because candles are moving quickly.
The market can remain bullish while still producing a short-term pullback.
That distinction matters.
A disciplined trader separates:
Market direction
from
Entry timing.
Bitcoin's current structure is bullish, but the better opportunity may come from either:
A controlled pullback into support, or
A confirmed breakout above the current high followed by a retest.
The goal is not to predict every candle.
The goal is to wait for the market to provide evidence.
📊 Bitcoin Technical Market Analysis
4H Timeframe — Strong Bullish Breakout
The 4H chart remains clearly constructive.
Current price is around $86,160, while the moving averages are:
MA7: $82,494
MA25: $80,495
MA99: $78,579
Price is trading significantly above all three averages.
More importantly, the recent structure shows:
Higher highs
Higher lows
Strong bullish candles
Breakout from the previous consolidation
Noticeable volume expansion
The $81.9K–$82.5K region has now become an important structural area to monitor.
As long as the broader structure remains intact, the 4H trend continues to favor the upside.
15M Timeframe — Momentum Remains Bullish
The short-term chart is also aligned with the higher timeframe.
Current moving averages:
MA7: $85,965
MA25: $85,189
MA99: $82,442
The alignment remains bullish:
MA7 > MA25 > MA99
Price is also holding above the short-term averages.
However, BTC is currently close to the $86,344.70 high, meaning immediate resistance is nearby.
This makes chasing the current candle less attractive than waiting for confirmation.
🎯 Premium Trade Setup
🟢 Setup A — Pullback Long
Preferred setup
Entry Zone: $85,600–$85,950
The setup becomes more attractive if BTC returns to this area and produces:
Bullish rejection
Higher low
15M bullish candle confirmation
MA7 support/reclaim
Trade Levels
Entry: $85,600–$85,950
Stop Loss: $84,950
TP1: $86,350
TP2: $87,200
TP3: $88,000
After TP1, traders can consider reducing risk and protecting the position rather than allowing a profitable trade to turn into a loss.
🚀 Setup B — Breakout Long
The second possibility is continuation.
If BTC produces a confirmed 15M close above $86,350 and successfully retests the breakout zone:
Entry: $86,350–$86,550
SL: $85,650
Targets
TP1: $87,200
TP2: $88,000
TP3: $89,000
The key word here is confirmed.
A temporary wick above $86,350 is not enough.
We want:
Breakout → Close → Retest → Hold → Continuation
🛡️ Confirmation & Invalidation
Confirmation
A long setup becomes stronger when:
15M candle confirms the level
BTC forms a higher low
Volume supports the move
Price maintains short-term MA structure
Previous resistance turns into support
Invalidation
The immediate bullish setup becomes weaker if:
15M closes decisively below $85,450.
A deeper loss of the $84,400–$84,600 support zone would further weaken the short-term bullish structure.
The major 4H structural area remains around $81,900–$82,500.
🧭 Key BTC Levels
Support
S1: $85,400–$85,700
S2: $84,400–$84,600
S3: $81,900–$82,500
Resistance
R1: $86,350
R2: $86,900–$87,000
R3: $88,000
R4: $89,000+
🔮 Scenario Analysis
🟢 Bullish Scenario
BTC holds above the $85.4K area and either:
A) Pulls back → forms higher low → resumes upward
or
B) Breaks $86,350 → confirms above it → retests → continues higher.
Potential upside areas:
$87,200 → $88,000 → $89,000
🔴 Bearish / Invalidated Scenario
If BTC loses $85,450 with decisive 15M weakness, the immediate long setup loses strength.
A deeper move through $84,400–$84,600 would suggest that the market needs a larger reset before another continuation attempt.
This does not automatically mean a trend reversal; it means the current long thesis requires reassessment.
📊 AltcoinWolF Market Scorecard
Factor
Reading
4H Trend
🟢 Bullish
15M Trend
🟢 Bullish
Moving Averages
🟢 Bullish
Breakout Structure
🟢 Positive
Volume
🟢 Expanded
Immediate Resistance
🟡 $86,350
Entry Risk
🟡 Avoid FOMO
Long Bias
🟢 Active
🎯 Final Call
Bitcoin's structure remains bullish across both analyzed timeframes.
But the strongest lesson from today's chart is simple:
Don't confuse bullish momentum with an invitation to chase.
The preferred approach is to wait for either:
$85,600–$85,950 pullback + bullish confirmation
or
$86,350 breakout + 15M close + successful retest.
The market does not reward the trader who enters first.
It rewards the trader who manages risk when the setup appears.
Trade smarter. Move faster. Stay ahead.
📊 Follow AltcoinWolF for high-conviction setups, precision entries, and market-leading crypto insights. 🐺⚡
The market rewards patience, not emotions. Wait for confirmation, protect your capital, and let the charts lead the way.
— AltcoinWolF
Educational market analysis only. No setup guarantees profit. Always manage position size and risk according to your own strategy.
#BitcoinHits$85K #BTC走势分析 #BTC☀️ #bitcoin #AltcoinWolF $BTC
BTC climbed from the $80K area toward $86,344, while both the 4H and 15M charts continue to show a strong bullish structure.
But this is exactly where traders need to slow down.
A strong move does not automatically mean a strong entry.
When price is already near a fresh local high, the key question is no longer “Is Bitcoin bullish?”
The better question is:
Where can a long position be entered with controlled risk?
Today’s AltcoinWolF analysis focuses on that question.
Premium Education Post: Why Patience Beats FOMO
One of the biggest mistakes traders make during strong rallies is buying simply because candles are moving quickly.
The market can remain bullish while still producing a short-term pullback.
That distinction matters.
A disciplined trader separates:
Market direction
from
Entry timing.
Bitcoin's current structure is bullish, but the better opportunity may come from either:
A controlled pullback into support, or
A confirmed breakout above the current high followed by a retest.
The goal is not to predict every candle.
The goal is to wait for the market to provide evidence.
📊 Bitcoin Technical Market Analysis
4H Timeframe — Strong Bullish Breakout
The 4H chart remains clearly constructive.
Current price is around $86,160, while the moving averages are:
MA7: $82,494
MA25: $80,495
MA99: $78,579
Price is trading significantly above all three averages.
More importantly, the recent structure shows:
Higher highs
Higher lows
Strong bullish candles
Breakout from the previous consolidation
Noticeable volume expansion
The $81.9K–$82.5K region has now become an important structural area to monitor.
As long as the broader structure remains intact, the 4H trend continues to favor the upside.
15M Timeframe — Momentum Remains Bullish
The short-term chart is also aligned with the higher timeframe.
Current moving averages:
MA7: $85,965
MA25: $85,189
MA99: $82,442
The alignment remains bullish:
MA7 > MA25 > MA99
Price is also holding above the short-term averages.
However, BTC is currently close to the $86,344.70 high, meaning immediate resistance is nearby.
This makes chasing the current candle less attractive than waiting for confirmation.
🎯 Premium Trade Setup
🟢 Setup A — Pullback Long
Preferred setup
Entry Zone: $85,600–$85,950
The setup becomes more attractive if BTC returns to this area and produces:
Bullish rejection
Higher low
15M bullish candle confirmation
MA7 support/reclaim
Trade Levels
Entry: $85,600–$85,950
Stop Loss: $84,950
TP1: $86,350
TP2: $87,200
TP3: $88,000
After TP1, traders can consider reducing risk and protecting the position rather than allowing a profitable trade to turn into a loss.
🚀 Setup B — Breakout Long
The second possibility is continuation.
If BTC produces a confirmed 15M close above $86,350 and successfully retests the breakout zone:
Entry: $86,350–$86,550
SL: $85,650
Targets
TP1: $87,200
TP2: $88,000
TP3: $89,000
The key word here is confirmed.
A temporary wick above $86,350 is not enough.
We want:
Breakout → Close → Retest → Hold → Continuation
🛡️ Confirmation & Invalidation
Confirmation
A long setup becomes stronger when:
15M candle confirms the level
BTC forms a higher low
Volume supports the move
Price maintains short-term MA structure
Previous resistance turns into support
Invalidation
The immediate bullish setup becomes weaker if:
15M closes decisively below $85,450.
A deeper loss of the $84,400–$84,600 support zone would further weaken the short-term bullish structure.
The major 4H structural area remains around $81,900–$82,500.
🧭 Key BTC Levels
Support
S1: $85,400–$85,700
S2: $84,400–$84,600
S3: $81,900–$82,500
Resistance
R1: $86,350
R2: $86,900–$87,000
R3: $88,000
R4: $89,000+
🔮 Scenario Analysis
🟢 Bullish Scenario
BTC holds above the $85.4K area and either:
A) Pulls back → forms higher low → resumes upward
or
B) Breaks $86,350 → confirms above it → retests → continues higher.
Potential upside areas:
$87,200 → $88,000 → $89,000
🔴 Bearish / Invalidated Scenario
If BTC loses $85,450 with decisive 15M weakness, the immediate long setup loses strength.
A deeper move through $84,400–$84,600 would suggest that the market needs a larger reset before another continuation attempt.
This does not automatically mean a trend reversal; it means the current long thesis requires reassessment.
📊 AltcoinWolF Market Scorecard
Factor
Reading
4H Trend
🟢 Bullish
15M Trend
🟢 Bullish
Moving Averages
🟢 Bullish
Breakout Structure
🟢 Positive
Volume
🟢 Expanded
Immediate Resistance
🟡 $86,350
Entry Risk
🟡 Avoid FOMO
Long Bias
🟢 Active
🎯 Final Call
Bitcoin's structure remains bullish across both analyzed timeframes.
But the strongest lesson from today's chart is simple:
Don't confuse bullish momentum with an invitation to chase.
The preferred approach is to wait for either:
$85,600–$85,950 pullback + bullish confirmation
or
$86,350 breakout + 15M close + successful retest.
The market does not reward the trader who enters first.
It rewards the trader who manages risk when the setup appears.
Trade smarter. Move faster. Stay ahead.
📊 Follow AltcoinWolF for high-conviction setups, precision entries, and market-leading crypto insights. 🐺⚡
The market rewards patience, not emotions. Wait for confirmation, protect your capital, and let the charts lead the way.
— AltcoinWolF
Educational market analysis only. No setup guarantees profit. Always manage position size and risk according to your own strategy.
#BitcoinHits$85K #BTC走势分析 #BTC☀️ #bitcoin #AltcoinWolF $BTC
1
569
·
--
🚨 BTC/USDT: Bullish Structure Intact
Bitcoin is trading around $86,160, with the latest high near $86,345.
4H + 15M structure remains bullish.
📌 Preferred Long:
Entry: $85,600–$85,950
SL: $84,950
TP1: $86,350
TP2: $87,200
TP3: $88,000
🚀 Breakout alternative:
Above $86,350 only after a confirmed 15M close + retest.
Key support: $85,400–$85,700
Major support: $84,400–$84,600
⚠️ Don't chase a vertical move. Confirmation first.
Trade smarter. Stay disciplined. 🐺
#BTC☀ #Bitcoin #Crypto #Trading #AltcoinWolF $BTC
{spot}(BTCUSDT)
🚨 BTC/USDT: Bullish Structure Intact
Bitcoin is trading around $86,160, with the latest high near $86,345.
4H + 15M structure remains bullish.
📌 Preferred Long:
Entry: $85,600–$85,950
SL: $84,950
TP1: $86,350
TP2: $87,200
TP3: $88,000
🚀 Breakout alternative:
Above $86,350 only after a confirmed 15M close + retest.
Key support: $85,400–$85,700
Major support: $84,400–$84,600
⚠️ Don't chase a vertical move. Confirmation first.
Trade smarter. Stay disciplined. 🐺
#BTC☀ #Bitcoin #Crypto #Trading #AltcoinWolF $BTC
Bitcoin is trading around $86,160, with the latest high near $86,345.
4H + 15M structure remains bullish.
📌 Preferred Long:
Entry: $85,600–$85,950
SL: $84,950
TP1: $86,350
TP2: $87,200
TP3: $88,000
🚀 Breakout alternative:
Above $86,350 only after a confirmed 15M close + retest.
Key support: $85,400–$85,700
Major support: $84,400–$84,600
⚠️ Don't chase a vertical move. Confirmation first.
Trade smarter. Stay disciplined. 🐺
#BTC☀ #Bitcoin #Crypto #Trading #AltcoinWolF $BTC
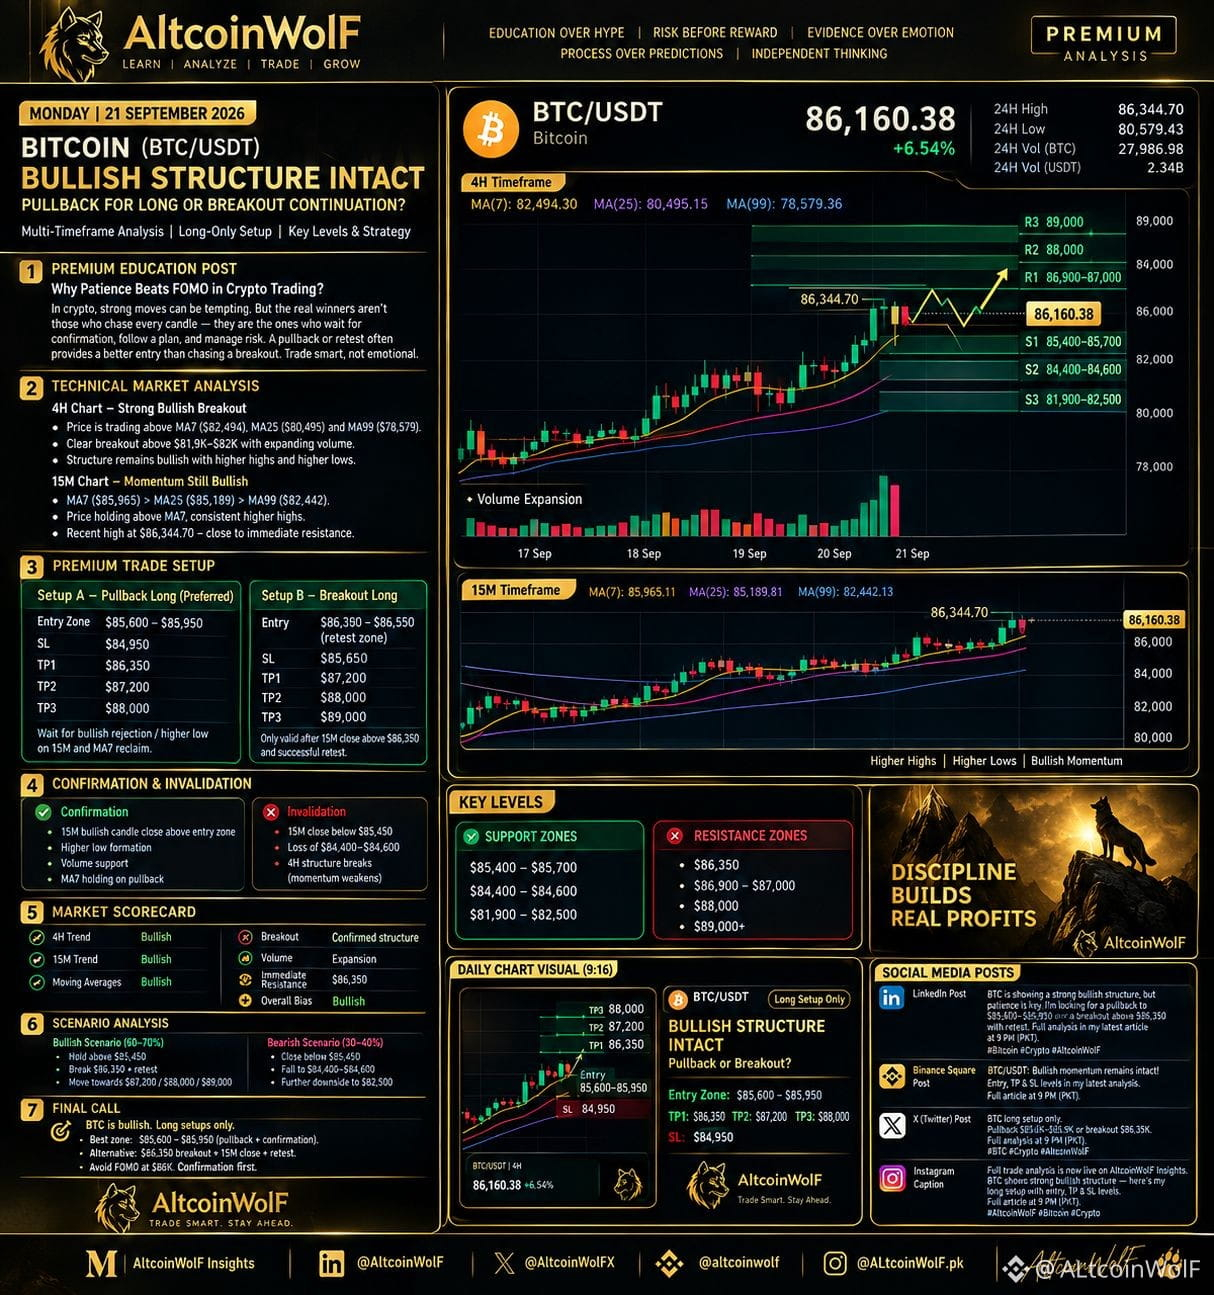
1
107
·
--

Article
Bitcoin Is Holding $80K — Is the Next Move a Breakout or Another Rejection?Bitcoin has had an important recovery week.
After dropping toward the $75K area, BTC pushed aggressively higher and reclaimed $80K. On the charts provided for today’s analysis, BTC is trading around $80,825, with the 4H high at $81,951.
But there is an important distinction between recovering toward resistance and actually breaking resistance.
That is where today's AltcoinWolF analysis begins.
Recent market coverage also places the current battle around the $80K–$83K region, with BTC recently stalling close to $82K after its recovery. �
24/7 Wall St. +1
🐺 Premium Education Post: Don't Confuse Momentum With Confirmation
One of the biggest mistakes traders make after a strong Bitcoin move is entering simply because the candles look bullish.
A strong move does not automatically mean the next candle will continue higher.
Instead, we want to answer three questions:
Where is support?
Where is resistance?
What price action confirms the next move?
Today's chart gives us a relatively clean structure.
BTC has:
Recovered strongly from ~$74,968.
Reclaimed the $80K region.
Remained above its major 4H moving averages.
Pulled back from ~$81,951.
Started recovering again around the $80.1K–$80.5K region.
The key now is whether buyers can reclaim the short-term resistance around $80.9K–$81K and eventually challenge the larger $81.95K–$82.3K zone.
📊 BTC/USDT Technical Analysis
1. 4H Timeframe — Bullish Structure With Resistance Ahead
The 4H chart shows a powerful recovery from approximately $74,968 to $81,951.
Current price: ~$80,825
Moving averages
MA7: $80,907.92
MA25: $78,928.17
MA99: $78,414.83
The most important observation is that BTC remains above the MA25 and MA99.
That keeps the broader 4H structure constructive.
However, price is currently slightly below the 4H MA7, showing that short-term momentum has cooled after the rally.
Major 4H resistance
🔴 $81,950–$82,300
This is the area bulls need to overcome.
Recent market coverage likewise identifies the low-$82K to low-$83K region as an important resistance area. �
24/7 Wall St. +1
Major support
🟢 $80,150–$80,500
Below that:
🟢 $78,900–$79,000
2. 15M Timeframe — Buyers Are Attempting a Recovery
The 15M chart gives us the short-term execution structure.
Current price: ~$80,825
Moving averages
MA7: $80,670.85
MA25: $80,511.50
MA99: $80,872.67
BTC is currently above the MA7 and MA25 but is approaching the MA99.
That makes approximately $80,870–$80,930 the immediate confirmation area.
The chart also shows:
Local low: ~$80,165
Local high: ~$80,929
So the immediate question is simple:
Can BTC reclaim and hold ~$80,930–$81,000?
If yes, momentum can potentially expand toward the higher resistance zone.
🎯 Premium Trade Setup — Long Only
As always with the AltcoinWolF framework:
We don't chase candles. We wait for confirmation.
🟢 Setup A — Pullback Long
Entry zone:
$80,500–$80,650
Wait for:
bullish rejection from the zone
15M bullish candle confirmation
support holding after the retest
TargetsBitcoin Is Holding $80K — Is the Next Move a Breakout or Another Rejection?
TP1: $81,000
TP2: $81,500
TP3: $81,900–$82,000
SL: Around $80,100, adjusted according to the confirmation candle/structure and personal risk tolerance.
🚀 Setup B — Breakout Long
If BTC does not provide the pullback and instead pushes higher:
Confirmation
15M candle close above $80,950–$81,000
Then look for a successful retest of that area.
Entry
~$80,950–$81,100 after confirmation/retest
Targets
TP1: $81,500
TP2: $81,950
TP3: $82,300
SL: Around $80,550, subject to the actual retest structure.
Important
Do not chase BTC directly into $81,950–$82,300.
That is the major 4H resistance zone.
🛑 Confirmation & Invalidation
Bullish confirmation
BTC:
$80,500 support → bullish reaction → $80,930/$81K reclaim → continuation
This would strengthen the long setup.
Bullish breakout confirmation
$81K reclaim + successful retest → $81.5K → $81.95K
Then the market can test the larger $82K region.
Invalidation
A decisive loss of approximately:
$80,100
would weaken the immediate long setup.
A deeper loss of:
$78,900
would materially weaken the current 4H bullish structure.
🧠 Risk Management: The Part Most Traders Ignore
A setup is not complete just because an entry and targets exist.
Risk management comes first.
For today's BTC setup:
Don't enter simply because BTC is green.
Don't increase leverage to compensate for a missed entry.
Don't move the stop farther away emotionally.
Don't chase a breakout candle without confirmation.
If the setup invalidates, step aside.
Protect capital before looking for the next opportunity.
Risk first. Reward second.
That is one of the core principles behind the AltcoinWolF framework.
📊 AltcoinWolF Market Scorecard
Factor
Current Reading
4H Structure
🟢 Bullish
Price vs MA25
🟢 Above
Price vs MA99
🟢 Above
15M Structure
🟢 Recovering
Immediate Resistance
🔴 $80.93K–$81K
Major Resistance
🔴 $81.95K–$82.3K
Immediate Support
🟢 $80.15K–$80.5K
Major Support
🟢 $78.9K–$79K
Long Setup
🟢 Confirmation required
Chase Entry
❌ Avoid
🔮 Sunday Scenario Analysis
🟢 Scenario 1 — Bullish Continuation
BTC holds $80.5K and reclaims $81K.
Potential path:
$80.5K → $81K → $81.5K → $81.95K → $82.3K
The key requirement is confirmation rather than simply touching each level.
🟡 Scenario 2 — Sideways Consolidation
BTC remains between approximately:
$80.1K–$81K
This would mean the market is building liquidity before the next directional move.
In this scenario, patience matters more than forcing a trade.
🔴 Scenario 3 — Support Breakdown
BTC loses $80.1K decisively.
The immediate long setup becomes invalid.
The next major area to monitor would be around:
$78.9K–$79K
That zone is particularly important because it aligns closely with the 4H MA25.
🧩 Why $82K Matters
BTC has already demonstrated that buyers can reclaim $80K.
The next challenge is different.
Can buyers absorb the supply around $82K?
Recent reporting has also highlighted BTC's difficulty pushing through the ~$82K area after the recovery from lower levels. �
Pluang +1
Therefore, today's trade isn't about predicting that BTC must break $82K.
It's about preparing for both possibilities.
Breakout + retest = continuation setup.
Rejection + loss of support = wait.
That is the difference between having a plan and chasing price.
🐺 Final Call
Bitcoin's current structure remains constructive on the 4H chart, with price holding above the MA25 and MA99.
But the market is approaching an important resistance cluster.
The AltcoinWolF plan:
Don't chase $80.8K.
Watch:
🟢 $80.5K–$80.65K for a confirmed pullback long.
OR
🚀 $81K reclaim + retest for a breakout continuation setup.
And above everything:
$81.95K–$82.3K is the major battlefield.
Let Bitcoin prove the move.
The market rewards patience, not emotions. Wait for confirmation, protect your capital, and let the charts lead the way.
🚀 AltcoinWolF Closing CTA
🚀 Trade smarter. Move faster. Stay ahead.
📊 Follow AltcoinWolF for high-conviction setups, precision entries, and market-leading crypto insights.
🐺⚡
#BitcoinMarketCapTopsTesla #BTCBreaks80K #SaylorHintsStrategyBitcoinBuy #AltcoinWolF #BTC走势分析 $BTC
{spot}(BTCUSDT)
Bitcoin Is Holding $80K — Is the Next Move a Breakout or Another Rejection?
Bitcoin has had an important recovery week.
After dropping toward the $75K area, BTC pushed aggressively higher and reclaimed $80K. On the charts provided for today’s analysis, BTC is trading around $80,825, with the 4H high at $81,951.
But there is an important distinction between recovering toward resistance and actually breaking resistance.
That is where today's AltcoinWolF analysis begins.
Recent market coverage also places the current battle around the $80K–$83K region, with BTC recently stalling close to $82K after its recovery. �
24/7 Wall St. +1
🐺 Premium Education Post: Don't Confuse Momentum With Confirmation
One of the biggest mistakes traders make after a strong Bitcoin move is entering simply because the candles look bullish.
A strong move does not automatically mean the next candle will continue higher.
Instead, we want to answer three questions:
Where is support?
Where is resistance?
What price action confirms the next move?
Today's chart gives us a relatively clean structure.
BTC has:
Recovered strongly from ~$74,968.
Reclaimed the $80K region.
Remained above its major 4H moving averages.
Pulled back from ~$81,951.
Started recovering again around the $80.1K–$80.5K region.
The key now is whether buyers can reclaim the short-term resistance around $80.9K–$81K and eventually challenge the larger $81.95K–$82.3K zone.
📊 BTC/USDT Technical Analysis
1. 4H Timeframe — Bullish Structure With Resistance Ahead
The 4H chart shows a powerful recovery from approximately $74,968 to $81,951.
Current price: ~$80,825
Moving averages
MA7: $80,907.92
MA25: $78,928.17
MA99: $78,414.83
The most important observation is that BTC remains above the MA25 and MA99.
That keeps the broader 4H structure constructive.
However, price is currently slightly below the 4H MA7, showing that short-term momentum has cooled after the rally.
Major 4H resistance
🔴 $81,950–$82,300
This is the area bulls need to overcome.
Recent market coverage likewise identifies the low-$82K to low-$83K region as an important resistance area. �
24/7 Wall St. +1
Major support
🟢 $80,150–$80,500
Below that:
🟢 $78,900–$79,000
2. 15M Timeframe — Buyers Are Attempting a Recovery
The 15M chart gives us the short-term execution structure.
Current price: ~$80,825
Moving averages
MA7: $80,670.85
MA25: $80,511.50
MA99: $80,872.67
BTC is currently above the MA7 and MA25 but is approaching the MA99.
That makes approximately $80,870–$80,930 the immediate confirmation area.
The chart also shows:
Local low: ~$80,165
Local high: ~$80,929
So the immediate question is simple:
Can BTC reclaim and hold ~$80,930–$81,000?
If yes, momentum can potentially expand toward the higher resistance zone.
🎯 Premium Trade Setup — Long Only
As always with the AltcoinWolF framework:
We don't chase candles. We wait for confirmation.
🟢 Setup A — Pullback Long
Entry zone:
$80,500–$80,650
Wait for:
bullish rejection from the zone
15M bullish candle confirmation
support holding after the retest
TargetsBitcoin Is Holding $80K — Is the Next Move a Breakout or Another Rejection?
TP1: $81,000
TP2: $81,500
TP3: $81,900–$82,000
SL: Around $80,100, adjusted according to the confirmation candle/structure and personal risk tolerance.
🚀 Setup B — Breakout Long
If BTC does not provide the pullback and instead pushes higher:
Confirmation
15M candle close above $80,950–$81,000
Then look for a successful retest of that area.
Entry
~$80,950–$81,100 after confirmation/retest
Targets
TP1: $81,500
TP2: $81,950
TP3: $82,300
SL: Around $80,550, subject to the actual retest structure.
Important
Do not chase BTC directly into $81,950–$82,300.
That is the major 4H resistance zone.
🛑 Confirmation & Invalidation
Bullish confirmation
BTC:
$80,500 support → bullish reaction → $80,930/$81K reclaim → continuation
This would strengthen the long setup.
Bullish breakout confirmation
$81K reclaim + successful retest → $81.5K → $81.95K
Then the market can test the larger $82K region.
Invalidation
A decisive loss of approximately:
$80,100
would weaken the immediate long setup.
A deeper loss of:
$78,900
would materially weaken the current 4H bullish structure.
🧠 Risk Management: The Part Most Traders Ignore
A setup is not complete just because an entry and targets exist.
Risk management comes first.
For today's BTC setup:
Don't enter simply because BTC is green.
Don't increase leverage to compensate for a missed entry.
Don't move the stop farther away emotionally.
Don't chase a breakout candle without confirmation.
If the setup invalidates, step aside.
Protect capital before looking for the next opportunity.
Risk first. Reward second.
That is one of the core principles behind the AltcoinWolF framework.
📊 AltcoinWolF Market Scorecard
Factor
Current Reading
4H Structure
🟢 Bullish
Price vs MA25
🟢 Above
Price vs MA99
🟢 Above
15M Structure
🟢 Recovering
Immediate Resistance
🔴 $80.93K–$81K
Major Resistance
🔴 $81.95K–$82.3K
Immediate Support
🟢 $80.15K–$80.5K
Major Support
🟢 $78.9K–$79K
Long Setup
🟢 Confirmation required
Chase Entry
❌ Avoid
🔮 Sunday Scenario Analysis
🟢 Scenario 1 — Bullish Continuation
BTC holds $80.5K and reclaims $81K.
Potential path:
$80.5K → $81K → $81.5K → $81.95K → $82.3K
The key requirement is confirmation rather than simply touching each level.
🟡 Scenario 2 — Sideways Consolidation
BTC remains between approximately:
$80.1K–$81K
This would mean the market is building liquidity before the next directional move.
In this scenario, patience matters more than forcing a trade.
🔴 Scenario 3 — Support Breakdown
BTC loses $80.1K decisively.
The immediate long setup becomes invalid.
The next major area to monitor would be around:
$78.9K–$79K
That zone is particularly important because it aligns closely with the 4H MA25.
🧩 Why $82K Matters
BTC has already demonstrated that buyers can reclaim $80K.
The next challenge is different.
Can buyers absorb the supply around $82K?
Recent reporting has also highlighted BTC's difficulty pushing through the ~$82K area after the recovery from lower levels. �
Pluang +1
Therefore, today's trade isn't about predicting that BTC must break $82K.
It's about preparing for both possibilities.
Breakout + retest = continuation setup.
Rejection + loss of support = wait.
That is the difference between having a plan and chasing price.
🐺 Final Call
Bitcoin's current structure remains constructive on the 4H chart, with price holding above the MA25 and MA99.
But the market is approaching an important resistance cluster.
The AltcoinWolF plan:
Don't chase $80.8K.
Watch:
🟢 $80.5K–$80.65K for a confirmed pullback long.
OR
🚀 $81K reclaim + retest for a breakout continuation setup.
And above everything:
$81.95K–$82.3K is the major battlefield.
Let Bitcoin prove the move.
The market rewards patience, not emotions. Wait for confirmation, protect your capital, and let the charts lead the way.
🚀 AltcoinWolF Closing CTA
🚀 Trade smarter. Move faster. Stay ahead.
📊 Follow AltcoinWolF for high-conviction setups, precision entries, and market-leading crypto insights.
🐺⚡
#BitcoinMarketCapTopsTesla #BTCBreaks80K #SaylorHintsStrategyBitcoinBuy #AltcoinWolF #BTC走势分析 $BTC
After dropping toward the $75K area, BTC pushed aggressively higher and reclaimed $80K. On the charts provided for today’s analysis, BTC is trading around $80,825, with the 4H high at $81,951.
But there is an important distinction between recovering toward resistance and actually breaking resistance.
That is where today's AltcoinWolF analysis begins.
Recent market coverage also places the current battle around the $80K–$83K region, with BTC recently stalling close to $82K after its recovery. �
24/7 Wall St. +1
🐺 Premium Education Post: Don't Confuse Momentum With Confirmation
One of the biggest mistakes traders make after a strong Bitcoin move is entering simply because the candles look bullish.
A strong move does not automatically mean the next candle will continue higher.
Instead, we want to answer three questions:
Where is support?
Where is resistance?
What price action confirms the next move?
Today's chart gives us a relatively clean structure.
BTC has:
Recovered strongly from ~$74,968.
Reclaimed the $80K region.
Remained above its major 4H moving averages.
Pulled back from ~$81,951.
Started recovering again around the $80.1K–$80.5K region.
The key now is whether buyers can reclaim the short-term resistance around $80.9K–$81K and eventually challenge the larger $81.95K–$82.3K zone.
📊 BTC/USDT Technical Analysis
1. 4H Timeframe — Bullish Structure With Resistance Ahead
The 4H chart shows a powerful recovery from approximately $74,968 to $81,951.
Current price: ~$80,825
Moving averages
MA7: $80,907.92
MA25: $78,928.17
MA99: $78,414.83
The most important observation is that BTC remains above the MA25 and MA99.
That keeps the broader 4H structure constructive.
However, price is currently slightly below the 4H MA7, showing that short-term momentum has cooled after the rally.
Major 4H resistance
🔴 $81,950–$82,300
This is the area bulls need to overcome.
Recent market coverage likewise identifies the low-$82K to low-$83K region as an important resistance area. �
24/7 Wall St. +1
Major support
🟢 $80,150–$80,500
Below that:
🟢 $78,900–$79,000
2. 15M Timeframe — Buyers Are Attempting a Recovery
The 15M chart gives us the short-term execution structure.
Current price: ~$80,825
Moving averages
MA7: $80,670.85
MA25: $80,511.50
MA99: $80,872.67
BTC is currently above the MA7 and MA25 but is approaching the MA99.
That makes approximately $80,870–$80,930 the immediate confirmation area.
The chart also shows:
Local low: ~$80,165
Local high: ~$80,929
So the immediate question is simple:
Can BTC reclaim and hold ~$80,930–$81,000?
If yes, momentum can potentially expand toward the higher resistance zone.
🎯 Premium Trade Setup — Long Only
As always with the AltcoinWolF framework:
We don't chase candles. We wait for confirmation.
🟢 Setup A — Pullback Long
Entry zone:
$80,500–$80,650
Wait for:
bullish rejection from the zone
15M bullish candle confirmation
support holding after the retest
TargetsBitcoin Is Holding $80K — Is the Next Move a Breakout or Another Rejection?
TP1: $81,000
TP2: $81,500
TP3: $81,900–$82,000
SL: Around $80,100, adjusted according to the confirmation candle/structure and personal risk tolerance.
🚀 Setup B — Breakout Long
If BTC does not provide the pullback and instead pushes higher:
Confirmation
15M candle close above $80,950–$81,000
Then look for a successful retest of that area.
Entry
~$80,950–$81,100 after confirmation/retest
Targets
TP1: $81,500
TP2: $81,950
TP3: $82,300
SL: Around $80,550, subject to the actual retest structure.
Important
Do not chase BTC directly into $81,950–$82,300.
That is the major 4H resistance zone.
🛑 Confirmation & Invalidation
Bullish confirmation
BTC:
$80,500 support → bullish reaction → $80,930/$81K reclaim → continuation
This would strengthen the long setup.
Bullish breakout confirmation
$81K reclaim + successful retest → $81.5K → $81.95K
Then the market can test the larger $82K region.
Invalidation
A decisive loss of approximately:
$80,100
would weaken the immediate long setup.
A deeper loss of:
$78,900
would materially weaken the current 4H bullish structure.
🧠 Risk Management: The Part Most Traders Ignore
A setup is not complete just because an entry and targets exist.
Risk management comes first.
For today's BTC setup:
Don't enter simply because BTC is green.
Don't increase leverage to compensate for a missed entry.
Don't move the stop farther away emotionally.
Don't chase a breakout candle without confirmation.
If the setup invalidates, step aside.
Protect capital before looking for the next opportunity.
Risk first. Reward second.
That is one of the core principles behind the AltcoinWolF framework.
📊 AltcoinWolF Market Scorecard
Factor
Current Reading
4H Structure
🟢 Bullish
Price vs MA25
🟢 Above
Price vs MA99
🟢 Above
15M Structure
🟢 Recovering
Immediate Resistance
🔴 $80.93K–$81K
Major Resistance
🔴 $81.95K–$82.3K
Immediate Support
🟢 $80.15K–$80.5K
Major Support
🟢 $78.9K–$79K
Long Setup
🟢 Confirmation required
Chase Entry
❌ Avoid
🔮 Sunday Scenario Analysis
🟢 Scenario 1 — Bullish Continuation
BTC holds $80.5K and reclaims $81K.
Potential path:
$80.5K → $81K → $81.5K → $81.95K → $82.3K
The key requirement is confirmation rather than simply touching each level.
🟡 Scenario 2 — Sideways Consolidation
BTC remains between approximately:
$80.1K–$81K
This would mean the market is building liquidity before the next directional move.
In this scenario, patience matters more than forcing a trade.
🔴 Scenario 3 — Support Breakdown
BTC loses $80.1K decisively.
The immediate long setup becomes invalid.
The next major area to monitor would be around:
$78.9K–$79K
That zone is particularly important because it aligns closely with the 4H MA25.
🧩 Why $82K Matters
BTC has already demonstrated that buyers can reclaim $80K.
The next challenge is different.
Can buyers absorb the supply around $82K?
Recent reporting has also highlighted BTC's difficulty pushing through the ~$82K area after the recovery from lower levels. �
Pluang +1
Therefore, today's trade isn't about predicting that BTC must break $82K.
It's about preparing for both possibilities.
Breakout + retest = continuation setup.
Rejection + loss of support = wait.
That is the difference between having a plan and chasing price.
🐺 Final Call
Bitcoin's current structure remains constructive on the 4H chart, with price holding above the MA25 and MA99.
But the market is approaching an important resistance cluster.
The AltcoinWolF plan:
Don't chase $80.8K.
Watch:
🟢 $80.5K–$80.65K for a confirmed pullback long.
OR
🚀 $81K reclaim + retest for a breakout continuation setup.
And above everything:
$81.95K–$82.3K is the major battlefield.
Let Bitcoin prove the move.
The market rewards patience, not emotions. Wait for confirmation, protect your capital, and let the charts lead the way.
🚀 AltcoinWolF Closing CTA
🚀 Trade smarter. Move faster. Stay ahead.
📊 Follow AltcoinWolF for high-conviction setups, precision entries, and market-leading crypto insights.
🐺⚡
#BitcoinMarketCapTopsTesla #BTCBreaks80K #SaylorHintsStrategyBitcoinBuy #AltcoinWolF #BTC走势分析 $BTC
88
·
--
BTC $80K Is Holding — But Can Bulls Break $82K? 🐺
Bitcoin is currently around $80.8K after a strong recovery from the ~$75K area.
Key levels:
🟢 Support: $80.15K–$80.5K
🟢 Major support: $78.9K–$79K
🔴 Resistance: $80.93K–$81K
🔴 Major resistance: $81.95K–$82.3K
Long Plan
Pullback: $80.5K–$80.65K + bullish confirmation
Breakout: $81K reclaim + successful retest
🎯 TP1: $81K / $81.5K
🎯 TP2: $81.95K
🎯 TP3: $82.3K
❌ No confirmation = no forced entry.
The market doesn't pay traders for predicting.
It pays them for managing risk and executing a plan.
What level are you watching — $80.5K support or $81K breakout?
🐺 AltcoinWolF#SaylorHintsStrategyBitcoinBuy #BitcoinMarketCapTopsTesla #BTCBreaks80K #BuffettStepsDownAsBerkshireChairman #AltcoinWolF $BTC
{spot}(BTCUSDT)
BTC $80K Is Holding — But Can Bulls Break $82K? 🐺
Bitcoin is currently around $80.8K after a strong recovery from the ~$75K area.
Key levels:
🟢 Support: $80.15K–$80.5K
🟢 Major support: $78.9K–$79K
🔴 Resistance: $80.93K–$81K
🔴 Major resistance: $81.95K–$82.3K
Long Plan
Pullback: $80.5K–$80.65K + bullish confirmation
Breakout: $81K reclaim + successful retest
🎯 TP1: $81K / $81.5K
🎯 TP2: $81.95K
🎯 TP3: $82.3K
❌ No confirmation = no forced entry.
The market doesn't pay traders for predicting.
It pays them for managing risk and executing a plan.
What level are you watching — $80.5K support or $81K breakout?
🐺 AltcoinWolF#SaylorHintsStrategyBitcoinBuy #BitcoinMarketCapTopsTesla #BTCBreaks80K #BuffettStepsDownAsBerkshireChairman #AltcoinWolF $BTC
Bitcoin is currently around $80.8K after a strong recovery from the ~$75K area.
Key levels:
🟢 Support: $80.15K–$80.5K
🟢 Major support: $78.9K–$79K
🔴 Resistance: $80.93K–$81K
🔴 Major resistance: $81.95K–$82.3K
Long Plan
Pullback: $80.5K–$80.65K + bullish confirmation
Breakout: $81K reclaim + successful retest
🎯 TP1: $81K / $81.5K
🎯 TP2: $81.95K
🎯 TP3: $82.3K
❌ No confirmation = no forced entry.
The market doesn't pay traders for predicting.
It pays them for managing risk and executing a plan.
What level are you watching — $80.5K support or $81K breakout?
🐺 AltcoinWolF#SaylorHintsStrategyBitcoinBuy #BitcoinMarketCapTopsTesla #BTCBreaks80K #BuffettStepsDownAsBerkshireChairman #AltcoinWolF $BTC
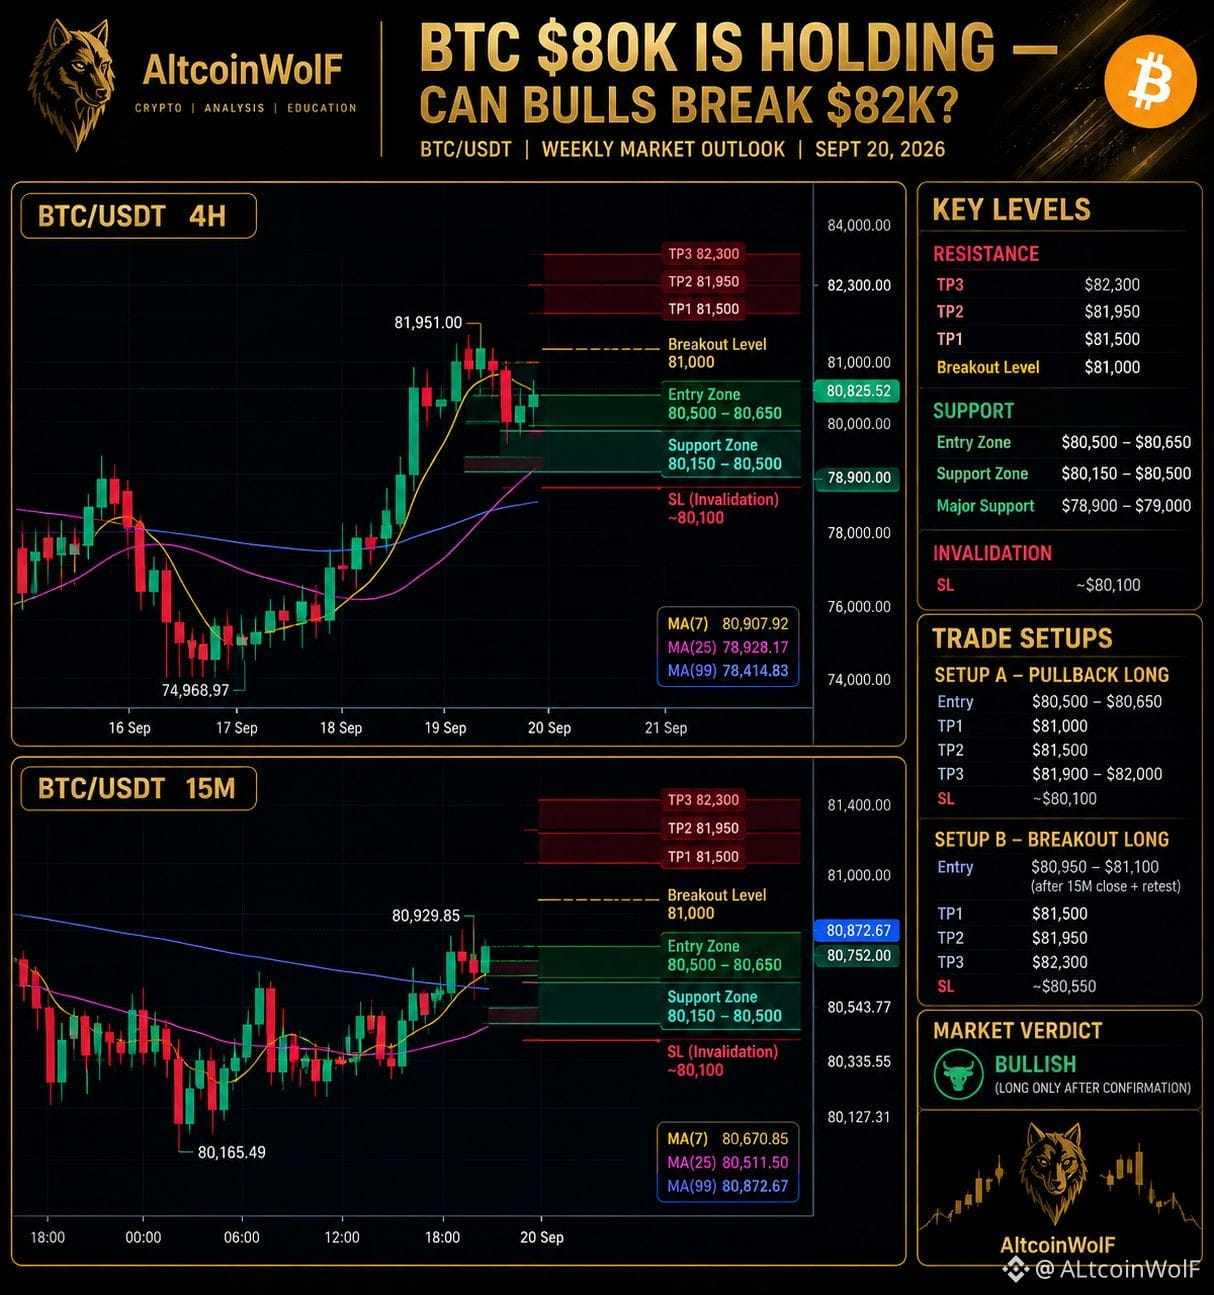
101
Log in to explore more content
Join global crypto users on Binance Square
⚡️ Get latest and useful information about crypto.
💬 Trusted by the world’s largest crypto exchange.
👍 Discover real insights from verified creators.
Email / Phone number
Trending Topics
DriftHackVictimsBeginClaims
12,802 views
214 Discussing
#DriftHackVictimsBeginClaims
Victims of the April 1 Drift exploit, which caused nearly $295.4M in verified losses, can now claim DFX recovery tokens.
the initial recovery pool is only about $3.1M, so the launch payout is roughly $0.0104 per $1 lost - around $10.40 for every $1,000 lost.
Victims can redeem, sell, or hold DFX and wait for future recovery funds, including protocol revenue, partner commitments and recovered assets.
Taking the payout now burns the DFX and ends that claim permanently. #Mahanadi
Digital Mahanadi
·0 Likes
·115 views
SolanaTokenizedStockVolumeTops$4.4BInSeptember
2,042 views
30 Discussing
BitcoinSpotETFsDraw$6.34BInflowsInQ3
10,403 views
143 Discussing