
Sujit sahu
5 Posts

Sujit sahu
Report
Block User
Smart Crypto Intelligence15m/30m Timeframe Analysis RSI Divergence & Support Levels Follow for daily trades!
4 Following
0 Followers
1 Liked
Posts
PINNED
·
--
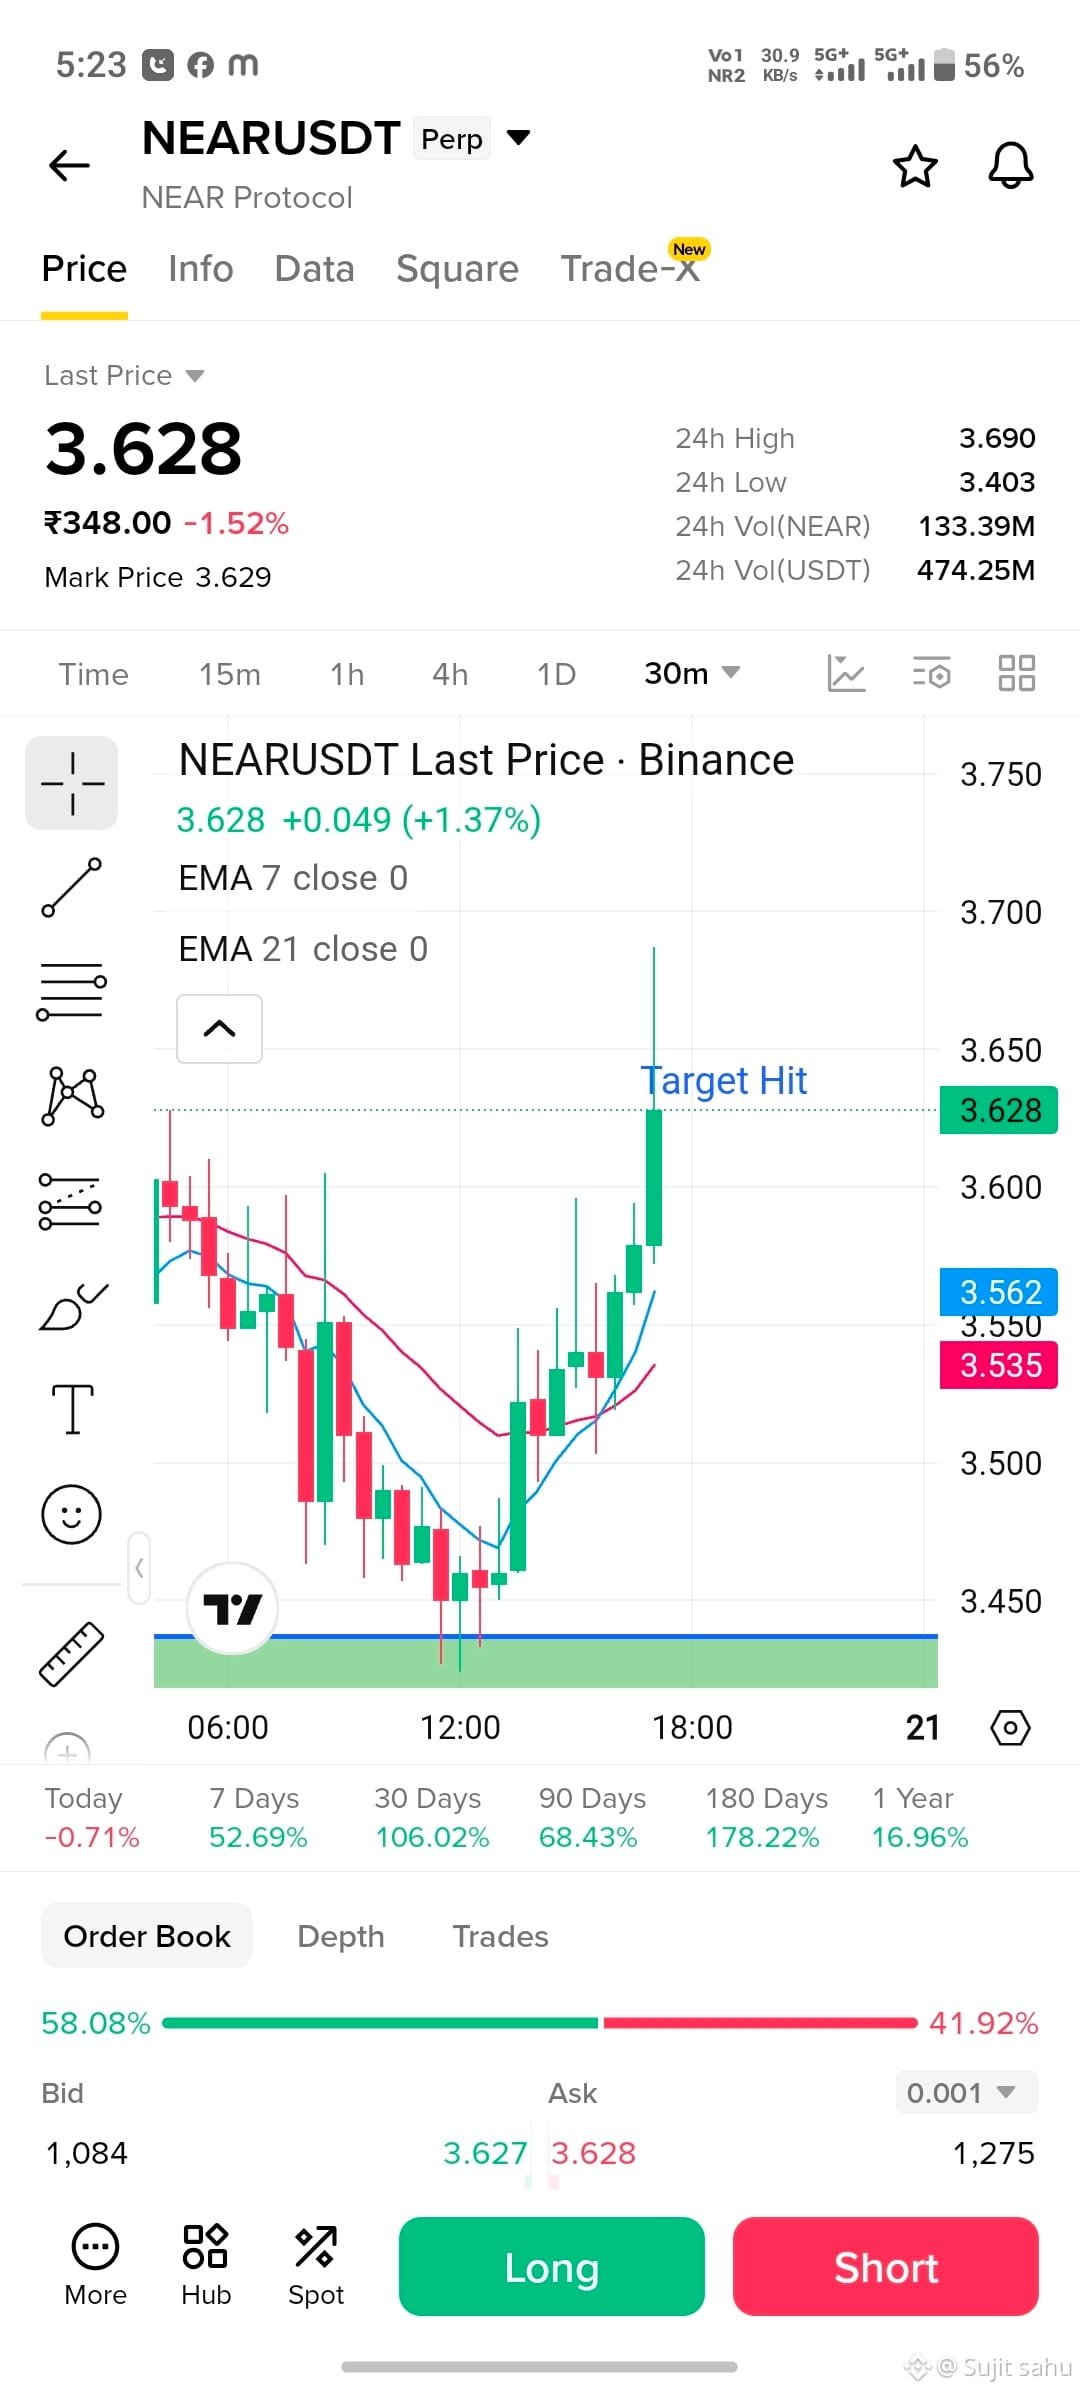
🎯 BOOM! $NEAR Target 1 Hit Perfectly (+5.5% Move Unlocked)! 🚀
Another precision setup delivered right on schedule!
In our previous 30m chart analysis, we identified the key demand/support zone around $3.400 - $3.430. Price reacted exactly as predicted with a strong bullish surge!
📌 Setup Recap:
• Entry Zone: $3.410 - $3.438
• Target 1 (TP1): $3.600 🎯 [HIT AT $3.628]
• Target 2 (TP2): $3.750 ⏳ (In Progress)
Consistent high-accuracy predictions on $ETH,$NEAR & major pairs! 📊
🔥 Trading Tip: Trail your Stop Loss (SL) to your entry price to secure risk-free profits as we push toward Target 2!
👉 Tap the $NEAR Widget below to view the live order book & trade the momentum!
Don't forget to Follow & Turn on Notifications 🔔 for daily accurate chart updates! 👇
⚠️ Disclaimer: Content provided is for educational purposes only. Always manage your risk and DYOR (Do Your Own Research) before taking any financial decisions.#NEARUSDT #NearBullish #targethit
🎯 BOOM! $NEAR Target 1 Hit Perfectly (+5.5% Move Unlocked)! 🚀
Another precision setup delivered right on schedule!
In our previous 30m chart analysis, we identified the key demand/support zone around $3.400 - $3.430. Price reacted exactly as predicted with a strong bullish surge!
📌 Setup Recap:
• Entry Zone: $3.410 - $3.438
• Target 1 (TP1): $3.600 🎯 [HIT AT $3.628]
• Target 2 (TP2): $3.750 ⏳ (In Progress)
Consistent high-accuracy predictions on $ETH,$NEAR & major pairs! 📊
🔥 Trading Tip: Trail your Stop Loss (SL) to your entry price to secure risk-free profits as we push toward Target 2!
👉 Tap the $NEAR Widget below to view the live order book & trade the momentum!
Don't forget to Follow & Turn on Notifications 🔔 for daily accurate chart updates! 👇
⚠️ Disclaimer: Content provided is for educational purposes only. Always manage your risk and DYOR (Do Your Own Research) before taking any financial decisions.#NEARUSDT #NearBullish #targethit
Another precision setup delivered right on schedule!
In our previous 30m chart analysis, we identified the key demand/support zone around $3.400 - $3.430. Price reacted exactly as predicted with a strong bullish surge!
📌 Setup Recap:
• Entry Zone: $3.410 - $3.438
• Target 1 (TP1): $3.600 🎯 [HIT AT $3.628]
• Target 2 (TP2): $3.750 ⏳ (In Progress)
Consistent high-accuracy predictions on $ETH,$NEAR & major pairs! 📊
🔥 Trading Tip: Trail your Stop Loss (SL) to your entry price to secure risk-free profits as we push toward Target 2!
👉 Tap the $NEAR Widget below to view the live order book & trade the momentum!
Don't forget to Follow & Turn on Notifications 🔔 for daily accurate chart updates! 👇
⚠️ Disclaimer: Content provided is for educational purposes only. Always manage your risk and DYOR (Do Your Own Research) before taking any financial decisions.#NEARUSDT #NearBullish #targethit
96
PINNED
·
--
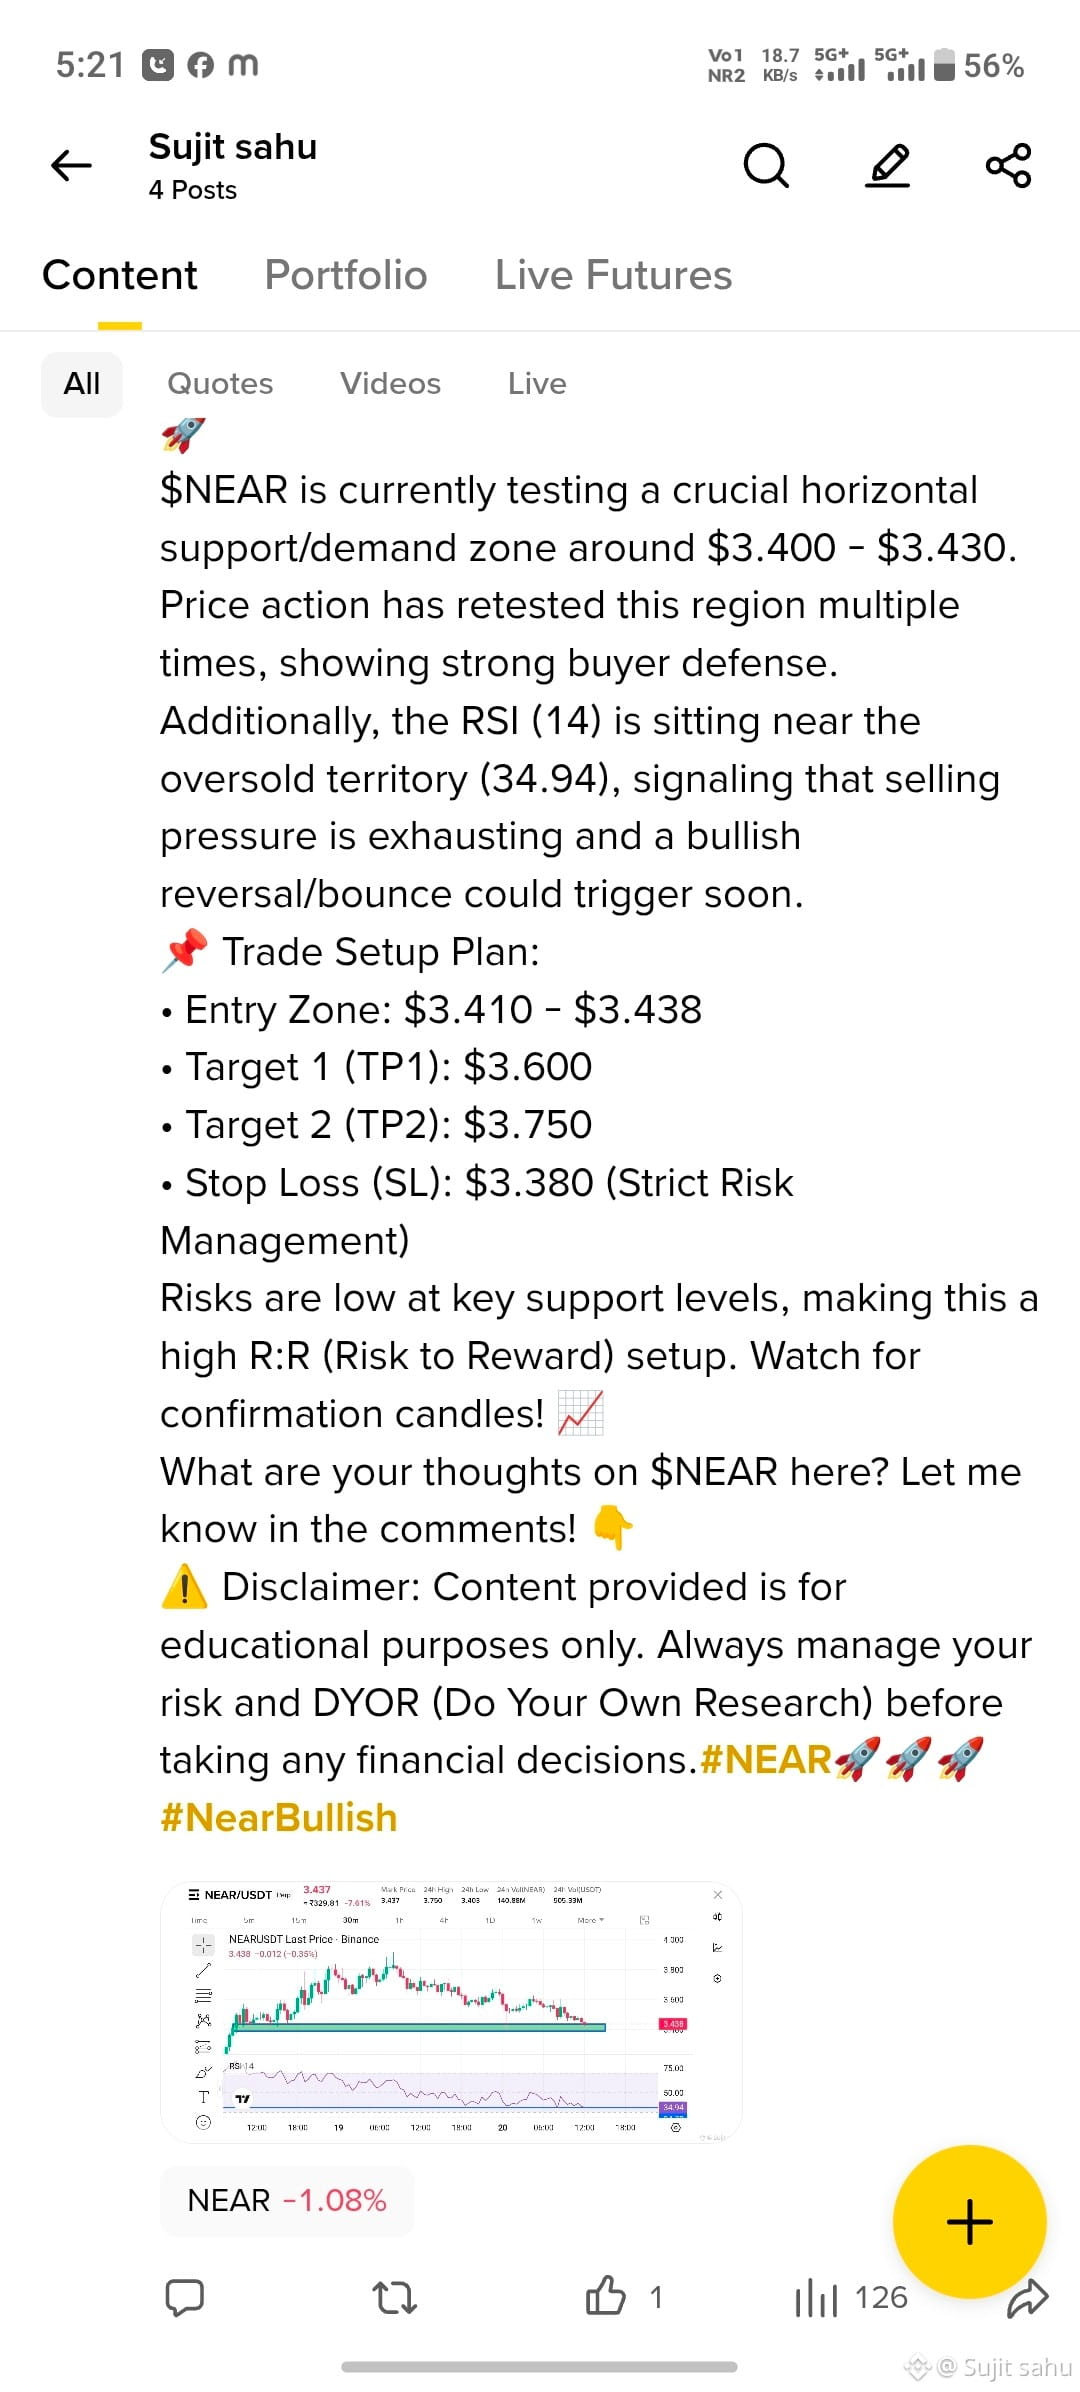
🚨 $NEAR /USDT (30m Timeframe) - Strong Demand Zone & RSI Oversold Bounce Loading! 🚀
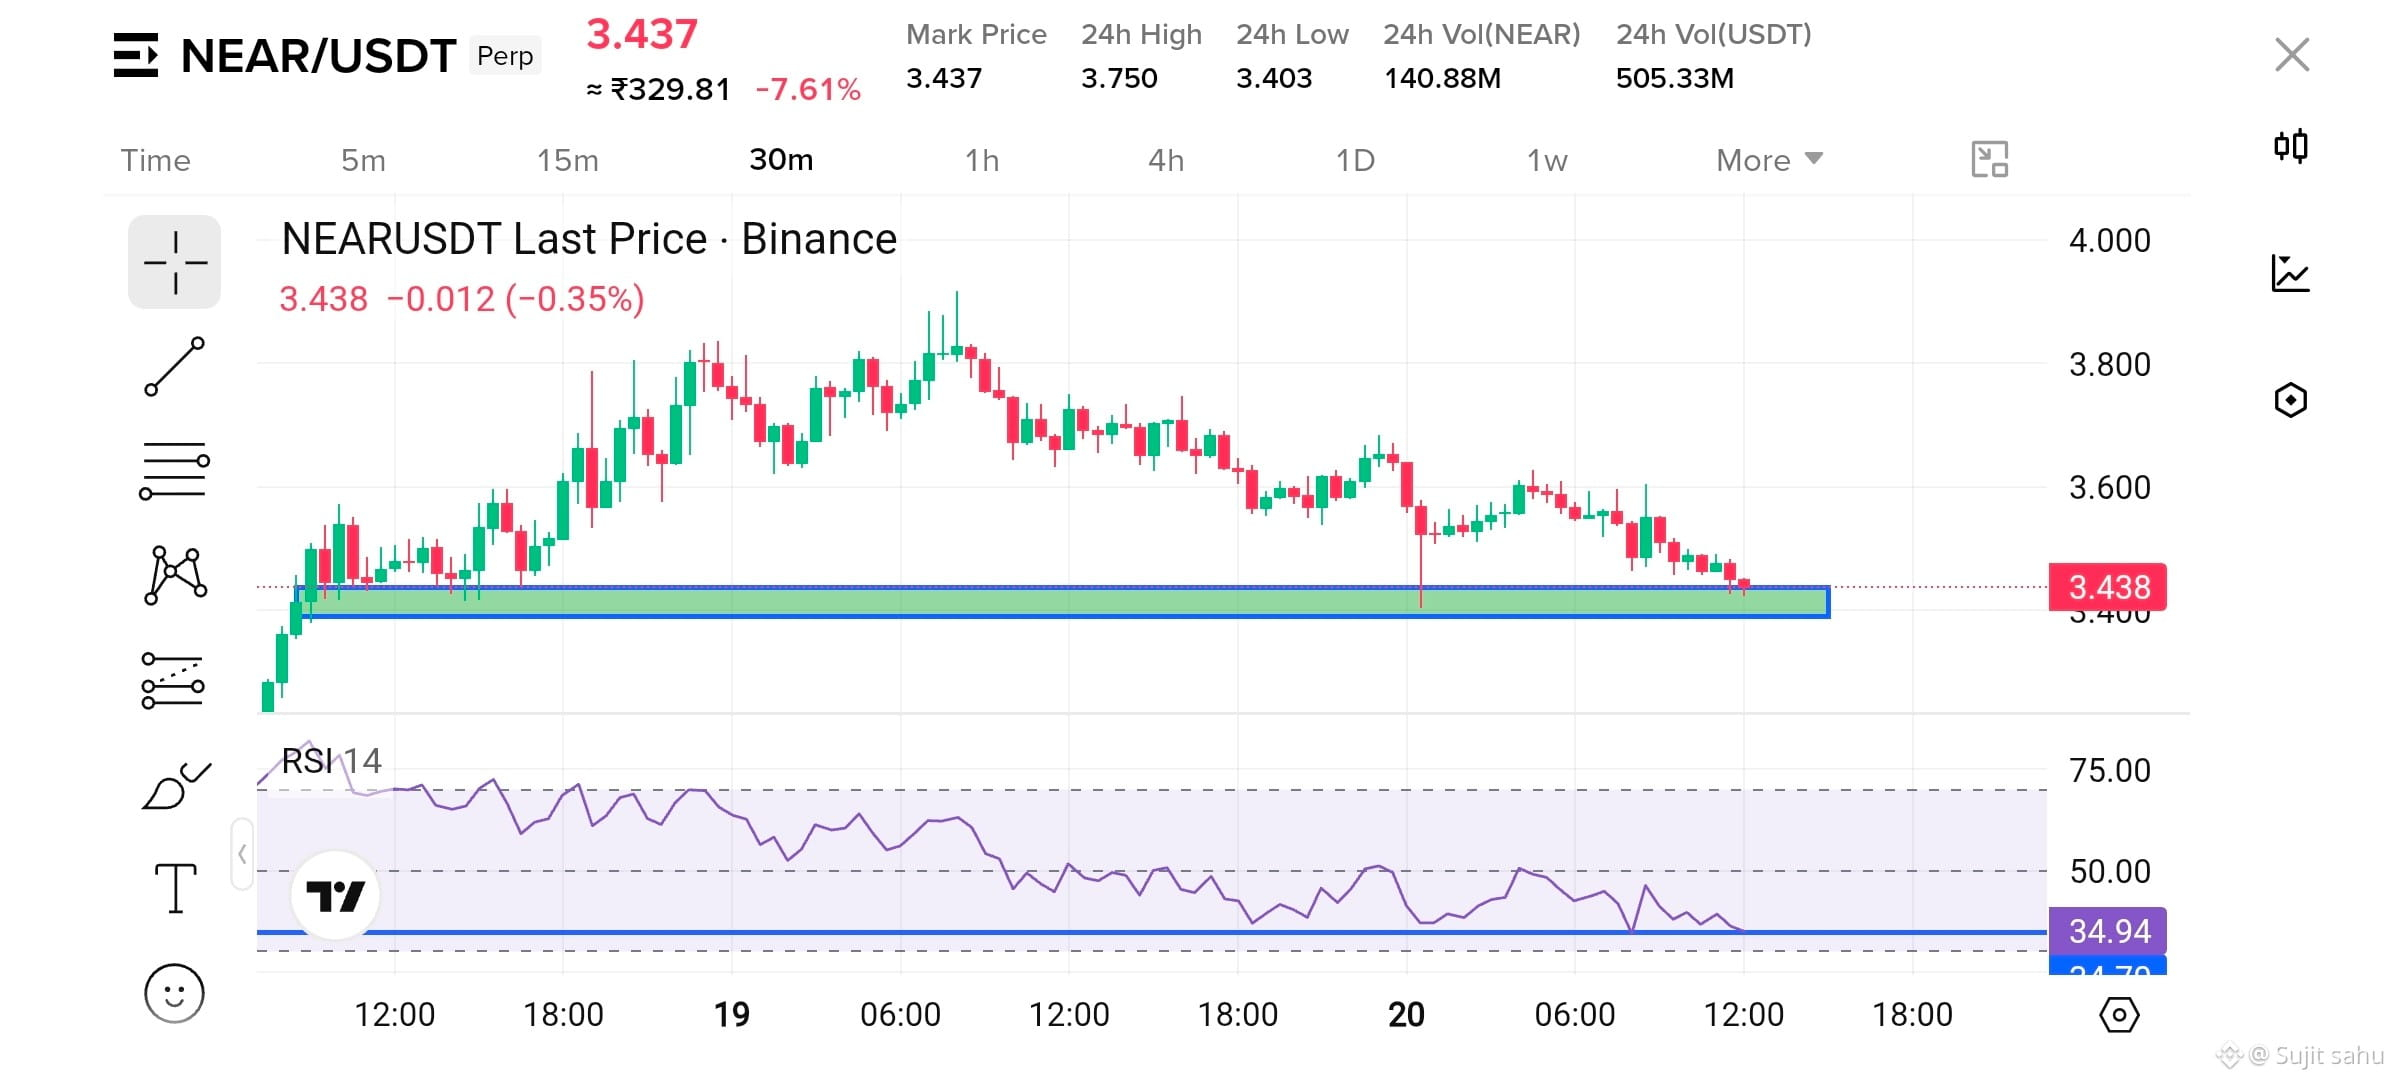
$NEAR is currently testing a crucial horizontal support/demand zone around $3.400 - $3.430. Price action has retested this region multiple times, showing strong buyer defense.
Additionally, the RSI (14) is sitting near the oversold territory (34.94), signaling that selling pressure is exhausting and a bullish reversal/bounce could trigger soon.
📌 Trade Setup Plan:
• Entry Zone: $3.410 - $3.438
• Target 1 (TP1): $3.600
• Target 2 (TP2): $3.750
• Stop Loss (SL): $3.380 (Strict Risk Management)
Risks are low at key support levels, making this a high R:R (Risk to Reward) setup. Watch for confirmation candles! 📈
What are your thoughts on $NEAR here? Let me know in the comments! 👇
⚠️ Disclaimer: Content provided is for educational purposes only. Always manage your risk and DYOR (Do Your Own Research) before taking any financial decisions.#NEAR🚀🚀🚀 #NearBullish
🚨 $NEAR /USDT (30m Timeframe) - Strong Demand Zone & RSI Oversold Bounce Loading! 🚀
$NEAR is currently testing a crucial horizontal support/demand zone around $3.400 - $3.430. Price action has retested this region multiple times, showing strong buyer defense.
Additionally, the RSI (14) is sitting near the oversold territory (34.94), signaling that selling pressure is exhausting and a bullish reversal/bounce could trigger soon.
📌 Trade Setup Plan:
• Entry Zone: $3.410 - $3.438
• Target 1 (TP1): $3.600
• Target 2 (TP2): $3.750
• Stop Loss (SL): $3.380 (Strict Risk Management)
Risks are low at key support levels, making this a high R:R (Risk to Reward) setup. Watch for confirmation candles! 📈
What are your thoughts on $NEAR here? Let me know in the comments! 👇
⚠️ Disclaimer: Content provided is for educational purposes only. Always manage your risk and DYOR (Do Your Own Research) before taking any financial decisions.#NEAR🚀🚀🚀 #NearBullish
$NEAR is currently testing a crucial horizontal support/demand zone around $3.400 - $3.430. Price action has retested this region multiple times, showing strong buyer defense.
Additionally, the RSI (14) is sitting near the oversold territory (34.94), signaling that selling pressure is exhausting and a bullish reversal/bounce could trigger soon.
📌 Trade Setup Plan:
• Entry Zone: $3.410 - $3.438
• Target 1 (TP1): $3.600
• Target 2 (TP2): $3.750
• Stop Loss (SL): $3.380 (Strict Risk Management)
Risks are low at key support levels, making this a high R:R (Risk to Reward) setup. Watch for confirmation candles! 📈
What are your thoughts on $NEAR here? Let me know in the comments! 👇
⚠️ Disclaimer: Content provided is for educational purposes only. Always manage your risk and DYOR (Do Your Own Research) before taking any financial decisions.#NEAR🚀🚀🚀 #NearBullish
1
149
·
--
🚨 $CAKE /USDT (30m Timeframe) - Approaching Major Supply Zone! 📉
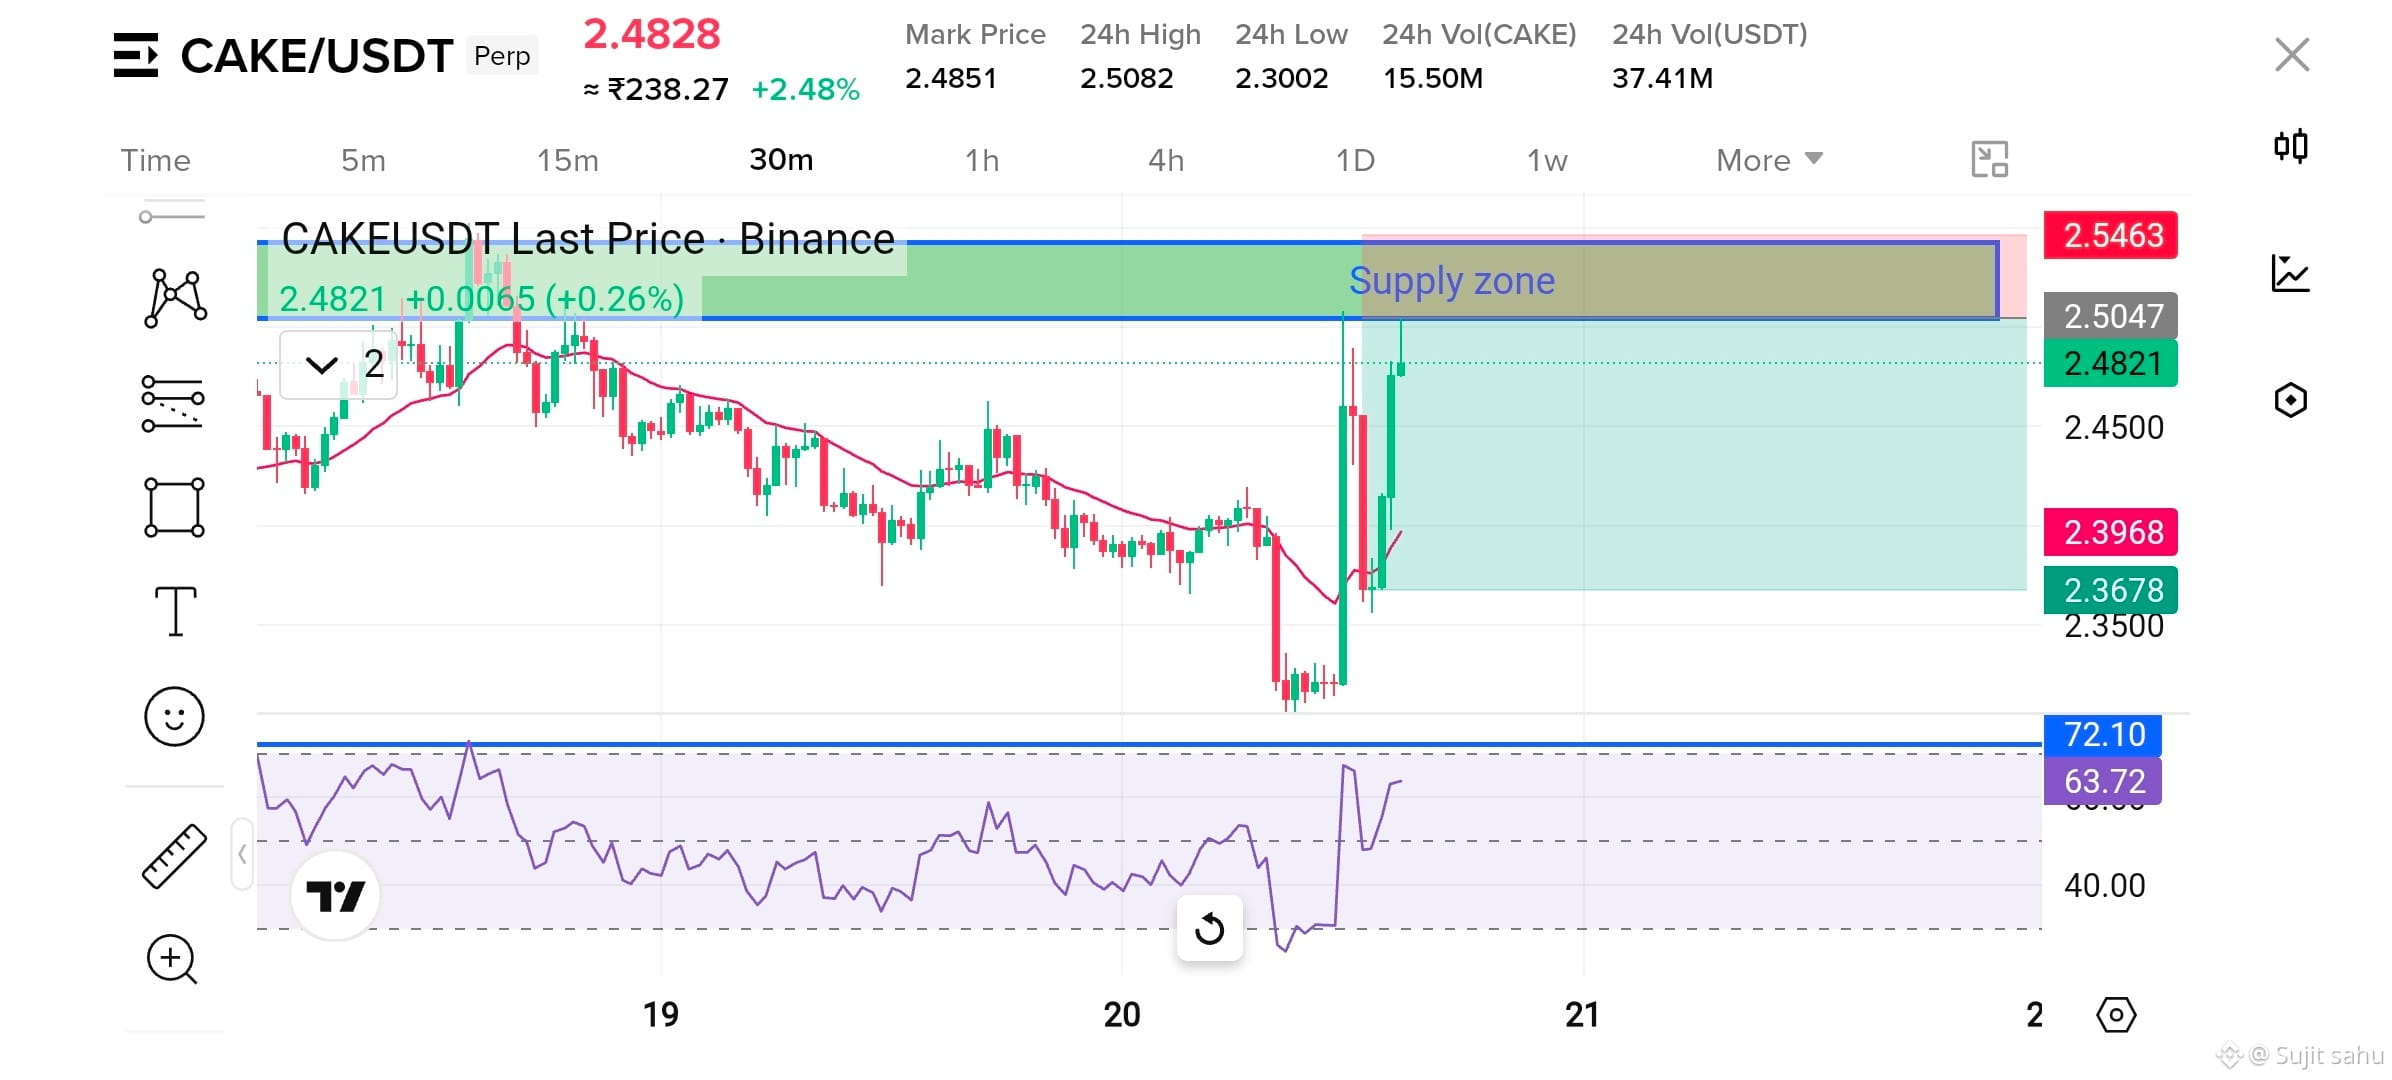
$CAKE has made a strong impulsive move upwards and is now testing a strong overhead Supply Zone ($2.500 - $2.540).
With RSI sitting near 63.72, momentum is starting to cool down near resistance, indicating a potential pullback or short trade setup.
📌 Bearish Setup Plan:
• Entry Zone: $2.480 - $2.500
• Target 1 (TP1): $2.420
• Target 2 (TP2): $2.368
• Stop Loss (SL): $2.546 (Strict Risk Management)
Watch for lower timeframe rejection candles before entering! 📊
How are you trading $CAKE today? Drop your thoughts below! 👇
⚠️ Disclaimer: Content provided is for educational purposes only. Always manage your risk and DYOR (Do Your Own Research) before taking any financial decisions.#CAKEUSDT #BearishAlert
🚨 $CAKE /USDT (30m Timeframe) - Approaching Major Supply Zone! 📉
$CAKE has made a strong impulsive move upwards and is now testing a strong overhead Supply Zone ($2.500 - $2.540).
With RSI sitting near 63.72, momentum is starting to cool down near resistance, indicating a potential pullback or short trade setup.
📌 Bearish Setup Plan:
• Entry Zone: $2.480 - $2.500
• Target 1 (TP1): $2.420
• Target 2 (TP2): $2.368
• Stop Loss (SL): $2.546 (Strict Risk Management)
Watch for lower timeframe rejection candles before entering! 📊
How are you trading $CAKE today? Drop your thoughts below! 👇
⚠️ Disclaimer: Content provided is for educational purposes only. Always manage your risk and DYOR (Do Your Own Research) before taking any financial decisions.#CAKEUSDT #BearishAlert
$CAKE has made a strong impulsive move upwards and is now testing a strong overhead Supply Zone ($2.500 - $2.540).
With RSI sitting near 63.72, momentum is starting to cool down near resistance, indicating a potential pullback or short trade setup.
📌 Bearish Setup Plan:
• Entry Zone: $2.480 - $2.500
• Target 1 (TP1): $2.420
• Target 2 (TP2): $2.368
• Stop Loss (SL): $2.546 (Strict Risk Management)
Watch for lower timeframe rejection candles before entering! 📊
How are you trading $CAKE today? Drop your thoughts below! 👇
⚠️ Disclaimer: Content provided is for educational purposes only. Always manage your risk and DYOR (Do Your Own Research) before taking any financial decisions.#CAKEUSDT #BearishAlert
257
·
--
Article
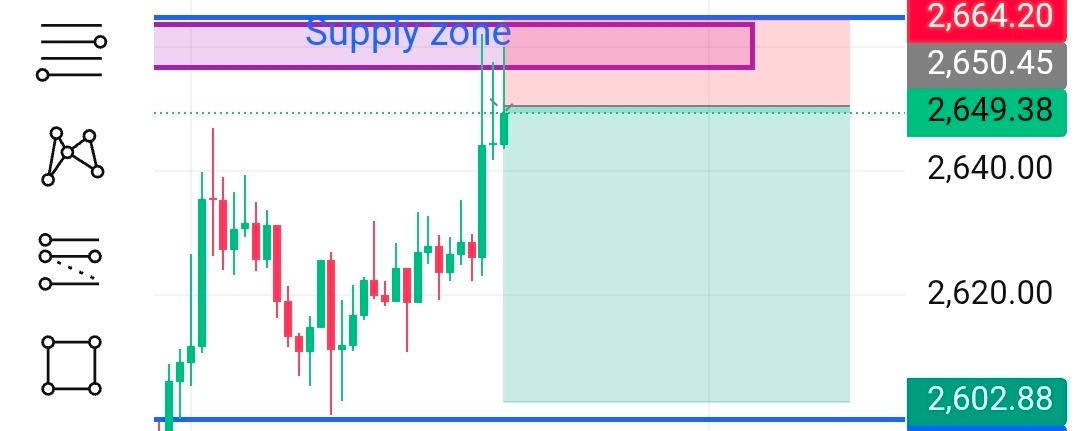
📉 $ETH Supply Zone Analysis: Resistance Rejection Setup on 30M Timeframe!#ETHUSDT is currently facing heavy resistance inside a key Supply Zone ($2,650 – $2,664) on the 30-minute chart. After testing a 24-hour high near $2,662.00, buyers are losing momentum, hinting at a potential short-term pullback toward lower support levels.
📊 Detailed Key Levels & Trade Setup (30M Chart):
🎯 Supply Zone (Resistance): $2,650.00 – $2,664.20
🟢 Current Price: ~$2,649.38
🔴 Stop-Loss (SL): $2,664.77 (Placed safely above the resistance level)
🟢 Take-Profit (TP): $2,600.08 – $2,602.88 (Major Demand / Support Zone)
⚖️ Risk-to-Reward Ratio: ~1:3.2 (Solid R:R Setup)
💡 Technical Breakdown & Strategy:
Supply Zone Dynamics: A Supply Zone represents an area with heavy seller concentration. As price hits $2,650–$2,664, sellers step in to drive prices lower.
Key Target: If the rejection holds, $ETH is expected to retest the lower support zone around $2,600.
Invalidation Point: A candle closing above $2,665 will invalidate this bearish short scenario.
⚠️ Disclaimer: This post is for educational and market analysis purposes only and does not constitute financial advice. Always manage your risk properly and Do Your Own Research (DYOR).#ETH #ETH🔥🔥🔥🔥🔥🔥 #Ethereum
📉 $ETH Supply Zone Analysis: Resistance Rejection Setup on 30M Timeframe!
#ETHUSDT is currently facing heavy resistance inside a key Supply Zone ($2,650 – $2,664) on the 30-minute chart. After testing a 24-hour high near $2,662.00, buyers are losing momentum, hinting at a potential short-term pullback toward lower support levels.
📊 Detailed Key Levels & Trade Setup (30M Chart):
🎯 Supply Zone (Resistance): $2,650.00 – $2,664.20
🟢 Current Price: ~$2,649.38
🔴 Stop-Loss (SL): $2,664.77 (Placed safely above the resistance level)
🟢 Take-Profit (TP): $2,600.08 – $2,602.88 (Major Demand / Support Zone)
⚖️ Risk-to-Reward Ratio: ~1:3.2 (Solid R:R Setup)
💡 Technical Breakdown & Strategy:
Supply Zone Dynamics: A Supply Zone represents an area with heavy seller concentration. As price hits $2,650–$2,664, sellers step in to drive prices lower.
Key Target: If the rejection holds, $ETH is expected to retest the lower support zone around $2,600.
Invalidation Point: A candle closing above $2,665 will invalidate this bearish short scenario.
⚠️ Disclaimer: This post is for educational and market analysis purposes only and does not constitute financial advice. Always manage your risk properly and Do Your Own Research (DYOR).#ETH #ETH🔥🔥🔥🔥🔥🔥 #Ethereum
📊 Detailed Key Levels & Trade Setup (30M Chart):
🎯 Supply Zone (Resistance): $2,650.00 – $2,664.20
🟢 Current Price: ~$2,649.38
🔴 Stop-Loss (SL): $2,664.77 (Placed safely above the resistance level)
🟢 Take-Profit (TP): $2,600.08 – $2,602.88 (Major Demand / Support Zone)
⚖️ Risk-to-Reward Ratio: ~1:3.2 (Solid R:R Setup)
💡 Technical Breakdown & Strategy:
Supply Zone Dynamics: A Supply Zone represents an area with heavy seller concentration. As price hits $2,650–$2,664, sellers step in to drive prices lower.
Key Target: If the rejection holds, $ETH is expected to retest the lower support zone around $2,600.
Invalidation Point: A candle closing above $2,665 will invalidate this bearish short scenario.
⚠️ Disclaimer: This post is for educational and market analysis purposes only and does not constitute financial advice. Always manage your risk properly and Do Your Own Research (DYOR).#ETH #ETH🔥🔥🔥🔥🔥🔥 #Ethereum
239
·
--
🚀 $BNB Market Update: Bullish Momentum Continues Near $760 Zone!#BNB is displaying strong bullish momentum on the 1-hour chart, currently trading around $761.24. After recovering from the $710–$720 support zone earlier this week, $BNB recently touched a 24-hour high of $768.92.
📊 Key Levels to Watch (1H Chart Analysis):
🟢 Immediate Support: $745.00 (24h Low)
🟢 Major Support Zone: $710.00 – $720.00
🔴 Immediate Resistance: $768.92 – $770.00
🔴 Major Target Level: $800.00
If $BNB manages to break above the $770 resistance with strong trading volume, we could see a push toward the $800 psychological barrier. On the downside, maintaining above $745 is crucial to sustain the short-term uptrend.
💡 Trading Strategy & Outlook:
Launchpool Advantage: $BNB holders continue to benefit from Binance ecosystem rewards and Launchpools.
Risk Management: Always use a Stop-Loss (SL) below $745 if opening short-term long position#BNB_Market_Update
🚀 $BNB Market Update: Bullish Momentum Continues Near $760 Zone!
#BNB is displaying strong bullish momentum on the 1-hour chart, currently trading around $761.24. After recovering from the $710–$720 support zone earlier this week, $BNB recently touched a 24-hour high of $768.92.
📊 Key Levels to Watch (1H Chart Analysis):
🟢 Immediate Support: $745.00 (24h Low)
🟢 Major Support Zone: $710.00 – $720.00
🔴 Immediate Resistance: $768.92 – $770.00
🔴 Major Target Level: $800.00
If $BNB manages to break above the $770 resistance with strong trading volume, we could see a push toward the $800 psychological barrier. On the downside, maintaining above $745 is crucial to sustain the short-term uptrend.
💡 Trading Strategy & Outlook:
Launchpool Advantage: $BNB holders continue to benefit from Binance ecosystem rewards and Launchpools.
Risk Management: Always use a Stop-Loss (SL) below $745 if opening short-term long position#BNB_Market_Update
📊 Key Levels to Watch (1H Chart Analysis):
🟢 Immediate Support: $745.00 (24h Low)
🟢 Major Support Zone: $710.00 – $720.00
🔴 Immediate Resistance: $768.92 – $770.00
🔴 Major Target Level: $800.00
If $BNB manages to break above the $770 resistance with strong trading volume, we could see a push toward the $800 psychological barrier. On the downside, maintaining above $745 is crucial to sustain the short-term uptrend.
💡 Trading Strategy & Outlook:
Launchpool Advantage: $BNB holders continue to benefit from Binance ecosystem rewards and Launchpools.
Risk Management: Always use a Stop-Loss (SL) below $745 if opening short-term long position#BNB_Market_Update
71
Log in to explore more content
Join global crypto users on Binance Square
⚡️ Get latest and useful information about crypto.
💬 Trusted by the world’s largest crypto exchange.
👍 Discover real insights from verified creators.
Email / Phone number
Trending Topics
SaylorHintsStrategyBitcoinBuy
2.2M views
11,612 Discussing
SAYLOR MAY HAVE BOUGHT MORE $BTC !
Michael Saylor reposted the chart he regularly shares on Sundays. #SaylorHintsStrategyBitcoinBuy
This means that the more orange dots there are, the more buying is taking place. He reposted this today.
He’ll most likely make another substantial purchase. We’ve mentioned before just how significant these purchases are. He holds nearly as much #Bitcoin as Satoshi does.
I think these purchases need to stop at some point and he might even start selling. Do you think this single hand dominance will ever end?
Kripto Kurdu
·10 Likes
·3.2k views
BOJRaisesRatesTo31YearHigh
190,181 views
2,801 Discussing
BuffettStepsDownAsBerkshireChairman
92,428 views
1,453 Discussing