

Sayid mondal
1k Posts

Sayid mondal
Report
Block User
Your shield against overbought RSI and panic trades! 📊 No FOMO, only logic.
Open Trade
Occasional Trader
1.7 Years
30 Following
222 Followers
1.1K+ Liked
Posts
Portfolio
All
Quotes
PINNED
·
--
Bullish
🚨 $DOGE : The Pullback That Could Send It to $0.13! (LONG Setup 🎯)
$DOGE just ripped +12% to $0.10594 and is now cooling off. This is a healthy pullback, not a reversal. The 4H uptrend is intact, and the 1H structure is holding above the EMA cluster. Smart money buys the retest, not the pump.
Don't chase above $0.1025. Wait for the retest and confirmation.
Confirmation Trigger: 15M bullish reversal candle (engulfing/hammer) at the $0.0980–$0.1000 zone with volume expansion, OR a 15M close above $0.1005 with rising volume.
📍 Ideal Entry: $0.0980 – $0.0995
🚫 Chase Zone: Above $0.1025 → CANCEL
🎯 Target 1: $0.1150 (24h High)
🚀 Target 2: $0.1200(Psychological extension)
🚀 Target 3:$0.1300 (If BTC holds strength)
🛑 Stop Loss: $0.0850 (Below 1H EMA cluster + recent swing low $0.09779)
{future}(DOGEUSDT)
⚠️ Note: 4H RSI is overbought (76.52). A deeper pullback is possible — manage size accordingly.
Will DOGE hit $0.10594 or retest $0.0950 first? comment below! 👇
#DOGE #Dogecoin #Crypto #BinanceSquare
(If you found this setup helpful, smash the 👍 LIKE button and consider leaving a 💡 TIP to support my work!)
🚨 $DOGE : The Pullback That Could Send It to $0.13! (LONG Setup 🎯)
$DOGE just ripped +12% to $0.10594 and is now cooling off. This is a healthy pullback, not a reversal. The 4H uptrend is intact, and the 1H structure is holding above the EMA cluster. Smart money buys the retest, not the pump.
Don't chase above $0.1025. Wait for the retest and confirmation.
Confirmation Trigger: 15M bullish reversal candle (engulfing/hammer) at the $0.0980–$0.1000 zone with volume expansion, OR a 15M close above $0.1005 with rising volume.
📍 Ideal Entry: $0.0980 – $0.0995
🚫 Chase Zone: Above $0.1025 → CANCEL
🎯 Target 1: $0.1150 (24h High)
🚀 Target 2: $0.1200(Psychological extension)
🚀 Target 3:$0.1300 (If BTC holds strength)
🛑 Stop Loss: $0.0850 (Below 1H EMA cluster + recent swing low $0.09779)
⚠️ Note: 4H RSI is overbought (76.52). A deeper pullback is possible — manage size accordingly.
Will DOGE hit $0.10594 or retest $0.0950 first? comment below! 👇
#DOGE #Dogecoin #Crypto #BinanceSquare
(If you found this setup helpful, smash the 👍 LIKE button and consider leaving a 💡 TIP to support my work!)
$DOGE just ripped +12% to $0.10594 and is now cooling off. This is a healthy pullback, not a reversal. The 4H uptrend is intact, and the 1H structure is holding above the EMA cluster. Smart money buys the retest, not the pump.
Don't chase above $0.1025. Wait for the retest and confirmation.
Confirmation Trigger: 15M bullish reversal candle (engulfing/hammer) at the $0.0980–$0.1000 zone with volume expansion, OR a 15M close above $0.1005 with rising volume.
📍 Ideal Entry: $0.0980 – $0.0995
🚫 Chase Zone: Above $0.1025 → CANCEL
🎯 Target 1: $0.1150 (24h High)
🚀 Target 2: $0.1200(Psychological extension)
🚀 Target 3:$0.1300 (If BTC holds strength)
🛑 Stop Loss: $0.0850 (Below 1H EMA cluster + recent swing low $0.09779)
⚠️ Note: 4H RSI is overbought (76.52). A deeper pullback is possible — manage size accordingly.
Will DOGE hit $0.10594 or retest $0.0950 first? comment below! 👇
#DOGE #Dogecoin #Crypto #BinanceSquare
(If you found this setup helpful, smash the 👍 LIKE button and consider leaving a 💡 TIP to support my work!)
1
94
PINNED
·
--
Bullish
🚨 STOP GAMBLING. START TRADING. 🚨
Hi, I'm Sayid Mondal — and I'm not here to sell you dreams.
I'm your shield against overbought RSI and panic trades.
What you get by following me:
📊 Clean, high-probability setups with exact Entry, SL, and TP1/TP2/TP3.
🧠 Real market context — $BTC trend, macro news, liquidity, and volume before every call.
✅ Honest updates — winners appreciated, losers owned, no fake promises.
⚠️ Risk management first — I'll say NO TRADE if the setup isn't clean.
No FOMO. No hype. No paid groups.
If you want to survive this market and build capital with discipline — hit FOLLOW and turn on 🔔.
Let's trade smart. Let's trade together. 🚀
#Crypto #BinanceSquare #RiskManagement #TradingSignals
If my analysis helps you, even a small tip means a lot. ❤️
Your support motivates me to keep sharing more setups.
🚨 STOP GAMBLING. START TRADING. 🚨
Hi, I'm Sayid Mondal — and I'm not here to sell you dreams.
I'm your shield against overbought RSI and panic trades.
What you get by following me:
📊 Clean, high-probability setups with exact Entry, SL, and TP1/TP2/TP3.
🧠 Real market context — $BTC trend, macro news, liquidity, and volume before every call.
✅ Honest updates — winners appreciated, losers owned, no fake promises.
⚠️ Risk management first — I'll say NO TRADE if the setup isn't clean.
No FOMO. No hype. No paid groups.
If you want to survive this market and build capital with discipline — hit FOLLOW and turn on 🔔.
Let's trade smart. Let's trade together. 🚀
#Crypto #BinanceSquare #RiskManagement #TradingSignals
If my analysis helps you, even a small tip means a lot. ❤️
Your support motivates me to keep sharing more setups.
Hi, I'm Sayid Mondal — and I'm not here to sell you dreams.
I'm your shield against overbought RSI and panic trades.
What you get by following me:
📊 Clean, high-probability setups with exact Entry, SL, and TP1/TP2/TP3.
🧠 Real market context — $BTC trend, macro news, liquidity, and volume before every call.
✅ Honest updates — winners appreciated, losers owned, no fake promises.
⚠️ Risk management first — I'll say NO TRADE if the setup isn't clean.
No FOMO. No hype. No paid groups.
If you want to survive this market and build capital with discipline — hit FOLLOW and turn on 🔔.
Let's trade smart. Let's trade together. 🚀
#Crypto #BinanceSquare #RiskManagement #TradingSignals
If my analysis helps you, even a small tip means a lot. ❤️
Your support motivates me to keep sharing more setups.
1
36
·
--
Bearish
🚨 $AVAX : The Range Pullback Short Setup! (HTF Bearish Bias) 🎯
$AVAX is showing a clean pullback short opportunity within a range-bound market. The higher timeframe bias is bearish, and the setup offers a tight invalidation with a solid risk-to-reward ratio. This is a classic sell-the-rally setup in a range.
Trade Plan:
📍 Entry (Limit Short): $10.524
🛑 Stop Loss: $10.655 (1.24% risk)
🎯 Target 1: $10.400 (0.95R) → Close 50%
🚀 Target 2: $10.243 (2.15R) → Close remaining 50%
{future}(AVAXUSDT)
Why Short?
· HTF Bias: BEARISH
· Market Regime: RANGE
· RSI(14): 53.5 (neutral, room to move down)
· ATR%: 0.8 (moderate volatility)
· Score: 108 (strong signal)
· Trade management: Move SL to entry after TP1 hits
⚠️ Note: This is a limit order. Wait for price to reach $10.524 and show rejection before entering. If TP1 hits, move stop loss to entry to make it a risk-free trade. Do not chase.
#AVAX #Avalanche #Crypto #BinanceSquare #ShortSetup
(If you found this setup helpful, smash the 👍 LIKE button and consider leaving a 💡 TIP to support my work!)
🚨 $AVAX : The Range Pullback Short Setup! (HTF Bearish Bias) 🎯
$AVAX is showing a clean pullback short opportunity within a range-bound market. The higher timeframe bias is bearish, and the setup offers a tight invalidation with a solid risk-to-reward ratio. This is a classic sell-the-rally setup in a range.
Trade Plan:
📍 Entry (Limit Short): $10.524
🛑 Stop Loss: $10.655 (1.24% risk)
🎯 Target 1: $10.400 (0.95R) → Close 50%
🚀 Target 2: $10.243 (2.15R) → Close remaining 50%
Why Short?
· HTF Bias: BEARISH
· Market Regime: RANGE
· RSI(14): 53.5 (neutral, room to move down)
· ATR%: 0.8 (moderate volatility)
· Score: 108 (strong signal)
· Trade management: Move SL to entry after TP1 hits
⚠️ Note: This is a limit order. Wait for price to reach $10.524 and show rejection before entering. If TP1 hits, move stop loss to entry to make it a risk-free trade. Do not chase.
#AVAX #Avalanche #Crypto #BinanceSquare #ShortSetup
(If you found this setup helpful, smash the 👍 LIKE button and consider leaving a 💡 TIP to support my work!)
$AVAX is showing a clean pullback short opportunity within a range-bound market. The higher timeframe bias is bearish, and the setup offers a tight invalidation with a solid risk-to-reward ratio. This is a classic sell-the-rally setup in a range.
Trade Plan:
📍 Entry (Limit Short): $10.524
🛑 Stop Loss: $10.655 (1.24% risk)
🎯 Target 1: $10.400 (0.95R) → Close 50%
🚀 Target 2: $10.243 (2.15R) → Close remaining 50%
Why Short?
· HTF Bias: BEARISH
· Market Regime: RANGE
· RSI(14): 53.5 (neutral, room to move down)
· ATR%: 0.8 (moderate volatility)
· Score: 108 (strong signal)
· Trade management: Move SL to entry after TP1 hits
⚠️ Note: This is a limit order. Wait for price to reach $10.524 and show rejection before entering. If TP1 hits, move stop loss to entry to make it a risk-free trade. Do not chase.
#AVAX #Avalanche #Crypto #BinanceSquare #ShortSetup
(If you found this setup helpful, smash the 👍 LIKE button and consider leaving a 💡 TIP to support my work!)
🔴 Will AVAX hit TP1
🟢 bounce back to SL first?
12 hr(s) left
1
360
·
--
Bearish
🚨 $SOL : The Pullback Short Setup! (HTF Bearish Bias) 🎯
$SOL is showing a clear pullback short setup based on the latest V32 Live Scan. The higher timeframe bias is bearish, and the market regime is normal, favoring a continuation down. With a tight 0.69% risk, this setup offers a clean, high-probability short opportunity.
Trade Plan:
📍 Entry: $118.46 (Limit or on pullback confirmation)
🎯 Target 1: $117.69 (0.95R) → Take 50% profits
🚀 Target 2: $116.71 (2.15R) → Take remaining 50%
🛑 Stop Loss: $119.27 (0.69% risk)
{future}(SOLUSDT)
Why Short?
· HTF Bias: BEARISH
· Market Regime: NORMAL
· RSI(14): 54.3 (neutral, room to move down)
· ATR%: 0.44 (controlled volatility)
· Score: 111 (strong signal)
⚠️ Note: TP1 is a quick scalp just under 1R. The real target is TP2 at 2.15R. Wait for the pullback to hold resistance before entering. Do not chase.
#SOL #Solana #Crypto #ShortSetup
(If you found this setup helpful, smash the 👍 LIKE button and consider leaving a 💡 TIP to support my work!)
🚨 $SOL : The Pullback Short Setup! (HTF Bearish Bias) 🎯
$SOL is showing a clear pullback short setup based on the latest V32 Live Scan. The higher timeframe bias is bearish, and the market regime is normal, favoring a continuation down. With a tight 0.69% risk, this setup offers a clean, high-probability short opportunity.
Trade Plan:
📍 Entry: $118.46 (Limit or on pullback confirmation)
🎯 Target 1: $117.69 (0.95R) → Take 50% profits
🚀 Target 2: $116.71 (2.15R) → Take remaining 50%
🛑 Stop Loss: $119.27 (0.69% risk)
Why Short?
· HTF Bias: BEARISH
· Market Regime: NORMAL
· RSI(14): 54.3 (neutral, room to move down)
· ATR%: 0.44 (controlled volatility)
· Score: 111 (strong signal)
⚠️ Note: TP1 is a quick scalp just under 1R. The real target is TP2 at 2.15R. Wait for the pullback to hold resistance before entering. Do not chase.
#SOL #Solana #Crypto #ShortSetup
(If you found this setup helpful, smash the 👍 LIKE button and consider leaving a 💡 TIP to support my work!)
$SOL is showing a clear pullback short setup based on the latest V32 Live Scan. The higher timeframe bias is bearish, and the market regime is normal, favoring a continuation down. With a tight 0.69% risk, this setup offers a clean, high-probability short opportunity.
Trade Plan:
📍 Entry: $118.46 (Limit or on pullback confirmation)
🎯 Target 1: $117.69 (0.95R) → Take 50% profits
🚀 Target 2: $116.71 (2.15R) → Take remaining 50%
🛑 Stop Loss: $119.27 (0.69% risk)
Why Short?
· HTF Bias: BEARISH
· Market Regime: NORMAL
· RSI(14): 54.3 (neutral, room to move down)
· ATR%: 0.44 (controlled volatility)
· Score: 111 (strong signal)
⚠️ Note: TP1 is a quick scalp just under 1R. The real target is TP2 at 2.15R. Wait for the pullback to hold resistance before entering. Do not chase.
#SOL #Solana #Crypto #ShortSetup
(If you found this setup helpful, smash the 👍 LIKE button and consider leaving a 💡 TIP to support my work!)
🔴 Will SOL hit TP1
🟢bounce back to SL first?
11 hr(s) left
1
376
·
--
Bullish
🚨 $LTC USDT — RANGE LONG SETUP (Bullish HTF Bias) 🎯
$LTC is consolidating in a range with a bullish higher timeframe bias. RSI at 58.5 shows there’s still room to run, and this is a classic buy-the-dip opportunity within the range. The setup offers a defined risk with a clear invalidation level.
Trade Plan:
📍 Entry (Limit Long): $71.72
🛑 Stop Loss: $70.68
🎯 Take Profit 1: $72.71 (Close 50% of position)
🚀 Take Profit 2: $73.96 (Close remaining 50%)
{future}(LTCUSDT)
Why Long?
· HTF Bias: BULLISH
· Market Regime: RANGE (buy support, sell resistance)
· RSI(14): 58.5 (neutral, not overbought)
· ATR%: 0.94 (moderate volatility)
· Score: 112 (strong setup)
📊 Risk/Reward:
· Risk: ~1.04 points
· Reward to TP1: ~0.99 points (1:0.95)
· Reward to TP2: ~2.24 points (1:2.15)
· Overall R:R ≈ 1:2.15 if both targets hit
⚠️ Note: This is a limit entry — wait for price to come to your level. If you’re entering manually, wait for a bullish confirmation candle at the entry zone. Do not chase.
#LTC #Litecoin #Crypto #BinanceSquare #LongSetup
(If you found this setup helpful, smash the 👍 LIKE button and consider leaving a 💡 TIP to support my work!)
🚨 $LTC USDT — RANGE LONG SETUP (Bullish HTF Bias) 🎯
$LTC is consolidating in a range with a bullish higher timeframe bias. RSI at 58.5 shows there’s still room to run, and this is a classic buy-the-dip opportunity within the range. The setup offers a defined risk with a clear invalidation level.
Trade Plan:
📍 Entry (Limit Long): $71.72
🛑 Stop Loss: $70.68
🎯 Take Profit 1: $72.71 (Close 50% of position)
🚀 Take Profit 2: $73.96 (Close remaining 50%)
Why Long?
· HTF Bias: BULLISH
· Market Regime: RANGE (buy support, sell resistance)
· RSI(14): 58.5 (neutral, not overbought)
· ATR%: 0.94 (moderate volatility)
· Score: 112 (strong setup)
📊 Risk/Reward:
· Risk: ~1.04 points
· Reward to TP1: ~0.99 points (1:0.95)
· Reward to TP2: ~2.24 points (1:2.15)
· Overall R:R ≈ 1:2.15 if both targets hit
⚠️ Note: This is a limit entry — wait for price to come to your level. If you’re entering manually, wait for a bullish confirmation candle at the entry zone. Do not chase.
#LTC #Litecoin #Crypto #BinanceSquare #LongSetup
(If you found this setup helpful, smash the 👍 LIKE button and consider leaving a 💡 TIP to support my work!)
$LTC is consolidating in a range with a bullish higher timeframe bias. RSI at 58.5 shows there’s still room to run, and this is a classic buy-the-dip opportunity within the range. The setup offers a defined risk with a clear invalidation level.
Trade Plan:
📍 Entry (Limit Long): $71.72
🛑 Stop Loss: $70.68
🎯 Take Profit 1: $72.71 (Close 50% of position)
🚀 Take Profit 2: $73.96 (Close remaining 50%)
Why Long?
· HTF Bias: BULLISH
· Market Regime: RANGE (buy support, sell resistance)
· RSI(14): 58.5 (neutral, not overbought)
· ATR%: 0.94 (moderate volatility)
· Score: 112 (strong setup)
📊 Risk/Reward:
· Risk: ~1.04 points
· Reward to TP1: ~0.99 points (1:0.95)
· Reward to TP2: ~2.24 points (1:2.15)
· Overall R:R ≈ 1:2.15 if both targets hit
⚠️ Note: This is a limit entry — wait for price to come to your level. If you’re entering manually, wait for a bullish confirmation candle at the entry zone. Do not chase.
#LTC #Litecoin #Crypto #BinanceSquare #LongSetup
(If you found this setup helpful, smash the 👍 LIKE button and consider leaving a 💡 TIP to support my work!)
🟢 Will LTC hit TP1
🔴 break below SL first?
11 hr(s) left
1
418
·
--
Bullish
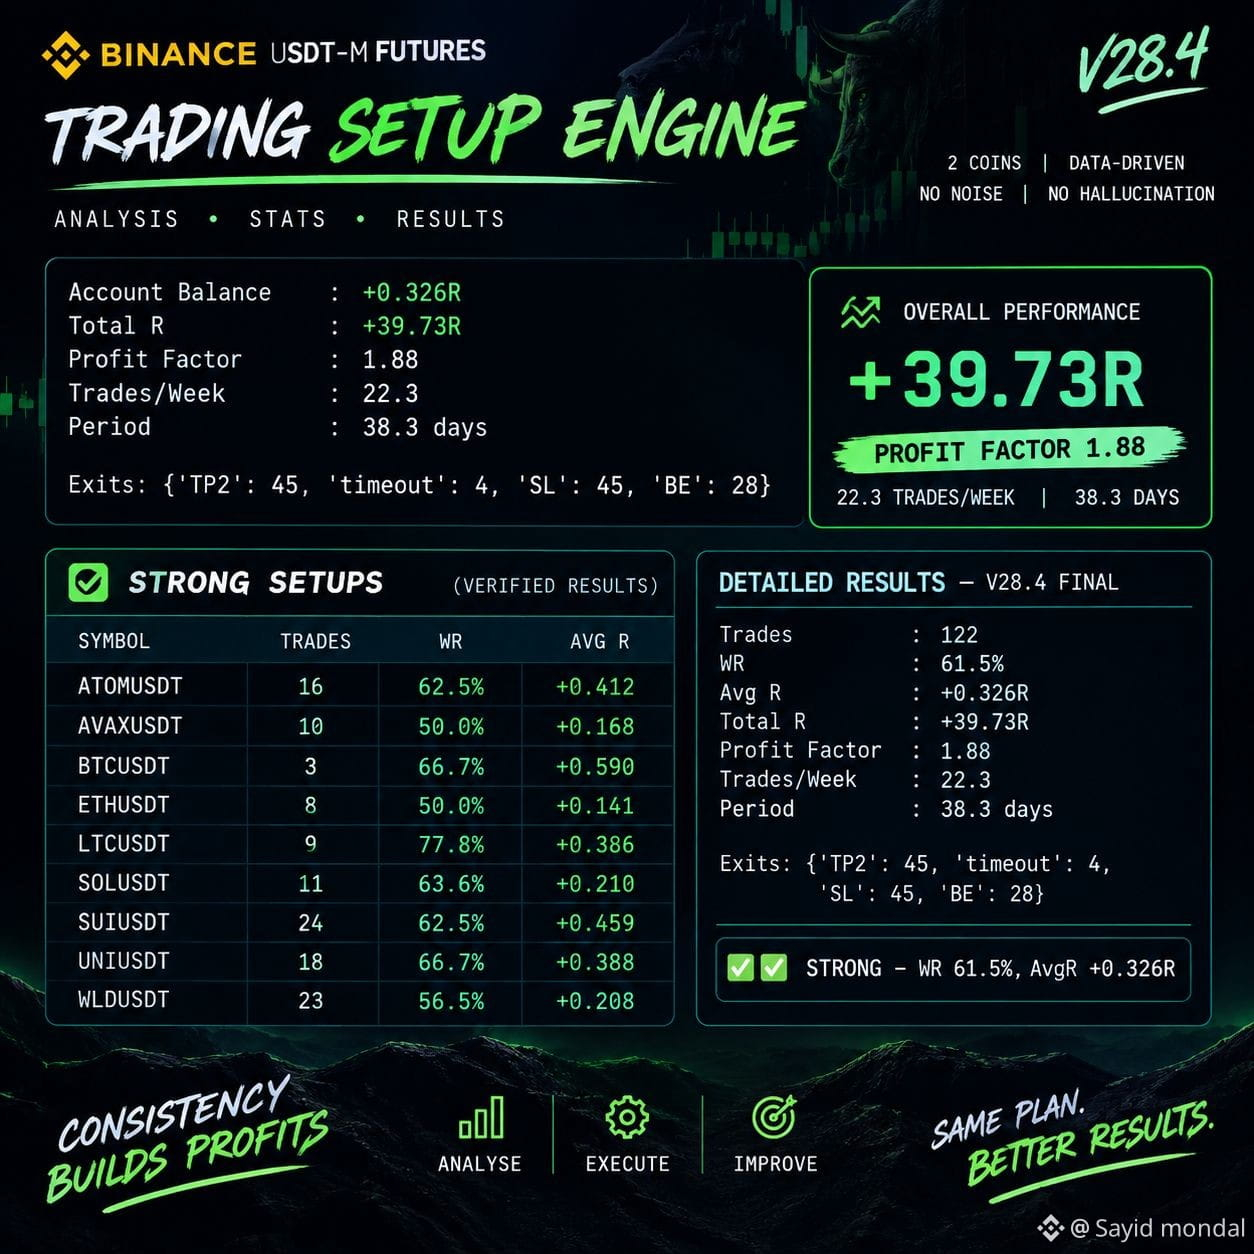
I built 28 versions of this bot.
Only 1 survived.
Here's the final version 👇
━━━━━━━━━━━━━━━━━━━━━━
40 days. 9 coins. 122 trades.
📊 61.5% Win Rate
💰 +0.326R Average
🎯 Profit Factor 1.88
📈 Total: +39.73R
No hallucination. No fake numbers.
Every trade logged. Every exit tracked.
━━━━━━━━━━━━━━━━━━━━━━
WHAT MADE IT WORK:
→ HTF bias (1H + 4H must agree)
→ 15m pullback to EMA21
→ Volume + body confirmation
→ 1.55× ATR stop loss
→ TP1 at 0.95R | TP2 at 2.15R
→ After TP1 → SL to breakeven
→ Skip chop regimes
━━━━━━━━━━━━━━━━━━━━━━
The biggest lesson:
I tested breakouts. Failed.
I tested single indicators. Failed.
I tested 10 indicators together. Failed.
What worked: Simple logic + strict filters + few trades.
━━━━━━━━━━━━━━━━━━━━━━
Curious how many of you have tried building algo strategies?
What's your biggest learning?
Drop it below 👇
#crypto #trading #algo #python #backtest
$BTC $ETH $BNB
I built 28 versions of this bot.
Only 1 survived.
Here's the final version 👇
━━━━━━━━━━━━━━━━━━━━━━
40 days. 9 coins. 122 trades.
📊 61.5% Win Rate
💰 +0.326R Average
🎯 Profit Factor 1.88
📈 Total: +39.73R
No hallucination. No fake numbers.
Every trade logged. Every exit tracked.
━━━━━━━━━━━━━━━━━━━━━━
WHAT MADE IT WORK:
→ HTF bias (1H + 4H must agree)
→ 15m pullback to EMA21
→ Volume + body confirmation
→ 1.55× ATR stop loss
→ TP1 at 0.95R | TP2 at 2.15R
→ After TP1 → SL to breakeven
→ Skip chop regimes
━━━━━━━━━━━━━━━━━━━━━━
The biggest lesson:
I tested breakouts. Failed.
I tested single indicators. Failed.
I tested 10 indicators together. Failed.
What worked: Simple logic + strict filters + few trades.
━━━━━━━━━━━━━━━━━━━━━━
Curious how many of you have tried building algo strategies?
What's your biggest learning?
Drop it below 👇
#crypto #trading #algo #python #backtest
$BTC $ETH $BNB
Only 1 survived.
Here's the final version 👇
━━━━━━━━━━━━━━━━━━━━━━
40 days. 9 coins. 122 trades.
📊 61.5% Win Rate
💰 +0.326R Average
🎯 Profit Factor 1.88
📈 Total: +39.73R
No hallucination. No fake numbers.
Every trade logged. Every exit tracked.
━━━━━━━━━━━━━━━━━━━━━━
WHAT MADE IT WORK:
→ HTF bias (1H + 4H must agree)
→ 15m pullback to EMA21
→ Volume + body confirmation
→ 1.55× ATR stop loss
→ TP1 at 0.95R | TP2 at 2.15R
→ After TP1 → SL to breakeven
→ Skip chop regimes
━━━━━━━━━━━━━━━━━━━━━━
The biggest lesson:
I tested breakouts. Failed.
I tested single indicators. Failed.
I tested 10 indicators together. Failed.
What worked: Simple logic + strict filters + few trades.
━━━━━━━━━━━━━━━━━━━━━━
Curious how many of you have tried building algo strategies?
What's your biggest learning?
Drop it below 👇
#crypto #trading #algo #python #backtest
$BTC $ETH $BNB
1
66
·
--
Bullish
🚨 $LTC : The Momentum Long Setup! (R:R 1:1.5 → 1:2.8) 🎯
$LTC is showing strong bullish momentum, and the structure remains firmly up. This setup is a momentum long, entering on the current strength with a defined risk and a solid risk-to-reward ratio. The invalidation is clear, and the targets are based on structural levels.
Trade Plan:
📍 Entry: $72.98 (Limit or market on confirmation)
🎯 Target 1:$76.107 (1.5R)
🚀 Target 2: $78.817 (2.8R)
🛑 Stop Loss: $70.895 (2.86% risk)
{future}(LTCUSDT)
Why Long?
· Momentum-following setup on a bullish structure
· Higher timeframe trend remains up
· Clean invalidation level defined
· Staged targets for profit-taking and letting the rest ride
⚠️ Note: This is a momentum entry. Manage your position size according to the 2.86% risk. Wait for a confirmation candle if you are not already in.
#LTC #Litecoin #Crypto #BinanceSquare #LongSetup
(If you found this setup helpful, smash the 👍 LIKE button and consider leaving a 💡 TIP to support my work!)
🚨 $LTC : The Momentum Long Setup! (R:R 1:1.5 → 1:2.8) 🎯
$LTC is showing strong bullish momentum, and the structure remains firmly up. This setup is a momentum long, entering on the current strength with a defined risk and a solid risk-to-reward ratio. The invalidation is clear, and the targets are based on structural levels.
Trade Plan:
📍 Entry: $72.98 (Limit or market on confirmation)
🎯 Target 1:$76.107 (1.5R)
🚀 Target 2: $78.817 (2.8R)
🛑 Stop Loss: $70.895 (2.86% risk)
Why Long?
· Momentum-following setup on a bullish structure
· Higher timeframe trend remains up
· Clean invalidation level defined
· Staged targets for profit-taking and letting the rest ride
⚠️ Note: This is a momentum entry. Manage your position size according to the 2.86% risk. Wait for a confirmation candle if you are not already in.
#LTC #Litecoin #Crypto #BinanceSquare #LongSetup
(If you found this setup helpful, smash the 👍 LIKE button and consider leaving a 💡 TIP to support my work!)
$LTC is showing strong bullish momentum, and the structure remains firmly up. This setup is a momentum long, entering on the current strength with a defined risk and a solid risk-to-reward ratio. The invalidation is clear, and the targets are based on structural levels.
Trade Plan:
📍 Entry: $72.98 (Limit or market on confirmation)
🎯 Target 1:$76.107 (1.5R)
🚀 Target 2: $78.817 (2.8R)
🛑 Stop Loss: $70.895 (2.86% risk)
Why Long?
· Momentum-following setup on a bullish structure
· Higher timeframe trend remains up
· Clean invalidation level defined
· Staged targets for profit-taking and letting the rest ride
⚠️ Note: This is a momentum entry. Manage your position size according to the 2.86% risk. Wait for a confirmation candle if you are not already in.
#LTC #Litecoin #Crypto #BinanceSquare #LongSetup
(If you found this setup helpful, smash the 👍 LIKE button and consider leaving a 💡 TIP to support my work!)
🟢 Will LTC hit TP1
100%
🔴 retest SL first?
0%
1 votes • Voting closed
1
110
·
--
Bullish
🚨 $SUI : The Trend-Follow Long Setup! (R:R 1:1.5 → 1:2.8) 🎯
$SUI is holding a clean bullish structure, and the trend remains firmly up. This setup is a trend-following long, entering on the current strength with a defined risk and a solid risk-to-reward ratio. The invalidation is clear, and the targets are based on structural levels.
Trade Plan:
📍 Entry: $1.1595 (Limit or market on confirmation)
🎯 Target 1: $1.2287 (1.5R)
🚀 Target 2: $1.2896 (2.8R)
🛑 Stop Loss: $1.1116 (4.04% risk)
{future}(SUIUSDT)
Why Long?
· Trend-following setup on a bullish structure
· Higher timeframe trend remains up
· Clean invalidation level defined
· Staged targets for profit-taking and letting the rest ride
⚠️ Note: This is a trend-following entry. Manage your position size according to the 4.04% risk. Wait for a confirmation candle if you are not already in.
Will SUI hit TP1 or retest SL first? comment below! 👇
#SUI #SuiNetwork #Crypto #BinanceSquare #LongSetup
(If you found this setup helpful, smash the 👍 LIKE button and consider leaving a 💡 TIP to support my work!)
🚨 $SUI : The Trend-Follow Long Setup! (R:R 1:1.5 → 1:2.8) 🎯
$SUI is holding a clean bullish structure, and the trend remains firmly up. This setup is a trend-following long, entering on the current strength with a defined risk and a solid risk-to-reward ratio. The invalidation is clear, and the targets are based on structural levels.
Trade Plan:
📍 Entry: $1.1595 (Limit or market on confirmation)
🎯 Target 1: $1.2287 (1.5R)
🚀 Target 2: $1.2896 (2.8R)
🛑 Stop Loss: $1.1116 (4.04% risk)
Why Long?
· Trend-following setup on a bullish structure
· Higher timeframe trend remains up
· Clean invalidation level defined
· Staged targets for profit-taking and letting the rest ride
⚠️ Note: This is a trend-following entry. Manage your position size according to the 4.04% risk. Wait for a confirmation candle if you are not already in.
Will SUI hit TP1 or retest SL first? comment below! 👇
#SUI #SuiNetwork #Crypto #BinanceSquare #LongSetup
(If you found this setup helpful, smash the 👍 LIKE button and consider leaving a 💡 TIP to support my work!)
$SUI is holding a clean bullish structure, and the trend remains firmly up. This setup is a trend-following long, entering on the current strength with a defined risk and a solid risk-to-reward ratio. The invalidation is clear, and the targets are based on structural levels.
Trade Plan:
📍 Entry: $1.1595 (Limit or market on confirmation)
🎯 Target 1: $1.2287 (1.5R)
🚀 Target 2: $1.2896 (2.8R)
🛑 Stop Loss: $1.1116 (4.04% risk)
Why Long?
· Trend-following setup on a bullish structure
· Higher timeframe trend remains up
· Clean invalidation level defined
· Staged targets for profit-taking and letting the rest ride
⚠️ Note: This is a trend-following entry. Manage your position size according to the 4.04% risk. Wait for a confirmation candle if you are not already in.
Will SUI hit TP1 or retest SL first? comment below! 👇
#SUI #SuiNetwork #Crypto #BinanceSquare #LongSetup
(If you found this setup helpful, smash the 👍 LIKE button and consider leaving a 💡 TIP to support my work!)
1
56
·
--
Bullish
🚨 $UNI : The Trend-Follow Long Setup! (R:R 1:1.5 → 1:2.8) 🎯
$UNI is holding a clean bullish structure, and the trend remains firmly up. This setup is a trend-following long, entering on the current strength with a defined risk and a solid risk-to-reward ratio. The invalidation is clear, and the targets are based on structural levels.
Trade Plan:
📍 Entry: $9.677 (Limit or market on confirmation)
🎯 Target 1: $10.094 (1.5R)
🚀 Target 2: $10.455 (2.8R)
🛑 Stop Loss: $9.399 (2.87% risk)
{future}(UNIUSDT)
Why Long?
· Trend-following setup on a bullish structure
· Higher timeframe trend remains up
· Clean invalidation level defined
· Staged targets for profit-taking and letting the rest ride
⚠️ Note: This is a trend-following entry. Manage your position size according to the 2.87% risk. Wait for a confirmation candle if you are not already in.
#UNI #Uniswap #Crypto #BinanceSquare #LongSetup
(If you found this setup helpful, smash the 👍 LIKE button and consider leaving a 💡 TIP to support my work!)
🚨 $UNI : The Trend-Follow Long Setup! (R:R 1:1.5 → 1:2.8) 🎯
$UNI is holding a clean bullish structure, and the trend remains firmly up. This setup is a trend-following long, entering on the current strength with a defined risk and a solid risk-to-reward ratio. The invalidation is clear, and the targets are based on structural levels.
Trade Plan:
📍 Entry: $9.677 (Limit or market on confirmation)
🎯 Target 1: $10.094 (1.5R)
🚀 Target 2: $10.455 (2.8R)
🛑 Stop Loss: $9.399 (2.87% risk)
Why Long?
· Trend-following setup on a bullish structure
· Higher timeframe trend remains up
· Clean invalidation level defined
· Staged targets for profit-taking and letting the rest ride
⚠️ Note: This is a trend-following entry. Manage your position size according to the 2.87% risk. Wait for a confirmation candle if you are not already in.
#UNI #Uniswap #Crypto #BinanceSquare #LongSetup
(If you found this setup helpful, smash the 👍 LIKE button and consider leaving a 💡 TIP to support my work!)
$UNI is holding a clean bullish structure, and the trend remains firmly up. This setup is a trend-following long, entering on the current strength with a defined risk and a solid risk-to-reward ratio. The invalidation is clear, and the targets are based on structural levels.
Trade Plan:
📍 Entry: $9.677 (Limit or market on confirmation)
🎯 Target 1: $10.094 (1.5R)
🚀 Target 2: $10.455 (2.8R)
🛑 Stop Loss: $9.399 (2.87% risk)
Why Long?
· Trend-following setup on a bullish structure
· Higher timeframe trend remains up
· Clean invalidation level defined
· Staged targets for profit-taking and letting the rest ride
⚠️ Note: This is a trend-following entry. Manage your position size according to the 2.87% risk. Wait for a confirmation candle if you are not already in.
#UNI #Uniswap #Crypto #BinanceSquare #LongSetup
(If you found this setup helpful, smash the 👍 LIKE button and consider leaving a 💡 TIP to support my work!)
🟢 Will UNI hit TP1
100%
🔴 retest SL first?
0%
1 votes • Voting closed
1
78
·
--
Bullish
🚨 $XRP : The Trend-Follow Long Setup! (R:R 1:1.5 → 1:2.8) 🎯
$XRP is holding a clean bullish structure, and the trend remains firmly up. This setup is a trend-following long, entering on the current strength with a defined risk and a solid risk-to-reward ratio. The invalidation is clear, and the targets are based on structural levels.
Trade Plan:
📍 Entry: $1.5779 (Live: $1.5785)
🎯 Target 1: $1.6496 (1.5R)
🚀 Target 2:$1.71174 (2.8R)
🛑 Stop Loss: $1.5301 (3.03% risk)
{future}(XRPUSDT)
Why Long?
· Trend-following setup on a bullish structure
· Higher timeframe trend remains up
· Clean invalidation level defined
· Staged targets for profit-taking and letting the rest ride
⚠️ Note: This is a trend-following entry. Manage your position size according to the 3.03% risk. Wait for a confirmation candle if you are not already in.
Will XRP hit TP1 or retest SL first? comment below! 👇
#XRP #Ripple #Crypto #BinanceSquare #LongSetup
(If you found this setup helpful, smash the 👍 LIKE button and consider leaving a 💡 TIP to support my work!)
🚨 $XRP : The Trend-Follow Long Setup! (R:R 1:1.5 → 1:2.8) 🎯
$XRP is holding a clean bullish structure, and the trend remains firmly up. This setup is a trend-following long, entering on the current strength with a defined risk and a solid risk-to-reward ratio. The invalidation is clear, and the targets are based on structural levels.
Trade Plan:
📍 Entry: $1.5779 (Live: $1.5785)
🎯 Target 1: $1.6496 (1.5R)
🚀 Target 2:$1.71174 (2.8R)
🛑 Stop Loss: $1.5301 (3.03% risk)
Why Long?
· Trend-following setup on a bullish structure
· Higher timeframe trend remains up
· Clean invalidation level defined
· Staged targets for profit-taking and letting the rest ride
⚠️ Note: This is a trend-following entry. Manage your position size according to the 3.03% risk. Wait for a confirmation candle if you are not already in.
Will XRP hit TP1 or retest SL first? comment below! 👇
#XRP #Ripple #Crypto #BinanceSquare #LongSetup
(If you found this setup helpful, smash the 👍 LIKE button and consider leaving a 💡 TIP to support my work!)
$XRP is holding a clean bullish structure, and the trend remains firmly up. This setup is a trend-following long, entering on the current strength with a defined risk and a solid risk-to-reward ratio. The invalidation is clear, and the targets are based on structural levels.
Trade Plan:
📍 Entry: $1.5779 (Live: $1.5785)
🎯 Target 1: $1.6496 (1.5R)
🚀 Target 2:$1.71174 (2.8R)
🛑 Stop Loss: $1.5301 (3.03% risk)
Why Long?
· Trend-following setup on a bullish structure
· Higher timeframe trend remains up
· Clean invalidation level defined
· Staged targets for profit-taking and letting the rest ride
⚠️ Note: This is a trend-following entry. Manage your position size according to the 3.03% risk. Wait for a confirmation candle if you are not already in.
Will XRP hit TP1 or retest SL first? comment below! 👇
#XRP #Ripple #Crypto #BinanceSquare #LongSetup
(If you found this setup helpful, smash the 👍 LIKE button and consider leaving a 💡 TIP to support my work!)
1
51
·
--
Bullish
🚨 $BTC : The Pullback Long Setup! (R:R 1:1.5 → 1:3.0) 🎯
$BTC is pulling back into a key demand zone after its recent run. The higher timeframe trend remains bullish, and this dip offers a clean, high-probability long entry with a tight invalidation and a solid risk-to-reward ratio.
Trade Plan:
📍 Entry: $83,500.5
🎯 Target 1:$86000.03 (1.5R) → Take 50% profits
🚀 Target 2: $87,437.55 (3.0R) → Take remaining 50%
🛑 Stop Loss:$82,261.48 (1.64% risk)
{future}(BTCUSDT)
Why Long?
· Pullback into a structural demand zone
· Higher timeframe trend remains bullish
· Tight invalidation — clean risk definition
· RSI cooling off after the recent push
· Staged targets allow for profit-taking and letting the rest ride
⚠️ Note: Wait for a bullish confirmation candle at the entry zone before executing. Do not chase.
Will BTC hit TP1 or break below the SL first? comment below! 👇
#BTC #Bitcoin #Crypto #BinanceSquare #LongSetup
(If you found this setup helpful, smash the 👍 LIKE button and consider leaving a 💡 TIP to support my work!)
🚨 $BTC : The Pullback Long Setup! (R:R 1:1.5 → 1:3.0) 🎯
$BTC is pulling back into a key demand zone after its recent run. The higher timeframe trend remains bullish, and this dip offers a clean, high-probability long entry with a tight invalidation and a solid risk-to-reward ratio.
Trade Plan:
📍 Entry: $83,500.5
🎯 Target 1:$86000.03 (1.5R) → Take 50% profits
🚀 Target 2: $87,437.55 (3.0R) → Take remaining 50%
🛑 Stop Loss:$82,261.48 (1.64% risk)
Why Long?
· Pullback into a structural demand zone
· Higher timeframe trend remains bullish
· Tight invalidation — clean risk definition
· RSI cooling off after the recent push
· Staged targets allow for profit-taking and letting the rest ride
⚠️ Note: Wait for a bullish confirmation candle at the entry zone before executing. Do not chase.
Will BTC hit TP1 or break below the SL first? comment below! 👇
#BTC #Bitcoin #Crypto #BinanceSquare #LongSetup
(If you found this setup helpful, smash the 👍 LIKE button and consider leaving a 💡 TIP to support my work!)
$BTC is pulling back into a key demand zone after its recent run. The higher timeframe trend remains bullish, and this dip offers a clean, high-probability long entry with a tight invalidation and a solid risk-to-reward ratio.
Trade Plan:
📍 Entry: $83,500.5
🎯 Target 1:$86000.03 (1.5R) → Take 50% profits
🚀 Target 2: $87,437.55 (3.0R) → Take remaining 50%
🛑 Stop Loss:$82,261.48 (1.64% risk)
Why Long?
· Pullback into a structural demand zone
· Higher timeframe trend remains bullish
· Tight invalidation — clean risk definition
· RSI cooling off after the recent push
· Staged targets allow for profit-taking and letting the rest ride
⚠️ Note: Wait for a bullish confirmation candle at the entry zone before executing. Do not chase.
Will BTC hit TP1 or break below the SL first? comment below! 👇
#BTC #Bitcoin #Crypto #BinanceSquare #LongSetup
(If you found this setup helpful, smash the 👍 LIKE button and consider leaving a 💡 TIP to support my work!)
1
40
·
--
Bearish
🚨 $AVAX USDT SHORT SETUP — REJECTION AT RESISTANCE! 🎯
$AVAX is showing rejection at a key resistance zone after failing to hold above recent highs. Momentum is shifting bearish, and this setup offers a clean short entry with defined risk and a solid risk-to-reward ratio.
Trade Plan:
📍 Entry: $10.595
🎯 Target 1: $9.977
🎯 Target 2: $9.565
🛑 Stop Loss: $11.007
{future}(AVAXUSDT)
📊 Risk: 0.412 (3.89%) | Reward: 0.618 (5.83%) to TP1, 1.03 (9.72%) to TP2 | R:R: 1:1.5 to TP1, 1:2.5 to TP2
Why Short?
· Rejection at key resistance zone
· Bearish structure forming on lower timeframes
· Tight invalidation — clean risk definition
· RSI showing exhaustion after recent push
Will AVAX hit the target or bounce back? comment below! 👇
#AVAX #Avalanche #Crypto #BinanceSquare #ShortSetup
(If you found this setup helpful, smash the 👍 LIKE button and consider leaving a 💡 TIP to support my work!)
🚨 $AVAX USDT SHORT SETUP — REJECTION AT RESISTANCE! 🎯
$AVAX is showing rejection at a key resistance zone after failing to hold above recent highs. Momentum is shifting bearish, and this setup offers a clean short entry with defined risk and a solid risk-to-reward ratio.
Trade Plan:
📍 Entry: $10.595
🎯 Target 1: $9.977
🎯 Target 2: $9.565
🛑 Stop Loss: $11.007
📊 Risk: 0.412 (3.89%) | Reward: 0.618 (5.83%) to TP1, 1.03 (9.72%) to TP2 | R:R: 1:1.5 to TP1, 1:2.5 to TP2
Why Short?
· Rejection at key resistance zone
· Bearish structure forming on lower timeframes
· Tight invalidation — clean risk definition
· RSI showing exhaustion after recent push
Will AVAX hit the target or bounce back? comment below! 👇
#AVAX #Avalanche #Crypto #BinanceSquare #ShortSetup
(If you found this setup helpful, smash the 👍 LIKE button and consider leaving a 💡 TIP to support my work!)
$AVAX is showing rejection at a key resistance zone after failing to hold above recent highs. Momentum is shifting bearish, and this setup offers a clean short entry with defined risk and a solid risk-to-reward ratio.
Trade Plan:
📍 Entry: $10.595
🎯 Target 1: $9.977
🎯 Target 2: $9.565
🛑 Stop Loss: $11.007
📊 Risk: 0.412 (3.89%) | Reward: 0.618 (5.83%) to TP1, 1.03 (9.72%) to TP2 | R:R: 1:1.5 to TP1, 1:2.5 to TP2
Why Short?
· Rejection at key resistance zone
· Bearish structure forming on lower timeframes
· Tight invalidation — clean risk definition
· RSI showing exhaustion after recent push
Will AVAX hit the target or bounce back? comment below! 👇
#AVAX #Avalanche #Crypto #BinanceSquare #ShortSetup
(If you found this setup helpful, smash the 👍 LIKE button and consider leaving a 💡 TIP to support my work!)
1
62
·
--
Bullish
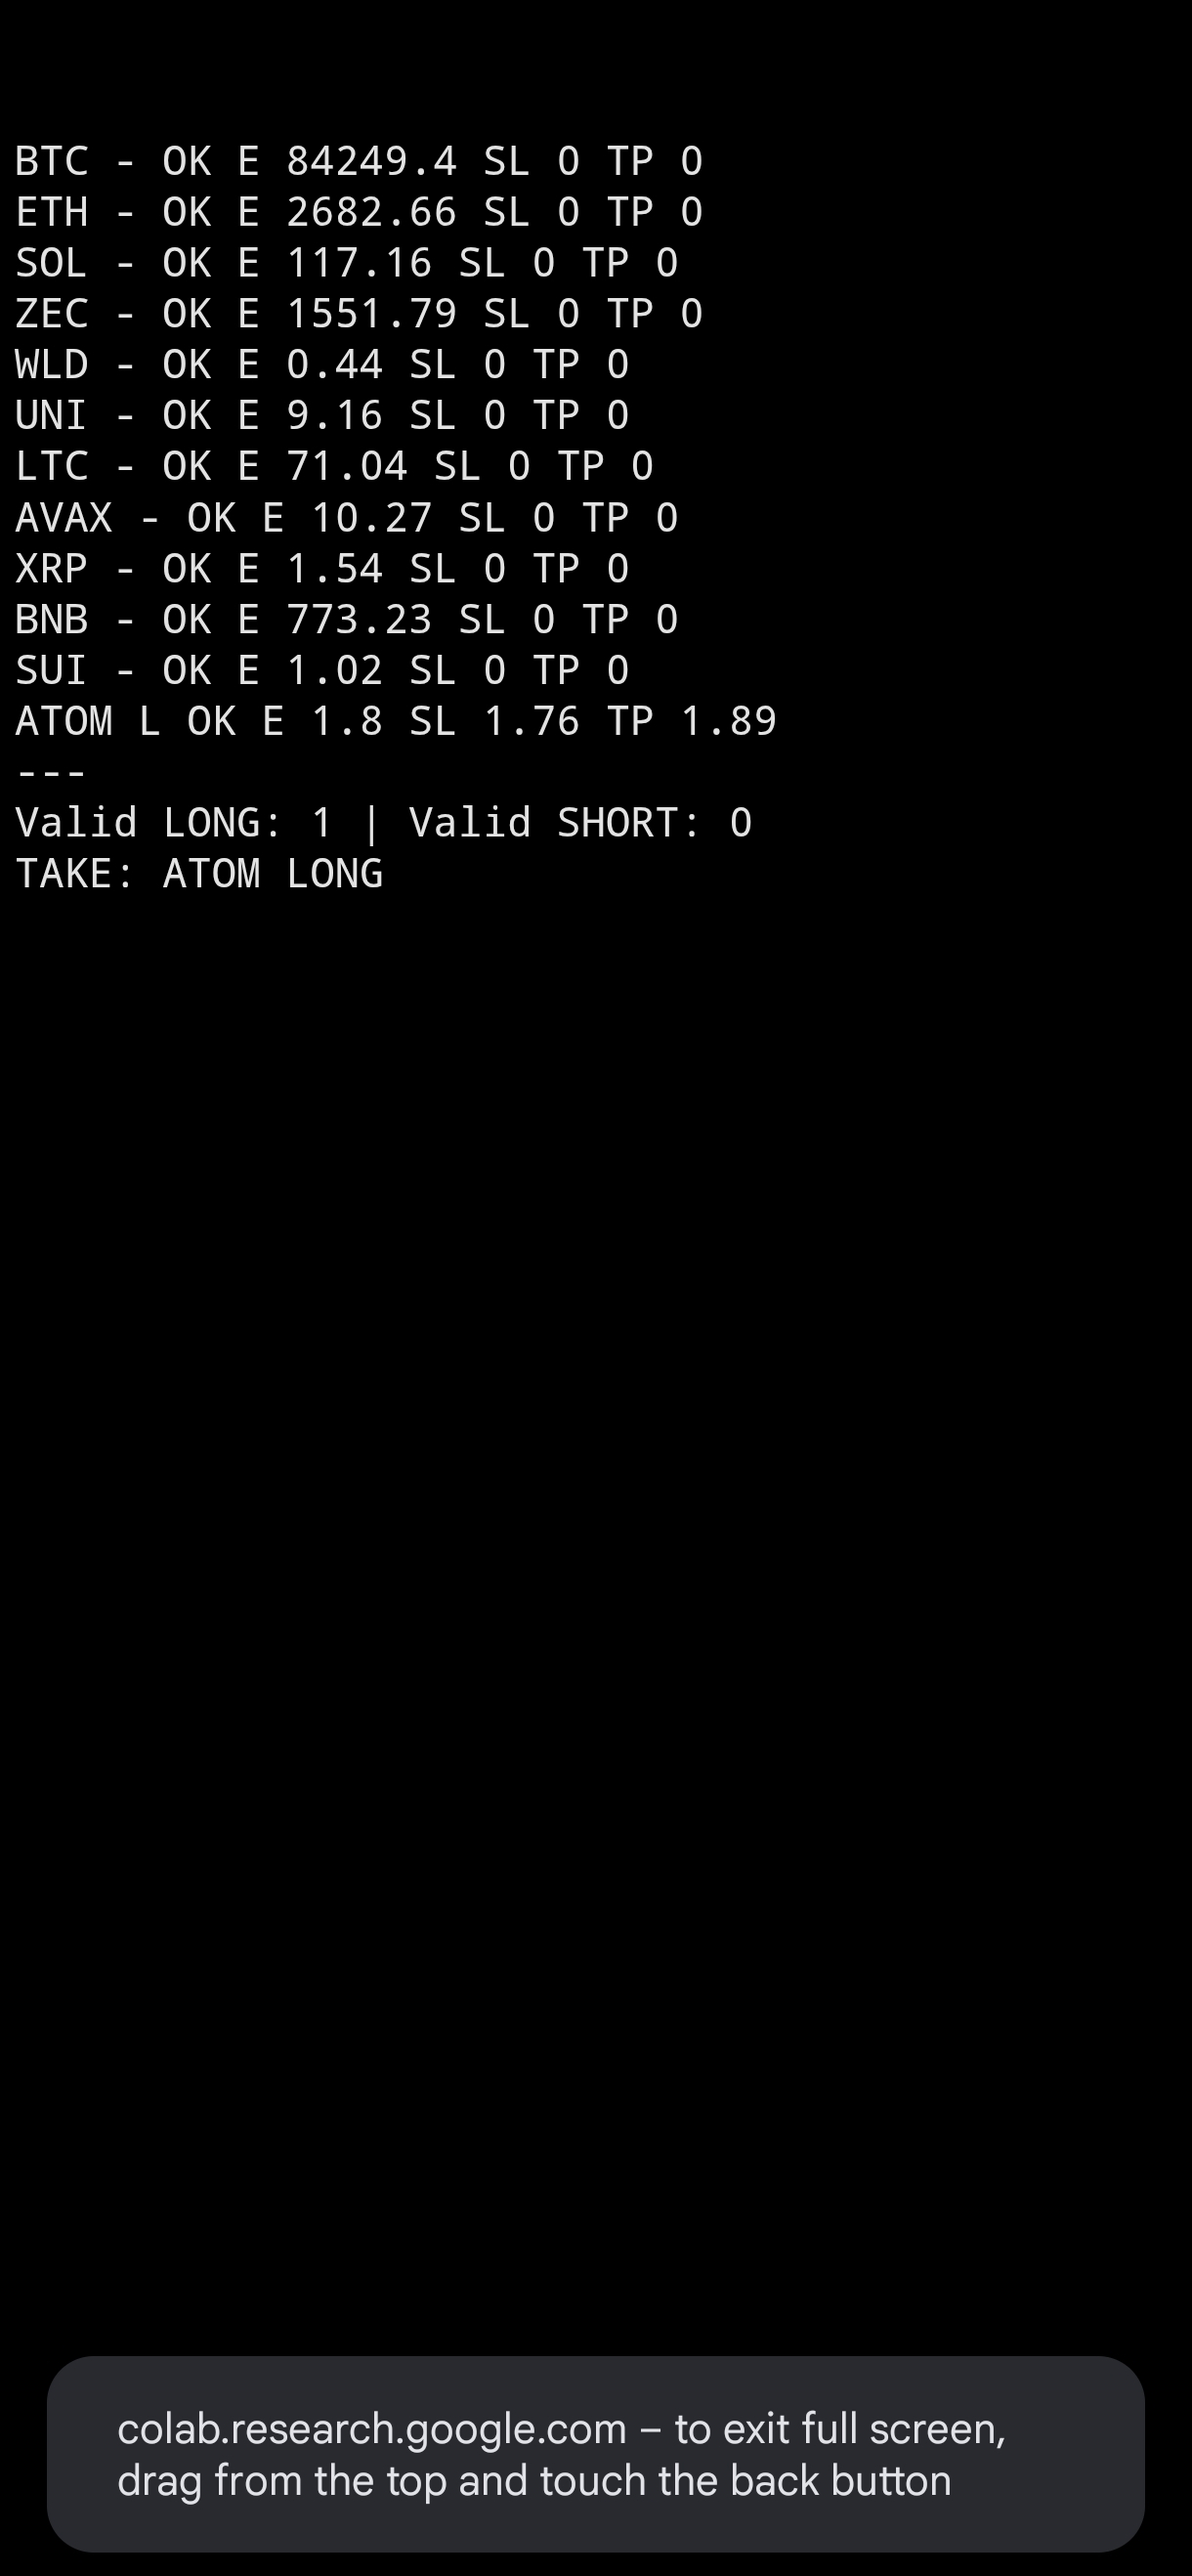
🚨 $ATOM : The Pullback Long Setup! (R:R 1:2.25) 🎯
$ATOM is showing a clean bullish structure after holding key support. The pullback into the demand zone offers a high-probability long entry with a tight invalidation and a solid risk-to-reward ratio.
Trade Plan:
📍 Entry: $1.80
🎯 Target: $1.89
🛑 Stop Loss: $1.76
{future}(ATOMUSDT)
📊 R:R: 1:2.25
Why Long?
· Bullish market structure intact
· Pullback into a key demand zone
· Tight invalidation — clean risk definition
· Momentum building for the next leg up
⚠️ Note: Wait for a bullish confirmation candle at the entry zone before executing. Do not chase.
Will ATOM hit the target or break below the SL first? comment below! 👇
#ATOM #Cosmos #Crypto #BinanceSquare #LongSetup
(If you found this setup helpful, smash the 👍 LIKE button and consider leaving a 💡 TIP to support my work!)
🚨 $ATOM : The Pullback Long Setup! (R:R 1:2.25) 🎯
$ATOM is showing a clean bullish structure after holding key support. The pullback into the demand zone offers a high-probability long entry with a tight invalidation and a solid risk-to-reward ratio.
Trade Plan:
📍 Entry: $1.80
🎯 Target: $1.89
🛑 Stop Loss: $1.76
📊 R:R: 1:2.25
Why Long?
· Bullish market structure intact
· Pullback into a key demand zone
· Tight invalidation — clean risk definition
· Momentum building for the next leg up
⚠️ Note: Wait for a bullish confirmation candle at the entry zone before executing. Do not chase.
Will ATOM hit the target or break below the SL first? comment below! 👇
#ATOM #Cosmos #Crypto #BinanceSquare #LongSetup
(If you found this setup helpful, smash the 👍 LIKE button and consider leaving a 💡 TIP to support my work!)
$ATOM is showing a clean bullish structure after holding key support. The pullback into the demand zone offers a high-probability long entry with a tight invalidation and a solid risk-to-reward ratio.
Trade Plan:
📍 Entry: $1.80
🎯 Target: $1.89
🛑 Stop Loss: $1.76
📊 R:R: 1:2.25
Why Long?
· Bullish market structure intact
· Pullback into a key demand zone
· Tight invalidation — clean risk definition
· Momentum building for the next leg up
⚠️ Note: Wait for a bullish confirmation candle at the entry zone before executing. Do not chase.
Will ATOM hit the target or break below the SL first? comment below! 👇
#ATOM #Cosmos #Crypto #BinanceSquare #LongSetup
(If you found this setup helpful, smash the 👍 LIKE button and consider leaving a 💡 TIP to support my work!)
1
90
·
--
Bullish
🚨 $BTC HAS PLANS TOMORROW 😂
$BTC traders… tomorrow could get interesting. 👀
Around $15.6 BILLION in Bitcoin options are expiring on Deribit at 8:00 AM UTC.
And Bitcoin isn't getting just one headache. 😂
We've got:
💥 $15.6B options expiry
🇺🇸 U.S. economic data
📊 CME Bitcoin futures settlement
All on the same day.
So what does it actually mean?
Simple:
When a huge batch of options expires, some of the hedging activity around those contracts can change or disappear.
That can affect short-term liquidity and volatility.
Think of it like this:
🎉 The party is still going…
…but someone just unplugged the DJ's backup speaker. 😂
The party doesn't automatically end.
It just might get a little chaotic.
🎯 Max pain: around $76K
But please don't see that number and start screaming:
“$BTC TO $76K!” 😂
Max pain is a positioning reference, not a guaranteed price target.
And here's the biggest thing:
❌ Expiry ≠ guaranteed dump
❌ Expiry ≠ guaranteed pump
It simply means the market has another potential volatility catalyst to deal with.
So tomorrow…
Don't predict. Don't chase. Watch the reaction. 👀
If BTC moves like it just had 5 energy drinks…
let it move. 😂
Your job is to wait for confirmation.
#Bitcoin #BTC #CryptoTrading #CryptoNews #BinanceSquare
🚨 $BTC HAS PLANS TOMORROW 😂
$BTC traders… tomorrow could get interesting. 👀
Around $15.6 BILLION in Bitcoin options are expiring on Deribit at 8:00 AM UTC.
And Bitcoin isn't getting just one headache. 😂
We've got:
💥 $15.6B options expiry
🇺🇸 U.S. economic data
📊 CME Bitcoin futures settlement
All on the same day.
So what does it actually mean?
Simple:
When a huge batch of options expires, some of the hedging activity around those contracts can change or disappear.
That can affect short-term liquidity and volatility.
Think of it like this:
🎉 The party is still going…
…but someone just unplugged the DJ's backup speaker. 😂
The party doesn't automatically end.
It just might get a little chaotic.
🎯 Max pain: around $76K
But please don't see that number and start screaming:
“$BTC TO $76K!” 😂
Max pain is a positioning reference, not a guaranteed price target.
And here's the biggest thing:
❌ Expiry ≠ guaranteed dump
❌ Expiry ≠ guaranteed pump
It simply means the market has another potential volatility catalyst to deal with.
So tomorrow…
Don't predict. Don't chase. Watch the reaction. 👀
If BTC moves like it just had 5 energy drinks…
let it move. 😂
Your job is to wait for confirmation.
#Bitcoin #BTC #CryptoTrading #CryptoNews #BinanceSquare
$BTC traders… tomorrow could get interesting. 👀
Around $15.6 BILLION in Bitcoin options are expiring on Deribit at 8:00 AM UTC.
And Bitcoin isn't getting just one headache. 😂
We've got:
💥 $15.6B options expiry
🇺🇸 U.S. economic data
📊 CME Bitcoin futures settlement
All on the same day.
So what does it actually mean?
Simple:
When a huge batch of options expires, some of the hedging activity around those contracts can change or disappear.
That can affect short-term liquidity and volatility.
Think of it like this:
🎉 The party is still going…
…but someone just unplugged the DJ's backup speaker. 😂
The party doesn't automatically end.
It just might get a little chaotic.
🎯 Max pain: around $76K
But please don't see that number and start screaming:
“$BTC TO $76K!” 😂
Max pain is a positioning reference, not a guaranteed price target.
And here's the biggest thing:
❌ Expiry ≠ guaranteed dump
❌ Expiry ≠ guaranteed pump
It simply means the market has another potential volatility catalyst to deal with.
So tomorrow…
Don't predict. Don't chase. Watch the reaction. 👀
If BTC moves like it just had 5 energy drinks…
let it move. 😂
Your job is to wait for confirmation.
#Bitcoin #BTC #CryptoTrading #CryptoNews #BinanceSquare
🟢 Volatility explodes
28%
🚀 BTC continues up
24%
🔴 BTC pulls back
44%
🦀 BTC stays sideways 😂
4%
25 votes • Voting closed
1
277
·
--
Bearish
🚨 $SUI USDT SHORT SETUP — REJECTION AT RESISTANCE! (R:R 1:2.0) 🎯
$SUI is showing clear rejection at a key resistance zone after failing to hold above recent highs. Momentum is shifting bearish, and this setup offers a clean short entry with defined risk and a 1:2 risk-to-reward ratio.
Trade Plan:
📍 Entry: $0.9553
🎯 Target: $0.896
🛑 Stop Loss: $0.985
{future}(SUIUSDT)
📊 Risk: 0.0297 (3.11%) | Reward: 0.0594 (6.22%) | R:R: 1:2.0
Why Short?
· Rejection at key resistance zone
· Bearish structure forming on lower timeframes
· Tight invalidation — clean risk definition
· RSI showing exhaustion after recent push
Will SUI hit the target or bounce back? comment below! 👇
#SUI #SuiNetwork #Crypto #BinanceSquare #ShortSetup
(If you found this setup helpful, smash the 👍 LIKE button and consider leaving a 💡 TIP to support my work!)
🚨 $SUI USDT SHORT SETUP — REJECTION AT RESISTANCE! (R:R 1:2.0) 🎯
$SUI is showing clear rejection at a key resistance zone after failing to hold above recent highs. Momentum is shifting bearish, and this setup offers a clean short entry with defined risk and a 1:2 risk-to-reward ratio.
Trade Plan:
📍 Entry: $0.9553
🎯 Target: $0.896
🛑 Stop Loss: $0.985
📊 Risk: 0.0297 (3.11%) | Reward: 0.0594 (6.22%) | R:R: 1:2.0
Why Short?
· Rejection at key resistance zone
· Bearish structure forming on lower timeframes
· Tight invalidation — clean risk definition
· RSI showing exhaustion after recent push
Will SUI hit the target or bounce back? comment below! 👇
#SUI #SuiNetwork #Crypto #BinanceSquare #ShortSetup
(If you found this setup helpful, smash the 👍 LIKE button and consider leaving a 💡 TIP to support my work!)
$SUI is showing clear rejection at a key resistance zone after failing to hold above recent highs. Momentum is shifting bearish, and this setup offers a clean short entry with defined risk and a 1:2 risk-to-reward ratio.
Trade Plan:
📍 Entry: $0.9553
🎯 Target: $0.896
🛑 Stop Loss: $0.985
📊 Risk: 0.0297 (3.11%) | Reward: 0.0594 (6.22%) | R:R: 1:2.0
Why Short?
· Rejection at key resistance zone
· Bearish structure forming on lower timeframes
· Tight invalidation — clean risk definition
· RSI showing exhaustion after recent push
Will SUI hit the target or bounce back? comment below! 👇
#SUI #SuiNetwork #Crypto #BinanceSquare #ShortSetup
(If you found this setup helpful, smash the 👍 LIKE button and consider leaving a 💡 TIP to support my work!)
1
6
·
--
Bearish
🚨 $XRP USDT SHORT SETUP — REJECTION AT RESISTANCE! (R:R 1:2.0) 🎯
$XRP is showing clear rejection at a key resistance zone after failing to hold above recent highs. Momentum is shifting bearish, and this setup offers a clean short entry with defined risk and a 1:2 risk-to-reward ratio.
Trade Plan:
📍 Entry: $1.4844
🎯 Target: $1.4166
🛑 Stop Loss: $1.5183
{future}(XRPUSDT)
📊 Risk: 0.0339 (2.28%) | Reward: 0.0678 (4.56%) | R:R: 1:2.0
Why Short?
· Rejection at key resistance zone
· Bearish structure forming on lower timeframes
· Tight invalidation — clean risk definition
· RSI showing exhaustion after recent push
Will XRP hit the target or bounce back? comment below! 👇
#XRP #Ripple #Crypto #BinanceSquare #ShortSetup
(If you found this setup helpful, smash the 👍 LIKE button and consider leaving a 💡 TIP to support my work!)
🚨 $XRP USDT SHORT SETUP — REJECTION AT RESISTANCE! (R:R 1:2.0) 🎯
$XRP is showing clear rejection at a key resistance zone after failing to hold above recent highs. Momentum is shifting bearish, and this setup offers a clean short entry with defined risk and a 1:2 risk-to-reward ratio.
Trade Plan:
📍 Entry: $1.4844
🎯 Target: $1.4166
🛑 Stop Loss: $1.5183
📊 Risk: 0.0339 (2.28%) | Reward: 0.0678 (4.56%) | R:R: 1:2.0
Why Short?
· Rejection at key resistance zone
· Bearish structure forming on lower timeframes
· Tight invalidation — clean risk definition
· RSI showing exhaustion after recent push
Will XRP hit the target or bounce back? comment below! 👇
#XRP #Ripple #Crypto #BinanceSquare #ShortSetup
(If you found this setup helpful, smash the 👍 LIKE button and consider leaving a 💡 TIP to support my work!)
$XRP is showing clear rejection at a key resistance zone after failing to hold above recent highs. Momentum is shifting bearish, and this setup offers a clean short entry with defined risk and a 1:2 risk-to-reward ratio.
Trade Plan:
📍 Entry: $1.4844
🎯 Target: $1.4166
🛑 Stop Loss: $1.5183
📊 Risk: 0.0339 (2.28%) | Reward: 0.0678 (4.56%) | R:R: 1:2.0
Why Short?
· Rejection at key resistance zone
· Bearish structure forming on lower timeframes
· Tight invalidation — clean risk definition
· RSI showing exhaustion after recent push
Will XRP hit the target or bounce back? comment below! 👇
#XRP #Ripple #Crypto #BinanceSquare #ShortSetup
(If you found this setup helpful, smash the 👍 LIKE button and consider leaving a 💡 TIP to support my work!)
1
32
·
--
Bearish
🚨 $AVAX USDT SHORT SETUP — REJECTION AT RESISTANCE! (R:R 1:2.0) 🎯
$AVAX is showing rejection at a key resistance zone after failing to hold above recent highs. Momentum is shifting bearish, and this setup offers a clean short entry with defined risk and a 1:2 risk-to-reward ratio.
Trade Plan:
📍 Entry: $10.151
🎯 Target: $9.7605
🛑 Stop Loss: $10.3462
{future}(AVAXUSDT)
📊 Risk: 0.1952 (1.92%) | Reward: 0.3904 (3.84%) | R:R: 1:2.0
Why Short?
· Rejection at key resistance zone
· Bearish structure forming on lower timeframes
· Tight invalidation — clean risk definition
· RSI showing exhaustion after recent push
Will AVAX hit the target or bounce back? comment below! 👇
#AVAX #Avalanche #Crypto #BinanceSquare #ShortSetup
(If you found this setup helpful, smash the 👍 LIKE button and consider leaving a 💡 TIP to support my work!)
🚨 $AVAX USDT SHORT SETUP — REJECTION AT RESISTANCE! (R:R 1:2.0) 🎯
$AVAX is showing rejection at a key resistance zone after failing to hold above recent highs. Momentum is shifting bearish, and this setup offers a clean short entry with defined risk and a 1:2 risk-to-reward ratio.
Trade Plan:
📍 Entry: $10.151
🎯 Target: $9.7605
🛑 Stop Loss: $10.3462
📊 Risk: 0.1952 (1.92%) | Reward: 0.3904 (3.84%) | R:R: 1:2.0
Why Short?
· Rejection at key resistance zone
· Bearish structure forming on lower timeframes
· Tight invalidation — clean risk definition
· RSI showing exhaustion after recent push
Will AVAX hit the target or bounce back? comment below! 👇
#AVAX #Avalanche #Crypto #BinanceSquare #ShortSetup
(If you found this setup helpful, smash the 👍 LIKE button and consider leaving a 💡 TIP to support my work!)
$AVAX is showing rejection at a key resistance zone after failing to hold above recent highs. Momentum is shifting bearish, and this setup offers a clean short entry with defined risk and a 1:2 risk-to-reward ratio.
Trade Plan:
📍 Entry: $10.151
🎯 Target: $9.7605
🛑 Stop Loss: $10.3462
📊 Risk: 0.1952 (1.92%) | Reward: 0.3904 (3.84%) | R:R: 1:2.0
Why Short?
· Rejection at key resistance zone
· Bearish structure forming on lower timeframes
· Tight invalidation — clean risk definition
· RSI showing exhaustion after recent push
Will AVAX hit the target or bounce back? comment below! 👇
#AVAX #Avalanche #Crypto #BinanceSquare #ShortSetup
(If you found this setup helpful, smash the 👍 LIKE button and consider leaving a 💡 TIP to support my work!)
1
4
·
--
Bearish
🚨 $UNI USDT SHORT SETUP — REJECTION AT RESISTANCE! (R:R 1:2.0) 🎯
$UNI is showing clear rejection at a key resistance zone after failing to hold above recent highs. Momentum is shifting bearish, and this setup offers a clean short entry with defined risk and a 1:2 risk-to-reward ratio.
Trade Plan:
📍 Entry: $9.101
🎯 Target: $8.2851
🛑 Stop Loss: $9.5089
{future}(UNIUSDT)
📊 Risk: 0.4079 (4.48%) | Reward: 0.8158 (8.96%) | R:R: 1:2.0
Why Short?
· Rejection at key resistance zone
· Bearish structure forming on lower timeframes
· Tight invalidation — clean risk definition
· RSI showing exhaustion after recent push
Will UNI hit the target or bounce back? comment below! 👇
#UNI #Uniswap #Crypto #BinanceSquare #ShortSetup
(If you found this setup helpful, smash the 👍 LIKE button and consider leaving a 💡 TIP to support my work!)
🚨 $UNI USDT SHORT SETUP — REJECTION AT RESISTANCE! (R:R 1:2.0) 🎯
$UNI is showing clear rejection at a key resistance zone after failing to hold above recent highs. Momentum is shifting bearish, and this setup offers a clean short entry with defined risk and a 1:2 risk-to-reward ratio.
Trade Plan:
📍 Entry: $9.101
🎯 Target: $8.2851
🛑 Stop Loss: $9.5089
📊 Risk: 0.4079 (4.48%) | Reward: 0.8158 (8.96%) | R:R: 1:2.0
Why Short?
· Rejection at key resistance zone
· Bearish structure forming on lower timeframes
· Tight invalidation — clean risk definition
· RSI showing exhaustion after recent push
Will UNI hit the target or bounce back? comment below! 👇
#UNI #Uniswap #Crypto #BinanceSquare #ShortSetup
(If you found this setup helpful, smash the 👍 LIKE button and consider leaving a 💡 TIP to support my work!)
$UNI is showing clear rejection at a key resistance zone after failing to hold above recent highs. Momentum is shifting bearish, and this setup offers a clean short entry with defined risk and a 1:2 risk-to-reward ratio.
Trade Plan:
📍 Entry: $9.101
🎯 Target: $8.2851
🛑 Stop Loss: $9.5089
📊 Risk: 0.4079 (4.48%) | Reward: 0.8158 (8.96%) | R:R: 1:2.0
Why Short?
· Rejection at key resistance zone
· Bearish structure forming on lower timeframes
· Tight invalidation — clean risk definition
· RSI showing exhaustion after recent push
Will UNI hit the target or bounce back? comment below! 👇
#UNI #Uniswap #Crypto #BinanceSquare #ShortSetup
(If you found this setup helpful, smash the 👍 LIKE button and consider leaving a 💡 TIP to support my work!)
1
30
·
--
Bearish
🚨 $WLD USDT SHORT SETUP — REJECTION AT RESISTANCE! (R:R 1:2.0) 🎯
$WLD is showing clear rejection at a key resistance zone after failing to hold above recent highs. Momentum is shifting bearish, and this setup offers a clean short entry with defined risk and a 1:2 risk-to-reward ratio.
Trade Plan:
📍 Entry: $0.4081
🎯 Target: $0.3787
🛑 Stop Loss: $0.4228
{future}(WLDUSDT)
📊 Risk: 0.0147 (3.60%) | Reward: 0.0294 (7.20%) | R:R: 1:2.0
Why Short?
· Rejection at key resistance zone
· Bearish structure forming on lower timeframes
· Tight invalidation — clean risk definition
· RSI showing exhaustion after recent push
#WLD #Worldcoin #Crypto #BinanceSquare #ShortSetup
(If you found this setup helpful, smash the 👍 LIKE button and consider leaving a 💡 TIP to support my work!)
🚨 $WLD USDT SHORT SETUP — REJECTION AT RESISTANCE! (R:R 1:2.0) 🎯
$WLD is showing clear rejection at a key resistance zone after failing to hold above recent highs. Momentum is shifting bearish, and this setup offers a clean short entry with defined risk and a 1:2 risk-to-reward ratio.
Trade Plan:
📍 Entry: $0.4081
🎯 Target: $0.3787
🛑 Stop Loss: $0.4228
📊 Risk: 0.0147 (3.60%) | Reward: 0.0294 (7.20%) | R:R: 1:2.0
Why Short?
· Rejection at key resistance zone
· Bearish structure forming on lower timeframes
· Tight invalidation — clean risk definition
· RSI showing exhaustion after recent push
#WLD #Worldcoin #Crypto #BinanceSquare #ShortSetup
(If you found this setup helpful, smash the 👍 LIKE button and consider leaving a 💡 TIP to support my work!)
$WLD is showing clear rejection at a key resistance zone after failing to hold above recent highs. Momentum is shifting bearish, and this setup offers a clean short entry with defined risk and a 1:2 risk-to-reward ratio.
Trade Plan:
📍 Entry: $0.4081
🎯 Target: $0.3787
🛑 Stop Loss: $0.4228
📊 Risk: 0.0147 (3.60%) | Reward: 0.0294 (7.20%) | R:R: 1:2.0
Why Short?
· Rejection at key resistance zone
· Bearish structure forming on lower timeframes
· Tight invalidation — clean risk definition
· RSI showing exhaustion after recent push
#WLD #Worldcoin #Crypto #BinanceSquare #ShortSetup
(If you found this setup helpful, smash the 👍 LIKE button and consider leaving a 💡 TIP to support my work!)
🔴 Will WLD hit the target
100%
🟢 bounce back?
0%
1 votes • Voting closed
1
38
·
--
Bearish
🚨 $SOL USDT SHORT SETUP — REJECTION AT RESISTANCE! (R:R 1:2.0) 🎯
$SOL is showing clear rejection at a key resistance zone after failing to hold above recent highs. Momentum is shifting bearish, and this setup offers a clean short entry with defined risk and a 1:2 risk-to-reward ratio.
Trade Plan:
📍 Entry: $114.14
🎯 Target: $110.22
🛑 Stop Loss: $116.10
{future}(SOLUSDT)
📊 Risk: 1.96 (1.72%) | Reward: 3.92 (3.44%) | R:R: 1:2.0
Why Short?
· Rejection at key resistance zone
· Bearish structure forming on lower timeframes
· Tight invalidation — clean risk definition
· RSI showing exhaustion after recent push
#SOL #Solana #Crypto #BinanceSquare #ShortSetup
(If you found this setup helpful, smash the 👍 LIKE button and consider leaving a 💡 TIP to support my work!)
🚨 $SOL USDT SHORT SETUP — REJECTION AT RESISTANCE! (R:R 1:2.0) 🎯
$SOL is showing clear rejection at a key resistance zone after failing to hold above recent highs. Momentum is shifting bearish, and this setup offers a clean short entry with defined risk and a 1:2 risk-to-reward ratio.
Trade Plan:
📍 Entry: $114.14
🎯 Target: $110.22
🛑 Stop Loss: $116.10
📊 Risk: 1.96 (1.72%) | Reward: 3.92 (3.44%) | R:R: 1:2.0
Why Short?
· Rejection at key resistance zone
· Bearish structure forming on lower timeframes
· Tight invalidation — clean risk definition
· RSI showing exhaustion after recent push
#SOL #Solana #Crypto #BinanceSquare #ShortSetup
(If you found this setup helpful, smash the 👍 LIKE button and consider leaving a 💡 TIP to support my work!)
$SOL is showing clear rejection at a key resistance zone after failing to hold above recent highs. Momentum is shifting bearish, and this setup offers a clean short entry with defined risk and a 1:2 risk-to-reward ratio.
Trade Plan:
📍 Entry: $114.14
🎯 Target: $110.22
🛑 Stop Loss: $116.10
📊 Risk: 1.96 (1.72%) | Reward: 3.92 (3.44%) | R:R: 1:2.0
Why Short?
· Rejection at key resistance zone
· Bearish structure forming on lower timeframes
· Tight invalidation — clean risk definition
· RSI showing exhaustion after recent push
#SOL #Solana #Crypto #BinanceSquare #ShortSetup
(If you found this setup helpful, smash the 👍 LIKE button and consider leaving a 💡 TIP to support my work!)
🔴 Will SOL hit the target
100%
🟢 bounce back?
0%
1 votes • Voting closed
1
30
Log in to explore more content
Join global crypto users on Binance Square
⚡️ Get latest and useful information about crypto.
💬 Trusted by the world’s largest crypto exchange.
👍 Discover real insights from verified creators.
Email / Phone number
Trending Topics
UKFCAWinsCourtOrderToRecover851400Pounds
28,138 views
736 Discussing
🚨 CRYPTO REGULATION JUST ENTERED A NEW PHASE: THEY’RE NOT ONLY WRITING RULES — THEY’RE TAKING MONEY BACK.
The UK’s FCA has secured another court-backed asset recovery, reinforcing a broader enforcement push against unauthorized financial and crypto-related activity.
And look at what’s happening simultaneously:
🇬🇧 FCA → enforcement + asset recovery
🇺🇸 SEC → clearer rules for functional crypto assets
🇺🇸 Fed → formal stablecoin supervision under the GENIUS Act
That combination matters.
Regulators are no longer debating whether crypto belongs inside the financial system.
They’re increasingly deciding who gets access, what rules they follow, and what happens when those rules are broken.
The next crypto cycle may not be “regulation vs innovation.”
It may be regulated crypto vs everyone who can’t meet the standard. 👀
$COIN $CRCL $BTC
#ukfcawinscourtordertorecover851400pounds #ChainlinkLaunchesCCIP2WithEnterpriseVerification #GoldFallsTo$4144 #QNTFallsOver40%FromMorningHigh #USDTAdds845900HoldersInPast7Days
KimHotbae
·3 Likes
·4.3k views
ChainlinkLaunchesCCIP2WithEnterpriseVerification
42,487 views
918 Discussing
GoldFallsTo$4144
15,211 views
157 Discussing