

Leo Bull Square
3.6k Beiträge

Leo Bull Square
Melden
Nutzer blockieren
Crypto Expert, Trader, Trading strategies, Sharing Market insights for all levels of traders.
54 Following
2.8K+ Follower
7.9K+ Like gegeben
Beiträge
Alle
Zitierungen
Übersetzung ansehen
🔥 $LINK /USDT: Compression After Liquidity Sweep — Breakout Move Loading? $LINK is trading near $14.401 (+0.24%) on the 1H chart after recovering from the deeper $13.476 liquidity sweep and now consolidating beneath the $14.56–$14.65 resistance zone. The structure shows buyers defending the $14.14–$14.25 support area, but a clean bullish BOS above $14.56 is still needed before momentum can strengthen. A confirmed breakout and retest could open the path toward $14.88, $15.38 and potentially $15.77, while rejection from resistance may send price back toward $14.20–$14.14; losing that zone would expose $13.87 again. With $35.87M USDT in 24H volume, the better approach is to avoid chasing the middle of the range and wait for either a breakout-retest long above $14.56 or a clear reaction from support—trade the confirmation, not the anticipation.
#LINK
{spot}(LINKUSDT)
🔥 $LINK /USDT: Compression After Liquidity Sweep — Breakout Move Loading? $LINK is trading near $14.401 (+0.24%) on the 1H chart after recovering from the deeper $13.476 liquidity sweep and now consolidating beneath the $14.56–$14.65 resistance zone. The structure shows buyers defending the $14.14–$14.25 support area, but a clean bullish BOS above $14.56 is still needed before momentum can strengthen. A confirmed breakout and retest could open the path toward $14.88, $15.38 and potentially $15.77, while rejection from resistance may send price back toward $14.20–$14.14; losing that zone would expose $13.87 again. With $35.87M USDT in 24H volume, the better approach is to avoid chasing the middle of the range and wait for either a breakout-retest long above $14.56 or a clear reaction from support—trade the confirmation, not the anticipation.
#LINK
#LINK
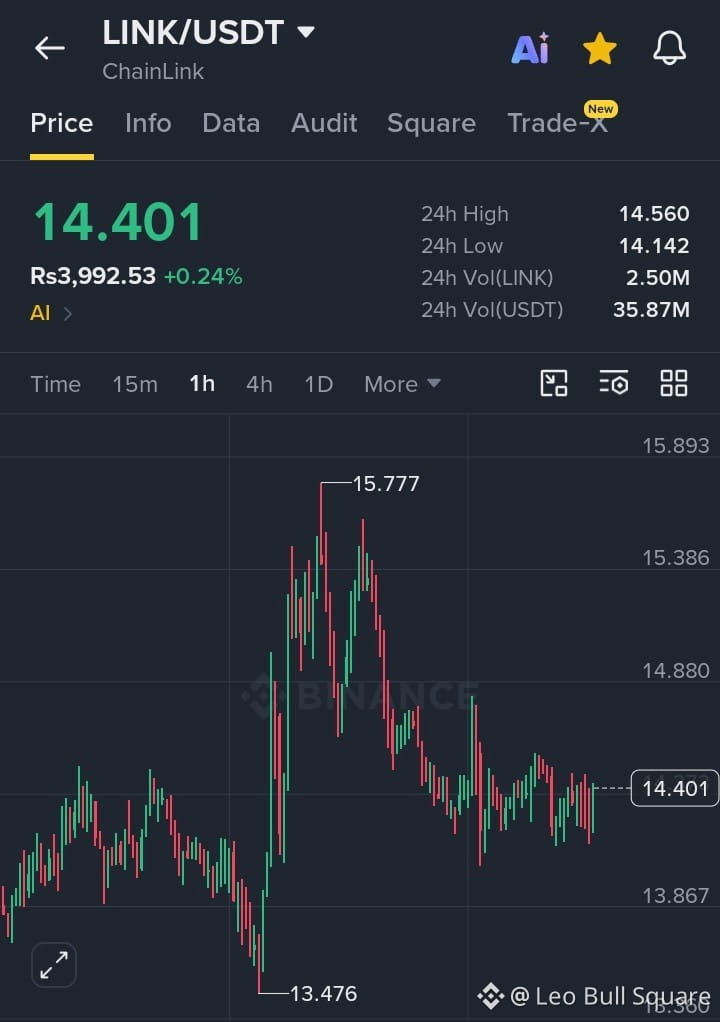

follow for more
Von Leo Bull Square
2
6
55
·
--
Bullisch
Übersetzung ansehen
🔥 $LDO /USDT LONG REVERSAL WATCH — Liquidity Sweep Near 24H Low Could Trigger a Bounce $LDO is trading around $0.4356 (-6.82%) on the 1H chart after a sharp bearish leg pushed price into the $0.4337–$0.4271 demand/liquidity zone, where buyers previously reacted strongly. The current structure is still bearish, so the smarter long is confirmation-based: watch for a sweep below $0.4337 followed by a reclaim of $0.4406, which could signal a short-term bullish BOS and open a recovery toward higher resistance. Long Entry: $0.4335–$0.4380 | SL: $0.4260 | TP1: $0.4460 | TP2: $0.4580 | TP3: $0.4750. A strong 1H close above $0.4406 would strengthen the reversal case, while a clean break below $0.4271 would invalidate the setup. Don’t catch the falling knife—wait for the liquidity sweep, reclaim and bullish confirmation before execution.
#ldo
{spot}(LDOUSDT)
🔥 $LDO /USDT LONG REVERSAL WATCH — Liquidity Sweep Near 24H Low Could Trigger a Bounce $LDO is trading around $0.4356 (-6.82%) on the 1H chart after a sharp bearish leg pushed price into the $0.4337–$0.4271 demand/liquidity zone, where buyers previously reacted strongly. The current structure is still bearish, so the smarter long is confirmation-based: watch for a sweep below $0.4337 followed by a reclaim of $0.4406, which could signal a short-term bullish BOS and open a recovery toward higher resistance. Long Entry: $0.4335–$0.4380 | SL: $0.4260 | TP1: $0.4460 | TP2: $0.4580 | TP3: $0.4750. A strong 1H close above $0.4406 would strengthen the reversal case, while a clean break below $0.4271 would invalidate the setup. Don’t catch the falling knife—wait for the liquidity sweep, reclaim and bullish confirmation before execution.
#ldo
#ldo
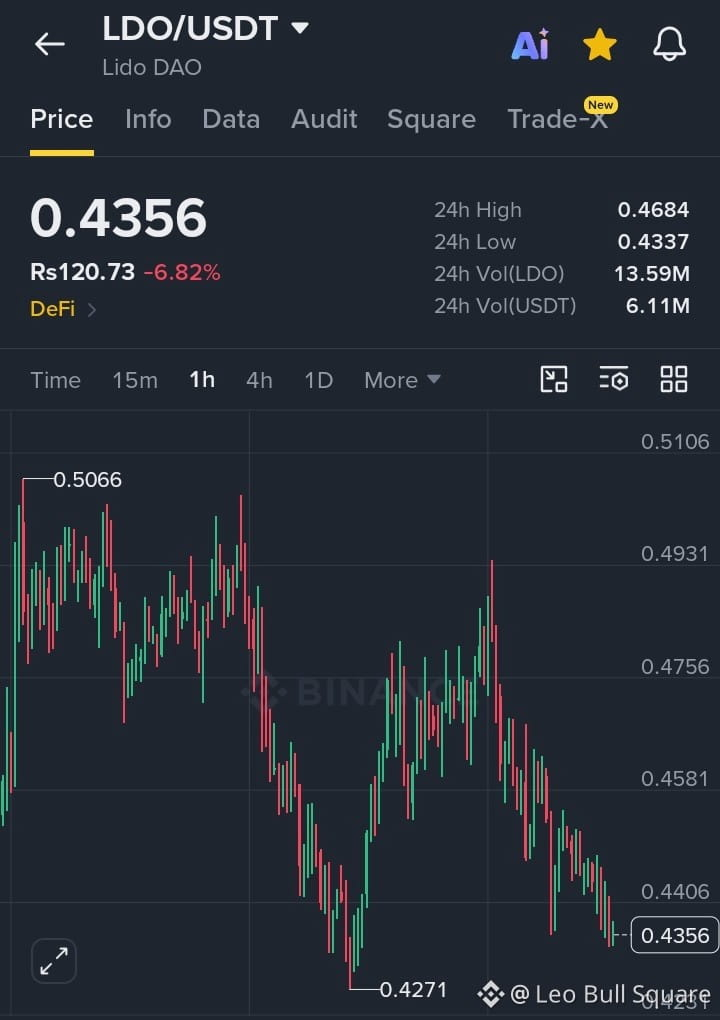
follow for more
Von Leo Bull Square
Vollständig beansprucht
6
2
24
80
Übersetzung ansehen
🔴 $AVAX /USDT – Bearish BOS Near 24H Low, Pullback Short Setup
$AVAX is trading around $10.751 (-2.50%) on the 15M chart after sellers pushed price below the $10.84 support area, creating a fresh bearish structure and bringing price close to the 24H low at $10.732. The cleaner setup is not to chase the drop, but to wait for a pullback into the $10.84–$10.92 supply zone and look for bearish rejection or a lower-timeframe BOS before entering. Short Entry: $10.84–$10.92 | TP1: $10.73 | TP2: $10.60 | TP3: $10.45 | Stop Loss: $11.02. As long as AVAX remains below $10.98–$11.02, sellers keep the short-term advantage; a strong reclaim above this zone would weaken the bearish setup. Best approach: wait for the pullback, confirm rejection, and manage risk tightly instead of entering after an extended red candle.
#AVAX
{spot}(AVAXUSDT)
🔴 $AVAX /USDT – Bearish BOS Near 24H Low, Pullback Short Setup
$AVAX is trading around $10.751 (-2.50%) on the 15M chart after sellers pushed price below the $10.84 support area, creating a fresh bearish structure and bringing price close to the 24H low at $10.732. The cleaner setup is not to chase the drop, but to wait for a pullback into the $10.84–$10.92 supply zone and look for bearish rejection or a lower-timeframe BOS before entering. Short Entry: $10.84–$10.92 | TP1: $10.73 | TP2: $10.60 | TP3: $10.45 | Stop Loss: $11.02. As long as AVAX remains below $10.98–$11.02, sellers keep the short-term advantage; a strong reclaim above this zone would weaken the bearish setup. Best approach: wait for the pullback, confirm rejection, and manage risk tightly instead of entering after an extended red candle.
#AVAX
$AVAX is trading around $10.751 (-2.50%) on the 15M chart after sellers pushed price below the $10.84 support area, creating a fresh bearish structure and bringing price close to the 24H low at $10.732. The cleaner setup is not to chase the drop, but to wait for a pullback into the $10.84–$10.92 supply zone and look for bearish rejection or a lower-timeframe BOS before entering. Short Entry: $10.84–$10.92 | TP1: $10.73 | TP2: $10.60 | TP3: $10.45 | Stop Loss: $11.02. As long as AVAX remains below $10.98–$11.02, sellers keep the short-term advantage; a strong reclaim above this zone would weaken the bearish setup. Best approach: wait for the pullback, confirm rejection, and manage risk tightly instead of entering after an extended red candle.
#AVAX
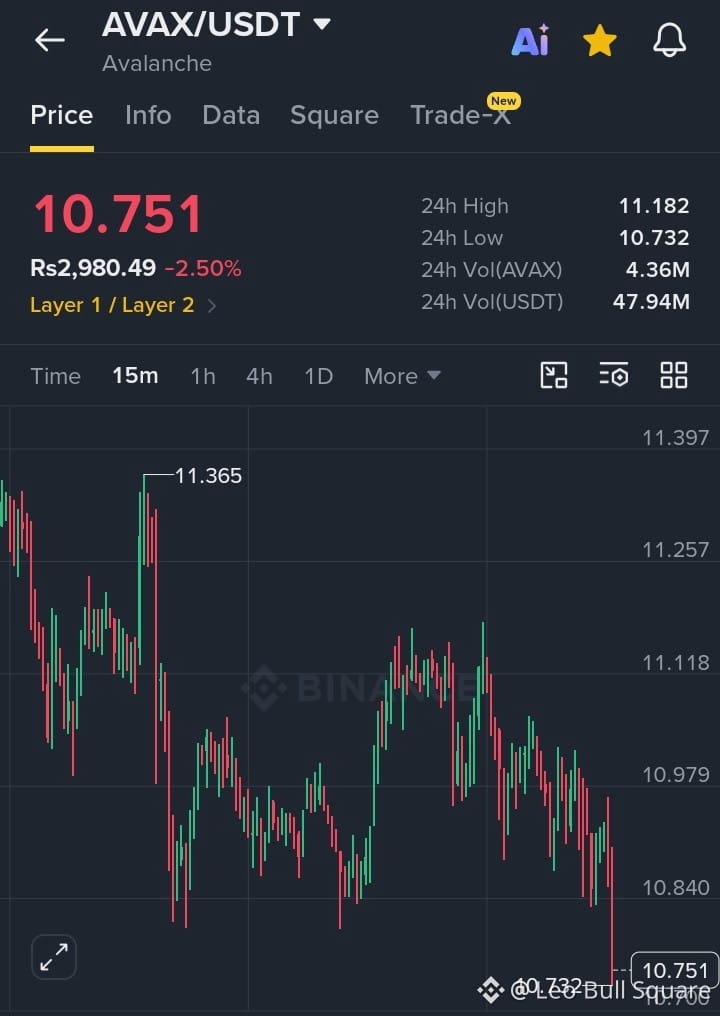
follow for follow
Von Leo Bull Square
4
1
19
89
Übersetzung ansehen
🔥 $SAGA /USDT SHORT SETUP — Bearish BOS Keeps Sellers in Control $SAGA is trading near $0.02447 (-7.56%) on the 15M chart after a sustained sequence of lower highs and lower lows, confirming a bearish market structure from the $0.02794 swing high. Price has already broken below the $0.02483 structure zone, so chasing the move near support is risky; the cleaner SMC setup is to wait for a pullback into $0.02475–$0.02490, where a liquidity grab and bearish rejection could offer a higher-quality short. Entry: $0.02475–$0.02490 | SL: $0.02515 | TP1: $0.02435 | TP2: $0.02419 | TP3: $0.02390. As long as SAGA stays below $0.02500–$0.02515, sellers retain the short-term advantage, while a strong reclaim above that zone would invalidate the setup. Follow for clean BOS, liquidity-sweep and pullback setups built around confirmation—not chasing candles.
#Saga
{spot}(SAGAUSDT)
🔥 $SAGA /USDT SHORT SETUP — Bearish BOS Keeps Sellers in Control $SAGA is trading near $0.02447 (-7.56%) on the 15M chart after a sustained sequence of lower highs and lower lows, confirming a bearish market structure from the $0.02794 swing high. Price has already broken below the $0.02483 structure zone, so chasing the move near support is risky; the cleaner SMC setup is to wait for a pullback into $0.02475–$0.02490, where a liquidity grab and bearish rejection could offer a higher-quality short. Entry: $0.02475–$0.02490 | SL: $0.02515 | TP1: $0.02435 | TP2: $0.02419 | TP3: $0.02390. As long as SAGA stays below $0.02500–$0.02515, sellers retain the short-term advantage, while a strong reclaim above that zone would invalidate the setup. Follow for clean BOS, liquidity-sweep and pullback setups built around confirmation—not chasing candles.
#Saga
#Saga
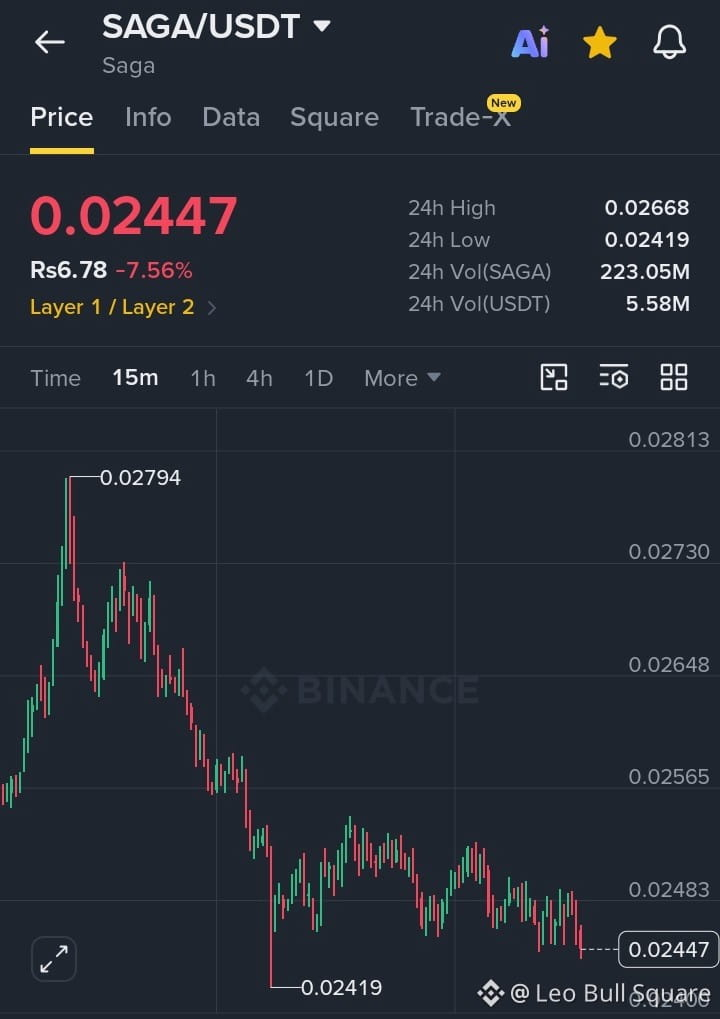
follow for more
Von Leo Bull Square
3
2
9
68
Übersetzung ansehen
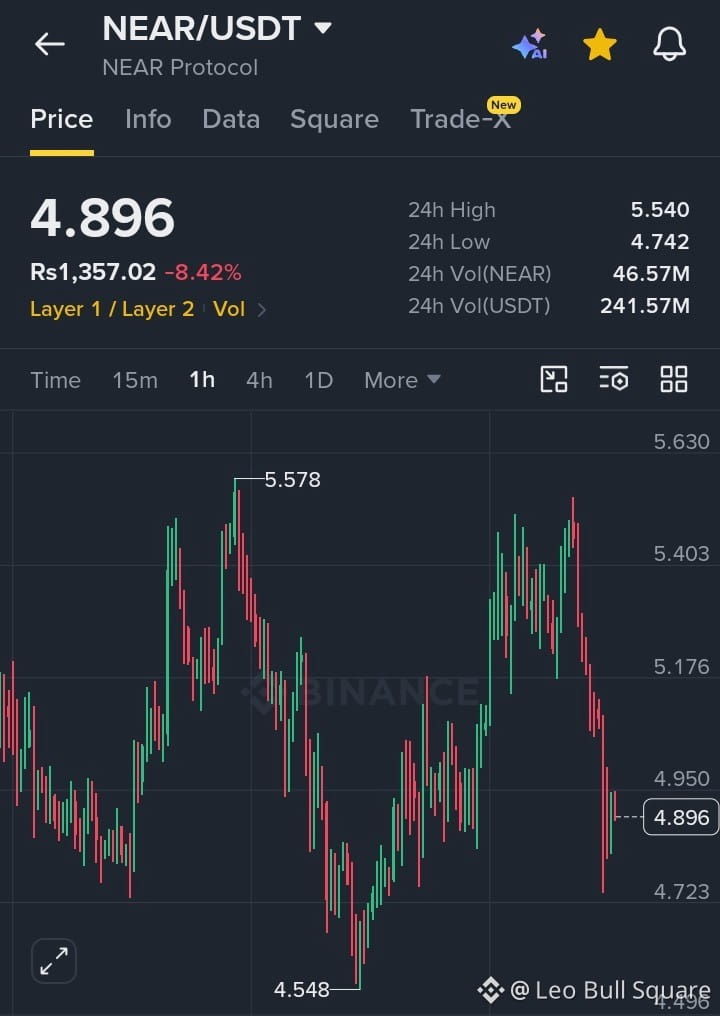
🔥 $NEAR /USDT LONG SETUP: Liquidity Sweep at $4.72 — Reversal Window Opening? $NEAR is trading near $4.896 on the 1H chart after a sharp sell-off from the $5.40–$5.50 supply zone, but the latest move swept liquidity below the $4.74 support and quickly reclaimed higher levels, creating a potential smart-money reversal setup. The cleaner long idea is to wait for price to hold $4.82–$4.90 and confirm strength with a 1H reclaim above $4.95, which would signal a short-term BOS and improve the probability of a recovery move. Entry: $4.82–$4.90 | SL: $4.68 | TP1: $5.05 | TP2: $5.17 | TP3: $5.40. If buyers continue defending the swept liquidity zone, the next pullback could become an attractive continuation entry; however, a clean break below $4.72 would invalidate the bullish idea and expose lower support. Follow for clean SMC setups focused on liquidity sweeps, BOS and confirmation-based entries—not blind chasing.
#Near
{spot}(NEARUSDT)
🔥 $NEAR /USDT LONG SETUP: Liquidity Sweep at $4.72 — Reversal Window Opening? $NEAR is trading near $4.896 on the 1H chart after a sharp sell-off from the $5.40–$5.50 supply zone, but the latest move swept liquidity below the $4.74 support and quickly reclaimed higher levels, creating a potential smart-money reversal setup. The cleaner long idea is to wait for price to hold $4.82–$4.90 and confirm strength with a 1H reclaim above $4.95, which would signal a short-term BOS and improve the probability of a recovery move. Entry: $4.82–$4.90 | SL: $4.68 | TP1: $5.05 | TP2: $5.17 | TP3: $5.40. If buyers continue defending the swept liquidity zone, the next pullback could become an attractive continuation entry; however, a clean break below $4.72 would invalidate the bullish idea and expose lower support. Follow for clean SMC setups focused on liquidity sweeps, BOS and confirmation-based entries—not blind chasing.
#Near
#Near
follow for more
Von Leo Bull Square
Vollständig beansprucht
7
1
17
128
Übersetzung ansehen
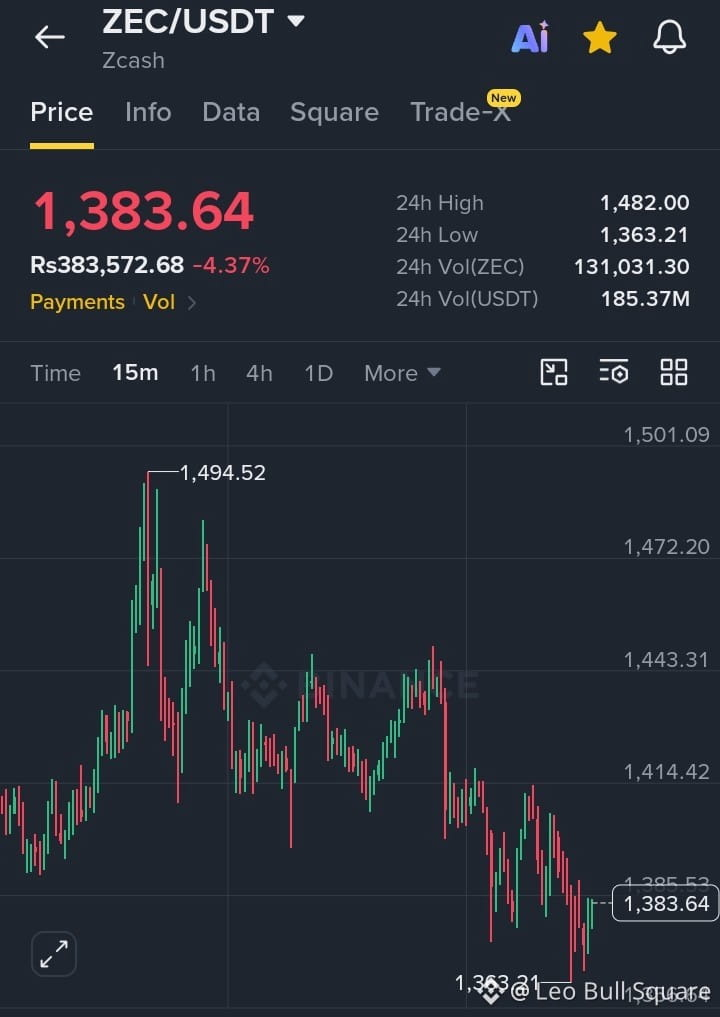
🔥 $ZEC /USDT: Bearish BOS Confirmed — Pullback Short Setup in Play $ZEC is trading near $1,383.64 (-4.37%) on the 15M chart after rejecting from the $1,494.52 swing high and printing a clear bearish BOS below $1,414, while the drop into $1,363.21 swept downside liquidity before a weak rebound. The cleaner smart-money idea is to wait for a pullback into $1,390–$1,405 and look for rejection rather than chasing the dump. Entry: $1,390–$1,405 | SL: $1,418 | TP1: $1,375 | TP2: $1,363 | TP3: $1,345. As long as price stays below $1,414–$1,420, sellers retain short-term control; a strong 15M reclaim above that zone would weaken the bearish setup. Follow for clean SMC-based Binance setups with BOS, liquidity sweeps and confirmation entries.
#zec
{spot}(ZECUSDT)
🔥 $ZEC /USDT: Bearish BOS Confirmed — Pullback Short Setup in Play $ZEC is trading near $1,383.64 (-4.37%) on the 15M chart after rejecting from the $1,494.52 swing high and printing a clear bearish BOS below $1,414, while the drop into $1,363.21 swept downside liquidity before a weak rebound. The cleaner smart-money idea is to wait for a pullback into $1,390–$1,405 and look for rejection rather than chasing the dump. Entry: $1,390–$1,405 | SL: $1,418 | TP1: $1,375 | TP2: $1,363 | TP3: $1,345. As long as price stays below $1,414–$1,420, sellers retain short-term control; a strong 15M reclaim above that zone would weaken the bearish setup. Follow for clean SMC-based Binance setups with BOS, liquidity sweeps and confirmation entries.
#zec
#zec
follow for more
Von Leo Bull Square
Vollständig beansprucht
3
1
12
179
·
--
Bullisch
Übersetzung ansehen
🔥 $QNT /USDT LONG REVERSAL WATCH — Buyers Defending the $255 Zone?
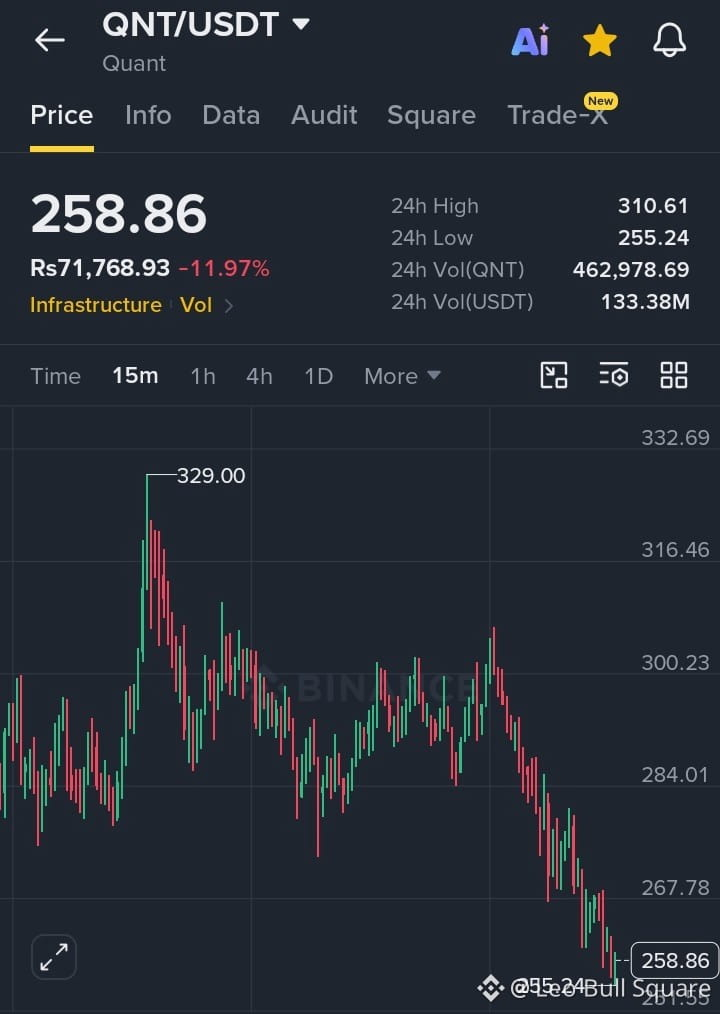
$QNT /USDT is trading near $258.86 (-11.97%) on the 15M chart after a sharp sell-off from the $300+ region, with price now testing the crucial $255.24–$258.00 support zone near the 24H low. A confirmed bullish reaction from this demand area could trigger a relief bounce, making $258–$262 the potential entry zone, with TP1: $267.80, TP2: $284.00, TP3: $300.20, while a stop-loss below $252 helps protect against another breakdown. The technical trigger to watch is a strong 15M reclaim above $267.80 with rising volume; that would signal buyers are regaining short-term control, while a clean break below $255.24 would invalidate the long idea and keep the bearish structure intact. High-volatility setup—wait for confirmation instead of catching a falling knife.
#QNT
{spot}(QNTUSDT)
🔥 $QNT /USDT LONG REVERSAL WATCH — Buyers Defending the $255 Zone?
$QNT /USDT is trading near $258.86 (-11.97%) on the 15M chart after a sharp sell-off from the $300+ region, with price now testing the crucial $255.24–$258.00 support zone near the 24H low. A confirmed bullish reaction from this demand area could trigger a relief bounce, making $258–$262 the potential entry zone, with TP1: $267.80, TP2: $284.00, TP3: $300.20, while a stop-loss below $252 helps protect against another breakdown. The technical trigger to watch is a strong 15M reclaim above $267.80 with rising volume; that would signal buyers are regaining short-term control, while a clean break below $255.24 would invalidate the long idea and keep the bearish structure intact. High-volatility setup—wait for confirmation instead of catching a falling knife.
#QNT
$QNT /USDT is trading near $258.86 (-11.97%) on the 15M chart after a sharp sell-off from the $300+ region, with price now testing the crucial $255.24–$258.00 support zone near the 24H low. A confirmed bullish reaction from this demand area could trigger a relief bounce, making $258–$262 the potential entry zone, with TP1: $267.80, TP2: $284.00, TP3: $300.20, while a stop-loss below $252 helps protect against another breakdown. The technical trigger to watch is a strong 15M reclaim above $267.80 with rising volume; that would signal buyers are regaining short-term control, while a clean break below $255.24 would invalidate the long idea and keep the bearish structure intact. High-volatility setup—wait for confirmation instead of catching a falling knife.
#QNT
follow for follow
Von Leo Bull Square
Vollständig beansprucht
7
2
17
218
·
--
Bärisch
Übersetzung ansehen
🔥 $MOVR /USDT SHORT SETUP — PARABOLIC PUMP LOSING STEAM?
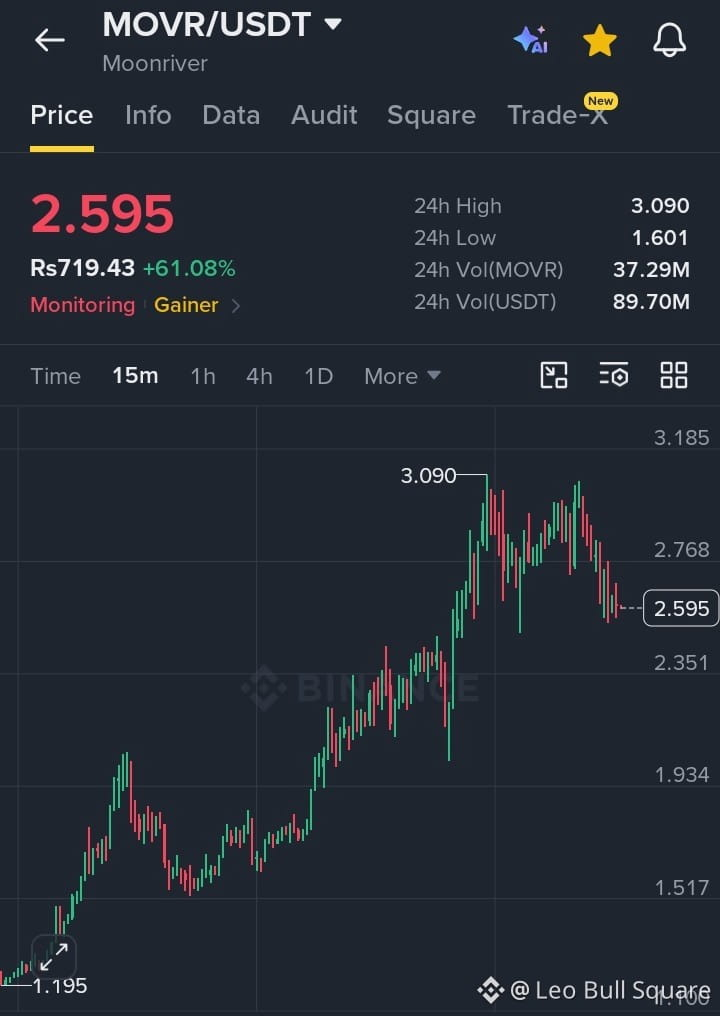
$MOVR /USDT is trading around $2.595 after a massive +61.08% 24H surge, but the 15M chart now shows clear post-pump exhaustion after rejection from the $3.090 high. Price is forming lower highs beneath the $2.76–$2.82 resistance zone, suggesting sellers are gaining intraday control. Short Entry: $2.68–$2.76 on confirmed rejection | TP1: $2.50 | TP2: $2.35 | TP3: $2.15 | Stop-Loss: $2.86. The key bearish trigger is failure to reclaim $2.76 with strong volume; if that resistance continues to hold, a deeper liquidity flush toward $2.35 becomes possible. A clean break back above $2.86 would weaken the short thesis, so wait for rejection confirmation and keep risk tight on this highly volatile mover.
#MOVR/USDT
{spot}(MOVRUSDT)
🔥 $MOVR /USDT SHORT SETUP — PARABOLIC PUMP LOSING STEAM?
$MOVR /USDT is trading around $2.595 after a massive +61.08% 24H surge, but the 15M chart now shows clear post-pump exhaustion after rejection from the $3.090 high. Price is forming lower highs beneath the $2.76–$2.82 resistance zone, suggesting sellers are gaining intraday control. Short Entry: $2.68–$2.76 on confirmed rejection | TP1: $2.50 | TP2: $2.35 | TP3: $2.15 | Stop-Loss: $2.86. The key bearish trigger is failure to reclaim $2.76 with strong volume; if that resistance continues to hold, a deeper liquidity flush toward $2.35 becomes possible. A clean break back above $2.86 would weaken the short thesis, so wait for rejection confirmation and keep risk tight on this highly volatile mover.
#MOVR/USDT
$MOVR /USDT is trading around $2.595 after a massive +61.08% 24H surge, but the 15M chart now shows clear post-pump exhaustion after rejection from the $3.090 high. Price is forming lower highs beneath the $2.76–$2.82 resistance zone, suggesting sellers are gaining intraday control. Short Entry: $2.68–$2.76 on confirmed rejection | TP1: $2.50 | TP2: $2.35 | TP3: $2.15 | Stop-Loss: $2.86. The key bearish trigger is failure to reclaim $2.76 with strong volume; if that resistance continues to hold, a deeper liquidity flush toward $2.35 becomes possible. A clean break back above $2.86 would weaken the short thesis, so wait for rejection confirmation and keep risk tight on this highly volatile mover.
#MOVR/USDT
follow for more
Von Leo Bull Square
Vollständig beansprucht
3
1
10
172
Übersetzung ansehen
click and claim 🎁
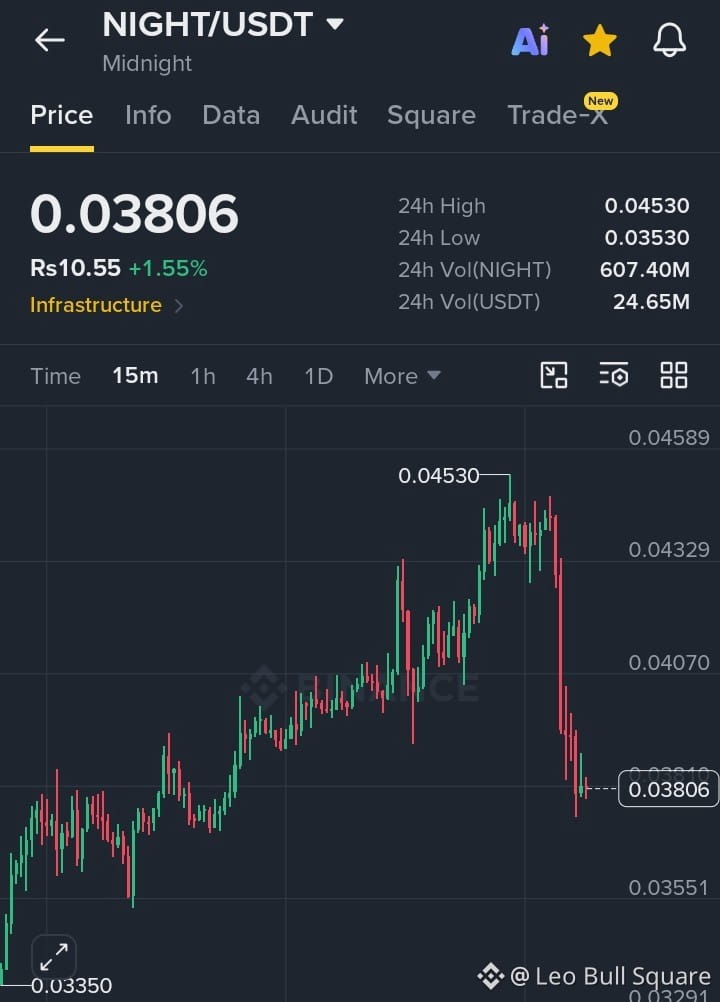
🔥 $NIGHT /USDT: LIQUIDITY FLUSH DONE — REBOUND SETUP LOADING?
$NIGHT/USDT is trading near $0.03806 (+1.55%) on the 15M chart after a powerful run from $0.03350 to $0.04530, followed by an aggressive rejection that swept late buyers and pushed price back into the $0.0375–$0.0382 demand zone. With 607.40M NIGHT / $24.65M USDT in 24H volume, volatility remains high. A sustained hold above $0.0375 and reclaim of $0.0388–$0.0392 could trigger a relief move toward TP1 $0.04070, TP2 $0.04330, TP3 $0.04530; a speculative entry around $0.0377–$0.0382 can be considered only after bullish confirmation, with SL below $0.0367. Losing $0.0375 would weaken the setup and expose the $0.03530 24H low, so confirmation is crucial rather than chasing the first bounce. Key trigger: reclaim $0.0392 with volume = momentum shift. High-volatility setup; manage position size and risk carefully.
#night
{spot}(NIGHTUSDT)
click and claim 🎁
🔥 $NIGHT /USDT: LIQUIDITY FLUSH DONE — REBOUND SETUP LOADING?
$NIGHT /USDT is trading near $0.03806 (+1.55%) on the 15M chart after a powerful run from $0.03350 to $0.04530, followed by an aggressive rejection that swept late buyers and pushed price back into the $0.0375–$0.0382 demand zone. With 607.40M NIGHT / $24.65M USDT in 24H volume, volatility remains high. A sustained hold above $0.0375 and reclaim of $0.0388–$0.0392 could trigger a relief move toward TP1 $0.04070, TP2 $0.04330, TP3 $0.04530; a speculative entry around $0.0377–$0.0382 can be considered only after bullish confirmation, with SL below $0.0367. Losing $0.0375 would weaken the setup and expose the $0.03530 24H low, so confirmation is crucial rather than chasing the first bounce. Key trigger: reclaim $0.0392 with volume = momentum shift. High-volatility setup; manage position size and risk carefully.
#night
🔥 $NIGHT /USDT: LIQUIDITY FLUSH DONE — REBOUND SETUP LOADING?
$NIGHT /USDT is trading near $0.03806 (+1.55%) on the 15M chart after a powerful run from $0.03350 to $0.04530, followed by an aggressive rejection that swept late buyers and pushed price back into the $0.0375–$0.0382 demand zone. With 607.40M NIGHT / $24.65M USDT in 24H volume, volatility remains high. A sustained hold above $0.0375 and reclaim of $0.0388–$0.0392 could trigger a relief move toward TP1 $0.04070, TP2 $0.04330, TP3 $0.04530; a speculative entry around $0.0377–$0.0382 can be considered only after bullish confirmation, with SL below $0.0367. Losing $0.0375 would weaken the setup and expose the $0.03530 24H low, so confirmation is crucial rather than chasing the first bounce. Key trigger: reclaim $0.0392 with volume = momentum shift. High-volatility setup; manage position size and risk carefully.
#night
follow for more
Von Leo Bull Square
Vollständig beansprucht
12
1
17
186
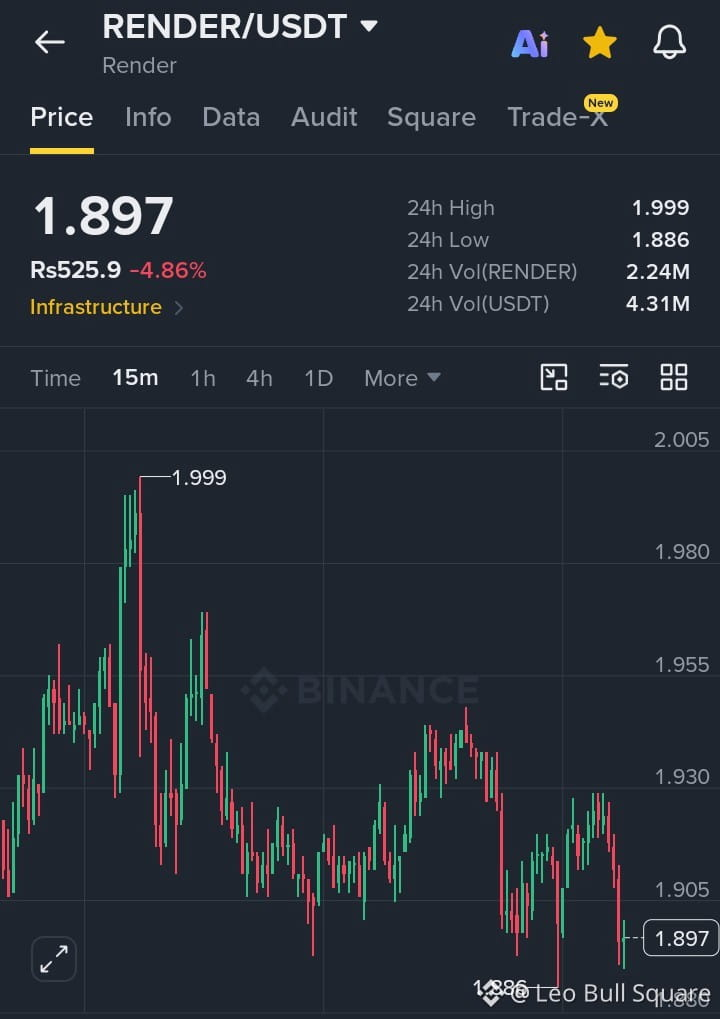
🔥 $RENDER /USDT — Kritischer $1.886 Support: Bounce-Setup oder Breakdown voraus? 👀 $RENDER handelt derzeit nahe $1.897 (-4.86%) im 15M-Chart, nachdem der Kurs scharf von dem Hoch bei $1.999 zurückgewiesen wurde. Aktuell drückt der Preis gegen die zentrale $1.886–$1.900- Nachfragezone. Die kurzfristige Struktur bleibt bärisch, solange der Kurs unter $1.905–$1.930 bleibt. Ein sauberer Schutz von $1.886, gefolgt von der Rückeroberung von $1.905, könnte jedoch einen Erholungsimpuls auslösen Richtung $1.930, $1.955 und potenziell $1.980. Long-Idee: Einstieg $1.890–$1.905 nur nach bullischer Bestätigung | SL: $1.878 | TP1: $1.930 | TP2: $1.955 | TP3: $1.980. Technischer Fokus: Test der Sell-Side-Liquidität → Reaktion auf den Support → bullischer BOS → Fortsetzung im Pullback. Wenn $1.886 mit starkem Momentum bricht, ist das bullische Setup ungültig und der Abwärtsdruck könnte sich verlängern. Bitte lass daher den Preis erst bestätigen, bevor du einsteigst.
#render
{spot}(RENDERUSDT)
🔥 $RENDER /USDT — Kritischer $1.886 Support: Bounce-Setup oder Breakdown voraus? 👀 $RENDER handelt derzeit nahe $1.897 (-4.86%) im 15M-Chart, nachdem der Kurs scharf von dem Hoch bei $1.999 zurückgewiesen wurde. Aktuell drückt der Preis gegen die zentrale $1.886–$1.900- Nachfragezone. Die kurzfristige Struktur bleibt bärisch, solange der Kurs unter $1.905–$1.930 bleibt. Ein sauberer Schutz von $1.886, gefolgt von der Rückeroberung von $1.905, könnte jedoch einen Erholungsimpuls auslösen Richtung $1.930, $1.955 und potenziell $1.980. Long-Idee: Einstieg $1.890–$1.905 nur nach bullischer Bestätigung | SL: $1.878 | TP1: $1.930 | TP2: $1.955 | TP3: $1.980. Technischer Fokus: Test der Sell-Side-Liquidität → Reaktion auf den Support → bullischer BOS → Fortsetzung im Pullback. Wenn $1.886 mit starkem Momentum bricht, ist das bullische Setup ungültig und der Abwärtsdruck könnte sich verlängern. Bitte lass daher den Preis erst bestätigen, bevor du einsteigst.
#render
#render
2
44
Übersetzung ansehen
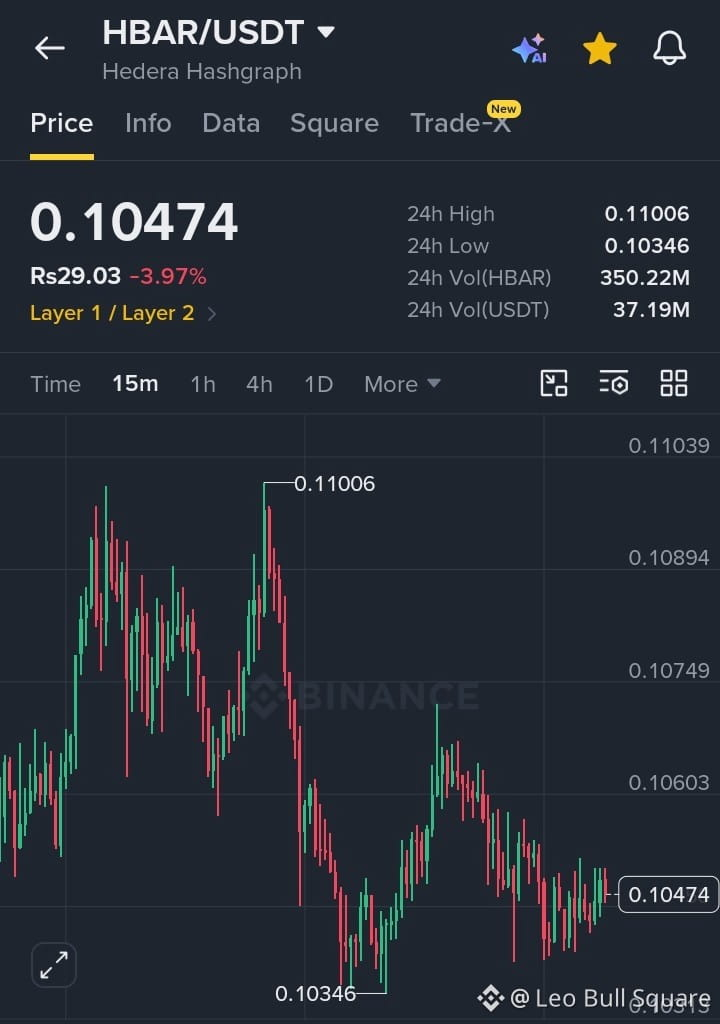
🔥 $HBAR R/USDT — Liquidity Sweep at $0.10346: Is a Reversal Loading? 👀 $HBAR is trading near $0.10474 (-3.97%) on the 15M chart after a sharp rejection from the $0.11006 high and a sweep into the $0.10346 liquidity zone, where buyers have started defending price. With 350.22M HBAR traded in 24 hours, volatility remains active, but bulls still need to reclaim $0.1060–$0.1075 to confirm a meaningful momentum shift. Bullish setup: a clean break and hold above $0.1060 could open the path toward $0.1075, $0.1089, and eventually $0.1100; bearish risk: losing $0.10346 would invalidate the bounce and expose lower support near $0.1020–$0.1010. Technical focus: sell-side liquidity sweep → demand reaction → BOS confirmation → pullback entry. Don’t chase the first green candle—let the reclaim and volume confirm the move before entering.
#hbar
{spot}(HBARUSDT)
🔥 $HBAR R/USDT — Liquidity Sweep at $0.10346: Is a Reversal Loading? 👀 $HBAR is trading near $0.10474 (-3.97%) on the 15M chart after a sharp rejection from the $0.11006 high and a sweep into the $0.10346 liquidity zone, where buyers have started defending price. With 350.22M HBAR traded in 24 hours, volatility remains active, but bulls still need to reclaim $0.1060–$0.1075 to confirm a meaningful momentum shift. Bullish setup: a clean break and hold above $0.1060 could open the path toward $0.1075, $0.1089, and eventually $0.1100; bearish risk: losing $0.10346 would invalidate the bounce and expose lower support near $0.1020–$0.1010. Technical focus: sell-side liquidity sweep → demand reaction → BOS confirmation → pullback entry. Don’t chase the first green candle—let the reclaim and volume confirm the move before entering.
#hbar
#hbar
1
48
Übersetzung ansehen
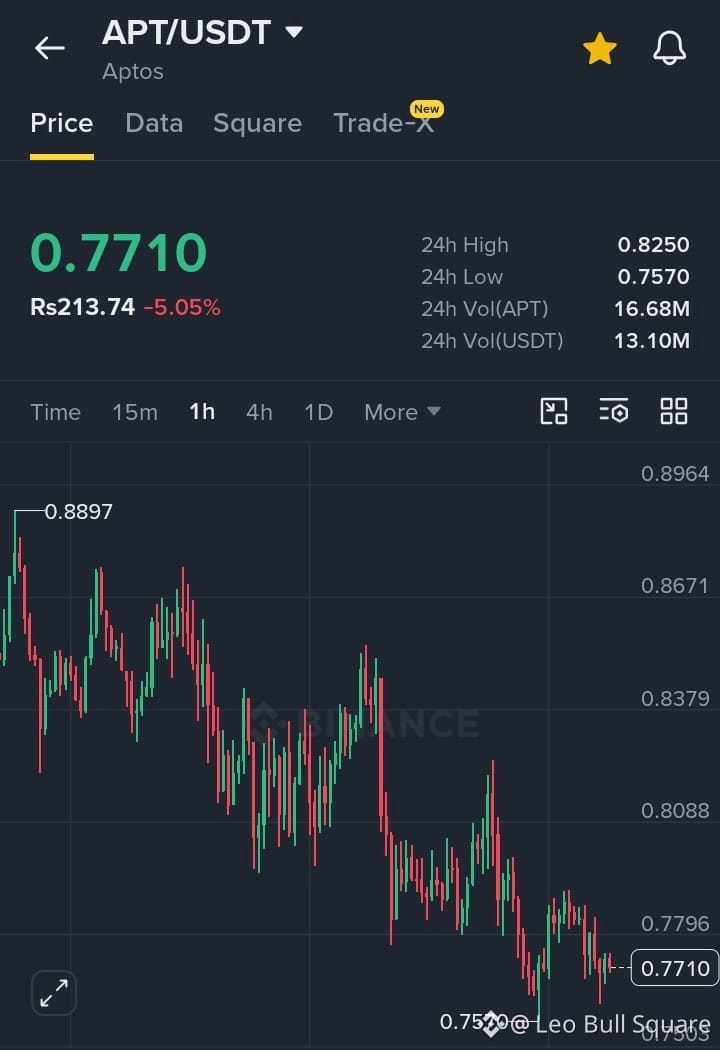
🔥 $APT /USDT — Liquidity Sweep at $0.757: Reversal Setup Starting to Form? 👀 $APT is trading near $0.7710 (-5.05%) on the 1H chart after sweeping the $0.7570 24h low and showing an initial reaction from that demand area, but the broader structure is still bearish with a clear sequence of lower highs. The key level now is $0.7796–$0.7820; a strong 1H reclaim above this zone could signal a short-term bullish BOS and open room for a recovery toward $0.7950, $0.8088, and potentially $0.8250. Long Setup: Entry $0.770–$0.780 only after bullish confirmation | SL: $0.753 | TP1: $0.795 | TP2: $0.809 | TP3: $0.825. Technical logic: sell-side liquidity sweep → demand reaction → reclaim of local resistance → potential momentum reversal. Avoid entering blindly while price remains below $0.780; let the market confirm the shift first, because a clean break below $0.7570 would invalidate the bounce setup and keep sellers in control.
#APT
{spot}(APTUSDT)
🔥 $APT /USDT — Liquidity Sweep at $0.757: Reversal Setup Starting to Form? 👀 $APT is trading near $0.7710 (-5.05%) on the 1H chart after sweeping the $0.7570 24h low and showing an initial reaction from that demand area, but the broader structure is still bearish with a clear sequence of lower highs. The key level now is $0.7796–$0.7820; a strong 1H reclaim above this zone could signal a short-term bullish BOS and open room for a recovery toward $0.7950, $0.8088, and potentially $0.8250. Long Setup: Entry $0.770–$0.780 only after bullish confirmation | SL: $0.753 | TP1: $0.795 | TP2: $0.809 | TP3: $0.825. Technical logic: sell-side liquidity sweep → demand reaction → reclaim of local resistance → potential momentum reversal. Avoid entering blindly while price remains below $0.780; let the market confirm the shift first, because a clean break below $0.7570 would invalidate the bounce setup and keep sellers in control.
#APT
#APT
1
58
Übersetzung ansehen
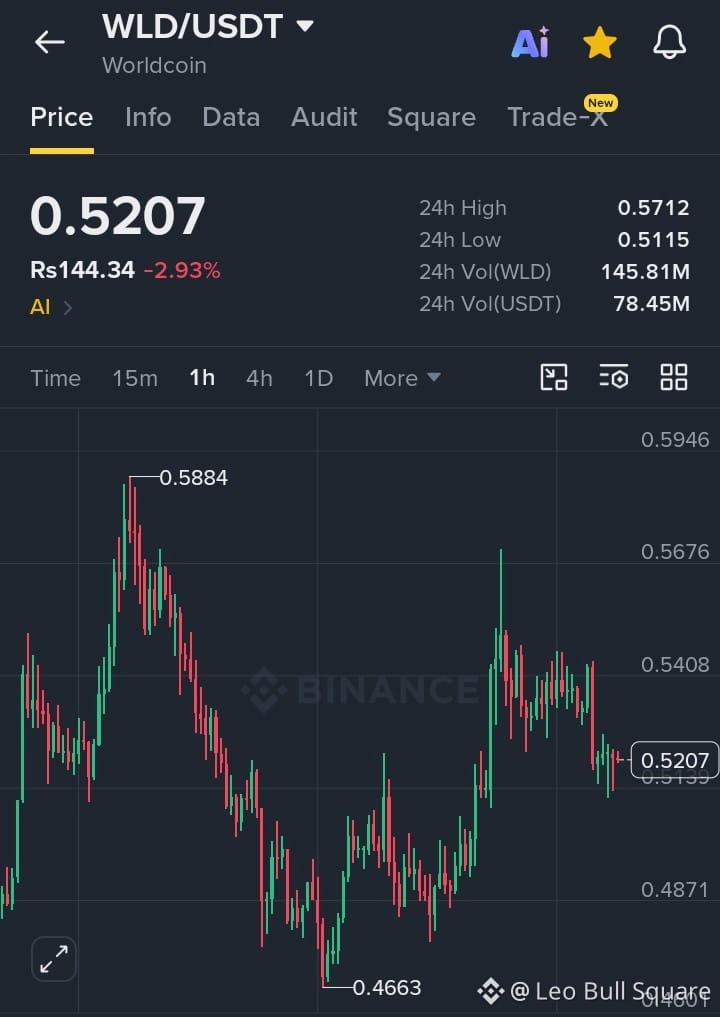
🔥 $WLD /USDT — Support Reclaim Could Trigger the Next Expansion Move $WLD is trading near $0.5207 (-2.93%) on the 1H chart after rejecting from the $0.5408–$0.5676 supply zone, but price is now sitting close to an important support area around $0.5115–$0.5200. The broader recovery from $0.4663 remains intact, so traders should watch for a bullish reaction and reclaim above $0.528–$0.532 before considering continuation. Long Setup: Entry $0.516–$0.523 on confirmation | TP1: $0.5408 | TP2: $0.5550 | TP3: $0.5675 | Stop Loss: $0.5070. Technical logic: liquidity pullback → demand defense → bullish reclaim → continuation toward upper liquidity. A clean 1H break below $0.5115 would weaken the setup and could expose $0.4870, so wait for confirmation rather than entering blindly.
#WLD
{spot}(WLDUSDT)
🔥 $WLD /USDT — Support Reclaim Could Trigger the Next Expansion Move $WLD is trading near $0.5207 (-2.93%) on the 1H chart after rejecting from the $0.5408–$0.5676 supply zone, but price is now sitting close to an important support area around $0.5115–$0.5200. The broader recovery from $0.4663 remains intact, so traders should watch for a bullish reaction and reclaim above $0.528–$0.532 before considering continuation. Long Setup: Entry $0.516–$0.523 on confirmation | TP1: $0.5408 | TP2: $0.5550 | TP3: $0.5675 | Stop Loss: $0.5070. Technical logic: liquidity pullback → demand defense → bullish reclaim → continuation toward upper liquidity. A clean 1H break below $0.5115 would weaken the setup and could expose $0.4870, so wait for confirmation rather than entering blindly.
#WLD
#WLD
1
60
Übersetzung ansehen
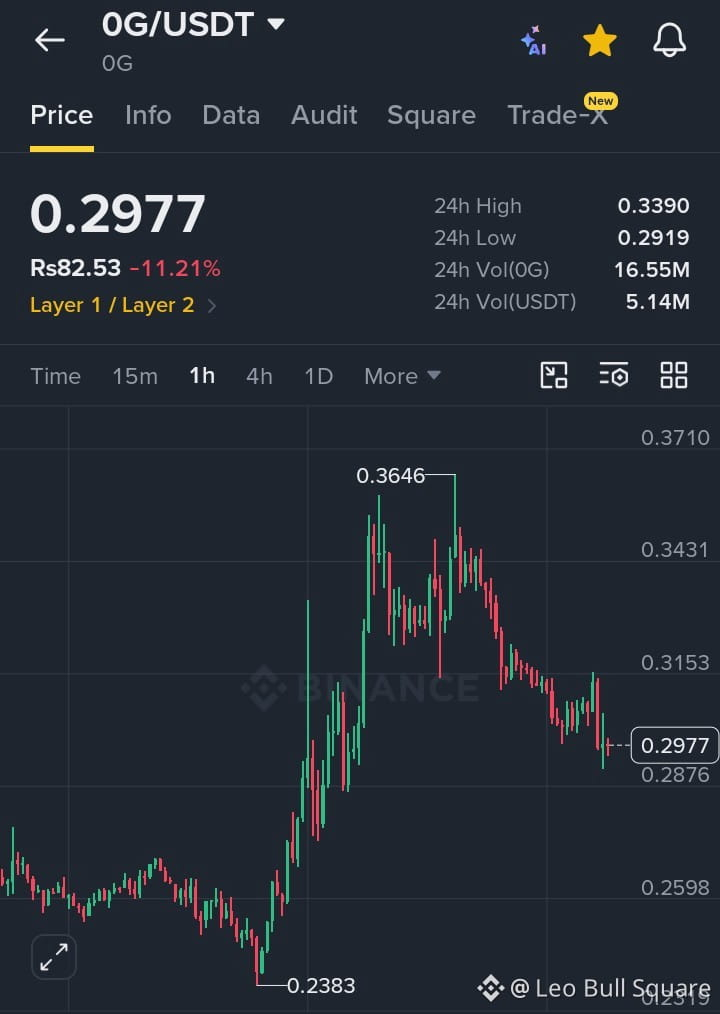
🔥 $OG /USDT — Critical 1H Decision Zone: Breakout or Breakdown Next?
$OG is trading near $0.2977 (-11.21%) after a sharp rejection from the $0.3390–$0.3646 supply zone, with price now sitting just above key support around $0.2919–$0.2876. The short-term structure remains weak while price stays below $0.3153, but this support area could still trigger a relief bounce if buyers step in. Bullish scenario: a clean reclaim above $0.3153 can open the door toward TP1 $0.3270 and TP2 $0.3390. Bearish scenario: if $0.2876 breaks with momentum, downside liquidity may be targeted near TP1 $0.2750 and TP2 $0.2600. The key is confirmation: watch for a strong rejection from support or a decisive 1H breakdown before entering, and avoid chasing candles in this high-volatility zone.
#og
{spot}(OGUSDT)
🔥 $OG /USDT — Critical 1H Decision Zone: Breakout or Breakdown Next?
$OG is trading near $0.2977 (-11.21%) after a sharp rejection from the $0.3390–$0.3646 supply zone, with price now sitting just above key support around $0.2919–$0.2876. The short-term structure remains weak while price stays below $0.3153, but this support area could still trigger a relief bounce if buyers step in. Bullish scenario: a clean reclaim above $0.3153 can open the door toward TP1 $0.3270 and TP2 $0.3390. Bearish scenario: if $0.2876 breaks with momentum, downside liquidity may be targeted near TP1 $0.2750 and TP2 $0.2600. The key is confirmation: watch for a strong rejection from support or a decisive 1H breakdown before entering, and avoid chasing candles in this high-volatility zone.
#og
$OG is trading near $0.2977 (-11.21%) after a sharp rejection from the $0.3390–$0.3646 supply zone, with price now sitting just above key support around $0.2919–$0.2876. The short-term structure remains weak while price stays below $0.3153, but this support area could still trigger a relief bounce if buyers step in. Bullish scenario: a clean reclaim above $0.3153 can open the door toward TP1 $0.3270 and TP2 $0.3390. Bearish scenario: if $0.2876 breaks with momentum, downside liquidity may be targeted near TP1 $0.2750 and TP2 $0.2600. The key is confirmation: watch for a strong rejection from support or a decisive 1H breakdown before entering, and avoid chasing candles in this high-volatility zone.
#og
1
29
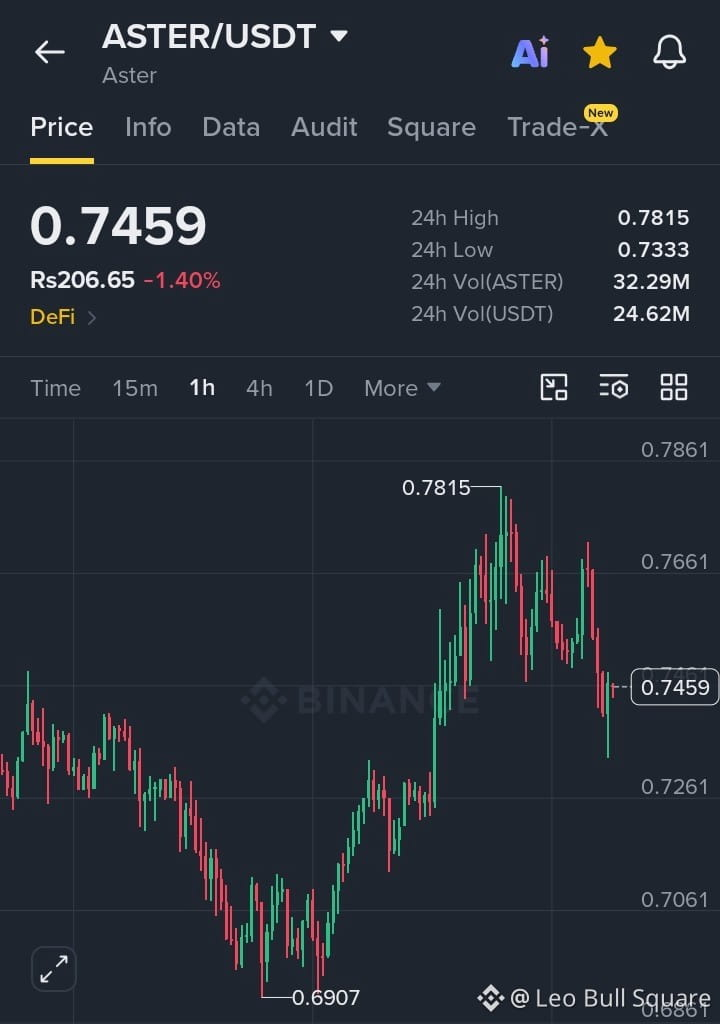
🔥 $ASTER /USDT — Scharfer Rücksetzer in die Nachfrage: Lädt der nächste Bounce bereits? 👀 $ASTER handelt derzeit um $0.7459 (-1.40%) auf dem 1H-Chart, nachdem der Kurs die Abweisung vom Hoch bei $0.7815 erhalten hat. Nun nähert sich der Preis einer wichtigen $0.733–$0.742 Nachfrage-/Support-Zone, in der Käufer zuvor Stärke gezeigt haben. Die größere Erholung von $0.6907 ist weiterhin sichtbar, sodass dieser Pullback eine frische Fortsetzungsgelegenheit werden könnte, wenn die Bullen den Support verteidigen und $0.750–$0.755 mit starkem Volumen zurückgewinnen. Long Setup: Einstieg $0.739–$0.746 | TP1: $0.758 | TP2: $0.766 | TP3: $0.781 | Stop Loss: $0.731. Technischer Fokus: Liquiditäts-Rücksetzer → Reaktion an der Nachfrage → bullisches Zurückerobern → Fortsetzung Richtung vorherige Hochs. Ein sauberer 1H-Close unter $0.7333 würde die Bounce-Idee schwächen, daher abwarten, statt eine fallende Kerze zu erwischen.
#asterix
{spot}(ASTERUSDT)
🔥 $ASTER /USDT — Scharfer Rücksetzer in die Nachfrage: Lädt der nächste Bounce bereits? 👀 $ASTER handelt derzeit um $0.7459 (-1.40%) auf dem 1H-Chart, nachdem der Kurs die Abweisung vom Hoch bei $0.7815 erhalten hat. Nun nähert sich der Preis einer wichtigen $0.733–$0.742 Nachfrage-/Support-Zone, in der Käufer zuvor Stärke gezeigt haben. Die größere Erholung von $0.6907 ist weiterhin sichtbar, sodass dieser Pullback eine frische Fortsetzungsgelegenheit werden könnte, wenn die Bullen den Support verteidigen und $0.750–$0.755 mit starkem Volumen zurückgewinnen. Long Setup: Einstieg $0.739–$0.746 | TP1: $0.758 | TP2: $0.766 | TP3: $0.781 | Stop Loss: $0.731. Technischer Fokus: Liquiditäts-Rücksetzer → Reaktion an der Nachfrage → bullisches Zurückerobern → Fortsetzung Richtung vorherige Hochs. Ein sauberer 1H-Close unter $0.7333 würde die Bounce-Idee schwächen, daher abwarten, statt eine fallende Kerze zu erwischen.
#asterix
#asterix
1
38
Übersetzung ansehen
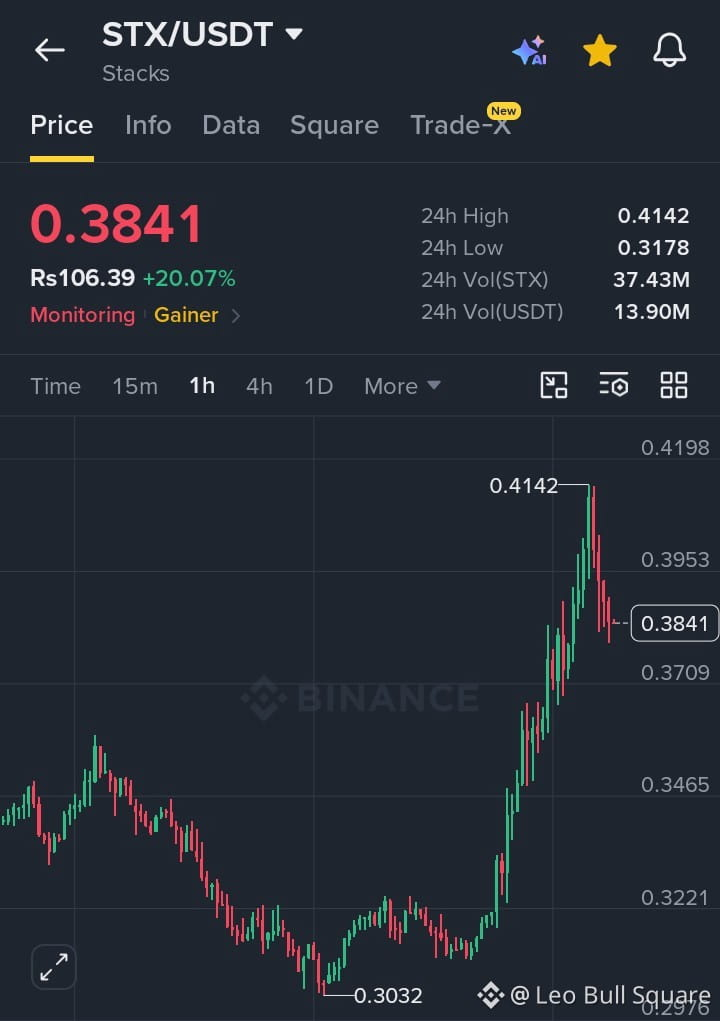
🔥 $STX /USDT — Explosive +20% Run, Now the Pullback Zone Matters Most! $STX is trading near $0.3841 (+20.07%) after an aggressive 1H expansion from the $0.3032 swing low to a fresh $0.4142 high, showing strong bullish displacement but also clear profit-taking from the top. Price is now pulling back toward the $0.3710–$0.3840 demand area, and this zone could decide the next leg: if buyers defend it and price reclaims $0.3950, momentum can rotate back toward $0.4050 and $0.4142; however, a clean break below $0.3709 would weaken the bullish structure and expose $0.3465 as the next major support. Long idea: Entry $0.3740–$0.3840 on bullish confirmation | SL: $0.3670 | TP1: $0.3950 | TP2: $0.4050 | TP3: $0.4140. Technical view: strong BOS → liquidity expansion → healthy pullback into demand; avoid chasing the top and let the retest confirm the trade.
#STX
{spot}(STXUSDT)
🔥 $STX /USDT — Explosive +20% Run, Now the Pullback Zone Matters Most! $STX is trading near $0.3841 (+20.07%) after an aggressive 1H expansion from the $0.3032 swing low to a fresh $0.4142 high, showing strong bullish displacement but also clear profit-taking from the top. Price is now pulling back toward the $0.3710–$0.3840 demand area, and this zone could decide the next leg: if buyers defend it and price reclaims $0.3950, momentum can rotate back toward $0.4050 and $0.4142; however, a clean break below $0.3709 would weaken the bullish structure and expose $0.3465 as the next major support. Long idea: Entry $0.3740–$0.3840 on bullish confirmation | SL: $0.3670 | TP1: $0.3950 | TP2: $0.4050 | TP3: $0.4140. Technical view: strong BOS → liquidity expansion → healthy pullback into demand; avoid chasing the top and let the retest confirm the trade.
#STX
#STX
1
31
Übersetzung ansehen
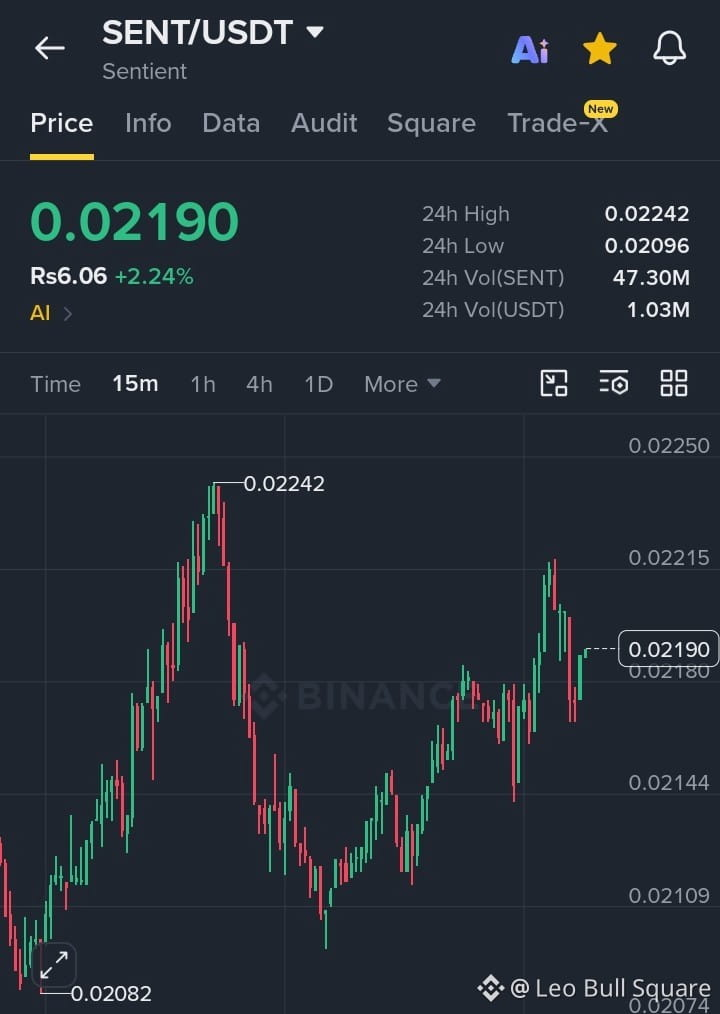
🔥 $SENT /USDT — Smart-Money Rejection Setup: Bears Eye the Next Liquidity Pocket 📉
$SENT is trading around $0.02190 (+2.24%) on the 15M chart after recovering strongly from the lower liquidity area, but the latest push into $0.02215–$0.02242 has met clear selling pressure, creating a key supply zone that traders should watch closely. The smarter short idea is to wait for a controlled pullback toward $0.02205–$0.02218 and enter only if price prints a strong rejection or bearish confirmation; a break below $0.02175–$0.02180 would strengthen the bearish BOS and expose lower liquidity. Short Entry: $0.02205–$0.02218 | Stop Loss: $0.02248 | TP1: $0.02165 | TP2: $0.02144 | TP3: $0.02110. The setup is simple: buy-side liquidity test → rejection from supply → bearish structure shift → pullback entry. Avoid chasing the first red candle, keep risk controlled, and let price confirmation do the work—good trades come from patience, not prediction.
#SENT
{spot}(SENTUSDT)
🔥 $SENT /USDT — Smart-Money Rejection Setup: Bears Eye the Next Liquidity Pocket 📉
$SENT is trading around $0.02190 (+2.24%) on the 15M chart after recovering strongly from the lower liquidity area, but the latest push into $0.02215–$0.02242 has met clear selling pressure, creating a key supply zone that traders should watch closely. The smarter short idea is to wait for a controlled pullback toward $0.02205–$0.02218 and enter only if price prints a strong rejection or bearish confirmation; a break below $0.02175–$0.02180 would strengthen the bearish BOS and expose lower liquidity. Short Entry: $0.02205–$0.02218 | Stop Loss: $0.02248 | TP1: $0.02165 | TP2: $0.02144 | TP3: $0.02110. The setup is simple: buy-side liquidity test → rejection from supply → bearish structure shift → pullback entry. Avoid chasing the first red candle, keep risk controlled, and let price confirmation do the work—good trades come from patience, not prediction.
#SENT
$SENT is trading around $0.02190 (+2.24%) on the 15M chart after recovering strongly from the lower liquidity area, but the latest push into $0.02215–$0.02242 has met clear selling pressure, creating a key supply zone that traders should watch closely. The smarter short idea is to wait for a controlled pullback toward $0.02205–$0.02218 and enter only if price prints a strong rejection or bearish confirmation; a break below $0.02175–$0.02180 would strengthen the bearish BOS and expose lower liquidity. Short Entry: $0.02205–$0.02218 | Stop Loss: $0.02248 | TP1: $0.02165 | TP2: $0.02144 | TP3: $0.02110. The setup is simple: buy-side liquidity test → rejection from supply → bearish structure shift → pullback entry. Avoid chasing the first red candle, keep risk controlled, and let price confirmation do the work—good trades come from patience, not prediction.
#SENT
1
31
Übersetzung ansehen
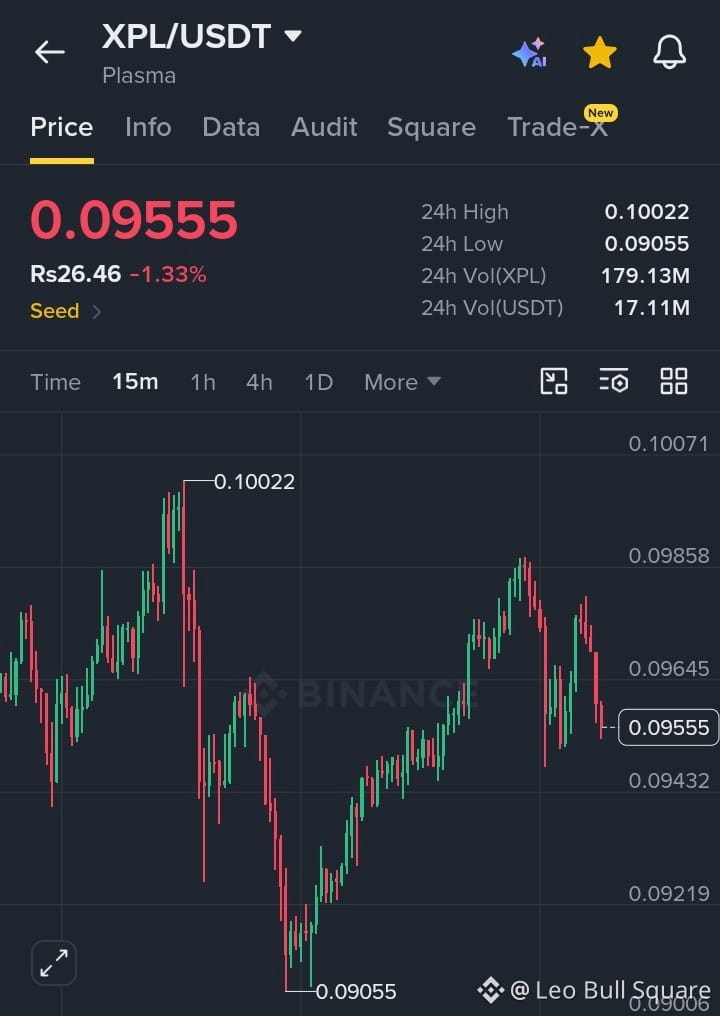
🔥 $XPL /USDT — Liquidity Sweep Rejected, Bearish Momentum Building 📉
$XPL /USDT is trading near $0.09555 (-1.33%) on the 15M chart after a strong recovery from the $0.09055 liquidity low, but buyers failed to reclaim the $0.0985–$0.1002 supply zone and price is now printing renewed bearish pressure. The recent rejection suggests a possible lower-high structure, with $0.0964 acting as immediate resistance and $0.0943 as the key support to watch; a confirmed break below $0.0943 could trigger a bearish BOS toward $0.0922 and potentially the $0.0906 liquidity zone. SHORT Setup: Entry $0.0960–$0.0966 on rejection | SL: $0.0987 | TP1: $0.0943 | TP2: $0.0922 | TP3: $0.0906. Technical focus: buy-side rejection → lower high → bearish BOS → pullback entry. Avoid chasing red candles and wait for confirmation before entering. Follow for more clean, structure-based Binance setups.
#XPL
{spot}(XPLUSDT)
🔥 $XPL /USDT — Liquidity Sweep Rejected, Bearish Momentum Building 📉
$XPL /USDT is trading near $0.09555 (-1.33%) on the 15M chart after a strong recovery from the $0.09055 liquidity low, but buyers failed to reclaim the $0.0985–$0.1002 supply zone and price is now printing renewed bearish pressure. The recent rejection suggests a possible lower-high structure, with $0.0964 acting as immediate resistance and $0.0943 as the key support to watch; a confirmed break below $0.0943 could trigger a bearish BOS toward $0.0922 and potentially the $0.0906 liquidity zone. SHORT Setup: Entry $0.0960–$0.0966 on rejection | SL: $0.0987 | TP1: $0.0943 | TP2: $0.0922 | TP3: $0.0906. Technical focus: buy-side rejection → lower high → bearish BOS → pullback entry. Avoid chasing red candles and wait for confirmation before entering. Follow for more clean, structure-based Binance setups.
#XPL
$XPL /USDT is trading near $0.09555 (-1.33%) on the 15M chart after a strong recovery from the $0.09055 liquidity low, but buyers failed to reclaim the $0.0985–$0.1002 supply zone and price is now printing renewed bearish pressure. The recent rejection suggests a possible lower-high structure, with $0.0964 acting as immediate resistance and $0.0943 as the key support to watch; a confirmed break below $0.0943 could trigger a bearish BOS toward $0.0922 and potentially the $0.0906 liquidity zone. SHORT Setup: Entry $0.0960–$0.0966 on rejection | SL: $0.0987 | TP1: $0.0943 | TP2: $0.0922 | TP3: $0.0906. Technical focus: buy-side rejection → lower high → bearish BOS → pullback entry. Avoid chasing red candles and wait for confirmation before entering. Follow for more clean, structure-based Binance setups.
#XPL
1
38
Übersetzung ansehen
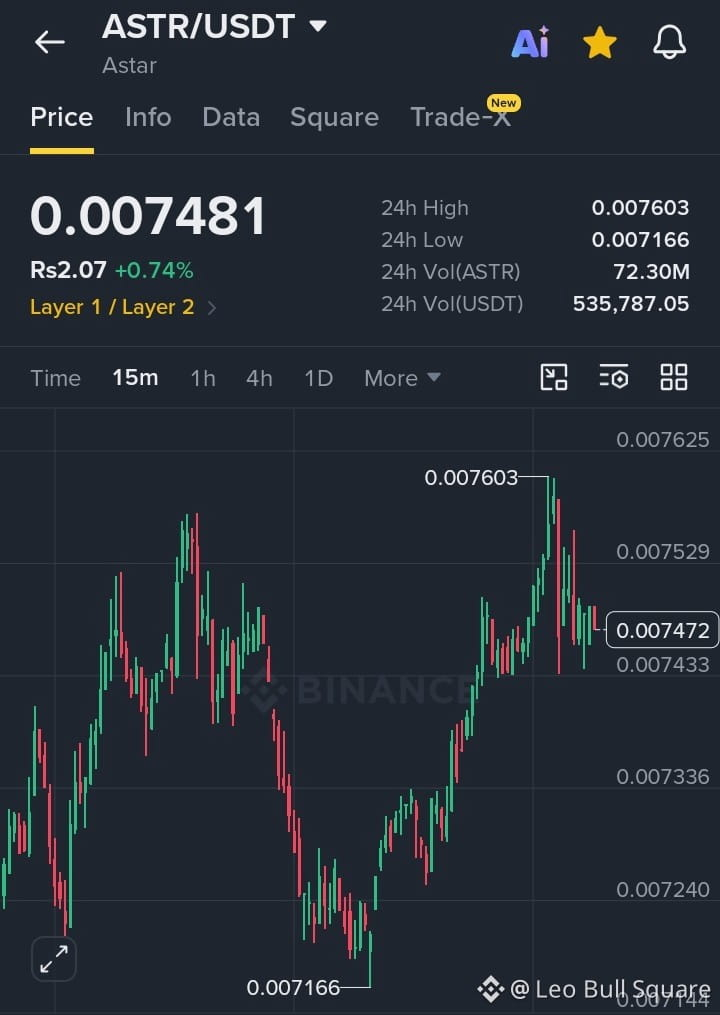
🔴 $ASTR /USDT – Liquidity Sweep Rejection | Short Setup Building 📉
$ASTR is trading near $0.00748 on the 15M chart after a strong run from $0.007166 into the $0.007603 high. Price has now rejected the upper liquidity zone, suggesting buyers are losing momentum while sellers defend the $0.00753–$0.00760 supply area. A clean rejection followed by a break below $0.00743 would strengthen the bearish BOS and open room for a deeper pullback. Short Entry: $0.00750–$0.00755
🎯 TP1: $0.00743
🎯 TP2: $0.00734
🎯 TP3: $0.00724
🛑 Stop Loss: $0.00762
Technical Logic: buy-side liquidity sweep near $0.007603 → rejection from supply → weakening momentum → potential bearish BOS below $0.00743. Wait for confirmation before entry and keep risk controlled.
#ASTR
{spot}(ASTRUSDT)
🔴 $ASTR /USDT – Liquidity Sweep Rejection | Short Setup Building 📉
$ASTR is trading near $0.00748 on the 15M chart after a strong run from $0.007166 into the $0.007603 high. Price has now rejected the upper liquidity zone, suggesting buyers are losing momentum while sellers defend the $0.00753–$0.00760 supply area. A clean rejection followed by a break below $0.00743 would strengthen the bearish BOS and open room for a deeper pullback. Short Entry: $0.00750–$0.00755
🎯 TP1: $0.00743
🎯 TP2: $0.00734
🎯 TP3: $0.00724
🛑 Stop Loss: $0.00762
Technical Logic: buy-side liquidity sweep near $0.007603 → rejection from supply → weakening momentum → potential bearish BOS below $0.00743. Wait for confirmation before entry and keep risk controlled.
#ASTR
$ASTR is trading near $0.00748 on the 15M chart after a strong run from $0.007166 into the $0.007603 high. Price has now rejected the upper liquidity zone, suggesting buyers are losing momentum while sellers defend the $0.00753–$0.00760 supply area. A clean rejection followed by a break below $0.00743 would strengthen the bearish BOS and open room for a deeper pullback. Short Entry: $0.00750–$0.00755
🎯 TP1: $0.00743
🎯 TP2: $0.00734
🎯 TP3: $0.00724
🛑 Stop Loss: $0.00762
Technical Logic: buy-side liquidity sweep near $0.007603 → rejection from supply → weakening momentum → potential bearish BOS below $0.00743. Wait for confirmation before entry and keep risk controlled.
#ASTR
1
18
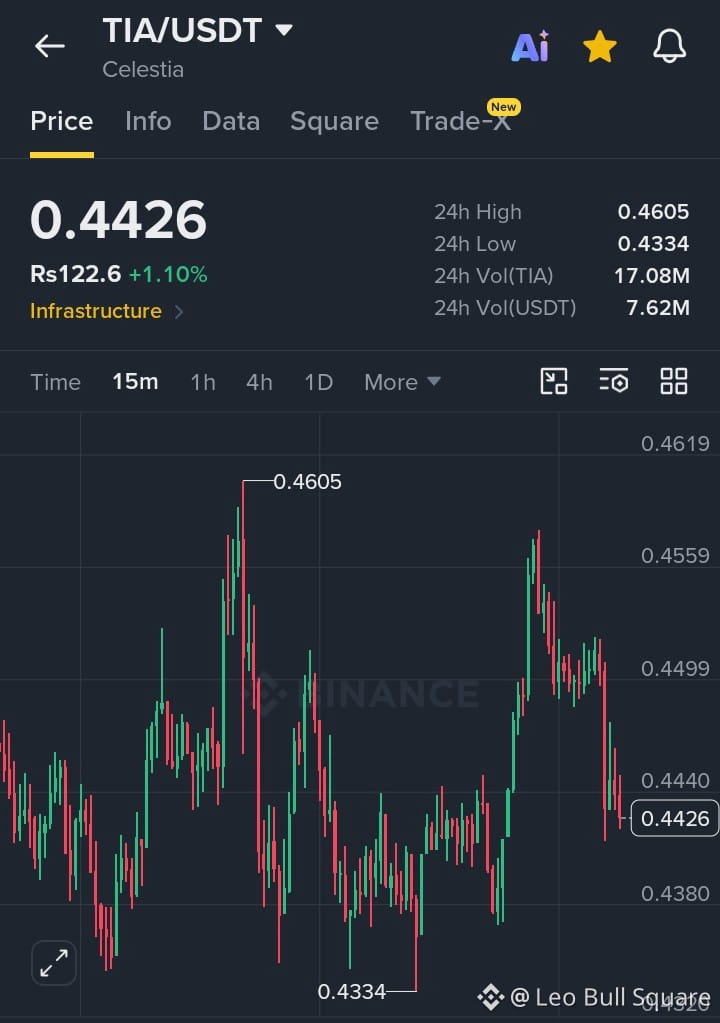
🔥 $TIA /USDT SHORT — Liquidity Sweep + Bearish BOS in Play 📉 $TIA handelt nahe $0.4426 auf dem 15M-Chart, nachdem die Liquidity-Zone $0.4559–$0.4605 abgelehnt wurde, gefolgt von einer scharfen bärischen Displacement-Bewegung und einem Bruch unter die Struktur $0.4499, was auf ein potenzielles bärisches BOS hindeutet. Das sauberere Setup ist, nicht dem Dump hinterherzulaufen, sondern auf einen Pullback in den Widerstand zu warten. SHORT-Einstieg: $0.4470–$0.4500 | SL: $0.4565 | TP1: $0.4420 | TP2: $0.4380 | TP3: $0.4340. Logik: Buy-Side-Liquidity-Sweep → bärisches BOS → Pullback in die Supply-Zone; Einstieg erst nach Bestätigung der Ablehnung, während eine anhaltende Bewegung zurück über $0.4565 das Setup ungültig macht. Folge für weitere saubere SMC-basierte Trade-Setups.
#tia
{spot}(TIAUSDT)
🔥 $TIA /USDT SHORT — Liquidity Sweep + Bearish BOS in Play 📉 $TIA handelt nahe $0.4426 auf dem 15M-Chart, nachdem die Liquidity-Zone $0.4559–$0.4605 abgelehnt wurde, gefolgt von einer scharfen bärischen Displacement-Bewegung und einem Bruch unter die Struktur $0.4499, was auf ein potenzielles bärisches BOS hindeutet. Das sauberere Setup ist, nicht dem Dump hinterherzulaufen, sondern auf einen Pullback in den Widerstand zu warten. SHORT-Einstieg: $0.4470–$0.4500 | SL: $0.4565 | TP1: $0.4420 | TP2: $0.4380 | TP3: $0.4340. Logik: Buy-Side-Liquidity-Sweep → bärisches BOS → Pullback in die Supply-Zone; Einstieg erst nach Bestätigung der Ablehnung, während eine anhaltende Bewegung zurück über $0.4565 das Setup ungültig macht. Folge für weitere saubere SMC-basierte Trade-Setups.
#tia
#tia
1
21
Anmelden und weiter Inhalte entdecken
Krypto-Nutzer weltweit auf Binance Square kennenlernen
⚡️ Bleib in Sachen Krypto stets am Puls.
💬 Die weltgrößte Kryptobörse vertraut darauf.
👍 Erhalte verlässliche Einblicke von verifizierten Creators.
E-Mail-Adresse/Telefonnummer
Trendthemen
EtherGains70.9%InQ3
49,445 Aufrufe
625 Kommentare
🧭🧭🧭 ANALYSE 🧭🧭🧭
💡 Saison-Index für Altcoins 💡
🚨🚨🚨 Die T3 ist zu Ende. ETH stieg um 71% und BTC stieg um 43%.🚨🚨🚨
War das der Beginn der Altcoin-Saison?
Von den Top 100:
🌐🌐🌐 57 haben BTC in 90 Tagen überholt
Die Altcoin-Saison beginnt bei 75, also ist es noch nicht
Es liegt noch 10 Punkte unter seinem Jahreshoch von 67🌐🌐
💥💥💥 Aber hey, vor einem Monat lag der Index nur bei 23!
Kann Oktober ihn auf 75 bringen? 👀💥💥💥
#EtherGains70.9%InQ3
$GRAM
$TAO
$CRMB
SkyRichYesh3
·2 Likes
·3.2k Aufrufe
TreasuryLetsStatesFileStablecoinCertificationsEarly
1,614 Aufrufe
25 Kommentare
US10YearYieldNears5.3%
83,552 Aufrufe
790 Kommentare