
SNouzen
760 Postlar

SNouzen
Shikoyat qilish
Foydalanuvchini bloklash
My posts and analyses are not financial advice. DYOR/NFA!
Yuqori chastotali treyder
1.8 yil
12 Kuzatilmoqda
69 Kuzatuvchilar
584 Yoqdi
Postlar
Barchasi
Iqtiboslar
·
--
Pasayuvchi
Tarjimani ko‘rish
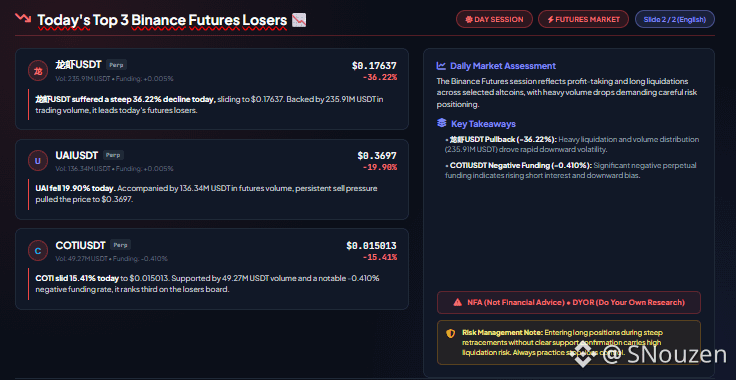
Today's Top 3 Binance Futures Losers!
$龙虾 $UAI $COTI
{future}(COTIUSDT)
{future}(UAIUSDT)
{future}(龙虾USDT)
Today's Top 3 Binance Futures Losers!
$龙虾 $UAI $COTI
$龙虾 $UAI $COTI
1
774
·
--
O‘suvchi
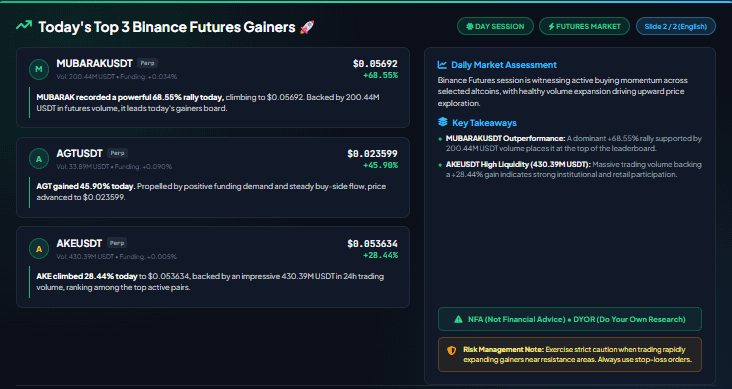
Bugungi eng yaxshi 3 ta Binance Futures o‘sishiga erishganlar!
$MUBARAK $AGT $AKE
{future}(AKEUSDT)
{future}(AGTUSDT)
{future}(MUBARAKUSDT)
Bugungi eng yaxshi 3 ta Binance Futures o‘sishiga erishganlar!
$MUBARAK $AGT $AKE
$MUBARAK $AGT $AKE
449
·
--
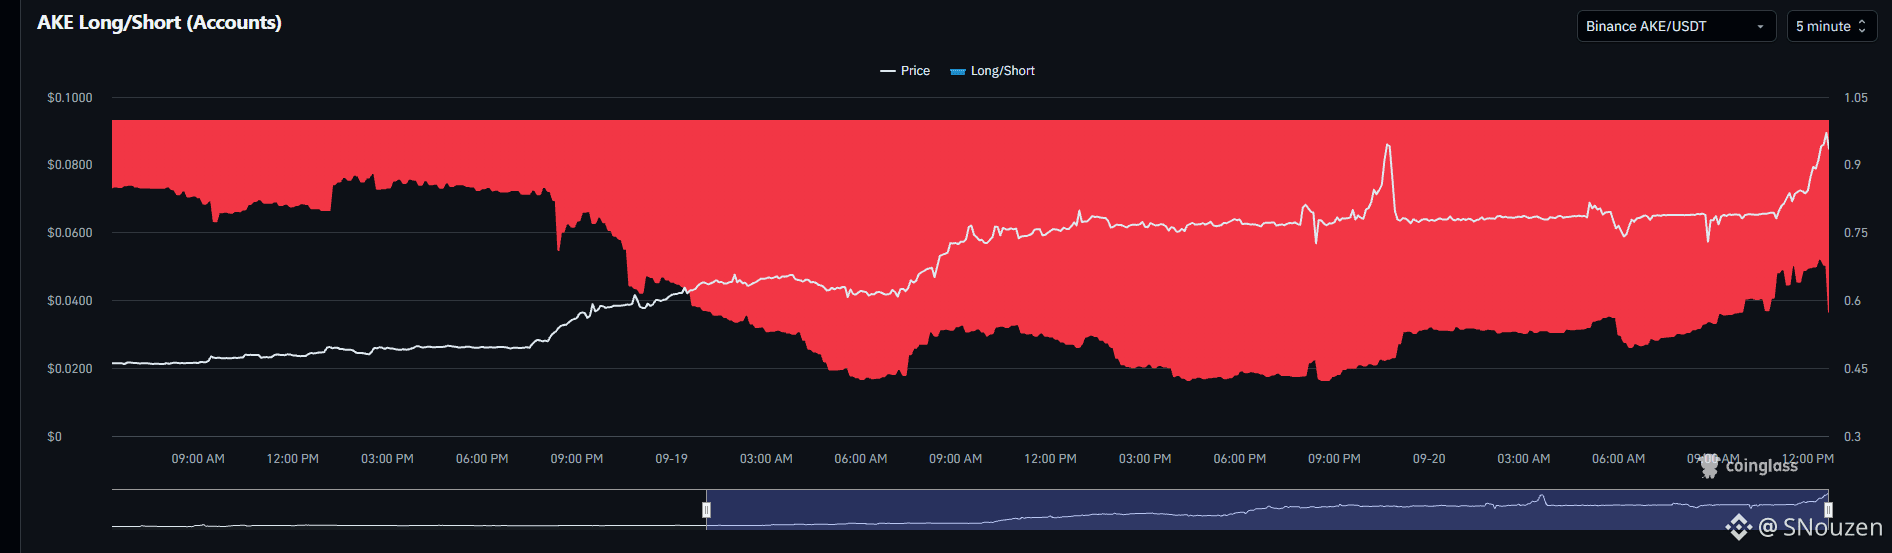
AKE bo‘yicha bu qadar qisqa pozitsiyalarga ega bo‘lgan holda qisqa muddatli savdo ochish bema’nilik.
$AKE
{future}(AKEUSDT)
AKE bo‘yicha bu qadar qisqa pozitsiyalarga ega bo‘lgan holda qisqa muddatli savdo ochish bema’nilik.
$AKE
$AKE
389
·
--
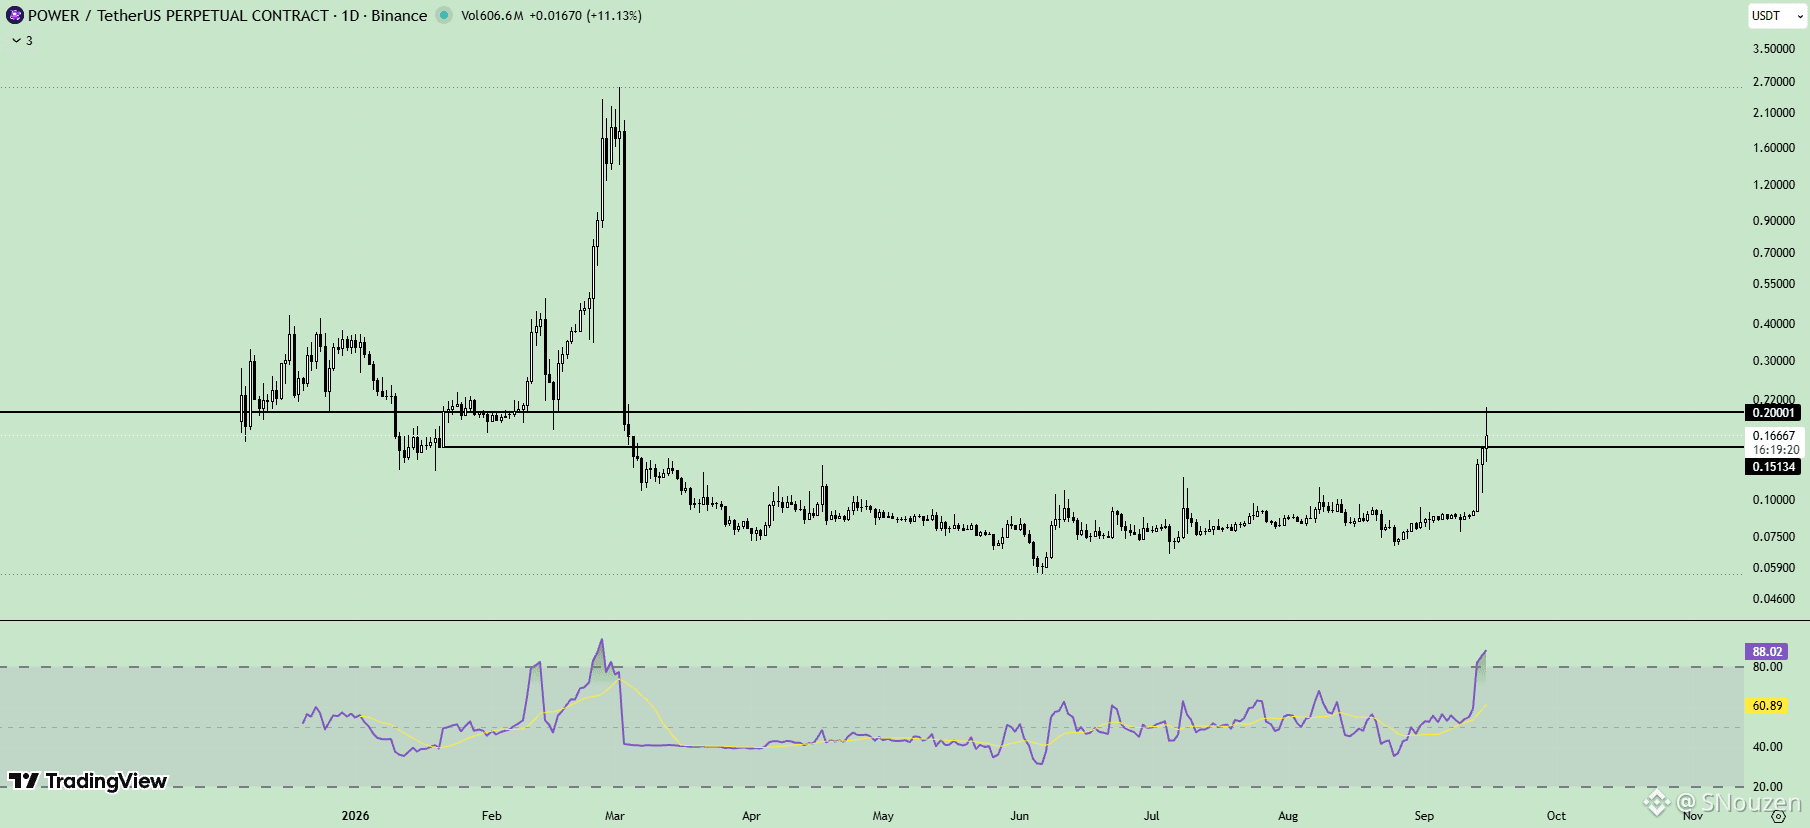
$POWER ta muhim 0.20 psixologik to‘sig‘ini bosib o‘tishi fonida sotuv bosimi kuchayib, mahalliy likvidlikni siljitadi va 0.166 atrofida savdoga qaytadi.
• Bullish signal: 0.151 tayanch polini himoya qilish va 0.20 shiftidan yuqorida barqaror breakoutga erishish 0.30 hamda 0.40 kengayish zonalariga yo‘l ochadi.
• Bearish tahdid: 0.20 cho‘qqisidan davomli rad etilish va 0.151 tayanchdan pastga tushish tuzatishning 0.08 - 0.10 konsolidatsiya bazasiga qayta tezlashish xavfini oshiradi.
Savdoga o‘tish uchun bosing👇$POWER
{future}(POWERUSDT)
$POWER ta muhim 0.20 psixologik to‘sig‘ini bosib o‘tishi fonida sotuv bosimi kuchayib, mahalliy likvidlikni siljitadi va 0.166 atrofida savdoga qaytadi.
• Bullish signal: 0.151 tayanch polini himoya qilish va 0.20 shiftidan yuqorida barqaror breakoutga erishish 0.30 hamda 0.40 kengayish zonalariga yo‘l ochadi.
• Bearish tahdid: 0.20 cho‘qqisidan davomli rad etilish va 0.151 tayanchdan pastga tushish tuzatishning 0.08 - 0.10 konsolidatsiya bazasiga qayta tezlashish xavfini oshiradi.
Savdoga o‘tish uchun bosing👇$POWER
• Bullish signal: 0.151 tayanch polini himoya qilish va 0.20 shiftidan yuqorida barqaror breakoutga erishish 0.30 hamda 0.40 kengayish zonalariga yo‘l ochadi.
• Bearish tahdid: 0.20 cho‘qqisidan davomli rad etilish va 0.151 tayanchdan pastga tushish tuzatishning 0.08 - 0.10 konsolidatsiya bazasiga qayta tezlashish xavfini oshiradi.
Savdoga o‘tish uchun bosing👇$POWER
127
·
--
Pasayuvchi
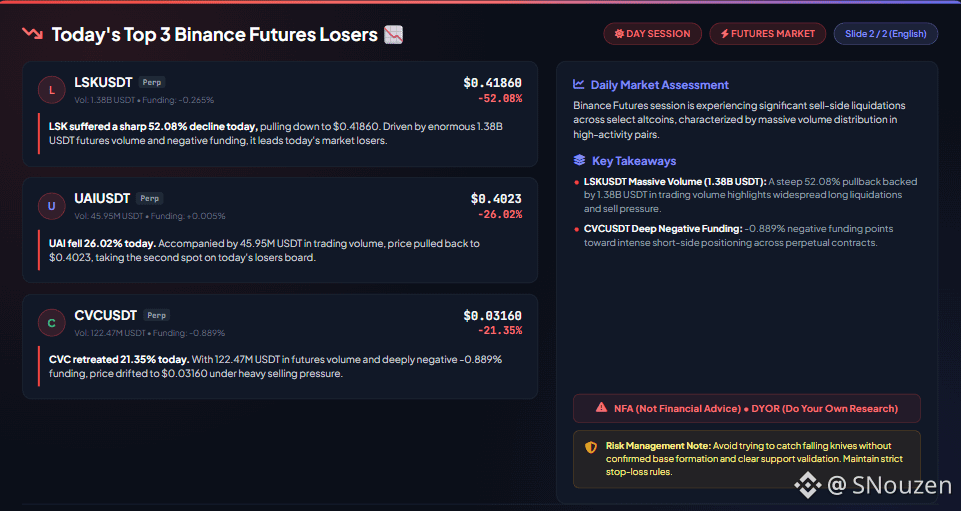
Bugungi Binance Futuresdagi eng yirik 3 ta yutqazgan!
$LSK $UAI $CVC
{future}(CVCUSDT)
{future}(UAIUSDT)
{future}(LSKUSDT)
Bugungi Binance Futuresdagi eng yirik 3 ta yutqazgan!
$LSK $UAI $CVC
$LSK $UAI $CVC
318
·
--
O‘suvchi
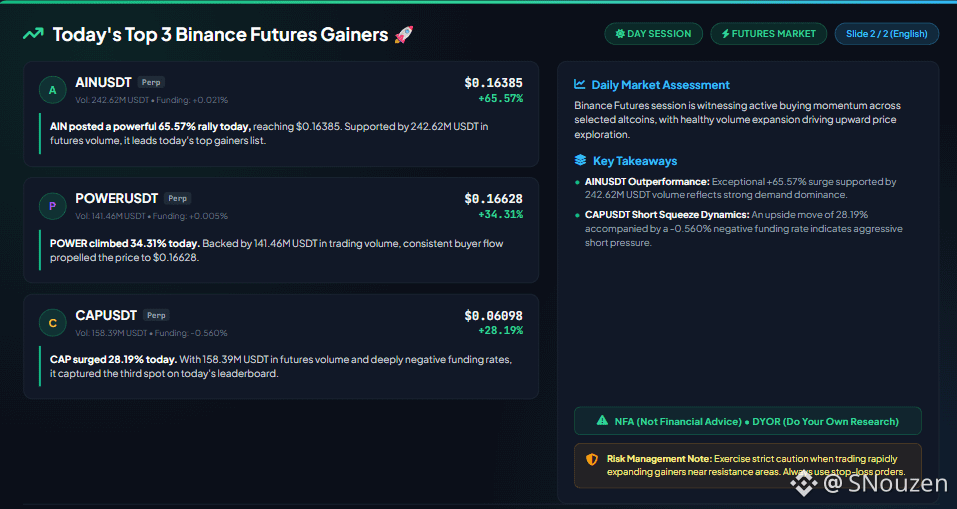
Bugungi eng yaxshi 3 ta Binance Futures bo‘yicha o‘sish qayd etganlar!
$AIN $POWER $CAP
{future}(CAPUSDT)
{future}(POWERUSDT)
{future}(AINUSDT)
Bugungi eng yaxshi 3 ta Binance Futures bo‘yicha o‘sish qayd etganlar!
$AIN $POWER $CAP
$AIN $POWER $CAP
302
·
--
O‘suvchi
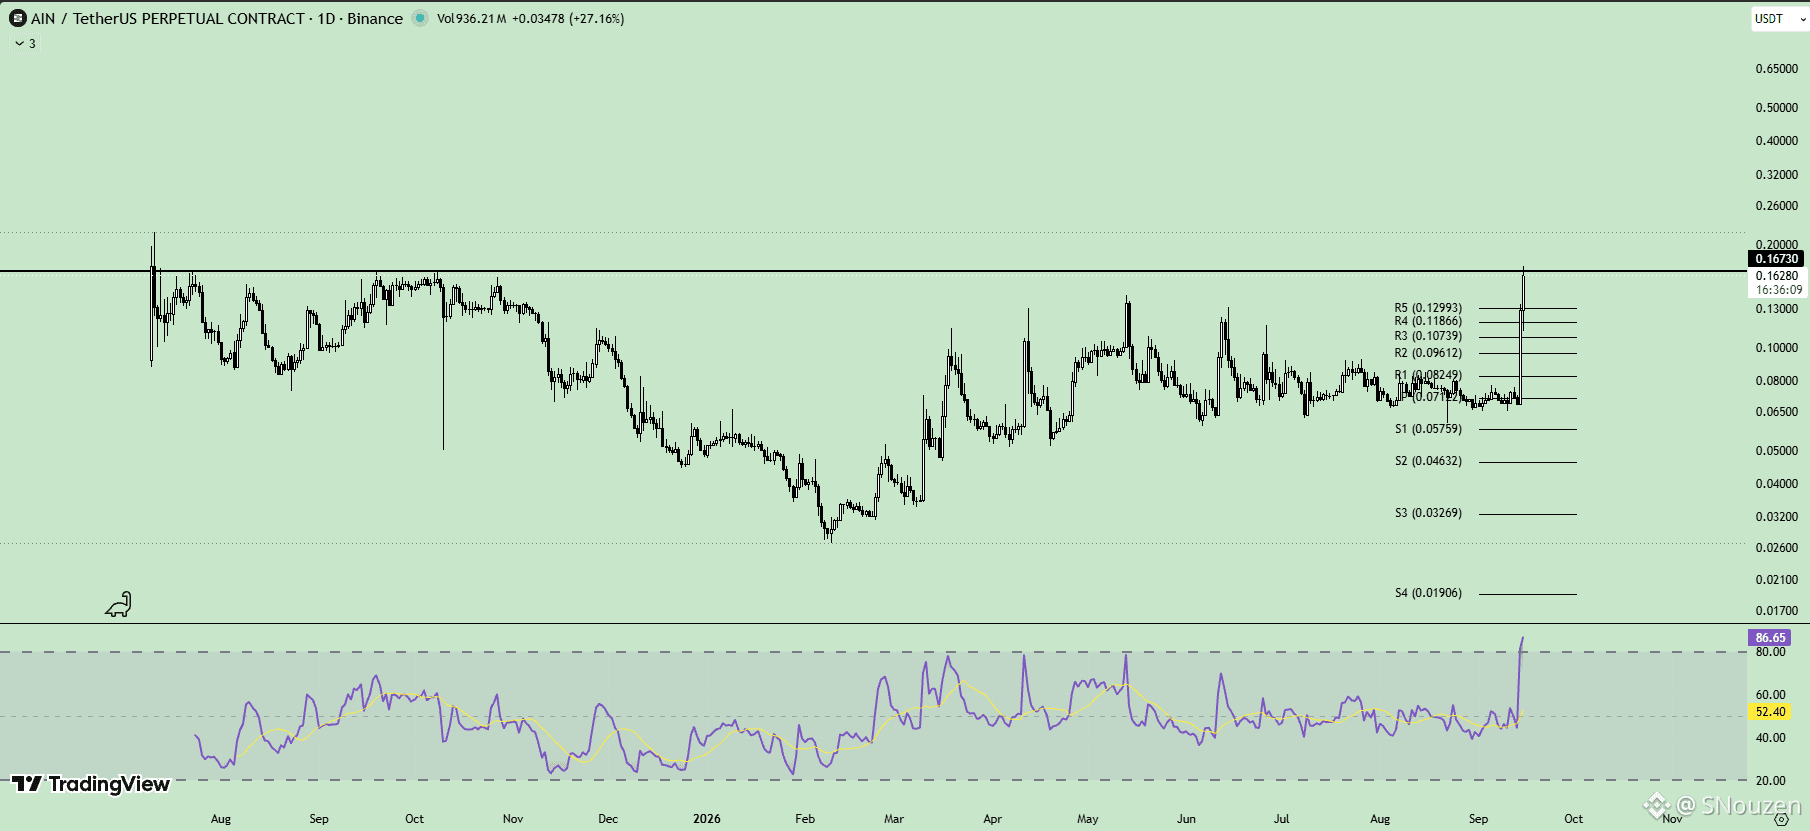
Ko‘p oylik konsolidatsiya diapazonidan keskin chiqib ketgandan so‘ng, $AIN hozir 0.1628 - 0.1673 atrofida savdo qilmoqda va bevosita 0.17 muhim qarshilik chizig‘iga yaqinlashgan.
• LONG (Bullish Trigger): 0.17 qarshilik darajasidan qat’iy ravishda chiqib, u ustida barqaror ushlanish yuqoriga harakat impulsining tezlashishi yo‘lini ochadi va 0.20 asosiy psixologik to‘siqqa yo‘naltiradi.
👇Savdo qilish uchun bosing$AIN
{future}(AINUSDT)
Ko‘p oylik konsolidatsiya diapazonidan keskin chiqib ketgandan so‘ng, $AIN hozir 0.1628 - 0.1673 atrofida savdo qilmoqda va bevosita 0.17 muhim qarshilik chizig‘iga yaqinlashgan.
• LONG (Bullish Trigger): 0.17 qarshilik darajasidan qat’iy ravishda chiqib, u ustida barqaror ushlanish yuqoriga harakat impulsining tezlashishi yo‘lini ochadi va 0.20 asosiy psixologik to‘siqqa yo‘naltiradi.
👇Savdo qilish uchun bosing$AIN
• LONG (Bullish Trigger): 0.17 qarshilik darajasidan qat’iy ravishda chiqib, u ustida barqaror ushlanish yuqoriga harakat impulsining tezlashishi yo‘lini ochadi va 0.20 asosiy psixologik to‘siqqa yo‘naltiradi.
👇Savdo qilish uchun bosing$AIN
205
·
--
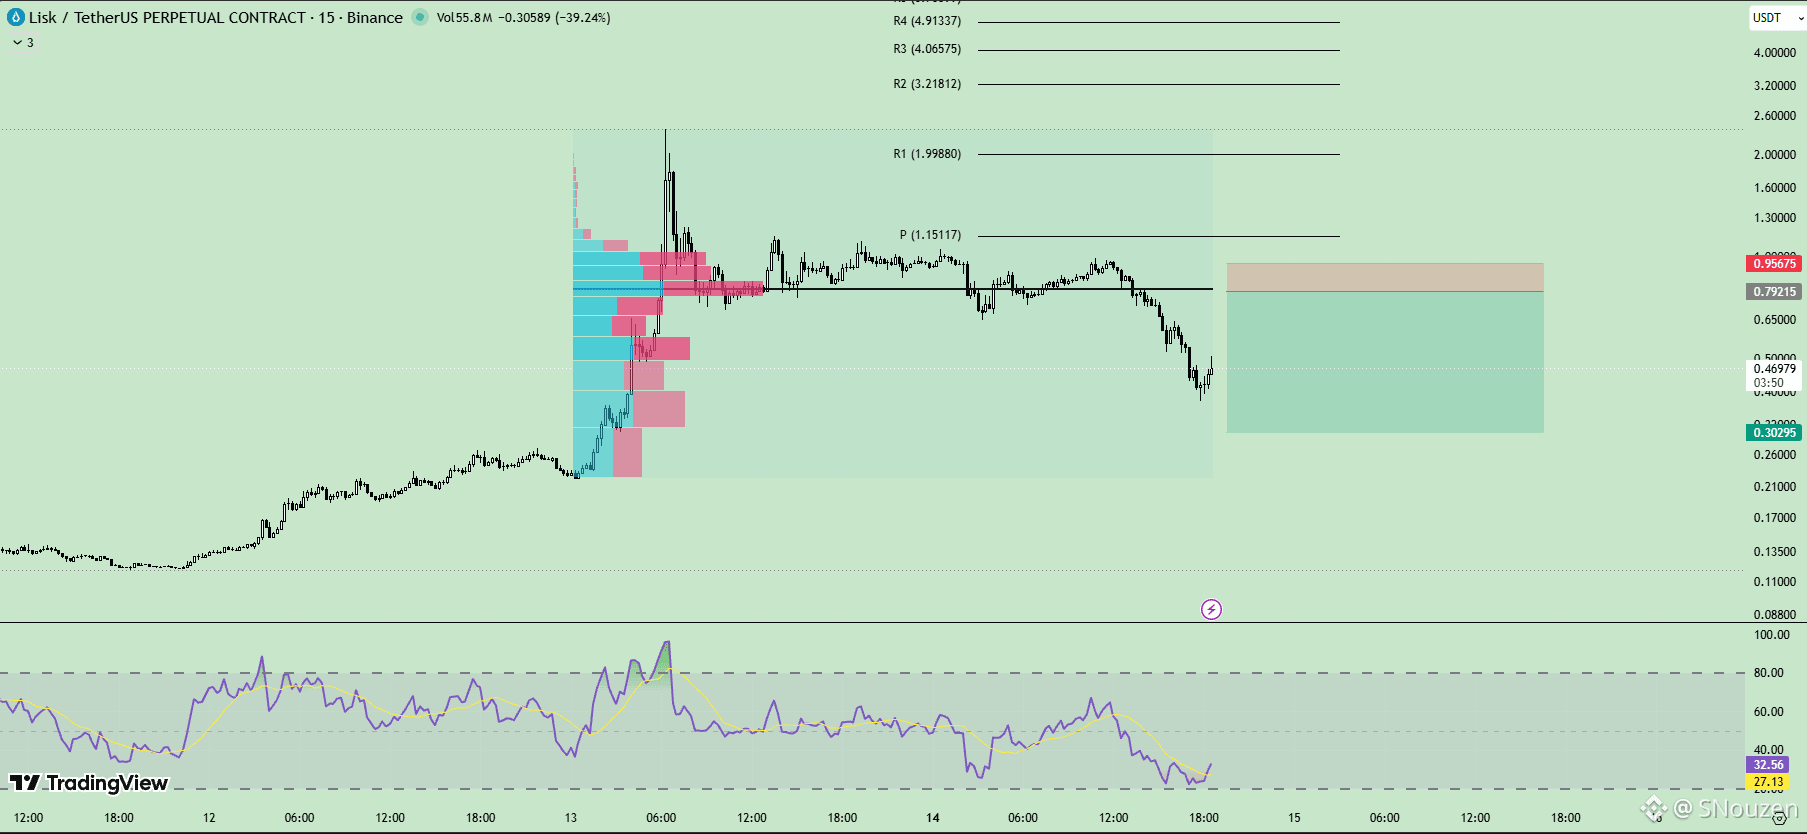
Quyidagi 1.00 psixologik darajadan pastdagi keskin buzilishdan so‘ng, 0.86 POC (Point of Control) va 0.77 support poydevorining orqasidan $LSK 0.49 atrofida pasayishga o‘tgan.
• Ayiqona xavf: Agar yengillikdagi sakrash bo‘lib, 0.77 qarshilik zonasi va 0.86 POC darajasini potensial sinab ko‘rsa, ushbu zonadan tasdiqlangan rad etilish qisqa muddatli kirish imkoniyatini berishi mumkin va katta ko‘lamdagi pastga davom etish faol qoladi. NFA/DYOR
👇Savdoga o‘ting $LSK
{future}(LSKUSDT)
Quyidagi 1.00 psixologik darajadan pastdagi keskin buzilishdan so‘ng, 0.86 POC (Point of Control) va 0.77 support poydevorining orqasidan $LSK 0.49 atrofida pasayishga o‘tgan.
• Ayiqona xavf: Agar yengillikdagi sakrash bo‘lib, 0.77 qarshilik zonasi va 0.86 POC darajasini potensial sinab ko‘rsa, ushbu zonadan tasdiqlangan rad etilish qisqa muddatli kirish imkoniyatini berishi mumkin va katta ko‘lamdagi pastga davom etish faol qoladi. NFA/DYOR
👇Savdoga o‘ting $LSK
• Ayiqona xavf: Agar yengillikdagi sakrash bo‘lib, 0.77 qarshilik zonasi va 0.86 POC darajasini potensial sinab ko‘rsa, ushbu zonadan tasdiqlangan rad etilish qisqa muddatli kirish imkoniyatini berishi mumkin va katta ko‘lamdagi pastga davom etish faol qoladi. NFA/DYOR
👇Savdoga o‘ting $LSK
274
·
--
Pasayuvchi
$SAGA 0.02 cho‘qqisidan keskin rad javobini olgach, 0.01558 mahalliy pastlikdan korreksion qaytish (bounce) holatida.
• Ayiqcha xavf: 0.01781 - 0.01833 Golden Zone (0.5 - 0.618) ichiga reja-relefer rally bo‘lishi sotuvchilar uchun yuqori ehtimolli asosiy qarshilik zonasi hisoblanadi. Agar ushbu hududdan aniq rad javobi bo‘lsa, 0.01558 mahalliy tayanch poliga qayta sinov ehtimoli paydo bo‘ladi; bunda esa kengroq pasayish tendensiyasi davom etishi mumkin.
Savdoga bosing👇$SAGA
{future}(SAGAUSDT)
$SAGA 0.02 cho‘qqisidan keskin rad javobini olgach, 0.01558 mahalliy pastlikdan korreksion qaytish (bounce) holatida.
• Ayiqcha xavf: 0.01781 - 0.01833 Golden Zone (0.5 - 0.618) ichiga reja-relefer rally bo‘lishi sotuvchilar uchun yuqori ehtimolli asosiy qarshilik zonasi hisoblanadi. Agar ushbu hududdan aniq rad javobi bo‘lsa, 0.01558 mahalliy tayanch poliga qayta sinov ehtimoli paydo bo‘ladi; bunda esa kengroq pasayish tendensiyasi davom etishi mumkin.
Savdoga bosing👇$SAGA
• Ayiqcha xavf: 0.01781 - 0.01833 Golden Zone (0.5 - 0.618) ichiga reja-relefer rally bo‘lishi sotuvchilar uchun yuqori ehtimolli asosiy qarshilik zonasi hisoblanadi. Agar ushbu hududdan aniq rad javobi bo‘lsa, 0.01558 mahalliy tayanch poliga qayta sinov ehtimoli paydo bo‘ladi; bunda esa kengroq pasayish tendensiyasi davom etishi mumkin.
Savdoga bosing👇$SAGA

117
·
--
Pasayuvchi
Bugungi eng yirik 3 ta Binance Futures yutqazuvchisi!
$RVN $VTHO $BULLA
{future}(BULLAUSDT)
{future}(VTHOUSDT)
{future}(RVNUSDT)
Bugungi eng yirik 3 ta Binance Futures yutqazuvchisi!
$RVN $VTHO $BULLA
$RVN $VTHO $BULLA

425
·
--
O‘suvchi
Bugungi kunning eng yaxshi 3 ta Binance Futures o‘sish ko‘rsatkichi!
$牛来 $RAYSOL $LSK
{future}(LSKUSDT)
{future}(RAYSOLUSDT)
{future}(牛来USDT)
Bugungi kunning eng yaxshi 3 ta Binance Futures o‘sish ko‘rsatkichi!
$牛来 $RAYSOL $LSK
$牛来 $RAYSOL $LSK

257
·
--
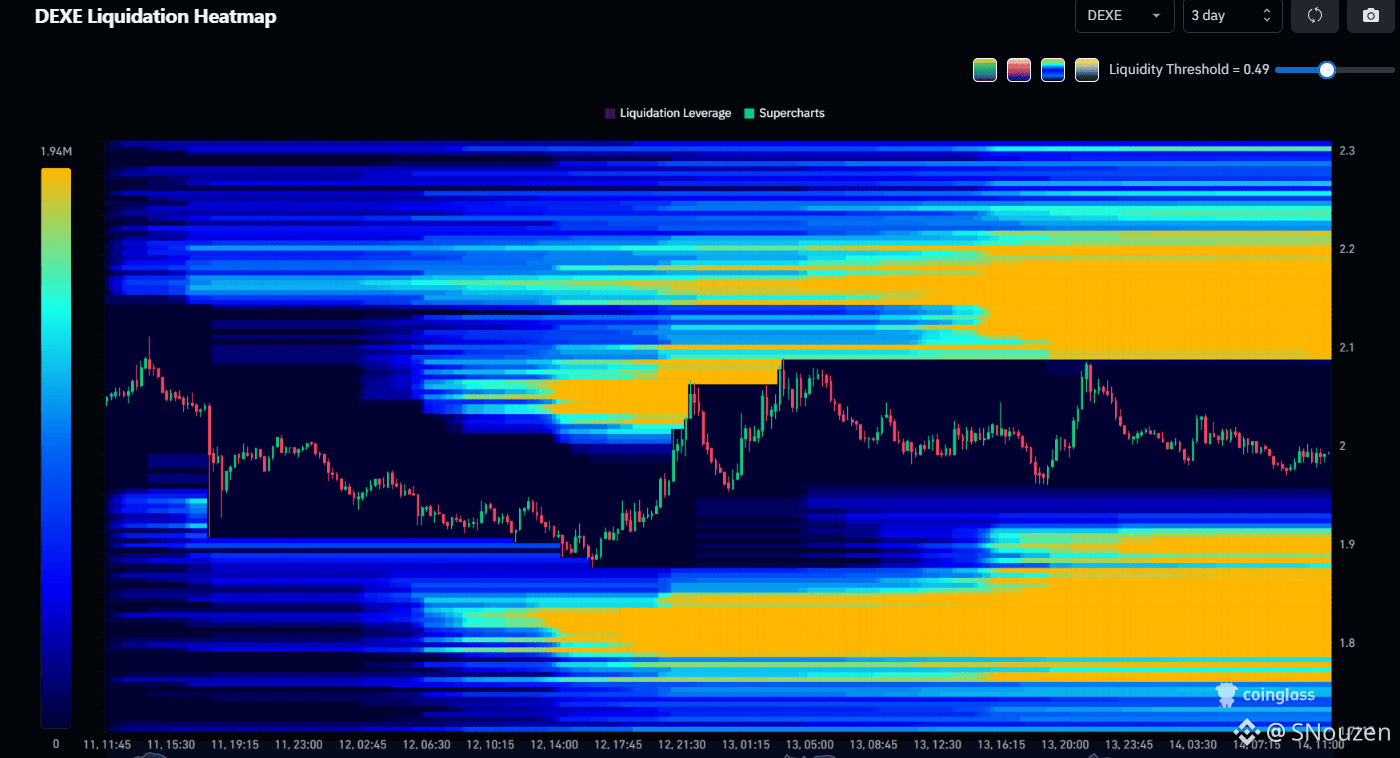
$DEXE 1.98 - 2.02 atrofida konsolidatsiyalanyapti, 2.00 asosiy psixologik darajasini faol himoya qilmoqda va ikki zich likvidatsiya pulining oralig‘ida qolgan.
• Bullish Trigger: 2.00 bazadan yuqorida ushlab turish va 2.08 - 2.10 oraliq qarshiligidan yuqoriga chiqish 2.15 dan 2.22 gacha joylashgan, Short tomondagi kuchli likvidatsiya klasterlariga qarab yo‘lni ochadi; bu 2.30 asosiy nishon tomon davom etadi.
• Bearish Threat: 2.00 psixologik tayanchining barqaror yo‘qolishi 1.90 - 1.95 hududiga tomon sotuv bosimini tezlashtirishi, pastga yana 1.78 - 1.84 likvidatsiya puliga qadar tushish ehtimolini oshirishi mumkin.
Savdo qilish uchun bosing👇$DEXE
{future}(DEXEUSDT)
$DEXE 1.98 - 2.02 atrofida konsolidatsiyalanyapti, 2.00 asosiy psixologik darajasini faol himoya qilmoqda va ikki zich likvidatsiya pulining oralig‘ida qolgan.
• Bullish Trigger: 2.00 bazadan yuqorida ushlab turish va 2.08 - 2.10 oraliq qarshiligidan yuqoriga chiqish 2.15 dan 2.22 gacha joylashgan, Short tomondagi kuchli likvidatsiya klasterlariga qarab yo‘lni ochadi; bu 2.30 asosiy nishon tomon davom etadi.
• Bearish Threat: 2.00 psixologik tayanchining barqaror yo‘qolishi 1.90 - 1.95 hududiga tomon sotuv bosimini tezlashtirishi, pastga yana 1.78 - 1.84 likvidatsiya puliga qadar tushish ehtimolini oshirishi mumkin.
Savdo qilish uchun bosing👇$DEXE
• Bullish Trigger: 2.00 bazadan yuqorida ushlab turish va 2.08 - 2.10 oraliq qarshiligidan yuqoriga chiqish 2.15 dan 2.22 gacha joylashgan, Short tomondagi kuchli likvidatsiya klasterlariga qarab yo‘lni ochadi; bu 2.30 asosiy nishon tomon davom etadi.
• Bearish Threat: 2.00 psixologik tayanchining barqaror yo‘qolishi 1.90 - 1.95 hududiga tomon sotuv bosimini tezlashtirishi, pastga yana 1.78 - 1.84 likvidatsiya puliga qadar tushish ehtimolini oshirishi mumkin.
Savdo qilish uchun bosing👇$DEXE
66
·
--
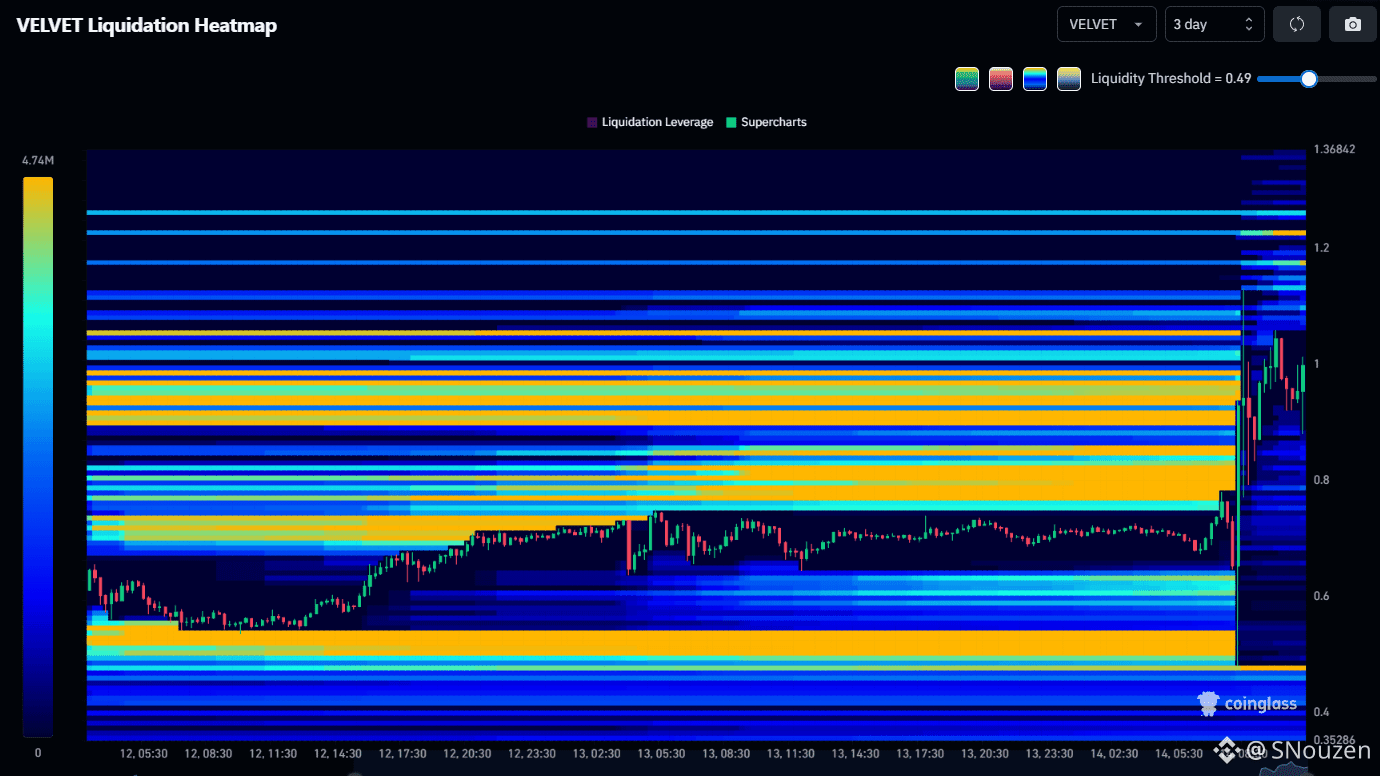
$VELVET vertikal kengayishdan so‘ng 0.95 - 1.05 atrofida konsolidatsiyalanmoqda, 1.00 muhim psixologik darajada to‘g‘ridan-to‘g‘ri jang qilmoqda va yirik likvidatsiya puliari orasida qamalib qolgan.
• Bullish Trigger: 1.00 psixologik qo‘llab-quvvatlash ustida ushlab turish hamda 1.08 - 1.10 oralig‘idagi oraliq qarshilikdan yuqoriga chiqish 1.15 dan 1.25 gacha joylashgan, Short’ga oid yorqin likvidatsiya klasterlari sari yo‘lni ochadi va u 1.35 cho‘qqi likvidlik nishonigacha uzayadi.
• Bearish Threat: 1.00 darajasidan pastga tushib ketish sotuv bosimini tezlashtirib, 0.78 - 0.85 hududiga tomon riskni kuchaytiradi, keyingi salbiy ehtimol esa undan ham pastdagi 0.45 - 0.52 likvidatsiya “pol”igacha cho‘zilishi mumkin.
Click to Trade👇$VELVET
{future}(VELVETUSDT)
$VELVET vertikal kengayishdan so‘ng 0.95 - 1.05 atrofida konsolidatsiyalanmoqda, 1.00 muhim psixologik darajada to‘g‘ridan-to‘g‘ri jang qilmoqda va yirik likvidatsiya puliari orasida qamalib qolgan.
• Bullish Trigger: 1.00 psixologik qo‘llab-quvvatlash ustida ushlab turish hamda 1.08 - 1.10 oralig‘idagi oraliq qarshilikdan yuqoriga chiqish 1.15 dan 1.25 gacha joylashgan, Short’ga oid yorqin likvidatsiya klasterlari sari yo‘lni ochadi va u 1.35 cho‘qqi likvidlik nishonigacha uzayadi.
• Bearish Threat: 1.00 darajasidan pastga tushib ketish sotuv bosimini tezlashtirib, 0.78 - 0.85 hududiga tomon riskni kuchaytiradi, keyingi salbiy ehtimol esa undan ham pastdagi 0.45 - 0.52 likvidatsiya “pol”igacha cho‘zilishi mumkin.
Click to Trade👇$VELVET
• Bullish Trigger: 1.00 psixologik qo‘llab-quvvatlash ustida ushlab turish hamda 1.08 - 1.10 oralig‘idagi oraliq qarshilikdan yuqoriga chiqish 1.15 dan 1.25 gacha joylashgan, Short’ga oid yorqin likvidatsiya klasterlari sari yo‘lni ochadi va u 1.35 cho‘qqi likvidlik nishonigacha uzayadi.
• Bearish Threat: 1.00 darajasidan pastga tushib ketish sotuv bosimini tezlashtirib, 0.78 - 0.85 hududiga tomon riskni kuchaytiradi, keyingi salbiy ehtimol esa undan ham pastdagi 0.45 - 0.52 likvidatsiya “pol”igacha cho‘zilishi mumkin.
Click to Trade👇$VELVET
155
·
--
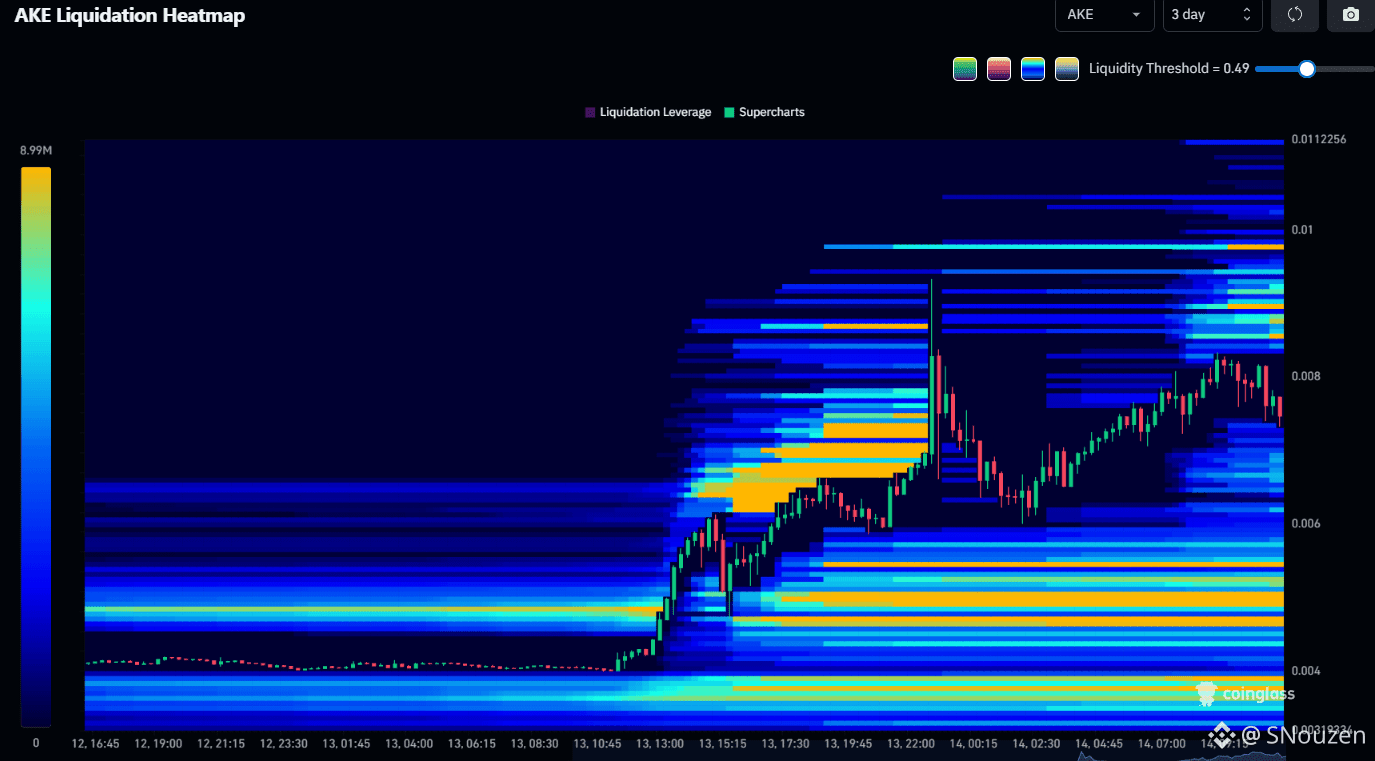
$AKE lokalizatsiyalangan qayta tushishdan so‘ng 0.0075 atrofida barqarorlashishga urinmoqda va yangi qo‘llab-quvvatlash bazasini shakllantirmoqchi.
• Bullish signal: 0.0075 dan yuqorida ushlab turish hamda 0.0080 oraliq qarshiligidan yuqoriga chiqish 0.0088 dan 0.0095 gacha bo‘lgan yorqin Short likvidatsiya klasterlariga yo‘l ochadi, bu esa 0.0100 asosiy psixologik darajagacha yuqoriga cho‘ziladi.
• Bearish xavf: 0.0072 - 0.0075 qo‘llab-quvvatlash bazasidan pastga tushib ketish sotuv bosimini tezlashtirib, undan keyin 0.0055 - 0.0062 likvidatsiya havzasiga yanada chuqurroq tuzatish olib kelishi mumkin.
Click to Trade👇$AKE
{future}(AKEUSDT)
$AKE lokalizatsiyalangan qayta tushishdan so‘ng 0.0075 atrofida barqarorlashishga urinmoqda va yangi qo‘llab-quvvatlash bazasini shakllantirmoqchi.
• Bullish signal: 0.0075 dan yuqorida ushlab turish hamda 0.0080 oraliq qarshiligidan yuqoriga chiqish 0.0088 dan 0.0095 gacha bo‘lgan yorqin Short likvidatsiya klasterlariga yo‘l ochadi, bu esa 0.0100 asosiy psixologik darajagacha yuqoriga cho‘ziladi.
• Bearish xavf: 0.0072 - 0.0075 qo‘llab-quvvatlash bazasidan pastga tushib ketish sotuv bosimini tezlashtirib, undan keyin 0.0055 - 0.0062 likvidatsiya havzasiga yanada chuqurroq tuzatish olib kelishi mumkin.
Click to Trade👇$AKE
• Bullish signal: 0.0075 dan yuqorida ushlab turish hamda 0.0080 oraliq qarshiligidan yuqoriga chiqish 0.0088 dan 0.0095 gacha bo‘lgan yorqin Short likvidatsiya klasterlariga yo‘l ochadi, bu esa 0.0100 asosiy psixologik darajagacha yuqoriga cho‘ziladi.
• Bearish xavf: 0.0072 - 0.0075 qo‘llab-quvvatlash bazasidan pastga tushib ketish sotuv bosimini tezlashtirib, undan keyin 0.0055 - 0.0062 likvidatsiya havzasiga yanada chuqurroq tuzatish olib kelishi mumkin.
Click to Trade👇$AKE
138
·
--
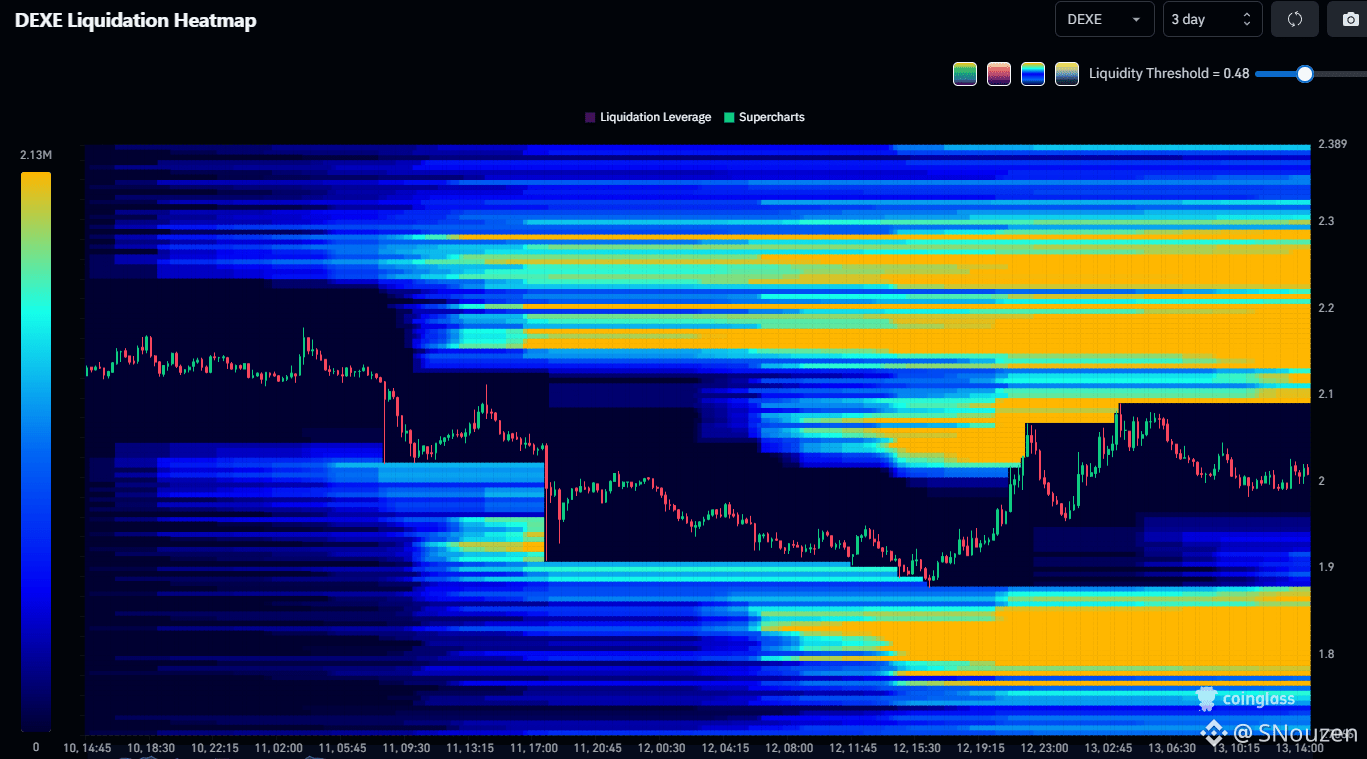
$DEXE lokal pastlardan qaytganidan keyin 1.98 - 2.02 atrofida konsolidatsiya qilmoqda, asosiy supportdan yuqorida ushlab turib, yirik likvidatsiya pool’lari orasida kuch to‘plamoqda.
• Bullish Trigger: 2.00 support bazasidan yuqorida barqaror turib, 2.08 - 2.10 oraliq rezistentlikdan qat’iy chiqib olinsa, 2.15 dan 2.20 gacha joylashgan yorqin Short likvidatsiya klasterlariga yo‘l ochiladi va u 2.30 bo‘yicha asosiy maqsad tomon kengayadi.
• Bearish Threat: Joriy darajalarda rad etilish va 2.00 supportning yo‘qolishi 1.90 - 1.95 hududiga retracement xavfini oshiradi, qo‘shimcha pastga siljish esa pastda joylashgan 1.78 - 1.83 likvidatsiya pool’iga qarab davom etishi mumkin.
Savdo qilish uchun bosing👇$DEXE
{future}(DEXEUSDT)
$DEXE lokal pastlardan qaytganidan keyin 1.98 - 2.02 atrofida konsolidatsiya qilmoqda, asosiy supportdan yuqorida ushlab turib, yirik likvidatsiya pool’lari orasida kuch to‘plamoqda.
• Bullish Trigger: 2.00 support bazasidan yuqorida barqaror turib, 2.08 - 2.10 oraliq rezistentlikdan qat’iy chiqib olinsa, 2.15 dan 2.20 gacha joylashgan yorqin Short likvidatsiya klasterlariga yo‘l ochiladi va u 2.30 bo‘yicha asosiy maqsad tomon kengayadi.
• Bearish Threat: Joriy darajalarda rad etilish va 2.00 supportning yo‘qolishi 1.90 - 1.95 hududiga retracement xavfini oshiradi, qo‘shimcha pastga siljish esa pastda joylashgan 1.78 - 1.83 likvidatsiya pool’iga qarab davom etishi mumkin.
Savdo qilish uchun bosing👇$DEXE
• Bullish Trigger: 2.00 support bazasidan yuqorida barqaror turib, 2.08 - 2.10 oraliq rezistentlikdan qat’iy chiqib olinsa, 2.15 dan 2.20 gacha joylashgan yorqin Short likvidatsiya klasterlariga yo‘l ochiladi va u 2.30 bo‘yicha asosiy maqsad tomon kengayadi.
• Bearish Threat: Joriy darajalarda rad etilish va 2.00 supportning yo‘qolishi 1.90 - 1.95 hududiga retracement xavfini oshiradi, qo‘shimcha pastga siljish esa pastda joylashgan 1.78 - 1.83 likvidatsiya pool’iga qarab davom etishi mumkin.
Savdo qilish uchun bosing👇$DEXE
146
·
--
O‘suvchi
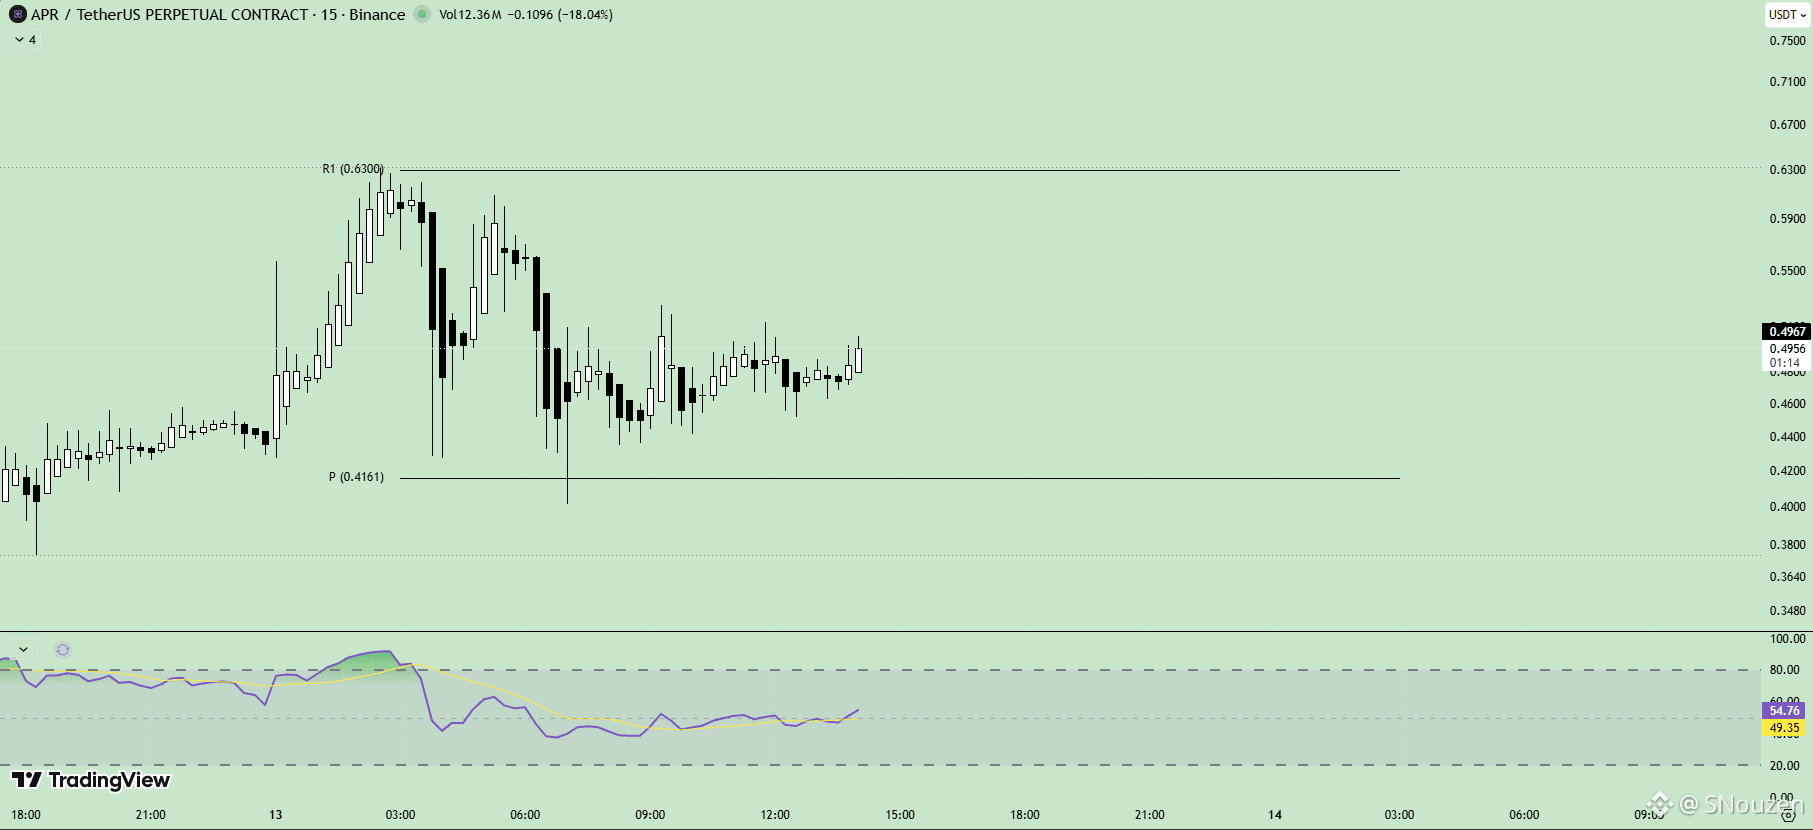
Yuqori savdo hajmi bilan qo‘llab-quvvatlanib, $APR 0.4161 qo‘llab-quvvatlash darajasidan yuqorida o‘zining bullish strukturasini saqlab qolmoqda va bevosita 0.50 muhim psixologik qarshilik darajasiga qarshi bosim qilmoqda, taxminan 0.4956 - 0.4967 atrofida.
• LONG (Bullish Trigger): Narx 0.41 dan yuqorida ushlab turguncha, umumiy yo‘nalish ijobiy bo‘lib qoladi. Kuchli hajm bilan 0.50 psixologik qarshiligidan qat’iy breakout yuz bersa, 0.55 va 0.60 tomon yo‘l ochiladi, yuqoriga esa 0.63 asosiy cho‘qqi maqsadiga qadar cho‘ziladi. DYOR/NFA
Click to Trade👇$APR
{future}(APRUSDT)
Yuqori savdo hajmi bilan qo‘llab-quvvatlanib, $APR 0.4161 qo‘llab-quvvatlash darajasidan yuqorida o‘zining bullish strukturasini saqlab qolmoqda va bevosita 0.50 muhim psixologik qarshilik darajasiga qarshi bosim qilmoqda, taxminan 0.4956 - 0.4967 atrofida.
• LONG (Bullish Trigger): Narx 0.41 dan yuqorida ushlab turguncha, umumiy yo‘nalish ijobiy bo‘lib qoladi. Kuchli hajm bilan 0.50 psixologik qarshiligidan qat’iy breakout yuz bersa, 0.55 va 0.60 tomon yo‘l ochiladi, yuqoriga esa 0.63 asosiy cho‘qqi maqsadiga qadar cho‘ziladi. DYOR/NFA
Click to Trade👇$APR
• LONG (Bullish Trigger): Narx 0.41 dan yuqorida ushlab turguncha, umumiy yo‘nalish ijobiy bo‘lib qoladi. Kuchli hajm bilan 0.50 psixologik qarshiligidan qat’iy breakout yuz bersa, 0.55 va 0.60 tomon yo‘l ochiladi, yuqoriga esa 0.63 asosiy cho‘qqi maqsadiga qadar cho‘ziladi. DYOR/NFA
Click to Trade👇$APR
184
·
--
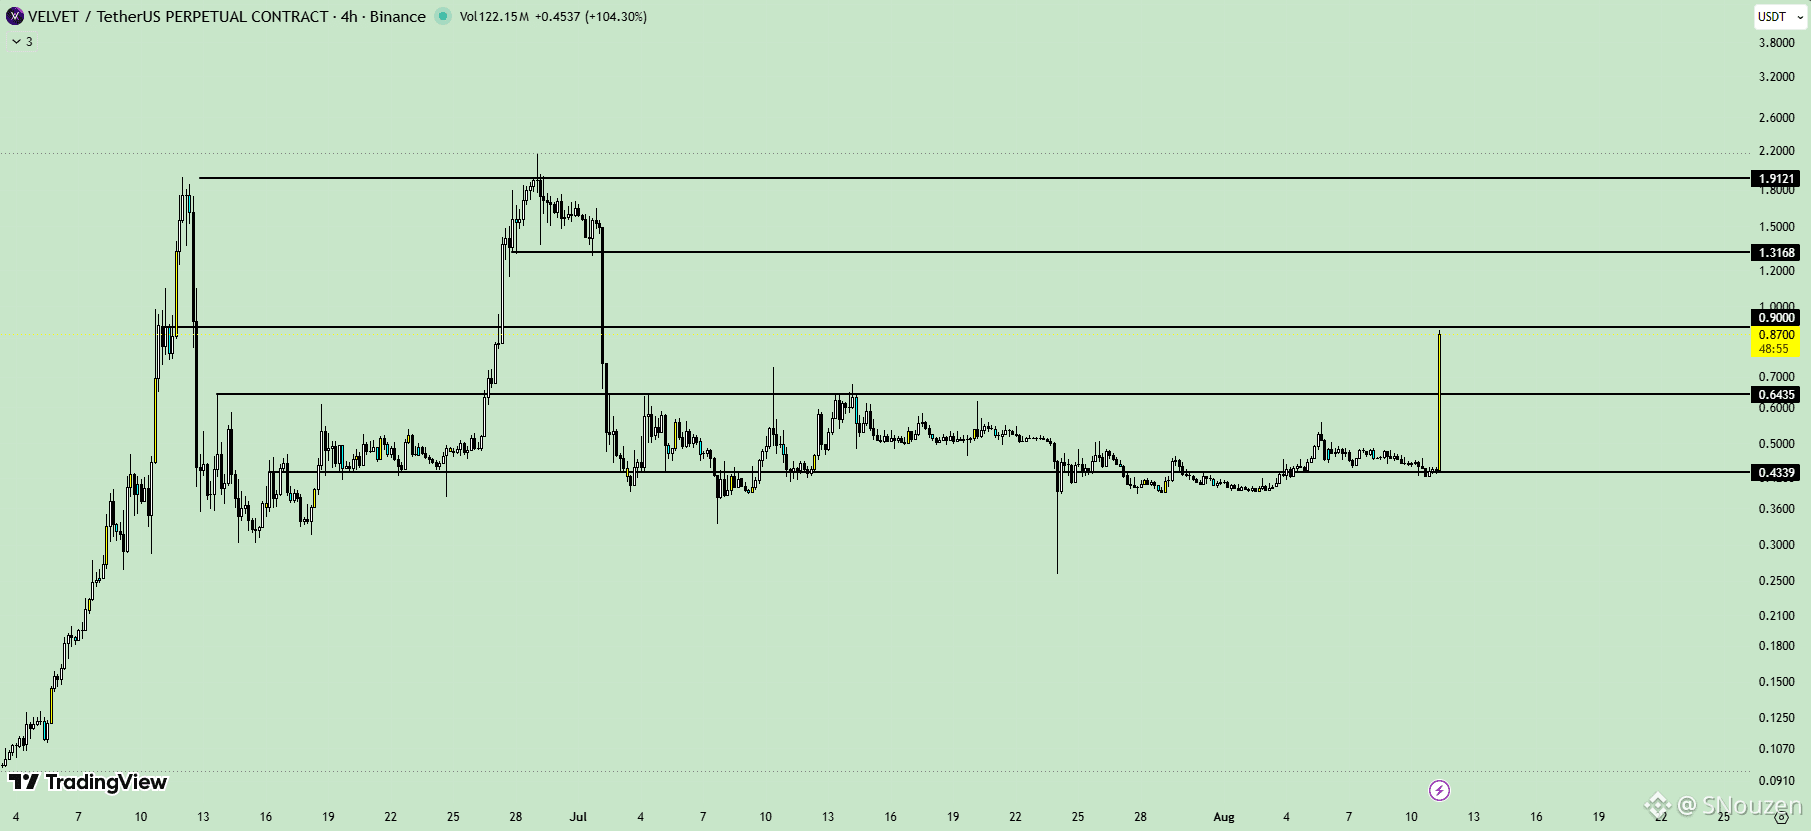
$VELVET $0.87 atrofida vertikal kunlik kengayish (wick)dan keyin konsolidatsiya qilmoqda: u avval $0.90 asosiy qarshilik darajasini qayta sinab ko‘rdi va katta hajm (massive volume) bilan qo‘llab-quvvatlandi.
• Bullish Trigger: $0.87 ustida barqaror ushlab turish, so‘ngra $0.90 dan yuqoriga breakout $1.00 muhim psixologik qarshilikni sinash yo‘lini ochadi; keyingi o‘sish salohiyati $1.3168 gacha va $1.9121 dagi asosiy cho‘qqi (peak) nishoniga tomon cho‘zilishi mumkin.
• Bearish Threat: $0.90 qarshiligidan rad etilish $0.6435 asosiy tayanch (support) bazasini qayta sinashga olib kelishi mumkin; agar pasayish davom etsa, koreksiya $0.4339 talab (demand) poligacha cho‘zilishi ehtimoli bor.
Savdo qilish uchun bosing👇$VELVET
{future}(VELVETUSDT)
$VELVET $0.87 atrofida vertikal kunlik kengayish (wick)dan keyin konsolidatsiya qilmoqda: u avval $0.90 asosiy qarshilik darajasini qayta sinab ko‘rdi va katta hajm (massive volume) bilan qo‘llab-quvvatlandi.
• Bullish Trigger: $0.87 ustida barqaror ushlab turish, so‘ngra $0.90 dan yuqoriga breakout $1.00 muhim psixologik qarshilikni sinash yo‘lini ochadi; keyingi o‘sish salohiyati $1.3168 gacha va $1.9121 dagi asosiy cho‘qqi (peak) nishoniga tomon cho‘zilishi mumkin.
• Bearish Threat: $0.90 qarshiligidan rad etilish $0.6435 asosiy tayanch (support) bazasini qayta sinashga olib kelishi mumkin; agar pasayish davom etsa, koreksiya $0.4339 talab (demand) poligacha cho‘zilishi ehtimoli bor.
Savdo qilish uchun bosing👇$VELVET
• Bullish Trigger: $0.87 ustida barqaror ushlab turish, so‘ngra $0.90 dan yuqoriga breakout $1.00 muhim psixologik qarshilikni sinash yo‘lini ochadi; keyingi o‘sish salohiyati $1.3168 gacha va $1.9121 dagi asosiy cho‘qqi (peak) nishoniga tomon cho‘zilishi mumkin.
• Bearish Threat: $0.90 qarshiligidan rad etilish $0.6435 asosiy tayanch (support) bazasini qayta sinashga olib kelishi mumkin; agar pasayish davom etsa, koreksiya $0.4339 talab (demand) poligacha cho‘zilishi ehtimoli bor.
Savdo qilish uchun bosing👇$VELVET
133
·
--
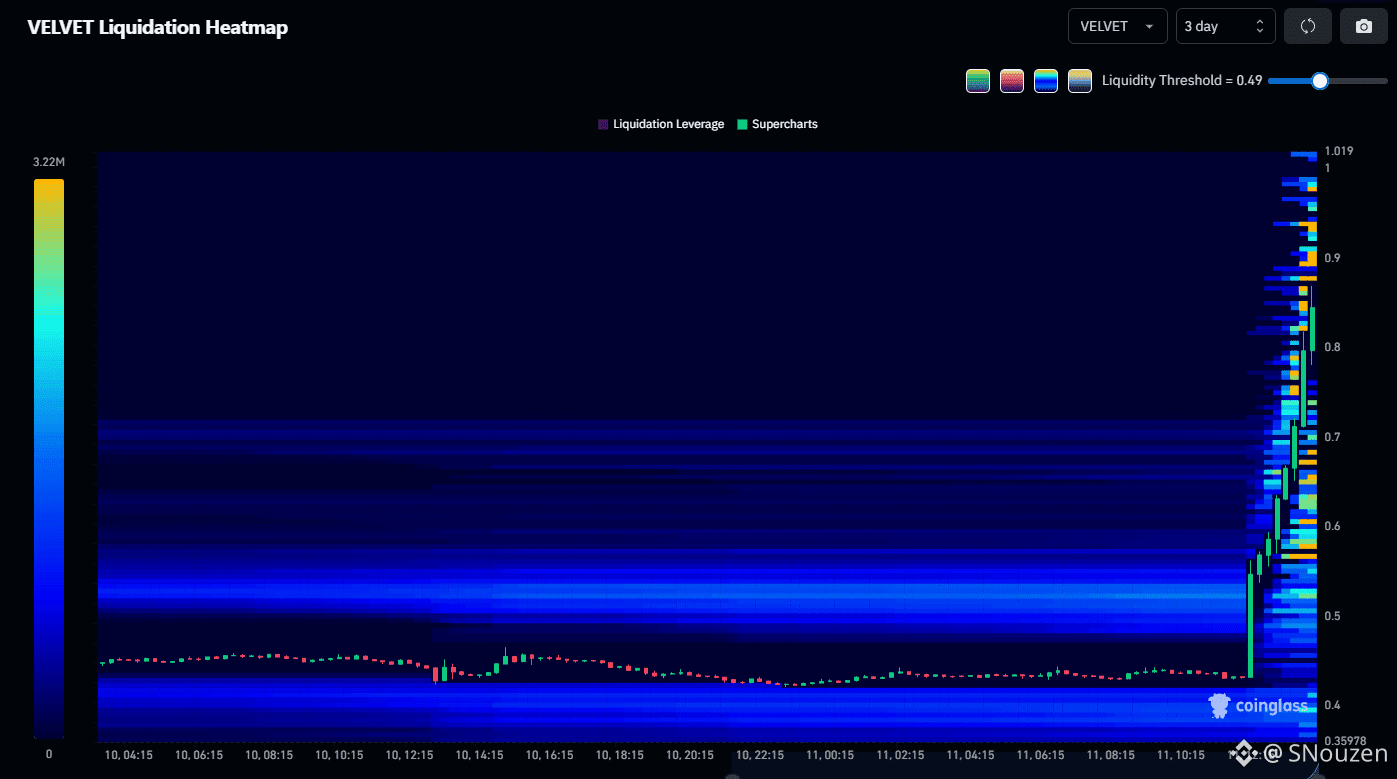
$VELVET $0.78 - $0.83 oralig‘ida konsolidatsiya qilmoqda; bu $0.85 dan yuqorida likvidatsiyalarni yuvib o‘tgan vertikal pul ko‘tarilishi ortidan sodir bo‘ldi va zich ustki (overhead) Short klasterlari ostida ushlab turilmoqda.
• Bullish signal: $0.85 dagi darhol qarshilikdan yuqoriga qat’iy breakout bo‘lsa, $0.88 dan $0.95 gacha bo‘lgan Short likvidatsiya klasterlari tomonga yo‘l ochiladi va yuqoriga $1.00 ning muhim psixologik darajasigacha cho‘ziladi.
• Bearish xavf: $0.78 tayanchining yo‘qolishi $0.65 - $0.70 hududiga qaratilgan retracement xavfini oshiradi; keyingi pastga bosim esa pastdagi $0.40 - $0.45 talab (demand) bazasigacha yetishi mumkin.
Savdo qilish uchun bosing👇$VELVET
{future}(VELVETUSDT)
$VELVET $0.78 - $0.83 oralig‘ida konsolidatsiya qilmoqda; bu $0.85 dan yuqorida likvidatsiyalarni yuvib o‘tgan vertikal pul ko‘tarilishi ortidan sodir bo‘ldi va zich ustki (overhead) Short klasterlari ostida ushlab turilmoqda.
• Bullish signal: $0.85 dagi darhol qarshilikdan yuqoriga qat’iy breakout bo‘lsa, $0.88 dan $0.95 gacha bo‘lgan Short likvidatsiya klasterlari tomonga yo‘l ochiladi va yuqoriga $1.00 ning muhim psixologik darajasigacha cho‘ziladi.
• Bearish xavf: $0.78 tayanchining yo‘qolishi $0.65 - $0.70 hududiga qaratilgan retracement xavfini oshiradi; keyingi pastga bosim esa pastdagi $0.40 - $0.45 talab (demand) bazasigacha yetishi mumkin.
Savdo qilish uchun bosing👇$VELVET
• Bullish signal: $0.85 dagi darhol qarshilikdan yuqoriga qat’iy breakout bo‘lsa, $0.88 dan $0.95 gacha bo‘lgan Short likvidatsiya klasterlari tomonga yo‘l ochiladi va yuqoriga $1.00 ning muhim psixologik darajasigacha cho‘ziladi.
• Bearish xavf: $0.78 tayanchining yo‘qolishi $0.65 - $0.70 hududiga qaratilgan retracement xavfini oshiradi; keyingi pastga bosim esa pastdagi $0.40 - $0.45 talab (demand) bazasigacha yetishi mumkin.
Savdo qilish uchun bosing👇$VELVET
214
·
--
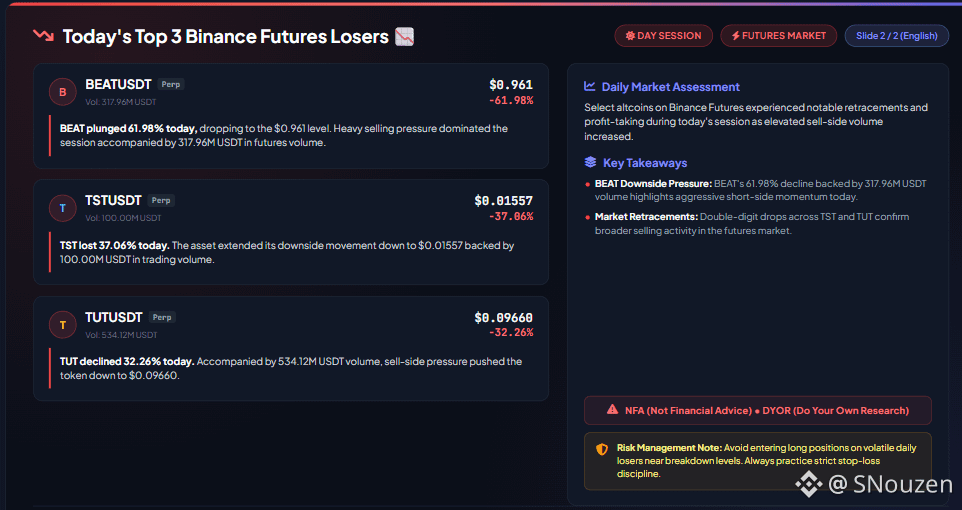
Pasayuvchi
Bugungi eng yirik 3 ta Binance Futures yutqazuvchisi!
$BEAT $TST $TUT
{future}(TUTUSDT)
{future}(TSTUSDT)
{future}(BEATUSDT)
Bugungi eng yirik 3 ta Binance Futures yutqazuvchisi!
$BEAT $TST $TUT
$BEAT $TST $TUT
561
·
--
O‘suvchi
Bugunning eng yaxshi 3 talik Binance Futures yutuqlari!
$BLUAI $VELVET $BTR
{future}(BTRUSDT)
{future}(VELVETUSDT)
{future}(BLUAIUSDT)
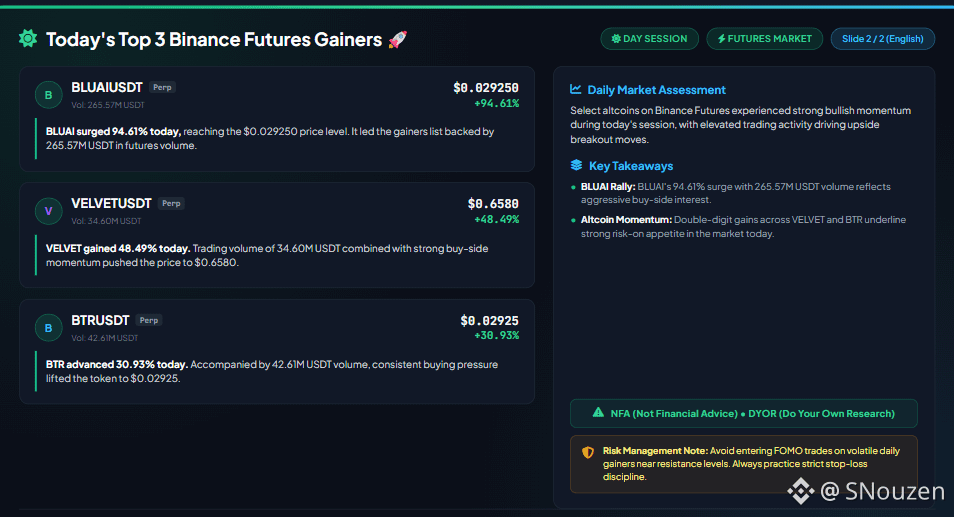
Bugunning eng yaxshi 3 talik Binance Futures yutuqlari!
$BLUAI $VELVET $BTR
$BLUAI $VELVET $BTR
302
Ko‘proq kontentni ko‘rish uchun tizimga kiring
Binance Square'da global kriptovalyuta foydalanuvchilariga qo‘shiling
⚡️ Kriptovalyuta haqida eng so‘nggi va foydali ma’lumotlarni oling.
💬 Dunyoning eng yirik kriptovalyuta birjasi tomonidan ishonchli deb topilgan.
👍 Tasdiqlangan mualliflardan haqiqiy tahlillarni kashf eting.
Email / telefon raqami
Trenddagi mavzular
AIStocksWhatNext
222,667 marta koʻrilgan
2,351 muhokama qilmoqda
Trendlashayotgan xeshteglar kampaniyamizda “Share & Win” trafik mukofotini qo‘lga kiriting
✨Mavzu: AI aksiya kurslari o‘sishda davom etayotgan bir paytda yana qanday investitsiya imkoniyatlari bor?
👉Qanday qo‘shilish:
#AIStocksWhatNext xeshtegi bilan qisqa post yoki maqola joylang
Siz bu holatda bullish tomondamisiz yoki bearish — shuni ayting va AI aksiyalaringiz bo‘yicha portfelingizni yoki treydlaringizni ulashing; treyd vidjeti sizning ishtirokingizga moslikni oshirishi mumkin.
Shuningdek, postingizni ma’lumotlar yoki grafiklar bilan boyitib, AI tomonidan yaratilgan rasmlardan foydalanmaslik orqali kuchaytira olasiz.
✍️Quyidagi yo‘nalishlardan kelib chiqib kontent yarating:
- Nvidia chip sotuvlari kelasi yili ikki baravar bo‘lishini aytdi, eng yirik AI kompaniyalar esa rekord darajadagi daromadlarni qayd etishda davom etyapti — ortidagi hisoblash xarajatlari ham juda katta. AIga talab haqiqatan ham shiddat bilan oshyaptimi? Bu qancha davom etishi mumkin? AI aksiyalar hamma joyda o‘sishda. Bu haqiqiy “breakout”mi yoki faqat qisqa muddatli sakrashmi?
- Tarmoq yetakchilari AI rivojlanishini sekinlashtirishga chaqirmoqda, Trump esa “AI Force” barpo etishni rejalashtirib, AI kelajakda AQSh YAIMning 25%ini tashkil qilishi mumkinligini aytmoqda. Siz qaysi tomondsiz? Davlat darajasidagi qo‘llab-quvvatlash AI aksiyalar uchun uzoq muddatli yutuq bo‘ladimi?
- Siz AI aksiyalarini sotib olyapsizmi? Bizning trade sharing vidjetimiz orqali AI’ga oid treydingiz/ulushingizni ulashing.
⏰Kampaniya davri:
- 2026-09-22 7:00 - 2026-09-24 4:00 UTC
🎁Mukofot:
- Yuqoridagi ko‘rsatmalarga mos keladigan va 100 tadan ko‘p so‘zdan iborat malakali postlar ko‘rib chiqiladi hamda 500 dan 3 000 gacha bo‘lgan tasodifiy trafik oshiruvchi qo‘shimcha olishi mumkin. Postingiz tanlansa, feed kotibingizdan bildirishnoma olasiz.
- Binance Square Official’da maqolangizni namoyish qilish imkoniyatiga ega bo‘ling
Postingiz uchun g‘oyalar kerakmi? Mavzu sahifasiga kiring #AIStocksWhatNext yoki Square Guide on How to Post for Better Reach.
Binance Square Official
·305 ta layk
·662k marta koʻrilgan
BitcoinBreaksAboveMayHighNears$86K
7,937 marta koʻrilgan
129 muhokama qilmoqda
DogecoinRises15%
19,999 marta koʻrilgan
696 muhokama qilmoqda