
Harshith Elite Trader
7.9k Postlar

Harshith Elite Trader
Shikoyat qilish
Foydalanuvchini bloklash
Harshith | Private Crypto Trader | Precision Entries. Calculated Risk. | Capital Preservation First. | Profits Built with Discipline.🔥🔥
Ochiq savdo
Tez-tez savdo qiluvchi
9.4 oy
498 Kuzatilmoqda
1.4K+ Kuzatuvchilar
7.7K+ Yoqdi
Postlar
Portfel
Barchasi
Iqtiboslar
Jonli
·
--
O‘suvchi
🚀🔥 $C /USDT — 1H TREND DAVOMIY LONG 🟢📈
🟢 LONG — Dipni sotib oling
🎯 Kirish zonasi: $0.07815 – $0.07991
🎯 TP1: $0.08750
🎯 TP2: $0.09430
🛑 SL: $0.07424
📌 Makro qo‘llab-quvvatlashga tushishlar sotib olinayapti
📌 1H struktura bullish bo‘lib qolmoqda
📌 Yuqorilarga qaytishni davom ettirishni kutyapmiz
📌 Kirish zonasi tasdiqlasin, quvib ketmang
👉 $C 👈 bo‘yicha kuchli yo‘nalish
👇 bosing va savdo qiling $C Here
{future}(CUSDT)
🚀🔥 $C /USDT — 1H TREND DAVOMIY LONG 🟢📈
🟢 LONG — Dipni sotib oling
🎯 Kirish zonasi: $0.07815 – $0.07991
🎯 TP1: $0.08750
🎯 TP2: $0.09430
🛑 SL: $0.07424
📌 Makro qo‘llab-quvvatlashga tushishlar sotib olinayapti
📌 1H struktura bullish bo‘lib qolmoqda
📌 Yuqorilarga qaytishni davom ettirishni kutyapmiz
📌 Kirish zonasi tasdiqlasin, quvib ketmang
👉 $C 👈 bo‘yicha kuchli yo‘nalish
👇 bosing va savdo qiling $C Here
🟢 LONG — Dipni sotib oling
🎯 Kirish zonasi: $0.07815 – $0.07991
🎯 TP1: $0.08750
🎯 TP2: $0.09430
🛑 SL: $0.07424
📌 Makro qo‘llab-quvvatlashga tushishlar sotib olinayapti
📌 1H struktura bullish bo‘lib qolmoqda
📌 Yuqorilarga qaytishni davom ettirishni kutyapmiz
📌 Kirish zonasi tasdiqlasin, quvib ketmang
👉 $C 👈 bo‘yicha kuchli yo‘nalish
👇 bosing va savdo qiling $C Here
127
·
--
O‘suvchi
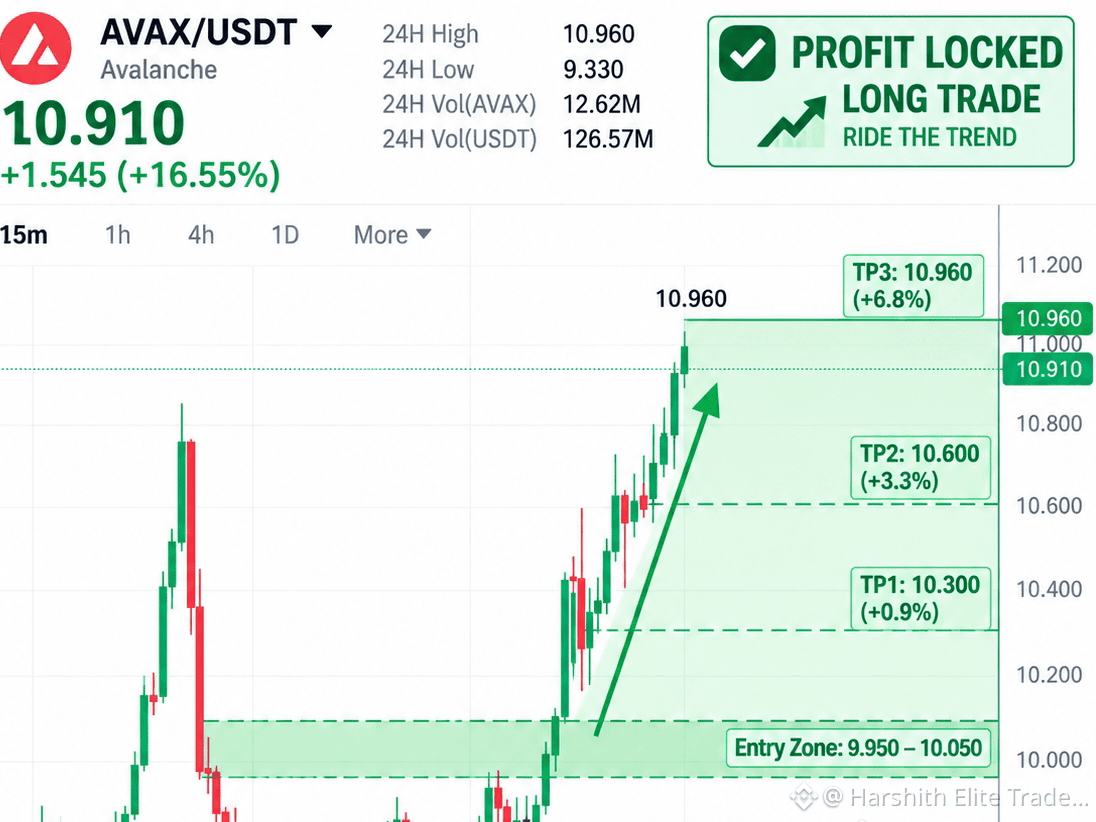
🏆 $AVAX — MUKAMMAL UZOQ YO‘LI UZAYDI! 🟢
$AVAX barcha yo‘l bilan $10.96 gacha chiqdi va UZOQ kutilganidek juda chiroyli bo‘ldi! 🚀
Momentum hali ham kuchli ko‘rinmoqda, keyingi kuzatayotgan darajalarim:
🎯 $11.20
🎯 $11.50
🎯 $12.00
Harakat o‘z yo‘lida — endi narx har bir darajada qanday reaksiyaga kirishini kuzatyapman.
👉 $AVAX 👈 bo‘yicha Kuchli Yo‘nalish
👇 Bosib savdo qiling Bu yerda
{future}(AVAXUSDT)
🏆 $AVAX — MUKAMMAL UZOQ YO‘LI UZAYDI! 🟢
$AVAX barcha yo‘l bilan $10.96 gacha chiqdi va UZOQ kutilganidek juda chiroyli bo‘ldi! 🚀
Momentum hali ham kuchli ko‘rinmoqda, keyingi kuzatayotgan darajalarim:
🎯 $11.20
🎯 $11.50
🎯 $12.00
Harakat o‘z yo‘lida — endi narx har bir darajada qanday reaksiyaga kirishini kuzatyapman.
👉 $AVAX 👈 bo‘yicha Kuchli Yo‘nalish
👇 Bosib savdo qiling Bu yerda
$AVAX barcha yo‘l bilan $10.96 gacha chiqdi va UZOQ kutilganidek juda chiroyli bo‘ldi! 🚀
Momentum hali ham kuchli ko‘rinmoqda, keyingi kuzatayotgan darajalarim:
🎯 $11.20
🎯 $11.50
🎯 $12.00
Harakat o‘z yo‘lida — endi narx har bir darajada qanday reaksiyaga kirishini kuzatyapman.
👉 $AVAX 👈 bo‘yicha Kuchli Yo‘nalish
👇 Bosib savdo qiling Bu yerda
66
·
--
O‘suvchi
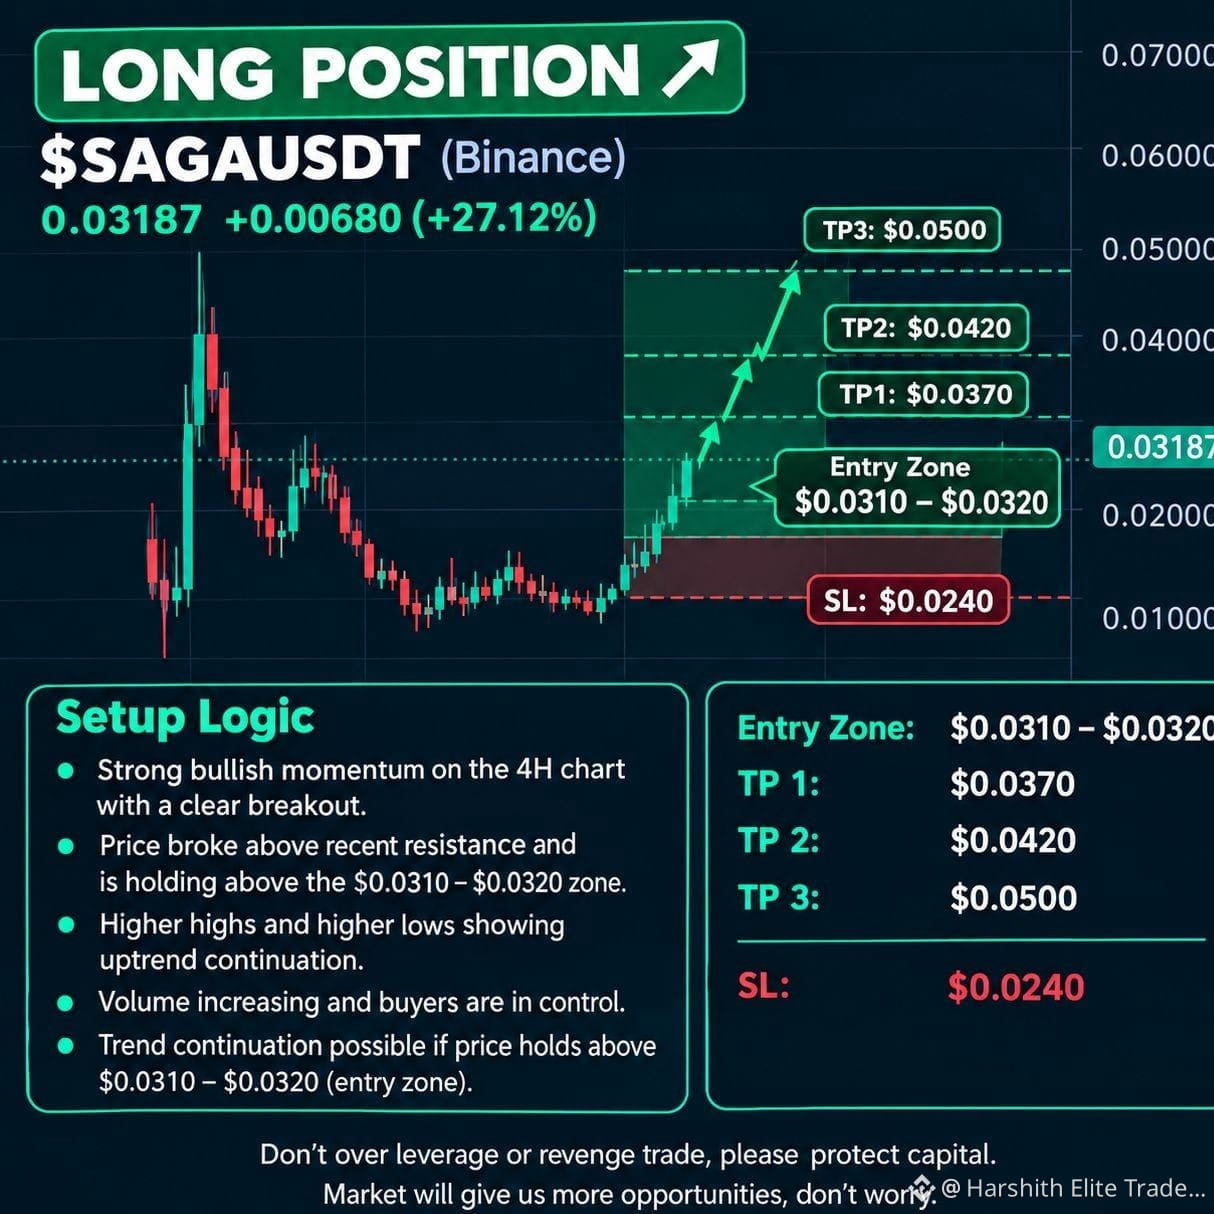
🚀🔥 $SAGA /USDT — YUQORI ISHONCHLI UZUN SETUP 🟢📈
💥 +30%+ HARAKAT | Xaridorlar nazoratni qo'lga olayapti
🟢 UZUN · 10x Leverage
🎯 Kirish zonasi: $0.0312 – $0.0324
🎯 TP1: $0.0340
🎯 TP2: $0.0365
🎯 TP3: $0.0395
🎯 TP4: $0.0440
🎯 TP5: $0.0500
🛑 SL: $0.02420
📌 Breakoutdan keyin kuchli impuls
📌 Kirish zonasini toza retest uchun kuzating
📌 Nishonlarga bosqichma-bosqich chiqib boring
👉 $SAGA 👈 bo'yicha kuchli bias
👇 $SAGA Bu yerda bosing va savdo qiling
{future}(SAGAUSDT)
🚀🔥 $SAGA /USDT — YUQORI ISHONCHLI UZUN SETUP 🟢📈
💥 +30%+ HARAKAT | Xaridorlar nazoratni qo'lga olayapti
🟢 UZUN · 10x Leverage
🎯 Kirish zonasi: $0.0312 – $0.0324
🎯 TP1: $0.0340
🎯 TP2: $0.0365
🎯 TP3: $0.0395
🎯 TP4: $0.0440
🎯 TP5: $0.0500
🛑 SL: $0.02420
📌 Breakoutdan keyin kuchli impuls
📌 Kirish zonasini toza retest uchun kuzating
📌 Nishonlarga bosqichma-bosqich chiqib boring
👉 $SAGA 👈 bo'yicha kuchli bias
👇 $SAGA Bu yerda bosing va savdo qiling
💥 +30%+ HARAKAT | Xaridorlar nazoratni qo'lga olayapti
🟢 UZUN · 10x Leverage
🎯 Kirish zonasi: $0.0312 – $0.0324
🎯 TP1: $0.0340
🎯 TP2: $0.0365
🎯 TP3: $0.0395
🎯 TP4: $0.0440
🎯 TP5: $0.0500
🛑 SL: $0.02420
📌 Breakoutdan keyin kuchli impuls
📌 Kirish zonasini toza retest uchun kuzating
📌 Nishonlarga bosqichma-bosqich chiqib boring
👉 $SAGA 👈 bo'yicha kuchli bias
👇 $SAGA Bu yerda bosing va savdo qiling
2
229
·
--
O‘suvchi
🚀🔥 $UNI /USDT — PULBACK SOTIB OLISH ZONASI 🟢📈
$UNI $9 dan yuqoriga chiqqan va endi taxminan ~$8.70 tomon qaytdi — davom etish uchun potentsial setap kuzatishga arziydigan daraja.
📌 Oldingi zona: $6+
📌 Breakout: $9+
🟢 Sotib olish zonasi: ~$8.70
🎯 Yuqoriga maqsad: $9.50 → $10.00+
💎 UNI — taniqli DeFi nomlaridan biri bo‘lib, protokol to‘lovlari va token-burn mexanizmlari faqat governancega tayanuvchi DeFi tokenlaridan farqli token-qiymat dinamikasini beradi.
Asosiysi: xaridorlar ~$8.70 zonasini himoya qila oladimi va impul’s bilan $9 ni qayta egallaydimi.
👉 $UNI bo‘yicha kuchli bias 👈
👇 Bu yerdan bosing va savdo qiling
{future}(UNIUSDT)
🚀🔥 $UNI /USDT — PULBACK SOTIB OLISH ZONASI 🟢📈
$UNI $9 dan yuqoriga chiqqan va endi taxminan ~$8.70 tomon qaytdi — davom etish uchun potentsial setap kuzatishga arziydigan daraja.
📌 Oldingi zona: $6+
📌 Breakout: $9+
🟢 Sotib olish zonasi: ~$8.70
🎯 Yuqoriga maqsad: $9.50 → $10.00+
💎 UNI — taniqli DeFi nomlaridan biri bo‘lib, protokol to‘lovlari va token-burn mexanizmlari faqat governancega tayanuvchi DeFi tokenlaridan farqli token-qiymat dinamikasini beradi.
Asosiysi: xaridorlar ~$8.70 zonasini himoya qila oladimi va impul’s bilan $9 ni qayta egallaydimi.
👉 $UNI bo‘yicha kuchli bias 👈
👇 Bu yerdan bosing va savdo qiling
$UNI $9 dan yuqoriga chiqqan va endi taxminan ~$8.70 tomon qaytdi — davom etish uchun potentsial setap kuzatishga arziydigan daraja.
📌 Oldingi zona: $6+
📌 Breakout: $9+
🟢 Sotib olish zonasi: ~$8.70
🎯 Yuqoriga maqsad: $9.50 → $10.00+
💎 UNI — taniqli DeFi nomlaridan biri bo‘lib, protokol to‘lovlari va token-burn mexanizmlari faqat governancega tayanuvchi DeFi tokenlaridan farqli token-qiymat dinamikasini beradi.
Asosiysi: xaridorlar ~$8.70 zonasini himoya qila oladimi va impul’s bilan $9 ni qayta egallaydimi.
👉 $UNI bo‘yicha kuchli bias 👈
👇 Bu yerdan bosing va savdo qiling
1
43
·
--
O‘suvchi
🚀🔥 $BTC /USDT — PULLBACK, TREND REVERSALI EMASMI? 🟢📈
$BTC ~$81,900 atrofidan ~$80,700 gacha orqaga qaytdi, lekin kattaroq struktura hali ham $76,000 muhim darajasi ustida ushlab turibdi.
📌 Oldingi past: ~$75,000
📌 Yaqinda bo'lgan eng yuqori: ~$81,900+
📌 Muhim tayanch: $80,000
📌 Muhim bekor qilinish: $76,000
🎯 Yuqoriga maqsad: $84,000
🟢 Agar BTC $80K atrofida ushlab tursa, pullback tasdiqlangan trend reversali emas, balki sog‘lom retracement bo‘lib qolishi mumkin.
Keyingi asosiy yuqoriga daraja 👉 $84,000 👈 bo‘lib qolmoqda.
👇 bosing va savdo qiling $BTC Here
{future}(BTCUSDT)
🚀🔥 $BTC /USDT — PULLBACK, TREND REVERSALI EMASMI? 🟢📈
$BTC ~$81,900 atrofidan ~$80,700 gacha orqaga qaytdi, lekin kattaroq struktura hali ham $76,000 muhim darajasi ustida ushlab turibdi.
📌 Oldingi past: ~$75,000
📌 Yaqinda bo'lgan eng yuqori: ~$81,900+
📌 Muhim tayanch: $80,000
📌 Muhim bekor qilinish: $76,000
🎯 Yuqoriga maqsad: $84,000
🟢 Agar BTC $80K atrofida ushlab tursa, pullback tasdiqlangan trend reversali emas, balki sog‘lom retracement bo‘lib qolishi mumkin.
Keyingi asosiy yuqoriga daraja 👉 $84,000 👈 bo‘lib qolmoqda.
👇 bosing va savdo qiling $BTC Here
$BTC ~$81,900 atrofidan ~$80,700 gacha orqaga qaytdi, lekin kattaroq struktura hali ham $76,000 muhim darajasi ustida ushlab turibdi.
📌 Oldingi past: ~$75,000
📌 Yaqinda bo'lgan eng yuqori: ~$81,900+
📌 Muhim tayanch: $80,000
📌 Muhim bekor qilinish: $76,000
🎯 Yuqoriga maqsad: $84,000
🟢 Agar BTC $80K atrofida ushlab tursa, pullback tasdiqlangan trend reversali emas, balki sog‘lom retracement bo‘lib qolishi mumkin.
Keyingi asosiy yuqoriga daraja 👉 $84,000 👈 bo‘lib qolmoqda.
👇 bosing va savdo qiling $BTC Here
1
31
·
--
Pasayuvchi
🔻💥 $CELR /USDT — RAD ETISH → SHORT SETUP 📉🔴
⚠️ $CELR kuchli mitingidan keyin $0.0040 atrofida qiynalyapti. Shu yerda rad etish yana keskin tuzatishni keltirib chiqarishi mumkin.
🔴 SHORT — Rad Etishni Sotib Olish
🎯 Kirish zonasi: 0.00390 – 0.00405
🎯 TP1: 0.00350
🎯 TP2: 0.00300
🎯 TP3: 0.00250
🛑 SL: 0.00445
📌 0.00385 dan pastga tushish pastga harakatni tezlatishi mumkin
📌 0.00445 = muhim inkor (invalidatsiya) darajasi
📌 Harakatni quvishdan oldin tasdiqni kuting
👉 $CELR bo‘yicha ayanchli (bearish) kayfiyat 👈
👇 Bu yerga bosing va savdo qiling
{future}(CELRUSDT)
🔻💥 $CELR /USDT — RAD ETISH → SHORT SETUP 📉🔴
⚠️ $CELR kuchli mitingidan keyin $0.0040 atrofida qiynalyapti. Shu yerda rad etish yana keskin tuzatishni keltirib chiqarishi mumkin.
🔴 SHORT — Rad Etishni Sotib Olish
🎯 Kirish zonasi: 0.00390 – 0.00405
🎯 TP1: 0.00350
🎯 TP2: 0.00300
🎯 TP3: 0.00250
🛑 SL: 0.00445
📌 0.00385 dan pastga tushish pastga harakatni tezlatishi mumkin
📌 0.00445 = muhim inkor (invalidatsiya) darajasi
📌 Harakatni quvishdan oldin tasdiqni kuting
👉 $CELR bo‘yicha ayanchli (bearish) kayfiyat 👈
👇 Bu yerga bosing va savdo qiling
⚠️ $CELR kuchli mitingidan keyin $0.0040 atrofida qiynalyapti. Shu yerda rad etish yana keskin tuzatishni keltirib chiqarishi mumkin.
🔴 SHORT — Rad Etishni Sotib Olish
🎯 Kirish zonasi: 0.00390 – 0.00405
🎯 TP1: 0.00350
🎯 TP2: 0.00300
🎯 TP3: 0.00250
🛑 SL: 0.00445
📌 0.00385 dan pastga tushish pastga harakatni tezlatishi mumkin
📌 0.00445 = muhim inkor (invalidatsiya) darajasi
📌 Harakatni quvishdan oldin tasdiqni kuting
👉 $CELR bo‘yicha ayanchli (bearish) kayfiyat 👈
👇 Bu yerga bosing va savdo qiling
1
111
·
--
Pasayuvchi
🛢️🔻 $CL /USDT — NEFT AQLAShARI KUZATYAPTI 📉🐻
⚠️ AQSh–Eron bo‘yicha muzokaralar ta’minot bosimi kuchayishi kutilmalarini kuchaytirmoqda, shu bilan birga neft keyingi ochilishda pasayish xavfi ostida.
🔴 QISQA POZITSIYA USTUNLIGI
🎯 1-maqsad: 90.00
🎯 2-maqsad: 88.50
🎯 3-maqsad: 87.00
📌 Ochilish reaksiyasini diqqat bilan kuzating
📌 Tasdiqlangan yemirilish pastga harakat sur’atini tezlashtirishi mumkin
📌 Narx keskin pastga sakrasa, quvib kirmang
👉 $CL bo‘yicha AYANCHLI (bearish) ustunlik 👈
👇 $CL Here bosib va savdo qiling
{future}(CLUSDT)
🛢️🔻 $CL /USDT — NEFT AQLAShARI KUZATYAPTI 📉🐻
⚠️ AQSh–Eron bo‘yicha muzokaralar ta’minot bosimi kuchayishi kutilmalarini kuchaytirmoqda, shu bilan birga neft keyingi ochilishda pasayish xavfi ostida.
🔴 QISQA POZITSIYA USTUNLIGI
🎯 1-maqsad: 90.00
🎯 2-maqsad: 88.50
🎯 3-maqsad: 87.00
📌 Ochilish reaksiyasini diqqat bilan kuzating
📌 Tasdiqlangan yemirilish pastga harakat sur’atini tezlashtirishi mumkin
📌 Narx keskin pastga sakrasa, quvib kirmang
👉 $CL bo‘yicha AYANCHLI (bearish) ustunlik 👈
👇 $CL Here bosib va savdo qiling
⚠️ AQSh–Eron bo‘yicha muzokaralar ta’minot bosimi kuchayishi kutilmalarini kuchaytirmoqda, shu bilan birga neft keyingi ochilishda pasayish xavfi ostida.
🔴 QISQA POZITSIYA USTUNLIGI
🎯 1-maqsad: 90.00
🎯 2-maqsad: 88.50
🎯 3-maqsad: 87.00
📌 Ochilish reaksiyasini diqqat bilan kuzating
📌 Tasdiqlangan yemirilish pastga harakat sur’atini tezlashtirishi mumkin
📌 Narx keskin pastga sakrasa, quvib kirmang
👉 $CL bo‘yicha AYANCHLI (bearish) ustunlik 👈
👇 $CL Here bosib va savdo qiling
1
205
·
--
Pasayuvchi
🔻💥 $G /USDT — AYIGʻIY PARCHALANISH (BEARISH BREAKDOWN) JOYLASHUVI 📉🔴
⚠️ $G ~0.0151 atrofidan rad etilib, shundan beri pastroqqa ketma-ket (lower highs) hosil qilmoqda.
🔴 SHORT — Ayigʻiy bosim kuchaymoqda
🎯 Kirish: 0.00650 – 0.00680
🎯 TP1: 0.00630
🎯 TP2: 0.00600
🎯 TP3: 0.00570
🛑 SL: 0.00720
📌 Muhim tayanch: 0.00650
📌 0.00650 dan pastga tushish 0.00600 tomon yo‘lni ochishi mumkin
📌 Bullish tiklanish uchun 0.00740 ni qayta egallash (reclaim) kerak
Bearish yoʻnalish On 👉 $G 👈
👇 Bu yerga bosing va savdo qiling
{future}(GUSDT)
🔻💥 $G /USDT — AYIGʻIY PARCHALANISH (BEARISH BREAKDOWN) JOYLASHUVI 📉🔴
⚠️ $G ~0.0151 atrofidan rad etilib, shundan beri pastroqqa ketma-ket (lower highs) hosil qilmoqda.
🔴 SHORT — Ayigʻiy bosim kuchaymoqda
🎯 Kirish: 0.00650 – 0.00680
🎯 TP1: 0.00630
🎯 TP2: 0.00600
🎯 TP3: 0.00570
🛑 SL: 0.00720
📌 Muhim tayanch: 0.00650
📌 0.00650 dan pastga tushish 0.00600 tomon yo‘lni ochishi mumkin
📌 Bullish tiklanish uchun 0.00740 ni qayta egallash (reclaim) kerak
Bearish yoʻnalish On 👉 $G 👈
👇 Bu yerga bosing va savdo qiling
⚠️ $G ~0.0151 atrofidan rad etilib, shundan beri pastroqqa ketma-ket (lower highs) hosil qilmoqda.
🔴 SHORT — Ayigʻiy bosim kuchaymoqda
🎯 Kirish: 0.00650 – 0.00680
🎯 TP1: 0.00630
🎯 TP2: 0.00600
🎯 TP3: 0.00570
🛑 SL: 0.00720
📌 Muhim tayanch: 0.00650
📌 0.00650 dan pastga tushish 0.00600 tomon yo‘lni ochishi mumkin
📌 Bullish tiklanish uchun 0.00740 ni qayta egallash (reclaim) kerak
Bearish yoʻnalish On 👉 $G 👈
👇 Bu yerga bosing va savdo qiling
1
248
·
--
O‘suvchi
🚀🔥 $SAGA /USDT — BULLISH BREAKOUT SETUP 🟢📈
💥 24H ichida +22.42% | Kuchli xarid bosimi
🟢 UZUN — Qaytishga sotib oling
🎯 Kirish zonasi: $0.02980 – $0.03050
🎯 TP1: $0.03190
🎯 TP2: $0.03350
🎯 TP3: $0.03600
🛑 SL: $0.02900 dan pastda
📌 1H trend MA(7), MA(25) & MA(99) dan yuqorida ushlab turibdi
📌 Kuchli hajm + bullish momentum
📌 Narx 24H maksimumiga yaqin → quvish o‘rniga toza qaytishni kuting
👉 $SAGA 👈 bo‘yicha kuchli yo‘nalish
👇 Bu yerda $SAGA ni bosing va savdo qiling
{future}(SAGAUSDT)
🚀🔥 $SAGA /USDT — BULLISH BREAKOUT SETUP 🟢📈
💥 24H ichida +22.42% | Kuchli xarid bosimi
🟢 UZUN — Qaytishga sotib oling
🎯 Kirish zonasi: $0.02980 – $0.03050
🎯 TP1: $0.03190
🎯 TP2: $0.03350
🎯 TP3: $0.03600
🛑 SL: $0.02900 dan pastda
📌 1H trend MA(7), MA(25) & MA(99) dan yuqorida ushlab turibdi
📌 Kuchli hajm + bullish momentum
📌 Narx 24H maksimumiga yaqin → quvish o‘rniga toza qaytishni kuting
👉 $SAGA 👈 bo‘yicha kuchli yo‘nalish
👇 Bu yerda $SAGA ni bosing va savdo qiling
💥 24H ichida +22.42% | Kuchli xarid bosimi
🟢 UZUN — Qaytishga sotib oling
🎯 Kirish zonasi: $0.02980 – $0.03050
🎯 TP1: $0.03190
🎯 TP2: $0.03350
🎯 TP3: $0.03600
🛑 SL: $0.02900 dan pastda
📌 1H trend MA(7), MA(25) & MA(99) dan yuqorida ushlab turibdi
📌 Kuchli hajm + bullish momentum
📌 Narx 24H maksimumiga yaqin → quvish o‘rniga toza qaytishni kuting
👉 $SAGA 👈 bo‘yicha kuchli yo‘nalish
👇 Bu yerda $SAGA ni bosing va savdo qiling
1
130
·
--
Pasayuvchi
⚡️ $BTW /USDT — TEZKOR SCALP QISQA 🔴📉
🚨 $0.80 ga haydaldi → keskin rad etish → impuls so‘nmoqda
Uzoq soyacha (wick) kuchli rad etishni ko‘rsatadi va struktura qayrilib, zaiflashyapti.
🎯 QISQA (SHORT) KIRISH: $0.7146
⚡ Leverage: 20x
MAQSADLAR 🎯
TP1: $0.700
TP2: $0.690
TP3: $0.680
TP4: $0.670
TP5: $0.650
🛑 STOP LOSS: $0.760
Chirpin ushlang — bu scalp, ushlab turish (hold) emas.
⚠️ Kirib-chiqing. Ochko‘zlik yo‘q. Har bir TP ga bosqichma-bosqich (scale out) chiqing.
Kuchli Ayiqcha (Bearish) Kayfiyat 👉 $BTW 👈
👇 Bosing va $BTW Here savdo qiling
{future}(BTWUSDT)
⚡️ $BTW /USDT — TEZKOR SCALP QISQA 🔴📉
🚨 $0.80 ga haydaldi → keskin rad etish → impuls so‘nmoqda
Uzoq soyacha (wick) kuchli rad etishni ko‘rsatadi va struktura qayrilib, zaiflashyapti.
🎯 QISQA (SHORT) KIRISH: $0.7146
⚡ Leverage: 20x
MAQSADLAR 🎯
TP1: $0.700
TP2: $0.690
TP3: $0.680
TP4: $0.670
TP5: $0.650
🛑 STOP LOSS: $0.760
Chirpin ushlang — bu scalp, ushlab turish (hold) emas.
⚠️ Kirib-chiqing. Ochko‘zlik yo‘q. Har bir TP ga bosqichma-bosqich (scale out) chiqing.
Kuchli Ayiqcha (Bearish) Kayfiyat 👉 $BTW 👈
👇 Bosing va $BTW Here savdo qiling
🚨 $0.80 ga haydaldi → keskin rad etish → impuls so‘nmoqda
Uzoq soyacha (wick) kuchli rad etishni ko‘rsatadi va struktura qayrilib, zaiflashyapti.
🎯 QISQA (SHORT) KIRISH: $0.7146
⚡ Leverage: 20x
MAQSADLAR 🎯
TP1: $0.700
TP2: $0.690
TP3: $0.680
TP4: $0.670
TP5: $0.650
🛑 STOP LOSS: $0.760
Chirpin ushlang — bu scalp, ushlab turish (hold) emas.
⚠️ Kirib-chiqing. Ochko‘zlik yo‘q. Har bir TP ga bosqichma-bosqich (scale out) chiqing.
Kuchli Ayiqcha (Bearish) Kayfiyat 👉 $BTW 👈
👇 Bosing va $BTW Here savdo qiling
1
86
·
--
O‘suvchi
🚀💥 $BULLA /USDT — YUQORI ISHONCHLI UZUN SETUP 🟢📈
🟢 UZUN · 85% ISHONCH
🎯 Kirish: 0.1046668 – 0.1059132
🛑 SL: 0.0889579
🎯 TP1: 0.1175391
🎯 TP2: 0.1270000
🎯 TP3: 0.1379543
📌 Buqaga xos trend + talab zonasi bo‘yicha kirish
📌 Yuqoriroq maqsadlar tomonga davom etishini kutyapmiz
📌 Narx setupni tasdiqlasin — harakatni quvib ketmang
👉 $BULLA ga Kuchli yo‘nalish
👇 bosing va $BULLA bilan savdo qiling
{future}(BULLAUSDT)
🚀💥 $BULLA /USDT — YUQORI ISHONCHLI UZUN SETUP 🟢📈
🟢 UZUN · 85% ISHONCH
🎯 Kirish: 0.1046668 – 0.1059132
🛑 SL: 0.0889579
🎯 TP1: 0.1175391
🎯 TP2: 0.1270000
🎯 TP3: 0.1379543
📌 Buqaga xos trend + talab zonasi bo‘yicha kirish
📌 Yuqoriroq maqsadlar tomonga davom etishini kutyapmiz
📌 Narx setupni tasdiqlasin — harakatni quvib ketmang
👉 $BULLA ga Kuchli yo‘nalish
👇 bosing va $BULLA bilan savdo qiling
🟢 UZUN · 85% ISHONCH
🎯 Kirish: 0.1046668 – 0.1059132
🛑 SL: 0.0889579
🎯 TP1: 0.1175391
🎯 TP2: 0.1270000
🎯 TP3: 0.1379543
📌 Buqaga xos trend + talab zonasi bo‘yicha kirish
📌 Yuqoriroq maqsadlar tomonga davom etishini kutyapmiz
📌 Narx setupni tasdiqlasin — harakatni quvib ketmang
👉 $BULLA ga Kuchli yo‘nalish
👇 bosing va $BULLA bilan savdo qiling
1
142
·
--
O‘suvchi
🟢 $AVAX — BREAKOUT MODE, lekin quvlamang 🚀📈
$AVAX 15M da kuchli higher-high (yuqoriroq cho‘qqi) strukturasini ko‘rsatmoqda, xaridorlar 10.80 dan yuqorida ushlab turibdi. Hozir narx 11.20–11.25 qarshilik zonasini sinovdan o‘tkazmoqda, shuning uchun retest yanada toza entry (kirish) imkonini berishi mumkin.
🟢 UZUN (LONG) — RETEST KONFIRM QILSIN
Kirish: 10.95 – 11.05
TP1: 11.25
TP2: 11.45
TP3: 11.70
SL: 10.70
⚡ Muhim daraja: 10.80–10.90 ushlanib qolishi kerak.
Ushlab turing + qaytarib oling → yuqoriga davom etish diqqat markazida qoladi.
Zonani yo‘qotish → setup (sxema) zaiflashadi.
Shaxsiy chart (grafik) tahlili. Riskni boshqaring & DYOR.
👇 $AVAX ni shu yerda trade qiling
{future}(AVAXUSDT)
🟢 $AVAX — BREAKOUT MODE, lekin quvlamang 🚀📈
$AVAX 15M da kuchli higher-high (yuqoriroq cho‘qqi) strukturasini ko‘rsatmoqda, xaridorlar 10.80 dan yuqorida ushlab turibdi. Hozir narx 11.20–11.25 qarshilik zonasini sinovdan o‘tkazmoqda, shuning uchun retest yanada toza entry (kirish) imkonini berishi mumkin.
🟢 UZUN (LONG) — RETEST KONFIRM QILSIN
Kirish: 10.95 – 11.05
TP1: 11.25
TP2: 11.45
TP3: 11.70
SL: 10.70
⚡ Muhim daraja: 10.80–10.90 ushlanib qolishi kerak.
Ushlab turing + qaytarib oling → yuqoriga davom etish diqqat markazida qoladi.
Zonani yo‘qotish → setup (sxema) zaiflashadi.
Shaxsiy chart (grafik) tahlili. Riskni boshqaring & DYOR.
👇 $AVAX ni shu yerda trade qiling
$AVAX 15M da kuchli higher-high (yuqoriroq cho‘qqi) strukturasini ko‘rsatmoqda, xaridorlar 10.80 dan yuqorida ushlab turibdi. Hozir narx 11.20–11.25 qarshilik zonasini sinovdan o‘tkazmoqda, shuning uchun retest yanada toza entry (kirish) imkonini berishi mumkin.
🟢 UZUN (LONG) — RETEST KONFIRM QILSIN
Kirish: 10.95 – 11.05
TP1: 11.25
TP2: 11.45
TP3: 11.70
SL: 10.70
⚡ Muhim daraja: 10.80–10.90 ushlanib qolishi kerak.
Ushlab turing + qaytarib oling → yuqoriga davom etish diqqat markazida qoladi.
Zonani yo‘qotish → setup (sxema) zaiflashadi.
Shaxsiy chart (grafik) tahlili. Riskni boshqaring & DYOR.
👇 $AVAX ni shu yerda trade qiling
1
94
·
--
O‘suvchi
🟢 $ETH — 50X UZUN SETUP 🚀📈
Yigitlar, $ETH ni endi 50x leverage bilan UZUN qiling.
🟢 UZUN · 50X
Kirish zona: $2,570 – $2,585
TP1: $2,610
TP2: $2,640
TP3: $2,670
SL: $2,550
⚡ $2,550 da tor invalidatsiya. 50x leverage bilan pozitsiyaga qarshi nisbatan kichik harakat ham katta ta'sir ko‘rsatishi mumkin.
🚀 Bu yerga bosing 👇👇 UZUN $ETH
{spot}(ETHUSDT)
🟢 $ETH — 50X UZUN SETUP 🚀📈
Yigitlar, $ETH ni endi 50x leverage bilan UZUN qiling.
🟢 UZUN · 50X
Kirish zona: $2,570 – $2,585
TP1: $2,610
TP2: $2,640
TP3: $2,670
SL: $2,550
⚡ $2,550 da tor invalidatsiya. 50x leverage bilan pozitsiyaga qarshi nisbatan kichik harakat ham katta ta'sir ko‘rsatishi mumkin.
🚀 Bu yerga bosing 👇👇 UZUN $ETH
Yigitlar, $ETH ni endi 50x leverage bilan UZUN qiling.
🟢 UZUN · 50X
Kirish zona: $2,570 – $2,585
TP1: $2,610
TP2: $2,640
TP3: $2,670
SL: $2,550
⚡ $2,550 da tor invalidatsiya. 50x leverage bilan pozitsiyaga qarshi nisbatan kichik harakat ham katta ta'sir ko‘rsatishi mumkin.
🚀 Bu yerga bosing 👇👇 UZUN $ETH
1
47
·
--
Pasayuvchi
🔴 $DASH — BREAKDOWN SIGNALS ANOTHER MOVE LOWER 📉🔥
$DASH 4H chartda yuqori darajalardan aniq rad etilgandan keyin kuchli ayiqona momentum ko'rsatayapti.
🔻 SHORT SETUP
Kirish zonasi: 54.60 – 54.96
TP1: 52.50
TP2: 49.50
TP3: 45.88
SL: 59.51
⚡ Muhim level: 54.60
54.60 ostida barqaror tanaffus pastga yo'nalishdagi maqsadlarga yo'l ochishi mumkin, 59.51 esa invalidatsiya qiluvchi asosiy daraja bo'lib qoladi.
📉 Sellers breakdown zonasidan pastda nazoratni ushlab turishmoqda.
👇 $DASH ni bu yerda trade qiling
{future}(DASHUSDT)
🔴 $DASH — BREAKDOWN SIGNALS ANOTHER MOVE LOWER 📉🔥
$DASH 4H chartda yuqori darajalardan aniq rad etilgandan keyin kuchli ayiqona momentum ko'rsatayapti.
🔻 SHORT SETUP
Kirish zonasi: 54.60 – 54.96
TP1: 52.50
TP2: 49.50
TP3: 45.88
SL: 59.51
⚡ Muhim level: 54.60
54.60 ostida barqaror tanaffus pastga yo'nalishdagi maqsadlarga yo'l ochishi mumkin, 59.51 esa invalidatsiya qiluvchi asosiy daraja bo'lib qoladi.
📉 Sellers breakdown zonasidan pastda nazoratni ushlab turishmoqda.
👇 $DASH ni bu yerda trade qiling
$DASH 4H chartda yuqori darajalardan aniq rad etilgandan keyin kuchli ayiqona momentum ko'rsatayapti.
🔻 SHORT SETUP
Kirish zonasi: 54.60 – 54.96
TP1: 52.50
TP2: 49.50
TP3: 45.88
SL: 59.51
⚡ Muhim level: 54.60
54.60 ostida barqaror tanaffus pastga yo'nalishdagi maqsadlarga yo'l ochishi mumkin, 59.51 esa invalidatsiya qiluvchi asosiy daraja bo'lib qoladi.
📉 Sellers breakdown zonasidan pastda nazoratni ushlab turishmoqda.
👇 $DASH ni bu yerda trade qiling
1
257
·
--
O‘suvchi
🟢 $G — O‘LIMTIRAKMI YOKI QISQA SIQILISH? 🚀📈
Moliyalashtirish keskin manfiy holatda, $G esa 19.24%ga pasaygan — xaridorlar kirib kelsa, keskin yengillik (relyef) sakrashi uchun yoqilg‘i bo‘lish ehtimoli bor.
🟢 UZOQ (LONG) SETUP
Kirish: 0.006525 – 0.006672
TP1: 0.00720
TP2: 0.00770
SL: 0.006199
⚡ Muhim risk: Volum sust bo‘lib qolmoqda. Zaif qaytish (bounce) muvaffaqiyatsiz bo‘lishi va kengroq pasayish trendi davom etishi mumkin.
Hech qachon hammasini tikmang. Hisobingizga mos keladigan pozitsiya hajmidan foydalaning.
👇👇 Xarid bosimi — LONG $G
{future}(GUSDT)
🟢 $G — O‘LIMTIRAKMI YOKI QISQA SIQILISH? 🚀📈
Moliyalashtirish keskin manfiy holatda, $G esa 19.24%ga pasaygan — xaridorlar kirib kelsa, keskin yengillik (relyef) sakrashi uchun yoqilg‘i bo‘lish ehtimoli bor.
🟢 UZOQ (LONG) SETUP
Kirish: 0.006525 – 0.006672
TP1: 0.00720
TP2: 0.00770
SL: 0.006199
⚡ Muhim risk: Volum sust bo‘lib qolmoqda. Zaif qaytish (bounce) muvaffaqiyatsiz bo‘lishi va kengroq pasayish trendi davom etishi mumkin.
Hech qachon hammasini tikmang. Hisobingizga mos keladigan pozitsiya hajmidan foydalaning.
👇👇 Xarid bosimi — LONG $G
Moliyalashtirish keskin manfiy holatda, $G esa 19.24%ga pasaygan — xaridorlar kirib kelsa, keskin yengillik (relyef) sakrashi uchun yoqilg‘i bo‘lish ehtimoli bor.
🟢 UZOQ (LONG) SETUP
Kirish: 0.006525 – 0.006672
TP1: 0.00720
TP2: 0.00770
SL: 0.006199
⚡ Muhim risk: Volum sust bo‘lib qolmoqda. Zaif qaytish (bounce) muvaffaqiyatsiz bo‘lishi va kengroq pasayish trendi davom etishi mumkin.
Hech qachon hammasini tikmang. Hisobingizga mos keladigan pozitsiya hajmidan foydalaning.
👇👇 Xarid bosimi — LONG $G
1
277
·
--
O‘suvchi
🟢 YIGITLAR 💪 $CELR — QISQA SIQILISH SETAPI? 🚀📈
Moliyalashtirish -1.13% da, narx esa 1H MA25 ichiga tushmoqda — agar xaridorlar kirsa, keskin qaytish uchun yoqilg‘i bo‘lishi mumkin bo‘lgan setup.
🟢 UZUN (LONG) SETUP
Kirish: 0.003776 – 0.003861
TP1: 0.004246
TP2: 0.004588
SL: 0.003499
⚡ Asosiy daraja: 1H MA25 tayanchi
Agar tayanch ushlab tursa → yuqoriga davom etish rivojlanishi mumkin.
Agar shiddatli sotuvlar undan pastga sindirib yuborsa → bullish setup zaiflashadi.
Hech qachon hammasini birga tikmang. Hisobingizga mos keladigan pozitsiya hajmidan foydalaning.
👇👇 Yuqoriga reja — LONG $CELR
{future}(CELRUSDT)
🟢 YIGITLAR 💪 $CELR — QISQA SIQILISH SETAPI? 🚀📈
Moliyalashtirish -1.13% da, narx esa 1H MA25 ichiga tushmoqda — agar xaridorlar kirsa, keskin qaytish uchun yoqilg‘i bo‘lishi mumkin bo‘lgan setup.
🟢 UZUN (LONG) SETUP
Kirish: 0.003776 – 0.003861
TP1: 0.004246
TP2: 0.004588
SL: 0.003499
⚡ Asosiy daraja: 1H MA25 tayanchi
Agar tayanch ushlab tursa → yuqoriga davom etish rivojlanishi mumkin.
Agar shiddatli sotuvlar undan pastga sindirib yuborsa → bullish setup zaiflashadi.
Hech qachon hammasini birga tikmang. Hisobingizga mos keladigan pozitsiya hajmidan foydalaning.
👇👇 Yuqoriga reja — LONG $CELR
Moliyalashtirish -1.13% da, narx esa 1H MA25 ichiga tushmoqda — agar xaridorlar kirsa, keskin qaytish uchun yoqilg‘i bo‘lishi mumkin bo‘lgan setup.
🟢 UZUN (LONG) SETUP
Kirish: 0.003776 – 0.003861
TP1: 0.004246
TP2: 0.004588
SL: 0.003499
⚡ Asosiy daraja: 1H MA25 tayanchi
Agar tayanch ushlab tursa → yuqoriga davom etish rivojlanishi mumkin.
Agar shiddatli sotuvlar undan pastga sindirib yuborsa → bullish setup zaiflashadi.
Hech qachon hammasini birga tikmang. Hisobingizga mos keladigan pozitsiya hajmidan foydalaning.
👇👇 Yuqoriga reja — LONG $CELR
1
155
·
--
O‘suvchi
🚀🔥 $ONE — MOMENTUM OYONMOQDA
Yigitlar, atrofida +37.63% harakatga qarang: $0.003696 atrofida. $ONE katta qaytishni amalga oshirdi — kuchli sessiyada taxminan $0.0015 → $0.0052 gacha ko‘tarildi.
📊 Momentum tekshiruvi
• Hozirgi: $0.003696
• 24H High: $0.0052
• Hajm: $911M+
• Savdo qilingan tokenlar: 232B+
• Ushlab turish: $0.0036 dan yuqorida
Breakout jiddiy hajm va e’tiborni olib keldi. $0.0036 hududini ushlab turish bullish tuzilmani faol saqlashi mumkin, uni yo‘qotish esa chuqurroq pasayishni keltirib chiqarishi ehtimol.
🚀 Harakat kuchli — endi xaridorlar momentumni ushlab tura oladimi-yo‘qmi, kuzating.
$ONE ni radarlaringizda tuting 👀🔥
{future}(ONEUSDT)
🚀🔥 $ONE — MOMENTUM OYONMOQDA
Yigitlar, atrofida +37.63% harakatga qarang: $0.003696 atrofida. $ONE katta qaytishni amalga oshirdi — kuchli sessiyada taxminan $0.0015 → $0.0052 gacha ko‘tarildi.
📊 Momentum tekshiruvi
• Hozirgi: $0.003696
• 24H High: $0.0052
• Hajm: $911M+
• Savdo qilingan tokenlar: 232B+
• Ushlab turish: $0.0036 dan yuqorida
Breakout jiddiy hajm va e’tiborni olib keldi. $0.0036 hududini ushlab turish bullish tuzilmani faol saqlashi mumkin, uni yo‘qotish esa chuqurroq pasayishni keltirib chiqarishi ehtimol.
🚀 Harakat kuchli — endi xaridorlar momentumni ushlab tura oladimi-yo‘qmi, kuzating.
$ONE ni radarlaringizda tuting 👀🔥
Yigitlar, atrofida +37.63% harakatga qarang: $0.003696 atrofida. $ONE katta qaytishni amalga oshirdi — kuchli sessiyada taxminan $0.0015 → $0.0052 gacha ko‘tarildi.
📊 Momentum tekshiruvi
• Hozirgi: $0.003696
• 24H High: $0.0052
• Hajm: $911M+
• Savdo qilingan tokenlar: 232B+
• Ushlab turish: $0.0036 dan yuqorida
Breakout jiddiy hajm va e’tiborni olib keldi. $0.0036 hududini ushlab turish bullish tuzilmani faol saqlashi mumkin, uni yo‘qotish esa chuqurroq pasayishni keltirib chiqarishi ehtimol.
🚀 Harakat kuchli — endi xaridorlar momentumni ushlab tura oladimi-yo‘qmi, kuzating.
$ONE ni radarlaringizda tuting 👀🔥
2
361
·
--
O‘suvchi
⚡ $BTW — O‘ZGARUVCHANLIK QIZIYAPTI 🔥📉
$BTW shiddat bilan harakatlanmoqda, hozir taxminan 0.7224 (+26.67%) atrofida.
Kechki savdolarda 20M+ hajmdan so‘ng, bu tanga juda o‘ta o‘zgaruvchan bo‘lishi mumkin, keskin pasayish spike’lari kuzatish uchun asosiy ssenariyga aylanadi.
🔴 QISQA TOMONNI KUZATISH
Qaytarilish (rejection) va tasdiqlangan yemirilish (breakdown)ni ko‘ring, keyingina short haqida o‘ylang. Ko‘r-ko‘rona kirish qilmang — narx harakati tasdiqlasin.
$BTW ni radarda tuting 👀🔥
{future}(BTWUSDT)
⚡ $BTW — O‘ZGARUVCHANLIK QIZIYAPTI 🔥📉
$BTW shiddat bilan harakatlanmoqda, hozir taxminan 0.7224 (+26.67%) atrofida.
Kechki savdolarda 20M+ hajmdan so‘ng, bu tanga juda o‘ta o‘zgaruvchan bo‘lishi mumkin, keskin pasayish spike’lari kuzatish uchun asosiy ssenariyga aylanadi.
🔴 QISQA TOMONNI KUZATISH
Qaytarilish (rejection) va tasdiqlangan yemirilish (breakdown)ni ko‘ring, keyingina short haqida o‘ylang. Ko‘r-ko‘rona kirish qilmang — narx harakati tasdiqlasin.
$BTW ni radarda tuting 👀🔥
$BTW shiddat bilan harakatlanmoqda, hozir taxminan 0.7224 (+26.67%) atrofida.
Kechki savdolarda 20M+ hajmdan so‘ng, bu tanga juda o‘ta o‘zgaruvchan bo‘lishi mumkin, keskin pasayish spike’lari kuzatish uchun asosiy ssenariyga aylanadi.
🔴 QISQA TOMONNI KUZATISH
Qaytarilish (rejection) va tasdiqlangan yemirilish (breakdown)ni ko‘ring, keyingina short haqida o‘ylang. Ko‘r-ko‘rona kirish qilmang — narx harakati tasdiqlasin.
$BTW ni radarda tuting 👀🔥
1
334
·
--
O‘suvchi
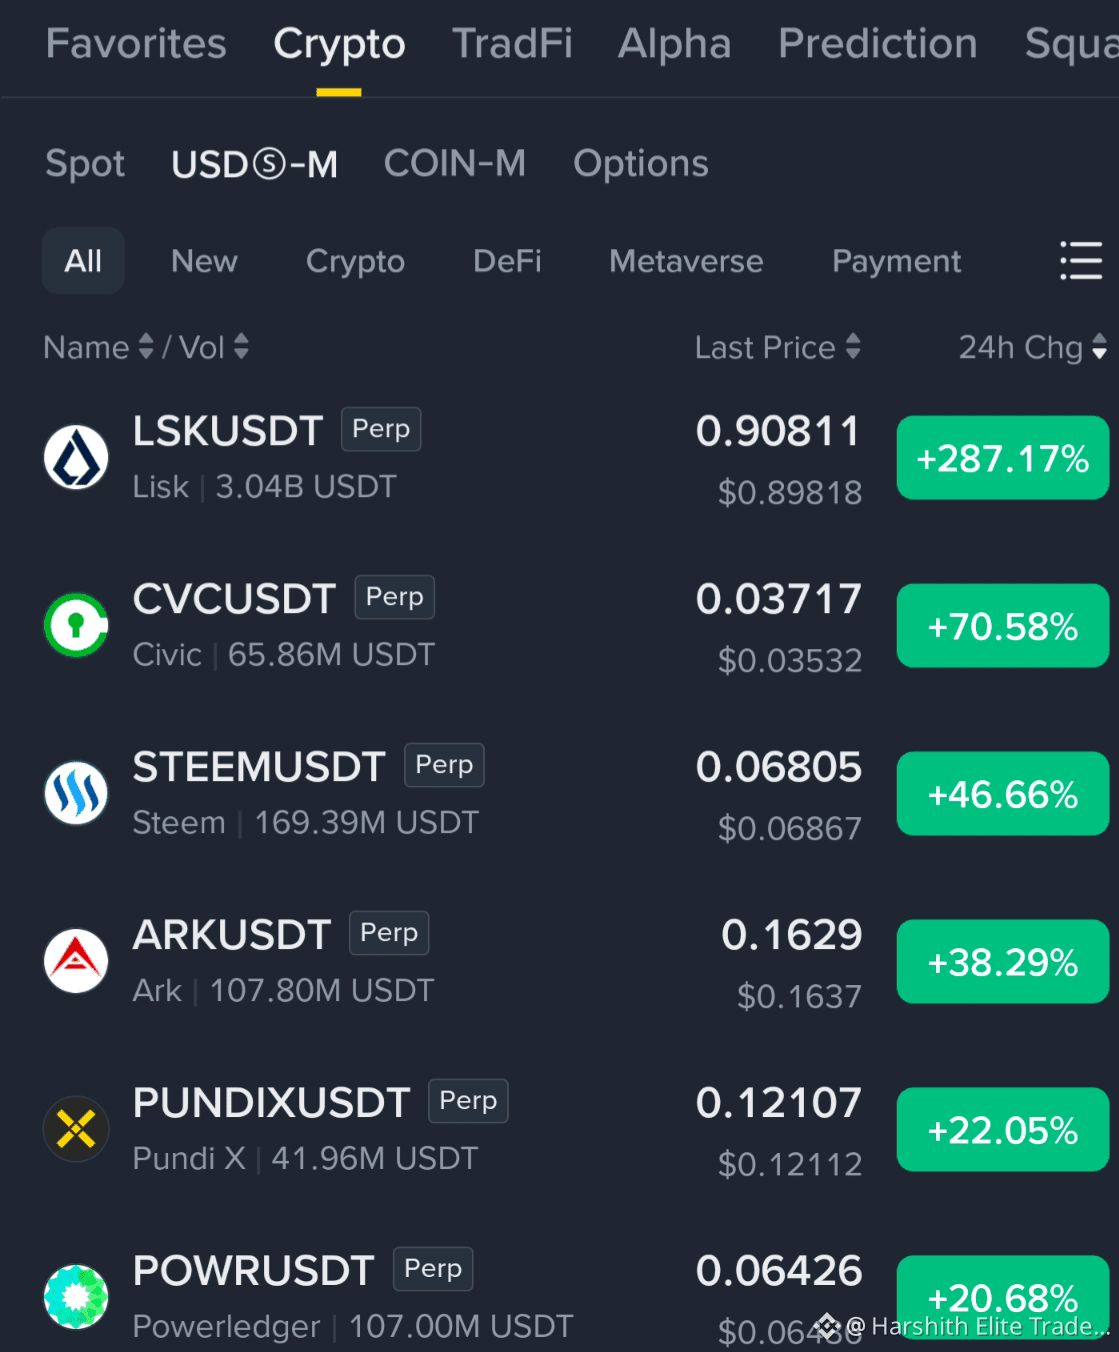
🔥🔥 FUTURES BOZORI ALANGADA — MANA BU MAQSADLARNI TOMOSHA QILING 🚀📈
Momentum juda kuchaymoqda. Kutilishi mumkin bo‘lgan keyingi darajalarga e’tibor bering:
🚀 $LSK
Hozir: 0.90526 | +284.75%
🎯 Maqsad: 1.10
🔥 $CVC
Hozir: 0.03646 | +67.63%
🎯 Maqsad: 0.05
📈 $STEEM
🎯 Maqsad: 0.075
⚡ Katta volatillik allaqachon ishga tushgan — momentum va muhim darajalarni diqqat bilan kuzating.
Buni e’tiboringizda tuting 👀🔥
{future}(STEEMUSDT)
{future}(CVCUSDT)
{future}(LSKUSDT)
🔥🔥 FUTURES BOZORI ALANGADA — MANA BU MAQSADLARNI TOMOSHA QILING 🚀📈
Momentum juda kuchaymoqda. Kutilishi mumkin bo‘lgan keyingi darajalarga e’tibor bering:
🚀 $LSK
Hozir: 0.90526 | +284.75%
🎯 Maqsad: 1.10
🔥 $CVC
Hozir: 0.03646 | +67.63%
🎯 Maqsad: 0.05
📈 $STEEM
🎯 Maqsad: 0.075
⚡ Katta volatillik allaqachon ishga tushgan — momentum va muhim darajalarni diqqat bilan kuzating.
Buni e’tiboringizda tuting 👀🔥
Momentum juda kuchaymoqda. Kutilishi mumkin bo‘lgan keyingi darajalarga e’tibor bering:
🚀 $LSK
Hozir: 0.90526 | +284.75%
🎯 Maqsad: 1.10
🔥 $CVC
Hozir: 0.03646 | +67.63%
🎯 Maqsad: 0.05
📈 $STEEM
🎯 Maqsad: 0.075
⚡ Katta volatillik allaqachon ishga tushgan — momentum va muhim darajalarni diqqat bilan kuzating.
Buni e’tiboringizda tuting 👀🔥
3
679
·
--
Pasayuvchi
🔴 Yigitlar 💪 $CL — QISQA SOZLASH DIQQATDA 📉🔥
$CL /USDT rad etish yo‘li orqali keyingi pasayish uchun imkon ochishi mumkin bo‘lgan muhim zonaga yaqinlashmoqda.
🔻 SHORT SOZLASH
Kirish: 96.80 – 97.00
TP1: 95.50
TP2: 94.50
TP3: 93.50
SL: 98.00
⚡ 96.80–97.00 zonani diqqat bilan kuzating. Bu yerda rad etish bearish harakatni maqsadlarga tomon kuchaytirishi mumkin.
👇👇 $CL NI SHORT QILISH UCHUN BU YERNI BOSING
{future}(CLUSDT)
🔴 Yigitlar 💪 $CL — QISQA SOZLASH DIQQATDA 📉🔥
$CL /USDT rad etish yo‘li orqali keyingi pasayish uchun imkon ochishi mumkin bo‘lgan muhim zonaga yaqinlashmoqda.
🔻 SHORT SOZLASH
Kirish: 96.80 – 97.00
TP1: 95.50
TP2: 94.50
TP3: 93.50
SL: 98.00
⚡ 96.80–97.00 zonani diqqat bilan kuzating. Bu yerda rad etish bearish harakatni maqsadlarga tomon kuchaytirishi mumkin.
👇👇 $CL NI SHORT QILISH UCHUN BU YERNI BOSING
$CL /USDT rad etish yo‘li orqali keyingi pasayish uchun imkon ochishi mumkin bo‘lgan muhim zonaga yaqinlashmoqda.
🔻 SHORT SOZLASH
Kirish: 96.80 – 97.00
TP1: 95.50
TP2: 94.50
TP3: 93.50
SL: 98.00
⚡ 96.80–97.00 zonani diqqat bilan kuzating. Bu yerda rad etish bearish harakatni maqsadlarga tomon kuchaytirishi mumkin.
👇👇 $CL NI SHORT QILISH UCHUN BU YERNI BOSING
1
166
Ko‘proq kontentni ko‘rish uchun tizimga kiring
Binance Square'da global kriptovalyuta foydalanuvchilariga qo‘shiling
⚡️ Kriptovalyuta haqida eng so‘nggi va foydali ma’lumotlarni oling.
💬 Dunyoning eng yirik kriptovalyuta birjasi tomonidan ishonchli deb topilgan.
👍 Tasdiqlangan mualliflardan haqiqiy tahlillarni kashf eting.
Email / telefon raqami
Trenddagi mavzular
SouthAfricaProposesCryptoExchangeControls
0 marta koʻrilgan
27 muhokama qilmoqda
$DOGE Yangilik: Asosiy qo'llab-quvvatlash ushlanib tursa, bullish trend o'z kuchida qoladi.
Uzoq muddatli setup:
Sotib olish zonasi: 0.0905 – 0.0920
Stop Loss: 0.0871
Maqsadlar: 0.0955 / 0.0980 / 0.1020
Narx faol xaridorlar hajmi bilan 0.0905 darajasidan barqaror yuqorida ushlab turilmoqda. Ushbu baza saqlansa, 0.0955 va undan yuqoriga harakat uchun yo'l ochiladi.
$DOGE trade ni quyida 👇 bajaring
$DOGE
#SouthAfricaProposesCryptoExchangeControls #CanaryFilesSecondAmendmentForStakedSEIETF #BOJRaisesRatesTo31YearHigh
Rose Sweet
·0 ta layk
·14 marta koʻrilgan
SolanaCutsTargetSlotTimeTo250ms
850 marta koʻrilgan
74 muhokama qilmoqda
EthereumSurpasses$2700
5,389 marta koʻrilgan
142 muhokama qilmoqda