
Yeakub Durjoy
384 Postlar

Yeakub Durjoy
Shikoyat qilish
Foydalanuvchini bloklash
Community Moderator and Builder | Crypto Analyst | Web3 Enthusiasts
Vaqti-vaqti bilan savdo qiluvchi
4.8 yil
25 Kuzatilmoqda
1.4K+ Kuzatuvchilar
1.8K+ Yoqdi
Postlar
Barchasi
Iqtiboslar
QADAB QO‘YILGAN

Maqola
Bitcoin nolga tushmaydi — u 1 million dollarga va undan ham yuqoriga tomon uchyaptiBu buqa bozori boshlandi degan paytda men $BTC taxminan 200 ming dollarda cho‘qqiga chiqadi, deb ishonib qolgan edim. Keyin esa bozor o‘zgardi, siyosat yanada chigallashdi va men maqsadli ko‘rsatkichimni 150 ming dollarga tushirdim.
Ma’lum bo‘ldiki, men butunlay noto‘g‘ri ekanman va ha, buni shovqin, shubha bilan qarayotganlar hamda internetdagi “kripto ekspert”larning yarmiga aytish mumkin.
Soat mexanizmi kabi — har necha oyda o‘sha bir guruh chiqib, yana Bitcoin “o‘lib qoldi” deya e’lon qiladi. Tuzatish (dip) bo‘ladi, tartibga soluvchilar gapira boshlaydi, qandaydir geosiyosiy sarlavha uriladi va birdaniga — hammasi qiyomatga o‘xshab ketadi.
Buni 16 yildan beri aytishyapti. Va har safar nuqtani butunlay o‘tkazib yuborishdi.
Bitcoin nolga tushmaydi — u 1 million dollarga va undan ham yuqoriga tomon uchyapti
Bu buqa bozori boshlandi degan paytda men $BTC taxminan 200 ming dollarda cho‘qqiga chiqadi, deb ishonib qolgan edim. Keyin esa bozor o‘zgardi, siyosat yanada chigallashdi va men maqsadli ko‘rsatkichimni 150 ming dollarga tushirdim.
Ma’lum bo‘ldiki, men butunlay noto‘g‘ri ekanman va ha, buni shovqin, shubha bilan qarayotganlar hamda internetdagi “kripto ekspert”larning yarmiga aytish mumkin.
Soat mexanizmi kabi — har necha oyda o‘sha bir guruh chiqib, yana Bitcoin “o‘lib qoldi” deya e’lon qiladi. Tuzatish (dip) bo‘ladi, tartibga soluvchilar gapira boshlaydi, qandaydir geosiyosiy sarlavha uriladi va birdaniga — hammasi qiyomatga o‘xshab ketadi.
Buni 16 yildan beri aytishyapti. Va har safar nuqtani butunlay o‘tkazib yuborishdi.
Ma’lum bo‘ldiki, men butunlay noto‘g‘ri ekanman va ha, buni shovqin, shubha bilan qarayotganlar hamda internetdagi “kripto ekspert”larning yarmiga aytish mumkin.
Soat mexanizmi kabi — har necha oyda o‘sha bir guruh chiqib, yana Bitcoin “o‘lib qoldi” deya e’lon qiladi. Tuzatish (dip) bo‘ladi, tartibga soluvchilar gapira boshlaydi, qandaydir geosiyosiy sarlavha uriladi va birdaniga — hammasi qiyomatga o‘xshab ketadi.
Buni 16 yildan beri aytishyapti. Va har safar nuqtani butunlay o‘tkazib yuborishdi.
16
2
26
6.2k
QADAB QO‘YILGAN

Maqola
Memecoin iqtisodiyotini tushunish: Men buni qanday ko‘ramanKriptoda “foydasiz” deb ko‘riladigan narsalarning ham g‘ayritabiiy baholarga yetib borishini ko‘rish odatiy hol. O‘nlab milliardlab ko‘rsatkichdagi Dogecoin. Millionlab dollarga sotilayotgan Monkey NFT’lari. Yuzaki qaraganda, aniq foydali dastur yo‘q. Unda biz aslida nimani baholayapmiz?
$DOGE , $PEPE , $pippin ga o‘xshash memecoinlar faqat blokcheindagi bitta token. O‘z mablag‘ini o‘zi saqlash (self custody), shaffoflik, tsenzuraga chidamlilik. Texnik jihatdan u Bitcoin bilan bir xil asosiy xususiyatlarga ega. Dastlab esa, hatto Bitcoin ham “yaxshiroq” versiyalariga ega bo‘lgan: Litecoin tezroq va arzonroq ekanini aytgan. Tarix esa boshqacha bo‘ldi.
Memecoin iqtisodiyotini tushunish: Men buni qanday ko‘raman
Kriptoda “foydasiz” deb ko‘riladigan narsalarning ham g‘ayritabiiy baholarga yetib borishini ko‘rish odatiy hol. O‘nlab milliardlab ko‘rsatkichdagi Dogecoin. Millionlab dollarga sotilayotgan Monkey NFT’lari. Yuzaki qaraganda, aniq foydali dastur yo‘q. Unda biz aslida nimani baholayapmiz?
$DOGE , $PEPE , $pippin ga o‘xshash memecoinlar faqat blokcheindagi bitta token. O‘z mablag‘ini o‘zi saqlash (self custody), shaffoflik, tsenzuraga chidamlilik. Texnik jihatdan u Bitcoin bilan bir xil asosiy xususiyatlarga ega. Dastlab esa, hatto Bitcoin ham “yaxshiroq” versiyalariga ega bo‘lgan: Litecoin tezroq va arzonroq ekanini aytgan. Tarix esa boshqacha bo‘ldi.
$DOGE , $PEPE , $pippin ga o‘xshash memecoinlar faqat blokcheindagi bitta token. O‘z mablag‘ini o‘zi saqlash (self custody), shaffoflik, tsenzuraga chidamlilik. Texnik jihatdan u Bitcoin bilan bir xil asosiy xususiyatlarga ega. Dastlab esa, hatto Bitcoin ham “yaxshiroq” versiyalariga ega bo‘lgan: Litecoin tezroq va arzonroq ekanini aytgan. Tarix esa boshqacha bo‘ldi.
21
8
88
70.2k
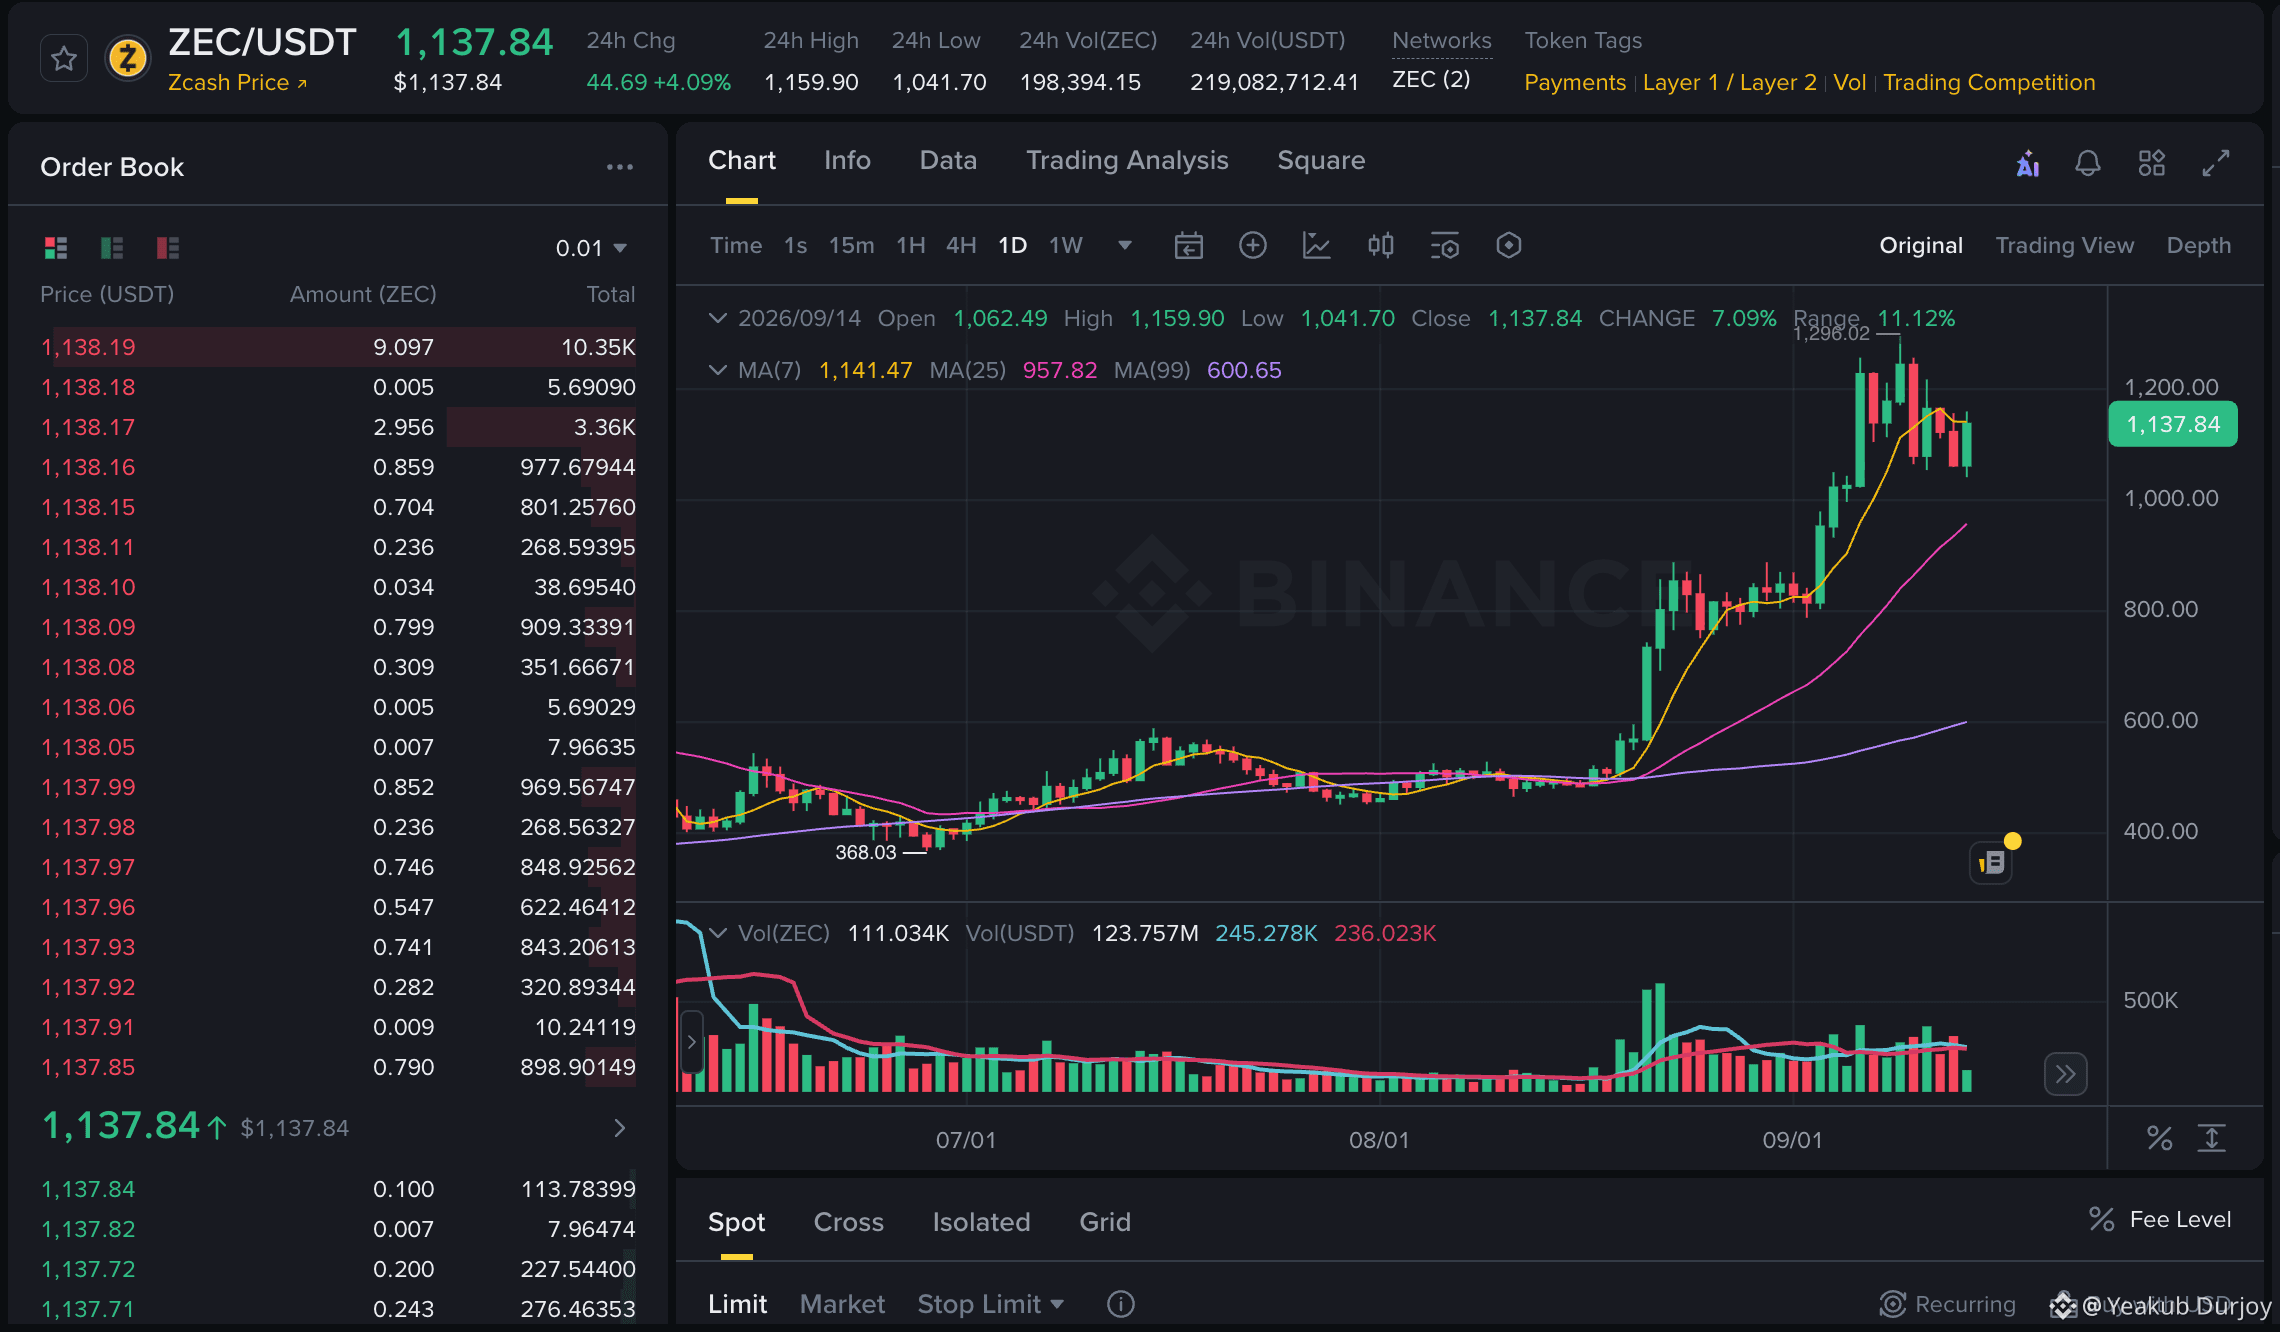
$ZEC hali ham ko‘tarilish (bullish) tomonga moyil, lekin men buni joriy narxni quvib ketish emas, balki shartli long sifatida ko‘rardim.
Yo‘nalish: Reclaim (qayta egallash) yoki tayanch ushlab qolinsa — Long
Kirish zonasi: 1 080 dan 1 125 gacha
Tasdiqlovchi kirish: 1 145 dan yuqori
Stop: 1 040 dan past
TP1: 1 160
TP2: 1 220 dan 1 260 gacha
TP3: 1 296 dan 1 350 gacha, agar impuls yana kuchaysa
Hali ham longni afzal ko‘rishimning sababi: ZEC breakoutdan keyin ham kuchli uptrendni ushlab turibdi va pullback hali kengroq struktura buzilgani yo‘q. Muhim daraja — MA7 taxminan 1 141. Agar ZEC bu hududni hajm bilan qayta egallasa, davomiylik yanada tozaroq ko‘rinadi. Agar u 1 040 ni yo‘qotsa, ortga chekinardim, chunki koreksiya MA25 zonagacha chuqurroq davom etishi mumkin.
{future}(ZECUSDT)
$ZEC hali ham ko‘tarilish (bullish) tomonga moyil, lekin men buni joriy narxni quvib ketish emas, balki shartli long sifatida ko‘rardim.
Yo‘nalish: Reclaim (qayta egallash) yoki tayanch ushlab qolinsa — Long
Kirish zonasi: 1 080 dan 1 125 gacha
Tasdiqlovchi kirish: 1 145 dan yuqori
Stop: 1 040 dan past
TP1: 1 160
TP2: 1 220 dan 1 260 gacha
TP3: 1 296 dan 1 350 gacha, agar impuls yana kuchaysa
Hali ham longni afzal ko‘rishimning sababi: ZEC breakoutdan keyin ham kuchli uptrendni ushlab turibdi va pullback hali kengroq struktura buzilgani yo‘q. Muhim daraja — MA7 taxminan 1 141. Agar ZEC bu hududni hajm bilan qayta egallasa, davomiylik yanada tozaroq ko‘rinadi. Agar u 1 040 ni yo‘qotsa, ortga chekinardim, chunki koreksiya MA25 zonagacha chuqurroq davom etishi mumkin.
Yo‘nalish: Reclaim (qayta egallash) yoki tayanch ushlab qolinsa — Long
Kirish zonasi: 1 080 dan 1 125 gacha
Tasdiqlovchi kirish: 1 145 dan yuqori
Stop: 1 040 dan past
TP1: 1 160
TP2: 1 220 dan 1 260 gacha
TP3: 1 296 dan 1 350 gacha, agar impuls yana kuchaysa
Hali ham longni afzal ko‘rishimning sababi: ZEC breakoutdan keyin ham kuchli uptrendni ushlab turibdi va pullback hali kengroq struktura buzilgani yo‘q. Muhim daraja — MA7 taxminan 1 141. Agar ZEC bu hududni hajm bilan qayta egallasa, davomiylik yanada tozaroq ko‘rinadi. Agar u 1 040 ni yo‘qotsa, ortga chekinardim, chunki koreksiya MA25 zonagacha chuqurroq davom etishi mumkin.
2
414
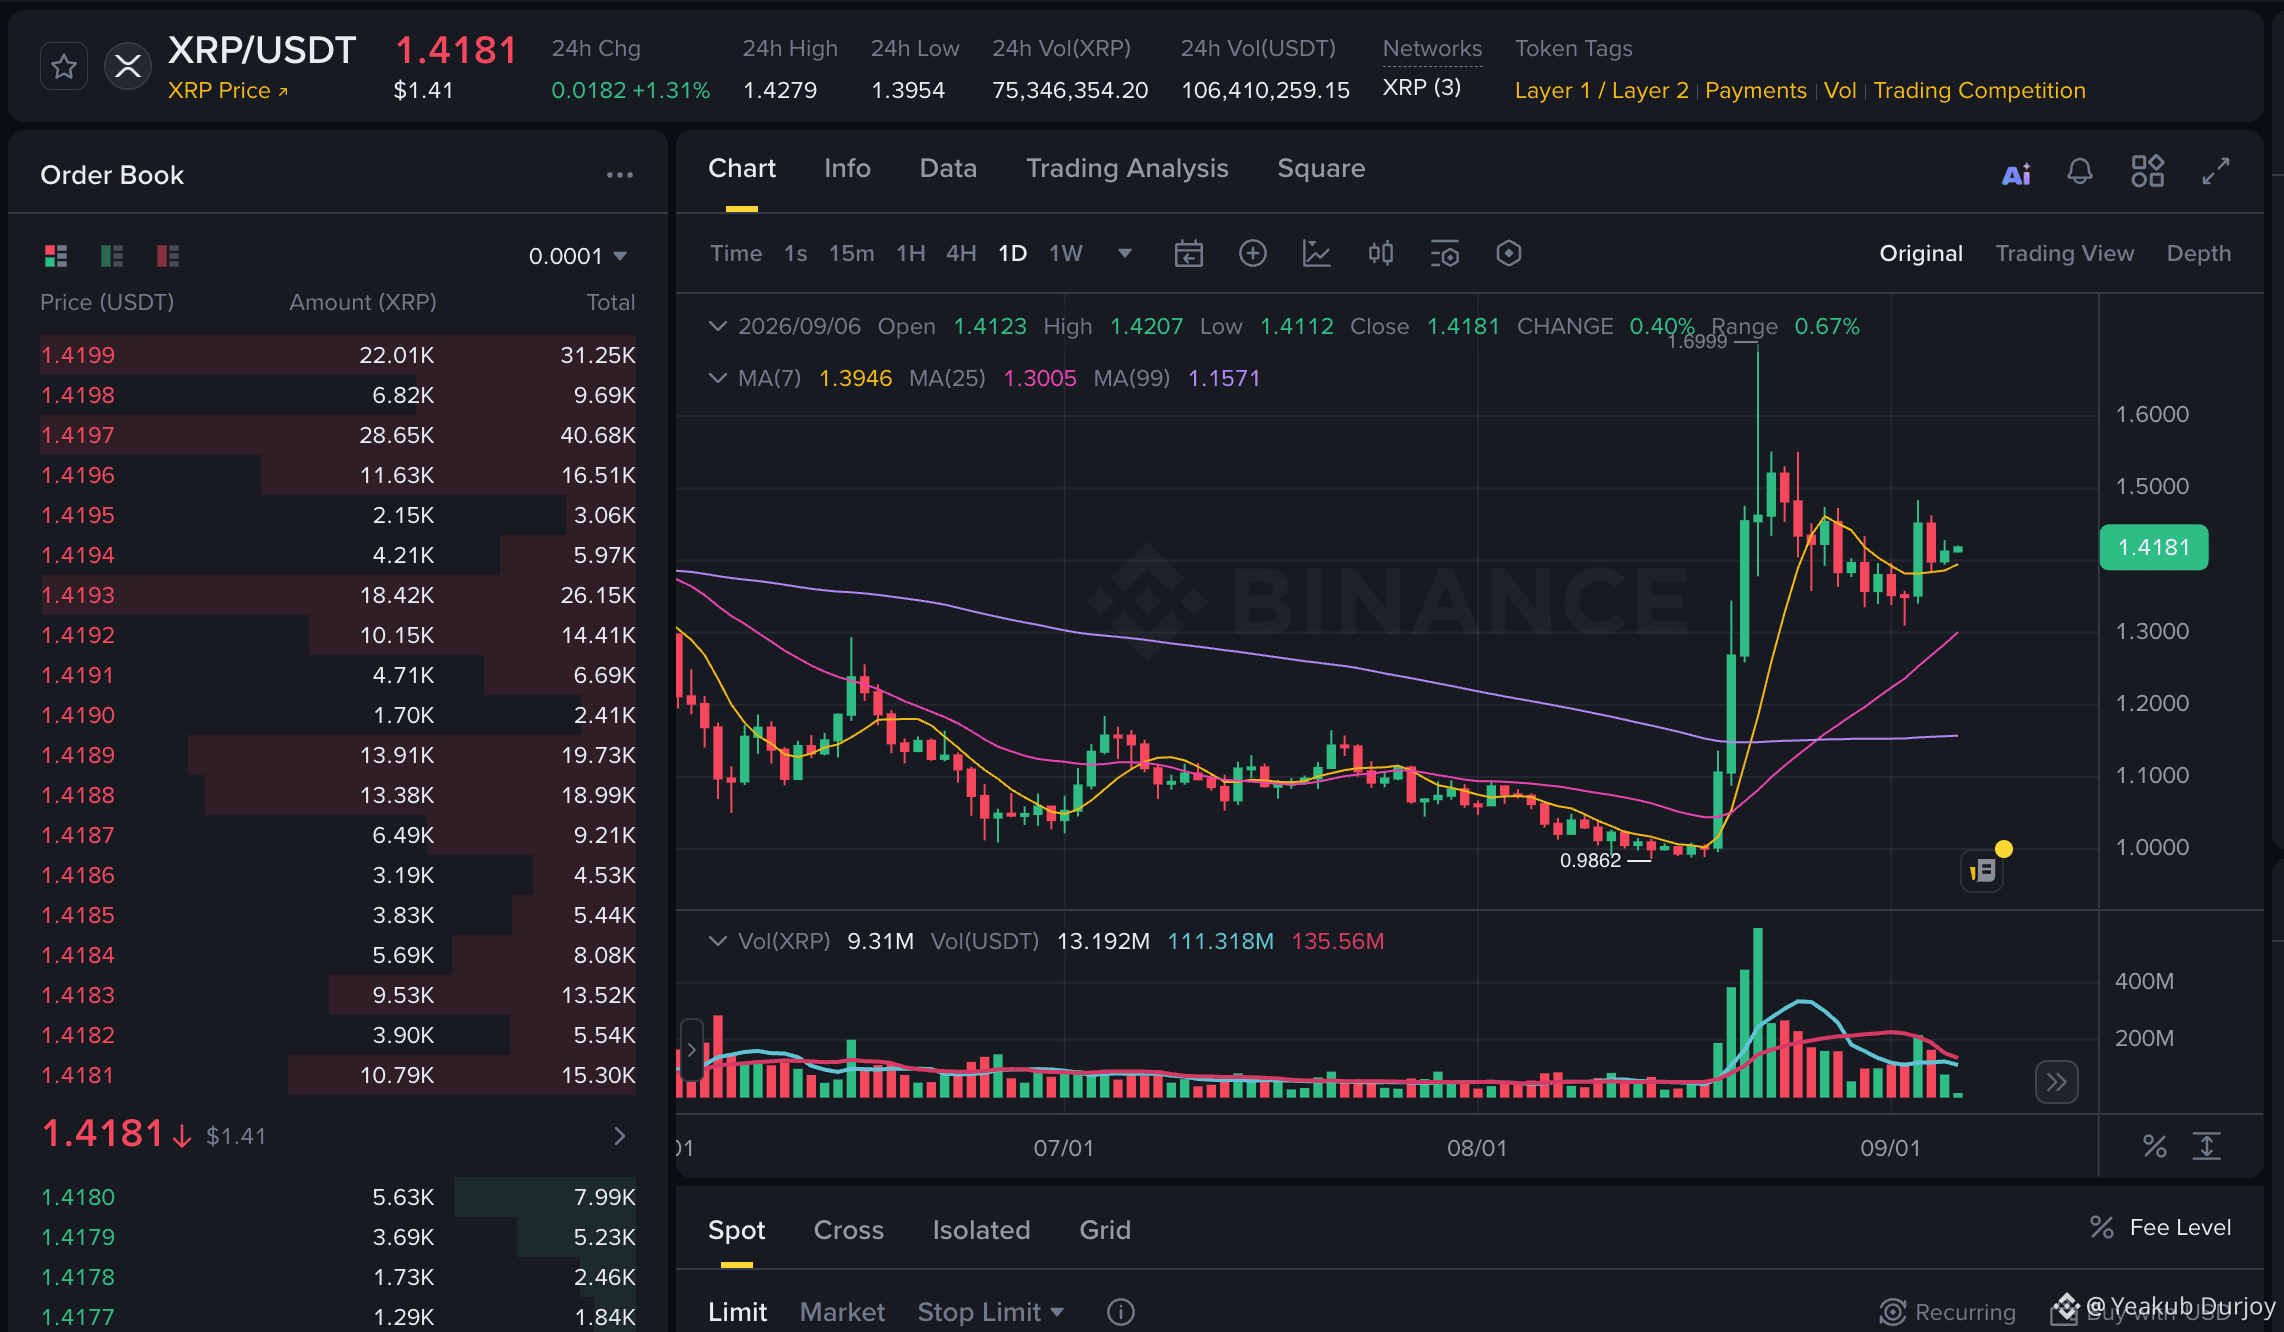
$XRP bu yerda yaxshi uzoq muddatli setupni ushlab turibdi, ammo entry baribir muhim, chunki narx 24 soatlik maksimumga yaqin joylashgan. Hozirgi narx taxminan 1.4181, MA7 esa 1.3946, MA25 1.3005 va MA99 1.1571.
Bias: Qaytish (pullback) paytida long yoki breakout tasdig‘i
Entry zonasi: 1.3950 dan 1.4100 gacha
Tasdiqli entry: 1.4280 dan yuqori
Stop: 1.3700 dan past
TP1: 1.4280
TP2: 1.4700 dan 1.5000 gacha
TP3: Momentum kengaysa 1.5600 dan 1.6000 gacha
Longni afzal ko‘rishim sababi shuki, XRP pullback zonasidan tiklangandan keyin MA7 ustida ushlab turibdi va kengroq strukturasi hali ham MA25 hamda MA99 ustida. 1.3950 dan yuqorida aniq ushlanib qolsa setup haqiqiyligicha qoladi, 1.4280 dan yuqoridagi breakout esa davomiylikni tasdiqlashi mumkin. Agar XRP 1.3700 ni yo‘qotsa, orqaga chekinaman, chunki qisqa muddatli tiklanish zaiflashishi mumkin.
{future}(XRPUSDT)
$XRP bu yerda yaxshi uzoq muddatli setupni ushlab turibdi, ammo entry baribir muhim, chunki narx 24 soatlik maksimumga yaqin joylashgan. Hozirgi narx taxminan 1.4181, MA7 esa 1.3946, MA25 1.3005 va MA99 1.1571.
Bias: Qaytish (pullback) paytida long yoki breakout tasdig‘i
Entry zonasi: 1.3950 dan 1.4100 gacha
Tasdiqli entry: 1.4280 dan yuqori
Stop: 1.3700 dan past
TP1: 1.4280
TP2: 1.4700 dan 1.5000 gacha
TP3: Momentum kengaysa 1.5600 dan 1.6000 gacha
Longni afzal ko‘rishim sababi shuki, XRP pullback zonasidan tiklangandan keyin MA7 ustida ushlab turibdi va kengroq strukturasi hali ham MA25 hamda MA99 ustida. 1.3950 dan yuqorida aniq ushlanib qolsa setup haqiqiyligicha qoladi, 1.4280 dan yuqoridagi breakout esa davomiylikni tasdiqlashi mumkin. Agar XRP 1.3700 ni yo‘qotsa, orqaga chekinaman, chunki qisqa muddatli tiklanish zaiflashishi mumkin.
Bias: Qaytish (pullback) paytida long yoki breakout tasdig‘i
Entry zonasi: 1.3950 dan 1.4100 gacha
Tasdiqli entry: 1.4280 dan yuqori
Stop: 1.3700 dan past
TP1: 1.4280
TP2: 1.4700 dan 1.5000 gacha
TP3: Momentum kengaysa 1.5600 dan 1.6000 gacha
Longni afzal ko‘rishim sababi shuki, XRP pullback zonasidan tiklangandan keyin MA7 ustida ushlab turibdi va kengroq strukturasi hali ham MA25 hamda MA99 ustida. 1.3950 dan yuqorida aniq ushlanib qolsa setup haqiqiyligicha qoladi, 1.4280 dan yuqoridagi breakout esa davomiylikni tasdiqlashi mumkin. Agar XRP 1.3700 ni yo‘qotsa, orqaga chekinaman, chunki qisqa muddatli tiklanish zaiflashishi mumkin.
2
5
3.1k
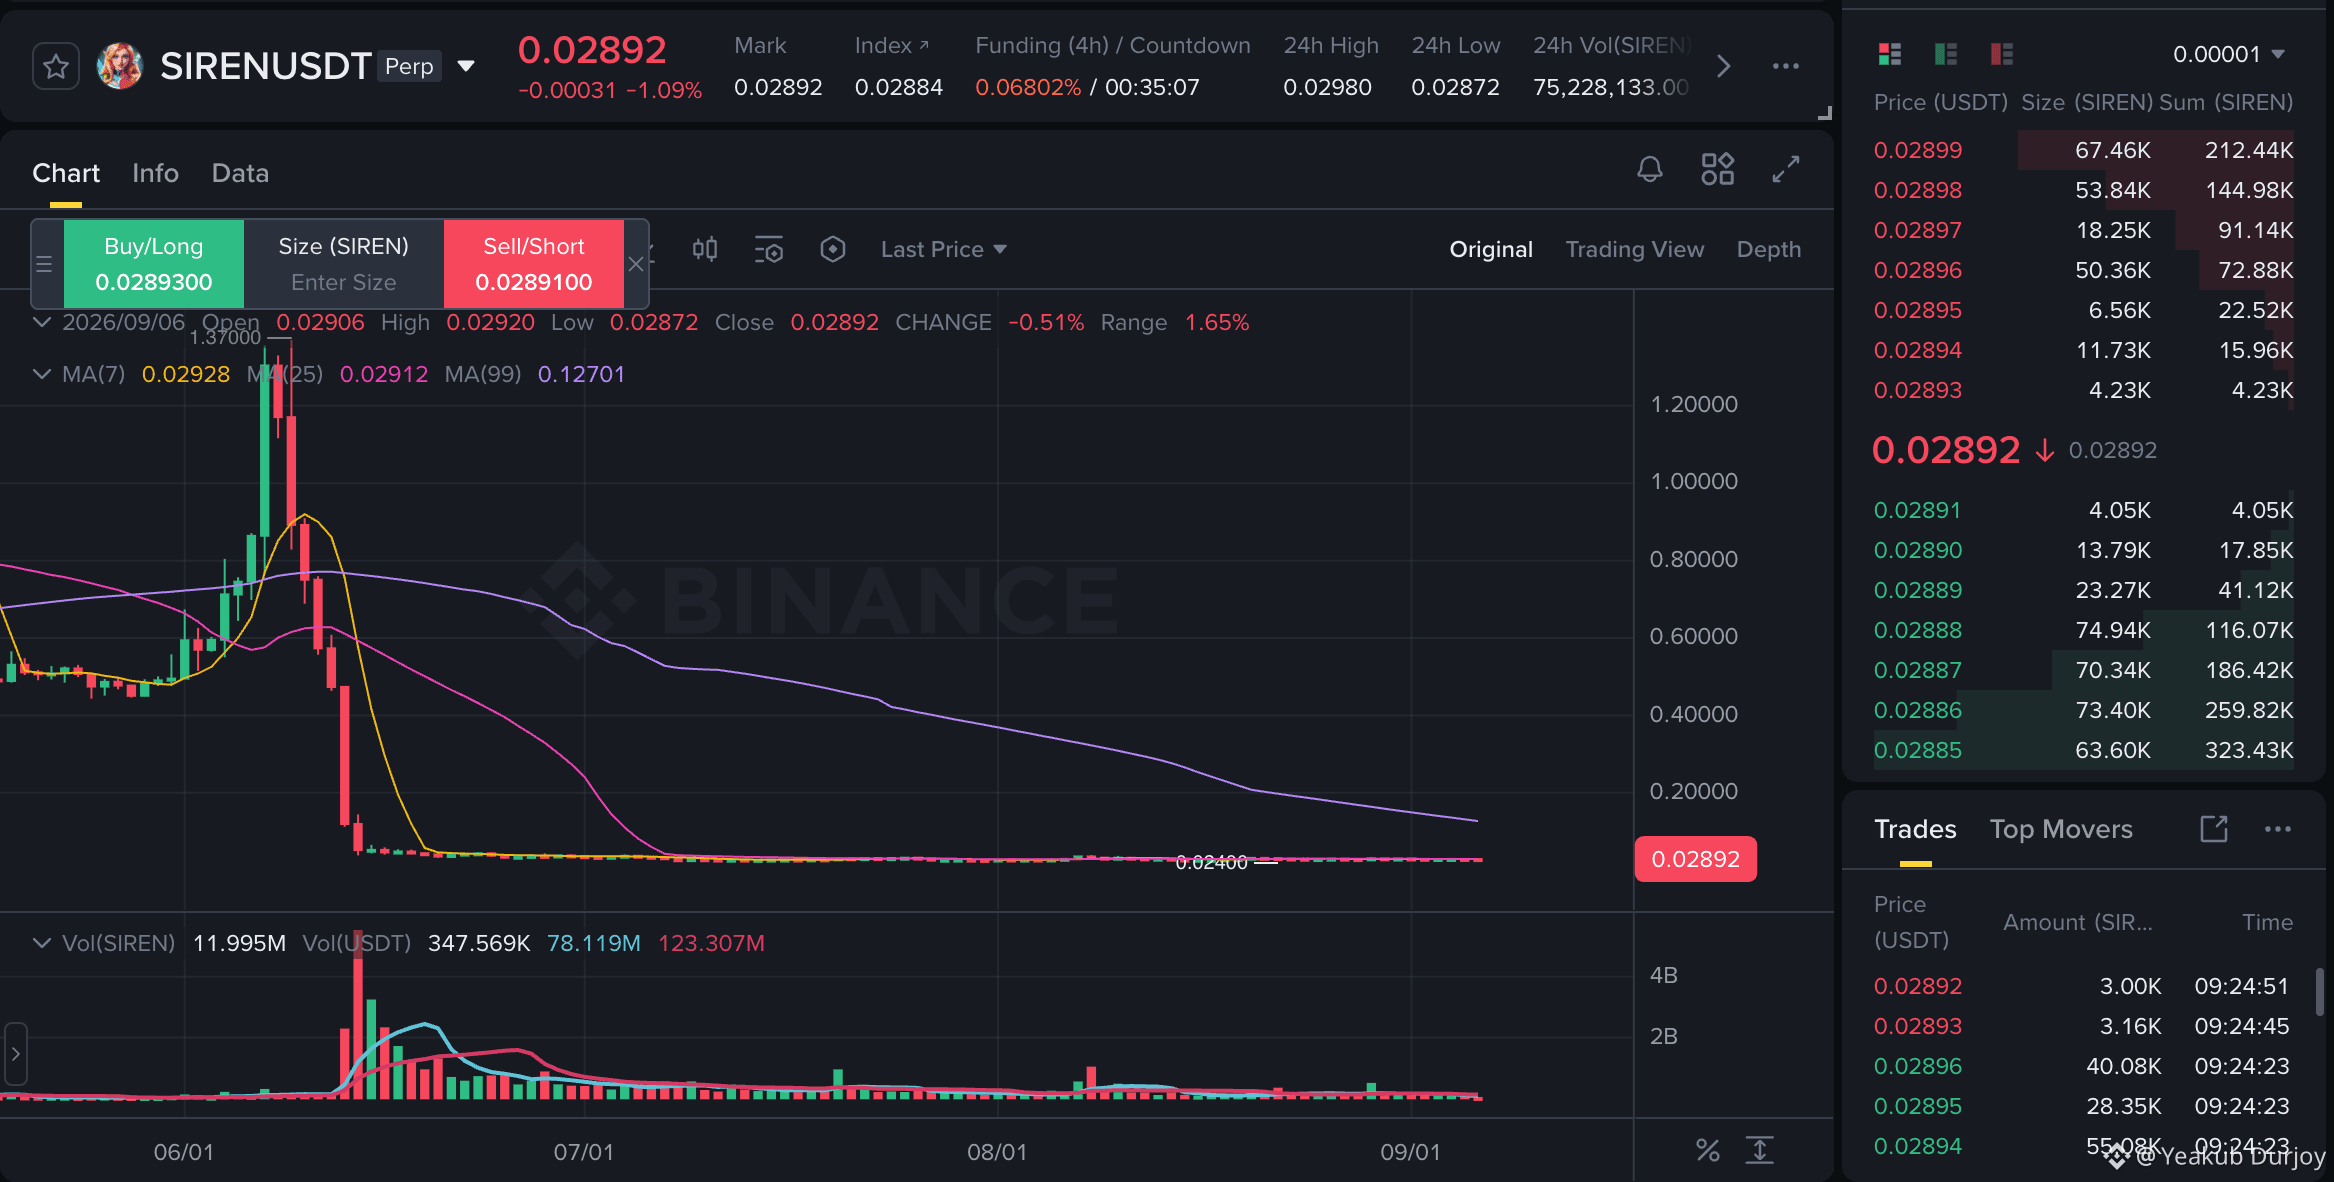
$SIREN qisqa tayyorlov uchun yaxshiroq ko‘rinadi, lekin uni hozirgi qo‘llab-quvvatlash zonasida bevosita qisqartirib (short) kiritmasdim. Narx taxminan 0.02892 atrofida bo‘lib, MA7 0.02928 va MA25 0.02912 dan pastda turibdi, shuning uchun qisqa muddatli struktura hali ham sust.
Yo‘nalish: Qaytishdan keyin short
Kirish zona: 0.02910 dan 0.02950 gacha
Stop: 0.03020 dan yuqorida
TP1: 0.02872
TP2: 0.02780 dan 0.02700 gacha
TP3: 0.02550 dan 0.02400 gacha, agar sotuv bosimi davom etsa
Men shortni afzal ko‘rishimning sababi shuki, SIREN oldingi keskin o‘sish/spike dan keyin katta yemirilish (breakdown) bo‘lganidan so‘ng pastliklar atrofida biroz tekis (flat) bo‘lib turibdi va narx hali ham qisqa muddatli harakatlanuvchi o‘rtachalar ostida muvaffaqiyatsiz bo‘lyapti. Tozaroq setup 0.02910 dan 0.02950 gacha bo‘lgan orqaga qaytishni (bounce) kutmoqda va rad etilishini (rejection) kuzatadi. Agar SIREN 0.03020 dan hajm (volume) bilan yuqoriga buzsa, short g‘oyasini bekor qilardim, chunki bu kichik tiklanish urinishini ko‘rsatishi mumkin.
{future}(SIRENUSDT)
$SIREN qisqa tayyorlov uchun yaxshiroq ko‘rinadi, lekin uni hozirgi qo‘llab-quvvatlash zonasida bevosita qisqartirib (short) kiritmasdim. Narx taxminan 0.02892 atrofida bo‘lib, MA7 0.02928 va MA25 0.02912 dan pastda turibdi, shuning uchun qisqa muddatli struktura hali ham sust.
Yo‘nalish: Qaytishdan keyin short
Kirish zona: 0.02910 dan 0.02950 gacha
Stop: 0.03020 dan yuqorida
TP1: 0.02872
TP2: 0.02780 dan 0.02700 gacha
TP3: 0.02550 dan 0.02400 gacha, agar sotuv bosimi davom etsa
Men shortni afzal ko‘rishimning sababi shuki, SIREN oldingi keskin o‘sish/spike dan keyin katta yemirilish (breakdown) bo‘lganidan so‘ng pastliklar atrofida biroz tekis (flat) bo‘lib turibdi va narx hali ham qisqa muddatli harakatlanuvchi o‘rtachalar ostida muvaffaqiyatsiz bo‘lyapti. Tozaroq setup 0.02910 dan 0.02950 gacha bo‘lgan orqaga qaytishni (bounce) kutmoqda va rad etilishini (rejection) kuzatadi. Agar SIREN 0.03020 dan hajm (volume) bilan yuqoriga buzsa, short g‘oyasini bekor qilardim, chunki bu kichik tiklanish urinishini ko‘rsatishi mumkin.
Yo‘nalish: Qaytishdan keyin short
Kirish zona: 0.02910 dan 0.02950 gacha
Stop: 0.03020 dan yuqorida
TP1: 0.02872
TP2: 0.02780 dan 0.02700 gacha
TP3: 0.02550 dan 0.02400 gacha, agar sotuv bosimi davom etsa
Men shortni afzal ko‘rishimning sababi shuki, SIREN oldingi keskin o‘sish/spike dan keyin katta yemirilish (breakdown) bo‘lganidan so‘ng pastliklar atrofida biroz tekis (flat) bo‘lib turibdi va narx hali ham qisqa muddatli harakatlanuvchi o‘rtachalar ostida muvaffaqiyatsiz bo‘lyapti. Tozaroq setup 0.02910 dan 0.02950 gacha bo‘lgan orqaga qaytishni (bounce) kutmoqda va rad etilishini (rejection) kuzatadi. Agar SIREN 0.03020 dan hajm (volume) bilan yuqoriga buzsa, short g‘oyasini bekor qilardim, chunki bu kichik tiklanish urinishini ko‘rsatishi mumkin.
1
1.3k
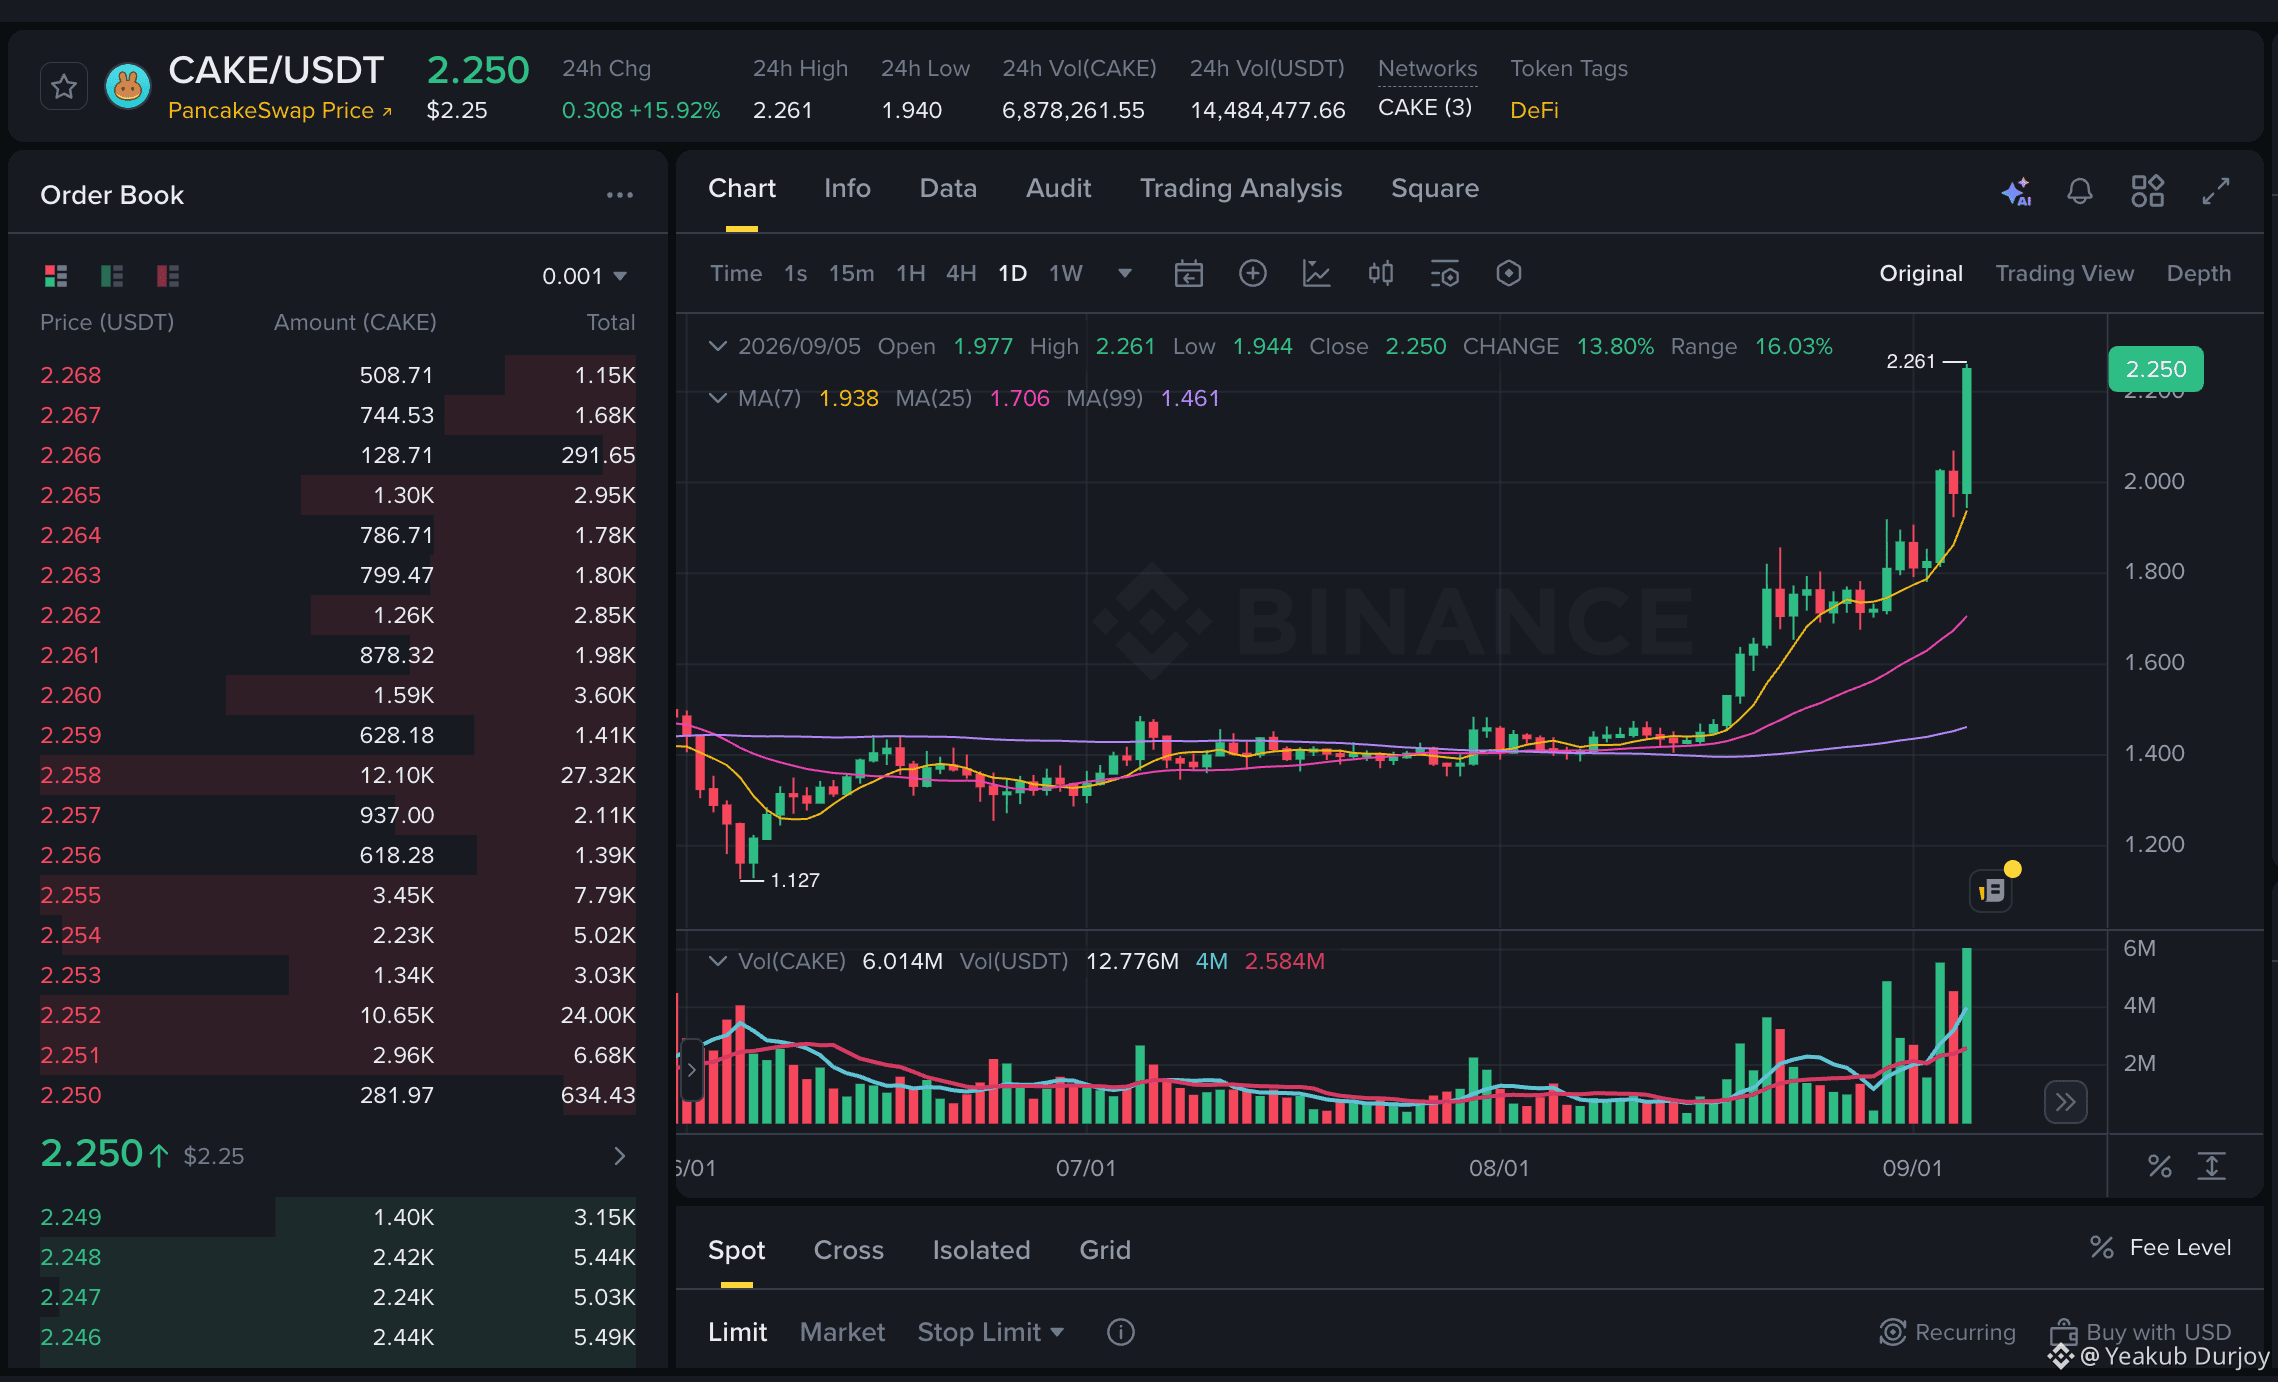
$CAKE kuchli uzoq muddatli setupni ko‘rsatmoqda, lekin men uni shamning eng yuqori qismida bevosita quvlamagan bo‘lardim.
Kirish zonasi: 2.120 dan 2.200 gacha
Tasdiqlovchi kirish: 2.265 dan yuqori
Stop: 2.030 dan past
TP1: 2.260
TP2: 2.400 dan 2.500 gacha
TP3: impuls kengaysa 2.700 dan 2.850 gacha
Nega men longni afzal ko‘raman: CAKE uzoq davom etgan yonlama oraliqdan chiqib ketdi va harakat bilan birga hajm (volume) kuchli tarzda kirib kelmoqda. Faqat bitta muammo bor: narx 2.261 darajasida 24 soatlik eng yuqoriga yaqin, shuning uchun yanada toza setup qo‘llab-quvvatlovga qaytib (pullback) kirish yoki 2.265 dan yuqorida toza breakoutni kutmoqda. Agar CAKE 2.030 dan pastga tushsa, men orqaga chekinardim, chunki breakout yanada chuqurroq sovishi mumkin.
{future}(CAKEUSDT)
$CAKE kuchli uzoq muddatli setupni ko‘rsatmoqda, lekin men uni shamning eng yuqori qismida bevosita quvlamagan bo‘lardim.
Kirish zonasi: 2.120 dan 2.200 gacha
Tasdiqlovchi kirish: 2.265 dan yuqori
Stop: 2.030 dan past
TP1: 2.260
TP2: 2.400 dan 2.500 gacha
TP3: impuls kengaysa 2.700 dan 2.850 gacha
Nega men longni afzal ko‘raman: CAKE uzoq davom etgan yonlama oraliqdan chiqib ketdi va harakat bilan birga hajm (volume) kuchli tarzda kirib kelmoqda. Faqat bitta muammo bor: narx 2.261 darajasida 24 soatlik eng yuqoriga yaqin, shuning uchun yanada toza setup qo‘llab-quvvatlovga qaytib (pullback) kirish yoki 2.265 dan yuqorida toza breakoutni kutmoqda. Agar CAKE 2.030 dan pastga tushsa, men orqaga chekinardim, chunki breakout yanada chuqurroq sovishi mumkin.
Kirish zonasi: 2.120 dan 2.200 gacha
Tasdiqlovchi kirish: 2.265 dan yuqori
Stop: 2.030 dan past
TP1: 2.260
TP2: 2.400 dan 2.500 gacha
TP3: impuls kengaysa 2.700 dan 2.850 gacha
Nega men longni afzal ko‘raman: CAKE uzoq davom etgan yonlama oraliqdan chiqib ketdi va harakat bilan birga hajm (volume) kuchli tarzda kirib kelmoqda. Faqat bitta muammo bor: narx 2.261 darajasida 24 soatlik eng yuqoriga yaqin, shuning uchun yanada toza setup qo‘llab-quvvatlovga qaytib (pullback) kirish yoki 2.265 dan yuqorida toza breakoutni kutmoqda. Agar CAKE 2.030 dan pastga tushsa, men orqaga chekinardim, chunki breakout yanada chuqurroq sovishi mumkin.
4
1.6k
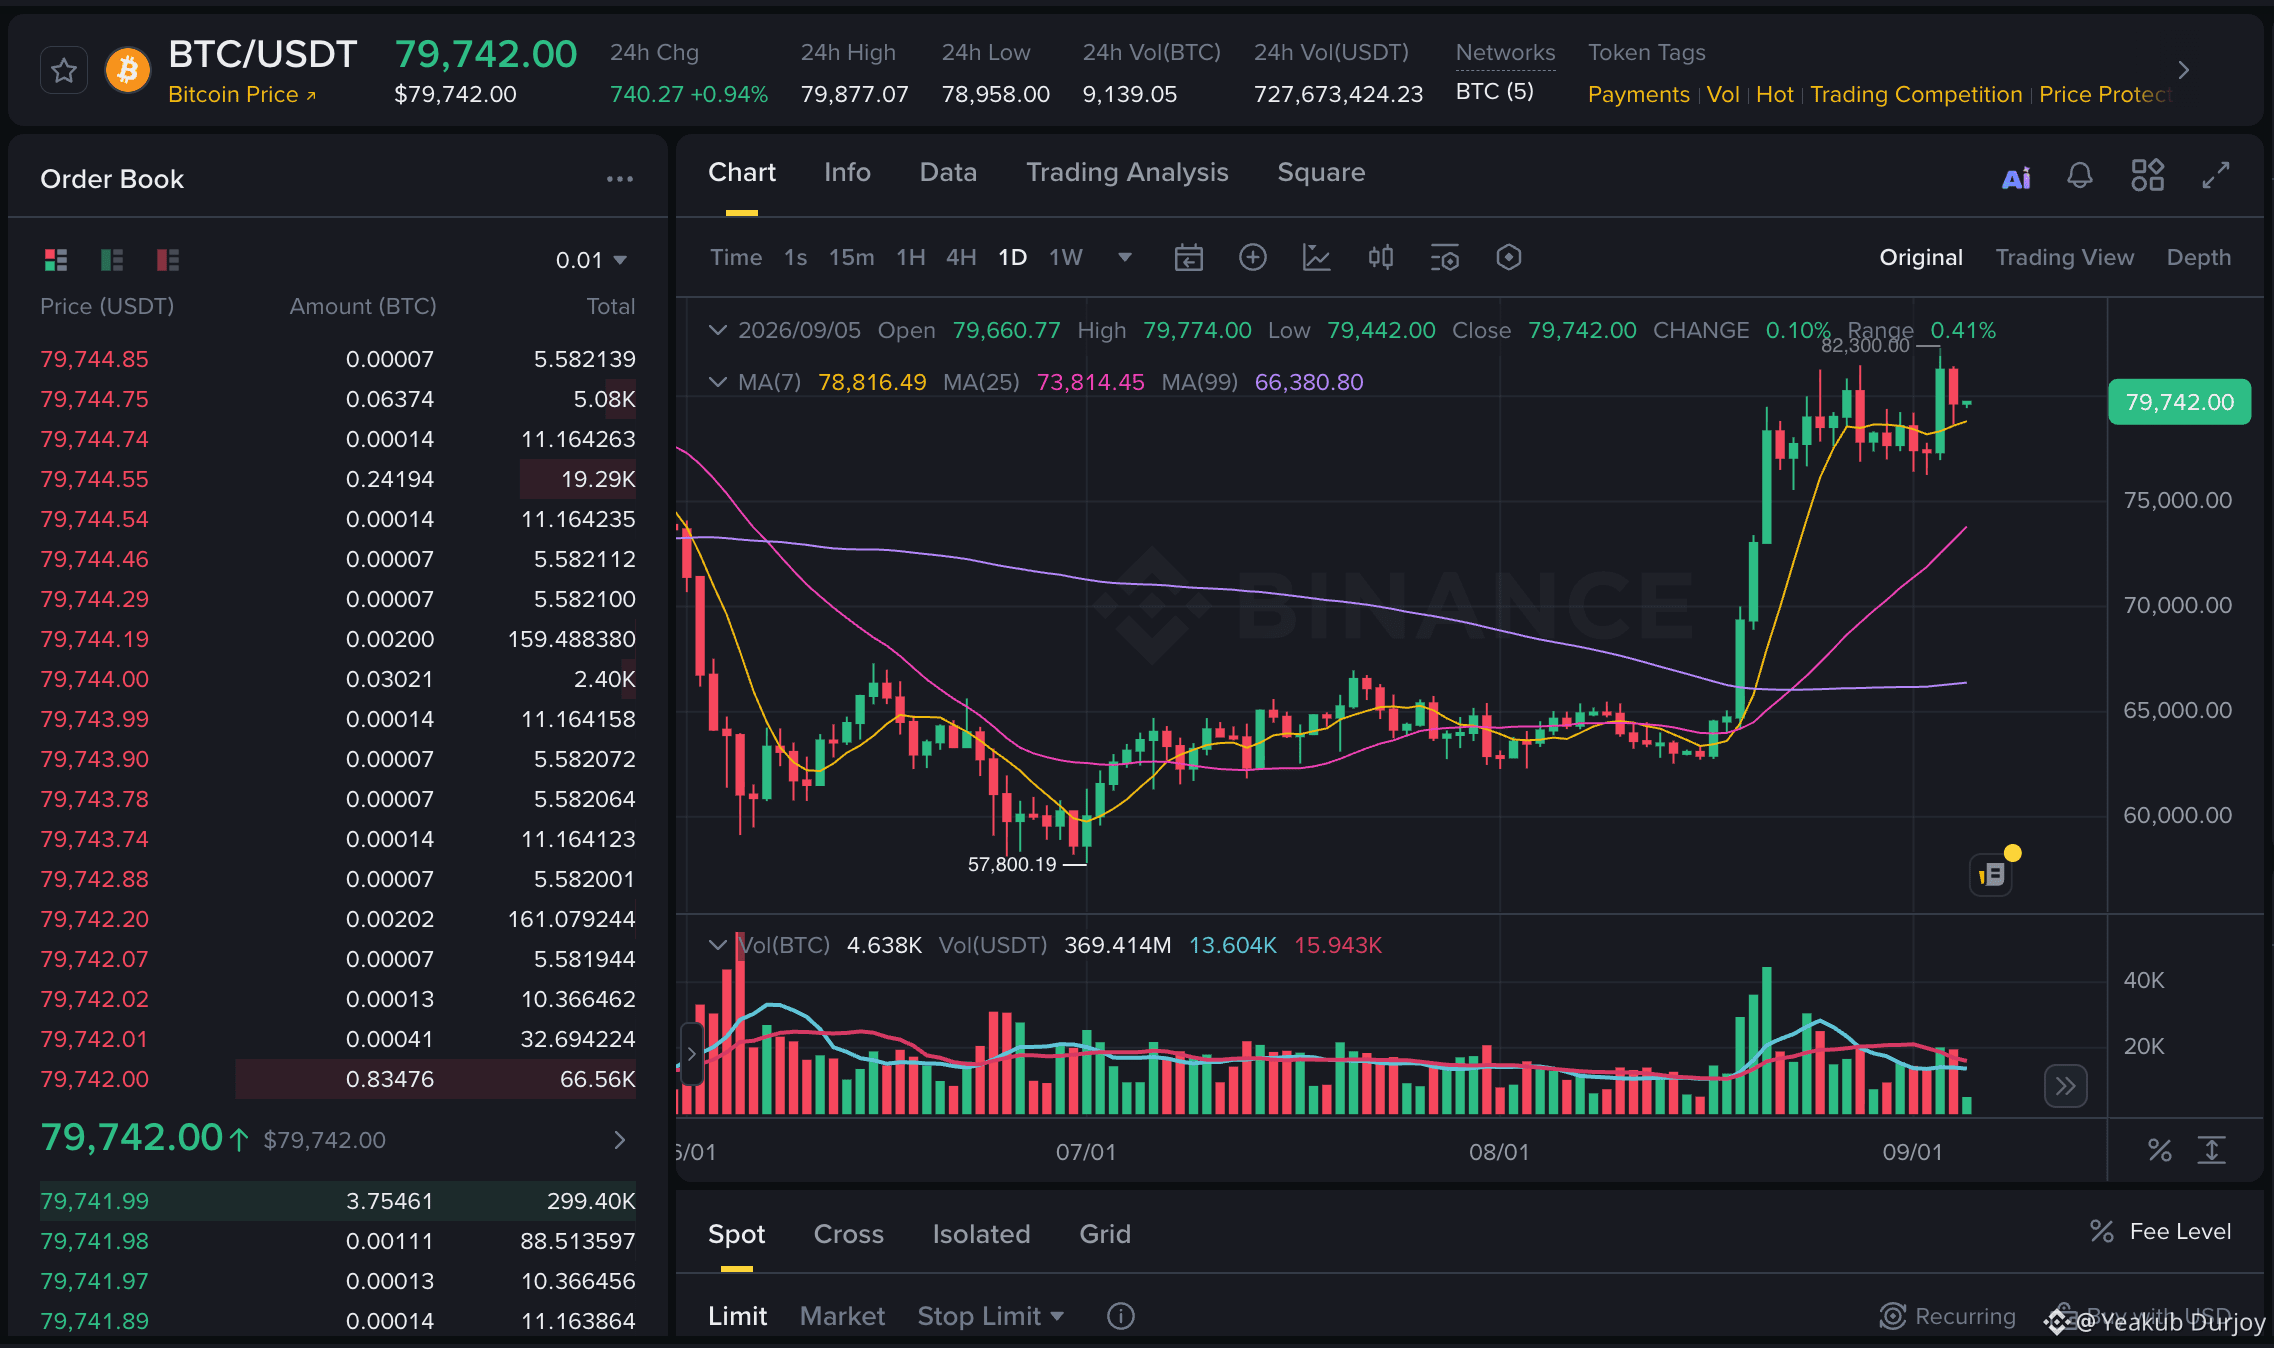
$BTC uzoq muddatli setup uchun hali ham yaxshiroq ko‘rinadi, lekin uni bevosita 24 soatlik maksimum yaqinida quvib yurmasdim.
Bias: Qaytish (pullback) paytida yoki breakout tasdig‘i bilan Long
Kirish zona: 78,900 dan 79,300 gacha
Tasdiqlovchi kirish: 79,900 dan 80,000 gacha bo‘lishi ustida
Stop: 78,200 dan past
TP1: 79,877
TP2: 81,000 dan 82,300 gacha
TP3: impuls kengaysa 84,000 dan 85,000 gacha
Men Longni afzal ko‘rishim sababi shuki, BTC hali ham breakout diapazonini ushlab turibdi va MA7 ustida qolmoqda — bu esa xaridorlar hali nazoratni yo‘qotmaganini ko‘rsatadi. Faqat muammo shundaki, narx kunlik maksimumga allaqachon yaqin, shuning uchun yanada “toza” setup quyidagilardan biri: 78,900 dan 79,300 gacha orqaga qaytish (pullback) yoki 80,000 dan yuqorida aniq break. Agar BTC 78,200 ni yo‘qotsa, orqaga chekinardim, chunki pullback yanada chuqurlashishi mumkin.
{future}(BTCUSDT)
$BTC uzoq muddatli setup uchun hali ham yaxshiroq ko‘rinadi, lekin uni bevosita 24 soatlik maksimum yaqinida quvib yurmasdim.
Bias: Qaytish (pullback) paytida yoki breakout tasdig‘i bilan Long
Kirish zona: 78,900 dan 79,300 gacha
Tasdiqlovchi kirish: 79,900 dan 80,000 gacha bo‘lishi ustida
Stop: 78,200 dan past
TP1: 79,877
TP2: 81,000 dan 82,300 gacha
TP3: impuls kengaysa 84,000 dan 85,000 gacha
Men Longni afzal ko‘rishim sababi shuki, BTC hali ham breakout diapazonini ushlab turibdi va MA7 ustida qolmoqda — bu esa xaridorlar hali nazoratni yo‘qotmaganini ko‘rsatadi. Faqat muammo shundaki, narx kunlik maksimumga allaqachon yaqin, shuning uchun yanada “toza” setup quyidagilardan biri: 78,900 dan 79,300 gacha orqaga qaytish (pullback) yoki 80,000 dan yuqorida aniq break. Agar BTC 78,200 ni yo‘qotsa, orqaga chekinardim, chunki pullback yanada chuqurlashishi mumkin.
Bias: Qaytish (pullback) paytida yoki breakout tasdig‘i bilan Long
Kirish zona: 78,900 dan 79,300 gacha
Tasdiqlovchi kirish: 79,900 dan 80,000 gacha bo‘lishi ustida
Stop: 78,200 dan past
TP1: 79,877
TP2: 81,000 dan 82,300 gacha
TP3: impuls kengaysa 84,000 dan 85,000 gacha
Men Longni afzal ko‘rishim sababi shuki, BTC hali ham breakout diapazonini ushlab turibdi va MA7 ustida qolmoqda — bu esa xaridorlar hali nazoratni yo‘qotmaganini ko‘rsatadi. Faqat muammo shundaki, narx kunlik maksimumga allaqachon yaqin, shuning uchun yanada “toza” setup quyidagilardan biri: 78,900 dan 79,300 gacha orqaga qaytish (pullback) yoki 80,000 dan yuqorida aniq break. Agar BTC 78,200 ni yo‘qotsa, orqaga chekinardim, chunki pullback yanada chuqurlashishi mumkin.
2
2
1.2k
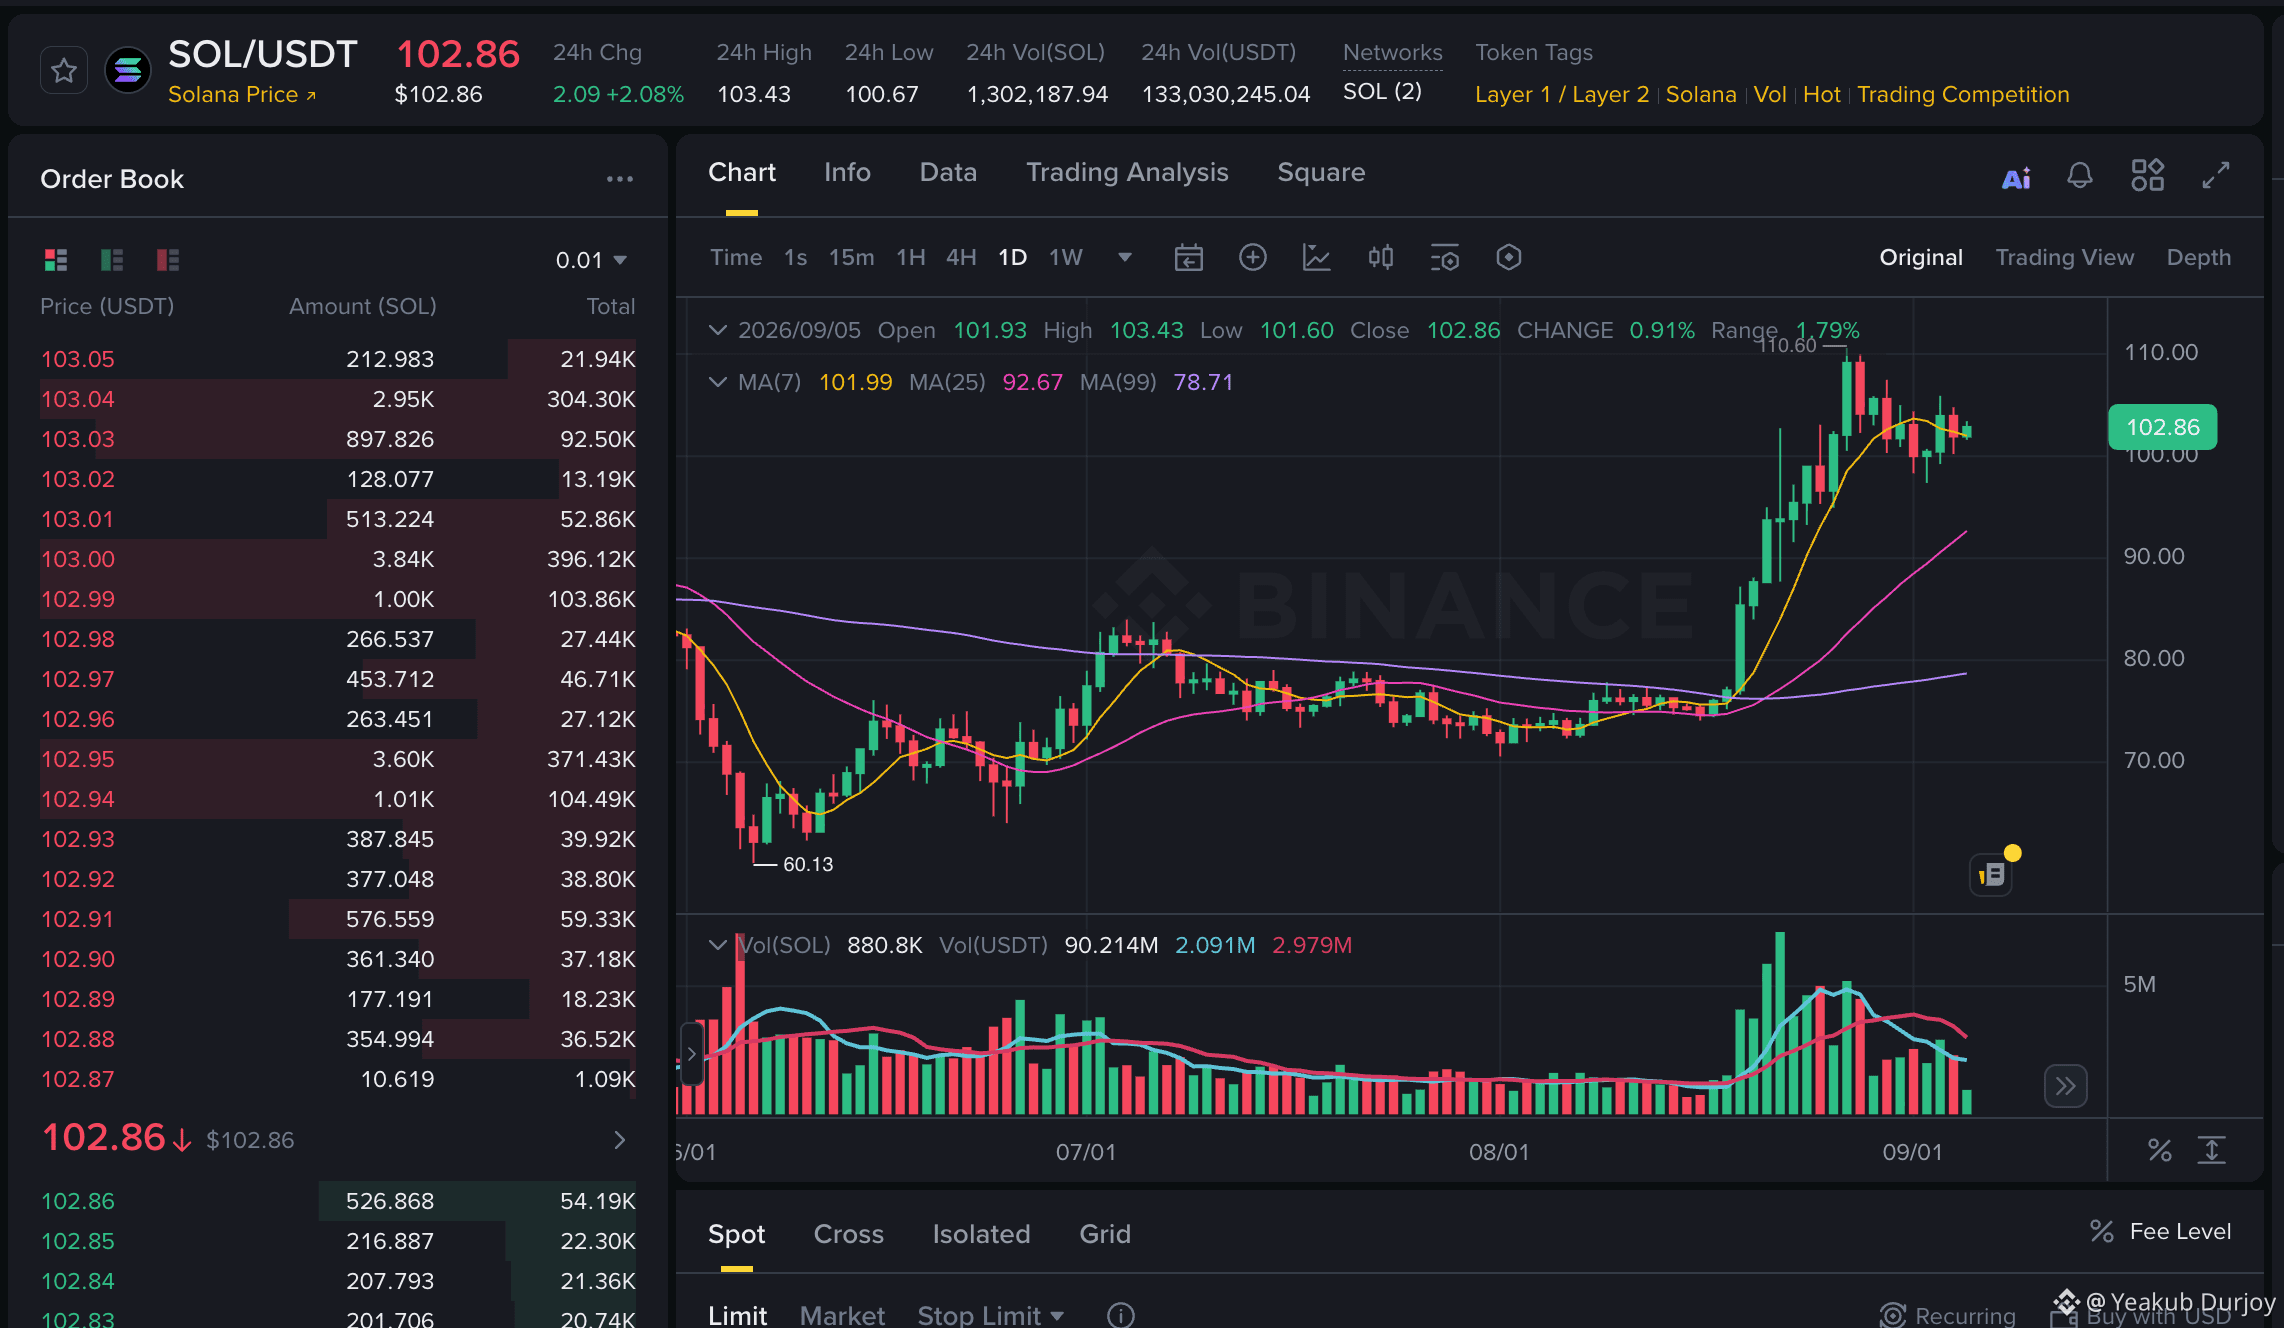
$SOL endi uzoq muddatli setup uchun yaxshiroq ko‘rinmoqda, chunki narx MA7 ni qayta egalladi va breakout tuzilmasini ushlab turibdi.
Bias: Pullbackda long
Entry zone: 101.50 dan 102.50 gacha
Confirmation entry: 103.50 dan yuqori
Stop: 100.40 dan pastda
TP1: 105.00
TP2: 107.50
TP3: agar momentum yana kengaysa 110.60
Men longni afzal ko‘rishimning sababi shuki, SOL hali ham eski 75 dan 80 gacha bo‘lgan diapazondan chiqib ketgandan keyin qisqa muddatli moving average dan yuqorida turibdi. Hozirgi harakat hali juda agressiv emas, shuning uchun 101.50 dan 102.50 gacha bo‘lgan boshqariladigan pullback yanada toza kirish imkonini berishi mumkin. Agar SOL 103.50 dan yuqoriga chiqsa, 105 dan 107.50 gacha davom etish ehtimoli oshadi. Agar u 100.40 ni yo‘qotsa, men chetga chiqaman, chunki pullback yanada chuqurlashishi mumkin.
{future}(SOLUSDT)
$SOL endi uzoq muddatli setup uchun yaxshiroq ko‘rinmoqda, chunki narx MA7 ni qayta egalladi va breakout tuzilmasini ushlab turibdi.
Bias: Pullbackda long
Entry zone: 101.50 dan 102.50 gacha
Confirmation entry: 103.50 dan yuqori
Stop: 100.40 dan pastda
TP1: 105.00
TP2: 107.50
TP3: agar momentum yana kengaysa 110.60
Men longni afzal ko‘rishimning sababi shuki, SOL hali ham eski 75 dan 80 gacha bo‘lgan diapazondan chiqib ketgandan keyin qisqa muddatli moving average dan yuqorida turibdi. Hozirgi harakat hali juda agressiv emas, shuning uchun 101.50 dan 102.50 gacha bo‘lgan boshqariladigan pullback yanada toza kirish imkonini berishi mumkin. Agar SOL 103.50 dan yuqoriga chiqsa, 105 dan 107.50 gacha davom etish ehtimoli oshadi. Agar u 100.40 ni yo‘qotsa, men chetga chiqaman, chunki pullback yanada chuqurlashishi mumkin.
Bias: Pullbackda long
Entry zone: 101.50 dan 102.50 gacha
Confirmation entry: 103.50 dan yuqori
Stop: 100.40 dan pastda
TP1: 105.00
TP2: 107.50
TP3: agar momentum yana kengaysa 110.60
Men longni afzal ko‘rishimning sababi shuki, SOL hali ham eski 75 dan 80 gacha bo‘lgan diapazondan chiqib ketgandan keyin qisqa muddatli moving average dan yuqorida turibdi. Hozirgi harakat hali juda agressiv emas, shuning uchun 101.50 dan 102.50 gacha bo‘lgan boshqariladigan pullback yanada toza kirish imkonini berishi mumkin. Agar SOL 103.50 dan yuqoriga chiqsa, 105 dan 107.50 gacha davom etish ehtimoli oshadi. Agar u 100.40 ni yo‘qotsa, men chetga chiqaman, chunki pullback yanada chuqurlashishi mumkin.
2
10
9.9k
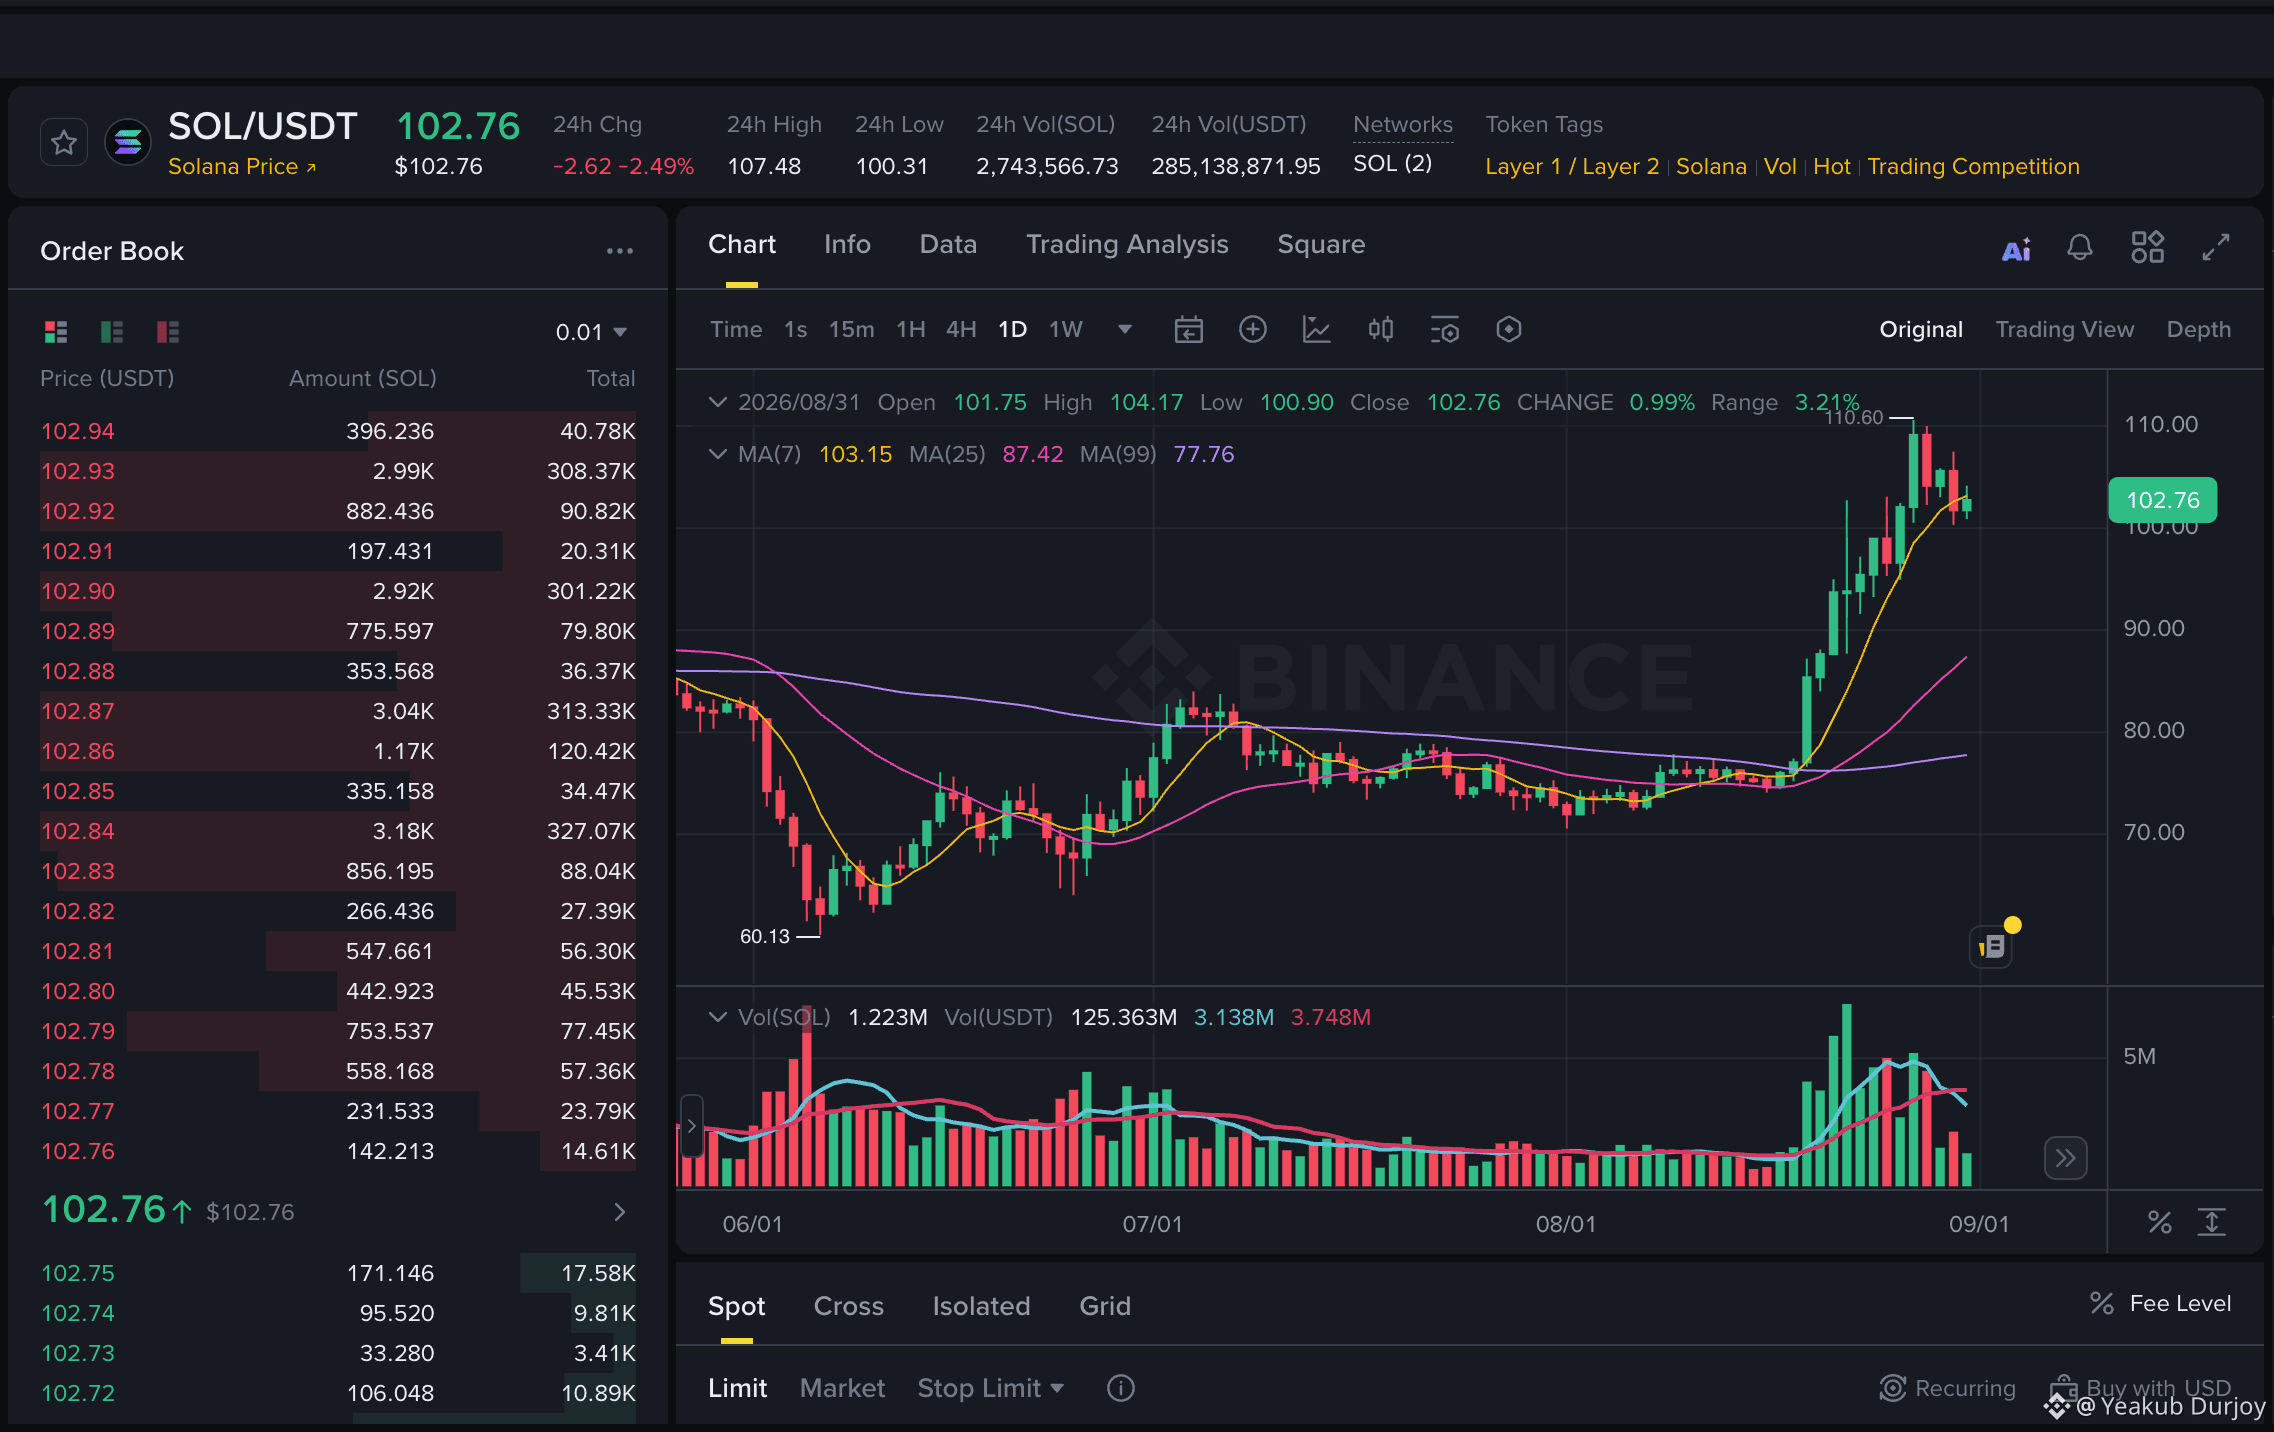
$SOL baribir shartli uzoq pozitsiya ko‘rinishida yaxshiroq, lekin narx MA7 dan biroz pastda turgan paytda ko‘r-ko‘rona kirishga kirmagan bo‘lardim.
Yo‘nalish (Bias): qaytarib olish yoki support ushlab tursa — Long
Kirib kelish zonasi: 100.50 dan 102.50 gacha
Tasdiqlovchi kirish: 103.20 dan yuqori
Stop: 98.80 dan past
TP1: 107.48
TP2: 110.60
TP3: momentum qaytsa 115.00 dan 120.00 gacha
SOL’ni long tomonda ushlab qolishimning sababi shundaki, kengroq trend 75 dan 80 diapazondan breakoutdan keyin hali ham kuchli. Muammo faqat 110.60 atrofida qisqa muddatli rad etilish, shuning uchun tozaroq setup 100.50 dan 102.50 gacha support yaqinida yoki 103.20 dan yuqori reclaim bo‘lishini kutmoqda. Agar SOL 98.80 ni yo‘qotsa, men orqaga chekinardim, chunki pullback yanada chuqurroq cho‘zilishi mumkin.
{future}(SOLUSDT)
$SOL baribir shartli uzoq pozitsiya ko‘rinishida yaxshiroq, lekin narx MA7 dan biroz pastda turgan paytda ko‘r-ko‘rona kirishga kirmagan bo‘lardim.
Yo‘nalish (Bias): qaytarib olish yoki support ushlab tursa — Long
Kirib kelish zonasi: 100.50 dan 102.50 gacha
Tasdiqlovchi kirish: 103.20 dan yuqori
Stop: 98.80 dan past
TP1: 107.48
TP2: 110.60
TP3: momentum qaytsa 115.00 dan 120.00 gacha
SOL’ni long tomonda ushlab qolishimning sababi shundaki, kengroq trend 75 dan 80 diapazondan breakoutdan keyin hali ham kuchli. Muammo faqat 110.60 atrofida qisqa muddatli rad etilish, shuning uchun tozaroq setup 100.50 dan 102.50 gacha support yaqinida yoki 103.20 dan yuqori reclaim bo‘lishini kutmoqda. Agar SOL 98.80 ni yo‘qotsa, men orqaga chekinardim, chunki pullback yanada chuqurroq cho‘zilishi mumkin.
Yo‘nalish (Bias): qaytarib olish yoki support ushlab tursa — Long
Kirib kelish zonasi: 100.50 dan 102.50 gacha
Tasdiqlovchi kirish: 103.20 dan yuqori
Stop: 98.80 dan past
TP1: 107.48
TP2: 110.60
TP3: momentum qaytsa 115.00 dan 120.00 gacha
SOL’ni long tomonda ushlab qolishimning sababi shundaki, kengroq trend 75 dan 80 diapazondan breakoutdan keyin hali ham kuchli. Muammo faqat 110.60 atrofida qisqa muddatli rad etilish, shuning uchun tozaroq setup 100.50 dan 102.50 gacha support yaqinida yoki 103.20 dan yuqori reclaim bo‘lishini kutmoqda. Agar SOL 98.80 ni yo‘qotsa, men orqaga chekinardim, chunki pullback yanada chuqurroq cho‘zilishi mumkin.
1
1k
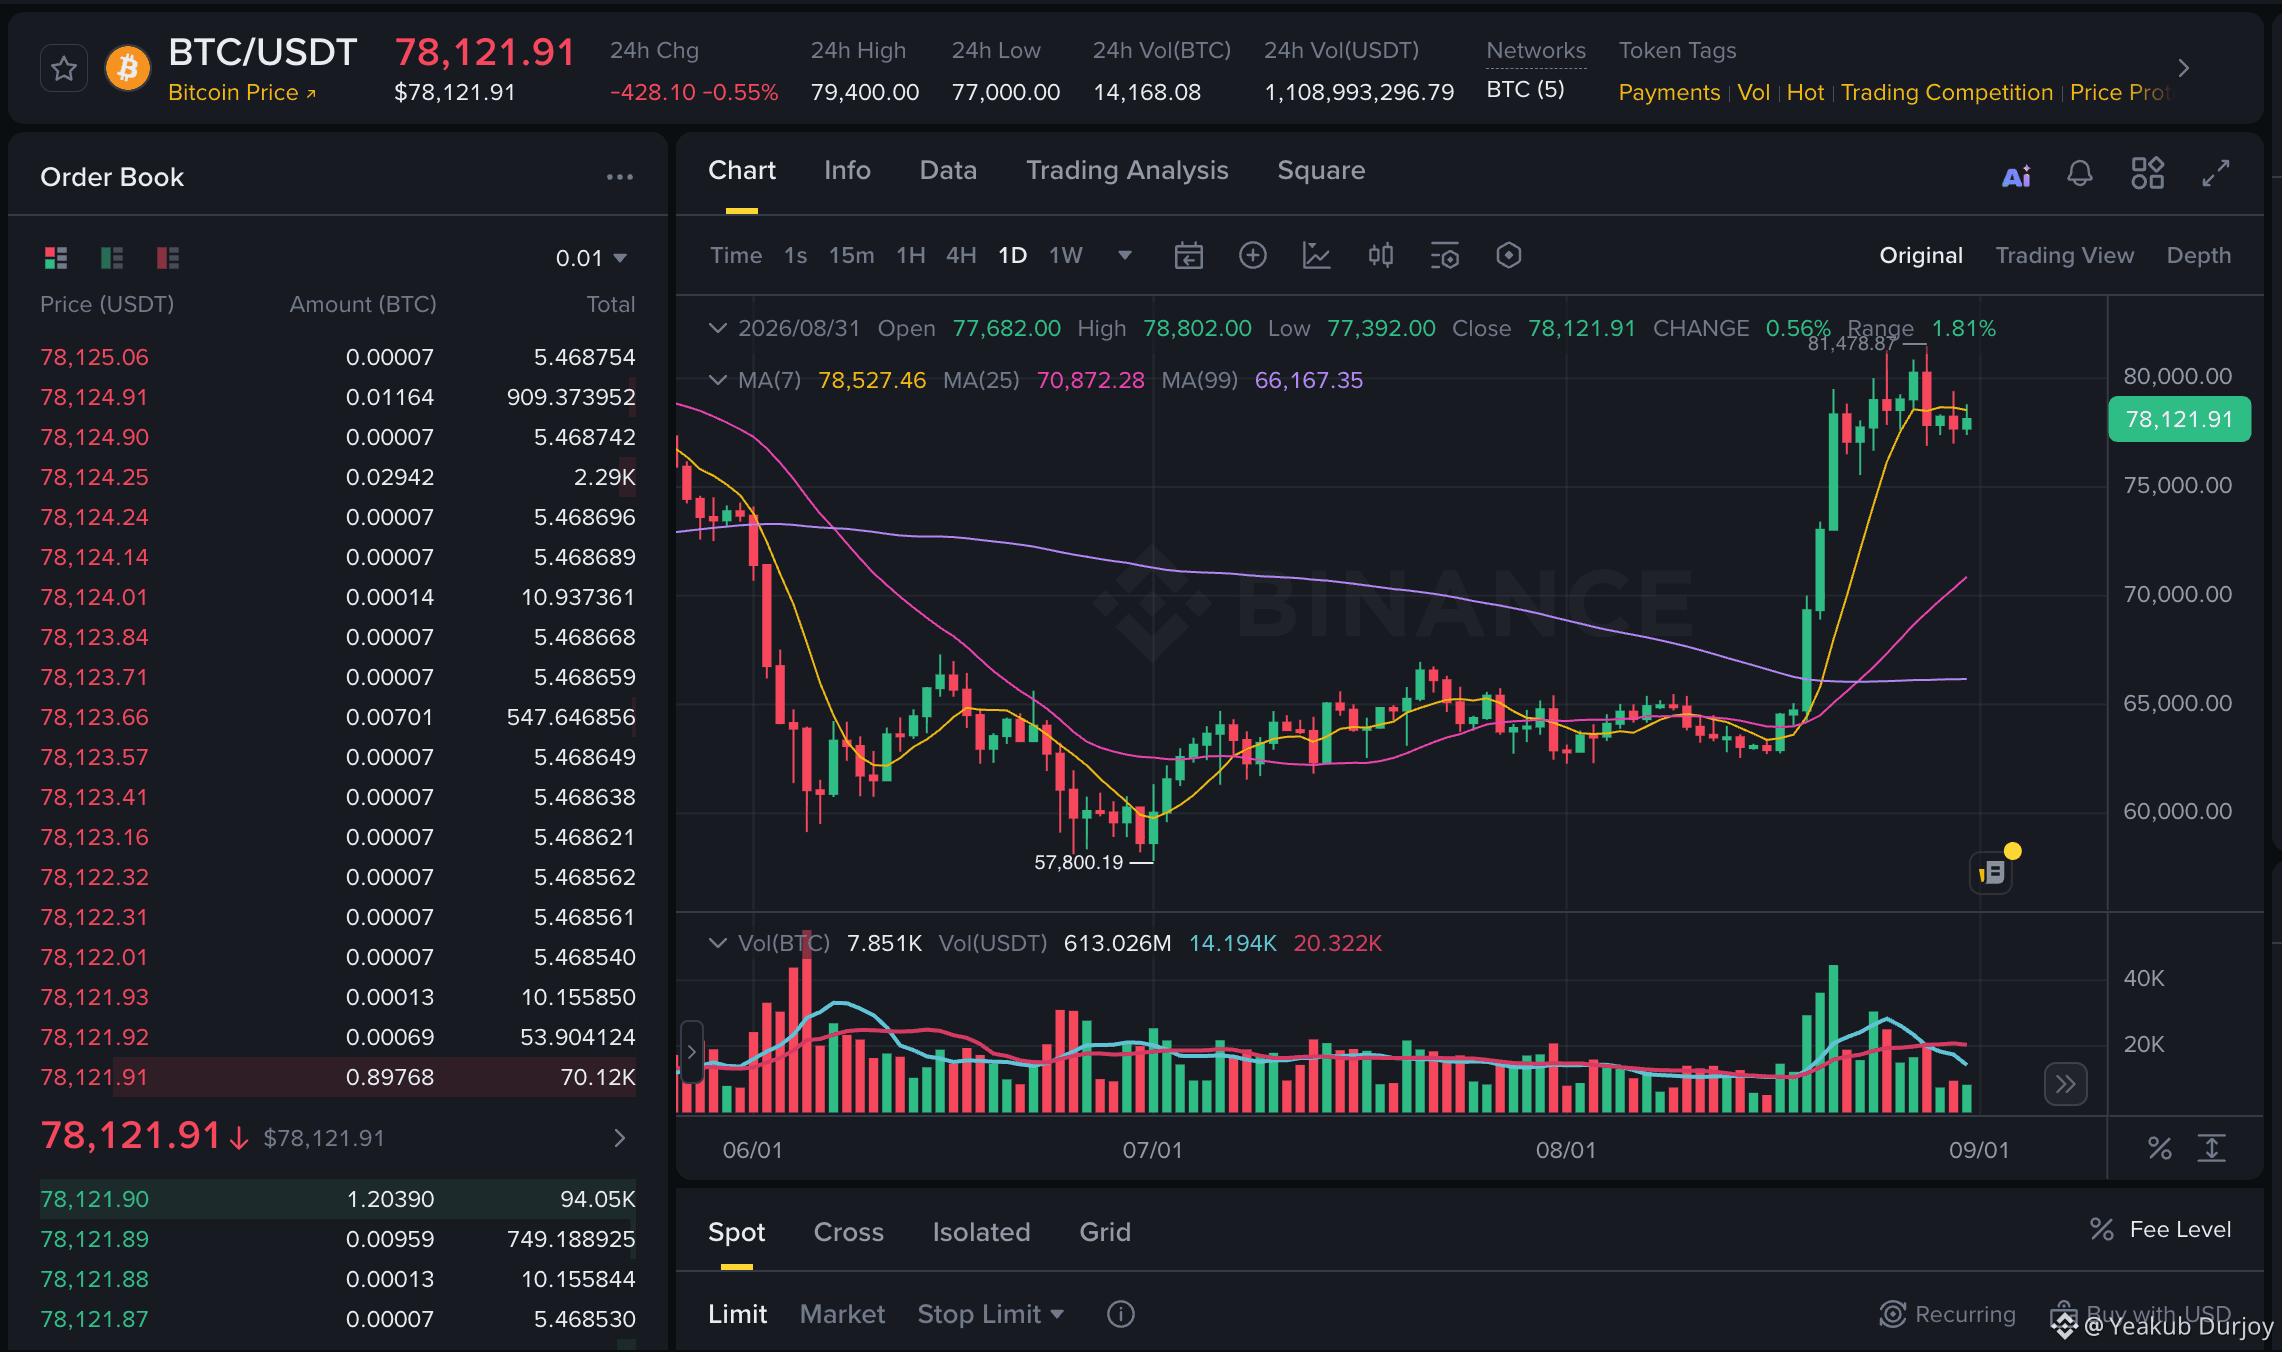
$BTC bu yerda nozik nuqtada turibdi, shuning uchun uni darhol kirish sifatida emas, balki shartli uzun (long) setup deb ko‘rardim.
Bias: Reclaim yoki support ushlab turish tomon long
Entry zone: 77,200 dan 78,000 gacha
Tasdiqlovchi kirish: 78,550 dan yuqorida
Stop: 76,800 dan pastda
TP1: 79,400
TP2: 80,500 dan 81,478 gacha
TP3: Momentum qaytsa 83,000
BTC’ni long tomonda ushlab turishimning sababi shuki, katta breakout struktura hali ham buzilmagan va narx asosiy harakatlanuvchi o‘rtachalardan (moving averages) yuqorida ushlab turilmoqda. Faqat muammo shundaki, BTC hozircha MA7 dan pastda, shuning uchun 77,200 dan 78,000 gacha yaqin joyda aniq ushlab turish yoki 78,550 dan yuqoriga qayta tiklanishni (reclaim) kutaman. Agar BTC 76,800’ni yo‘qotsa, men orqaga chekinaman, chunki bu yanada chuqurroq pullback’ni ochishi mumkin.
{future}(BTCUSDT)
$BTC bu yerda nozik nuqtada turibdi, shuning uchun uni darhol kirish sifatida emas, balki shartli uzun (long) setup deb ko‘rardim.
Bias: Reclaim yoki support ushlab turish tomon long
Entry zone: 77,200 dan 78,000 gacha
Tasdiqlovchi kirish: 78,550 dan yuqorida
Stop: 76,800 dan pastda
TP1: 79,400
TP2: 80,500 dan 81,478 gacha
TP3: Momentum qaytsa 83,000
BTC’ni long tomonda ushlab turishimning sababi shuki, katta breakout struktura hali ham buzilmagan va narx asosiy harakatlanuvchi o‘rtachalardan (moving averages) yuqorida ushlab turilmoqda. Faqat muammo shundaki, BTC hozircha MA7 dan pastda, shuning uchun 77,200 dan 78,000 gacha yaqin joyda aniq ushlab turish yoki 78,550 dan yuqoriga qayta tiklanishni (reclaim) kutaman. Agar BTC 76,800’ni yo‘qotsa, men orqaga chekinaman, chunki bu yanada chuqurroq pullback’ni ochishi mumkin.
Bias: Reclaim yoki support ushlab turish tomon long
Entry zone: 77,200 dan 78,000 gacha
Tasdiqlovchi kirish: 78,550 dan yuqorida
Stop: 76,800 dan pastda
TP1: 79,400
TP2: 80,500 dan 81,478 gacha
TP3: Momentum qaytsa 83,000
BTC’ni long tomonda ushlab turishimning sababi shuki, katta breakout struktura hali ham buzilmagan va narx asosiy harakatlanuvchi o‘rtachalardan (moving averages) yuqorida ushlab turilmoqda. Faqat muammo shundaki, BTC hozircha MA7 dan pastda, shuning uchun 77,200 dan 78,000 gacha yaqin joyda aniq ushlab turish yoki 78,550 dan yuqoriga qayta tiklanishni (reclaim) kutaman. Agar BTC 76,800’ni yo‘qotsa, men orqaga chekinaman, chunki bu yanada chuqurroq pullback’ni ochishi mumkin.
1
1
574
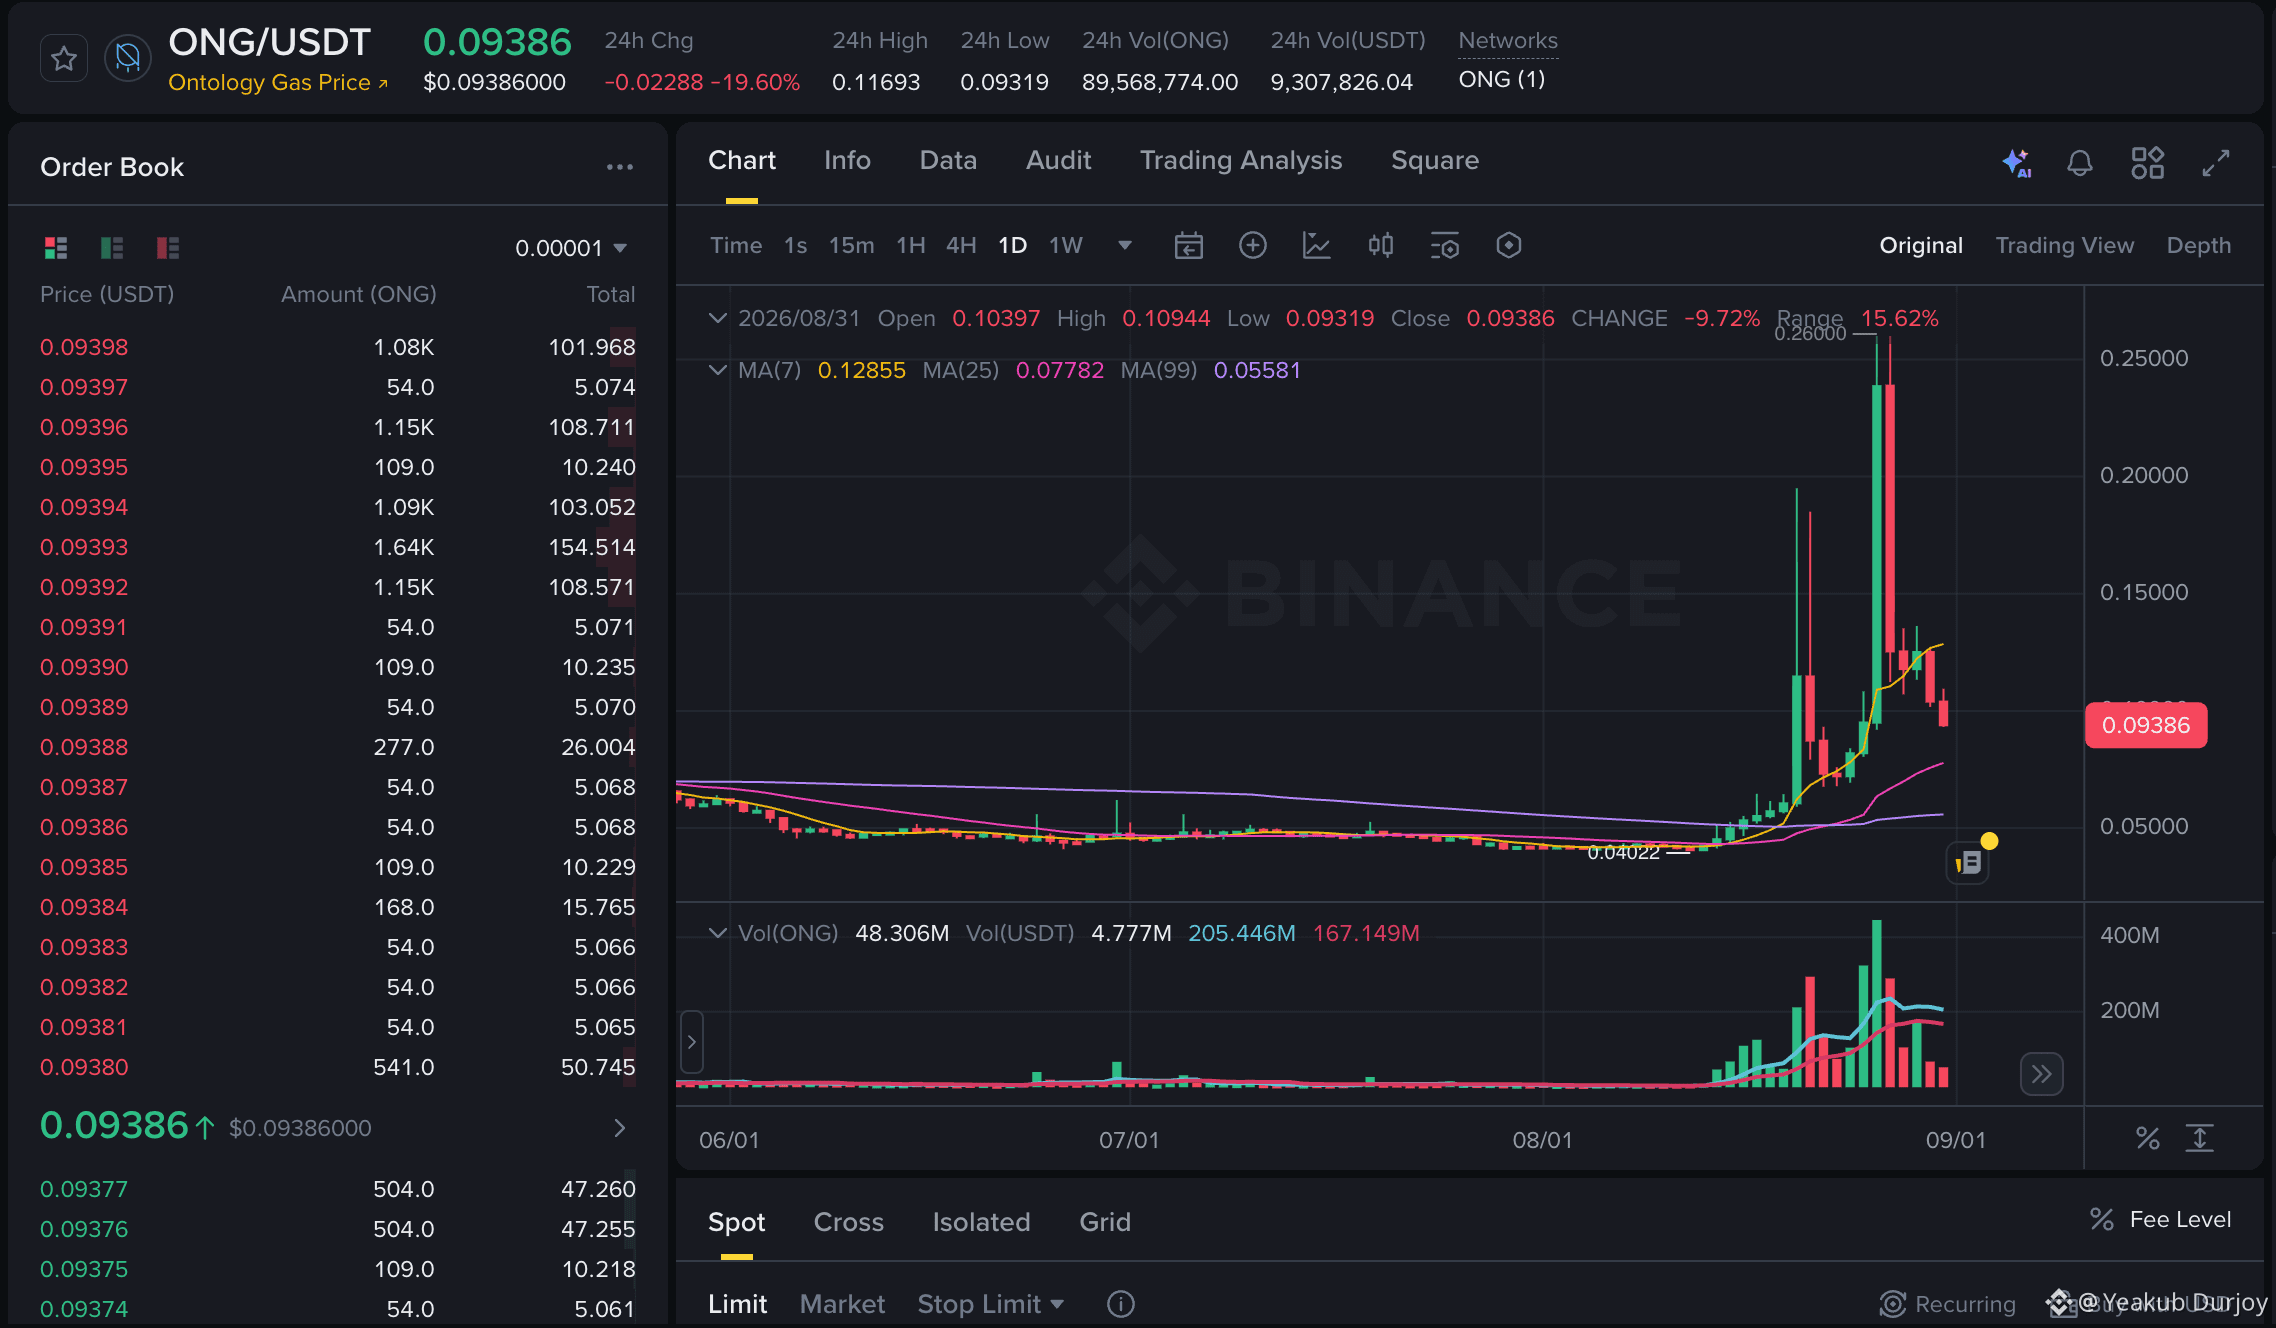
$ONG keskin rad etilgandan keyin zaifroq ko‘rinmoqda, shuning uchun men uchun tozaroq g‘oya qisqa (short) setup, lekin hozirgi pastlikdan to‘g‘ridan-to‘g‘ri short emas.
Bias: Qaytish (bounce) dan keyin short
Entry zona: 0.10000 dan 0.11000 gacha
Stop: 0.11700 dan yuqori
TP1: 0.09320
TP2: 0.08500 dan 0.08000 gacha
TP3: 0.07780 dan 0.07000 gacha, agar sotuv bosimi davom etsa
Men shortni afzal ko‘rishimning sababi shundaki, ONG 0.26000 tomon bo‘lgan spike’dan keyin keskin rad etdi va hozirgi struktura haddan tashqari cho‘zilgan harakatdan keyin foyda olishga o‘xshaydi. Narx allaqachon 24 soatlik low (0.09319) ga yaqin bo‘lgani uchun avval qarshilikka qaytishni kutardim. Agar ONG 0.10000 dan 0.11000 gacha atrofida ishlamay qolsa, short setup yanada tozaroq ko‘rinadi. 0.11700 dan yuqoriga qaytish mening short g‘oyamni bekor qiladi.
{future}(ONGUSDT)
$ONG keskin rad etilgandan keyin zaifroq ko‘rinmoqda, shuning uchun men uchun tozaroq g‘oya qisqa (short) setup, lekin hozirgi pastlikdan to‘g‘ridan-to‘g‘ri short emas.
Bias: Qaytish (bounce) dan keyin short
Entry zona: 0.10000 dan 0.11000 gacha
Stop: 0.11700 dan yuqori
TP1: 0.09320
TP2: 0.08500 dan 0.08000 gacha
TP3: 0.07780 dan 0.07000 gacha, agar sotuv bosimi davom etsa
Men shortni afzal ko‘rishimning sababi shundaki, ONG 0.26000 tomon bo‘lgan spike’dan keyin keskin rad etdi va hozirgi struktura haddan tashqari cho‘zilgan harakatdan keyin foyda olishga o‘xshaydi. Narx allaqachon 24 soatlik low (0.09319) ga yaqin bo‘lgani uchun avval qarshilikka qaytishni kutardim. Agar ONG 0.10000 dan 0.11000 gacha atrofida ishlamay qolsa, short setup yanada tozaroq ko‘rinadi. 0.11700 dan yuqoriga qaytish mening short g‘oyamni bekor qiladi.
Bias: Qaytish (bounce) dan keyin short
Entry zona: 0.10000 dan 0.11000 gacha
Stop: 0.11700 dan yuqori
TP1: 0.09320
TP2: 0.08500 dan 0.08000 gacha
TP3: 0.07780 dan 0.07000 gacha, agar sotuv bosimi davom etsa
Men shortni afzal ko‘rishimning sababi shundaki, ONG 0.26000 tomon bo‘lgan spike’dan keyin keskin rad etdi va hozirgi struktura haddan tashqari cho‘zilgan harakatdan keyin foyda olishga o‘xshaydi. Narx allaqachon 24 soatlik low (0.09319) ga yaqin bo‘lgani uchun avval qarshilikka qaytishni kutardim. Agar ONG 0.10000 dan 0.11000 gacha atrofida ishlamay qolsa, short setup yanada tozaroq ko‘rinadi. 0.11700 dan yuqoriga qaytish mening short g‘oyamni bekor qiladi.
2
2.7k
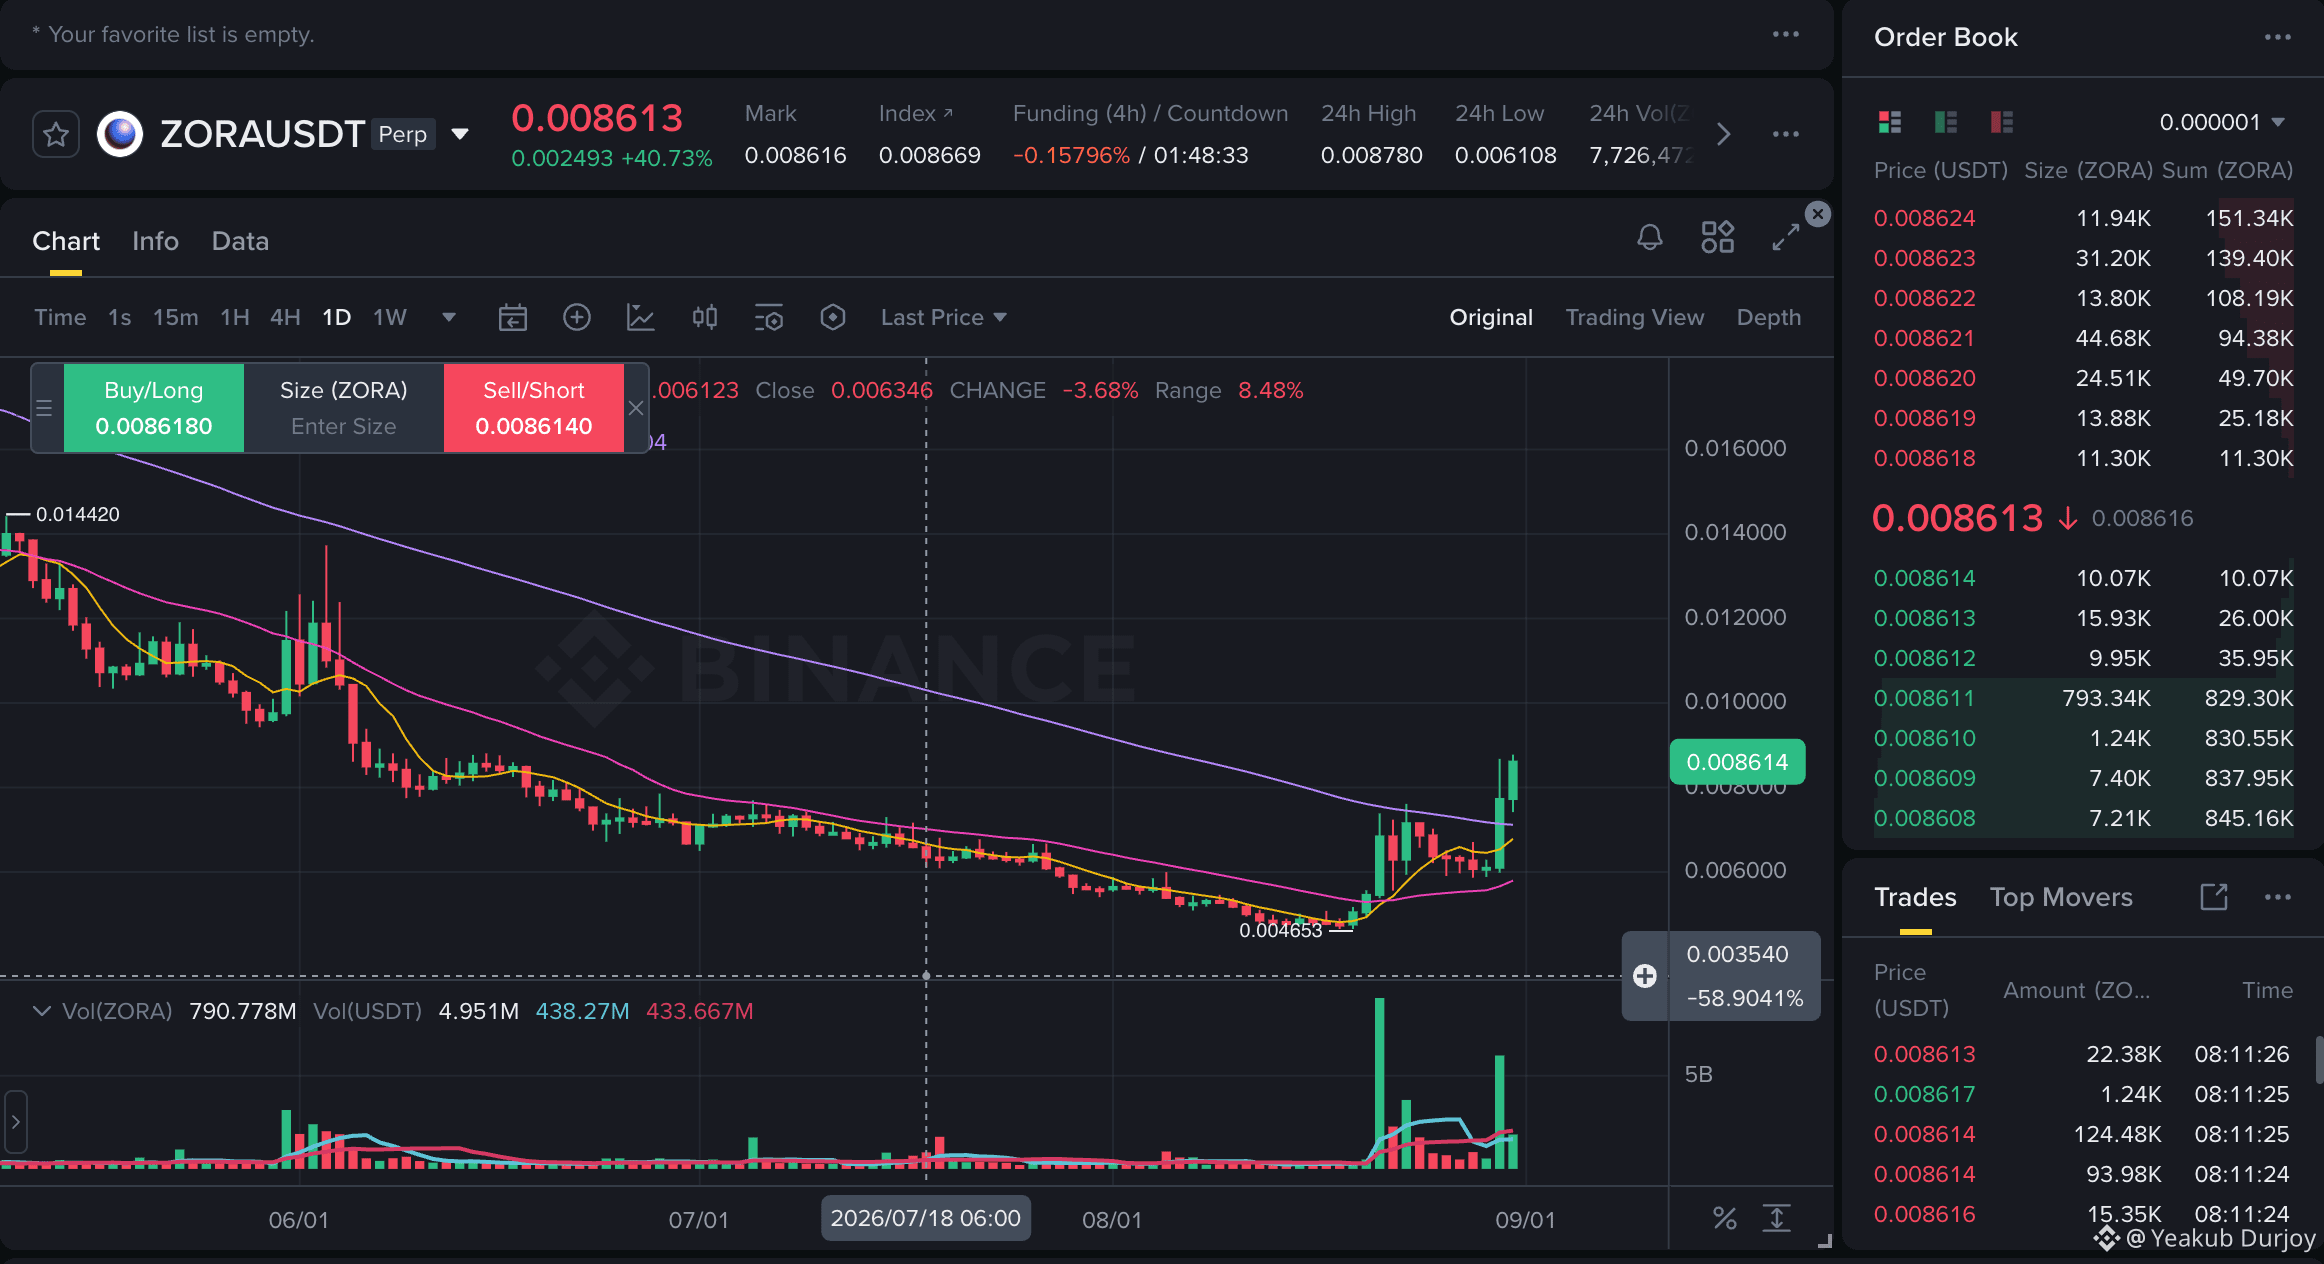
0.008613 atrofida, 40.73% ga oshgan va uzoq vaqt davom etgan pasayish trendidan keyin breakout (chiqib ketish) qilgan.
Biaс: Pullbackdan keyin Long
Kirish zonasi: 0.00790 dan 0.00835 gacha
Stop: 0.00725 dan past
TP1: 0.00878
TP2: 0.00950 dan 0.01000 gacha
TP3: 0.01150 dan 0.01250 gacha, agar hajm davom etsa
Longni afzal ko‘rishim sababi shundaki, ZORA 0.004653 pastki hududidan kuchli qaytdi va hozir kuchli hajm bilan yaqinda bo‘lgan qarshilik zonasi ustiga chiqyapti. Harakat yaxshi ko‘rinadi, lekin narx allaqachon kunlik maksimumga yaqin, shuning uchun yanada toza signal qo‘llab-quvvatlashga pullback kutadi. Agar ZORA 0.00790 dan yuqorida tursa, long g‘oyasi dolzarb bo‘lib qoladi. Agar u 0.00725 ni yo‘qotsa, men orqaga chekinaman, chunki breakout fakeoutga aylanishi mumkin.
{future}(ZORAUSDT)
0.008613 atrofida, 40.73% ga oshgan va uzoq vaqt davom etgan pasayish trendidan keyin breakout (chiqib ketish) qilgan.
Biaс: Pullbackdan keyin Long
Kirish zonasi: 0.00790 dan 0.00835 gacha
Stop: 0.00725 dan past
TP1: 0.00878
TP2: 0.00950 dan 0.01000 gacha
TP3: 0.01150 dan 0.01250 gacha, agar hajm davom etsa
Longni afzal ko‘rishim sababi shundaki, ZORA 0.004653 pastki hududidan kuchli qaytdi va hozir kuchli hajm bilan yaqinda bo‘lgan qarshilik zonasi ustiga chiqyapti. Harakat yaxshi ko‘rinadi, lekin narx allaqachon kunlik maksimumga yaqin, shuning uchun yanada toza signal qo‘llab-quvvatlashga pullback kutadi. Agar ZORA 0.00790 dan yuqorida tursa, long g‘oyasi dolzarb bo‘lib qoladi. Agar u 0.00725 ni yo‘qotsa, men orqaga chekinaman, chunki breakout fakeoutga aylanishi mumkin.
Biaс: Pullbackdan keyin Long
Kirish zonasi: 0.00790 dan 0.00835 gacha
Stop: 0.00725 dan past
TP1: 0.00878
TP2: 0.00950 dan 0.01000 gacha
TP3: 0.01150 dan 0.01250 gacha, agar hajm davom etsa
Longni afzal ko‘rishim sababi shundaki, ZORA 0.004653 pastki hududidan kuchli qaytdi va hozir kuchli hajm bilan yaqinda bo‘lgan qarshilik zonasi ustiga chiqyapti. Harakat yaxshi ko‘rinadi, lekin narx allaqachon kunlik maksimumga yaqin, shuning uchun yanada toza signal qo‘llab-quvvatlashga pullback kutadi. Agar ZORA 0.00790 dan yuqorida tursa, long g‘oyasi dolzarb bo‘lib qoladi. Agar u 0.00725 ni yo‘qotsa, men orqaga chekinaman, chunki breakout fakeoutga aylanishi mumkin.
1
747
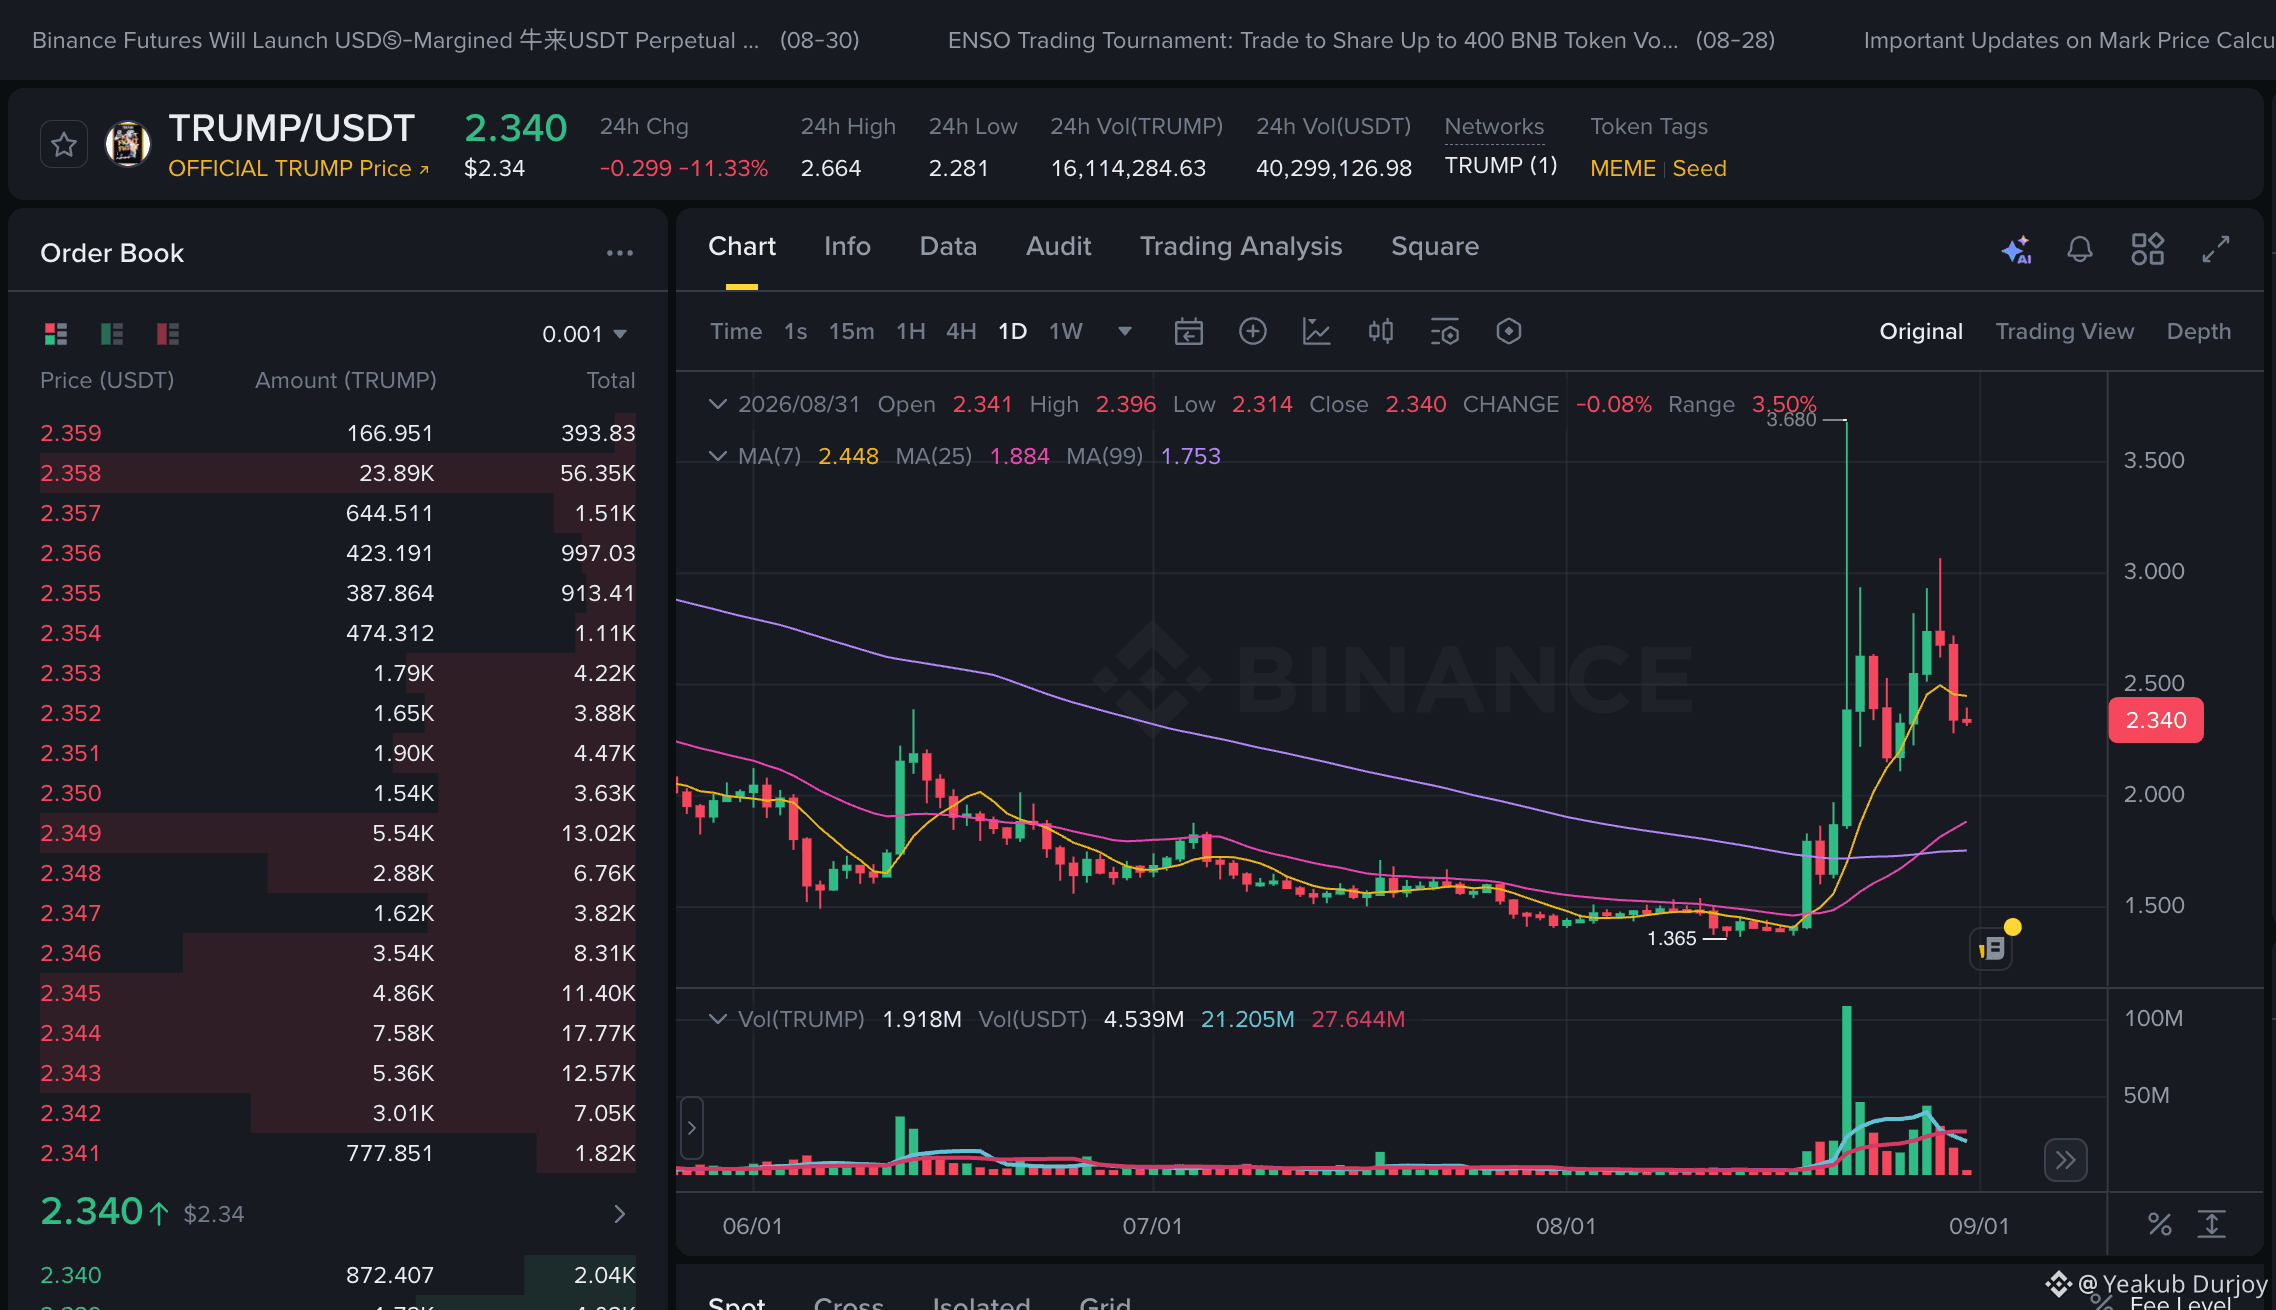
$TRUMP qisqa muddatli setup uchun yaxshiroq ko‘rinayapti, lekin 24 soatlik minimum yaqinida to‘g‘ridan-to‘g‘ri short qilmas edim. Narx taxminan 2.340, −11.33% ga tushgan va u MA7 2.448’ning pastiga tushib bo‘ldi; bu esa qisqa muddatli momentum zaiflashayotganini ko‘rsatadi.
Yo‘nalish: Qaytishdan keyin short
Kirish zonasi: 2.420 dan 2.500 gacha
Stop: 2.660 dan yuqori
TP1: 2.280
TP2: 2.100 dan 2.000 gacha
TP3: 1.884 dan 1.750 gacha, agar sotish bosimi kuchaysa
Men shortni afzal ko‘rishimning sababi shuki, TRUMP 3.680 atrofidagi skokdan keyin keskin rad etdi va endi narx MA7 ostida ishlamayapti, hajm esa soviy boshlagan. Yanada toza setup 2.420 dan 2.500 gacha bo‘lgan zonaga qaytishni kutyapti va rad etish joyidan short qilishni nazarda tutadi. Agar narx 2.660 dan yuqoriga qaytsa, men short g‘oyasini bekor qilardim, chunki xaridorlar nazoratni qayta qo‘lga olishi mumkin.
{future}(TRUMPUSDT)
$TRUMP qisqa muddatli setup uchun yaxshiroq ko‘rinayapti, lekin 24 soatlik minimum yaqinida to‘g‘ridan-to‘g‘ri short qilmas edim. Narx taxminan 2.340, −11.33% ga tushgan va u MA7 2.448’ning pastiga tushib bo‘ldi; bu esa qisqa muddatli momentum zaiflashayotganini ko‘rsatadi.
Yo‘nalish: Qaytishdan keyin short
Kirish zonasi: 2.420 dan 2.500 gacha
Stop: 2.660 dan yuqori
TP1: 2.280
TP2: 2.100 dan 2.000 gacha
TP3: 1.884 dan 1.750 gacha, agar sotish bosimi kuchaysa
Men shortni afzal ko‘rishimning sababi shuki, TRUMP 3.680 atrofidagi skokdan keyin keskin rad etdi va endi narx MA7 ostida ishlamayapti, hajm esa soviy boshlagan. Yanada toza setup 2.420 dan 2.500 gacha bo‘lgan zonaga qaytishni kutyapti va rad etish joyidan short qilishni nazarda tutadi. Agar narx 2.660 dan yuqoriga qaytsa, men short g‘oyasini bekor qilardim, chunki xaridorlar nazoratni qayta qo‘lga olishi mumkin.
Yo‘nalish: Qaytishdan keyin short
Kirish zonasi: 2.420 dan 2.500 gacha
Stop: 2.660 dan yuqori
TP1: 2.280
TP2: 2.100 dan 2.000 gacha
TP3: 1.884 dan 1.750 gacha, agar sotish bosimi kuchaysa
Men shortni afzal ko‘rishimning sababi shuki, TRUMP 3.680 atrofidagi skokdan keyin keskin rad etdi va endi narx MA7 ostida ishlamayapti, hajm esa soviy boshlagan. Yanada toza setup 2.420 dan 2.500 gacha bo‘lgan zonaga qaytishni kutyapti va rad etish joyidan short qilishni nazarda tutadi. Agar narx 2.660 dan yuqoriga qaytsa, men short g‘oyasini bekor qilardim, chunki xaridorlar nazoratni qayta qo‘lga olishi mumkin.
1
5
11.7k
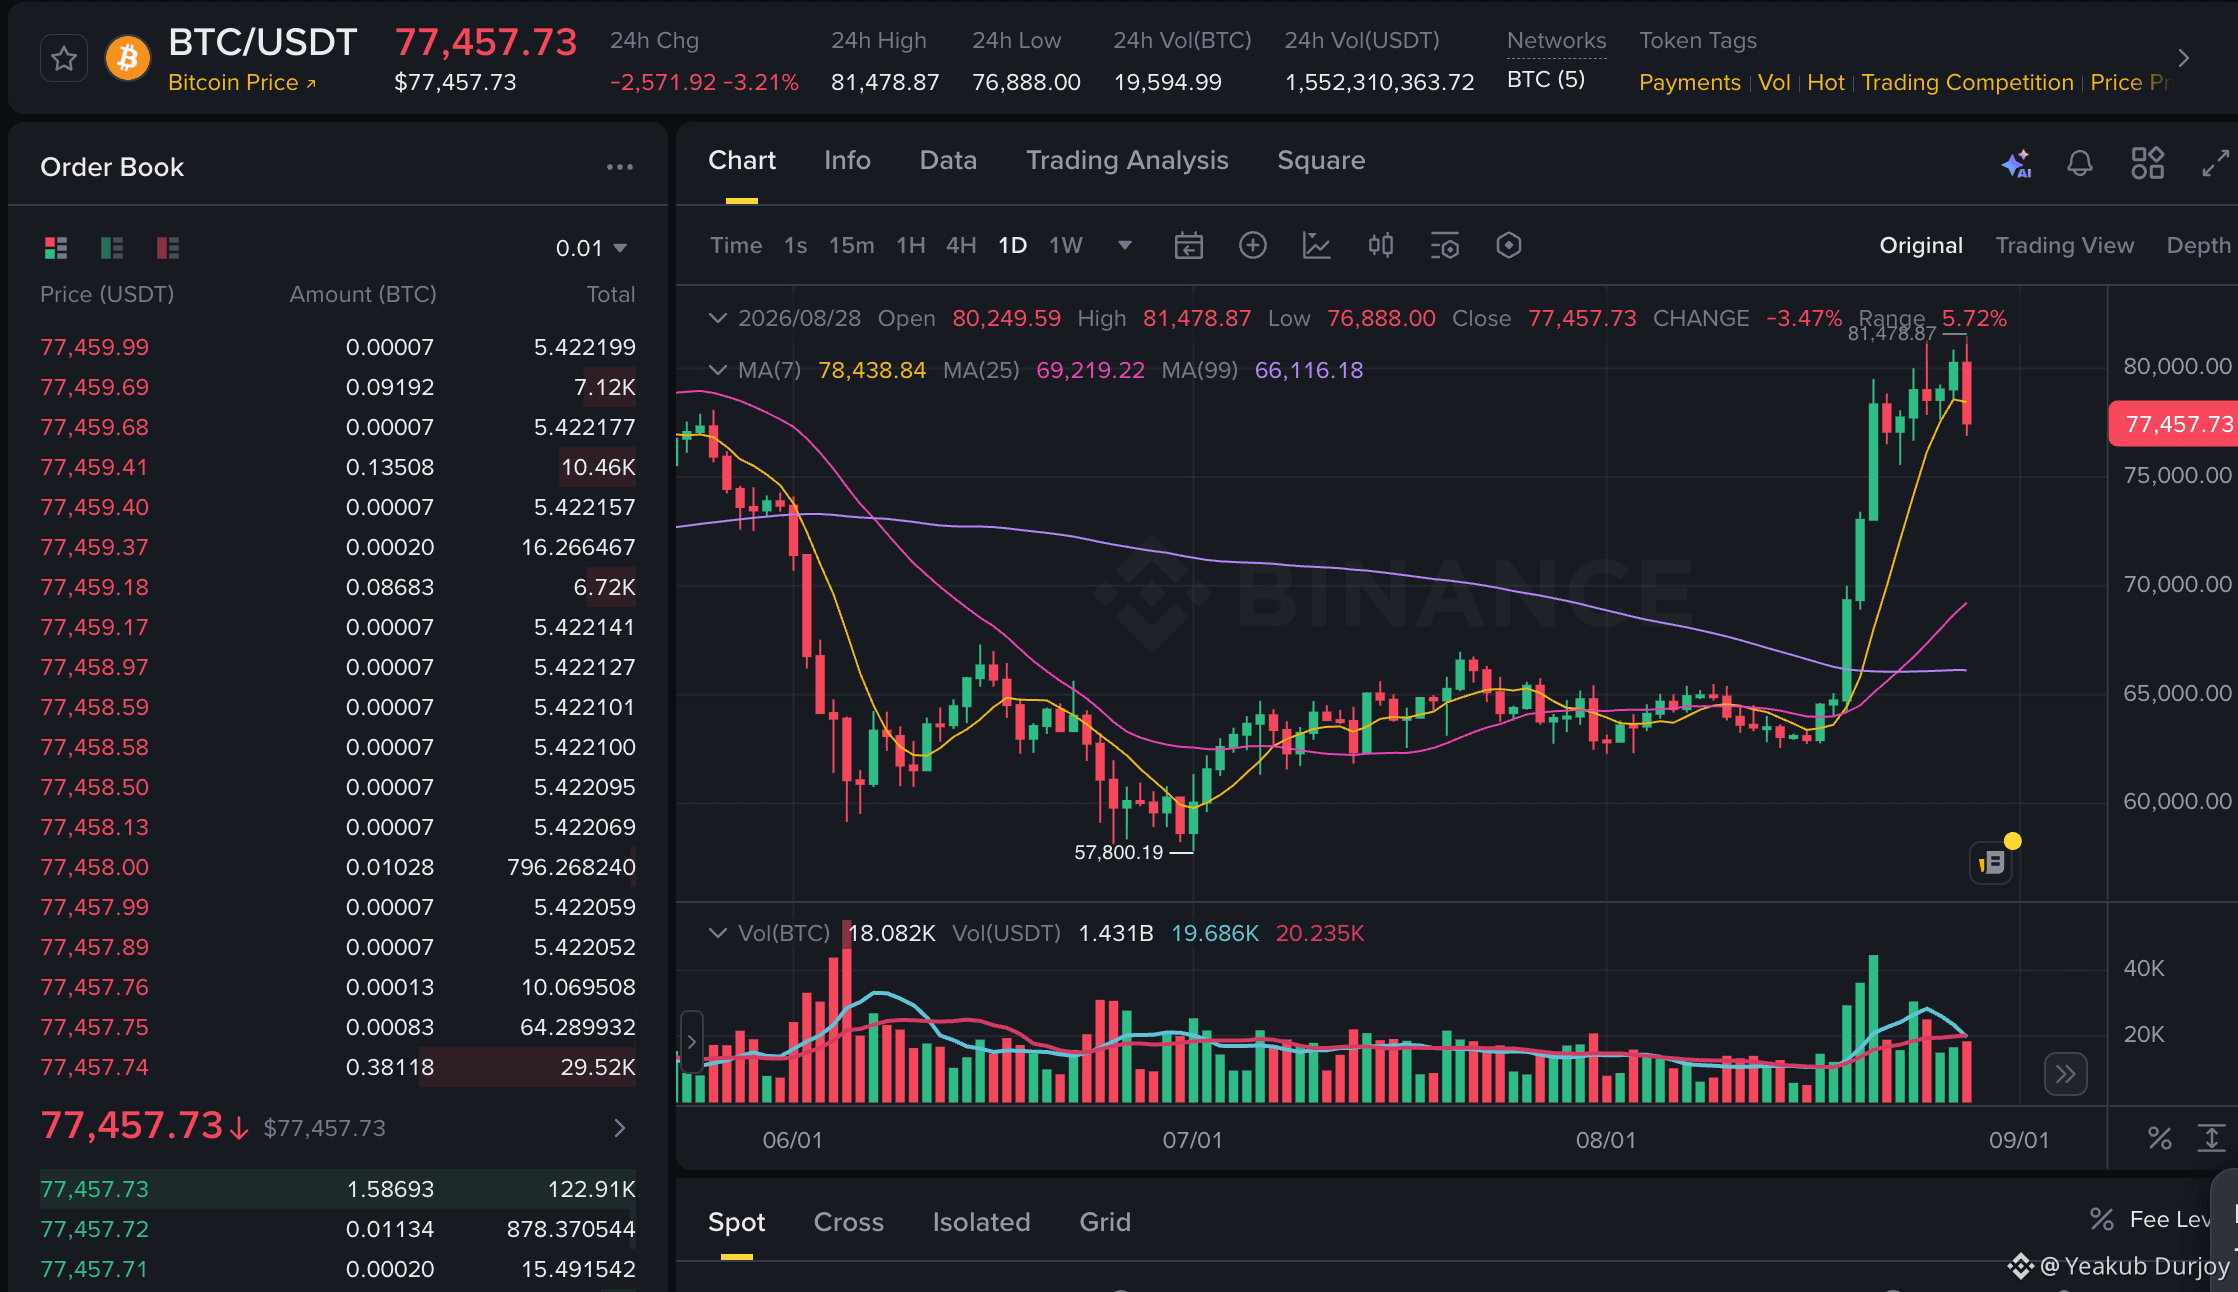
$BTC hali ham uzoq muddatli setup sifatida ishlashi mumkin, ammo faqat pullback ushlab tursa. Narx taxminan 77,457, 24 soatda 3.21% ga pasaygan va hozir MA7 78,438 ostida biroz turibdi; shu bilan birga MA25 69,219 va MA99 66,116 dan yuqorida ushlab turibdi.
Yo'nalish (Bias): Support (tayanch) ushlab tursa, Long
Kirish zonasi: 76,900 dan 77,800 gacha
Stop: 75,800 dan past
TP1: 78,438
TP2: 80,000 dan 80,500 gacha
TP3: Xaridorlar momentumni qayta tiklasa 81,478 dan 83,000 gacha
Men BTC ni long tomonda ushlab qolishimning sababi shuki, kengroq breakout struktura hali buzilmagan. 81,478 dan 77K atrofga tushish kuchli harakatdan keyingi pullbackka o'xshaydi, to'liq trend qaytishiga emas. Ammo muhim nuqta MA7. Agar BTC 78,438 ni qaytarib olsa, long setup ancha toza bo'ladi. Agar 75,800 ni yo'qotsa, men orqaga qadam tashlayman, chunki pullback yanada chuqorroq cho'zilishi mumkin; keyingi yuqoriga urinishdan oldin.
{future}(BTCUSDT)
$BTC hali ham uzoq muddatli setup sifatida ishlashi mumkin, ammo faqat pullback ushlab tursa. Narx taxminan 77,457, 24 soatda 3.21% ga pasaygan va hozir MA7 78,438 ostida biroz turibdi; shu bilan birga MA25 69,219 va MA99 66,116 dan yuqorida ushlab turibdi.
Yo'nalish (Bias): Support (tayanch) ushlab tursa, Long
Kirish zonasi: 76,900 dan 77,800 gacha
Stop: 75,800 dan past
TP1: 78,438
TP2: 80,000 dan 80,500 gacha
TP3: Xaridorlar momentumni qayta tiklasa 81,478 dan 83,000 gacha
Men BTC ni long tomonda ushlab qolishimning sababi shuki, kengroq breakout struktura hali buzilmagan. 81,478 dan 77K atrofga tushish kuchli harakatdan keyingi pullbackka o'xshaydi, to'liq trend qaytishiga emas. Ammo muhim nuqta MA7. Agar BTC 78,438 ni qaytarib olsa, long setup ancha toza bo'ladi. Agar 75,800 ni yo'qotsa, men orqaga qadam tashlayman, chunki pullback yanada chuqorroq cho'zilishi mumkin; keyingi yuqoriga urinishdan oldin.
Yo'nalish (Bias): Support (tayanch) ushlab tursa, Long
Kirish zonasi: 76,900 dan 77,800 gacha
Stop: 75,800 dan past
TP1: 78,438
TP2: 80,000 dan 80,500 gacha
TP3: Xaridorlar momentumni qayta tiklasa 81,478 dan 83,000 gacha
Men BTC ni long tomonda ushlab qolishimning sababi shuki, kengroq breakout struktura hali buzilmagan. 81,478 dan 77K atrofga tushish kuchli harakatdan keyingi pullbackka o'xshaydi, to'liq trend qaytishiga emas. Ammo muhim nuqta MA7. Agar BTC 78,438 ni qaytarib olsa, long setup ancha toza bo'ladi. Agar 75,800 ni yo'qotsa, men orqaga qadam tashlayman, chunki pullback yanada chuqorroq cho'zilishi mumkin; keyingi yuqoriga urinishdan oldin.
1
1.1k
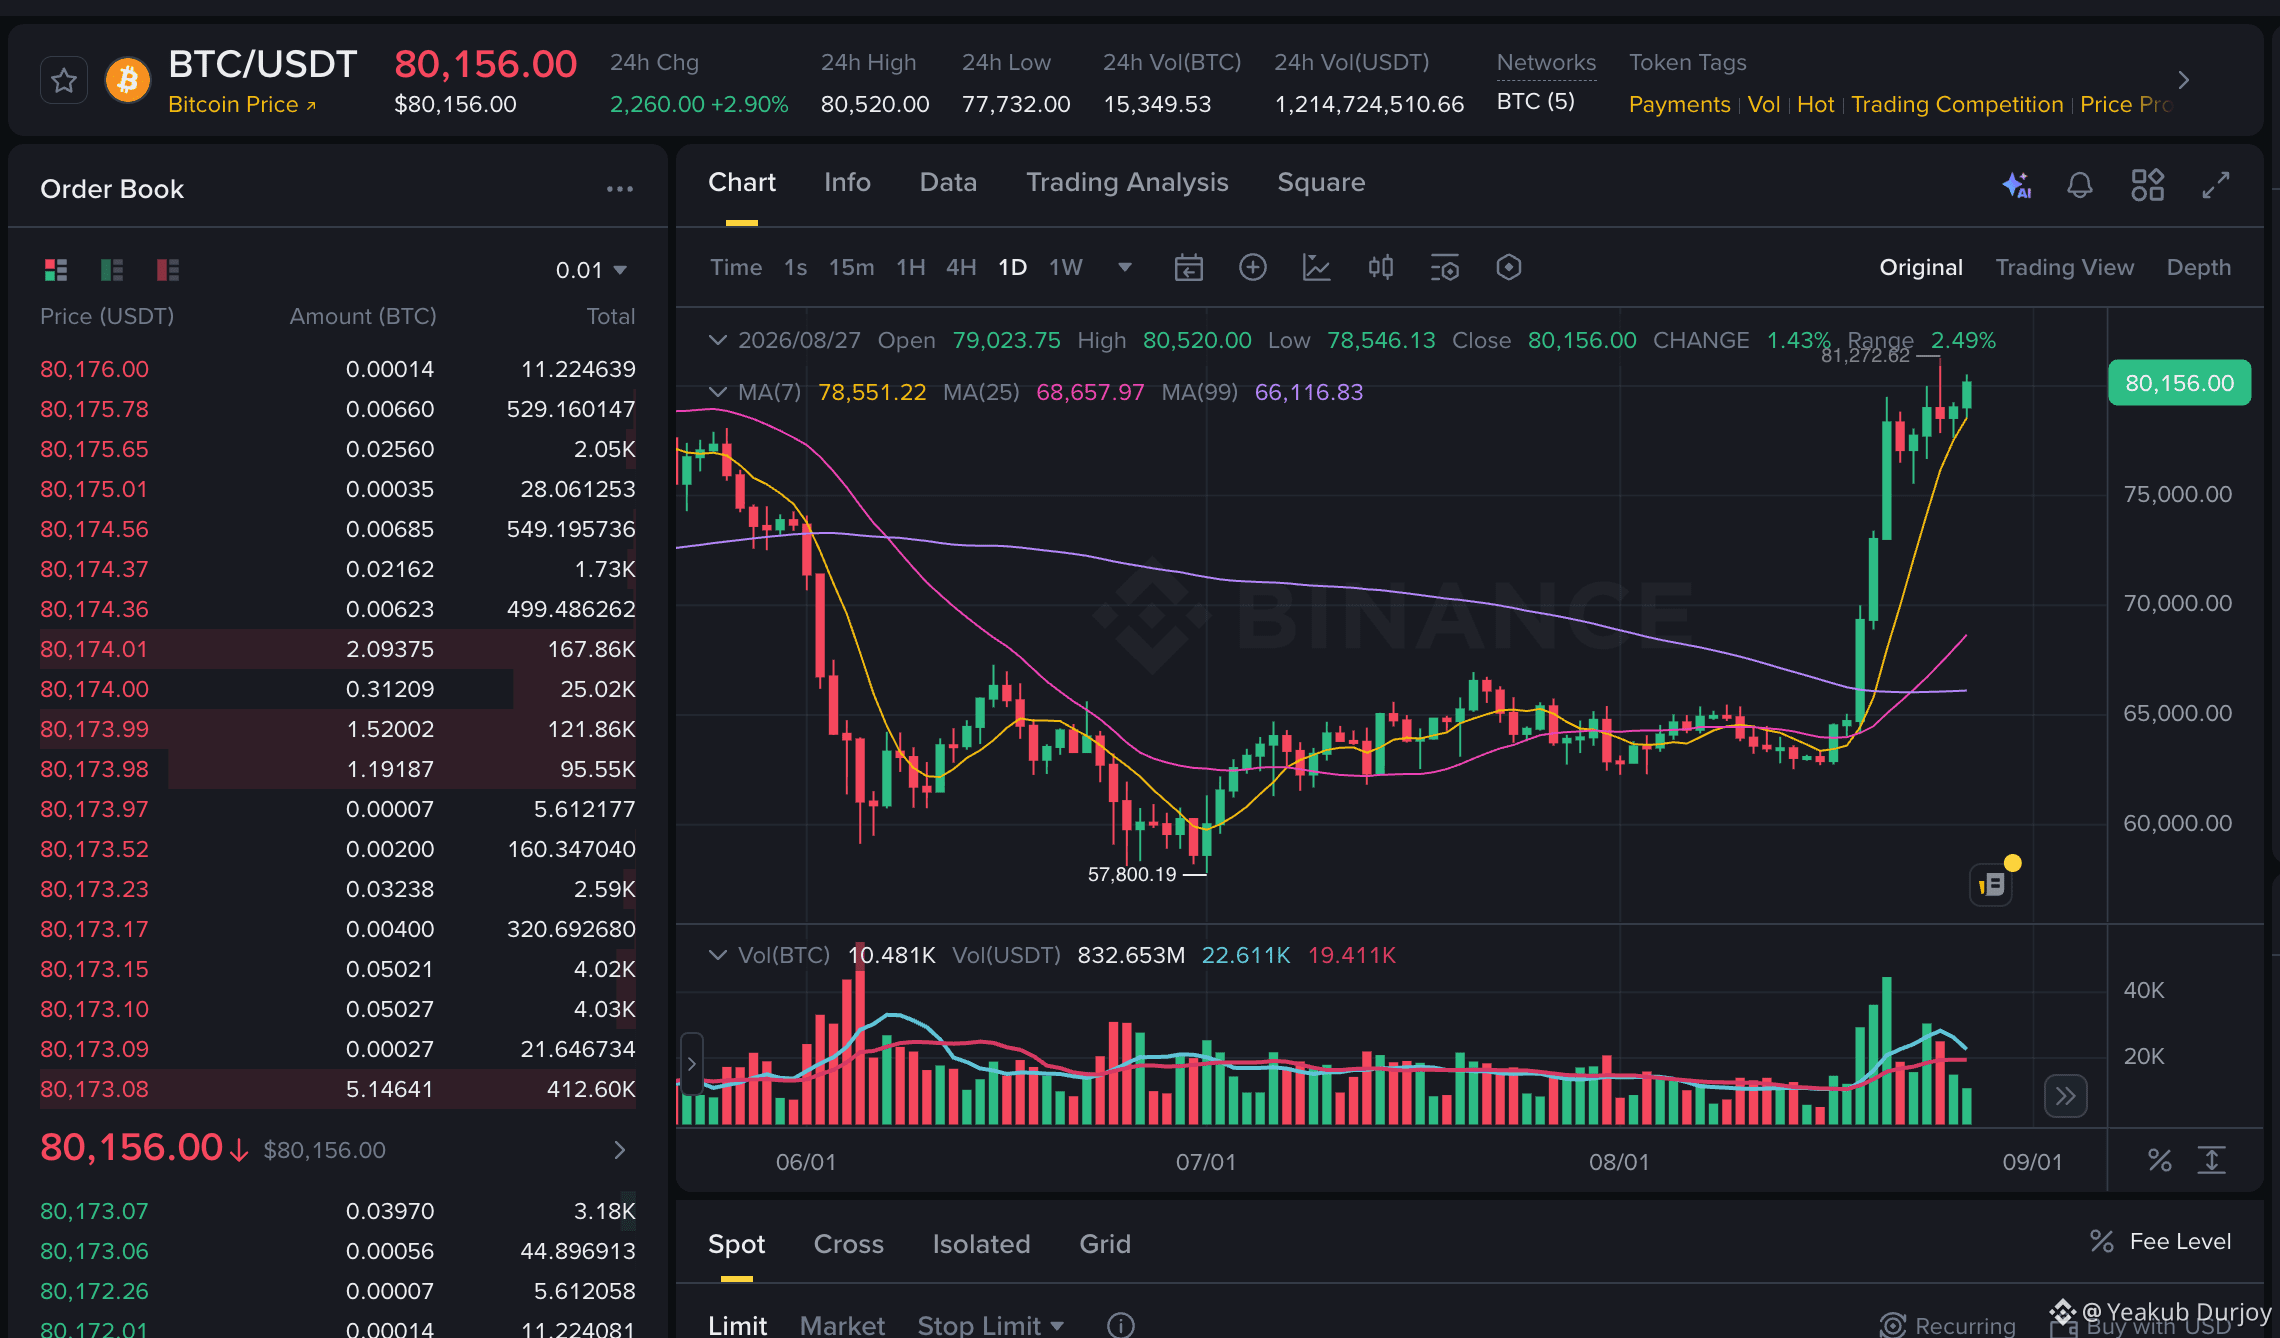
$BTC uzoq muddatli setup uchun hali ham yaxshiroq ko‘rinadi, lekin bu kuchli breakoutdan keyin narxning eng yuqori qismida unga bevosita kirish quvlamagan bo‘lardim. Narx taxminan 80,156 atrofida, MA7 78,551, MA25 68,657 va MA99 66,116 dan yuqorida ushlab turibdi, shuning uchun trend hanuz aniq bullish.
Bias: Pullbackda long
Entry zone: 78,500 dan 79,300 gacha
Stop: 77,700 dan past
TP1: 80,520
TP2: 81,272
TP3: Agar momentum davom etsa 83,000 dan 85,000 gacha
Longni afzal ko‘rishimning sababi shuki, BTC oldingi konsolidatsiyadan kuchli breakout qildi va xaridorlar hanuz MA7 ustida himoya qilmoqda.
Yagona muammo shundaki, narx allaqachon yaqindagi yuqori zona yaqinida, shuning uchun eng yaxshi setup — cho‘qqidan sotib olish o‘rniga pullbackni kutish. Qisqa pozitsiya faqat BTC 80,500 dan 81,272 gacha yana rad etilib, kuchli sotuvlar bilan 78,500 ni yo‘qotsa ma’no kasb etadi. Ungacha esa toza savdo hanuz support ushlanganda long hisoblanadi.
{future}(BTCUSDT)
$BTC uzoq muddatli setup uchun hali ham yaxshiroq ko‘rinadi, lekin bu kuchli breakoutdan keyin narxning eng yuqori qismida unga bevosita kirish quvlamagan bo‘lardim. Narx taxminan 80,156 atrofida, MA7 78,551, MA25 68,657 va MA99 66,116 dan yuqorida ushlab turibdi, shuning uchun trend hanuz aniq bullish.
Bias: Pullbackda long
Entry zone: 78,500 dan 79,300 gacha
Stop: 77,700 dan past
TP1: 80,520
TP2: 81,272
TP3: Agar momentum davom etsa 83,000 dan 85,000 gacha
Longni afzal ko‘rishimning sababi shuki, BTC oldingi konsolidatsiyadan kuchli breakout qildi va xaridorlar hanuz MA7 ustida himoya qilmoqda.
Yagona muammo shundaki, narx allaqachon yaqindagi yuqori zona yaqinida, shuning uchun eng yaxshi setup — cho‘qqidan sotib olish o‘rniga pullbackni kutish. Qisqa pozitsiya faqat BTC 80,500 dan 81,272 gacha yana rad etilib, kuchli sotuvlar bilan 78,500 ni yo‘qotsa ma’no kasb etadi. Ungacha esa toza savdo hanuz support ushlanganda long hisoblanadi.
Bias: Pullbackda long
Entry zone: 78,500 dan 79,300 gacha
Stop: 77,700 dan past
TP1: 80,520
TP2: 81,272
TP3: Agar momentum davom etsa 83,000 dan 85,000 gacha
Longni afzal ko‘rishimning sababi shuki, BTC oldingi konsolidatsiyadan kuchli breakout qildi va xaridorlar hanuz MA7 ustida himoya qilmoqda.
Yagona muammo shundaki, narx allaqachon yaqindagi yuqori zona yaqinida, shuning uchun eng yaxshi setup — cho‘qqidan sotib olish o‘rniga pullbackni kutish. Qisqa pozitsiya faqat BTC 80,500 dan 81,272 gacha yana rad etilib, kuchli sotuvlar bilan 78,500 ni yo‘qotsa ma’no kasb etadi. Ungacha esa toza savdo hanuz support ushlanganda long hisoblanadi.
2
643
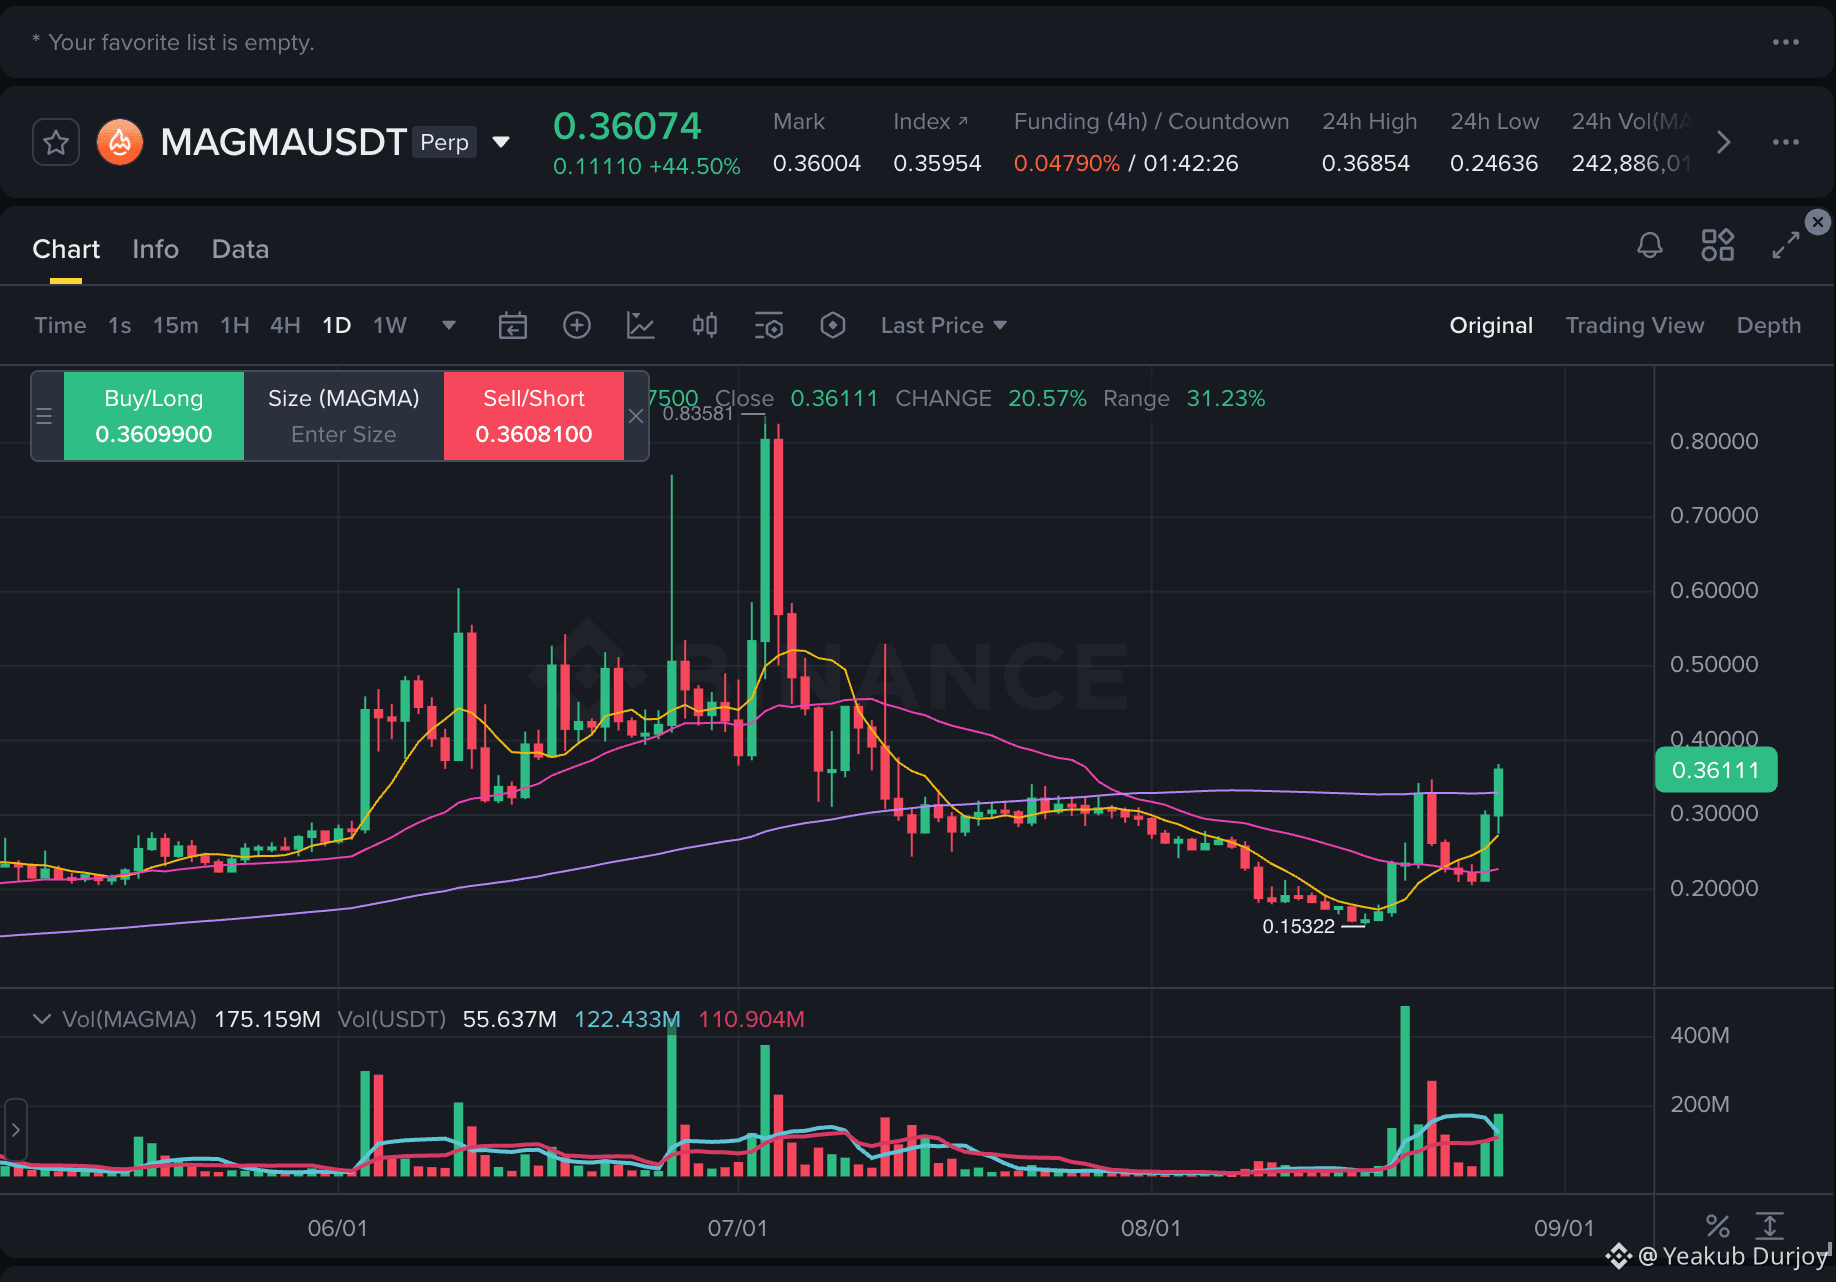
$MAGMA uzoq pozitsiya uchun ehtimoliy setapni ko‘rsatmoqda, ammo men uni 24 soatlik maksimum yaqinida to‘g‘ridan-to‘g‘ri quvmagan bo‘lardim. Narx taxminan 0.3607 atrofida, allaqachon 44.50% ga oshgan, 24 soatlik maksimum esa 0.3685 yaqinida turibdi.
Xulosa: ortga qaytishda long
Kirish zonasi: 0.3300 dan 0.3480 gacha
Stop: 0.3050 dan pastda
TP1: 0.3685
TP2: 0.4000 dan 0.4200 gacha
TP3: agar hajm kengayishda davom etsa, 0.4600 dan 0.5000 gacha
Men longni afzal ko‘rishimning sababi shundaki, MAGMA 0.1532 pastlik hududidan kuchli qaytdi va hozir kuchli hajm bilan yaqinda shakllangan diapazondan yana yuqoriga chiqmoqda. Agar narx ortga qaytib, 0.3300 dan yuqorida ushlanib tursa, setap ancha toza bo‘lib qoladi. 0.3685 ustidagi to‘g‘ridan-to‘g‘ri breakout davom etishni tasdiqlashi mumkin, ammo agar u 0.3050 ni yo‘qotsa, men chetga chiqaman, chunki harakat foyda olish bosqichiga aylanishi mumkin.
{future}(MAGMAUSDT)
$MAGMA uzoq pozitsiya uchun ehtimoliy setapni ko‘rsatmoqda, ammo men uni 24 soatlik maksimum yaqinida to‘g‘ridan-to‘g‘ri quvmagan bo‘lardim. Narx taxminan 0.3607 atrofida, allaqachon 44.50% ga oshgan, 24 soatlik maksimum esa 0.3685 yaqinida turibdi.
Xulosa: ortga qaytishda long
Kirish zonasi: 0.3300 dan 0.3480 gacha
Stop: 0.3050 dan pastda
TP1: 0.3685
TP2: 0.4000 dan 0.4200 gacha
TP3: agar hajm kengayishda davom etsa, 0.4600 dan 0.5000 gacha
Men longni afzal ko‘rishimning sababi shundaki, MAGMA 0.1532 pastlik hududidan kuchli qaytdi va hozir kuchli hajm bilan yaqinda shakllangan diapazondan yana yuqoriga chiqmoqda. Agar narx ortga qaytib, 0.3300 dan yuqorida ushlanib tursa, setap ancha toza bo‘lib qoladi. 0.3685 ustidagi to‘g‘ridan-to‘g‘ri breakout davom etishni tasdiqlashi mumkin, ammo agar u 0.3050 ni yo‘qotsa, men chetga chiqaman, chunki harakat foyda olish bosqichiga aylanishi mumkin.
Xulosa: ortga qaytishda long
Kirish zonasi: 0.3300 dan 0.3480 gacha
Stop: 0.3050 dan pastda
TP1: 0.3685
TP2: 0.4000 dan 0.4200 gacha
TP3: agar hajm kengayishda davom etsa, 0.4600 dan 0.5000 gacha
Men longni afzal ko‘rishimning sababi shundaki, MAGMA 0.1532 pastlik hududidan kuchli qaytdi va hozir kuchli hajm bilan yaqinda shakllangan diapazondan yana yuqoriga chiqmoqda. Agar narx ortga qaytib, 0.3300 dan yuqorida ushlanib tursa, setap ancha toza bo‘lib qoladi. 0.3685 ustidagi to‘g‘ridan-to‘g‘ri breakout davom etishni tasdiqlashi mumkin, ammo agar u 0.3050 ni yo‘qotsa, men chetga chiqaman, chunki harakat foyda olish bosqichiga aylanishi mumkin.
1
966
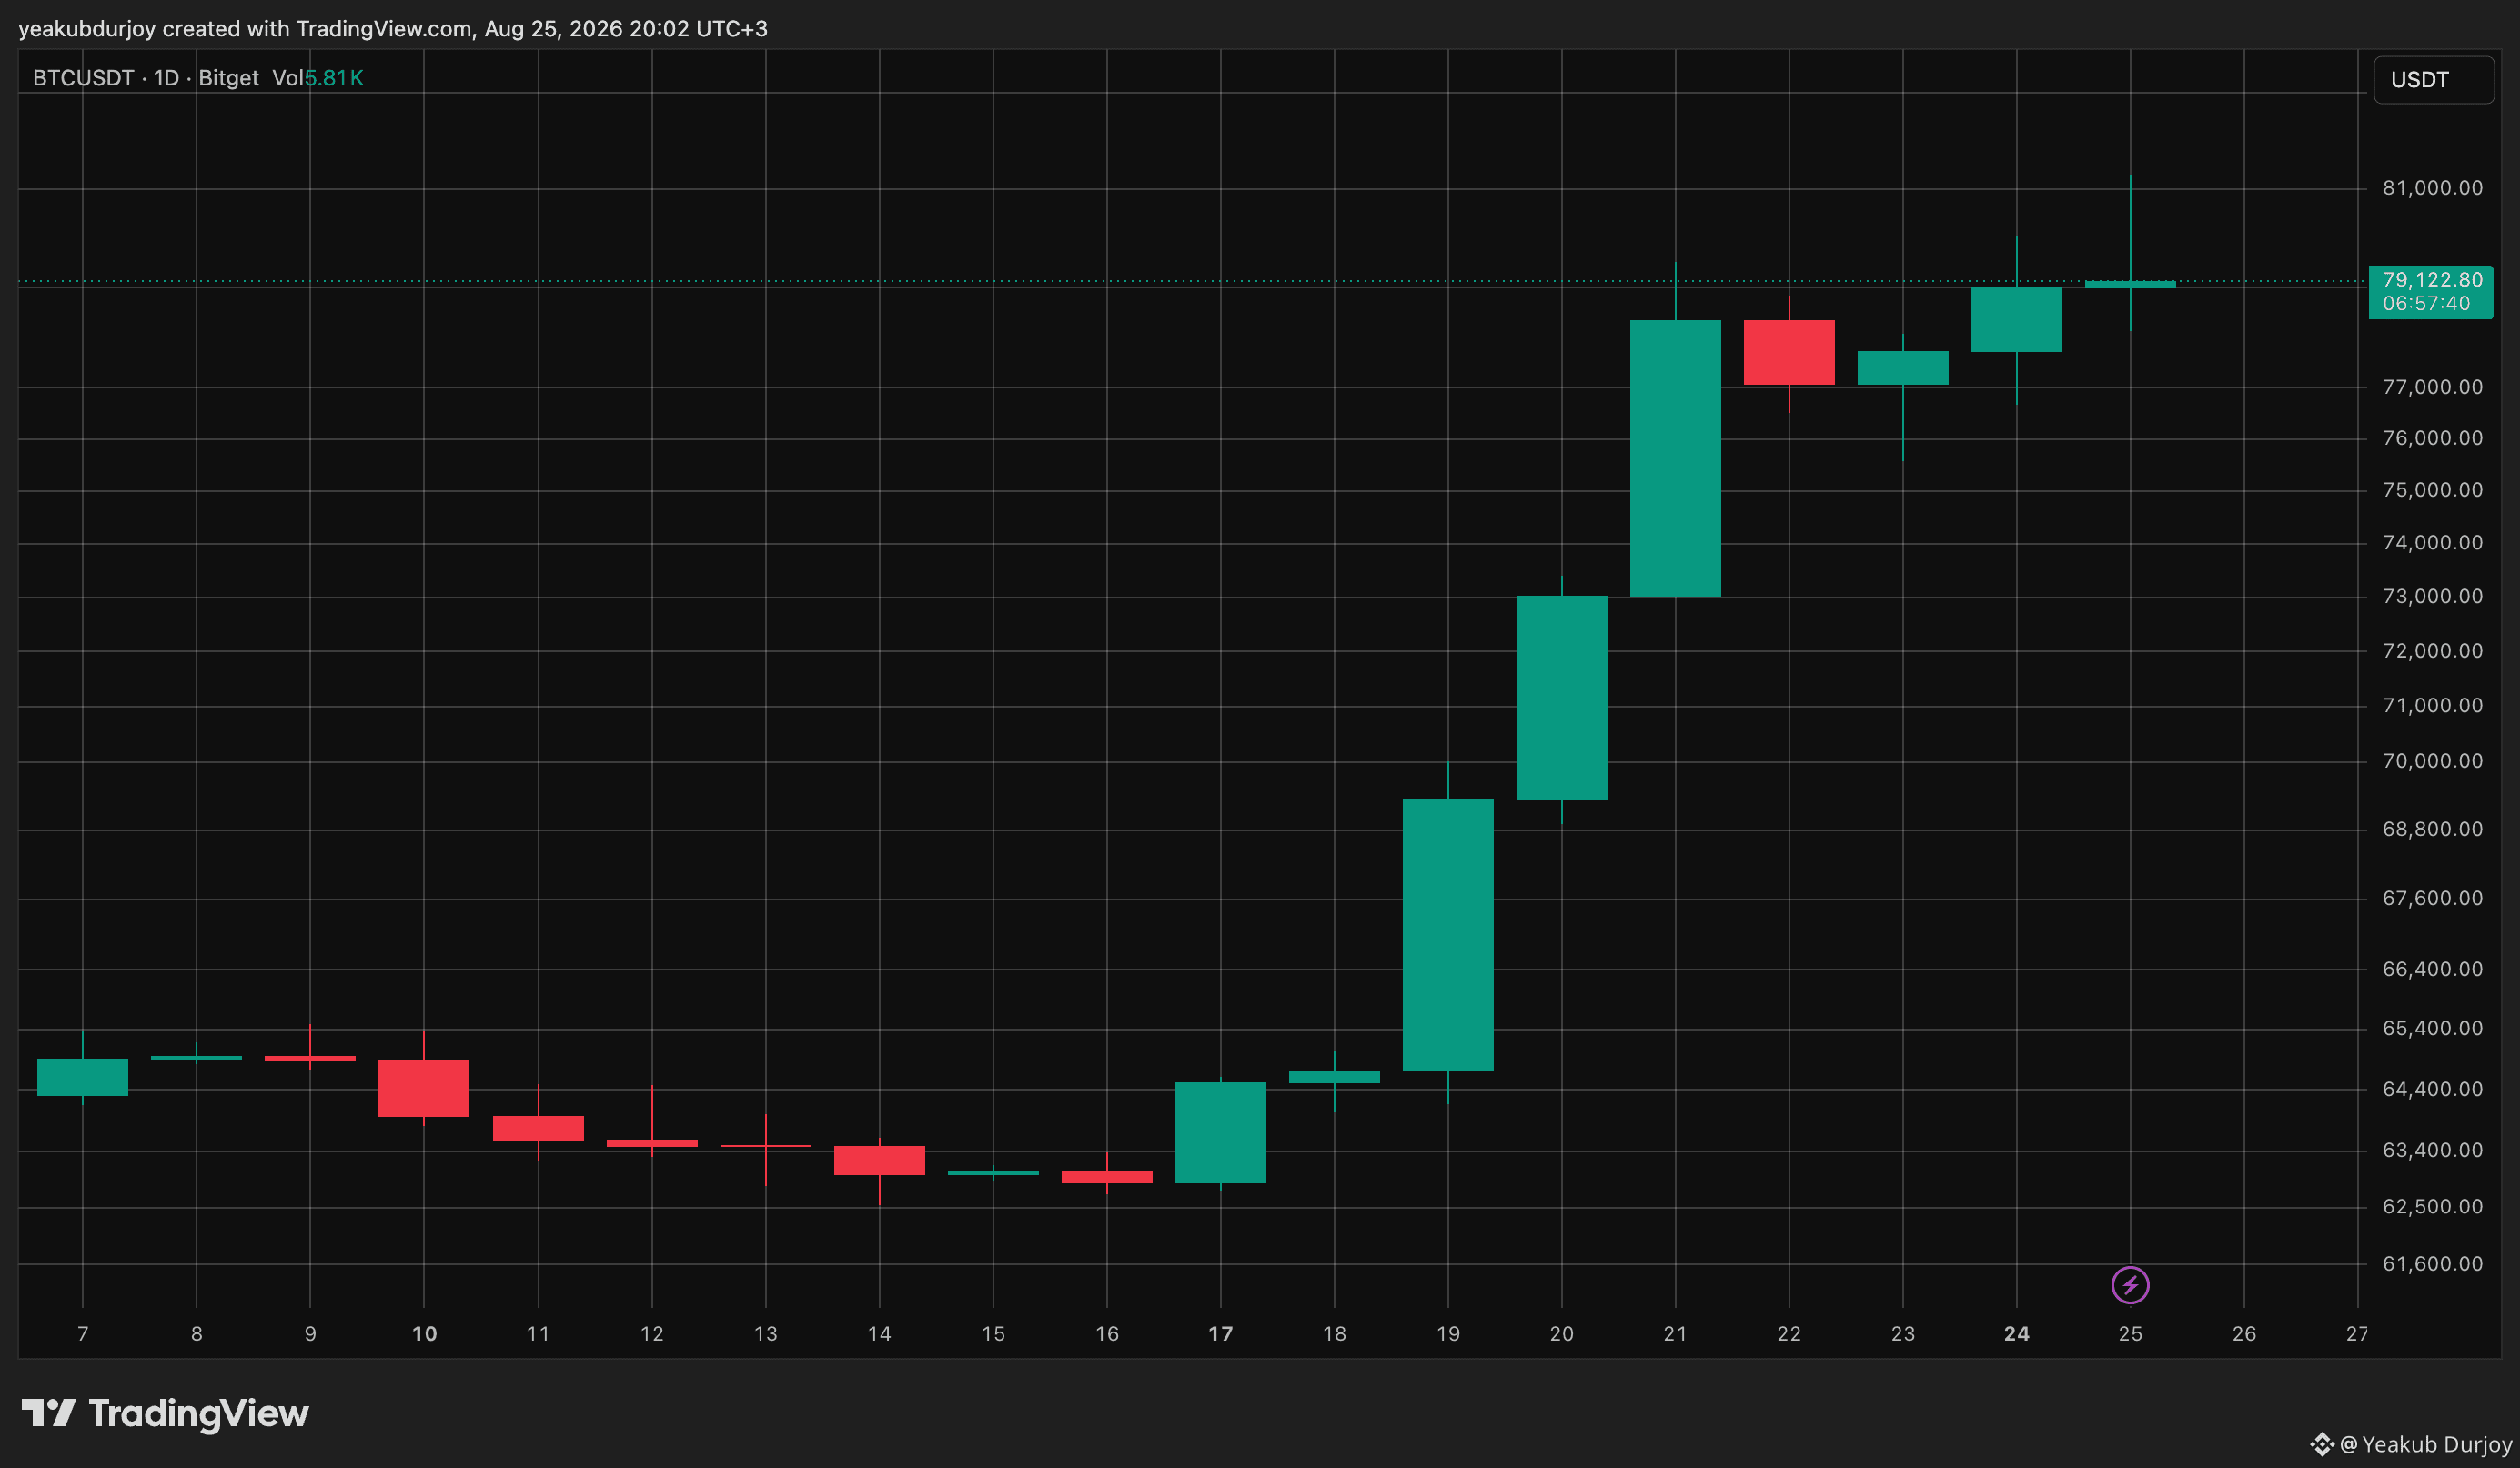
$BTC hali ham uzun tomonda kuchliroq ko‘rinadi, ammo hozirgi narx yaqinda bo‘lgan rad etish zonasiga juda yaqin, shuning uchun toza (aniq) ta’qib qilish uchun kirish qiyin.
Yo‘nalish: Trendlash (Long) — qaytish paytida
Kirish zonasi: 77,800 dan 78,600 gacha
Stop: 77,000 dan past
TP1: 81,272
TP2: 82,500 dan 84,000 gacha
TP3: Momentum davom etsa 86,000 dan 88,000 gacha
Men longni afzal ko‘rishimning sababi shuki, BTC avvalgi oraliqdan kuchli tarzda yuqoriga chiqdi va xaridorlar hali ham qisqa muddatli harakatlanuvchi o‘rtacha ko‘rsatkich (MA) ustida ushlab turishmoqda. Yagona muammo — 81,272 yaqinidagi rad etish, shuning uchun qarshilik ichiga sotib olishdan ko‘ra qaytish (pullback)ni kutgan bo‘lardim. Agar BTC 77,000 ni yo‘qotsa, long setup kuchsizlanadi va narx MA7 atrofida yanada sovishi mumkin.
{future}(BTCUSDT)
$BTC hali ham uzun tomonda kuchliroq ko‘rinadi, ammo hozirgi narx yaqinda bo‘lgan rad etish zonasiga juda yaqin, shuning uchun toza (aniq) ta’qib qilish uchun kirish qiyin.
Yo‘nalish: Trendlash (Long) — qaytish paytida
Kirish zonasi: 77,800 dan 78,600 gacha
Stop: 77,000 dan past
TP1: 81,272
TP2: 82,500 dan 84,000 gacha
TP3: Momentum davom etsa 86,000 dan 88,000 gacha
Men longni afzal ko‘rishimning sababi shuki, BTC avvalgi oraliqdan kuchli tarzda yuqoriga chiqdi va xaridorlar hali ham qisqa muddatli harakatlanuvchi o‘rtacha ko‘rsatkich (MA) ustida ushlab turishmoqda. Yagona muammo — 81,272 yaqinidagi rad etish, shuning uchun qarshilik ichiga sotib olishdan ko‘ra qaytish (pullback)ni kutgan bo‘lardim. Agar BTC 77,000 ni yo‘qotsa, long setup kuchsizlanadi va narx MA7 atrofida yanada sovishi mumkin.
Yo‘nalish: Trendlash (Long) — qaytish paytida
Kirish zonasi: 77,800 dan 78,600 gacha
Stop: 77,000 dan past
TP1: 81,272
TP2: 82,500 dan 84,000 gacha
TP3: Momentum davom etsa 86,000 dan 88,000 gacha
Men longni afzal ko‘rishimning sababi shuki, BTC avvalgi oraliqdan kuchli tarzda yuqoriga chiqdi va xaridorlar hali ham qisqa muddatli harakatlanuvchi o‘rtacha ko‘rsatkich (MA) ustida ushlab turishmoqda. Yagona muammo — 81,272 yaqinidagi rad etish, shuning uchun qarshilik ichiga sotib olishdan ko‘ra qaytish (pullback)ni kutgan bo‘lardim. Agar BTC 77,000 ni yo‘qotsa, long setup kuchsizlanadi va narx MA7 atrofida yanada sovishi mumkin.
3
2.5k
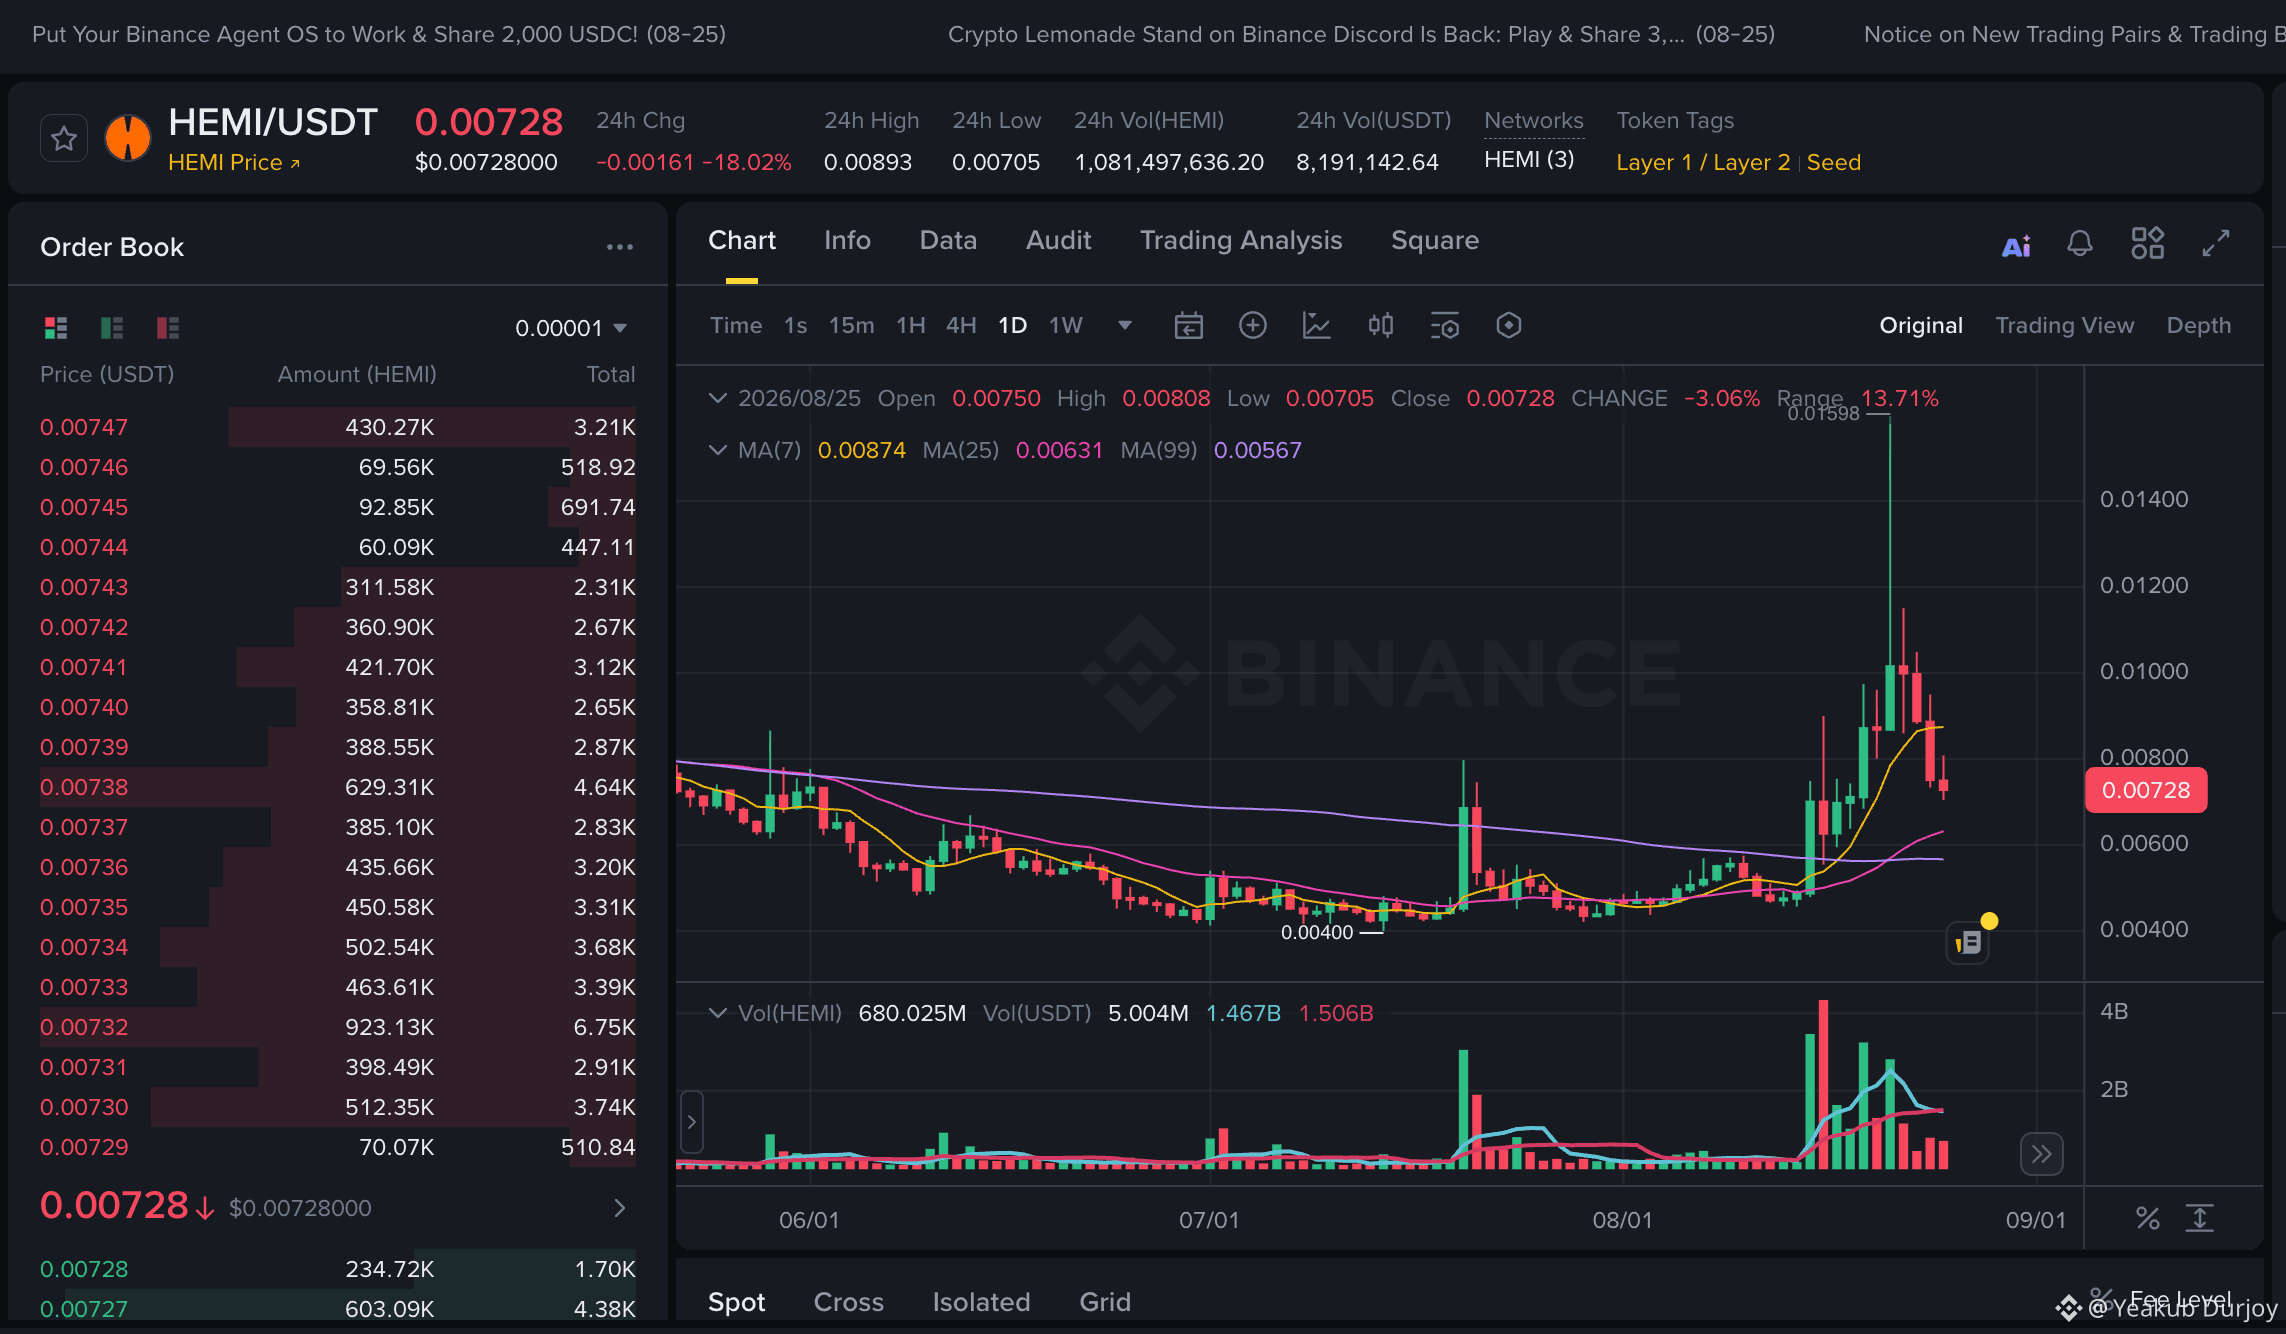
$HEMI o‘sha keskin rad etilishdan keyin kuchsiz ko‘rinayapti, shuning uchun bu yerda dipni ushlashga urinishdan ko‘ra qisqa (short) setupga e’tibor qaratardim.
Bias: Bounce (qaytish) bo‘yicha short
Entry zone: 0.00755 dan 0.00785 gacha
Stop: 0.00815 dan yuqori
TP1: 0.00705
TP2: 0.00660
TP3: 0.00630 dan 0.00600 gacha, agar sotish davom etsa
Men shortni afzal ko‘rishimning sababi: HEMI 0.01598 tomonga bo‘lgan spike (keskin ko‘tarilish) dan keyin qattiq rad etdi va oxirgi shamchalar tepa qism yaqinida sotuvchilar nazoratni qo‘lga olayotganini ko‘rsatmoqda. Biroq aynan eng past (low) nuqtaga short qilmasdim. 0.00755 dan 0.00785 gacha bo‘lgan oraliqqa bounce bo‘lib, so‘ng rad etilish kuzatilsa, bu aniqroq setup bo‘ladi. Agar narx hajm bilan 0.00815 ni qaytarib olsa, short g‘oyasini bekor qilardim.
{future}(HEMIUSDT)
$HEMI o‘sha keskin rad etilishdan keyin kuchsiz ko‘rinayapti, shuning uchun bu yerda dipni ushlashga urinishdan ko‘ra qisqa (short) setupga e’tibor qaratardim.
Bias: Bounce (qaytish) bo‘yicha short
Entry zone: 0.00755 dan 0.00785 gacha
Stop: 0.00815 dan yuqori
TP1: 0.00705
TP2: 0.00660
TP3: 0.00630 dan 0.00600 gacha, agar sotish davom etsa
Men shortni afzal ko‘rishimning sababi: HEMI 0.01598 tomonga bo‘lgan spike (keskin ko‘tarilish) dan keyin qattiq rad etdi va oxirgi shamchalar tepa qism yaqinida sotuvchilar nazoratni qo‘lga olayotganini ko‘rsatmoqda. Biroq aynan eng past (low) nuqtaga short qilmasdim. 0.00755 dan 0.00785 gacha bo‘lgan oraliqqa bounce bo‘lib, so‘ng rad etilish kuzatilsa, bu aniqroq setup bo‘ladi. Agar narx hajm bilan 0.00815 ni qaytarib olsa, short g‘oyasini bekor qilardim.
Bias: Bounce (qaytish) bo‘yicha short
Entry zone: 0.00755 dan 0.00785 gacha
Stop: 0.00815 dan yuqori
TP1: 0.00705
TP2: 0.00660
TP3: 0.00630 dan 0.00600 gacha, agar sotish davom etsa
Men shortni afzal ko‘rishimning sababi: HEMI 0.01598 tomonga bo‘lgan spike (keskin ko‘tarilish) dan keyin qattiq rad etdi va oxirgi shamchalar tepa qism yaqinida sotuvchilar nazoratni qo‘lga olayotganini ko‘rsatmoqda. Biroq aynan eng past (low) nuqtaga short qilmasdim. 0.00755 dan 0.00785 gacha bo‘lgan oraliqqa bounce bo‘lib, so‘ng rad etilish kuzatilsa, bu aniqroq setup bo‘ladi. Agar narx hajm bilan 0.00815 ni qaytarib olsa, short g‘oyasini bekor qilardim.
2
2.8k
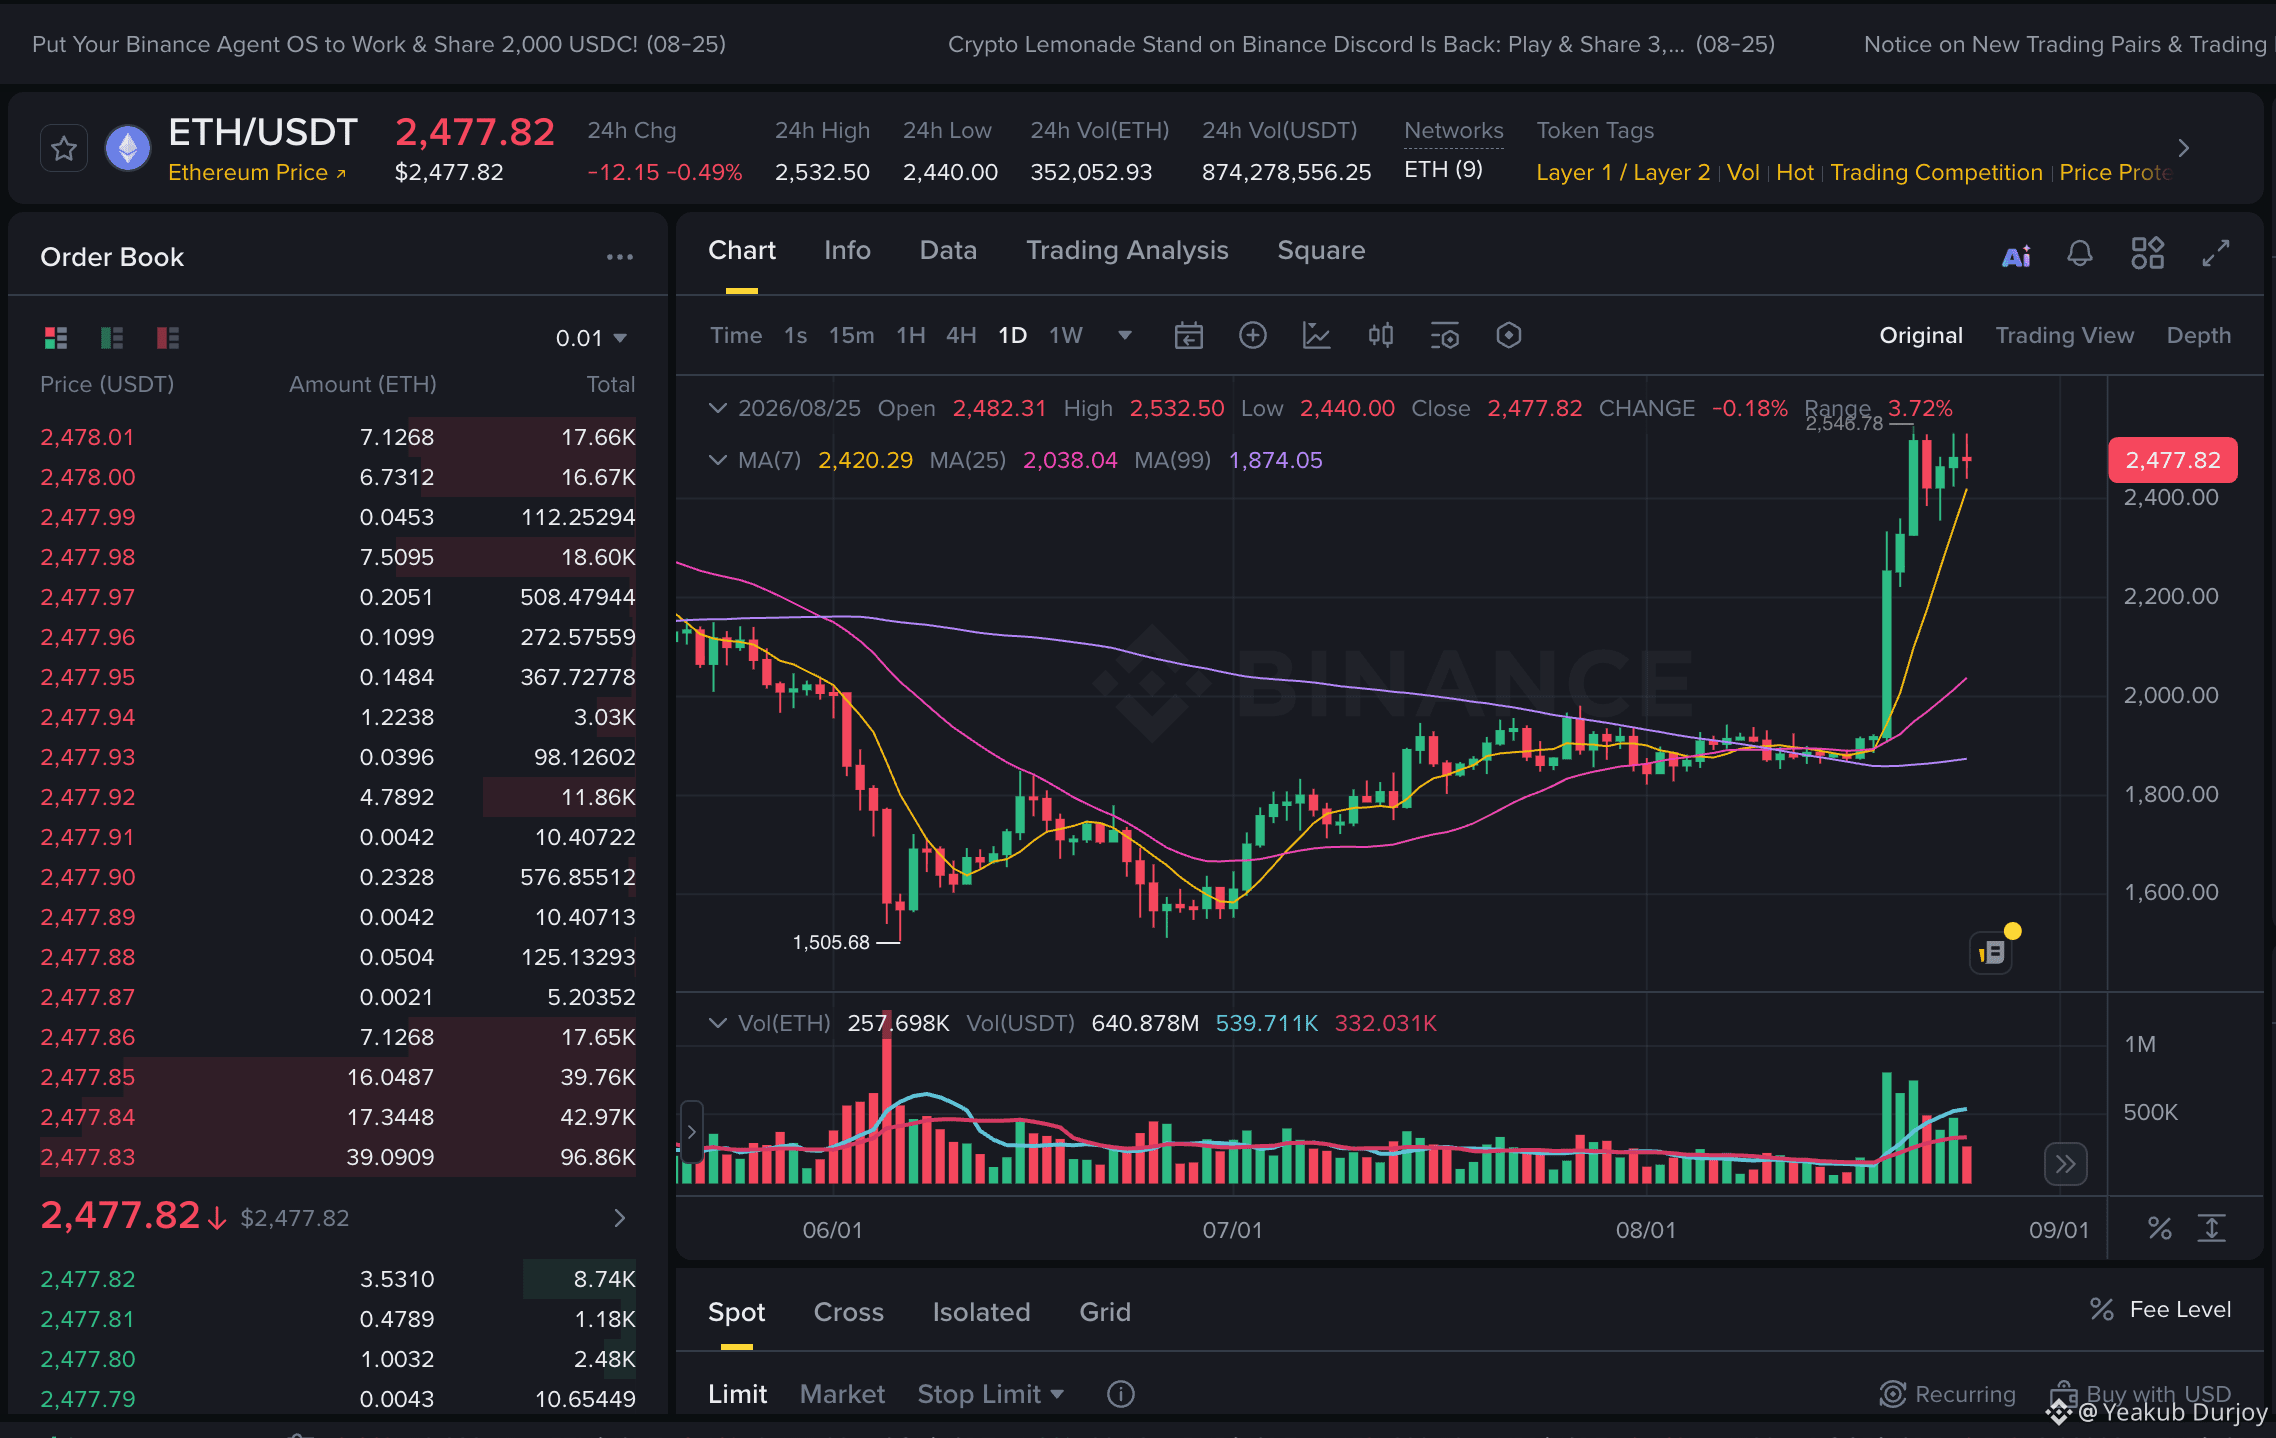
$ETH 2,506 dan rad etilgandan keyin kuchsizroq ko‘rina boshladi, shuning uchun buni majburan long qilish o‘rniga bounce’dan keyin qisqa (short) qilish setup’iga o‘tkazaman.
Yo‘nalish: Bounce’dan keyin short
Kirish zonasi: 2,490 dan 2,500 gacha
Stop: 2,520 dan yuqori
TP1: 2,440
TP2: 2,420
TP3: 2,355 dan 2,390 gacha, agar sotuv davom etsa
Menga bounce’ni kutish afzal, chunki ETH allaqachon high’dan deyarli 100 punkt pastga tushgan, shuning uchun hozirning o‘zida short qilish xavf bo‘yicha yomonroq setup beradi. Agar narx 2,500 dan 2,532 gacha bounce qilib, yana qaytarsa (rad etsa), bu sotuvchilar hali ham faol ekanini tasdiqlaydi.
{future}(ETHUSDT)
$ETH 2,506 dan rad etilgandan keyin kuchsizroq ko‘rina boshladi, shuning uchun buni majburan long qilish o‘rniga bounce’dan keyin qisqa (short) qilish setup’iga o‘tkazaman.
Yo‘nalish: Bounce’dan keyin short
Kirish zonasi: 2,490 dan 2,500 gacha
Stop: 2,520 dan yuqori
TP1: 2,440
TP2: 2,420
TP3: 2,355 dan 2,390 gacha, agar sotuv davom etsa
Menga bounce’ni kutish afzal, chunki ETH allaqachon high’dan deyarli 100 punkt pastga tushgan, shuning uchun hozirning o‘zida short qilish xavf bo‘yicha yomonroq setup beradi. Agar narx 2,500 dan 2,532 gacha bounce qilib, yana qaytarsa (rad etsa), bu sotuvchilar hali ham faol ekanini tasdiqlaydi.
Yo‘nalish: Bounce’dan keyin short
Kirish zonasi: 2,490 dan 2,500 gacha
Stop: 2,520 dan yuqori
TP1: 2,440
TP2: 2,420
TP3: 2,355 dan 2,390 gacha, agar sotuv davom etsa
Menga bounce’ni kutish afzal, chunki ETH allaqachon high’dan deyarli 100 punkt pastga tushgan, shuning uchun hozirning o‘zida short qilish xavf bo‘yicha yomonroq setup beradi. Agar narx 2,500 dan 2,532 gacha bounce qilib, yana qaytarsa (rad etsa), bu sotuvchilar hali ham faol ekanini tasdiqlaydi.
3
8
12.8k
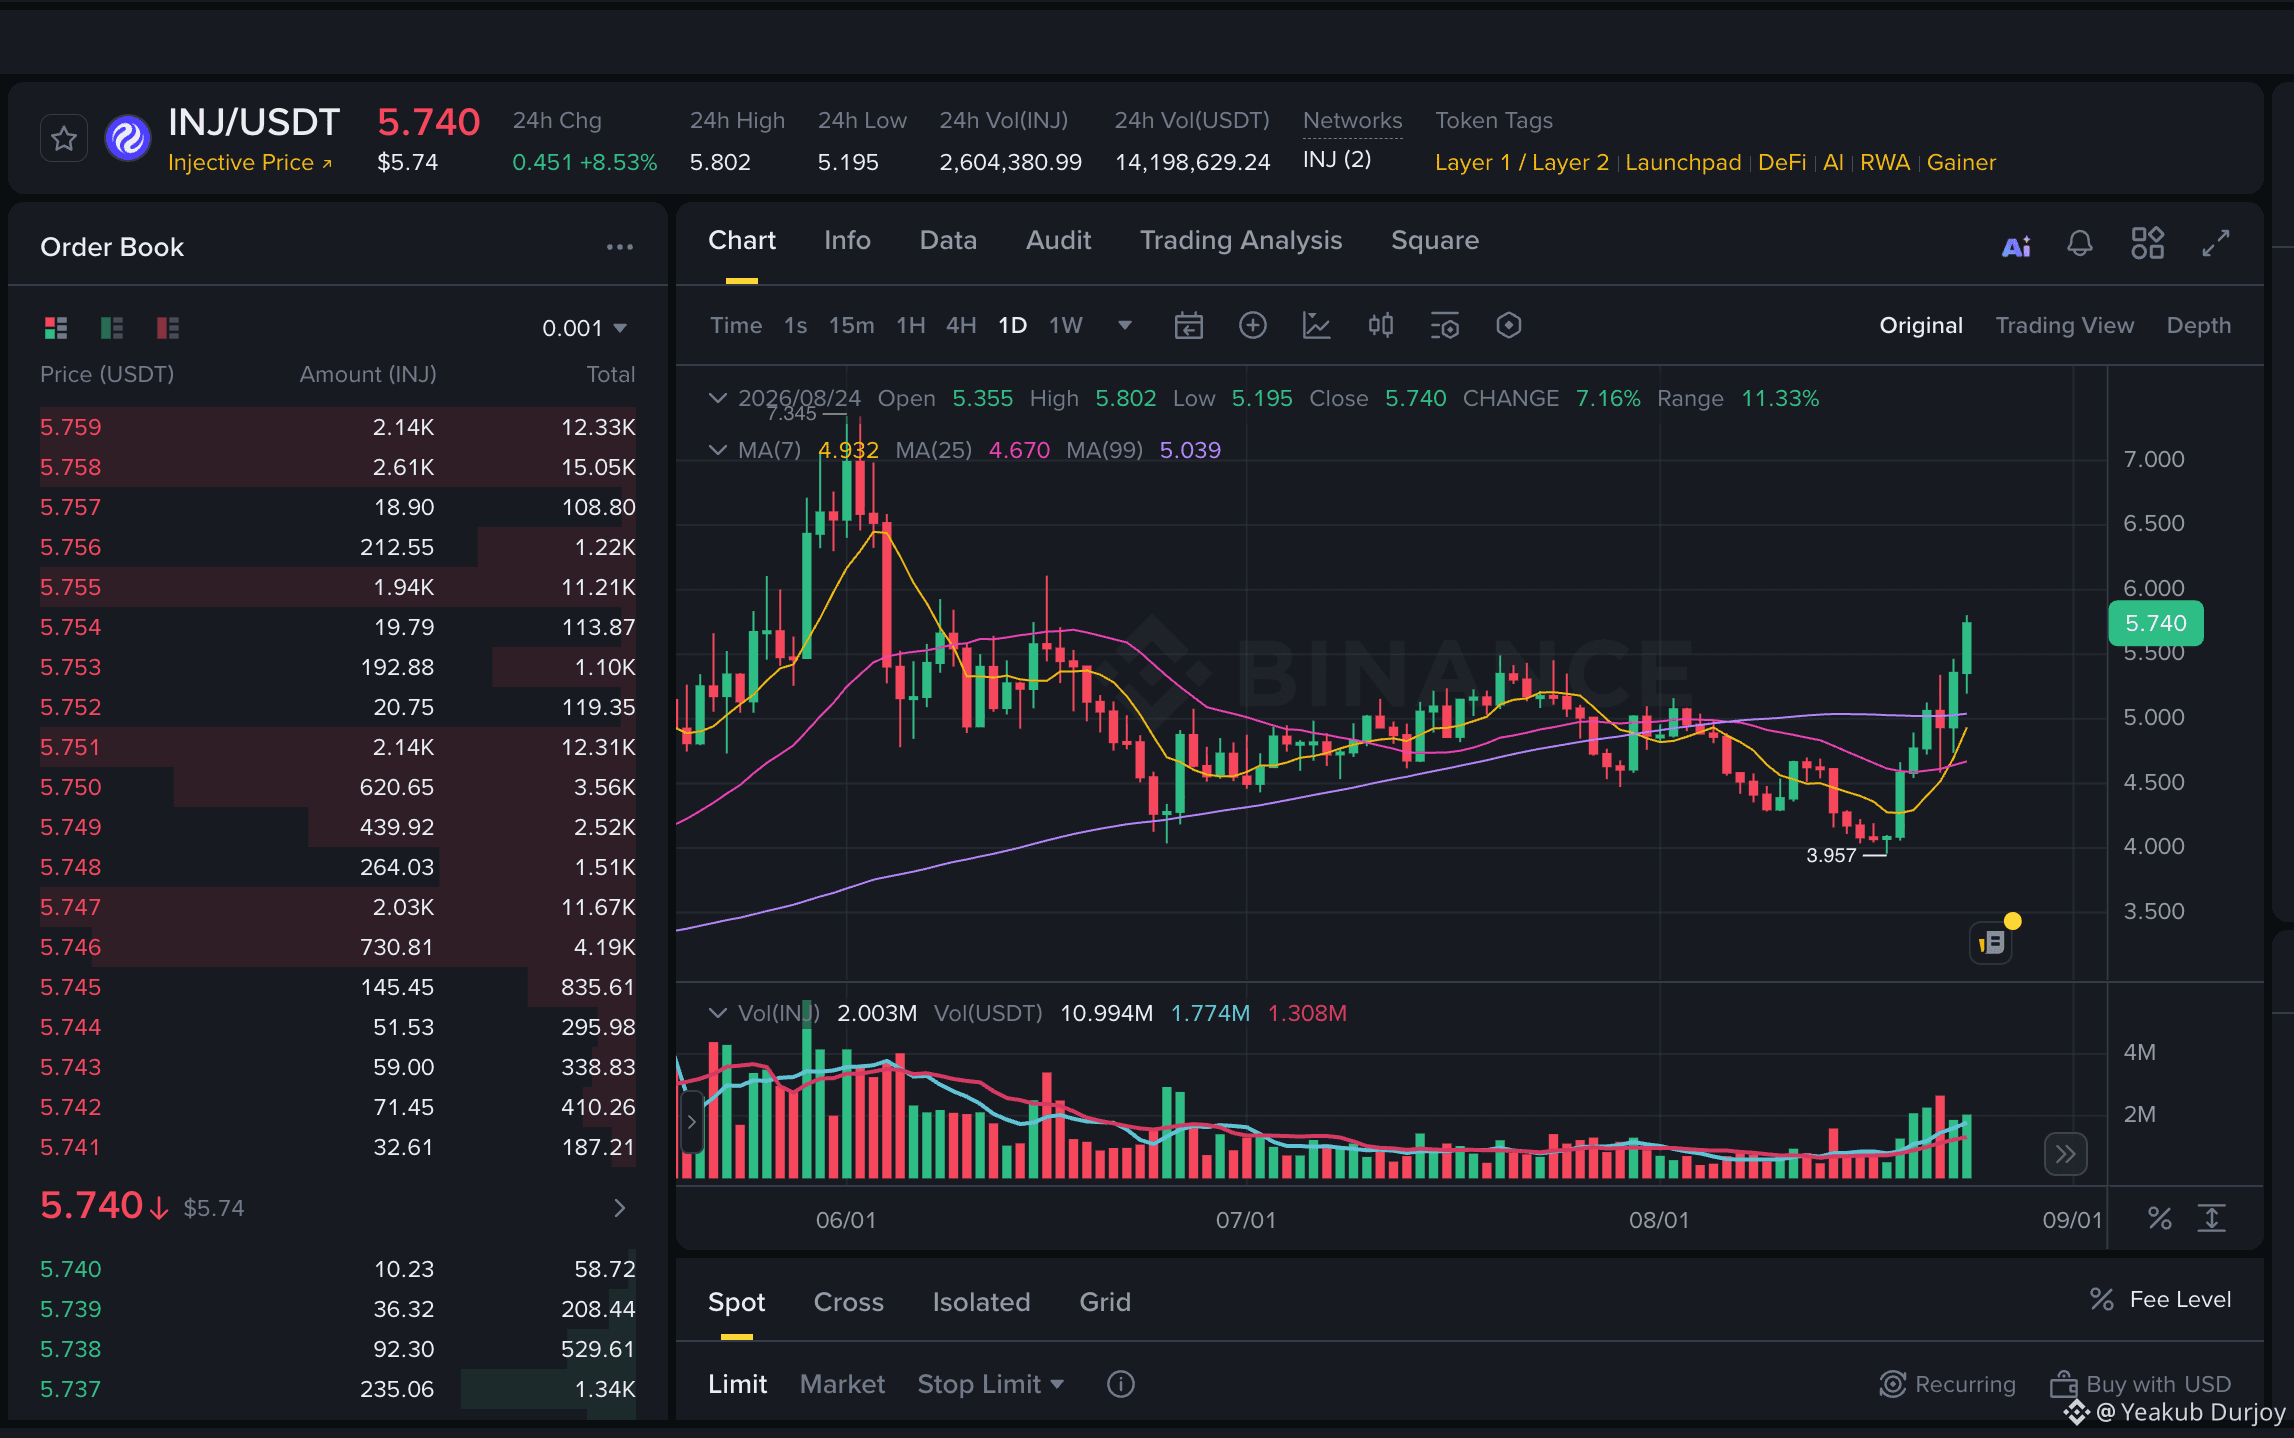
$INJ uzoq muddatli konsolidatsiya uchun yanada konstruktiv ko‘rinishni boshlamoqda, lekin baribir 24 soatlik eng yuqori darajani quvib emas, balki yaxshiroq kirish nuqtasini kutgan bo‘lardim. Narx taxminan 5.740 atrofida, 24 soat ichida +8.53% va u qaytib MA7 4.932, MA25 4.670 hamda MA99 5.039 ustiga chiqqan.
Yo‘nalish: Qaytishdan keyin Long
Kirish zonasi: 5.350 dan 5.550 gacha
Stop: 5.100 dan past
TP1: 5.802
TP2: 6.200
TP3: 6.700 dan 7.000 gacha, agar impuls davom etsa
Longni afzal ko‘rishim sababi shuki, INJ 3.957 dan qaytib tushganidan keyin harakatlanuvchi o‘rtachalarni qayta qo‘lga kiritdi va so‘nggi hajm xaridorlar qaytayotganini ko‘rsatmoqda. Setap 5.100–5.200 atrofidagi tayanch zonadan narx yuqorida ushlanib tursa, amal qilaveradi. 5.802 dan yuqoriga toza break davomiylikni tasdiqlaydi, lekin yanada yaxshi kirish — avval tayanchga qaytish (pullback) bo‘ladi.
{future}(INJUSDT)
$INJ uzoq muddatli konsolidatsiya uchun yanada konstruktiv ko‘rinishni boshlamoqda, lekin baribir 24 soatlik eng yuqori darajani quvib emas, balki yaxshiroq kirish nuqtasini kutgan bo‘lardim. Narx taxminan 5.740 atrofida, 24 soat ichida +8.53% va u qaytib MA7 4.932, MA25 4.670 hamda MA99 5.039 ustiga chiqqan.
Yo‘nalish: Qaytishdan keyin Long
Kirish zonasi: 5.350 dan 5.550 gacha
Stop: 5.100 dan past
TP1: 5.802
TP2: 6.200
TP3: 6.700 dan 7.000 gacha, agar impuls davom etsa
Longni afzal ko‘rishim sababi shuki, INJ 3.957 dan qaytib tushganidan keyin harakatlanuvchi o‘rtachalarni qayta qo‘lga kiritdi va so‘nggi hajm xaridorlar qaytayotganini ko‘rsatmoqda. Setap 5.100–5.200 atrofidagi tayanch zonadan narx yuqorida ushlanib tursa, amal qilaveradi. 5.802 dan yuqoriga toza break davomiylikni tasdiqlaydi, lekin yanada yaxshi kirish — avval tayanchga qaytish (pullback) bo‘ladi.
Yo‘nalish: Qaytishdan keyin Long
Kirish zonasi: 5.350 dan 5.550 gacha
Stop: 5.100 dan past
TP1: 5.802
TP2: 6.200
TP3: 6.700 dan 7.000 gacha, agar impuls davom etsa
Longni afzal ko‘rishim sababi shuki, INJ 3.957 dan qaytib tushganidan keyin harakatlanuvchi o‘rtachalarni qayta qo‘lga kiritdi va so‘nggi hajm xaridorlar qaytayotganini ko‘rsatmoqda. Setap 5.100–5.200 atrofidagi tayanch zonadan narx yuqorida ushlanib tursa, amal qilaveradi. 5.802 dan yuqoriga toza break davomiylikni tasdiqlaydi, lekin yanada yaxshi kirish — avval tayanchga qaytish (pullback) bo‘ladi.
4
3k
Ko‘proq kontentni ko‘rish uchun tizimga kiring
Binance Square'da global kriptovalyuta foydalanuvchilariga qo‘shiling
⚡️ Kriptovalyuta haqida eng so‘nggi va foydali ma’lumotlarni oling.
💬 Dunyoning eng yirik kriptovalyuta birjasi tomonidan ishonchli deb topilgan.
👍 Tasdiqlangan mualliflardan haqiqiy tahlillarni kashf eting.
Email / telefon raqami
Trenddagi mavzular
AIStocksWhatNext
732,345 marta koʻrilgan
5,582 muhokama qilmoqda
Trendlashayotgan xeshteglar kampaniyamizda “Share & Win” trafik mukofotini qo‘lga kiriting
✨Mavzu: AI aksiya kurslari o‘sishda davom etayotgan bir paytda yana qanday investitsiya imkoniyatlari bor?
👉Qanday qo‘shilish:
#AIStocksWhatNext xeshtegi bilan qisqa post yoki maqola joylang
Siz bu holatda bullish tomondamisiz yoki bearish — shuni ayting va AI aksiyalaringiz bo‘yicha portfelingizni yoki treydlaringizni ulashing; treyd vidjeti sizning ishtirokingizga moslikni oshirishi mumkin.
Shuningdek, postingizni ma’lumotlar yoki grafiklar bilan boyitib, AI tomonidan yaratilgan rasmlardan foydalanmaslik orqali kuchaytira olasiz.
✍️Quyidagi yo‘nalishlardan kelib chiqib kontent yarating:
- Nvidia chip sotuvlari kelasi yili ikki baravar bo‘lishini aytdi, eng yirik AI kompaniyalar esa rekord darajadagi daromadlarni qayd etishda davom etyapti — ortidagi hisoblash xarajatlari ham juda katta. AIga talab haqiqatan ham shiddat bilan oshyaptimi? Bu qancha davom etishi mumkin? AI aksiyalar hamma joyda o‘sishda. Bu haqiqiy “breakout”mi yoki faqat qisqa muddatli sakrashmi?
- Tarmoq yetakchilari AI rivojlanishini sekinlashtirishga chaqirmoqda, Trump esa “AI Force” barpo etishni rejalashtirib, AI kelajakda AQSh YAIMning 25%ini tashkil qilishi mumkinligini aytmoqda. Siz qaysi tomondsiz? Davlat darajasidagi qo‘llab-quvvatlash AI aksiyalar uchun uzoq muddatli yutuq bo‘ladimi?
- Siz AI aksiyalarini sotib olyapsizmi? Bizning trade sharing vidjetimiz orqali AI’ga oid treydingiz/ulushingizni ulashing.
⏰Kampaniya davri:
- 2026-09-22 7:00 - 2026-09-24 4:00 UTC
🎁Mukofot:
- Yuqoridagi ko‘rsatmalarga mos keladigan va 100 tadan ko‘p so‘zdan iborat malakali postlar ko‘rib chiqiladi hamda 500 dan 3 000 gacha bo‘lgan tasodifiy trafik oshiruvchi qo‘shimcha olishi mumkin. Postingiz tanlansa, feed kotibingizdan bildirishnoma olasiz.
- Binance Square Official’da maqolangizni namoyish qilish imkoniyatiga ega bo‘ling
Postingiz uchun g‘oyalar kerakmi? Mavzu sahifasiga kiring #AIStocksWhatNext yoki Square Guide on How to Post for Better Reach.
Binance Square Official
·537 ta layk
·1.5M marta koʻrilgan
BCHJumps28%OnCMEFuturesListing
0 marta koʻrilgan
62 muhokama qilmoqda
WallStreetEarningsRevisionsTurnBearish
23 marta koʻrilgan
32 muhokama qilmoqda