
Link Trading Frenzy
20.1k Posts

Link Trading Frenzy
High win rate intraday refueling📈, make me your money making tool💰.
Frequent Trader
6 Years
134 Following
5.5K+ Followers
16.6K+ Liked
Posts
All
Quotes
Videos
See translation
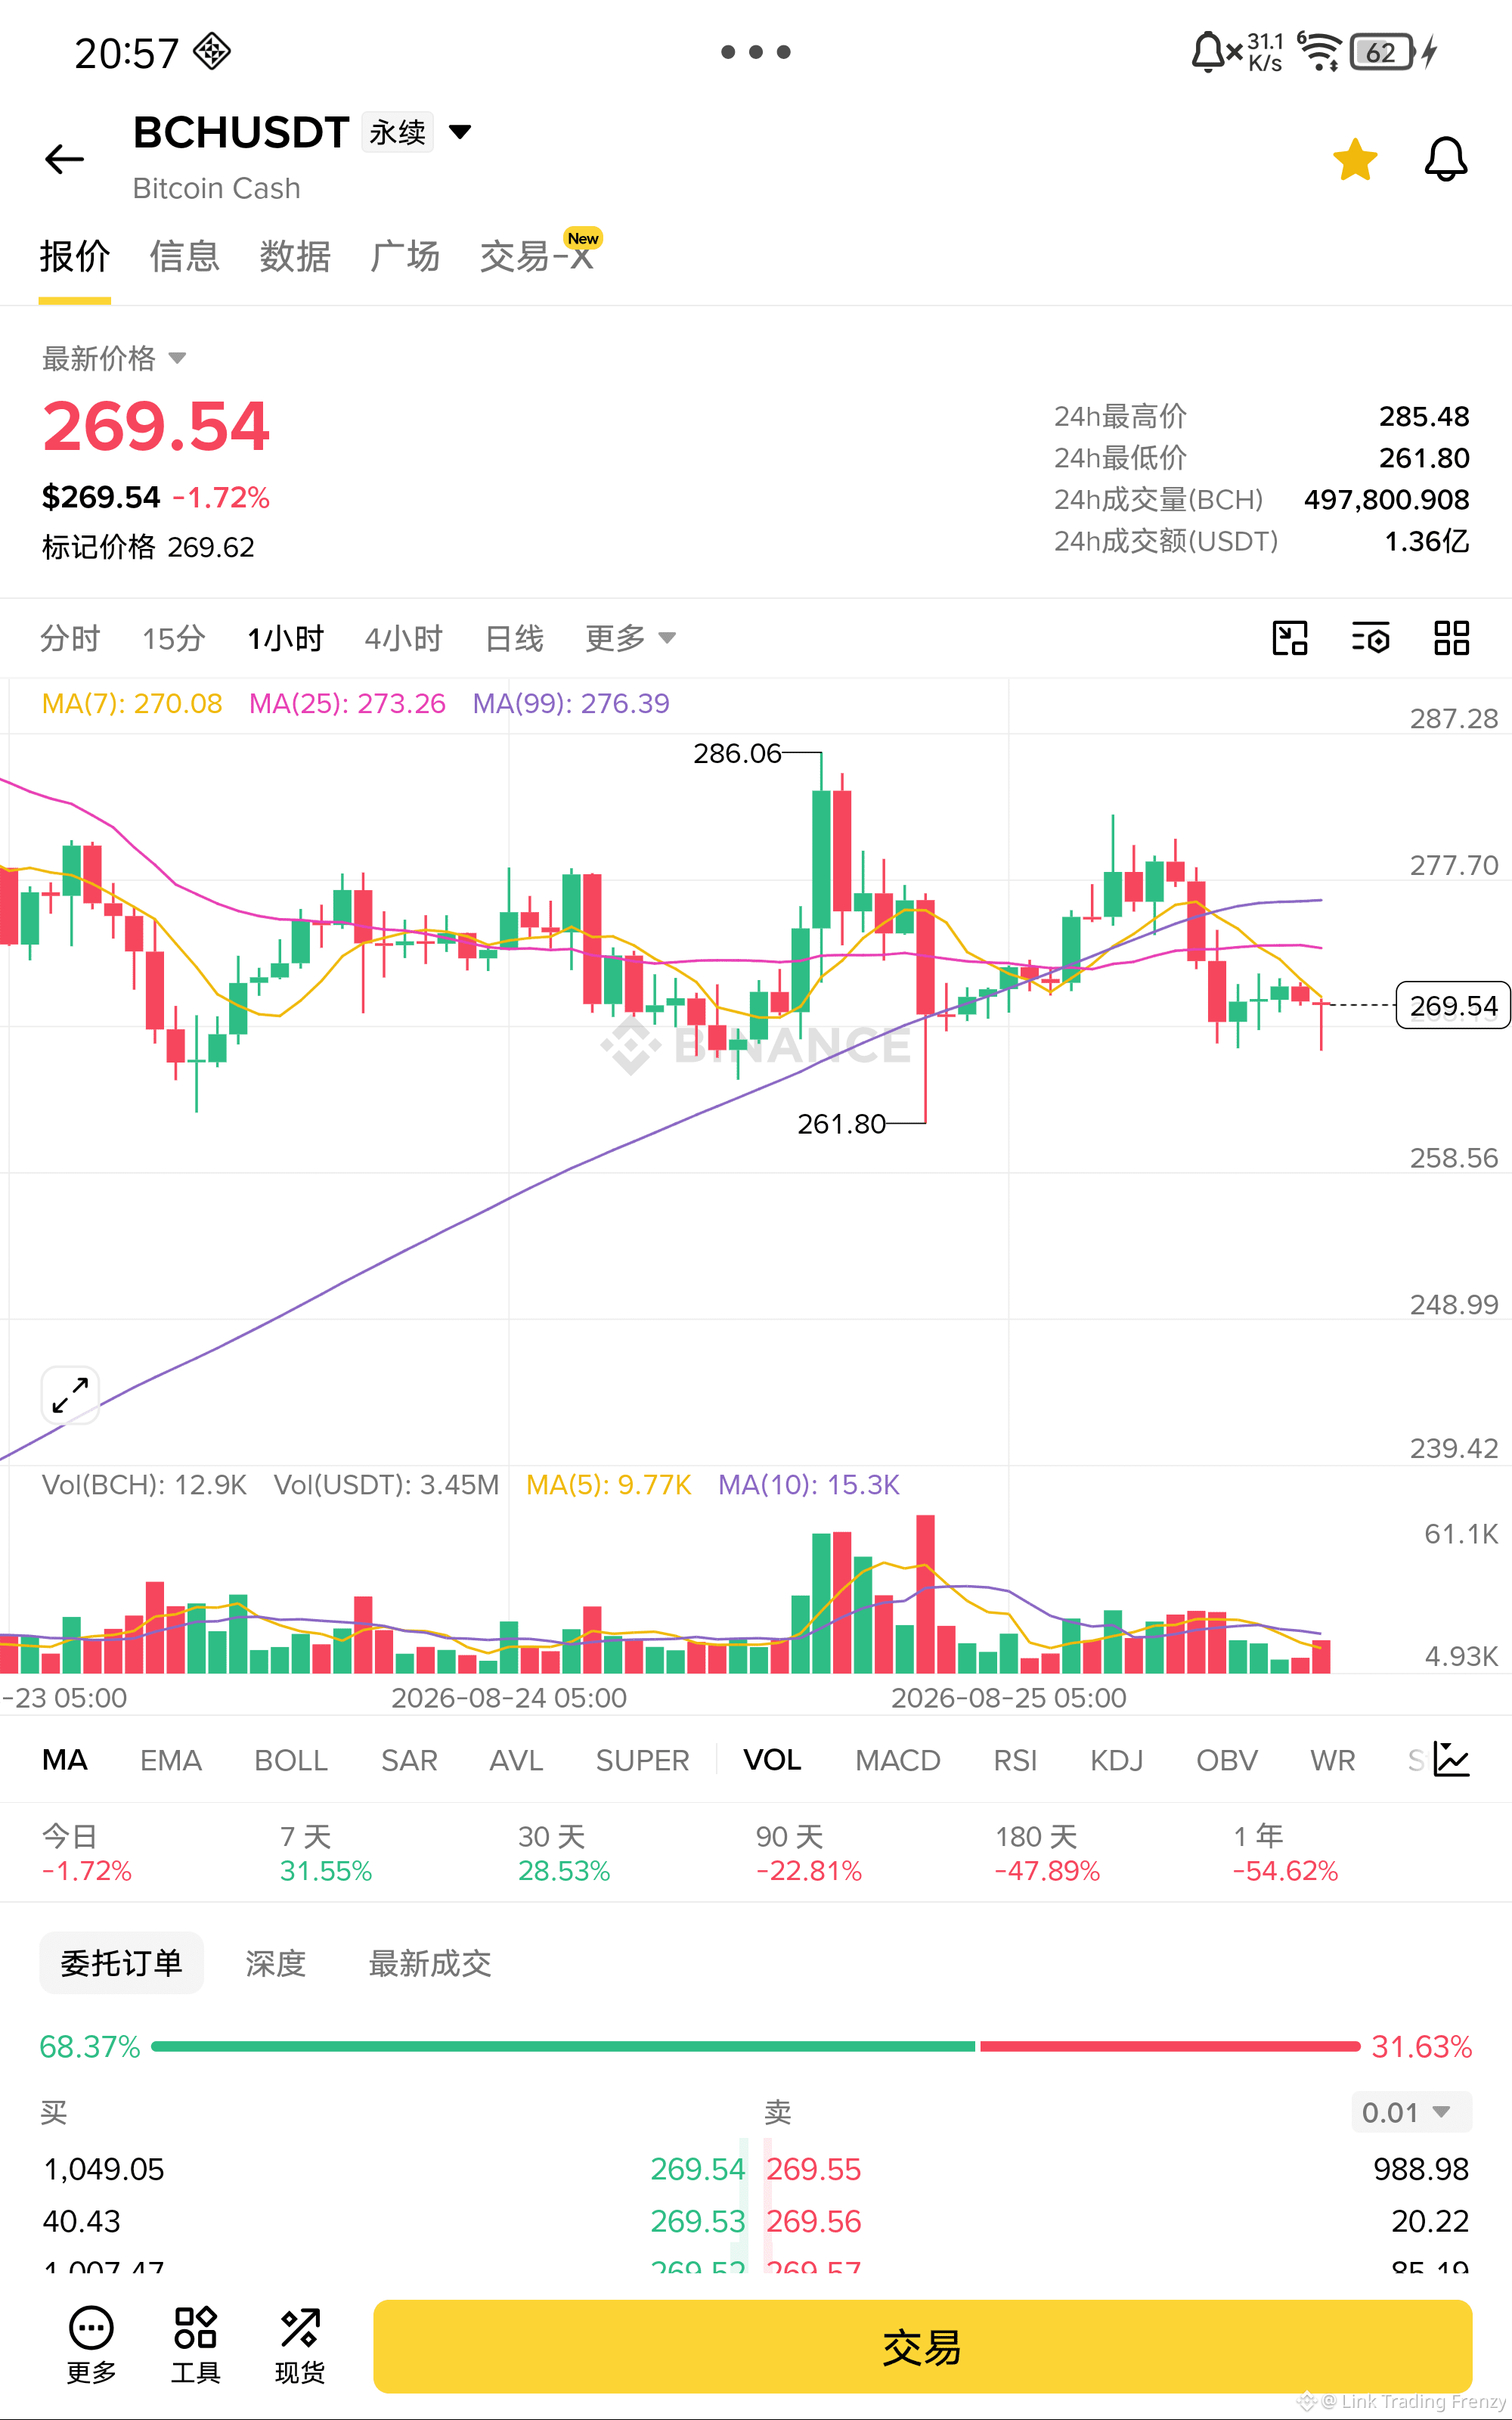
$BCH 速度做空!!
BCH连续跌破MA7、MA25、MA99三道均线,MA7即将死叉MA25确认翻空,均线系统全面转空头排列,MACD绿柱持续放大,KDJ向下扩散,从285.48冲高回落后反弹连272都摸不回去,下方261.80前低就是第一目标。
入场:269.54
止损:274.00
止盈:262.00
$BCH - 空 🔻
从下方进入交易👇
BCH连续跌破MA7、MA25、MA99三道均线,MA7即将死叉MA25确认翻空,均线系统全面转空头排列,MACD绿柱持续放大,KDJ向下扩散,从285.48冲高回落后反弹连272都摸不回去,下方261.80前低就是第一目标。
入场:269.54
止损:274.00
止盈:262.00
$BCH - 空 🔻
从下方进入交易👇
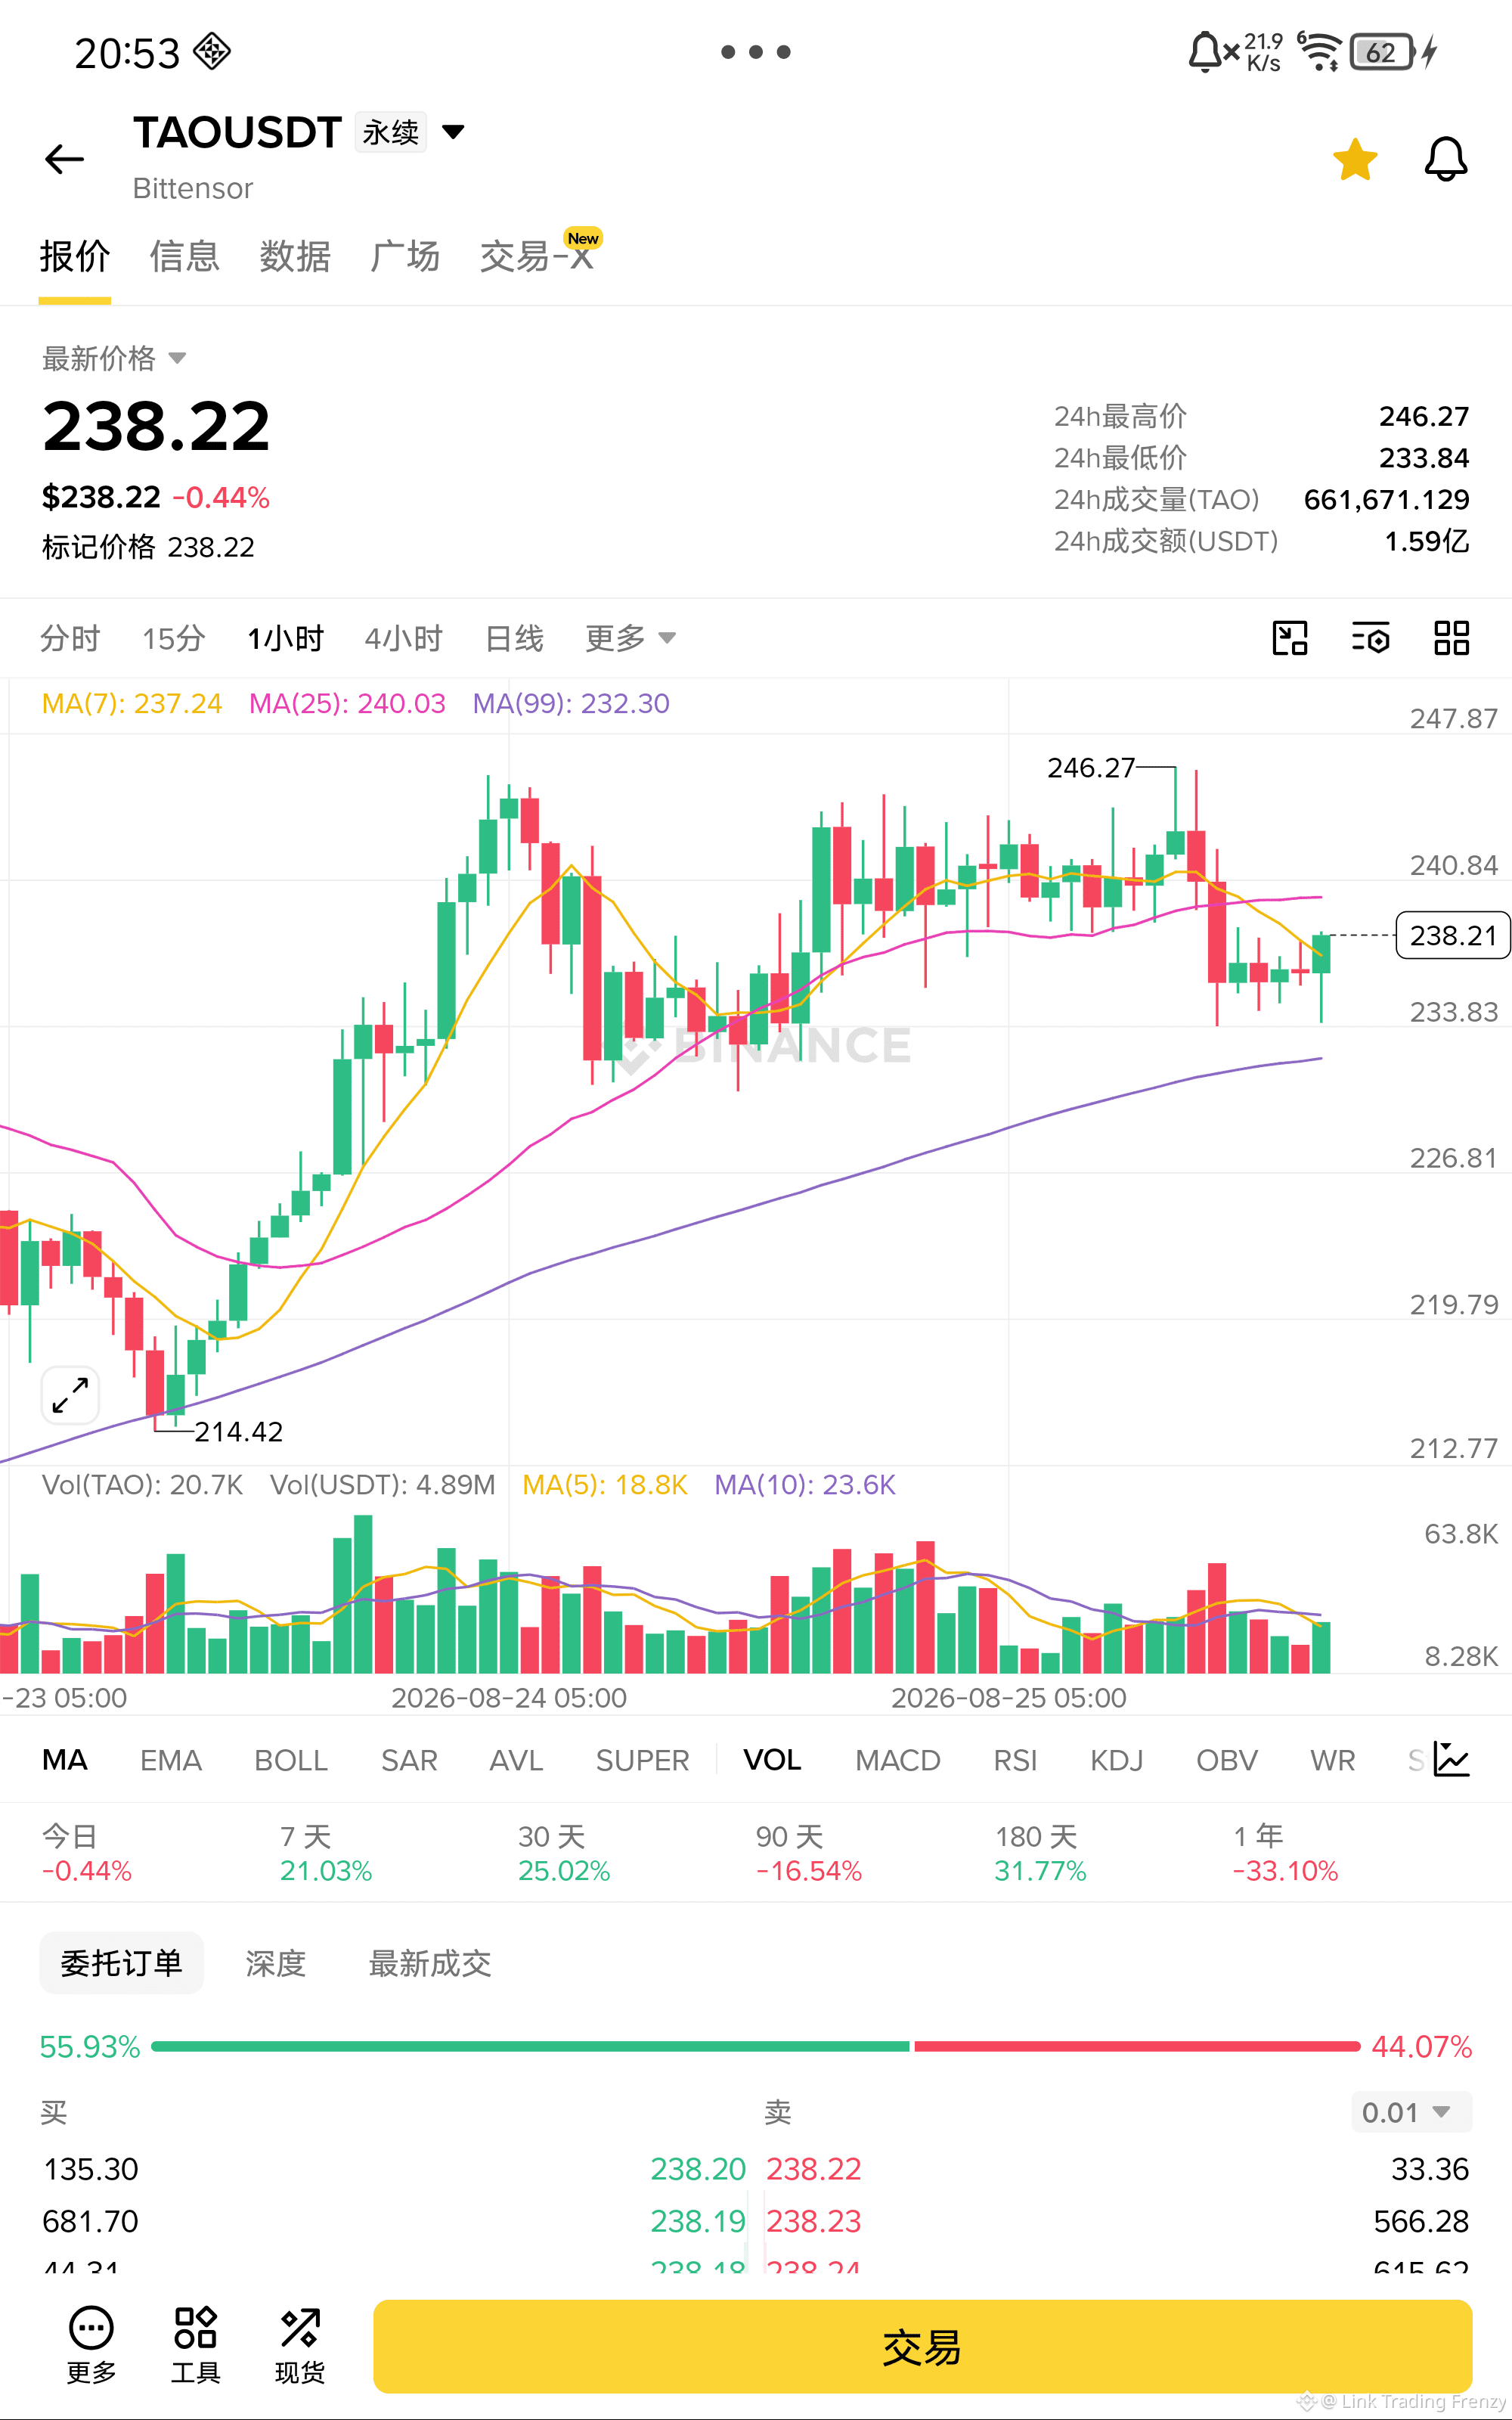
$TAO Sell/short aggressively!!
TAO has been repeatedly under pressure below the MA25 (240.03). Although MA7 has moved above, the momentum is clearly insufficient. The MACD histogram’s green bars continue to expand, the KDJ is spreading downward, and after the price fell back from around 245, the rebound has become increasingly weak. 240 is a hard ceiling on top, while the MA99 (232.30) below is the first target.
Entry: 238.22
Stop loss: 242.00
Take profit: 229.00
$TAO - Short 🔻
Enter from the bottom of the chart👇
TAO has been repeatedly under pressure below the MA25 (240.03). Although MA7 has moved above, the momentum is clearly insufficient. The MACD histogram’s green bars continue to expand, the KDJ is spreading downward, and after the price fell back from around 245, the rebound has become increasingly weak. 240 is a hard ceiling on top, while the MA99 (232.30) below is the first target.
Entry: 238.22
Stop loss: 242.00
Take profit: 229.00
$TAO - Short 🔻
Enter from the bottom of the chart👇
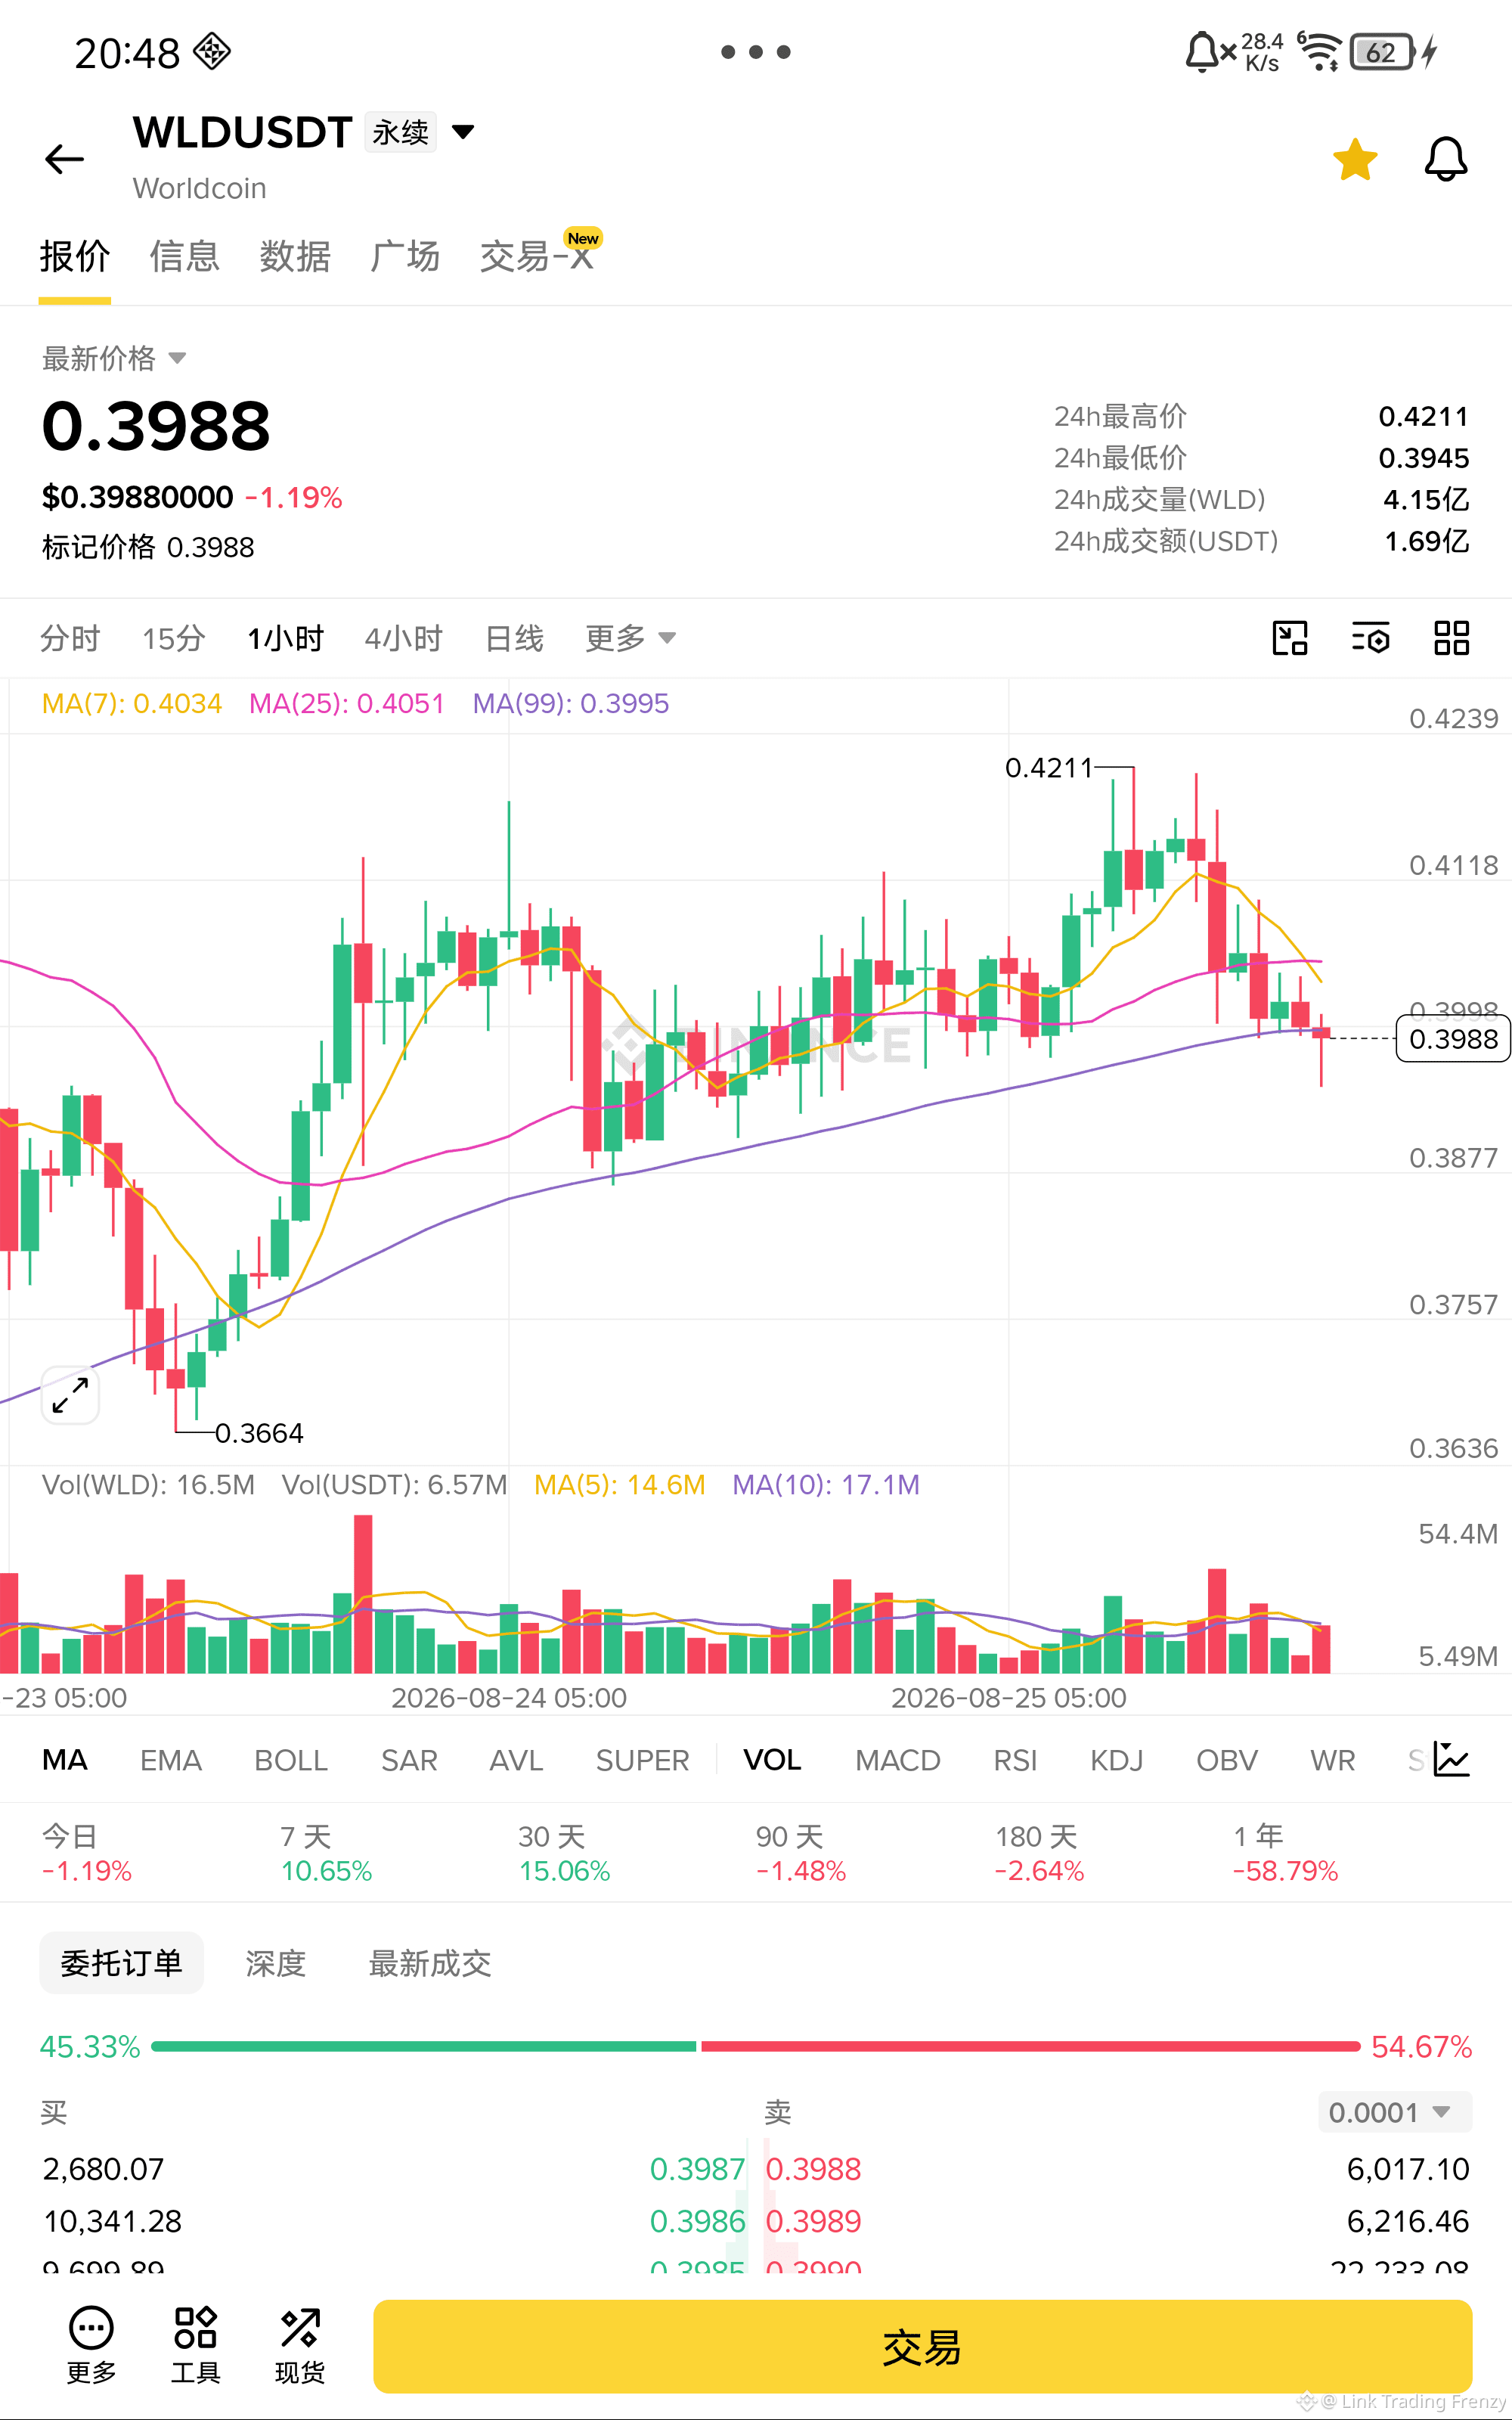
$WLD Sell short fast!!
WLD has been suppressed by the MA7 and MA25 for multiple consecutive days. The price has been unable to break through the 0.40 level effectively. The MACD green histogram continues to expand, and the KDJ dead cross keeps spreading downward. The short-term downtrend is very smooth.
MA99 (0.3995) has already turned from support into resistance. The moving averages above are tightly stacking and suppressing the price. The first target is the prior low at 0.3867. This level is very likely not to hold.
Entry: 0.3988
Stop loss: 0.4050
Take profit: 0.3700
$WLD - Short 🔻
Enter from below👇
WLD has been suppressed by the MA7 and MA25 for multiple consecutive days. The price has been unable to break through the 0.40 level effectively. The MACD green histogram continues to expand, and the KDJ dead cross keeps spreading downward. The short-term downtrend is very smooth.
MA99 (0.3995) has already turned from support into resistance. The moving averages above are tightly stacking and suppressing the price. The first target is the prior low at 0.3867. This level is very likely not to hold.
Entry: 0.3988
Stop loss: 0.4050
Take profit: 0.3700
$WLD - Short 🔻
Enter from below👇
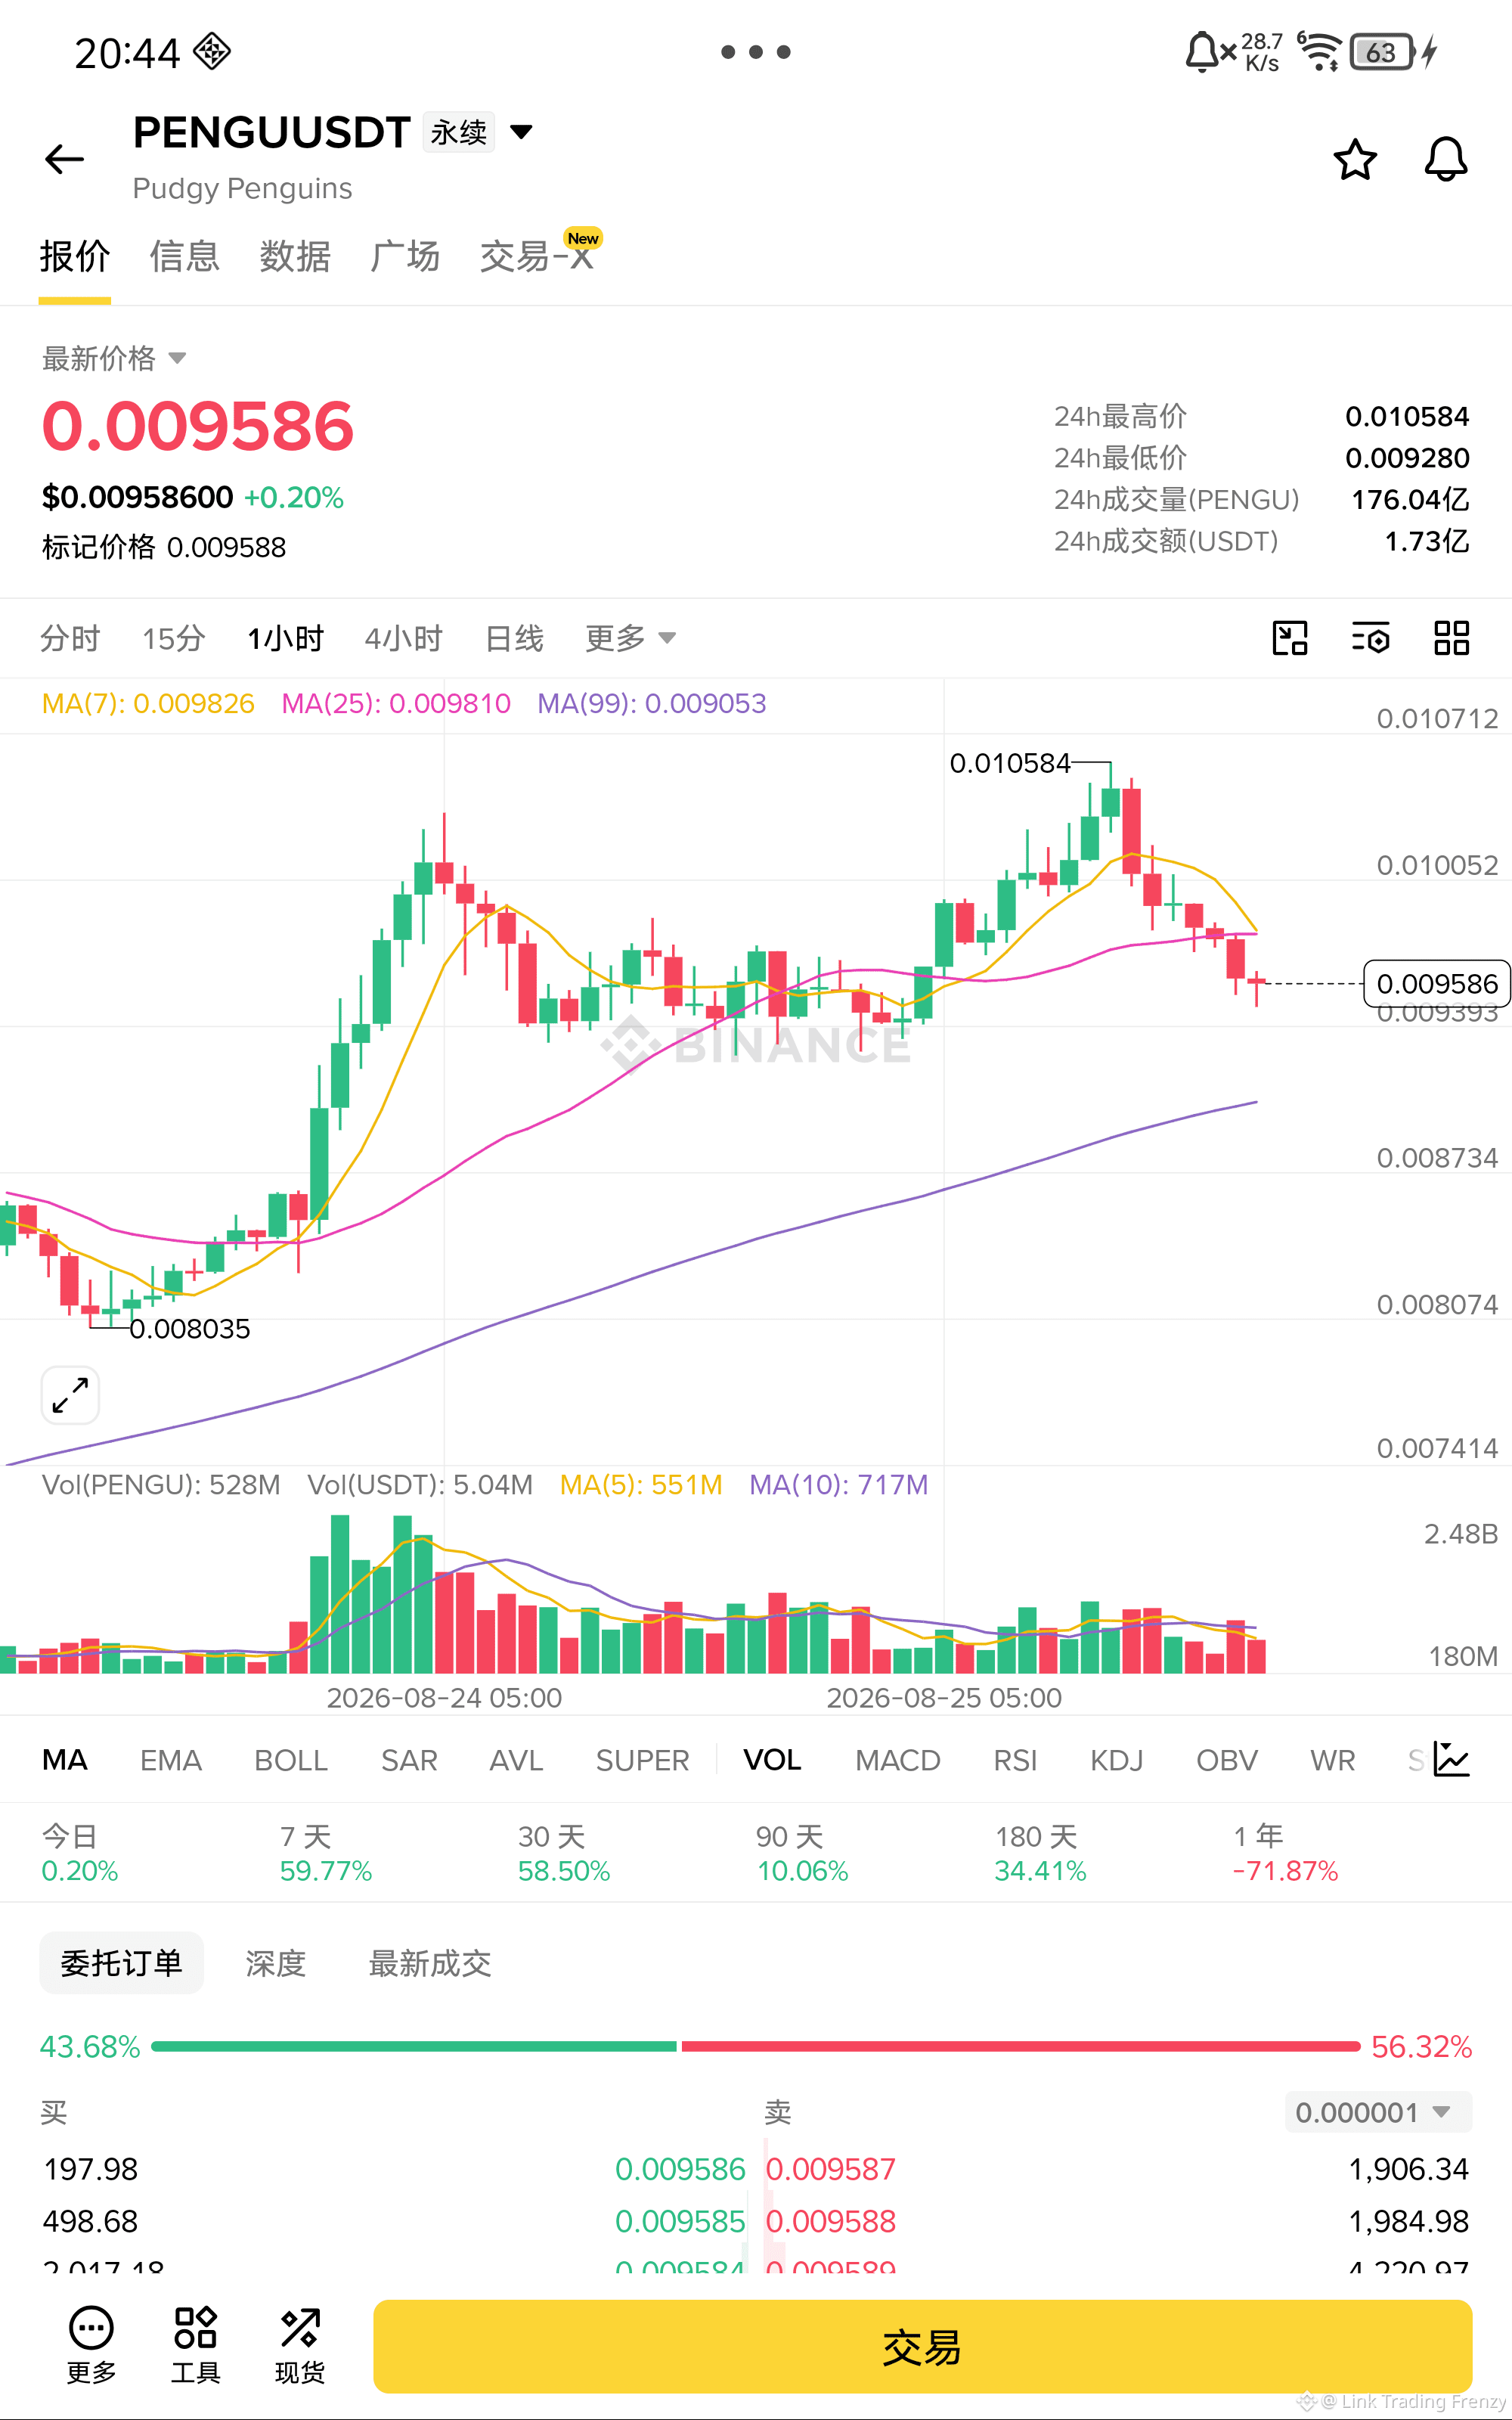
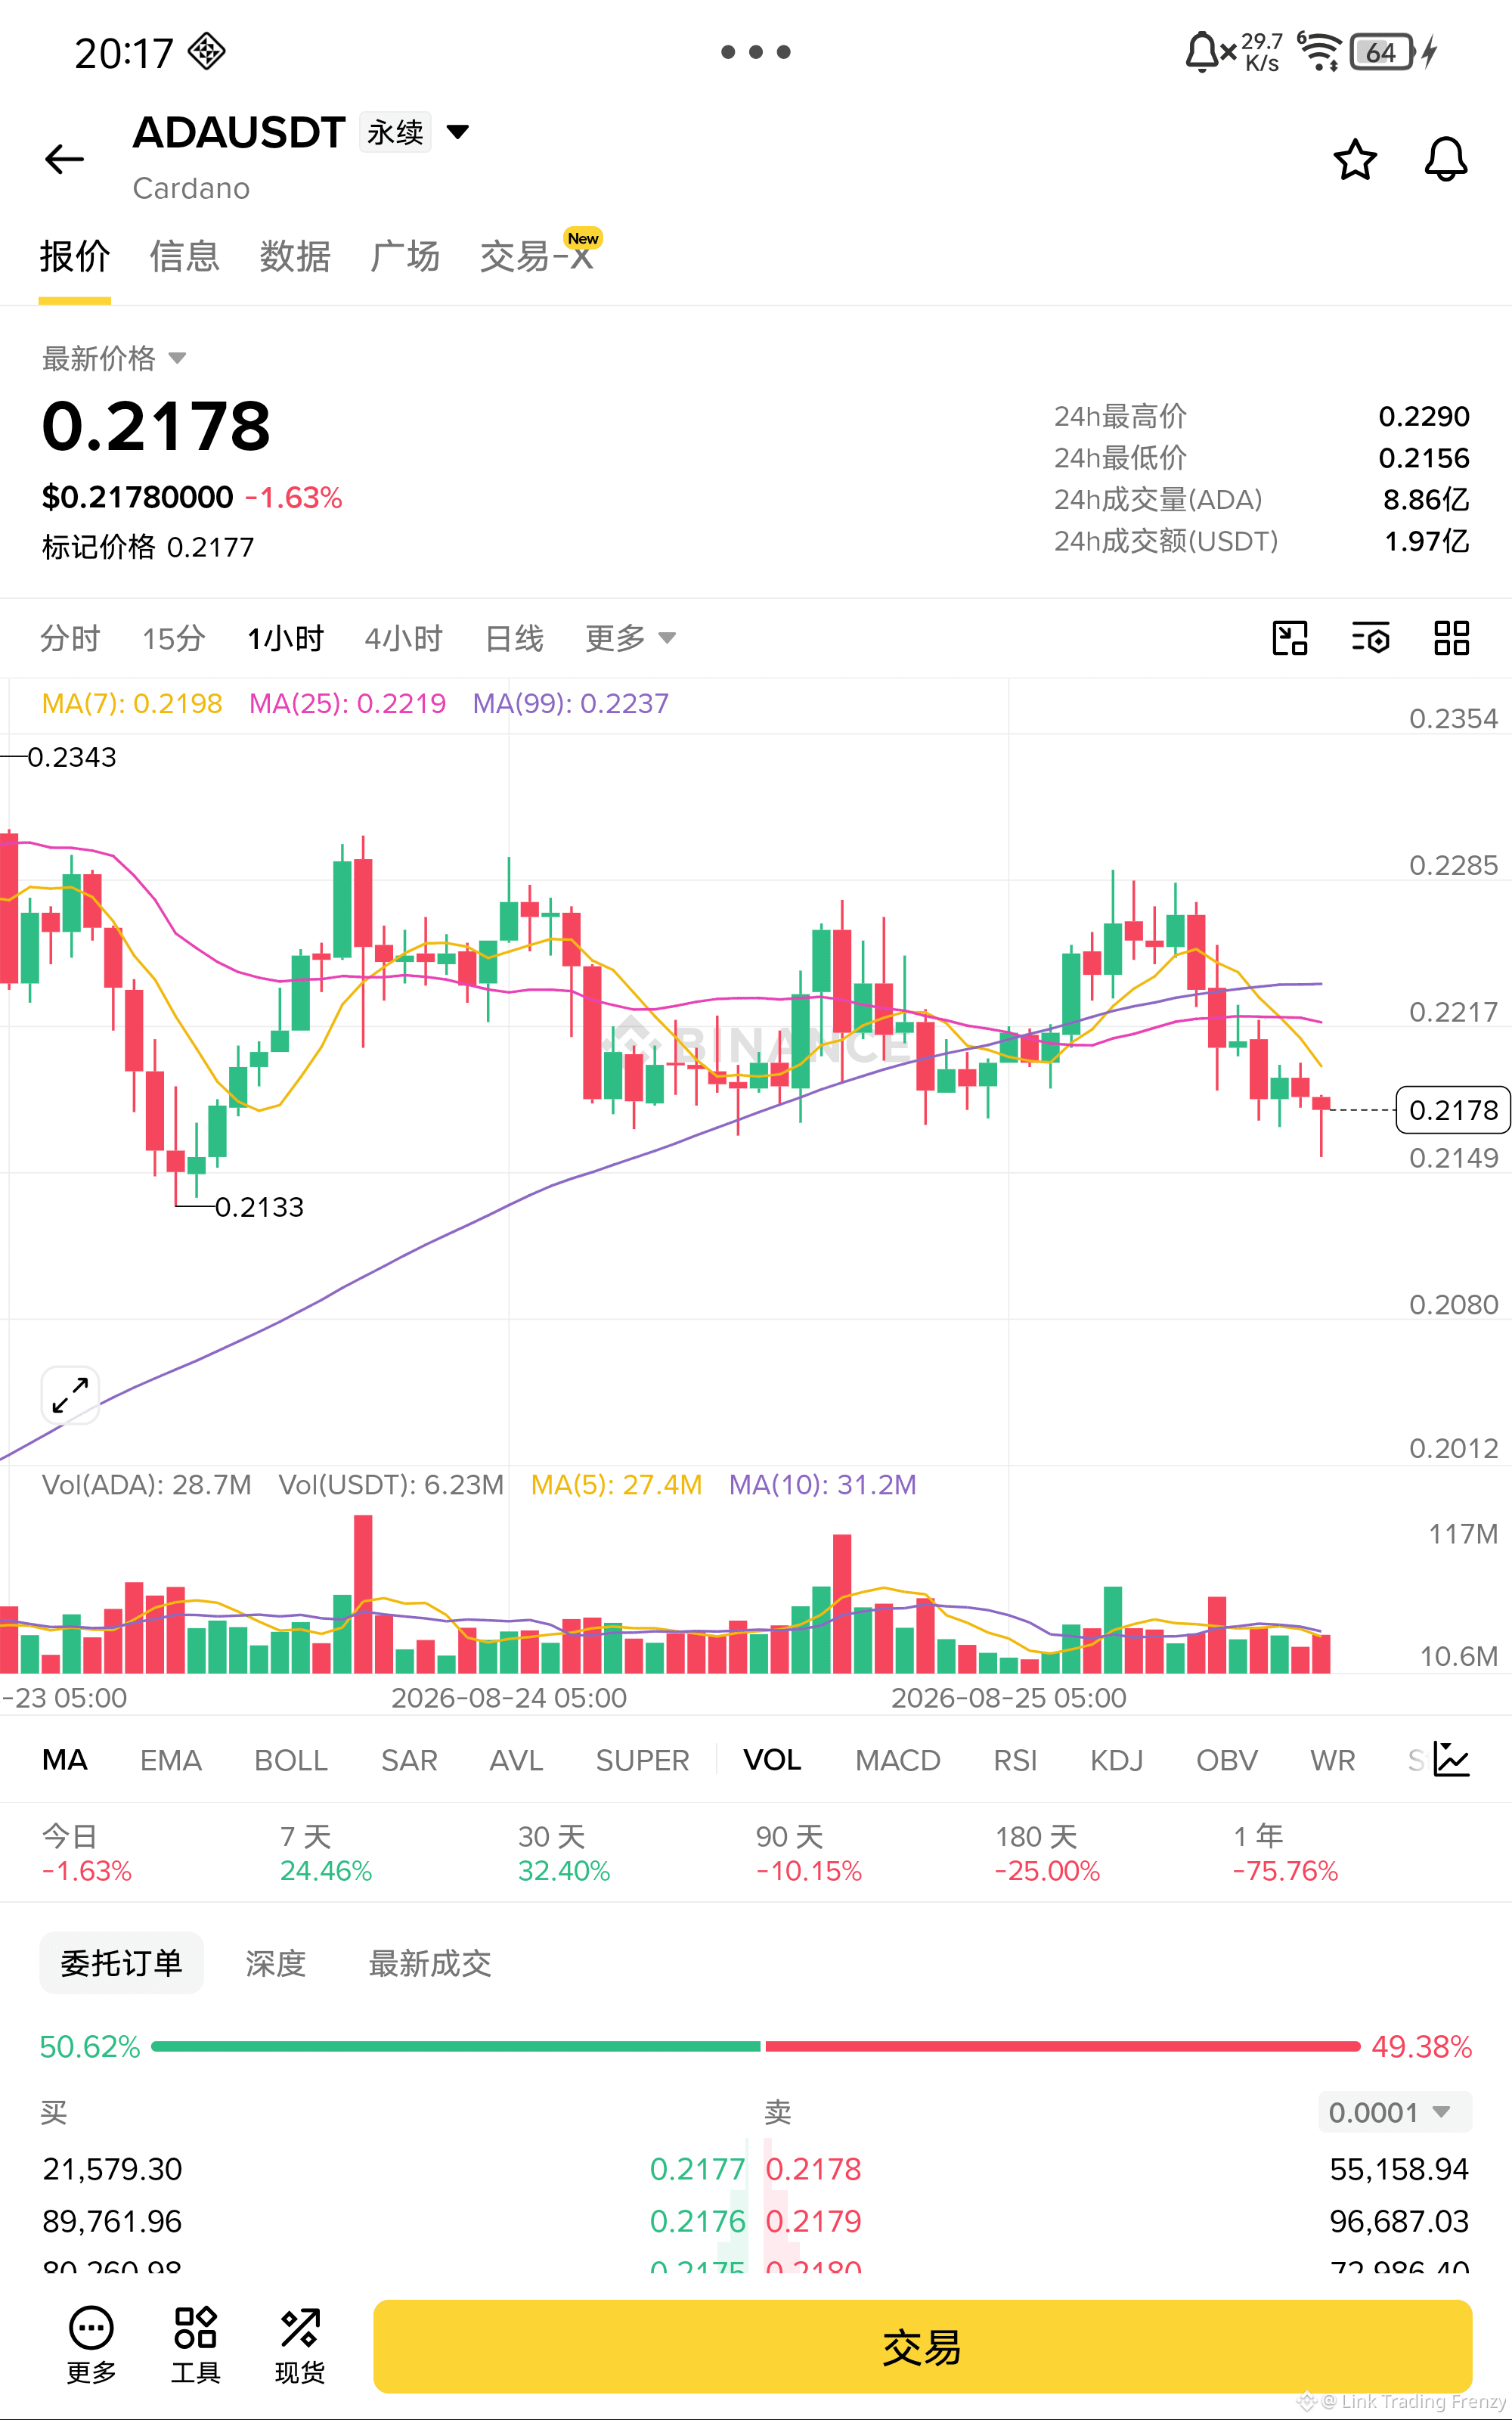
$PENGU velocity short sell!!
PENGU rebound lacks momentum; the price is tightly suppressed by MA7 and MA25. In the short term, the moving averages have already formed a dead cross. The MACD red histogram keeps shrinking and is about to turn green. The KDJ is spreading downward. After rebounding from 0.010584 and falling back, every subsequent rally is precisely pushed back. Above 0.00995, sell pressure is heavy. Below 0.00928, the prior low is the first target zone.
Entry: 0.009586
Stop loss: 0.009950
Take profit: 0.008500
$PENGU - Short 🔻
Enter from below👇
PENGU rebound lacks momentum; the price is tightly suppressed by MA7 and MA25. In the short term, the moving averages have already formed a dead cross. The MACD red histogram keeps shrinking and is about to turn green. The KDJ is spreading downward. After rebounding from 0.010584 and falling back, every subsequent rally is precisely pushed back. Above 0.00995, sell pressure is heavy. Below 0.00928, the prior low is the first target zone.
Entry: 0.009586
Stop loss: 0.009950
Take profit: 0.008500
$PENGU - Short 🔻
Enter from below👇
$PENGU PENGU surged from 0.0105 and then fell back; MA7 and MA25 have already formed a bearish crossover and are suppressing the price. The price has continued to break below two short-term moving averages. The MACD red histogram keeps shrinking, the KDJ is dispersing downward, and even after a rebound it can’t get back up to 0.0097. The first target is the previous low at 0.00928.
Entry: 0.009555
Stop loss: 0.010000
Take profit: 0.008580
$PENGU - Sell 🔻
Enter from below 👇
Entry: 0.009555
Stop loss: 0.010000
Take profit: 0.008580
$PENGU - Sell 🔻
Enter from below 👇
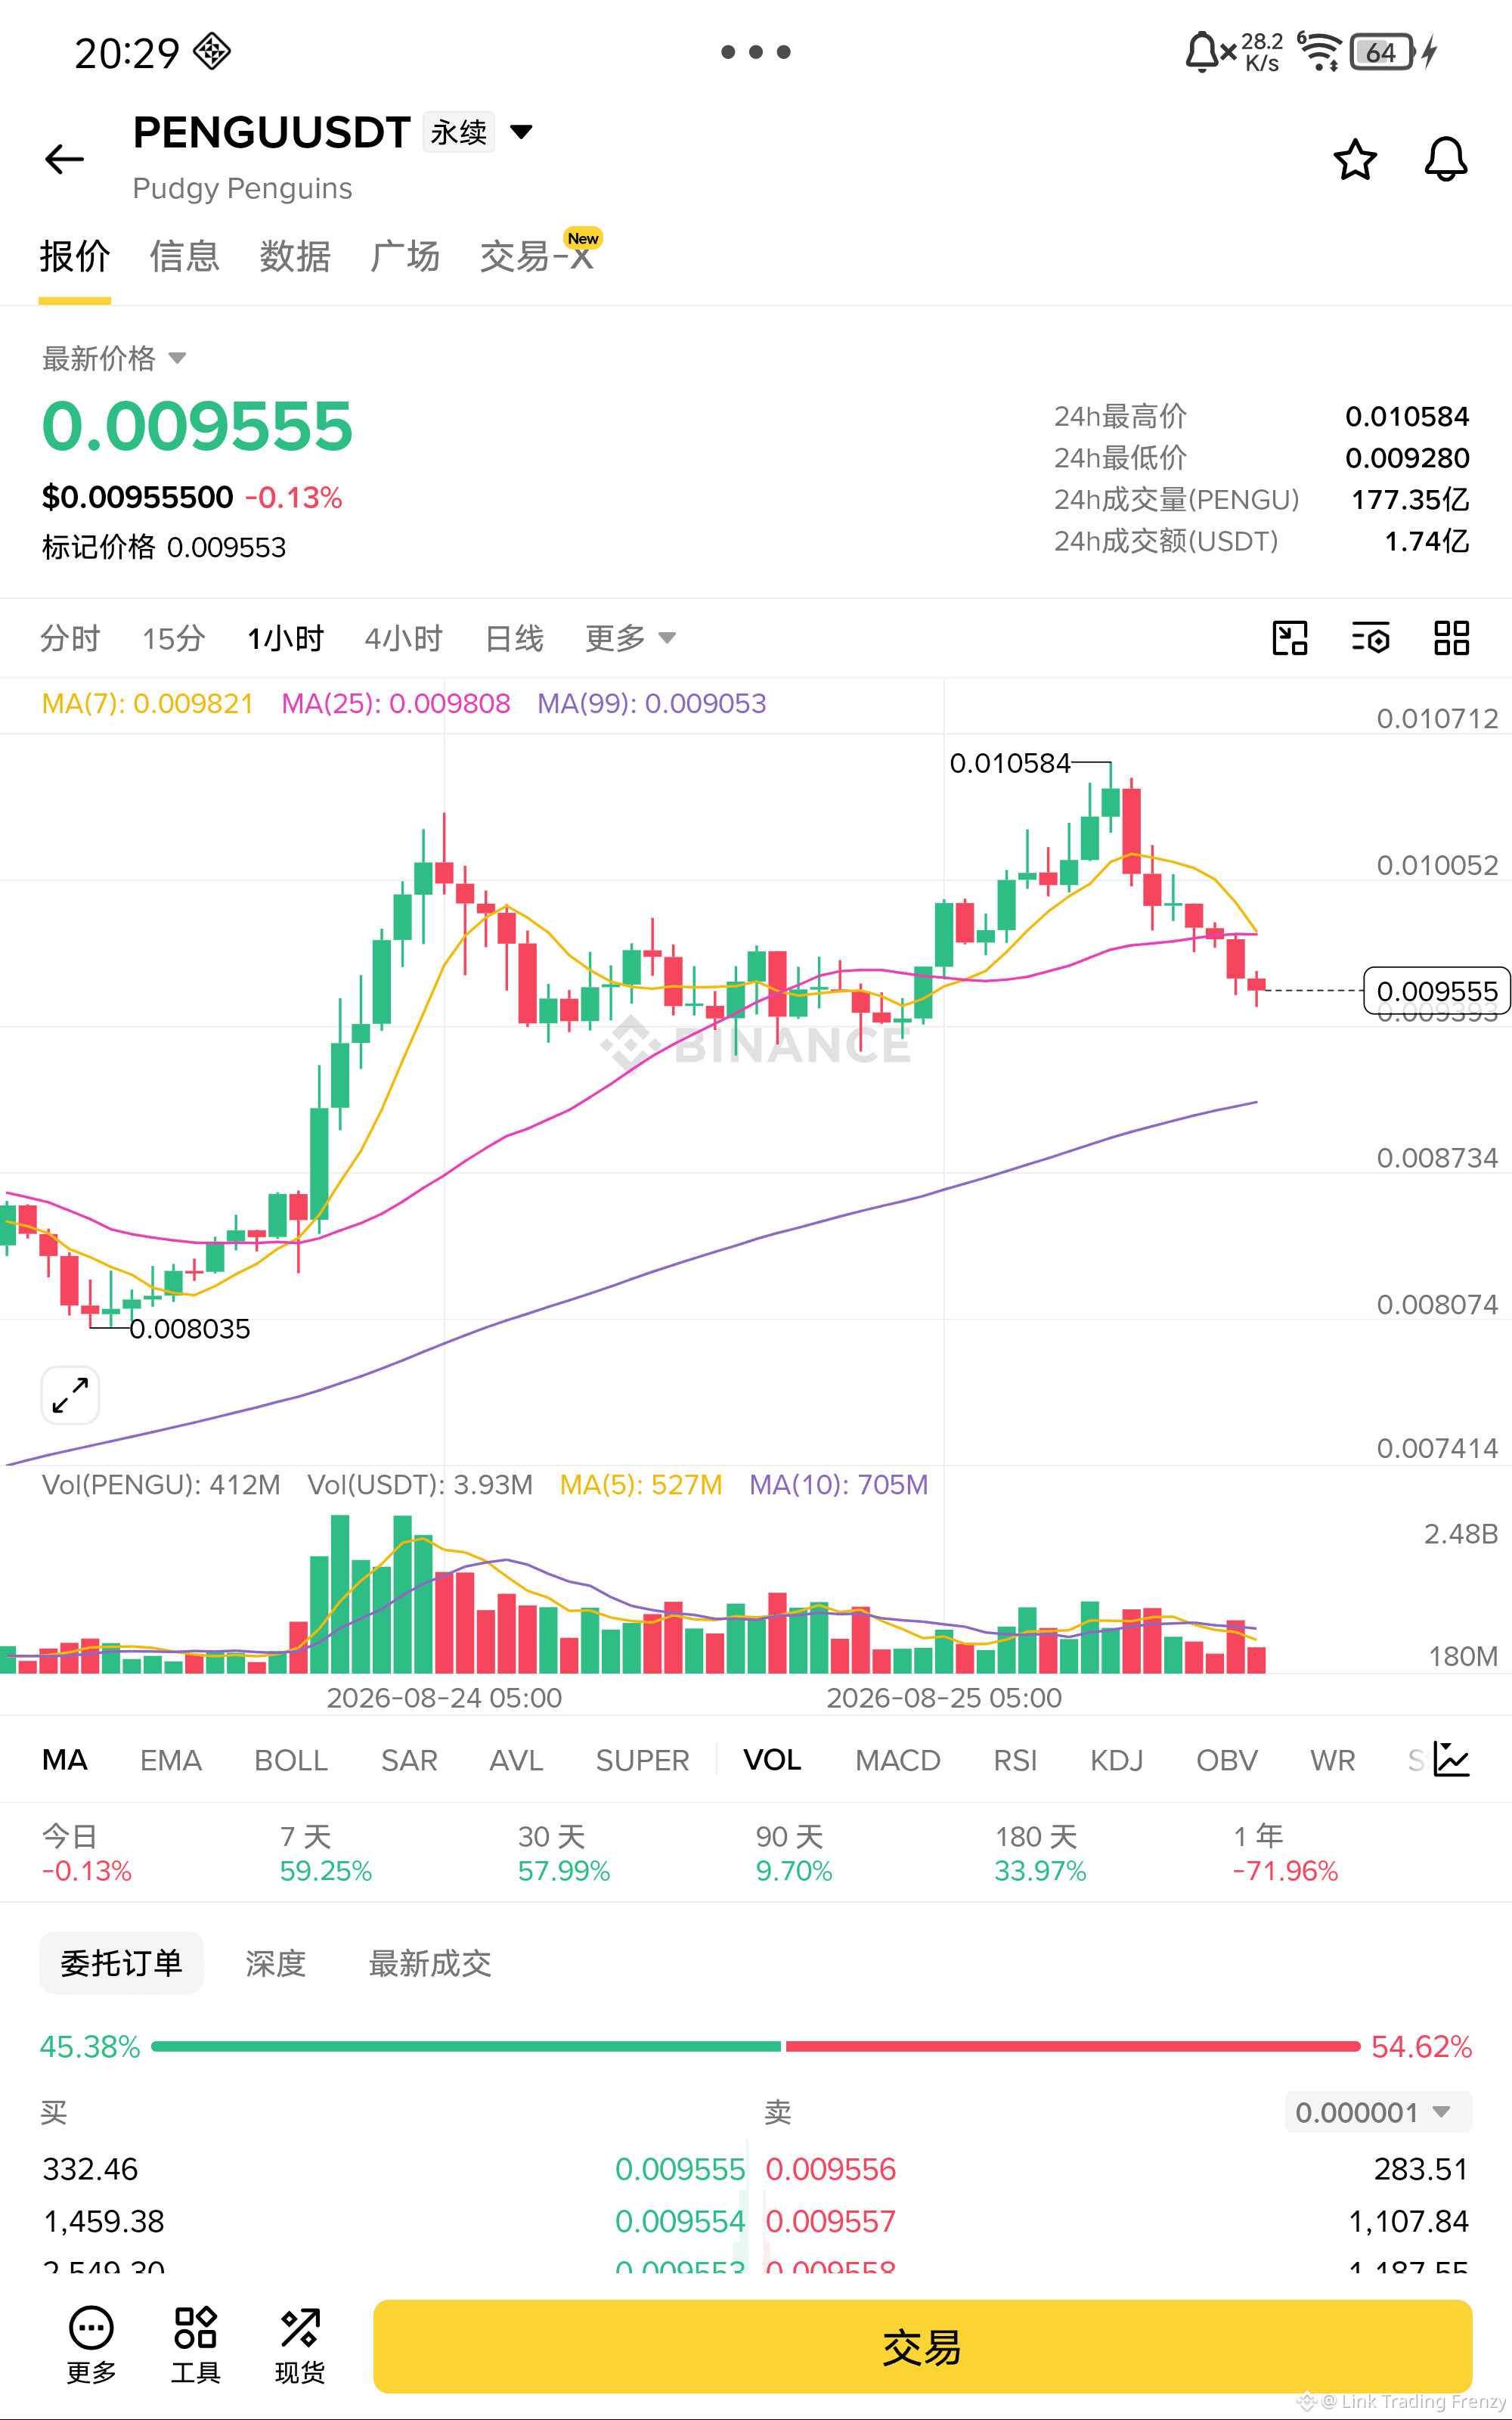
$NEAR Speed shorting!!
NEAR dropped from 2.04 and then consecutively broke below MA7, MA25, and MA99. MA7 just formed a dead cross with MA25, confirming the switch to a short bias. The moving average system is fully bearish, with MACD green histogram bars continuing to expand. KDJ is diffusing downward. Even rebounds can’t get back above 1.95, and 1.90 is the previous low below—its the first target.
Entry: 1.928
Stop loss: 1.960
Take profit: 1.844
$NEAR - Short 🔻
Enter from below👇
NEAR dropped from 2.04 and then consecutively broke below MA7, MA25, and MA99. MA7 just formed a dead cross with MA25, confirming the switch to a short bias. The moving average system is fully bearish, with MACD green histogram bars continuing to expand. KDJ is diffusing downward. Even rebounds can’t get back above 1.95, and 1.90 is the previous low below—its the first target.
Entry: 1.928
Stop loss: 1.960
Take profit: 1.844
$NEAR - Short 🔻
Enter from below👇
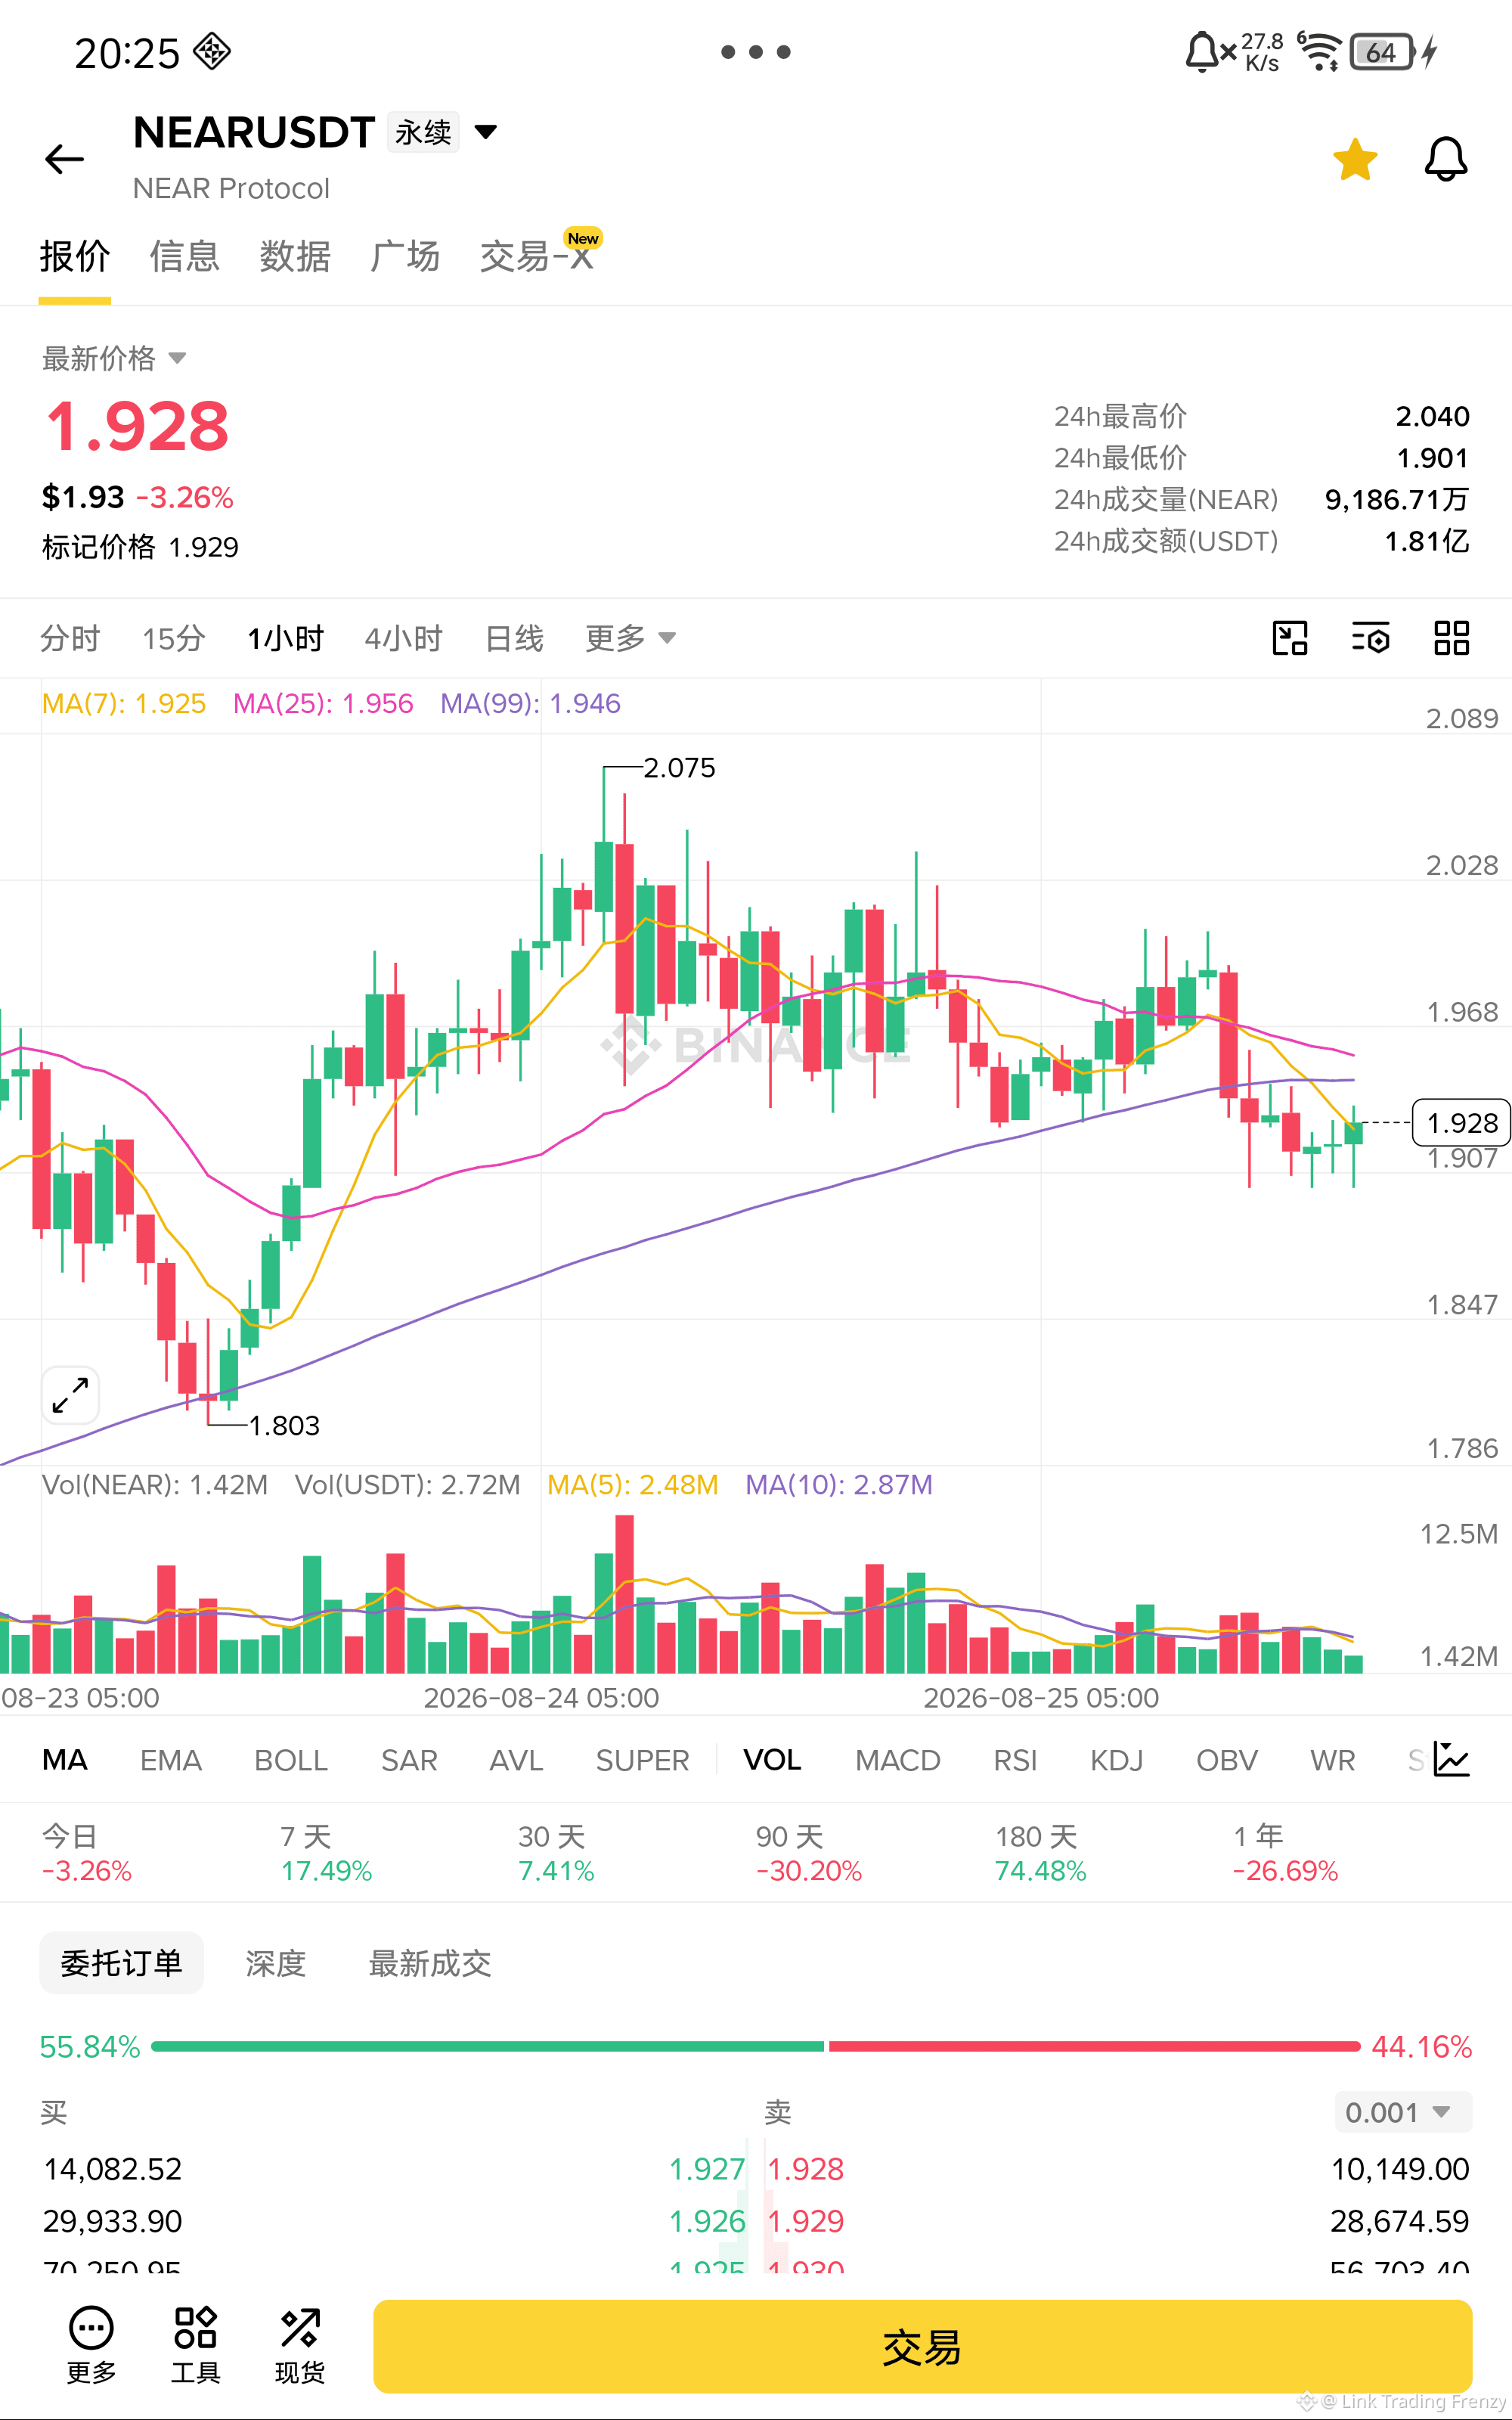
$LINK Sell short fast!
LINK has been pinned down tightly by the MA7, MA25, and MA99 moving averages for three consecutive days. After the price surged from 12.020 and pulled back, the rebound strength kept weakening. The MACD red histogram bars continue shortening and are about to turn green; the KDJ shows a death cross at a high level confirming downward spread. The rebound can’t even reach 11.6—pullback momentum fails. The first target is the prior low at 11.404.
Entry: 11.572
Stop loss: 11.850
Take profit: 11.000
$LINK - Short 🔻
Enter from below👇
LINK has been pinned down tightly by the MA7, MA25, and MA99 moving averages for three consecutive days. After the price surged from 12.020 and pulled back, the rebound strength kept weakening. The MACD red histogram bars continue shortening and are about to turn green; the KDJ shows a death cross at a high level confirming downward spread. The rebound can’t even reach 11.6—pullback momentum fails. The first target is the prior low at 11.404.
Entry: 11.572
Stop loss: 11.850
Take profit: 11.000
$LINK - Short 🔻
Enter from below👇
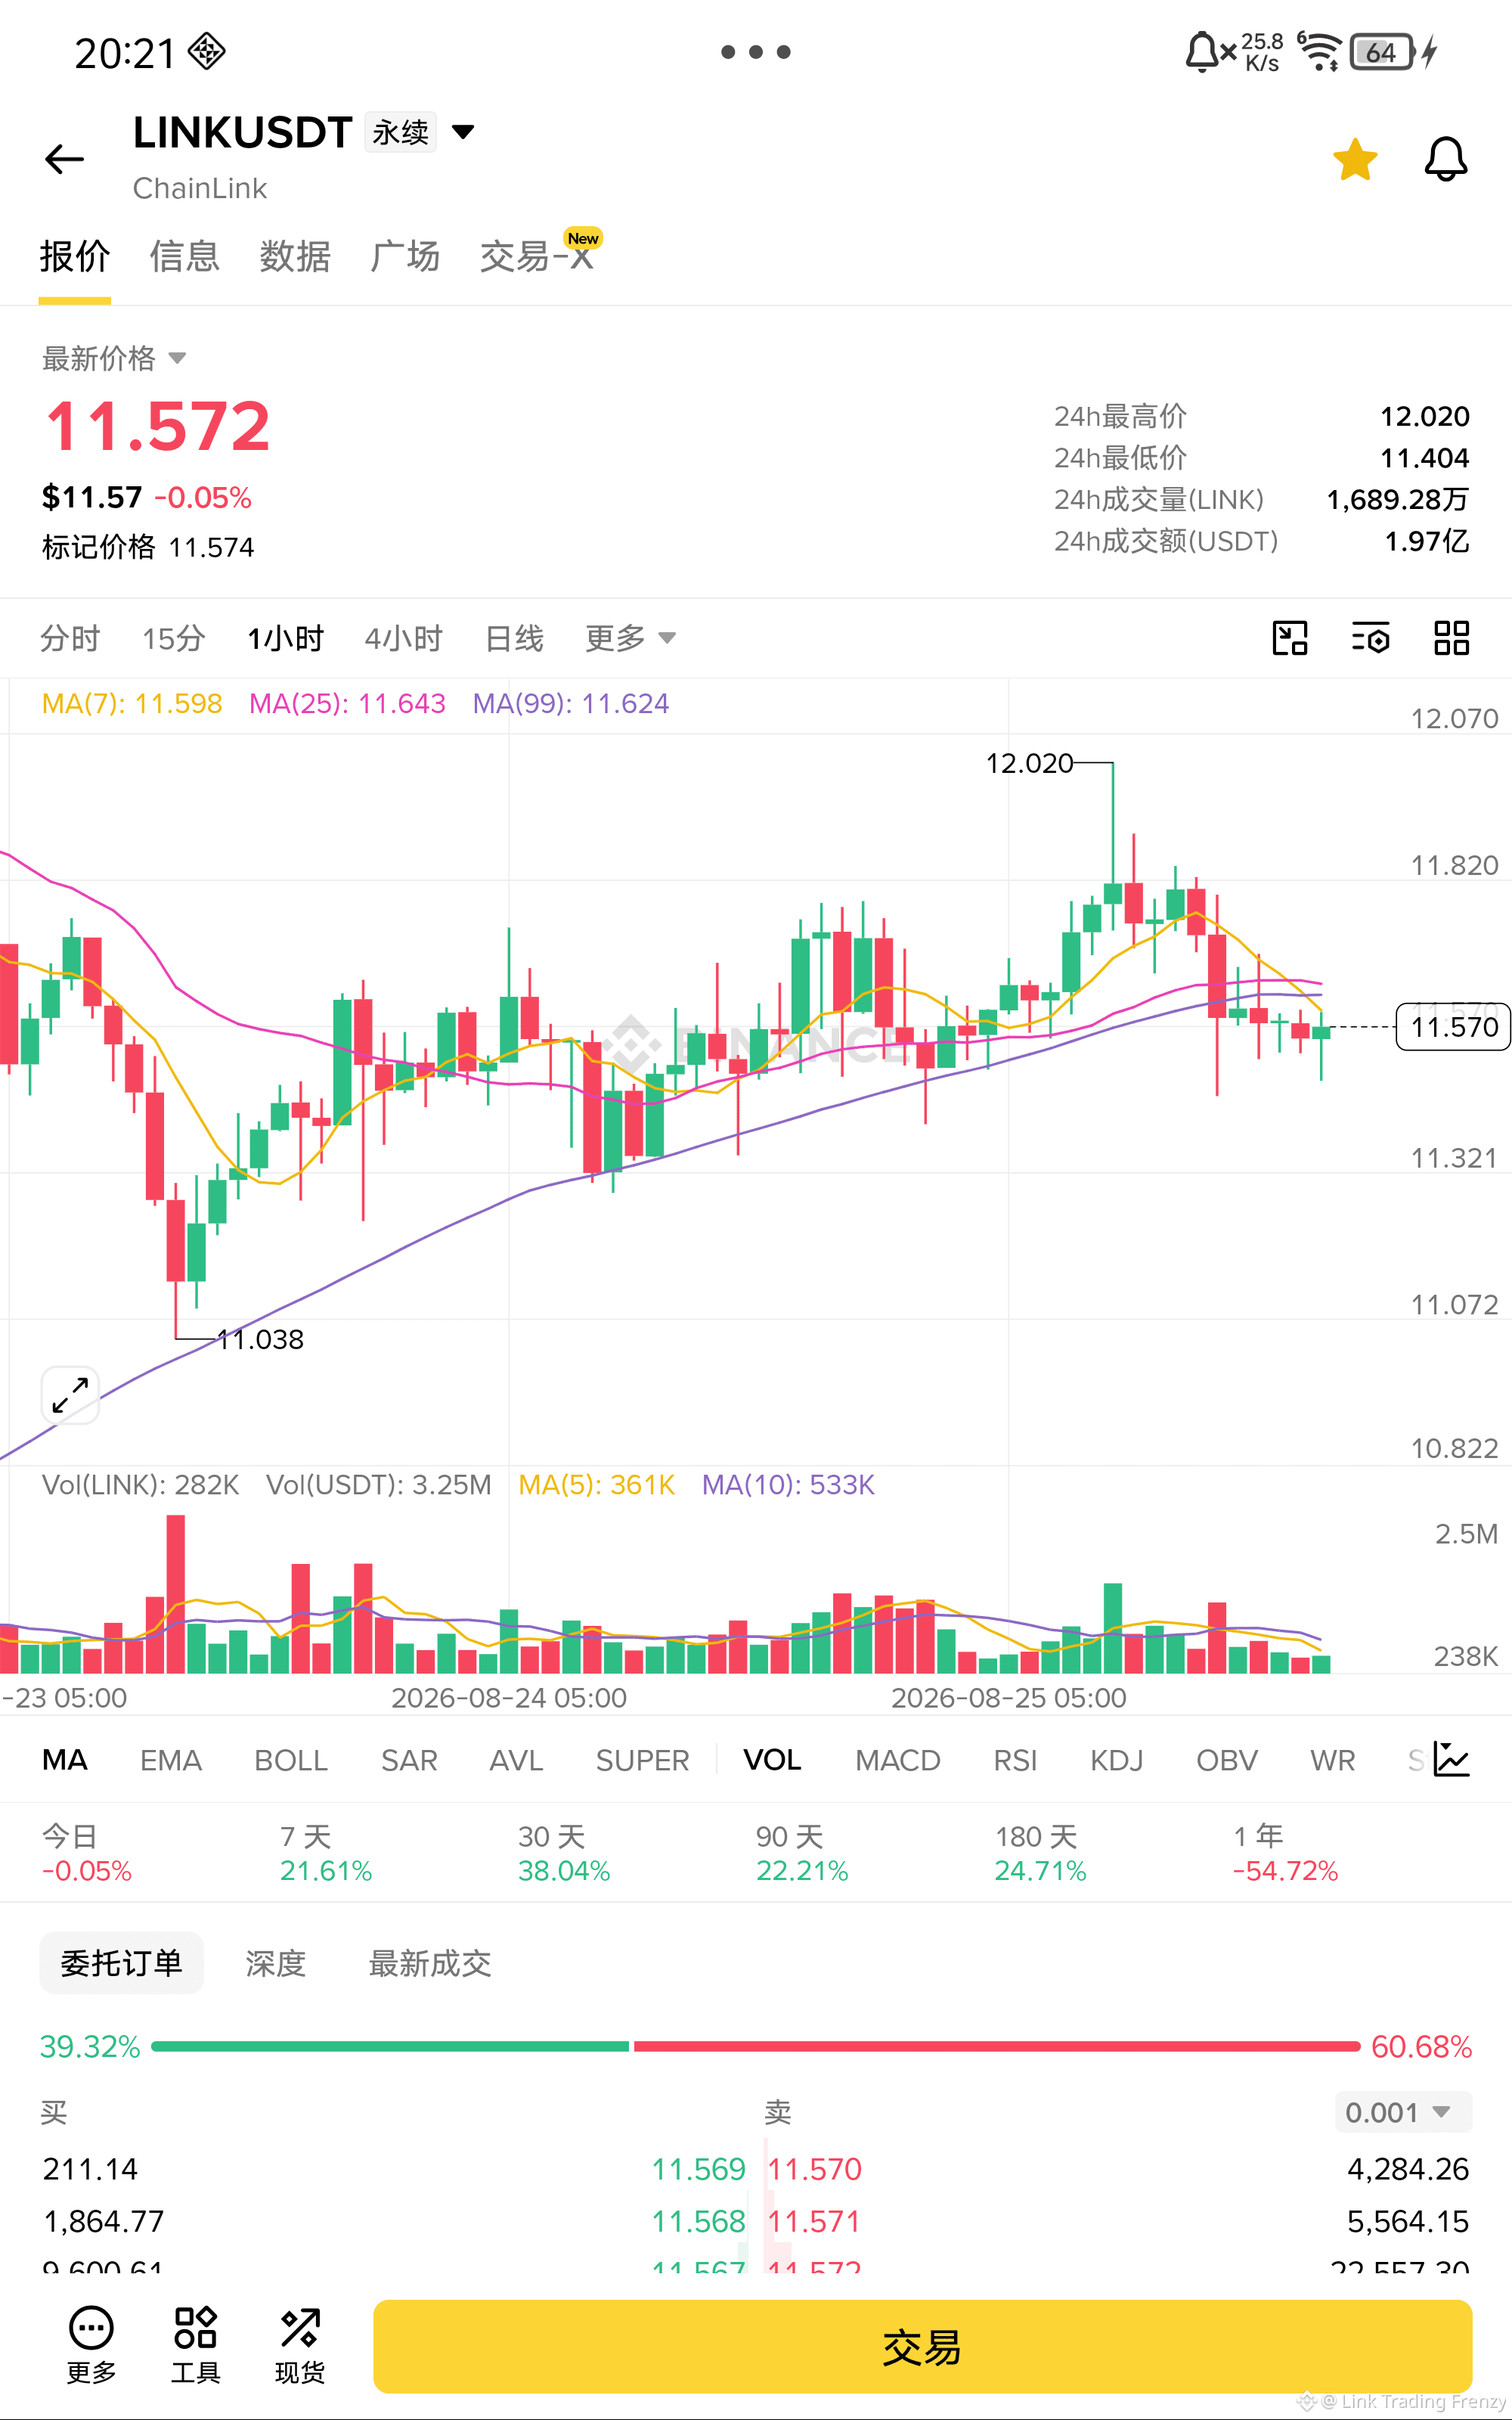
$ADA Sell short now!!
ADA has already broken below the MA7, MA25, and MA99 moving averages consecutively. MA7 has dead-crossed MA25 and confirmed a bearish reversal. The MACD red histogram continues to shrink and is about to turn green. The KDJ is diffusing downward. After surging from 0.2290, it pulled back and bounced, but it still couldn’t even reclaim 0.22. The first target is the prior low at 0.2156.
Entry: 0.2178
Stop loss: 0.2230
Take profit: 0.2110
$ADA - Sell short 🔻
Enter the trade from below👇
ADA has already broken below the MA7, MA25, and MA99 moving averages consecutively. MA7 has dead-crossed MA25 and confirmed a bearish reversal. The MACD red histogram continues to shrink and is about to turn green. The KDJ is diffusing downward. After surging from 0.2290, it pulled back and bounced, but it still couldn’t even reclaim 0.22. The first target is the prior low at 0.2156.
Entry: 0.2178
Stop loss: 0.2230
Take profit: 0.2110
$ADA - Sell short 🔻
Enter the trade from below👇
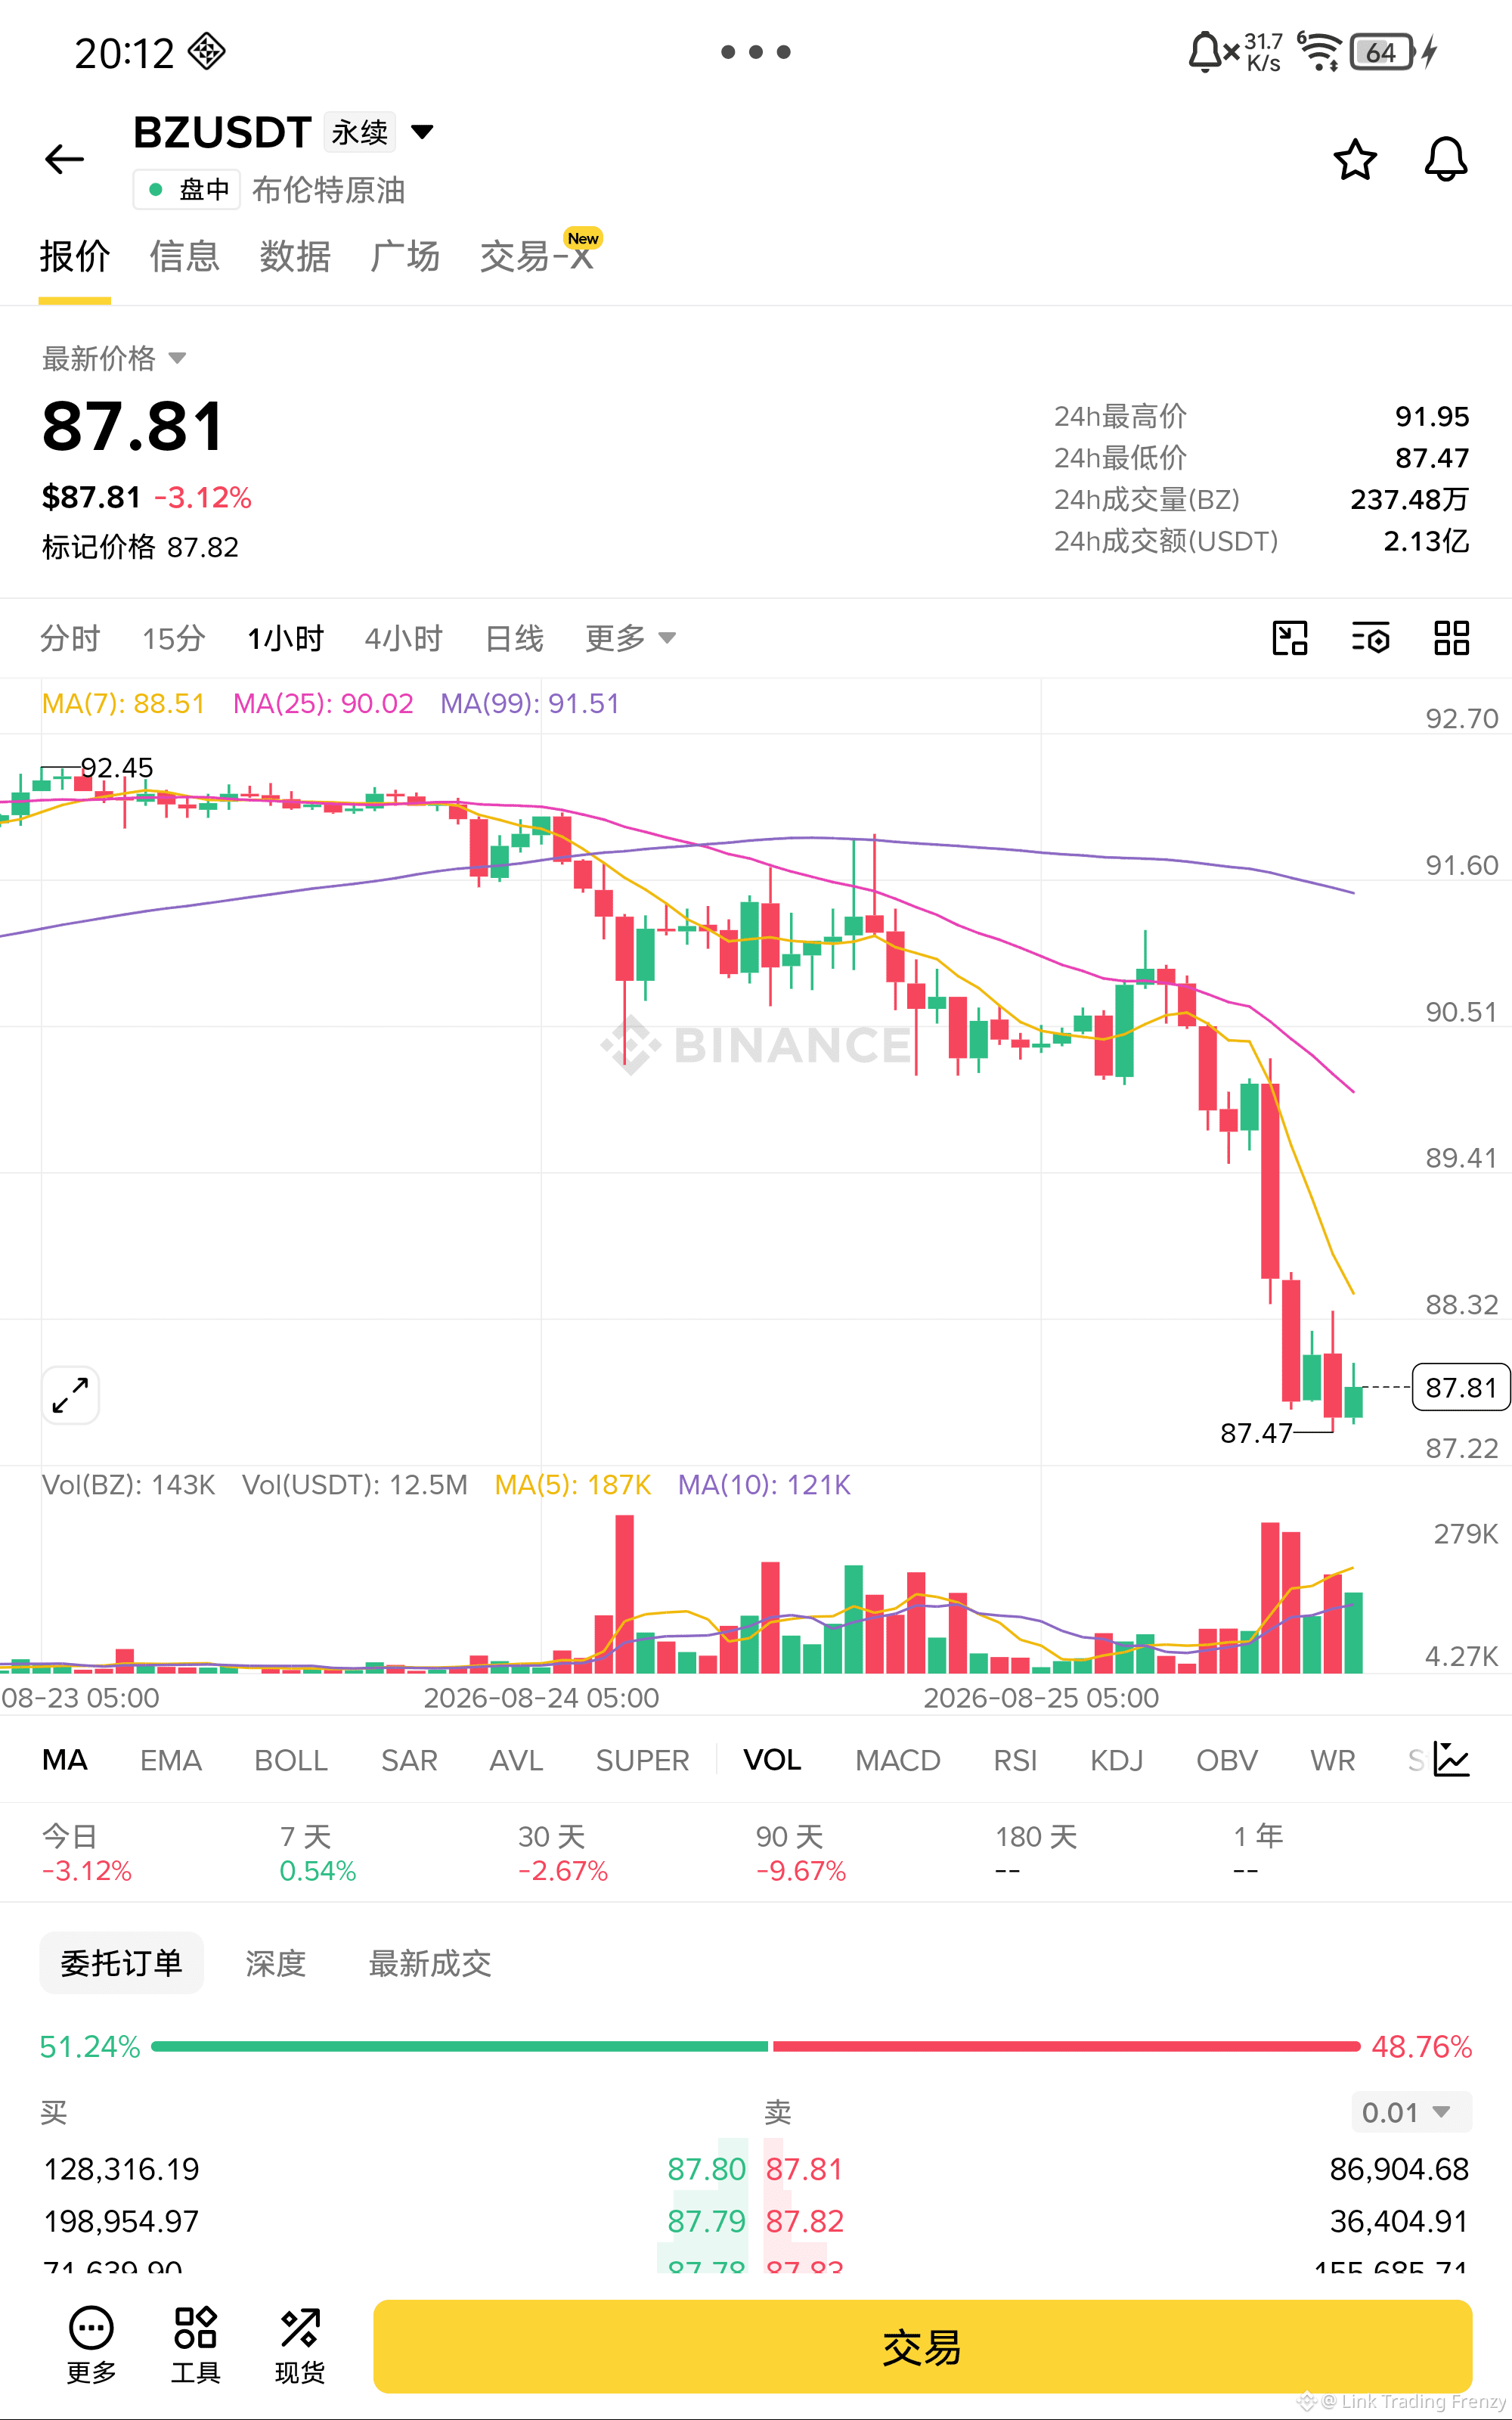
$BZ Sell the market short!!
This oil bearish giant candle has directly broken through MA7, MA25, and MA99 in one go. MA7 has just formed a dead cross with MA25 and MA25 has confirmed the short call. The moving average system is fully aligned bearishly. After the MACD dead cross, the green histogram continues to expand. The KDJ spreads downward; the bounce can’t even reclaim 88.5, let alone recover. The first target is 87.22, the previous low.
OPEC+ supply-increase expectations combined with ongoing concerns about global demand continue to weigh on oil prices. In the short term, there are no signs of any reversal.
Entry: 87.81
Stop loss: 90.02
Take profit: 84.85
$BZ - Short 🔻
Enter from below 👇
This oil bearish giant candle has directly broken through MA7, MA25, and MA99 in one go. MA7 has just formed a dead cross with MA25 and MA25 has confirmed the short call. The moving average system is fully aligned bearishly. After the MACD dead cross, the green histogram continues to expand. The KDJ spreads downward; the bounce can’t even reclaim 88.5, let alone recover. The first target is 87.22, the previous low.
OPEC+ supply-increase expectations combined with ongoing concerns about global demand continue to weigh on oil prices. In the short term, there are no signs of any reversal.
Entry: 87.81
Stop loss: 90.02
Take profit: 84.85
$BZ - Short 🔻
Enter from below 👇
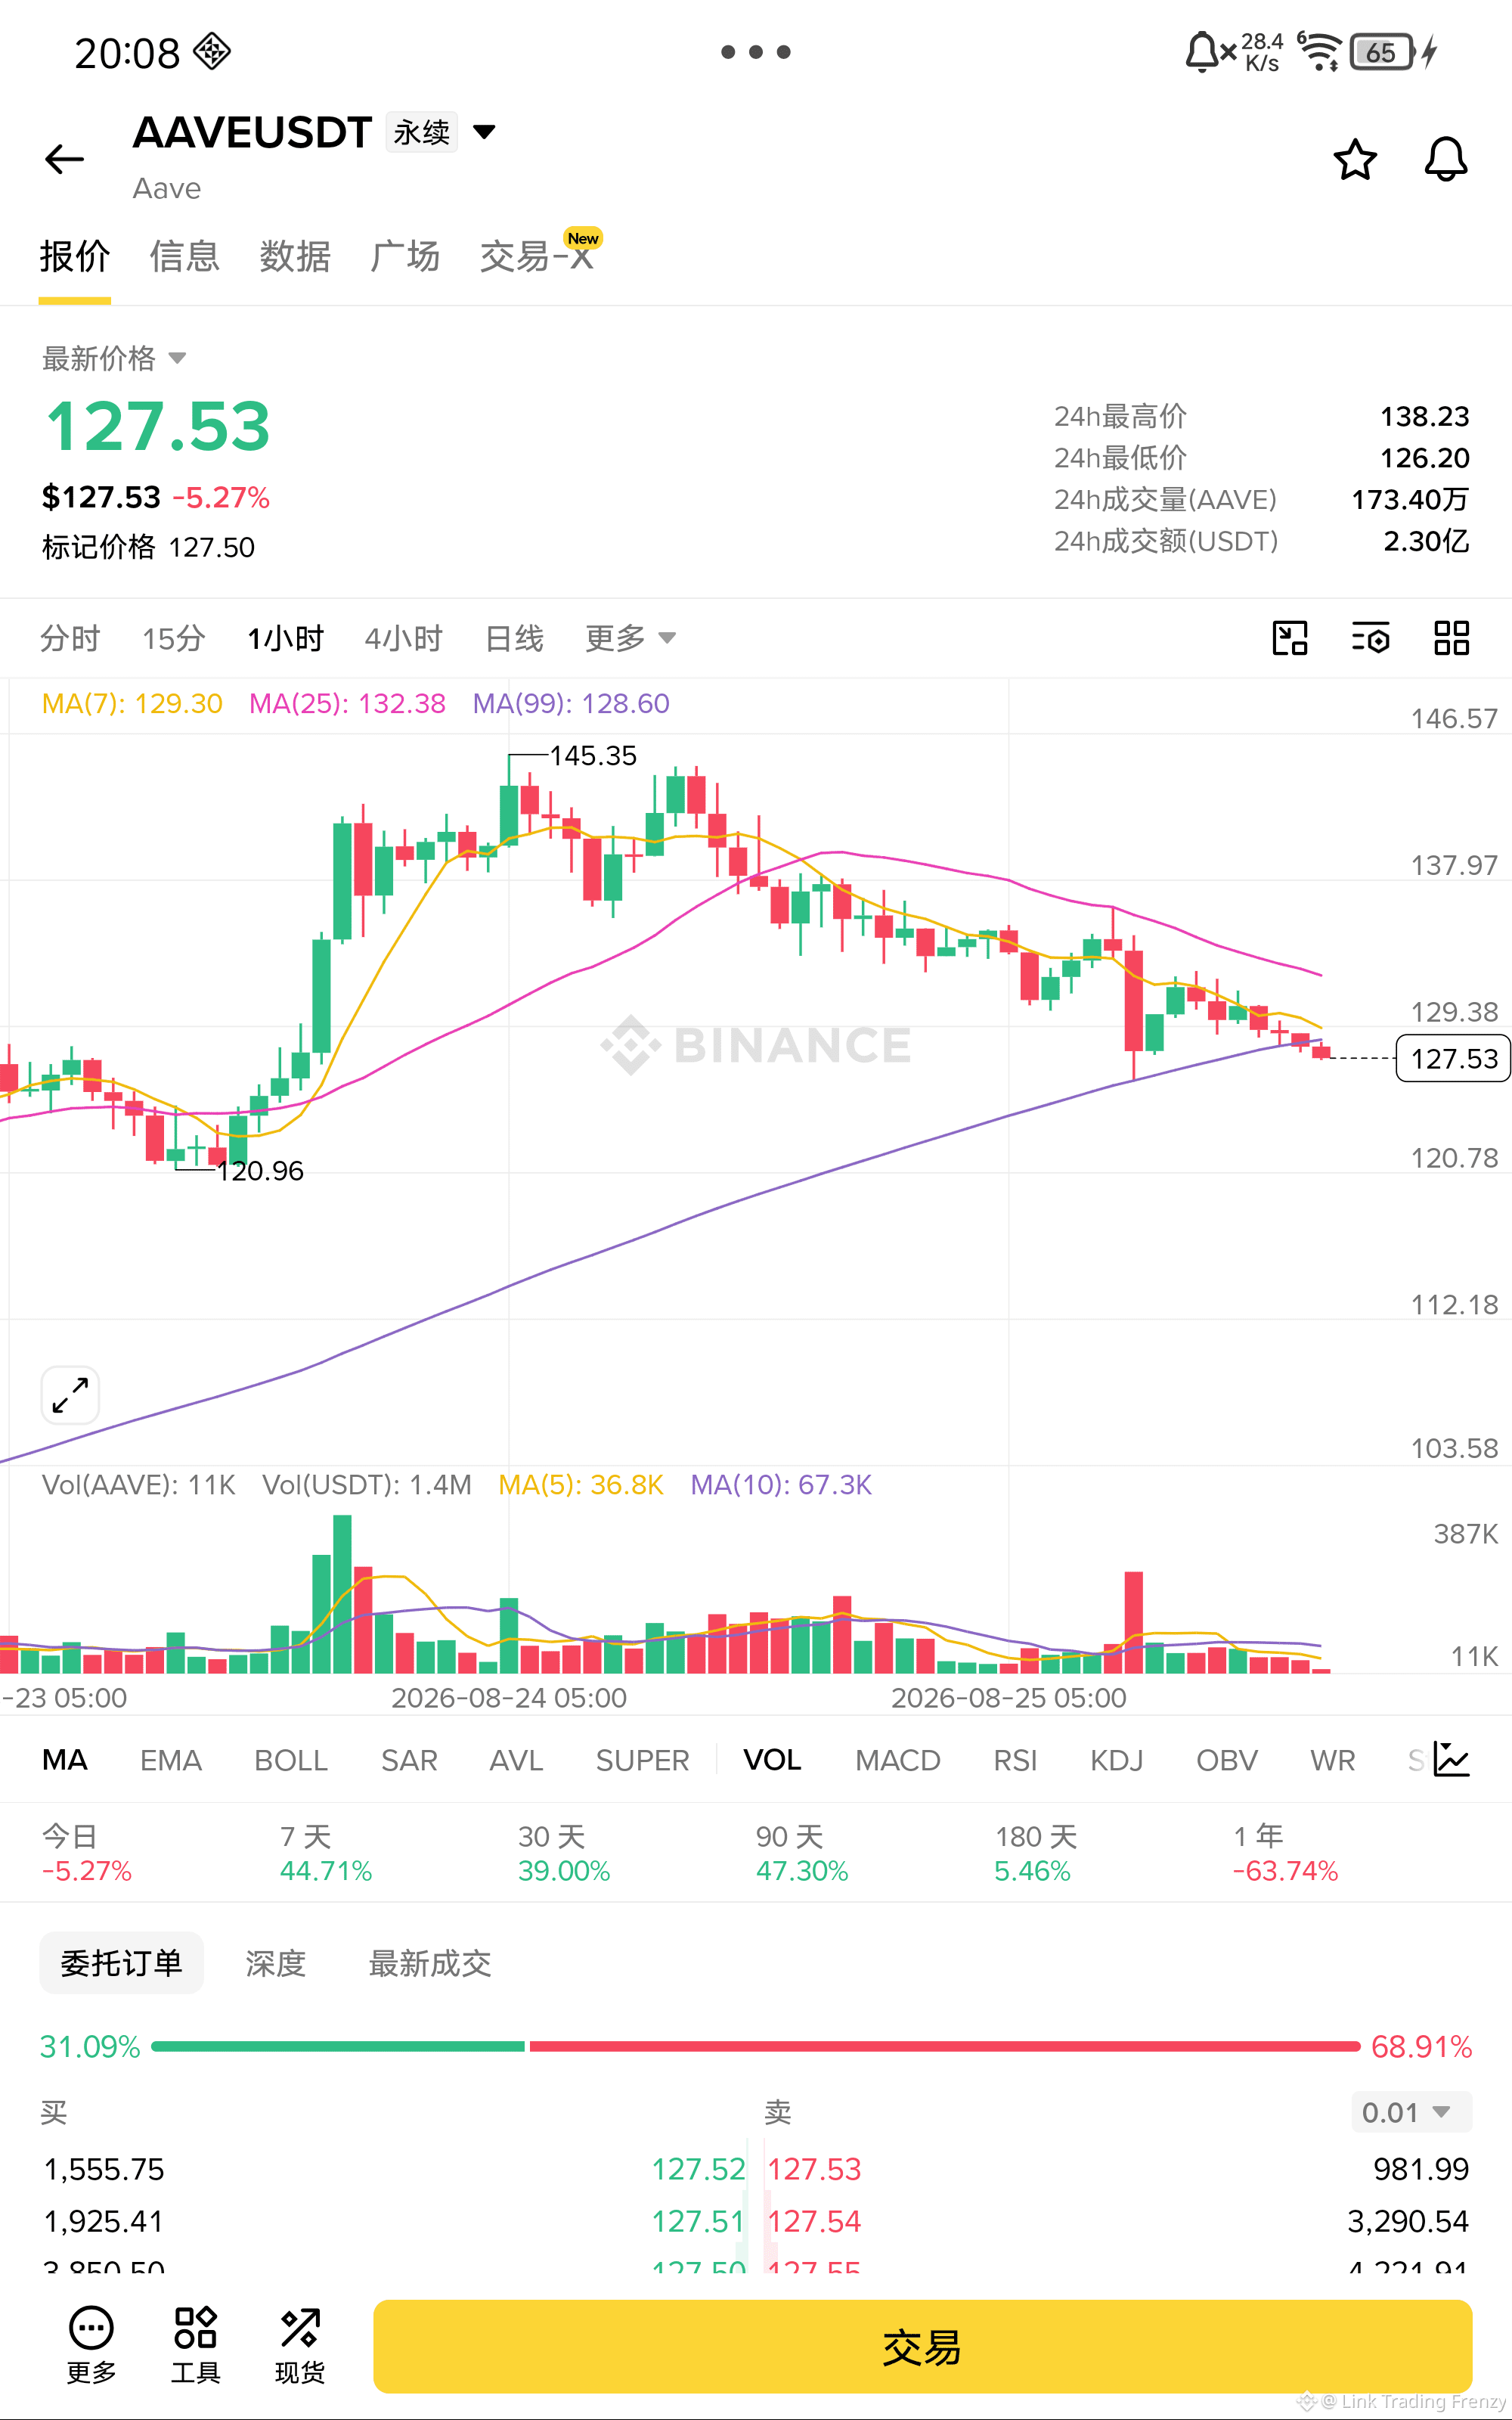
$AAVE Sell short fast!!
AAVE has been falling for days and has broken below MA7, MA25, and MA99. MA7 has made a death cross with MA99, confirming the short bias. The entire moving-average system has turned bearish in a full bearish alignment. The MACD green histogram keeps expanding, and the KDJ has spread downward. After spiking up from 138.23, it pulled back; the rebound failed to even retake 129. The first target below is 126.20, the prior low.
Entry: 127.53
Stop loss: 131.00
Take profit: 122.00
$AAVE - Sell short 🔻
Enter the trade from below👇
AAVE has been falling for days and has broken below MA7, MA25, and MA99. MA7 has made a death cross with MA99, confirming the short bias. The entire moving-average system has turned bearish in a full bearish alignment. The MACD green histogram keeps expanding, and the KDJ has spread downward. After spiking up from 138.23, it pulled back; the rebound failed to even retake 129. The first target below is 126.20, the prior low.
Entry: 127.53
Stop loss: 131.00
Take profit: 122.00
$AAVE - Sell short 🔻
Enter the trade from below👇
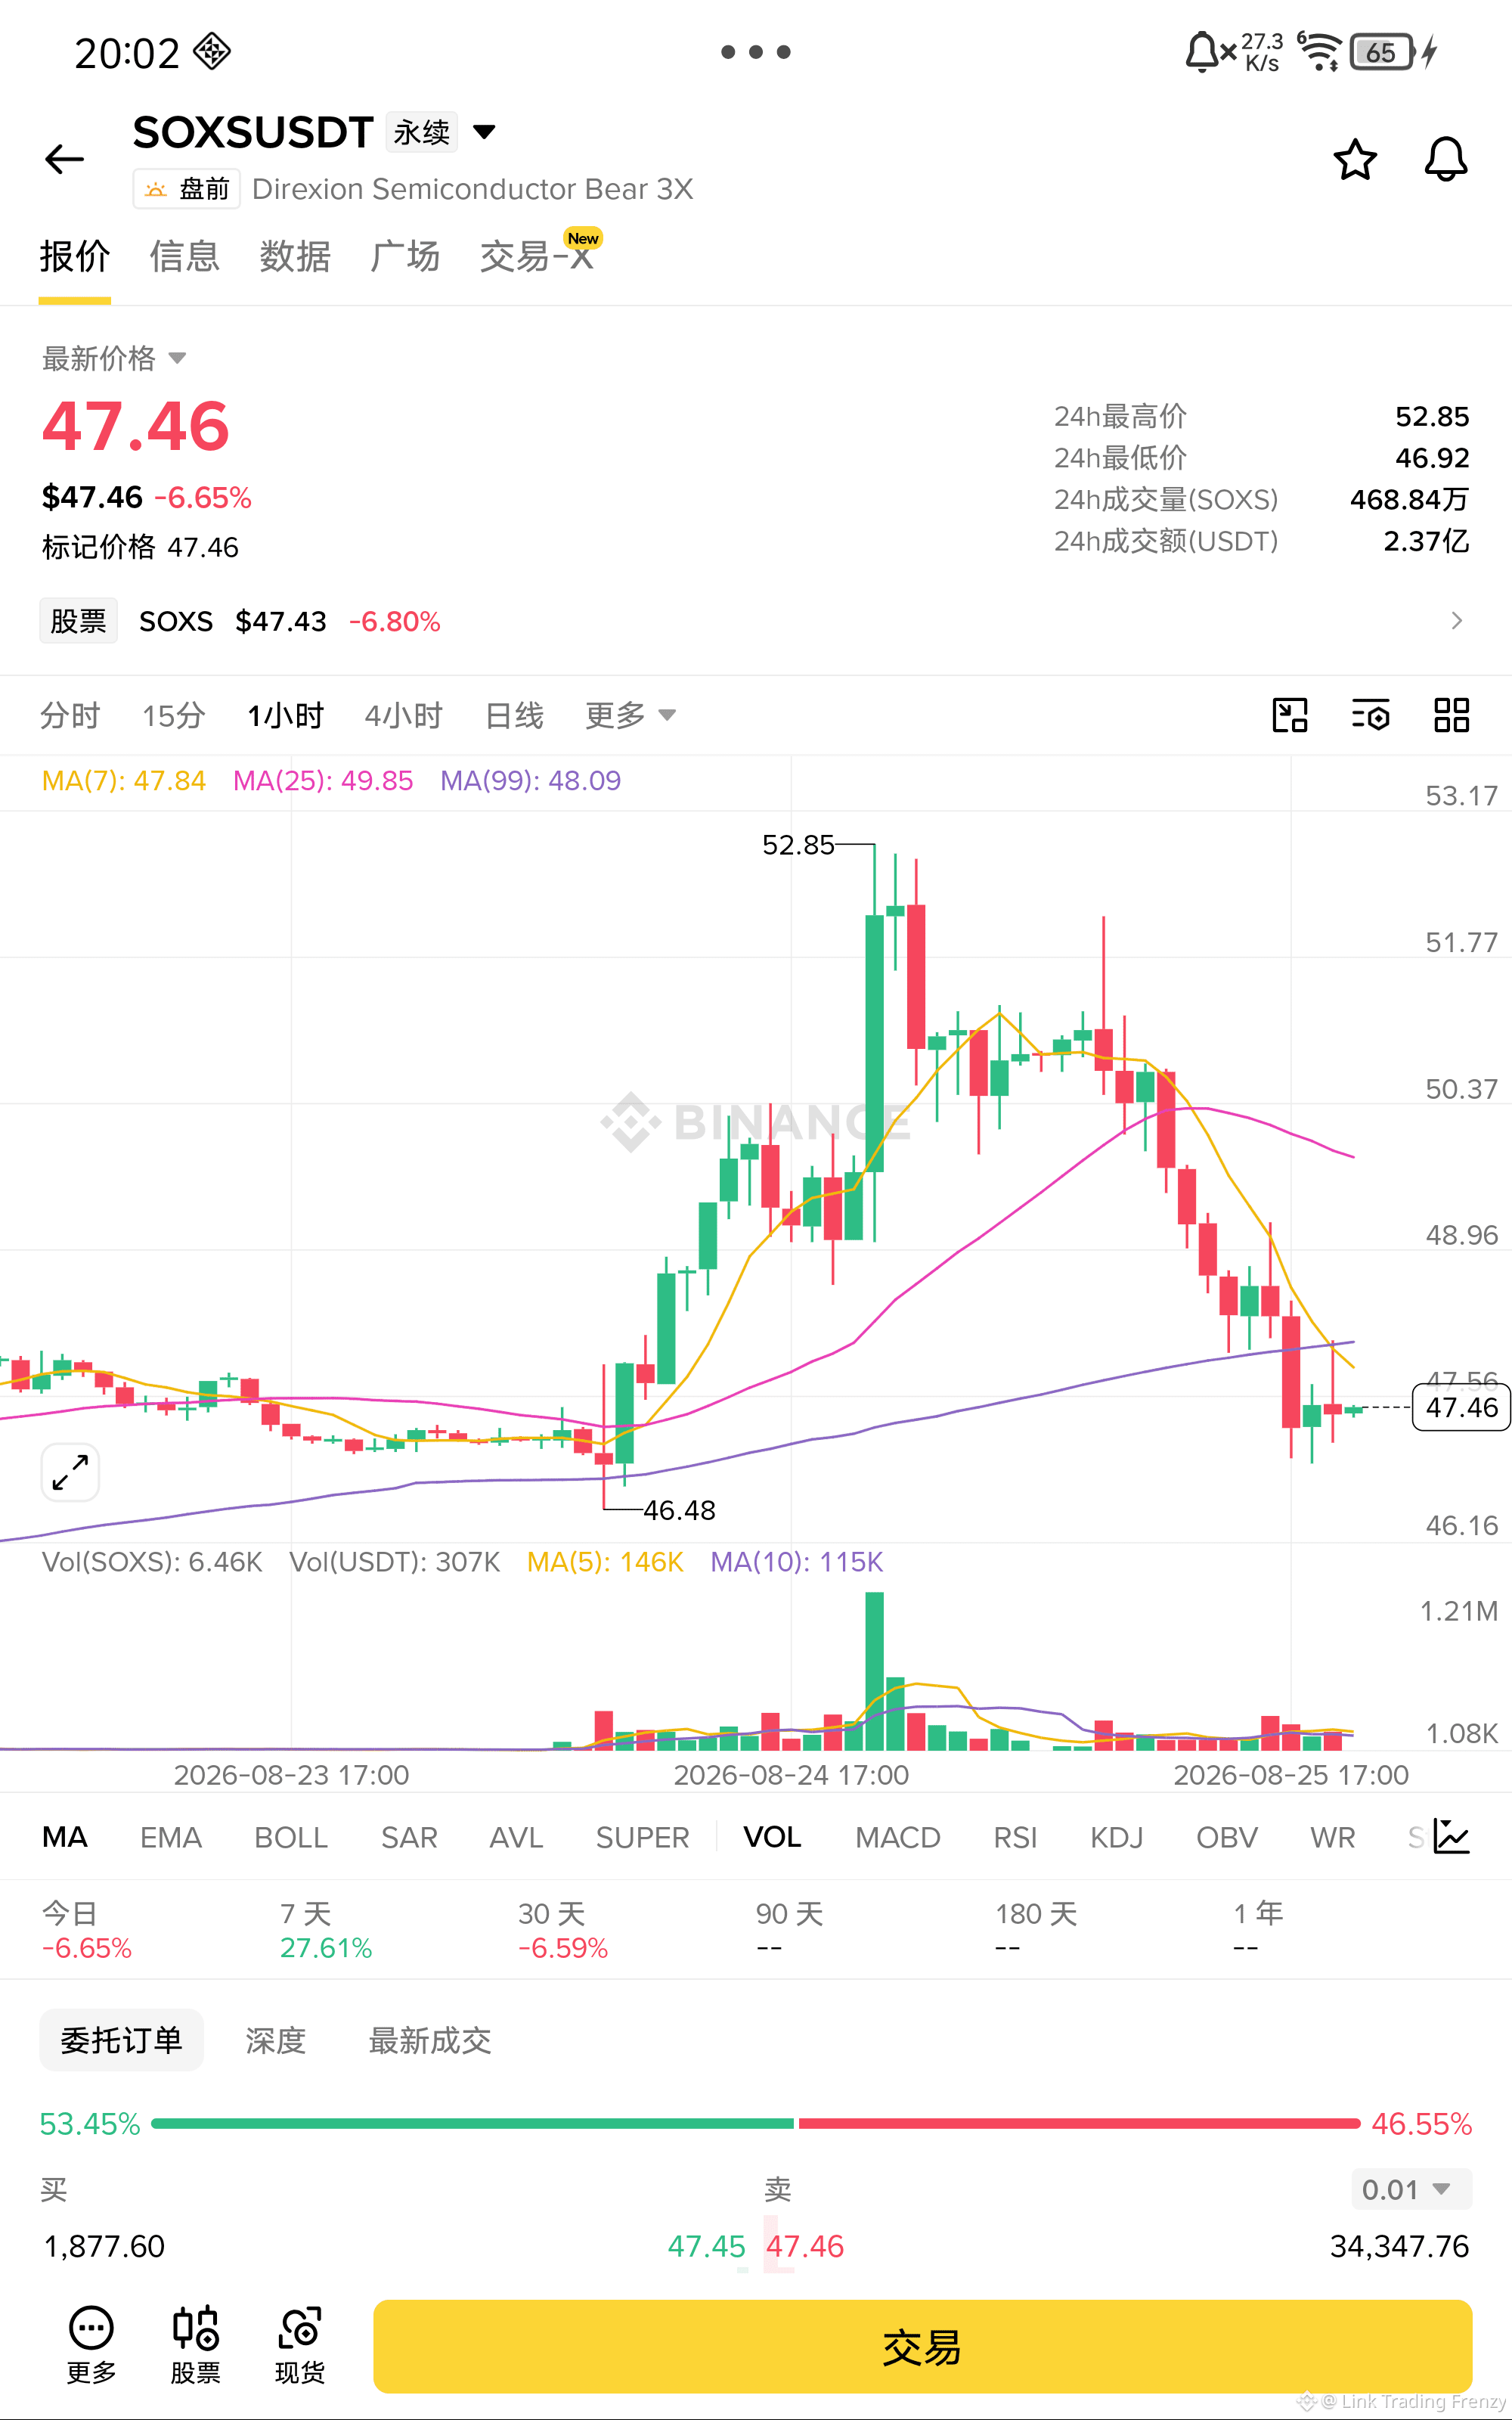
$SOXS The Air Force has already taken over the board!
This round of SOXS has been falling from 52.85. Just now, MA7 has died-crossed MA99 to confirm a short position; the moving average system has fully flipped into a bearish configuration—MACD red bars have been continuously shrinking and are about to turn green, and the KDJ high-level dead cross confirms downward spread. The rebound can’t even climb back to 48, and the first target is the previous low at 46.48. The semiconductor sector is under overall pressure, and the 3x short ETF continues to benefit in the ongoing downtrend.
Entry: 47.46
Stop loss: 49.00
Take profit: 45.50
$SOXS - Short 🔻
Enter from below👇
This round of SOXS has been falling from 52.85. Just now, MA7 has died-crossed MA99 to confirm a short position; the moving average system has fully flipped into a bearish configuration—MACD red bars have been continuously shrinking and are about to turn green, and the KDJ high-level dead cross confirms downward spread. The rebound can’t even climb back to 48, and the first target is the previous low at 46.48. The semiconductor sector is under overall pressure, and the 3x short ETF continues to benefit in the ongoing downtrend.
Entry: 47.46
Stop loss: 49.00
Take profit: 45.50
$SOXS - Short 🔻
Enter from below👇
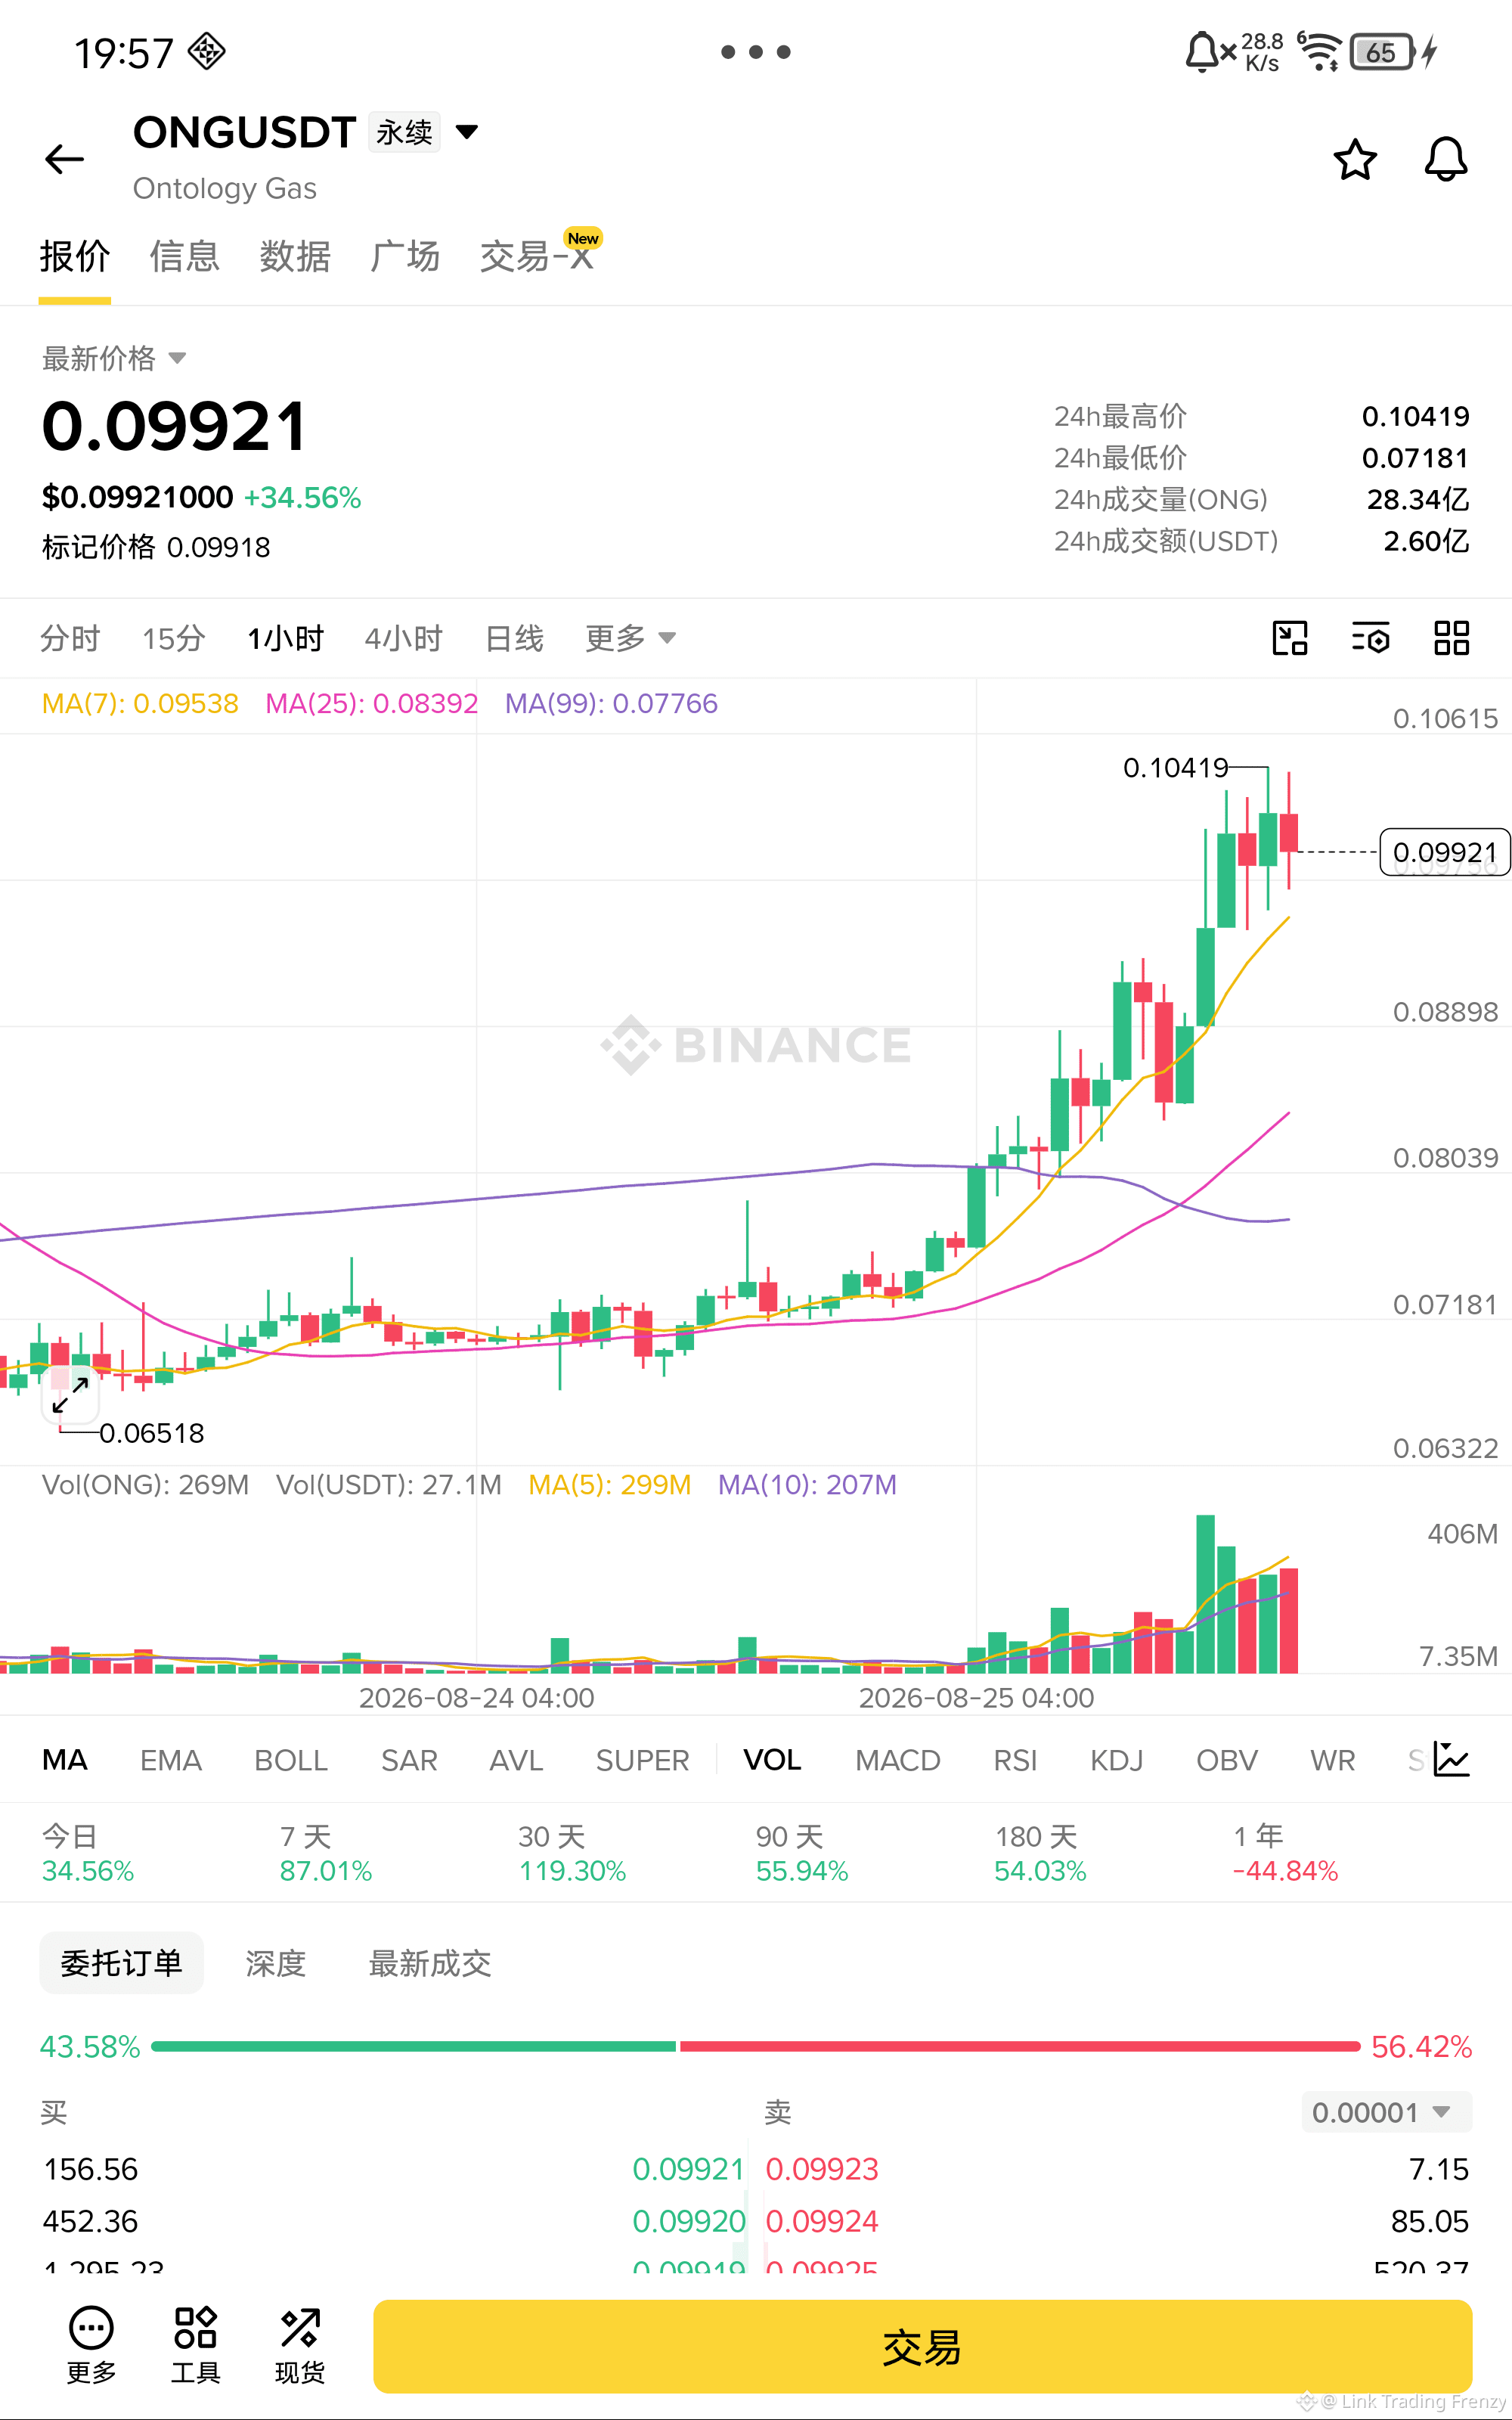
$ONG The Air Force has started to assemble!
ONG—this surge today is indeed impressive, but the 0.10419 high is clearly being blocked. Even though the price is still above MA7, the MACD red histogram continues to shrink. The KDJ at the top shows a bearish cross, confirming the downward spread. After a short-term explosive rally, the selling pressure from profit-taking is huge. There is heavy supply overhead above 0.10, and there is a very strong need for a downside correction.
Entry: 0.09921
Stop loss: 0.10500
Take profit: 0.08800
$ONG - Short 🔻
Enter from the bottom👇
ONG—this surge today is indeed impressive, but the 0.10419 high is clearly being blocked. Even though the price is still above MA7, the MACD red histogram continues to shrink. The KDJ at the top shows a bearish cross, confirming the downward spread. After a short-term explosive rally, the selling pressure from profit-taking is huge. There is heavy supply overhead above 0.10, and there is a very strong need for a downside correction.
Entry: 0.09921
Stop loss: 0.10500
Take profit: 0.08800
$ONG - Short 🔻
Enter from the bottom👇
$CRCL The Air Force is starting to gain momentum!
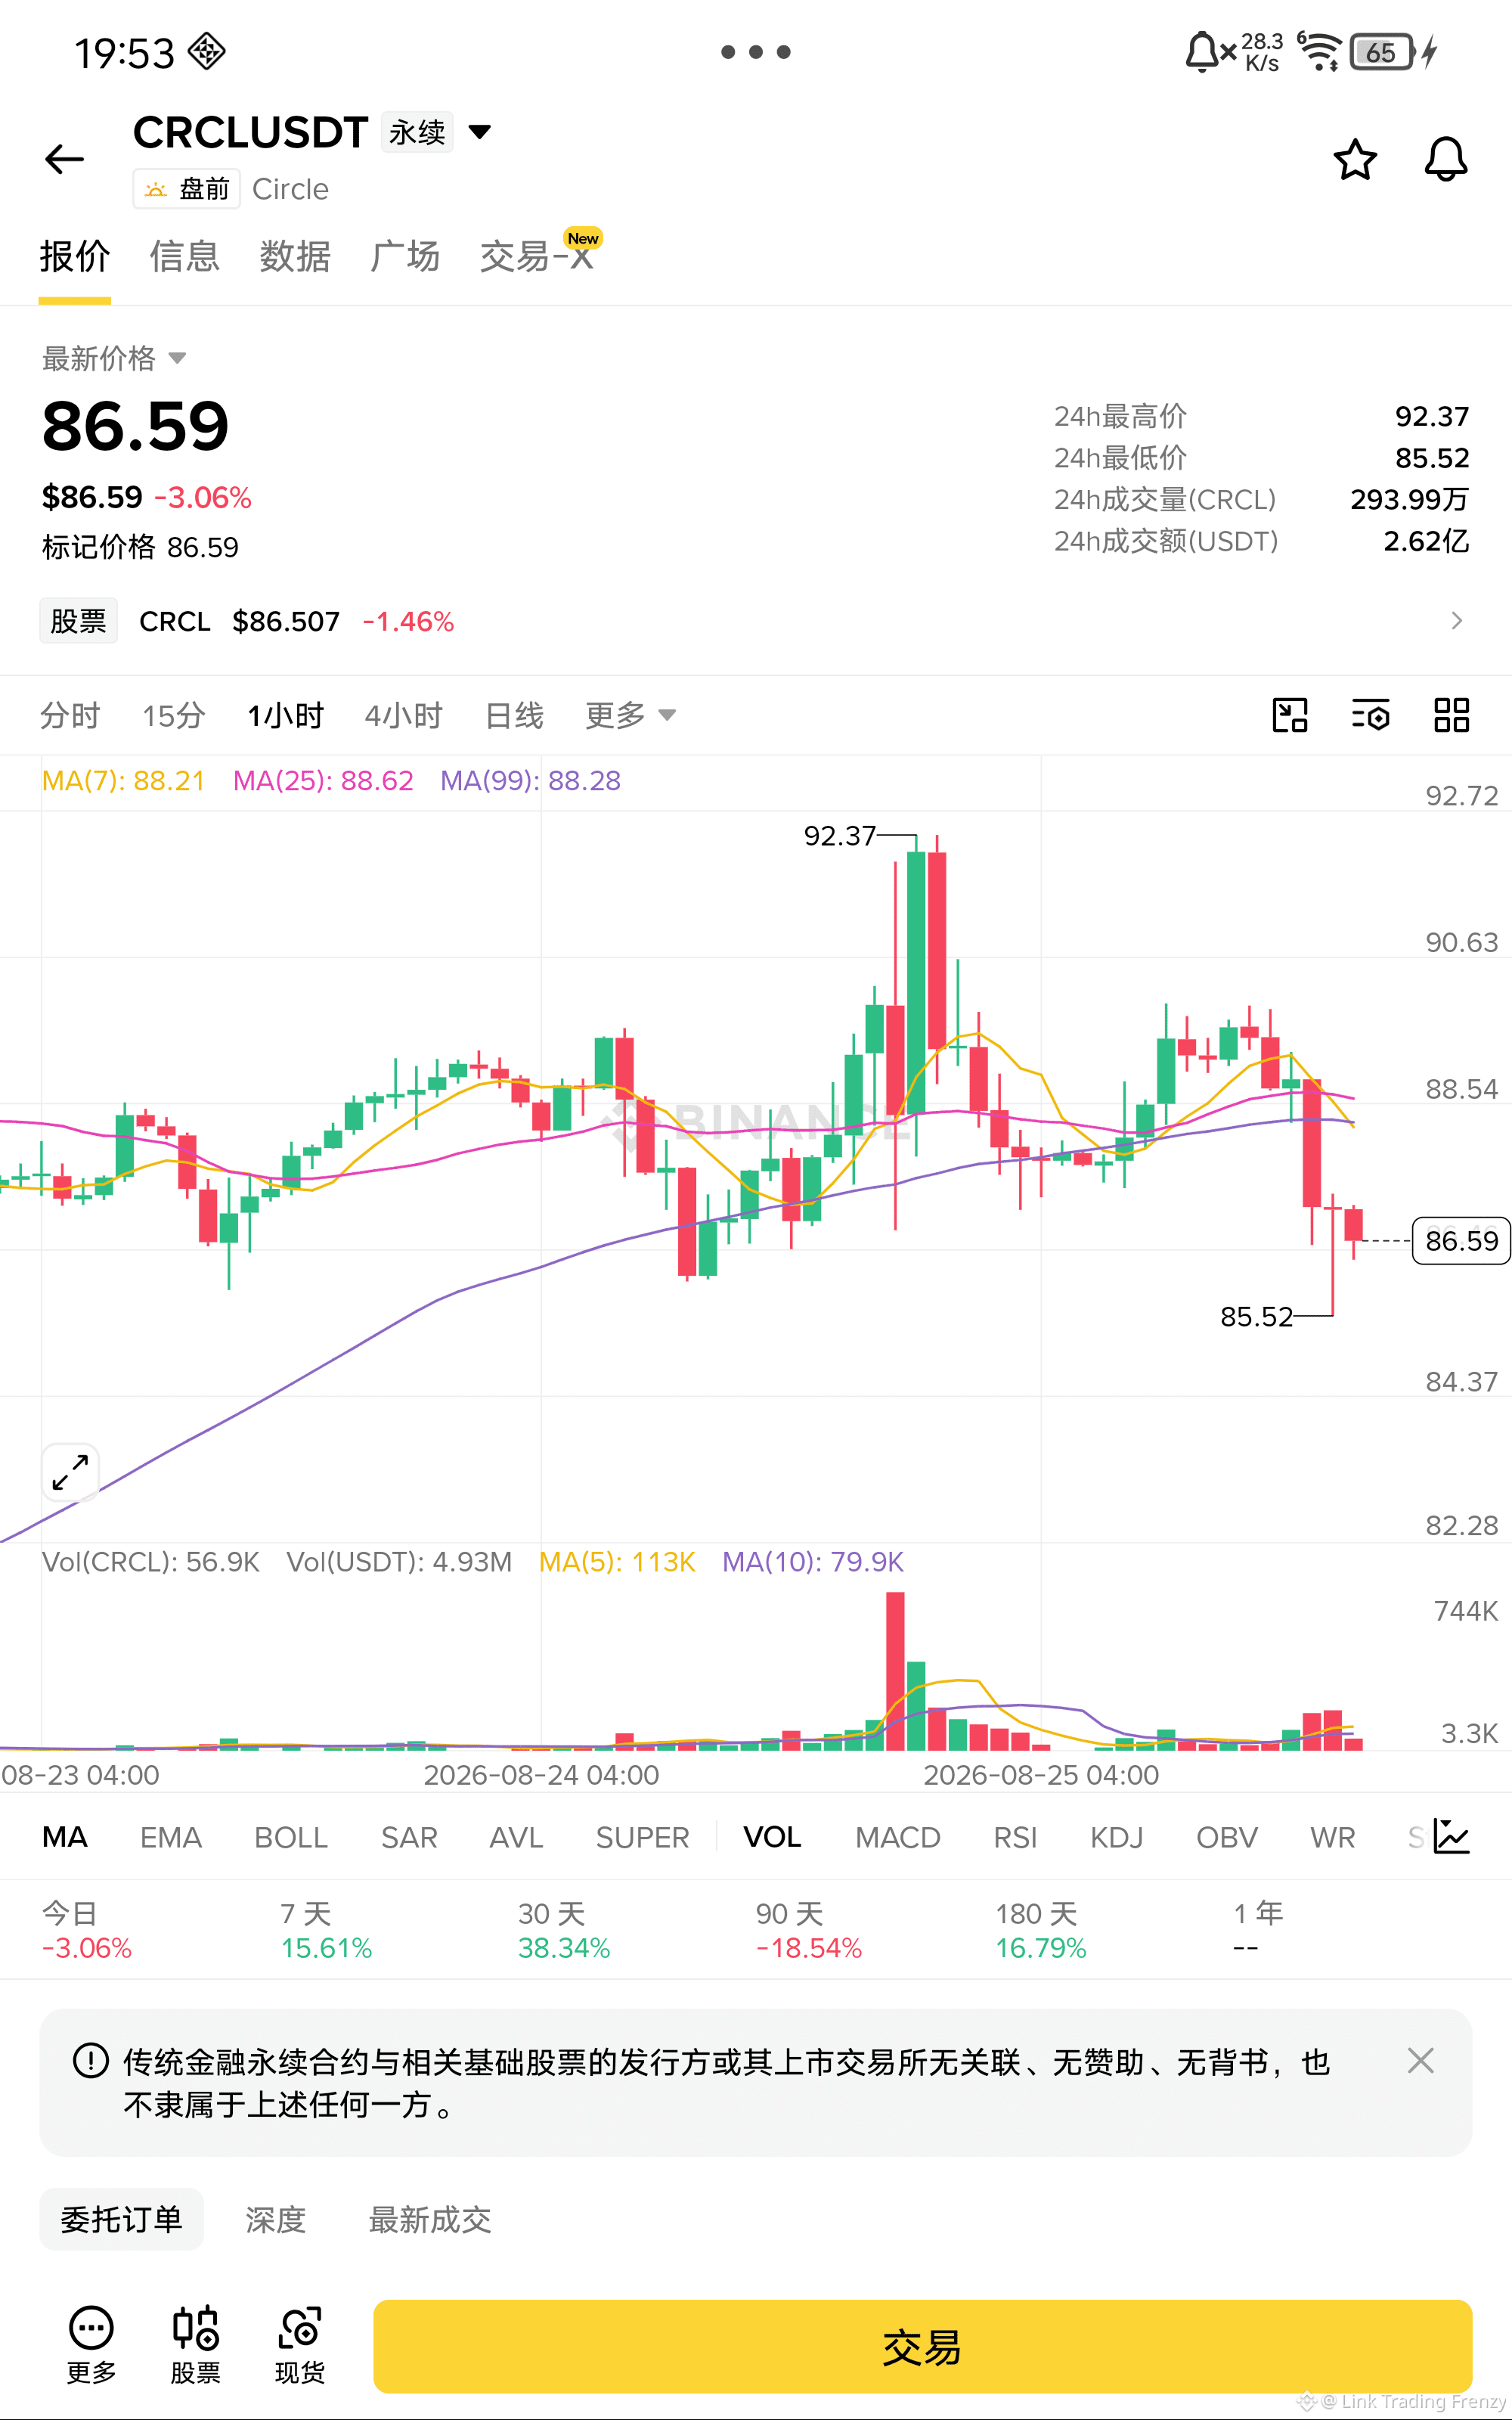
This CRCL move has been slammed all the way down from 92.37 without any pause. The price has already fallen below the MA7, MA25, and MA99 moving averages. The moving-average system is about to fully turn bearish. The MACD red histogram has been compressed to the extreme and is about to flip green. The KDJ high-position dead cross confirms downward expansion. Even the rebound can’t get back to 87.5. The first target below is the previous low at 85.52.
Entry: 86.59
Stop-loss: 88.50
Take-profit: 84.50
$CRCL - Air Force 🔻
Enter the trade from below👇
This CRCL move has been slammed all the way down from 92.37 without any pause. The price has already fallen below the MA7, MA25, and MA99 moving averages. The moving-average system is about to fully turn bearish. The MACD red histogram has been compressed to the extreme and is about to flip green. The KDJ high-position dead cross confirms downward expansion. Even the rebound can’t get back to 87.5. The first target below is the previous low at 85.52.
Entry: 86.59
Stop-loss: 88.50
Take-profit: 84.50
$CRCL - Air Force 🔻
Enter the trade from below👇
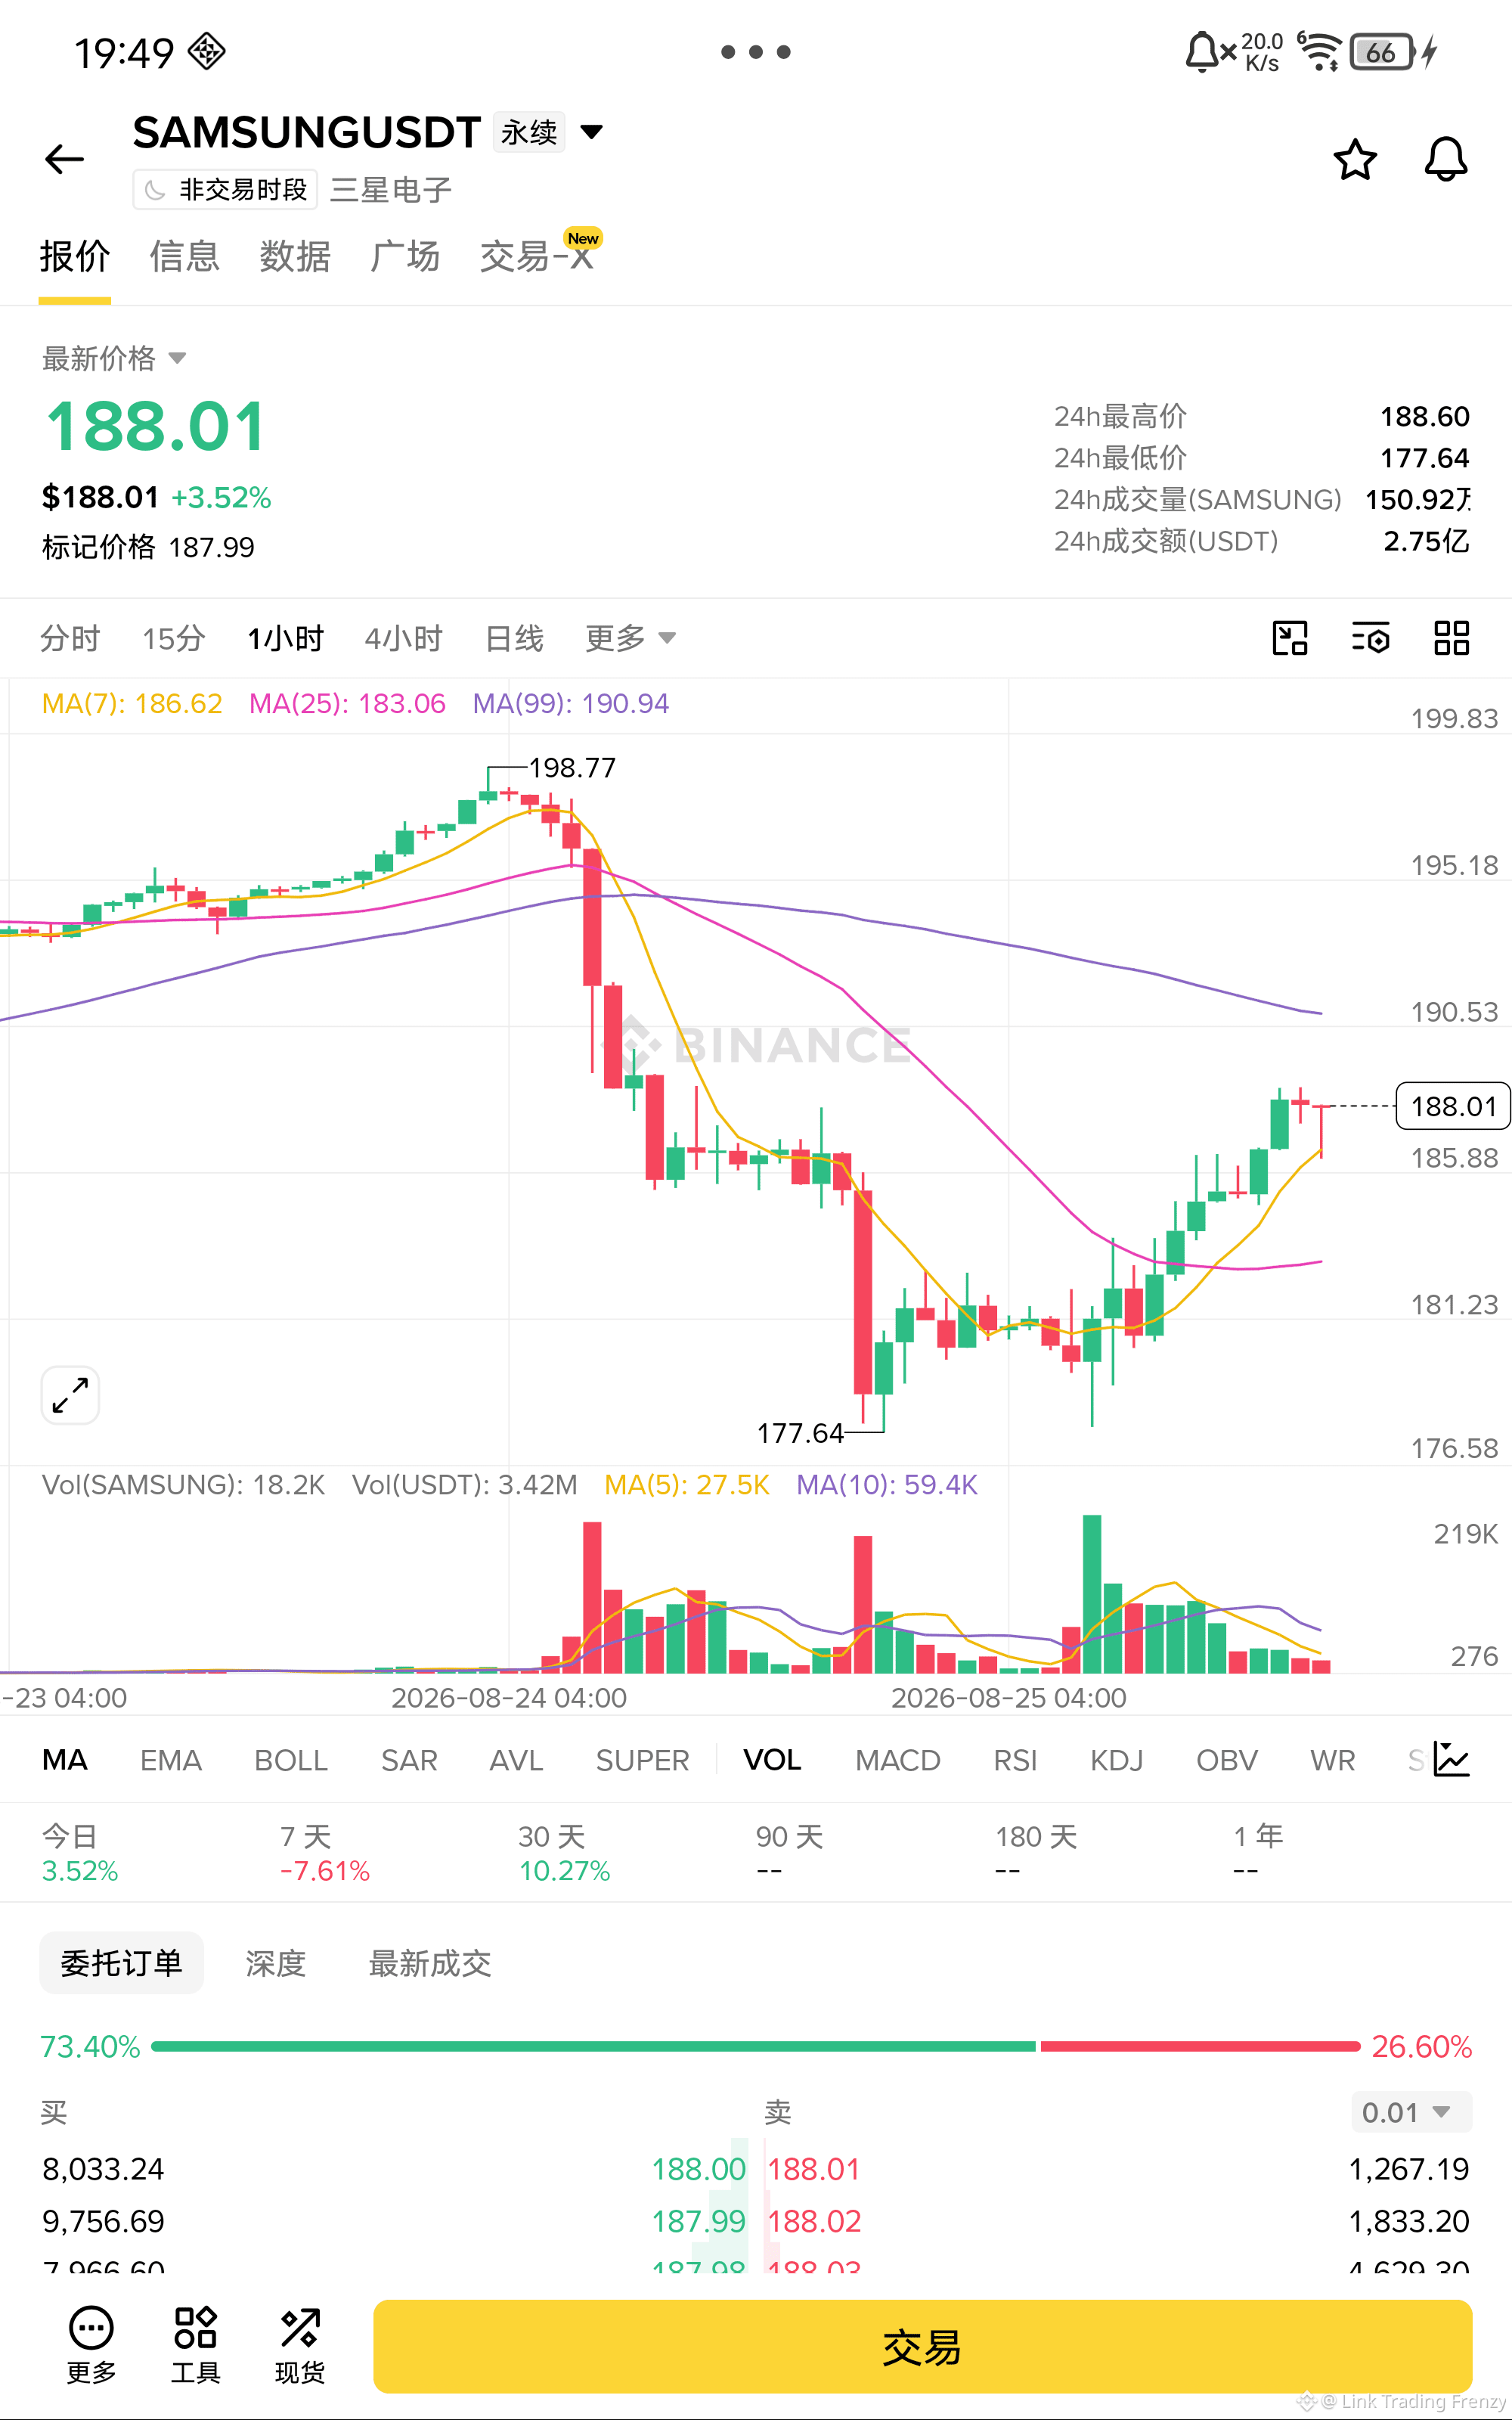
$SAMSUNG This rebound is quite solid. SAMSUNG has been pushed up from 177.64 all the way, continuously breaking through the MA7 and MA25 moving averages. The moving-average system has begun to shift from a bearish to a bullish configuration. The MACD histogram red bars have been expanding continuously. After the KDJ golden cross, the signal is spreading upward. Volume and price action are also coordinating well. Although MA99 (190.94) lies above and acts as resistance, the short-term momentum is still there, so the probability of a momentum-driven push to test the upside is relatively high.
Entry: 188.01
Stop loss: 182.00
Take profit: 196.00
$SAMSUNG - Long 🚀
Enter from below👇
Entry: 188.01
Stop loss: 182.00
Take profit: 196.00
$SAMSUNG - Long 🚀
Enter from below👇
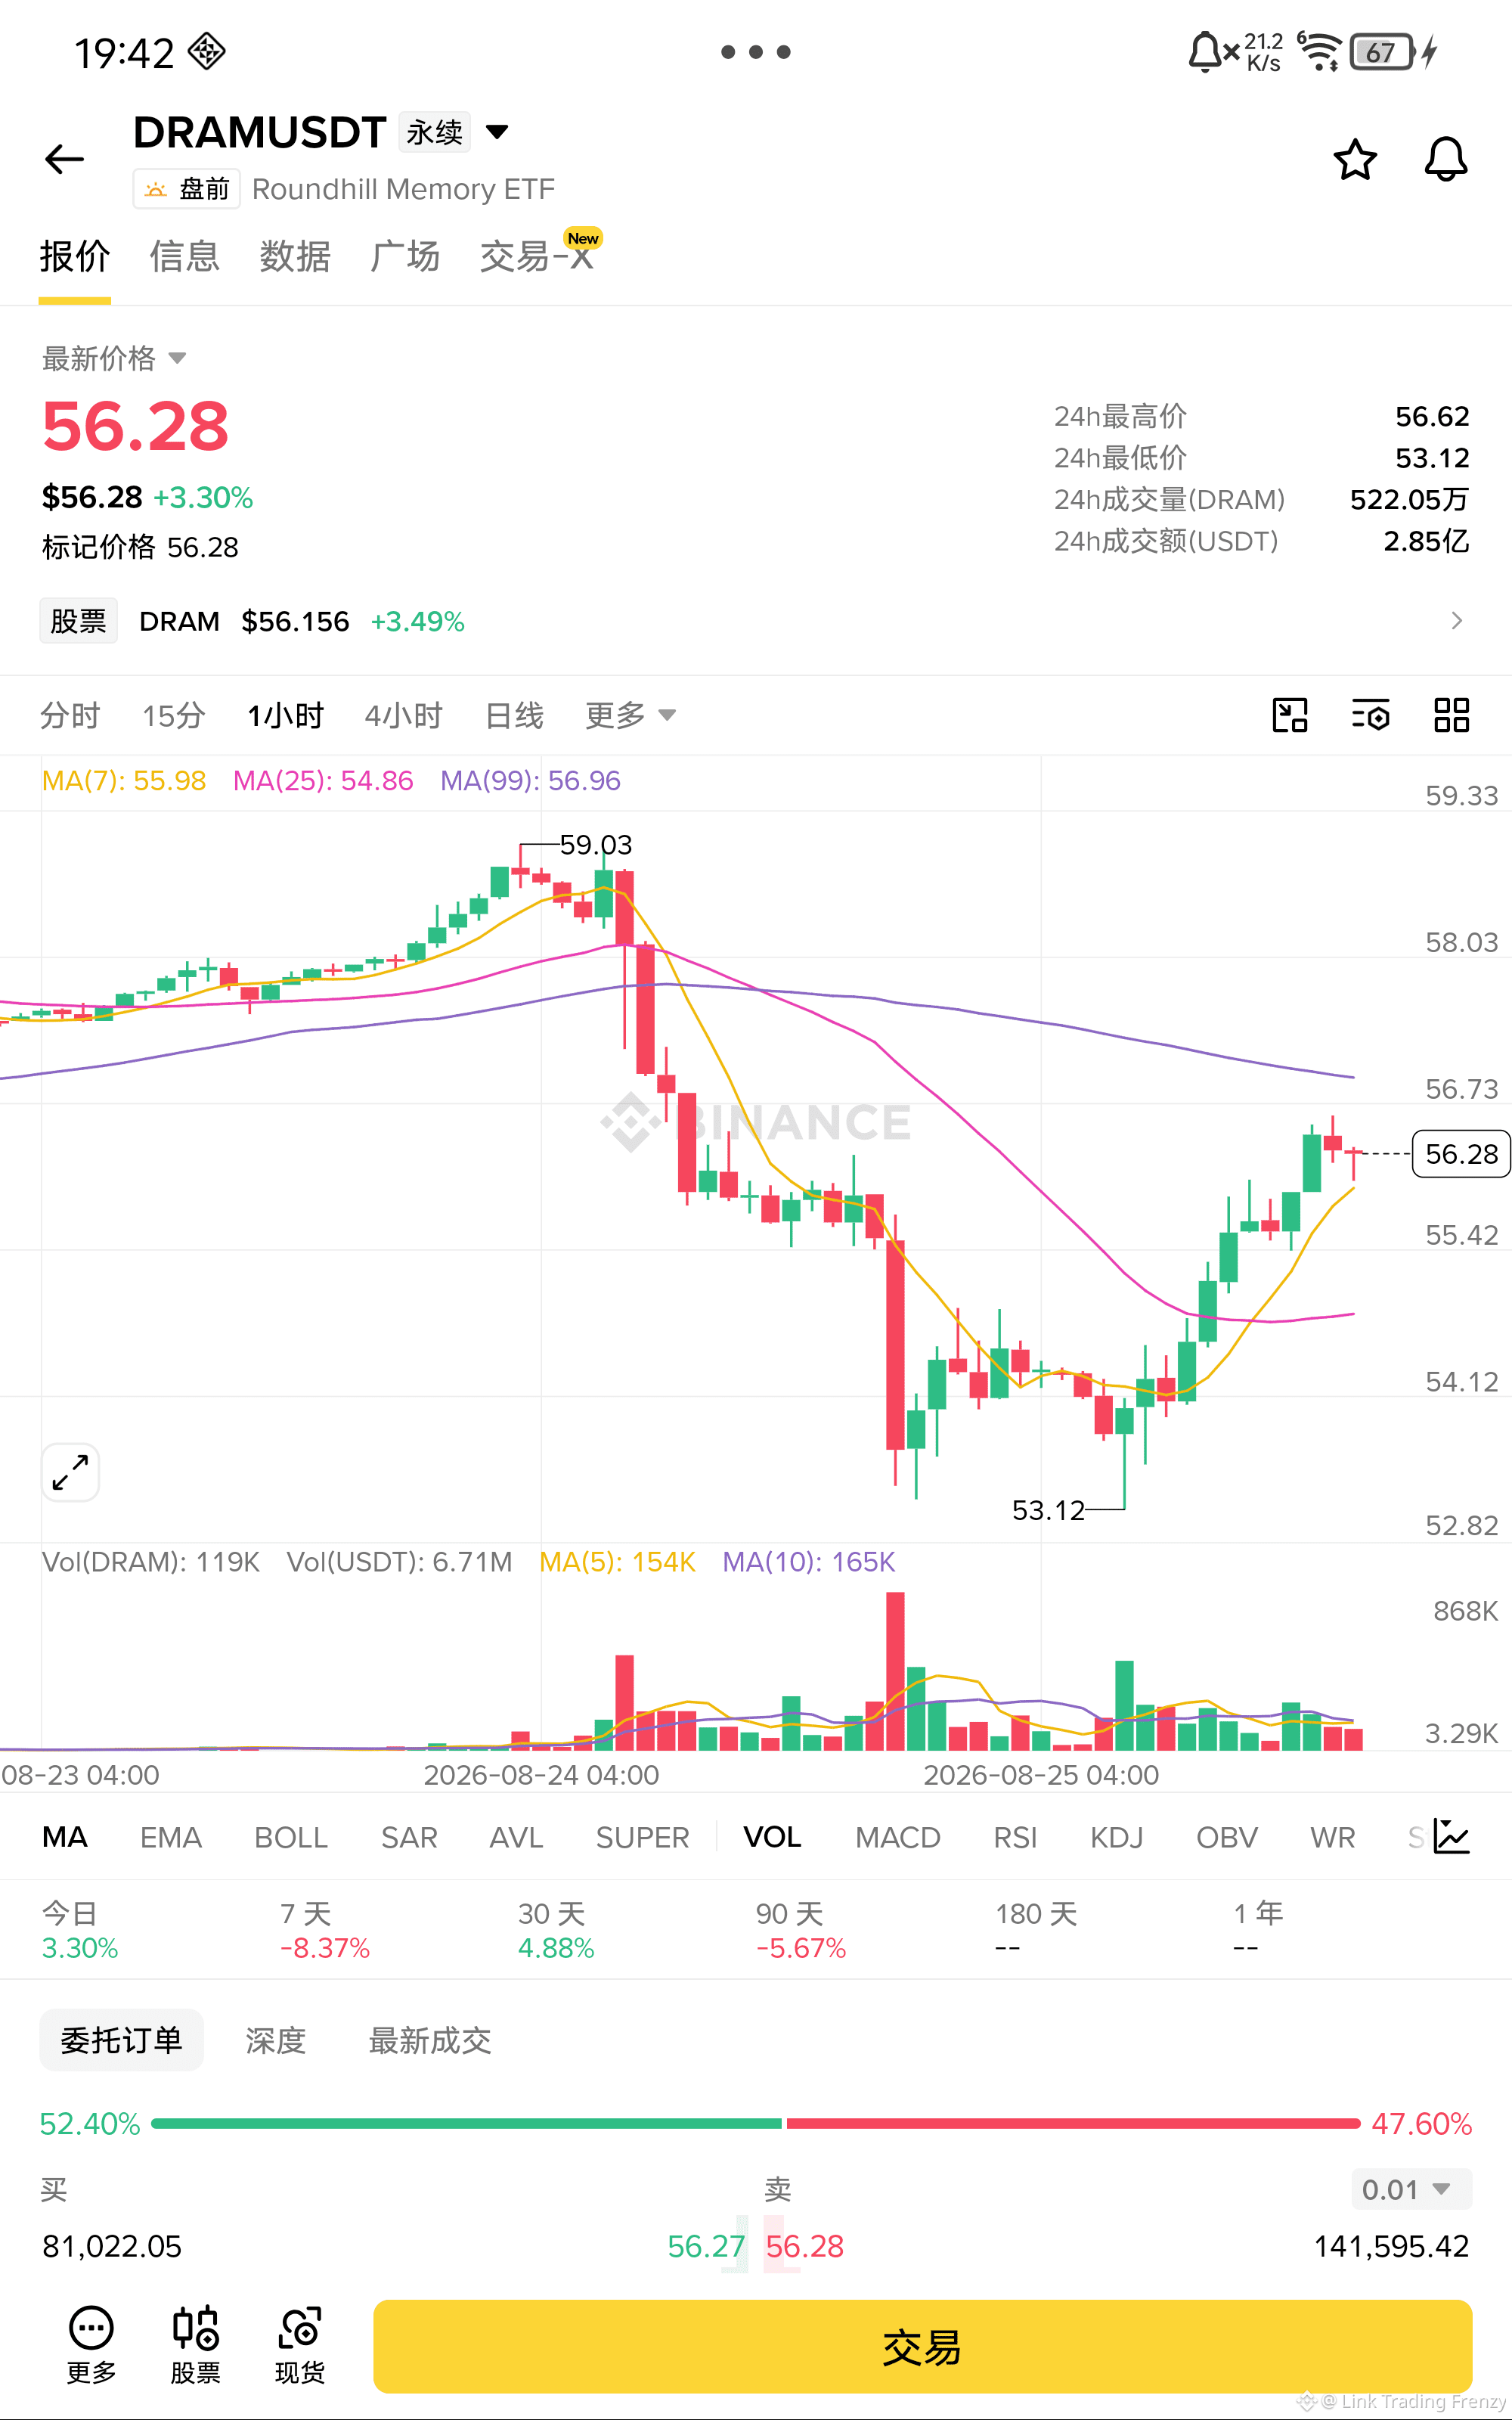
$DRAM This rebound is quite solid. The DRAM has been pushed up steadily from around 54. The MA7 just crossed above the MA25 to form a golden cross, and the moving-average system has begun to shift into a bullish alignment. The MACD red bars continue to expand with increasing volume. After the KDJ golden cross, it is spreading upward. The volume and price are also coordinating well.
In the storage-chip sector, there are signs of a bottoming and rebound in the near term: DRAM prices have stabilized and started rebounding, industry inventory destocking is accelerating, and capital is showing a strong willingness to re-enter. Although MA99 (56.96) overhead creates resistance, given the current momentum, there is a relatively high probability of an inertia-driven push upward to test that level.
Entry: 56.28
Stop loss: 54.50
Take profit: 59.00
$DRAM - Buy 🚀
Enter from below👇
In the storage-chip sector, there are signs of a bottoming and rebound in the near term: DRAM prices have stabilized and started rebounding, industry inventory destocking is accelerating, and capital is showing a strong willingness to re-enter. Although MA99 (56.96) overhead creates resistance, given the current momentum, there is a relatively high probability of an inertia-driven push upward to test that level.
Entry: 56.28
Stop loss: 54.50
Take profit: 59.00
$DRAM - Buy 🚀
Enter from below👇
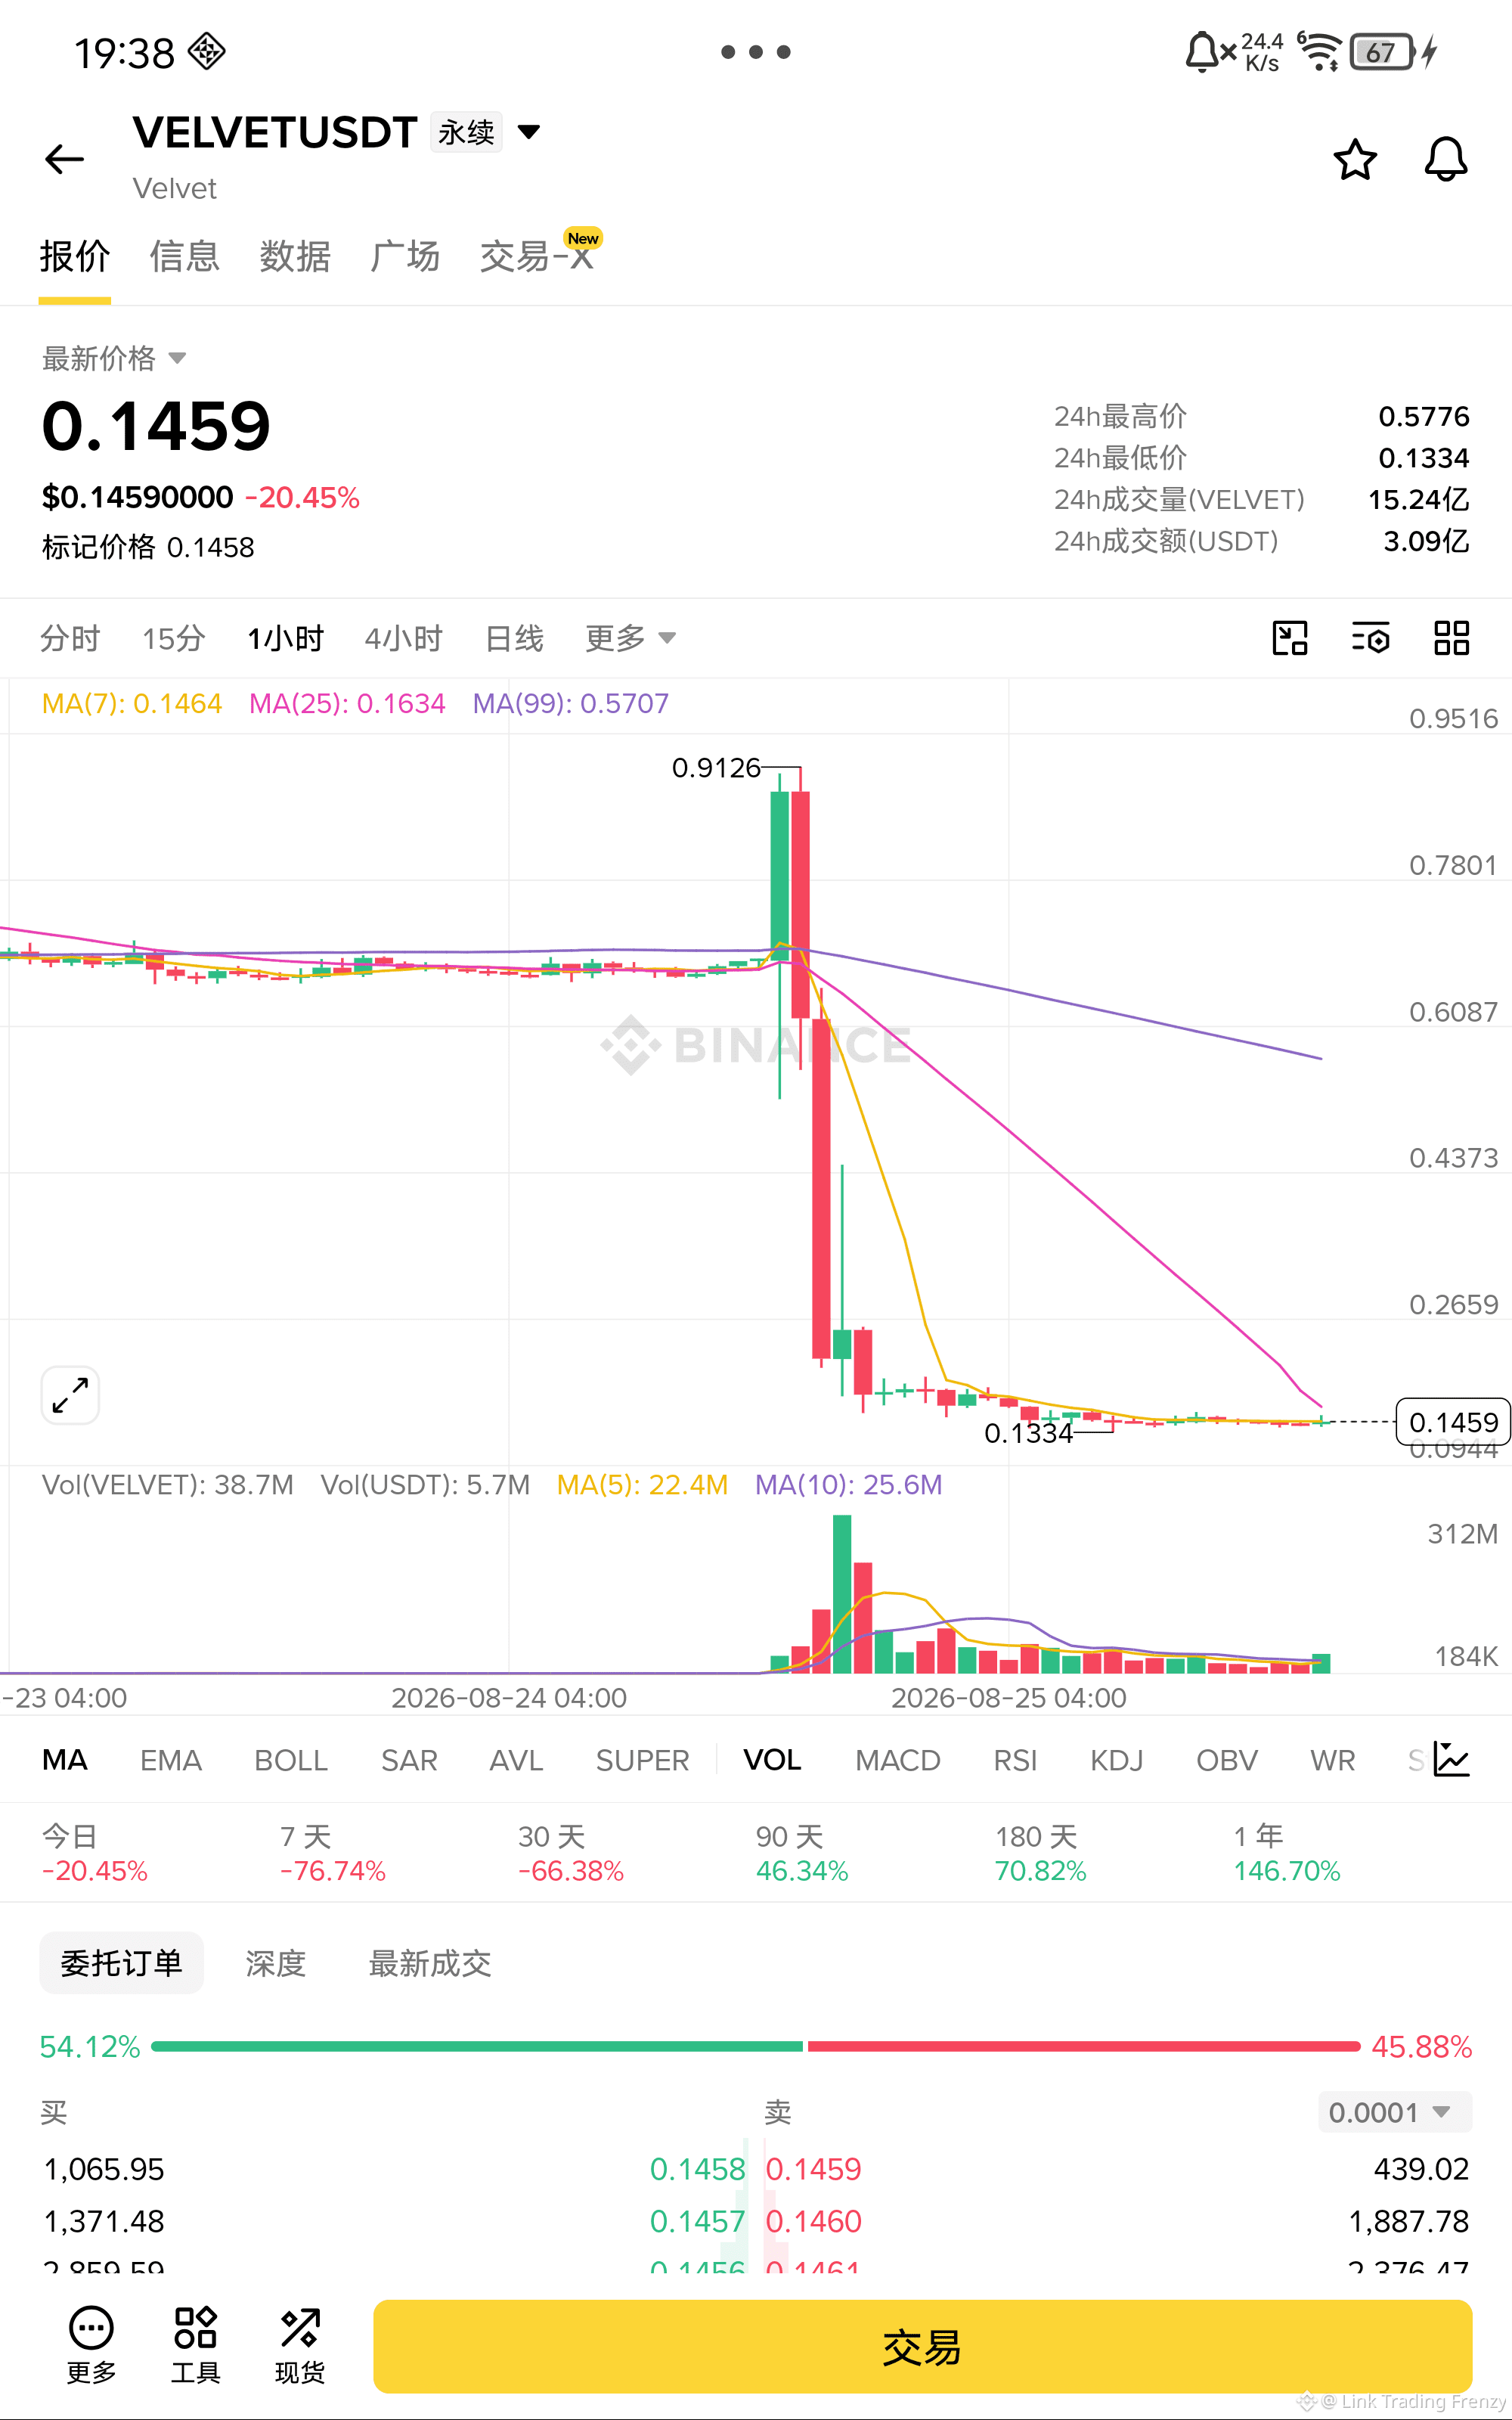
$VELVET The short-sellers are absolutely ruthless this move. VELVET was smashed directly from 0.5776 to 0.1459, with almost no resistance at all. Price is far away from all moving averages. MA99 is still at 0.57, showing just how extreme this drop is. The MACD green bars keep expanding, and the KDJ spreads downward. Even the rebound can’t even get back to 0.15. The first target below is the previous low at 0.1334.
Entry: 0.1459
Stop loss: 0.1550
Take profit: 0.1334
$VELVET - Short 🔻
Enter from the lower side👇
Entry: 0.1459
Stop loss: 0.1550
Take profit: 0.1334
$VELVET - Short 🔻
Enter from the lower side👇
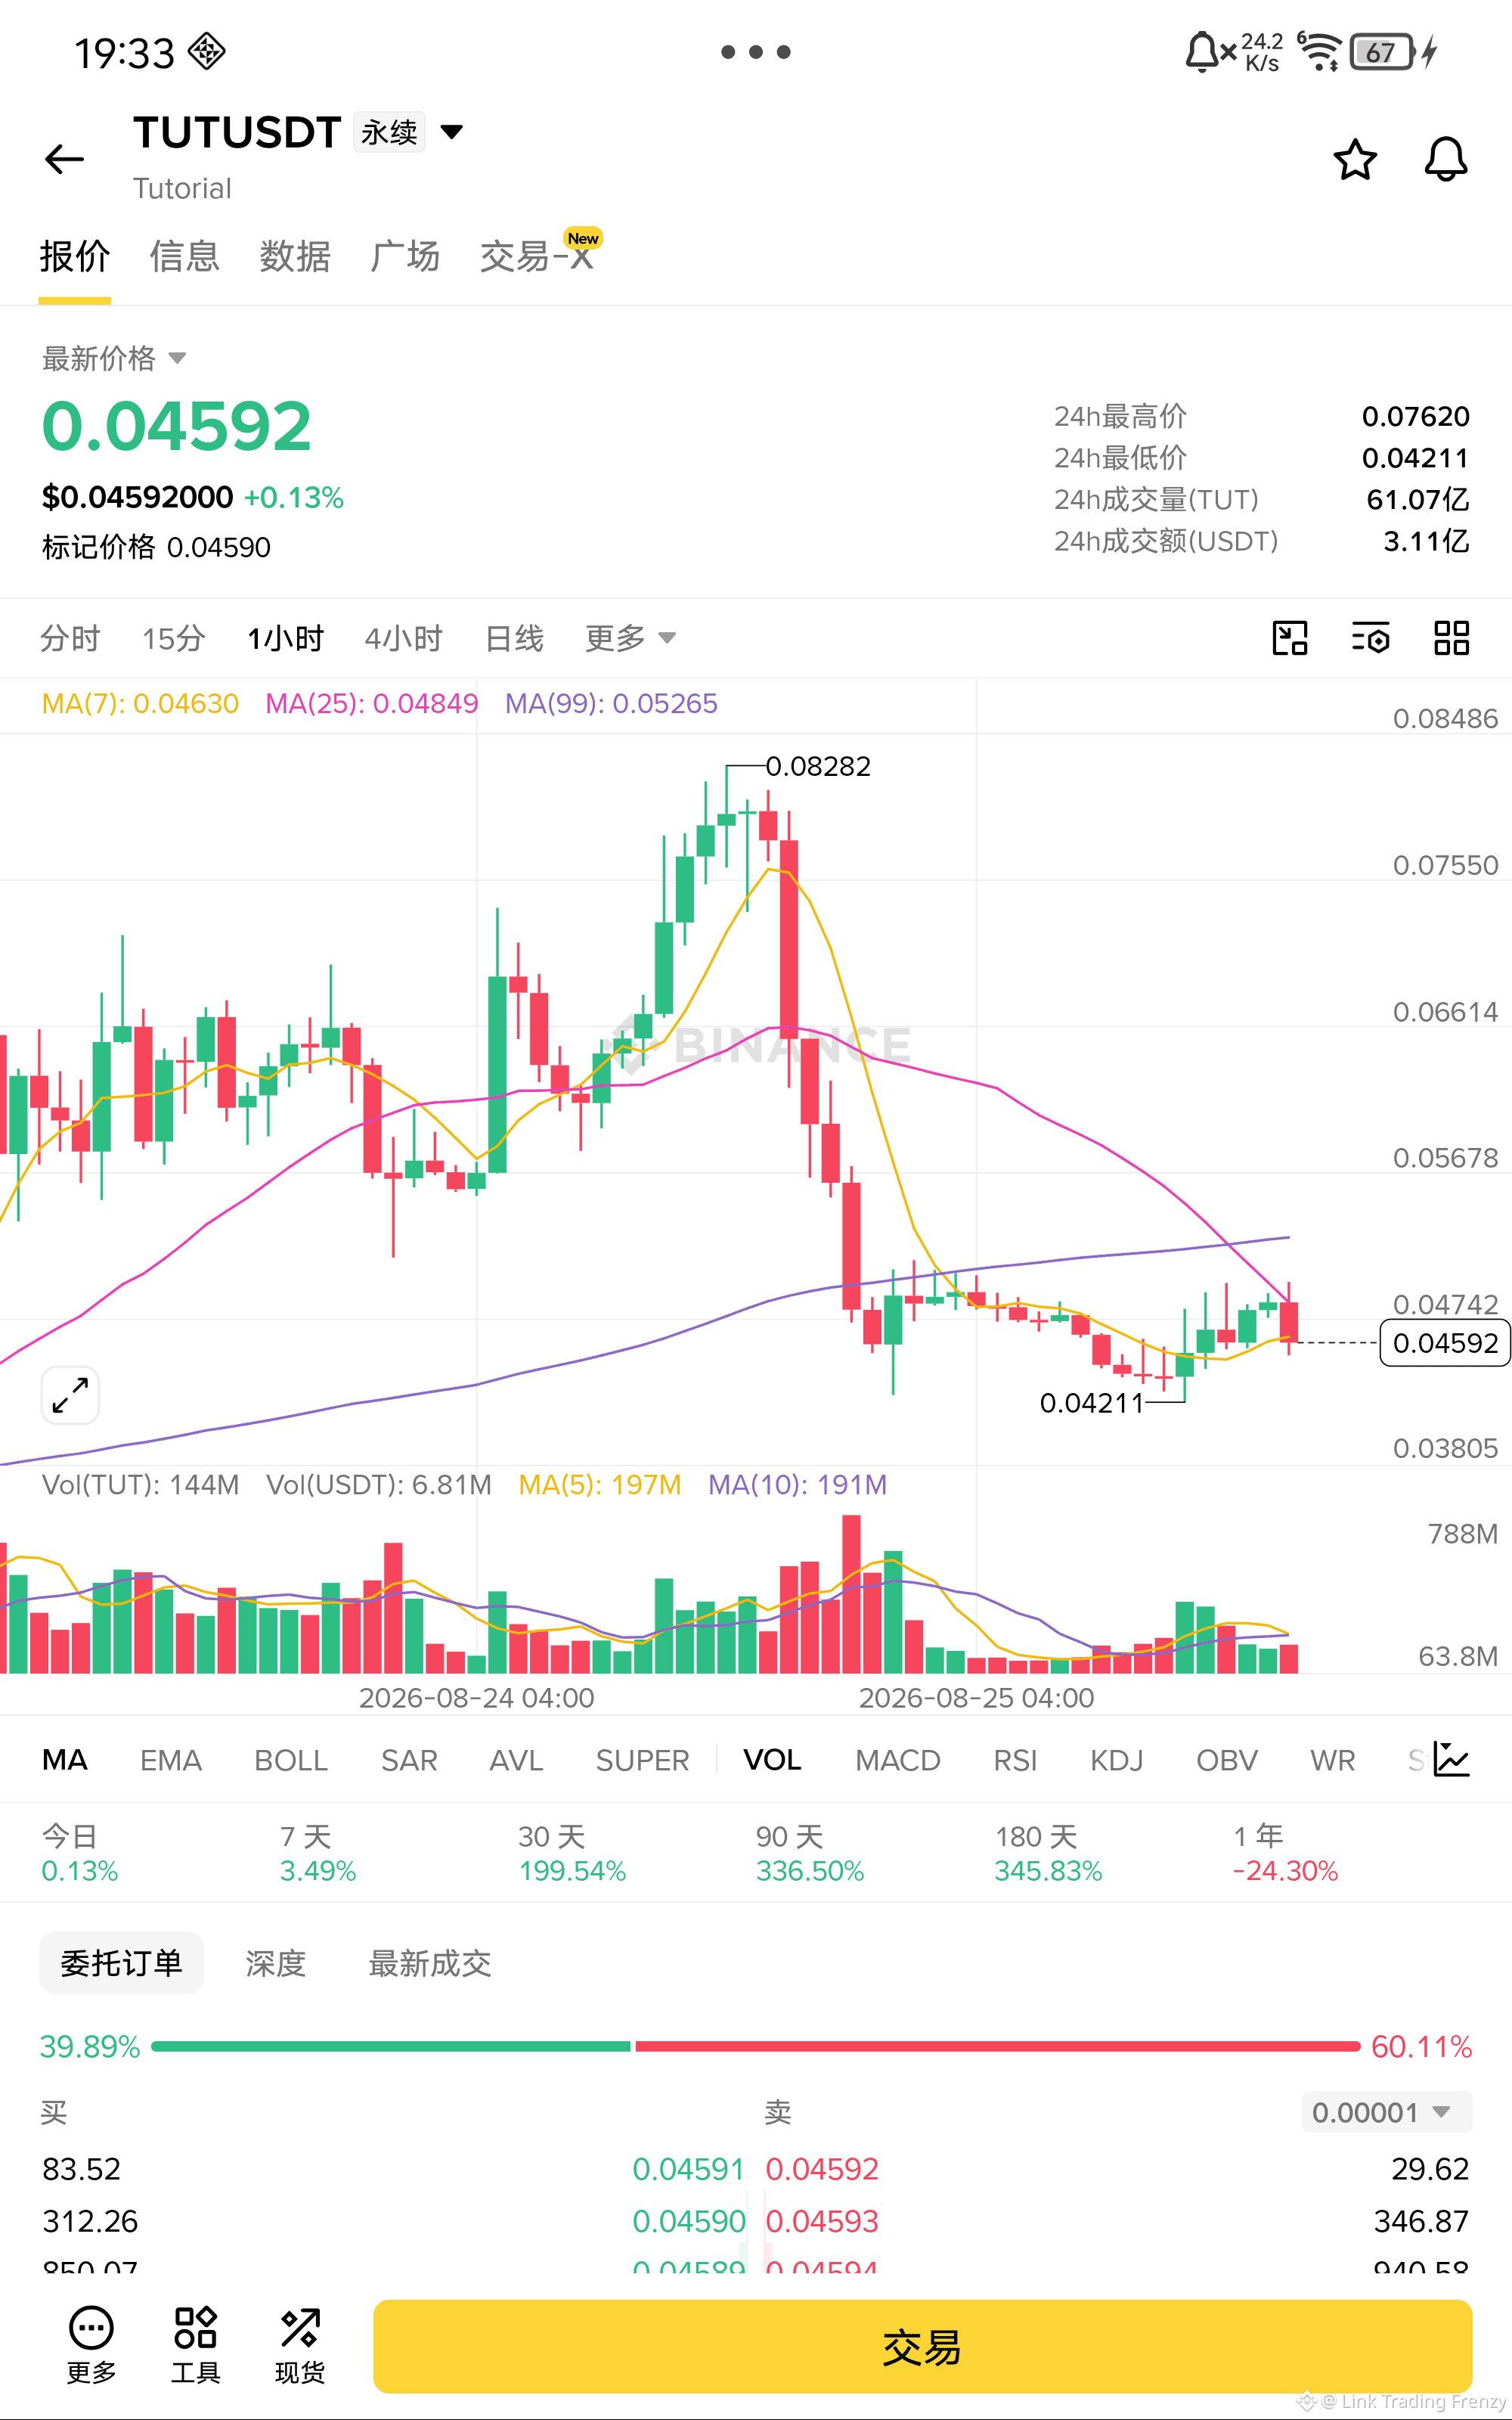
$TUT The short-term downtrend is very smooth. TUT has been dumped from 0.07620 all the way down with barely any rebound. The price is already below all moving averages, with MA7, MA25, and MA99 all fully aligned in a bearish order. The MACD green bars keep expanding, and the KDJ is spreading downward. Even the rebound can’t get back up to touch 0.047. The next target is the previous low at 0.04211.
Entry: 0.04592
Stop loss: 0.04750
Take profit: 0.04050
$TUT - Short 🔻
Enter the trade from below👇
Entry: 0.04592
Stop loss: 0.04750
Take profit: 0.04050
$TUT - Short 🔻
Enter the trade from below👇
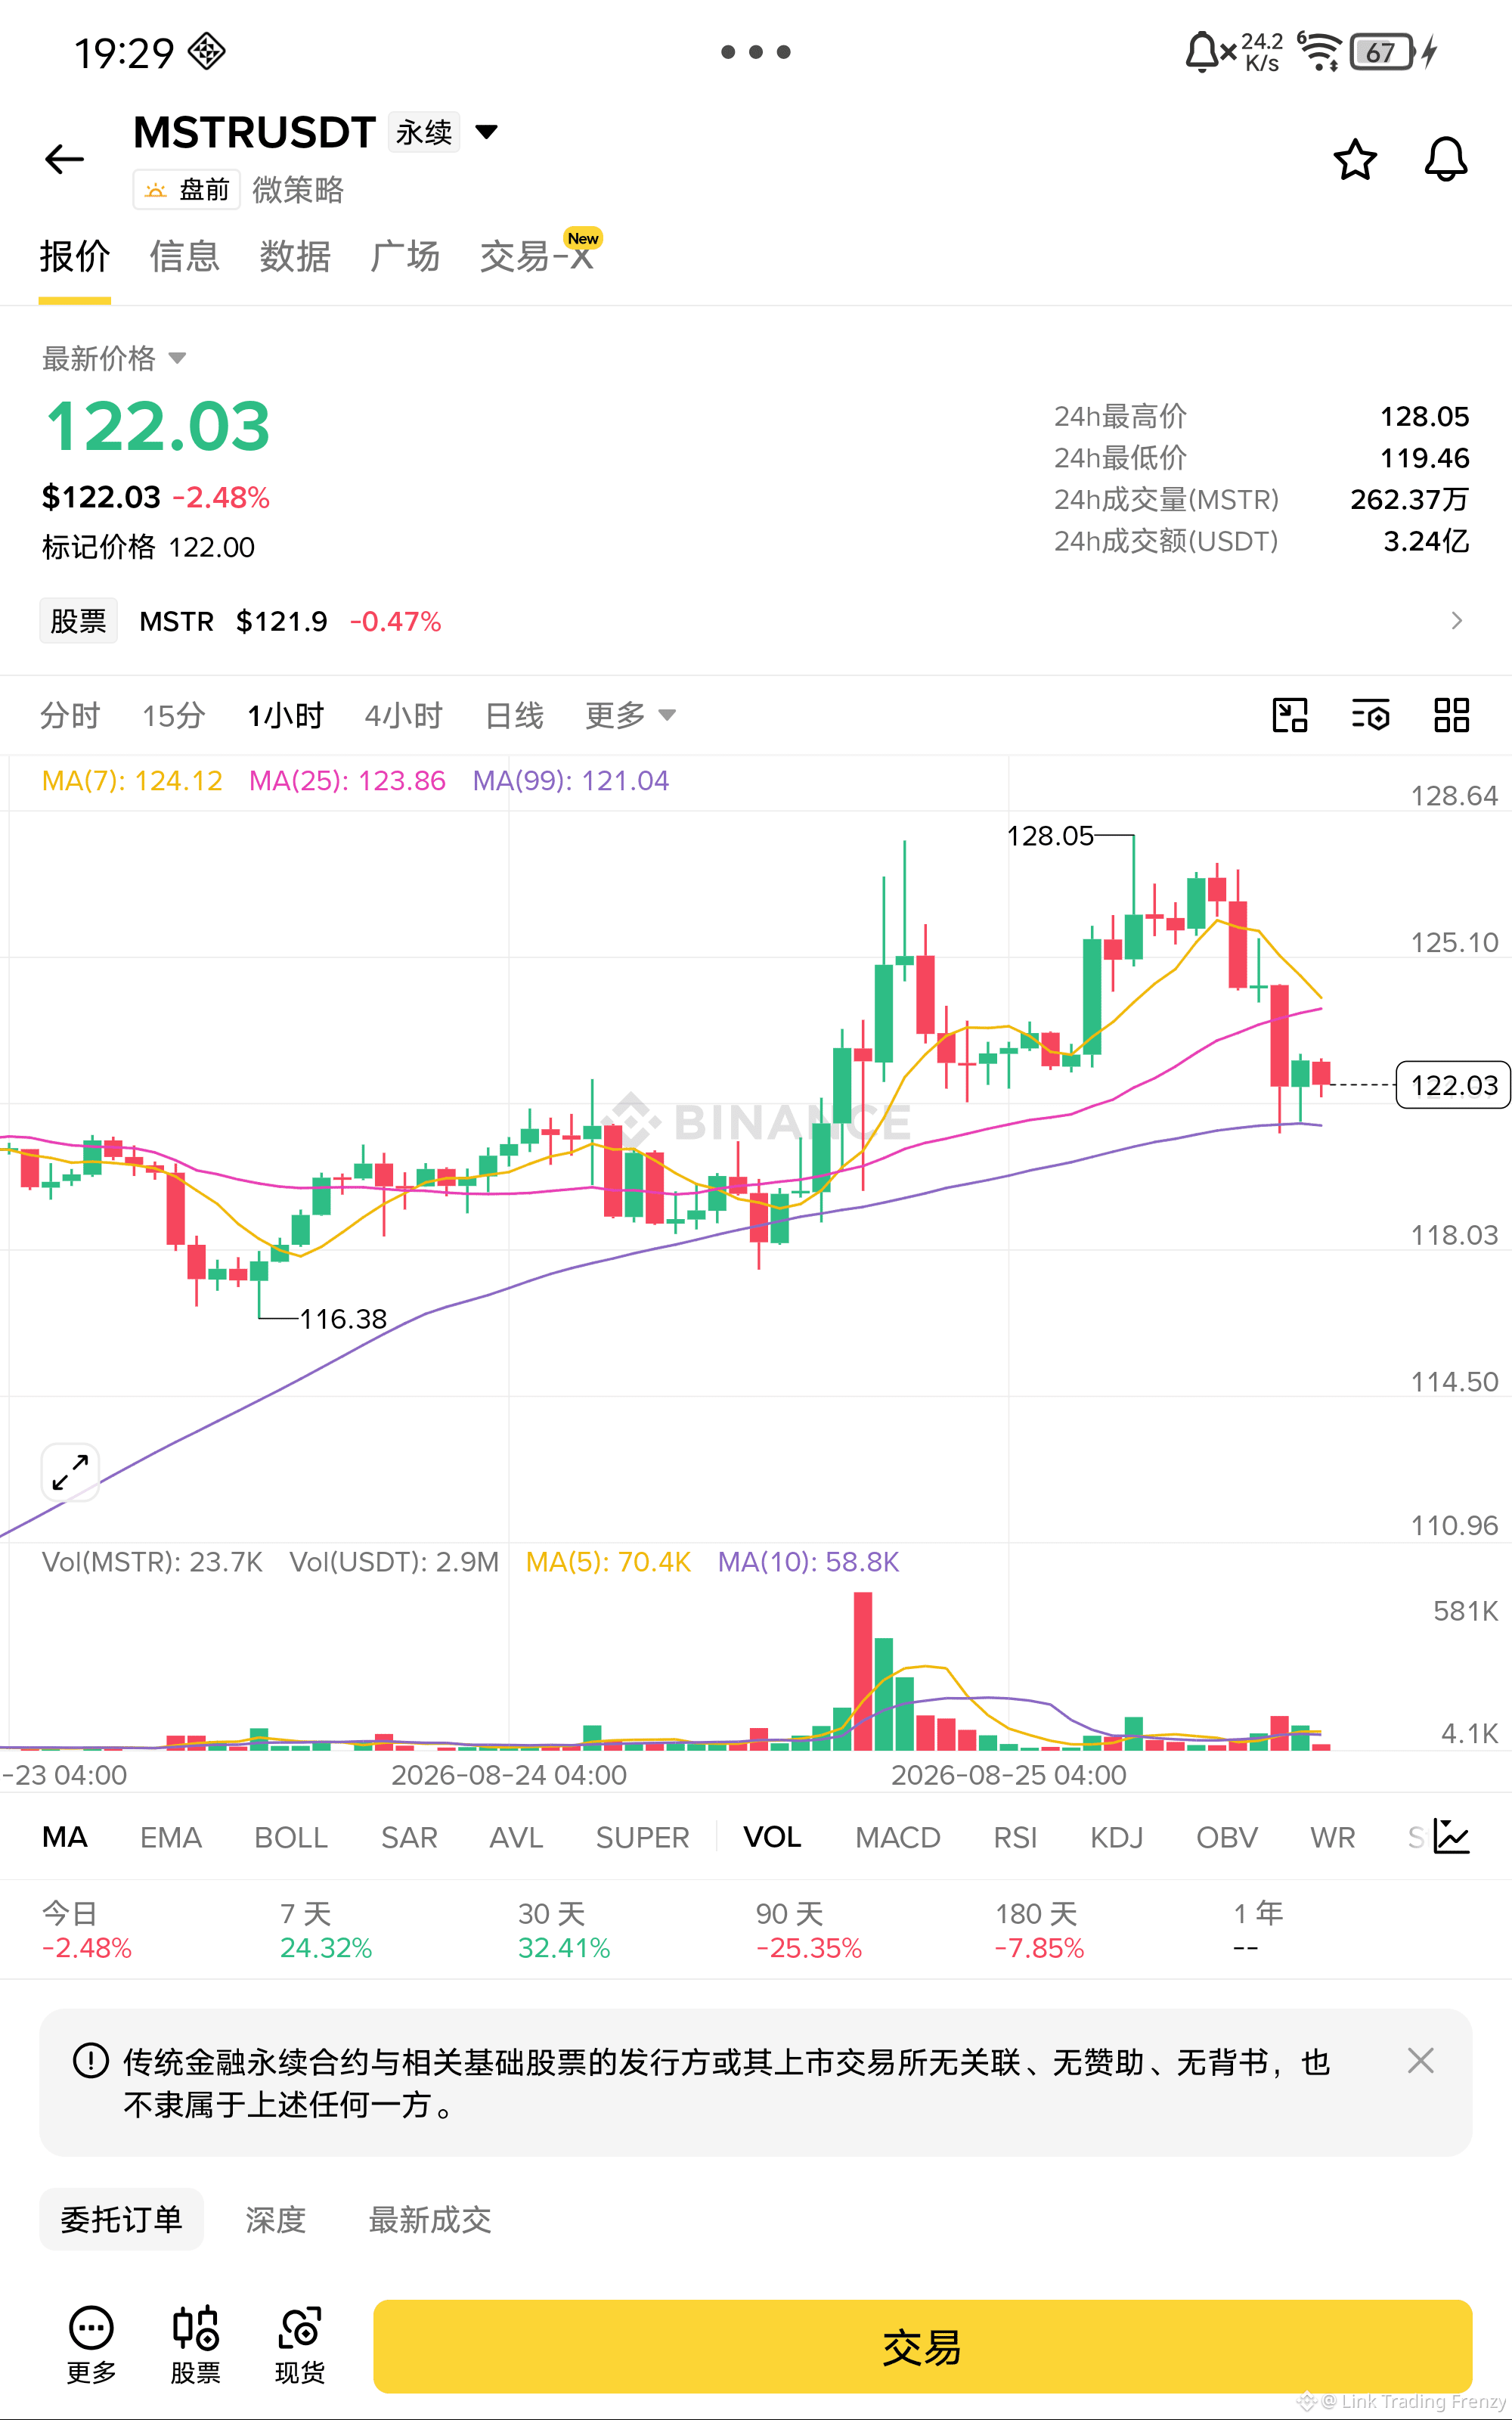
$MSTR The short side is clearly in a superior position. MSTR has been falling steadily from around 124. MA7 and MA25 have already formed a dead cross, putting downward pressure. The price has been pinned down by these two moving averages for two consecutive days. The MACD red histogram bars continue to shrink, and the KDJ is spreading downward. Even during rebounds, the price can’t climb back up to 123. Below, MA99 (121.04) is the first target.
Entry: 122.03
Stop loss: 125.00
Take profit: 118.00
$MSTR - Short 🔻
Enter from below 👇
Entry: 122.03
Stop loss: 125.00
Take profit: 118.00
$MSTR - Short 🔻
Enter from below 👇
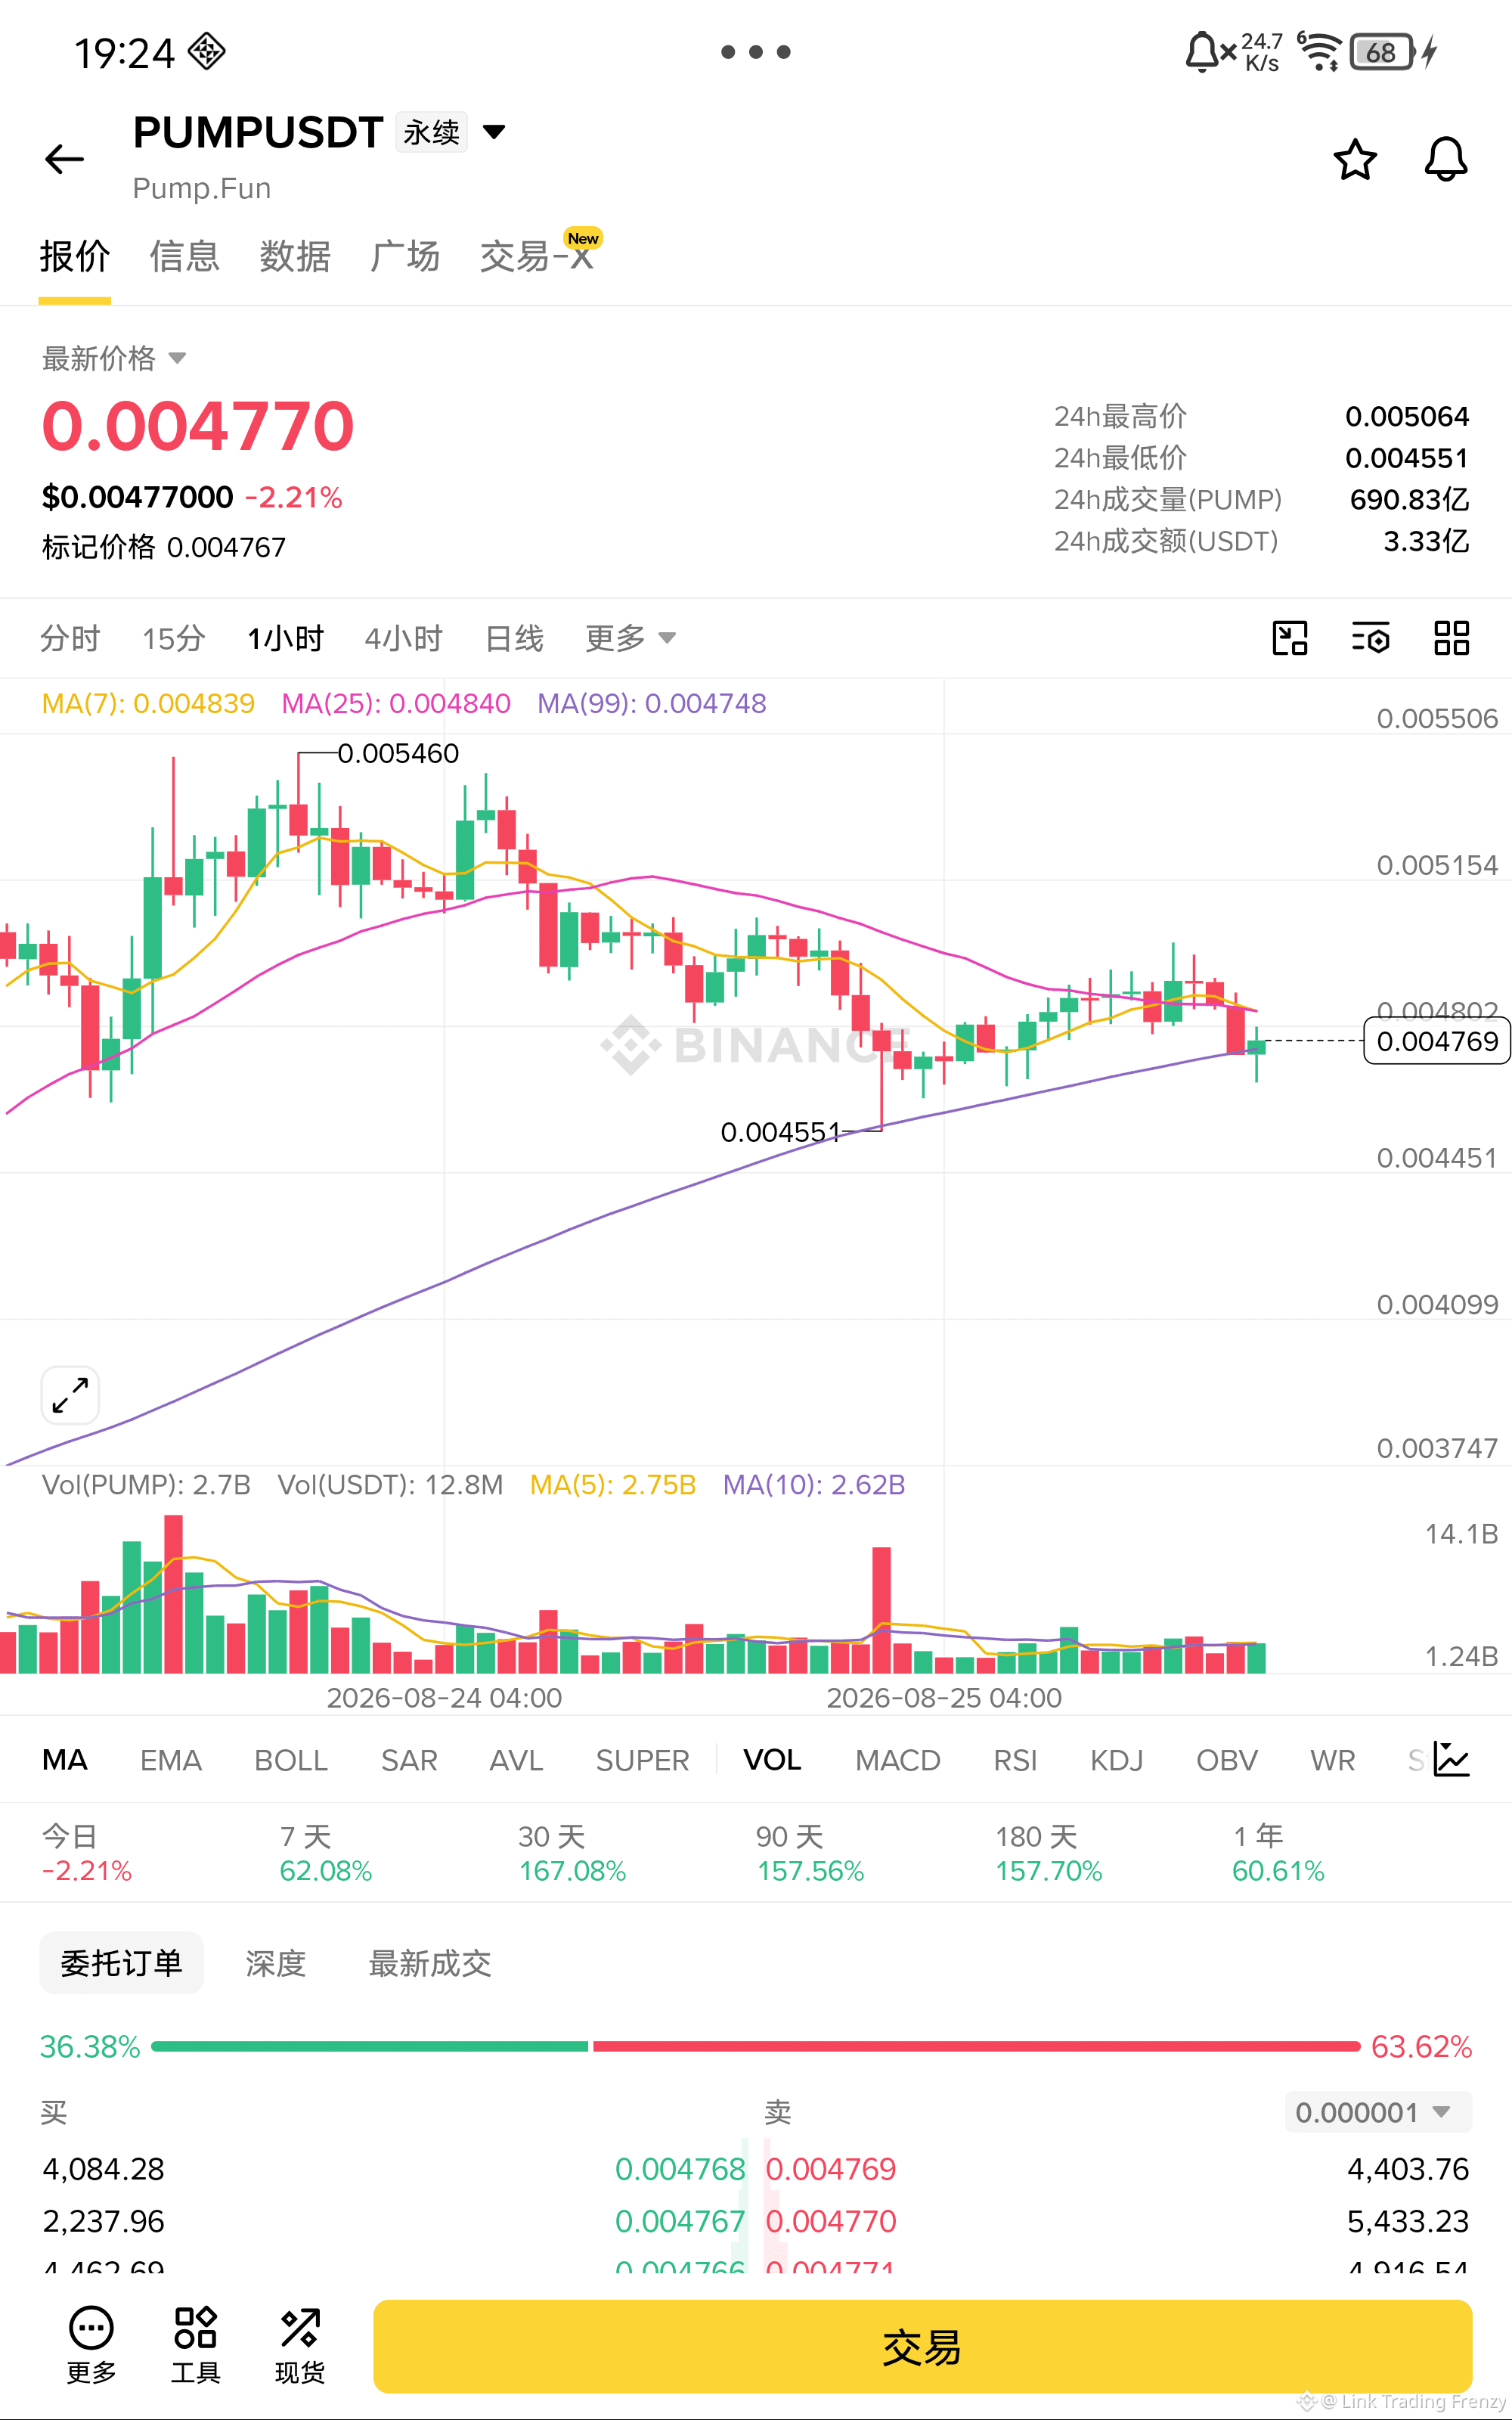
$PUMP The bears have already taken control of the situation. This PUMP move, after falling back from 0.005064, has been continuously suppressed by MA7 and MA25; the two moving averages have just formed a dead cross. The MACD green histogram keeps expanding, and the KDJ is diffusing downward. Even the rebound can’t get back up to 0.00485. Below, MA99 (0.004748) is the first target—once it breaks, the move will accelerate downward.
Entry: 0.004770
Stop loss: 0.004950
Take profit: 0.004450
$PUMP - Bear 🔻
Enter from below👇
Entry: 0.004770
Stop loss: 0.004950
Take profit: 0.004450
$PUMP - Bear 🔻
Enter from below👇
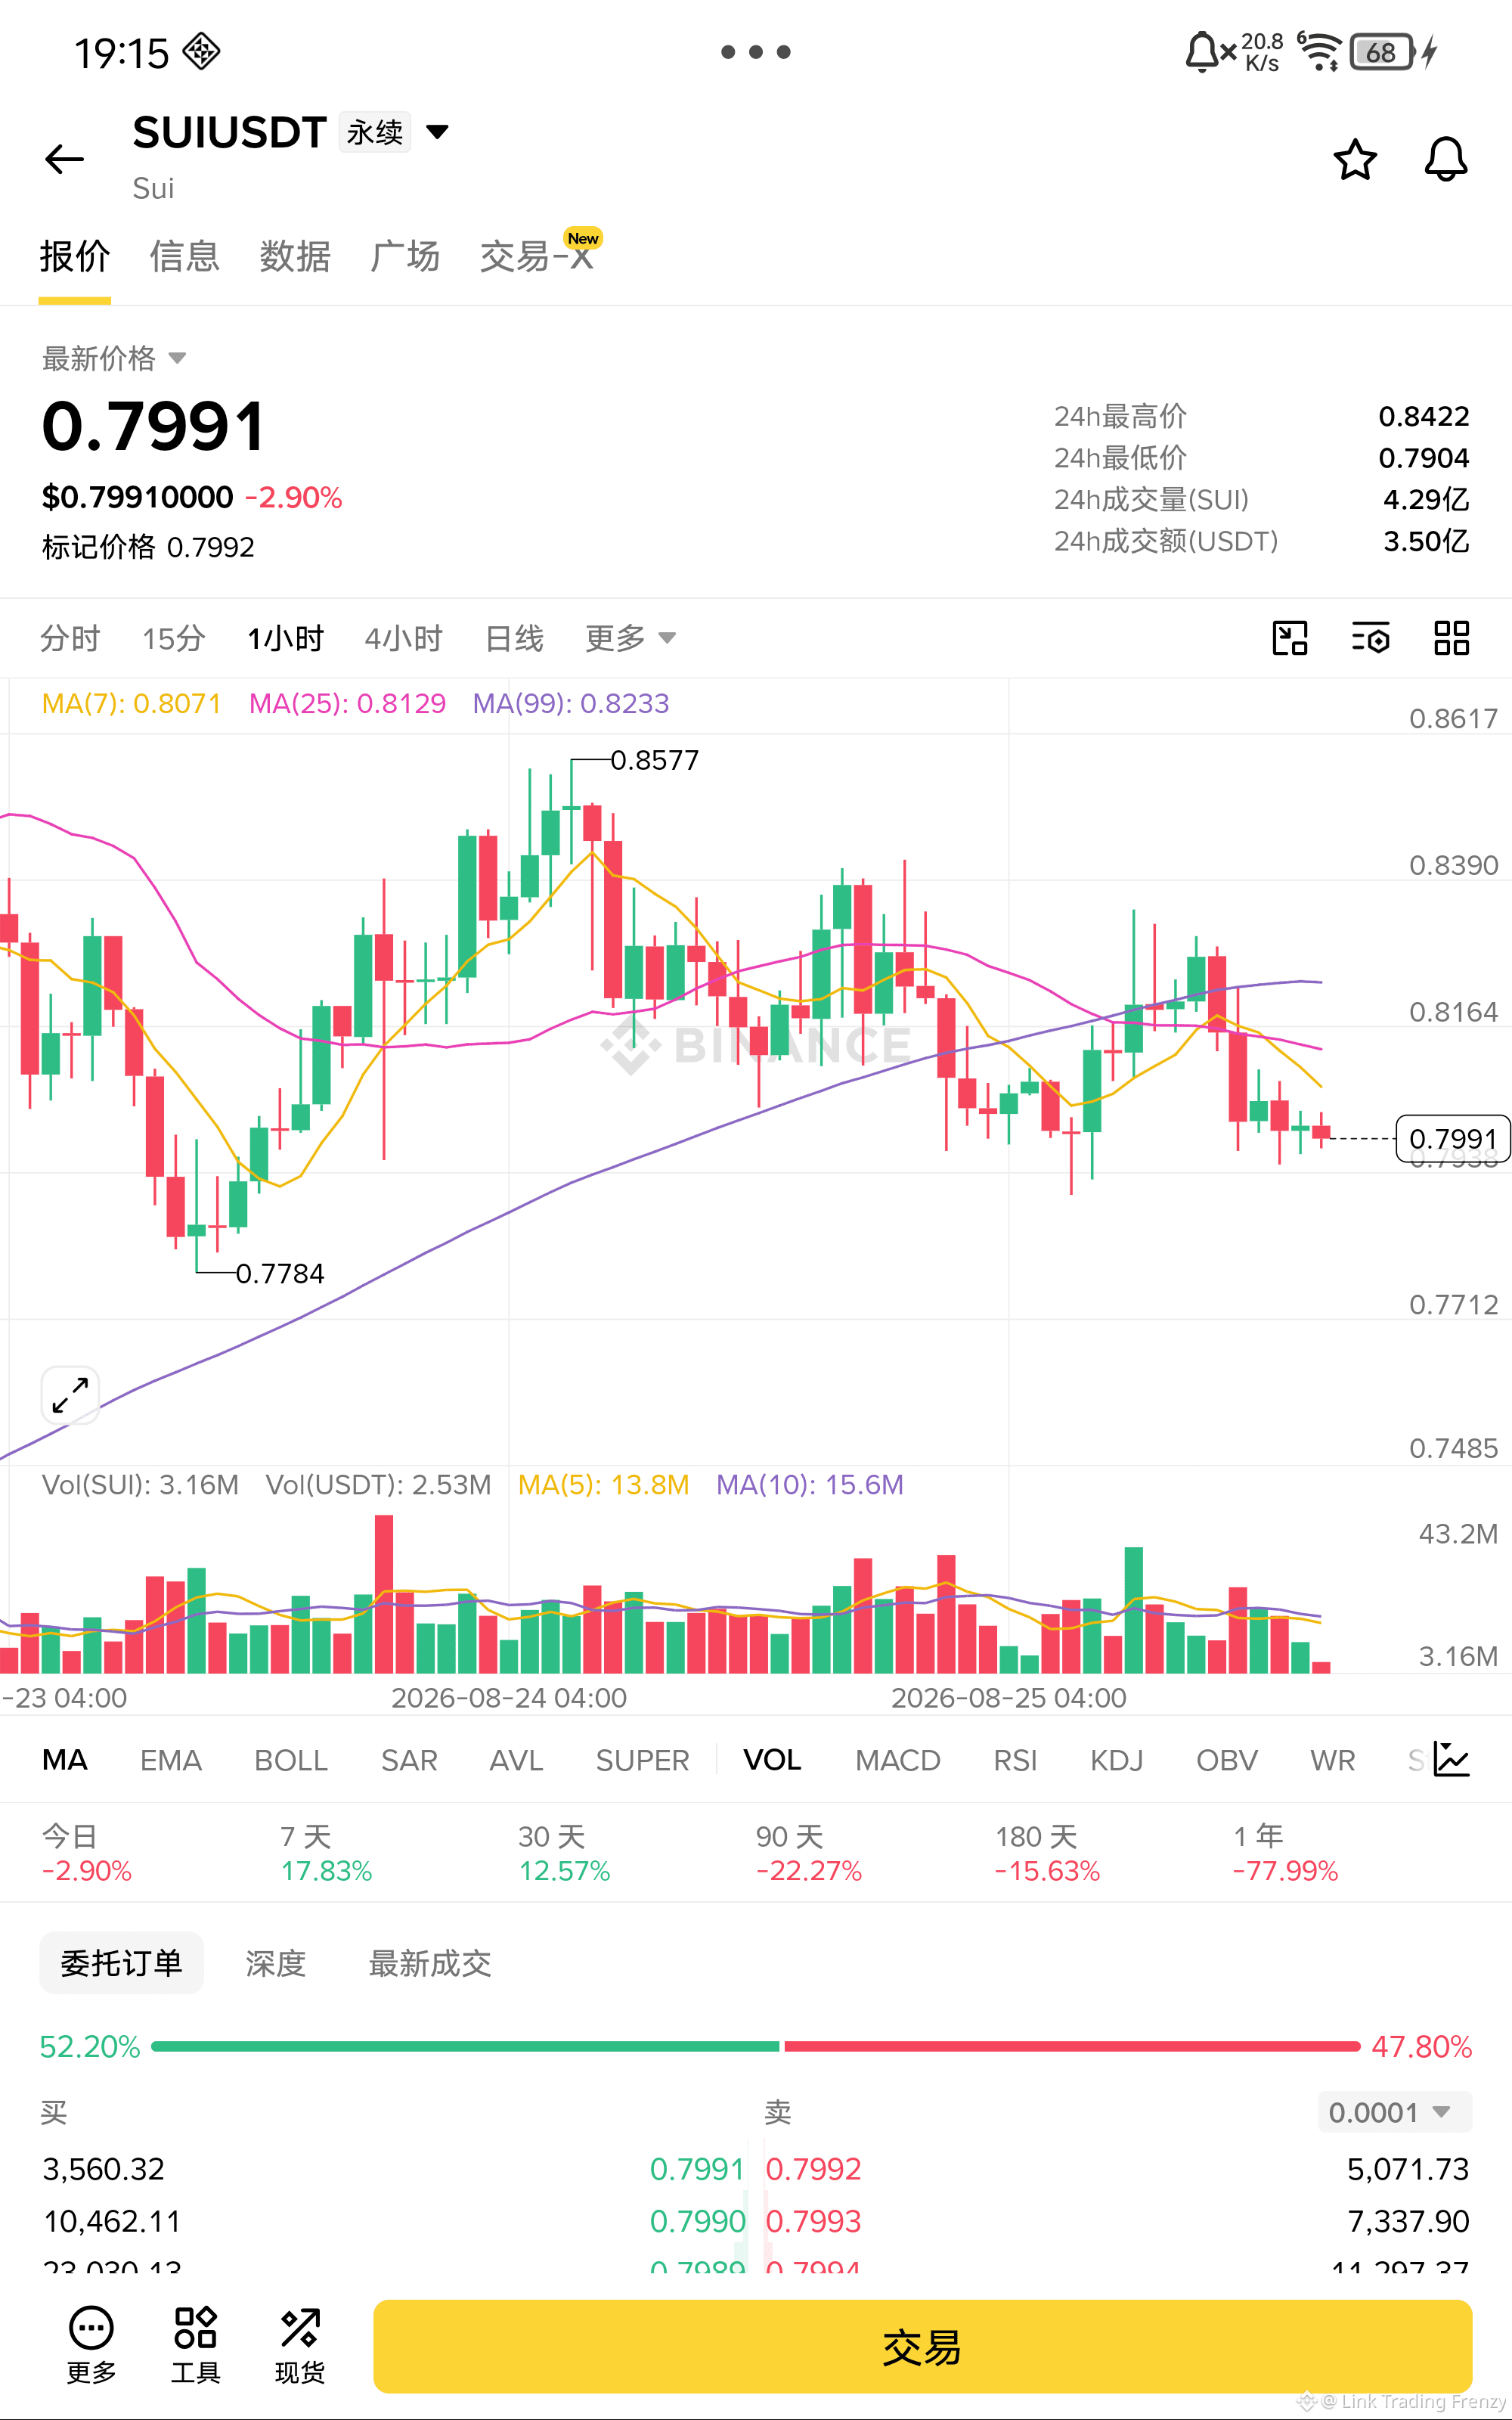
$SUI SUI This wave has been sliding all the way down from 0.8422 with basically no rebound. MA7 has just formed a bearish cross with MA25. Price has already broken below MA99. All three moving averages have lost support. The MACD green histogram continues to expand. The KDJ is spreading downward. The downtrend is very smooth—most likely the prior low at 0.7904 won’t hold.
Entry: 0.7991
Stop loss: 0.8150
Take profit: 0.7670
$SUI - Sell 🔻
Enter from below👇
Entry: 0.7991
Stop loss: 0.8150
Take profit: 0.7670
$SUI - Sell 🔻
Enter from below👇
Log in to explore more content