

Najmul sakib meraj
11 පෝස්ටු

Najmul sakib meraj
වාර්තා කරන්න
පරිශීලක අවහිර කරන්න
විවෘත වෙළෙඳාම
ඉඳහිට වෙළෙන්දා
{වේලාව} වසර
1 හඹා යමින්
1 හඹා යන්නන්
1 කැමති විය
පෝස්ටු
ආයෝජන කළඹ
සියල්ල
උපුටා දැක්වීම්
·
--
උසබ තත්ත්වය
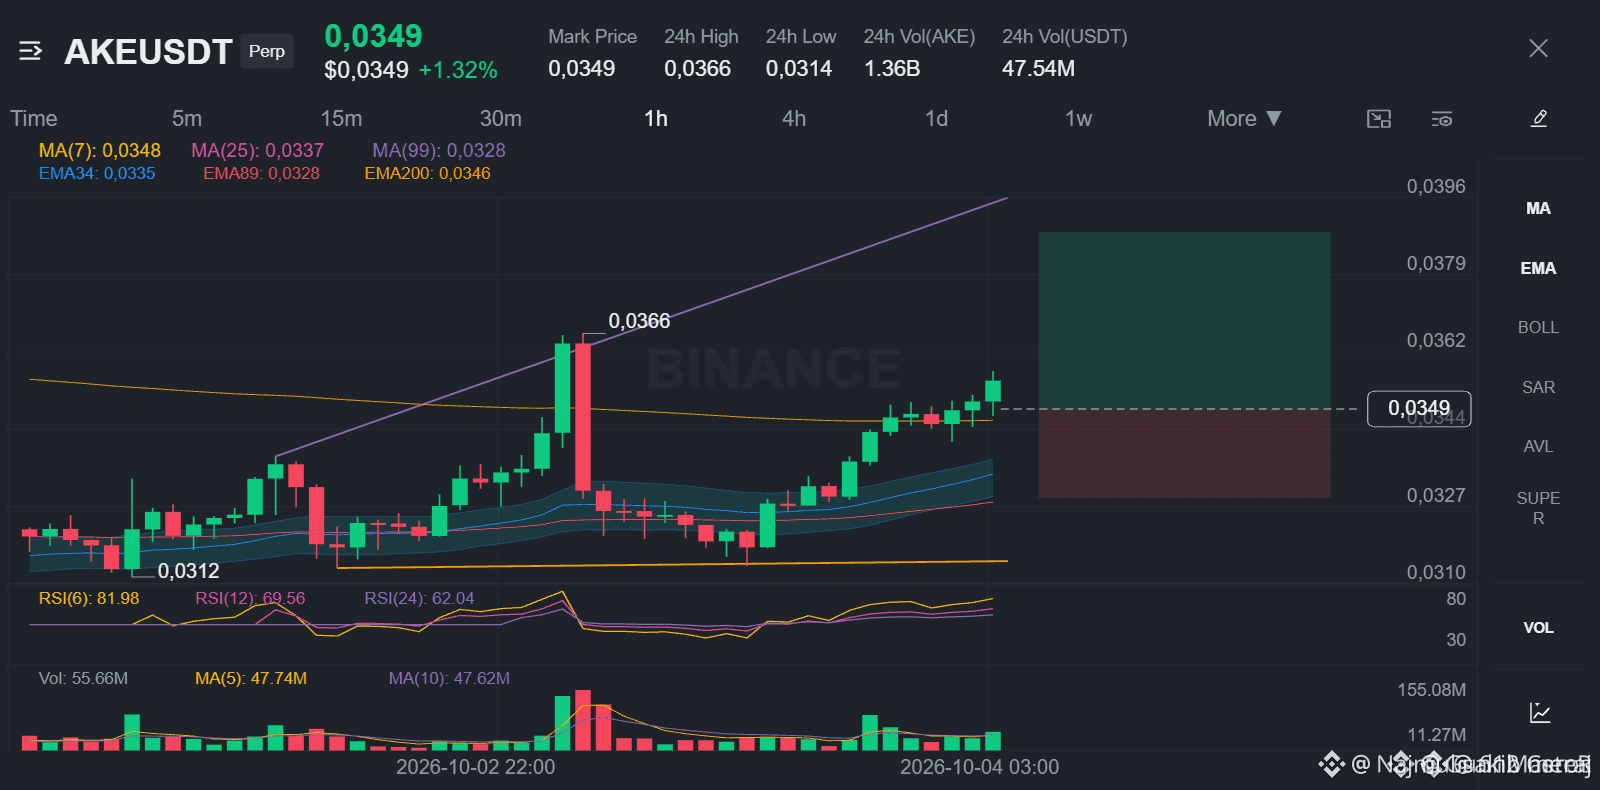
🚀 BSQUARE ALPHA TRADE | LONG $AKE/USDT ⚡
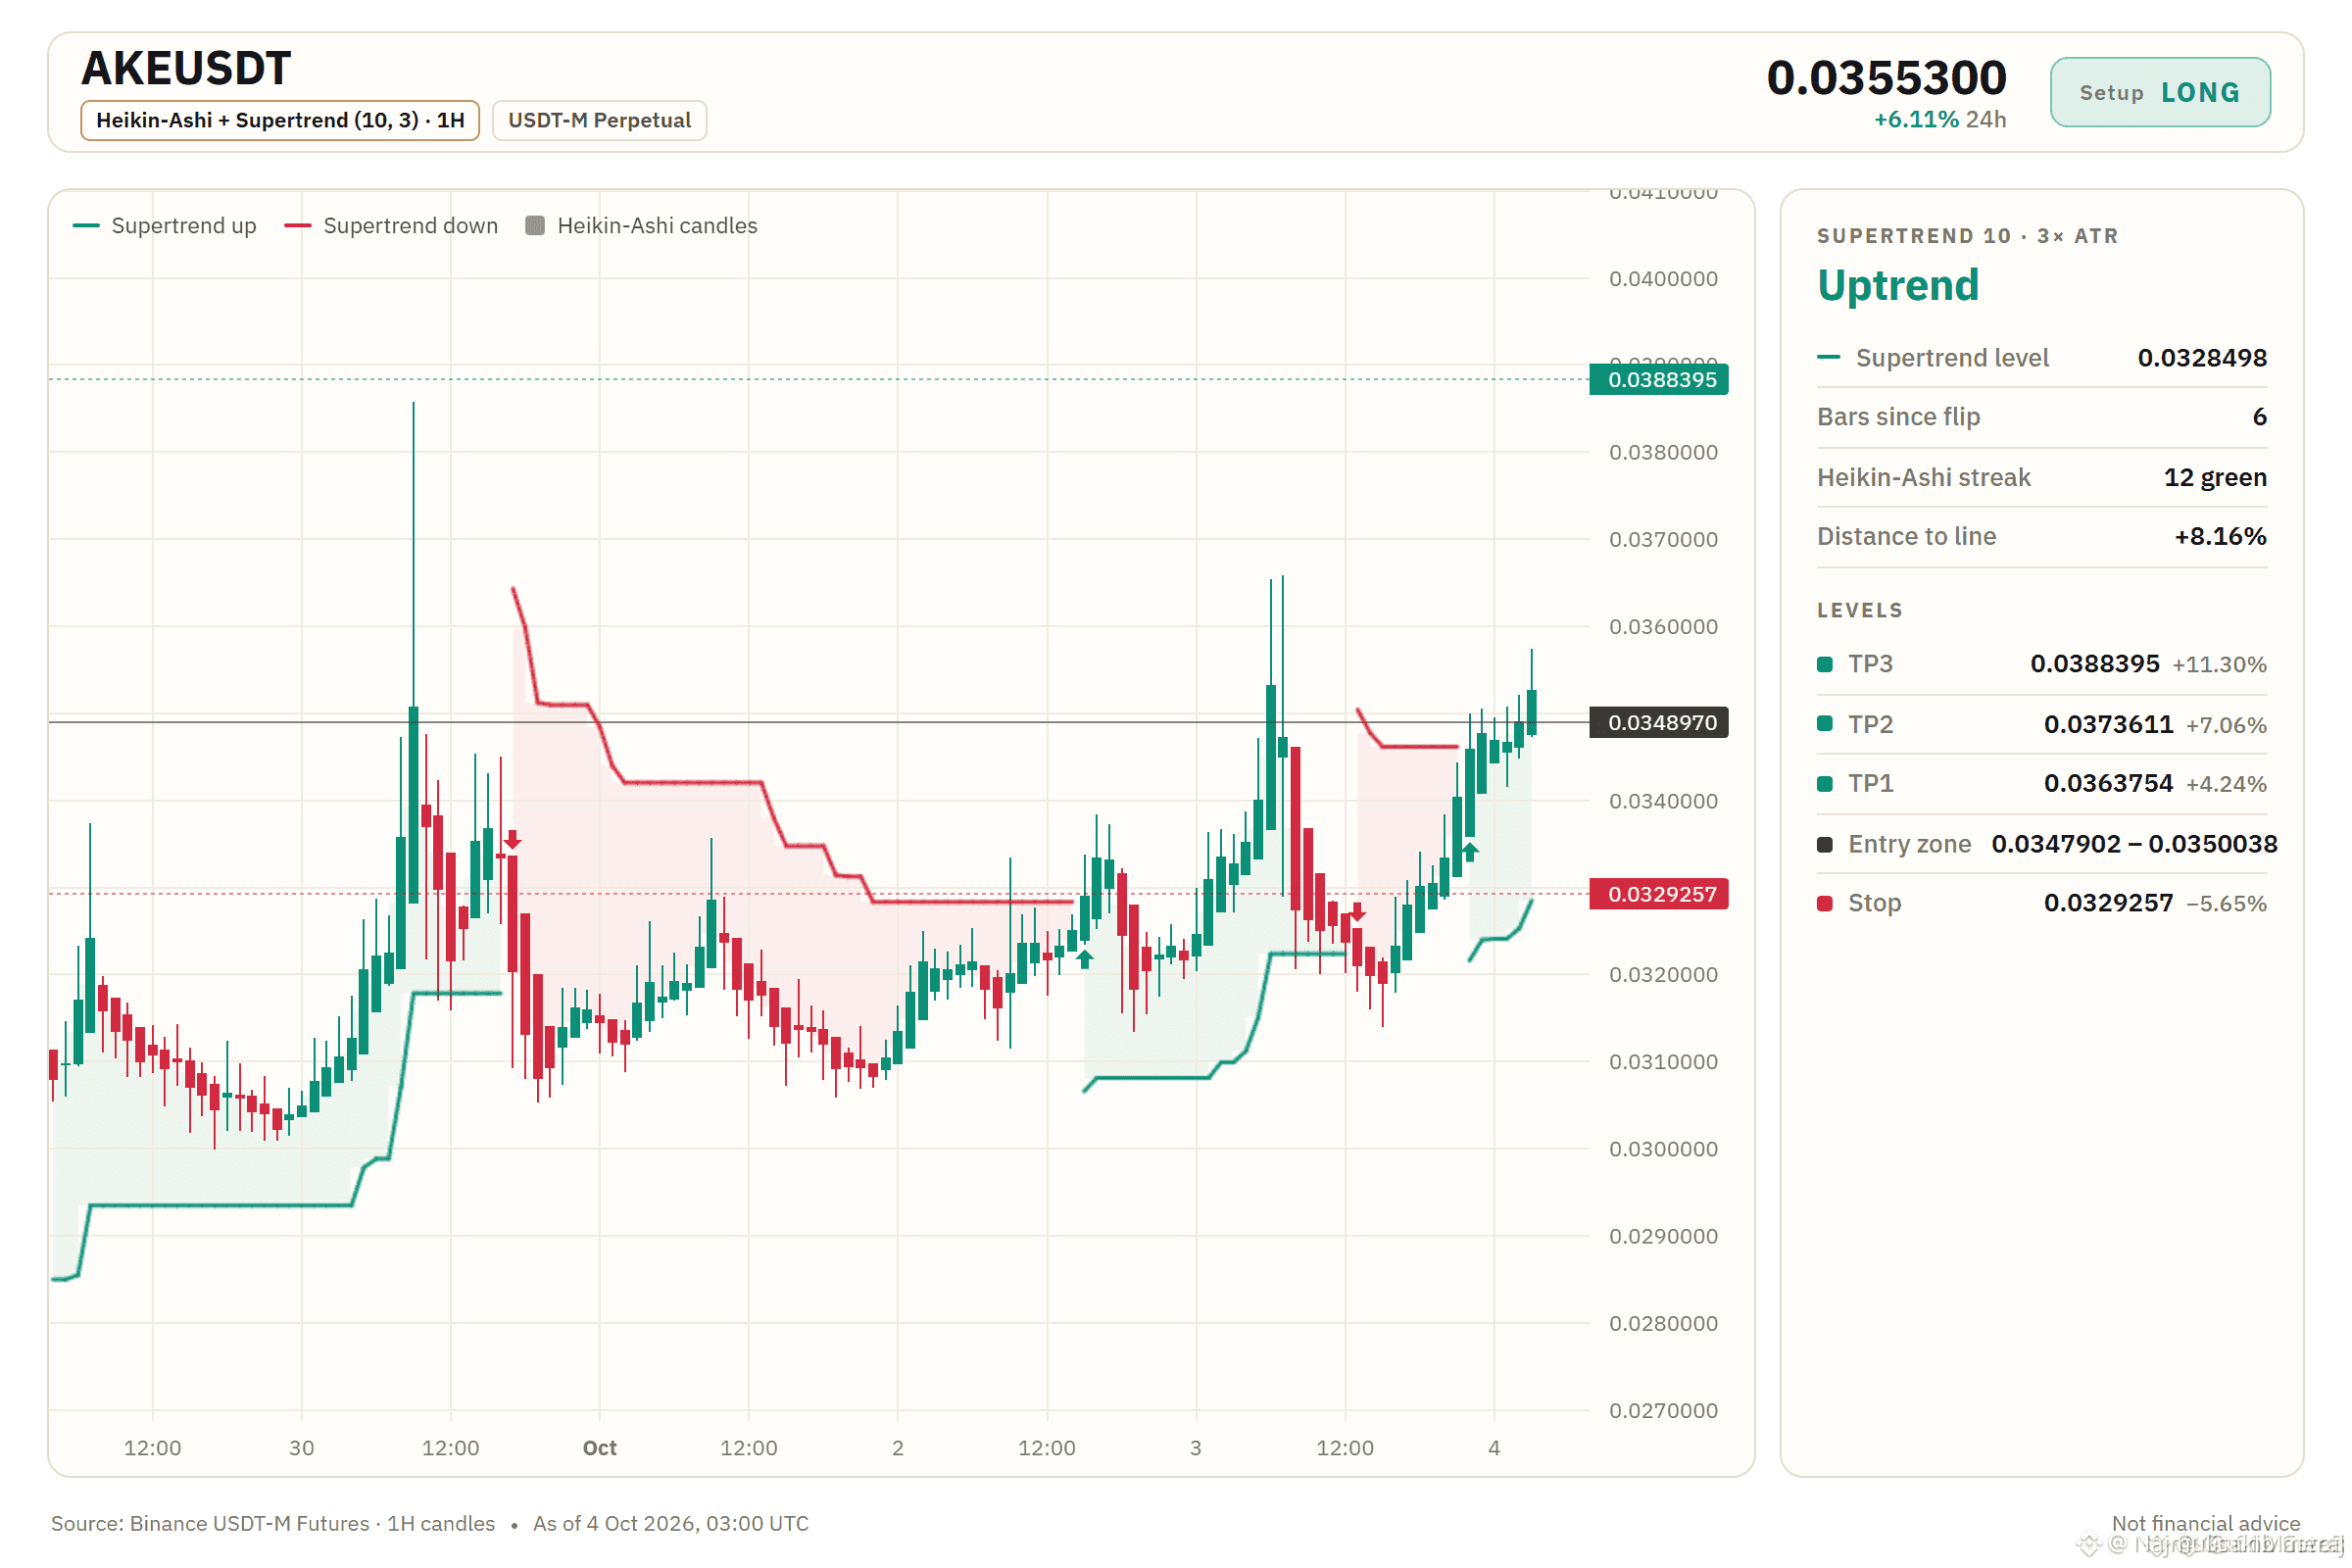
$AKE is showing a strong bullish structure across the Daily & 4H timeframes, with EMAs aligned in a clear bullish stack. Meanwhile, the lower-timeframe pullback is creating a potential opportunity to enter before the next upside move.
📌 LONG ENTRY:
🔹 0.0347902 – 0.0350038
🎯 TAKE PROFIT LEVELS:
🥇 TP1 — 0.0363754 | +4.2%
🥈 TP2 — 0.0373611 | +7.1%
🥉 TP3 — 0.0388395 | +11.3%
🛑 STOP LOSS:
0.0329257 | -5.6%
📊 TRADE MANAGEMENT:
• The bullish setup remains valid while price holds the key structure.
• A 4H candle close below 0.0329257 / the 4H EMA50 structure would invalidate the setup.
• Scaling in closer to 0.0347902 can improve the overall risk-to-reward profile, provided the 1H structure continues to hold.
• Secure 50% at TP1, then move SL to Breakeven to protect the position.
🔥 Bias: BULLISH
⚠️ Manage risk. Never trade more than you can afford to lose.
#BSQUARE #AKE #AKEUSDT #CryptoSignals #LongSetup #Altcoins #CryptoTrading #TechnicalAnalysis #TradingSetup #CryptoMarket #FuturesTrading #Binance
🚀 BSQUARE ALPHA TRADE | LONG $AKE /USDT ⚡
$AKE is showing a strong bullish structure across the Daily & 4H timeframes, with EMAs aligned in a clear bullish stack. Meanwhile, the lower-timeframe pullback is creating a potential opportunity to enter before the next upside move.
📌 LONG ENTRY:
🔹 0.0347902 – 0.0350038
🎯 TAKE PROFIT LEVELS:
🥇 TP1 — 0.0363754 | +4.2%
🥈 TP2 — 0.0373611 | +7.1%
🥉 TP3 — 0.0388395 | +11.3%
🛑 STOP LOSS:
0.0329257 | -5.6%
📊 TRADE MANAGEMENT:
• The bullish setup remains valid while price holds the key structure.
• A 4H candle close below 0.0329257 / the 4H EMA50 structure would invalidate the setup.
• Scaling in closer to 0.0347902 can improve the overall risk-to-reward profile, provided the 1H structure continues to hold.
• Secure 50% at TP1, then move SL to Breakeven to protect the position.
🔥 Bias: BULLISH
⚠️ Manage risk. Never trade more than you can afford to lose.
#BSQUARE #AKE #AKEUSDT #CryptoSignals #LongSetup #Altcoins #CryptoTrading #TechnicalAnalysis #TradingSetup #CryptoMarket #FuturesTrading #Binance
$AKE is showing a strong bullish structure across the Daily & 4H timeframes, with EMAs aligned in a clear bullish stack. Meanwhile, the lower-timeframe pullback is creating a potential opportunity to enter before the next upside move.
📌 LONG ENTRY:
🔹 0.0347902 – 0.0350038
🎯 TAKE PROFIT LEVELS:
🥇 TP1 — 0.0363754 | +4.2%
🥈 TP2 — 0.0373611 | +7.1%
🥉 TP3 — 0.0388395 | +11.3%
🛑 STOP LOSS:
0.0329257 | -5.6%
📊 TRADE MANAGEMENT:
• The bullish setup remains valid while price holds the key structure.
• A 4H candle close below 0.0329257 / the 4H EMA50 structure would invalidate the setup.
• Scaling in closer to 0.0347902 can improve the overall risk-to-reward profile, provided the 1H structure continues to hold.
• Secure 50% at TP1, then move SL to Breakeven to protect the position.
🔥 Bias: BULLISH
⚠️ Manage risk. Never trade more than you can afford to lose.
#BSQUARE #AKE #AKEUSDT #CryptoSignals #LongSetup #Altcoins #CryptoTrading #TechnicalAnalysis #TradingSetup #CryptoMarket #FuturesTrading #Binance
312
·
--
උසබ තත්ත්වය
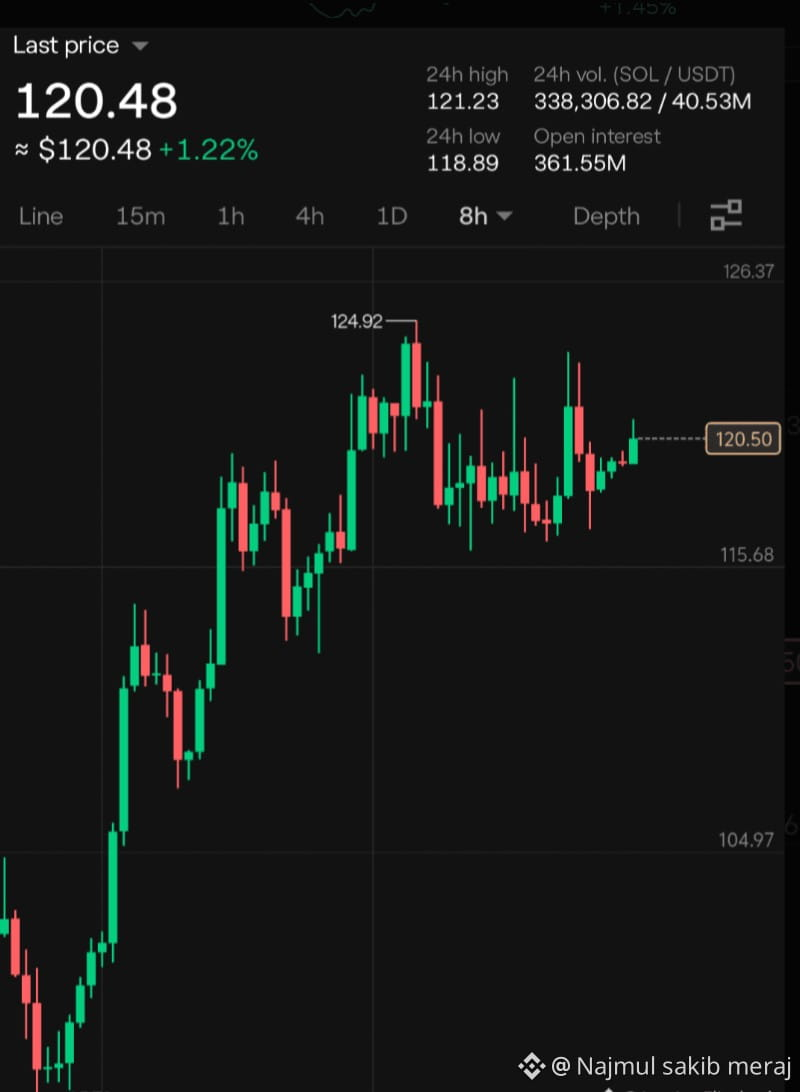
🚀 $SOL LONG TRADE ALERT 🚀
⚡ Market Setup: LONG $SOL/USDT
$SOL is showing promising strength after building a solid base around the current accumulation area. If bullish momentum continues, we could see a move toward the upcoming resistance levels. 📈
📌 Entry Zone: $119.78 – $121.00
🎯 TP1: $124.56
🎯 TP2: $127.80
🛑 Stop Loss: $114.00
💎 Trade Management:
Keep your position size under control and always manage risk according to your own strategy. Consider securing partial profits as price moves in your favor.
🔥 Trade smart. Stay disciplined. Protect your capital.
#BSQUARE #sol #solana #SOLUSDT #CryptoTradin #CryptoSignals #TradingSignal #Altcoins #FuturesTrading #LongSetup #Bullish #CryptoMarket #TradingSetup #RiskManagement
🚀 $SOL LONG TRADE ALERT 🚀
⚡ Market Setup: LONG $SOL /USDT
$SOL is showing promising strength after building a solid base around the current accumulation area. If bullish momentum continues, we could see a move toward the upcoming resistance levels. 📈
📌 Entry Zone: $119.78 – $121.00
🎯 TP1: $124.56
🎯 TP2: $127.80
🛑 Stop Loss: $114.00
💎 Trade Management:
Keep your position size under control and always manage risk according to your own strategy. Consider securing partial profits as price moves in your favor.
🔥 Trade smart. Stay disciplined. Protect your capital.
#BSQUARE #sol #solana #SOLUSDT #CryptoTradin #CryptoSignals #TradingSignal #Altcoins #FuturesTrading #LongSetup #Bullish #CryptoMarket #TradingSetup #RiskManagement
⚡ Market Setup: LONG $SOL /USDT
$SOL is showing promising strength after building a solid base around the current accumulation area. If bullish momentum continues, we could see a move toward the upcoming resistance levels. 📈
📌 Entry Zone: $119.78 – $121.00
🎯 TP1: $124.56
🎯 TP2: $127.80
🛑 Stop Loss: $114.00
💎 Trade Management:
Keep your position size under control and always manage risk according to your own strategy. Consider securing partial profits as price moves in your favor.
🔥 Trade smart. Stay disciplined. Protect your capital.
#BSQUARE #sol #solana #SOLUSDT #CryptoTradin #CryptoSignals #TradingSignal #Altcoins #FuturesTrading #LongSetup #Bullish #CryptoMarket #TradingSetup #RiskManagement
102
·
--
උසබ තත්ත්වය
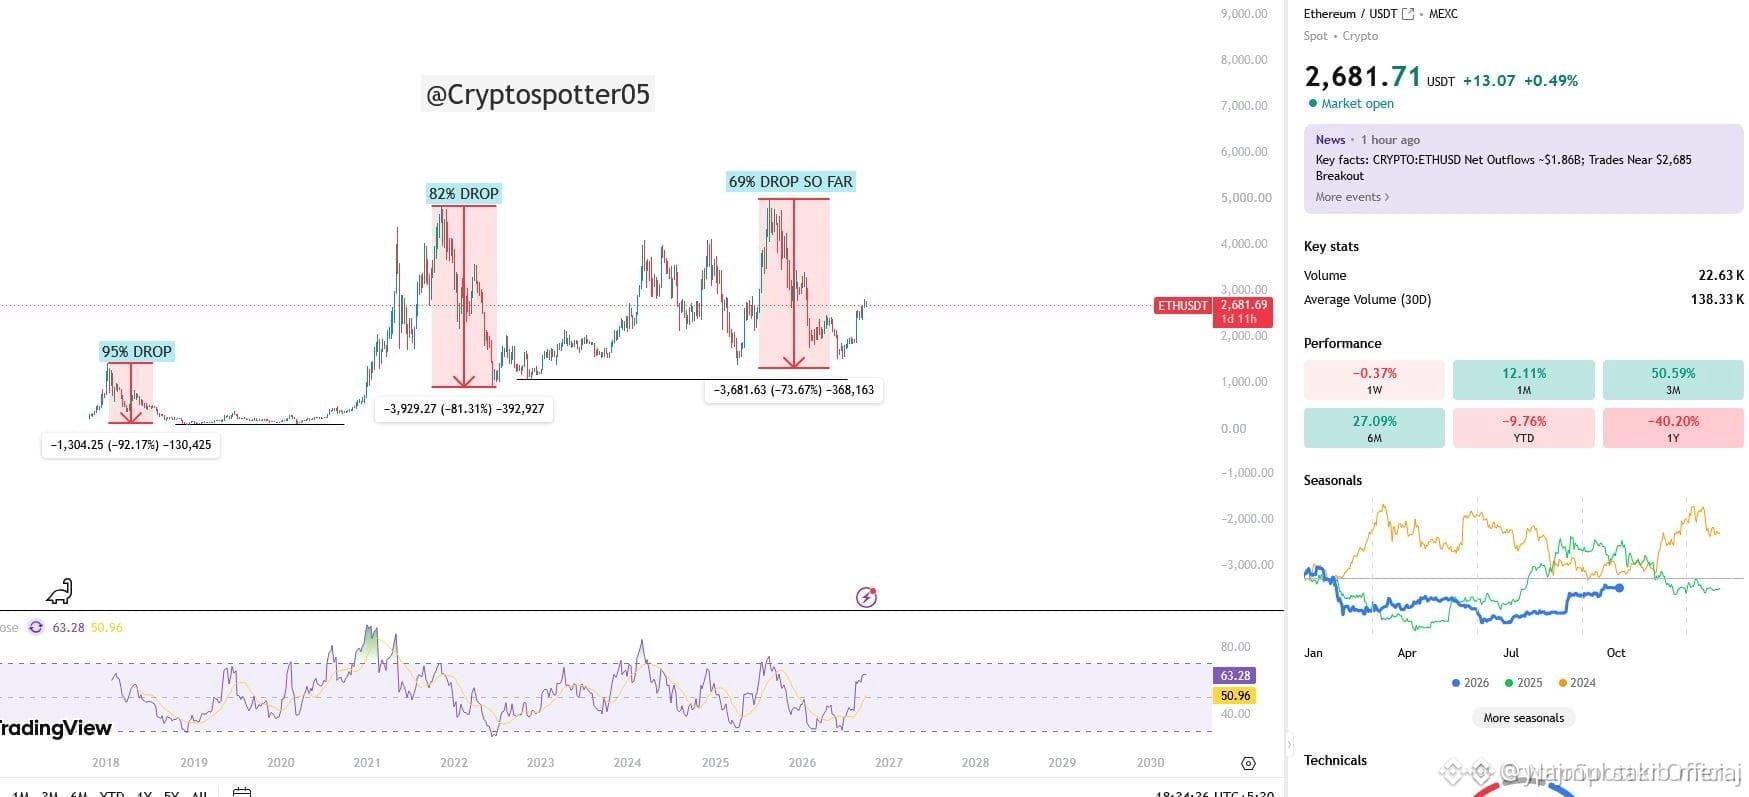
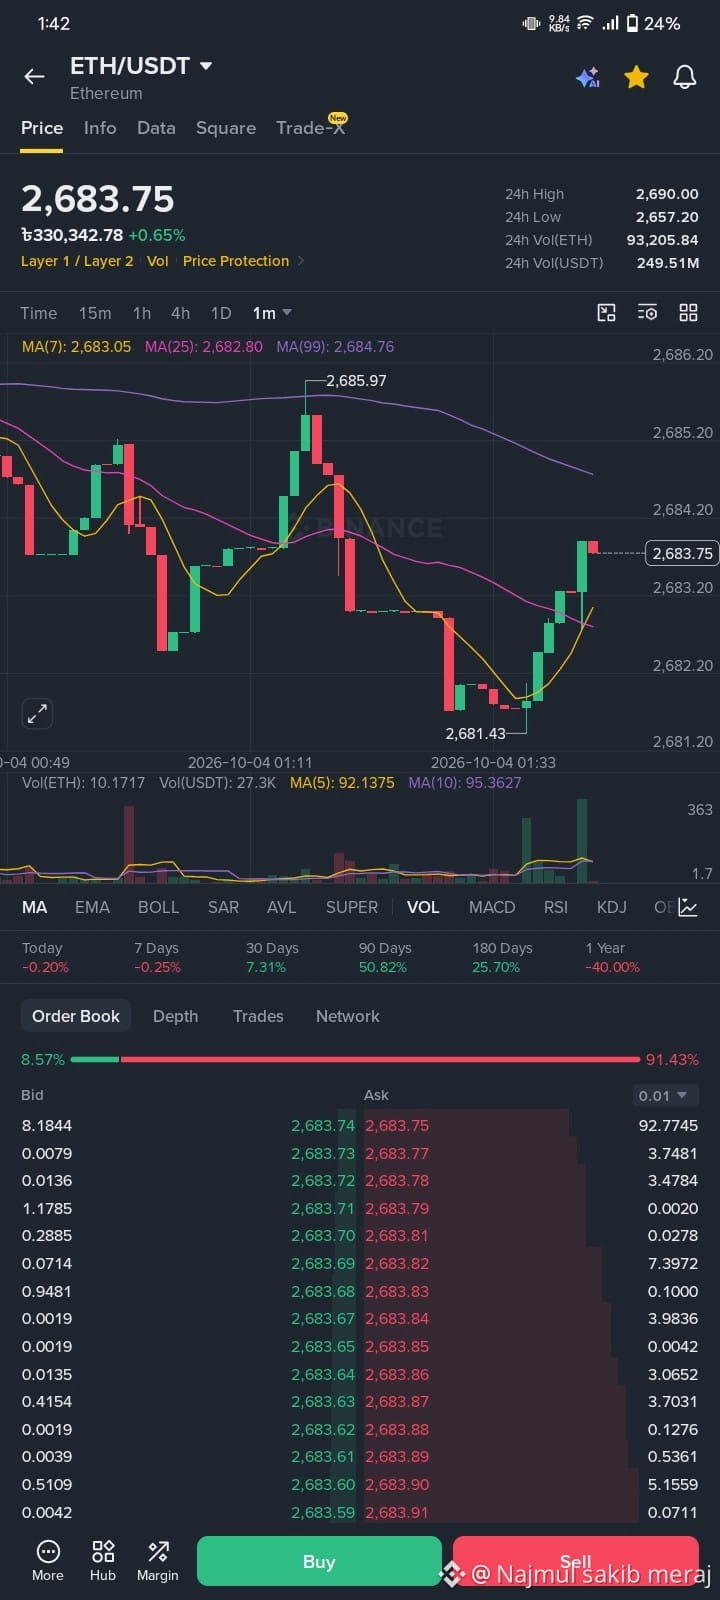
$ETH Bottom Could Already Be In? 👀📉
Let’s take a quick look at Ethereum’s historical cycle drawdowns:
🔹 Cycle 1: ~95% drop
🔹 Cycle 2: ~82% drop
🔹 Cycle 3 projection: ~69% drop
Interestingly, $ETH has already experienced a decline of roughly 69% in the current cycle.
If historical patterns continue to repeat, there’s a possibility that the cycle bottom may already be behind us. 📊
However, history doesn’t always repeat perfectly. In a worst-case scenario, ETH could still revisit the ~$1,500 area, with some volatility above or below that level.
This is purely based on historical patterns and is not a guarantee or financial advice. ⚠️
Now, the real question is: Has ETH already found its bottom, or could another dip be coming? 🤔
Let’s see how this cycle unfolds. What do you think? Drop your thoughts in the comments! 👇
Follow @CryptoSpotter Official
#ETHETFsApproved #Ethereum✅ #Crypto #Bitcoin #altcoins #CryptoMarket #EthereumPrice #ETHUSD #BullRun #CryptoAnalysis #CryptoTrading
$ETH Bottom Could Already Be In? 👀📉
Let’s take a quick look at Ethereum’s historical cycle drawdowns:
🔹 Cycle 1: ~95% drop
🔹 Cycle 2: ~82% drop
🔹 Cycle 3 projection: ~69% drop
Interestingly, $ETH has already experienced a decline of roughly 69% in the current cycle.
If historical patterns continue to repeat, there’s a possibility that the cycle bottom may already be behind us. 📊
However, history doesn’t always repeat perfectly. In a worst-case scenario, ETH could still revisit the ~$1,500 area, with some volatility above or below that level.
This is purely based on historical patterns and is not a guarantee or financial advice. ⚠️
Now, the real question is: Has ETH already found its bottom, or could another dip be coming? 🤔
Let’s see how this cycle unfolds. What do you think? Drop your thoughts in the comments! 👇
Follow @CryptoSpotter Official
#ETHETFsApproved #Ethereum✅ #Crypto #Bitcoin #altcoins #CryptoMarket #EthereumPrice #ETHUSD #BullRun #CryptoAnalysis #CryptoTrading
Let’s take a quick look at Ethereum’s historical cycle drawdowns:
🔹 Cycle 1: ~95% drop
🔹 Cycle 2: ~82% drop
🔹 Cycle 3 projection: ~69% drop
Interestingly, $ETH has already experienced a decline of roughly 69% in the current cycle.
If historical patterns continue to repeat, there’s a possibility that the cycle bottom may already be behind us. 📊
However, history doesn’t always repeat perfectly. In a worst-case scenario, ETH could still revisit the ~$1,500 area, with some volatility above or below that level.
This is purely based on historical patterns and is not a guarantee or financial advice. ⚠️
Now, the real question is: Has ETH already found its bottom, or could another dip be coming? 🤔
Let’s see how this cycle unfolds. What do you think? Drop your thoughts in the comments! 👇
Follow @CryptoSpotter Official
#ETHETFsApproved #Ethereum✅ #Crypto #Bitcoin #altcoins #CryptoMarket #EthereumPrice #ETHUSD #BullRun #CryptoAnalysis #CryptoTrading
39
·
--
උසබ තත්ත්වය
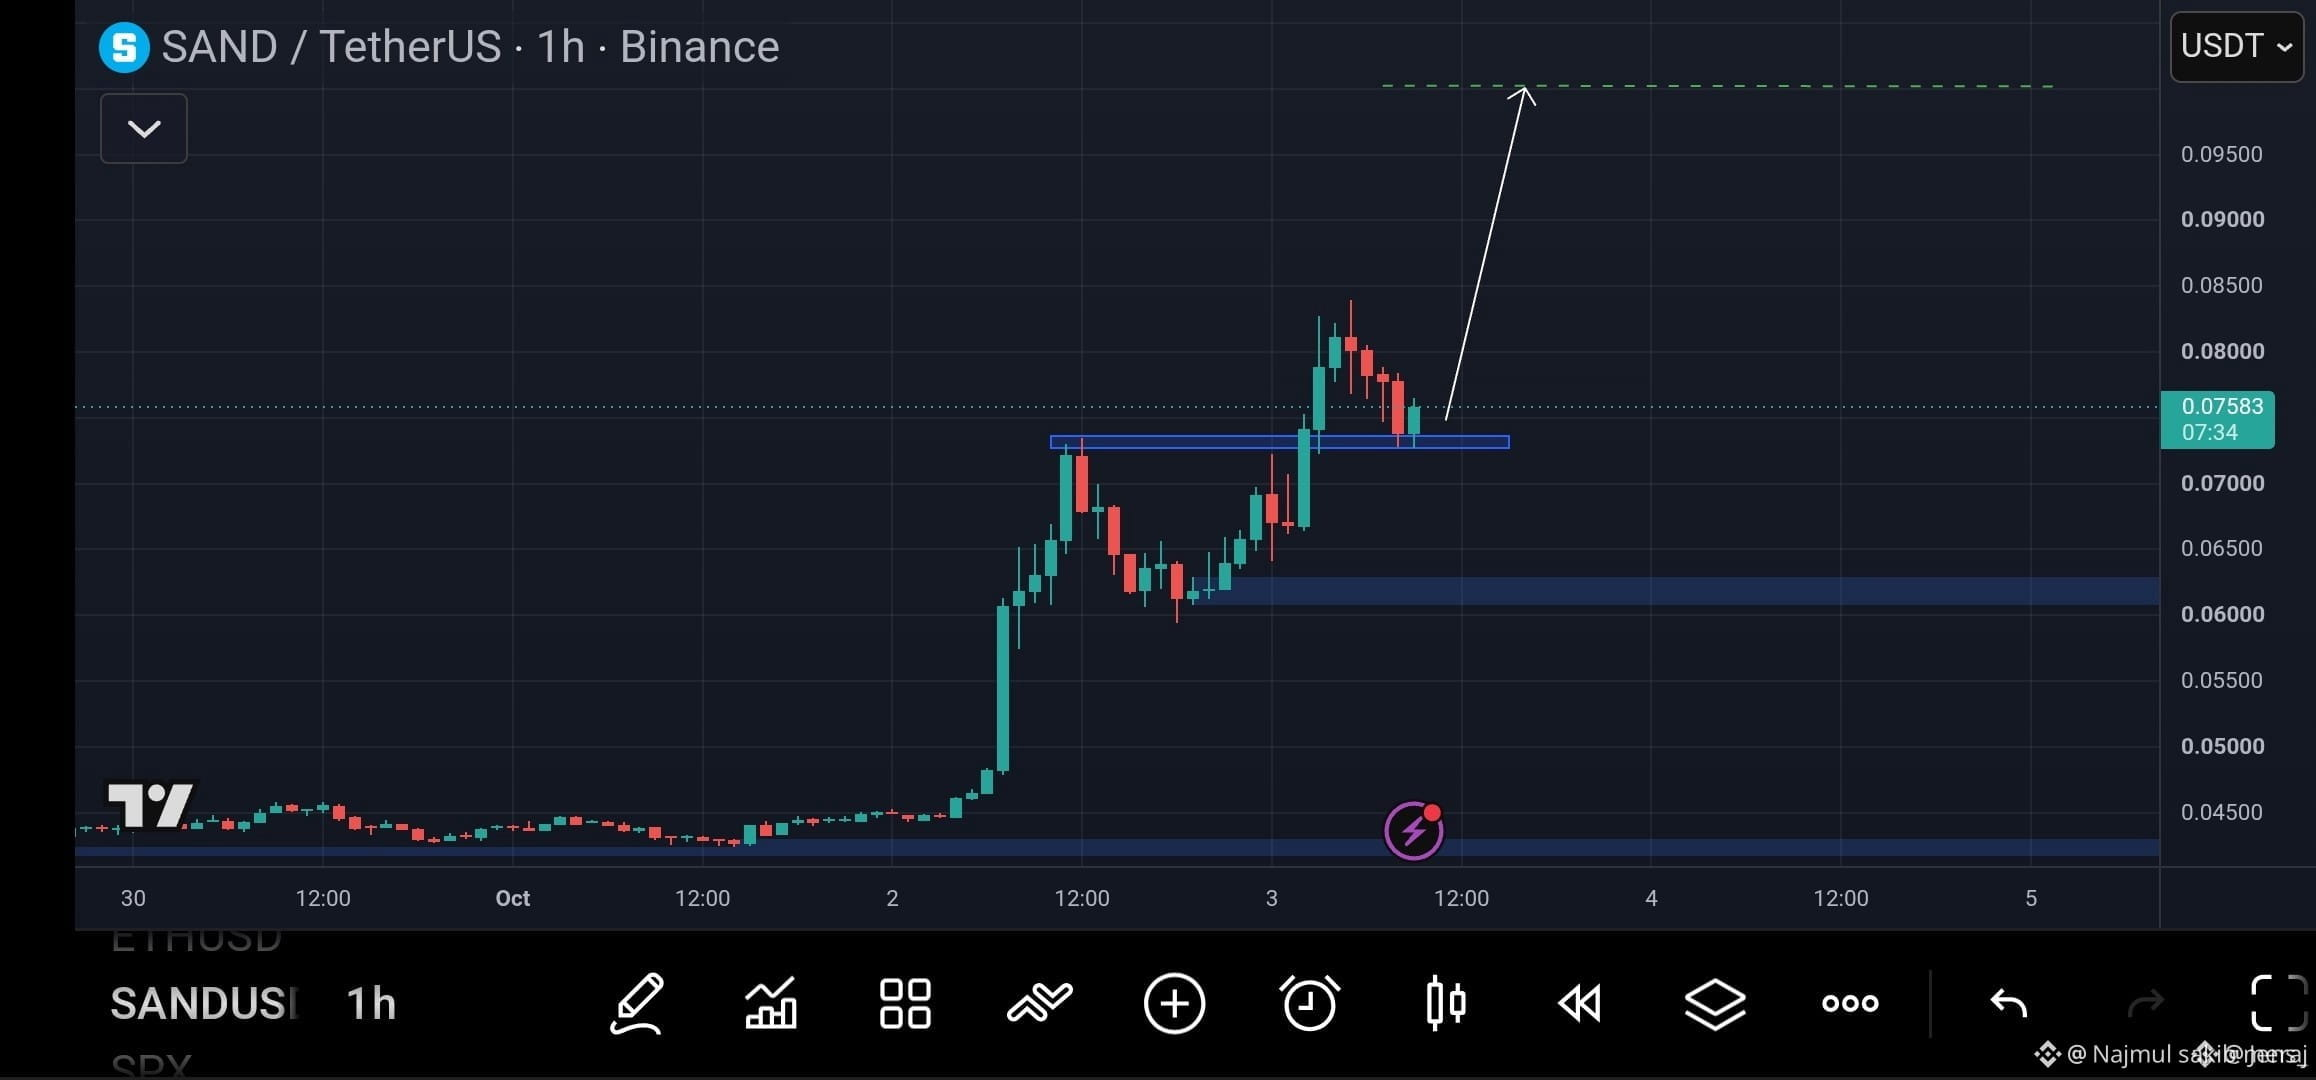
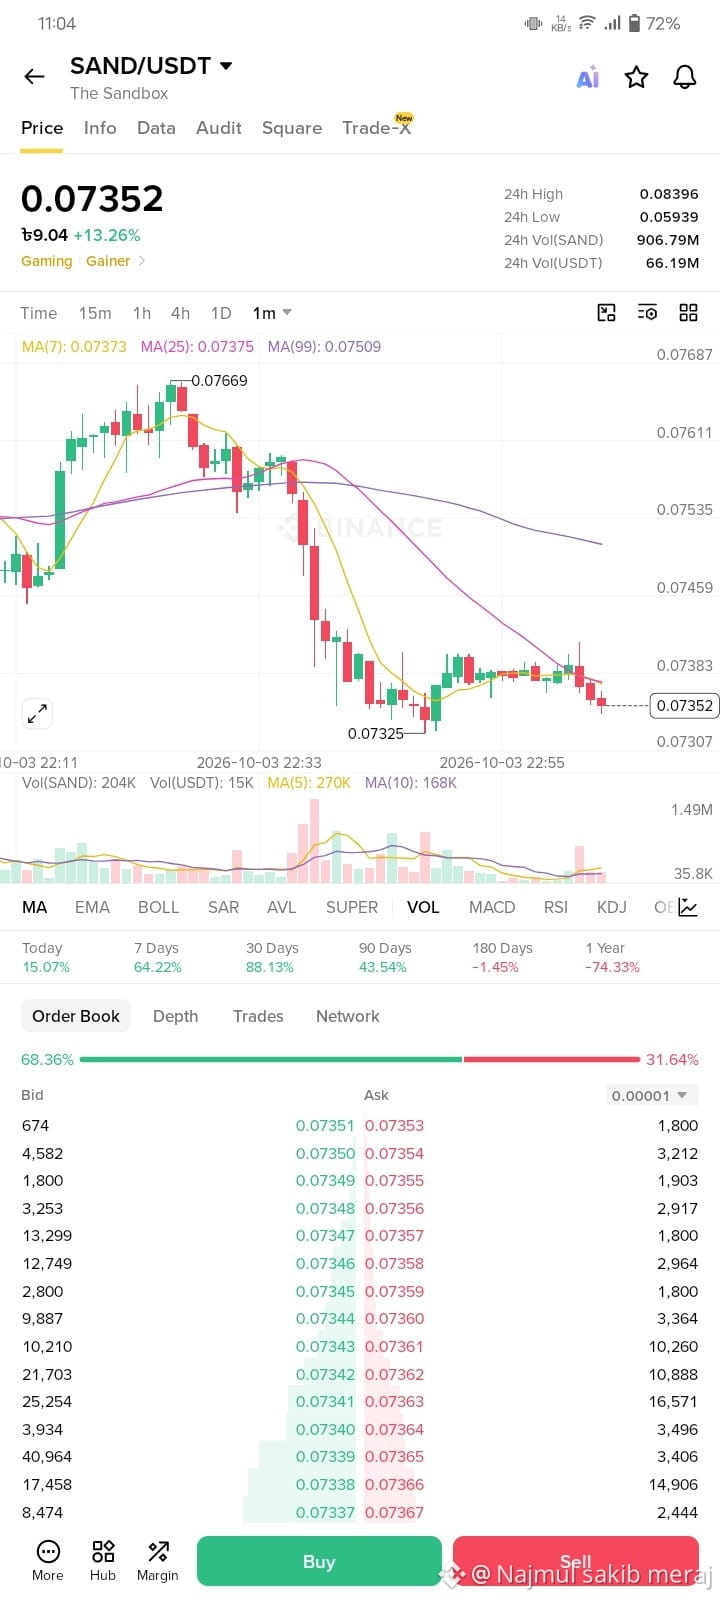
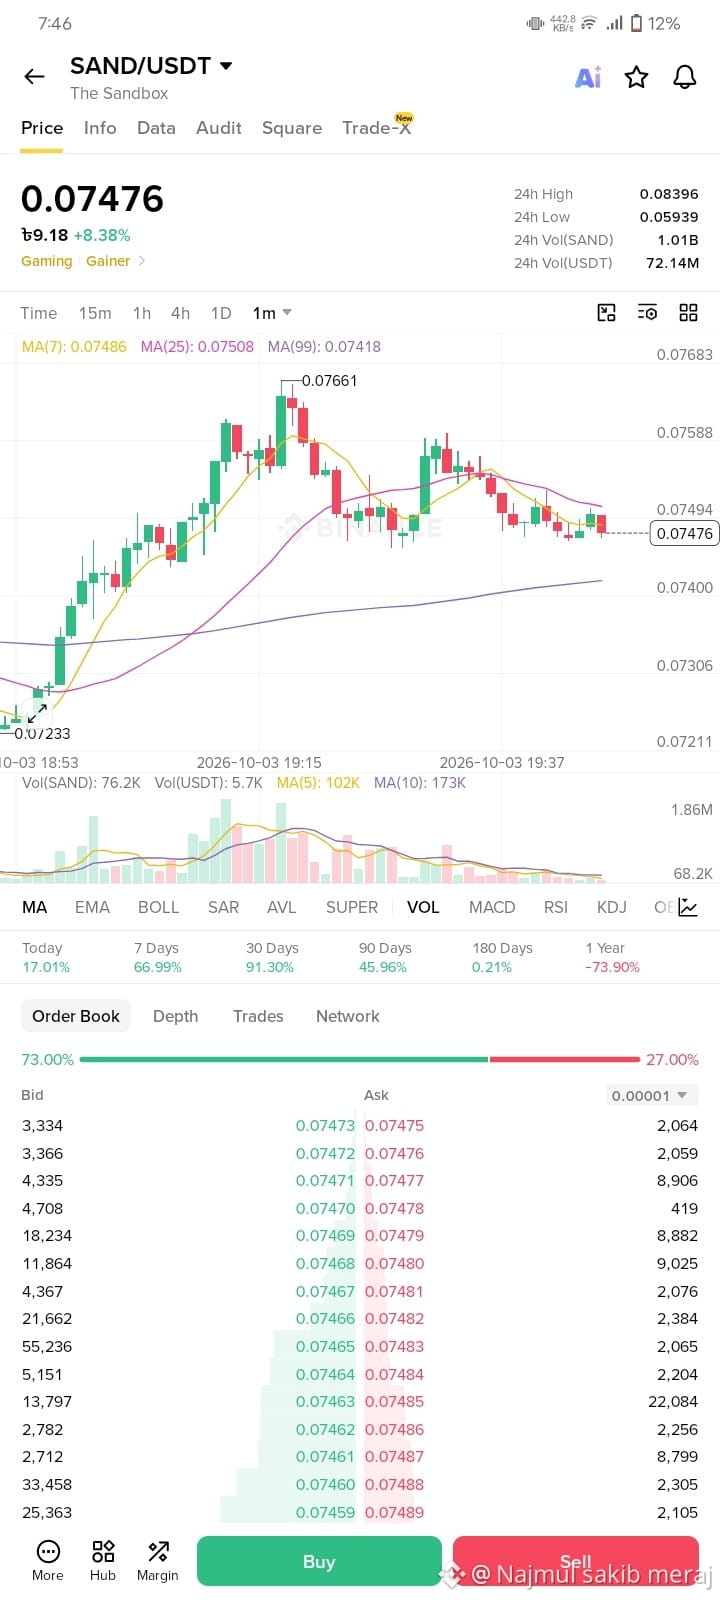
$SAND is keeping the momentum alive after that breakout. 🚀
I got in around $0.06, and now we’re seeing a retest of the $0.073–$0.075 breakout area with volume still looking strong.
A little pullback wouldn’t be a bad thing — it could give the chart some room to breathe. I’m not looking for $0.06 again unless the momentum starts to fade.
If $0.073–$0.075 holds as support, $0.08 could be the next stop, with $0.10 still in sight. 👀
No FOMO. No chasing. Just waiting for a clean confirmation and setup.
DYOR. NFA.
#sand #TheSandbox #CryptoTrends2024 #BinanceSquareTalks $ #Altcoins #CryptoTrading #Web3 #Bullish
$SAND is keeping the momentum alive after that breakout. 🚀
I got in around $0.06, and now we’re seeing a retest of the $0.073–$0.075 breakout area with volume still looking strong.
A little pullback wouldn’t be a bad thing — it could give the chart some room to breathe. I’m not looking for $0.06 again unless the momentum starts to fade.
If $0.073–$0.075 holds as support, $0.08 could be the next stop, with $0.10 still in sight. 👀
No FOMO. No chasing. Just waiting for a clean confirmation and setup.
DYOR. NFA.
#sand #TheSandbox #CryptoTrends2024 #BinanceSquareTalks $ #Altcoins #CryptoTrading #Web3 #Bullish
I got in around $0.06, and now we’re seeing a retest of the $0.073–$0.075 breakout area with volume still looking strong.
A little pullback wouldn’t be a bad thing — it could give the chart some room to breathe. I’m not looking for $0.06 again unless the momentum starts to fade.
If $0.073–$0.075 holds as support, $0.08 could be the next stop, with $0.10 still in sight. 👀
No FOMO. No chasing. Just waiting for a clean confirmation and setup.
DYOR. NFA.
#sand #TheSandbox #CryptoTrends2024 #BinanceSquareTalks $ #Altcoins #CryptoTrading #Web3 #Bullish
198
·
--
උසබ තත්ත්වය
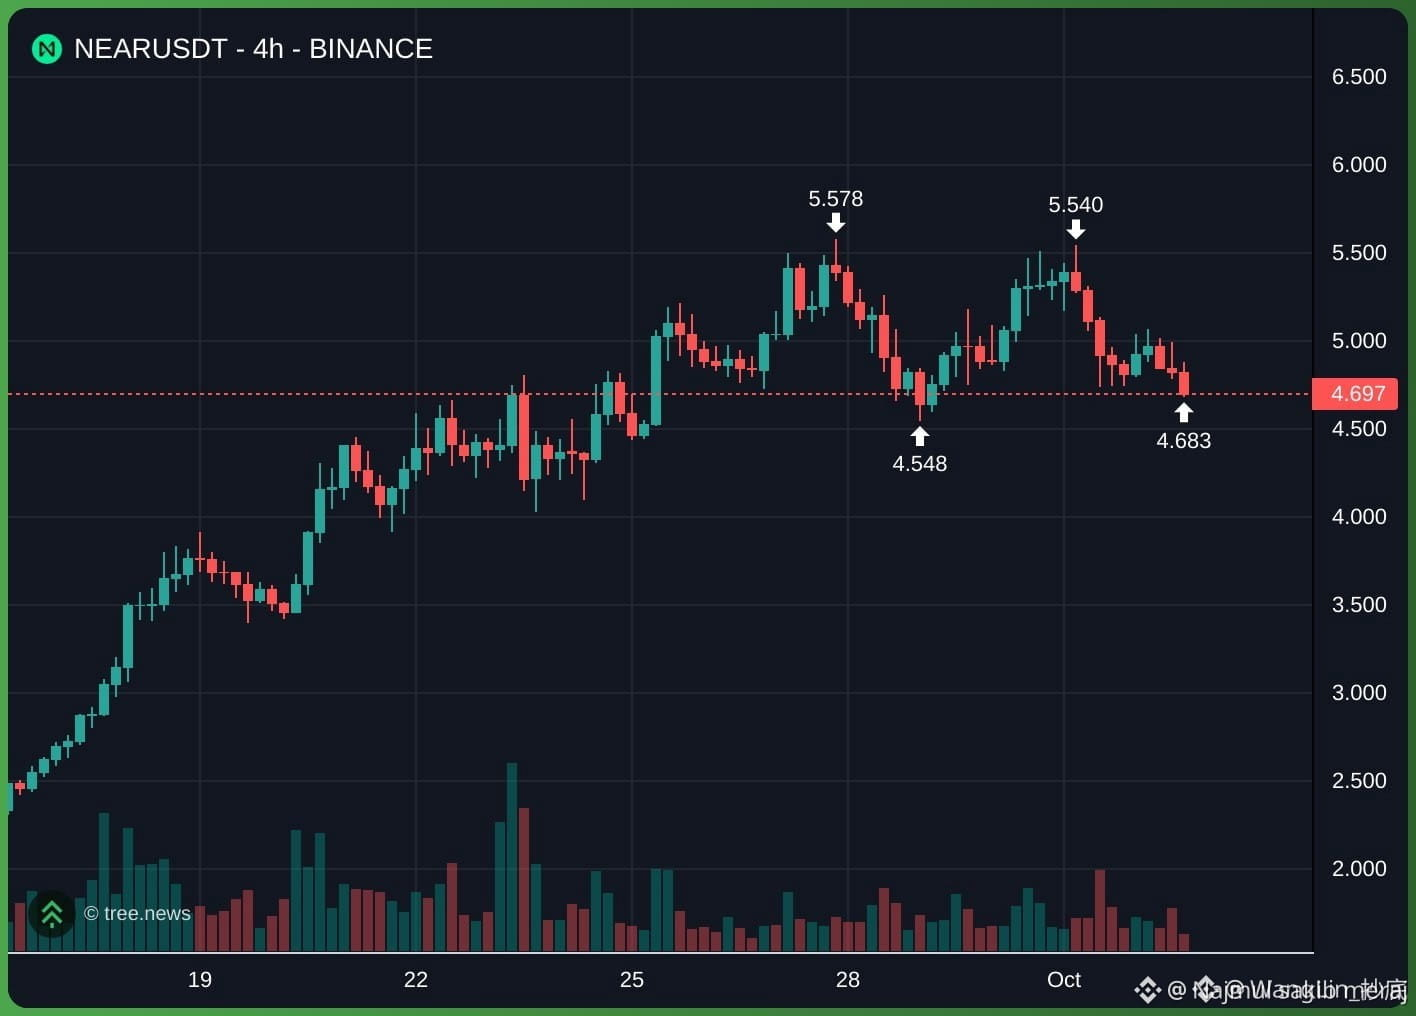
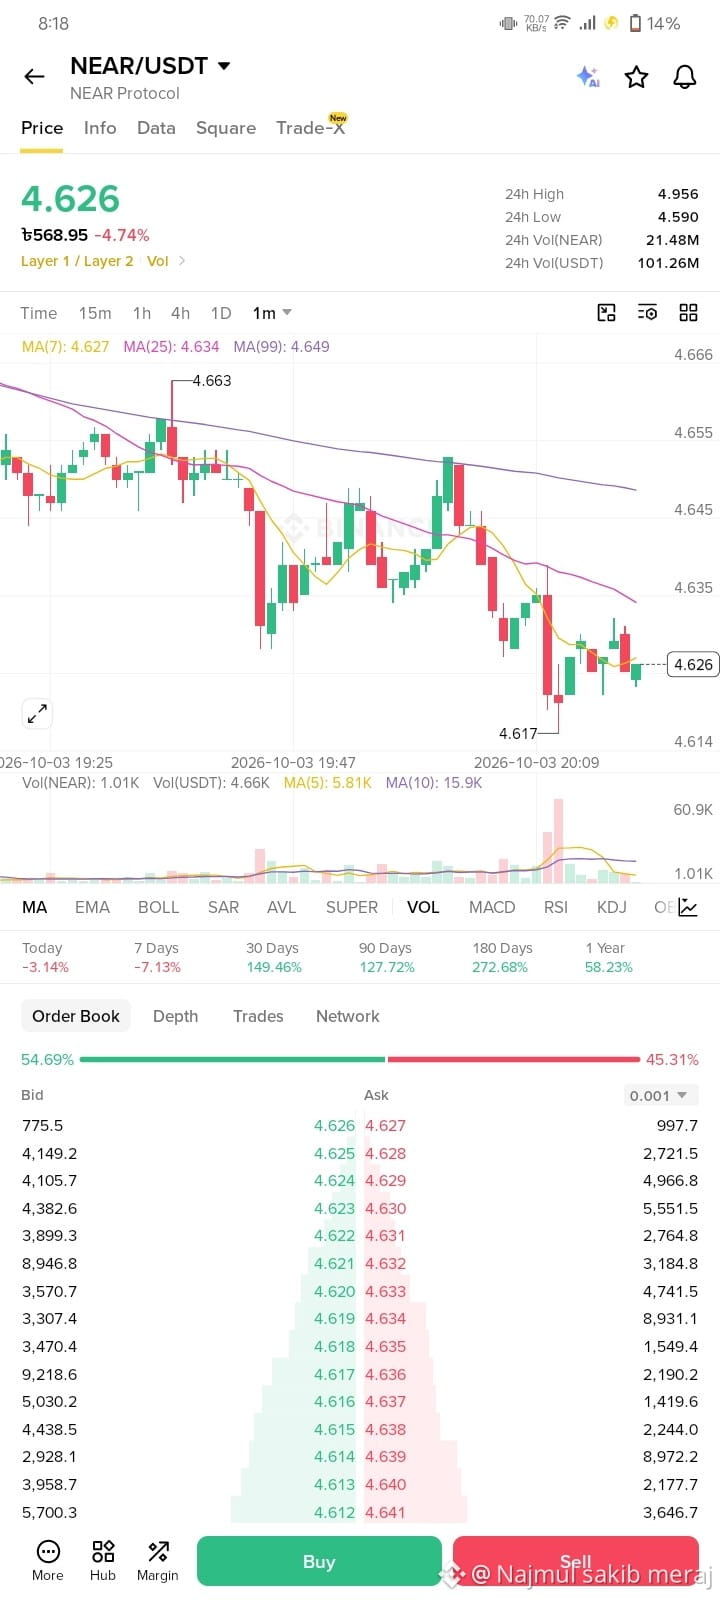
📉 $NEAR — Bearish Market Structure
$NEAR is still trading in a clear downtrend. After rejection from the 5.5 area, price continued to print lower highs and lower lows, confirming bearish momentum.
🔻 Key Levels
Resistance / retest zone: 4.7–4.8
Stop Loss: Above 5.15
TP1: 4.5
TP2: 4.2–4.0
⚠️ The 4.7 support breakdown suggests the market structure has shifted bearish. A retest of the 4.7–4.8 zone could provide a potential short setup if rejection confirms.
🎯 Trade with the trend, manage risk, and wait for confirmation.
👇 Follow the setup here.
#NEAR #nearprotocol #NEARUSDT #Crypto #CryptoTrading #Altcoins #TradingSetup #ShortSetup #Bearish #TechnicalAnalysis #PriceAction #CryptoSignals
📉 $NEAR — Bearish Market Structure
$NEAR is still trading in a clear downtrend. After rejection from the 5.5 area, price continued to print lower highs and lower lows, confirming bearish momentum.
🔻 Key Levels
Resistance / retest zone: 4.7–4.8
Stop Loss: Above 5.15
TP1: 4.5
TP2: 4.2–4.0
⚠️ The 4.7 support breakdown suggests the market structure has shifted bearish. A retest of the 4.7–4.8 zone could provide a potential short setup if rejection confirms.
🎯 Trade with the trend, manage risk, and wait for confirmation.
👇 Follow the setup here.
#NEAR #nearprotocol #NEARUSDT #Crypto #CryptoTrading #Altcoins #TradingSetup #ShortSetup #Bearish #TechnicalAnalysis #PriceAction #CryptoSignals
$NEAR is still trading in a clear downtrend. After rejection from the 5.5 area, price continued to print lower highs and lower lows, confirming bearish momentum.
🔻 Key Levels
Resistance / retest zone: 4.7–4.8
Stop Loss: Above 5.15
TP1: 4.5
TP2: 4.2–4.0
⚠️ The 4.7 support breakdown suggests the market structure has shifted bearish. A retest of the 4.7–4.8 zone could provide a potential short setup if rejection confirms.
🎯 Trade with the trend, manage risk, and wait for confirmation.
👇 Follow the setup here.
#NEAR #nearprotocol #NEARUSDT #Crypto #CryptoTrading #Altcoins #TradingSetup #ShortSetup #Bearish #TechnicalAnalysis #PriceAction #CryptoSignals
107
·
--
උසබ තත්ත්වය
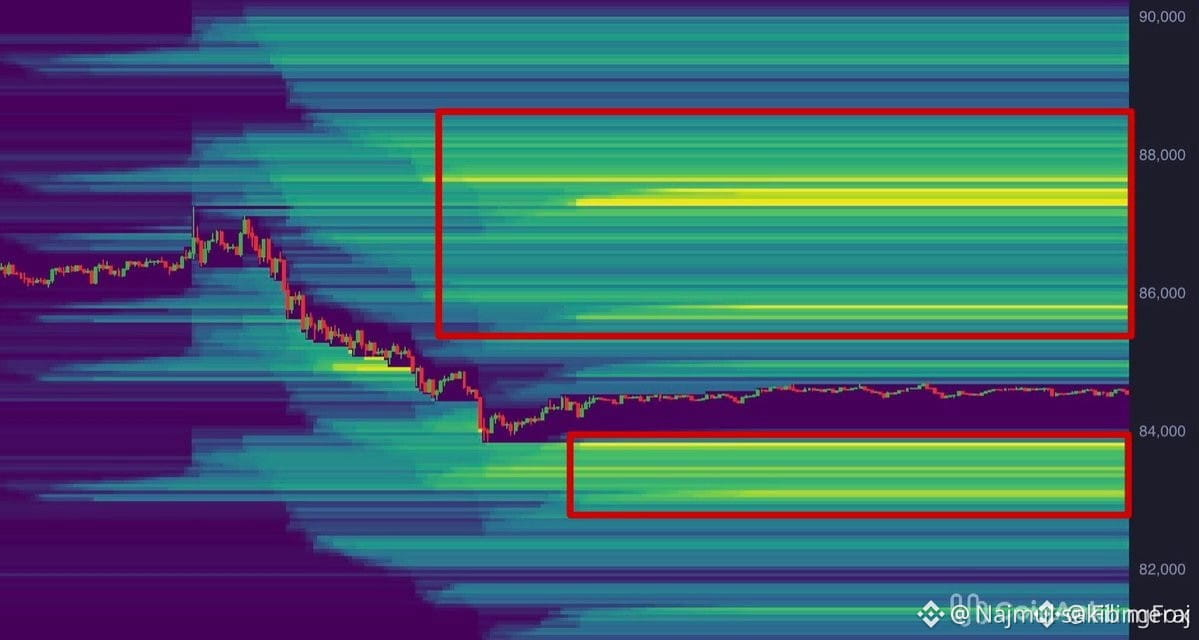
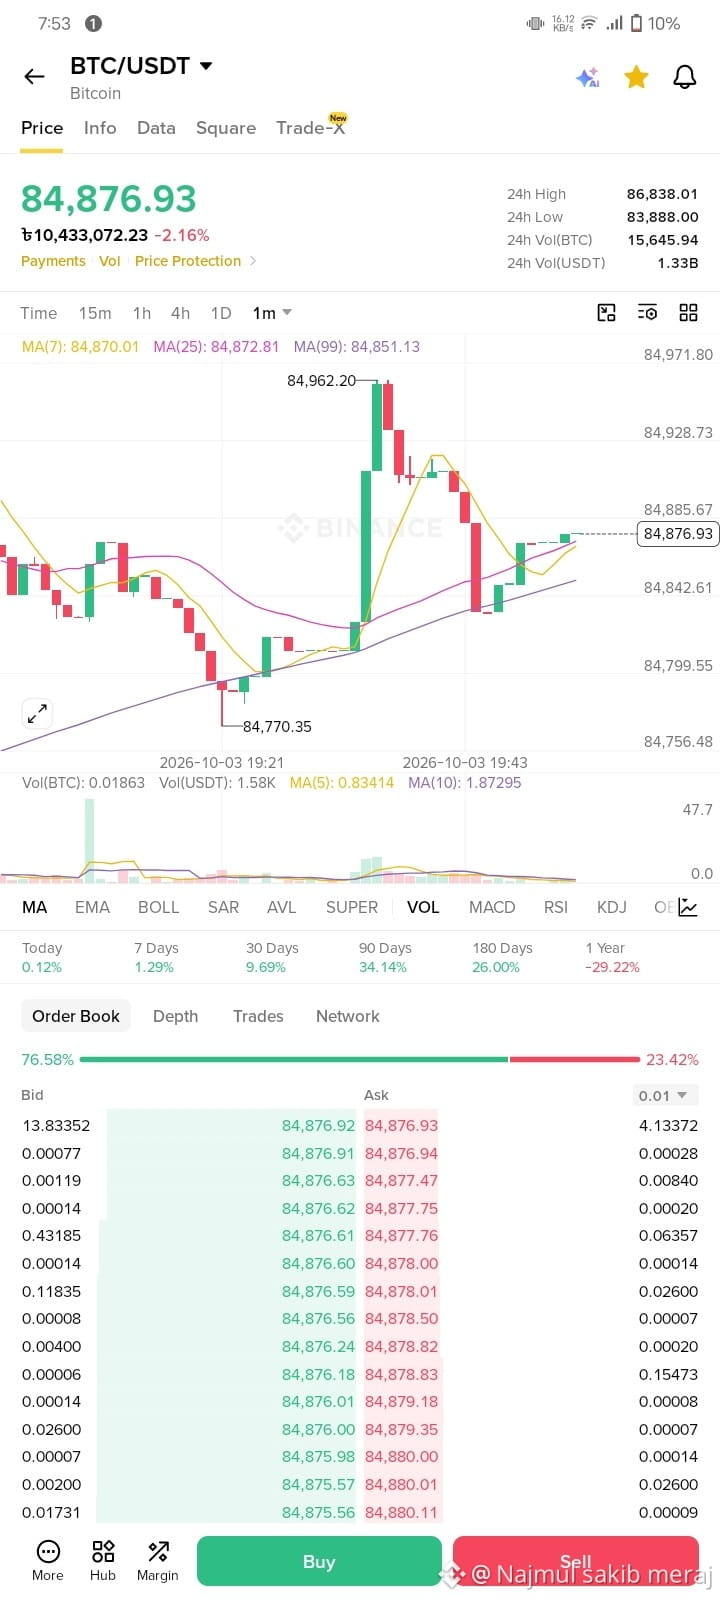
$BTC is currently stuck in a tight range, with some short-term long liquidity sitting just below $84K.
On the upside, there’s a heavy pocket of liquidity around $86K–$88K.
Wouldn’t be surprised to see BTC make one more sweep below the lows, grab that liquidity, and then reverse sharply toward $86K–$88K to hunt the upside liquidity.
Classic liquidity-hunt setup: down first, then up.
Keep an eye out for that double-tap move.
Invalidation: a clean break below $84K followed by sustained trading under it.
#NvidiaHitsRecordHighUp2.4% #BTC
$BTC is currently stuck in a tight range, with some short-term long liquidity sitting just below $84K.
On the upside, there’s a heavy pocket of liquidity around $86K–$88K.
Wouldn’t be surprised to see BTC make one more sweep below the lows, grab that liquidity, and then reverse sharply toward $86K–$88K to hunt the upside liquidity.
Classic liquidity-hunt setup: down first, then up.
Keep an eye out for that double-tap move.
Invalidation: a clean break below $84K followed by sustained trading under it.
#NvidiaHitsRecordHighUp2.4% #BTC
On the upside, there’s a heavy pocket of liquidity around $86K–$88K.
Wouldn’t be surprised to see BTC make one more sweep below the lows, grab that liquidity, and then reverse sharply toward $86K–$88K to hunt the upside liquidity.
Classic liquidity-hunt setup: down first, then up.
Keep an eye out for that double-tap move.
Invalidation: a clean break below $84K followed by sustained trading under it.
#NvidiaHitsRecordHighUp2.4% #BTC
57
·
--
උසබ තත්ත්වය
🚨 $SAND — Momentum Watch
$SAND has delivered a 100%+ move this week, but the chart is starting to show signs of overheating.
📊 Daily RSI is around 85, while price is testing the 0.0850–0.0845 resistance zone.
⚠️ Momentum appears to be cooling, with bearish RSI divergence visible across the H1–H4 timeframes. A pullback/correction could remain in play before the next major move.
🎯 Key demand zone: 0.0620–0.0600
If bulls can hold and consolidate above this area, another push toward fresh highs could become possible.
📌 Levels marked on the chart.
⚠️ NFA — Always DYOR.
#SAND #TheSandbox ndbox #Crypto #CryptoAnalysis #Technic alAnalysis #Altcoins #Binance #BTC走势分析 TC #Trading #CryptoTrading #DYOR* OR #NFA
🚨 $SAND — Momentum Watch
$SAND has delivered a 100%+ move this week, but the chart is starting to show signs of overheating.
📊 Daily RSI is around 85, while price is testing the 0.0850–0.0845 resistance zone.
⚠️ Momentum appears to be cooling, with bearish RSI divergence visible across the H1–H4 timeframes. A pullback/correction could remain in play before the next major move.
🎯 Key demand zone: 0.0620–0.0600
If bulls can hold and consolidate above this area, another push toward fresh highs could become possible.
📌 Levels marked on the chart.
⚠️ NFA — Always DYOR.
#SAND #TheSandbox ndbox #Crypto #CryptoAnalysis #Technic alAnalysis #Altcoins #Binance #BTC走势分析 TC #Trading #CryptoTrading #DYOR* OR #NFA
$SAND has delivered a 100%+ move this week, but the chart is starting to show signs of overheating.
📊 Daily RSI is around 85, while price is testing the 0.0850–0.0845 resistance zone.
⚠️ Momentum appears to be cooling, with bearish RSI divergence visible across the H1–H4 timeframes. A pullback/correction could remain in play before the next major move.
🎯 Key demand zone: 0.0620–0.0600
If bulls can hold and consolidate above this area, another push toward fresh highs could become possible.
📌 Levels marked on the chart.
⚠️ NFA — Always DYOR.
#SAND #TheSandbox ndbox #Crypto #CryptoAnalysis #Technic alAnalysis #Altcoins #Binance #BTC走势分析 TC #Trading #CryptoTrading #DYOR* OR #NFA
255
·
--
උසබ තත්ත්වය
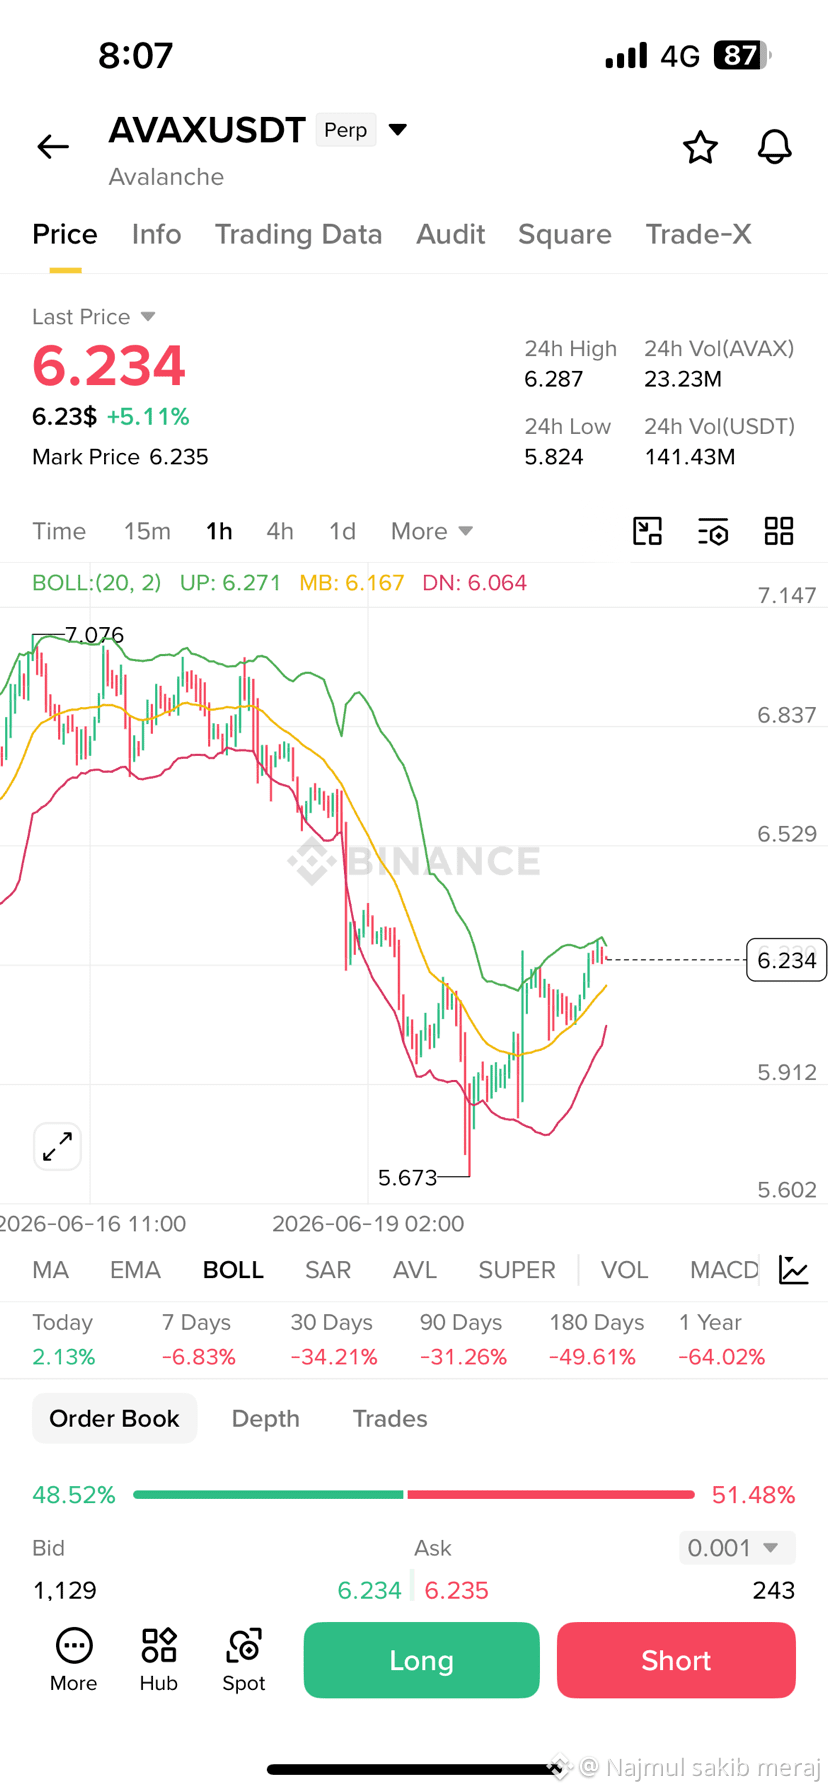
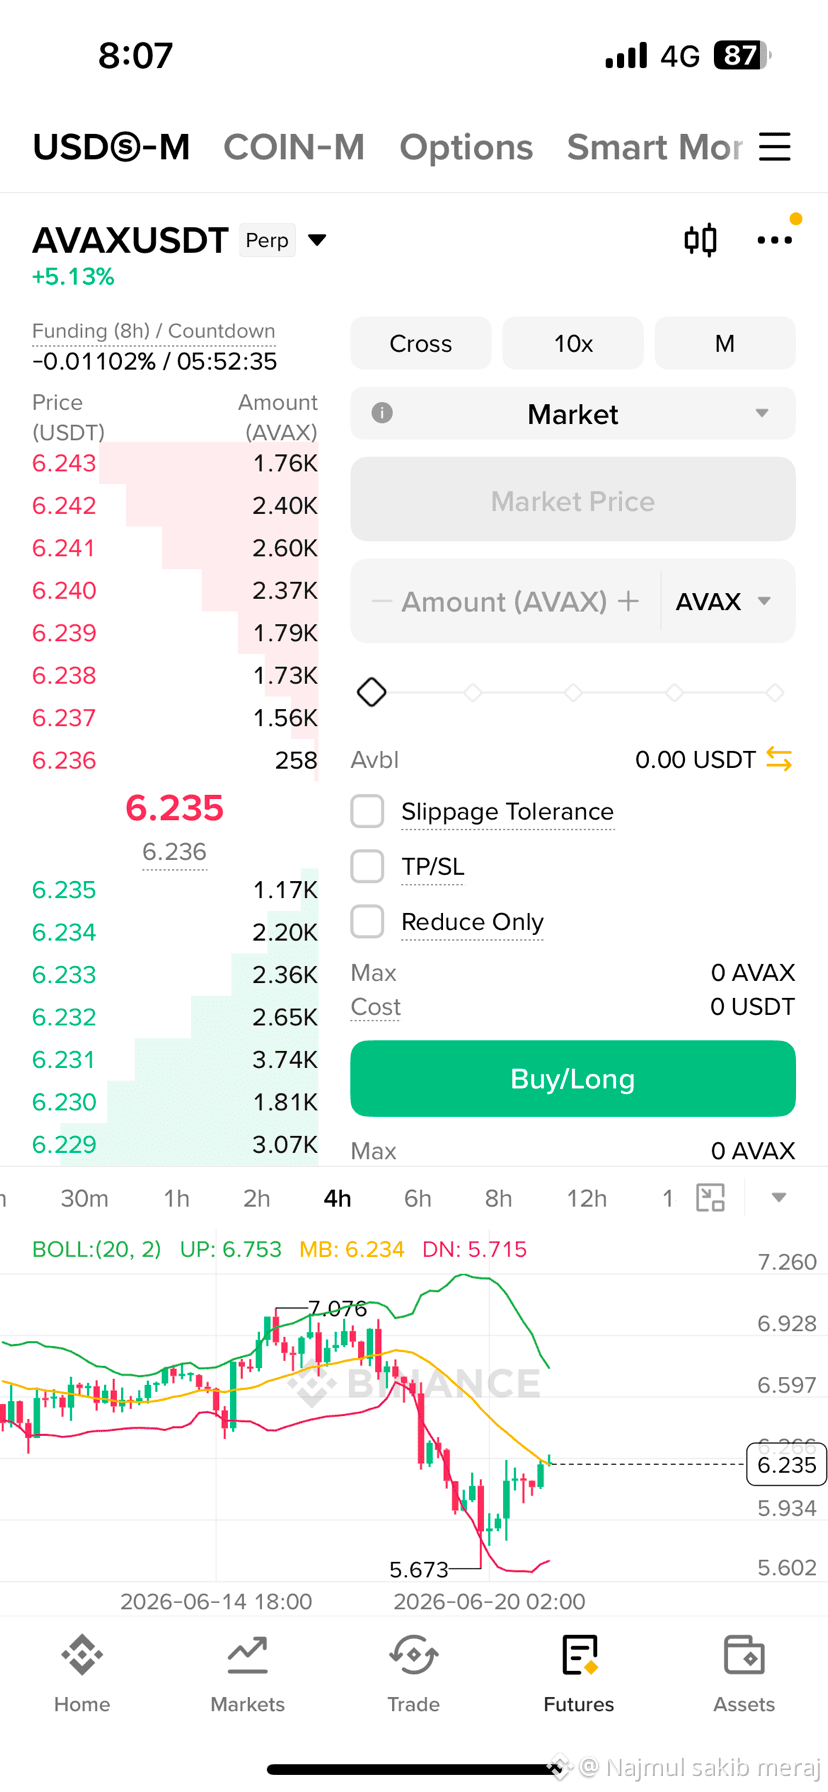
🔥 $AVAX to $23 in 30 Days? Bold move or realistic goal?
No matter the dips, my 17 $AVAX are locked. My targets: $13 ➡️ $19 ➡️ $23.
image.png" shows a solid bounce from $5.673 up to $6.234, showing some neat short-term recovery. But hitting $23 requires a huge 269% rally.
Are you bullish or bearish for the next 4 weeks? Drop a comment! 💎👀
#AVAX #HODL #CryptoTrading #Binance
{spot}(AVAXUSDT)
🔥 $AVAX to $23 in 30 Days? Bold move or realistic goal?
No matter the dips, my 17 $AVAX are locked. My targets: $13 ➡️ $19 ➡️ $23.
image.png" shows a solid bounce from $5.673 up to $6.234, showing some neat short-term recovery. But hitting $23 requires a huge 269% rally.
Are you bullish or bearish for the next 4 weeks? Drop a comment! 💎👀
#AVAX #HODL #CryptoTrading #Binance
No matter the dips, my 17 $AVAX are locked. My targets: $13 ➡️ $19 ➡️ $23.
image.png" shows a solid bounce from $5.673 up to $6.234, showing some neat short-term recovery. But hitting $23 requires a huge 269% rally.
Are you bullish or bearish for the next 4 weeks? Drop a comment! 💎👀
#AVAX #HODL #CryptoTrading #Binance

1
1
178
තවත් අන්තර්ගතයන් ගවේෂණය කිරීමට ඇතුල් වන්න
Binance චතුරශ්රය හි ගෝලීය ක්රිප්ටෝ පරිශීලකයින් හා එක්වන්න
⚡️ ක්රිප්ටෝ පිළිබඳ නවතම සහ ප්රයෝජනවත් තොරතුරු ලබා ගන්න.
💬 ලොව විශාලතම ක්රිප්ටෝ හුවමාරුව මගින් විශ්වාස කෙරේ.
👍 සත්යායනය කරන ලද නිර්මාණකරුවන්ගෙන් සැබෑ විදසුන් සොයා ගන්න.
විද්යුත් තැපෑල / දුරකථන අංකය
නැගී එන මාතෘකා
BNBSurpasses$790
13,976 views
118 සාකච්ඡා කරමින්
$BNB strategic long plan -> FOCUS NOW
BNB has created 2 strong lows after taking out internal liquidity
I'm expecting a move towards swing high $815-$830 and looking for a long on a retest of the green box
#BNBSurpasses$790 #bnb
Ghost Writer
·5 කැමත්ත දැක්වීම්
·6.6k views
ZamaRises15.99%ToIntradayHigh$0.09
9,991 views
93 සාකච්ඡා කරමින්
BitcoinSpotETFsDraw$6.34BInflowsInQ3
4,756 views
79 සාකච්ඡා කරමින්