
hs_dracula77
8 පෝස්ටු

hs_dracula77
වාර්තා කරන්න
පරිශීලක අවහිර කරන්න
1 හඹා යමින්
39 හඹා යන්නන්
27 කැමති විය
පෝස්ටු
·
--
පරිවර්තනය බලන්න
SUI/USDT — 1D Technical Analysis 📊
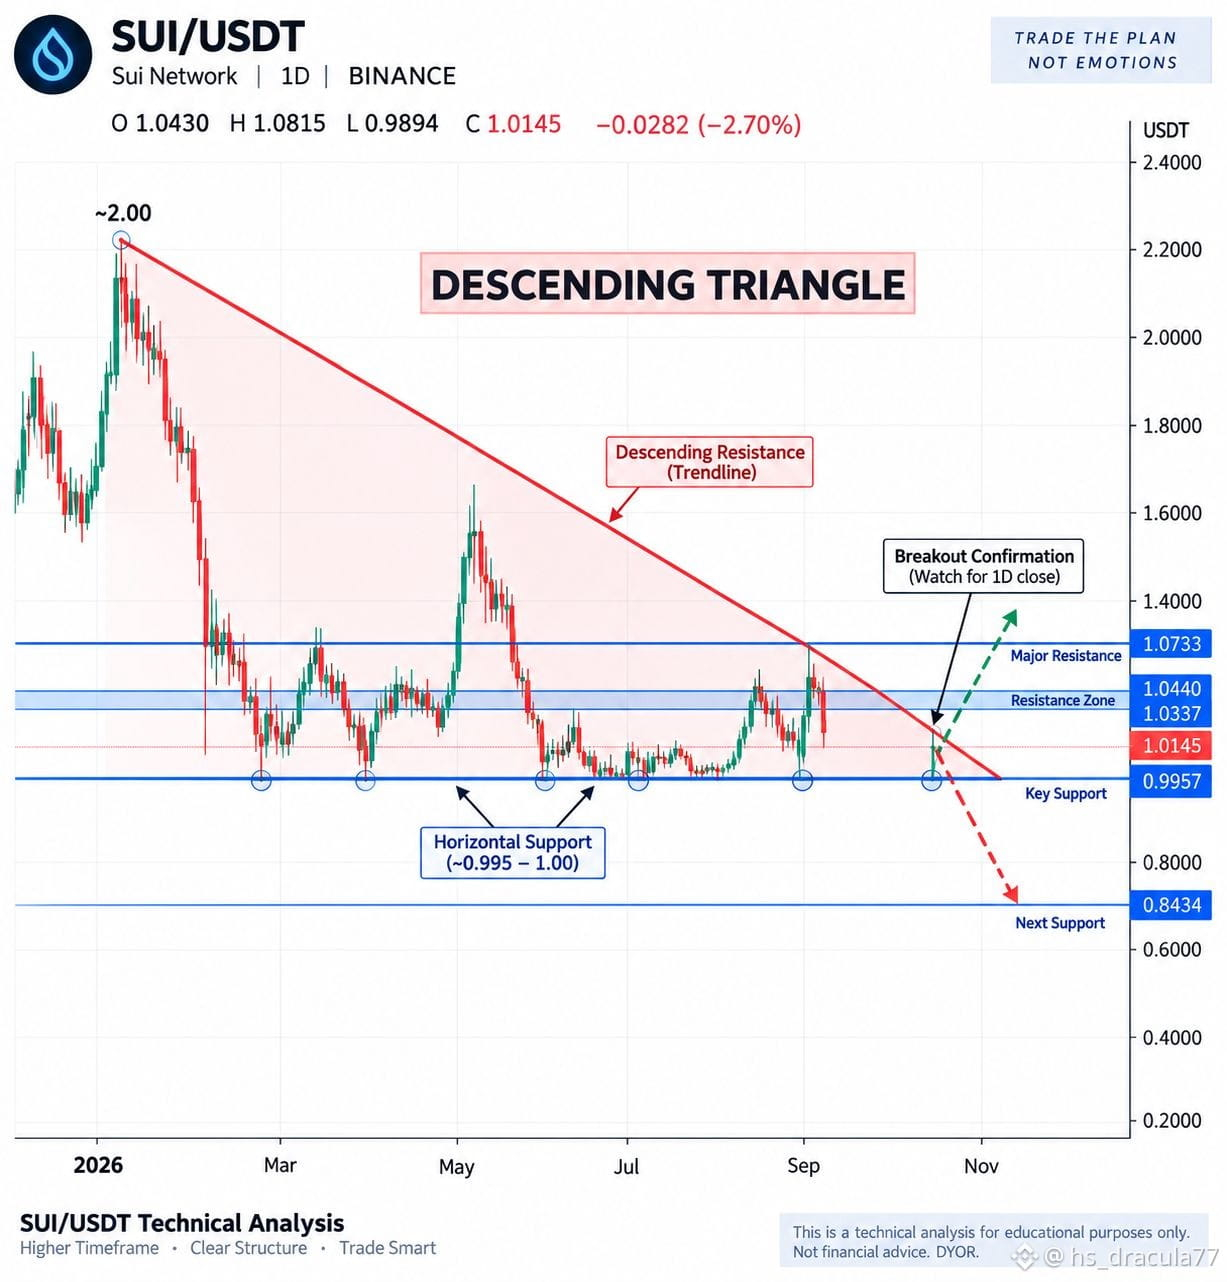
$SUI is currently trading around $1.0145 and is sitting at a critical decision zone on the daily timeframe.
The overall structure of $SUI is forming a Descending Triangle, with a clear descending resistance trendline from the ~$2.00 area and horizontal support around $0.995–$1.00.
Key Levels:
🔴 Resistance: $1.0337–$1.0440
🔴 Major resistance: $1.0733
🟡 Current price: ~$1.0145
🟢 Key support: $0.9957
🟢 Major lower support: $0.8434
Bullish scenario:
A strong daily close above the descending trendline and $1.0440 could open the way toward $1.0733 and potentially higher levels.
Bearish scenario:
If $SUI loses $0.9957 with a confirmed daily close below support, the triangle could break downward, with $0.8434 becoming an important lower support area.
For now, $0.9957–$1.0440 is the key battle zone. I would wait for confirmation rather than treating an intraday wick as a confirmed breakout/breakdown.
Technical analysis only — not financial advice. DYOR.
#SUİ #crypto #SUIAnalysis
SUI/USDT — 1D Technical Analysis 📊
$SUI is currently trading around $1.0145 and is sitting at a critical decision zone on the daily timeframe.
The overall structure of $SUI is forming a Descending Triangle, with a clear descending resistance trendline from the ~$2.00 area and horizontal support around $0.995–$1.00.
Key Levels:
🔴 Resistance: $1.0337–$1.0440
🔴 Major resistance: $1.0733
🟡 Current price: ~$1.0145
🟢 Key support: $0.9957
🟢 Major lower support: $0.8434
Bullish scenario:
A strong daily close above the descending trendline and $1.0440 could open the way toward $1.0733 and potentially higher levels.
Bearish scenario:
If $SUI loses $0.9957 with a confirmed daily close below support, the triangle could break downward, with $0.8434 becoming an important lower support area.
For now, $0.9957–$1.0440 is the key battle zone. I would wait for confirmation rather than treating an intraday wick as a confirmed breakout/breakdown.
Technical analysis only — not financial advice. DYOR.
#SUİ #crypto #SUIAnalysis
$SUI is currently trading around $1.0145 and is sitting at a critical decision zone on the daily timeframe.
The overall structure of $SUI is forming a Descending Triangle, with a clear descending resistance trendline from the ~$2.00 area and horizontal support around $0.995–$1.00.
Key Levels:
🔴 Resistance: $1.0337–$1.0440
🔴 Major resistance: $1.0733
🟡 Current price: ~$1.0145
🟢 Key support: $0.9957
🟢 Major lower support: $0.8434
Bullish scenario:
A strong daily close above the descending trendline and $1.0440 could open the way toward $1.0733 and potentially higher levels.
Bearish scenario:
If $SUI loses $0.9957 with a confirmed daily close below support, the triangle could break downward, with $0.8434 becoming an important lower support area.
For now, $0.9957–$1.0440 is the key battle zone. I would wait for confirmation rather than treating an intraday wick as a confirmed breakout/breakdown.
Technical analysis only — not financial advice. DYOR.
#SUİ #crypto #SUIAnalysis
124
·
--
📊 NEAR/USDT — 1D තාක්ෂණික විශ්ලේෂණය
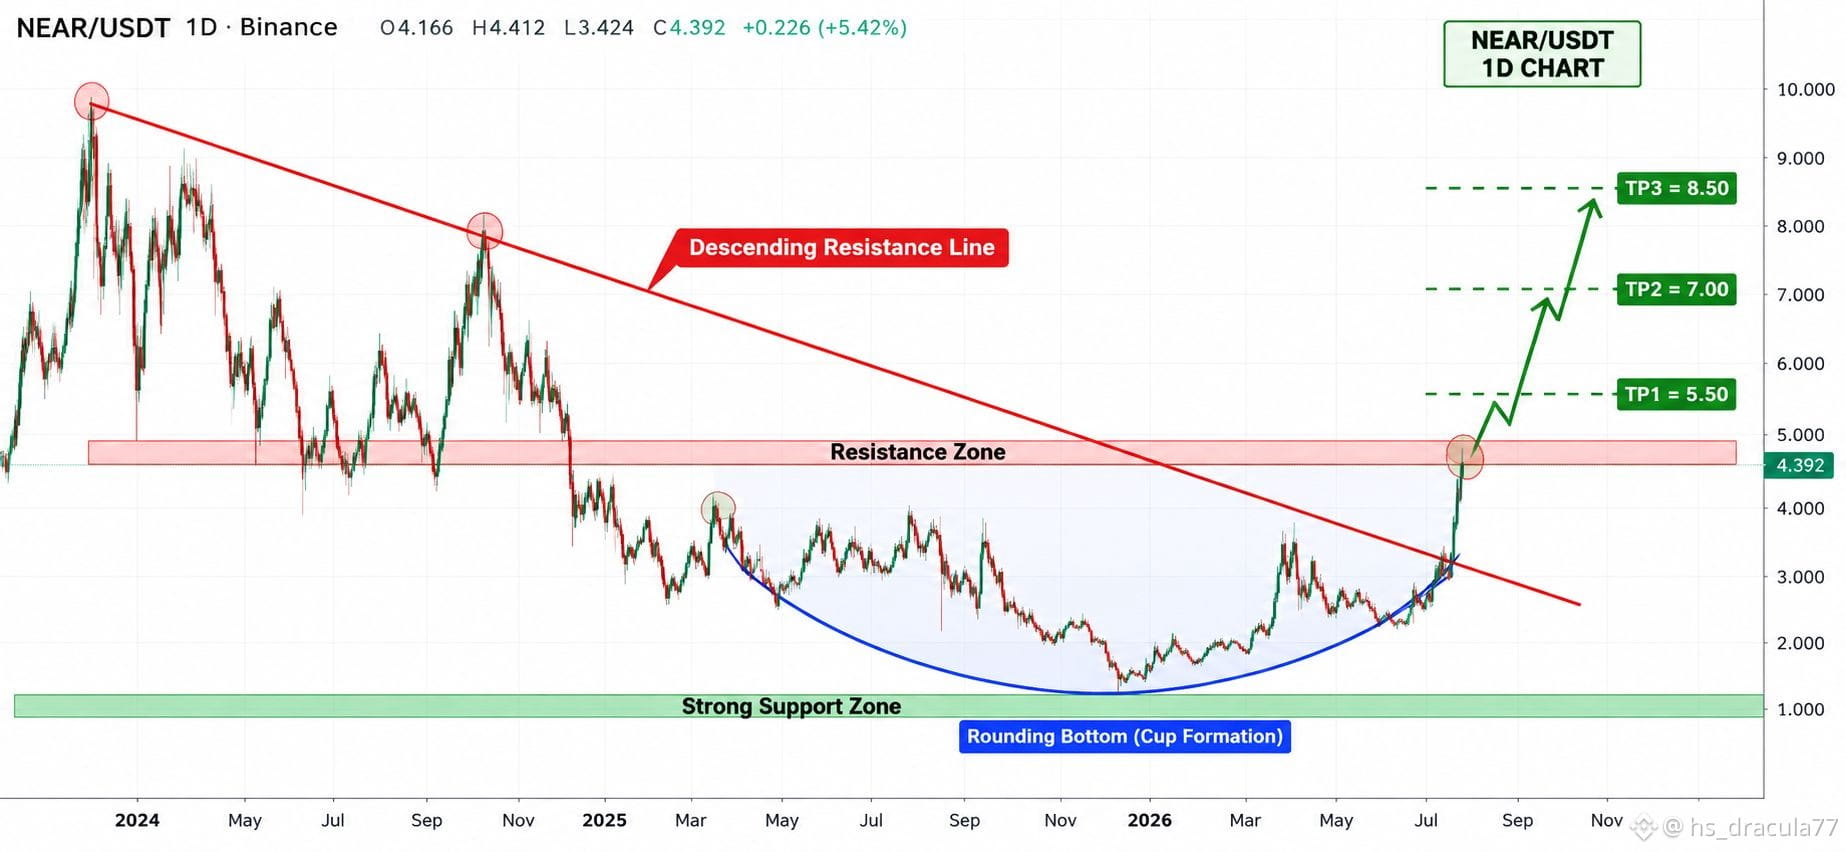
$NEAR 1D ප්රස්ථාරයේ බලවත් බුලිෂ් ප්රතිවර්තන ව්යුහයක් පෙන්නුම් කරයි.
අඩු උච්ච (lower highs) සහ අඩු මිල ගණන් දිගු කාලයක් පැවති පසු, $NEAR බලවත් ගම්යතාවයක් සමඟින් සිය දිගුකාලීන පහළට බෑවුම්වූ ප්රතිරෝධ රේඛාව ඉහළින් කැඩී ඇත. ප්රස්ථාරය විශාල රවුම්-පහළ / Cup වර්ගයේ ව්යුහයකටද සමාන වන අතර, මෙය එකතු කිරීම (accumulation) අදියරෙන් ව්යාප්ති (expansion) අදියරකට මාරුවීමක් විය හැකි බව යෝජනා කරයි.
බලාගත වැදගත් මට්ටම්:
වත්මන් මිල: ~$4.39
ප්රතිරෝධ කලාපය: $4.60–$5.00
බිඳී යාමේ තහවුරු කිරීම: $5.00 ට ඉහළින් දෛනික වසා දැමීම + සාර්ථක නැවත පරීක්ෂාව
සහාය: $3.20–$3.50
ප්රධාන සහාය: $1.00–$1.30
ඉහළ අගයන්: $5.50 → $7.00 → $8.50
$4.60–$5.00 කලාපය ඉතා තීරණාත්මකයි. එහි පිරිසිදු බිඳී යාමක් සහ එය ඉහළින් රඳවා ගැනීමක් ඉහළ මට්ටම් වෙත මඟ පෑදිය හැක; එහෙත් ප්රතික්ෂේප වීමක් සිදුවුවහොත් $3.20–$3.50 සහාය කලාපය වෙත නැවත පහතට ඇද වැටීමක් ඇතිවිය හැක.
Binance Square කැප්ෂන්:
🚀 $NEAR 1D BREAKOUT SETUP
NEAR 1D කාලරාමුවේ ප්රධාන බුලිෂ් ප්රතිවර්තන ව්යුහයක් පෙන්වමින් සිටී.
මාස ගණනාවක සන්සුන් තත්ත්වයකින් පසු, මිල දිගුකාලීන පහළට බෑවුම්වූ ප්රතිරෝධ ප්රවණතා රේඛාවෙන් ඉහළට කැඩී ගොස් ඇති අතර දැන් ප්රධාන $4.60–$5.00 ප්රතිරෝධ කලාපයට ළඟා වෙමින් පවතී.
📌 වැදගත් මට්ටම්: සහාය: $3.20–$3.50
ප්රතිරෝධය: $4.60–$5.00
ඉලක්කය 1: $5.50
ඉලක්කය 2: $7.00
ඉලක්කය 3: $8.50
ප්රධාන තහවුරු කිරීම $5.00 ට ඉහළින් දෛනික වසා දැමීමක් වන අතර පසුව සාර්ථක නැවත පරීක්ෂාවකි.
$5.00 සහායක් බවට පත් වුවහොත්, ඊළඟ ඉහළ ව්යාප්තිය සැලකිය යුතු විය හැක. මිල ප්රතික්ෂේප වුවහොත්, නැවත පරීක්ෂාවක් සඳහා හැකි වීමට $3.20–$3.50 දෙස බලන්න.
තාක්ෂණික විශ්ලේෂණය පමණයි — DYOR.
#NEAR🚀🚀🚀 #NEARUSDT.P #NEARProtocol #CryptoWatchMay2024 #CryptoTrading
📊 NEAR/USDT — 1D තාක්ෂණික විශ්ලේෂණය
$NEAR 1D ප්රස්ථාරයේ බලවත් බුලිෂ් ප්රතිවර්තන ව්යුහයක් පෙන්නුම් කරයි.
අඩු උච්ච (lower highs) සහ අඩු මිල ගණන් දිගු කාලයක් පැවති පසු, $NEAR බලවත් ගම්යතාවයක් සමඟින් සිය දිගුකාලීන පහළට බෑවුම්වූ ප්රතිරෝධ රේඛාව ඉහළින් කැඩී ඇත. ප්රස්ථාරය විශාල රවුම්-පහළ / Cup වර්ගයේ ව්යුහයකටද සමාන වන අතර, මෙය එකතු කිරීම (accumulation) අදියරෙන් ව්යාප්ති (expansion) අදියරකට මාරුවීමක් විය හැකි බව යෝජනා කරයි.
බලාගත වැදගත් මට්ටම්:
වත්මන් මිල: ~$4.39
ප්රතිරෝධ කලාපය: $4.60–$5.00
බිඳී යාමේ තහවුරු කිරීම: $5.00 ට ඉහළින් දෛනික වසා දැමීම + සාර්ථක නැවත පරීක්ෂාව
සහාය: $3.20–$3.50
ප්රධාන සහාය: $1.00–$1.30
ඉහළ අගයන්: $5.50 → $7.00 → $8.50
$4.60–$5.00 කලාපය ඉතා තීරණාත්මකයි. එහි පිරිසිදු බිඳී යාමක් සහ එය ඉහළින් රඳවා ගැනීමක් ඉහළ මට්ටම් වෙත මඟ පෑදිය හැක; එහෙත් ප්රතික්ෂේප වීමක් සිදුවුවහොත් $3.20–$3.50 සහාය කලාපය වෙත නැවත පහතට ඇද වැටීමක් ඇතිවිය හැක.
Binance Square කැප්ෂන්:
🚀 $NEAR 1D BREAKOUT SETUP
NEAR 1D කාලරාමුවේ ප්රධාන බුලිෂ් ප්රතිවර්තන ව්යුහයක් පෙන්වමින් සිටී.
මාස ගණනාවක සන්සුන් තත්ත්වයකින් පසු, මිල දිගුකාලීන පහළට බෑවුම්වූ ප්රතිරෝධ ප්රවණතා රේඛාවෙන් ඉහළට කැඩී ගොස් ඇති අතර දැන් ප්රධාන $4.60–$5.00 ප්රතිරෝධ කලාපයට ළඟා වෙමින් පවතී.
📌 වැදගත් මට්ටම්: සහාය: $3.20–$3.50
ප්රතිරෝධය: $4.60–$5.00
ඉලක්කය 1: $5.50
ඉලක්කය 2: $7.00
ඉලක්කය 3: $8.50
ප්රධාන තහවුරු කිරීම $5.00 ට ඉහළින් දෛනික වසා දැමීමක් වන අතර පසුව සාර්ථක නැවත පරීක්ෂාවකි.
$5.00 සහායක් බවට පත් වුවහොත්, ඊළඟ ඉහළ ව්යාප්තිය සැලකිය යුතු විය හැක. මිල ප්රතික්ෂේප වුවහොත්, නැවත පරීක්ෂාවක් සඳහා හැකි වීමට $3.20–$3.50 දෙස බලන්න.
තාක්ෂණික විශ්ලේෂණය පමණයි — DYOR.
#NEAR🚀🚀🚀 #NEARUSDT.P #NEARProtocol #CryptoWatchMay2024 #CryptoTrading
$NEAR 1D ප්රස්ථාරයේ බලවත් බුලිෂ් ප්රතිවර්තන ව්යුහයක් පෙන්නුම් කරයි.
අඩු උච්ච (lower highs) සහ අඩු මිල ගණන් දිගු කාලයක් පැවති පසු, $NEAR බලවත් ගම්යතාවයක් සමඟින් සිය දිගුකාලීන පහළට බෑවුම්වූ ප්රතිරෝධ රේඛාව ඉහළින් කැඩී ඇත. ප්රස්ථාරය විශාල රවුම්-පහළ / Cup වර්ගයේ ව්යුහයකටද සමාන වන අතර, මෙය එකතු කිරීම (accumulation) අදියරෙන් ව්යාප්ති (expansion) අදියරකට මාරුවීමක් විය හැකි බව යෝජනා කරයි.
බලාගත වැදගත් මට්ටම්:
වත්මන් මිල: ~$4.39
ප්රතිරෝධ කලාපය: $4.60–$5.00
බිඳී යාමේ තහවුරු කිරීම: $5.00 ට ඉහළින් දෛනික වසා දැමීම + සාර්ථක නැවත පරීක්ෂාව
සහාය: $3.20–$3.50
ප්රධාන සහාය: $1.00–$1.30
ඉහළ අගයන්: $5.50 → $7.00 → $8.50
$4.60–$5.00 කලාපය ඉතා තීරණාත්මකයි. එහි පිරිසිදු බිඳී යාමක් සහ එය ඉහළින් රඳවා ගැනීමක් ඉහළ මට්ටම් වෙත මඟ පෑදිය හැක; එහෙත් ප්රතික්ෂේප වීමක් සිදුවුවහොත් $3.20–$3.50 සහාය කලාපය වෙත නැවත පහතට ඇද වැටීමක් ඇතිවිය හැක.
Binance Square කැප්ෂන්:
🚀 $NEAR 1D BREAKOUT SETUP
NEAR 1D කාලරාමුවේ ප්රධාන බුලිෂ් ප්රතිවර්තන ව්යුහයක් පෙන්වමින් සිටී.
මාස ගණනාවක සන්සුන් තත්ත්වයකින් පසු, මිල දිගුකාලීන පහළට බෑවුම්වූ ප්රතිරෝධ ප්රවණතා රේඛාවෙන් ඉහළට කැඩී ගොස් ඇති අතර දැන් ප්රධාන $4.60–$5.00 ප්රතිරෝධ කලාපයට ළඟා වෙමින් පවතී.
📌 වැදගත් මට්ටම්: සහාය: $3.20–$3.50
ප්රතිරෝධය: $4.60–$5.00
ඉලක්කය 1: $5.50
ඉලක්කය 2: $7.00
ඉලක්කය 3: $8.50
ප්රධාන තහවුරු කිරීම $5.00 ට ඉහළින් දෛනික වසා දැමීමක් වන අතර පසුව සාර්ථක නැවත පරීක්ෂාවකි.
$5.00 සහායක් බවට පත් වුවහොත්, ඊළඟ ඉහළ ව්යාප්තිය සැලකිය යුතු විය හැක. මිල ප්රතික්ෂේප වුවහොත්, නැවත පරීක්ෂාවක් සඳහා හැකි වීමට $3.20–$3.50 දෙස බලන්න.
තාක්ෂණික විශ්ලේෂණය පමණයි — DYOR.
#NEAR🚀🚀🚀 #NEARUSDT.P #NEARProtocol #CryptoWatchMay2024 #CryptoTrading
1.4k
·
--
📊 $BTC/USDT — 1D චාර්ට් විශ්ලේෂණය
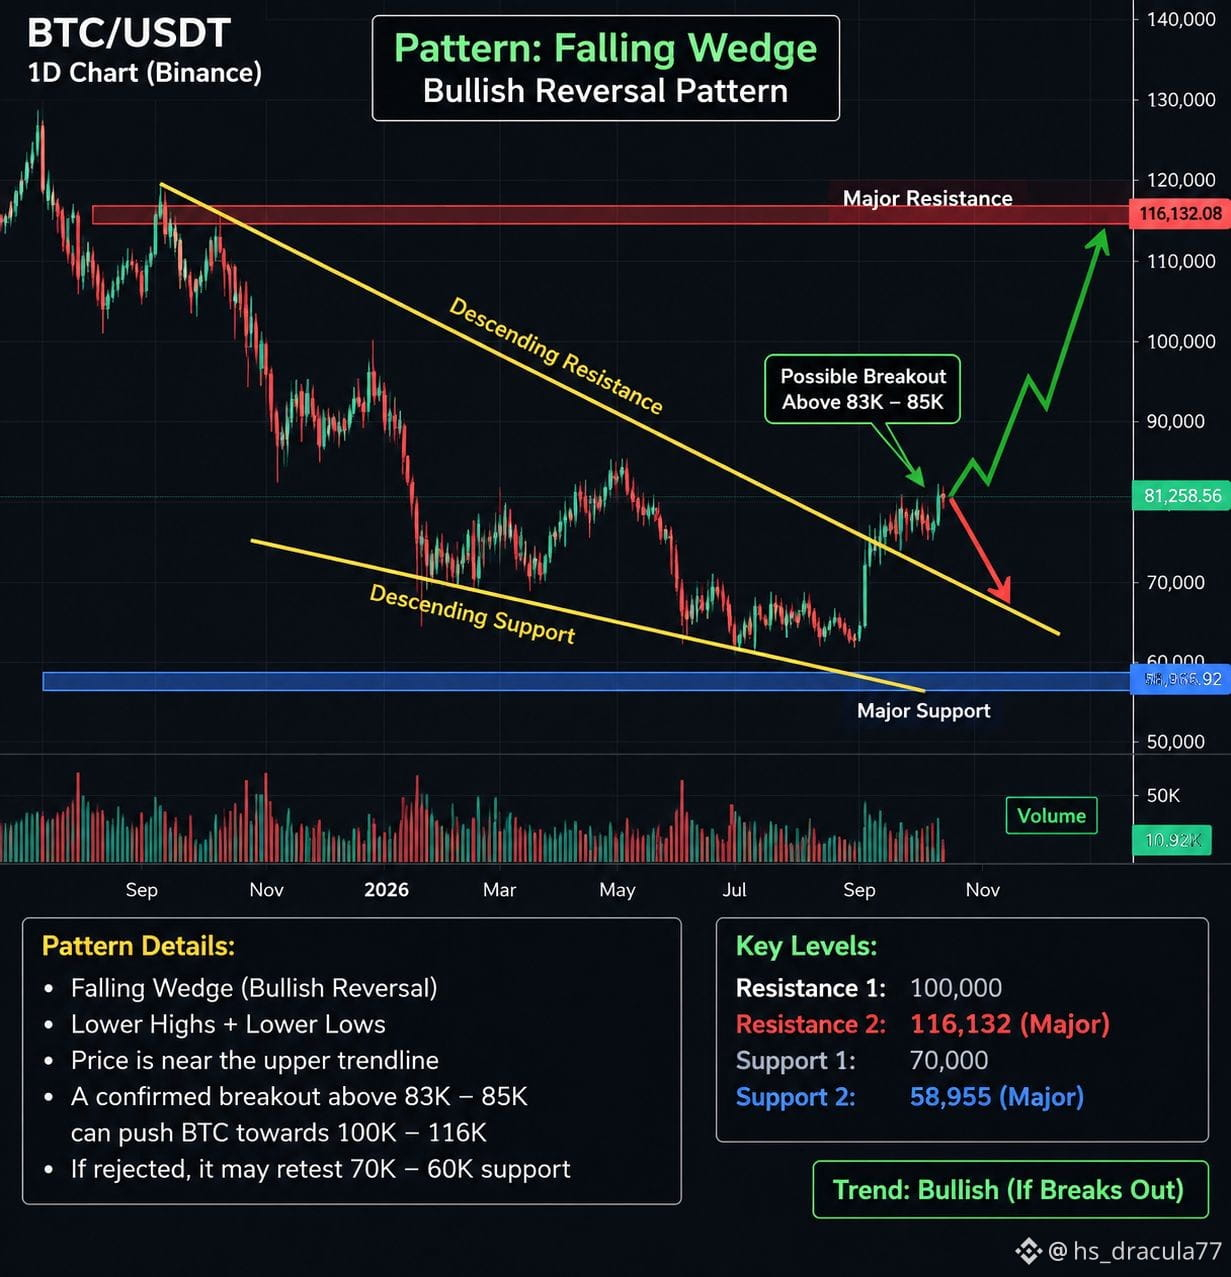
$BTC දැනට $81,258 පමණ ගනුදෙනු කරමින් සිටින අතර, විශාල පහත වැටීමෙන් පසුව 1D චාර්ට් එකෙහි වැටෙන-බෑවුම් (falling-wedge) වර්ගයේ ව්යුහයක් පෙන්වා ඇත.
බලාගත යුතු ප්රධාන කලාපය $83K–$85K වේ. දිනක අවසානය (daily close) සහ මෙම කලාපය ඉහළට තහවුරු වීමෙන් ඉහළ ට්රෙන්ඩ්ලයින් එකෙන් පිටවීමක් (breakout) පෙන්නුම් කරමින් $90K → $100K දක්වා ගමන් කිරීමට ඉඩක් විවෘත විය හැක.
$BTC පහත පැත්තෙන්, $83K–$85K කලාපය වටා ප්රතික්ෂේප වීමෙන් $70K වෙත නැවත පරීක්ෂණයක් (retest) ලැබිය හැකි අතර, චාර්ට් එකේ පෙන්වා ඇති ප්රධාන දිගුකාලීන ආධාරකය ආසන්නව $58,955 වේ.
ප්රධාන මට්ටම්:
🟢 වර්තමාන: $81,258
🔥 Breakout කලාපය: $83K–$85K
🎯 ප්රතිරෝධය: $90K → $100K
🔴 ප්රධාන ප්රතිරෝධය: $116,132
🟡 ආධාරකය: $70K
🔵 ප්රධාන ආධාරකය: $58,955
වැදගත්: වැටෙන-බෑවුම් (falling-wedge) අර්ථකථනය $BTC ඉහළ ට්රෙන්ඩ්ලයින් එකට ඉහළින් බිඳගෙන (break) ඒ ඉහළින්ම රැඳී සිටියහොත් පමණක් තහවුරු වේ; එසේ නොවුණහොත්, ව්යුහය තවමත් තවත් එක් ප්රතික්ෂේපයක් (rejection) ජනනය කළ හැක.
#BTCUSDT #Binance #TechnicalAnalysis #cryptotrading #BitcoinAnalysis
📊 $BTC /USDT — 1D චාර්ට් විශ්ලේෂණය
$BTC දැනට $81,258 පමණ ගනුදෙනු කරමින් සිටින අතර, විශාල පහත වැටීමෙන් පසුව 1D චාර්ට් එකෙහි වැටෙන-බෑවුම් (falling-wedge) වර්ගයේ ව්යුහයක් පෙන්වා ඇත.
බලාගත යුතු ප්රධාන කලාපය $83K–$85K වේ. දිනක අවසානය (daily close) සහ මෙම කලාපය ඉහළට තහවුරු වීමෙන් ඉහළ ට්රෙන්ඩ්ලයින් එකෙන් පිටවීමක් (breakout) පෙන්නුම් කරමින් $90K → $100K දක්වා ගමන් කිරීමට ඉඩක් විවෘත විය හැක.
$BTC පහත පැත්තෙන්, $83K–$85K කලාපය වටා ප්රතික්ෂේප වීමෙන් $70K වෙත නැවත පරීක්ෂණයක් (retest) ලැබිය හැකි අතර, චාර්ට් එකේ පෙන්වා ඇති ප්රධාන දිගුකාලීන ආධාරකය ආසන්නව $58,955 වේ.
ප්රධාන මට්ටම්:
🟢 වර්තමාන: $81,258
🔥 Breakout කලාපය: $83K–$85K
🎯 ප්රතිරෝධය: $90K → $100K
🔴 ප්රධාන ප්රතිරෝධය: $116,132
🟡 ආධාරකය: $70K
🔵 ප්රධාන ආධාරකය: $58,955
වැදගත්: වැටෙන-බෑවුම් (falling-wedge) අර්ථකථනය $BTC ඉහළ ට්රෙන්ඩ්ලයින් එකට ඉහළින් බිඳගෙන (break) ඒ ඉහළින්ම රැඳී සිටියහොත් පමණක් තහවුරු වේ; එසේ නොවුණහොත්, ව්යුහය තවමත් තවත් එක් ප්රතික්ෂේපයක් (rejection) ජනනය කළ හැක.
#BTCUSDT #Binance #TechnicalAnalysis #cryptotrading #BitcoinAnalysis
$BTC දැනට $81,258 පමණ ගනුදෙනු කරමින් සිටින අතර, විශාල පහත වැටීමෙන් පසුව 1D චාර්ට් එකෙහි වැටෙන-බෑවුම් (falling-wedge) වර්ගයේ ව්යුහයක් පෙන්වා ඇත.
බලාගත යුතු ප්රධාන කලාපය $83K–$85K වේ. දිනක අවසානය (daily close) සහ මෙම කලාපය ඉහළට තහවුරු වීමෙන් ඉහළ ට්රෙන්ඩ්ලයින් එකෙන් පිටවීමක් (breakout) පෙන්නුම් කරමින් $90K → $100K දක්වා ගමන් කිරීමට ඉඩක් විවෘත විය හැක.
$BTC පහත පැත්තෙන්, $83K–$85K කලාපය වටා ප්රතික්ෂේප වීමෙන් $70K වෙත නැවත පරීක්ෂණයක් (retest) ලැබිය හැකි අතර, චාර්ට් එකේ පෙන්වා ඇති ප්රධාන දිගුකාලීන ආධාරකය ආසන්නව $58,955 වේ.
ප්රධාන මට්ටම්:
🟢 වර්තමාන: $81,258
🔥 Breakout කලාපය: $83K–$85K
🎯 ප්රතිරෝධය: $90K → $100K
🔴 ප්රධාන ප්රතිරෝධය: $116,132
🟡 ආධාරකය: $70K
🔵 ප්රධාන ආධාරකය: $58,955
වැදගත්: වැටෙන-බෑවුම් (falling-wedge) අර්ථකථනය $BTC ඉහළ ට්රෙන්ඩ්ලයින් එකට ඉහළින් බිඳගෙන (break) ඒ ඉහළින්ම රැඳී සිටියහොත් පමණක් තහවුරු වේ; එසේ නොවුණහොත්, ව්යුහය තවමත් තවත් එක් ප්රතික්ෂේපයක් (rejection) ජනනය කළ හැක.
#BTCUSDT #Binance #TechnicalAnalysis #cryptotrading #BitcoinAnalysis
13
·
--
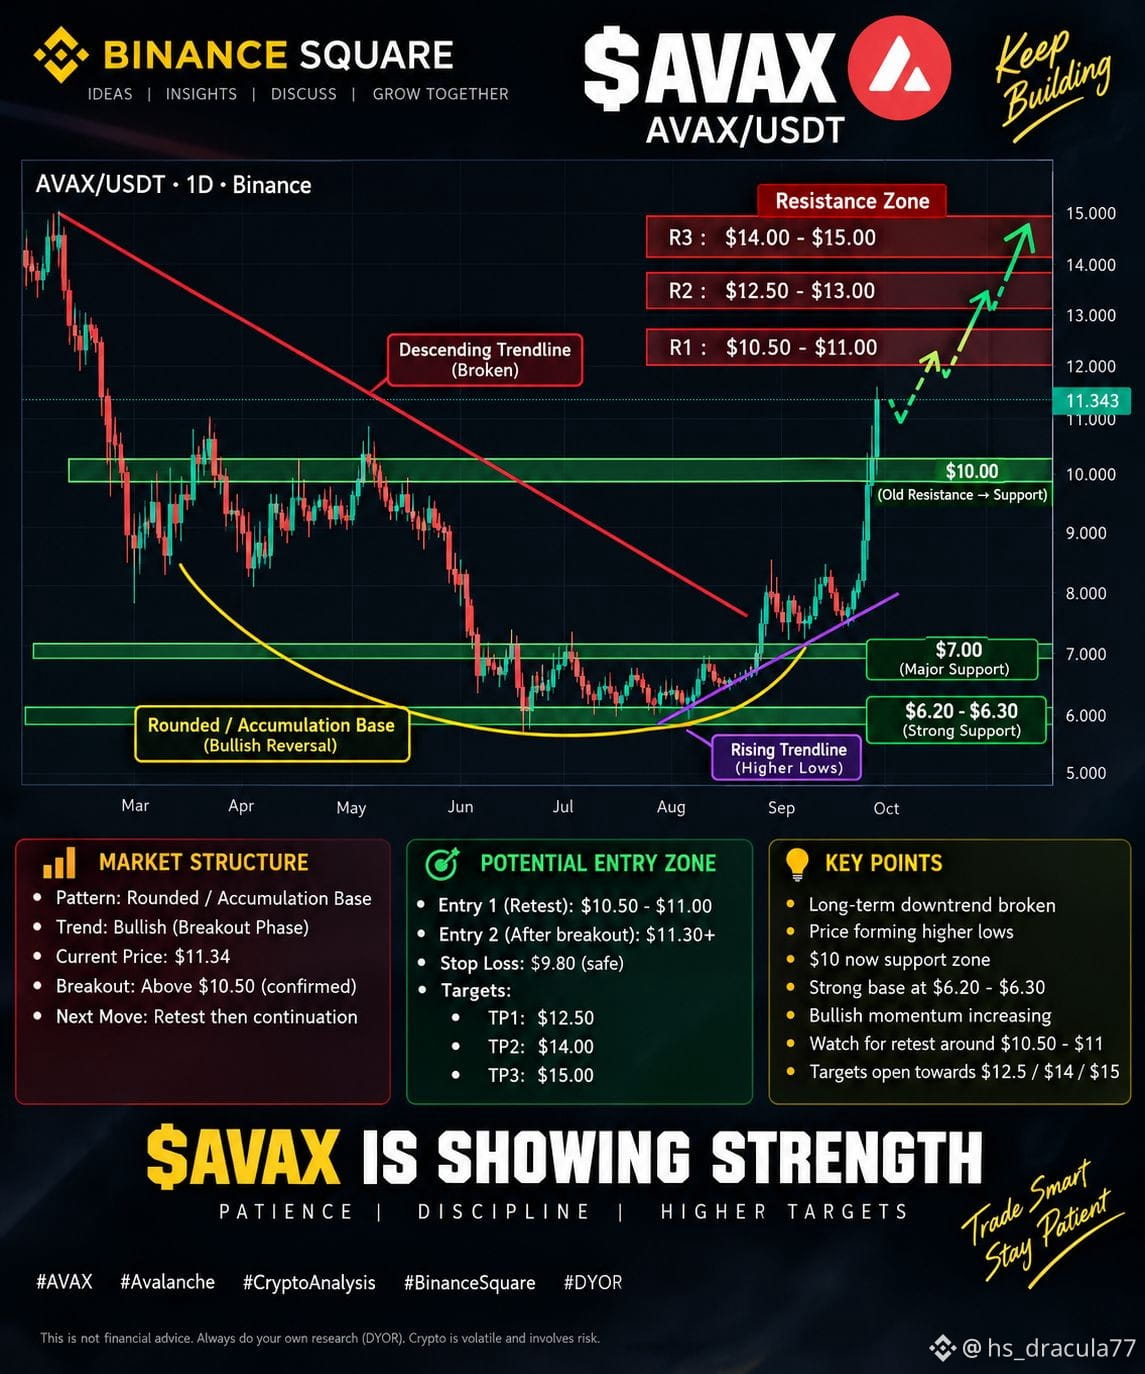
🚨 $AVAX — အဓိက Breakout အခြေအနေ အသက်ဝင်နေပြီ 🚨 AVAX သည် 1D timeframe ပေါ်တွင် အားကြီးသော breakout ပုံစံတစ်ခုကို နောက်ဆုံးတော့ပြသနေပါပြီ။
လများစွာ စုဆောင်းခြင်း (accumulation) လုပ်ပြီးနောက် စျေးနှုန်းသည် အဓိကကျသည့် (major descending) trendline အထက်ကို ဖြတ်တက်ပြီး $10 resistance နယ်မြေကိုလည်း ကျော်ဖြတ်သွားခဲ့သည်။
📊 စောင့်ကြည့်ရမည့် အရေးကြီးအဆင့်များ:
🟢 $10.00 → ယခင် resistance ဖြစ်ပြီး အခုတော့ အရေးကြီးသော support ဖြစ်သည်
🟢 $7.00 → အဓိက support
🟢 $6.20–$6.30 → အားကောင်းသည့် စုဆောင်း/base နယ်မြေ
🔴 $10.50–$11.00 → ပထမအဓိက resistance / retest နယ်မြေ
🎯 $12.50–$13.00 → နောက်ထပ် resistance နယ်မြေ
🎯 $14.00–$15.00 → ပိုမိုမြင့်မားသည့် resistance ဇုန်
📈 ပုံစံ
1D chart က Rounded Accumulation Base + Breakout ပုံစံကို ပြနေပြီး နွေရာသီအောက်ခြေ (summer bottom) မှစပြီး higher lows တွေ ဖွံ့ဖြိုးနေပါတယ်။
အခုအရေးကြီးဆုံးကတော့ $AVAX က $10.50–$11.00 ပတ်ဝန်းကျင်မှာ ဘယ်လိုတုံ့ပြန်မလဲဆိုတာပါပဲ။
ဒီနယ်မြေက retest ပြီးနောက် support အဖြစ် တည်နိုင်မယ်ဆိုရင် စောင့်ကြည့်ရမယ့် နောက်တက်မည့်အဆင့်တွေကတော့:
➡️ $12.50
➡️ $13.00
➡️ $14.00
➡️ $15.00
ဒါပေမယ့် breakout ပြီးနောက် $10 ဇုန်ကို စျေးနှုန်းက ဆုံးရှုံးသွားမယ်ဆိုရင် breakout structure ကို ပြန်လည်စိစစ်ရလိမ့်မယ်။
အခု ကျွန်တော့်ရဲ့ အဓိကဇုန်: $10–$11 🔥
FOMO မလိုပါဘူး။ retest က move ကို အတည်ပြုအောင်ထားပါ။
အစီအစဉ်နဲ့ရောင်းဝယ်ပါ၊ အန္တရာယ်ကို စီမံပါ။
သင်ထင်တာက $AVAX က $15 ကိုရောက်နိုင်မလား? 👀
#AVAX #Avalanche #Crypto #CryptoAnalysis #BinanceSquare #Altcoins #Trading #CryptoTrading #DYOR
🚨 $AVAX — အဓိက Breakout အခြေအနေ အသက်ဝင်နေပြီ 🚨 AVAX သည် 1D timeframe ပေါ်တွင် အားကြီးသော breakout ပုံစံတစ်ခုကို နောက်ဆုံးတော့ပြသနေပါပြီ။
လများစွာ စုဆောင်းခြင်း (accumulation) လုပ်ပြီးနောက် စျေးနှုန်းသည် အဓိကကျသည့် (major descending) trendline အထက်ကို ဖြတ်တက်ပြီး $10 resistance နယ်မြေကိုလည်း ကျော်ဖြတ်သွားခဲ့သည်။
📊 စောင့်ကြည့်ရမည့် အရေးကြီးအဆင့်များ:
🟢 $10.00 → ယခင် resistance ဖြစ်ပြီး အခုတော့ အရေးကြီးသော support ဖြစ်သည်
🟢 $7.00 → အဓိက support
🟢 $6.20–$6.30 → အားကောင်းသည့် စုဆောင်း/base နယ်မြေ
🔴 $10.50–$11.00 → ပထမအဓိက resistance / retest နယ်မြေ
🎯 $12.50–$13.00 → နောက်ထပ် resistance နယ်မြေ
🎯 $14.00–$15.00 → ပိုမိုမြင့်မားသည့် resistance ဇုန်
📈 ပုံစံ
1D chart က Rounded Accumulation Base + Breakout ပုံစံကို ပြနေပြီး နွေရာသီအောက်ခြေ (summer bottom) မှစပြီး higher lows တွေ ဖွံ့ဖြိုးနေပါတယ်။
အခုအရေးကြီးဆုံးကတော့ $AVAX က $10.50–$11.00 ပတ်ဝန်းကျင်မှာ ဘယ်လိုတုံ့ပြန်မလဲဆိုတာပါပဲ။
ဒီနယ်မြေက retest ပြီးနောက် support အဖြစ် တည်နိုင်မယ်ဆိုရင် စောင့်ကြည့်ရမယ့် နောက်တက်မည့်အဆင့်တွေကတော့:
➡️ $12.50
➡️ $13.00
➡️ $14.00
➡️ $15.00
ဒါပေမယ့် breakout ပြီးနောက် $10 ဇုန်ကို စျေးနှုန်းက ဆုံးရှုံးသွားမယ်ဆိုရင် breakout structure ကို ပြန်လည်စိစစ်ရလိမ့်မယ်။
အခု ကျွန်တော့်ရဲ့ အဓိကဇုန်: $10–$11 🔥
FOMO မလိုပါဘူး။ retest က move ကို အတည်ပြုအောင်ထားပါ။
အစီအစဉ်နဲ့ရောင်းဝယ်ပါ၊ အန္တရာယ်ကို စီမံပါ။
သင်ထင်တာက $AVAX က $15 ကိုရောက်နိုင်မလား? 👀
#AVAX #Avalanche #Crypto #CryptoAnalysis #BinanceSquare #Altcoins #Trading #CryptoTrading #DYOR
လများစွာ စုဆောင်းခြင်း (accumulation) လုပ်ပြီးနောက် စျေးနှုန်းသည် အဓိကကျသည့် (major descending) trendline အထက်ကို ဖြတ်တက်ပြီး $10 resistance နယ်မြေကိုလည်း ကျော်ဖြတ်သွားခဲ့သည်။
📊 စောင့်ကြည့်ရမည့် အရေးကြီးအဆင့်များ:
🟢 $10.00 → ယခင် resistance ဖြစ်ပြီး အခုတော့ အရေးကြီးသော support ဖြစ်သည်
🟢 $7.00 → အဓိက support
🟢 $6.20–$6.30 → အားကောင်းသည့် စုဆောင်း/base နယ်မြေ
🔴 $10.50–$11.00 → ပထမအဓိက resistance / retest နယ်မြေ
🎯 $12.50–$13.00 → နောက်ထပ် resistance နယ်မြေ
🎯 $14.00–$15.00 → ပိုမိုမြင့်မားသည့် resistance ဇုန်
📈 ပုံစံ
1D chart က Rounded Accumulation Base + Breakout ပုံစံကို ပြနေပြီး နွေရာသီအောက်ခြေ (summer bottom) မှစပြီး higher lows တွေ ဖွံ့ဖြိုးနေပါတယ်။
အခုအရေးကြီးဆုံးကတော့ $AVAX က $10.50–$11.00 ပတ်ဝန်းကျင်မှာ ဘယ်လိုတုံ့ပြန်မလဲဆိုတာပါပဲ။
ဒီနယ်မြေက retest ပြီးနောက် support အဖြစ် တည်နိုင်မယ်ဆိုရင် စောင့်ကြည့်ရမယ့် နောက်တက်မည့်အဆင့်တွေကတော့:
➡️ $12.50
➡️ $13.00
➡️ $14.00
➡️ $15.00
ဒါပေမယ့် breakout ပြီးနောက် $10 ဇုန်ကို စျေးနှုန်းက ဆုံးရှုံးသွားမယ်ဆိုရင် breakout structure ကို ပြန်လည်စိစစ်ရလိမ့်မယ်။
အခု ကျွန်တော့်ရဲ့ အဓိကဇုန်: $10–$11 🔥
FOMO မလိုပါဘူး။ retest က move ကို အတည်ပြုအောင်ထားပါ။
အစီအစဉ်နဲ့ရောင်းဝယ်ပါ၊ အန္တရာယ်ကို စီမံပါ။
သင်ထင်တာက $AVAX က $15 ကိုရောက်နိုင်မလား? 👀
#AVAX #Avalanche #Crypto #CryptoAnalysis #BinanceSquare #Altcoins #Trading #CryptoTrading #DYOR
1
4
2.9k
·
--
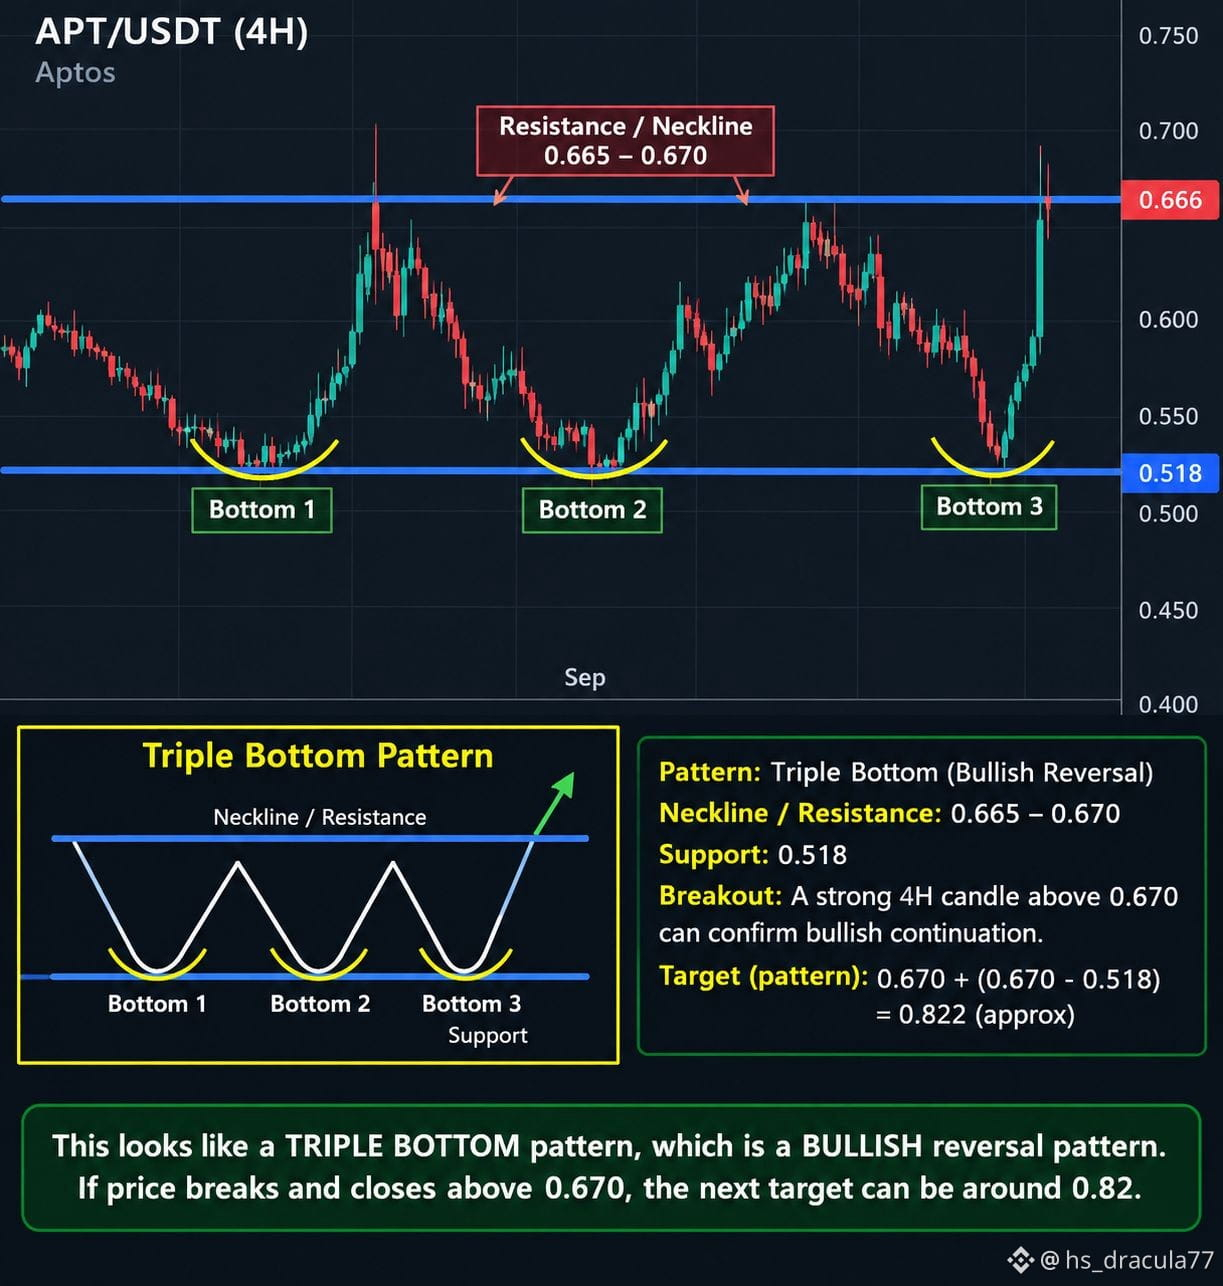
📊 APT/USDT 4H — Triple Bottom සෙට්අප්
$APT 4H ප්රස්ථාරයේ Triple Bottom විය හැකි රටාවක් පෙන්වමින් තිබේ.
🔹 ප්රධාන සහය: $0.518
🔹 බෙල්ල/ප්රතිරෝධය (Neckline / Resistance): $0.665–$0.670
🔹 වර්තමාන මිල: $0.666 පමණ
මිල $0.518 ප්රදේශය වරක් තුනක් පරීක්ෂා කර ඇති අතර සෑම වාරයකම ගැනුම්කරුවන් ඇතුළු වී, Triple Bottom ආපසු හැරවීමක් විය හැකි ව්යුහයක් නිර්මාණය කර ඇත.
දැන් නිරීක්ෂණය කළ යුතු ප්රධාන මට්ටම $0.665–$0.670 වේ.
බුලිෂ් (Bullish) අවස්ථාව:
$0.670 ඉක්මවා දැඩි ලෙස 4H මෙහෙයුම් වසාගැනීමක් (candle close) සිදු වීමෙන් පසුව සාර්ථක නැවත පරීක්ෂාවක් (retest) ලැබෙන්නේ නම්, එය බ්රේක්අවුට් එක තහවුරු කළ හැකිය. මනින ලද (measured) රටා ඉලක්කය $0.82 අසලට පැමිණේ.
නිරීක්ෂණය කළ හැකි මට්ටම්:
🟢 බ්රේක්අවුට්: $0.670+
🟢 නැවත පරීක්ෂා කලාපය: $0.650–$0.670
🎯 රටා ඉලක්කය: ~$0.82
🔴 වැදගත් සහය: $0.518
$0.670 දී මිල නැවත ප්රතික්ෂේප (reject) වීම දිගටම සිදු වන්නේ නම්, APT ගැනුම්කරුවන් තහවුරු කරන බ්රේක්අවුට් එකක් සඳහා ප්රමාණවත් ගම්යතාව (momentum) ලබා දෙන තුරු පරාසයක (range-bound) රැඳී සිටිය හැක.
ප්රධාන මට්ටම: $0.670 — wick (කෙළවර) පමණක් නොව 4H වසාගැනීම (close) නිරීක්ෂණය කරන්න.
$APT $APT #Aptos #APTUSDT #Crypto #BinanceSquare #CryptoAnalysis #TechnicalAnalysis #Altcoins
මෙය මූල්ය උපදෙස් නොවේ. මට්ටම් (levels) ප්රස්ථාරයේ පෙන්වා ඇති ව්යුහය මත පදනම් වන අතර වෙළඳපල තත්වයන් අනුව වෙනස් විය හැක.
📊 APT/USDT 4H — Triple Bottom සෙට්අප්
$APT 4H ප්රස්ථාරයේ Triple Bottom විය හැකි රටාවක් පෙන්වමින් තිබේ.
🔹 ප්රධාන සහය: $0.518
🔹 බෙල්ල/ප්රතිරෝධය (Neckline / Resistance): $0.665–$0.670
🔹 වර්තමාන මිල: $0.666 පමණ
මිල $0.518 ප්රදේශය වරක් තුනක් පරීක්ෂා කර ඇති අතර සෑම වාරයකම ගැනුම්කරුවන් ඇතුළු වී, Triple Bottom ආපසු හැරවීමක් විය හැකි ව්යුහයක් නිර්මාණය කර ඇත.
දැන් නිරීක්ෂණය කළ යුතු ප්රධාන මට්ටම $0.665–$0.670 වේ.
බුලිෂ් (Bullish) අවස්ථාව:
$0.670 ඉක්මවා දැඩි ලෙස 4H මෙහෙයුම් වසාගැනීමක් (candle close) සිදු වීමෙන් පසුව සාර්ථක නැවත පරීක්ෂාවක් (retest) ලැබෙන්නේ නම්, එය බ්රේක්අවුට් එක තහවුරු කළ හැකිය. මනින ලද (measured) රටා ඉලක්කය $0.82 අසලට පැමිණේ.
නිරීක්ෂණය කළ හැකි මට්ටම්:
🟢 බ්රේක්අවුට්: $0.670+
🟢 නැවත පරීක්ෂා කලාපය: $0.650–$0.670
🎯 රටා ඉලක්කය: ~$0.82
🔴 වැදගත් සහය: $0.518
$0.670 දී මිල නැවත ප්රතික්ෂේප (reject) වීම දිගටම සිදු වන්නේ නම්, APT ගැනුම්කරුවන් තහවුරු කරන බ්රේක්අවුට් එකක් සඳහා ප්රමාණවත් ගම්යතාව (momentum) ලබා දෙන තුරු පරාසයක (range-bound) රැඳී සිටිය හැක.
ප්රධාන මට්ටම: $0.670 — wick (කෙළවර) පමණක් නොව 4H වසාගැනීම (close) නිරීක්ෂණය කරන්න.
$APT $APT #Aptos #APTUSDT #Crypto #BinanceSquare #CryptoAnalysis #TechnicalAnalysis #Altcoins
මෙය මූල්ය උපදෙස් නොවේ. මට්ටම් (levels) ප්රස්ථාරයේ පෙන්වා ඇති ව්යුහය මත පදනම් වන අතර වෙළඳපල තත්වයන් අනුව වෙනස් විය හැක.
$APT 4H ප්රස්ථාරයේ Triple Bottom විය හැකි රටාවක් පෙන්වමින් තිබේ.
🔹 ප්රධාන සහය: $0.518
🔹 බෙල්ල/ප්රතිරෝධය (Neckline / Resistance): $0.665–$0.670
🔹 වර්තමාන මිල: $0.666 පමණ
මිල $0.518 ප්රදේශය වරක් තුනක් පරීක්ෂා කර ඇති අතර සෑම වාරයකම ගැනුම්කරුවන් ඇතුළු වී, Triple Bottom ආපසු හැරවීමක් විය හැකි ව්යුහයක් නිර්මාණය කර ඇත.
දැන් නිරීක්ෂණය කළ යුතු ප්රධාන මට්ටම $0.665–$0.670 වේ.
බුලිෂ් (Bullish) අවස්ථාව:
$0.670 ඉක්මවා දැඩි ලෙස 4H මෙහෙයුම් වසාගැනීමක් (candle close) සිදු වීමෙන් පසුව සාර්ථක නැවත පරීක්ෂාවක් (retest) ලැබෙන්නේ නම්, එය බ්රේක්අවුට් එක තහවුරු කළ හැකිය. මනින ලද (measured) රටා ඉලක්කය $0.82 අසලට පැමිණේ.
නිරීක්ෂණය කළ හැකි මට්ටම්:
🟢 බ්රේක්අවුට්: $0.670+
🟢 නැවත පරීක්ෂා කලාපය: $0.650–$0.670
🎯 රටා ඉලක්කය: ~$0.82
🔴 වැදගත් සහය: $0.518
$0.670 දී මිල නැවත ප්රතික්ෂේප (reject) වීම දිගටම සිදු වන්නේ නම්, APT ගැනුම්කරුවන් තහවුරු කරන බ්රේක්අවුට් එකක් සඳහා ප්රමාණවත් ගම්යතාව (momentum) ලබා දෙන තුරු පරාසයක (range-bound) රැඳී සිටිය හැක.
ප්රධාන මට්ටම: $0.670 — wick (කෙළවර) පමණක් නොව 4H වසාගැනීම (close) නිරීක්ෂණය කරන්න.
$APT $APT #Aptos #APTUSDT #Crypto #BinanceSquare #CryptoAnalysis #TechnicalAnalysis #Altcoins
මෙය මූල්ය උපදෙස් නොවේ. මට්ටම් (levels) ප්රස්ථාරයේ පෙන්වා ඇති ව්යුහය මත පදනම් වන අතර වෙළඳපල තත්වයන් අනුව වෙනස් විය හැක.
1
1.4k
·
--
පරිවර්තනය බලන්න
Breakout Strength: $SOMI
{spot}(SOMIUSDT)
has broken above the $1.00 psychological level, confirming bullish sentiment. A +35% move in 24 hours with strong trading volume suggests real momentum rather than a weak pump.
Support Zone (Entry): The 0.97–1.00 range is a critical retest zone. If buyers hold this area, it acts as a springboard for another upward push.
Target Levels: Next resistance lies around 1.02–1.05. Breaking above 1.05 could open the door toward 1.10 or higher, depending on market sentiment.
Stop-Loss Zone: Below 0.945 structure breaks down, signaling bulls lost control. That’s a logical invalidation point.
Momentum: RSI and volume likely remain elevated after such a move — great for breakout trades but also warning of possible exhaustion.
In short: Bias is bullish above 0.97–1.00, but risk management is crucial since vertical rallies often retrace quickly.
Clean Chart (support, resistance, entry, TP, SL levels marked).
Here’s the first chart 📈 showing the SOMI/USDT trade setup:
✅ Green Zone = Ideal Entry (0.97–1.00)
🟣 Dashed Line = Target (1.05)
🔴 Dashed Line = Stop-Loss (0.945)
🟠 Resistance = 1.02
⚪ Support = 0.95
Breakout Strength: $SOMI
has broken above the $1.00 psychological level, confirming bullish sentiment. A +35% move in 24 hours with strong trading volume suggests real momentum rather than a weak pump.
Support Zone (Entry): The 0.97–1.00 range is a critical retest zone. If buyers hold this area, it acts as a springboard for another upward push.
Target Levels: Next resistance lies around 1.02–1.05. Breaking above 1.05 could open the door toward 1.10 or higher, depending on market sentiment.
Stop-Loss Zone: Below 0.945 structure breaks down, signaling bulls lost control. That’s a logical invalidation point.
Momentum: RSI and volume likely remain elevated after such a move — great for breakout trades but also warning of possible exhaustion.
In short: Bias is bullish above 0.97–1.00, but risk management is crucial since vertical rallies often retrace quickly.
Clean Chart (support, resistance, entry, TP, SL levels marked).
Here’s the first chart 📈 showing the SOMI/USDT trade setup:
✅ Green Zone = Ideal Entry (0.97–1.00)
🟣 Dashed Line = Target (1.05)
🔴 Dashed Line = Stop-Loss (0.945)
🟠 Resistance = 1.02
⚪ Support = 0.95
has broken above the $1.00 psychological level, confirming bullish sentiment. A +35% move in 24 hours with strong trading volume suggests real momentum rather than a weak pump.
Support Zone (Entry): The 0.97–1.00 range is a critical retest zone. If buyers hold this area, it acts as a springboard for another upward push.
Target Levels: Next resistance lies around 1.02–1.05. Breaking above 1.05 could open the door toward 1.10 or higher, depending on market sentiment.
Stop-Loss Zone: Below 0.945 structure breaks down, signaling bulls lost control. That’s a logical invalidation point.
Momentum: RSI and volume likely remain elevated after such a move — great for breakout trades but also warning of possible exhaustion.
In short: Bias is bullish above 0.97–1.00, but risk management is crucial since vertical rallies often retrace quickly.
Clean Chart (support, resistance, entry, TP, SL levels marked).
Here’s the first chart 📈 showing the SOMI/USDT trade setup:
✅ Green Zone = Ideal Entry (0.97–1.00)
🟣 Dashed Line = Target (1.05)
🔴 Dashed Line = Stop-Loss (0.945)
🟠 Resistance = 1.02
⚪ Support = 0.95
8
239
·
--
පරිවර්තනය බලන්න
The increasing adoption of BTC as a settlement layer means that rather than being used for every small transaction, BTC is increasingly relied upon to record final, high-value, irreversible settlements. This shifts everyday payments to Layer-2s (like Lightning Network) or sidechains, while BTC Layer-1 serves as the ultimate arbiter of truth. However, this model creates a tradeoff BTC block space is limited to ~7 transactions per second, so as more demand concentrates on settlement, fees rise and small-value on-chain transactions may get priced out.
To address throughput without compromising $BTC decentralization, scaling improvements are being explored:
Layer-2 protocols like the Lightning Network allow instant, low-fee payments secured by $BTC BTC without congesting the base layer.
Batching & Coin Join
{spot}(BTCUSDT)
{future}(BTCUSDT)
techniques help aggregate multiple $BTC transactions into fewer block entries, improving efficiency.
$SegWit (2017) and Taproot (2021) already optimized transaction weight and script flexibility, paving the way for more complex but efficient multi-party settlements.
Future concepts like rollups, drive chains, or sidechains are under discussion to extend BTC utility while anchoring back to Layer-1 for security.
The challenge remains: increasing throughput without increasing block size too much, since larger blocks could centralize BTC by making it harder for individuals to run nodes. Thus, most scaling efforts keep BTC Layer-1 lean and conservative, while pushing innovation to off-chain or Layer-2 systems.
The increasing adoption of BTC as a settlement layer means that rather than being used for every small transaction, BTC is increasingly relied upon to record final, high-value, irreversible settlements. This shifts everyday payments to Layer-2s (like Lightning Network) or sidechains, while BTC Layer-1 serves as the ultimate arbiter of truth. However, this model creates a tradeoff BTC block space is limited to ~7 transactions per second, so as more demand concentrates on settlement, fees rise and small-value on-chain transactions may get priced out.
To address throughput without compromising $BTC decentralization, scaling improvements are being explored:
Layer-2 protocols like the Lightning Network allow instant, low-fee payments secured by $BTC BTC without congesting the base layer.
Batching & Coin Join
techniques help aggregate multiple $BTC transactions into fewer block entries, improving efficiency.
$SegWit (2017) and Taproot (2021) already optimized transaction weight and script flexibility, paving the way for more complex but efficient multi-party settlements.
Future concepts like rollups, drive chains, or sidechains are under discussion to extend BTC utility while anchoring back to Layer-1 for security.
The challenge remains: increasing throughput without increasing block size too much, since larger blocks could centralize BTC by making it harder for individuals to run nodes. Thus, most scaling efforts keep BTC Layer-1 lean and conservative, while pushing innovation to off-chain or Layer-2 systems.
To address throughput without compromising $BTC decentralization, scaling improvements are being explored:
Layer-2 protocols like the Lightning Network allow instant, low-fee payments secured by $BTC BTC without congesting the base layer.
Batching & Coin Join
techniques help aggregate multiple $BTC transactions into fewer block entries, improving efficiency.
$SegWit (2017) and Taproot (2021) already optimized transaction weight and script flexibility, paving the way for more complex but efficient multi-party settlements.
Future concepts like rollups, drive chains, or sidechains are under discussion to extend BTC utility while anchoring back to Layer-1 for security.
The challenge remains: increasing throughput without increasing block size too much, since larger blocks could centralize BTC by making it harder for individuals to run nodes. Thus, most scaling efforts keep BTC Layer-1 lean and conservative, while pushing innovation to off-chain or Layer-2 systems.
7
198
තවත් අන්තර්ගතයන් ගවේෂණය කිරීමට ඇතුල් වන්න
Binance චතුරශ්රය හි ගෝලීය ක්රිප්ටෝ පරිශීලකයින් හා එක්වන්න
⚡️ ක්රිප්ටෝ පිළිබඳ නවතම සහ ප්රයෝජනවත් තොරතුරු ලබා ගන්න.
💬 ලොව විශාලතම ක්රිප්ටෝ හුවමාරුව මගින් විශ්වාස කෙරේ.
👍 සත්යායනය කරන ලද නිර්මාණකරුවන්ගෙන් සැබෑ විදසුන් සොයා ගන්න.
විද්යුත් තැපෑල / දුරකථන අංකය
නැගී එන මාතෘකා
AIStocksWhatNext
619,634 views
4,686 සාකච්ඡා කරමින්
අපගේ ඉතාමත් ජනප්රිය හැෂ්ටැග් ව්යාපාරයේදී “Share & Win” මඟින් ගමනාගමන ත්යාග ලබා ගන්න
✨මාතෘකාව: AI කොටස් ඉහළ යමින් පවතිද්දී තවත් ආයෝජන අවස්ථා මොනවාද?
👉සම්බන්ධ වන්නේ කෙසේද:
හැෂ්ටැග් #AIStocksWhatNext සමඟ කෙටි පෝස්ට් එකක් හෝ ලිපියක් පළ කරන්න
ඔබ බුලිෂ් ද බෙයරිෂ් ද යන්න සඳහන් කර ඔබේ AI කොටස් හෝ වෙළඳාම පළ කරන්න — වෙළඳ විජට් එක භාවිතා කිරීම ඔබේ සුදුසුකම වැඩි කළ හැක.
දත්ත හෝ චාර්ට් බෙදාගනිමින් සහ AI මඟින් ජනනය කළ රූප මඟහරිමින් ඔබගේ පෝස්ට් එක තවදුරටත් ශක්තිමත් කළ හැක.
✍️පහත කෝණ අනුව අන්තර්ගතය සාදන්න:
- Nvidia පවසන්නේ ලබන වසරේ චිප් විකුණුම් දෙගුණ වන බවත්, ඉහළ AI සමාගම් දිගටම වාර්තාගත ආදායම් ලබා ගැනීමත් සිදුවන බවත් ය. ඒ සඳහා ඇති compute වියදමද අතිවිශාලය. ඇත්තටම AI ඉල්ලුම ඉහළ යනවාද? තව කොතරම් කාලයක් මෙය පවතින්න පුළුවන්ද? AI කොටස් මුළුම තැනම ඉහළ ගොස් ඇත. මෙය සැබෑ breakout එකක්ද, නැත්තම් කෙටි කාලීන bounce එකක්ද?
- කර්මාන්තයේ නායකයෝ AI සංවර්ධනය මන්දගාමී කිරීමට කියා සිටින අතර, Trump “AI Force” එකක් ගොඩනඟීමට සැලසුම් කරමින්, අනාගතයේ AI එක්සත් ජනපදයේ GDP වලින් 25%ක් දක්වා ගත හැකි බව පවසයි. ඔබ කාගේ පැත්තේද? AI කොටස් සඳහා ප්රාන්ත මට්ටමේ සහාය දිගුකාලීන ජයග්රහණයක් වේද?
- ඔබ AI කොටස් මිලදී ගන්නවාද? අපගේ වෙළඳ බෙදාගැනීමේ විජට් එක හරහා ඔබේ AI-අදාළ වෙළඳාම/පැවැත්වීම් බෙදාගන්න.
⏰ව්යාපාර කාලය:
- 2026-09-22 7:00 - 2026-09-24 4:00 UTC
🎁ත්යාගය:
- ඉහත මාර්ගෝපදේශවලට අනුකූල වන අතර වචන 100කට වඩා අඩංගු සුදුසුකම් ලත් පෝස්ට් පරීක්ෂා කරනු ලබන අතර, 500 සිට 3,000 දක්වා වූ අහඹු ගමනාගමන වැඩිවීමක් ලැබීමටද ඉඩ ඇත. ඔබේ පෝස්ට් එක තෝරාගනු ලැබුවහොත් ඔබට ඔබේ feed secretary වෙතින් දැනුම්දීමක් ලැබෙනු ඇත.
- ඔබගේ ලිපිය Binance Square Official හි පළ කිරීමට අවස්ථාවක් ලබා ගන්න
ඔබේ පෝස්ට් එකට අදහස් අවශ්යද? මාතෘකා පිටුවට පිවිසෙන්න #AIStocksWhatNext හෝ Square Guide on How to Post for Better Reach.
Binance Square Official
·470 කැමත්ත දැක්වීම්
·1.3M views
21SharesLaunchesEuropesFirstZcashETP
7,235 views
322 සාකච්ඡා කරමින්
CardanoJoinsX402PaymentStandard
5,382 views
259 සාකච්ඡා කරමින්