
BlockVibe Global
11k පෝස්ටු

BlockVibe Global
 Binance චතුරශ්ර සත්යාපිත+
වාර්තා කරන්න
පරිශීලක අවහිර කරන්න
📊 Crypto Strategist | High-Conviction Signals | Trade Smart, Not Emotional | Real-Time Setups | Manage Your Risk — Not Responsible for Losses
විවෘත වෙළෙඳාම
අධි-සංඛ්යාත වෙළෙන්දා
{වේලාව} වසර
0 හඹා යමින්
40.3K+ හඹා යන්නන්
17.9K+ කැමති විය
පෝස්ටු
ආයෝජන කළඹ
සියල්ල
උපුටා දැක්වීම්
වීඩියෝ
අමුණා ඇත
👍🚀🚀🚀 let's go...!
👍🚀🚀🚀 let's go...!
BlockVibe Global
·
--
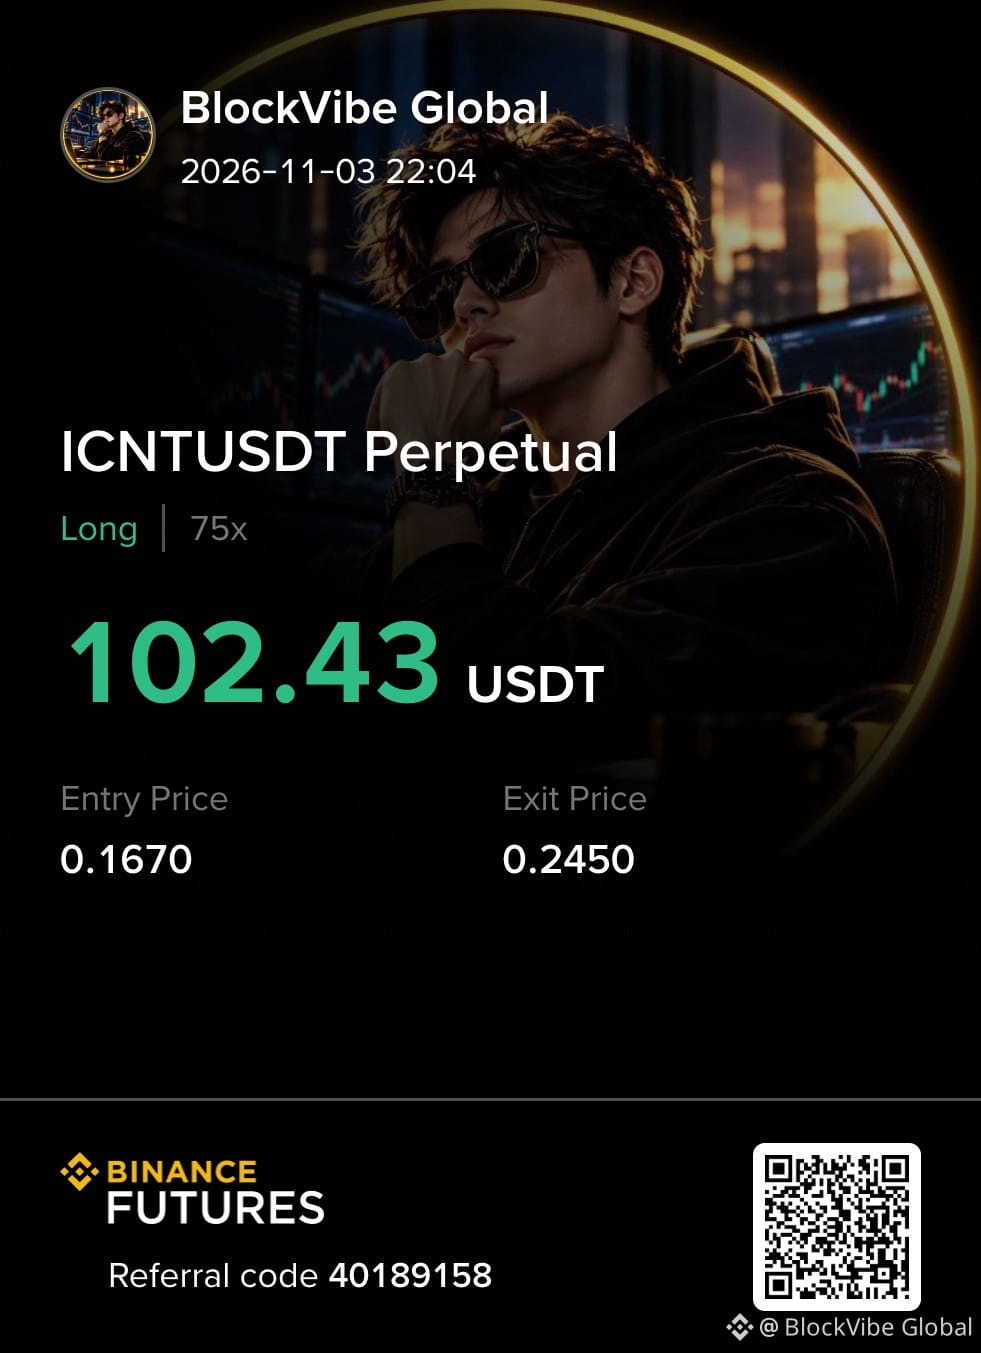
Cloud narrative is finding a floor.
🟢 $ICNT - LONG
Trade Plan:
Current Price: ~0.1669
Entry Zone: 0.1610 – 0.1710
SL: 0.1490
TP1: 0.1810
TP2: 0.1950
TP3: 0.2140
ICNT is holding above the 0.1600 support shelf after a strong multi-day gain, and the current 0.1669 price is inside the 0.1610–0.1710 entry zone as the 4H EMA20 turns up. The higher-low structure from 0.1490 remains intact, and a clean reclaim of 0.1730 would confirm the continuation rather than a failed breakout. Volume profile shows a dense node at 0.1610–0.1710, meaning the retest is occurring on prior accumulation rather than air. Futures data supports the long: funding is neutral, open interest is rising, and the 0.1810–0.1830 zone has a visible short-liquidation cluster that can accelerate a move toward TP1. RSI at 54 is strong but not overbought, leaving room for continuation. A 4H close below 0.1490 invalidates the higher-low thesis. This is a trend-continuation long at a proven demand base.
Is ICNT the next cloud narrative leader, or does 0.1810 reject first?
Click below for trade 👇
DYOR & manage risk!
$ICNT
🟢 $ICNT - LONG
Trade Plan:
Current Price: ~0.1669
Entry Zone: 0.1610 – 0.1710
SL: 0.1490
TP1: 0.1810
TP2: 0.1950
TP3: 0.2140
ICNT is holding above the 0.1600 support shelf after a strong multi-day gain, and the current 0.1669 price is inside the 0.1610–0.1710 entry zone as the 4H EMA20 turns up. The higher-low structure from 0.1490 remains intact, and a clean reclaim of 0.1730 would confirm the continuation rather than a failed breakout. Volume profile shows a dense node at 0.1610–0.1710, meaning the retest is occurring on prior accumulation rather than air. Futures data supports the long: funding is neutral, open interest is rising, and the 0.1810–0.1830 zone has a visible short-liquidation cluster that can accelerate a move toward TP1. RSI at 54 is strong but not overbought, leaving room for continuation. A 4H close below 0.1490 invalidates the higher-low thesis. This is a trend-continuation long at a proven demand base.
Is ICNT the next cloud narrative leader, or does 0.1810 reject first?
Click below for trade 👇
DYOR & manage risk!
$ICNT
2
477
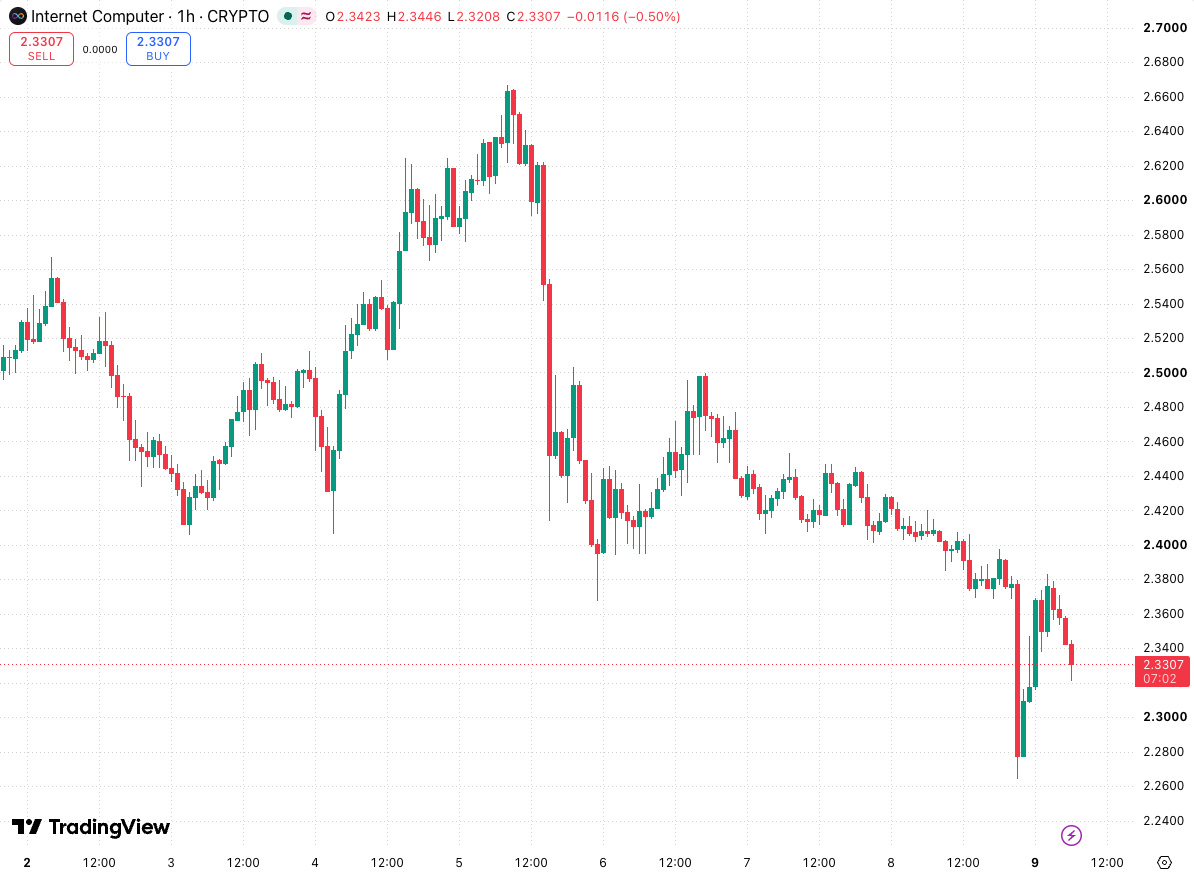
ICP demand zone: reclaim close sets the long
🟢 $ICP - LONG
Trade Plan:
Entry Zone: 2.3455 – 2.368
SL: 2.2635
TP1: 2.4565
TP2: 2.5425
TP3: 2.6285
The 2.3455 to 2.368 band is the area to watch, but a confirmed long needs a close back inside it after any probe lower. If price slips under 2.3455 and then closes above 2.368, the reclaim gives a clearer trigger than a simple touch. A close below 2.2635 invalidates the scenario and should end the idea rather than invite averaging down. Book partials at TP1 and TP2, then manage the remainder toward TP3 with the stop still at 2.2635 until the first target is reached. A stall under 2.368 after the probe would keep the setup unconfirmed and argue for patience.
How much room below 2.3455 would you tolerate before calling the reclaim failed?
DYOR & manage risk!
$ICP
ICP demand zone: reclaim close sets the long
🟢 $ICP - LONG
Trade Plan:
Entry Zone: 2.3455 – 2.368
SL: 2.2635
TP1: 2.4565
TP2: 2.5425
TP3: 2.6285
The 2.3455 to 2.368 band is the area to watch, but a confirmed long needs a close back inside it after any probe lower. If price slips under 2.3455 and then closes above 2.368, the reclaim gives a clearer trigger than a simple touch. A close below 2.2635 invalidates the scenario and should end the idea rather than invite averaging down. Book partials at TP1 and TP2, then manage the remainder toward TP3 with the stop still at 2.2635 until the first target is reached. A stall under 2.368 after the probe would keep the setup unconfirmed and argue for patience.
How much room below 2.3455 would you tolerate before calling the reclaim failed?
DYOR & manage risk!
$ICP
🟢 $ICP - LONG
Trade Plan:
Entry Zone: 2.3455 – 2.368
SL: 2.2635
TP1: 2.4565
TP2: 2.5425
TP3: 2.6285
The 2.3455 to 2.368 band is the area to watch, but a confirmed long needs a close back inside it after any probe lower. If price slips under 2.3455 and then closes above 2.368, the reclaim gives a clearer trigger than a simple touch. A close below 2.2635 invalidates the scenario and should end the idea rather than invite averaging down. Book partials at TP1 and TP2, then manage the remainder toward TP3 with the stop still at 2.2635 until the first target is reached. A stall under 2.368 after the probe would keep the setup unconfirmed and argue for patience.
How much room below 2.3455 would you tolerate before calling the reclaim failed?
DYOR & manage risk!
$ICP
37
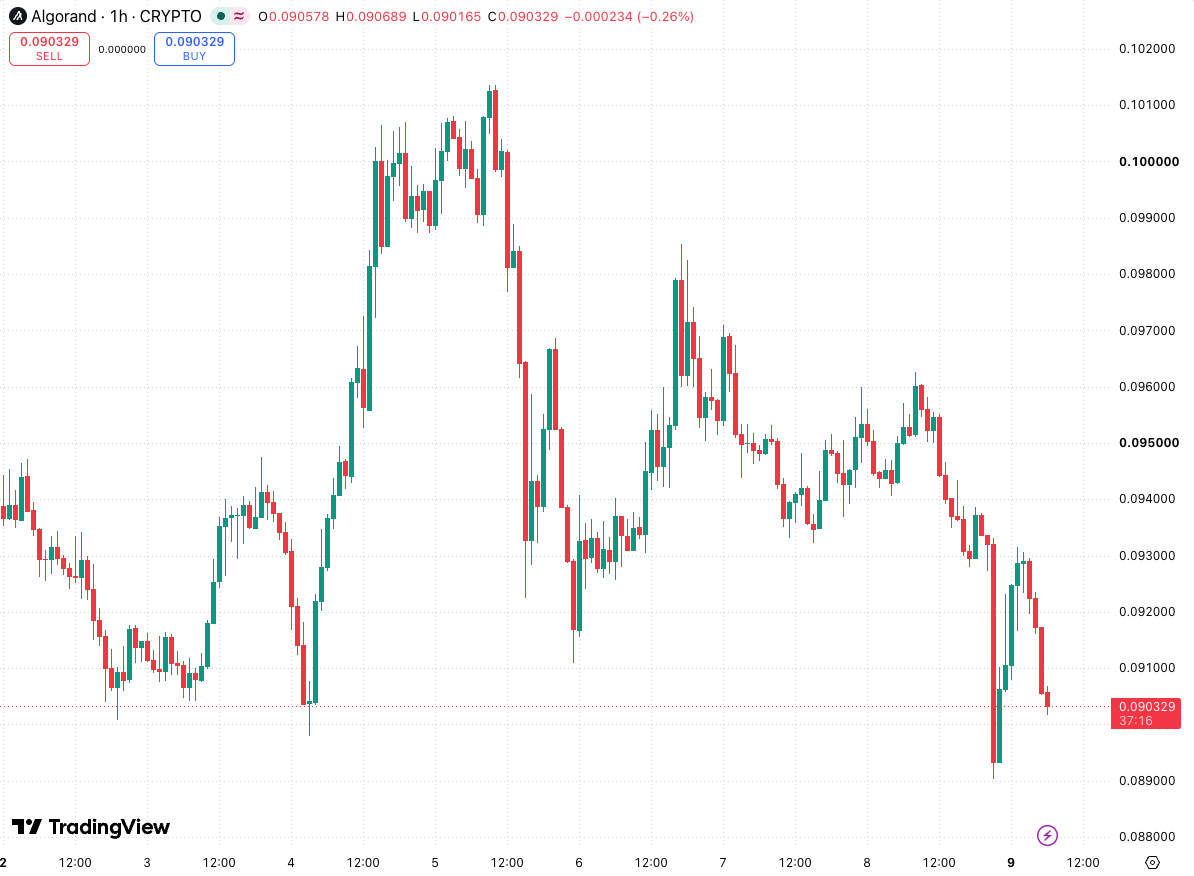
ALGO demand band: hold after a zone probe
🟢 $ALGO - LONG
Trade Plan:
Entry Zone: 0.0911 – 0.0921
SL: 0.0872
TP1: 0.0968
TP2: 0.1001
TP3: 0.1034
Treat the 0.0911 to 0.0921 band as a decision area, and require a hold above 0.0911 after any probe before considering the long. A close back above 0.0921 after a brief dip would strengthen the case, while a rejection that leaves price under the zone keeps it unresolved. Invalidation sits at 0.0872; a close through that level means the demand response did not hold and the scenario is void. Scale out at TP1 and TP2, and only carry the last portion toward TP3 if price keeps closing above the zone. If price merely wicks into 0.0911 and closes below 0.0921, that is a touch rather than a confirmed entry.
Is a hold above 0.0911 enough for you, or do you need the close above 0.0921?
DYOR & manage risk!
$ALGO
ALGO demand band: hold after a zone probe
🟢 $ALGO - LONG
Trade Plan:
Entry Zone: 0.0911 – 0.0921
SL: 0.0872
TP1: 0.0968
TP2: 0.1001
TP3: 0.1034
Treat the 0.0911 to 0.0921 band as a decision area, and require a hold above 0.0911 after any probe before considering the long. A close back above 0.0921 after a brief dip would strengthen the case, while a rejection that leaves price under the zone keeps it unresolved. Invalidation sits at 0.0872; a close through that level means the demand response did not hold and the scenario is void. Scale out at TP1 and TP2, and only carry the last portion toward TP3 if price keeps closing above the zone. If price merely wicks into 0.0911 and closes below 0.0921, that is a touch rather than a confirmed entry.
Is a hold above 0.0911 enough for you, or do you need the close above 0.0921?
DYOR & manage risk!
$ALGO
🟢 $ALGO - LONG
Trade Plan:
Entry Zone: 0.0911 – 0.0921
SL: 0.0872
TP1: 0.0968
TP2: 0.1001
TP3: 0.1034
Treat the 0.0911 to 0.0921 band as a decision area, and require a hold above 0.0911 after any probe before considering the long. A close back above 0.0921 after a brief dip would strengthen the case, while a rejection that leaves price under the zone keeps it unresolved. Invalidation sits at 0.0872; a close through that level means the demand response did not hold and the scenario is void. Scale out at TP1 and TP2, and only carry the last portion toward TP3 if price keeps closing above the zone. If price merely wicks into 0.0911 and closes below 0.0921, that is a touch rather than a confirmed entry.
Is a hold above 0.0911 enough for you, or do you need the close above 0.0921?
DYOR & manage risk!
$ALGO
71
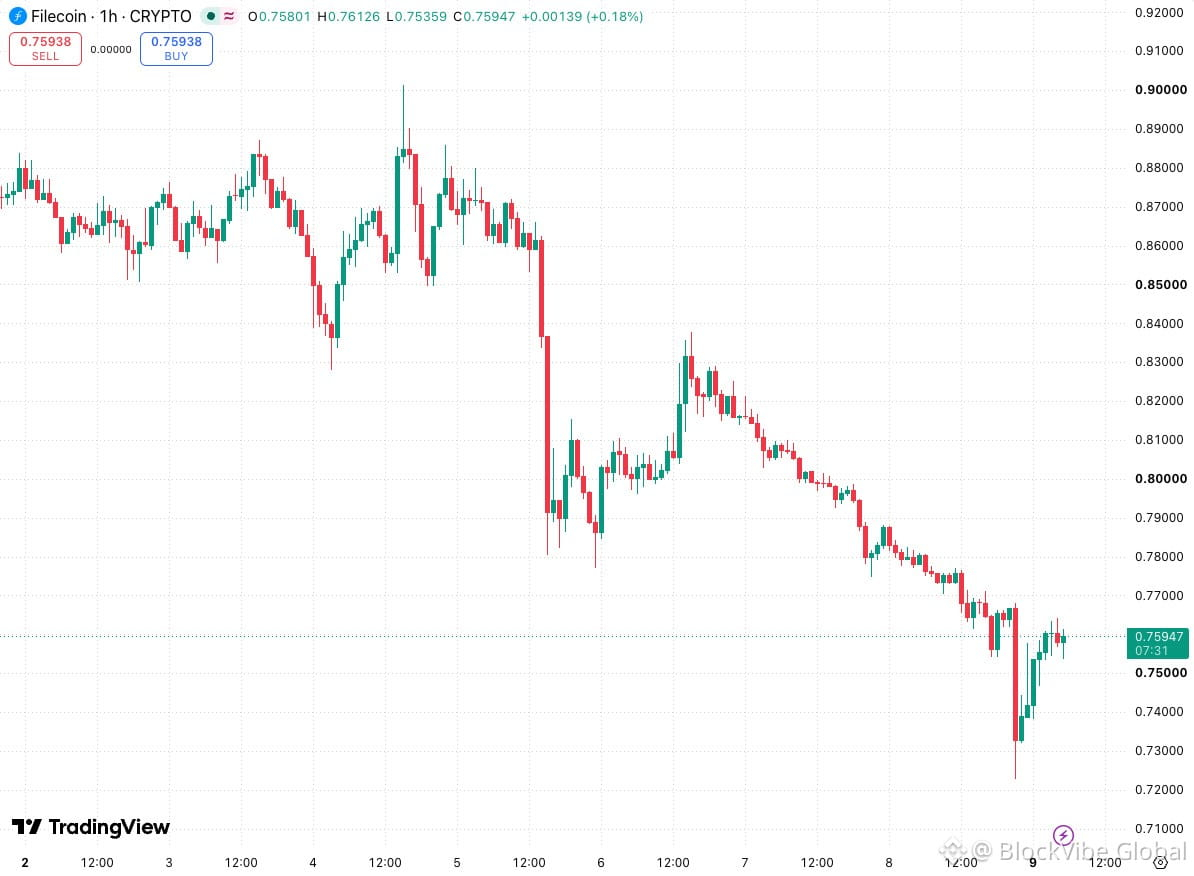
FIL demand band: close back inside is the trigger
🟢 $FIL - LONG
Trade Plan:
Entry Zone: 0.7548 – 0.763
SL: 0.7285
TP1: 0.7905
TP2: 0.8185
TP3: 0.8465
A touch of the 0.7548 to 0.763 band alone is not an entry; wait for a close back inside the zone after any probe below it. If price dips under 0.7548 and then reclaims 0.763 on a closing basis, the long scenario has a clearer confirmation. The idea is invalidated if price closes below 0.7285, so size the position from that distance rather than from the zone midpoint. Take partial exits at TP1 and TP2, then trail the remainder toward TP3 while keeping the stop at 0.7285 until the first target prints. A failed reclaim that stalls under 0.763 keeps the setup unconfirmed, and a close back under 0.7548 argues for standing aside.
Would you wait for the close back inside the zone or act on the first touch of 0.7548?
DYOR & manage risk!
$FIL
FIL demand band: close back inside is the trigger
🟢 $FIL - LONG
Trade Plan:
Entry Zone: 0.7548 – 0.763
SL: 0.7285
TP1: 0.7905
TP2: 0.8185
TP3: 0.8465
A touch of the 0.7548 to 0.763 band alone is not an entry; wait for a close back inside the zone after any probe below it. If price dips under 0.7548 and then reclaims 0.763 on a closing basis, the long scenario has a clearer confirmation. The idea is invalidated if price closes below 0.7285, so size the position from that distance rather than from the zone midpoint. Take partial exits at TP1 and TP2, then trail the remainder toward TP3 while keeping the stop at 0.7285 until the first target prints. A failed reclaim that stalls under 0.763 keeps the setup unconfirmed, and a close back under 0.7548 argues for standing aside.
Would you wait for the close back inside the zone or act on the first touch of 0.7548?
DYOR & manage risk!
$FIL
🟢 $FIL - LONG
Trade Plan:
Entry Zone: 0.7548 – 0.763
SL: 0.7285
TP1: 0.7905
TP2: 0.8185
TP3: 0.8465
A touch of the 0.7548 to 0.763 band alone is not an entry; wait for a close back inside the zone after any probe below it. If price dips under 0.7548 and then reclaims 0.763 on a closing basis, the long scenario has a clearer confirmation. The idea is invalidated if price closes below 0.7285, so size the position from that distance rather than from the zone midpoint. Take partial exits at TP1 and TP2, then trail the remainder toward TP3 while keeping the stop at 0.7285 until the first target prints. A failed reclaim that stalls under 0.763 keeps the setup unconfirmed, and a close back under 0.7548 argues for standing aside.
Would you wait for the close back inside the zone or act on the first touch of 0.7548?
DYOR & manage risk!
$FIL
1
174
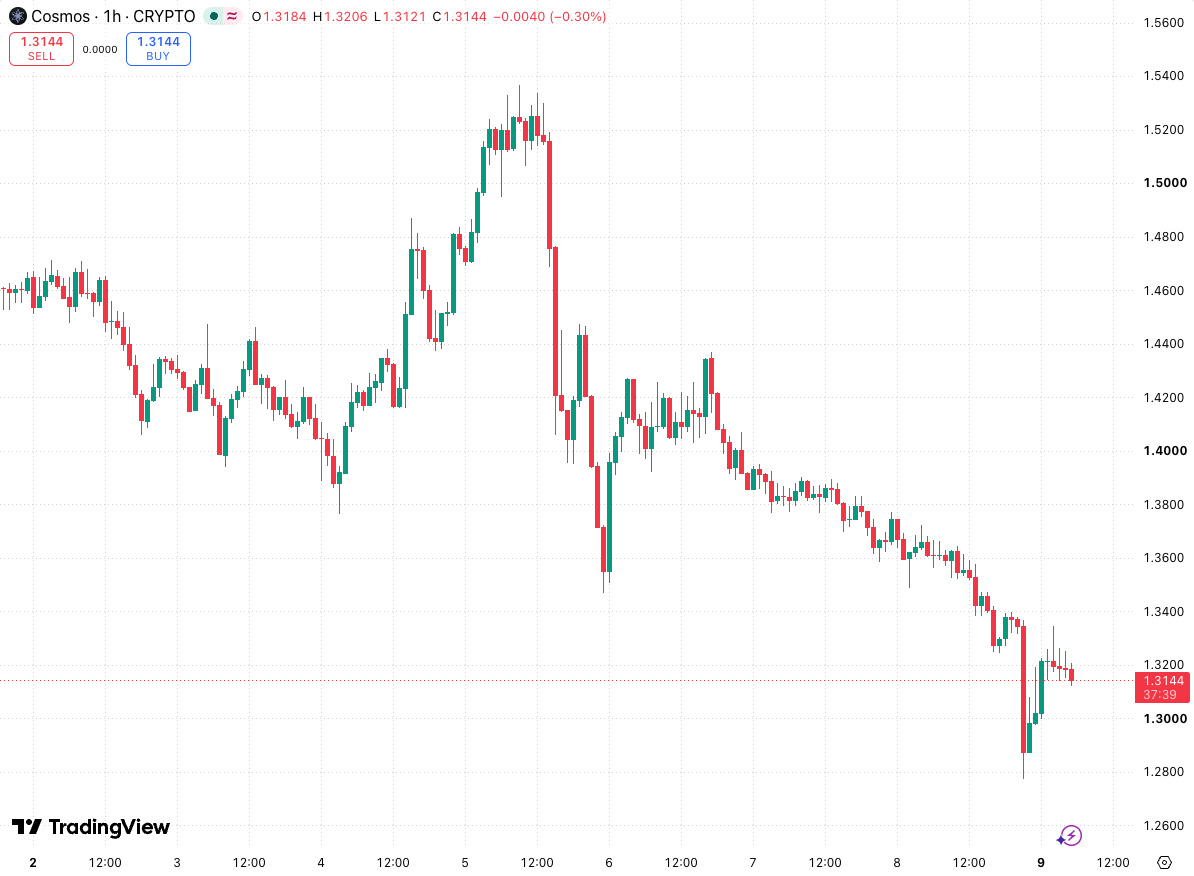
ATOM demand hold: reclaim close is the trigger
🟢 $ATOM - LONG
Trade Plan:
Entry Zone: 1.2978 – 1.3169
SL: 1.2750
TP1: 1.3350
TP2: 1.3550
TP3: 1.3800
If price dips into the 1.2978–1.3169 zone and then closes back above 1.2978, a long trigger becomes clearer. A touch alone is not confirmation; wait for a close that reclaims the zone low or a failed retest that holds above it. Place the stop at 1.2750, giving room beyond the zone in case the probe turns into a deeper breakdown. Invalidation occurs if price closes below 1.2750 or fails to reclaim the zone after multiple attempts. Take partial profits at 1.3350 and 1.3550, then trail the remainder toward 1.3800 while managing risk. Would you wait for the reclaim close or enter on the first touch of the zone?
Would you wait for the reclaim close or enter on the first touch of the zone?
DYOR & manage risk!
$ATOM
ATOM demand hold: reclaim close is the trigger
🟢 $ATOM - LONG
Trade Plan:
Entry Zone: 1.2978 – 1.3169
SL: 1.2750
TP1: 1.3350
TP2: 1.3550
TP3: 1.3800
If price dips into the 1.2978–1.3169 zone and then closes back above 1.2978, a long trigger becomes clearer. A touch alone is not confirmation; wait for a close that reclaims the zone low or a failed retest that holds above it. Place the stop at 1.2750, giving room beyond the zone in case the probe turns into a deeper breakdown. Invalidation occurs if price closes below 1.2750 or fails to reclaim the zone after multiple attempts. Take partial profits at 1.3350 and 1.3550, then trail the remainder toward 1.3800 while managing risk. Would you wait for the reclaim close or enter on the first touch of the zone?
Would you wait for the reclaim close or enter on the first touch of the zone?
DYOR & manage risk!
$ATOM
🟢 $ATOM - LONG
Trade Plan:
Entry Zone: 1.2978 – 1.3169
SL: 1.2750
TP1: 1.3350
TP2: 1.3550
TP3: 1.3800
If price dips into the 1.2978–1.3169 zone and then closes back above 1.2978, a long trigger becomes clearer. A touch alone is not confirmation; wait for a close that reclaims the zone low or a failed retest that holds above it. Place the stop at 1.2750, giving room beyond the zone in case the probe turns into a deeper breakdown. Invalidation occurs if price closes below 1.2750 or fails to reclaim the zone after multiple attempts. Take partial profits at 1.3350 and 1.3550, then trail the remainder toward 1.3800 while managing risk. Would you wait for the reclaim close or enter on the first touch of the zone?
Would you wait for the reclaim close or enter on the first touch of the zone?
DYOR & manage risk!
$ATOM
64
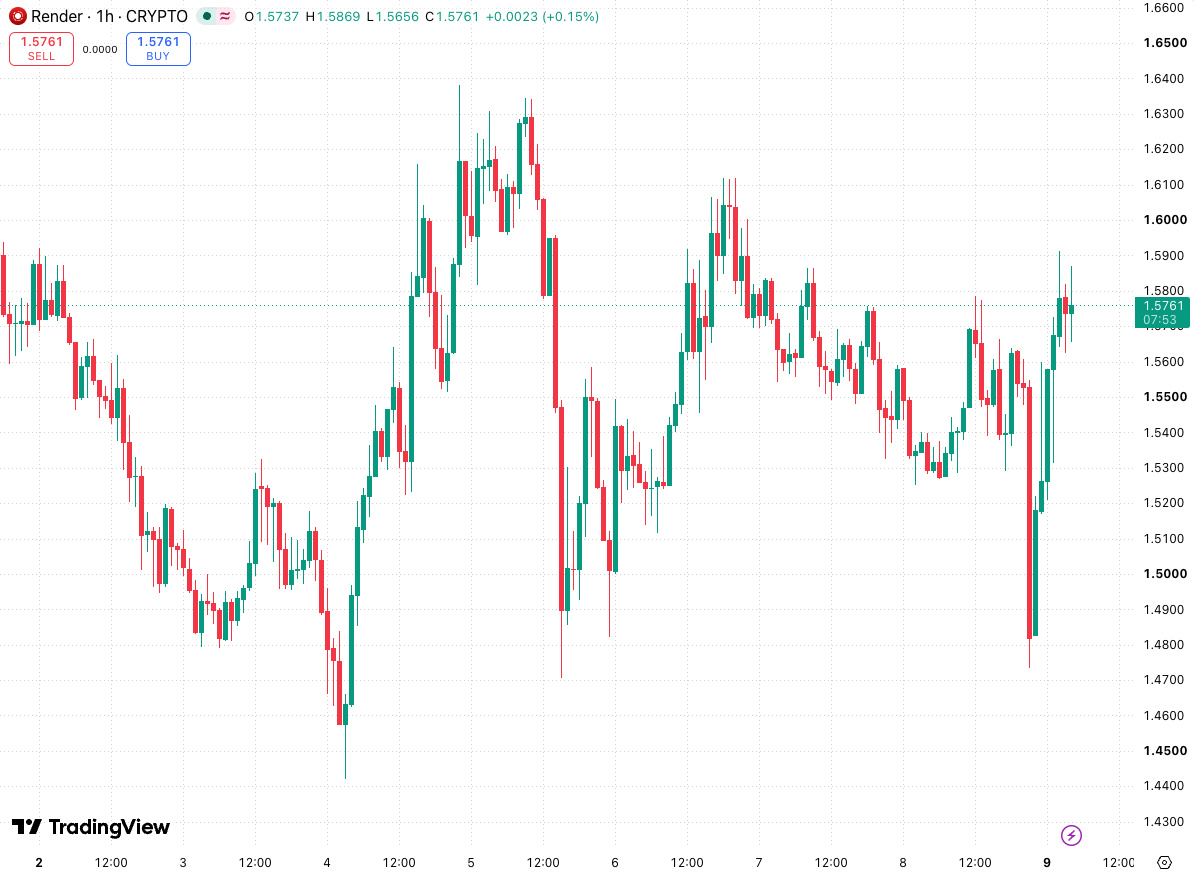
RENDER supply retest: fade a failed push
🔴 $RENDER - SHORT
Trade Plan:
Entry Zone: 1.5269 – 1.5388
SL: 1.575000
TP1: 1.485000
TP2: 1.440000
TP3: 1.385000
A push into the 1.5269 to 1.5388 band is a test until price rejects. If price retests 1.5388 from below and closes back under it, the short has a clearer trigger. A failed retest that stalls under 1.5388 supports the confirmation. Invalidation sits at 1.575000, giving room above the zone for a squeeze. Scale partials at 1.485000 and 1.440000, then trail the rest toward 1.385000. A close back above 1.5388 would leave the short unconfirmed.
Would you short the first rejection or wait for a failed retest of the zone high?
DYOR & manage risk!
$RENDER
RENDER supply retest: fade a failed push
🔴 $RENDER - SHORT
Trade Plan:
Entry Zone: 1.5269 – 1.5388
SL: 1.575000
TP1: 1.485000
TP2: 1.440000
TP3: 1.385000
A push into the 1.5269 to 1.5388 band is a test until price rejects. If price retests 1.5388 from below and closes back under it, the short has a clearer trigger. A failed retest that stalls under 1.5388 supports the confirmation. Invalidation sits at 1.575000, giving room above the zone for a squeeze. Scale partials at 1.485000 and 1.440000, then trail the rest toward 1.385000. A close back above 1.5388 would leave the short unconfirmed.
Would you short the first rejection or wait for a failed retest of the zone high?
DYOR & manage risk!
$RENDER
🔴 $RENDER - SHORT
Trade Plan:
Entry Zone: 1.5269 – 1.5388
SL: 1.575000
TP1: 1.485000
TP2: 1.440000
TP3: 1.385000
A push into the 1.5269 to 1.5388 band is a test until price rejects. If price retests 1.5388 from below and closes back under it, the short has a clearer trigger. A failed retest that stalls under 1.5388 supports the confirmation. Invalidation sits at 1.575000, giving room above the zone for a squeeze. Scale partials at 1.485000 and 1.440000, then trail the rest toward 1.385000. A close back above 1.5388 would leave the short unconfirmed.
Would you short the first rejection or wait for a failed retest of the zone high?
DYOR & manage risk!
$RENDER
128
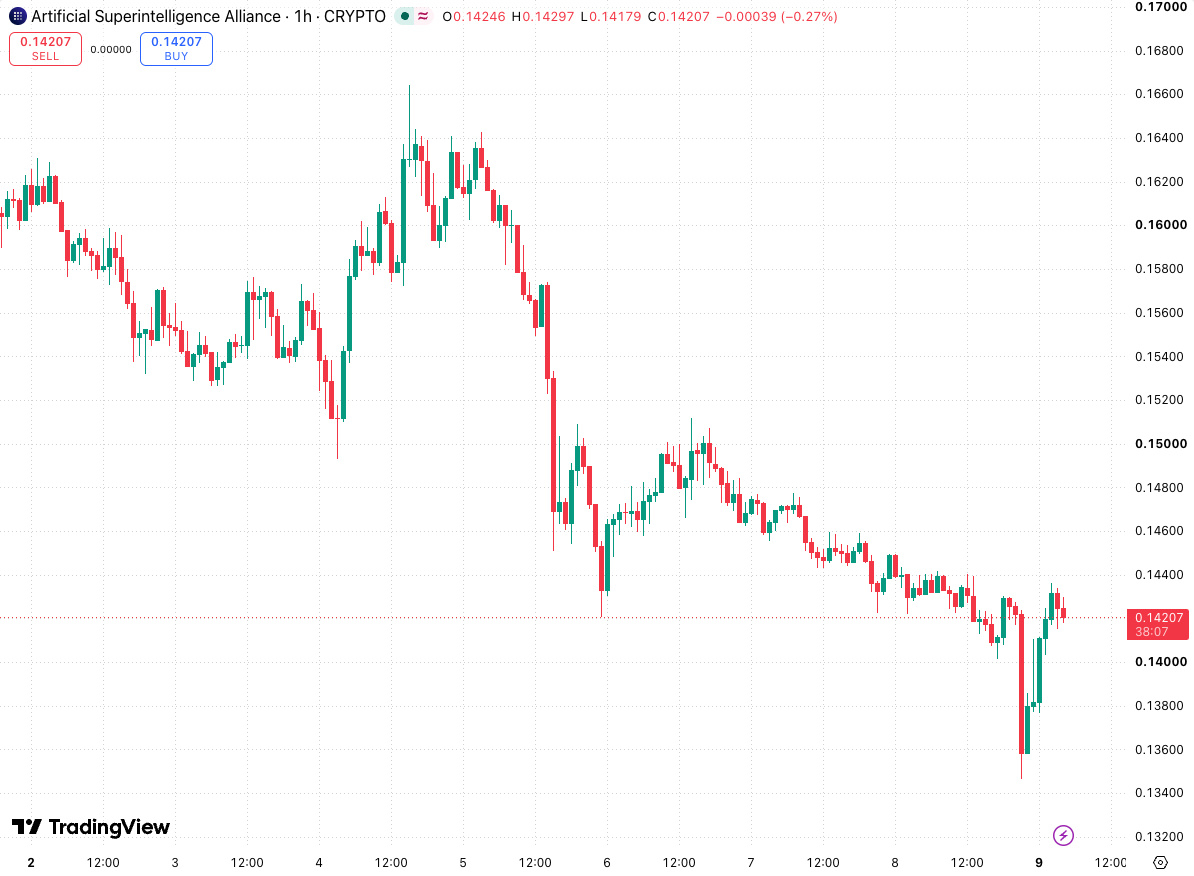
FET demand band: hold after a zone dip
🟢 $FET - LONG
Trade Plan:
Entry Zone: 0.1373 – 0.1394
SL: 0.132500
TP1: 0.144000
TP2: 0.149000
TP3: 0.155500
Watch whether price dips into the 0.1373 to 0.1394 band and holds. A close back above 0.1373 after the dip would set the long trigger. Confirmation improves if a retest of 0.1373 refuses to break. The stop at 0.132500 keeps risk beyond the zone, with a close under it as invalidation. Book partials at 0.144000 and 0.149000, then manage the remainder toward 0.155500. A touch without the hold leaves the setup unresolved.
Would you enter on the hold or wait for the retest to confirm?
DYOR & manage risk!
$FET
FET demand band: hold after a zone dip
🟢 $FET - LONG
Trade Plan:
Entry Zone: 0.1373 – 0.1394
SL: 0.132500
TP1: 0.144000
TP2: 0.149000
TP3: 0.155500
Watch whether price dips into the 0.1373 to 0.1394 band and holds. A close back above 0.1373 after the dip would set the long trigger. Confirmation improves if a retest of 0.1373 refuses to break. The stop at 0.132500 keeps risk beyond the zone, with a close under it as invalidation. Book partials at 0.144000 and 0.149000, then manage the remainder toward 0.155500. A touch without the hold leaves the setup unresolved.
Would you enter on the hold or wait for the retest to confirm?
DYOR & manage risk!
$FET
🟢 $FET - LONG
Trade Plan:
Entry Zone: 0.1373 – 0.1394
SL: 0.132500
TP1: 0.144000
TP2: 0.149000
TP3: 0.155500
Watch whether price dips into the 0.1373 to 0.1394 band and holds. A close back above 0.1373 after the dip would set the long trigger. Confirmation improves if a retest of 0.1373 refuses to break. The stop at 0.132500 keeps risk beyond the zone, with a close under it as invalidation. Book partials at 0.144000 and 0.149000, then manage the remainder toward 0.155500. A touch without the hold leaves the setup unresolved.
Would you enter on the hold or wait for the retest to confirm?
DYOR & manage risk!
$FET
95
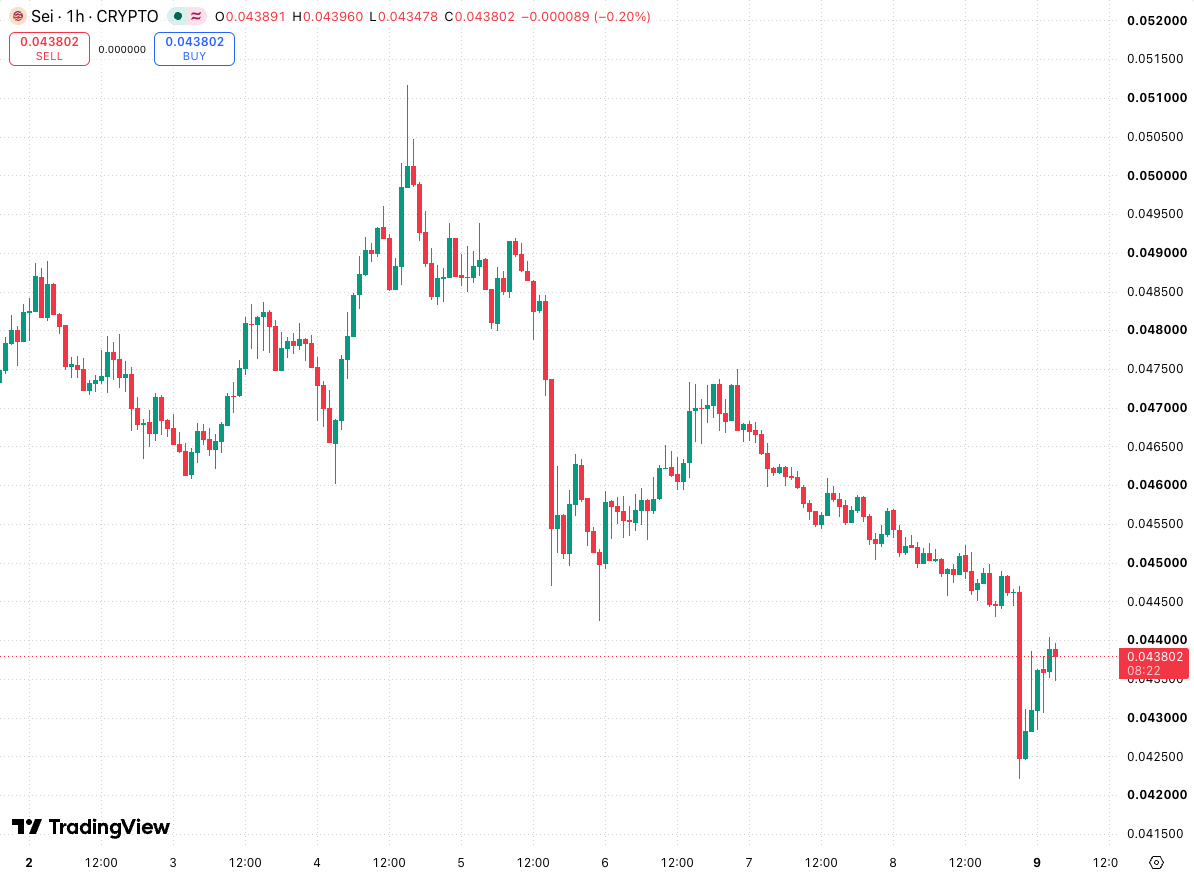
SEI supply band: clean fade needs a rejection
🔴 $SEI - SHORT
Trade Plan:
Entry Zone: 0.0427 – 0.0434
SL: 0.045200
TP1: 0.041000
TP2: 0.039500
TP3: 0.037800
A push into the 0.0427 to 0.0434 band is only a test until price rejects. If price retests 0.0434 from below and closes back under it, the short has a clearer trigger. A failed retest that cannot reclaim 0.0434 strengthens the confirmation. Invalidation sits at 0.045200, with room above the zone for a squeeze. Take partials at 0.041000 and 0.039500, then trail the remainder toward 0.037800. A close back above 0.0434 keeps the short unconfirmed.
Would you fade the first rejection or wait for the failed retest to print?
DYOR & manage risk!
$SEI
SEI supply band: clean fade needs a rejection
🔴 $SEI - SHORT
Trade Plan:
Entry Zone: 0.0427 – 0.0434
SL: 0.045200
TP1: 0.041000
TP2: 0.039500
TP3: 0.037800
A push into the 0.0427 to 0.0434 band is only a test until price rejects. If price retests 0.0434 from below and closes back under it, the short has a clearer trigger. A failed retest that cannot reclaim 0.0434 strengthens the confirmation. Invalidation sits at 0.045200, with room above the zone for a squeeze. Take partials at 0.041000 and 0.039500, then trail the remainder toward 0.037800. A close back above 0.0434 keeps the short unconfirmed.
Would you fade the first rejection or wait for the failed retest to print?
DYOR & manage risk!
$SEI
🔴 $SEI - SHORT
Trade Plan:
Entry Zone: 0.0427 – 0.0434
SL: 0.045200
TP1: 0.041000
TP2: 0.039500
TP3: 0.037800
A push into the 0.0427 to 0.0434 band is only a test until price rejects. If price retests 0.0434 from below and closes back under it, the short has a clearer trigger. A failed retest that cannot reclaim 0.0434 strengthens the confirmation. Invalidation sits at 0.045200, with room above the zone for a squeeze. Take partials at 0.041000 and 0.039500, then trail the remainder toward 0.037800. A close back above 0.0434 keeps the short unconfirmed.
Would you fade the first rejection or wait for the failed retest to print?
DYOR & manage risk!
$SEI
109
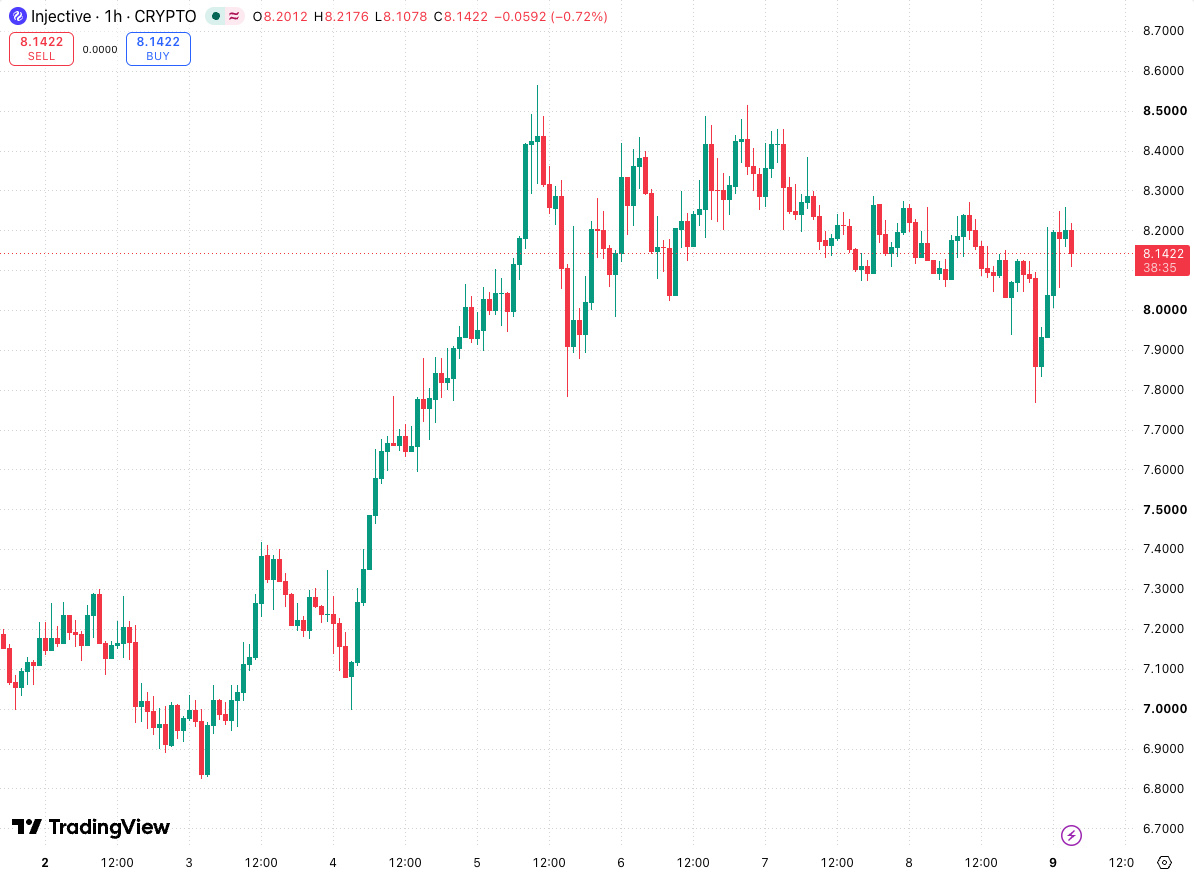
INJ demand shelf: reclaim close in focus
🟢 $INJ - LONG
Trade Plan:
Entry Zone: 7.9908 – 8.0779
SL: 7.820000
TP1: 8.300000
TP2: 8.550000
TP3: 8.900000
A dip into the 7.9908 to 8.0779 band needs a reclaim to count. If price closes back above 7.9908 after the probe, the long trigger is clearer. A retest of 7.9908 that holds would add confirmation. The stop at 7.820000 keeps risk beyond the zone, with a close under it as invalidation. Scale partials at 8.300000 and 8.550000, then trail the rest toward 8.900000. Without the reclaim close, the zone stays a touch.
Would you act on the reclaim close or require the retest to hold first?
DYOR & manage risk!
$INJ
INJ demand shelf: reclaim close in focus
🟢 $INJ - LONG
Trade Plan:
Entry Zone: 7.9908 – 8.0779
SL: 7.820000
TP1: 8.300000
TP2: 8.550000
TP3: 8.900000
A dip into the 7.9908 to 8.0779 band needs a reclaim to count. If price closes back above 7.9908 after the probe, the long trigger is clearer. A retest of 7.9908 that holds would add confirmation. The stop at 7.820000 keeps risk beyond the zone, with a close under it as invalidation. Scale partials at 8.300000 and 8.550000, then trail the rest toward 8.900000. Without the reclaim close, the zone stays a touch.
Would you act on the reclaim close or require the retest to hold first?
DYOR & manage risk!
$INJ
🟢 $INJ - LONG
Trade Plan:
Entry Zone: 7.9908 – 8.0779
SL: 7.820000
TP1: 8.300000
TP2: 8.550000
TP3: 8.900000
A dip into the 7.9908 to 8.0779 band needs a reclaim to count. If price closes back above 7.9908 after the probe, the long trigger is clearer. A retest of 7.9908 that holds would add confirmation. The stop at 7.820000 keeps risk beyond the zone, with a close under it as invalidation. Scale partials at 8.300000 and 8.550000, then trail the rest toward 8.900000. Without the reclaim close, the zone stays a touch.
Would you act on the reclaim close or require the retest to hold first?
DYOR & manage risk!
$INJ
157
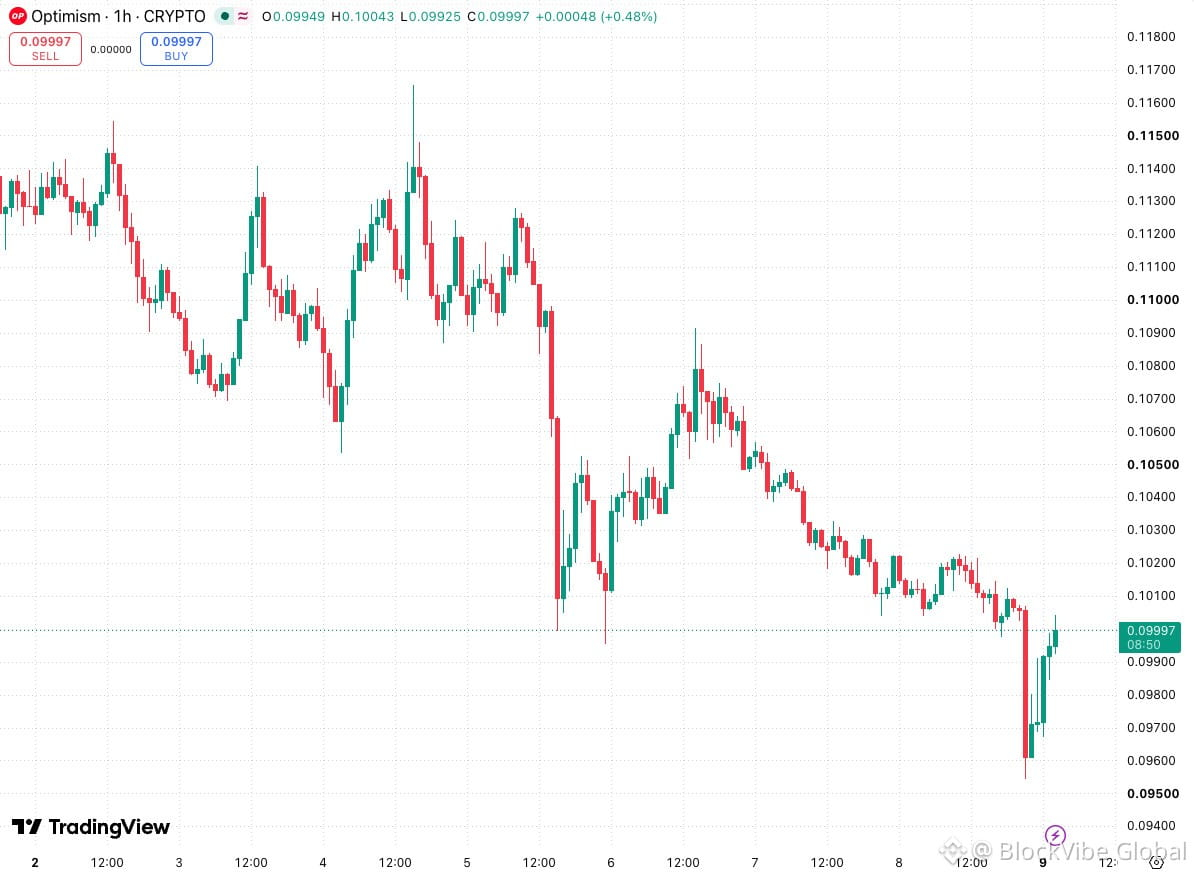
OP supply edge: rejection watch
🔴 $OP - SHORT
Trade Plan:
Entry Zone: 0.0965 – 0.098
SL: 0.101000
TP1: 0.093000
TP2: 0.090500
TP3: 0.087500
A move into the 0.0965 to 0.098 band is a test until price rejects. If price retests 0.098 from below and closes back under it, the short has a clearer trigger. A failed retest that stalls under 0.098 supports the confirmation. Invalidation sits at 0.101000, giving room above the zone. Book partials at 0.093000 and 0.090500, then trail the remainder toward 0.087500. A close back above 0.098 would leave the short unconfirmed.
Would you short the first rejection or wait for a failed retest of the zone high?
DYOR & manage risk!
$OP
OP supply edge: rejection watch
🔴 $OP - SHORT
Trade Plan:
Entry Zone: 0.0965 – 0.098
SL: 0.101000
TP1: 0.093000
TP2: 0.090500
TP3: 0.087500
A move into the 0.0965 to 0.098 band is a test until price rejects. If price retests 0.098 from below and closes back under it, the short has a clearer trigger. A failed retest that stalls under 0.098 supports the confirmation. Invalidation sits at 0.101000, giving room above the zone. Book partials at 0.093000 and 0.090500, then trail the remainder toward 0.087500. A close back above 0.098 would leave the short unconfirmed.
Would you short the first rejection or wait for a failed retest of the zone high?
DYOR & manage risk!
$OP
🔴 $OP - SHORT
Trade Plan:
Entry Zone: 0.0965 – 0.098
SL: 0.101000
TP1: 0.093000
TP2: 0.090500
TP3: 0.087500
A move into the 0.0965 to 0.098 band is a test until price rejects. If price retests 0.098 from below and closes back under it, the short has a clearer trigger. A failed retest that stalls under 0.098 supports the confirmation. Invalidation sits at 0.101000, giving room above the zone. Book partials at 0.093000 and 0.090500, then trail the remainder toward 0.087500. A close back above 0.098 would leave the short unconfirmed.
Would you short the first rejection or wait for a failed retest of the zone high?
DYOR & manage risk!
$OP
238
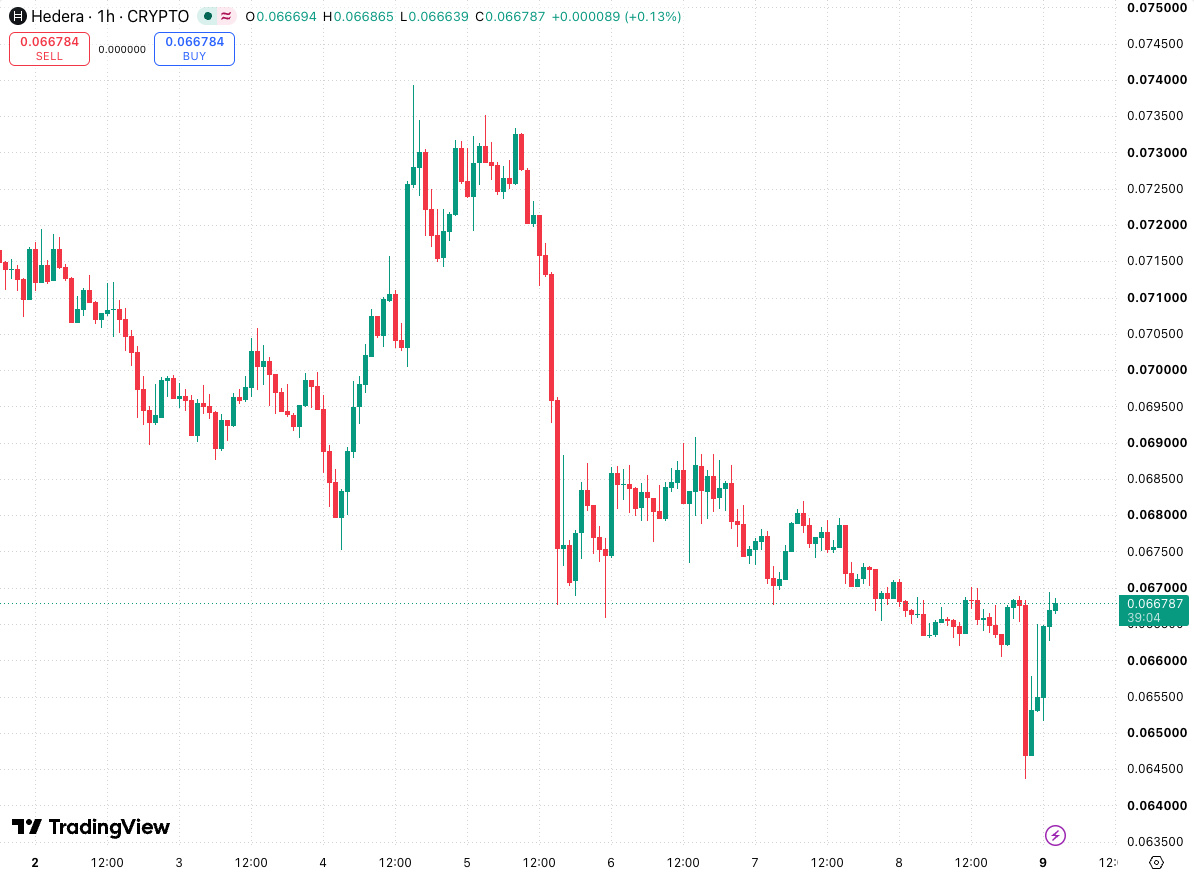
HBAR demand band: defense in focus
🟢 $HBAR - LONG
Trade Plan:
Entry Zone: 0.0651 – 0.0658
SL: 0.062800
TP1: 0.068000
TP2: 0.070000
TP3: 0.072500
Watch whether price dips into the 0.0651 to 0.0658 band and defends. A close back above 0.0651 after the probe would set the long trigger. Confirmation improves if a retest of 0.0651 holds rather than breaks. The stop at 0.062800 keeps risk beyond the zone, with a close under it as invalidation. Take partials at 0.068000 and 0.070000, then manage the remainder toward 0.072500. A touch without a defense leaves the setup unresolved.
Would you buy the reclaim close or wait for the retest to hold?
DYOR & manage risk!
$HBAR
HBAR demand band: defense in focus
🟢 $HBAR - LONG
Trade Plan:
Entry Zone: 0.0651 – 0.0658
SL: 0.062800
TP1: 0.068000
TP2: 0.070000
TP3: 0.072500
Watch whether price dips into the 0.0651 to 0.0658 band and defends. A close back above 0.0651 after the probe would set the long trigger. Confirmation improves if a retest of 0.0651 holds rather than breaks. The stop at 0.062800 keeps risk beyond the zone, with a close under it as invalidation. Take partials at 0.068000 and 0.070000, then manage the remainder toward 0.072500. A touch without a defense leaves the setup unresolved.
Would you buy the reclaim close or wait for the retest to hold?
DYOR & manage risk!
$HBAR
🟢 $HBAR - LONG
Trade Plan:
Entry Zone: 0.0651 – 0.0658
SL: 0.062800
TP1: 0.068000
TP2: 0.070000
TP3: 0.072500
Watch whether price dips into the 0.0651 to 0.0658 band and defends. A close back above 0.0651 after the probe would set the long trigger. Confirmation improves if a retest of 0.0651 holds rather than breaks. The stop at 0.062800 keeps risk beyond the zone, with a close under it as invalidation. Take partials at 0.068000 and 0.070000, then manage the remainder toward 0.072500. A touch without a defense leaves the setup unresolved.
Would you buy the reclaim close or wait for the retest to hold?
DYOR & manage risk!
$HBAR
140
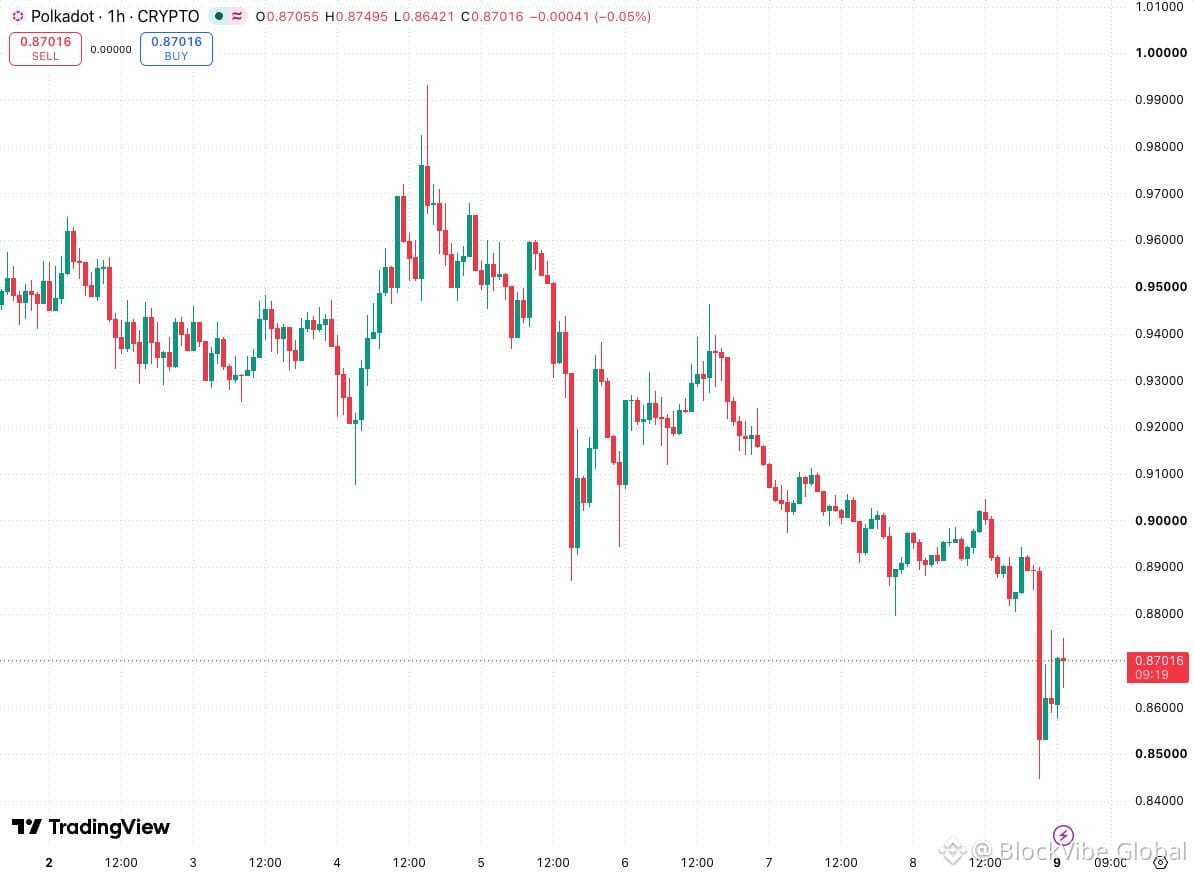
DOT supply band: fade a failed push
🔴 $DOT - SHORT
Trade Plan:
Entry Zone: 0.8558 – 0.8675
SL: 0.881000
TP1: 0.842000
TP2: 0.830000
TP3: 0.815000
A push into the 0.8558 to 0.8675 band is only a test until price rejects. If price retests 0.8675 from below and closes back under it, the short has a clearer trigger. A failed retest that cannot reclaim 0.8675 strengthens the confirmation. Invalidation sits at 0.881000, with room above the zone for a squeeze. Scale partials at 0.842000 and 0.830000, then trail the rest toward 0.815000. A close back above 0.8675 would keep the short unconfirmed.
Would you fade the first rejection or wait for a failed retest of the zone high?
DYOR & manage risk!
$DOT
DOT supply band: fade a failed push
🔴 $DOT - SHORT
Trade Plan:
Entry Zone: 0.8558 – 0.8675
SL: 0.881000
TP1: 0.842000
TP2: 0.830000
TP3: 0.815000
A push into the 0.8558 to 0.8675 band is only a test until price rejects. If price retests 0.8675 from below and closes back under it, the short has a clearer trigger. A failed retest that cannot reclaim 0.8675 strengthens the confirmation. Invalidation sits at 0.881000, with room above the zone for a squeeze. Scale partials at 0.842000 and 0.830000, then trail the rest toward 0.815000. A close back above 0.8675 would keep the short unconfirmed.
Would you fade the first rejection or wait for a failed retest of the zone high?
DYOR & manage risk!
$DOT
🔴 $DOT - SHORT
Trade Plan:
Entry Zone: 0.8558 – 0.8675
SL: 0.881000
TP1: 0.842000
TP2: 0.830000
TP3: 0.815000
A push into the 0.8558 to 0.8675 band is only a test until price rejects. If price retests 0.8675 from below and closes back under it, the short has a clearer trigger. A failed retest that cannot reclaim 0.8675 strengthens the confirmation. Invalidation sits at 0.881000, with room above the zone for a squeeze. Scale partials at 0.842000 and 0.830000, then trail the rest toward 0.815000. A close back above 0.8675 would keep the short unconfirmed.
Would you fade the first rejection or wait for a failed retest of the zone high?
DYOR & manage risk!
$DOT
86
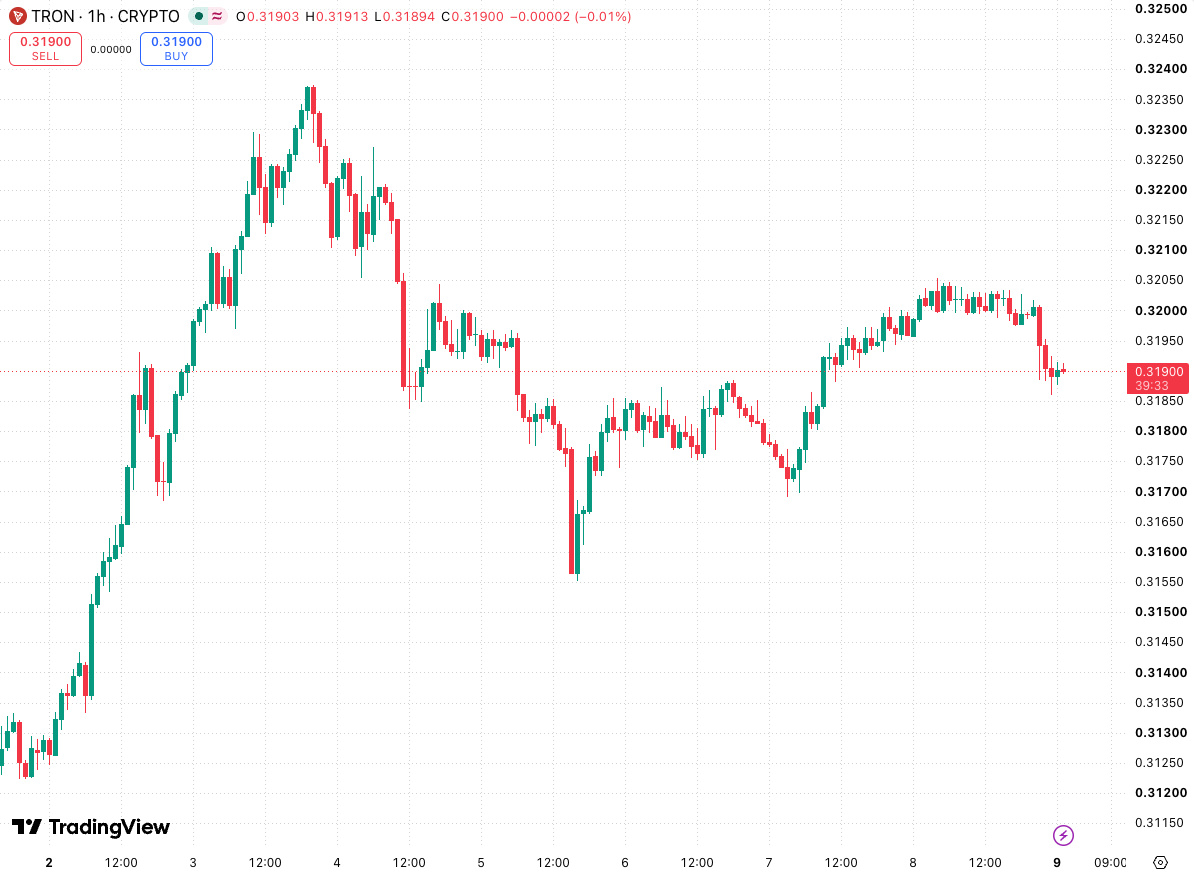
TRX demand band: hold check after probe
🟢 $TRX - LONG
Trade Plan:
Entry Zone: 0.3181 – 0.3196
SL: 0.311000
TP1: 0.326000
TP2: 0.334000
TP3: 0.345000
A probe into the 0.3181 to 0.3196 band needs a hold to matter. If price closes back above 0.3181 after the dip, the long trigger is clearer. A failed retest that refuses to break 0.3181 supports the confirmation. The stop at 0.311000 keeps risk beyond the zone, with a close under it as invalidation. Book partials at 0.326000 and 0.334000, then manage the remainder toward 0.345000. Without the hold, the zone remains just a touch.
Would you enter on the hold or wait for the retest to confirm?
DYOR & manage risk!
$TRX
TRX demand band: hold check after probe
🟢 $TRX - LONG
Trade Plan:
Entry Zone: 0.3181 – 0.3196
SL: 0.311000
TP1: 0.326000
TP2: 0.334000
TP3: 0.345000
A probe into the 0.3181 to 0.3196 band needs a hold to matter. If price closes back above 0.3181 after the dip, the long trigger is clearer. A failed retest that refuses to break 0.3181 supports the confirmation. The stop at 0.311000 keeps risk beyond the zone, with a close under it as invalidation. Book partials at 0.326000 and 0.334000, then manage the remainder toward 0.345000. Without the hold, the zone remains just a touch.
Would you enter on the hold or wait for the retest to confirm?
DYOR & manage risk!
$TRX
🟢 $TRX - LONG
Trade Plan:
Entry Zone: 0.3181 – 0.3196
SL: 0.311000
TP1: 0.326000
TP2: 0.334000
TP3: 0.345000
A probe into the 0.3181 to 0.3196 band needs a hold to matter. If price closes back above 0.3181 after the dip, the long trigger is clearer. A failed retest that refuses to break 0.3181 supports the confirmation. The stop at 0.311000 keeps risk beyond the zone, with a close under it as invalidation. Book partials at 0.326000 and 0.334000, then manage the remainder toward 0.345000. Without the hold, the zone remains just a touch.
Would you enter on the hold or wait for the retest to confirm?
DYOR & manage risk!
$TRX
81
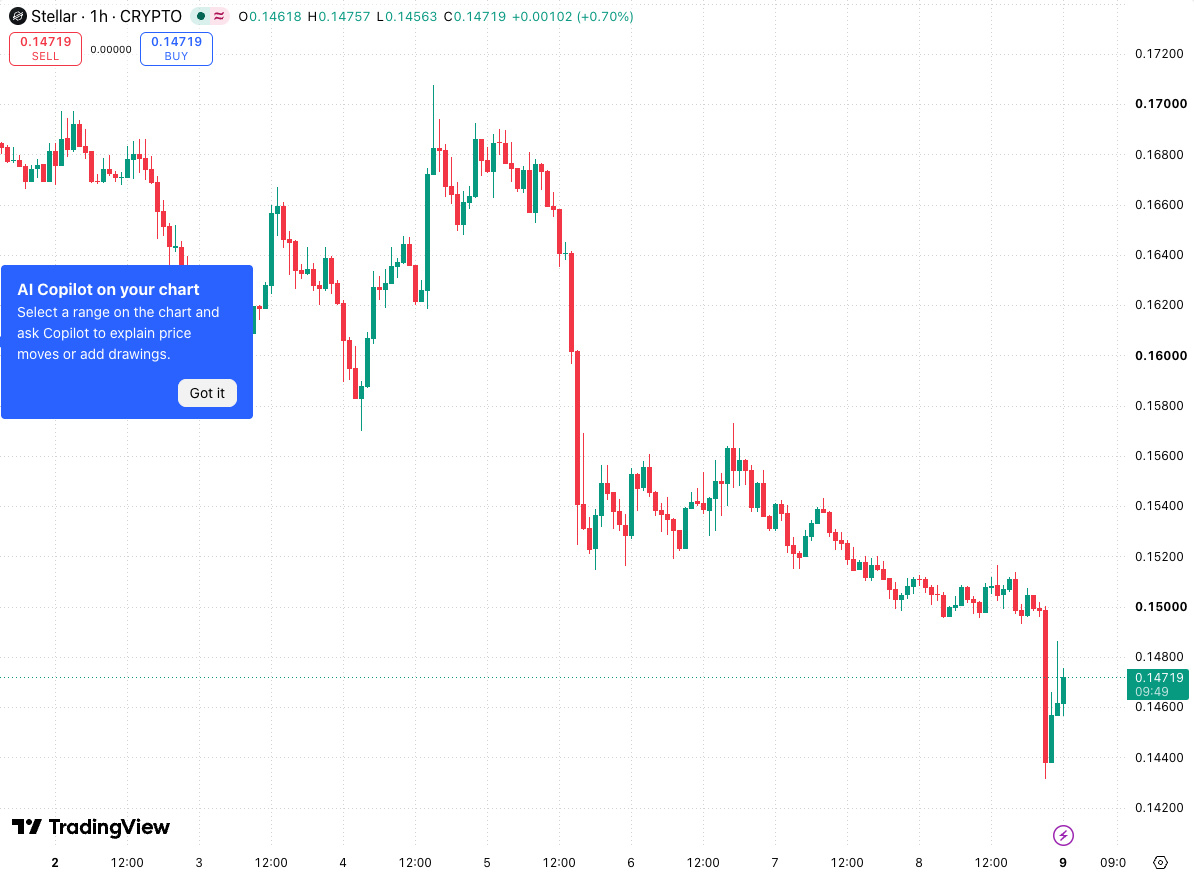
XLM demand band: reclaim close is the trigger
🟢 $XLM - LONG
Trade Plan:
Entry Zone: 0.1456 – 0.1472
SL: 0.141000
TP1: 0.152000
TP2: 0.156500
TP3: 0.162000
Watch whether price taps the 0.1456 to 0.1472 band and stalls or reclaims. A close back inside the zone after a probe would set the long trigger. Confirmation improves if a retest of 0.1456 holds on the next attempt. Invalidation sits at 0.141000, giving room beneath the zone for noise. Take partials at 0.152000 and 0.156500, and let the rest run toward 0.162000 only while the reclaim holds. A touch without a reclaim close leaves the setup unconfirmed.
Is a single reclaim close enough, or would you want the retest to hold too?
DYOR & manage risk!
$XLM
XLM demand band: reclaim close is the trigger
🟢 $XLM - LONG
Trade Plan:
Entry Zone: 0.1456 – 0.1472
SL: 0.141000
TP1: 0.152000
TP2: 0.156500
TP3: 0.162000
Watch whether price taps the 0.1456 to 0.1472 band and stalls or reclaims. A close back inside the zone after a probe would set the long trigger. Confirmation improves if a retest of 0.1456 holds on the next attempt. Invalidation sits at 0.141000, giving room beneath the zone for noise. Take partials at 0.152000 and 0.156500, and let the rest run toward 0.162000 only while the reclaim holds. A touch without a reclaim close leaves the setup unconfirmed.
Is a single reclaim close enough, or would you want the retest to hold too?
DYOR & manage risk!
$XLM
🟢 $XLM - LONG
Trade Plan:
Entry Zone: 0.1456 – 0.1472
SL: 0.141000
TP1: 0.152000
TP2: 0.156500
TP3: 0.162000
Watch whether price taps the 0.1456 to 0.1472 band and stalls or reclaims. A close back inside the zone after a probe would set the long trigger. Confirmation improves if a retest of 0.1456 holds on the next attempt. Invalidation sits at 0.141000, giving room beneath the zone for noise. Take partials at 0.152000 and 0.156500, and let the rest run toward 0.162000 only while the reclaim holds. A touch without a reclaim close leaves the setup unconfirmed.
Is a single reclaim close enough, or would you want the retest to hold too?
DYOR & manage risk!
$XLM
92
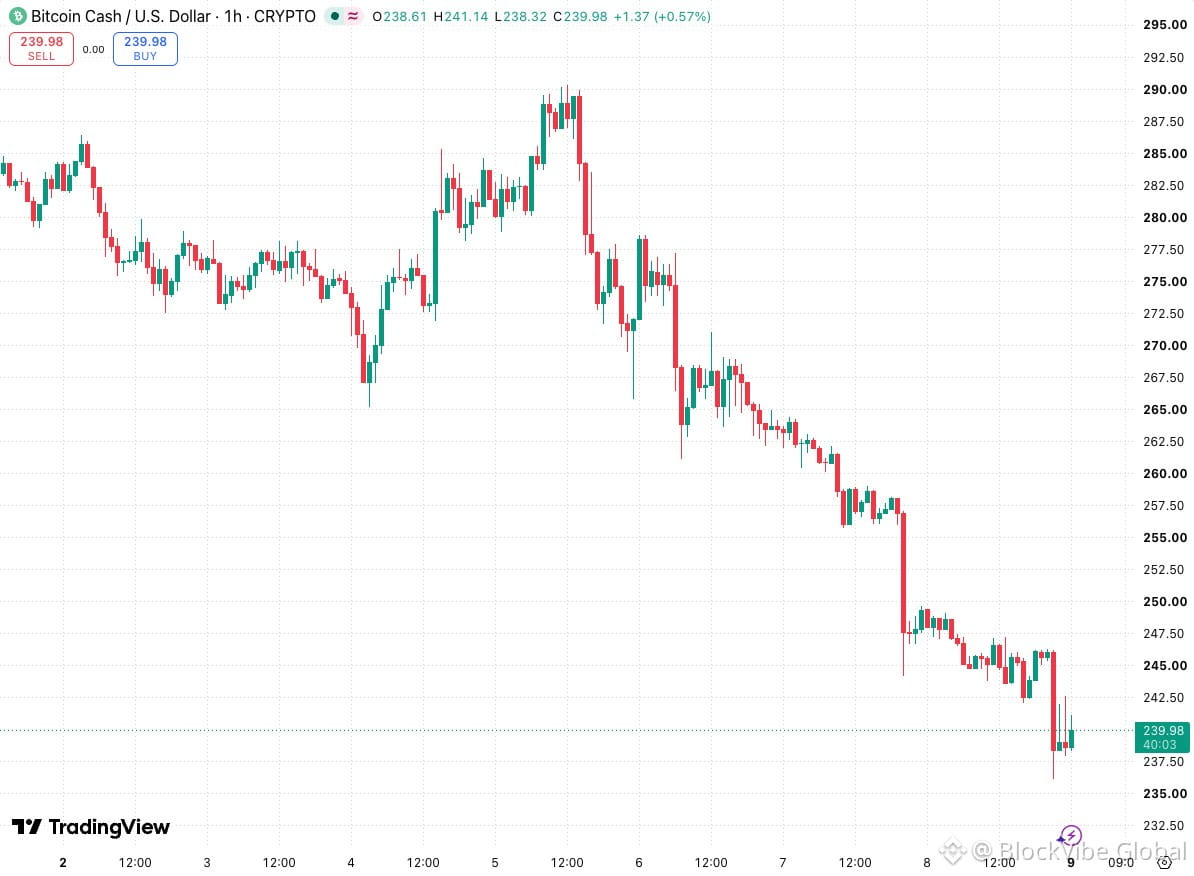
BCH demand shelf: wait for the reclaim
🟢 $BCH - LONG
Trade Plan:
Entry Zone: 237.3647 – 240.6752
SL: 232.1000
TP1: 246.5000
TP2: 252.8000
TP3: 260.4000
A touch of the 237.3647 to 240.6752 band is only a probe, not an entry. If price dips into the zone and closes back above 237.3647, the long has a clearer trigger. A failed retest that holds above 237.3647 offers a second confirmation before committing risk. Place the stop at 232.1000 to keep room beyond the zone, and treat a decisive close under 232.1000 as invalidation. Scale out partials at 246.5000 and 252.8000, then trail the remainder toward 260.4000. If the reclaim never prints, standing aside is a valid decision.
Would you take the reclaim close or wait for the failed retest to hold?
DYOR & manage risk!
$BCH
BCH demand shelf: wait for the reclaim
🟢 $BCH - LONG
Trade Plan:
Entry Zone: 237.3647 – 240.6752
SL: 232.1000
TP1: 246.5000
TP2: 252.8000
TP3: 260.4000
A touch of the 237.3647 to 240.6752 band is only a probe, not an entry. If price dips into the zone and closes back above 237.3647, the long has a clearer trigger. A failed retest that holds above 237.3647 offers a second confirmation before committing risk. Place the stop at 232.1000 to keep room beyond the zone, and treat a decisive close under 232.1000 as invalidation. Scale out partials at 246.5000 and 252.8000, then trail the remainder toward 260.4000. If the reclaim never prints, standing aside is a valid decision.
Would you take the reclaim close or wait for the failed retest to hold?
DYOR & manage risk!
$BCH
🟢 $BCH - LONG
Trade Plan:
Entry Zone: 237.3647 – 240.6752
SL: 232.1000
TP1: 246.5000
TP2: 252.8000
TP3: 260.4000
A touch of the 237.3647 to 240.6752 band is only a probe, not an entry. If price dips into the zone and closes back above 237.3647, the long has a clearer trigger. A failed retest that holds above 237.3647 offers a second confirmation before committing risk. Place the stop at 232.1000 to keep room beyond the zone, and treat a decisive close under 232.1000 as invalidation. Scale out partials at 246.5000 and 252.8000, then trail the remainder toward 260.4000. If the reclaim never prints, standing aside is a valid decision.
Would you take the reclaim close or wait for the failed retest to hold?
DYOR & manage risk!
$BCH
1
108
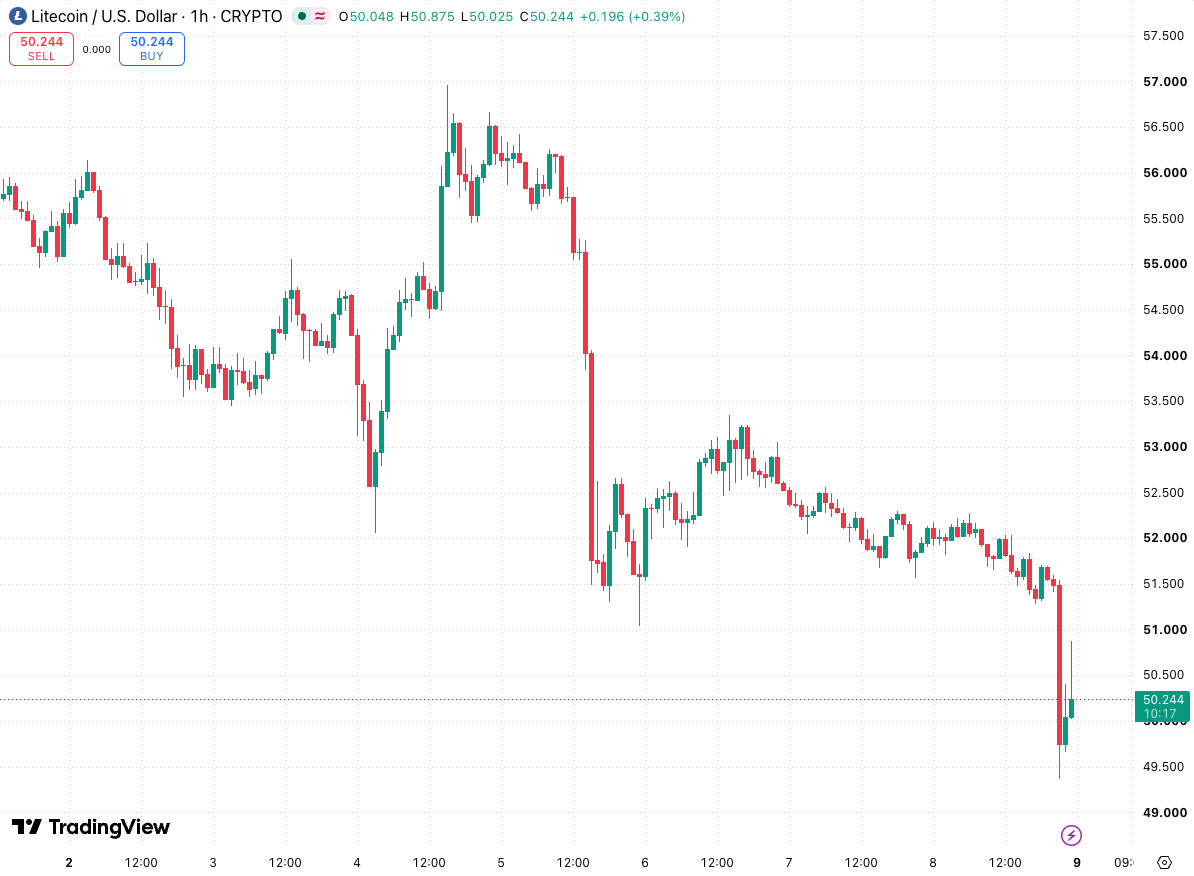
LTC supply retest: fade a failed push above zone
🔴 $LTC - SHORT
Trade Plan:
Entry Zone: 51.4811 – 51.8388
SL: 52.5000
TP1: 50.8000
TP2: 50.2000
TP3: 49.5000
If price rallies into the zone and stalls near 51.8388, watch for a rejection wick or a close back below 51.8388 to confirm supply. A failed retest above 51.8388 that quickly reverses and closes back under the zone would strengthen the short case. The stop at 52.5000 sits beyond the zone high, providing buffer against a breakout. Invalidation is a sustained close above 52.5000, which would suggest supply has been absorbed. Consider taking partial profits at TP1 (50.8000), TP2 (50.2000), and TP3 (49.5000) as price moves lower.
Do you prefer to short on the first touch of 51.8388 or wait for a confirmed rejection close?
DYOR & manage risk!
$LTC
LTC supply retest: fade a failed push above zone
🔴 $LTC - SHORT
Trade Plan:
Entry Zone: 51.4811 – 51.8388
SL: 52.5000
TP1: 50.8000
TP2: 50.2000
TP3: 49.5000
If price rallies into the zone and stalls near 51.8388, watch for a rejection wick or a close back below 51.8388 to confirm supply. A failed retest above 51.8388 that quickly reverses and closes back under the zone would strengthen the short case. The stop at 52.5000 sits beyond the zone high, providing buffer against a breakout. Invalidation is a sustained close above 52.5000, which would suggest supply has been absorbed. Consider taking partial profits at TP1 (50.8000), TP2 (50.2000), and TP3 (49.5000) as price moves lower.
Do you prefer to short on the first touch of 51.8388 or wait for a confirmed rejection close?
DYOR & manage risk!
$LTC
🔴 $LTC - SHORT
Trade Plan:
Entry Zone: 51.4811 – 51.8388
SL: 52.5000
TP1: 50.8000
TP2: 50.2000
TP3: 49.5000
If price rallies into the zone and stalls near 51.8388, watch for a rejection wick or a close back below 51.8388 to confirm supply. A failed retest above 51.8388 that quickly reverses and closes back under the zone would strengthen the short case. The stop at 52.5000 sits beyond the zone high, providing buffer against a breakout. Invalidation is a sustained close above 52.5000, which would suggest supply has been absorbed. Consider taking partial profits at TP1 (50.8000), TP2 (50.2000), and TP3 (49.5000) as price moves lower.
Do you prefer to short on the first touch of 51.8388 or wait for a confirmed rejection close?
DYOR & manage risk!
$LTC
757
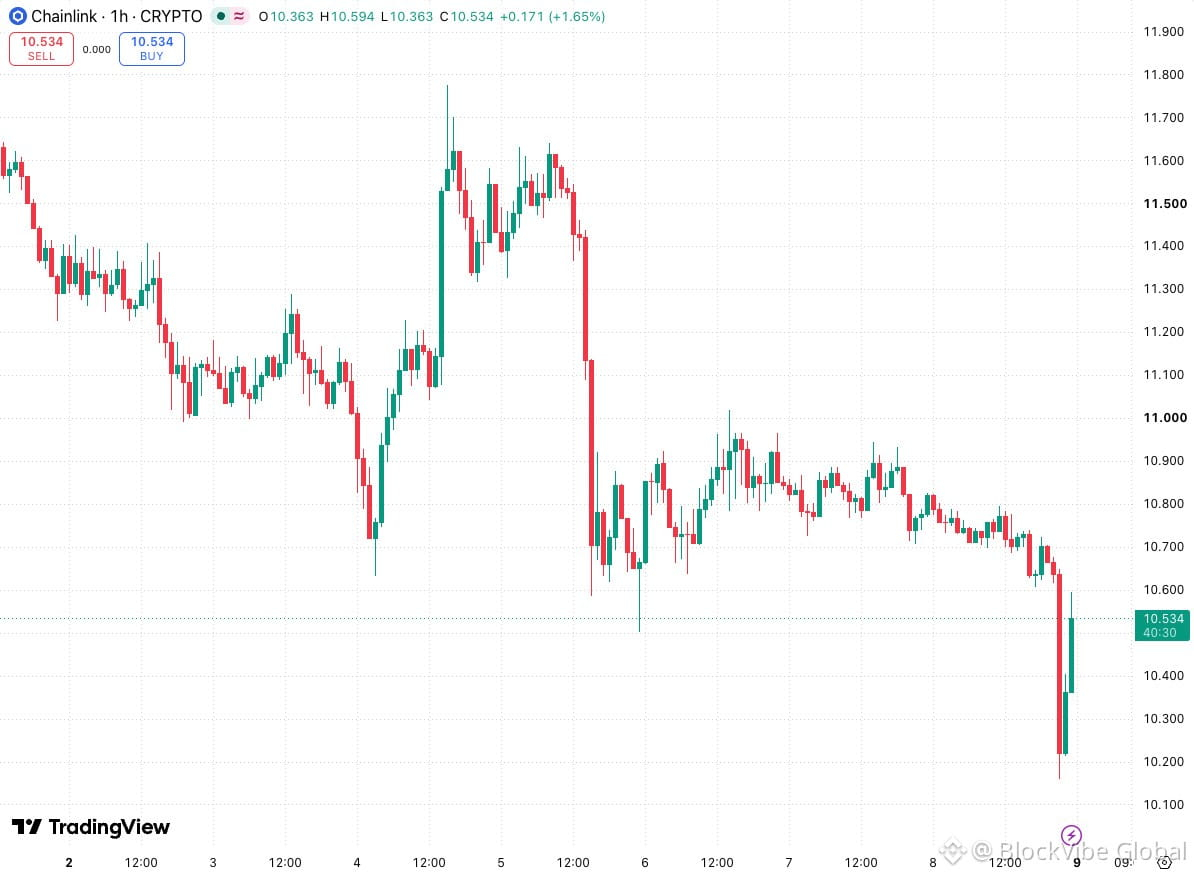
LINK demand hold: reclaim close inside zone
🟢 $LINK - LONG
Trade Plan:
Entry Zone: 10.67 – 10.7539
SL: 10.5200
TP1: 10.9000
TP2: 11.0500
TP3: 11.2500
A dip into the zone that finds support near 10.67 and closes back above that level could signal a long opportunity. Watch for a failed breakdown below 10.67 that quickly reverses, as it may indicate absorption of selling pressure. The stop at 10.5200 provides room beyond the zone low to withstand a deeper probe. The setup is invalidated if price closes below 10.5200, suggesting demand has failed. Consider scaling out at TP1 (10.9000), TP2 (11.0500), and TP3 (11.2500) as price advances.
Would you enter on a reclaim close or wait for a retest of 10.67 after the reclaim?
DYOR & manage risk!
$LINK
LINK demand hold: reclaim close inside zone
🟢 $LINK - LONG
Trade Plan:
Entry Zone: 10.67 – 10.7539
SL: 10.5200
TP1: 10.9000
TP2: 11.0500
TP3: 11.2500
A dip into the zone that finds support near 10.67 and closes back above that level could signal a long opportunity. Watch for a failed breakdown below 10.67 that quickly reverses, as it may indicate absorption of selling pressure. The stop at 10.5200 provides room beyond the zone low to withstand a deeper probe. The setup is invalidated if price closes below 10.5200, suggesting demand has failed. Consider scaling out at TP1 (10.9000), TP2 (11.0500), and TP3 (11.2500) as price advances.
Would you enter on a reclaim close or wait for a retest of 10.67 after the reclaim?
DYOR & manage risk!
$LINK
🟢 $LINK - LONG
Trade Plan:
Entry Zone: 10.67 – 10.7539
SL: 10.5200
TP1: 10.9000
TP2: 11.0500
TP3: 11.2500
A dip into the zone that finds support near 10.67 and closes back above that level could signal a long opportunity. Watch for a failed breakdown below 10.67 that quickly reverses, as it may indicate absorption of selling pressure. The stop at 10.5200 provides room beyond the zone low to withstand a deeper probe. The setup is invalidated if price closes below 10.5200, suggesting demand has failed. Consider scaling out at TP1 (10.9000), TP2 (11.0500), and TP3 (11.2500) as price advances.
Would you enter on a reclaim close or wait for a retest of 10.67 after the reclaim?
DYOR & manage risk!
$LINK
17
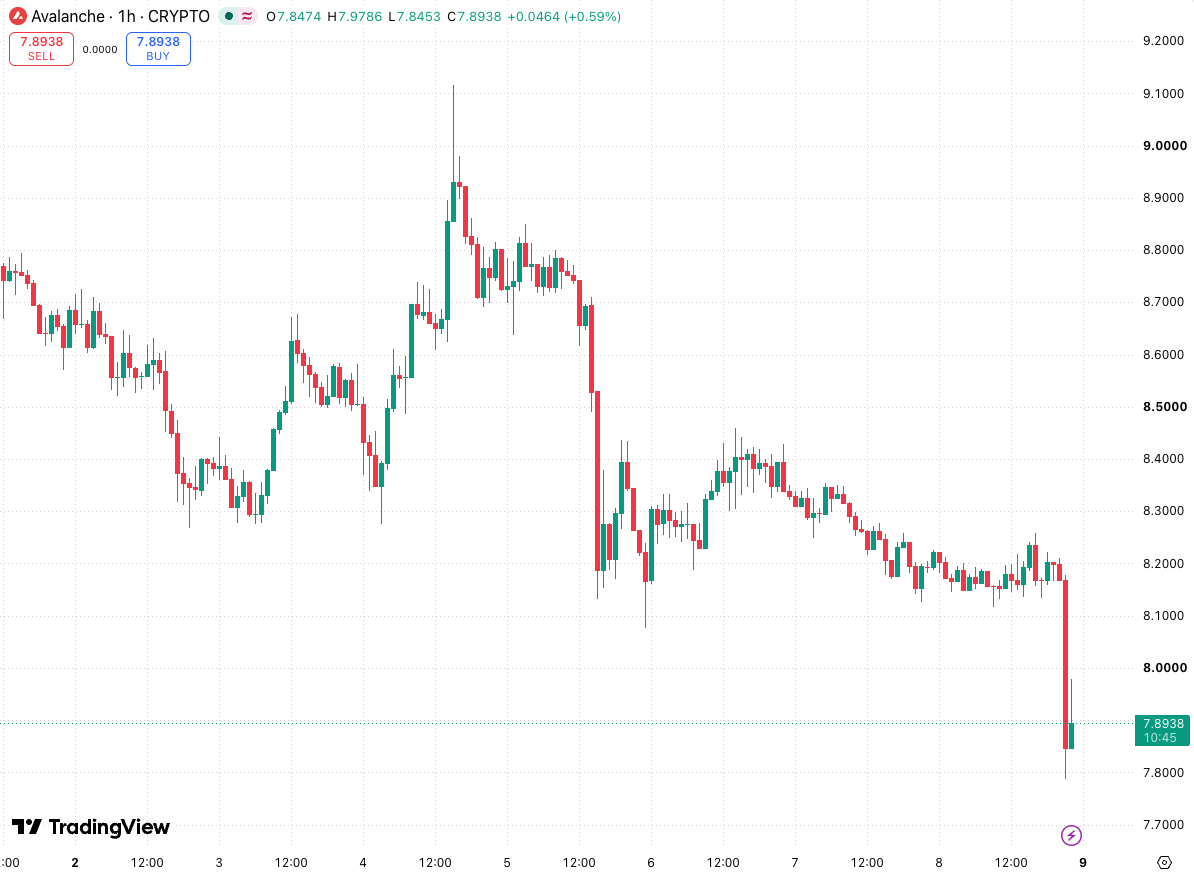
AVAX supply band: rejection close under zone high
🔴 $AVAX - SHORT
Trade Plan:
Entry Zone: 8.1802 – 8.2221
SL: 8.3500
TP1: 8.0800
TP2: 7.9800
TP3: 7.8800
If price rallies into the zone and fails to close above 8.2221, a rejection close could set up a short. A failed retest of 8.2221 that leaves a long upper wick would add confidence to the bearish scenario. The stop at 8.3500 is placed beyond the zone high to guard against a breakout. Invalidation occurs on a close above 8.3500, which would negate the supply thesis. Take partial exits at TP1 (8.0800), TP2 (7.9800), and TP3 (7.8800) to secure profits.
What would you need to see at 8.2221 to confirm a rejection rather than a breakout?
DYOR & manage risk!
$AVAX
AVAX supply band: rejection close under zone high
🔴 $AVAX - SHORT
Trade Plan:
Entry Zone: 8.1802 – 8.2221
SL: 8.3500
TP1: 8.0800
TP2: 7.9800
TP3: 7.8800
If price rallies into the zone and fails to close above 8.2221, a rejection close could set up a short. A failed retest of 8.2221 that leaves a long upper wick would add confidence to the bearish scenario. The stop at 8.3500 is placed beyond the zone high to guard against a breakout. Invalidation occurs on a close above 8.3500, which would negate the supply thesis. Take partial exits at TP1 (8.0800), TP2 (7.9800), and TP3 (7.8800) to secure profits.
What would you need to see at 8.2221 to confirm a rejection rather than a breakout?
DYOR & manage risk!
$AVAX
🔴 $AVAX - SHORT
Trade Plan:
Entry Zone: 8.1802 – 8.2221
SL: 8.3500
TP1: 8.0800
TP2: 7.9800
TP3: 7.8800
If price rallies into the zone and fails to close above 8.2221, a rejection close could set up a short. A failed retest of 8.2221 that leaves a long upper wick would add confidence to the bearish scenario. The stop at 8.3500 is placed beyond the zone high to guard against a breakout. Invalidation occurs on a close above 8.3500, which would negate the supply thesis. Take partial exits at TP1 (8.0800), TP2 (7.9800), and TP3 (7.8800) to secure profits.
What would you need to see at 8.2221 to confirm a rejection rather than a breakout?
DYOR & manage risk!
$AVAX
15
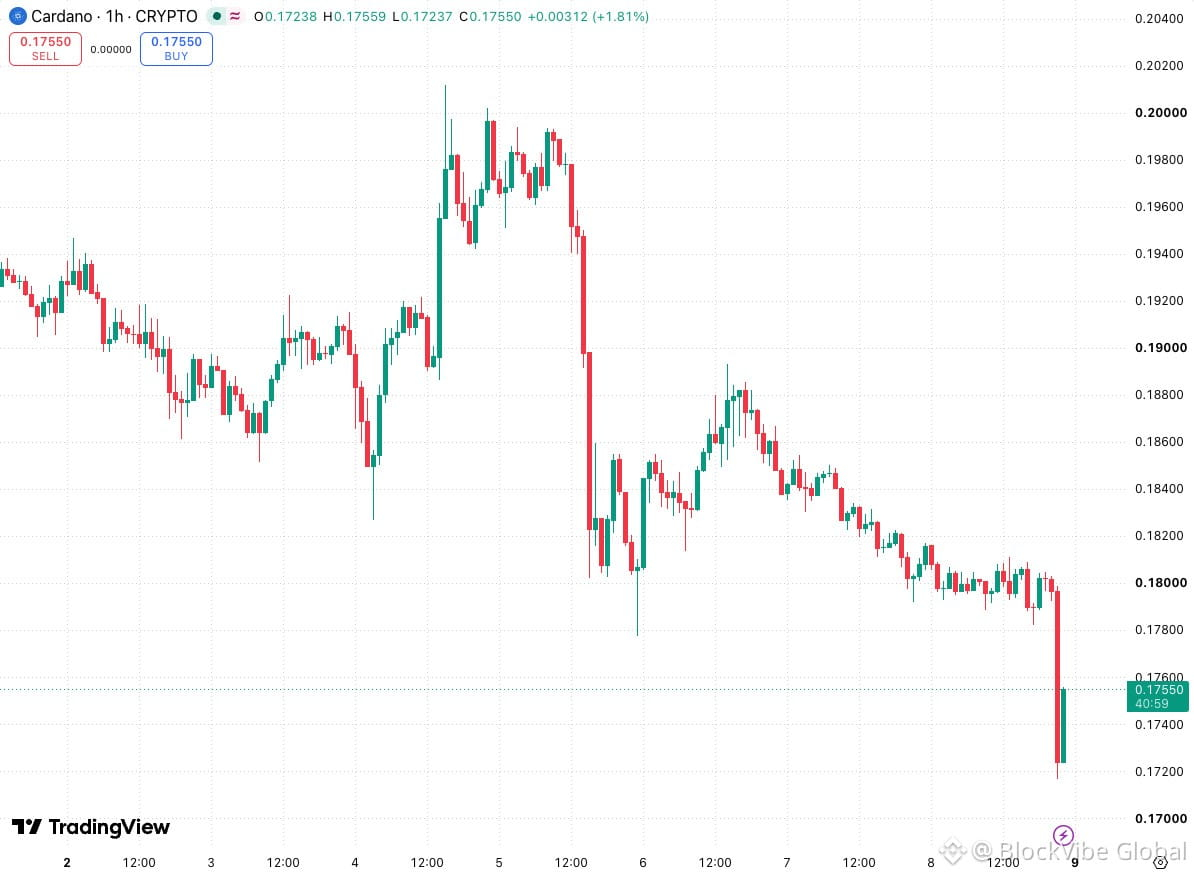
ADA demand hold: reclaim close above zone low
🟢 $ADA - LONG
Trade Plan:
Entry Zone: 0.1795 – 0.1807
SL: 0.1760
TP1: 0.1835
TP2: 0.1855
TP3: 0.1880
Watch for price to dip into the zone and then close back above 0.1795 to signal demand. A failed breakdown below 0.1795 that quickly reclaims the zone would provide a stronger trigger. The stop at 0.1760 is set beyond the zone low to allow for a sweep. The long scenario is invalidated if price closes below 0.1760, indicating demand failure. Scale out at TP1 (0.1835), TP2 (0.1855), and TP3 (0.1880) as price moves higher.
Would a close above 0.1795 be sufficient confirmation, or would you wait for a retest of that level?
DYOR & manage risk!
$ADA
ADA demand hold: reclaim close above zone low
🟢 $ADA - LONG
Trade Plan:
Entry Zone: 0.1795 – 0.1807
SL: 0.1760
TP1: 0.1835
TP2: 0.1855
TP3: 0.1880
Watch for price to dip into the zone and then close back above 0.1795 to signal demand. A failed breakdown below 0.1795 that quickly reclaims the zone would provide a stronger trigger. The stop at 0.1760 is set beyond the zone low to allow for a sweep. The long scenario is invalidated if price closes below 0.1760, indicating demand failure. Scale out at TP1 (0.1835), TP2 (0.1855), and TP3 (0.1880) as price moves higher.
Would a close above 0.1795 be sufficient confirmation, or would you wait for a retest of that level?
DYOR & manage risk!
$ADA
🟢 $ADA - LONG
Trade Plan:
Entry Zone: 0.1795 – 0.1807
SL: 0.1760
TP1: 0.1835
TP2: 0.1855
TP3: 0.1880
Watch for price to dip into the zone and then close back above 0.1795 to signal demand. A failed breakdown below 0.1795 that quickly reclaims the zone would provide a stronger trigger. The stop at 0.1760 is set beyond the zone low to allow for a sweep. The long scenario is invalidated if price closes below 0.1760, indicating demand failure. Scale out at TP1 (0.1835), TP2 (0.1855), and TP3 (0.1880) as price moves higher.
Would a close above 0.1795 be sufficient confirmation, or would you wait for a retest of that level?
DYOR & manage risk!
$ADA
46
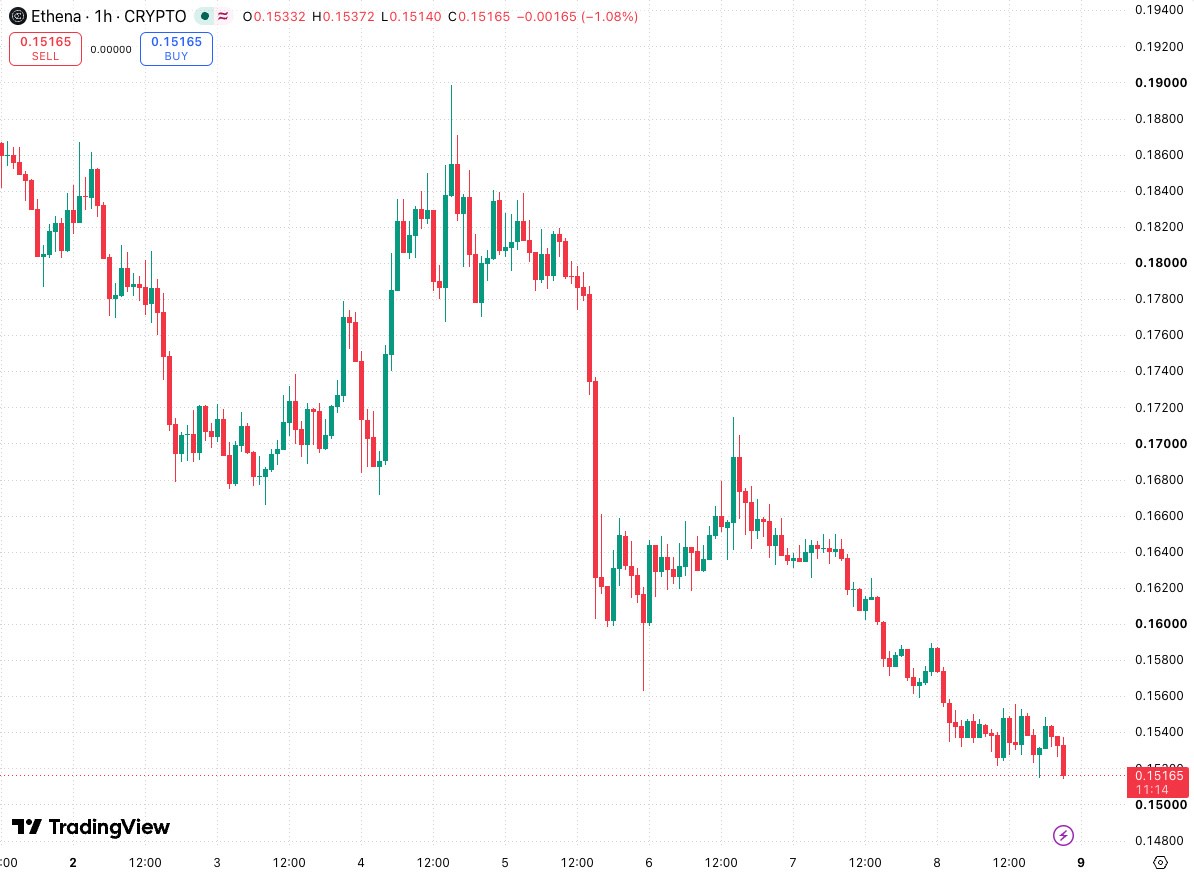
ENA supply shelf: fade a stall at zone high
🔴 $ENA - SHORT
Trade Plan:
Entry Zone: 0.1537 – 0.1552
SL: 0.1590
TP1: 0.1510
TP2: 0.1485
TP3: 0.1460
If price pushes into the zone and stalls near 0.1552, a rejection close below that level could trigger a short. A failed retest above 0.1552 that reverses and closes back under the zone would strengthen the bearish case. Place the stop at 0.1590 to allow for a brief overshoot above the zone. Invalidation is a sustained close above 0.1590, which would indicate supply is being absorbed. Manage partial exits at TP1 (0.1510), TP2 (0.1485), and TP3 (0.1460) to lock in gains.
Do you prefer to short on the first touch of 0.1552 or wait for a confirmed rejection close?
DYOR & manage risk!
$ENA
ENA supply shelf: fade a stall at zone high
🔴 $ENA - SHORT
Trade Plan:
Entry Zone: 0.1537 – 0.1552
SL: 0.1590
TP1: 0.1510
TP2: 0.1485
TP3: 0.1460
If price pushes into the zone and stalls near 0.1552, a rejection close below that level could trigger a short. A failed retest above 0.1552 that reverses and closes back under the zone would strengthen the bearish case. Place the stop at 0.1590 to allow for a brief overshoot above the zone. Invalidation is a sustained close above 0.1590, which would indicate supply is being absorbed. Manage partial exits at TP1 (0.1510), TP2 (0.1485), and TP3 (0.1460) to lock in gains.
Do you prefer to short on the first touch of 0.1552 or wait for a confirmed rejection close?
DYOR & manage risk!
$ENA
🔴 $ENA - SHORT
Trade Plan:
Entry Zone: 0.1537 – 0.1552
SL: 0.1590
TP1: 0.1510
TP2: 0.1485
TP3: 0.1460
If price pushes into the zone and stalls near 0.1552, a rejection close below that level could trigger a short. A failed retest above 0.1552 that reverses and closes back under the zone would strengthen the bearish case. Place the stop at 0.1590 to allow for a brief overshoot above the zone. Invalidation is a sustained close above 0.1590, which would indicate supply is being absorbed. Manage partial exits at TP1 (0.1510), TP2 (0.1485), and TP3 (0.1460) to lock in gains.
Do you prefer to short on the first touch of 0.1552 or wait for a confirmed rejection close?
DYOR & manage risk!
$ENA
1
84
තවත් අන්තර්ගතයන් ගවේෂණය කිරීමට ඇතුල් වන්න
Binance චතුරශ්රය හි ගෝලීය ක්රිප්ටෝ පරිශීලකයින් හා එක්වන්න
⚡️ ක්රිප්ටෝ පිළිබඳ නවතම සහ ප්රයෝජනවත් තොරතුරු ලබා ගන්න.
💬 ලොව විශාලතම ක්රිප්ටෝ හුවමාරුව මගින් විශ්වාස කෙරේ.
👍 සත්යායනය කරන ලද නිර්මාණකරුවන්ගෙන් සැබෑ විදසුන් සොයා ගන්න.
විද්යුත් තැපෑල / දුරකථන අංකය
නැගී එන මාතෘකා
BitcoinFiveWeeklyLosses
28,248 නැරඹීම්
618 සාකච්ඡා කරමින්
Bitcoin News | Bitcoin Slides for Five Straight Weeks as AI Stock Rout Spills Into Crypto
Binance News
·9 කැමත්ත දැක්වීම්
·13k නැරඹීම්
AIChipSlumpNasdaq
14,822 නැරඹීම්
344 සාකච්ඡා කරමින්
NvidiaInvestigatesAfterHuang’sAffairApology
14,329 නැරඹීම්
193 සාකච්ඡා කරමින්