

Coins Holder
4.9k Публикации

Coins Holder
Отправить жалобу
Заблокировать пользователя
Programmer reading crypto from the inside: code and architecture before charts. Daily market scenarios , the engineering behind the projects.

Traders League Badge Beginner
Открытая сделка

Владелец PAXG
Случайный трейдер
2.2 г
1.7K+ подписок(и/а)
1.4K+ подписчиков(а)
7.0K+ понравилось
1 Значки
Посты
Портфель
Все
Цитирования
Видео
PINNED
·
--
MOVR went from ~$0.93 to $3.34 in about 3 days. I don't see this as a healthy rally. 👀
Price: $2.93 | 24h: +33.5% | Volume: ~$96.6M (~4x its recent daily average)
What I checked on-chain (Base MOVR holders):
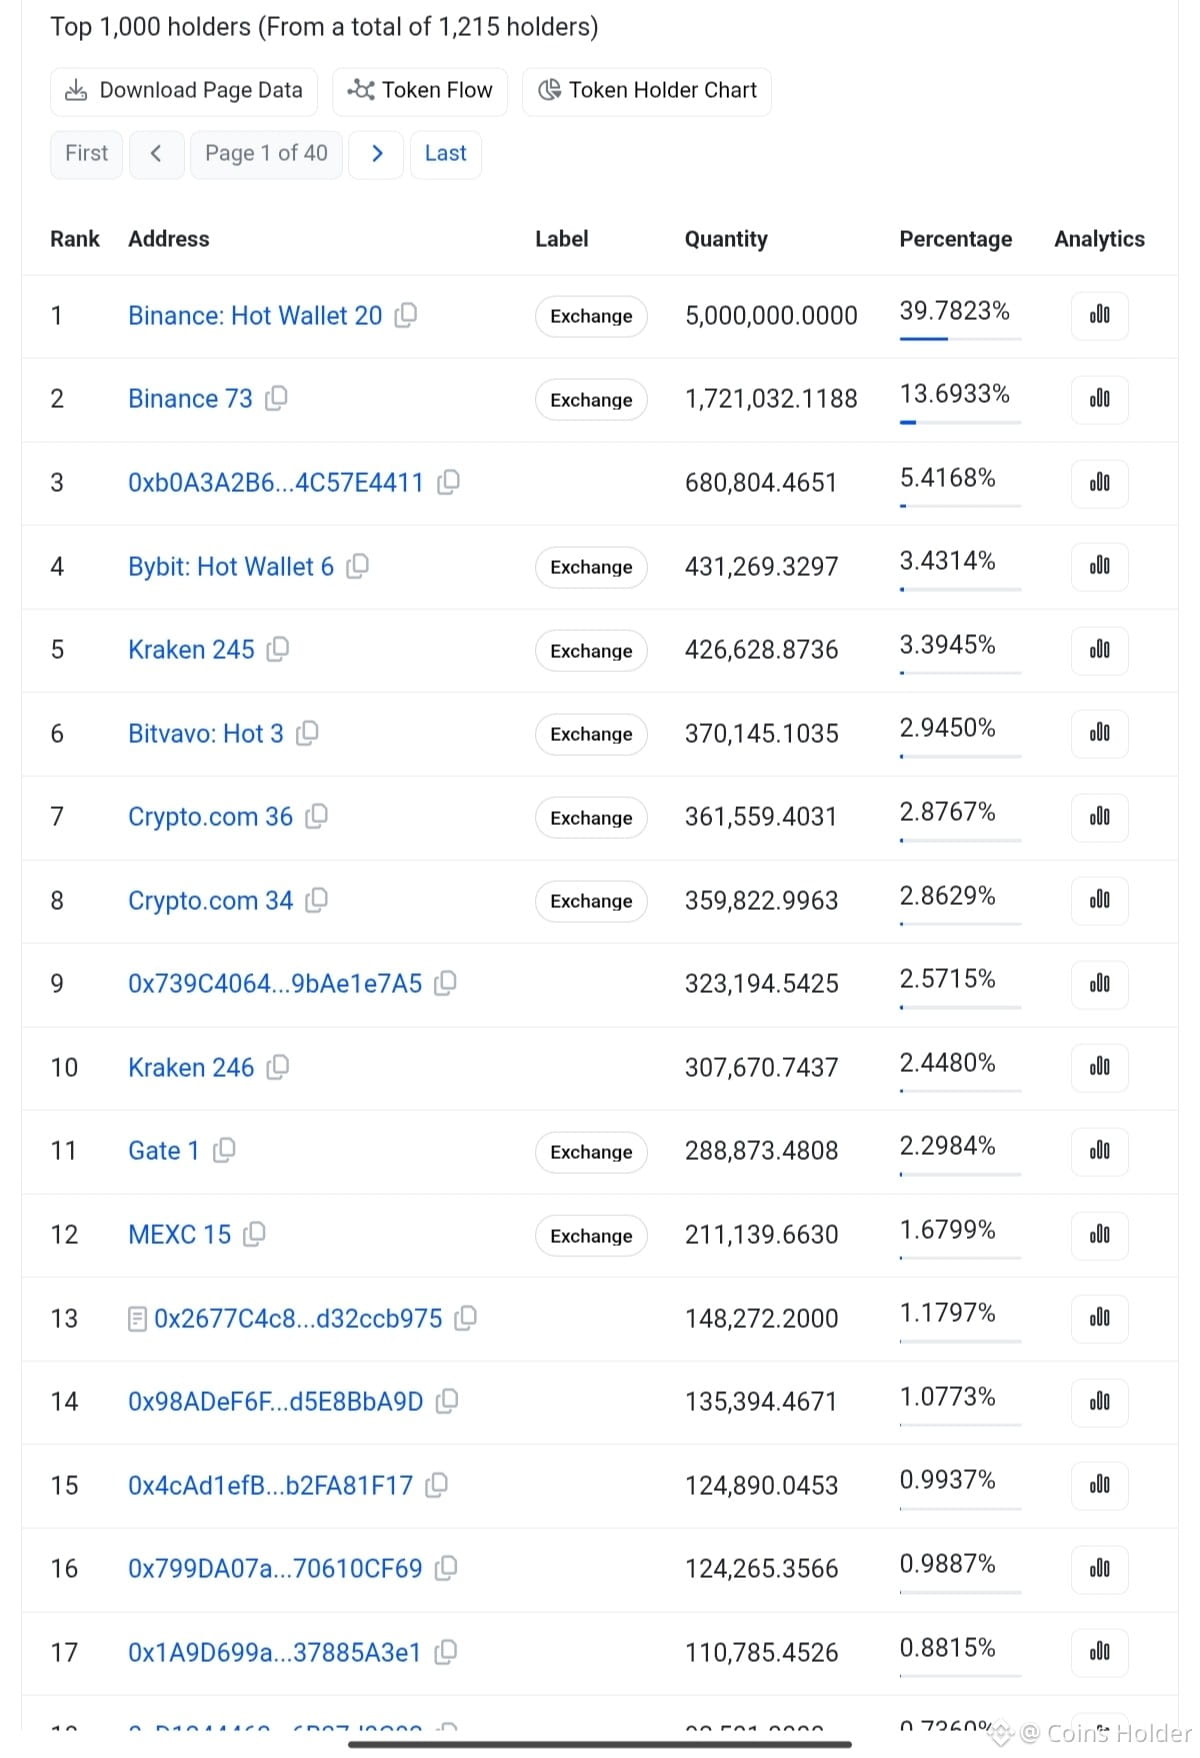
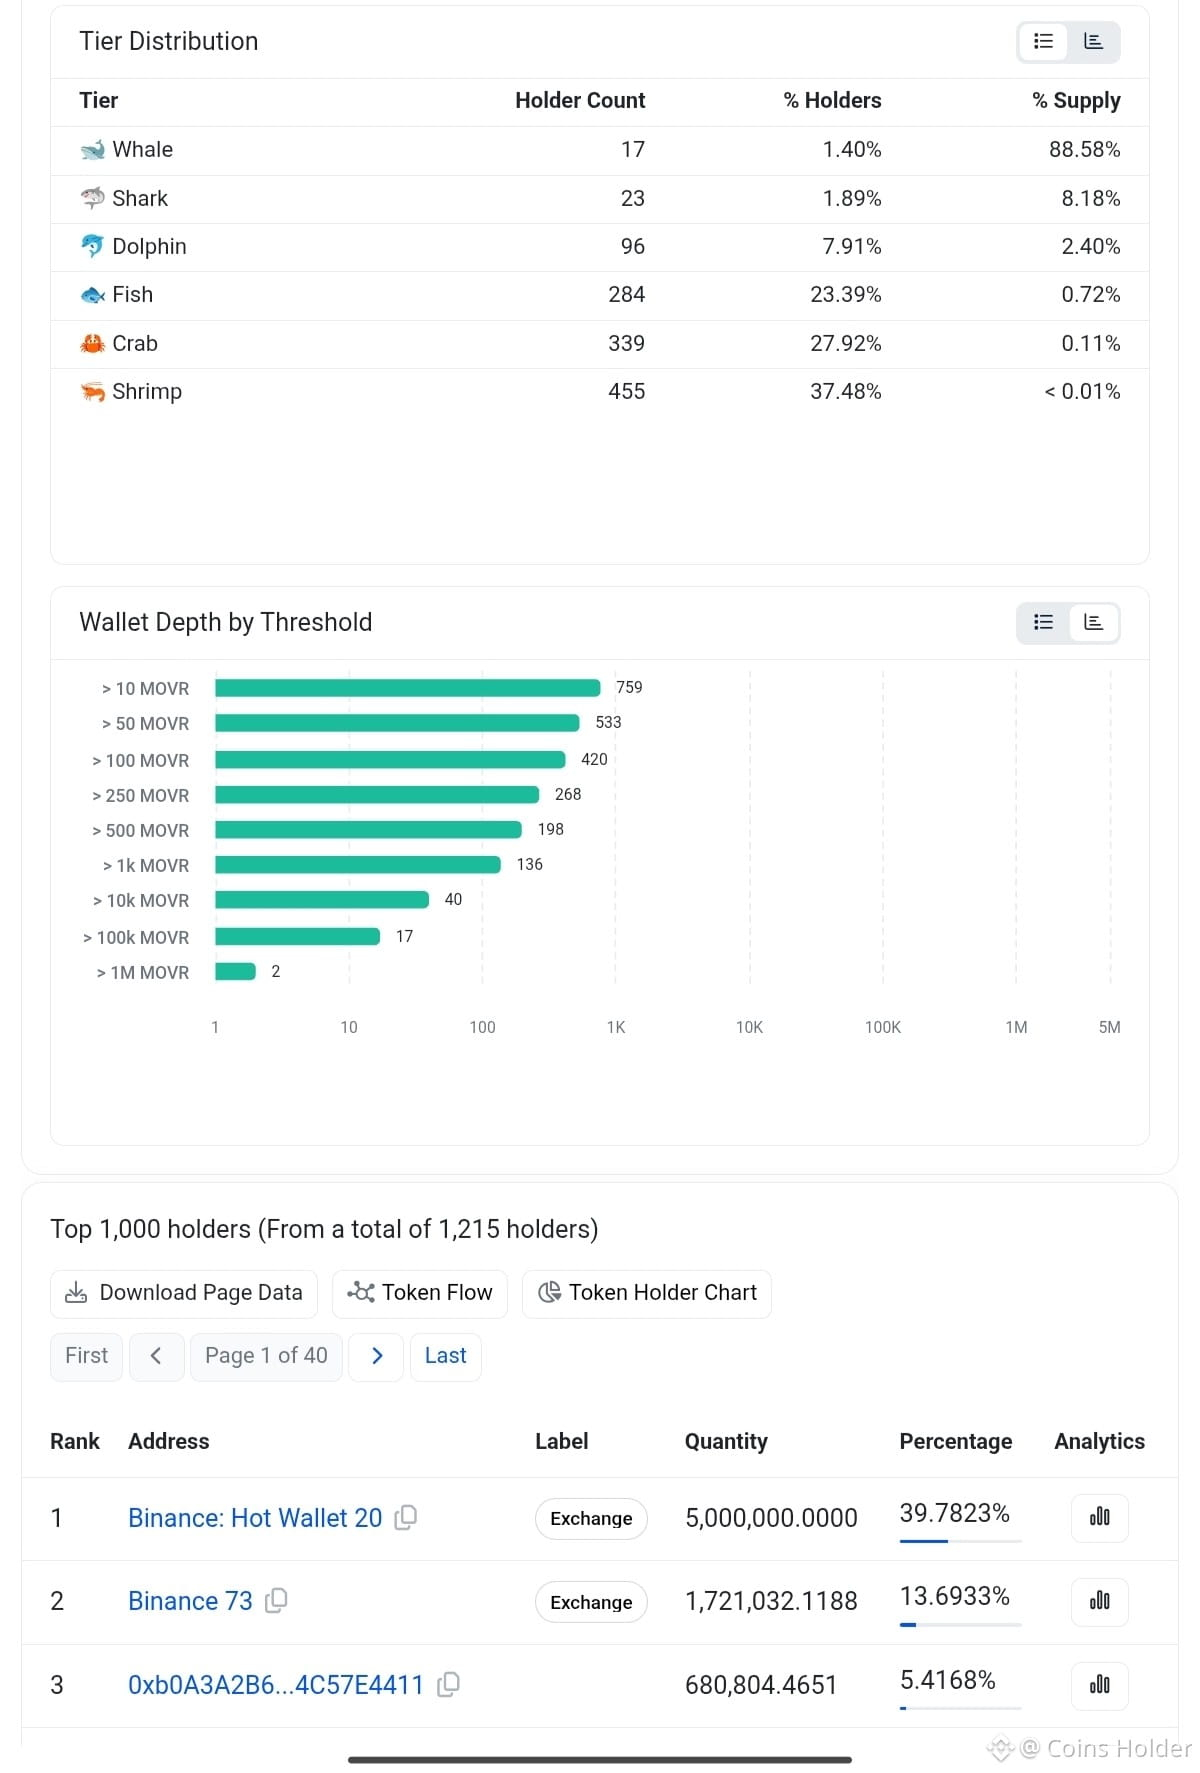
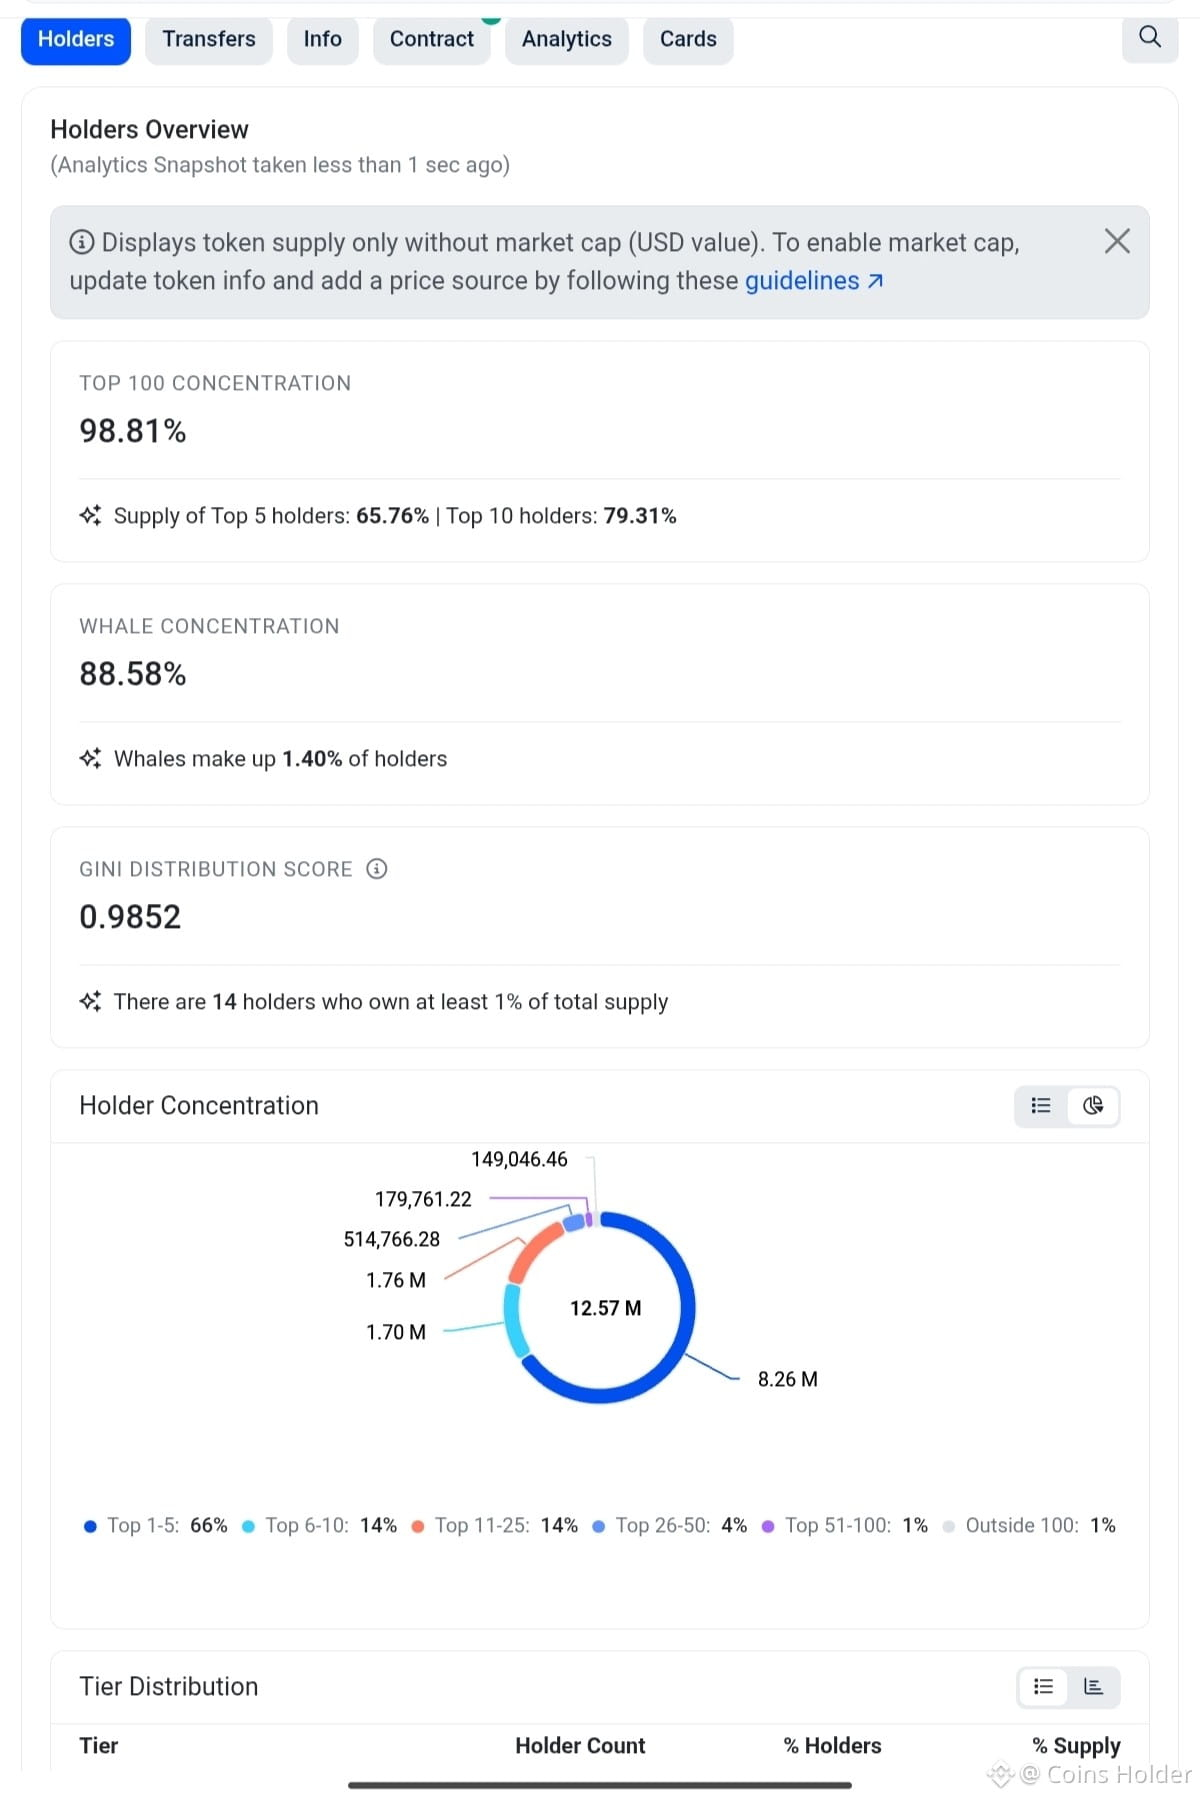
- ~75% of the supply sits in exchange wallets. Binance alone holds ~53% across two wallets.
- One Binance wallet holds exactly 5,000,000 MOVR. A round number like that looks deliberate, so I'd trace where it came from.
- Only ~1,200 holders in total. Two unlabeled wallets hold ~5.4% and ~2.6%.
Why that matters:
Exchange wallets mostly hold customer balances, so this is not automatically insiders selling. But with so little supply outside exchanges, liquidity is thin, and a few unlabeled wallets moving could move price fast.
Context: the Base migration late-claim window closed on Sept 30, and Binance placed MOVR under a Monitoring Tag in August.
Daily levels:
🔴 ~$3.34 (today's high, rejected with a long wick)
🟢 ~$2.03 (24h low), then the ~$1.5 area
Price is far above its daily MAs (MA7 ~1.49), so the move is stretched.
My read: speculative, not a clean trend. I'd rather wait than chase a ~3x move.
Not financial advice. Size small, know your stop.
Is this a real breakout or a liquidity pump? 👇
$MOVR #MOVR #BinanceSquare
$MOVR /USDT
{future}(MOVRUSDT)
MOVR went from ~$0.93 to $3.34 in about 3 days. I don't see this as a healthy rally. 👀
Price: $2.93 | 24h: +33.5% | Volume: ~$96.6M (~4x its recent daily average)
What I checked on-chain (Base MOVR holders):
- ~75% of the supply sits in exchange wallets. Binance alone holds ~53% across two wallets.
- One Binance wallet holds exactly 5,000,000 MOVR. A round number like that looks deliberate, so I'd trace where it came from.
- Only ~1,200 holders in total. Two unlabeled wallets hold ~5.4% and ~2.6%.
Why that matters:
Exchange wallets mostly hold customer balances, so this is not automatically insiders selling. But with so little supply outside exchanges, liquidity is thin, and a few unlabeled wallets moving could move price fast.
Context: the Base migration late-claim window closed on Sept 30, and Binance placed MOVR under a Monitoring Tag in August.
Daily levels:
🔴 ~$3.34 (today's high, rejected with a long wick)
🟢 ~$2.03 (24h low), then the ~$1.5 area
Price is far above its daily MAs (MA7 ~1.49), so the move is stretched.
My read: speculative, not a clean trend. I'd rather wait than chase a ~3x move.
Not financial advice. Size small, know your stop.
Is this a real breakout or a liquidity pump? 👇
$MOVR #MOVR #BinanceSquare
$MOVR /USDT
1
451
·
--
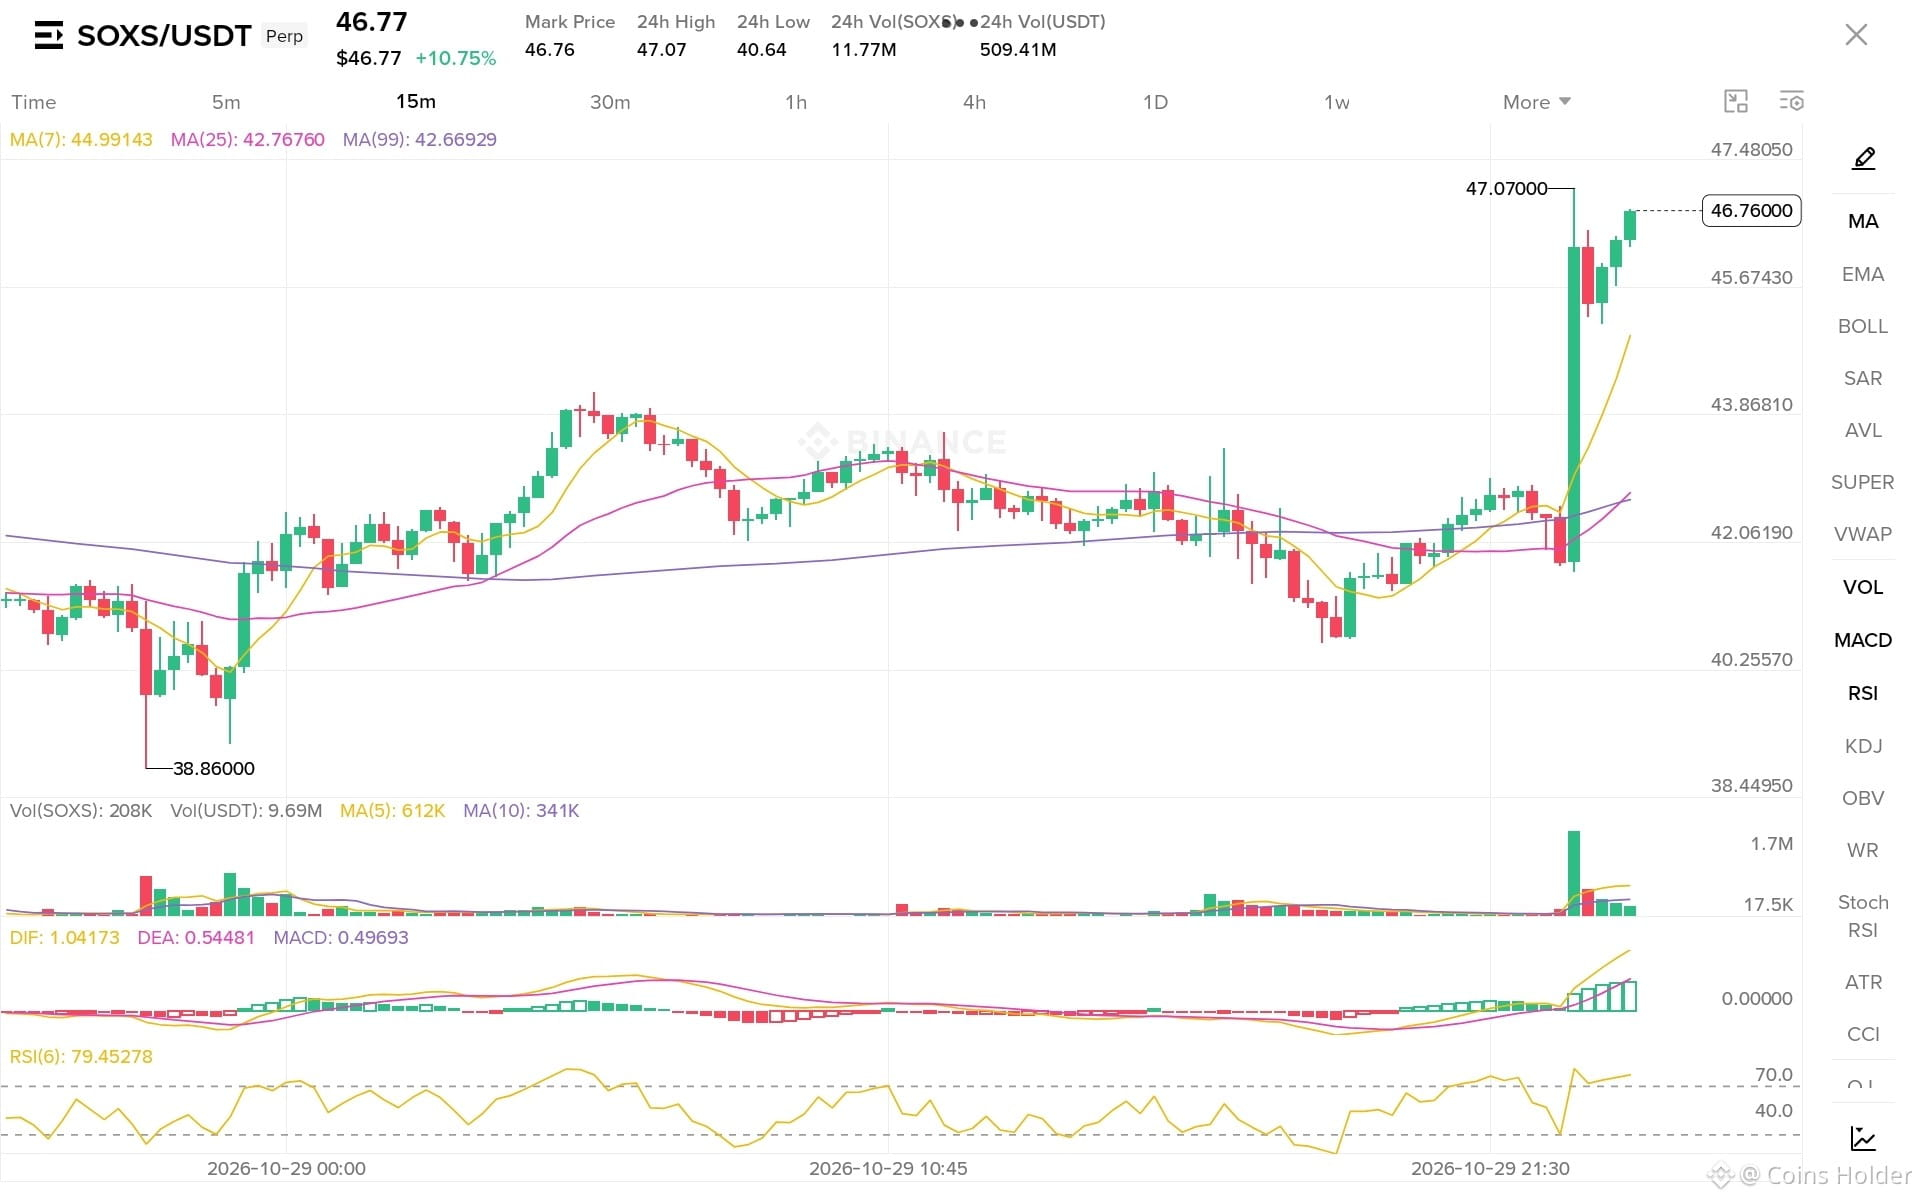
📊 SOXS/USDT — Dual-Way Action Plan (15m)
Current Price: 46.77
🟢 Bullish Breakout Setup:
- Entry Trigger: 47.300 (Above Resistance)
- Targets: 49.00 ⬅️ 51.50 ⬅️ 54.00
- Stop Loss: 45.20
🔴 Bearish Breakdown Setup:
- Entry Trigger: 45.000 (Below Support)
- Targets: 42.66 (MA 99) ⬅️ 40.25 ⬅️ 38.86 (24h Low)
- Stop Loss: 46.50
⚠️ Execution Rules:
- Wait for confirmed breakout or breakdown.
- Cancel the pending opposite order immediately upon execution.
- Maintain strict risk control and avoid chasing sudden pumps.
#DoublePlan #SOXS #BinanceSquare
{future}(SOXSUSDT)
📊 SOXS/USDT — Dual-Way Action Plan (15m)
Current Price: 46.77
🟢 Bullish Breakout Setup:
- Entry Trigger: 47.300 (Above Resistance)
- Targets: 49.00 ⬅️ 51.50 ⬅️ 54.00
- Stop Loss: 45.20
🔴 Bearish Breakdown Setup:
- Entry Trigger: 45.000 (Below Support)
- Targets: 42.66 (MA 99) ⬅️ 40.25 ⬅️ 38.86 (24h Low)
- Stop Loss: 46.50
⚠️ Execution Rules:
- Wait for confirmed breakout or breakdown.
- Cancel the pending opposite order immediately upon execution.
- Maintain strict risk control and avoid chasing sudden pumps.
#DoublePlan #SOXS #BinanceSquare
1
4
·
--
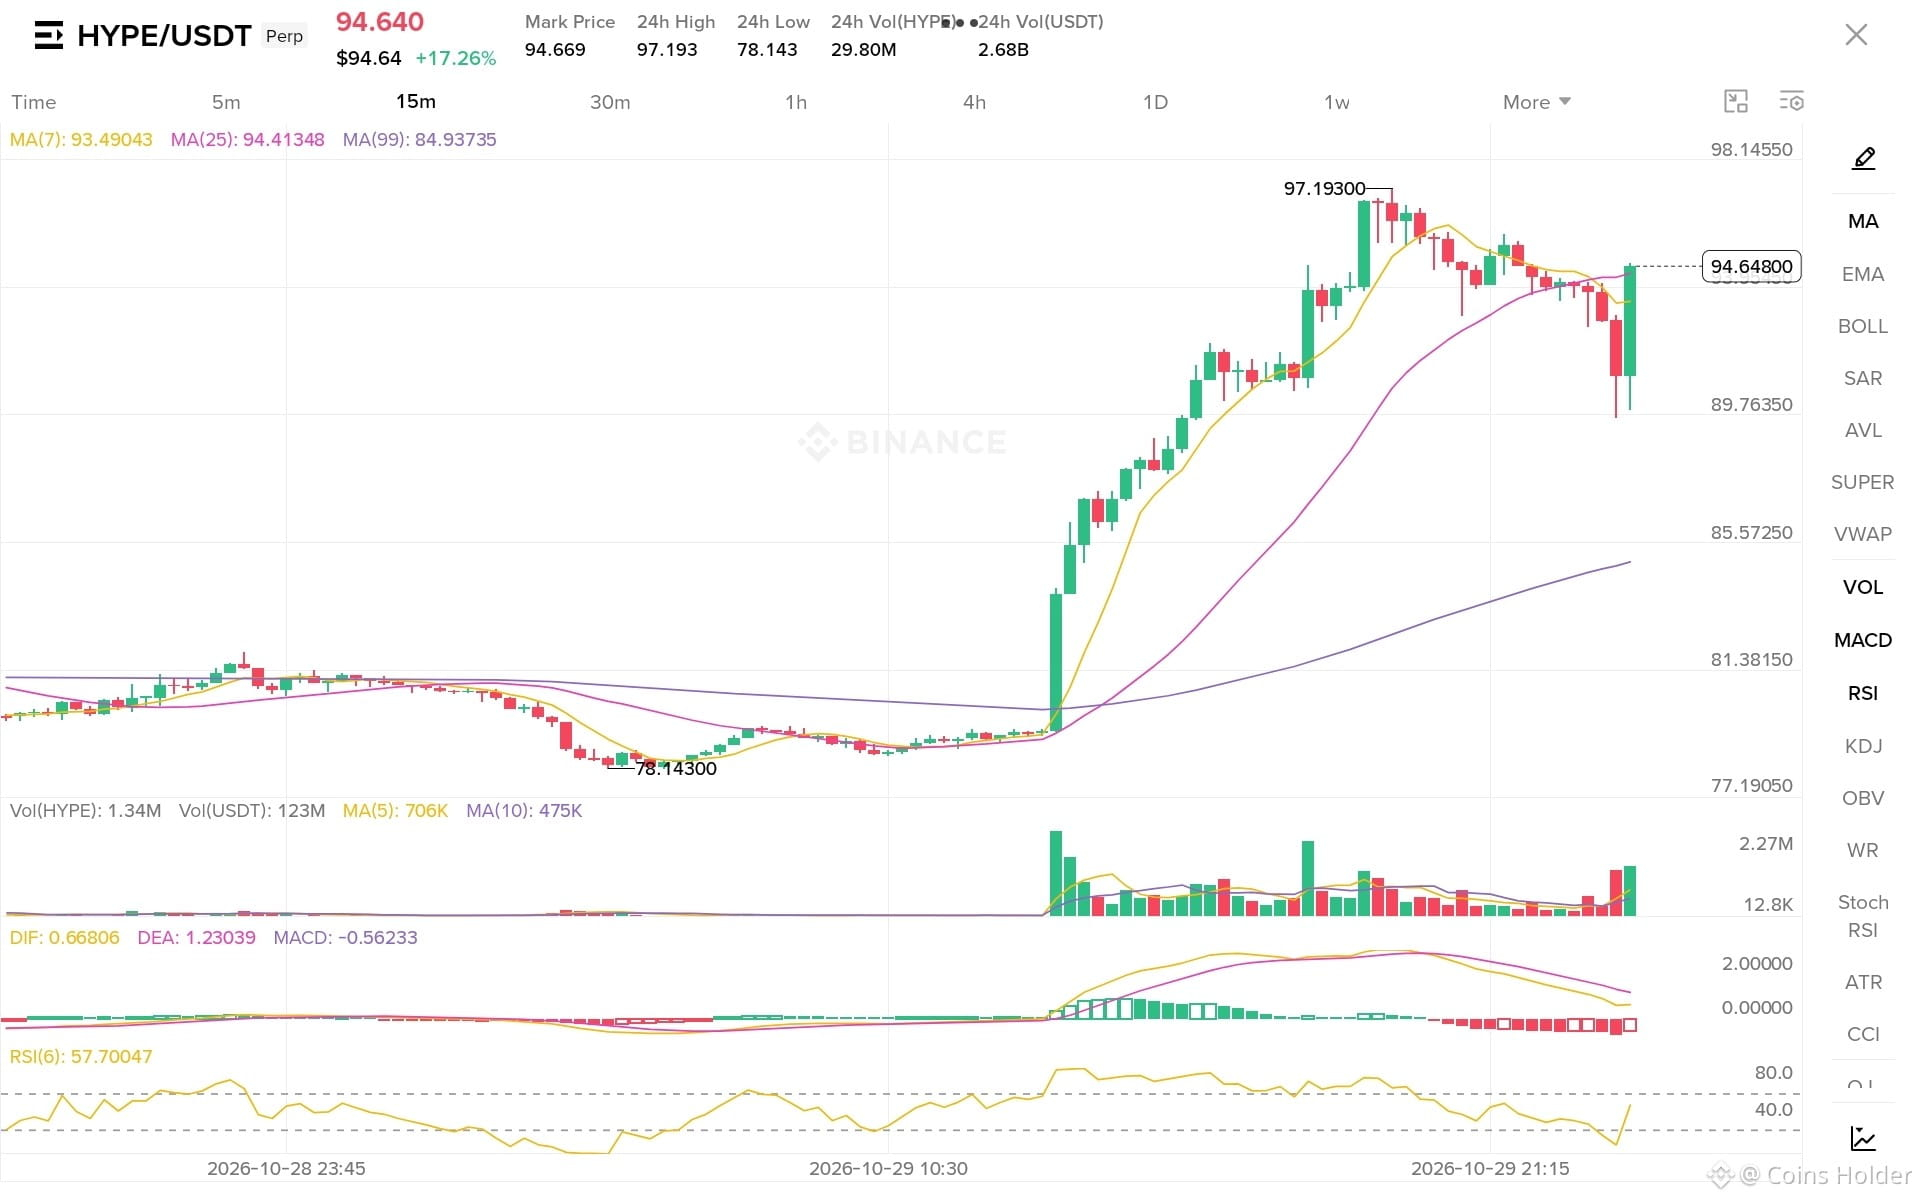
📊 HYPE/USDT — Dual-Way Action Plan (15m)
Current Price: 94.64
🟢 Bullish Breakout Setup:
- Entry Trigger: 97.200 (Above Resistance)
- Targets: 100.50 ⬅️ 104.00 ⬅️ 108.00
- Stop Loss: 92.50
🔴 Bearish Breakdown Setup:
- Entry Trigger: 91.500 (Below Support)
- Targets: 88.00 ⬅️ 84.93 (MA 99) ⬅️ 81.38
- Stop Loss: 95.80
⚠️ Execution Rules:
- Wait for confirmed breakout or breakdown.
- Cancel the pending opposite order immediately upon execution.
- Maintain strict risk control and avoid chasing sudden pumps.
#DoublePlan #HYPE #BinanceSquare
{spot}(HYPEUSDT)
📊 HYPE/USDT — Dual-Way Action Plan (15m)
Current Price: 94.64
🟢 Bullish Breakout Setup:
- Entry Trigger: 97.200 (Above Resistance)
- Targets: 100.50 ⬅️ 104.00 ⬅️ 108.00
- Stop Loss: 92.50
🔴 Bearish Breakdown Setup:
- Entry Trigger: 91.500 (Below Support)
- Targets: 88.00 ⬅️ 84.93 (MA 99) ⬅️ 81.38
- Stop Loss: 95.80
⚠️ Execution Rules:
- Wait for confirmed breakout or breakdown.
- Cancel the pending opposite order immediately upon execution.
- Maintain strict risk control and avoid chasing sudden pumps.
#DoublePlan #HYPE #BinanceSquare
16
·
--
#BinancePick Think Your Picks Never Miss? Prove It! 🚀
Are you ready to test your prediction skills and compete for massive rewards? Join me now in Binance Pick and show off your accuracy!
💰 A huge prize pool of 1,000,000 USDC is waiting for the winners[span_0](start_span)[span_0](end_span).
Make your picks, collect scores, and climb the leaderboard with us today! 👇
#Crypto #BinanceSquare

1
·
--
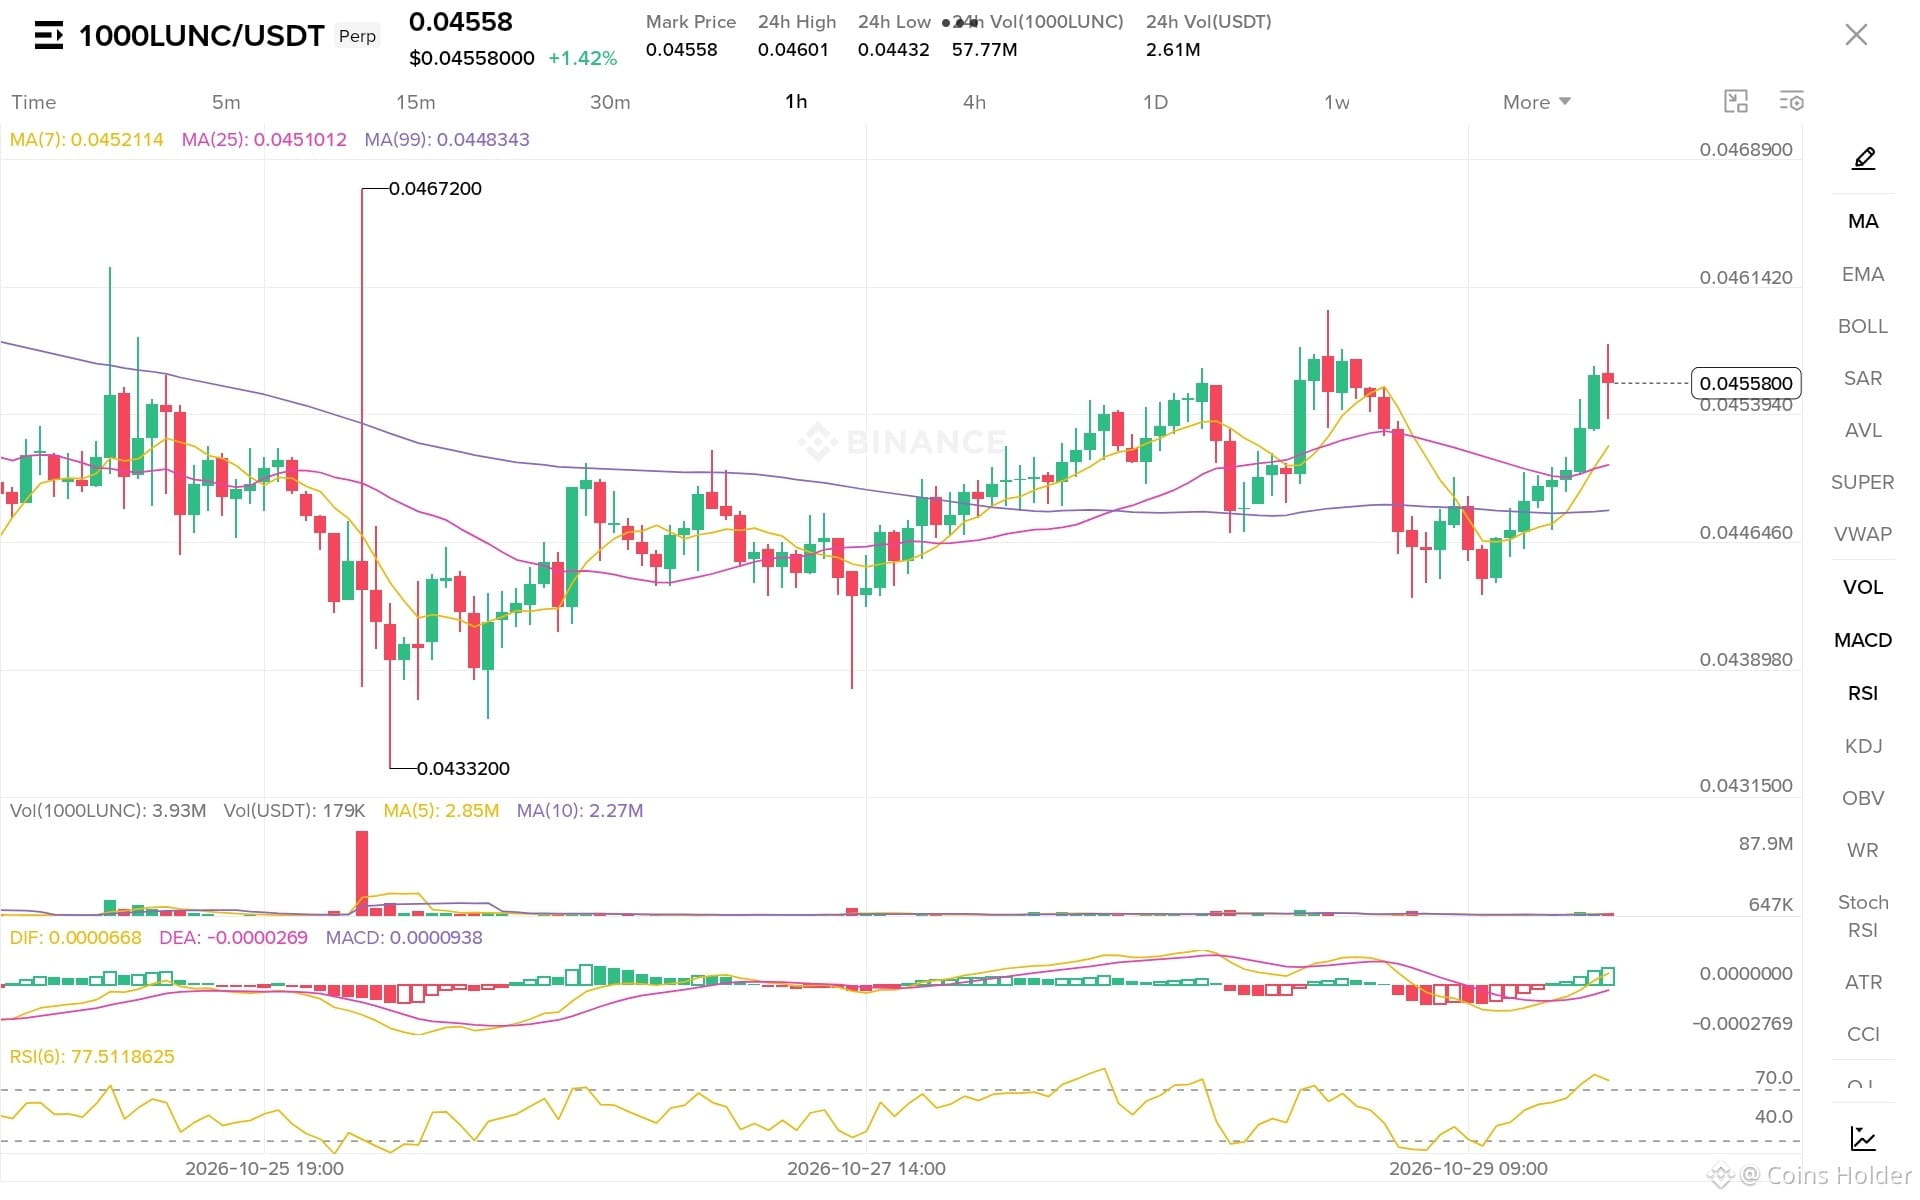
📊 1000LUNC/USDT — Dual-Way Action Plan (1H)
Current Price: 0.04558
🟢 Bullish Breakout Setup:
- Entry Trigger: 0.04650 (Above Resistance)
- Targets: 0.04800 ⬅️ 0.05000 ⬅️ 0.05250
- Stop Loss: 0.04450
🔴 Bearish Breakdown Setup:
- Entry Trigger: 0.04430 (Below Support)
- Targets: 0.04280 ⬅️ 0.04100 ⬅️ 0.03950
- Stop Loss: 0.04520
⚠️ Execution Rules:
- Wait for confirmed breakout or breakdown.
- Cancel the pending opposite order immediately upon execution.
- Maintain strict risk control and avoid chasing sudden pumps.
#DoublePlan #1000LUNC #BinanceSquare
{future}(1000LUNCUSDT)
📊 1000LUNC/USDT — Dual-Way Action Plan (1H)
Current Price: 0.04558
🟢 Bullish Breakout Setup:
- Entry Trigger: 0.04650 (Above Resistance)
- Targets: 0.04800 ⬅️ 0.05000 ⬅️ 0.05250
- Stop Loss: 0.04450
🔴 Bearish Breakdown Setup:
- Entry Trigger: 0.04430 (Below Support)
- Targets: 0.04280 ⬅️ 0.04100 ⬅️ 0.03950
- Stop Loss: 0.04520
⚠️ Execution Rules:
- Wait for confirmed breakout or breakdown.
- Cancel the pending opposite order immediately upon execution.
- Maintain strict risk control and avoid chasing sudden pumps.
#DoublePlan #1000LUNC #BinanceSquare
33
·
--
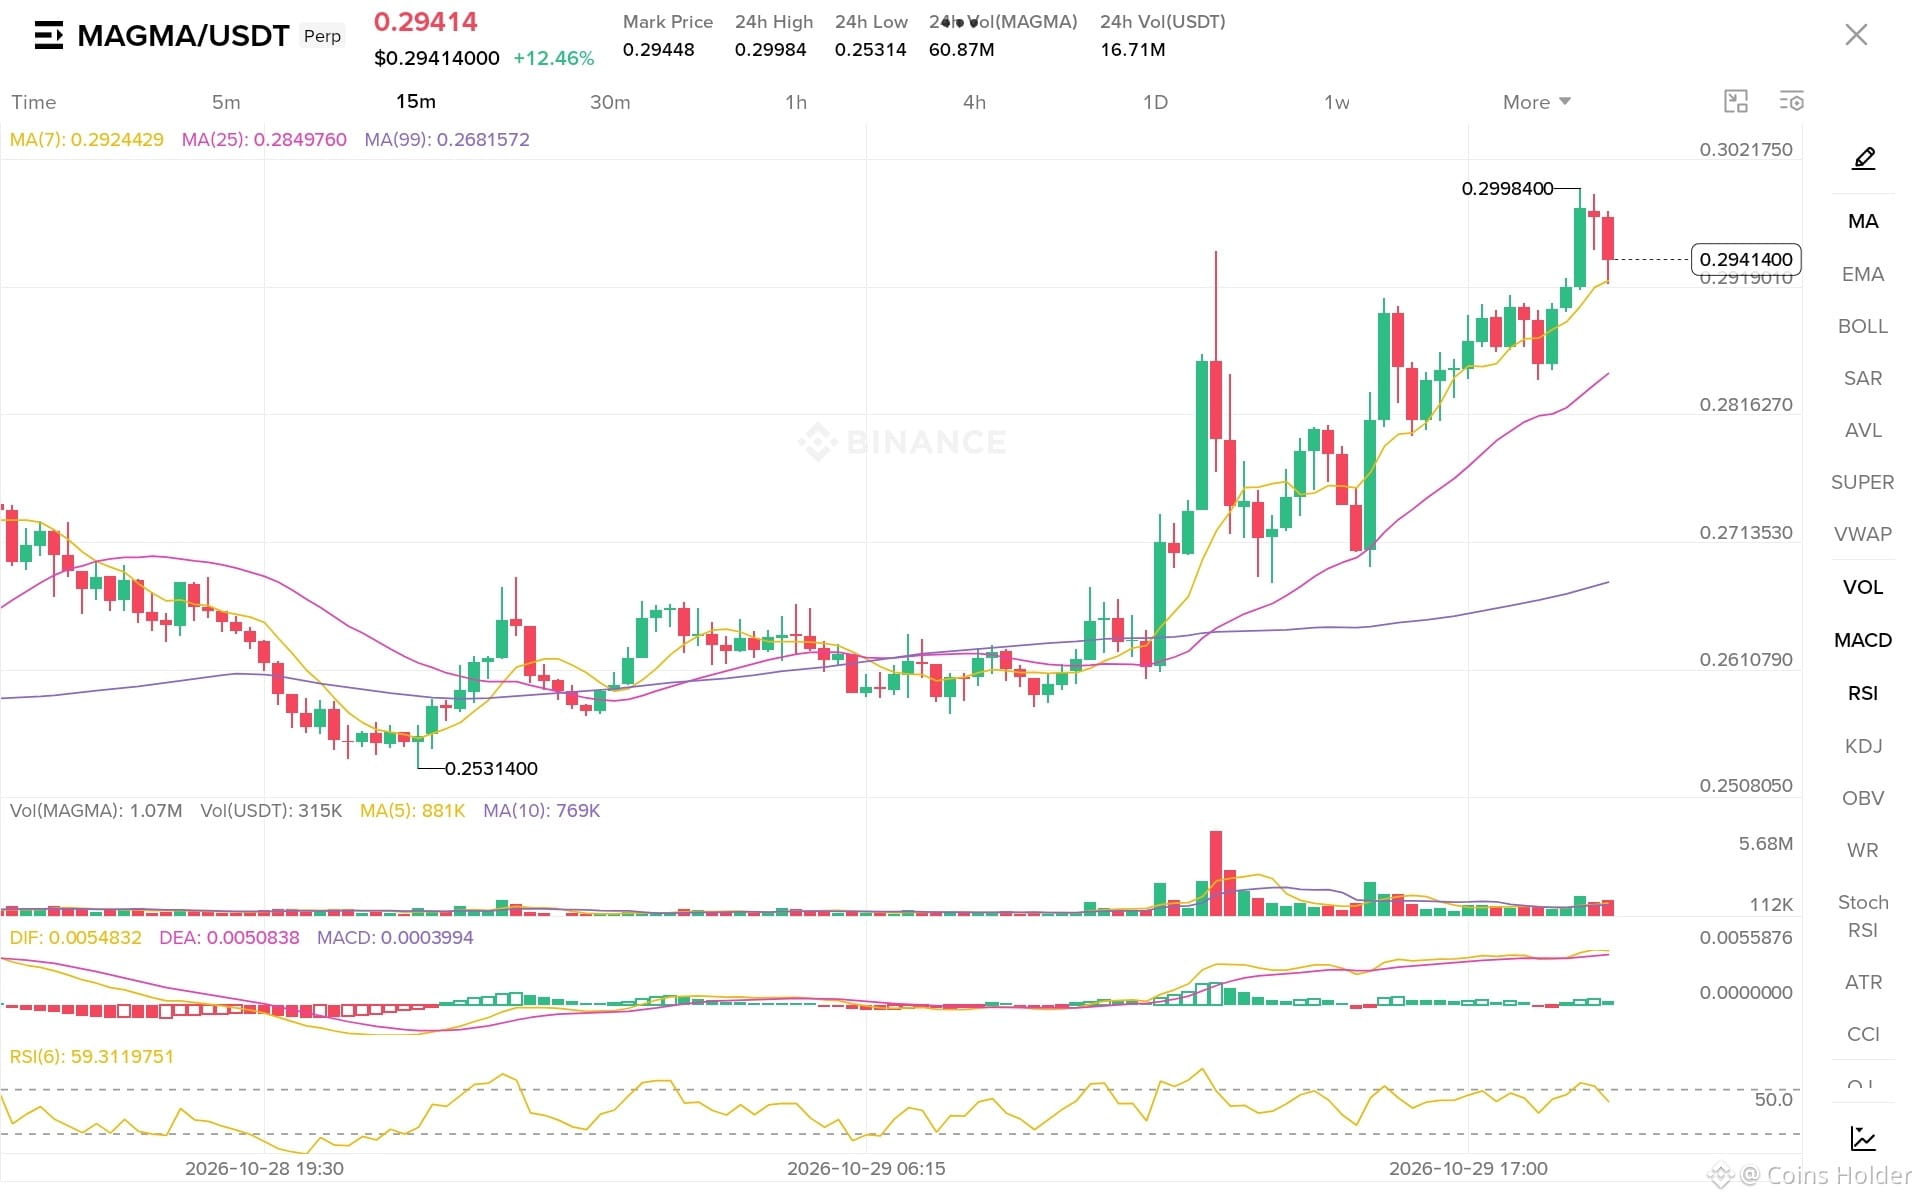
📊 MAGMA/USDT — Dual-Way Action Plan (15m)
Current Price: 0.29414[span_0](start_span)[span_0](end_span)
🟢 Bullish Breakout Setup:
- Entry Trigger: 0.30100 (Above Resistance)
- Targets: 0.31500 ⬅️ 0.33000 ⬅️ 0.35000
- Stop Loss: 0.28500
🔴 Bearish Breakdown Setup:
- Entry Trigger: 0.28000 (Below Support)
- Targets: 0.26815 (MA 99)[span_1](start_span)[span_1](end_span) ⬅️ 0.25300 (24h Low)[span_2](start_span)[span_2](end_span) ⬅️ 0.24000
- Stop Loss: 0.29100
⚠️ Execution Rules:
- Wait for confirmed breakout or breakdown.
- Cancel the pending opposite order immediately upon execution.
- Maintain strict risk control and avoid chasing sudden pumps.
#DoublePlan #MAGMA #BinanceSquare
{future}(MAGMAUSDT)
📊 MAGMA/USDT — Dual-Way Action Plan (15m)
Current Price: 0.29414[span_0](start_span)[span_0](end_span)
🟢 Bullish Breakout Setup:
- Entry Trigger: 0.30100 (Above Resistance)
- Targets: 0.31500 ⬅️ 0.33000 ⬅️ 0.35000
- Stop Loss: 0.28500
🔴 Bearish Breakdown Setup:
- Entry Trigger: 0.28000 (Below Support)
- Targets: 0.26815 (MA 99)[span_1](start_span)[span_1](end_span) ⬅️ 0.25300 (24h Low)[span_2](start_span)[span_2](end_span) ⬅️ 0.24000
- Stop Loss: 0.29100
⚠️ Execution Rules:
- Wait for confirmed breakout or breakdown.
- Cancel the pending opposite order immediately upon execution.
- Maintain strict risk control and avoid chasing sudden pumps.
#DoublePlan #MAGMA #BinanceSquare
46
·
--
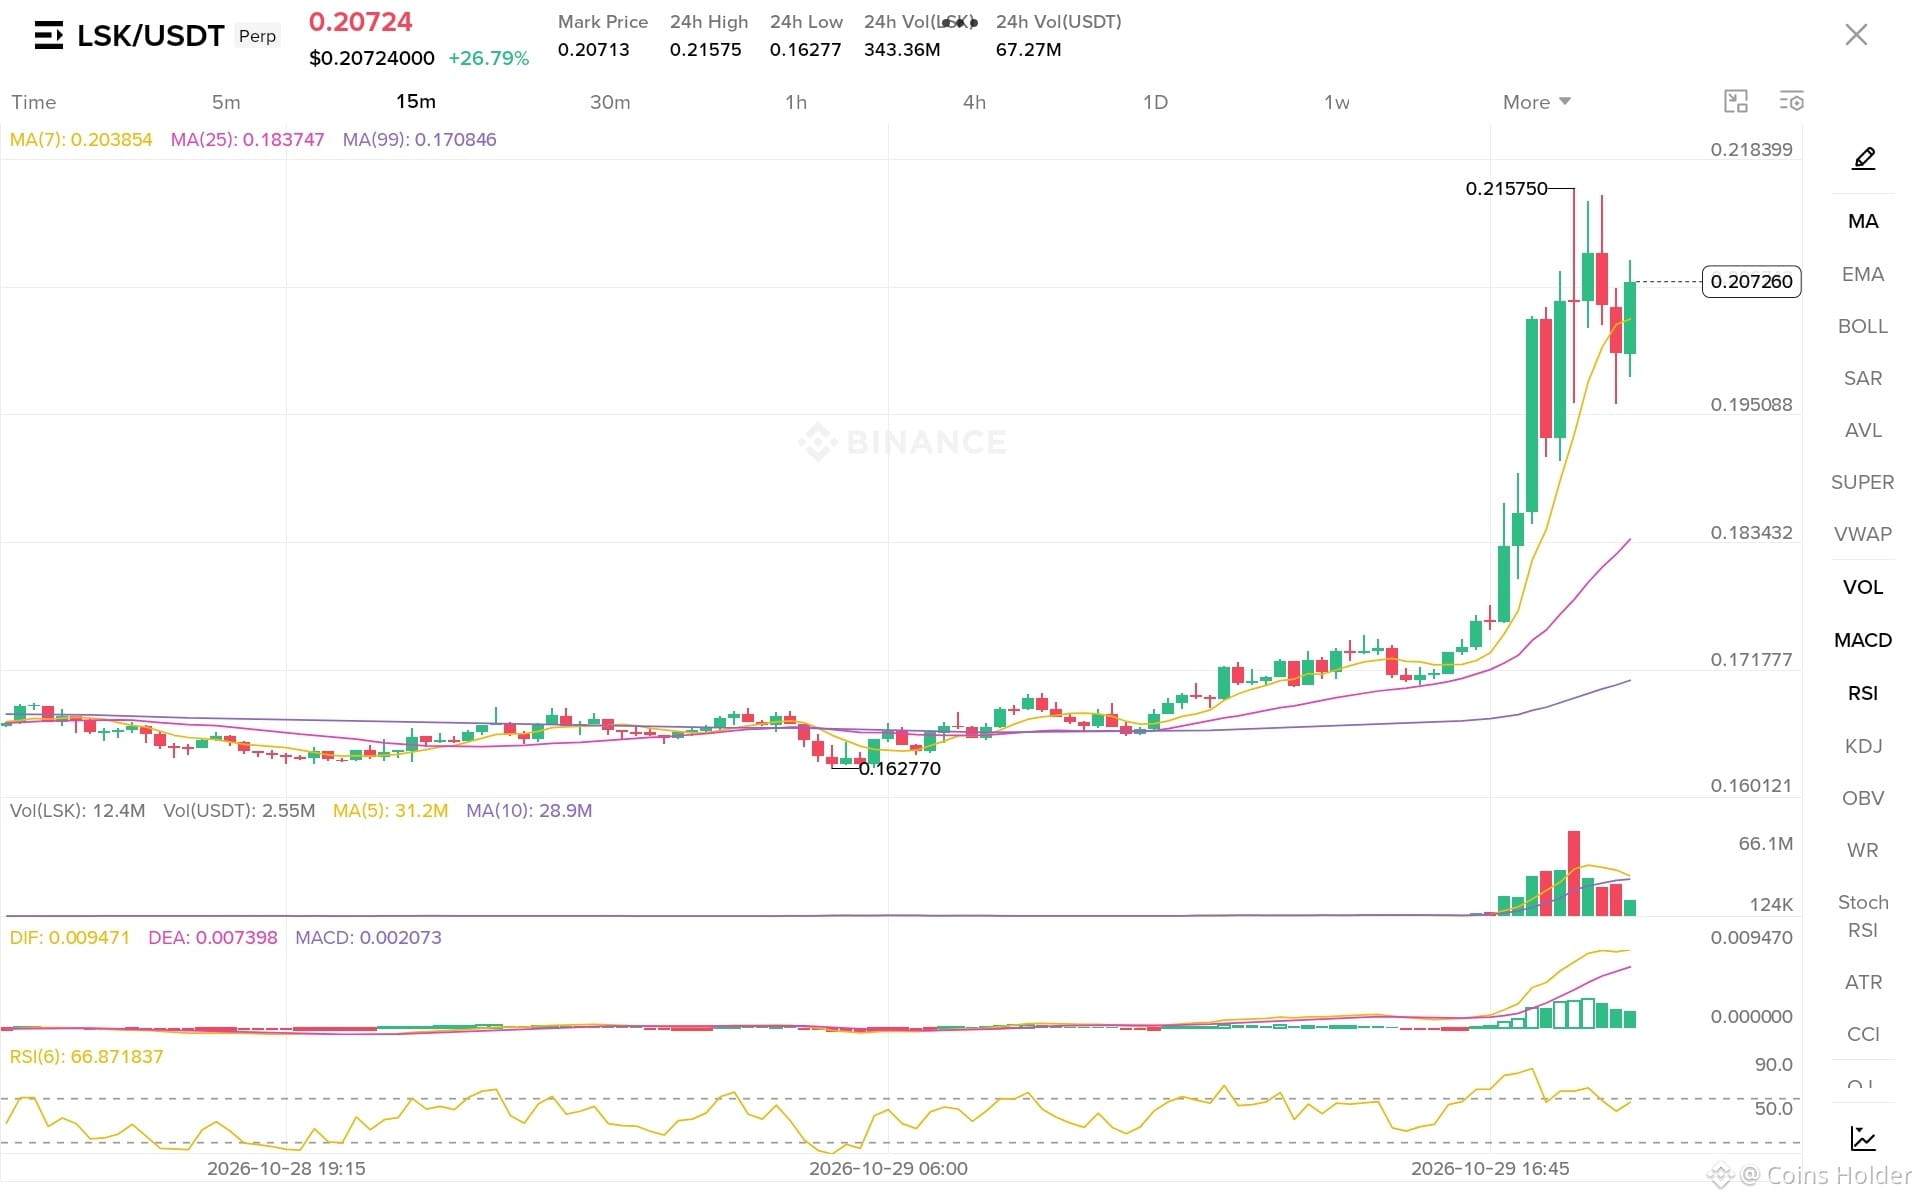
📊 LSK/USDT — Dual-Way Action Plan (15m)
Current Price: 0.20724
🟢 Bullish Breakout Setup:
- Entry Trigger: 0.21600 (Above Resistance)
- Targets: 0.22500 ⬅️ 0.23500 ⬅️ 0.24800
- Stop Loss: 0.20000
🔴 Bearish Breakdown Setup:
- Entry Trigger: 0.19400 (Below Support)
- Targets: 0.18347 (MA 25) ⬅️ 0.17084 (MA 99) ⬅️ 0.15500
- Stop Loss: 0.20400
⚠️ Execution Rules:
- Wait for confirmed breakout or breakdown.
- Cancel the pending opposite order immediately upon execution.
- Maintain strict risk control and avoid chasing sudden pumps.
#DoublePlan #LSK #BinanceSquare
{future}(LSKUSDT)
📊 LSK/USDT — Dual-Way Action Plan (15m)
Current Price: 0.20724
🟢 Bullish Breakout Setup:
- Entry Trigger: 0.21600 (Above Resistance)
- Targets: 0.22500 ⬅️ 0.23500 ⬅️ 0.24800
- Stop Loss: 0.20000
🔴 Bearish Breakdown Setup:
- Entry Trigger: 0.19400 (Below Support)
- Targets: 0.18347 (MA 25) ⬅️ 0.17084 (MA 99) ⬅️ 0.15500
- Stop Loss: 0.20400
⚠️ Execution Rules:
- Wait for confirmed breakout or breakdown.
- Cancel the pending opposite order immediately upon execution.
- Maintain strict risk control and avoid chasing sudden pumps.
#DoublePlan #LSK #BinanceSquare
35
·
--
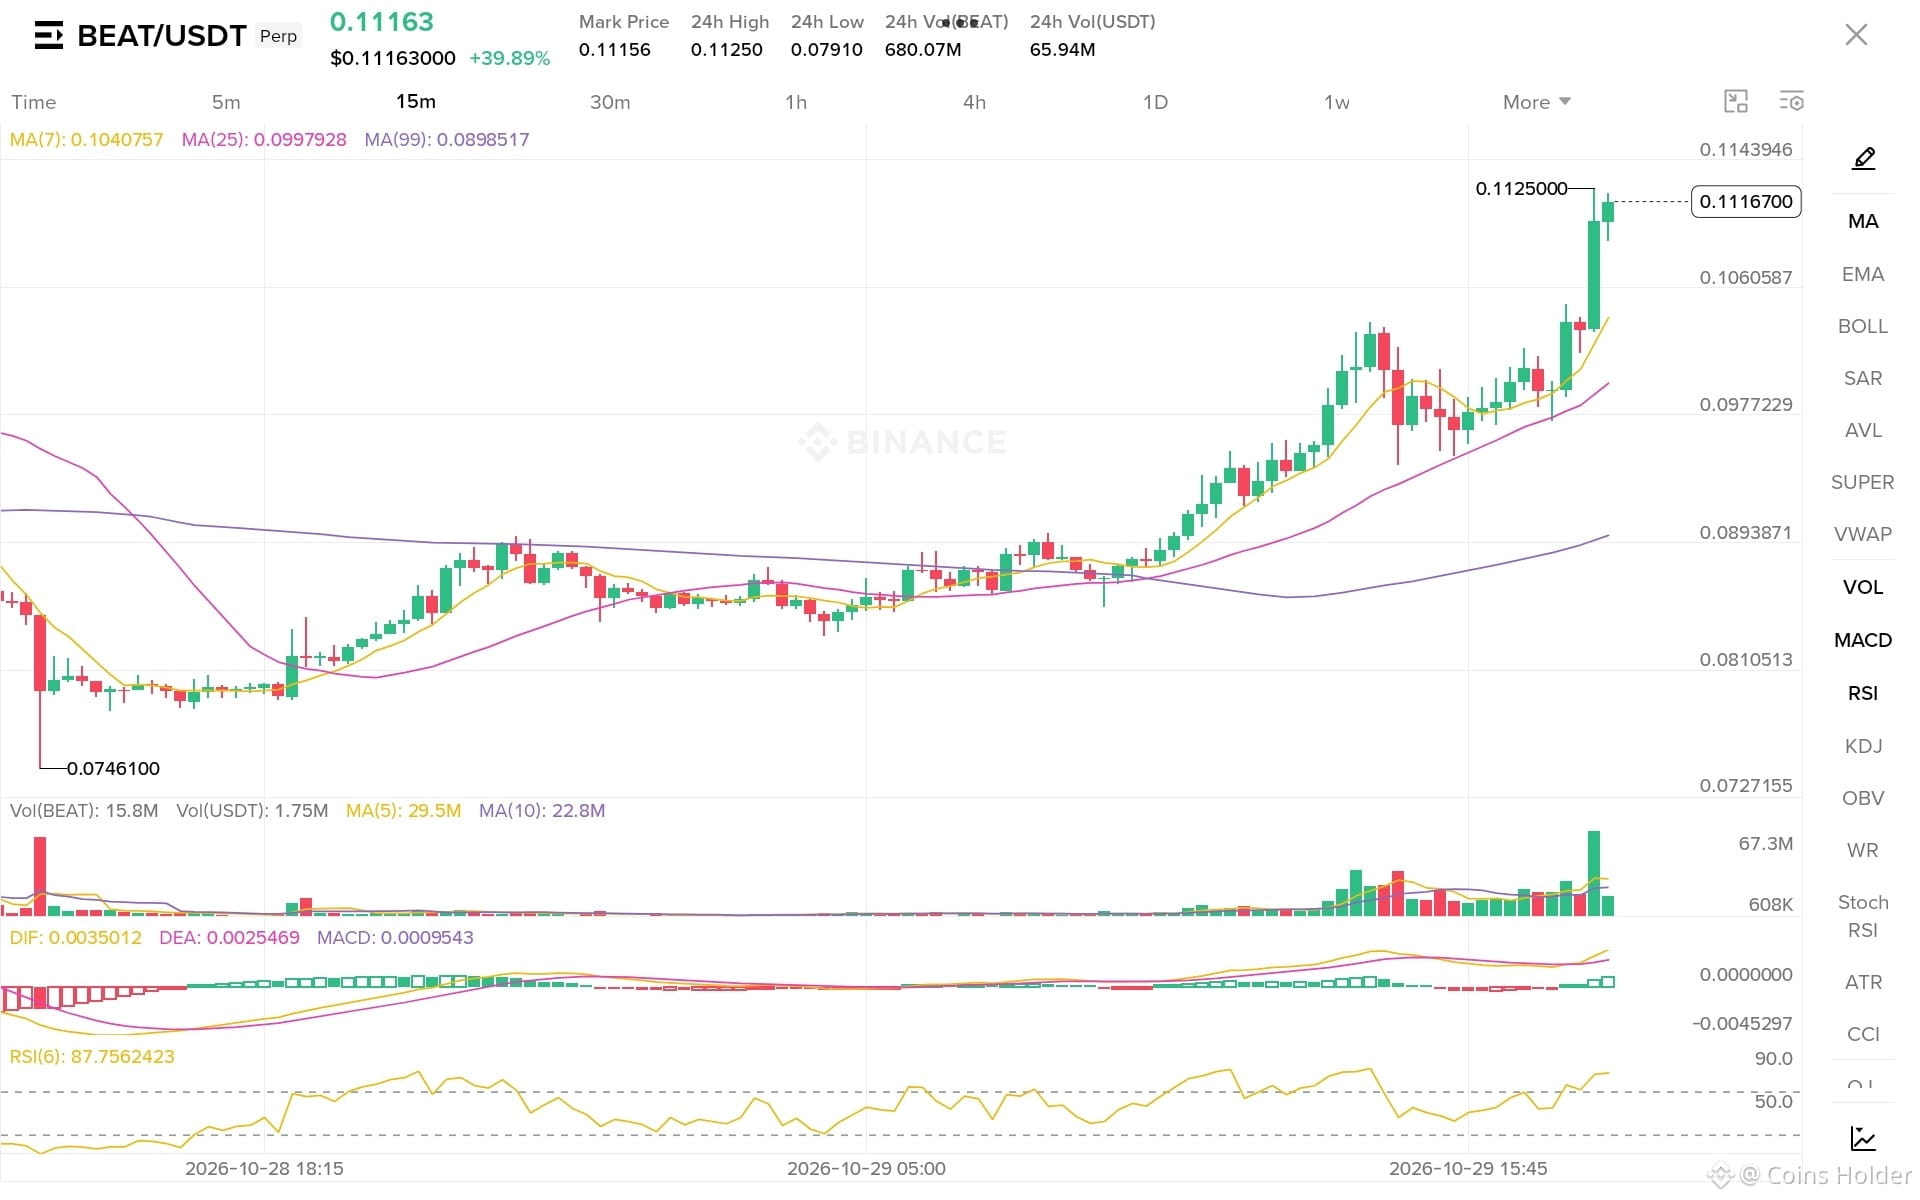
📊 BEAT/USDT — Dual-Way Action Plan (15m)
Current Price: 0.11163
🟢 Bullish Breakout Setup:
- Entry Trigger: 0.11300 (Above Resistance)
- Targets: 0.11800 ⬅️ 0.12400 ⬅️ 0.13000
- Stop Loss: 0.10800
🔴 Bearish Breakdown Setup:
- Entry Trigger: 0.10500 (Below Support)
- Targets: 0.09979 (MA 25) ⬅️ 0.09400 ⬅️ 0.08985 (MA 99)
- Stop Loss: 0.10950
⚠️ Execution Rules:
- Wait for confirmed breakout or breakdown.
- Cancel the pending opposite order immediately upon execution.
- Maintain strict risk control and avoid chasing sudden pumps.
#DoublePlan #BEAT #BinanceSquare
{future}(BEATUSDT)
📊 BEAT/USDT — Dual-Way Action Plan (15m)
Current Price: 0.11163
🟢 Bullish Breakout Setup:
- Entry Trigger: 0.11300 (Above Resistance)
- Targets: 0.11800 ⬅️ 0.12400 ⬅️ 0.13000
- Stop Loss: 0.10800
🔴 Bearish Breakdown Setup:
- Entry Trigger: 0.10500 (Below Support)
- Targets: 0.09979 (MA 25) ⬅️ 0.09400 ⬅️ 0.08985 (MA 99)
- Stop Loss: 0.10950
⚠️ Execution Rules:
- Wait for confirmed breakout or breakdown.
- Cancel the pending opposite order immediately upon execution.
- Maintain strict risk control and avoid chasing sudden pumps.
#DoublePlan #BEAT #BinanceSquare
1
353
·
--
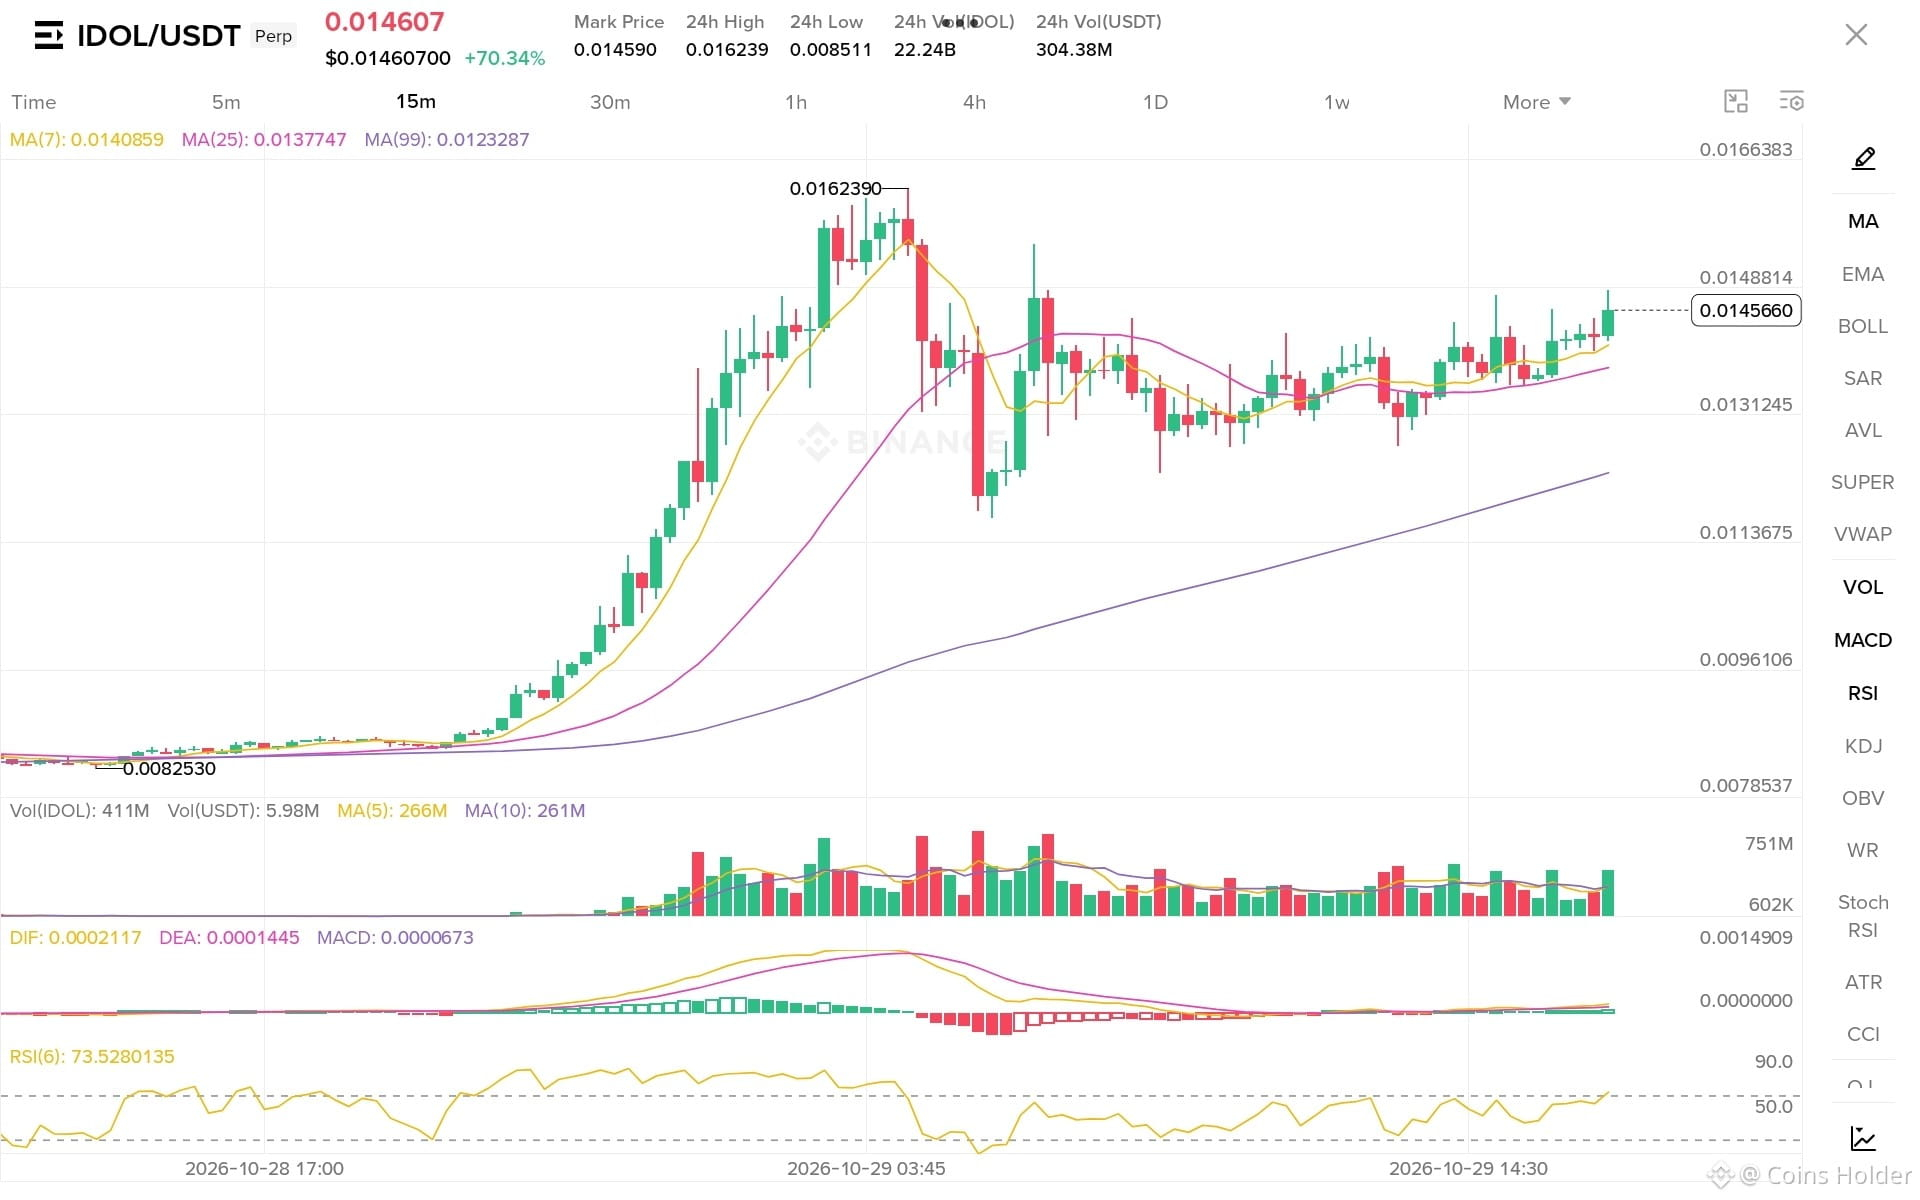
IDOL/USDT Dual Plan | The Breakout Has Paused — What Comes Next?
IDOL has already made a massive move, rising over 70% in 24 hours. Now the question is whether buyers can push through resistance or the market needs another pullback first.
On the 15m chart, price is holding above the MA(7), MA(25), and MA(99). The short-term structure is improving, but the previous high at 0.016239 is still the key obstacle. I would rather let price confirm its next move than chase the rally.
📈 PLAN A — LONG
Entry: Break above 0.01490 with confirmation
Stop Loss: 0.01435
Take Profit 1: 0.01550
Take Profit 2: 0.01620
📉 PLAN B — SHORT
Entry: Break below 0.01375 with confirmation
Stop Loss: 0.01415
Take Profit 1: 0.01315
Take Profit 2: 0.01250
⚠️ Execution rules:
• Use conditional stop orders for both scenarios.
• Once one order triggers, cancel the opposite order.
• Never activate both directions simultaneously.
• These are technical scenario levels, not guaranteed outcomes. Manage leverage and risk carefully.
💬 IDOL is consolidating after a powerful rally. Would you trade the next breakout or wait for a deeper pullback?
{future}(IDOLUSDT)
IDOL/USDT Dual Plan | The Breakout Has Paused — What Comes Next?
IDOL has already made a massive move, rising over 70% in 24 hours. Now the question is whether buyers can push through resistance or the market needs another pullback first.
On the 15m chart, price is holding above the MA(7), MA(25), and MA(99). The short-term structure is improving, but the previous high at 0.016239 is still the key obstacle. I would rather let price confirm its next move than chase the rally.
📈 PLAN A — LONG
Entry: Break above 0.01490 with confirmation
Stop Loss: 0.01435
Take Profit 1: 0.01550
Take Profit 2: 0.01620
📉 PLAN B — SHORT
Entry: Break below 0.01375 with confirmation
Stop Loss: 0.01415
Take Profit 1: 0.01315
Take Profit 2: 0.01250
⚠️ Execution rules:
• Use conditional stop orders for both scenarios.
• Once one order triggers, cancel the opposite order.
• Never activate both directions simultaneously.
• These are technical scenario levels, not guaranteed outcomes. Manage leverage and risk carefully.
💬 IDOL is consolidating after a powerful rally. Would you trade the next breakout or wait for a deeper pullback?
233
·
--
Рост
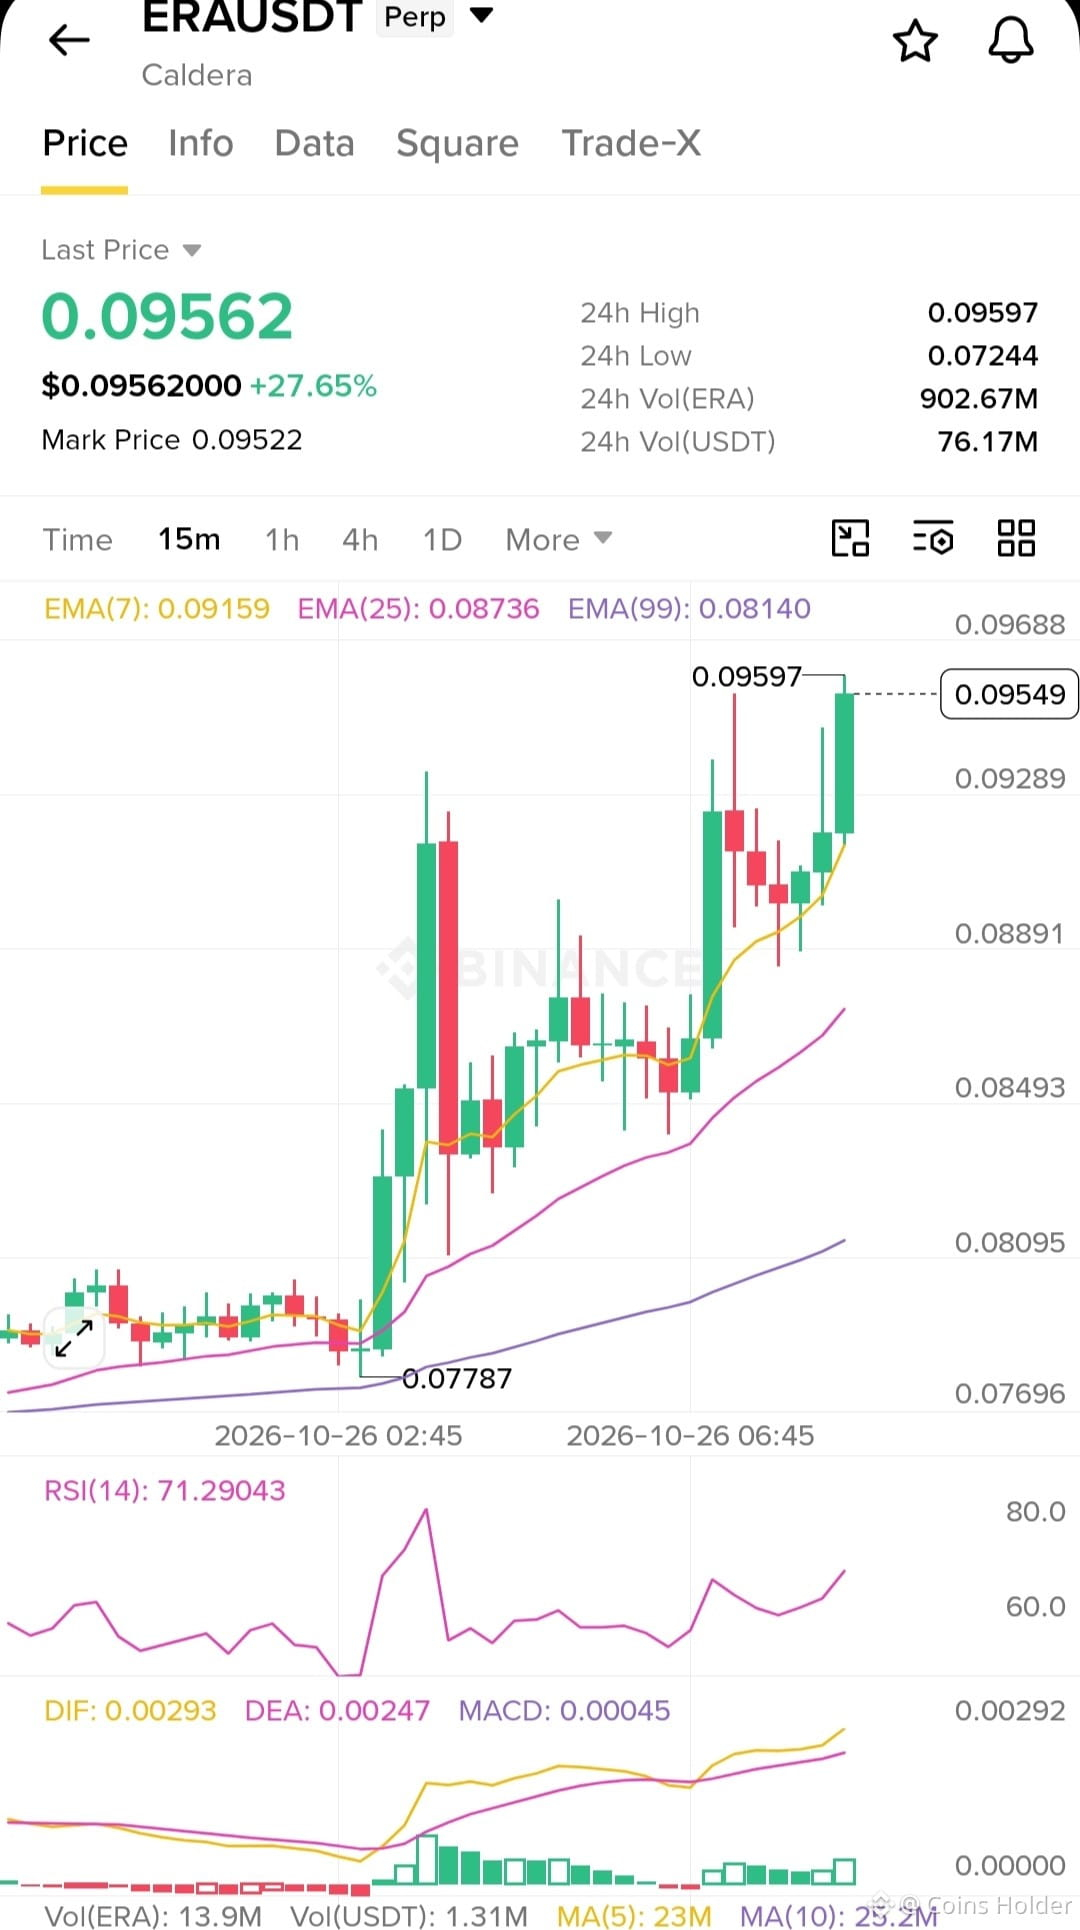
📊 ERA/USDT — Dual-Way Action Plan (15m)
Current Price: 0.09562
🟢 Bullish Breakout Setup:
- Entry Trigger: 0.09650 (Above Resistance)
- Targets: 0.10000 ⬅️ 0.10500 ⬅️ 0.11000
- Stop Loss: 0.09200
🔴 Bearish Breakdown Setup:
- Entry Trigger: 0.09000 (Below Support)
- Targets: 0.08736 (EMA 25) ⬅️ 0.08140 (EMA 99) ⬅️ 0.07500
- Stop Loss: 0.09400
⚠️ Execution Rules:
- Wait for confirmed breakout or breakdown.
- Cancel the pending opposite order immediately upon execution.
- Maintain strict risk control and avoid chasing sudden pumps.
#DoublePlan #ERA #BinanceSquare
{future}(ERAUSDT)
📊 ERA/USDT — Dual-Way Action Plan (15m)
Current Price: 0.09562
🟢 Bullish Breakout Setup:
- Entry Trigger: 0.09650 (Above Resistance)
- Targets: 0.10000 ⬅️ 0.10500 ⬅️ 0.11000
- Stop Loss: 0.09200
🔴 Bearish Breakdown Setup:
- Entry Trigger: 0.09000 (Below Support)
- Targets: 0.08736 (EMA 25) ⬅️ 0.08140 (EMA 99) ⬅️ 0.07500
- Stop Loss: 0.09400
⚠️ Execution Rules:
- Wait for confirmed breakout or breakdown.
- Cancel the pending opposite order immediately upon execution.
- Maintain strict risk control and avoid chasing sudden pumps.
#DoublePlan #ERA #BinanceSquare
91
·
--
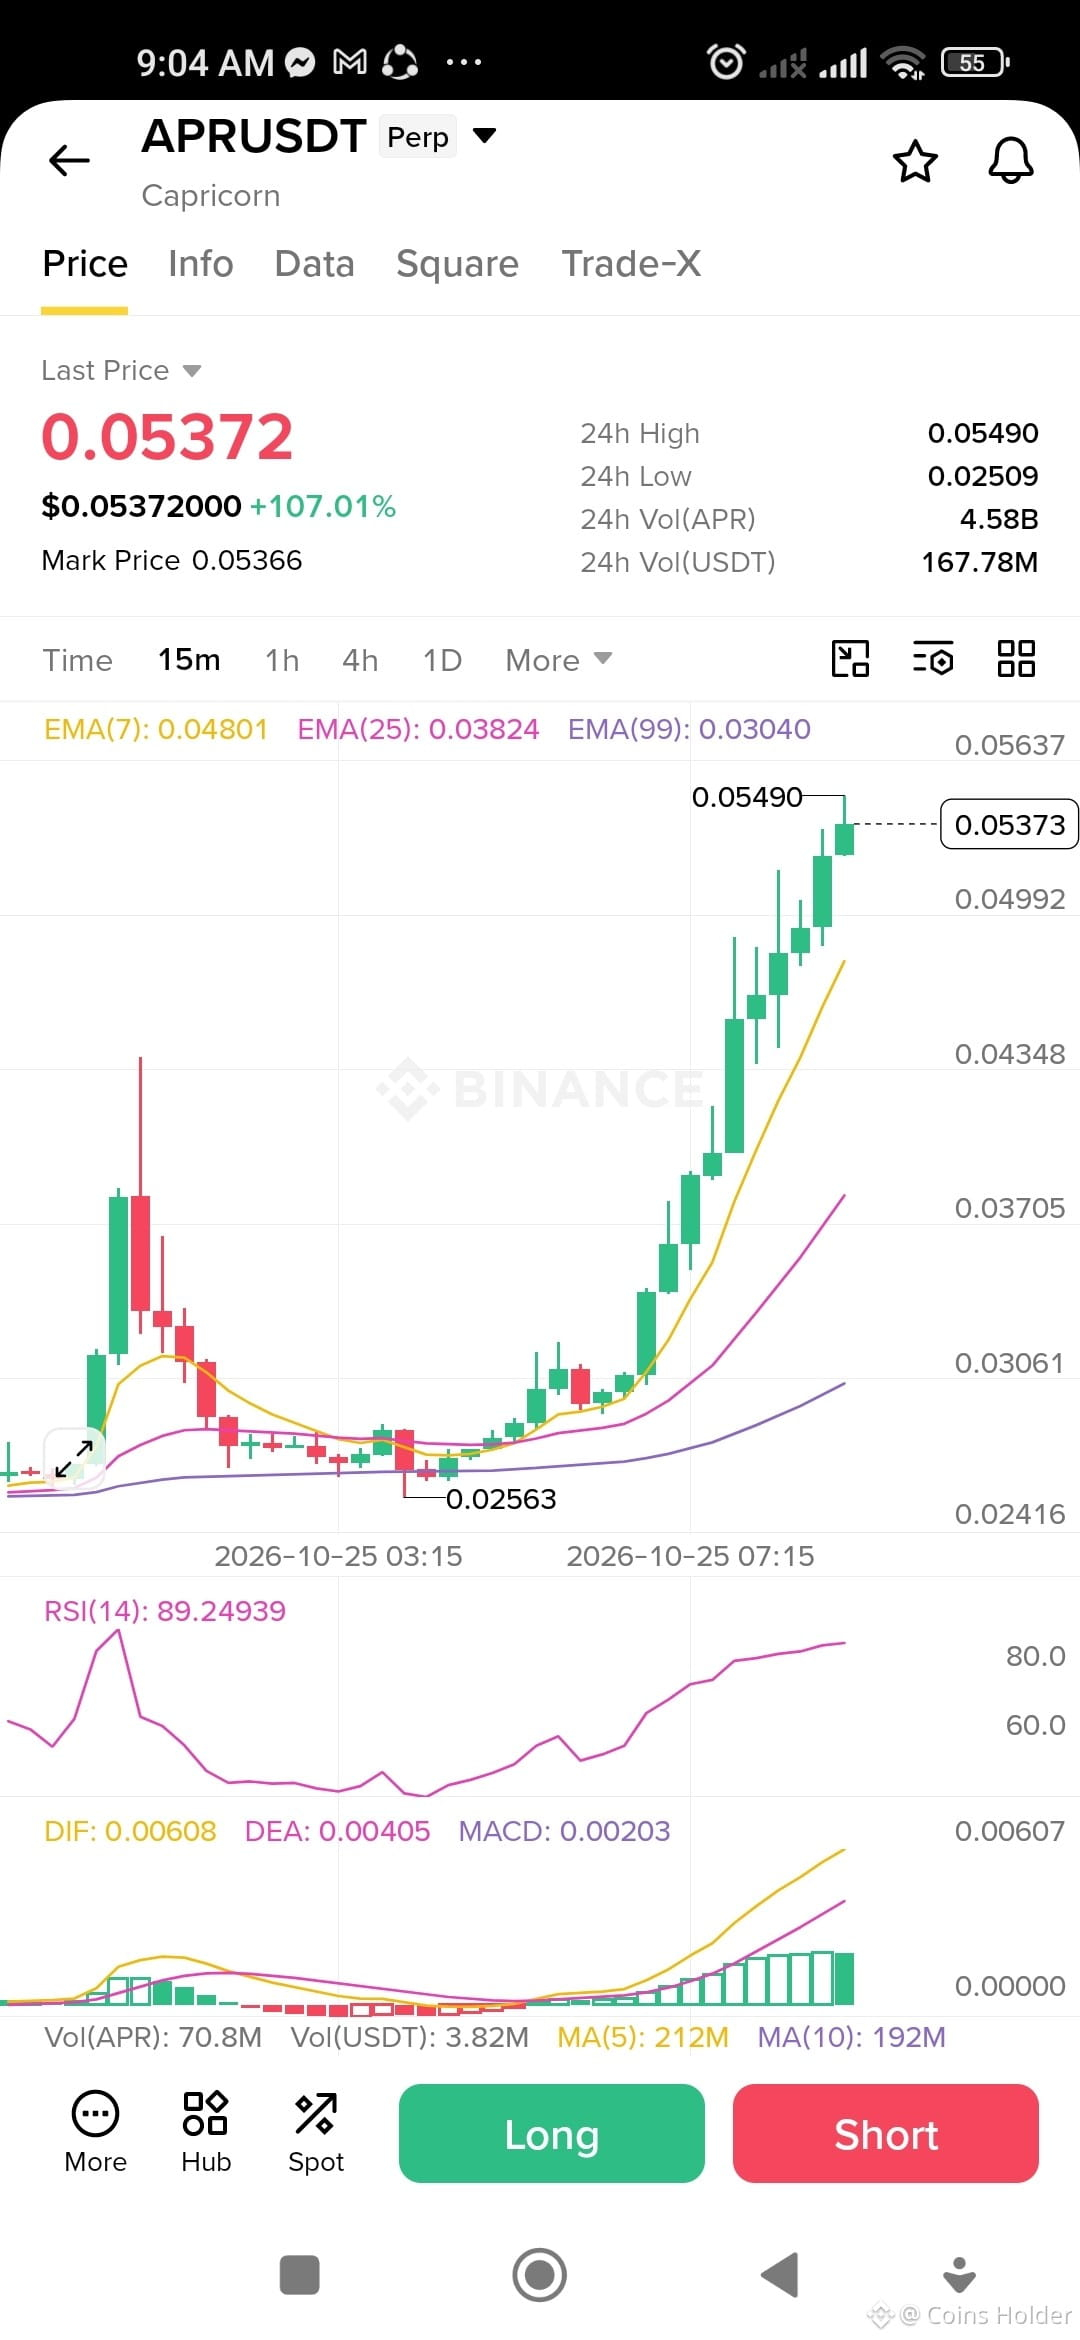
📊 APR/USDT — Start trade Dual-Way Action Plan (15m)
Current Price: 0.05372
🟢 Bullish Breakout Setup:
- Entry Trigger: 0.05520 (Above Resistance)
- Targets: 0.05800 ⬅️ 0.06100 ⬅️ 0.06500
- Stop Loss: 0.05150
🔴 Bearish Breakdown Setup:
- Entry Trigger: 0.04750 (Below Support)
- Targets: 0.04300 ⬅️ 0.03824 (EMA 25) ⬅️ 0.03040 (EMA 99)
- Stop Loss: 0.05100
⚠️ Execution Rules:
- Wait for confirmed breakout or breakdown.
- Cancel the pending opposite order immediately upon execution.
- Maintain strict risk control and avoid chasing sudden pumps.
#DoublePlan #APR #BinanceSquare
{future}(APRUSDT)
📊 APR/USDT — Start trade Dual-Way Action Plan (15m)
Current Price: 0.05372
🟢 Bullish Breakout Setup:
- Entry Trigger: 0.05520 (Above Resistance)
- Targets: 0.05800 ⬅️ 0.06100 ⬅️ 0.06500
- Stop Loss: 0.05150
🔴 Bearish Breakdown Setup:
- Entry Trigger: 0.04750 (Below Support)
- Targets: 0.04300 ⬅️ 0.03824 (EMA 25) ⬅️ 0.03040 (EMA 99)
- Stop Loss: 0.05100
⚠️ Execution Rules:
- Wait for confirmed breakout or breakdown.
- Cancel the pending opposite order immediately upon execution.
- Maintain strict risk control and avoid chasing sudden pumps.
#DoublePlan #APR #BinanceSquare
77
·
--
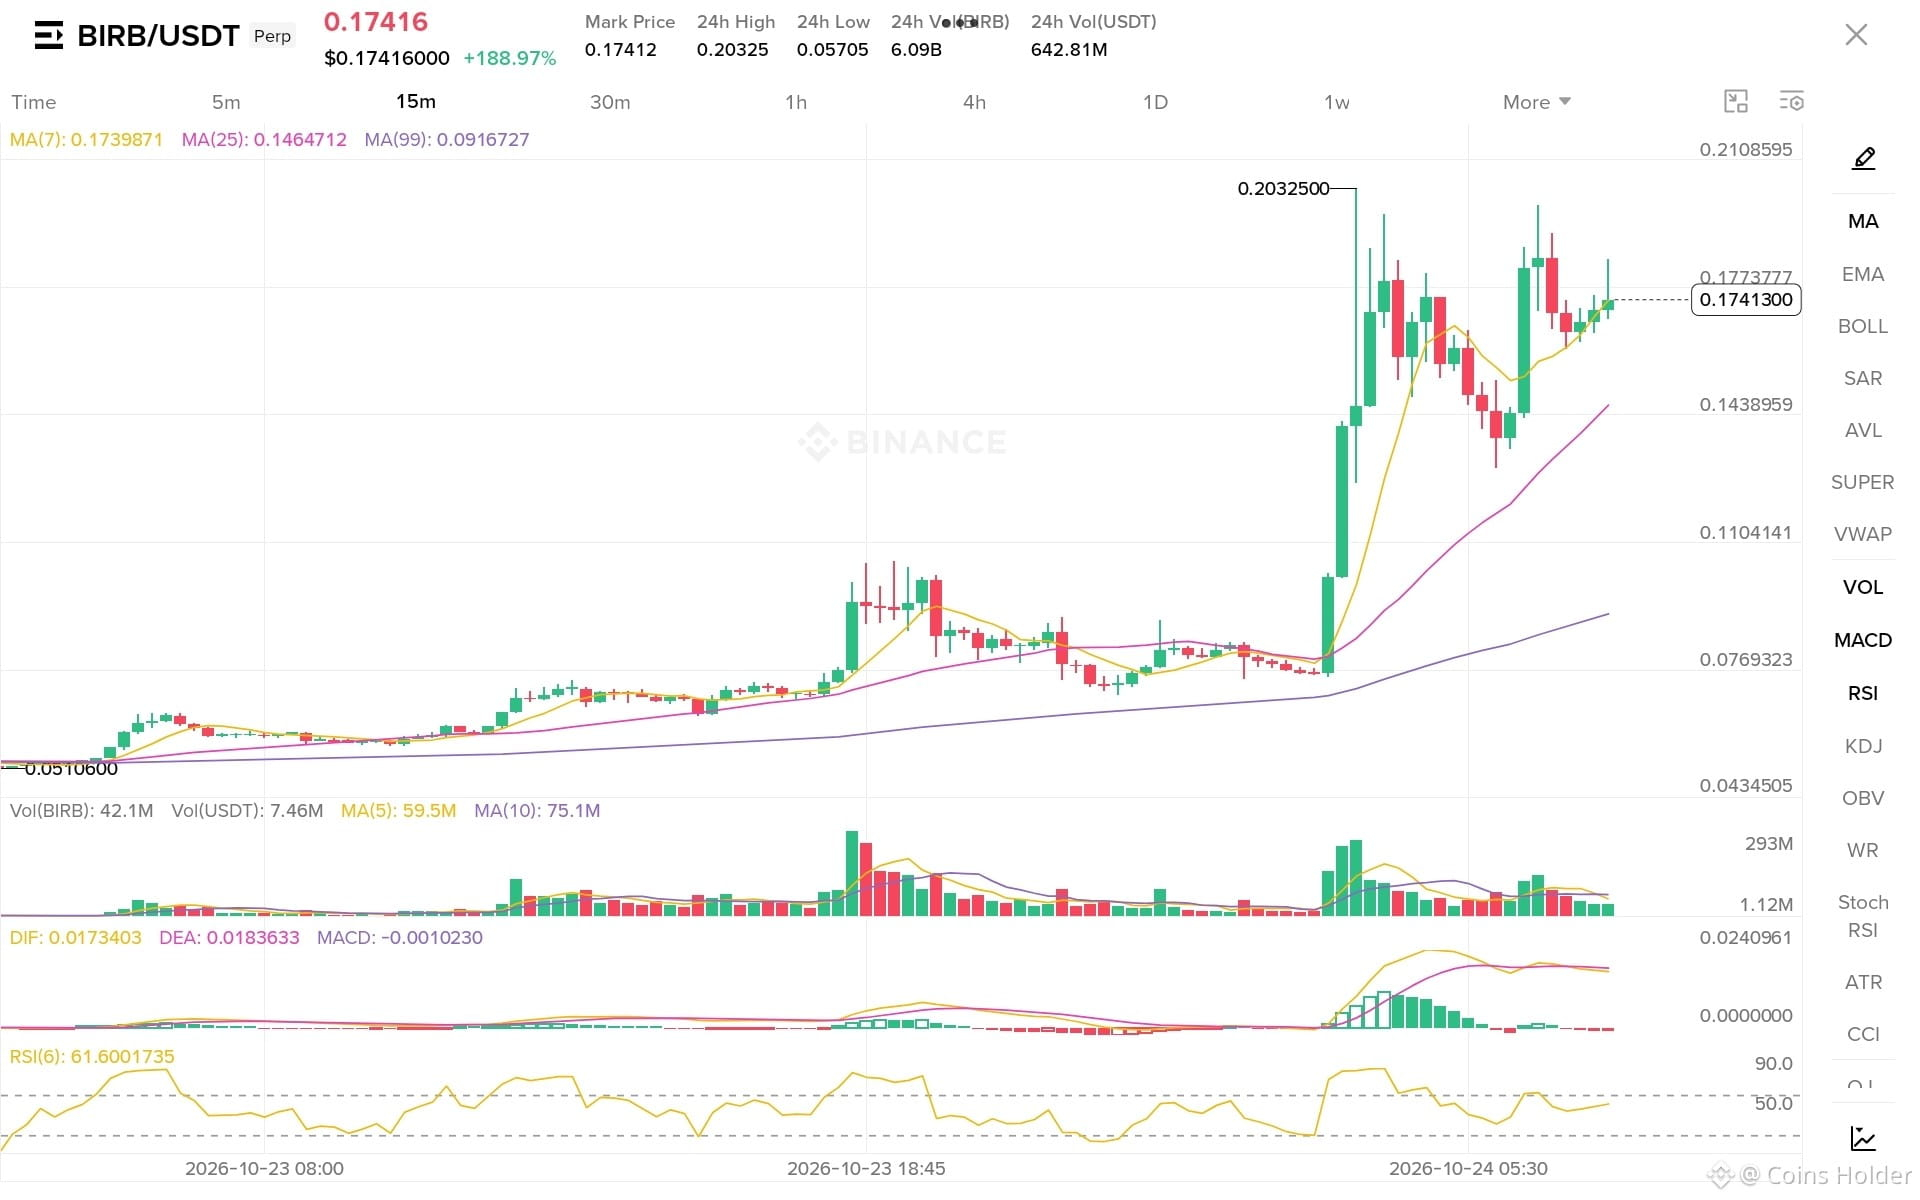
📊 BIRB/USDT — Dual-Way Action Plan (15m)
Current Price: 0.17416
🟢 Bullish Breakout Setup:
- Entry Trigger: 0.18000 (Above Resistance)
- Targets: 0.19200 ⬅️ 0.20325 (24h High) ⬅️ 0.21500
- Stop Loss: 0.16500
🔴 Bearish Breakdown Setup:
- Entry Trigger: 0.16000 (Below Support)
- Targets: 0.14647 (MA 25) ⬅️ 0.12000 ⬅️ 0.09167 (MA 99)
- Stop Loss: 0.17200
⚠️ Execution Rules:
- Wait for confirmed breakout or breakdown.
- Cancel the pending opposite order immediately upon execution.
- Maintain strict risk control and avoid chasing sudden pumps.
#DoublePlan #BIRB #BinanceSquare
{future}(BIRBUSDT)
📊 BIRB/USDT — Dual-Way Action Plan (15m)
Current Price: 0.17416
🟢 Bullish Breakout Setup:
- Entry Trigger: 0.18000 (Above Resistance)
- Targets: 0.19200 ⬅️ 0.20325 (24h High) ⬅️ 0.21500
- Stop Loss: 0.16500
🔴 Bearish Breakdown Setup:
- Entry Trigger: 0.16000 (Below Support)
- Targets: 0.14647 (MA 25) ⬅️ 0.12000 ⬅️ 0.09167 (MA 99)
- Stop Loss: 0.17200
⚠️ Execution Rules:
- Wait for confirmed breakout or breakdown.
- Cancel the pending opposite order immediately upon execution.
- Maintain strict risk control and avoid chasing sudden pumps.
#DoublePlan #BIRB #BinanceSquare
74
·
--
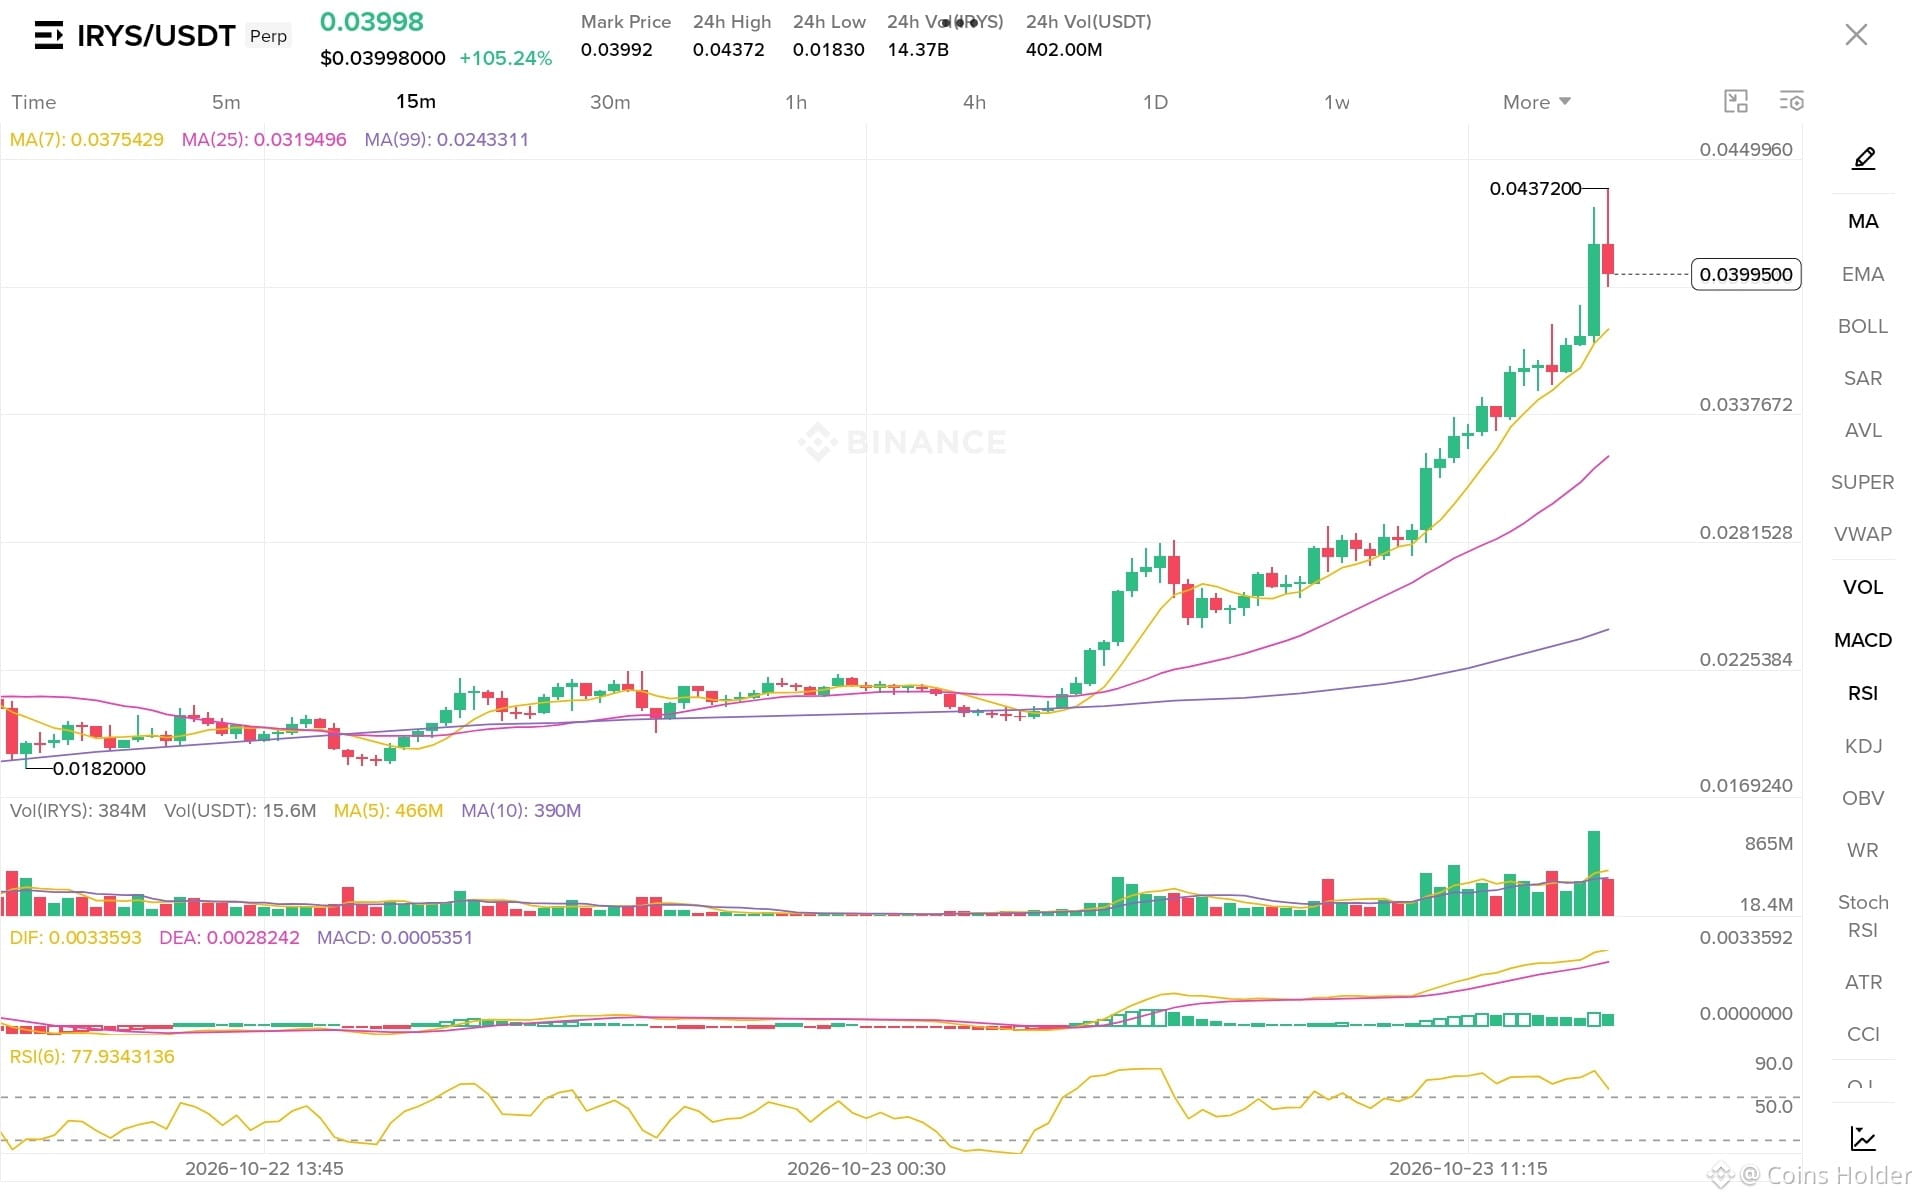
📊 IRYS/USDT — Dual-Way Action Plan (15m)
Current Price: 0.03998
🟢 Bullish Breakout Setup:
- Entry Trigger: 0.04400 (Above Resistance)
- Targets: 0.04700 ⬅️ 0.05000 ⬅️ 0.05400
- Stop Loss: 0.03750
🔴 Bearish Breakdown Setup:
- Entry Trigger: 0.03650 (Below Support)
- Targets: 0.03200 (MA 25) ⬅️ 0.02800 ⬅️ 0.02430 (MA 99)
- Stop Loss: 0.03950
⚠️ Execution Rules:
- Wait for confirmed breakout or breakdown.
- Cancel the pending opposite order immediately upon execution.
- Maintain strict risk control and avoid chasing sudden pumps.
#DoublePlan #IRYS #BinanceSquare
{future}(IRYSUSDT)
📊 IRYS/USDT — Dual-Way Action Plan (15m)
Current Price: 0.03998
🟢 Bullish Breakout Setup:
- Entry Trigger: 0.04400 (Above Resistance)
- Targets: 0.04700 ⬅️ 0.05000 ⬅️ 0.05400
- Stop Loss: 0.03750
🔴 Bearish Breakdown Setup:
- Entry Trigger: 0.03650 (Below Support)
- Targets: 0.03200 (MA 25) ⬅️ 0.02800 ⬅️ 0.02430 (MA 99)
- Stop Loss: 0.03950
⚠️ Execution Rules:
- Wait for confirmed breakout or breakdown.
- Cancel the pending opposite order immediately upon execution.
- Maintain strict risk control and avoid chasing sudden pumps.
#DoublePlan #IRYS #BinanceSquare
90
·
--
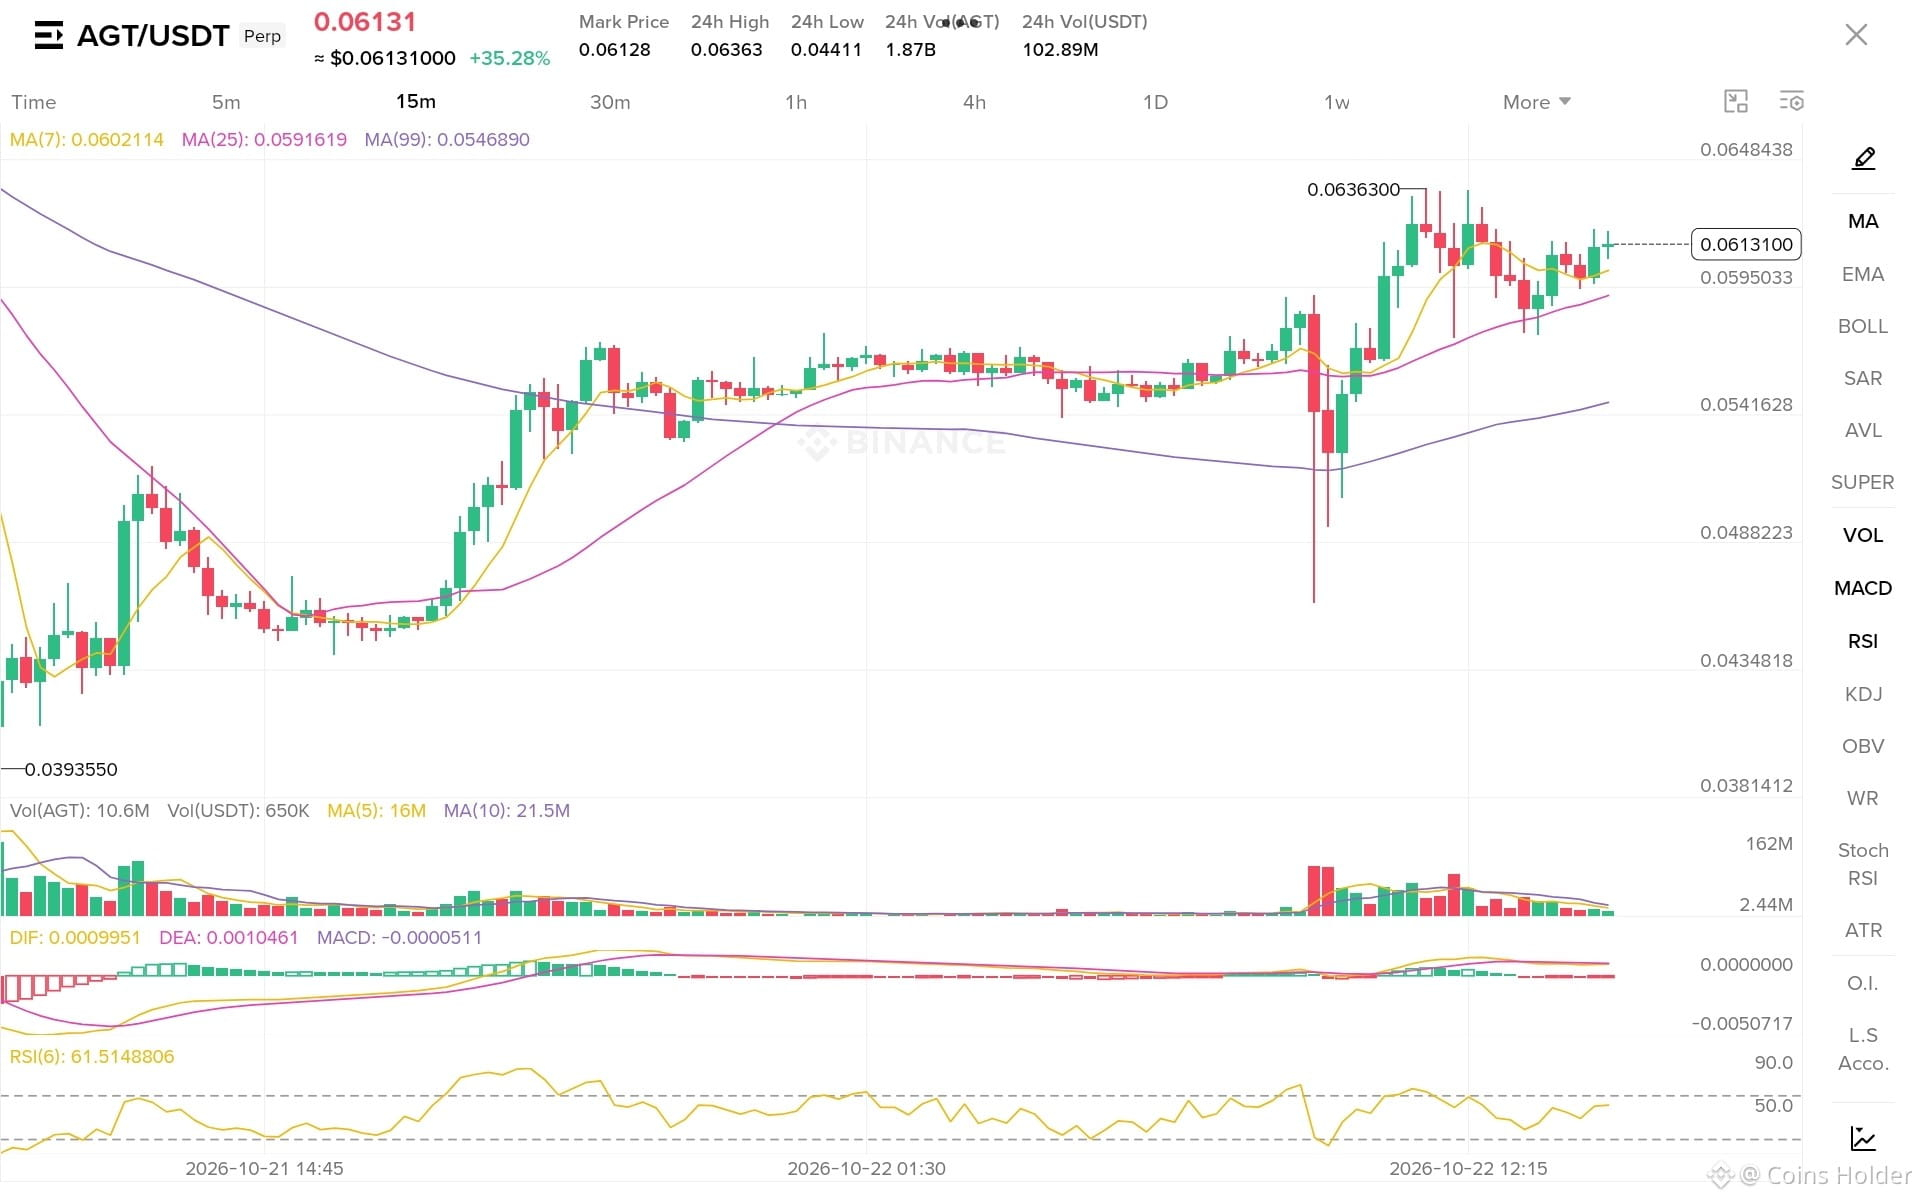
📊 AGT/USDT — Dual-Way Action Plan (15m)
Current Price: 0.06131
🟢 Bullish Breakout Setup:
- Entry Trigger: 0.06400 (Above Resistance)
- Targets: 0.06700 ⬅️ 0.07000 ⬅️ 0.07400
- Stop Loss: 0.05900
🔴 Bearish Breakdown Setup:
- Entry Trigger: 0.05850 (Below Support)
- Targets: 0.05460 (MA 99) ⬅️ 0.05100 ⬅️ 0.04750
- Stop Loss: 0.06050
⚠️ Execution Rules:
- Wait for confirmed breakout or breakdown.
- Cancel the pending opposite order immediately upon execution.
- Maintain strict risk control and avoid chasing sudden pumps.
#DoublePlan #AGT #BinanceSquare
{future}(AGTUSDT)
📊 AGT/USDT — Dual-Way Action Plan (15m)
Current Price: 0.06131
🟢 Bullish Breakout Setup:
- Entry Trigger: 0.06400 (Above Resistance)
- Targets: 0.06700 ⬅️ 0.07000 ⬅️ 0.07400
- Stop Loss: 0.05900
🔴 Bearish Breakdown Setup:
- Entry Trigger: 0.05850 (Below Support)
- Targets: 0.05460 (MA 99) ⬅️ 0.05100 ⬅️ 0.04750
- Stop Loss: 0.06050
⚠️ Execution Rules:
- Wait for confirmed breakout or breakdown.
- Cancel the pending opposite order immediately upon execution.
- Maintain strict risk control and avoid chasing sudden pumps.
#DoublePlan #AGT #BinanceSquare
3
·
--
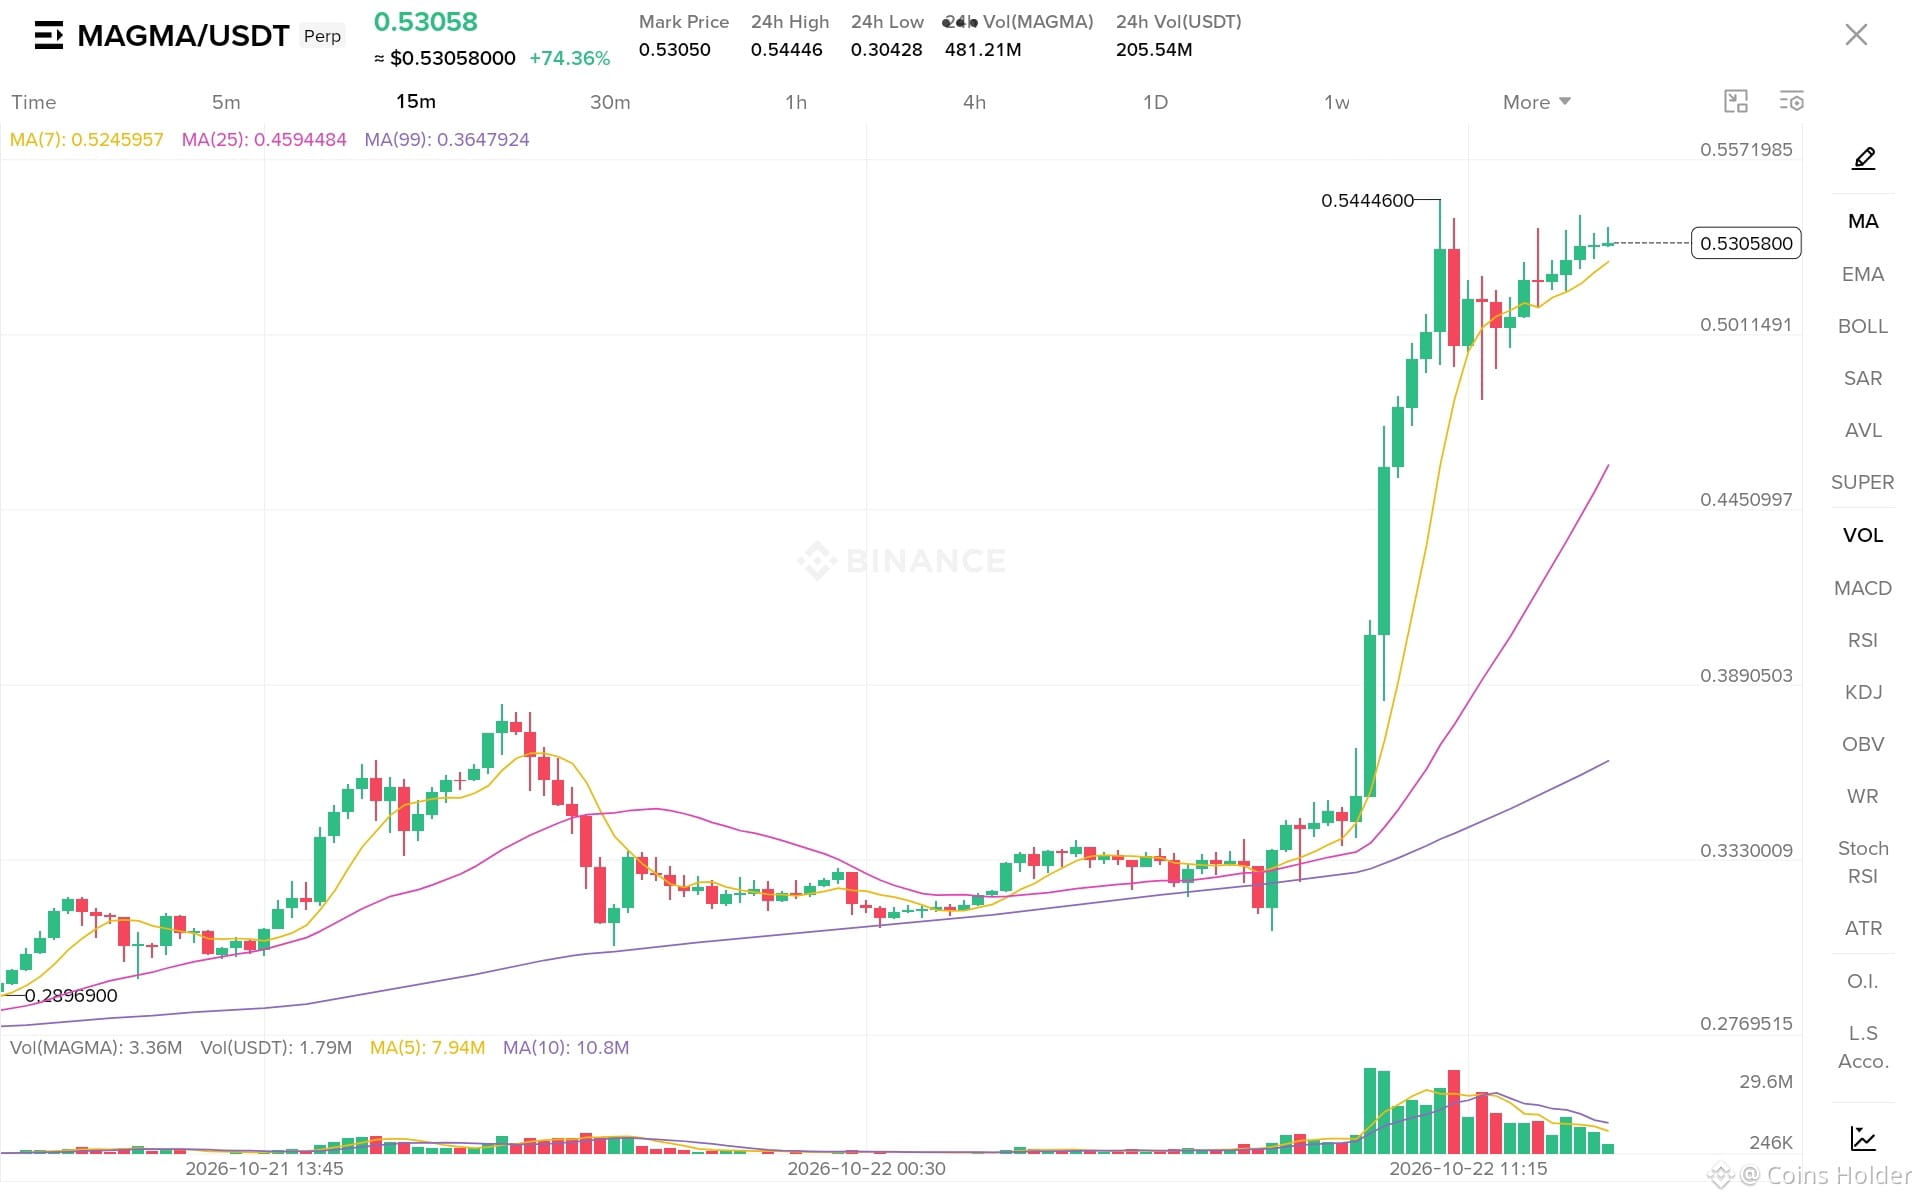
📊 MAGMA/USDT — Dual-Way Action Plan Update (15m)
As shared in our post 3 hours ago, the previous plan hit all 3 targets successfully! Following this strong performance, here is the updated setup based on the latest chart:
Current Price: 0.53058
🟢 Bullish Breakout Setup:
- Entry Trigger: 0.54500 (Above Resistance)
- Targets: 0.56000 ⬅️ 0.58000 ⬅️ 0.60000
- Stop Loss: 0.51800
🔴 Bearish Breakdown Setup:
- Entry Trigger: 0.51000 (Below Support)
- Targets: 0.48500 ⬅️ 0.45900 (MA 25) ⬅️ 0.43000
- Stop Loss: 0.53800
⚠️ Execution Rules:
- Wait for confirmed breakout or breakdown.
- Cancel the pending opposite order immediately upon execution.
- Maintain strict risk control and avoid chasing sudden pumps.
#DoublePlan #MAGMA #BinanceSquare
{future}(MAGMAUSDT)
📊 MAGMA/USDT — Dual-Way Action Plan Update (15m)
As shared in our post 3 hours ago, the previous plan hit all 3 targets successfully! Following this strong performance, here is the updated setup based on the latest chart:
Current Price: 0.53058
🟢 Bullish Breakout Setup:
- Entry Trigger: 0.54500 (Above Resistance)
- Targets: 0.56000 ⬅️ 0.58000 ⬅️ 0.60000
- Stop Loss: 0.51800
🔴 Bearish Breakdown Setup:
- Entry Trigger: 0.51000 (Below Support)
- Targets: 0.48500 ⬅️ 0.45900 (MA 25) ⬅️ 0.43000
- Stop Loss: 0.53800
⚠️ Execution Rules:
- Wait for confirmed breakout or breakdown.
- Cancel the pending opposite order immediately upon execution.
- Maintain strict risk control and avoid chasing sudden pumps.
#DoublePlan #MAGMA #BinanceSquare
4
1
407
·
--
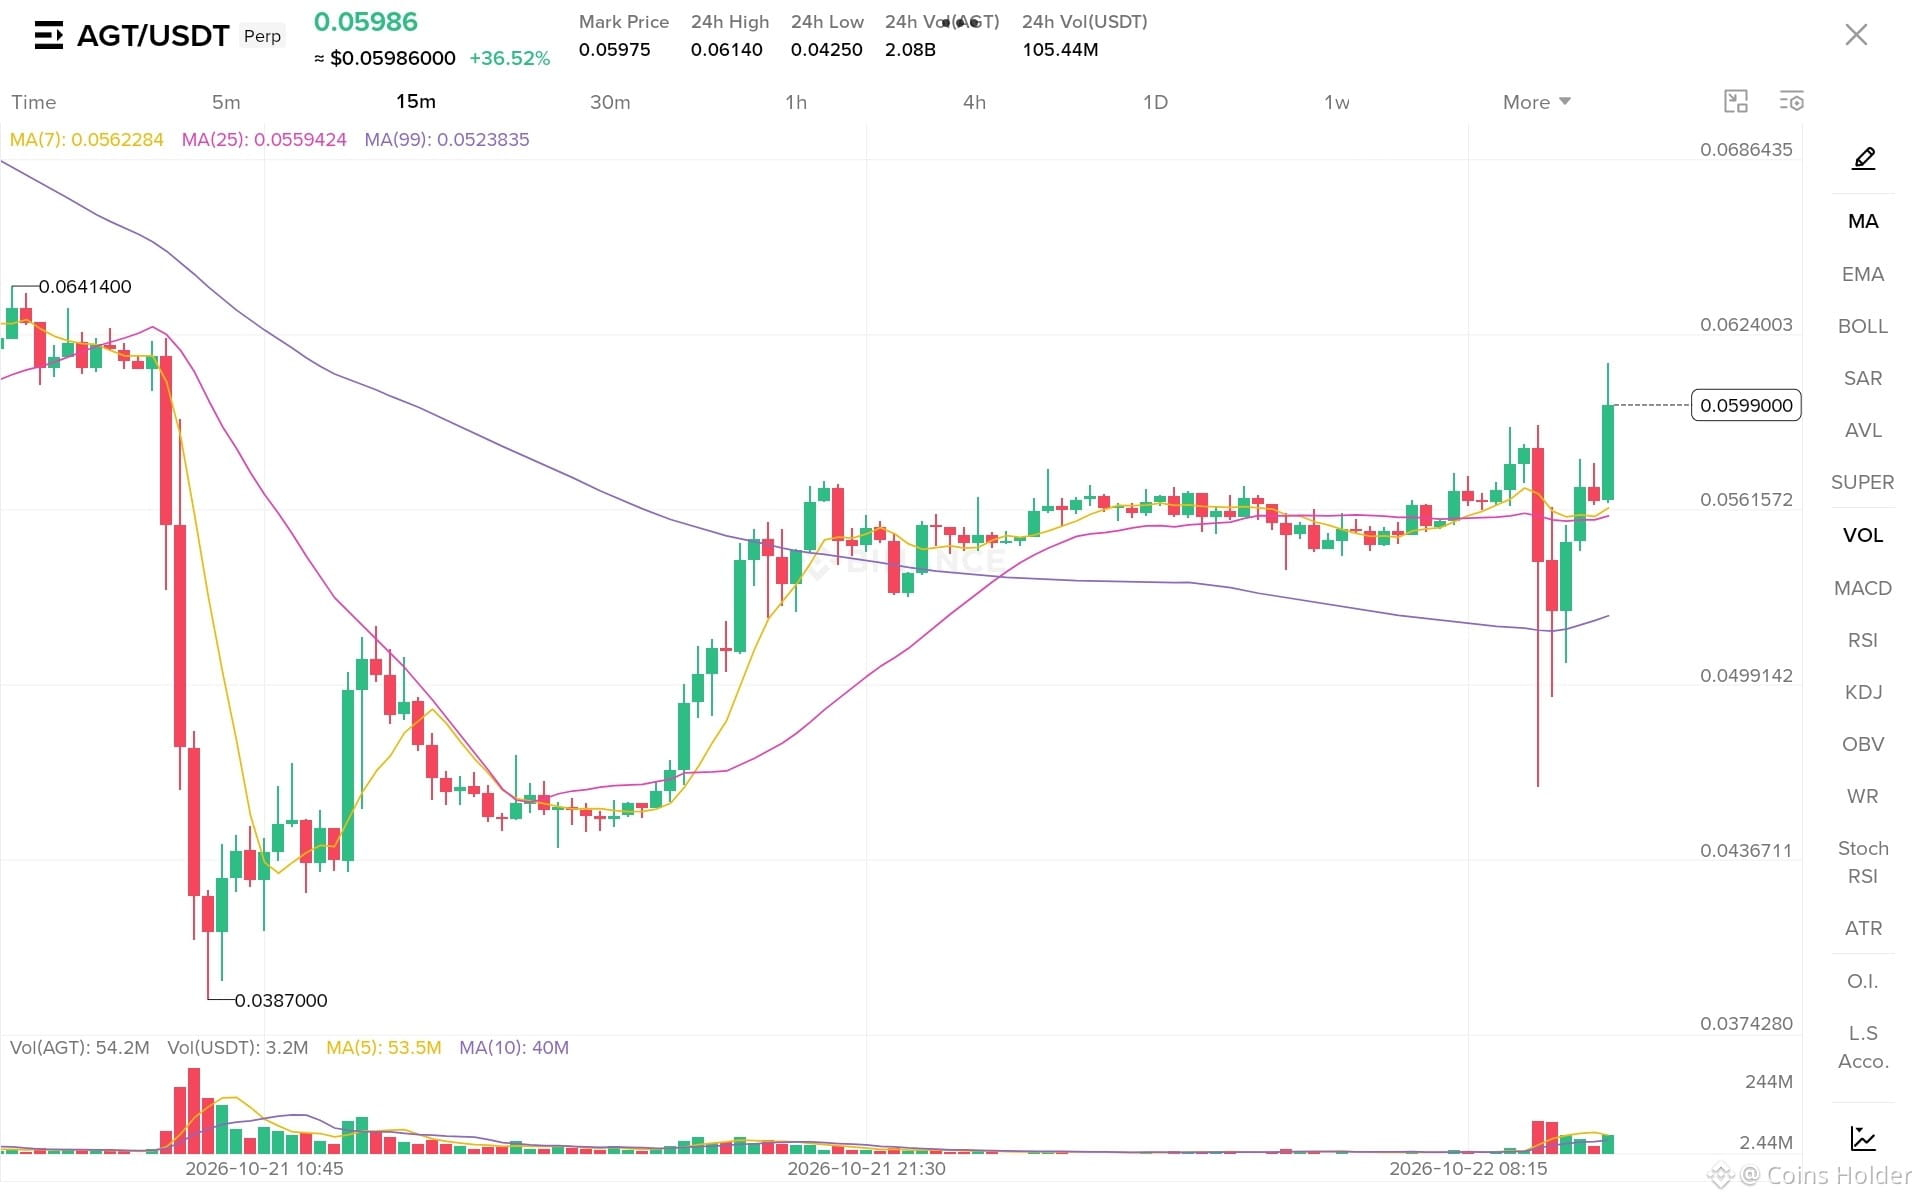
📊 AGT/USDT — Dual-Way Action Plan (15m)
Current Price: 0.05986
🟢 Bullish Breakout Setup:
Entry Trigger: 0.06150 (Above Resistance)
Targets: 0.06350 ⬅️ 0.06600 ⬅️ 0.06850
Stop Loss: 0.05720
🔴 Bearish Breakdown Setup:
Entry Trigger: 0.05500 (Below Support)
Targets: 0.05230 (MA 99) ⬅️ 0.04800 ⬅️ 0.04350
Stop Loss: 0.05850
⚠️ Execution Rules:
Wait for confirmed breakout or breakdown.
Cancel the pending opposite order immediately upon execution.
Maintain strict risk control and avoid chasing sudden pumps.
#DoublePlan #AGT #BinanceSquare
{future}(AGTUSDT)
📊 AGT/USDT — Dual-Way Action Plan (15m)
Current Price: 0.05986
🟢 Bullish Breakout Setup:
Entry Trigger: 0.06150 (Above Resistance)
Targets: 0.06350 ⬅️ 0.06600 ⬅️ 0.06850
Stop Loss: 0.05720
🔴 Bearish Breakdown Setup:
Entry Trigger: 0.05500 (Below Support)
Targets: 0.05230 (MA 99) ⬅️ 0.04800 ⬅️ 0.04350
Stop Loss: 0.05850
⚠️ Execution Rules:
Wait for confirmed breakout or breakdown.
Cancel the pending opposite order immediately upon execution.
Maintain strict risk control and avoid chasing sudden pumps.
#DoublePlan #AGT #BinanceSquare
32
·
--
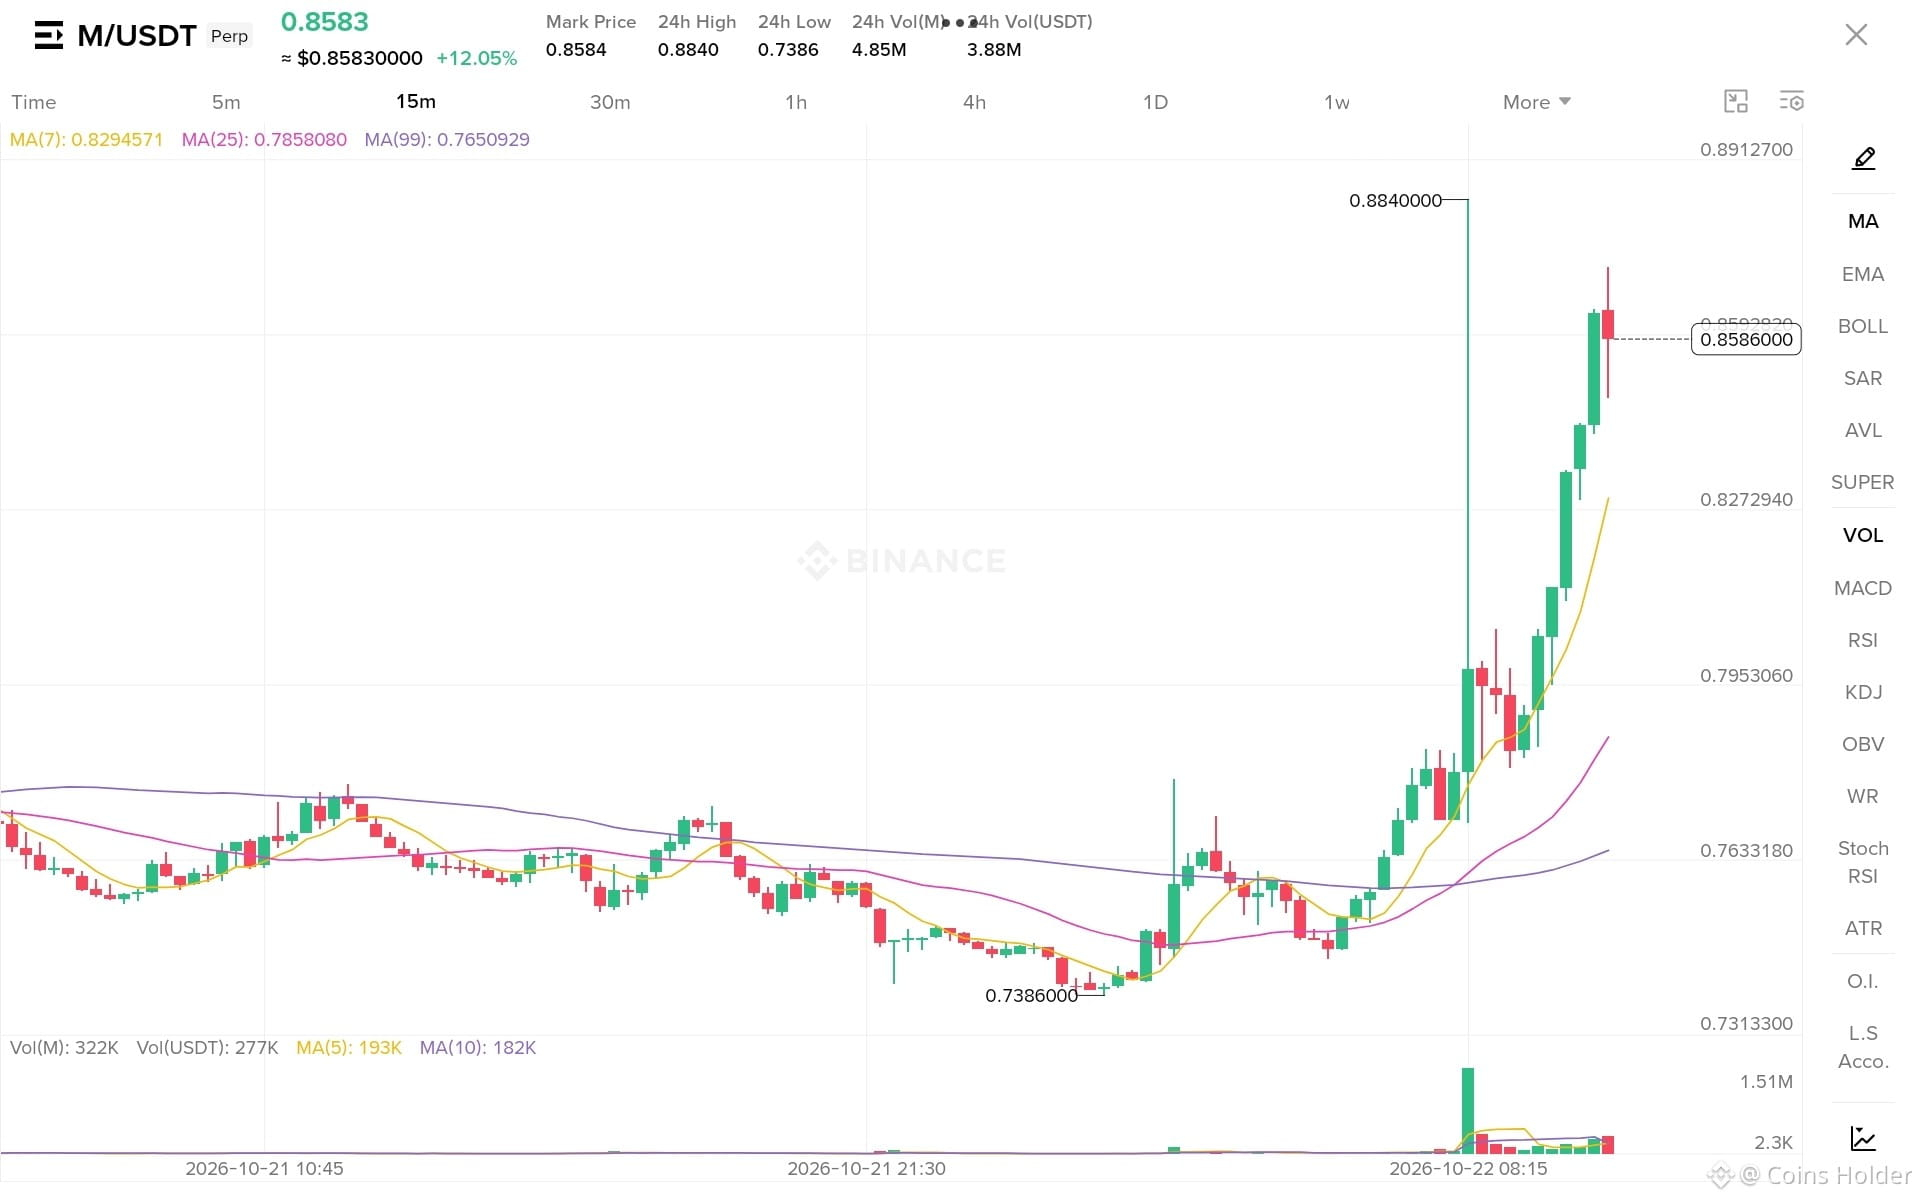
📊 M/USDT — Dual-Way Action Plan (15m)
Current Price: 0.8583
🟢 Bullish Breakout Setup:
- Entry Trigger: 0.8850 (Above Resistance)
- Targets: 0.9050 ⬅️ 0.9250 ⬅️ 0.9500
- Stop Loss: 0.8350
🔴 Bearish Breakdown Setup:
- Entry Trigger: 0.8200 (Below Support)
- Targets: 0.7850 ⬅️ 0.7650 ⬅️ 0.7380
- Stop Loss: 0.8450
⚠️ Execution Rules:
- Wait for confirmed breakout or breakdown.
- Cancel the pending opposite order immediately upon execution.
- Maintain strict risk control and avoid chasing sudden pumps.
#DoublePlan #M #BinanceSquare
258
·
--
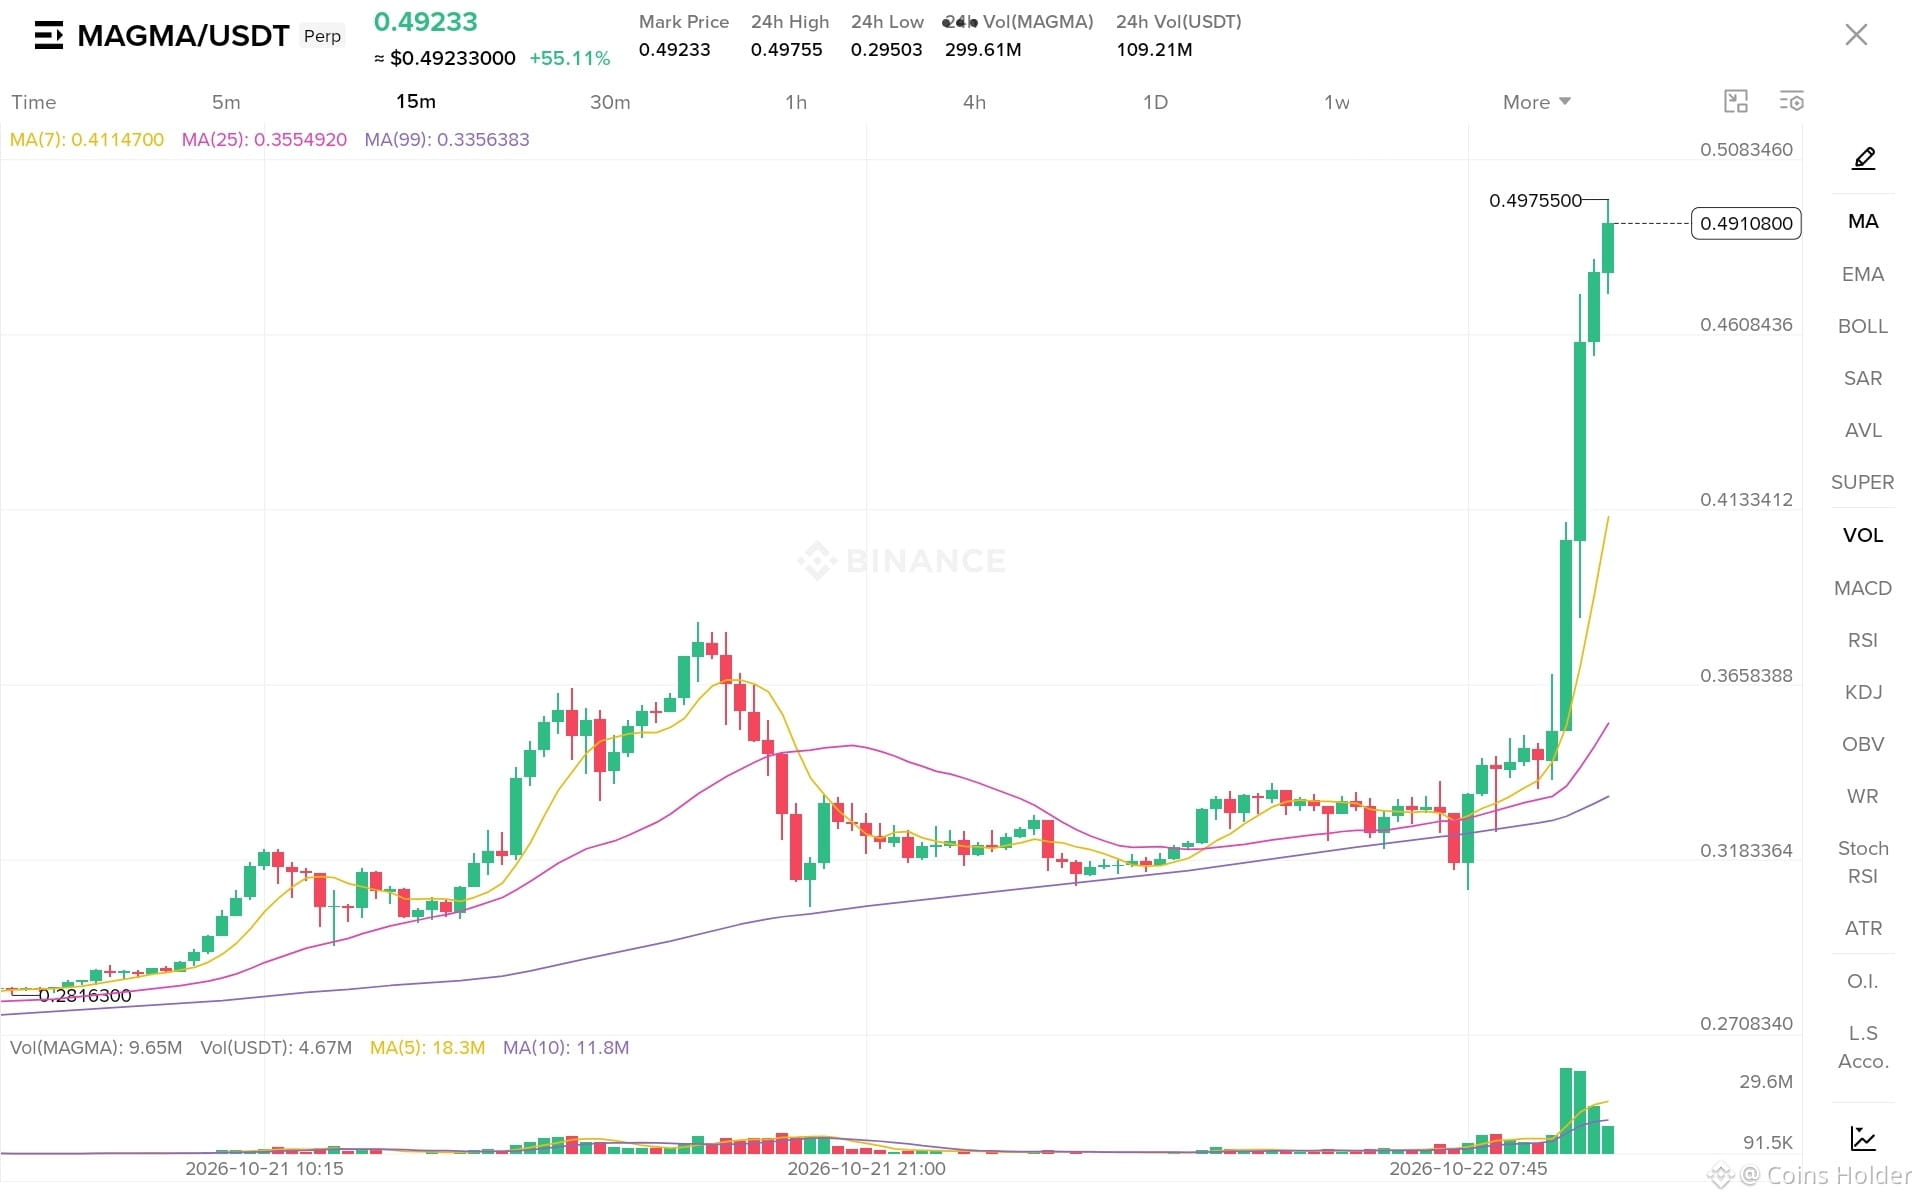
MAGMA/USDT — TWO-SCENARIO PLAN
Price: 0.4923
🟢 LONG — Breakout
Entry: 0.5000
TP1: 0.5100
TP2: 0.5220
TP3: 0.5350
SL: 0.4890
🔴 SHORT — Breakdown
Entry: 0.4750
TP1: 0.4630
TP2: 0.4500
TP3: 0.4350
SL: 0.4860
Wait for confirmation.
Cancel the opposite order after entry.
Don't chase the pump.
{future}(MAGMAUSDT)
MAGMA/USDT — TWO-SCENARIO PLAN
Price: 0.4923
🟢 LONG — Breakout
Entry: 0.5000
TP1: 0.5100
TP2: 0.5220
TP3: 0.5350
SL: 0.4890
🔴 SHORT — Breakdown
Entry: 0.4750
TP1: 0.4630
TP2: 0.4500
TP3: 0.4350
SL: 0.4860
Wait for confirmation.
Cancel the opposite order after entry.
Don't chase the pump.
Price: 0.4923
🟢 LONG — Breakout
Entry: 0.5000
TP1: 0.5100
TP2: 0.5220
TP3: 0.5350
SL: 0.4890
🔴 SHORT — Breakdown
Entry: 0.4750
TP1: 0.4630
TP2: 0.4500
TP3: 0.4350
SL: 0.4860
Wait for confirmation.
Cancel the opposite order after entry.
Don't chase the pump.
1
1
648
·
--
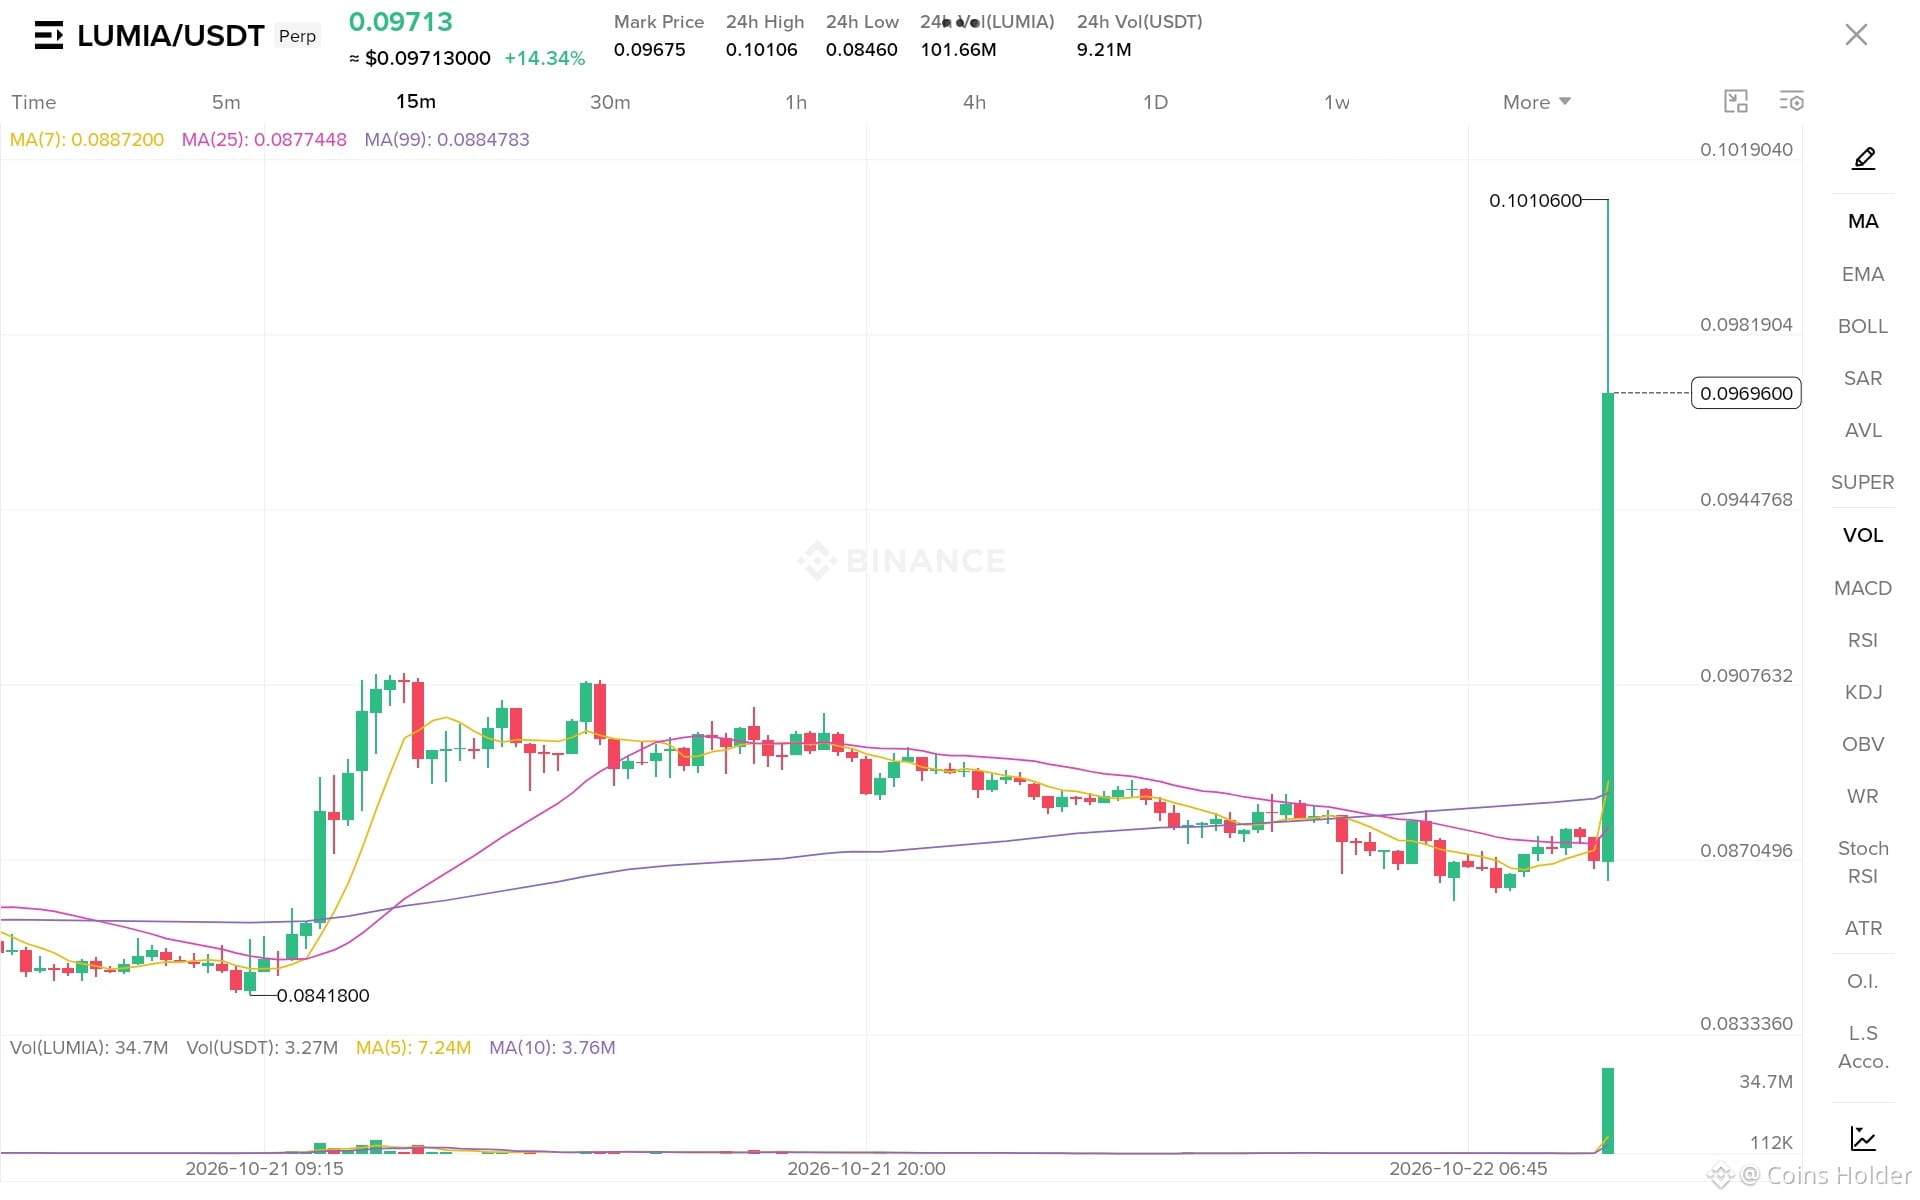
📊 LUMIA/USDT Technical Analysis & Momentum Overview (15m)
The price is experiencing a powerful vertical price expansion and strong momentum breakout, surging from the 0.0841800 base to test a local peak of 0.1010600, and currently trading around 0.0971300 well above the key moving averages (MA 7, 25, 99). This aggressive volume spike signals intense short-term buying pressure, alongside the need to monitor potential high volatility or short-term consolidation near resistance.
🎯 Trading Levels & Dual-Plan Strategy:
🔼 Bullish Continuation Scenario:
🟢 Stop Limit Buy Order
- Entry Trigger: 0.1015000 (Confirmation of breaking and holding above the 0.1010600 resistance peak)
- Targets: 0.1080000 ⬅️ 0.1050000 ⬅️ 0.1025000
- Stop Loss: 0.0935000
🔽 Bearish Pullback Scenario:
🔴 Stop Limit Sell Order
- Entry Trigger: 0.0885000 (Confirmation of breaking below local support and the fast MA 7 line)
- Targets: 0.0874000 (MA 25) ⬅️ 0.0847000 (MA 99) ⬅️ 0.0820000
- Stop Loss: 0.0950000
🛡️ Risk Management Guidelines:
- Place both pending orders simultaneously to capture high-volume breakouts in either direction.
- Manually cancel the opposite pending order as soon as one order gets executed.
- Move your stop loss to the entry level once Target 1 is hit to secure profits and safeguard capital.
#DoublePlan #LUMIA #BinanceSquare
{future}(LUMIAUSDT)
📊 LUMIA/USDT Technical Analysis & Momentum Overview (15m)
The price is experiencing a powerful vertical price expansion and strong momentum breakout, surging from the 0.0841800 base to test a local peak of 0.1010600, and currently trading around 0.0971300 well above the key moving averages (MA 7, 25, 99). This aggressive volume spike signals intense short-term buying pressure, alongside the need to monitor potential high volatility or short-term consolidation near resistance.
🎯 Trading Levels & Dual-Plan Strategy:
🔼 Bullish Continuation Scenario:
🟢 Stop Limit Buy Order
- Entry Trigger: 0.1015000 (Confirmation of breaking and holding above the 0.1010600 resistance peak)
- Targets: 0.1080000 ⬅️ 0.1050000 ⬅️ 0.1025000
- Stop Loss: 0.0935000
🔽 Bearish Pullback Scenario:
🔴 Stop Limit Sell Order
- Entry Trigger: 0.0885000 (Confirmation of breaking below local support and the fast MA 7 line)
- Targets: 0.0874000 (MA 25) ⬅️ 0.0847000 (MA 99) ⬅️ 0.0820000
- Stop Loss: 0.0950000
🛡️ Risk Management Guidelines:
- Place both pending orders simultaneously to capture high-volume breakouts in either direction.
- Manually cancel the opposite pending order as soon as one order gets executed.
- Move your stop loss to the entry level once Target 1 is hit to secure profits and safeguard capital.
#DoublePlan #LUMIA #BinanceSquare
302
·
--
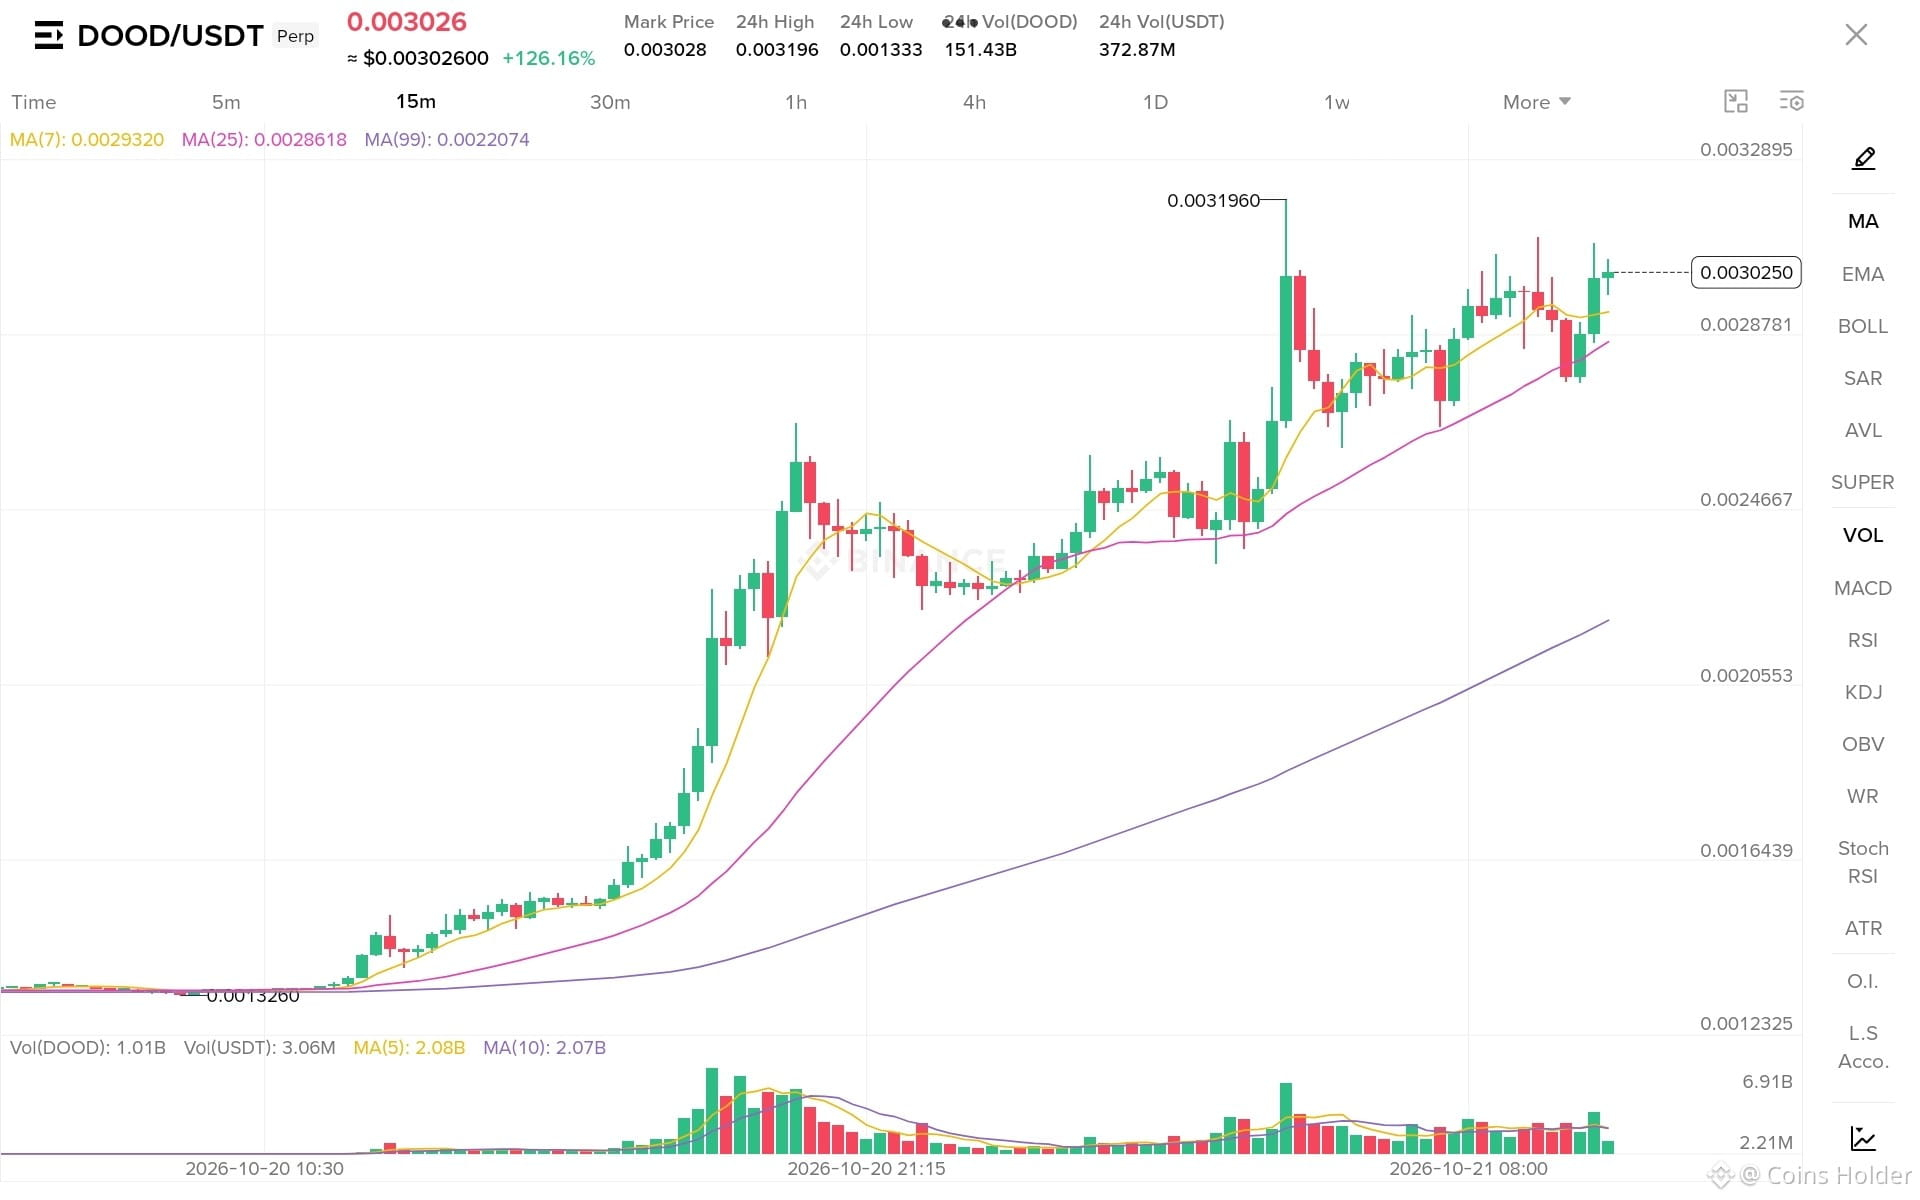
📊 DOOD/USDT Technical Analysis & Momentum Overview (15m)
The price is showing strong bullish momentum after rebounding from the 0.0013330 base and pushing up toward a local peak of 0.0031960. Currently consolidating around 0.0030260, the asset remains securely positioned above the key moving averages (MA 7, 25, 99). This structure highlights solid buying pressure with potential for further expansion or consolidation near resistance.
🎯 Trading Levels & Dual-Plan Strategy:
🔼 Bullish Continuation Scenario:
🟢 Stop Limit Buy Order
- Entry Trigger: 0.0032200 (Confirmation of breaking and holding above the 0.0031960 resistance peak)
- Targets: 0.0035000 ⬅️ 0.0034000 ⬅️ 0.0033000
- Stop Loss: 0.0029000
🔽 Bearish Pullback Scenario:
🔴 Stop Limit Sell Order
- Entry Trigger: 0.0027500 (Confirmation of breaking below local support and the MA 25 line)
- Targets: 0.0024600 ⬅️ 0.0022070 (MA 99) ⬅️ 0.0020000
- Stop Loss: 0.0029500
🛡️ Risk Management Guidelines:
- Place both pending orders simultaneously to capture high-volume breakouts in either direction.
- Manually cancel the opposite pending order as soon as one order gets executed.
- Move your stop loss to the entry level once Target 1 is hit to secure profits and safeguard capital.
#DoublePlan #DOOD #BinanceSquare
{future}(DOODUSDT)
📊 DOOD/USDT Technical Analysis & Momentum Overview (15m)
The price is showing strong bullish momentum after rebounding from the 0.0013330 base and pushing up toward a local peak of 0.0031960. Currently consolidating around 0.0030260, the asset remains securely positioned above the key moving averages (MA 7, 25, 99). This structure highlights solid buying pressure with potential for further expansion or consolidation near resistance.
🎯 Trading Levels & Dual-Plan Strategy:
🔼 Bullish Continuation Scenario:
🟢 Stop Limit Buy Order
- Entry Trigger: 0.0032200 (Confirmation of breaking and holding above the 0.0031960 resistance peak)
- Targets: 0.0035000 ⬅️ 0.0034000 ⬅️ 0.0033000
- Stop Loss: 0.0029000
🔽 Bearish Pullback Scenario:
🔴 Stop Limit Sell Order
- Entry Trigger: 0.0027500 (Confirmation of breaking below local support and the MA 25 line)
- Targets: 0.0024600 ⬅️ 0.0022070 (MA 99) ⬅️ 0.0020000
- Stop Loss: 0.0029500
🛡️ Risk Management Guidelines:
- Place both pending orders simultaneously to capture high-volume breakouts in either direction.
- Manually cancel the opposite pending order as soon as one order gets executed.
- Move your stop loss to the entry level once Target 1 is hit to secure profits and safeguard capital.
#DoublePlan #DOOD #BinanceSquare
260
Войдите, чтобы посмотреть больше материала
Присоединяйтесь к пользователям криптовалют по всему миру на Binance Square
⚡️ Получайте новейшую и полезную информацию о криптоактивах.
💬 Нам доверяет крупнейшая в мире криптобиржа.
👍 Получите достоверные аналитические данные от верифицированных создателей контента.
Эл. почта/номер телефона
В тренде
FedWatch
Просмотров: 16.3M
39,401 обсуждают
🚨 🇺🇸 PETER SCHIFF JUST THREW A BIG WARNING AT THE FED!
Peter Schiff is calling Kevin Warsh’s tough talk on inflation a “bluff,” and his prediction could have major implications for the markets.
Schiff believes the Fed could eventually return to money printing through quantitative easing (QE) and even cut interest rates next year, despite inflation continuing to rise.
Think about that for a moment.
🔥 Inflation could remain a problem. 🔥 The Fed could still move toward easier monetary policy. 🔥 More liquidity could flow into financial markets.
If this scenario plays out, it could create a very different market environment for stocks, gold, Bitcoin, and the wider crypto market.
But there’s a catch: if inflation stays high, the Fed could face a difficult choice between fighting rising prices and supporting the economy.
Will Warsh stick to a tough inflation policy, or will the Fed eventually change direction?
The next move could matter a lot for investors.
#FedWatch #EarningsSeason #USMidtermElections #BrazilCryptoExchangesMustApplyForLicensesByFriday #StanDruckenmillerBecomesInvestorInTradeXYZ
Jackson Liam
·Лайков: 4
·Просмотров: 8.4k
EarningsSeason
Просмотров: 6.4M
32,095 обсуждают
USMidtermElections
Просмотров: 42,628
623 обсуждают