

#liquidationmap
liquidationmap
Просмотров: 401,227
1,024 обсуждают
Популярные
Новые

·
--
Рост
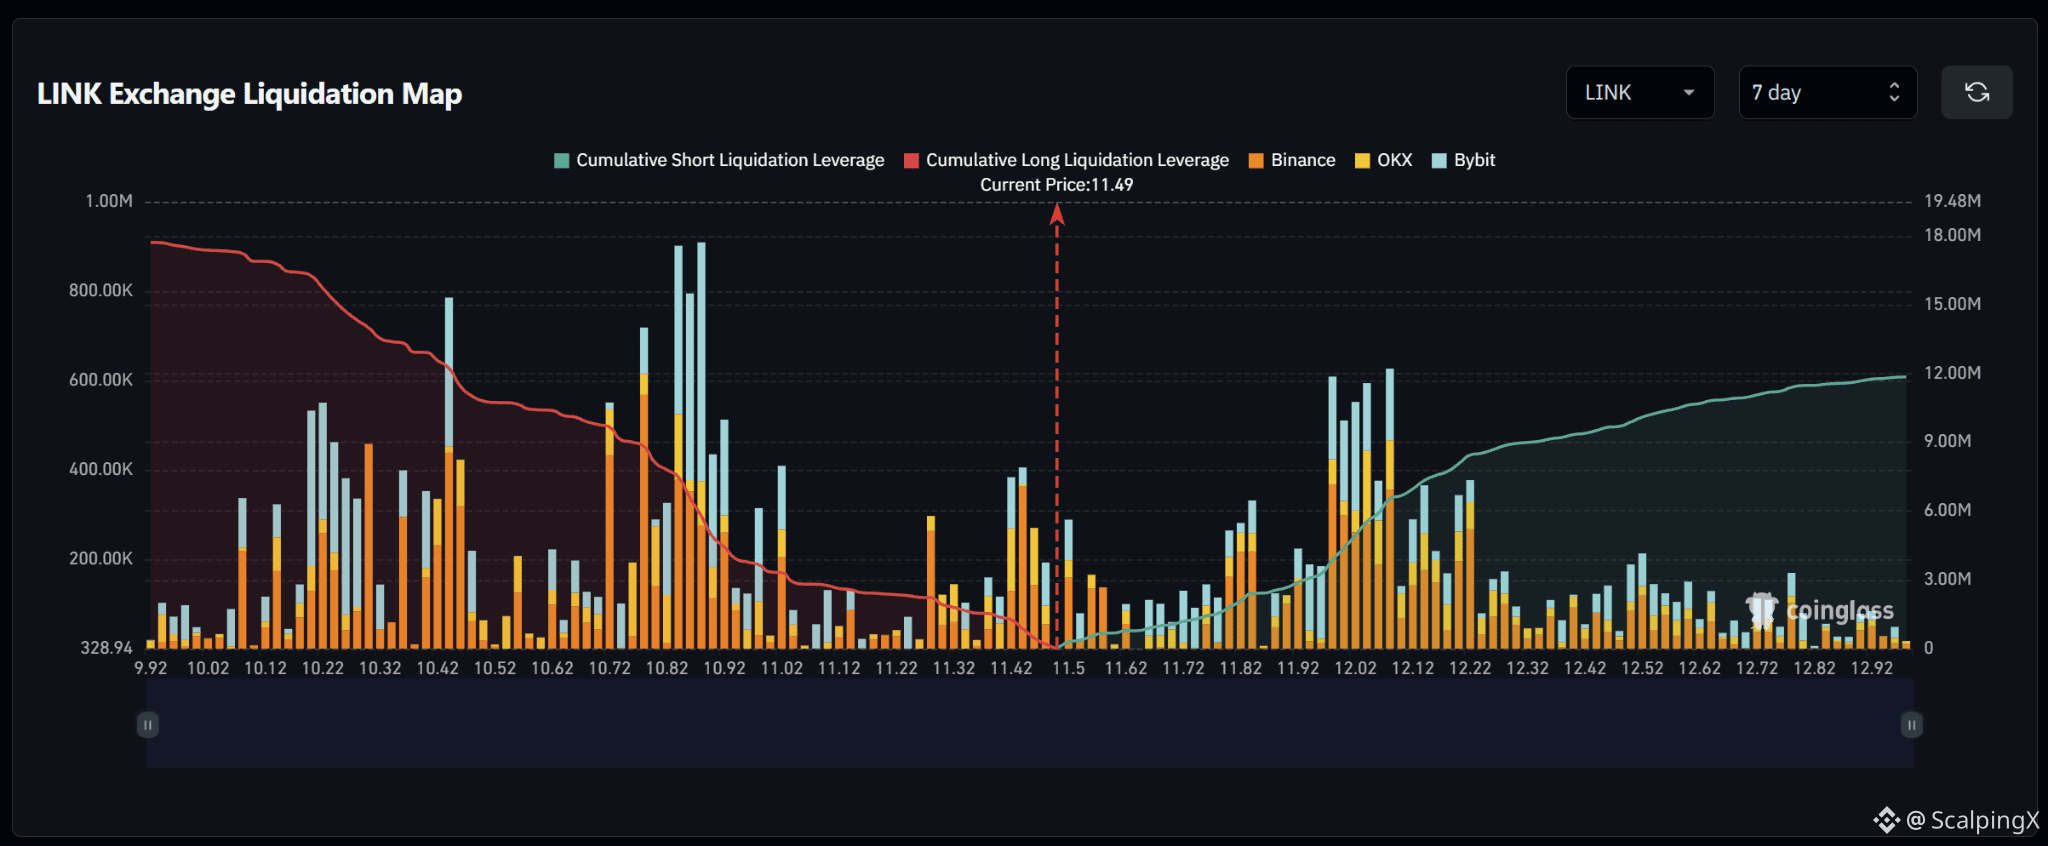
$LINK – Liquidation Map (7 days) – Index ~11.49
🧭 The preferred scenario is a nearby long sweep at 11.40–11.46 first. Estimated cumulative long liquidation exposure is nearly $18M, versus roughly $12M on the short side across the displayed range. The major upper short cluster sits farther away at 11.98–12.10.
🔻 Losing 11.40 without a reclaim shifts attention to 11.28–11.33. Liquidation density drops noticeably below that zone before clusters around 11.02 and 10.80–10.92.
🎯 The 10.80–10.92 band is the most prominent long cluster below, but remains a farther target if the decline continues. Conversely, a sweep of 11.40–11.46 followed by a quick reclaim of 11.49 would weaken the downside scenario.
⚖️ A break and hold above 11.55 shifts priority to short clusters at 11.80–11.85. Density between these zones is thin, requiring additional buying pressure to sustain the advance. Holding above 11.85 brings 11.98–12.10, then 12.14–12.22, into focus.
#LiquidationMap
16
·
--
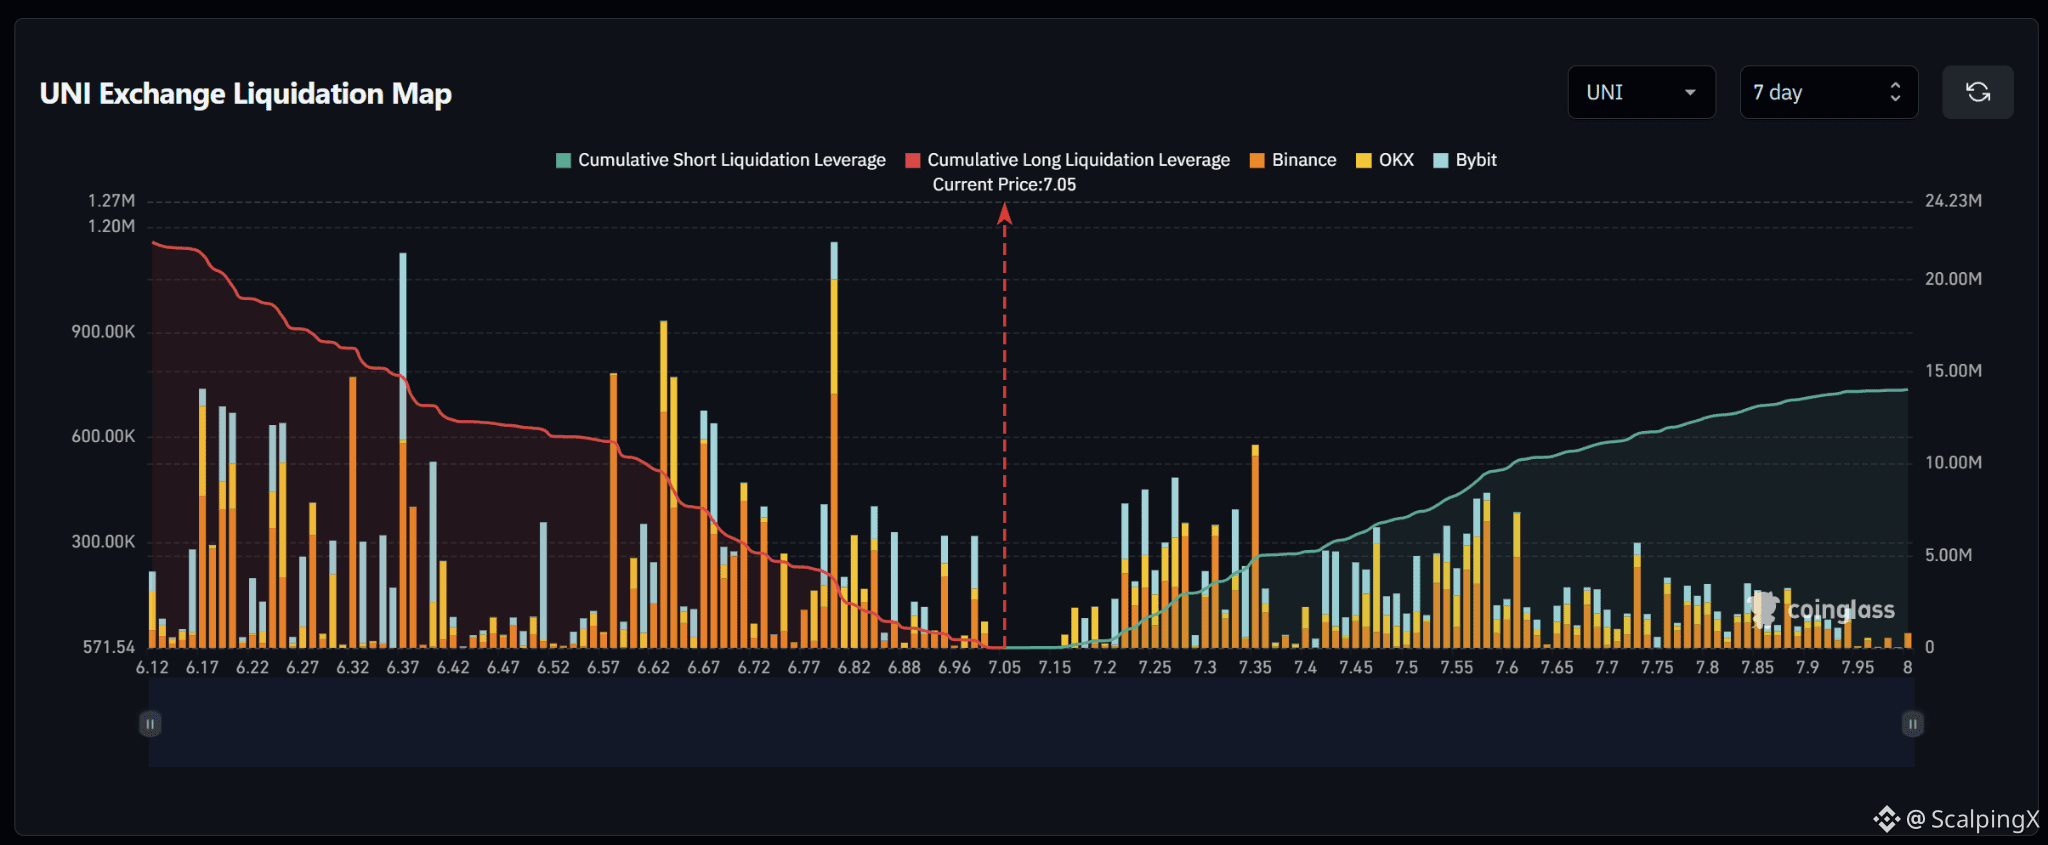
$UNI – Liquidation Map (7 days) – Index ~7.05
🧭 The map favors a downside long sweep first. Estimated cumulative long liquidation exposure is roughly $22M, versus nearly $14M on the short side across the displayed range. Long clusters at 6.96–7.02 sit closer to price than the major short band at 7.22–7.35.
🔻 Losing 7.02 without a reclaim shifts attention to 6.96–7.00. A further break below 6.96 brings 6.80–6.85 into focus, particularly near 6.80, with relatively thin density between the zones.
🎯 Long liquidations near 6.80 could amplify the decline. Failure to reclaim 6.85 after a sweep brings 6.62–6.72 into focus. Conversely, a quick reclaim of 6.96 would weaken the case for further declines.
⚖️ A break and hold above 7.15 shifts priority to short clusters at 7.22–7.35. Holding above 7.35 would bring 7.44–7.48, then 7.54–7.61, into focus. Avoid chasing a decline if price sweeps a long cluster and quickly recovers.
#LiquidationMap
3
·
--
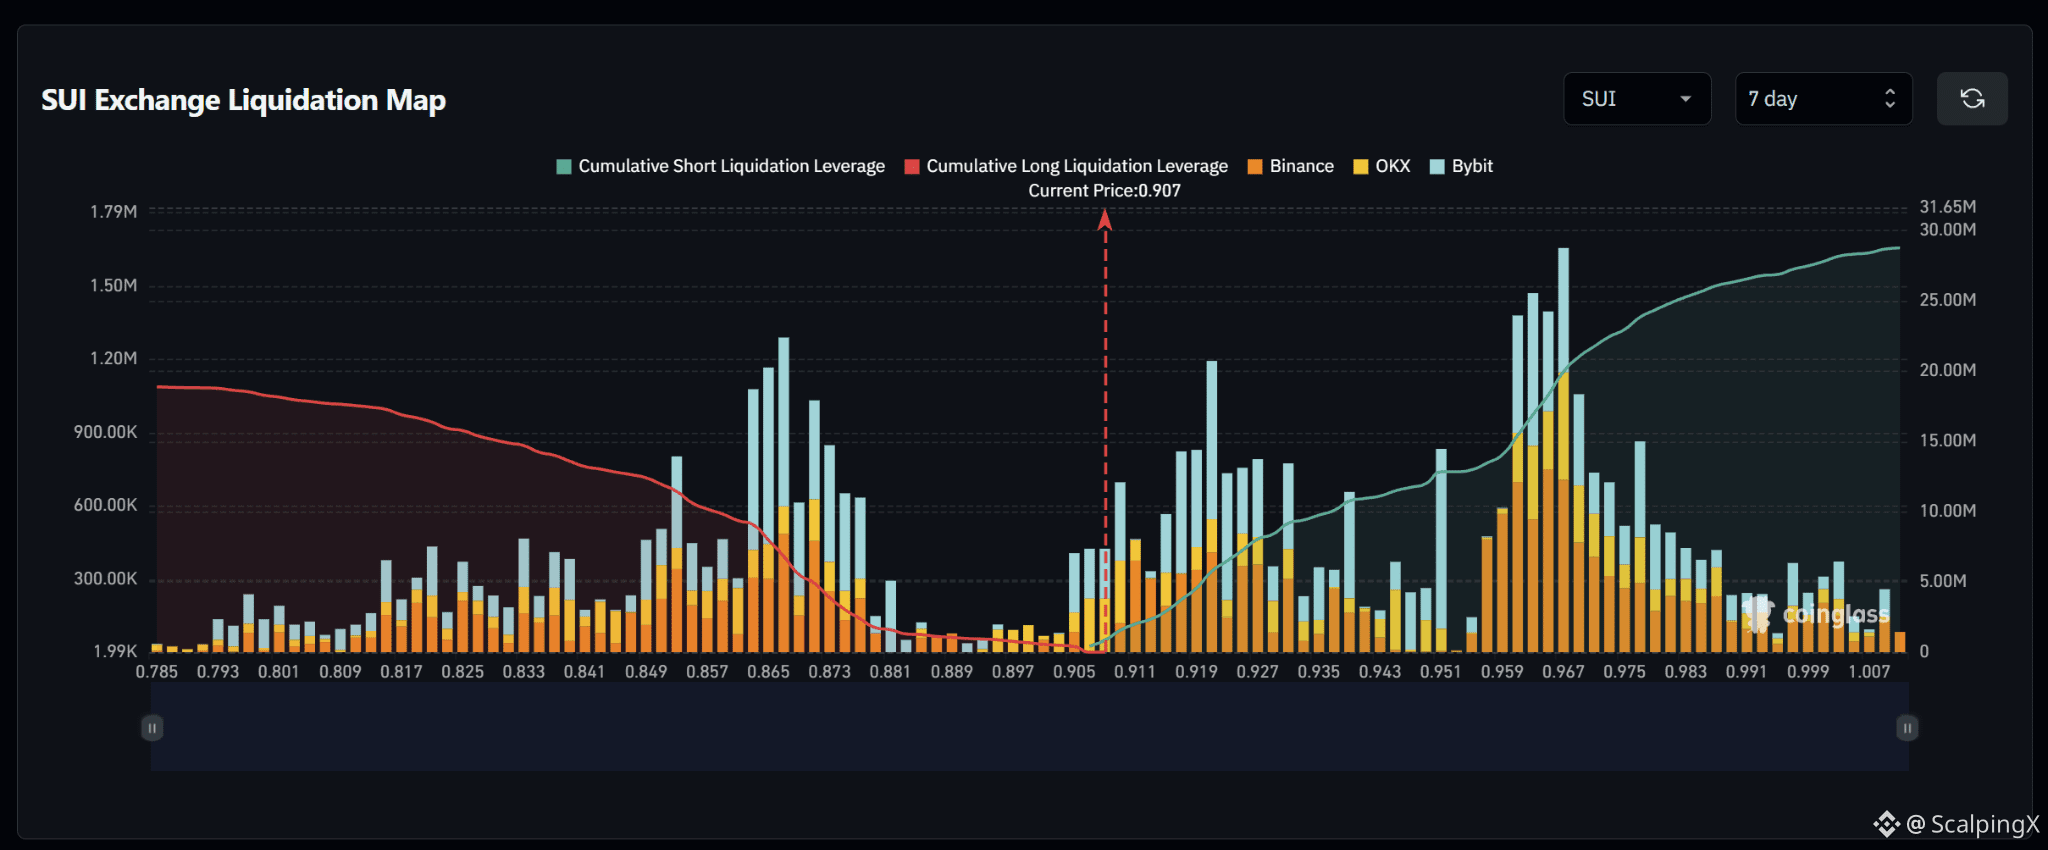
$SUI – Liquidation Map (7 days) – Index ~0.907
🧭 The map favors an upside short sweep. Estimated cumulative short liquidation exposure is roughly $29M, versus nearly $19M on the long side across the displayed range. Nearby short clusters are more pronounced, while the major long cluster sits farther away at 0.863–0.875.
🔺 The initial target is 0.909–0.913. A break and hold above 0.913 shifts attention to 0.917–0.929, particularly near 0.921. Short liquidations within this band could amplify the advance.
🎯 Holding above 0.929 after a sweep brings 0.943–0.951 into focus. Farther above sits the large short band at 0.959–0.975, concentrated around 0.961–0.967. The reaction there will help assess continuation.
⚖️ Losing 0.903 without a reclaim weakens the upside bias. Long exposure is relatively thin through 0.881–0.901 before the major cluster at 0.863–0.875. Avoid chasing a sweep of 0.917–0.929 that quickly falls back below 0.917.
#LiquidationMap
27
·
--
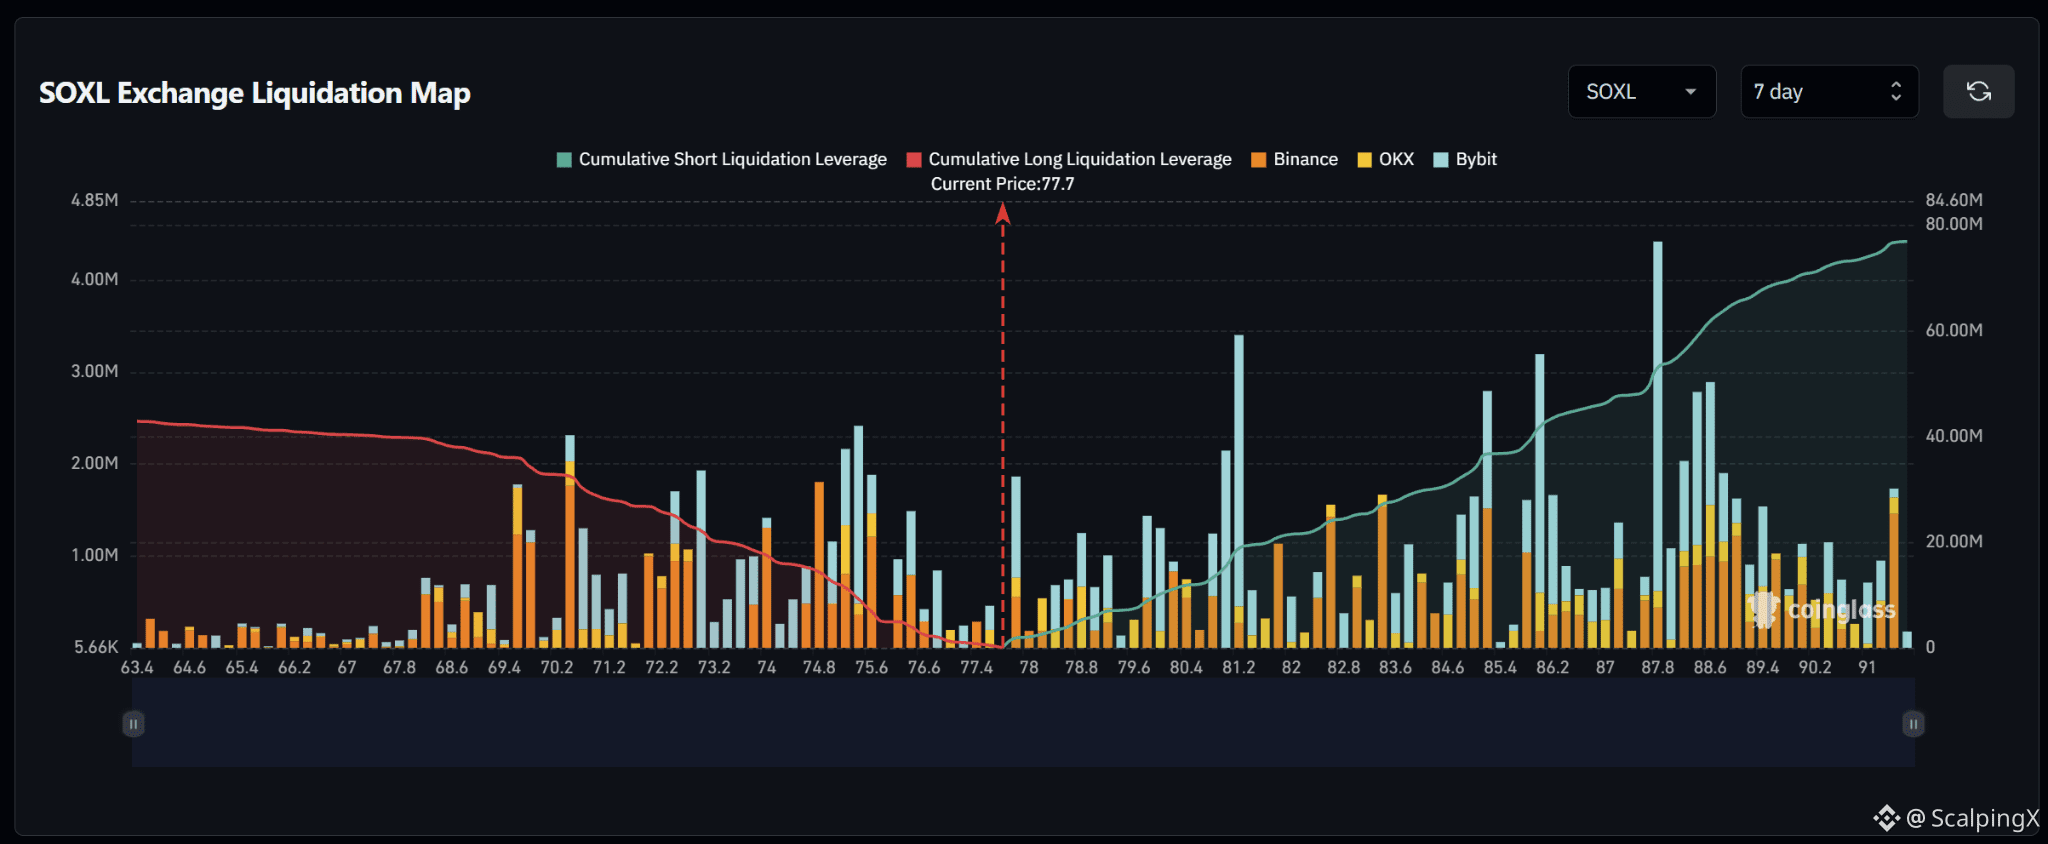
$SOXL – Liquidation Map (7 days) – Index ~77.7
🧭 The map favors an upside short sweep. Estimated cumulative short liquidation exposure is nearly $77M, versus roughly $43M on the long side across the displayed range. The nearest short cluster sits around 77.8–78.0.
🔺 A break and hold above 78.0 shifts attention to 78.6–78.9 and 79.8–80.2. Next is 81.0–81.3, where density rises noticeably; short liquidations there could amplify the advance.
🎯 Holding above 81.3 after a sweep brings 82.6–83.5, then 84.8–86.2, into focus. The 87.6–89.0 band remains a farther target, particularly near 87.8, which has the largest liquidation bar on the map.
⚖️ Losing 77.4 without a reclaim weakens the upside bias and shifts attention to 76.5–76.8, then the larger long cluster at 75.0–75.6. Avoid chasing a sweep of 81.0–81.3 that quickly falls back below 81.0.
#LiquidationMap
87
·
--
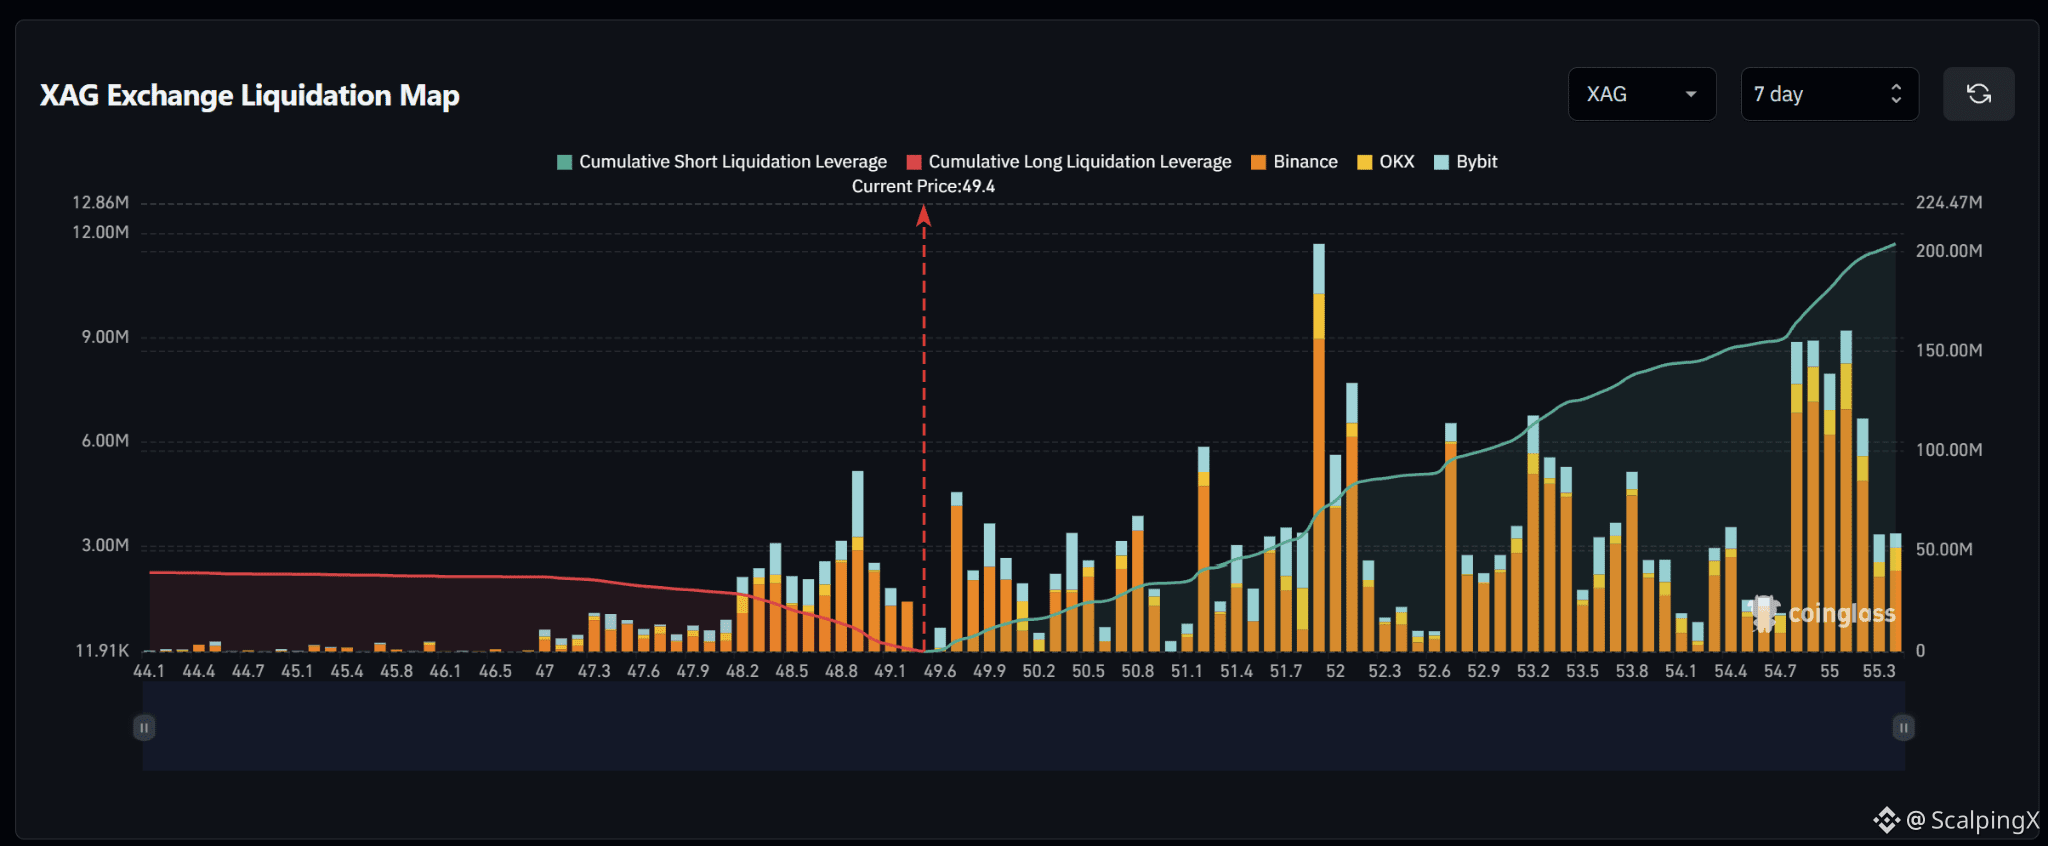
$XAG – Liquidation Map (7 days) – Index ~49.4
🧭 The map favors an upside short sweep. Estimated cumulative short liquidation exposure is roughly $200M, over five times long exposure across the displayed range. Upper clusters span several bands, making nearby targets the first focus.
🔺 The initial target is 49.7–50.0. A break and hold above 50.0 shifts attention to 50.4–50.8, then 51.2–51.4. The reaction after each sweep will help assess whether the advance can continue.
🎯 The most prominent short cluster sits around 51.9–52.2. Liquidations there could amplify the advance; holding above 52.2 brings 53.2–53.8 into focus. The 54.8–55.2 band remains a farther target if momentum persists.
⚖️ Losing 49.1 without a reclaim weakens the upside bias and shifts attention to long clusters at 48.7–49.0, then 48.2–48.5. Avoid chasing a sweep of 49.7–50.0 that quickly falls back below 49.7.
#LiquidationMap
28
·
--
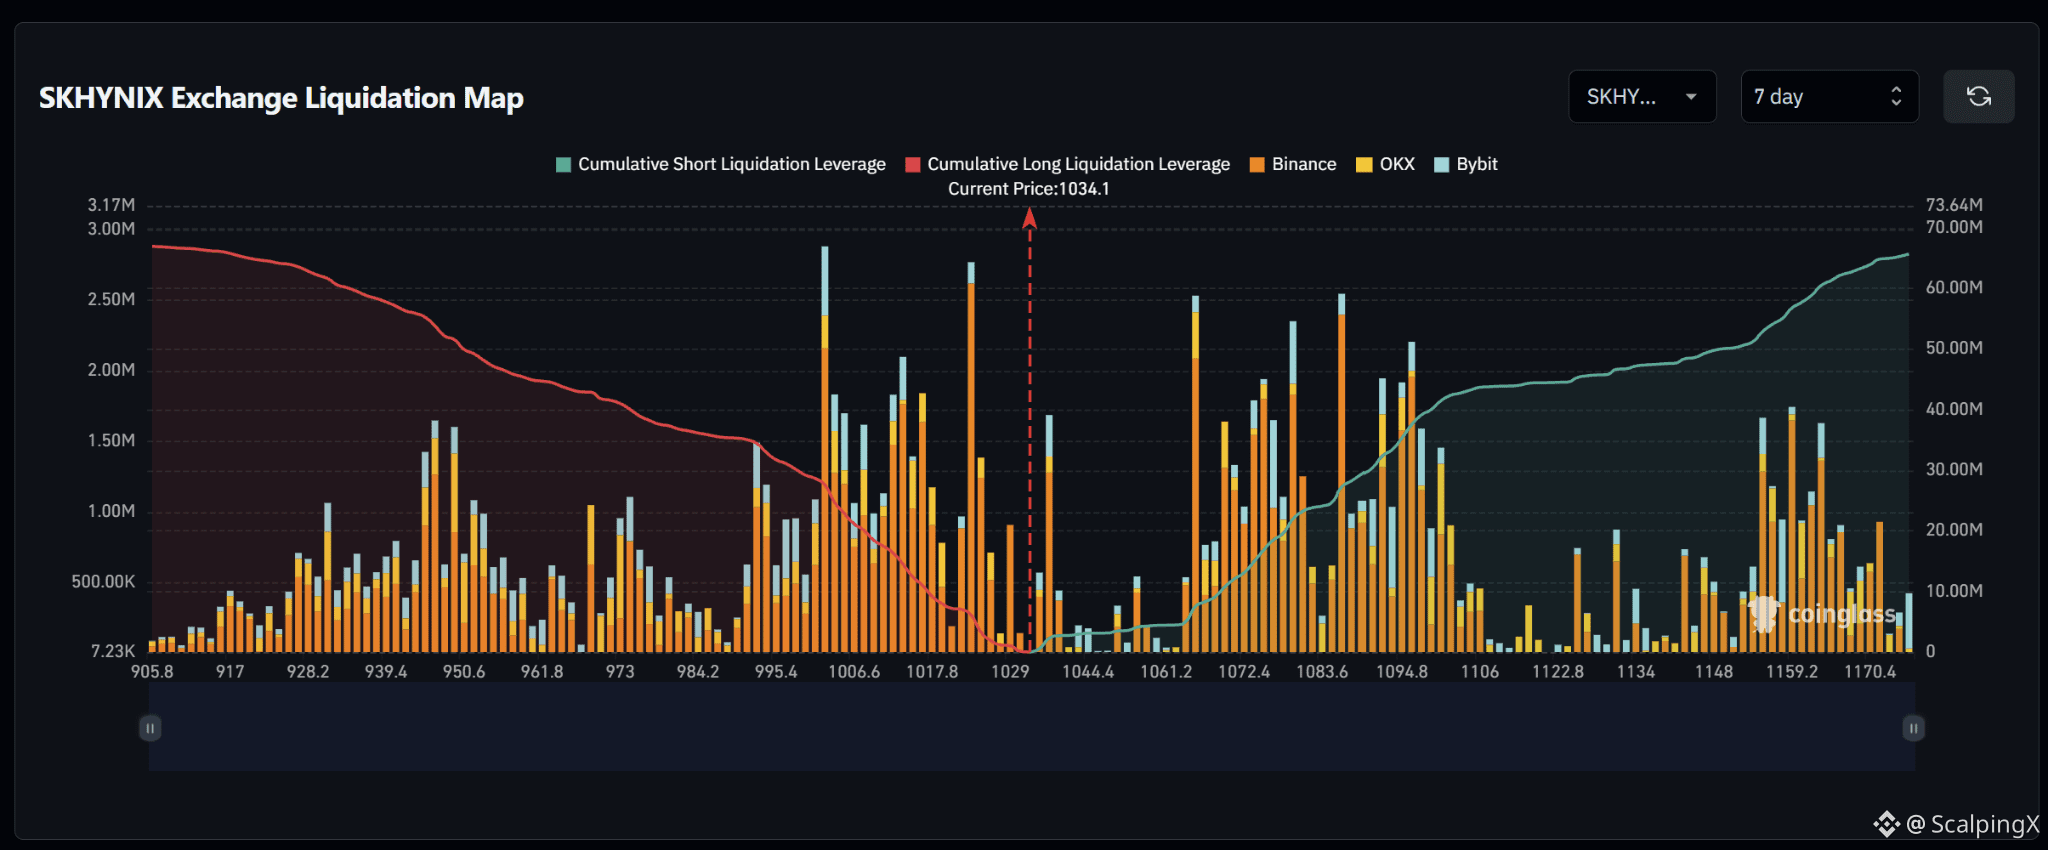
$SKHYNIX – Liquidation Map (7 days) – Index ~1,034.1
🧭 The preferred initial scenario is a nearby short sweep at 1,037–1,040. Cumulative liquidation exposure is broadly balanced across the displayed range, making nearby cluster locations more relevant than the difference in totals.
🔺 A break and hold above 1,040 brings smaller clusters around 1,050–1,056 into focus. However, density remains relatively thin through roughly 1,062, limiting the case for an uninterrupted advance.
🎯 Major short clusters sit at 1,064–1,081, followed by 1,086–1,102. Liquidations could amplify the advance if price enters these bands. Density drops sharply beyond 1,106 before a distant cluster around 1,154–1,164.
⚖️ Losing 1,029 without a reclaim weakens the upside bias and shifts attention to long clusters at 1,022–1,025, then 1,012–1,019 and 1,002–1,008. Avoid chasing a sweep of 1,037–1,040 that quickly falls back below 1,037.
#LiquidationMap
19
·
--
Рост
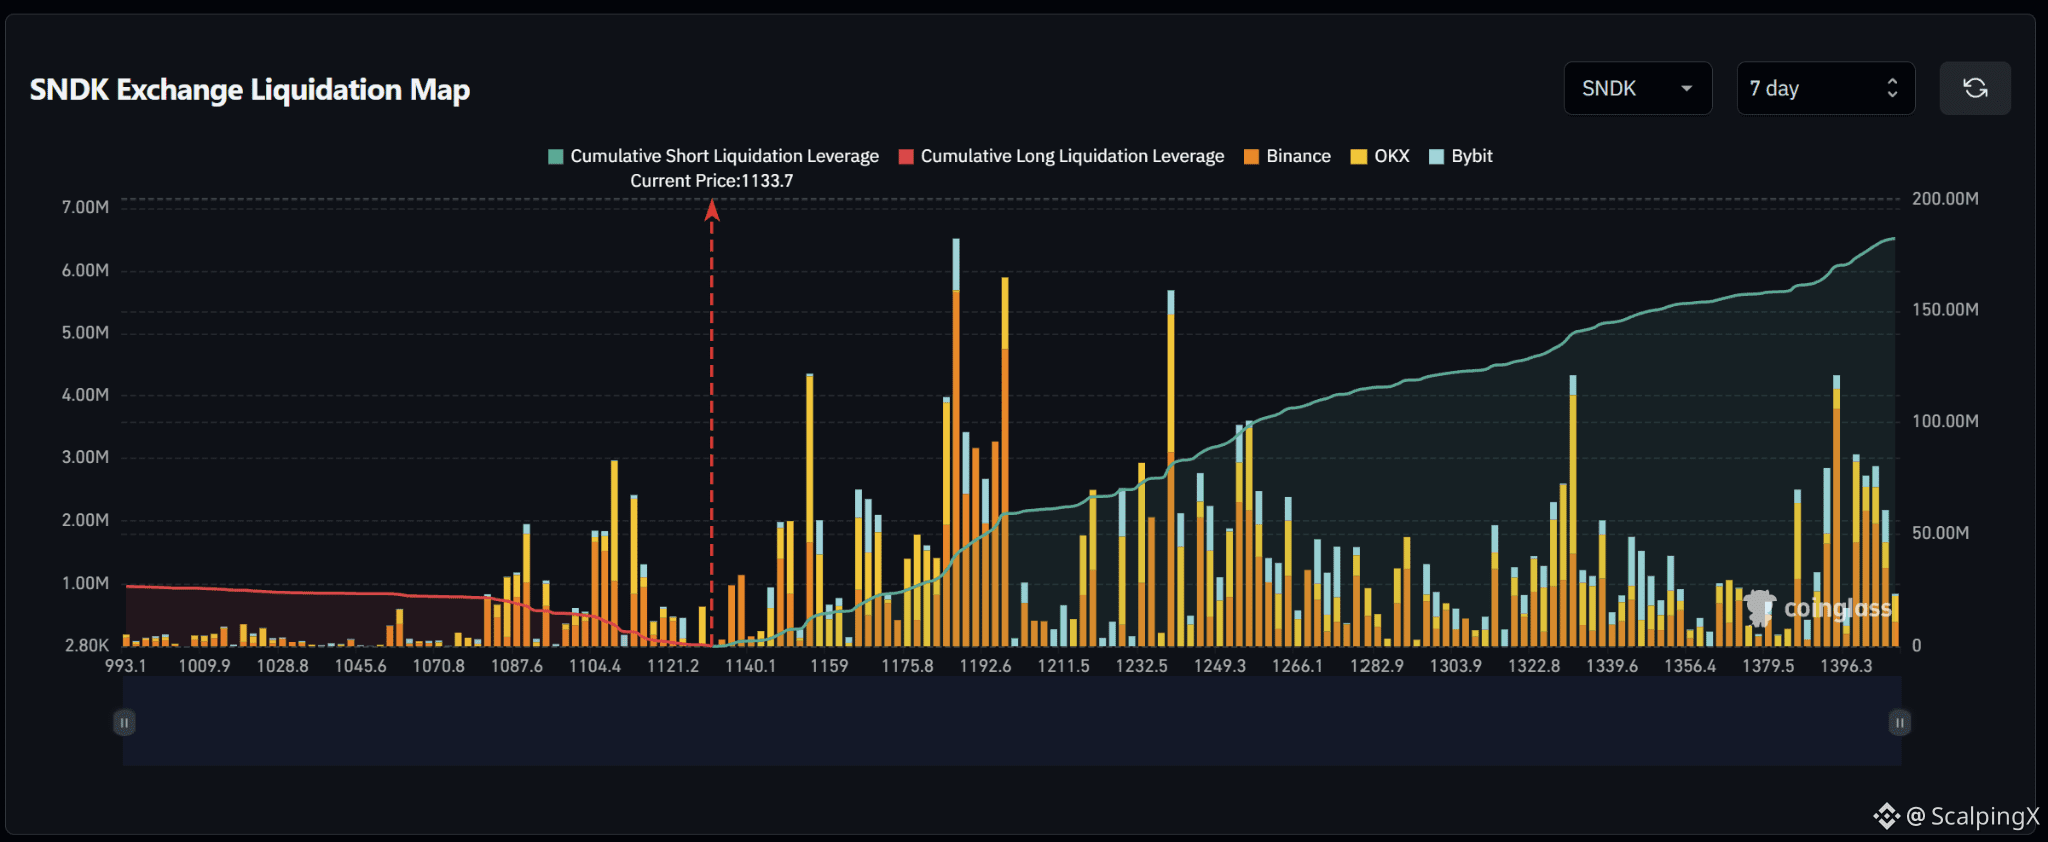
$SNDK – Liquidation Map (7 days) – Index ~1,133.7
🧭 The map favors an upside short sweep. Estimated cumulative short liquidation exposure is roughly $180M, over six times long exposure across the displayed range. Upper clusters span several bands, making nearby targets the first focus.
🔺 The initial target is 1,138–1,145, followed by 1,148–1,156, particularly near 1,154. Holding above 1,156 after a sweep shifts attention to 1,164–1,170.
🎯 Farther above sits the large short band at 1,184–1,198, particularly near 1,186 and 1,197. Short liquidations there could amplify the advance. Holding above 1,198 would bring 1,232–1,258 into focus, with noticeably thinner density between the two bands.
⚖️ Losing 1,128 without a reclaim weakens the upside bias and shifts attention to 1,121–1,125, then the larger long cluster at 1,104–1,115. Avoid chasing a sweep of 1,148–1,156 that quickly falls back below 1,148.
#LiquidationMap
212
·
--
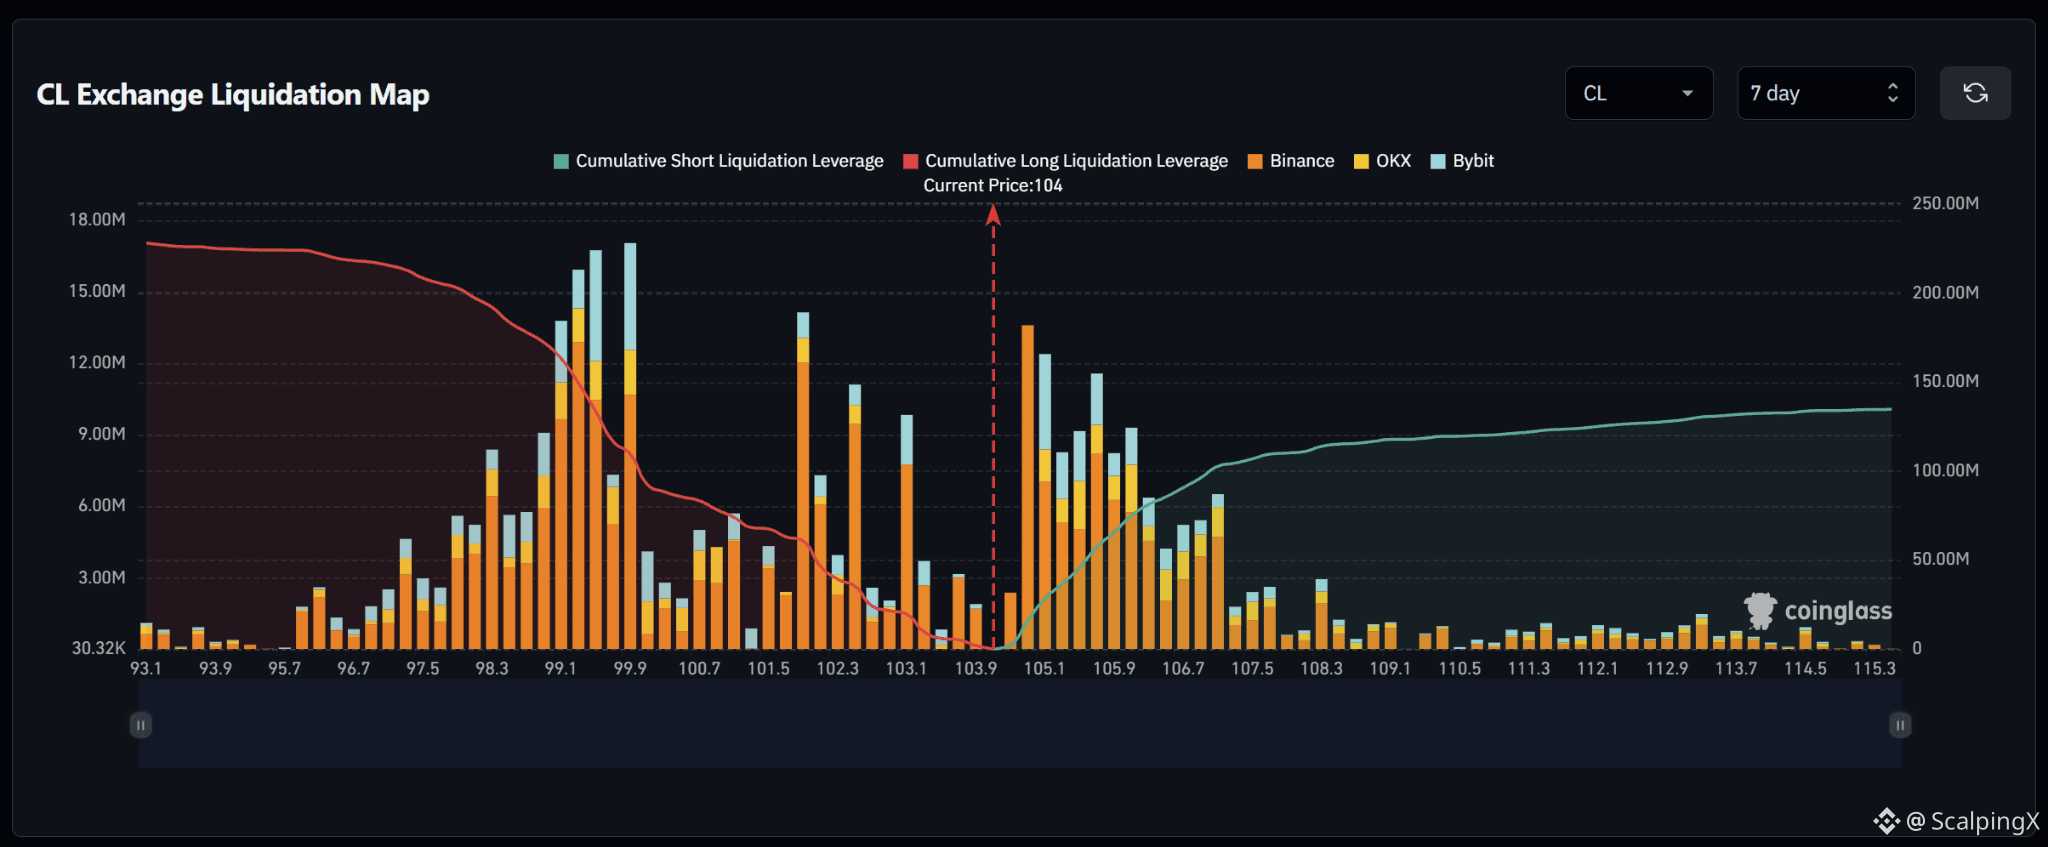
$CL – Liquidation Map (7 days) – Index ~104
🧭 The preferred scenario is an upside short sweep first. The nearby 104.6–106.1 band has dense short exposure. Although cumulative long exposure is larger across the displayed range, its heaviest concentration sits farther away around 99.1–100.
🔺 The first target is 104.6–105.2. A break and hold above 105.2 shifts attention to 105.5–106.1. Short liquidations within this band could amplify the advance.
🎯 Holding above 106.1 after a sweep brings 106.7–107.1 into focus. Density drops noticeably beyond that zone, with a smaller cluster near 108.3; further gains would require additional buying pressure.
⚖️ Losing 103.9 without a reclaim weakens the upside bias and shifts attention to 103.1–103.5, then 101.9–102.6. The large long cluster at 99.1–100 becomes a farther target if the decline continues. Avoid chasing a sweep of 104.6–105.2 that quickly falls back below 104.6.
#LiquidationMap
22
·
--
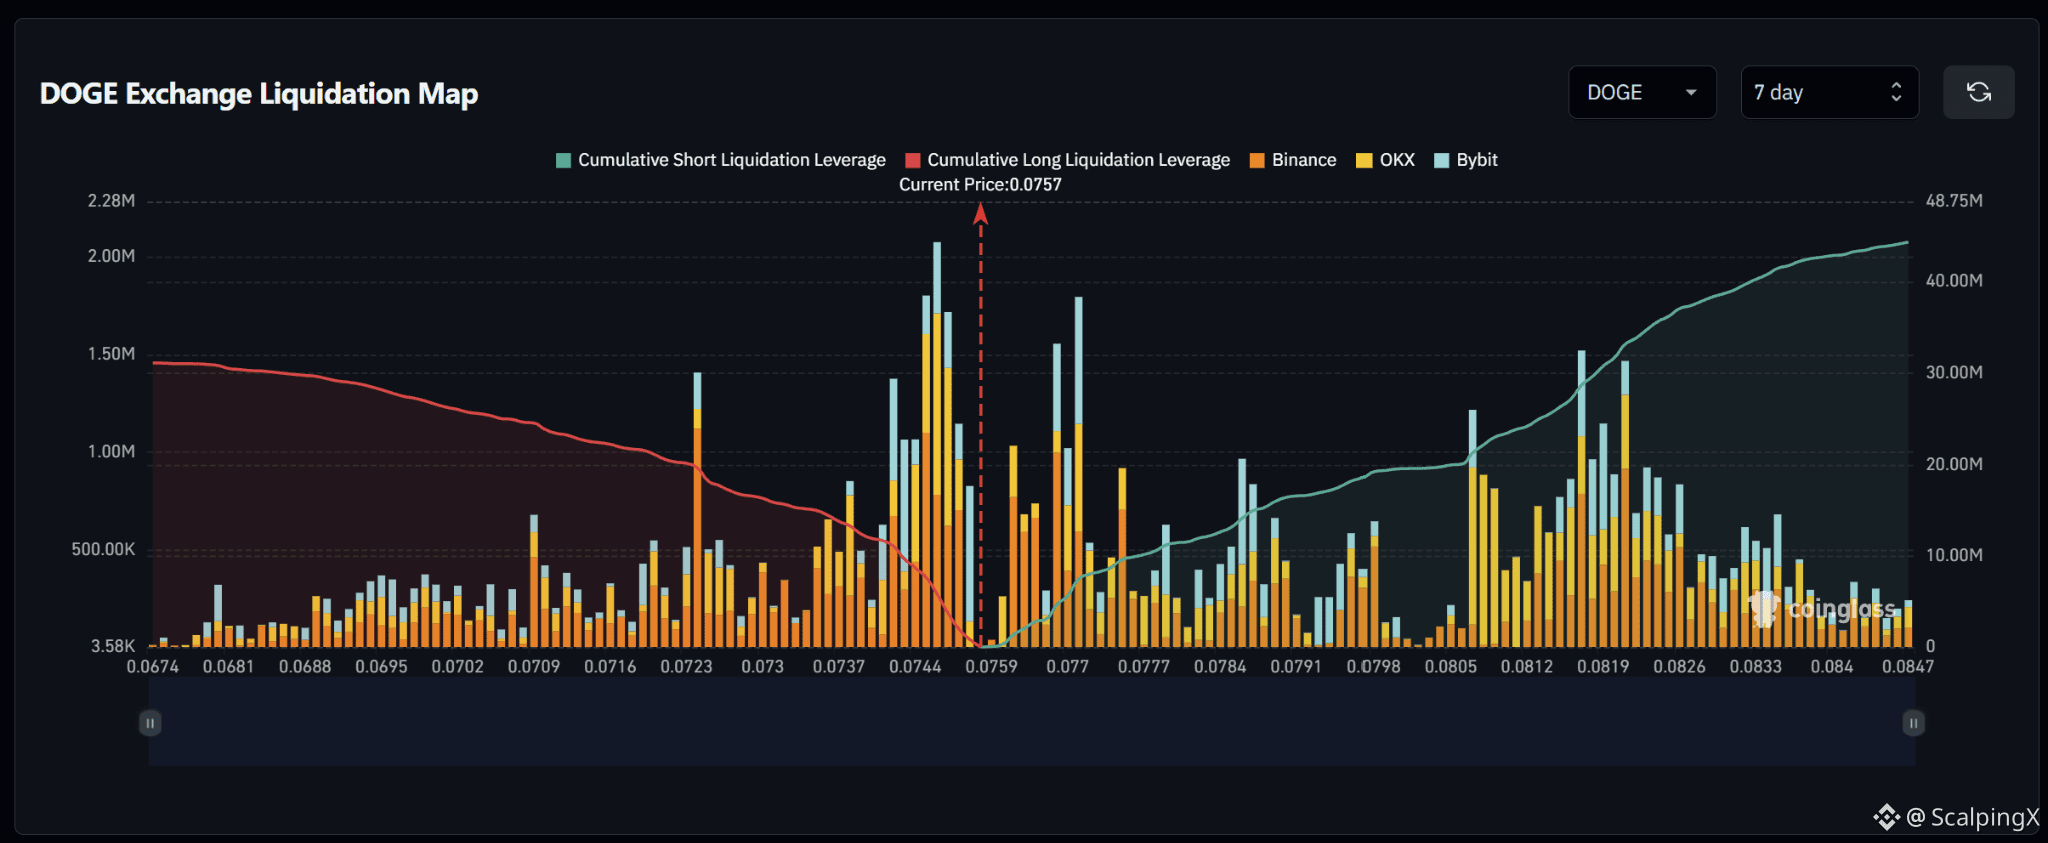
$DOGE – Liquidation Map (7 days) – Index ~0.0757
🧭 The preferred scenario is a downside long sweep first. The nearby 0.0744–0.0754 cluster stands out around 0.0748. Although cumulative short exposure is larger across the displayed range, a substantial concentration sits farther away at 0.0807–0.0826.
🔻 Losing 0.0754 without a reclaim shifts attention to 0.0746–0.0750, then 0.0744. Long liquidations within this band could amplify the decline.
🎯 A further break below 0.0744 brings 0.0734–0.0740, followed by 0.0723, into focus. Conversely, a downside sweep followed by a quick reclaim of 0.0754 would weaken the case for further declines.
⚖️ A break and hold above 0.0762 shifts priority to short clusters at 0.0768–0.0772, then 0.0785–0.0789. The 0.0807–0.0826 band becomes a farther target if momentum holds, with thinner density around 0.0800–0.0805 along the way.
#LiquidationMap
107
·
--
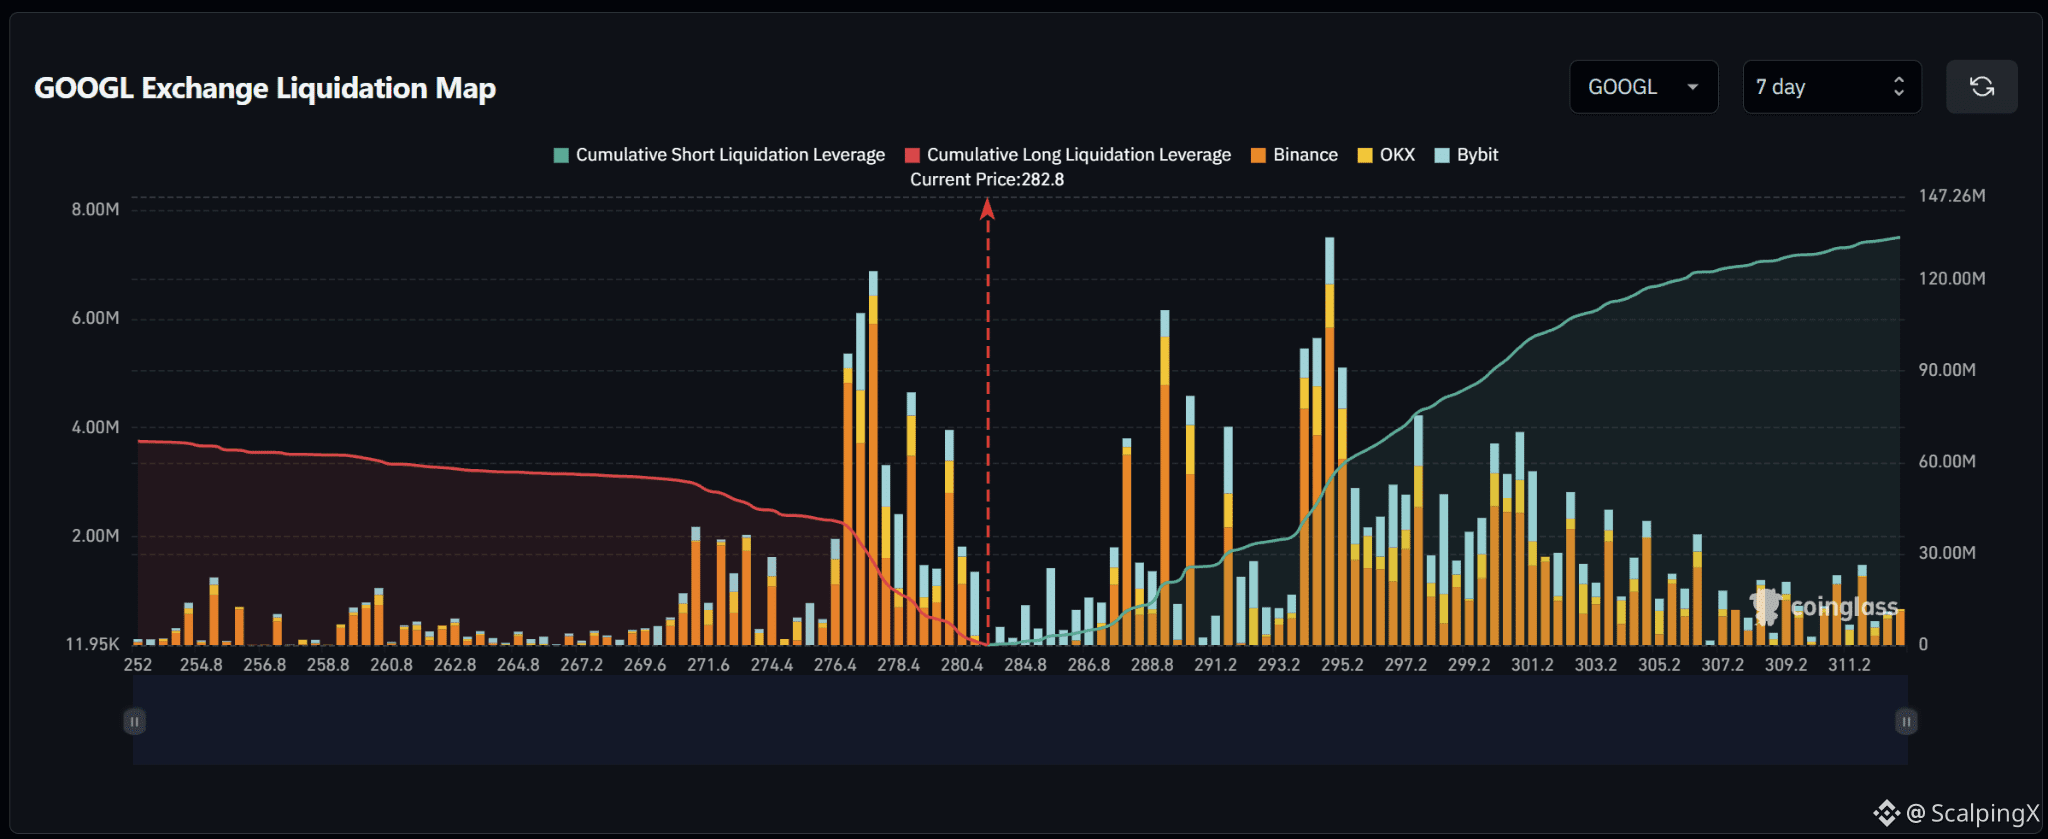
$GOOGL – Liquidation Map (7 days) – Index ~282.8
🧭 The preferred scenario is a downside long sweep first. Clusters around 280–281 and 277–279 sit closer to price than the major short clusters above. Cumulative short exposure is nearly twice long exposure across the displayed range, but that alone does not favor an immediate advance.
🔻 Losing 280 without a reclaim shifts attention to 277–279, particularly near 277.5. Long liquidations there could amplify the decline; the reaction after the sweep will help assess continuation.
🎯 A further break below 277 brings 271–274 into focus as a farther target. Conversely, a downside sweep followed by a quick reclaim of 280–281 would weaken the case for further declines.
⚖️ A break and hold above 286.5 shifts priority to short clusters at 288–291.5, then 294–295.5, particularly near 294.8. Holding above 295.5 would bring 299.5–301.5 into focus. Avoid chasing a cluster sweep that quickly reverses.
#LiquidationMap
115
·
--
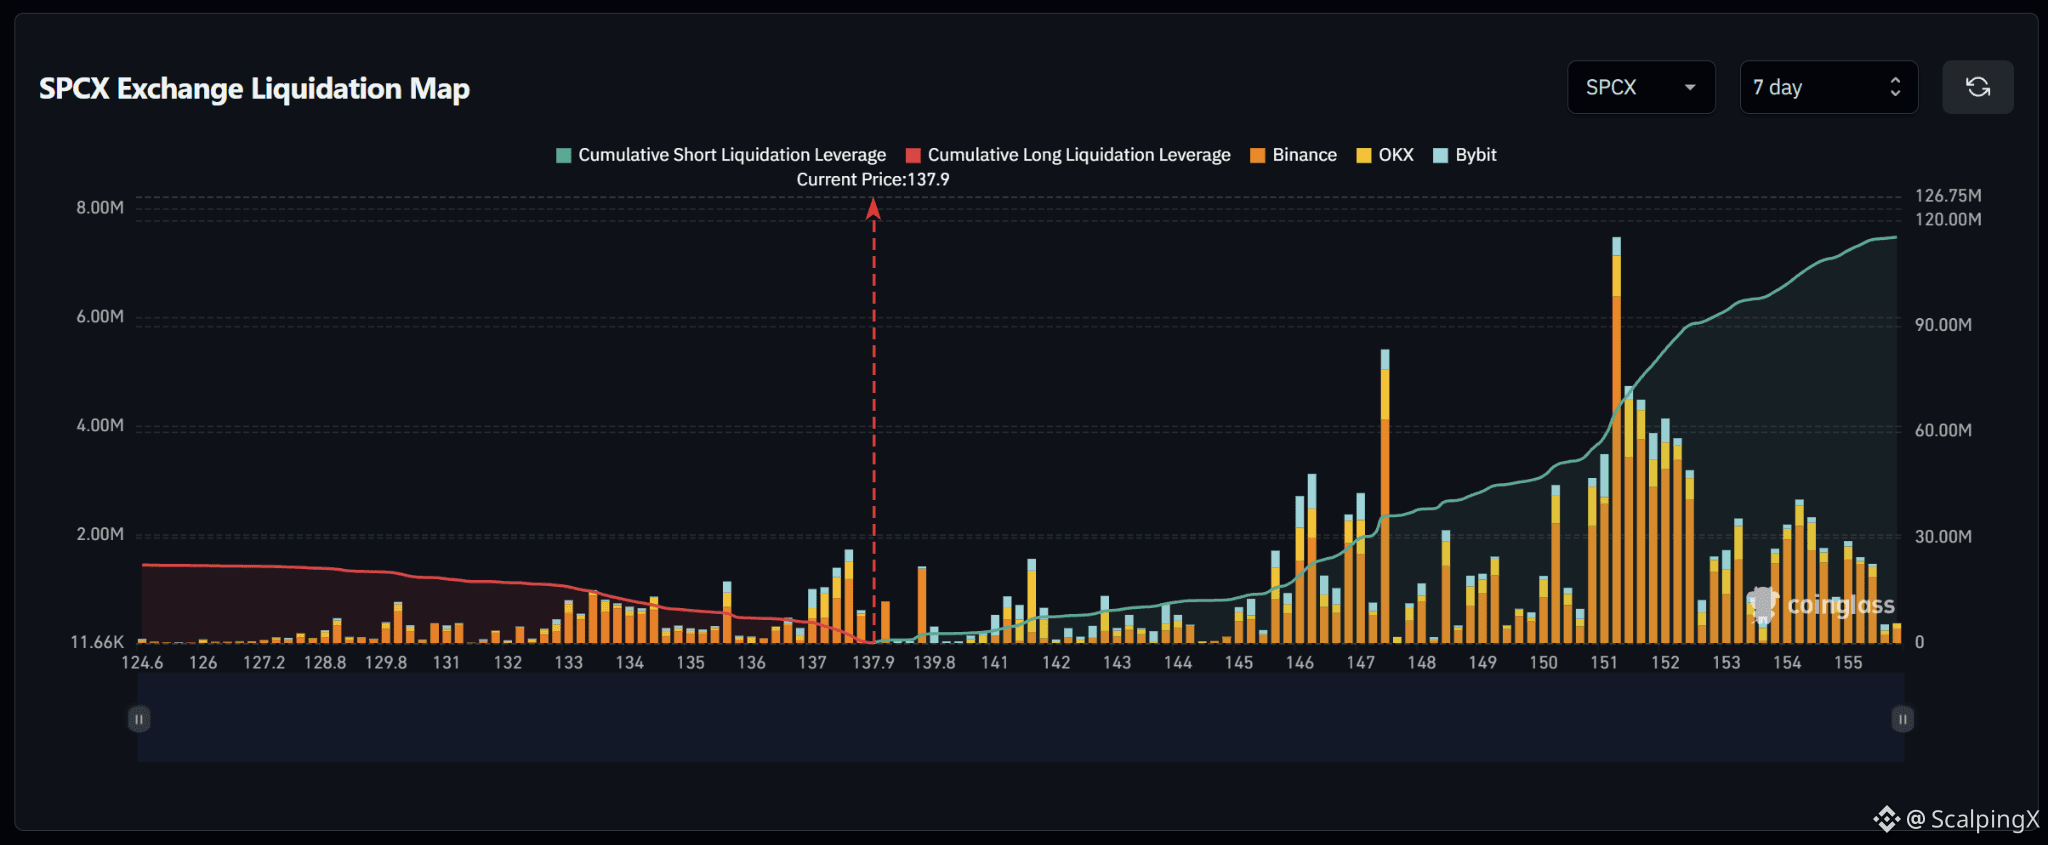
$SPCX – Liquidation Map (7 days) – Index ~137.9
🧭 The map favors an upside short sweep. Estimated cumulative short liquidation exposure is roughly $115M, nearly five times long exposure across the displayed range. However, the largest clusters sit farther away, making nearby zones the first focus.
🔺 The initial target is 139.5–140, followed by 141–141.7 if price breaks and holds above 140. Density is relatively thin through 142–145 before rising sharply at 145.6–147.5.
🎯 Holding above 147.5 after a sweep shifts attention to 150–152.4, particularly near 151.2. Short liquidations there could amplify the advance, while the reaction afterward will help assess profit-taking pressure.
⚖️ Nearby long exposure sits at 137–137.6. Losing 137 without a reclaim weakens the upside bias and brings 135–136, then 133–134.5, into focus. Avoid chasing a break above 140 that quickly falls back below the zone.
#LiquidationMap
126
·
--
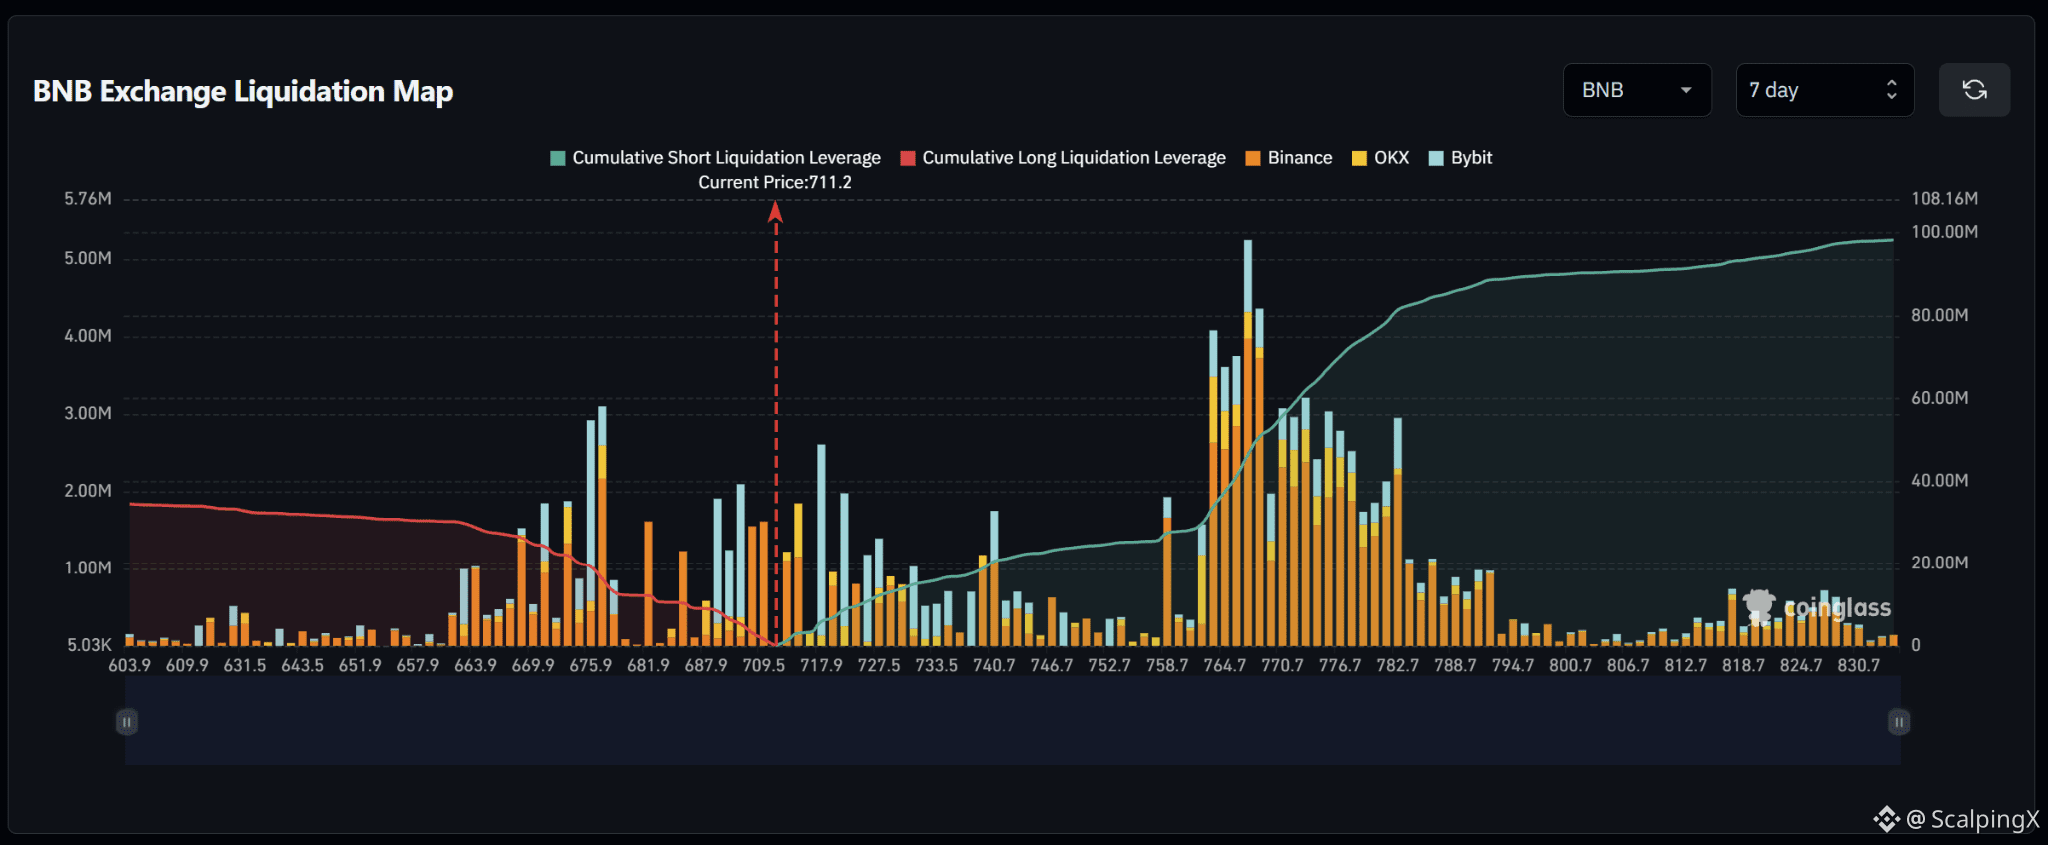
$BNB – Liquidation Map (7 days) – Index ~711.2
🧭 BNB favors an upside short sweep. Estimated cumulative short liquidations approach $100M, nearly three times long exposure across the displayed range. However, the heaviest concentration sits farther away at 764–783, requiring progress through nearby clusters first.
🔺 The first target is 717–724. A break and hold above 724 shifts attention to 733–742. These intermediate clusters will help assess whether the advance can hold.
🎯 Above 742, the next target is 758, followed by the large short band at 764–783, particularly near 767. Short liquidations there could amplify the advance; density drops sharply beyond 789.
⚖️ Losing 709.5 without a reclaim weakens the upside bias and shifts attention to 699–706. Losing that zone would bring the large long cluster at 674–682 into focus as a farther target. Avoid chasing if price sweeps 717–724 and falls back below 717.
#LiquidationMap
24
·
--
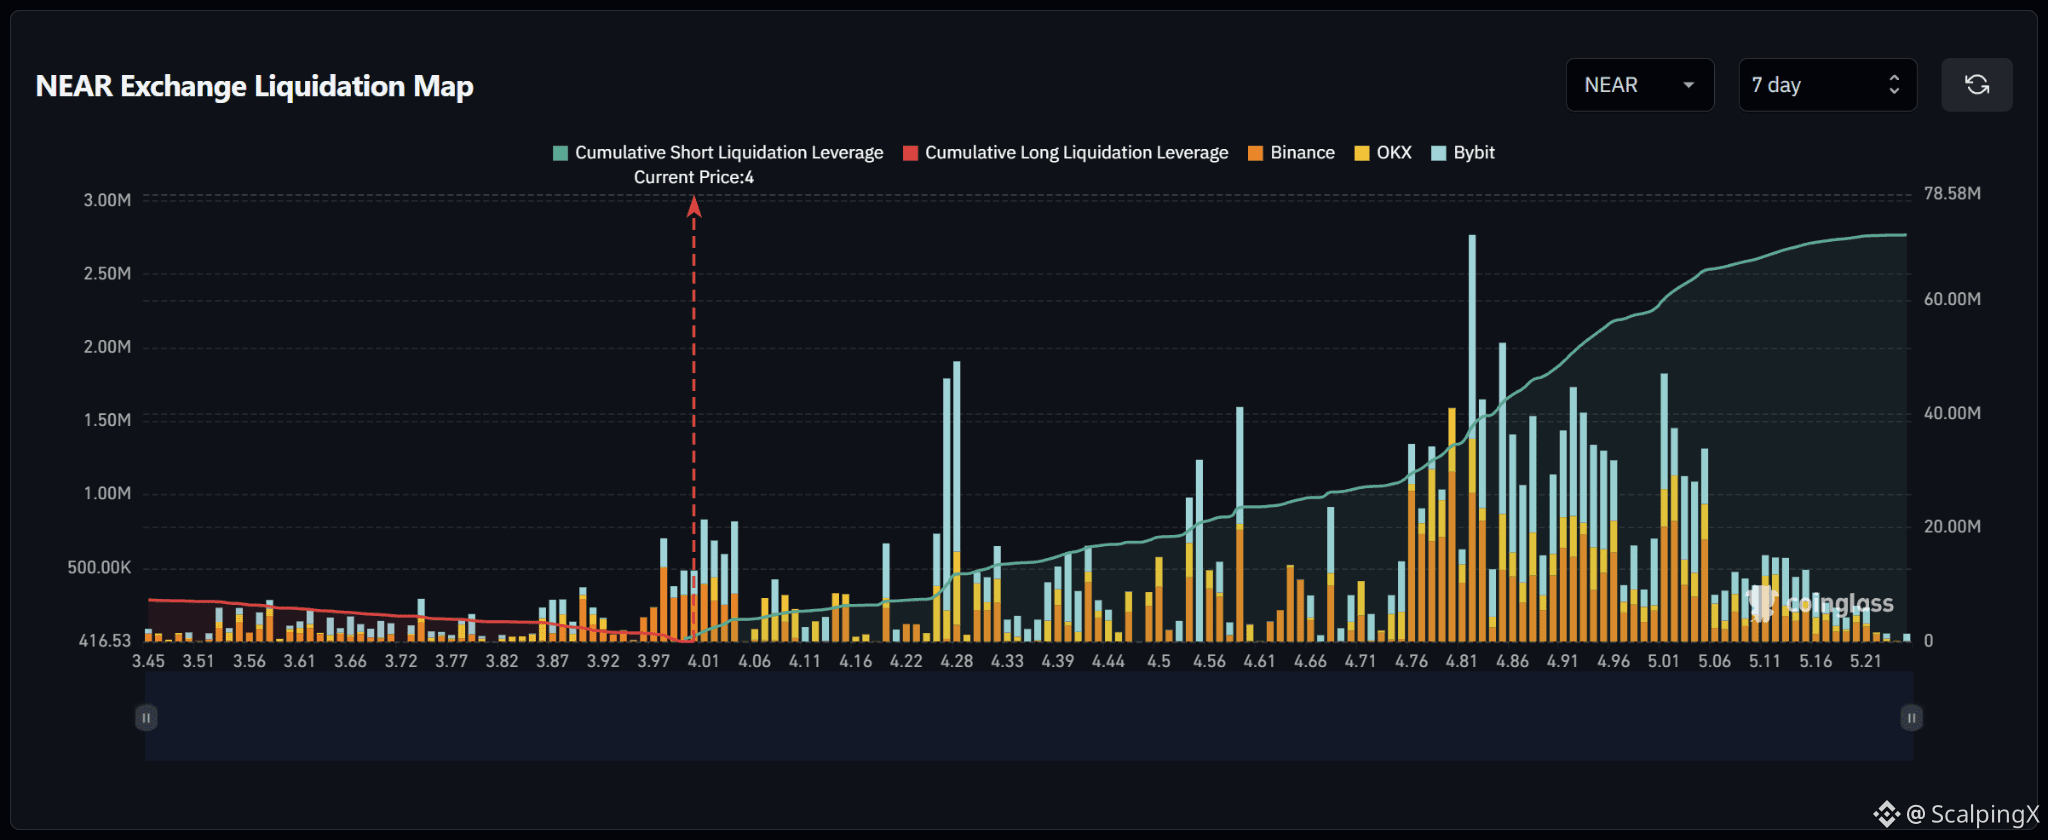
$NEAR – Liquidation Map (7 days) – Index ~4.00
🧭 NEAR clearly favors an upside short sweep. Estimated cumulative short liquidations reach roughly $70M versus nearly $7M in longs across the displayed range. However, most short exposure sits farther above the current price.
🔺 The first target is 4.01–4.05. A break and hold above 4.05 shifts attention to 4.26–4.29, featuring two prominent liquidation spikes. Density is lower between these zones, making reclaimed levels important to sustain the upside scenario.
🎯 Above 4.29, the next targets are 4.54–4.61, followed by the large band at 4.76–5.05. The biggest spike sits near 4.82; this is an extended target, rather than an expectation for one uninterrupted advance.
⚖️ Losing 3.97 without a reclaim weakens the upside bias and shifts attention to 3.87–3.92. A sweep of 4.26–4.29 followed by a drop below 4.26 would also weaken continuation; avoid chasing after the short cluster has been cleared.
#LiquidationMap
20
·
--
Рост
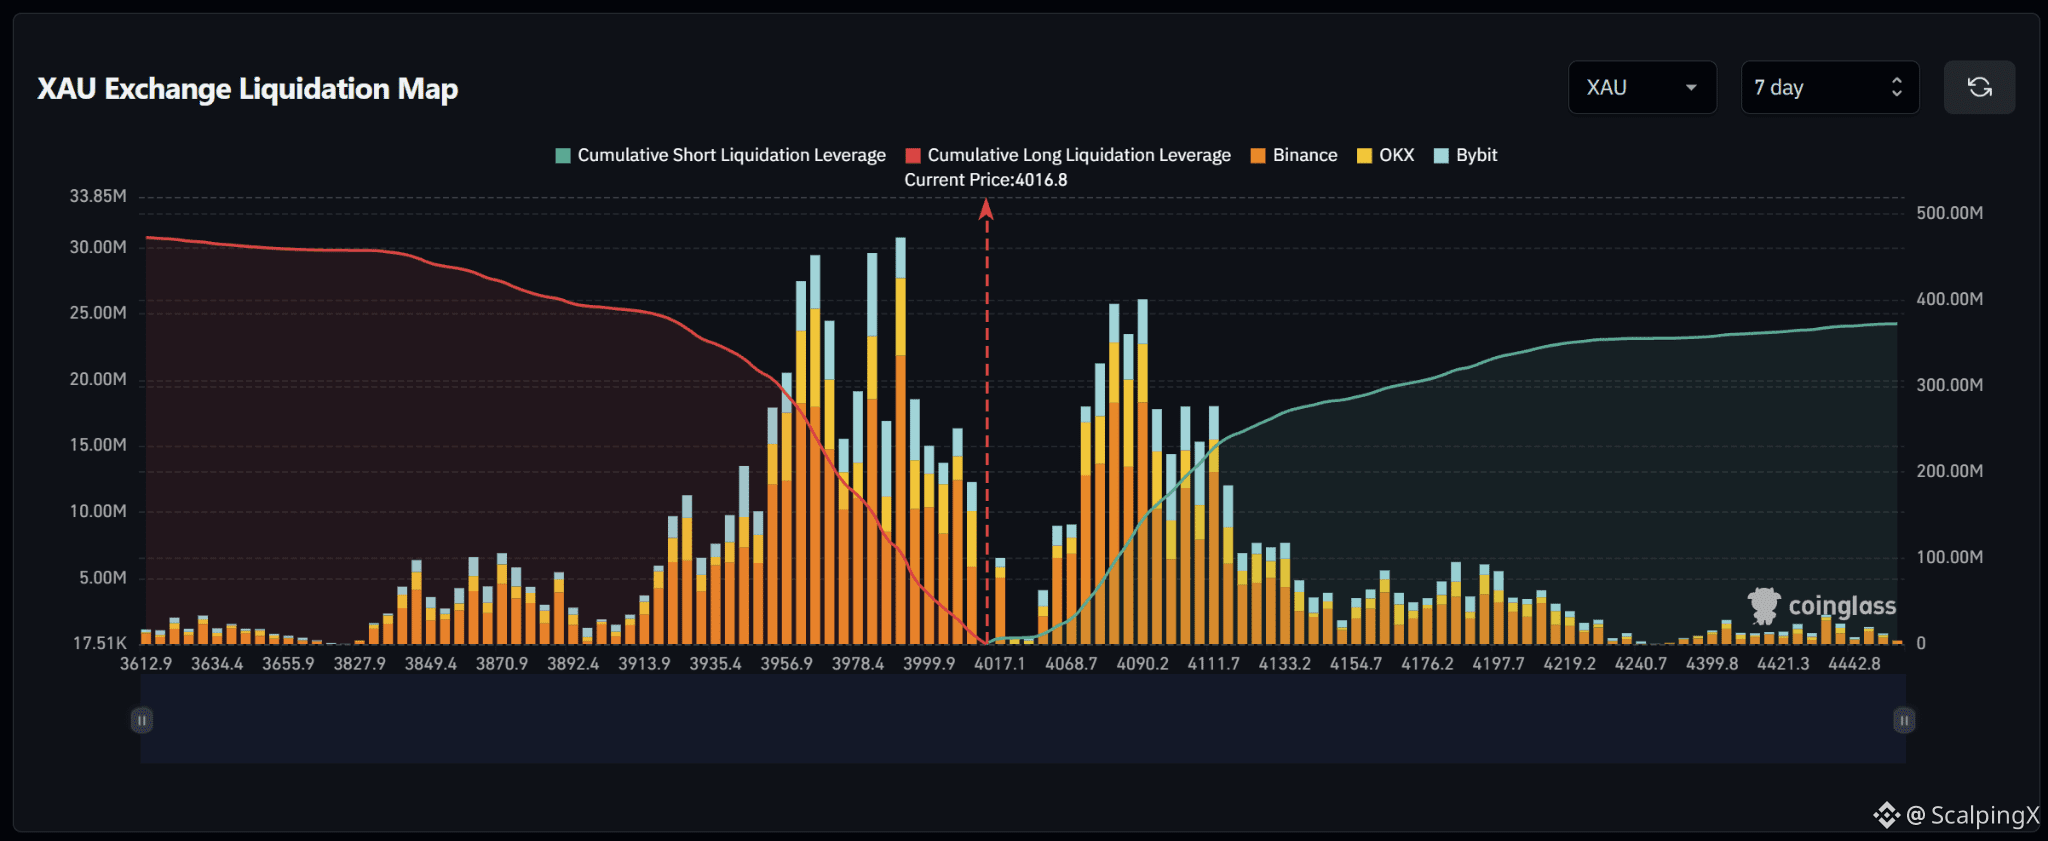
$XAU – Liquidation Map (7 days) – Index ~4,016.8
🧭 XAU favors a downside long sweep first. Cumulative long exposure exceeds shorts, with a heavy concentration at 3,950–4,010. The main short cluster sits farther away at 4,065–4,115, making the downside more relevant for the initial move.
🔻 The trigger to watch is 4,000. Losing it without a reclaim shifts attention to 3,975–3,990, then 3,950–3,965. Several large liquidation spikes sit together and could amplify the decline.
🎯 A break below 3,950 opens targets at 3,925–3,940, then 3,850–3,890. However, sweeping 3,950–3,965 and reclaiming 3,965 would weaken further downside expectations; avoid chasing after a sharp liquidation move.
⚖️ A break and hold above 4,050 weakens the downside priority and shifts attention to shorts at 4,065–4,095, then 4,100–4,115. Density drops noticeably above 4,135, warranting lower expectations for an extended squeeze.
#LiquidationMap
103
·
--
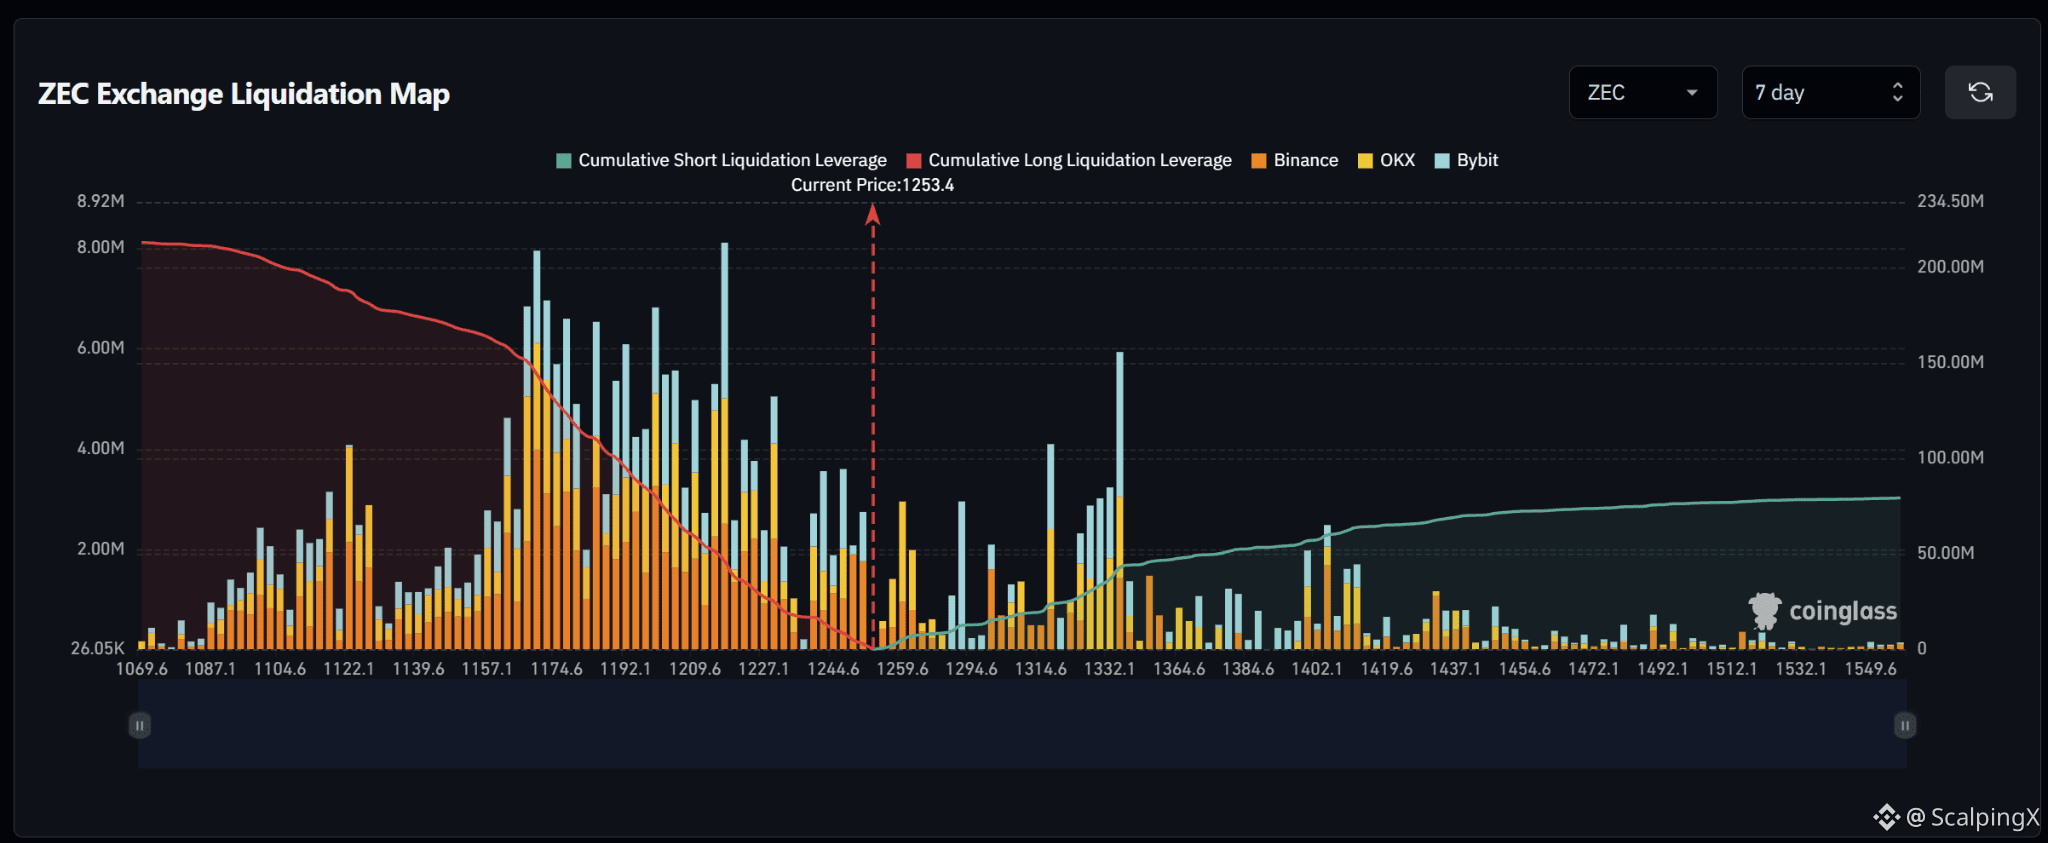
$ZEC – Liquidation Map (7 days) – Index ~1,253.4
🧭 ZEC clearly favors a downside long sweep. Estimated cumulative long liquidations reach roughly $210M versus nearly $80M in shorts across the displayed range. Successive large clusters at 1,165–1,230 create cascade risk if price falls into that band.
🔻 The first target is 1,240–1,250. Losing 1,240 without a reclaim shifts attention to 1,220–1,230, featuring one of the map’s largest liquidation spikes near 1,220.
🎯 A break below 1,220 opens targets at 1,190–1,210, then 1,165–1,180. However, sweeping the 1,220 cluster and reclaiming 1,230 would weaken further downside expectations; avoid chasing after a sharp liquidation move.
⚖️ A break and hold above 1,295 weakens the downside priority and shifts attention to shorts at 1,315–1,335. Density drops beyond this zone before another cluster around 1,400–1,415, so an extended squeeze should not be assumed.
#LiquidationMap
73
·
--
Рост
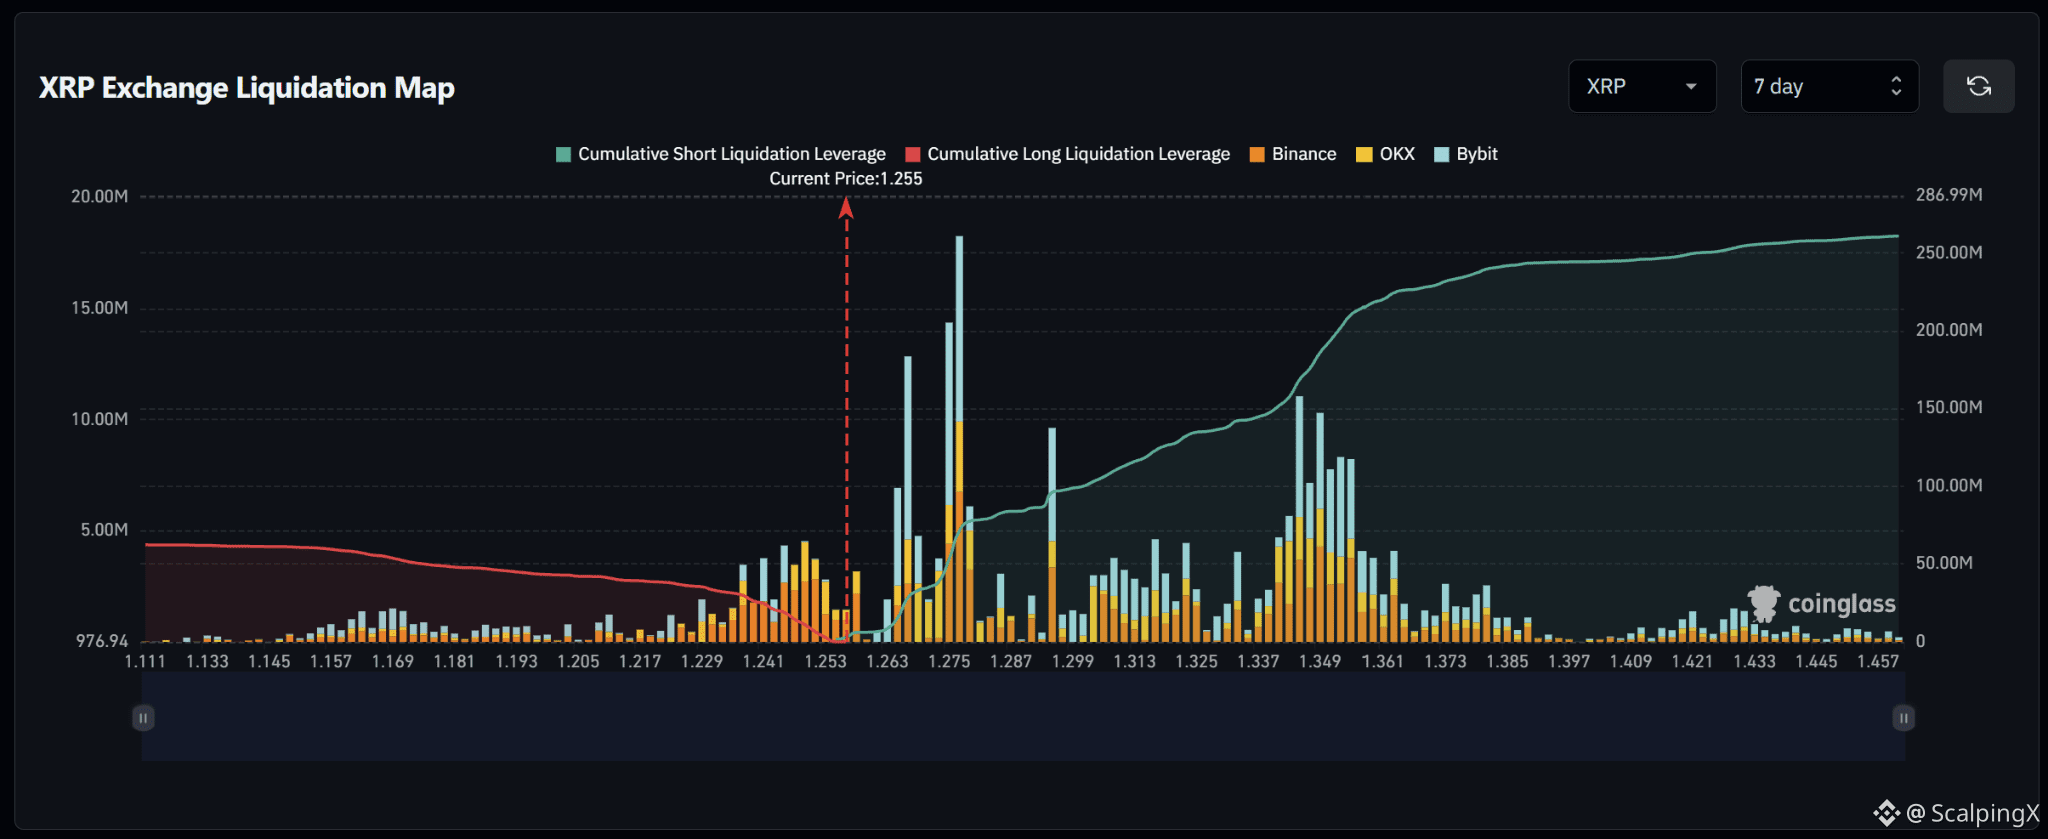
$XRP – Liquidation Map (7 days) – Index ~1.255
🧭 XRP clearly favors an upside short sweep. Estimated cumulative short liquidations reach roughly $260M, about four times long exposure across the displayed range. The large nearby cluster at 1.263–1.279 features a prominent spike near 1.277.
🔺 The first target is 1.263–1.279. A break and hold above 1.279 shifts attention to 1.295, then 1.305–1.325. Short liquidations within the nearby cluster could amplify the advance.
🎯 The main extended target is 1.341–1.355, where several large liquidation spikes sit together. Beyond 1.361–1.385, density drops sharply, warranting lower expectations for a prolonged squeeze toward farther levels.
⚖️ Losing 1.241 without a reclaim weakens the upside bias and shifts attention to 1.229–1.237. A sweep near 1.277 followed by a drop below 1.263 would also weaken continuation; avoid chasing after the large short cluster has been cleared.
#LiquidationMap
44
·
--
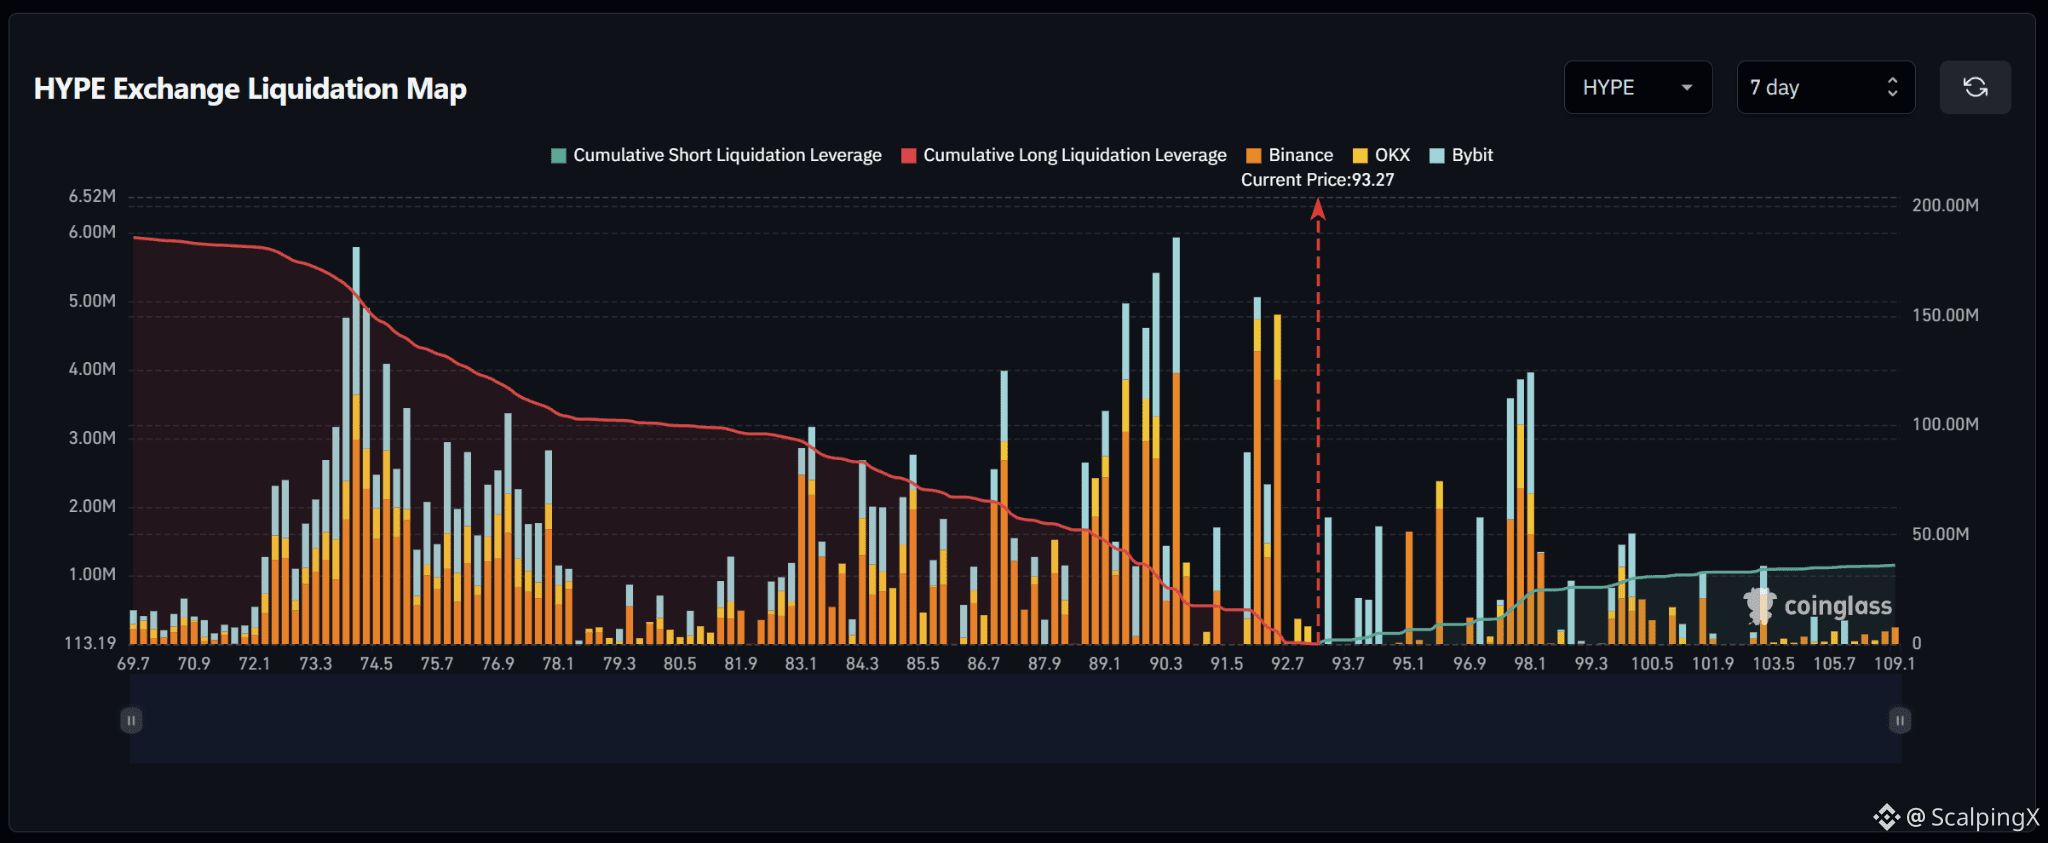
$HYPE – Liquidation Map (7 days) – Index ~93.27
🧭 HYPE clearly favors a downside long sweep. Estimated cumulative long exposure exceeds shorts by more than five times across the displayed range. Large bands at 92.0–92.5 and 89.1–90.6 sit just below price, highlighting liquidation cascade risk.
🔻 The first target is 92.0–92.5. Losing 92.0 without a reclaim shifts attention to 89.1–90.6, particularly 90.3–90.6. Long liquidations there could amplify the decline.
🎯 A break below 89.1 opens targets at 86.7–87.2, then 83.1–85.5. However, sweeping the 89.1–90.6 cluster and reclaiming 90.6 would weaken further downside expectations; avoid chasing after a sharp liquidation move.
⚖️ A break and hold above 95.1 weakens the downside priority and shifts attention to shorts at 97.6–98.3, then 100.0–100.5. Density becomes very thin beyond that zone, limiting further squeeze fuel.
#LiquidationMap
77
·
--
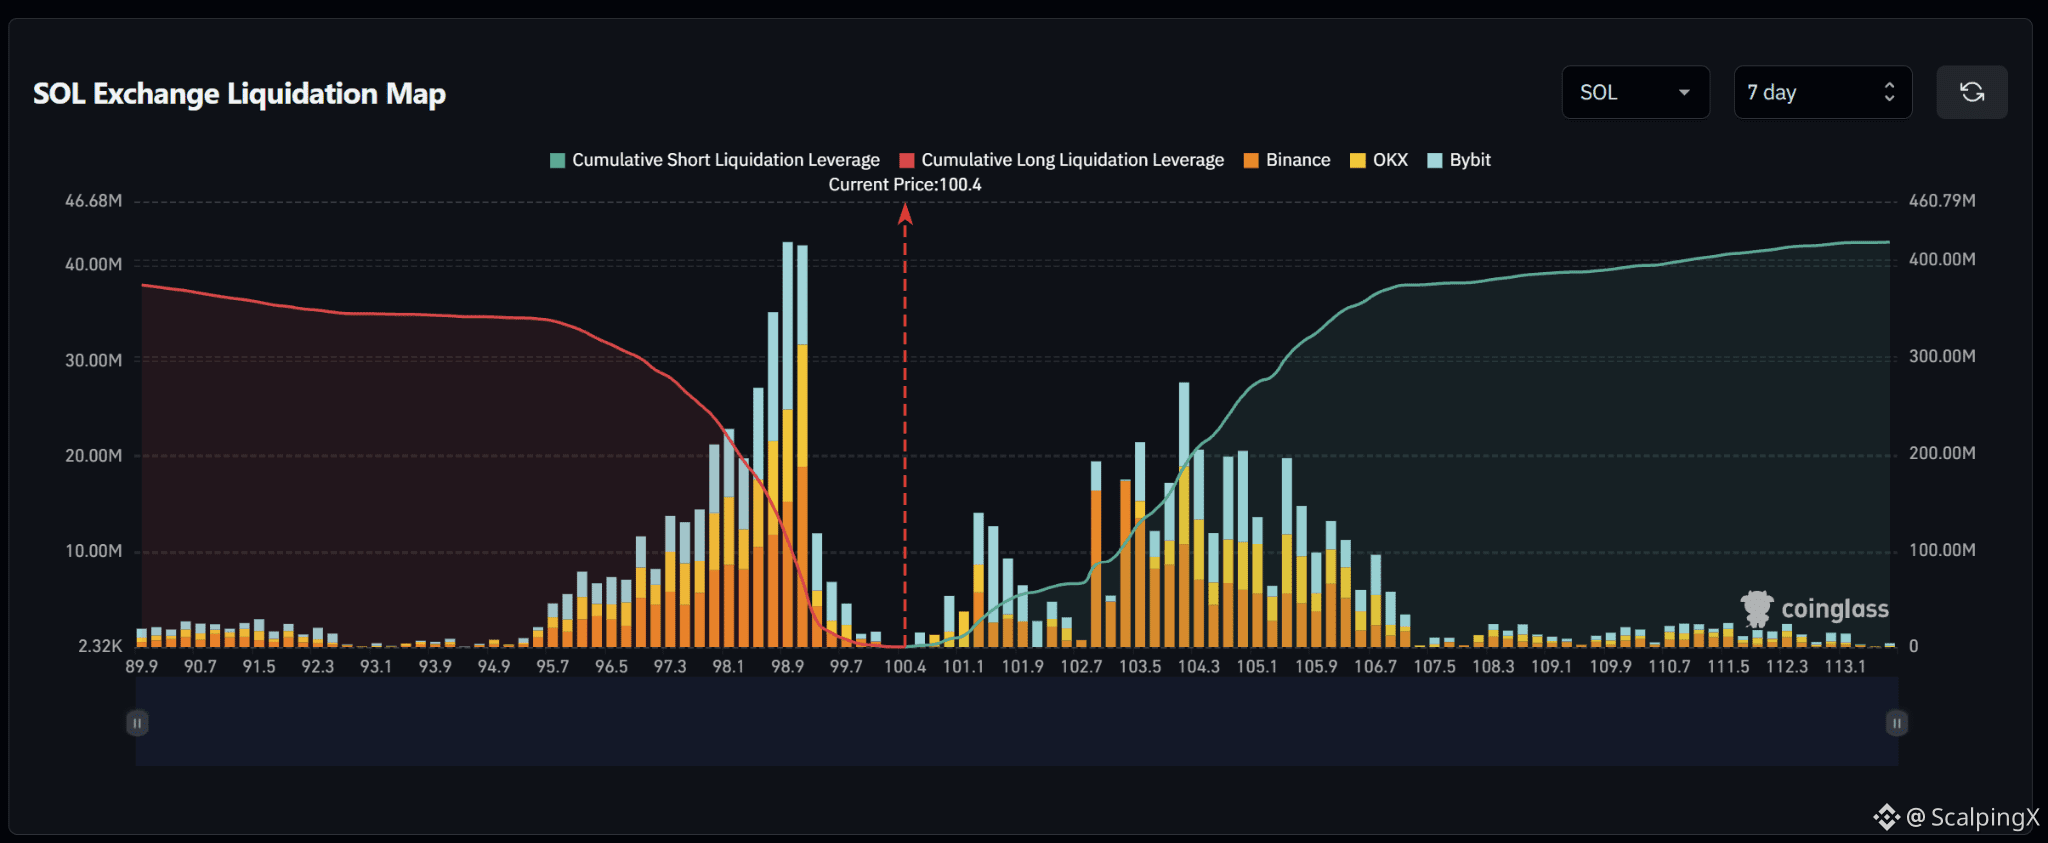
$SOL – Liquidation Map (7 days) – Index ~100.4
🧭 SOL favors a downside long sweep first. Although cumulative short exposure is slightly larger, the biggest liquidation spikes sit nearby below at 98.8–99.2. The main short concentration lies farther away at 102.9–106.8.
🔻 The trigger to watch is 99.7. Losing it without a reclaim shifts attention to 98.8–99.2, then 98.0–98.4. Long liquidations within this band could amplify the decline.
🎯 A break below 98.0 opens targets at 97.3–97.7, then 95.7–96.5. However, sweeping near 98.9 and reclaiming 99.2 would weaken further downside expectations; avoid chasing after the large cluster has been cleared.
⚖️ A break and hold above 101.7 weakens the downside-first scenario. Attention shifts to shorts at 102.9–104.3, then 105.0–106.8. Liquidation density drops sharply above 107, warranting lower expectations for an extended squeeze.
#LiquidationMap
35
·
--
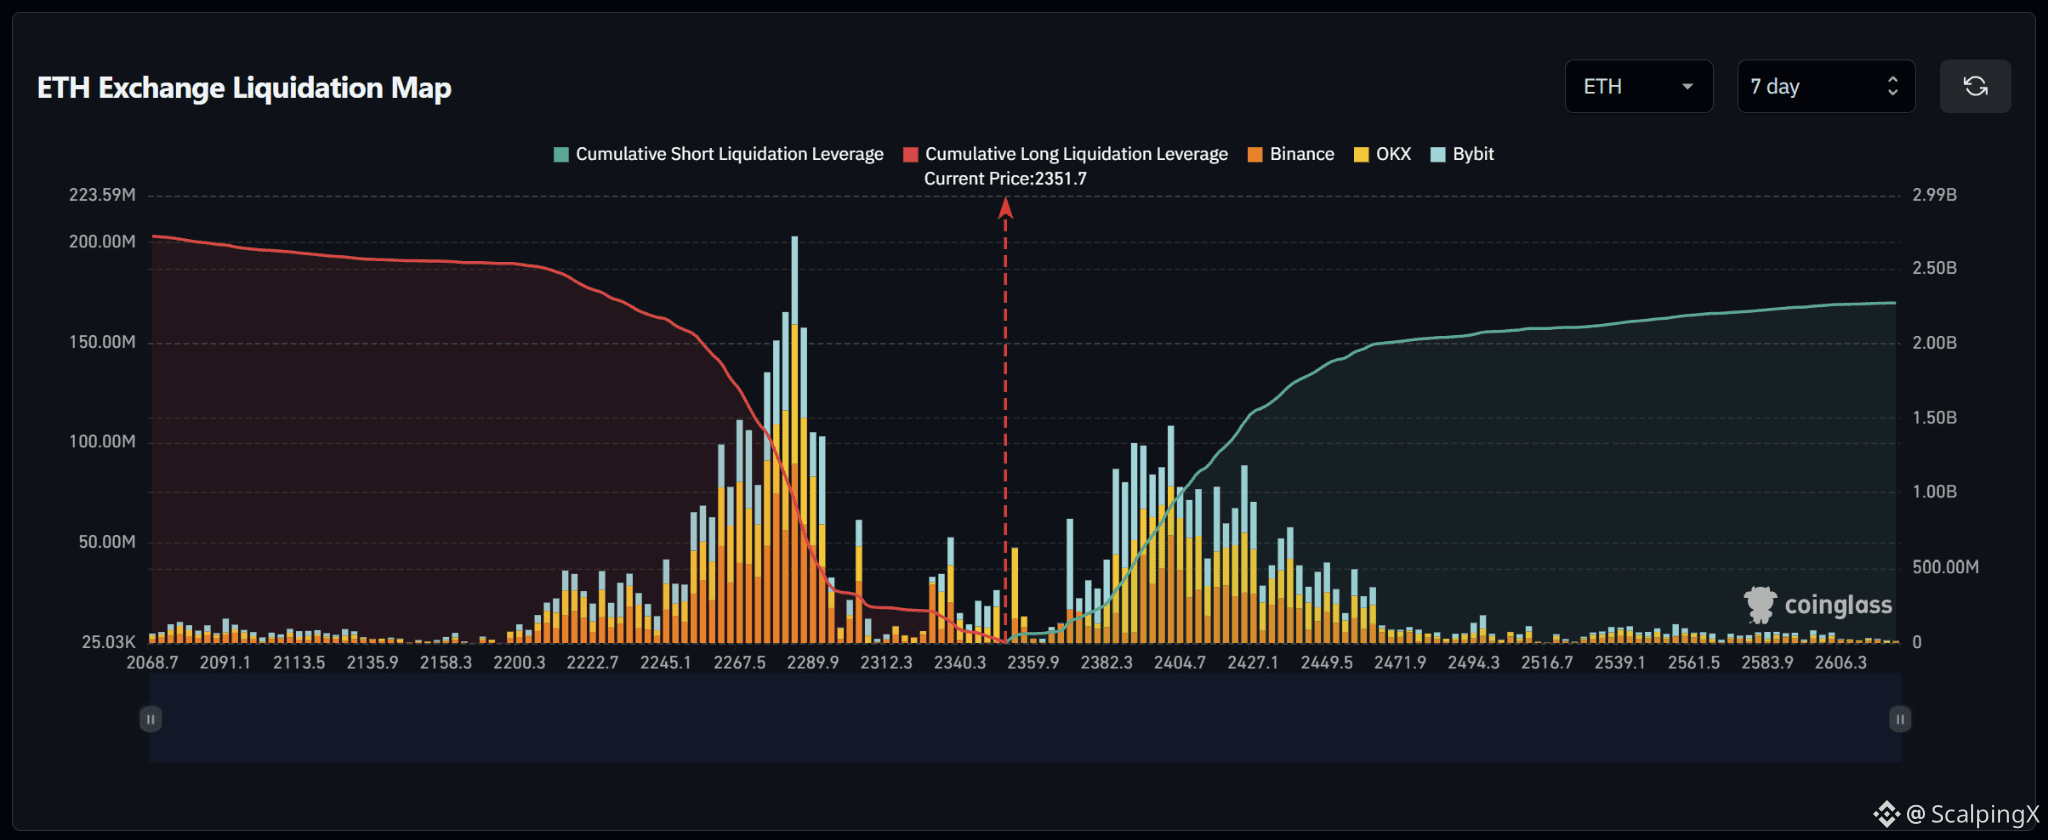
$ETH – Liquidation Map (7 days) – Index ~2,351.7
🧭 ETH favors an upside short sweep first. Although cumulative long exposure is larger, its strongest cluster sits farther away at 2,260–2,290. The short band at 2,385–2,450 is closer and contains successive liquidation spikes.
🔺 The first target is 2,385–2,410. A break and hold above 2,410 shifts attention to 2,420–2,450. Short liquidations within this band could amplify the advance, particularly around 2,400–2,410.
🎯 The 2,450–2,470 zone is the final extension of the main cluster. Liquidation density drops sharply beyond 2,470, making the reaction after a sweep more important than chasing farther targets.
⚖️ Losing 2,330 without a reclaim weakens the upside bias and shifts attention to 2,310, then 2,260–2,290, featuring the largest spike near 2,285. A sweep of 2,400–2,410 followed by a drop below 2,385 would also weaken expectations for continuation.
#LiquidationMap
22
·
--
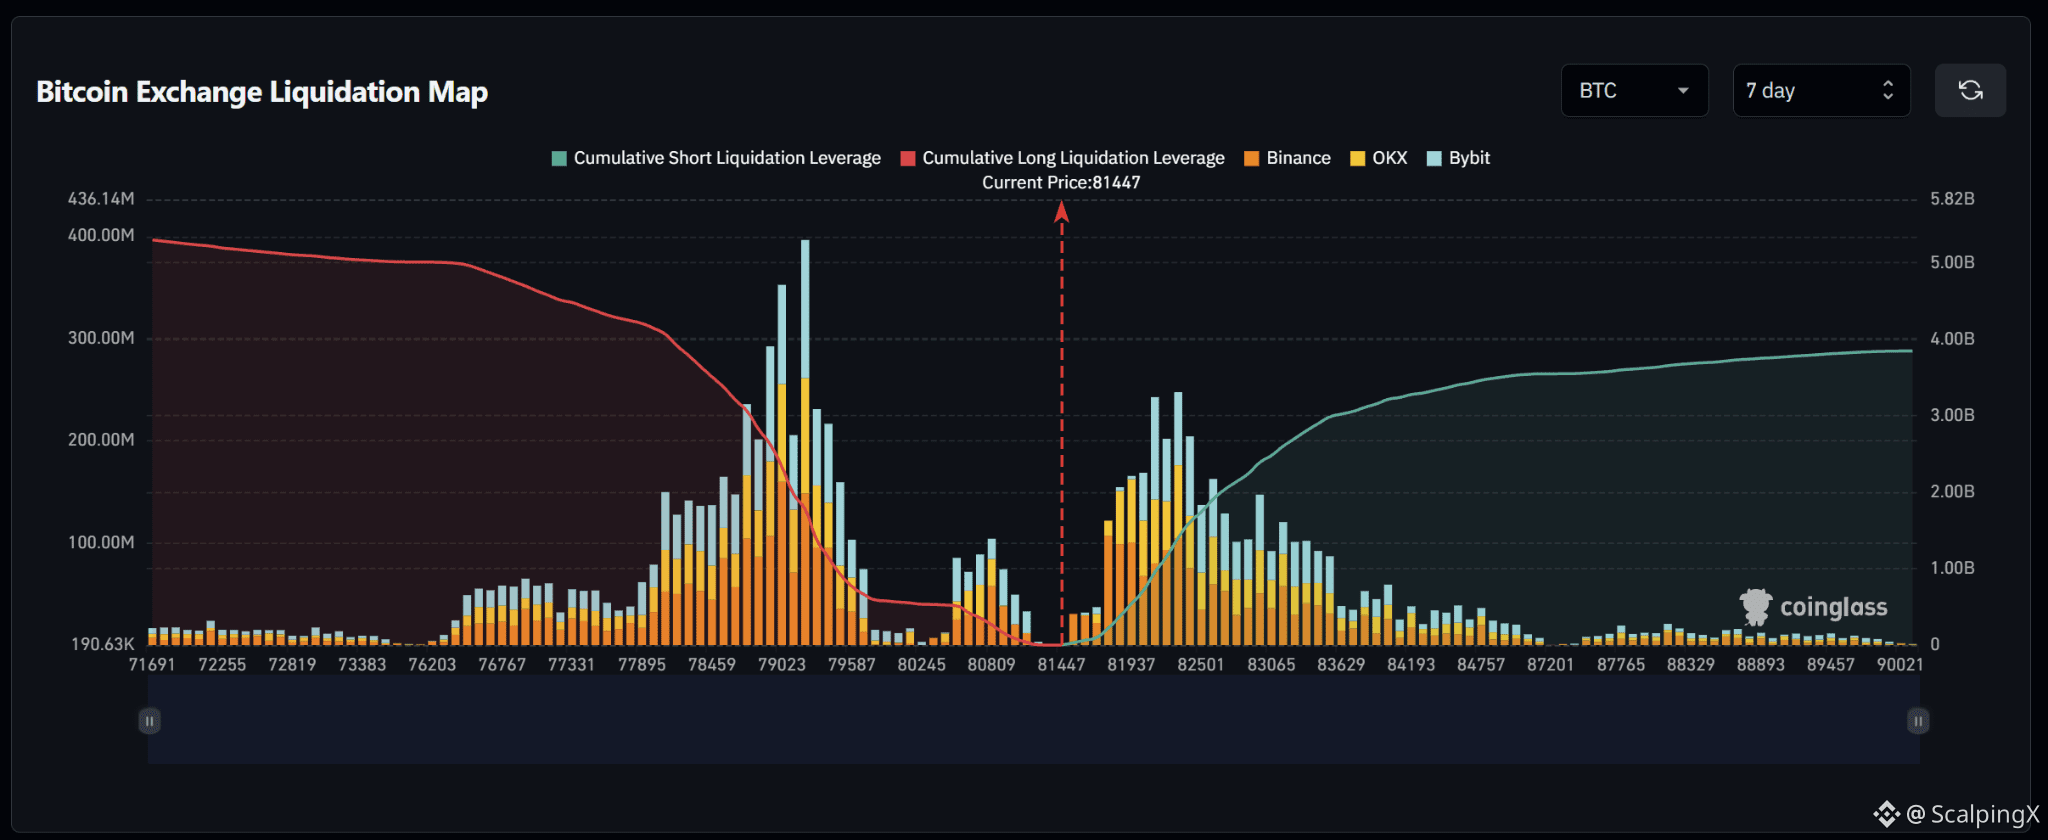
$BTC – Liquidation Map (7 days) – Index ~81,447
🧭 BTC favors an upside short sweep first. Although cumulative long exposure is larger, its strongest cluster sits farther away at 78,900–79,600. The dense short cluster at 81,800–82,500 is closer, making it the preferred initial target.
🔺 The main nearby target is 81,800–82,500, particularly around 82,200–82,300. A break and hold above 82,500 shifts attention to 82,900–83,600. Short liquidations within this band could amplify the advance.
🎯 Liquidation density drops noticeably beyond 83,600. Smaller clusters remain at 84,000–84,800, but further squeeze fuel diminishes; the reaction after the main cluster matters more than chasing higher prices.
⚖️ Losing 80,800 without a reclaim weakens the upside bias and shifts attention to 80,500, then 78,900–79,600. A sweep of 82,200–82,500 followed by a drop below 81,800 would also weaken expectations for continuation.
#LiquidationMap
36
Войдите, чтобы посмотреть больше материала
Присоединяйтесь к пользователям криптовалют по всему миру на Binance Square
⚡️ Получайте новейшую и полезную информацию о криптоактивах.
💬 Нам доверяет крупнейшая в мире криптобиржа.
👍 Получите достоверные аналитические данные от верифицированных создателей контента.
Эл. почта/номер телефона
В тренде
1
#BinanceReports80%Recoveryof$6.3BillioninLossesfromHackIncident
Просмотров: 582
35 обсуждают
2
#HeYiSaysWithdrawalsExpectedtoResumeWithin42Hours
Просмотров: 302
62 обсуждают
3
#CZSaysCompensationIsinPlaceUsersAreProtected
Просмотров: 156
30 обсуждают
4
#RichardTengSaysBinanceWillCoverAllHackedLosseswithCompanyFunds
Просмотров: 0
0 обсуждают
5
#TRMCambodianCasinosReceived$1.07BInCrypto
Просмотров: 334
25 обсуждают
6
#USDCCirculationFallsAbout800MInSevenDays
Просмотров: 590
57 обсуждают
7
#SuspectedNorthKoreaAttacksAccountForNearly89%OfCryptoHackLosses
Просмотров: 5,110
62 обсуждают
8
#OpenAICutsFundraisingTargetBy$10B
Просмотров: 969
50 обсуждают
9
#ASICHasReceivedNoPredictionMarketApplications
Просмотров: 16,223
467 обсуждают
10
#RecallAnnouncesLiquidationPlansToBurn35.86%OfSupply
Просмотров: 518
22 обсуждают