
Bull Master Official
2k Публикации

Bull Master Official
Отправить жалобу
Заблокировать пользователя
Crypto Expert - Trader - Sharing Market Insights, Trends || crypto matrix
Открытая сделка
Трейдер с регулярными сделками
11.8 мес.
7 подписок(и/а)
3.2K+ подписчиков(а)
3.9K+ понравилось
Посты
Портфель
Все
Цитирования
Активно
·
--
Рост
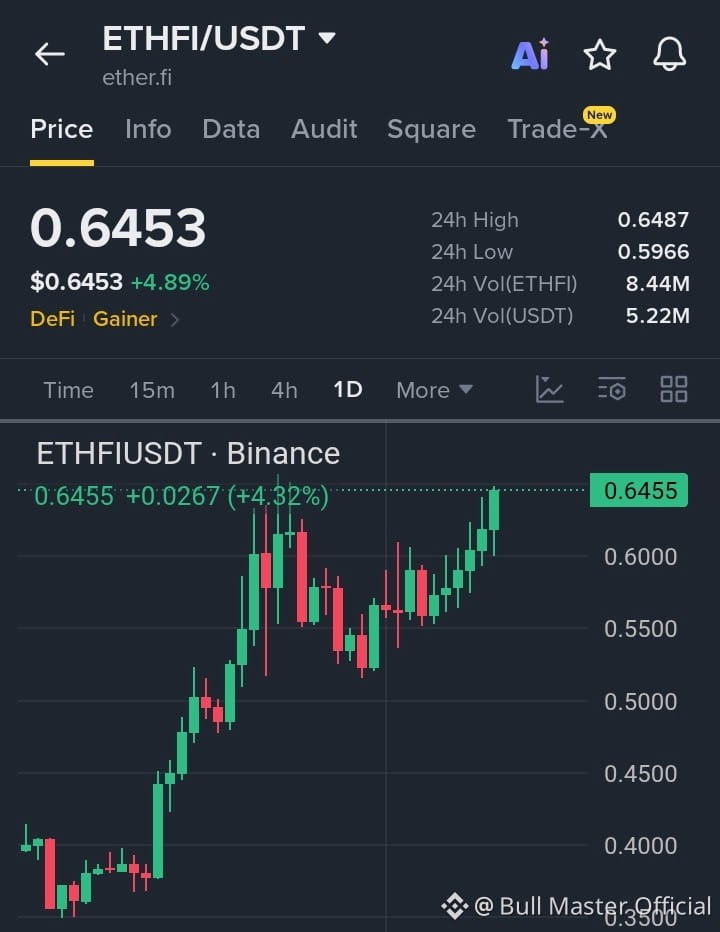
Наблюдаем за тем, как $ETHFI целится прямо в мощный уровень предложения, формируя потенциальную сделку на шорт с высокой вероятностью. 📉💥
Хотя бычий импульс был сильным, токен тестирует критический ценовой потолок, где ожидается фиксация прибыли. Чистый пробой отсюда может спровоцировать резкую коррекцию вниз, поэтому крайне важно дождаться подтверждения. ⚡️⏳
📍 Вход: 0.6400 – 0.6480 🎯 TP1: 0.6000 🎯 TP2: 0.5500 🎯 TP3: 0.5000 🛑 SL:
{spot}(ETHFIUSDT)
0.6700
$ZEC
{spot}(ZECUSDT)
$BTR
{future}(BTRUSDT)
Наблюдаем за тем, как $ETHFI целится прямо в мощный уровень предложения, формируя потенциальную сделку на шорт с высокой вероятностью. 📉💥
Хотя бычий импульс был сильным, токен тестирует критический ценовой потолок, где ожидается фиксация прибыли. Чистый пробой отсюда может спровоцировать резкую коррекцию вниз, поэтому крайне важно дождаться подтверждения. ⚡️⏳
📍 Вход: 0.6400 – 0.6480 🎯 TP1: 0.6000 🎯 TP2: 0.5500 🎯 TP3: 0.5000 🛑 SL:
0.6700
$ZEC
$BTR
Хотя бычий импульс был сильным, токен тестирует критический ценовой потолок, где ожидается фиксация прибыли. Чистый пробой отсюда может спровоцировать резкую коррекцию вниз, поэтому крайне важно дождаться подтверждения. ⚡️⏳
📍 Вход: 0.6400 – 0.6480 🎯 TP1: 0.6000 🎯 TP2: 0.5500 🎯 TP3: 0.5000 🛑 SL:
0.6700
$ZEC
$BTR
1
78
·
--
Падение
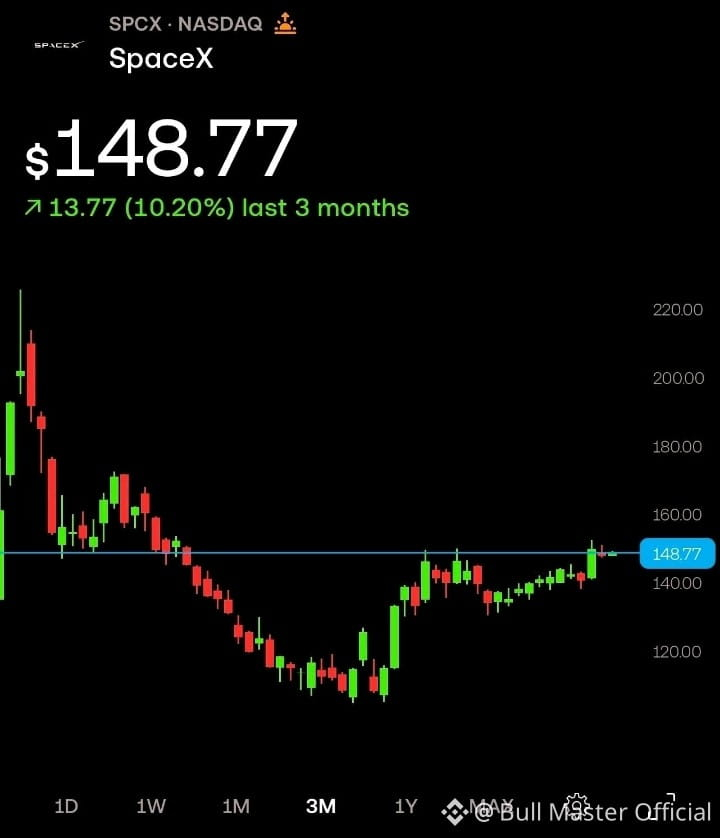
$SPACE
{future}(SPACEUSDT)
показывает силу после надежного восстановления из зоны $110–$120. На $148.77 структура выглядит готовой к еще одному рывку, если сохранится импульс. Пробой выше $150 может открыть путь к $160+.
$ZEC
{spot}(ZECUSDT)
$BTR
{future}(BTRUSDT)
Цель:
160–$170
$SPACE
показывает силу после надежного восстановления из зоны $110–$120. На $148.77 структура выглядит готовой к еще одному рывку, если сохранится импульс. Пробой выше $150 может открыть путь к $160+.
$ZEC
$BTR
Цель:
160–$170
показывает силу после надежного восстановления из зоны $110–$120. На $148.77 структура выглядит готовой к еще одному рывку, если сохранится импульс. Пробой выше $150 может открыть путь к $160+.
$ZEC
$BTR
Цель:
160–$170
1
201
·
--
Рост
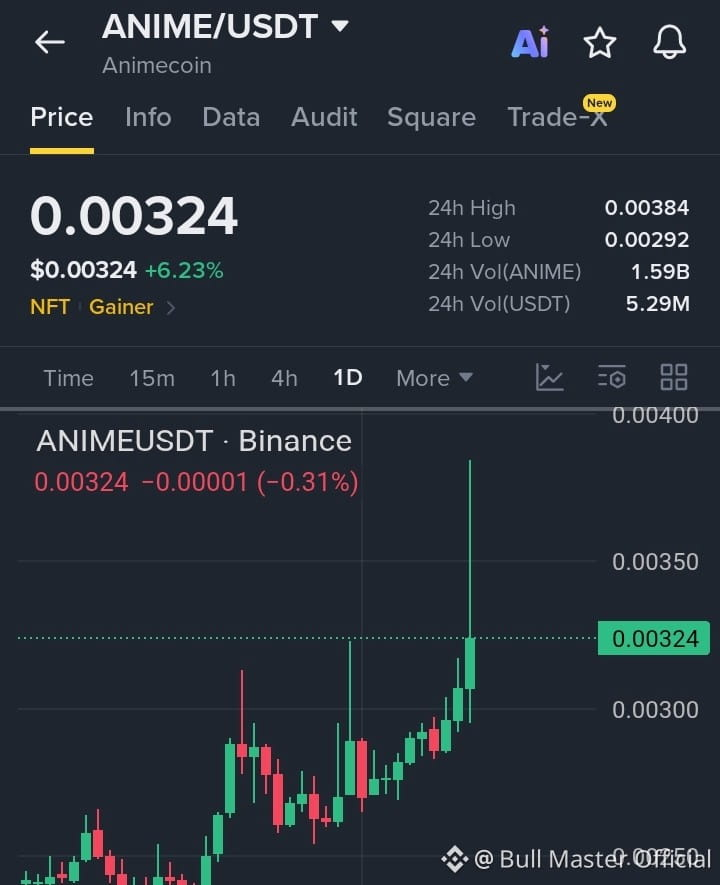
🚨 СРОЧНО: $ANIME IS ВЗРЫВАЕТСЯ! 🚨
Ожидается резкий разворот импульса для #Animecoin! Дневная свеча только что совершила мощный пробой: она выросла более чем на +6% при сильном объёме, поддерживающем движение. Покупатели агрессивно заходят после отскока от ключевых уровней нижней поддержки.
Почему это важно: Внушительный приток объёма сигнализирует о сильном интересе покупателей, которые пробивают устойчивое сопротивление. Такие пробои запускают мощную FOMO по всему рынку, приводя к взрывным продолжениям ралли.
🎯 Следующая цель: $0.00385 🚀 Ключевой уровень:
{spot}(ANIMEUSDT)
$0.00400
$ZEC
{spot}(ZECUSDT)
$BTR
{future}(BTRUSDT)
🚨 СРОЧНО: $ANIME IS ВЗРЫВАЕТСЯ! 🚨
Ожидается резкий разворот импульса для #Animecoin! Дневная свеча только что совершила мощный пробой: она выросла более чем на +6% при сильном объёме, поддерживающем движение. Покупатели агрессивно заходят после отскока от ключевых уровней нижней поддержки.
Почему это важно: Внушительный приток объёма сигнализирует о сильном интересе покупателей, которые пробивают устойчивое сопротивление. Такие пробои запускают мощную FOMO по всему рынку, приводя к взрывным продолжениям ралли.
🎯 Следующая цель: $0.00385 🚀 Ключевой уровень:
$0.00400
$ZEC
$BTR
Ожидается резкий разворот импульса для #Animecoin! Дневная свеча только что совершила мощный пробой: она выросла более чем на +6% при сильном объёме, поддерживающем движение. Покупатели агрессивно заходят после отскока от ключевых уровней нижней поддержки.
Почему это важно: Внушительный приток объёма сигнализирует о сильном интересе покупателей, которые пробивают устойчивое сопротивление. Такие пробои запускают мощную FOMO по всему рынку, приводя к взрывным продолжениям ралли.
🎯 Следующая цель: $0.00385 🚀 Ключевой уровень:
$0.00400
$ZEC
$BTR
1
156
·
--
Рост
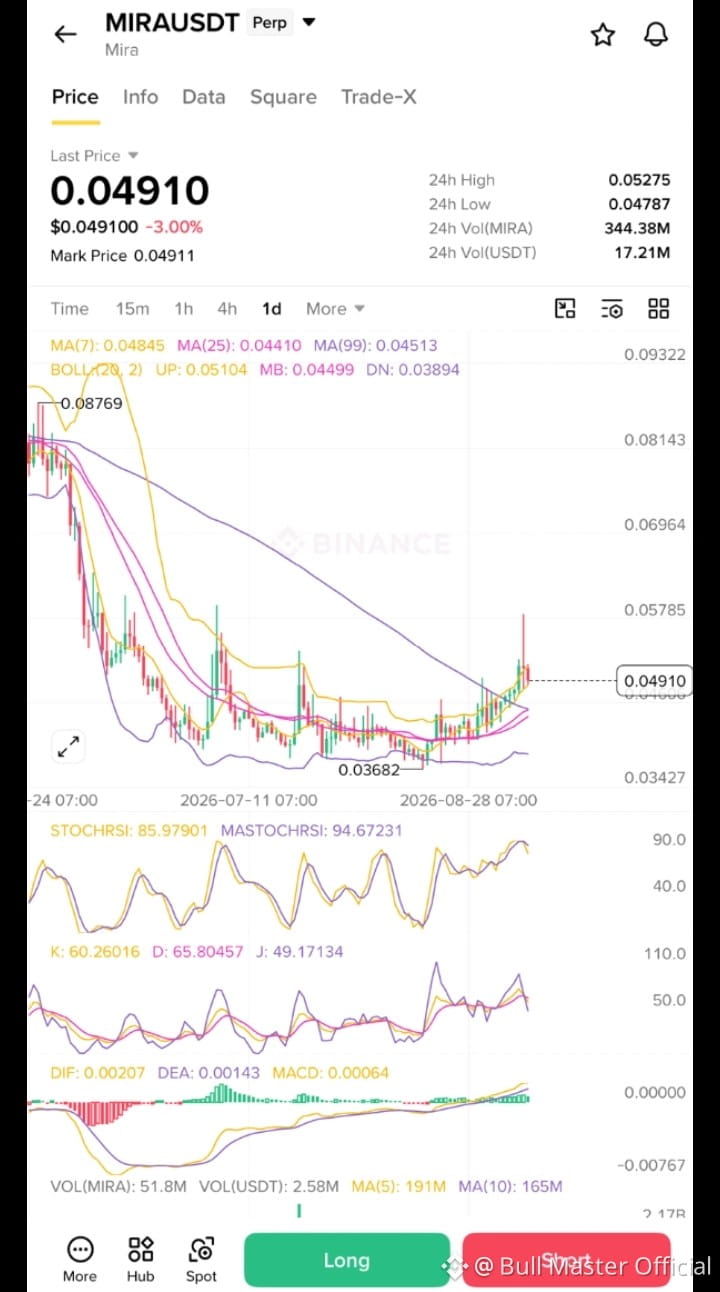
$MIRA is демонстрирует сильную восстановительную структуру: цена удерживается выше ключевых скользящих средних, а MACD остается положительным. Если импульс продолжит сохраняться, возможен повторный тест недавнего максимума. Сетап выглядит интересно, но волатильность остается высокой.
Цель: 0.0550
{spot}(MIRAUSDT)
$ZEC
{spot}(ZECUSDT)
$BTR
{future}(BTRUSDT)
$MIRA is демонстрирует сильную восстановительную структуру: цена удерживается выше ключевых скользящих средних, а MACD остается положительным. Если импульс продолжит сохраняться, возможен повторный тест недавнего максимума. Сетап выглядит интересно, но волатильность остается высокой.
Цель: 0.0550
$ZEC
$BTR
Цель: 0.0550
$ZEC
$BTR
1
204
·
--
Рост
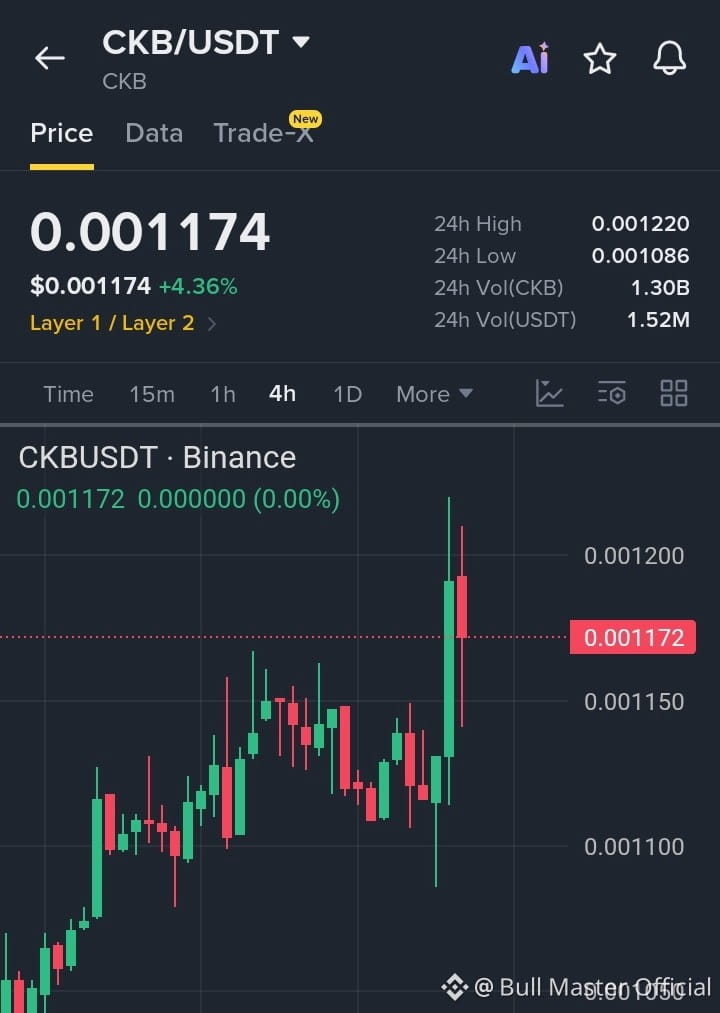
🚨 СРОЧНОЕ ОБНОВЛЕНИЕ: $CKB ПРОРЫВ УЖЕ НАЧАЛСЯ! 🚨
только что пробило узкую зону консолидации, подскочив более чем на +4,3% за сегодня и протестировав 24-часовой максимум $0.001220! После повторного закрепления выше $0.001174 покупатели активно заходят в рынок, чтобы подтолкнуть цену ещё выше.
Почему это важно: Эта сильная свеча прорыва показывает, что покупатели поглощают локальное сопротивление после формирования более высоких минимумов. Увеличение объёма по протоколам Layer 1/Layer 2 указывает на приток новой ликвидности на рынок — это закладывает основу для взрывного продолжения тренда в сторону более высоких целей.
🎯 Следующая цель: $0.001450 🛡️ Поддержка:
{spot}(CKBUSDT)
$0.001080
$ZEC
{spot}(ZECUSDT)
$BTR
{future}(BTRUSDT)
🚨 СРОЧНОЕ ОБНОВЛЕНИЕ: $CKB ПРОРЫВ УЖЕ НАЧАЛСЯ! 🚨
только что пробило узкую зону консолидации, подскочив более чем на +4,3% за сегодня и протестировав 24-часовой максимум $0.001220! После повторного закрепления выше $0.001174 покупатели активно заходят в рынок, чтобы подтолкнуть цену ещё выше.
Почему это важно: Эта сильная свеча прорыва показывает, что покупатели поглощают локальное сопротивление после формирования более высоких минимумов. Увеличение объёма по протоколам Layer 1/Layer 2 указывает на приток новой ликвидности на рынок — это закладывает основу для взрывного продолжения тренда в сторону более высоких целей.
🎯 Следующая цель: $0.001450 🛡️ Поддержка:
$0.001080
$ZEC
$BTR
только что пробило узкую зону консолидации, подскочив более чем на +4,3% за сегодня и протестировав 24-часовой максимум $0.001220! После повторного закрепления выше $0.001174 покупатели активно заходят в рынок, чтобы подтолкнуть цену ещё выше.
Почему это важно: Эта сильная свеча прорыва показывает, что покупатели поглощают локальное сопротивление после формирования более высоких минимумов. Увеличение объёма по протоколам Layer 1/Layer 2 указывает на приток новой ликвидности на рынок — это закладывает основу для взрывного продолжения тренда в сторону более высоких целей.
🎯 Следующая цель: $0.001450 🛡️ Поддержка:
$0.001080
$ZEC
$BTR
1
206
·
--
Падение
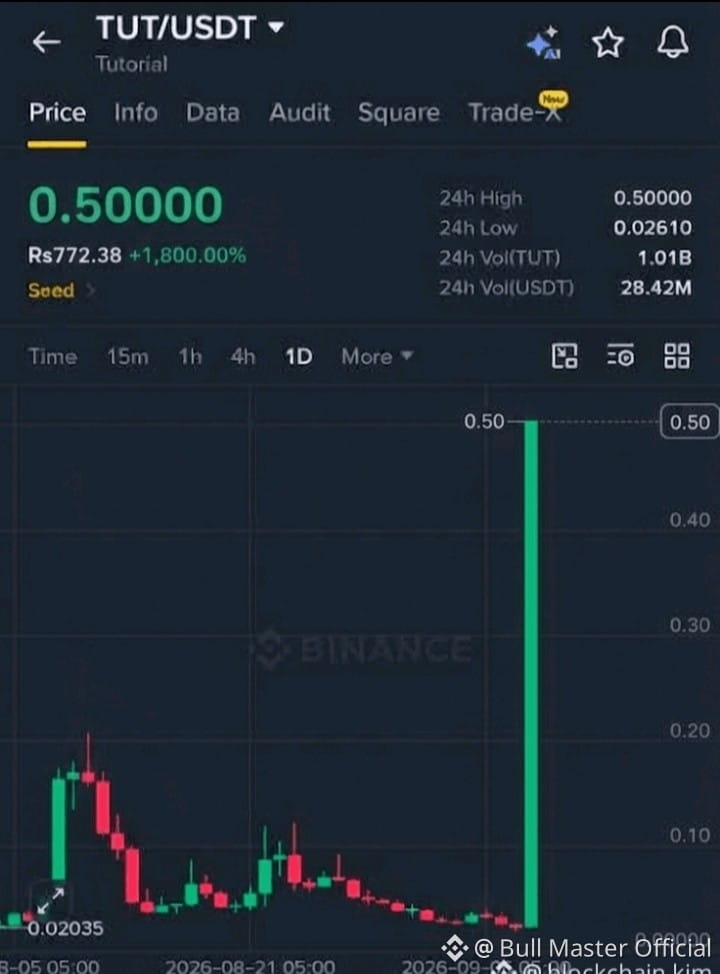
$TUT is демонстрирует серьезный импульс после масштабного пробоя от минимумов. Движение уже взрывное, но если давление покупателей продолжится, может появиться еще один более высокий этап. Внимательно наблюдаем за этим.
Target: 0.55
{spot}(TUTUSDT)
$ZEC
{spot}(ZECUSDT)
$BTR
{future}(BTRUSDT)
$TUT is демонстрирует серьезный импульс после масштабного пробоя от минимумов. Движение уже взрывное, но если давление покупателей продолжится, может появиться еще один более высокий этап. Внимательно наблюдаем за этим.
Target: 0.55
$ZEC
$BTR
Target: 0.55
$ZEC
$BTR
1
1
367
·
--
Рост
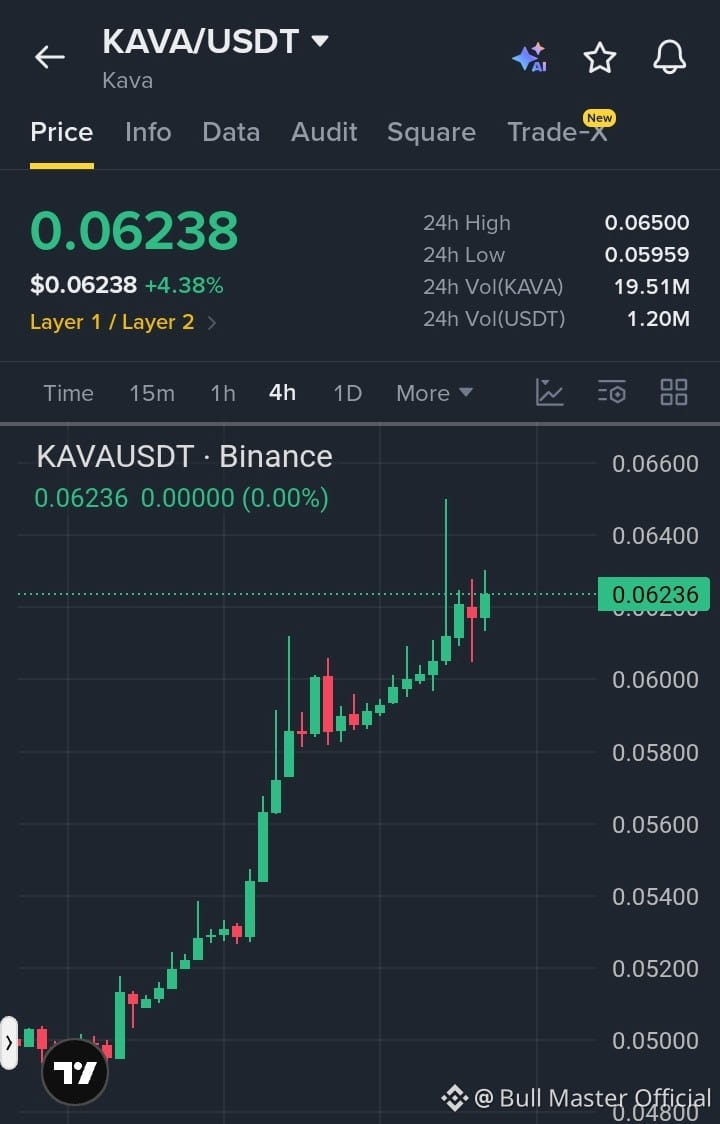
Сохраняю $KAVA в моём watchlist, поскольку он прямо упирается в ключевой уровень сопротивления сверху, подготавливая отличную короткую позицию. 📉⚡
Плавный рост выглядит чрезмерным, и цена упирается в потолок, где должен начаться набор фиксации прибыли. Чистый отбой на этих уровнях легко может спровоцировать резкую коррекцию, поэтому точный момент входа будет критически важен. 📊🔥
📍 Вход: 0.0625 – 0.0645 🎯 TP1: 0.0580 🎯 TP2: 0.0540 🎯 TP3: 0.0500 🛑 SL:
{spot}(KAVAUSDT)
0.0665
$ZEC
{spot}(ZECUSDT)
$BTR
{future}(BTRUSDT)
Сохраняю $KAVA в моём watchlist, поскольку он прямо упирается в ключевой уровень сопротивления сверху, подготавливая отличную короткую позицию. 📉⚡
Плавный рост выглядит чрезмерным, и цена упирается в потолок, где должен начаться набор фиксации прибыли. Чистый отбой на этих уровнях легко может спровоцировать резкую коррекцию, поэтому точный момент входа будет критически важен. 📊🔥
📍 Вход: 0.0625 – 0.0645 🎯 TP1: 0.0580 🎯 TP2: 0.0540 🎯 TP3: 0.0500 🛑 SL:
0.0665
$ZEC
$BTR
Плавный рост выглядит чрезмерным, и цена упирается в потолок, где должен начаться набор фиксации прибыли. Чистый отбой на этих уровнях легко может спровоцировать резкую коррекцию, поэтому точный момент входа будет критически важен. 📊🔥
📍 Вход: 0.0625 – 0.0645 🎯 TP1: 0.0580 🎯 TP2: 0.0540 🎯 TP3: 0.0500 🛑 SL:
0.0665
$ZEC
$BTR
1
171
·
--
Падение
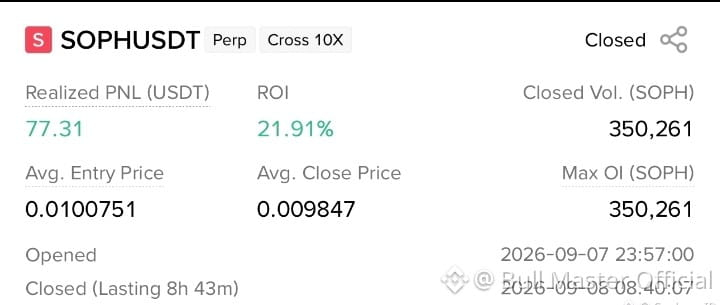
$SOPH только что доставил чистую рентабельность инвестиций (ROI) 21,91% с реализованной прибылью 77,31 USDT. Сценарий разыгрался ровно так, как планировалось: была сильная динамика и грамотное исполнение входа. Если вернется давление покупателей, SOPH может попытаться пойти еще одним шагом выше.
{spot}(SOPHUSDT)
$ZEC
{spot}(ZECUSDT)
$BTR
{future}(BTRUSDT)
$SOPH только что доставил чистую рентабельность инвестиций (ROI) 21,91% с реализованной прибылью 77,31 USDT. Сценарий разыгрался ровно так, как планировалось: была сильная динамика и грамотное исполнение входа. Если вернется давление покупателей, SOPH может попытаться пойти еще одним шагом выше.
$ZEC
$BTR
$ZEC
$BTR
1
399
·
--
Рост
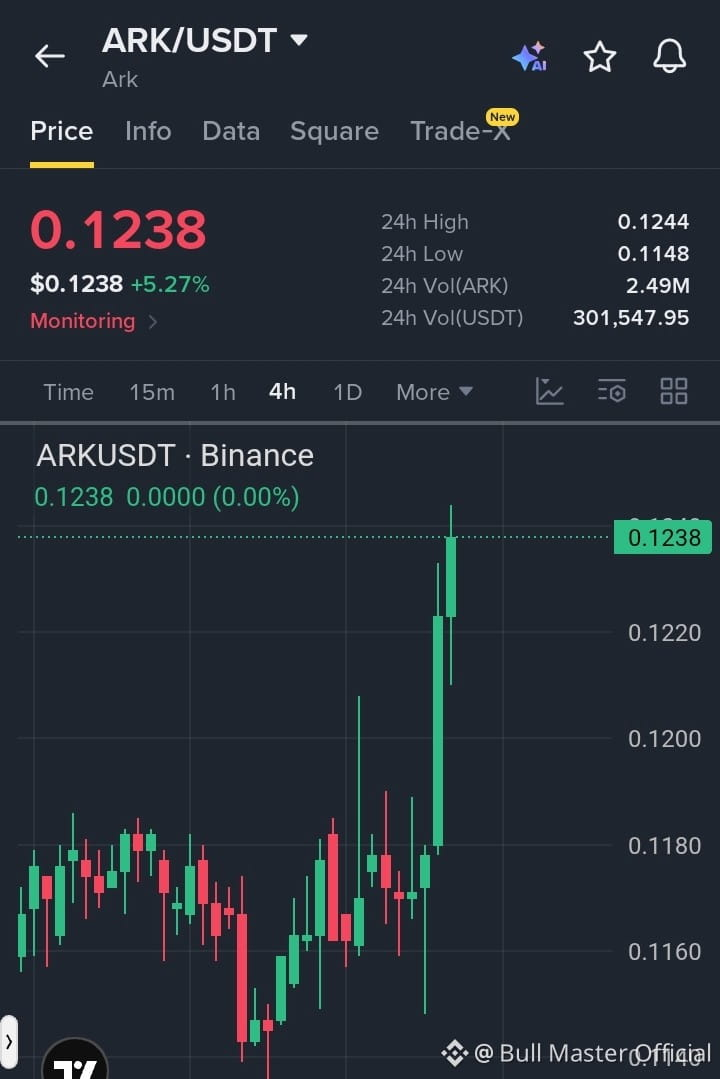
$ARK просто прорвался из узкого диапазона с сильной вертикальной свечой до 0.1238.
Объём начинает быстро нарастать, поскольку покупатели пробивают локальное сопротивление. Когда цена сжимается подобным образом перед внезапным импульсом, последующее движение может быть взрывным.
Ты заходишь в этот импульс или ждёшь повторного теста? Оставь своё мнение ниже и подписывайся на ежедневные обновления по рынку.
Цель:
{spot}(ARKUSDT)
0.1450
$ZEC
{spot}(ZECUSDT)
$BTR
{future}(BTRUSDT)
$ARK просто прорвался из узкого диапазона с сильной вертикальной свечой до 0.1238.
Объём начинает быстро нарастать, поскольку покупатели пробивают локальное сопротивление. Когда цена сжимается подобным образом перед внезапным импульсом, последующее движение может быть взрывным.
Ты заходишь в этот импульс или ждёшь повторного теста? Оставь своё мнение ниже и подписывайся на ежедневные обновления по рынку.
Цель:
0.1450
$ZEC
$BTR
Объём начинает быстро нарастать, поскольку покупатели пробивают локальное сопротивление. Когда цена сжимается подобным образом перед внезапным импульсом, последующее движение может быть взрывным.
Ты заходишь в этот импульс или ждёшь повторного теста? Оставь своё мнение ниже и подписывайся на ежедневные обновления по рынку.
Цель:
0.1450
$ZEC
$BTR
1
192
·
--
Рост
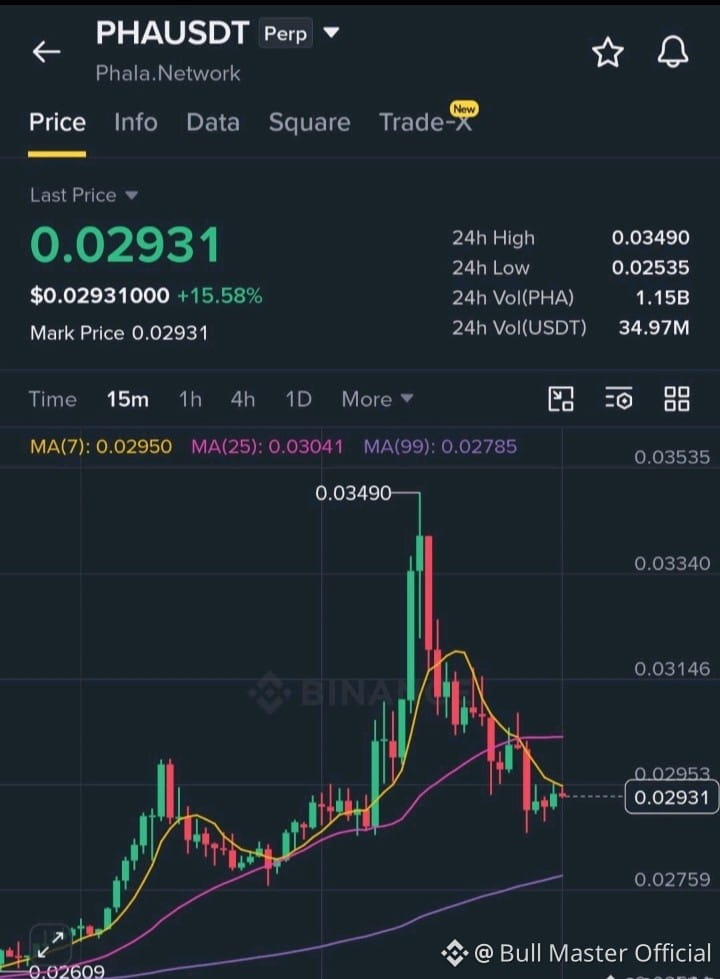
$PHA is уверенно консолидируется выше ключевых скользящих средних после аккуратного 15-процентного всплеска. Умные покупатели удерживают поддержку плотно, закладывая основу для следующего взрывного рывка вверх, как только будет пробит уровень сопротивления.
Цель:
{spot}(PHAUSDT)
0.04200
$ZEC
{spot}(ZECUSDT)
$BTR
{future}(BTRUSDT)
$PHA is уверенно консолидируется выше ключевых скользящих средних после аккуратного 15-процентного всплеска. Умные покупатели удерживают поддержку плотно, закладывая основу для следующего взрывного рывка вверх, как только будет пробит уровень сопротивления.
Цель:
0.04200
$ZEC
$BTR
Цель:
0.04200
$ZEC
$BTR
2
236
·
--
Рост
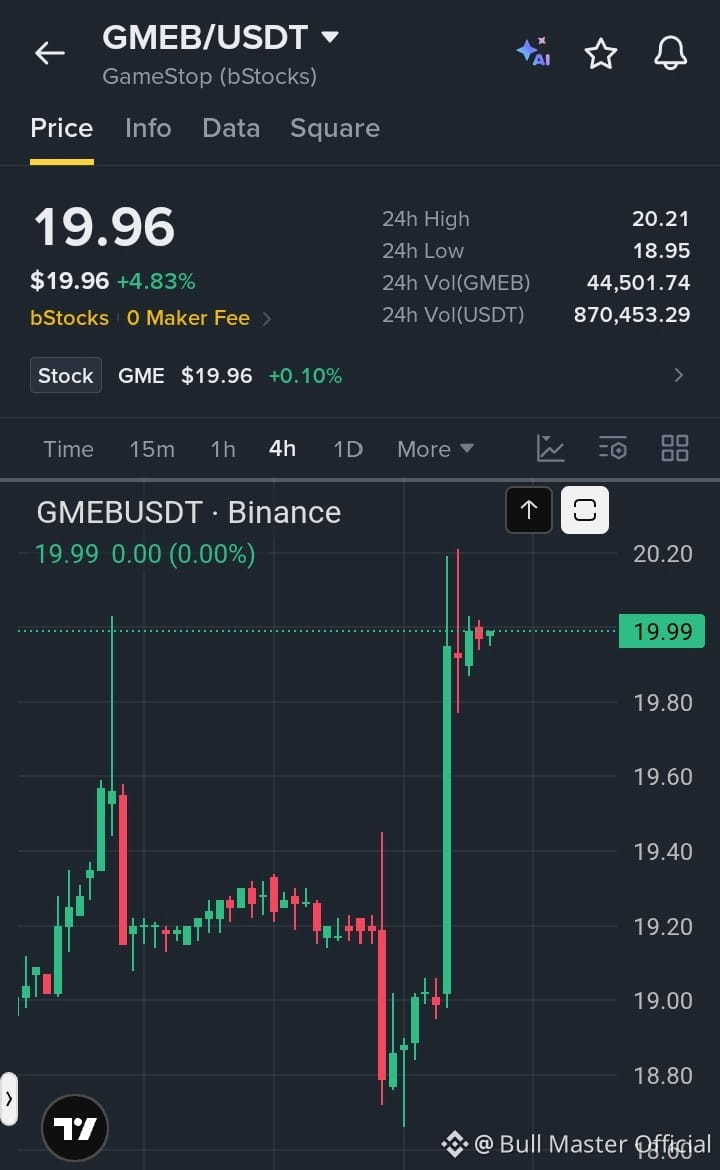
🚨 СРОЧНОЕ ОБНОВЛЕНИЕ: $GMEB Моментум-импульс резко взлетел! 🚨
только что вырвался из зоны консолидации, подскочив почти на +5% к 24-часовому максимуму $20.21! После возврата уровня $19.90 покупатели активно поглощают предложение и нацелены на дальнейший рост цены.
Почему это важно: Этот сильный вертикальный импульс указывает на резкий всплеск интереса покупателей после просадки к $18.95. Сильные притоки объёмов в токенизированных традиционных акциях часто вызывают значительную волатильность, создавая предпосылки для мощного продолжения тренда, если сопротивление будет пробито.
🎯 Следующая цель:
{spot}(GMEBUSDT)
22.50 🛡️ Поддержка: $19.20
$ZEC
{spot}(ZECUSDT)
$BTR
{future}(BTRUSDT)
🚨 СРОЧНОЕ ОБНОВЛЕНИЕ: $GMEB Моментум-импульс резко взлетел! 🚨
только что вырвался из зоны консолидации, подскочив почти на +5% к 24-часовому максимуму $20.21! После возврата уровня $19.90 покупатели активно поглощают предложение и нацелены на дальнейший рост цены.
Почему это важно: Этот сильный вертикальный импульс указывает на резкий всплеск интереса покупателей после просадки к $18.95. Сильные притоки объёмов в токенизированных традиционных акциях часто вызывают значительную волатильность, создавая предпосылки для мощного продолжения тренда, если сопротивление будет пробито.
🎯 Следующая цель:
22.50 🛡️ Поддержка: $19.20
$ZEC
$BTR
только что вырвался из зоны консолидации, подскочив почти на +5% к 24-часовому максимуму $20.21! После возврата уровня $19.90 покупатели активно поглощают предложение и нацелены на дальнейший рост цены.
Почему это важно: Этот сильный вертикальный импульс указывает на резкий всплеск интереса покупателей после просадки к $18.95. Сильные притоки объёмов в токенизированных традиционных акциях часто вызывают значительную волатильность, создавая предпосылки для мощного продолжения тренда, если сопротивление будет пробито.
🎯 Следующая цель:
22.50 🛡️ Поддержка: $19.20
$ZEC
$BTR
2
204
·
--
Рост
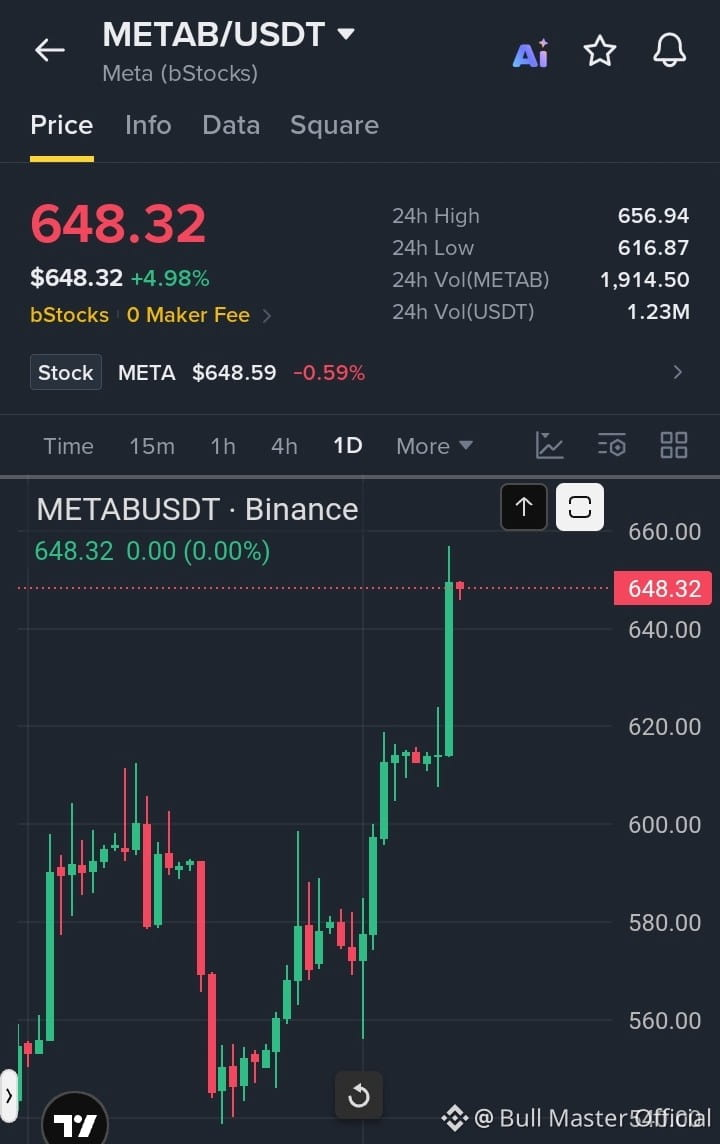
$METAB пробивает локализованные уровни консолидации, и массивная зелёная свеча прямо нацеливается на новые максимумы. Сильный покупательский спрос резко усиливается, сигнализируя о крупной волне волатильности, которая может запустить эту тенденцию в многонедельное расширение.
Цель:
{spot}(METABUSDT)
720.00
$ZEC
{spot}(ZECUSDT)
$BTR
{future}(BTRUSDT)
$METAB пробивает локализованные уровни консолидации, и массивная зелёная свеча прямо нацеливается на новые максимумы. Сильный покупательский спрос резко усиливается, сигнализируя о крупной волне волатильности, которая может запустить эту тенденцию в многонедельное расширение.
Цель:
720.00
$ZEC
$BTR
Цель:
720.00
$ZEC
$BTR
1
195
·
--
Падение
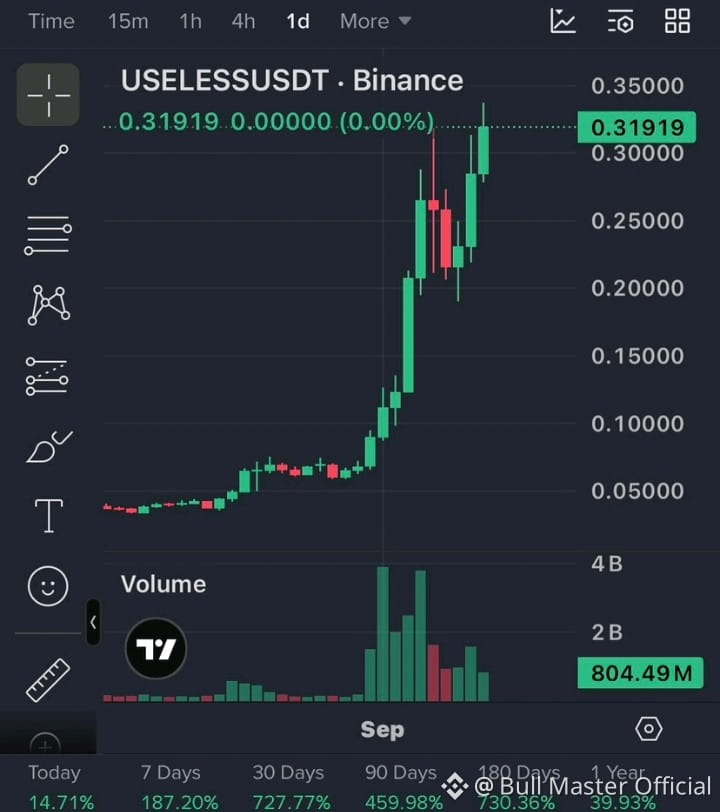
$USELESS is печатает массивное параболическое ралли, пробивая ключевые уровни, поскольку агрессивный объем подпитывает это расширение. Похоже, «умные деньги» подталкивают движение к новым максимумам, но управление рисками вокруг текущего сопротивления имеет решающее значение.
Цель:
{future}(USELESSUSDT)
0.4500
$TRUMP
{spot}(TRUMPUSDT)
$USELESS is печатает массивное параболическое ралли, пробивая ключевые уровни, поскольку агрессивный объем подпитывает это расширение. Похоже, «умные деньги» подталкивают движение к новым максимумам, но управление рисками вокруг текущего сопротивления имеет решающее значение.
Цель:
0.4500
$TRUMP
Цель:
0.4500
$TRUMP
1
329
·
--
Рост
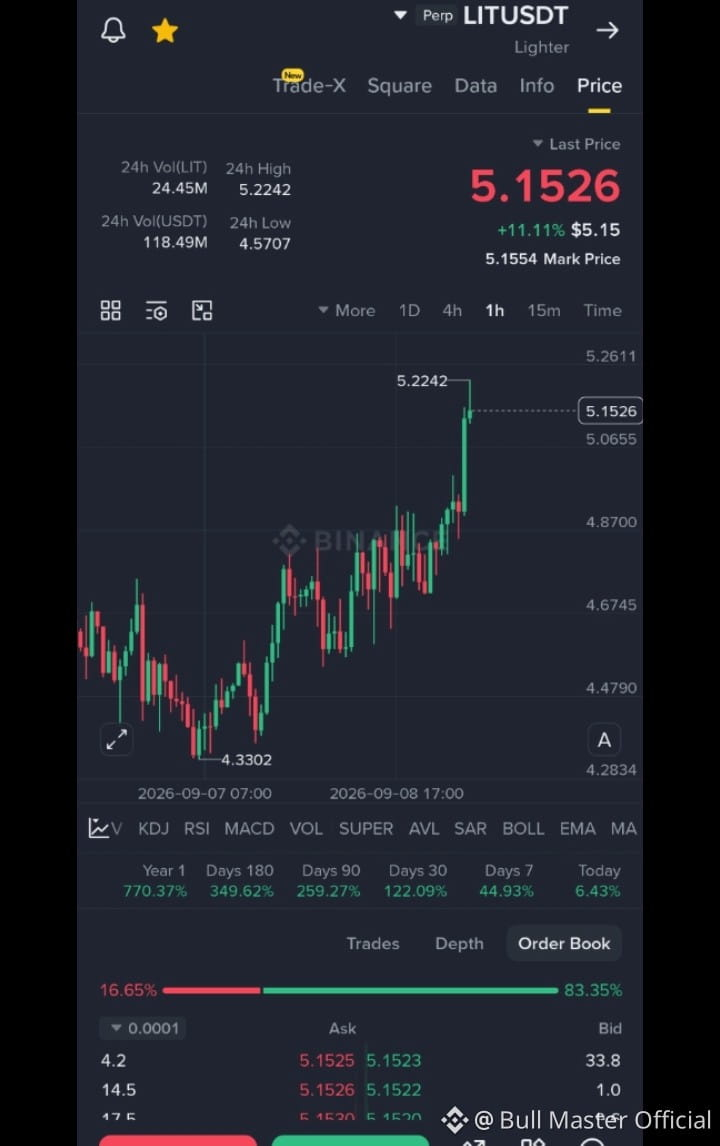
$LIT жестко прорывается, пробивая локализованное сопротивление — покупатели полностью доминируют в стакане заявок. Сегодня рост более чем на одиннадцать процентов: этот агрессивный рывок вверх указывает на то, что, вероятно, уже идет масштабный шорт-сквиз, который легко может запустить полноценный ралли ценового открытия.
Цель:
{future}(LITUSDT)
6.2000
$ZEC
{spot}(ZECUSDT)
$BTR
{future}(BTRUSDT)
$LIT жестко прорывается, пробивая локализованное сопротивление — покупатели полностью доминируют в стакане заявок. Сегодня рост более чем на одиннадцать процентов: этот агрессивный рывок вверх указывает на то, что, вероятно, уже идет масштабный шорт-сквиз, который легко может запустить полноценный ралли ценового открытия.
Цель:
6.2000
$ZEC
$BTR
Цель:
6.2000
$ZEC
$BTR
1
273
·
--
Рост
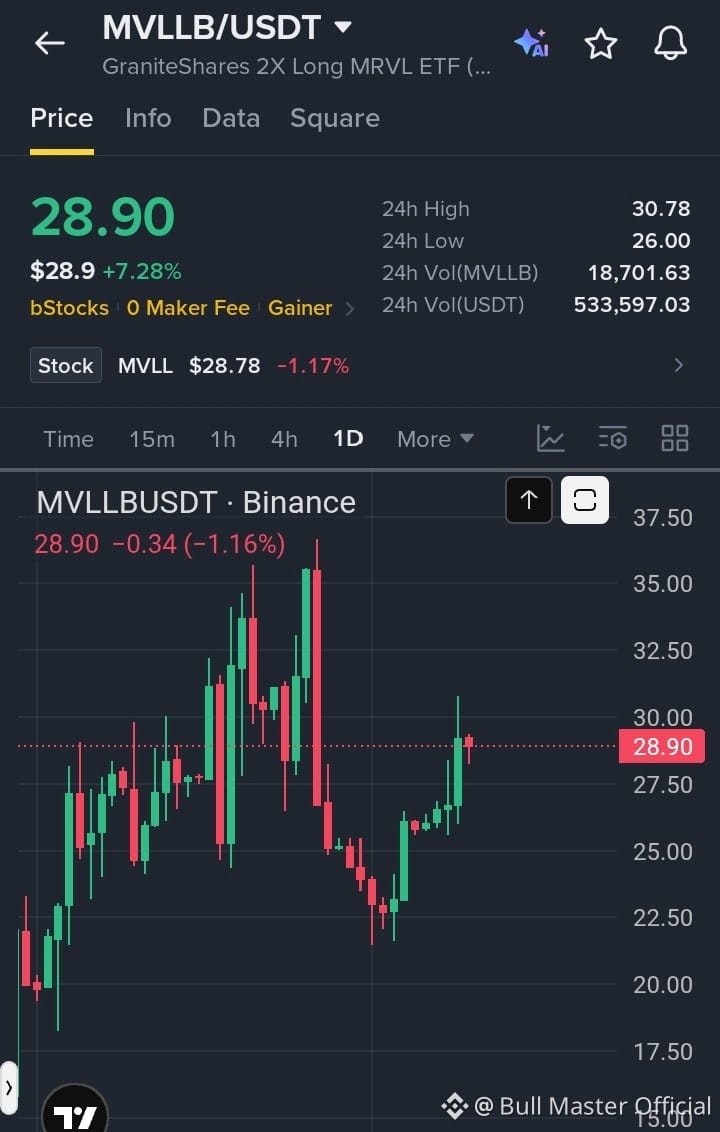
Наблюдаем за $MVLLB очень внимательно, поскольку ценовое движение остается сильным после теста сопротивления около 30.78. 📉⚡
Недавний отскок с более низких уровней показывает наличие неплохих покупателей, но пара консолидируется возле ключевой зоны предложения, где продавцы могут снова войти в сделку. Отбой здесь может подготовить аккуратную возможность для входа на откате. 📊🔥
📍 Вход: 28.50 – 29.20 🎯 TP1: 26.50 🎯 TP2: 24.80 🎯 TP3: 22.50 🛑 SL: 31.20
{spot}(MVLLBUSDT)
$ZEC
{spot}(ZECUSDT)
$LA
{spot}(LAUSDT)
Наблюдаем за $MVLLB очень внимательно, поскольку ценовое движение остается сильным после теста сопротивления около 30.78. 📉⚡
Недавний отскок с более низких уровней показывает наличие неплохих покупателей, но пара консолидируется возле ключевой зоны предложения, где продавцы могут снова войти в сделку. Отбой здесь может подготовить аккуратную возможность для входа на откате. 📊🔥
📍 Вход: 28.50 – 29.20 🎯 TP1: 26.50 🎯 TP2: 24.80 🎯 TP3: 22.50 🛑 SL: 31.20
$ZEC
$LA
Недавний отскок с более низких уровней показывает наличие неплохих покупателей, но пара консолидируется возле ключевой зоны предложения, где продавцы могут снова войти в сделку. Отбой здесь может подготовить аккуратную возможность для входа на откате. 📊🔥
📍 Вход: 28.50 – 29.20 🎯 TP1: 26.50 🎯 TP2: 24.80 🎯 TP3: 22.50 🛑 SL: 31.20
$ZEC
$LA
1
213
·
--
Рост
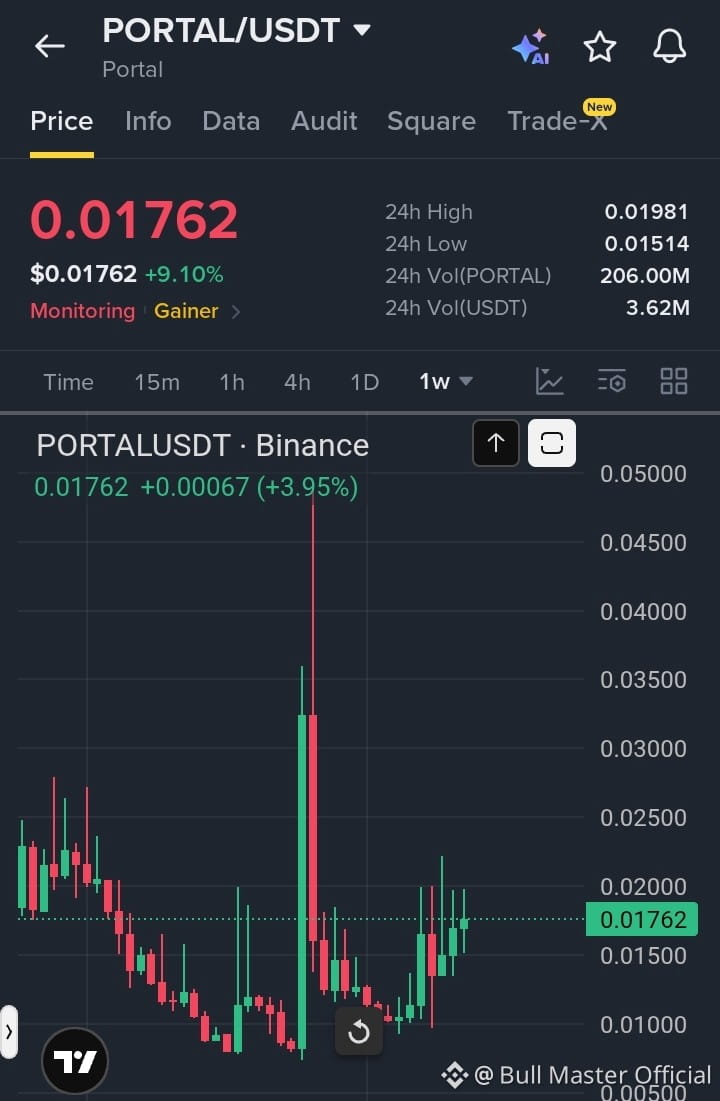
$PORTAL is просыпается и формирует классическое накопление дна перед взрывным расширением. Умные деньги тихо поглощают ликвидность на этих низких уровнях. Как только основной уровень сопротивления будет пробит, ожидайте последующий массивный прорывной ралли.
Цель:
{spot}(PORTALUSDT)
0.03500
$ZEC
{spot}(ZECUSDT)
$LA
{spot}(LAUSDT)
$PORTAL is просыпается и формирует классическое накопление дна перед взрывным расширением. Умные деньги тихо поглощают ликвидность на этих низких уровнях. Как только основной уровень сопротивления будет пробит, ожидайте последующий массивный прорывной ралли.
Цель:
0.03500
$ZEC
$LA
Цель:
0.03500
$ZEC
$LA
1
182
·
--
Рост
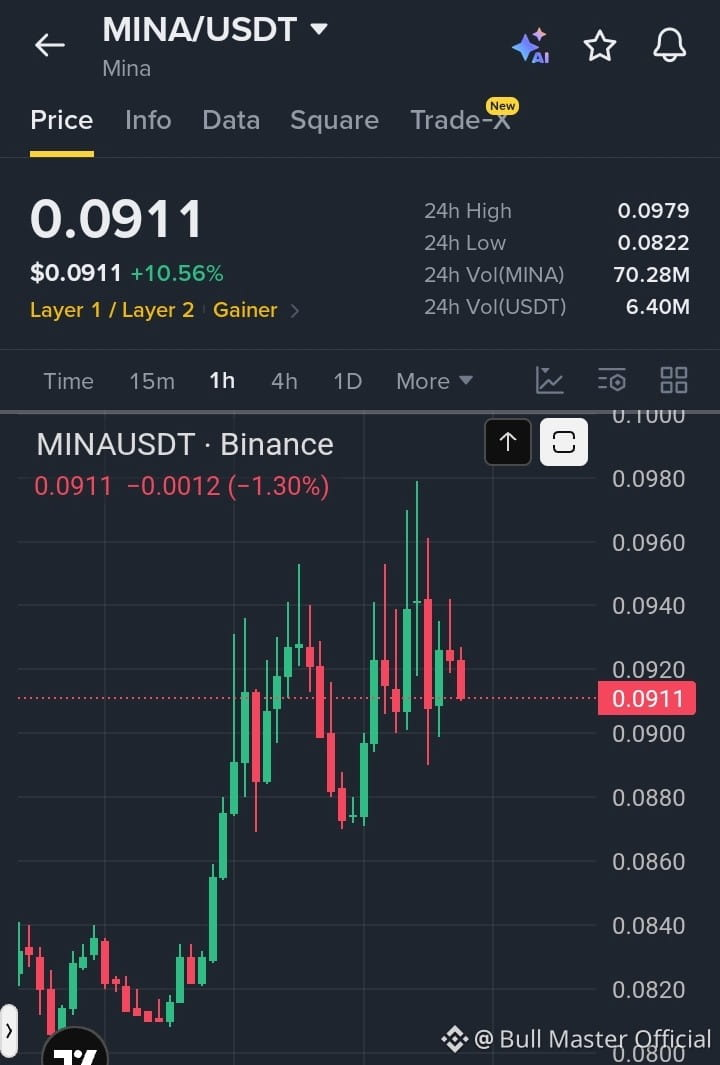
🚨 СРОЧНОЕ ОБНОВЛЕНИЕ: $MINA MOMENTUM НАКАПЛИВАЕТСЯ! 🚨
только что опубликовал(а) сильный рост +10,56% сегодня, подталкивая цену к тесту 24-часового максимума $0,0979! После небольшого отката к $0,0911 график показывает более высокие минимумы и стабильный объём покупок на ключевых уровнях.
Почему это важно: всплеск объёма подчёркивает новый интерес к архитектурам Layer 1 с нулевым разглашением (zero-knowledge). Поскольку ликвидность возвращается в протоколы mid-cap, удержание поддержки здесь запускает сильное техническое продолжение, сигнализируя о том, что покупатели поглощают давление продаж для очередного рывка.
🎯 Следующая цель: $0,1150 🛡️ Поддержка:
{spot}(MINAUSDT)
0,0860
$ZEC
{spot}(ZECUSDT)
$LA
{spot}(LAUSDT)
🚨 СРОЧНОЕ ОБНОВЛЕНИЕ: $MINA MOMENTUM НАКАПЛИВАЕТСЯ! 🚨
только что опубликовал(а) сильный рост +10,56% сегодня, подталкивая цену к тесту 24-часового максимума $0,0979! После небольшого отката к $0,0911 график показывает более высокие минимумы и стабильный объём покупок на ключевых уровнях.
Почему это важно: всплеск объёма подчёркивает новый интерес к архитектурам Layer 1 с нулевым разглашением (zero-knowledge). Поскольку ликвидность возвращается в протоколы mid-cap, удержание поддержки здесь запускает сильное техническое продолжение, сигнализируя о том, что покупатели поглощают давление продаж для очередного рывка.
🎯 Следующая цель: $0,1150 🛡️ Поддержка:
0,0860
$ZEC
$LA
только что опубликовал(а) сильный рост +10,56% сегодня, подталкивая цену к тесту 24-часового максимума $0,0979! После небольшого отката к $0,0911 график показывает более высокие минимумы и стабильный объём покупок на ключевых уровнях.
Почему это важно: всплеск объёма подчёркивает новый интерес к архитектурам Layer 1 с нулевым разглашением (zero-knowledge). Поскольку ликвидность возвращается в протоколы mid-cap, удержание поддержки здесь запускает сильное техническое продолжение, сигнализируя о том, что покупатели поглощают давление продаж для очередного рывка.
🎯 Следующая цель: $0,1150 🛡️ Поддержка:
0,0860
$ZEC
$LA
1
144
·
--
Рост
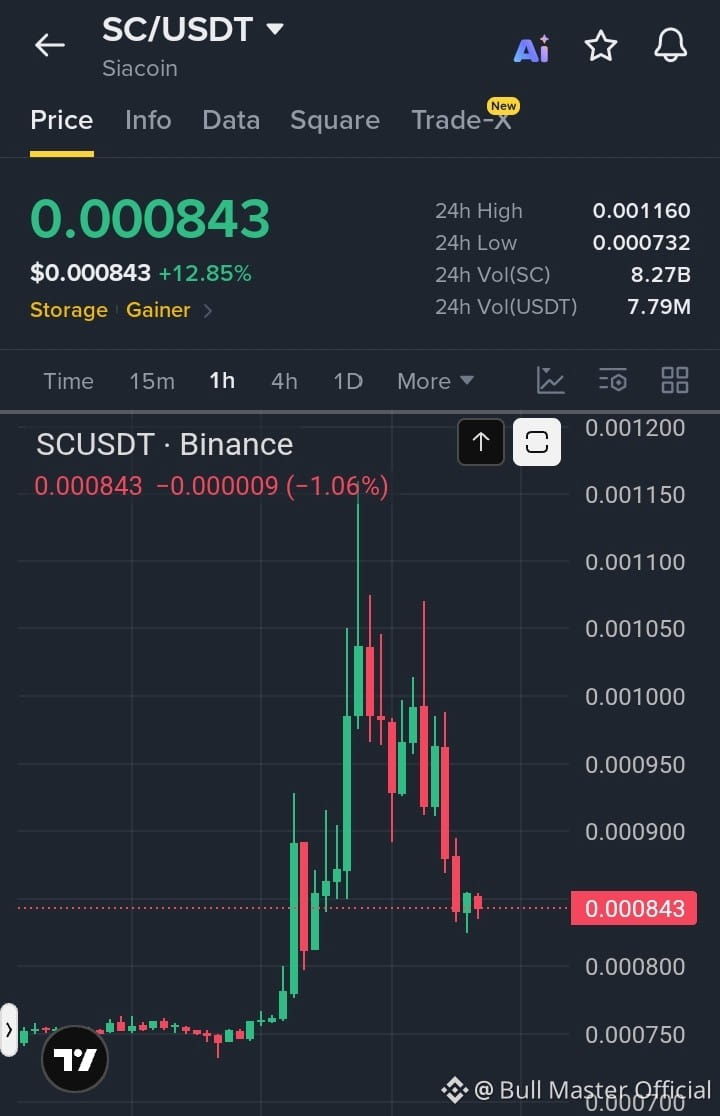
$SC только что сорвал дикий всплеск до 0.001160 и дал резкую коррекцию прямо вниз к поддержке около 0.000843.
Это падение выбило панических продавцов, но внимательно посмотрите на объём, который скопился внизу. Умные деньги обычно тихо набирают позицию сразу после таких агрессивных встрясок. Если это основание удержится, следующий отскок удивит всех.
Что вы делаете здесь: заходите на просадке или ждёте подтверждения? Напишите свои мысли в комментариях и подписывайтесь на ежедневные разборы.
Цель:
{spot}(SCUSDT)
0.001120
$ZEC
{spot}(ZECUSDT)
$LA
{spot}(LAUSDT)
$SC только что сорвал дикий всплеск до 0.001160 и дал резкую коррекцию прямо вниз к поддержке около 0.000843.
Это падение выбило панических продавцов, но внимательно посмотрите на объём, который скопился внизу. Умные деньги обычно тихо набирают позицию сразу после таких агрессивных встрясок. Если это основание удержится, следующий отскок удивит всех.
Что вы делаете здесь: заходите на просадке или ждёте подтверждения? Напишите свои мысли в комментариях и подписывайтесь на ежедневные разборы.
Цель:
0.001120
$ZEC
$LA
Это падение выбило панических продавцов, но внимательно посмотрите на объём, который скопился внизу. Умные деньги обычно тихо набирают позицию сразу после таких агрессивных встрясок. Если это основание удержится, следующий отскок удивит всех.
Что вы делаете здесь: заходите на просадке или ждёте подтверждения? Напишите свои мысли в комментариях и подписывайтесь на ежедневные разборы.
Цель:
0.001120
$ZEC
$LA
1
171
·
--
Рост
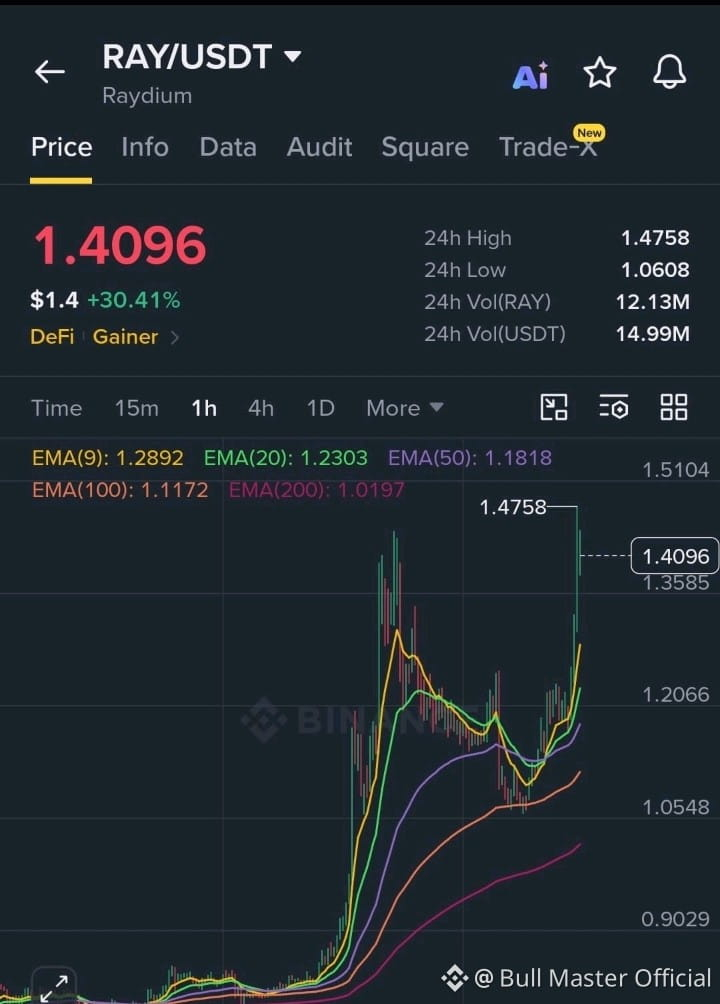
$RAY is разрывает вверх с массивным бычьим импульсом, пробивая ключевые скользящие средние, пока покупатели активно входят в рынок. Сегодня рост более чем на тридцать процентов: эта параболическая экспансия указывает на огромный приток ликвидности, который с легкостью может отправить цену в направлении следующего крупного уровня сопротивления.
Цель:
{spot}(RAYUSDT)
1.8500
$ZEC
{spot}(ZECUSDT)
$LA
{spot}(LAUSDT)
$RAY is разрывает вверх с массивным бычьим импульсом, пробивая ключевые скользящие средние, пока покупатели активно входят в рынок. Сегодня рост более чем на тридцать процентов: эта параболическая экспансия указывает на огромный приток ликвидности, который с легкостью может отправить цену в направлении следующего крупного уровня сопротивления.
Цель:
1.8500
$ZEC
$LA
Цель:
1.8500
$ZEC
$LA
1
147
·
--
Рост
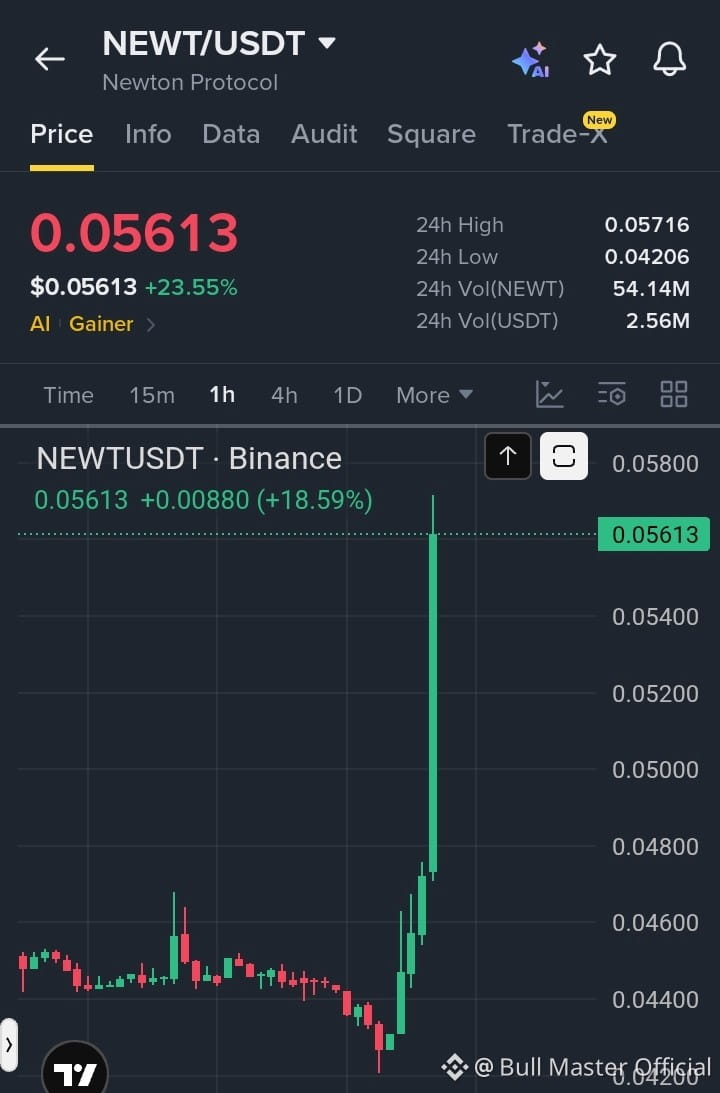
Сейчас внимательно наблюдаю за $NEWT , как цена резко пробивает прямо в крупный барьер предложения, готовя потенциальную сделку на шорт. 📉⚡
Хотя импульс сегодня был сильным, движение цены приближается к зоне перекупленности, где вероятно начнутся фиксации прибыли. Отбой от этих максимумов может вызвать резкую коррекцию, поэтому крайне важно дождаться подтверждения. 📊🔥
📍 Вход: 0.0560 – 0.0570 🎯 TP1: 0.0525 🎯 TP2: 0.0485 🎯 TP3: 0.0440 🛑 SL:
{spot}(NEWTUSDT)
0.0585
$ZEC
{spot}(ZECUSDT)
$LA
{spot}(LAUSDT)
Сейчас внимательно наблюдаю за $NEWT , как цена резко пробивает прямо в крупный барьер предложения, готовя потенциальную сделку на шорт. 📉⚡
Хотя импульс сегодня был сильным, движение цены приближается к зоне перекупленности, где вероятно начнутся фиксации прибыли. Отбой от этих максимумов может вызвать резкую коррекцию, поэтому крайне важно дождаться подтверждения. 📊🔥
📍 Вход: 0.0560 – 0.0570 🎯 TP1: 0.0525 🎯 TP2: 0.0485 🎯 TP3: 0.0440 🛑 SL:
0.0585
$ZEC
$LA
Хотя импульс сегодня был сильным, движение цены приближается к зоне перекупленности, где вероятно начнутся фиксации прибыли. Отбой от этих максимумов может вызвать резкую коррекцию, поэтому крайне важно дождаться подтверждения. 📊🔥
📍 Вход: 0.0560 – 0.0570 🎯 TP1: 0.0525 🎯 TP2: 0.0485 🎯 TP3: 0.0440 🛑 SL:
0.0585
$ZEC
$LA
1
193
Войдите, чтобы посмотреть больше материала
Присоединяйтесь к пользователям криптовалют по всему миру на Binance Square
⚡️ Получайте новейшую и полезную информацию о криптоактивах.
💬 Нам доверяет крупнейшая в мире криптобиржа.
👍 Получите достоверные аналитические данные от верифицированных создателей контента.
Эл. почта/номер телефона
В тренде
USAugustPPIRisesLessThanExpected
Просмотров: 36,267
674 обсуждают
🚨 США: PPI в августе растёт меньше ожиданий! Бычий сигнал для крипто? 🚀
PPI +0.4% м/м как и ожидалось, но CORE PPI только +0.2% вместо +0.3% ожиданий — охлаждение!
Что это значит:
• Оптовая инфляция мягче, чем опасались
• Вероятность повышения ставки ФРС теперь 62% — но идут «голубиные» сигналы
• Пересмотр Core PCE ожидается вниз — бычий фактор
• Обычно BTC растёт на более мягком PPI
Заседание ФРС 15–16 сентября — рынок теперь ожидает паузу, а не повышение?
Это зелёный свет для ралли в Q4?
#Bitcoin #PPI #Fed #CryptoNews #BTC#usaugustppiriseslessthanexpected
True News
·Лайков: 1
·Просмотров: 1.3k
SECApprovesNasdaqTexasCommodityTrustRule
Просмотров: 21,932
498 обсуждают
ECBRaisesRatesSecondTimeTo2.5%
Просмотров: 19,275
369 обсуждают