
Sherrell Hirth E7Bo
105 ပို့စ်များ

Sherrell Hirth E7Bo
တိုင်ကြားမည်
သုံးစွဲသူကို ဘလော့မည်
Open Trade
Frequent Trader
2.2 Years
293 ဖော်လိုလုပ်ထားသည်
37 ဖော်လိုလုပ်သူများ
133 လိုက်ခ်လုပ်ထားသည်
ပို့စ်များ
ပိုင်ဆိုင်မှုစာရင်း
ဘာသာပြန်ဆိုချက် ကြည့်မည်
🚨 $NEAR
{future}(NEARUSDT)
IS RECOVERING FAST — BULLS ARE STEPPING BACK IN! 🔥
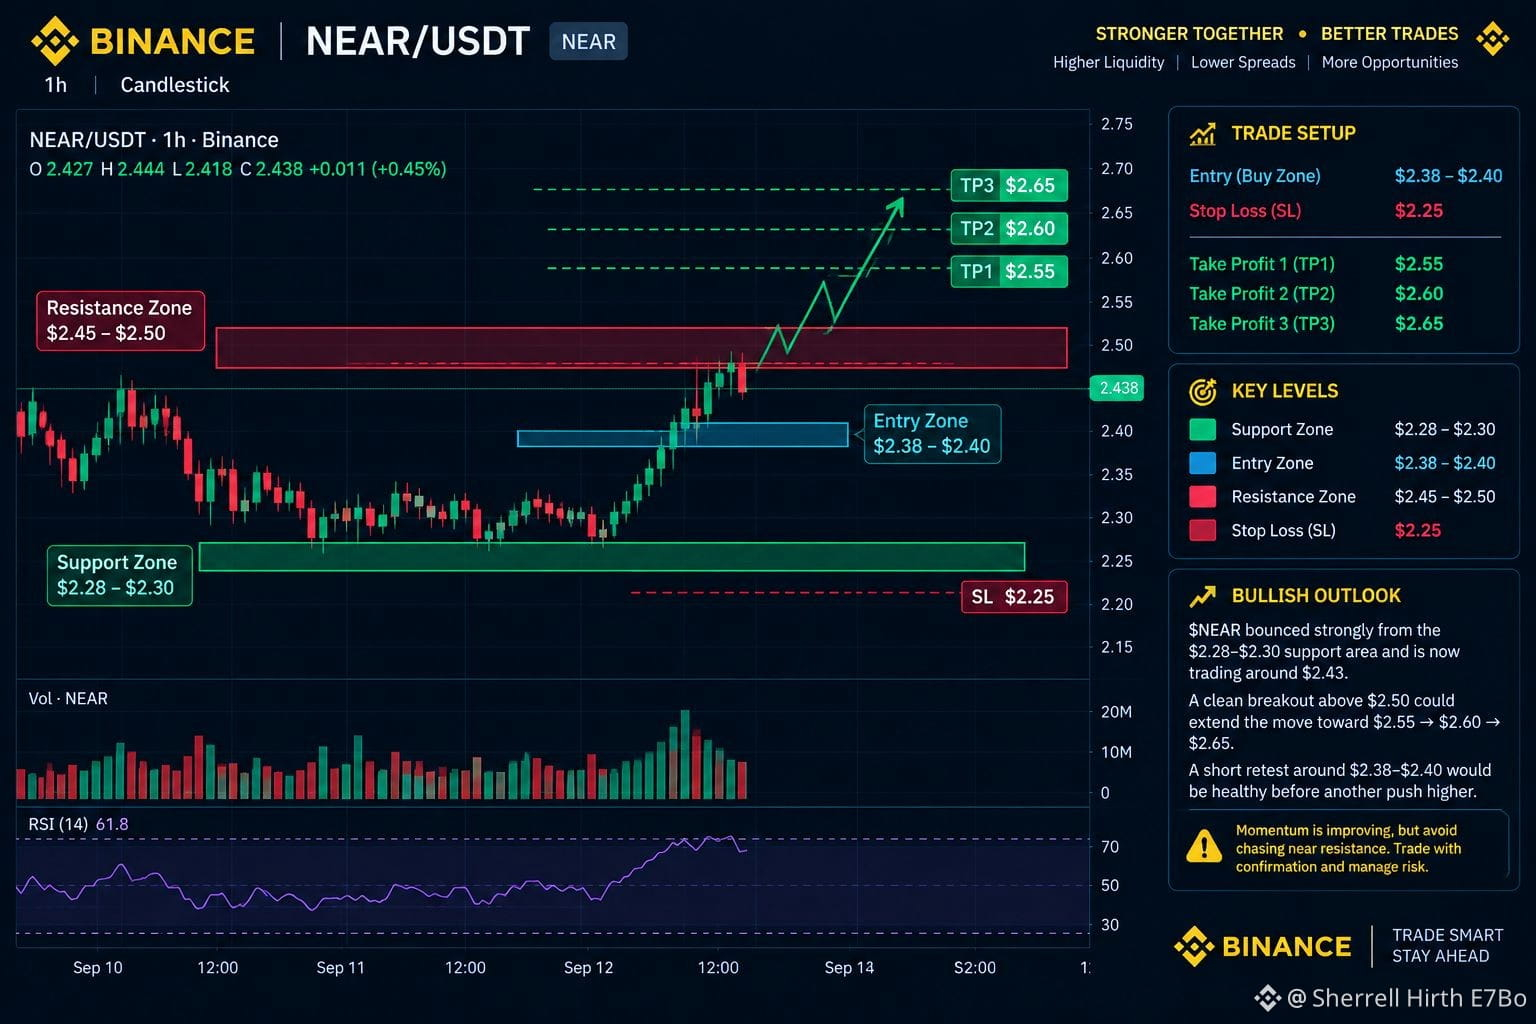
$NEAR has bounced strongly from the $2.28–$2.30 support zone and is now trading around $2.43, showing a solid recovery on the 1H chart.
📊 KEY LEVELS
🟢 Support: $2.28–$2.30
🔄 Healthy Retest Zone: $2.38–$2.40
🔴 Immediate Resistance: $2.45–$2.50
🚀 BULLISH TARGETS:
🎯 TP1: $2.55
🎯 TP2: $2.60
🎯 TP3: $2.65
A clean breakout and hold above $2.50 could open the door toward the next upside targets.
Momentum is improving and buyers are stepping back in, but avoid chasing near resistance. A controlled retest around $2.38–$2.40 could provide a healthier setup for continuation.
🚨 $NEAR
IS RECOVERING FAST — BULLS ARE STEPPING BACK IN! 🔥
$NEAR has bounced strongly from the $2.28–$2.30 support zone and is now trading around $2.43, showing a solid recovery on the 1H chart.
📊 KEY LEVELS
🟢 Support: $2.28–$2.30
🔄 Healthy Retest Zone: $2.38–$2.40
🔴 Immediate Resistance: $2.45–$2.50
🚀 BULLISH TARGETS:
🎯 TP1: $2.55
🎯 TP2: $2.60
🎯 TP3: $2.65
A clean breakout and hold above $2.50 could open the door toward the next upside targets.
Momentum is improving and buyers are stepping back in, but avoid chasing near resistance. A controlled retest around $2.38–$2.40 could provide a healthier setup for continuation.
IS RECOVERING FAST — BULLS ARE STEPPING BACK IN! 🔥
$NEAR has bounced strongly from the $2.28–$2.30 support zone and is now trading around $2.43, showing a solid recovery on the 1H chart.
📊 KEY LEVELS
🟢 Support: $2.28–$2.30
🔄 Healthy Retest Zone: $2.38–$2.40
🔴 Immediate Resistance: $2.45–$2.50
🚀 BULLISH TARGETS:
🎯 TP1: $2.55
🎯 TP2: $2.60
🎯 TP3: $2.65
A clean breakout and hold above $2.50 could open the door toward the next upside targets.
Momentum is improving and buyers are stepping back in, but avoid chasing near resistance. A controlled retest around $2.38–$2.40 could provide a healthier setup for continuation.
41
ဘာသာပြန်ဆိုချက် ကြည့်မည်
$BNC
{future}(BNCUSDT)
FACING RESISTANCE — PULLBACK SETUP? 📉
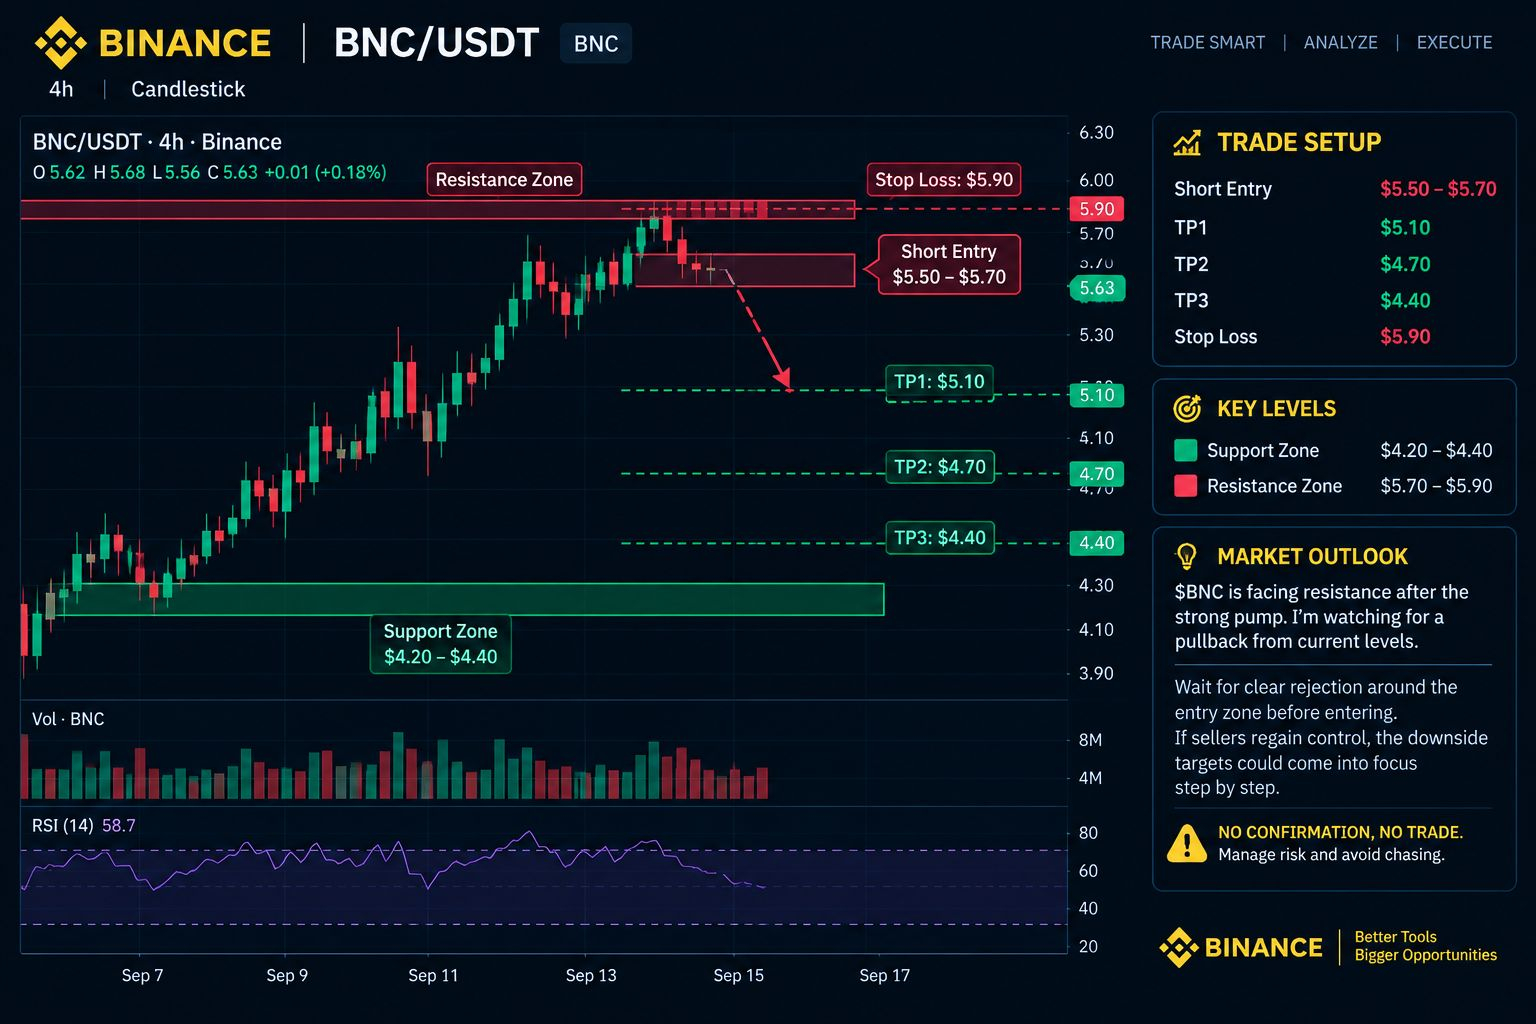
$BNC has delivered a strong pump, but price is now approaching a key resistance area. I’m watching for signs of rejection and a potential pullback from current levels.
📊 SHORT TRADE SETUP
🔴 Short Entry: $5.50–$5.70
🎯 TP1: $5.10
🎯 TP2: $4.70
🎯 TP3: $4.40
🛑 Stop Loss: $5.90
Key Confirmation:
Wait for clear rejection around the entry zone before entering. If sellers regain control, the downside targets could come into focus step by step.
$BNC
FACING RESISTANCE — PULLBACK SETUP? 📉
$BNC has delivered a strong pump, but price is now approaching a key resistance area. I’m watching for signs of rejection and a potential pullback from current levels.
📊 SHORT TRADE SETUP
🔴 Short Entry: $5.50–$5.70
🎯 TP1: $5.10
🎯 TP2: $4.70
🎯 TP3: $4.40
🛑 Stop Loss: $5.90
Key Confirmation:
Wait for clear rejection around the entry zone before entering. If sellers regain control, the downside targets could come into focus step by step.
FACING RESISTANCE — PULLBACK SETUP? 📉
$BNC has delivered a strong pump, but price is now approaching a key resistance area. I’m watching for signs of rejection and a potential pullback from current levels.
📊 SHORT TRADE SETUP
🔴 Short Entry: $5.50–$5.70
🎯 TP1: $5.10
🎯 TP2: $4.70
🎯 TP3: $4.40
🛑 Stop Loss: $5.90
Key Confirmation:
Wait for clear rejection around the entry zone before entering. If sellers regain control, the downside targets could come into focus step by step.
36
ဘာသာပြန်ဆိုချက် ကြည့်မည်
🚨 $ZEC IS HOLDING — IS $1,300 NEXT? 🔥
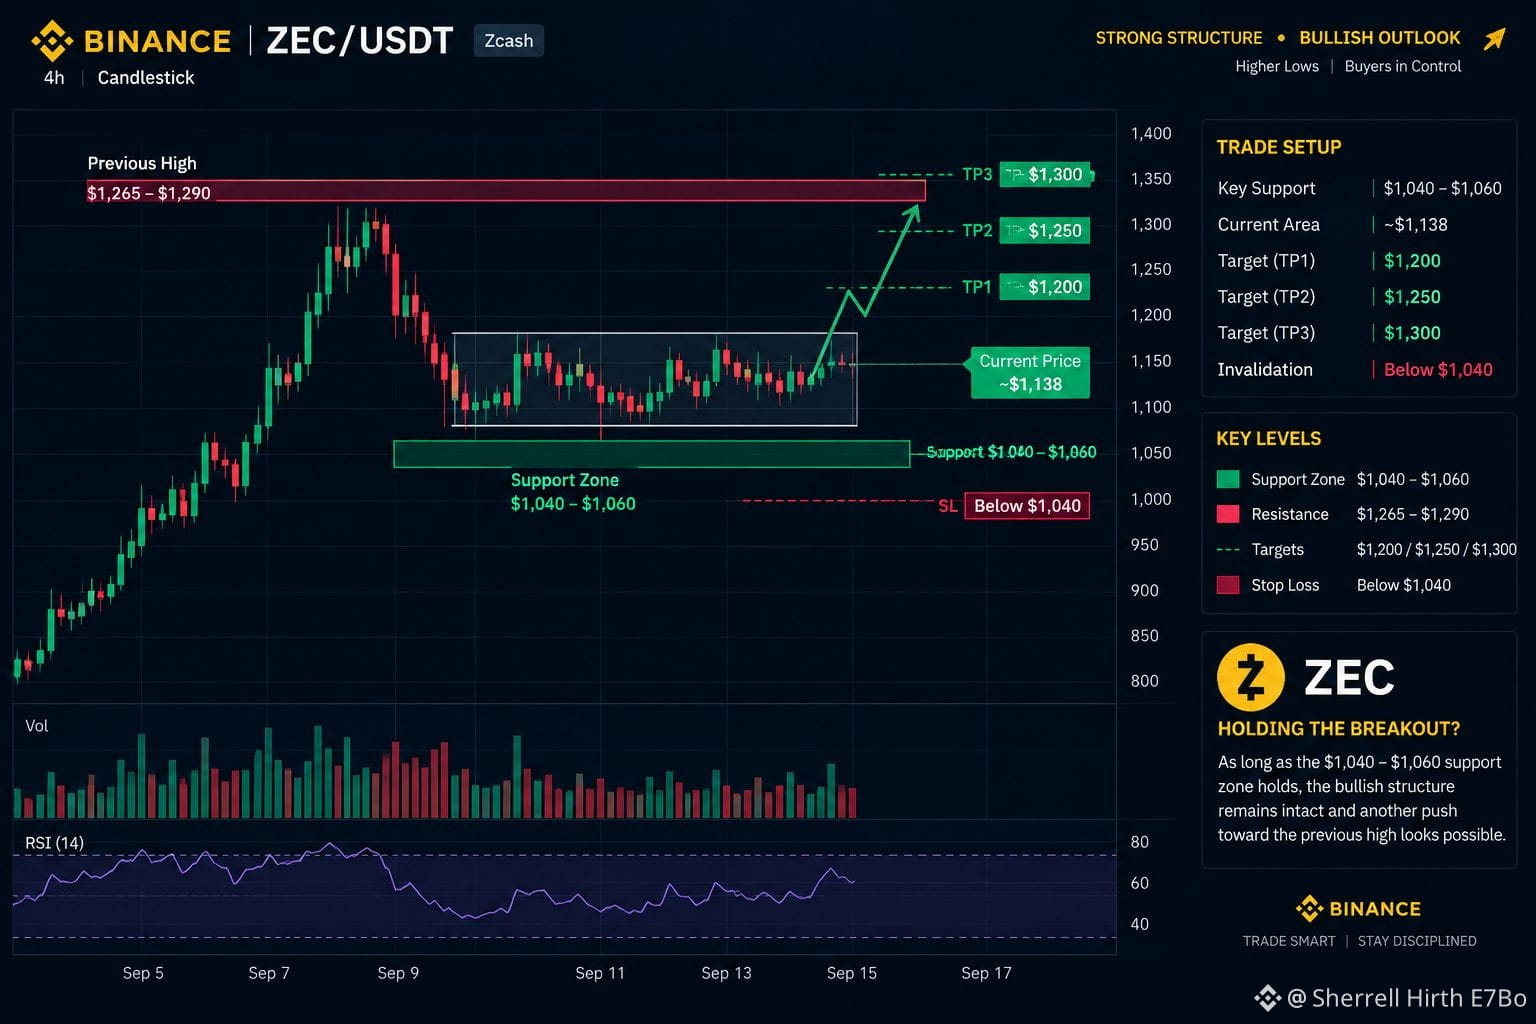
$ZEC is consolidating after a powerful rally, while buyers continue to defend the $1,040–$1,060 support zone.
As long as this area holds, the bullish structure remains intact and another push toward the previous high could be on the table. 📈
📊 TRADE SETUP
🟢 Key Support: $1,040–$1,060
💰 Current Area: ~$1,138
🎯 Target: $1,250 → $1,300
🛑 Invalidation: Below $1,040
🔥 What to watch:
A confirmed breakout above the current consolidation range could provide the momentum needed for the next leg higher.
⚠️ If $1,040 fails, the bullish setup weakens and traders should reassess the structure.
Patience + confirmation > chasing the move.
🚨 $ZEC IS HOLDING — IS $1,300 NEXT? 🔥
$ZEC is consolidating after a powerful rally, while buyers continue to defend the $1,040–$1,060 support zone.
As long as this area holds, the bullish structure remains intact and another push toward the previous high could be on the table. 📈
📊 TRADE SETUP
🟢 Key Support: $1,040–$1,060
💰 Current Area: ~$1,138
🎯 Target: $1,250 → $1,300
🛑 Invalidation: Below $1,040
🔥 What to watch:
A confirmed breakout above the current consolidation range could provide the momentum needed for the next leg higher.
⚠️ If $1,040 fails, the bullish setup weakens and traders should reassess the structure.
Patience + confirmation > chasing the move.
$ZEC is consolidating after a powerful rally, while buyers continue to defend the $1,040–$1,060 support zone.
As long as this area holds, the bullish structure remains intact and another push toward the previous high could be on the table. 📈
📊 TRADE SETUP
🟢 Key Support: $1,040–$1,060
💰 Current Area: ~$1,138
🎯 Target: $1,250 → $1,300
🛑 Invalidation: Below $1,040
🔥 What to watch:
A confirmed breakout above the current consolidation range could provide the momentum needed for the next leg higher.
⚠️ If $1,040 fails, the bullish setup weakens and traders should reassess the structure.
Patience + confirmation > chasing the move.
45
ဘာသာပြန်ဆိုချက် ကြည့်မည်
🔥 TOP GAINERS DEFY THE BEARISH MARKET — MOMENTUM REMAINS STRONG!
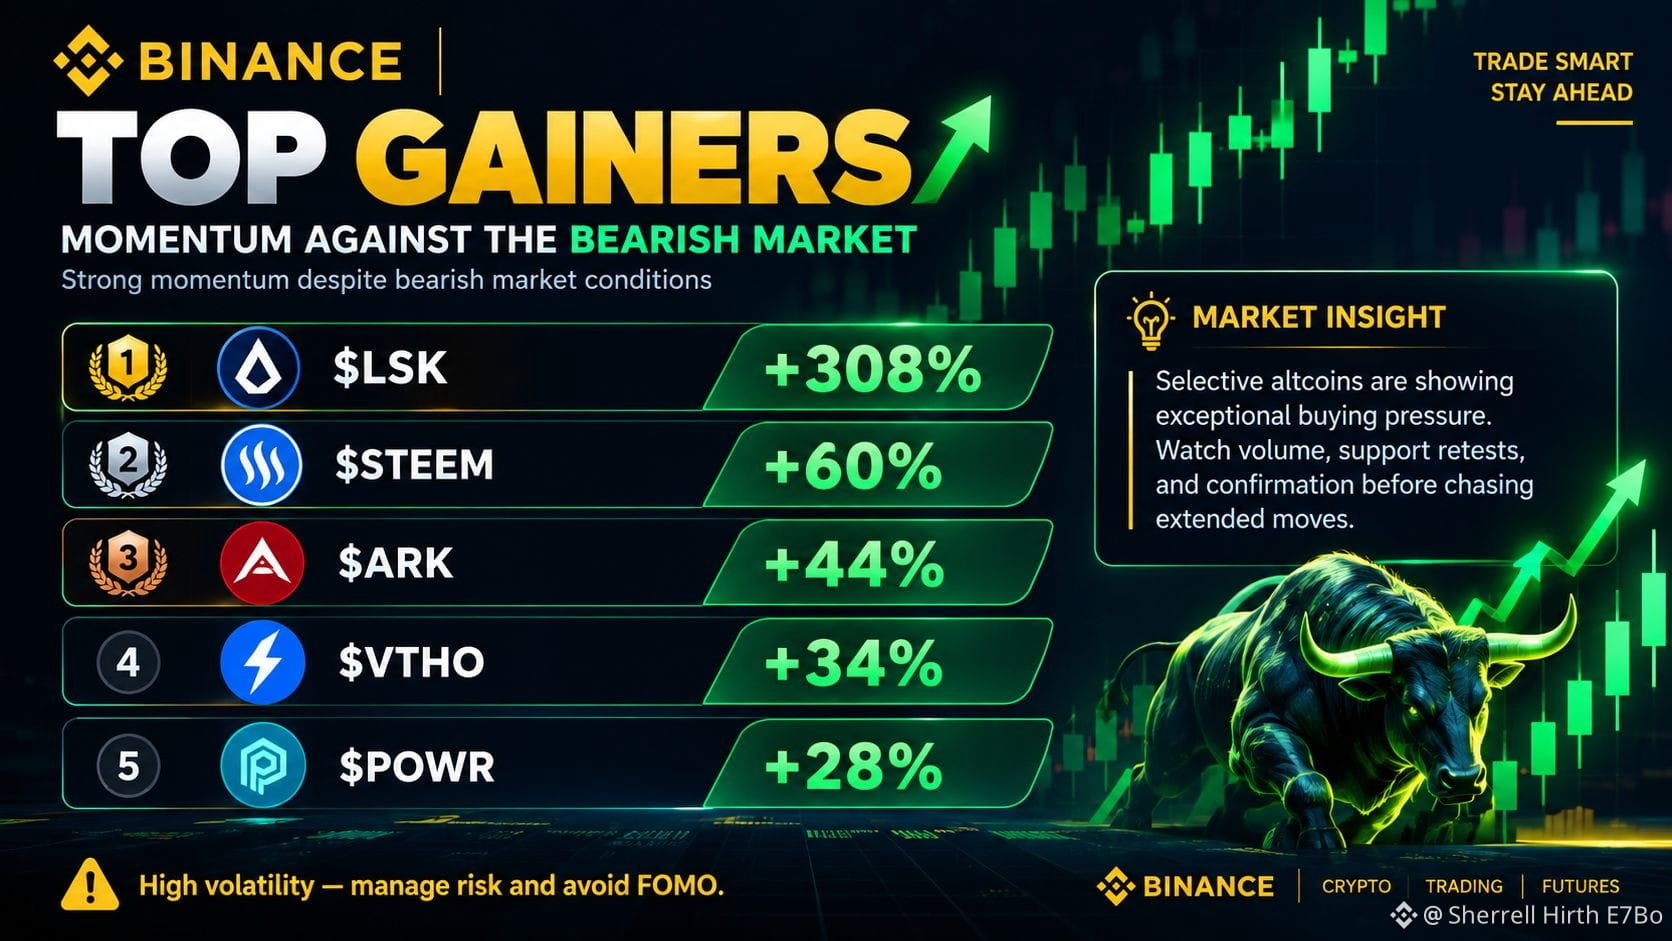
Even with broader market sentiment remaining bearish, several altcoins are showing exceptional upside momentum and attracting strong buying interest.
🚀 TOP GAINERS
🟢 $LSK : +308%🟢 $STEEM : +60%🟢 $ARK: +44%🟢 $VTHO: +34%🟢 $POWR: +28%
📊 Market Insight
The strength in these gainers suggests that selective buying opportunities are still emerging despite the broader bearish environment.
$LSK is clearly leading the move, while $STEEM, $ARK, $VTHO, and $POWR are also maintaining impressive momentum.
🔥 TOP GAINERS DEFY THE BEARISH MARKET — MOMENTUM REMAINS STRONG!
Even with broader market sentiment remaining bearish, several altcoins are showing exceptional upside momentum and attracting strong buying interest.
🚀 TOP GAINERS
🟢 $LSK : +308%🟢 $STEEM : +60%🟢 $ARK: +44%🟢 $VTHO: +34%🟢 $POWR: +28%
📊 Market Insight
The strength in these gainers suggests that selective buying opportunities are still emerging despite the broader bearish environment.
$LSK is clearly leading the move, while $STEEM , $ARK, $VTHO, and $POWR are also maintaining impressive momentum.
Even with broader market sentiment remaining bearish, several altcoins are showing exceptional upside momentum and attracting strong buying interest.
🚀 TOP GAINERS
🟢 $LSK : +308%🟢 $STEEM : +60%🟢 $ARK: +44%🟢 $VTHO: +34%🟢 $POWR: +28%
📊 Market Insight
The strength in these gainers suggests that selective buying opportunities are still emerging despite the broader bearish environment.
$LSK is clearly leading the move, while $STEEM , $ARK, $VTHO, and $POWR are also maintaining impressive momentum.
2
310
ဘာသာပြန်ဆိုချက် ကြည့်မည်
🚀 $AGLD
{future}(AGLDUSDT)
LONG NOW — 10X LEVERAGE SETUP
Guys, $AGLD is showing a potential bullish opportunity, and buyers are stepping in around the current support area.
📈 LONG TRADE SETUP — 10X LEVERAGE
Entry Zone: $0.1820 – $0.1870
SL: $0.1760
🎯 Take Profit Targets
TP1: $0.1920TP2: $0.1980TP3: $0.2050
🔥 Bullish Scenario: If $AGLD holds the entry zone and buyers maintain momentum, price could continue toward $0.1920 → $0.1980 → $0.2050.
🚀 $AGLD
LONG NOW — 10X LEVERAGE SETUP
Guys, $AGLD is showing a potential bullish opportunity, and buyers are stepping in around the current support area.
📈 LONG TRADE SETUP — 10X LEVERAGE
Entry Zone: $0.1820 – $0.1870
SL: $0.1760
🎯 Take Profit Targets
TP1: $0.1920TP2: $0.1980TP3: $0.2050
🔥 Bullish Scenario: If $AGLD holds the entry zone and buyers maintain momentum, price could continue toward $0.1920 → $0.1980 → $0.2050.
LONG NOW — 10X LEVERAGE SETUP
Guys, $AGLD is showing a potential bullish opportunity, and buyers are stepping in around the current support area.
📈 LONG TRADE SETUP — 10X LEVERAGE
Entry Zone: $0.1820 – $0.1870
SL: $0.1760
🎯 Take Profit Targets
TP1: $0.1920TP2: $0.1980TP3: $0.2050
🔥 Bullish Scenario: If $AGLD holds the entry zone and buyers maintain momentum, price could continue toward $0.1920 → $0.1980 → $0.2050.
2
38
ဘာသာပြန်ဆိုချက် ကြည့်မည်
🚀 $TAO
{future}(TAOUSDT)
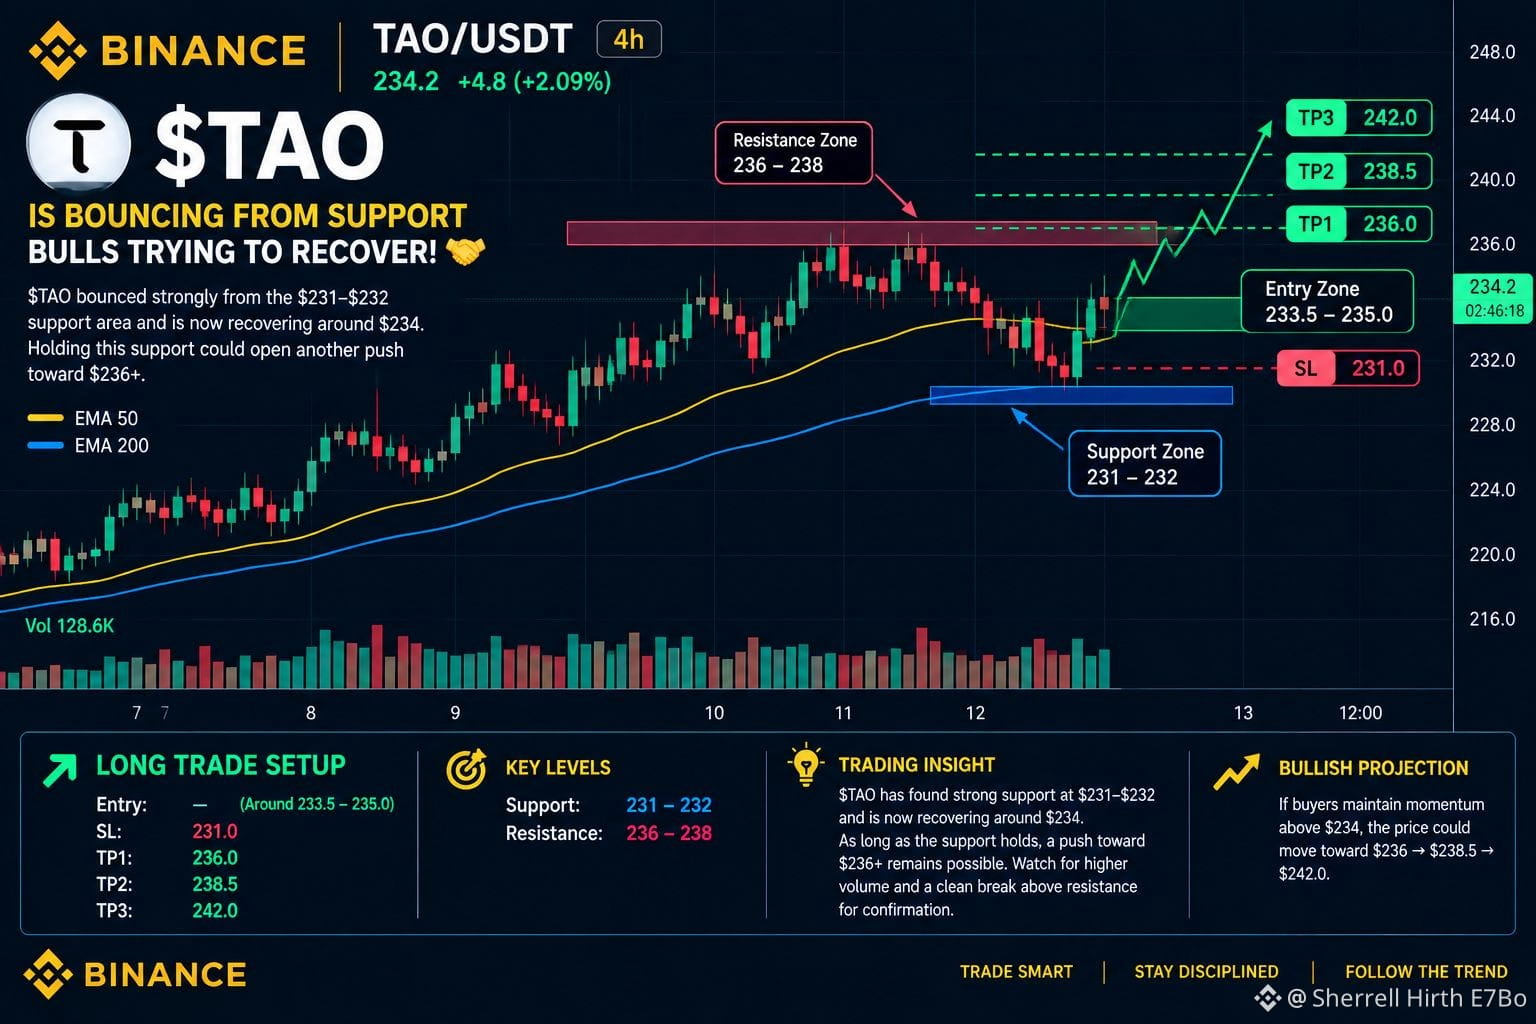
BOUNCING FROM SUPPORT — BULLS TRYING TO RECOVER! 🤝
$TAO is showing signs of a short-term recovery after a strong bounce from the $231–$232 support zone.
Price is now recovering around $234, with buyers attempting to regain momentum. As long as the $231–$232 support area continues to hold, another push toward $236+ remains possible.
📈 BULLISH OUTLOOK
🔹 Support: $231–$232
🔹 Current Recovery Area: Around $234
🔹 Upside Focus: $236+
A sustained hold above support could strengthen the recovery structure and attract additional buying pressure. Watch for confirmation through increasing volume and a clean move above nearby resistance.
🚀 $TAO
BOUNCING FROM SUPPORT — BULLS TRYING TO RECOVER! 🤝
$TAO is showing signs of a short-term recovery after a strong bounce from the $231–$232 support zone.
Price is now recovering around $234, with buyers attempting to regain momentum. As long as the $231–$232 support area continues to hold, another push toward $236+ remains possible.
📈 BULLISH OUTLOOK
🔹 Support: $231–$232
🔹 Current Recovery Area: Around $234
🔹 Upside Focus: $236+
A sustained hold above support could strengthen the recovery structure and attract additional buying pressure. Watch for confirmation through increasing volume and a clean move above nearby resistance.
BOUNCING FROM SUPPORT — BULLS TRYING TO RECOVER! 🤝
$TAO is showing signs of a short-term recovery after a strong bounce from the $231–$232 support zone.
Price is now recovering around $234, with buyers attempting to regain momentum. As long as the $231–$232 support area continues to hold, another push toward $236+ remains possible.
📈 BULLISH OUTLOOK
🔹 Support: $231–$232
🔹 Current Recovery Area: Around $234
🔹 Upside Focus: $236+
A sustained hold above support could strengthen the recovery structure and attract additional buying pressure. Watch for confirmation through increasing volume and a clean move above nearby resistance.
2
37
ဘာသာပြန်ဆိုချက် ကြည့်မည်
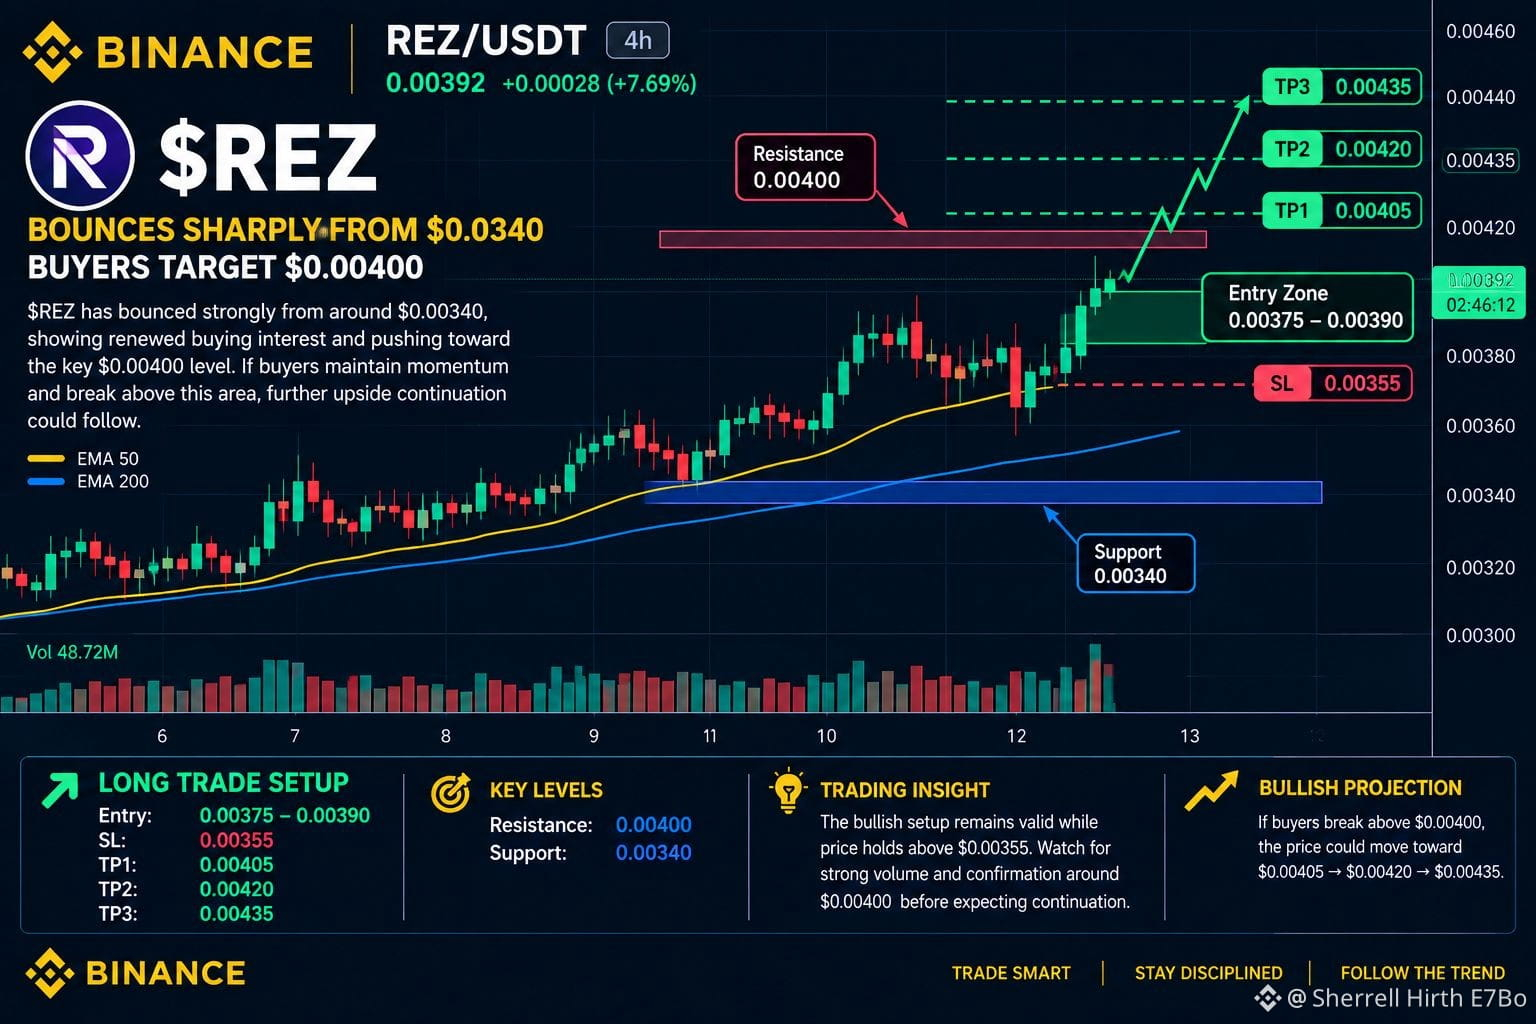
🚀 $REZ BOUNCES SHARPLY — BUYERS TARGET $0.00400
$REZ has bounced strongly from around $0.00340, showing renewed buying interest and pushing toward the key $0.00400 level.
If buyers maintain momentum and successfully break through this area, further upside continuation could follow toward the next target zones.
📈 LONG TRADE SETUP
Entry: $0.00375 – $0.00390
SL: $0.00355
🎯 Take Profit Targets
TP1: $0.00405TP2: $0.00420TP3: $0.00435
🔑 Key Level: $0.00400 resistance
🛡️ Risk Level: $0.00355
The bullish setup remains valid while price holds above the $0.00355 SL level. Watch for strong volume and confirmation around $0.00400 before expecting continuation.
🚀 $REZ BOUNCES SHARPLY — BUYERS TARGET $0.00400
$REZ has bounced strongly from around $0.00340, showing renewed buying interest and pushing toward the key $0.00400 level.
If buyers maintain momentum and successfully break through this area, further upside continuation could follow toward the next target zones.
📈 LONG TRADE SETUP
Entry: $0.00375 – $0.00390
SL: $0.00355
🎯 Take Profit Targets
TP1: $0.00405TP2: $0.00420TP3: $0.00435
🔑 Key Level: $0.00400 resistance
🛡️ Risk Level: $0.00355
The bullish setup remains valid while price holds above the $0.00355 SL level. Watch for strong volume and confirmation around $0.00400 before expecting continuation.
$REZ has bounced strongly from around $0.00340, showing renewed buying interest and pushing toward the key $0.00400 level.
If buyers maintain momentum and successfully break through this area, further upside continuation could follow toward the next target zones.
📈 LONG TRADE SETUP
Entry: $0.00375 – $0.00390
SL: $0.00355
🎯 Take Profit Targets
TP1: $0.00405TP2: $0.00420TP3: $0.00435
🔑 Key Level: $0.00400 resistance
🛡️ Risk Level: $0.00355
The bullish setup remains valid while price holds above the $0.00355 SL level. Watch for strong volume and confirmation around $0.00400 before expecting continuation.
2
79
ဘာသာပြန်ဆိုချက် ကြည့်မည်
🚀 $ANKR
{future}(ANKRUSDT)
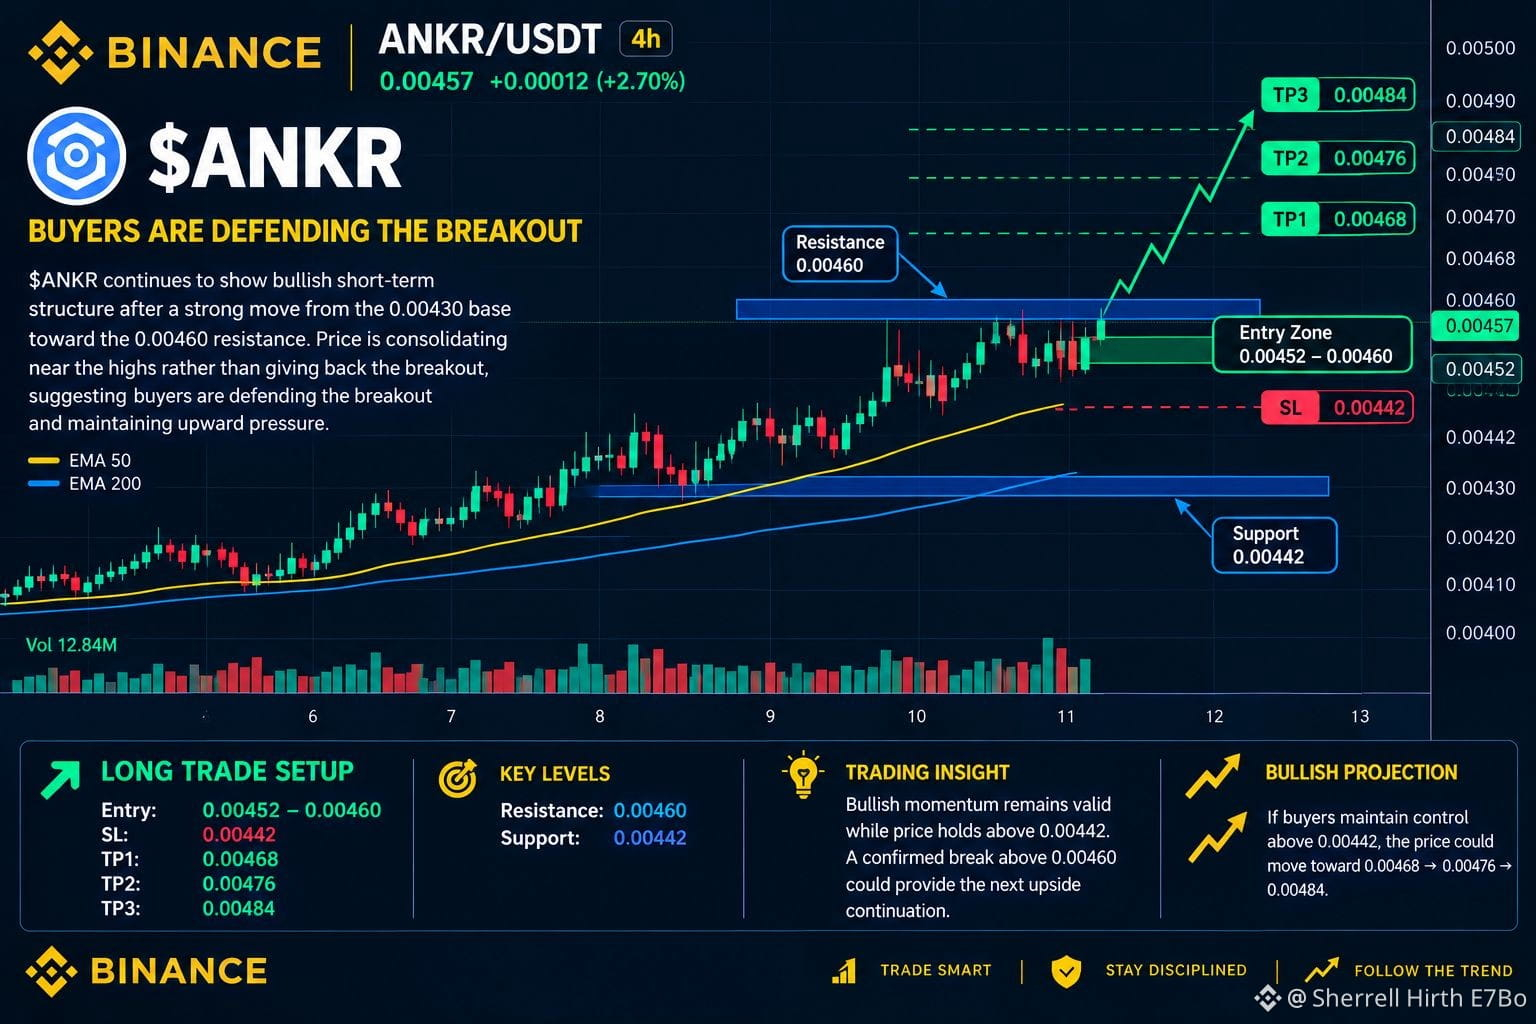
BUYERS ARE DEFENDING THE BREAKOUT
$ANKR continues to show bullish short-term structure after a strong move from the 0.00430 base toward the 0.00460 resistance.
Instead of sharply retracing, price is consolidating near the highs, suggesting buyers are defending the breakout and maintaining upward pressure.
📈 LONG TRADE SETUP
Entry: 0.00452 – 0.00460
SL: 0.00442
🎯 Take Profit Targets
TP1: 0.00468TP2: 0.00476TP3: 0.00484
🔑 Key Resistance: 0.00460
🛡️ Key Support / Invalidation: 0.00442
As long as $ANKR holds above 0.00442, the bullish momentum remains intact. A confirmed break above 0.00460 could provide the next upside continuation.
🚀 $ANKR
BUYERS ARE DEFENDING THE BREAKOUT
$ANKR continues to show bullish short-term structure after a strong move from the 0.00430 base toward the 0.00460 resistance.
Instead of sharply retracing, price is consolidating near the highs, suggesting buyers are defending the breakout and maintaining upward pressure.
📈 LONG TRADE SETUP
Entry: 0.00452 – 0.00460
SL: 0.00442
🎯 Take Profit Targets
TP1: 0.00468TP2: 0.00476TP3: 0.00484
🔑 Key Resistance: 0.00460
🛡️ Key Support / Invalidation: 0.00442
As long as $ANKR holds above 0.00442, the bullish momentum remains intact. A confirmed break above 0.00460 could provide the next upside continuation.
BUYERS ARE DEFENDING THE BREAKOUT
$ANKR continues to show bullish short-term structure after a strong move from the 0.00430 base toward the 0.00460 resistance.
Instead of sharply retracing, price is consolidating near the highs, suggesting buyers are defending the breakout and maintaining upward pressure.
📈 LONG TRADE SETUP
Entry: 0.00452 – 0.00460
SL: 0.00442
🎯 Take Profit Targets
TP1: 0.00468TP2: 0.00476TP3: 0.00484
🔑 Key Resistance: 0.00460
🛡️ Key Support / Invalidation: 0.00442
As long as $ANKR holds above 0.00442, the bullish momentum remains intact. A confirmed break above 0.00460 could provide the next upside continuation.
2
36
ဘာသာပြန်ဆိုချက် ကြည့်မည်
$ZEC
{future}(ZECUSDT)
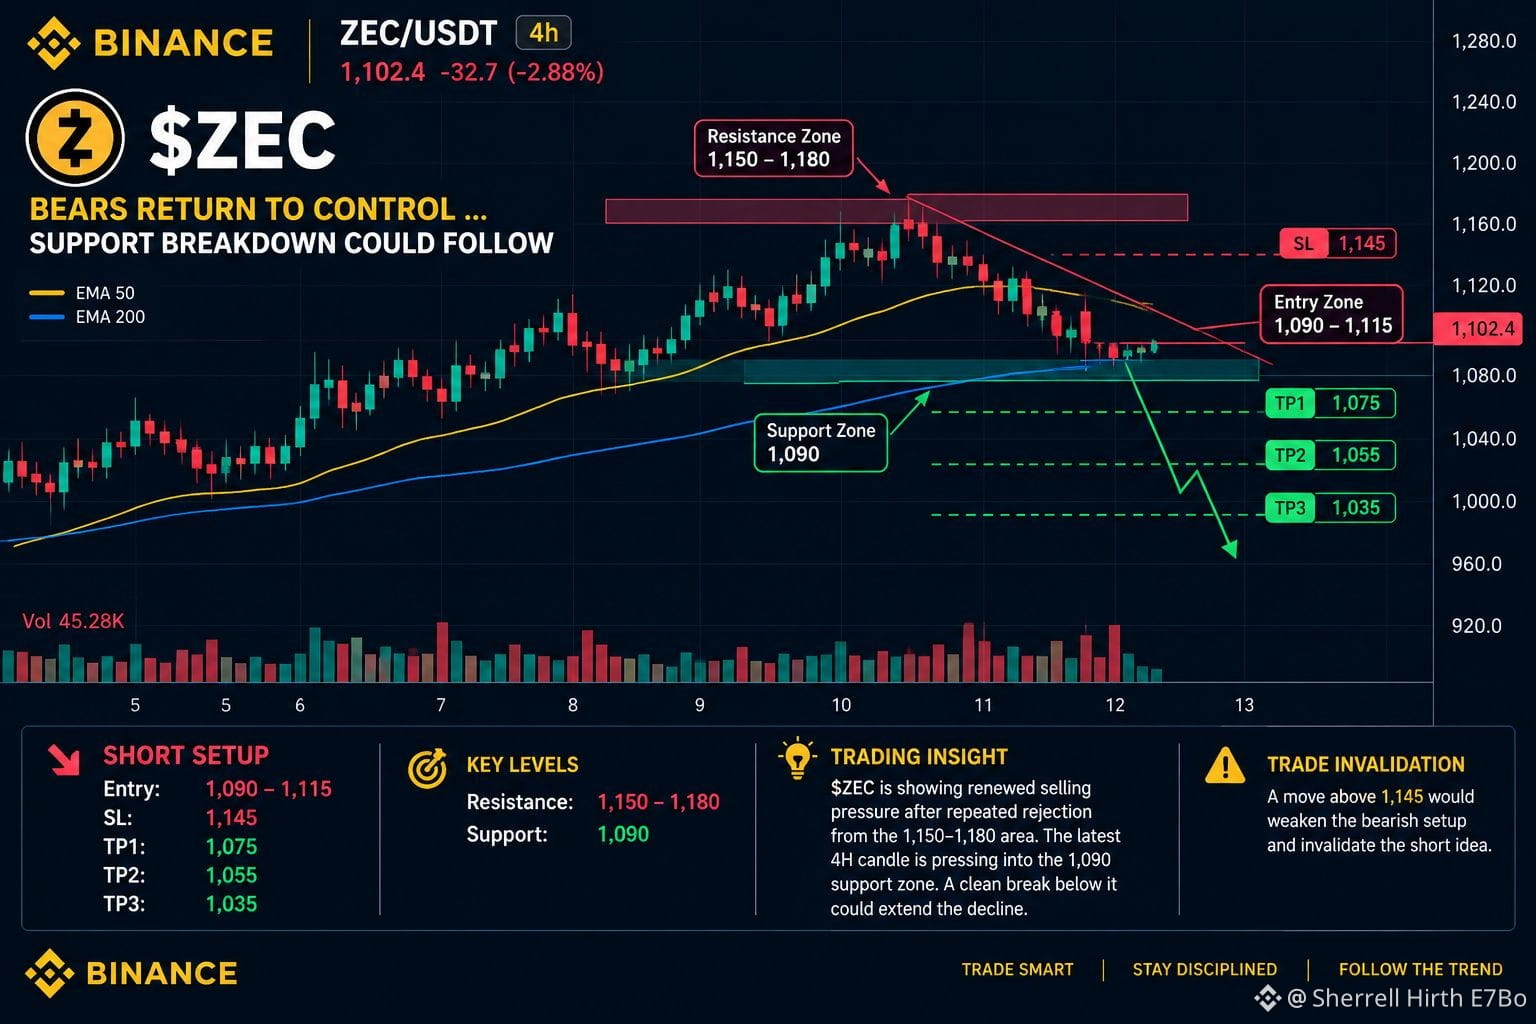
BEARS RETURN TO CONTROL — SUPPORT BREAKDOWN COULD FOLLOW
My Family, $ZEC is showing renewed bearish pressure after repeated rejection from the 1,150–1,180 resistance zone.
The latest 4H candle is now pressing into the 1,090 support area. If sellers secure a clean breakdown below this level, downside continuation could follow toward the next support zones.
📉 SHORT SETUP
Entry: 1,090 – 1,115
SL: 1,145
🎯 Take Profit Targets
TP1: 1,075TP2: 1,055TP3: 1,035
🔻 Key Resistance: 1,150–1,180
🔻 Key Support: 1,090
⚠️ Trade Invalidation: A move above 1,145 would weaken the bearish setup and invalidate the short idea.
$ZEC
BEARS RETURN TO CONTROL — SUPPORT BREAKDOWN COULD FOLLOW
My Family, $ZEC is showing renewed bearish pressure after repeated rejection from the 1,150–1,180 resistance zone.
The latest 4H candle is now pressing into the 1,090 support area. If sellers secure a clean breakdown below this level, downside continuation could follow toward the next support zones.
📉 SHORT SETUP
Entry: 1,090 – 1,115
SL: 1,145
🎯 Take Profit Targets
TP1: 1,075TP2: 1,055TP3: 1,035
🔻 Key Resistance: 1,150–1,180
🔻 Key Support: 1,090
⚠️ Trade Invalidation: A move above 1,145 would weaken the bearish setup and invalidate the short idea.
BEARS RETURN TO CONTROL — SUPPORT BREAKDOWN COULD FOLLOW
My Family, $ZEC is showing renewed bearish pressure after repeated rejection from the 1,150–1,180 resistance zone.
The latest 4H candle is now pressing into the 1,090 support area. If sellers secure a clean breakdown below this level, downside continuation could follow toward the next support zones.
📉 SHORT SETUP
Entry: 1,090 – 1,115
SL: 1,145
🎯 Take Profit Targets
TP1: 1,075TP2: 1,055TP3: 1,035
🔻 Key Resistance: 1,150–1,180
🔻 Key Support: 1,090
⚠️ Trade Invalidation: A move above 1,145 would weaken the bearish setup and invalidate the short idea.
2
47
ဘာသာပြန်ဆိုချက် ကြည့်မည်
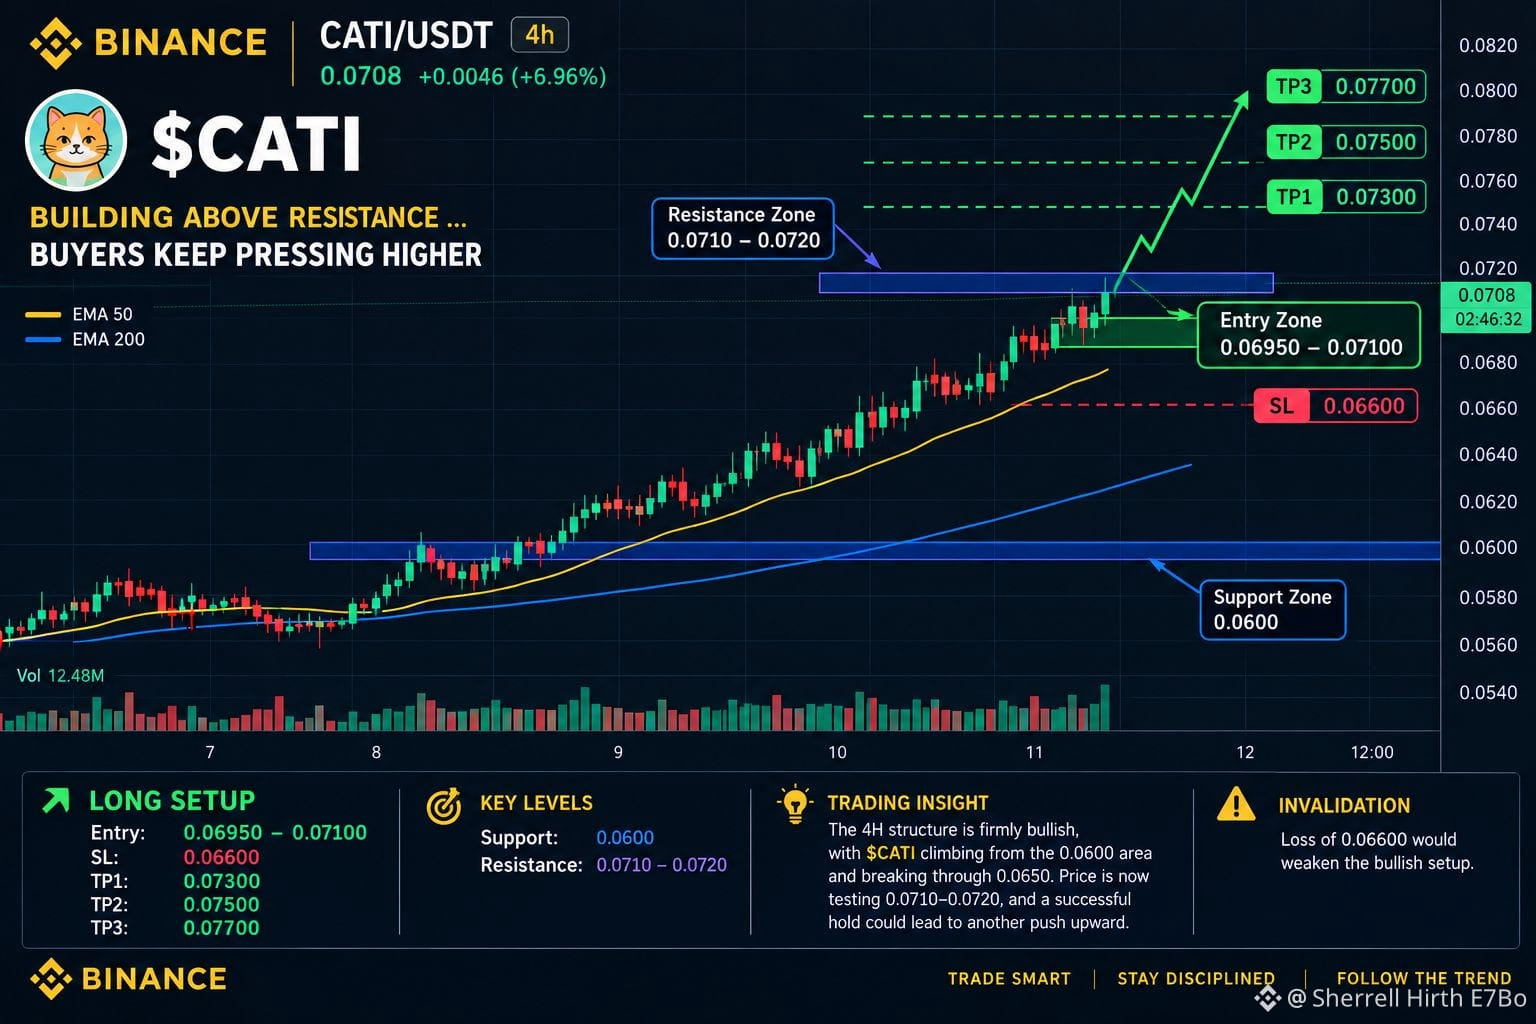
🚀 $CATI BUILDING ABOVE RESISTANCE — BUYERS KEEP PRESSING HIGHER
$CATI is maintaining a strong bullish structure on the 4H timeframe.
After climbing from the 0.0600 area and breaking above 0.0650, price is now testing the 0.0710–0.0720 resistance zone. A successful breakout and hold above this area could open the door for another leg higher.
📈 LONG SETUP
Entry: 0.06950 – 0.07100
SL: 0.06600
🎯 Take Profit Targets
TP1: 0.07300TP2: 0.07500TP3: 0.07700
⚠️ Invalidation: A loss of 0.06600 would weaken the bullish setup and signal increased downside risk.
Key Levels:
Support: 0.06600
Resistance: 0.0710–0.0720
🔥 As long as $CATI holds the key support structure, buyers remain in control. Watch for confirmation above resistance before expecting continuation.
🚀 $CATI BUILDING ABOVE RESISTANCE — BUYERS KEEP PRESSING HIGHER
$CATI is maintaining a strong bullish structure on the 4H timeframe.
After climbing from the 0.0600 area and breaking above 0.0650, price is now testing the 0.0710–0.0720 resistance zone. A successful breakout and hold above this area could open the door for another leg higher.
📈 LONG SETUP
Entry: 0.06950 – 0.07100
SL: 0.06600
🎯 Take Profit Targets
TP1: 0.07300TP2: 0.07500TP3: 0.07700
⚠️ Invalidation: A loss of 0.06600 would weaken the bullish setup and signal increased downside risk.
Key Levels:
Support: 0.06600
Resistance: 0.0710–0.0720
🔥 As long as $CATI holds the key support structure, buyers remain in control. Watch for confirmation above resistance before expecting continuation.
$CATI is maintaining a strong bullish structure on the 4H timeframe.
After climbing from the 0.0600 area and breaking above 0.0650, price is now testing the 0.0710–0.0720 resistance zone. A successful breakout and hold above this area could open the door for another leg higher.
📈 LONG SETUP
Entry: 0.06950 – 0.07100
SL: 0.06600
🎯 Take Profit Targets
TP1: 0.07300TP2: 0.07500TP3: 0.07700
⚠️ Invalidation: A loss of 0.06600 would weaken the bullish setup and signal increased downside risk.
Key Levels:
Support: 0.06600
Resistance: 0.0710–0.0720
🔥 As long as $CATI holds the key support structure, buyers remain in control. Watch for confirmation above resistance before expecting continuation.
2
56
ဘာသာပြန်ဆိုချက် ကြည့်မည်
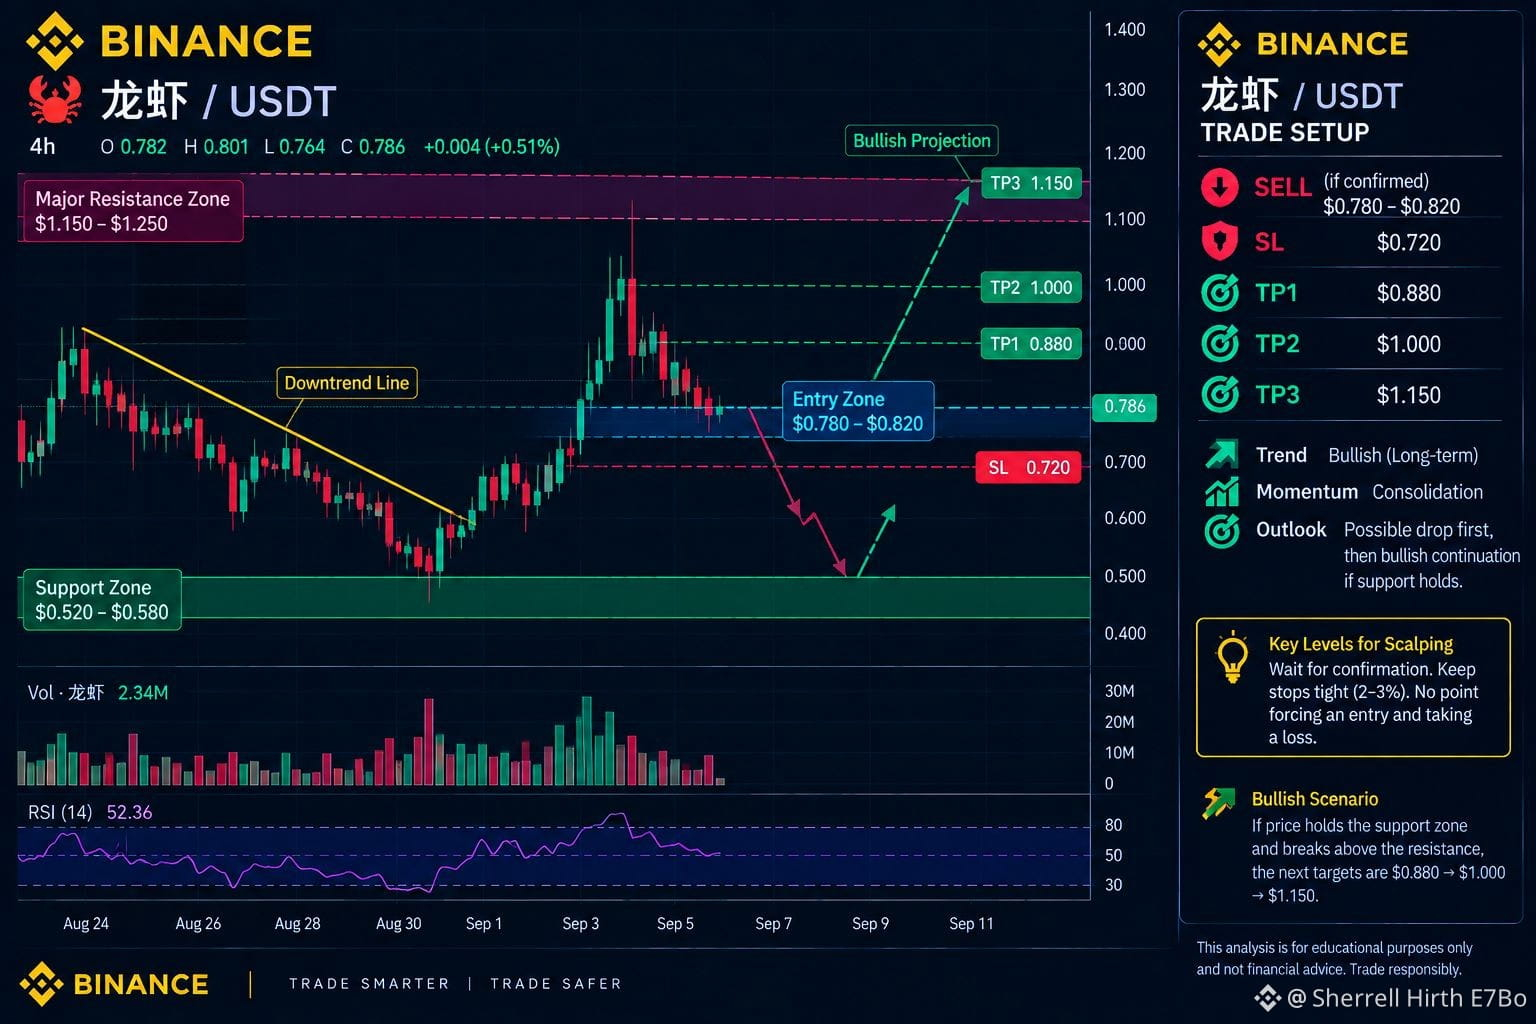
$龙虾
{future}(龙虾USDT)
— SCALPING WATCH | WAITING FOR CONFIRMATION
🚨 $龙虾 just printed a massive +90% move!
After such an aggressive pump, price has been stuck around the same level for hours, showing signs of consolidation. I’m watching closely for a potential hard rejection and downside move.
📉 BEARISH SCENARIO
I’m expecting a possible drop, but no entry will be forced without confirmation. The priority is to wait for clear bearish price action before taking a short.
📌 SCALPING PLAN
🔴 Bias: Bearish / Short Watch
⏳ Entry: Wait for confirmation
🛑 Stop: Keep risk tight around 2–3%
🎯 Targets: Scalping levels to be confirmed after the rejection
A clean breakdown with increasing selling volume could provide the confirmation needed for the next move lower.
$龙虾
— SCALPING WATCH | WAITING FOR CONFIRMATION
🚨 $龙虾 just printed a massive +90% move!
After such an aggressive pump, price has been stuck around the same level for hours, showing signs of consolidation. I’m watching closely for a potential hard rejection and downside move.
📉 BEARISH SCENARIO
I’m expecting a possible drop, but no entry will be forced without confirmation. The priority is to wait for clear bearish price action before taking a short.
📌 SCALPING PLAN
🔴 Bias: Bearish / Short Watch
⏳ Entry: Wait for confirmation
🛑 Stop: Keep risk tight around 2–3%
🎯 Targets: Scalping levels to be confirmed after the rejection
A clean breakdown with increasing selling volume could provide the confirmation needed for the next move lower.
— SCALPING WATCH | WAITING FOR CONFIRMATION
🚨 $龙虾 just printed a massive +90% move!
After such an aggressive pump, price has been stuck around the same level for hours, showing signs of consolidation. I’m watching closely for a potential hard rejection and downside move.
📉 BEARISH SCENARIO
I’m expecting a possible drop, but no entry will be forced without confirmation. The priority is to wait for clear bearish price action before taking a short.
📌 SCALPING PLAN
🔴 Bias: Bearish / Short Watch
⏳ Entry: Wait for confirmation
🛑 Stop: Keep risk tight around 2–3%
🎯 Targets: Scalping levels to be confirmed after the rejection
A clean breakdown with increasing selling volume could provide the confirmation needed for the next move lower.
2
239
ဘာသာပြန်ဆိုချက် ကြည့်မည်
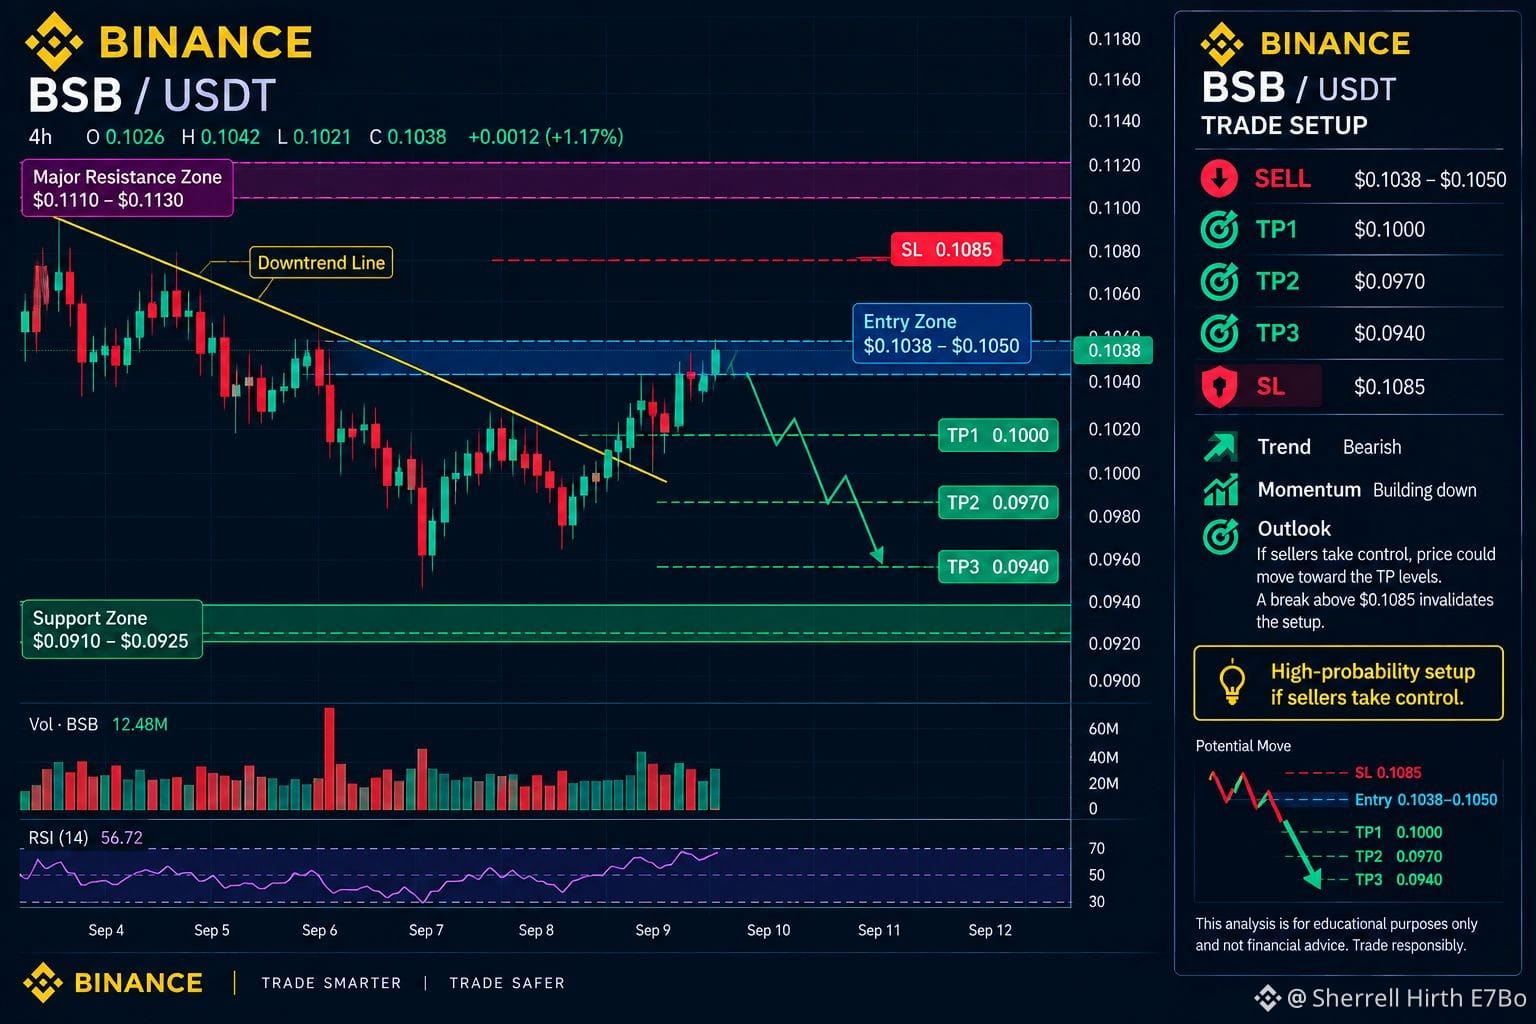
$BSB
{future}(BSBUSDT)
— BEARISH SETUP | WATCHING FOR THE DROP‼️
$BSB is approaching a key selling zone, and the setup could favor further downside if sellers step in and take control. Confirmation of bearish momentum around the entry area could open the path toward the projected support levels.
📌 TRADE SETUP
🔴 SELL: $0.1038–$0.1050
🎯 TP1: $0.1000
🎯 TP2: $0.0970
🎯 TP3: $0.0940
🛑 SL: $0.1085
📉 MARKET OUTLOOK
The setup remains bearish if sellers gain control and price rejects the selling zone. Watch volume and price action closely for confirmation before entering.
🔥 High-probability setup only if bearish momentum is confirmed.
$BSB
— BEARISH SETUP | WATCHING FOR THE DROP‼️
$BSB is approaching a key selling zone, and the setup could favor further downside if sellers step in and take control. Confirmation of bearish momentum around the entry area could open the path toward the projected support levels.
📌 TRADE SETUP
🔴 SELL: $0.1038–$0.1050
🎯 TP1: $0.1000
🎯 TP2: $0.0970
🎯 TP3: $0.0940
🛑 SL: $0.1085
📉 MARKET OUTLOOK
The setup remains bearish if sellers gain control and price rejects the selling zone. Watch volume and price action closely for confirmation before entering.
🔥 High-probability setup only if bearish momentum is confirmed.
— BEARISH SETUP | WATCHING FOR THE DROP‼️
$BSB is approaching a key selling zone, and the setup could favor further downside if sellers step in and take control. Confirmation of bearish momentum around the entry area could open the path toward the projected support levels.
📌 TRADE SETUP
🔴 SELL: $0.1038–$0.1050
🎯 TP1: $0.1000
🎯 TP2: $0.0970
🎯 TP3: $0.0940
🛑 SL: $0.1085
📉 MARKET OUTLOOK
The setup remains bearish if sellers gain control and price rejects the selling zone. Watch volume and price action closely for confirmation before entering.
🔥 High-probability setup only if bearish momentum is confirmed.
2
61
ဘာသာပြန်ဆိုချက် ကြည့်မည်
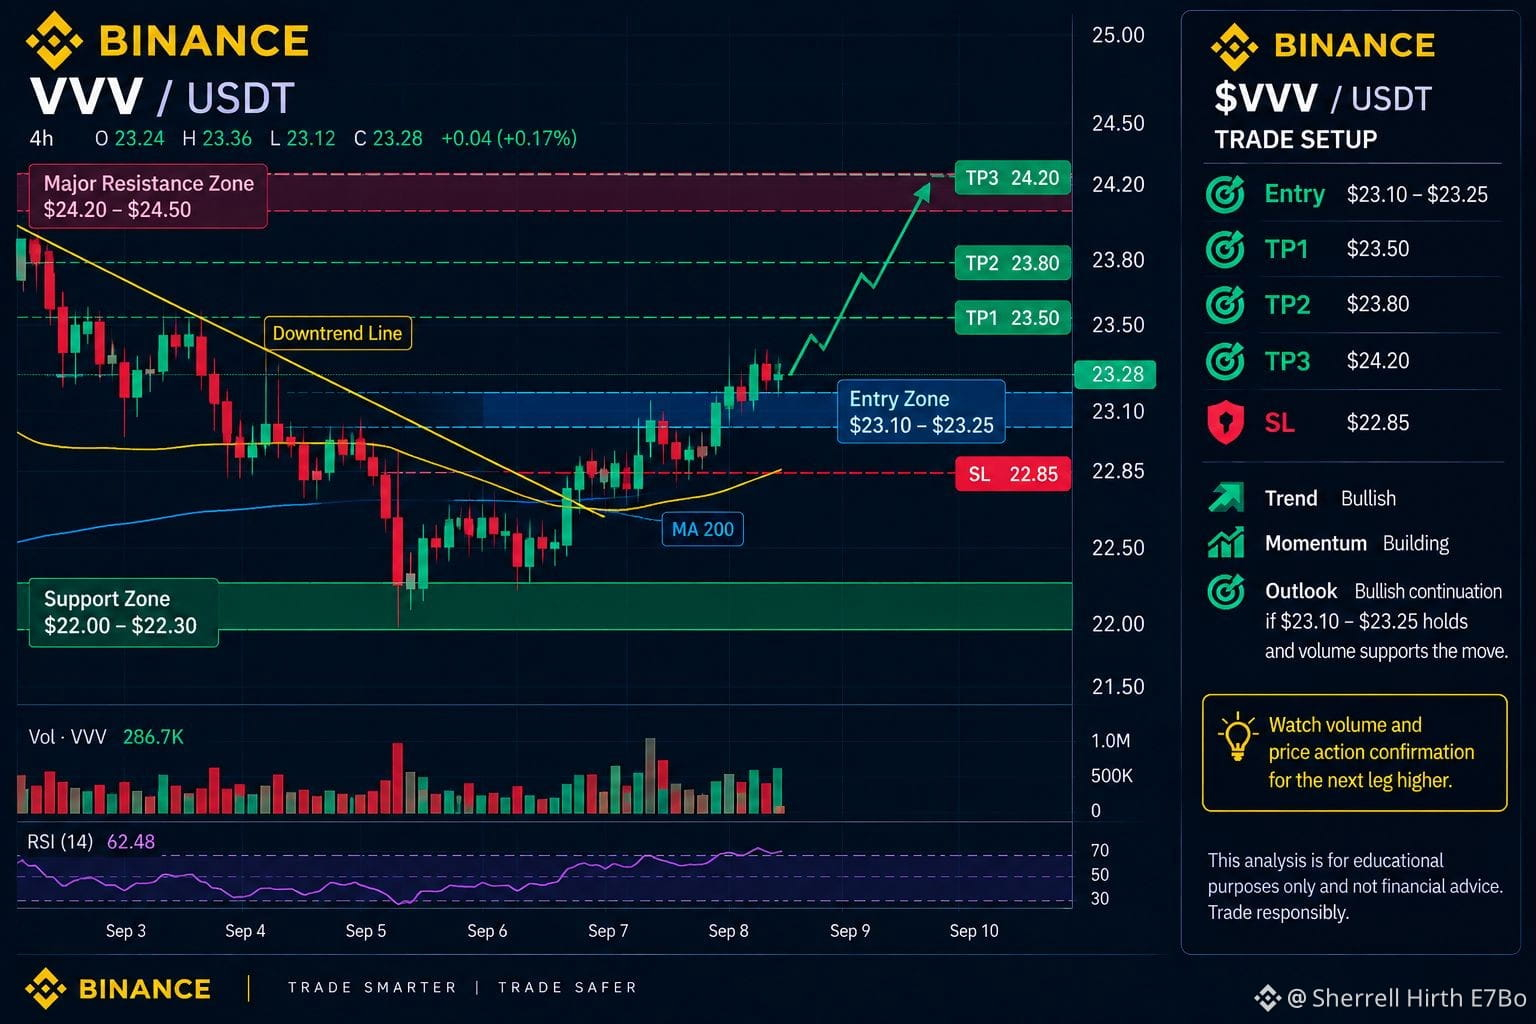
🚀 $VVV
{future}(VVVUSDT)
— BOUNCE SETUP LOOKING GOOD‼️
$VVV is showing a promising bounce, with buyers stepping back in and short-term momentum improving. If bullish pressure continues, price could push toward the next resistance levels.
📌 TRADE SETUP
🟢 Entry: $23.10–$23.25
🎯 TP1: $23.50
🎯 TP2: $23.80
🎯 TP3: $24.20
🛑 SL: $22.85
📈 MARKET OUTLOOK
As long as $VVV holds above the entry zone, the bullish bounce remains in focus. Watch for sustained buying volume and clean price action confirmation as price approaches each target.
🚀 $VVV
— BOUNCE SETUP LOOKING GOOD‼️
$VVV is showing a promising bounce, with buyers stepping back in and short-term momentum improving. If bullish pressure continues, price could push toward the next resistance levels.
📌 TRADE SETUP
🟢 Entry: $23.10–$23.25
🎯 TP1: $23.50
🎯 TP2: $23.80
🎯 TP3: $24.20
🛑 SL: $22.85
📈 MARKET OUTLOOK
As long as $VVV holds above the entry zone, the bullish bounce remains in focus. Watch for sustained buying volume and clean price action confirmation as price approaches each target.
— BOUNCE SETUP LOOKING GOOD‼️
$VVV is showing a promising bounce, with buyers stepping back in and short-term momentum improving. If bullish pressure continues, price could push toward the next resistance levels.
📌 TRADE SETUP
🟢 Entry: $23.10–$23.25
🎯 TP1: $23.50
🎯 TP2: $23.80
🎯 TP3: $24.20
🛑 SL: $22.85
📈 MARKET OUTLOOK
As long as $VVV holds above the entry zone, the bullish bounce remains in focus. Watch for sustained buying volume and clean price action confirmation as price approaches each target.
1
52
ဘာသာပြန်ဆိုချက် ကြည့်မည်
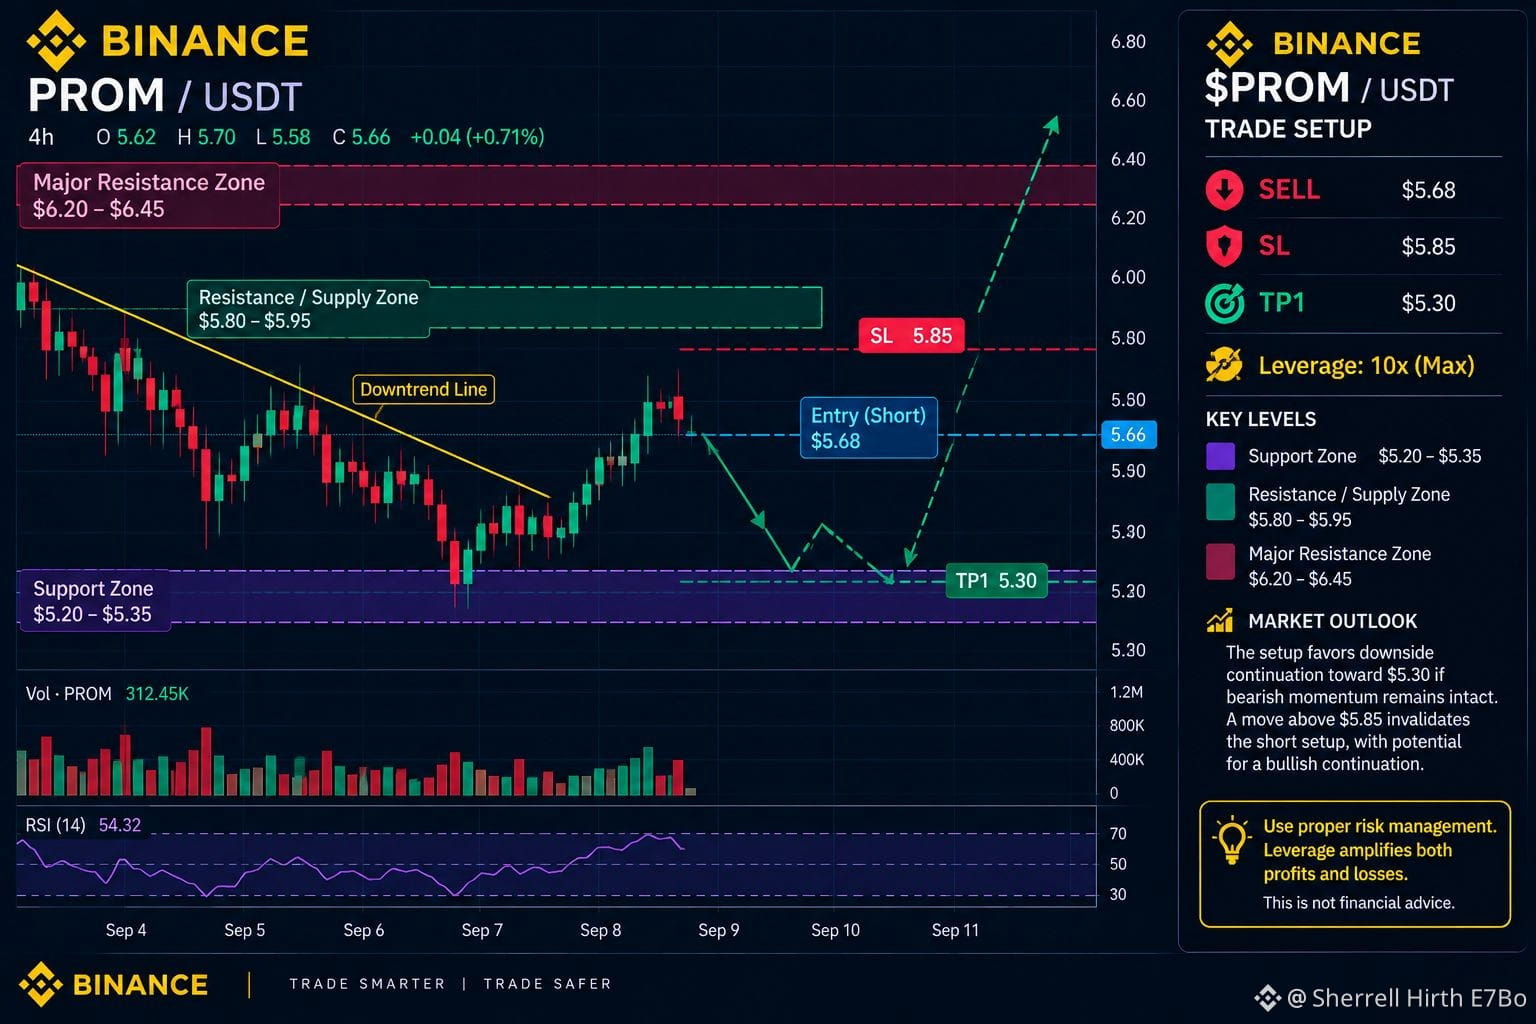
$PROM
{future}(PROMUSDT)
— SHORT SETUP | HIGH-PROBABILITY TRADE
Guys, $PROM is setting up for a potential short, with sellers looking to take control from the current level.
📌 TRADE SETUP
🔴 SELL: $5.68
🎯 TP: $5.30
🛑 SL: $5.85
⚡ Leverage: Maximum 10x
📉 Market Outlook:
The setup favors downside continuation toward $5.30 if bearish momentum remains intact. A move above $5.85 invalidates the setup, so strict risk management is essential.
$PROM
— SHORT SETUP | HIGH-PROBABILITY TRADE
Guys, $PROM is setting up for a potential short, with sellers looking to take control from the current level.
📌 TRADE SETUP
🔴 SELL: $5.68
🎯 TP: $5.30
🛑 SL: $5.85
⚡ Leverage: Maximum 10x
📉 Market Outlook:
The setup favors downside continuation toward $5.30 if bearish momentum remains intact. A move above $5.85 invalidates the setup, so strict risk management is essential.
— SHORT SETUP | HIGH-PROBABILITY TRADE
Guys, $PROM is setting up for a potential short, with sellers looking to take control from the current level.
📌 TRADE SETUP
🔴 SELL: $5.68
🎯 TP: $5.30
🛑 SL: $5.85
⚡ Leverage: Maximum 10x
📉 Market Outlook:
The setup favors downside continuation toward $5.30 if bearish momentum remains intact. A move above $5.85 invalidates the setup, so strict risk management is essential.
1
43
ဘာသာပြန်ဆိုချက် ကြည့်မည်
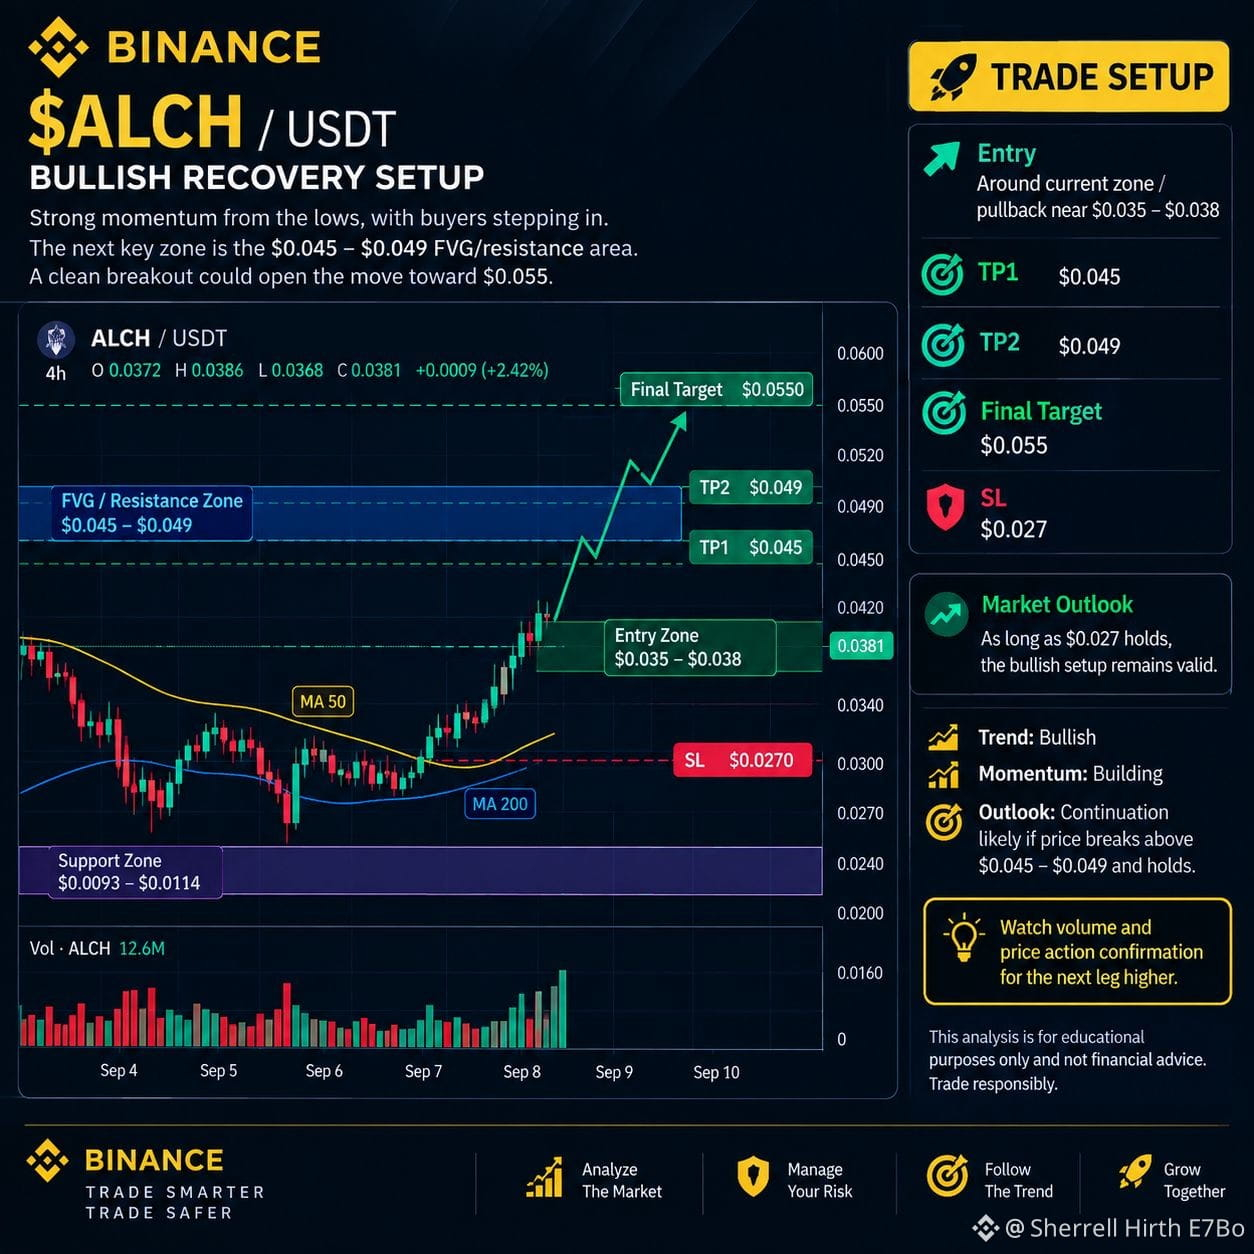
🚀 $ALCH
{future}(ALCHUSDT)
— BULLISH RECOVERY SETUP
$ALCH is showing a strong bullish recovery from the lows, with buyers steadily regaining control and momentum building.
The next key area to watch is the $0.045–$0.049 FVG/resistance zone. A clean breakout and hold above this area could open the path toward $0.055, the main target of this setup.
📌 TRADE SETUP
🟢 Entry: Around current zone / pullback near $0.035–$0.038
🎯 TP1: $0.045
🎯 TP2: $0.049
🎯 Final Target: $0.055
🛑 SL: $0.027
📈 Market Outlook:
As long as $0.027 holds, the bullish recovery structure remains valid. Traders should watch the $0.045–$0.049 zone closely for breakout confirmation, supported by strong volume and sustained buying pressure.
🚀 $ALCH
— BULLISH RECOVERY SETUP
$ALCH is showing a strong bullish recovery from the lows, with buyers steadily regaining control and momentum building.
The next key area to watch is the $0.045–$0.049 FVG/resistance zone. A clean breakout and hold above this area could open the path toward $0.055, the main target of this setup.
📌 TRADE SETUP
🟢 Entry: Around current zone / pullback near $0.035–$0.038
🎯 TP1: $0.045
🎯 TP2: $0.049
🎯 Final Target: $0.055
🛑 SL: $0.027
📈 Market Outlook:
As long as $0.027 holds, the bullish recovery structure remains valid. Traders should watch the $0.045–$0.049 zone closely for breakout confirmation, supported by strong volume and sustained buying pressure.
— BULLISH RECOVERY SETUP
$ALCH is showing a strong bullish recovery from the lows, with buyers steadily regaining control and momentum building.
The next key area to watch is the $0.045–$0.049 FVG/resistance zone. A clean breakout and hold above this area could open the path toward $0.055, the main target of this setup.
📌 TRADE SETUP
🟢 Entry: Around current zone / pullback near $0.035–$0.038
🎯 TP1: $0.045
🎯 TP2: $0.049
🎯 Final Target: $0.055
🛑 SL: $0.027
📈 Market Outlook:
As long as $0.027 holds, the bullish recovery structure remains valid. Traders should watch the $0.045–$0.049 zone closely for breakout confirmation, supported by strong volume and sustained buying pressure.
1
49
ဘာသာပြန်ဆိုချက် ကြည့်မည်
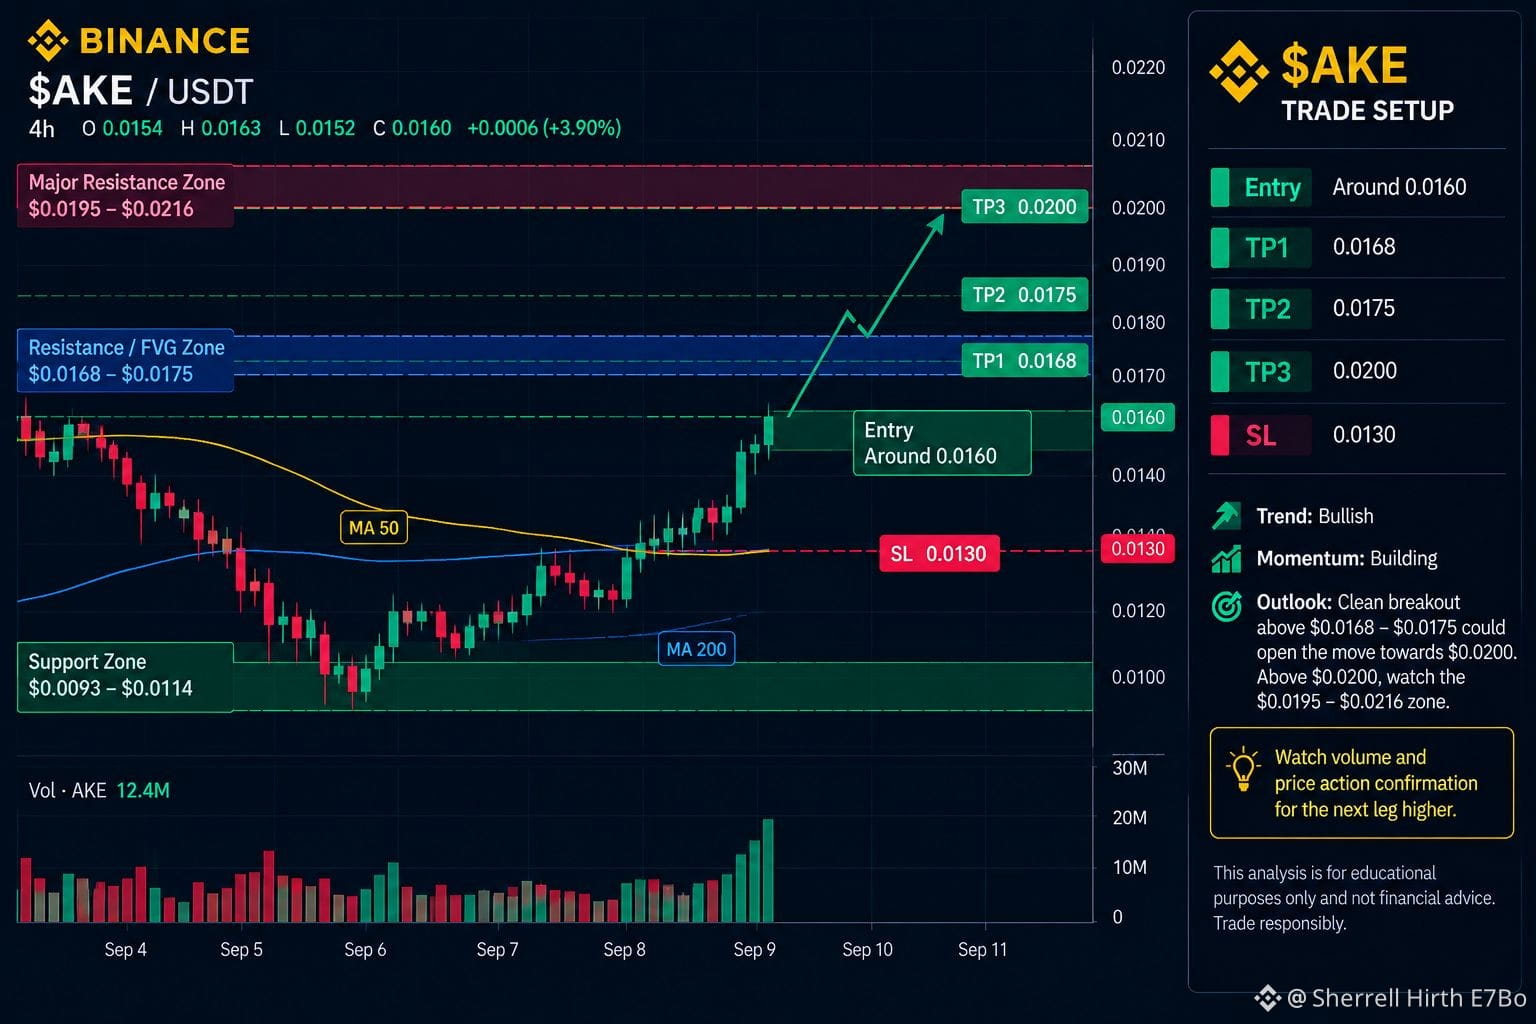
🚀 $AKE
{future}(AKEUSDT)
— BULLISH RECOVERY SETUP
$AKE is showing a strong recovery from the lows, with buyers stepping in aggressively from the $0.0093–$0.0114 support zone. Price is now trading around $0.0160, bringing the next major resistance area into focus.
📊 KEY LEVELS
🔴 Resistance / FVG: $0.0168–$0.0175
🎯 A clean breakout above this zone could open the way toward $0.0200, the main target for this setup.
⚠️ Above $0.0200, the $0.0195–$0.0216 major resistance zone becomes the key decision area.
📌 TRADE SETUP
🟢 Entry: Around $0.0160
🎯 TP: $0.0200
🛑 SL: $0.0130
📈 Market Outlook:
As long as $AKE holds above the $0.0130 invalidation level, the bullish recovery structure remains valid. Watch the $0.0168–$0.0175 zone closely for breakout confirmation and sustained buying volume.
🚀 $AKE
— BULLISH RECOVERY SETUP
$AKE is showing a strong recovery from the lows, with buyers stepping in aggressively from the $0.0093–$0.0114 support zone. Price is now trading around $0.0160, bringing the next major resistance area into focus.
📊 KEY LEVELS
🔴 Resistance / FVG: $0.0168–$0.0175
🎯 A clean breakout above this zone could open the way toward $0.0200, the main target for this setup.
⚠️ Above $0.0200, the $0.0195–$0.0216 major resistance zone becomes the key decision area.
📌 TRADE SETUP
🟢 Entry: Around $0.0160
🎯 TP: $0.0200
🛑 SL: $0.0130
📈 Market Outlook:
As long as $AKE holds above the $0.0130 invalidation level, the bullish recovery structure remains valid. Watch the $0.0168–$0.0175 zone closely for breakout confirmation and sustained buying volume.
— BULLISH RECOVERY SETUP
$AKE is showing a strong recovery from the lows, with buyers stepping in aggressively from the $0.0093–$0.0114 support zone. Price is now trading around $0.0160, bringing the next major resistance area into focus.
📊 KEY LEVELS
🔴 Resistance / FVG: $0.0168–$0.0175
🎯 A clean breakout above this zone could open the way toward $0.0200, the main target for this setup.
⚠️ Above $0.0200, the $0.0195–$0.0216 major resistance zone becomes the key decision area.
📌 TRADE SETUP
🟢 Entry: Around $0.0160
🎯 TP: $0.0200
🛑 SL: $0.0130
📈 Market Outlook:
As long as $AKE holds above the $0.0130 invalidation level, the bullish recovery structure remains valid. Watch the $0.0168–$0.0175 zone closely for breakout confirmation and sustained buying volume.
1
99
ဘာသာပြန်ဆိုချက် ကြည့်မည်
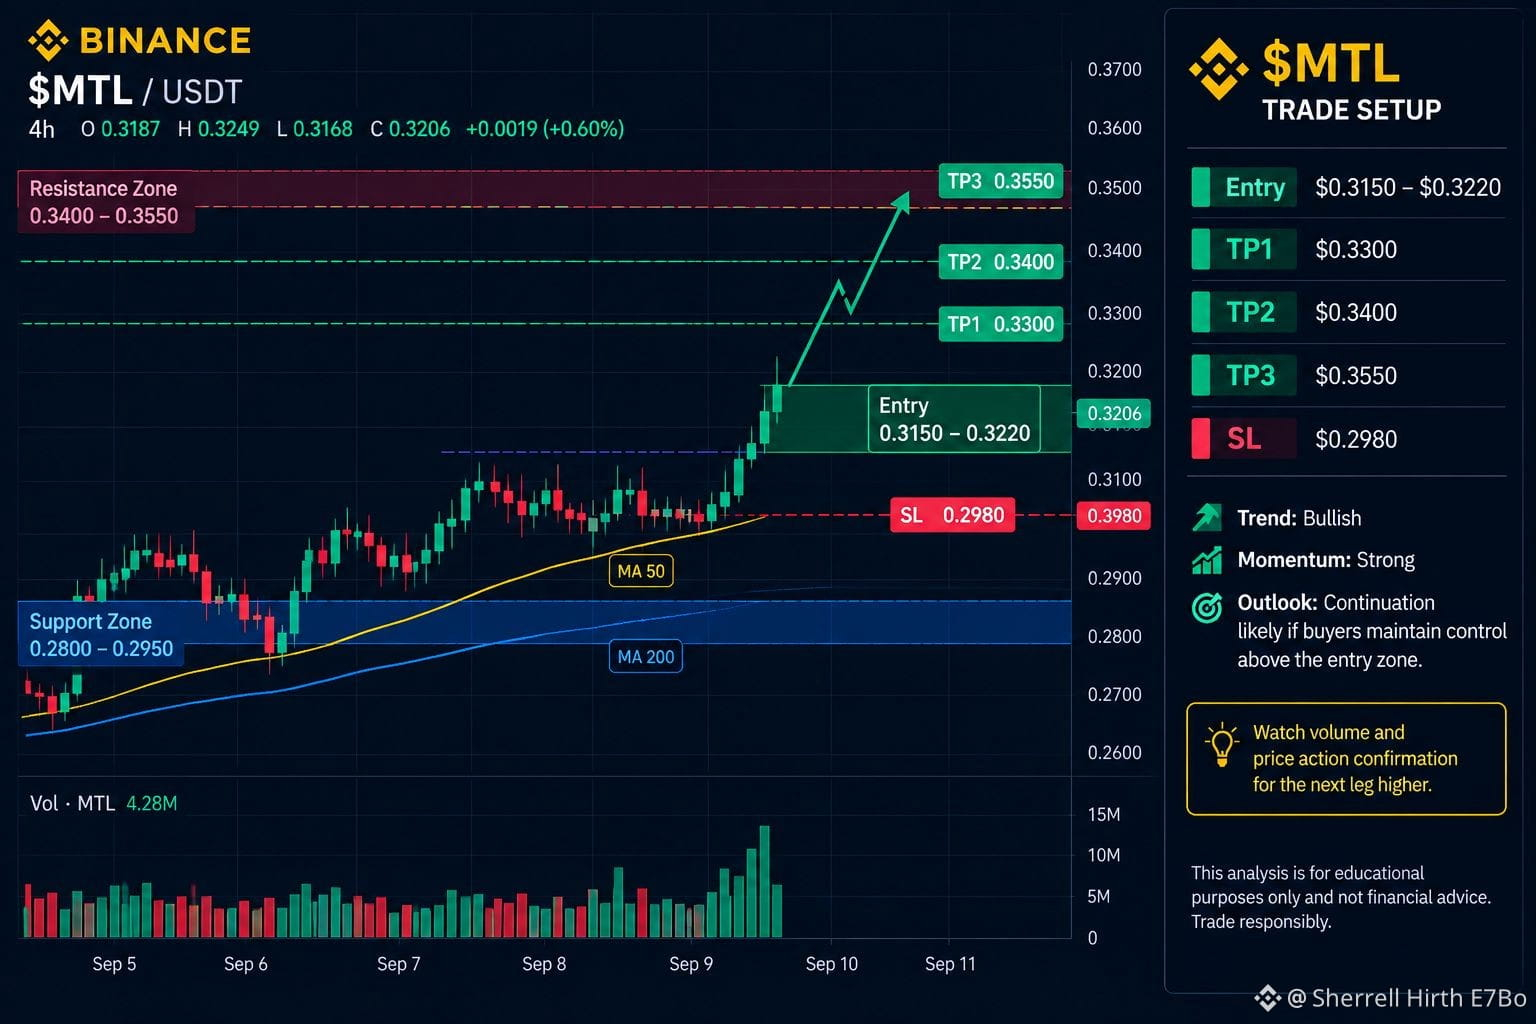
🚀 $MTL
{future}(MTLUSDT)
— STRONG BULLISH BREAKOUT
$MTL is exploding with strong bullish momentum, with buyers firmly in control following the breakout. If this strength holds, the next leg higher could offer a continuation move toward the projected targets.
📌 TRADE SETUP
🟢 Entry: $0.3150 – $0.3220
🎯 TP1: $0.3300
🎯 TP2: $0.3400
🎯 TP3: $0.3550
🛑 SL: $0.2980
📈 Market Outlook:
As long as $MTL maintains strength above the entry zone, bullish continuation remains in focus. Watch for sustained volume and clean price action confirmation after the breakout.
🚀 $MTL
— STRONG BULLISH BREAKOUT
$MTL is exploding with strong bullish momentum, with buyers firmly in control following the breakout. If this strength holds, the next leg higher could offer a continuation move toward the projected targets.
📌 TRADE SETUP
🟢 Entry: $0.3150 – $0.3220
🎯 TP1: $0.3300
🎯 TP2: $0.3400
🎯 TP3: $0.3550
🛑 SL: $0.2980
📈 Market Outlook:
As long as $MTL maintains strength above the entry zone, bullish continuation remains in focus. Watch for sustained volume and clean price action confirmation after the breakout.
— STRONG BULLISH BREAKOUT
$MTL is exploding with strong bullish momentum, with buyers firmly in control following the breakout. If this strength holds, the next leg higher could offer a continuation move toward the projected targets.
📌 TRADE SETUP
🟢 Entry: $0.3150 – $0.3220
🎯 TP1: $0.3300
🎯 TP2: $0.3400
🎯 TP3: $0.3550
🛑 SL: $0.2980
📈 Market Outlook:
As long as $MTL maintains strength above the entry zone, bullish continuation remains in focus. Watch for sustained volume and clean price action confirmation after the breakout.
1
45
ဘာသာပြန်ဆိုချက် ကြည့်မည်
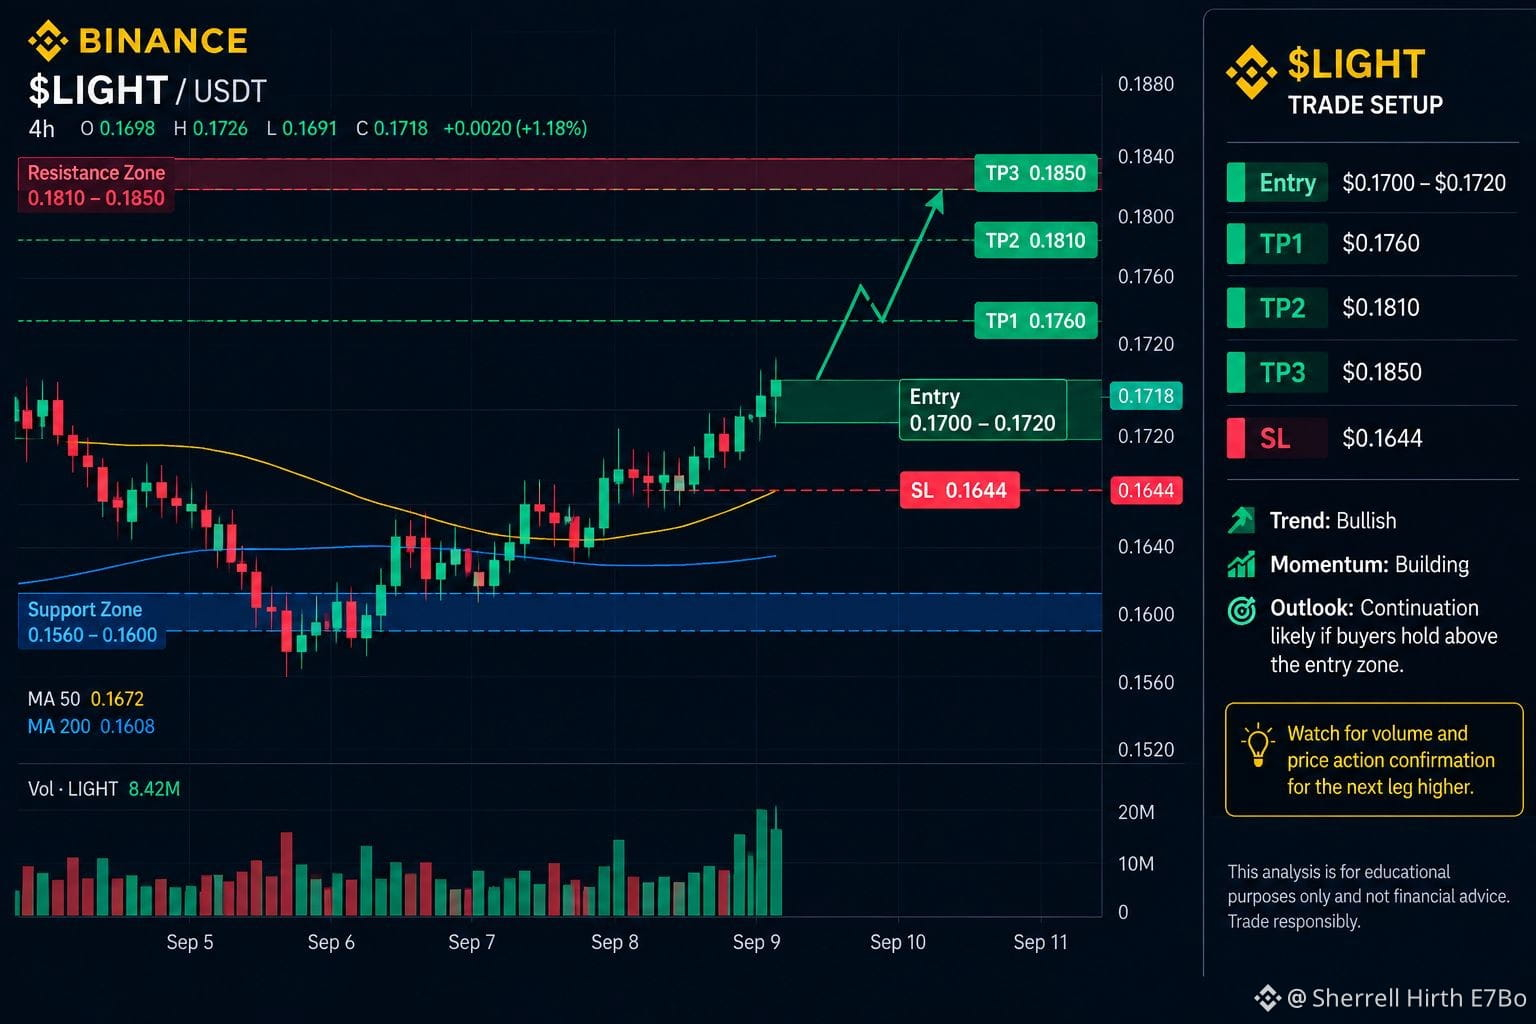
🚀 $LIGHT
{future}(LIGHTUSDT)
— BULLISH CONTINUATION SETUP
$LIGHT is showing a strong bullish recovery, with momentum building above the recent consolidation zone. Buyers are steadily pushing price higher, signaling potential for another continuation move if bullish momentum remains intact.
📌 TRADE SETUP
🟢 Entry: $0.1700 – $0.1720
🎯 TP1: $0.1760
🎯 TP2: $0.1810
🎯 TP3: $0.1850
🛑 SL: $0.1644
📈 Market Outlook:
Holding above the entry zone could keep the bullish structure intact and open the way toward the projected targets. Watch volume and price action for confirmation as $LIGHT attempts to extend higher.
🚀 $LIGHT
— BULLISH CONTINUATION SETUP
$LIGHT is showing a strong bullish recovery, with momentum building above the recent consolidation zone. Buyers are steadily pushing price higher, signaling potential for another continuation move if bullish momentum remains intact.
📌 TRADE SETUP
🟢 Entry: $0.1700 – $0.1720
🎯 TP1: $0.1760
🎯 TP2: $0.1810
🎯 TP3: $0.1850
🛑 SL: $0.1644
📈 Market Outlook:
Holding above the entry zone could keep the bullish structure intact and open the way toward the projected targets. Watch volume and price action for confirmation as $LIGHT attempts to extend higher.
— BULLISH CONTINUATION SETUP
$LIGHT is showing a strong bullish recovery, with momentum building above the recent consolidation zone. Buyers are steadily pushing price higher, signaling potential for another continuation move if bullish momentum remains intact.
📌 TRADE SETUP
🟢 Entry: $0.1700 – $0.1720
🎯 TP1: $0.1760
🎯 TP2: $0.1810
🎯 TP3: $0.1850
🛑 SL: $0.1644
📈 Market Outlook:
Holding above the entry zone could keep the bullish structure intact and open the way toward the projected targets. Watch volume and price action for confirmation as $LIGHT attempts to extend higher.
1
120
ဘာသာပြန်ဆိုချက် ကြည့်မည်
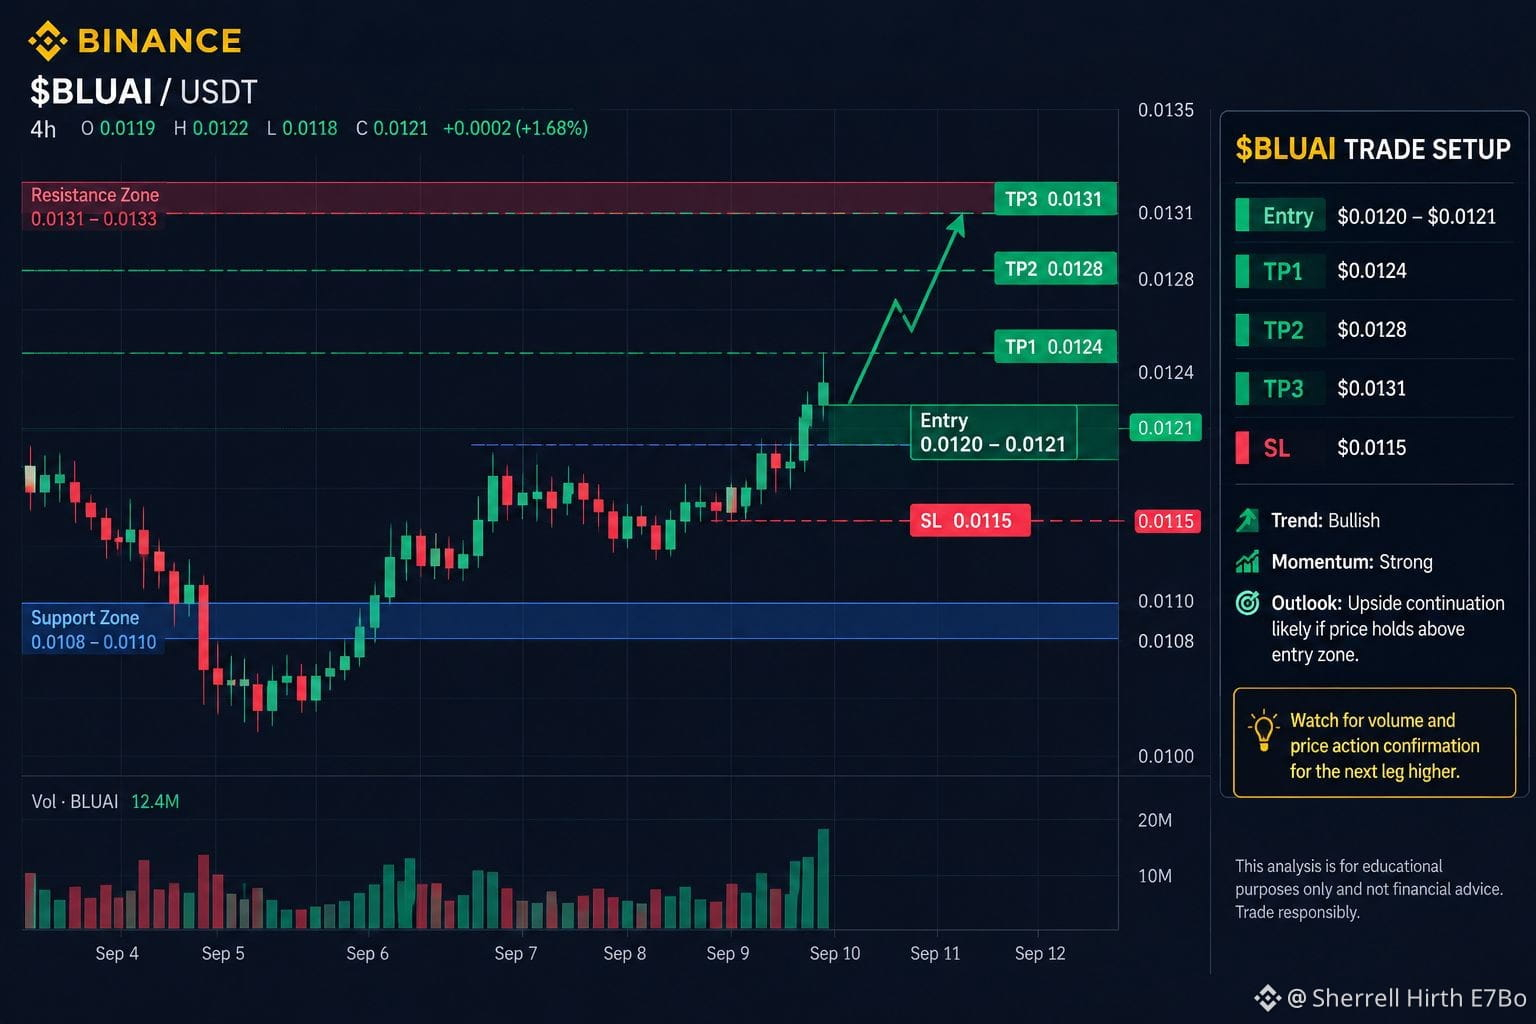
$BLUAI
{future}(BLUAIUSDT)
— BULLISH BREAKOUT SETUP
$BLUAI is breaking out with strong bullish momentum after a steady recovery. Buyers are stepping in aggressively, and the market structure is showing signs of continued upside potential.
📌 TRADE SETUP
🟢 Entry: $0.0120 – $0.0121
🎯 TP1: $0.0124
🎯 TP2: $0.0128
🎯 TP3: $0.0131
🛑 SL: $0.0115
Market Outlook:
As long as $BLUAI holds above the entry zone, bullish momentum could continue toward the projected targets. Watch volume and price action closely for confirmation of the breakout.
$BLUAI
— BULLISH BREAKOUT SETUP
$BLUAI is breaking out with strong bullish momentum after a steady recovery. Buyers are stepping in aggressively, and the market structure is showing signs of continued upside potential.
📌 TRADE SETUP
🟢 Entry: $0.0120 – $0.0121
🎯 TP1: $0.0124
🎯 TP2: $0.0128
🎯 TP3: $0.0131
🛑 SL: $0.0115
Market Outlook:
As long as $BLUAI holds above the entry zone, bullish momentum could continue toward the projected targets. Watch volume and price action closely for confirmation of the breakout.
— BULLISH BREAKOUT SETUP
$BLUAI is breaking out with strong bullish momentum after a steady recovery. Buyers are stepping in aggressively, and the market structure is showing signs of continued upside potential.
📌 TRADE SETUP
🟢 Entry: $0.0120 – $0.0121
🎯 TP1: $0.0124
🎯 TP2: $0.0128
🎯 TP3: $0.0131
🛑 SL: $0.0115
Market Outlook:
As long as $BLUAI holds above the entry zone, bullish momentum could continue toward the projected targets. Watch volume and price action closely for confirmation of the breakout.
2
66
ဘာသာပြန်ဆိုချက် ကြည့်မည်
⚠️ $ZEC
{future}(ZECUSDT)
CLEAR REJECTION — BEARS ARE BACK! 🔻
$ZEC is showing a clear rejection from the recent resistance area, with sellers stepping back in and bearish momentum building.
The SHORT setup is now active as long as price remains below the rejection zone.
📉 SHORT SETUP
🔴 Entry: $1,096.93 – $1,112.60
🎯 TP1: $1,080
🎯 TP2: $1,060
🎯 TP3: $1,040.11
🛑 SL: $1,139.70
If selling pressure continues, $ZEC could move lower toward $1,080 → $1,060 → $1,040.11.
⚠️ A move toward or above $1,139.70 invalidates the setup.
⚠️ $ZEC
CLEAR REJECTION — BEARS ARE BACK! 🔻
$ZEC is showing a clear rejection from the recent resistance area, with sellers stepping back in and bearish momentum building.
The SHORT setup is now active as long as price remains below the rejection zone.
📉 SHORT SETUP
🔴 Entry: $1,096.93 – $1,112.60
🎯 TP1: $1,080
🎯 TP2: $1,060
🎯 TP3: $1,040.11
🛑 SL: $1,139.70
If selling pressure continues, $ZEC could move lower toward $1,080 → $1,060 → $1,040.11.
⚠️ A move toward or above $1,139.70 invalidates the setup.
CLEAR REJECTION — BEARS ARE BACK! 🔻
$ZEC is showing a clear rejection from the recent resistance area, with sellers stepping back in and bearish momentum building.
The SHORT setup is now active as long as price remains below the rejection zone.
📉 SHORT SETUP
🔴 Entry: $1,096.93 – $1,112.60
🎯 TP1: $1,080
🎯 TP2: $1,060
🎯 TP3: $1,040.11
🛑 SL: $1,139.70
If selling pressure continues, $ZEC could move lower toward $1,080 → $1,060 → $1,040.11.
⚠️ A move toward or above $1,139.70 invalidates the setup.

1
49
Log in to explore more content
Join global crypto users on Binance Square
⚡️ Get latest and useful information about crypto.
💬 Trusted by the world’s largest crypto exchange.
👍 Discover real insights from verified creators.
အီးမေးလ် / ဖုန်းနံပါတ်
ရေပန်းစားနေသော ခေါင်းစဉ်များ
BitcoinHoldsAbove$77000
933 views
54 Discussing
#anthropicceocallsforaislowdown
🚨 $BTC สะสม $77K ขณะที่ตลาดจับตา BTC & ETH! 🦅
บิทคอยน์กำลังเคารพเส้นแนวโน้มในกรอบ 4 ชม. ทำให้โมเมนตัมขาขึ้นยังคงใช้งานอยู่! 🎯
📍 จุดเข้า: 76,826 – 76,500
🎯 เป้าหมาย: 76,900 ➔ 77,000 ➔ 77,300
🛑 จุดตัดขาดทุน: 76,400
⚠️ กฎเคร่งครัด: กลยุทธ์นี้ใช้ได้เท่านั้นตราบใดที่โครงสร้างสำคัญยังอยู่ หากหลุดโซน stop จะถือว่าโมฆะ
⚡ รายการเฝ้าดู:
🪙 $BTC — เคารพแนวรับทางเทคนิคสำคัญก่อนความผันผวนระดับมหภาค! 📈
🌐 $ETH — กำลังรวมตัวแน่นในโซนอุปสงค์หลัก เพื่อเตรียมเกิดการพุ่งทะลุที่อาจเกิดขึ้น! 📊
บริหารเลเวอเรจอย่างระมัดระวัง และรอให้ราคามาถึงโซนล่าที่คุณกำหนดไว้! 🛡️🧠
❓ คุณจะทำอย่างไร? จะลอง Long BTC ตรงนี้ หรือรอจังหวะเข้าที่ต่ำลง? คอมเมนต์แผนของคุณด้านล่าง! 👇
คำเตือน: ทำการวิจัยของคุณเอง (DYOR) ไม่ใช่คำแนะนำทางการเงิน
#BitcoinHoldsAbove$77000
#AvalancheIntegratesIntoUAEPassDigitalVault
#AnthropicCEOCallsForAISlowdown
#BrazilCentralBankRaisesVASPCapitalRequirements
Hifza Rubab
·နှစ်သက်မှု 0 ခု
·104 views
FedHikeOddsRiseTo89%
2,717 views
159 Discussing
BitcoinCrosses$78000
3,331 views
138 Discussing