

BlockoraX
8k ပို့စ်များ

BlockoraX
တိုင်ကြားမည်
သုံးစွဲသူကို ဘလော့မည်
Harshith | Private Crypto Trader | Precision Entries. Calculated Risk. | Capital Preservation First. | Profits Built with Discipline.🔥🔥
Open Trade
Frequent Trader
9.8 Months
498 ဖော်လိုလုပ်ထားသည်
1.4K+ ဖော်လိုလုပ်သူများ
7.7K+ လိုက်ခ်လုပ်ထားသည်
ပို့စ်များ
ပိုင်ဆိုင်မှုစာရင်း
အားလုံး
Quotes
တိုက်ရိုက်ထုတ်လွှင့်ခြင်း
·
--
တက်ရိပ်ရှိသည်
🟢🔥 $ATOM — THE ENTRY ZONE IS HERE 🚀📈
🟢 LONG SETUP
Entry: 1.713 – 1.731
SL: 1.627
🎯 TP1: 1.832
🎯 TP2: 1.938
🎯 TP3: 2.041
⚡ Scenario: $ATOM is approaching the planned entry zone. If buyers defend 1.713–1.731 and momentum starts building, the next upside levels could come into focus.
🔑 Hold the entry zone → continuation setup stays active.
❌ Lose 1.627 → bullish setup invalidated.
💎 Clean levels. Defined risk. Let price action confirm.
👉 Get In — Trade $ATOM
{future}(ATOMUSDT)
🟢🔥 $ATOM — THE ENTRY ZONE IS HERE 🚀📈
🟢 LONG SETUP
Entry: 1.713 – 1.731
SL: 1.627
🎯 TP1: 1.832
🎯 TP2: 1.938
🎯 TP3: 2.041
⚡ Scenario: $ATOM is approaching the planned entry zone. If buyers defend 1.713–1.731 and momentum starts building, the next upside levels could come into focus.
🔑 Hold the entry zone → continuation setup stays active.
❌ Lose 1.627 → bullish setup invalidated.
💎 Clean levels. Defined risk. Let price action confirm.
👉 Get In — Trade $ATOM
🟢 LONG SETUP
Entry: 1.713 – 1.731
SL: 1.627
🎯 TP1: 1.832
🎯 TP2: 1.938
🎯 TP3: 2.041
⚡ Scenario: $ATOM is approaching the planned entry zone. If buyers defend 1.713–1.731 and momentum starts building, the next upside levels could come into focus.
🔑 Hold the entry zone → continuation setup stays active.
❌ Lose 1.627 → bullish setup invalidated.
💎 Clean levels. Defined risk. Let price action confirm.
👉 Get In — Trade $ATOM
1
93
·
--
တက်ရိပ်ရှိသည်
🟢🔥 $DEXE — BUYING THE DIP AFTER A MONSTER PUMP 🚀📈
🟢 LONG SETUP
Entry: 1.99 – 2.03
SL: 1.930
🎯 TP1: 2.150
🎯 TP2: 2.260
⚡ Scenario: $DEXE is cooling off after a powerful pump, and this zone is being watched for a potential dip-buy opportunity. A healthy flush could shake out late buyers before momentum resumes.
If buyers defend 1.99–2.03 and MA support holds, another upside push could develop toward 2.15 → 2.26.
⚠️ Deep correction or continued profit-taking below key MA support could weaken the setup.
Never go all-in. Use a position size that fits your account.
👇👇 Buy $DEXE here
{future}(DEXEUSDT)
🟢🔥 $DEXE — BUYING THE DIP AFTER A MONSTER PUMP 🚀📈
🟢 LONG SETUP
Entry: 1.99 – 2.03
SL: 1.930
🎯 TP1: 2.150
🎯 TP2: 2.260
⚡ Scenario: $DEXE is cooling off after a powerful pump, and this zone is being watched for a potential dip-buy opportunity. A healthy flush could shake out late buyers before momentum resumes.
If buyers defend 1.99–2.03 and MA support holds, another upside push could develop toward 2.15 → 2.26.
⚠️ Deep correction or continued profit-taking below key MA support could weaken the setup.
Never go all-in. Use a position size that fits your account.
👇👇 Buy $DEXE here
🟢 LONG SETUP
Entry: 1.99 – 2.03
SL: 1.930
🎯 TP1: 2.150
🎯 TP2: 2.260
⚡ Scenario: $DEXE is cooling off after a powerful pump, and this zone is being watched for a potential dip-buy opportunity. A healthy flush could shake out late buyers before momentum resumes.
If buyers defend 1.99–2.03 and MA support holds, another upside push could develop toward 2.15 → 2.26.
⚠️ Deep correction or continued profit-taking below key MA support could weaken the setup.
Never go all-in. Use a position size that fits your account.
👇👇 Buy $DEXE here
1
232
·
--
တက်ရိပ်ရှိသည်
🟢🔥 $SAND — BREAKOUT MOMENTUM JUST EXPLODED 🚀📈
🟢 LONG SETUP
Entry: 0.0550 – 0.0570
SL: 0.0525
🎯 TP1: 0.0590
🎯 TP2: 0.0615
🎯 TP3: 0.0650
⚡ Scenario: $SAND has just broken out with a powerful momentum candle and is trading around 0.0577. Instead of chasing the spike, the focus is on a pullback into the entry zone.
If buyers defend 0.0550–0.0570 and momentum holds, the next upside levels come into focus. A loss of 0.0525 invalidates the setup.
🔥 Let the pullback come — don’t chase the candle.
👇 Trade $SAND here
{future}(SANDUSDT)
🟢🔥 $SAND — BREAKOUT MOMENTUM JUST EXPLODED 🚀📈
🟢 LONG SETUP
Entry: 0.0550 – 0.0570
SL: 0.0525
🎯 TP1: 0.0590
🎯 TP2: 0.0615
🎯 TP3: 0.0650
⚡ Scenario: $SAND has just broken out with a powerful momentum candle and is trading around 0.0577. Instead of chasing the spike, the focus is on a pullback into the entry zone.
If buyers defend 0.0550–0.0570 and momentum holds, the next upside levels come into focus. A loss of 0.0525 invalidates the setup.
🔥 Let the pullback come — don’t chase the candle.
👇 Trade $SAND here
🟢 LONG SETUP
Entry: 0.0550 – 0.0570
SL: 0.0525
🎯 TP1: 0.0590
🎯 TP2: 0.0615
🎯 TP3: 0.0650
⚡ Scenario: $SAND has just broken out with a powerful momentum candle and is trading around 0.0577. Instead of chasing the spike, the focus is on a pullback into the entry zone.
If buyers defend 0.0550–0.0570 and momentum holds, the next upside levels come into focus. A loss of 0.0525 invalidates the setup.
🔥 Let the pullback come — don’t chase the candle.
👇 Trade $SAND here
1
303
·
--
တက်ရိပ်ရှိသည်
🟢🔥 $CKB — ACCUMULATION ZONE IS BUILDING 🚀📈
🟢 BUY SETUP | Score: 45/100 — MEDIUM
Entry: 0.001309 – 0.001319
SL: 0.001258
🎯 TP1: 0.001362
🎯 TP2: 0.001428
🎯 TP3: 0.001513
⚡ Scenario: $CKB is tightening inside an accumulation zone while volume builds and momentum starts turning positive. If buyers break and hold above the recent consolidation high, the setup could gain momentum toward the targets.
🔑 Key level: 0.001319
Hold the entry zone → bullish continuation stays in focus.
Lose 0.001258 → setup invalidated.
⚠️ Medium signal score — avoid chasing sudden spikes and keep position size controlled.
👇 Trade $CKB here
{future}(CKBUSDT)
🟢🔥 $CKB — ACCUMULATION ZONE IS BUILDING 🚀📈
🟢 BUY SETUP | Score: 45/100 — MEDIUM
Entry: 0.001309 – 0.001319
SL: 0.001258
🎯 TP1: 0.001362
🎯 TP2: 0.001428
🎯 TP3: 0.001513
⚡ Scenario: $CKB is tightening inside an accumulation zone while volume builds and momentum starts turning positive. If buyers break and hold above the recent consolidation high, the setup could gain momentum toward the targets.
🔑 Key level: 0.001319
Hold the entry zone → bullish continuation stays in focus.
Lose 0.001258 → setup invalidated.
⚠️ Medium signal score — avoid chasing sudden spikes and keep position size controlled.
👇 Trade $CKB here
🟢 BUY SETUP | Score: 45/100 — MEDIUM
Entry: 0.001309 – 0.001319
SL: 0.001258
🎯 TP1: 0.001362
🎯 TP2: 0.001428
🎯 TP3: 0.001513
⚡ Scenario: $CKB is tightening inside an accumulation zone while volume builds and momentum starts turning positive. If buyers break and hold above the recent consolidation high, the setup could gain momentum toward the targets.
🔑 Key level: 0.001319
Hold the entry zone → bullish continuation stays in focus.
Lose 0.001258 → setup invalidated.
⚠️ Medium signal score — avoid chasing sudden spikes and keep position size controlled.
👇 Trade $CKB here
1
45
·
--
တက်ရိပ်ရှိသည်
🟢🔥 $BTC — 1H TREND LONG | BUYERS EYEING THE NEXT LEG 🚀📈
🟢 LONG SETUP
Entry: 85,785.5 – 85,880.5
SL: 84,741.6
🎯 TP1: 86,888 — 0.97R
🎯 TP2: 87,642.5 — 1.66R
🎯 TP3: 88,019.8 — 2.00R
📊 Scale Out: 20% / 30% / 50%
⚡ Scenario: BTC is holding a bullish 1H structure, keeping this zone in focus for a potential continuation. If buyers defend 85.8K and reclaim the upper range, momentum could build toward 86.9K → 87.6K → 88K.
🔑 Key level: 84,741.6
Hold the entry zone → bullish continuation stays in focus.
Lose the SL → long structure is invalidated.
👇 Trade $BTC here
{future}(BTCUSDT)
🟢🔥 $BTC — 1H TREND LONG | BUYERS EYEING THE NEXT LEG 🚀📈
🟢 LONG SETUP
Entry: 85,785.5 – 85,880.5
SL: 84,741.6
🎯 TP1: 86,888 — 0.97R
🎯 TP2: 87,642.5 — 1.66R
🎯 TP3: 88,019.8 — 2.00R
📊 Scale Out: 20% / 30% / 50%
⚡ Scenario: BTC is holding a bullish 1H structure, keeping this zone in focus for a potential continuation. If buyers defend 85.8K and reclaim the upper range, momentum could build toward 86.9K → 87.6K → 88K.
🔑 Key level: 84,741.6
Hold the entry zone → bullish continuation stays in focus.
Lose the SL → long structure is invalidated.
👇 Trade $BTC here
🟢 LONG SETUP
Entry: 85,785.5 – 85,880.5
SL: 84,741.6
🎯 TP1: 86,888 — 0.97R
🎯 TP2: 87,642.5 — 1.66R
🎯 TP3: 88,019.8 — 2.00R
📊 Scale Out: 20% / 30% / 50%
⚡ Scenario: BTC is holding a bullish 1H structure, keeping this zone in focus for a potential continuation. If buyers defend 85.8K and reclaim the upper range, momentum could build toward 86.9K → 87.6K → 88K.
🔑 Key level: 84,741.6
Hold the entry zone → bullish continuation stays in focus.
Lose the SL → long structure is invalidated.
👇 Trade $BTC here
1
50
·
--
တက်ရိပ်ရှိသည်
🚀🔥 $Q — BULLS ARE RIDING THE WAVE 📈💎
🟢 LONG SETUP
Entry: 0.019987 – 0.020188
SL: 0.019381
🎯 TP1: 0.021440
🎯 TP2: 0.022314
🎯 TP3: 0.022631
⚡ $Q is showing strength across multiple timeframes, with buyers maintaining control.
Hold the entry zone → bullish continuation remains in focus.
💎 Stay with the trend, not the noise.
👉 Trade $Q Now 👈
{future}(QUSDT)
🚀🔥 $Q — BULLS ARE RIDING THE WAVE 📈💎
🟢 LONG SETUP
Entry: 0.019987 – 0.020188
SL: 0.019381
🎯 TP1: 0.021440
🎯 TP2: 0.022314
🎯 TP3: 0.022631
⚡ $Q is showing strength across multiple timeframes, with buyers maintaining control.
Hold the entry zone → bullish continuation remains in focus.
💎 Stay with the trend, not the noise.
👉 Trade $Q Now 👈
🟢 LONG SETUP
Entry: 0.019987 – 0.020188
SL: 0.019381
🎯 TP1: 0.021440
🎯 TP2: 0.022314
🎯 TP3: 0.022631
⚡ $Q is showing strength across multiple timeframes, with buyers maintaining control.
Hold the entry zone → bullish continuation remains in focus.
💎 Stay with the trend, not the noise.
👉 Trade $Q Now 👈
2
304
·
--
တက်ရိပ်ရှိသည်
💎🔥 $KOMA — REVERSAL TRADE IS LIVE 🚀📈
🟢 LONG SETUP
Entry: 0.018487 – 0.018673
SL: 0.017901
🎯 TP1: 0.019403
🎯 TP2: 0.020182
🎯 TP3: 0.020988
⚡ $KOMA is setting up for a potential reversal move. Holding the entry zone could keep the upside targets in focus.
💎 High-conviction setup — execute with disciplined risk.
👉 Strike While Hot — Trade $KOMA Now 👈
{future}(KOMAUSDT)
💎🔥 $KOMA — REVERSAL TRADE IS LIVE 🚀📈
🟢 LONG SETUP
Entry: 0.018487 – 0.018673
SL: 0.017901
🎯 TP1: 0.019403
🎯 TP2: 0.020182
🎯 TP3: 0.020988
⚡ $KOMA is setting up for a potential reversal move. Holding the entry zone could keep the upside targets in focus.
💎 High-conviction setup — execute with disciplined risk.
👉 Strike While Hot — Trade $KOMA Now 👈
🟢 LONG SETUP
Entry: 0.018487 – 0.018673
SL: 0.017901
🎯 TP1: 0.019403
🎯 TP2: 0.020182
🎯 TP3: 0.020988
⚡ $KOMA is setting up for a potential reversal move. Holding the entry zone could keep the upside targets in focus.
💎 High-conviction setup — execute with disciplined risk.
👉 Strike While Hot — Trade $KOMA Now 👈
1
74
·
--
တက်ရိပ်ရှိသည်
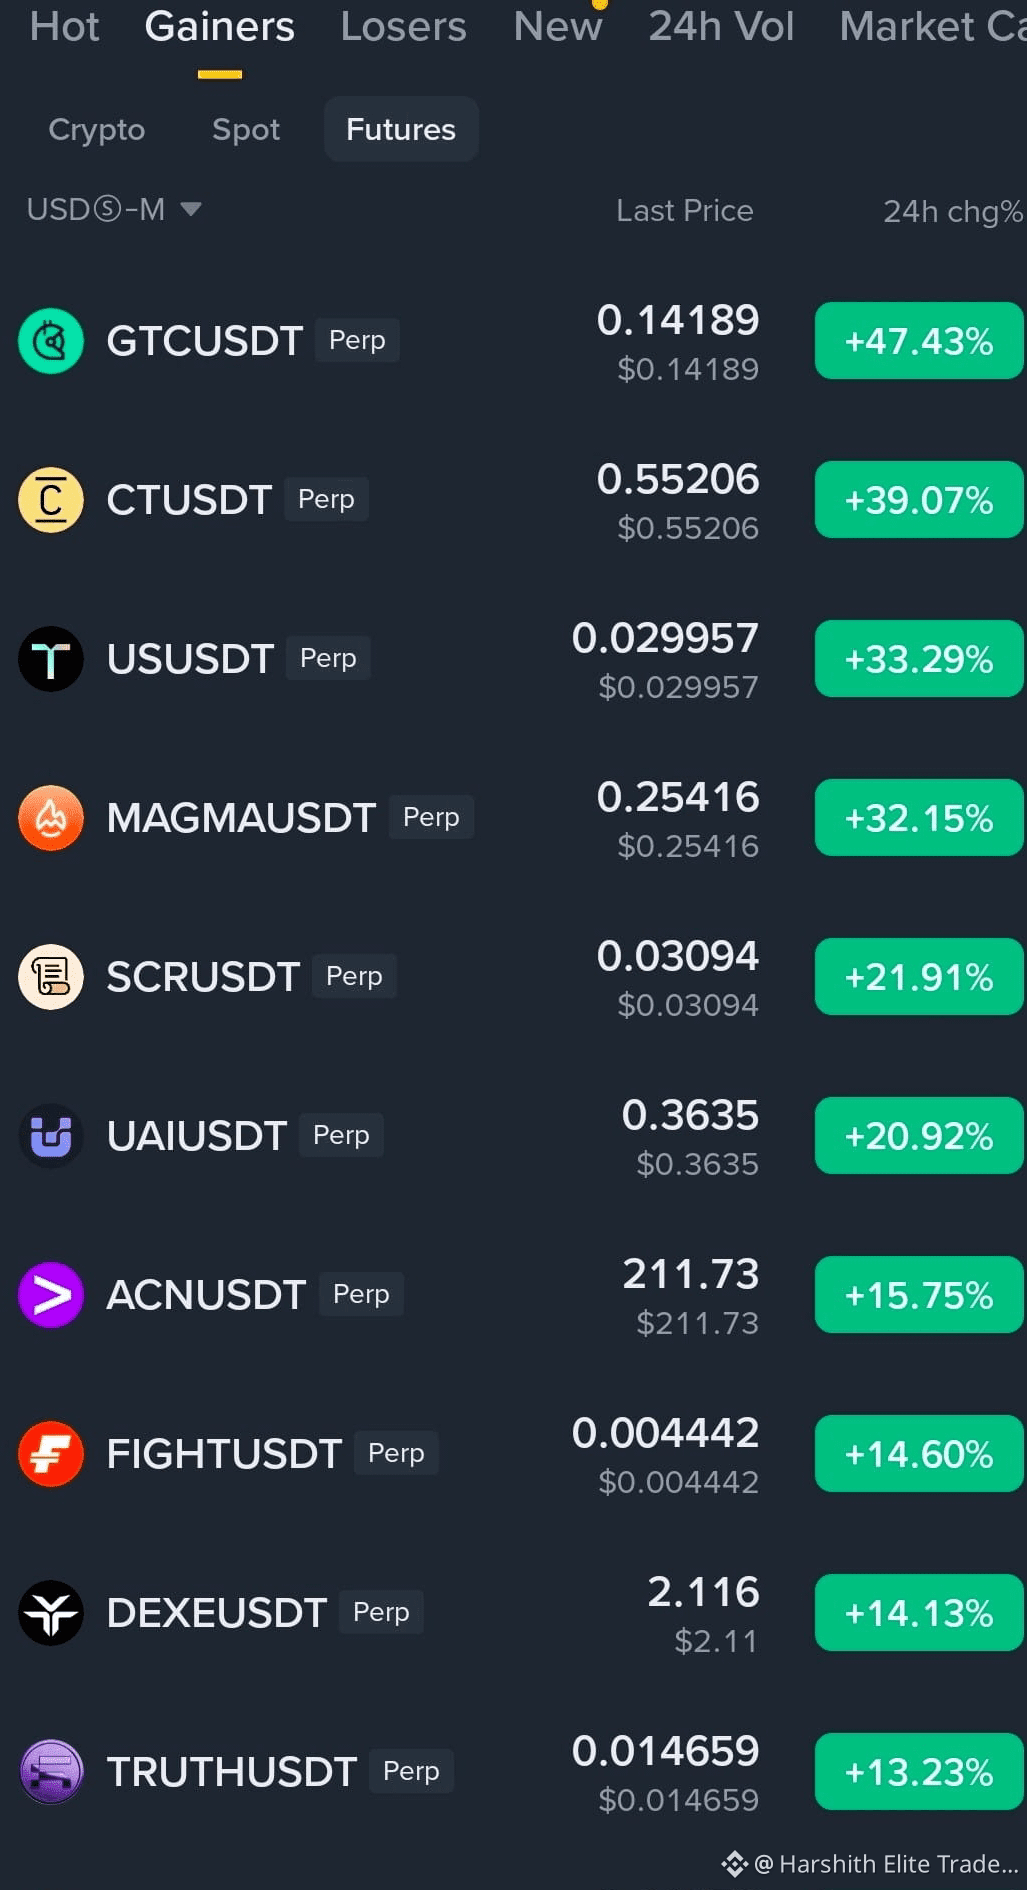
🚀🔥 TODAY’S TOP FUTURES GAINERS — MOMENTUM IS EXPLODING 📈
🔥 $GTC +47.43%
🚀 $CT +39.07%
⚡ $US +33.29%
🔥 $MAGMA +32.15%
📈 $SCR +21.91%
🚀 $UAI +20.92%
⚡ $ACN +15.75%
🔥 $FIGHT +14.60%
📈 $DEXE +14.13%
🚀 $TRUTH +13.23%
⚡ $SAND +12.00%
💹 Best approach: watch for clean pullbacks and controlled entries instead of chasing extended candles.
👀 Keep these movers on the radar — volatility is high.🔥
{future}(GTCUSDT)
{future}(CTUSDT)
{future}(UAIUSDT)
🚀🔥 TODAY’S TOP FUTURES GAINERS — MOMENTUM IS EXPLODING 📈
🔥 $GTC +47.43%
🚀 $CT +39.07%
⚡ $US +33.29%
🔥 $MAGMA +32.15%
📈 $SCR +21.91%
🚀 $UAI +20.92%
⚡ $ACN +15.75%
🔥 $FIGHT +14.60%
📈 $DEXE +14.13%
🚀 $TRUTH +13.23%
⚡ $SAND +12.00%
💹 Best approach: watch for clean pullbacks and controlled entries instead of chasing extended candles.
👀 Keep these movers on the radar — volatility is high.🔥
🔥 $GTC +47.43%
🚀 $CT +39.07%
⚡ $US +33.29%
🔥 $MAGMA +32.15%
📈 $SCR +21.91%
🚀 $UAI +20.92%
⚡ $ACN +15.75%
🔥 $FIGHT +14.60%
📈 $DEXE +14.13%
🚀 $TRUTH +13.23%
⚡ $SAND +12.00%
💹 Best approach: watch for clean pullbacks and controlled entries instead of chasing extended candles.
👀 Keep these movers on the radar — volatility is high.🔥
1
957
·
--
တက်ရိပ်ရှိသည်
🟢🔥 $SOXL — 1H LONG SETUP | BUYERS ON WATCH 📈
🟢 LONG SETUP
Entry: 155.58 – 155.93
SL: 155.05
🎯 TP1: 156.58 — 1.19R
🎯 TP2: 157.28 — 2.19R
🎯 TP3: 157.62 — 2.67R
📊 Scale Out: 20% / 30% / 50%
The trend is pausing, putting this zone on watch for a potential continuation move.
⚡ Key level: 155.58–155.93
Hold the zone → upside targets remain in focus.
Lose 155.05 → setup invalidated.
👇 Trade $SOXL here
{future}(SOXLUSDT)
🟢🔥 $SOXL — 1H LONG SETUP | BUYERS ON WATCH 📈
🟢 LONG SETUP
Entry: 155.58 – 155.93
SL: 155.05
🎯 TP1: 156.58 — 1.19R
🎯 TP2: 157.28 — 2.19R
🎯 TP3: 157.62 — 2.67R
📊 Scale Out: 20% / 30% / 50%
The trend is pausing, putting this zone on watch for a potential continuation move.
⚡ Key level: 155.58–155.93
Hold the zone → upside targets remain in focus.
Lose 155.05 → setup invalidated.
👇 Trade $SOXL here
🟢 LONG SETUP
Entry: 155.58 – 155.93
SL: 155.05
🎯 TP1: 156.58 — 1.19R
🎯 TP2: 157.28 — 2.19R
🎯 TP3: 157.62 — 2.67R
📊 Scale Out: 20% / 30% / 50%
The trend is pausing, putting this zone on watch for a potential continuation move.
⚡ Key level: 155.58–155.93
Hold the zone → upside targets remain in focus.
Lose 155.05 → setup invalidated.
👇 Trade $SOXL here
1
312
·
--
တက်ရိပ်ရှိသည်
🟢🔥 $SHIB — ACCUMULATION ZONE IS ACTIVE 📈
🟢 BUY SETUP | Score: 21/100 — LOW
Entry: 0.000006
TP1: 0.000006
TP2: 0.000006
TP3: 0.000007
SL: 0.000006
$SHIB is entering an accumulation zone with rising 24H volume and improving momentum.
⚡ MACD is turning bullish, RSI is climbing above the neutral zone, and short-term moving averages are converging with a potential golden-cross signal.
Key trigger: a clean breakout above resistance could strengthen the upside setup. A pullback into the accumulation zone may offer another entry opportunity.
⚠️ Low signal score — keep position size controlled and avoid chasing.
👇 Trade $SHIB here
{spot}(SHIBUSDT)
🟢🔥 $SHIB — ACCUMULATION ZONE IS ACTIVE 📈
🟢 BUY SETUP | Score: 21/100 — LOW
Entry: 0.000006
TP1: 0.000006
TP2: 0.000006
TP3: 0.000007
SL: 0.000006
$SHIB is entering an accumulation zone with rising 24H volume and improving momentum.
⚡ MACD is turning bullish, RSI is climbing above the neutral zone, and short-term moving averages are converging with a potential golden-cross signal.
Key trigger: a clean breakout above resistance could strengthen the upside setup. A pullback into the accumulation zone may offer another entry opportunity.
⚠️ Low signal score — keep position size controlled and avoid chasing.
👇 Trade $SHIB here
🟢 BUY SETUP | Score: 21/100 — LOW
Entry: 0.000006
TP1: 0.000006
TP2: 0.000006
TP3: 0.000007
SL: 0.000006
$SHIB is entering an accumulation zone with rising 24H volume and improving momentum.
⚡ MACD is turning bullish, RSI is climbing above the neutral zone, and short-term moving averages are converging with a potential golden-cross signal.
Key trigger: a clean breakout above resistance could strengthen the upside setup. A pullback into the accumulation zone may offer another entry opportunity.
⚠️ Low signal score — keep position size controlled and avoid chasing.
👇 Trade $SHIB here
2
60
·
--
ကျရိပ်ရှိသည်
🚨🔥 $龙虾 — 900K USDT GONE IN ONE ORDER?! 😳💥
One position reportedly worth around 900,000 USDT — more than 6 million RMB — was wiped out in a single order.
That kind of liquidation is a brutal reminder of how quickly leveraged futures can move against a position. ⚠️
$龙虾 USDT Perp is clearly showing extreme volatility right now.
❌ Don’t copy huge positions.
❌ Don’t go all-in trying to “win it back.”
⚡ One trade can change everything when leverage gets aggressive.
Stay sharp. Protect your capital.
$龙虾 👀🔥
{future}(龙虾USDT)
🚨🔥 $龙虾 — 900K USDT GONE IN ONE ORDER?! 😳💥
One position reportedly worth around 900,000 USDT — more than 6 million RMB — was wiped out in a single order.
That kind of liquidation is a brutal reminder of how quickly leveraged futures can move against a position. ⚠️
$龙虾 USDT Perp is clearly showing extreme volatility right now.
❌ Don’t copy huge positions.
❌ Don’t go all-in trying to “win it back.”
⚡ One trade can change everything when leverage gets aggressive.
Stay sharp. Protect your capital.
$龙虾 👀🔥
One position reportedly worth around 900,000 USDT — more than 6 million RMB — was wiped out in a single order.
That kind of liquidation is a brutal reminder of how quickly leveraged futures can move against a position. ⚠️
$龙虾 USDT Perp is clearly showing extreme volatility right now.
❌ Don’t copy huge positions.
❌ Don’t go all-in trying to “win it back.”
⚡ One trade can change everything when leverage gets aggressive.
Stay sharp. Protect your capital.
$龙虾 👀🔥
1
1.1k
·
--
ကျရိပ်ရှိသည်
🔴🔥 $XRP — BIG SHORT SETUP IS BACK 📉
🔻 SHORT SETUP
Entry: Current Market Price
TP: 1.43
SL: 1.55
$XRP is back on the short radar. Watching for downside continuation from the current zone, with $1.55 as the key invalidation level.
⚡ If sellers stay in control, $1.43 comes into focus.
👇👇 Click Here To SHORT $XRP
{future}(XRPUSDT)
🔴🔥 $XRP — BIG SHORT SETUP IS BACK 📉
🔻 SHORT SETUP
Entry: Current Market Price
TP: 1.43
SL: 1.55
$XRP is back on the short radar. Watching for downside continuation from the current zone, with $1.55 as the key invalidation level.
⚡ If sellers stay in control, $1.43 comes into focus.
👇👇 Click Here To SHORT $XRP
🔻 SHORT SETUP
Entry: Current Market Price
TP: 1.43
SL: 1.55
$XRP is back on the short radar. Watching for downside continuation from the current zone, with $1.55 as the key invalidation level.
⚡ If sellers stay in control, $1.43 comes into focus.
👇👇 Click Here To SHORT $XRP
1
39
·
--
တက်ရိပ်ရှိသည်
🟢🔥 $TIA — BULLS ARE PRESSING THE BREAKOUT ZONE 🚀📈
🟢 LONG SETUP
Entry: 0.4590 – 0.4613
TP1: 0.4850
TP2: 0.5050
SL: 0.4452
⚡ $TIA bulls are squeezing shorts near the highs, with 0.465 acting as the key breakout level.
A clean push above 0.465 could open the way toward the targets. But with RSI overbought and rejection wicks around 0.4655, a deeper 15M pullback remains possible.
⚠️ Never go all-in. Use a position size that fits your account.
🟢 Long bias here. 👇👇👇
🚀 Trade $TIA here
{future}(TIAUSDT)
🟢🔥 $TIA — BULLS ARE PRESSING THE BREAKOUT ZONE 🚀📈
🟢 LONG SETUP
Entry: 0.4590 – 0.4613
TP1: 0.4850
TP2: 0.5050
SL: 0.4452
⚡ $TIA bulls are squeezing shorts near the highs, with 0.465 acting as the key breakout level.
A clean push above 0.465 could open the way toward the targets. But with RSI overbought and rejection wicks around 0.4655, a deeper 15M pullback remains possible.
⚠️ Never go all-in. Use a position size that fits your account.
🟢 Long bias here. 👇👇👇
🚀 Trade $TIA here
🟢 LONG SETUP
Entry: 0.4590 – 0.4613
TP1: 0.4850
TP2: 0.5050
SL: 0.4452
⚡ $TIA bulls are squeezing shorts near the highs, with 0.465 acting as the key breakout level.
A clean push above 0.465 could open the way toward the targets. But with RSI overbought and rejection wicks around 0.4655, a deeper 15M pullback remains possible.
⚠️ Never go all-in. Use a position size that fits your account.
🟢 Long bias here. 👇👇👇
🚀 Trade $TIA here
1
253
·
--
တက်ရိပ်ရှိသည်
🚀🔥 $CT — BOOOOOMMM! ALL TPs HIT 🎯💥
$CT delivered the move beautifully! 🔥
Another setup completed successfully with all targets achieved. 🎉🤝
🎯 TP1: 0.6345 ✅
🎯 TP2: 0.7000 ✅📈🔥
🥳 CONGRATS TO EVERYONE WHO CAUGHT THE MOVE!
🚀 $CT — WHAT’S NEXT? 👀
{future}(CTUSDT)
🚀🔥 $CT — BOOOOOMMM! ALL TPs HIT 🎯💥
$CT delivered the move beautifully! 🔥
Another setup completed successfully with all targets achieved. 🎉🤝
🎯 TP1: 0.6345 ✅
🎯 TP2: 0.7000 ✅📈🔥
🥳 CONGRATS TO EVERYONE WHO CAUGHT THE MOVE!
🚀 $CT — WHAT’S NEXT? 👀
$CT delivered the move beautifully! 🔥
Another setup completed successfully with all targets achieved. 🎉🤝
🎯 TP1: 0.6345 ✅
🎯 TP2: 0.7000 ✅📈🔥
🥳 CONGRATS TO EVERYONE WHO CAUGHT THE MOVE!
🚀 $CT — WHAT’S NEXT? 👀
1
181
·
--
တက်ရိပ်ရှိသည်
🚨🔥 $BTC — $86K DECISION ZONE IS HERE 📈👀
🔹 RESISTANCE: $86,880 → $87K
🔹 SUPPORT: $85K → $84K
$BTC just pushed strongly higher and tapped $86,880. Now price is cooling off and consolidating around the $86K area.
⚡ Key scenario:
Hold above $85K → buyers could attempt another push toward $86,880–$87K.
Lose $85K → deeper pullback toward $84K–$83K could come into focus.
For now, the key question is simple: can $BTC turn $86K into support, or does it need more time to cool off?
👀 Watch the reaction around $85K–$86K closely.
NFA — Manage your risk.
{future}(BTCUSDT)
🚨🔥 $BTC — $86K DECISION ZONE IS HERE 📈👀
🔹 RESISTANCE: $86,880 → $87K
🔹 SUPPORT: $85K → $84K
$BTC just pushed strongly higher and tapped $86,880. Now price is cooling off and consolidating around the $86K area.
⚡ Key scenario:
Hold above $85K → buyers could attempt another push toward $86,880–$87K.
Lose $85K → deeper pullback toward $84K–$83K could come into focus.
For now, the key question is simple: can $BTC turn $86K into support, or does it need more time to cool off?
👀 Watch the reaction around $85K–$86K closely.
NFA — Manage your risk.
🔹 RESISTANCE: $86,880 → $87K
🔹 SUPPORT: $85K → $84K
$BTC just pushed strongly higher and tapped $86,880. Now price is cooling off and consolidating around the $86K area.
⚡ Key scenario:
Hold above $85K → buyers could attempt another push toward $86,880–$87K.
Lose $85K → deeper pullback toward $84K–$83K could come into focus.
For now, the key question is simple: can $BTC turn $86K into support, or does it need more time to cool off?
👀 Watch the reaction around $85K–$86K closely.
NFA — Manage your risk.
1
79
·
--
တက်ရိပ်ရှိသည်
🚀🔥 $ETC — THE NEXT MOVE COULD BE LOADING 📈
Big-cap crypto has been making moves one after another, and now $ETC is starting to attract attention.
🟢 ETC MOMENTUM WATCH
If buyers step in with volume and momentum follows through, could potentially join the next rotation higher.
💥 I’m watching closely and actively trading the setup as momentum develops.
No chasing — let price action confirm the move.
👇 Keep $ETC on your radar 👀🔥
{future}(ETCUSDT)
🚀🔥 $ETC — THE NEXT MOVE COULD BE LOADING 📈
Big-cap crypto has been making moves one after another, and now $ETC is starting to attract attention.
🟢 ETC MOMENTUM WATCH
If buyers step in with volume and momentum follows through, could potentially join the next rotation higher.
💥 I’m watching closely and actively trading the setup as momentum develops.
No chasing — let price action confirm the move.
👇 Keep $ETC on your radar 👀🔥
Big-cap crypto has been making moves one after another, and now $ETC is starting to attract attention.
🟢 ETC MOMENTUM WATCH
If buyers step in with volume and momentum follows through, could potentially join the next rotation higher.
💥 I’m watching closely and actively trading the setup as momentum develops.
No chasing — let price action confirm the move.
👇 Keep $ETC on your radar 👀🔥
1
104
·
--
ကျရိပ်ရှိသည်
🔴🔥 $1000000BOB — BREAKDOWN MODE, DOWNSIDE IN FOCUS 📉
🔻 SHORT SETUP
Entry: 0.0135 – 0.0138
TP1: 0.01262
TP2: 0.01172
TP3: 0.01108
SL: 0.0147
$1000000BOB has already broken down sharply, with price around 0.01351 (-22.88%). If sellers maintain control below 0.0138, further downside could remain in focus.
⚡ Key level: 0.0138
Below it → bearish momentum stays active.
Reclaim above it → short setup weakens.
👇 Trade $1000000BOB here
{future}(1000000BOBUSDT)
🔴🔥 $1000000BOB — BREAKDOWN MODE, DOWNSIDE IN FOCUS 📉
🔻 SHORT SETUP
Entry: 0.0135 – 0.0138
TP1: 0.01262
TP2: 0.01172
TP3: 0.01108
SL: 0.0147
$1000000BOB has already broken down sharply, with price around 0.01351 (-22.88%). If sellers maintain control below 0.0138, further downside could remain in focus.
⚡ Key level: 0.0138
Below it → bearish momentum stays active.
Reclaim above it → short setup weakens.
👇 Trade $1000000BOB here
🔻 SHORT SETUP
Entry: 0.0135 – 0.0138
TP1: 0.01262
TP2: 0.01172
TP3: 0.01108
SL: 0.0147
$1000000BOB has already broken down sharply, with price around 0.01351 (-22.88%). If sellers maintain control below 0.0138, further downside could remain in focus.
⚡ Key level: 0.0138
Below it → bearish momentum stays active.
Reclaim above it → short setup weakens.
👇 Trade $1000000BOB here
1
428
·
--
တက်ရိပ်ရှိသည်
🟢🔥 $SKHYNIX — DIP BUYERS ARE BACK 📈🚀
🟢 LONG SETUP
Entry: 1,304.75 – 1,311.31
TP1: 1,371.29
TP2: 1,421.90
SL: 1,265.61
⚡ Funding is heavily pressuring shorts, creating potential fuel for a sharp relief squeeze if buyers defend the entry zone.
🔑 Key level: 1,304
Hold support → upside continuation stays in focus.
Lose 1,304 → trend continuation risk increases.
Never go all-in. Use a position size that fits your account.
👇👇 Ride the upside — Trade $SKHYNIX
{future}(SKHYNIXUSDT)
🟢🔥 $SKHYNIX — DIP BUYERS ARE BACK 📈🚀
🟢 LONG SETUP
Entry: 1,304.75 – 1,311.31
TP1: 1,371.29
TP2: 1,421.90
SL: 1,265.61
⚡ Funding is heavily pressuring shorts, creating potential fuel for a sharp relief squeeze if buyers defend the entry zone.
🔑 Key level: 1,304
Hold support → upside continuation stays in focus.
Lose 1,304 → trend continuation risk increases.
Never go all-in. Use a position size that fits your account.
👇👇 Ride the upside — Trade $SKHYNIX
🟢 LONG SETUP
Entry: 1,304.75 – 1,311.31
TP1: 1,371.29
TP2: 1,421.90
SL: 1,265.61
⚡ Funding is heavily pressuring shorts, creating potential fuel for a sharp relief squeeze if buyers defend the entry zone.
🔑 Key level: 1,304
Hold support → upside continuation stays in focus.
Lose 1,304 → trend continuation risk increases.
Never go all-in. Use a position size that fits your account.
👇👇 Ride the upside — Trade $SKHYNIX
1
22
·
--
တက်ရိပ်ရှိသည်
🚀🔥 $ALICE — WONDERLAND RALLY IS JUST GETTING STARTED? 📈
🟢 LONG SETUP
Entry: 0.2114 – 0.2162
TP1: 0.2450
TP2: 0.2700
SL: 0.2008
$ALICE is moving parabolic with aggressive buying pressure. If momentum holds, the next upside levels could come into focus.
⚠️ RSI is extremely overbought, so a sharp pullback remains possible. Don’t chase the candle.
Never go all-in. Use a position size that fits your account.
👇 Trade $ALICE here
{future}(ALICEUSDT)
🚀🔥 $ALICE — WONDERLAND RALLY IS JUST GETTING STARTED? 📈
🟢 LONG SETUP
Entry: 0.2114 – 0.2162
TP1: 0.2450
TP2: 0.2700
SL: 0.2008
$ALICE is moving parabolic with aggressive buying pressure. If momentum holds, the next upside levels could come into focus.
⚠️ RSI is extremely overbought, so a sharp pullback remains possible. Don’t chase the candle.
Never go all-in. Use a position size that fits your account.
👇 Trade $ALICE here
🟢 LONG SETUP
Entry: 0.2114 – 0.2162
TP1: 0.2450
TP2: 0.2700
SL: 0.2008
$ALICE is moving parabolic with aggressive buying pressure. If momentum holds, the next upside levels could come into focus.
⚠️ RSI is extremely overbought, so a sharp pullback remains possible. Don’t chase the candle.
Never go all-in. Use a position size that fits your account.
👇 Trade $ALICE here
1
195
·
--
တက်ရိပ်ရှိသည်
🟢 $SOON — LONG SETUP 🚀📈
Entry: 0.420 – 0.430
TP1: 0.455
TP2: 0.490
TP3: 0.545
SL: 0.396
⚡ Support Zone: 0.40
Sharp move ke baad $SOON 0.40 ke around stabilize kar raha hai. Agar support hold hota hai aur buyers momentum regain karte hain, 0.455 → 0.490 → 0.545 recovery targets open ho sakte hain.
❌ 0.40 ke neeche strong breakdown = setup invalid.
👇 Trade $SOON here
{future}(SOONUSDT)
🟢 $SOON — LONG SETUP 🚀📈
Entry: 0.420 – 0.430
TP1: 0.455
TP2: 0.490
TP3: 0.545
SL: 0.396
⚡ Support Zone: 0.40
Sharp move ke baad $SOON 0.40 ke around stabilize kar raha hai. Agar support hold hota hai aur buyers momentum regain karte hain, 0.455 → 0.490 → 0.545 recovery targets open ho sakte hain.
❌ 0.40 ke neeche strong breakdown = setup invalid.
👇 Trade $SOON here
Entry: 0.420 – 0.430
TP1: 0.455
TP2: 0.490
TP3: 0.545
SL: 0.396
⚡ Support Zone: 0.40
Sharp move ke baad $SOON 0.40 ke around stabilize kar raha hai. Agar support hold hota hai aur buyers momentum regain karte hain, 0.455 → 0.490 → 0.545 recovery targets open ho sakte hain.
❌ 0.40 ke neeche strong breakdown = setup invalid.
👇 Trade $SOON here
1
53
Log in to explore more content
Join global crypto users on Binance Square
⚡️ Get latest and useful information about crypto.
💬 Trusted by the world’s largest crypto exchange.
👍 Discover real insights from verified creators.
အီးမေးလ် / ဖုန်းနံပါတ်
ရေပန်းစားနေသော ခေါင်းစဉ်များ
NFPWatch
10.5M views
17,332 Discussing
Crypto News | Bitcoin Rises Toward $85K as Treasury Yields Fall Ahead of U.S. NFP Report
Binance News
·နှစ်သက်မှု 22 ခု
·27.5k views
ZcashFalls21%FromSeptemberPeak
8 views
19 Discussing
XRPPostsFirstThreeGreenMonthsInQ3
4,189 views
129 Discussing