

C Queen
39.6k ပို့စ်များ

C Queen
 Square Verified+
တိုင်ကြားမည်
သုံးစွဲသူကို ဘလော့မည်
Full time trader_analyst_Your trusted sources for real_time Crypto trading (Twitter X .. (C_Queen55)
151 ဖော်လိုလုပ်ထားသည်
36.9K+ ဖော်လိုလုပ်သူများ
77.0K+ လိုက်ခ်လုပ်ထားသည်
ပို့စ်များ
အားလုံး
Quotes
တိုက်ရိုက်ထုတ်လွှင့်ခြင်း
ပုံသေထားသည်
·
--
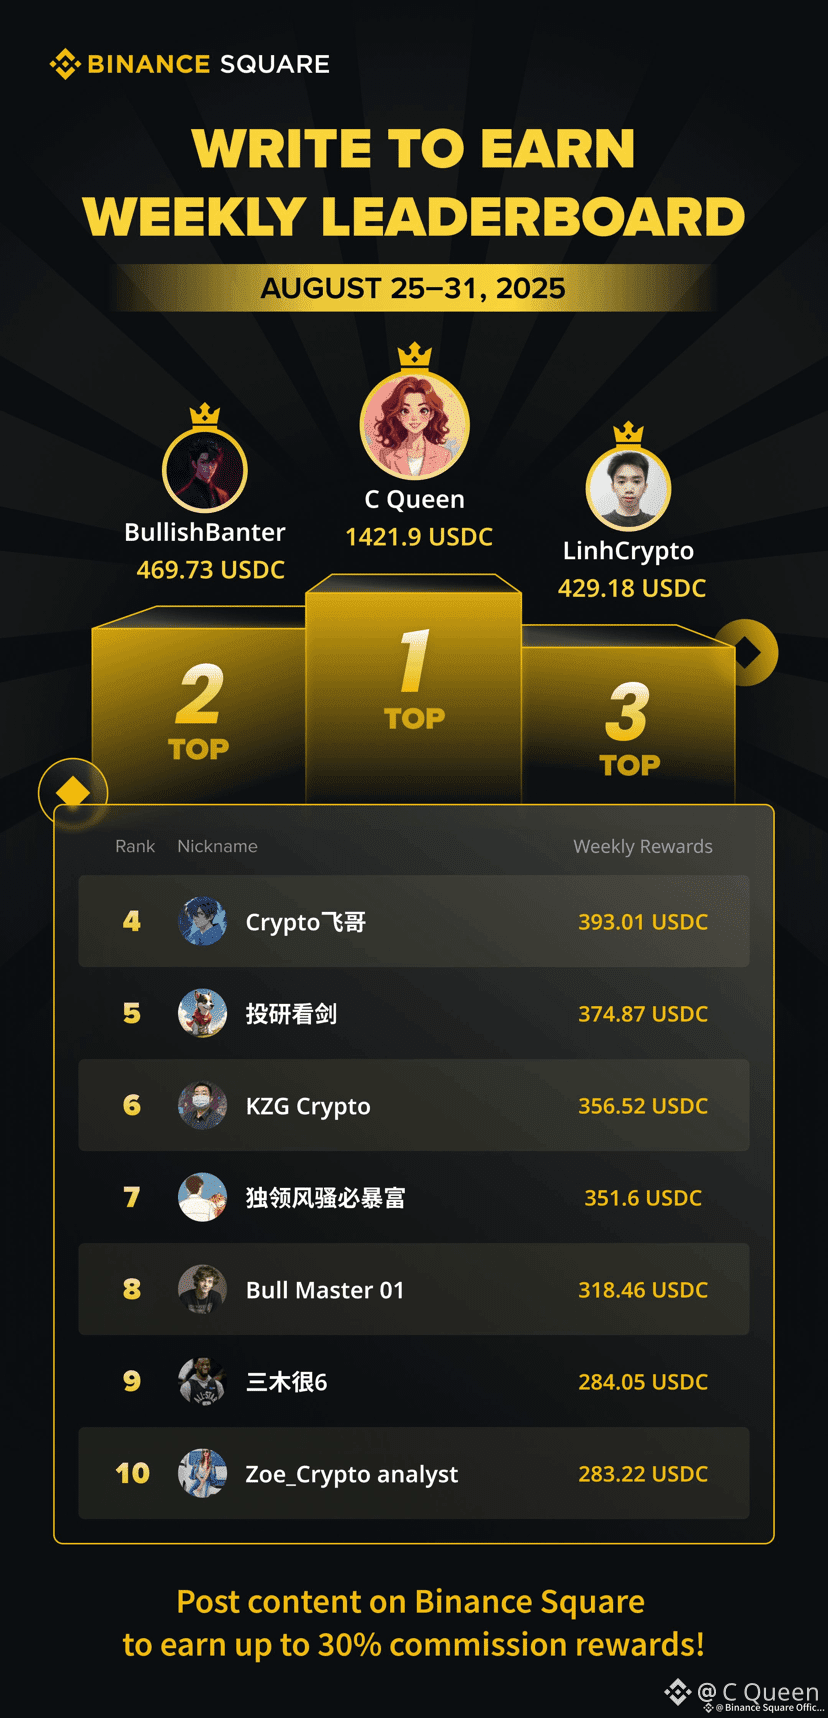
I’m truly grateful to the Binance family❤️❤️
Hitting #1 on the Binance Square Write to Earn Weekly Leaderboard is not just my win — it’s our win.
Your support, engagement, and trust made this possible.
Every like, every comment, every share means everything to me.
This journey proves one thing:
Consistency + Strategy + Community = Results
To everyone grinding daily — keep going.
Your moment is coming.
Let’s grow together, earn together, and dominate together on Binance Square.
Thank you for being part of this journey.
I’m truly grateful to the Binance family❤️❤️
Hitting #1 on the Binance Square Write to Earn Weekly Leaderboard is not just my win — it’s our win.
Your support, engagement, and trust made this possible.
Every like, every comment, every share means everything to me.
This journey proves one thing:
Consistency + Strategy + Community = Results
To everyone grinding daily — keep going.
Your moment is coming.
Let’s grow together, earn together, and dominate together on Binance Square.
Thank you for being part of this journey.
Hitting #1 on the Binance Square Write to Earn Weekly Leaderboard is not just my win — it’s our win.
Your support, engagement, and trust made this possible.
Every like, every comment, every share means everything to me.
This journey proves one thing:
Consistency + Strategy + Community = Results
To everyone grinding daily — keep going.
Your moment is coming.
Let’s grow together, earn together, and dominate together on Binance Square.
Thank you for being part of this journey.
17
1
67
219
·
--
တက်ရိပ်ရှိသည်
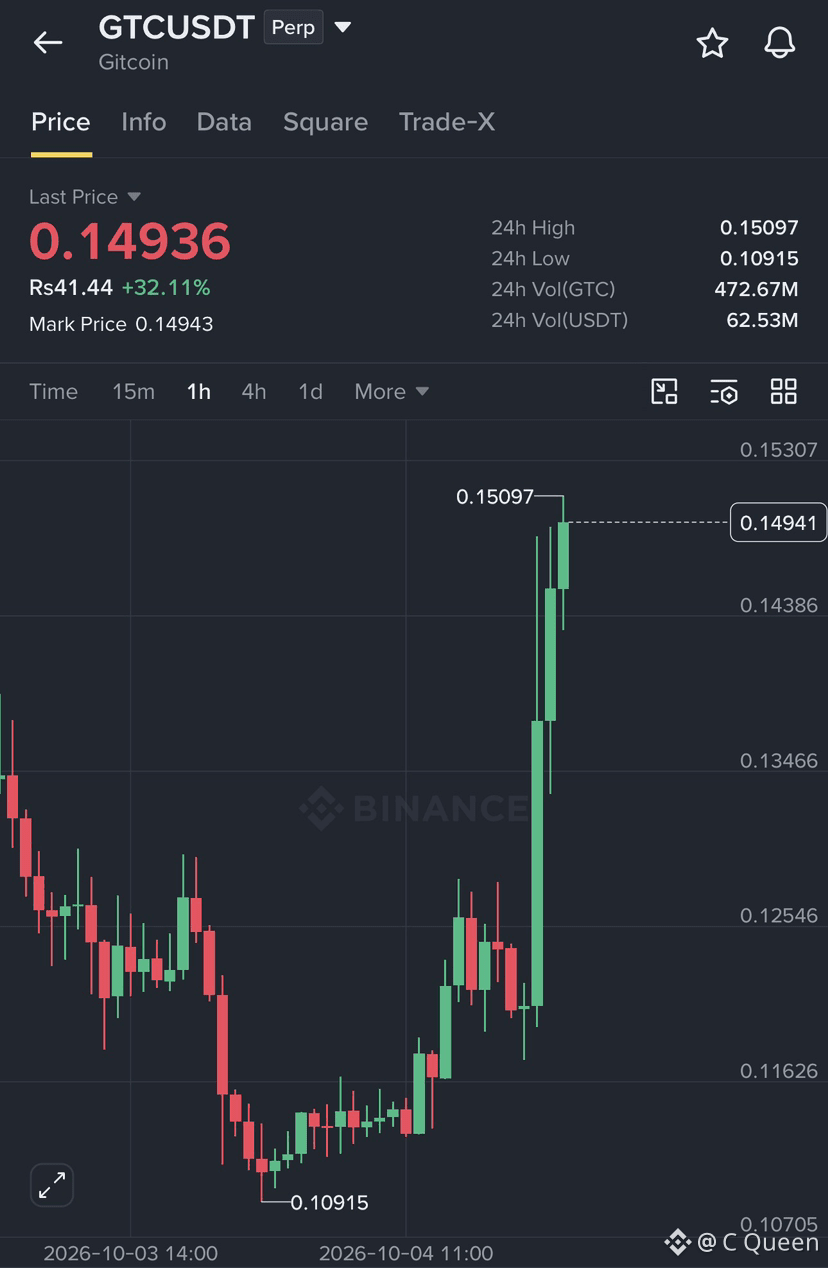
Guys, $GTC is showing strong bullish momentum after a 32% pump..!! 🔥 Price is trading near $0.14936, with $0.15097 as the key resistance. A clean breakout could open the way for higher levels.
🎯 TP1: $0.1550
🎯 TP2: $0.1620
💰 Take Profit: $0.1700
{future}(GTCUSDT)
Guys, $GTC is showing strong bullish momentum after a 32% pump..!! 🔥 Price is trading near $0.14936, with $0.15097 as the key resistance. A clean breakout could open the way for higher levels.
🎯 TP1: $0.1550
🎯 TP2: $0.1620
💰 Take Profit: $0.1700
🎯 TP1: $0.1550
🎯 TP2: $0.1620
💰 Take Profit: $0.1700
1
2
398
·
--
တက်ရိပ်ရှိသည်
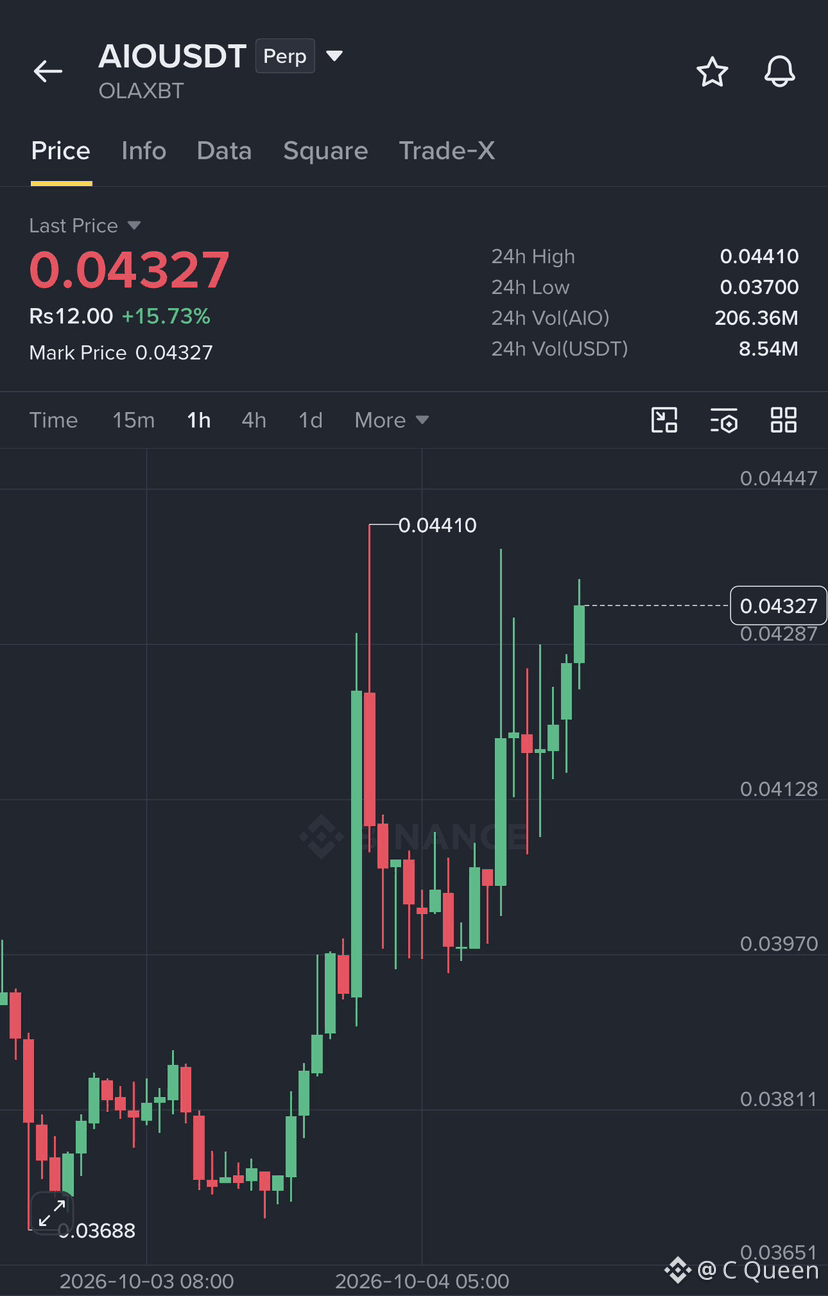
Guys, $AIO is showing some strong bullish momentum!! 🚀 $AIO is trading at $0.04327, up 15.73%. Buyers are pushing the price higher, and holding above $0.04410 could open the door for another move. TP1: $0.04600 | TP2: $0.04900 🎯 Take Profit: $0.05200. Let’s watch this one closely, Binance family!!
{future}(AIOUSDT)
Guys, $AIO is showing some strong bullish momentum!! 🚀 $AIO is trading at $0.04327, up 15.73%. Buyers are pushing the price higher, and holding above $0.04410 could open the door for another move. TP1: $0.04600 | TP2: $0.04900 🎯 Take Profit: $0.05200. Let’s watch this one closely, Binance family!!
1
435
·
--
တက်ရိပ်ရှိသည်
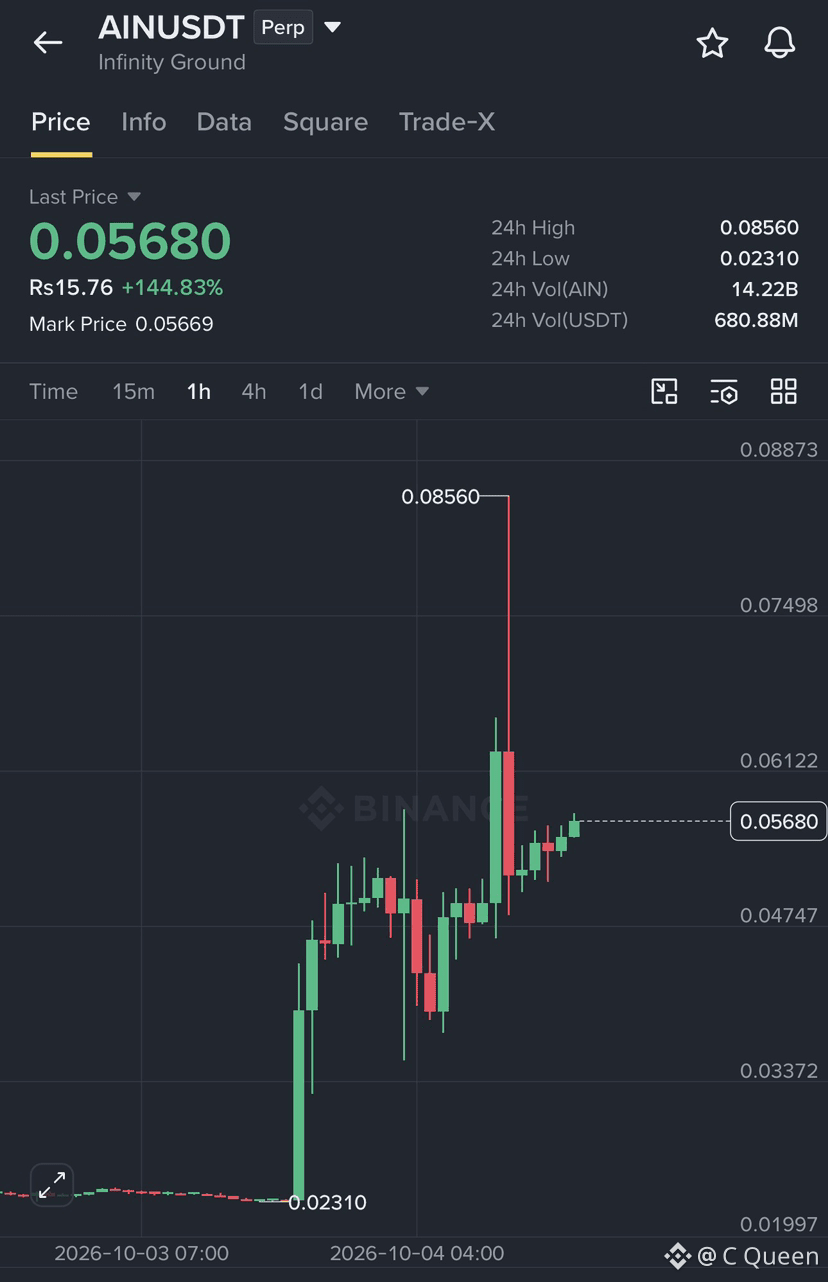
Guys, $AIN is making a massive move…!! 🚀 $AIN is up nearly 145%, showing strong bullish momentum. Price is now around $0.05680 after a sharp rally. Watch $0.06122 as the next resistance. A breakout could push towards TP1 $0.07498 and TP2 $0.08560. 🎯 Take Profit: $0.08560. Stay focused, Binance family…!!
{future}(AINUSDT)
Guys, $AIN is making a massive move…!! 🚀 $AIN is up nearly 145%, showing strong bullish momentum. Price is now around $0.05680 after a sharp rally. Watch $0.06122 as the next resistance. A breakout could push towards TP1 $0.07498 and TP2 $0.08560. 🎯 Take Profit: $0.08560. Stay focused, Binance family…!!
2
541
·
--
တက်ရိပ်ရှိသည်
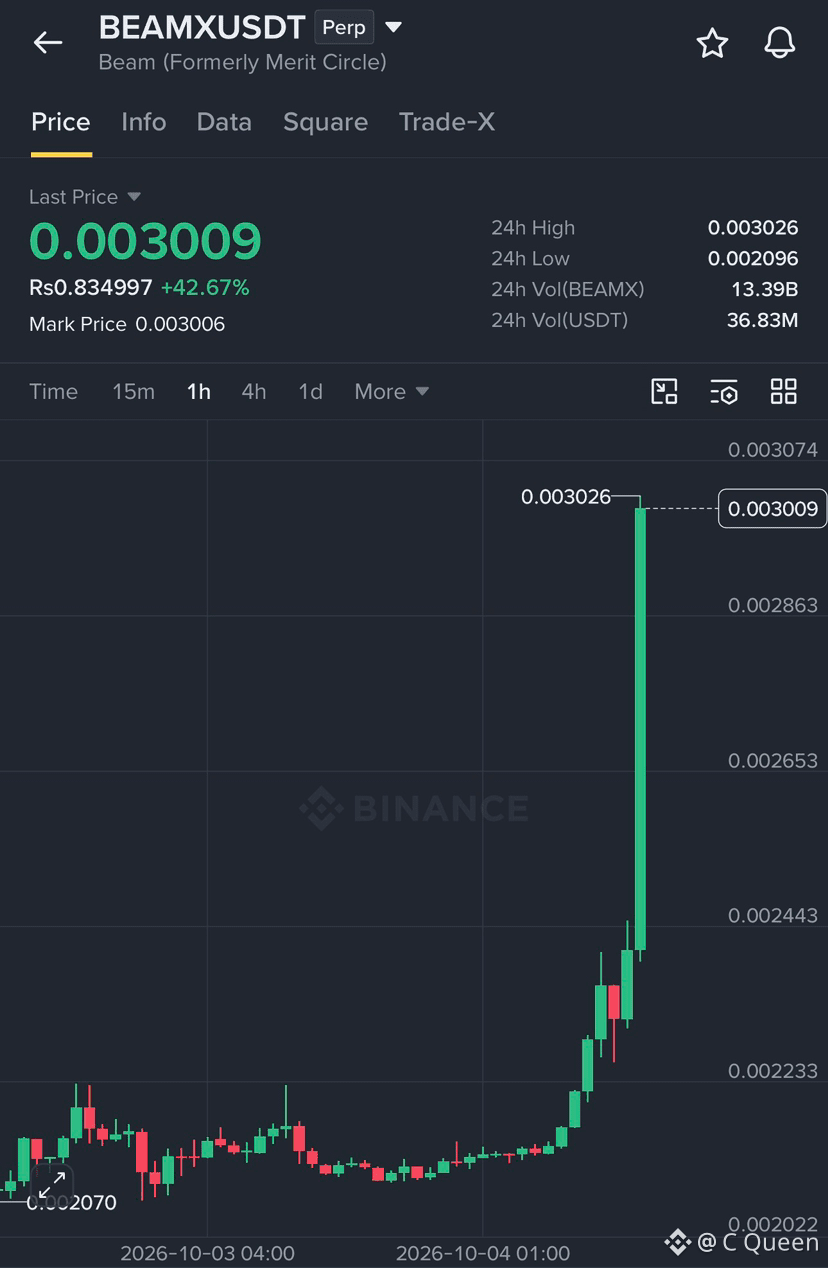
Guys, $BEAMX is moving fast…!! 🚀 $BEAMX just made a powerful bullish breakout, jumping +42.67% with strong momentum. Buyers are clearly active, and I’m watching the next resistance levels closely.
🎯 TP1: $0.003026
🎯 TP2: $0.003074
💰 Take Profit: $0.003074
If momentum continues, $BEAMX could surprise everyone!
{future}(BEAMXUSDT)
Guys, $BEAMX is moving fast…!! 🚀 $BEAMX just made a powerful bullish breakout, jumping +42.67% with strong momentum. Buyers are clearly active, and I’m watching the next resistance levels closely.
🎯 TP1: $0.003026
🎯 TP2: $0.003074
💰 Take Profit: $0.003074
If momentum continues, $BEAMX could surprise everyone!
🎯 TP1: $0.003026
🎯 TP2: $0.003074
💰 Take Profit: $0.003074
If momentum continues, $BEAMX could surprise everyone!
1
4
860
·
--
တက်ရိပ်ရှိသည်
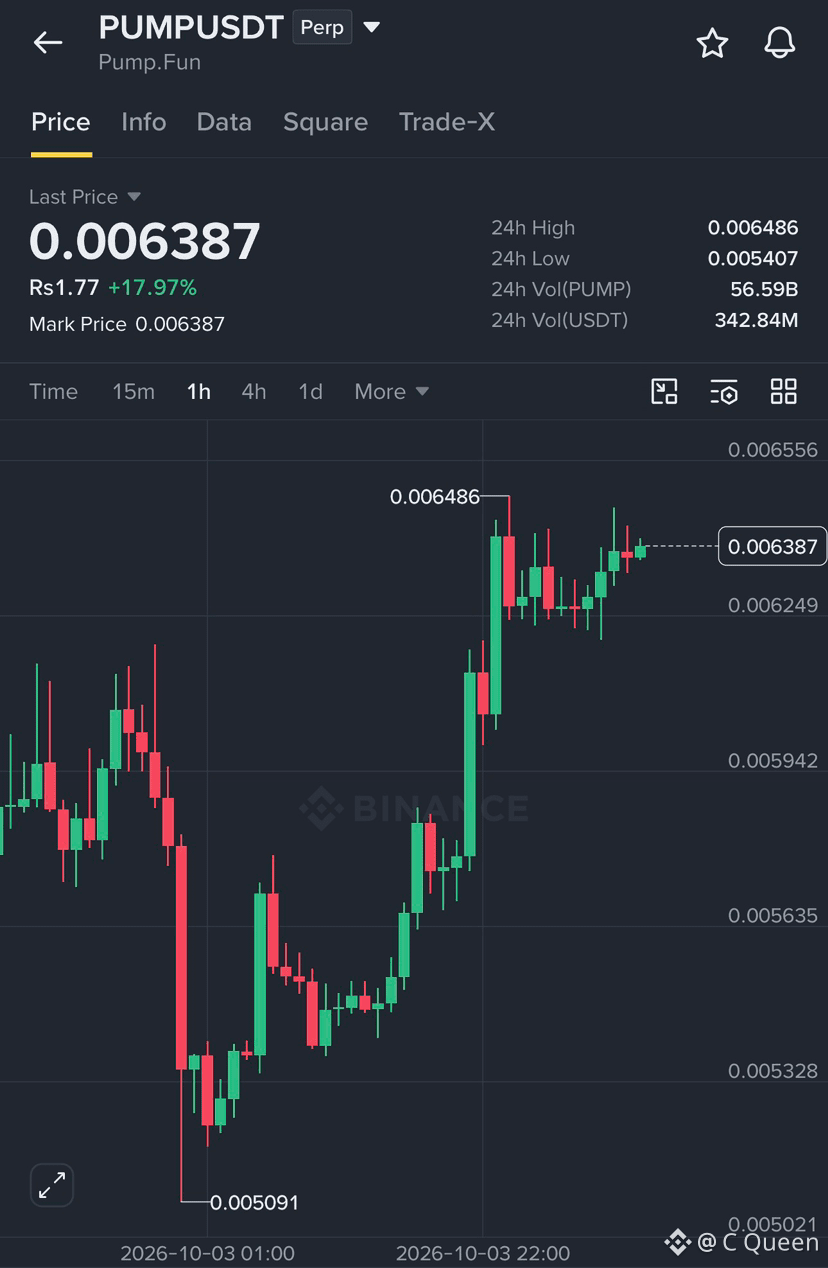
$PUMP — Bulls are trying to push higher! 👀 Price is holding around 0.006387 after a strong recovery. The key resistance is 0.006486. A breakout above this level could bring another bullish move.
🎯 TP1: 0.00655
🎯 TP2: 0.00670
💰 Take Profit: Scale out at both targets.
{future}(PUMPUSDT)
$PUMP — Bulls are trying to push higher! 👀 Price is holding around 0.006387 after a strong recovery. The key resistance is 0.006486. A breakout above this level could bring another bullish move.
🎯 TP1: 0.00655
🎯 TP2: 0.00670
💰 Take Profit: Scale out at both targets.
🎯 TP1: 0.00655
🎯 TP2: 0.00670
💰 Take Profit: Scale out at both targets.
1
245
·
--
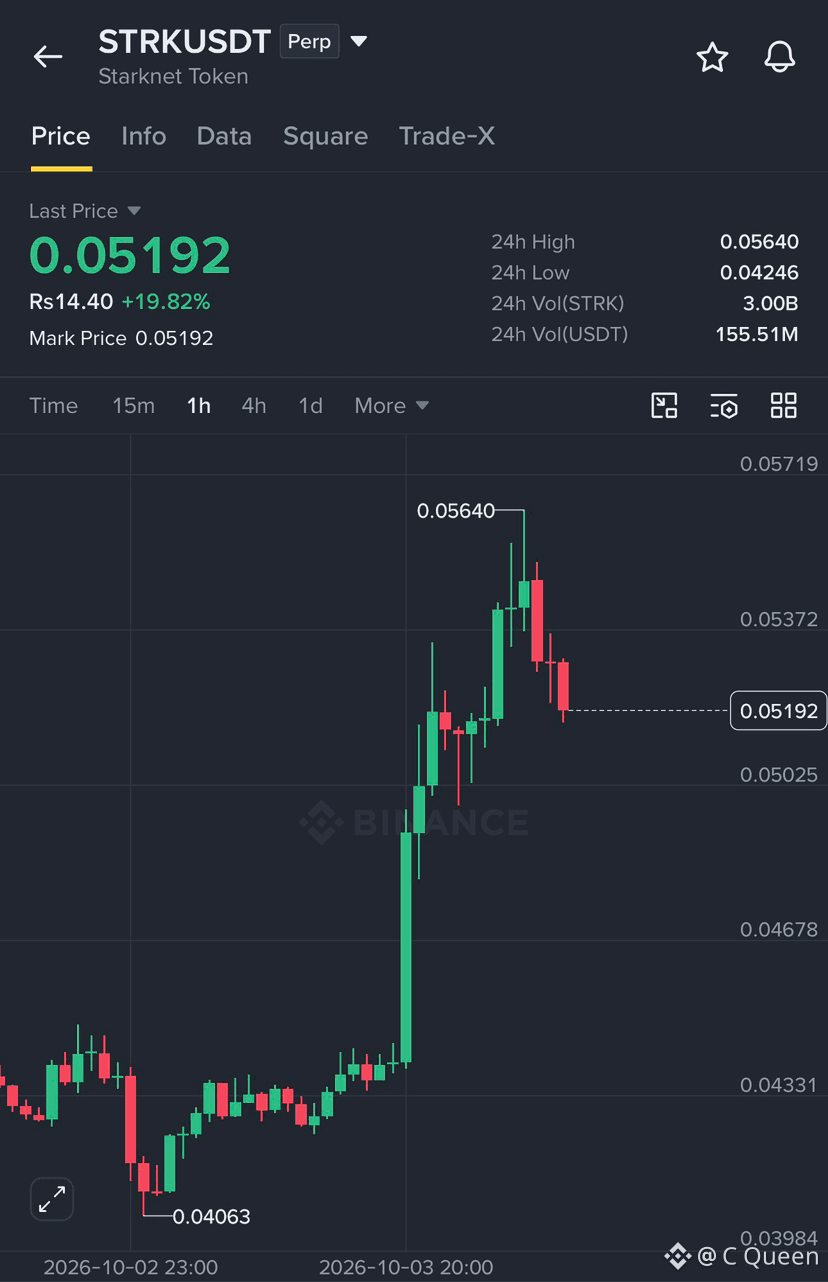
$STRK is waking up, guys! 🔥 Price made a strong move from $0.043 and touched $0.05640, but now taking a breather around $0.05192. I’m watching $0.05025 closely. If buyers step in here, $0.05400 and $0.05640 could be next. Let’s see if bulls can take control again! �
{future}(STRKUSDT)
$STRK is waking up, guys! 🔥 Price made a strong move from $0.043 and touched $0.05640, but now taking a breather around $0.05192. I’m watching $0.05025 closely. If buyers step in here, $0.05400 and $0.05640 could be next. Let’s see if bulls can take control again! �
4
617
·
--
တက်ရိပ်ရှိသည်
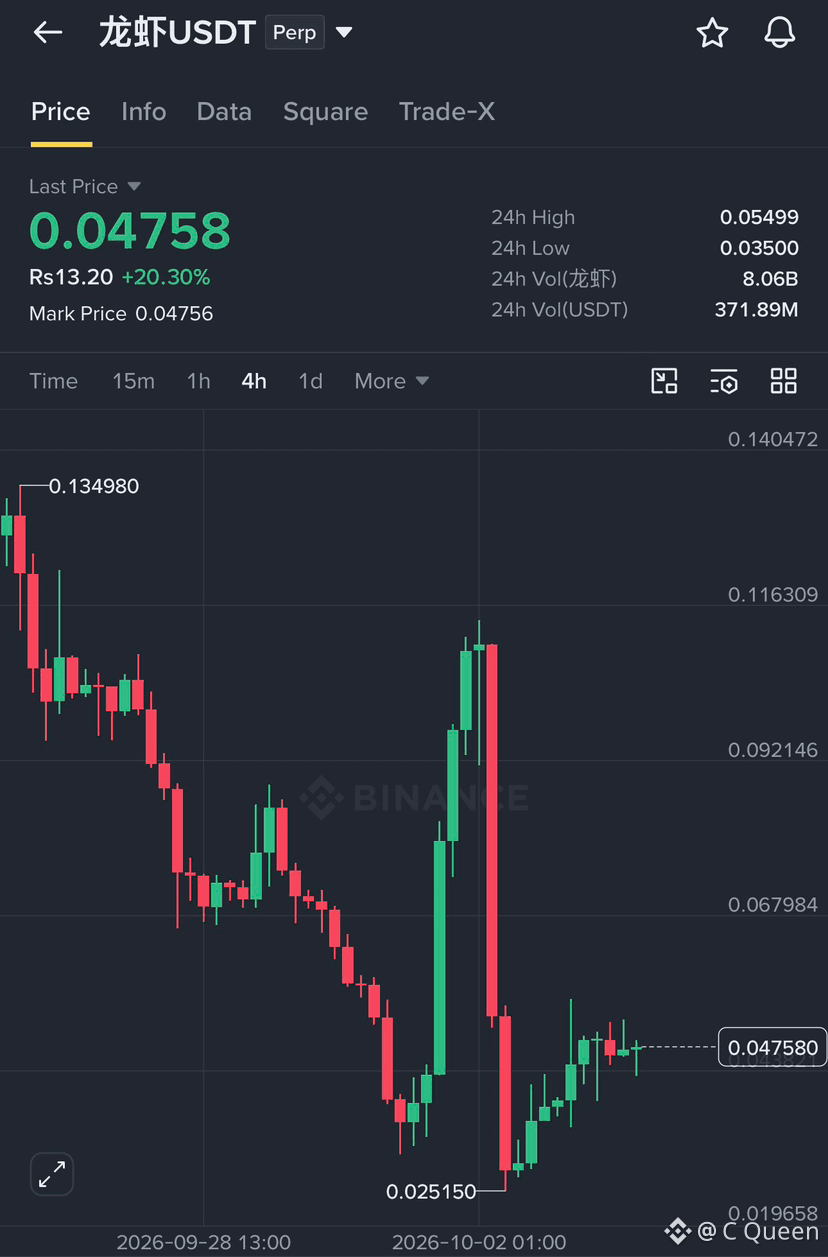
$龙虾 USDT🚀 Recovery is getting interesting, guys! After a sharp drop to $0.02515, price has bounced back strongly and is now trading around $0.04758. Buyers are trying to build momentum again. A breakout above $0.05000 could open the door toward $0.05499 and $0.06000. Watch the $0.04200 support closely. If buyers hold this zone, another bullish move could be coming. �
{future}(龙虾USDT)
$龙虾 USDT🚀 Recovery is getting interesting, guys! After a sharp drop to $0.02515, price has bounced back strongly and is now trading around $0.04758. Buyers are trying to build momentum again. A breakout above $0.05000 could open the door toward $0.05499 and $0.06000. Watch the $0.04200 support closely. If buyers hold this zone, another bullish move could be coming. �
1
2
1.1k
·
--
တက်ရိပ်ရှိသည်
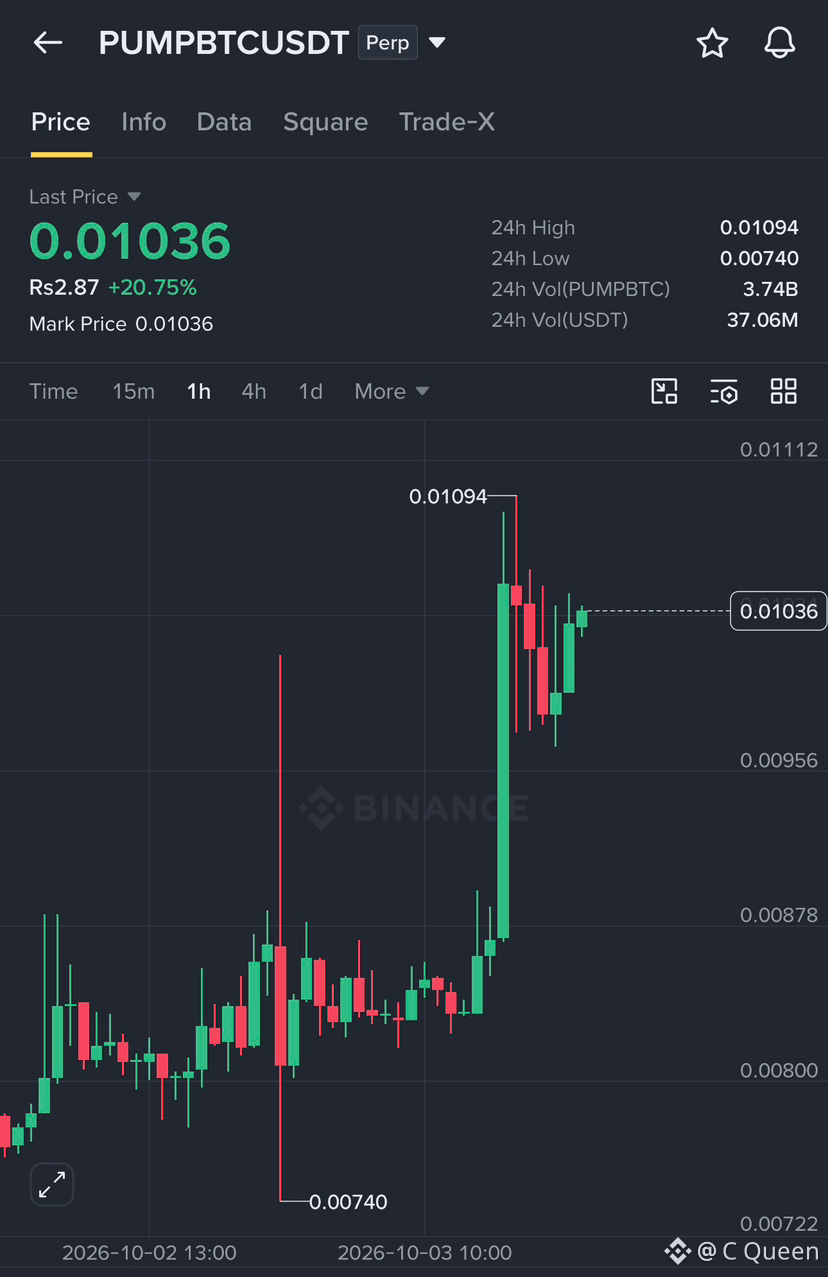
🚀 $PUMPBTC — Bulls Are Back in Action!
Guys, $PUMPBTC is showing strong bullish momentum, currently trading at 0.01036 (+20.75%). Buyers are stepping in with strength, and the price is approaching a major resistance zone at 0.01094. A clean breakout could open the door for another upward move.
🎯 TP1: 0.01150
🎯 TP2: 0.01220
🛑 SL: 0.00970
{future}(PUMPBTCUSDT)
🚀 $PUMPBTC — Bulls Are Back in Action!
Guys, $PUMPBTC is showing strong bullish momentum, currently trading at 0.01036 (+20.75%). Buyers are stepping in with strength, and the price is approaching a major resistance zone at 0.01094. A clean breakout could open the door for another upward move.
🎯 TP1: 0.01150
🎯 TP2: 0.01220
🛑 SL: 0.00970
Guys, $PUMPBTC is showing strong bullish momentum, currently trading at 0.01036 (+20.75%). Buyers are stepping in with strength, and the price is approaching a major resistance zone at 0.01094. A clean breakout could open the door for another upward move.
🎯 TP1: 0.01150
🎯 TP2: 0.01220
🛑 SL: 0.00970
1
3
668
·
--
တက်ရိပ်ရှိသည်
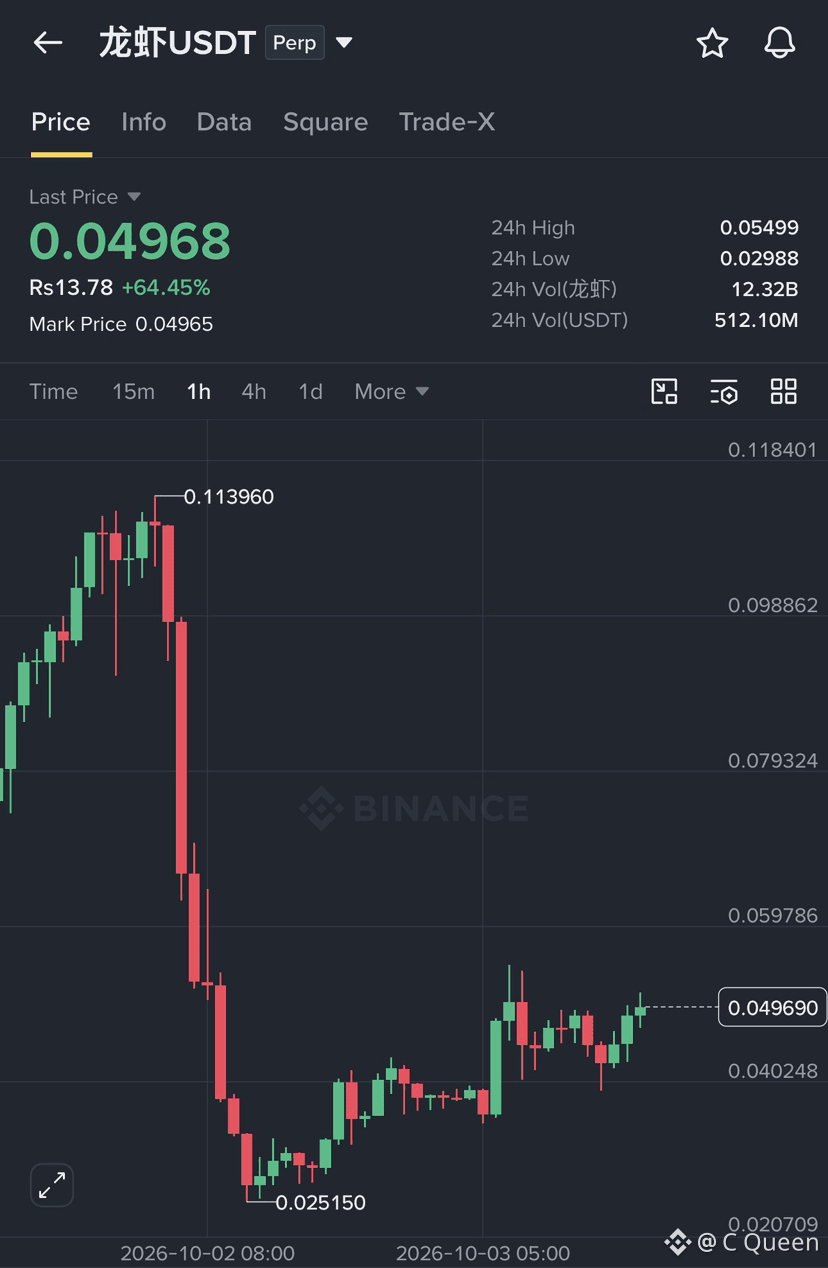
Guys, $龙虾 is showing a strong recovery! Price is trading around 0.04968 USDT, up 64.45%, with massive volume of 512M USDT. Bulls are pushing hard after the recent drop. Watch 0.05499 as the key resistance. A breakout could open the way toward TP1: 0.05978 and TP2: 0.07932. But losing 0.04024 may weaken the recovery. Let’s see if buyers can keep this momentum alive! �
{future}(龙虾USDT)
Guys, $龙虾 is showing a strong recovery! Price is trading around 0.04968 USDT, up 64.45%, with massive volume of 512M USDT. Bulls are pushing hard after the recent drop. Watch 0.05499 as the key resistance. A breakout could open the way toward TP1: 0.05978 and TP2: 0.07932. But losing 0.04024 may weaken the recovery. Let’s see if buyers can keep this momentum alive! �
1
3
1.1k
·
--
တက်ရိပ်ရှိသည်
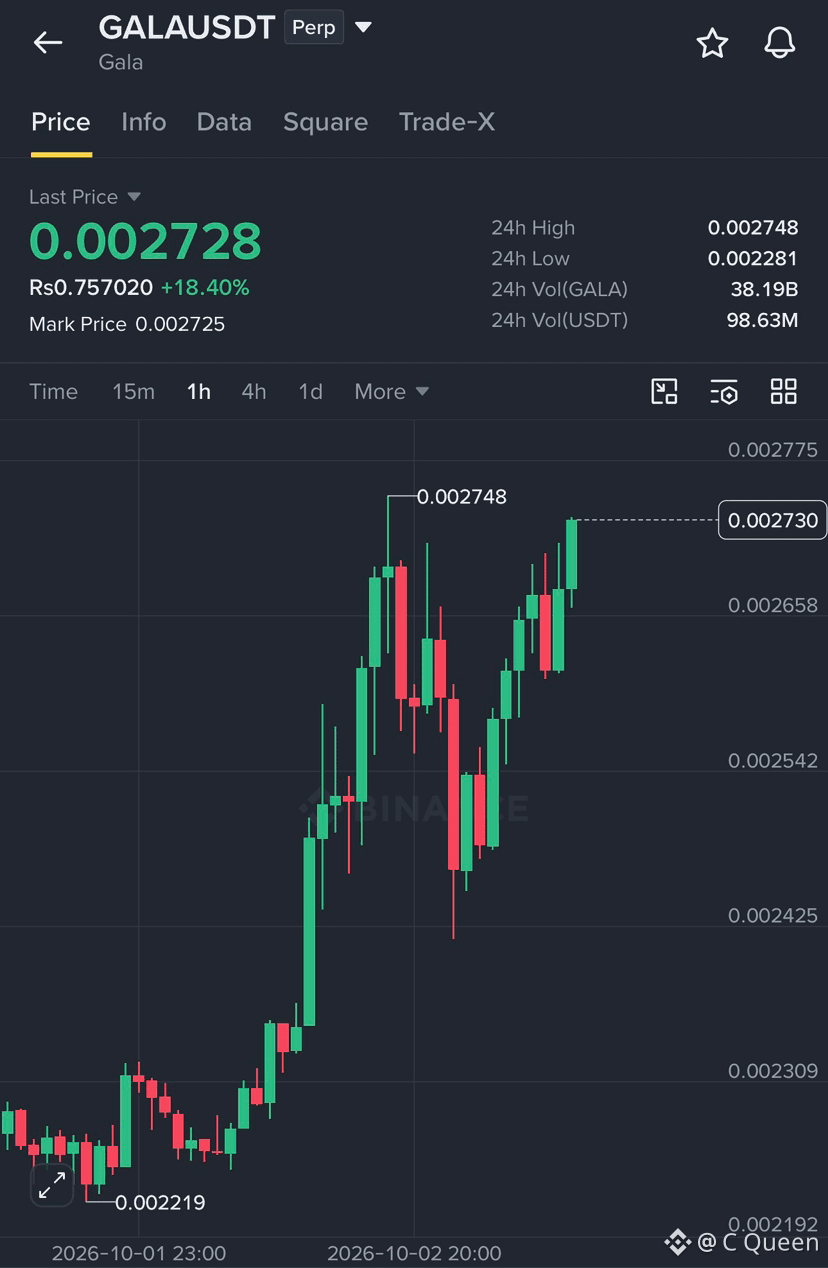
🚀 $GALA is showing strong bullish momentum, guys! Price is holding near $0.002730 after a solid recovery. Bulls are pushing toward the $0.002748 resistance, and a breakout could open the way for another move up.
🎯 TP1: $0.00280
🎯 TP2: $0.00290
💰 Take profit partially at each target.
Support: $0.002658
Keep an eye on the breakout, guys! �
{future}(GALAUSDT)
🚀 $GALA is showing strong bullish momentum, guys! Price is holding near $0.002730 after a solid recovery. Bulls are pushing toward the $0.002748 resistance, and a breakout could open the way for another move up.
🎯 TP1: $0.00280
🎯 TP2: $0.00290
💰 Take profit partially at each target.
Support: $0.002658
Keep an eye on the breakout, guys! �
🎯 TP1: $0.00280
🎯 TP2: $0.00290
💰 Take profit partially at each target.
Support: $0.002658
Keep an eye on the breakout, guys! �
1
277
·
--
တက်ရိပ်ရှိသည်
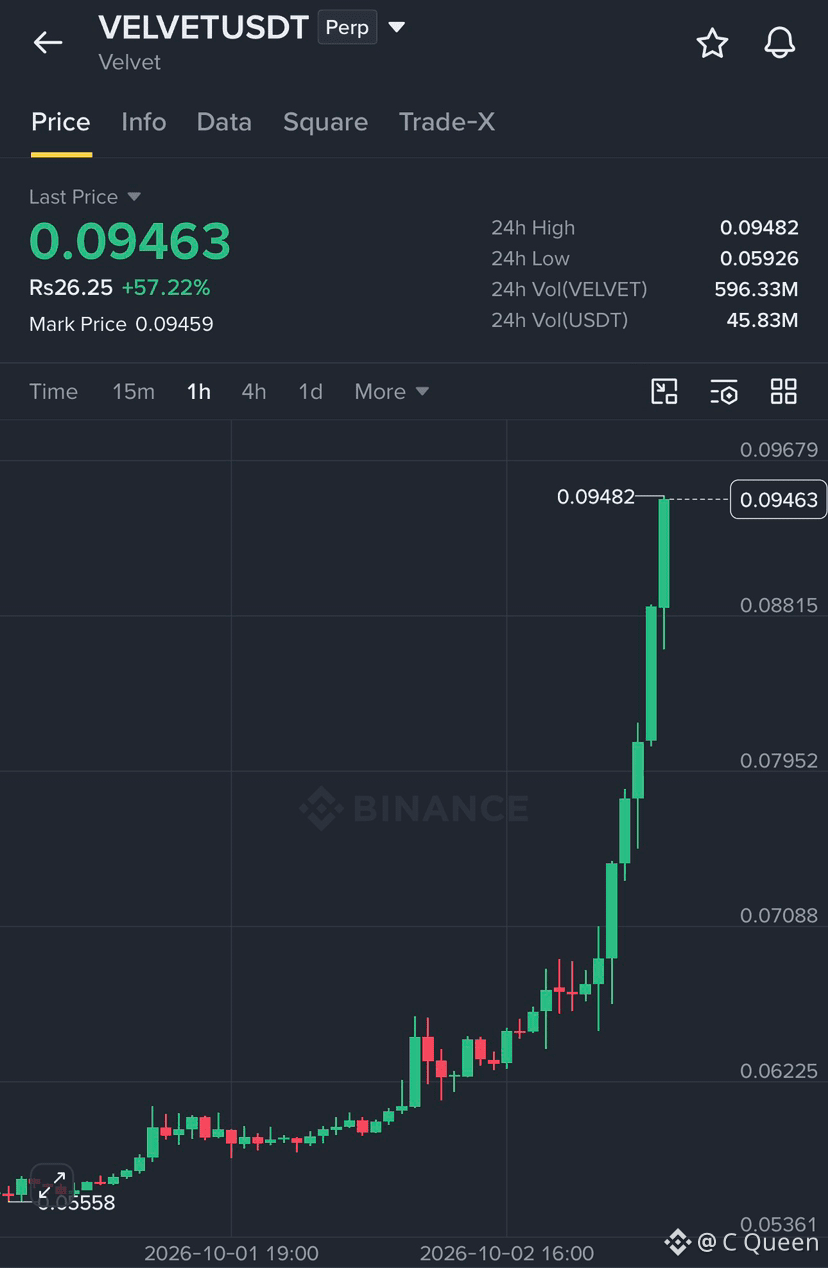
$VELVET is showing strong momentum, Guys! Up 57.22% and trading at $0.09463. Bulls are testing the $0.09482 resistance.
🎯 TP1: $0.100
🎯 TP2: $0.105
Take profit gradually and watch for a confirmed breakout. Stay safe!
{future}(VELVETUSDT)
$VELVET is showing strong momentum, Guys! Up 57.22% and trading at $0.09463. Bulls are testing the $0.09482 resistance.
🎯 TP1: $0.100
🎯 TP2: $0.105
Take profit gradually and watch for a confirmed breakout. Stay safe!
🎯 TP1: $0.100
🎯 TP2: $0.105
Take profit gradually and watch for a confirmed breakout. Stay safe!
4
733
·
--
တက်ရိပ်ရှိသည်
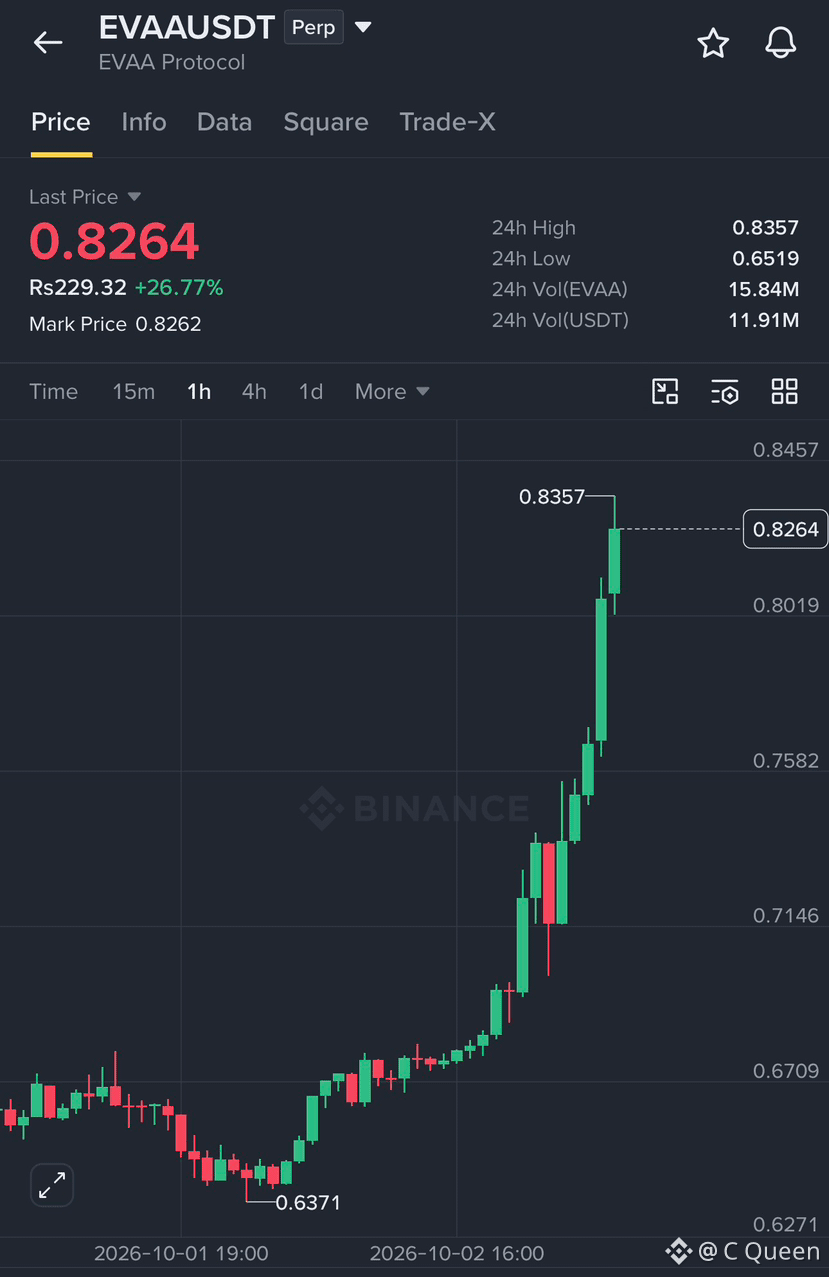
Guys, $EVAA is showing serious bullish momentum! 🚀 Price is up 26.77% and trading near $0.8264, just below the $0.8357 resistance. A clean breakout above this level could open the way toward $0.85 and $0.88. Watch for a strong candle close above resistance before entry. �
{future}(EVAAUSDT)
Guys, $EVAA is showing serious bullish momentum! 🚀 Price is up 26.77% and trading near $0.8264, just below the $0.8357 resistance. A clean breakout above this level could open the way toward $0.85 and $0.88. Watch for a strong candle close above resistance before entry. �
1
3
633
·
--
တက်ရိပ်ရှိသည်
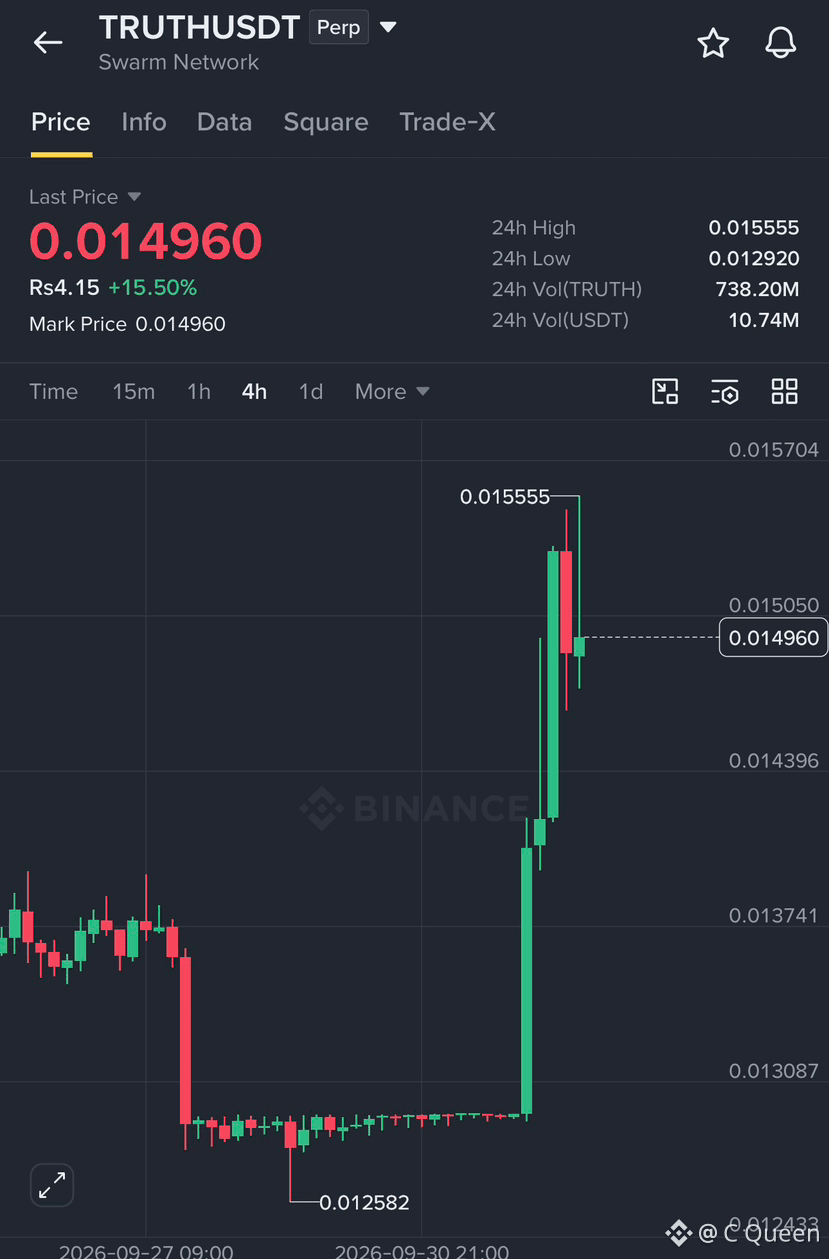
Guys, $TRUTH is moving 👀 Up 15.5% at $0.01496. Watching $0.01555 next — a clean break could push it higher. 🔥📈
{future}(TRUTHUSDT)
Guys, $TRUTH is moving 👀 Up 15.5% at $0.01496. Watching $0.01555 next — a clean break could push it higher. 🔥📈
2
422
·
--
တက်ရိပ်ရှိသည်
🚀 $MAGMA Is Heating Up Fast!
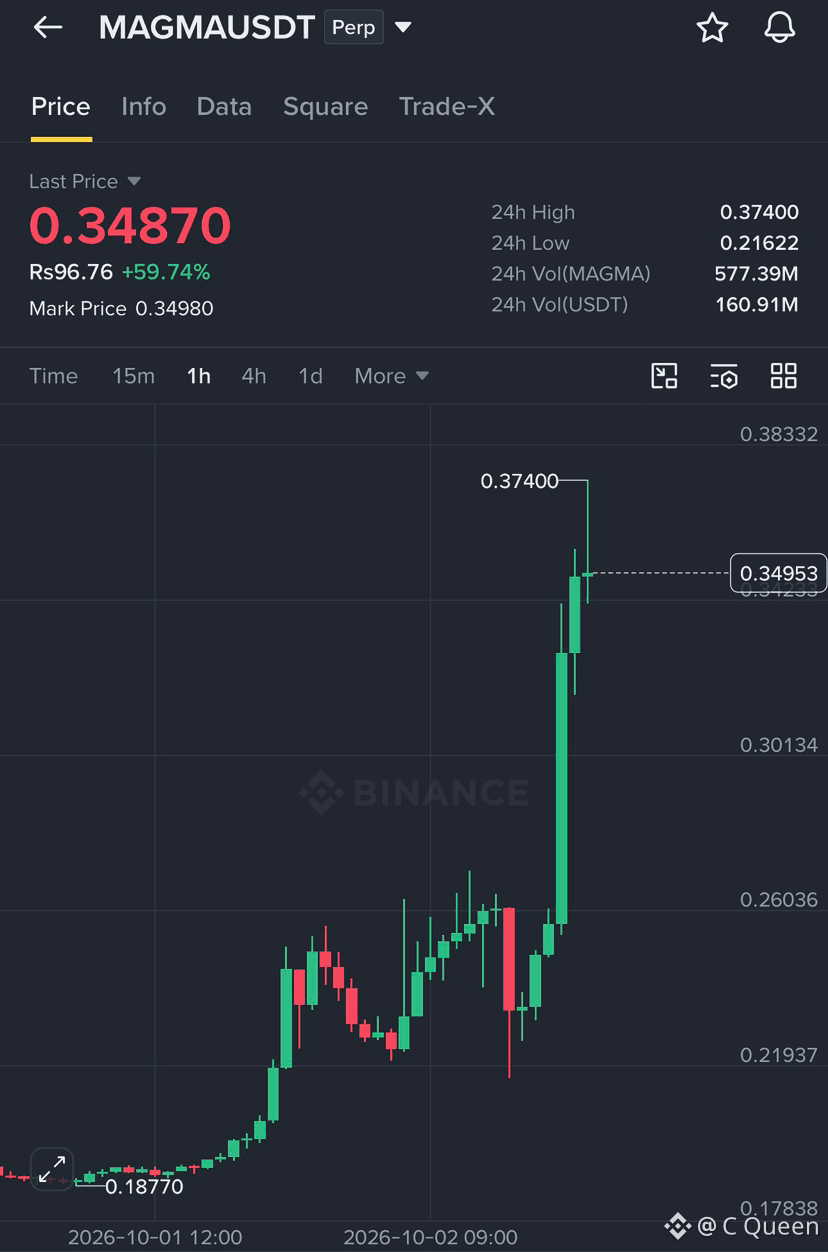
$MAGMA is holding strong after a massive 59.74% surge, with price around $0.34870. Buyers are pushing toward $0.37400, and a clean breakout could bring $0.38332 and $0.40000 into focus. As long as $0.30134 holds, bullish momentum remains active. Watch the next move closely! �
{future}(MAGMAUSDT)
🚀 $MAGMA Is Heating Up Fast!
$MAGMA is holding strong after a massive 59.74% surge, with price around $0.34870. Buyers are pushing toward $0.37400, and a clean breakout could bring $0.38332 and $0.40000 into focus. As long as $0.30134 holds, bullish momentum remains active. Watch the next move closely! �
$MAGMA is holding strong after a massive 59.74% surge, with price around $0.34870. Buyers are pushing toward $0.37400, and a clean breakout could bring $0.38332 and $0.40000 into focus. As long as $0.30134 holds, bullish momentum remains active. Watch the next move closely! �
1
486
·
--
တက်ရိပ်ရှိသည်
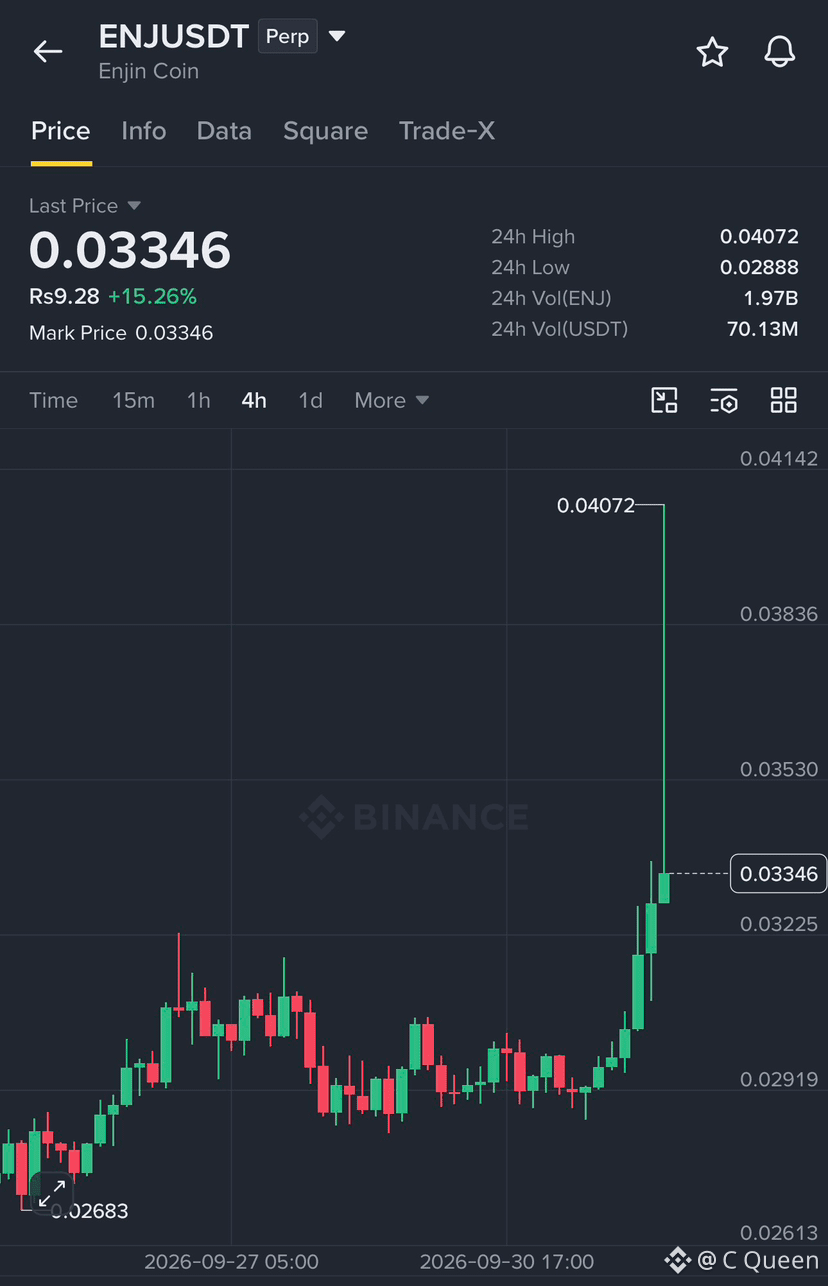
🚀 $ENJ is Showing Strong Bullish Momentum! Buyers are stepping in with solid volume as Enjin Coin trades at $0.03346, up 15.26%. Price is holding above the $0.03225 support, keeping the bullish structure alive. A breakout above $0.03530 could open the way toward $0.03836 and $0.04142. Watch $0.03225 closely, as losing this level may trigger a pullback toward $0.02919. Bulls are in control for now, but confirmation is key! �
{future}(ENJUSDT)
🚀 $ENJ is Showing Strong Bullish Momentum! Buyers are stepping in with solid volume as Enjin Coin trades at $0.03346, up 15.26%. Price is holding above the $0.03225 support, keeping the bullish structure alive. A breakout above $0.03530 could open the way toward $0.03836 and $0.04142. Watch $0.03225 closely, as losing this level may trigger a pullback toward $0.02919. Bulls are in control for now, but confirmation is key! �
1
422
·
--
ကျရိပ်ရှိသည်
🚀 $US – Bulls Are Taking Control!
$US is showing strong bullish momentum with a massive 38.65% gain, currently trading at $0.027703. Buyers are active, and the price is holding near $0.02769 support. A breakout above $0.031617 could open the way toward $0.036495 and $0.040265. Watch for a strong candle confirmation as momentum builds! �
{future}(USUSDT)
🚀 $US – Bulls Are Taking Control!
$US is showing strong bullish momentum with a massive 38.65% gain, currently trading at $0.027703. Buyers are active, and the price is holding near $0.02769 support. A breakout above $0.031617 could open the way toward $0.036495 and $0.040265. Watch for a strong candle confirmation as momentum builds! �
$US is showing strong bullish momentum with a massive 38.65% gain, currently trading at $0.027703. Buyers are active, and the price is holding near $0.02769 support. A breakout above $0.031617 could open the way toward $0.036495 and $0.040265. Watch for a strong candle confirmation as momentum builds! �
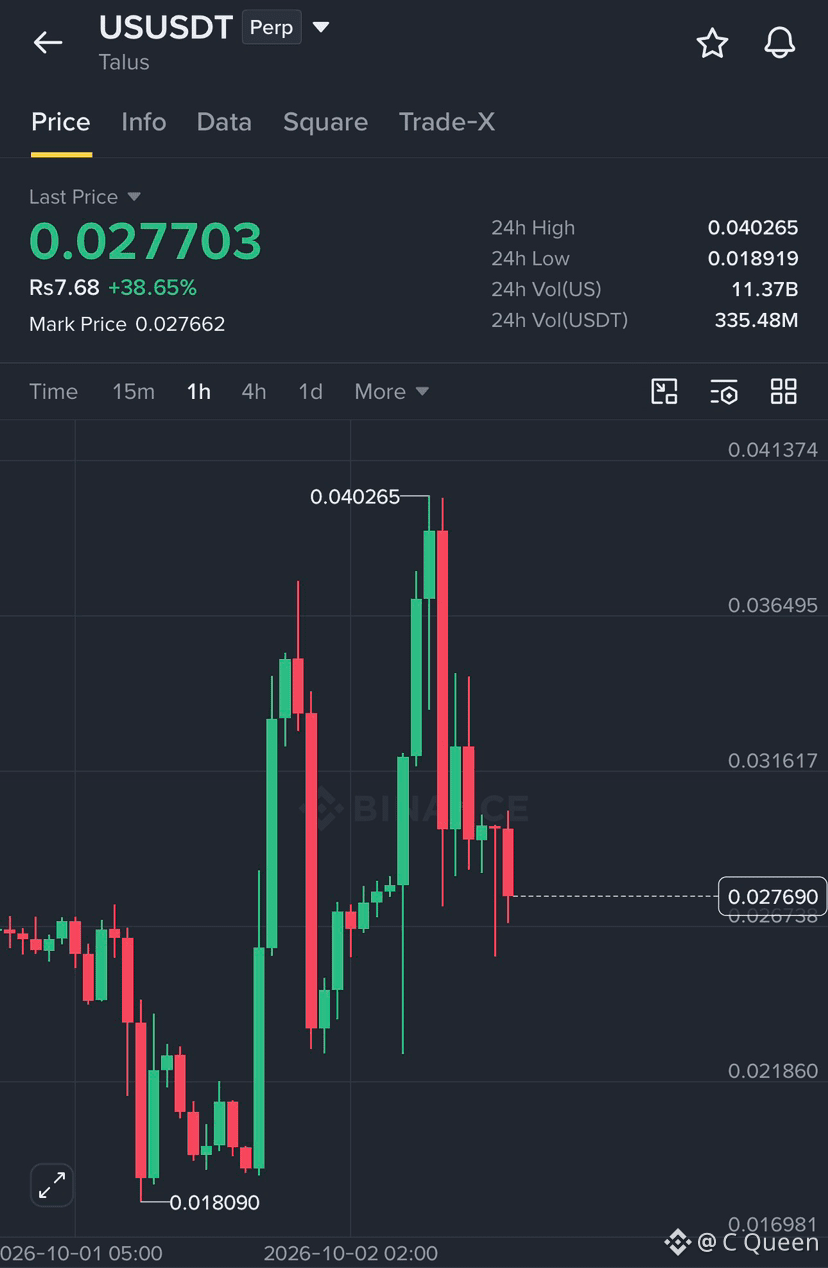
2
414
·
--
တက်ရိပ်ရှိသည်
🔥 $SAND LONG TRADE | Bulls Are Taking Control!
$SAND is holding strong after a massive 40% pump! Price is trading near $0.06163, with buyers pushing toward the $0.06343 resistance.
🎯 TP1: $0.06463
🎯 TP2: $0.06800
📈 Bullish above $0.05937. A breakout could trigger another strong move upward. Watch the momentum! �
{spot}(SANDUSDT)
🔥 $SAND LONG TRADE | Bulls Are Taking Control!
$SAND is holding strong after a massive 40% pump! Price is trading near $0.06163, with buyers pushing toward the $0.06343 resistance.
🎯 TP1: $0.06463
🎯 TP2: $0.06800
📈 Bullish above $0.05937. A breakout could trigger another strong move upward. Watch the momentum! �
$SAND is holding strong after a massive 40% pump! Price is trading near $0.06163, with buyers pushing toward the $0.06343 resistance.
🎯 TP1: $0.06463
🎯 TP2: $0.06800
📈 Bullish above $0.05937. A breakout could trigger another strong move upward. Watch the momentum! �
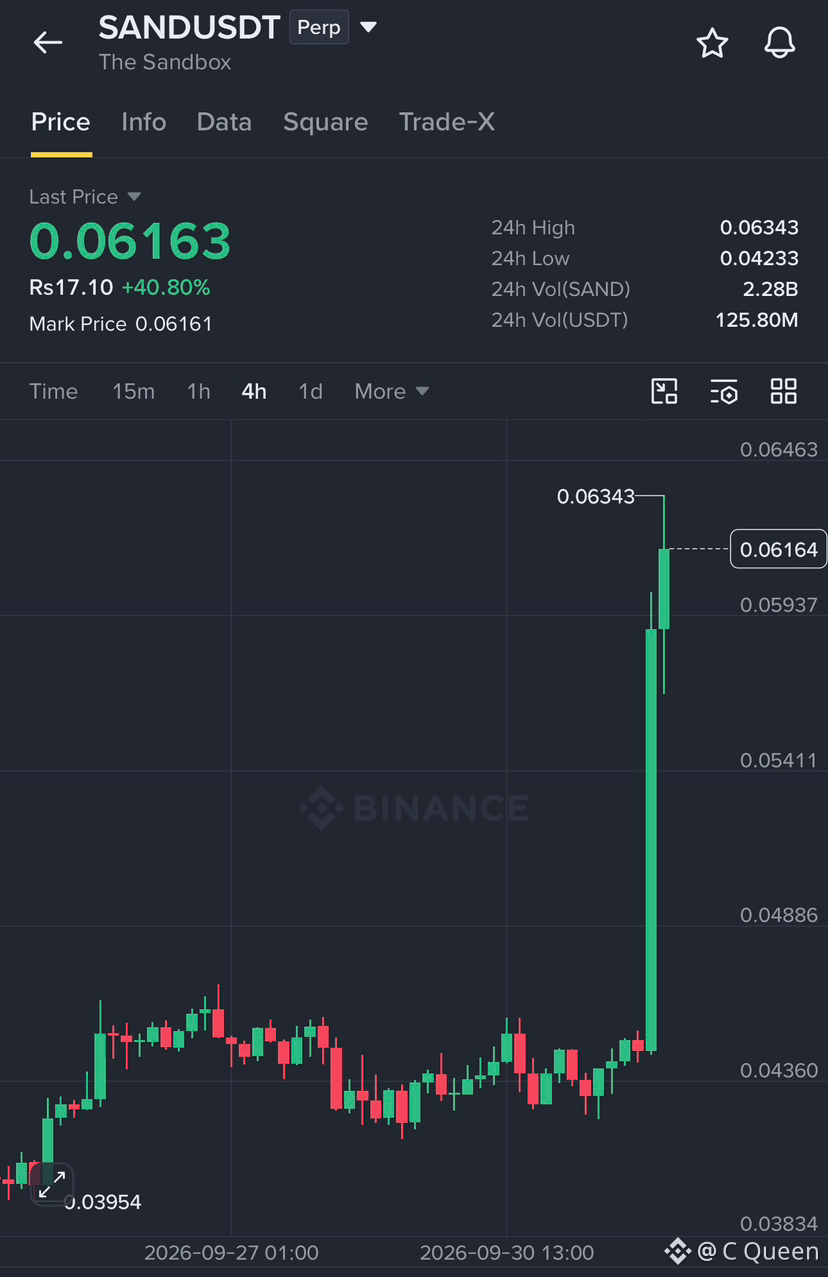
297
·
--
တက်ရိပ်ရှိသည်
Guys, $CT is holding strong near $0.6005 after a massive 43% pump! Bulls are targeting the next resistance zone. 👀
🟢 Entry: $0.595 – $0.603
🎯 TP1: $0.621
🎯 TP2: $0.632
🚀 TP3: $0.650
🛑 SL: $0.582
{future}(CTUSDT)
Guys, $CT is holding strong near $0.6005 after a massive 43% pump! Bulls are targeting the next resistance zone. 👀
🟢 Entry: $0.595 – $0.603
🎯 TP1: $0.621
🎯 TP2: $0.632
🚀 TP3: $0.650
🛑 SL: $0.582
🟢 Entry: $0.595 – $0.603
🎯 TP1: $0.621
🎯 TP2: $0.632
🚀 TP3: $0.650
🛑 SL: $0.582
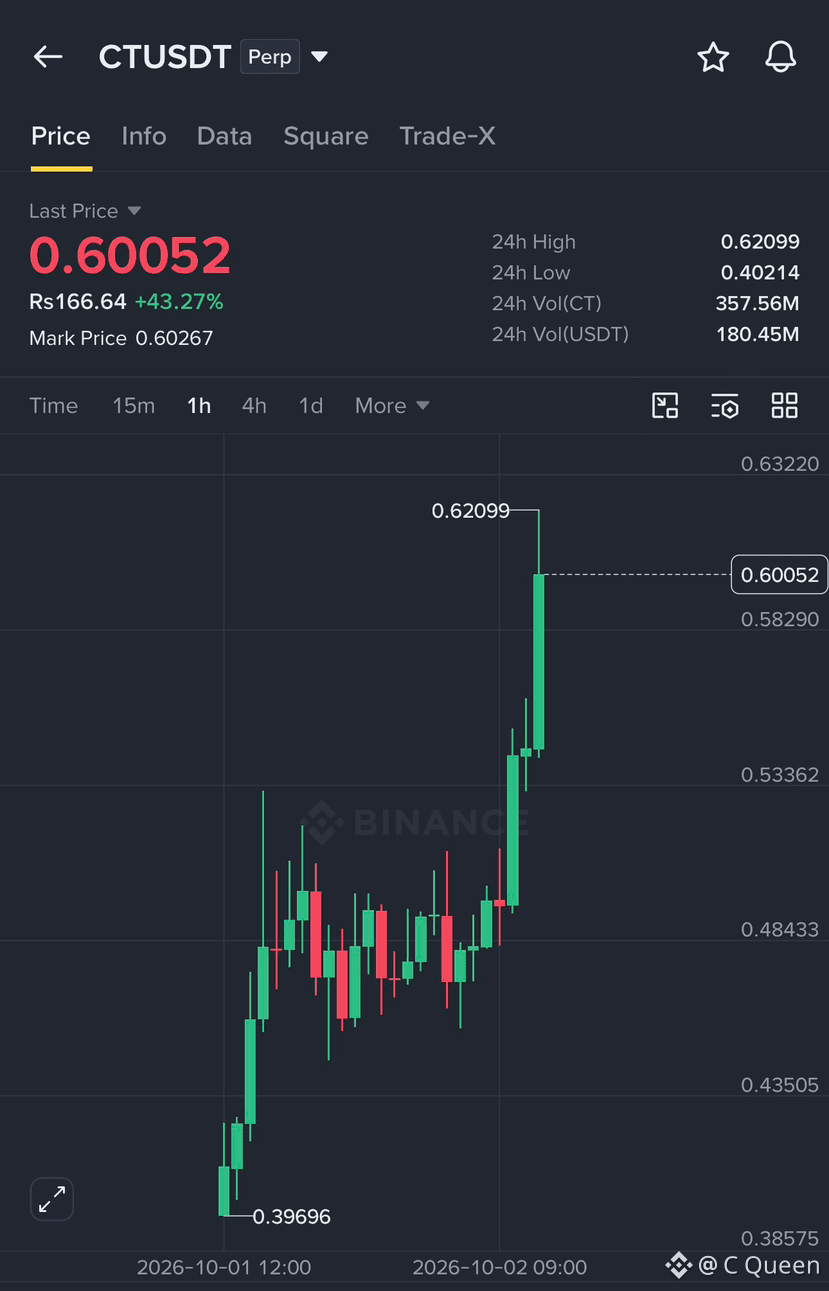
2
552
·
--
တက်ရိပ်ရှိသည်
🚀 $MEGA /USDT | LONG TRADE fx
🔥 Guys, look at this! $MEGA is showing strong bullish momentum, currently trading at 0.05344 with a massive +19.26% gain.
🟢 Entry: 0.0530 – 0.0535
🎯 TP1: 0.05616
🎯 TP2: 0.05800
💰 Take Profit: Book profits gradually.
Bulls are gaining control! A breakout above the 24H high could bring more upside momentum. �
{spot}(MEGAUSDT)
🚀 $MEGA /USDT | LONG TRADE fx
🔥 Guys, look at this! $MEGA is showing strong bullish momentum, currently trading at 0.05344 with a massive +19.26% gain.
🟢 Entry: 0.0530 – 0.0535
🎯 TP1: 0.05616
🎯 TP2: 0.05800
💰 Take Profit: Book profits gradually.
Bulls are gaining control! A breakout above the 24H high could bring more upside momentum. �
🔥 Guys, look at this! $MEGA is showing strong bullish momentum, currently trading at 0.05344 with a massive +19.26% gain.
🟢 Entry: 0.0530 – 0.0535
🎯 TP1: 0.05616
🎯 TP2: 0.05800
💰 Take Profit: Book profits gradually.
Bulls are gaining control! A breakout above the 24H high could bring more upside momentum. �
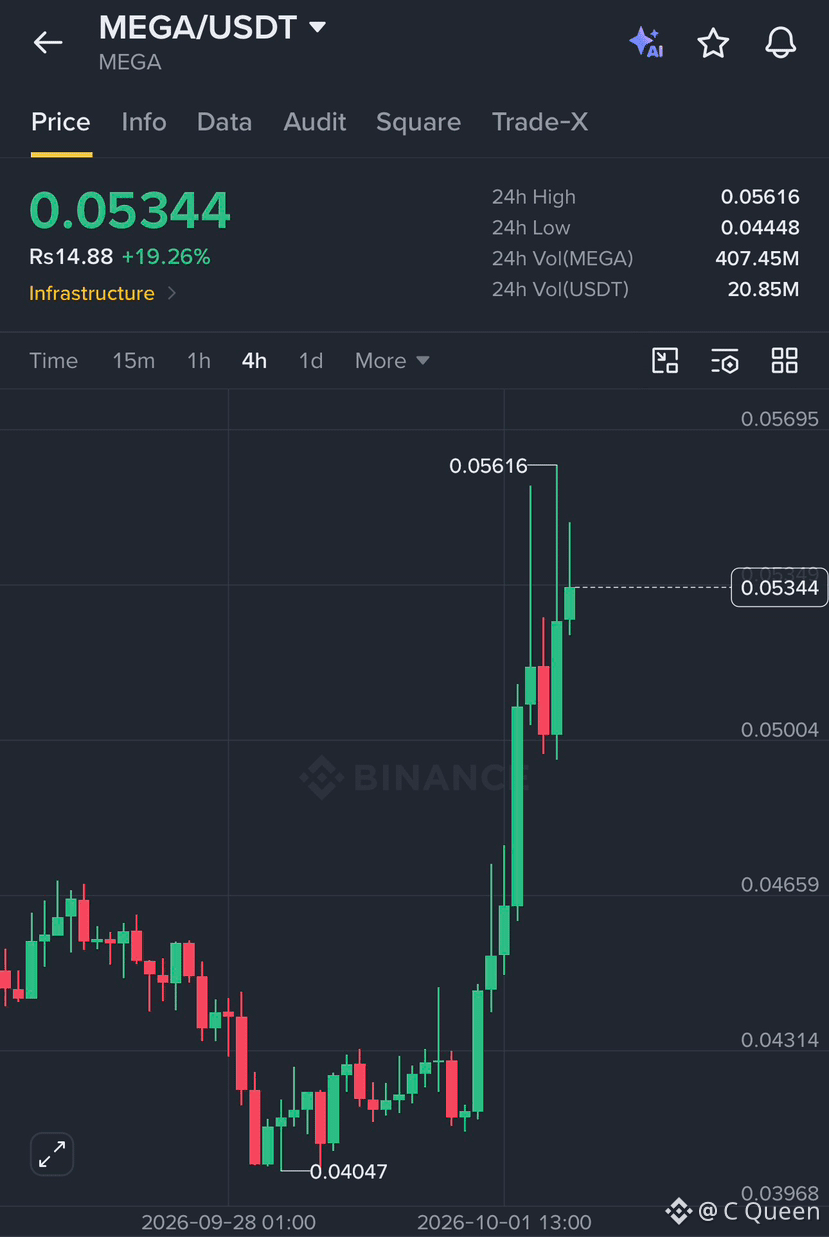
1
444
Log in to explore more content
Join global crypto users on Binance Square
⚡️ Get latest and useful information about crypto.
💬 Trusted by the world’s largest crypto exchange.
👍 Discover real insights from verified creators.
အီးမေးလ် / ဖုန်းနံပါတ်
ရေပန်းစားနေသော ခေါင်းစဉ်များ
BNBSurpasses$790
11,712 views
93 Discussing
$BNB strategic long plan -> FOCUS NOW
BNB has created 2 strong lows after taking out internal liquidity
I'm expecting a move towards swing high $815-$830 and looking for a long on a retest of the green box
#BNBSurpasses$790 #bnb
Ghost Writer
·နှစ်သက်မှု 4 ခု
·5.8k views
ZamaRises15.99%ToIntradayHigh$0.09
6,540 views
78 Discussing
BitcoinSpotETFsDraw$6.34BInflowsInQ3
4,021 views
67 Discussing