
MissBlockChain_01
53.2k ໂພສ

MissBlockChain_01
 Square Verified+
ລາຍງານ
ບລັອກຜູ້ໃຊ້
X/Twitter:@zoe_crypto_01 | Since 2019 | Trader Crypto analyst,Signals & Insights | #Kol Manager |
8 ກໍາລັງຕິດຕາມ
43.0K+ ຜູ້ຕິດຕາມ
188.4K+ Liked
ໂພສ
ທັງໝົດ
ວົງຢືມ
ຖ່າຍທອດສົດ
ປັກໝຸດ
ເບິ່ງການແປ
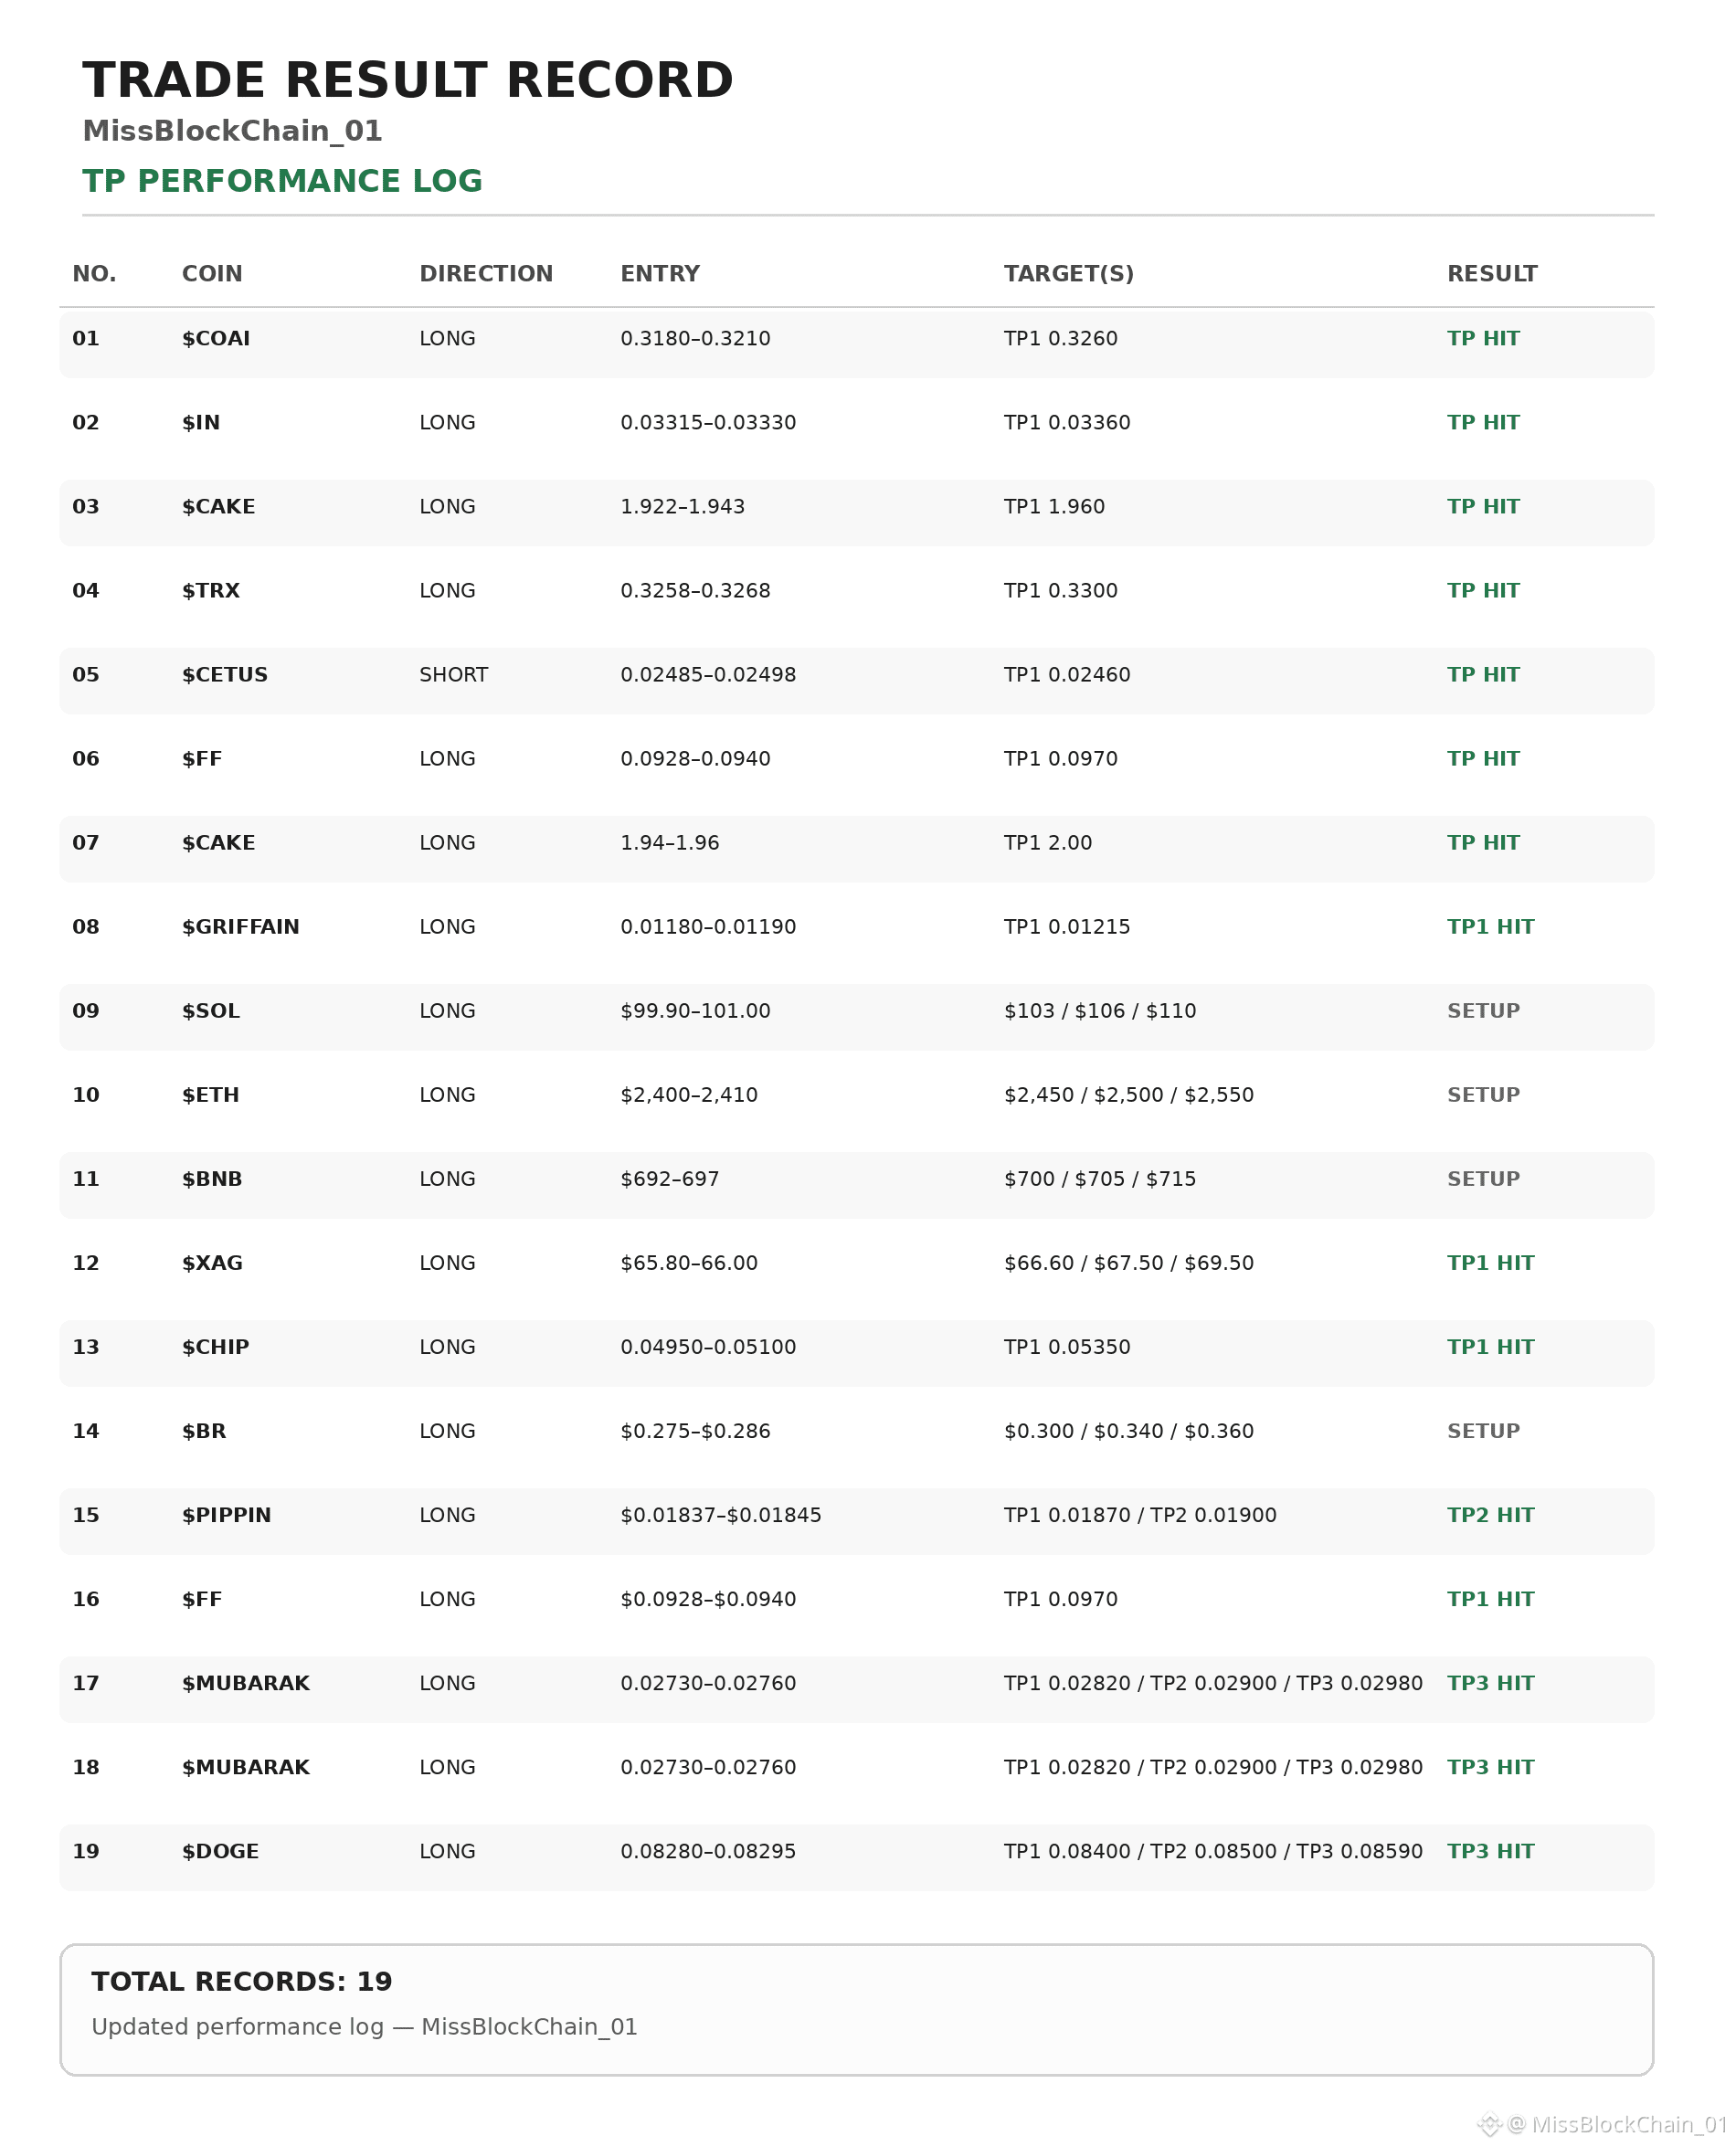
🎉 CONGRATULATIONS 42K FAMILY! 🎉
Another strong round for @zoe_cryptoanalyst — TP levels are getting smashed one after another! 🔥
✅ TP HIT:
$COAI • $IN • $CAKE • $TRX • $CETUS • $FF • $GRIFFAIN • $XAG • $CHIP • $PIPPIN • $MUBARAK • $DOGE
📌 Active Setups:
$SOL • $ETH • $BNB • $BR
42K FAMILY, THIS IS YOUR RESULT! ❤️
Stay disciplined, follow the setup, protect your capital, and let the targets do the work.
Congratulations to everyone who caught these moves! 🚀 $DOGE
{future}(DOGEUSDT)
$BR
{alpha}(560xff7d6a96ae471bbcd7713af9cb1feeb16cf56b41)
{future}(XAGUSDT)
🎉 CONGRATULATIONS 42K FAMILY! 🎉
Another strong round for @MissBlockChain_01 — TP levels are getting smashed one after another! 🔥
✅ TP HIT:
$COAI • $IN • $CAKE • $TRX • $CETUS • $FF • $GRIFFAIN • $XAG • $CHIP • $PIPPIN • $MUBARAK • $DOGE
📌 Active Setups:
$SOL • $ETH • $BNB • $BR
42K FAMILY, THIS IS YOUR RESULT! ❤️
Stay disciplined, follow the setup, protect your capital, and let the targets do the work.
Congratulations to everyone who caught these moves! 🚀 $DOGE
$BR
Another strong round for @MissBlockChain_01 — TP levels are getting smashed one after another! 🔥
✅ TP HIT:
$COAI • $IN • $CAKE • $TRX • $CETUS • $FF • $GRIFFAIN • $XAG • $CHIP • $PIPPIN • $MUBARAK • $DOGE
📌 Active Setups:
$SOL • $ETH • $BNB • $BR
42K FAMILY, THIS IS YOUR RESULT! ❤️
Stay disciplined, follow the setup, protect your capital, and let the targets do the work.
Congratulations to everyone who caught these moves! 🚀 $DOGE
$BR
12
14
2.3k
ເບິ່ງການແປ
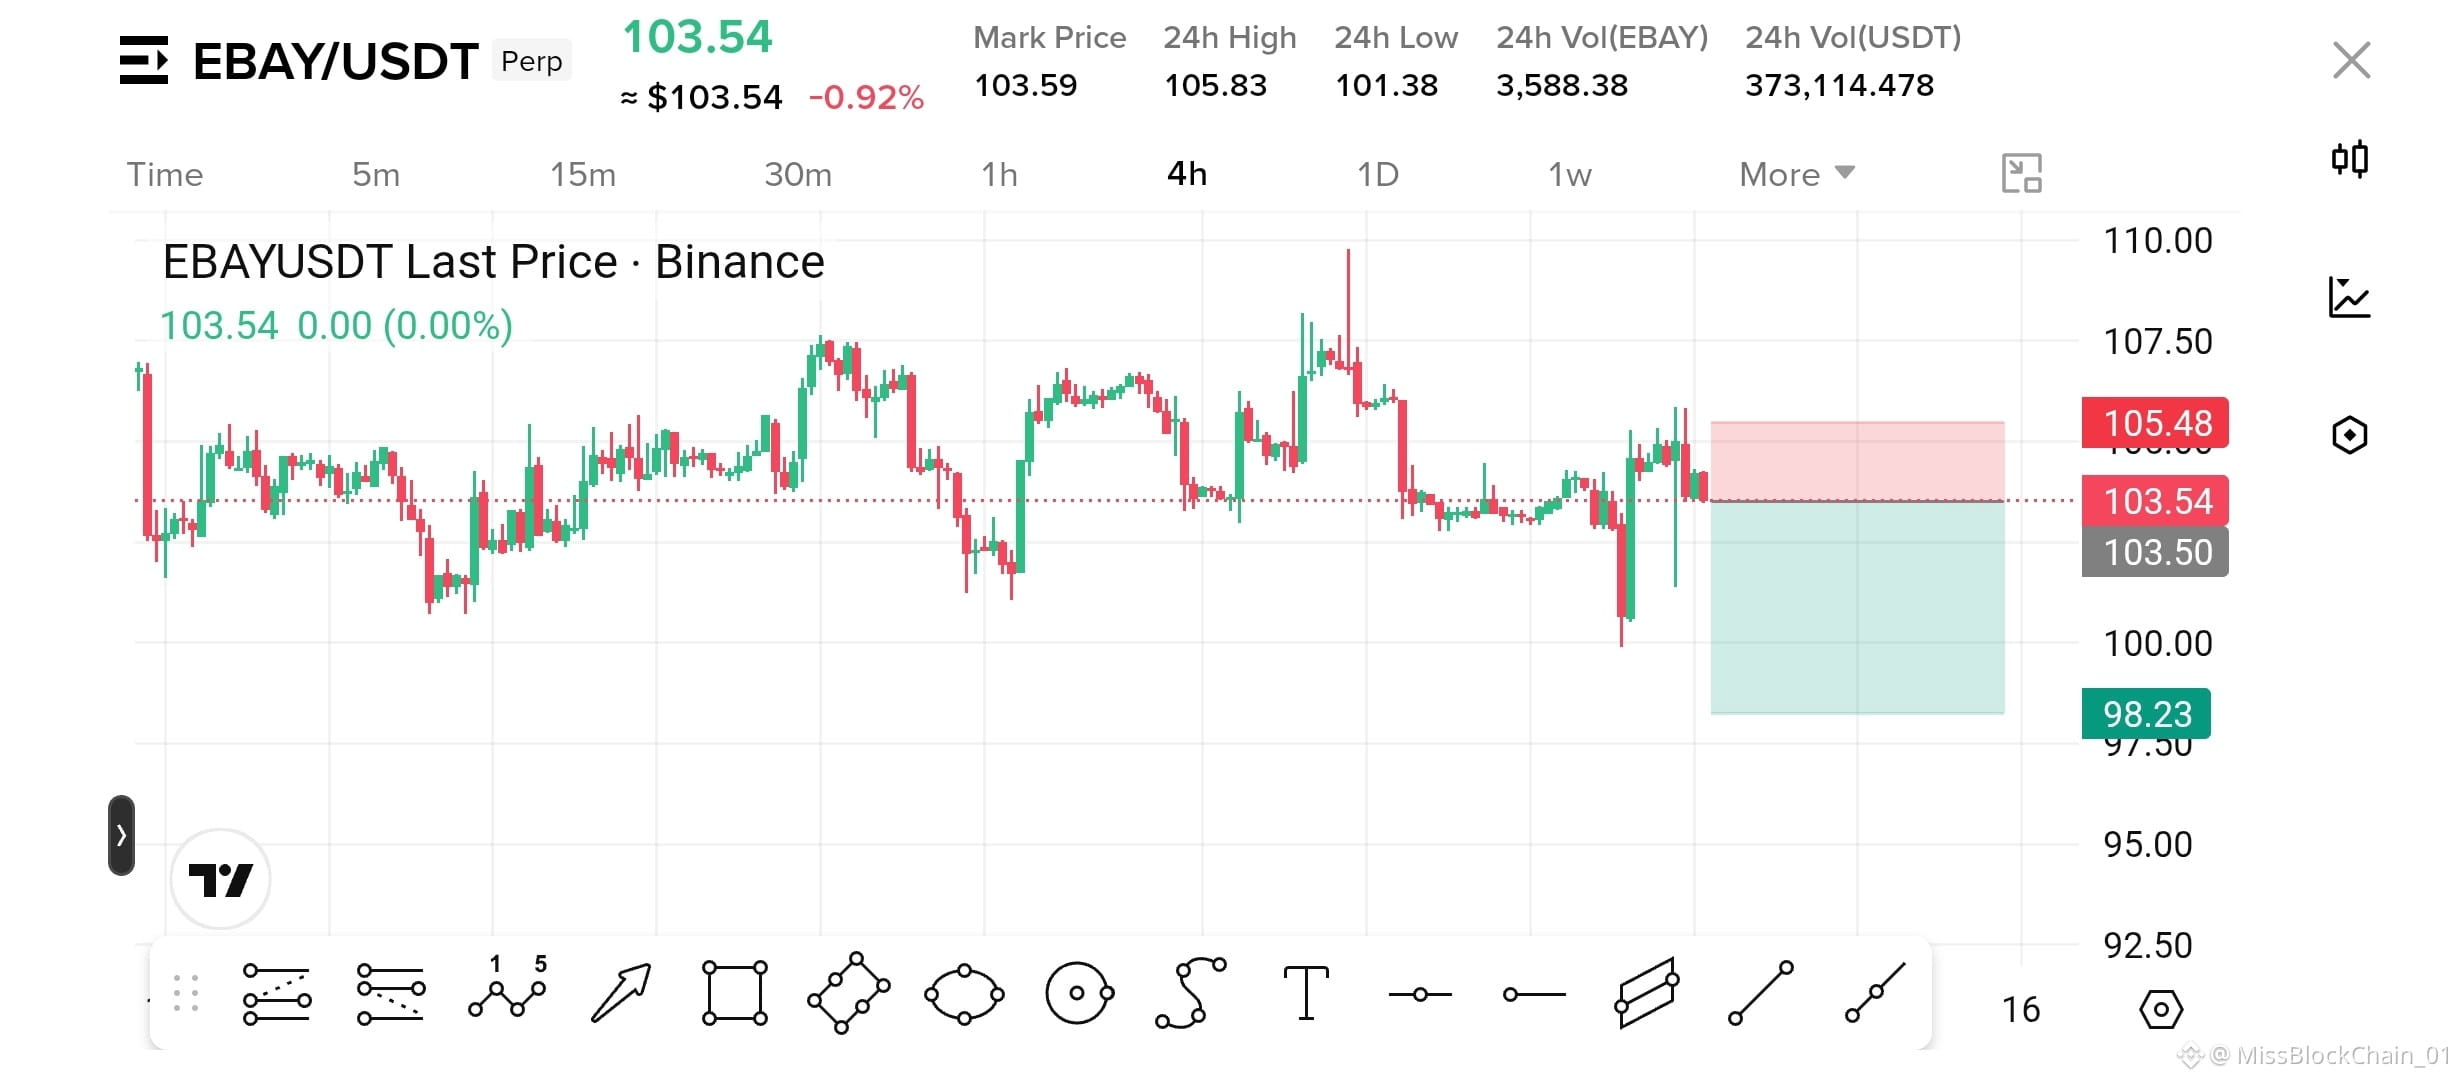
🚨 $EBAY SHORT SETUP — REJECTION ZONE 🚨
$EBAY — SHORT
Entry: $103.55–$105.00
SL: $105.48
TP1: $102.00
TP2: $100.00
TP3: $98.23
Why? Price is struggling below the $105 resistance zone after repeated rejection. A break below $103.50 can open the path toward $100 and the deeper $98.23 target.
Click here to Trade 👇
{future}(EBAYUSDT)
🚨 $EBAY SHORT SETUP — REJECTION ZONE 🚨
$EBAY — SHORT
Entry: $103.55–$105.00
SL: $105.48
TP1: $102.00
TP2: $100.00
TP3: $98.23
Why? Price is struggling below the $105 resistance zone after repeated rejection. A break below $103.50 can open the path toward $100 and the deeper $98.23 target.
Click here to Trade 👇
$EBAY — SHORT
Entry: $103.55–$105.00
SL: $105.48
TP1: $102.00
TP2: $100.00
TP3: $98.23
Why? Price is struggling below the $105 resistance zone after repeated rejection. A break below $103.50 can open the path toward $100 and the deeper $98.23 target.
Click here to Trade 👇
1
5
ເບິ່ງການແປ
🚨 Top Gainers of the Day! 🚨
$LSK — +12.49%
$CROSS — +11.42%
$PHAROS — +9.06%
Strong buying momentum is pushing these coins higher. LSK is leading the move, while CROSS and PHAROS are also showing solid strength.
Which one could be the next breakout? 🔥
{future}(PHAROSUSDT)
{future}(CROSSUSDT)
{future}(LSKUSDT)
🚨 Top Gainers of the Day! 🚨
$LSK — +12.49%
$CROSS — +11.42%
$PHAROS — +9.06%
Strong buying momentum is pushing these coins higher. LSK is leading the move, while CROSS and PHAROS are also showing solid strength.
Which one could be the next breakout? 🔥
$LSK — +12.49%
$CROSS — +11.42%
$PHAROS — +9.06%
Strong buying momentum is pushing these coins higher. LSK is leading the move, while CROSS and PHAROS are also showing solid strength.
Which one could be the next breakout? 🔥

1
78
ເບິ່ງການແປ
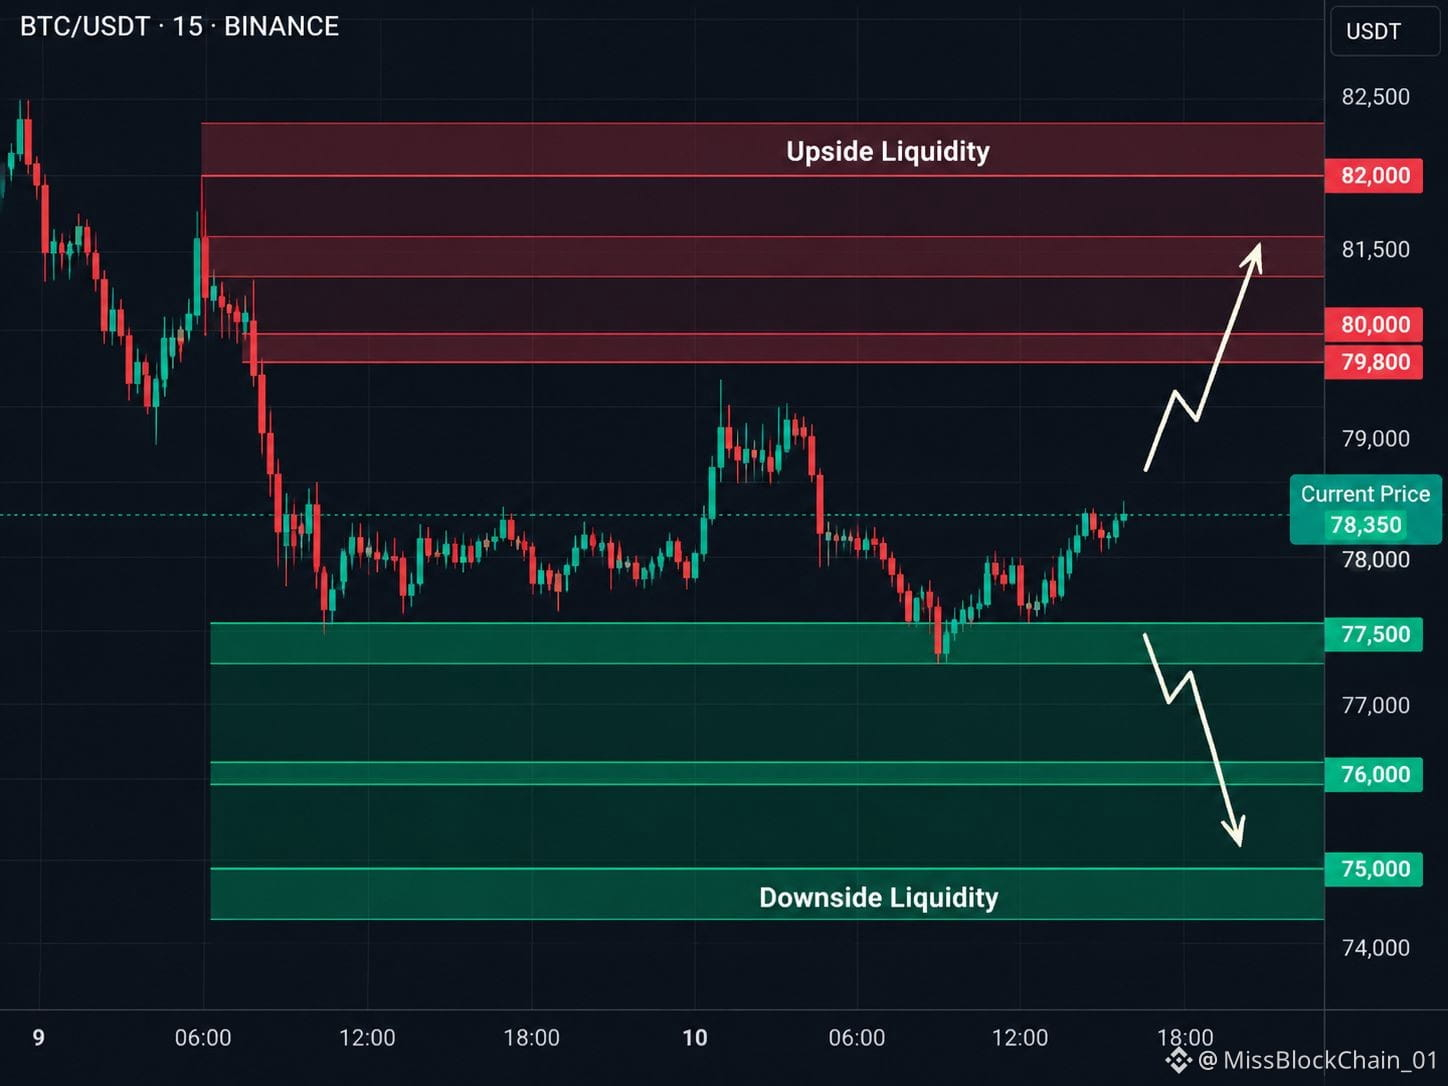
$BTC is sitting between two major liquidity zones, and the next move could be decisive.
BTC — LONG
Entry: 78,200–78,300
SL: 77,400
TP1: 78,800
TP2: 80,000
TP3: 82,000
Why? Upside liquidity is concentrated around $79.8K–$82K, while downside liquidity sits around $77.5K–$75K. A reclaim above $79.8K can trigger a stronger upside liquidity sweep.
Click here to Trade 👇
{future}(BTCUSDT)
$BTC is sitting between two major liquidity zones, and the next move could be decisive.
BTC — LONG
Entry: 78,200–78,300
SL: 77,400
TP1: 78,800
TP2: 80,000
TP3: 82,000
Why? Upside liquidity is concentrated around $79.8K–$82K, while downside liquidity sits around $77.5K–$75K. A reclaim above $79.8K can trigger a stronger upside liquidity sweep.
Click here to Trade 👇
BTC — LONG
Entry: 78,200–78,300
SL: 77,400
TP1: 78,800
TP2: 80,000
TP3: 82,000
Why? Upside liquidity is concentrated around $79.8K–$82K, while downside liquidity sits around $77.5K–$75K. A reclaim above $79.8K can trigger a stronger upside liquidity sweep.
Click here to Trade 👇
1
53
ເບິ່ງການແປ
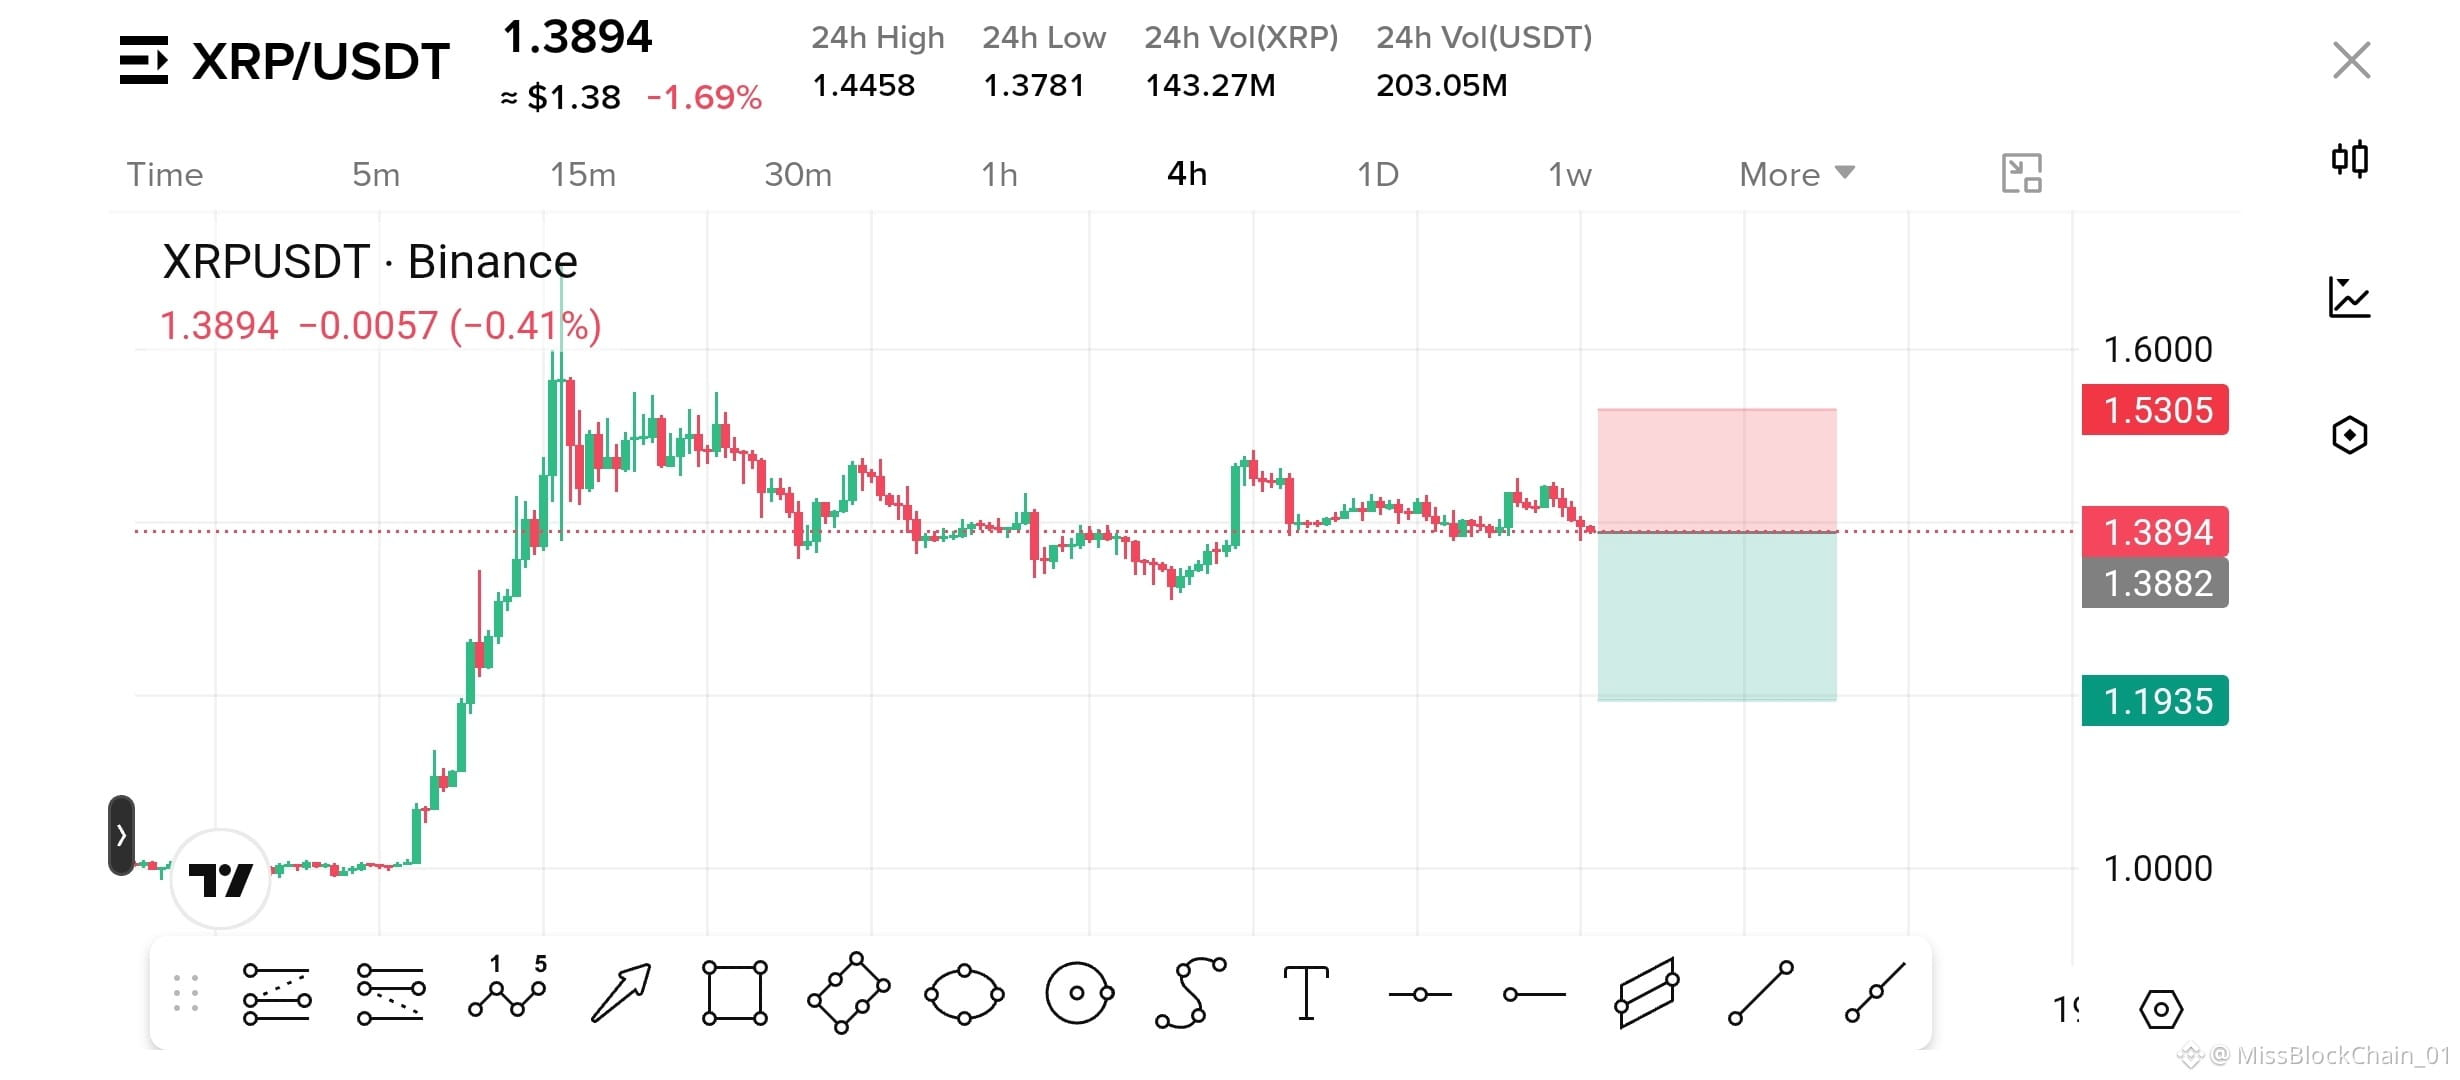
$XRP is losing momentum after failing to build above the recent consolidation zone. The 4H structure shows repeated hesitation near the $1.40–$1.45 region, while price is now sitting around $1.3894.
That makes the rejection setup worth watching.
$XRP — SHORT
Entry: $1.3894
TP1: $1.1935
SL: $1.5305
Why this setup? Price is struggling to regain bullish momentum after the earlier spike, with resistance continuing to hold overhead.
If $1.5305 is reclaimed decisively, the short thesis is invalidated.
Would you short this rejection or wait for a breakdown confirmation?
{future}(XRPUSDT)
$XRP is losing momentum after failing to build above the recent consolidation zone. The 4H structure shows repeated hesitation near the $1.40–$1.45 region, while price is now sitting around $1.3894.
That makes the rejection setup worth watching.
$XRP — SHORT
Entry: $1.3894
TP1: $1.1935
SL: $1.5305
Why this setup? Price is struggling to regain bullish momentum after the earlier spike, with resistance continuing to hold overhead.
If $1.5305 is reclaimed decisively, the short thesis is invalidated.
Would you short this rejection or wait for a breakdown confirmation?
That makes the rejection setup worth watching.
$XRP — SHORT
Entry: $1.3894
TP1: $1.1935
SL: $1.5305
Why this setup? Price is struggling to regain bullish momentum after the earlier spike, with resistance continuing to hold overhead.
If $1.5305 is reclaimed decisively, the short thesis is invalidated.
Would you short this rejection or wait for a breakdown confirmation?
1
76
ເບິ່ງການແປ
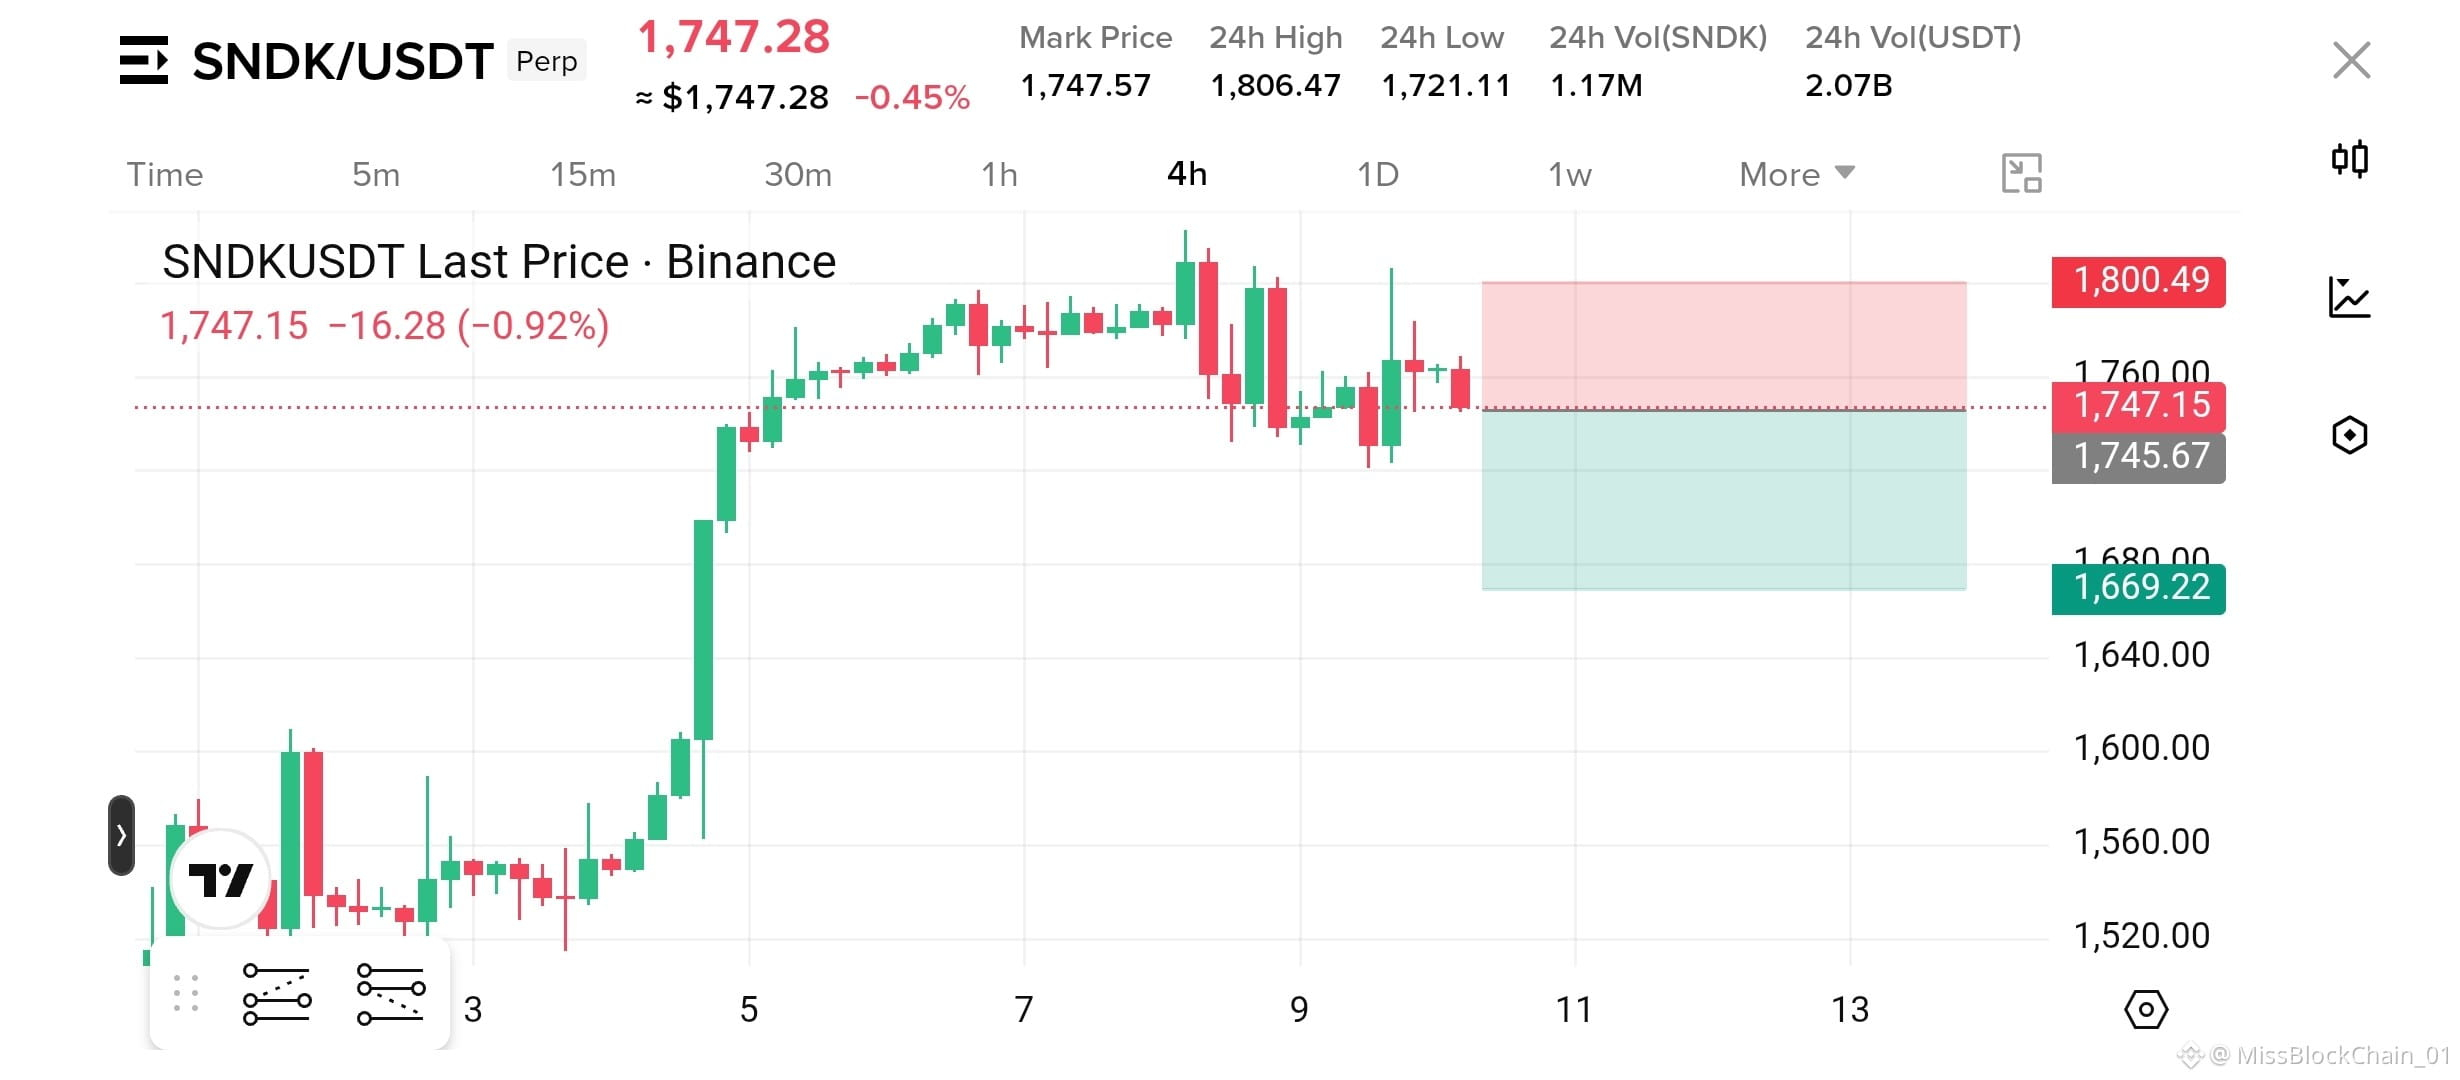
$SNDK is showing a very different picture after that explosive rally — momentum has stalled near the highs, and sellers are starting to test the structure.
On the 4H chart, price has repeatedly struggled around the $1,800 region while slipping back toward $1,747 support. That creates a potential rejection setup, especially if buyers fail to reclaim the recent highs.
For the short side, the key is whether $SNDK loses its nearby support and starts accelerating lower. A move toward the $1,669 area becomes interesting if weakness continues.
The setup is invalidated if price decisively reclaims $1,800.
Are sellers finally taking control, or is this just another pullback?
{future}(SNDKUSDT)
$SNDK is showing a very different picture after that explosive rally — momentum has stalled near the highs, and sellers are starting to test the structure.
On the 4H chart, price has repeatedly struggled around the $1,800 region while slipping back toward $1,747 support. That creates a potential rejection setup, especially if buyers fail to reclaim the recent highs.
For the short side, the key is whether $SNDK loses its nearby support and starts accelerating lower. A move toward the $1,669 area becomes interesting if weakness continues.
The setup is invalidated if price decisively reclaims $1,800.
Are sellers finally taking control, or is this just another pullback?
On the 4H chart, price has repeatedly struggled around the $1,800 region while slipping back toward $1,747 support. That creates a potential rejection setup, especially if buyers fail to reclaim the recent highs.
For the short side, the key is whether $SNDK loses its nearby support and starts accelerating lower. A move toward the $1,669 area becomes interesting if weakness continues.
The setup is invalidated if price decisively reclaims $1,800.
Are sellers finally taking control, or is this just another pullback?
156
ເບິ່ງການແປ
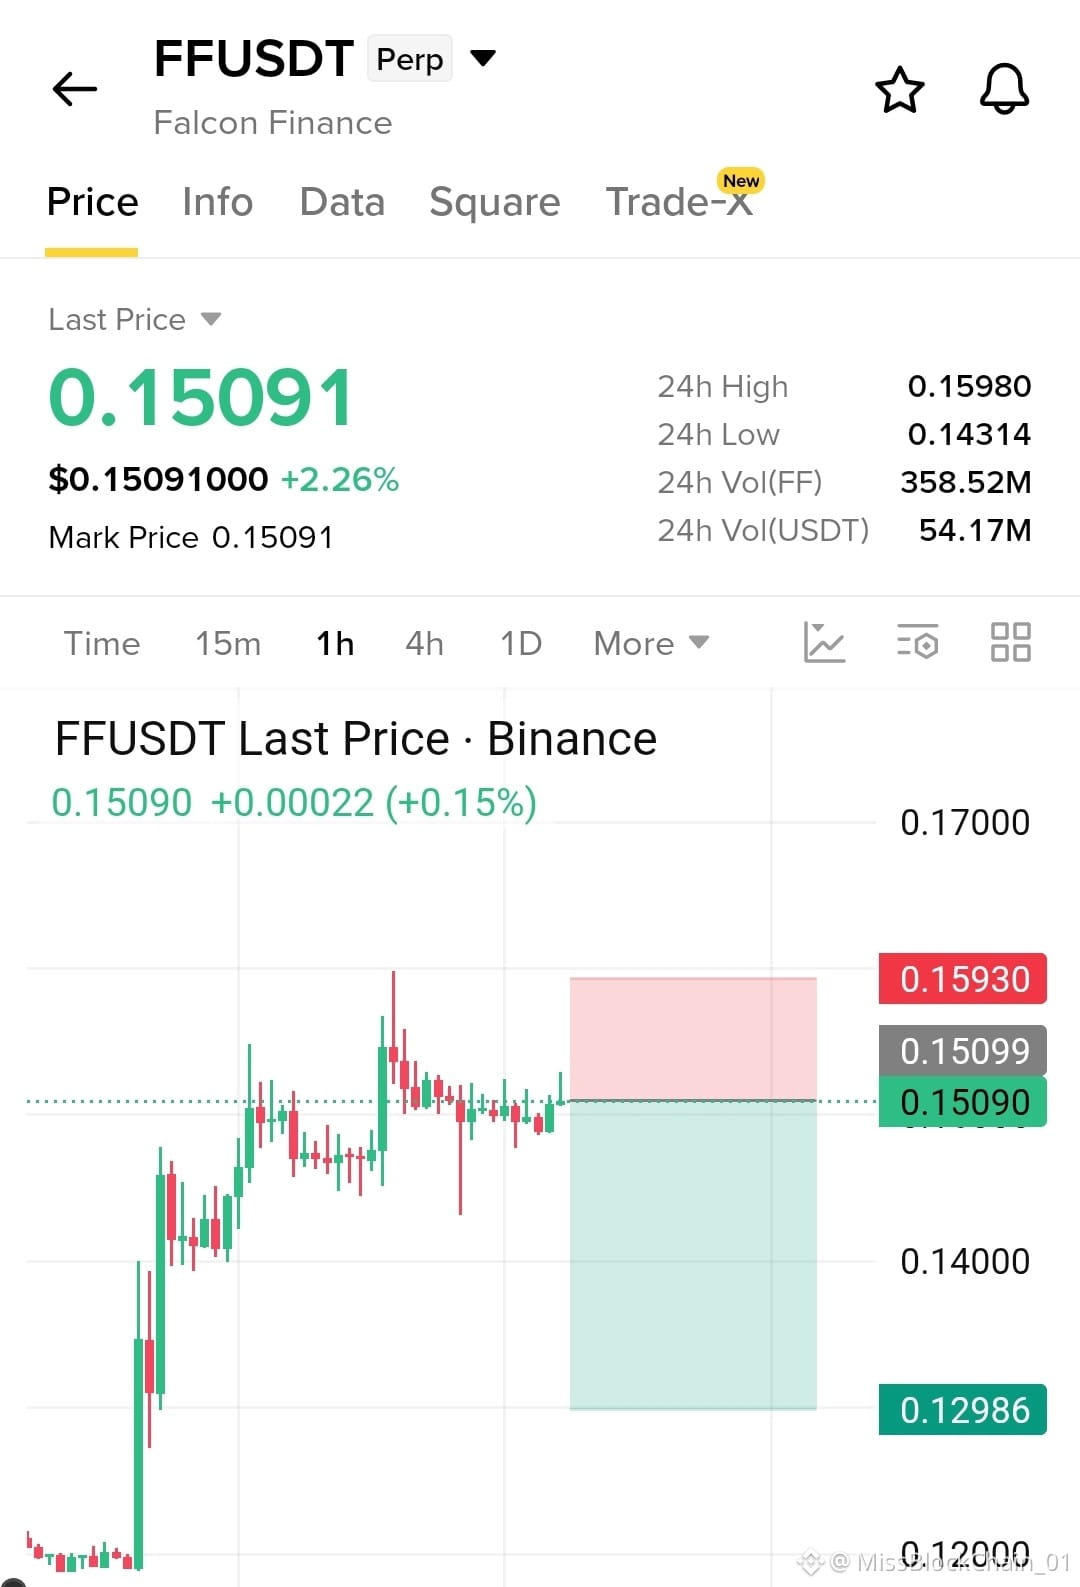
$FF is consolidating near $0.151 after rejection from the recent high, keeping the short setup active.
$FF — SHORT
Entry: $0.1505–$0.1509
SL: $0.1593
TP1: $0.1460
TP2: $0.1380
TP3: $0.1299
Why? Rejection and weak follow-through suggest downside continuation.
{future}(FFUSDT)
$FF is consolidating near $0.151 after rejection from the recent high, keeping the short setup active.
$FF — SHORT
Entry: $0.1505–$0.1509
SL: $0.1593
TP1: $0.1460
TP2: $0.1380
TP3: $0.1299
Why? Rejection and weak follow-through suggest downside continuation.
$FF — SHORT
Entry: $0.1505–$0.1509
SL: $0.1593
TP1: $0.1460
TP2: $0.1380
TP3: $0.1299
Why? Rejection and weak follow-through suggest downside continuation.
1
420
ເບິ່ງການແປ
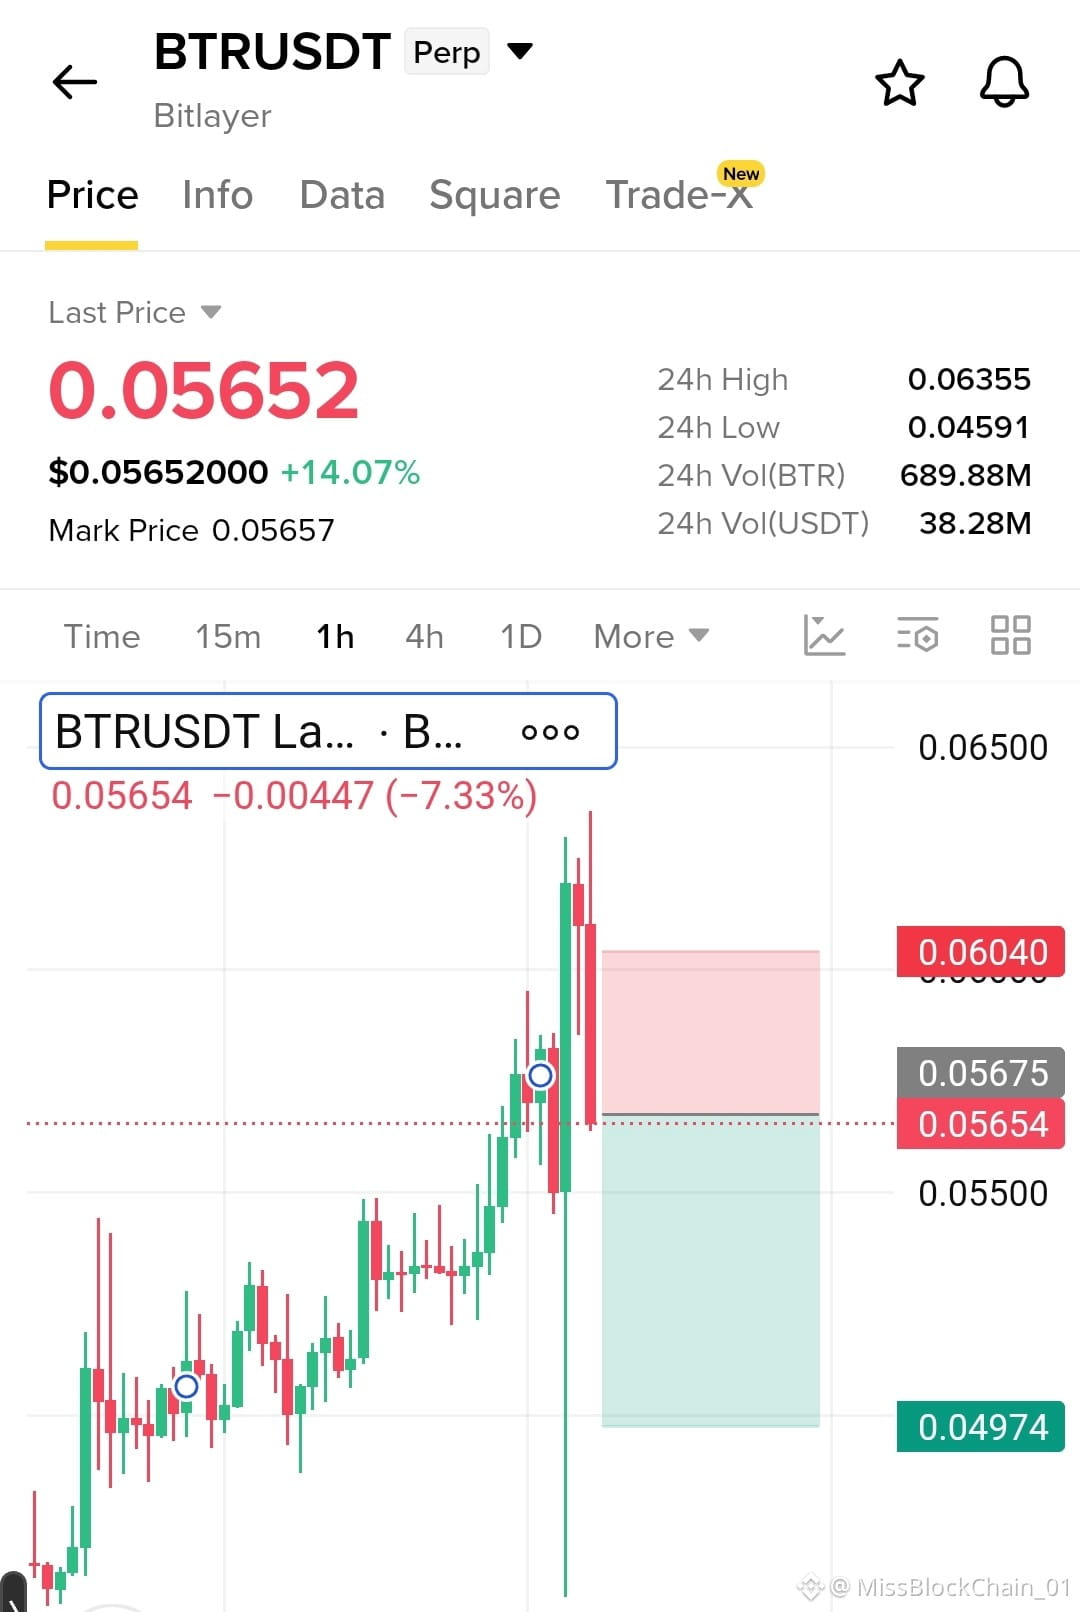
$BTR rejection from the $0.057 zone is showing selling pressure, with the structure favoring a deeper pullback....
Entry: $0.0569–$0.0571
| TP: $0.0540 / $0.0520 / $0.0497 | SL: $0.0604
{future}(BTRUSDT)
$BTR rejection from the $0.057 zone is showing selling pressure, with the structure favoring a deeper pullback....
Entry: $0.0569–$0.0571
| TP: $0.0540 / $0.0520 / $0.0497 | SL: $0.0604
Entry: $0.0569–$0.0571
| TP: $0.0540 / $0.0520 / $0.0497 | SL: $0.0604
1
305
ເບິ່ງການແປ
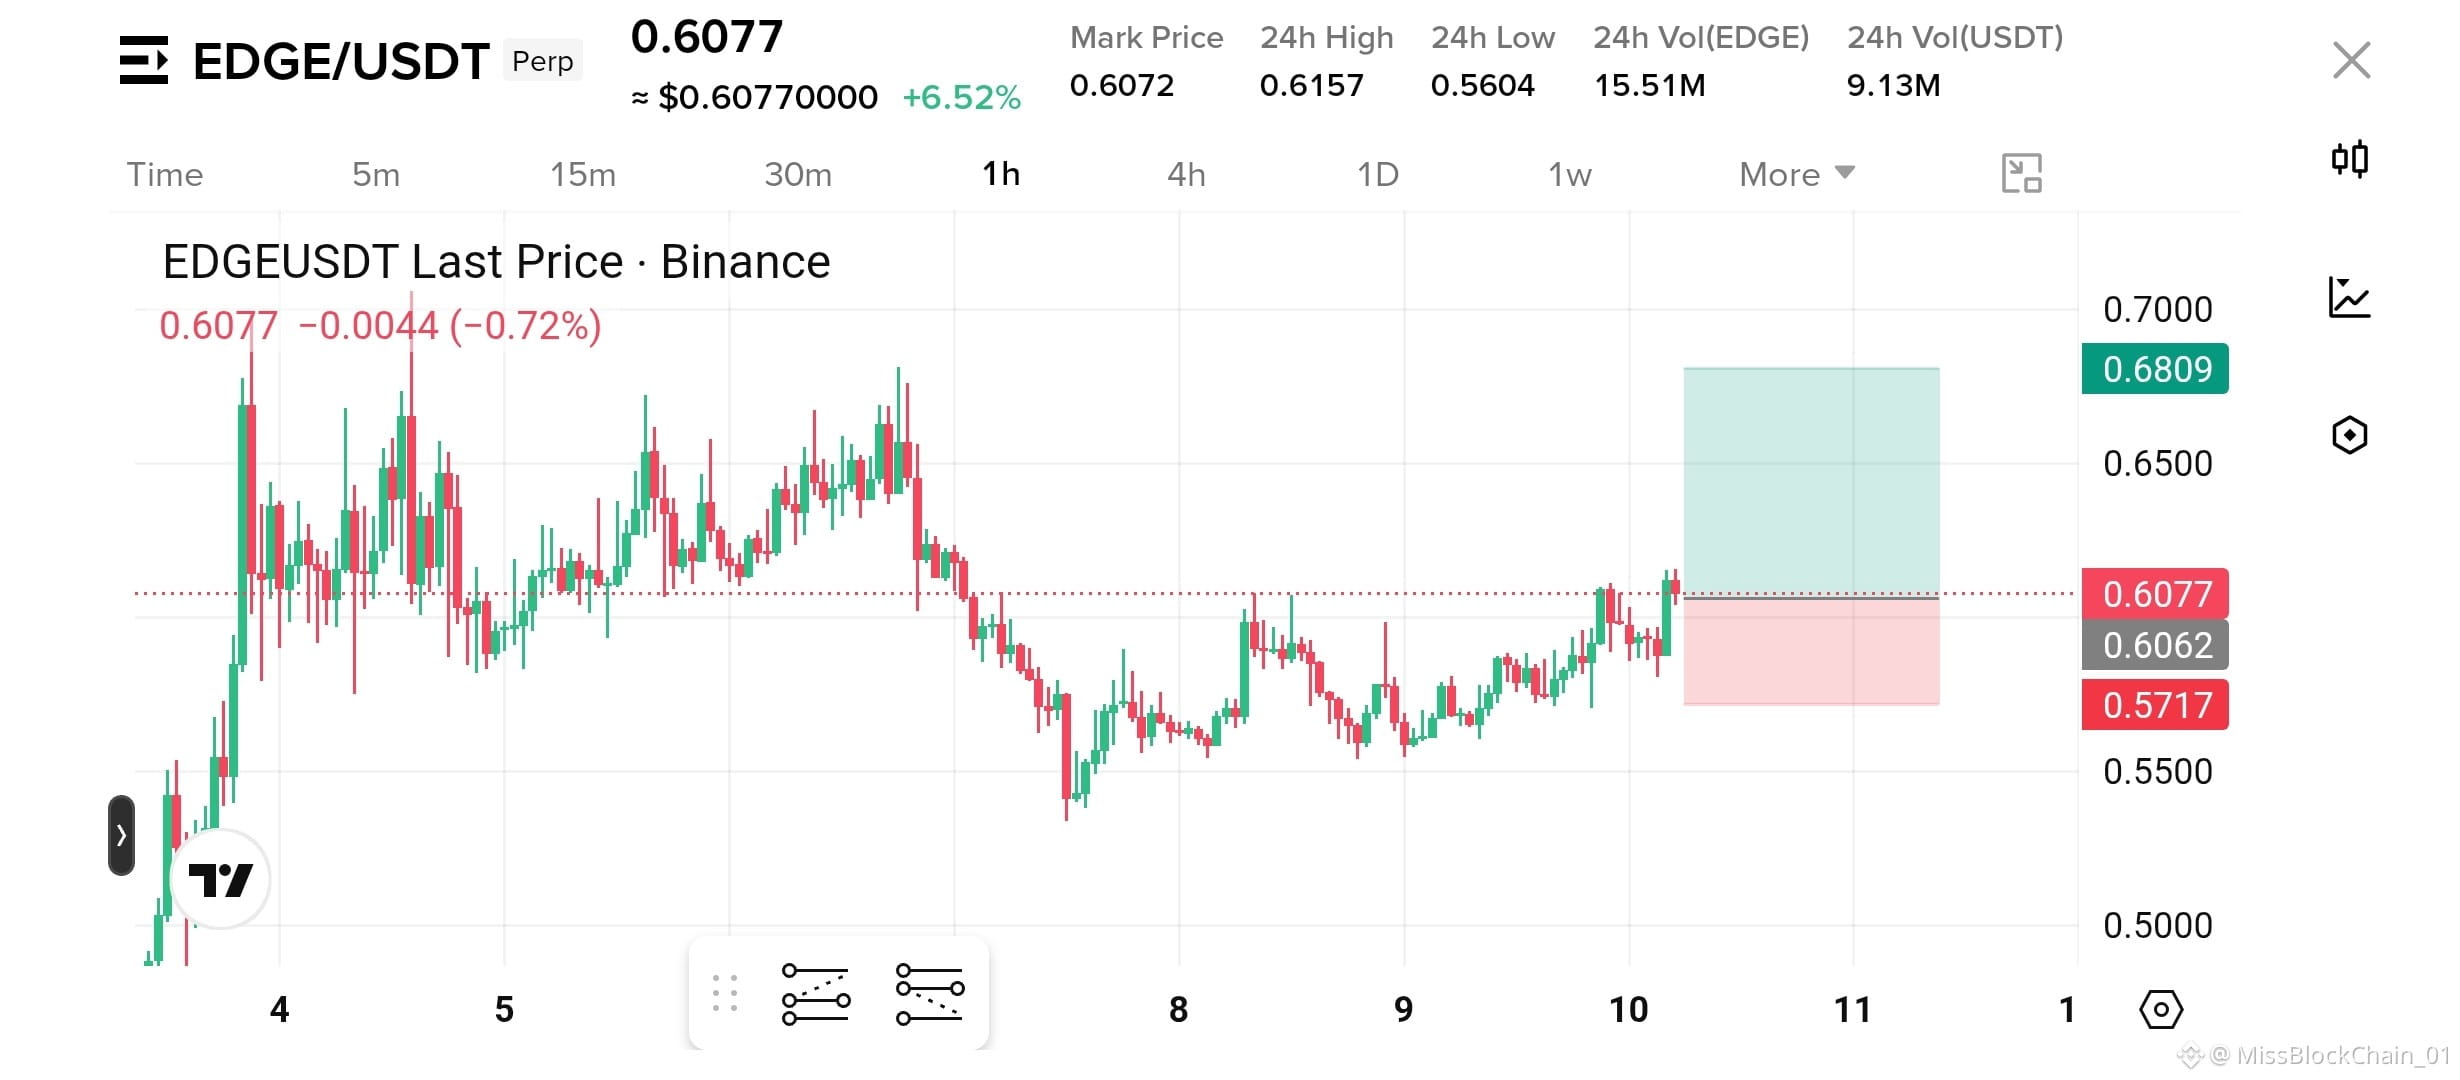
$EDGE is reclaiming the $0.606 zone with buyers holding momentum for another push higher....
Entry: $0.606–$0.610 | TP: $0.630 / $0.655 / $0.681 | SL: $0.572
{future}(EDGEUSDT)
$EDGE is reclaiming the $0.606 zone with buyers holding momentum for another push higher....
Entry: $0.606–$0.610 | TP: $0.630 / $0.655 / $0.681 | SL: $0.572
Entry: $0.606–$0.610 | TP: $0.630 / $0.655 / $0.681 | SL: $0.572
1
176
ເບິ່ງການແປ
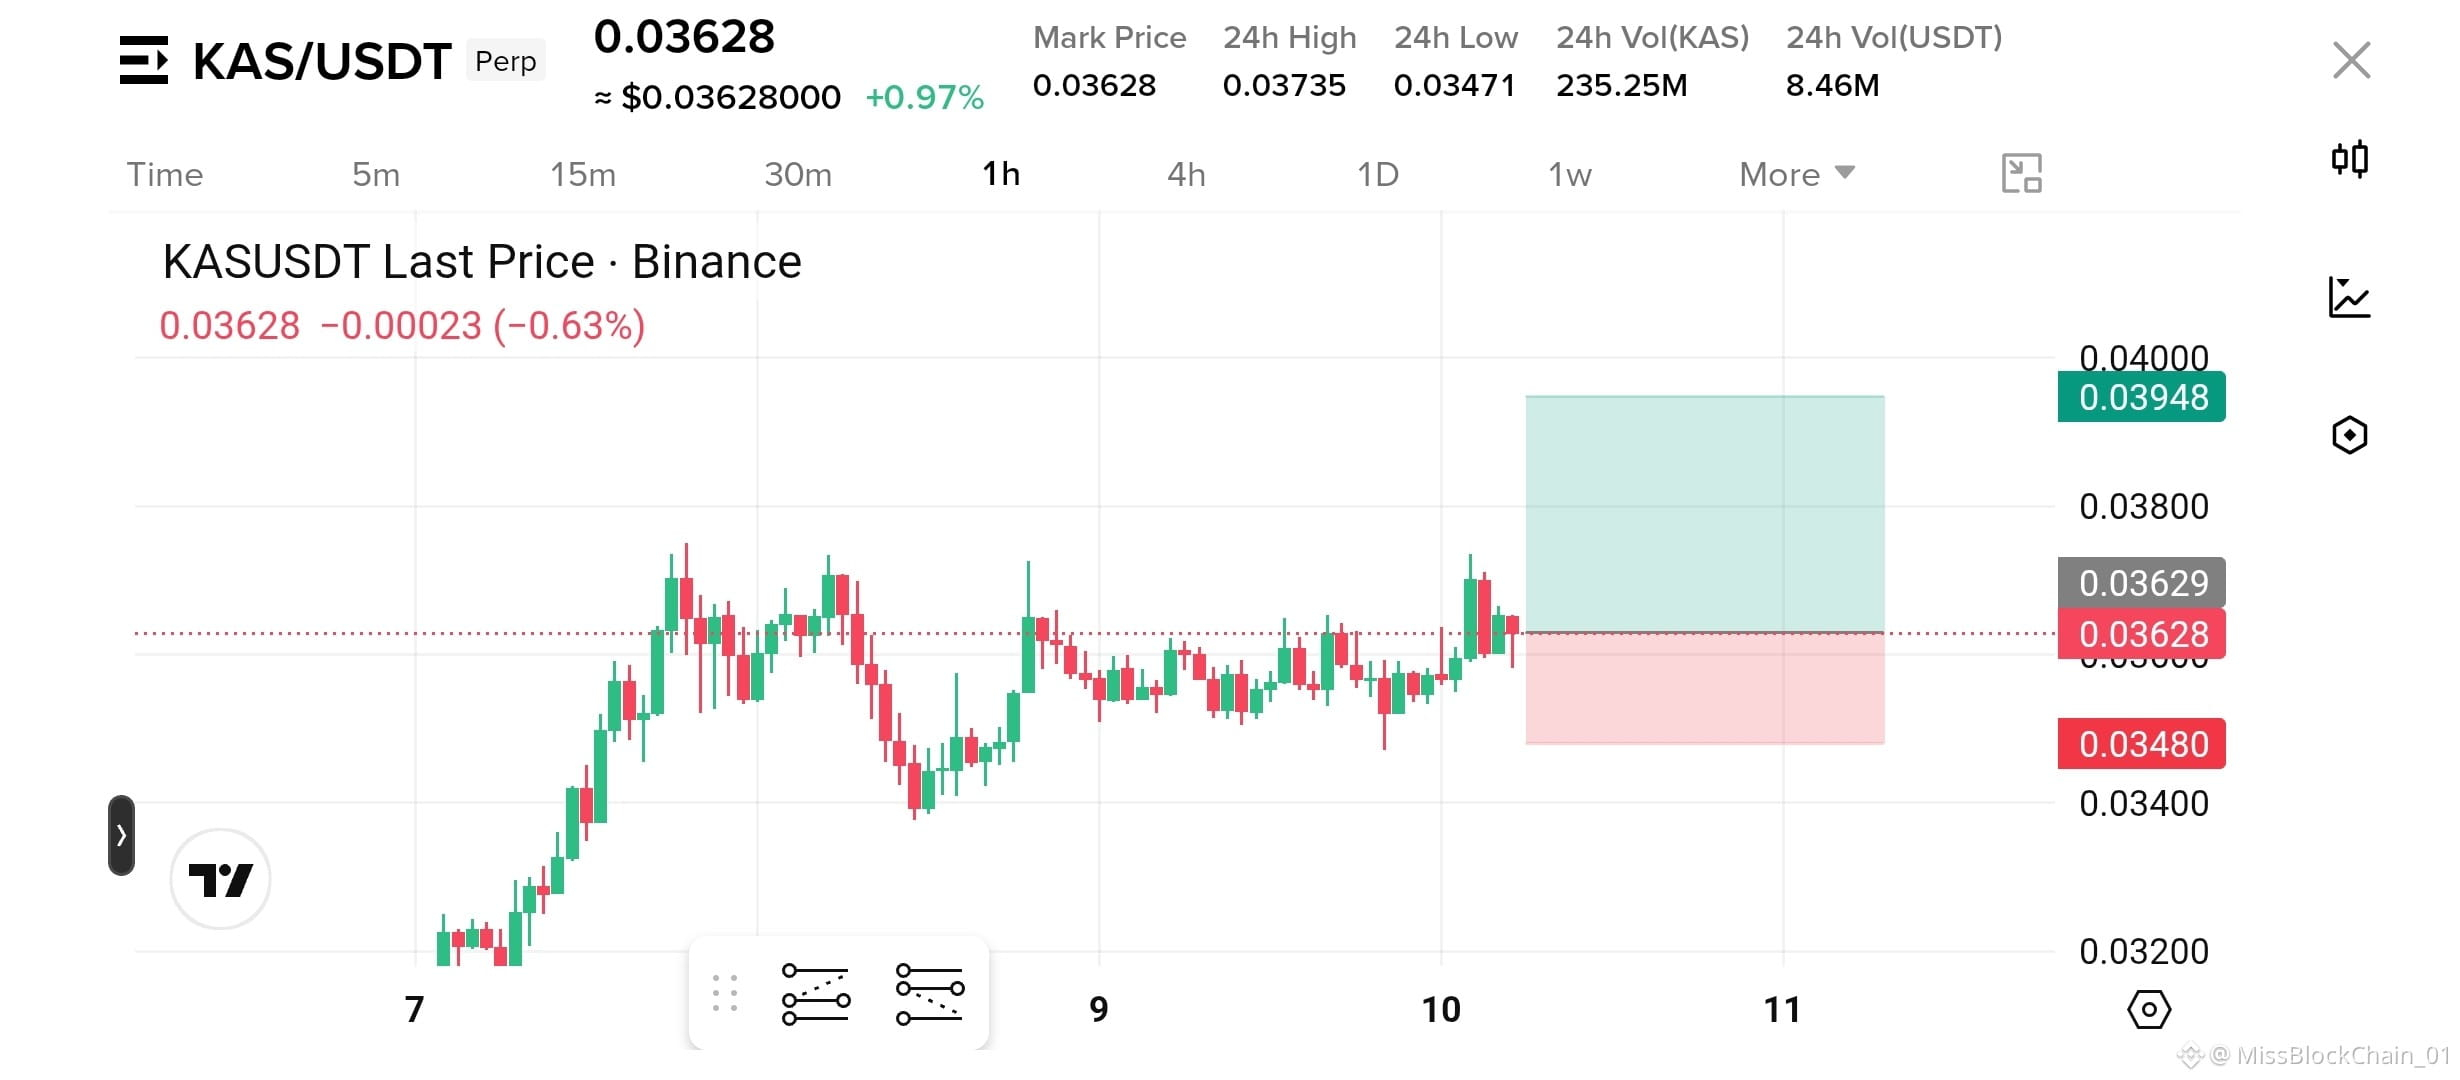
$KAS is compressing just below the recent high, and that tight range is where the next expansion could begin.
The 1H chart shows buyers defending the $0.035 area while price pushes back toward $0.03735 resistance. A sustained move above that zone would strengthen the upside setup.
$KAS — LONG
Entry: $0.03608
TP1: $0.03735
TP2: $0.03800
TP3: $0.03948
SL: $0.03480
Why: Price structure remains constructive with higher support holding.
If $0.03480 breaks, the long thesis is invalidated.
Are buyers ready to break the range?
{future}(KASUSDT)
$KAS is compressing just below the recent high, and that tight range is where the next expansion could begin.
The 1H chart shows buyers defending the $0.035 area while price pushes back toward $0.03735 resistance. A sustained move above that zone would strengthen the upside setup.
$KAS — LONG
Entry: $0.03608
TP1: $0.03735
TP2: $0.03800
TP3: $0.03948
SL: $0.03480
Why: Price structure remains constructive with higher support holding.
If $0.03480 breaks, the long thesis is invalidated.
Are buyers ready to break the range?
The 1H chart shows buyers defending the $0.035 area while price pushes back toward $0.03735 resistance. A sustained move above that zone would strengthen the upside setup.
$KAS — LONG
Entry: $0.03608
TP1: $0.03735
TP2: $0.03800
TP3: $0.03948
SL: $0.03480
Why: Price structure remains constructive with higher support holding.
If $0.03480 breaks, the long thesis is invalidated.
Are buyers ready to break the range?
124
·
--
ສັນຍານກະທິງ
ເບິ່ງການແປ
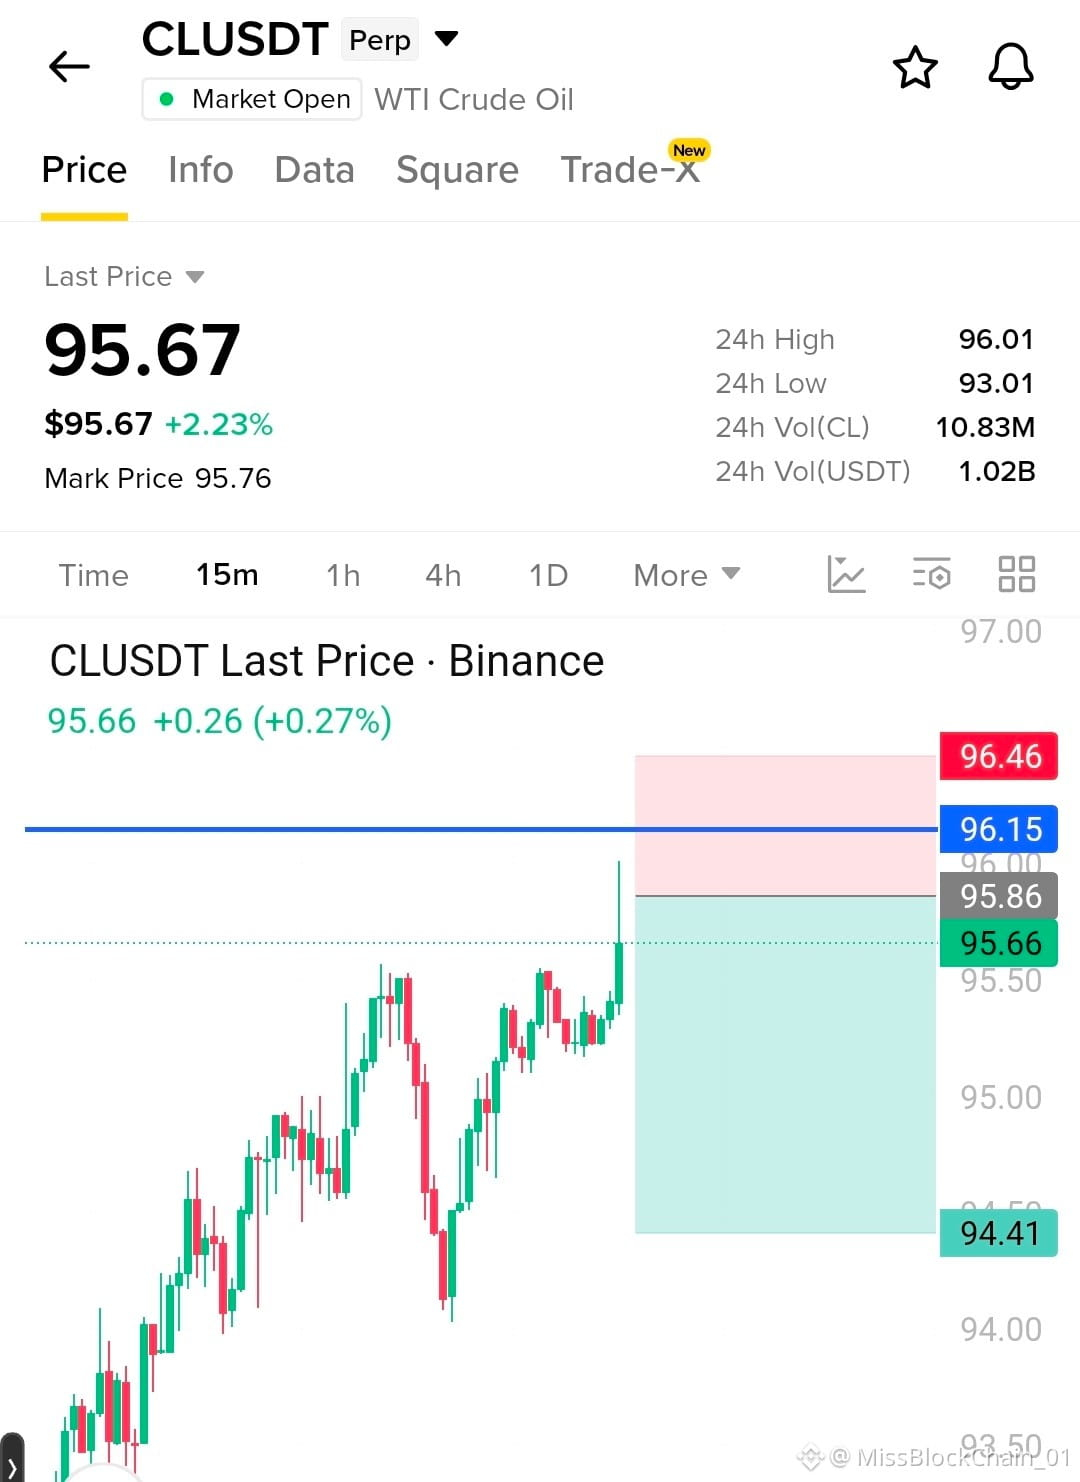
🚨 $CL SHORT SETUP 🚨
$CL — SHORT
Entry: 95.65–95.90
SL: 96.46
TP1: 95.10
TP2: 94.70
TP3: 94.41
Why? Price is pushing into the 96.15 resistance zone after an extended intraday climb. The 15M chart shows potential exhaustion near resistance; rejection below 96.15 could trigger a pullback toward the 94.41 support area.
{future}(CLUSDT)
Risk/Reward: ~1:1.6 to TP3.
Debate: Will $CL reject 96.15 or break higher?
Click here to Trade 👇️
🚨 $CL SHORT SETUP 🚨
$CL — SHORT
Entry: 95.65–95.90
SL: 96.46
TP1: 95.10
TP2: 94.70
TP3: 94.41
Why? Price is pushing into the 96.15 resistance zone after an extended intraday climb. The 15M chart shows potential exhaustion near resistance; rejection below 96.15 could trigger a pullback toward the 94.41 support area.
Risk/Reward: ~1:1.6 to TP3.
Debate: Will $CL reject 96.15 or break higher?
Click here to Trade 👇️
$CL — SHORT
Entry: 95.65–95.90
SL: 96.46
TP1: 95.10
TP2: 94.70
TP3: 94.41
Why? Price is pushing into the 96.15 resistance zone after an extended intraday climb. The 15M chart shows potential exhaustion near resistance; rejection below 96.15 could trigger a pullback toward the 94.41 support area.
Risk/Reward: ~1:1.6 to TP3.
Debate: Will $CL reject 96.15 or break higher?
Click here to Trade 👇️
3
378
ເບິ່ງການແປ
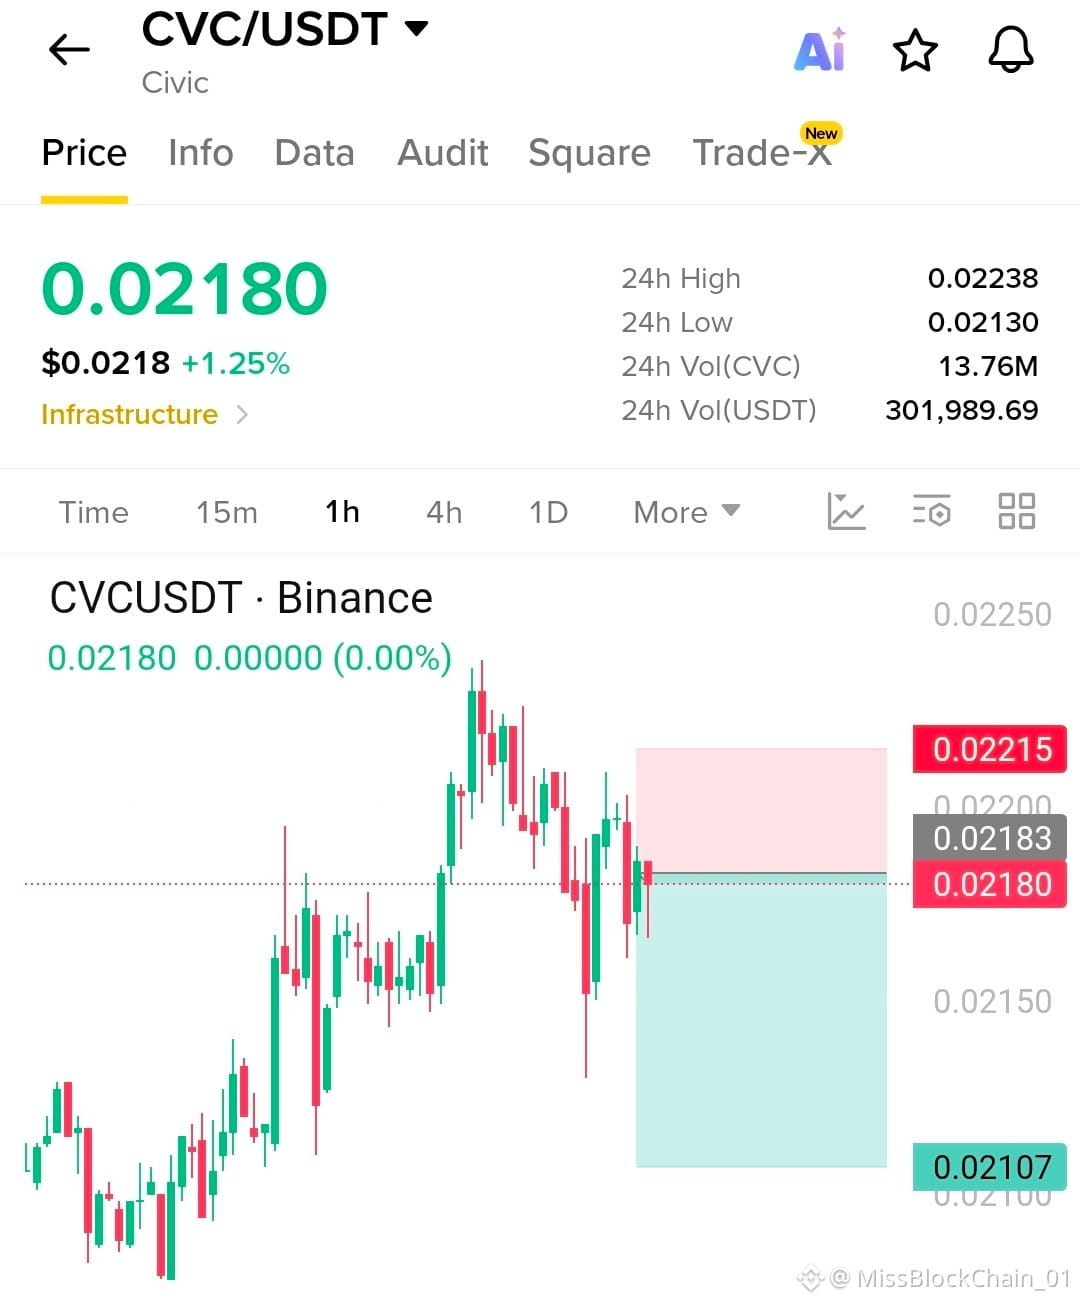
🚨 $CVC SHORT SETUP 🚨
$CVC — SHORT
Entry: 0.02180–0.02195
SL: 0.02215
TP1: 0.02150
TP2: 0.02130
TP3: 0.02107
Why? The 1H chart shows repeated rejection around 0.0219–0.0220, with momentum fading after the recent push higher. A clean loss of 0.02170 could open the downside toward the marked support zones.
{future}(CVCUSDT)
Risk/Reward: ~1:3 to TP3.
Debate: Will $CVC break 0.02170 and extend the pullback?
Click here to Trade 👇️
🚨 $CVC SHORT SETUP 🚨
$CVC — SHORT
Entry: 0.02180–0.02195
SL: 0.02215
TP1: 0.02150
TP2: 0.02130
TP3: 0.02107
Why? The 1H chart shows repeated rejection around 0.0219–0.0220, with momentum fading after the recent push higher. A clean loss of 0.02170 could open the downside toward the marked support zones.
Risk/Reward: ~1:3 to TP3.
Debate: Will $CVC break 0.02170 and extend the pullback?
Click here to Trade 👇️
$CVC — SHORT
Entry: 0.02180–0.02195
SL: 0.02215
TP1: 0.02150
TP2: 0.02130
TP3: 0.02107
Why? The 1H chart shows repeated rejection around 0.0219–0.0220, with momentum fading after the recent push higher. A clean loss of 0.02170 could open the downside toward the marked support zones.
Risk/Reward: ~1:3 to TP3.
Debate: Will $CVC break 0.02170 and extend the pullback?
Click here to Trade 👇️
2
1
202
·
--
ສັນຍານໝີ
ເບິ່ງການແປ
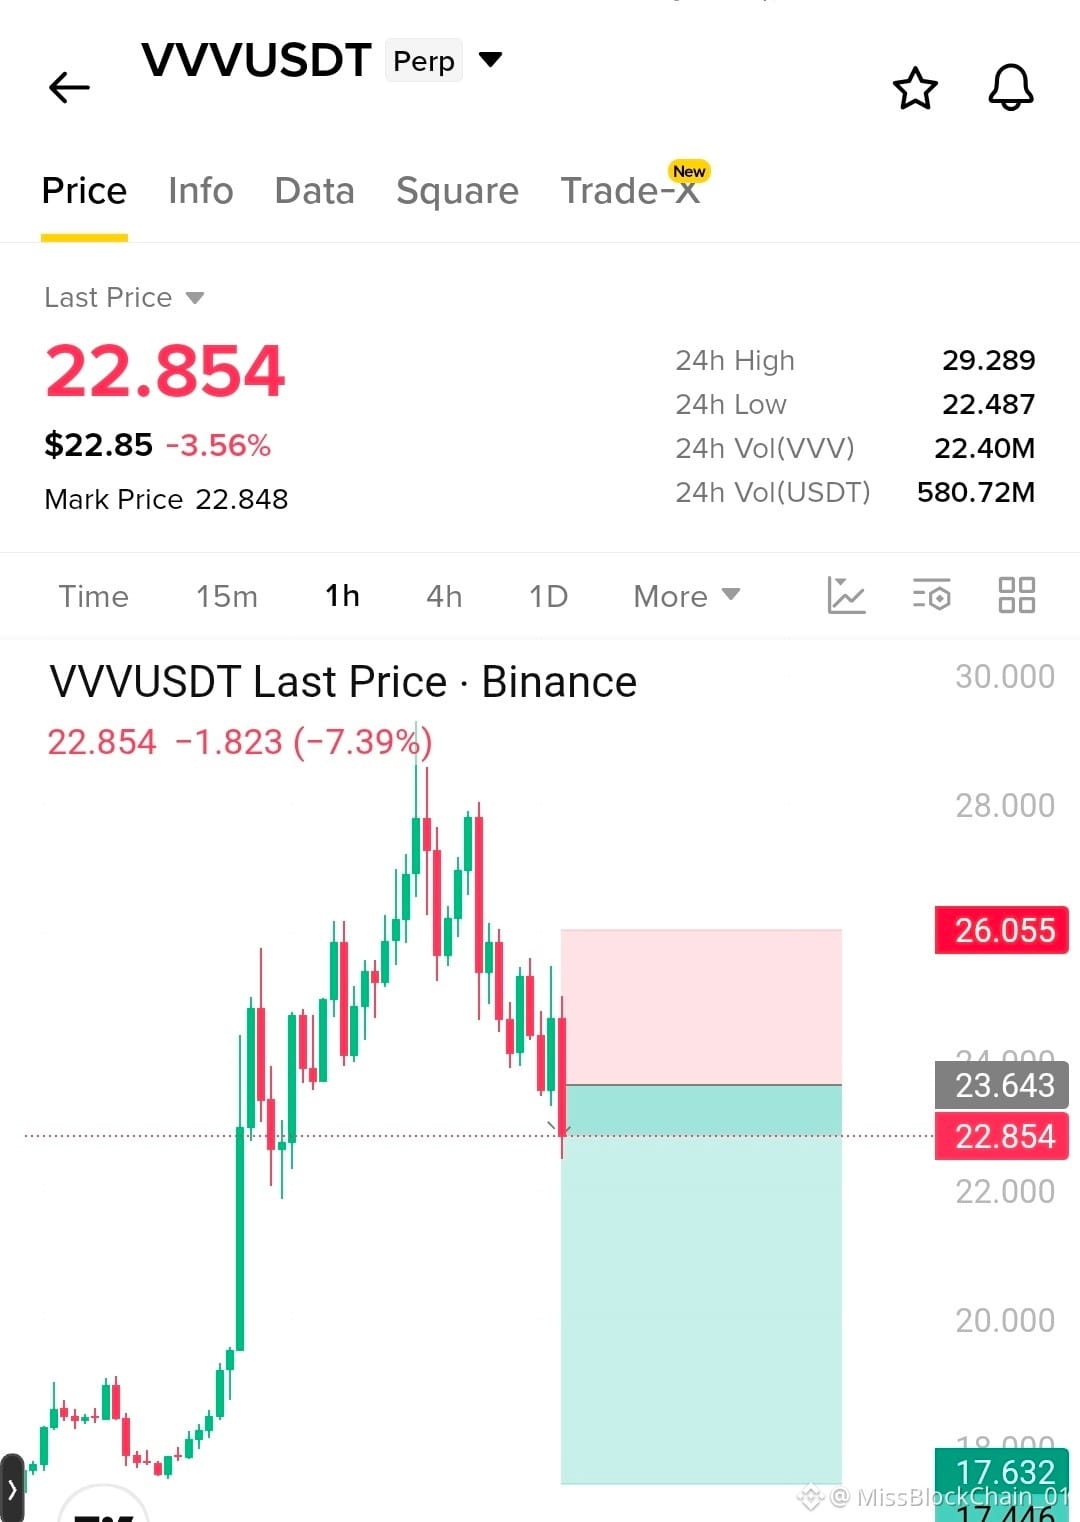
🚨 $VVV SHORT SETUP 🚨
$VVV — SHORT
Entry: 22.85–23.65
SL: 26.05
TP1: 21.50
TP2: 19.50
TP3: 17.63
Why? The 1H structure has shifted bearish with consecutive lower highs and strong selling pressure. Price is now testing the 22.85 area; rejection from 23.65 could extend the downside toward the marked demand zones.
Risk/Reward: ~1:2.3 to TP3.
Debate: Will $VVV
{future}(VVVUSDT)
break 22.50 and accelerate lower?
Click here to Trade 👇️
🚨 $VVV SHORT SETUP 🚨
$VVV — SHORT
Entry: 22.85–23.65
SL: 26.05
TP1: 21.50
TP2: 19.50
TP3: 17.63
Why? The 1H structure has shifted bearish with consecutive lower highs and strong selling pressure. Price is now testing the 22.85 area; rejection from 23.65 could extend the downside toward the marked demand zones.
Risk/Reward: ~1:2.3 to TP3.
Debate: Will $VVV
break 22.50 and accelerate lower?
Click here to Trade 👇️
$VVV — SHORT
Entry: 22.85–23.65
SL: 26.05
TP1: 21.50
TP2: 19.50
TP3: 17.63
Why? The 1H structure has shifted bearish with consecutive lower highs and strong selling pressure. Price is now testing the 22.85 area; rejection from 23.65 could extend the downside toward the marked demand zones.
Risk/Reward: ~1:2.3 to TP3.
Debate: Will $VVV
break 22.50 and accelerate lower?
Click here to Trade 👇️
4
400
·
--
ສັນຍານໝີ
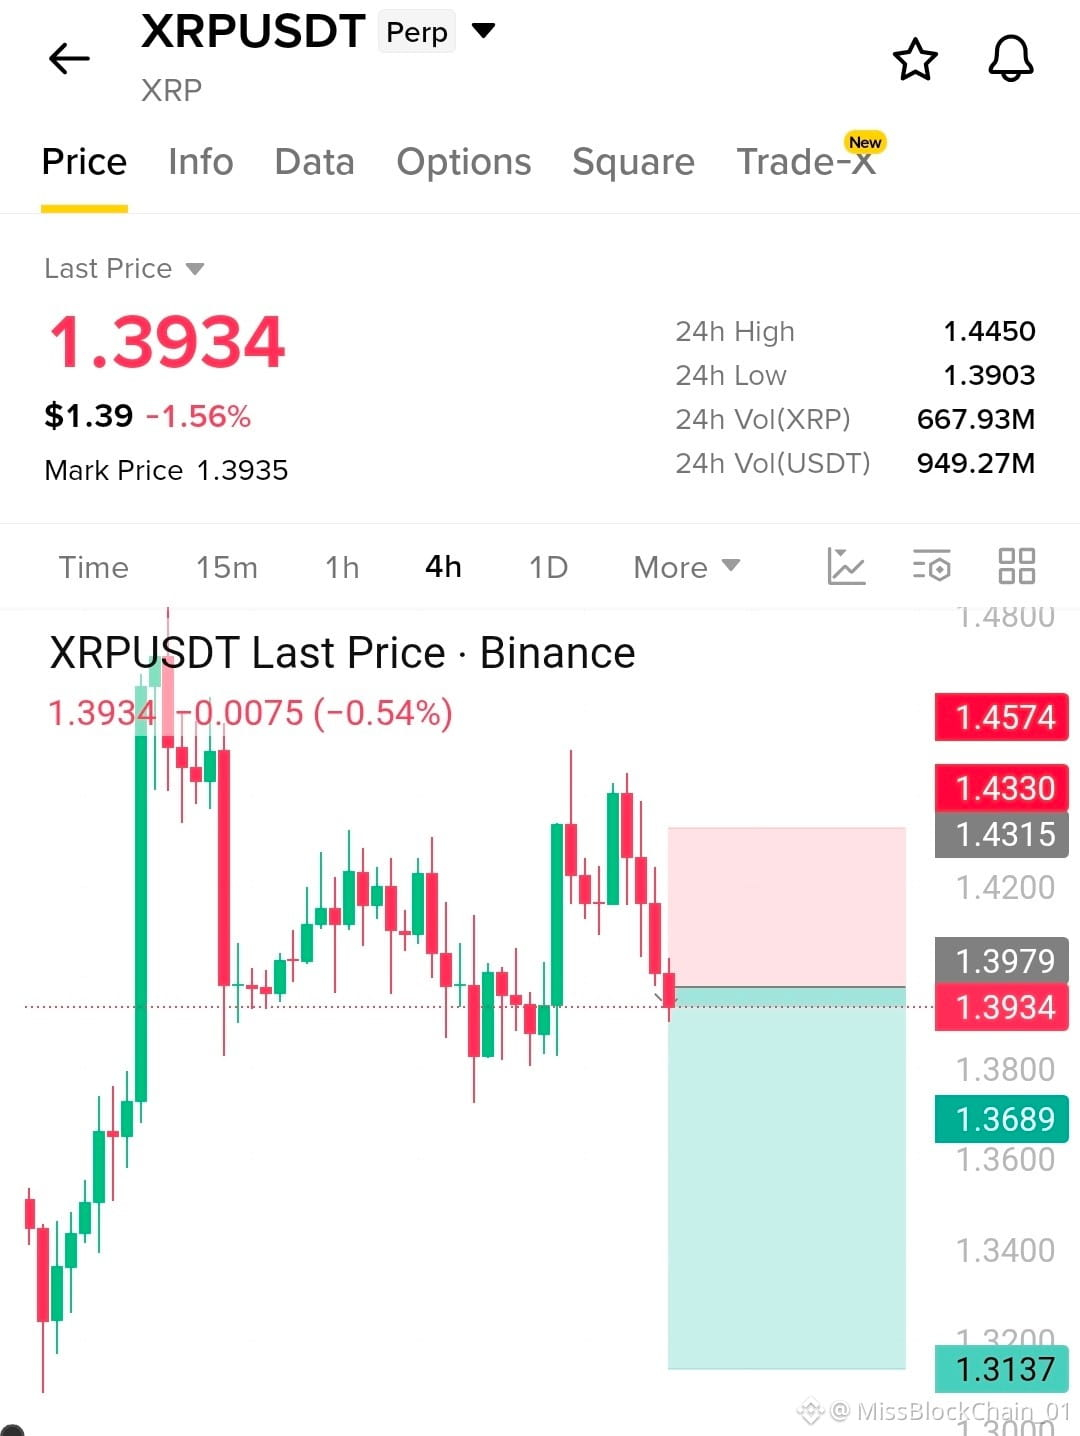
🚨 $XRP SHORT SETUP 🚨
$XRP — SHORT
Entry: 1.3920–1.3980
SL: 1.4330
TP1: 1.3689
TP2: 1.3400
TP3: 1.3137
ហេតុអ្វី? តារាង 4H បង្ហាញការបដិសេធពីតំបន់ធន់ 1.43 ជាមួយនឹងទៀន bearish ជាប់ៗគ្នា និងរចនាសម្ព័ន្ធ lower-high ដែលកំពុងបង្កើត។ ការបំបែកយ៉ាងបន្តបន្ទាប់ក្រោម 1.3900 អាចជំរុញល្បឿនធ្លាក់ចុះឲ្យខ្លាំងขึ้น។
Risk/Reward: ~1:2.1 ទៅ TP3.
ការជជែក៖ $XRP នឹងបាត់បង់ 1.3900 ហើយបើកជើង bearish បន្ទាប់ឬទេ?
{future}(XRPUSDT)
ចុចទីនេះដើម្បី Trade 👇️
🚨 $XRP SHORT SETUP 🚨
$XRP — SHORT
Entry: 1.3920–1.3980
SL: 1.4330
TP1: 1.3689
TP2: 1.3400
TP3: 1.3137
ហេតុអ្វី? តារាង 4H បង្ហាញការបដិសេធពីតំបន់ធន់ 1.43 ជាមួយនឹងទៀន bearish ជាប់ៗគ្នា និងរចនាសម្ព័ន្ធ lower-high ដែលកំពុងបង្កើត។ ការបំបែកយ៉ាងបន្តបន្ទាប់ក្រោម 1.3900 អាចជំរុញល្បឿនធ្លាក់ចុះឲ្យខ្លាំងขึ้น។
Risk/Reward: ~1:2.1 ទៅ TP3.
ការជជែក៖ $XRP នឹងបាត់បង់ 1.3900 ហើយបើកជើង bearish បន្ទាប់ឬទេ?
ចុចទីនេះដើម្បី Trade 👇️
$XRP — SHORT
Entry: 1.3920–1.3980
SL: 1.4330
TP1: 1.3689
TP2: 1.3400
TP3: 1.3137
ហេតុអ្វី? តារាង 4H បង្ហាញការបដិសេធពីតំបន់ធន់ 1.43 ជាមួយនឹងទៀន bearish ជាប់ៗគ្នា និងរចនាសម្ព័ន្ធ lower-high ដែលកំពុងបង្កើត។ ការបំបែកយ៉ាងបន្តបន្ទាប់ក្រោម 1.3900 អាចជំរុញល្បឿនធ្លាក់ចុះឲ្យខ្លាំងขึ้น។
Risk/Reward: ~1:2.1 ទៅ TP3.
ការជជែក៖ $XRP នឹងបាត់បង់ 1.3900 ហើយបើកជើង bearish បន្ទាប់ឬទេ?
ចុចទីនេះដើម្បី Trade 👇️
3
243
·
--
ສັນຍານໝີ
ເບິ່ງການແປ
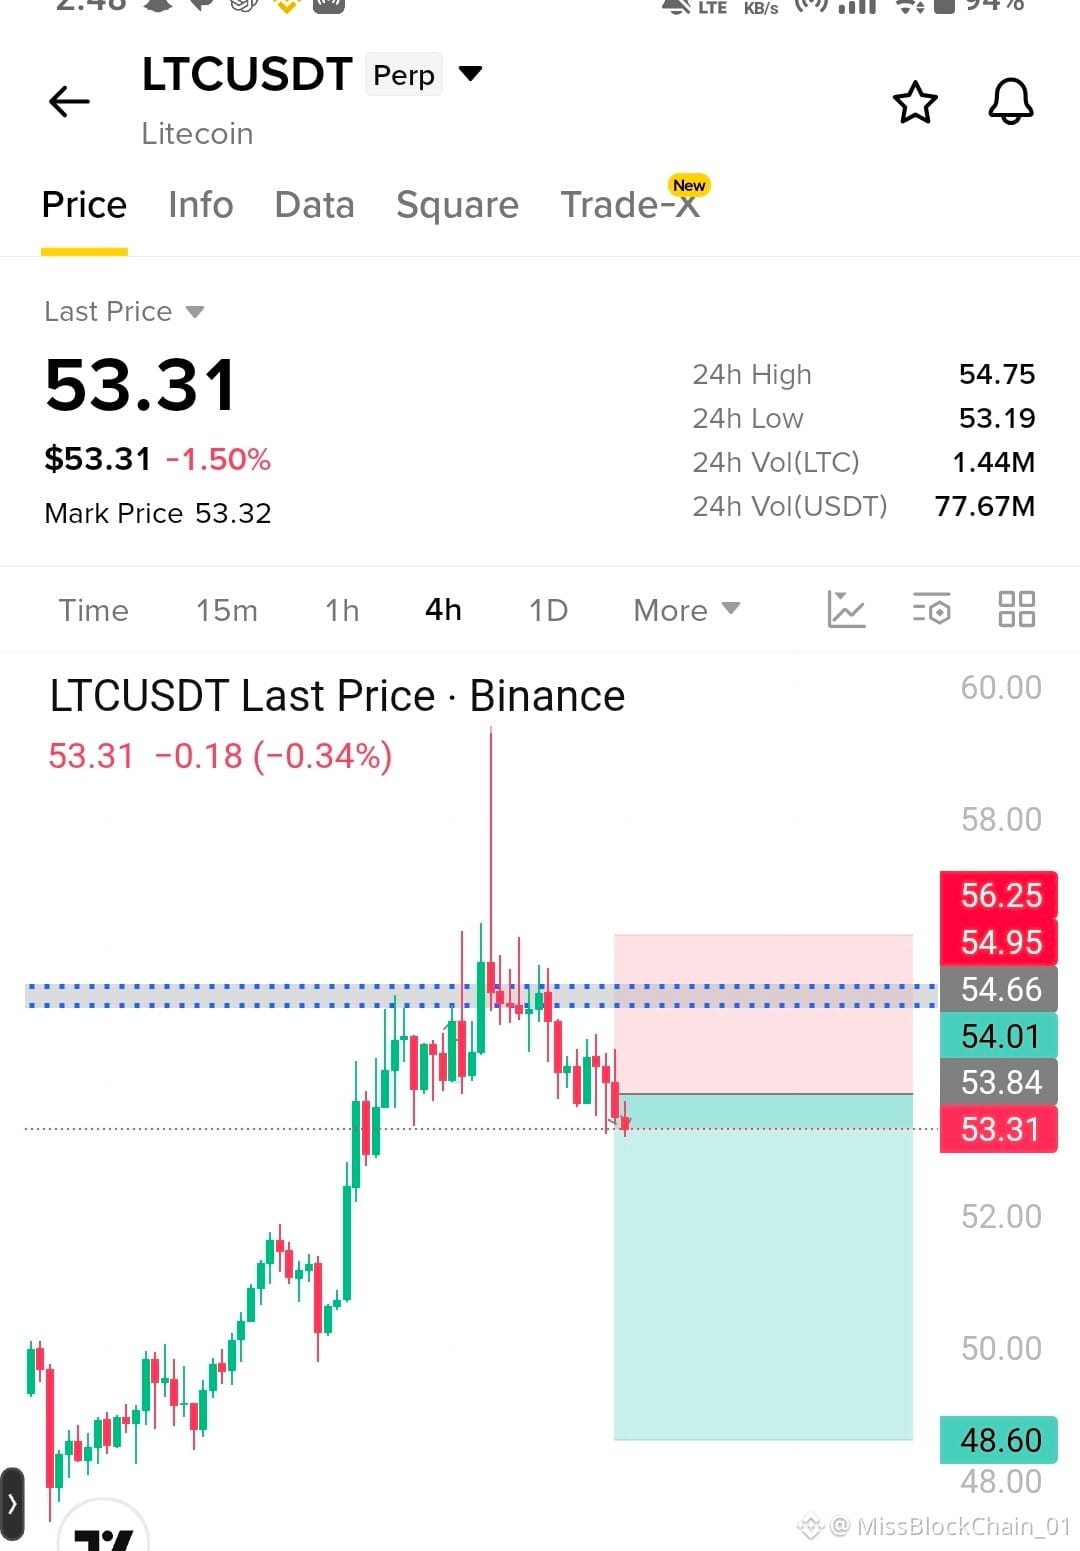
🚨 $LTC SHORT SETUP 🚨
$LTC — SHORT
Entry: 53.30–54.00
SL: 56.25
TP1: 52.00
TP2: 50.00
TP3: 48.60
{future}(LTCUSDT)
Why? The 4H structure shows rejection from the 54.66 resistance band, followed by lower highs and weakening momentum. A sustained break below 53.20 could accelerate the move toward 50.00–48.60.
Risk/Reward: ~1:2.1 to TP3.
Debate: Will $LTC lose 53.20 and confirm the next downside leg?
Click here to Trade 👇️
🚨 $LTC SHORT SETUP 🚨
$LTC — SHORT
Entry: 53.30–54.00
SL: 56.25
TP1: 52.00
TP2: 50.00
TP3: 48.60
Why? The 4H structure shows rejection from the 54.66 resistance band, followed by lower highs and weakening momentum. A sustained break below 53.20 could accelerate the move toward 50.00–48.60.
Risk/Reward: ~1:2.1 to TP3.
Debate: Will $LTC lose 53.20 and confirm the next downside leg?
Click here to Trade 👇️
$LTC — SHORT
Entry: 53.30–54.00
SL: 56.25
TP1: 52.00
TP2: 50.00
TP3: 48.60
Why? The 4H structure shows rejection from the 54.66 resistance band, followed by lower highs and weakening momentum. A sustained break below 53.20 could accelerate the move toward 50.00–48.60.
Risk/Reward: ~1:2.1 to TP3.
Debate: Will $LTC lose 53.20 and confirm the next downside leg?
Click here to Trade 👇️
2
276
·
--
ສັນຍານກະທິງ
ເບິ່ງການແປ
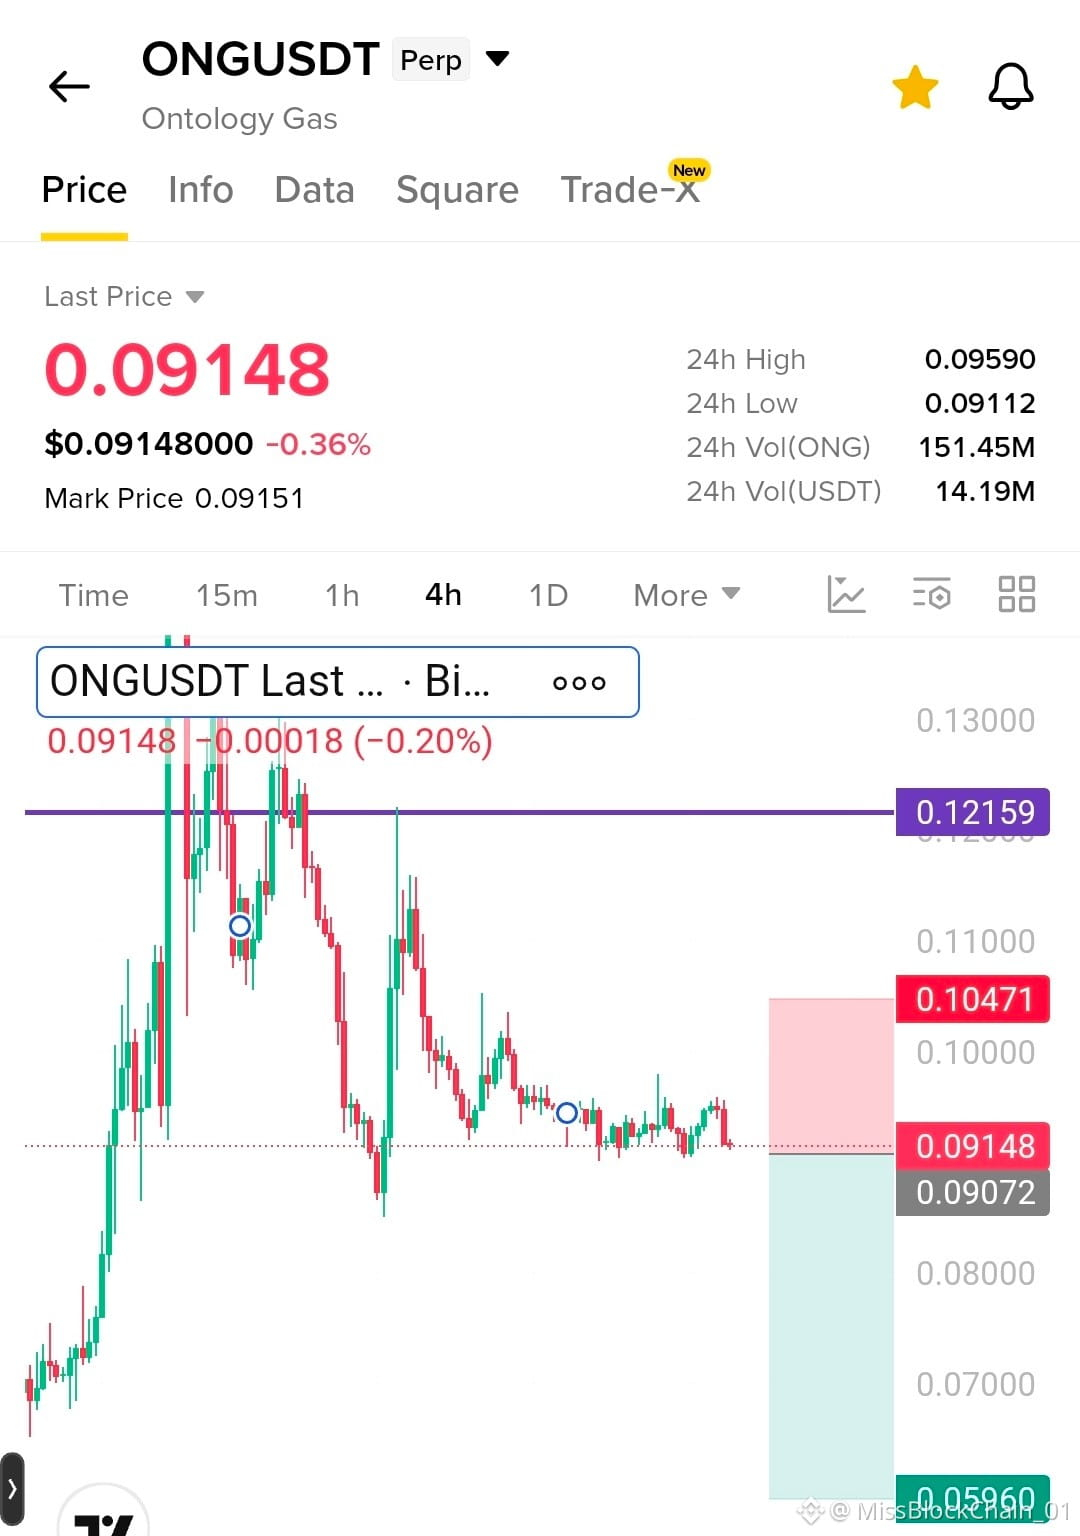
🚨 $ONG SHORT SETUP 🚨
$ONG — SHORT
Entry: 0.09150–0.09300
SL: 0.10471
TP1: 0.08500
TP2: 0.07200
{future}(ONGUSDT)
TP3: 0.05960
Why? The 4H structure remains bearish, with repeated rejection and lower highs below the major 0.12159 resistance. Price is consolidating near 0.0915; a breakdown of this range could open a deeper downside move.
Risk/Reward: ~1:2.5 to TP3.
Debate: Will $ONG lose 0.09000 and trigger the next sell-off?
Click here to Trade 👇️
🚨 $ONG SHORT SETUP 🚨
$ONG — SHORT
Entry: 0.09150–0.09300
SL: 0.10471
TP1: 0.08500
TP2: 0.07200
TP3: 0.05960
Why? The 4H structure remains bearish, with repeated rejection and lower highs below the major 0.12159 resistance. Price is consolidating near 0.0915; a breakdown of this range could open a deeper downside move.
Risk/Reward: ~1:2.5 to TP3.
Debate: Will $ONG lose 0.09000 and trigger the next sell-off?
Click here to Trade 👇️
$ONG — SHORT
Entry: 0.09150–0.09300
SL: 0.10471
TP1: 0.08500
TP2: 0.07200
TP3: 0.05960
Why? The 4H structure remains bearish, with repeated rejection and lower highs below the major 0.12159 resistance. Price is consolidating near 0.0915; a breakdown of this range could open a deeper downside move.
Risk/Reward: ~1:2.5 to TP3.
Debate: Will $ONG lose 0.09000 and trigger the next sell-off?
Click here to Trade 👇️
2
3
950
·
--
ສັນຍານໝີ
ເບິ່ງການແປ
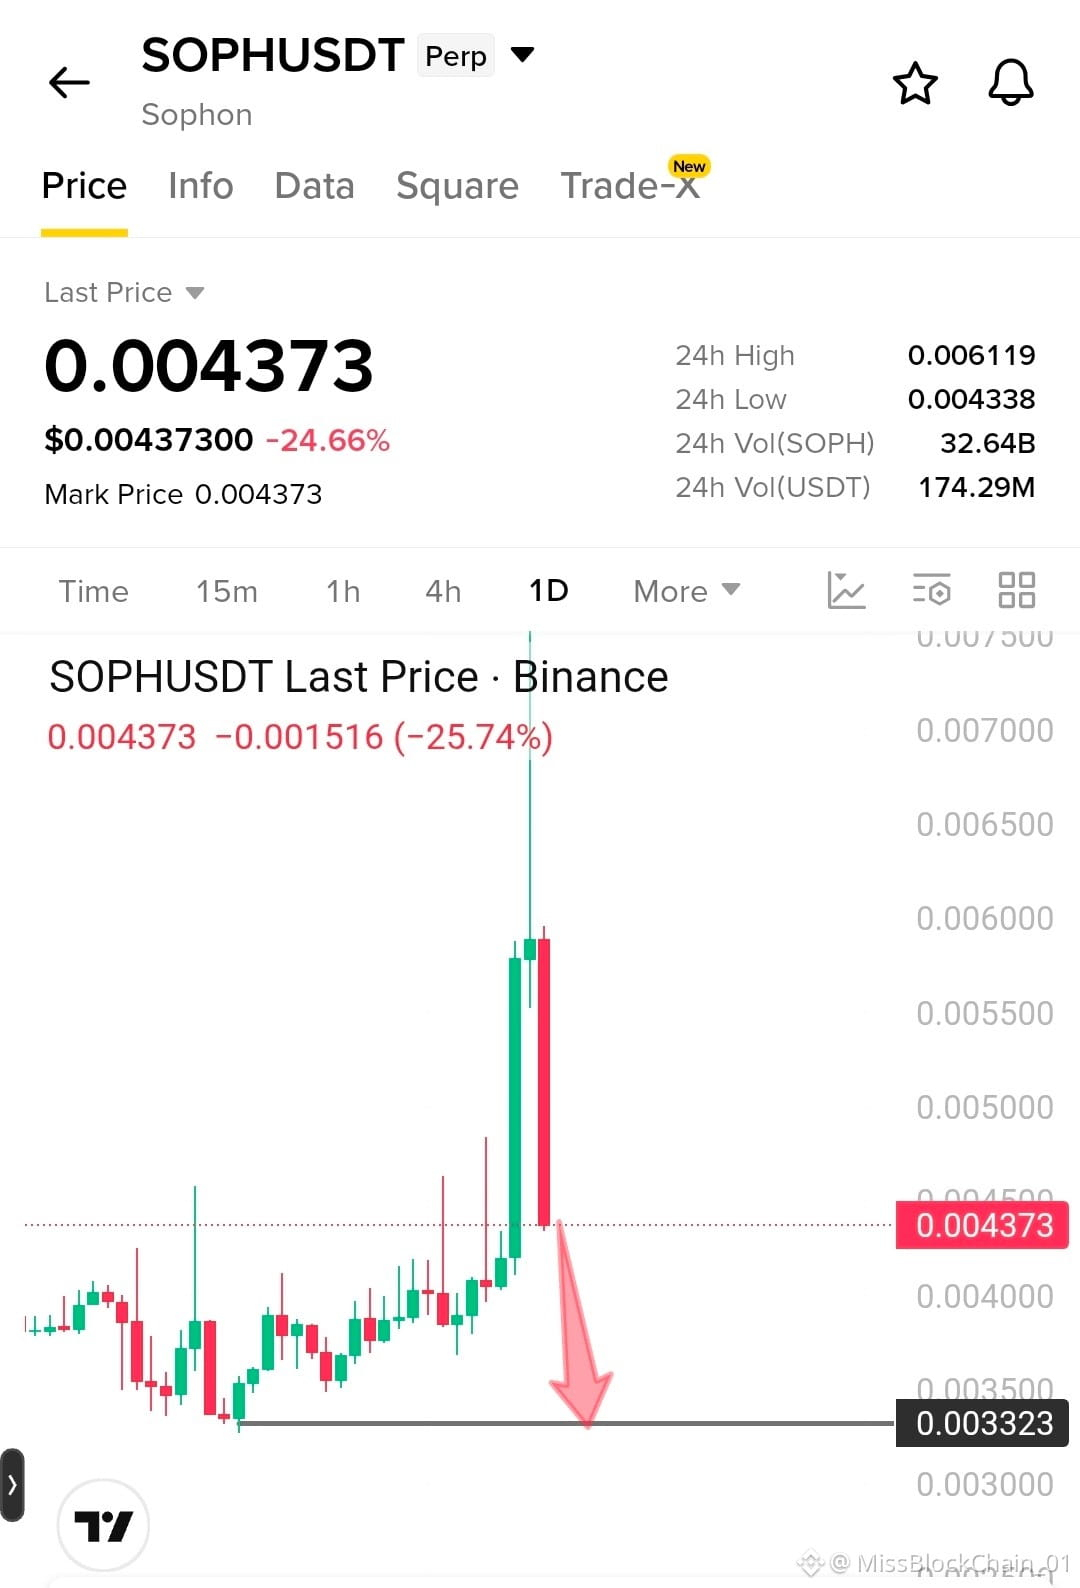
🚨 $SOPH SHORT SETUP 🚨
$SOPH — SHORT
Entry: 0.00435–0.00445
SL: 0.00472
TP1: 0.00400
TP2: 0.00365
TP3: 0.00332
{future}(SOPHUSDT)
Why? The daily chart shows a sharp rejection from the 0.0058–0.0060 region followed by heavy bearish displacement. Momentum remains weak, with 0.00332 acting as the key downside support.
Risk/Reward: ~1:3 to TP3.
Debate: Will $SOPH break 0.00332 next?
Click here to Trade 👇️
🚨 $SOPH SHORT SETUP 🚨
$SOPH — SHORT
Entry: 0.00435–0.00445
SL: 0.00472
TP1: 0.00400
TP2: 0.00365
TP3: 0.00332
Why? The daily chart shows a sharp rejection from the 0.0058–0.0060 region followed by heavy bearish displacement. Momentum remains weak, with 0.00332 acting as the key downside support.
Risk/Reward: ~1:3 to TP3.
Debate: Will $SOPH break 0.00332 next?
Click here to Trade 👇️
$SOPH — SHORT
Entry: 0.00435–0.00445
SL: 0.00472
TP1: 0.00400
TP2: 0.00365
TP3: 0.00332
Why? The daily chart shows a sharp rejection from the 0.0058–0.0060 region followed by heavy bearish displacement. Momentum remains weak, with 0.00332 acting as the key downside support.
Risk/Reward: ~1:3 to TP3.
Debate: Will $SOPH break 0.00332 next?
Click here to Trade 👇️
1
247
·
--
ສັນຍານໝີ
ເບິ່ງການແປ
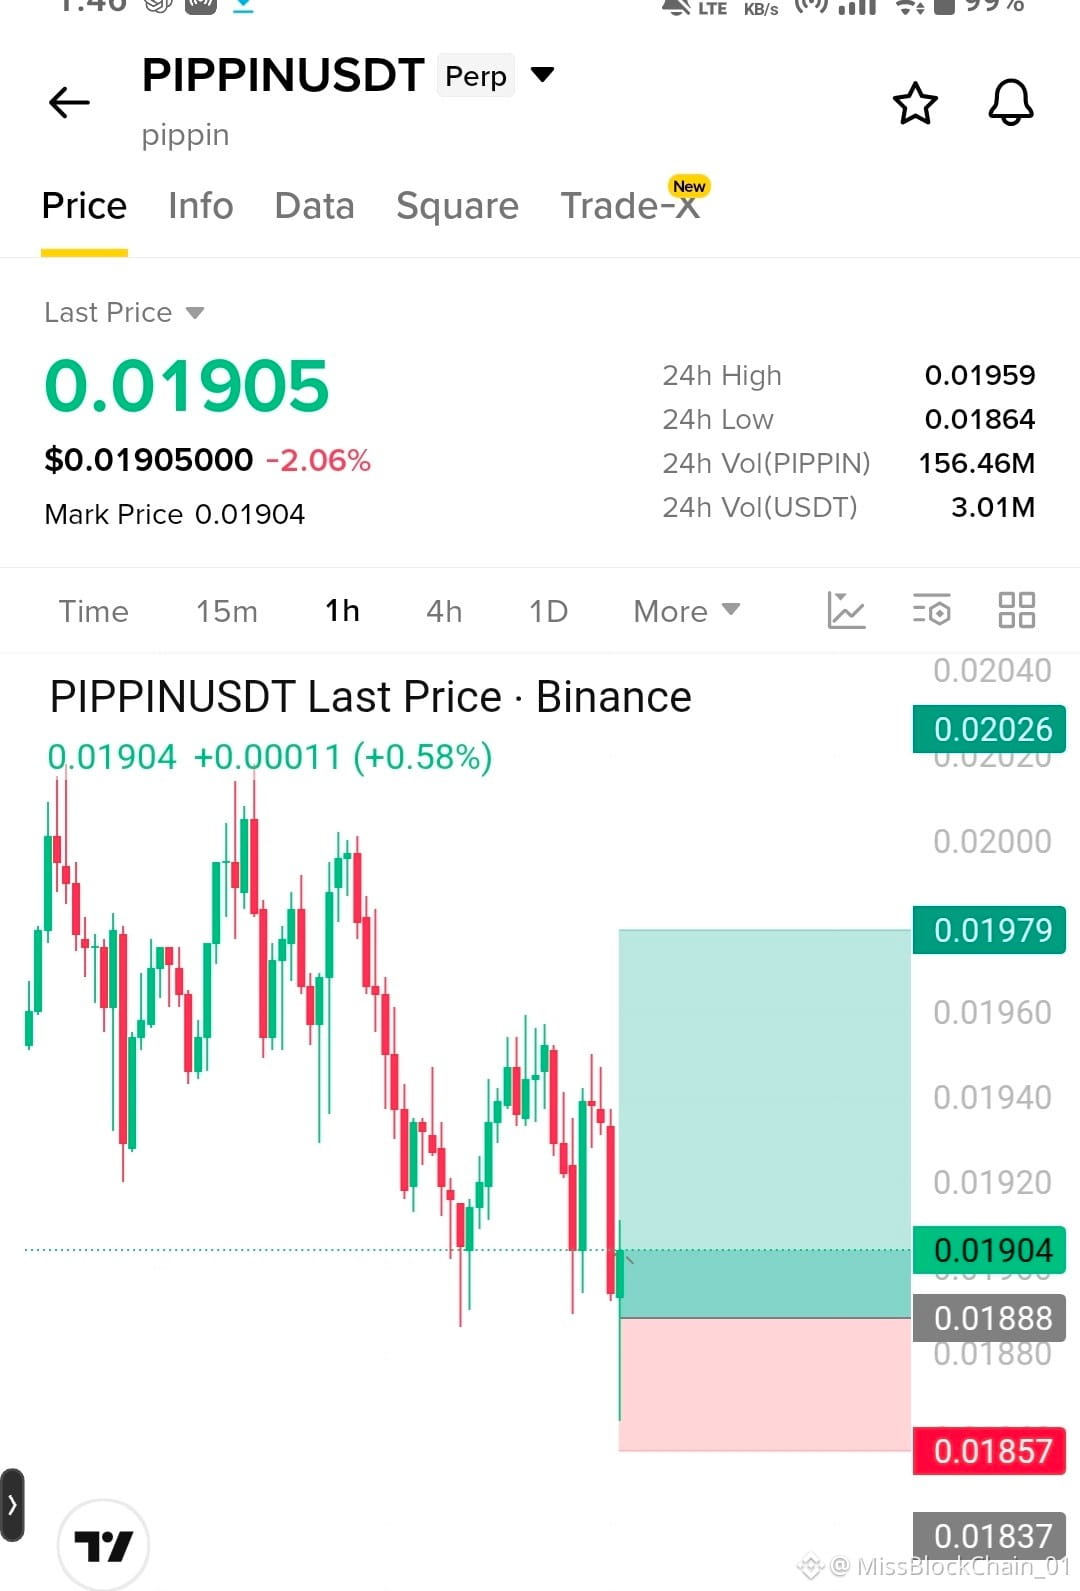
🚨 $PIPPIN LONG SETUP 🚨
$PIPPIN — LONG
Entry: 0.01900–0.01908
SL: 0.01857
TP1: 0.01940
TP2: 0.01979
TP3: 0.02026
{future}(PIPPINUSDT)
{alpha}(CT_501Dfh5DzRgSvvCFDoYc2ciTkMrbDfRKybA4SoFbPmApump)
Why? Price is reacting from the 0.01885–0.01900 demand area after a sharp sweep lower. Holding this zone could trigger a relief move toward the nearby resistance levels.
Risk/Reward: ~1:3 to TP3.
Debate: Can $PIPPIN reclaim 0.01940 and accelerate toward 0.02000?
Click here to Trade 👇️
🚨 $PIPPIN LONG SETUP 🚨
$PIPPIN — LONG
Entry: 0.01900–0.01908
SL: 0.01857
TP1: 0.01940
TP2: 0.01979
TP3: 0.02026
Why? Price is reacting from the 0.01885–0.01900 demand area after a sharp sweep lower. Holding this zone could trigger a relief move toward the nearby resistance levels.
Risk/Reward: ~1:3 to TP3.
Debate: Can $PIPPIN reclaim 0.01940 and accelerate toward 0.02000?
Click here to Trade 👇️
$PIPPIN — LONG
Entry: 0.01900–0.01908
SL: 0.01857
TP1: 0.01940
TP2: 0.01979
TP3: 0.02026
Why? Price is reacting from the 0.01885–0.01900 demand area after a sharp sweep lower. Holding this zone could trigger a relief move toward the nearby resistance levels.
Risk/Reward: ~1:3 to TP3.
Debate: Can $PIPPIN reclaim 0.01940 and accelerate toward 0.02000?
Click here to Trade 👇️
1
167
·
--
ສັນຍານກະທິງ
ເບິ່ງການແປ
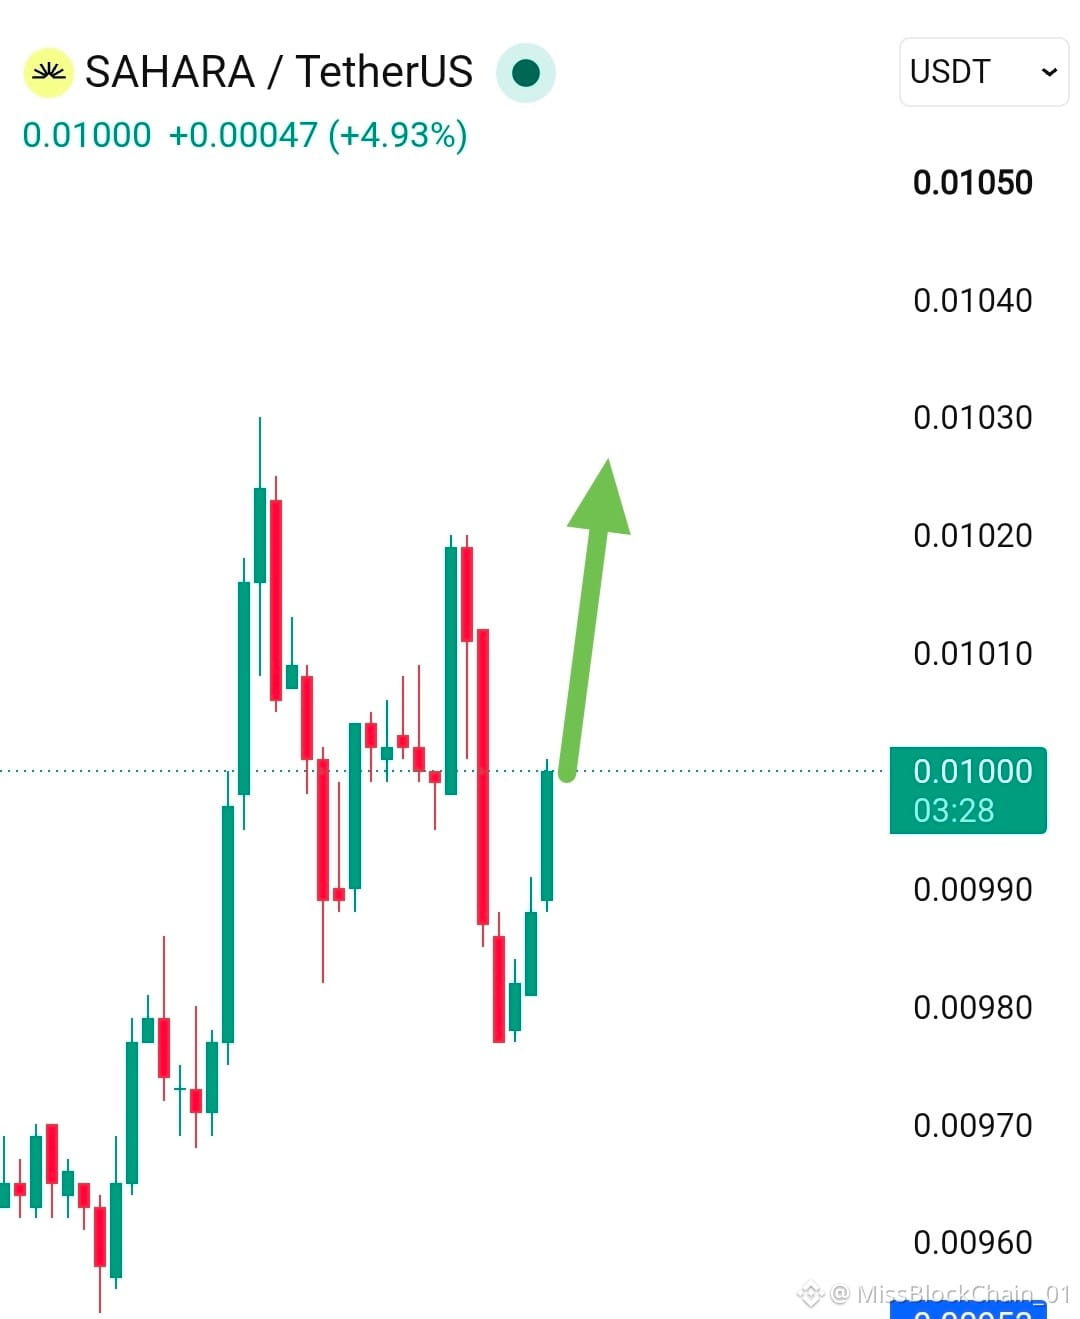
🚨 $SAHARA LONG SETUP 🚨
$SAHARA — LONG
Entry: 0.00998–0.01003
SL: 0.00974
TP1: 0.01020
TP2: 0.01030
TP3: 0.01050
Why? Strong rebound from the 0.00975–0.00980 demand zone with consecutive bullish candles suggests momentum recovery. A clean hold above 0.01000 could trigger continuation toward the previous swing highs.
Risk/Reward: ~1:2.1 to TP3.
Debate: Can $SAHARA break 0.01020 and extend the recovery?
{future}(SAHARAUSDT)
Click here to Trade 👇️
🚨 $SAHARA LONG SETUP 🚨
$SAHARA — LONG
Entry: 0.00998–0.01003
SL: 0.00974
TP1: 0.01020
TP2: 0.01030
TP3: 0.01050
Why? Strong rebound from the 0.00975–0.00980 demand zone with consecutive bullish candles suggests momentum recovery. A clean hold above 0.01000 could trigger continuation toward the previous swing highs.
Risk/Reward: ~1:2.1 to TP3.
Debate: Can $SAHARA break 0.01020 and extend the recovery?
Click here to Trade 👇️
$SAHARA — LONG
Entry: 0.00998–0.01003
SL: 0.00974
TP1: 0.01020
TP2: 0.01030
TP3: 0.01050
Why? Strong rebound from the 0.00975–0.00980 demand zone with consecutive bullish candles suggests momentum recovery. A clean hold above 0.01000 could trigger continuation toward the previous swing highs.
Risk/Reward: ~1:2.1 to TP3.
Debate: Can $SAHARA break 0.01020 and extend the recovery?
Click here to Trade 👇️
3
440
·
--
ສັນຍານໝີ
ເບິ່ງການແປ
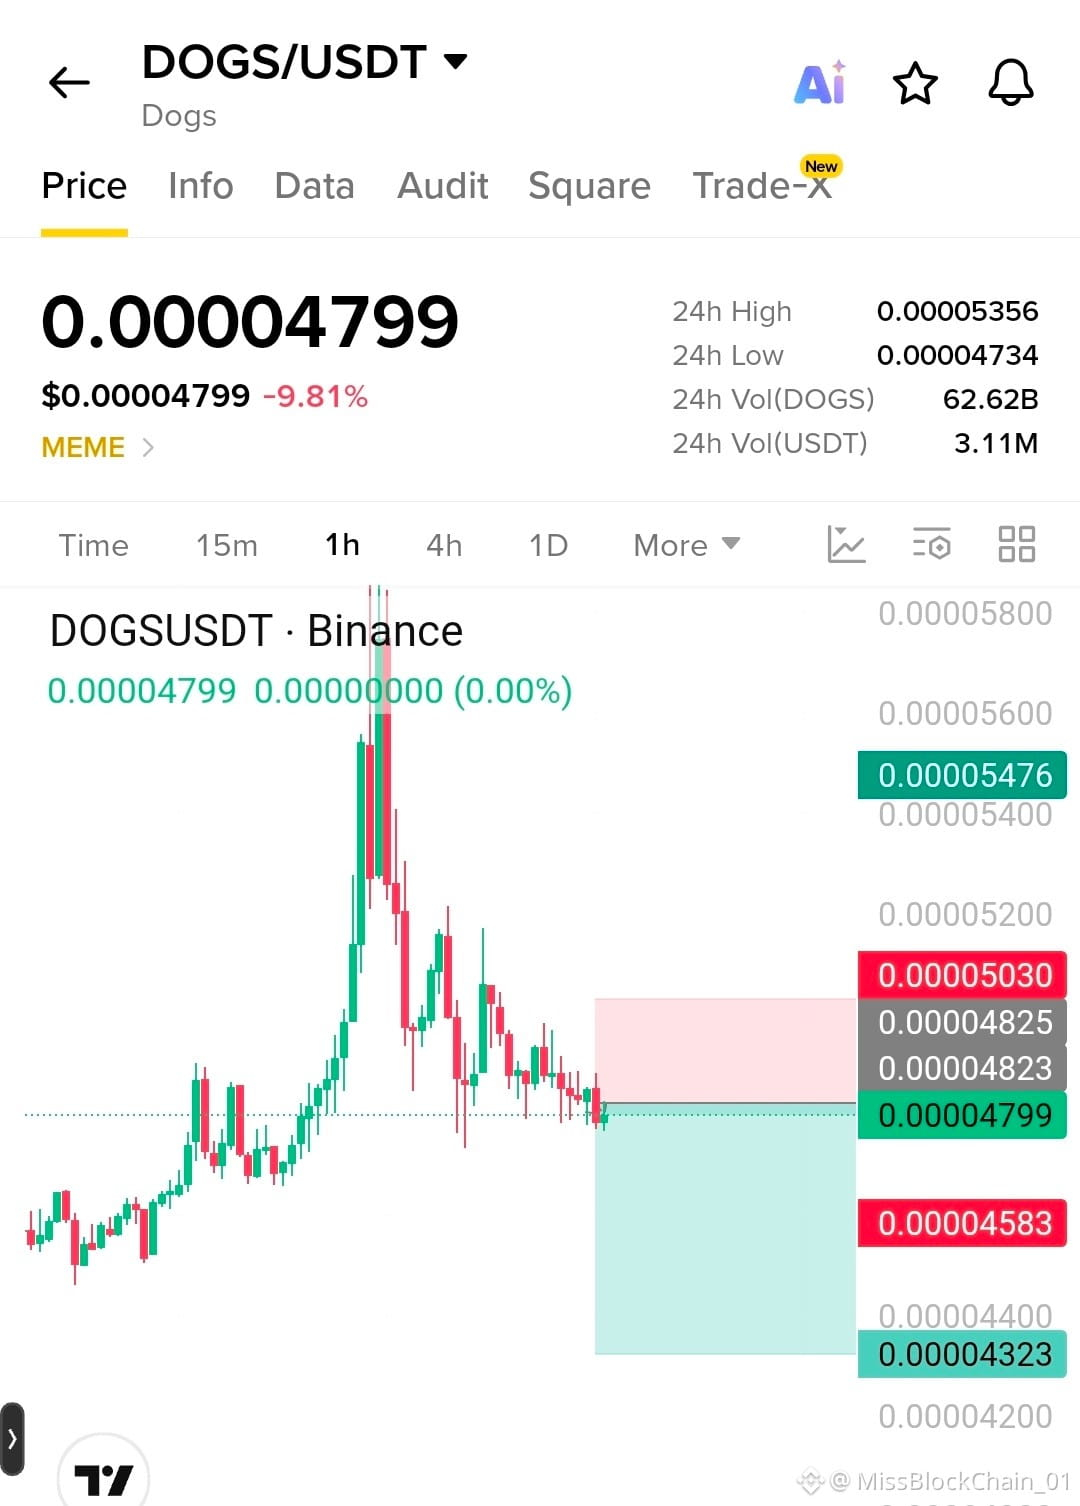
🚨 $DOGS SHORT SETUP 🚨
$DOGS — SHORT
Entry: 0.00004799–0.00004825
SL: 0.00005030
TP1: 0.00004583
TP2: 0.00004450
TP3: 0.00004323
Why? Price is struggling below the 0.0000482–0.0000503 resistance zone, maintaining a bearish lower-high structure. Rejection here could accelerate downside momentum.
{future}(DOGSUSDT)
Risk/Reward: ~1:2.2 to TP3.
Debate: Can $DOGS reclaim 0.0000503, or is another leg down coming?
Click here to Trade 👇️
🚨 $DOGS SHORT SETUP 🚨
$DOGS — SHORT
Entry: 0.00004799–0.00004825
SL: 0.00005030
TP1: 0.00004583
TP2: 0.00004450
TP3: 0.00004323
Why? Price is struggling below the 0.0000482–0.0000503 resistance zone, maintaining a bearish lower-high structure. Rejection here could accelerate downside momentum.
Risk/Reward: ~1:2.2 to TP3.
Debate: Can $DOGS reclaim 0.0000503, or is another leg down coming?
Click here to Trade 👇️
$DOGS — SHORT
Entry: 0.00004799–0.00004825
SL: 0.00005030
TP1: 0.00004583
TP2: 0.00004450
TP3: 0.00004323
Why? Price is struggling below the 0.0000482–0.0000503 resistance zone, maintaining a bearish lower-high structure. Rejection here could accelerate downside momentum.
Risk/Reward: ~1:2.2 to TP3.
Debate: Can $DOGS reclaim 0.0000503, or is another leg down coming?
Click here to Trade 👇️
2
166
ເຂົ້າສູ່ລະບົບເພື່ອສຳຫຼວດເນື້ອຫາເພີ່ມເຕີມ
ເຂົ້າຮ່ວມກຸ່ມຜູ້ໃຊ້ຄຣິບໂຕທົ່ວໂລກໃນ Binance Square.
⚡️ ໄດ້ຮັບຂໍ້ມູນຫຼ້າສຸດ ແລະ ທີ່ມີປະໂຫຍດກ່ຽວກັບຄຣິບໂຕ.
💬 ໄດ້ຮັບຄວາມໄວ້ວາງໃຈຈາກຕະຫຼາດແລກປ່ຽນຄຣິບໂຕທີ່ໃຫຍ່ທີ່ສຸດໃນໂລກ.
👍 ຄົ້ນຫາຂໍ້ມູນເຊີງເລິກທີ່ແທ້ຈາກນັກສ້າງທີ່ໄດ້ຮັບການຢືນຢັນ.
ອີເມວ / ເບີໂທລະສັບ
ຫົວຂໍ້ທີ່ກໍາລັງນິຍົມ
USTreasuryToBuyBackUpTo$6BLongDatedDebt
6,146 views
118 ກຳລັງສົນທະນາ
🚨 ຄັງສົມບັດໄດ້ເພີ່ມການຊື້ຄືນເປັນ 3 ເທົ່າເປັນ $6B — ອັດຕາຜົນໄດ້ຂຶ້ນ.
📈 10Y: 4.85% , ສູງສຸດຕັ້ງແຕ່ເດືອນ ພະຈິກ 2023
📈 30Y: >5.3%
⚠️ Wall St ຄາດວ່າຈະໄດ້ $8–10B. ໄດ້ $6B.
$6B < ພຽງ 2 ວັນຂອງດອກເບ້ຍສຳລັບໜີ້ $40T.
Bessent: "ຂ້ອຍຄືເຈົ້າເຮືອນແລ້ວ." ຕະຫຼາດພັນທະບັດ: ພະນັນ. 💀
ບໍ່ແມ່ນ QE. ການບໍລິຫານໜີ້. ແລະມັນກຳລັງເສຍ.
$XAU $BTC $ZEC #LAPTOPFoundationXAccountSuspended #USTreasuryToBuyBackUpTo$6BLongDatedDebt #BitcoinSurpasses$79K #BrentCrudeTops$100 #USADPWeeklyEmploymentRises12000
KimHotbae
·0 ຖືກໃຈ
·22 views
BitcoinSurpasses$79K
45,366 views
238 ກຳລັງສົນທະນາ
BrentCrudeTops$100
104,000 views
362 ກຳລັງສົນທະນາ