

Future Pulse
28.7k ໂພສ

Future Pulse
 Square Verified+
ລາຍງານ
ບລັອກຜູ້ໃຊ້
Hi, I'm passionate about crypto, technology, and innovation. I enjoy exploring ideas, sharing insights, and staying ahead of what's next.
ເປີດການຊື້ຂາຍ
ຜູ້ຊື້ຂາຍປະຈໍາ
2.8 ປີ
4.3K+ ກໍາລັງຕິດຕາມ
34.6K+ ຜູ້ຕິດຕາມ
54.2K+ Liked
ໂພສ
Portfolio
ທັງໝົດ
ວົງຢືມ
ວີດີໂອ
ຖ່າຍທອດສົດ
·
--
🎯 Binance Pick: Where Market Knowledge Meets Prediction! 🚀
I find @Binance's new #BinancePick campaign interesting because it combines market analysis, prediction skills, and community participation in one experience.
Users can earn campaign Scores through eligible tasks and use them to make predictions across available markets, including crypto, sports, and other events. Accurate predictions can help improve leaderboard rankings.
🏆 Season 1 features a reward pool of up to 1,000,000 USDC, distributed across seasonal leaderboards, weekly competitions, and participation rewards.
What I like most is the opportunity to test my own judgment instead of simply following market hype. Research, discipline, and consistency can make the experience more meaningful.
One important point: Scores are campaign points, not real money, and rewards are not guaranteed. Always check the official rules and regional eligibility before participating.
💬 What's your strategy for Binance Pick: careful research or market sentiment?
$UNI
{future}(UNIUSDT)
$ZAMA
{future}(ZAMAUSDT)
$PROVE
{future}(PROVEUSDT)
#BinancePick
#BinanceSquare
#CryptoCommunity
🎯 Binance Pick: Where Market Knowledge Meets Prediction! 🚀
I find @Binance's new #BinancePick campaign interesting because it combines market analysis, prediction skills, and community participation in one experience.
Users can earn campaign Scores through eligible tasks and use them to make predictions across available markets, including crypto, sports, and other events. Accurate predictions can help improve leaderboard rankings.
🏆 Season 1 features a reward pool of up to 1,000,000 USDC, distributed across seasonal leaderboards, weekly competitions, and participation rewards.
What I like most is the opportunity to test my own judgment instead of simply following market hype. Research, discipline, and consistency can make the experience more meaningful.
One important point: Scores are campaign points, not real money, and rewards are not guaranteed. Always check the official rules and regional eligibility before participating.
💬 What's your strategy for Binance Pick: careful research or market sentiment?
$UNI
$ZAMA
$PROVE
#BinancePick
#BinanceSquare
#CryptoCommunity
I find @Binance's new #BinancePick campaign interesting because it combines market analysis, prediction skills, and community participation in one experience.
Users can earn campaign Scores through eligible tasks and use them to make predictions across available markets, including crypto, sports, and other events. Accurate predictions can help improve leaderboard rankings.
🏆 Season 1 features a reward pool of up to 1,000,000 USDC, distributed across seasonal leaderboards, weekly competitions, and participation rewards.
What I like most is the opportunity to test my own judgment instead of simply following market hype. Research, discipline, and consistency can make the experience more meaningful.
One important point: Scores are campaign points, not real money, and rewards are not guaranteed. Always check the official rules and regional eligibility before participating.
💬 What's your strategy for Binance Pick: careful research or market sentiment?
$UNI
$ZAMA
$PROVE
#BinancePick
#BinanceSquare
#CryptoCommunity

255
·
--
CHIPUSDT Is Heating Up — Can Buyers Push Higher?
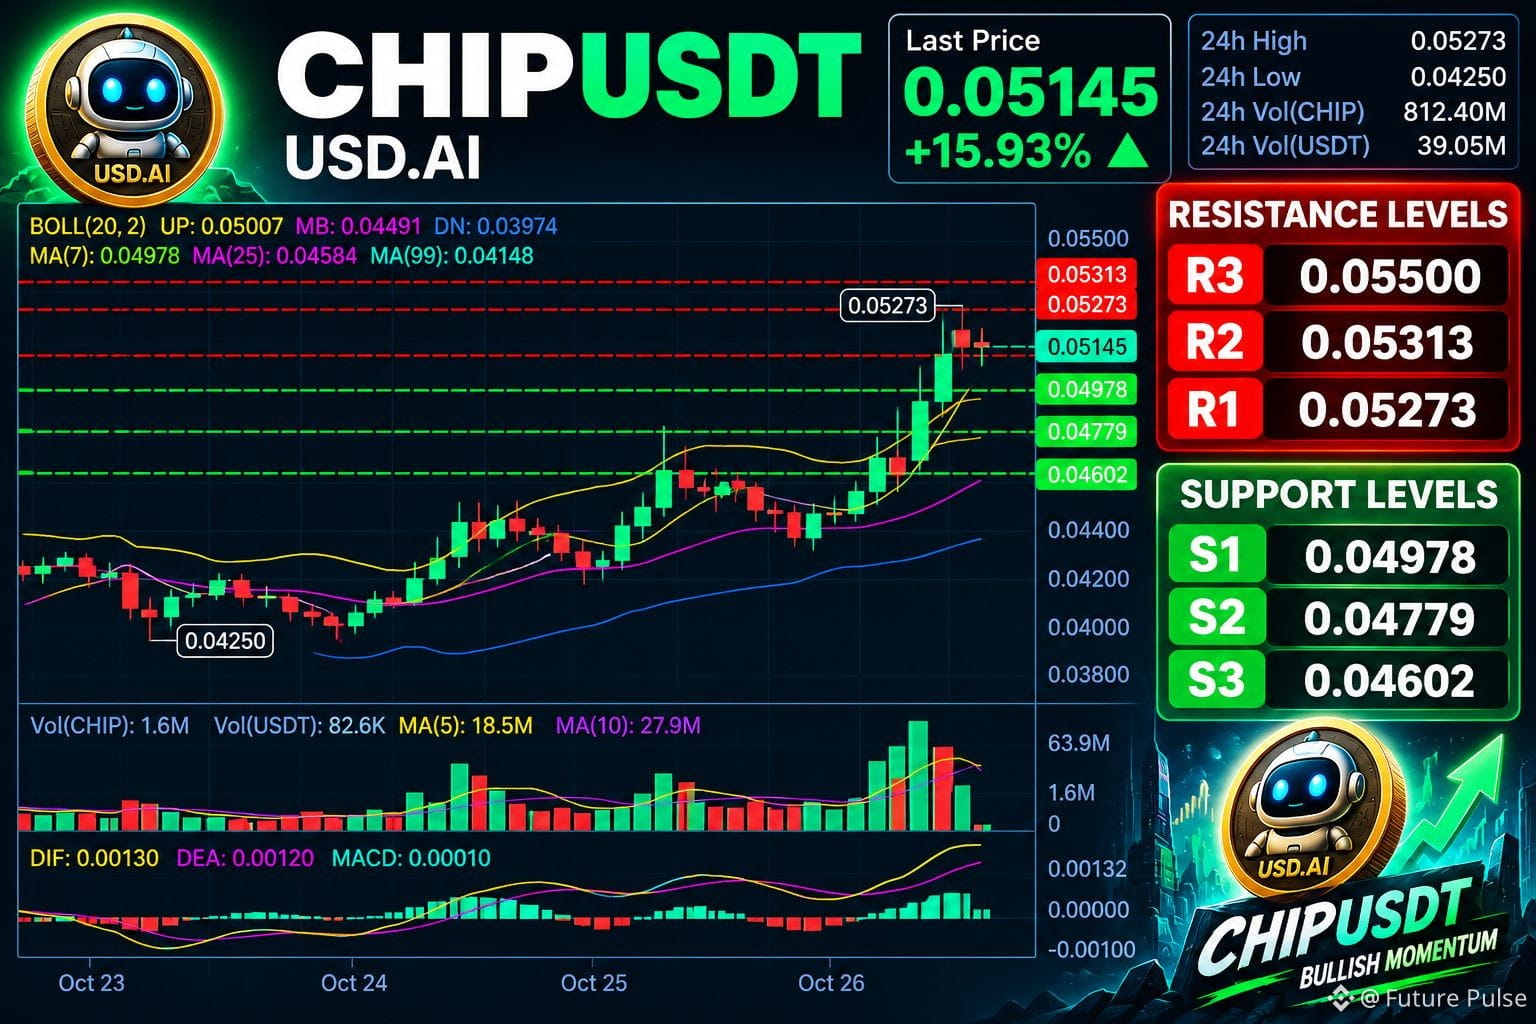
CHIPUSDT is trading around $0.05145, up nearly 16% after a strong upward move. The charts show a breakout from the $0.04250 area, supported by a significant increase in volume. On the 4H chart, bullish momentum remains strong, while the 15M chart suggests consolidation near the recent high of $0.05273. A confirmed break above this level could open the door to further gains, but profit-taking may trigger a pullback.
🟢 Support:
$0.04978
$0.04779
$0.04602
🔴 Resistance:
$0.05273
$0.05313
$0.05500
📊 My focus is on breakout confirmation and volume, not chasing the pump. Always manage risk carefully.
$BEAMX
{future}(BEAMXUSDT)
$HAEDAL
{future}(HAEDALUSDT)
$CHIP
{future}(CHIPUSDT)
CHIPUSDT Is Heating Up — Can Buyers Push Higher?
CHIPUSDT is trading around $0.05145, up nearly 16% after a strong upward move. The charts show a breakout from the $0.04250 area, supported by a significant increase in volume. On the 4H chart, bullish momentum remains strong, while the 15M chart suggests consolidation near the recent high of $0.05273. A confirmed break above this level could open the door to further gains, but profit-taking may trigger a pullback.
🟢 Support:
$0.04978
$0.04779
$0.04602
🔴 Resistance:
$0.05273
$0.05313
$0.05500
📊 My focus is on breakout confirmation and volume, not chasing the pump. Always manage risk carefully.
$BEAMX
$HAEDAL
$CHIP
CHIPUSDT is trading around $0.05145, up nearly 16% after a strong upward move. The charts show a breakout from the $0.04250 area, supported by a significant increase in volume. On the 4H chart, bullish momentum remains strong, while the 15M chart suggests consolidation near the recent high of $0.05273. A confirmed break above this level could open the door to further gains, but profit-taking may trigger a pullback.
🟢 Support:
$0.04978
$0.04779
$0.04602
🔴 Resistance:
$0.05273
$0.05313
$0.05500
📊 My focus is on breakout confirmation and volume, not chasing the pump. Always manage risk carefully.
$BEAMX
$HAEDAL
$CHIP
1
288
·
--
ຢືນຢັນແລ້ວ
🚀 AXIS: A Project Worth Watching Beyond the Hype
What makes AXIS interesting to me is its focus on solving a real problem rather than relying only on market speculation.
Axis Robotics is building a platform that collects and verifies robot-training data to help advance Physical AI. Contributors perform tasks in simulated environments, and accepted data records are stored on Base for transparency. The AXIS token is designed to support contributor rewards and fund data-collection programs.
I believe the connection between blockchain incentives and robotics could become an important area to watch as AI continues to evolve. However, long-term success will depend on real adoption, data quality, token utility, and sustainable demand.
For me, the key question is simple: Can AXIS turn useful contributions into lasting ecosystem value?
$AXIS
{alpha}(84530x5be75e3b0aff5d1a042a5363ae36acb1d6d755ea)
$JCT
{alpha}(560xea37a8de1de2d9d10772eeb569e28bfa5cb17707)
$AGT
{alpha}(560x5dbde81fce337ff4bcaaee4ca3466c00aecae274)
#axis
#Robotics
#AI
🚀 AXIS: A Project Worth Watching Beyond the Hype
What makes AXIS interesting to me is its focus on solving a real problem rather than relying only on market speculation.
Axis Robotics is building a platform that collects and verifies robot-training data to help advance Physical AI. Contributors perform tasks in simulated environments, and accepted data records are stored on Base for transparency. The AXIS token is designed to support contributor rewards and fund data-collection programs.
I believe the connection between blockchain incentives and robotics could become an important area to watch as AI continues to evolve. However, long-term success will depend on real adoption, data quality, token utility, and sustainable demand.
For me, the key question is simple: Can AXIS turn useful contributions into lasting ecosystem value?
$AXIS
$JCT
$AGT
#axis
#Robotics
#AI
What makes AXIS interesting to me is its focus on solving a real problem rather than relying only on market speculation.
Axis Robotics is building a platform that collects and verifies robot-training data to help advance Physical AI. Contributors perform tasks in simulated environments, and accepted data records are stored on Base for transparency. The AXIS token is designed to support contributor rewards and fund data-collection programs.
I believe the connection between blockchain incentives and robotics could become an important area to watch as AI continues to evolve. However, long-term success will depend on real adoption, data quality, token utility, and sustainable demand.
For me, the key question is simple: Can AXIS turn useful contributions into lasting ecosystem value?
$AXIS
$JCT
$AGT
#axis
#Robotics
#AI

1
837
·
--
📉 Robinhood Chain DEX Volume Drops 23.1% — Is Momentum Fading?
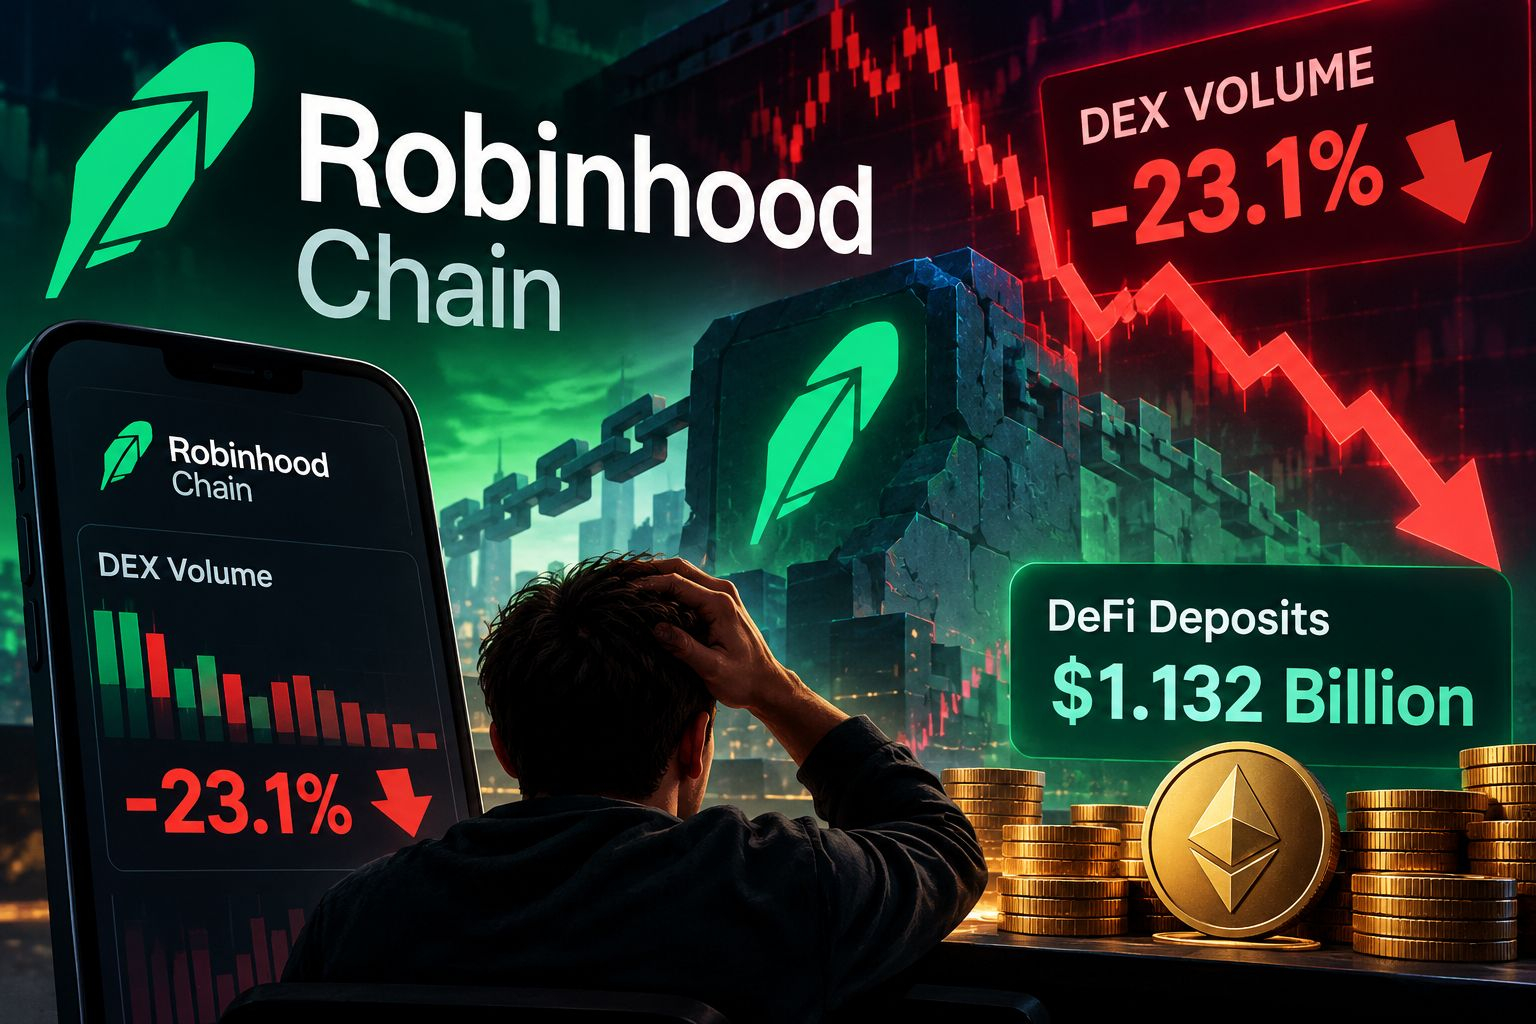
Robinhood Chain is facing a key test as its decentralized exchange (DEX) volume falls 23.1% over the past week. Despite the slowdown, the network still holds approximately $1.132 billion in DeFi deposits.
This creates an interesting contrast: capital remains in the ecosystem, but trading activity is losing momentum. Does this reflect a normal cooling period after launch, or are traders becoming less interested?
I believe volume trends deserve close attention. Deposits show how much capital is committed to DeFi, while DEX volume reveals how actively that capital is being used. Neither metric alone tells the full story.
The next thing to watch is whether trading activity recovers, liquidity remains stable, and users continue engaging with the ecosystem.
What do you think? Is this just a post-launch slowdown, or an early warning sign? 👇
$HOODB
{spot}(HOODBUSDT)
$QNT
{future}(QNTUSDT)
$BABY
{future}(BABYUSDT)
#Robinhood
#defi
#DEX
#crypto
#robinhoodchain
📉 Robinhood Chain DEX Volume Drops 23.1% — Is Momentum Fading?
Robinhood Chain is facing a key test as its decentralized exchange (DEX) volume falls 23.1% over the past week. Despite the slowdown, the network still holds approximately $1.132 billion in DeFi deposits.
This creates an interesting contrast: capital remains in the ecosystem, but trading activity is losing momentum. Does this reflect a normal cooling period after launch, or are traders becoming less interested?
I believe volume trends deserve close attention. Deposits show how much capital is committed to DeFi, while DEX volume reveals how actively that capital is being used. Neither metric alone tells the full story.
The next thing to watch is whether trading activity recovers, liquidity remains stable, and users continue engaging with the ecosystem.
What do you think? Is this just a post-launch slowdown, or an early warning sign? 👇
$HOODB
$QNT
$BABY
#Robinhood
#defi
#DEX
#crypto
#robinhoodchain
Robinhood Chain is facing a key test as its decentralized exchange (DEX) volume falls 23.1% over the past week. Despite the slowdown, the network still holds approximately $1.132 billion in DeFi deposits.
This creates an interesting contrast: capital remains in the ecosystem, but trading activity is losing momentum. Does this reflect a normal cooling period after launch, or are traders becoming less interested?
I believe volume trends deserve close attention. Deposits show how much capital is committed to DeFi, while DEX volume reveals how actively that capital is being used. Neither metric alone tells the full story.
The next thing to watch is whether trading activity recovers, liquidity remains stable, and users continue engaging with the ecosystem.
What do you think? Is this just a post-launch slowdown, or an early warning sign? 👇
$HOODB
$QNT
$BABY
#Robinhood
#defi
#DEX
#crypto
#robinhoodchain
1
455
·
--
When you are ready to take short?
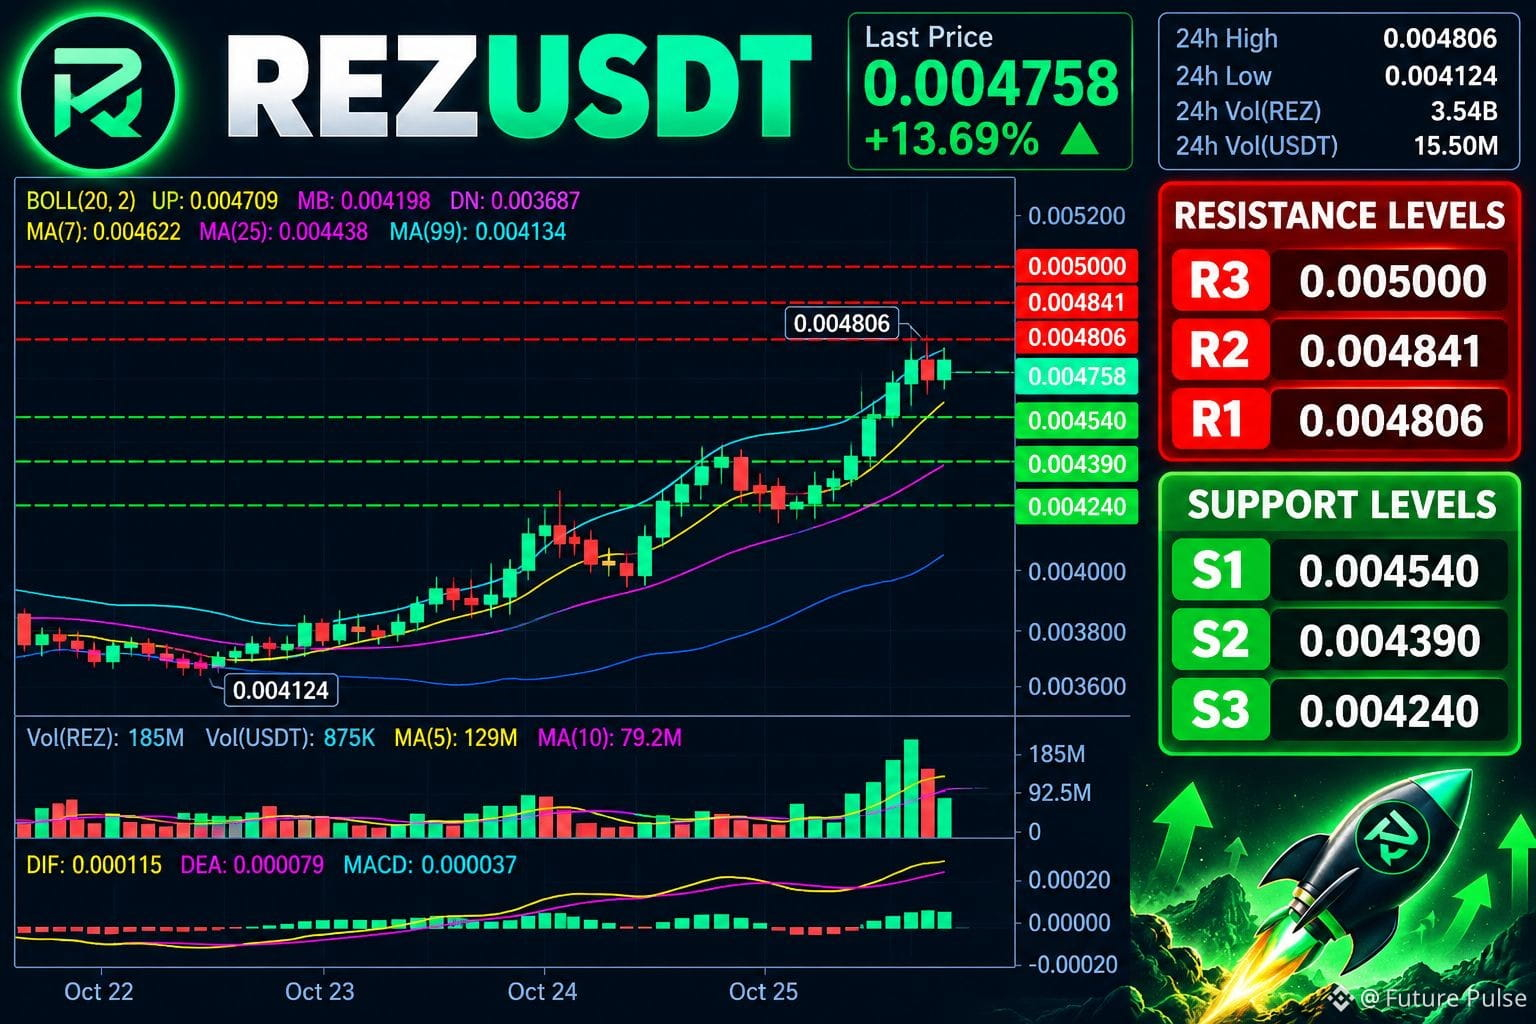
REZUSDT is trading near $0.004758, up around 13.7%, with strong green candles and rising volume across the 15m, 1h, and 4h charts.
The price is testing the recent high at $0.004806, while MACD momentum remains bullish. A confirmed breakout above resistance could support further upside, but after such a sharp rally, a short pullback or consolidation is also possible. I’d watch the next candle closes and volume before drawing conclusions.
🟢 Support:
$0.004540
$0.004390
$0.004240
🔴 Resistance:
$0.004806
$0.004841
$0.005000
📊 Confirmation matters more than chasing a fast move.
$ENA
{future}(ENAUSDT)
$CHIP
{future}(CHIPUSDT)
$REZ
{future}(REZUSDT)
#REZ
When you are ready to take short?
REZUSDT is trading near $0.004758, up around 13.7%, with strong green candles and rising volume across the 15m, 1h, and 4h charts.
The price is testing the recent high at $0.004806, while MACD momentum remains bullish. A confirmed breakout above resistance could support further upside, but after such a sharp rally, a short pullback or consolidation is also possible. I’d watch the next candle closes and volume before drawing conclusions.
🟢 Support:
$0.004540
$0.004390
$0.004240
🔴 Resistance:
$0.004806
$0.004841
$0.005000
📊 Confirmation matters more than chasing a fast move.
$ENA
$CHIP
$REZ
#REZ
REZUSDT is trading near $0.004758, up around 13.7%, with strong green candles and rising volume across the 15m, 1h, and 4h charts.
The price is testing the recent high at $0.004806, while MACD momentum remains bullish. A confirmed breakout above resistance could support further upside, but after such a sharp rally, a short pullback or consolidation is also possible. I’d watch the next candle closes and volume before drawing conclusions.
🟢 Support:
$0.004540
$0.004390
$0.004240
🔴 Resistance:
$0.004806
$0.004841
$0.005000
📊 Confirmation matters more than chasing a fast move.
$ENA
$CHIP
$REZ
#REZ
2
762
·
--
🔍 TMX: Undervalued Opportunity or a High-Risk Recovery Play?
TMX has a fixed maximum supply of 1 billion tokens, with around 152.8 million currently circulating. Its reported 24-hour trading volume is approximately $1.24M, while its market cap is near $1M. However, TermMax’s TVL has dropped sharply, making protocol adoption a key metric to watch.
The long-term outlook depends on whether fixed-rate DeFi lending, staking utility, cross-chain expansion and upcoming product upgrades can attract sustainable demand. A low valuation alone does not guarantee recovery. I’ll be watching volume consistency, token unlocks, TVL recovery and real protocol revenue before drawing stronger conclusions.
Can TMX rebuild momentum through actual usage?
$ZEC
{future}(ZECUSDT)
$DASH
{future}(DASHUSDT)
$TMX
{alpha}(560x3c2f61f2e27c865981d2e7aaf6b2cdf823030039)
#TermMax
🔍 TMX: Undervalued Opportunity or a High-Risk Recovery Play?
TMX has a fixed maximum supply of 1 billion tokens, with around 152.8 million currently circulating. Its reported 24-hour trading volume is approximately $1.24M, while its market cap is near $1M. However, TermMax’s TVL has dropped sharply, making protocol adoption a key metric to watch.
The long-term outlook depends on whether fixed-rate DeFi lending, staking utility, cross-chain expansion and upcoming product upgrades can attract sustainable demand. A low valuation alone does not guarantee recovery. I’ll be watching volume consistency, token unlocks, TVL recovery and real protocol revenue before drawing stronger conclusions.
Can TMX rebuild momentum through actual usage?
$ZEC
$DASH
$TMX
#TermMax
TMX has a fixed maximum supply of 1 billion tokens, with around 152.8 million currently circulating. Its reported 24-hour trading volume is approximately $1.24M, while its market cap is near $1M. However, TermMax’s TVL has dropped sharply, making protocol adoption a key metric to watch.
The long-term outlook depends on whether fixed-rate DeFi lending, staking utility, cross-chain expansion and upcoming product upgrades can attract sustainable demand. A low valuation alone does not guarantee recovery. I’ll be watching volume consistency, token unlocks, TVL recovery and real protocol revenue before drawing stronger conclusions.
Can TMX rebuild momentum through actual usage?
$ZEC
$DASH
$TMX
#TermMax

4
1.3k
·
--
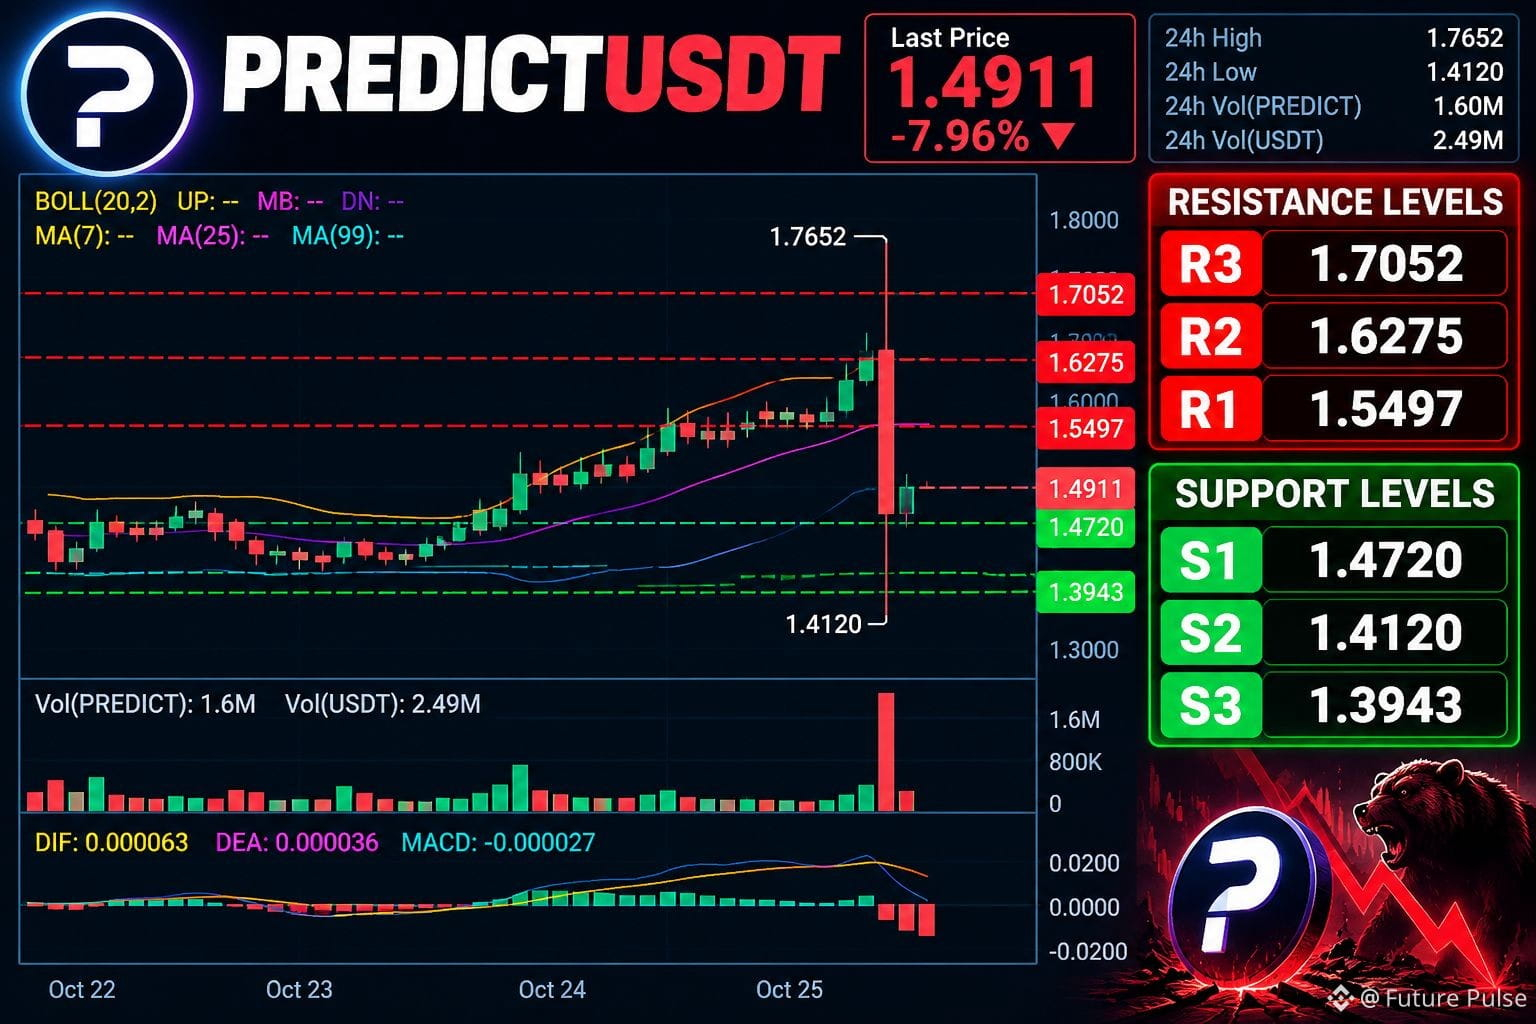
PREDICT has dropped nearly 8%, trading around $1.49 after a sharp rejection from $1.7652. The 4H chart shows a massive bearish candle with a long wick, highlighting extreme volatility and strong selling pressure. Buyers managed to push the price down to $1.4120 before a small recovery, but bullish confirmation is still missing. A break below $1.4120 could trigger further downside, while reclaiming $1.55 may help stabilize the chart.
🟢 Support:
$1.4720
$1.4120
$1.3943
🔴 Resistance:
$1.5497
$1.6275
$1.7052
⚠️ Volatility is high. Wait for price confirmation before entering a trade.
$PREDICT
{future}(PREDICTUSDT)
$POLYX
{future}(POLYXUSDT)
$ANKR
{future}(ANKRUSDT)
PREDICT has dropped nearly 8%, trading around $1.49 after a sharp rejection from $1.7652. The 4H chart shows a massive bearish candle with a long wick, highlighting extreme volatility and strong selling pressure. Buyers managed to push the price down to $1.4120 before a small recovery, but bullish confirmation is still missing. A break below $1.4120 could trigger further downside, while reclaiming $1.55 may help stabilize the chart.
🟢 Support:
$1.4720
$1.4120
$1.3943
🔴 Resistance:
$1.5497
$1.6275
$1.7052
⚠️ Volatility is high. Wait for price confirmation before entering a trade.
$PREDICT
$POLYX
$ANKR
🟢 Support:
$1.4720
$1.4120
$1.3943
🔴 Resistance:
$1.5497
$1.6275
$1.7052
⚠️ Volatility is high. Wait for price confirmation before entering a trade.
$PREDICT
$POLYX
$ANKR
1
826
·
--
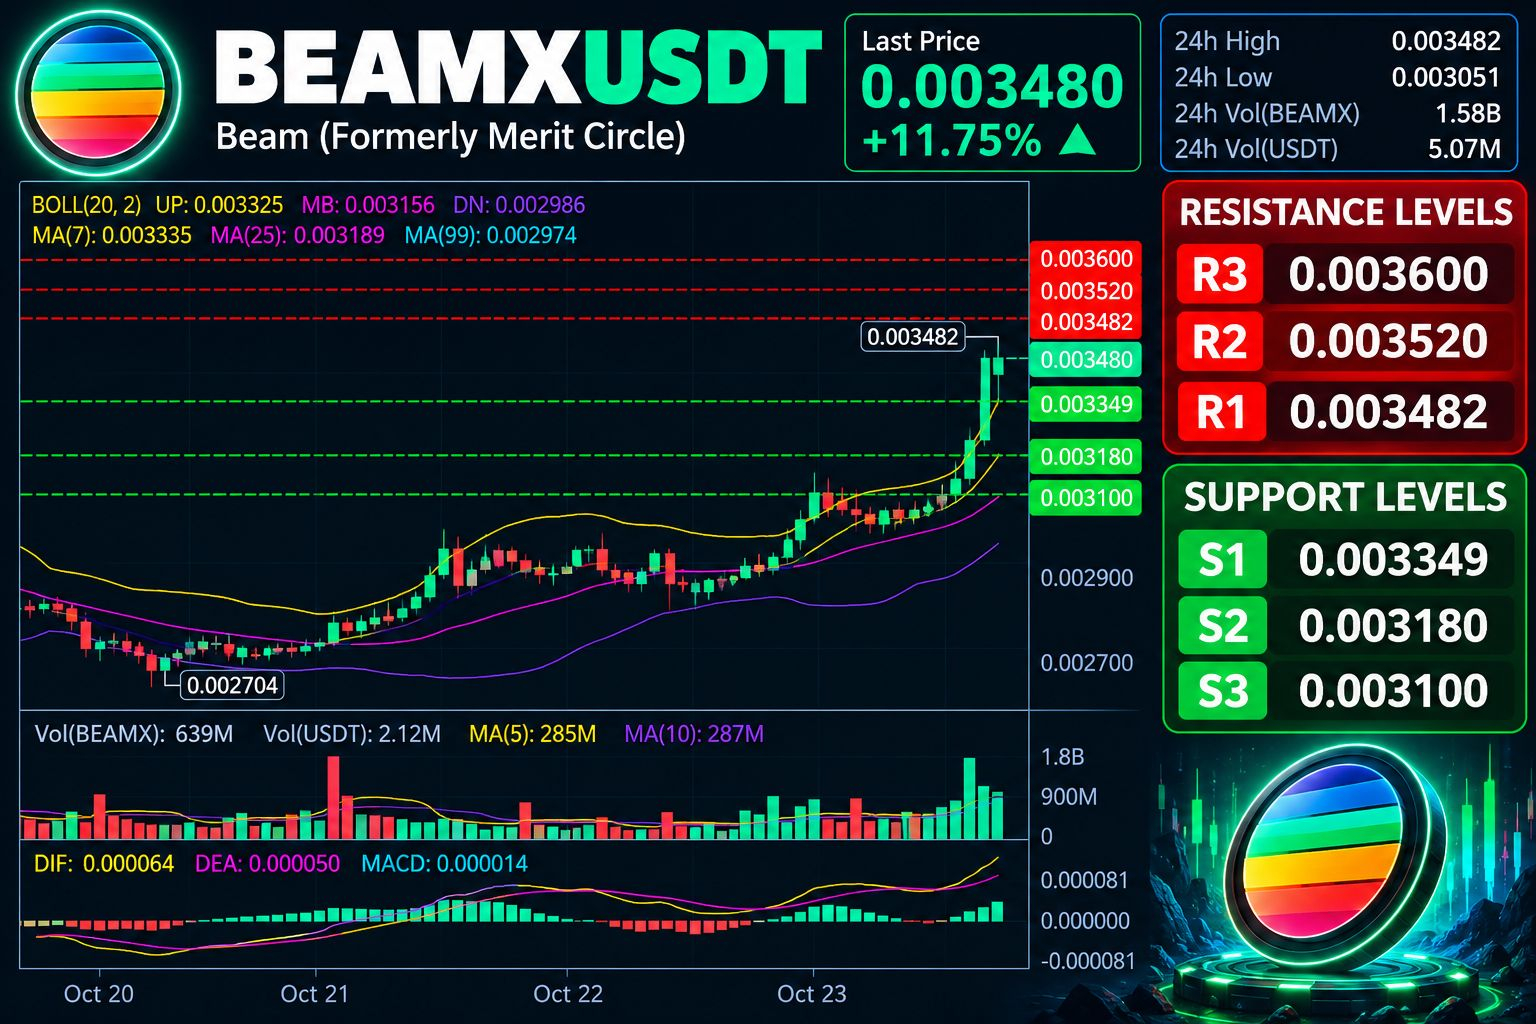
BEAMX is showing impressive bullish strength, trading near $0.003480 after gaining around 11.75%. 📈 The 1H and 4H charts show a sharp breakout supported by rising volume and a bullish MACD crossover.
Buyers are in control, but the rapid surge could trigger a short-term pullback. A clean break above $0.003482 may open the door to further upside, while holding the breakout zone is crucial for continuation.
🟢 Support:
$0.003349
$0.003180
$0.003100
🔴 Resistance:
$0.003482
$0.003520
$0.003600
⚠️ Watch for confirmation before entering. Avoid chasing a sudden pump!
$BEAMX
{future}(BEAMXUSDT)
$SIREN
{future}(SIRENUSDT)
$BEAT
{future}(BEATUSDT)
BEAMX is showing impressive bullish strength, trading near $0.003480 after gaining around 11.75%. 📈 The 1H and 4H charts show a sharp breakout supported by rising volume and a bullish MACD crossover.
Buyers are in control, but the rapid surge could trigger a short-term pullback. A clean break above $0.003482 may open the door to further upside, while holding the breakout zone is crucial for continuation.
🟢 Support:
$0.003349
$0.003180
$0.003100
🔴 Resistance:
$0.003482
$0.003520
$0.003600
⚠️ Watch for confirmation before entering. Avoid chasing a sudden pump!
$BEAMX
$SIREN
$BEAT
Buyers are in control, but the rapid surge could trigger a short-term pullback. A clean break above $0.003482 may open the door to further upside, while holding the breakout zone is crucial for continuation.
🟢 Support:
$0.003349
$0.003180
$0.003100
🔴 Resistance:
$0.003482
$0.003520
$0.003600
⚠️ Watch for confirmation before entering. Avoid chasing a sudden pump!
$BEAMX
$SIREN
$BEAT
1
1.1k
·
--
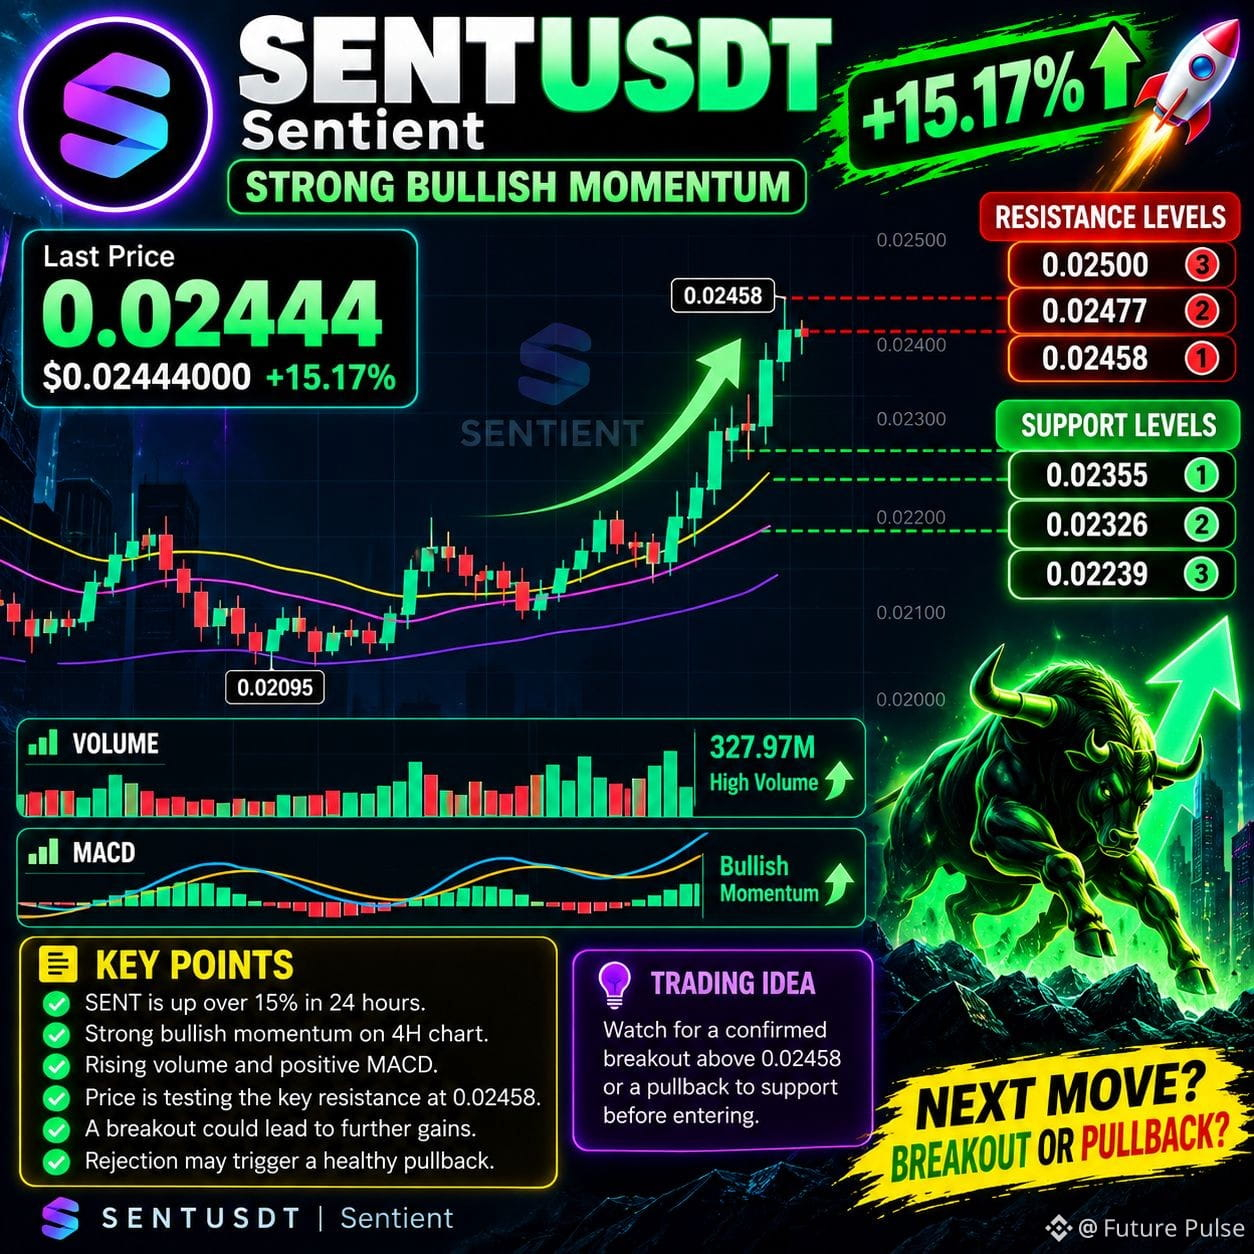
SENT is trading around $0.02442, up over 15% in 24 hours. The 4H chart shows strong bullish momentum, supported by rising volume and a positive MACD. However, price is approaching the recent high at $0.02458, where sellers could step in. A confirmed breakout may open the door to further gains, while rejection could trigger a healthy pullback. I'll be watching whether buyers can hold the breakout structure.
🟢 Support:
$0.02355
$0.02326
$0.02239
🔴 Resistance:
$0.02458
$0.02477
$0.02500
$SENT
{future}(SENTUSDT)
$MEGA
{future}(MEGAUSDT)
$POWR
{future}(POWRUSDT)
SENT is trading around $0.02442, up over 15% in 24 hours. The 4H chart shows strong bullish momentum, supported by rising volume and a positive MACD. However, price is approaching the recent high at $0.02458, where sellers could step in. A confirmed breakout may open the door to further gains, while rejection could trigger a healthy pullback. I'll be watching whether buyers can hold the breakout structure.
🟢 Support:
$0.02355
$0.02326
$0.02239
🔴 Resistance:
$0.02458
$0.02477
$0.02500
$SENT
$MEGA
$POWR
🟢 Support:
$0.02355
$0.02326
$0.02239
🔴 Resistance:
$0.02458
$0.02477
$0.02500
$SENT
$MEGA
$POWR
2
578
·
--
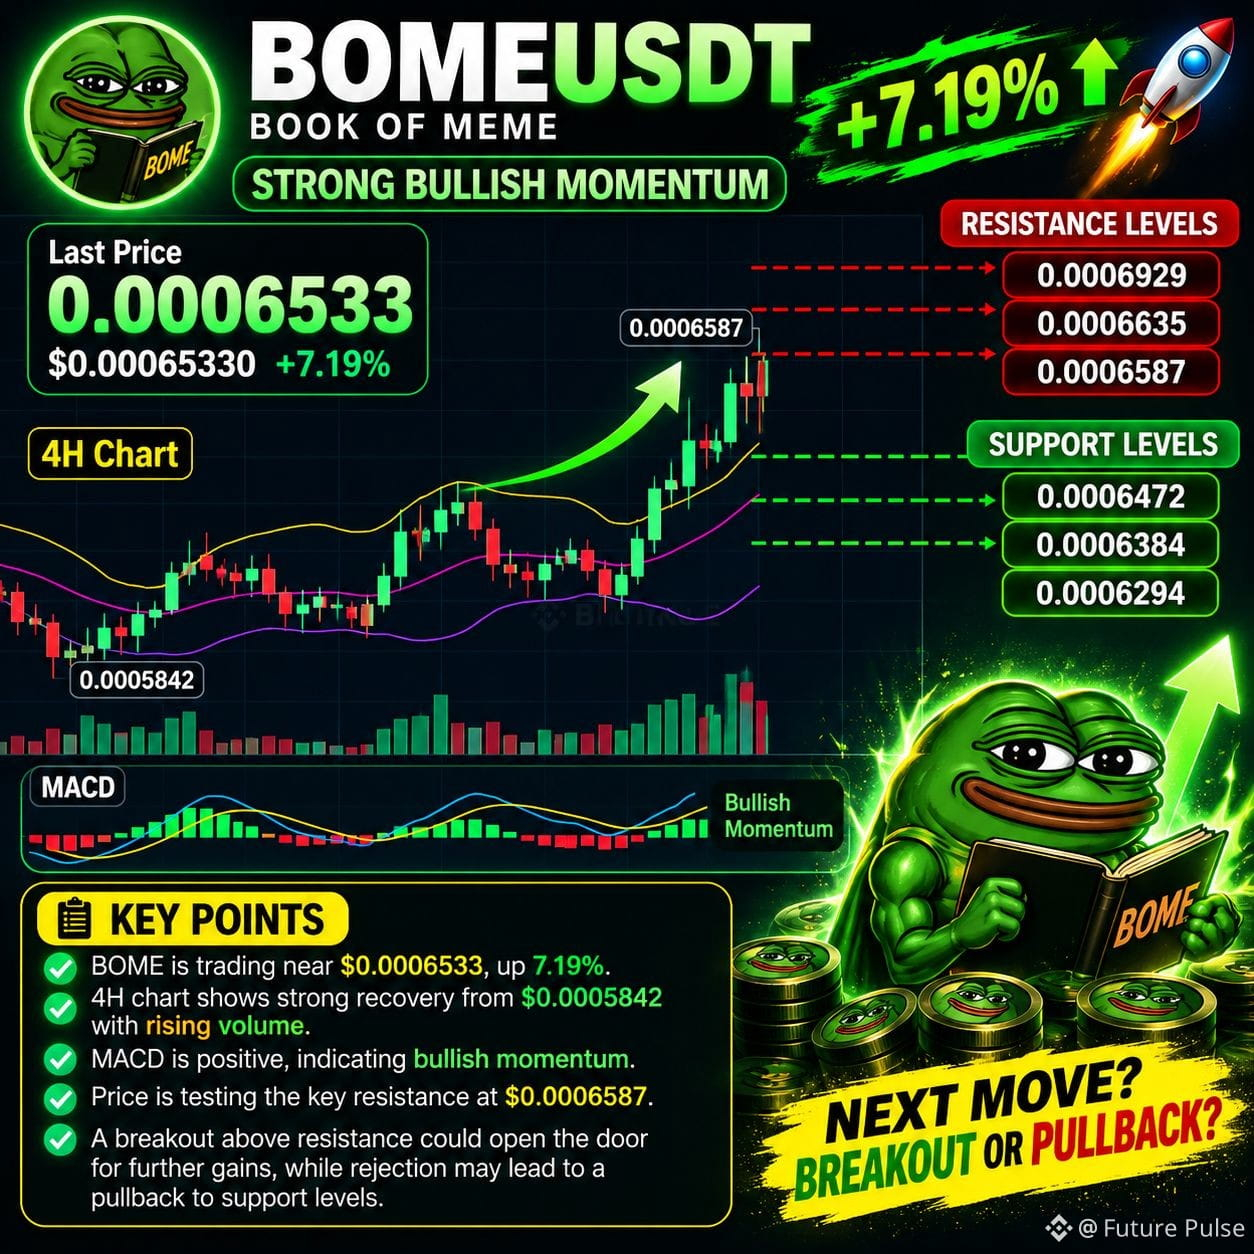
BOMEUSDT is trading near $0.0006533, up around 7.19%. The 4H chart shows a strong recovery from $0.0005842, supported by rising volume and a positive MACD. Buyers are pushing toward the recent high at $0.0006587, but resistance is still a key hurdle.
On the lower timeframes, a small pullback has appeared after the latest rally. A breakout above resistance could strengthen bullish momentum, while rejection may bring a retest of nearby support levels.
🟢 Support:
$0.0006472
$0.0006384
$0.0006294
🔴 Resistance:
$0.0006587
$0.0006635
$0.0006929
📊 Watch the breakout and volume confirmation before making a move. Avoid chasing a sudden pump!
$BOME
{future}(BOMEUSDT)
$BONK
{spot}(BONKUSDT)
$BREV
{future}(BREVUSDT)
BOMEUSDT is trading near $0.0006533, up around 7.19%. The 4H chart shows a strong recovery from $0.0005842, supported by rising volume and a positive MACD. Buyers are pushing toward the recent high at $0.0006587, but resistance is still a key hurdle.
On the lower timeframes, a small pullback has appeared after the latest rally. A breakout above resistance could strengthen bullish momentum, while rejection may bring a retest of nearby support levels.
🟢 Support:
$0.0006472
$0.0006384
$0.0006294
🔴 Resistance:
$0.0006587
$0.0006635
$0.0006929
📊 Watch the breakout and volume confirmation before making a move. Avoid chasing a sudden pump!
$BOME
$BONK
$BREV
On the lower timeframes, a small pullback has appeared after the latest rally. A breakout above resistance could strengthen bullish momentum, while rejection may bring a retest of nearby support levels.
🟢 Support:
$0.0006472
$0.0006384
$0.0006294
🔴 Resistance:
$0.0006587
$0.0006635
$0.0006929
📊 Watch the breakout and volume confirmation before making a move. Avoid chasing a sudden pump!
$BOME
$BONK
$BREV
567
1
14
567
·
--
Me: “ETH, please go to the moon! 🚀🌕”
Starts pumping ETH with a real pump machine 💪😂
ETH: Goes up a little… then starts dumping! 📉💀
Me after all that hard work: 🫠😭
Bro, I wanted a moon trip, not a trip to depression! 🤣
$ETH
$SOPH
$BMT
#ETH
Me: “ETH, please go to the moon! 🚀🌕”
Starts pumping ETH with a real pump machine 💪😂
ETH: Goes up a little… then starts dumping! 📉💀
Me after all that hard work: 🫠😭
Bro, I wanted a moon trip, not a trip to depression! 🤣
$ETH
$SOPH
$BMT
#ETH
Starts pumping ETH with a real pump machine 💪😂
ETH: Goes up a little… then starts dumping! 📉💀
Me after all that hard work: 🫠😭
Bro, I wanted a moon trip, not a trip to depression! 🤣
$ETH
$SOPH
$BMT
#ETH
1
123
·
--
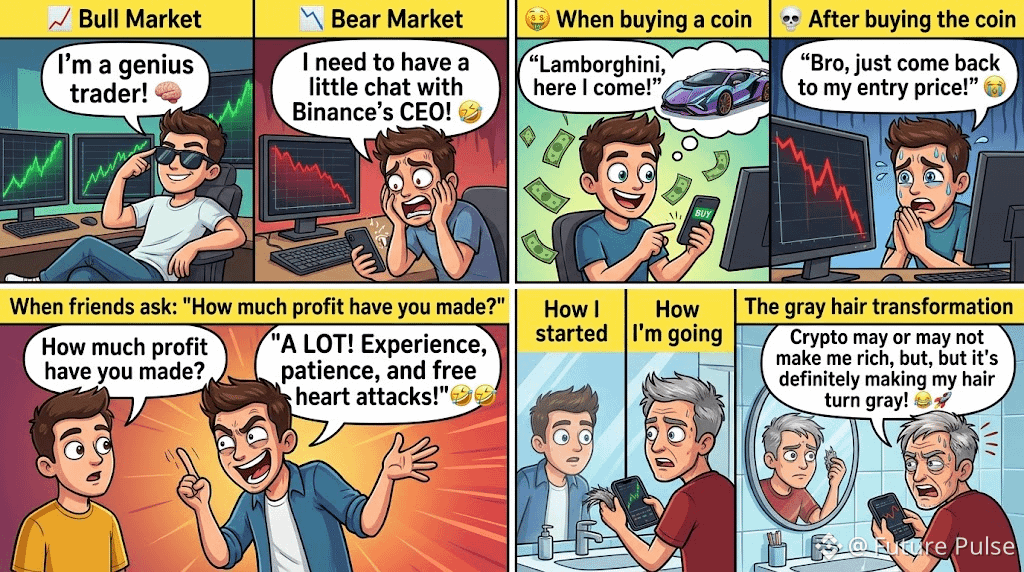
😂 Every Crypto Trader Knows This Feeling!
📈 Bull Market: I’m a genius trader! 🧠
📉 Bear Market: I need to have a little chat with Binance’s CEO! 🤣
🤑 When buying a coin: “Lamborghini, here I come!”
💀 After buying the coin: “Bro, just come back to my entry price!” 😭
When friends ask, “How much profit have you made?”
I say, “A LOT! Experience, patience, and free heart attacks!” 🤣🤣
Crypto may or may not make me rich, but it’s definitely making my hair turn gray! 😂🚀
$AXIS
{alpha}(84530x5be75e3b0aff5d1a042a5363ae36acb1d6d755ea)
$ARIA
{future}(ARIAUSDT)
$BR
{future}(BRUSDT)
😂 Every Crypto Trader Knows This Feeling!
📈 Bull Market: I’m a genius trader! 🧠
📉 Bear Market: I need to have a little chat with Binance’s CEO! 🤣
🤑 When buying a coin: “Lamborghini, here I come!”
💀 After buying the coin: “Bro, just come back to my entry price!” 😭
When friends ask, “How much profit have you made?”
I say, “A LOT! Experience, patience, and free heart attacks!” 🤣🤣
Crypto may or may not make me rich, but it’s definitely making my hair turn gray! 😂🚀
$AXIS
$ARIA
$BR
📈 Bull Market: I’m a genius trader! 🧠
📉 Bear Market: I need to have a little chat with Binance’s CEO! 🤣
🤑 When buying a coin: “Lamborghini, here I come!”
💀 After buying the coin: “Bro, just come back to my entry price!” 😭
When friends ask, “How much profit have you made?”
I say, “A LOT! Experience, patience, and free heart attacks!” 🤣🤣
Crypto may or may not make me rich, but it’s definitely making my hair turn gray! 😂🚀
$AXIS
$ARIA
$BR
1
797
·
--
Me putting all my energy into pushing BTC to the moon 🚀
Bitcoin: “Bro, I think I’m going the other way!” 💀
The harder we try to push the market up, the more exhausted we feel watching those red candles.
Sometimes, being a crypto trader feels exactly like pushing a giant Bitcoin uphill! 🤣
Who else can relate to this struggle? 😂🙋
$BTC
$AVA
$PROM
Me putting all my energy into pushing BTC to the moon 🚀
Bitcoin: “Bro, I think I’m going the other way!” 💀
The harder we try to push the market up, the more exhausted we feel watching those red candles.
Sometimes, being a crypto trader feels exactly like pushing a giant Bitcoin uphill! 🤣
Who else can relate to this struggle? 😂🙋
$BTC
$AVA
$PROM
Bitcoin: “Bro, I think I’m going the other way!” 💀
The harder we try to push the market up, the more exhausted we feel watching those red candles.
Sometimes, being a crypto trader feels exactly like pushing a giant Bitcoin uphill! 🤣
Who else can relate to this struggle? 😂🙋
$BTC
$AVA
$PROM
1
138
·
--
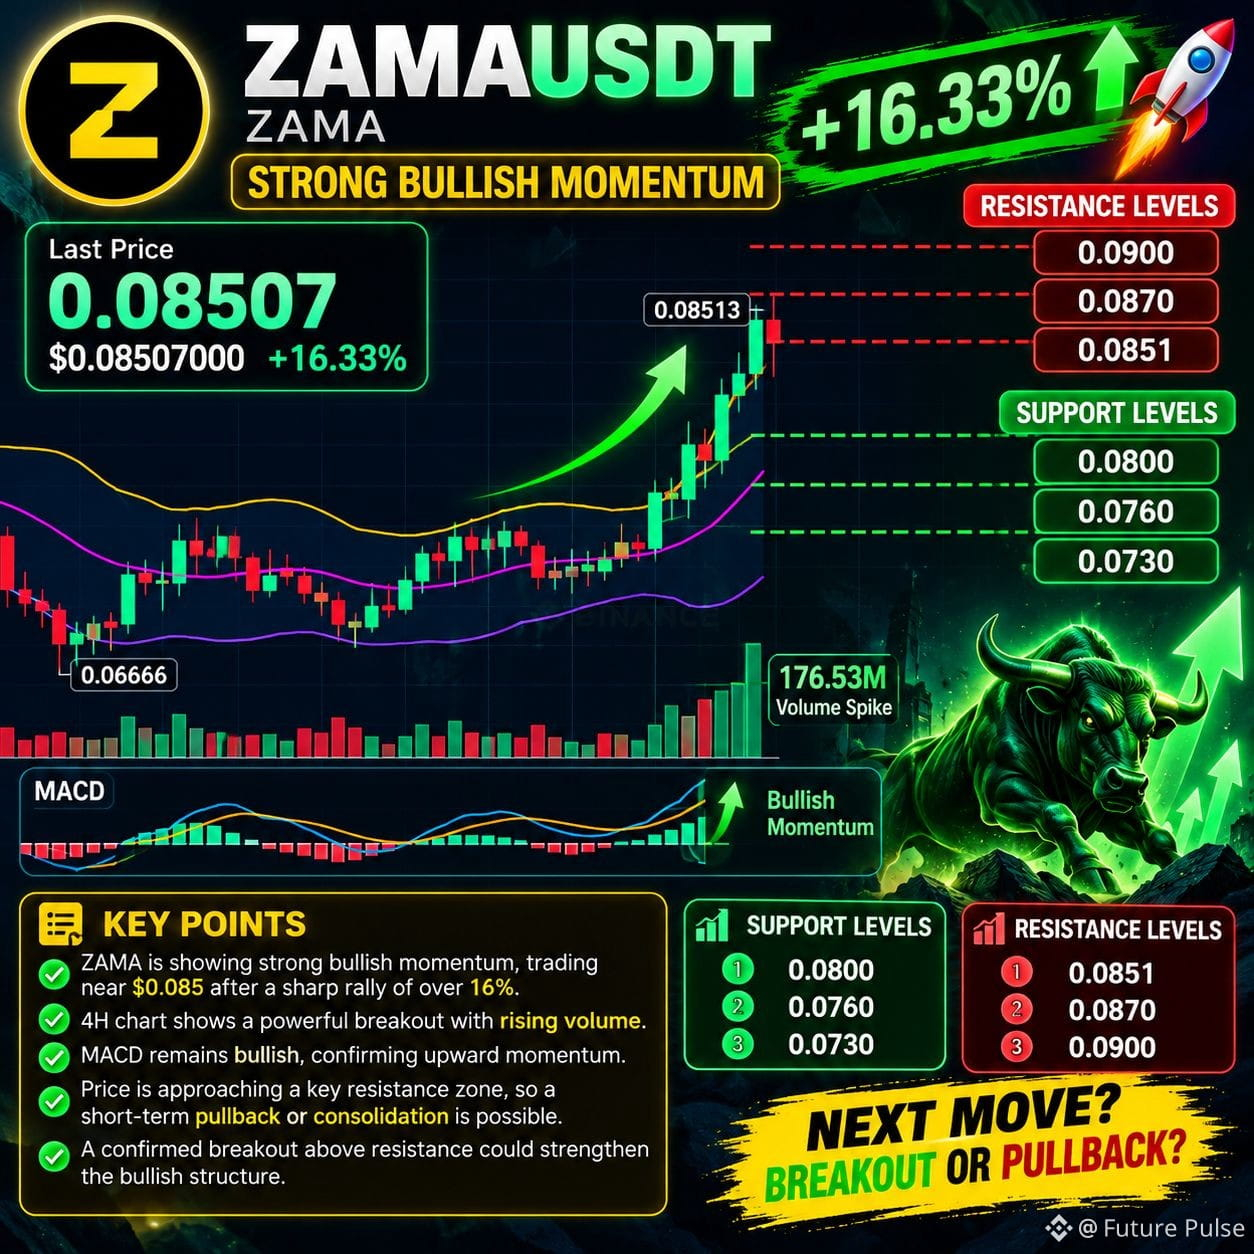
ZAMA is showing strong bullish momentum, trading near $0.085 after a sharp rally of over 16%. 📈 The 4H chart shows a powerful breakout supported by rising volume, while the MACD remains bullish. On the 1H and 15M charts, buyers are still in control, but the price is approaching a key resistance zone.
⚠️ With price extended above the Bollinger middle band, a pullback or consolidation is possible before another move higher.
🟢 Support:
$0.0800
$0.0760
$0.0730
🔴 Resistance:
$0.0851
$0.0870
$0.0900
A confirmed breakout above resistance could strengthen the bullish structure. If buyers lose momentum, watch the support levels closely.
$ZAMA
{future}(ZAMAUSDT)
$AGT
{future}(AGTUSDT)
$SIREN
{future}(SIRENUSDT)
ZAMA is showing strong bullish momentum, trading near $0.085 after a sharp rally of over 16%. 📈 The 4H chart shows a powerful breakout supported by rising volume, while the MACD remains bullish. On the 1H and 15M charts, buyers are still in control, but the price is approaching a key resistance zone.
⚠️ With price extended above the Bollinger middle band, a pullback or consolidation is possible before another move higher.
🟢 Support:
$0.0800
$0.0760
$0.0730
🔴 Resistance:
$0.0851
$0.0870
$0.0900
A confirmed breakout above resistance could strengthen the bullish structure. If buyers lose momentum, watch the support levels closely.
$ZAMA
$AGT
$SIREN
⚠️ With price extended above the Bollinger middle band, a pullback or consolidation is possible before another move higher.
🟢 Support:
$0.0800
$0.0760
$0.0730
🔴 Resistance:
$0.0851
$0.0870
$0.0900
A confirmed breakout above resistance could strengthen the bullish structure. If buyers lose momentum, watch the support levels closely.
$ZAMA
$AGT
$SIREN
576
1
28
943
·
--
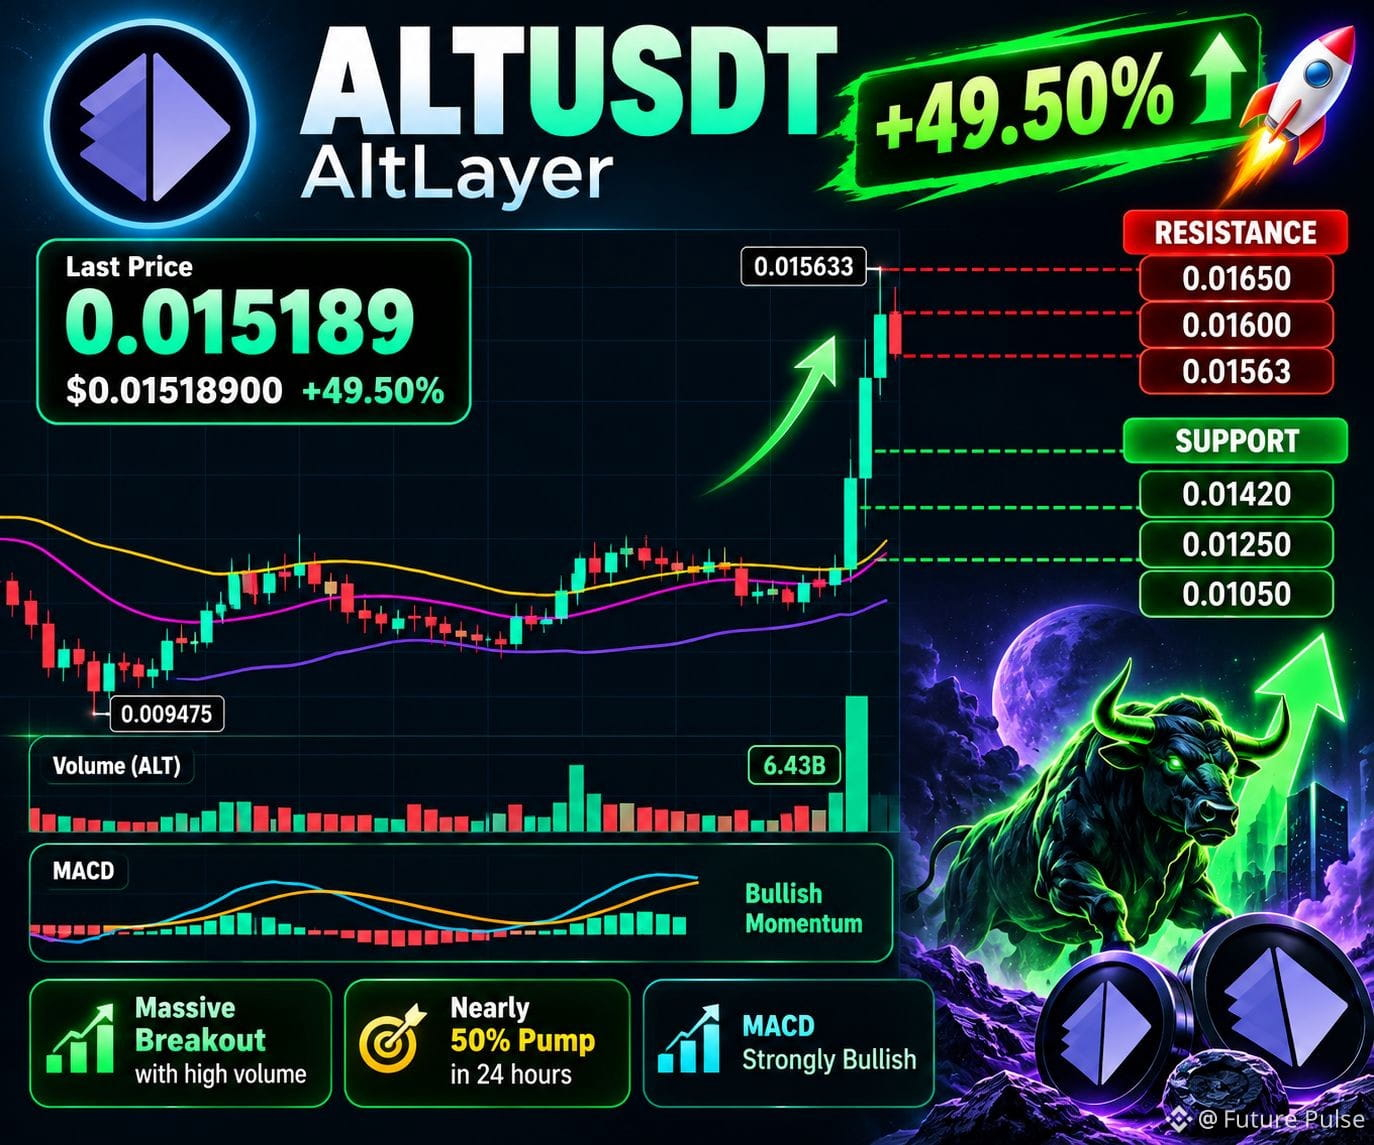
ALT has surged nearly 50%, breaking out of its previous consolidation zone with a massive green candle and a significant volume spike. 📈
The MACD is strongly bullish, showing powerful upward momentum.
However, price is trading far above its previous range, so a short-term pullback or profit-taking could occur. The key is whether buyers can defend the breakout zone.
Are you ready for short?
🟢 Support:
$0.01420-$0.01250-$0.01050
🔴 Resistance:
$0.01563-$0.01600-$0.01650
A sustained move above $0.01563 could strengthen bullish momentum, while rejection may trigger a retest of lower support levels.
$ALT
{future}(ALTUSDT)
$IOST
{future}(IOSTUSDT)
$CVX
{future}(CVXUSDT)
ALT has surged nearly 50%, breaking out of its previous consolidation zone with a massive green candle and a significant volume spike. 📈
The MACD is strongly bullish, showing powerful upward momentum.
However, price is trading far above its previous range, so a short-term pullback or profit-taking could occur. The key is whether buyers can defend the breakout zone.
Are you ready for short?
🟢 Support:
$0.01420-$0.01250-$0.01050
🔴 Resistance:
$0.01563-$0.01600-$0.01650
A sustained move above $0.01563 could strengthen bullish momentum, while rejection may trigger a retest of lower support levels.
$ALT
$IOST
$CVX
The MACD is strongly bullish, showing powerful upward momentum.
However, price is trading far above its previous range, so a short-term pullback or profit-taking could occur. The key is whether buyers can defend the breakout zone.
Are you ready for short?
🟢 Support:
$0.01420-$0.01250-$0.01050
🔴 Resistance:
$0.01563-$0.01600-$0.01650
A sustained move above $0.01563 could strengthen bullish momentum, while rejection may trigger a retest of lower support levels.
$ALT
$IOST
$CVX
1
770
·
--
What Bitcoin’s Rebound Reveals About Liquidity, Leverage, and Market Contagion
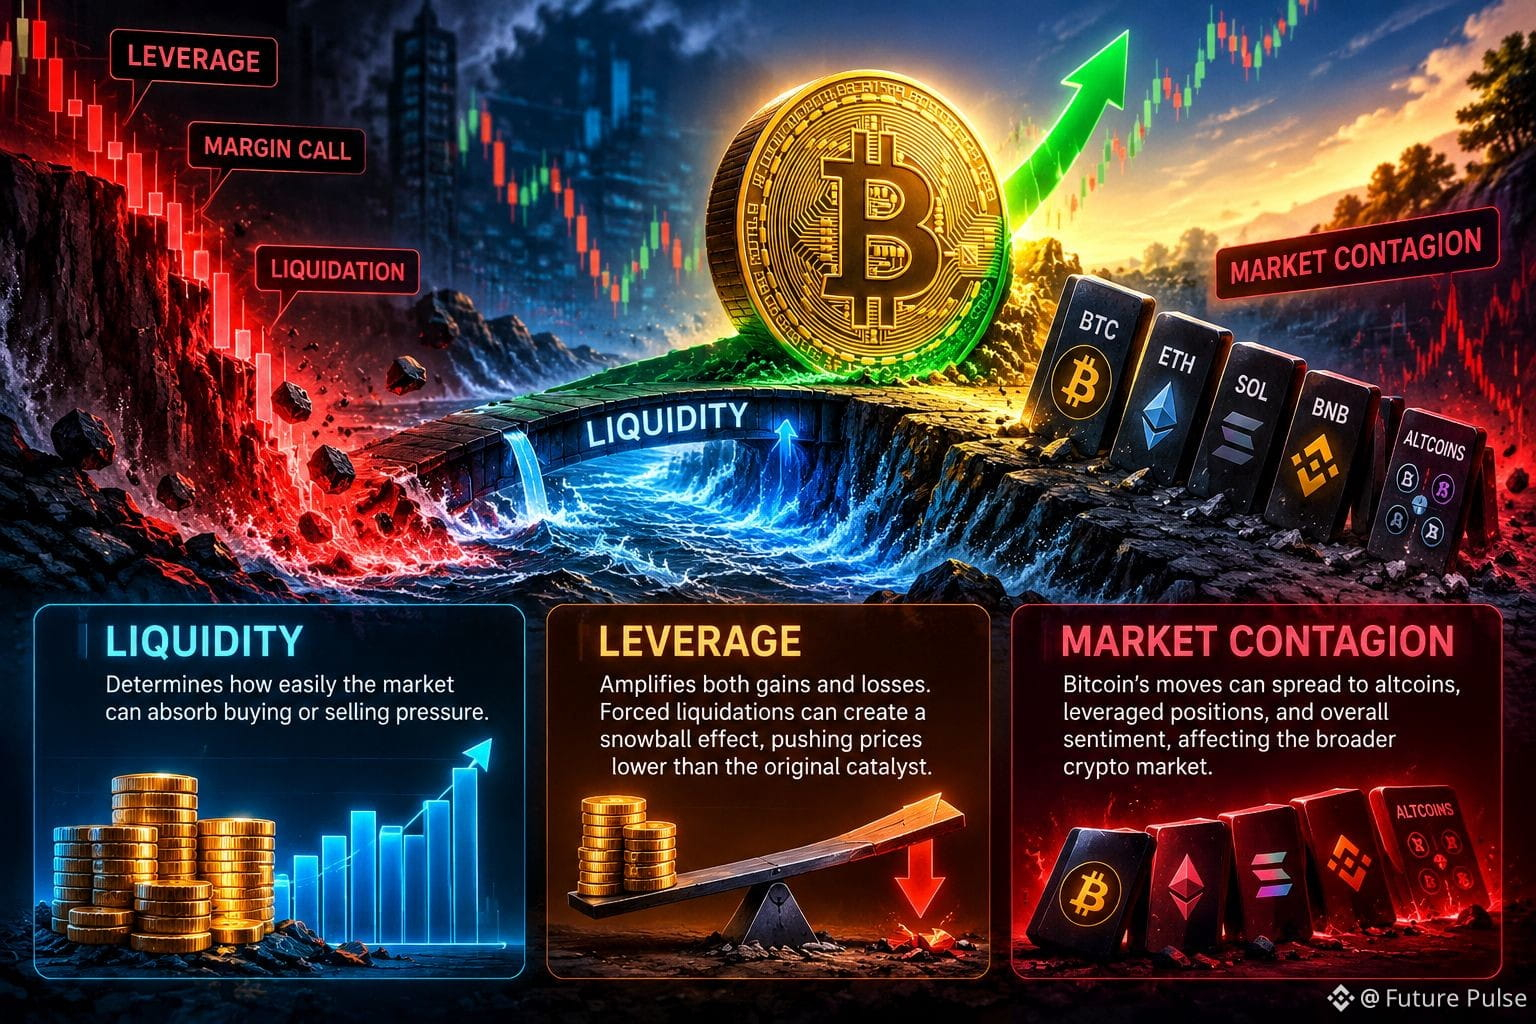
Bitcoin’s rebound is more than a price recovery. It offers a useful look at how liquidity, leverage, and market contagion interact during periods of uncertainty.
When Bitcoin drops sharply, leveraged traders can face forced liquidations. These liquidations create additional selling pressure, pushing prices lower and potentially triggering more liquidations. This feedback loop can make a market correction far more aggressive than the original catalyst alone would justify.
Liquidity determines how easily the market absorbs that pressure. When buyers step in with sufficient capital, prices can recover quickly. But a rebound does not automatically mean liquidity has fully returned or that market confidence is restored.
The contagion effect matters just as much. Bitcoin’s volatility can influence altcoins, leveraged positions, and broader crypto sentiment as traders reduce risk across multiple assets. A recovery in BTC may ease some pressure, but weaker assets can continue struggling.
My key takeaway is that price direction tells only part of the story. To understand whether a rebound is sustainable, I would examine trading volume, derivatives open interest, funding rates, liquidation data, and spot-market demand together.
A strong recovery is not simply about how far Bitcoin rises. It is about whether real demand supports the move and whether excessive leverage is being rebuilt too quickly.
$BTC
{future}(BTCUSDT)
$SC
{spot}(SCUSDT)
$PROM
{future}(PROMUSDT)
#MarketAnalysis
#liquidity
#CryptoMarket
#bitcoin
#BitcoinDunyamiz
What Bitcoin’s Rebound Reveals About Liquidity, Leverage, and Market Contagion
Bitcoin’s rebound is more than a price recovery. It offers a useful look at how liquidity, leverage, and market contagion interact during periods of uncertainty.
When Bitcoin drops sharply, leveraged traders can face forced liquidations. These liquidations create additional selling pressure, pushing prices lower and potentially triggering more liquidations. This feedback loop can make a market correction far more aggressive than the original catalyst alone would justify.
Liquidity determines how easily the market absorbs that pressure. When buyers step in with sufficient capital, prices can recover quickly. But a rebound does not automatically mean liquidity has fully returned or that market confidence is restored.
The contagion effect matters just as much. Bitcoin’s volatility can influence altcoins, leveraged positions, and broader crypto sentiment as traders reduce risk across multiple assets. A recovery in BTC may ease some pressure, but weaker assets can continue struggling.
My key takeaway is that price direction tells only part of the story. To understand whether a rebound is sustainable, I would examine trading volume, derivatives open interest, funding rates, liquidation data, and spot-market demand together.
A strong recovery is not simply about how far Bitcoin rises. It is about whether real demand supports the move and whether excessive leverage is being rebuilt too quickly.
$BTC
$SC
$PROM
#MarketAnalysis
#liquidity
#CryptoMarket
#bitcoin
#BitcoinDunyamiz
Bitcoin’s rebound is more than a price recovery. It offers a useful look at how liquidity, leverage, and market contagion interact during periods of uncertainty.
When Bitcoin drops sharply, leveraged traders can face forced liquidations. These liquidations create additional selling pressure, pushing prices lower and potentially triggering more liquidations. This feedback loop can make a market correction far more aggressive than the original catalyst alone would justify.
Liquidity determines how easily the market absorbs that pressure. When buyers step in with sufficient capital, prices can recover quickly. But a rebound does not automatically mean liquidity has fully returned or that market confidence is restored.
The contagion effect matters just as much. Bitcoin’s volatility can influence altcoins, leveraged positions, and broader crypto sentiment as traders reduce risk across multiple assets. A recovery in BTC may ease some pressure, but weaker assets can continue struggling.
My key takeaway is that price direction tells only part of the story. To understand whether a rebound is sustainable, I would examine trading volume, derivatives open interest, funding rates, liquidation data, and spot-market demand together.
A strong recovery is not simply about how far Bitcoin rises. It is about whether real demand supports the move and whether excessive leverage is being rebuilt too quickly.
$BTC
$SC
$PROM
#MarketAnalysis
#liquidity
#CryptoMarket
#bitcoin
#BitcoinDunyamiz
1
324
·
--
😂 My crypto portfolio has something in common with my relationships!
Both gave me so many dreams at first! ❤️🚀
Then both went down so hard that now I survive on old memories! 🤣😭
📈 When Bitcoin rises: I’m a financial expert! 😎
📉 When Bitcoin falls: Market manipulation! 😤
🟢 When my coin turns green: I’m a genius! 🤑
🔴 When my coin turns red: I’m a long-term investor! 💎🙃
And when my meme coin drops 90%?
I tell myself:
“Bro, this isn’t a loss… I’m just providing long-term support to the project!” 🤣🤣
Here’s my question!
Will crypto make us rich, or will we become monks while waiting patiently? 😂🙏
$DOGE
{future}(DOGEUSDT)
$SHIB
{spot}(SHIBUSDT)
$WIF
{future}(WIFUSDT)
#CryptoLife
#memecoin
#crypto
#Binance
#DOGE
😂 My crypto portfolio has something in common with my relationships!
Both gave me so many dreams at first! ❤️🚀
Then both went down so hard that now I survive on old memories! 🤣😭
📈 When Bitcoin rises: I’m a financial expert! 😎
📉 When Bitcoin falls: Market manipulation! 😤
🟢 When my coin turns green: I’m a genius! 🤑
🔴 When my coin turns red: I’m a long-term investor! 💎🙃
And when my meme coin drops 90%?
I tell myself:
“Bro, this isn’t a loss… I’m just providing long-term support to the project!” 🤣🤣
Here’s my question!
Will crypto make us rich, or will we become monks while waiting patiently? 😂🙏
$DOGE
$SHIB
$WIF
#CryptoLife
#memecoin
#crypto
#Binance
#DOGE
Both gave me so many dreams at first! ❤️🚀
Then both went down so hard that now I survive on old memories! 🤣😭
📈 When Bitcoin rises: I’m a financial expert! 😎
📉 When Bitcoin falls: Market manipulation! 😤
🟢 When my coin turns green: I’m a genius! 🤑
🔴 When my coin turns red: I’m a long-term investor! 💎🙃
And when my meme coin drops 90%?
I tell myself:
“Bro, this isn’t a loss… I’m just providing long-term support to the project!” 🤣🤣
Here’s my question!
Will crypto make us rich, or will we become monks while waiting patiently? 😂🙏
$DOGE
$SHIB
$WIF
#CryptoLife
#memecoin
#crypto
#Binance
#DOGE

1
213
·
--
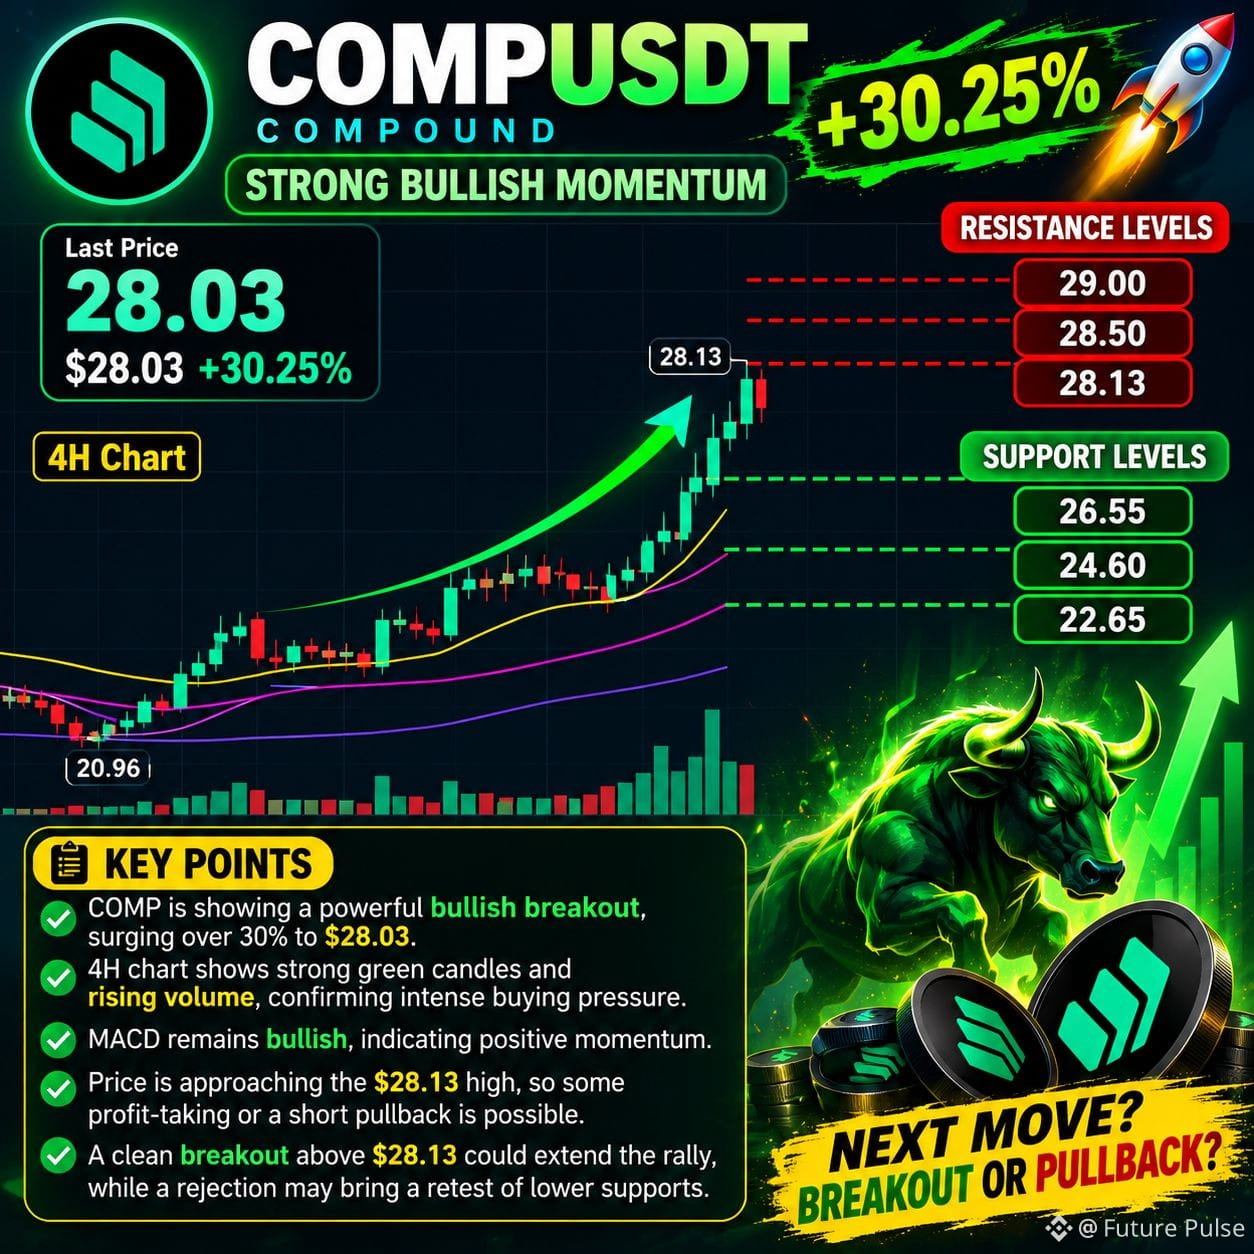
COMP is showing a powerful bullish breakout, surging over 30% to $28.03. 🚀
The 4H chart shows strong green candles, rising volume, and a bullish MACD, confirming intense buying pressure.
However, price is approaching the $28.13 high, so some profit-taking or a short pullback is possible. A clean breakout above this level could extend the rally, while a rejection may bring a retest of lower supports. I’d watch volume and candle closes before judging the next move.
🟢 Support:
$26.55
$24.60
$22.65
🔴 Resistance:
$28.13
$28.50
$29.00
$COMP
{future}(COMPUSDT)
$IOST
{future}(IOSTUSDT)
$THETA
{future}(THETAUSDT)
#Comp
COMP is showing a powerful bullish breakout, surging over 30% to $28.03. 🚀
The 4H chart shows strong green candles, rising volume, and a bullish MACD, confirming intense buying pressure.
However, price is approaching the $28.13 high, so some profit-taking or a short pullback is possible. A clean breakout above this level could extend the rally, while a rejection may bring a retest of lower supports. I’d watch volume and candle closes before judging the next move.
🟢 Support:
$26.55
$24.60
$22.65
🔴 Resistance:
$28.13
$28.50
$29.00
$COMP
$IOST
$THETA
#Comp
The 4H chart shows strong green candles, rising volume, and a bullish MACD, confirming intense buying pressure.
However, price is approaching the $28.13 high, so some profit-taking or a short pullback is possible. A clean breakout above this level could extend the rally, while a rejection may bring a retest of lower supports. I’d watch volume and candle closes before judging the next move.
🟢 Support:
$26.55
$24.60
$22.65
🔴 Resistance:
$28.13
$28.50
$29.00
$COMP
$IOST
$THETA
#Comp
539
21
671
·
--
ຢືນຢັນແລ້ວ
#BinanceAIPro
Binance AI Pro: Turning Trading Ideas Into Automated Strategies 🤖
What interests me most about Binance AI Pro is how it connects AI with practical trading workflows. Instead of writing code, users can describe a trading idea in plain language, refine the strategy, and review its workflow before putting it into action.
The ability to test strategies through simulated trading is especially important. It gives users a chance to evaluate their approach before risking real funds. Binance also keeps users involved through approval requirements, dedicated sub-accounts, and the ability to pause or revoke a live strategy.
However, automation does not eliminate market risk. AI-generated strategies can still make mistakes, and simulated results do not guarantee real-world performance. I believe the real value of Binance AI Pro will depend on how responsibly users define their parameters, test their strategies, and manage risk.
AI can make trading workflows more accessible, but informed decisions and human oversight remain essential.
$SNXXB
{spot}(SNXXBUSDT)
$KORUB
{spot}(KORUBUSDT)
$MVLLB
{spot}(MVLLBUSDT)
#BinanceAIPro
Binance AI Pro: Turning Trading Ideas Into Automated Strategies 🤖
What interests me most about Binance AI Pro is how it connects AI with practical trading workflows. Instead of writing code, users can describe a trading idea in plain language, refine the strategy, and review its workflow before putting it into action.
The ability to test strategies through simulated trading is especially important. It gives users a chance to evaluate their approach before risking real funds. Binance also keeps users involved through approval requirements, dedicated sub-accounts, and the ability to pause or revoke a live strategy.
However, automation does not eliminate market risk. AI-generated strategies can still make mistakes, and simulated results do not guarantee real-world performance. I believe the real value of Binance AI Pro will depend on how responsibly users define their parameters, test their strategies, and manage risk.
AI can make trading workflows more accessible, but informed decisions and human oversight remain essential.
$SNXXB
$KORUB
$MVLLB
Binance AI Pro: Turning Trading Ideas Into Automated Strategies 🤖
What interests me most about Binance AI Pro is how it connects AI with practical trading workflows. Instead of writing code, users can describe a trading idea in plain language, refine the strategy, and review its workflow before putting it into action.
The ability to test strategies through simulated trading is especially important. It gives users a chance to evaluate their approach before risking real funds. Binance also keeps users involved through approval requirements, dedicated sub-accounts, and the ability to pause or revoke a live strategy.
However, automation does not eliminate market risk. AI-generated strategies can still make mistakes, and simulated results do not guarantee real-world performance. I believe the real value of Binance AI Pro will depend on how responsibly users define their parameters, test their strategies, and manage risk.
AI can make trading workflows more accessible, but informed decisions and human oversight remain essential.
$SNXXB
$KORUB
$MVLLB

2
361
·
--
ຢືນຢັນແລ້ວ
The Real Challenge of AI Agents Isn’t Intelligence. It’s Financial Authority.
Imagine an AI research agent that needs to purchase market data, pay for a specialized API, and hire another agent to complete a task. Each interaction requires more than intelligence. It requires a way to authorize payments, enforce limits, and verify what happened.
This is where I find @GoKiteAI particularly interesting.
Kite Passport introduces a practical approach to delegated spending. A user can approve a spending session using a passkey, define a maximum amount per transaction, set a total budget, and specify how long the session remains valid. Once approved, an agent can make eligible payments within those boundaries.
The important distinction is that autonomy does not have to mean unlimited access to someone’s funds.
Consider a simple example: I authorize a research agent to spend up to $10 in total, with a maximum of $2 per transaction, for a limited period. The agent can purchase eligible services within those rules, but a request exceeding the approved limits should not simply be treated as authorized.
Kite’s support for agent-native payment workflows, including x402-based paid API access, addresses another important challenge: enabling software to pay for individual services instead of relying entirely on traditional human-driven payment processes.
Still, spending limits alone cannot solve every problem. Service quality, compromised agents, unauthorized requests, and merchant verification remain important challenges. Real adoption will depend on how reliably the complete system handles these risks.
My takeaway is that the agent economy needs more than autonomous AI. It needs controlled delegation, verifiable authorization, and accountable transactions.
Would you trust an AI agent with a funded wallet if you could define its spending limits and approve its permissions first? Why or why not?
$KITE #KiteBBW @GoKiteAI
🗳️ Vote and share your perspective!
🤖 What matters most when giving AI agents financial authority?
The Real Challenge of AI Agents Isn’t Intelligence. It’s Financial Authority.
Imagine an AI research agent that needs to purchase market data, pay for a specialized API, and hire another agent to complete a task. Each interaction requires more than intelligence. It requires a way to authorize payments, enforce limits, and verify what happened.
This is where I find @KITE AI 中文 particularly interesting.
Kite Passport introduces a practical approach to delegated spending. A user can approve a spending session using a passkey, define a maximum amount per transaction, set a total budget, and specify how long the session remains valid. Once approved, an agent can make eligible payments within those boundaries.
The important distinction is that autonomy does not have to mean unlimited access to someone’s funds.
Consider a simple example: I authorize a research agent to spend up to $10 in total, with a maximum of $2 per transaction, for a limited period. The agent can purchase eligible services within those rules, but a request exceeding the approved limits should not simply be treated as authorized.
Kite’s support for agent-native payment workflows, including x402-based paid API access, addresses another important challenge: enabling software to pay for individual services instead of relying entirely on traditional human-driven payment processes.
Still, spending limits alone cannot solve every problem. Service quality, compromised agents, unauthorized requests, and merchant verification remain important challenges. Real adoption will depend on how reliably the complete system handles these risks.
My takeaway is that the agent economy needs more than autonomous AI. It needs controlled delegation, verifiable authorization, and accountable transactions.
Would you trust an AI agent with a funded wallet if you could define its spending limits and approve its permissions first? Why or why not?
$KITE #KiteBBW @KITE AI 中文
🗳️ Vote and share your perspective!
🤖 What matters most when giving AI agents financial authority?
Imagine an AI research agent that needs to purchase market data, pay for a specialized API, and hire another agent to complete a task. Each interaction requires more than intelligence. It requires a way to authorize payments, enforce limits, and verify what happened.
This is where I find @KITE AI 中文 particularly interesting.
Kite Passport introduces a practical approach to delegated spending. A user can approve a spending session using a passkey, define a maximum amount per transaction, set a total budget, and specify how long the session remains valid. Once approved, an agent can make eligible payments within those boundaries.
The important distinction is that autonomy does not have to mean unlimited access to someone’s funds.
Consider a simple example: I authorize a research agent to spend up to $10 in total, with a maximum of $2 per transaction, for a limited period. The agent can purchase eligible services within those rules, but a request exceeding the approved limits should not simply be treated as authorized.
Kite’s support for agent-native payment workflows, including x402-based paid API access, addresses another important challenge: enabling software to pay for individual services instead of relying entirely on traditional human-driven payment processes.
Still, spending limits alone cannot solve every problem. Service quality, compromised agents, unauthorized requests, and merchant verification remain important challenges. Real adoption will depend on how reliably the complete system handles these risks.
My takeaway is that the agent economy needs more than autonomous AI. It needs controlled delegation, verifiable authorization, and accountable transactions.
Would you trust an AI agent with a funded wallet if you could define its spending limits and approve its permissions first? Why or why not?
$KITE #KiteBBW @KITE AI 中文
🗳️ Vote and share your perspective!
🤖 What matters most when giving AI agents financial authority?

🔐 Strict Spending Limits
40%
🪪 Verified Agent Identity
20%
🛡️ Human Approval & Control
0%
💳 Secure Autonomous Payments
40%
5 ຄະແນນສຽງ • ປິດລົງຄະແນນສຽງ
14
1
11
1.1k
ເຂົ້າສູ່ລະບົບເພື່ອສຳຫຼວດເນື້ອຫາເພີ່ມເຕີມ
ເຂົ້າຮ່ວມກຸ່ມຜູ້ໃຊ້ຄຣິບໂຕທົ່ວໂລກໃນ Binance Square.
⚡️ ໄດ້ຮັບຂໍ້ມູນຫຼ້າສຸດ ແລະ ທີ່ມີປະໂຫຍດກ່ຽວກັບຄຣິບໂຕ.
💬 ໄດ້ຮັບຄວາມໄວ້ວາງໃຈຈາກຕະຫຼາດແລກປ່ຽນຄຣິບໂຕທີ່ໃຫຍ່ທີ່ສຸດໃນໂລກ.
👍 ຄົ້ນຫາຂໍ້ມູນເຊີງເລິກທີ່ແທ້ຈາກນັກສ້າງທີ່ໄດ້ຮັບການຢືນຢັນ.
ອີເມວ / ເບີໂທລະສັບ
ຫົວຂໍ້ທີ່ກໍາລັງນິຍົມ
BinancePick
3M ຄັ້ງທີ່ເບິ່ງ
152,006 ກຳລັງສົນທະນາ
Join #EarningsSeason: Predict Earnings on Binance Pick, Share Your Take on Binance Square!
Binance Square Official
·408 ຖືກໃຈ
·342.5k ຄັ້ງທີ່ເບິ່ງ
EarningsSeason
5.2M ຄັ້ງທີ່ເບິ່ງ
25,828 ກຳລັງສົນທະນາ
AnthropicTTMRevenueGrewAbout1200%
21,552 ຄັ້ງທີ່ເບິ່ງ
351 ກຳລັງສົນທະນາ