

Max _ Hunter
14.7k ໂພສ

Max _ Hunter
 Square ຢືນຢັນແລ້ວ
ລາຍງານ
ບລັອກຜູ້ໃຊ້
Bull Market Hunter | Technical Analysis | AI Enthusiast
ເປີດການຊື້ຂາຍ
ຜູ້ຊື້ຂາຍປະຈໍາ
2 ປີ
320 ກໍາລັງຕິດຕາມ
34.2K+ ຜູ້ຕິດຕາມ
38.3K+ Liked
ໂພສ
Portfolio
ທັງໝົດ
ວົງຢືມ
ວີດີໂອ
ຖ່າຍທອດສົດ
·
--
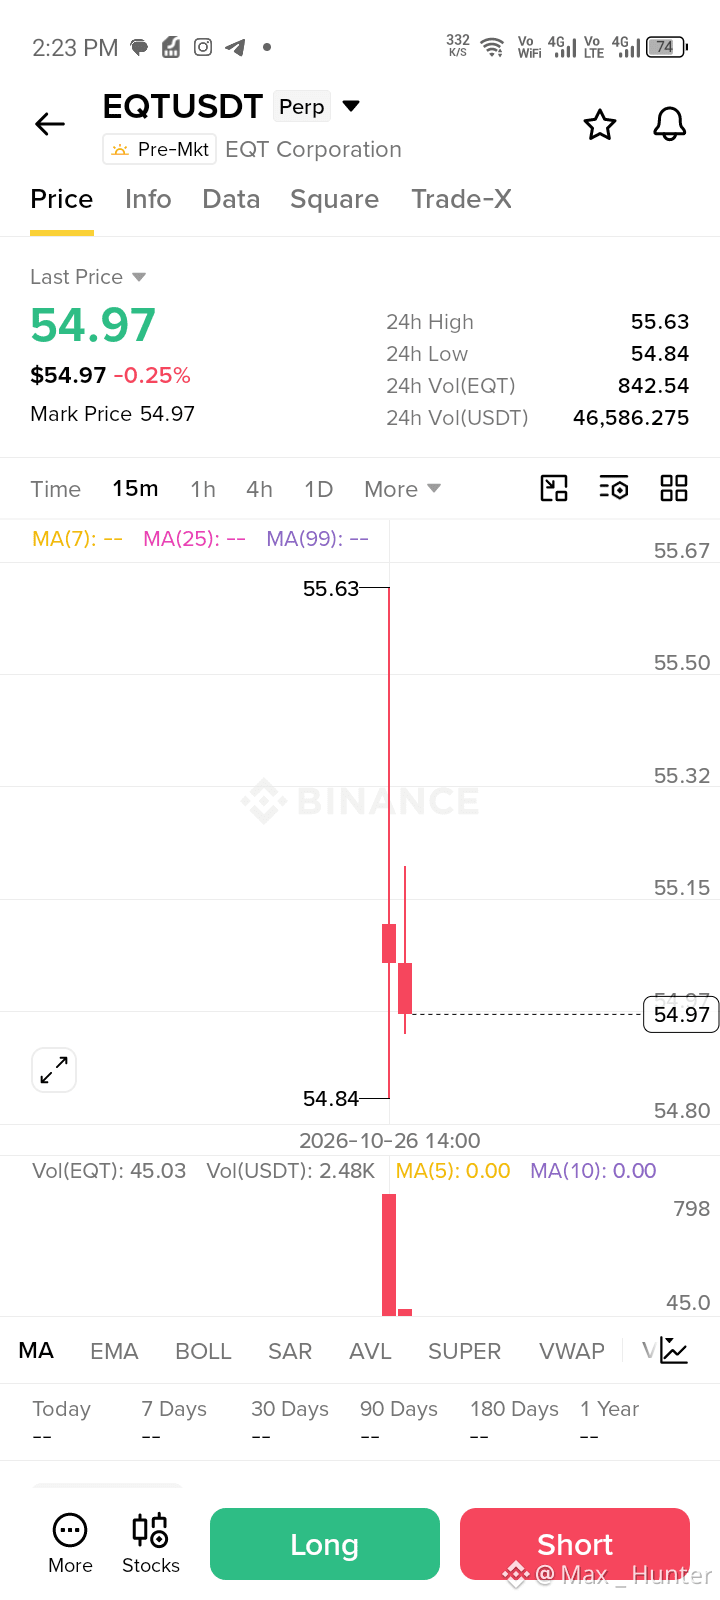
$EQT has faced strong selling pressure after a sharp rejection near the $55.63 resistance area. The latest bearish candles have pushed price down to $54.97, with support near $54.84. The continued selling pressure suggests bearish momentum may persist unless buyers reclaim the nearby resistance zones.
Entry: $54.95–55.05
TP1: $54.85
TP2: $54.70
TP3: $54.50
SL: $55.25
A sustained move below $54.84 could strengthen the bearish continuation toward $54.50, while a recovery above $55.15 could weaken the bearish setup.
Buy and Trade $EQT
$EQT has faced strong selling pressure after a sharp rejection near the $55.63 resistance area. The latest bearish candles have pushed price down to $54.97, with support near $54.84. The continued selling pressure suggests bearish momentum may persist unless buyers reclaim the nearby resistance zones.
Entry: $54.95–55.05
TP1: $54.85
TP2: $54.70
TP3: $54.50
SL: $55.25
A sustained move below $54.84 could strengthen the bearish continuation toward $54.50, while a recovery above $55.15 could weaken the bearish setup.
Buy and Trade $EQT
Entry: $54.95–55.05
TP1: $54.85
TP2: $54.70
TP3: $54.50
SL: $55.25
A sustained move below $54.84 could strengthen the bearish continuation toward $54.50, while a recovery above $55.15 could weaken the bearish setup.
Buy and Trade $EQT
146
·
--
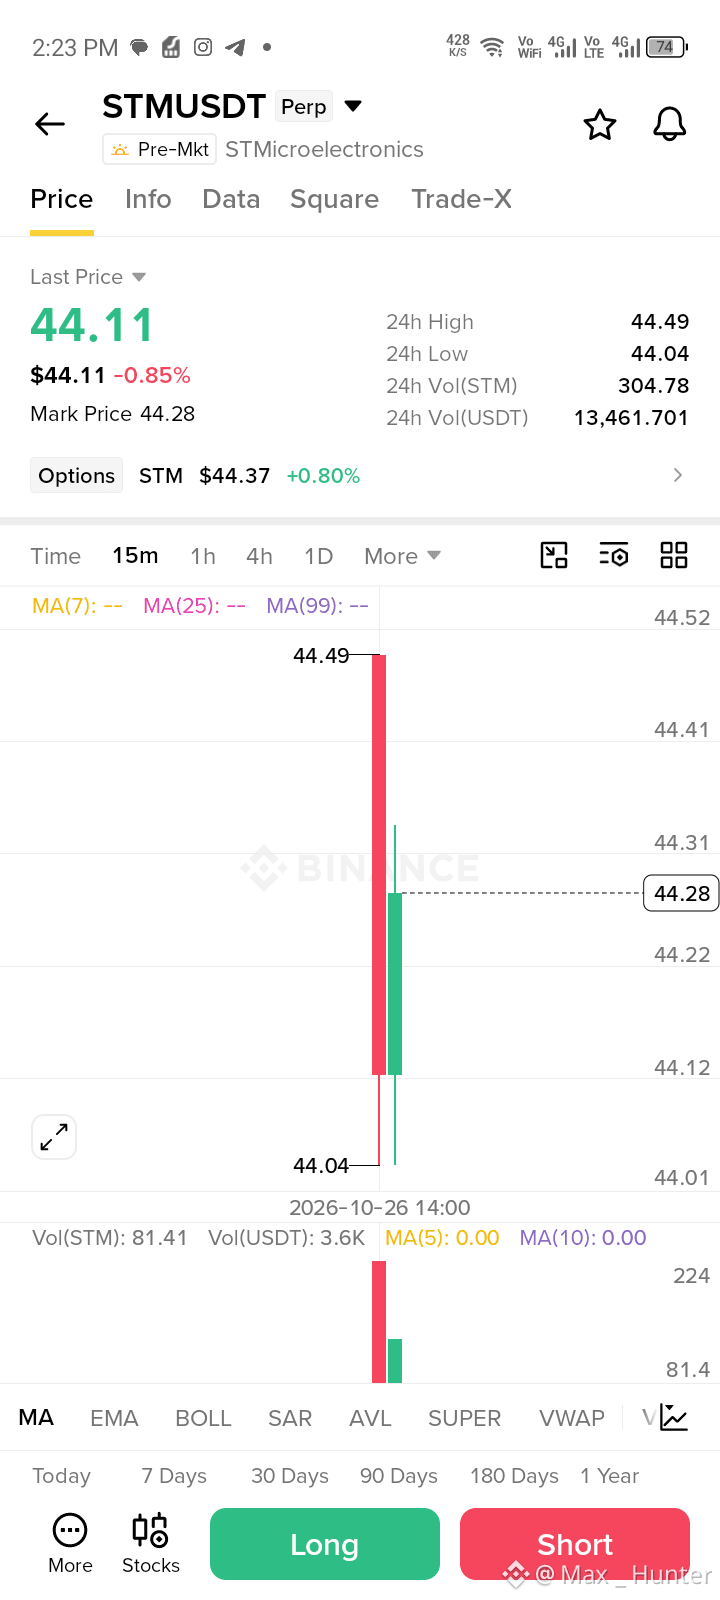
$STM has faced sharp selling pressure after rejection near the $44.49 resistance area, dropping toward $44.04 support before buyers stepped in with a short-term rebound. The latest green candle suggests a recovery attempt, but bearish momentum remains a concern unless price reclaims the nearby resistance zones.
Entry: $44.20–44.30
TP1: $44.35
TP2: $44.41
TP3: $44.49
SL: $44.03
A sustained move above $44.35 could strengthen the recovery toward $44.49, while a breakdown below $44.04 could signal further downside.
Buy and Trade $STMX
$STM has faced sharp selling pressure after rejection near the $44.49 resistance area, dropping toward $44.04 support before buyers stepped in with a short-term rebound. The latest green candle suggests a recovery attempt, but bearish momentum remains a concern unless price reclaims the nearby resistance zones.
Entry: $44.20–44.30
TP1: $44.35
TP2: $44.41
TP3: $44.49
SL: $44.03
A sustained move above $44.35 could strengthen the recovery toward $44.49, while a breakdown below $44.04 could signal further downside.
Buy and Trade $STMX
Entry: $44.20–44.30
TP1: $44.35
TP2: $44.41
TP3: $44.49
SL: $44.03
A sustained move above $44.35 could strengthen the recovery toward $44.49, while a breakdown below $44.04 could signal further downside.
Buy and Trade $STMX
127
·
--
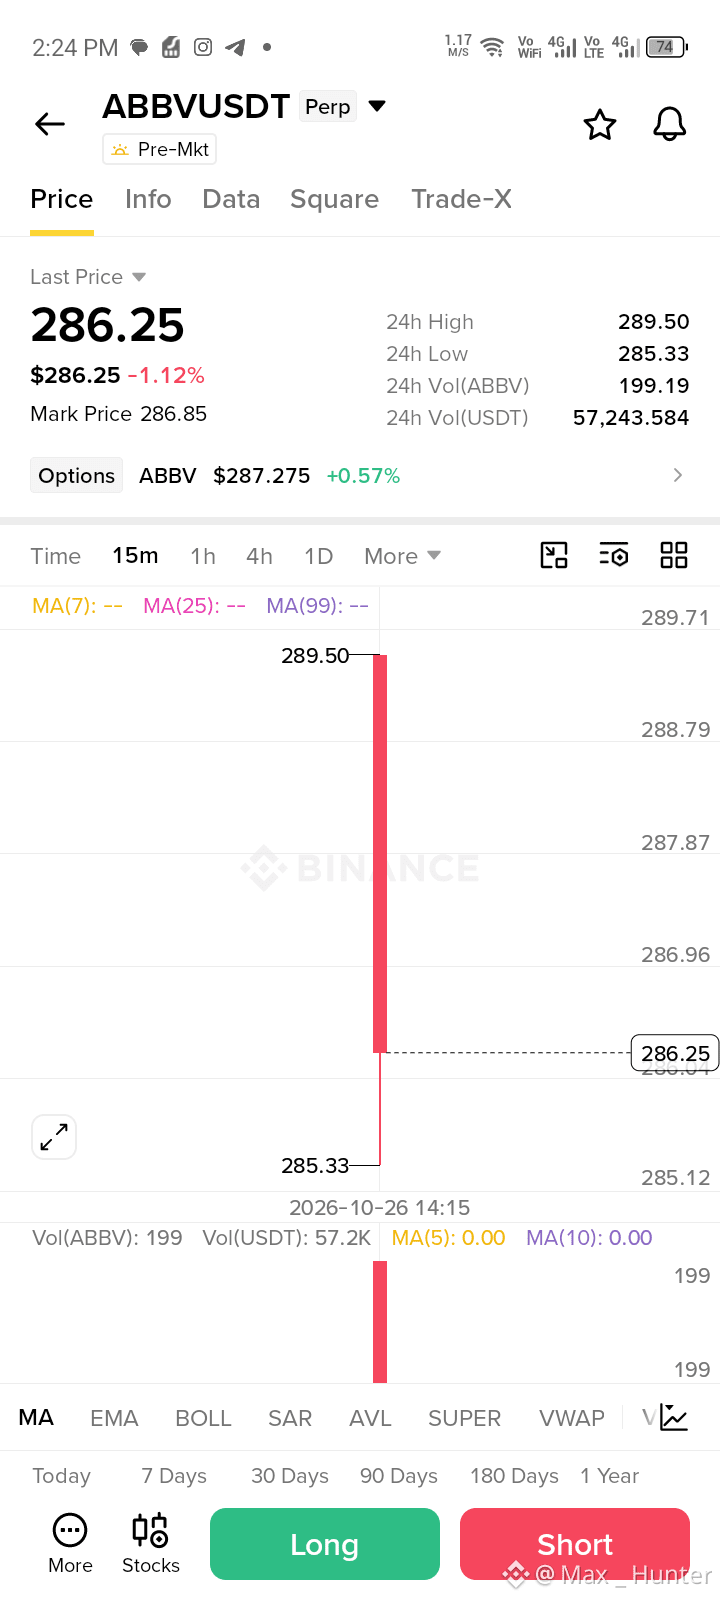
$ABBVUSDT has faced strong selling pressure after getting rejected near the $289.50 area. The latest bearish candle has pushed price down to $286.25, with support around $285.33. A breakdown below this level could open the door for further downside toward lower support zones.
Entry: $285.20–285.50
TP1: $284.80
TP2: $284.30
TP3: $283.80
SL: $286.30
A sustained move below $285.33 could strengthen the bearish continuation toward $283.80.
Buy and Trade $ABBV USDT
$ABBVUSDT has faced strong selling pressure after getting rejected near the $289.50 area. The latest bearish candle has pushed price down to $286.25, with support around $285.33. A breakdown below this level could open the door for further downside toward lower support zones.
Entry: $285.20–285.50
TP1: $284.80
TP2: $284.30
TP3: $283.80
SL: $286.30
A sustained move below $285.33 could strengthen the bearish continuation toward $283.80.
Buy and Trade $ABBV USDT
Entry: $285.20–285.50
TP1: $284.80
TP2: $284.30
TP3: $283.80
SL: $286.30
A sustained move below $285.33 could strengthen the bearish continuation toward $283.80.
Buy and Trade $ABBV USDT
138
·
--
🚨 NEW LISTING ALERT! 🔥
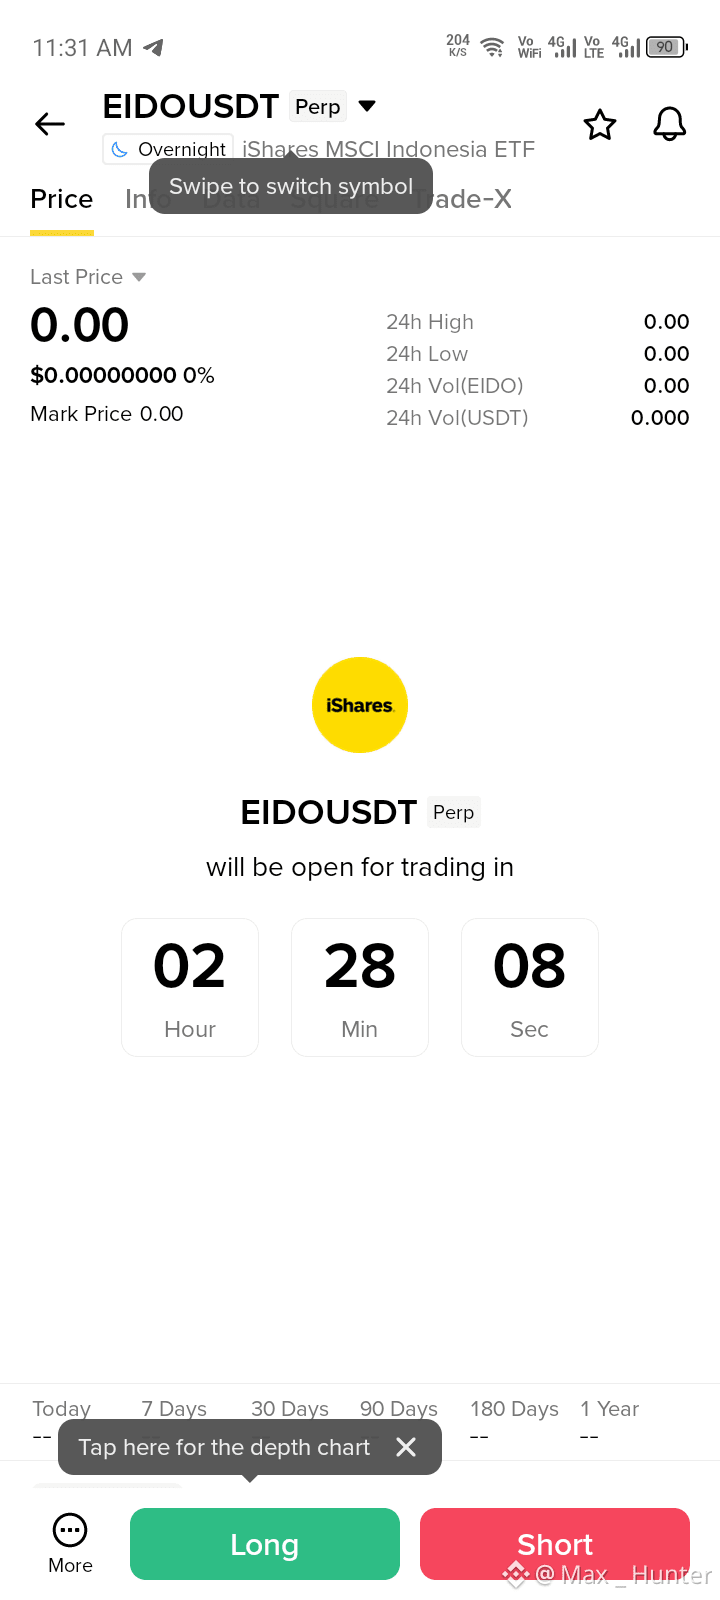
👀 EIDOUSDT PERPETUAL CONTRACT IS COMING!
⏳ The countdown is on! EIDOUSDT Perp is preparing to open for trading on Binance, according to the screenshot.
📊 Trading Pair: $EIDO.ETF
⚡ Contract: Perpetual Futures
🟢 Long
🔴 Short
💡 Stay alert, watch price action after launch, and manage your risk carefully. New listings can bring high volatility!
🔥 Will you go LONG or SHORT on EIDOUSDT? 👇
#EIDOUSDT #Binance #NewListing #CryptoTrading #FuturesTrading #Altcoins #CryptoCommunity #BİNANCESQUARE
{etf_us}(EIDO.ETF)
🚨 NEW LISTING ALERT! 🔥
👀 EIDOUSDT PERPETUAL CONTRACT IS COMING!
⏳ The countdown is on! EIDOUSDT Perp is preparing to open for trading on Binance, according to the screenshot.
📊 Trading Pair: $EIDO.ETF
⚡ Contract: Perpetual Futures
🟢 Long
🔴 Short
💡 Stay alert, watch price action after launch, and manage your risk carefully. New listings can bring high volatility!
🔥 Will you go LONG or SHORT on EIDOUSDT? 👇
#EIDOUSDT #Binance #NewListing #CryptoTrading #FuturesTrading #Altcoins #CryptoCommunity #BİNANCESQUARE
👀 EIDOUSDT PERPETUAL CONTRACT IS COMING!
⏳ The countdown is on! EIDOUSDT Perp is preparing to open for trading on Binance, according to the screenshot.
📊 Trading Pair: $EIDO.ETF
⚡ Contract: Perpetual Futures
🟢 Long
🔴 Short
💡 Stay alert, watch price action after launch, and manage your risk carefully. New listings can bring high volatility!
🔥 Will you go LONG or SHORT on EIDOUSDT? 👇
#EIDOUSDT #Binance #NewListing #CryptoTrading #FuturesTrading #Altcoins #CryptoCommunity #BİNANCESQUARE
EIDOETF-1,00%
220
·
--
⚡ JUST IN: Elon Musk is bringing a new way to tip on X! 🚀💸
Users may soon be able to send $1 directly to someone by long-pressing the Like button through X Money. 👀
🔥 Like a post, appreciate the creator, and send a tip — all in one simple action!
💰 Could this be the future of social media payments?
What do you think? Would you use this feature? 👇
$LAB
{future}(LABUSDT)
$BTC
{future}(BTCUSDT)
#ElonMusk #Fintech #DigitalPayments #Innovation #BinanceSquare $MSFTB
⚡ JUST IN: Elon Musk is bringing a new way to tip on X! 🚀💸
Users may soon be able to send $1 directly to someone by long-pressing the Like button through X Money. 👀
🔥 Like a post, appreciate the creator, and send a tip — all in one simple action!
💰 Could this be the future of social media payments?
What do you think? Would you use this feature? 👇
$LAB
$BTC
#ElonMusk #Fintech #DigitalPayments #Innovation #BinanceSquare $MSFTB
Users may soon be able to send $1 directly to someone by long-pressing the Like button through X Money. 👀
🔥 Like a post, appreciate the creator, and send a tip — all in one simple action!
💰 Could this be the future of social media payments?
What do you think? Would you use this feature? 👇
$LAB
$BTC
#ElonMusk #Fintech #DigitalPayments #Innovation #BinanceSquare $MSFTB

463

·
--
ສັນຍານກະທິງ
🎃👻 Halloween is here, and the crypto world is ready for a little spooky excitement with Binance! 🟡🖤
Imagine a Halloween night filled with glowing pumpkins, mysterious shadows, digital ghosts, and the exciting world of crypto. While the spooky season brings surprises around every corner, one thing should always stay clear: DYOR, protect your account, and make responsible decisions in the crypto market.
For me, Halloween is all about creativity, community, and sharing positive energy. Binance brings crypto enthusiasts together from different parts of the world, and this season is a great opportunity to celebrate that spirit with a fun Halloween-themed creation featuring Binance branding.
Whether you're exploring the crypto ecosystem, learning something new, or connecting with fellow enthusiasts, remember that knowledge and security matter in every season. Let's make this Halloween creative, memorable, and full of community spirit! 🎃✨
Happy Halloween to the Binance community! 🟡
#SEAPumkinFrenzy #Binance #Halloween #CryptoCommunity #BinanceSquare 👻👻👻👻👻👻👻🎃🎃🎃
🎃👻 Halloween is here, and the crypto world is ready for a little spooky excitement with Binance! 🟡🖤
Imagine a Halloween night filled with glowing pumpkins, mysterious shadows, digital ghosts, and the exciting world of crypto. While the spooky season brings surprises around every corner, one thing should always stay clear: DYOR, protect your account, and make responsible decisions in the crypto market.
For me, Halloween is all about creativity, community, and sharing positive energy. Binance brings crypto enthusiasts together from different parts of the world, and this season is a great opportunity to celebrate that spirit with a fun Halloween-themed creation featuring Binance branding.
Whether you're exploring the crypto ecosystem, learning something new, or connecting with fellow enthusiasts, remember that knowledge and security matter in every season. Let's make this Halloween creative, memorable, and full of community spirit! 🎃✨
Happy Halloween to the Binance community! 🟡
#SEAPumkinFrenzy #Binance #Halloween #CryptoCommunity #BinanceSquare 👻👻👻👻👻👻👻🎃🎃🎃
Imagine a Halloween night filled with glowing pumpkins, mysterious shadows, digital ghosts, and the exciting world of crypto. While the spooky season brings surprises around every corner, one thing should always stay clear: DYOR, protect your account, and make responsible decisions in the crypto market.
For me, Halloween is all about creativity, community, and sharing positive energy. Binance brings crypto enthusiasts together from different parts of the world, and this season is a great opportunity to celebrate that spirit with a fun Halloween-themed creation featuring Binance branding.
Whether you're exploring the crypto ecosystem, learning something new, or connecting with fellow enthusiasts, remember that knowledge and security matter in every season. Let's make this Halloween creative, memorable, and full of community spirit! 🎃✨
Happy Halloween to the Binance community! 🟡
#SEAPumkinFrenzy #Binance #Halloween #CryptoCommunity #BinanceSquare 👻👻👻👻👻👻👻🎃🎃🎃

1
2
333
·
--
🚨 BITCOIN CLARITY ACT UPDATE 🇺🇸₿
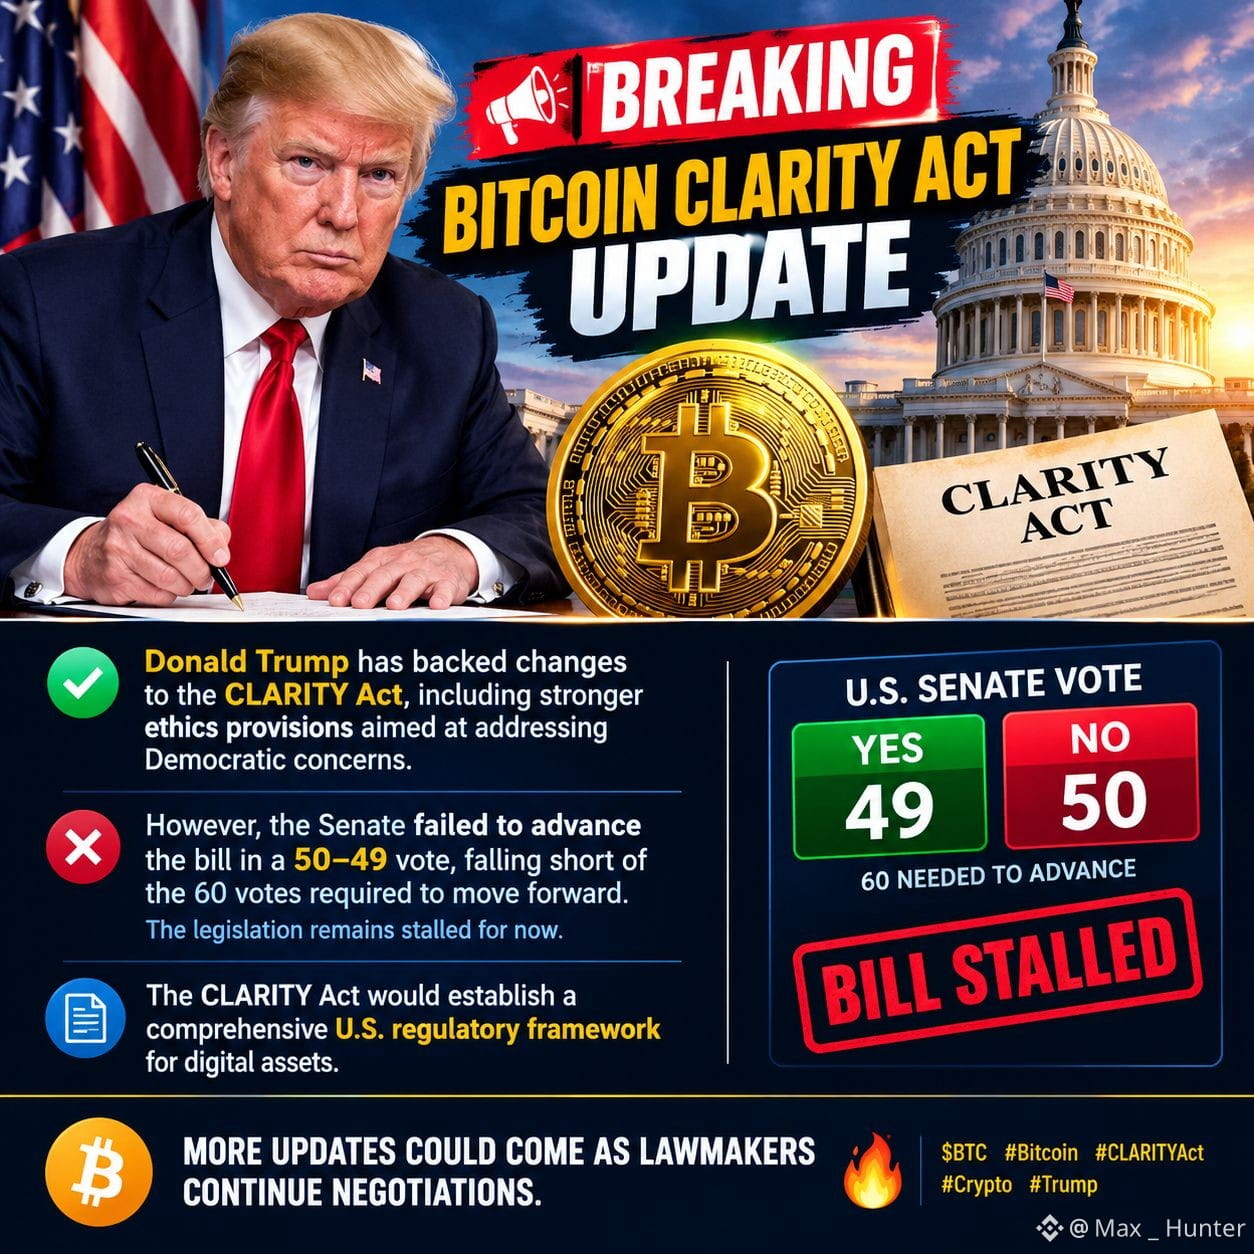
President Donald Trump has backed changes to the CLARITY Act, including stronger ethics provisions aimed at addressing Democratic concerns. 🔥
⚠️ However, the Senate failed to advance the bill in a 50–49 vote, falling short of the 60 votes required to move forward. The legislation remains stalled for now.
👀 The CLARITY Act would establish a comprehensive U.S. regulatory framework for digital assets. Further negotiations could determine whether the bill returns for another vote.
🔥 MORE UPDATES COULD COME AS LAWMAKERS CONTINUE NEGOTIATIONS.
$BTC #Bitcoin #BTC #CLARITYAct #Crypto #TRUMP
🚨 BITCOIN CLARITY ACT UPDATE 🇺🇸₿
President Donald Trump has backed changes to the CLARITY Act, including stronger ethics provisions aimed at addressing Democratic concerns. 🔥
⚠️ However, the Senate failed to advance the bill in a 50–49 vote, falling short of the 60 votes required to move forward. The legislation remains stalled for now.
👀 The CLARITY Act would establish a comprehensive U.S. regulatory framework for digital assets. Further negotiations could determine whether the bill returns for another vote.
🔥 MORE UPDATES COULD COME AS LAWMAKERS CONTINUE NEGOTIATIONS.
$BTC #Bitcoin #BTC #CLARITYAct #Crypto #TRUMP
President Donald Trump has backed changes to the CLARITY Act, including stronger ethics provisions aimed at addressing Democratic concerns. 🔥
⚠️ However, the Senate failed to advance the bill in a 50–49 vote, falling short of the 60 votes required to move forward. The legislation remains stalled for now.
👀 The CLARITY Act would establish a comprehensive U.S. regulatory framework for digital assets. Further negotiations could determine whether the bill returns for another vote.
🔥 MORE UPDATES COULD COME AS LAWMAKERS CONTINUE NEGOTIATIONS.
$BTC #Bitcoin #BTC #CLARITYAct #Crypto #TRUMP
507
·
--
🚨 BREAKING: MICHAEL SAYLOR IS BUYING AGAIN! 🟠🔥
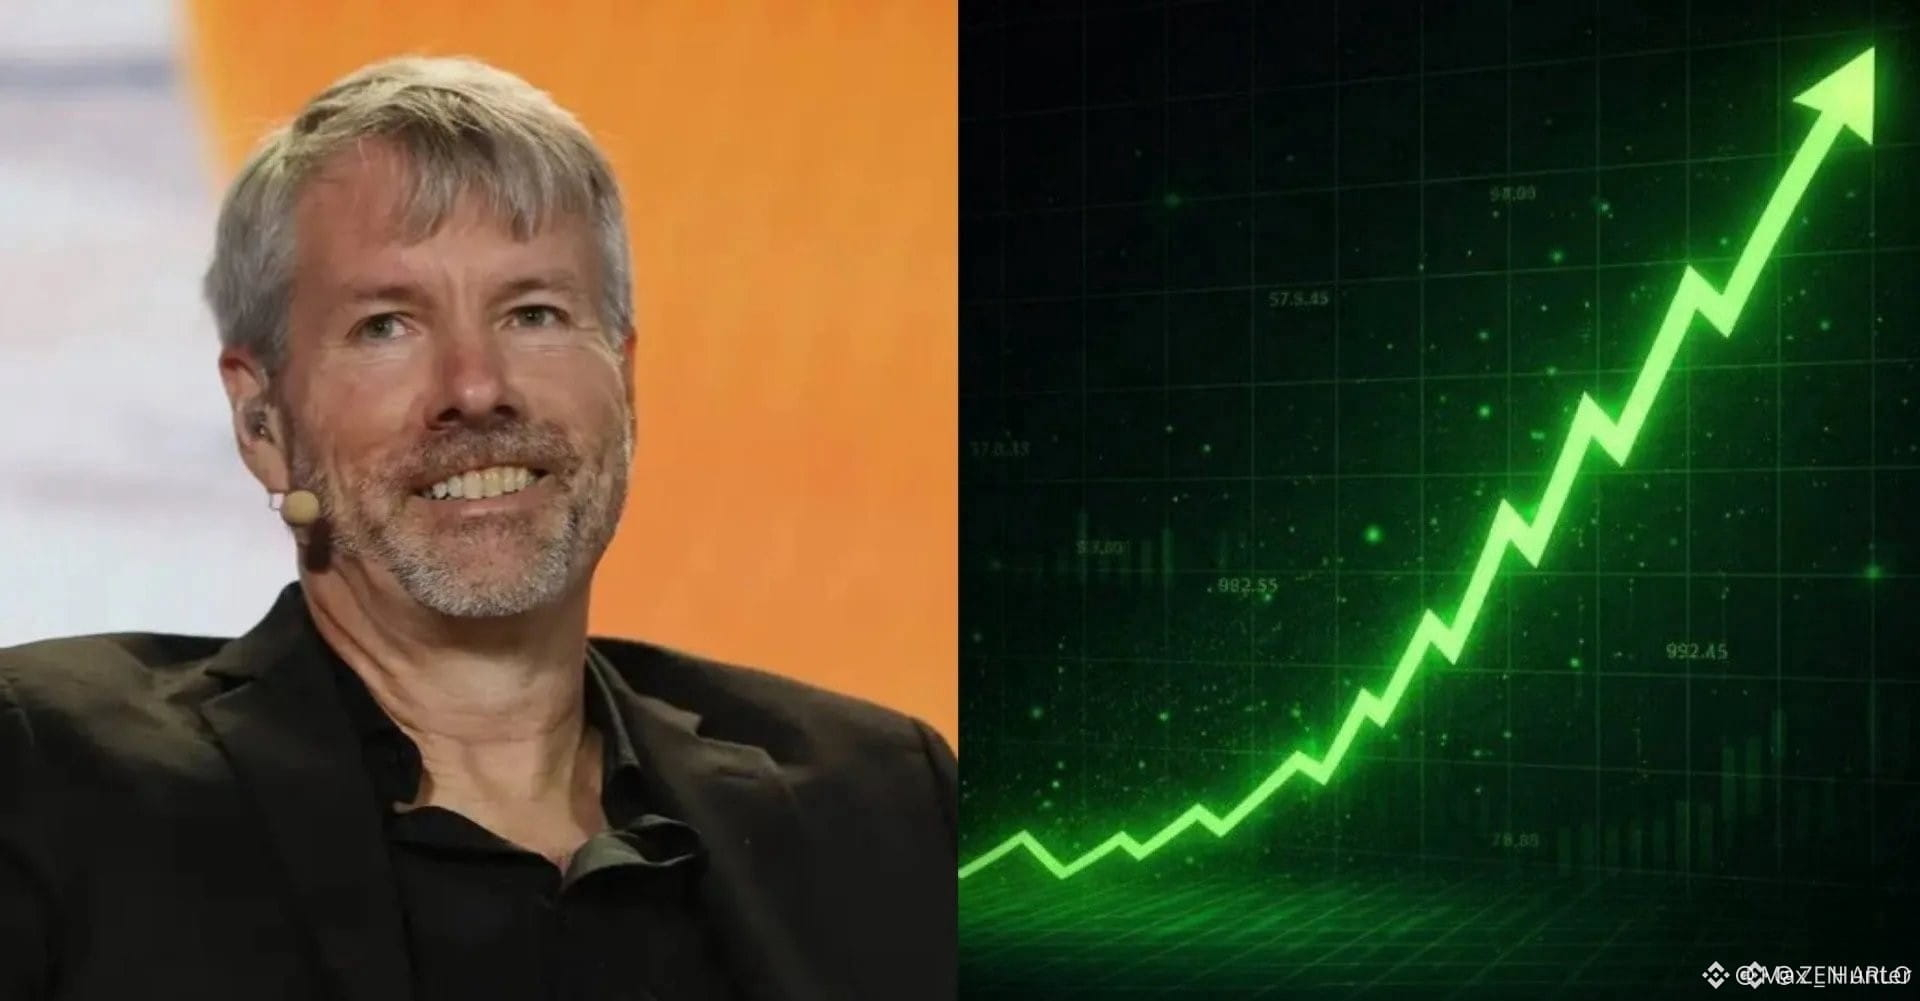
Strategy just added 334 $BTC for approximately $28.7 MILLION, paying an average of $85,838.80 per Bitcoin. The purchase brings Strategy’s total holdings to a record 848,000 BTC.
💰 At current market prices, Strategy’s Bitcoin stash is worth roughly $73 BILLION, with a cumulative acquisition cost of about $63.97 BILLION and an average cost of $75,440.70 per BTC.
🔥 The accumulation continues. Strategy remains the largest corporate Bitcoin holder, with its 848,000 BTC representing more than 4% of Bitcoin’s 21 million maximum supply.
🟠 SAYLOR KEEPS STACKING. THE BIGGEST CORPORATE BITCOIN BET JUST GOT EVEN BIGGER.
$BTC #Bitcoin #BTC #MichaelSaylor #Strategy #MSTR
🚨 BREAKING: MICHAEL SAYLOR IS BUYING AGAIN! 🟠🔥
Strategy just added 334 $BTC for approximately $28.7 MILLION, paying an average of $85,838.80 per Bitcoin. The purchase brings Strategy’s total holdings to a record 848,000 BTC.
💰 At current market prices, Strategy’s Bitcoin stash is worth roughly $73 BILLION, with a cumulative acquisition cost of about $63.97 BILLION and an average cost of $75,440.70 per BTC.
🔥 The accumulation continues. Strategy remains the largest corporate Bitcoin holder, with its 848,000 BTC representing more than 4% of Bitcoin’s 21 million maximum supply.
🟠 SAYLOR KEEPS STACKING. THE BIGGEST CORPORATE BITCOIN BET JUST GOT EVEN BIGGER.
$BTC #Bitcoin #BTC #MichaelSaylor #Strategy #MSTR
Strategy just added 334 $BTC for approximately $28.7 MILLION, paying an average of $85,838.80 per Bitcoin. The purchase brings Strategy’s total holdings to a record 848,000 BTC.
💰 At current market prices, Strategy’s Bitcoin stash is worth roughly $73 BILLION, with a cumulative acquisition cost of about $63.97 BILLION and an average cost of $75,440.70 per BTC.
🔥 The accumulation continues. Strategy remains the largest corporate Bitcoin holder, with its 848,000 BTC representing more than 4% of Bitcoin’s 21 million maximum supply.
🟠 SAYLOR KEEPS STACKING. THE BIGGEST CORPORATE BITCOIN BET JUST GOT EVEN BIGGER.
$BTC #Bitcoin #BTC #MichaelSaylor #Strategy #MSTR
222
·
--
🚨 BINANCE JUST ENTERED THE AI TRADING ERA! 🤖🔥
Binance has launched Binance Intelligence, bringing AI deeper into the crypto ecosystem with Binance AI, Binance AI Pro and Agent OS — combining market intelligence, automation and AI-powered trading workflows. 🚀
📊 Binance AI is rolling out as a free 24/7 market assistant, while AI Pro can turn plain-language ideas into automated workflows and monitor markets for key events, including $BTC price levels.
⚡ Built directly across the Binance ecosystem, including $BNB, the launch signals a deeper integration of AI + crypto trading + market data + automation.
🤖 AI isn’t just analyzing crypto anymore — it’s moving toward actively assisting with how traders interact with markets.
#Binance #BNB #BTC #AI #Crypto #trading
🚨 BINANCE JUST ENTERED THE AI TRADING ERA! 🤖🔥
Binance has launched Binance Intelligence, bringing AI deeper into the crypto ecosystem with Binance AI, Binance AI Pro and Agent OS — combining market intelligence, automation and AI-powered trading workflows. 🚀
📊 Binance AI is rolling out as a free 24/7 market assistant, while AI Pro can turn plain-language ideas into automated workflows and monitor markets for key events, including $BTC price levels.
⚡ Built directly across the Binance ecosystem, including $BNB, the launch signals a deeper integration of AI + crypto trading + market data + automation.
🤖 AI isn’t just analyzing crypto anymore — it’s moving toward actively assisting with how traders interact with markets.
#Binance #BNB #BTC #AI #Crypto #trading
Binance has launched Binance Intelligence, bringing AI deeper into the crypto ecosystem with Binance AI, Binance AI Pro and Agent OS — combining market intelligence, automation and AI-powered trading workflows. 🚀
📊 Binance AI is rolling out as a free 24/7 market assistant, while AI Pro can turn plain-language ideas into automated workflows and monitor markets for key events, including $BTC price levels.
⚡ Built directly across the Binance ecosystem, including $BNB, the launch signals a deeper integration of AI + crypto trading + market data + automation.
🤖 AI isn’t just analyzing crypto anymore — it’s moving toward actively assisting with how traders interact with markets.
#Binance #BNB #BTC #AI #Crypto #trading

99
·
--
🚨 MASSIVE SPACEX UPDATE 🚨 🚀
Elon Musk says roughly 90% of SpaceX ($SPCX) revenue this year will be commercial, while government revenue is expected to fall below 5% in Q4. 🇺🇸📊
🔥 Starlink is driving the transformation — Connectivity generated $4.29B in Q2, more than half of SpaceX’s total quarterly revenue, while Starlink subscribers reached 12 million.
🌐 SpaceX is increasingly looking less like a traditional government-focused launch company and more like a global connectivity platform, powered by Starlink, enterprise services and expanding mobile partnerships. 🚀📡
#BinanceLaunchesBinanceIntelligence
#EvernorthXRPTreasuryCompletesSPACMerger
#ETHUp70%InQ3ButLiquidityFalls
#EthStakingExitQueueHits2026High
🚨 MASSIVE SPACEX UPDATE 🚨 🚀
Elon Musk says roughly 90% of SpaceX ($SPCX) revenue this year will be commercial, while government revenue is expected to fall below 5% in Q4. 🇺🇸📊
🔥 Starlink is driving the transformation — Connectivity generated $4.29B in Q2, more than half of SpaceX’s total quarterly revenue, while Starlink subscribers reached 12 million.
🌐 SpaceX is increasingly looking less like a traditional government-focused launch company and more like a global connectivity platform, powered by Starlink, enterprise services and expanding mobile partnerships. 🚀📡
#BinanceLaunchesBinanceIntelligence
#EvernorthXRPTreasuryCompletesSPACMerger
#ETHUp70%InQ3ButLiquidityFalls
#EthStakingExitQueueHits2026High
Elon Musk says roughly 90% of SpaceX ($SPCX) revenue this year will be commercial, while government revenue is expected to fall below 5% in Q4. 🇺🇸📊
🔥 Starlink is driving the transformation — Connectivity generated $4.29B in Q2, more than half of SpaceX’s total quarterly revenue, while Starlink subscribers reached 12 million.
🌐 SpaceX is increasingly looking less like a traditional government-focused launch company and more like a global connectivity platform, powered by Starlink, enterprise services and expanding mobile partnerships. 🚀📡
#BinanceLaunchesBinanceIntelligence
#EvernorthXRPTreasuryCompletesSPACMerger
#ETHUp70%InQ3ButLiquidityFalls
#EthStakingExitQueueHits2026High


313
·
--
🚨 CRYPTO MARKET STRUCTURE UPDATE 🚨 🇺🇸
Trump continues pushing for the CLARITY Act, but the Senate failed to advance the major crypto market-structure bill on Sept. 15, 2026.
🔥 The legislation is designed to establish clearer U.S. rules for digital assets and define regulatory responsibilities, with the White House continuing to support a crypto-friendly regulatory framework.
₿ If the bill advances in the future, clearer regulation could have major implications for institutional participation and the broader crypto market—but claims of an immediate “trillions of dollars” inflow or a historic Bitcoin inflow are not currently verified. 📊🚀
#US10YearYieldNears5.3%
#KoreaProposesTokenizingStocksAndBonds
#MetaMaskExitsLidoValidatorsAfterSecurityIncident
#MicronBeatsEarningsLiftsGuidance
#CFTCSubmitsTwoEventContractRulesToWhiteHouse
$BTC
{spot}(BTCUSDT)
$LAB
{future}(LABUSDT)
$TLM
{spot}(TLMUSDT)
🚨 CRYPTO MARKET STRUCTURE UPDATE 🚨 🇺🇸
Trump continues pushing for the CLARITY Act, but the Senate failed to advance the major crypto market-structure bill on Sept. 15, 2026.
🔥 The legislation is designed to establish clearer U.S. rules for digital assets and define regulatory responsibilities, with the White House continuing to support a crypto-friendly regulatory framework.
₿ If the bill advances in the future, clearer regulation could have major implications for institutional participation and the broader crypto market—but claims of an immediate “trillions of dollars” inflow or a historic Bitcoin inflow are not currently verified. 📊🚀
#US10YearYieldNears5.3%
#KoreaProposesTokenizingStocksAndBonds
#MetaMaskExitsLidoValidatorsAfterSecurityIncident
#MicronBeatsEarningsLiftsGuidance
#CFTCSubmitsTwoEventContractRulesToWhiteHouse
$BTC
$LAB
$TLM
Trump continues pushing for the CLARITY Act, but the Senate failed to advance the major crypto market-structure bill on Sept. 15, 2026.
🔥 The legislation is designed to establish clearer U.S. rules for digital assets and define regulatory responsibilities, with the White House continuing to support a crypto-friendly regulatory framework.
₿ If the bill advances in the future, clearer regulation could have major implications for institutional participation and the broader crypto market—but claims of an immediate “trillions of dollars” inflow or a historic Bitcoin inflow are not currently verified. 📊🚀
#US10YearYieldNears5.3%
#KoreaProposesTokenizingStocksAndBonds
#MetaMaskExitsLidoValidatorsAfterSecurityIncident
#MicronBeatsEarningsLiftsGuidance
#CFTCSubmitsTwoEventContractRulesToWhiteHouse
$BTC
$LAB
$TLM

1
1.1k
·
--
🚨 IMPORTANT MARKET ALERT 🚨
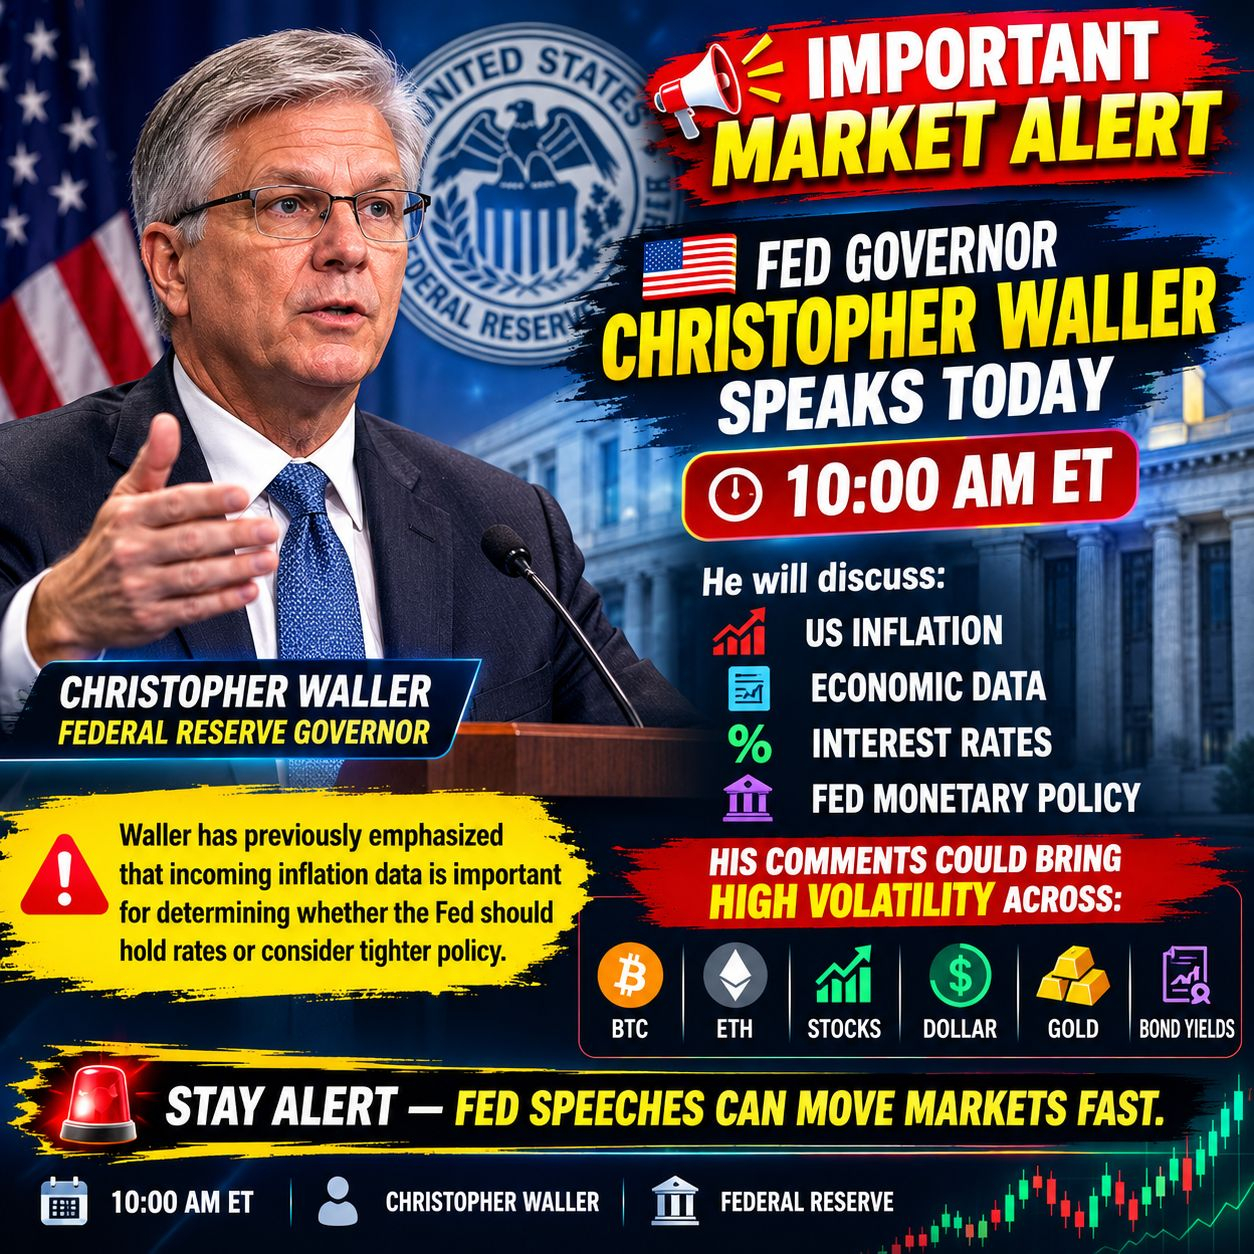
🇺🇸 FED GOVERNOR CHRISTOPHER WALLER SPEAKS TODAY
⏰ 10:00 AM ET
🎙️ Markets will be watching closely for his comments on:
📊 US INFLATION
🇺🇸 ECONOMIC DATA
💵 INTEREST RATES
🏦 FED MONETARY POLICY
⚠️ Waller has previously emphasized that incoming inflation data is important for determining whether the Fed should hold rates or consider tighter policy.
🔥 HIS COMMENTS COULD BRING HIGH VOLATILITY ACROSS:
₿ BTC
♦️ ETH
📈 STOCKS
💵 DOLLAR
🥇 GOLD
📊 BOND YIELDS
🚨 STAY ALERT — FED SPEECHES CAN MOVE MARKETS FAST.
⏳ 10:00 AM ET
🇺🇸 CHRISTOPHER WALLER
🏦 FEDERAL RESERVE
#Bitcoin #BTC #US10YearYieldNears5.3%
#KoreaProposesTokenizingStocksAndBonds
#USADPAdds90000JobsInSeptember
🚨 IMPORTANT MARKET ALERT 🚨
🇺🇸 FED GOVERNOR CHRISTOPHER WALLER SPEAKS TODAY
⏰ 10:00 AM ET
🎙️ Markets will be watching closely for his comments on:
📊 US INFLATION
🇺🇸 ECONOMIC DATA
💵 INTEREST RATES
🏦 FED MONETARY POLICY
⚠️ Waller has previously emphasized that incoming inflation data is important for determining whether the Fed should hold rates or consider tighter policy.
🔥 HIS COMMENTS COULD BRING HIGH VOLATILITY ACROSS:
₿ BTC
♦️ ETH
📈 STOCKS
💵 DOLLAR
🥇 GOLD
📊 BOND YIELDS
🚨 STAY ALERT — FED SPEECHES CAN MOVE MARKETS FAST.
⏳ 10:00 AM ET
🇺🇸 CHRISTOPHER WALLER
🏦 FEDERAL RESERVE
#Bitcoin #BTC #US10YearYieldNears5.3%
#KoreaProposesTokenizingStocksAndBonds
#USADPAdds90000JobsInSeptember
🇺🇸 FED GOVERNOR CHRISTOPHER WALLER SPEAKS TODAY
⏰ 10:00 AM ET
🎙️ Markets will be watching closely for his comments on:
📊 US INFLATION
🇺🇸 ECONOMIC DATA
💵 INTEREST RATES
🏦 FED MONETARY POLICY
⚠️ Waller has previously emphasized that incoming inflation data is important for determining whether the Fed should hold rates or consider tighter policy.
🔥 HIS COMMENTS COULD BRING HIGH VOLATILITY ACROSS:
₿ BTC
♦️ ETH
📈 STOCKS
💵 DOLLAR
🥇 GOLD
📊 BOND YIELDS
🚨 STAY ALERT — FED SPEECHES CAN MOVE MARKETS FAST.
⏳ 10:00 AM ET
🇺🇸 CHRISTOPHER WALLER
🏦 FEDERAL RESERVE
#Bitcoin #BTC #US10YearYieldNears5.3%
#KoreaProposesTokenizingStocksAndBonds
#USADPAdds90000JobsInSeptember
158
·
--
ສັນຍານກະທິງ
🚨 TRUMP You might want to start buying now
💰 BILLIONS & TRILLIONS OF CAPITAL ARE WATCHING CRYPTO
🔥 Institutional adoption, clearer regulation, tokenization and growing crypto infrastructure could bring massive new liquidity into digital assets.
🐂 If capital rotation accelerates, Bitcoin and major altcoins could enter a powerful new market phase
📈 The next major crypto cycle could be driven by
• 🏦 Institutional capital
• 💵 Stablecoin growth
• 🔗 Real-world asset tokenization
• ⚖️ Regulatory clarity
• 🌐 Global crypto adoption
🚨 IMPORTANT: The widely shared $30 TRILLION flowing into crypto figure should be treated as a projection/claim not guaranteed capital inflow
🔥 FOLLOW ME — WE’RE READY TO TRACK THE BIG MOVES TOGETHER
🚀 $BTC • $ETH • ALTCOINS
🐂 $NEXT.US BULL RUN WATCH
💎 STAY ALERT. STAY READY.
#Bitcoin #BTC #Crypto #Ethereum #ETH #Altcoins #BullRun #CryptoMarket #Trump #InstitutionalAdoption #CryptoNews #Blockchain #Web3 #trading
{spot}(ETHUSDT)
🚨 TRUMP You might want to start buying now
💰 BILLIONS & TRILLIONS OF CAPITAL ARE WATCHING CRYPTO
🔥 Institutional adoption, clearer regulation, tokenization and growing crypto infrastructure could bring massive new liquidity into digital assets.
🐂 If capital rotation accelerates, Bitcoin and major altcoins could enter a powerful new market phase
📈 The next major crypto cycle could be driven by
• 🏦 Institutional capital
• 💵 Stablecoin growth
• 🔗 Real-world asset tokenization
• ⚖️ Regulatory clarity
• 🌐 Global crypto adoption
🚨 IMPORTANT: The widely shared $30 TRILLION flowing into crypto figure should be treated as a projection/claim not guaranteed capital inflow
🔥 FOLLOW ME — WE’RE READY TO TRACK THE BIG MOVES TOGETHER
🚀 $BTC • $ETH • ALTCOINS
🐂 $NEXT.US BULL RUN WATCH
💎 STAY ALERT. STAY READY.
#Bitcoin #BTC #Crypto #Ethereum #ETH #Altcoins #BullRun #CryptoMarket #Trump #InstitutionalAdoption #CryptoNews #Blockchain #Web3 #trading
💰 BILLIONS & TRILLIONS OF CAPITAL ARE WATCHING CRYPTO
🔥 Institutional adoption, clearer regulation, tokenization and growing crypto infrastructure could bring massive new liquidity into digital assets.
🐂 If capital rotation accelerates, Bitcoin and major altcoins could enter a powerful new market phase
📈 The next major crypto cycle could be driven by
• 🏦 Institutional capital
• 💵 Stablecoin growth
• 🔗 Real-world asset tokenization
• ⚖️ Regulatory clarity
• 🌐 Global crypto adoption
🚨 IMPORTANT: The widely shared $30 TRILLION flowing into crypto figure should be treated as a projection/claim not guaranteed capital inflow
🔥 FOLLOW ME — WE’RE READY TO TRACK THE BIG MOVES TOGETHER
🚀 $BTC • $ETH • ALTCOINS
🐂 $NEXT.US BULL RUN WATCH
💎 STAY ALERT. STAY READY.
#Bitcoin #BTC #Crypto #Ethereum #ETH #Altcoins #BullRun #CryptoMarket #Trump #InstitutionalAdoption #CryptoNews #Blockchain #Web3 #trading

214
·
--
ສັນຍານກະທິງ
ຢືນຢັນແລ້ວ
🚀 $USDBRL USDT /USDT Trading Launch ⏳
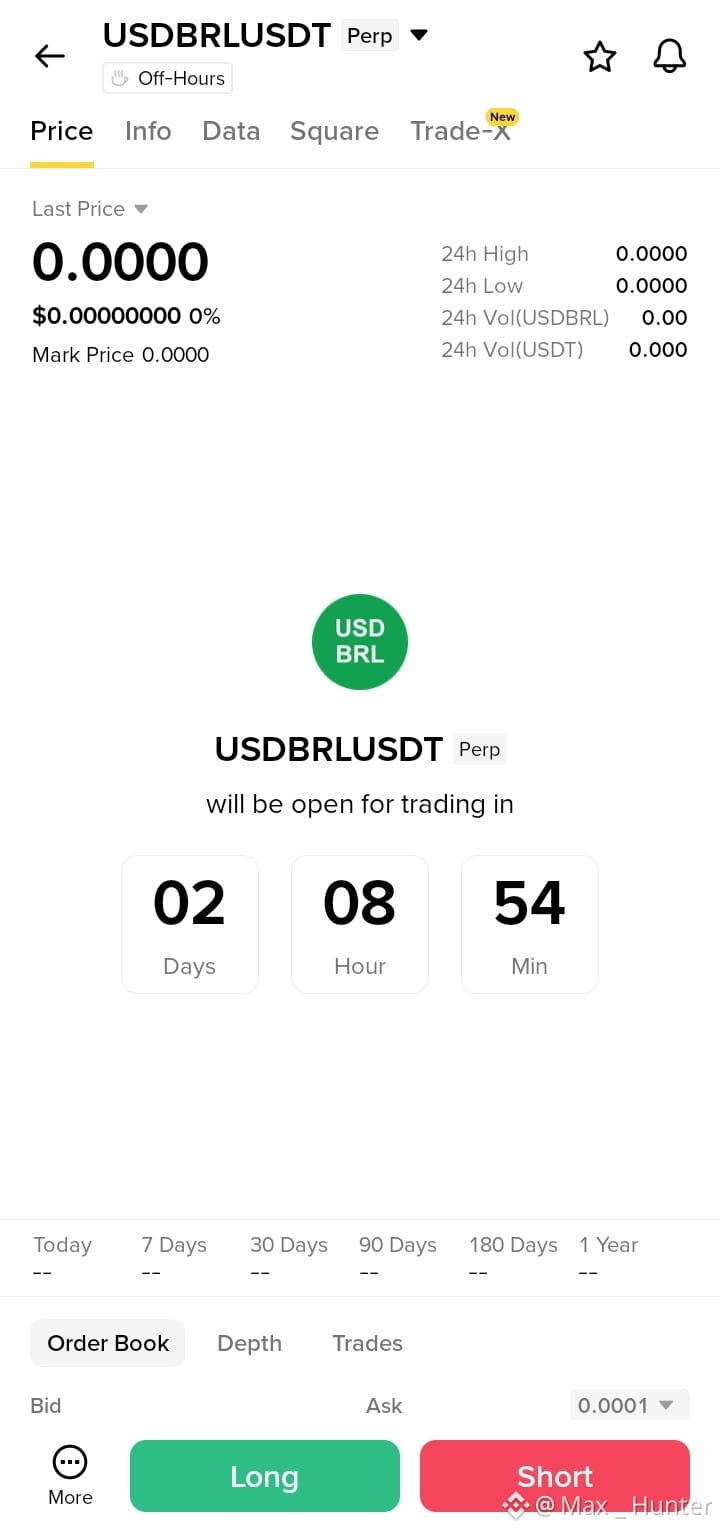
📌 USDBRLUSDT Perpetual will be open for trading soon.
⏰ Launch Countdown: 02 Days • 08 Hours • 54 Min
💰 Current Price: 0.0000
📊 Mark Price: 0.0000
📈 24h High: 0.0000
📉 24h Low: 0.0000
⚠️ Trading Tip: Wait for the market to open and price discovery to begin before taking a position. 📊
🚨 Risk: Since the contract has not started trading yet, there is no live price action or established market structure. Strict risk management is essential.
#BTCBreaks80K
#SOLJumpsAbout10%
#SECReceivesAmendedInjectiveETFFiling
#SanDiskToJoinSP100OnSep21
#TRMReportsYouTubeScamStole274.6ETH
🚀 $USDBRL USDT /USDT Trading Launch ⏳
📌 USDBRLUSDT Perpetual will be open for trading soon.
⏰ Launch Countdown: 02 Days • 08 Hours • 54 Min
💰 Current Price: 0.0000
📊 Mark Price: 0.0000
📈 24h High: 0.0000
📉 24h Low: 0.0000
⚠️ Trading Tip: Wait for the market to open and price discovery to begin before taking a position. 📊
🚨 Risk: Since the contract has not started trading yet, there is no live price action or established market structure. Strict risk management is essential.
#BTCBreaks80K
#SOLJumpsAbout10%
#SECReceivesAmendedInjectiveETFFiling
#SanDiskToJoinSP100OnSep21
#TRMReportsYouTubeScamStole274.6ETH
📌 USDBRLUSDT Perpetual will be open for trading soon.
⏰ Launch Countdown: 02 Days • 08 Hours • 54 Min
💰 Current Price: 0.0000
📊 Mark Price: 0.0000
📈 24h High: 0.0000
📉 24h Low: 0.0000
⚠️ Trading Tip: Wait for the market to open and price discovery to begin before taking a position. 📊
🚨 Risk: Since the contract has not started trading yet, there is no live price action or established market structure. Strict risk management is essential.
#BTCBreaks80K
#SOLJumpsAbout10%
#SECReceivesAmendedInjectiveETFFiling
#SanDiskToJoinSP100OnSep21
#TRMReportsYouTubeScamStole274.6ETH
1.1k
·
--
🔥 #FedRateWatch | FOMC September: What Could Be the Fed’s Next Move?
The September FOMC meeting is becoming a major focus for global markets. With August core CPI rising 0.3% month-over-month and expectations for a 25bp rate hike reportedly close to 90%, the Fed’s next decision could create a strong reaction across crypto, stocks, and gold.
In my view, the key question is not only whether the Fed hikes rates, but how the market interprets its guidance afterward. A rate hike combined with a hawkish message could strengthen the dollar and put pressure on risk assets. BTC and technology stocks could face short-term selling pressure, while gold may also struggle if yields move higher.
However, markets often move on expectations before the actual decision. If the hike is already fully priced in, BTC and tech stocks could potentially rebound if the Fed sounds less aggressive than expected. Gold could also find support if investors begin pricing in future rate cuts.
For BTC, I would watch the reaction after the announcement rather than chase the first move. The real opportunity may come from the market’s response to the Fed’s guidance.
One thing is certain: volatility could remain elevated, and risk management will be more important than ever.
What’s your view — bullish or bearish for $BTC , tech stocks, and gold?
{future}(LABUSDT)
#FOMC #Bitcoin #Crypto #Stocks
🔥 #FedRateWatch | FOMC September: What Could Be the Fed’s Next Move?
The September FOMC meeting is becoming a major focus for global markets. With August core CPI rising 0.3% month-over-month and expectations for a 25bp rate hike reportedly close to 90%, the Fed’s next decision could create a strong reaction across crypto, stocks, and gold.
In my view, the key question is not only whether the Fed hikes rates, but how the market interprets its guidance afterward. A rate hike combined with a hawkish message could strengthen the dollar and put pressure on risk assets. BTC and technology stocks could face short-term selling pressure, while gold may also struggle if yields move higher.
However, markets often move on expectations before the actual decision. If the hike is already fully priced in, BTC and tech stocks could potentially rebound if the Fed sounds less aggressive than expected. Gold could also find support if investors begin pricing in future rate cuts.
For BTC, I would watch the reaction after the announcement rather than chase the first move. The real opportunity may come from the market’s response to the Fed’s guidance.
One thing is certain: volatility could remain elevated, and risk management will be more important than ever.
What’s your view — bullish or bearish for $BTC , tech stocks, and gold?
#FOMC #Bitcoin #Crypto #Stocks
The September FOMC meeting is becoming a major focus for global markets. With August core CPI rising 0.3% month-over-month and expectations for a 25bp rate hike reportedly close to 90%, the Fed’s next decision could create a strong reaction across crypto, stocks, and gold.
In my view, the key question is not only whether the Fed hikes rates, but how the market interprets its guidance afterward. A rate hike combined with a hawkish message could strengthen the dollar and put pressure on risk assets. BTC and technology stocks could face short-term selling pressure, while gold may also struggle if yields move higher.
However, markets often move on expectations before the actual decision. If the hike is already fully priced in, BTC and tech stocks could potentially rebound if the Fed sounds less aggressive than expected. Gold could also find support if investors begin pricing in future rate cuts.
For BTC, I would watch the reaction after the announcement rather than chase the first move. The real opportunity may come from the market’s response to the Fed’s guidance.
One thing is certain: volatility could remain elevated, and risk management will be more important than ever.
What’s your view — bullish or bearish for $BTC , tech stocks, and gold?
#FOMC #Bitcoin #Crypto #Stocks

290
·
--
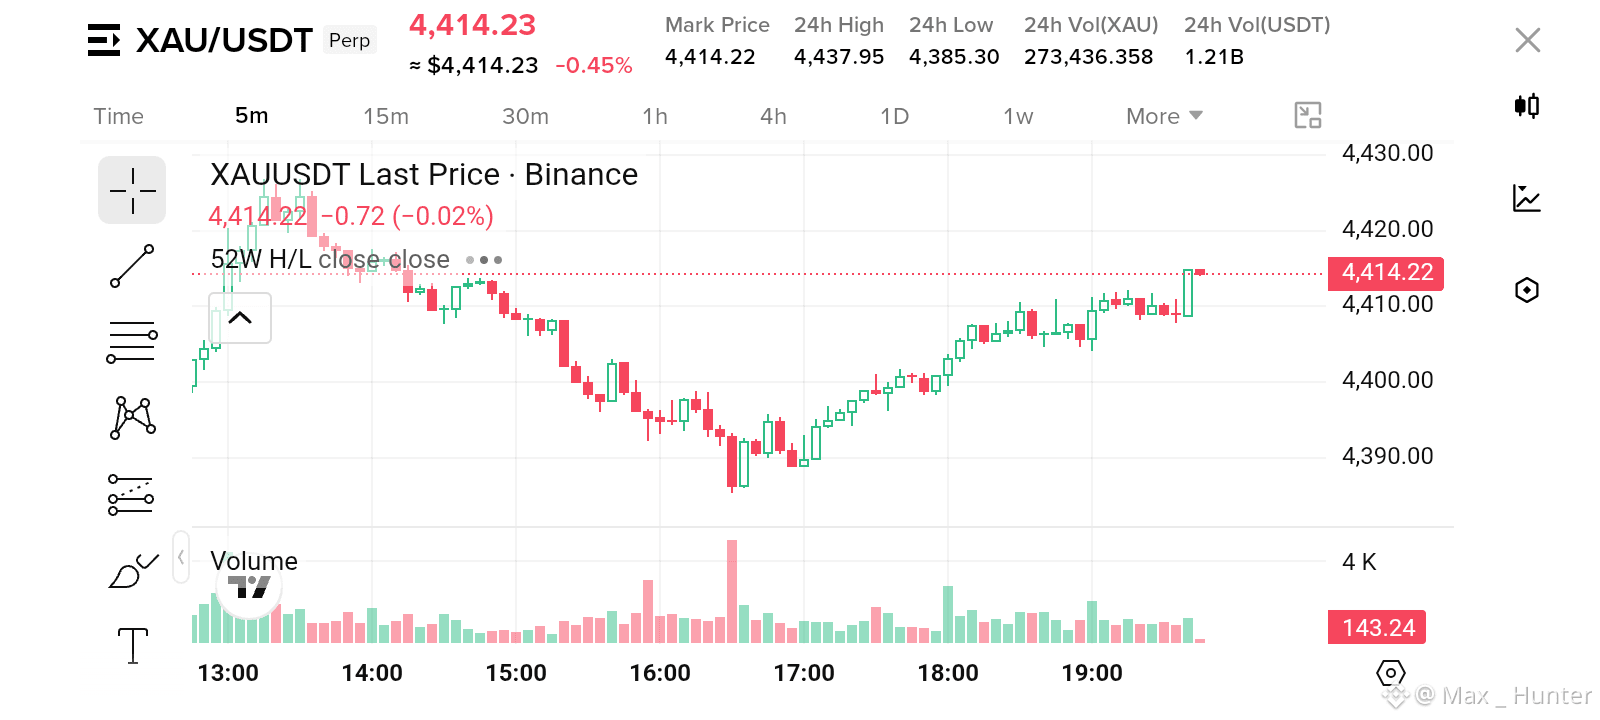
Gold's V-shaped bounce off the 4390 flush looks like dip-buyers won this round.
$XAUT USDT — LONG
Entry: 4405.00 – 4414.00
SL: 4385.00
TP1: 4420.00
TP2: 4430.00
TP3: 4437.95
⚠️ Personal market analysis only. NFA — manage risk and DYOR. Educational content, not investment advice or a recommendation to buy, sell, deposit, or withdraw any asset. No paid promotion or referral/affiliate links.
I'm watching gold here because after tapping the 24h low near 4385, price staged a sharp, near-uninterrupted V-recovery back to 4414 — that kind of quick reclaim usually signals aggressive dip-buying rather than a dead-cat bounce. On the 5m chart, the move off the 16:00 flush was accompanied by a volume spike, and since then price has been grinding higher in small, controlled candles rather than spiking and fading. The current price of 4414 is sitting right at the top of this recovery range, just under the session's earlier levels. I'm not calling for a clean breakout to new highs immediately; I'm noting that the risk-to-reward here — with SL below the 4385 low and TP2 near 4430 — favors staying long as long as price holds above the mid-recovery zone, rather than fading the bounce.
Do you think gold can push through 4420+ and reclaim the highs, or does it need to retest the 4400 zone first before the next move?
Gold's V-shaped bounce off the 4390 flush looks like dip-buyers won this round.
$XAUT USDT — LONG
Entry: 4405.00 – 4414.00
SL: 4385.00
TP1: 4420.00
TP2: 4430.00
TP3: 4437.95
⚠️ Personal market analysis only. NFA — manage risk and DYOR. Educational content, not investment advice or a recommendation to buy, sell, deposit, or withdraw any asset. No paid promotion or referral/affiliate links.
I'm watching gold here because after tapping the 24h low near 4385, price staged a sharp, near-uninterrupted V-recovery back to 4414 — that kind of quick reclaim usually signals aggressive dip-buying rather than a dead-cat bounce. On the 5m chart, the move off the 16:00 flush was accompanied by a volume spike, and since then price has been grinding higher in small, controlled candles rather than spiking and fading. The current price of 4414 is sitting right at the top of this recovery range, just under the session's earlier levels. I'm not calling for a clean breakout to new highs immediately; I'm noting that the risk-to-reward here — with SL below the 4385 low and TP2 near 4430 — favors staying long as long as price holds above the mid-recovery zone, rather than fading the bounce.
Do you think gold can push through 4420+ and reclaim the highs, or does it need to retest the 4400 zone first before the next move?
$XAUT USDT — LONG
Entry: 4405.00 – 4414.00
SL: 4385.00
TP1: 4420.00
TP2: 4430.00
TP3: 4437.95
⚠️ Personal market analysis only. NFA — manage risk and DYOR. Educational content, not investment advice or a recommendation to buy, sell, deposit, or withdraw any asset. No paid promotion or referral/affiliate links.
I'm watching gold here because after tapping the 24h low near 4385, price staged a sharp, near-uninterrupted V-recovery back to 4414 — that kind of quick reclaim usually signals aggressive dip-buying rather than a dead-cat bounce. On the 5m chart, the move off the 16:00 flush was accompanied by a volume spike, and since then price has been grinding higher in small, controlled candles rather than spiking and fading. The current price of 4414 is sitting right at the top of this recovery range, just under the session's earlier levels. I'm not calling for a clean breakout to new highs immediately; I'm noting that the risk-to-reward here — with SL below the 4385 low and TP2 near 4430 — favors staying long as long as price holds above the mid-recovery zone, rather than fading the bounce.
Do you think gold can push through 4420+ and reclaim the highs, or does it need to retest the 4400 zone first before the next move?
1
387
·
--
$ZEC is showing bullish momentum after a $1.7469K short liquidation around $1069.07.
Buyers remain active while sellers attempt to stabilize the current reaction zone.
EP
$1062–$1076
TP
TP1 $1090
TP2 $1115
TP3 $1145
SL
$1042
Liquidity remains exposed above the current structure while sellers stay under pressure.
Unless price loses the lower reaction zone, bullish continuation toward higher liquidity remains favored.
Let’s go $ZEC 🟢
$ZEC is showing bullish momentum after a $1.7469K short liquidation around $1069.07.
Buyers remain active while sellers attempt to stabilize the current reaction zone.
EP
$1062–$1076
TP
TP1 $1090
TP2 $1115
TP3 $1145
SL
$1042
Liquidity remains exposed above the current structure while sellers stay under pressure.
Unless price loses the lower reaction zone, bullish continuation toward higher liquidity remains favored.
Let’s go $ZEC 🟢
Buyers remain active while sellers attempt to stabilize the current reaction zone.
EP
$1062–$1076
TP
TP1 $1090
TP2 $1115
TP3 $1145
SL
$1042
Liquidity remains exposed above the current structure while sellers stay under pressure.
Unless price loses the lower reaction zone, bullish continuation toward higher liquidity remains favored.
Let’s go $ZEC 🟢
257
·
--
$DEXE is showing bearish momentum after a $4.9973K long liquidation around $1.97222.
Sellers remain active while buyers attempt to stabilize the current reaction zone.
EP
$1.955–$1.985
TP
TP1 $1.930
TP2 $1.890
TP3 $1.840
SL
$2.025
Liquidity remains exposed below the current structure while buyers stay under pressure.
Unless price reclaims the upper reaction zone, bearish continuation toward lower liquidity remains favored.
Let’s go $DEXE 🔻
$DEXE is showing bearish momentum after a $4.9973K long liquidation around $1.97222.
Sellers remain active while buyers attempt to stabilize the current reaction zone.
EP
$1.955–$1.985
TP
TP1 $1.930
TP2 $1.890
TP3 $1.840
SL
$2.025
Liquidity remains exposed below the current structure while buyers stay under pressure.
Unless price reclaims the upper reaction zone, bearish continuation toward lower liquidity remains favored.
Let’s go $DEXE 🔻
Sellers remain active while buyers attempt to stabilize the current reaction zone.
EP
$1.955–$1.985
TP
TP1 $1.930
TP2 $1.890
TP3 $1.840
SL
$2.025
Liquidity remains exposed below the current structure while buyers stay under pressure.
Unless price reclaims the upper reaction zone, bearish continuation toward lower liquidity remains favored.
Let’s go $DEXE 🔻
55
·
--
$NEAR is showing bearish momentum after a $4.9662K long liquidation around $2.182.
Sellers remain active while buyers attempt to stabilize the current reaction zone.
EP
$2.165–$2.195
TP
TP1 $2.140
TP2 $2.100
TP3 $2.050
SL
$2.230
Liquidity remains exposed below the current structure while buyers stay under pressure.
Unless price reclaims the upper reaction zone, bearish continuation toward lower liquidity remains favored.
Let’s go $NEAR 🔻
$NEAR is showing bearish momentum after a $4.9662K long liquidation around $2.182.
Sellers remain active while buyers attempt to stabilize the current reaction zone.
EP
$2.165–$2.195
TP
TP1 $2.140
TP2 $2.100
TP3 $2.050
SL
$2.230
Liquidity remains exposed below the current structure while buyers stay under pressure.
Unless price reclaims the upper reaction zone, bearish continuation toward lower liquidity remains favored.
Let’s go $NEAR 🔻
Sellers remain active while buyers attempt to stabilize the current reaction zone.
EP
$2.165–$2.195
TP
TP1 $2.140
TP2 $2.100
TP3 $2.050
SL
$2.230
Liquidity remains exposed below the current structure while buyers stay under pressure.
Unless price reclaims the upper reaction zone, bearish continuation toward lower liquidity remains favored.
Let’s go $NEAR 🔻
53
ເຂົ້າສູ່ລະບົບເພື່ອສຳຫຼວດເນື້ອຫາເພີ່ມເຕີມ
ເຂົ້າຮ່ວມກຸ່ມຜູ້ໃຊ້ຄຣິບໂຕທົ່ວໂລກໃນ Binance Square.
⚡️ ໄດ້ຮັບຂໍ້ມູນຫຼ້າສຸດ ແລະ ທີ່ມີປະໂຫຍດກ່ຽວກັບຄຣິບໂຕ.
💬 ໄດ້ຮັບຄວາມໄວ້ວາງໃຈຈາກຕະຫຼາດແລກປ່ຽນຄຣິບໂຕທີ່ໃຫຍ່ທີ່ສຸດໃນໂລກ.
👍 ຄົ້ນຫາຂໍ້ມູນເຊີງເລິກທີ່ແທ້ຈາກນັກສ້າງທີ່ໄດ້ຮັບການຢືນຢັນ.
ອີເມວ / ເບີໂທລະສັບ
ຫົວຂໍ້ທີ່ກໍາລັງນິຍົມ
BinancePick
2.7M ຄັ້ງທີ່ເບິ່ງ
144,553 ກຳລັງສົນທະນາ
Join #EarningsSeason: Predict Earnings on Binance Pick, Share Your Take on Binance Square!
Binance Square Official
·402 ຖືກໃຈ
·339.5k ຄັ້ງທີ່ເບິ່ງ
EarningsSeason
5M ຄັ້ງທີ່ເບິ່ງ
24,786 ກຳລັງສົນທະນາ
SouthKoreaReportedlyWeighsFourthCryptoTaxDelay
4,117 ຄັ້ງທີ່ເບິ່ງ
164 ກຳລັງສົນທະນາ