

henrco
3.7k Жариялаулар

henrco
Хабарлау
Пайдаланушыны блоктау
attempting to map out the charts. sometimes wrong, but that's how it's played.
Ашық сауда
Жоғары жиілікті трейдер
7.1 ай
55 Жазылым
186 Жазылушылар
494 лайк басылған
Жазбалар
Портфолио
Барлығы
Баға ұсыныстары
·
--
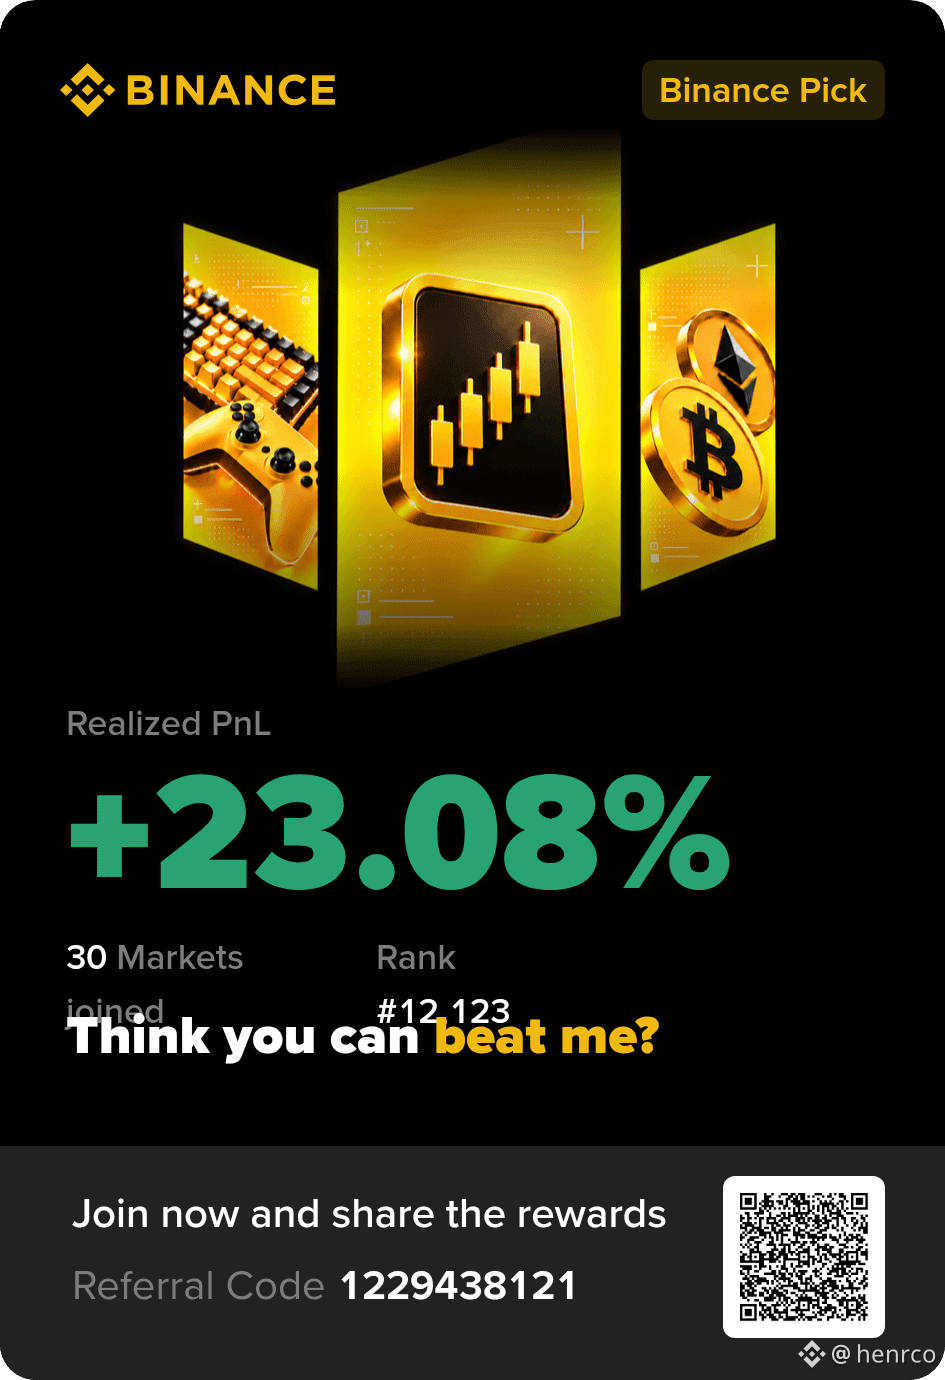
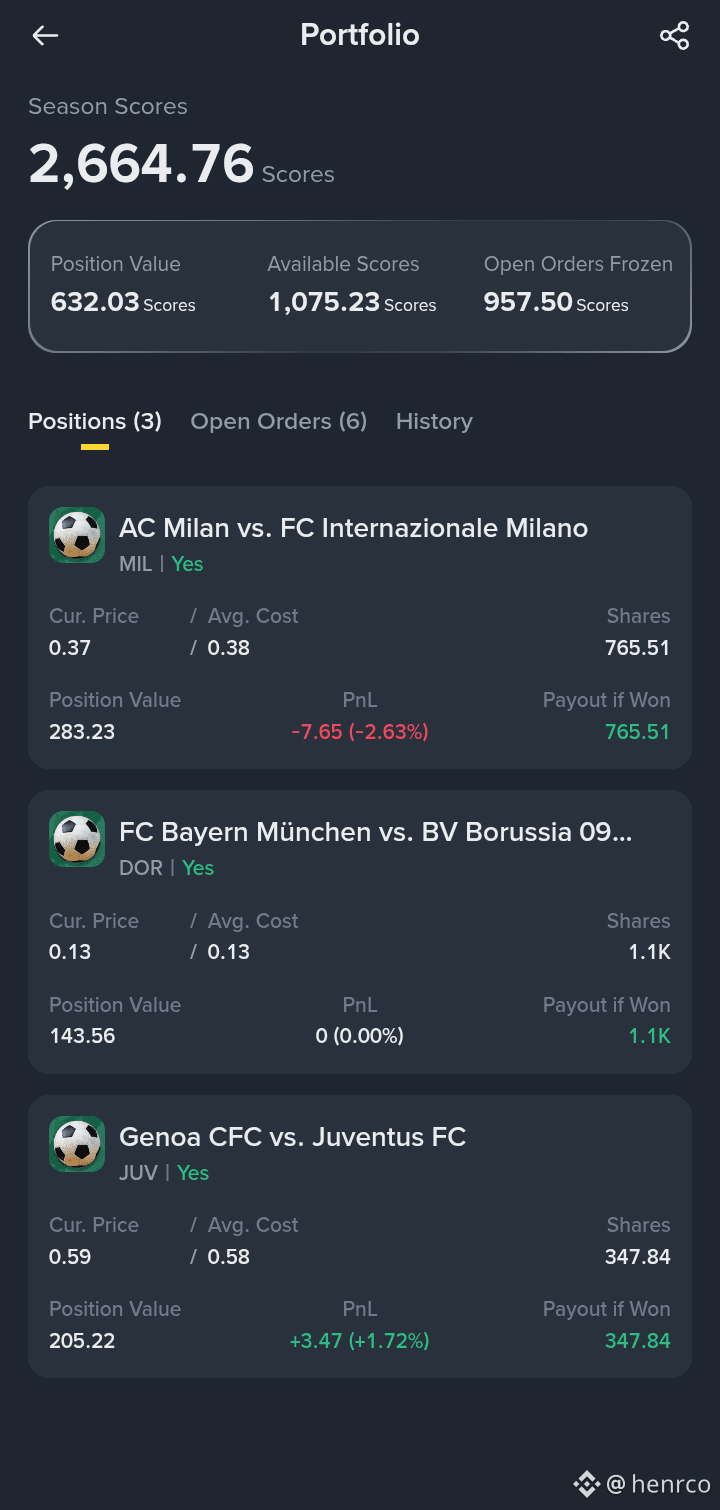
#BinancePick sementara cuma ngepick 3 pertandingan ini,
pick yang diyakini buat dipick aja, bukan apa yg banyak orang orang pick, aka dyor
#BinancePick sementara cuma ngepick 3 pertandingan ini,
pick yang diyakini buat dipick aja, bukan apa yg banyak orang orang pick, aka dyor
pick yang diyakini buat dipick aja, bukan apa yg banyak orang orang pick, aka dyor
Binance Pick тарапынан
1
·
--
targetku di #BinancePick masuk top 1000 di weekly leaderboard, tapi jelas mustahil
targetku di #BinancePick masuk top 1000 di weekly leaderboard, tapi jelas mustahil
75
·
--
sama sekali gak semangat nyoret timeline square, gk guna 👀
sama sekali gak semangat nyoret timeline square, gk guna 👀
8
·
--
#BinancePick kalian udah sampe mana? atau emng gk ikutan sama sekalai?
#BinancePick kalian udah sampe mana? atau emng gk ikutan sama sekalai?

68
·
--
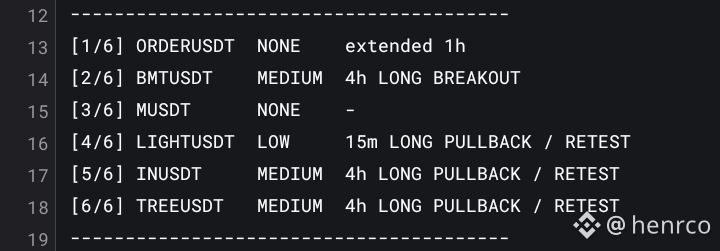
kali ini kita gk share setup atau breakdown token, ini beberapa list gainer yang sempat di analisis tapi belum nemu setup atau arah yang punya potensi,
sebenarnya ada, tapi banyak tapi nya. dyor
{future}(ORDERUSDT)
{future}(TREEUSDT)
kali ini kita gk share setup atau breakdown token, ini beberapa list gainer yang sempat di analisis tapi belum nemu setup atau arah yang punya potensi,
sebenarnya ada, tapi banyak tapi nya. dyor
sebenarnya ada, tapi banyak tapi nya. dyor
429
·
--
baru ngeliat data chart $LA, lumayan menarik nih. di TF 4H ada breakout kenceng nembus resistance 0.06100 plus volumenya melonjak sampai 4x lipat lebih. OI juga kepantau naik hampir 10% barengan sama funding rate yang tipis minus, kelihatan buyer masih megang kendali,
meskipun market BTC lagi cenderung bearish, struktur di $LA masih rapi ngebentuk higher high. sekarang harganya udah agak lumayan melambung tinggi dari EMA200, jadi opsi paling enak tunggu LA pullback atau retest dulu di area 0.06100 - 0.06109 buat nyari risk to reward yang pas, dengan target ke 0.06825 sampai 0.06966 dan batasi resiko di bawah 0.05907.
{future}(LAUSDT)
baru ngeliat data chart $LA , lumayan menarik nih. di TF 4H ada breakout kenceng nembus resistance 0.06100 plus volumenya melonjak sampai 4x lipat lebih. OI juga kepantau naik hampir 10% barengan sama funding rate yang tipis minus, kelihatan buyer masih megang kendali,
meskipun market BTC lagi cenderung bearish, struktur di $LA masih rapi ngebentuk higher high. sekarang harganya udah agak lumayan melambung tinggi dari EMA200, jadi opsi paling enak tunggu LA pullback atau retest dulu di area 0.06100 - 0.06109 buat nyari risk to reward yang pas, dengan target ke 0.06825 sampai 0.06966 dan batasi resiko di bawah 0.05907.
meskipun market BTC lagi cenderung bearish, struktur di $LA masih rapi ngebentuk higher high. sekarang harganya udah agak lumayan melambung tinggi dari EMA200, jadi opsi paling enak tunggu LA pullback atau retest dulu di area 0.06100 - 0.06109 buat nyari risk to reward yang pas, dengan target ke 0.06825 sampai 0.06966 dan batasi resiko di bawah 0.05907.
1
251
·
--
ngeliat data market sekarang ini, posisinya emang serba bingung sih. kelihatannya kaya market belum nemu alasan atau tenaga buat dorong ke satu arah yang mantap. Total mcap nahan di $2,71T kemudian Fear & Greed masuk area netral 46,
tapi pas market lagi begini, rotasinya berasa banget. diantaranya $HYPER yang naik lumayan di 6,59% sama $BABY sekitar 5,26% keliatan masih ada tenaga, beda cerita sama $SYRUP yang malah turun 5,31%. Keliatan kan yang dapet suntikan likuiditas mana aja, tinggal dites volume-nya kuat nahan beberapa hari ke depan atau cuma candle kaget doang.
di luar pergerakan altcoin, kabar dari makro juga lumayan rame. Swiss baru nge-approve ETF spot $BTC buat ritel di SIX Swiss Exchange bulan depan, mantap buat adopsi jangka panjang. tapi dari kubu $ETH ada penundaan upgrade Glamsterdam di testnet Hoodi gara-gara masalah security.
selama BTC masih nyari pijakan stabil, pilihan paling masuk akal ya merhatiin token-token yang dapet inflow duluan kaya HYPER sama BABY ini, sanggup konsisten apa nggak. kuncinya tetep di volume sih, kalau harga naik tapi volume tipis biasanya gampang turun lagi.
{future}(HYPERUSDT)
ngeliat data market sekarang ini, posisinya emang serba bingung sih. kelihatannya kaya market belum nemu alasan atau tenaga buat dorong ke satu arah yang mantap. Total mcap nahan di $2,71T kemudian Fear & Greed masuk area netral 46,
tapi pas market lagi begini, rotasinya berasa banget. diantaranya $HYPER yang naik lumayan di 6,59% sama $BABY sekitar 5,26% keliatan masih ada tenaga, beda cerita sama $SYRUP yang malah turun 5,31%. Keliatan kan yang dapet suntikan likuiditas mana aja, tinggal dites volume-nya kuat nahan beberapa hari ke depan atau cuma candle kaget doang.
di luar pergerakan altcoin, kabar dari makro juga lumayan rame. Swiss baru nge-approve ETF spot $BTC buat ritel di SIX Swiss Exchange bulan depan, mantap buat adopsi jangka panjang. tapi dari kubu $ETH ada penundaan upgrade Glamsterdam di testnet Hoodi gara-gara masalah security.
selama BTC masih nyari pijakan stabil, pilihan paling masuk akal ya merhatiin token-token yang dapet inflow duluan kaya HYPER sama BABY ini, sanggup konsisten apa nggak. kuncinya tetep di volume sih, kalau harga naik tapi volume tipis biasanya gampang turun lagi.
tapi pas market lagi begini, rotasinya berasa banget. diantaranya $HYPER yang naik lumayan di 6,59% sama $BABY sekitar 5,26% keliatan masih ada tenaga, beda cerita sama $SYRUP yang malah turun 5,31%. Keliatan kan yang dapet suntikan likuiditas mana aja, tinggal dites volume-nya kuat nahan beberapa hari ke depan atau cuma candle kaget doang.
di luar pergerakan altcoin, kabar dari makro juga lumayan rame. Swiss baru nge-approve ETF spot $BTC buat ritel di SIX Swiss Exchange bulan depan, mantap buat adopsi jangka panjang. tapi dari kubu $ETH ada penundaan upgrade Glamsterdam di testnet Hoodi gara-gara masalah security.
selama BTC masih nyari pijakan stabil, pilihan paling masuk akal ya merhatiin token-token yang dapet inflow duluan kaya HYPER sama BABY ini, sanggup konsisten apa nggak. kuncinya tetep di volume sih, kalau harga naik tapi volume tipis biasanya gampang turun lagi.
292
·
--
kalo udah event sistem leaderboard kemungkinan masuk hitungannya tipis, #BinancePick
kalo udah event sistem leaderboard kemungkinan masuk hitungannya tipis, #BinancePick
56
·
--
Naik lebih dari 300%, tembus $0,118, lalu balik ke area $0,089. Pergerakan $IRYS di Binance hari ini benar-benar agresif,
{future}(IRYSUSDT)
Volume futures 24 jam sudah menembus $1,16 miliar. Aktivitas beli dominan, tetapi open interest terbaru turun dari sekitar 891 juta menjadi 787 juta IRYS.
Naik lebih dari 300%, tembus $0,118, lalu balik ke area $0,089. Pergerakan $IRYS di Binance hari ini benar-benar agresif,
Volume futures 24 jam sudah menembus $1,16 miliar. Aktivitas beli dominan, tetapi open interest terbaru turun dari sekitar 891 juta menjadi 787 juta IRYS.
Volume futures 24 jam sudah menembus $1,16 miliar. Aktivitas beli dominan, tetapi open interest terbaru turun dari sekitar 891 juta menjadi 787 juta IRYS.
378
·
--
Жоғары (өспелі)
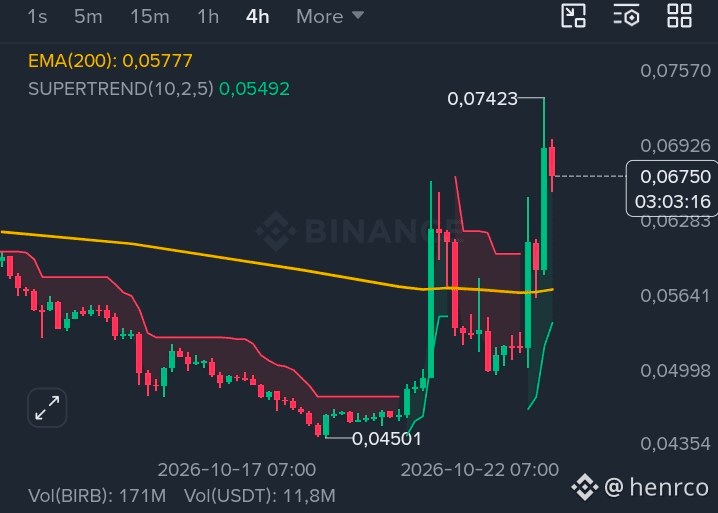
ngeliat pergerakan $BIRB lumayan gokil, strukturnya makin rapi di TF 4 jam setelah nembus resis 0.06708. Volume transaksinya juga melonjak tajam sampai 5x lipat dari biasanya, plus OI naik hampir 50% dalam beberapa jam terakhir.
Funding rate-nya tembus -2.00%, tanda posisi short lagi pada numpuk dan bayar ke long.
walaupun kondisi $BTC dan market secara umum masih agak bearish, setup breakout di BIRB ini kelihatan punya momentum bullish yang kuat buat ngejar target di area 0.07423 sampai 0.07775. Area retracement sekitar 0.06708 - 0.06873 menarik buat diperhatikan.
{future}(BIRBUSDT)
ngeliat pergerakan $BIRB lumayan gokil, strukturnya makin rapi di TF 4 jam setelah nembus resis 0.06708. Volume transaksinya juga melonjak tajam sampai 5x lipat dari biasanya, plus OI naik hampir 50% dalam beberapa jam terakhir.
Funding rate-nya tembus -2.00%, tanda posisi short lagi pada numpuk dan bayar ke long.
walaupun kondisi $BTC dan market secara umum masih agak bearish, setup breakout di BIRB ini kelihatan punya momentum bullish yang kuat buat ngejar target di area 0.07423 sampai 0.07775. Area retracement sekitar 0.06708 - 0.06873 menarik buat diperhatikan.
Funding rate-nya tembus -2.00%, tanda posisi short lagi pada numpuk dan bayar ke long.
walaupun kondisi $BTC dan market secara umum masih agak bearish, setup breakout di BIRB ini kelihatan punya momentum bullish yang kuat buat ngejar target di area 0.07423 sampai 0.07775. Area retracement sekitar 0.06708 - 0.06873 menarik buat diperhatikan.
199
·
--
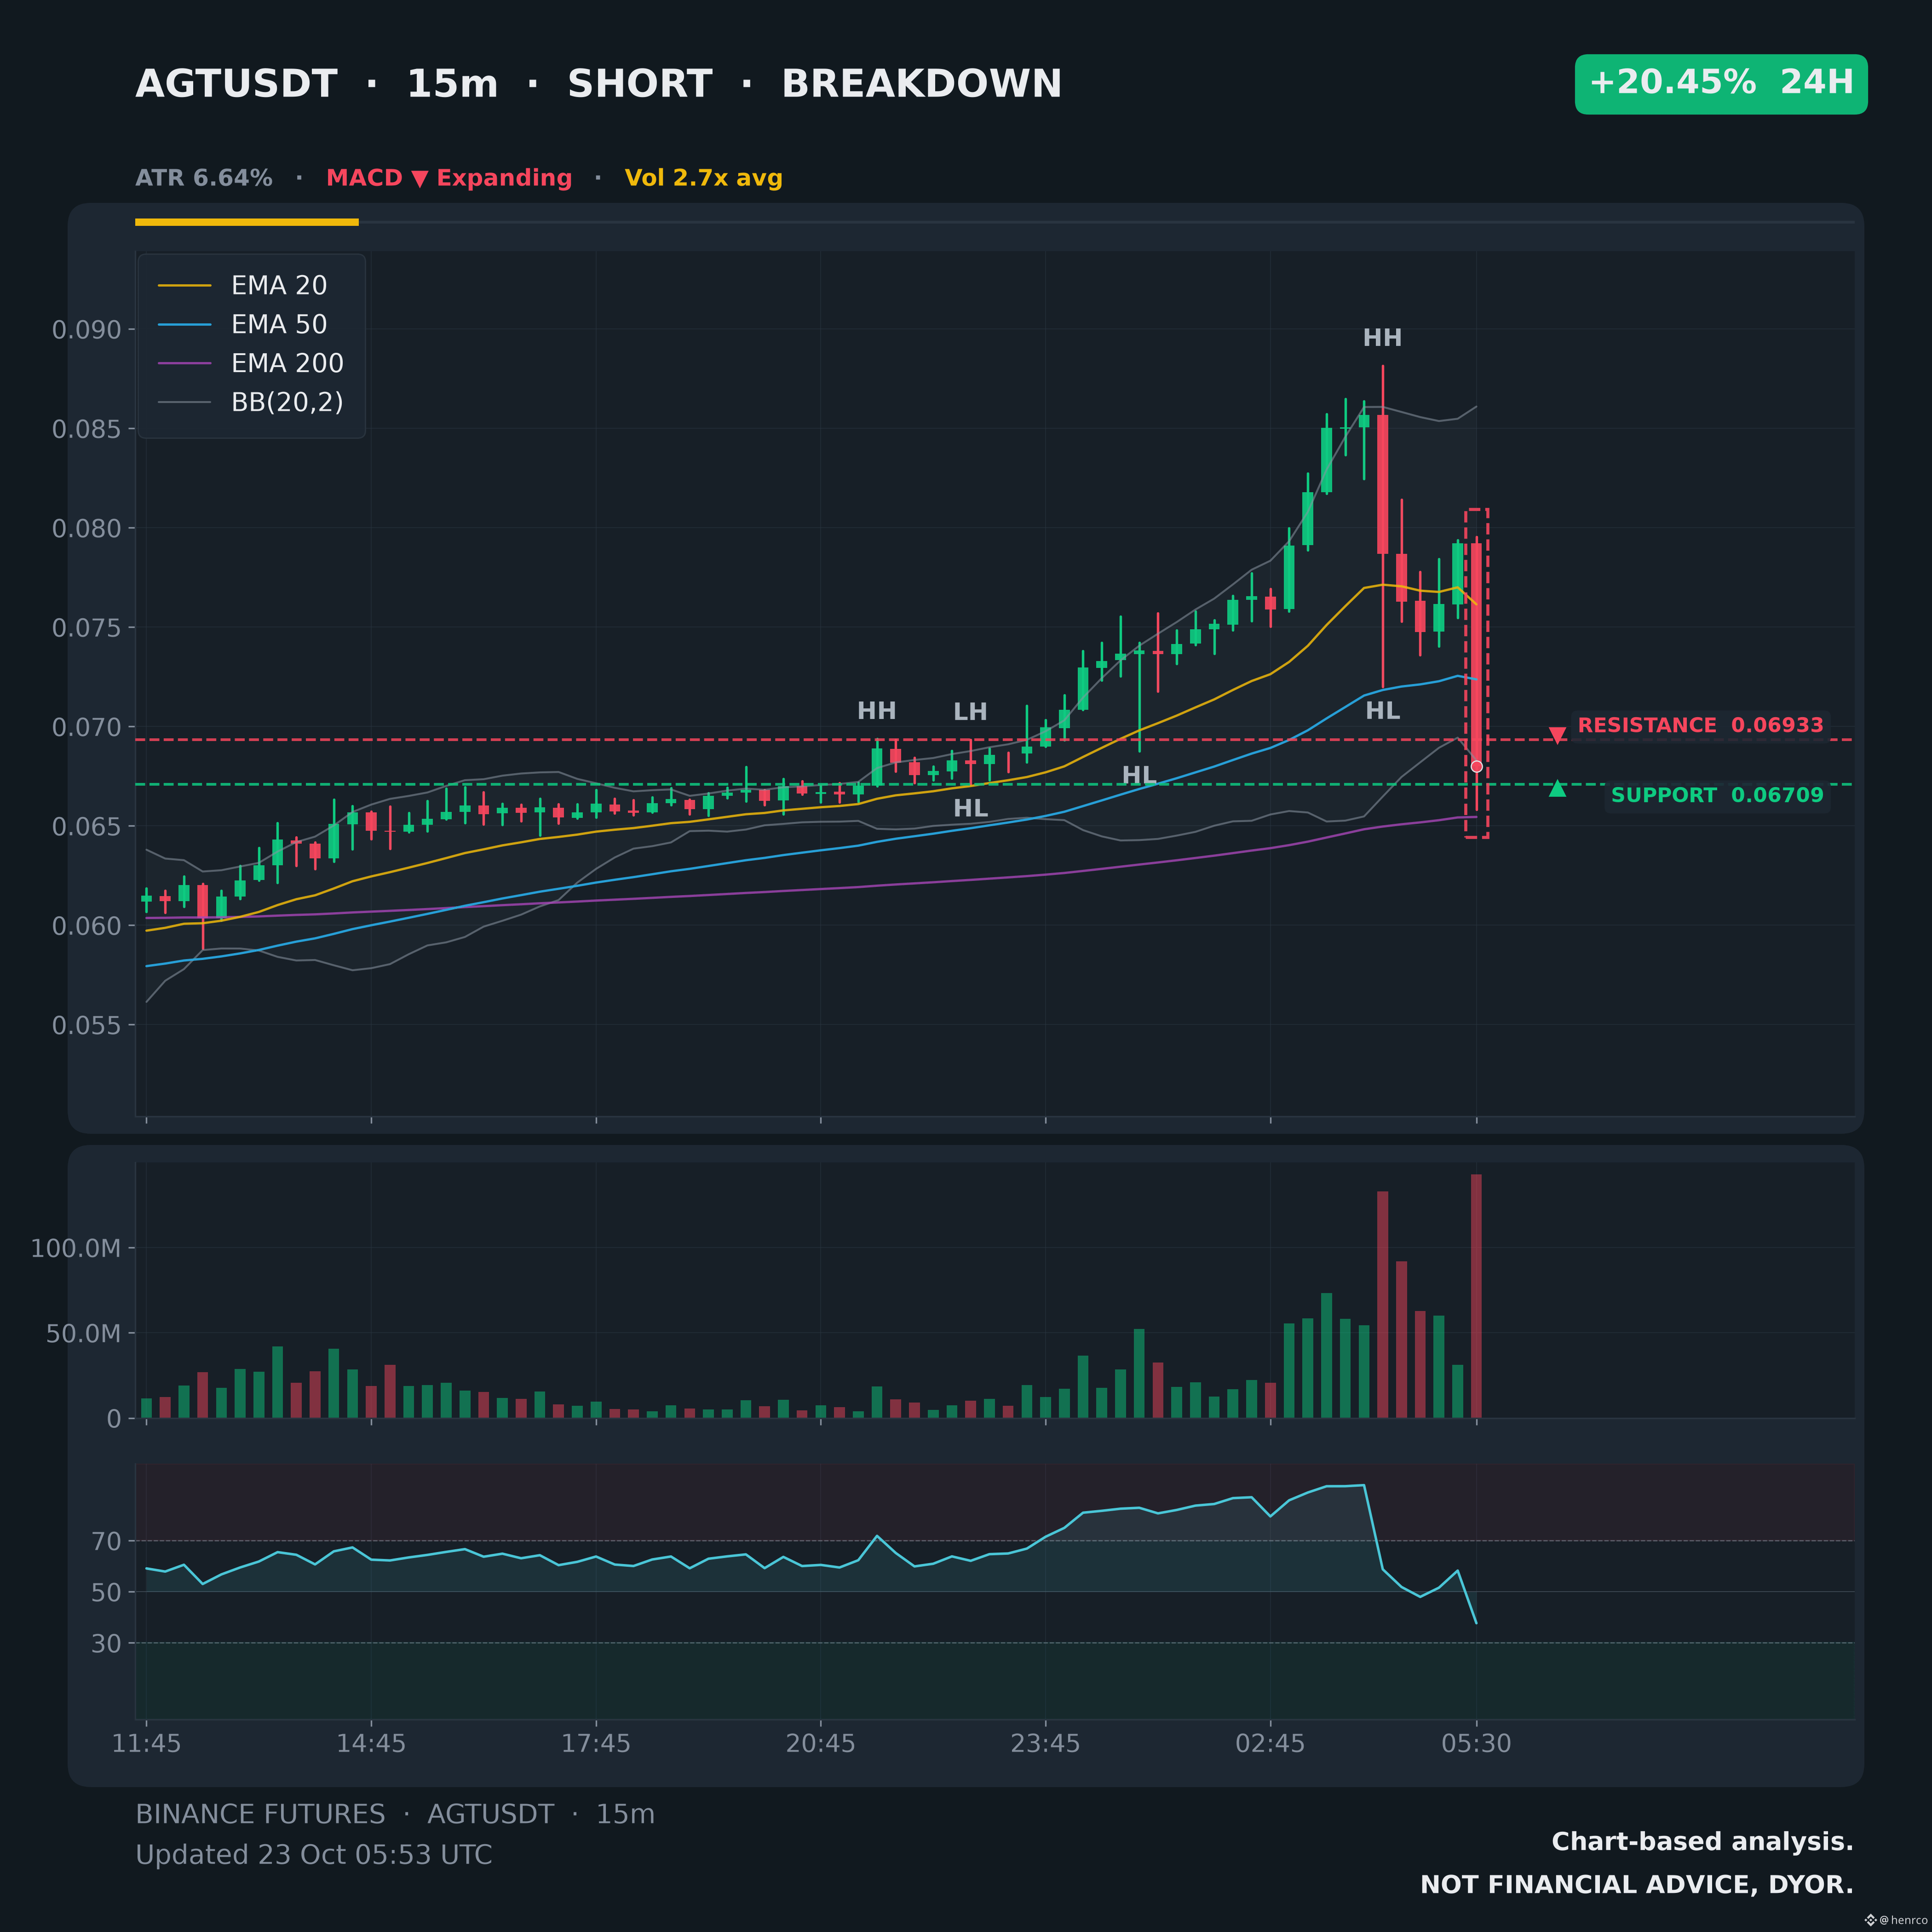
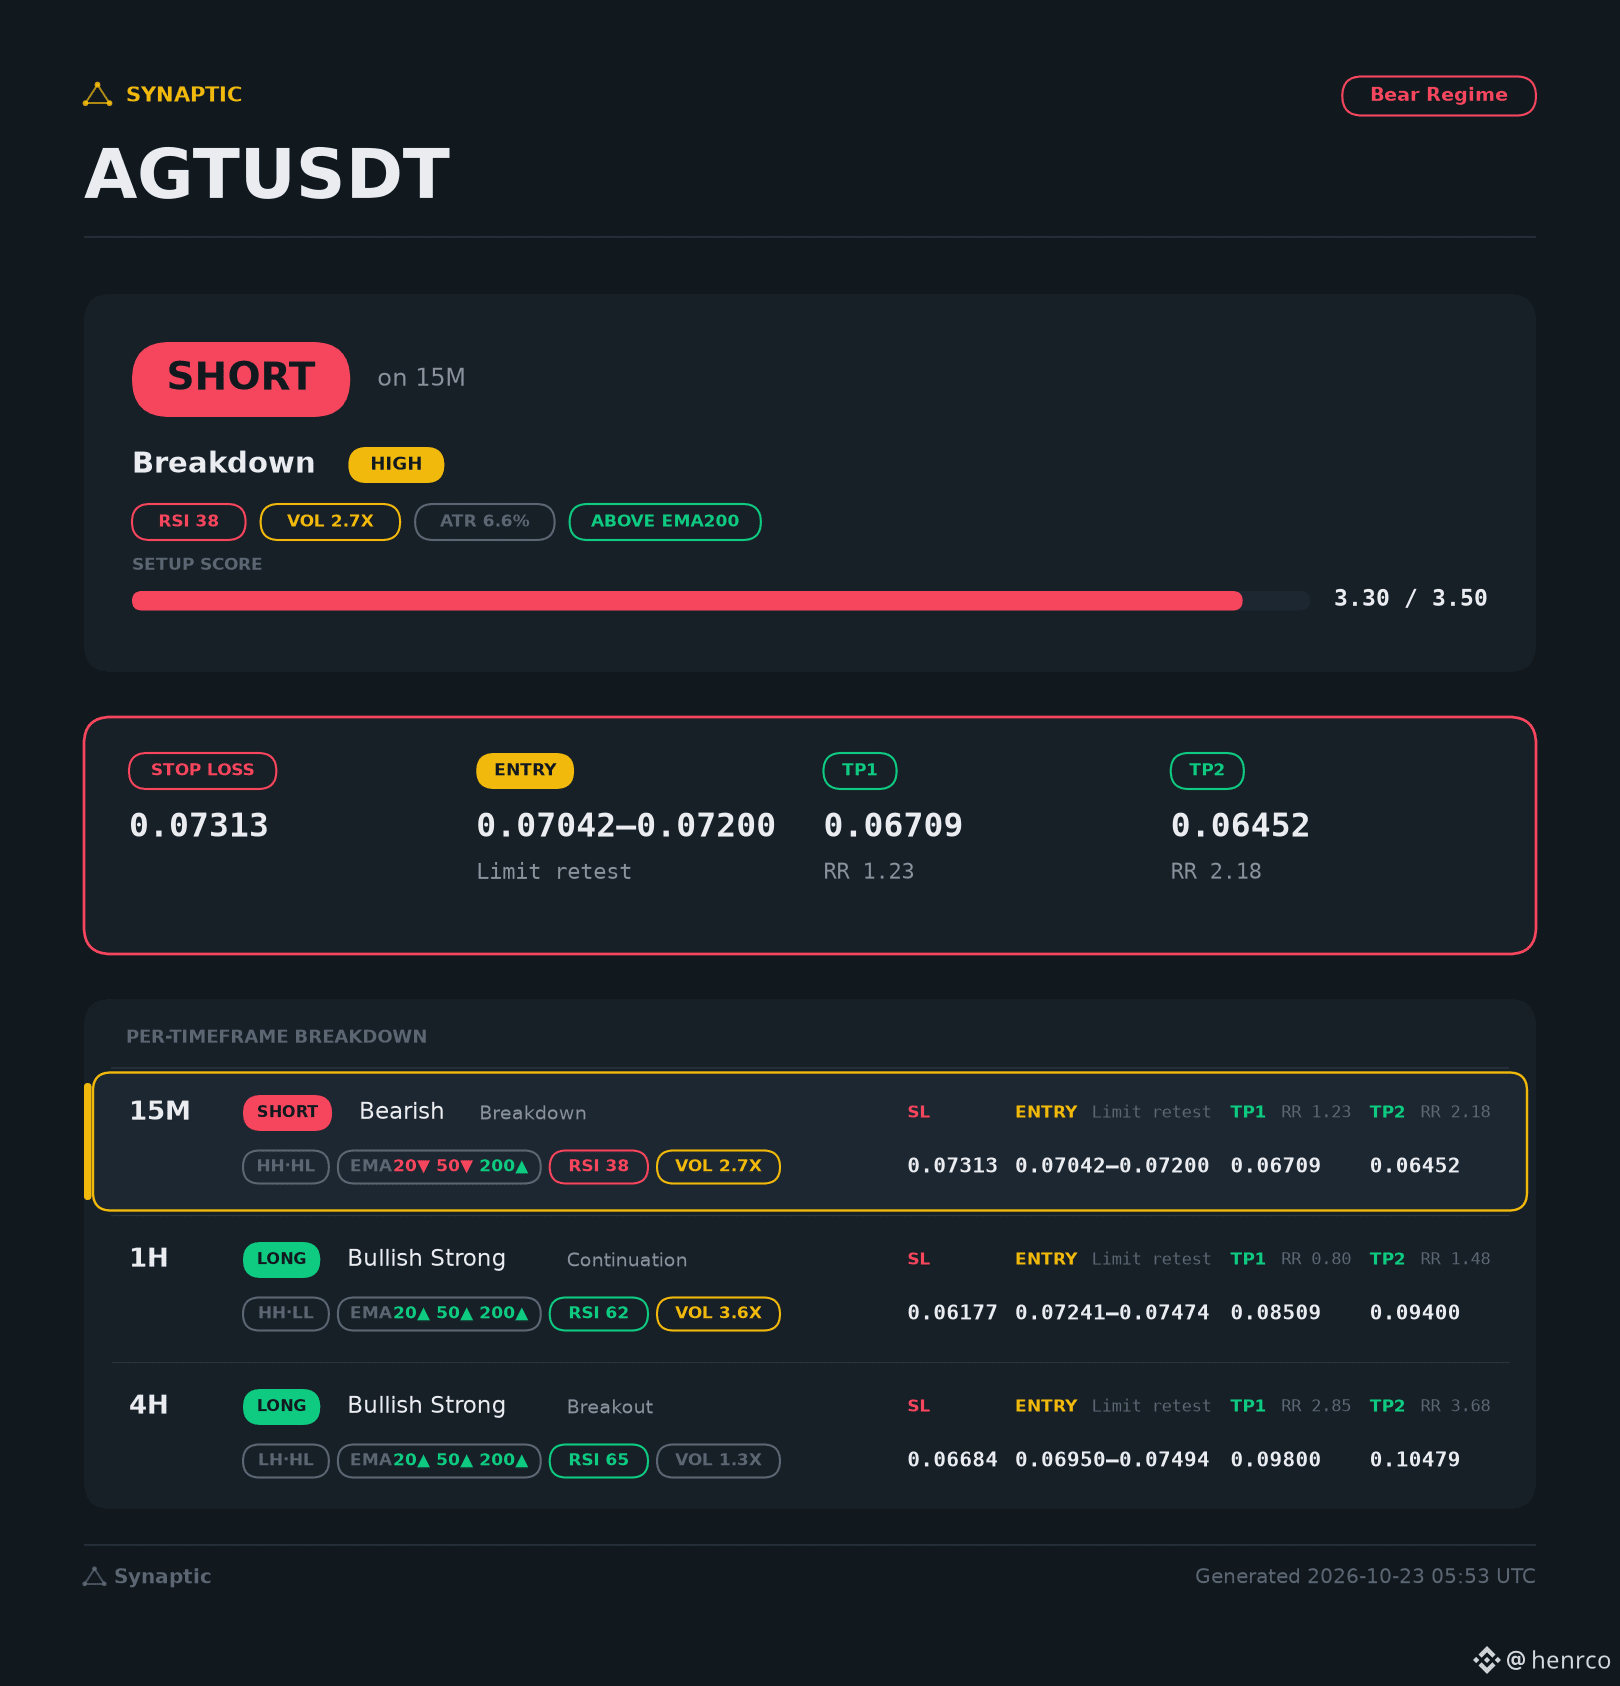
barusan ngeliat setup $AGT. Di TF 15m keliatannya ada potensi short gegara udah bobol support 0.07200 plus volume turunnya kenceng, tapi mending tunggu mantul dulu ke area 0.07042 - 0.07200 biar dapet entry retest yang rapi.
Yang perlu diperhatiin, di TF besar (1h sama 4h) tren dasarnya emang masih strong bullish. Jadi yang mau ambil scalping short di 15m ini sifatnya emang counter-trend buat manfaatin koreksi tipis, target terdekatnya di 0.06709 sampe 0.06452 dengan batasan rugi di 0.07313. Lumayan menarik buat dipantau pergerakannya kalau pasarnya ngasih jemputan di area retest.
{future}(AGTUSDT)
barusan ngeliat setup $AGT. Di TF 15m keliatannya ada potensi short gegara udah bobol support 0.07200 plus volume turunnya kenceng, tapi mending tunggu mantul dulu ke area 0.07042 - 0.07200 biar dapet entry retest yang rapi.
Yang perlu diperhatiin, di TF besar (1h sama 4h) tren dasarnya emang masih strong bullish. Jadi yang mau ambil scalping short di 15m ini sifatnya emang counter-trend buat manfaatin koreksi tipis, target terdekatnya di 0.06709 sampe 0.06452 dengan batasan rugi di 0.07313. Lumayan menarik buat dipantau pergerakannya kalau pasarnya ngasih jemputan di area retest.
Yang perlu diperhatiin, di TF besar (1h sama 4h) tren dasarnya emang masih strong bullish. Jadi yang mau ambil scalping short di 15m ini sifatnya emang counter-trend buat manfaatin koreksi tipis, target terdekatnya di 0.06709 sampe 0.06452 dengan batasan rugi di 0.07313. Lumayan menarik buat dipantau pergerakannya kalau pasarnya ngasih jemputan di area retest.
703
·
--
Aktivitas futures $DASH tembus $162,44 juta sementara harganya bergerak di kisaran $51–54. $DASH mulai kebagian perhatian dari sektor privacy coin yang mulai rame,
di luar pergerakan harga, DASH juga punya kabar soal dukungan transaksi terlindungi berbasis Orchard yang sudah mulai aktif di mainnet pada 15 Oktober. lumayan, ada perkembangan dari sisi teknologinya juga.
Untuk harga, area $54 jadi titik yang wajib dipantau dalam pergerakan DASH selanjutnya. 👀
{future}(DASHUSDT)
Aktivitas futures $DASH tembus $162,44 juta sementara harganya bergerak di kisaran $51–54. $DASH mulai kebagian perhatian dari sektor privacy coin yang mulai rame,
di luar pergerakan harga, DASH juga punya kabar soal dukungan transaksi terlindungi berbasis Orchard yang sudah mulai aktif di mainnet pada 15 Oktober. lumayan, ada perkembangan dari sisi teknologinya juga.
Untuk harga, area $54 jadi titik yang wajib dipantau dalam pergerakan DASH selanjutnya. 👀
di luar pergerakan harga, DASH juga punya kabar soal dukungan transaksi terlindungi berbasis Orchard yang sudah mulai aktif di mainnet pada 15 Oktober. lumayan, ada perkembangan dari sisi teknologinya juga.
Untuk harga, area $54 jadi titik yang wajib dipantau dalam pergerakan DASH selanjutnya. 👀
299
·
--
gila sih gerakan $AKE, sehari naik 45% sampai nyentuh $0,033. Volume futures udah $163 juta, market-nya rame banget. Dari harga $0,021 langsung terbang sejauh ini.
cuma ada satu hal, jumlah $AKE di open interest malah turun pas harganya naik kencang. kayaknya ini bukan murni gara-gara banyak posisi long baru masuk. bisa jadi ada posisi short yang mulai ngamanin posisi juga,
sekarang tinggal lihat $AKE sanggup bikin kejutan lagi atau malah muter dulu di area atas. Apalagi token unlock-nya baru lewat 21 Oktober kemarin. Gerakannya lagi liar,
penasaran bakal sejauh apa kali ini. 👀
{future}(AKEUSDT)
gila sih gerakan $AKE , sehari naik 45% sampai nyentuh $0,033. Volume futures udah $163 juta, market-nya rame banget. Dari harga $0,021 langsung terbang sejauh ini.
cuma ada satu hal, jumlah $AKE di open interest malah turun pas harganya naik kencang. kayaknya ini bukan murni gara-gara banyak posisi long baru masuk. bisa jadi ada posisi short yang mulai ngamanin posisi juga,
sekarang tinggal lihat $AKE sanggup bikin kejutan lagi atau malah muter dulu di area atas. Apalagi token unlock-nya baru lewat 21 Oktober kemarin. Gerakannya lagi liar,
penasaran bakal sejauh apa kali ini. 👀
cuma ada satu hal, jumlah $AKE di open interest malah turun pas harganya naik kencang. kayaknya ini bukan murni gara-gara banyak posisi long baru masuk. bisa jadi ada posisi short yang mulai ngamanin posisi juga,
sekarang tinggal lihat $AKE sanggup bikin kejutan lagi atau malah muter dulu di area atas. Apalagi token unlock-nya baru lewat 21 Oktober kemarin. Gerakannya lagi liar,
penasaran bakal sejauh apa kali ini. 👀
1
767
·
--
Baru ngeh kalau sekarang di Binance ada Binance Pick. Jadi bukan cuma mantengin chart, ternyata ada cara lain buat ngumpulin poin juga. 😂
Ada daily check-in, tebak arah market, selesaikan tugas, trading, sampai bikin postingan di Square. Poin yang terkumpul bisa bantu naikin posisi di leaderboard, dengan total hadiah kampanye yang diumumkan mencapai 1 juta USDC.
penasaran sih, apalagi ada leaderboard mingguan juga, jadi bukan cuma soal bersaing di satu papan peringkat.
Kalian udah nyobain Binance Pick belum? Lebih gampang ngumpulin poin lewat prediksi market atau ngerjain tugas hariannya? 👀 #BinancePick
Baru ngeh kalau sekarang di Binance ada Binance Pick. Jadi bukan cuma mantengin chart, ternyata ada cara lain buat ngumpulin poin juga. 😂
Ada daily check-in, tebak arah market, selesaikan tugas, trading, sampai bikin postingan di Square. Poin yang terkumpul bisa bantu naikin posisi di leaderboard, dengan total hadiah kampanye yang diumumkan mencapai 1 juta USDC.
penasaran sih, apalagi ada leaderboard mingguan juga, jadi bukan cuma soal bersaing di satu papan peringkat.
Kalian udah nyobain Binance Pick belum? Lebih gampang ngumpulin poin lewat prediksi market atau ngerjain tugas hariannya? 👀 #BinancePick
Ada daily check-in, tebak arah market, selesaikan tugas, trading, sampai bikin postingan di Square. Poin yang terkumpul bisa bantu naikin posisi di leaderboard, dengan total hadiah kampanye yang diumumkan mencapai 1 juta USDC.
penasaran sih, apalagi ada leaderboard mingguan juga, jadi bukan cuma soal bersaing di satu papan peringkat.
Kalian udah nyobain Binance Pick belum? Lebih gampang ngumpulin poin lewat prediksi market atau ngerjain tugas hariannya? 👀 #BinancePick

160
·
--
Lagi cek data Binance dan kelihatannya market memang lagi masuk fase koreksi yang lumayan serentak. Kapitalisasi global turun ke kisaran 2,72 triliun, tapi volume perdagangan justru naik tipis. Keliatan banget tekanan jual lagi aktif di berbagai sudut.
Bitcoin ada di area 81.500 dan gerakannya udah mendekati batas bawah kisaran 24 jam. Sementara itu, $ETH sama $SOL keliatan lebih ringkih dengan penurunan yang lebih dalam dibanding $BTC. Jadi wajar kalau sentimen di altcoin kerasa agak berat.
Menariknya, tekanan ini nggak cuma numpuk di satu narasi aja. Sektor kayak restaking, layer 2, sampai ZK kompak ikut tertekan, bahkan ada beberapa token yang koreksinya lumayan dalam.
Buat sekarang, posisinya masih nunggu konfirmasi. Aku lebih mantau token-token yang masih bisa nahan posisi atau nunjukin kekuatan relatif ketimbang buru-buru masuk pas market lagi merah begini. Sambil jalan kita lihat apakah BTC bisa bikin dasar harga baru atau justru lanjut turun.
Lagi cek data Binance dan kelihatannya market memang lagi masuk fase koreksi yang lumayan serentak. Kapitalisasi global turun ke kisaran 2,72 triliun, tapi volume perdagangan justru naik tipis. Keliatan banget tekanan jual lagi aktif di berbagai sudut.
Bitcoin ada di area 81.500 dan gerakannya udah mendekati batas bawah kisaran 24 jam. Sementara itu, $ETH sama $SOL keliatan lebih ringkih dengan penurunan yang lebih dalam dibanding $BTC. Jadi wajar kalau sentimen di altcoin kerasa agak berat.
Menariknya, tekanan ini nggak cuma numpuk di satu narasi aja. Sektor kayak restaking, layer 2, sampai ZK kompak ikut tertekan, bahkan ada beberapa token yang koreksinya lumayan dalam.
Buat sekarang, posisinya masih nunggu konfirmasi. Aku lebih mantau token-token yang masih bisa nahan posisi atau nunjukin kekuatan relatif ketimbang buru-buru masuk pas market lagi merah begini. Sambil jalan kita lihat apakah BTC bisa bikin dasar harga baru atau justru lanjut turun.
Bitcoin ada di area 81.500 dan gerakannya udah mendekati batas bawah kisaran 24 jam. Sementara itu, $ETH sama $SOL keliatan lebih ringkih dengan penurunan yang lebih dalam dibanding $BTC. Jadi wajar kalau sentimen di altcoin kerasa agak berat.
Menariknya, tekanan ini nggak cuma numpuk di satu narasi aja. Sektor kayak restaking, layer 2, sampai ZK kompak ikut tertekan, bahkan ada beberapa token yang koreksinya lumayan dalam.
Buat sekarang, posisinya masih nunggu konfirmasi. Aku lebih mantau token-token yang masih bisa nahan posisi atau nunjukin kekuatan relatif ketimbang buru-buru masuk pas market lagi merah begini. Sambil jalan kita lihat apakah BTC bisa bikin dasar harga baru atau justru lanjut turun.
114
·
--
Pergerakan di $GRVT bikin geleng-geleng kepala. Lonjakan 18% dalam sehari sampai menyentuh puncak 0,2636 jelas ditarik volume yang kencang, tapi ada satu detail yang bikin mikir pas ngeliat data perp Binance: harganya lari jauh lebih cepat ketimbang pertumbuhan Open Interest-nya.
OI cuma nambah sekitar 3,4% pas harga ngegas hampir 10% di gelombang terakhir. Ini tipikal pergerakan yang dicampur sama aktivitas nutup posisi short atau emang taker buy yang masuknya kelewat agresif di awal. Kelihatan juga pas nyentuh area atas, langsung ada aksi ambil profit yang bikin candle-nya melipir balik ke rentang 0,2550.
Artinya struktur pasarnya lagi diuji. Funding rate sih masih tergolong adem di +0,005%, jadi belum kelihatan euforia lebay yang bikin posisi long kegedean beban. Tapi rasio akun long yang udah nembus 58% tetep perlu diwaspadai, takutnya jadi agak sensitif kalau ada koreksi mendadak.
Nantinya penentu arah ada di reaksi sekitar $0,2636. Kalau area itu bisa ditebas lagi barengan OI yang makin naik, dorongan bullish-nya makin tervalidasi. Sebaliknya, kalau malah jebol ke bawah 0,2420, ya berarti energi dorongan kemarin cuma numpang lewat buat perapihan posisi aja. Kita pantau terus pembentukan candle berikutnya.
Pergerakan di $GRVT bikin geleng-geleng kepala. Lonjakan 18% dalam sehari sampai menyentuh puncak 0,2636 jelas ditarik volume yang kencang, tapi ada satu detail yang bikin mikir pas ngeliat data perp Binance: harganya lari jauh lebih cepat ketimbang pertumbuhan Open Interest-nya.
OI cuma nambah sekitar 3,4% pas harga ngegas hampir 10% di gelombang terakhir. Ini tipikal pergerakan yang dicampur sama aktivitas nutup posisi short atau emang taker buy yang masuknya kelewat agresif di awal. Kelihatan juga pas nyentuh area atas, langsung ada aksi ambil profit yang bikin candle-nya melipir balik ke rentang 0,2550.
Artinya struktur pasarnya lagi diuji. Funding rate sih masih tergolong adem di +0,005%, jadi belum kelihatan euforia lebay yang bikin posisi long kegedean beban. Tapi rasio akun long yang udah nembus 58% tetep perlu diwaspadai, takutnya jadi agak sensitif kalau ada koreksi mendadak.
Nantinya penentu arah ada di reaksi sekitar $0,2636. Kalau area itu bisa ditebas lagi barengan OI yang makin naik, dorongan bullish-nya makin tervalidasi. Sebaliknya, kalau malah jebol ke bawah 0,2420, ya berarti energi dorongan kemarin cuma numpang lewat buat perapihan posisi aja. Kita pantau terus pembentukan candle berikutnya.
OI cuma nambah sekitar 3,4% pas harga ngegas hampir 10% di gelombang terakhir. Ini tipikal pergerakan yang dicampur sama aktivitas nutup posisi short atau emang taker buy yang masuknya kelewat agresif di awal. Kelihatan juga pas nyentuh area atas, langsung ada aksi ambil profit yang bikin candle-nya melipir balik ke rentang 0,2550.
Artinya struktur pasarnya lagi diuji. Funding rate sih masih tergolong adem di +0,005%, jadi belum kelihatan euforia lebay yang bikin posisi long kegedean beban. Tapi rasio akun long yang udah nembus 58% tetep perlu diwaspadai, takutnya jadi agak sensitif kalau ada koreksi mendadak.
Nantinya penentu arah ada di reaksi sekitar $0,2636. Kalau area itu bisa ditebas lagi barengan OI yang makin naik, dorongan bullish-nya makin tervalidasi. Sebaliknya, kalau malah jebol ke bawah 0,2420, ya berarti energi dorongan kemarin cuma numpang lewat buat perapihan posisi aja. Kita pantau terus pembentukan candle berikutnya.
262
·
--
Baru beres baca breakdown data Futures Binance buat beberapa token, ada beberapa nama yang chart sama OI-nya lumayan kelihatan cakep buat dilirik,
$SAND paling kelihatan rapi, harga makin naik, volume ngisi, OI juga nambah dari 205 juta ke 218 juta SAND. Kalo tembus area $0,06004 dan kuat nahan di situ, ombak lanjutannya bisa makin kerasa.
$MINA juga menarik. Kemarin smpat koreksi dikit tapi langsung direcovery naik ke $0,07899, plus OI-nya naik terus ke 80,62 juta. Buyer masih kelihatan nambah muatan pas dipush naik. Kunci berikutnya di $0,07951.
$RSR gerakannya lumayan agresif. OI meloncat tembus 4,19 miliar RSR barengan sama volume yang makin rame. Target terdekatnya $0,02048 - $0,02094.
buat $NMR ($12,355) sama $NIL ($0,08724) sebenernya masih naik, tapi OI-nya agak ngedrop. Ada indikasi kenaikannya sebagian cuma gara-gara short squeeze / orang tutup posisi, bukan murni akumulasi long baru.
Secara struktur, tiga yang paling enak dibaca posisinya masih $SAND, $MINA, sama $RSR. tinggal diliat kelanjutan candle 4 jamnya nanti malam.
Baru beres baca breakdown data Futures Binance buat beberapa token, ada beberapa nama yang chart sama OI-nya lumayan kelihatan cakep buat dilirik,
$SAND paling kelihatan rapi, harga makin naik, volume ngisi, OI juga nambah dari 205 juta ke 218 juta SAND. Kalo tembus area $0,06004 dan kuat nahan di situ, ombak lanjutannya bisa makin kerasa.
$MINA juga menarik. Kemarin smpat koreksi dikit tapi langsung direcovery naik ke $0,07899, plus OI-nya naik terus ke 80,62 juta. Buyer masih kelihatan nambah muatan pas dipush naik. Kunci berikutnya di $0,07951.
$RSR gerakannya lumayan agresif. OI meloncat tembus 4,19 miliar RSR barengan sama volume yang makin rame. Target terdekatnya $0,02048 - $0,02094.
buat $NMR ($12,355) sama $NIL ($0,08724) sebenernya masih naik, tapi OI-nya agak ngedrop. Ada indikasi kenaikannya sebagian cuma gara-gara short squeeze / orang tutup posisi, bukan murni akumulasi long baru.
Secara struktur, tiga yang paling enak dibaca posisinya masih $SAND , $MINA , sama $RSR . tinggal diliat kelanjutan candle 4 jamnya nanti malam.
$SAND paling kelihatan rapi, harga makin naik, volume ngisi, OI juga nambah dari 205 juta ke 218 juta SAND. Kalo tembus area $0,06004 dan kuat nahan di situ, ombak lanjutannya bisa makin kerasa.
$MINA juga menarik. Kemarin smpat koreksi dikit tapi langsung direcovery naik ke $0,07899, plus OI-nya naik terus ke 80,62 juta. Buyer masih kelihatan nambah muatan pas dipush naik. Kunci berikutnya di $0,07951.
$RSR gerakannya lumayan agresif. OI meloncat tembus 4,19 miliar RSR barengan sama volume yang makin rame. Target terdekatnya $0,02048 - $0,02094.
buat $NMR ($12,355) sama $NIL ($0,08724) sebenernya masih naik, tapi OI-nya agak ngedrop. Ada indikasi kenaikannya sebagian cuma gara-gara short squeeze / orang tutup posisi, bukan murni akumulasi long baru.
Secara struktur, tiga yang paling enak dibaca posisinya masih $SAND , $MINA , sama $RSR . tinggal diliat kelanjutan candle 4 jamnya nanti malam.
457
·
--
Lagi ngeliatin pergerakan $Q di futures. dari tadi mepet area 0.052–0.056, tiba-tiba volume meledak tembus 0.06 terus meluncur kencang sampai nge-wick tinggi ke 0.076. Seksi memang bentuk candle-nya, tapi pas diliat lagi koreksinya juga nggak main-main—dalam satu jam candle aja swing-nya sempet ekstrem banget dari kisaran 0.072 turun sampe 0.051-an sebelum ditarik balik.
Lucunya, funding rate udah masuk area positif tapi ratio akun malah didominasi short sampai nyaris 65%. banyak yang gatel mau nge-short di atas karena ngira udah ketinggian, tapi selama buyer masih sanggup nahan di support lokal 0.0688–0.0700, posisinya masih rentan ke-pressure lagi. Kalau area itu jebol baru deh arahnya bisa makin dalem nyari 0.065 atau bahkan 0.060.
Beda cerita kalau 0.0732 berhasil ditebas ulang pake volume sama OI yang ngegas bareng, ATH 0.0768 kemarin sangat mungkin dites lagi. Cuma ya gitu, gerakannya lagi super volatil, mending perhatiin reaksi pas tes level kunci daripada cuma tergiur liat running persenannya doang.
Lagi ngeliatin pergerakan $Q di futures. dari tadi mepet area 0.052–0.056, tiba-tiba volume meledak tembus 0.06 terus meluncur kencang sampai nge-wick tinggi ke 0.076. Seksi memang bentuk candle-nya, tapi pas diliat lagi koreksinya juga nggak main-main—dalam satu jam candle aja swing-nya sempet ekstrem banget dari kisaran 0.072 turun sampe 0.051-an sebelum ditarik balik.
Lucunya, funding rate udah masuk area positif tapi ratio akun malah didominasi short sampai nyaris 65%. banyak yang gatel mau nge-short di atas karena ngira udah ketinggian, tapi selama buyer masih sanggup nahan di support lokal 0.0688–0.0700, posisinya masih rentan ke-pressure lagi. Kalau area itu jebol baru deh arahnya bisa makin dalem nyari 0.065 atau bahkan 0.060.
Beda cerita kalau 0.0732 berhasil ditebas ulang pake volume sama OI yang ngegas bareng, ATH 0.0768 kemarin sangat mungkin dites lagi. Cuma ya gitu, gerakannya lagi super volatil, mending perhatiin reaksi pas tes level kunci daripada cuma tergiur liat running persenannya doang.
Lucunya, funding rate udah masuk area positif tapi ratio akun malah didominasi short sampai nyaris 65%. banyak yang gatel mau nge-short di atas karena ngira udah ketinggian, tapi selama buyer masih sanggup nahan di support lokal 0.0688–0.0700, posisinya masih rentan ke-pressure lagi. Kalau area itu jebol baru deh arahnya bisa makin dalem nyari 0.065 atau bahkan 0.060.
Beda cerita kalau 0.0732 berhasil ditebas ulang pake volume sama OI yang ngegas bareng, ATH 0.0768 kemarin sangat mungkin dites lagi. Cuma ya gitu, gerakannya lagi super volatil, mending perhatiin reaksi pas tes level kunci daripada cuma tergiur liat running persenannya doang.
563
·
--
sektor chip AS lagi kena hantam lumayan parah. Indeks SOX udah jeblok 8 hari beruntun, dan imbasnya $SOXS langsung melesat tajam,
Ngecek data penutupan kemarin, $SOXS tembus $49,23. Kalau ditarik dari tanggal 12 Okt kemaren, kenaikannya udah sekitar 32% lebih. Buat ETF bear leveraged 3x, pergerakan impulsif kek gini emang gurih banget pas sektor utamanya lagi dirujak.
Pemicunya ya biasa, isu biaya infrastruktur AI yang kemahalan, ketakutan suku bunga, plus rotasi karena valuasi saham chip udah kelewat tinggi. Tapi inget aja ini produk leveraged harian, volatilitasnya gila-gilaan. Pas chip balik arah naik dikit aja, SOXS bisa kepangkas cepet banget.
Batas atas kemarin di $49,36 jadi level krusial buat ngeliat ini rally masih ada bensin atau kagak. Kalau jebol itu, momentumnya lanjut. Tapi kalau meluncur balik ke bawah $46,22, brarti udah mulai ngos-ngosan.
Tinggal liat sesi berikutnya, saham chip masih mau dijual terus apa udah ada yang nampung.
{future}(SOXSUSDT)
sektor chip AS lagi kena hantam lumayan parah. Indeks SOX udah jeblok 8 hari beruntun, dan imbasnya $SOXS langsung melesat tajam,
Ngecek data penutupan kemarin, $SOXS tembus $49,23. Kalau ditarik dari tanggal 12 Okt kemaren, kenaikannya udah sekitar 32% lebih. Buat ETF bear leveraged 3x, pergerakan impulsif kek gini emang gurih banget pas sektor utamanya lagi dirujak.
Pemicunya ya biasa, isu biaya infrastruktur AI yang kemahalan, ketakutan suku bunga, plus rotasi karena valuasi saham chip udah kelewat tinggi. Tapi inget aja ini produk leveraged harian, volatilitasnya gila-gilaan. Pas chip balik arah naik dikit aja, SOXS bisa kepangkas cepet banget.
Batas atas kemarin di $49,36 jadi level krusial buat ngeliat ini rally masih ada bensin atau kagak. Kalau jebol itu, momentumnya lanjut. Tapi kalau meluncur balik ke bawah $46,22, brarti udah mulai ngos-ngosan.
Tinggal liat sesi berikutnya, saham chip masih mau dijual terus apa udah ada yang nampung.
Ngecek data penutupan kemarin, $SOXS tembus $49,23. Kalau ditarik dari tanggal 12 Okt kemaren, kenaikannya udah sekitar 32% lebih. Buat ETF bear leveraged 3x, pergerakan impulsif kek gini emang gurih banget pas sektor utamanya lagi dirujak.
Pemicunya ya biasa, isu biaya infrastruktur AI yang kemahalan, ketakutan suku bunga, plus rotasi karena valuasi saham chip udah kelewat tinggi. Tapi inget aja ini produk leveraged harian, volatilitasnya gila-gilaan. Pas chip balik arah naik dikit aja, SOXS bisa kepangkas cepet banget.
Batas atas kemarin di $49,36 jadi level krusial buat ngeliat ini rally masih ada bensin atau kagak. Kalau jebol itu, momentumnya lanjut. Tapi kalau meluncur balik ke bawah $46,22, brarti udah mulai ngos-ngosan.
Tinggal liat sesi berikutnya, saham chip masih mau dijual terus apa udah ada yang nampung.
293
Көбірек контент көру үшін кіріңіз
Binance Square платформасында әлемдік криптоқоғамдастыққа қосылыңыз
⚡️ Криптовалюта туралы ең соңғы және пайдалы ақпаратты алыңыз.
💬 Әлемдегі ең ірі криптобиржаның сеніміне ие.
👍 Расталған авторлардың нақты пікірлерін табыңыз.
Электрондық пошта/телефон нөмірі
Трендтегі тақырыптар
BinancePick
2.9M рет көрілді
149,401 адам талқылап жатыр
Join #EarningsSeason: Predict Earnings on Binance Pick, Share Your Take on Binance Square!
Binance Square Official
·405 лайк
·341.5k рет көрілді
EarningsSeason
5.2M рет көрілді
25,491 адам талқылап жатыр
AnthropicTTMRevenueGrewAbout1200%
7,725 рет көрілді
226 адам талқылап жатыр