

MarketMind Crypto
814 投稿

MarketMind Crypto
報告
ユーザーをブロック
Market Analyst | Crypto Enthusiast Daily Technical Analysis on BTC, ETH & Trending Alts Updated Charts | Price Targets | Market Trends Stay ahead of
取引を発注
低高頻度トレーダー
1.7年
14 フォロー
127 フォロワー
297 いいね
投稿
ポートフォリオ
·
--
ブリッシュ
翻訳参照
🚀 Coin: $ZEC
{spot}(ZECUSDT)
(Zcash)
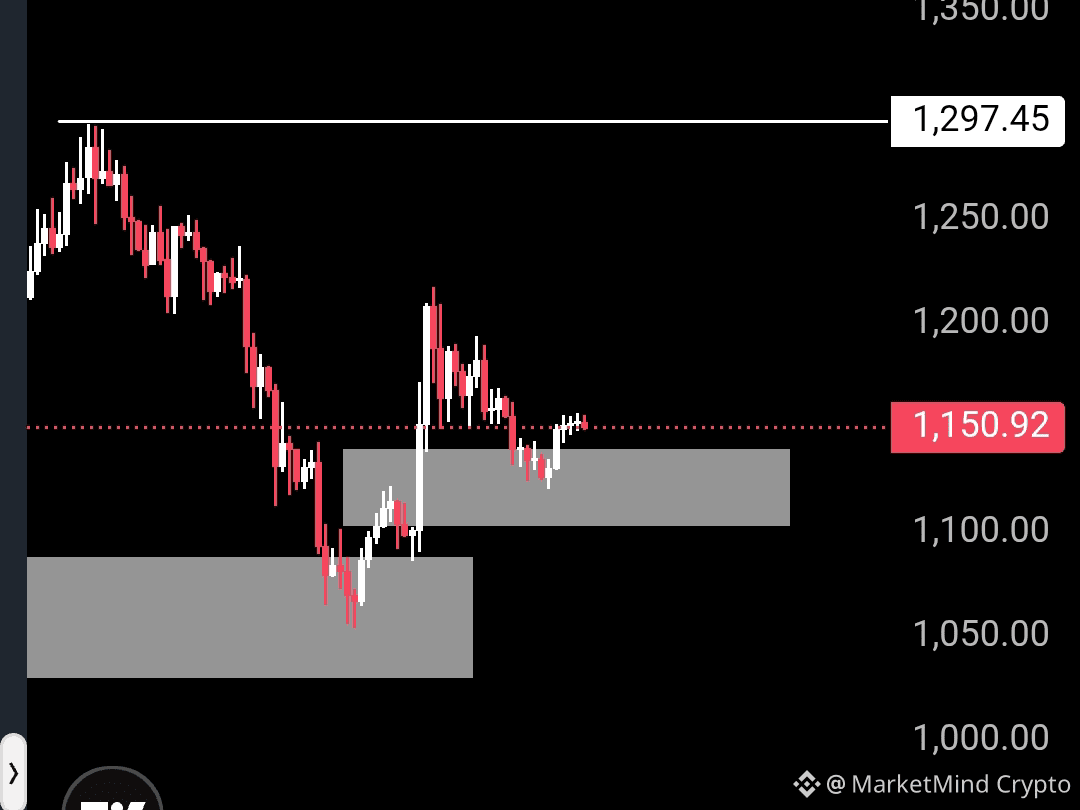
💰 Current Price: $1,150.92
📈 Trend/Bias: Bullish
🎯 Entry Zone: $1,110.00 to $1,140.00
🏆 Take Profit (TP): $1,295.00
🛑 Stop Loss (SL): $1,040.00
📊 Brief Analysis: ZEC is consolidating right above a strong demand block on the 1-hour chart after pulling back from its local high at $1,297.45. The RSI is holding stable in healthy territory, indicating potential for buyers to step in and defend this key support zone. A successful bounce here opens the pathway for a retest of the recent resistance level. 🔥
⚠️ Disclaimer: This analysis is for educational purposes and is not financial advice. Always do your own research and use a Stop Loss..
#RevolutConfirmsFakeGovEmailDataBreach #USBankCompletesCrossBorderPaymentPilotOnStellar #EtherRalliesAsBearishBetsLiquidate #OpticalCommsStocksRallyOver3% #USInflationHoldsAt3.4%InAugust
🚀 Coin: $ZEC
(Zcash)
💰 Current Price: $1,150.92
📈 Trend/Bias: Bullish
🎯 Entry Zone: $1,110.00 to $1,140.00
🏆 Take Profit (TP): $1,295.00
🛑 Stop Loss (SL): $1,040.00
📊 Brief Analysis: ZEC is consolidating right above a strong demand block on the 1-hour chart after pulling back from its local high at $1,297.45. The RSI is holding stable in healthy territory, indicating potential for buyers to step in and defend this key support zone. A successful bounce here opens the pathway for a retest of the recent resistance level. 🔥
⚠️ Disclaimer: This analysis is for educational purposes and is not financial advice. Always do your own research and use a Stop Loss..
#RevolutConfirmsFakeGovEmailDataBreach #USBankCompletesCrossBorderPaymentPilotOnStellar #EtherRalliesAsBearishBetsLiquidate #OpticalCommsStocksRallyOver3% #USInflationHoldsAt3.4%InAugust
(Zcash)
💰 Current Price: $1,150.92
📈 Trend/Bias: Bullish
🎯 Entry Zone: $1,110.00 to $1,140.00
🏆 Take Profit (TP): $1,295.00
🛑 Stop Loss (SL): $1,040.00
📊 Brief Analysis: ZEC is consolidating right above a strong demand block on the 1-hour chart after pulling back from its local high at $1,297.45. The RSI is holding stable in healthy territory, indicating potential for buyers to step in and defend this key support zone. A successful bounce here opens the pathway for a retest of the recent resistance level. 🔥
⚠️ Disclaimer: This analysis is for educational purposes and is not financial advice. Always do your own research and use a Stop Loss..
#RevolutConfirmsFakeGovEmailDataBreach #USBankCompletesCrossBorderPaymentPilotOnStellar #EtherRalliesAsBearishBetsLiquidate #OpticalCommsStocksRallyOver3% #USInflationHoldsAt3.4%InAugust
101
·
--
ブリッシュ
翻訳参照
Coin: $TAO 🤖
Current Price: $232.3 💵
Trend/Bias: Bullish 🐂
Entry Zone: $224.0 to $232.5 🎯
Take Profit (TP): $252.0 🎯
Stop Loss (SL): $218.0 🛡️
Brief Analysis:
Price is currently retesting a major 4-hour order block and demand zone between $224 and $232 following a brief pullback. Holding above this key support region indicates solid buyer interest, creating an optimal risk-to-reward setup for a bounce back toward recent highs! 📈✨
Disclaimer: This analysis is for educational purposes and is not financial advice. Always do your own research and use a Stop Loss.
#CPIWatch #CLARITYActRevisionToRuleNonDeFiControllers #BlockstreamRefusesToPayRansomToLiquidAttacker #USToSanctionBigBankMonday #TrumpDeclinesSaudiRequestToStrikeHouthis
{spot}(TAOUSDT)
Coin: $TAO 🤖
Current Price: $232.3 💵
Trend/Bias: Bullish 🐂
Entry Zone: $224.0 to $232.5 🎯
Take Profit (TP): $252.0 🎯
Stop Loss (SL): $218.0 🛡️
Brief Analysis:
Price is currently retesting a major 4-hour order block and demand zone between $224 and $232 following a brief pullback. Holding above this key support region indicates solid buyer interest, creating an optimal risk-to-reward setup for a bounce back toward recent highs! 📈✨
Disclaimer: This analysis is for educational purposes and is not financial advice. Always do your own research and use a Stop Loss.
#CPIWatch #CLARITYActRevisionToRuleNonDeFiControllers #BlockstreamRefusesToPayRansomToLiquidAttacker #USToSanctionBigBankMonday #TrumpDeclinesSaudiRequestToStrikeHouthis
Current Price: $232.3 💵
Trend/Bias: Bullish 🐂
Entry Zone: $224.0 to $232.5 🎯
Take Profit (TP): $252.0 🎯
Stop Loss (SL): $218.0 🛡️
Brief Analysis:
Price is currently retesting a major 4-hour order block and demand zone between $224 and $232 following a brief pullback. Holding above this key support region indicates solid buyer interest, creating an optimal risk-to-reward setup for a bounce back toward recent highs! 📈✨
Disclaimer: This analysis is for educational purposes and is not financial advice. Always do your own research and use a Stop Loss.
#CPIWatch #CLARITYActRevisionToRuleNonDeFiControllers #BlockstreamRefusesToPayRansomToLiquidAttacker #USToSanctionBigBankMonday #TrumpDeclinesSaudiRequestToStrikeHouthis

69
·
--
ブリッシュ
翻訳参照
Coin: $ZEC
{spot}(ZECUSDT)
(Zcash) 📈
Current Price: $1,086.70 💲
Trend/Bias: Bullish 🐂
Entry Zone: $1,060.00 to $1,086.70 🎯
Take Profit (TP): $1,295.00 🚀
Stop Loss (SL): $1,020.00 🛡️
Brief Analysis:
ZEC has pulled back precisely into a strong 4-hour demand/support zone around $1,060.00 - $1,086.00 after testing major resistance at $1,297.45. 📊 Oversold conditions on lower timeframes point to a solid relief bounce off this structural base, setting up a favorable risk-to-reward long setup. 📈
Disclaimer: This analysis is for educational purposes and is not financial advice. Always do your own research and use a Stop Loss.
#CPIWatch #CryptoSectorsFallSecondDay #BitcoinGoldenCrossConfirms #AppleRises3.56%AfterIPhoneDuoLaunch #US10YTreasuryYieldHitsHighestSinceOct2023
Coin: $ZEC
(Zcash) 📈
Current Price: $1,086.70 💲
Trend/Bias: Bullish 🐂
Entry Zone: $1,060.00 to $1,086.70 🎯
Take Profit (TP): $1,295.00 🚀
Stop Loss (SL): $1,020.00 🛡️
Brief Analysis:
ZEC has pulled back precisely into a strong 4-hour demand/support zone around $1,060.00 - $1,086.00 after testing major resistance at $1,297.45. 📊 Oversold conditions on lower timeframes point to a solid relief bounce off this structural base, setting up a favorable risk-to-reward long setup. 📈
Disclaimer: This analysis is for educational purposes and is not financial advice. Always do your own research and use a Stop Loss.
#CPIWatch #CryptoSectorsFallSecondDay #BitcoinGoldenCrossConfirms #AppleRises3.56%AfterIPhoneDuoLaunch #US10YTreasuryYieldHitsHighestSinceOct2023
(Zcash) 📈
Current Price: $1,086.70 💲
Trend/Bias: Bullish 🐂
Entry Zone: $1,060.00 to $1,086.70 🎯
Take Profit (TP): $1,295.00 🚀
Stop Loss (SL): $1,020.00 🛡️
Brief Analysis:
ZEC has pulled back precisely into a strong 4-hour demand/support zone around $1,060.00 - $1,086.00 after testing major resistance at $1,297.45. 📊 Oversold conditions on lower timeframes point to a solid relief bounce off this structural base, setting up a favorable risk-to-reward long setup. 📈
Disclaimer: This analysis is for educational purposes and is not financial advice. Always do your own research and use a Stop Loss.
#CPIWatch #CryptoSectorsFallSecondDay #BitcoinGoldenCrossConfirms #AppleRises3.56%AfterIPhoneDuoLaunch #US10YTreasuryYieldHitsHighestSinceOct2023

70
·
--
ブリッシュ
コイン: $ENA
{spot}(ENAUSDT)
(Ethena)🚀
現在の価格: $0.1473 📈
トレンド/バイアス: 強気 🟢
エントリーゾーン: $0.1380 〜 $0.1470 🎯
利確(TP): $0.1880 💰
損切り(SL): $0.1320 🛡️
簡易分析: ENAは健全な調整の後、重要なサポート付近の高いコンフルエンス需要ゾーンをテストしています。モメンタム指標は、$0.1400付近で売り圧力が弱まっていることを示しており、前回のスイング高値である$0.1888を目標とする堅実なリスク・リワードのセットアップです。📊🔥
免責事項: 本分析は教育目的であり、金融アドバイスではありません。必ずご自身で調査し、ストップロスをご利用ください。
#USContinuingJoblessClaims1.774M #USAugustPPIYoYRisesTo5.4% #AppleDebutsFoldablePhone #IranSaysReadyToEscalateWarWithUS #TSMCAugustRevenueUp53.3%YoY
コイン: $ENA
(Ethena)🚀
現在の価格: $0.1473 📈
トレンド/バイアス: 強気 🟢
エントリーゾーン: $0.1380 〜 $0.1470 🎯
利確(TP): $0.1880 💰
損切り(SL): $0.1320 🛡️
簡易分析: ENAは健全な調整の後、重要なサポート付近の高いコンフルエンス需要ゾーンをテストしています。モメンタム指標は、$0.1400付近で売り圧力が弱まっていることを示しており、前回のスイング高値である$0.1888を目標とする堅実なリスク・リワードのセットアップです。📊🔥
免責事項: 本分析は教育目的であり、金融アドバイスではありません。必ずご自身で調査し、ストップロスをご利用ください。
#USContinuingJoblessClaims1.774M #USAugustPPIYoYRisesTo5.4% #AppleDebutsFoldablePhone #IranSaysReadyToEscalateWarWithUS #TSMCAugustRevenueUp53.3%YoY
(Ethena)🚀
現在の価格: $0.1473 📈
トレンド/バイアス: 強気 🟢
エントリーゾーン: $0.1380 〜 $0.1470 🎯
利確(TP): $0.1880 💰
損切り(SL): $0.1320 🛡️
簡易分析: ENAは健全な調整の後、重要なサポート付近の高いコンフルエンス需要ゾーンをテストしています。モメンタム指標は、$0.1400付近で売り圧力が弱まっていることを示しており、前回のスイング高値である$0.1888を目標とする堅実なリスク・リワードのセットアップです。📊🔥
免責事項: 本分析は教育目的であり、金融アドバイスではありません。必ずご自身で調査し、ストップロスをご利用ください。
#USContinuingJoblessClaims1.774M #USAugustPPIYoYRisesTo5.4% #AppleDebutsFoldablePhone #IranSaysReadyToEscalateWarWithUS #TSMCAugustRevenueUp53.3%YoY

71
·
--
ブリッシュ
翻訳参照
Coin: $AERO 🚀
Current Price: $0.5511 📈
Trend/Bias: Bullish 🐂
Entry Zone: $0.5300 to $0.5550 🎯
Take Profit (TP): $0.6700 💰
Stop Loss (SL): $0.5100 🛡️
Brief Analysis: Price has pulled back perfectly to test key demand and former resistance zone around $0.5300–$0.5500 on the 4-hour chart. Buyers are actively defending this level, showing clear rejection wicks that indicate momentum building for a retest of the recent swing high at $0.6761 ⚡.
Disclaimer: This analysis is for educational purposes and is not financial advice. Always do your own research and use a Stop Loss.
#AppleDebutsFoldablePhone
#AppleDebutsFoldablePhone #TSMCAugustRevenueUp53.3%YoY #IranSaysReadyToEscalateWarWithUS #EUExtendsCentralContactPointToCASPs
Coin: $AERO 🚀
Current Price: $0.5511 📈
Trend/Bias: Bullish 🐂
Entry Zone: $0.5300 to $0.5550 🎯
Take Profit (TP): $0.6700 💰
Stop Loss (SL): $0.5100 🛡️
Brief Analysis: Price has pulled back perfectly to test key demand and former resistance zone around $0.5300–$0.5500 on the 4-hour chart. Buyers are actively defending this level, showing clear rejection wicks that indicate momentum building for a retest of the recent swing high at $0.6761 ⚡.
Disclaimer: This analysis is for educational purposes and is not financial advice. Always do your own research and use a Stop Loss.
#AppleDebutsFoldablePhone
#AppleDebutsFoldablePhone #TSMCAugustRevenueUp53.3%YoY #IranSaysReadyToEscalateWarWithUS #EUExtendsCentralContactPointToCASPs
Current Price: $0.5511 📈
Trend/Bias: Bullish 🐂
Entry Zone: $0.5300 to $0.5550 🎯
Take Profit (TP): $0.6700 💰
Stop Loss (SL): $0.5100 🛡️
Brief Analysis: Price has pulled back perfectly to test key demand and former resistance zone around $0.5300–$0.5500 on the 4-hour chart. Buyers are actively defending this level, showing clear rejection wicks that indicate momentum building for a retest of the recent swing high at $0.6761 ⚡.
Disclaimer: This analysis is for educational purposes and is not financial advice. Always do your own research and use a Stop Loss.
#AppleDebutsFoldablePhone
#AppleDebutsFoldablePhone #TSMCAugustRevenueUp53.3%YoY #IranSaysReadyToEscalateWarWithUS #EUExtendsCentralContactPointToCASPs

1
9
·
--
ブリッシュ
コイン:$USELESS
{future}(USELESSUSDT)
🚀 現在価格:$0.25458 📈 トレンド/バイアス:強気 🐂 エントリーゾーン:$0.2200〜$0.2450 🎯 利確(TP):$0.3200 💰 損切り(SL):$0.2000 🛡️
簡単な分析:価格は4時間足チャートで、$0.2200〜$0.2400付近の強い需要・サポートゾーンを再テストすることに成功し、力強い強気のリバーサル・ウィック 🕯️ を形成しました。この重要なサポート水準を維持していることは、買い手の強い防衛を示しており、直近の高値のレジスタンス水準に向けたクリーンなブレイクアウト・ラリーを準備している可能性があります ⚡。
免責事項:本分析は教育目的であり、金融アドバイスではありません。必ずご自身で調査を行い、必ず損切り(Stop Loss)を使用してください。
#AppleDebutsFoldablePhone #IranSaysReadyToEscalateWarWithUS #EUExtendsCentralContactPointToCASPs #US10YTreasuryYieldHitsHighestSinceNov2023 #CryptoTrading
コイン:$USELESS
🚀 現在価格:$0.25458 📈 トレンド/バイアス:強気 🐂 エントリーゾーン:$0.2200〜$0.2450 🎯 利確(TP):$0.3200 💰 損切り(SL):$0.2000 🛡️
簡単な分析:価格は4時間足チャートで、$0.2200〜$0.2400付近の強い需要・サポートゾーンを再テストすることに成功し、力強い強気のリバーサル・ウィック 🕯️ を形成しました。この重要なサポート水準を維持していることは、買い手の強い防衛を示しており、直近の高値のレジスタンス水準に向けたクリーンなブレイクアウト・ラリーを準備している可能性があります ⚡。
免責事項:本分析は教育目的であり、金融アドバイスではありません。必ずご自身で調査を行い、必ず損切り(Stop Loss)を使用してください。
#AppleDebutsFoldablePhone #IranSaysReadyToEscalateWarWithUS #EUExtendsCentralContactPointToCASPs #US10YTreasuryYieldHitsHighestSinceNov2023 #CryptoTrading
🚀 現在価格:$0.25458 📈 トレンド/バイアス:強気 🐂 エントリーゾーン:$0.2200〜$0.2450 🎯 利確(TP):$0.3200 💰 損切り(SL):$0.2000 🛡️
簡単な分析:価格は4時間足チャートで、$0.2200〜$0.2400付近の強い需要・サポートゾーンを再テストすることに成功し、力強い強気のリバーサル・ウィック 🕯️ を形成しました。この重要なサポート水準を維持していることは、買い手の強い防衛を示しており、直近の高値のレジスタンス水準に向けたクリーンなブレイクアウト・ラリーを準備している可能性があります ⚡。
免責事項:本分析は教育目的であり、金融アドバイスではありません。必ずご自身で調査を行い、必ず損切り(Stop Loss)を使用してください。
#AppleDebutsFoldablePhone #IranSaysReadyToEscalateWarWithUS #EUExtendsCentralContactPointToCASPs #US10YTreasuryYieldHitsHighestSinceNov2023 #CryptoTrading

1
2
46
·
--
ブリッシュ
コイン: ライトコイン ($LTC
{spot}(LTCUSDT)
/USDT) 🟢
現在価格: $52.26 📊
トレンド/バイアス: 強気 🚀
エントリーゾーン: $51.00 〜 $52.26 🎯
利確(TP): $59.49 💰
損切り(SL): $49.80 🛑
簡易分析:
LTCは、直近の高値をスイープした後、$51.00〜$52.26の強い水平サポート需要ブロックへ反落しました。この重要なサポートゾーンを維持していることは、堅い買い需要と構造的な安定性を示しています。この需要エリアでの確かな反発は、主要なレジスタンスである$59.49に向けた再上昇の可能性を作ります。📈✨
免責事項: 本分析は教育目的であり、金融助言ではありません。必ずご自身で調査し、ストップロスを使用してください。
#AppleDebutsFoldablePhone #TSMCAugustRevenueUp53.3%YoY #IranSaysReadyToEscalateWarWithUS #EUExtendsCentralContactPointToCASPs #USADPWeeklyEmploymentRises12000
コイン: ライトコイン ($LTC
/USDT) 🟢
現在価格: $52.26 📊
トレンド/バイアス: 強気 🚀
エントリーゾーン: $51.00 〜 $52.26 🎯
利確(TP): $59.49 💰
損切り(SL): $49.80 🛑
簡易分析:
LTCは、直近の高値をスイープした後、$51.00〜$52.26の強い水平サポート需要ブロックへ反落しました。この重要なサポートゾーンを維持していることは、堅い買い需要と構造的な安定性を示しています。この需要エリアでの確かな反発は、主要なレジスタンスである$59.49に向けた再上昇の可能性を作ります。📈✨
免責事項: 本分析は教育目的であり、金融助言ではありません。必ずご自身で調査し、ストップロスを使用してください。
#AppleDebutsFoldablePhone #TSMCAugustRevenueUp53.3%YoY #IranSaysReadyToEscalateWarWithUS #EUExtendsCentralContactPointToCASPs #USADPWeeklyEmploymentRises12000
/USDT) 🟢
現在価格: $52.26 📊
トレンド/バイアス: 強気 🚀
エントリーゾーン: $51.00 〜 $52.26 🎯
利確(TP): $59.49 💰
損切り(SL): $49.80 🛑
簡易分析:
LTCは、直近の高値をスイープした後、$51.00〜$52.26の強い水平サポート需要ブロックへ反落しました。この重要なサポートゾーンを維持していることは、堅い買い需要と構造的な安定性を示しています。この需要エリアでの確かな反発は、主要なレジスタンスである$59.49に向けた再上昇の可能性を作ります。📈✨
免責事項: 本分析は教育目的であり、金融助言ではありません。必ずご自身で調査し、ストップロスを使用してください。
#AppleDebutsFoldablePhone #TSMCAugustRevenueUp53.3%YoY #IranSaysReadyToEscalateWarWithUS #EUExtendsCentralContactPointToCASPs #USADPWeeklyEmploymentRises12000

58
·
--
ブリッシュ
翻訳参照
Coin: Zcash ($ZEC
{spot}(ZECUSDT)
/USDT) 🟢
Current Price: $1,229.50 📊
Trend/Bias: Bullish 🚀
Entry Zone: $1,170.00 to $1,230.00 🎯
Take Profit (TP): $1,297.45 💰
Stop Loss (SL): $1,150.00 🛑
Brief Analysis:
ZEC is currently consolidating following a sharp push toward the local high at $1,297.45. The price is holding steadily above a key support demand zone around $1,170–$1,200, signaling continued buyer dominance. A successful bounce from this region opens up a clear retest path toward major resistance. 📈✨
Disclaimer: This analysis is for educational purposes and is not financial advice. Always do your own research and use a Stop Loss.
#AppleDebutsFoldablePhone #TSMCAugustRevenueUp53.3%YoY #IranSaysReadyToEscalateWarWithUS #EUExtendsCentralContactPointToCASPs #US10YTreasuryYieldHitsHighestSinceNov2023
Coin: Zcash ($ZEC
/USDT) 🟢
Current Price: $1,229.50 📊
Trend/Bias: Bullish 🚀
Entry Zone: $1,170.00 to $1,230.00 🎯
Take Profit (TP): $1,297.45 💰
Stop Loss (SL): $1,150.00 🛑
Brief Analysis:
ZEC is currently consolidating following a sharp push toward the local high at $1,297.45. The price is holding steadily above a key support demand zone around $1,170–$1,200, signaling continued buyer dominance. A successful bounce from this region opens up a clear retest path toward major resistance. 📈✨
Disclaimer: This analysis is for educational purposes and is not financial advice. Always do your own research and use a Stop Loss.
#AppleDebutsFoldablePhone #TSMCAugustRevenueUp53.3%YoY #IranSaysReadyToEscalateWarWithUS #EUExtendsCentralContactPointToCASPs #US10YTreasuryYieldHitsHighestSinceNov2023
/USDT) 🟢
Current Price: $1,229.50 📊
Trend/Bias: Bullish 🚀
Entry Zone: $1,170.00 to $1,230.00 🎯
Take Profit (TP): $1,297.45 💰
Stop Loss (SL): $1,150.00 🛑
Brief Analysis:
ZEC is currently consolidating following a sharp push toward the local high at $1,297.45. The price is holding steadily above a key support demand zone around $1,170–$1,200, signaling continued buyer dominance. A successful bounce from this region opens up a clear retest path toward major resistance. 📈✨
Disclaimer: This analysis is for educational purposes and is not financial advice. Always do your own research and use a Stop Loss.
#AppleDebutsFoldablePhone #TSMCAugustRevenueUp53.3%YoY #IranSaysReadyToEscalateWarWithUS #EUExtendsCentralContactPointToCASPs #US10YTreasuryYieldHitsHighestSinceNov2023

42
·
--
ブリッシュ
コイン:$HEMI
{spot}(HEMIUSDT)
(HEMI/USDT)🟢
現在価格:$0.00741 📊
トレンド/バイアス:強気 🚀
エントリーゾーン:$0.00680〜$0.00740 🎯
利確(TP):$0.00982 💰
損切り(SL):$0.00630 🛑
簡単な分析:
HEMIは低い水準で強い流動性のスイープを見せており、現在は$0.00680〜$0.00740の重要なサポート需要ブロックから反発しています。この水準を上回っての維持に成功すると、$0.00982にある主要な上方レジスタンスに向けた強いリリーフラリーの準備が整います。価格が局所的な売られすぎの状態から回復するにつれて、確認のため出来高を監視してください。📈✨
免責事項:本分析は教育目的であり、金融アドバイスではありません。必ずご自身で調査を行い、必ず損切り(Stop Loss)を使用してください。
#AppleDebutsFoldablePhone #TSMCAugustRevenueUp53.3%YoY #IranSaysReadyToEscalateWarWithUS #EUExtendsCentralContactPointToCASPs #USADPWeeklyEmploymentRises12000
コイン:$HEMI
(HEMI/USDT)🟢
現在価格:$0.00741 📊
トレンド/バイアス:強気 🚀
エントリーゾーン:$0.00680〜$0.00740 🎯
利確(TP):$0.00982 💰
損切り(SL):$0.00630 🛑
簡単な分析:
HEMIは低い水準で強い流動性のスイープを見せており、現在は$0.00680〜$0.00740の重要なサポート需要ブロックから反発しています。この水準を上回っての維持に成功すると、$0.00982にある主要な上方レジスタンスに向けた強いリリーフラリーの準備が整います。価格が局所的な売られすぎの状態から回復するにつれて、確認のため出来高を監視してください。📈✨
免責事項:本分析は教育目的であり、金融アドバイスではありません。必ずご自身で調査を行い、必ず損切り(Stop Loss)を使用してください。
#AppleDebutsFoldablePhone #TSMCAugustRevenueUp53.3%YoY #IranSaysReadyToEscalateWarWithUS #EUExtendsCentralContactPointToCASPs #USADPWeeklyEmploymentRises12000
(HEMI/USDT)🟢
現在価格:$0.00741 📊
トレンド/バイアス:強気 🚀
エントリーゾーン:$0.00680〜$0.00740 🎯
利確(TP):$0.00982 💰
損切り(SL):$0.00630 🛑
簡単な分析:
HEMIは低い水準で強い流動性のスイープを見せており、現在は$0.00680〜$0.00740の重要なサポート需要ブロックから反発しています。この水準を上回っての維持に成功すると、$0.00982にある主要な上方レジスタンスに向けた強いリリーフラリーの準備が整います。価格が局所的な売られすぎの状態から回復するにつれて、確認のため出来高を監視してください。📈✨
免責事項:本分析は教育目的であり、金融アドバイスではありません。必ずご自身で調査を行い、必ず損切り(Stop Loss)を使用してください。
#AppleDebutsFoldablePhone #TSMCAugustRevenueUp53.3%YoY #IranSaysReadyToEscalateWarWithUS #EUExtendsCentralContactPointToCASPs #USADPWeeklyEmploymentRises12000

60
·
--
ブリッシュ
コイン: ポルカドット ($DOT
{spot}(DOTUSDT)
/USDT) 🟢
現在価格: $1.095 📊
トレンド/バイアス: 強気 🚀
エントリーゾーン: $1.050 〜 $1.095 🎯
テイクプロフィット(TP): $1.286 💰
ストップロス(SL): $1.035 🛑
簡易分析:
DOTは、$1.286の直近高値まで急騰した後、高需要のサポートゾーンまでリトレースしました。重要な$1.050のベース構造を上回って維持していることは、買い手の強い関心と、ダイナミックな需要の蓄積を示しています。価格がこのエントリー需要ブロック内でいったん落ち着いた後、主要な重要レジスタンスをテストするために上方向へ押し上げられるのを見てください。 📈✨
免責事項: 本分析は教育目的であり、投資助言ではありません。必ずご自身で調査を行い、ストップロスを使用してください。
#AppleDebutsFoldablePhone #TSMCAugustRevenueUp53.3%YoY #IranSaysReadyToEscalateWarWithUS #EUExtendsCentralContactPointToCASPs #US10YTreasuryYieldHitsHighestSinceNov2023
コイン: ポルカドット ($DOT
/USDT) 🟢
現在価格: $1.095 📊
トレンド/バイアス: 強気 🚀
エントリーゾーン: $1.050 〜 $1.095 🎯
テイクプロフィット(TP): $1.286 💰
ストップロス(SL): $1.035 🛑
簡易分析:
DOTは、$1.286の直近高値まで急騰した後、高需要のサポートゾーンまでリトレースしました。重要な$1.050のベース構造を上回って維持していることは、買い手の強い関心と、ダイナミックな需要の蓄積を示しています。価格がこのエントリー需要ブロック内でいったん落ち着いた後、主要な重要レジスタンスをテストするために上方向へ押し上げられるのを見てください。 📈✨
免責事項: 本分析は教育目的であり、投資助言ではありません。必ずご自身で調査を行い、ストップロスを使用してください。
#AppleDebutsFoldablePhone #TSMCAugustRevenueUp53.3%YoY #IranSaysReadyToEscalateWarWithUS #EUExtendsCentralContactPointToCASPs #US10YTreasuryYieldHitsHighestSinceNov2023
/USDT) 🟢
現在価格: $1.095 📊
トレンド/バイアス: 強気 🚀
エントリーゾーン: $1.050 〜 $1.095 🎯
テイクプロフィット(TP): $1.286 💰
ストップロス(SL): $1.035 🛑
簡易分析:
DOTは、$1.286の直近高値まで急騰した後、高需要のサポートゾーンまでリトレースしました。重要な$1.050のベース構造を上回って維持していることは、買い手の強い関心と、ダイナミックな需要の蓄積を示しています。価格がこのエントリー需要ブロック内でいったん落ち着いた後、主要な重要レジスタンスをテストするために上方向へ押し上げられるのを見てください。 📈✨
免責事項: 本分析は教育目的であり、投資助言ではありません。必ずご自身で調査を行い、ストップロスを使用してください。
#AppleDebutsFoldablePhone #TSMCAugustRevenueUp53.3%YoY #IranSaysReadyToEscalateWarWithUS #EUExtendsCentralContactPointToCASPs #US10YTreasuryYieldHitsHighestSinceNov2023

63
·
--
弱気相場
翻訳参照
Coin: $Q
{future}(QUSDT)
(Quack AI) 🪙
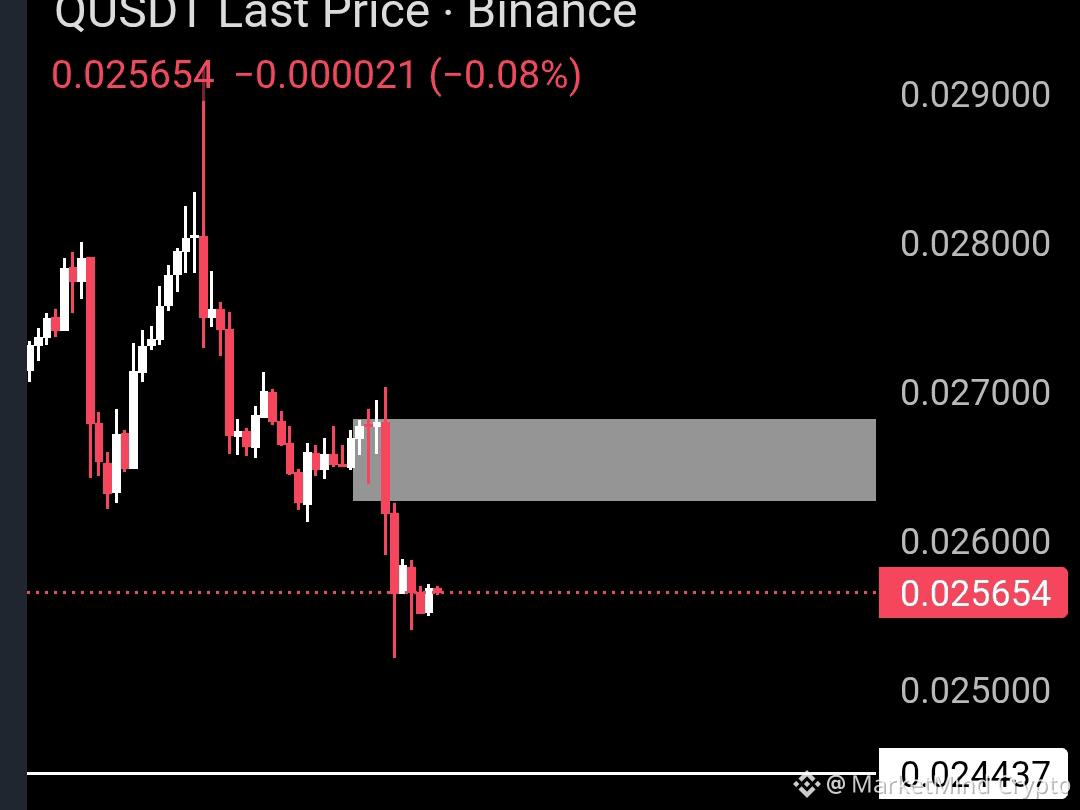
Current Price: $0.025659 💵
Trend/Bias: Bearish 🔴
Entry Zone: $0.026100 to $0.026700 🎯
Take Profit (TP): $0.024430 💰
Stop Loss (SL): $0.027200 🛑
Brief Analysis: 📊
$Q has broken down below its localized horizontal support consolidation block ($0.02610–$0.02670) on the 1H chart, converting previous support into strong overhead resistance. 📉 Price action shows a clear bearish rejection from the order block zone, pointing toward further downside momentum. ⚡ Look for a brief relief retest into the supply zone for a short entry targeting the major support level at $0.02443. 🔥
Disclaimer: This analysis is for educational purposes and is not financial advice. Always do your own research and use a Stop Loss.
#USADPWeeklyEmploymentRises12000 #BankOfAmericaGroupPilotsUSBDCStablecoin #RippleLobbiesToAdvanceCLARITYActVote #USStrikesTargetsNearHormuzAndJask #OilRisesToHighestSinceJuly
Coin: $Q
(Quack AI) 🪙
Current Price: $0.025659 💵
Trend/Bias: Bearish 🔴
Entry Zone: $0.026100 to $0.026700 🎯
Take Profit (TP): $0.024430 💰
Stop Loss (SL): $0.027200 🛑
Brief Analysis: 📊
$Q has broken down below its localized horizontal support consolidation block ($0.02610–$0.02670) on the 1H chart, converting previous support into strong overhead resistance. 📉 Price action shows a clear bearish rejection from the order block zone, pointing toward further downside momentum. ⚡ Look for a brief relief retest into the supply zone for a short entry targeting the major support level at $0.02443. 🔥
Disclaimer: This analysis is for educational purposes and is not financial advice. Always do your own research and use a Stop Loss.
#USADPWeeklyEmploymentRises12000 #BankOfAmericaGroupPilotsUSBDCStablecoin #RippleLobbiesToAdvanceCLARITYActVote #USStrikesTargetsNearHormuzAndJask #OilRisesToHighestSinceJuly
(Quack AI) 🪙
Current Price: $0.025659 💵
Trend/Bias: Bearish 🔴
Entry Zone: $0.026100 to $0.026700 🎯
Take Profit (TP): $0.024430 💰
Stop Loss (SL): $0.027200 🛑
Brief Analysis: 📊
$Q has broken down below its localized horizontal support consolidation block ($0.02610–$0.02670) on the 1H chart, converting previous support into strong overhead resistance. 📉 Price action shows a clear bearish rejection from the order block zone, pointing toward further downside momentum. ⚡ Look for a brief relief retest into the supply zone for a short entry targeting the major support level at $0.02443. 🔥
Disclaimer: This analysis is for educational purposes and is not financial advice. Always do your own research and use a Stop Loss.
#USADPWeeklyEmploymentRises12000 #BankOfAmericaGroupPilotsUSBDCStablecoin #RippleLobbiesToAdvanceCLARITYActVote #USStrikesTargetsNearHormuzAndJask #OilRisesToHighestSinceJuly
42
·
--
ブリッシュ
翻訳参照
Coin: $DOT
{spot}(DOTUSDT)
(Polkadot) 🪙
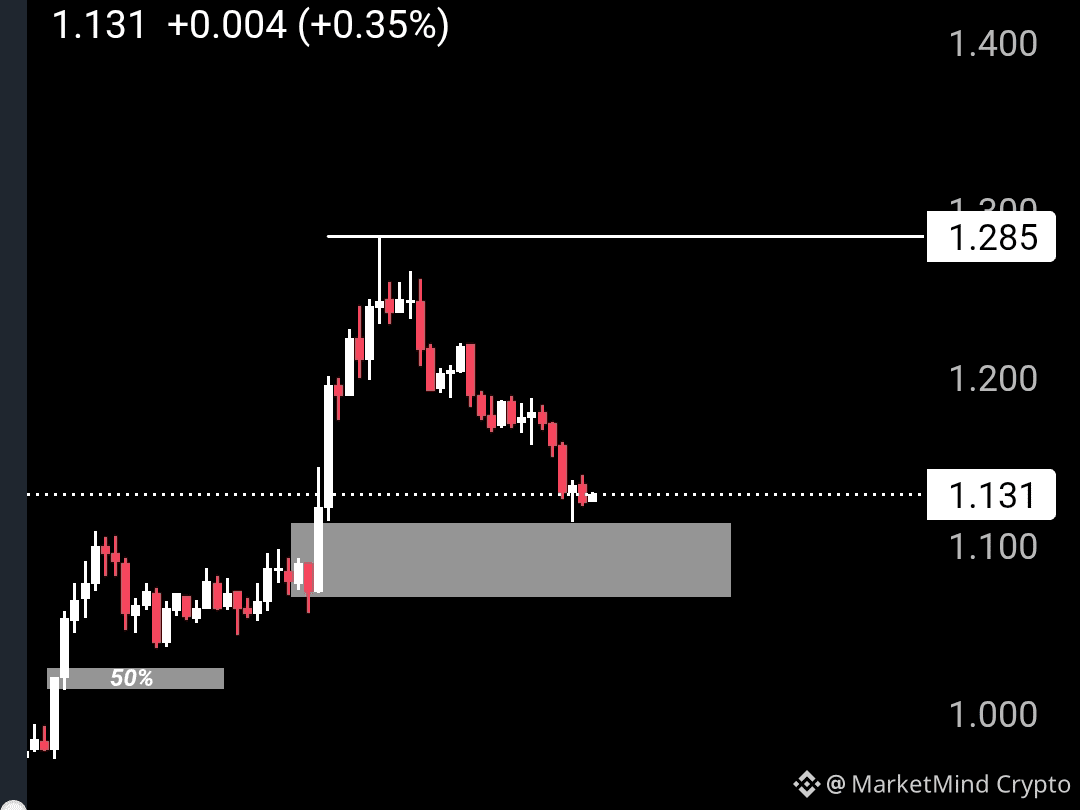
Current Price: $1.131 💵
Trend/Bias: Bullish 🟢
Entry Zone: $1.080 to $1.130 🎯
Take Profit (TP): $1.285 💰
Stop Loss (SL): $1.040 🛑
Brief Analysis: 📊
DOT is currently testing a crucial demand/support block right around $1.080–$1.100 following a sharp pull back from its local peak. 📉 Price action is showing early signs of buying absorption above this level, creating an excellent risk-to-reward setup for a retest of the recent high. ⚡ Holding above the $1.080 zone invalidates further downside momentum in the short term. 🔥
Disclaimer: This analysis is for educational purposes and is not financial advice. Always do your own research and use a Stop Loss.
#USADPWeeklyEmploymentRises12000 #BankOfAmericaGroupPilotsUSBDCStablecoin #RippleLobbiesToAdvanceCLARITYActVote #ChinaAugustCPIRises0.8%YoY
Coin: $DOT
(Polkadot) 🪙
Current Price: $1.131 💵
Trend/Bias: Bullish 🟢
Entry Zone: $1.080 to $1.130 🎯
Take Profit (TP): $1.285 💰
Stop Loss (SL): $1.040 🛑
Brief Analysis: 📊
DOT is currently testing a crucial demand/support block right around $1.080–$1.100 following a sharp pull back from its local peak. 📉 Price action is showing early signs of buying absorption above this level, creating an excellent risk-to-reward setup for a retest of the recent high. ⚡ Holding above the $1.080 zone invalidates further downside momentum in the short term. 🔥
Disclaimer: This analysis is for educational purposes and is not financial advice. Always do your own research and use a Stop Loss.
#USADPWeeklyEmploymentRises12000 #BankOfAmericaGroupPilotsUSBDCStablecoin #RippleLobbiesToAdvanceCLARITYActVote #ChinaAugustCPIRises0.8%YoY
(Polkadot) 🪙
Current Price: $1.131 💵
Trend/Bias: Bullish 🟢
Entry Zone: $1.080 to $1.130 🎯
Take Profit (TP): $1.285 💰
Stop Loss (SL): $1.040 🛑
Brief Analysis: 📊
DOT is currently testing a crucial demand/support block right around $1.080–$1.100 following a sharp pull back from its local peak. 📉 Price action is showing early signs of buying absorption above this level, creating an excellent risk-to-reward setup for a retest of the recent high. ⚡ Holding above the $1.080 zone invalidates further downside momentum in the short term. 🔥
Disclaimer: This analysis is for educational purposes and is not financial advice. Always do your own research and use a Stop Loss.
#USADPWeeklyEmploymentRises12000 #BankOfAmericaGroupPilotsUSBDCStablecoin #RippleLobbiesToAdvanceCLARITYActVote #ChinaAugustCPIRises0.8%YoY
15
·
--
ブリッシュ
コイン:$FET 🚀
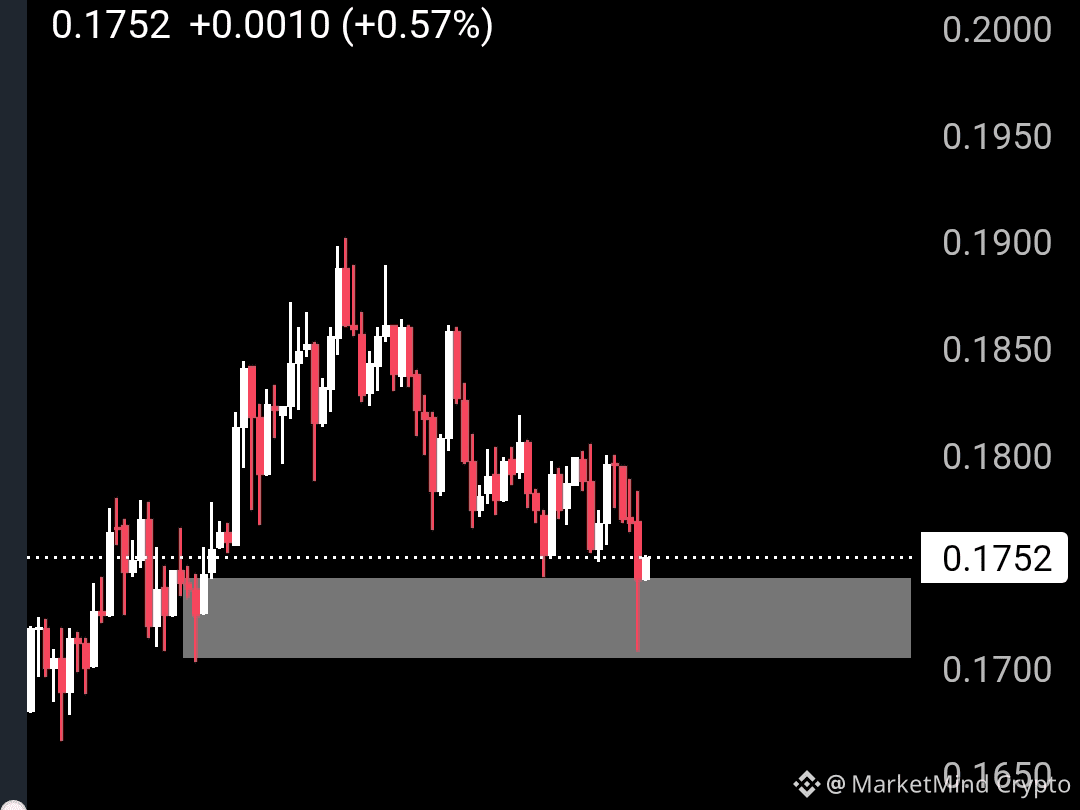
現在価格:$0.1753 📊
トレンド/バイアス:強気 📈
エントリーゾーン:$0.1700〜$0.1750 🎯
利益確定(TP):$0.1900 💰
損切り(SL):$0.1660 🛑
簡易分析:$FET は、$0.1900の高値から健全な押し目を経た後、$0.1700〜$0.1750付近の強固なサポート/需要ゾーンを再テストしています。この重要な水準を上回って維持できれば、強い買い需要が示され、主要なレジスタンスに向けた強気の反転への道が開けます。この需要ブロック内で確認された反発は、優れたリスクリワードのロングチャンスを提供します。 🔥
免責事項:本分析は教育目的であり、金融アドバイスではありません。必ずご自身で調査し、損切り(Stop Loss)を使用してください。
#USADPWeeklyEmploymentRises12000 #BankOfAmericaGroupPilotsUSBDCStablecoin #RippleLobbiesToAdvanceCLARITYActVote #ChinaAugustCPIRises0.8%YoY
{spot}(FETUSDT)
コイン:$FET 🚀
現在価格:$0.1753 📊
トレンド/バイアス:強気 📈
エントリーゾーン:$0.1700〜$0.1750 🎯
利益確定(TP):$0.1900 💰
損切り(SL):$0.1660 🛑
簡易分析:$FET は、$0.1900の高値から健全な押し目を経た後、$0.1700〜$0.1750付近の強固なサポート/需要ゾーンを再テストしています。この重要な水準を上回って維持できれば、強い買い需要が示され、主要なレジスタンスに向けた強気の反転への道が開けます。この需要ブロック内で確認された反発は、優れたリスクリワードのロングチャンスを提供します。 🔥
免責事項:本分析は教育目的であり、金融アドバイスではありません。必ずご自身で調査し、損切り(Stop Loss)を使用してください。
#USADPWeeklyEmploymentRises12000 #BankOfAmericaGroupPilotsUSBDCStablecoin #RippleLobbiesToAdvanceCLARITYActVote #ChinaAugustCPIRises0.8%YoY
現在価格:$0.1753 📊
トレンド/バイアス:強気 📈
エントリーゾーン:$0.1700〜$0.1750 🎯
利益確定(TP):$0.1900 💰
損切り(SL):$0.1660 🛑
簡易分析:$FET は、$0.1900の高値から健全な押し目を経た後、$0.1700〜$0.1750付近の強固なサポート/需要ゾーンを再テストしています。この重要な水準を上回って維持できれば、強い買い需要が示され、主要なレジスタンスに向けた強気の反転への道が開けます。この需要ブロック内で確認された反発は、優れたリスクリワードのロングチャンスを提供します。 🔥
免責事項:本分析は教育目的であり、金融アドバイスではありません。必ずご自身で調査し、損切り(Stop Loss)を使用してください。
#USADPWeeklyEmploymentRises12000 #BankOfAmericaGroupPilotsUSBDCStablecoin #RippleLobbiesToAdvanceCLARITYActVote #ChinaAugustCPIRises0.8%YoY
1
110
·
--
ブリッシュ
翻訳参照
Coin: $USELESS (Useless Coin) 🚀
Current Price: $0.27837 📊
Trend/Bias: Bullish 📈
Entry Zone: $0.2350 to $0.2550 🎯
Take Profit (TP): $0.3370 💰
Stop Loss (SL): $0.2200 🛑
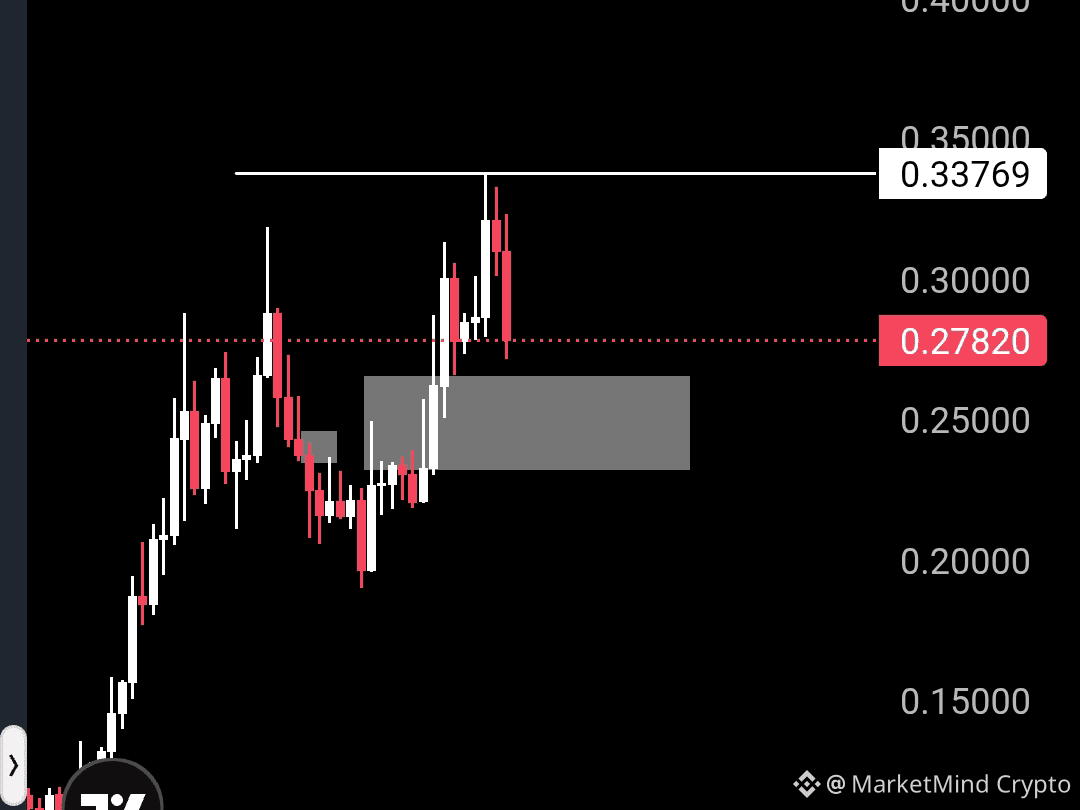
Brief Analysis: $USELESS is pulling back following a strong rally to the local high at $0.33769. The price is currently retracing toward a well-defined support/demand zone near $0.2350–$0.2550, which previously acted as resistance. A retest and stabilization within this demand area offers an excellent risk-to-reward long setup targeting a retest of the recent swing high. 🔥
Disclaimer: This analysis is for educational purposes and is not financial advice. Always do your own research and use a Stop Loss.
#USADPWeeklyEmploymentRises12000 #BankOfAmericaGroupPilotsUSBDCStablecoin #RippleLobbiesToAdvanceCLARITYActVote #ChinaAugustCPIRises0.8%YoY #OilRisesToHighestSinceJuly
{future}(USELESSUSDT)
Coin: $USELESS (Useless Coin) 🚀
Current Price: $0.27837 📊
Trend/Bias: Bullish 📈
Entry Zone: $0.2350 to $0.2550 🎯
Take Profit (TP): $0.3370 💰
Stop Loss (SL): $0.2200 🛑
Brief Analysis: $USELESS is pulling back following a strong rally to the local high at $0.33769. The price is currently retracing toward a well-defined support/demand zone near $0.2350–$0.2550, which previously acted as resistance. A retest and stabilization within this demand area offers an excellent risk-to-reward long setup targeting a retest of the recent swing high. 🔥
Disclaimer: This analysis is for educational purposes and is not financial advice. Always do your own research and use a Stop Loss.
#USADPWeeklyEmploymentRises12000 #BankOfAmericaGroupPilotsUSBDCStablecoin #RippleLobbiesToAdvanceCLARITYActVote #ChinaAugustCPIRises0.8%YoY #OilRisesToHighestSinceJuly
Current Price: $0.27837 📊
Trend/Bias: Bullish 📈
Entry Zone: $0.2350 to $0.2550 🎯
Take Profit (TP): $0.3370 💰
Stop Loss (SL): $0.2200 🛑
Brief Analysis: $USELESS is pulling back following a strong rally to the local high at $0.33769. The price is currently retracing toward a well-defined support/demand zone near $0.2350–$0.2550, which previously acted as resistance. A retest and stabilization within this demand area offers an excellent risk-to-reward long setup targeting a retest of the recent swing high. 🔥
Disclaimer: This analysis is for educational purposes and is not financial advice. Always do your own research and use a Stop Loss.
#USADPWeeklyEmploymentRises12000 #BankOfAmericaGroupPilotsUSBDCStablecoin #RippleLobbiesToAdvanceCLARITYActVote #ChinaAugustCPIRises0.8%YoY #OilRisesToHighestSinceJuly
185
·
--
ブリッシュ
翻訳参照
Coin: $LUNC (Terra Classic) 🚀
Current Price: $0.00005289 📊
Trend/Bias: Bullish 📈
Entry Zone: $0.00005180 to $0.00005220 🎯
Take Profit (TP): $0.00005450 💰
Stop Loss (SL): $0.00005120 🛑
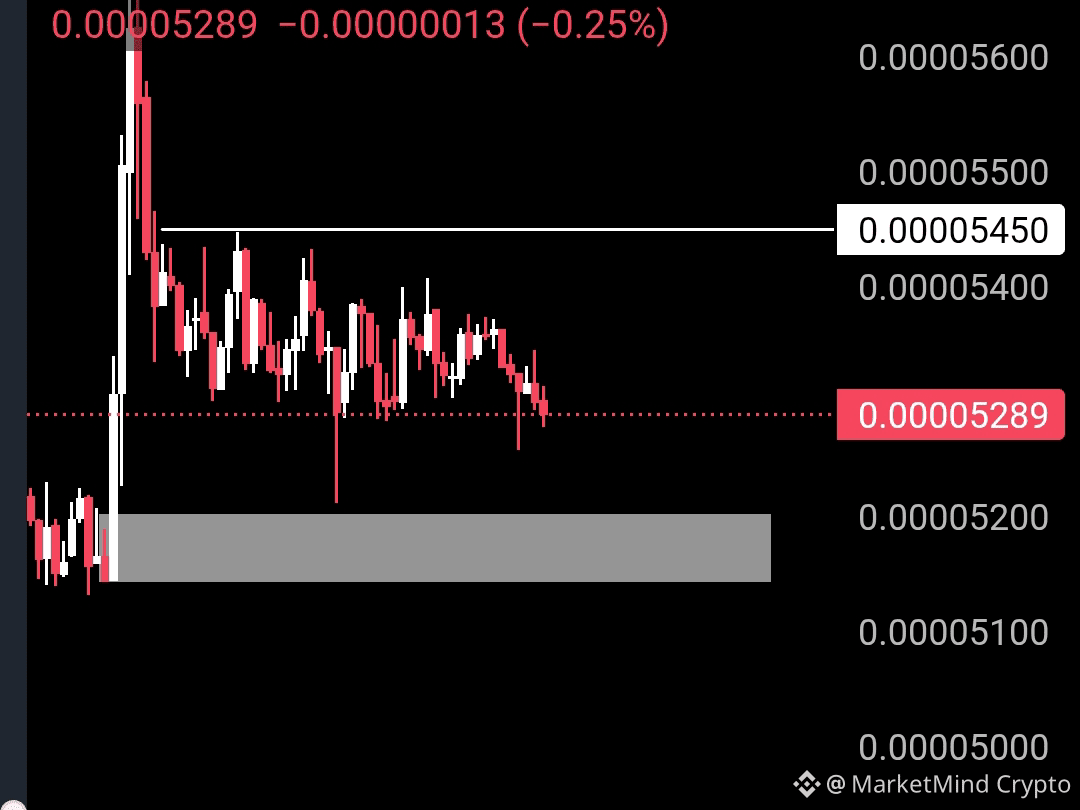
Brief Analysis: $LUNC is currently consolidating above a strong key support block situated around $0.00005180–$0.00005220 following its recent impulse wave. A retest of this high-demand zone provides a high-probability bounce setup back toward the local resistance level at $0.00005450. Buyers holding this support line will keep the short-term bullish structure intact for another leg up. 🔥
Disclaimer: This analysis is for educational purposes and is not financial advice. Always do your own research and use a Stop Loss.
#USADPWeeklyEmploymentRises12000 #BankOfAmericaGroupPilotsUSBDCStablecoin #ChinaAugustCPIRises0.8%YoY #RippleLobbiesToAdvanceCLARITYActVote #OilRisesToHighestSinceJuly
Coin: $LUNC (Terra Classic) 🚀
Current Price: $0.00005289 📊
Trend/Bias: Bullish 📈
Entry Zone: $0.00005180 to $0.00005220 🎯
Take Profit (TP): $0.00005450 💰
Stop Loss (SL): $0.00005120 🛑
Brief Analysis: $LUNC is currently consolidating above a strong key support block situated around $0.00005180–$0.00005220 following its recent impulse wave. A retest of this high-demand zone provides a high-probability bounce setup back toward the local resistance level at $0.00005450. Buyers holding this support line will keep the short-term bullish structure intact for another leg up. 🔥
Disclaimer: This analysis is for educational purposes and is not financial advice. Always do your own research and use a Stop Loss.
#USADPWeeklyEmploymentRises12000 #BankOfAmericaGroupPilotsUSBDCStablecoin #ChinaAugustCPIRises0.8%YoY #RippleLobbiesToAdvanceCLARITYActVote #OilRisesToHighestSinceJuly
Current Price: $0.00005289 📊
Trend/Bias: Bullish 📈
Entry Zone: $0.00005180 to $0.00005220 🎯
Take Profit (TP): $0.00005450 💰
Stop Loss (SL): $0.00005120 🛑
Brief Analysis: $LUNC is currently consolidating above a strong key support block situated around $0.00005180–$0.00005220 following its recent impulse wave. A retest of this high-demand zone provides a high-probability bounce setup back toward the local resistance level at $0.00005450. Buyers holding this support line will keep the short-term bullish structure intact for another leg up. 🔥
Disclaimer: This analysis is for educational purposes and is not financial advice. Always do your own research and use a Stop Loss.
#USADPWeeklyEmploymentRises12000 #BankOfAmericaGroupPilotsUSBDCStablecoin #ChinaAugustCPIRises0.8%YoY #RippleLobbiesToAdvanceCLARITYActVote #OilRisesToHighestSinceJuly
1
13
·
--
ブリッシュ
翻訳参照
Coin: $NEAR Protocol ($NEAR) 🚀
Current Price: $2.638 📊
Trend/Bias: Bullish 📈
Entry Zone: $2.380 to $2.440 🎯
Take Profit (TP): $2.850 💰
Stop Loss (SL): $2.260 🛑
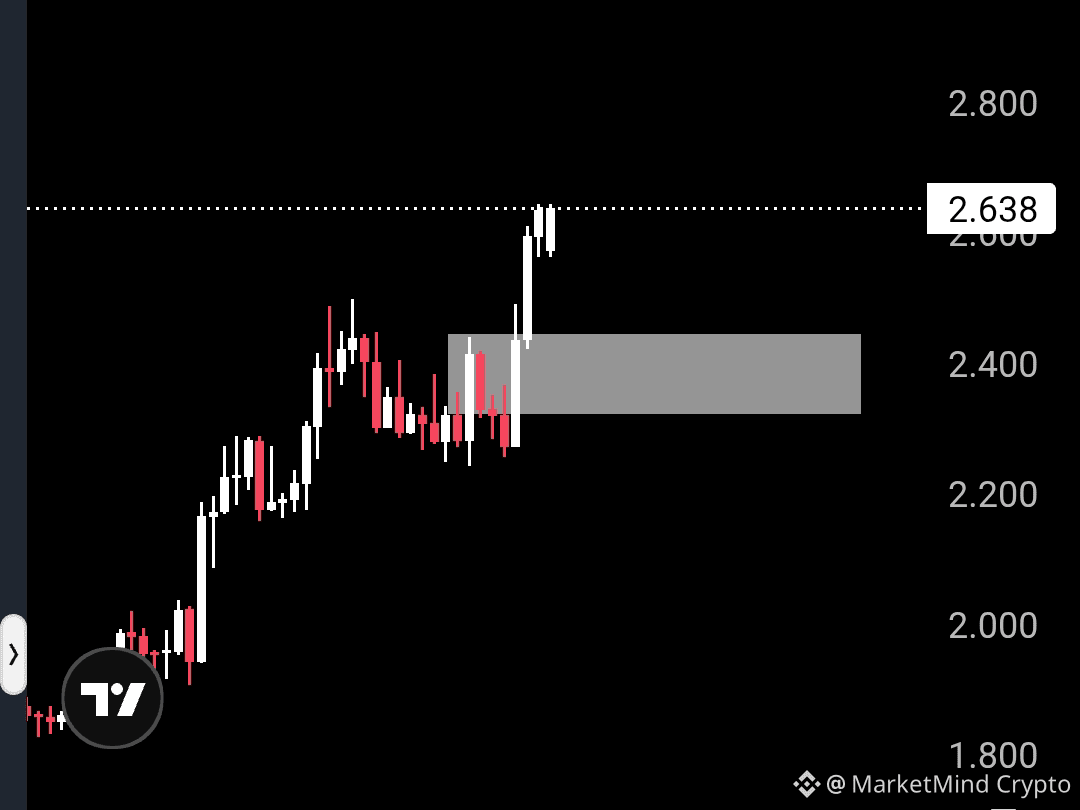
Brief Analysis: $NEAR is demonstrating explosive upward momentum following a strong rally out of the lower accumulation range. Price is currently breaking local key resistance and making higher highs, leaving behind a well-defined support/demand zone around $2.380–$2.440. Waiting for a retest of this grey demand box on lower timeframes will provide an optimal risk-to-reward setup as buyers maintain strong control. 🔥
Disclaimer: This analysis is for educational purposes and is not financial advice. Always do your own research and use a Stop Loss.
#USADPWeeklyEmploymentRises12000 #BankOfAmericaGroupPilotsUSBDCStablecoin #RippleLobbiesToAdvanceCLARITYActVote #USStrikesTargetsNearHormuzAndJask #DowFallsOver600Points
{spot}(NEARUSDT)
Coin: $NEAR Protocol ($NEAR ) 🚀
Current Price: $2.638 📊
Trend/Bias: Bullish 📈
Entry Zone: $2.380 to $2.440 🎯
Take Profit (TP): $2.850 💰
Stop Loss (SL): $2.260 🛑
Brief Analysis: $NEAR is demonstrating explosive upward momentum following a strong rally out of the lower accumulation range. Price is currently breaking local key resistance and making higher highs, leaving behind a well-defined support/demand zone around $2.380–$2.440. Waiting for a retest of this grey demand box on lower timeframes will provide an optimal risk-to-reward setup as buyers maintain strong control. 🔥
Disclaimer: This analysis is for educational purposes and is not financial advice. Always do your own research and use a Stop Loss.
#USADPWeeklyEmploymentRises12000 #BankOfAmericaGroupPilotsUSBDCStablecoin #RippleLobbiesToAdvanceCLARITYActVote #USStrikesTargetsNearHormuzAndJask #DowFallsOver600Points
Current Price: $2.638 📊
Trend/Bias: Bullish 📈
Entry Zone: $2.380 to $2.440 🎯
Take Profit (TP): $2.850 💰
Stop Loss (SL): $2.260 🛑
Brief Analysis: $NEAR is demonstrating explosive upward momentum following a strong rally out of the lower accumulation range. Price is currently breaking local key resistance and making higher highs, leaving behind a well-defined support/demand zone around $2.380–$2.440. Waiting for a retest of this grey demand box on lower timeframes will provide an optimal risk-to-reward setup as buyers maintain strong control. 🔥
Disclaimer: This analysis is for educational purposes and is not financial advice. Always do your own research and use a Stop Loss.
#USADPWeeklyEmploymentRises12000 #BankOfAmericaGroupPilotsUSBDCStablecoin #RippleLobbiesToAdvanceCLARITYActVote #USStrikesTargetsNearHormuzAndJask #DowFallsOver600Points
18
·
--
ブリッシュ
翻訳参照
🚀 Coin: $ICP
{spot}(ICPUSDT)
(Internet Computer)
💰 Current Price: $2.856
📈 Trend/Bias: Bullish
🎯 Entry Zone: $2.720 to $2.850
🎯 Take Profit (TP): $3.141
🛡️ Stop Loss (SL): $2.650
🔍 Brief Analysis:
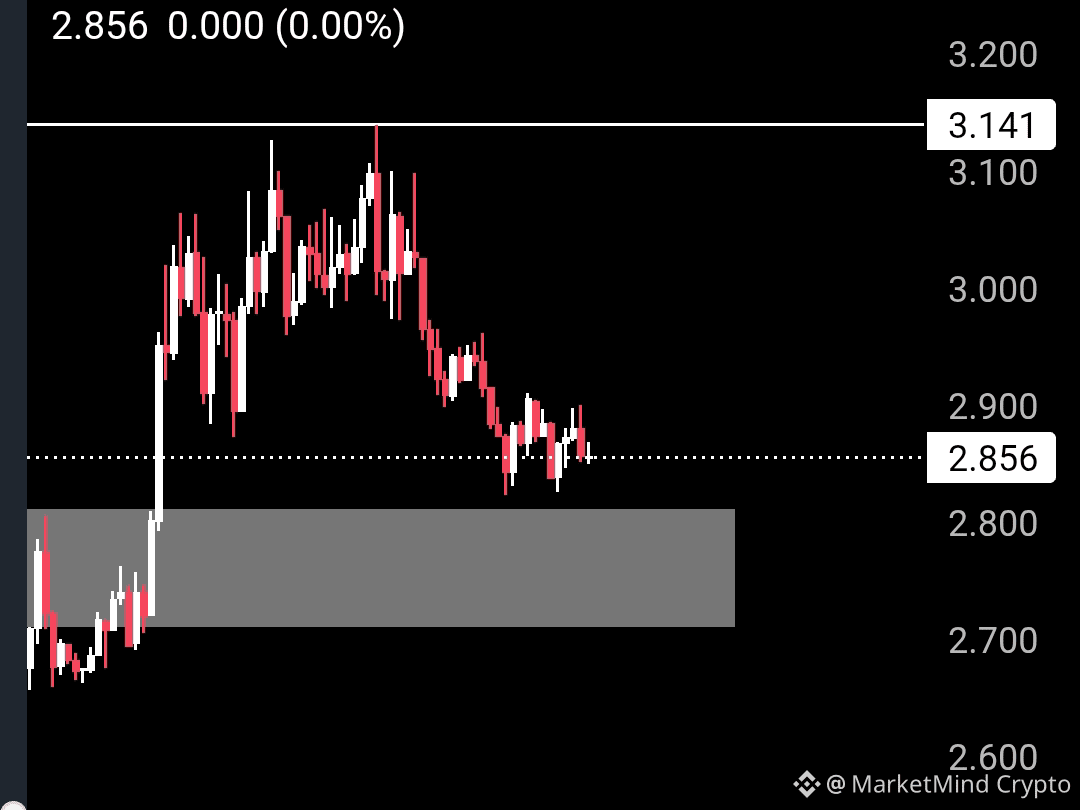
$ICP is currently cooling off after a solid move up and is retesting a key demand/support zone around $2.72–$2.80. 📊 As long as this consolidation area holds firm, buyers are likely to defend the level for a breakout move back toward the key resistance at $3.141. ⚡
Disclaimer: This analysis is for educational purposes and is not financial advice. Always do your own research and use a Stop Loss.
#USADPWeeklyEmploymentRises12000 #RippleLobbiesToAdvanceCLARITYActVote #BankOfAmericaGroupPilotsUSBDCStablecoin #ChinaAugustCPIRises0.8%YoY
🚀 Coin: $ICP
(Internet Computer)
💰 Current Price: $2.856
📈 Trend/Bias: Bullish
🎯 Entry Zone: $2.720 to $2.850
🎯 Take Profit (TP): $3.141
🛡️ Stop Loss (SL): $2.650
🔍 Brief Analysis:
$ICP is currently cooling off after a solid move up and is retesting a key demand/support zone around $2.72–$2.80. 📊 As long as this consolidation area holds firm, buyers are likely to defend the level for a breakout move back toward the key resistance at $3.141. ⚡
Disclaimer: This analysis is for educational purposes and is not financial advice. Always do your own research and use a Stop Loss.
#USADPWeeklyEmploymentRises12000 #RippleLobbiesToAdvanceCLARITYActVote #BankOfAmericaGroupPilotsUSBDCStablecoin #ChinaAugustCPIRises0.8%YoY
(Internet Computer)
💰 Current Price: $2.856
📈 Trend/Bias: Bullish
🎯 Entry Zone: $2.720 to $2.850
🎯 Take Profit (TP): $3.141
🛡️ Stop Loss (SL): $2.650
🔍 Brief Analysis:
$ICP is currently cooling off after a solid move up and is retesting a key demand/support zone around $2.72–$2.80. 📊 As long as this consolidation area holds firm, buyers are likely to defend the level for a breakout move back toward the key resistance at $3.141. ⚡
Disclaimer: This analysis is for educational purposes and is not financial advice. Always do your own research and use a Stop Loss.
#USADPWeeklyEmploymentRises12000 #RippleLobbiesToAdvanceCLARITYActVote #BankOfAmericaGroupPilotsUSBDCStablecoin #ChinaAugustCPIRises0.8%YoY
108
·
--
ブリッシュ
翻訳参照
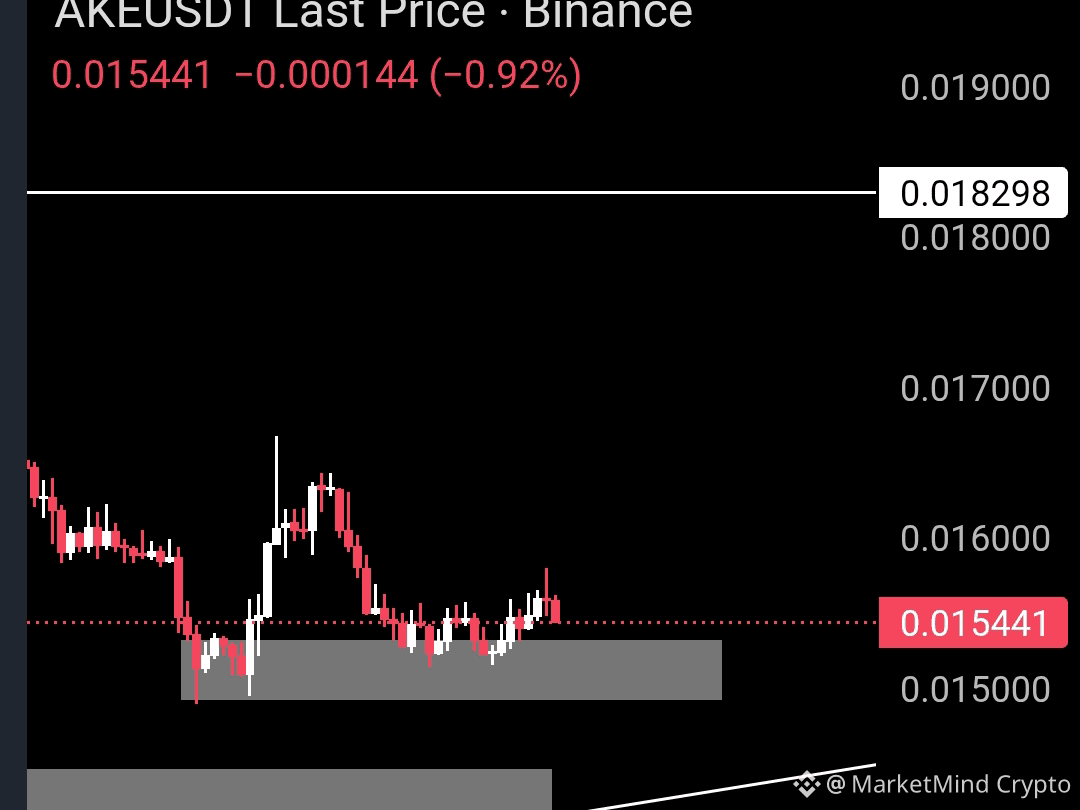
🚀 Coin: $AKRO (AKEDO)
💰 Current Price: $0.015443
📈 Trend/Bias: Bullish
🎯 Entry Zone: $0.015000 to $0.015450
🎯 Take Profit (TP): $0.018290
🛡️ Stop Loss (SL): $0.014500
🔍 Brief Analysis:
$AKE is holding firm near its key horizontal demand zone after a healthy pullback, indicating potential accumulation by buyers. 📊 The 15m structure shows strong rejection candles near $0.015000, signaling robust support and setting up a potential continuation rally toward the previous swing high resistance. ⚡
Disclaimer: This analysis is for educational purposes and is not financial advice. Always do your own research and use a Stop Loss.
#USADPWeeklyEmploymentRises12000 #BankOfAmericaGroupPilotsUSBDCStablecoin #RippleLobbiesToAdvanceCLARITYActVote #ChinaAugustCPIRises0.8%YoY
🚀 Coin: $AKRO (AKEDO)
💰 Current Price: $0.015443
📈 Trend/Bias: Bullish
🎯 Entry Zone: $0.015000 to $0.015450
🎯 Take Profit (TP): $0.018290
🛡️ Stop Loss (SL): $0.014500
🔍 Brief Analysis:
$AKE is holding firm near its key horizontal demand zone after a healthy pullback, indicating potential accumulation by buyers. 📊 The 15m structure shows strong rejection candles near $0.015000, signaling robust support and setting up a potential continuation rally toward the previous swing high resistance. ⚡
Disclaimer: This analysis is for educational purposes and is not financial advice. Always do your own research and use a Stop Loss.
#USADPWeeklyEmploymentRises12000 #BankOfAmericaGroupPilotsUSBDCStablecoin #RippleLobbiesToAdvanceCLARITYActVote #ChinaAugustCPIRises0.8%YoY
💰 Current Price: $0.015443
📈 Trend/Bias: Bullish
🎯 Entry Zone: $0.015000 to $0.015450
🎯 Take Profit (TP): $0.018290
🛡️ Stop Loss (SL): $0.014500
🔍 Brief Analysis:
$AKE is holding firm near its key horizontal demand zone after a healthy pullback, indicating potential accumulation by buyers. 📊 The 15m structure shows strong rejection candles near $0.015000, signaling robust support and setting up a potential continuation rally toward the previous swing high resistance. ⚡
Disclaimer: This analysis is for educational purposes and is not financial advice. Always do your own research and use a Stop Loss.
#USADPWeeklyEmploymentRises12000 #BankOfAmericaGroupPilotsUSBDCStablecoin #RippleLobbiesToAdvanceCLARITYActVote #ChinaAugustCPIRises0.8%YoY
85
·
--
ブリッシュ
翻訳参照
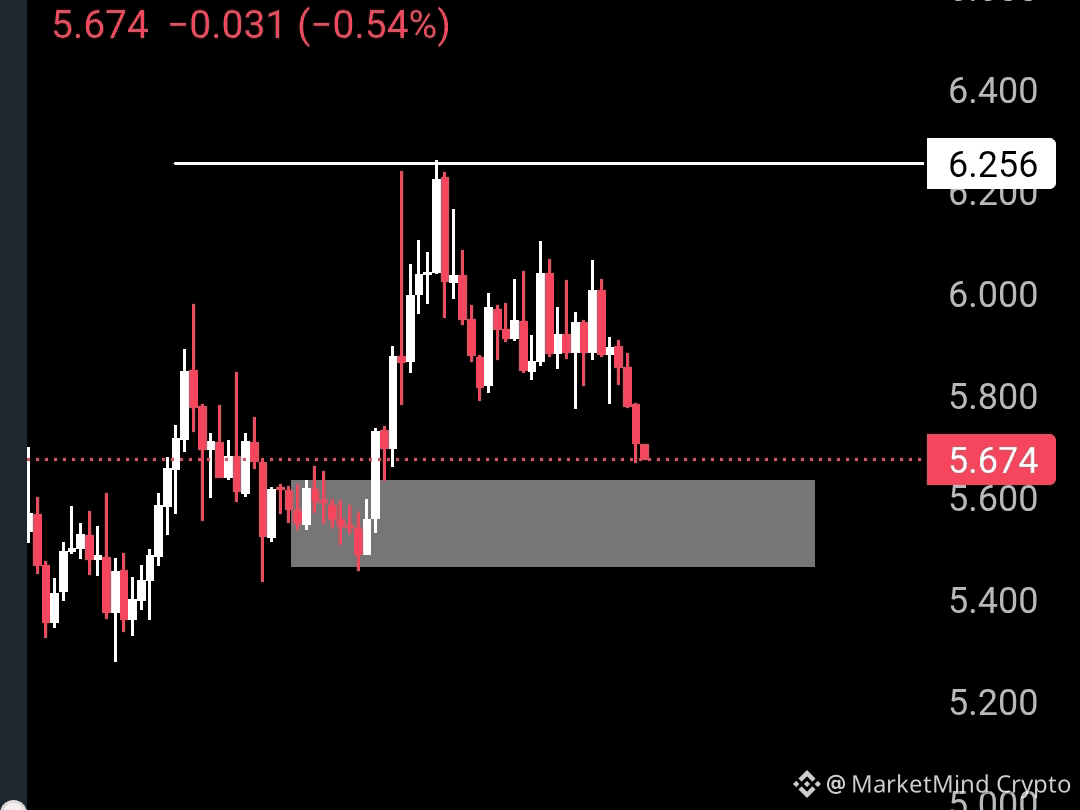
Coin: $PROM (Prometeus) 📈
Current Price: $5.674 💲
Trend/Bias: Bullish 🐂
Entry Zone: $5.550 to $5.680 🎯
Take Profit (TP): $6.250 🚀
Stop Loss (SL): $5.380 🛡️
Brief Analysis: PROM is currently retesting a solid demand zone around $5.550–$5.680 following a sharp retracement from its recent local high. The price action indicates a high probability for a bullish rebound off this structural support toward the $6.256 resistance level. 🔍📊
Disclaimer: This analysis is for educational purposes and is not financial advice. Always do your own research and use a Stop Loss.
#USADPWeeklyEmploymentRises12000 #BankOfAmericaGroupPilotsUSBDCStablecoin #RippleLobbiesToAdvanceCLARITYActVote #USStrikesTargetsNearHormuzAndJask #OilRisesToHighestSinceJuly
Coin: $PROM (Prometeus) 📈
Current Price: $5.674 💲
Trend/Bias: Bullish 🐂
Entry Zone: $5.550 to $5.680 🎯
Take Profit (TP): $6.250 🚀
Stop Loss (SL): $5.380 🛡️
Brief Analysis: PROM is currently retesting a solid demand zone around $5.550–$5.680 following a sharp retracement from its recent local high. The price action indicates a high probability for a bullish rebound off this structural support toward the $6.256 resistance level. 🔍📊
Disclaimer: This analysis is for educational purposes and is not financial advice. Always do your own research and use a Stop Loss.
#USADPWeeklyEmploymentRises12000 #BankOfAmericaGroupPilotsUSBDCStablecoin #RippleLobbiesToAdvanceCLARITYActVote #USStrikesTargetsNearHormuzAndJask #OilRisesToHighestSinceJuly
Current Price: $5.674 💲
Trend/Bias: Bullish 🐂
Entry Zone: $5.550 to $5.680 🎯
Take Profit (TP): $6.250 🚀
Stop Loss (SL): $5.380 🛡️
Brief Analysis: PROM is currently retesting a solid demand zone around $5.550–$5.680 following a sharp retracement from its recent local high. The price action indicates a high probability for a bullish rebound off this structural support toward the $6.256 resistance level. 🔍📊
Disclaimer: This analysis is for educational purposes and is not financial advice. Always do your own research and use a Stop Loss.
#USADPWeeklyEmploymentRises12000 #BankOfAmericaGroupPilotsUSBDCStablecoin #RippleLobbiesToAdvanceCLARITYActVote #USStrikesTargetsNearHormuzAndJask #OilRisesToHighestSinceJuly
45
·
--
ブリッシュ
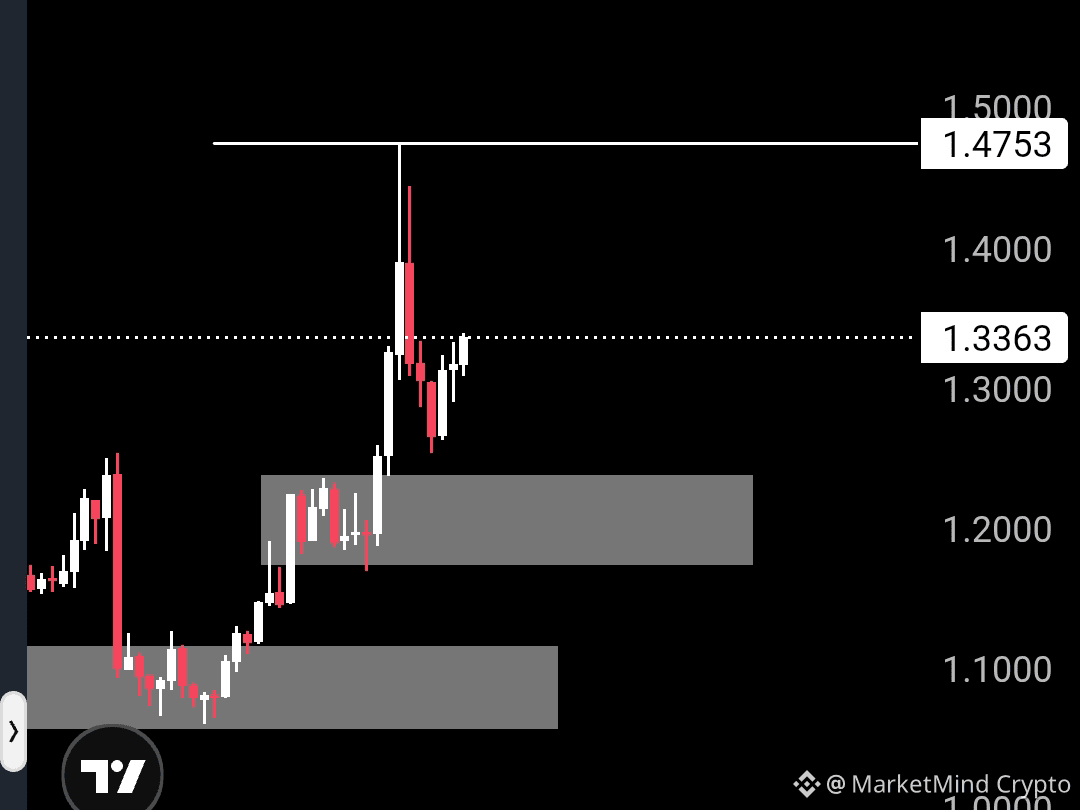
🚀 コイン:$RAY (Raydium)
💰 現在価格:$1.3366
📈 トレンド/バイアス:強気
🎯 エントリーゾーン:$1.2000〜$1.3300
🎯 利確(TP):$1.4753
🛡️ 損切り(SL):$1.1500
🧠 簡易分析:RAYは強いインパルス上昇を見せ、ローカル高値の$1.4753に到達した後、健全なレンジ(コンソリデーション)に押し戻されました。価格は$1.2000〜$1.2500付近に形成された重要なサポートをしっかり上回っており、押し目での強い買い需要を示しています。このサポートが維持されている限り、強気の構造は維持され、レジスタンスである$1.4753への再テストを目標とした動きが想定されます。
免責事項:本分析は教育目的であり、金融アドバイスではありません。必ずご自身で調査を行い、ストップロスを設定してください。
#RippleLobbiesToAdvanceCLARITYActVote #ChinaAugustCPIRises0.8%YoY #USStrikesTargetsNearHormuzAndJask #DowFallsOver600Points #OilRisesToHighestSinceJuly
🚀 コイン:$RAY (Raydium)
💰 現在価格:$1.3366
📈 トレンド/バイアス:強気
🎯 エントリーゾーン:$1.2000〜$1.3300
🎯 利確(TP):$1.4753
🛡️ 損切り(SL):$1.1500
🧠 簡易分析:RAYは強いインパルス上昇を見せ、ローカル高値の$1.4753に到達した後、健全なレンジ(コンソリデーション)に押し戻されました。価格は$1.2000〜$1.2500付近に形成された重要なサポートをしっかり上回っており、押し目での強い買い需要を示しています。このサポートが維持されている限り、強気の構造は維持され、レジスタンスである$1.4753への再テストを目標とした動きが想定されます。
免責事項:本分析は教育目的であり、金融アドバイスではありません。必ずご自身で調査を行い、ストップロスを設定してください。
#RippleLobbiesToAdvanceCLARITYActVote #ChinaAugustCPIRises0.8%YoY #USStrikesTargetsNearHormuzAndJask #DowFallsOver600Points #OilRisesToHighestSinceJuly
💰 現在価格:$1.3366
📈 トレンド/バイアス:強気
🎯 エントリーゾーン:$1.2000〜$1.3300
🎯 利確(TP):$1.4753
🛡️ 損切り(SL):$1.1500
🧠 簡易分析:RAYは強いインパルス上昇を見せ、ローカル高値の$1.4753に到達した後、健全なレンジ(コンソリデーション)に押し戻されました。価格は$1.2000〜$1.2500付近に形成された重要なサポートをしっかり上回っており、押し目での強い買い需要を示しています。このサポートが維持されている限り、強気の構造は維持され、レジスタンスである$1.4753への再テストを目標とした動きが想定されます。
免責事項:本分析は教育目的であり、金融アドバイスではありません。必ずご自身で調査を行い、ストップロスを設定してください。
#RippleLobbiesToAdvanceCLARITYActVote #ChinaAugustCPIRises0.8%YoY #USStrikesTargetsNearHormuzAndJask #DowFallsOver600Points #OilRisesToHighestSinceJuly
47
ログインして、さらにコンテンツを読む
厳選トピックで世界の暗号資産トレーダーの仲間入り
⚡️ 暗号資産に関する最新かつ有益な情報が見つかります。
💬 世界最大の暗号資産取引所から信頼されています。
👍 認証を受けたクリエイターから、有益なインサイトを得られます。
メール / 電話番号
トレンドトピック
FedMinutesFocusOnOctoberPause
閲覧回数 29,158
592人が討論中
#fedminutesfocusonoctoberpause
🚨 10月のFRB利上げ確率が21.6%に急落… $BTC は反応する? 👀
FRBは市場に、もう一つ重要な手がかりを与えようとしています。
投資家は本日のFOMC議事要旨を待っています。最大の疑問は、10月に再び利上げがあるのか、それとも一時停止となるのかです。
現時点で、10月に25ベーシスポイントの利上げが行われる確率は、わずか21.6%まで低下しました。
これは予想の大きな変化です。
しかし、興味深いのはここからです… 👀
FRBは9月に金利を3.75%~4.00%に引き上げましたが、雇用統計の最近の弱さとインフレの鈍化により、すぐに再利上げが行われる可能性は低くなっています。
そして、暗号資産にとってこれは重要です。
FRBが利上げを一時停止すれば、金融環境への圧力が和らぎ、リスク選好が改善する可能性があります。
それはBTCにとって追い風になるかもしれません。
ただし、注意点もあります…
ドルと米国債利回りが上昇するなか、ビットコインはすでに圧力を受けています。
そのため、今夜の議事要旨が相場変動の引き金になる可能性があります。
ハト派のFRB → 流動性への期待 → 強気のBTCシナリオ?
タカ派のFRB → 高金利への懸念 → リスク資産へのさらなる圧力?
本当の疑問はこうです。
10月はビットコイン強気派が待ち望んでいた利上げ一時停止となるのでしょうか…それともFRBが再び市場を驚かせるのでしょうか? 👀
BTC、FRBの政策見通し、米国債利回りを注意深く見守りましょう。
#FederalReserve #Fed #Crypto #InterestRates
$ETH
$SOL
Shae Cassler Sw9r
·いいね:19件
·閲覧回数 37.9k
BinanceLaunchesBinanceIntelligence
閲覧回数 953,549
5,829人が討論中
EvernorthDelaysNasdaqDebutToOct12
閲覧回数 246
55人が討論中