
TojiSignalShark
20.2k 投稿

TojiSignalShark
報告
ユーザーをブロック
Turning Charts Into OpportunitiesFutures • Spot • Technical Analysis Follow for High-Conviction Setups | DYOR
124 フォロー
2.0K+ フォロワー
17.4K+ いいね
投稿
すべて
引用
ライブ
·
--
弱気相場
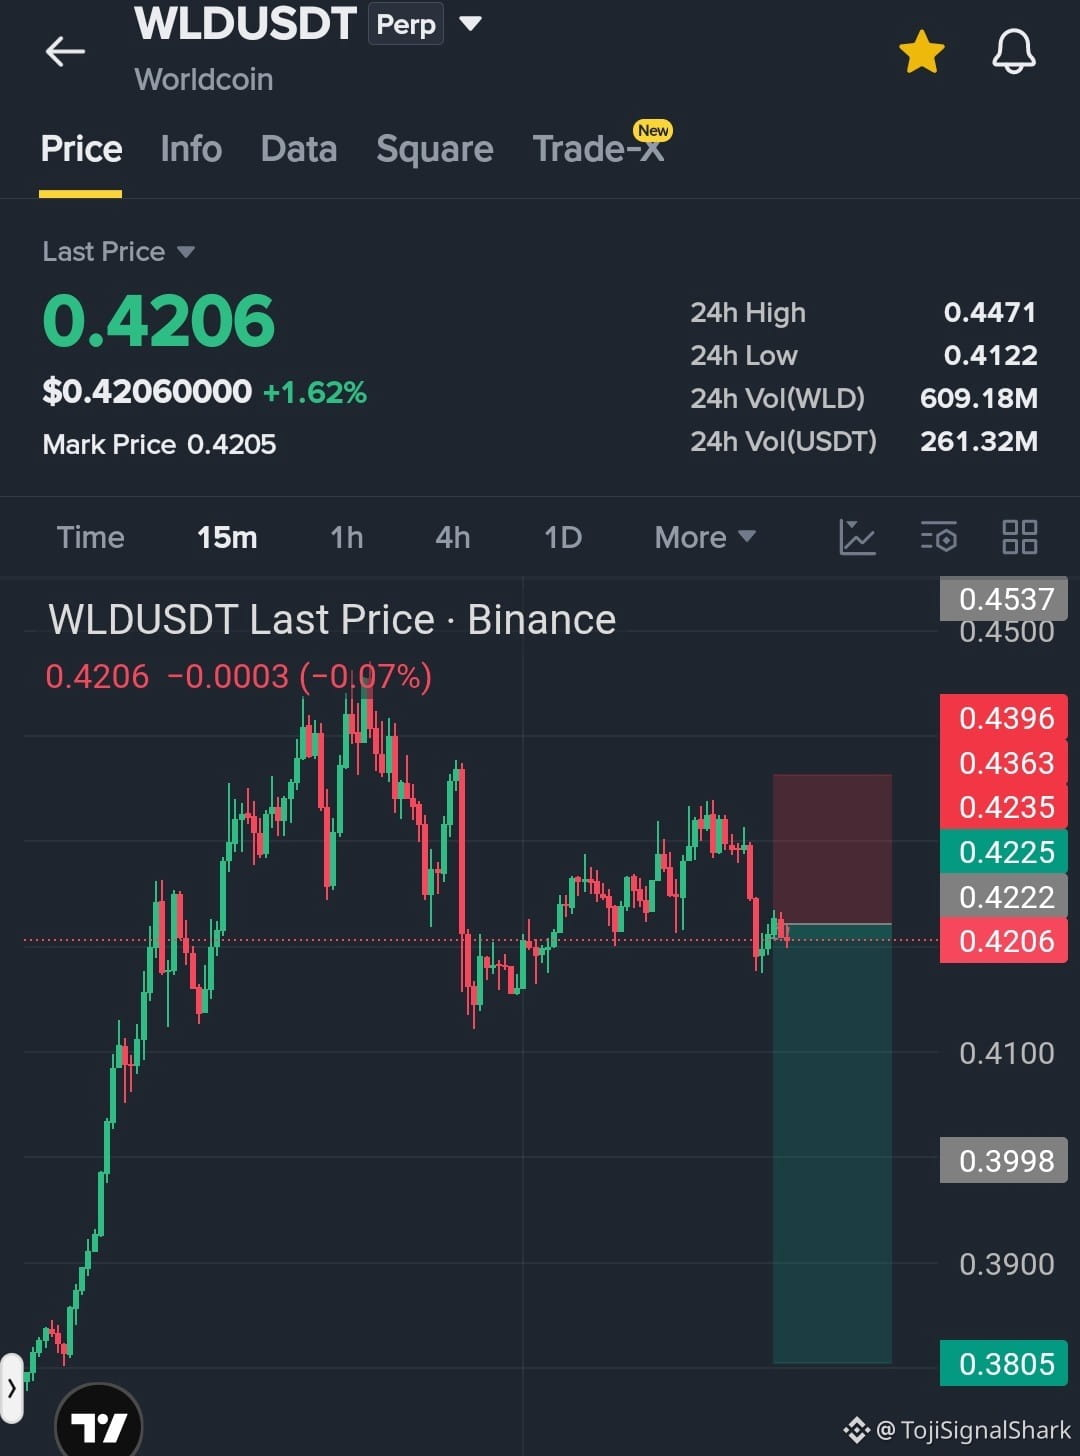
$WLD は、直近の高値更新後に売り圧力の兆候が見られています。モメンタムは現在の水準付近で弱まり始めています。このゾーンで拒否(リジェクト)が続く場合、さらなる下方向への回転が発生する可能性があります。
取引アイデア — $WLD をショート
エントリー: 0.419 - 0.440
SL: 0.460
TP1: 0.400
TP2: 0.390
TP3: 0.380
リスク管理を慎重に行い、エントリーを追いかけず、価格が無効化水準を上抜けた場合はセットアップを見直してください。
DYOR(自己調査の実施)。
{future}(WLDUSDT)
$WLD は、直近の高値更新後に売り圧力の兆候が見られています。モメンタムは現在の水準付近で弱まり始めています。このゾーンで拒否(リジェクト)が続く場合、さらなる下方向への回転が発生する可能性があります。
取引アイデア — $WLD をショート
エントリー: 0.419 - 0.440
SL: 0.460
TP1: 0.400
TP2: 0.390
TP3: 0.380
リスク管理を慎重に行い、エントリーを追いかけず、価格が無効化水準を上抜けた場合はセットアップを見直してください。
DYOR(自己調査の実施)。
取引アイデア — $WLD をショート
エントリー: 0.419 - 0.440
SL: 0.460
TP1: 0.400
TP2: 0.390
TP3: 0.380
リスク管理を慎重に行い、エントリーを追いかけず、価格が無効化水準を上抜けた場合はセットアップを見直してください。
DYOR(自己調査の実施)。

52
·
--
弱気相場
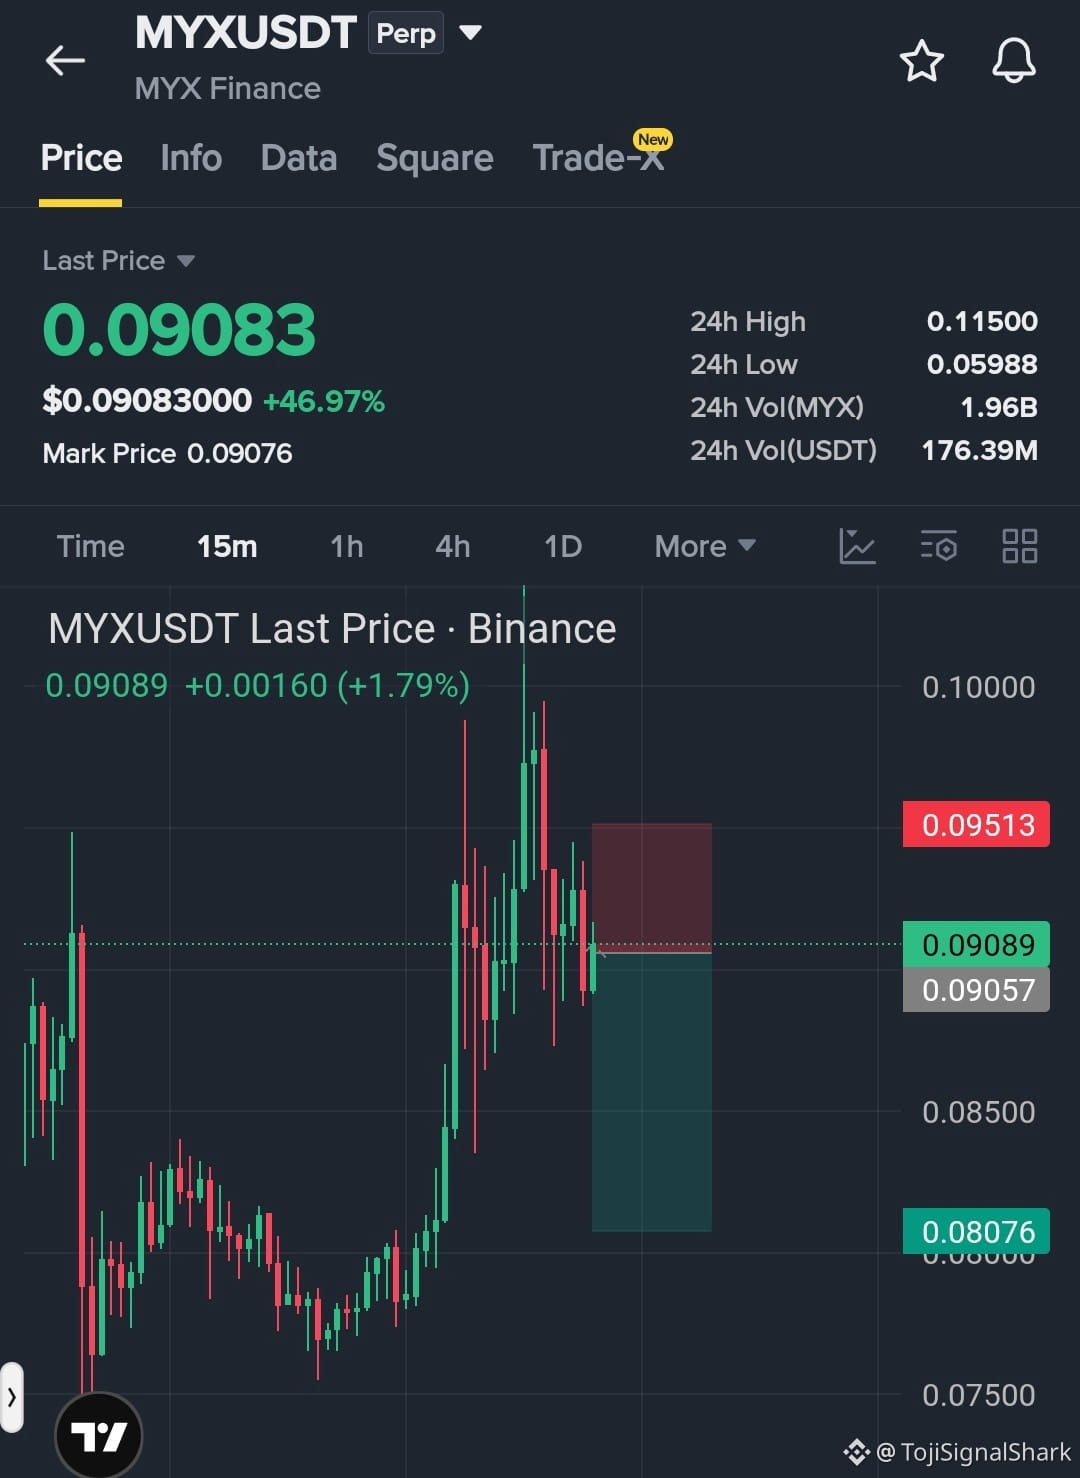
$MYX は主要なレジスタンス領域の周りで弱さの兆候を見せており、モメンタムが上昇を押し上げるのに苦戦しています。売り手が引き続き活発で、このゾーンが価格を拒否し続けるなら、さらなる下方向へのローテーションが発生する可能性があります。
トレーディング・アイデア — $MYX をショート
エントリー: 0.0890 - 0.0930
SL: 0.0970
TP1: 0.0870
TP2: 0.0840
TP3: 0.0810
リスクは管理したまま、エントリーを追いかけず、価格が無効化レベルを上抜けた場合はセットアップを見直してください。
DYOR(Do Your Own Research)。
{future}(MYXUSDT)
$MYX は主要なレジスタンス領域の周りで弱さの兆候を見せており、モメンタムが上昇を押し上げるのに苦戦しています。売り手が引き続き活発で、このゾーンが価格を拒否し続けるなら、さらなる下方向へのローテーションが発生する可能性があります。
トレーディング・アイデア — $MYX をショート
エントリー: 0.0890 - 0.0930
SL: 0.0970
TP1: 0.0870
TP2: 0.0840
TP3: 0.0810
リスクは管理したまま、エントリーを追いかけず、価格が無効化レベルを上抜けた場合はセットアップを見直してください。
DYOR(Do Your Own Research)。
トレーディング・アイデア — $MYX をショート
エントリー: 0.0890 - 0.0930
SL: 0.0970
TP1: 0.0870
TP2: 0.0840
TP3: 0.0810
リスクは管理したまま、エントリーを追いかけず、価格が無効化レベルを上抜けた場合はセットアップを見直してください。
DYOR(Do Your Own Research)。

1
122
·
--
弱気相場
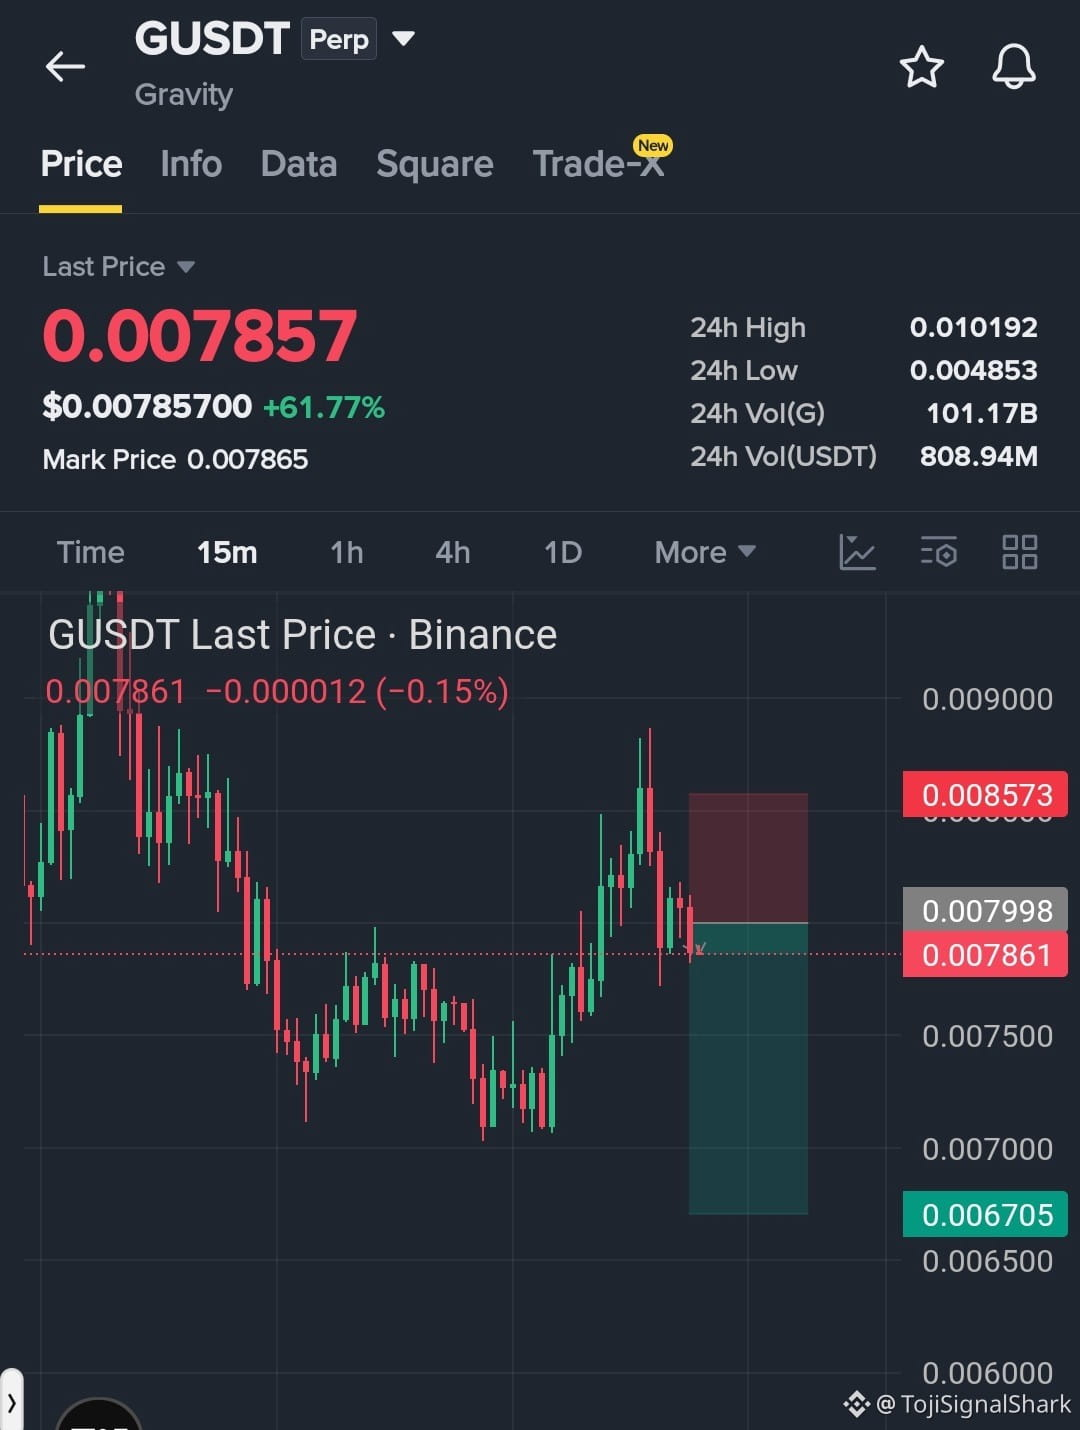
$G は、直近の上昇の後、レジスタンス付近で弱さが見られています。勢いは冷め始めており、売り手が主導権を取り戻そうとしています。このゾーンが引き続き価格を拒絶するなら、より深い下落が発生する可能性があります。
トレーディングアイデア — $G をショート
エントリー: 0.0078 - 0.0082
SL: 0.0086
TP1: 0.0075
TP2: 0.0071
TP3: 0.0067
リスク管理を慎重に行い、追いかけるような売買は避けてください。価格が無効化レベル(インバリデーション)を上抜けた場合は、セットアップを見直してください。
DYOR(自己で調査してください)。
{future}(GUSDT)
$G は、直近の上昇の後、レジスタンス付近で弱さが見られています。勢いは冷め始めており、売り手が主導権を取り戻そうとしています。このゾーンが引き続き価格を拒絶するなら、より深い下落が発生する可能性があります。
トレーディングアイデア — $G をショート
エントリー: 0.0078 - 0.0082
SL: 0.0086
TP1: 0.0075
TP2: 0.0071
TP3: 0.0067
リスク管理を慎重に行い、追いかけるような売買は避けてください。価格が無効化レベル(インバリデーション)を上抜けた場合は、セットアップを見直してください。
DYOR(自己で調査してください)。
トレーディングアイデア — $G をショート
エントリー: 0.0078 - 0.0082
SL: 0.0086
TP1: 0.0075
TP2: 0.0071
TP3: 0.0067
リスク管理を慎重に行い、追いかけるような売買は避けてください。価格が無効化レベル(インバリデーション)を上抜けた場合は、セットアップを見直してください。
DYOR(自己で調査してください)。

1
87
·
--
ブリッシュ
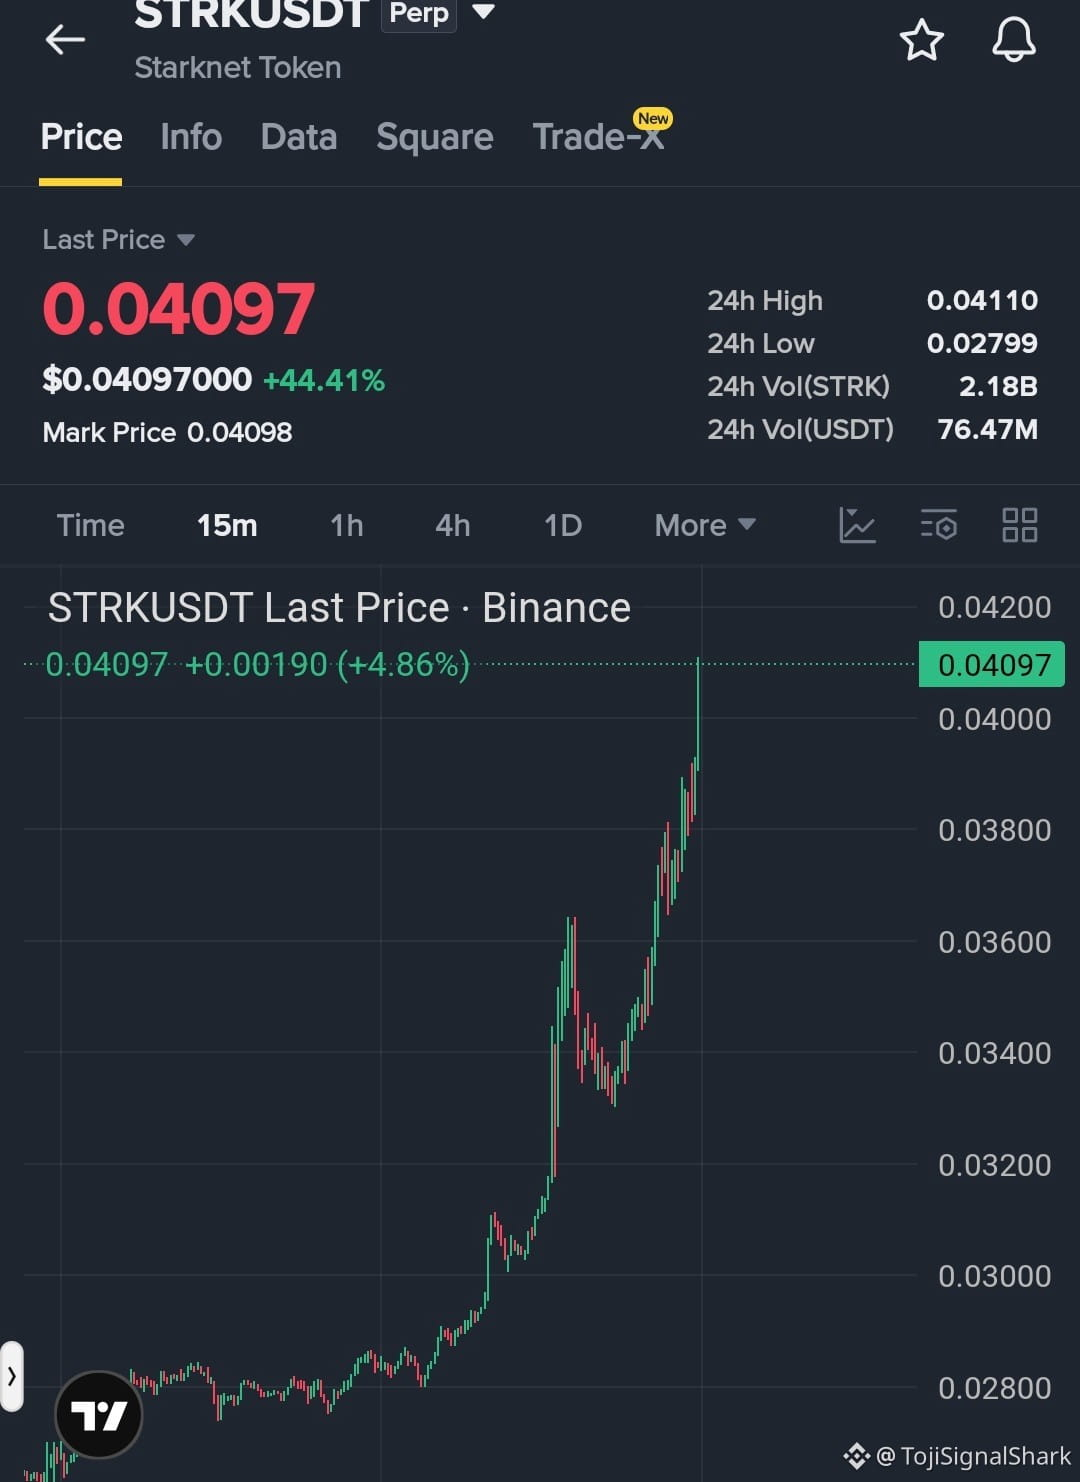
$STRK は、現在の水準の周辺で買い手が完全に活発なまま強い勢いを示しています。すでにロングポジションを持っている場合は、トレンドに沿って次の目標を0.045に維持してください。
現在はモメンタムが上方向を後押ししていますが、ボラティリティが上昇する可能性に備えて、規律を保ちポジションを慎重に管理してください。
DYOR(Do Your Own Research/自己調査を行ってください)。
{future}(STRKUSDT)
$STRK は、現在の水準の周辺で買い手が完全に活発なまま強い勢いを示しています。すでにロングポジションを持っている場合は、トレンドに沿って次の目標を0.045に維持してください。
現在はモメンタムが上方向を後押ししていますが、ボラティリティが上昇する可能性に備えて、規律を保ちポジションを慎重に管理してください。
DYOR(Do Your Own Research/自己調査を行ってください)。
現在はモメンタムが上方向を後押ししていますが、ボラティリティが上昇する可能性に備えて、規律を保ちポジションを慎重に管理してください。
DYOR(Do Your Own Research/自己調査を行ってください)。

1
117
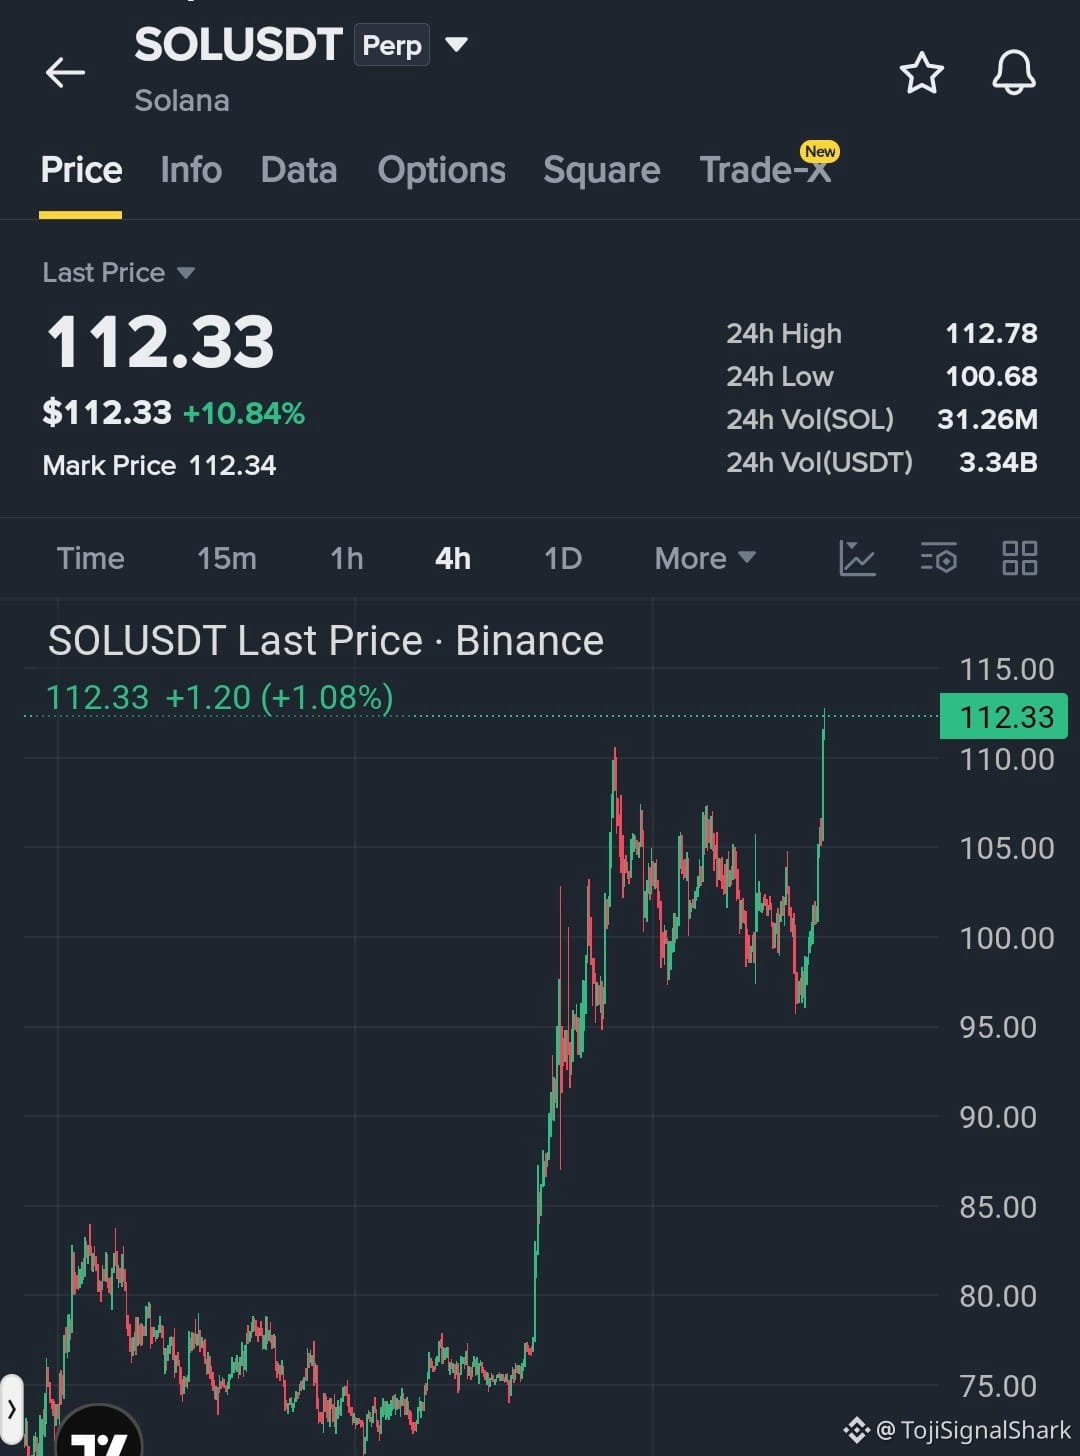
$SOL は現在強い上昇モメンタムを示しており、買い手が積極的に動き続けていて、現在の値動きの主導権を維持しています。強さはまだ価格アクションに明確に表れています。
すでにロングポジションを保有している場合は、重要な水準を注意深く監視しながら、そのまま保有することを検討してください。追いかけるのは避け、ポジションを慎重に管理しましょう。
DYOR(自己調査を行ってください)。
{future}(SOLUSDT)
$SOL は現在強い上昇モメンタムを示しており、買い手が積極的に動き続けていて、現在の値動きの主導権を維持しています。強さはまだ価格アクションに明確に表れています。
すでにロングポジションを保有している場合は、重要な水準を注意深く監視しながら、そのまま保有することを検討してください。追いかけるのは避け、ポジションを慎重に管理しましょう。
DYOR(自己調査を行ってください)。
すでにロングポジションを保有している場合は、重要な水準を注意深く監視しながら、そのまま保有することを検討してください。追いかけるのは避け、ポジションを慎重に管理しましょう。
DYOR(自己調査を行ってください)。
59
$LSK vs $AVA vs $ONE あなたはどの設定を最も注目して見ていますか?
市場は現在、方向感がまちまちです。
LSKは目立った売り圧力に直面しており、AVAは比較的落ち着いている一方で、ONEは勢いを増しながら急反発を見せました。これらの3つは、それぞれ異なる理由で注目する価値があります。
次に何が起きると思いますか?
{future}(ONEUSDT)
{future}(AVAUSDT)
{future}(LSKUSDT)
$LSK vs $AVA vs $ONE あなたはどの設定を最も注目して見ていますか?
市場は現在、方向感がまちまちです。
LSKは目立った売り圧力に直面しており、AVAは比較的落ち着いている一方で、ONEは勢いを増しながら急反発を見せました。これらの3つは、それぞれ異なる理由で注目する価値があります。
次に何が起きると思いますか?
市場は現在、方向感がまちまちです。
LSKは目立った売り圧力に直面しており、AVAは比較的落ち着いている一方で、ONEは勢いを増しながら急反発を見せました。これらの3つは、それぞれ異なる理由で注目する価値があります。
次に何が起きると思いますか?
LSK: Buyers may recover
AVA: Selling pressure rising
ONE: Momentum still strong
All three could move lower
11 残り時間
1
1.9k
·
--
ブリッシュ
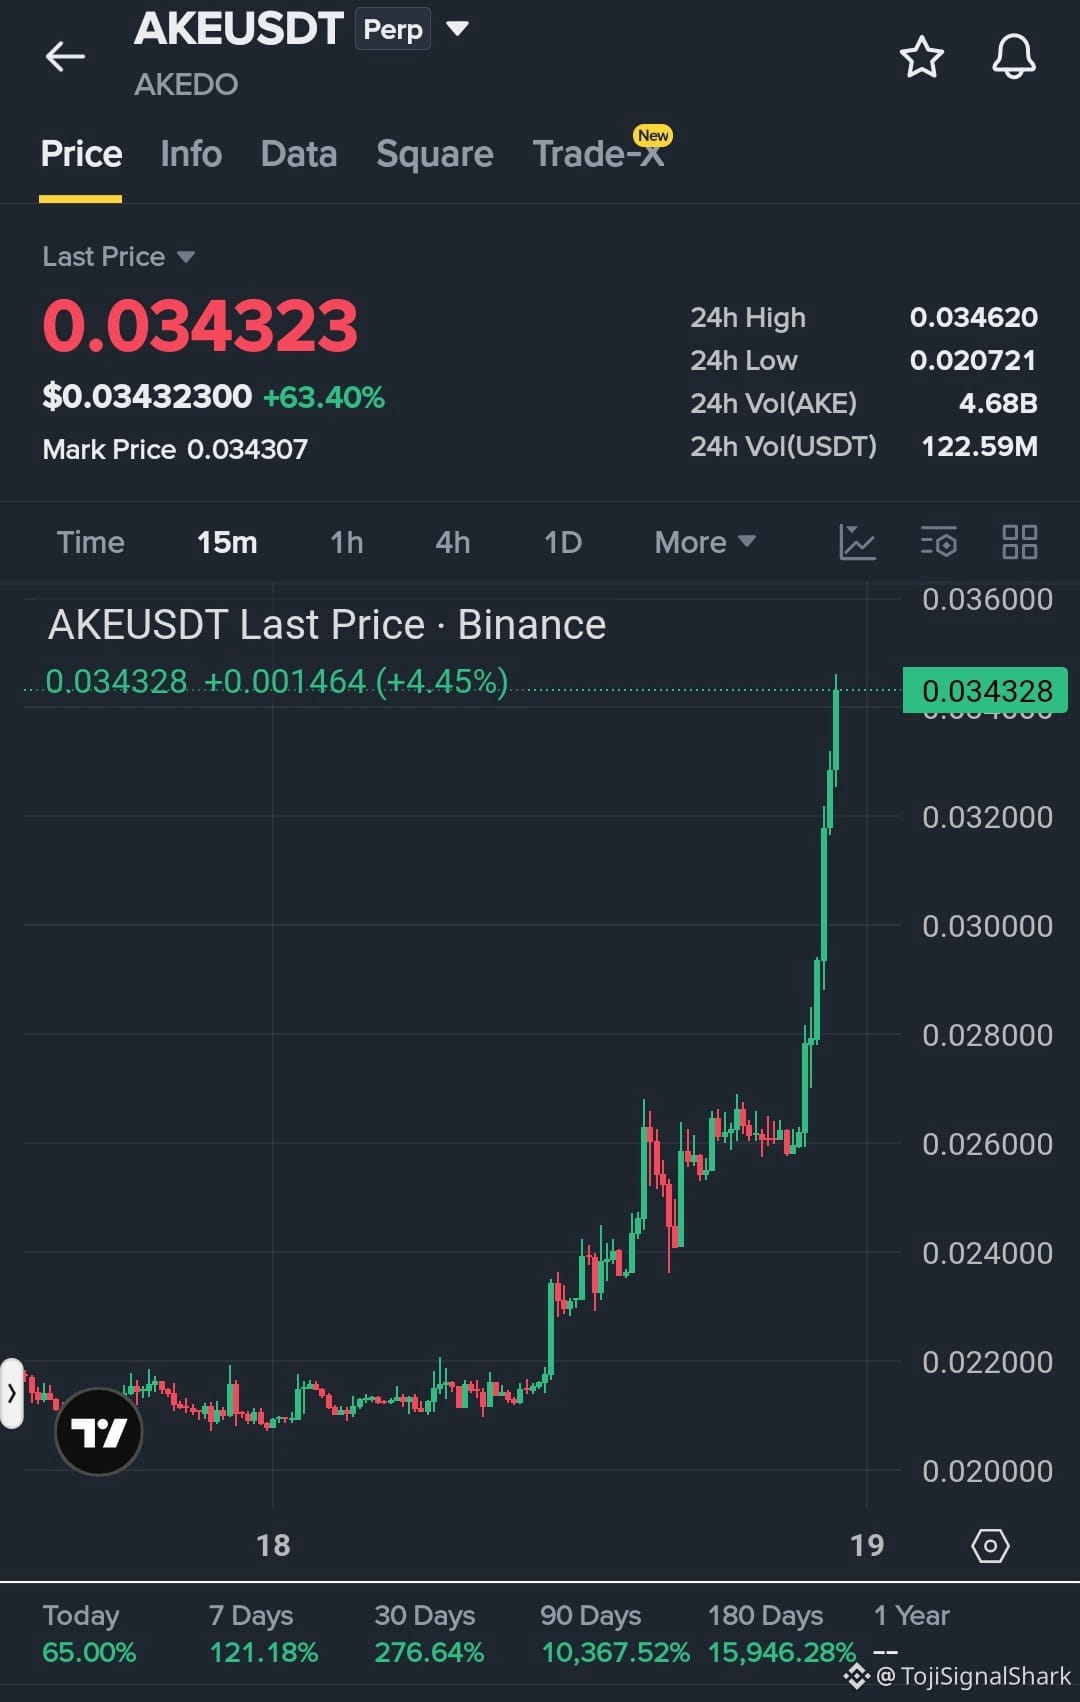
$AKE 今は強い強気モメンタムが見られ、買い手が主導権を維持しており、値動きはさらに上昇し続けています。モメンタムはまだ有効なので、ロングポジションは維持しつつ、重要な水準を注意深く監視してください。
急な値動きを追いかけず、ポジションを慎重に管理し、適切なリスク管理を行ってください。
DYOR(自己調査の実施)
{future}(AKEUSDT)
$AKE 今は強い強気モメンタムが見られ、買い手が主導権を維持しており、値動きはさらに上昇し続けています。モメンタムはまだ有効なので、ロングポジションは維持しつつ、重要な水準を注意深く監視してください。
急な値動きを追いかけず、ポジションを慎重に管理し、適切なリスク管理を行ってください。
DYOR(自己調査の実施)
急な値動きを追いかけず、ポジションを慎重に管理し、適切なリスク管理を行ってください。
DYOR(自己調査の実施)
1
245
·
--
弱気相場
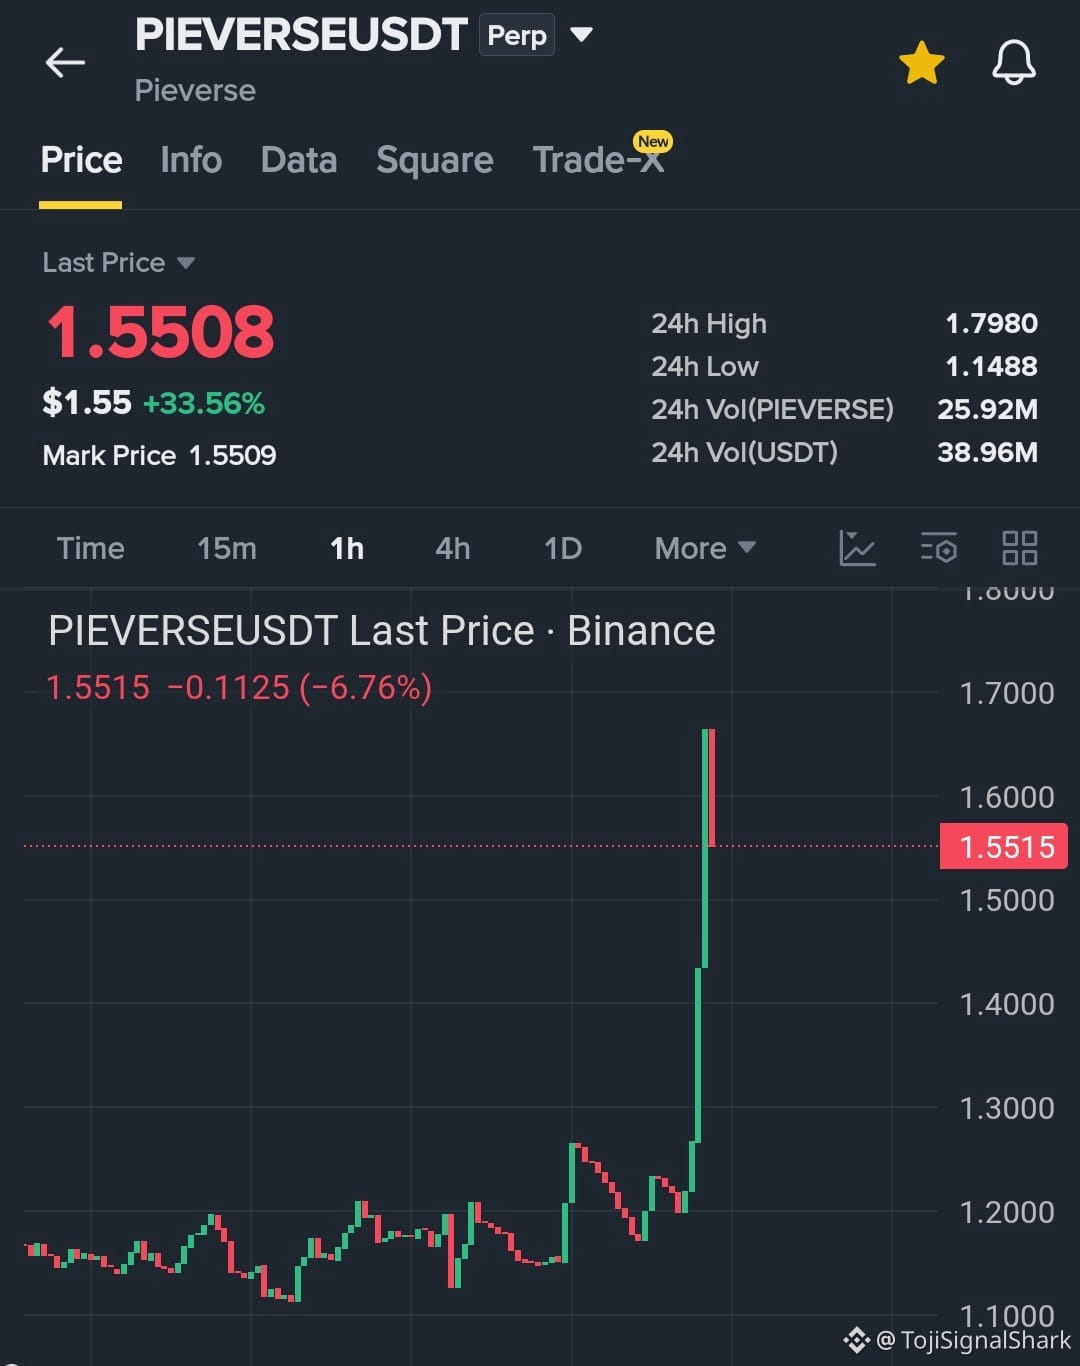
$PIEVERSE は、直近の推進後に勢いが鈍化している兆候を示しており、価格は潜在的なリジェクション(拒否)ゾーンに近づいています。売り手が主導権を取り戻せば下落の動きが発生する可能性がありますが、確認が重要です。
トレーディングアイデア(短期)$PIEVERSE
エントリー: 1.50 - 1.60
SL: 1.65
TP1: 1.45
TP2: 1.40
TP3: 1.35
リスク管理を慎重に行い、追いかけてエントリーせず、適切なポジションサイズを使用してください。これは取引アイデアであり、保証ではありません。DYOR(自己調査の実施)。
{future}(PIEVERSEUSDT)
$PIEVERSE は、直近の推進後に勢いが鈍化している兆候を示しており、価格は潜在的なリジェクション(拒否)ゾーンに近づいています。売り手が主導権を取り戻せば下落の動きが発生する可能性がありますが、確認が重要です。
トレーディングアイデア(短期)$PIEVERSE
エントリー: 1.50 - 1.60
SL: 1.65
TP1: 1.45
TP2: 1.40
TP3: 1.35
リスク管理を慎重に行い、追いかけてエントリーせず、適切なポジションサイズを使用してください。これは取引アイデアであり、保証ではありません。DYOR(自己調査の実施)。
トレーディングアイデア(短期)$PIEVERSE
エントリー: 1.50 - 1.60
SL: 1.65
TP1: 1.45
TP2: 1.40
TP3: 1.35
リスク管理を慎重に行い、追いかけてエントリーせず、適切なポジションサイズを使用してください。これは取引アイデアであり、保証ではありません。DYOR(自己調査の実施)。

2
81
·
--
弱気相場
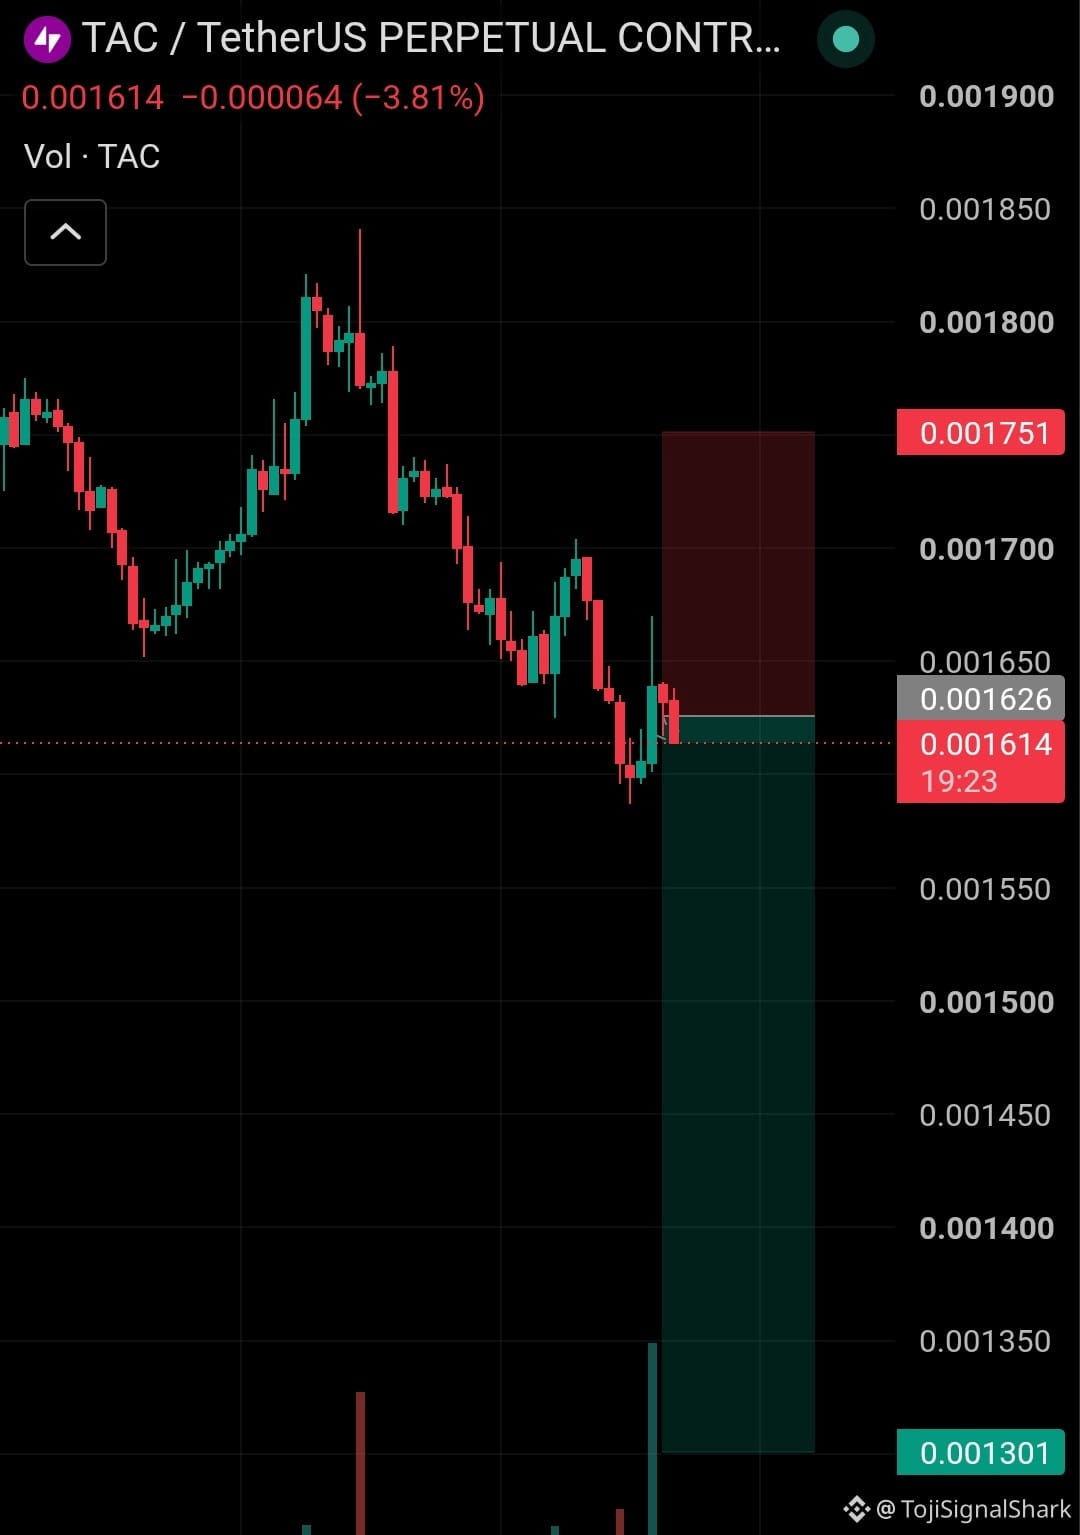
$TAC は、上位レベルからの拒否(リジェクト)の後に弱さを見せており、モメンタムが減速し、下方向の構造が開き始めています。売り手が支配を維持するなら、TACは印の付いたターゲットに向けてさらに下方向へもう一段の動きを見る可能性があります。
取引アイデア(ショート)$TAC
エントリー: 0.0016 - 0.0018
SL: 0.0019
TP1: 0.0015
TP2: 0.0014
TP3: 0.0013
ポジションは慎重に管理し、エントリーを追いかけないでください。適切なリスク管理を行いましょう。DYOR(Do Your Own Research:各自で調査してください)。
{future}(TACUSDT)
$TAC は、上位レベルからの拒否(リジェクト)の後に弱さを見せており、モメンタムが減速し、下方向の構造が開き始めています。売り手が支配を維持するなら、TACは印の付いたターゲットに向けてさらに下方向へもう一段の動きを見る可能性があります。
取引アイデア(ショート)$TAC
エントリー: 0.0016 - 0.0018
SL: 0.0019
TP1: 0.0015
TP2: 0.0014
TP3: 0.0013
ポジションは慎重に管理し、エントリーを追いかけないでください。適切なリスク管理を行いましょう。DYOR(Do Your Own Research:各自で調査してください)。
取引アイデア(ショート)$TAC
エントリー: 0.0016 - 0.0018
SL: 0.0019
TP1: 0.0015
TP2: 0.0014
TP3: 0.0013
ポジションは慎重に管理し、エントリーを追いかけないでください。適切なリスク管理を行いましょう。DYOR(Do Your Own Research:各自で調査してください)。

1
273
·
--
弱気相場
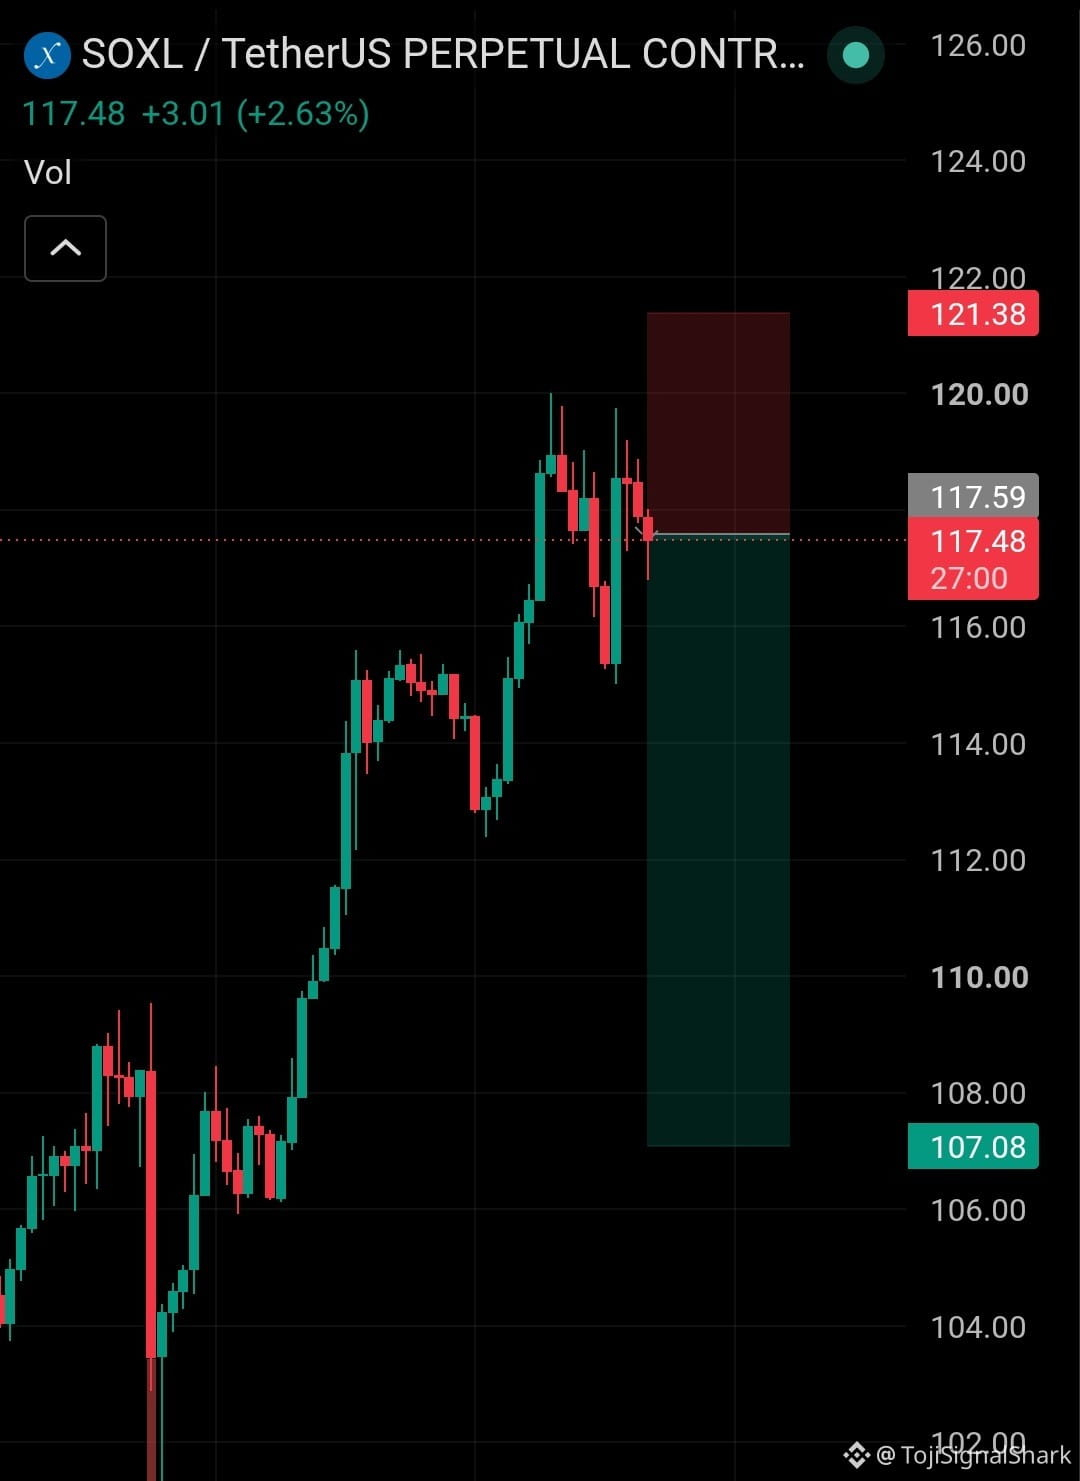
$SOXL は、押し上げて高値圏に入れた後に弱さの兆候が見られ、現在のレジスタンス・ゾーン付近でモメンタムが衰え始めています。売り手が主導権を維持できれば、価格は下方向の目標に向けてもう一段の下落(ローテーション)を見せる可能性があります。
取引アイデア — $SOXL をショート
エントリー: 117 - 120
SL: 128.2
TP1: 113
TP2: 110
TP3: 107
冷静に規律を守り、値動きを追いかけず、適切なリスク管理でポジションを管理してください。DYOR(自己調査の実施)。
{future}(SOXLUSDT)
$SOXL は、押し上げて高値圏に入れた後に弱さの兆候が見られ、現在のレジスタンス・ゾーン付近でモメンタムが衰え始めています。売り手が主導権を維持できれば、価格は下方向の目標に向けてもう一段の下落(ローテーション)を見せる可能性があります。
取引アイデア — $SOXL をショート
エントリー: 117 - 120
SL: 128.2
TP1: 113
TP2: 110
TP3: 107
冷静に規律を守り、値動きを追いかけず、適切なリスク管理でポジションを管理してください。DYOR(自己調査の実施)。
取引アイデア — $SOXL をショート
エントリー: 117 - 120
SL: 128.2
TP1: 113
TP2: 110
TP3: 107
冷静に規律を守り、値動きを追いかけず、適切なリスク管理でポジションを管理してください。DYOR(自己調査の実施)。

1
94
ログインして、さらにコンテンツを読む
厳選トピックで世界の暗号資産トレーダーの仲間入り
⚡️ 暗号資産に関する最新かつ有益な情報が見つかります。
💬 世界最大の暗号資産取引所から信頼されています。
👍 認証を受けたクリエイターから、有益なインサイトを得られます。
メール / 電話番号
トレンドトピック
BTCBreaks80K
閲覧回数 158,582
2,543人が討論中
サプライズな精算か、それとも流動性の狩り?ビットコインの$80Kの裏側の真実 📉🚀
$80,000近辺のショートポジションを持っていたなら、ここ数時間のプレッシャーをおそらく感じたはずです。多くの人は、この急な上昇を「出来高のない操作」と分類しますが、先物市場のメカニズムがまったく別の話を伝えています。
これは、週足の裏で実際に起きたことです:
1️⃣ 注文板が薄い:市場の大半が下方向(ショート)にポジションを取っていると、価格上側の売り指値注文が非常に少なくなります。適度な買いの量で、ストップを一掃できてしまうのです。
2️⃣ カスケード効果(ショートスクイーズ):ショートの清算ラインに触れると、取引所は損失を抱えたそのポジションをクローズするために、自動的に成行買いを実行します。「隠れた操作者が価格を押し上げた」のではなく、売り手自身のストップロスがポンプの資金になったのです。
3️⃣ 週足のクローズ:アルゴリズムや機関投資家は、ローソク足の切り替わり前に重要な移動平均線の上でクローズを狙うことがよくあります。
リスク管理の教訓:技術的に適切な位置にストップを置かずに、レバレッジ取引を決して行わないでください。また、市場が売り過多で過負荷になっているときにショートに入るのは避けましょう。
あなたはどう思いますか? $80Kを上抜けて定着し、新しい高値を狙いにいく展開ですか、それとも$78,000ゾーンへのリテストが来そうですか?コメントで教えてください!
$BTC #BTC #BTCBreaks80K #BinanceSquar
Angelo_Coin
·いいね:0件
·閲覧回数 1.2k
比特币突破8万
閲覧回数 111,477
328人が討論中
BitcoinMarketCapTopsTesla
閲覧回数 1,455
138人が討論中