

C Queen
39.6k 投稿

C Queen
 厳選トピック確認済+
報告
ユーザーをブロック
Full time trader_analyst_Your trusted sources for real_time Crypto trading (Twitter X .. (C_Queen55)
151 フォロー
37.0K+ フォロワー
77.0K+ いいね
投稿
すべて
引用
ライブ
PINNED
·
--
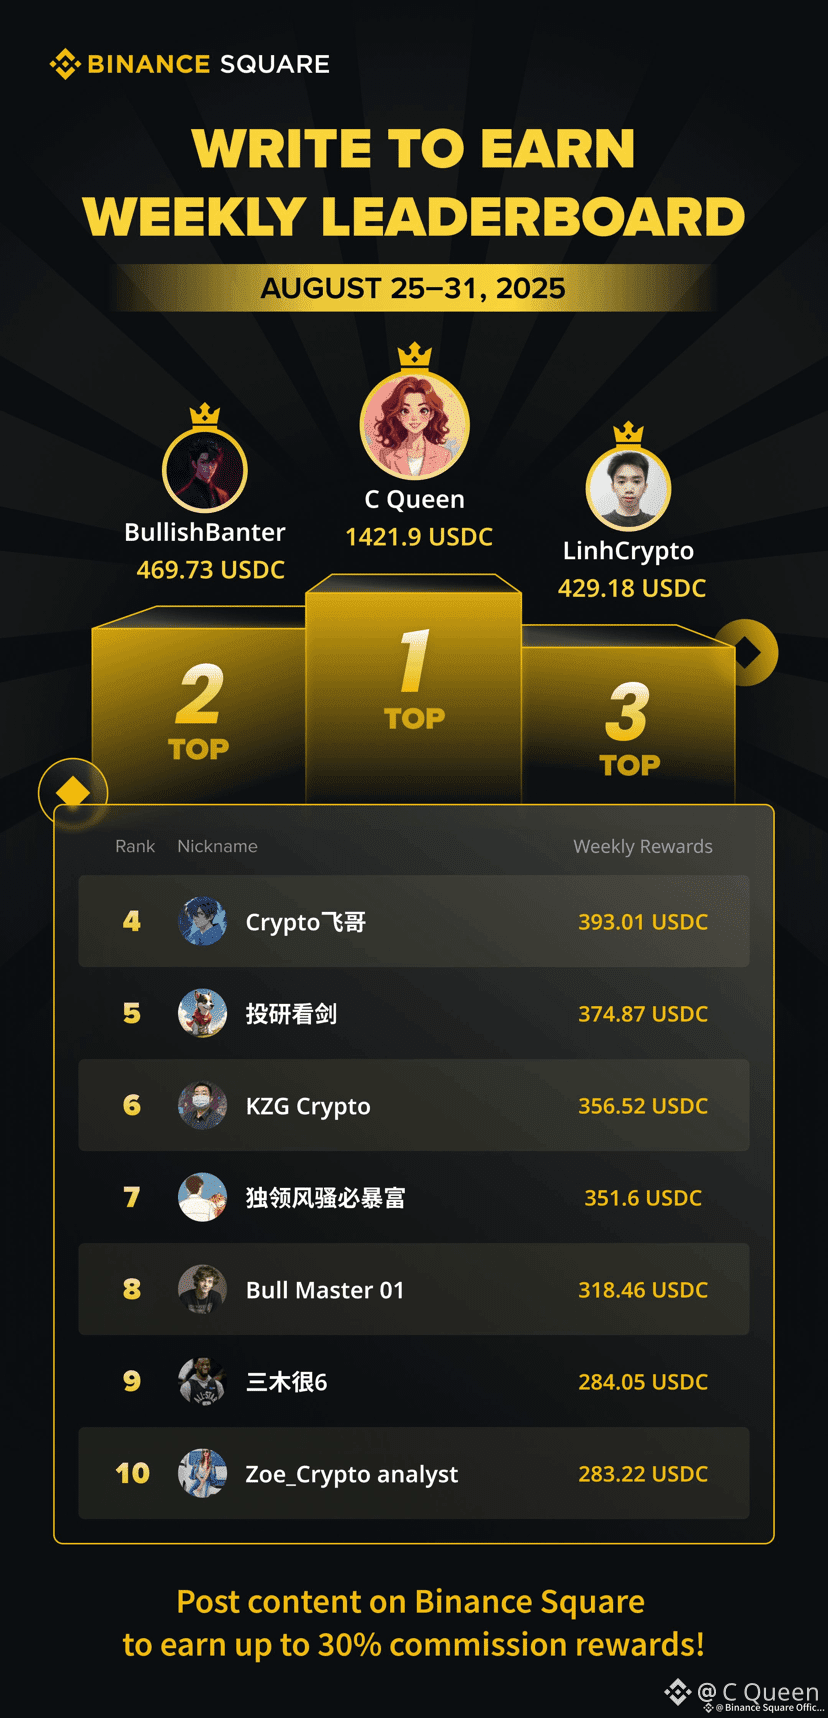
Binanceファミリーに心から感謝❤️❤️
Binance Square Write to Earnの週間リーダーボードで#1を獲得するのは、単なる私の勝利ではなく、私たちの勝利です。
あなたのサポート、エンゲージメント、信頼がこれを実現させました。
いいね、コメント、シェアの一つ一つが私にとってすべてです。
この旅は一つのことを証明しています:
一貫性 + 戦略 + コミュニティ = 結果
毎日努力している皆さん — 諦めずに続けてください。
あなたの瞬間が来ます。
共に成長し、共に稼ぎ、共にBinance Squareで支配しましょう。
この旅の一部でいてくれてありがとう。
Binanceファミリーに心から感謝❤️❤️
Binance Square Write to Earnの週間リーダーボードで#1を獲得するのは、単なる私の勝利ではなく、私たちの勝利です。
あなたのサポート、エンゲージメント、信頼がこれを実現させました。
いいね、コメント、シェアの一つ一つが私にとってすべてです。
この旅は一つのことを証明しています:
一貫性 + 戦略 + コミュニティ = 結果
毎日努力している皆さん — 諦めずに続けてください。
あなたの瞬間が来ます。
共に成長し、共に稼ぎ、共にBinance Squareで支配しましょう。
この旅の一部でいてくれてありがとう。
Binance Square Write to Earnの週間リーダーボードで#1を獲得するのは、単なる私の勝利ではなく、私たちの勝利です。
あなたのサポート、エンゲージメント、信頼がこれを実現させました。
いいね、コメント、シェアの一つ一つが私にとってすべてです。
この旅は一つのことを証明しています:
一貫性 + 戦略 + コミュニティ = 結果
毎日努力している皆さん — 諦めずに続けてください。
あなたの瞬間が来ます。
共に成長し、共に稼ぎ、共にBinance Squareで支配しましょう。
この旅の一部でいてくれてありがとう。
17
1
67
219
·
--
ブリッシュ
翻訳参照
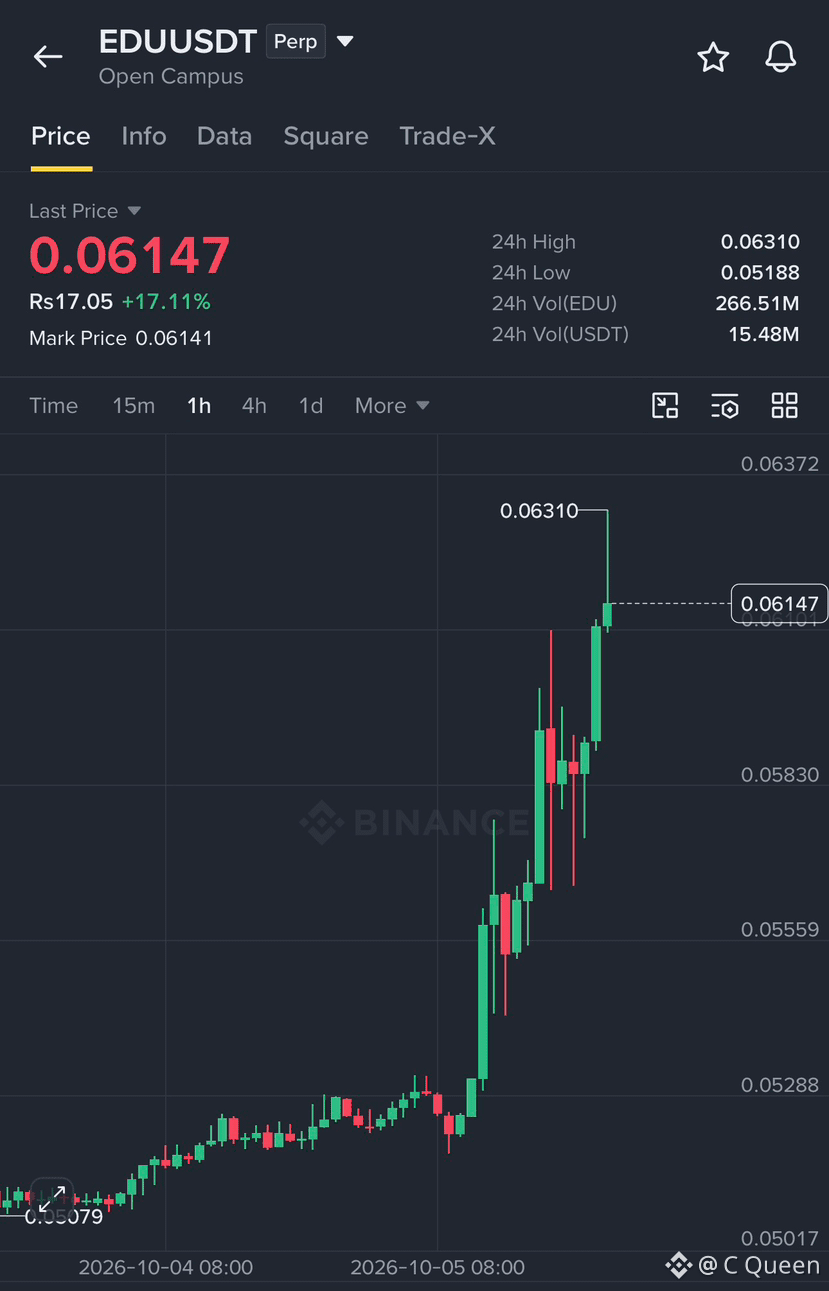
🚀 $EDU is showing serious momentum…!! $EDU is pushing strongly on the 1H chart after breaking above the 0.05830 area, with price now around 0.06147 and the 0.06310 high in sight. TP1: 0.06310 🎯 TP2: 0.06450 🎯 Take Profit: 0.06600. If buyers keep control, this move could extend higher.
{future}(EDUUSDT)
🚀 $EDU is showing serious momentum…!! $EDU is pushing strongly on the 1H chart after breaking above the 0.05830 area, with price now around 0.06147 and the 0.06310 high in sight. TP1: 0.06310 🎯 TP2: 0.06450 🎯 Take Profit: 0.06600. If buyers keep control, this move could extend higher.
1
191
·
--
ブリッシュ
翻訳参照
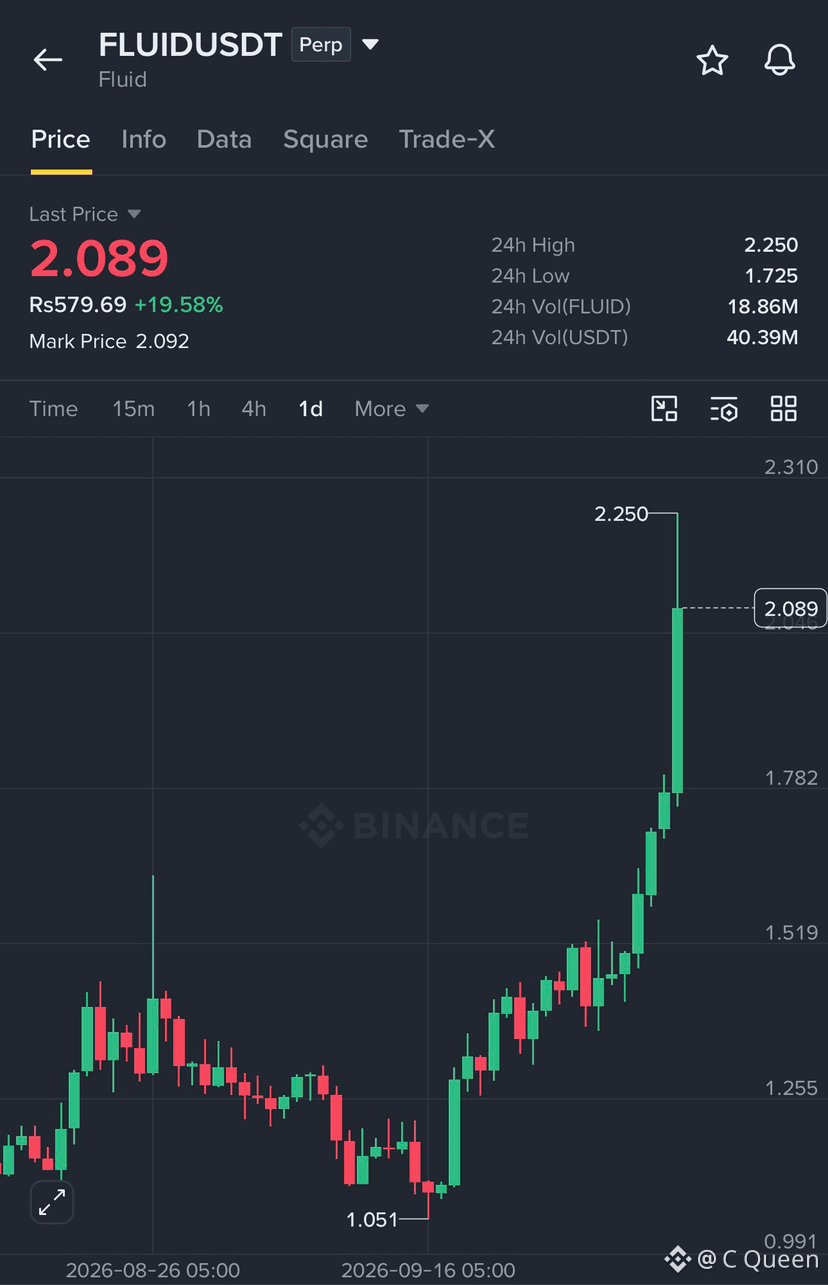
Guys, watch $FLUID 👀‼️ Price is holding around $2.09 after a strong move, and the bullish momentum is still looking active. TP1: $2.25, TP2: $2.50. Take profit near $2.50 if momentum starts cooling.
{future}(FLUIDUSDT)
Guys, watch $FLUID 👀‼️ Price is holding around $2.09 after a strong move, and the bullish momentum is still looking active. TP1: $2.25, TP2: $2.50. Take profit near $2.50 if momentum starts cooling.
2
267
·
--
ブリッシュ
翻訳参照
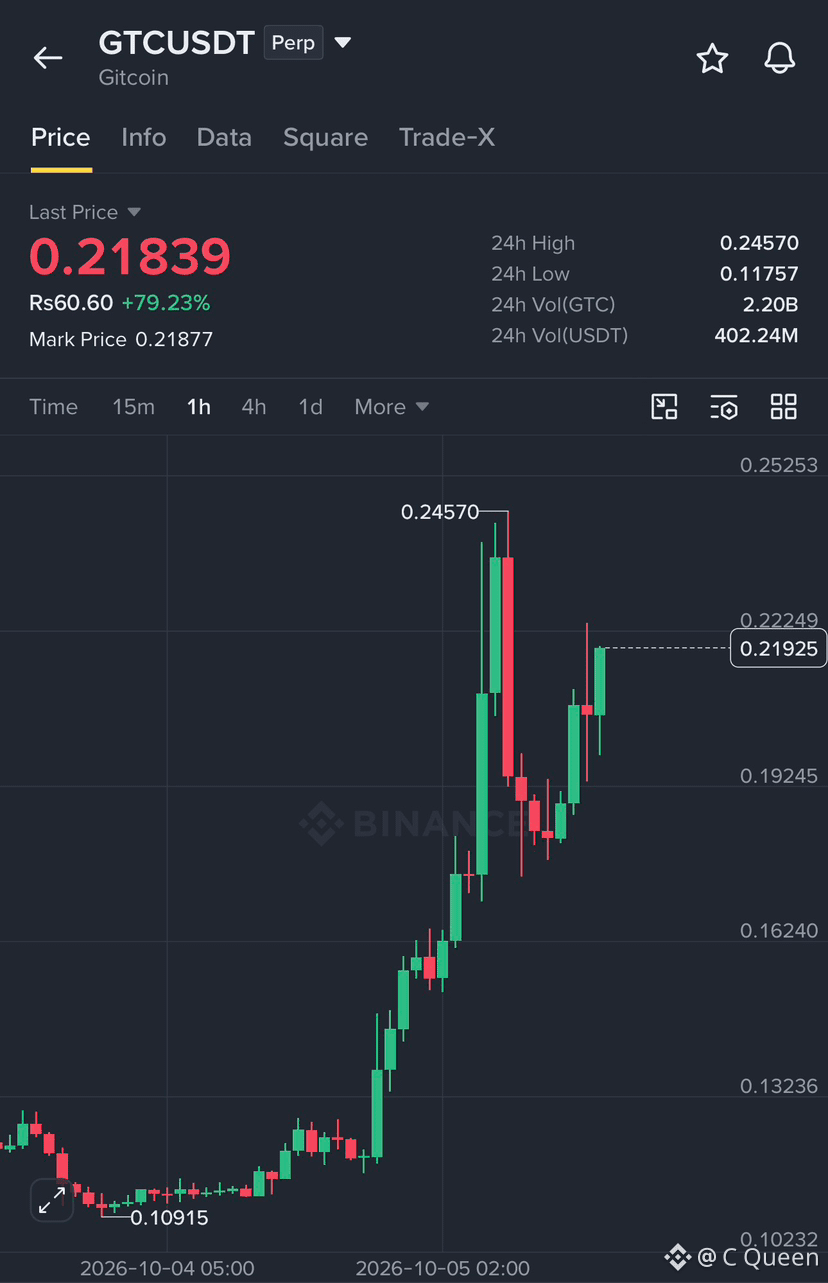
Guys, look at $GTC … this move is getting serious‼️ $GTC is holding strong around $0.218 after a powerful breakout from the $0.16 area. If momentum continues, TP1 $0.2457 and TP2 $0.2525 are the key upside levels to watch. Take profit step by step if price reaches these zones.
{future}(GTCUSDT)
Guys, look at $GTC … this move is getting serious‼️ $GTC is holding strong around $0.218 after a powerful breakout from the $0.16 area. If momentum continues, TP1 $0.2457 and TP2 $0.2525 are the key upside levels to watch. Take profit step by step if price reaches these zones.
2
579
·
--
ブリッシュ
翻訳参照
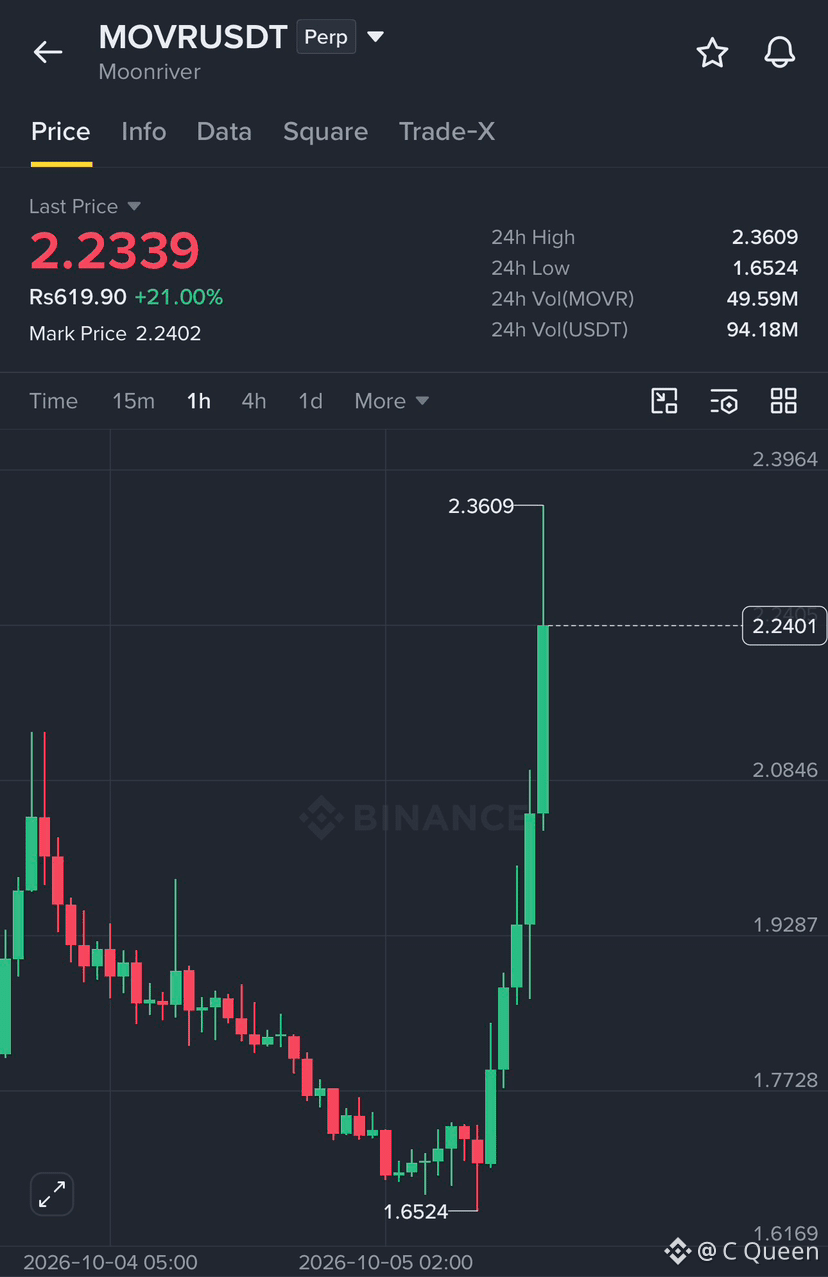
Guys, $MOVR is moving fast‼️ $MOVR just broke out strongly from the 1.65 area and pushed up to 2.3609 with heavy momentum. If buyers hold above 2.20–2.24, I’m watching TP1 2.36 and TP2 2.50. Take profit can be scaled out as price approaches the targets.
{future}(MOVRUSDT)
Guys, $MOVR is moving fast‼️ $MOVR just broke out strongly from the 1.65 area and pushed up to 2.3609 with heavy momentum. If buyers hold above 2.20–2.24, I’m watching TP1 2.36 and TP2 2.50. Take profit can be scaled out as price approaches the targets.
3
839
·
--
ブリッシュ
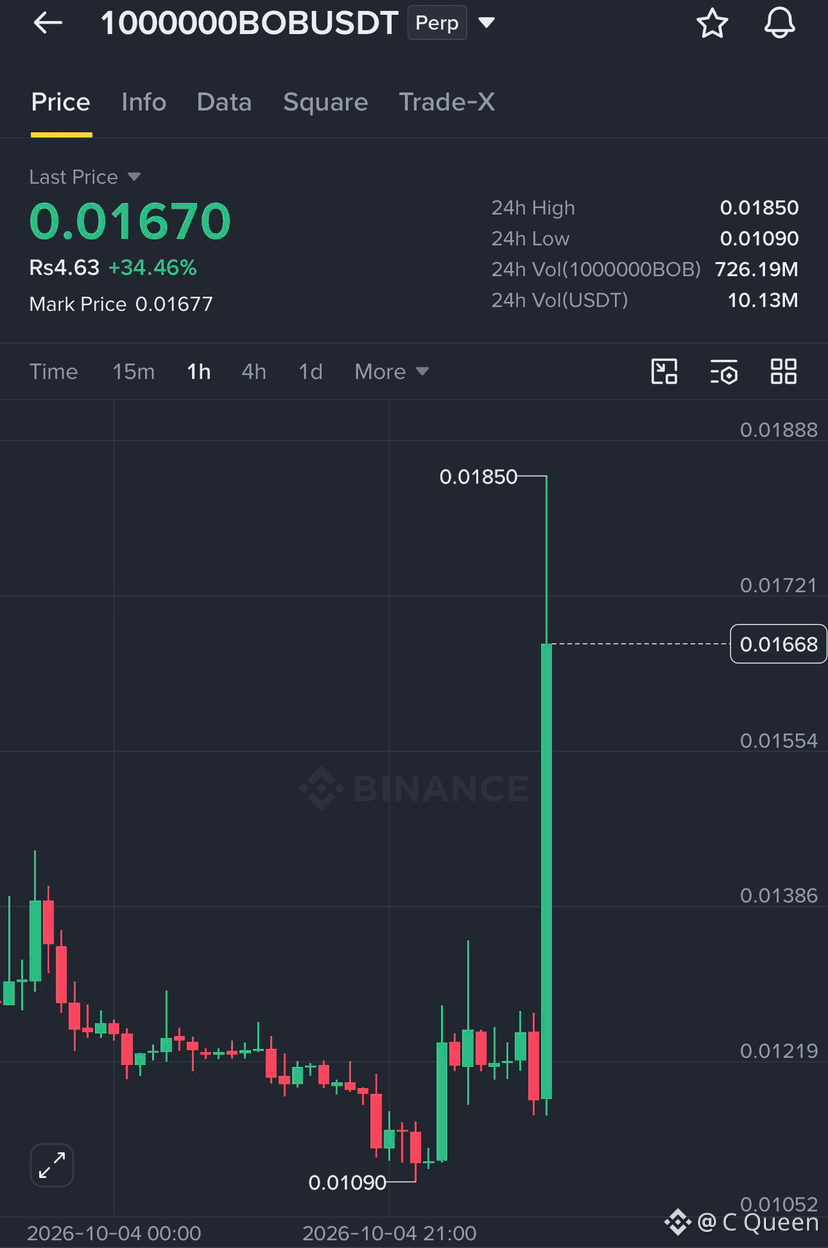
みんな、$1000000BOB を見て👀 今日は+34%で、0.01670付近を維持しています。勢いが続けば、TP1は0.01721、TP2は0.01850、利確は0.01888付近を目安に。重要なサポートとして0.01554に注目。
{future}(1000000BOBUSDT)
みんな、$1000000BOB を見て👀 今日は+34%で、0.01670付近を維持しています。勢いが続けば、TP1は0.01721、TP2は0.01850、利確は0.01888付近を目安に。重要なサポートとして0.01554に注目。
1
2
779
·
--
ブリッシュ
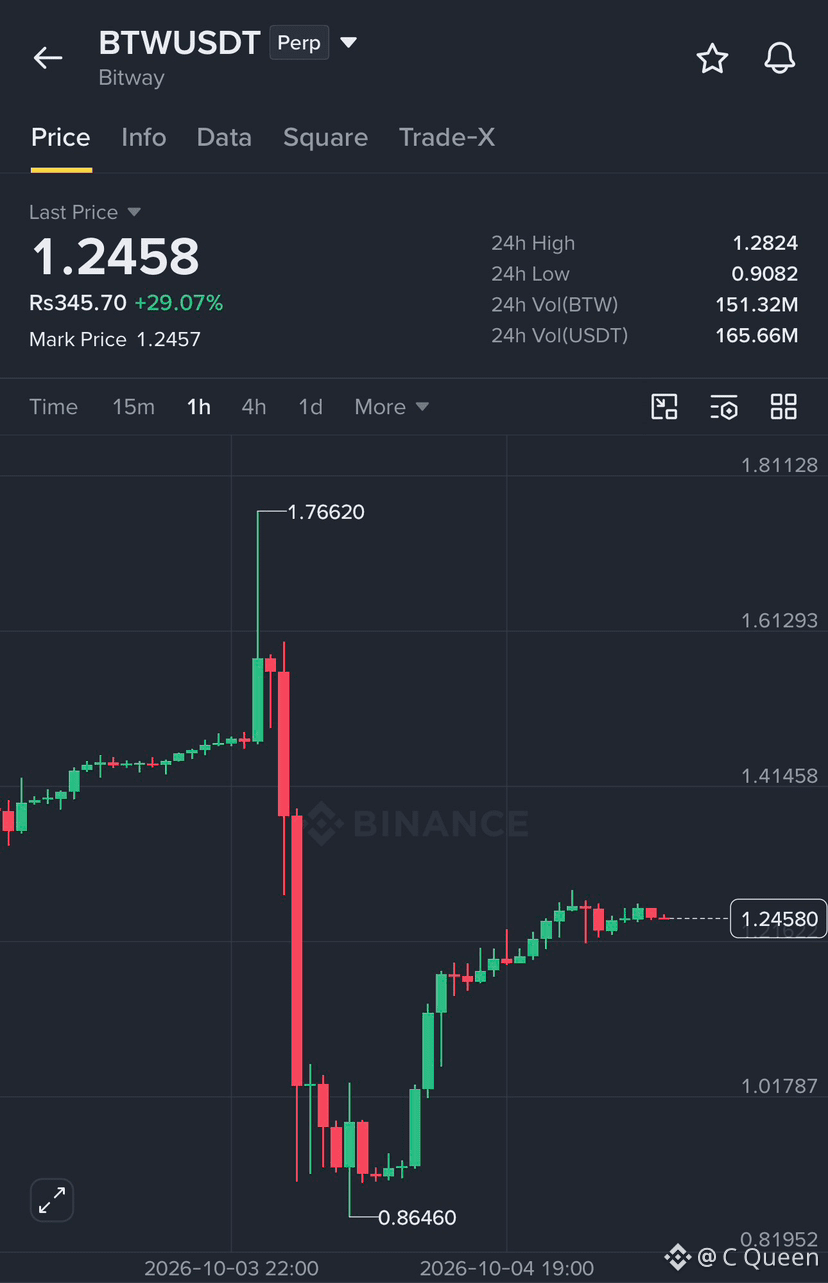
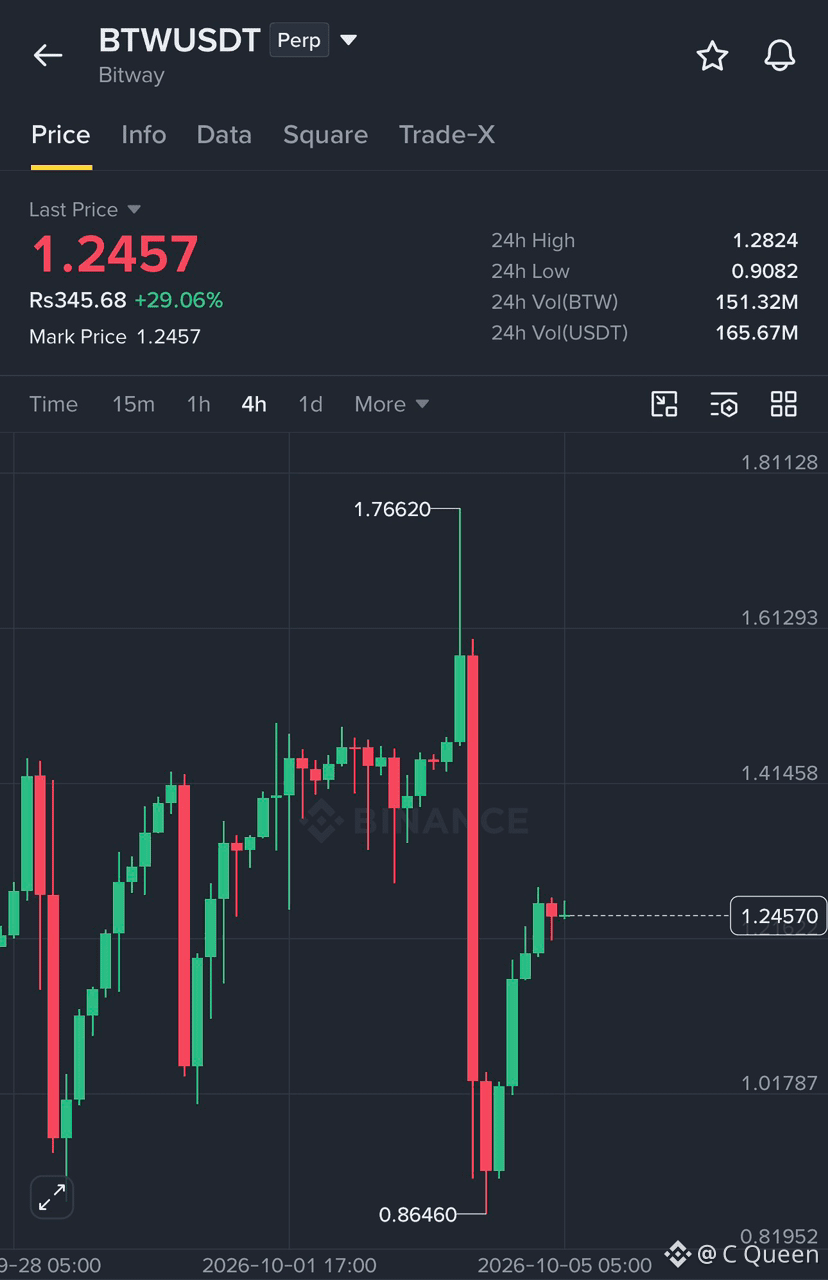
みんな、$BTW が強い勢いを見せています…!! 🔥 $BTW は現在約$1.2458で取引されており、29.07%上昇しています。大幅な上昇の後、価格は$1.28のレジスタンスを試しています。ここを上抜ければ、さらに高い水準を目指す展開になるかもしれません。
🎯 TP1: $1.4145
🎯 TP2: $1.6129
💰 利確目標: $1.8112
サポート: $1.0178
$1.28を力強く上抜けるか注目しています。$BTW が次にどう動くか見ていきましょう、Binanceファミリー! �
{future}(BTWUSDT)
みんな、$BTW が強い勢いを見せています…!! 🔥 $BTW は現在約$1.2458で取引されており、29.07%上昇しています。大幅な上昇の後、価格は$1.28のレジスタンスを試しています。ここを上抜ければ、さらに高い水準を目指す展開になるかもしれません。
🎯 TP1: $1.4145
🎯 TP2: $1.6129
💰 利確目標: $1.8112
サポート: $1.0178
$1.28を力強く上抜けるか注目しています。$BTW が次にどう動くか見ていきましょう、Binanceファミリー! �
🎯 TP1: $1.4145
🎯 TP2: $1.6129
💰 利確目標: $1.8112
サポート: $1.0178
$1.28を力強く上抜けるか注目しています。$BTW が次にどう動くか見ていきましょう、Binanceファミリー! �
2
561
·
--
ブリッシュ
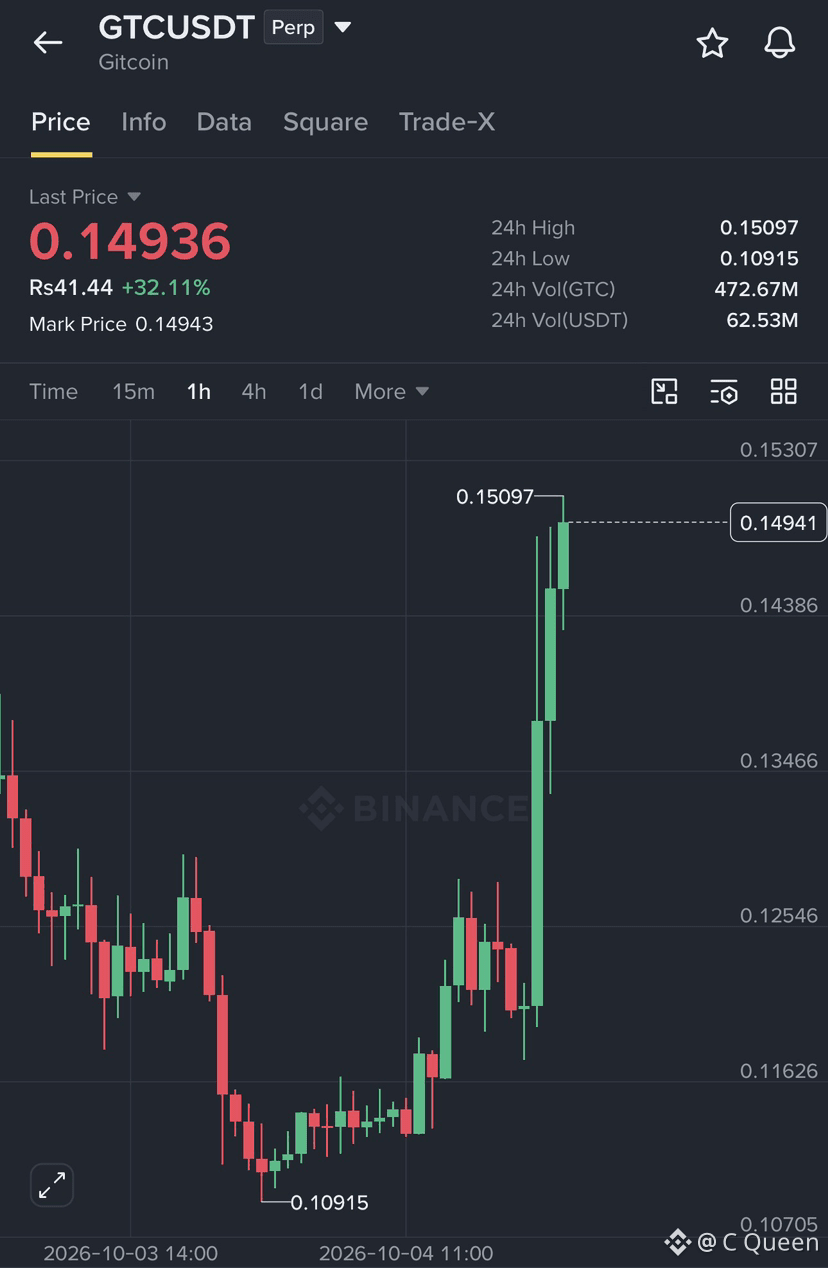
みなさん、$GTC は32%の急騰の後、強い強気モメンタムを見せています..!! 🔥 価格は$0.14936近辺で取引されており、重要なレジスタンスは$0.15097です。明確なブレイクアウトが起これば、さらなる高値への道が開けるかもしれません。
🎯 TP1: $0.1550
🎯 TP2: $0.1620
💰 利確(Take Profit): $0.1700
{future}(GTCUSDT)
みなさん、$GTC は32%の急騰の後、強い強気モメンタムを見せています..!! 🔥 価格は$0.14936近辺で取引されており、重要なレジスタンスは$0.15097です。明確なブレイクアウトが起これば、さらなる高値への道が開けるかもしれません。
🎯 TP1: $0.1550
🎯 TP2: $0.1620
💰 利確(Take Profit): $0.1700
🎯 TP1: $0.1550
🎯 TP2: $0.1620
💰 利確(Take Profit): $0.1700
1
2
850
·
--
ブリッシュ
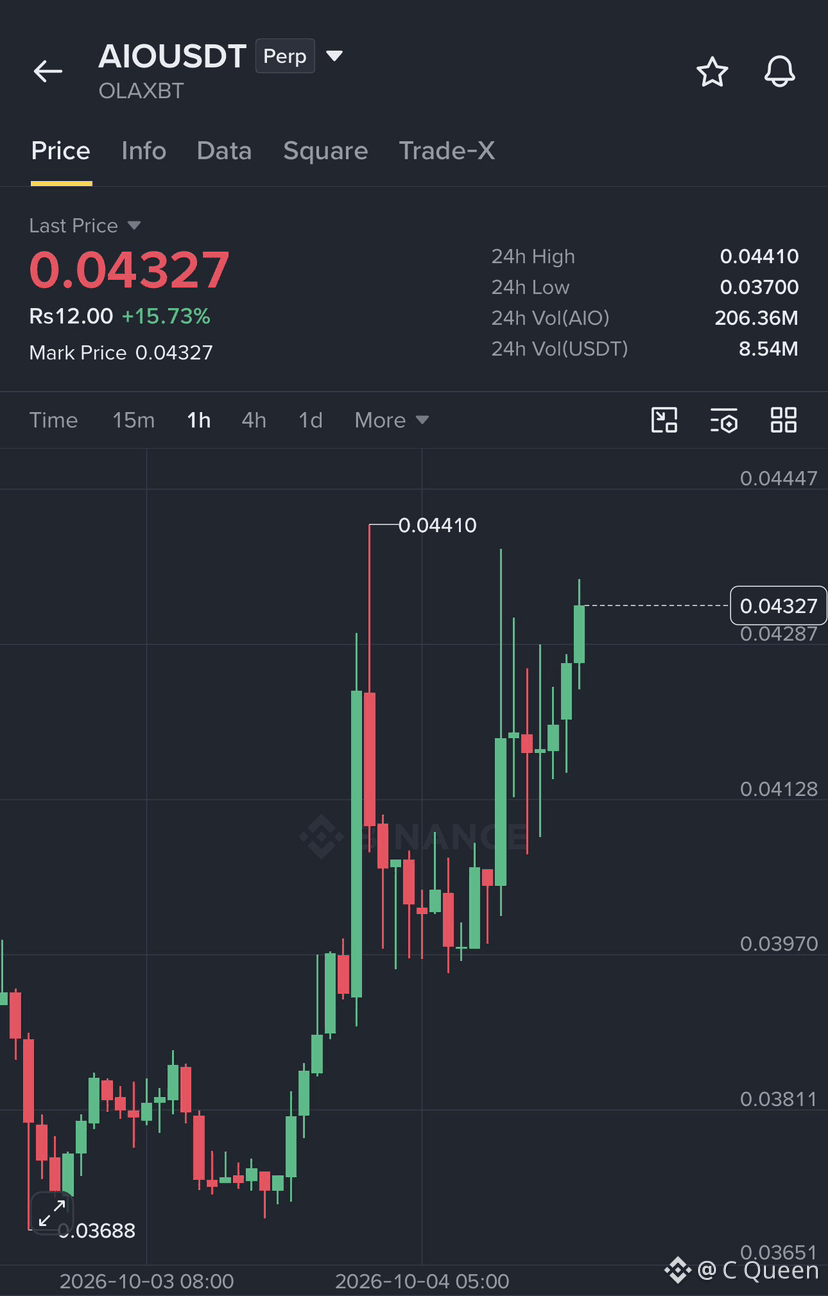
みんな、$AIO が強い強気モメンタムを見せてるよ!! 🚀 $AIO は$0.04327で取引されていて、15.73%上昇中。買い手が価格を押し上げており、$0.04410を上回ったまま維持できれば、次の動きへの扉が開くかもしれない。TP1: $0.04600 | TP2: $0.04900 🎯 利確: $0.05200。この一つはしっかり見ていこう、バイナンス仲間!!
{future}(AIOUSDT)
みんな、$AIO が強い強気モメンタムを見せてるよ!! 🚀 $AIO は$0.04327で取引されていて、15.73%上昇中。買い手が価格を押し上げており、$0.04410を上回ったまま維持できれば、次の動きへの扉が開くかもしれない。TP1: $0.04600 | TP2: $0.04900 🎯 利確: $0.05200。この一つはしっかり見ていこう、バイナンス仲間!!
1
480
·
--
ブリッシュ
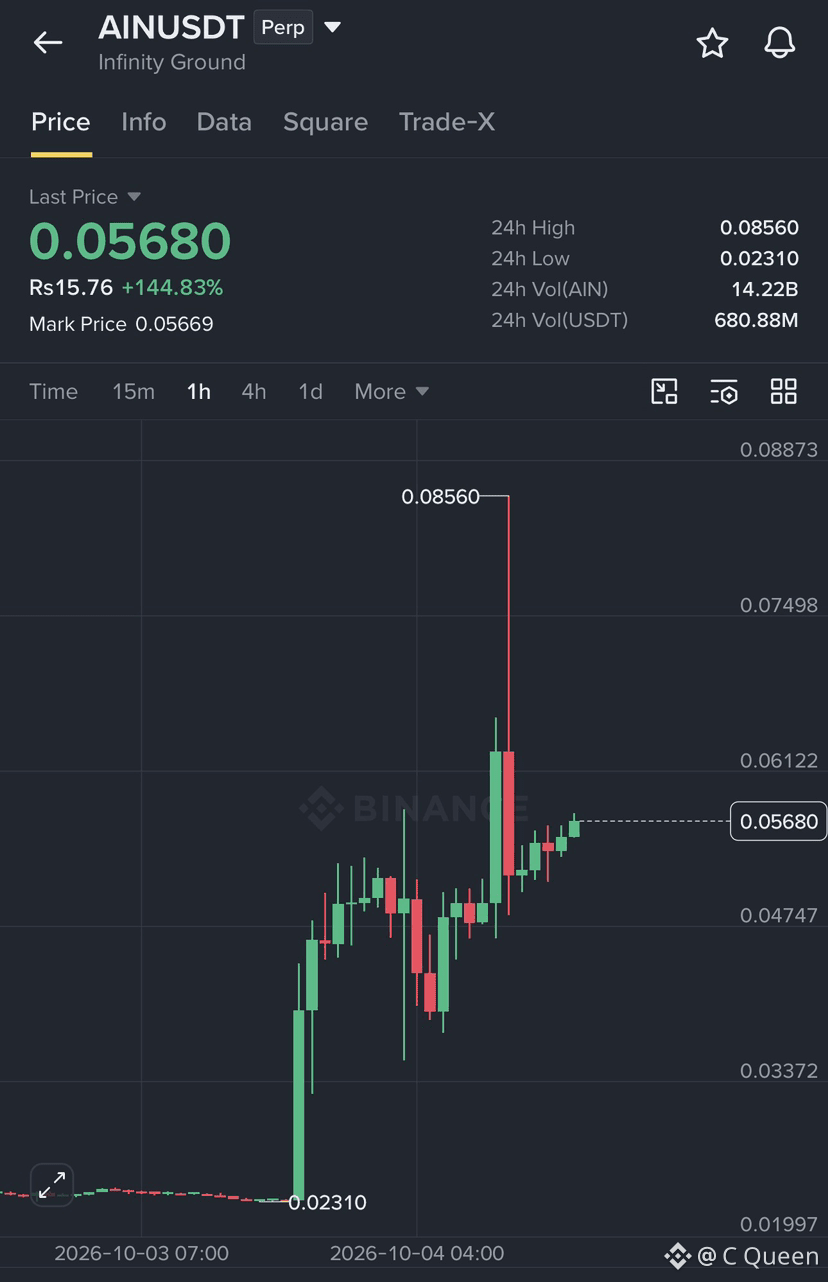
ねえ、$AIN が大きく動こうとしてる…!! 🚀 $AIN は約145%上昇していて、強い強気の勢いを見せてます。急騰の後、価格は現在およそ$0.05680。次のレジスタンスは$0.06122を見てください。ブレイクするとTP1 $0.07498、さらにTP2 $0.08560へ進む可能性があります。🎯 利確(Take Profit): $0.08560。集中していこう、Binanceファミリー…!!
{future}(AINUSDT)
ねえ、$AIN が大きく動こうとしてる…!! 🚀 $AIN は約145%上昇していて、強い強気の勢いを見せてます。急騰の後、価格は現在およそ$0.05680。次のレジスタンスは$0.06122を見てください。ブレイクするとTP1 $0.07498、さらにTP2 $0.08560へ進む可能性があります。🎯 利確(Take Profit): $0.08560。集中していこう、Binanceファミリー…!!
1
3
618
·
--
ブリッシュ
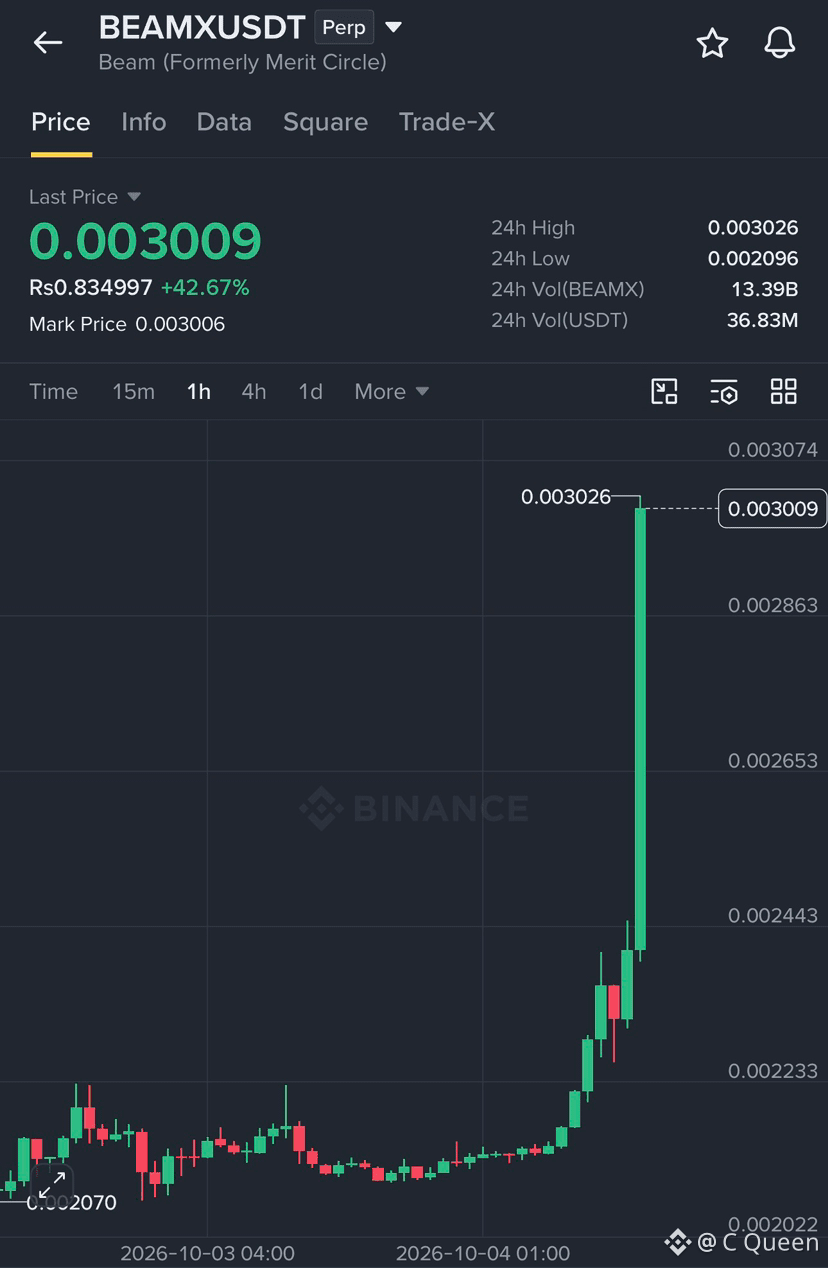
みんな、$BEAMX が急加速してる…!! 🚀 $BEAMX が強い強気のブレイクアウトを出して、勢いも強くて+42.67%まで跳ね上がった。買い手が明確に活発で、次のレジスタンス水準を注意深く見てるよ。
🎯 TP1: $0.003026
🎯 TP2: $0.003074
💰 利確(Take Profit): $0.003074
勢いが続けば、$BEAMX はみんなを驚かせるかもしれない!
{future}(BEAMXUSDT)
みんな、$BEAMX が急加速してる…!! 🚀 $BEAMX が強い強気のブレイクアウトを出して、勢いも強くて+42.67%まで跳ね上がった。買い手が明確に活発で、次のレジスタンス水準を注意深く見てるよ。
🎯 TP1: $0.003026
🎯 TP2: $0.003074
💰 利確(Take Profit): $0.003074
勢いが続けば、$BEAMX はみんなを驚かせるかもしれない!
🎯 TP1: $0.003026
🎯 TP2: $0.003074
💰 利確(Take Profit): $0.003074
勢いが続けば、$BEAMX はみんなを驚かせるかもしれない!
4
928
·
--
ブリッシュ
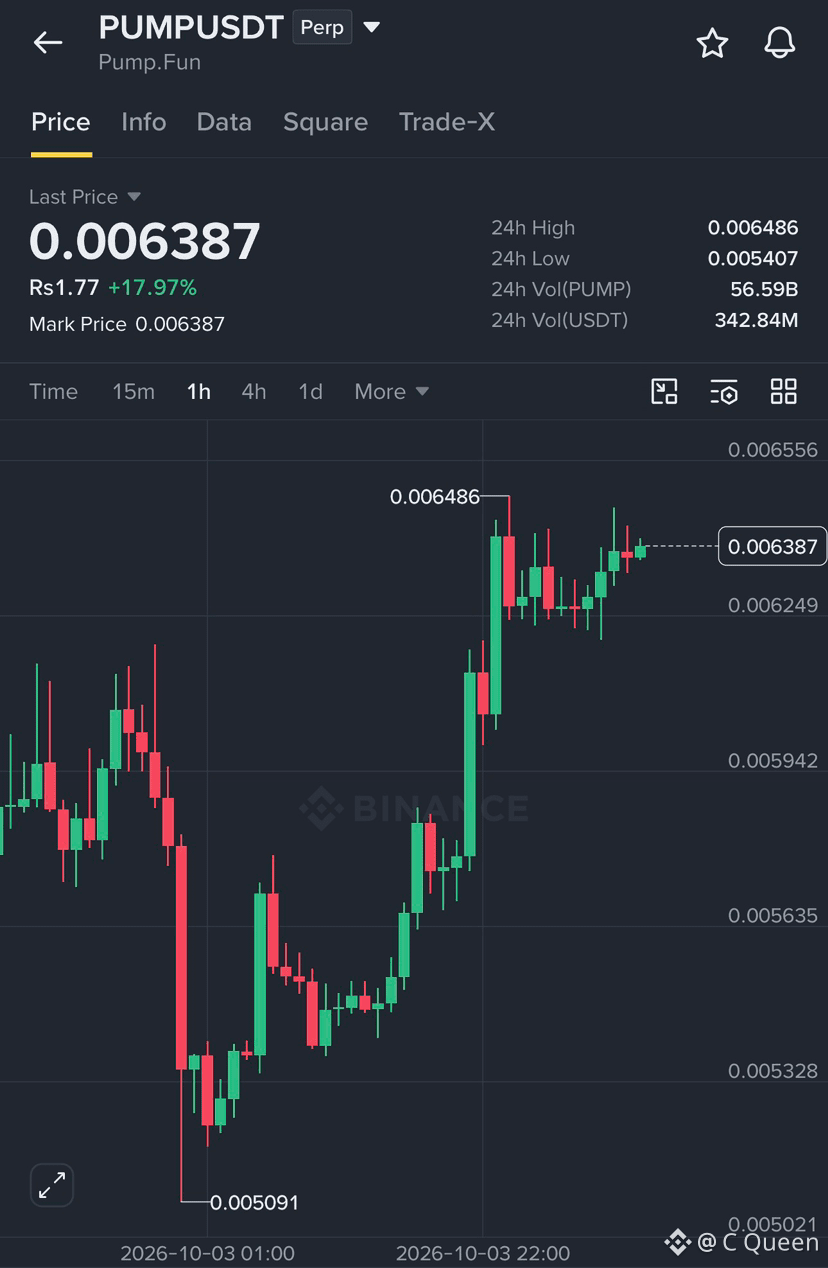
$PUMP — 強気派がさらに高値を狙っています!👀 強いリカバリーの後、価格は0.006387前後で推移しています。主要な抵抗は0.006486です。この水準を上抜けると、もう一段の強気の動きにつながる可能性があります。
🎯 TP1: 0.00655
🎯 TP2: 0.00670
💰 利確: 2つの目標で分割して利確。
{future}(PUMPUSDT)
$PUMP — 強気派がさらに高値を狙っています!👀 強いリカバリーの後、価格は0.006387前後で推移しています。主要な抵抗は0.006486です。この水準を上抜けると、もう一段の強気の動きにつながる可能性があります。
🎯 TP1: 0.00655
🎯 TP2: 0.00670
💰 利確: 2つの目標で分割して利確。
🎯 TP1: 0.00655
🎯 TP2: 0.00670
💰 利確: 2つの目標で分割して利確。
1
278
·
--
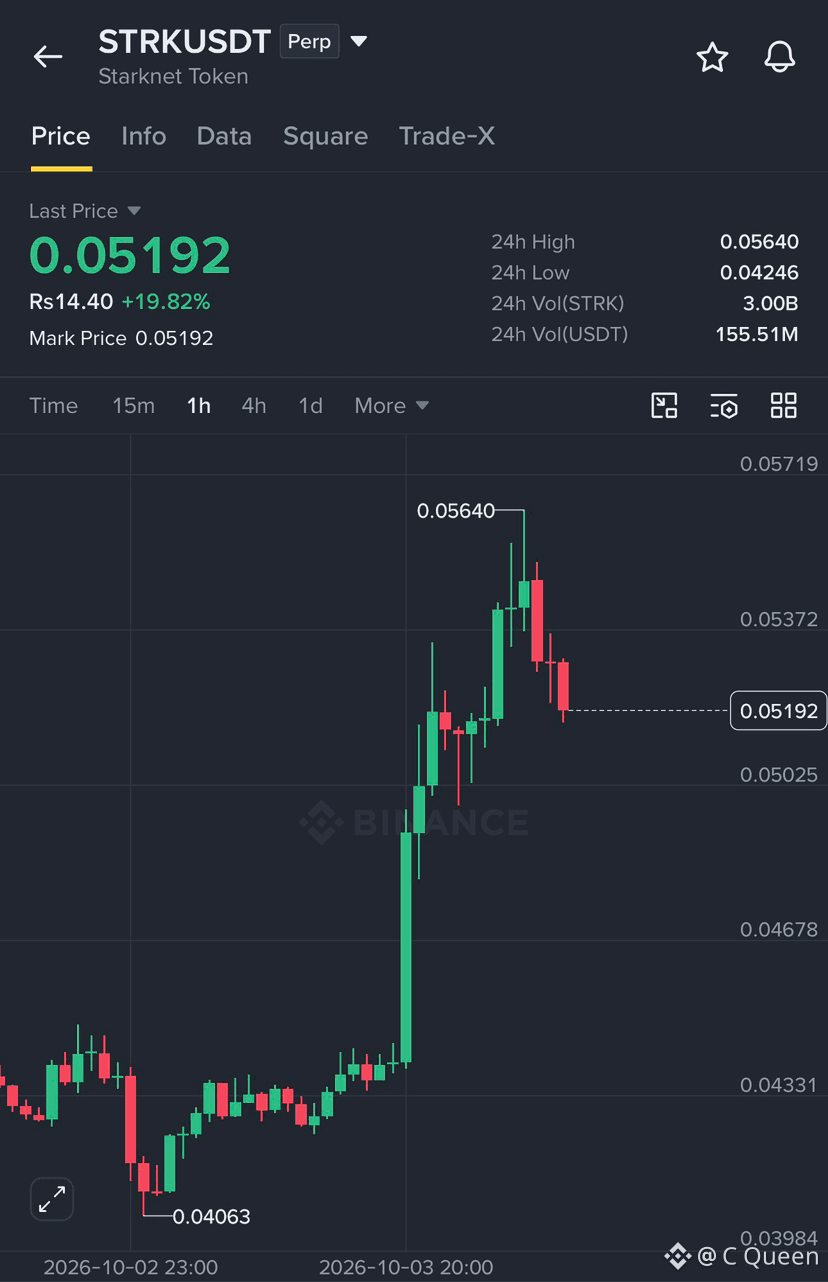
$STRK は目を覚ましてますよ、みんな!🔥 価格は$0.043から強い動きを見せて$0.05640まで到達しましたが、今は$0.05192あたりで一息ついています。$0.05025を注意深く見ています。ここで買い手が入ってくれば、次は$0.05400や$0.05640があり得ます。牡牛たちが再び主導権を取り戻せるか見ていきましょう! �
{future}(STRKUSDT)
$STRK は目を覚ましてますよ、みんな!🔥 価格は$0.043から強い動きを見せて$0.05640まで到達しましたが、今は$0.05192あたりで一息ついています。$0.05025を注意深く見ています。ここで買い手が入ってくれば、次は$0.05400や$0.05640があり得ます。牡牛たちが再び主導権を取り戻せるか見ていきましょう! �
4
692
·
--
ブリッシュ
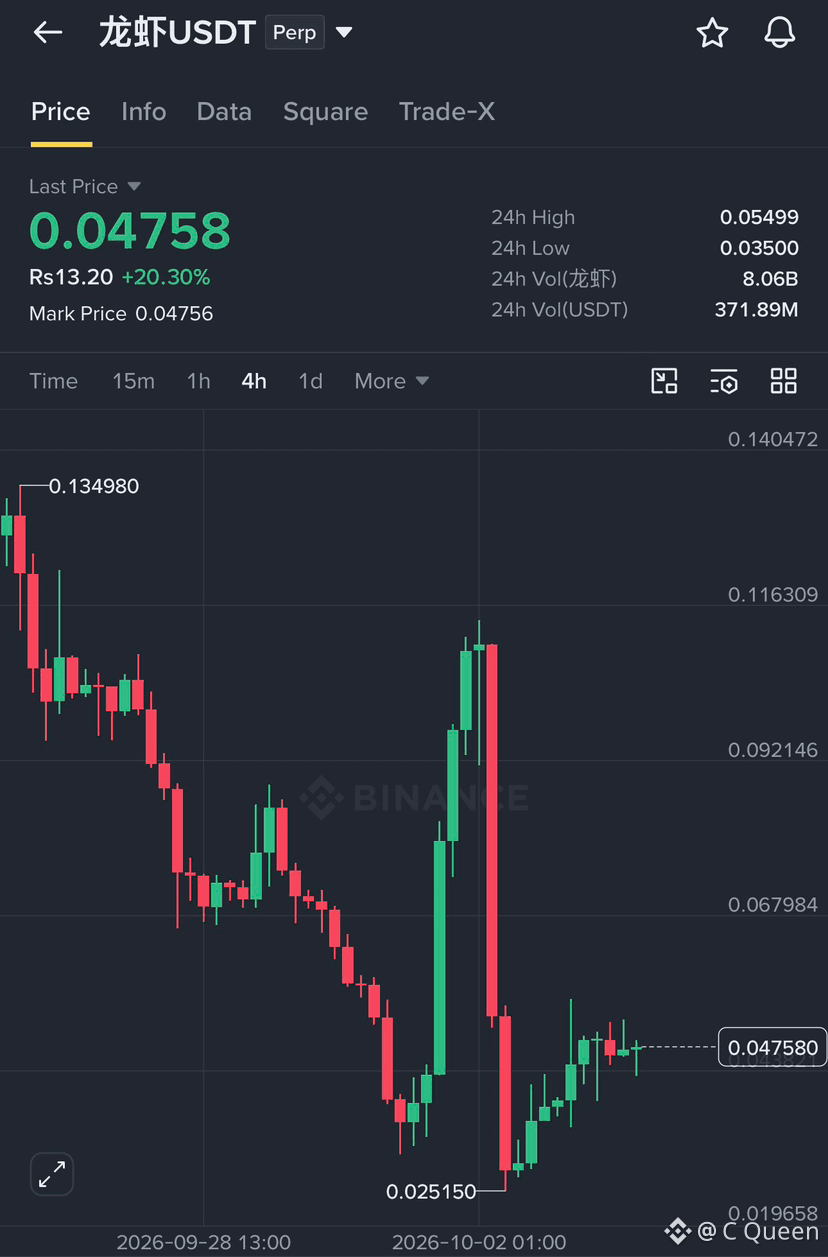
$龙虾 USDT🚀回復が面白くなってきました、皆さん!$0.02515まで急落した後、価格は強く反発し、現在は約$0.04758で取引されています。買い手は再び勢いをつけようとしています。$0.05000を上抜けると、$0.05499や$0.06000に向けた道が開ける可能性があります。$0.04200のサポートをしっかり注視してください。このゾーンを買い手が維持できれば、次の強気の動きが来るかもしれません。 �
{future}(龙虾USDT)
$龙虾 USDT🚀回復が面白くなってきました、皆さん!$0.02515まで急落した後、価格は強く反発し、現在は約$0.04758で取引されています。買い手は再び勢いをつけようとしています。$0.05000を上抜けると、$0.05499や$0.06000に向けた道が開ける可能性があります。$0.04200のサポートをしっかり注視してください。このゾーンを買い手が維持できれば、次の強気の動きが来るかもしれません。 �
1
2
1.2k
·
--
ブリッシュ
🚀 $PUMPBTC — ブルズが再始動!
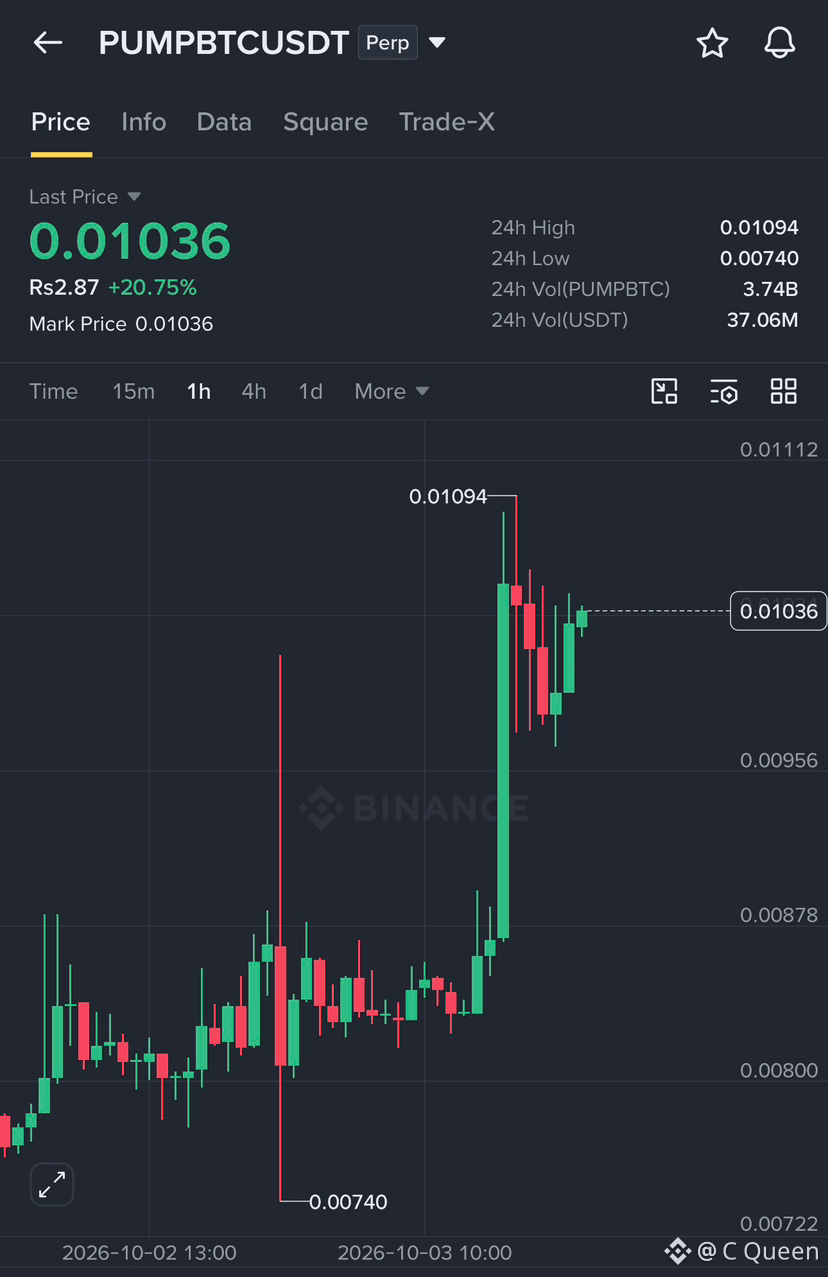
みんな、$PUMPBTC は強い強気モメンタムを示しており、現在 0.01036(+20.75%)で取引されています。買い手が勢いよく入ってきており、価格は 0.01094 の主要なレジスタンス・ゾーンに接近中です。明確なブレイクアウトが起きれば、さらに上方向への動きのチャンスが開けます。
🎯 TP1: 0.01150
🎯 TP2: 0.01220
🛑 SL: 0.00970
{future}(PUMPBTCUSDT)
🚀 $PUMPBTC — ブルズが再始動!
みんな、$PUMPBTC は強い強気モメンタムを示しており、現在 0.01036(+20.75%)で取引されています。買い手が勢いよく入ってきており、価格は 0.01094 の主要なレジスタンス・ゾーンに接近中です。明確なブレイクアウトが起きれば、さらに上方向への動きのチャンスが開けます。
🎯 TP1: 0.01150
🎯 TP2: 0.01220
🛑 SL: 0.00970
みんな、$PUMPBTC は強い強気モメンタムを示しており、現在 0.01036(+20.75%)で取引されています。買い手が勢いよく入ってきており、価格は 0.01094 の主要なレジスタンス・ゾーンに接近中です。明確なブレイクアウトが起きれば、さらに上方向への動きのチャンスが開けます。
🎯 TP1: 0.01150
🎯 TP2: 0.01220
🛑 SL: 0.00970
3
727
·
--
ブリッシュ
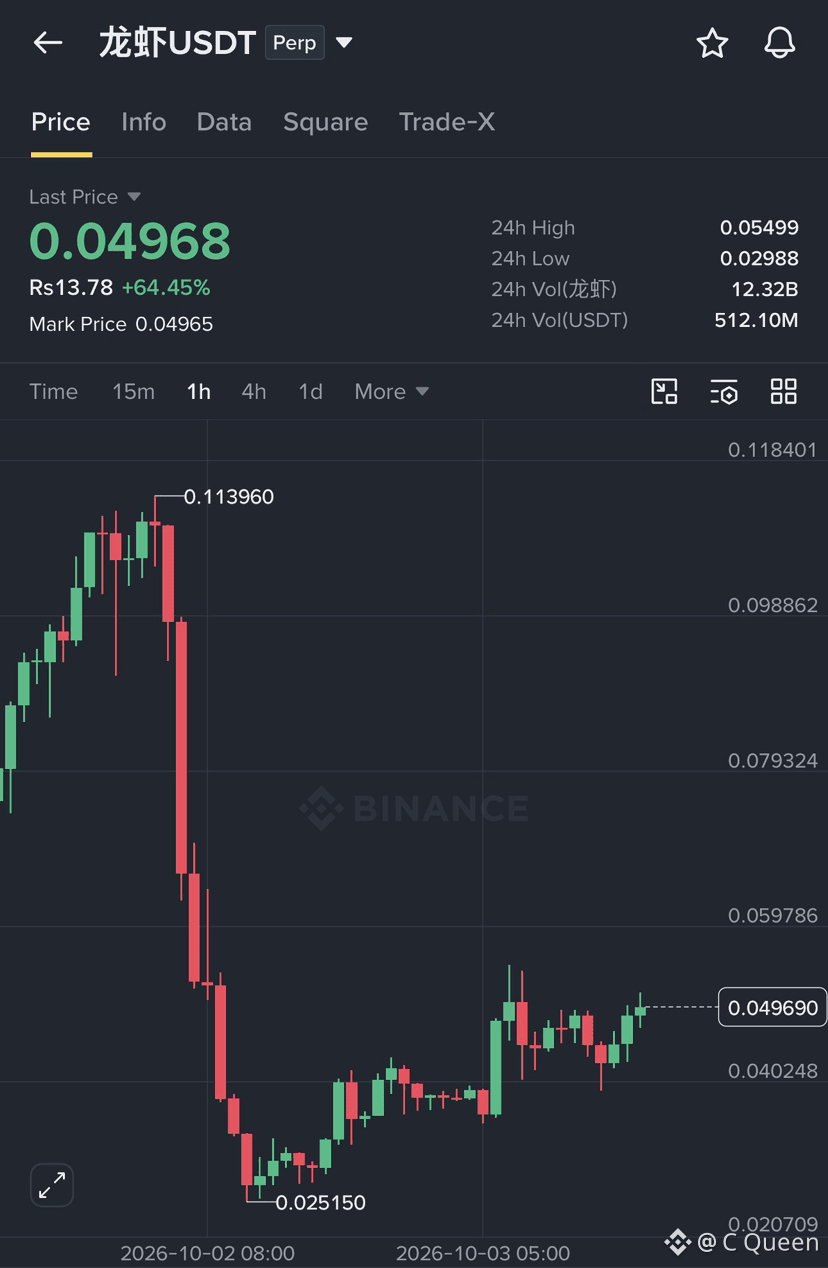
皆さん、$龙虾 が強いリカバリーを見せています!価格は0.04968 USDT前後で推移しており、64.45%上昇、出来高は512M USDTと非常に大きいです。最近の下落の後、ブル(買い手)が強く押し上げています。重要なレジスタンスは0.05499を注視してください。ブレイク(突破)すれば、TP1: 0.05978、TP2: 0.07932へ向かう道が開ける可能性があります。ただし、0.04024を割り込むとリカバリーが弱まるかもしれません。買い手がこの勢いを維持できるか見ていきましょう! �
{future}(龙虾USDT)
皆さん、$龙虾 が強いリカバリーを見せています!価格は0.04968 USDT前後で推移しており、64.45%上昇、出来高は512M USDTと非常に大きいです。最近の下落の後、ブル(買い手)が強く押し上げています。重要なレジスタンスは0.05499を注視してください。ブレイク(突破)すれば、TP1: 0.05978、TP2: 0.07932へ向かう道が開ける可能性があります。ただし、0.04024を割り込むとリカバリーが弱まるかもしれません。買い手がこの勢いを維持できるか見ていきましょう! �
1
3
1.1k
·
--
ブリッシュ
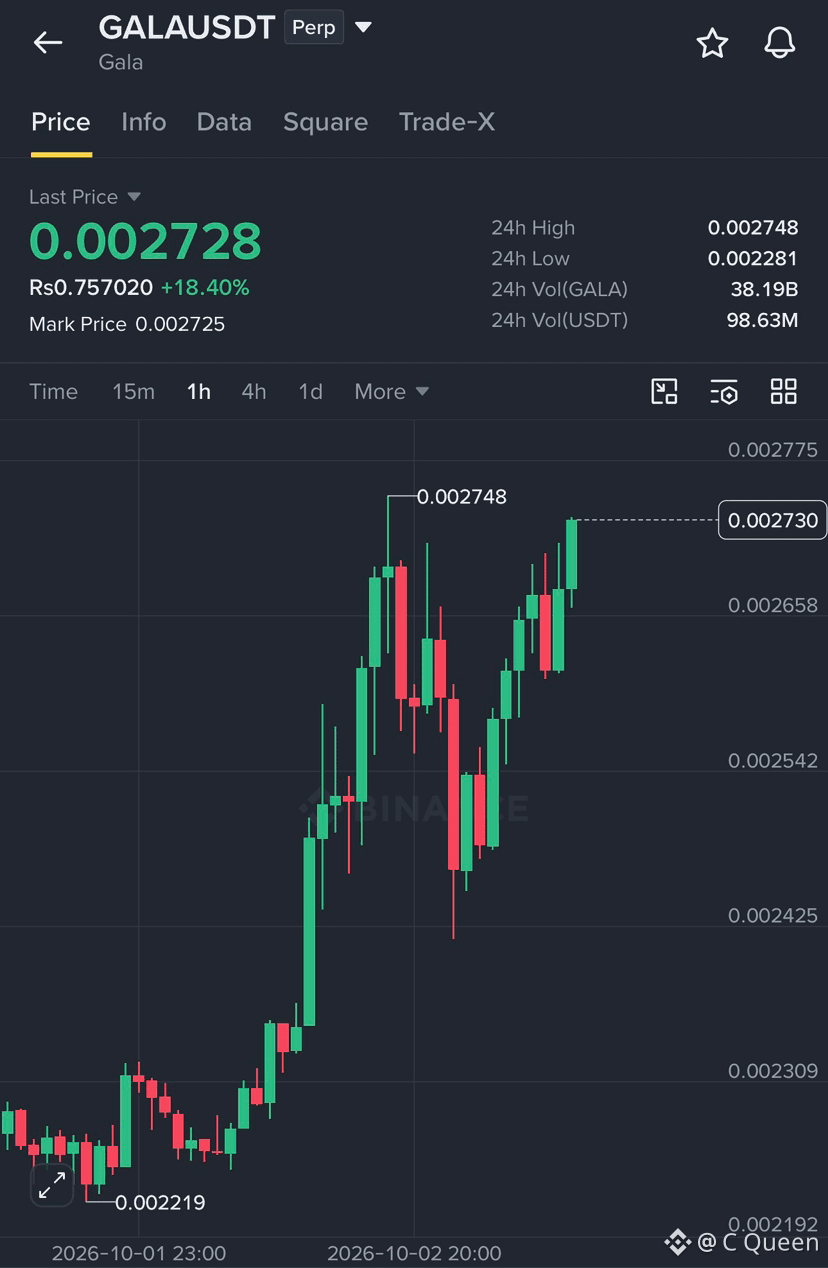
🚀 $GALA は強い上昇モメンタムを見せています、みんな!しっかりと回復した後、価格は $0.002730 付近で推移しています。買い方が $0.002748 のレジスタンスに向けて押し上げており、ブレイクアウトが起きればさらなる上昇の道が開けるかもしれません。
🎯 TP1: $0.00280
🎯 TP2: $0.00290
💰 各ターゲットで利益を部分的に確定してください。
サポート: $0.002658
ブレイクアウトに注目してね、みんな! �
{future}(GALAUSDT)
🚀 $GALA は強い上昇モメンタムを見せています、みんな!しっかりと回復した後、価格は $0.002730 付近で推移しています。買い方が $0.002748 のレジスタンスに向けて押し上げており、ブレイクアウトが起きればさらなる上昇の道が開けるかもしれません。
🎯 TP1: $0.00280
🎯 TP2: $0.00290
💰 各ターゲットで利益を部分的に確定してください。
サポート: $0.002658
ブレイクアウトに注目してね、みんな! �
🎯 TP1: $0.00280
🎯 TP2: $0.00290
💰 各ターゲットで利益を部分的に確定してください。
サポート: $0.002658
ブレイクアウトに注目してね、みんな! �
1
287
·
--
ブリッシュ
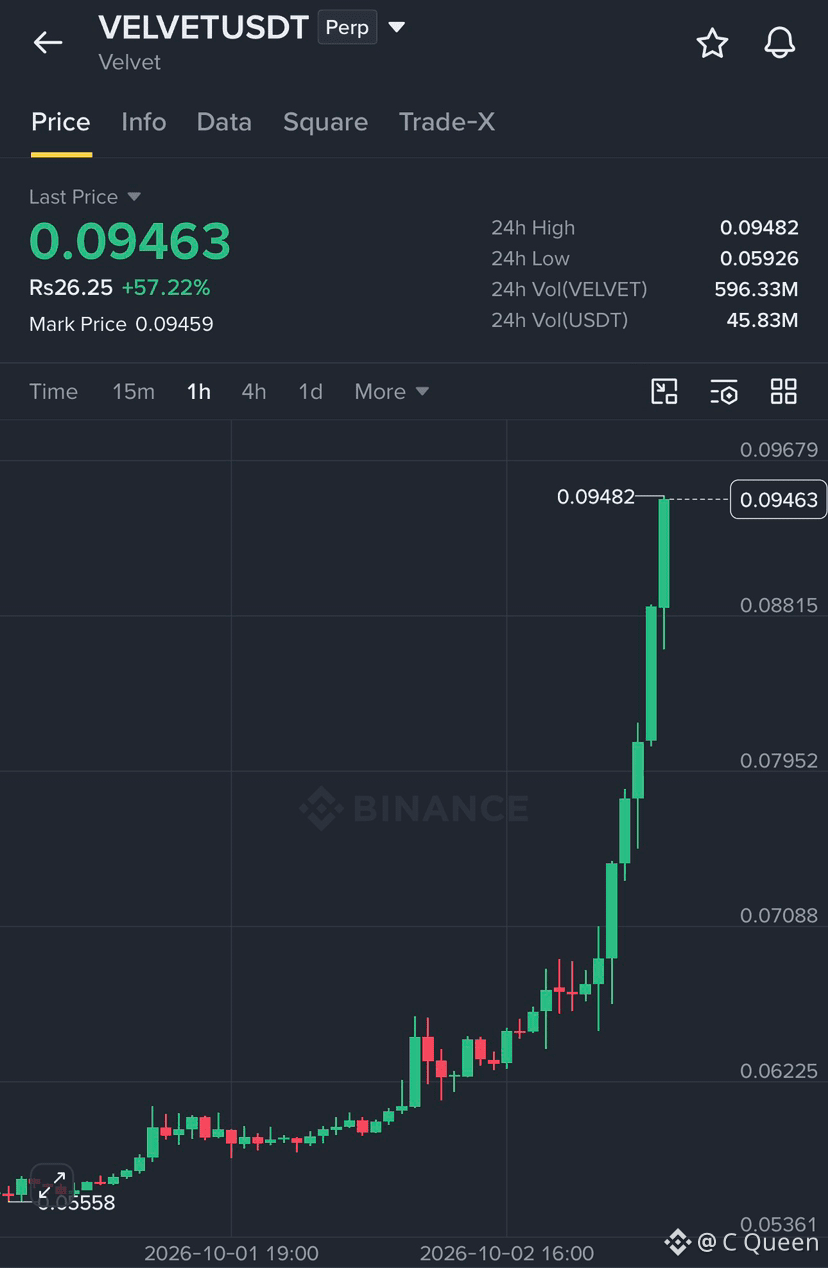
$VELVET は強い勢いを見せています、皆さん!+57.22%で、$0.09463で取引中です。買い手は $0.09482 のレジスタンスをテストしています。
🎯 TP1: $0.100
🎯 TP2: $0.105
利益確定は段階的に行い、ブレイク確認を待ちましょう。安全に!
{future}(VELVETUSDT)
$VELVET は強い勢いを見せています、皆さん!+57.22%で、$0.09463で取引中です。買い手は $0.09482 のレジスタンスをテストしています。
🎯 TP1: $0.100
🎯 TP2: $0.105
利益確定は段階的に行い、ブレイク確認を待ちましょう。安全に!
🎯 TP1: $0.100
🎯 TP2: $0.105
利益確定は段階的に行い、ブレイク確認を待ちましょう。安全に!
4
757
·
--
ブリッシュ
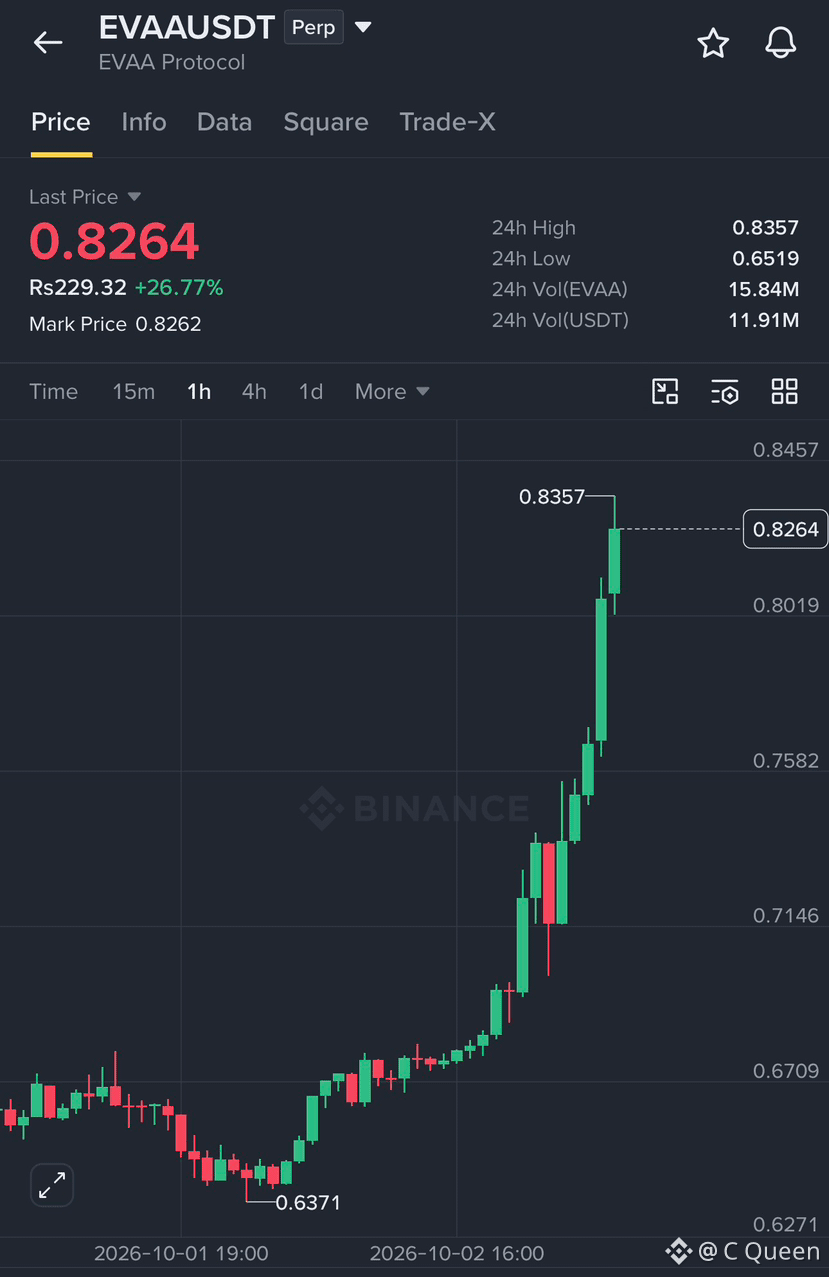
皆さん、$EVAA は強い強気モメンタムを示しています! 🚀 価格は26.77%上昇しており、$0.8264近辺で取引されていて、$0.8357のレジスタンスをわずかに下回っています。このレベルを上抜ける明確なブレイクが起これば、$0.85や$0.88に向かう可能性があります。エントリーする前に、レジスタンス上で強い足のクローズを確認してください。 �
{future}(EVAAUSDT)
皆さん、$EVAA は強い強気モメンタムを示しています! 🚀 価格は26.77%上昇しており、$0.8264近辺で取引されていて、$0.8357のレジスタンスをわずかに下回っています。このレベルを上抜ける明確なブレイクが起これば、$0.85や$0.88に向かう可能性があります。エントリーする前に、レジスタンス上で強い足のクローズを確認してください。 �
1
3
640
·
--
ブリッシュ
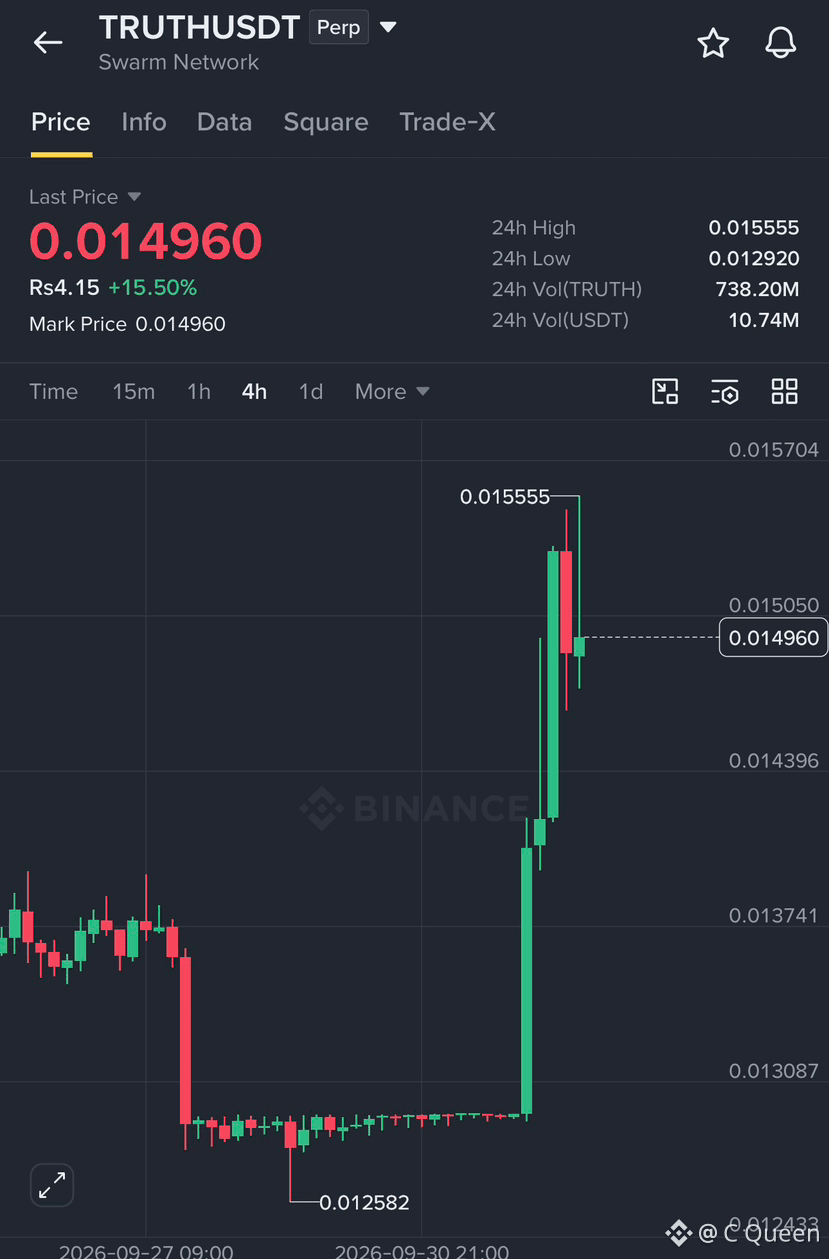
みなさん、$TRUTH が動いています👀。$0.01496で15.5%上昇中。次は$0.01555に注目 — 綺麗なブレイクが起こればさらに上昇する可能性があります。🔥📈
{future}(TRUTHUSDT)
みなさん、$TRUTH が動いています👀。$0.01496で15.5%上昇中。次は$0.01555に注目 — 綺麗なブレイクが起こればさらに上昇する可能性があります。🔥📈
2
426
ログインして、さらにコンテンツを読む
厳選トピックで世界の暗号資産トレーダーの仲間入り
⚡️ 暗号資産に関する最新かつ有益な情報が見つかります。
💬 世界最大の暗号資産取引所から信頼されています。
👍 認証を受けたクリエイターから、有益なインサイトを得られます。
メール / 電話番号
トレンドトピック
ADAGains10%Above$0.27
閲覧回数 6,305
132人が討論中
$ADA は本日大きく上昇し、10%超値上がりして027前後に達し、90日間の新高値を更新しました。
取引高も10億を超えて急増しており、市場の活況を示しています。
この動きは、$ADA が6月の安値から回復を続けるなか、最近のテクニカル面の形勢がより強気に転じたことを背景としています。
現在、027~028のゾーンが注目すべき重要な水準です。上抜けが続けば、さらに上の抵抗線を目指す展開となる可能性があります。
ただし、これほど急激な日中の値動きの後は、ボラティリティが高い状態が続く可能性があります。
#ADAGains10%Above$0.27 #crypto #ADA #Cardano #crypto #Write2Earn
AbdullahAbid_7
·いいね:0件
·閲覧回数 262
ETHUp70%InQ3ButLiquidityFalls
閲覧回数 74,690
771人が討論中
EthStakingExitQueueHits2026High
閲覧回数 28,519
602人が討論中