

Crypto Setups ZR
10.4k 投稿

Crypto Setups ZR
報告
ユーザーをブロック
توكلنا على الله أخوكم في الله أشارككم أفضل ما أجد Best setups take if fits you Follow FREE ورزقكم على الله دائما Zora_x
2 フォロー
2.8K+ フォロワー
22.0K+ いいね
投稿
すべて
引用
·
--
ブリッシュ
翻訳参照
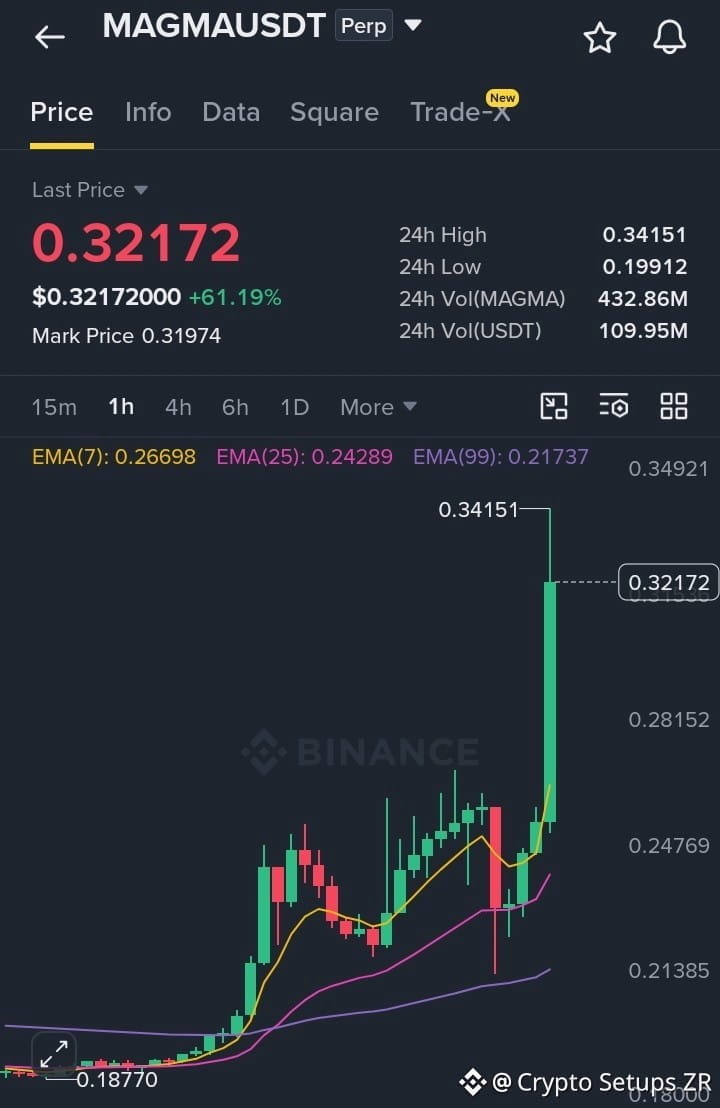
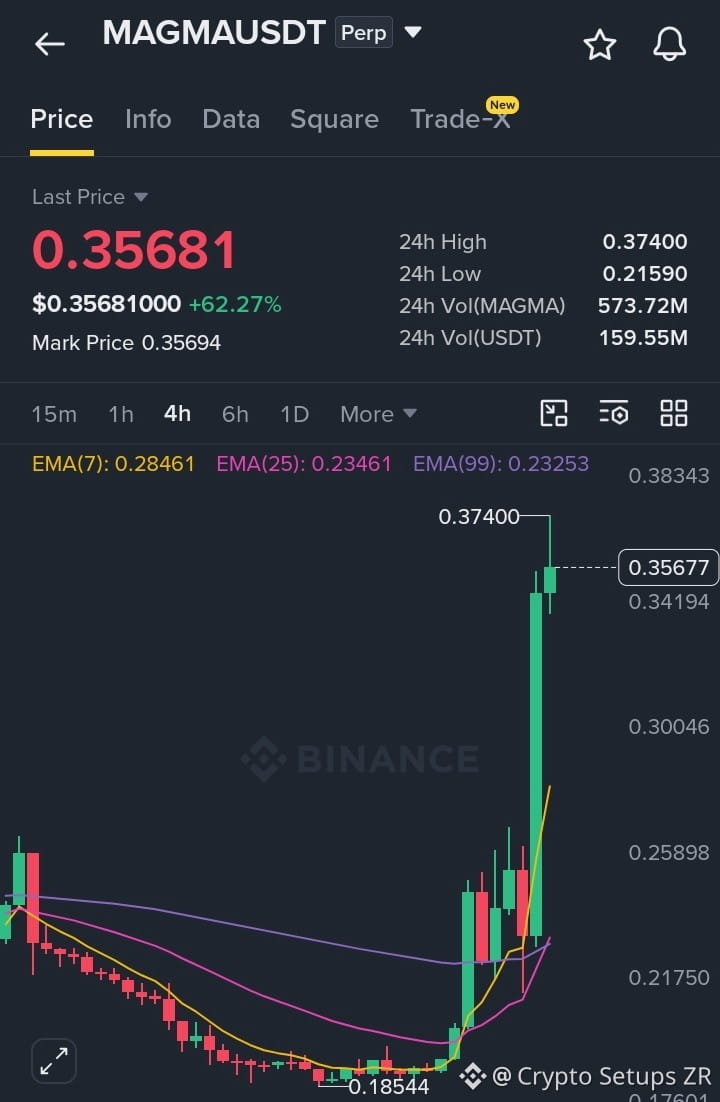
What do you think about $MAGMA ⁉️
It will pump like $QNT and $LSK ⁉️
Or Dump like $MOVR ⁉️
Big move is loading.. 💥💥💥💥
{future}(MAGMAUSDT)
{future}(QNTUSDT)
{future}(MOVRUSDT)
What do you think about $MAGMA ⁉️
It will pump like $QNT and $LSK ⁉️
Or Dump like $MOVR ⁉️
Big move is loading.. 💥💥💥💥
It will pump like $QNT and $LSK ⁉️
Or Dump like $MOVR ⁉️
Big move is loading.. 💥💥💥💥
2
314
·
--
ブリッシュ
翻訳参照
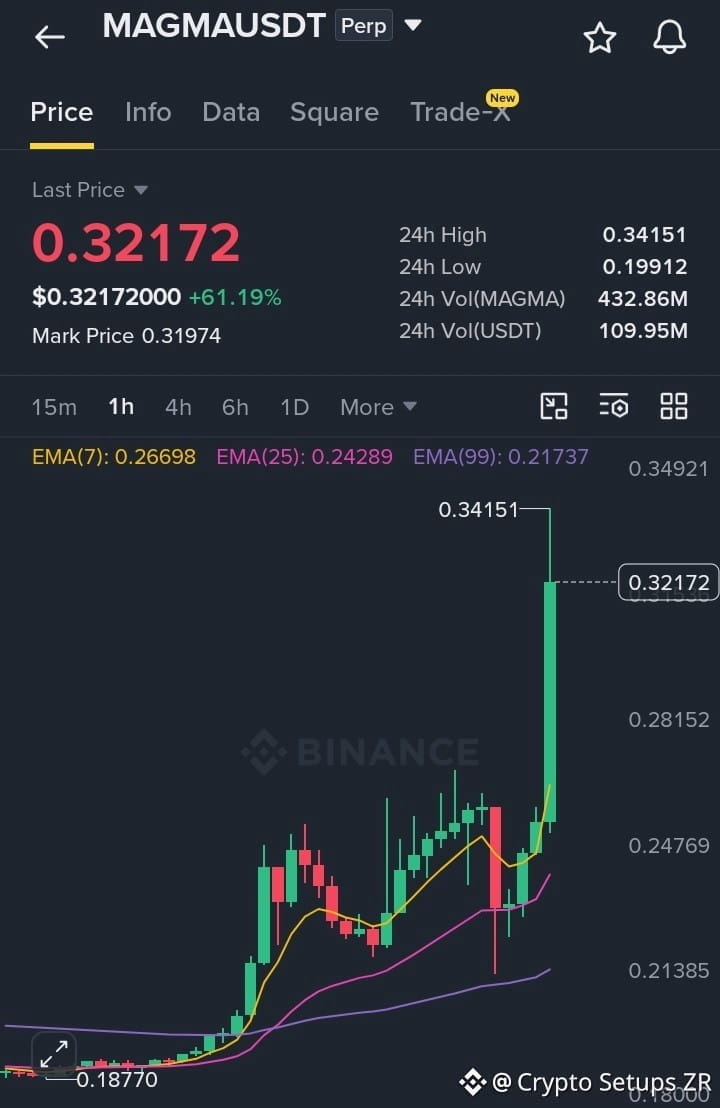
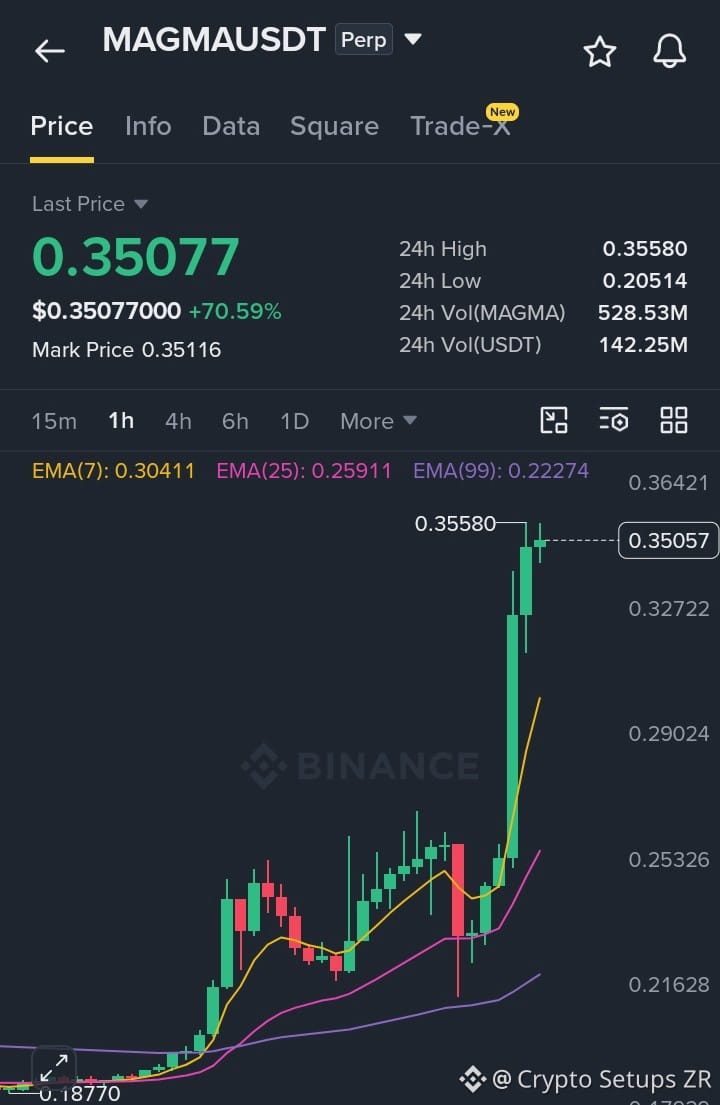
What I told about $MAGMA ⁉️
Look at the result 😆
You think it's stopping at 0.35?
That's wrong.. ‼️
It is pumping hard like $SAND and $LSK .
0.50 – 0.65 Loading.. 🚀
{future}(MAGMAUSDT)
{future}(SANDUSDT)
{future}(LSKUSDT)
#NFPWatch
What I told about $MAGMA ⁉️
Look at the result 😆
You think it's stopping at 0.35?
That's wrong.. ‼️
It is pumping hard like $SAND and $LSK .
0.50 – 0.65 Loading.. 🚀
#NFPWatch
Look at the result 😆
You think it's stopping at 0.35?
That's wrong.. ‼️
It is pumping hard like $SAND and $LSK .
0.50 – 0.65 Loading.. 🚀
#NFPWatch
Crypto Setups ZR
·
--
ブリッシュ$SAND runを逃した ?? $LSK のブレイクアウトを逃した ?? $MAGMA ‼️を逃さないで! それは巨大な拡大のローソク足に点火したばかり........... 🤑
#NFPWatch #BitcoinFundingRateTriplesTo10% #ZcashFalls21%FromSeptemberPeak #USSeptemberPayrollsAdd29KUnemploymentRises4.2% #XRPPostsFirstThreeGreenMonthsInQ3
#NFPWatch #BitcoinFundingRateTriplesTo10% #ZcashFalls21%FromSeptemberPeak #USSeptemberPayrollsAdd29KUnemploymentRises4.2% #XRPPostsFirstThreeGreenMonthsInQ3
4
755
·
--
ブリッシュ
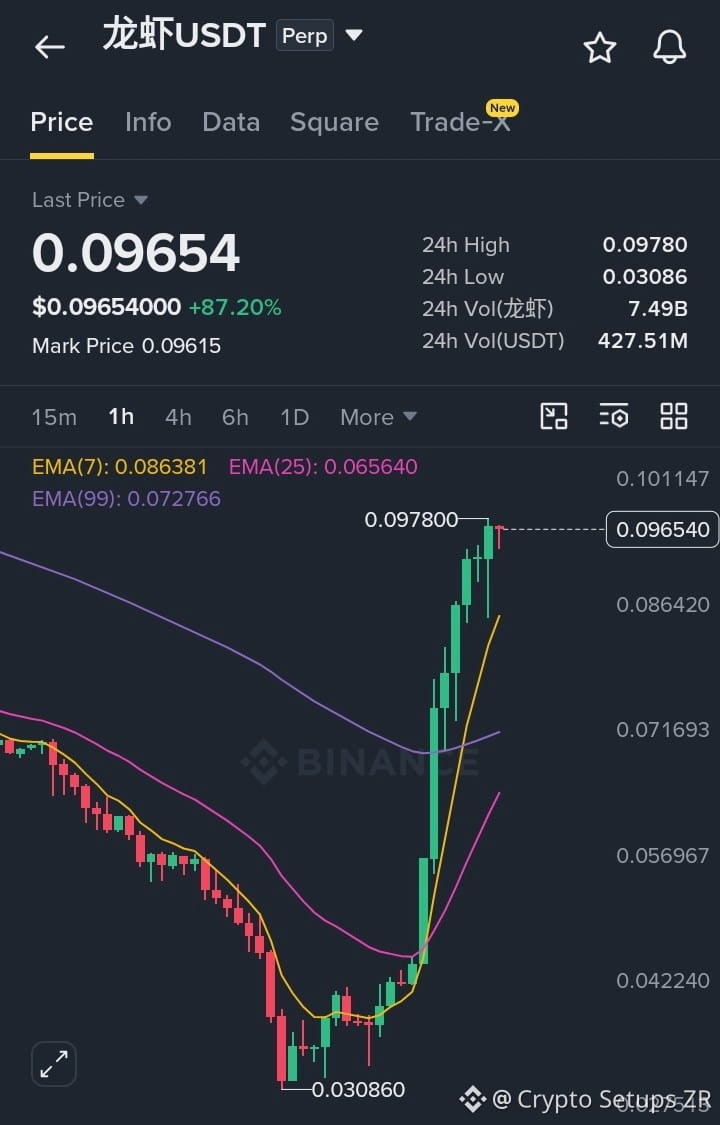
$龙虾 $0.1000 が来ています。🟢🟢
送れ。賛成なら「いいね」👍 💯
買い注文がすべての上値抵抗をクリアしています。
SL: $0.0880
$MOVR
{future}(MOVRUSDT)
$QNT
{future}(QNTUSDT)
#EtherGains70.9%InQ3 #US10YearYieldNears5.3% #crypto #MetaMaskExitsLidoValidatorsAfterSecurityIncident #MicronBeatsEarningsLiftsGuidance
{future}(龙虾USDT)
$龙虾 $0.1000 が来ています。🟢🟢
送れ。賛成なら「いいね」👍 💯
買い注文がすべての上値抵抗をクリアしています。
SL: $0.0880
$MOVR
$QNT
#EtherGains70.9%InQ3 #US10YearYieldNears5.3% #crypto #MetaMaskExitsLidoValidatorsAfterSecurityIncident #MicronBeatsEarningsLiftsGuidance
送れ。賛成なら「いいね」👍 💯
買い注文がすべての上値抵抗をクリアしています。
SL: $0.0880
$MOVR
$QNT
#EtherGains70.9%InQ3 #US10YearYieldNears5.3% #crypto #MetaMaskExitsLidoValidatorsAfterSecurityIncident #MicronBeatsEarningsLiftsGuidance
3
642
·
--
ブリッシュ
翻訳参照
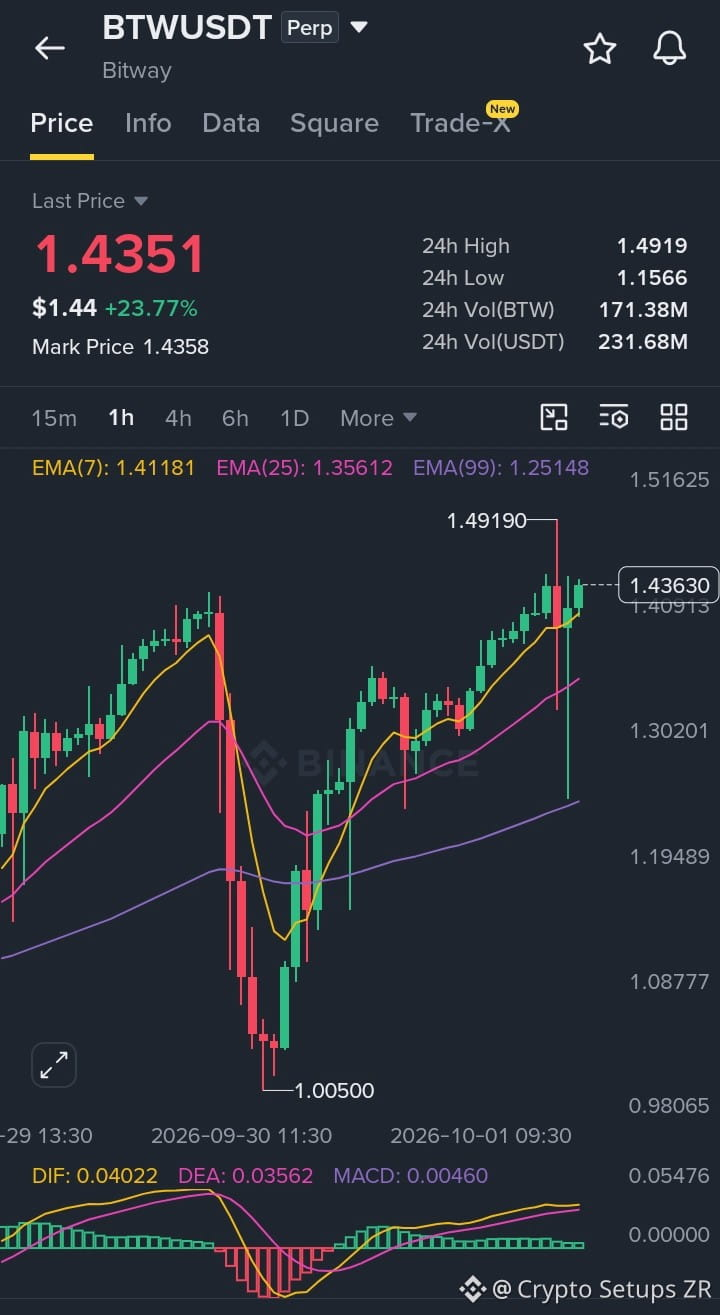
$BTW buyers aggressively soaking the EMA pullback, green tape accelerating as price drives to clear the $1.49 high.
#Longsetup
Entry: $1.4280 – $1.4380
TP: $1.4880 - $1.5420 - $1.6350
SL: $1.3820
#Bullish Above: $1.4100
Dip vacuum + continuation strength = long active...
{future}(BTWUSDT)
$MOVR
{future}(MOVRUSDT)
$QNT
{future}(QNTUSDT)
#MetaMaskExitsLidoValidatorsAfterSecurityIncident #US10YearYieldNears5.3%
$BTW buyers aggressively soaking the EMA pullback, green tape accelerating as price drives to clear the $1.49 high.
#Longsetup
Entry: $1.4280 – $1.4380
TP: $1.4880 - $1.5420 - $1.6350
SL: $1.3820
#Bullish Above: $1.4100
Dip vacuum + continuation strength = long active...
$MOVR
$QNT
#MetaMaskExitsLidoValidatorsAfterSecurityIncident #US10YearYieldNears5.3%
#Longsetup
Entry: $1.4280 – $1.4380
TP: $1.4880 - $1.5420 - $1.6350
SL: $1.3820
#Bullish Above: $1.4100
Dip vacuum + continuation strength = long active...
$MOVR
$QNT
#MetaMaskExitsLidoValidatorsAfterSecurityIncident #US10YearYieldNears5.3%
2
512
·
--
ブリッシュ
翻訳参照
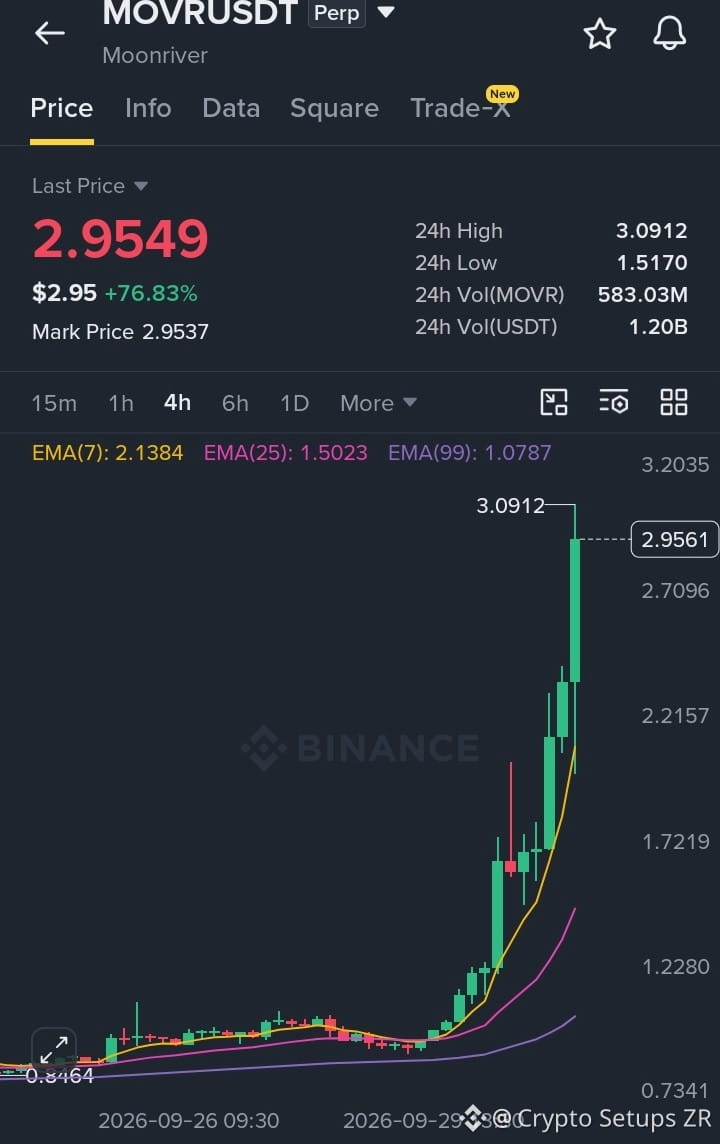
$MOVR breaks above $2.95 with massive +76% gain in the last 24Hrs 🔥
{future}(MOVRUSDT)
All the way from $1.51, MOVR just touched $3.09 backed by over $1.2B volume 🚀
Meanwhile, $QNT holds strong above $290 on the 4Hr EMA, and $BTW prepares for another leg to $1.44
Do you think MOVR is going straight to $3.50 next, or will BTW pump harder?
Like 👍 this post if you are trading 💯
{future}(BTWUSDT)
{future}(QNTUSDT)
#MetaMaskExitsLidoValidatorsAfterSecurityIncident #MicronBeatsEarningsLiftsGuidance #AltcoinSeasonIndexHoldsAbove60For5Days #MOVRPriceAnalysis
$MOVR breaks above $2.95 with massive +76% gain in the last 24Hrs 🔥
All the way from $1.51, MOVR just touched $3.09 backed by over $1.2B volume 🚀
Meanwhile, $QNT holds strong above $290 on the 4Hr EMA, and $BTW prepares for another leg to $1.44
Do you think MOVR is going straight to $3.50 next, or will BTW pump harder?
Like 👍 this post if you are trading 💯
#MetaMaskExitsLidoValidatorsAfterSecurityIncident #MicronBeatsEarningsLiftsGuidance #AltcoinSeasonIndexHoldsAbove60For5Days #MOVRPriceAnalysis
All the way from $1.51, MOVR just touched $3.09 backed by over $1.2B volume 🚀
Meanwhile, $QNT holds strong above $290 on the 4Hr EMA, and $BTW prepares for another leg to $1.44
Do you think MOVR is going straight to $3.50 next, or will BTW pump harder?
Like 👍 this post if you are trading 💯
#MetaMaskExitsLidoValidatorsAfterSecurityIncident #MicronBeatsEarningsLiftsGuidance #AltcoinSeasonIndexHoldsAbove60For5Days #MOVRPriceAnalysis
2
443
·
--
ブリッシュ
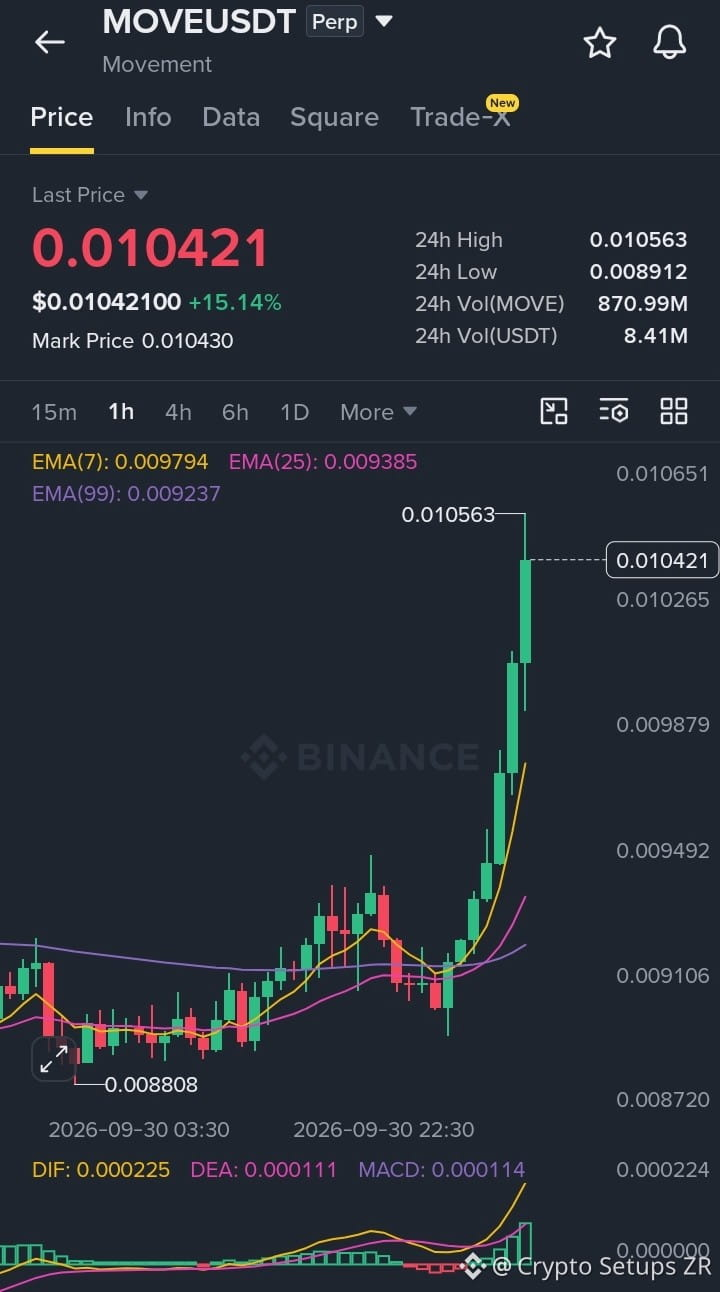
$MOVE just woke up and chose pure violence ⚡️ このグリーンの神キャンドルに乗ってる?それともサイドラインから眺めてるだけ?BUY側ならLIKEして👇
長めのセットアップ。
エントリー:$0.010350 – $0.010480
TP:$0.010750 - $0.011150 - $0.011700
SL:$0.010020
強気の基準:$0.010200
ブレイクアウトの点火+出来高の拡大=長期でアクティブ…
$QNT
{future}(QNTUSDT)
$MOVR
{future}(MOVRUSDT)
#AltcoinSeasonIndexHoldsAbove60For5Days #MetaMaskExitsLidoValidatorsAfterSecurityIncident #MicronBeatsEarningsLiftsGuidance #Write2Earn #Move
$MOVE just woke up and chose pure violence ⚡️ このグリーンの神キャンドルに乗ってる?それともサイドラインから眺めてるだけ?BUY側ならLIKEして👇
長めのセットアップ。
エントリー:$0.010350 – $0.010480
TP:$0.010750 - $0.011150 - $0.011700
SL:$0.010020
強気の基準:$0.010200
ブレイクアウトの点火+出来高の拡大=長期でアクティブ…
$QNT
$MOVR
#AltcoinSeasonIndexHoldsAbove60For5Days #MetaMaskExitsLidoValidatorsAfterSecurityIncident #MicronBeatsEarningsLiftsGuidance #Write2Earn #Move
長めのセットアップ。
エントリー:$0.010350 – $0.010480
TP:$0.010750 - $0.011150 - $0.011700
SL:$0.010020
強気の基準:$0.010200
ブレイクアウトの点火+出来高の拡大=長期でアクティブ…
$QNT
$MOVR
#AltcoinSeasonIndexHoldsAbove60For5Days #MetaMaskExitsLidoValidatorsAfterSecurityIncident #MicronBeatsEarningsLiftsGuidance #Write2Earn #Move
3
318
·
--
ブリッシュ
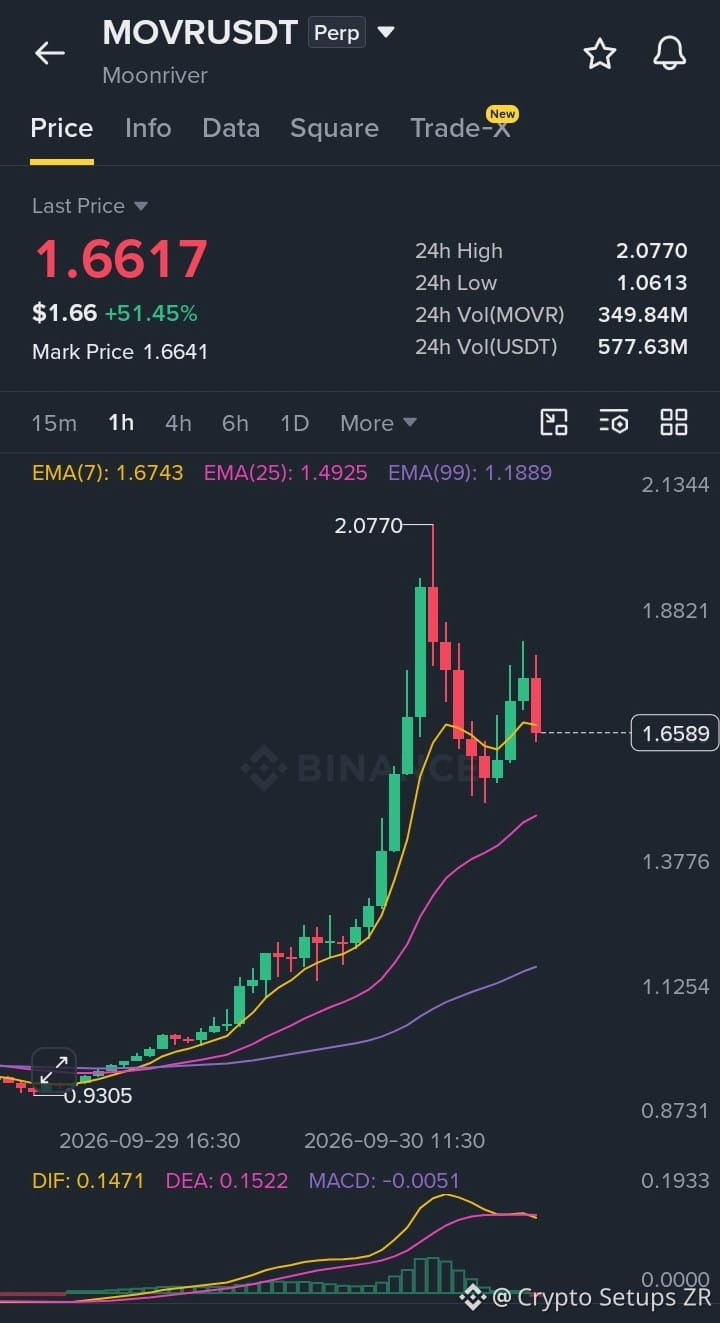
🟢 $MOVR 強い状態を維持してる(大規模な拡大の後)🟢🟢🟢
2.07を先にタッチして、いまは1.66まで落ち着いてきてる。
+51%はまだ保っていて、買い手がより高い水準を防衛している。
EMA7がサポートとして機能しており、全体の構造は依然として強気。
こういう値動きは、次の波に進む前に消化の時間が必要になりがち。
もう入ってる?それとも高値付近で少し乗った?
{future}(MOVRUSDT)
$QNT
{future}(QNTUSDT)
$PUMP
{future}(PUMPUSDT)
#AGT #US #Soon #zec #TopGainers
🟢 $MOVR 強い状態を維持してる(大規模な拡大の後)🟢🟢🟢
2.07を先にタッチして、いまは1.66まで落ち着いてきてる。
+51%はまだ保っていて、買い手がより高い水準を防衛している。
EMA7がサポートとして機能しており、全体の構造は依然として強気。
こういう値動きは、次の波に進む前に消化の時間が必要になりがち。
もう入ってる?それとも高値付近で少し乗った?
$QNT
$PUMP
#AGT #US #Soon #zec #TopGainers
2.07を先にタッチして、いまは1.66まで落ち着いてきてる。
+51%はまだ保っていて、買い手がより高い水準を防衛している。
EMA7がサポートとして機能しており、全体の構造は依然として強気。
こういう値動きは、次の波に進む前に消化の時間が必要になりがち。
もう入ってる?それとも高値付近で少し乗った?
$QNT
$PUMP
#AGT #US #Soon #zec #TopGainers
1
348
·
--
ブリッシュ
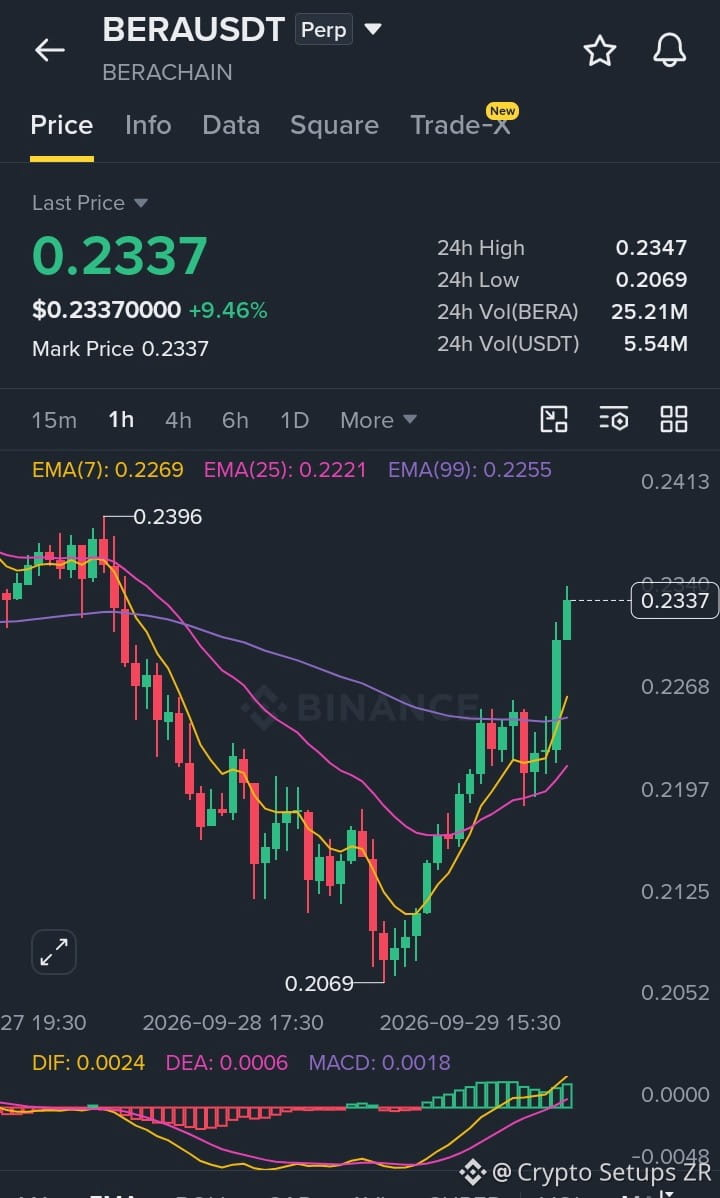
$BERA 攻撃的な丸みを帯びたボトムのブレイクアウト…EMAバンドをまっすぐ貫通。買いがテープを強く押し続け、0.2396のスイングハイを叩きに行くための継続サージがロード中...
ロングのセットアップ。
エントリー:$0.2300 ~ $0.2345
TP:$0.2420 ~ $0.2540 ~ $0.2700
SL:$0.2220
強気の条件:$0.2270 以上
ボトムのブレイクアウト+買いの勢い=ロングが有効...
{future}(BERAUSDT)
$QNT
{future}(QNTUSDT)
$BTW
{future}(BTWUSDT)
$BERA 攻撃的な丸みを帯びたボトムのブレイクアウト…EMAバンドをまっすぐ貫通。買いがテープを強く押し続け、0.2396のスイングハイを叩きに行くための継続サージがロード中...
ロングのセットアップ。
エントリー:$0.2300 ~ $0.2345
TP:$0.2420 ~ $0.2540 ~ $0.2700
SL:$0.2220
強気の条件:$0.2270 以上
ボトムのブレイクアウト+買いの勢い=ロングが有効...
$QNT
$BTW
ロングのセットアップ。
エントリー:$0.2300 ~ $0.2345
TP:$0.2420 ~ $0.2540 ~ $0.2700
SL:$0.2220
強気の条件:$0.2270 以上
ボトムのブレイクアウト+買いの勢い=ロングが有効...
$QNT
$BTW
1
2
243
·
--
ブリッシュ
翻訳参照
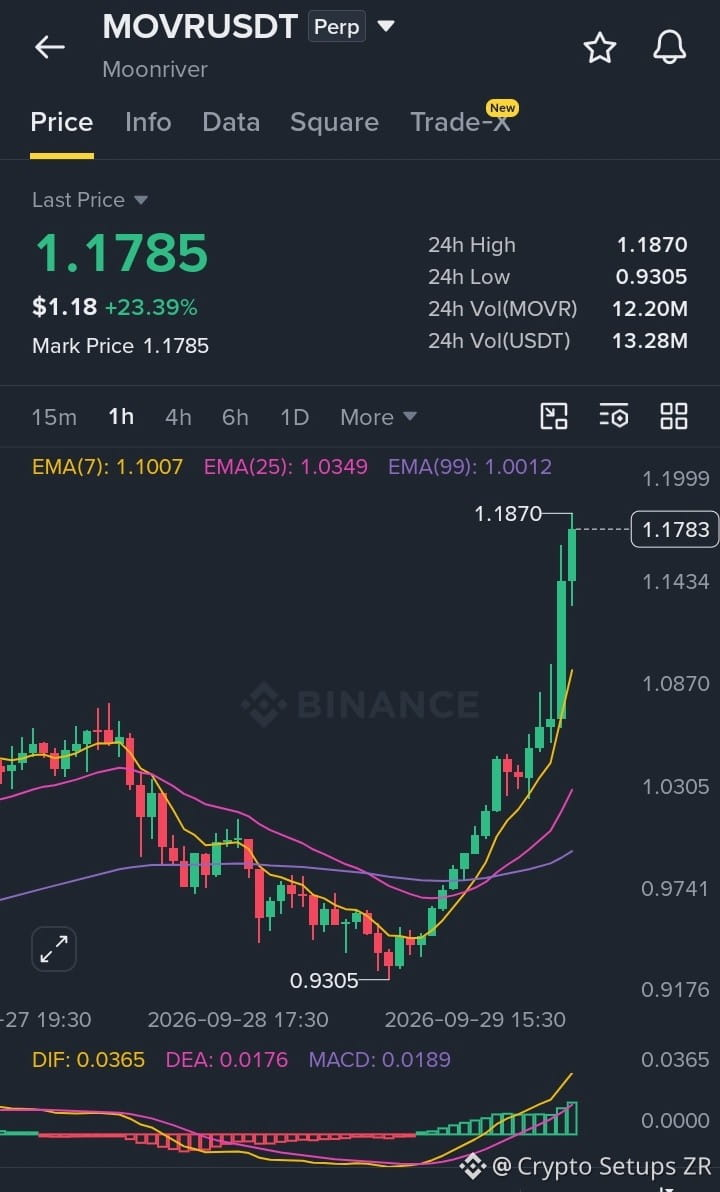
$MOVR vertical blast clearing overhead levels with intense spot momentum… bulls in complete control, continuation leg pushing hard to unlock the next expansion wave...
Long setup.
Entry: $1.1550 – $1.1820
TP: $1.2250 - $1.2800 - $1.3600
SL: $1.0950
Bullish Above: $1.1100
Impulse blast + spot flow acceleration = long active...
{future}(MOVRUSDT)
$QNT
{future}(QNTUSDT)
$BTW
{future}(BTWUSDT)
$MOVR vertical blast clearing overhead levels with intense spot momentum… bulls in complete control, continuation leg pushing hard to unlock the next expansion wave...
Long setup.
Entry: $1.1550 – $1.1820
TP: $1.2250 - $1.2800 - $1.3600
SL: $1.0950
Bullish Above: $1.1100
Impulse blast + spot flow acceleration = long active...
$QNT
$BTW
Long setup.
Entry: $1.1550 – $1.1820
TP: $1.2250 - $1.2800 - $1.3600
SL: $1.0950
Bullish Above: $1.1100
Impulse blast + spot flow acceleration = long active...
$QNT
$BTW
3
321
ログインして、さらにコンテンツを読む
厳選トピックで世界の暗号資産トレーダーの仲間入り
⚡️ 暗号資産に関する最新かつ有益な情報が見つかります。
💬 世界最大の暗号資産取引所から信頼されています。
👍 認証を受けたクリエイターから、有益なインサイトを得られます。
メール / 電話番号