
0x Mordegeer
495 投稿

0x Mordegeer
報告
ユーザーをブロック
Python programmer, alpha only, AI and crypto.
My twitter\x: https://x.com/0xMordegeer
14 フォロー
13 フォロワー
65 いいね
投稿
·
--
翻訳参照
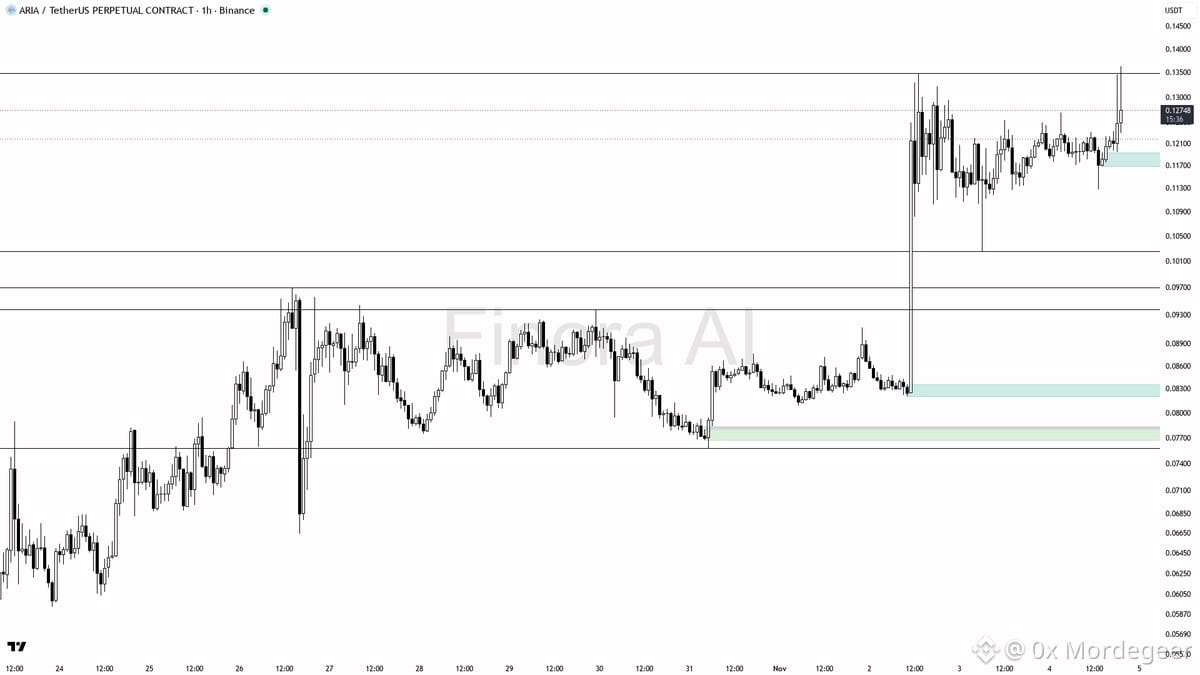
📊 $ARIA Technical Analysis & Setup
$ARIA volume is surging at 4.4x with buyer flow indicating real accumulation rather than noise. Multi-timeframe structure aligns positively across 1h, daily, and weekly charts.
• Key Support / Demand: 0.12415, 0.11820 (prior swing liquidity)
• Resistance / Supply Targets: 0.12930, 0.13487, and continuation toward 0.15909, 0.16902
• Trigger / Confirmation: Pullback into demand followed by a 1h bullish engulfing, pin bar, or lower-timeframe structure shift (do not chase the spike)
• Risk / Invalidation: 1h close below 0.11280 flips the bias bearish; place stops beyond the structure flip
• Market Execution: Monitor order book depth and volume profiles for optimal entry execution during volatility
DYOR — Educational setup, not financial advice.
#BinanceSquare #Crypto #ARIA #Trading
📊 $ARIA Technical Analysis & Setup
$ARIA volume is surging at 4.4x with buyer flow indicating real accumulation rather than noise. Multi-timeframe structure aligns positively across 1h, daily, and weekly charts.
• Key Support / Demand: 0.12415, 0.11820 (prior swing liquidity)
• Resistance / Supply Targets: 0.12930, 0.13487, and continuation toward 0.15909, 0.16902
• Trigger / Confirmation: Pullback into demand followed by a 1h bullish engulfing, pin bar, or lower-timeframe structure shift (do not chase the spike)
• Risk / Invalidation: 1h close below 0.11280 flips the bias bearish; place stops beyond the structure flip
• Market Execution: Monitor order book depth and volume profiles for optimal entry execution during volatility
DYOR — Educational setup, not financial advice.
#BinanceSquare #Crypto #ARIA #Trading
$ARIA volume is surging at 4.4x with buyer flow indicating real accumulation rather than noise. Multi-timeframe structure aligns positively across 1h, daily, and weekly charts.
• Key Support / Demand: 0.12415, 0.11820 (prior swing liquidity)
• Resistance / Supply Targets: 0.12930, 0.13487, and continuation toward 0.15909, 0.16902
• Trigger / Confirmation: Pullback into demand followed by a 1h bullish engulfing, pin bar, or lower-timeframe structure shift (do not chase the spike)
• Risk / Invalidation: 1h close below 0.11280 flips the bias bearish; place stops beyond the structure flip
• Market Execution: Monitor order book depth and volume profiles for optimal entry execution during volatility
DYOR — Educational setup, not financial advice.
#BinanceSquare #Crypto #ARIA #Trading
6
·
--
翻訳参照
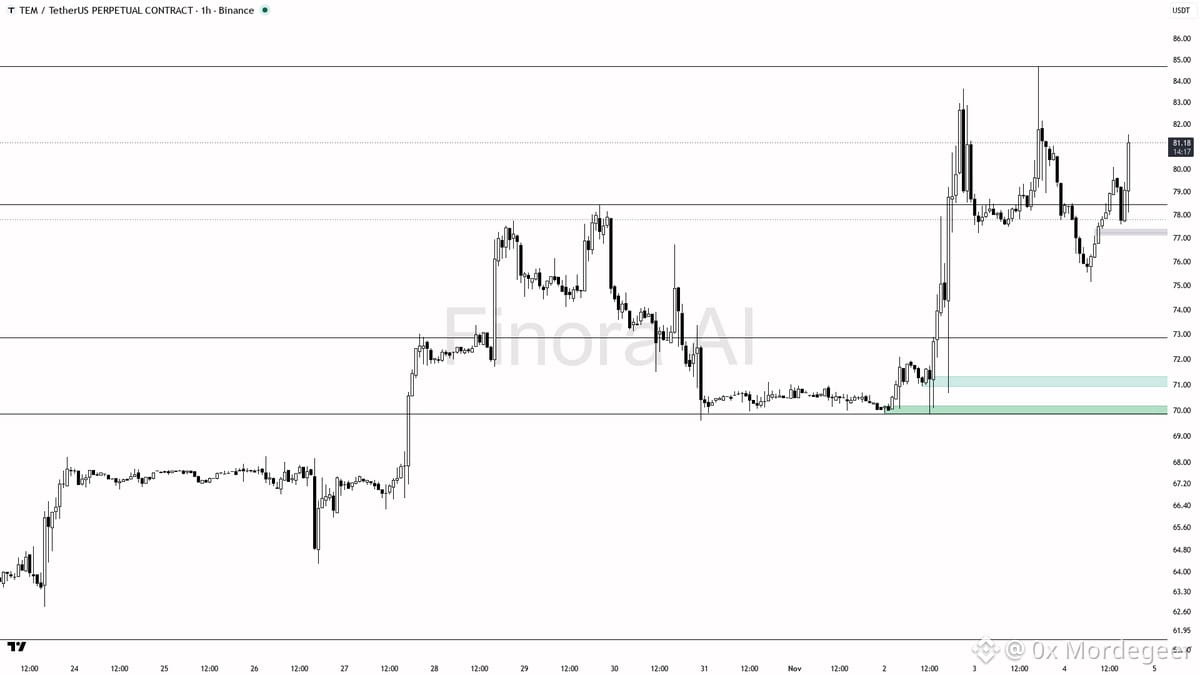
📊 $TEM Technical Analysis & Setup
Volume on that recent 2.8% pop looks like a liquidity grab into supply rather than clean accumulation, keeping the 1h structure bearish despite bullish daily and BTC contexts.
• Key Support / Demand: 78.44, 75.32–75.16, stretch target 74.19
• Resistance / Supply Targets: Prior supply zone 81.00–83.72, range edge 84.69
• Trigger / Confirmation: Lower-timeframe market structure shift down, bearish engulfing, or wick rejection failing to hold above 81.03
• Risk / Invalidation: A close above the 84.69 swing high flips bias and invalidates the setup
• Market Execution: Open interest sits at $532K (-10.1% 24h) with funding at +0.0039% and taker ratio at 1.00x; manage risk strictly against structural invalidation.
DYOR — Educational setup, not financial advice.
#BinanceSquare #Crypto #TEM #Trading
$BTC
📊 $TEM Technical Analysis & Setup
Volume on that recent 2.8% pop looks like a liquidity grab into supply rather than clean accumulation, keeping the 1h structure bearish despite bullish daily and BTC contexts.
• Key Support / Demand: 78.44, 75.32–75.16, stretch target 74.19
• Resistance / Supply Targets: Prior supply zone 81.00–83.72, range edge 84.69
• Trigger / Confirmation: Lower-timeframe market structure shift down, bearish engulfing, or wick rejection failing to hold above 81.03
• Risk / Invalidation: A close above the 84.69 swing high flips bias and invalidates the setup
• Market Execution: Open interest sits at $532K (-10.1% 24h) with funding at +0.0039% and taker ratio at 1.00x; manage risk strictly against structural invalidation.
DYOR — Educational setup, not financial advice.
#BinanceSquare #Crypto #TEM #Trading
$BTC
Volume on that recent 2.8% pop looks like a liquidity grab into supply rather than clean accumulation, keeping the 1h structure bearish despite bullish daily and BTC contexts.
• Key Support / Demand: 78.44, 75.32–75.16, stretch target 74.19
• Resistance / Supply Targets: Prior supply zone 81.00–83.72, range edge 84.69
• Trigger / Confirmation: Lower-timeframe market structure shift down, bearish engulfing, or wick rejection failing to hold above 81.03
• Risk / Invalidation: A close above the 84.69 swing high flips bias and invalidates the setup
• Market Execution: Open interest sits at $532K (-10.1% 24h) with funding at +0.0039% and taker ratio at 1.00x; manage risk strictly against structural invalidation.
DYOR — Educational setup, not financial advice.
#BinanceSquare #Crypto #TEM #Trading
$BTC
3
·
--
翻訳参照
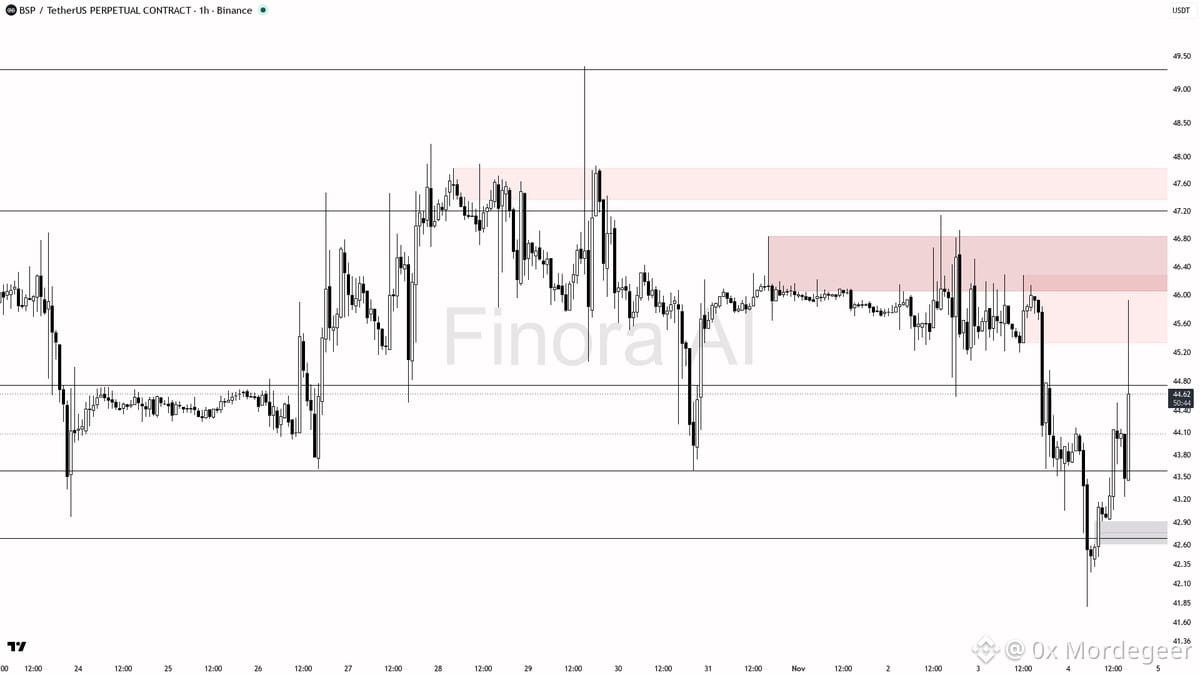
📊 $BSP Technical Analysis & Setup
$BSP has printed a massive 14x volume spike, signaling significant market interest. While daily momentum is currently aligning with broader market strength, the weekly structure remains range-bound, suggesting we are trading a continuation move within a larger sideways pattern rather than a fresh macro trend.
• Key Support / Demand: Major support is identified at 43.58, with a crucial entry zone located between 44.48 and 44.74.
• Resistance / Supply Targets: Initial profit-taking levels are set at 45.39 and 46.16, 46.21. A successful breakout could stretch toward 47.14.
• Trigger / Confirmation: Do not chase the recent wick. Wait for a bullish engulfing candle or a pin bar reversal off the 43.58, 44.48 zone. A lower-timeframe market structure shift back above 44.74 confirms the entry.
• Risk / Invalidation: The bullish bias fails if the price closes below 41.80, signaling a breakdown of the current structure.
• Market Execution: High volatility is expected following the liquidity raid at the 46.22 highs. Monitor standard market depth and order flow for execution.
Flow Data: OI stands at $880K (-4.1%) with neutral funding. The taker buy/sell ratio of 0.68 suggests sell-heavy flow at the highs, so patience for a retest is mandatory.
DYOR — Educational setup, not financial advice.
#BinanceSquare #Crypto #BSP #Trading
$MOVE
📊 $BSP Technical Analysis & Setup
$BSP has printed a massive 14x volume spike, signaling significant market interest. While daily momentum is currently aligning with broader market strength, the weekly structure remains range-bound, suggesting we are trading a continuation move within a larger sideways pattern rather than a fresh macro trend.
• Key Support / Demand: Major support is identified at 43.58, with a crucial entry zone located between 44.48 and 44.74.
• Resistance / Supply Targets: Initial profit-taking levels are set at 45.39 and 46.16, 46.21. A successful breakout could stretch toward 47.14.
• Trigger / Confirmation: Do not chase the recent wick. Wait for a bullish engulfing candle or a pin bar reversal off the 43.58, 44.48 zone. A lower-timeframe market structure shift back above 44.74 confirms the entry.
• Risk / Invalidation: The bullish bias fails if the price closes below 41.80, signaling a breakdown of the current structure.
• Market Execution: High volatility is expected following the liquidity raid at the 46.22 highs. Monitor standard market depth and order flow for execution.
Flow Data: OI stands at $880K (-4.1%) with neutral funding. The taker buy/sell ratio of 0.68 suggests sell-heavy flow at the highs, so patience for a retest is mandatory.
DYOR — Educational setup, not financial advice.
#BinanceSquare #Crypto #BSP #Trading
$MOVE
$BSP has printed a massive 14x volume spike, signaling significant market interest. While daily momentum is currently aligning with broader market strength, the weekly structure remains range-bound, suggesting we are trading a continuation move within a larger sideways pattern rather than a fresh macro trend.
• Key Support / Demand: Major support is identified at 43.58, with a crucial entry zone located between 44.48 and 44.74.
• Resistance / Supply Targets: Initial profit-taking levels are set at 45.39 and 46.16, 46.21. A successful breakout could stretch toward 47.14.
• Trigger / Confirmation: Do not chase the recent wick. Wait for a bullish engulfing candle or a pin bar reversal off the 43.58, 44.48 zone. A lower-timeframe market structure shift back above 44.74 confirms the entry.
• Risk / Invalidation: The bullish bias fails if the price closes below 41.80, signaling a breakdown of the current structure.
• Market Execution: High volatility is expected following the liquidity raid at the 46.22 highs. Monitor standard market depth and order flow for execution.
Flow Data: OI stands at $880K (-4.1%) with neutral funding. The taker buy/sell ratio of 0.68 suggests sell-heavy flow at the highs, so patience for a retest is mandatory.
DYOR — Educational setup, not financial advice.
#BinanceSquare #Crypto #BSP #Trading
$MOVE
2
·
--
翻訳参照
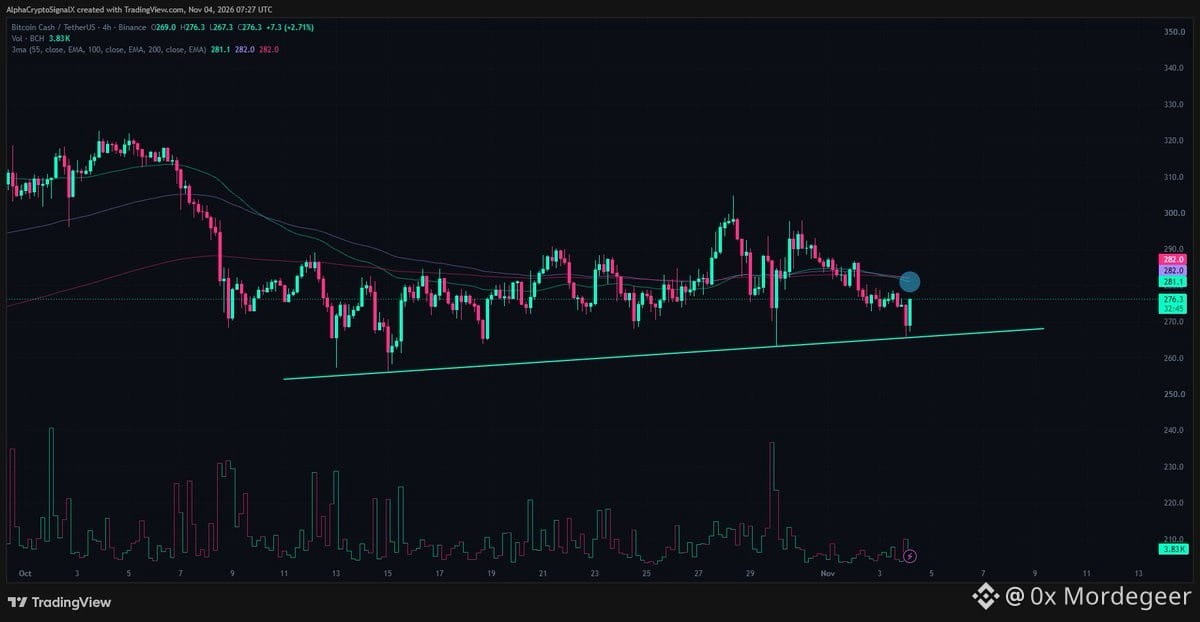
📊 $BCH Technical Analysis & Setup
Bitcoin Cash just bounced cleanly off the 4H rising support near $267, showing solid short-term demand. Price is currently hovering around $276 and pressing directly into the EMA cluster at $281–$282.
• Key Support / Demand: $267
• Resistance / Supply Targets: $281–$282, $300+
• Trigger / Confirmation: High-volume 4H close and clean reclaim above the $281–$282 EMA confluence
• Risk / Invalidation: A 4H close under $267 kills the setup
• Market Execution: Monitor order book depth and volume expansion on the breakout before entering
DYOR — Educational setup, not financial advice.
#BinanceSquare #Crypto #BCH #Trading
$BTC
📊 $BCH Technical Analysis & Setup
Bitcoin Cash just bounced cleanly off the 4H rising support near $267, showing solid short-term demand. Price is currently hovering around $276 and pressing directly into the EMA cluster at $281–$282.
• Key Support / Demand: $267
• Resistance / Supply Targets: $281–$282, $300+
• Trigger / Confirmation: High-volume 4H close and clean reclaim above the $281–$282 EMA confluence
• Risk / Invalidation: A 4H close under $267 kills the setup
• Market Execution: Monitor order book depth and volume expansion on the breakout before entering
DYOR — Educational setup, not financial advice.
#BinanceSquare #Crypto #BCH #Trading
$BTC
Bitcoin Cash just bounced cleanly off the 4H rising support near $267, showing solid short-term demand. Price is currently hovering around $276 and pressing directly into the EMA cluster at $281–$282.
• Key Support / Demand: $267
• Resistance / Supply Targets: $281–$282, $300+
• Trigger / Confirmation: High-volume 4H close and clean reclaim above the $281–$282 EMA confluence
• Risk / Invalidation: A 4H close under $267 kills the setup
• Market Execution: Monitor order book depth and volume expansion on the breakout before entering
DYOR — Educational setup, not financial advice.
#BinanceSquare #Crypto #BCH #Trading
$BTC
1
·
--
翻訳参照
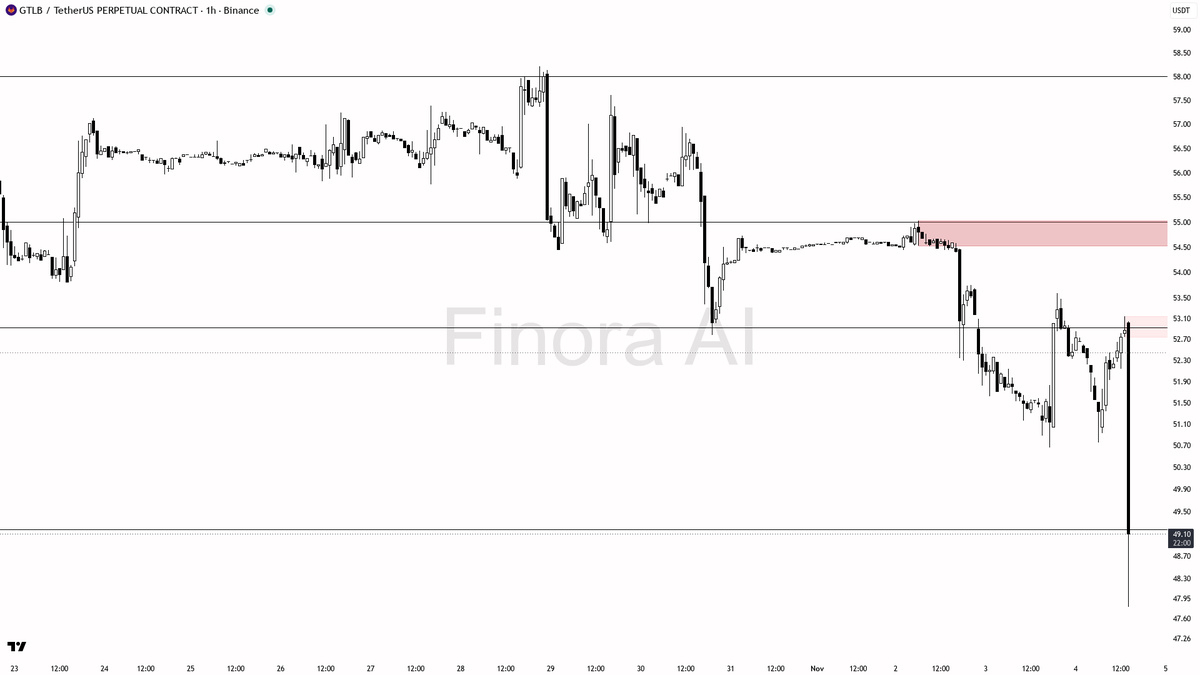
📊 $GTLB Technical Analysis & Setup
A sharp 4.1% dump accompanied by a 2.6x volume surge indicates aggressive distribution rather than standard capitulation. Sellers are stepping up at key supply zones, putting near-term bullish momentum under pressure.
• Key Support / Demand: 54.00, 52.50
• Resistance / Supply Targets: 59.50 and 62.00
• Trigger / Confirmation: Daily close below 52.50 to validate further downside acceleration.
• Risk / Invalidation: Reclaim and hold above 60.50 invalidates the distribution bias.
• Market Execution: Monitor order book depth closely as rising volatility increases slippage risk across spot venues.
DYOR — Educational setup, not financial advice.
#BinanceSquare #Crypto #GTLB #Trading
$NEAR
📊 $GTLB Technical Analysis & Setup
A sharp 4.1% dump accompanied by a 2.6x volume surge indicates aggressive distribution rather than standard capitulation. Sellers are stepping up at key supply zones, putting near-term bullish momentum under pressure.
• Key Support / Demand: 54.00, 52.50
• Resistance / Supply Targets: 59.50 and 62.00
• Trigger / Confirmation: Daily close below 52.50 to validate further downside acceleration.
• Risk / Invalidation: Reclaim and hold above 60.50 invalidates the distribution bias.
• Market Execution: Monitor order book depth closely as rising volatility increases slippage risk across spot venues.
DYOR — Educational setup, not financial advice.
#BinanceSquare #Crypto #GTLB #Trading
$NEAR
A sharp 4.1% dump accompanied by a 2.6x volume surge indicates aggressive distribution rather than standard capitulation. Sellers are stepping up at key supply zones, putting near-term bullish momentum under pressure.
• Key Support / Demand: 54.00, 52.50
• Resistance / Supply Targets: 59.50 and 62.00
• Trigger / Confirmation: Daily close below 52.50 to validate further downside acceleration.
• Risk / Invalidation: Reclaim and hold above 60.50 invalidates the distribution bias.
• Market Execution: Monitor order book depth closely as rising volatility increases slippage risk across spot venues.
DYOR — Educational setup, not financial advice.
#BinanceSquare #Crypto #GTLB #Trading
$NEAR
1
·
--
翻訳参照
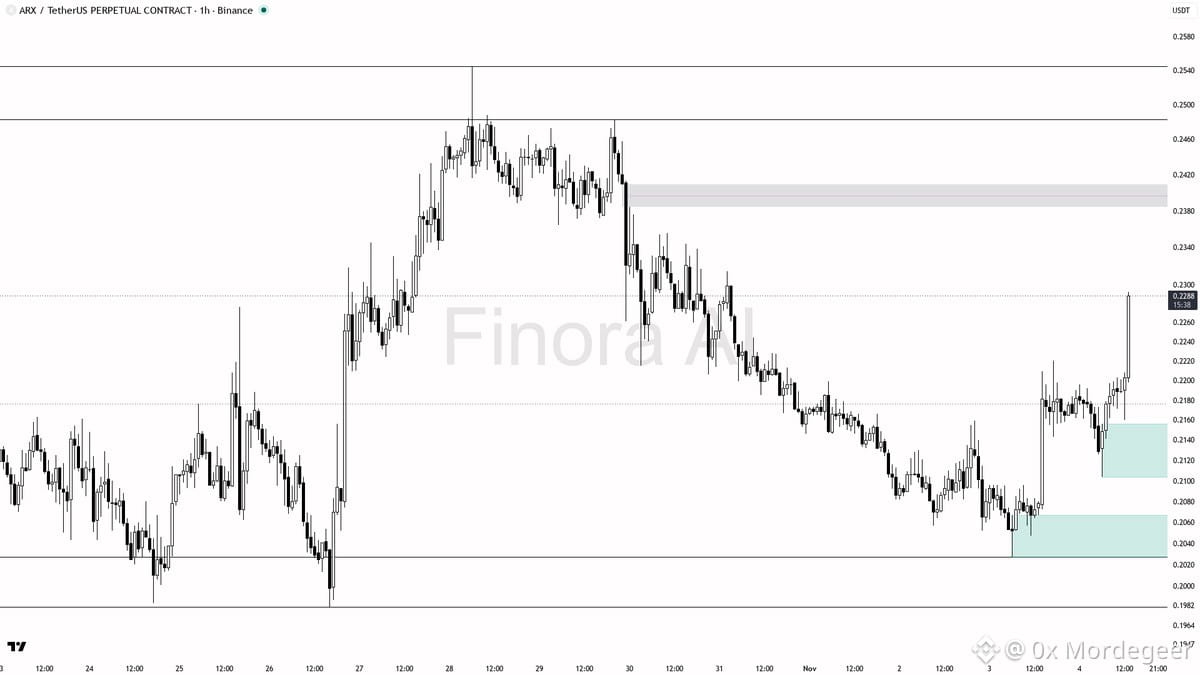
📊 $ARX Technical Analysis & Setup
$ARX is printing a massive 2.4x volume spike, signaling aggressive smart-money displacement right into the breakout zone. Momentum is shifting fast as buyers step in to absorb overhead supply.
• Key Support / Demand: $0.22 - $0.24 zone
• Resistance / Supply Targets: $0.35 and $0.42
• Trigger / Confirmation: Clean 4H candle close above immediate resistance on sustained volume
• Risk / Invalidation: Daily close below $0.19 structural support
• Market Execution: Monitor order book depth and wait for retest confirmations before scaling in
DYOR — Educational setup, not financial advice.
#BinanceSquare #Crypto #ARX #Trading
📊 $ARX Technical Analysis & Setup
$ARX is printing a massive 2.4x volume spike, signaling aggressive smart-money displacement right into the breakout zone. Momentum is shifting fast as buyers step in to absorb overhead supply.
• Key Support / Demand: $0.22 - $0.24 zone
• Resistance / Supply Targets: $0.35 and $0.42
• Trigger / Confirmation: Clean 4H candle close above immediate resistance on sustained volume
• Risk / Invalidation: Daily close below $0.19 structural support
• Market Execution: Monitor order book depth and wait for retest confirmations before scaling in
DYOR — Educational setup, not financial advice.
#BinanceSquare #Crypto #ARX #Trading
$ARX is printing a massive 2.4x volume spike, signaling aggressive smart-money displacement right into the breakout zone. Momentum is shifting fast as buyers step in to absorb overhead supply.
• Key Support / Demand: $0.22 - $0.24 zone
• Resistance / Supply Targets: $0.35 and $0.42
• Trigger / Confirmation: Clean 4H candle close above immediate resistance on sustained volume
• Risk / Invalidation: Daily close below $0.19 structural support
• Market Execution: Monitor order book depth and wait for retest confirmations before scaling in
DYOR — Educational setup, not financial advice.
#BinanceSquare #Crypto #ARX #Trading
3
·
--
翻訳参照
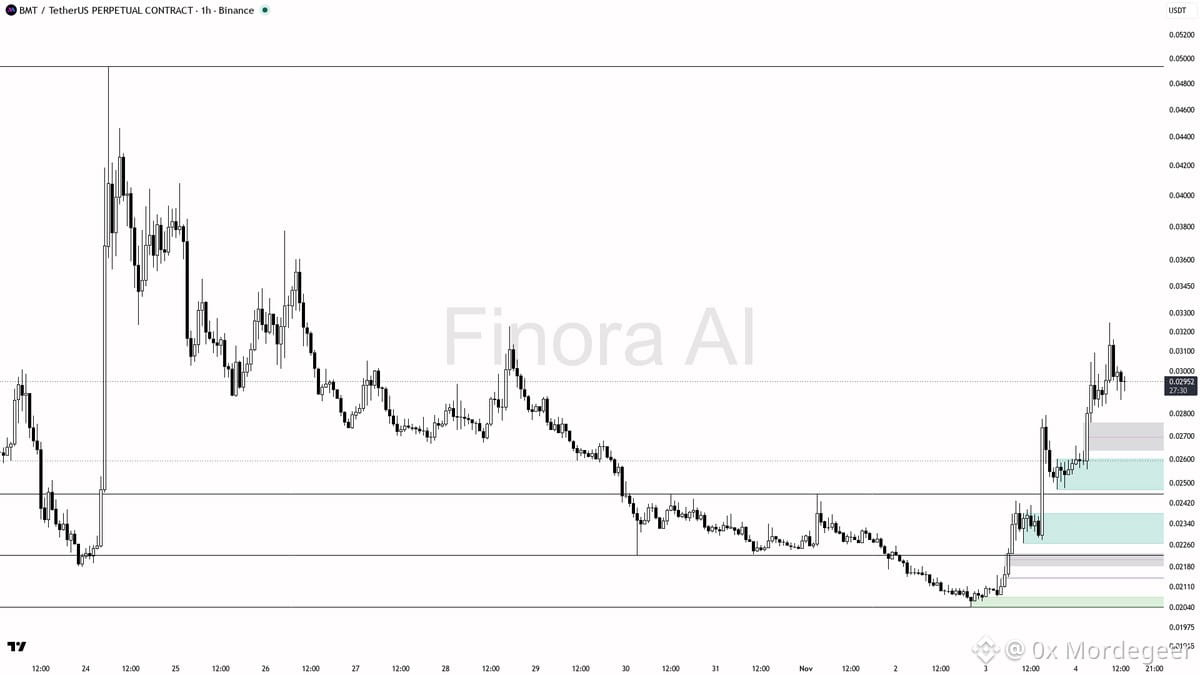
📊 $BMT Technical Analysis & Setup
Extreme negative funding at -0.824% combined with a +26.8% move signals crowded short positioning acting as prime squeeze fuel while higher timeframe structures remain aligned bullish.
• Key Support / Demand: 0.02664, 0.02793 pullback zone, with deeper sweep potential at 0.02456
• Resistance / Supply Targets: 0.03051, 0.03438, and 0.03677 major liquidity
• Trigger / Confirmation: Lower-timeframe market structure shift and bullish engulfing/pin off support before entry; avoid chasing spikes on quiet relative volume
• Risk / Invalidation: 1h close below the 0.02042 swing low completely invalidates the squeeze thesis
• Market Execution: Monitor order flow depth and open interest expansion for continuation signals
DYOR — Educational setup, not financial advice.
#BinanceSquare #Crypto #BMT #Trading
$MOVE
📊 $BMT Technical Analysis & Setup
Extreme negative funding at -0.824% combined with a +26.8% move signals crowded short positioning acting as prime squeeze fuel while higher timeframe structures remain aligned bullish.
• Key Support / Demand: 0.02664, 0.02793 pullback zone, with deeper sweep potential at 0.02456
• Resistance / Supply Targets: 0.03051, 0.03438, and 0.03677 major liquidity
• Trigger / Confirmation: Lower-timeframe market structure shift and bullish engulfing/pin off support before entry; avoid chasing spikes on quiet relative volume
• Risk / Invalidation: 1h close below the 0.02042 swing low completely invalidates the squeeze thesis
• Market Execution: Monitor order flow depth and open interest expansion for continuation signals
DYOR — Educational setup, not financial advice.
#BinanceSquare #Crypto #BMT #Trading
$MOVE
Extreme negative funding at -0.824% combined with a +26.8% move signals crowded short positioning acting as prime squeeze fuel while higher timeframe structures remain aligned bullish.
• Key Support / Demand: 0.02664, 0.02793 pullback zone, with deeper sweep potential at 0.02456
• Resistance / Supply Targets: 0.03051, 0.03438, and 0.03677 major liquidity
• Trigger / Confirmation: Lower-timeframe market structure shift and bullish engulfing/pin off support before entry; avoid chasing spikes on quiet relative volume
• Risk / Invalidation: 1h close below the 0.02042 swing low completely invalidates the squeeze thesis
• Market Execution: Monitor order flow depth and open interest expansion for continuation signals
DYOR — Educational setup, not financial advice.
#BinanceSquare #Crypto #BMT #Trading
$MOVE
4
·
--
翻訳参照
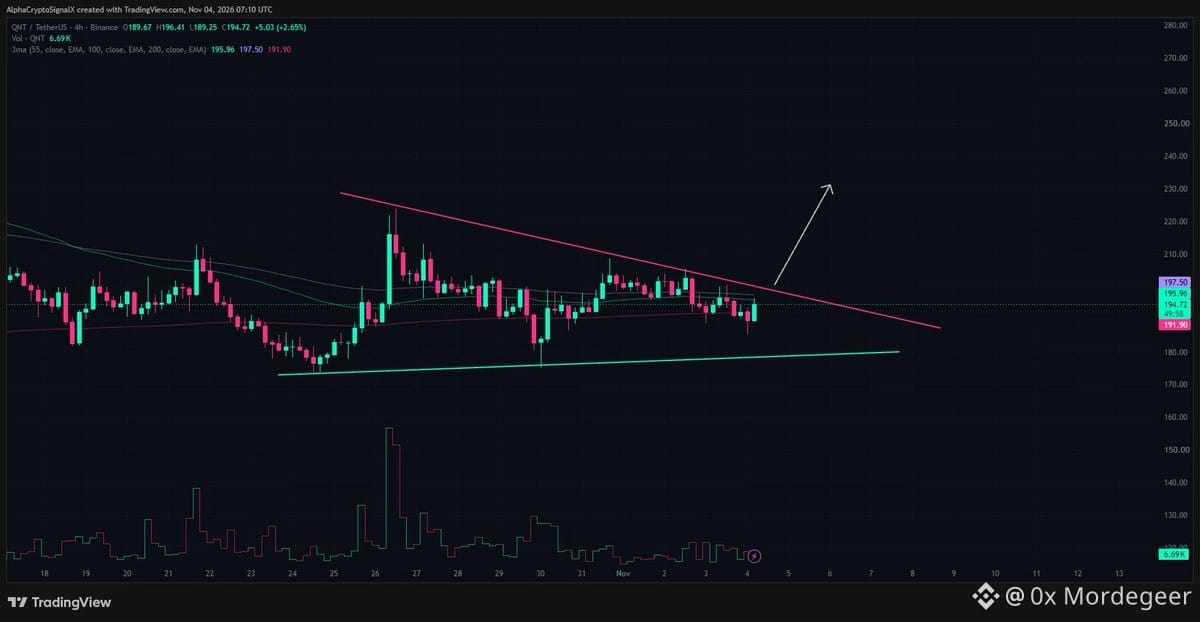
📊 $QNT Technical Analysis & Setup
Price is coiling near the apex of a 4h symmetrical triangle around 195, holding rising support while compressing tightly against the EMA cluster. Momentum is building for a decisive move.
• Key Support / Demand: Rising trendline support (~192, 193)
• Resistance / Supply Targets: Upper trendline & 100 EMA (~197.50), with upside targets at 205 and 215
• Trigger / Confirmation: High-volume 4h close above the upper trendline and a clean flip of the 100 EMA (~197.50)
• Risk / Invalidation: A 4h close under the rising support structure
• Market Execution: Monitor cross-chain volatility and wait for confirmed volume before scaling into positions
DYOR — Educational setup, not financial advice.
#BinanceSquare #Crypto #QNT #Trading
$NEAR
📊 $QNT Technical Analysis & Setup
Price is coiling near the apex of a 4h symmetrical triangle around 195, holding rising support while compressing tightly against the EMA cluster. Momentum is building for a decisive move.
• Key Support / Demand: Rising trendline support (~192, 193)
• Resistance / Supply Targets: Upper trendline & 100 EMA (~197.50), with upside targets at 205 and 215
• Trigger / Confirmation: High-volume 4h close above the upper trendline and a clean flip of the 100 EMA (~197.50)
• Risk / Invalidation: A 4h close under the rising support structure
• Market Execution: Monitor cross-chain volatility and wait for confirmed volume before scaling into positions
DYOR — Educational setup, not financial advice.
#BinanceSquare #Crypto #QNT #Trading
$NEAR
Price is coiling near the apex of a 4h symmetrical triangle around 195, holding rising support while compressing tightly against the EMA cluster. Momentum is building for a decisive move.
• Key Support / Demand: Rising trendline support (~192, 193)
• Resistance / Supply Targets: Upper trendline & 100 EMA (~197.50), with upside targets at 205 and 215
• Trigger / Confirmation: High-volume 4h close above the upper trendline and a clean flip of the 100 EMA (~197.50)
• Risk / Invalidation: A 4h close under the rising support structure
• Market Execution: Monitor cross-chain volatility and wait for confirmed volume before scaling into positions
DYOR — Educational setup, not financial advice.
#BinanceSquare #Crypto #QNT #Trading
$NEAR
18
·
--
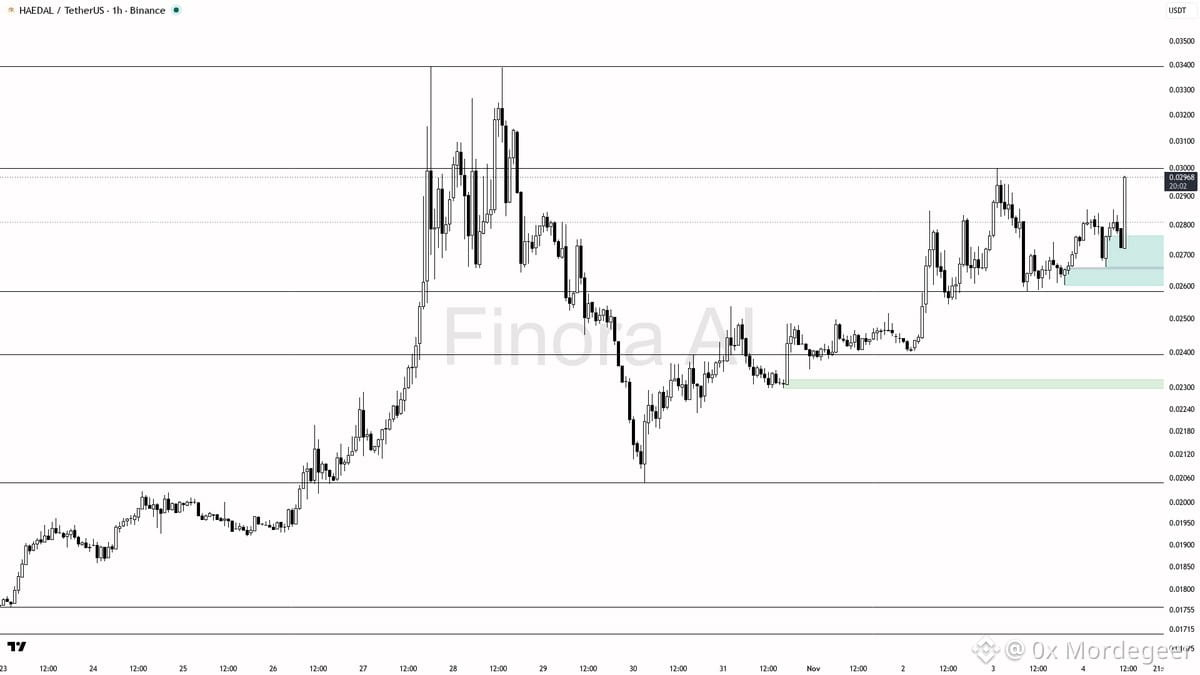
📊 $HAEDAL テクニカル分析と戦略
$HAEDAL は強い上昇モメンタムを示しており、出来高が2.2倍に急増しています。これは、直近の9.2%上昇の背景に実際の買い意欲があることを裏付けています。資金がこの資産に流入するなか、市場構造は強気に転じつつあります。
• 主なサポート/需要ゾーン:0.1850、0.1920
• レジスタンス/供給目標:0.2350、0.2680
• トリガー/確認条件:出来高を維持したまま、日足が0.2150を上回って終値を付けること
• リスク/無効化条件:0.1780を明確に割り込み、4時間足がその下で終値を付けること
• 市場での執行:エントリーを拡大する前に、主要な取引所で板の厚みと出来高の維持状況を確認してください。
リスクを厳格に管理し、ローソク足の終値が確定するのを待ってから取引してください。
DYOR — 教育目的の戦略であり、投資助言ではありません。
#BinanceSquare #Crypto #HAEDAL #トレーディング
📊 $HAEDAL テクニカル分析と戦略
$HAEDAL は強い上昇モメンタムを示しており、出来高が2.2倍に急増しています。これは、直近の9.2%上昇の背景に実際の買い意欲があることを裏付けています。資金がこの資産に流入するなか、市場構造は強気に転じつつあります。
• 主なサポート/需要ゾーン:0.1850、0.1920
• レジスタンス/供給目標:0.2350、0.2680
• トリガー/確認条件:出来高を維持したまま、日足が0.2150を上回って終値を付けること
• リスク/無効化条件:0.1780を明確に割り込み、4時間足がその下で終値を付けること
• 市場での執行:エントリーを拡大する前に、主要な取引所で板の厚みと出来高の維持状況を確認してください。
リスクを厳格に管理し、ローソク足の終値が確定するのを待ってから取引してください。
DYOR — 教育目的の戦略であり、投資助言ではありません。
#BinanceSquare #Crypto #HAEDAL #トレーディング
$HAEDAL は強い上昇モメンタムを示しており、出来高が2.2倍に急増しています。これは、直近の9.2%上昇の背景に実際の買い意欲があることを裏付けています。資金がこの資産に流入するなか、市場構造は強気に転じつつあります。
• 主なサポート/需要ゾーン:0.1850、0.1920
• レジスタンス/供給目標:0.2350、0.2680
• トリガー/確認条件:出来高を維持したまま、日足が0.2150を上回って終値を付けること
• リスク/無効化条件:0.1780を明確に割り込み、4時間足がその下で終値を付けること
• 市場での執行:エントリーを拡大する前に、主要な取引所で板の厚みと出来高の維持状況を確認してください。
リスクを厳格に管理し、ローソク足の終値が確定するのを待ってから取引してください。
DYOR — 教育目的の戦略であり、投資助言ではありません。
#BinanceSquare #Crypto #HAEDAL #トレーディング
28
·
--
翻訳参照
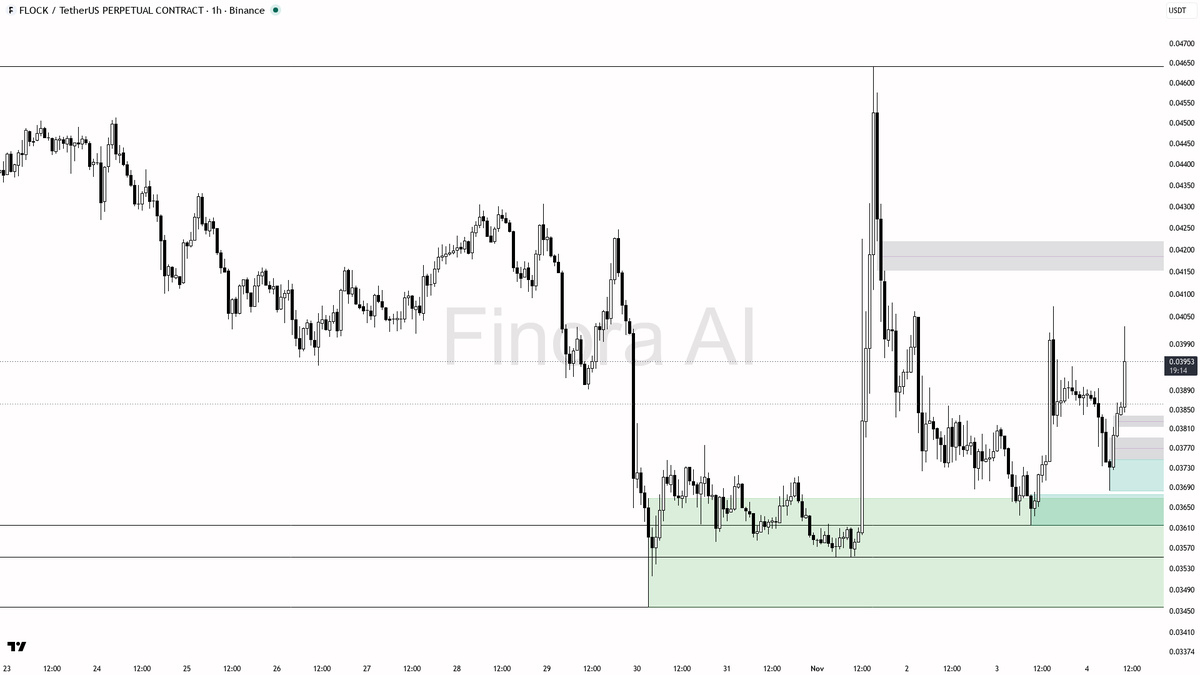
📊 $FLOCK Technical Analysis & Setup
$FLOCK is showing renewed upside momentum with a solid 2.9% push on the 15-minute timeframe, backed by a significant 6.8x volume expansion that confirms active buyer interest and strong market participation.
• Key Support / Demand: Immediate local floor holding the current consolidation range, acting as the primary springboard for continuation.
• Resistance / Supply Targets: Immediate overhead liquidity clusters where profit-taking is expected.
• Trigger / Confirmation: Sustained volume and a clean candle close above local resistance to validate the next impulsive leg up.
• Risk / Invalidation: A high-volume break below local support invalidates the bullish structure and signals a deeper correction.
• Market Execution: Monitor order book depth closely and wait for retest confirmations before scaling into positions amid ongoing cross-chain volatility.
DYOR — Educational setup, not financial advice.
#BinanceSquare #Crypto #FLOCK #Trading
📊 $FLOCK Technical Analysis & Setup
$FLOCK is showing renewed upside momentum with a solid 2.9% push on the 15-minute timeframe, backed by a significant 6.8x volume expansion that confirms active buyer interest and strong market participation.
• Key Support / Demand: Immediate local floor holding the current consolidation range, acting as the primary springboard for continuation.
• Resistance / Supply Targets: Immediate overhead liquidity clusters where profit-taking is expected.
• Trigger / Confirmation: Sustained volume and a clean candle close above local resistance to validate the next impulsive leg up.
• Risk / Invalidation: A high-volume break below local support invalidates the bullish structure and signals a deeper correction.
• Market Execution: Monitor order book depth closely and wait for retest confirmations before scaling into positions amid ongoing cross-chain volatility.
DYOR — Educational setup, not financial advice.
#BinanceSquare #Crypto #FLOCK #Trading
$FLOCK is showing renewed upside momentum with a solid 2.9% push on the 15-minute timeframe, backed by a significant 6.8x volume expansion that confirms active buyer interest and strong market participation.
• Key Support / Demand: Immediate local floor holding the current consolidation range, acting as the primary springboard for continuation.
• Resistance / Supply Targets: Immediate overhead liquidity clusters where profit-taking is expected.
• Trigger / Confirmation: Sustained volume and a clean candle close above local resistance to validate the next impulsive leg up.
• Risk / Invalidation: A high-volume break below local support invalidates the bullish structure and signals a deeper correction.
• Market Execution: Monitor order book depth closely and wait for retest confirmations before scaling into positions amid ongoing cross-chain volatility.
DYOR — Educational setup, not financial advice.
#BinanceSquare #Crypto #FLOCK #Trading
26
·
--
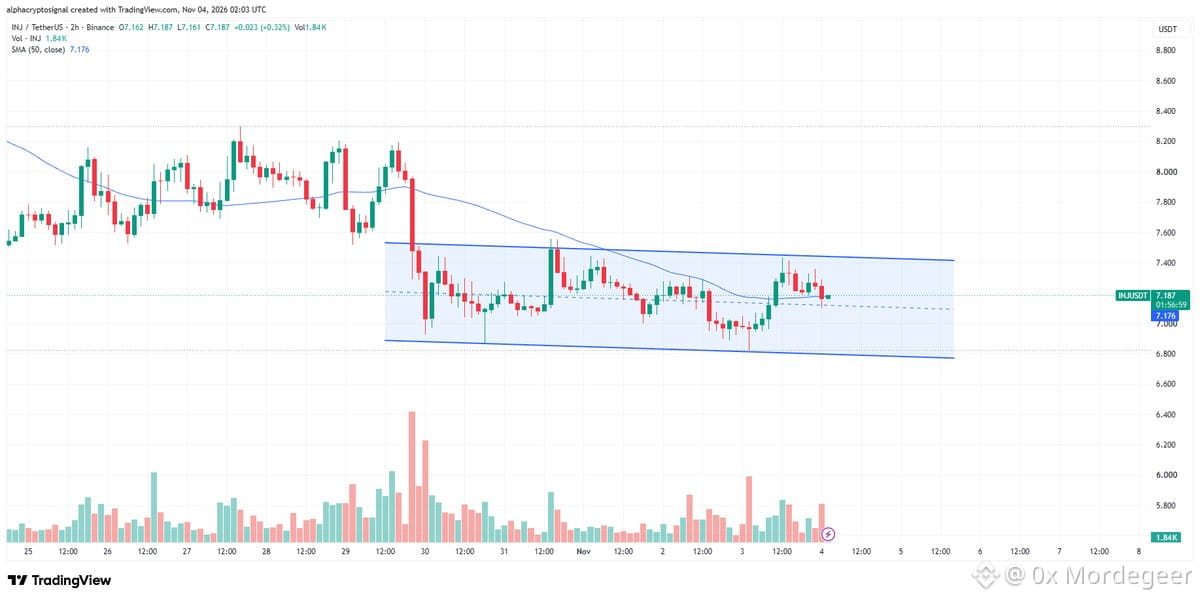
📊 $INJ テクニカル分析とセットアップ
$INJ は現在、下位時間足で明確な水平チャネル内の持ち合いを続けており、市場のモメンタムが高まるなか、レンジの中間付近で底堅さを保っています。
• 主要サポート/需要帯:$18.50~$19.00のレンジを堅持
• レジスタンス/供給目標:$22.20と$24.50のチャネル上限
• トリガー/確認条件:出来高を伴う4時間足ローソク足がチャネル上限を上抜けて確定
• リスク/無効化条件:日足が$17.80を下回って確定した場合、強気シナリオは無効
• 市場での執行:ブレイクアウトの試しで、オーダーブックの厚みと出来高の拡大を確認
DYOR — 教育目的のセットアップであり、金融アドバイスではありません。
#BinanceSquare #Crypto #INJ #トレード
📊 $INJ テクニカル分析とセットアップ
$INJ は現在、下位時間足で明確な水平チャネル内の持ち合いを続けており、市場のモメンタムが高まるなか、レンジの中間付近で底堅さを保っています。
• 主要サポート/需要帯:$18.50~$19.00のレンジを堅持
• レジスタンス/供給目標:$22.20と$24.50のチャネル上限
• トリガー/確認条件:出来高を伴う4時間足ローソク足がチャネル上限を上抜けて確定
• リスク/無効化条件:日足が$17.80を下回って確定した場合、強気シナリオは無効
• 市場での執行:ブレイクアウトの試しで、オーダーブックの厚みと出来高の拡大を確認
DYOR — 教育目的のセットアップであり、金融アドバイスではありません。
#BinanceSquare #Crypto #INJ #トレード
$INJ は現在、下位時間足で明確な水平チャネル内の持ち合いを続けており、市場のモメンタムが高まるなか、レンジの中間付近で底堅さを保っています。
• 主要サポート/需要帯:$18.50~$19.00のレンジを堅持
• レジスタンス/供給目標:$22.20と$24.50のチャネル上限
• トリガー/確認条件:出来高を伴う4時間足ローソク足がチャネル上限を上抜けて確定
• リスク/無効化条件:日足が$17.80を下回って確定した場合、強気シナリオは無効
• 市場での執行:ブレイクアウトの試しで、オーダーブックの厚みと出来高の拡大を確認
DYOR — 教育目的のセットアップであり、金融アドバイスではありません。
#BinanceSquare #Crypto #INJ #トレード
43
·
--
翻訳参照
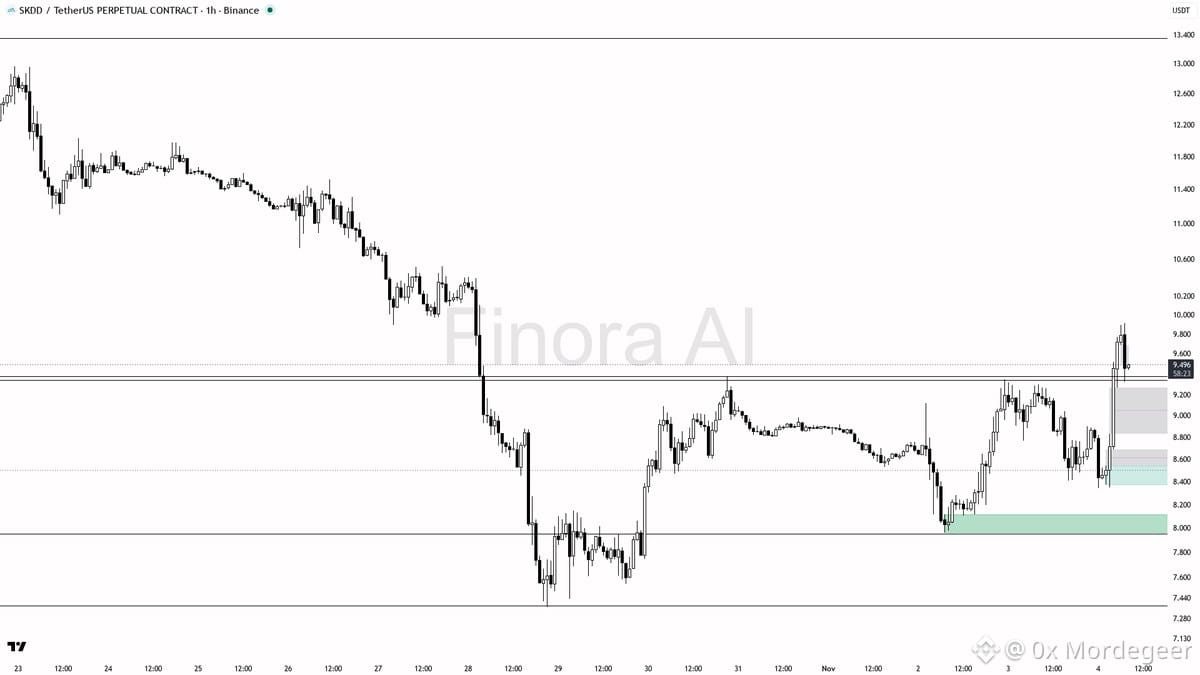
📊 $SKDD Technical Analysis & Setup
Heavy volume coming in on a -2.5% dip suggests profit-taking rather than a structural market flip, keeping momentum under close watch. Traders should wait for clear confirmation before entering new positions.
• Key Support / Demand: $0.0042 - $0.0045 zone
• Resistance / Supply Targets: $0.0058 / $0.0065
• Trigger / Confirmation: Volume expansion on a reclaim of the local moving average
• Risk / Invalidation: Daily close below $0.0038 support
• Market Execution: Monitor order book depth closely to manage volatility and slippage during retests
DYOR — Educational setup, not financial advice. Manage your risk carefully.
#BinanceSquare #Crypto #SKDD #Trading
📊 $SKDD Technical Analysis & Setup
Heavy volume coming in on a -2.5% dip suggests profit-taking rather than a structural market flip, keeping momentum under close watch. Traders should wait for clear confirmation before entering new positions.
• Key Support / Demand: $0.0042 - $0.0045 zone
• Resistance / Supply Targets: $0.0058 / $0.0065
• Trigger / Confirmation: Volume expansion on a reclaim of the local moving average
• Risk / Invalidation: Daily close below $0.0038 support
• Market Execution: Monitor order book depth closely to manage volatility and slippage during retests
DYOR — Educational setup, not financial advice. Manage your risk carefully.
#BinanceSquare #Crypto #SKDD #Trading
Heavy volume coming in on a -2.5% dip suggests profit-taking rather than a structural market flip, keeping momentum under close watch. Traders should wait for clear confirmation before entering new positions.
• Key Support / Demand: $0.0042 - $0.0045 zone
• Resistance / Supply Targets: $0.0058 / $0.0065
• Trigger / Confirmation: Volume expansion on a reclaim of the local moving average
• Risk / Invalidation: Daily close below $0.0038 support
• Market Execution: Monitor order book depth closely to manage volatility and slippage during retests
DYOR — Educational setup, not financial advice. Manage your risk carefully.
#BinanceSquare #Crypto #SKDD #Trading
48
·
--
翻訳参照
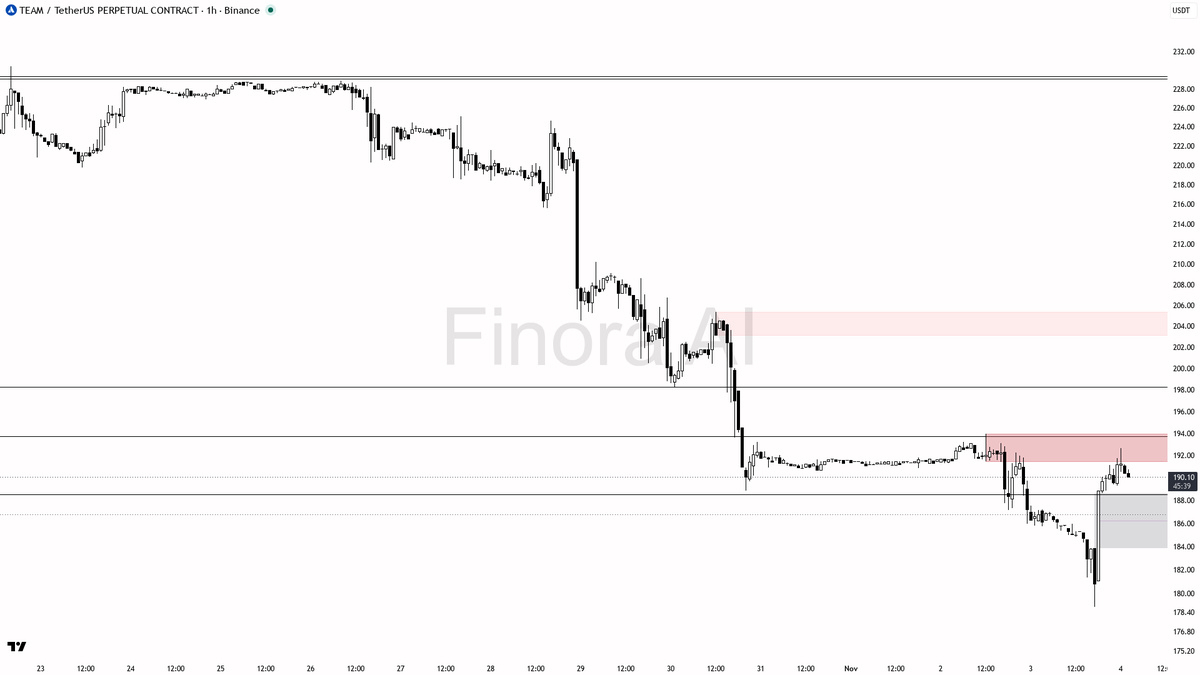
📊 $TEAM Technical Analysis & Setup
$TEAM daily and 1h Dow structures print lower highs and lower lows while crowded positive funding (+0.56%) against the trend acts as prime fuel for a long squeeze.
• Key Support / Demand: 188.21–186.95, 186.11, 183, and swing low 178.89
• Resistance / Supply Targets: Liquidity high at 193.99, followed by downside targets 186.95, 183, and 178.89
• Trigger / Confirmation: Failed sweep/rejection wick at 193.99, loss of 190.67, and a 1h close back under the 188-189 demand cluster on thin volume
• Risk / Invalidation: A solid 1h close above 193.99 invalidates the bearish setup and flips market structure
• Market Execution: Wait for confirmation on the high-timeframe trend; avoid chasing naked moves with low volume depth
DYOR — Educational setup, not financial advice.
#BinanceSquare #Crypto #TEAM #Trading
📊 $TEAM Technical Analysis & Setup
$TEAM daily and 1h Dow structures print lower highs and lower lows while crowded positive funding (+0.56%) against the trend acts as prime fuel for a long squeeze.
• Key Support / Demand: 188.21–186.95, 186.11, 183, and swing low 178.89
• Resistance / Supply Targets: Liquidity high at 193.99, followed by downside targets 186.95, 183, and 178.89
• Trigger / Confirmation: Failed sweep/rejection wick at 193.99, loss of 190.67, and a 1h close back under the 188-189 demand cluster on thin volume
• Risk / Invalidation: A solid 1h close above 193.99 invalidates the bearish setup and flips market structure
• Market Execution: Wait for confirmation on the high-timeframe trend; avoid chasing naked moves with low volume depth
DYOR — Educational setup, not financial advice.
#BinanceSquare #Crypto #TEAM #Trading
$TEAM daily and 1h Dow structures print lower highs and lower lows while crowded positive funding (+0.56%) against the trend acts as prime fuel for a long squeeze.
• Key Support / Demand: 188.21–186.95, 186.11, 183, and swing low 178.89
• Resistance / Supply Targets: Liquidity high at 193.99, followed by downside targets 186.95, 183, and 178.89
• Trigger / Confirmation: Failed sweep/rejection wick at 193.99, loss of 190.67, and a 1h close back under the 188-189 demand cluster on thin volume
• Risk / Invalidation: A solid 1h close above 193.99 invalidates the bearish setup and flips market structure
• Market Execution: Wait for confirmation on the high-timeframe trend; avoid chasing naked moves with low volume depth
DYOR — Educational setup, not financial advice.
#BinanceSquare #Crypto #TEAM #Trading
64
·
--
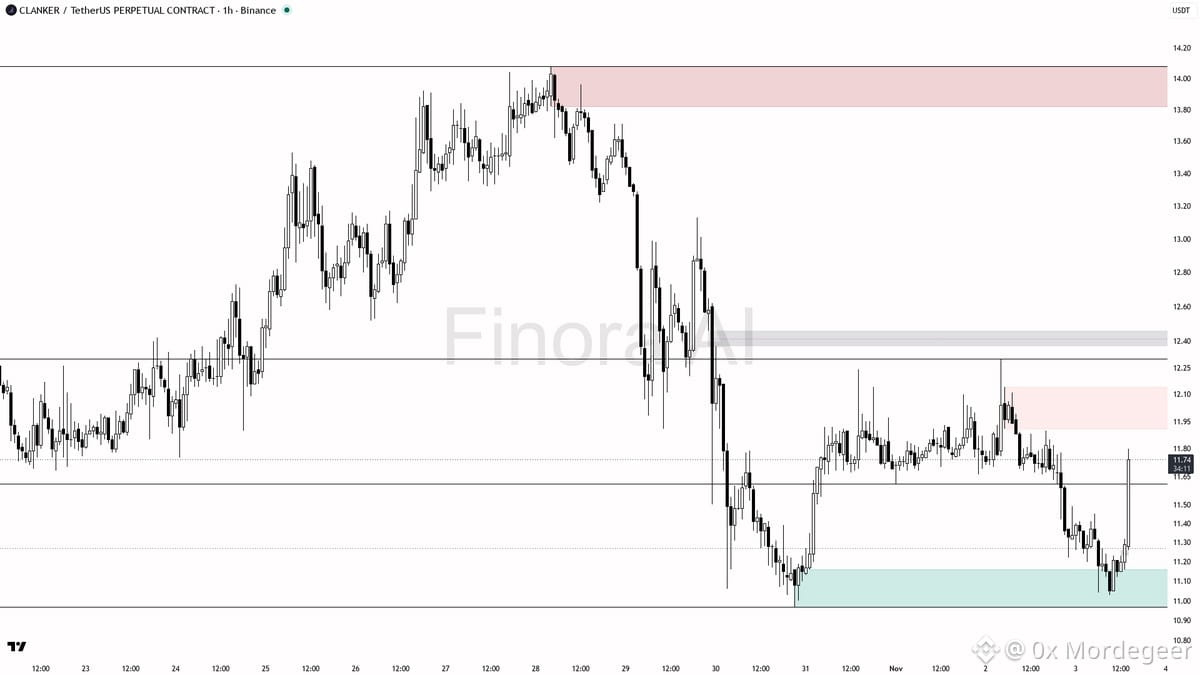
📊 $CLANKER テクニカル分析&セットアップ
15分足で出来高が2.1倍に急増し、価格も2.8%上昇するなか、大口投資家が積極的に参入しています。短期的なモメンタムの回復と、市場参加者の増加を示唆しています。
• 主要サポート/需要ゾーン:24.50、25.00
• レジスタンス/供給目標:28.50、32.00
• トリガー/確認条件:出来高を伴い、15分足が27.20を上回って継続的に終値をつけること
• リスク/無効化条件:23.80を明確に下抜けて終値をつけた場合、強気シナリオは無効
• 市場執行:ブレイクアウトを試みる際は、クロスチェーンのボラティリティとスリッページに対処するため、オーダーブックの厚みを注意深く確認してください
ご自身で調査してください(DYOR)— 教育目的のセットアップであり、投資助言ではありません。
#BinanceSquare #Crypto #CLANKER #トレーディング
📊 $CLANKER テクニカル分析&セットアップ
15分足で出来高が2.1倍に急増し、価格も2.8%上昇するなか、大口投資家が積極的に参入しています。短期的なモメンタムの回復と、市場参加者の増加を示唆しています。
• 主要サポート/需要ゾーン:24.50、25.00
• レジスタンス/供給目標:28.50、32.00
• トリガー/確認条件:出来高を伴い、15分足が27.20を上回って継続的に終値をつけること
• リスク/無効化条件:23.80を明確に下抜けて終値をつけた場合、強気シナリオは無効
• 市場執行:ブレイクアウトを試みる際は、クロスチェーンのボラティリティとスリッページに対処するため、オーダーブックの厚みを注意深く確認してください
ご自身で調査してください(DYOR)— 教育目的のセットアップであり、投資助言ではありません。
#BinanceSquare #Crypto #CLANKER #トレーディング
15分足で出来高が2.1倍に急増し、価格も2.8%上昇するなか、大口投資家が積極的に参入しています。短期的なモメンタムの回復と、市場参加者の増加を示唆しています。
• 主要サポート/需要ゾーン:24.50、25.00
• レジスタンス/供給目標:28.50、32.00
• トリガー/確認条件:出来高を伴い、15分足が27.20を上回って継続的に終値をつけること
• リスク/無効化条件:23.80を明確に下抜けて終値をつけた場合、強気シナリオは無効
• 市場執行:ブレイクアウトを試みる際は、クロスチェーンのボラティリティとスリッページに対処するため、オーダーブックの厚みを注意深く確認してください
ご自身で調査してください(DYOR)— 教育目的のセットアップであり、投資助言ではありません。
#BinanceSquare #Crypto #CLANKER #トレーディング
2
·
--
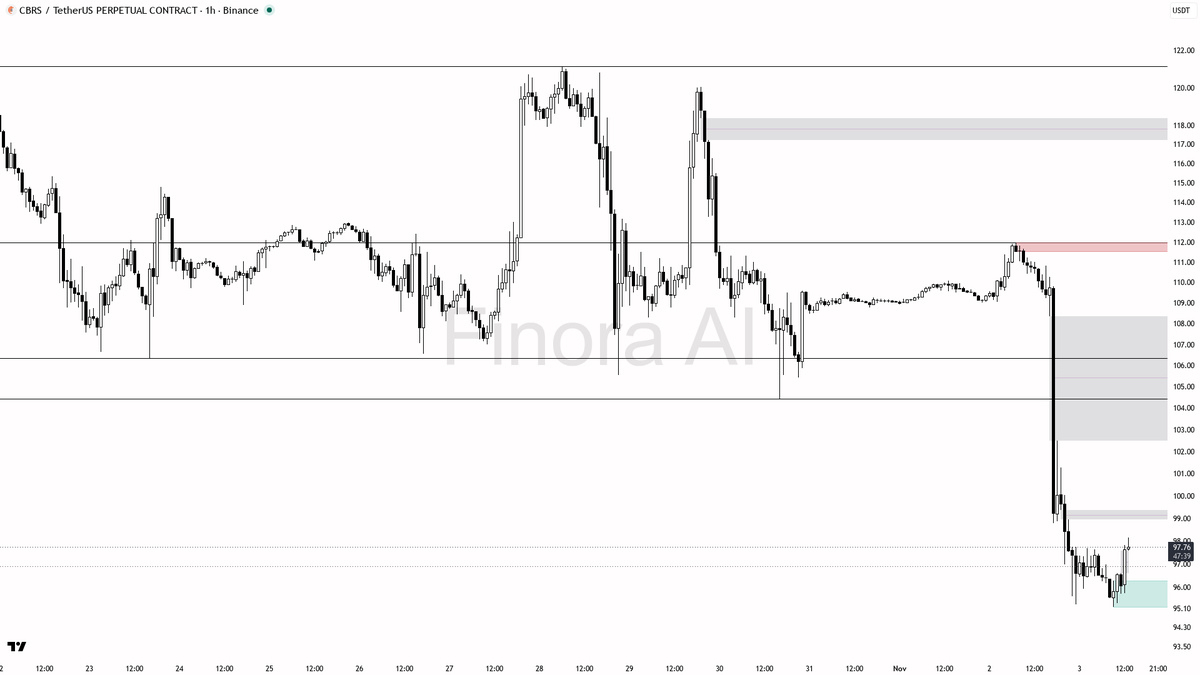
📊 $CBRS テクニカル分析とセットアップ
この資産は現在、明確なマクロ下降トレンドの中で97.83の水準を上抜ける動きを見せています。今回の試しで出来高が少ないことは、本格的な買い圧力の欠如を示唆しており、反転が確定したというより、さらに下落が続く可能性を示しています。
• 主要サポート/需要ゾーン:90.00、92.50付近
• レジスタンス/供給目標:97.83(直近の上抜け水準)/102.00
• トリガー/確認条件:ロングの場合は出来高の増加を伴う日足終値での98.00回復、またはショート継続の場合は92.50を下回る水準での定着。
• リスク/無効化条件:100.00を回復した場合、目先の弱気継続バイアスは無効となります。
• 市場での執行:ボラティリティが高い局面でのスリッページを避けるため、主要取引所の板の厚さを注意深く確認してください。
DYOR(ご自身で調査してください)— 教育目的のセットアップであり、金融アドバイスではありません。資金を守り、リスクを厳格に管理してください。
#BinanceSquare #Crypto #CBRS #トレード
📊 $CBRS テクニカル分析とセットアップ
この資産は現在、明確なマクロ下降トレンドの中で97.83の水準を上抜ける動きを見せています。今回の試しで出来高が少ないことは、本格的な買い圧力の欠如を示唆しており、反転が確定したというより、さらに下落が続く可能性を示しています。
• 主要サポート/需要ゾーン:90.00、92.50付近
• レジスタンス/供給目標:97.83(直近の上抜け水準)/102.00
• トリガー/確認条件:ロングの場合は出来高の増加を伴う日足終値での98.00回復、またはショート継続の場合は92.50を下回る水準での定着。
• リスク/無効化条件:100.00を回復した場合、目先の弱気継続バイアスは無効となります。
• 市場での執行:ボラティリティが高い局面でのスリッページを避けるため、主要取引所の板の厚さを注意深く確認してください。
DYOR(ご自身で調査してください)— 教育目的のセットアップであり、金融アドバイスではありません。資金を守り、リスクを厳格に管理してください。
#BinanceSquare #Crypto #CBRS #トレード
この資産は現在、明確なマクロ下降トレンドの中で97.83の水準を上抜ける動きを見せています。今回の試しで出来高が少ないことは、本格的な買い圧力の欠如を示唆しており、反転が確定したというより、さらに下落が続く可能性を示しています。
• 主要サポート/需要ゾーン:90.00、92.50付近
• レジスタンス/供給目標:97.83(直近の上抜け水準)/102.00
• トリガー/確認条件:ロングの場合は出来高の増加を伴う日足終値での98.00回復、またはショート継続の場合は92.50を下回る水準での定着。
• リスク/無効化条件:100.00を回復した場合、目先の弱気継続バイアスは無効となります。
• 市場での執行:ボラティリティが高い局面でのスリッページを避けるため、主要取引所の板の厚さを注意深く確認してください。
DYOR(ご自身で調査してください)— 教育目的のセットアップであり、金融アドバイスではありません。資金を守り、リスクを厳格に管理してください。
#BinanceSquare #Crypto #CBRS #トレード
3
·
--
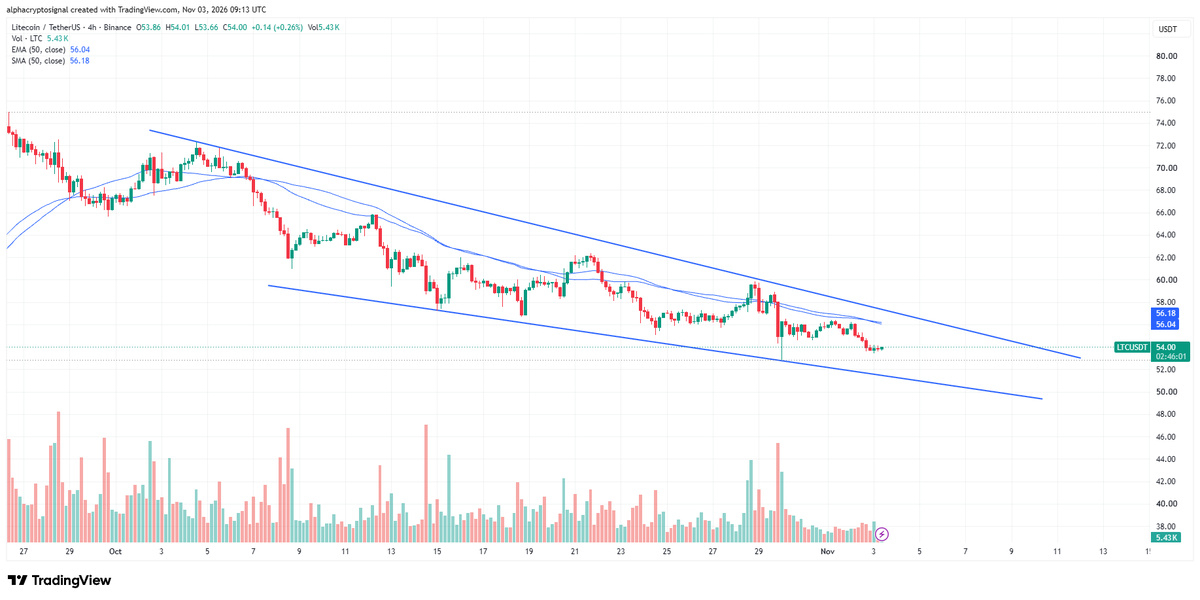
📊 $LTC テクニカル分析とセットアップ
$LTC は現在、下降ウェッジパターン内で取引されており、値動きは着実に下限へ近づいています。強気反応が起きる可能性のあるこの重要な領域を注意深く監視していますが、確認の主なきっかけとなるのは、上側のトレンドラインを明確に上抜けることです。
• 主要サポート/需要ゾーン:下降ウェッジの下限
• レジスタンス/供給目標:ウェッジ上側のトレンドラインと、その上方に続く供給ゾーン
• トリガー/確認条件:日足終値と出来高を伴って、下降レジスタンスラインを上抜けること
• リスク/無効化条件:ウェッジ下限を下回ると、強気シナリオは無効
• 市場での執行:ブレイクアウト後のリテスト時に、板の厚みと出来高の拡大を確認
DYOR — 学習目的のセットアップであり、投資助言ではありません。
#BinanceSquare #Crypto #LTC #トレード
📊 $LTC テクニカル分析とセットアップ
$LTC は現在、下降ウェッジパターン内で取引されており、値動きは着実に下限へ近づいています。強気反応が起きる可能性のあるこの重要な領域を注意深く監視していますが、確認の主なきっかけとなるのは、上側のトレンドラインを明確に上抜けることです。
• 主要サポート/需要ゾーン:下降ウェッジの下限
• レジスタンス/供給目標:ウェッジ上側のトレンドラインと、その上方に続く供給ゾーン
• トリガー/確認条件:日足終値と出来高を伴って、下降レジスタンスラインを上抜けること
• リスク/無効化条件:ウェッジ下限を下回ると、強気シナリオは無効
• 市場での執行:ブレイクアウト後のリテスト時に、板の厚みと出来高の拡大を確認
DYOR — 学習目的のセットアップであり、投資助言ではありません。
#BinanceSquare #Crypto #LTC #トレード
$LTC は現在、下降ウェッジパターン内で取引されており、値動きは着実に下限へ近づいています。強気反応が起きる可能性のあるこの重要な領域を注意深く監視していますが、確認の主なきっかけとなるのは、上側のトレンドラインを明確に上抜けることです。
• 主要サポート/需要ゾーン:下降ウェッジの下限
• レジスタンス/供給目標:ウェッジ上側のトレンドラインと、その上方に続く供給ゾーン
• トリガー/確認条件:日足終値と出来高を伴って、下降レジスタンスラインを上抜けること
• リスク/無効化条件:ウェッジ下限を下回ると、強気シナリオは無効
• 市場での執行:ブレイクアウト後のリテスト時に、板の厚みと出来高の拡大を確認
DYOR — 学習目的のセットアップであり、投資助言ではありません。
#BinanceSquare #Crypto #LTC #トレード
10
·
--
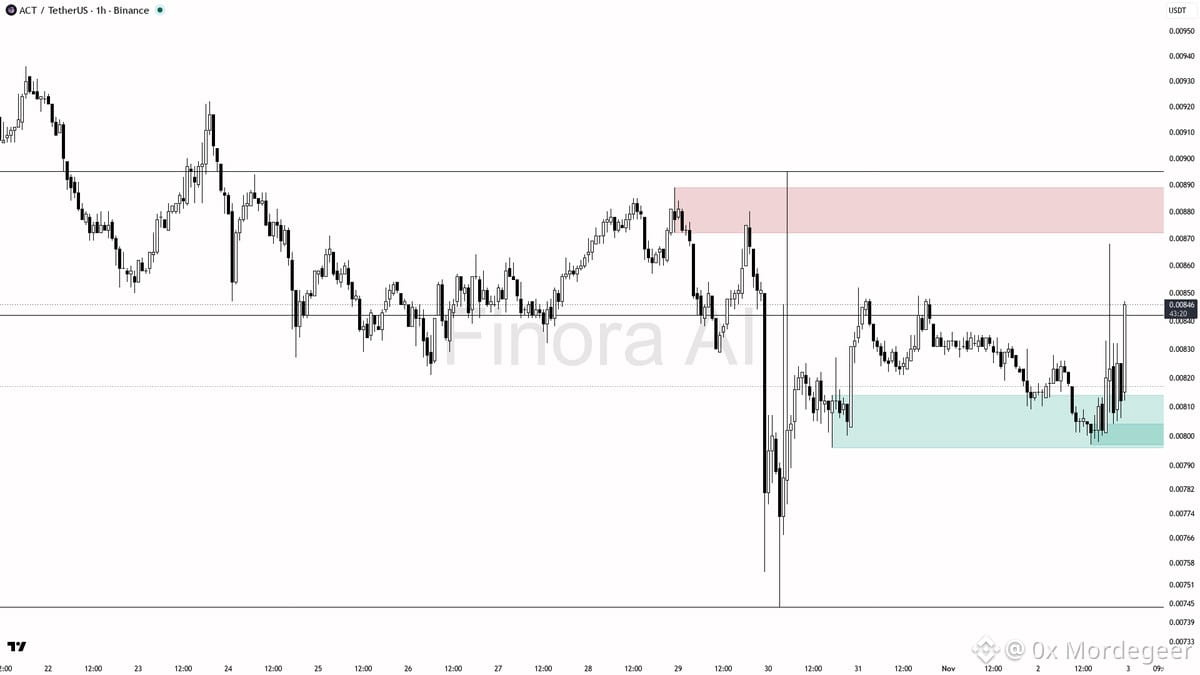
📊 $ACT テクニカル分析とセットアップ
$ACT は買い圧力を伴い、出来高が21.8倍に急増しています。価格が直近のスイング安値を上回っているため、1時間足のバイアスは強気を維持しています。ただし、これは日足・週足の弱気構造に逆行する反発です。焦らず、確認を待つことが重要です。
• 主要サポート/需要帯:0.00821、0.00809(流動性ゾーン)
• レジスタンス/供給目標:0.00864、0.00895、0.00922
• エントリートリガー/確認条件:ロングエントリー前に、明確なスイープ後の奪回と強気の終値、または下位時間足での転換を確認
• リスク/無効化条件:1時間足が0.00797を下回って引けると、バイアスは弱気に転じ、セットアップは無効になります
• 市場執行状況:建玉は190万ドル(+19.6%)、資金調達率は+0.0050%とプラス、テイカー比率は1.61倍で、短期的な強い蓄積を示しています
常にリスクを厳格に管理し、確認のローソク足を待ちましょう。DYOR — 学習目的のセットアップであり、金融アドバイスではありません。
#BinanceSquare #Crypto #ACT #トレーディング
📊 $ACT テクニカル分析とセットアップ
$ACT は買い圧力を伴い、出来高が21.8倍に急増しています。価格が直近のスイング安値を上回っているため、1時間足のバイアスは強気を維持しています。ただし、これは日足・週足の弱気構造に逆行する反発です。焦らず、確認を待つことが重要です。
• 主要サポート/需要帯:0.00821、0.00809(流動性ゾーン)
• レジスタンス/供給目標:0.00864、0.00895、0.00922
• エントリートリガー/確認条件:ロングエントリー前に、明確なスイープ後の奪回と強気の終値、または下位時間足での転換を確認
• リスク/無効化条件:1時間足が0.00797を下回って引けると、バイアスは弱気に転じ、セットアップは無効になります
• 市場執行状況:建玉は190万ドル(+19.6%)、資金調達率は+0.0050%とプラス、テイカー比率は1.61倍で、短期的な強い蓄積を示しています
常にリスクを厳格に管理し、確認のローソク足を待ちましょう。DYOR — 学習目的のセットアップであり、金融アドバイスではありません。
#BinanceSquare #Crypto #ACT #トレーディング
$ACT は買い圧力を伴い、出来高が21.8倍に急増しています。価格が直近のスイング安値を上回っているため、1時間足のバイアスは強気を維持しています。ただし、これは日足・週足の弱気構造に逆行する反発です。焦らず、確認を待つことが重要です。
• 主要サポート/需要帯:0.00821、0.00809(流動性ゾーン)
• レジスタンス/供給目標:0.00864、0.00895、0.00922
• エントリートリガー/確認条件:ロングエントリー前に、明確なスイープ後の奪回と強気の終値、または下位時間足での転換を確認
• リスク/無効化条件:1時間足が0.00797を下回って引けると、バイアスは弱気に転じ、セットアップは無効になります
• 市場執行状況:建玉は190万ドル(+19.6%)、資金調達率は+0.0050%とプラス、テイカー比率は1.61倍で、短期的な強い蓄積を示しています
常にリスクを厳格に管理し、確認のローソク足を待ちましょう。DYOR — 学習目的のセットアップであり、金融アドバイスではありません。
#BinanceSquare #Crypto #ACT #トレーディング
7
·
--
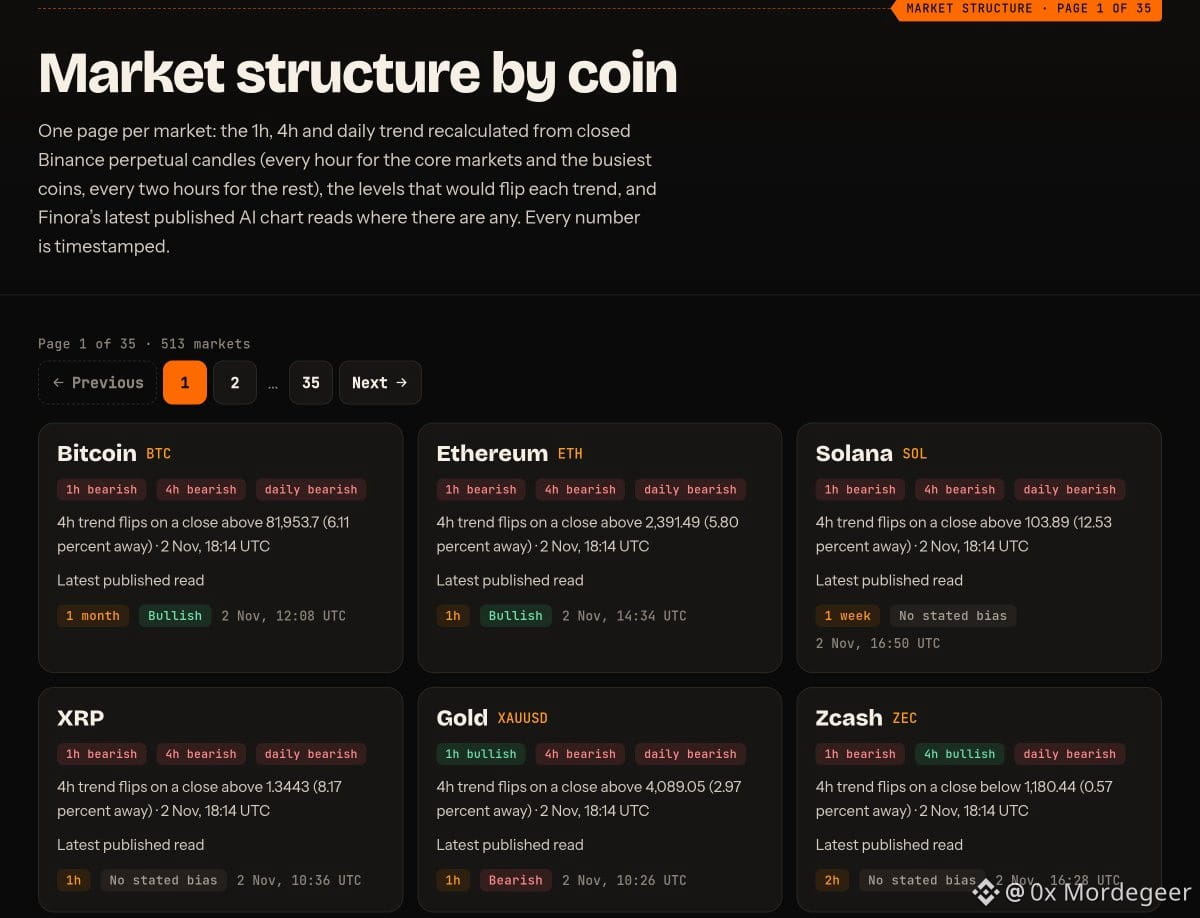
📊 $SOL テクニカル分析とセットアップ
複数の時間足で分析すると、現在は相反する市場構造が見られます。1時間足は強気、4時間足は弱気、日足のトレンドも弱気のままです。こうした混在するシグナルに対応するには、ポジションを取る前に重要なテクニカル上のトリガーを厳守する必要があります。
• 重要なサポート/需要帯:構造上のスイング安値や下位時間足の需要帯を注視し、買い吸収が起きていないか確認しましょう。
• レジスタンス/供給目標:上方のスイング高値や大局的なトレンド転換水準が、上値抵抗を決定します。
• トリガー/確認:4時間足と日足のトレンドを転換させる特定の水準を、終値で明確に超えるのを待ちましょう。
• リスク/無効化条件:出来高の裏付けがないまま価格が直近のサポートを割り込んだ場合、強気バイアスは無効となります。
• 市場執行:複数資産間のボラティリティを慎重に管理し、堅牢なマーケットデプスを活用してスリッページを回避しましょう。
ご自身で調査を行ってください — 教育目的のセットアップであり、金融助言ではありません。
#BinanceSquare #Crypto #SOL #トレーディング
$MULTI
📊 $SOL テクニカル分析とセットアップ
複数の時間足で分析すると、現在は相反する市場構造が見られます。1時間足は強気、4時間足は弱気、日足のトレンドも弱気のままです。こうした混在するシグナルに対応するには、ポジションを取る前に重要なテクニカル上のトリガーを厳守する必要があります。
• 重要なサポート/需要帯:構造上のスイング安値や下位時間足の需要帯を注視し、買い吸収が起きていないか確認しましょう。
• レジスタンス/供給目標:上方のスイング高値や大局的なトレンド転換水準が、上値抵抗を決定します。
• トリガー/確認:4時間足と日足のトレンドを転換させる特定の水準を、終値で明確に超えるのを待ちましょう。
• リスク/無効化条件:出来高の裏付けがないまま価格が直近のサポートを割り込んだ場合、強気バイアスは無効となります。
• 市場執行:複数資産間のボラティリティを慎重に管理し、堅牢なマーケットデプスを活用してスリッページを回避しましょう。
ご自身で調査を行ってください — 教育目的のセットアップであり、金融助言ではありません。
#BinanceSquare #Crypto #SOL #トレーディング
$MULTI
複数の時間足で分析すると、現在は相反する市場構造が見られます。1時間足は強気、4時間足は弱気、日足のトレンドも弱気のままです。こうした混在するシグナルに対応するには、ポジションを取る前に重要なテクニカル上のトリガーを厳守する必要があります。
• 重要なサポート/需要帯:構造上のスイング安値や下位時間足の需要帯を注視し、買い吸収が起きていないか確認しましょう。
• レジスタンス/供給目標:上方のスイング高値や大局的なトレンド転換水準が、上値抵抗を決定します。
• トリガー/確認:4時間足と日足のトレンドを転換させる特定の水準を、終値で明確に超えるのを待ちましょう。
• リスク/無効化条件:出来高の裏付けがないまま価格が直近のサポートを割り込んだ場合、強気バイアスは無効となります。
• 市場執行:複数資産間のボラティリティを慎重に管理し、堅牢なマーケットデプスを活用してスリッページを回避しましょう。
ご自身で調査を行ってください — 教育目的のセットアップであり、金融助言ではありません。
#BinanceSquare #Crypto #SOL #トレーディング
$MULTI
2
·
--
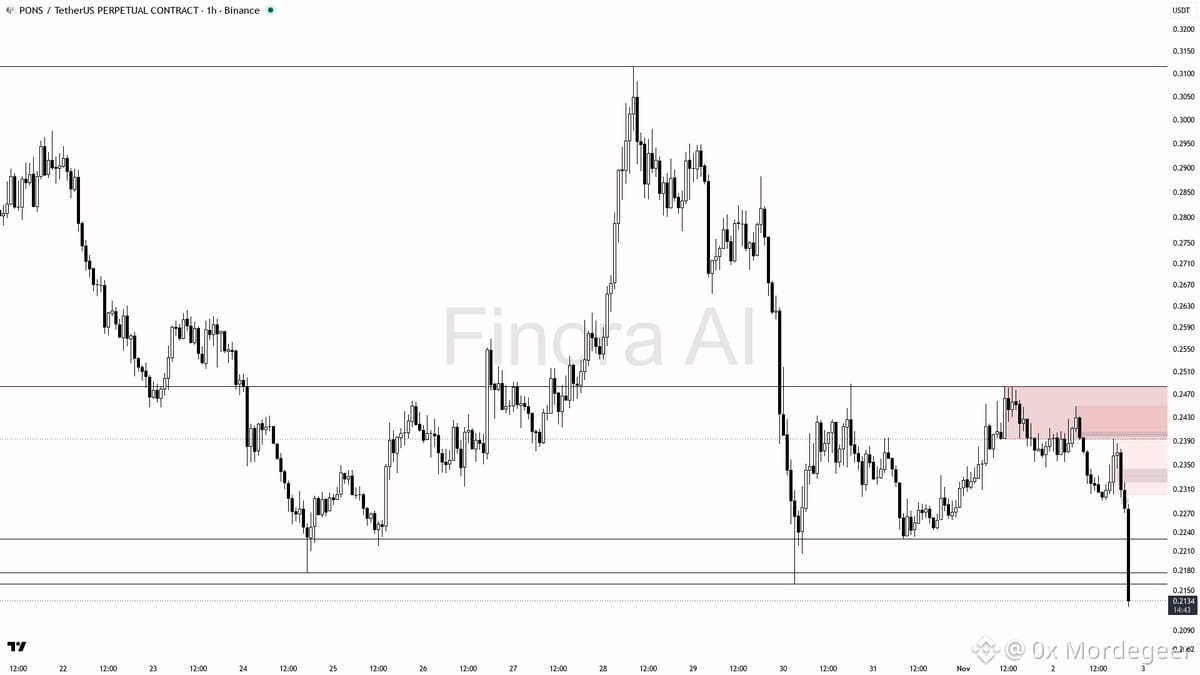
📊 $PONS テクニカル分析とセットアップ
出来高を伴う10.3%の下落は、パニック売りの底打ちというよりも、分配とロングポジションの解消を示唆しており、より広範な弱気相場の構造と一致しています。
• 主要サポート/需要ゾーン:0.2077、0.1919、0.1821
• レジスタンス/供給目標:0.2230、戻りの目安となる0.2295
• トリガー/確認条件:下位時間足での相場構造の転換、上ヒゲによる反落、0.2295を回復できないことを待つ
• リスク/無効化条件:終値で0.2449を上回れば、弱気バイアスは反転
• 市場執行:OIは1,940万ドル、資金調達率は中立。確認が取れるまでは、反発を売りの機会として扱う
DYOR(ご自身で調査してください)— 教育目的のセットアップであり、金融アドバイスではありません。
#BinanceSquare #Crypto #PONS #トレーディング
📊 $PONS テクニカル分析とセットアップ
出来高を伴う10.3%の下落は、パニック売りの底打ちというよりも、分配とロングポジションの解消を示唆しており、より広範な弱気相場の構造と一致しています。
• 主要サポート/需要ゾーン:0.2077、0.1919、0.1821
• レジスタンス/供給目標:0.2230、戻りの目安となる0.2295
• トリガー/確認条件:下位時間足での相場構造の転換、上ヒゲによる反落、0.2295を回復できないことを待つ
• リスク/無効化条件:終値で0.2449を上回れば、弱気バイアスは反転
• 市場執行:OIは1,940万ドル、資金調達率は中立。確認が取れるまでは、反発を売りの機会として扱う
DYOR(ご自身で調査してください)— 教育目的のセットアップであり、金融アドバイスではありません。
#BinanceSquare #Crypto #PONS #トレーディング
出来高を伴う10.3%の下落は、パニック売りの底打ちというよりも、分配とロングポジションの解消を示唆しており、より広範な弱気相場の構造と一致しています。
• 主要サポート/需要ゾーン:0.2077、0.1919、0.1821
• レジスタンス/供給目標:0.2230、戻りの目安となる0.2295
• トリガー/確認条件:下位時間足での相場構造の転換、上ヒゲによる反落、0.2295を回復できないことを待つ
• リスク/無効化条件:終値で0.2449を上回れば、弱気バイアスは反転
• 市場執行:OIは1,940万ドル、資金調達率は中立。確認が取れるまでは、反発を売りの機会として扱う
DYOR(ご自身で調査してください)— 教育目的のセットアップであり、金融アドバイスではありません。
#BinanceSquare #Crypto #PONS #トレーディング
5
·
--
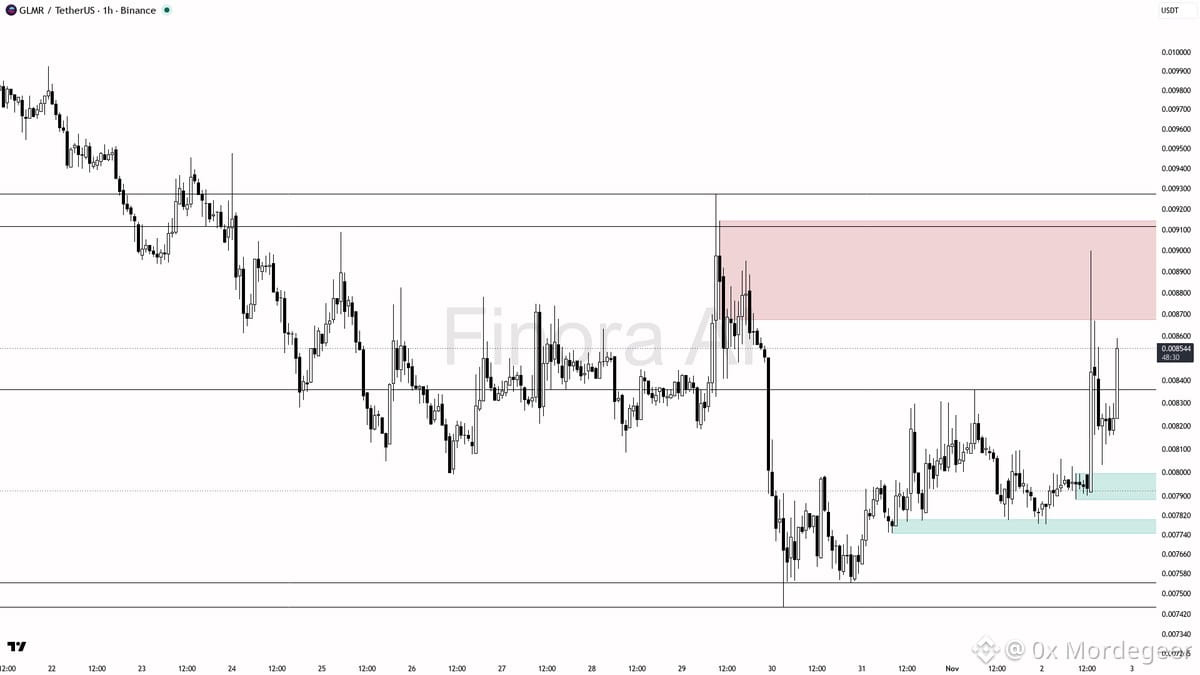
📊 $GLMR テクニカル分析とセットアップ
$GLMR 出来高は6.8倍に増加し、1時間足チャートで直近の高値切り上げ後の安値を上回る構造を維持したまま、3.4%の値動きを確認しています。これは、より大きな時間軸の日足・週足が弱気構造にある中での逆トレンドの反発です。そのため、取引を実行する前に、焦らず確認を待つことが重要です。
• 主要サポート/需要帯:0.00808の流動性スイープ後の0.00816~0.00836ゾーン
• レジスタンス/供給の目標水準:0.00863、0.00872、0.00889、0.00900~0.00916
• トリガー/確認条件:エントリー前に、15分足/5分足で強気の包み足、またはマーケット構造の転換(MSS)を待ち、リテスト時に0.00836を上回って維持することを確認
• リスク/無効化条件:日足終値が0.007885を下回ると、見通しは完全に弱気に転じます。最初のヒゲの下に置くだけでなく、構造転換点を超えた位置にストップロスを設定してください
• 市場での執行:ポジションサイズとタイミングを決める際は、BTCのディフェンシブな資金フローと現在の建玉を考慮してください
DYOR(ご自身で調査してください)— 教育目的のセットアップであり、投資助言ではありません。
#BinanceSquare #Crypto #GLMR #トレーディング
$MOVE
📊 $GLMR テクニカル分析とセットアップ
$GLMR 出来高は6.8倍に増加し、1時間足チャートで直近の高値切り上げ後の安値を上回る構造を維持したまま、3.4%の値動きを確認しています。これは、より大きな時間軸の日足・週足が弱気構造にある中での逆トレンドの反発です。そのため、取引を実行する前に、焦らず確認を待つことが重要です。
• 主要サポート/需要帯:0.00808の流動性スイープ後の0.00816~0.00836ゾーン
• レジスタンス/供給の目標水準:0.00863、0.00872、0.00889、0.00900~0.00916
• トリガー/確認条件:エントリー前に、15分足/5分足で強気の包み足、またはマーケット構造の転換(MSS)を待ち、リテスト時に0.00836を上回って維持することを確認
• リスク/無効化条件:日足終値が0.007885を下回ると、見通しは完全に弱気に転じます。最初のヒゲの下に置くだけでなく、構造転換点を超えた位置にストップロスを設定してください
• 市場での執行:ポジションサイズとタイミングを決める際は、BTCのディフェンシブな資金フローと現在の建玉を考慮してください
DYOR(ご自身で調査してください)— 教育目的のセットアップであり、投資助言ではありません。
#BinanceSquare #Crypto #GLMR #トレーディング
$MOVE
$GLMR 出来高は6.8倍に増加し、1時間足チャートで直近の高値切り上げ後の安値を上回る構造を維持したまま、3.4%の値動きを確認しています。これは、より大きな時間軸の日足・週足が弱気構造にある中での逆トレンドの反発です。そのため、取引を実行する前に、焦らず確認を待つことが重要です。
• 主要サポート/需要帯:0.00808の流動性スイープ後の0.00816~0.00836ゾーン
• レジスタンス/供給の目標水準:0.00863、0.00872、0.00889、0.00900~0.00916
• トリガー/確認条件:エントリー前に、15分足/5分足で強気の包み足、またはマーケット構造の転換(MSS)を待ち、リテスト時に0.00836を上回って維持することを確認
• リスク/無効化条件:日足終値が0.007885を下回ると、見通しは完全に弱気に転じます。最初のヒゲの下に置くだけでなく、構造転換点を超えた位置にストップロスを設定してください
• 市場での執行:ポジションサイズとタイミングを決める際は、BTCのディフェンシブな資金フローと現在の建玉を考慮してください
DYOR(ご自身で調査してください)— 教育目的のセットアップであり、投資助言ではありません。
#BinanceSquare #Crypto #GLMR #トレーディング
$MOVE
36
ログインして、さらにコンテンツを読む
厳選トピックで世界の暗号資産トレーダーの仲間入り
⚡️ 暗号資産に関する最新かつ有益な情報が見つかります。
💬 世界最大の暗号資産取引所から信頼されています。
👍 認証を受けたクリエイターから、有益なインサイトを得られます。
メール / 電話番号
トレンドトピック
BTCRebounds80K
閲覧回数 36,523
576人が討論中
ビットコイン最新情報:私はまだ弱気です。その理由はこちら! 🚨⚠️
皆さんもご覧になったように、BTCは75,700ドル付近から反発し、81,000ドルに到達しました。まず市場はロング勢を罠にはめ、その後ショート勢も罠にはめました。
私は依然として弱気です。まず、皆さんご存じのとおり、今日の米中間選挙では民主党が勝利しました。私の見方では、この結果は市場にとって弱材料です。
短期的には市場が不安定な状態を保ち、望むだけ多くのトレーダーを罠にはめる可能性があります。しかし、それによって市場全体の見通しが変わるわけではありません。
今後、重要なイベントがいくつか控えています。米国の非農業部門雇用者数(11月6日)、米国のCPIインフレ率(11月10日)、米国のPPI(11月13日)、米国の小売売上高(11月17日)、FOMC議事要旨(11月18日)、米国のPCEインフレ率(11月25日)、連邦準備制度理事会(FRB)の金利見通し、米ドル指数(DXY)、米国債利回り、ナスダックの動向、ビットコインETFの資金フロー、そして続いているイラン・イスラエル間の地政学的な情勢などです。これらはすべて、ビットコインと暗号資産市場全体に大きな影響を及ぼす可能性があります。
ただし、ビットコインの最近の値動きに浮かれすぎないでください。テクニカル面で言えば、まだ大きな上昇の動きはありません。昨日、BTCは80,000ドルから82,000ドルの間で取引され、今日も依然として同じようなレンジにあります。
強気に転じたいのであれば、それはあなたの自由です。
以前の投稿で、BTCには75,000ドル/76,000ドルのゾーンにテクニカルサポートがあり、価格はそのサポートから反発して80,000ドルに向けて戻したと明確に説明しました。しかし、これは以前に私が触れていなかったことではありません。実際、BTCが80,000ドル、81,000ドル、さらには82,000ドルに向かう可能性があると、投稿で何度も述べてきました。
それでも、私は依然として弱気です。
弱気の見通しを裏付ける理由は一つだけではありません。理由はいくつもあり、すでに以前の投稿で説明しています。
今のところ、BTCが74,000ドルを下回るのを引き続き待ちます。これはかなり近いうちに起こり得ると考えています。私の見方では、このような調整は市場にとっても必要です。
暗号資産に関するアドバイスが必要な方は、気軽にお知らせください。
#BTCRebounds80K
Strategic Adviser
·いいね:13件
·閲覧回数 8.1k
Binance98PercentReplenished
閲覧回数 29,640
495人が討論中
USMidterms-WhatAreMarketsExpecting?
閲覧回数 311,504
1,995人が討論中