

ZIV OREN
12.3k Publications

ZIV OREN
 Compte Square Vérifié+
Signaler
Bloquer l’utilisateur
Energy can't be faked | Sharp mind, Calm Soul
Ouvert au trading
Trade régulièrement
1.3 an(s)
276 Suivis
34.3K+ Abonnés
29.7K+ J’aime
Publications
Portefeuille
Tous
Citations
Direct
·
--
Haussier
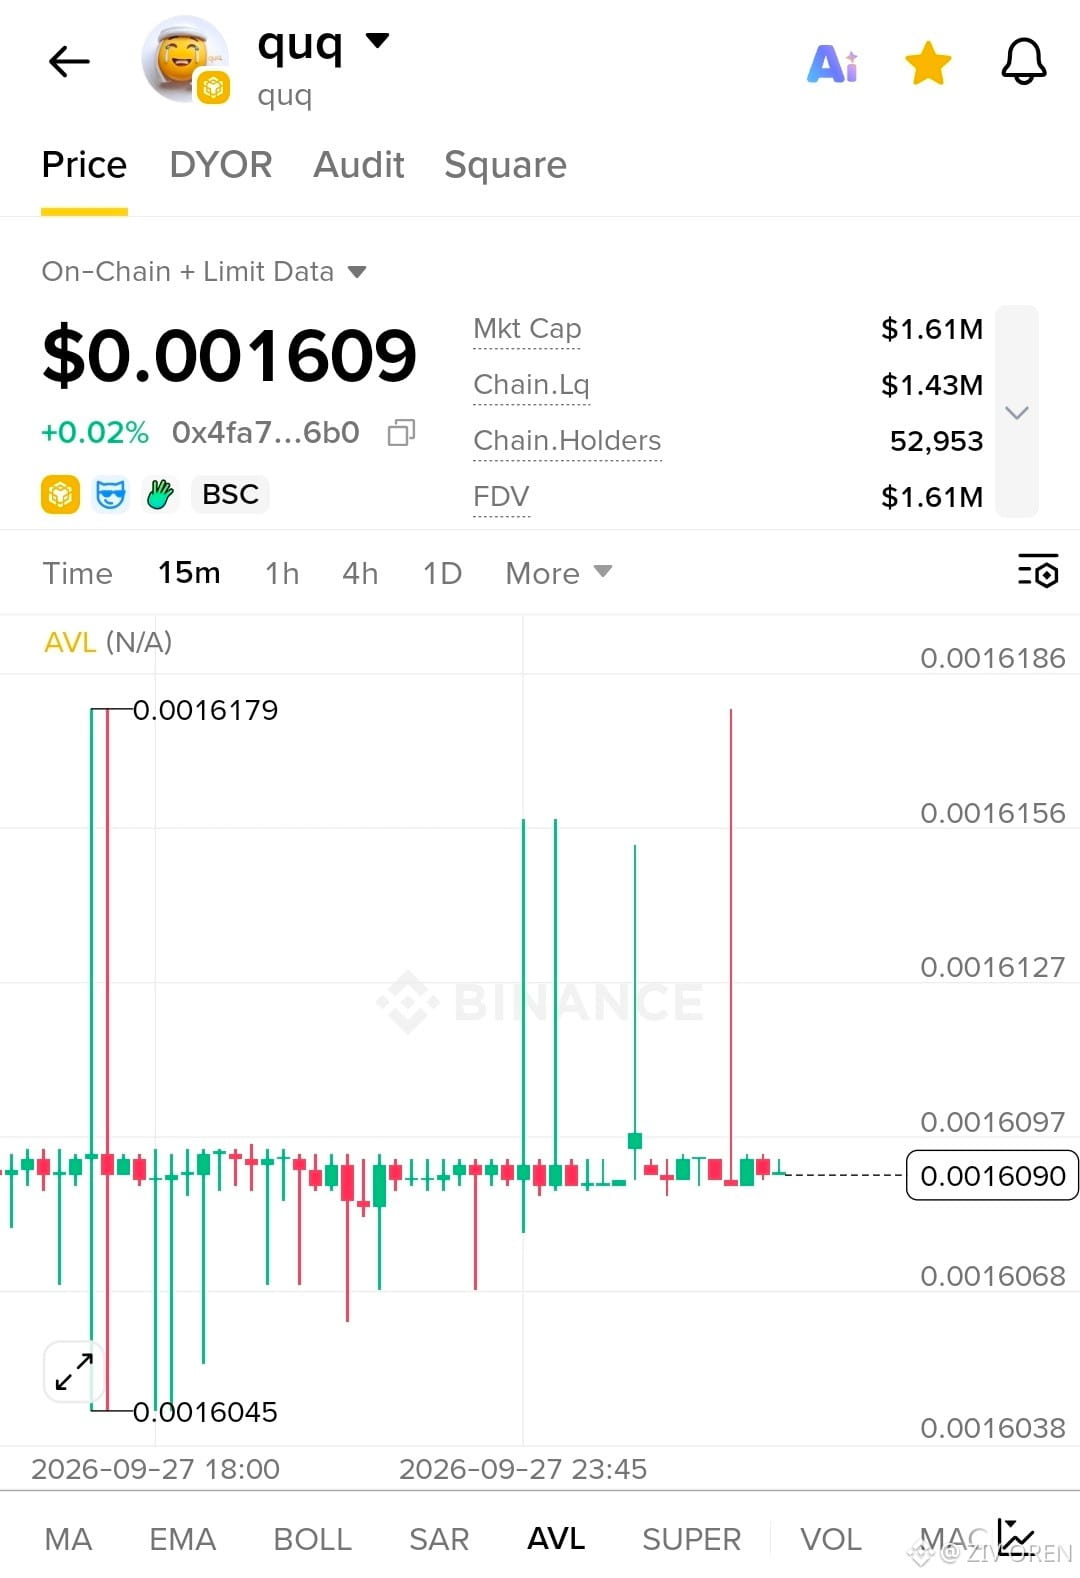
$quq
Tight base, volatility loading up for a breakout.
Trade Setup: 0.001608–0.001612
TP1: 0.001627
TP2: 0.001656
TP3: 0.001679
SL: 0.001604
Clean range. Breakout trigger, then send it. Let's go.
$quq
Tight base, volatility loading up for a breakout.
Trade Setup: 0.001608–0.001612
TP1: 0.001627
TP2: 0.001656
TP3: 0.001679
SL: 0.001604
Clean range. Breakout trigger, then send it. Let's go.
Tight base, volatility loading up for a breakout.
Trade Setup: 0.001608–0.001612
TP1: 0.001627
TP2: 0.001656
TP3: 0.001679
SL: 0.001604
Clean range. Breakout trigger, then send it. Let's go.
46
·
--
Haussier
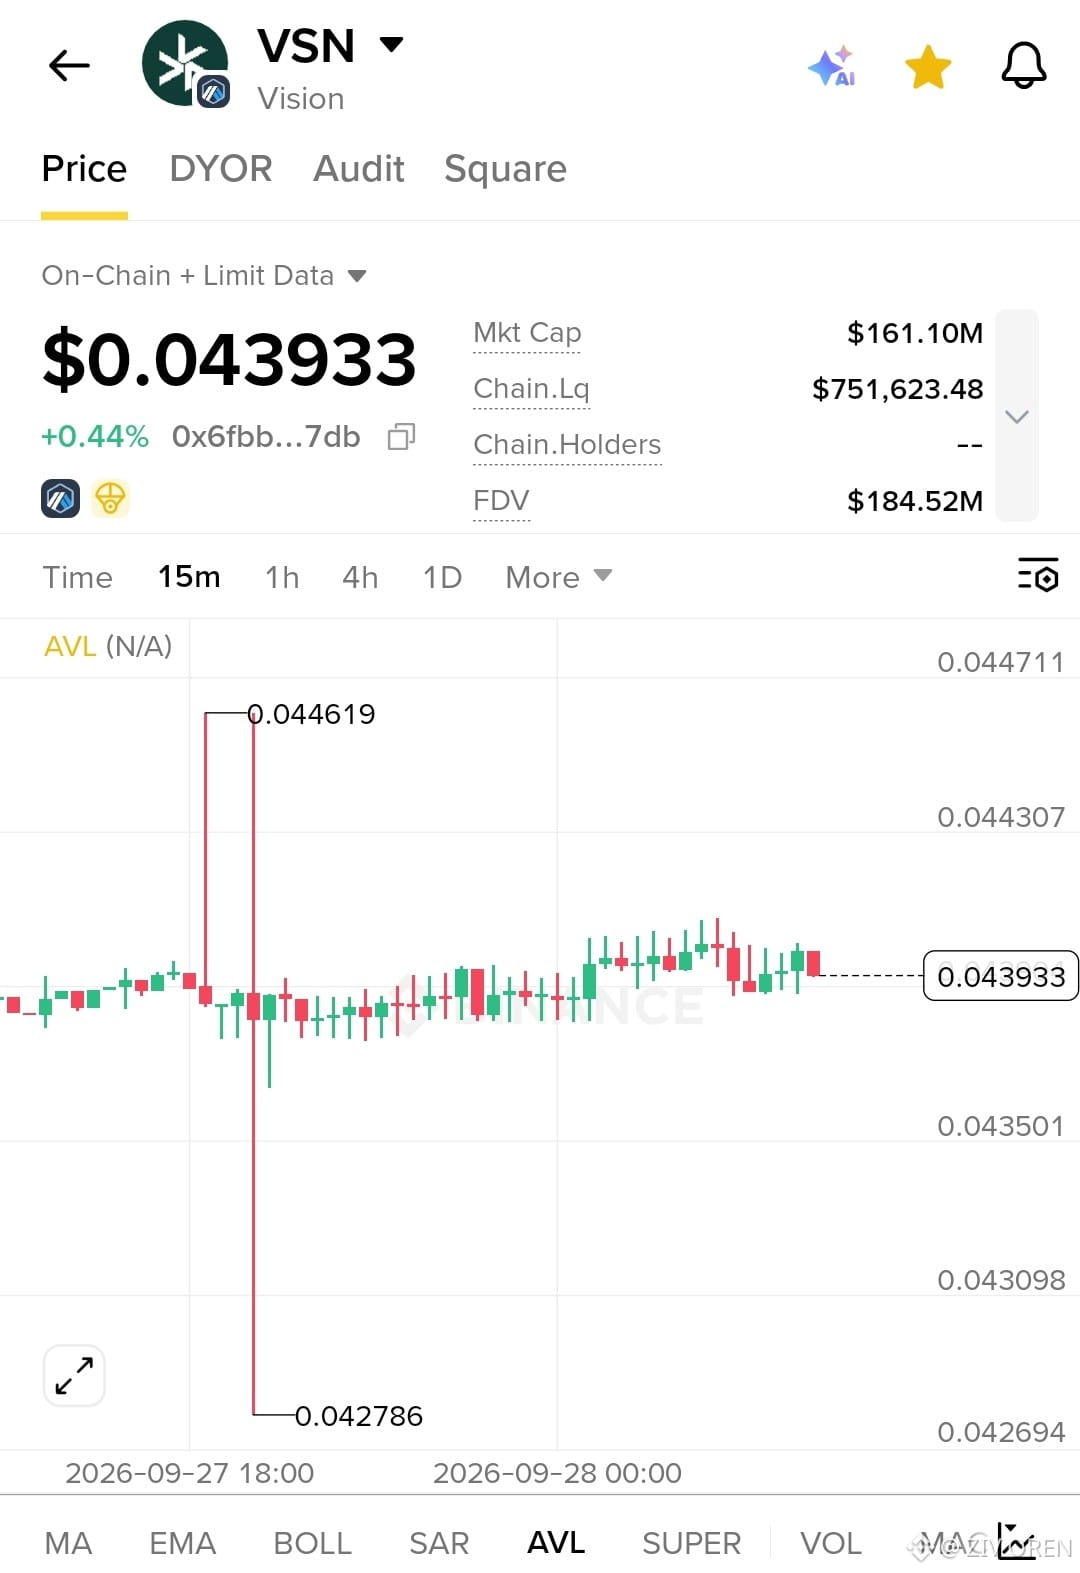
$VSN
Quiet accumulation, breakout pressure building.
Trade Setup: 0.04385–0.04400
TP1: 0.04430
TP2: 0.04462
TP3: 0.04490
SL: 0.04350
Tight range, clean trigger. Let's go.
$VSN
Quiet accumulation, breakout pressure building.
Trade Setup: 0.04385–0.04400
TP1: 0.04430
TP2: 0.04462
TP3: 0.04490
SL: 0.04350
Tight range, clean trigger. Let's go.
Quiet accumulation, breakout pressure building.
Trade Setup: 0.04385–0.04400
TP1: 0.04430
TP2: 0.04462
TP3: 0.04490
SL: 0.04350
Tight range, clean trigger. Let's go.
39
·
--
Haussier
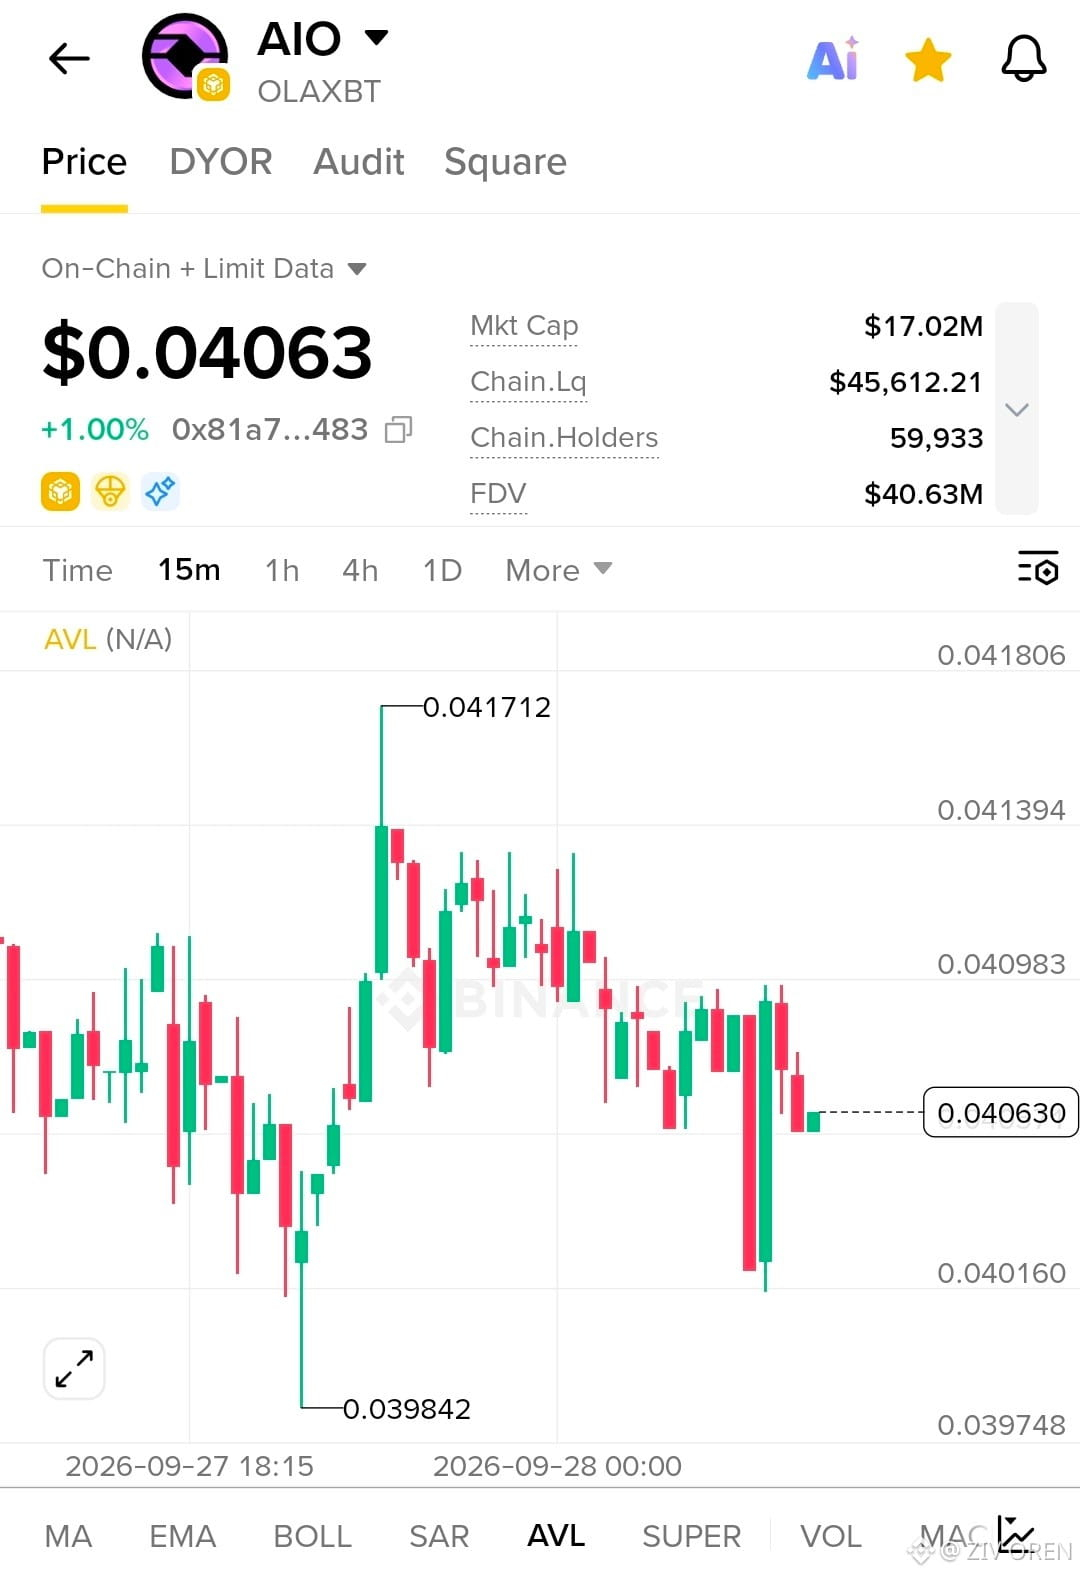
$AIO
Breakout pressure building after the sharp bounce from support.
Trade Setup: 0.04050–0.04070
TP1: 0.04098
TP2: 0.04139
TP3: 0.04171
SL: 0.04015
Hold the reclaim. Let the breakout come. Let's go.
$AIO
Breakout pressure building after the sharp bounce from support.
Trade Setup: 0.04050–0.04070
TP1: 0.04098
TP2: 0.04139
TP3: 0.04171
SL: 0.04015
Hold the reclaim. Let the breakout come. Let's go.
Breakout pressure building after the sharp bounce from support.
Trade Setup: 0.04050–0.04070
TP1: 0.04098
TP2: 0.04139
TP3: 0.04171
SL: 0.04015
Hold the reclaim. Let the breakout come. Let's go.
74
·
--
Haussier
$XAI
Strong reclaim setup building around support.
Trade Setup: 0.00970–0.00980
TP1: 0.00985
TP2: 0.01002
TP3: 0.01015
SL: 0.00960
Momentum is back. Break the local high and let's go.
$XAI
Strong reclaim setup building around support.
Trade Setup: 0.00970–0.00980
TP1: 0.00985
TP2: 0.01002
TP3: 0.01015
SL: 0.00960
Momentum is back. Break the local high and let's go.
Strong reclaim setup building around support.
Trade Setup: 0.00970–0.00980
TP1: 0.00985
TP2: 0.01002
TP3: 0.01015
SL: 0.00960
Momentum is back. Break the local high and let's go.
49
·
--
Haussier
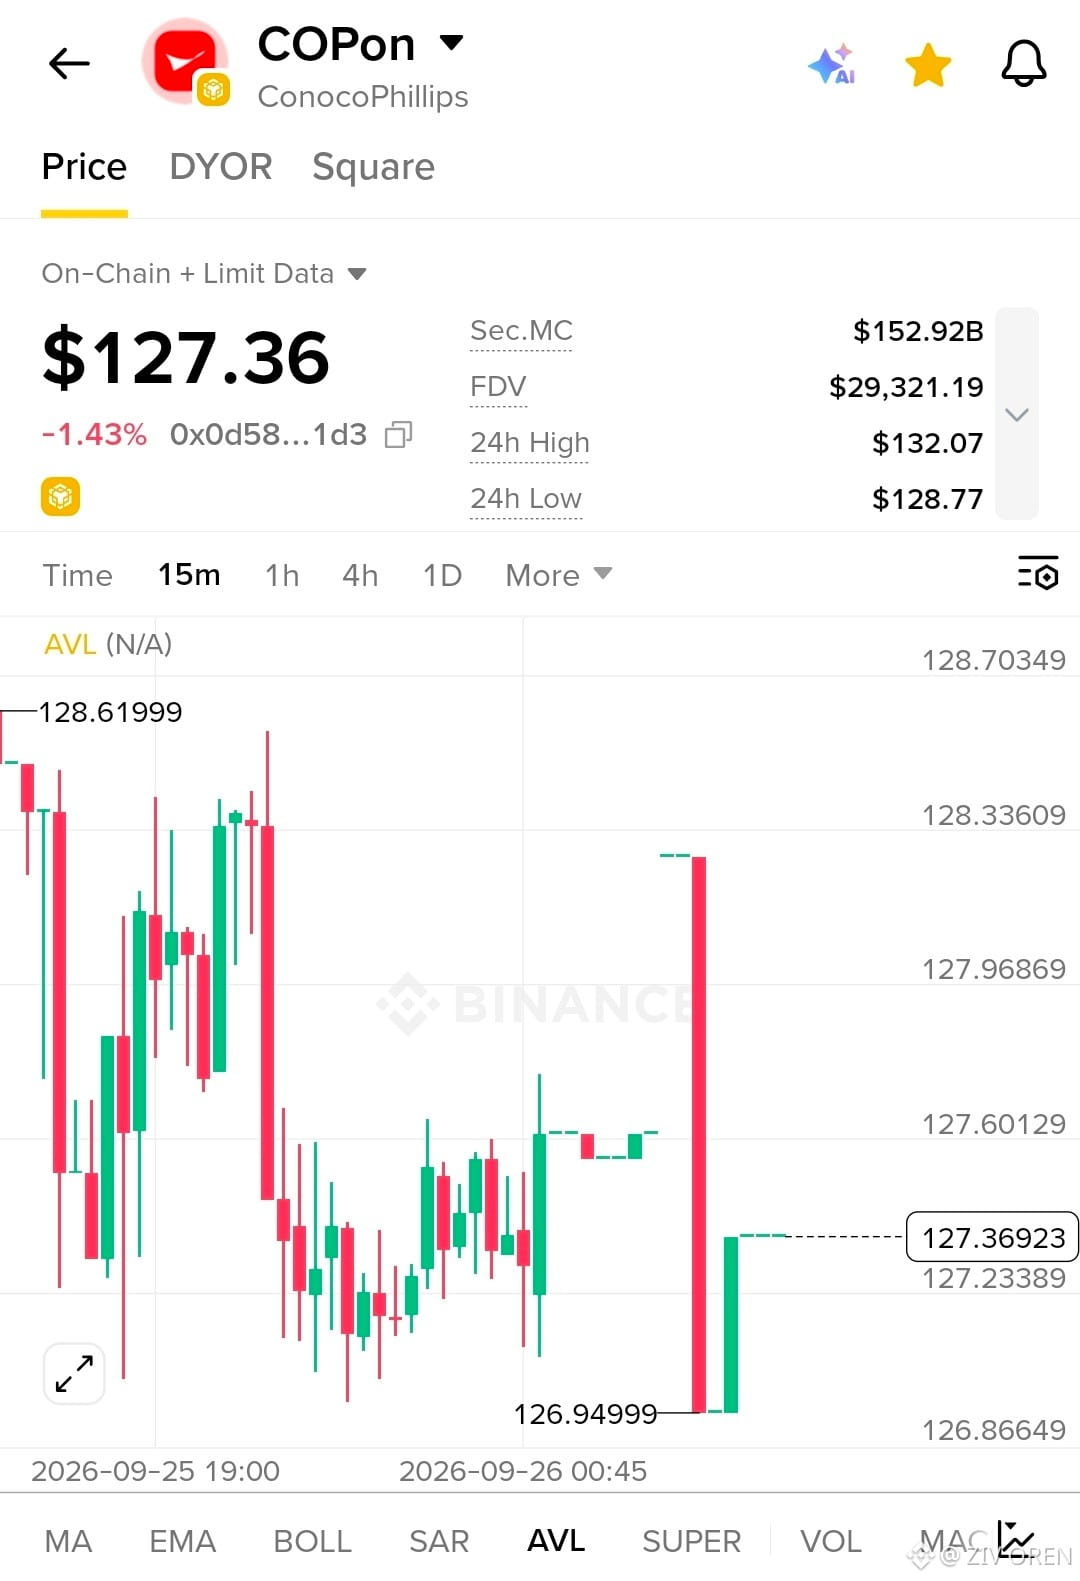
$COPon
Bullish rebound setup forming after the sharp flush.
Trade Setup: 127.20–127.40
TP1: 127.60
TP2: 127.97
TP3: 128.33
SL: 126.85
Coding setup — reclaim the zone, then let it run.
Let's go.
$COPon
Bullish rebound setup forming after the sharp flush.
Trade Setup: 127.20–127.40
TP1: 127.60
TP2: 127.97
TP3: 128.33
SL: 126.85
Coding setup — reclaim the zone, then let it run.
Let's go.
Bullish rebound setup forming after the sharp flush.
Trade Setup: 127.20–127.40
TP1: 127.60
TP2: 127.97
TP3: 128.33
SL: 126.85
Coding setup — reclaim the zone, then let it run.
Let's go.
25
·
--
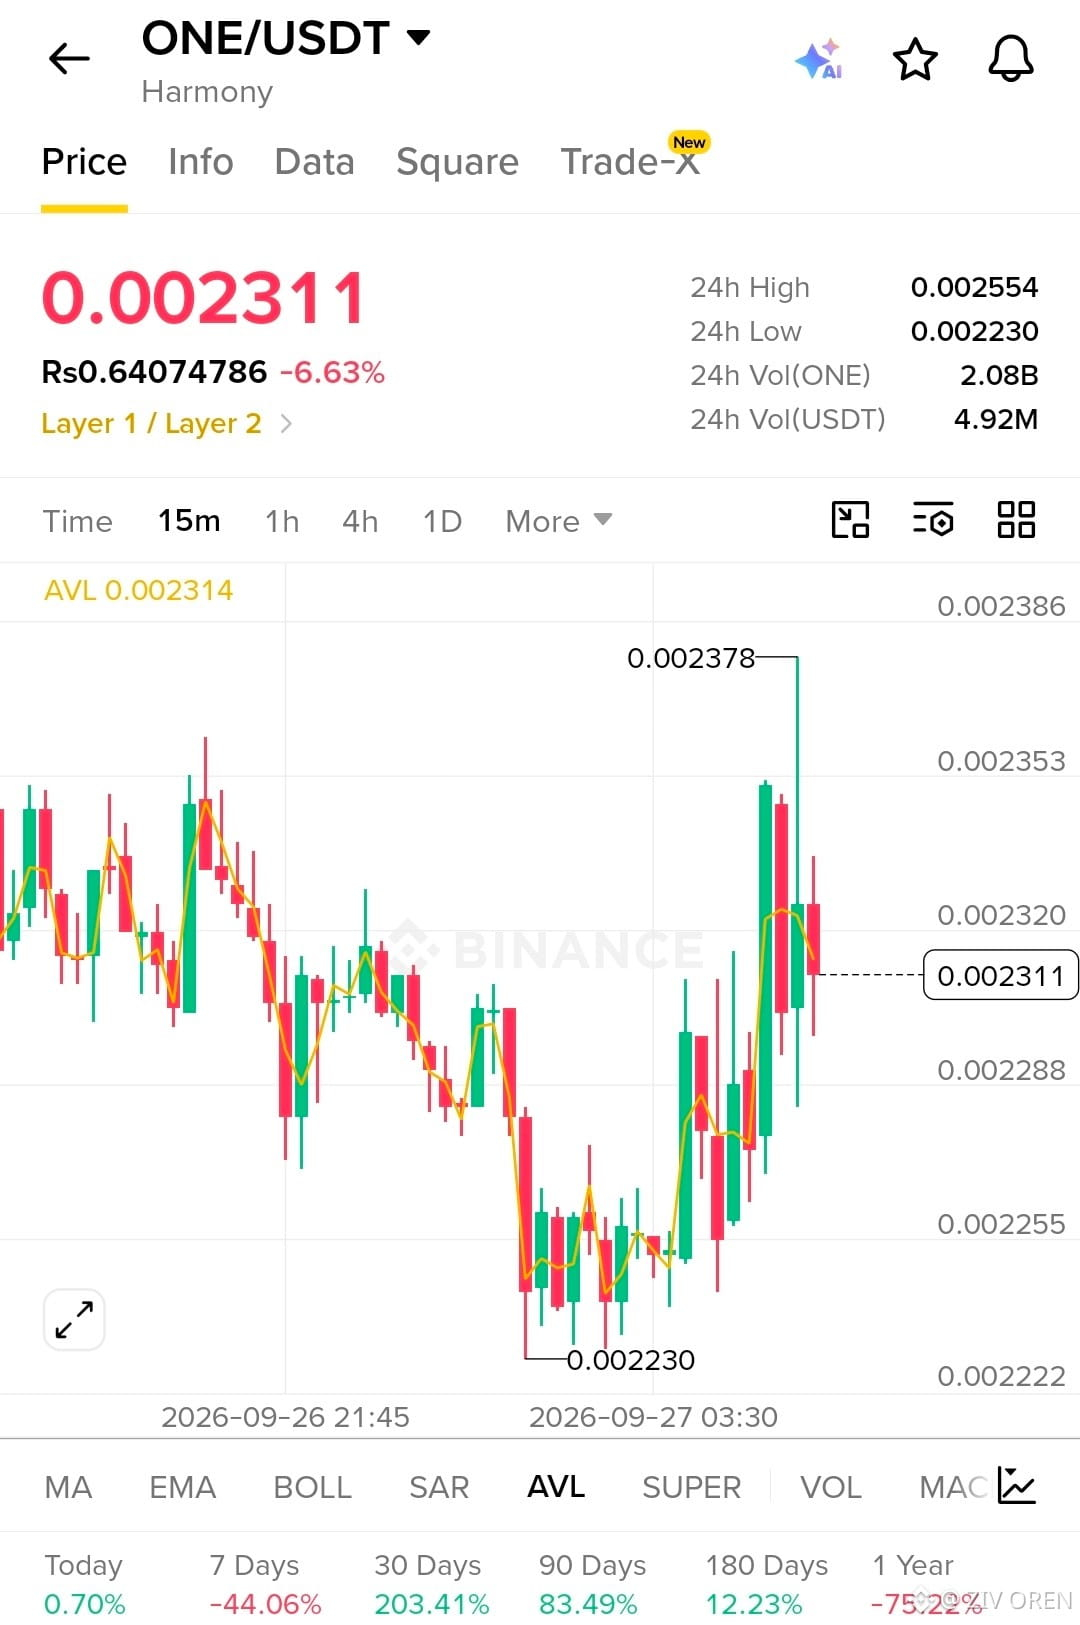
$ONE /USDT — BULLS JUST WOKE UP
Price: 0.002311
15M bounced hard from 0.002230 and spiked to 0.002378 before cooling off.
TRADE SETUP — LONG Entry: 0.00229–0.00232
TP1: 0.00235
TP2: 0.00238
TP3: 0.00245
SL: 0.00225
Coding Setup: 15M reclaim above 0.00232 → momentum confirmation. Lose 0.00225 → invalidate.
Break the spike high and $ONE could accelerate.$ONE
$ONE /USDT — BULLS JUST WOKE UP
Price: 0.002311
15M bounced hard from 0.002230 and spiked to 0.002378 before cooling off.
TRADE SETUP — LONG Entry: 0.00229–0.00232
TP1: 0.00235
TP2: 0.00238
TP3: 0.00245
SL: 0.00225
Coding Setup: 15M reclaim above 0.00232 → momentum confirmation. Lose 0.00225 → invalidate.
Break the spike high and $ONE could accelerate.$ONE
Price: 0.002311
15M bounced hard from 0.002230 and spiked to 0.002378 before cooling off.
TRADE SETUP — LONG Entry: 0.00229–0.00232
TP1: 0.00235
TP2: 0.00238
TP3: 0.00245
SL: 0.00225
Coding Setup: 15M reclaim above 0.00232 → momentum confirmation. Lose 0.00225 → invalidate.
Break the spike high and $ONE could accelerate.$ONE
1
129
·
--
Haussier
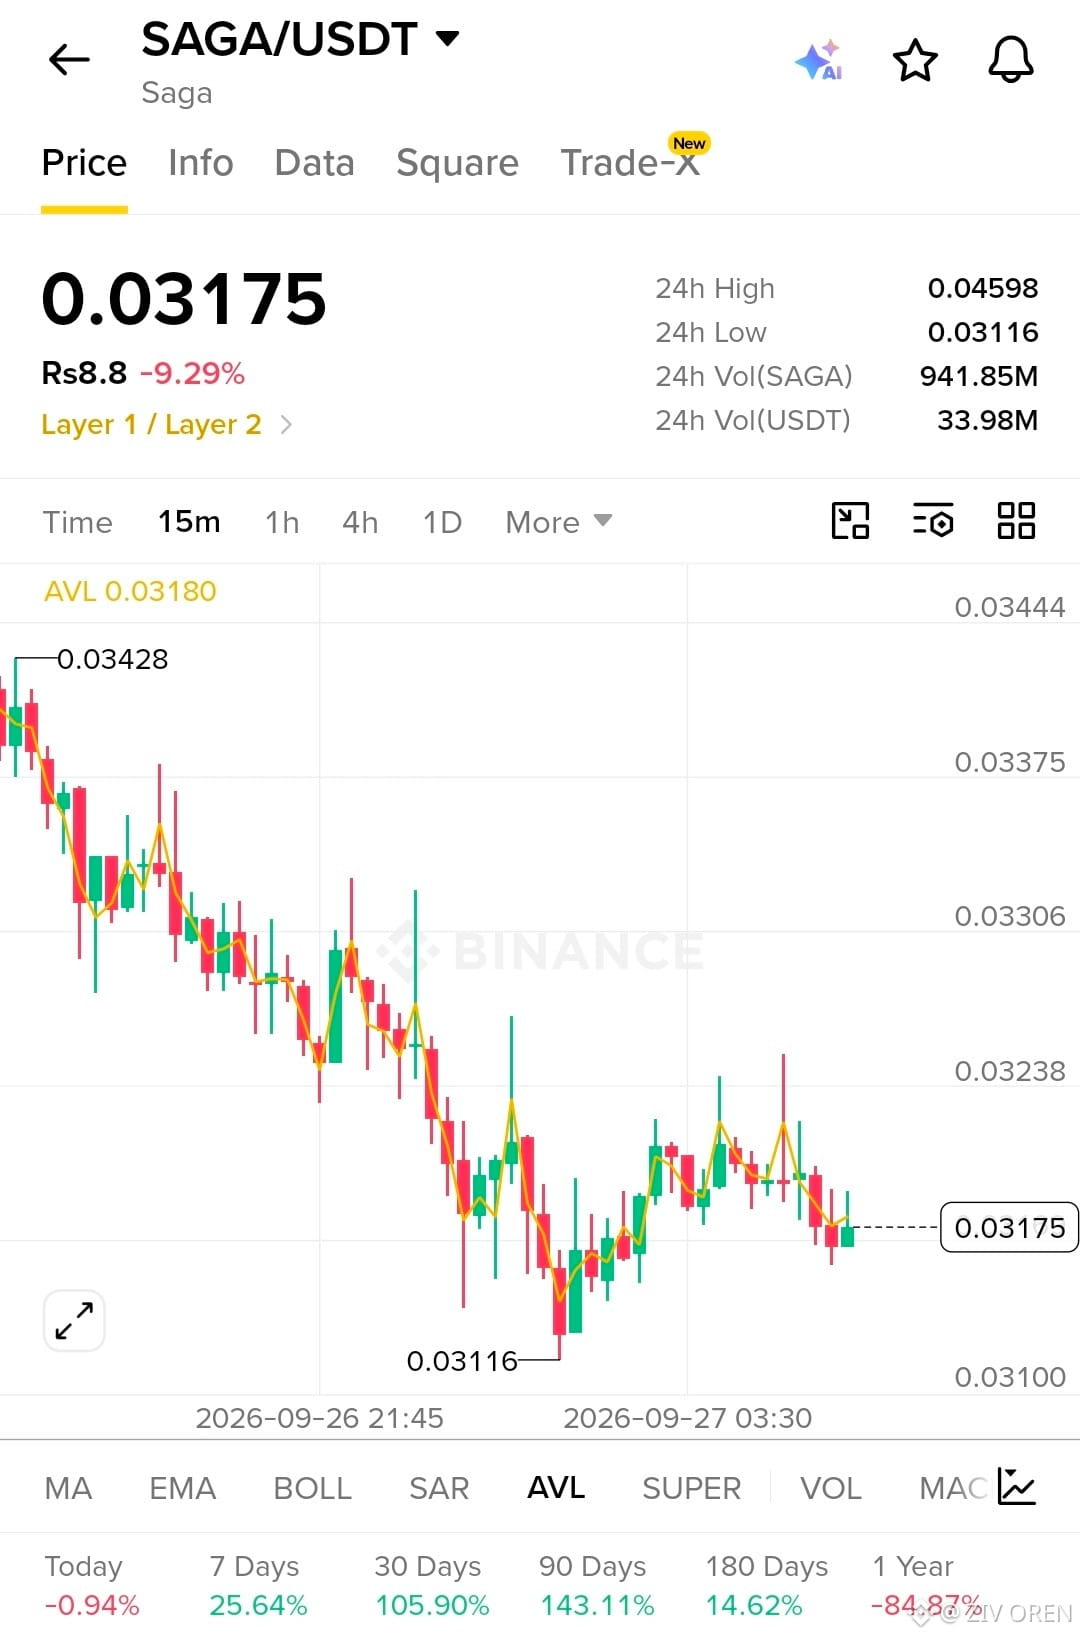
$SAGA /USDT — SUPPORT UNDER PRESSURE
Price: 0.03175
15M structure remains weak after falling from 0.03428, but buyers defended 0.03116.
TRADE SETUP — LONG Entry: 0.03155–0.03180
TP1: 0.03230
TP2: 0.03280
TP3: 0.03350
SL: 0.03110
Coding Setup: Wait for a 15M reclaim above 0.03200. A break below 0.03110 invalidates the setup.
Key level: 0.03116 — hold it, and the bounce gets interesting.$SAGA
$SAGA /USDT — SUPPORT UNDER PRESSURE
Price: 0.03175
15M structure remains weak after falling from 0.03428, but buyers defended 0.03116.
TRADE SETUP — LONG Entry: 0.03155–0.03180
TP1: 0.03230
TP2: 0.03280
TP3: 0.03350
SL: 0.03110
Coding Setup: Wait for a 15M reclaim above 0.03200. A break below 0.03110 invalidates the setup.
Key level: 0.03116 — hold it, and the bounce gets interesting.$SAGA
Price: 0.03175
15M structure remains weak after falling from 0.03428, but buyers defended 0.03116.
TRADE SETUP — LONG Entry: 0.03155–0.03180
TP1: 0.03230
TP2: 0.03280
TP3: 0.03350
SL: 0.03110
Coding Setup: Wait for a 15M reclaim above 0.03200. A break below 0.03110 invalidates the setup.
Key level: 0.03116 — hold it, and the bounce gets interesting.$SAGA
171
·
--
Haussier
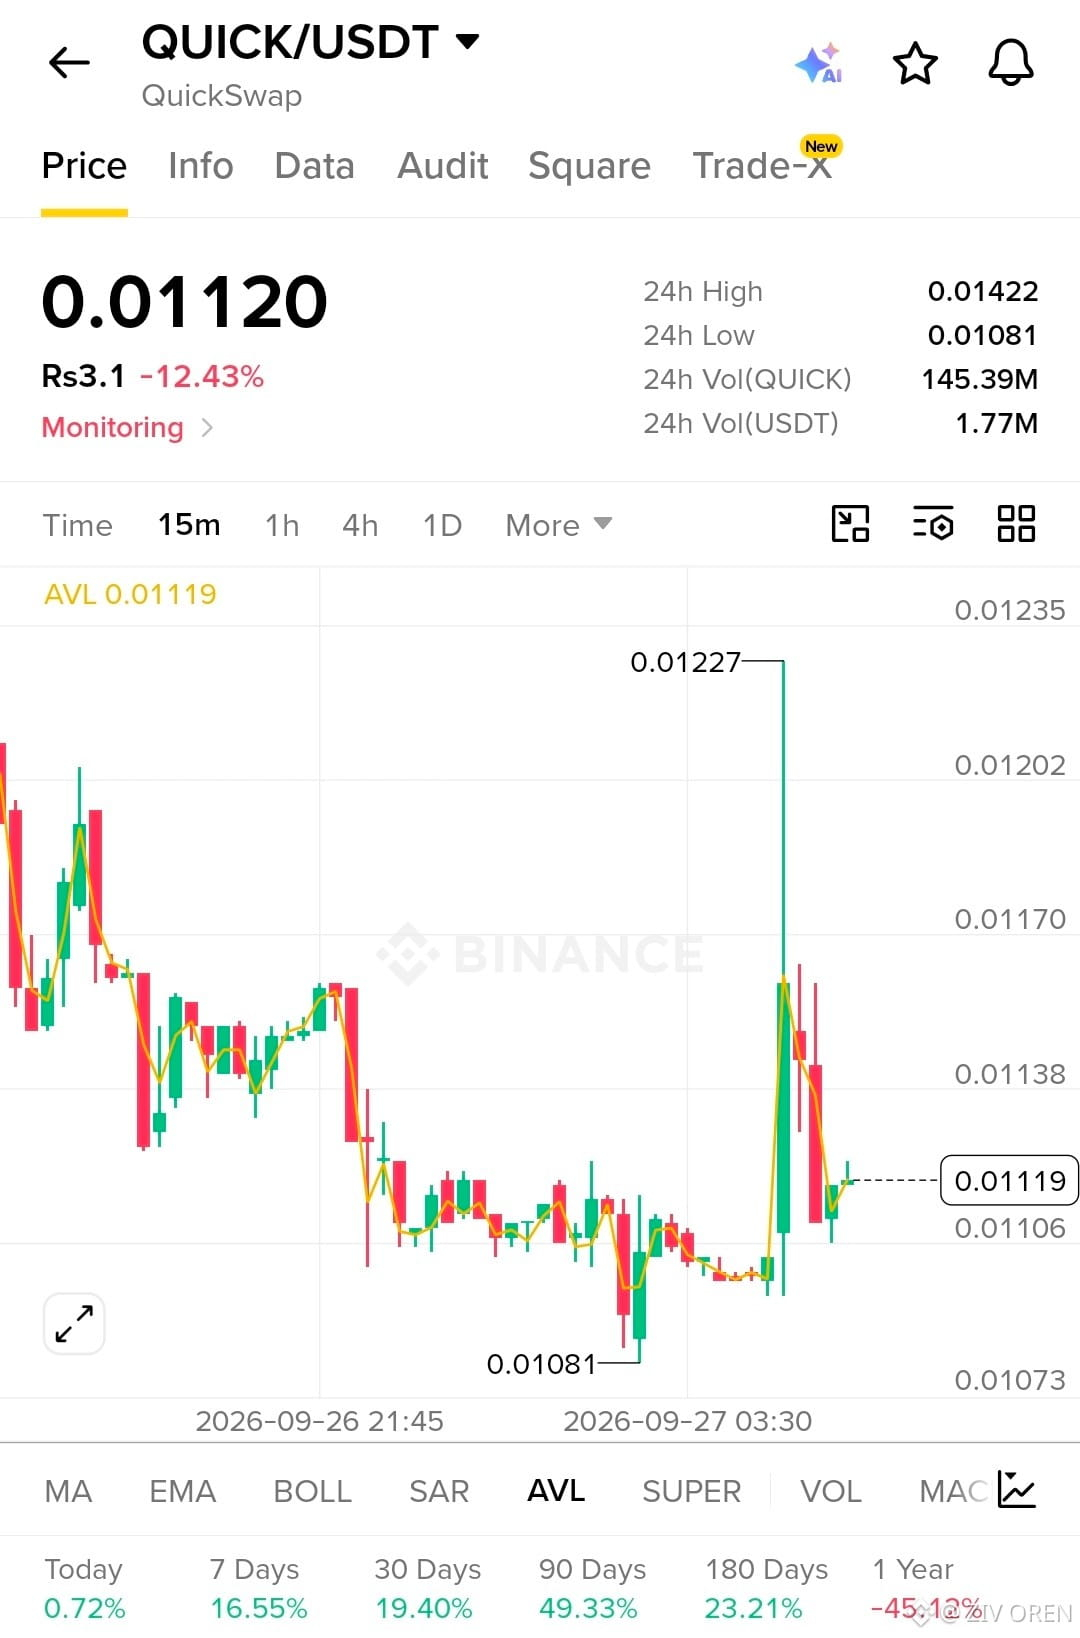
$QUICK /USDT — VOLATILITY ALERT
Price: 0.01120
A violent spike hit 0.01227, followed by a sharp rejection. Now price is trying to stabilize around 0.01120.
TRADE SETUP — LONG Entry: 0.01110–0.01125
TP1: 0.01140
TP2: 0.01170
TP3: 0.01220
SL: 0.01090
Coding Setup: 15M close above 0.01140 = momentum confirmation. Lose 0.01090 = invalidate.
Spike happened. Now comes the real test.
$QUICK /USDT — VOLATILITY ALERT
Price: 0.01120
A violent spike hit 0.01227, followed by a sharp rejection. Now price is trying to stabilize around 0.01120.
TRADE SETUP — LONG Entry: 0.01110–0.01125
TP1: 0.01140
TP2: 0.01170
TP3: 0.01220
SL: 0.01090
Coding Setup: 15M close above 0.01140 = momentum confirmation. Lose 0.01090 = invalidate.
Spike happened. Now comes the real test.
Price: 0.01120
A violent spike hit 0.01227, followed by a sharp rejection. Now price is trying to stabilize around 0.01120.
TRADE SETUP — LONG Entry: 0.01110–0.01125
TP1: 0.01140
TP2: 0.01170
TP3: 0.01220
SL: 0.01090
Coding Setup: 15M close above 0.01140 = momentum confirmation. Lose 0.01090 = invalidate.
Spike happened. Now comes the real test.
81
·
--
Haussier
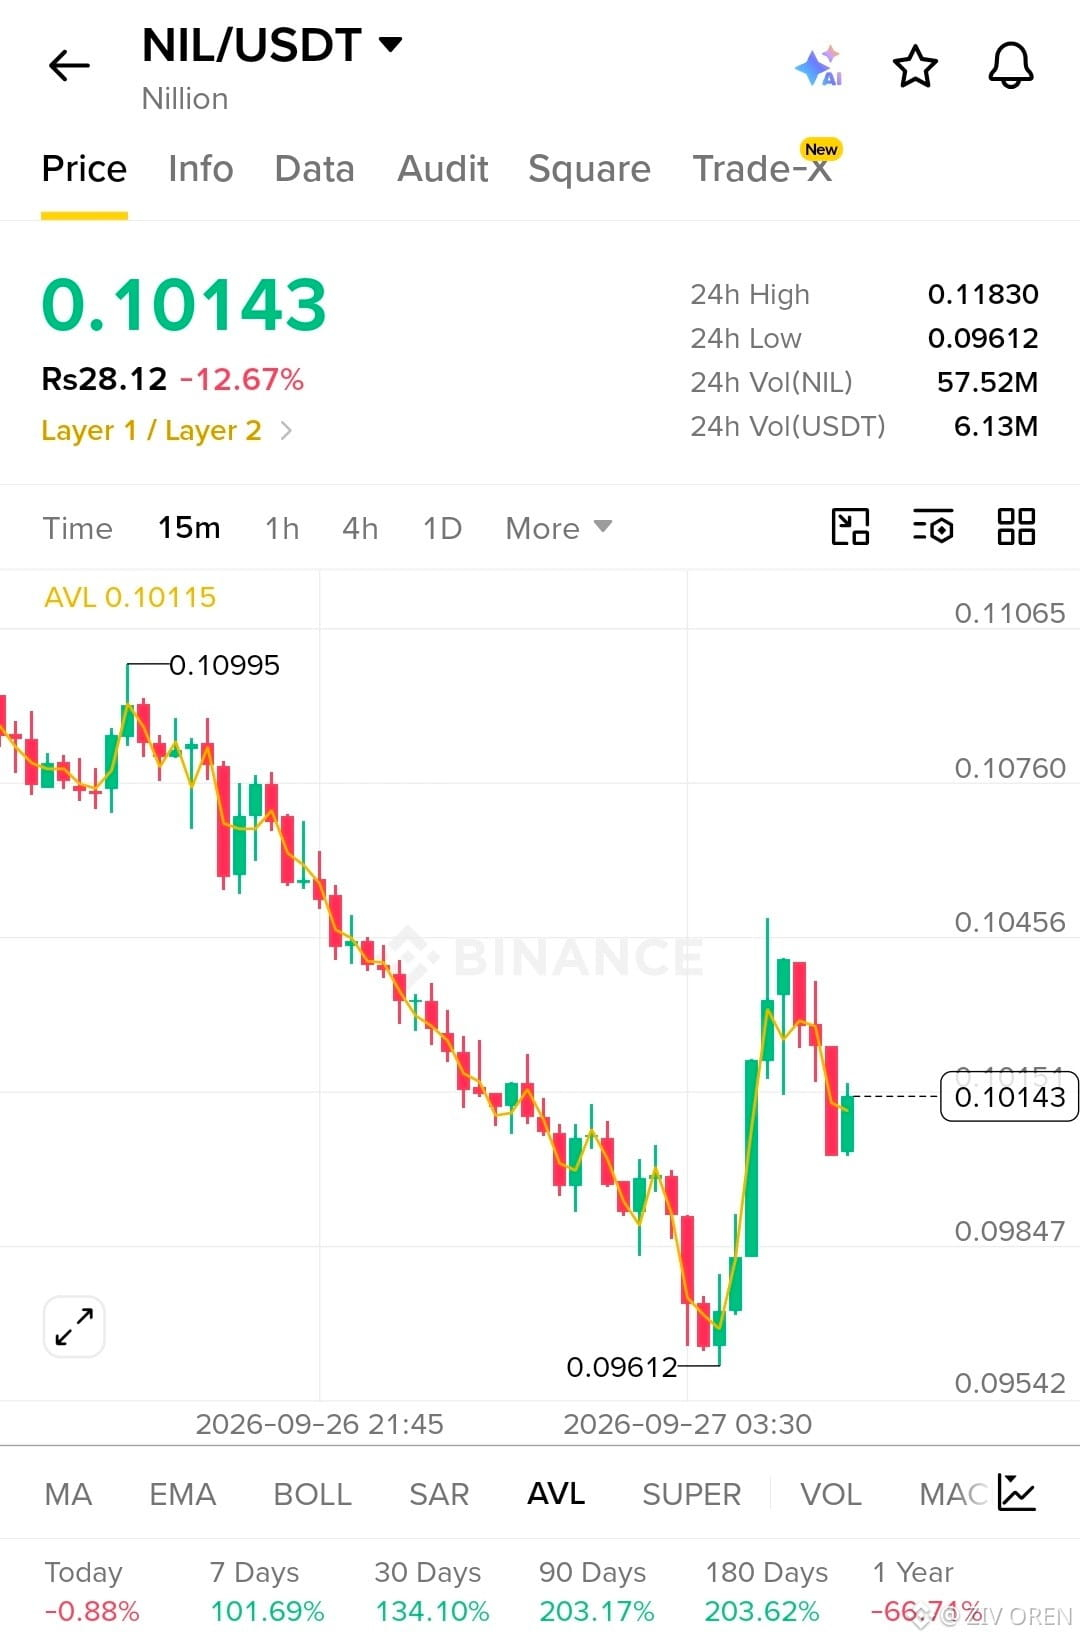
$NIL /USDT — BOUNCE INCOMING?
Price: 0.10143
15M chart shows a sharp rebound from 0.09612, but sellers are still active around 0.103–0.1045.
TRADE SETUP — LONG Entry: 0.1005–0.1015
TP1: 0.1030
TP2: 0.1045
TP3: 0.1075
SL: 0.0982
⚡ Coding Setup: Enter only if 0.1020+ holds on a 15M candle. Lose 0.0982 → setup invalid.
Bounce or breakdown — $NIL is at the decision zone.
$NIL /USDT — BOUNCE INCOMING?
Price: 0.10143
15M chart shows a sharp rebound from 0.09612, but sellers are still active around 0.103–0.1045.
TRADE SETUP — LONG Entry: 0.1005–0.1015
TP1: 0.1030
TP2: 0.1045
TP3: 0.1075
SL: 0.0982
⚡ Coding Setup: Enter only if 0.1020+ holds on a 15M candle. Lose 0.0982 → setup invalid.
Bounce or breakdown — $NIL is at the decision zone.
Price: 0.10143
15M chart shows a sharp rebound from 0.09612, but sellers are still active around 0.103–0.1045.
TRADE SETUP — LONG Entry: 0.1005–0.1015
TP1: 0.1030
TP2: 0.1045
TP3: 0.1075
SL: 0.0982
⚡ Coding Setup: Enter only if 0.1020+ holds on a 15M candle. Lose 0.0982 → setup invalid.
Bounce or breakdown — $NIL is at the decision zone.
118
·
--
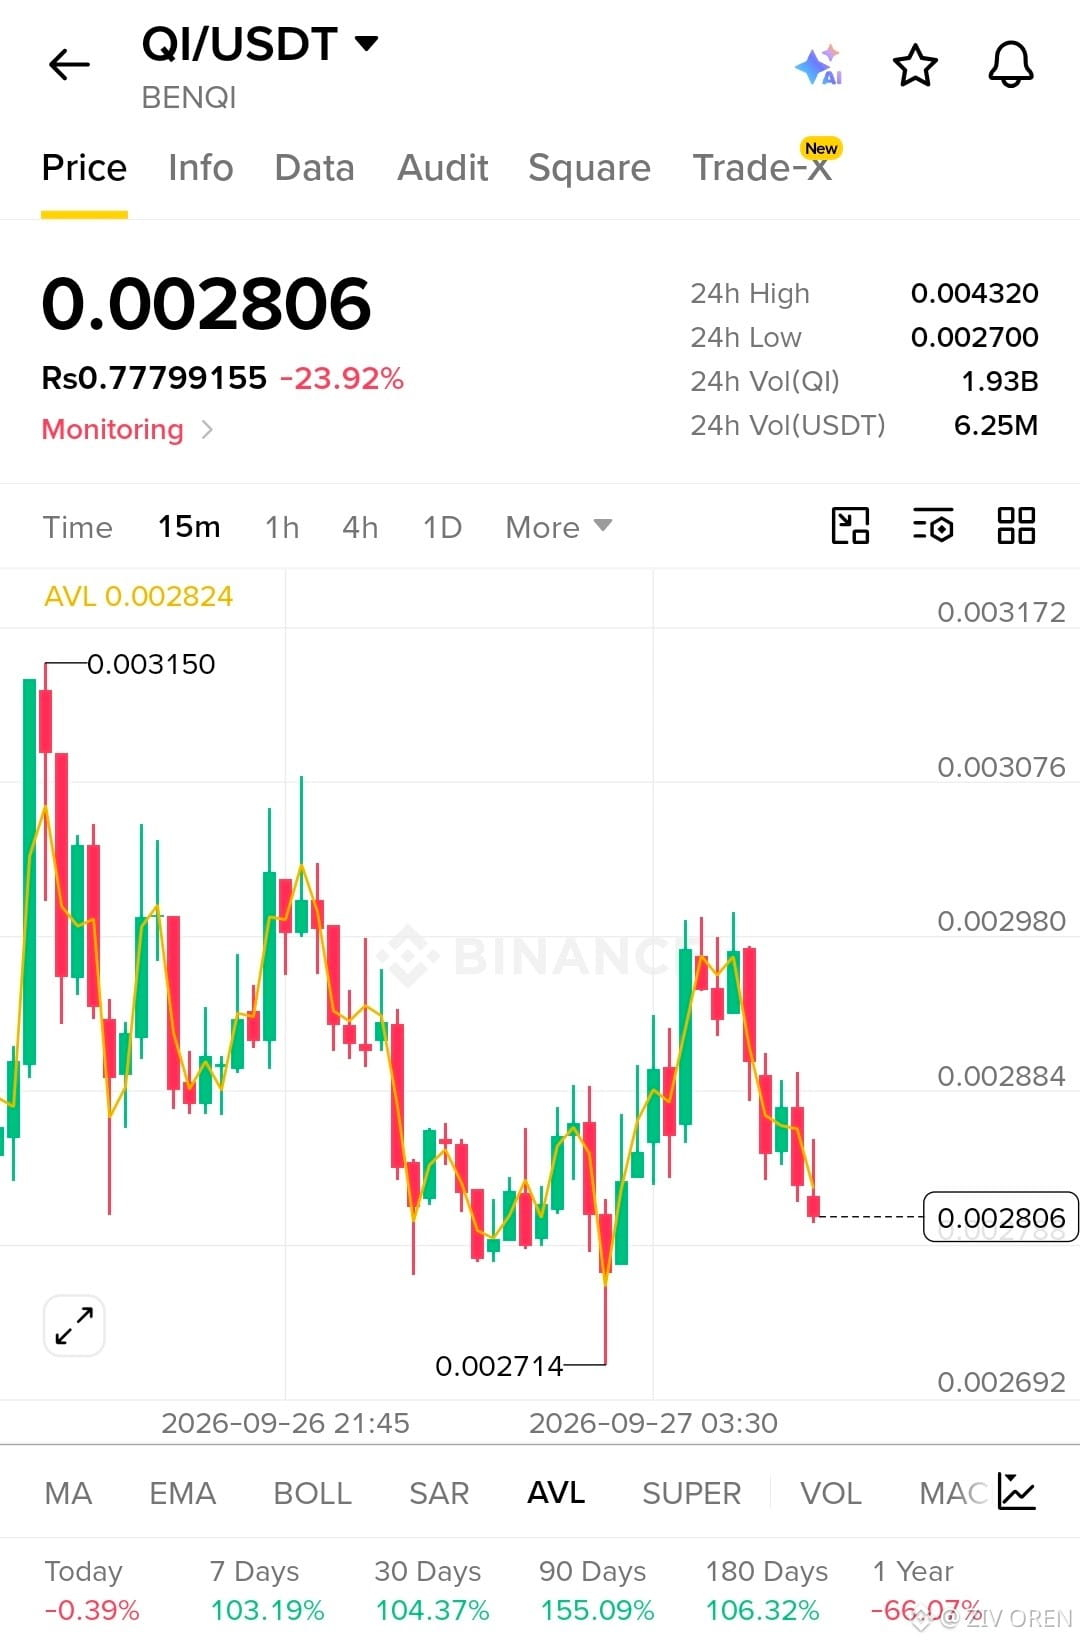
$QI /USDT — SETUP IS LOADING
Price: 0.002806
15M chart shows price sitting near support after rejection from 0.00298.
TRADE SETUP — LONG Entry: 0.00278–0.00282
TP1: 0.00288
TP2: 0.00298
TP3: 0.00308
SL: 0.00270
Coding Setup: Wait for a 15M reclaim above 0.00284 with momentum before entering aggressively. If 0.00270 breaks, invalidate the long.
Risk tight. Let the move come to you. $QI
$QI /USDT — SETUP IS LOADING
Price: 0.002806
15M chart shows price sitting near support after rejection from 0.00298.
TRADE SETUP — LONG Entry: 0.00278–0.00282
TP1: 0.00288
TP2: 0.00298
TP3: 0.00308
SL: 0.00270
Coding Setup: Wait for a 15M reclaim above 0.00284 with momentum before entering aggressively. If 0.00270 breaks, invalidate the long.
Risk tight. Let the move come to you. $QI
Price: 0.002806
15M chart shows price sitting near support after rejection from 0.00298.
TRADE SETUP — LONG Entry: 0.00278–0.00282
TP1: 0.00288
TP2: 0.00298
TP3: 0.00308
SL: 0.00270
Coding Setup: Wait for a 15M reclaim above 0.00284 with momentum before entering aggressively. If 0.00270 breaks, invalidate the long.
Risk tight. Let the move come to you. $QI
172
·
--
Haussier
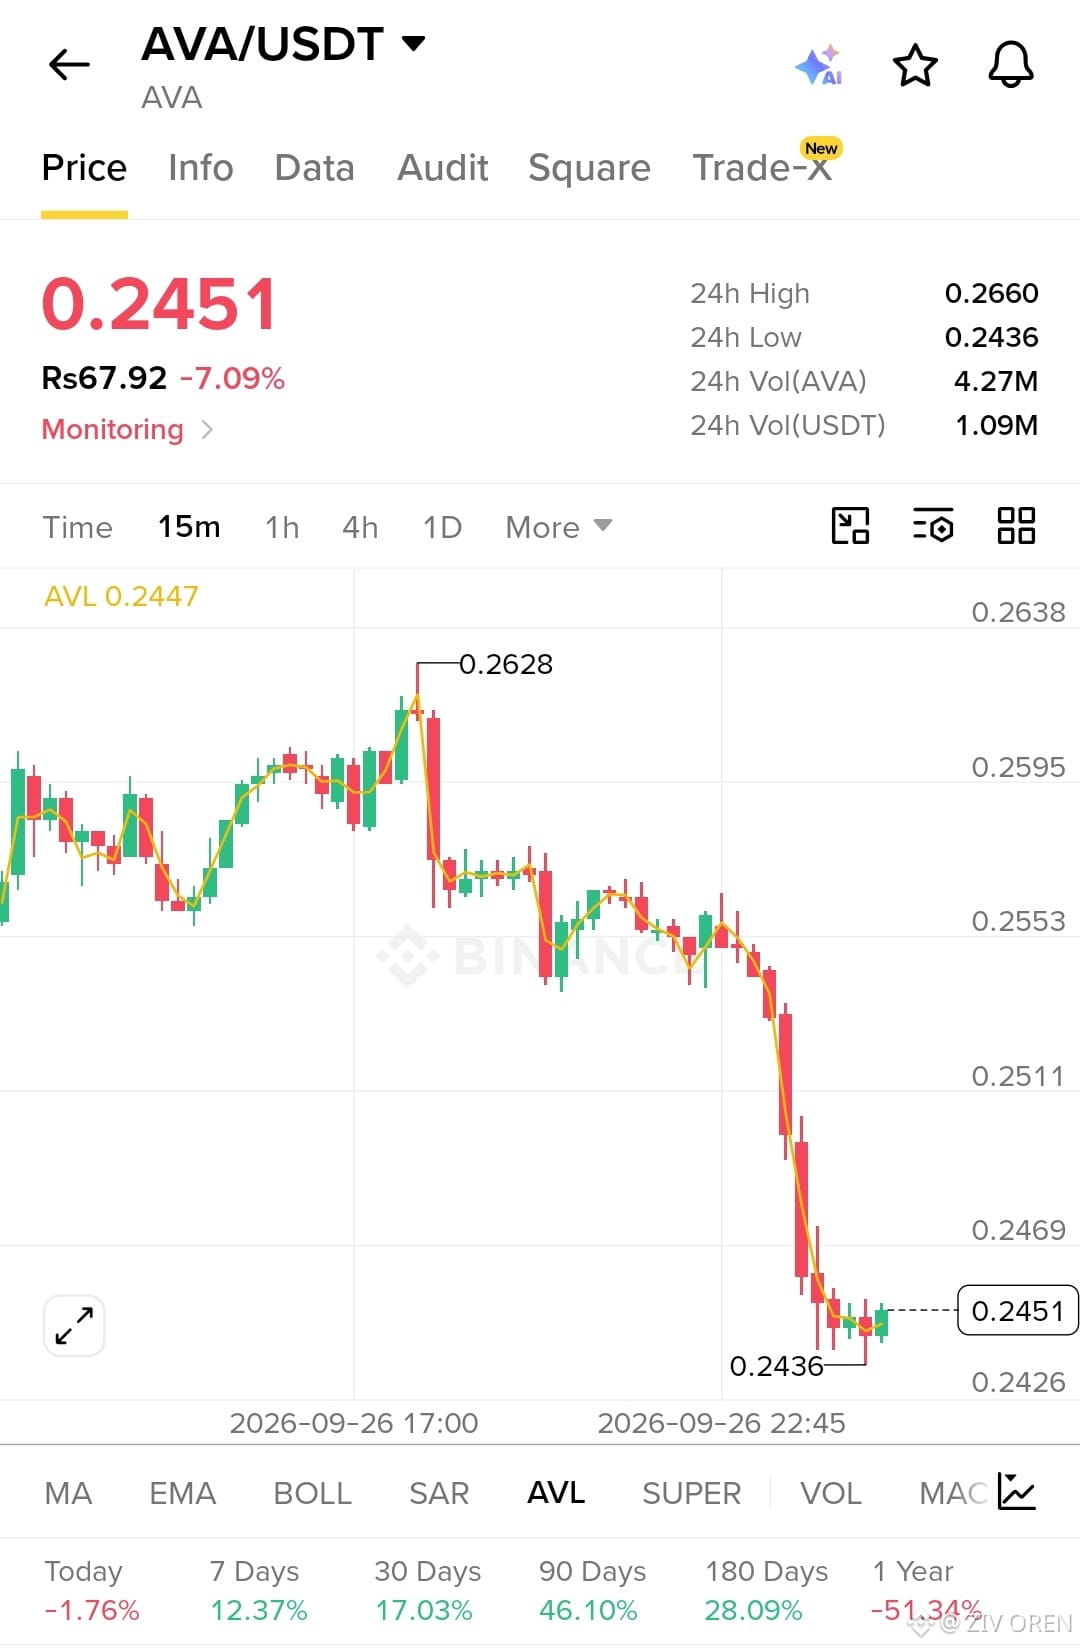
⚡ $AVA — Sellers Just Crushed the Structure
AVA is down 7.09% and the 15M chart shows a sharp breakdown from 0.2553 → 0.2436. Now price is trying to stabilize around 0.2451.
🔥 TRADE SETUP — SHORT THE REJECTION
📍 Entry: 0.2455–0.2470
🎯 TP1: 0.2436
🎯 TP2: 0.2415
🎯 TP3: 0.2390
🛑 SL: 0.2490
⚠️ If AVA reclaims 0.2490 and holds above it on 15M, the short setup is invalid.
Key idea: The bounce is tiny compared with the selloff. The next rejection could expose another leg down. 👀
Let's go 🚀
⚡ $AVA — Sellers Just Crushed the Structure
AVA is down 7.09% and the 15M chart shows a sharp breakdown from 0.2553 → 0.2436. Now price is trying to stabilize around 0.2451.
🔥 TRADE SETUP — SHORT THE REJECTION
📍 Entry: 0.2455–0.2470
🎯 TP1: 0.2436
🎯 TP2: 0.2415
🎯 TP3: 0.2390
🛑 SL: 0.2490
⚠️ If AVA reclaims 0.2490 and holds above it on 15M, the short setup is invalid.
Key idea: The bounce is tiny compared with the selloff. The next rejection could expose another leg down. 👀
Let's go 🚀
AVA is down 7.09% and the 15M chart shows a sharp breakdown from 0.2553 → 0.2436. Now price is trying to stabilize around 0.2451.
🔥 TRADE SETUP — SHORT THE REJECTION
📍 Entry: 0.2455–0.2470
🎯 TP1: 0.2436
🎯 TP2: 0.2415
🎯 TP3: 0.2390
🛑 SL: 0.2490
⚠️ If AVA reclaims 0.2490 and holds above it on 15M, the short setup is invalid.
Key idea: The bounce is tiny compared with the selloff. The next rejection could expose another leg down. 👀
Let's go 🚀
74
·
--
Haussier
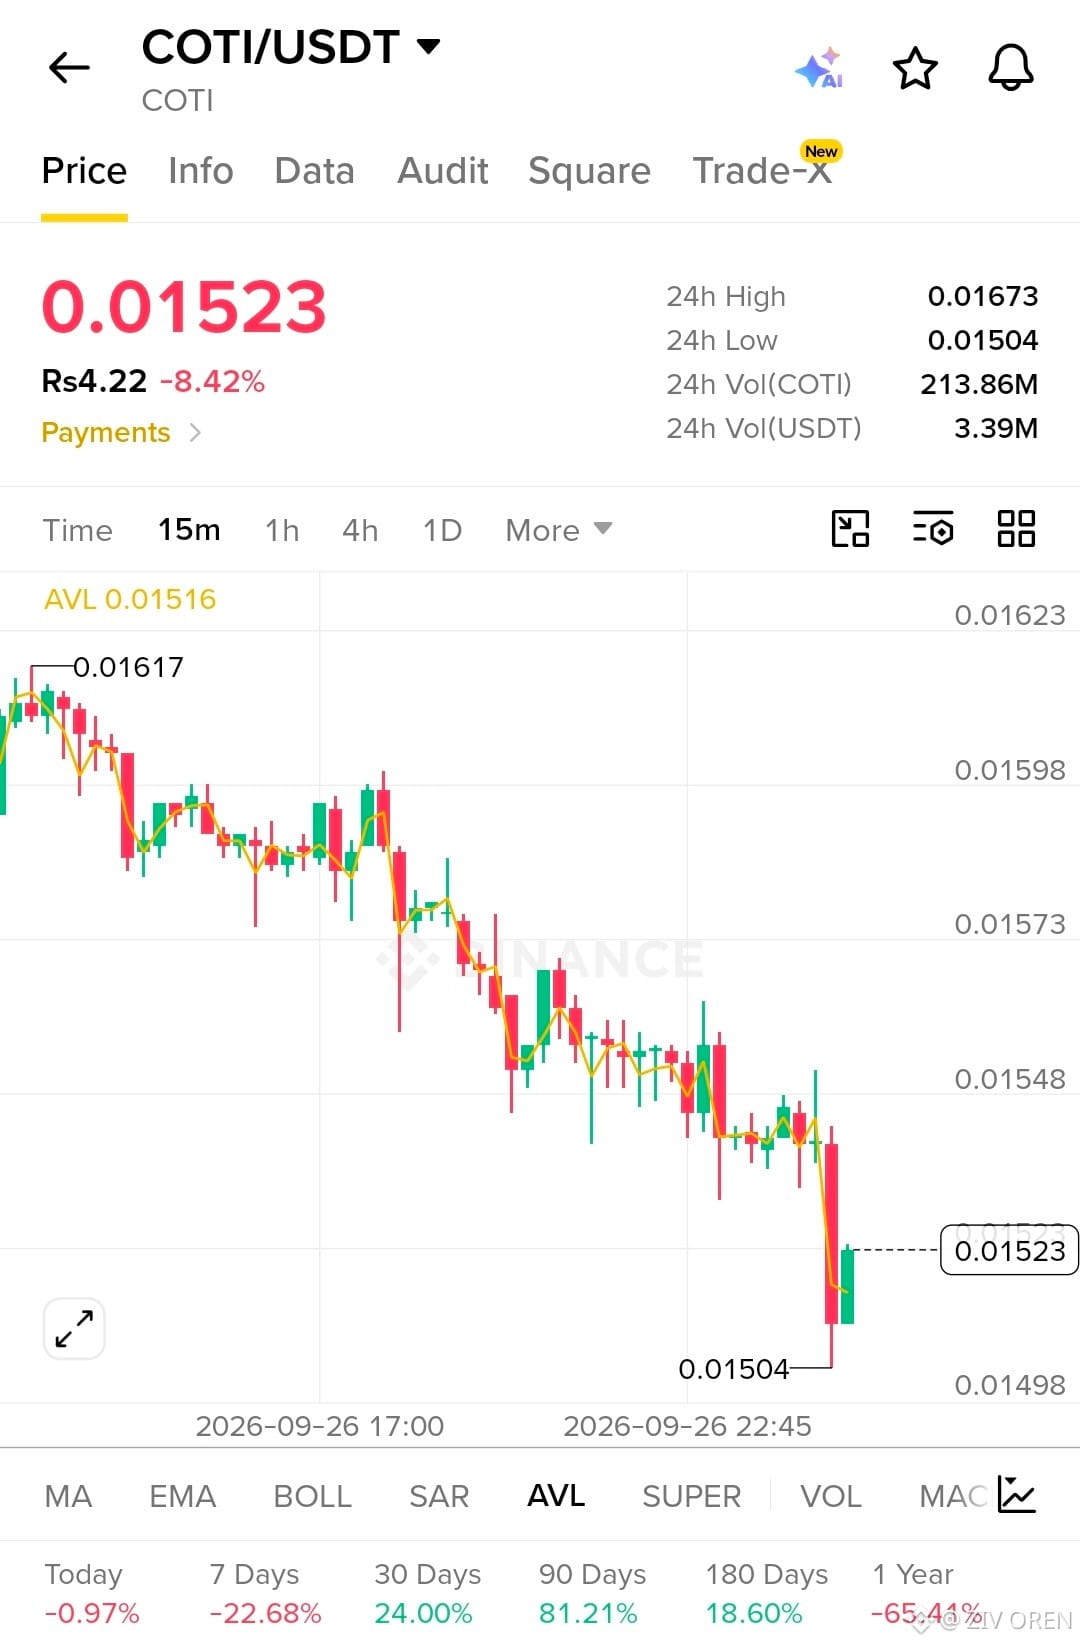
⚡ $COTI — Breakdown Setup Loading
COTI is still printing a clear 15M lower-high / lower-low structure. Price just wicked into 0.01504 and bounced, so the key battle is whether this is a real reversal or just a relief bounce.
📍 Trade Setup — SHORT on rejection
Entry: 0.01525–0.01540
🎯 TP1: 0.01516
🎯 TP2: 0.01504
🎯 TP3: 0.01490
🛑 SL: 0.01558
Trigger: Wait for a 15M rejection below 0.01540 before entering. A clean reclaim and hold above 0.01558 invalidates the setup.
The chart is basically saying: bounce or breakdown? 👀
Let's go 🚀
⚡ $COTI — Breakdown Setup Loading
COTI is still printing a clear 15M lower-high / lower-low structure. Price just wicked into 0.01504 and bounced, so the key battle is whether this is a real reversal or just a relief bounce.
📍 Trade Setup — SHORT on rejection
Entry: 0.01525–0.01540
🎯 TP1: 0.01516
🎯 TP2: 0.01504
🎯 TP3: 0.01490
🛑 SL: 0.01558
Trigger: Wait for a 15M rejection below 0.01540 before entering. A clean reclaim and hold above 0.01558 invalidates the setup.
The chart is basically saying: bounce or breakdown? 👀
Let's go 🚀
COTI is still printing a clear 15M lower-high / lower-low structure. Price just wicked into 0.01504 and bounced, so the key battle is whether this is a real reversal or just a relief bounce.
📍 Trade Setup — SHORT on rejection
Entry: 0.01525–0.01540
🎯 TP1: 0.01516
🎯 TP2: 0.01504
🎯 TP3: 0.01490
🛑 SL: 0.01558
Trigger: Wait for a 15M rejection below 0.01540 before entering. A clean reclaim and hold above 0.01558 invalidates the setup.
The chart is basically saying: bounce or breakdown? 👀
Let's go 🚀
59
·
--
Haussier
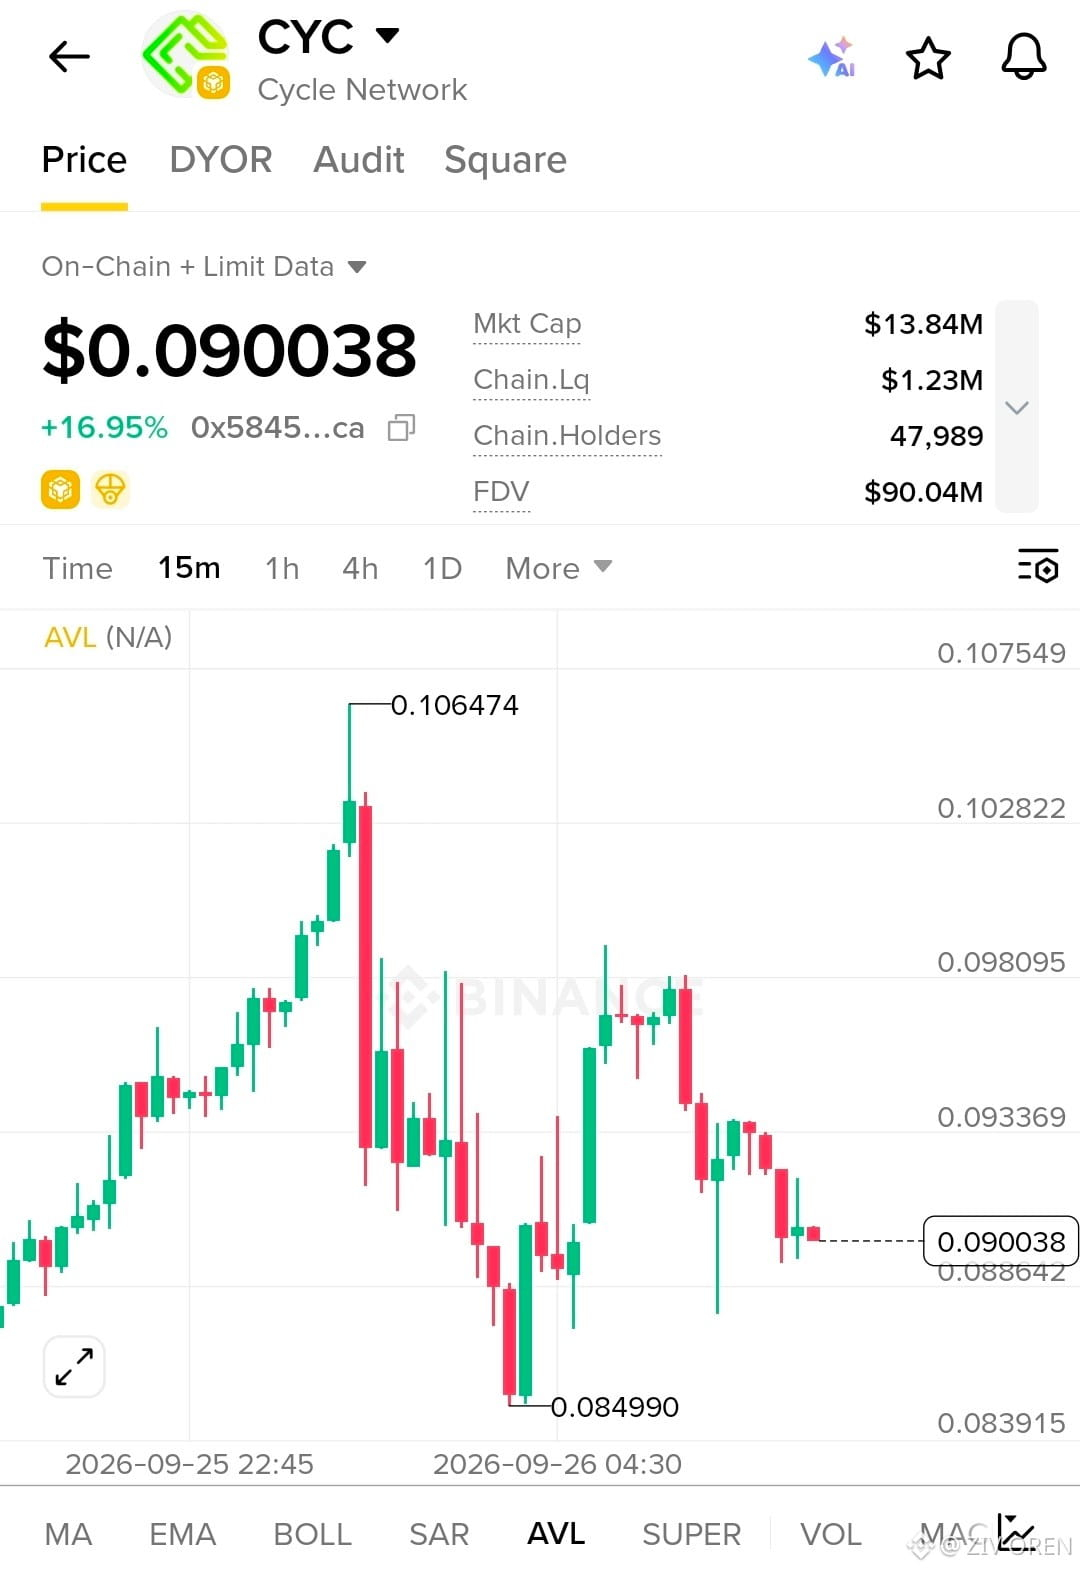
$CYC TRADE SETUP
Entry Zone: 0.08950 – 0.09050
TP1: 0.09335
TP2: 0.09810
TP3: 0.10280
SL: 0.08780
Trigger: 15m close above 0.09340
Support: 0.08860 / 0.08499
Let the breakout confirm.
Let's go — $CYC
$CYC TRADE SETUP
Entry Zone: 0.08950 – 0.09050
TP1: 0.09335
TP2: 0.09810
TP3: 0.10280
SL: 0.08780
Trigger: 15m close above 0.09340
Support: 0.08860 / 0.08499
Let the breakout confirm.
Let's go — $CYC
Entry Zone: 0.08950 – 0.09050
TP1: 0.09335
TP2: 0.09810
TP3: 0.10280
SL: 0.08780
Trigger: 15m close above 0.09340
Support: 0.08860 / 0.08499
Let the breakout confirm.
Let's go — $CYC
20
·
--
Haussier
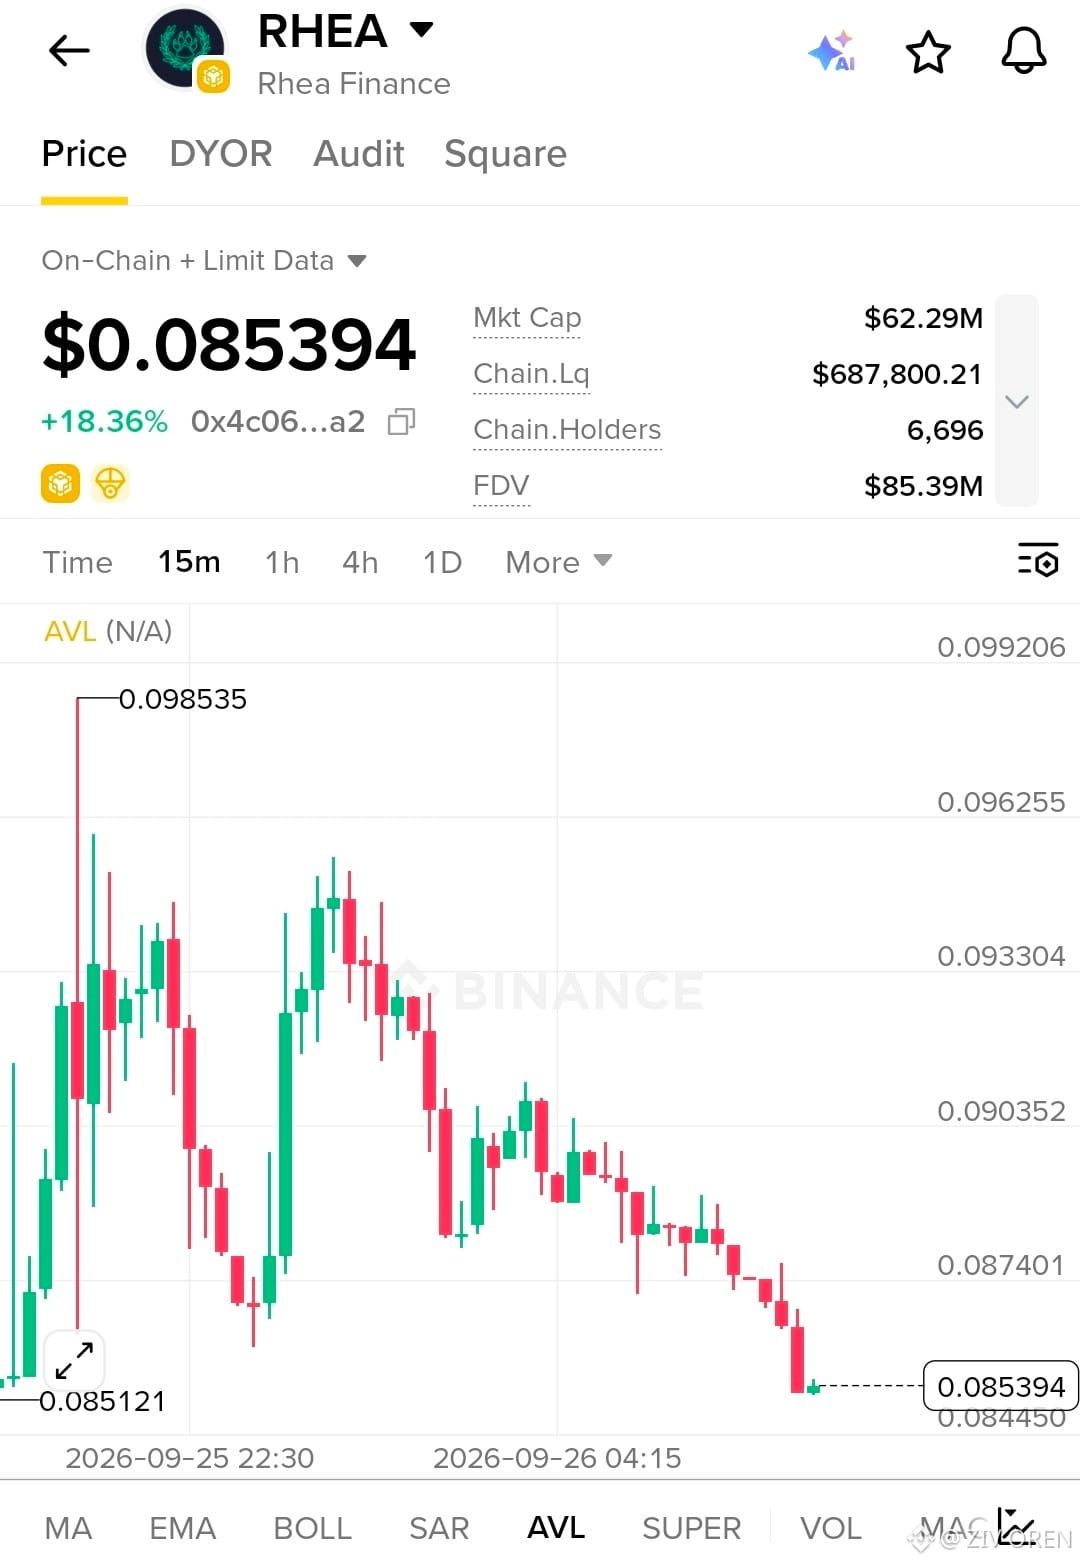
$RHEA TRADE SETUP
Entry Zone: 0.08520 – 0.08570
TP1: 0.08740
TP2: 0.09035
TP3: 0.09330
SL: 0.08420
Trigger: 15m close above 0.08740
Support: 0.08445
Wait for the bounce to confirm.
Let's go — $RHEA
$RHEA TRADE SETUP
Entry Zone: 0.08520 – 0.08570
TP1: 0.08740
TP2: 0.09035
TP3: 0.09330
SL: 0.08420
Trigger: 15m close above 0.08740
Support: 0.08445
Wait for the bounce to confirm.
Let's go — $RHEA
Entry Zone: 0.08520 – 0.08570
TP1: 0.08740
TP2: 0.09035
TP3: 0.09330
SL: 0.08420
Trigger: 15m close above 0.08740
Support: 0.08445
Wait for the bounce to confirm.
Let's go — $RHEA
48
·
--
Haussier
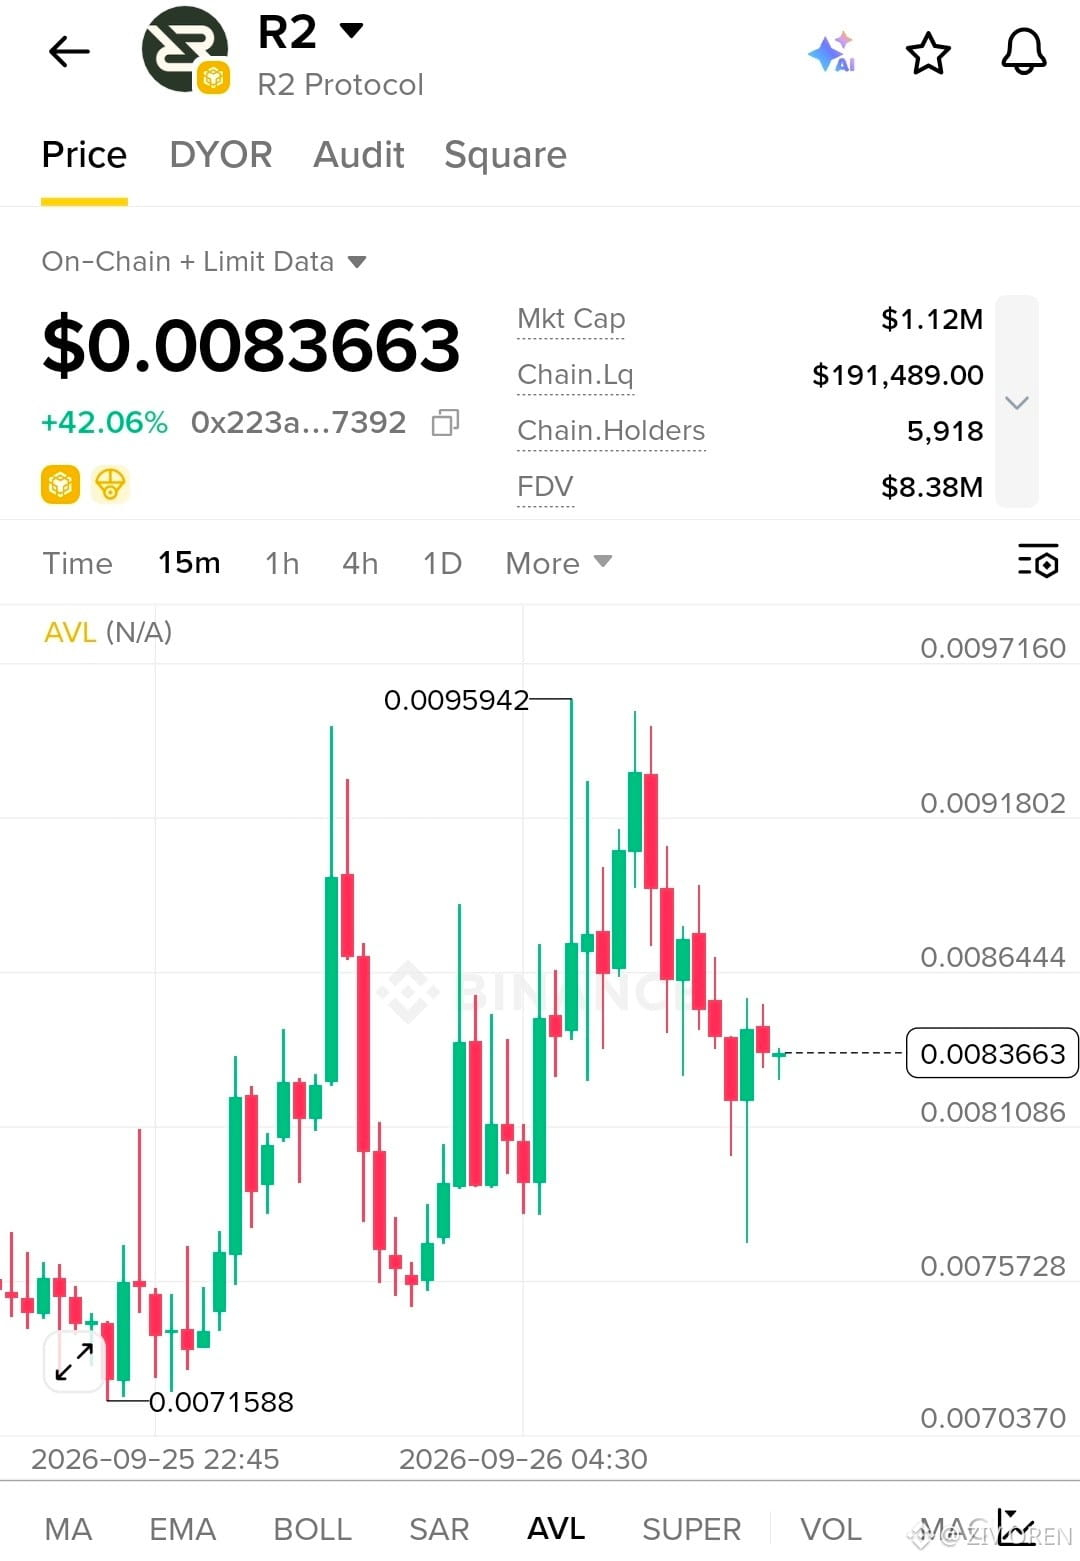
$R2 TRADE SETUP
Entry Zone: 0.00830 – 0.00845
TP1: 0.00865
TP2: 0.00918
TP3: 0.00959
SL: 0.00805
Trigger: 15m close above 0.00864
Support: 0.00810 / 0.00757
Momentum is rebuilding.
Wait for confirmation — let's go.
$R2
$R2 TRADE SETUP
Entry Zone: 0.00830 – 0.00845
TP1: 0.00865
TP2: 0.00918
TP3: 0.00959
SL: 0.00805
Trigger: 15m close above 0.00864
Support: 0.00810 / 0.00757
Momentum is rebuilding.
Wait for confirmation — let's go.
$R2
Entry Zone: 0.00830 – 0.00845
TP1: 0.00865
TP2: 0.00918
TP3: 0.00959
SL: 0.00805
Trigger: 15m close above 0.00864
Support: 0.00810 / 0.00757
Momentum is rebuilding.
Wait for confirmation — let's go.
$R2
80
·
--
Haussier
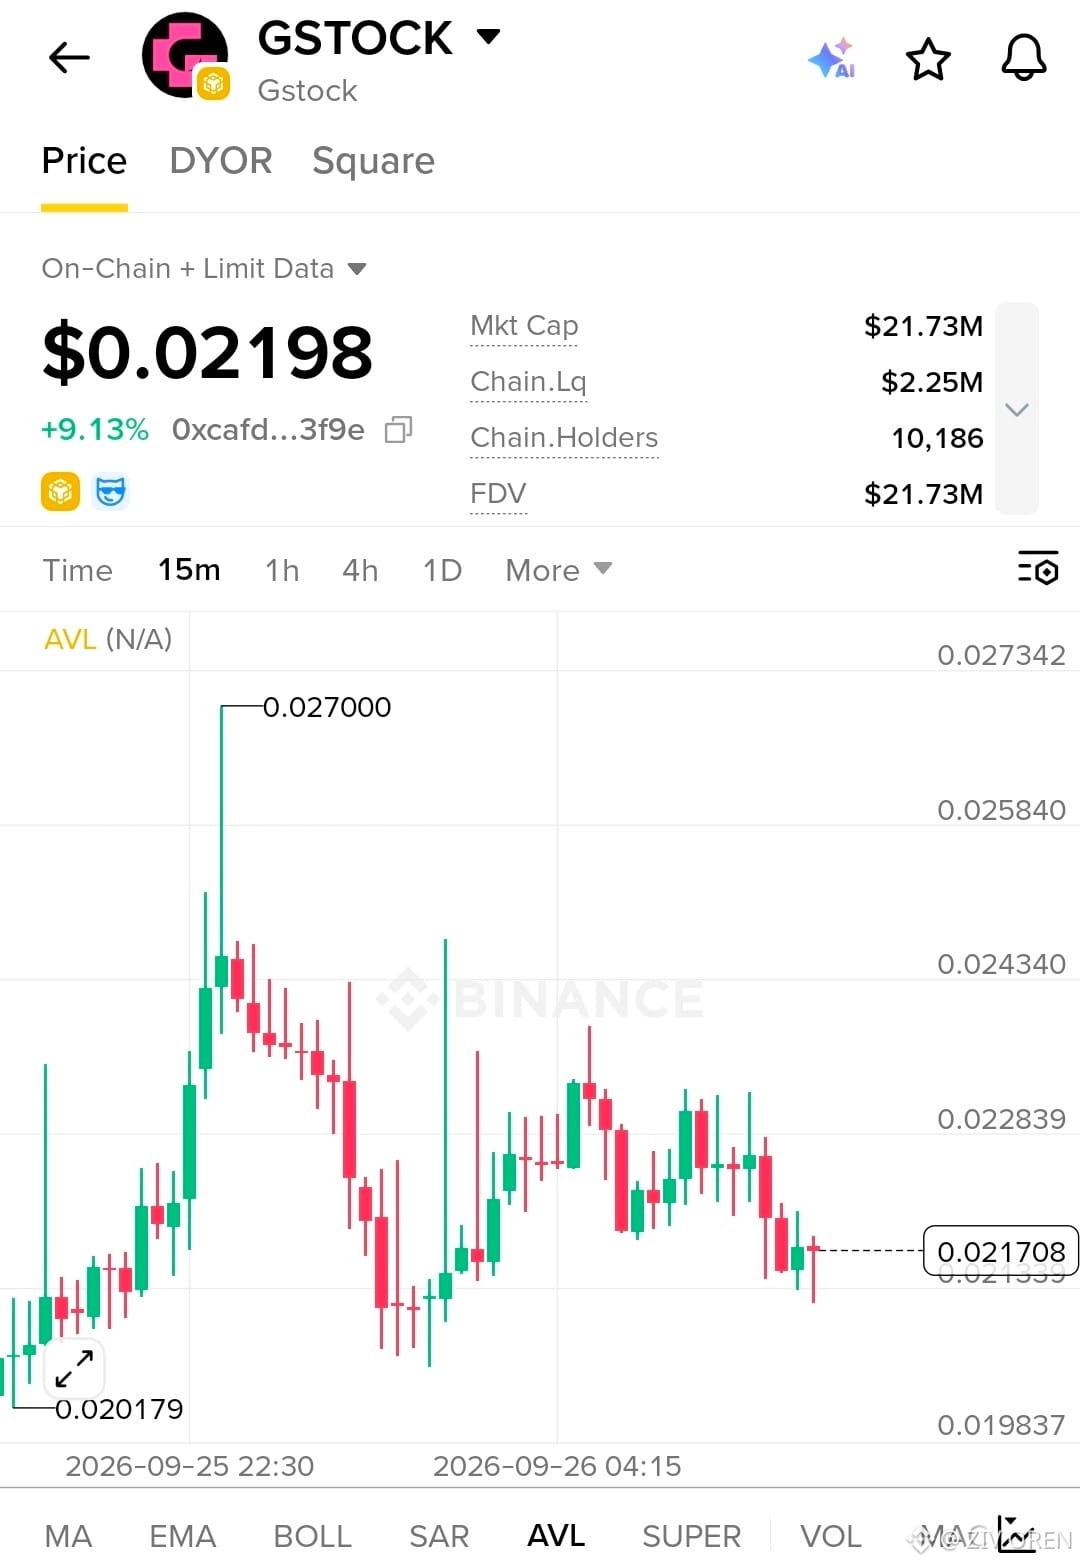
$GSTOCK TRADE SETUP
Entry Zone: 0.02180 – 0.02210
TP1: 0.02285
TP2: 0.02350
TP3: 0.02430
SL: 0.02120
Trigger: 15m close above 0.02285
Support: 0.02170 / 0.02018
Let the breakout confirm. Let's go — $GSTOCK
$GSTOCK TRADE SETUP
Entry Zone: 0.02180 – 0.02210
TP1: 0.02285
TP2: 0.02350
TP3: 0.02430
SL: 0.02120
Trigger: 15m close above 0.02285
Support: 0.02170 / 0.02018
Let the breakout confirm. Let's go — $GSTOCK
Entry Zone: 0.02180 – 0.02210
TP1: 0.02285
TP2: 0.02350
TP3: 0.02430
SL: 0.02120
Trigger: 15m close above 0.02285
Support: 0.02170 / 0.02018
Let the breakout confirm. Let's go — $GSTOCK
47
·
--
Haussier
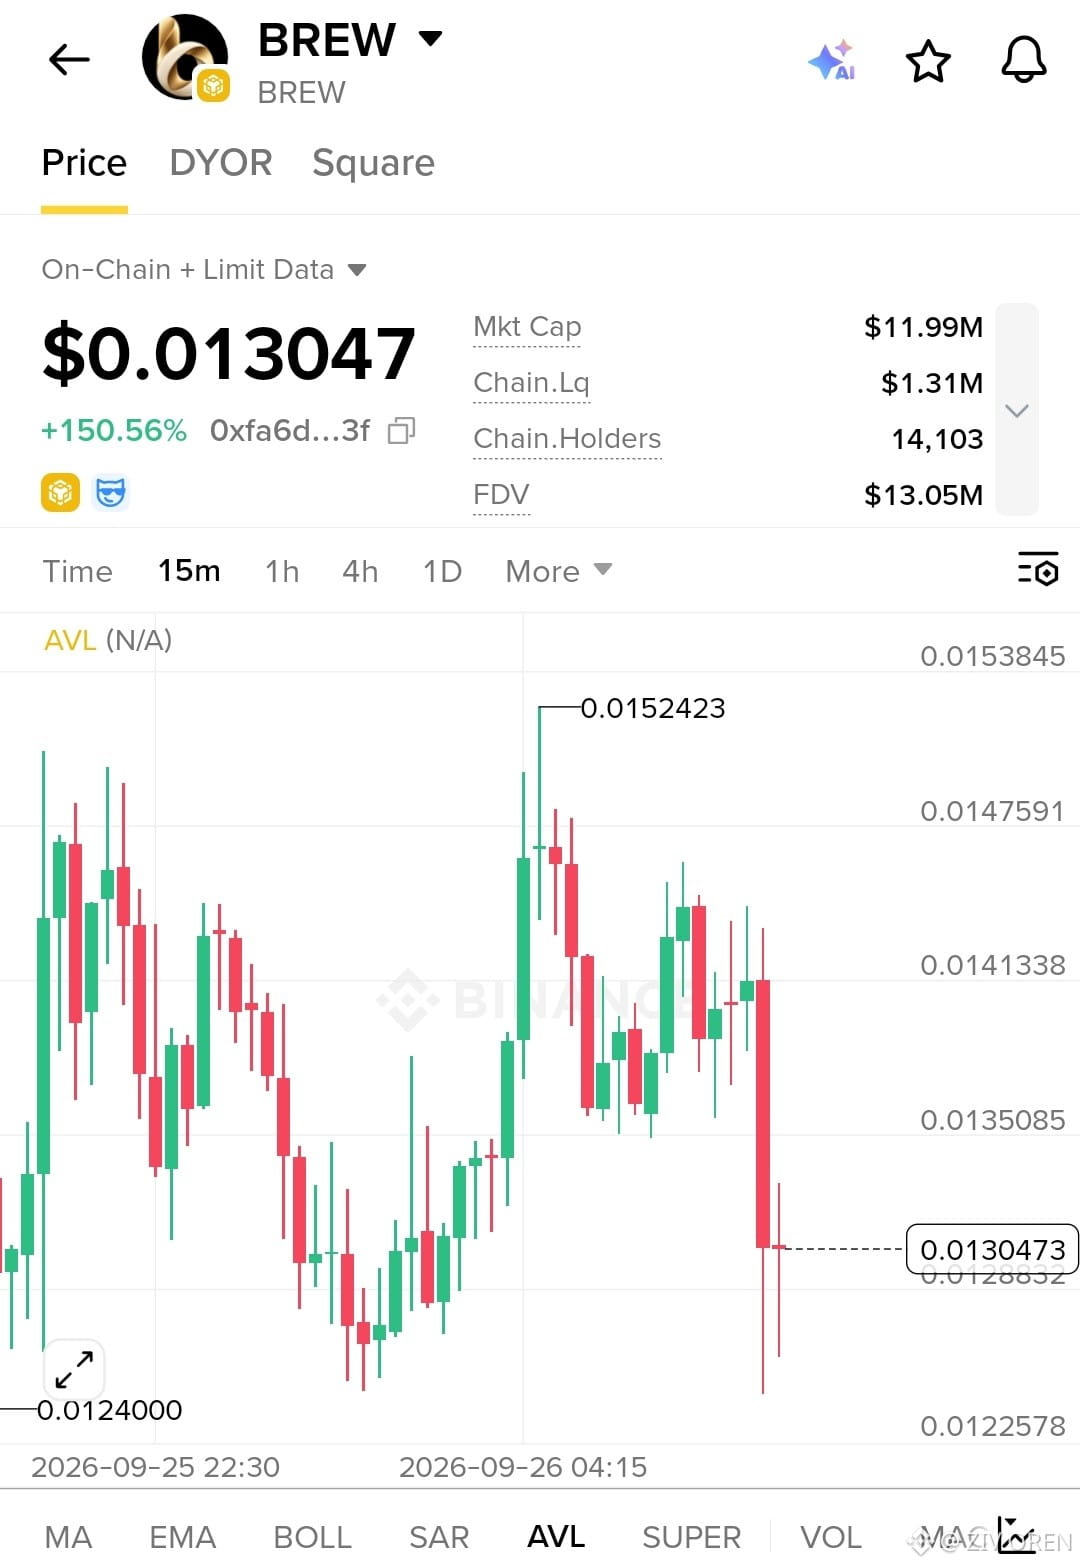
$BREW TRADE SETUP
Entry Zone: 0.01290 – 0.01310
TP1: 0.01350
TP2: 0.01415
TP3: 0.01475
SL: 0.01255
Trigger: 15m reclaim above 0.01330
Support: 0.01280 – 0.01240
Sharp move, sharp volatility.
Wait for confirmation — then let's go.
$BREW
$BREW TRADE SETUP
Entry Zone: 0.01290 – 0.01310
TP1: 0.01350
TP2: 0.01415
TP3: 0.01475
SL: 0.01255
Trigger: 15m reclaim above 0.01330
Support: 0.01280 – 0.01240
Sharp move, sharp volatility.
Wait for confirmation — then let's go.
$BREW
Entry Zone: 0.01290 – 0.01310
TP1: 0.01350
TP2: 0.01415
TP3: 0.01475
SL: 0.01255
Trigger: 15m reclaim above 0.01330
Support: 0.01280 – 0.01240
Sharp move, sharp volatility.
Wait for confirmation — then let's go.
$BREW
1
58
·
--
Haussier
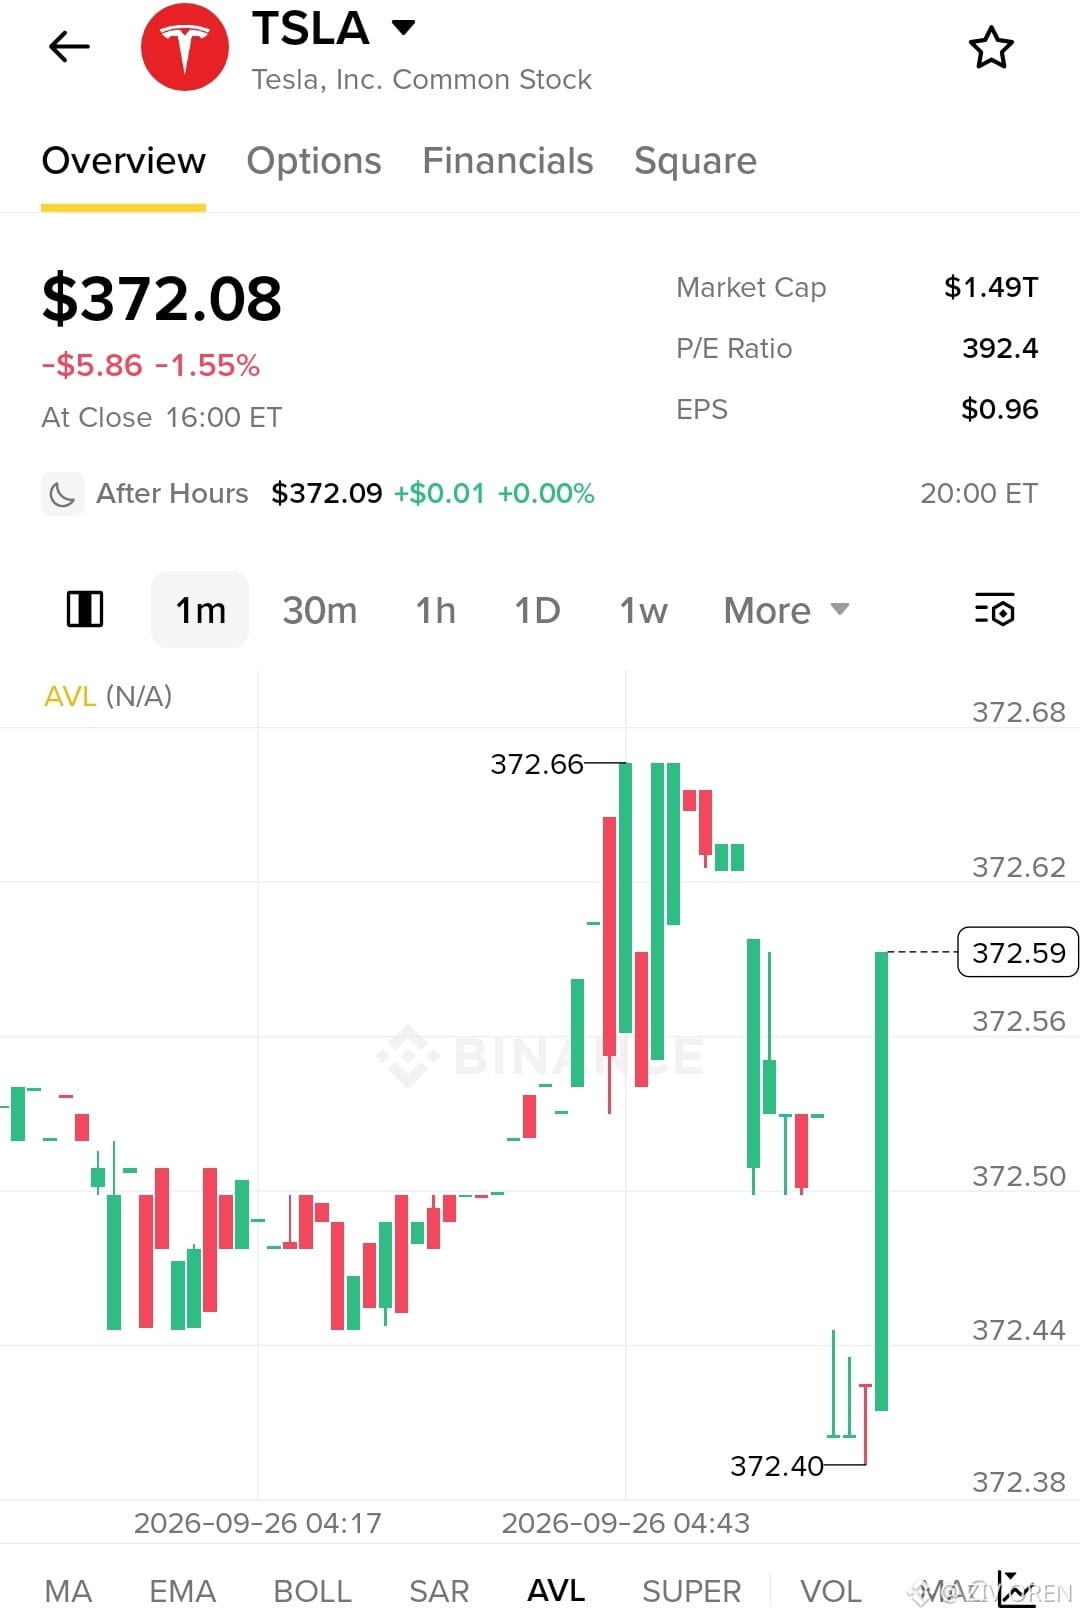
$TSLA — Buyers Defend the Dip
Trade Setup
Entry: $372.55 – $372.65
TP1: $372.80
TP2: $373.10
TP3: $373.50
SL: $372.38
Analysis:
$TSLA bounced sharply from the $372.40 low and reclaimed the $372.50 area with strong buying pressure. The 1M chart is showing a quick recovery toward the recent $372.66 high. A clean break above that level could extend the short-term move.
Let’s go — $TSLA
$TSLA — Buyers Defend the Dip
Trade Setup
Entry: $372.55 – $372.65
TP1: $372.80
TP2: $373.10
TP3: $373.50
SL: $372.38
Analysis:
$TSLA bounced sharply from the $372.40 low and reclaimed the $372.50 area with strong buying pressure. The 1M chart is showing a quick recovery toward the recent $372.66 high. A clean break above that level could extend the short-term move.
Let’s go — $TSLA
Trade Setup
Entry: $372.55 – $372.65
TP1: $372.80
TP2: $373.10
TP3: $373.50
SL: $372.38
Analysis:
$TSLA bounced sharply from the $372.40 low and reclaimed the $372.50 area with strong buying pressure. The 1M chart is showing a quick recovery toward the recent $372.66 high. A clean break above that level could extend the short-term move.
Let’s go — $TSLA
110
·
--
Haussier
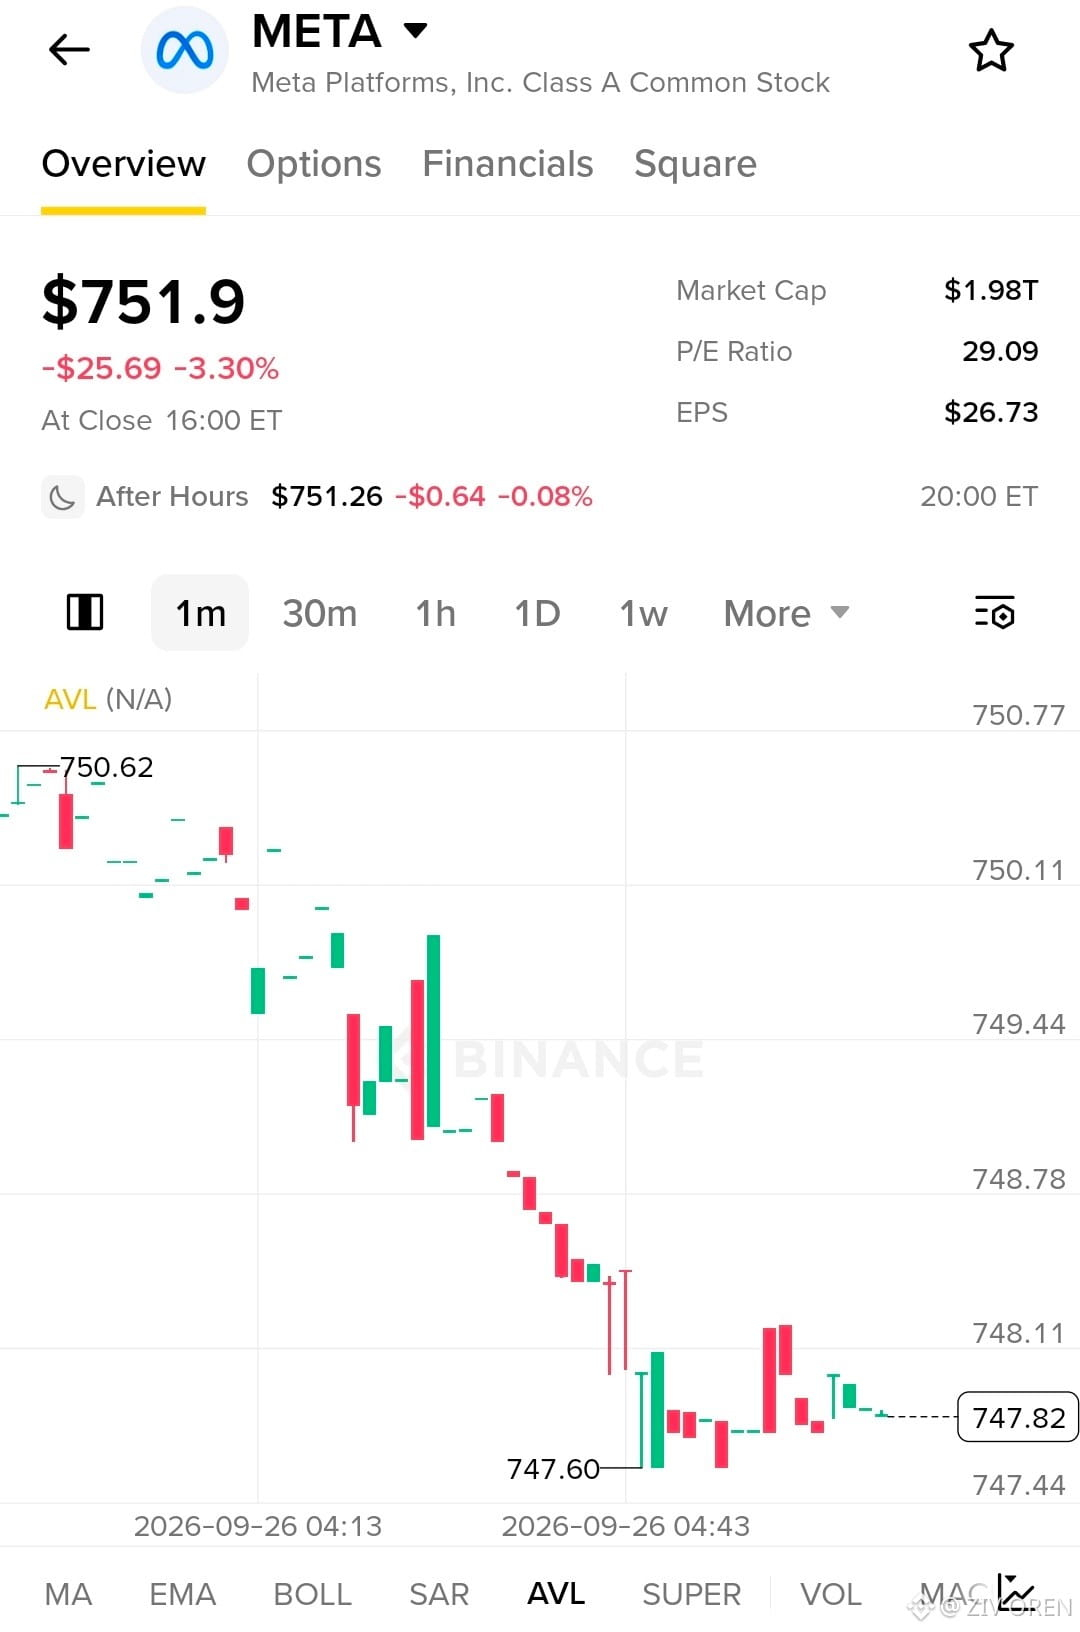
$META — Buyers Attempt a Bounce
Trade Setup
Entry: $747.80 – $748.00
TP1: $748.40
TP2: $749.00
TP3: $750.10
SL: $747.40
Analysis:
$META has fallen sharply from the $750.62 area and is now consolidating near $747.80 after touching $747.60. The 1M chart shows stabilization, but momentum remains fragile. A reclaim of $748.40 could trigger a short-term recovery toward the higher levels.
Let’s go — $META
$META — Buyers Attempt a Bounce
Trade Setup
Entry: $747.80 – $748.00
TP1: $748.40
TP2: $749.00
TP3: $750.10
SL: $747.40
Analysis:
$META has fallen sharply from the $750.62 area and is now consolidating near $747.80 after touching $747.60. The 1M chart shows stabilization, but momentum remains fragile. A reclaim of $748.40 could trigger a short-term recovery toward the higher levels.
Let’s go — $META
Trade Setup
Entry: $747.80 – $748.00
TP1: $748.40
TP2: $749.00
TP3: $750.10
SL: $747.40
Analysis:
$META has fallen sharply from the $750.62 area and is now consolidating near $747.80 after touching $747.60. The 1M chart shows stabilization, but momentum remains fragile. A reclaim of $748.40 could trigger a short-term recovery toward the higher levels.
Let’s go — $META
80
·
--
Haussier
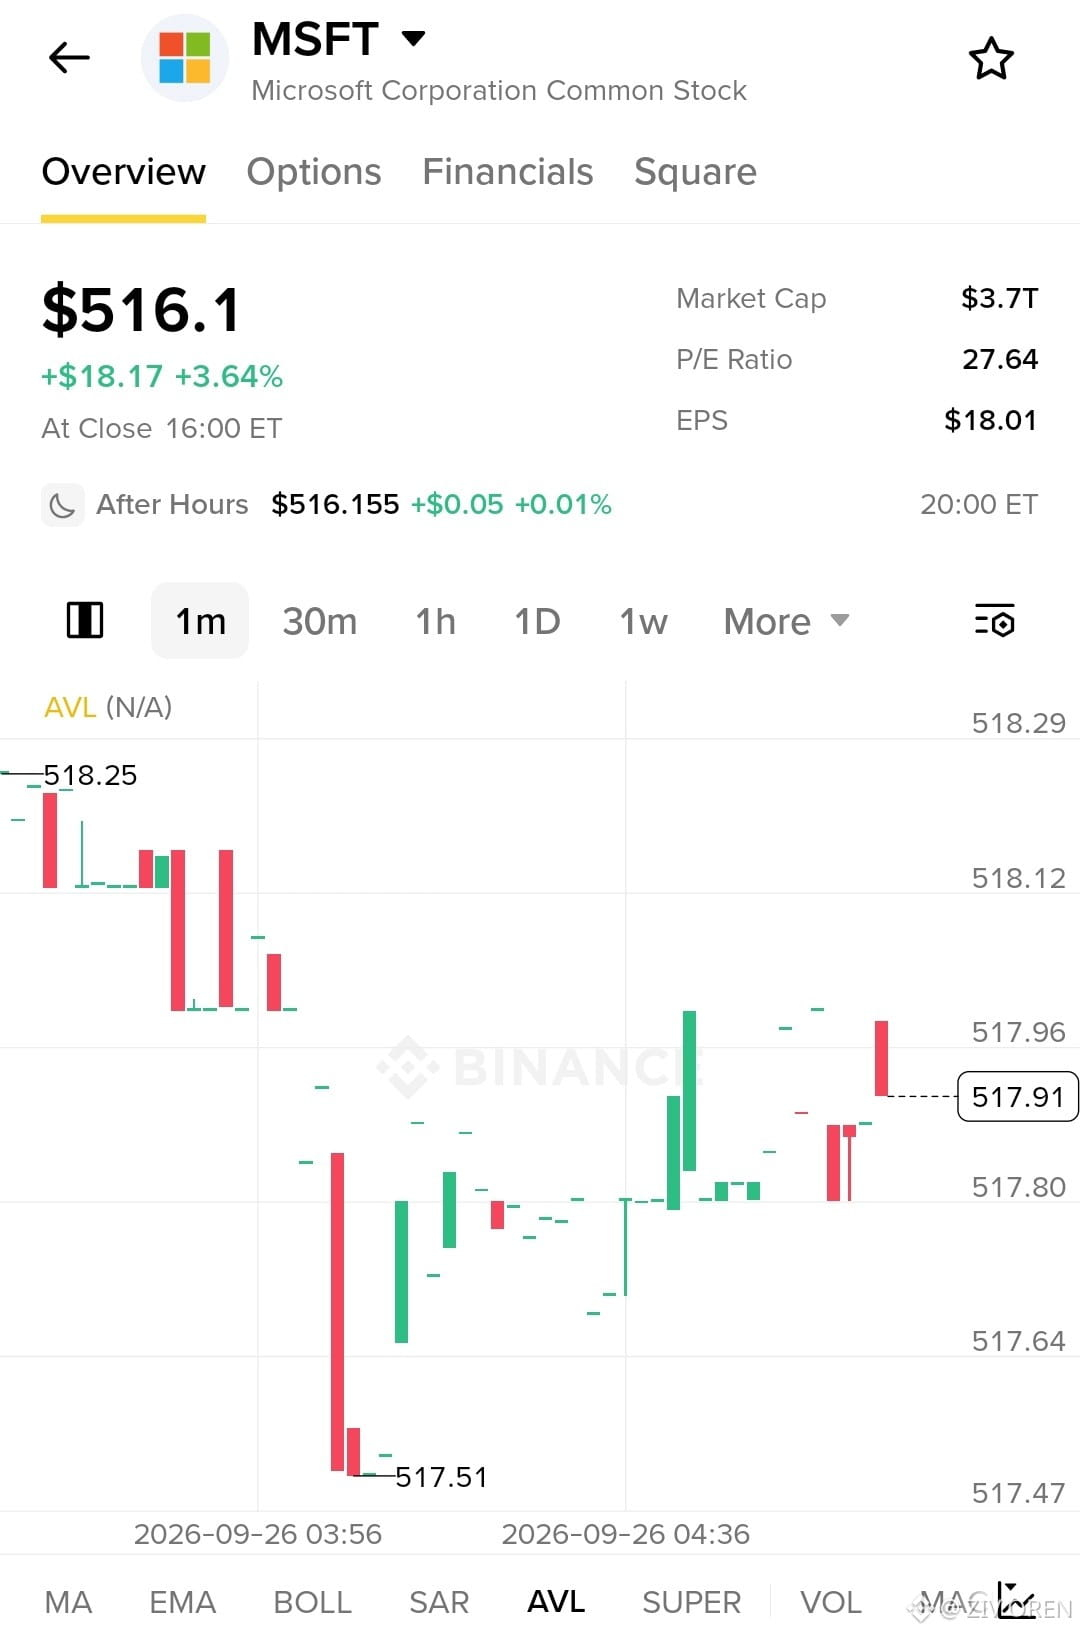
$MSFT — Bulls Defend the Recovery
Trade Setup
Entry: $517.85 – $518.00
TP1: $518.12
TP2: $518.25
TP3: $518.50
SL: $517.50
Analysis:
$MSFT is holding above the $517.80 area after bouncing from the $517.51 low. The 1M chart shows renewed buying attempts, with price still near the session highs. A break above $518.25 could extend the short-term move.
Let’s go — $MSFT
$MSFT — Bulls Defend the Recovery
Trade Setup
Entry: $517.85 – $518.00
TP1: $518.12
TP2: $518.25
TP3: $518.50
SL: $517.50
Analysis:
$MSFT is holding above the $517.80 area after bouncing from the $517.51 low. The 1M chart shows renewed buying attempts, with price still near the session highs. A break above $518.25 could extend the short-term move.
Let’s go — $MSFT
Trade Setup
Entry: $517.85 – $518.00
TP1: $518.12
TP2: $518.25
TP3: $518.50
SL: $517.50
Analysis:
$MSFT is holding above the $517.80 area after bouncing from the $517.51 low. The 1M chart shows renewed buying attempts, with price still near the session highs. A break above $518.25 could extend the short-term move.
Let’s go — $MSFT
91
Connectez-vous pour découvrir plus de contenu
Rejoignez la communauté mondiale des adeptes de cryptomonnaies sur Binance Square
⚡️ Suviez les dernières informations importantes sur les cryptomonnaies.
💬 Jugé digne de confiance par la plus grande plateforme d’échange de cryptomonnaies au monde.
👍 Découvrez les connaissances que partagent les créateurs vérifiés.
Adresse e-mail/Nº de téléphone