

Yuuki Trading
3.5k Publications

Yuuki Trading
Signaler
Bloquer l’utilisateur
I’m Yuuki | Futures Signals | Market Structure | Risk First | Precision Execution | No FOMO | DM Marketing: @Yuuki_Fi
666 Suivis
2.2K+ Abonnés
13.1K+ J’aime
Publications
Tous
Citations
Vidéos
Direct
·
--
Haussier
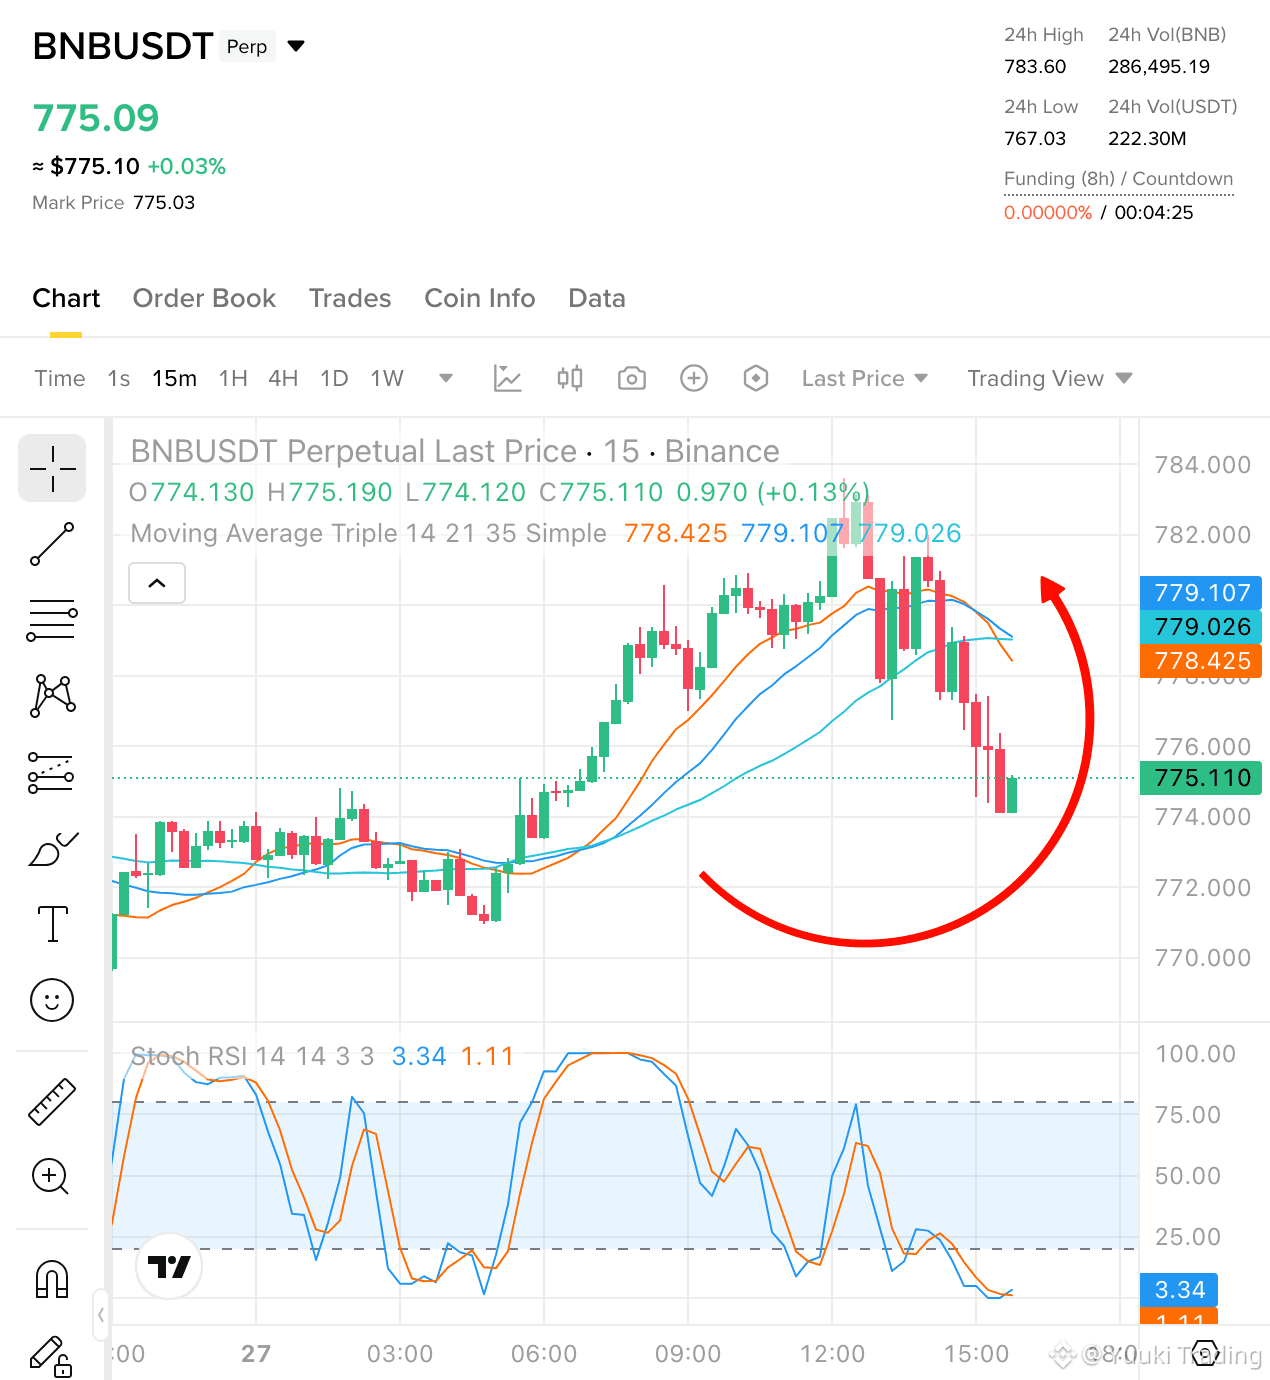
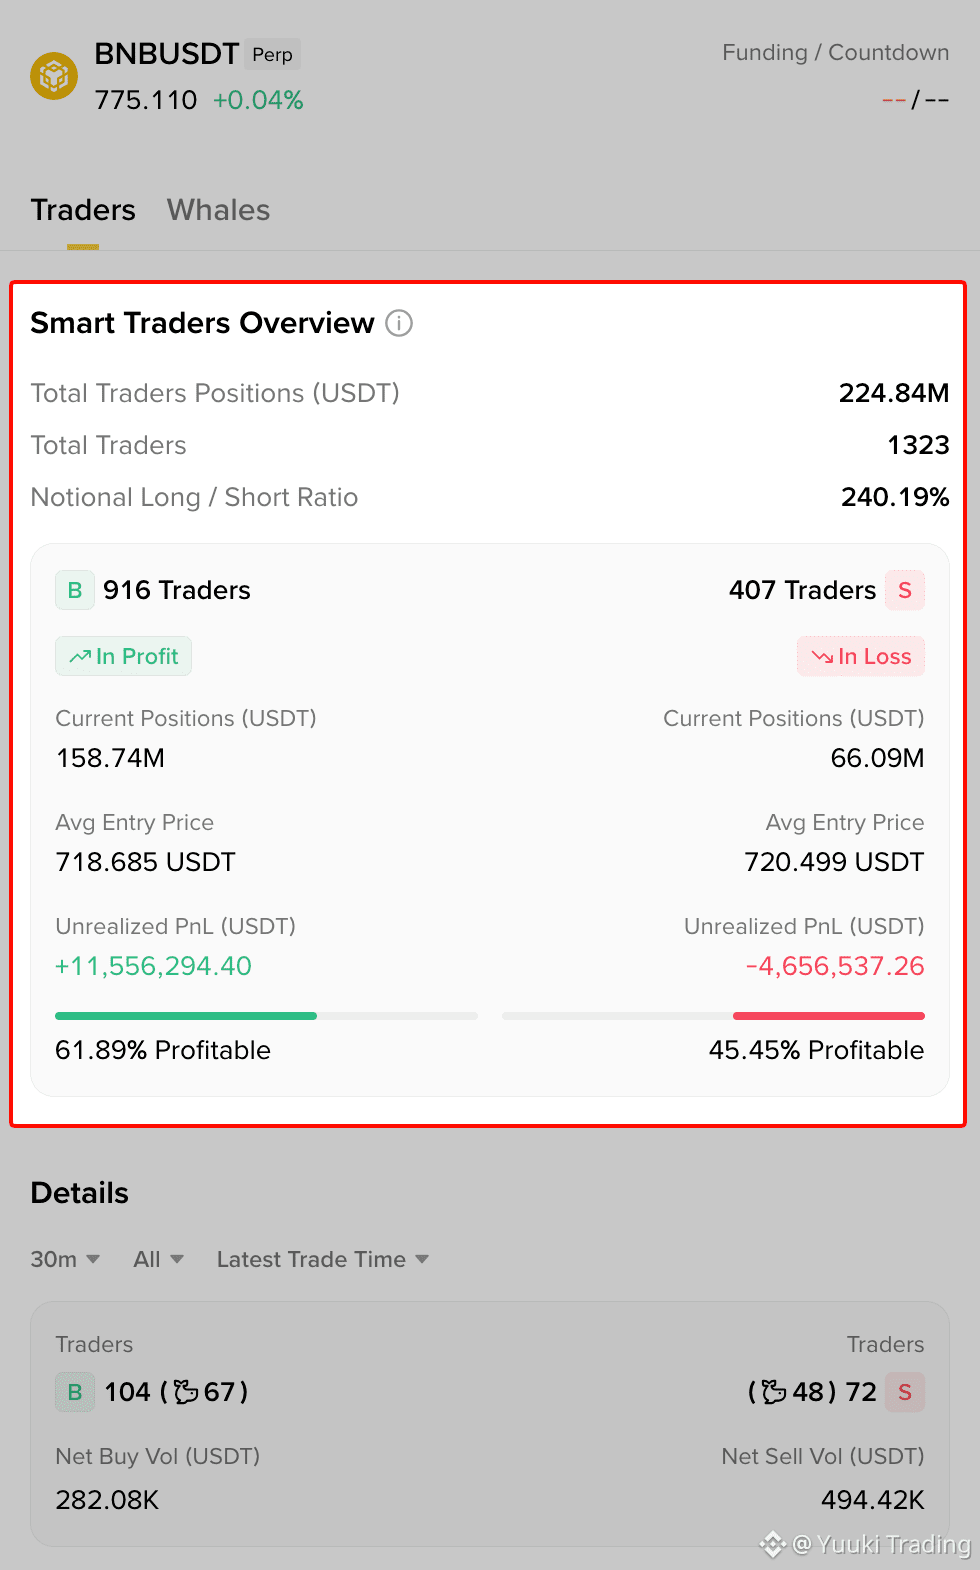
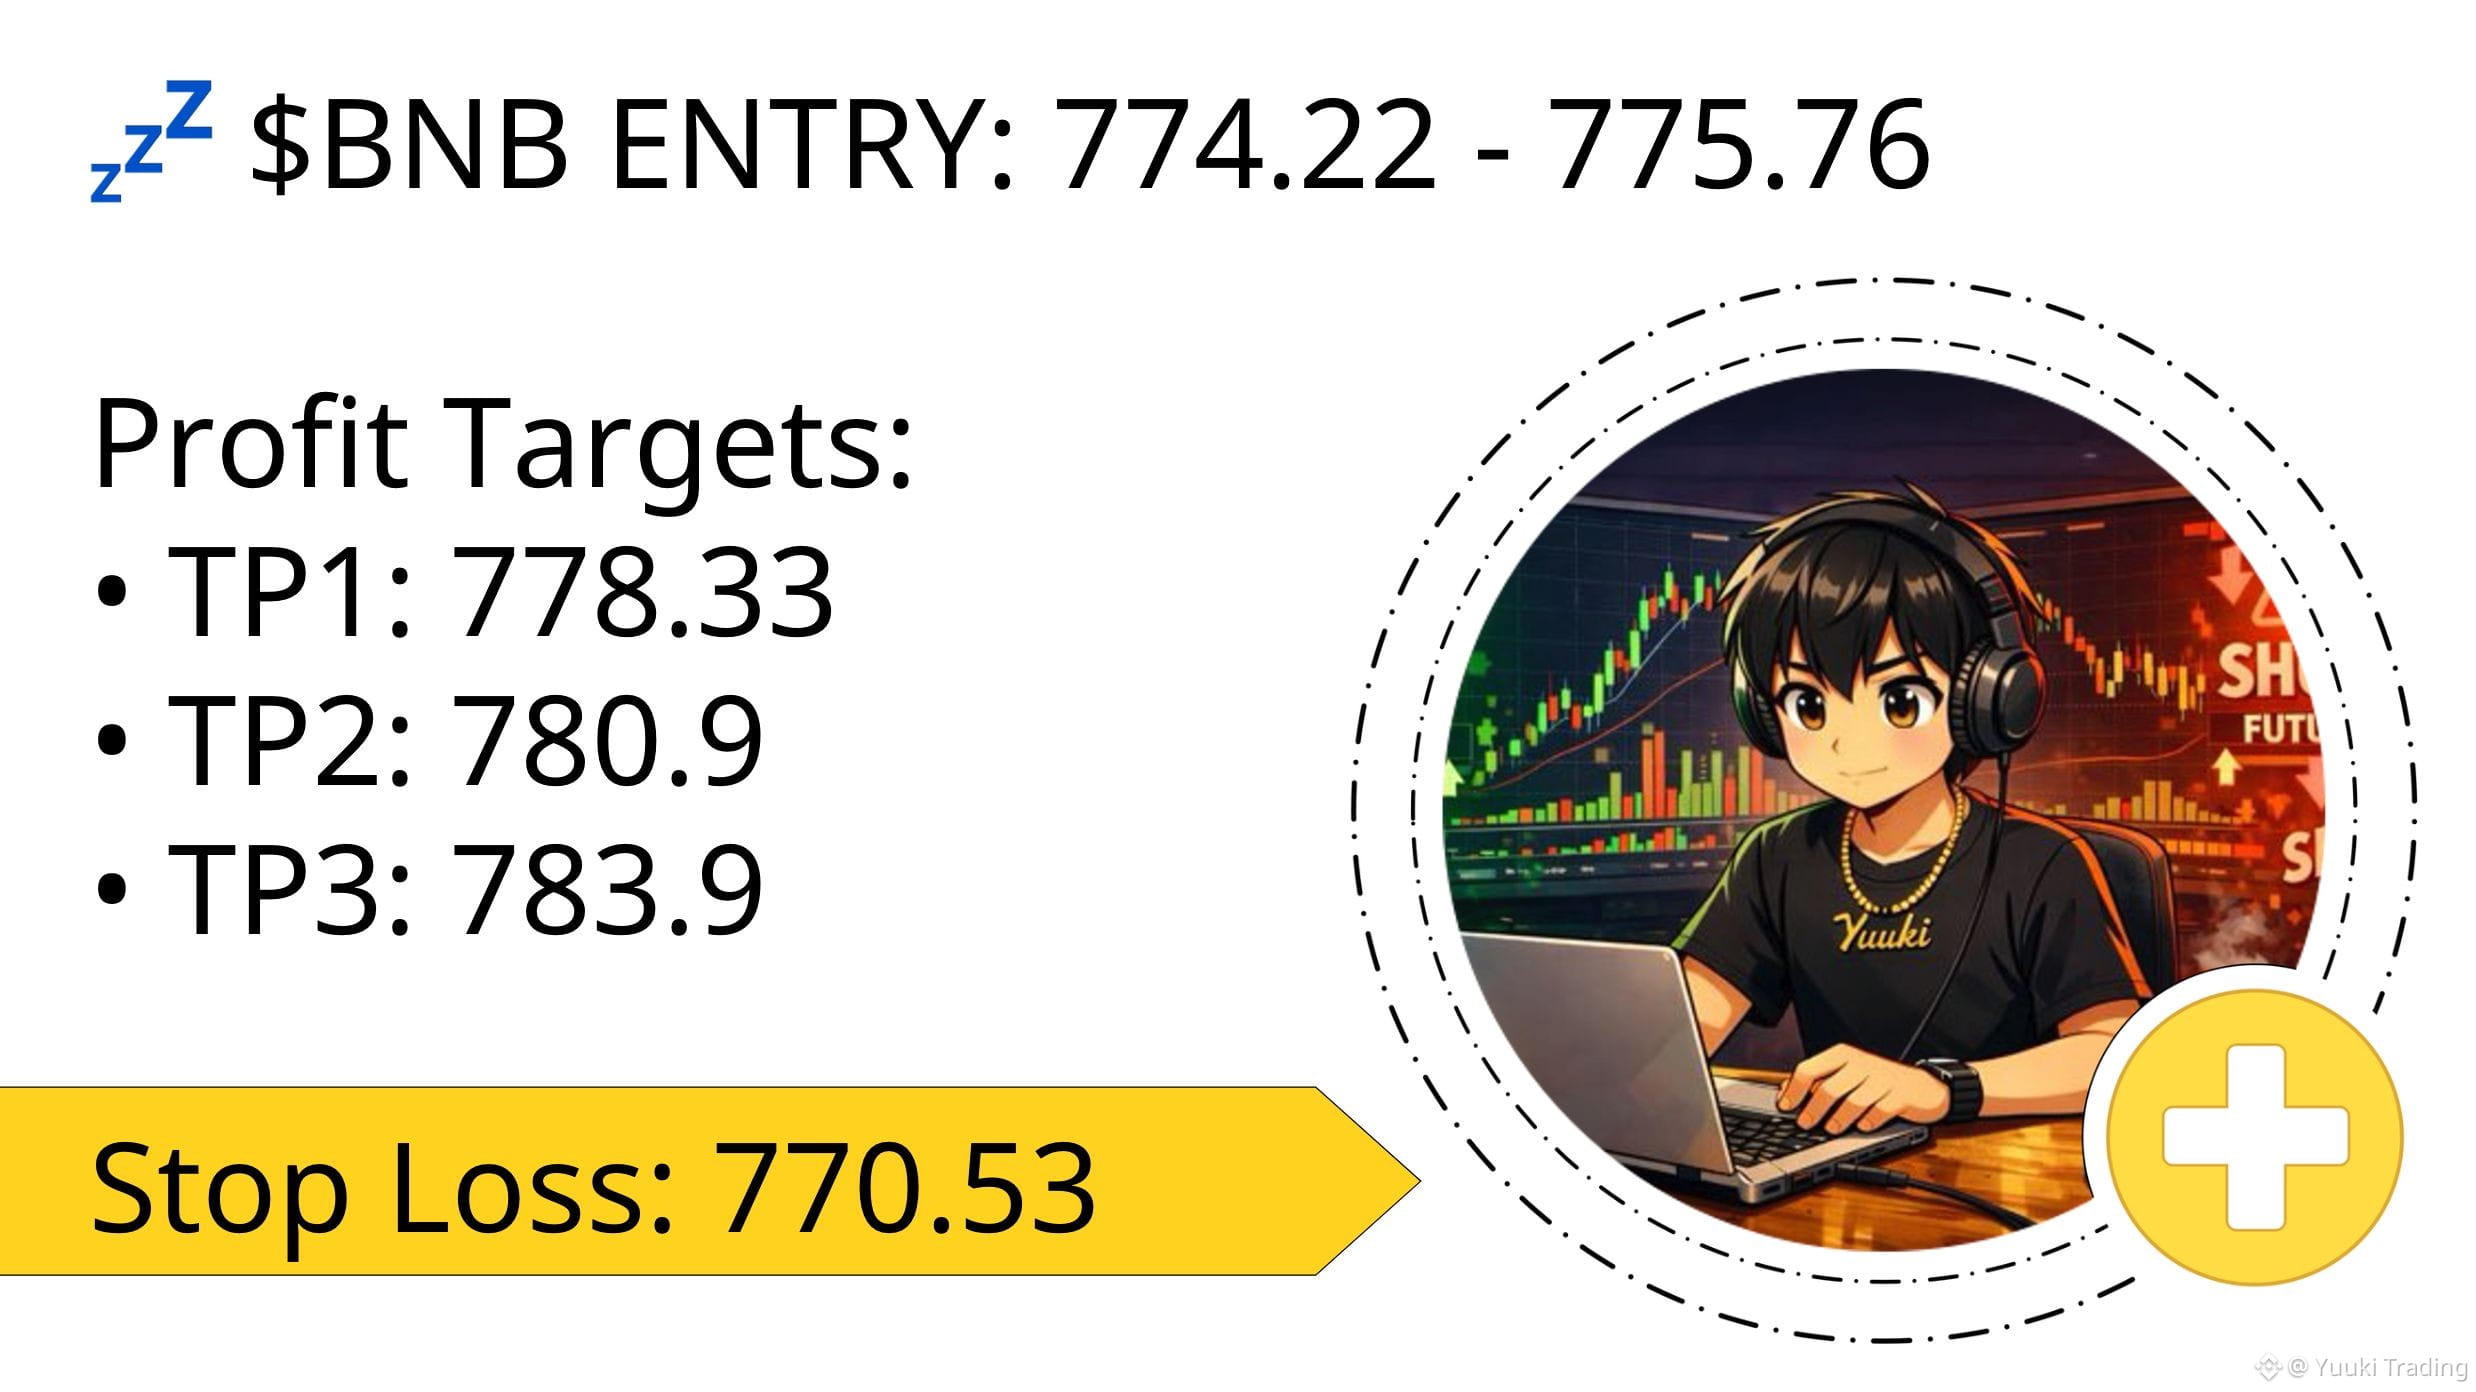
$BNB bullish!
Price has pulled back to the recent support area after five red candles, while the 1h and 4h trends still point higher. Aggregate CVD remains strongly positive despite the local weakness, long now 👇
$BNB bullish!
Price has pulled back to the recent support area after five red candles, while the 1h and 4h trends still point higher. Aggregate CVD remains strongly positive despite the local weakness, long now 👇
Price has pulled back to the recent support area after five red candles, while the 1h and 4h trends still point higher. Aggregate CVD remains strongly positive despite the local weakness, long now 👇
1
286
·
--
Haussier
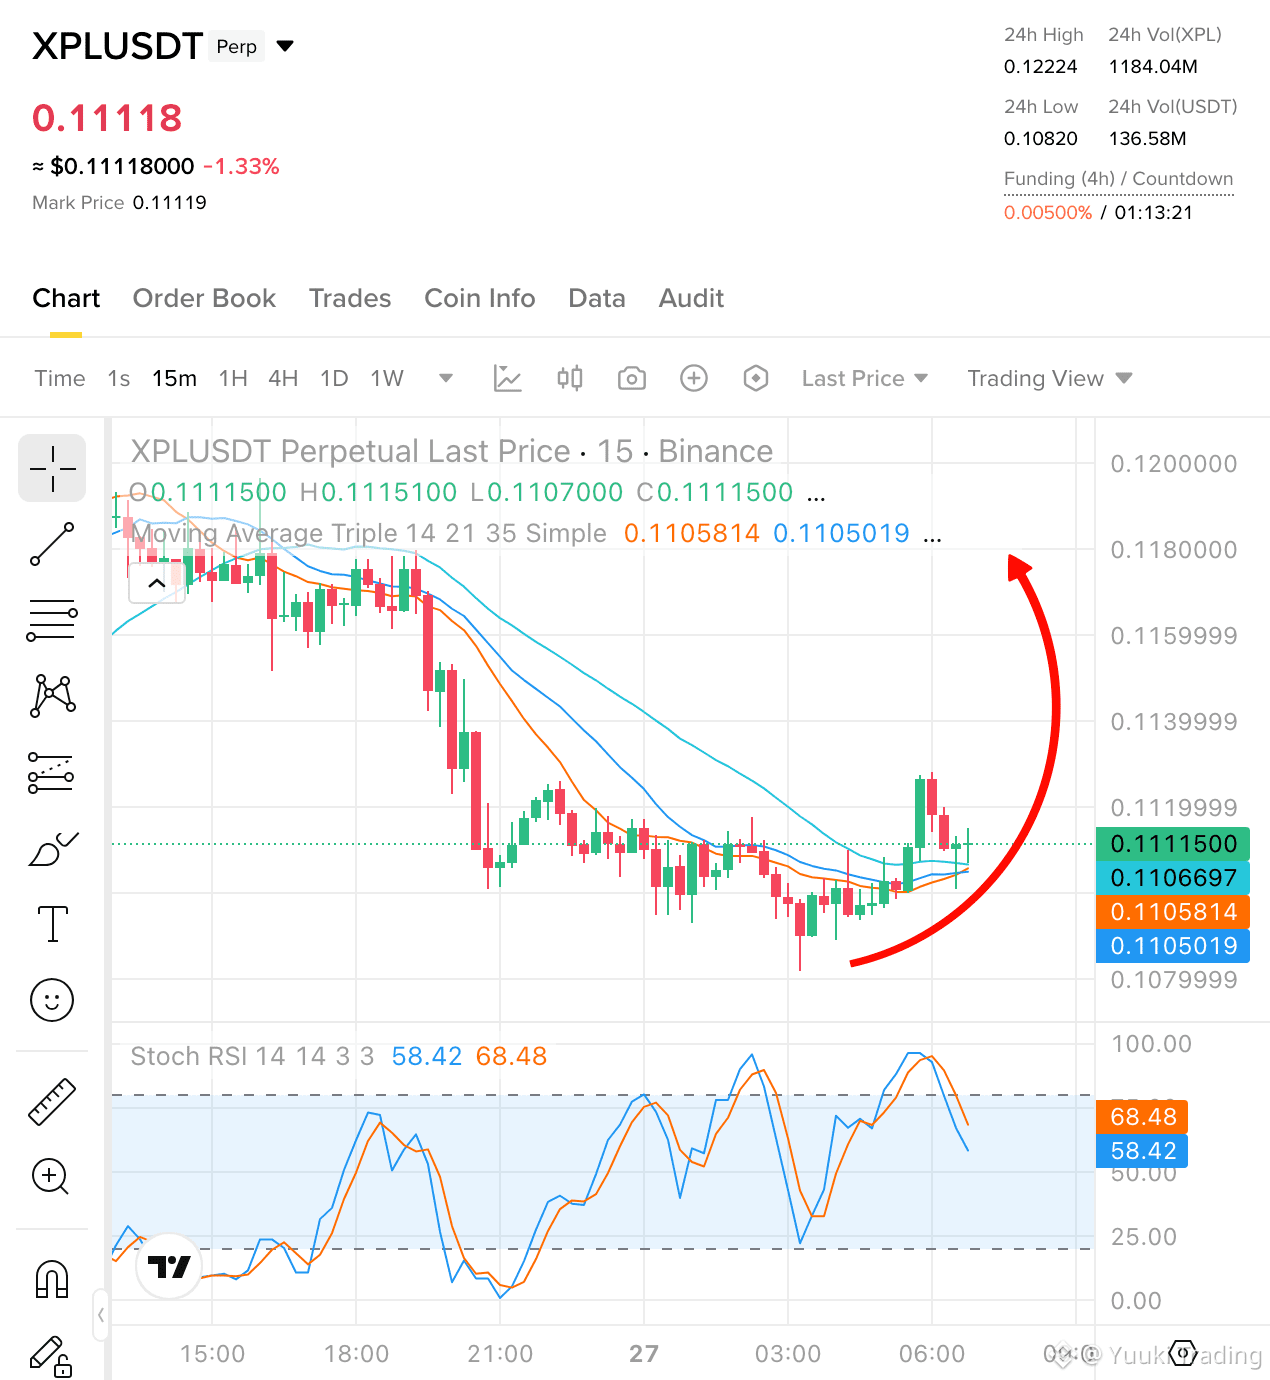
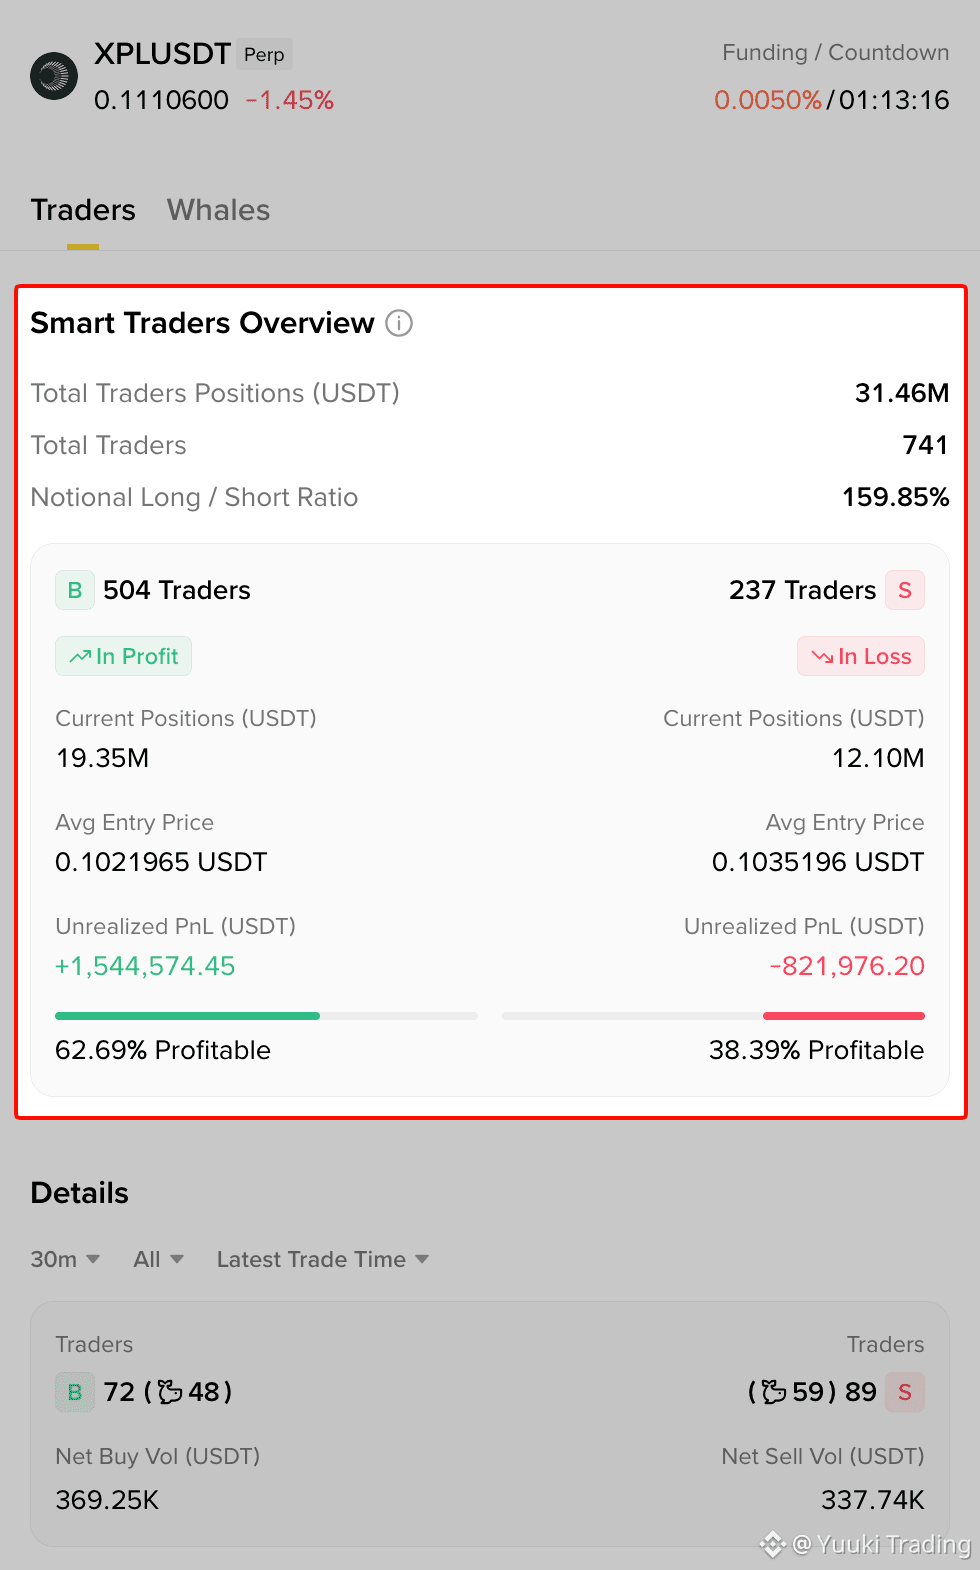
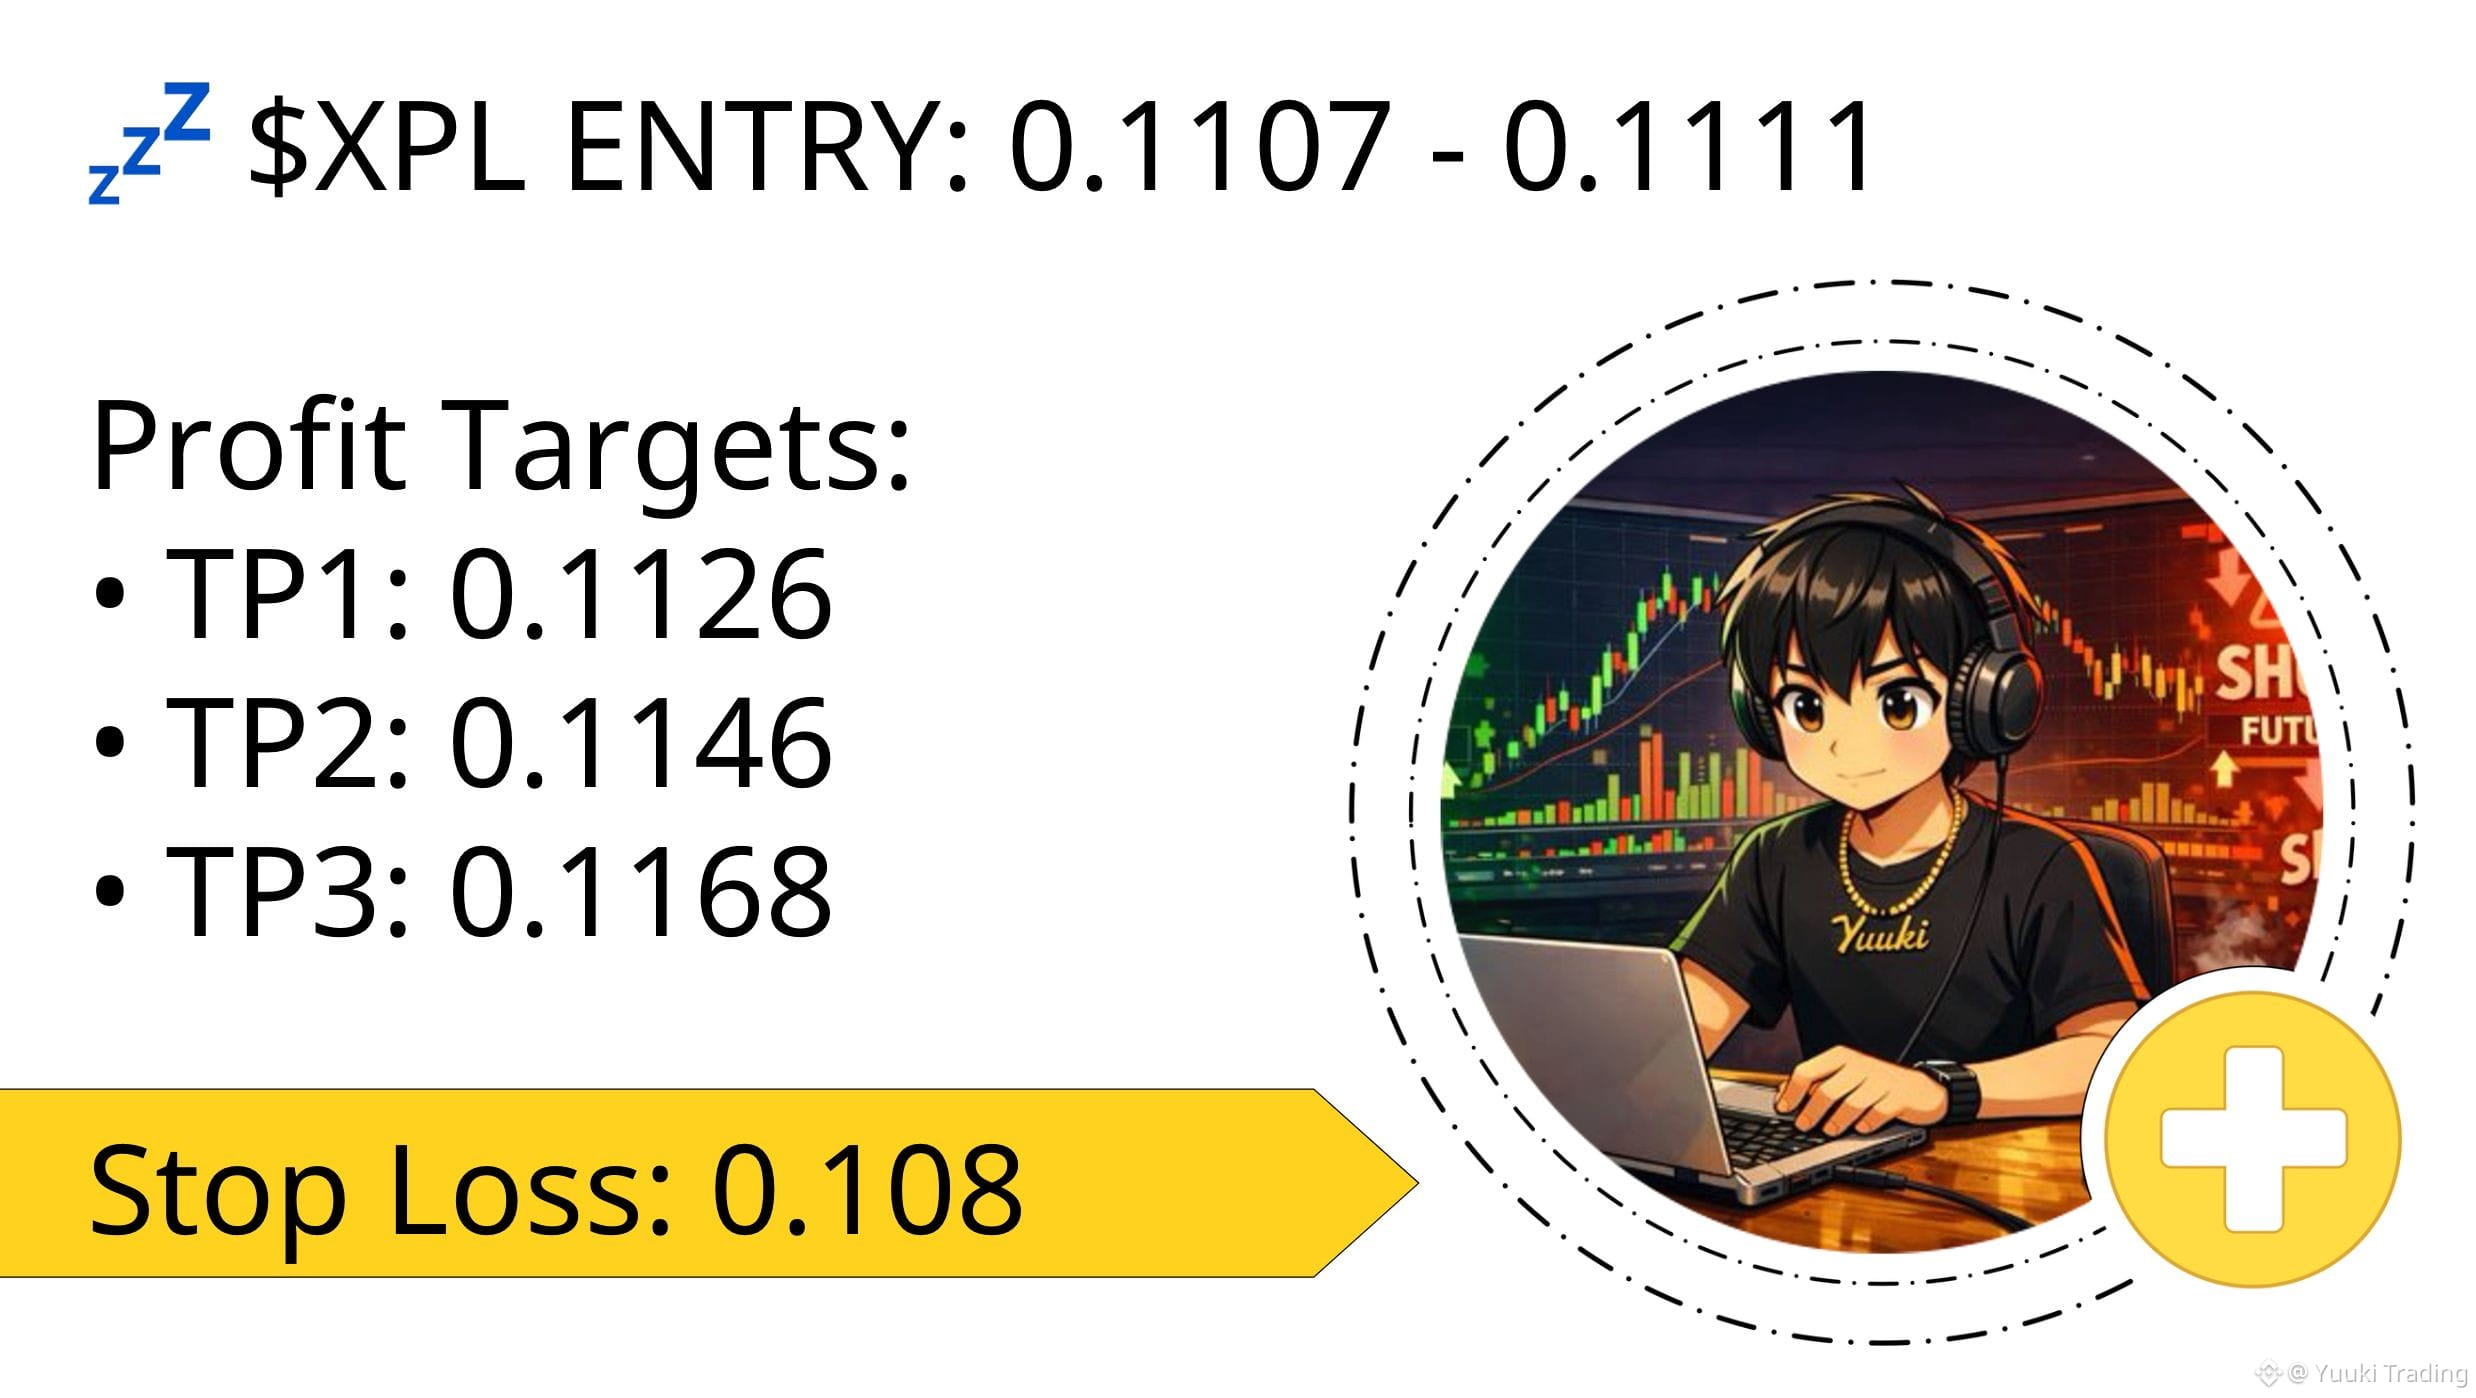
$XPL liquidity sweep low!
Price swept below support and snapped back above it, leaving a pronounced lower wick on the latest 15m candle. Positive CVD and a 33.53% bid-side depth imbalance show buyers responding to the rejection, long now 👇
$XPL liquidity sweep low!
Price swept below support and snapped back above it, leaving a pronounced lower wick on the latest 15m candle. Positive CVD and a 33.53% bid-side depth imbalance show buyers responding to the rejection, long now 👇
Price swept below support and snapped back above it, leaving a pronounced lower wick on the latest 15m candle. Positive CVD and a 33.53% bid-side depth imbalance show buyers responding to the rejection, long now 👇
1
599
·
--
Haussier
$MARSCOIN — Breakout!
Price pushed through TP1 and is holding between the first two targets. The move has already banked 50%, with price still pressing higher after the break.
The remaining half is protected in profit, and price now needs to hold above TP1 to keep pressing toward TP2 👇
$MARSCOIN — Breakout!
Price pushed through TP1 and is holding between the first two targets. The move has already banked 50%, with price still pressing higher after the break.
The remaining half is protected in profit, and price now needs to hold above TP1 to keep pressing toward TP2 👇
Price pushed through TP1 and is holding between the first two targets. The move has already banked 50%, with price still pressing higher after the break.
The remaining half is protected in profit, and price now needs to hold above TP1 to keep pressing toward TP2 👇
Yuuki Trading
·
--
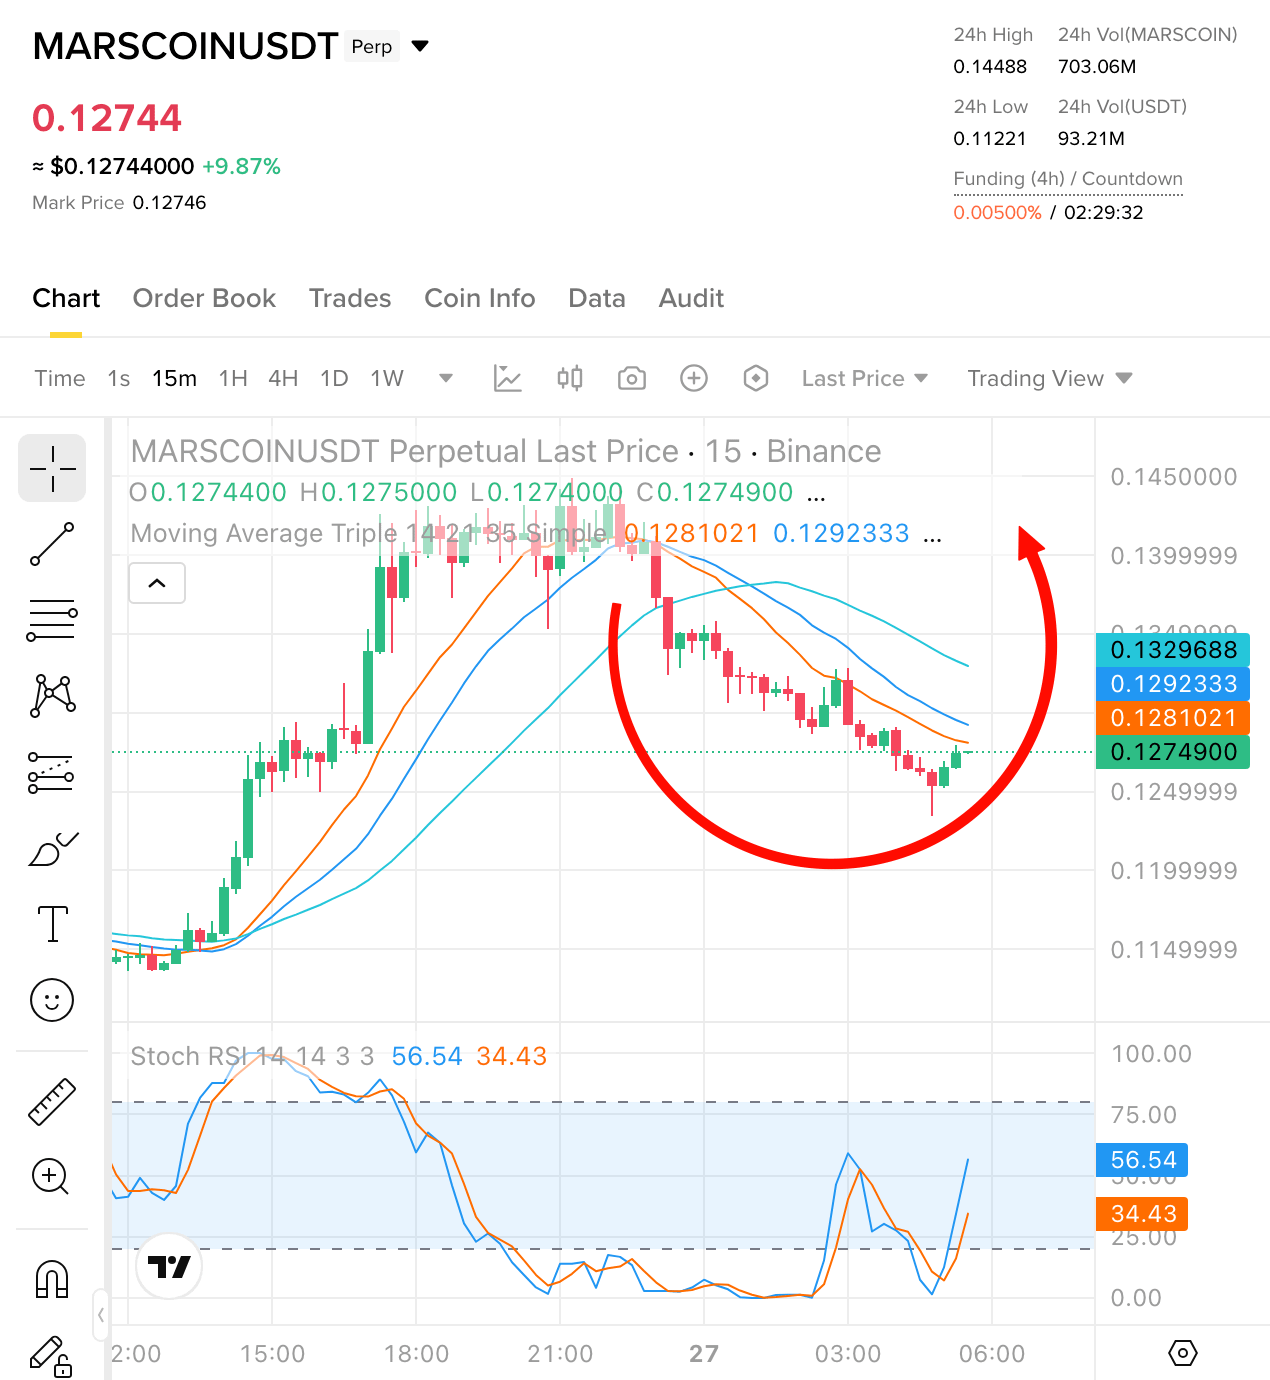
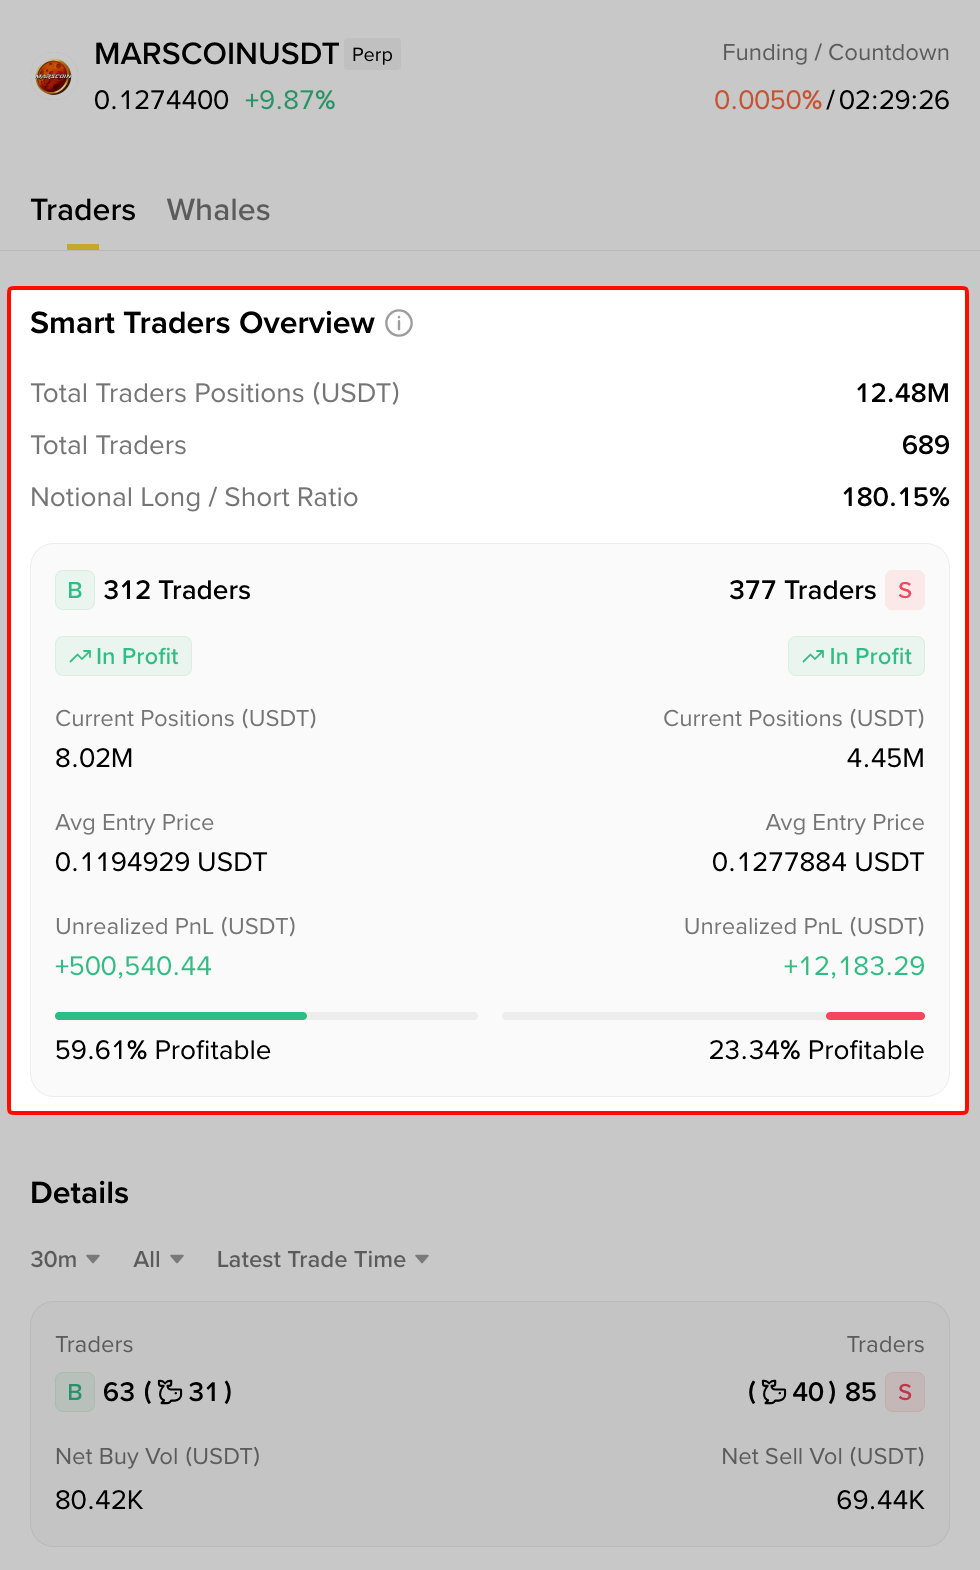
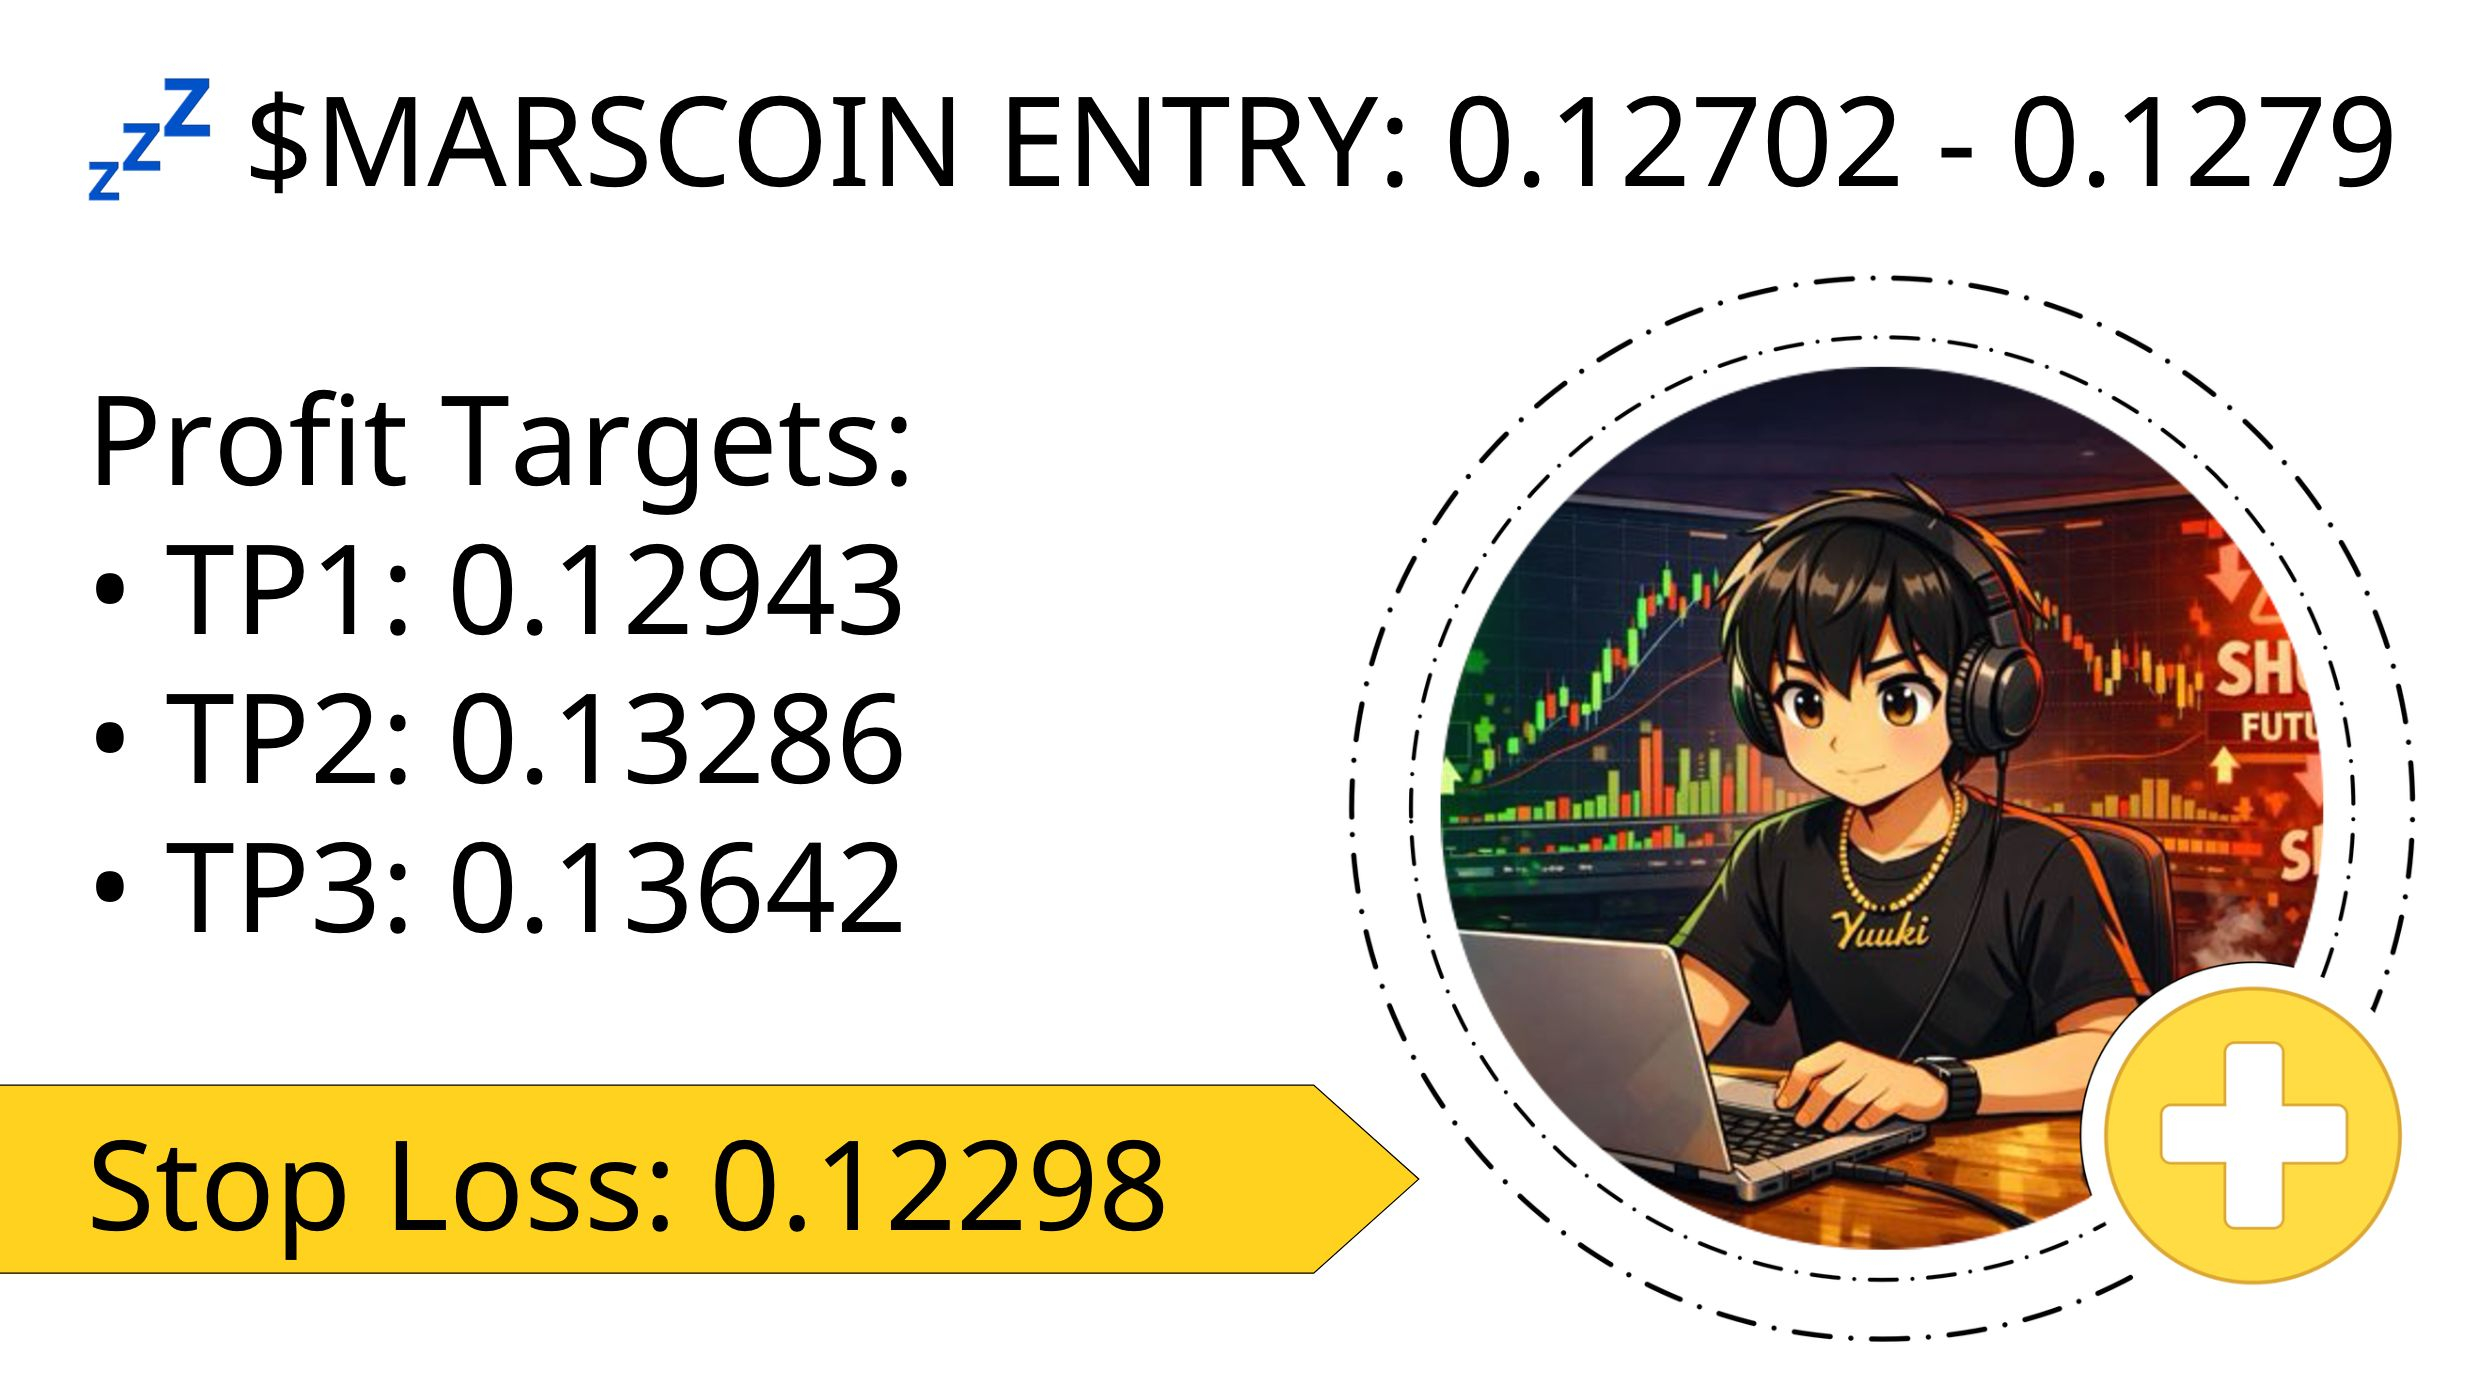
Haussier$MARSCOIN demand reaction!
Price bounced from the recent low after a sharp support test, printing two green 15m candles into the rebound. Aggressive flow has leaned back to buyers, with the 15m taker ratio at 1.56 and CVD positive, long now 👇
Price bounced from the recent low after a sharp support test, printing two green 15m candles into the rebound. Aggressive flow has leaned back to buyers, with the 15m taker ratio at 1.56 and CVD positive, long now 👇
1
745
·
--
Haussier
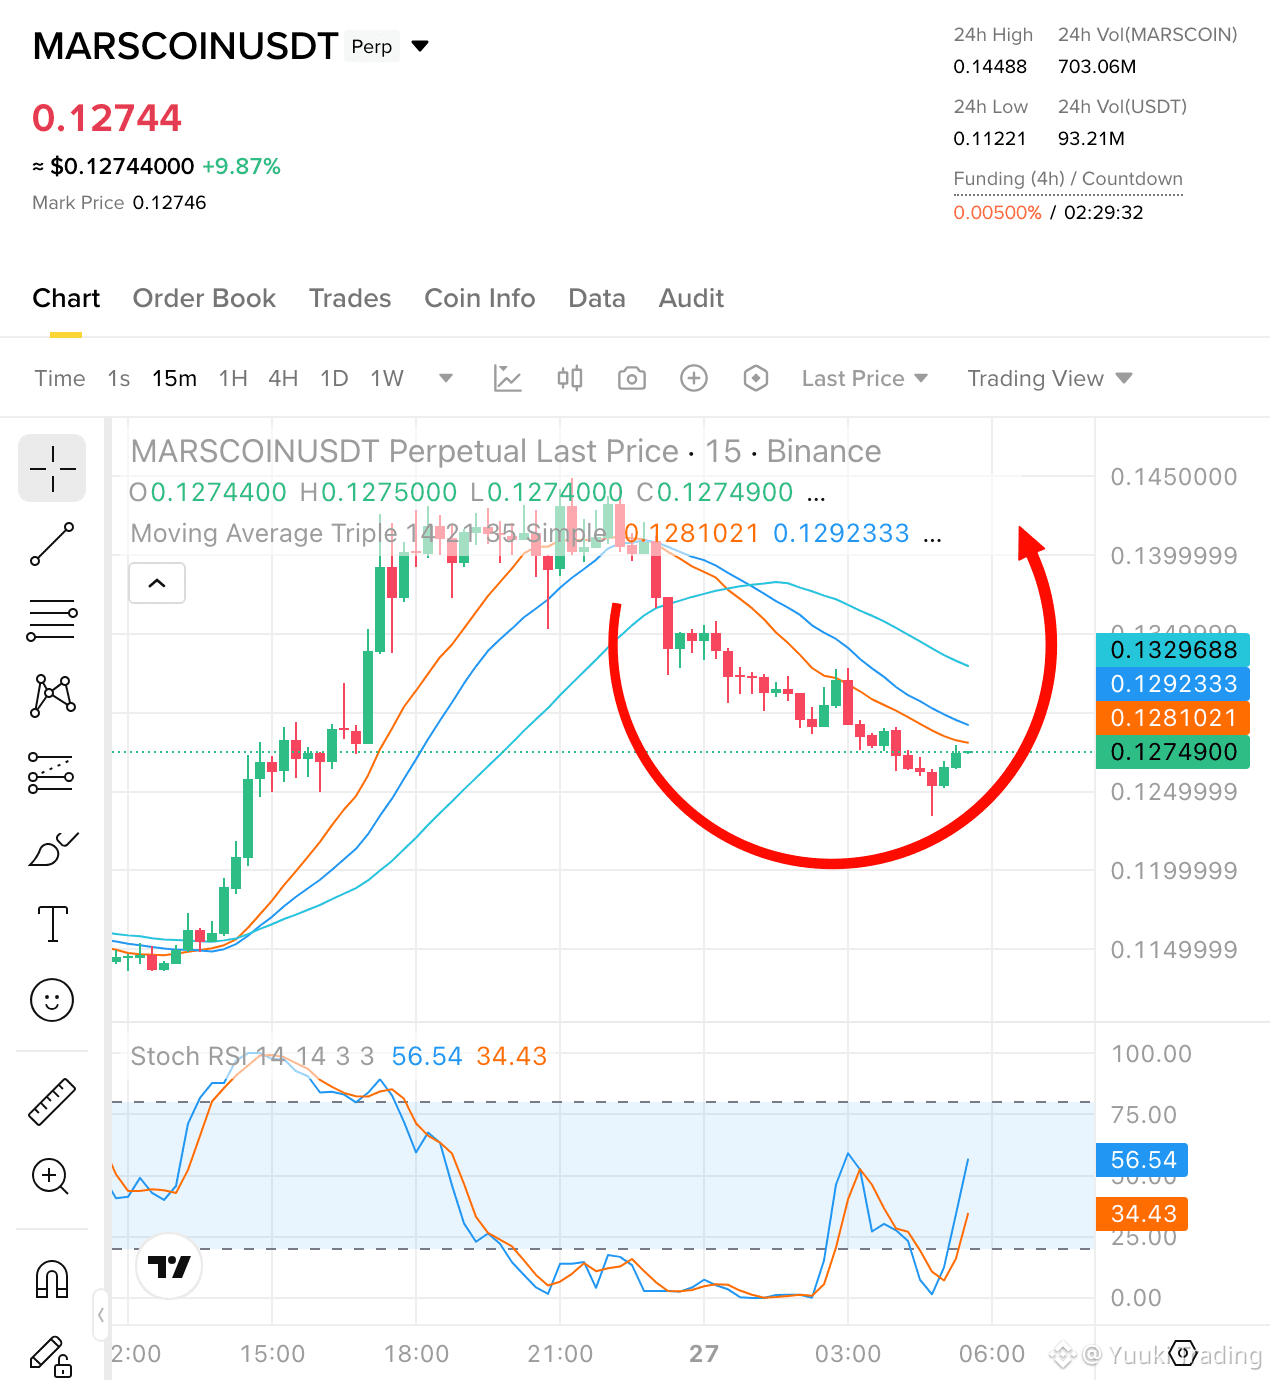
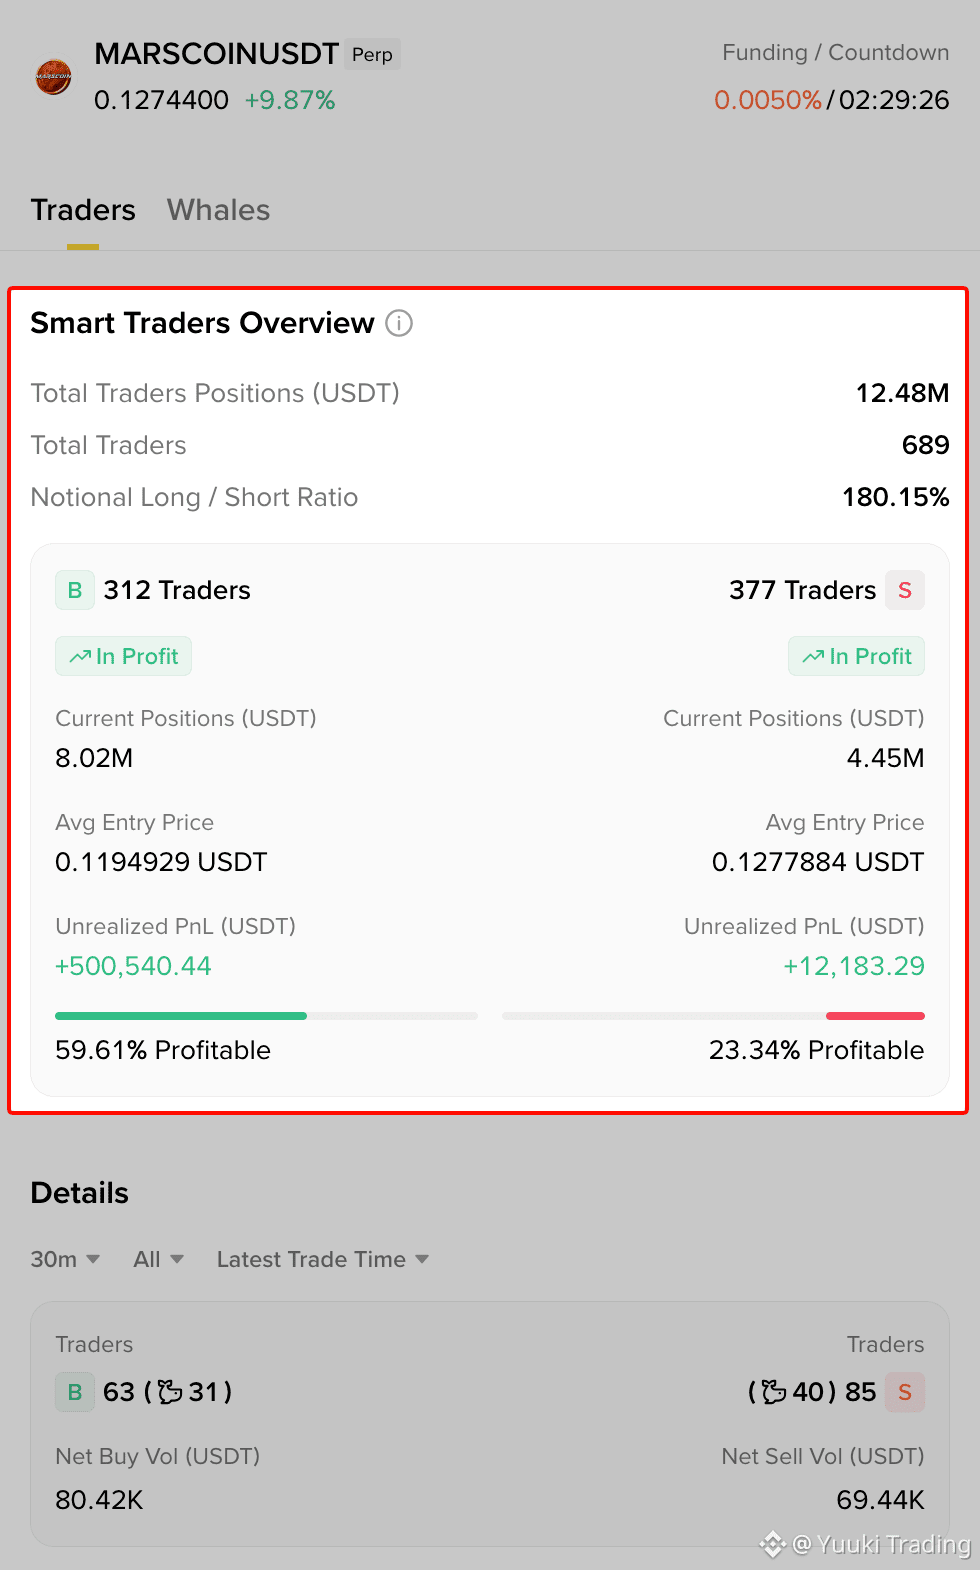
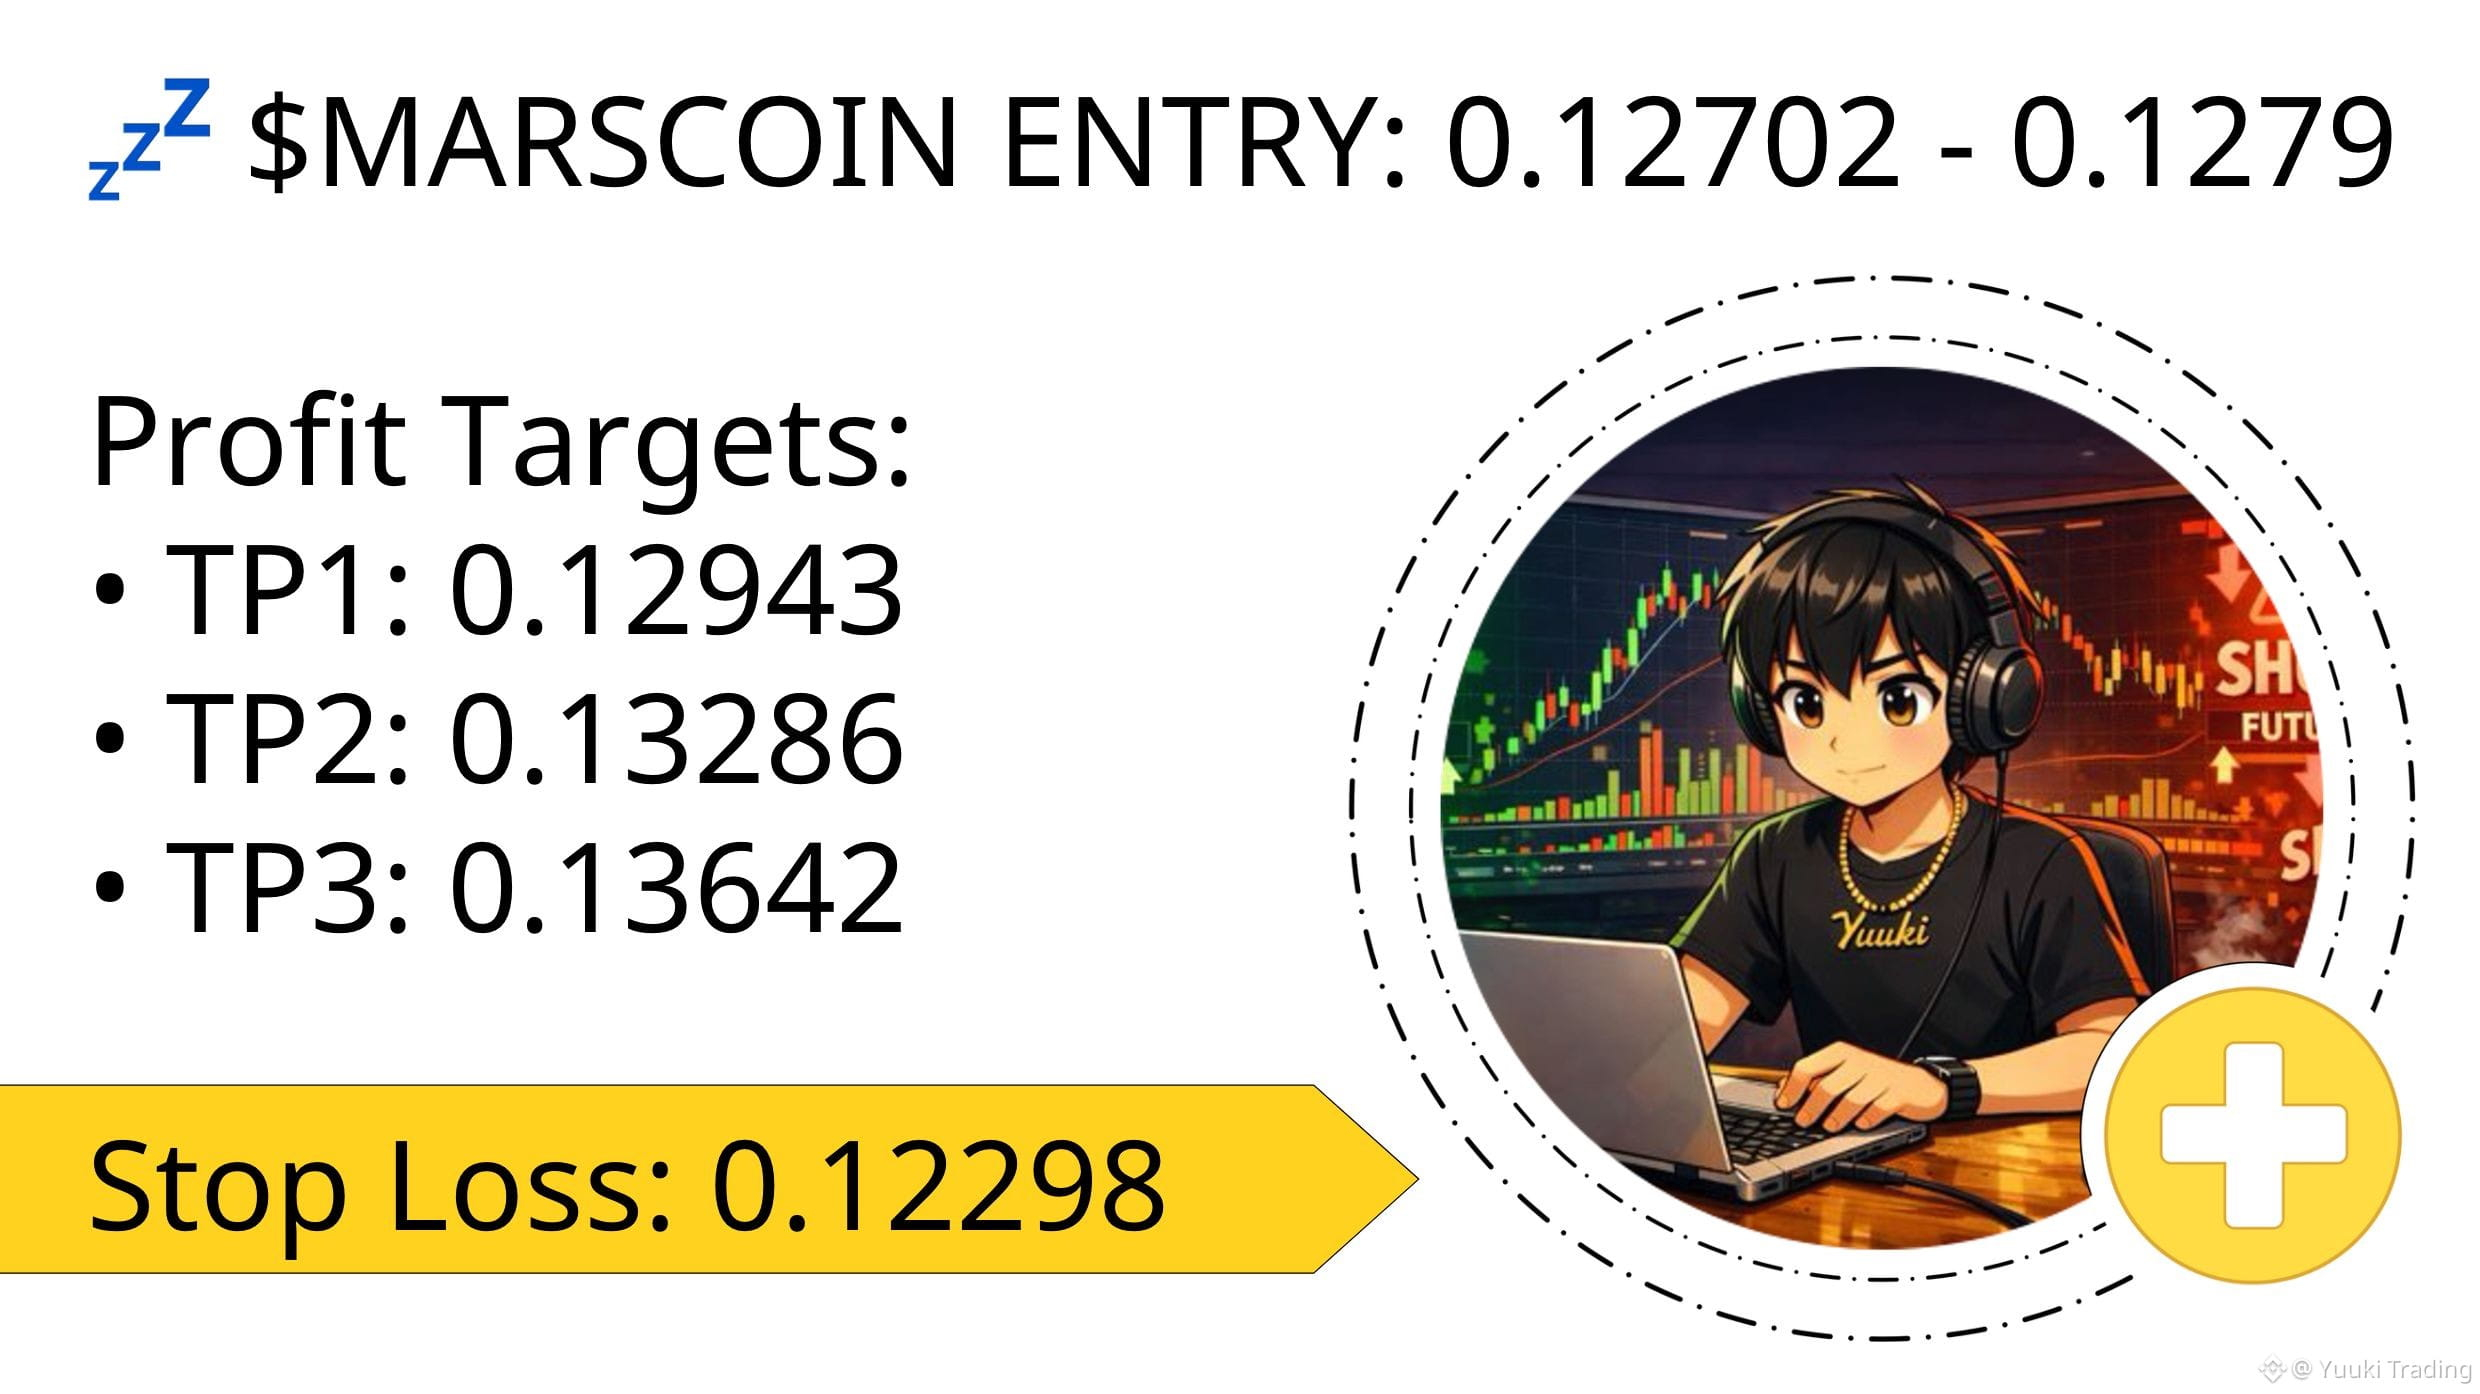
$MARSCOIN demand reaction!
Price bounced from the recent low after a sharp support test, printing two green 15m candles into the rebound. Aggressive flow has leaned back to buyers, with the 15m taker ratio at 1.56 and CVD positive, long now 👇
$MARSCOIN demand reaction!
Price bounced from the recent low after a sharp support test, printing two green 15m candles into the rebound. Aggressive flow has leaned back to buyers, with the 15m taker ratio at 1.56 and CVD positive, long now 👇
Price bounced from the recent low after a sharp support test, printing two green 15m candles into the rebound. Aggressive flow has leaned back to buyers, with the 15m taker ratio at 1.56 and CVD positive, long now 👇
1
1
855
·
--
Haussier
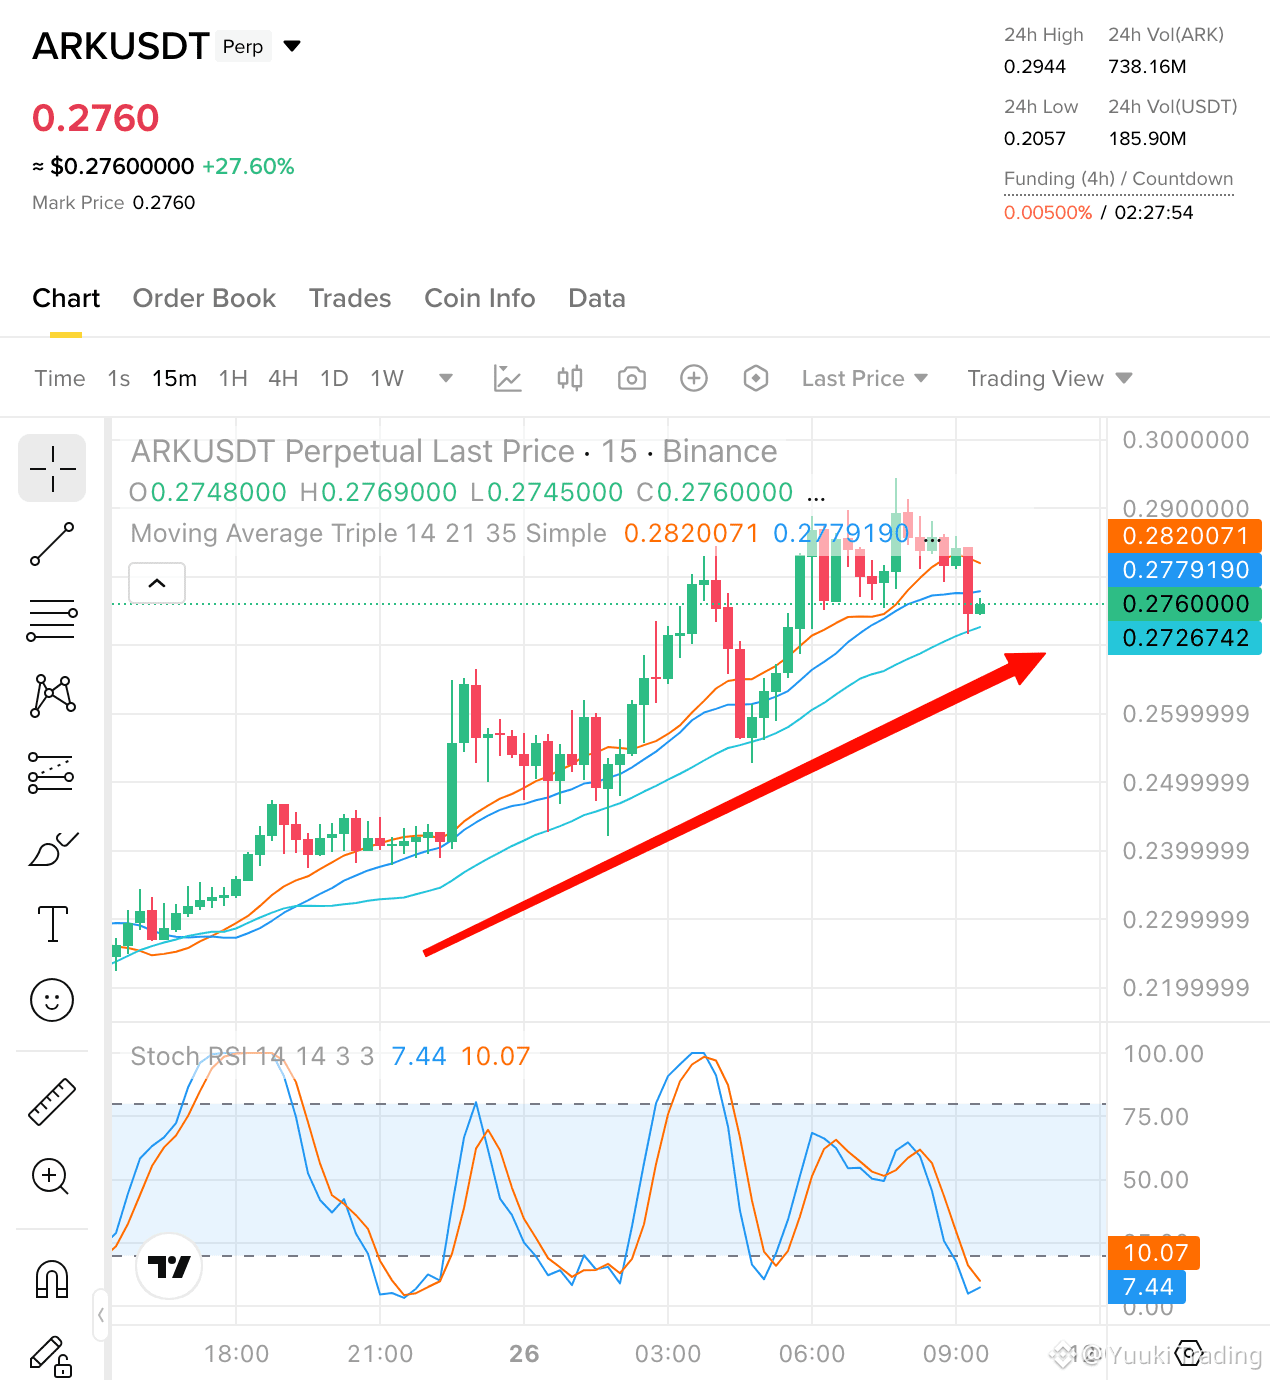
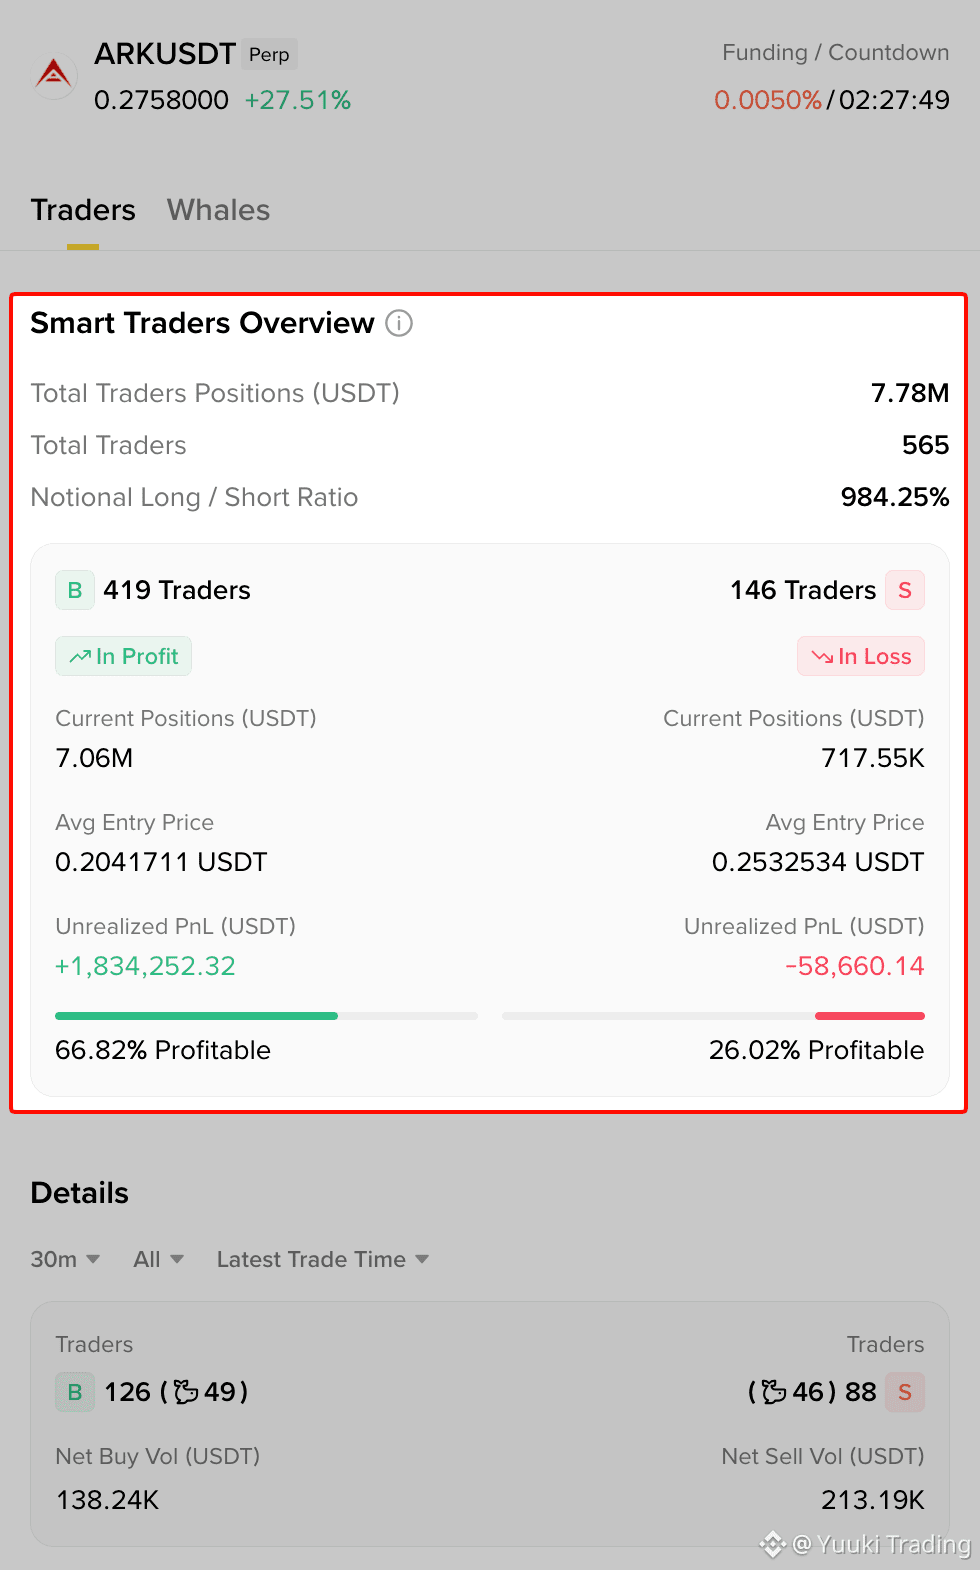
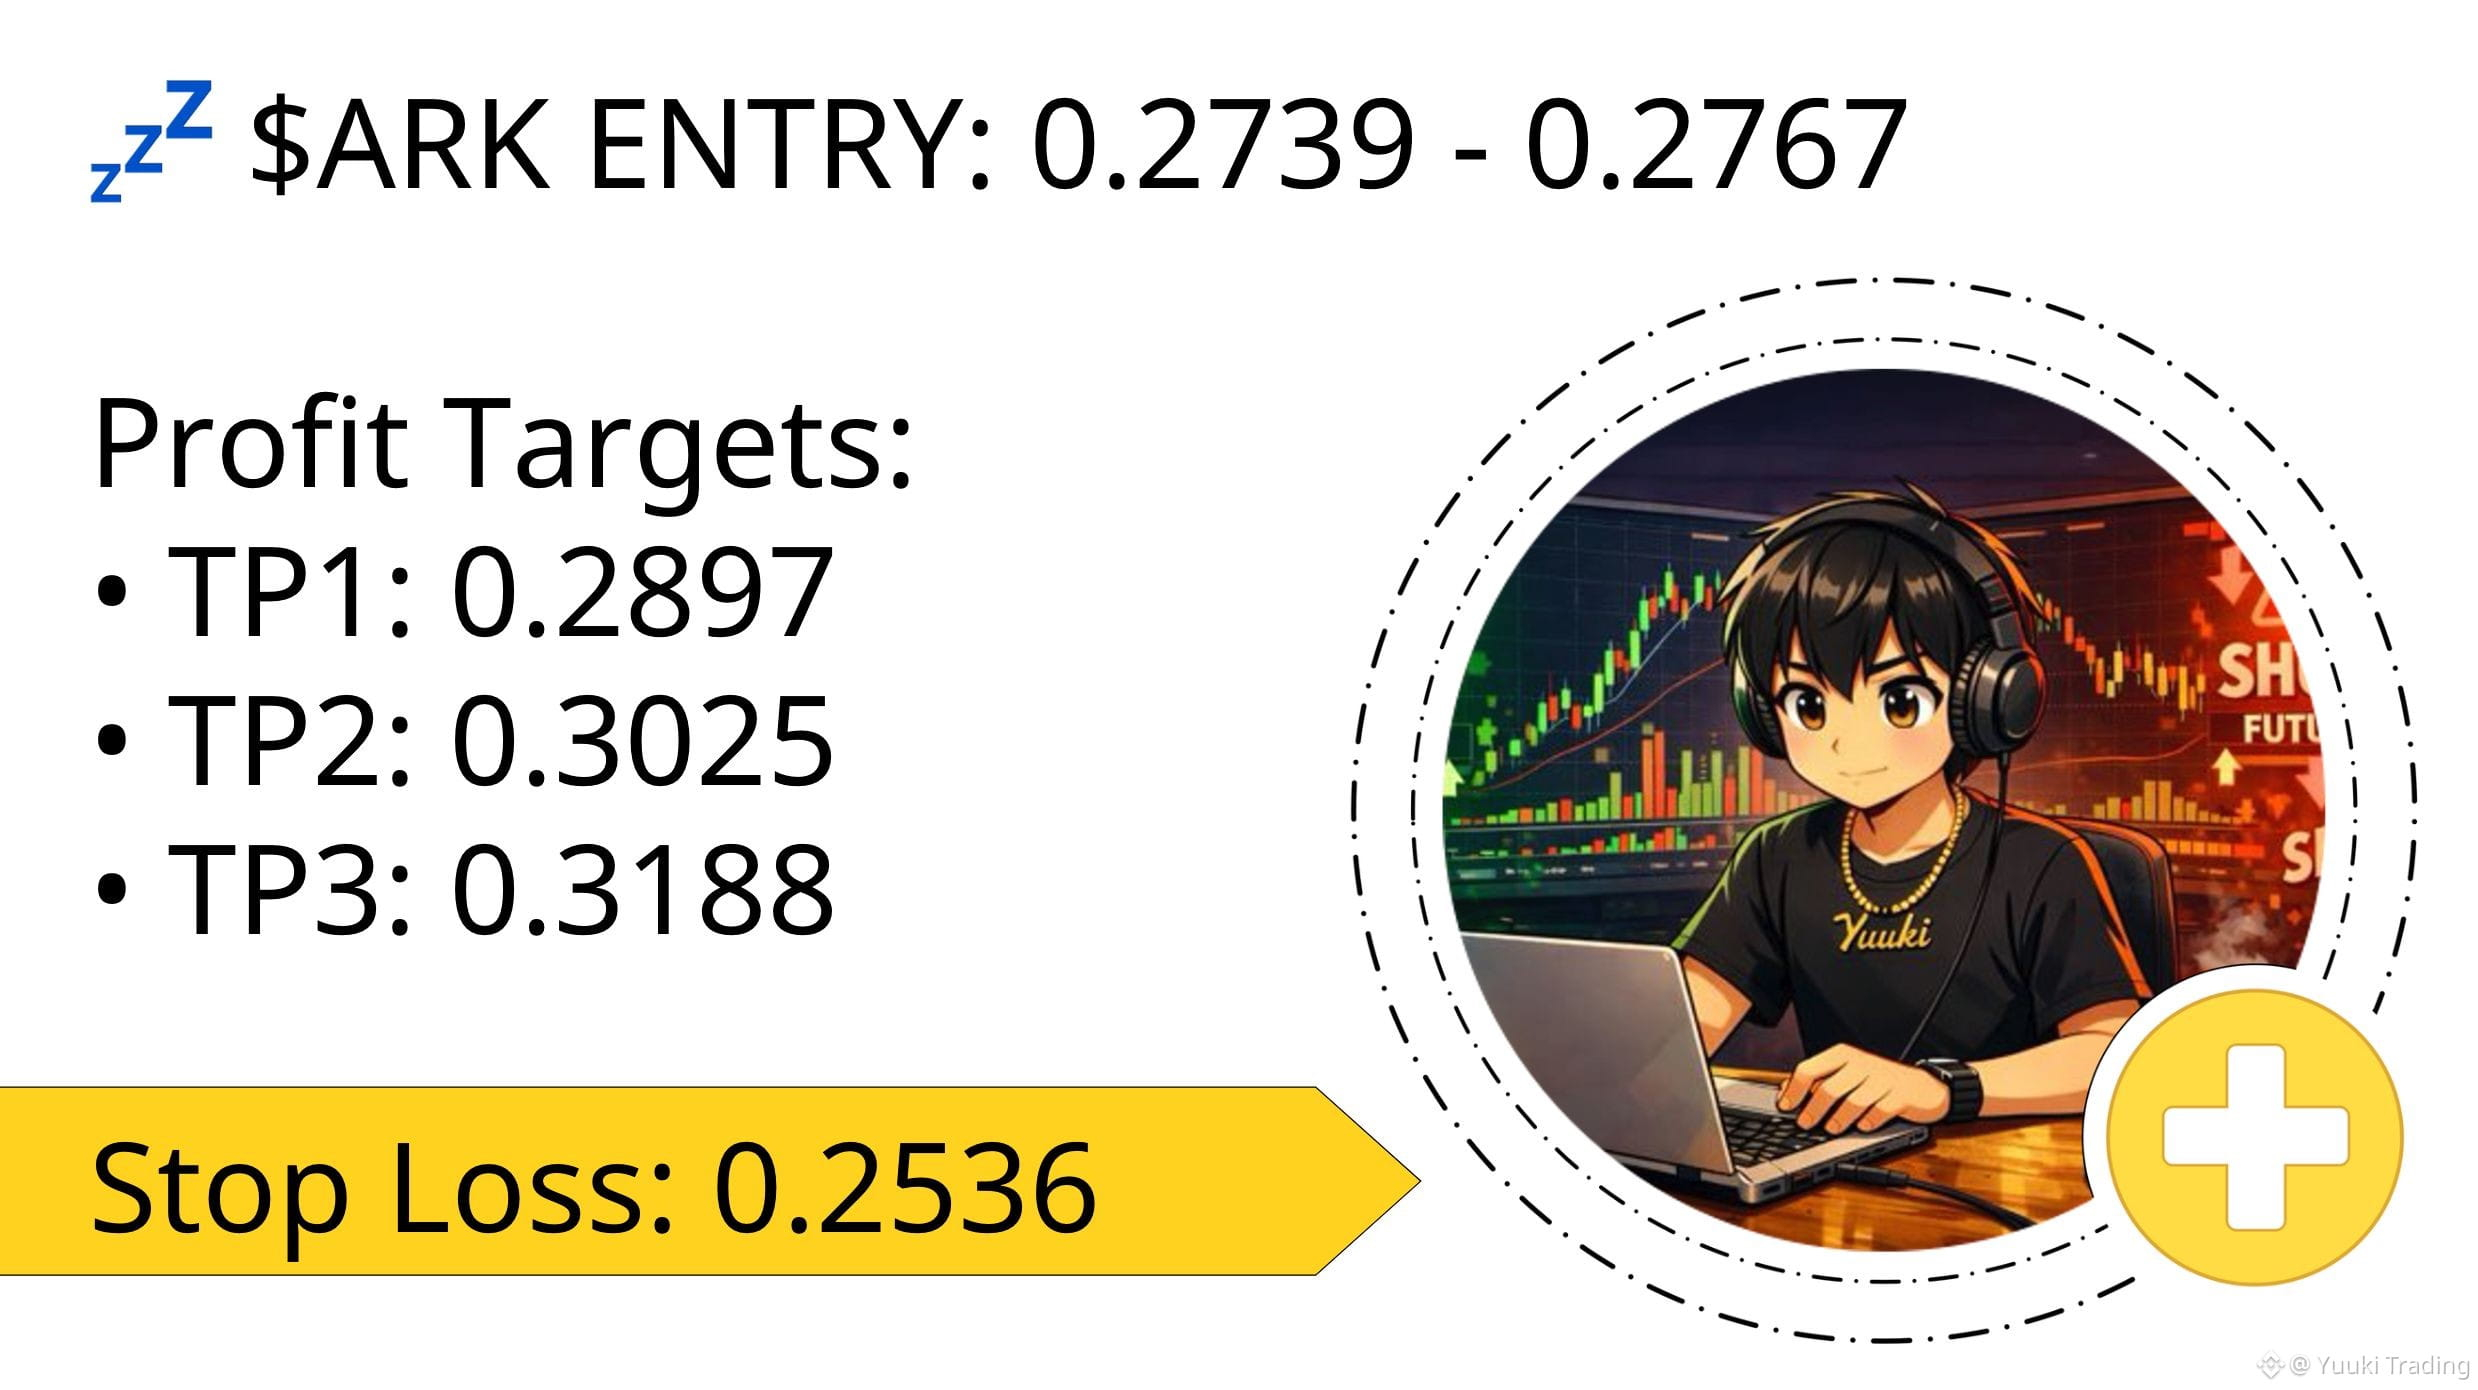
$ARK bullish!
The latest 15m selloff has pushed price back toward the lower end of its recent range, while the 1h and 4h trend still point higher. Aggregate CVD remains positive and 4h open interest is up 8.27%, long now 👇
$ARK bullish!
The latest 15m selloff has pushed price back toward the lower end of its recent range, while the 1h and 4h trend still point higher. Aggregate CVD remains positive and 4h open interest is up 8.27%, long now 👇
The latest 15m selloff has pushed price back toward the lower end of its recent range, while the 1h and 4h trend still point higher. Aggregate CVD remains positive and 4h open interest is up 8.27%, long now 👇
2
736
·
--
Haussier
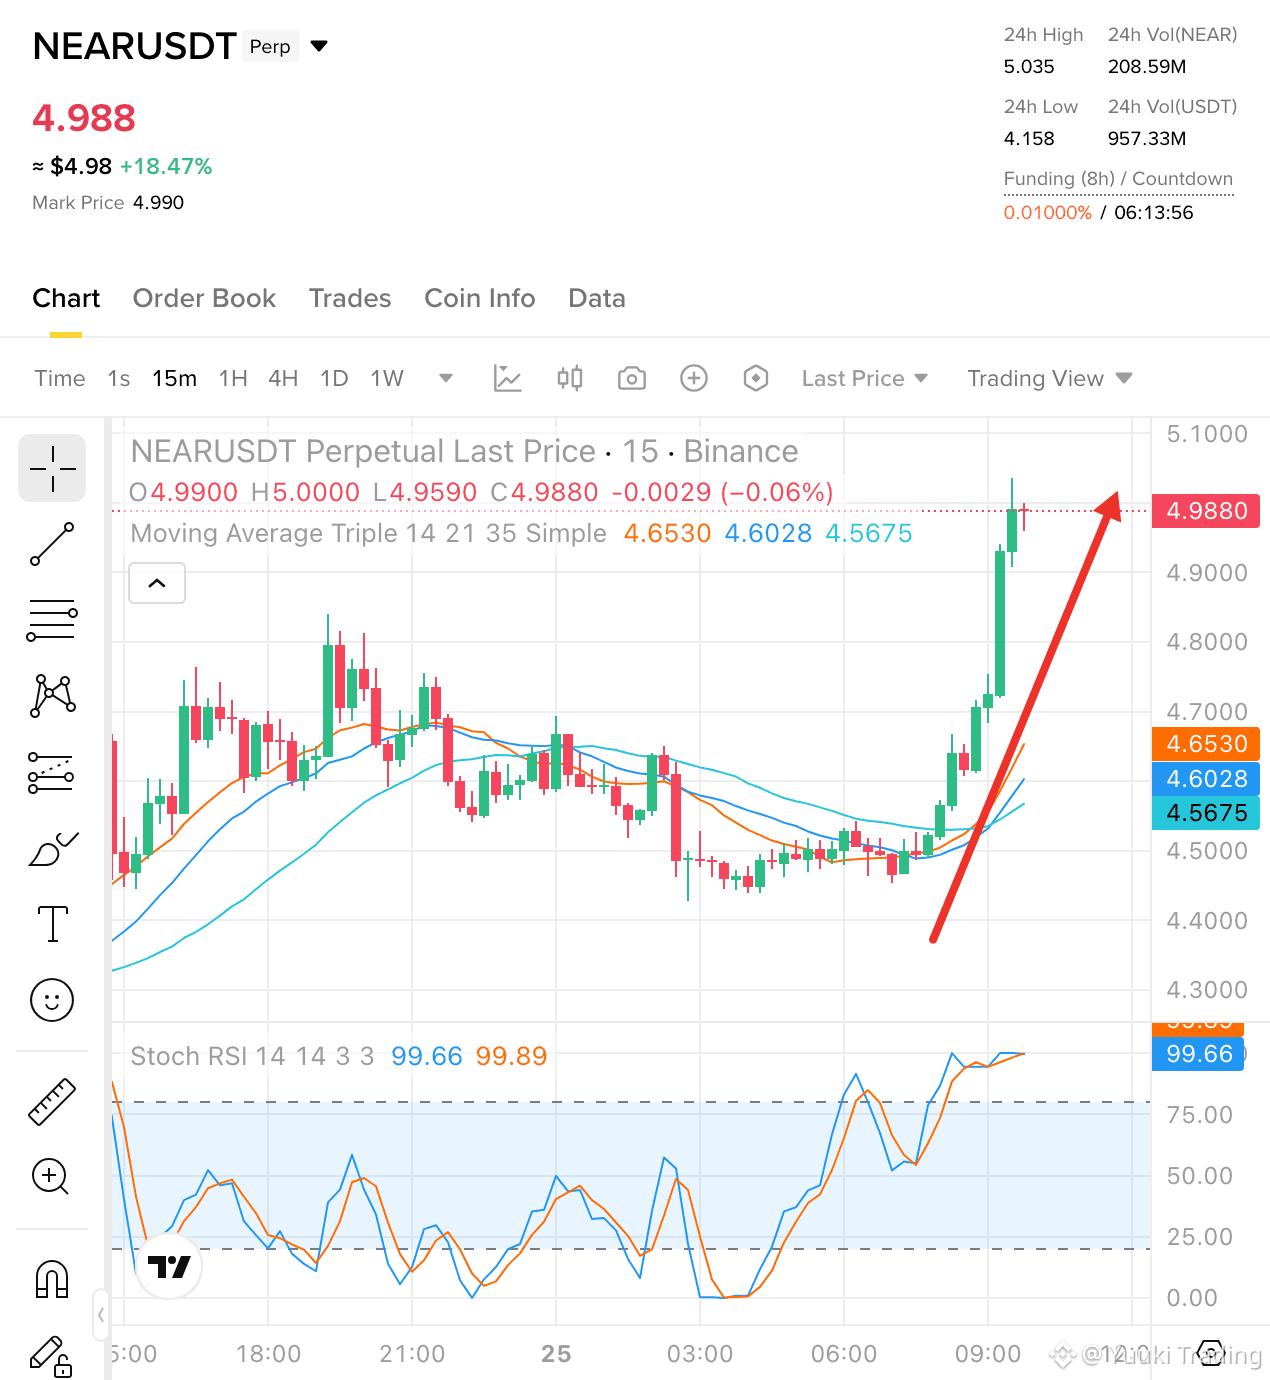
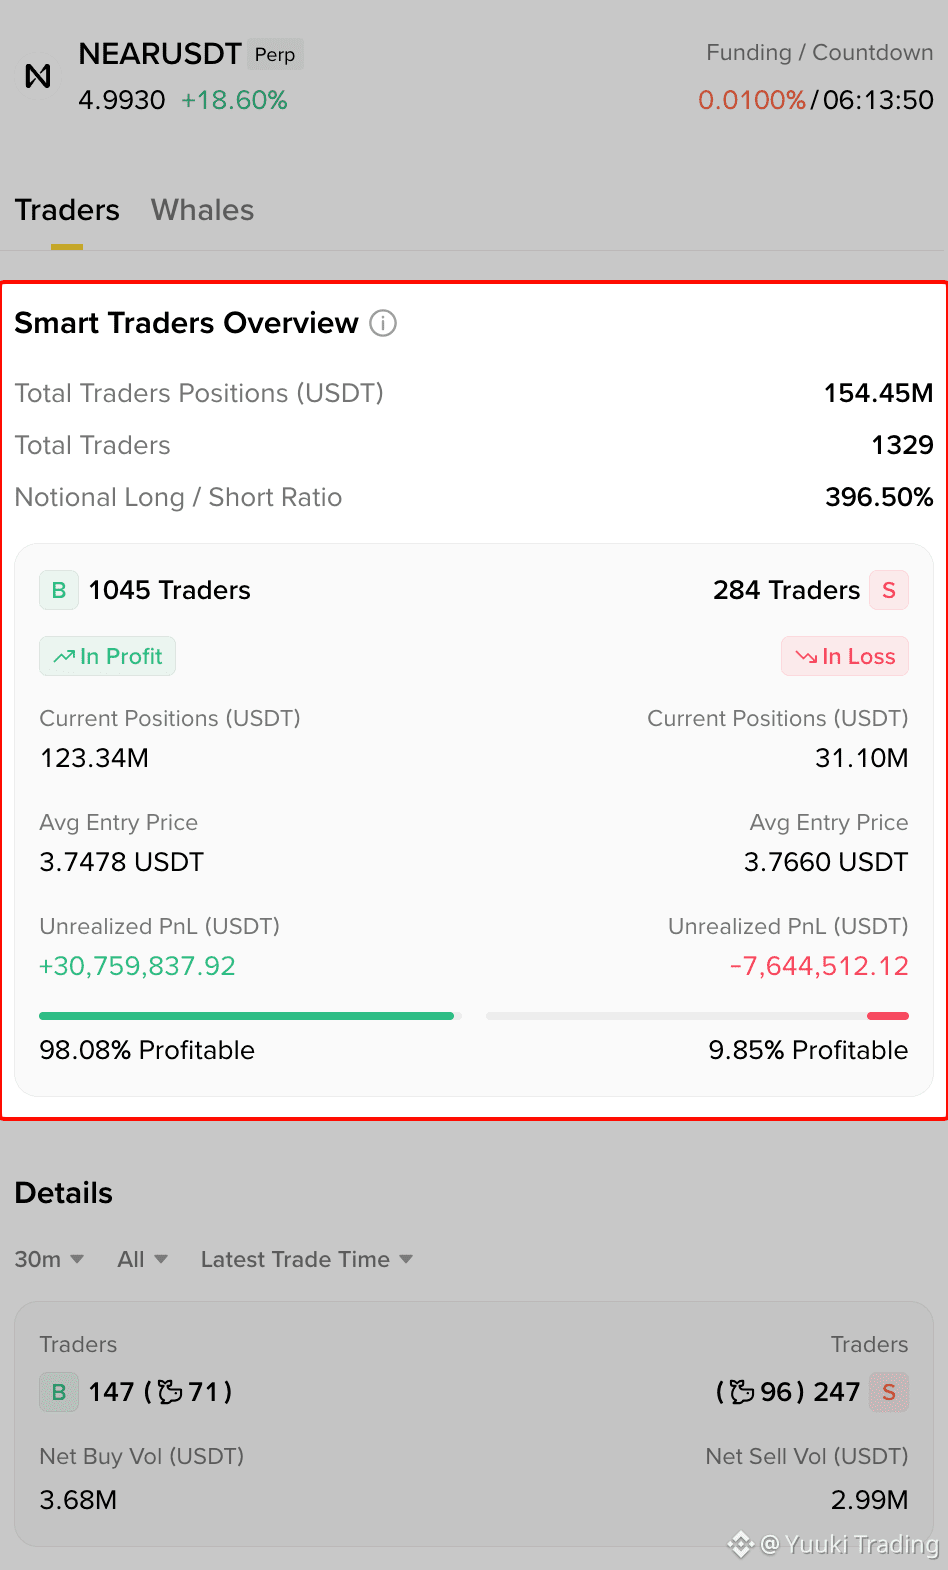
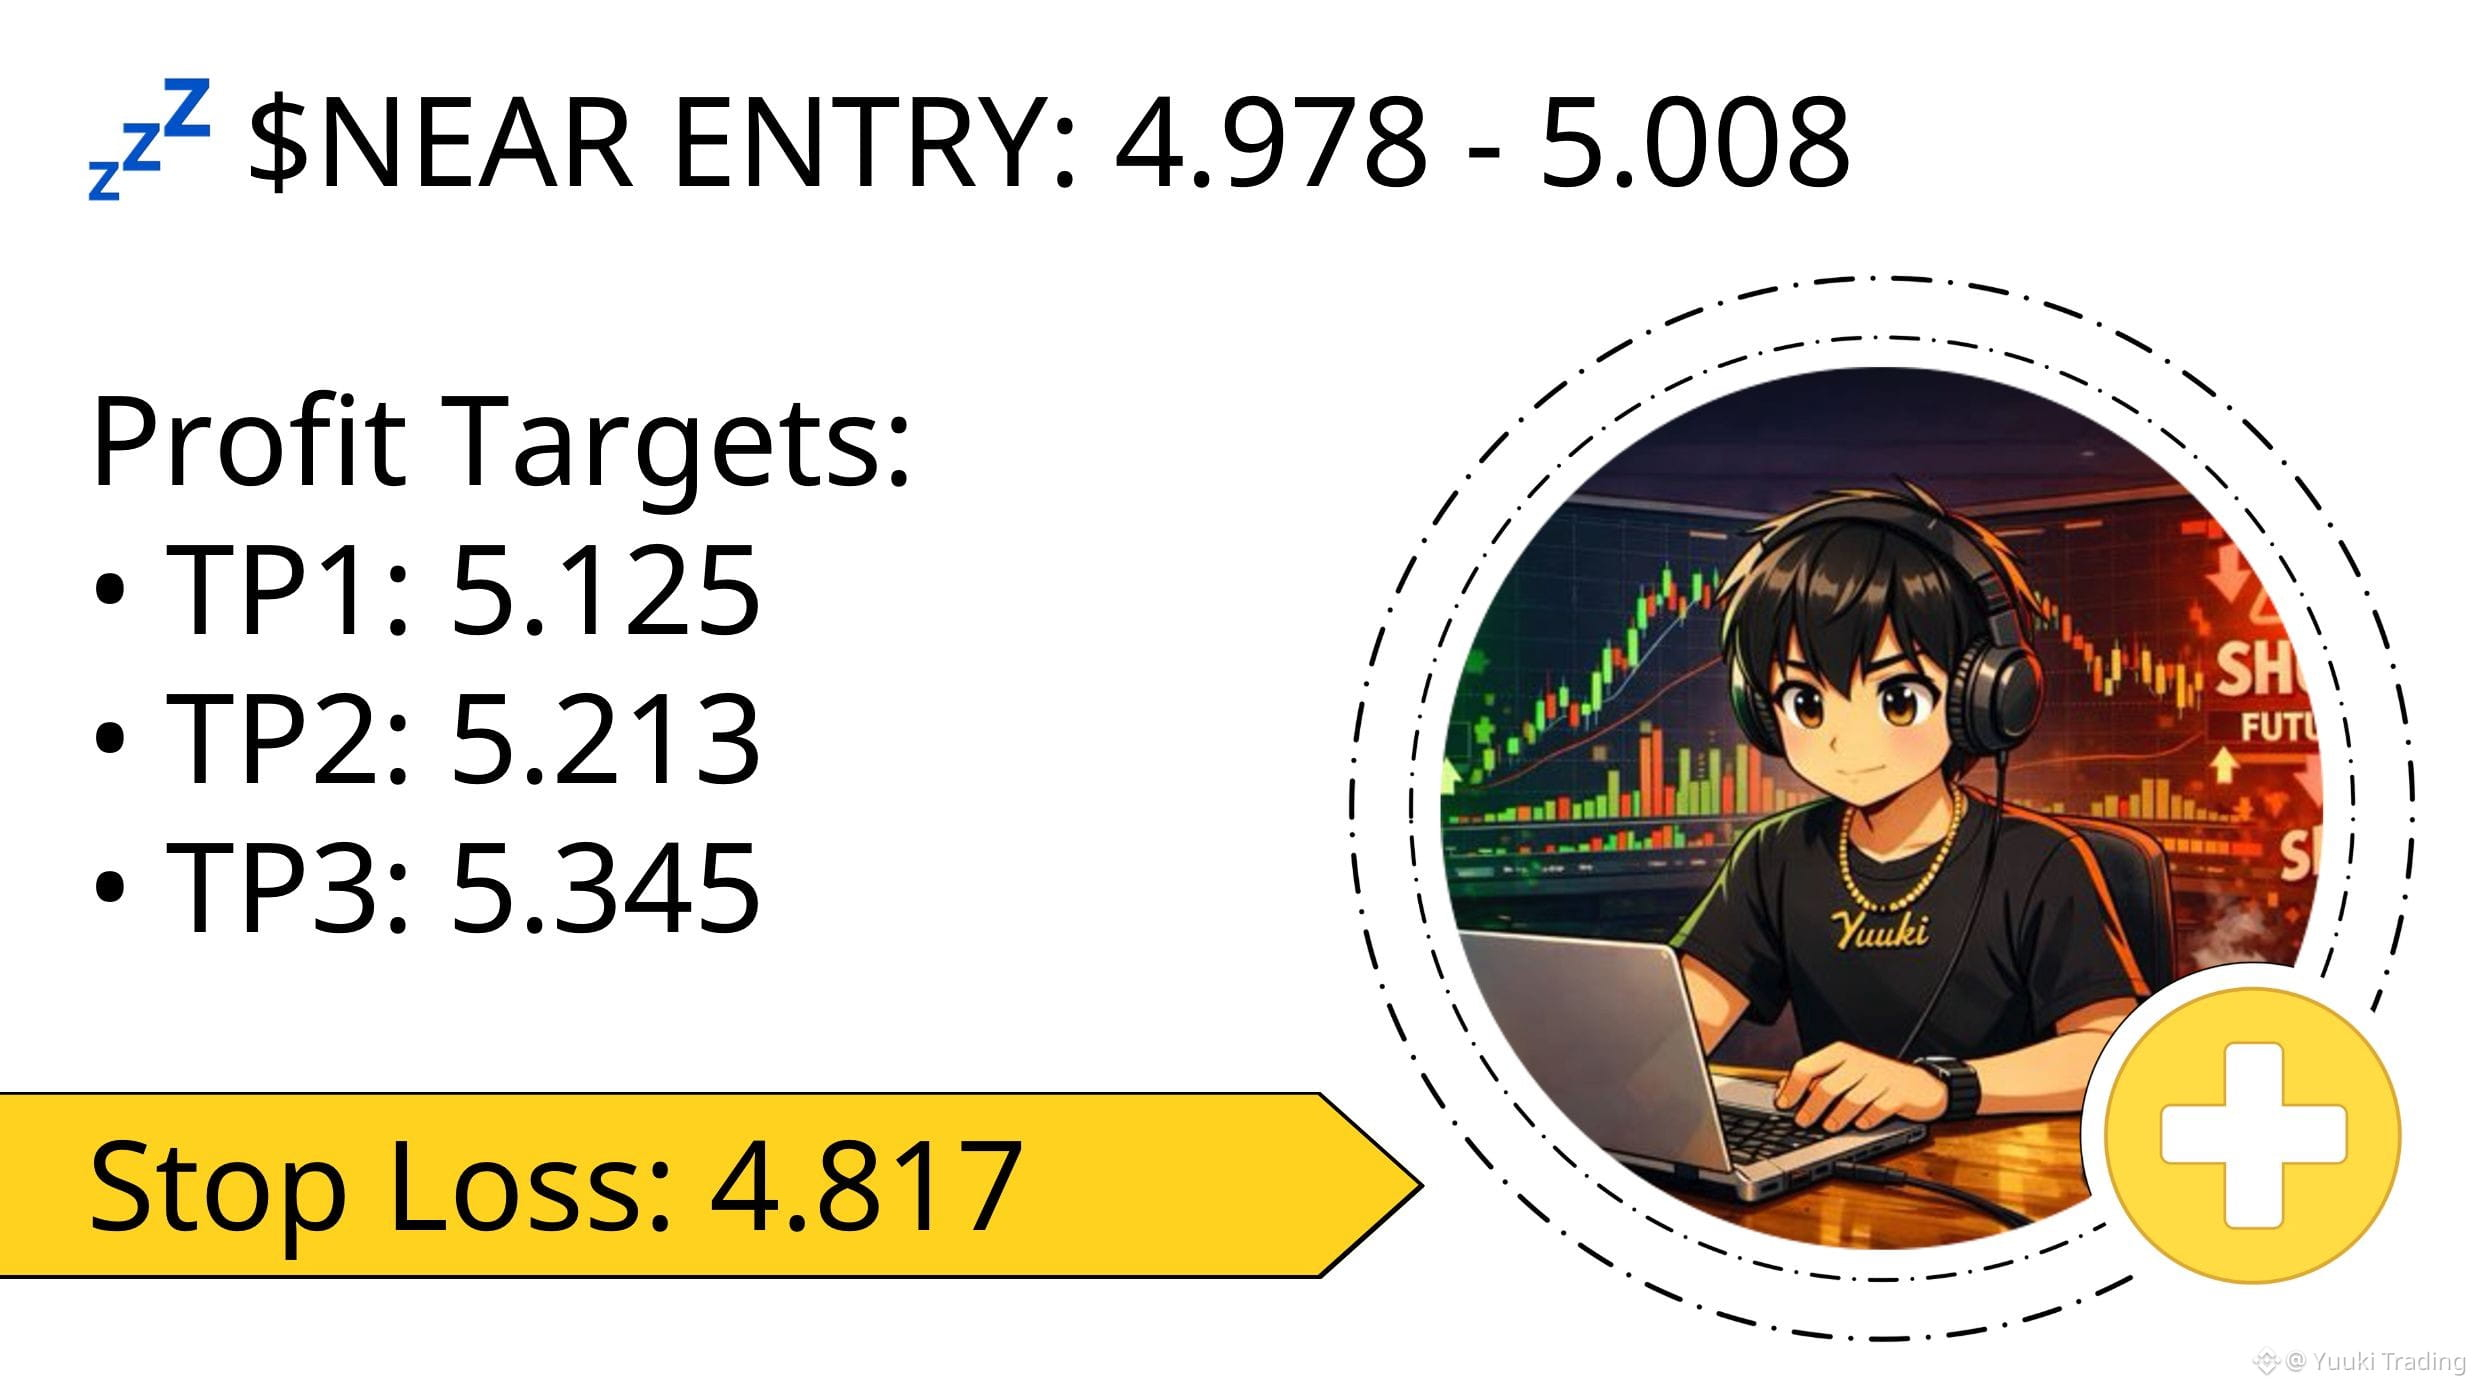
$NEAR structure break up!
Price pushed through the prior swing high on 2.60x 15m volume, extending a sharp run into the top of the recent range. Open interest is also expanding across the 1h and 4h moves, showing fresh participation behind the push, long now 👇
$NEAR structure break up!
Price pushed through the prior swing high on 2.60x 15m volume, extending a sharp run into the top of the recent range. Open interest is also expanding across the 1h and 4h moves, showing fresh participation behind the push, long now 👇
Price pushed through the prior swing high on 2.60x 15m volume, extending a sharp run into the top of the recent range. Open interest is also expanding across the 1h and 4h moves, showing fresh participation behind the push, long now 👇
2
6
4.5k
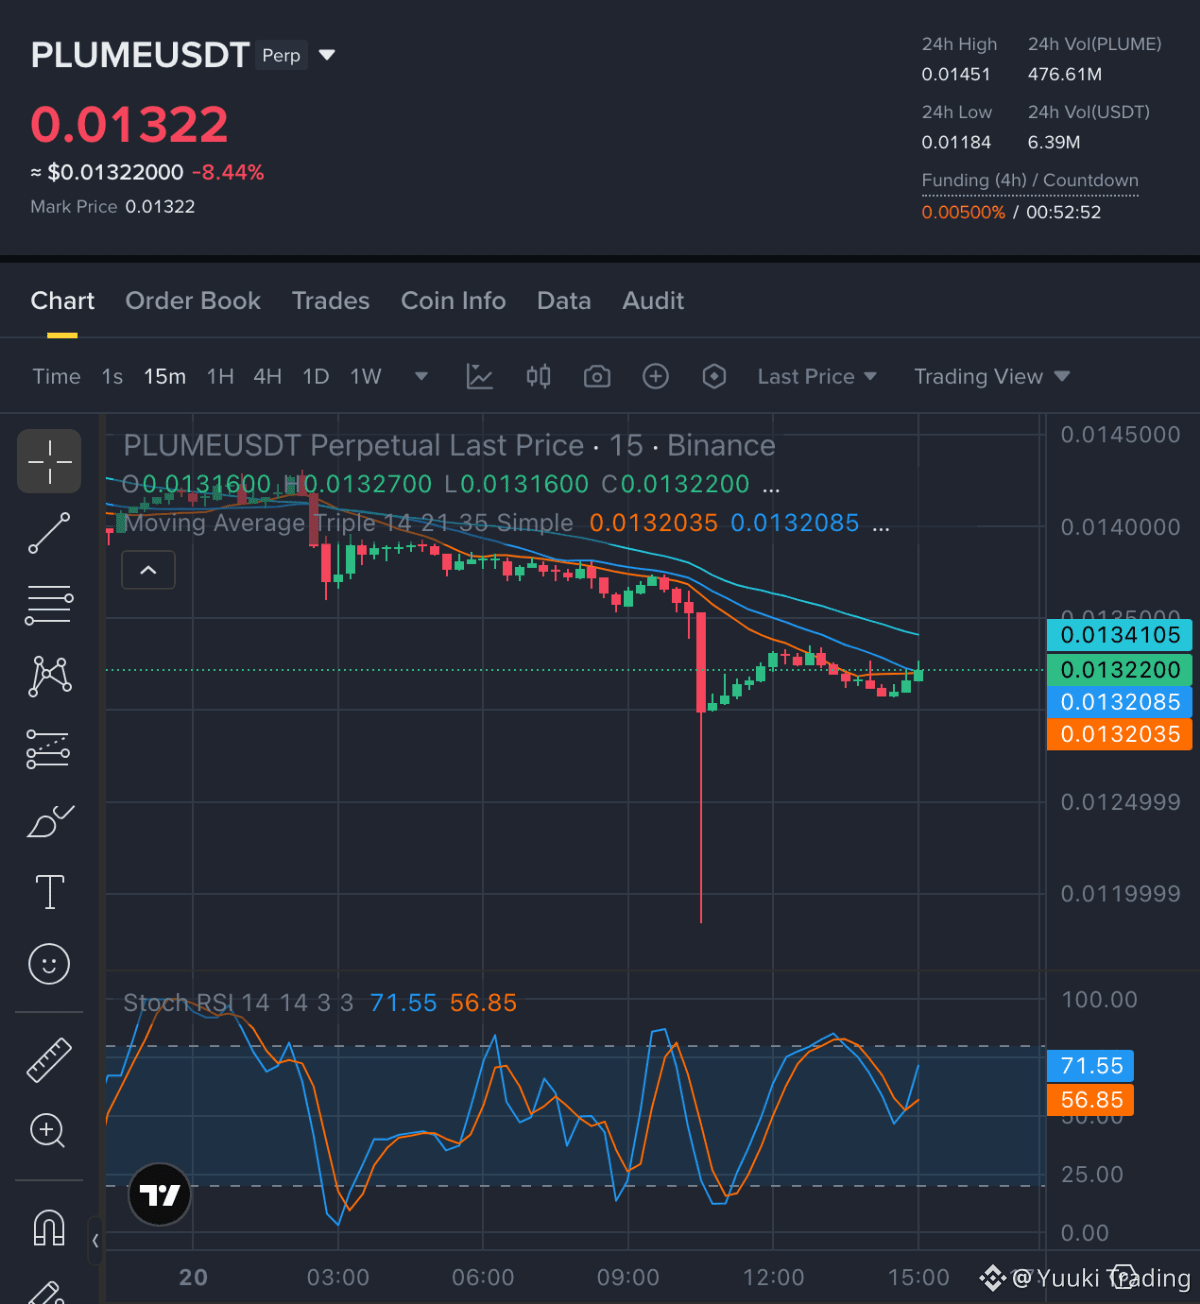
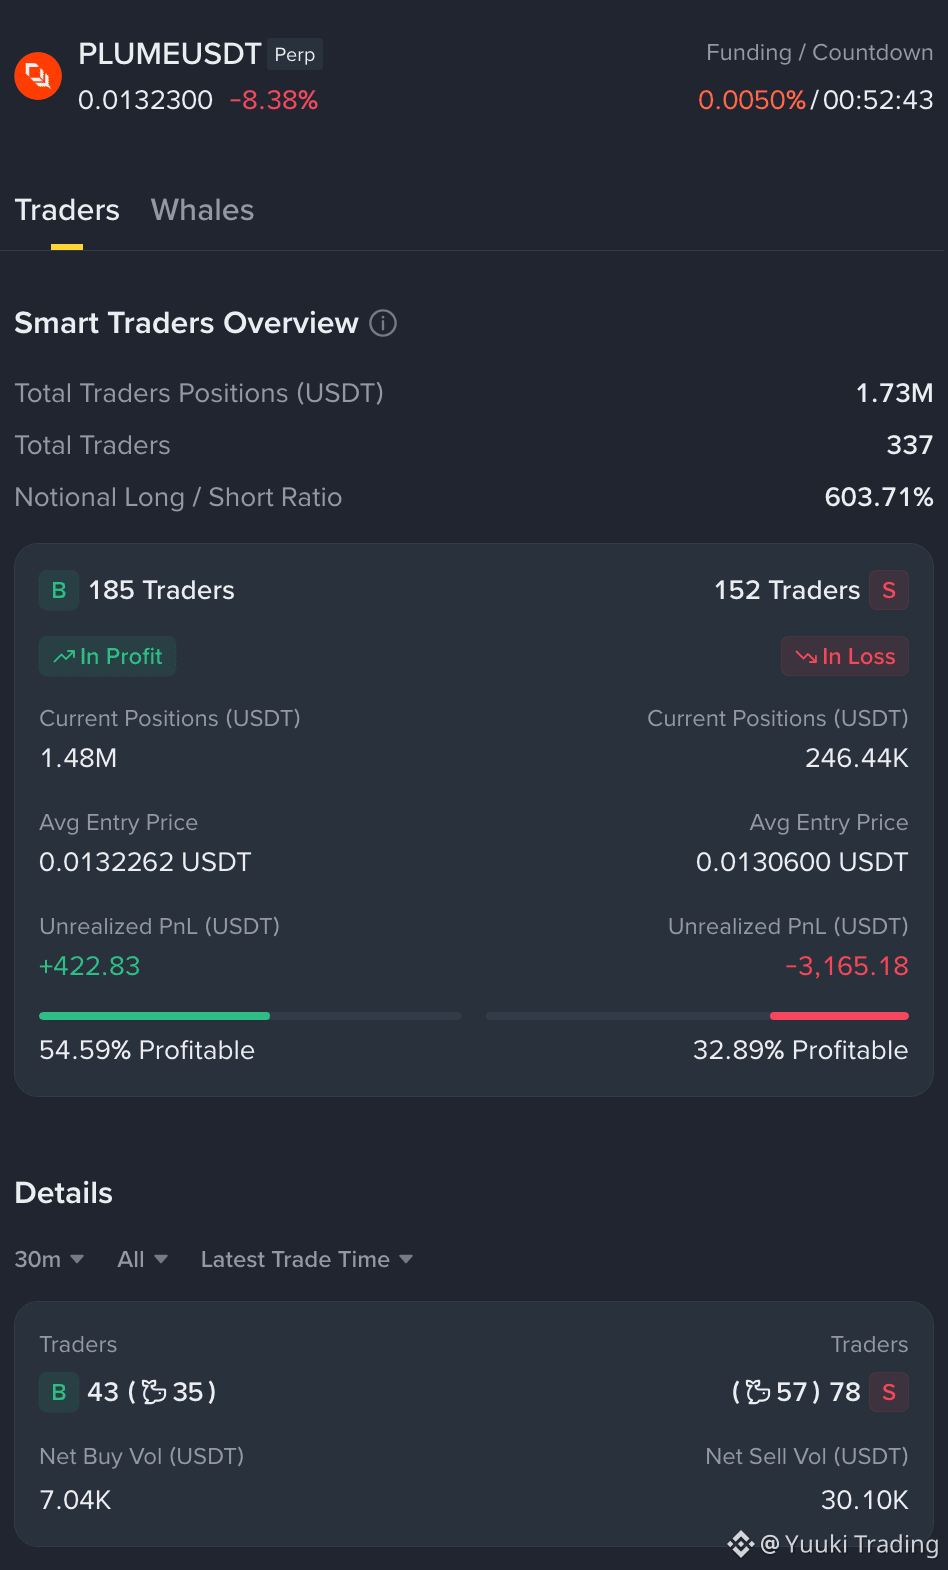
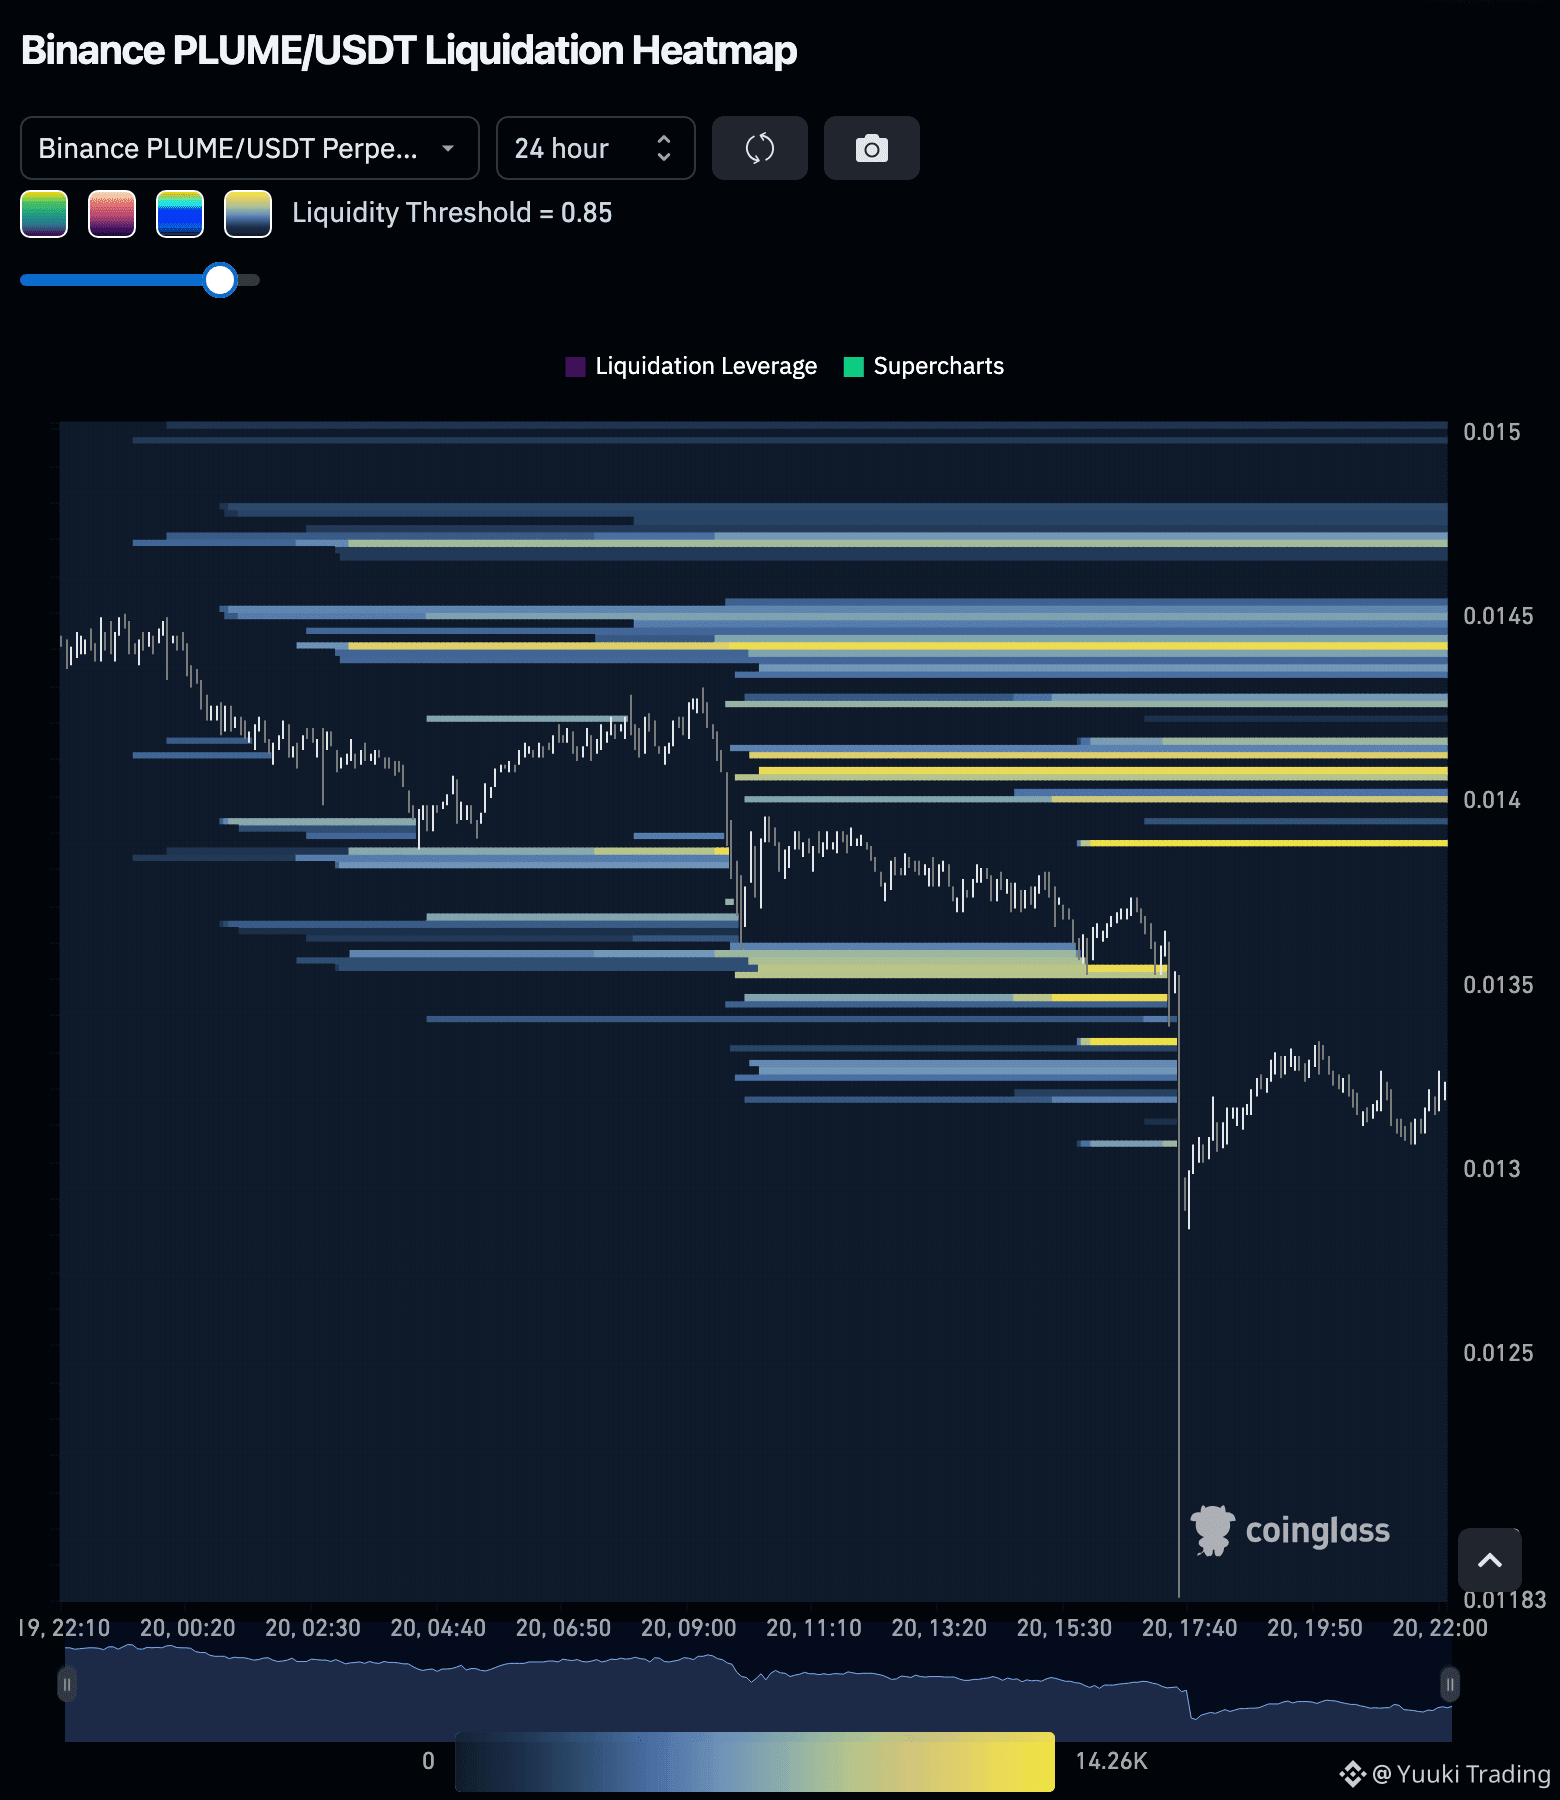
PLUME — The bears hold the advantage in this bearish structure, supported by weak taker demand and a high position ratio among sellers, although rising open interest presents a slight risk for downward momentum.
PLUME — SHORT NOW
Entry Zone: 0.0132 — 0.01324
• TP1: 0.01312
• TP2: 0.01303
• TP3: 0.01292
Stop Loss: 0.01337
The market exhibits a bearish structure, evidenced by an aggregate-trade delta of -20.68% and a taker buy/sell ratio of 0.6628, indicating sellers dominate. While open interest has increased slightly by 0.15%, suggesting some participation, the overall price momentum remains weak at +0.46%, reinforcing a downside thesis.
Disclaimer: This is not financial advice. Always do your own research and take full responsibility for your trading decisions and assets (DYOR).
Trade $PLUME here:
{future}(PLUMEUSDT)
PLUME — The bears hold the advantage in this bearish structure, supported by weak taker demand and a high position ratio among sellers, although rising open interest presents a slight risk for downward momentum.
PLUME — SHORT NOW
Entry Zone: 0.0132 — 0.01324
• TP1: 0.01312
• TP2: 0.01303
• TP3: 0.01292
Stop Loss: 0.01337
The market exhibits a bearish structure, evidenced by an aggregate-trade delta of -20.68% and a taker buy/sell ratio of 0.6628, indicating sellers dominate. While open interest has increased slightly by 0.15%, suggesting some participation, the overall price momentum remains weak at +0.46%, reinforcing a downside thesis.
Disclaimer: This is not financial advice. Always do your own research and take full responsibility for your trading decisions and assets (DYOR).
Trade $PLUME here:
PLUME — SHORT NOW
Entry Zone: 0.0132 — 0.01324
• TP1: 0.01312
• TP2: 0.01303
• TP3: 0.01292
Stop Loss: 0.01337
The market exhibits a bearish structure, evidenced by an aggregate-trade delta of -20.68% and a taker buy/sell ratio of 0.6628, indicating sellers dominate. While open interest has increased slightly by 0.15%, suggesting some participation, the overall price momentum remains weak at +0.46%, reinforcing a downside thesis.
Disclaimer: This is not financial advice. Always do your own research and take full responsibility for your trading decisions and assets (DYOR).
Trade $PLUME here:
3
227
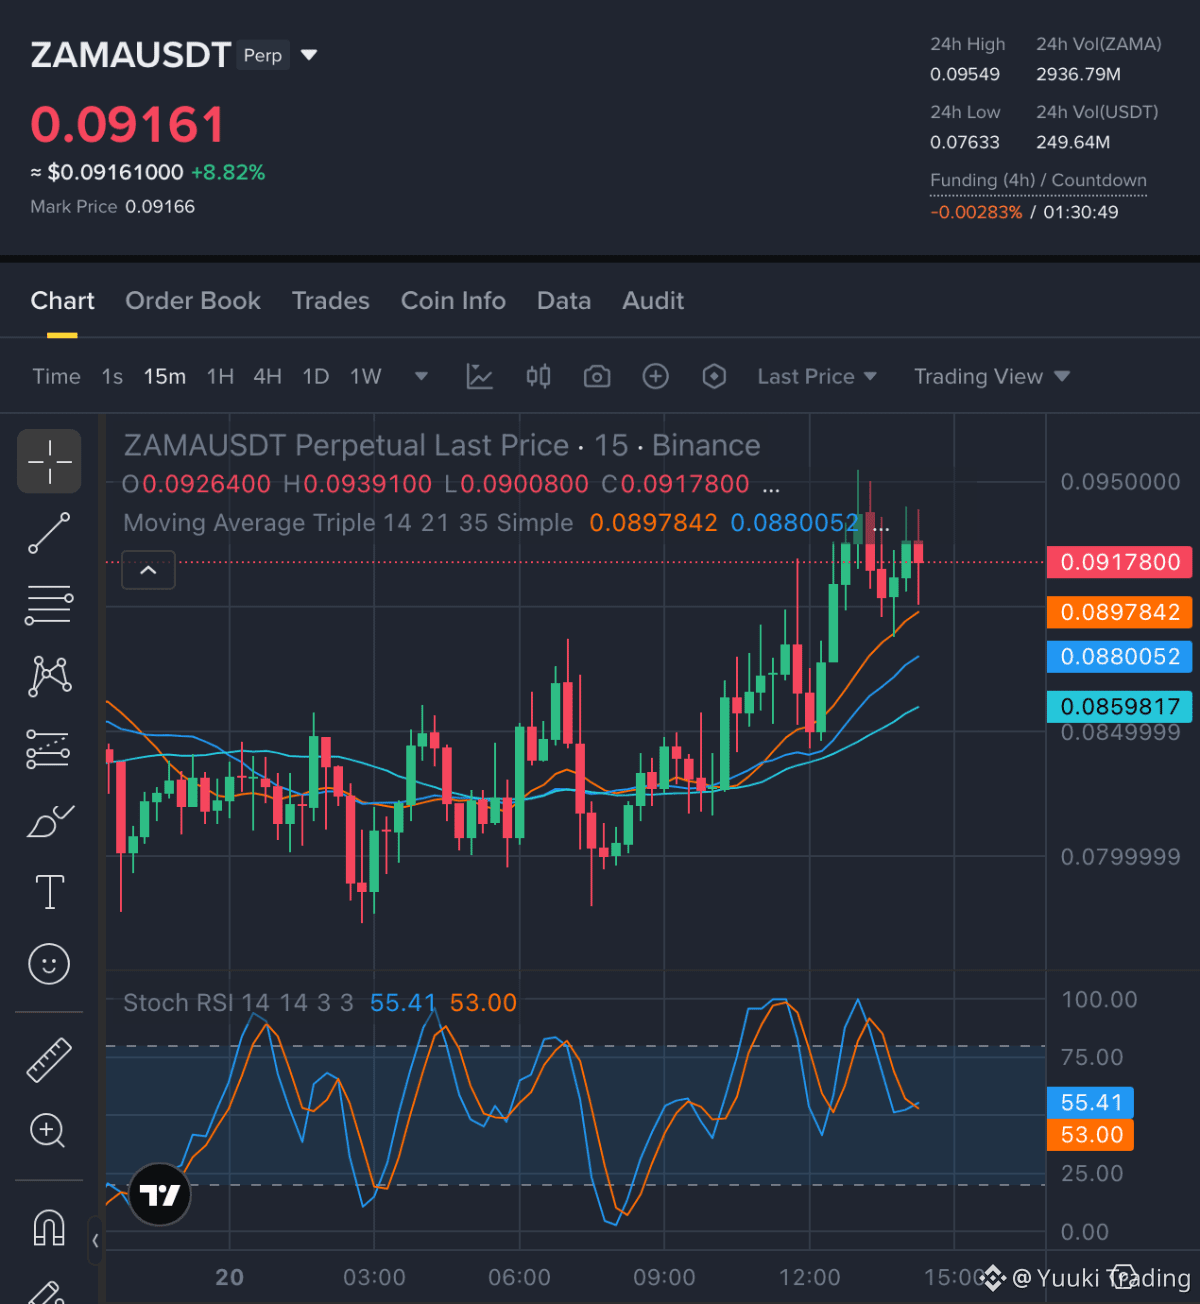
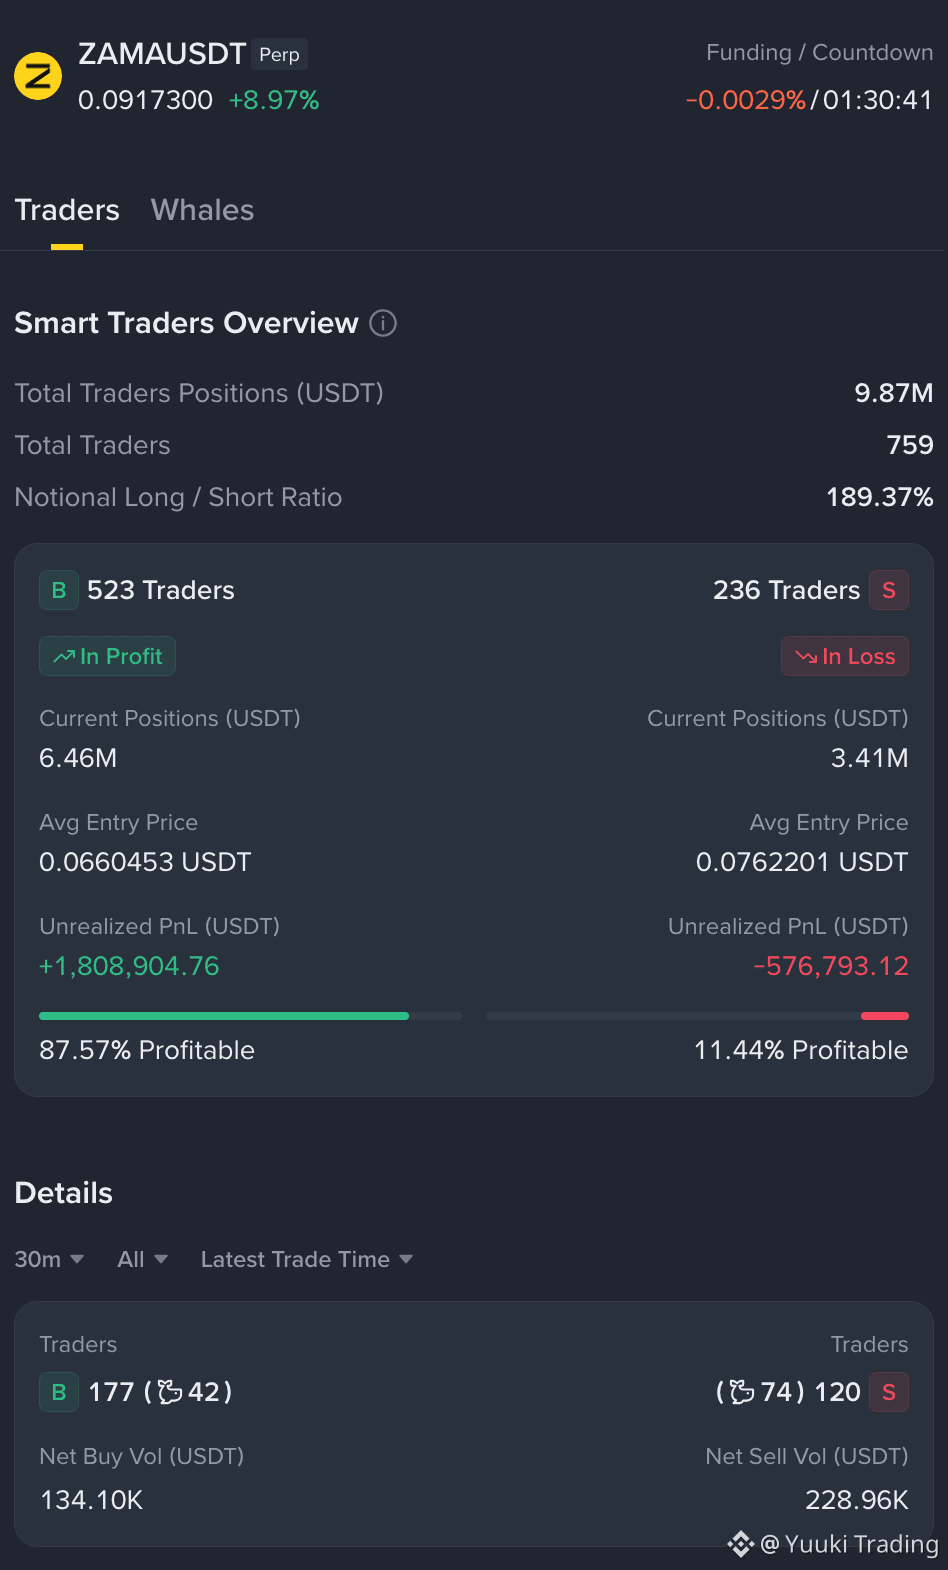
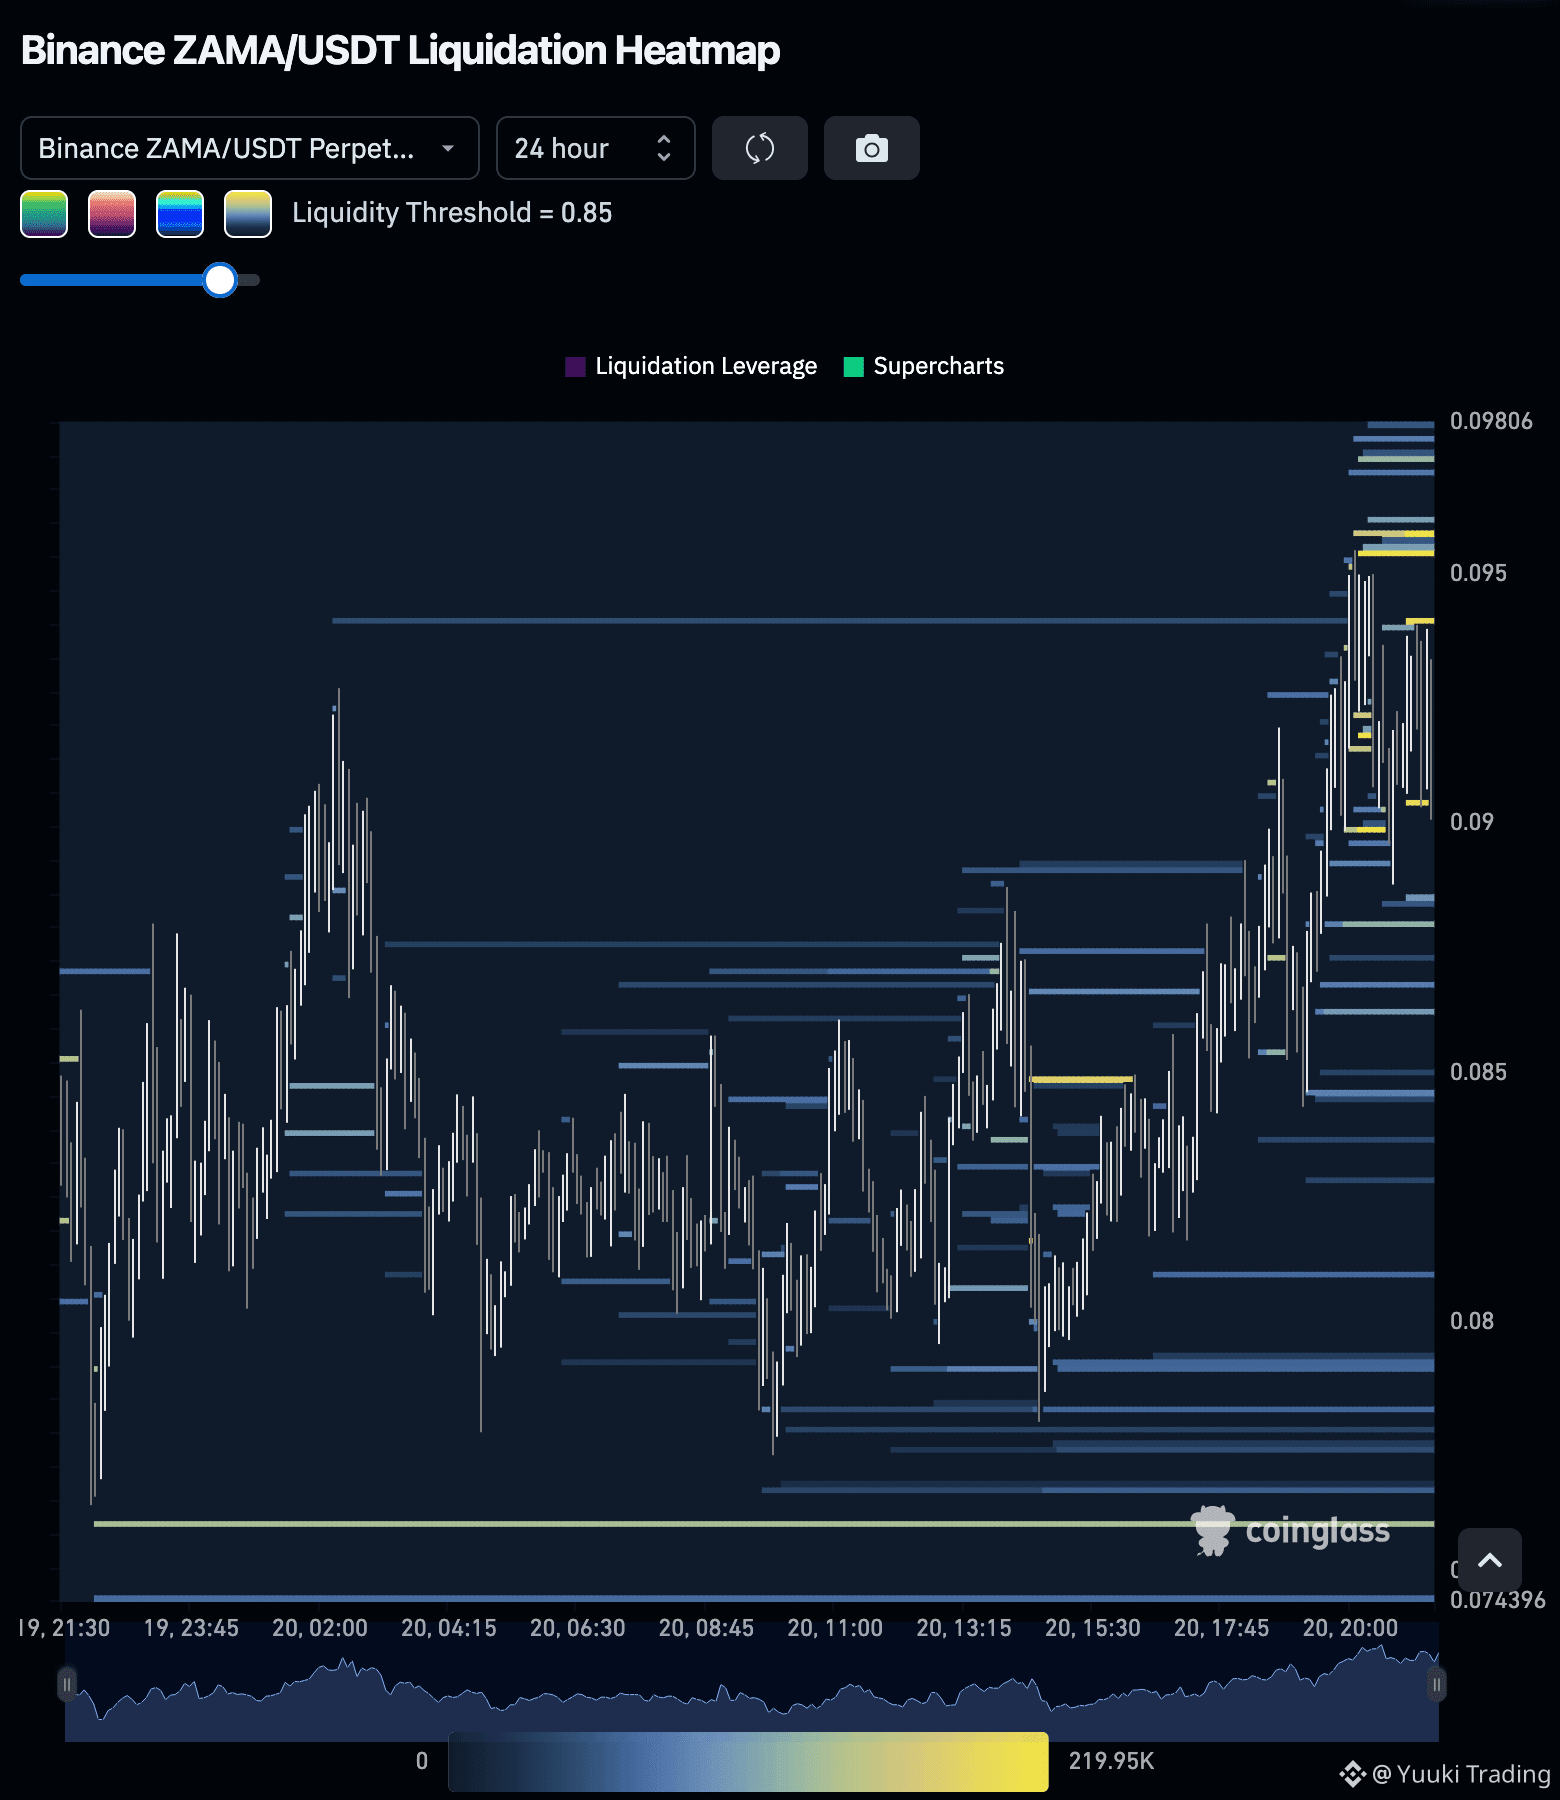
ZAMA — Buyers hold the advantage with a bullish structure supported by rising price momentum, though there’s slightly subdued participation indicated by the taker buy/sell ratio.
ZAMA — LONG NOW
Entry Zone: 0.09108 — 0.092
• TP1: 0.09839
• TP2: 0.10295
• TP3: 0.10979
Stop Loss: 0.08241
The current bullish structure is reinforced by a price momentum increase of 1.63% and a notable open-interest change of 1.16%, indicating a growing interest among buyers. However, the taker buy/sell ratio at 0.8826 suggests a slight imbalance in buying pressure, pointing to a need for stronger demand to fully capitalize on the upside.
Disclaimer: This is not financial advice. Always do your own research and take full responsibility for your trading decisions and assets (DYOR).
Trade $ZAMA here:
{future}(ZAMAUSDT)
ZAMA — Buyers hold the advantage with a bullish structure supported by rising price momentum, though there’s slightly subdued participation indicated by the taker buy/sell ratio.
ZAMA — LONG NOW
Entry Zone: 0.09108 — 0.092
• TP1: 0.09839
• TP2: 0.10295
• TP3: 0.10979
Stop Loss: 0.08241
The current bullish structure is reinforced by a price momentum increase of 1.63% and a notable open-interest change of 1.16%, indicating a growing interest among buyers. However, the taker buy/sell ratio at 0.8826 suggests a slight imbalance in buying pressure, pointing to a need for stronger demand to fully capitalize on the upside.
Disclaimer: This is not financial advice. Always do your own research and take full responsibility for your trading decisions and assets (DYOR).
Trade $ZAMA here:
ZAMA — LONG NOW
Entry Zone: 0.09108 — 0.092
• TP1: 0.09839
• TP2: 0.10295
• TP3: 0.10979
Stop Loss: 0.08241
The current bullish structure is reinforced by a price momentum increase of 1.63% and a notable open-interest change of 1.16%, indicating a growing interest among buyers. However, the taker buy/sell ratio at 0.8826 suggests a slight imbalance in buying pressure, pointing to a need for stronger demand to fully capitalize on the upside.
Disclaimer: This is not financial advice. Always do your own research and take full responsibility for your trading decisions and assets (DYOR).
Trade $ZAMA here:
3
296
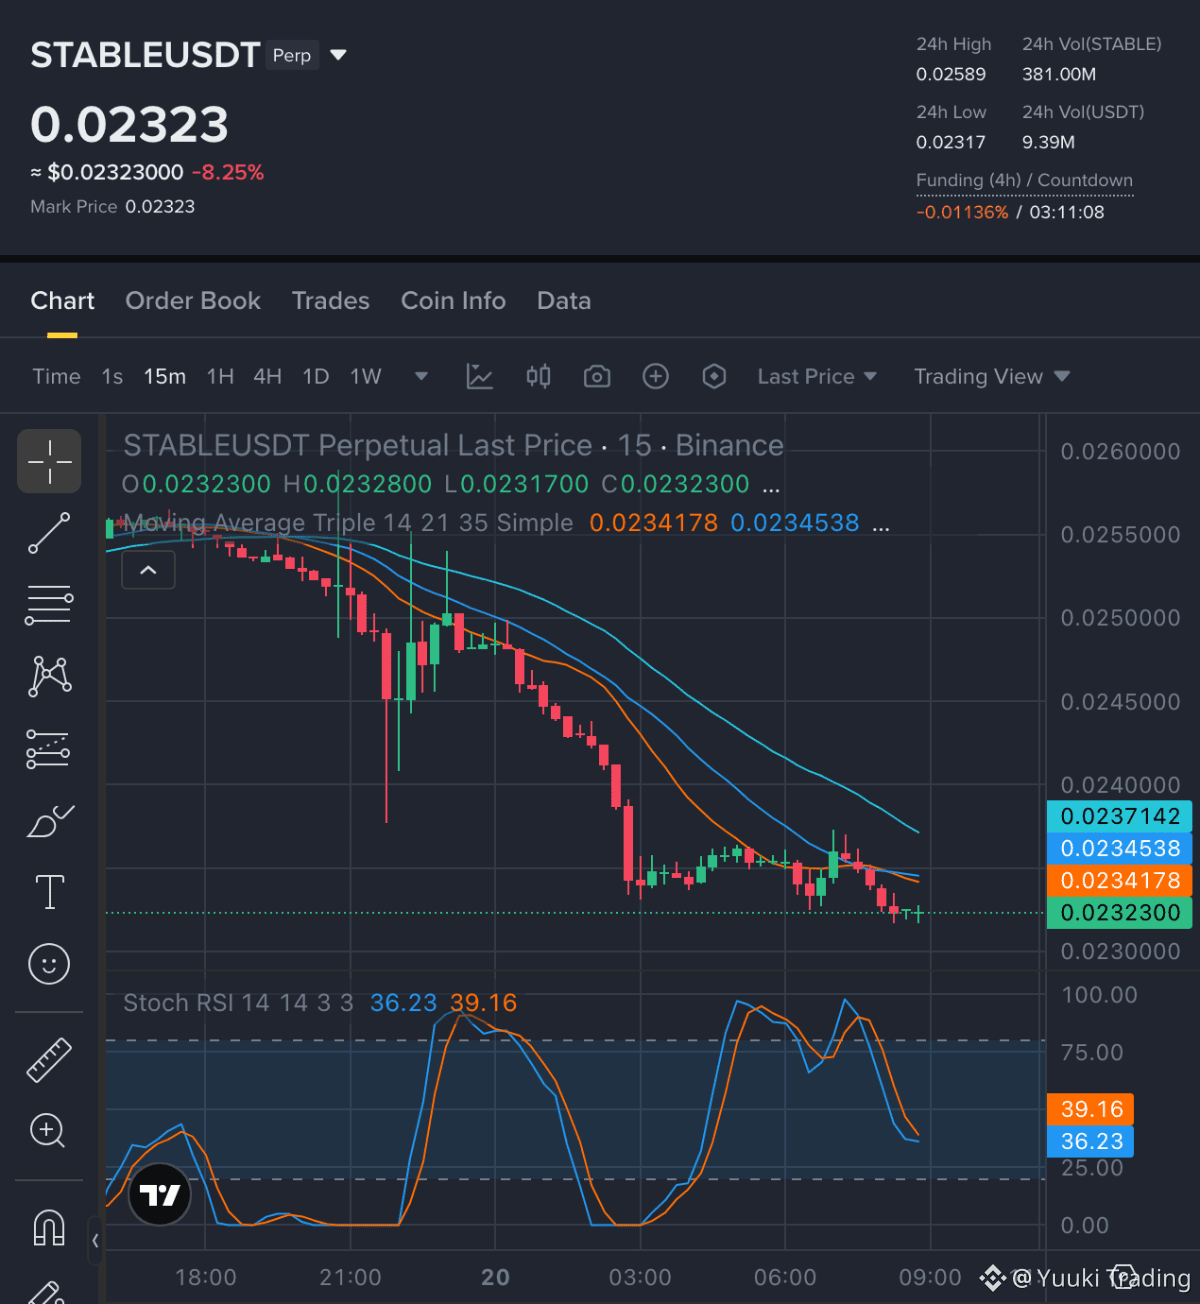
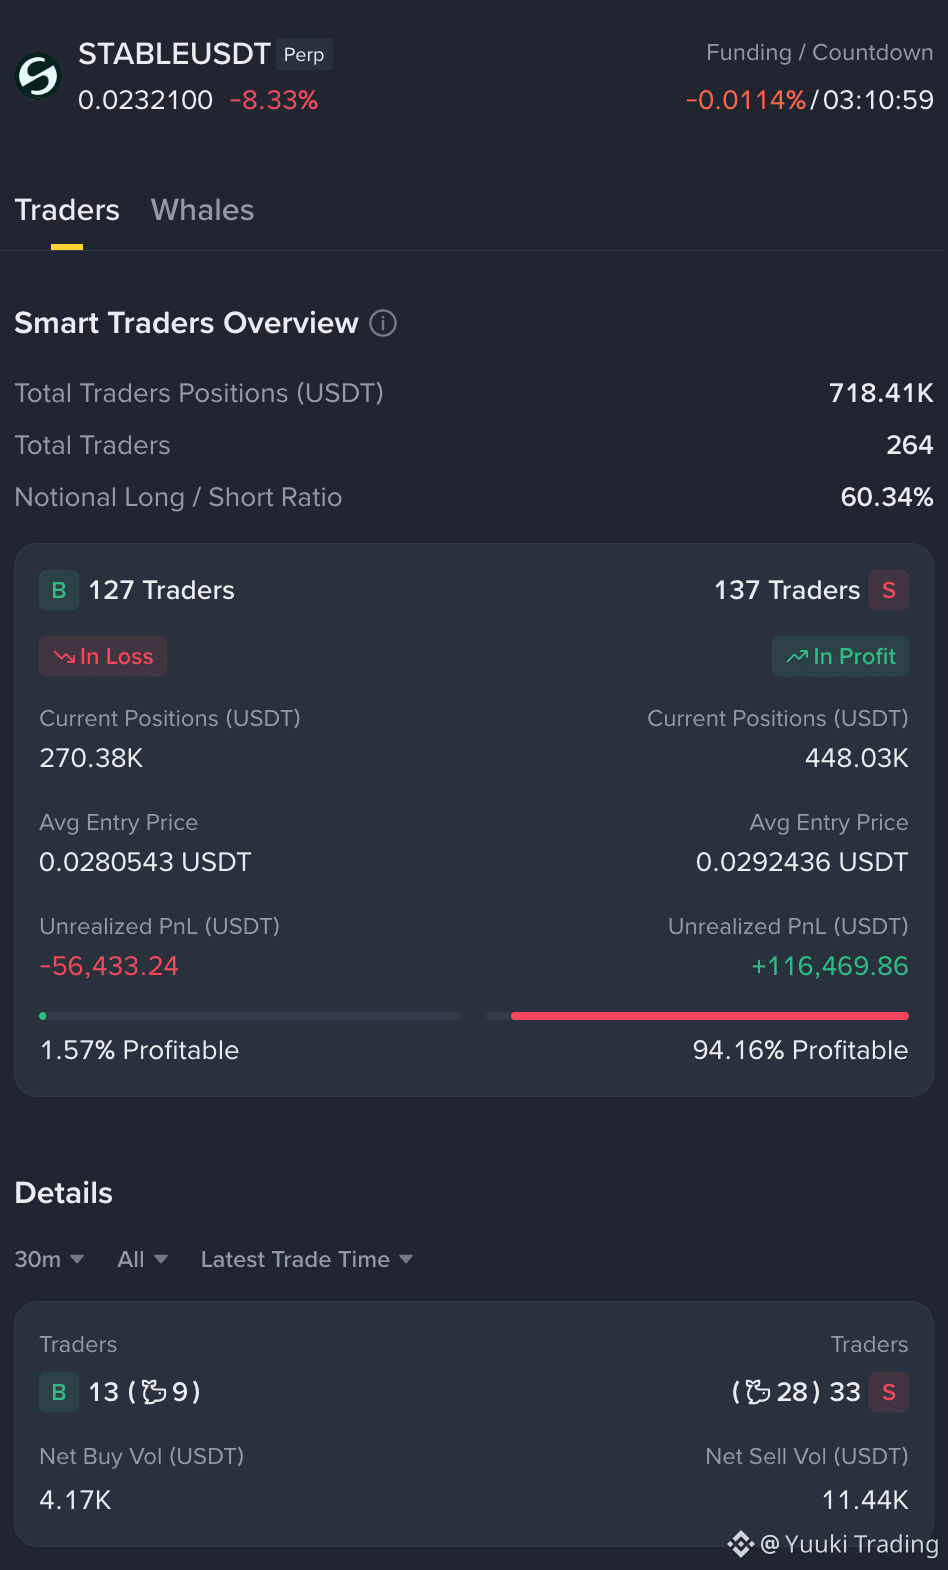
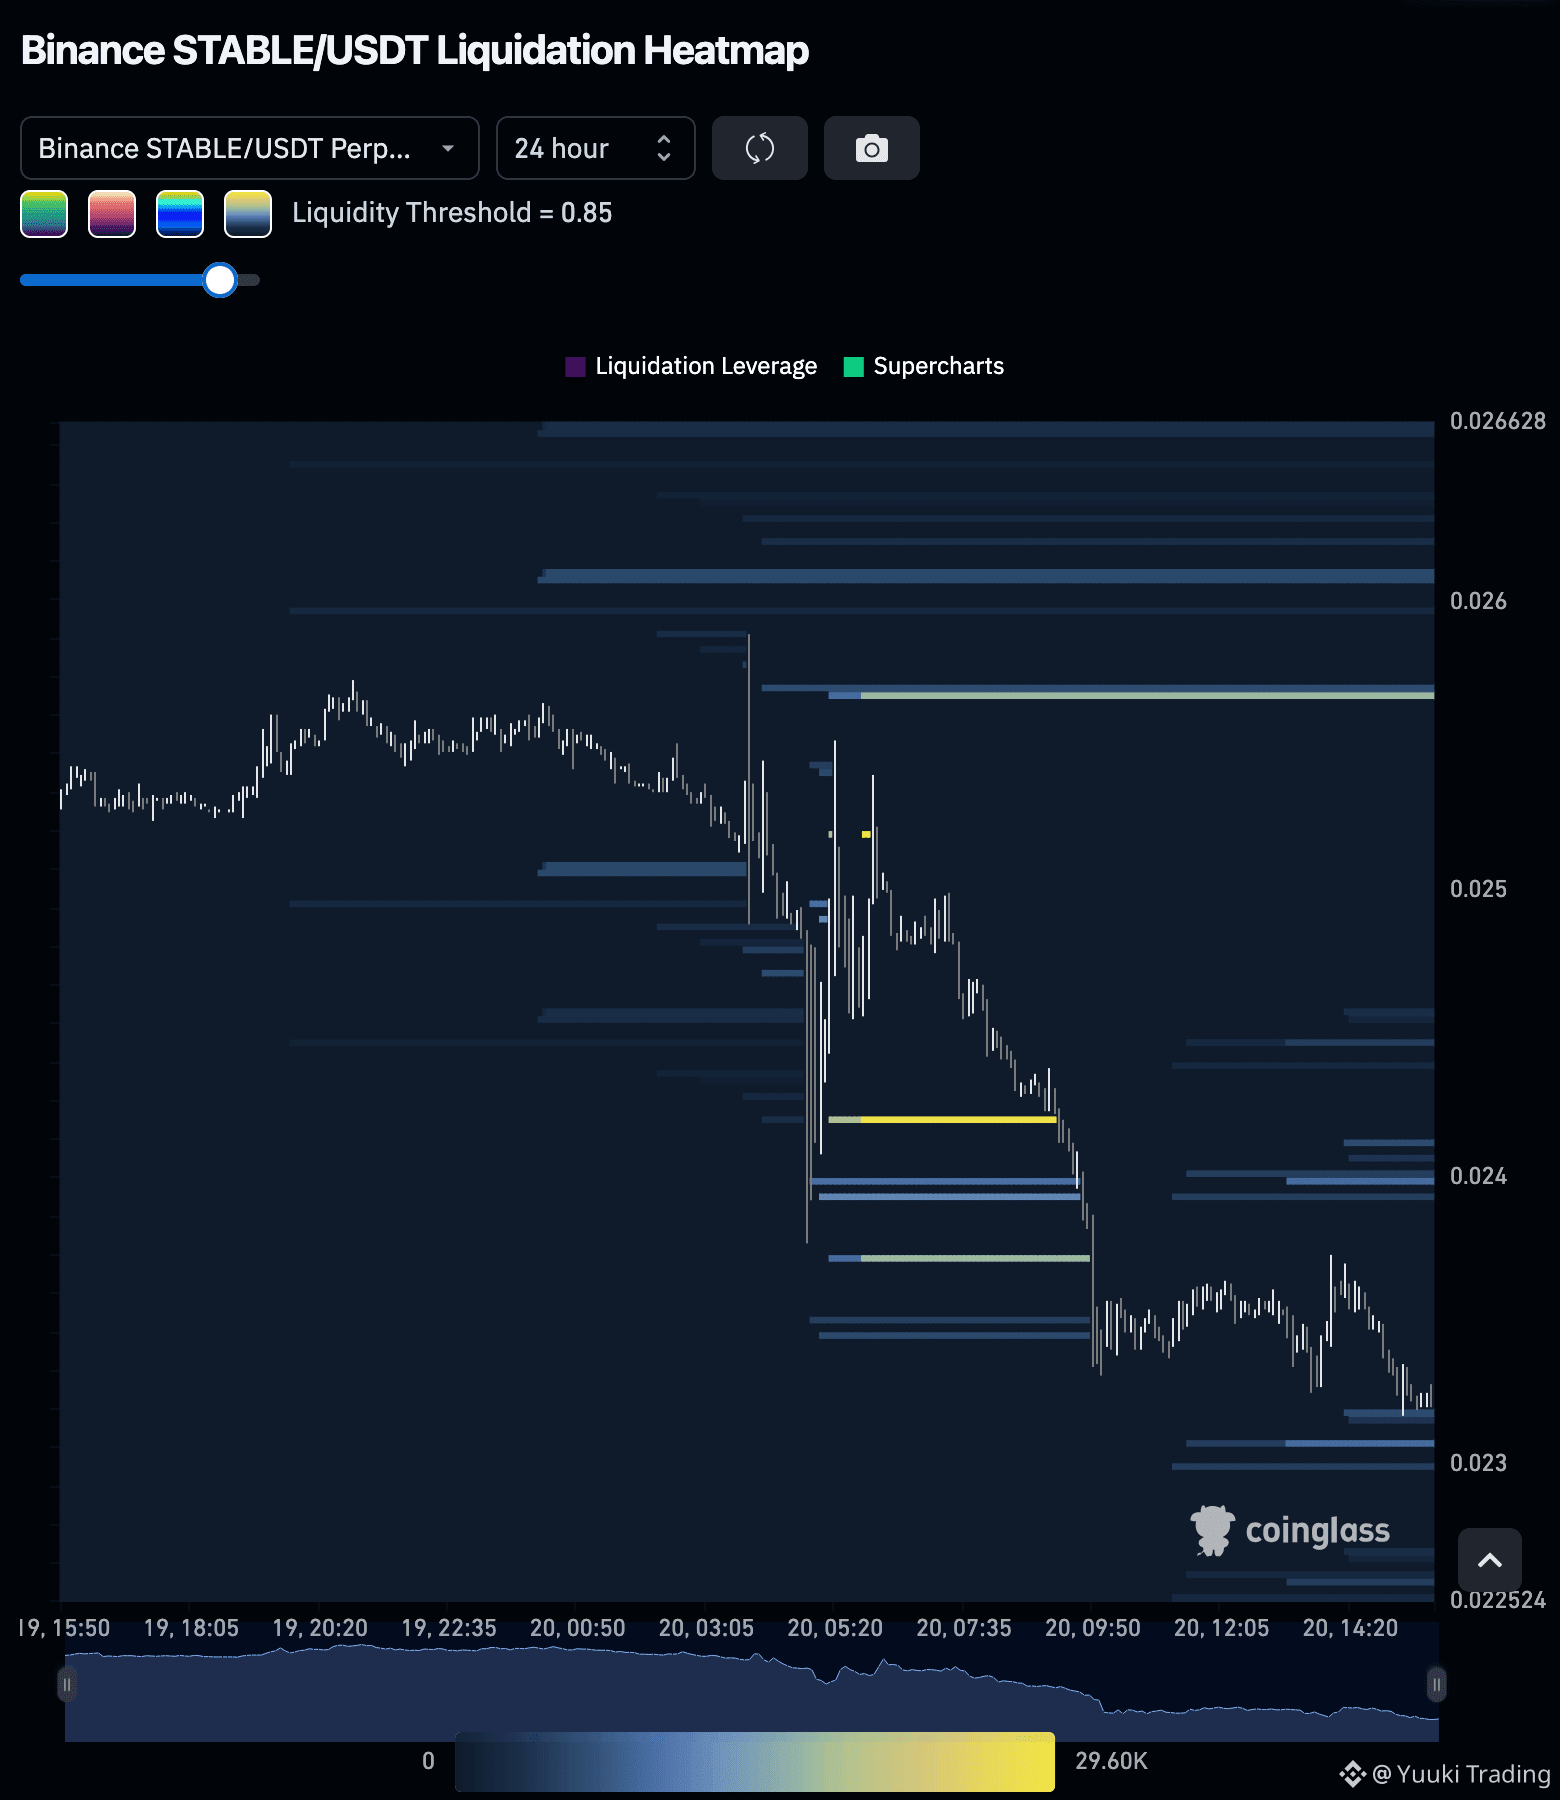
STABLE — The sellers currently hold the advantage with a bearish structure evident in the market, supported by weak taker demand, while rising open interest poses a potential risk.
STABLE — SHORT NOW
Entry Zone: 0.0232 — 0.02326
• TP1: 0.02292
• TP2: 0.02271
• TP3: 0.02241
Stop Loss: 0.02364
The market shows a bearish structure, with a price momentum increase of 0.09% alongside a significant taker buy/sell ratio of 3.2631, indicating weak demand from buyers. Additionally, the aggregate-trade delta is down by 6.87%, reflecting a stronger sell-side presence. Although open interest has slightly increased by 0.10%, the overall participation remains subdued, reinforcing the bearish outlook.
Disclaimer: This is not financial advice. Always do your own research and take full responsibility for your trading decisions and assets (DYOR).
Trade $STABLE here:
{future}(STABLEUSDT)
STABLE — The sellers currently hold the advantage with a bearish structure evident in the market, supported by weak taker demand, while rising open interest poses a potential risk.
STABLE — SHORT NOW
Entry Zone: 0.0232 — 0.02326
• TP1: 0.02292
• TP2: 0.02271
• TP3: 0.02241
Stop Loss: 0.02364
The market shows a bearish structure, with a price momentum increase of 0.09% alongside a significant taker buy/sell ratio of 3.2631, indicating weak demand from buyers. Additionally, the aggregate-trade delta is down by 6.87%, reflecting a stronger sell-side presence. Although open interest has slightly increased by 0.10%, the overall participation remains subdued, reinforcing the bearish outlook.
Disclaimer: This is not financial advice. Always do your own research and take full responsibility for your trading decisions and assets (DYOR).
Trade $STABLE here:
STABLE — SHORT NOW
Entry Zone: 0.0232 — 0.02326
• TP1: 0.02292
• TP2: 0.02271
• TP3: 0.02241
Stop Loss: 0.02364
The market shows a bearish structure, with a price momentum increase of 0.09% alongside a significant taker buy/sell ratio of 3.2631, indicating weak demand from buyers. Additionally, the aggregate-trade delta is down by 6.87%, reflecting a stronger sell-side presence. Although open interest has slightly increased by 0.10%, the overall participation remains subdued, reinforcing the bearish outlook.
Disclaimer: This is not financial advice. Always do your own research and take full responsibility for your trading decisions and assets (DYOR).
Trade $STABLE here:
3
190
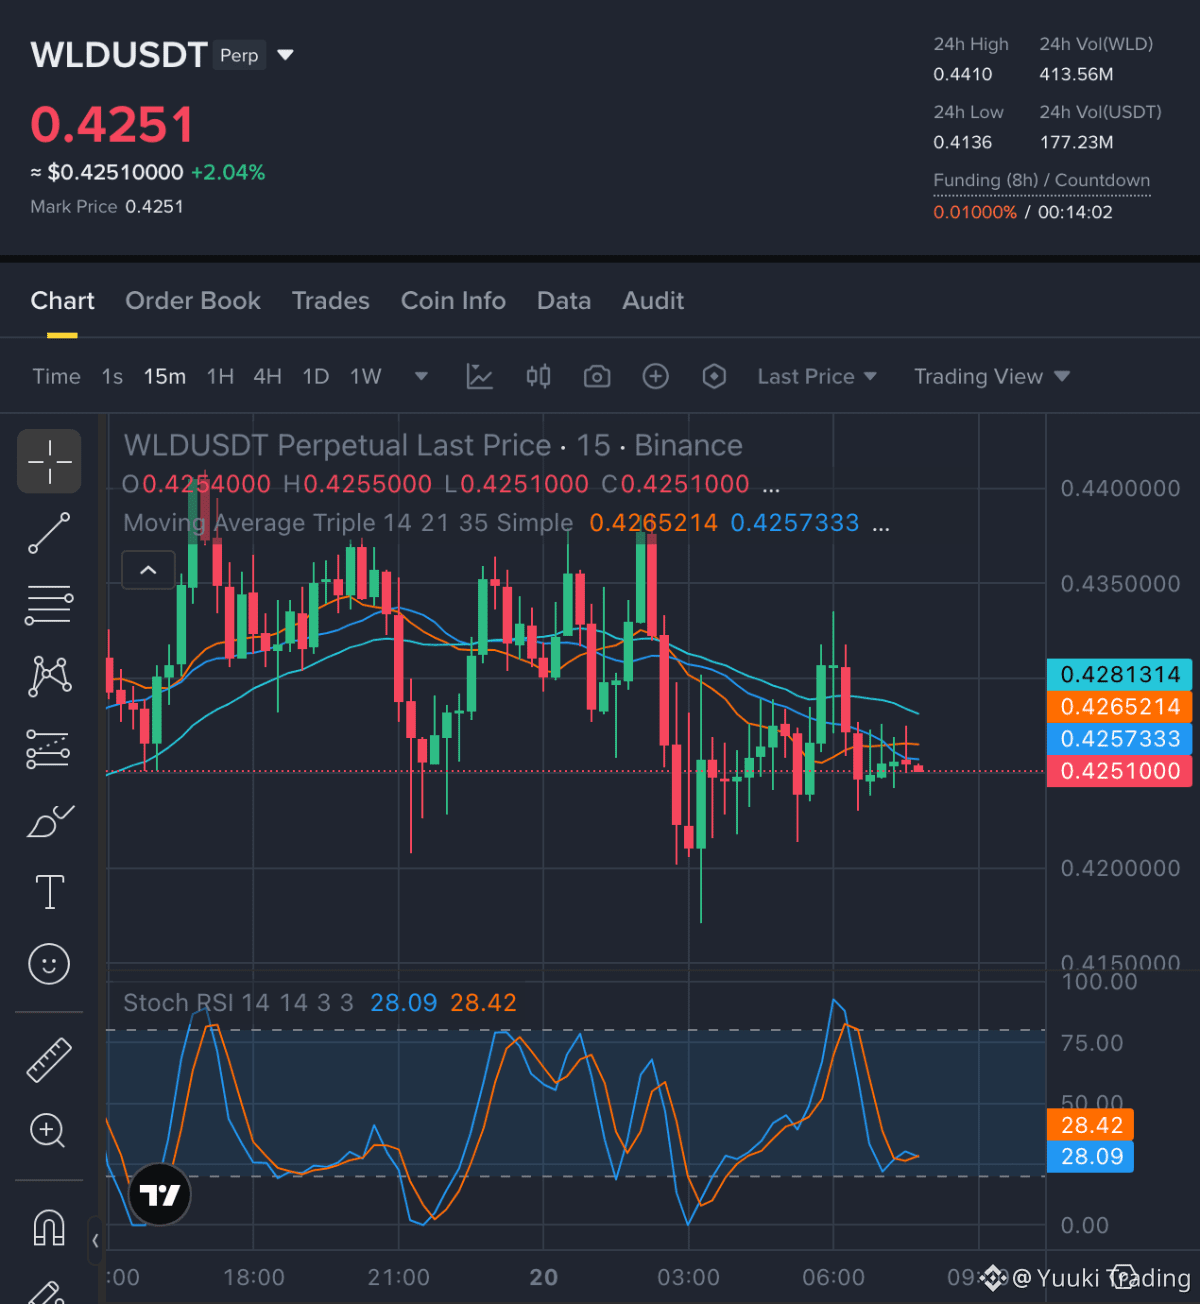
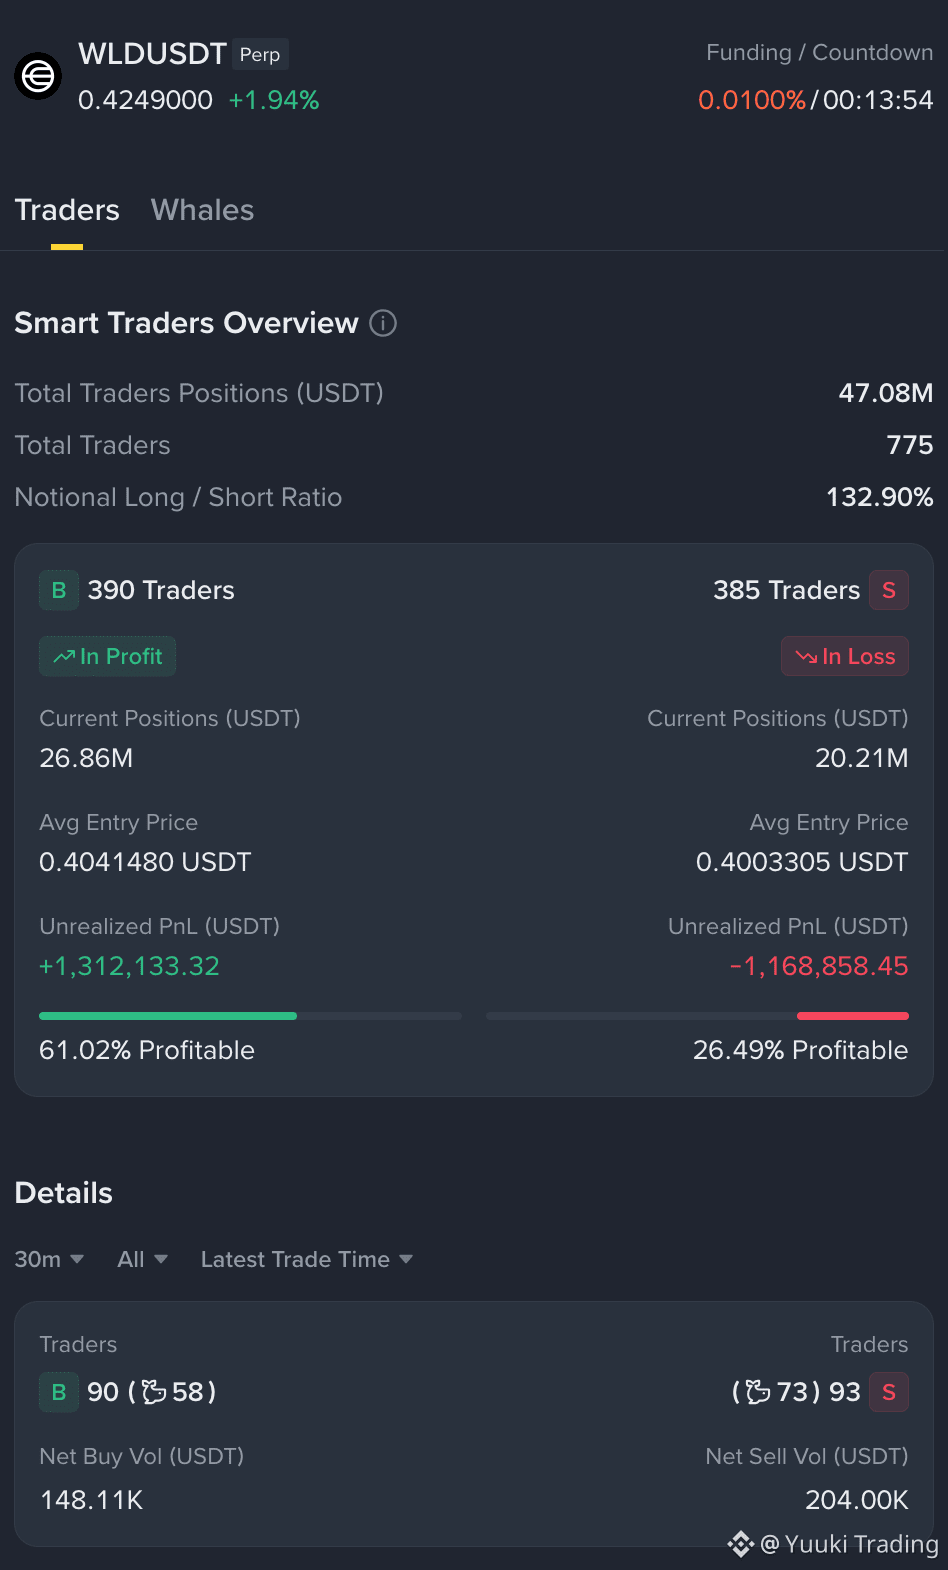
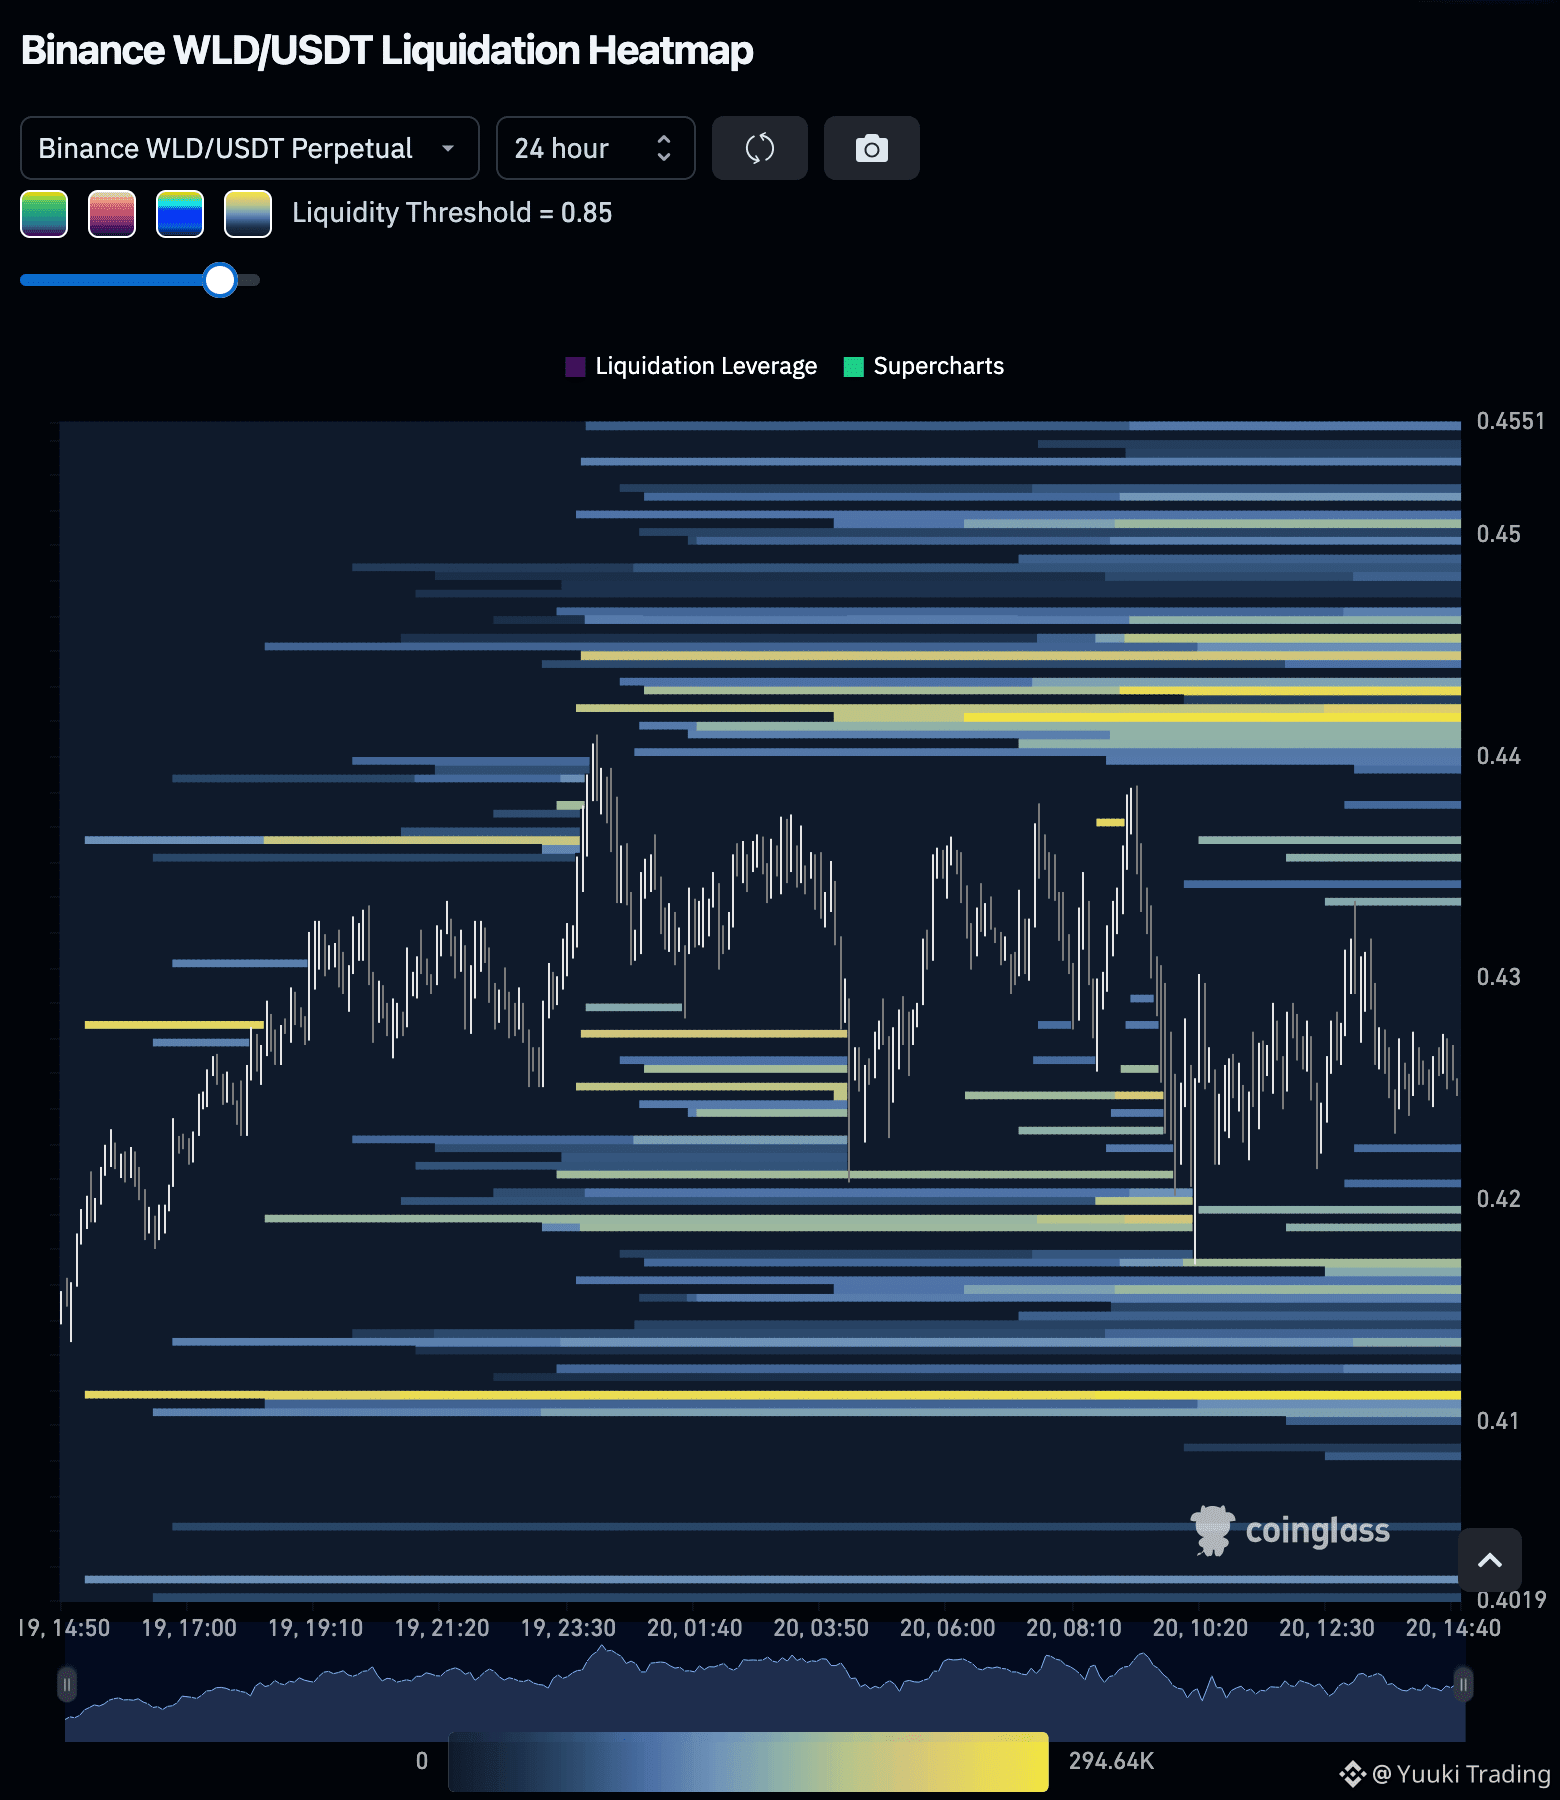
WLD — Despite a bearish structure dominating the 15m chart, weak taker demand and rising open interest suggest limited selling pressure, although the overall momentum remains slightly negative.
WLD — LONG NOW
Entry Zone: 0.4244 — 0.4262
• TP1: 0.4335
• TP2: 0.4387
• TP3: 0.4434
Stop Loss: 0.4162
The 15m structure indicates a bearish trend with price momentum showing a decrease of 0.02%. Additionally, the aggregate trade delta reflects a decline in buy-side activity at -1.87%. However, open interest has increased by 0.06%, suggesting some participants may be positioning themselves for potential upward movement despite the prevailing bearish sentiment.
Disclaimer: This is not financial advice. Always do your own research and take full responsibility for your trading decisions and assets (DYOR).
Trade $WLD here:
{future}(WLDUSDT)
WLD — Despite a bearish structure dominating the 15m chart, weak taker demand and rising open interest suggest limited selling pressure, although the overall momentum remains slightly negative.
WLD — LONG NOW
Entry Zone: 0.4244 — 0.4262
• TP1: 0.4335
• TP2: 0.4387
• TP3: 0.4434
Stop Loss: 0.4162
The 15m structure indicates a bearish trend with price momentum showing a decrease of 0.02%. Additionally, the aggregate trade delta reflects a decline in buy-side activity at -1.87%. However, open interest has increased by 0.06%, suggesting some participants may be positioning themselves for potential upward movement despite the prevailing bearish sentiment.
Disclaimer: This is not financial advice. Always do your own research and take full responsibility for your trading decisions and assets (DYOR).
Trade $WLD here:
WLD — LONG NOW
Entry Zone: 0.4244 — 0.4262
• TP1: 0.4335
• TP2: 0.4387
• TP3: 0.4434
Stop Loss: 0.4162
The 15m structure indicates a bearish trend with price momentum showing a decrease of 0.02%. Additionally, the aggregate trade delta reflects a decline in buy-side activity at -1.87%. However, open interest has increased by 0.06%, suggesting some participants may be positioning themselves for potential upward movement despite the prevailing bearish sentiment.
Disclaimer: This is not financial advice. Always do your own research and take full responsibility for your trading decisions and assets (DYOR).
Trade $WLD here:
4
719
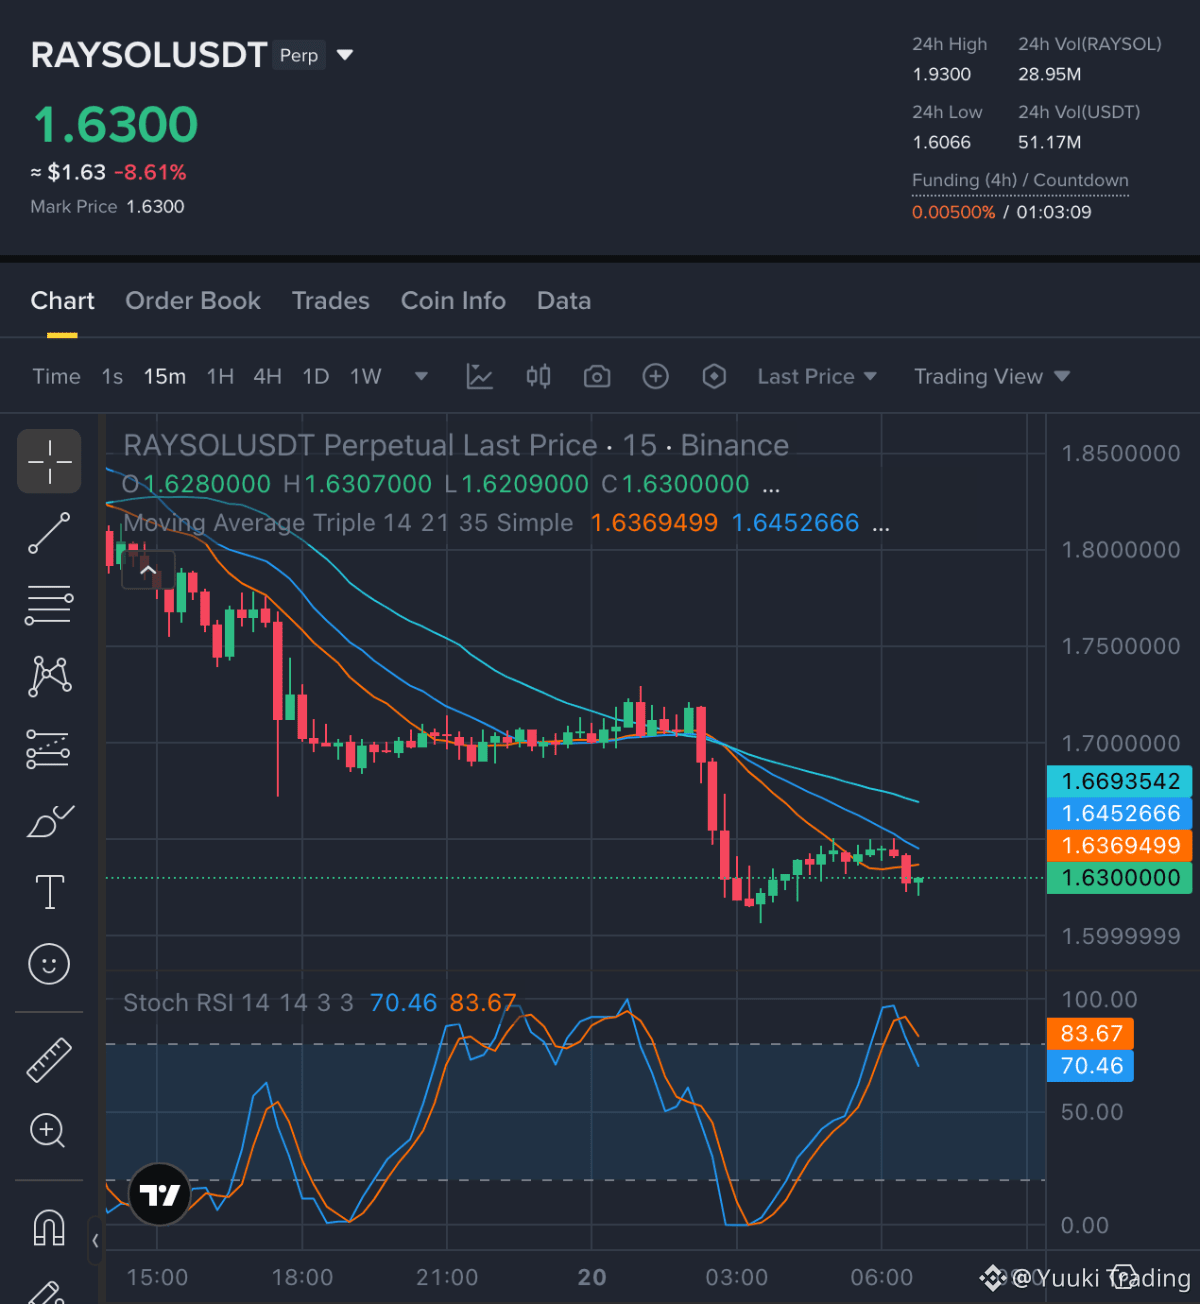
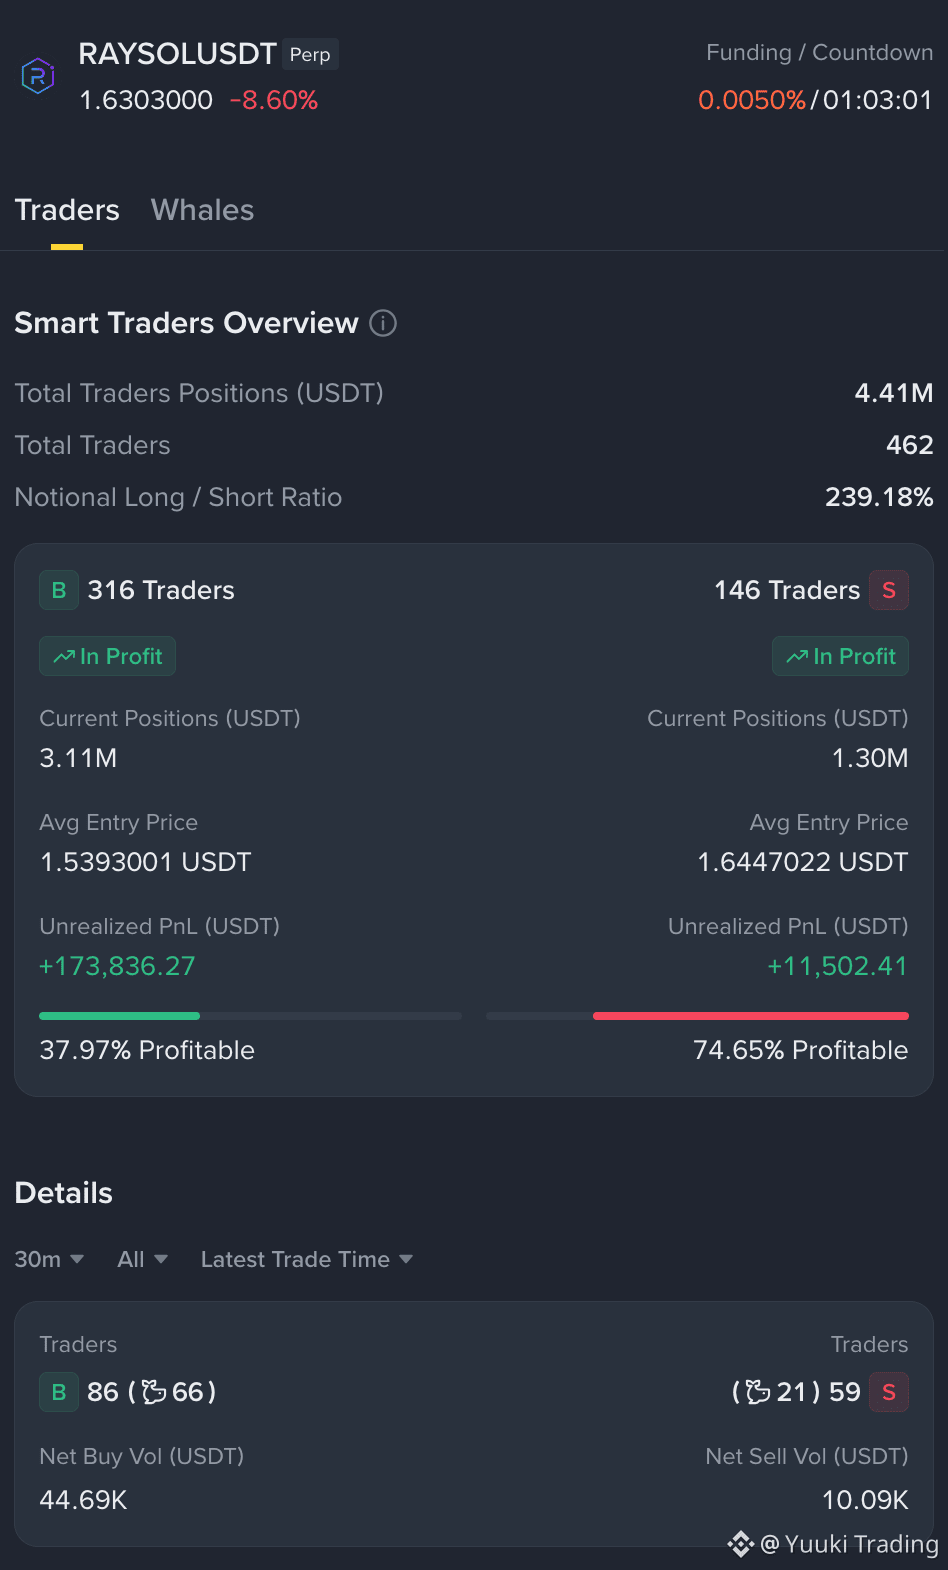
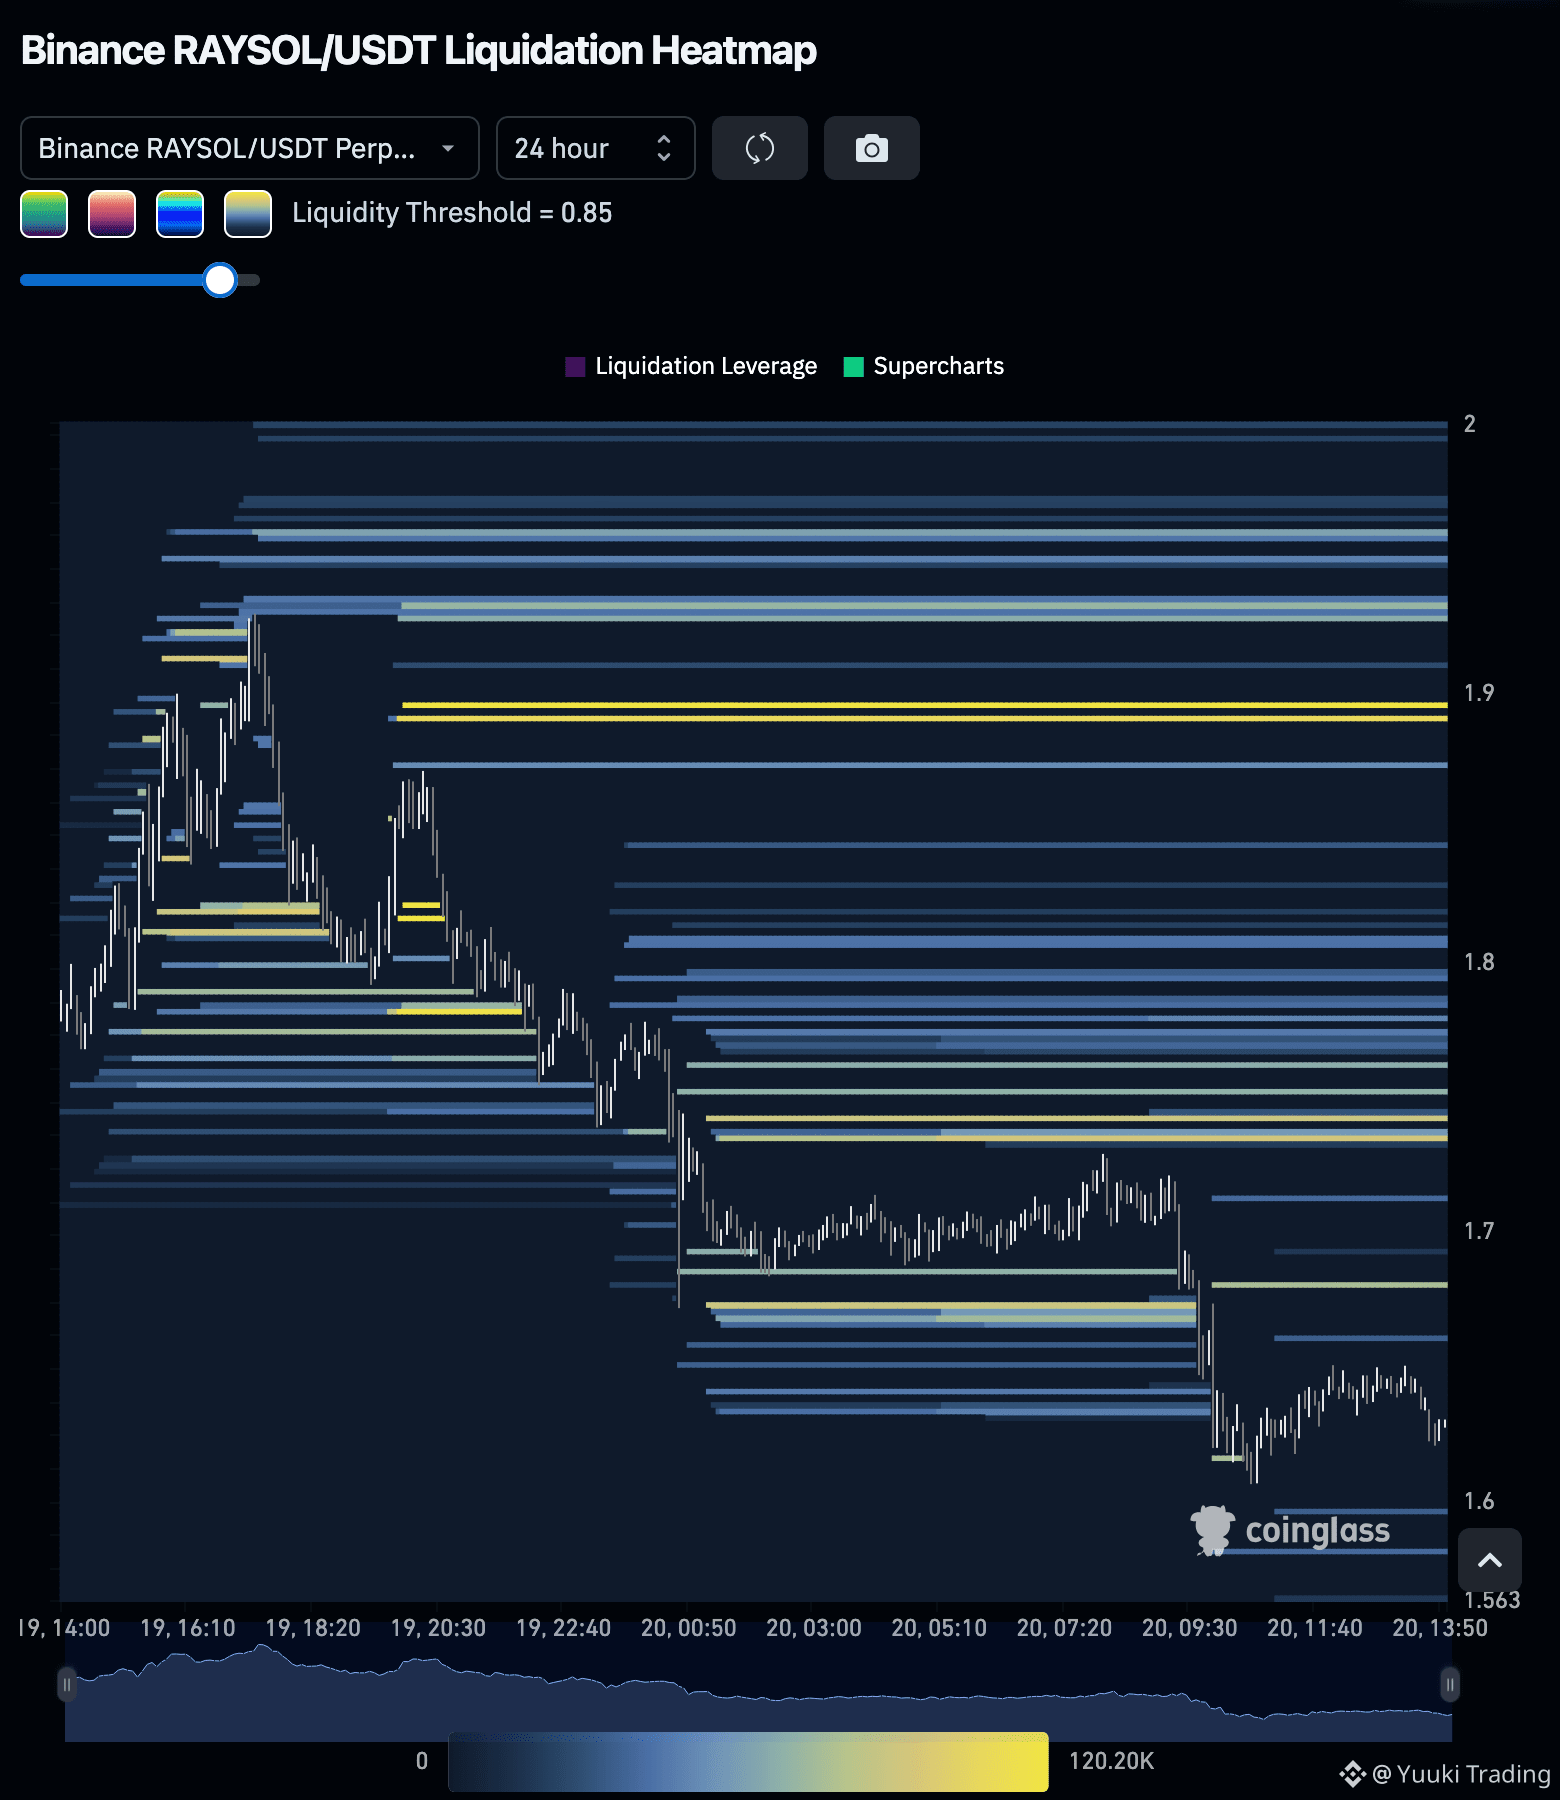
RAYSOL — The sellers currently hold the advantage, with a dominant bearish structure indicating a lack of buyer enthusiasm, further supported by weak taker demand, though limited participation introduces some risk.
RAYSOL — SHORT NOW
Entry Zone: 1.6274 — 1.6332
• TP1: 1.6066
• TP2: 1.6011
• TP3: 1.5836
Stop Loss: 1.6537
The 15m structure reflects a bearish sentiment, bolstered by negative price momentum indicating a downward trend. The aggregate-trade delta shows a significant imbalance in favor of sellers, while the taker buy/sell ratio further underlines weak demand from buyers. Although open interest has seen minimal change, it suggests limited participation, reinforcing the existing downside thesis.
Disclaimer: This is not financial advice. Always do your own research and take full responsibility for your trading decisions and assets (DYOR).
Trade $RAYSOL here:
{future}(RAYSOLUSDT)
RAYSOL — The sellers currently hold the advantage, with a dominant bearish structure indicating a lack of buyer enthusiasm, further supported by weak taker demand, though limited participation introduces some risk.
RAYSOL — SHORT NOW
Entry Zone: 1.6274 — 1.6332
• TP1: 1.6066
• TP2: 1.6011
• TP3: 1.5836
Stop Loss: 1.6537
The 15m structure reflects a bearish sentiment, bolstered by negative price momentum indicating a downward trend. The aggregate-trade delta shows a significant imbalance in favor of sellers, while the taker buy/sell ratio further underlines weak demand from buyers. Although open interest has seen minimal change, it suggests limited participation, reinforcing the existing downside thesis.
Disclaimer: This is not financial advice. Always do your own research and take full responsibility for your trading decisions and assets (DYOR).
Trade $RAYSOL here:
RAYSOL — SHORT NOW
Entry Zone: 1.6274 — 1.6332
• TP1: 1.6066
• TP2: 1.6011
• TP3: 1.5836
Stop Loss: 1.6537
The 15m structure reflects a bearish sentiment, bolstered by negative price momentum indicating a downward trend. The aggregate-trade delta shows a significant imbalance in favor of sellers, while the taker buy/sell ratio further underlines weak demand from buyers. Although open interest has seen minimal change, it suggests limited participation, reinforcing the existing downside thesis.
Disclaimer: This is not financial advice. Always do your own research and take full responsibility for your trading decisions and assets (DYOR).
Trade $RAYSOL here:
3
237
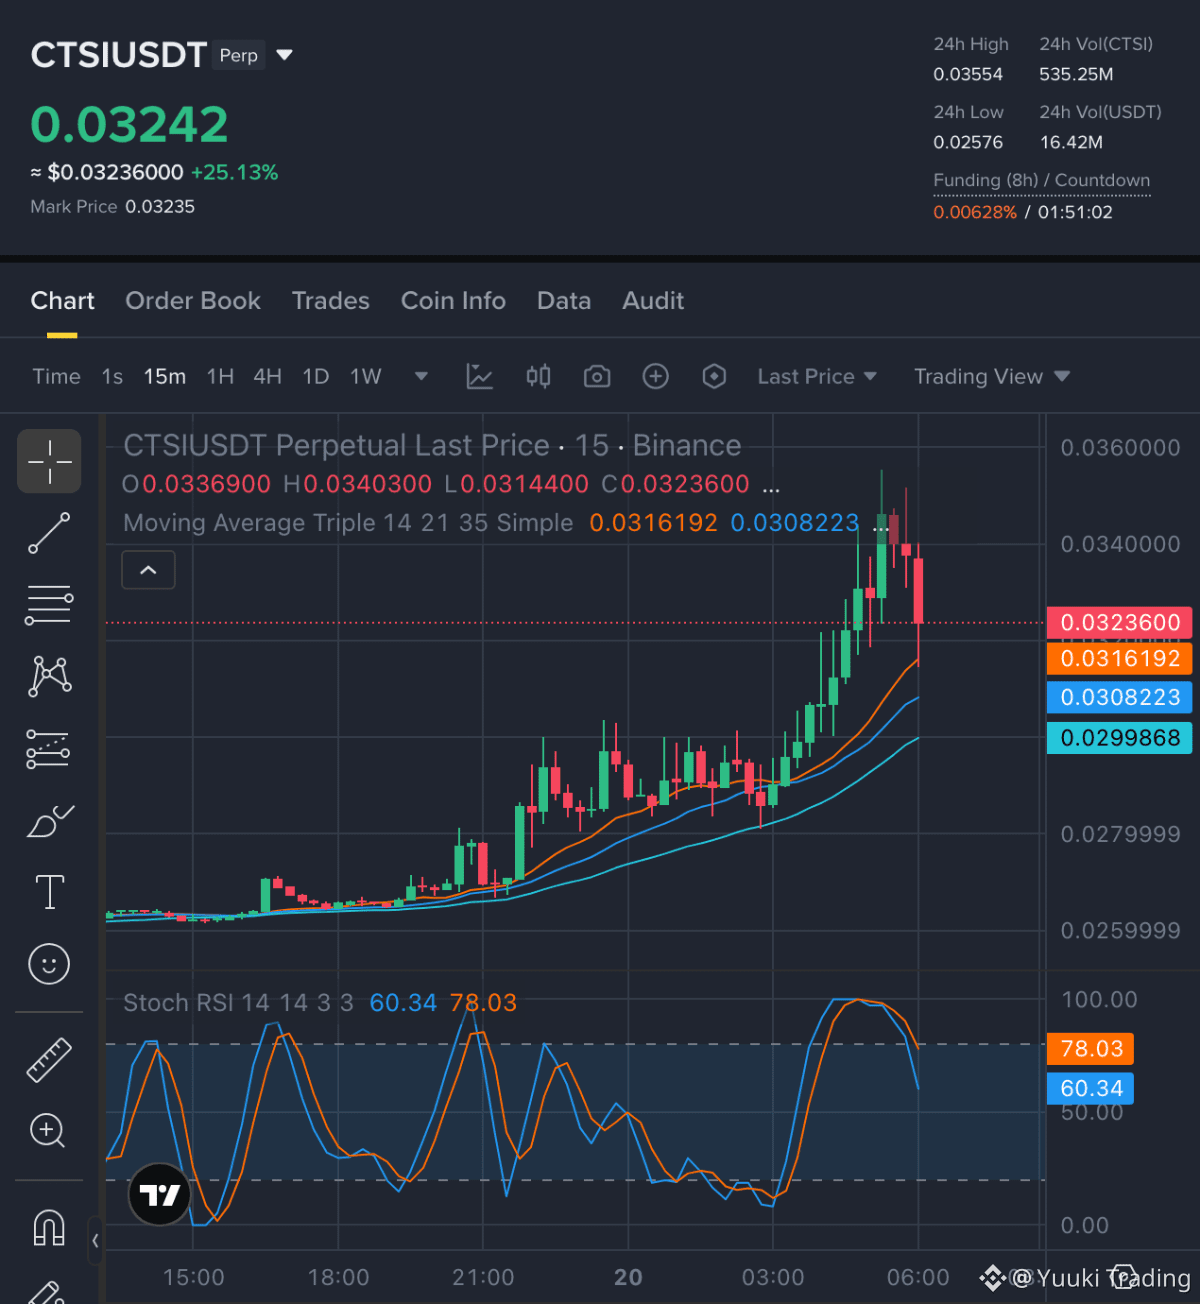
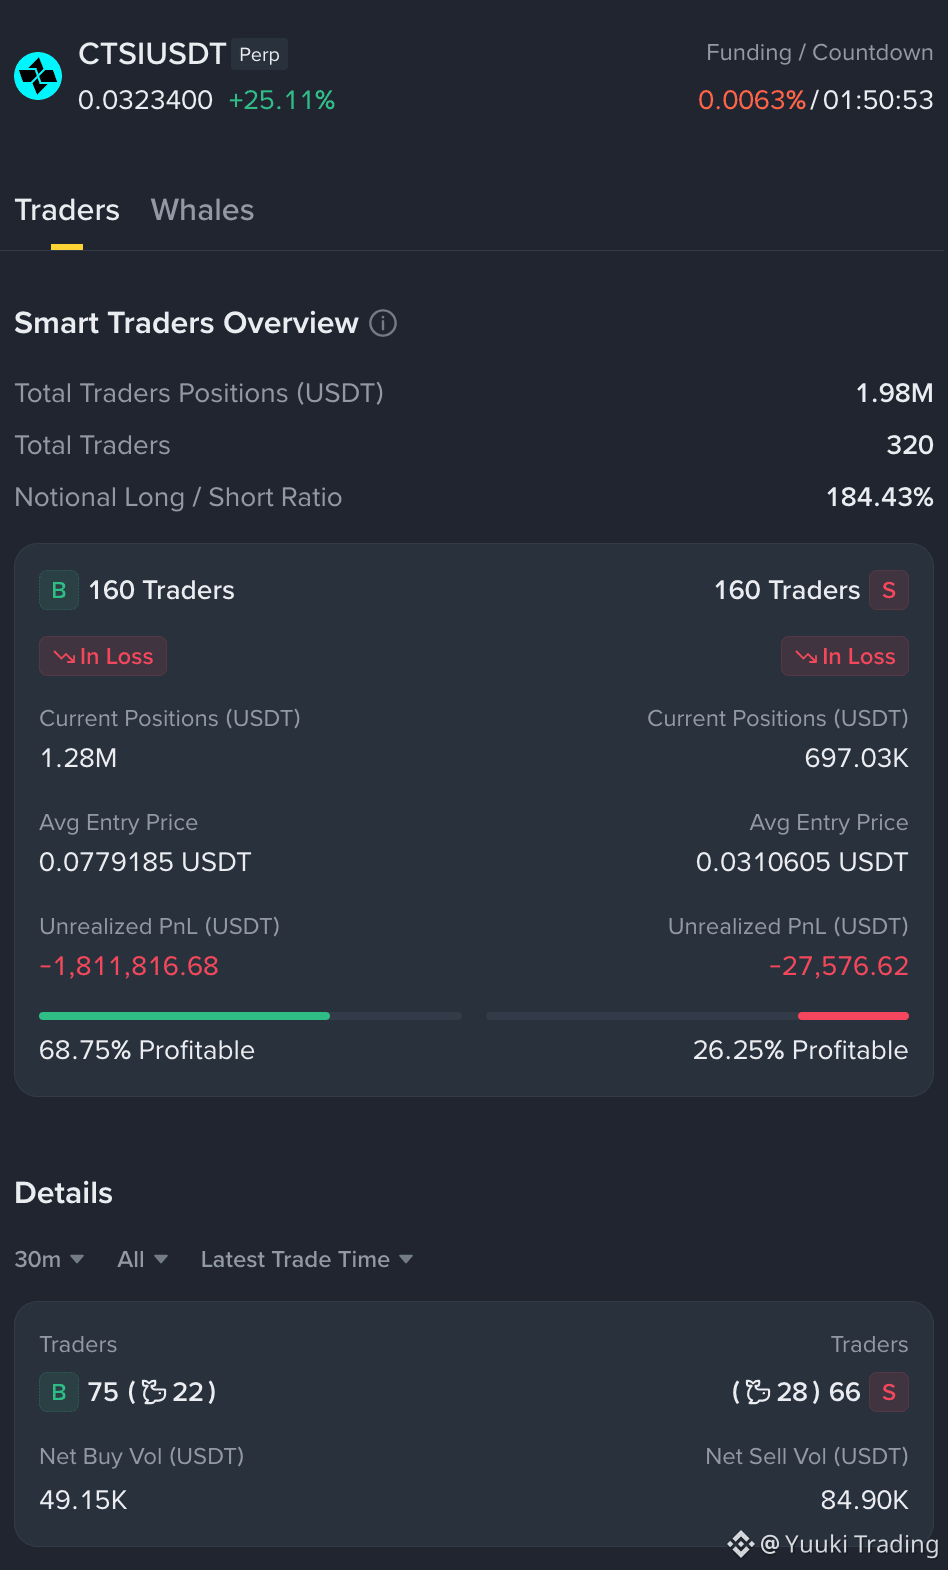
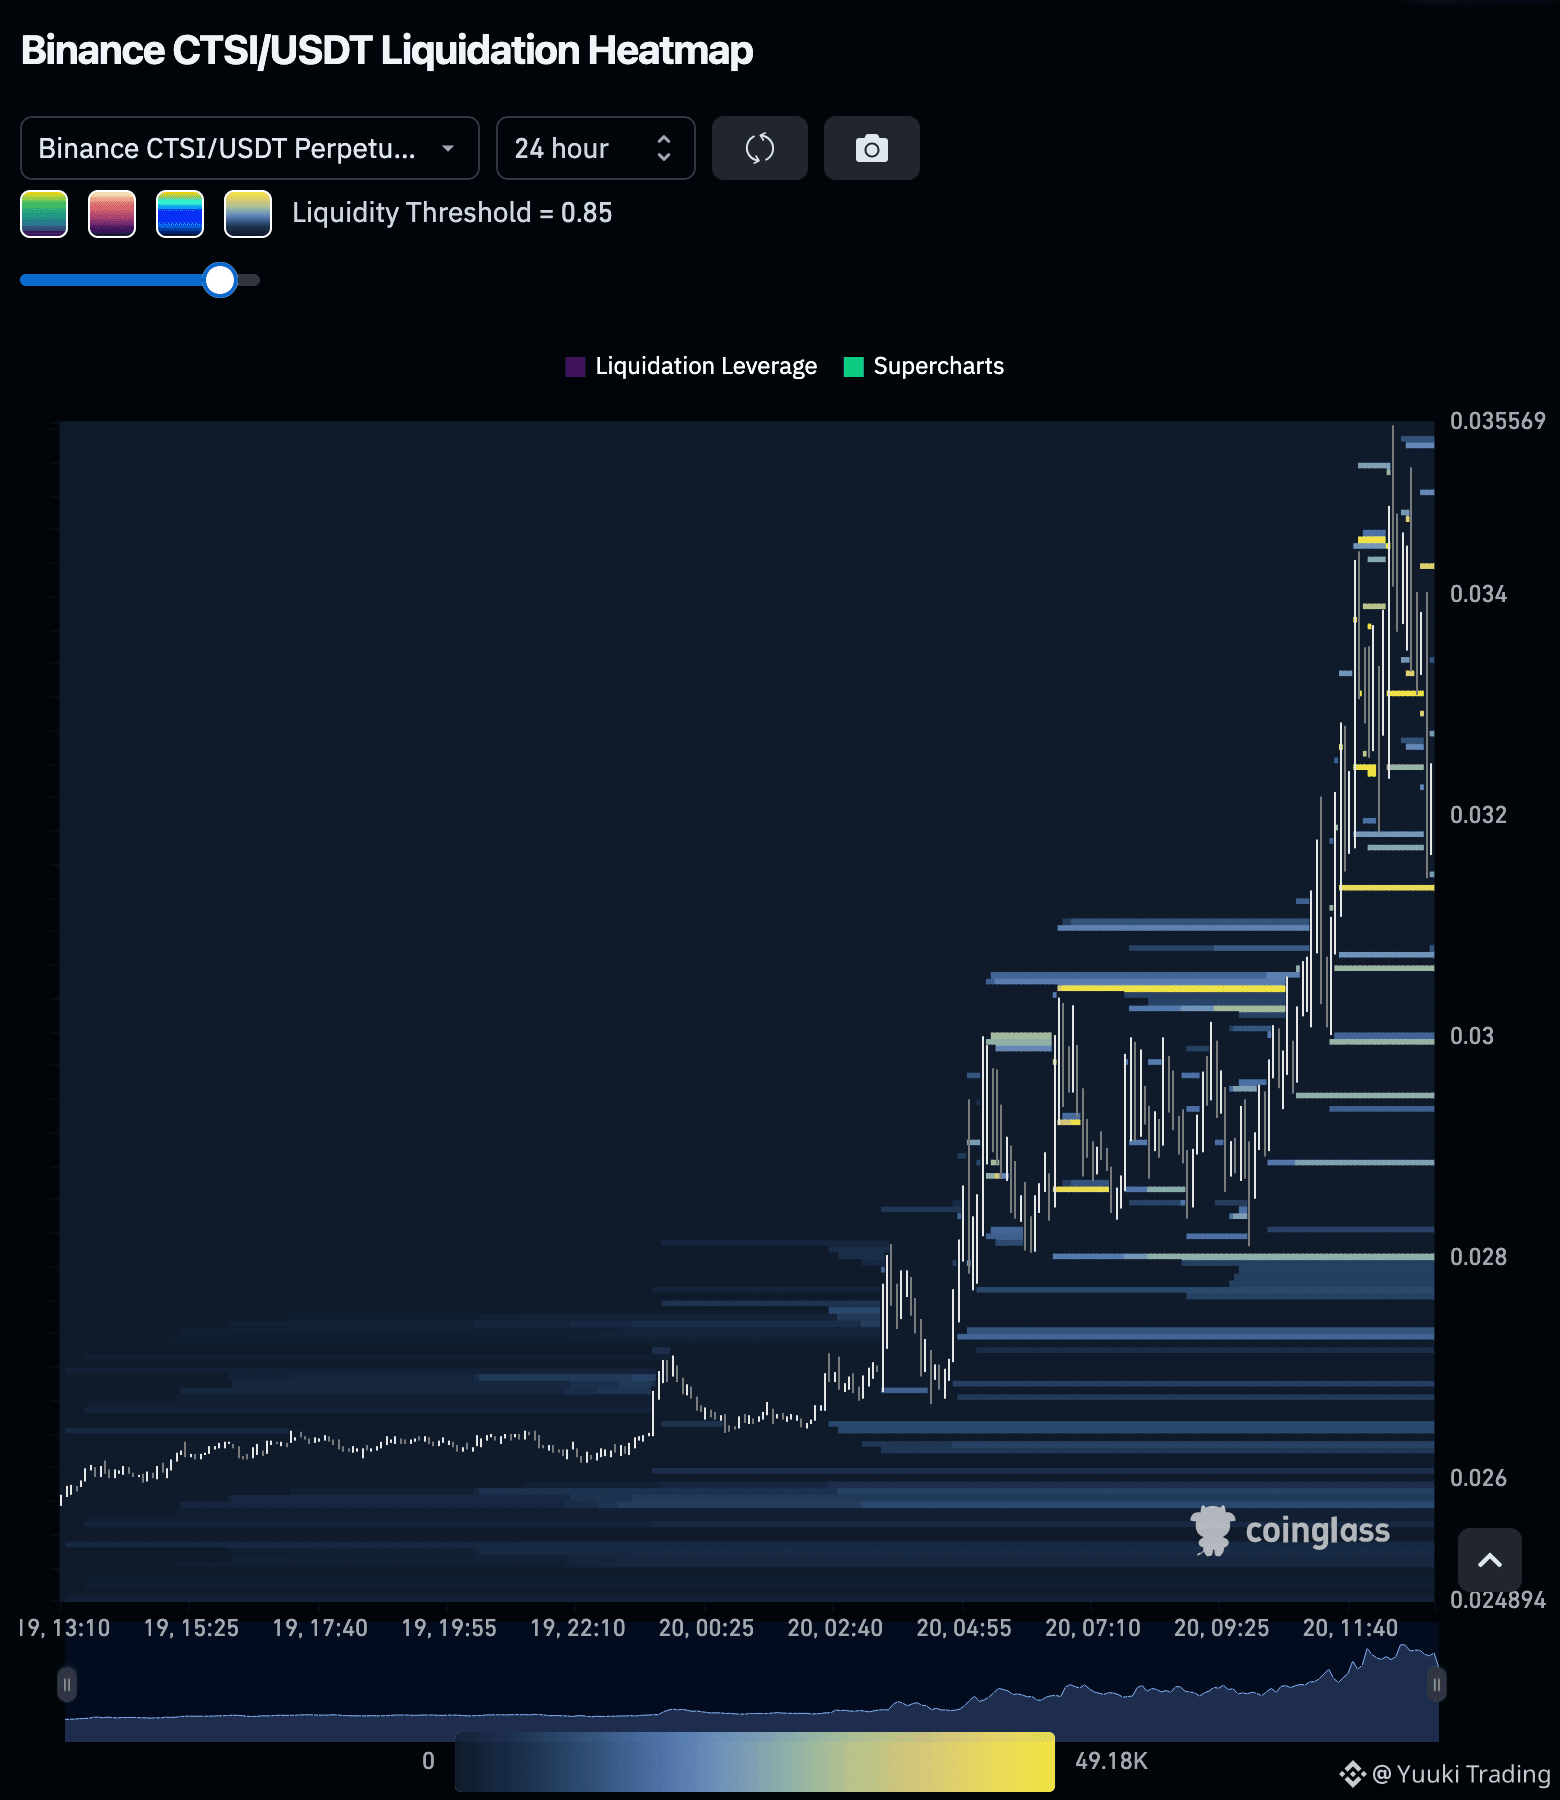
CTSI — Buyers hold the advantage with a bullish 15m structure, supported by a strong aggregate-trade delta of 21.82%, although a weak taker buy/sell ratio indicates subdued demand.
CTSI — LONG NOW
Entry Zone: 0.03227 — 0.03259
• TP1: 0.03554
• TP2: 0.03755
• TP3: 0.04063
Stop Loss: 0.02833
The bullish structure is reinforced by rising open interest, which suggests increasing participation from buyers. However, the price momentum is slightly negative at -0.68%, signaling potential caution. The taker buy/sell ratio of 0.8072 indicates that sellers are somewhat active, which could temper the overall bullish sentiment in the near term.
Disclaimer: This is not financial advice. Always do your own research and take full responsibility for your trading decisions and assets (DYOR).
Trade $CTSI here:
{future}(CTSIUSDT)
CTSI — Buyers hold the advantage with a bullish 15m structure, supported by a strong aggregate-trade delta of 21.82%, although a weak taker buy/sell ratio indicates subdued demand.
CTSI — LONG NOW
Entry Zone: 0.03227 — 0.03259
• TP1: 0.03554
• TP2: 0.03755
• TP3: 0.04063
Stop Loss: 0.02833
The bullish structure is reinforced by rising open interest, which suggests increasing participation from buyers. However, the price momentum is slightly negative at -0.68%, signaling potential caution. The taker buy/sell ratio of 0.8072 indicates that sellers are somewhat active, which could temper the overall bullish sentiment in the near term.
Disclaimer: This is not financial advice. Always do your own research and take full responsibility for your trading decisions and assets (DYOR).
Trade $CTSI here:
CTSI — LONG NOW
Entry Zone: 0.03227 — 0.03259
• TP1: 0.03554
• TP2: 0.03755
• TP3: 0.04063
Stop Loss: 0.02833
The bullish structure is reinforced by rising open interest, which suggests increasing participation from buyers. However, the price momentum is slightly negative at -0.68%, signaling potential caution. The taker buy/sell ratio of 0.8072 indicates that sellers are somewhat active, which could temper the overall bullish sentiment in the near term.
Disclaimer: This is not financial advice. Always do your own research and take full responsibility for your trading decisions and assets (DYOR).
Trade $CTSI here:
3
293
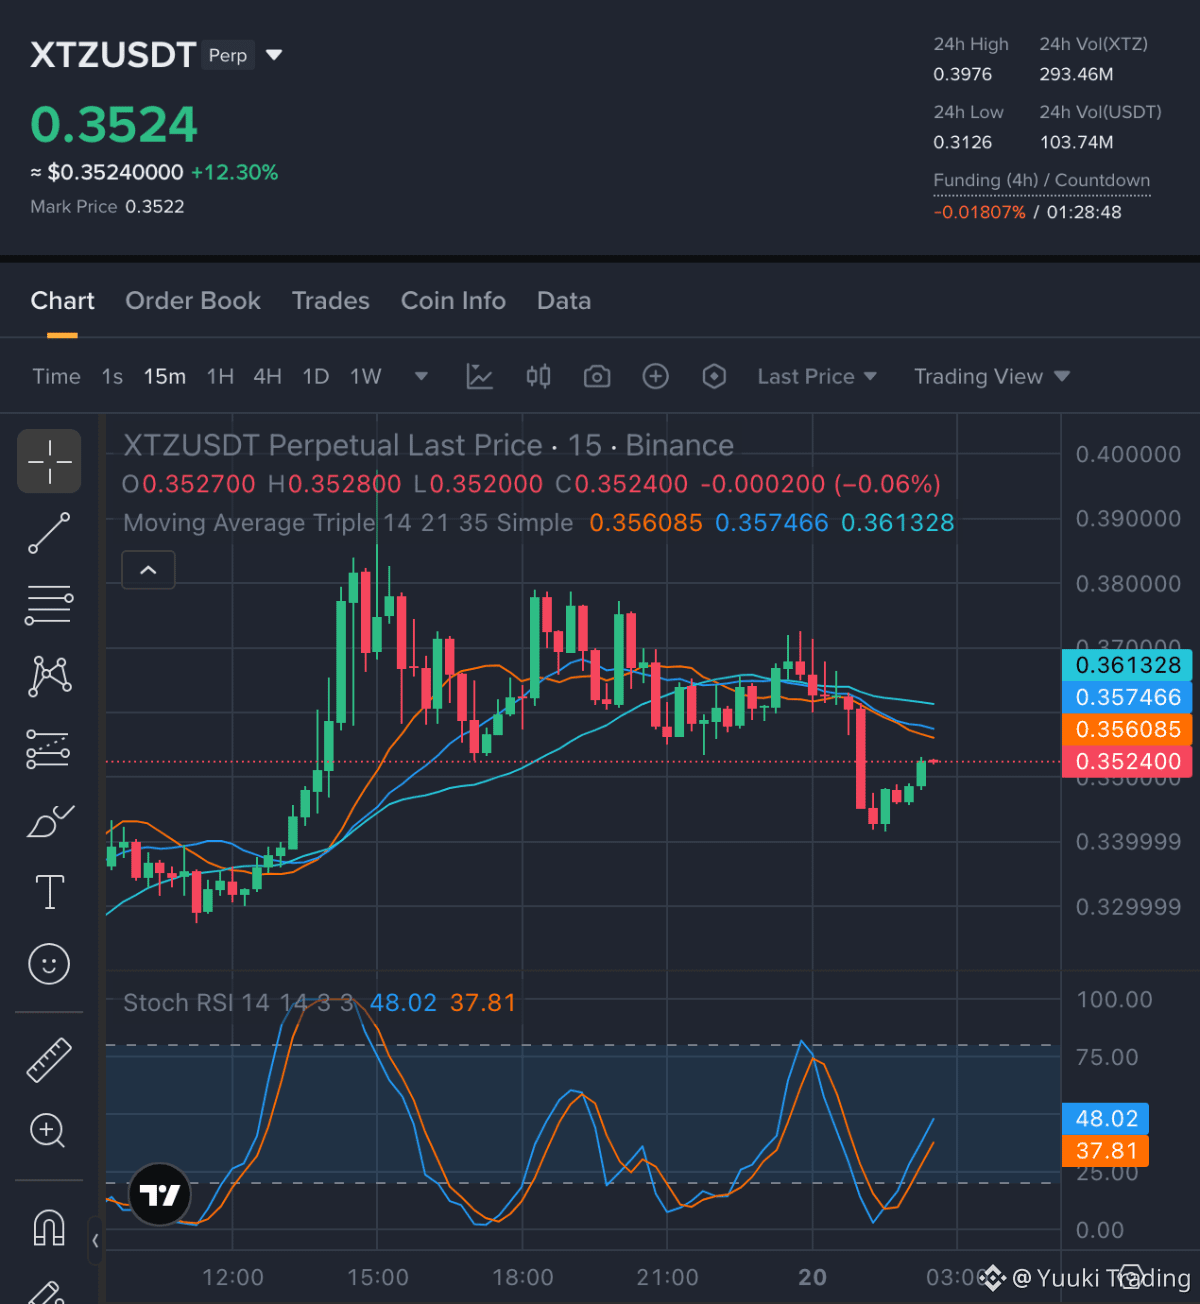
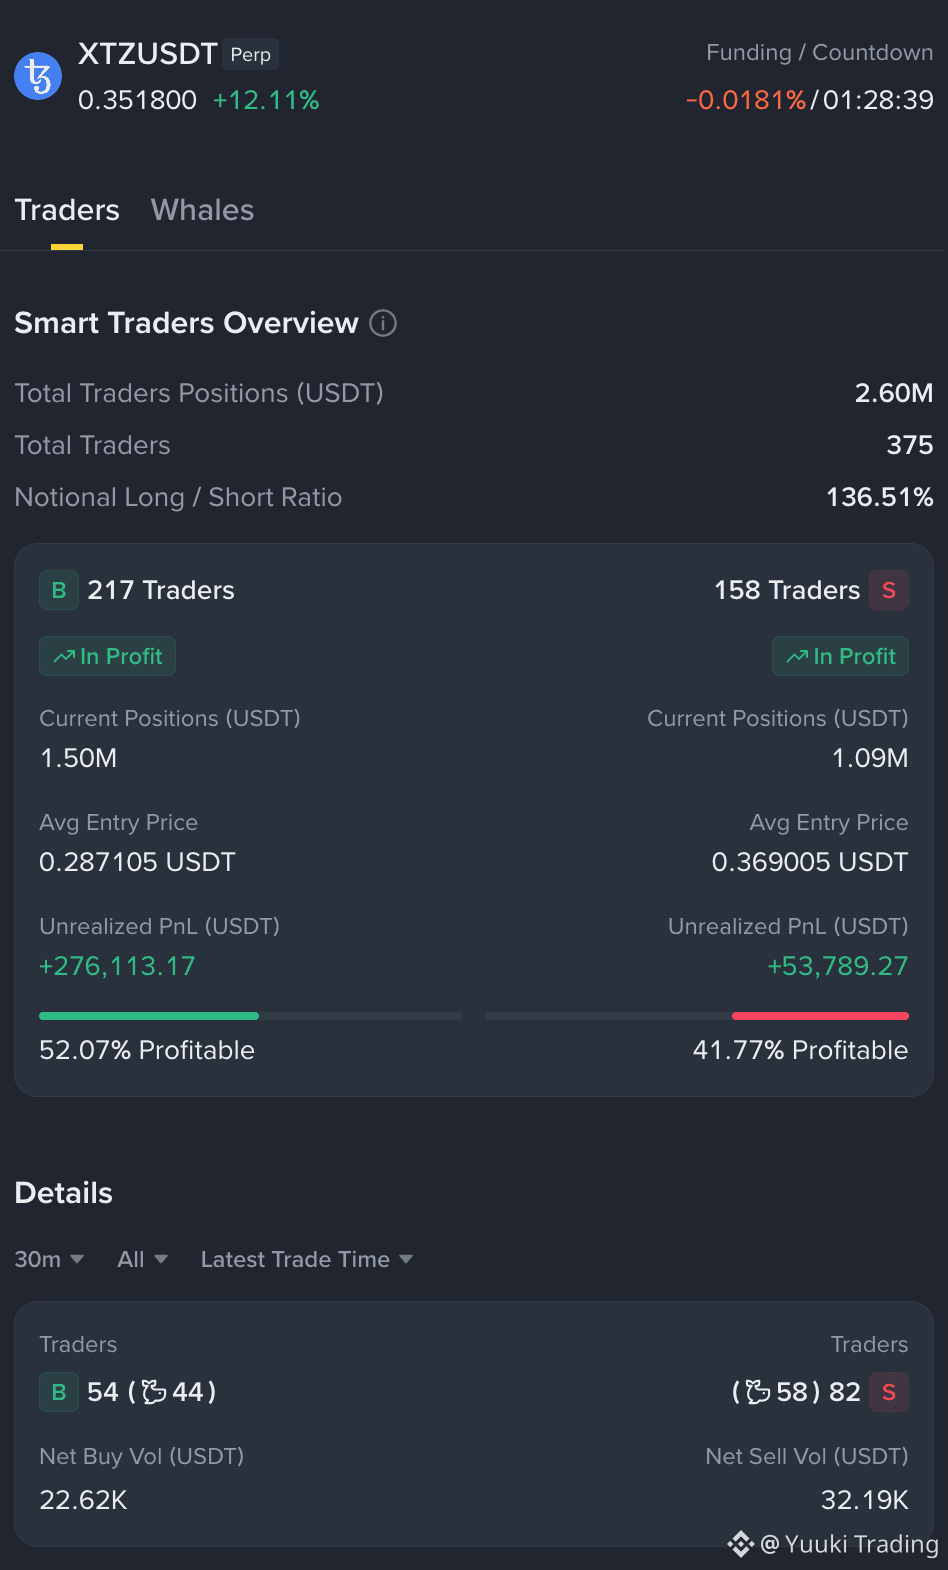
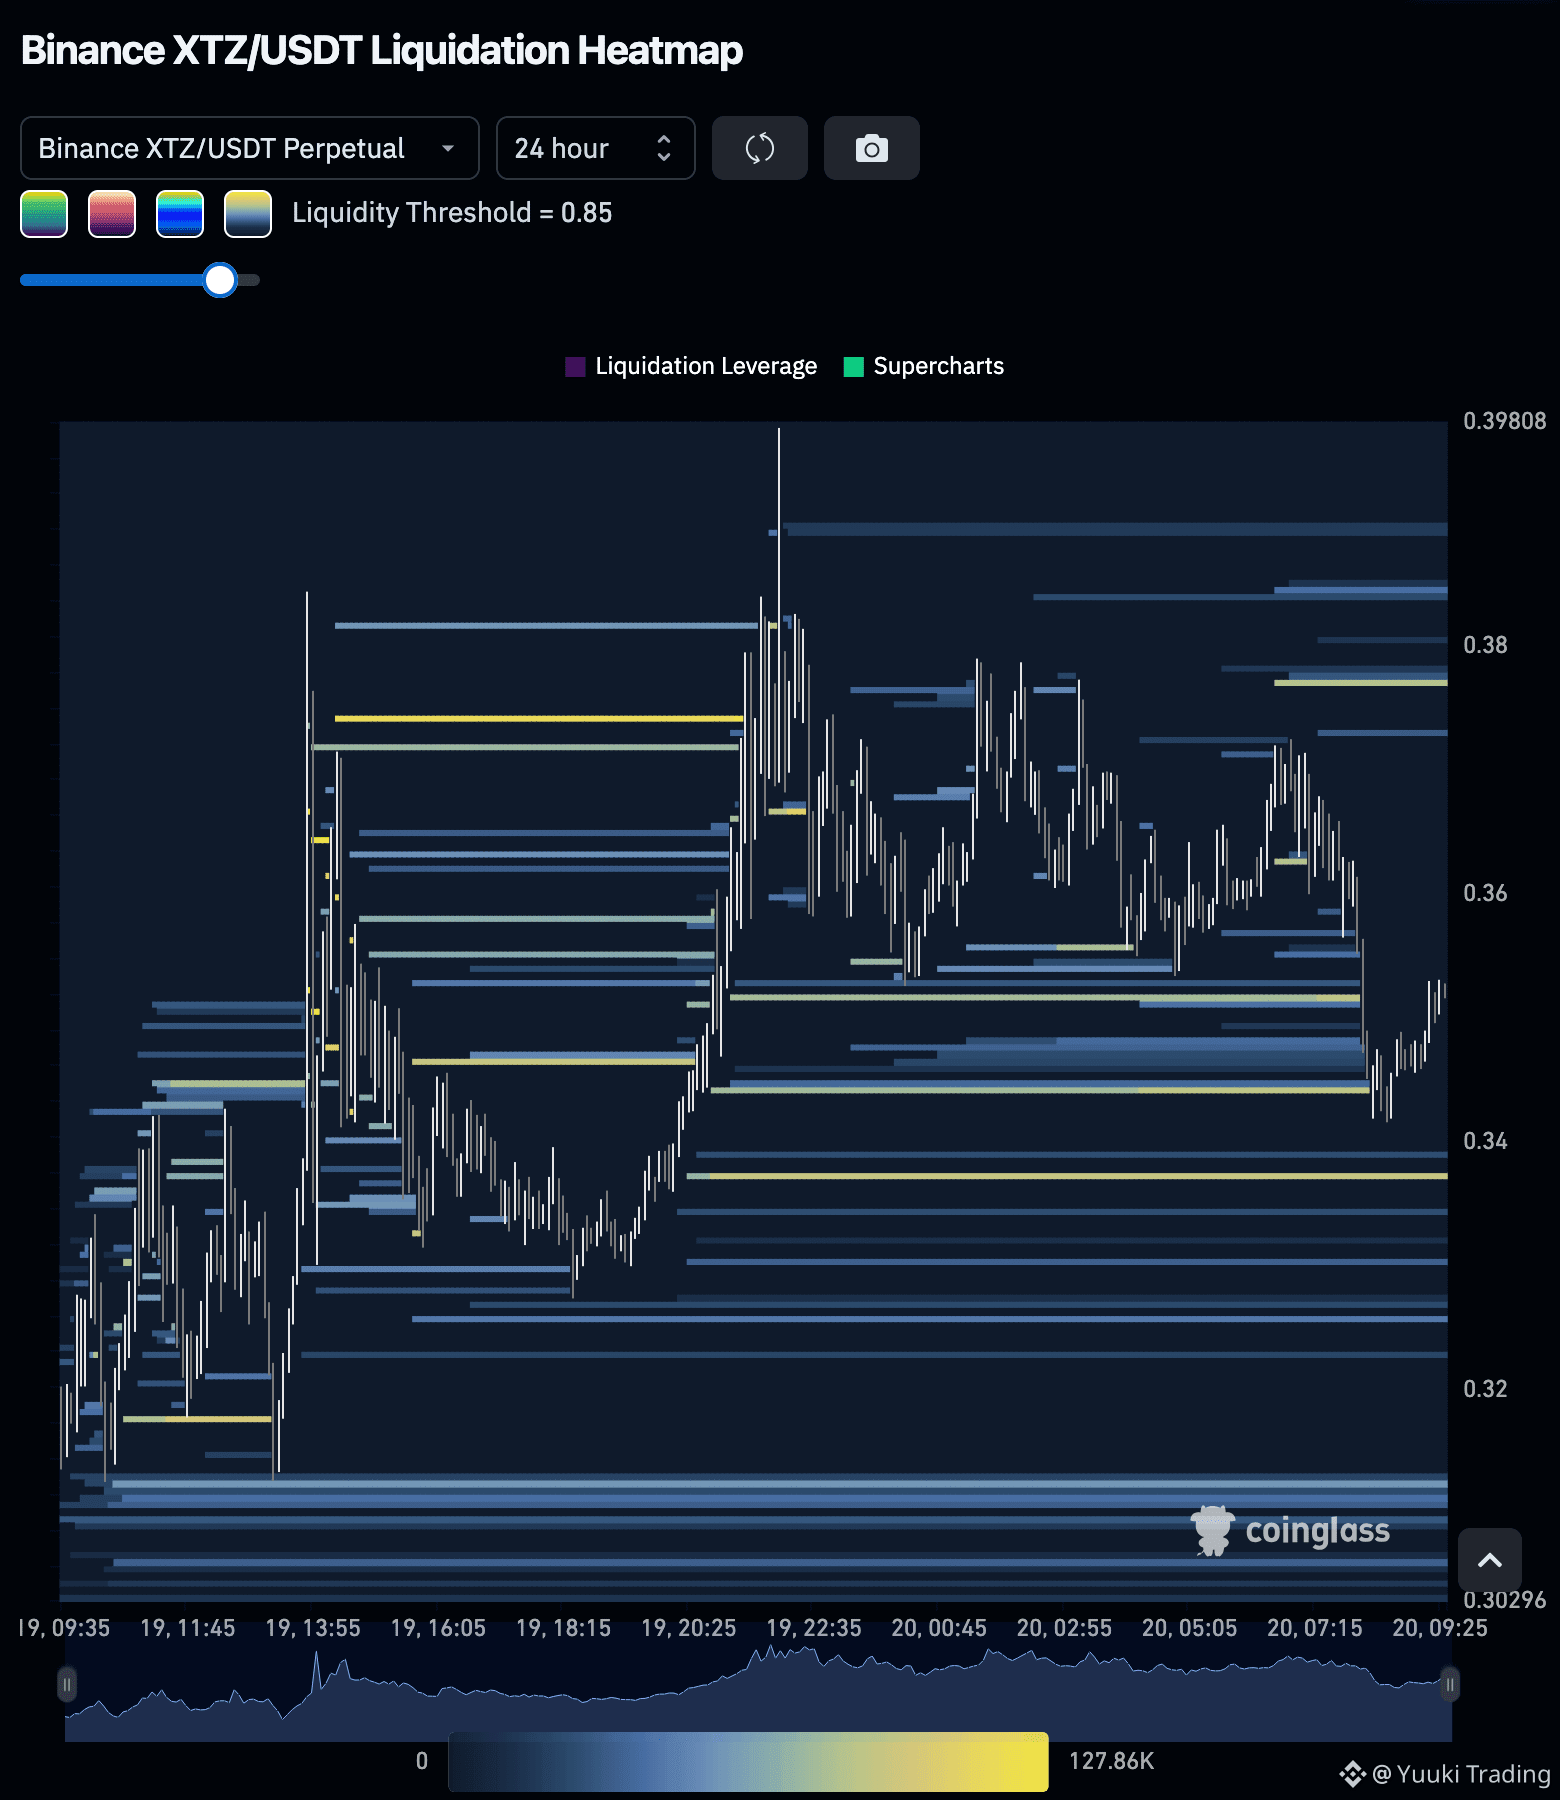
XTZ — With a bullish retest structure in play, buyers hold the advantage, supported by a strong taker buy/sell ratio of 1.5154, though a slight decline in open interest poses a potential risk.
XTZ — LONG NOW
Entry Zone: 0.3508 — 0.3536
• TP1: 0.3652
• TP2: 0.3672
• TP3: 0.379
Stop Loss: 0.3402
The current bullish thesis is bolstered by a price momentum of +1.15% and a robust aggregate-trade delta of 18.11%. However, the minor decrease in open interest suggests some caution among participants. Overall, the combination of strong buyer participation and positive momentum reinforces a favorable outlook for price appreciation.
Disclaimer: This is not financial advice. Always do your own research and take full responsibility for your trading decisions and assets (DYOR).
Trade $XTZ here:
{future}(XTZUSDT)
XTZ — With a bullish retest structure in play, buyers hold the advantage, supported by a strong taker buy/sell ratio of 1.5154, though a slight decline in open interest poses a potential risk.
XTZ — LONG NOW
Entry Zone: 0.3508 — 0.3536
• TP1: 0.3652
• TP2: 0.3672
• TP3: 0.379
Stop Loss: 0.3402
The current bullish thesis is bolstered by a price momentum of +1.15% and a robust aggregate-trade delta of 18.11%. However, the minor decrease in open interest suggests some caution among participants. Overall, the combination of strong buyer participation and positive momentum reinforces a favorable outlook for price appreciation.
Disclaimer: This is not financial advice. Always do your own research and take full responsibility for your trading decisions and assets (DYOR).
Trade $XTZ here:
XTZ — LONG NOW
Entry Zone: 0.3508 — 0.3536
• TP1: 0.3652
• TP2: 0.3672
• TP3: 0.379
Stop Loss: 0.3402
The current bullish thesis is bolstered by a price momentum of +1.15% and a robust aggregate-trade delta of 18.11%. However, the minor decrease in open interest suggests some caution among participants. Overall, the combination of strong buyer participation and positive momentum reinforces a favorable outlook for price appreciation.
Disclaimer: This is not financial advice. Always do your own research and take full responsibility for your trading decisions and assets (DYOR).
Trade $XTZ here:
4
253
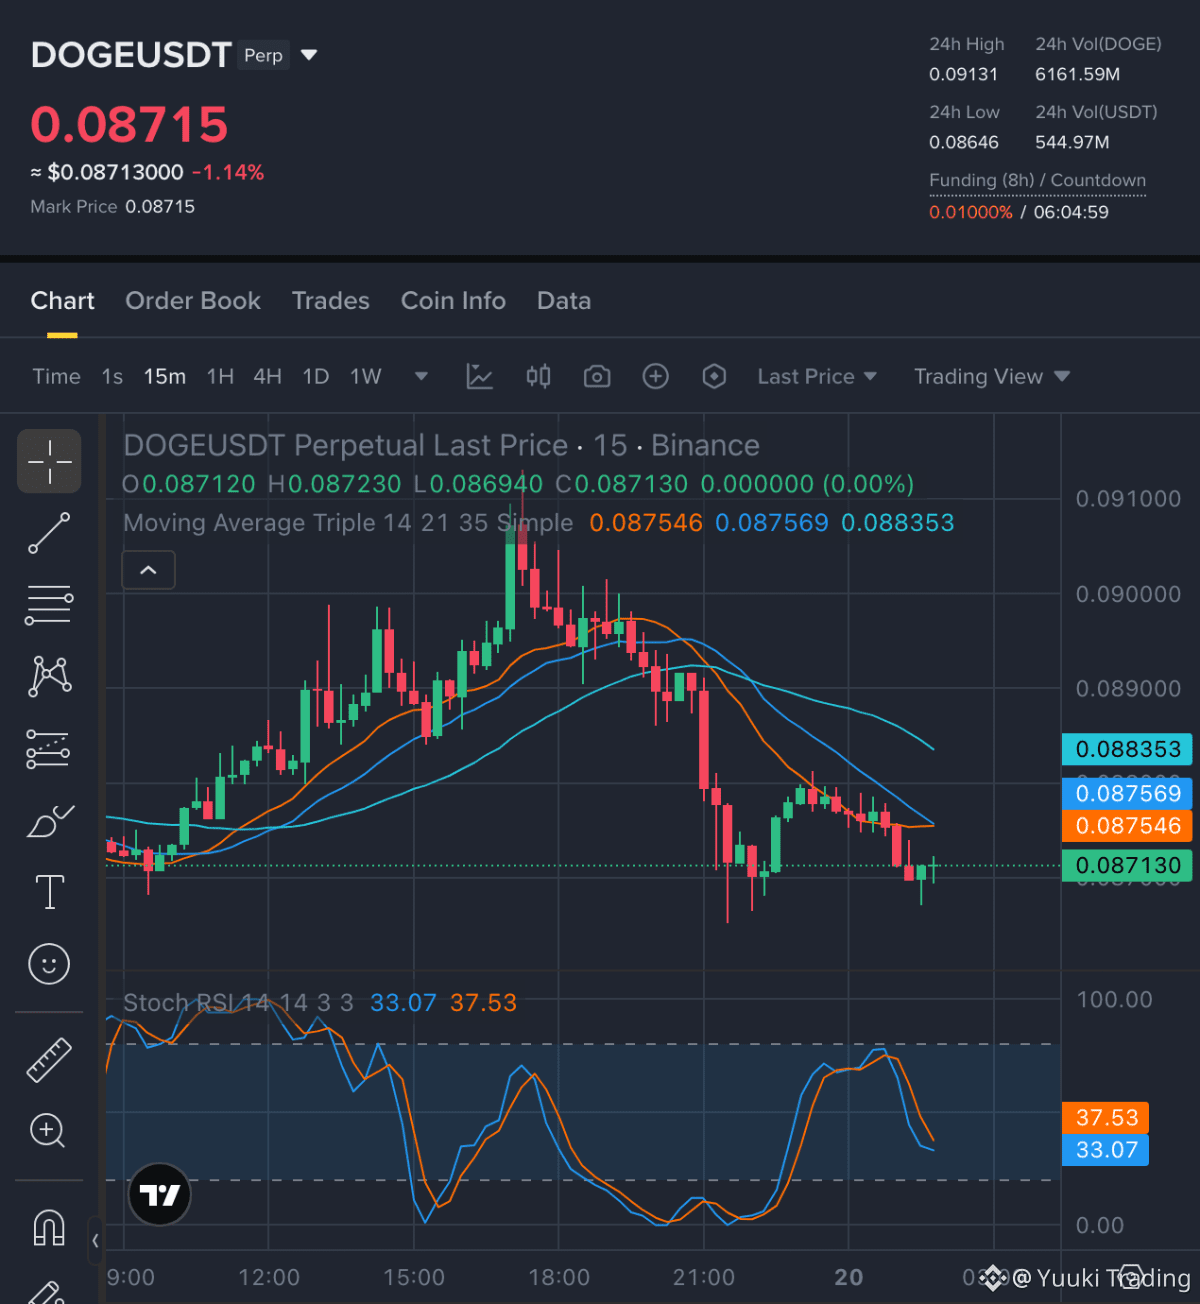
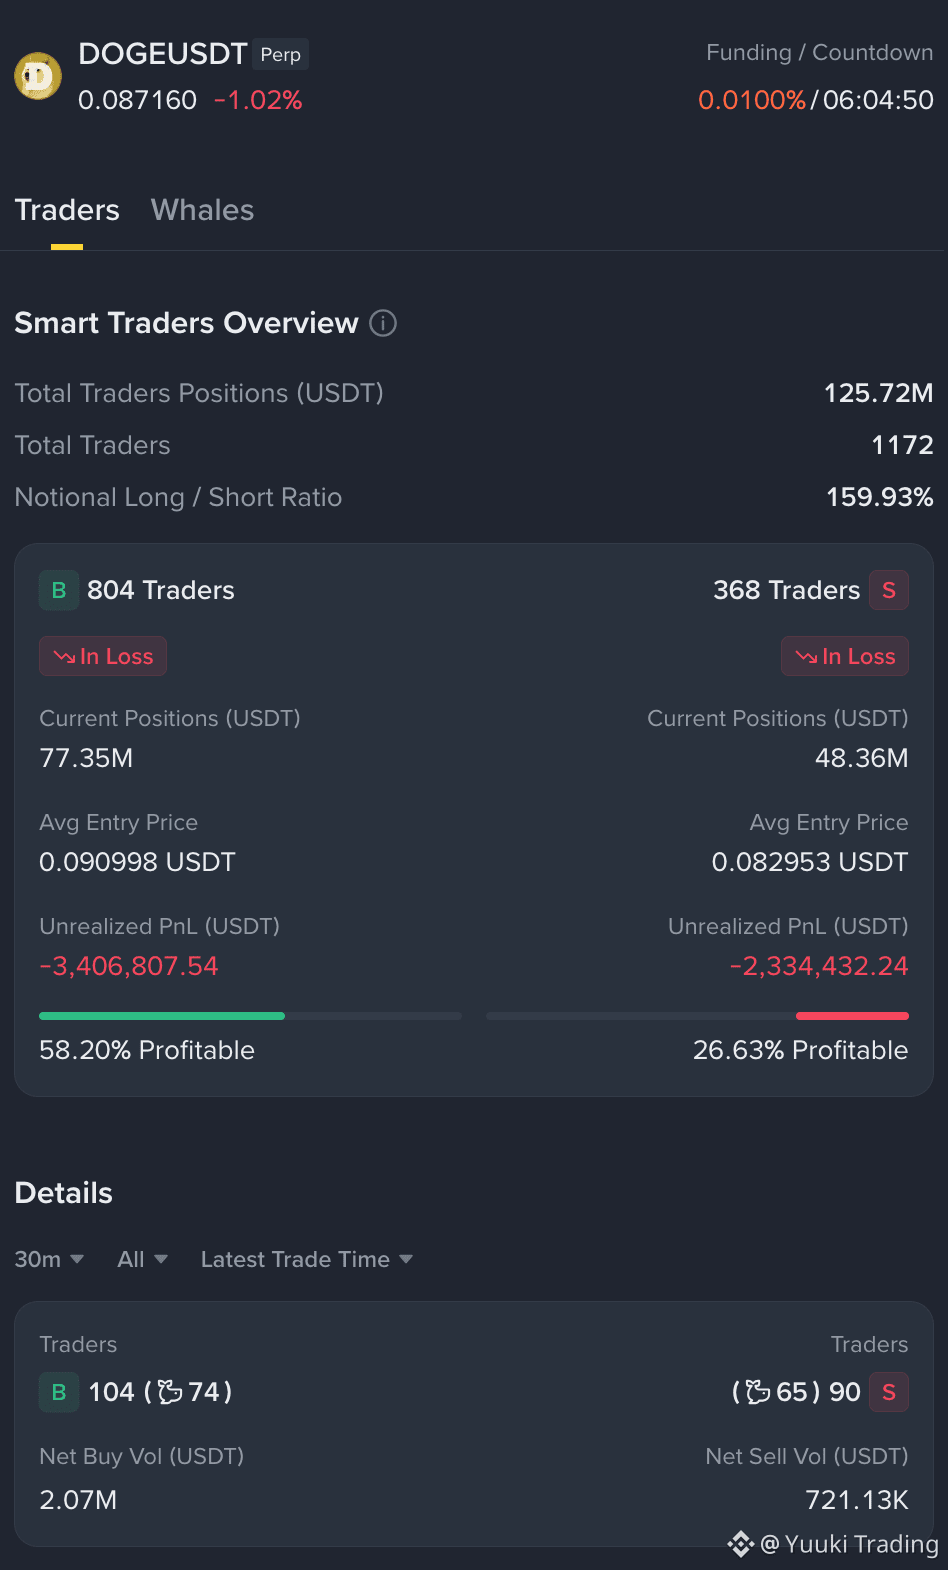
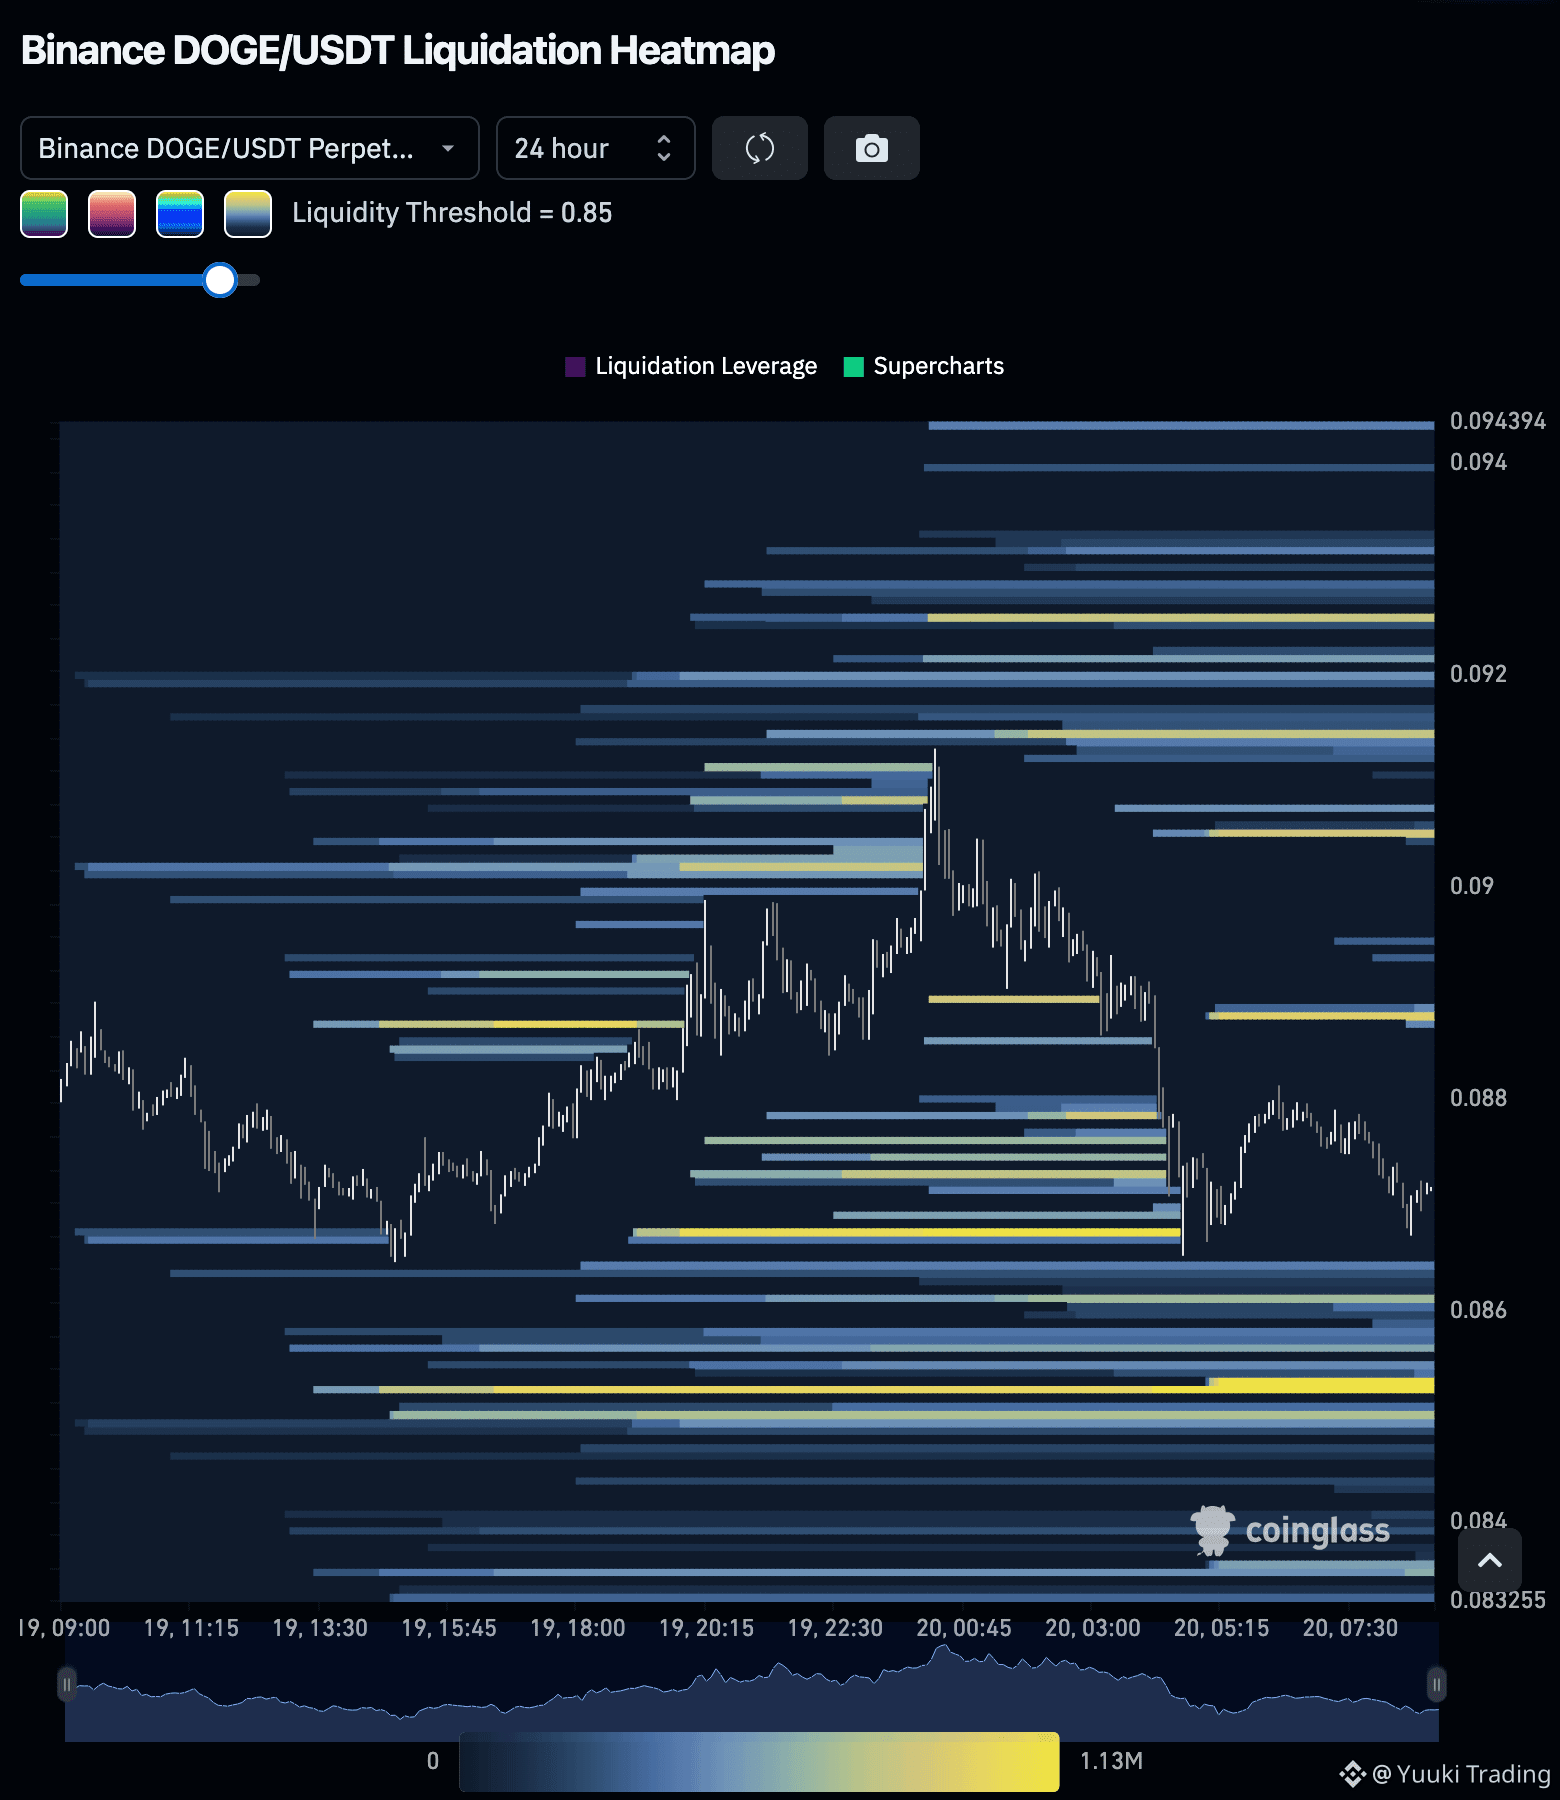
DOGE — Despite a bearish structure in the 15m timeframe, a modest price momentum of +0.17% suggests potential resilience, though weak taker demand reflected by a buy/sell ratio of 0.9609 raises caution.
DOGE — LONG NOW
Entry Zone: 0.08706 — 0.08724
• TP1: 0.08764
• TP2: 0.08813
• TP3: 0.08868
Stop Loss: 0.08639
The current market dynamics indicate a challenging environment for buyers, with a bearish structure dominating the 15m outlook. Although price momentum is slightly positive, the aggregate-trade delta of 14.13% and a high top-trader position ratio of 3.9160 suggest that sellers maintain control, creating a complex scenario for any potential upside thesis. Rising open interest may also indicate increasing participation, but the overall risk remains elevated due to subdued demand.
Disclaimer: This is not financial advice. Always do your own research and take full responsibility for your trading decisions and assets (DYOR).
Trade $DOGE here:
{future}(DOGEUSDT)
DOGE — Despite a bearish structure in the 15m timeframe, a modest price momentum of +0.17% suggests potential resilience, though weak taker demand reflected by a buy/sell ratio of 0.9609 raises caution.
DOGE — LONG NOW
Entry Zone: 0.08706 — 0.08724
• TP1: 0.08764
• TP2: 0.08813
• TP3: 0.08868
Stop Loss: 0.08639
The current market dynamics indicate a challenging environment for buyers, with a bearish structure dominating the 15m outlook. Although price momentum is slightly positive, the aggregate-trade delta of 14.13% and a high top-trader position ratio of 3.9160 suggest that sellers maintain control, creating a complex scenario for any potential upside thesis. Rising open interest may also indicate increasing participation, but the overall risk remains elevated due to subdued demand.
Disclaimer: This is not financial advice. Always do your own research and take full responsibility for your trading decisions and assets (DYOR).
Trade $DOGE here:
DOGE — LONG NOW
Entry Zone: 0.08706 — 0.08724
• TP1: 0.08764
• TP2: 0.08813
• TP3: 0.08868
Stop Loss: 0.08639
The current market dynamics indicate a challenging environment for buyers, with a bearish structure dominating the 15m outlook. Although price momentum is slightly positive, the aggregate-trade delta of 14.13% and a high top-trader position ratio of 3.9160 suggest that sellers maintain control, creating a complex scenario for any potential upside thesis. Rising open interest may also indicate increasing participation, but the overall risk remains elevated due to subdued demand.
Disclaimer: This is not financial advice. Always do your own research and take full responsibility for your trading decisions and assets (DYOR).
Trade $DOGE here:
3
266
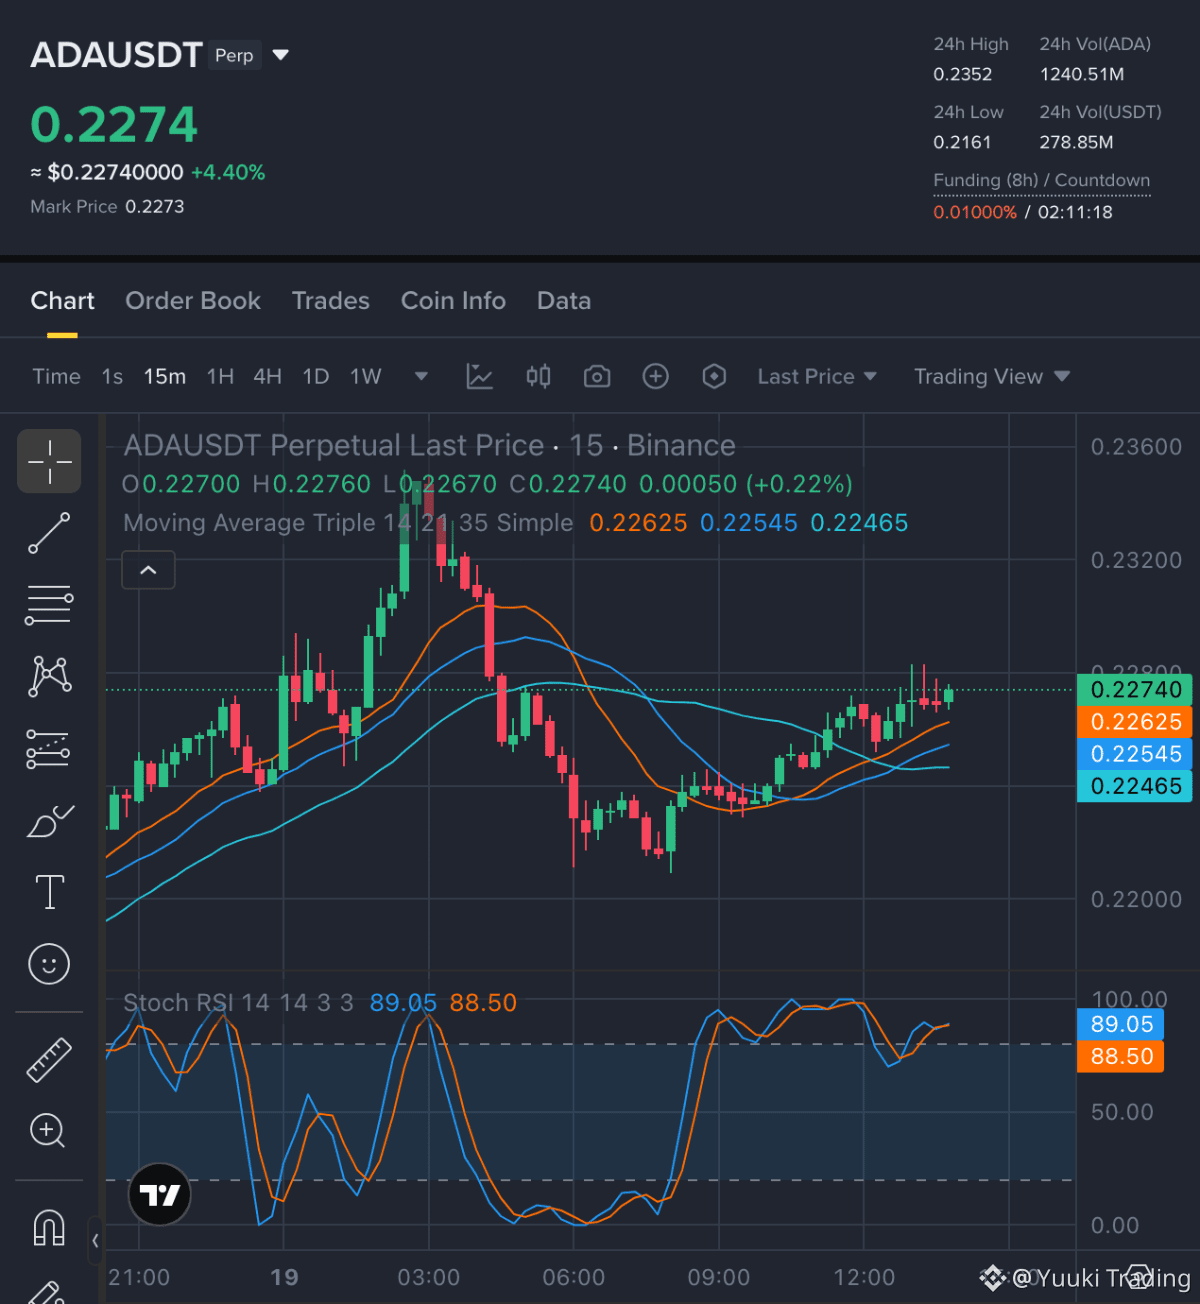
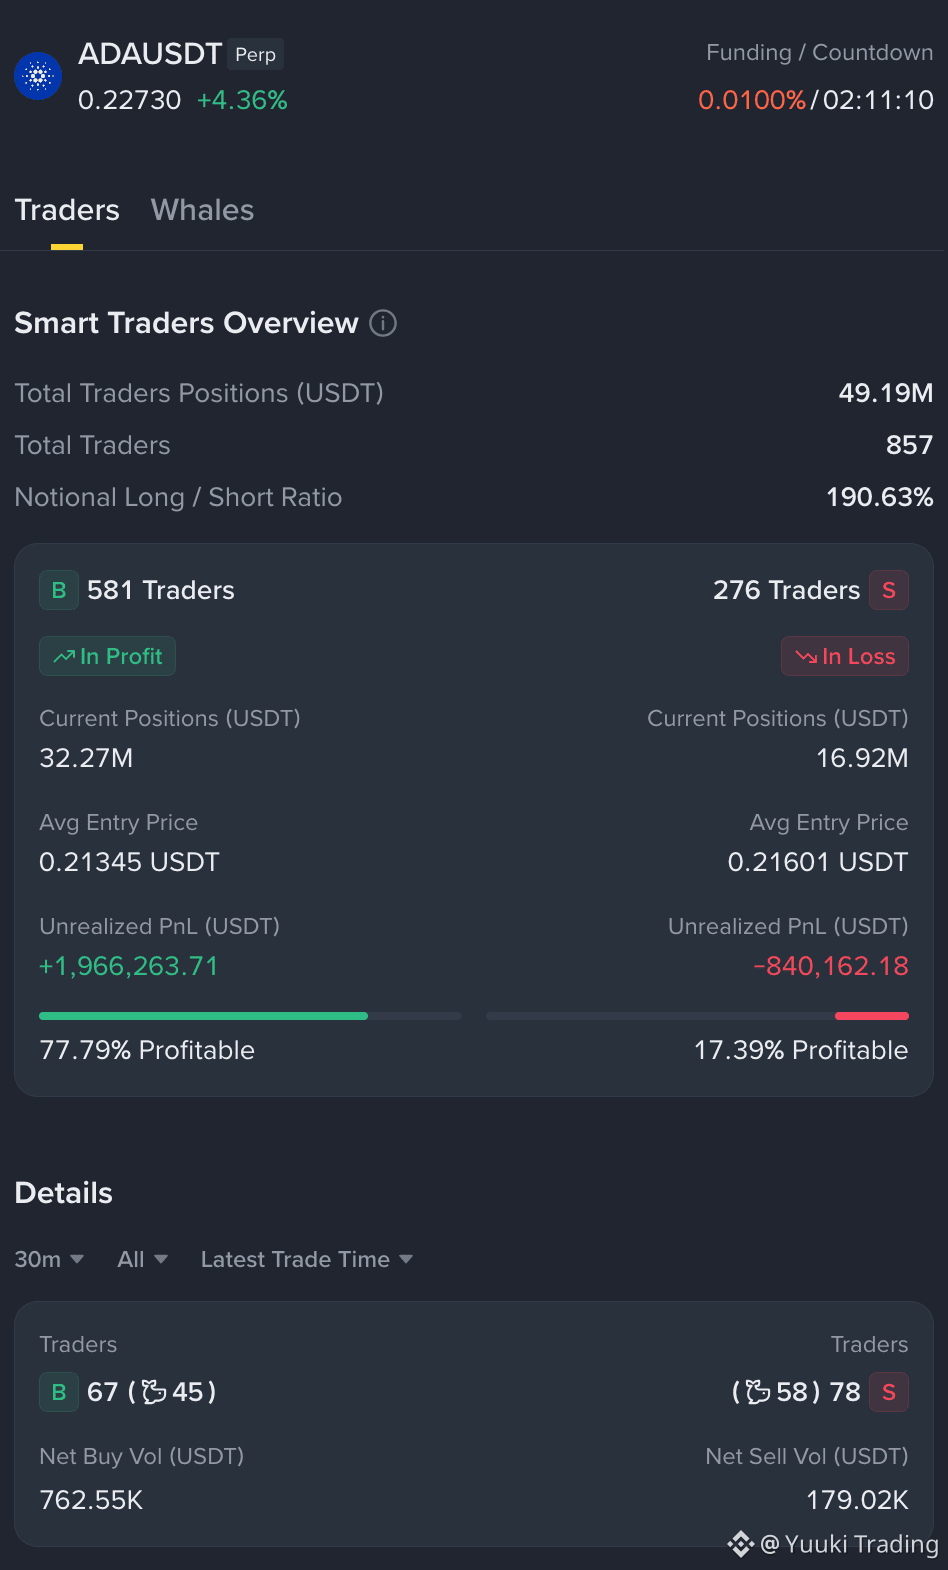
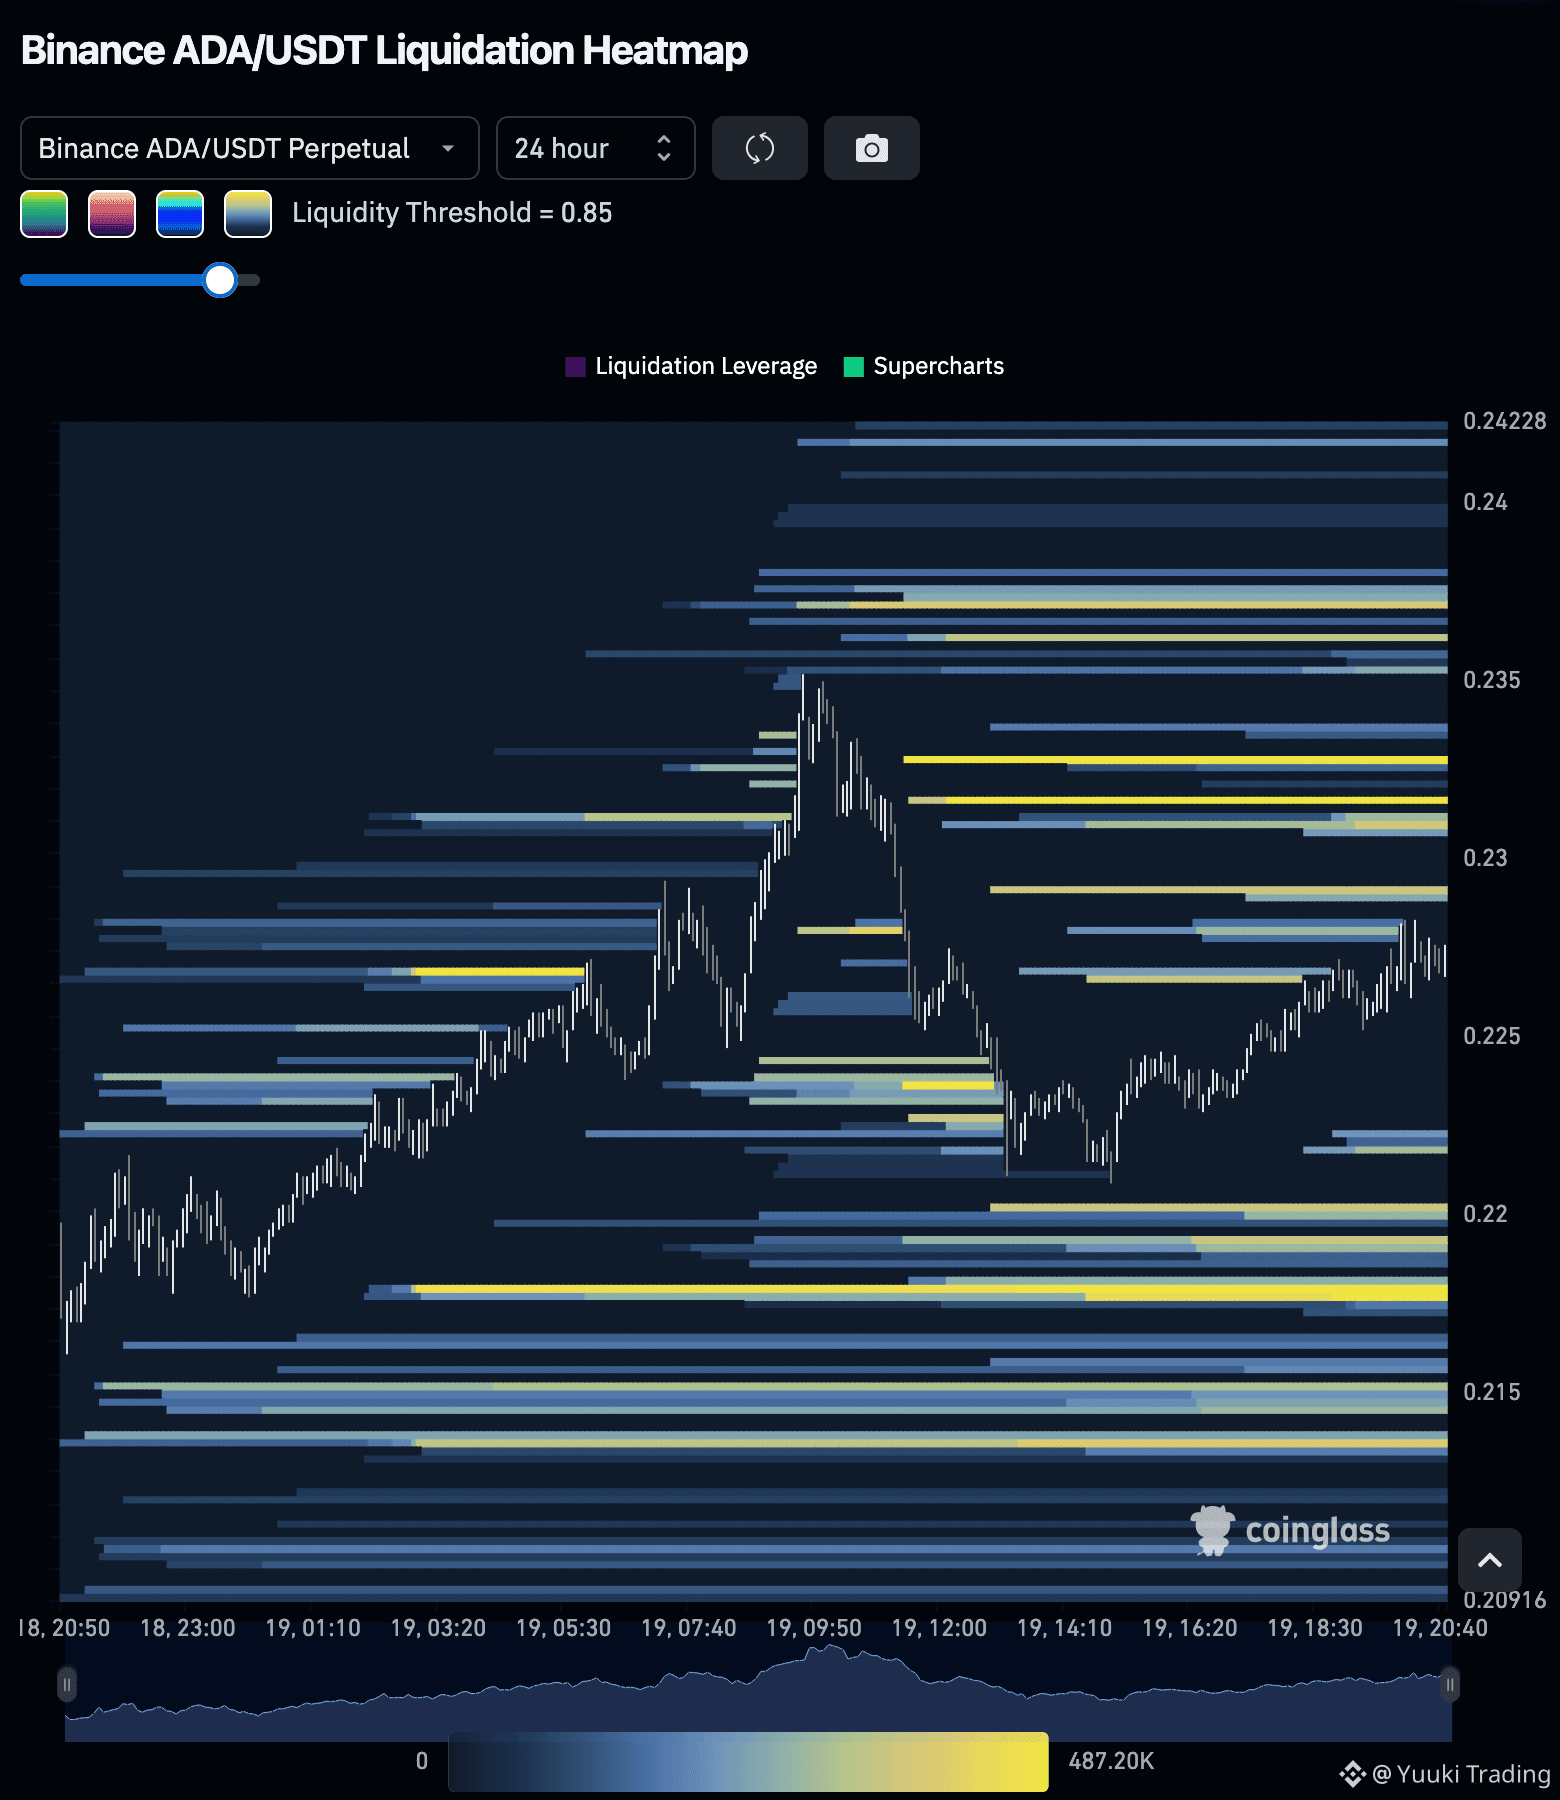
ADA — With a bullish structure prevailing, buyers currently have the advantage, supported by a top-trader position ratio of 1.6593, although weak taker demand indicates potential caution.
ADA — LONG NOW
Entry Zone: 0.227 — 0.2276
• TP1: 0.2294
• TP2: 0.2309
• TP3: 0.233
Stop Loss: 0.2244
The current bullish bias is supported by the 15m structure, despite the aggregate-trade delta showing a decline of 15.46%. With the taker buy/sell ratio at 0.8151, indicating weaker demand from buyers, the overall momentum remains neutral at 0.00%. This mixed participation suggests that while the outlook is bullish, caution is warranted due to the subdued demand signals.
Disclaimer: This is not financial advice. Always do your own research and take full responsibility for your trading decisions and assets (DYOR).
Trade $ADA here:
{future}(ADAUSDT)
ADA — With a bullish structure prevailing, buyers currently have the advantage, supported by a top-trader position ratio of 1.6593, although weak taker demand indicates potential caution.
ADA — LONG NOW
Entry Zone: 0.227 — 0.2276
• TP1: 0.2294
• TP2: 0.2309
• TP3: 0.233
Stop Loss: 0.2244
The current bullish bias is supported by the 15m structure, despite the aggregate-trade delta showing a decline of 15.46%. With the taker buy/sell ratio at 0.8151, indicating weaker demand from buyers, the overall momentum remains neutral at 0.00%. This mixed participation suggests that while the outlook is bullish, caution is warranted due to the subdued demand signals.
Disclaimer: This is not financial advice. Always do your own research and take full responsibility for your trading decisions and assets (DYOR).
Trade $ADA here:
ADA — LONG NOW
Entry Zone: 0.227 — 0.2276
• TP1: 0.2294
• TP2: 0.2309
• TP3: 0.233
Stop Loss: 0.2244
The current bullish bias is supported by the 15m structure, despite the aggregate-trade delta showing a decline of 15.46%. With the taker buy/sell ratio at 0.8151, indicating weaker demand from buyers, the overall momentum remains neutral at 0.00%. This mixed participation suggests that while the outlook is bullish, caution is warranted due to the subdued demand signals.
Disclaimer: This is not financial advice. Always do your own research and take full responsibility for your trading decisions and assets (DYOR).
Trade $ADA here:
1
268
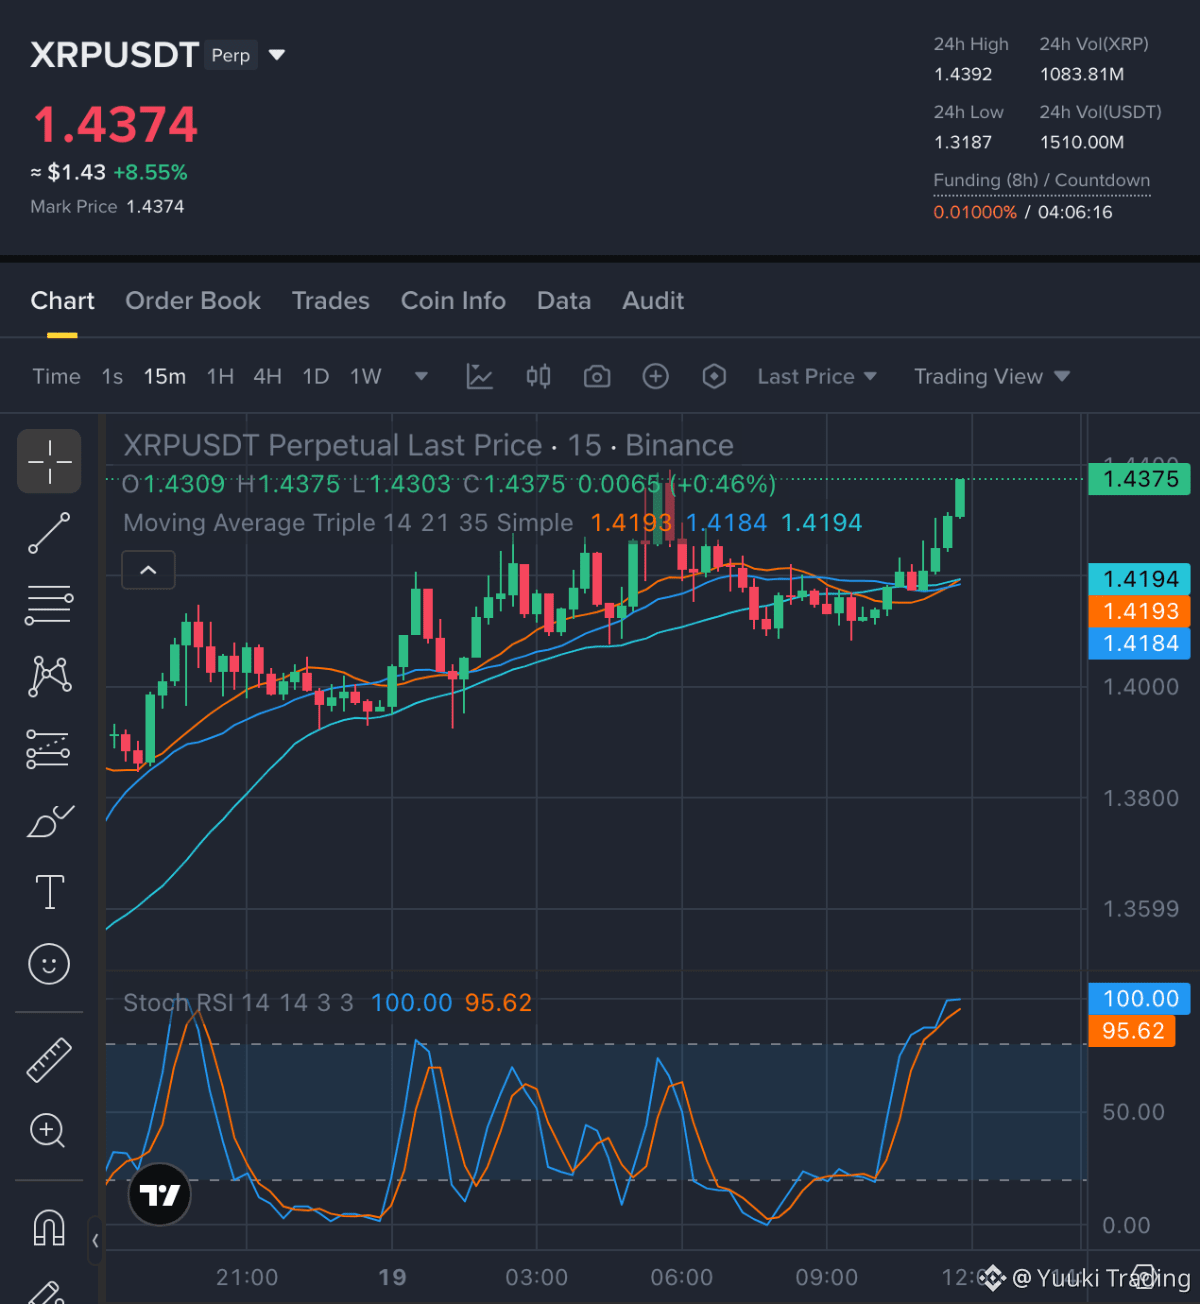
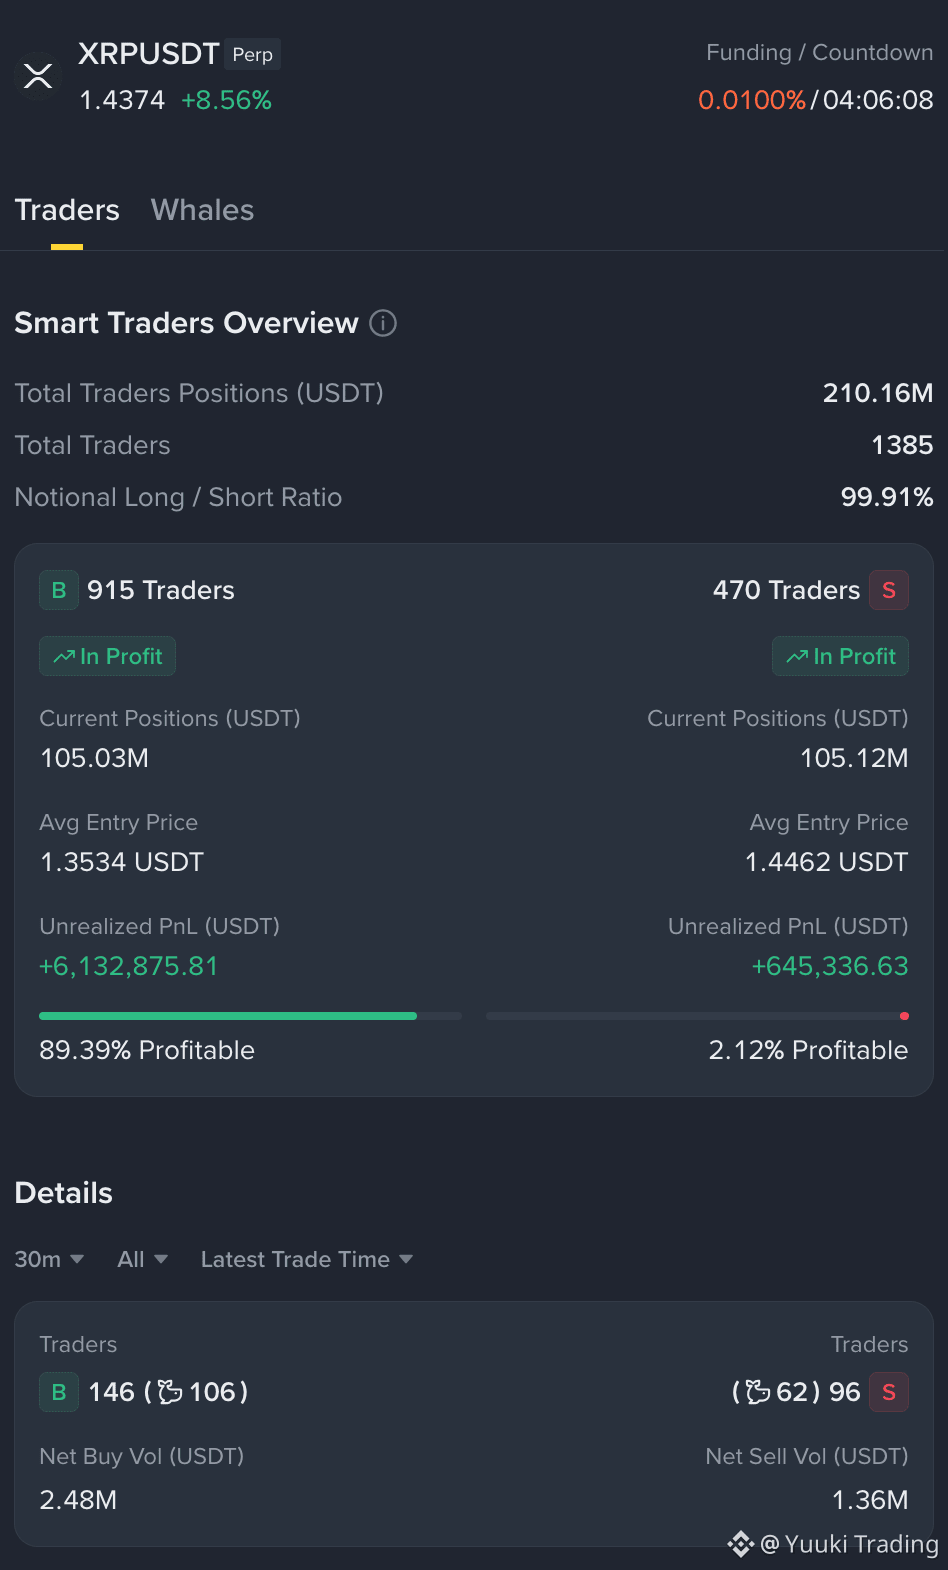
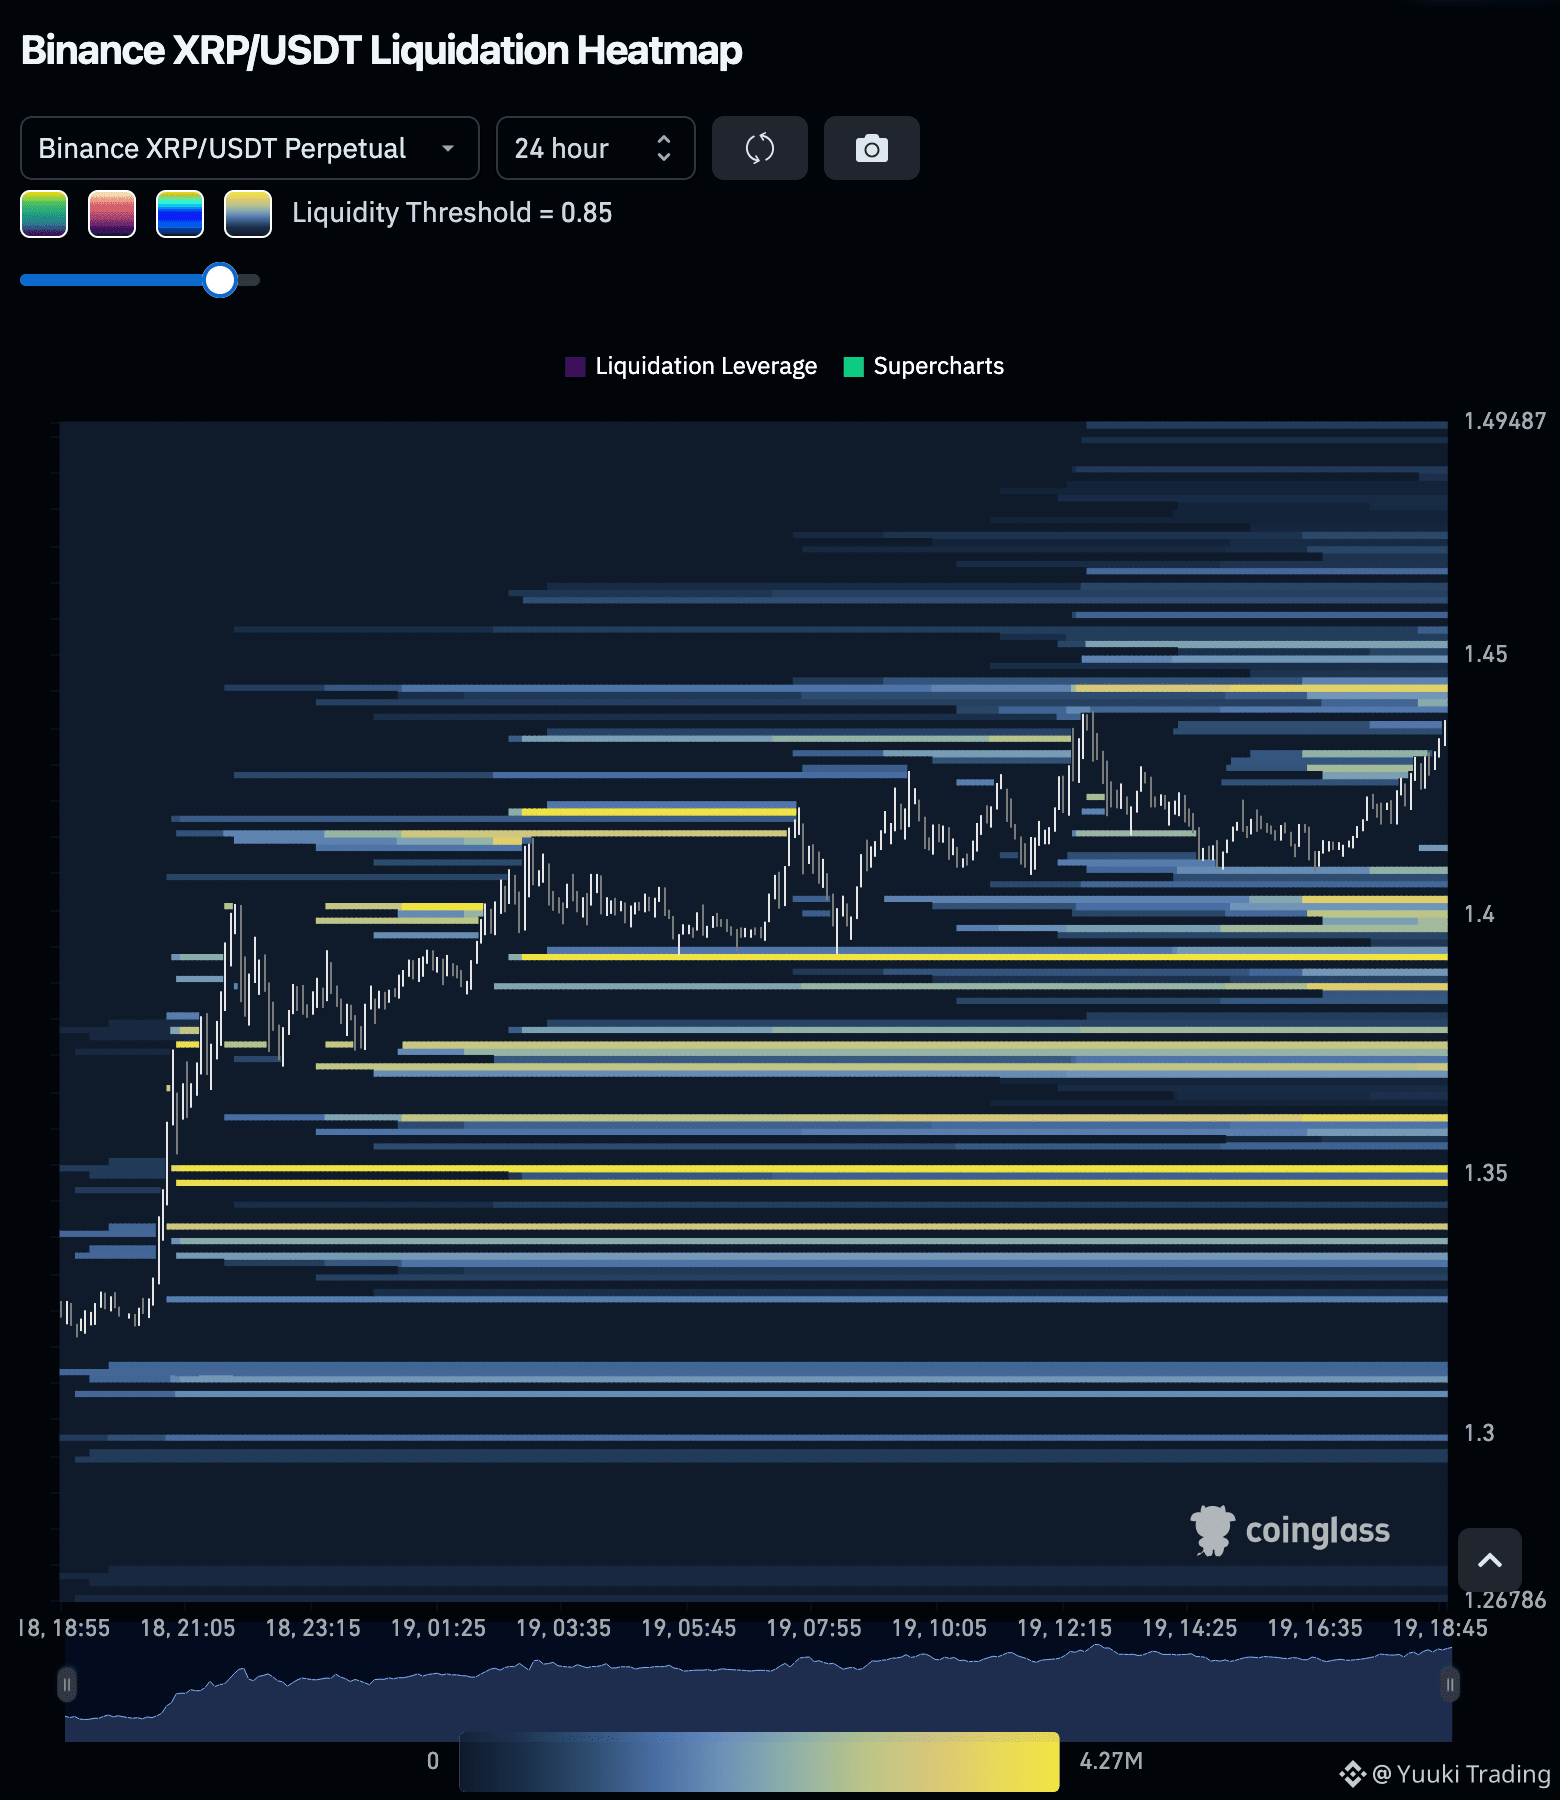
XRP — Buyers currently hold the advantage as the market shows a bullish structure, supported by a strong aggregate-trade delta of 15.23%, though the slight decline in open interest may pose some risk.
XRP — LONG NOW
Entry Zone: 1.4353 — 1.4381
• TP1: 1.4521
• TP2: 1.4623
• TP3: 1.4777
Stop Loss: 1.4162
The bullish structure is reinforced by a price momentum of +0.41% and a taker buy/sell ratio of 1.2305, indicating strong buyer participation. However, the slight decrease in open interest could suggest some caution among participants, which may temper enthusiasm. Overall, the prevailing metrics support a positive outlook, although vigilance is warranted due to the open interest shift.
Disclaimer: This is not financial advice. Always do your own research and take full responsibility for your trading decisions and assets (DYOR).
Trade $XRP here:
{future}(XRPUSDT)
XRP — Buyers currently hold the advantage as the market shows a bullish structure, supported by a strong aggregate-trade delta of 15.23%, though the slight decline in open interest may pose some risk.
XRP — LONG NOW
Entry Zone: 1.4353 — 1.4381
• TP1: 1.4521
• TP2: 1.4623
• TP3: 1.4777
Stop Loss: 1.4162
The bullish structure is reinforced by a price momentum of +0.41% and a taker buy/sell ratio of 1.2305, indicating strong buyer participation. However, the slight decrease in open interest could suggest some caution among participants, which may temper enthusiasm. Overall, the prevailing metrics support a positive outlook, although vigilance is warranted due to the open interest shift.
Disclaimer: This is not financial advice. Always do your own research and take full responsibility for your trading decisions and assets (DYOR).
Trade $XRP here:
XRP — LONG NOW
Entry Zone: 1.4353 — 1.4381
• TP1: 1.4521
• TP2: 1.4623
• TP3: 1.4777
Stop Loss: 1.4162
The bullish structure is reinforced by a price momentum of +0.41% and a taker buy/sell ratio of 1.2305, indicating strong buyer participation. However, the slight decrease in open interest could suggest some caution among participants, which may temper enthusiasm. Overall, the prevailing metrics support a positive outlook, although vigilance is warranted due to the open interest shift.
Disclaimer: This is not financial advice. Always do your own research and take full responsibility for your trading decisions and assets (DYOR).
Trade $XRP here:
1
231
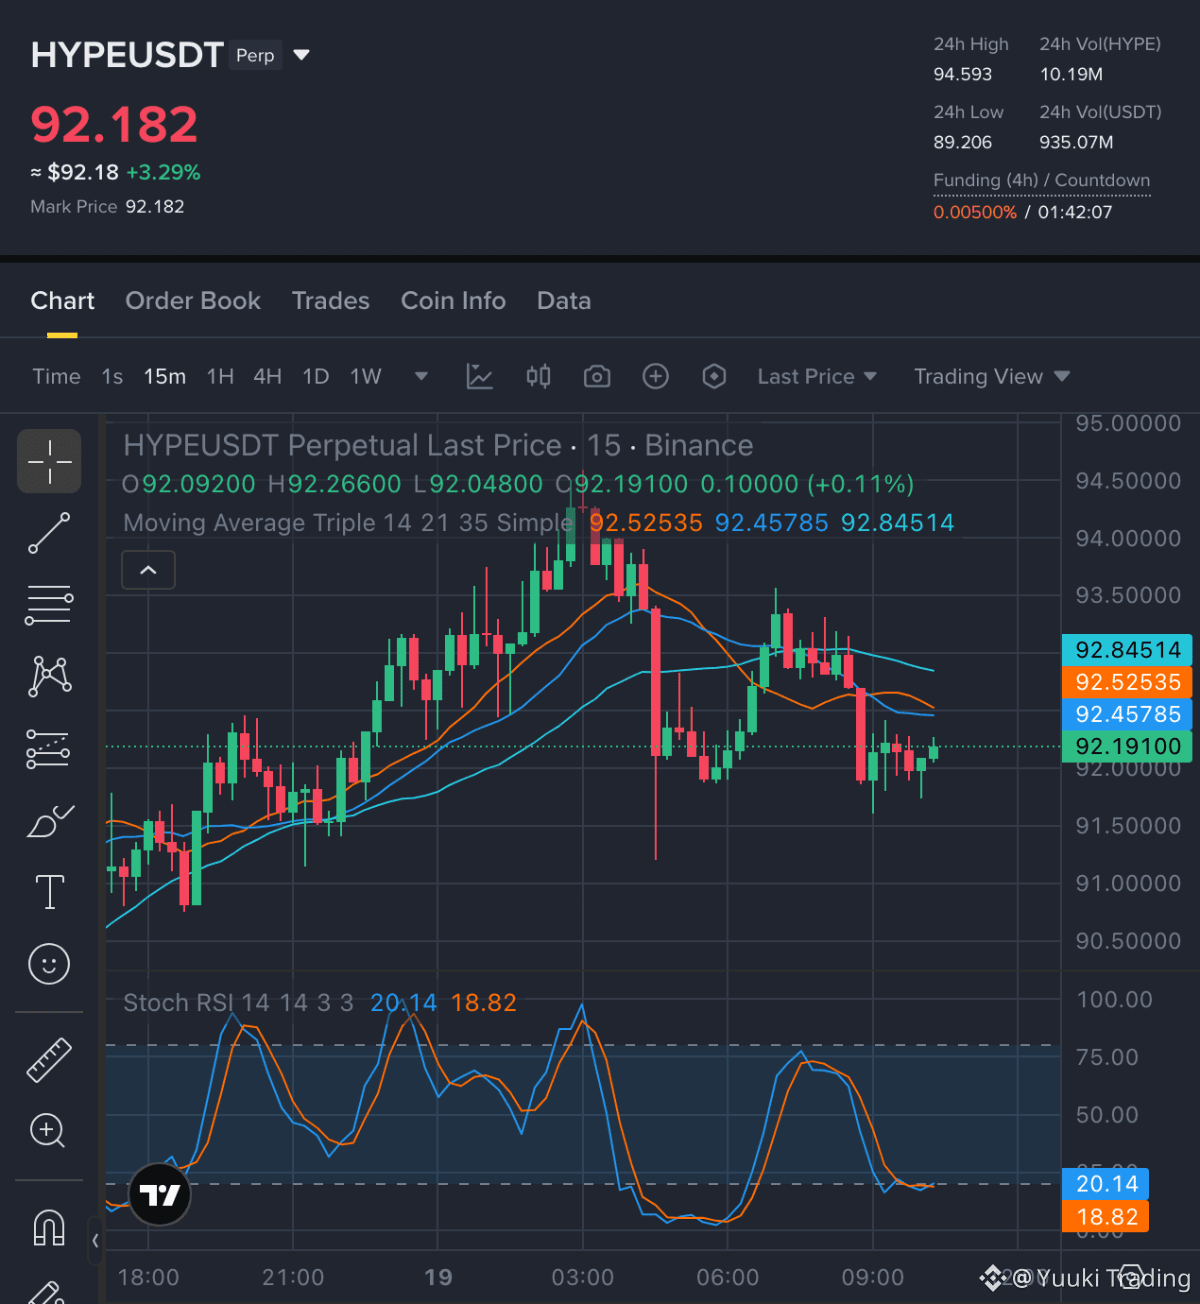
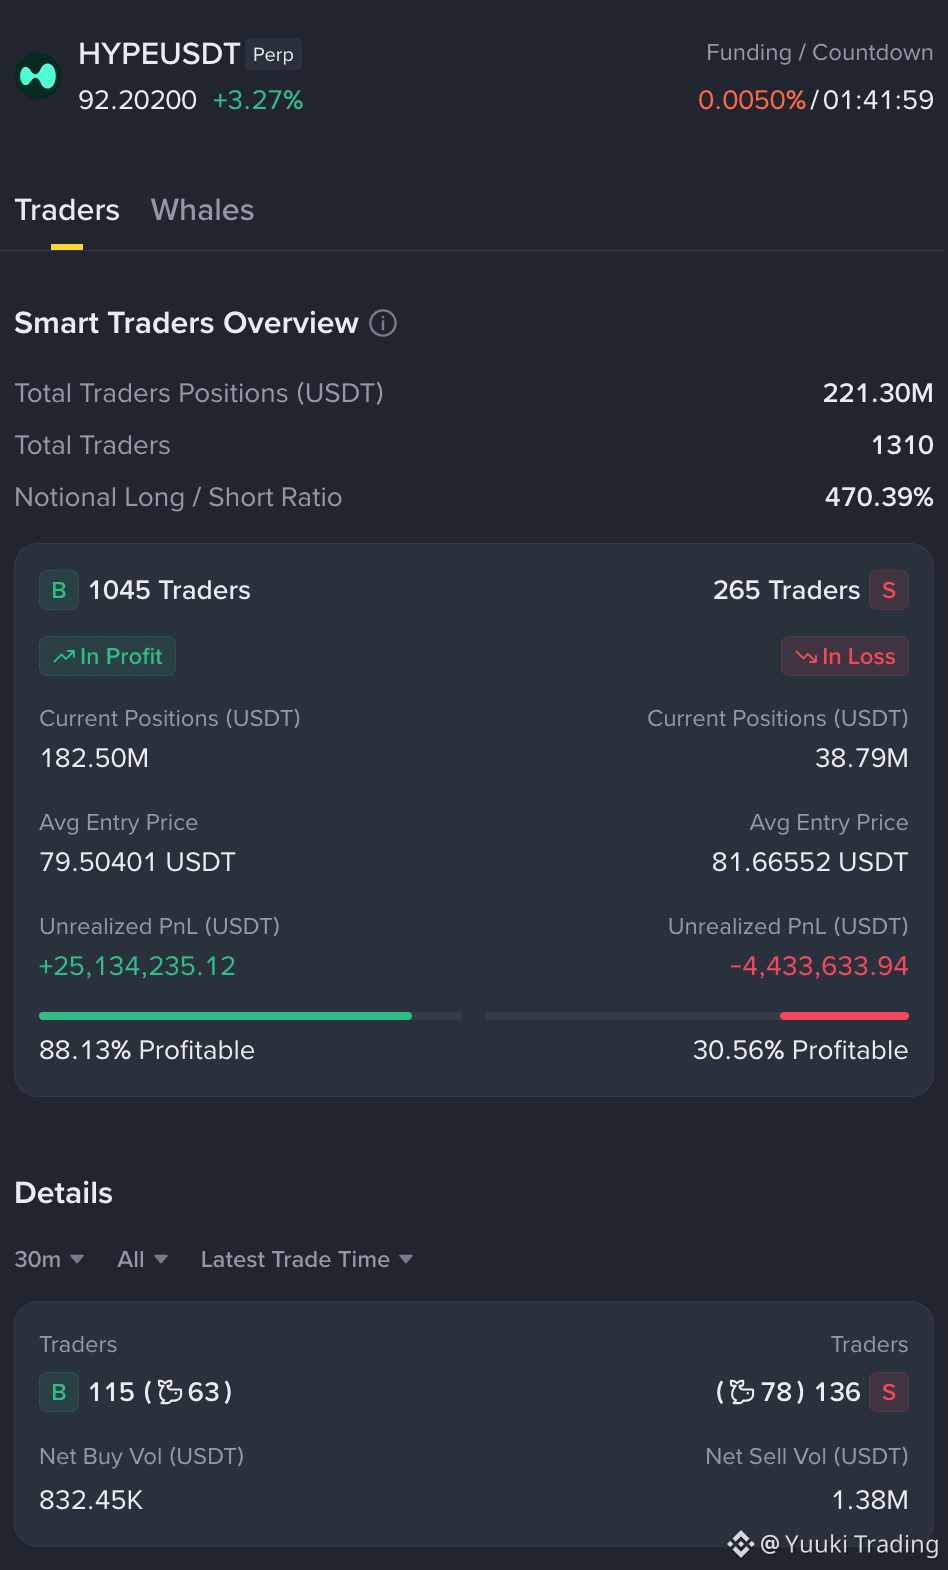
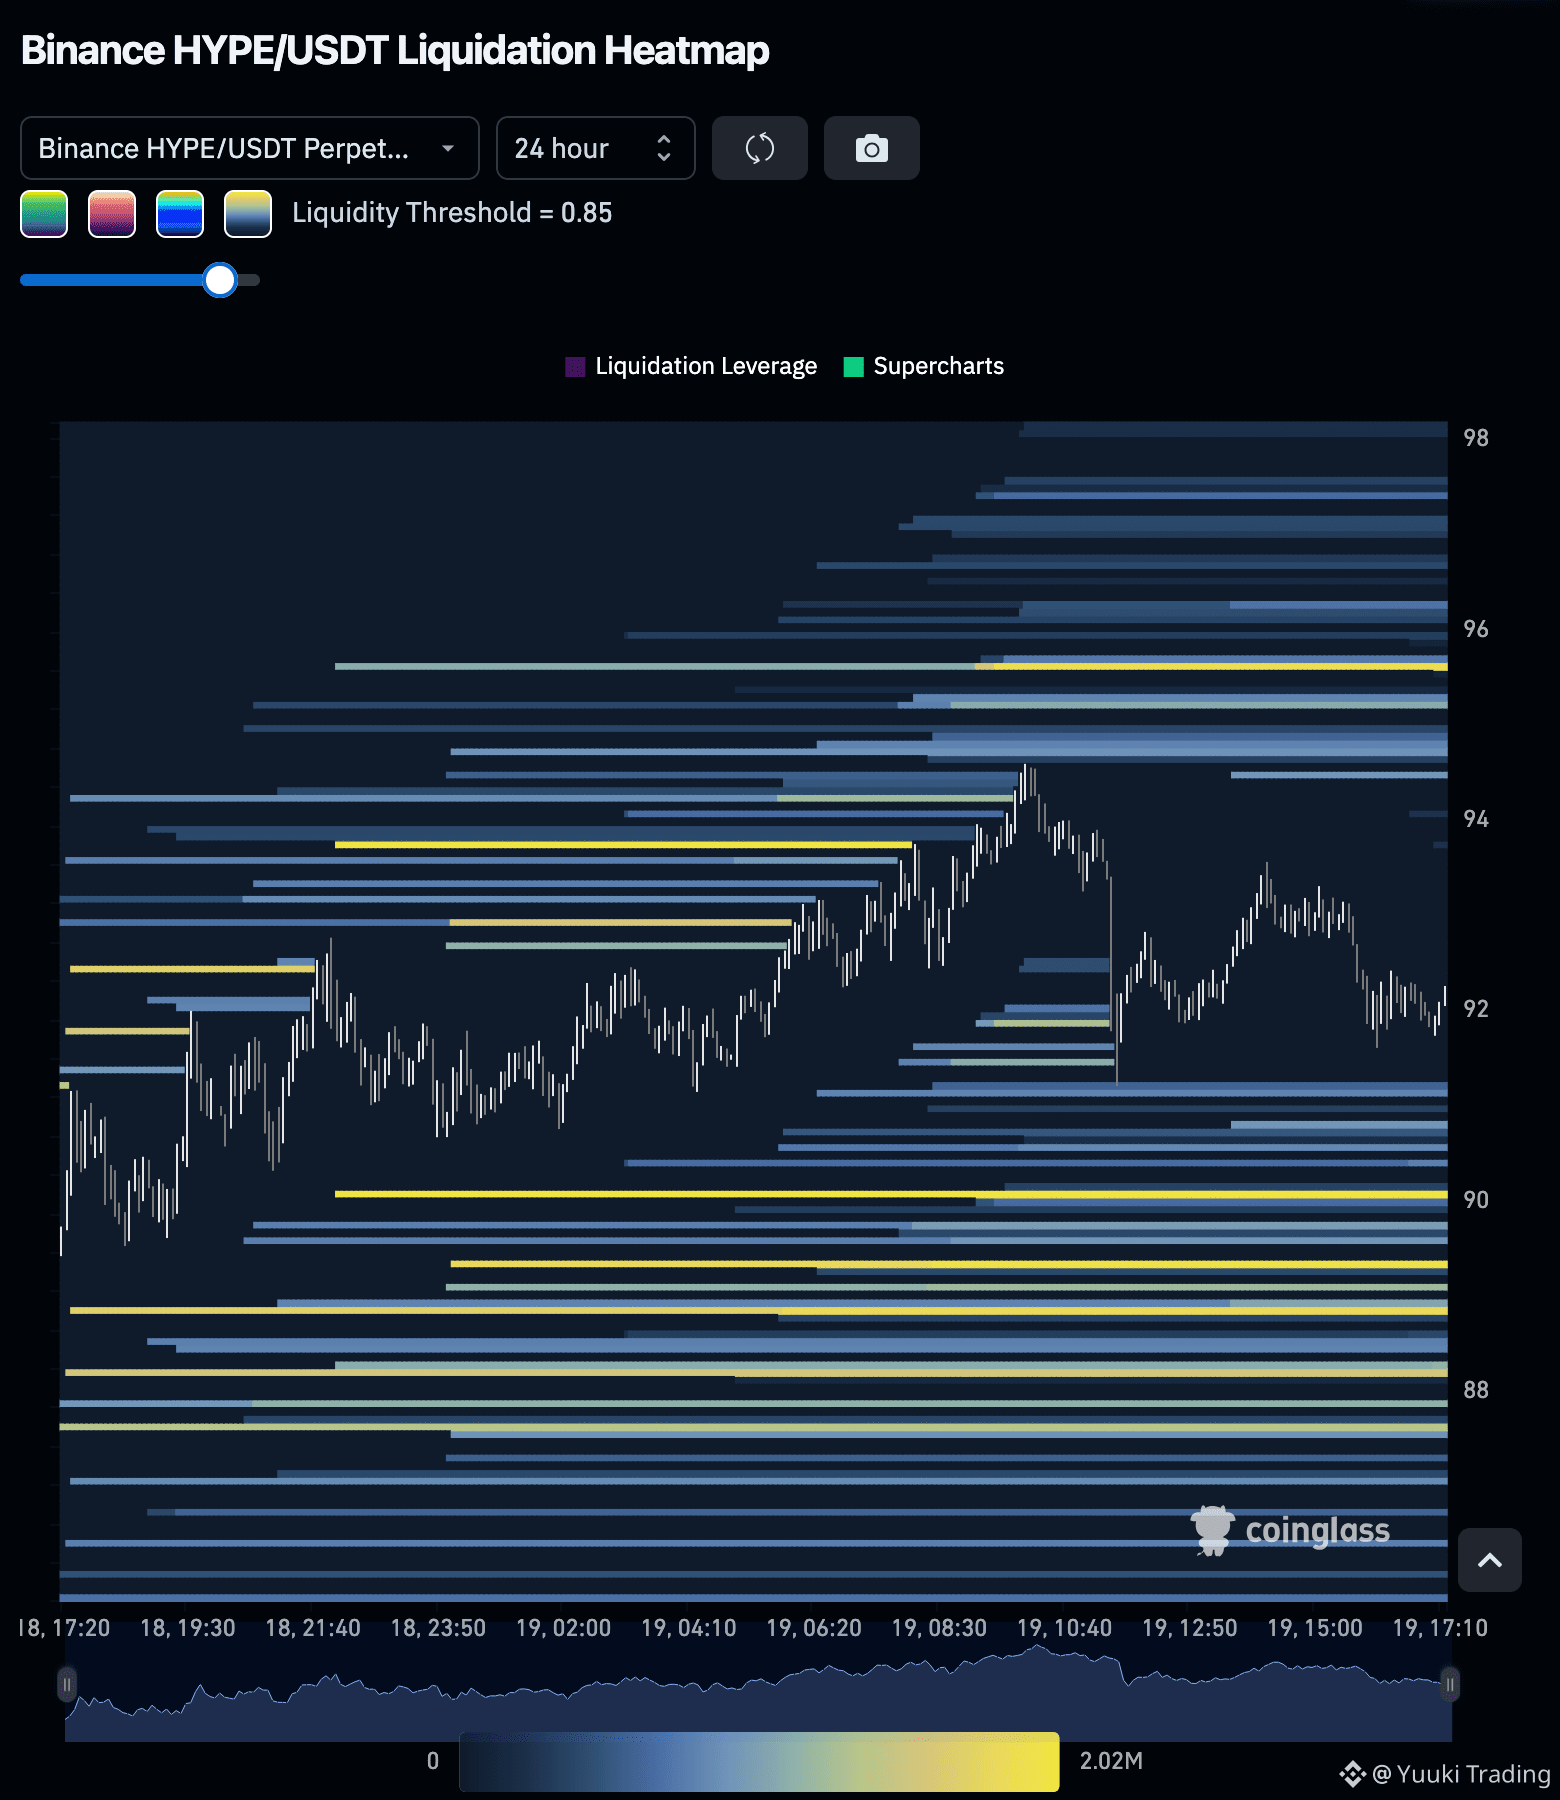
HYPE — The market remains in a neutral structure, with buyers holding an advantage supported by a positive price momentum of +0.12%, despite weak taker demand indicated by the 0.7258 ratio.
HYPE — LONG NOW
Entry Zone: 91.97 — 92.168
• TP1: 92.766
• TP2: 93.563
• TP3: 94.593
Stop Loss: 90.907
The neutral structure combined with a slight positive price momentum suggests cautious optimism among buyers. However, the weaker taker buy/sell ratio of 0.7258 indicates subdued demand, which may limit aggressive upward movement. Additionally, the top-trader position ratio of 1.8030 reflects a dominant buy-side positioning, but the overall market dynamics remain tempered by the mixed signals.
Disclaimer: This is not financial advice. Always do your own research and take full responsibility for your trading decisions and assets (DYOR).
Trade $HYPE here:
{future}(HYPEUSDT)
HYPE — The market remains in a neutral structure, with buyers holding an advantage supported by a positive price momentum of +0.12%, despite weak taker demand indicated by the 0.7258 ratio.
HYPE — LONG NOW
Entry Zone: 91.97 — 92.168
• TP1: 92.766
• TP2: 93.563
• TP3: 94.593
Stop Loss: 90.907
The neutral structure combined with a slight positive price momentum suggests cautious optimism among buyers. However, the weaker taker buy/sell ratio of 0.7258 indicates subdued demand, which may limit aggressive upward movement. Additionally, the top-trader position ratio of 1.8030 reflects a dominant buy-side positioning, but the overall market dynamics remain tempered by the mixed signals.
Disclaimer: This is not financial advice. Always do your own research and take full responsibility for your trading decisions and assets (DYOR).
Trade $HYPE here:
HYPE — LONG NOW
Entry Zone: 91.97 — 92.168
• TP1: 92.766
• TP2: 93.563
• TP3: 94.593
Stop Loss: 90.907
The neutral structure combined with a slight positive price momentum suggests cautious optimism among buyers. However, the weaker taker buy/sell ratio of 0.7258 indicates subdued demand, which may limit aggressive upward movement. Additionally, the top-trader position ratio of 1.8030 reflects a dominant buy-side positioning, but the overall market dynamics remain tempered by the mixed signals.
Disclaimer: This is not financial advice. Always do your own research and take full responsibility for your trading decisions and assets (DYOR).
Trade $HYPE here:
1
193
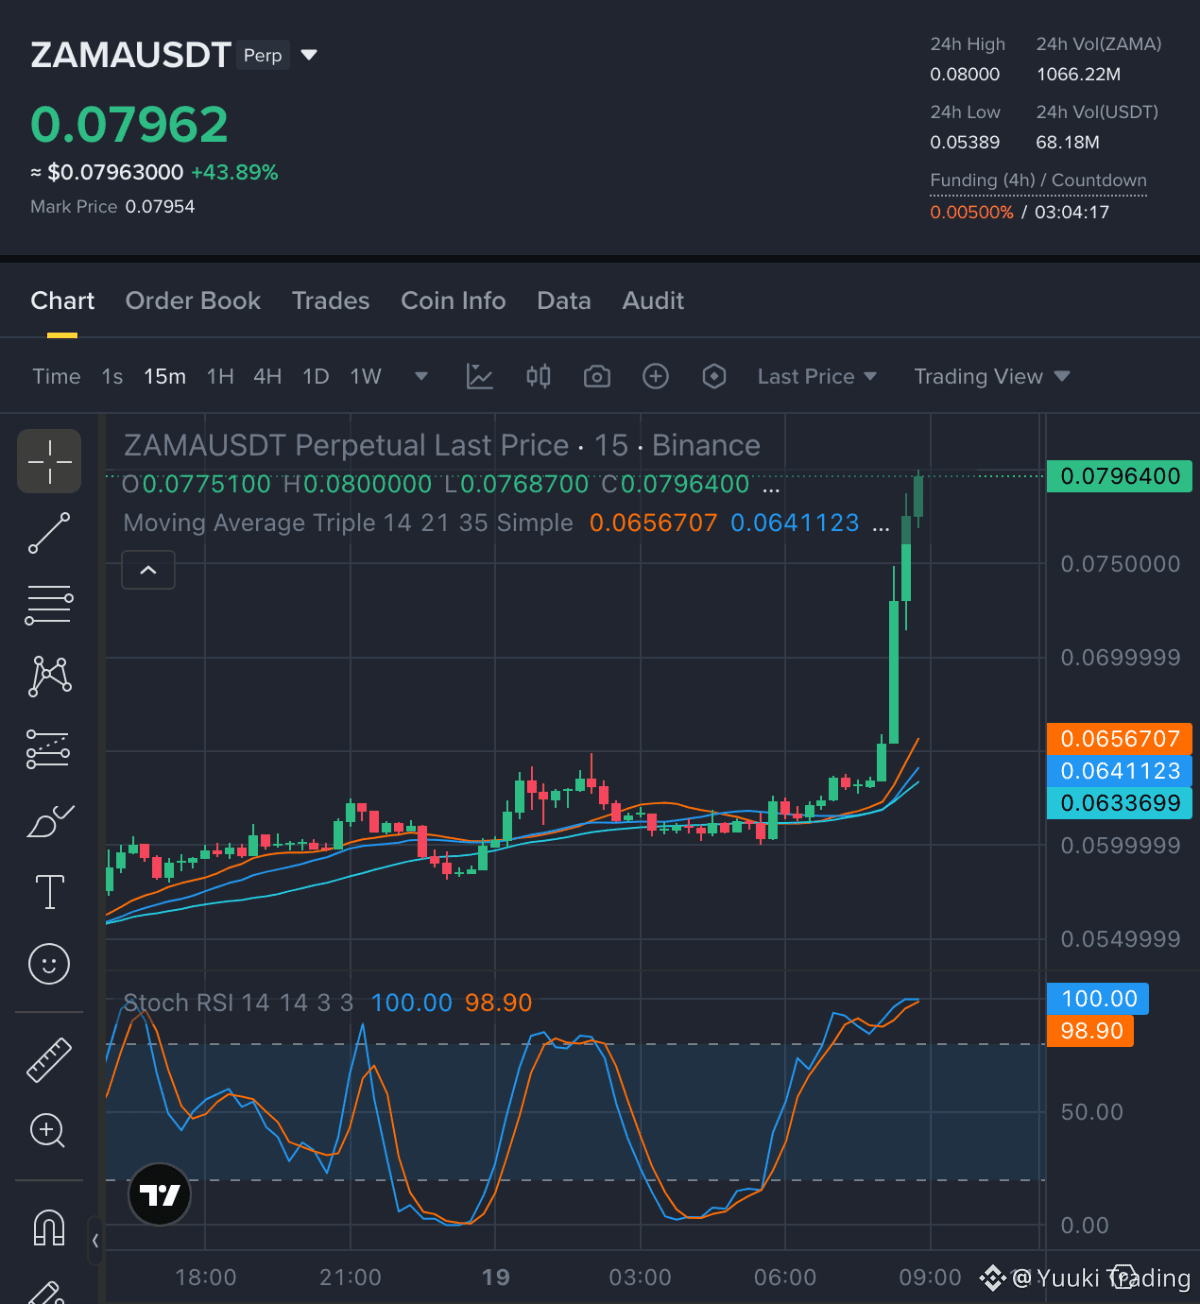
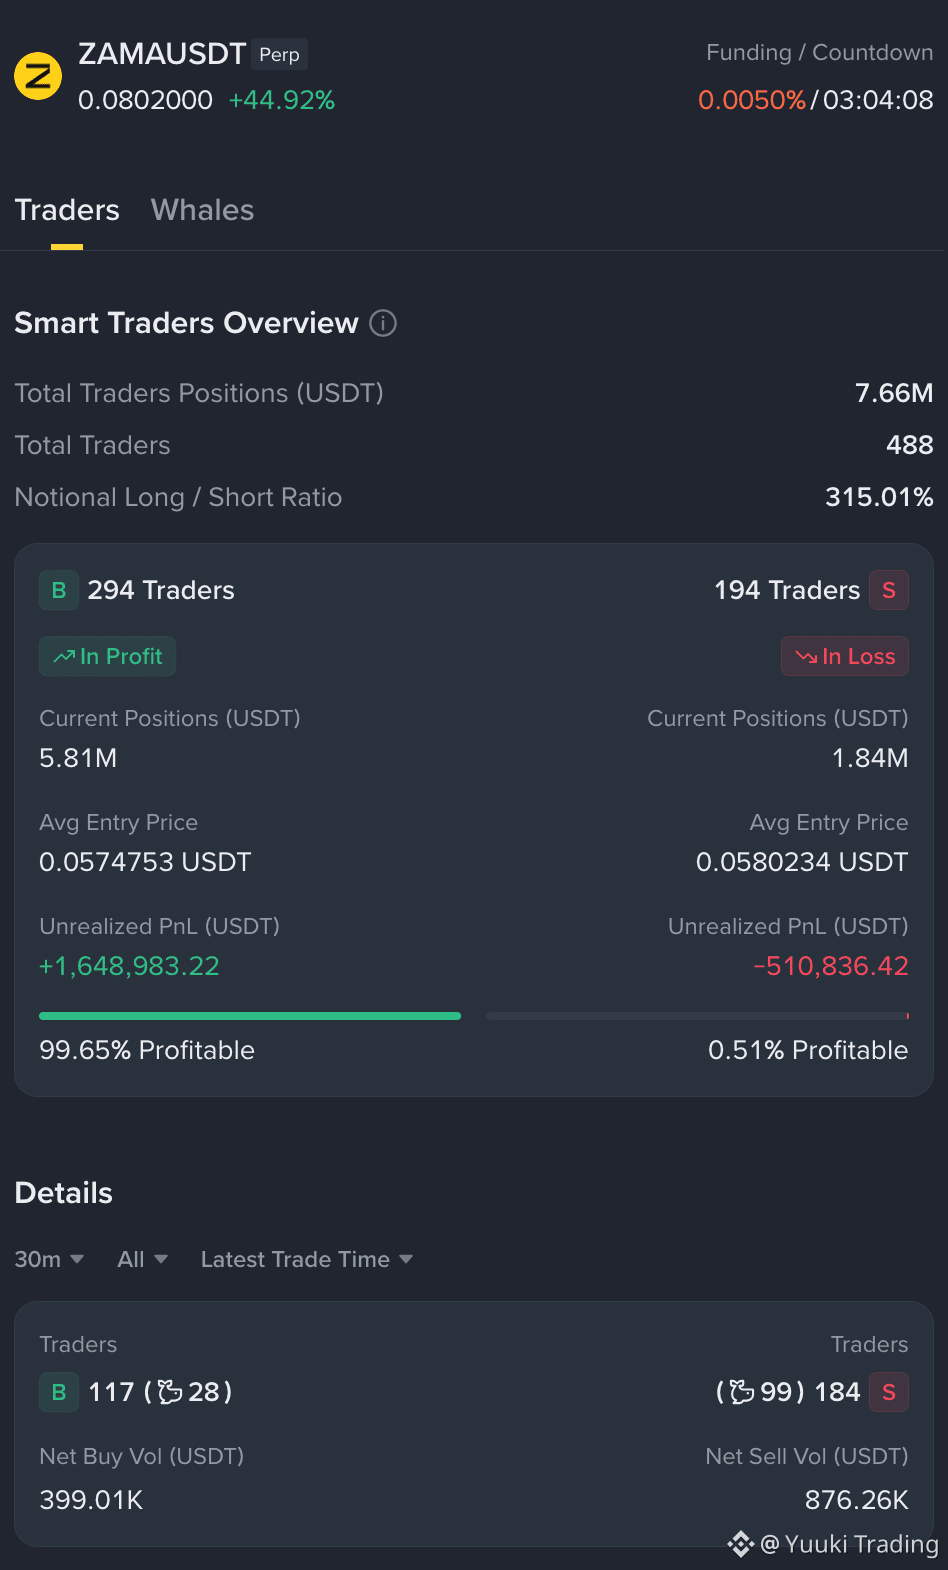
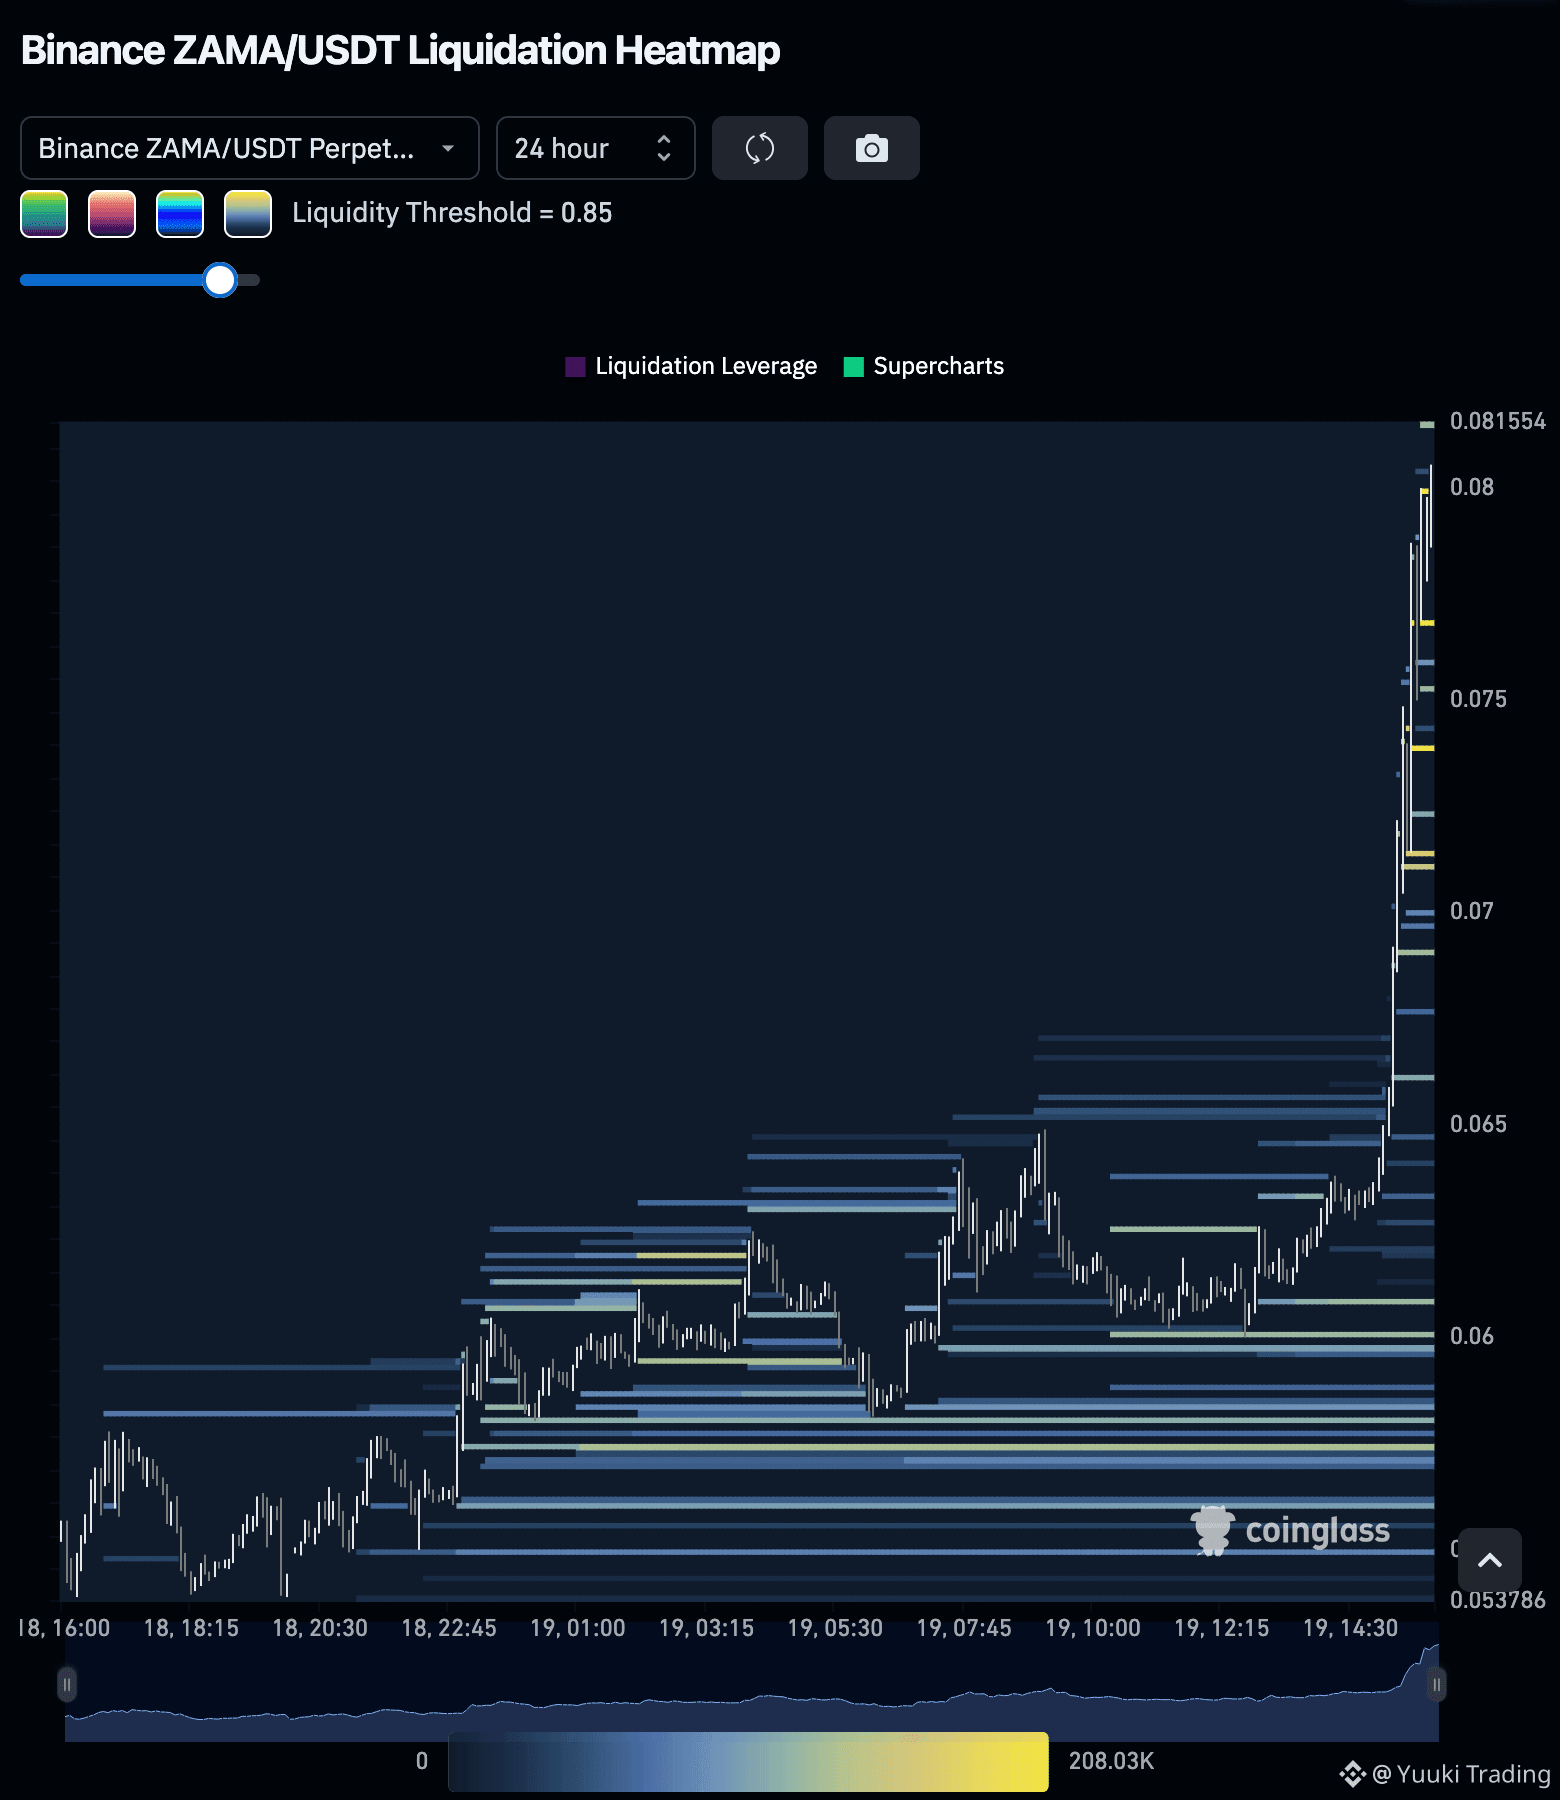
ZAMA — Buyers hold the advantage as the market structure is bullish, confirmed by a price momentum increase of 6.19%, although the aggregate-trade delta shows a slight negative at -8.66%.
ZAMA — LONG NOW
Entry Zone: 0.07892 — 0.07972
• TP1: 0.08333
• TP2: 0.086
• TP3: 0.09001
Stop Loss: 0.07398
The current bullish environment is supported by a strong price momentum of 6.19% and an increase in open interest by 6.63%, indicating growing participation. However, the aggregate-trade delta at -8.66% suggests some weakness in buyer demand, which could temper the overall bullish thesis if sustained.
Disclaimer: This is not financial advice. Always do your own research and take full responsibility for your trading decisions and assets (DYOR).
Trade $ZAMA here:
{future}(ZAMAUSDT)
ZAMA — Buyers hold the advantage as the market structure is bullish, confirmed by a price momentum increase of 6.19%, although the aggregate-trade delta shows a slight negative at -8.66%.
ZAMA — LONG NOW
Entry Zone: 0.07892 — 0.07972
• TP1: 0.08333
• TP2: 0.086
• TP3: 0.09001
Stop Loss: 0.07398
The current bullish environment is supported by a strong price momentum of 6.19% and an increase in open interest by 6.63%, indicating growing participation. However, the aggregate-trade delta at -8.66% suggests some weakness in buyer demand, which could temper the overall bullish thesis if sustained.
Disclaimer: This is not financial advice. Always do your own research and take full responsibility for your trading decisions and assets (DYOR).
Trade $ZAMA here:
ZAMA — LONG NOW
Entry Zone: 0.07892 — 0.07972
• TP1: 0.08333
• TP2: 0.086
• TP3: 0.09001
Stop Loss: 0.07398
The current bullish environment is supported by a strong price momentum of 6.19% and an increase in open interest by 6.63%, indicating growing participation. However, the aggregate-trade delta at -8.66% suggests some weakness in buyer demand, which could temper the overall bullish thesis if sustained.
Disclaimer: This is not financial advice. Always do your own research and take full responsibility for your trading decisions and assets (DYOR).
Trade $ZAMA here:
1
265
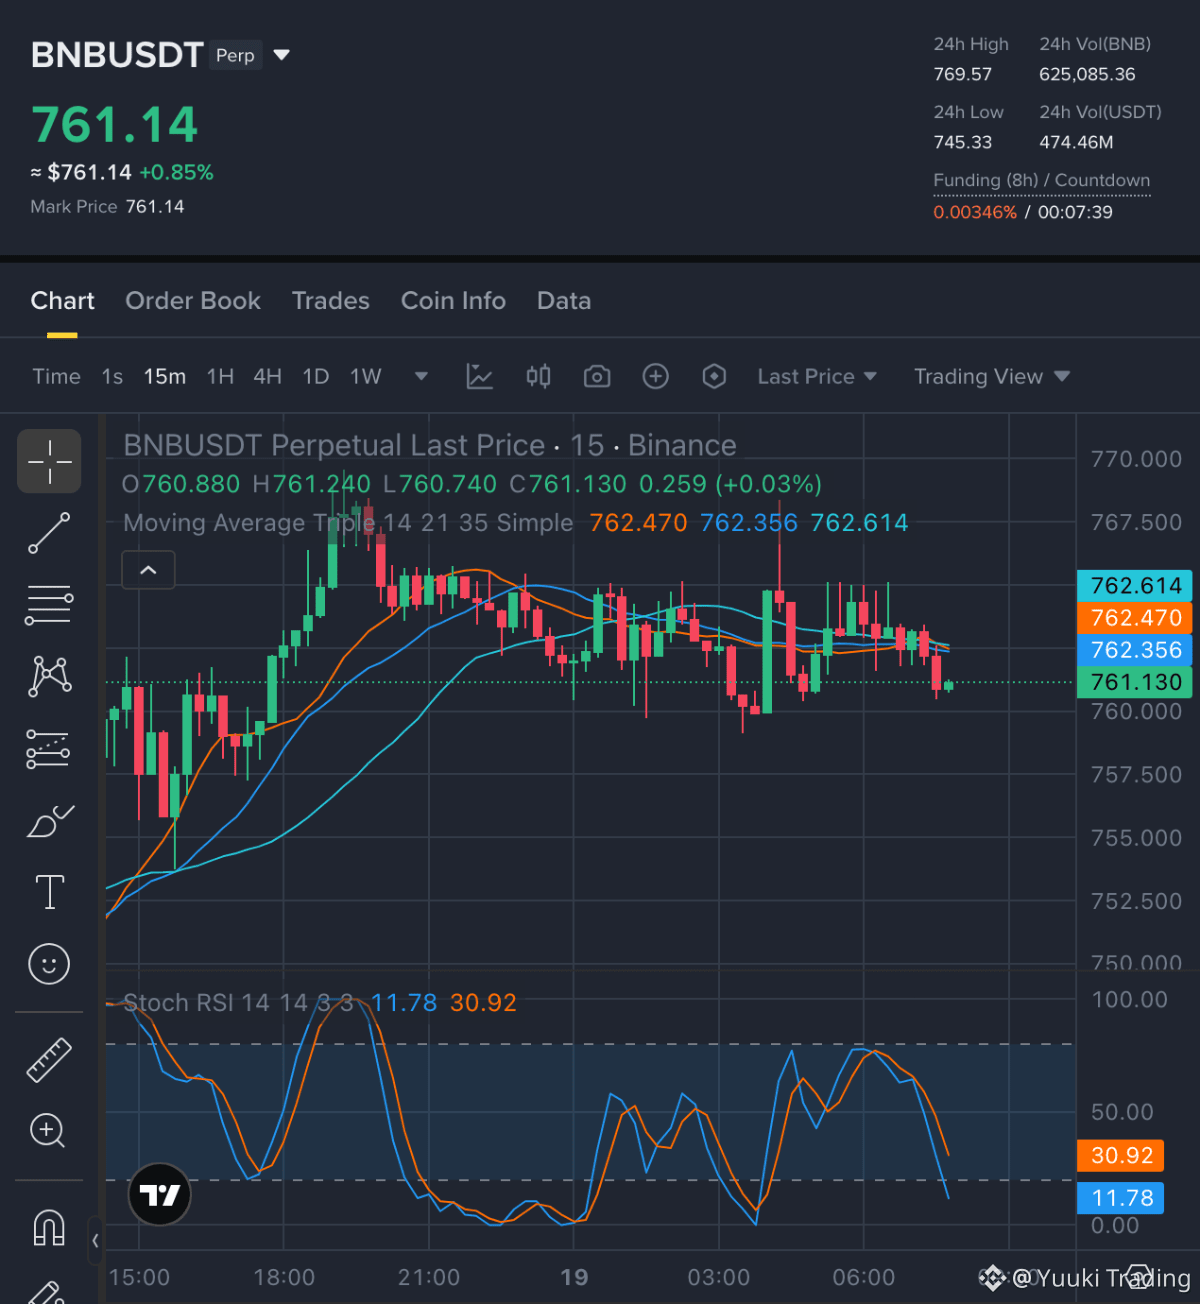
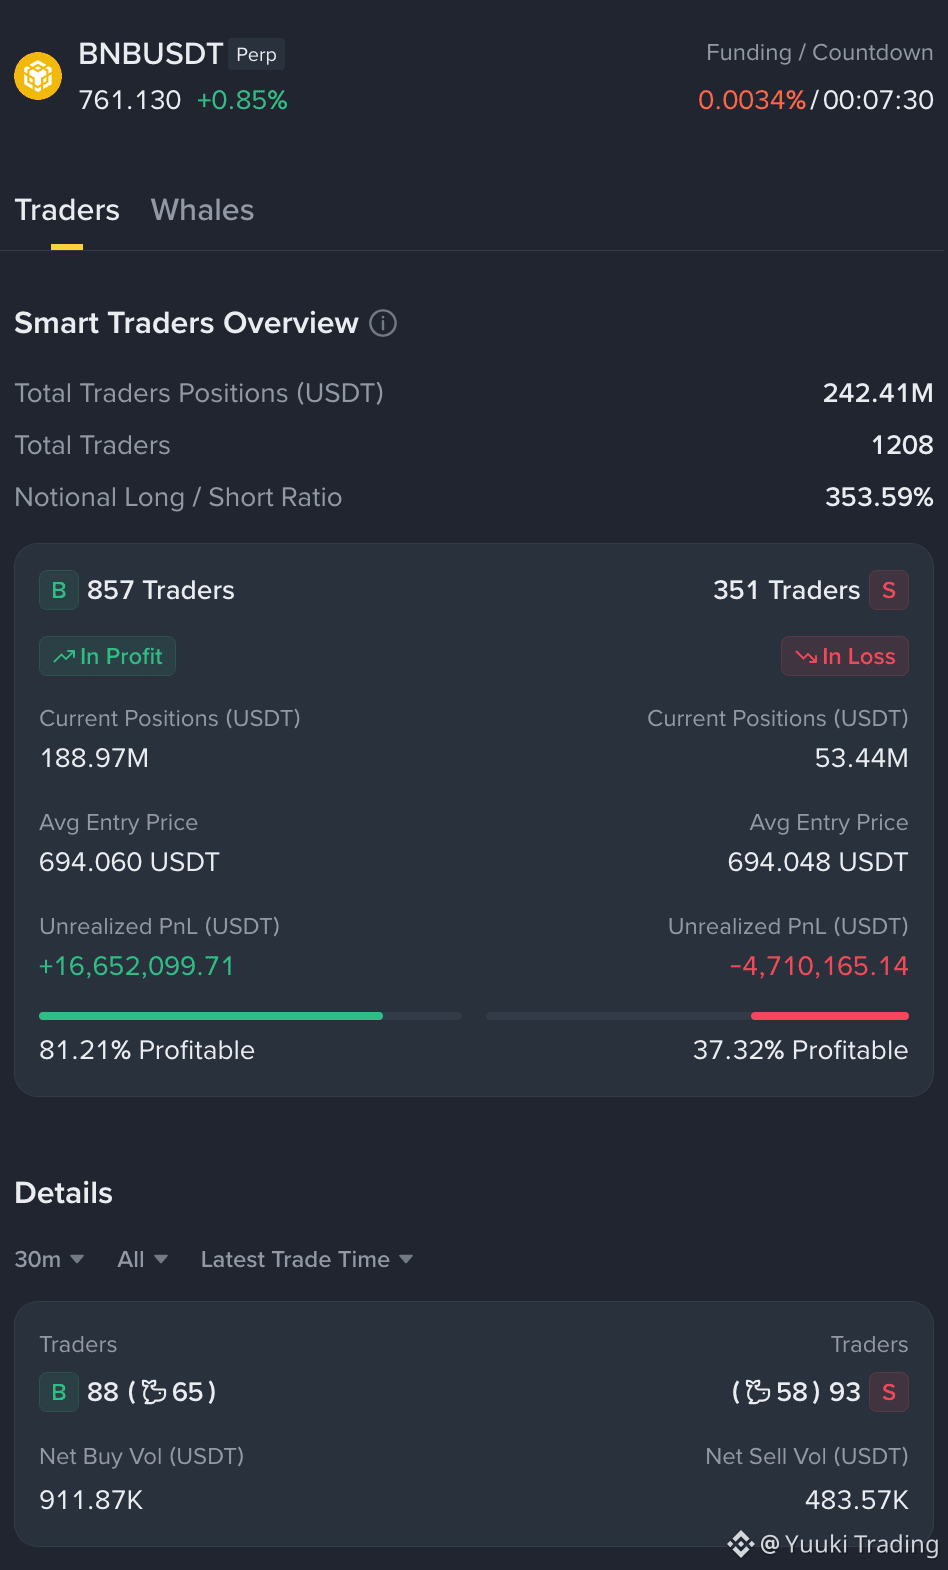
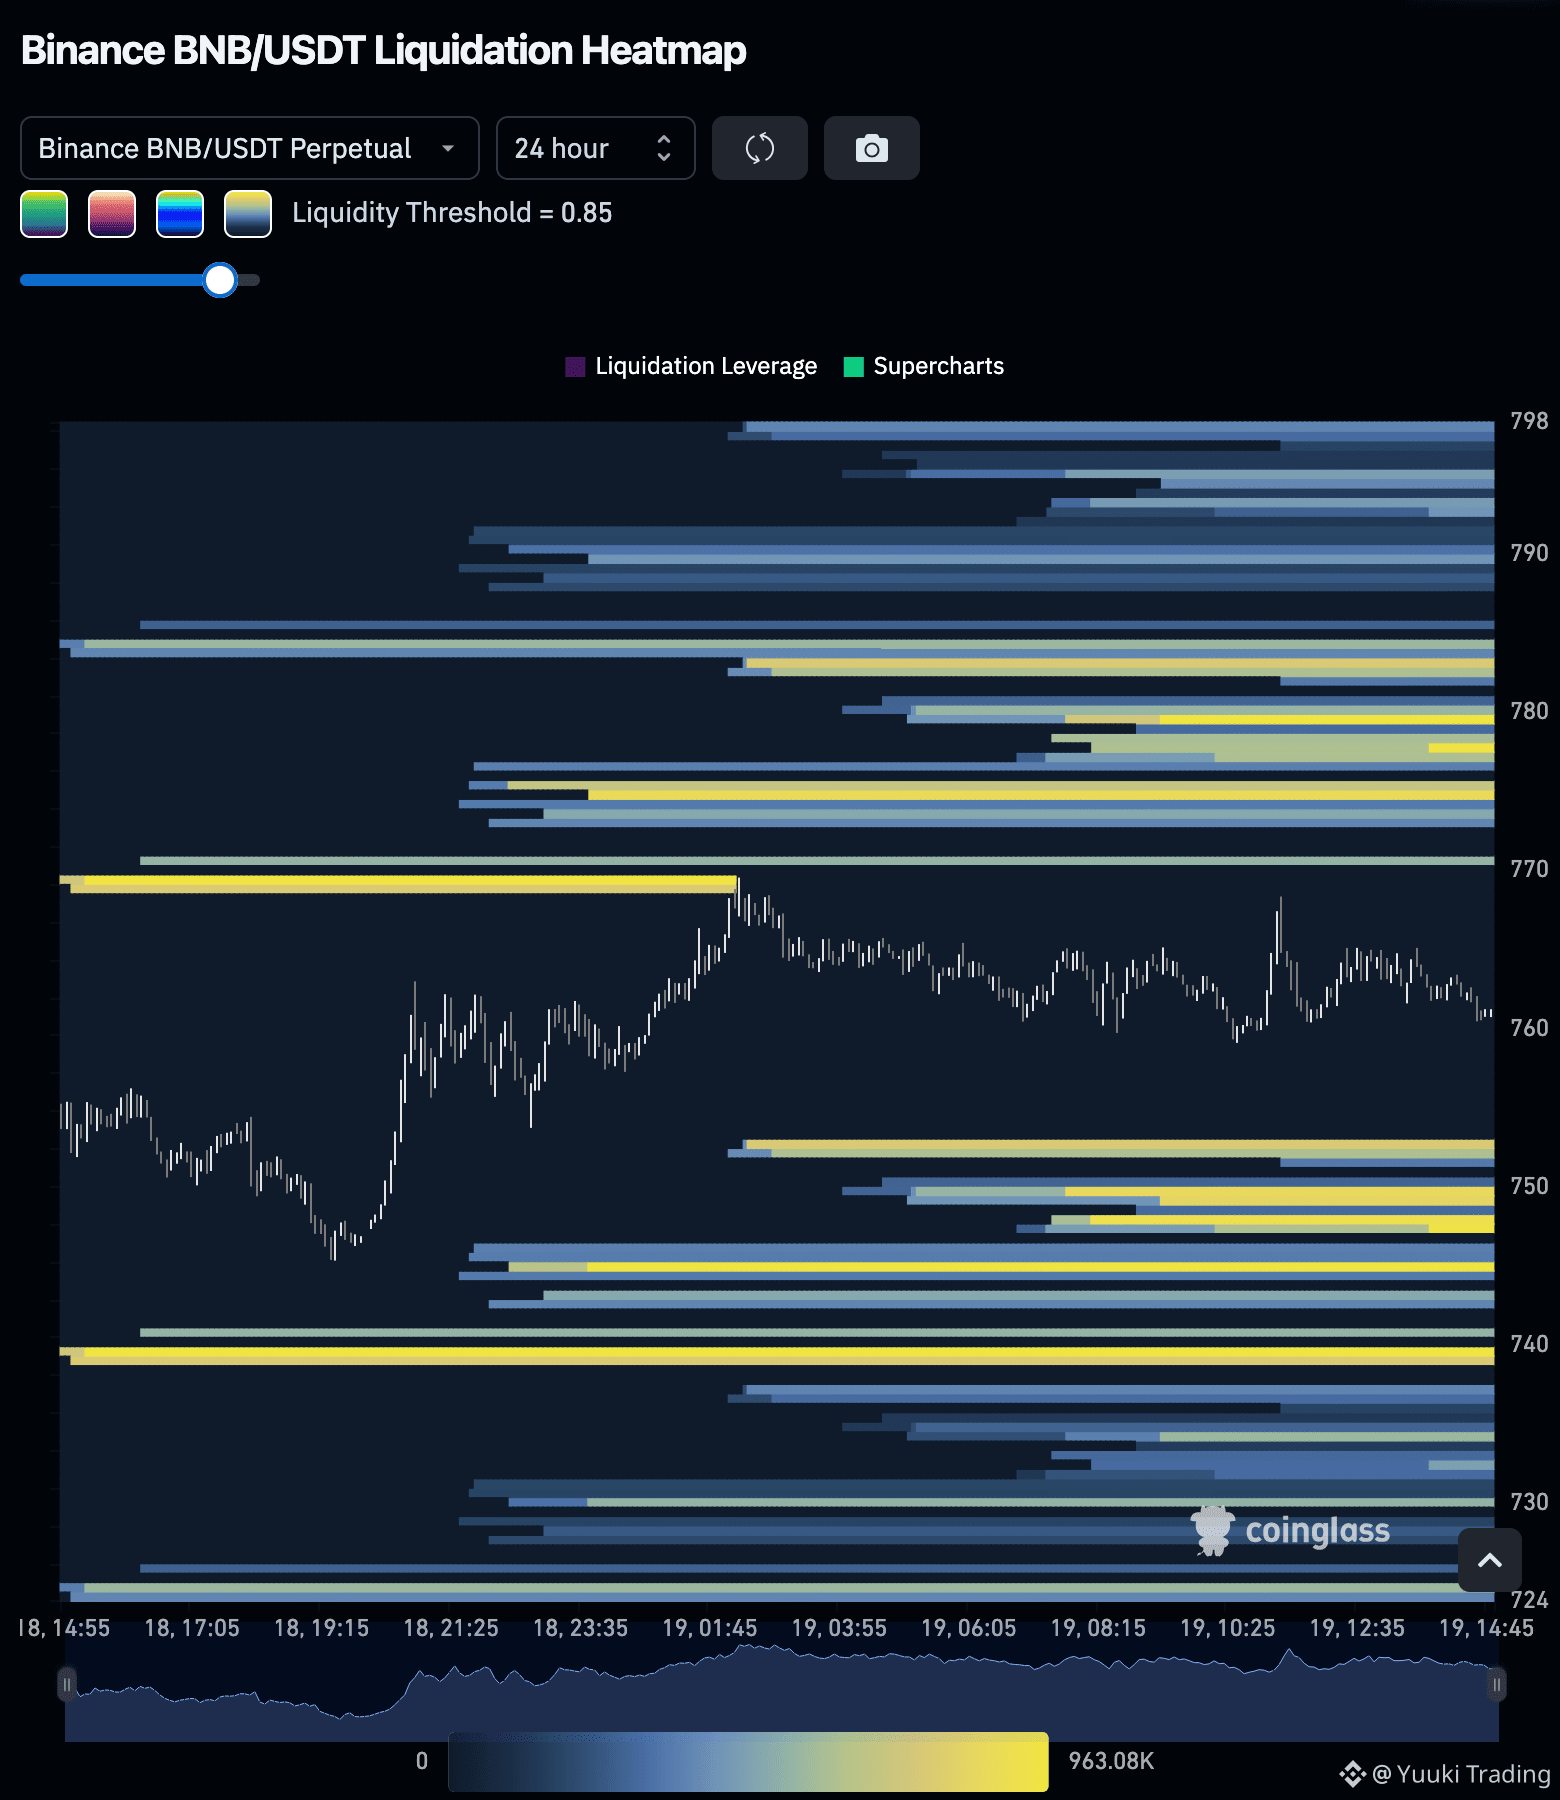
BNB — The market structure remains neutral, with buyers exhibiting an advantage through a strong top-trader position ratio of 1.7029, though weak taker demand indicates potential headwinds.
BNB — LONG NOW
Entry Zone: 760.39 — 761.91
• TP1: 765.75
• TP2: 766.59
• TP3: 769.86
Stop Loss: 756.79
The neutral market structure, combined with a slight negative price momentum of -0.17%, suggests cautious sentiment among participants. The top-trader position ratio indicates a predominance of buyers, yet the low taker buy/sell ratio of 0.8535 reflects subdued demand, which could hinder upward movement. Overall, these factors create a mixed outlook for the current bullish thesis.
Disclaimer: This is not financial advice. Always do your own research and take full responsibility for your trading decisions and assets (DYOR).
Trade $BNB here:
{future}(BNBUSDT)
BNB — The market structure remains neutral, with buyers exhibiting an advantage through a strong top-trader position ratio of 1.7029, though weak taker demand indicates potential headwinds.
BNB — LONG NOW
Entry Zone: 760.39 — 761.91
• TP1: 765.75
• TP2: 766.59
• TP3: 769.86
Stop Loss: 756.79
The neutral market structure, combined with a slight negative price momentum of -0.17%, suggests cautious sentiment among participants. The top-trader position ratio indicates a predominance of buyers, yet the low taker buy/sell ratio of 0.8535 reflects subdued demand, which could hinder upward movement. Overall, these factors create a mixed outlook for the current bullish thesis.
Disclaimer: This is not financial advice. Always do your own research and take full responsibility for your trading decisions and assets (DYOR).
Trade $BNB here:
BNB — LONG NOW
Entry Zone: 760.39 — 761.91
• TP1: 765.75
• TP2: 766.59
• TP3: 769.86
Stop Loss: 756.79
The neutral market structure, combined with a slight negative price momentum of -0.17%, suggests cautious sentiment among participants. The top-trader position ratio indicates a predominance of buyers, yet the low taker buy/sell ratio of 0.8535 reflects subdued demand, which could hinder upward movement. Overall, these factors create a mixed outlook for the current bullish thesis.
Disclaimer: This is not financial advice. Always do your own research and take full responsibility for your trading decisions and assets (DYOR).
Trade $BNB here:
1
153
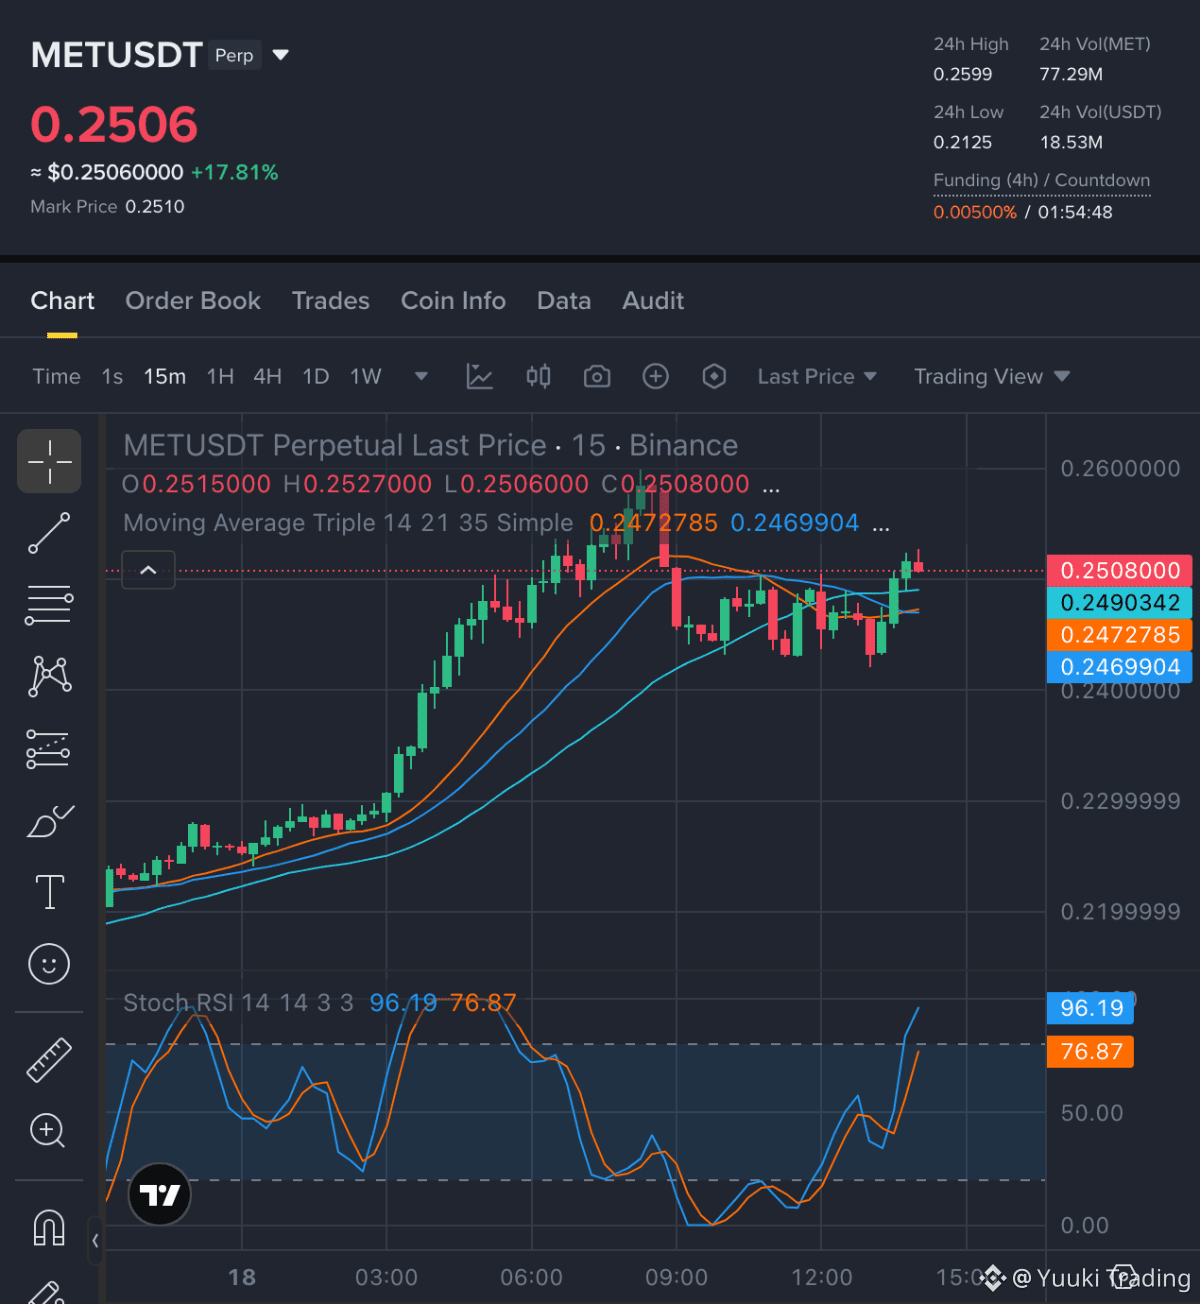
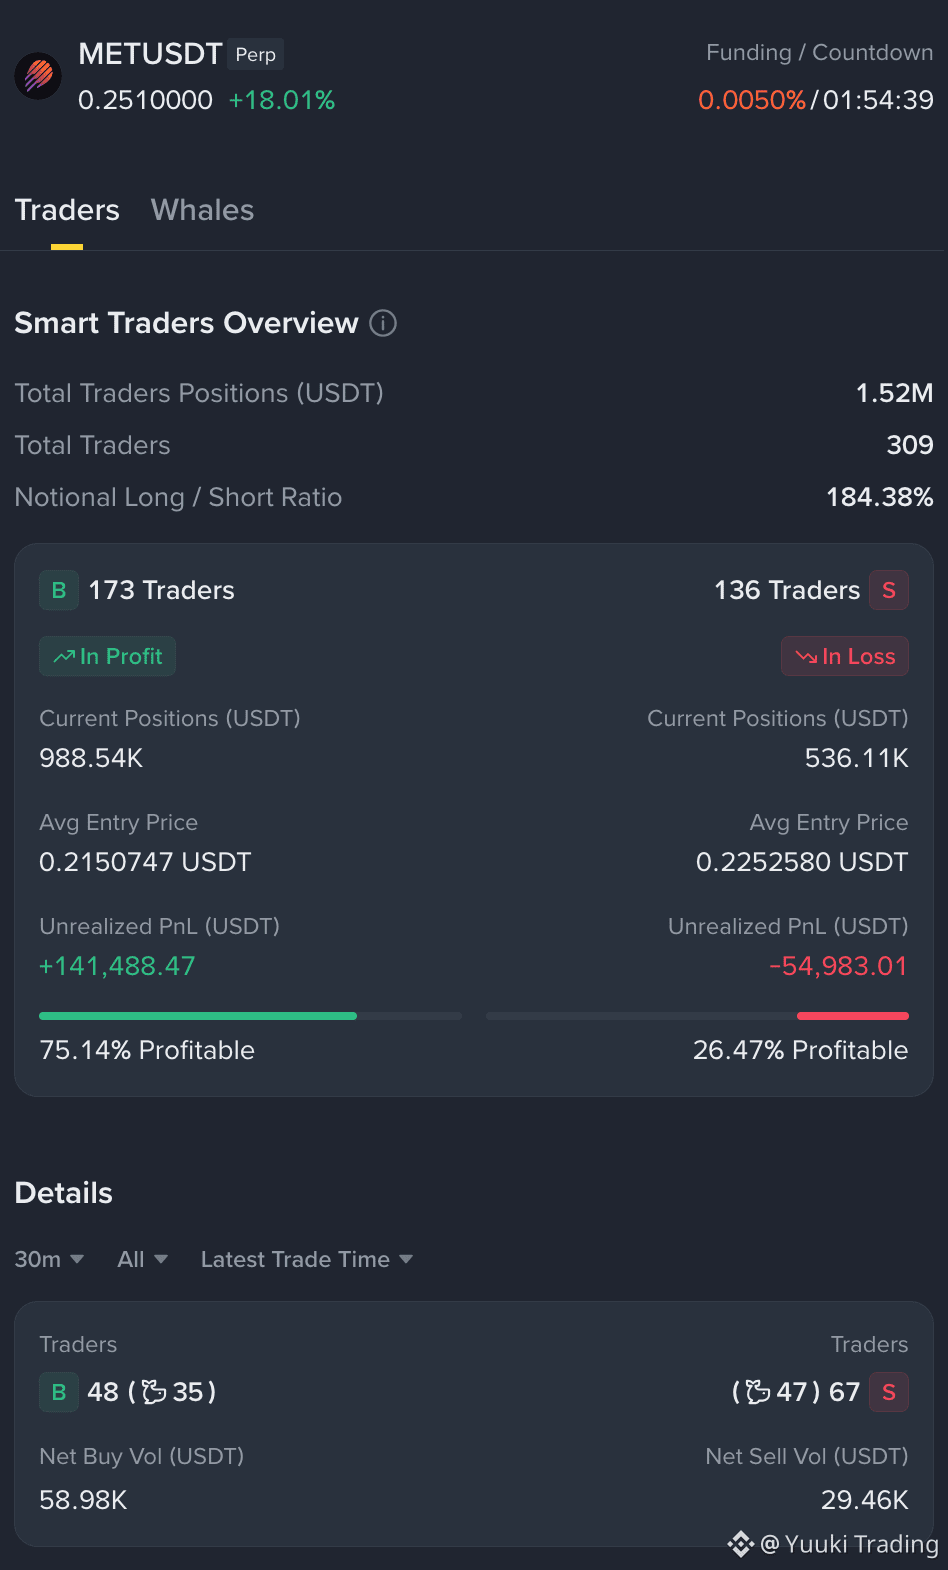
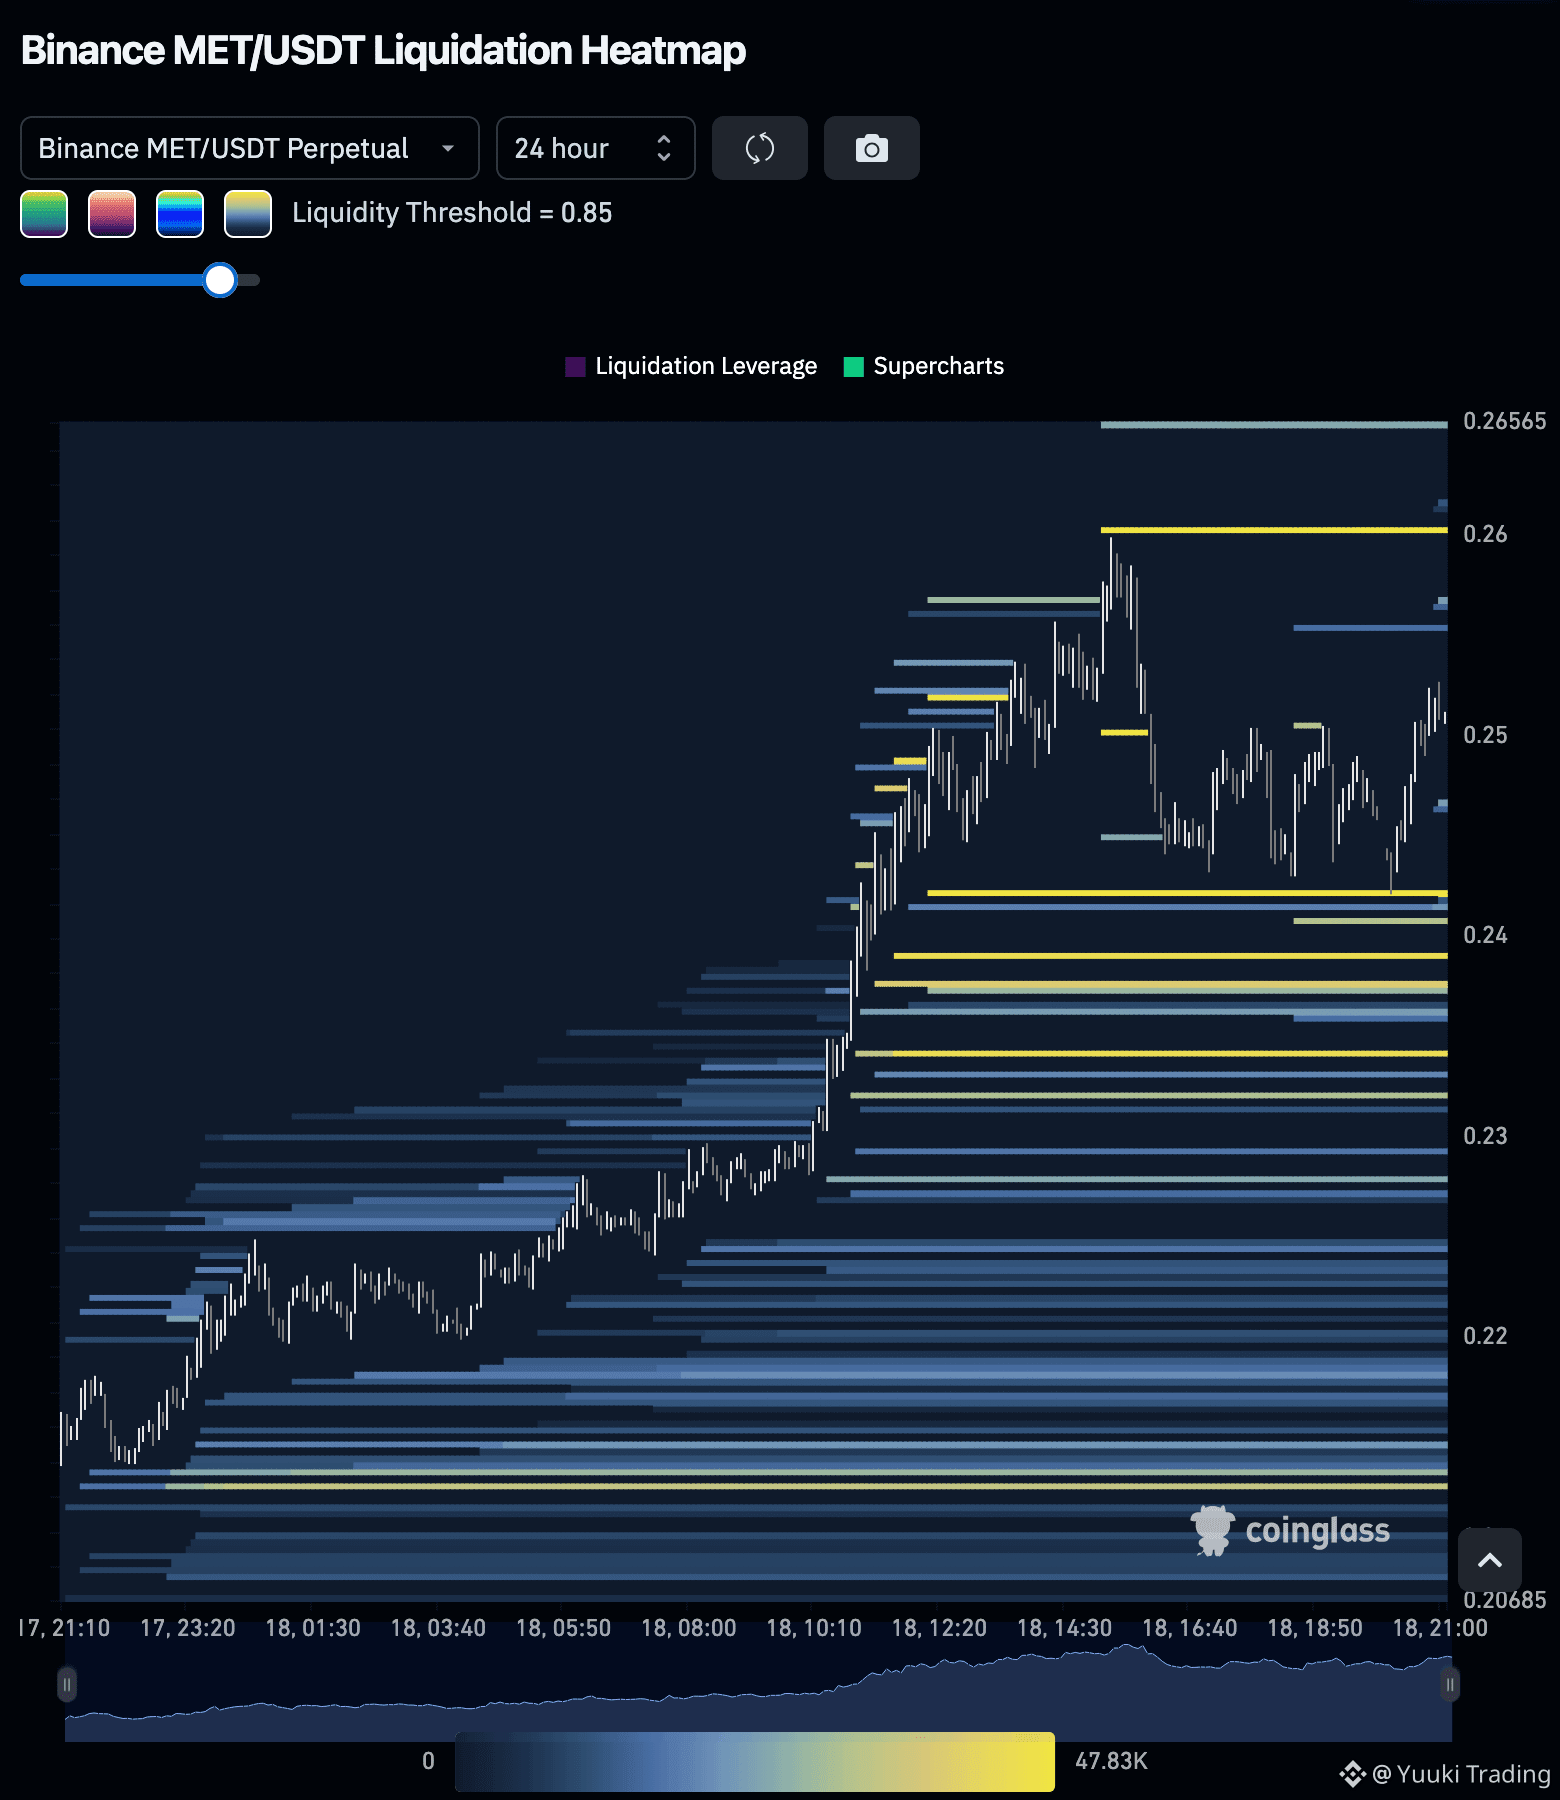
MET — Buyers currently hold the advantage with a bullish structure, confirmed by a robust price momentum of +0.60%, although the slight increase in open interest suggests some risk from sellers.
MET — LONG NOW
Entry Zone: 0.2505 — 0.2519
• TP1: 0.2599
• TP2: 0.2624
• TP3: 0.2691
Stop Loss: 0.2423
The prevailing bullish structure is supported by a strong aggregate-trade delta of 5.06% and a favorable taker buy/sell ratio of 1.1057, indicating active buyer participation. However, the modest rise in open interest may suggest potential profit-taking by sellers, introducing some risk to the current upside thesis. Overall, the metrics collectively bolster the bullish outlook while highlighting caution.
Disclaimer: This is not financial advice. Always do your own research and take full responsibility for your trading decisions and assets (DYOR).
Trade $MET here:
{future}(METUSDT)
MET — Buyers currently hold the advantage with a bullish structure, confirmed by a robust price momentum of +0.60%, although the slight increase in open interest suggests some risk from sellers.
MET — LONG NOW
Entry Zone: 0.2505 — 0.2519
• TP1: 0.2599
• TP2: 0.2624
• TP3: 0.2691
Stop Loss: 0.2423
The prevailing bullish structure is supported by a strong aggregate-trade delta of 5.06% and a favorable taker buy/sell ratio of 1.1057, indicating active buyer participation. However, the modest rise in open interest may suggest potential profit-taking by sellers, introducing some risk to the current upside thesis. Overall, the metrics collectively bolster the bullish outlook while highlighting caution.
Disclaimer: This is not financial advice. Always do your own research and take full responsibility for your trading decisions and assets (DYOR).
Trade $MET here:
MET — LONG NOW
Entry Zone: 0.2505 — 0.2519
• TP1: 0.2599
• TP2: 0.2624
• TP3: 0.2691
Stop Loss: 0.2423
The prevailing bullish structure is supported by a strong aggregate-trade delta of 5.06% and a favorable taker buy/sell ratio of 1.1057, indicating active buyer participation. However, the modest rise in open interest may suggest potential profit-taking by sellers, introducing some risk to the current upside thesis. Overall, the metrics collectively bolster the bullish outlook while highlighting caution.
Disclaimer: This is not financial advice. Always do your own research and take full responsibility for your trading decisions and assets (DYOR).
Trade $MET here:
1
725
Connectez-vous pour découvrir plus de contenu
Rejoignez la communauté mondiale des adeptes de cryptomonnaies sur Binance Square
⚡️ Suviez les dernières informations importantes sur les cryptomonnaies.
💬 Jugé digne de confiance par la plus grande plateforme d’échange de cryptomonnaies au monde.
👍 Découvrez les connaissances que partagent les créateurs vérifiés.
Adresse e-mail/Nº de téléphone
Sujets d’actualité
BitwiseFilesFinalNEARSpotETFProspectus
72,866 vues
1,288 mentions
#bitwisefilesfinalnearspotetfprospectus
Can $NEAR REALLY reach $562 with an ETF approval? 🚀
The crypto market is buzzing as Bitwise files its final prospectus for a Spot NEAR ETF (Ticker: NRR on NYSE Arca)! 📊🔥
Is institutional money about to unleash the biggest pump in NEAR’s history? Analysts are throwing around mind-blowing price targets:
🎯 Intermediate Target: $155
🎯 2030 Long-Term Target: $562
💡 Let's do the math:
At $562, $NEAR would sit at roughly a $680 Billion market cap—putting it right up there with Ethereum's potential valuation. With NEAR leading the Chain Abstraction & AI crypto narrative, this might not be as crazy as it sounds!
With SEC regulations turning more crypto-friendly and Wall Street knocking on the door, are you Accumulating or Holding?
👇 Drop your realistic price prediction for $NEAR in the comments! 👇
#BitwiseFilesFinalNEARSpotETFProspectus #Altcoins #CryptoNews #ETF
Doomsday-Trader
·6 mentions J’aime
·3.6k vues
BitgetHackerMoves$83MStolenXRP
29,861 vues
157 mentions
SOLSpotETFWeeklyInflow$188M
19,165 vues
127 mentions