

MOONRIDER TOP
2.1k Publications

MOONRIDER TOP
Signaler
Bloquer l’utilisateur
4 Suivis
47 Abonnés
229 J’aime
Publications
Tous
Citations
Vidéos
·
--
Haussier
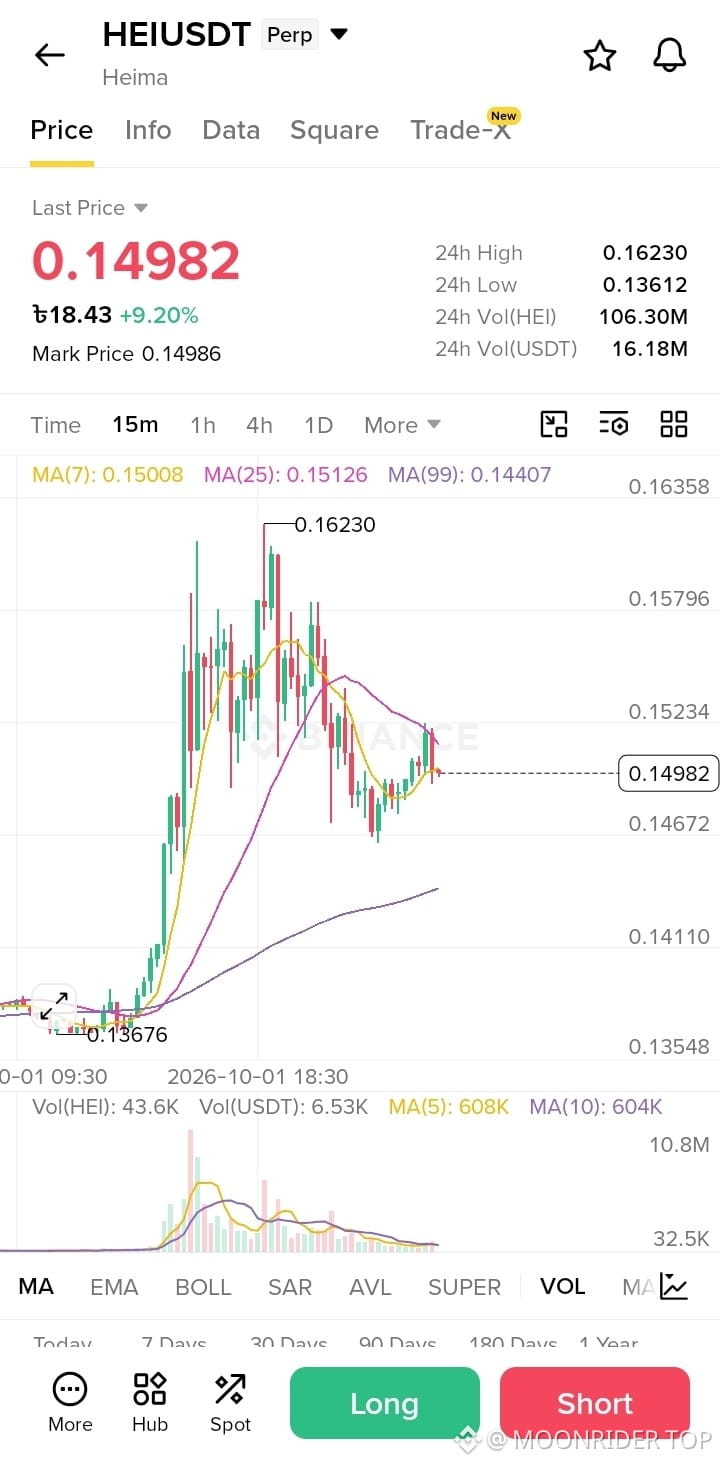
Coin: HEI / USDT
Position: Long Entry
Entry: 0.1450 - 0.1495 USD
Stop Loss: 0.1360 USD
Target 1: 0.1550 USD
Target 2: 0.1600 USD
Target 3: 0.1650 USD
Target 4: 0.1720 USD$HEI
{spot}(HEIUSDT)
Coin: HEI / USDT
Position: Long Entry
Entry: 0.1450 - 0.1495 USD
Stop Loss: 0.1360 USD
Target 1: 0.1550 USD
Target 2: 0.1600 USD
Target 3: 0.1650 USD
Target 4: 0.1720 USD$HEI
Position: Long Entry
Entry: 0.1450 - 0.1495 USD
Stop Loss: 0.1360 USD
Target 1: 0.1550 USD
Target 2: 0.1600 USD
Target 3: 0.1650 USD
Target 4: 0.1720 USD$HEI
142
·
--
Haussier
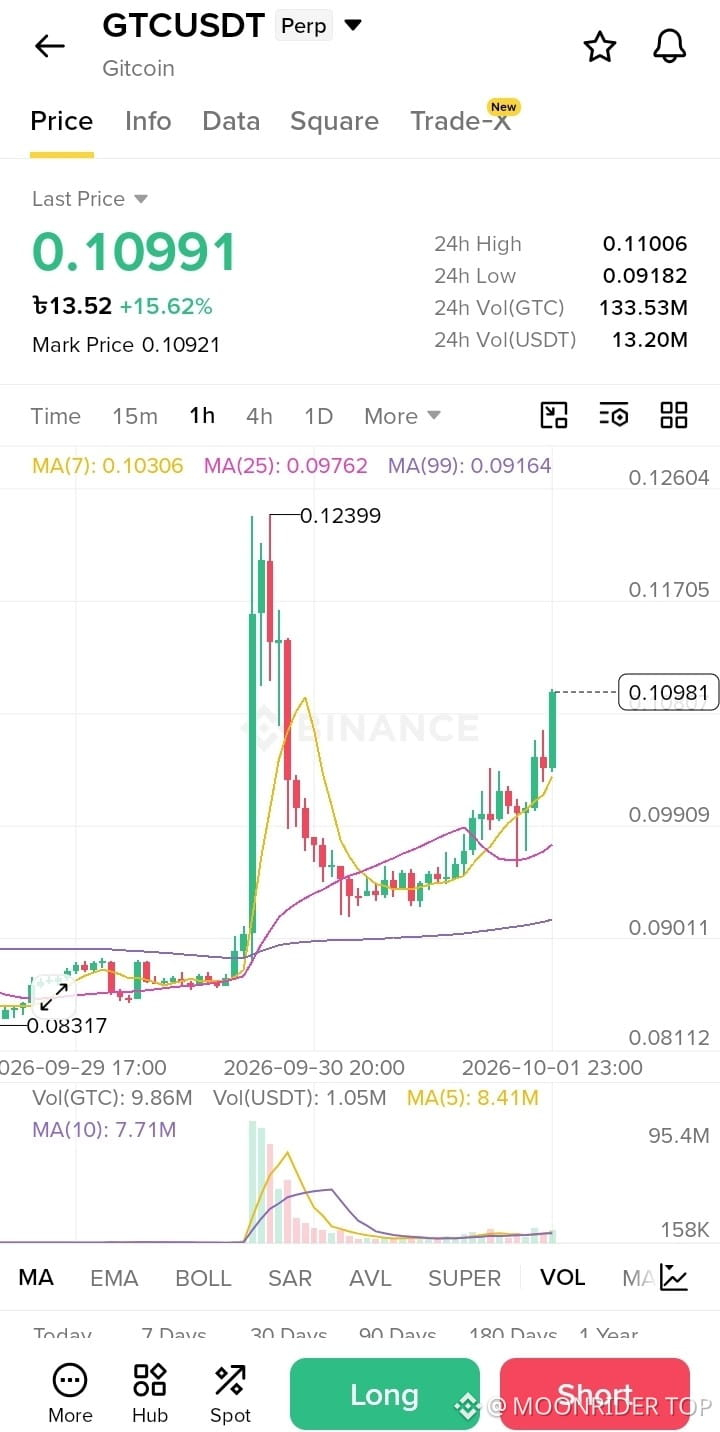
🎯 GTC/USDT Quick Long Setup (1H) 🎯
🟢 LONG (BUY)
• Entry: $0.1040 - $0.1099
• TP1: $0.1170
• TP2: $0.1235
• SL: $0.0970
⚠️ Risk Limit: 1-2% max.$GTC
{spot}(GTCUSDT)
🎯 GTC/USDT Quick Long Setup (1H) 🎯
🟢 LONG (BUY)
• Entry: $0.1040 - $0.1099
• TP1: $0.1170
• TP2: $0.1235
• SL: $0.0970
⚠️ Risk Limit: 1-2% max.$GTC
🟢 LONG (BUY)
• Entry: $0.1040 - $0.1099
• TP1: $0.1170
• TP2: $0.1235
• SL: $0.0970
⚠️ Risk Limit: 1-2% max.$GTC
1
·
--
Baissier
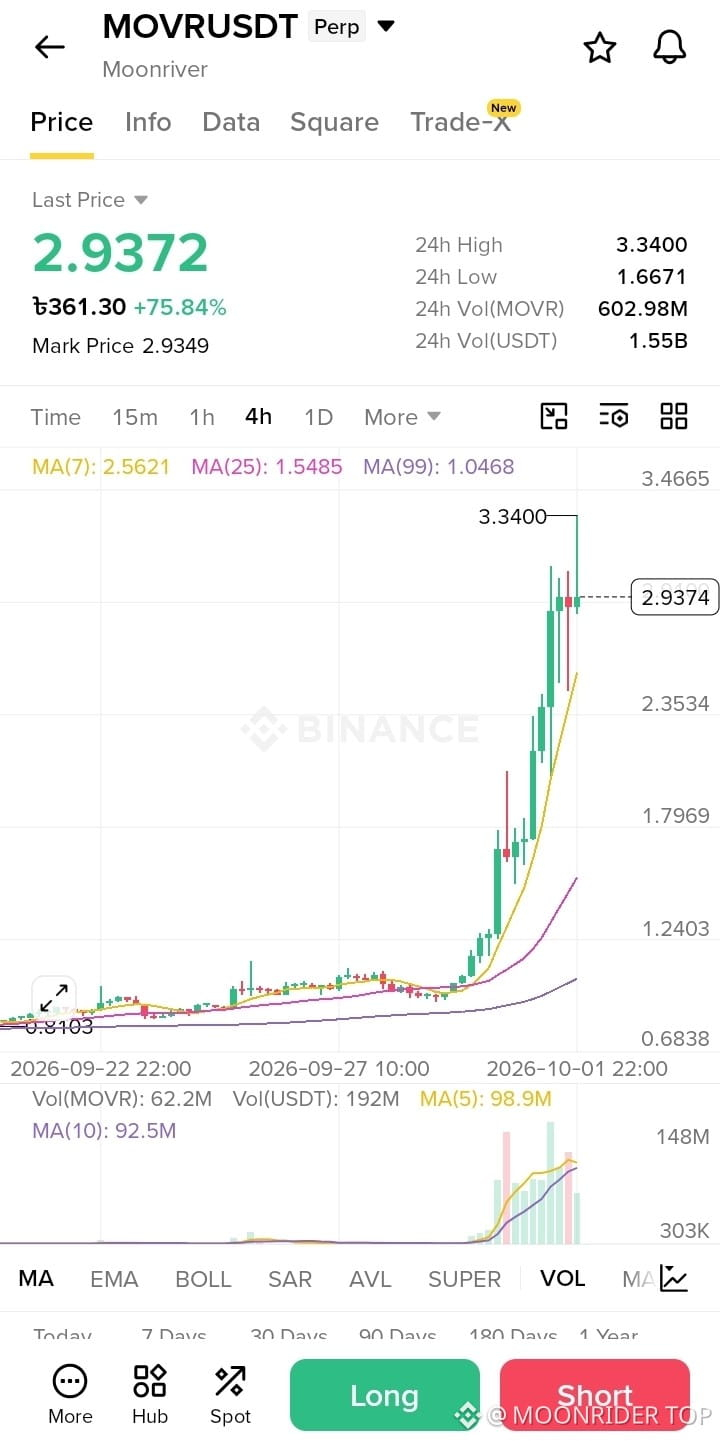
Coin: MOVR / USDT
Position: Short Entry
Entry: 2.9000 - 3.0500 USD
Stop Loss: 3.3500 USD
Target 1: 2.6500 USD
Target 2: 2.3500 USD
Target 3: 1.9500 USD
Target 4: 1.6500 USD$MOVR
{spot}(MOVRUSDT)
Coin: MOVR / USDT
Position: Short Entry
Entry: 2.9000 - 3.0500 USD
Stop Loss: 3.3500 USD
Target 1: 2.6500 USD
Target 2: 2.3500 USD
Target 3: 1.9500 USD
Target 4: 1.6500 USD$MOVR
Position: Short Entry
Entry: 2.9000 - 3.0500 USD
Stop Loss: 3.3500 USD
Target 1: 2.6500 USD
Target 2: 2.3500 USD
Target 3: 1.9500 USD
Target 4: 1.6500 USD$MOVR
1
376
·
--
Haussier
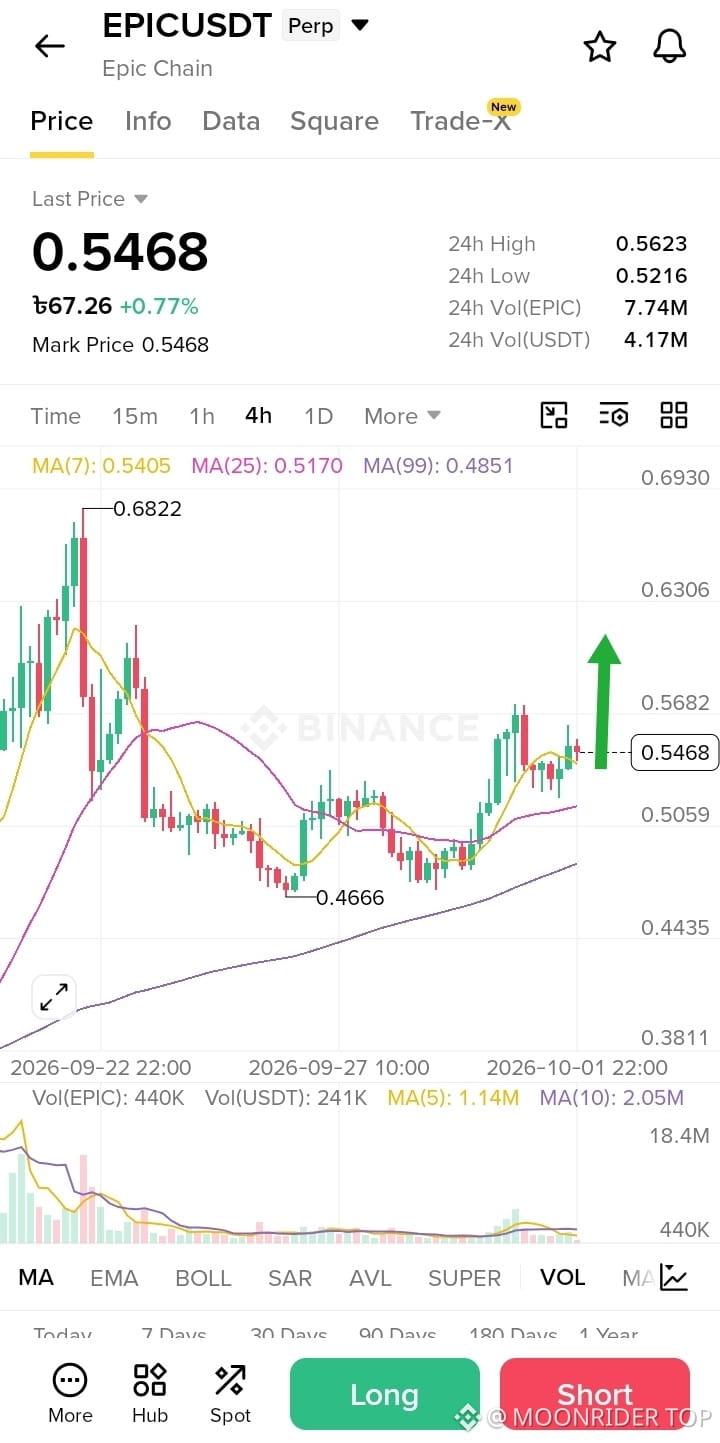
⚡ EPIC PERP MOMENTUM BREAKDOWN
Asset: EPIC/USDT (4H Perpetual Chart)
Market Status: Bullish Consolidation Phase
📊 CORE METRICS
• Last Price: 0.5468 (+0.77%)
• 24h High: 0.5623
• 24h Low: 0.5216
• 24h Turnover: 4.17M USDT
📐 TECHNICAL ZONES
• Resistance 1: 0.5623 (24h Peak Ceiling)
• Resistance 2: 0.6306 (Higher Target Level)
• Support 1: 0.5216 (24h Low Base)
• Support 2: 0.4666 (Major Swing Floor)
🎯 STRATEGIC TACTICS
• Breakout Play: Open long entries if price secures a clean 4H close above 0.5630 with rising volume confirmation.
• Dip-Buying Play: Look for accumulation opportunities around the 0.5200 - 0.5300 support pocket.
• Stop-Loss Placement: Keep risk tightly managed below 0.5050.
💡 Note: Moving averages (MA7 at 0.5405 and MA25 at 0.5170) are showing positive alignment, but watch out for volume spikes before chasing higher targets.$EPIC
{spot}(EPICUSDT)
⚡ EPIC PERP MOMENTUM BREAKDOWN
Asset: EPIC/USDT (4H Perpetual Chart)
Market Status: Bullish Consolidation Phase
📊 CORE METRICS
• Last Price: 0.5468 (+0.77%)
• 24h High: 0.5623
• 24h Low: 0.5216
• 24h Turnover: 4.17M USDT
📐 TECHNICAL ZONES
• Resistance 1: 0.5623 (24h Peak Ceiling)
• Resistance 2: 0.6306 (Higher Target Level)
• Support 1: 0.5216 (24h Low Base)
• Support 2: 0.4666 (Major Swing Floor)
🎯 STRATEGIC TACTICS
• Breakout Play: Open long entries if price secures a clean 4H close above 0.5630 with rising volume confirmation.
• Dip-Buying Play: Look for accumulation opportunities around the 0.5200 - 0.5300 support pocket.
• Stop-Loss Placement: Keep risk tightly managed below 0.5050.
💡 Note: Moving averages (MA7 at 0.5405 and MA25 at 0.5170) are showing positive alignment, but watch out for volume spikes before chasing higher targets.$EPIC
Asset: EPIC/USDT (4H Perpetual Chart)
Market Status: Bullish Consolidation Phase
📊 CORE METRICS
• Last Price: 0.5468 (+0.77%)
• 24h High: 0.5623
• 24h Low: 0.5216
• 24h Turnover: 4.17M USDT
📐 TECHNICAL ZONES
• Resistance 1: 0.5623 (24h Peak Ceiling)
• Resistance 2: 0.6306 (Higher Target Level)
• Support 1: 0.5216 (24h Low Base)
• Support 2: 0.4666 (Major Swing Floor)
🎯 STRATEGIC TACTICS
• Breakout Play: Open long entries if price secures a clean 4H close above 0.5630 with rising volume confirmation.
• Dip-Buying Play: Look for accumulation opportunities around the 0.5200 - 0.5300 support pocket.
• Stop-Loss Placement: Keep risk tightly managed below 0.5050.
💡 Note: Moving averages (MA7 at 0.5405 and MA25 at 0.5170) are showing positive alignment, but watch out for volume spikes before chasing higher targets.$EPIC
90
·
--
Haussier
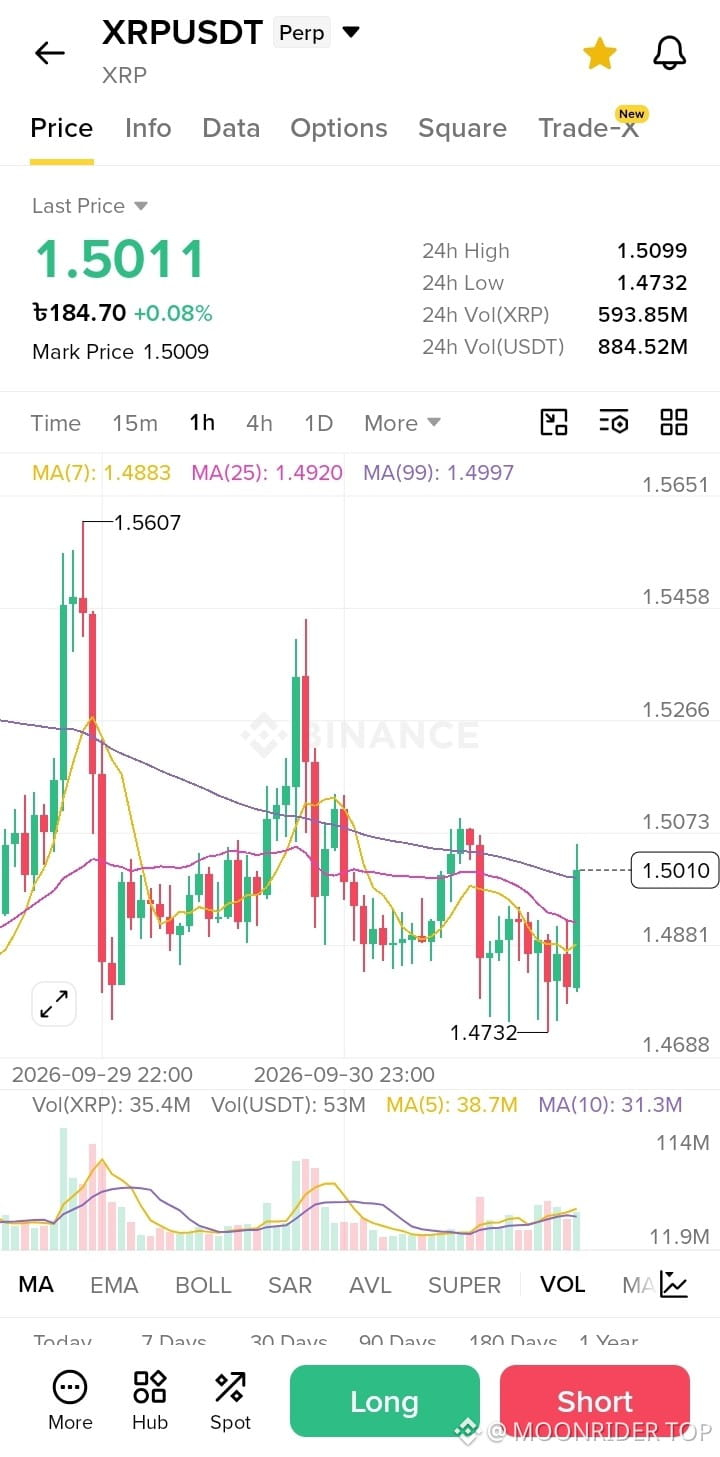
🎯 XRP/USDT Quick Long Setup (1H) 🎯
🟢 LONG (BUY)
• Entry: $1.490 - $1.501
• TP1: $1.525
• TP2: $1.550
• SL: $1.470
⚠️ Risk Limit: 1-2% max.$XRP
{spot}(XRPUSDT)
🎯 XRP/USDT Quick Long Setup (1H) 🎯
🟢 LONG (BUY)
• Entry: $1.490 - $1.501
• TP1: $1.525
• TP2: $1.550
• SL: $1.470
⚠️ Risk Limit: 1-2% max.$XRP
🟢 LONG (BUY)
• Entry: $1.490 - $1.501
• TP1: $1.525
• TP2: $1.550
• SL: $1.470
⚠️ Risk Limit: 1-2% max.$XRP
51
·
--
Baissier
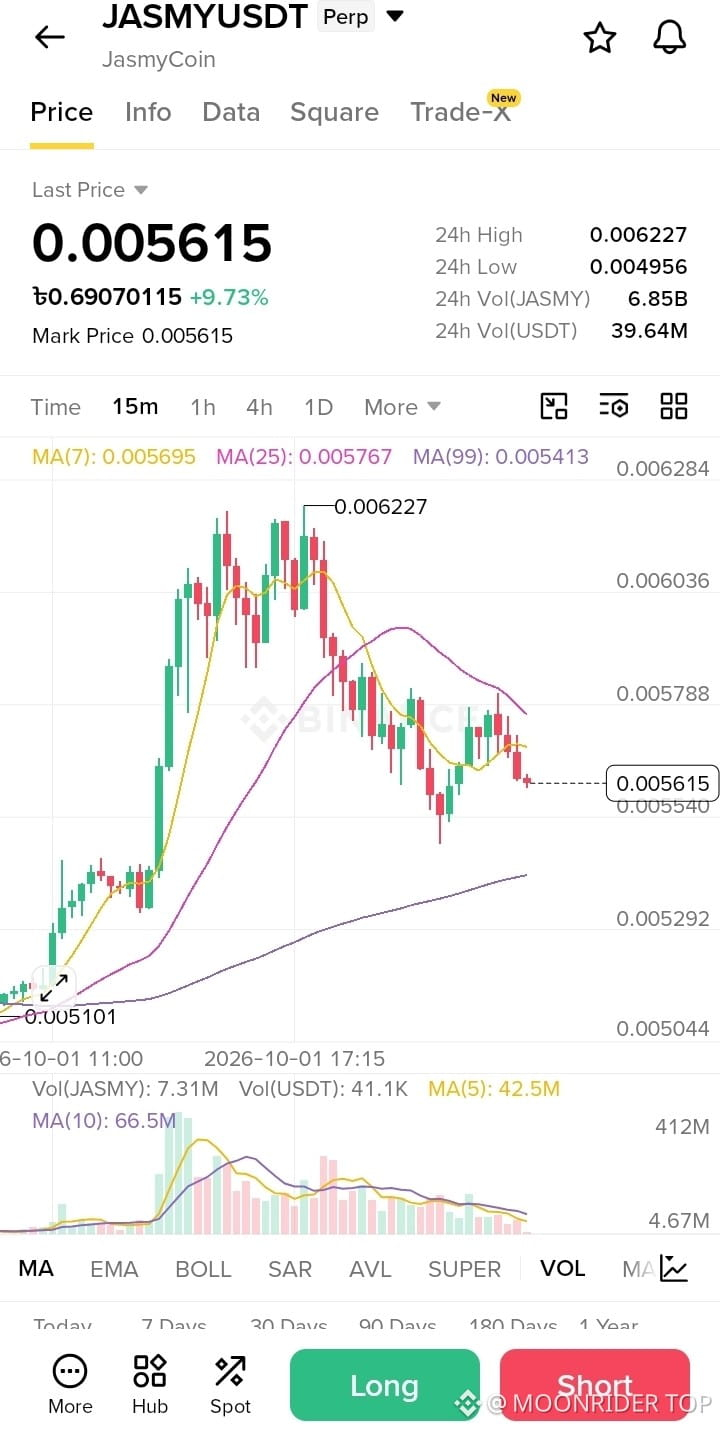
Coin: JASMY / USDT
Position: Short Entry
Entry: 0.005700 - 0.005850 USD
Stop Loss: 0.006050 USD
Target 1: 0.005450 USD
Target 2: 0.005250 USD
Target 3: 0.005050 USD
Target 4: 0.004800 USD$JASMY
{spot}(JASMYUSDT)
Coin: JASMY / USDT
Position: Short Entry
Entry: 0.005700 - 0.005850 USD
Stop Loss: 0.006050 USD
Target 1: 0.005450 USD
Target 2: 0.005250 USD
Target 3: 0.005050 USD
Target 4: 0.004800 USD$JASMY
Position: Short Entry
Entry: 0.005700 - 0.005850 USD
Stop Loss: 0.006050 USD
Target 1: 0.005450 USD
Target 2: 0.005250 USD
Target 3: 0.005050 USD
Target 4: 0.004800 USD$JASMY
115
·
--
Haussier
• Bitcoin (BTC/USDT) perpetual contract is currently changing hands at $84,399.9, exhibiting a modest 0.13% upward progression over the session.
• Intraday price parameters established a floor at $83,136.6 alongside an upper peak scaling to $84,599.9.
• Cumulative trading volume for the period recorded approximately 129,607.377 BTC, totaling roughly $10.86B in turnover.
• Short-term moving averages show the MA(7) positioned at $84,027.4 and the MA(25) at $83,814.3, both providing immediate structural support beneath current spot valuations.
• The baseline structural moving average MA(99) rests lower at $83,685.0, reflecting the broader underlying trend.
• Price action is currently consolidating after staging a rebound from the swing low support near $82,851.5 following an upward push toward the $85,632.7 local peak.
• Market participants are closely observing whether buyers can maintain this momentum to challenge overhead resistance boundaries.$BTC
{spot}(BTCUSDT)
• Bitcoin (BTC/USDT) perpetual contract is currently changing hands at $84,399.9, exhibiting a modest 0.13% upward progression over the session.
• Intraday price parameters established a floor at $83,136.6 alongside an upper peak scaling to $84,599.9.
• Cumulative trading volume for the period recorded approximately 129,607.377 BTC, totaling roughly $10.86B in turnover.
• Short-term moving averages show the MA(7) positioned at $84,027.4 and the MA(25) at $83,814.3, both providing immediate structural support beneath current spot valuations.
• The baseline structural moving average MA(99) rests lower at $83,685.0, reflecting the broader underlying trend.
• Price action is currently consolidating after staging a rebound from the swing low support near $82,851.5 following an upward push toward the $85,632.7 local peak.
• Market participants are closely observing whether buyers can maintain this momentum to challenge overhead resistance boundaries.$BTC
• Intraday price parameters established a floor at $83,136.6 alongside an upper peak scaling to $84,599.9.
• Cumulative trading volume for the period recorded approximately 129,607.377 BTC, totaling roughly $10.86B in turnover.
• Short-term moving averages show the MA(7) positioned at $84,027.4 and the MA(25) at $83,814.3, both providing immediate structural support beneath current spot valuations.
• The baseline structural moving average MA(99) rests lower at $83,685.0, reflecting the broader underlying trend.
• Price action is currently consolidating after staging a rebound from the swing low support near $82,851.5 following an upward push toward the $85,632.7 local peak.
• Market participants are closely observing whether buyers can maintain this momentum to challenge overhead resistance boundaries.$BTC

40
·
--
Haussier
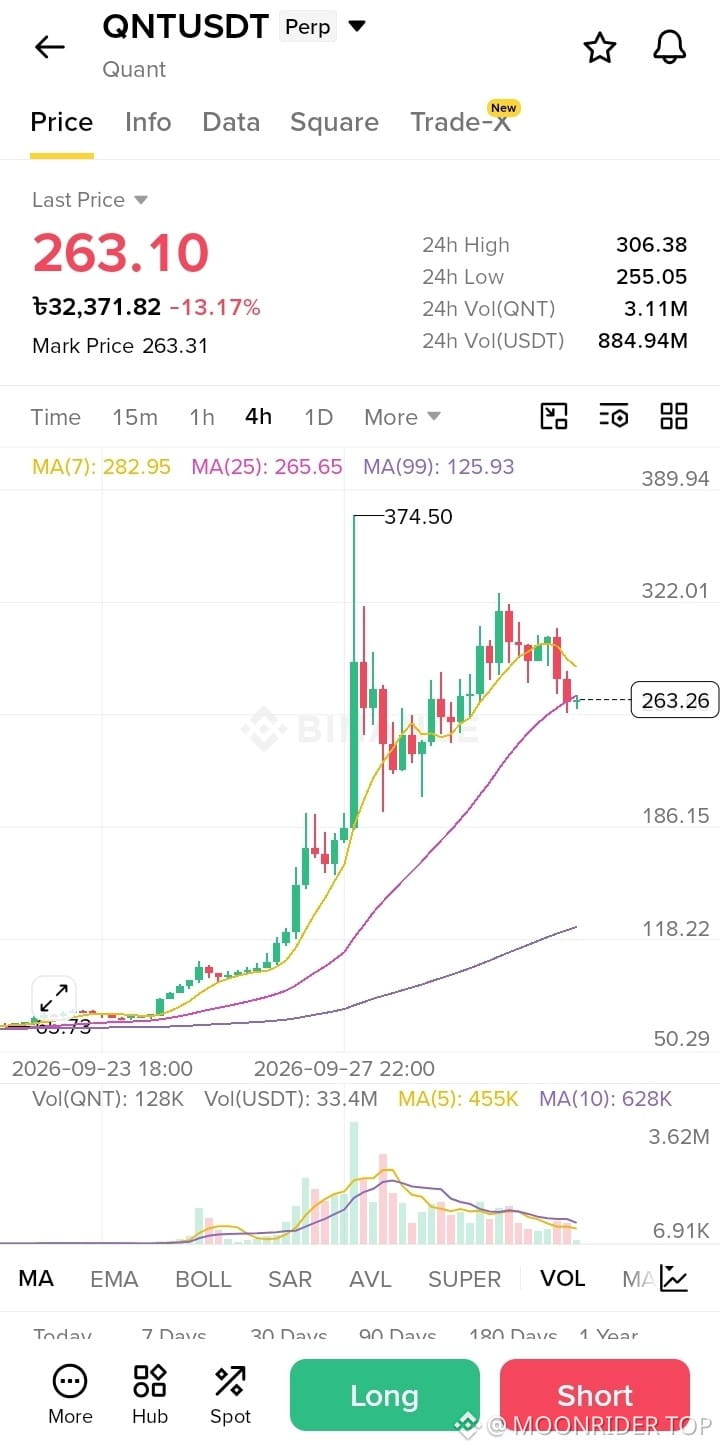
• QNT/USDT perpetual instrument is currently valued at $263.10, registering a 13.17% downward correction over the past trading session.
• Intraday price extremes established a lower floor at $255.05 alongside an upper peak reaching $306.38.
• Total trading turnover for the duration amounted to roughly 3.11M QNT tokens traded, equating to approximately $884.94M.
• Short-term moving averages show the MA(7) positioned at $282.95 and the MA(25) at $265.65, both acting as overhead resistance zones above current spot levels.
• The baseline structural moving average MA(99) sits much lower at $125.93, reflecting the broader historical uptrend structure.
• Price action is currently retracing from local swing highs following an extensive rally from initial swing low support bases near $65.73 up toward the $374.50 peak.
• Market participants are closely observing whether buyers can stabilize prices above the $255.05 support floor or if deeper corrective pressure will follow.$QNT
{spot}(QNTUSDT)
• QNT/USDT perpetual instrument is currently valued at $263.10, registering a 13.17% downward correction over the past trading session.
• Intraday price extremes established a lower floor at $255.05 alongside an upper peak reaching $306.38.
• Total trading turnover for the duration amounted to roughly 3.11M QNT tokens traded, equating to approximately $884.94M.
• Short-term moving averages show the MA(7) positioned at $282.95 and the MA(25) at $265.65, both acting as overhead resistance zones above current spot levels.
• The baseline structural moving average MA(99) sits much lower at $125.93, reflecting the broader historical uptrend structure.
• Price action is currently retracing from local swing highs following an extensive rally from initial swing low support bases near $65.73 up toward the $374.50 peak.
• Market participants are closely observing whether buyers can stabilize prices above the $255.05 support floor or if deeper corrective pressure will follow.$QNT
• Intraday price extremes established a lower floor at $255.05 alongside an upper peak reaching $306.38.
• Total trading turnover for the duration amounted to roughly 3.11M QNT tokens traded, equating to approximately $884.94M.
• Short-term moving averages show the MA(7) positioned at $282.95 and the MA(25) at $265.65, both acting as overhead resistance zones above current spot levels.
• The baseline structural moving average MA(99) sits much lower at $125.93, reflecting the broader historical uptrend structure.
• Price action is currently retracing from local swing highs following an extensive rally from initial swing low support bases near $65.73 up toward the $374.50 peak.
• Market participants are closely observing whether buyers can stabilize prices above the $255.05 support floor or if deeper corrective pressure will follow.$QNT
464
·
--
Haussier
BTC IS STUCK BETWEEN TWO DECISIONS
Bitcoin is sitting at 83,562.1 on the 4H chart, but the interesting part is not the current candle — it is the narrow area price has been respecting around the moving averages.
MA7: 83,714.7
MA14: 83,657.6
MA28: 83,773.5
EMA7: 83,663.6
EMA14: 83,672.7
EMA28: 83,734.7
Almost all of these references are clustered within a small range above the current price. That tells me BTC is currently fighting for short-term control rather than making a clean directional move.
The immediate ceiling is around 84,703.2, while the latest 24H high sits at 85,571.9.
On the other side, 83,147.6 is the latest 24H low. If that area gives way, the chart has room toward 82,004.5, with 79,305.9 becoming a much deeper reference.
There is also a bigger picture behind this consolidation.
The recent major swing high is 87,401.9, while the earlier marked low is 77,657.0. BTC has already made a large move between those extremes and is now spending time compressing beneath the upper region.
So I would watch the next expansion rather than force a prediction.
Above 84,703 → 85,571.9 → 87,401.9
Below 83,147.6 → 82,004.5 → 79,305.9
For now, 83.1K–84.7K is the area where the next move needs to prove itself.$BTC
{spot}(BTCUSDT)
BTC IS STUCK BETWEEN TWO DECISIONS
Bitcoin is sitting at 83,562.1 on the 4H chart, but the interesting part is not the current candle — it is the narrow area price has been respecting around the moving averages.
MA7: 83,714.7
MA14: 83,657.6
MA28: 83,773.5
EMA7: 83,663.6
EMA14: 83,672.7
EMA28: 83,734.7
Almost all of these references are clustered within a small range above the current price. That tells me BTC is currently fighting for short-term control rather than making a clean directional move.
The immediate ceiling is around 84,703.2, while the latest 24H high sits at 85,571.9.
On the other side, 83,147.6 is the latest 24H low. If that area gives way, the chart has room toward 82,004.5, with 79,305.9 becoming a much deeper reference.
There is also a bigger picture behind this consolidation.
The recent major swing high is 87,401.9, while the earlier marked low is 77,657.0. BTC has already made a large move between those extremes and is now spending time compressing beneath the upper region.
So I would watch the next expansion rather than force a prediction.
Above 84,703 → 85,571.9 → 87,401.9
Below 83,147.6 → 82,004.5 → 79,305.9
For now, 83.1K–84.7K is the area where the next move needs to prove itself.$BTC
Bitcoin is sitting at 83,562.1 on the 4H chart, but the interesting part is not the current candle — it is the narrow area price has been respecting around the moving averages.
MA7: 83,714.7
MA14: 83,657.6
MA28: 83,773.5
EMA7: 83,663.6
EMA14: 83,672.7
EMA28: 83,734.7
Almost all of these references are clustered within a small range above the current price. That tells me BTC is currently fighting for short-term control rather than making a clean directional move.
The immediate ceiling is around 84,703.2, while the latest 24H high sits at 85,571.9.
On the other side, 83,147.6 is the latest 24H low. If that area gives way, the chart has room toward 82,004.5, with 79,305.9 becoming a much deeper reference.
There is also a bigger picture behind this consolidation.
The recent major swing high is 87,401.9, while the earlier marked low is 77,657.0. BTC has already made a large move between those extremes and is now spending time compressing beneath the upper region.
So I would watch the next expansion rather than force a prediction.
Above 84,703 → 85,571.9 → 87,401.9
Below 83,147.6 → 82,004.5 → 79,305.9
For now, 83.1K–84.7K is the area where the next move needs to prove itself.$BTC

67
·
--
Haussier
ETH Is Stuck in a Tight Decision Zone
Ethereum is moving quietly, but the 4H chart is anything but uninteresting.
At $2,684.80, ETH is sitting almost directly inside a dense cluster of short-term moving averages. That usually means the market is still searching for direction rather than committing to one.
The numbers tell the story:
MA7 — $2,680.05
MA14 — $2,685.25
MA28 — $2,684.34
And the EMA readings are packed into almost the same area:
EMA7 — $2,681.98
EMA14 — $2,682.51
EMA28 — $2,683.06
So there is very little separation between the averages and the current price. ETH is effectively trading inside its own short-term equilibrium zone.
That is why the next breakout could matter more than the small candles currently visible.
The immediate upside reference is the $2,737.92 24H high. Above that, the chart has a visible resistance point around $2,726.82 before the market can challenge the larger marked high at $2,806.88.
The interesting part is that ETH has already shown it can reach that higher region. The chart previously pushed all the way to $2,806.88, but that move was followed by a sharp rejection and a long period of sideways trading.
So the market is now facing a completely different situation from that earlier expansion.
Instead of strong directional candles, ETH is producing repeated back-and-forth movement around the same price area. The moving averages have compressed, and volume has generally cooled compared with the larger activity seen during the earlier move.
That combination makes the current area worth watching.
If buyers can push ETH through $2,737.92 and keep price above that zone, the next larger reference becomes $2,806.88.
If the upper side continues to reject price, the first downside checkpoint is the $2,655.21 24H low.
A break beneath that area would expose the lower part of the current structure, while the much larger historical reference on this chart sits at $2,562.28.
There is also a smaller clue in the moving-average positioning.
$ETH
{spot}(ETHUSDT)
ETH Is Stuck in a Tight Decision Zone
Ethereum is moving quietly, but the 4H chart is anything but uninteresting.
At $2,684.80, ETH is sitting almost directly inside a dense cluster of short-term moving averages. That usually means the market is still searching for direction rather than committing to one.
The numbers tell the story:
MA7 — $2,680.05
MA14 — $2,685.25
MA28 — $2,684.34
And the EMA readings are packed into almost the same area:
EMA7 — $2,681.98
EMA14 — $2,682.51
EMA28 — $2,683.06
So there is very little separation between the averages and the current price. ETH is effectively trading inside its own short-term equilibrium zone.
That is why the next breakout could matter more than the small candles currently visible.
The immediate upside reference is the $2,737.92 24H high. Above that, the chart has a visible resistance point around $2,726.82 before the market can challenge the larger marked high at $2,806.88.
The interesting part is that ETH has already shown it can reach that higher region. The chart previously pushed all the way to $2,806.88, but that move was followed by a sharp rejection and a long period of sideways trading.
So the market is now facing a completely different situation from that earlier expansion.
Instead of strong directional candles, ETH is producing repeated back-and-forth movement around the same price area. The moving averages have compressed, and volume has generally cooled compared with the larger activity seen during the earlier move.
That combination makes the current area worth watching.
If buyers can push ETH through $2,737.92 and keep price above that zone, the next larger reference becomes $2,806.88.
If the upper side continues to reject price, the first downside checkpoint is the $2,655.21 24H low.
A break beneath that area would expose the lower part of the current structure, while the much larger historical reference on this chart sits at $2,562.28.
There is also a smaller clue in the moving-average positioning.
$ETH
Ethereum is moving quietly, but the 4H chart is anything but uninteresting.
At $2,684.80, ETH is sitting almost directly inside a dense cluster of short-term moving averages. That usually means the market is still searching for direction rather than committing to one.
The numbers tell the story:
MA7 — $2,680.05
MA14 — $2,685.25
MA28 — $2,684.34
And the EMA readings are packed into almost the same area:
EMA7 — $2,681.98
EMA14 — $2,682.51
EMA28 — $2,683.06
So there is very little separation between the averages and the current price. ETH is effectively trading inside its own short-term equilibrium zone.
That is why the next breakout could matter more than the small candles currently visible.
The immediate upside reference is the $2,737.92 24H high. Above that, the chart has a visible resistance point around $2,726.82 before the market can challenge the larger marked high at $2,806.88.
The interesting part is that ETH has already shown it can reach that higher region. The chart previously pushed all the way to $2,806.88, but that move was followed by a sharp rejection and a long period of sideways trading.
So the market is now facing a completely different situation from that earlier expansion.
Instead of strong directional candles, ETH is producing repeated back-and-forth movement around the same price area. The moving averages have compressed, and volume has generally cooled compared with the larger activity seen during the earlier move.
That combination makes the current area worth watching.
If buyers can push ETH through $2,737.92 and keep price above that zone, the next larger reference becomes $2,806.88.
If the upper side continues to reject price, the first downside checkpoint is the $2,655.21 24H low.
A break beneath that area would expose the lower part of the current structure, while the much larger historical reference on this chart sits at $2,562.28.
There is also a smaller clue in the moving-average positioning.
$ETH

67
·
--
Haussier
SOL Is Attempting a Rebound After the Recent Dip
Examining current market conditions, SOL has pushed higher following its recent local correction toward the 112.52 low. The recovery bounce has brought the price up to 116.04 (+1.16%), and recent 1-hour candles indicate steady upside momentum.
The focal point centers on the moving-average cluster. Price action is currently testing levels around MA7 (114.12) and MA25 (114.60), while MA99 sits just above at 115.45. This convergence makes the 114.12–115.45 range critical for the upcoming directional push.
Support
* 112.52 (24H Low)
* 109.01 (Macro Swing Floor)
* 106.53
Resistance
* 114.12 (MA7)
* 114.60 (MA25)
* 115.45 (MA99)
* 116.44 (24H High)
* 119.99 (Macro Peak)
Trading Setup
Should SOL successfully sustain its position above MA99 (115.45) and break cleanly through the 116.44 high, recovery momentum will accelerate, targeting the 119.99 resistance ceiling next.
Conversely, if the price slips below the 112.52 support floor, the short-term structure turns vulnerable, directing focus toward deeper structural support zones.
The broader outlook remains clear: SOL has previously delivered a robust expansion move, and the market is currently testing whether this recent recovery can establish a sustained bullish continuation.$SOL
{spot}(SOLUSDT)
$BTC
{spot}(BTCUSDT)
SOL Is Attempting a Rebound After the Recent Dip
Examining current market conditions, SOL has pushed higher following its recent local correction toward the 112.52 low. The recovery bounce has brought the price up to 116.04 (+1.16%), and recent 1-hour candles indicate steady upside momentum.
The focal point centers on the moving-average cluster. Price action is currently testing levels around MA7 (114.12) and MA25 (114.60), while MA99 sits just above at 115.45. This convergence makes the 114.12–115.45 range critical for the upcoming directional push.
Support
* 112.52 (24H Low)
* 109.01 (Macro Swing Floor)
* 106.53
Resistance
* 114.12 (MA7)
* 114.60 (MA25)
* 115.45 (MA99)
* 116.44 (24H High)
* 119.99 (Macro Peak)
Trading Setup
Should SOL successfully sustain its position above MA99 (115.45) and break cleanly through the 116.44 high, recovery momentum will accelerate, targeting the 119.99 resistance ceiling next.
Conversely, if the price slips below the 112.52 support floor, the short-term structure turns vulnerable, directing focus toward deeper structural support zones.
The broader outlook remains clear: SOL has previously delivered a robust expansion move, and the market is currently testing whether this recent recovery can establish a sustained bullish continuation.$SOL
$BTC
Examining current market conditions, SOL has pushed higher following its recent local correction toward the 112.52 low. The recovery bounce has brought the price up to 116.04 (+1.16%), and recent 1-hour candles indicate steady upside momentum.
The focal point centers on the moving-average cluster. Price action is currently testing levels around MA7 (114.12) and MA25 (114.60), while MA99 sits just above at 115.45. This convergence makes the 114.12–115.45 range critical for the upcoming directional push.
Support
* 112.52 (24H Low)
* 109.01 (Macro Swing Floor)
* 106.53
Resistance
* 114.12 (MA7)
* 114.60 (MA25)
* 115.45 (MA99)
* 116.44 (24H High)
* 119.99 (Macro Peak)
Trading Setup
Should SOL successfully sustain its position above MA99 (115.45) and break cleanly through the 116.44 high, recovery momentum will accelerate, targeting the 119.99 resistance ceiling next.
Conversely, if the price slips below the 112.52 support floor, the short-term structure turns vulnerable, directing focus toward deeper structural support zones.
The broader outlook remains clear: SOL has previously delivered a robust expansion move, and the market is currently testing whether this recent recovery can establish a sustained bullish continuation.$SOL
$BTC

104
·
--
Haussier
BCH/USDT Moving Average Trend Setup
• Core Strategy Overview : Capturing trend continuation as price stabilizes above short-term moving average baselines.
• Position Sizing & Leverage : Suggested 3x to 5x isolated margin allocations to effectively navigate hourly price fluctuations.
• Execution & Entry Matrix :
* Primary Market Entry : $341.51 (Current live trading price)
* Secondary Limit Entry : $320.29 (24-hour low support retest zone)
• Take-Profit Objectives (TP) :
* Profit Target 1 : $345.68 (Immediate local moving average resistance)
* Profit Target 2 : $366.44 (24-hour high resistance peak)
* Profit Target 3 : $372.55 (Extended psychological expansion target)
• Risk Mitigation & Stop Loss :
* Stop Loss Level : $315.00 (Positioned safely below the 24-hour low and structural support base)
* Risk-to-Reward Ratio : Approximately 1 : 3.4
• Volatility & Technical Confluence :
* Live Market Rate : $341.51
* Timeframe Focus : 1-Hour (1h) candlestick chart
* Moving Average Levels : MA(7) at $337.85, MA(25) at $345.55, and long-term MA(99) at $290.44
* Price Behavior : Price is consolidating right below the MA(25) line following a sharp bullish expansion phase.
• Liquidity & Support Mapping :
* Immediate Support Base : $337.85 and $320.29
* Overhead Supply Zone : $345.55 to $366.44
* Liquidity Pools : Buy-Side Liquidity (BSL) targeted at $366.44; Sell-Side Liquidity (SSL) resting beneath $320.29.
• Validation & Invalidation Triggers :
* Bullish Confirmation : A clean 1H candle body close above $345.55 accelerates upward momentum toward $366.44+.
* Setup Invalidation : A decisive break below $320.29 cancels the immediate continuation thesis. $BCH
{spot}(BCHUSDT)
BCH/USDT Moving Average Trend Setup
• Core Strategy Overview : Capturing trend continuation as price stabilizes above short-term moving average baselines.
• Position Sizing & Leverage : Suggested 3x to 5x isolated margin allocations to effectively navigate hourly price fluctuations.
• Execution & Entry Matrix :
* Primary Market Entry : $341.51 (Current live trading price)
* Secondary Limit Entry : $320.29 (24-hour low support retest zone)
• Take-Profit Objectives (TP) :
* Profit Target 1 : $345.68 (Immediate local moving average resistance)
* Profit Target 2 : $366.44 (24-hour high resistance peak)
* Profit Target 3 : $372.55 (Extended psychological expansion target)
• Risk Mitigation & Stop Loss :
* Stop Loss Level : $315.00 (Positioned safely below the 24-hour low and structural support base)
* Risk-to-Reward Ratio : Approximately 1 : 3.4
• Volatility & Technical Confluence :
* Live Market Rate : $341.51
* Timeframe Focus : 1-Hour (1h) candlestick chart
* Moving Average Levels : MA(7) at $337.85, MA(25) at $345.55, and long-term MA(99) at $290.44
* Price Behavior : Price is consolidating right below the MA(25) line following a sharp bullish expansion phase.
• Liquidity & Support Mapping :
* Immediate Support Base : $337.85 and $320.29
* Overhead Supply Zone : $345.55 to $366.44
* Liquidity Pools : Buy-Side Liquidity (BSL) targeted at $366.44; Sell-Side Liquidity (SSL) resting beneath $320.29.
• Validation & Invalidation Triggers :
* Bullish Confirmation : A clean 1H candle body close above $345.55 accelerates upward momentum toward $366.44+.
* Setup Invalidation : A decisive break below $320.29 cancels the immediate continuation thesis. $BCH
• Core Strategy Overview : Capturing trend continuation as price stabilizes above short-term moving average baselines.
• Position Sizing & Leverage : Suggested 3x to 5x isolated margin allocations to effectively navigate hourly price fluctuations.
• Execution & Entry Matrix :
* Primary Market Entry : $341.51 (Current live trading price)
* Secondary Limit Entry : $320.29 (24-hour low support retest zone)
• Take-Profit Objectives (TP) :
* Profit Target 1 : $345.68 (Immediate local moving average resistance)
* Profit Target 2 : $366.44 (24-hour high resistance peak)
* Profit Target 3 : $372.55 (Extended psychological expansion target)
• Risk Mitigation & Stop Loss :
* Stop Loss Level : $315.00 (Positioned safely below the 24-hour low and structural support base)
* Risk-to-Reward Ratio : Approximately 1 : 3.4
• Volatility & Technical Confluence :
* Live Market Rate : $341.51
* Timeframe Focus : 1-Hour (1h) candlestick chart
* Moving Average Levels : MA(7) at $337.85, MA(25) at $345.55, and long-term MA(99) at $290.44
* Price Behavior : Price is consolidating right below the MA(25) line following a sharp bullish expansion phase.
• Liquidity & Support Mapping :
* Immediate Support Base : $337.85 and $320.29
* Overhead Supply Zone : $345.55 to $366.44
* Liquidity Pools : Buy-Side Liquidity (BSL) targeted at $366.44; Sell-Side Liquidity (SSL) resting beneath $320.29.
• Validation & Invalidation Triggers :
* Bullish Confirmation : A clean 1H candle body close above $345.55 accelerates upward momentum toward $366.44+.
* Setup Invalidation : A decisive break below $320.29 cancels the immediate continuation thesis. $BCH

67
·
--
Haussier
📉 BTCUSDT SHORT POSITION & TRADE BLUEPRINT 📉
* Asset: Bitcoin ($BTC)
* Position: Short (10x Margin)
📊 Support & Resistance Levels:
* Resistance Zone: 87,383.60 (24h high and immediate overhead ceiling)
* Equilibrium Level: 81,921.52 (Bollinger Band baseline / midline)
* Support Zone: 76,096.07 (Lower Bollinger band) down to 74,919.60 (prior structural swing low)
🎯 Execution Plan & Strategy:
* Entry Zone: 86,000.00 – 86,434.90 (Scaling into short exposure near local resistance)
* Objective Alpha (TP1): 81,921.52 (Targeting the Bollinger midline equilibrium)
* Objective Beta (TP2): 76,096.07 (Targeting the lower channel support boundary)
* Risk Guard (SL): 88,000.00 (Strictly protected above the recent 87,383.60 spike high)
🔍 Technical Context:
* Indicator Status: On the 6-hour chart, price action is pressing near the upper boundary of the BOLL(20, 2) channels, showing clear signs of buying exhaustion and overextension.
* Market Dynamics: As trading hovers around 86,430.30, bullish momentum is slowing down significantly, laying the groundwork for a mean-reversion corrective pullback.
Execute strictly according to your defined risk management rules.$BTC
{spot}(BTCUSDT)
📉 BTCUSDT SHORT POSITION & TRADE BLUEPRINT 📉
* Asset: Bitcoin ($BTC )
* Position: Short (10x Margin)
📊 Support & Resistance Levels:
* Resistance Zone: 87,383.60 (24h high and immediate overhead ceiling)
* Equilibrium Level: 81,921.52 (Bollinger Band baseline / midline)
* Support Zone: 76,096.07 (Lower Bollinger band) down to 74,919.60 (prior structural swing low)
🎯 Execution Plan & Strategy:
* Entry Zone: 86,000.00 – 86,434.90 (Scaling into short exposure near local resistance)
* Objective Alpha (TP1): 81,921.52 (Targeting the Bollinger midline equilibrium)
* Objective Beta (TP2): 76,096.07 (Targeting the lower channel support boundary)
* Risk Guard (SL): 88,000.00 (Strictly protected above the recent 87,383.60 spike high)
🔍 Technical Context:
* Indicator Status: On the 6-hour chart, price action is pressing near the upper boundary of the BOLL(20, 2) channels, showing clear signs of buying exhaustion and overextension.
* Market Dynamics: As trading hovers around 86,430.30, bullish momentum is slowing down significantly, laying the groundwork for a mean-reversion corrective pullback.
Execute strictly according to your defined risk management rules.$BTC
* Asset: Bitcoin ($BTC )
* Position: Short (10x Margin)
📊 Support & Resistance Levels:
* Resistance Zone: 87,383.60 (24h high and immediate overhead ceiling)
* Equilibrium Level: 81,921.52 (Bollinger Band baseline / midline)
* Support Zone: 76,096.07 (Lower Bollinger band) down to 74,919.60 (prior structural swing low)
🎯 Execution Plan & Strategy:
* Entry Zone: 86,000.00 – 86,434.90 (Scaling into short exposure near local resistance)
* Objective Alpha (TP1): 81,921.52 (Targeting the Bollinger midline equilibrium)
* Objective Beta (TP2): 76,096.07 (Targeting the lower channel support boundary)
* Risk Guard (SL): 88,000.00 (Strictly protected above the recent 87,383.60 spike high)
🔍 Technical Context:
* Indicator Status: On the 6-hour chart, price action is pressing near the upper boundary of the BOLL(20, 2) channels, showing clear signs of buying exhaustion and overextension.
* Market Dynamics: As trading hovers around 86,430.30, bullish momentum is slowing down significantly, laying the groundwork for a mean-reversion corrective pullback.
Execute strictly according to your defined risk management rules.$BTC

103
BTC: Breakout or Bull Trap?
BTC pushed toward 86,353.3, but price is back near 85,875.7. The breakout needs follow-through—otherwise, buyers chasing the high could get caught.
Bull-trap watch: rejection near 86,353.3–86,422.7, followed by a drop below 85,190.1. Lower levels to monitor: 84,979.7 → 83,522.0.
If BTC holds above 85,806.4 and clears the recent high, the trap scenario weakens.
No confirmation yet—watch the reaction, not just the wick.$BTC $ETH
BTC: Breakout or Bull Trap?
BTC pushed toward 86,353.3, but price is back near 85,875.7. The breakout needs follow-through—otherwise, buyers chasing the high could get caught.
Bull-trap watch: rejection near 86,353.3–86,422.7, followed by a drop below 85,190.1. Lower levels to monitor: 84,979.7 → 83,522.0.
If BTC holds above 85,806.4 and clears the recent high, the trap scenario weakens.
No confirmation yet—watch the reaction, not just the wick.$BTC $ETH
BTC pushed toward 86,353.3, but price is back near 85,875.7. The breakout needs follow-through—otherwise, buyers chasing the high could get caught.
Bull-trap watch: rejection near 86,353.3–86,422.7, followed by a drop below 85,190.1. Lower levels to monitor: 84,979.7 → 83,522.0.
If BTC holds above 85,806.4 and clears the recent high, the trap scenario weakens.
No confirmation yet—watch the reaction, not just the wick.$BTC $ETH
70
·
--
Baissier
📉 Guys, Short $FF Now!
FFUSDT
Perp
📌 Entry Zone: 0.1450 - 0.14937
🎯 TP1: 0.1350
🎯 TP2: 0.1220
🛑 Stop Loss: 0.1560$FF
{spot}(FFUSDT)
📉 Guys, Short $FF Now!
FFUSDT
Perp
📌 Entry Zone: 0.1450 - 0.14937
🎯 TP1: 0.1350
🎯 TP2: 0.1220
🛑 Stop Loss: 0.1560$FF
FFUSDT
Perp
📌 Entry Zone: 0.1450 - 0.14937
🎯 TP1: 0.1350
🎯 TP2: 0.1220
🛑 Stop Loss: 0.1560$FF
1
·
--
Haussier
🔥 $KAT listen... open big long it now, thanks me later
entry 0.00460 - 0.004810
sl 0.00430
tp 0.00530 - 0.00600
Long $KAT 👇$KAT
{spot}(KATUSDT)
🔥 $KAT listen... open big long it now, thanks me later
entry 0.00460 - 0.004810
sl 0.00430
tp 0.00530 - 0.00600
Long $KAT 👇$KAT
entry 0.00460 - 0.004810
sl 0.00430
tp 0.00530 - 0.00600
Long $KAT 👇$KAT
1
46
·
--
Baissier
$ON — SHORT
ENTRY: 0.1457
TP1: 0.1453
TP2: 0.1370
TP3: 0.1250
SL: 0.1577
Resistance rejection highlights growing selling pressure at current levels.$ON
{future}(ONUSDT)
$ON — SHORT
ENTRY: 0.1457
TP1: 0.1453
TP2: 0.1370
TP3: 0.1250
SL: 0.1577
Resistance rejection highlights growing selling pressure at current levels.$ON
ENTRY: 0.1457
TP1: 0.1453
TP2: 0.1370
TP3: 0.1250
SL: 0.1577
Resistance rejection highlights growing selling pressure at current levels.$ON
51
·
--
Baissier
📉 Guys, Short $COTI Now!
COTIUSDT
Perp
📌 Entry Zone: 0.01670 - 0.016945
🎯 TP1: 0.01600
🎯 TP2: 0.01520
🛑 Stop Loss: 0.01760$COTI
{spot}(COTIUSDT)
📉 Guys, Short $COTI Now!
COTIUSDT
Perp
📌 Entry Zone: 0.01670 - 0.016945
🎯 TP1: 0.01600
🎯 TP2: 0.01520
🛑 Stop Loss: 0.01760$COTI
COTIUSDT
Perp
📌 Entry Zone: 0.01670 - 0.016945
🎯 TP1: 0.01600
🎯 TP2: 0.01520
🛑 Stop Loss: 0.01760$COTI
11
·
--
Haussier
🔥 $ZEC listen... open big long it now, thanks me later
entry 1100.00 - 1135.93
sl 1060.00
tp 1200.00 - 1280.00
Long $ZEC 👇$ZEC
{spot}(ZECUSDT)
🔥 $ZEC listen... open big long it now, thanks me later
entry 1100.00 - 1135.93
sl 1060.00
tp 1200.00 - 1280.00
Long $ZEC 👇$ZEC
entry 1100.00 - 1135.93
sl 1060.00
tp 1200.00 - 1280.00
Long $ZEC 👇$ZEC
12
·
--
Haussier
$XRP — LONG
ENTRY: 1.3628
TP1: 1.3679
TP2: 1.3976
TP3: 1.4502
SL: 1.3153
Buyers are stepping in near support, setting up for a potential recovery move higher.$XRP
{spot}(XRPUSDT)
$XRP — LONG
ENTRY: 1.3628
TP1: 1.3679
TP2: 1.3976
TP3: 1.4502
SL: 1.3153
Buyers are stepping in near support, setting up for a potential recovery move higher.$XRP
ENTRY: 1.3628
TP1: 1.3679
TP2: 1.3976
TP3: 1.4502
SL: 1.3153
Buyers are stepping in near support, setting up for a potential recovery move higher.$XRP
79
Connectez-vous pour découvrir plus de contenu
Rejoignez la communauté mondiale des adeptes de cryptomonnaies sur Binance Square
⚡️ Suviez les dernières informations importantes sur les cryptomonnaies.
💬 Jugé digne de confiance par la plus grande plateforme d’échange de cryptomonnaies au monde.
👍 Découvrez les connaissances que partagent les créateurs vérifiés.
Adresse e-mail/Nº de téléphone
Sujets d’actualité
EtherGains70.9%InQ3
167,531 vues
1,171 mentions
One of the best third quarters in history 💰
September closed out last night, and with it, the quarter. For the quarter, BTC is up 42%—the second-best Q3 on record. ETH had a record-breaking Q3 overall, up 70%.
Looking at the chart, things are still looking good: we’re holding support, but we’re testing it more and more often. Plus, ETF momentum is weakening — inflows are gradually declining, and yesterday saw outflows for the first time in a long while.
Yes, historically, October has been a good month for crypto — it’s not called “Uptober” for nothing. But it’s also one of the most volatile months. Last year, for example, we managed to hit a new all-time high (ATH) and experience a flash crash.
🚀 High Accuracy Trades.
$BTC
$ETH
$SOL
#EtherGains70.9%InQ3 #DollarIndexHitsHighestSinceMay2025 #CFTCSubmitsTwoEventContractRulesToWhiteHouse #MicronBeatsEarningsLiftsGuidance
Knowledge is Power
·0 mentions J’aime
·248 vues
TreasuryLetsStatesFileStablecoinCertificationsEarly
10,539 vues
89 mentions
US10YearYieldNears5.3%
156,354 vues
1,150 mentions