

BlockoraX
8k Publications

BlockoraX
Signaler
Bloquer l’utilisateur
Harshith | Private Crypto Trader | Precision Entries. Calculated Risk. | Capital Preservation First. | Profits Built with Discipline.🔥🔥
Ouvert au trading
Trade régulièrement
9.8 mois
498 Suivis
1.4K+ Abonnés
7.7K+ J’aime
Publications
Portefeuille
Tous
Citations
Direct
·
--
Baissier
🔴🔥 $STRK — REJECTION IS BUILDING, DOWNSIDE IN FOCUS 📉
🔻 SHORT SETUP
Entry: $0.05290 – $0.05441
🎯 TP1: $0.05150
🎯 TP2: $0.04859
🎯 TP3: $0.04568
🛑 SL: $0.05666
⚡ Scenario:
$STRK is facing rejection around $0.05290 after failing to hold the move from $0.05666. Sellers are defending the recent highs, while price remains below the EMA(7) and EMA(25).
A clean breakdown below $0.05290 with strong selling pressure could accelerate the move toward $0.05150 → $0.04859 → $0.04568.
🔑 Hold below $0.05290 → bearish continuation stays in focus.
❌ Reclaim $0.05666 → short setup invalidated.
👇 Short $STRK here
{future}(STRKUSDT)
🔴🔥 $STRK — REJECTION IS BUILDING, DOWNSIDE IN FOCUS 📉
🔻 SHORT SETUP
Entry: $0.05290 – $0.05441
🎯 TP1: $0.05150
🎯 TP2: $0.04859
🎯 TP3: $0.04568
🛑 SL: $0.05666
⚡ Scenario:
$STRK is facing rejection around $0.05290 after failing to hold the move from $0.05666. Sellers are defending the recent highs, while price remains below the EMA(7) and EMA(25).
A clean breakdown below $0.05290 with strong selling pressure could accelerate the move toward $0.05150 → $0.04859 → $0.04568.
🔑 Hold below $0.05290 → bearish continuation stays in focus.
❌ Reclaim $0.05666 → short setup invalidated.
👇 Short $STRK here
🔻 SHORT SETUP
Entry: $0.05290 – $0.05441
🎯 TP1: $0.05150
🎯 TP2: $0.04859
🎯 TP3: $0.04568
🛑 SL: $0.05666
⚡ Scenario:
$STRK is facing rejection around $0.05290 after failing to hold the move from $0.05666. Sellers are defending the recent highs, while price remains below the EMA(7) and EMA(25).
A clean breakdown below $0.05290 with strong selling pressure could accelerate the move toward $0.05150 → $0.04859 → $0.04568.
🔑 Hold below $0.05290 → bearish continuation stays in focus.
❌ Reclaim $0.05666 → short setup invalidated.
👇 Short $STRK here
1
97
·
--
Haussier
🚀🔥 $AIN — VOLUME IS EXPLODING… IS A MAJOR MOVE LOADING? 👀📈
$AIN is attracting serious volume after a massive breakout, with both spot activity and futures participation heating up sharply.
⚡ SCENARIO:
If buyers can hold the breakout zone and volume stays elevated, another aggressive expansion leg could develop.
But there’s a catch — futures open interest and funding are also elevated, meaning the move is getting crowded. A sudden flush could trigger heavy liquidations in either direction.
🔥 Volume expanding
🔥 Momentum accelerating
⚠️ Leverage getting crowded
Don’t chase the candle. Watch for a clean pullback, support retest, or fresh breakout confirmation.
👀 $AIN is definitely one to keep on the radar.
{future}(AINUSDT)
🚀🔥 $AIN — VOLUME IS EXPLODING… IS A MAJOR MOVE LOADING? 👀📈
$AIN is attracting serious volume after a massive breakout, with both spot activity and futures participation heating up sharply.
⚡ SCENARIO:
If buyers can hold the breakout zone and volume stays elevated, another aggressive expansion leg could develop.
But there’s a catch — futures open interest and funding are also elevated, meaning the move is getting crowded. A sudden flush could trigger heavy liquidations in either direction.
🔥 Volume expanding
🔥 Momentum accelerating
⚠️ Leverage getting crowded
Don’t chase the candle. Watch for a clean pullback, support retest, or fresh breakout confirmation.
👀 $AIN is definitely one to keep on the radar.
$AIN is attracting serious volume after a massive breakout, with both spot activity and futures participation heating up sharply.
⚡ SCENARIO:
If buyers can hold the breakout zone and volume stays elevated, another aggressive expansion leg could develop.
But there’s a catch — futures open interest and funding are also elevated, meaning the move is getting crowded. A sudden flush could trigger heavy liquidations in either direction.
🔥 Volume expanding
🔥 Momentum accelerating
⚠️ Leverage getting crowded
Don’t chase the candle. Watch for a clean pullback, support retest, or fresh breakout confirmation.
👀 $AIN is definitely one to keep on the radar.
1
316
·
--
Haussier
🟢🔥 $ETH — BULLISH MOMENTUM IS BUILDING 🚀📈
🟢 LONG SETUP · UP TO 10X
Entry: 2,697 – 2,699
SL: 2,691
🎯 TP1: 2,704
🎯 TP2: 2,708
🎯 TP3: 2,714
⚡ Scenario: $ETH started pushing higher from 2,688, with each pullback forming higher lows. Price is now retracing into the 2,696–2,700 support zone.
If buyers continue defending 2,696, the structure remains bullish and another retest of 2,708 could open the way toward 2,714.
🔑 Hold 2,696 → bullish continuation stays in focus.
❌ Lose 2,691 → setup invalidated.
⚠️ Up to 10x leverage carries elevated risk. Keep position size controlled and respect the SL.
🚀 Buy & Trade $ETH 👇
{future}(ETHUSDT)
🟢🔥 $ETH — BULLISH MOMENTUM IS BUILDING 🚀📈
🟢 LONG SETUP · UP TO 10X
Entry: 2,697 – 2,699
SL: 2,691
🎯 TP1: 2,704
🎯 TP2: 2,708
🎯 TP3: 2,714
⚡ Scenario: $ETH started pushing higher from 2,688, with each pullback forming higher lows. Price is now retracing into the 2,696–2,700 support zone.
If buyers continue defending 2,696, the structure remains bullish and another retest of 2,708 could open the way toward 2,714.
🔑 Hold 2,696 → bullish continuation stays in focus.
❌ Lose 2,691 → setup invalidated.
⚠️ Up to 10x leverage carries elevated risk. Keep position size controlled and respect the SL.
🚀 Buy & Trade $ETH 👇
🟢 LONG SETUP · UP TO 10X
Entry: 2,697 – 2,699
SL: 2,691
🎯 TP1: 2,704
🎯 TP2: 2,708
🎯 TP3: 2,714
⚡ Scenario: $ETH started pushing higher from 2,688, with each pullback forming higher lows. Price is now retracing into the 2,696–2,700 support zone.
If buyers continue defending 2,696, the structure remains bullish and another retest of 2,708 could open the way toward 2,714.
🔑 Hold 2,696 → bullish continuation stays in focus.
❌ Lose 2,691 → setup invalidated.
⚠️ Up to 10x leverage carries elevated risk. Keep position size controlled and respect the SL.
🚀 Buy & Trade $ETH 👇
1
39
·
--
Haussier
🟢🔥 $1000CHEEMS — 10X LONG IS LIVE 🚀📈
🟢 LONG SETUP · 10X
Entry: 0.000568 – 0.000575
SL: 0.000555
🎯 TP1: 0.000585
🎯 TP2: 0.000595
🎯 TP3: 0.000610
⚡ Scenario: I’ve opened a 10x long on $1000CHEEMS from the planned entry zone. Buyers need to defend 0.000568–0.000575 to keep the upside continuation setup active.
Hold the zone → 0.000585 → 0.000595 → 0.000610 come into focus.
Lose 0.000555 → setup invalidated.
⚠️ 10x leverage means increased risk. Keep the position controlled and respect the SL.
🚀 Trade $1000CHEEMS here 👇
{future}(1000CHEEMSUSDT)
🟢🔥 $1000CHEEMS — 10X LONG IS LIVE 🚀📈
🟢 LONG SETUP · 10X
Entry: 0.000568 – 0.000575
SL: 0.000555
🎯 TP1: 0.000585
🎯 TP2: 0.000595
🎯 TP3: 0.000610
⚡ Scenario: I’ve opened a 10x long on $1000CHEEMS from the planned entry zone. Buyers need to defend 0.000568–0.000575 to keep the upside continuation setup active.
Hold the zone → 0.000585 → 0.000595 → 0.000610 come into focus.
Lose 0.000555 → setup invalidated.
⚠️ 10x leverage means increased risk. Keep the position controlled and respect the SL.
🚀 Trade $1000CHEEMS here 👇
🟢 LONG SETUP · 10X
Entry: 0.000568 – 0.000575
SL: 0.000555
🎯 TP1: 0.000585
🎯 TP2: 0.000595
🎯 TP3: 0.000610
⚡ Scenario: I’ve opened a 10x long on $1000CHEEMS from the planned entry zone. Buyers need to defend 0.000568–0.000575 to keep the upside continuation setup active.
Hold the zone → 0.000585 → 0.000595 → 0.000610 come into focus.
Lose 0.000555 → setup invalidated.
⚠️ 10x leverage means increased risk. Keep the position controlled and respect the SL.
🚀 Trade $1000CHEEMS here 👇
1
13
·
--
Haussier
🟢🔥 $1000CHEEMS — 10X LONG IS LIVE 🚀📈
🟢 LONG SETUP · 10X
Entry: 0.000568 – 0.000575
SL: 0.000555
🎯 TP1: 0.000585
🎯 TP2: 0.000595
🎯 TP3: 0.000610
⚡ Scenario: I’ve opened a 10x long on $1000CHEEMS from the planned entry zone. Buyers need to defend 0.000568–0.000575 to keep the upside continuation setup active.
Hold the zone → 0.000585 → 0.000595 → 0.000610 come into focus.
Lose 0.000555 → setup invalidated.
⚠️ 10x leverage means increased risk. Keep the position controlled and respect the SL.
🚀 Trade $1000CHEEMS here 👇
{future}(1000CHEEMSUSDT)
🟢🔥 $1000CHEEMS — 10X LONG IS LIVE 🚀📈
🟢 LONG SETUP · 10X
Entry: 0.000568 – 0.000575
SL: 0.000555
🎯 TP1: 0.000585
🎯 TP2: 0.000595
🎯 TP3: 0.000610
⚡ Scenario: I’ve opened a 10x long on $1000CHEEMS from the planned entry zone. Buyers need to defend 0.000568–0.000575 to keep the upside continuation setup active.
Hold the zone → 0.000585 → 0.000595 → 0.000610 come into focus.
Lose 0.000555 → setup invalidated.
⚠️ 10x leverage means increased risk. Keep the position controlled and respect the SL.
🚀 Trade $1000CHEEMS here 👇
🟢 LONG SETUP · 10X
Entry: 0.000568 – 0.000575
SL: 0.000555
🎯 TP1: 0.000585
🎯 TP2: 0.000595
🎯 TP3: 0.000610
⚡ Scenario: I’ve opened a 10x long on $1000CHEEMS from the planned entry zone. Buyers need to defend 0.000568–0.000575 to keep the upside continuation setup active.
Hold the zone → 0.000585 → 0.000595 → 0.000610 come into focus.
Lose 0.000555 → setup invalidated.
⚠️ 10x leverage means increased risk. Keep the position controlled and respect the SL.
🚀 Trade $1000CHEEMS here 👇
1
93
·
--
Haussier
🟢🔥 $USELESS — 1H LONG SETUP | BULLISH TREND RETEST 📈
🟢 LONG SETUP — WATCHLIST ONLY
Entry: 0.24105 – 0.24179
SL: 0.23886
🎯 TP1: 0.24521 — 1.48R
🎯 TP2: 0.24660 — 2.02R
🎯 TP3: 0.25981 — 7.18R
📊 Scale Out: 30% / 30% / 40%
⚡ Scenario: $USELESS is retracing inside an established bullish 1H trend. The entry zone is being watched for a potential continuation, but confirmation is still needed before considering the trade.
A clean reaction from 0.24105–0.24179 could put the upside targets back in focus. Losing 0.23886 invalidates the setup.
⚠️ Current estimated EV: -0.44R
⚠️ Decision score is below the active threshold.
👀 WATCHLIST ONLY — wait for confirmation.
👇 Keep $USELESS on watch
{alpha}(560xba38b3c706f7a515ff7c8db04daa0a134ec46d2b)
🟢🔥 $USELESS — 1H LONG SETUP | BULLISH TREND RETEST 📈
🟢 LONG SETUP — WATCHLIST ONLY
Entry: 0.24105 – 0.24179
SL: 0.23886
🎯 TP1: 0.24521 — 1.48R
🎯 TP2: 0.24660 — 2.02R
🎯 TP3: 0.25981 — 7.18R
📊 Scale Out: 30% / 30% / 40%
⚡ Scenario: $USELESS is retracing inside an established bullish 1H trend. The entry zone is being watched for a potential continuation, but confirmation is still needed before considering the trade.
A clean reaction from 0.24105–0.24179 could put the upside targets back in focus. Losing 0.23886 invalidates the setup.
⚠️ Current estimated EV: -0.44R
⚠️ Decision score is below the active threshold.
👀 WATCHLIST ONLY — wait for confirmation.
👇 Keep $USELESS on watch
🟢 LONG SETUP — WATCHLIST ONLY
Entry: 0.24105 – 0.24179
SL: 0.23886
🎯 TP1: 0.24521 — 1.48R
🎯 TP2: 0.24660 — 2.02R
🎯 TP3: 0.25981 — 7.18R
📊 Scale Out: 30% / 30% / 40%
⚡ Scenario: $USELESS is retracing inside an established bullish 1H trend. The entry zone is being watched for a potential continuation, but confirmation is still needed before considering the trade.
A clean reaction from 0.24105–0.24179 could put the upside targets back in focus. Losing 0.23886 invalidates the setup.
⚠️ Current estimated EV: -0.44R
⚠️ Decision score is below the active threshold.
👀 WATCHLIST ONLY — wait for confirmation.
👇 Keep $USELESS on watch
1
232
·
--
Haussier
🟢🔥 $USELESS — BUYING THE DIP FOR ANOTHER LEG HIGHER 🚀📈
🟢 LONG SETUP
Entry: 0.237 – 0.241
SL: 0.22989
🎯 TP1: 0.2520
🎯 TP2: 0.2620
⚡ Scenario: $USELESS is refusing to stay down, bouncing directly from daily support and keeping the door open for another upside leg. If buyers continue defending the 0.237–0.241 zone, momentum could build toward 0.252 → 0.262.
🔑 Key level: 0.237
Hold support → bullish continuation stays in focus.
Lose 0.22989 → setup invalidated.
⚠️ Persistent short-term taker selling could still break local support, so avoid chasing and keep position size controlled.
🚀 Ride the upside. 👇👇👇
Trade $USELESS here
{future}(USELESSUSDT)
🟢🔥 $USELESS — BUYING THE DIP FOR ANOTHER LEG HIGHER 🚀📈
🟢 LONG SETUP
Entry: 0.237 – 0.241
SL: 0.22989
🎯 TP1: 0.2520
🎯 TP2: 0.2620
⚡ Scenario: $USELESS is refusing to stay down, bouncing directly from daily support and keeping the door open for another upside leg. If buyers continue defending the 0.237–0.241 zone, momentum could build toward 0.252 → 0.262.
🔑 Key level: 0.237
Hold support → bullish continuation stays in focus.
Lose 0.22989 → setup invalidated.
⚠️ Persistent short-term taker selling could still break local support, so avoid chasing and keep position size controlled.
🚀 Ride the upside. 👇👇👇
Trade $USELESS here
🟢 LONG SETUP
Entry: 0.237 – 0.241
SL: 0.22989
🎯 TP1: 0.2520
🎯 TP2: 0.2620
⚡ Scenario: $USELESS is refusing to stay down, bouncing directly from daily support and keeping the door open for another upside leg. If buyers continue defending the 0.237–0.241 zone, momentum could build toward 0.252 → 0.262.
🔑 Key level: 0.237
Hold support → bullish continuation stays in focus.
Lose 0.22989 → setup invalidated.
⚠️ Persistent short-term taker selling could still break local support, so avoid chasing and keep position size controlled.
🚀 Ride the upside. 👇👇👇
Trade $USELESS here
1
208
·
--
Baissier
🔴🔥 $HEMI — WHY IS THE BOUNCE FAILING? 📉
🔻 SHORT SETUP | STRONG BEARISH BIAS
Entry: 0.0059551 – 0.0059669
SL: 0.0060990
🎯 TP1: 0.0058575
🎯 TP2: 0.0057885
🎯 TP3: 0.0056851
⚡ Scenario: $HEMI is struggling to bounce because the bearish structure is aligned across the Daily, 4H and 1H timeframes. Price remains below both EMA50 and EMA200 on all three timeframes, keeping sellers in control of the broader trend.
The only warning is short-term momentum: 15M RSI z-score is +1.13 and buyers are currently pressing. That makes the entry zone important — no blind chase.
🔑 Key level: 0.0059551–0.0059669
Rejection here → downside targets stay in focus.
Break above 0.0060990 → short thesis invalidated.
📊 Signal confirmation: 7/12 bearish · 1 against · 4 undecided.
⚠️ Take partials at TP1 and consider moving SL to entry after the first target. Manage leverage carefully.
👇 Trade $HEMI here
{future}(HEMIUSDT)
🔴🔥 $HEMI — WHY IS THE BOUNCE FAILING? 📉
🔻 SHORT SETUP | STRONG BEARISH BIAS
Entry: 0.0059551 – 0.0059669
SL: 0.0060990
🎯 TP1: 0.0058575
🎯 TP2: 0.0057885
🎯 TP3: 0.0056851
⚡ Scenario: $HEMI is struggling to bounce because the bearish structure is aligned across the Daily, 4H and 1H timeframes. Price remains below both EMA50 and EMA200 on all three timeframes, keeping sellers in control of the broader trend.
The only warning is short-term momentum: 15M RSI z-score is +1.13 and buyers are currently pressing. That makes the entry zone important — no blind chase.
🔑 Key level: 0.0059551–0.0059669
Rejection here → downside targets stay in focus.
Break above 0.0060990 → short thesis invalidated.
📊 Signal confirmation: 7/12 bearish · 1 against · 4 undecided.
⚠️ Take partials at TP1 and consider moving SL to entry after the first target. Manage leverage carefully.
👇 Trade $HEMI here
🔻 SHORT SETUP | STRONG BEARISH BIAS
Entry: 0.0059551 – 0.0059669
SL: 0.0060990
🎯 TP1: 0.0058575
🎯 TP2: 0.0057885
🎯 TP3: 0.0056851
⚡ Scenario: $HEMI is struggling to bounce because the bearish structure is aligned across the Daily, 4H and 1H timeframes. Price remains below both EMA50 and EMA200 on all three timeframes, keeping sellers in control of the broader trend.
The only warning is short-term momentum: 15M RSI z-score is +1.13 and buyers are currently pressing. That makes the entry zone important — no blind chase.
🔑 Key level: 0.0059551–0.0059669
Rejection here → downside targets stay in focus.
Break above 0.0060990 → short thesis invalidated.
📊 Signal confirmation: 7/12 bearish · 1 against · 4 undecided.
⚠️ Take partials at TP1 and consider moving SL to entry after the first target. Manage leverage carefully.
👇 Trade $HEMI here
1
461
·
--
Baissier
🔴🔥 $ZRO — SHORT UPDATE | THE IDEA IS STILL ALIVE 📉🐼
🔻 SHORT SETUP — HOLDING THE BIAS
🎯 TP1: 2.015
🎯 TP2: 1.940
🎯 TP3: 1.855
⚡ Scenario: Yesterday’s short faced an initial squeeze as $ZRO pushed higher, but the bearish setup remains active as long as the invalidation level holds.
Price is still trading near a heavy supply zone, while crowded longs could provide liquidity for a potential pullback. The focus remains on downside continuation rather than chasing the pump.
💥 Sometimes price takes liquidity above first before the real move develops.
⚠️ Manage leverage carefully, respect the stop, and avoid overexposure.
🐼 Stay patient. Let price action confirm the move.
👇 Trade $ZRO here
{future}(ZROUSDT)
🔴🔥 $ZRO — SHORT UPDATE | THE IDEA IS STILL ALIVE 📉🐼
🔻 SHORT SETUP — HOLDING THE BIAS
🎯 TP1: 2.015
🎯 TP2: 1.940
🎯 TP3: 1.855
⚡ Scenario: Yesterday’s short faced an initial squeeze as $ZRO pushed higher, but the bearish setup remains active as long as the invalidation level holds.
Price is still trading near a heavy supply zone, while crowded longs could provide liquidity for a potential pullback. The focus remains on downside continuation rather than chasing the pump.
💥 Sometimes price takes liquidity above first before the real move develops.
⚠️ Manage leverage carefully, respect the stop, and avoid overexposure.
🐼 Stay patient. Let price action confirm the move.
👇 Trade $ZRO here
🔻 SHORT SETUP — HOLDING THE BIAS
🎯 TP1: 2.015
🎯 TP2: 1.940
🎯 TP3: 1.855
⚡ Scenario: Yesterday’s short faced an initial squeeze as $ZRO pushed higher, but the bearish setup remains active as long as the invalidation level holds.
Price is still trading near a heavy supply zone, while crowded longs could provide liquidity for a potential pullback. The focus remains on downside continuation rather than chasing the pump.
💥 Sometimes price takes liquidity above first before the real move develops.
⚠️ Manage leverage carefully, respect the stop, and avoid overexposure.
🐼 Stay patient. Let price action confirm the move.
👇 Trade $ZRO here
1
193
·
--
Haussier
🟢🔥 $ATOM — THE ENTRY ZONE IS HERE 🚀📈
🟢 LONG SETUP
Entry: 1.713 – 1.731
SL: 1.627
🎯 TP1: 1.832
🎯 TP2: 1.938
🎯 TP3: 2.041
⚡ Scenario: $ATOM is approaching the planned entry zone. If buyers defend 1.713–1.731 and momentum starts building, the next upside levels could come into focus.
🔑 Hold the entry zone → continuation setup stays active.
❌ Lose 1.627 → bullish setup invalidated.
💎 Clean levels. Defined risk. Let price action confirm.
👉 Get In — Trade $ATOM
{future}(ATOMUSDT)
🟢🔥 $ATOM — THE ENTRY ZONE IS HERE 🚀📈
🟢 LONG SETUP
Entry: 1.713 – 1.731
SL: 1.627
🎯 TP1: 1.832
🎯 TP2: 1.938
🎯 TP3: 2.041
⚡ Scenario: $ATOM is approaching the planned entry zone. If buyers defend 1.713–1.731 and momentum starts building, the next upside levels could come into focus.
🔑 Hold the entry zone → continuation setup stays active.
❌ Lose 1.627 → bullish setup invalidated.
💎 Clean levels. Defined risk. Let price action confirm.
👉 Get In — Trade $ATOM
🟢 LONG SETUP
Entry: 1.713 – 1.731
SL: 1.627
🎯 TP1: 1.832
🎯 TP2: 1.938
🎯 TP3: 2.041
⚡ Scenario: $ATOM is approaching the planned entry zone. If buyers defend 1.713–1.731 and momentum starts building, the next upside levels could come into focus.
🔑 Hold the entry zone → continuation setup stays active.
❌ Lose 1.627 → bullish setup invalidated.
💎 Clean levels. Defined risk. Let price action confirm.
👉 Get In — Trade $ATOM
1
220
·
--
Haussier
🟢🔥 $DEXE — BUYING THE DIP AFTER A MONSTER PUMP 🚀📈
🟢 LONG SETUP
Entry: 1.99 – 2.03
SL: 1.930
🎯 TP1: 2.150
🎯 TP2: 2.260
⚡ Scenario: $DEXE is cooling off after a powerful pump, and this zone is being watched for a potential dip-buy opportunity. A healthy flush could shake out late buyers before momentum resumes.
If buyers defend 1.99–2.03 and MA support holds, another upside push could develop toward 2.15 → 2.26.
⚠️ Deep correction or continued profit-taking below key MA support could weaken the setup.
Never go all-in. Use a position size that fits your account.
👇👇 Buy $DEXE here
{future}(DEXEUSDT)
🟢🔥 $DEXE — BUYING THE DIP AFTER A MONSTER PUMP 🚀📈
🟢 LONG SETUP
Entry: 1.99 – 2.03
SL: 1.930
🎯 TP1: 2.150
🎯 TP2: 2.260
⚡ Scenario: $DEXE is cooling off after a powerful pump, and this zone is being watched for a potential dip-buy opportunity. A healthy flush could shake out late buyers before momentum resumes.
If buyers defend 1.99–2.03 and MA support holds, another upside push could develop toward 2.15 → 2.26.
⚠️ Deep correction or continued profit-taking below key MA support could weaken the setup.
Never go all-in. Use a position size that fits your account.
👇👇 Buy $DEXE here
🟢 LONG SETUP
Entry: 1.99 – 2.03
SL: 1.930
🎯 TP1: 2.150
🎯 TP2: 2.260
⚡ Scenario: $DEXE is cooling off after a powerful pump, and this zone is being watched for a potential dip-buy opportunity. A healthy flush could shake out late buyers before momentum resumes.
If buyers defend 1.99–2.03 and MA support holds, another upside push could develop toward 2.15 → 2.26.
⚠️ Deep correction or continued profit-taking below key MA support could weaken the setup.
Never go all-in. Use a position size that fits your account.
👇👇 Buy $DEXE here
1
293
·
--
Haussier
🟢🔥 $SAND — BREAKOUT MOMENTUM JUST EXPLODED 🚀📈
🟢 LONG SETUP
Entry: 0.0550 – 0.0570
SL: 0.0525
🎯 TP1: 0.0590
🎯 TP2: 0.0615
🎯 TP3: 0.0650
⚡ Scenario: $SAND has just broken out with a powerful momentum candle and is trading around 0.0577. Instead of chasing the spike, the focus is on a pullback into the entry zone.
If buyers defend 0.0550–0.0570 and momentum holds, the next upside levels come into focus. A loss of 0.0525 invalidates the setup.
🔥 Let the pullback come — don’t chase the candle.
👇 Trade $SAND here
{future}(SANDUSDT)
🟢🔥 $SAND — BREAKOUT MOMENTUM JUST EXPLODED 🚀📈
🟢 LONG SETUP
Entry: 0.0550 – 0.0570
SL: 0.0525
🎯 TP1: 0.0590
🎯 TP2: 0.0615
🎯 TP3: 0.0650
⚡ Scenario: $SAND has just broken out with a powerful momentum candle and is trading around 0.0577. Instead of chasing the spike, the focus is on a pullback into the entry zone.
If buyers defend 0.0550–0.0570 and momentum holds, the next upside levels come into focus. A loss of 0.0525 invalidates the setup.
🔥 Let the pullback come — don’t chase the candle.
👇 Trade $SAND here
🟢 LONG SETUP
Entry: 0.0550 – 0.0570
SL: 0.0525
🎯 TP1: 0.0590
🎯 TP2: 0.0615
🎯 TP3: 0.0650
⚡ Scenario: $SAND has just broken out with a powerful momentum candle and is trading around 0.0577. Instead of chasing the spike, the focus is on a pullback into the entry zone.
If buyers defend 0.0550–0.0570 and momentum holds, the next upside levels come into focus. A loss of 0.0525 invalidates the setup.
🔥 Let the pullback come — don’t chase the candle.
👇 Trade $SAND here
1
334
·
--
Haussier
🟢🔥 $CKB — ACCUMULATION ZONE IS BUILDING 🚀📈
🟢 BUY SETUP | Score: 45/100 — MEDIUM
Entry: 0.001309 – 0.001319
SL: 0.001258
🎯 TP1: 0.001362
🎯 TP2: 0.001428
🎯 TP3: 0.001513
⚡ Scenario: $CKB is tightening inside an accumulation zone while volume builds and momentum starts turning positive. If buyers break and hold above the recent consolidation high, the setup could gain momentum toward the targets.
🔑 Key level: 0.001319
Hold the entry zone → bullish continuation stays in focus.
Lose 0.001258 → setup invalidated.
⚠️ Medium signal score — avoid chasing sudden spikes and keep position size controlled.
👇 Trade $CKB here
{future}(CKBUSDT)
🟢🔥 $CKB — ACCUMULATION ZONE IS BUILDING 🚀📈
🟢 BUY SETUP | Score: 45/100 — MEDIUM
Entry: 0.001309 – 0.001319
SL: 0.001258
🎯 TP1: 0.001362
🎯 TP2: 0.001428
🎯 TP3: 0.001513
⚡ Scenario: $CKB is tightening inside an accumulation zone while volume builds and momentum starts turning positive. If buyers break and hold above the recent consolidation high, the setup could gain momentum toward the targets.
🔑 Key level: 0.001319
Hold the entry zone → bullish continuation stays in focus.
Lose 0.001258 → setup invalidated.
⚠️ Medium signal score — avoid chasing sudden spikes and keep position size controlled.
👇 Trade $CKB here
🟢 BUY SETUP | Score: 45/100 — MEDIUM
Entry: 0.001309 – 0.001319
SL: 0.001258
🎯 TP1: 0.001362
🎯 TP2: 0.001428
🎯 TP3: 0.001513
⚡ Scenario: $CKB is tightening inside an accumulation zone while volume builds and momentum starts turning positive. If buyers break and hold above the recent consolidation high, the setup could gain momentum toward the targets.
🔑 Key level: 0.001319
Hold the entry zone → bullish continuation stays in focus.
Lose 0.001258 → setup invalidated.
⚠️ Medium signal score — avoid chasing sudden spikes and keep position size controlled.
👇 Trade $CKB here
1
139
·
--
Haussier
🟢🔥 $BTC — 1H TREND LONG | BUYERS EYEING THE NEXT LEG 🚀📈
🟢 LONG SETUP
Entry: 85,785.5 – 85,880.5
SL: 84,741.6
🎯 TP1: 86,888 — 0.97R
🎯 TP2: 87,642.5 — 1.66R
🎯 TP3: 88,019.8 — 2.00R
📊 Scale Out: 20% / 30% / 50%
⚡ Scenario: BTC is holding a bullish 1H structure, keeping this zone in focus for a potential continuation. If buyers defend 85.8K and reclaim the upper range, momentum could build toward 86.9K → 87.6K → 88K.
🔑 Key level: 84,741.6
Hold the entry zone → bullish continuation stays in focus.
Lose the SL → long structure is invalidated.
👇 Trade $BTC here
{future}(BTCUSDT)
🟢🔥 $BTC — 1H TREND LONG | BUYERS EYEING THE NEXT LEG 🚀📈
🟢 LONG SETUP
Entry: 85,785.5 – 85,880.5
SL: 84,741.6
🎯 TP1: 86,888 — 0.97R
🎯 TP2: 87,642.5 — 1.66R
🎯 TP3: 88,019.8 — 2.00R
📊 Scale Out: 20% / 30% / 50%
⚡ Scenario: BTC is holding a bullish 1H structure, keeping this zone in focus for a potential continuation. If buyers defend 85.8K and reclaim the upper range, momentum could build toward 86.9K → 87.6K → 88K.
🔑 Key level: 84,741.6
Hold the entry zone → bullish continuation stays in focus.
Lose the SL → long structure is invalidated.
👇 Trade $BTC here
🟢 LONG SETUP
Entry: 85,785.5 – 85,880.5
SL: 84,741.6
🎯 TP1: 86,888 — 0.97R
🎯 TP2: 87,642.5 — 1.66R
🎯 TP3: 88,019.8 — 2.00R
📊 Scale Out: 20% / 30% / 50%
⚡ Scenario: BTC is holding a bullish 1H structure, keeping this zone in focus for a potential continuation. If buyers defend 85.8K and reclaim the upper range, momentum could build toward 86.9K → 87.6K → 88K.
🔑 Key level: 84,741.6
Hold the entry zone → bullish continuation stays in focus.
Lose the SL → long structure is invalidated.
👇 Trade $BTC here
1
58
·
--
Haussier
🚀🔥 $Q — BULLS ARE RIDING THE WAVE 📈💎
🟢 LONG SETUP
Entry: 0.019987 – 0.020188
SL: 0.019381
🎯 TP1: 0.021440
🎯 TP2: 0.022314
🎯 TP3: 0.022631
⚡ $Q is showing strength across multiple timeframes, with buyers maintaining control.
Hold the entry zone → bullish continuation remains in focus.
💎 Stay with the trend, not the noise.
👉 Trade $Q Now 👈
{future}(QUSDT)
🚀🔥 $Q — BULLS ARE RIDING THE WAVE 📈💎
🟢 LONG SETUP
Entry: 0.019987 – 0.020188
SL: 0.019381
🎯 TP1: 0.021440
🎯 TP2: 0.022314
🎯 TP3: 0.022631
⚡ $Q is showing strength across multiple timeframes, with buyers maintaining control.
Hold the entry zone → bullish continuation remains in focus.
💎 Stay with the trend, not the noise.
👉 Trade $Q Now 👈
🟢 LONG SETUP
Entry: 0.019987 – 0.020188
SL: 0.019381
🎯 TP1: 0.021440
🎯 TP2: 0.022314
🎯 TP3: 0.022631
⚡ $Q is showing strength across multiple timeframes, with buyers maintaining control.
Hold the entry zone → bullish continuation remains in focus.
💎 Stay with the trend, not the noise.
👉 Trade $Q Now 👈
2
451
·
--
Haussier
💎🔥 $KOMA — REVERSAL TRADE IS LIVE 🚀📈
🟢 LONG SETUP
Entry: 0.018487 – 0.018673
SL: 0.017901
🎯 TP1: 0.019403
🎯 TP2: 0.020182
🎯 TP3: 0.020988
⚡ $KOMA is setting up for a potential reversal move. Holding the entry zone could keep the upside targets in focus.
💎 High-conviction setup — execute with disciplined risk.
👉 Strike While Hot — Trade $KOMA Now 👈
{future}(KOMAUSDT)
💎🔥 $KOMA — REVERSAL TRADE IS LIVE 🚀📈
🟢 LONG SETUP
Entry: 0.018487 – 0.018673
SL: 0.017901
🎯 TP1: 0.019403
🎯 TP2: 0.020182
🎯 TP3: 0.020988
⚡ $KOMA is setting up for a potential reversal move. Holding the entry zone could keep the upside targets in focus.
💎 High-conviction setup — execute with disciplined risk.
👉 Strike While Hot — Trade $KOMA Now 👈
🟢 LONG SETUP
Entry: 0.018487 – 0.018673
SL: 0.017901
🎯 TP1: 0.019403
🎯 TP2: 0.020182
🎯 TP3: 0.020988
⚡ $KOMA is setting up for a potential reversal move. Holding the entry zone could keep the upside targets in focus.
💎 High-conviction setup — execute with disciplined risk.
👉 Strike While Hot — Trade $KOMA Now 👈
3
170
·
--
Haussier
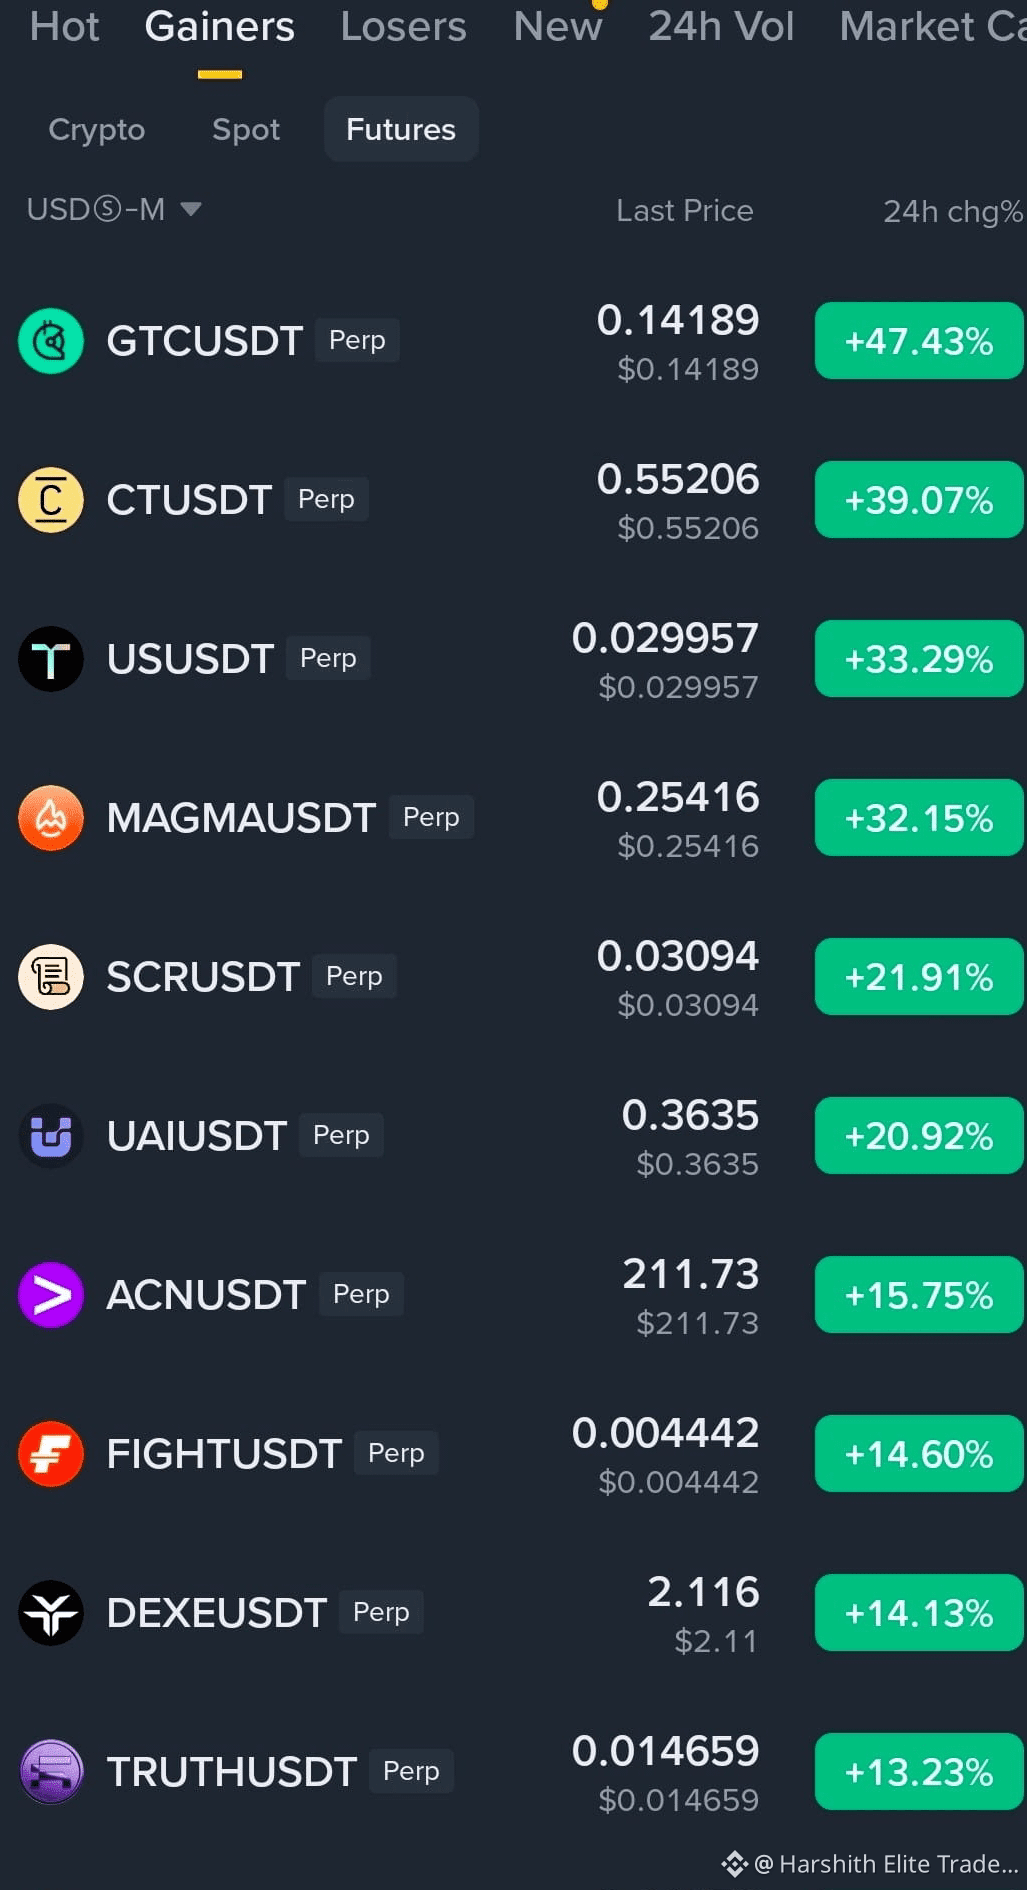
🚀🔥 TODAY’S TOP FUTURES GAINERS — MOMENTUM IS EXPLODING 📈
🔥 $GTC +47.43%
🚀 $CT +39.07%
⚡ $US +33.29%
🔥 $MAGMA +32.15%
📈 $SCR +21.91%
🚀 $UAI +20.92%
⚡ $ACN +15.75%
🔥 $FIGHT +14.60%
📈 $DEXE +14.13%
🚀 $TRUTH +13.23%
⚡ $SAND +12.00%
💹 Best approach: watch for clean pullbacks and controlled entries instead of chasing extended candles.
👀 Keep these movers on the radar — volatility is high.🔥
{future}(GTCUSDT)
{future}(CTUSDT)
{future}(UAIUSDT)
🚀🔥 TODAY’S TOP FUTURES GAINERS — MOMENTUM IS EXPLODING 📈
🔥 $GTC +47.43%
🚀 $CT +39.07%
⚡ $US +33.29%
🔥 $MAGMA +32.15%
📈 $SCR +21.91%
🚀 $UAI +20.92%
⚡ $ACN +15.75%
🔥 $FIGHT +14.60%
📈 $DEXE +14.13%
🚀 $TRUTH +13.23%
⚡ $SAND +12.00%
💹 Best approach: watch for clean pullbacks and controlled entries instead of chasing extended candles.
👀 Keep these movers on the radar — volatility is high.🔥
🔥 $GTC +47.43%
🚀 $CT +39.07%
⚡ $US +33.29%
🔥 $MAGMA +32.15%
📈 $SCR +21.91%
🚀 $UAI +20.92%
⚡ $ACN +15.75%
🔥 $FIGHT +14.60%
📈 $DEXE +14.13%
🚀 $TRUTH +13.23%
⚡ $SAND +12.00%
💹 Best approach: watch for clean pullbacks and controlled entries instead of chasing extended candles.
👀 Keep these movers on the radar — volatility is high.🔥
1
1.3k
·
--
Haussier
🟢🔥 $SOXL — 1H LONG SETUP | BUYERS ON WATCH 📈
🟢 LONG SETUP
Entry: 155.58 – 155.93
SL: 155.05
🎯 TP1: 156.58 — 1.19R
🎯 TP2: 157.28 — 2.19R
🎯 TP3: 157.62 — 2.67R
📊 Scale Out: 20% / 30% / 50%
The trend is pausing, putting this zone on watch for a potential continuation move.
⚡ Key level: 155.58–155.93
Hold the zone → upside targets remain in focus.
Lose 155.05 → setup invalidated.
👇 Trade $SOXL here
{future}(SOXLUSDT)
🟢🔥 $SOXL — 1H LONG SETUP | BUYERS ON WATCH 📈
🟢 LONG SETUP
Entry: 155.58 – 155.93
SL: 155.05
🎯 TP1: 156.58 — 1.19R
🎯 TP2: 157.28 — 2.19R
🎯 TP3: 157.62 — 2.67R
📊 Scale Out: 20% / 30% / 50%
The trend is pausing, putting this zone on watch for a potential continuation move.
⚡ Key level: 155.58–155.93
Hold the zone → upside targets remain in focus.
Lose 155.05 → setup invalidated.
👇 Trade $SOXL here
🟢 LONG SETUP
Entry: 155.58 – 155.93
SL: 155.05
🎯 TP1: 156.58 — 1.19R
🎯 TP2: 157.28 — 2.19R
🎯 TP3: 157.62 — 2.67R
📊 Scale Out: 20% / 30% / 50%
The trend is pausing, putting this zone on watch for a potential continuation move.
⚡ Key level: 155.58–155.93
Hold the zone → upside targets remain in focus.
Lose 155.05 → setup invalidated.
👇 Trade $SOXL here
1
401
·
--
Haussier
🟢🔥 $SHIB — ACCUMULATION ZONE IS ACTIVE 📈
🟢 BUY SETUP | Score: 21/100 — LOW
Entry: 0.000006
TP1: 0.000006
TP2: 0.000006
TP3: 0.000007
SL: 0.000006
$SHIB is entering an accumulation zone with rising 24H volume and improving momentum.
⚡ MACD is turning bullish, RSI is climbing above the neutral zone, and short-term moving averages are converging with a potential golden-cross signal.
Key trigger: a clean breakout above resistance could strengthen the upside setup. A pullback into the accumulation zone may offer another entry opportunity.
⚠️ Low signal score — keep position size controlled and avoid chasing.
👇 Trade $SHIB here
{spot}(SHIBUSDT)
🟢🔥 $SHIB — ACCUMULATION ZONE IS ACTIVE 📈
🟢 BUY SETUP | Score: 21/100 — LOW
Entry: 0.000006
TP1: 0.000006
TP2: 0.000006
TP3: 0.000007
SL: 0.000006
$SHIB is entering an accumulation zone with rising 24H volume and improving momentum.
⚡ MACD is turning bullish, RSI is climbing above the neutral zone, and short-term moving averages are converging with a potential golden-cross signal.
Key trigger: a clean breakout above resistance could strengthen the upside setup. A pullback into the accumulation zone may offer another entry opportunity.
⚠️ Low signal score — keep position size controlled and avoid chasing.
👇 Trade $SHIB here
🟢 BUY SETUP | Score: 21/100 — LOW
Entry: 0.000006
TP1: 0.000006
TP2: 0.000006
TP3: 0.000007
SL: 0.000006
$SHIB is entering an accumulation zone with rising 24H volume and improving momentum.
⚡ MACD is turning bullish, RSI is climbing above the neutral zone, and short-term moving averages are converging with a potential golden-cross signal.
Key trigger: a clean breakout above resistance could strengthen the upside setup. A pullback into the accumulation zone may offer another entry opportunity.
⚠️ Low signal score — keep position size controlled and avoid chasing.
👇 Trade $SHIB here
2
92
·
--
Baissier
🚨🔥 $龙虾 — 900K USDT GONE IN ONE ORDER?! 😳💥
One position reportedly worth around 900,000 USDT — more than 6 million RMB — was wiped out in a single order.
That kind of liquidation is a brutal reminder of how quickly leveraged futures can move against a position. ⚠️
$龙虾 USDT Perp is clearly showing extreme volatility right now.
❌ Don’t copy huge positions.
❌ Don’t go all-in trying to “win it back.”
⚡ One trade can change everything when leverage gets aggressive.
Stay sharp. Protect your capital.
$龙虾 👀🔥
{future}(龙虾USDT)
🚨🔥 $龙虾 — 900K USDT GONE IN ONE ORDER?! 😳💥
One position reportedly worth around 900,000 USDT — more than 6 million RMB — was wiped out in a single order.
That kind of liquidation is a brutal reminder of how quickly leveraged futures can move against a position. ⚠️
$龙虾 USDT Perp is clearly showing extreme volatility right now.
❌ Don’t copy huge positions.
❌ Don’t go all-in trying to “win it back.”
⚡ One trade can change everything when leverage gets aggressive.
Stay sharp. Protect your capital.
$龙虾 👀🔥
One position reportedly worth around 900,000 USDT — more than 6 million RMB — was wiped out in a single order.
That kind of liquidation is a brutal reminder of how quickly leveraged futures can move against a position. ⚠️
$龙虾 USDT Perp is clearly showing extreme volatility right now.
❌ Don’t copy huge positions.
❌ Don’t go all-in trying to “win it back.”
⚡ One trade can change everything when leverage gets aggressive.
Stay sharp. Protect your capital.
$龙虾 👀🔥
1
1.1k
Connectez-vous pour découvrir plus de contenu
Rejoignez la communauté mondiale des adeptes de cryptomonnaies sur Binance Square
⚡️ Suviez les dernières informations importantes sur les cryptomonnaies.
💬 Jugé digne de confiance par la plus grande plateforme d’échange de cryptomonnaies au monde.
👍 Découvrez les connaissances que partagent les créateurs vérifiés.
Adresse e-mail/Nº de téléphone
Sujets d’actualité
DriftHackVictimsBeginClaims
39,991 vues
537 mentions
🚨 $DRIFT HACK VICTIMS CAN NOW START CLAIMING
Victims of the Drift hack are beginning to receive access to the claims process.
After months of uncertainty, affected users finally have a path toward recovering their losses. 💰
If you were impacted, check the official claim details carefully and avoid fake links or scammers. ⚠️
$SOL
#DRIFT #solana #DriftHackVictimsBeginClaims $1000000BOB
Adeem Jutt
·1 mentions J’aime
·143 vues
SolanaTokenizedStockVolumeTops$4.4BInSeptember
5,935 vues
64 mentions
BitcoinSpotETFsDraw$6.34BInflowsInQ3
18,677 vues
180 mentions