

Sonum_Sohail
1.5k Publications
Sonum_Sohail
Signaler
Bloquer l’utilisateur
@Sonum_Sohail |Since 2019 |Analyst & Market Strategist | High-Conviction Market Forecaster | X/twitter;@Sonum_Sohail_6 |#KOLManager
Trade occasionnellement
1.6 an(s)
29 Suivis
9.3K+ Abonnés
1.0K+ J’aime
Publications
Tous
Citations
Direct
PINNED
·
--
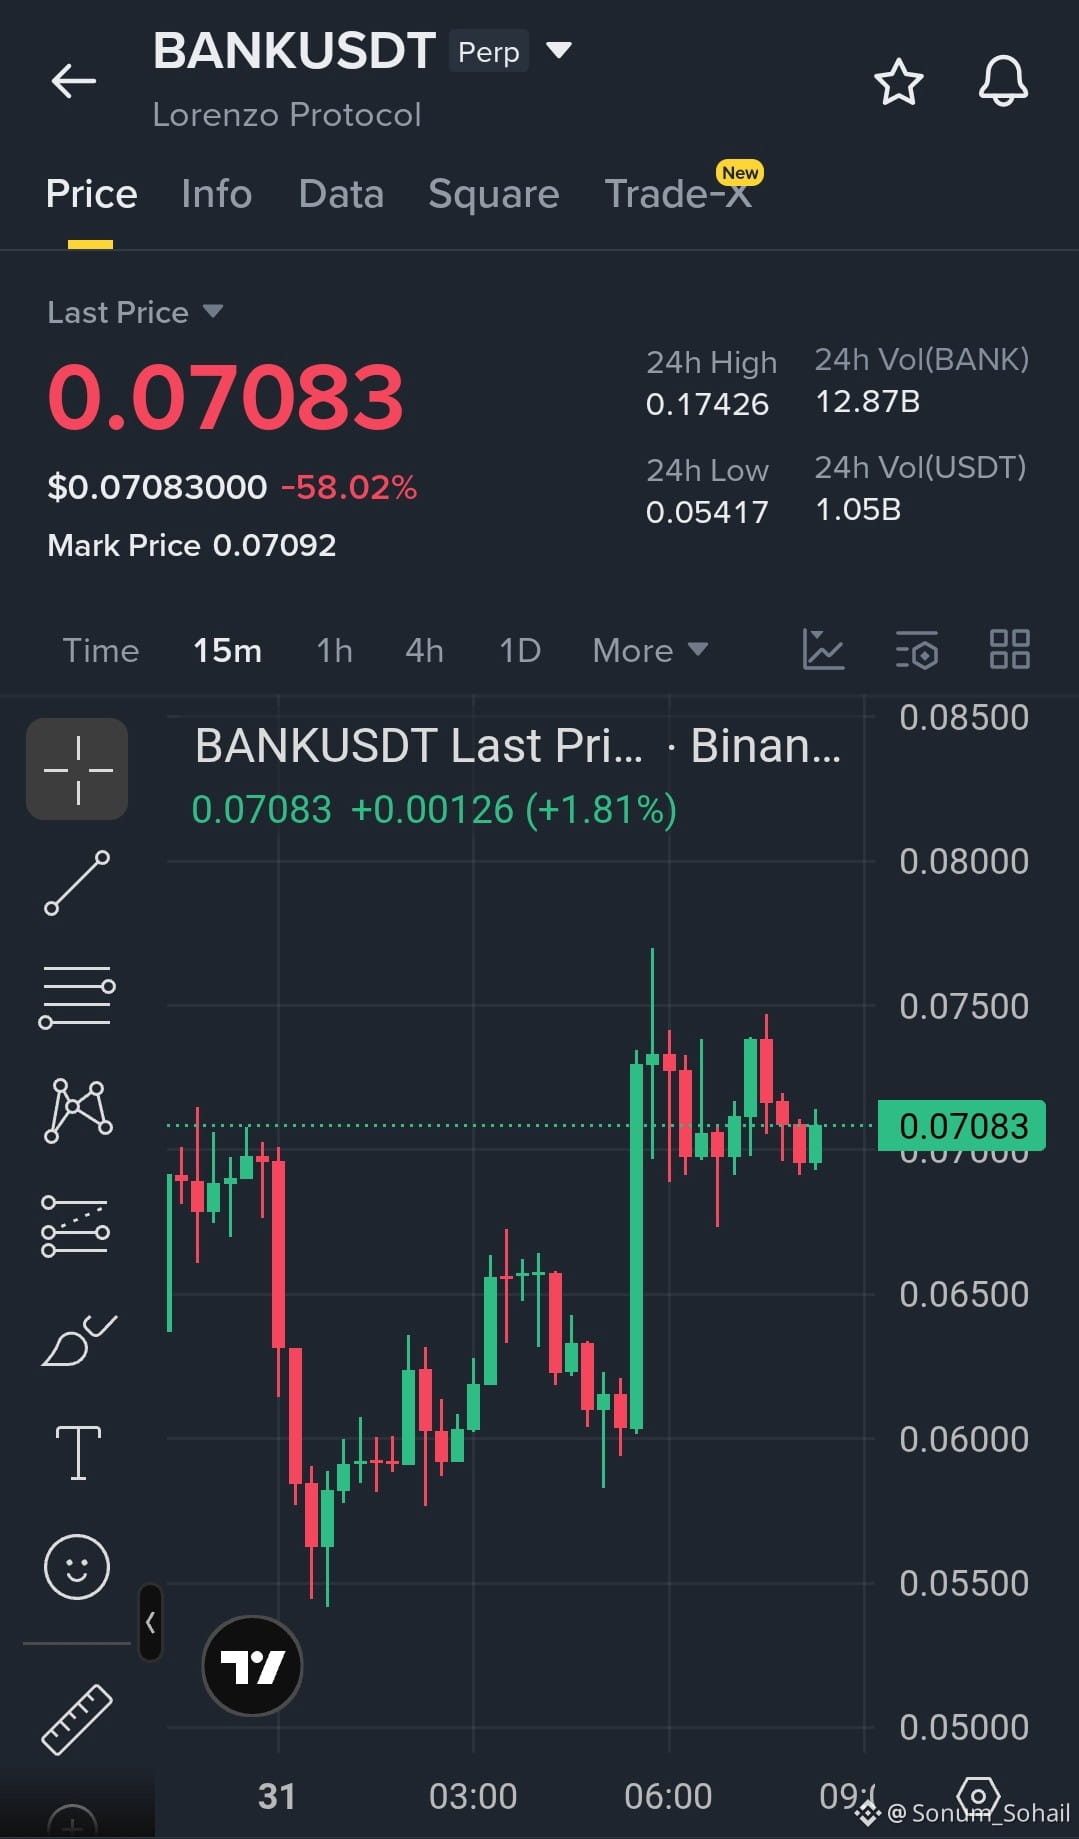
Whales are exiting... Are you still buying the hype?
$BANK is showing signs of weakness after a sharp rally. The recent pump has attracted heavy profit-taking, and large holders appear to be reducing exposure. Unless buyers reclaim key resistance with strong volume, the upside may remain limited.
Do you really think it will keep going up? I don't think so.
This is the time to focus on protecting your capital instead of chasing the market. A disciplined trader always waits for confirmation before entering a trade. Don't let FOMO control your decisions—move with strategy, manage your risk, and remember that preserving your capital is more important than catching every pump.
What's your opinion on $BANK ? Bullish or bearish?
Whales are exiting... Are you still buying the hype?
$BANK is showing signs of weakness after a sharp rally. The recent pump has attracted heavy profit-taking, and large holders appear to be reducing exposure. Unless buyers reclaim key resistance with strong volume, the upside may remain limited.
Do you really think it will keep going up? I don't think so.
This is the time to focus on protecting your capital instead of chasing the market. A disciplined trader always waits for confirmation before entering a trade. Don't let FOMO control your decisions—move with strategy, manage your risk, and remember that preserving your capital is more important than catching every pump.
What's your opinion on $BANK ? Bullish or bearish?
$BANK is showing signs of weakness after a sharp rally. The recent pump has attracted heavy profit-taking, and large holders appear to be reducing exposure. Unless buyers reclaim key resistance with strong volume, the upside may remain limited.
Do you really think it will keep going up? I don't think so.
This is the time to focus on protecting your capital instead of chasing the market. A disciplined trader always waits for confirmation before entering a trade. Don't let FOMO control your decisions—move with strategy, manage your risk, and remember that preserving your capital is more important than catching every pump.
What's your opinion on $BANK ? Bullish or bearish?
4
1
13
1.1k
PINNED
·
--
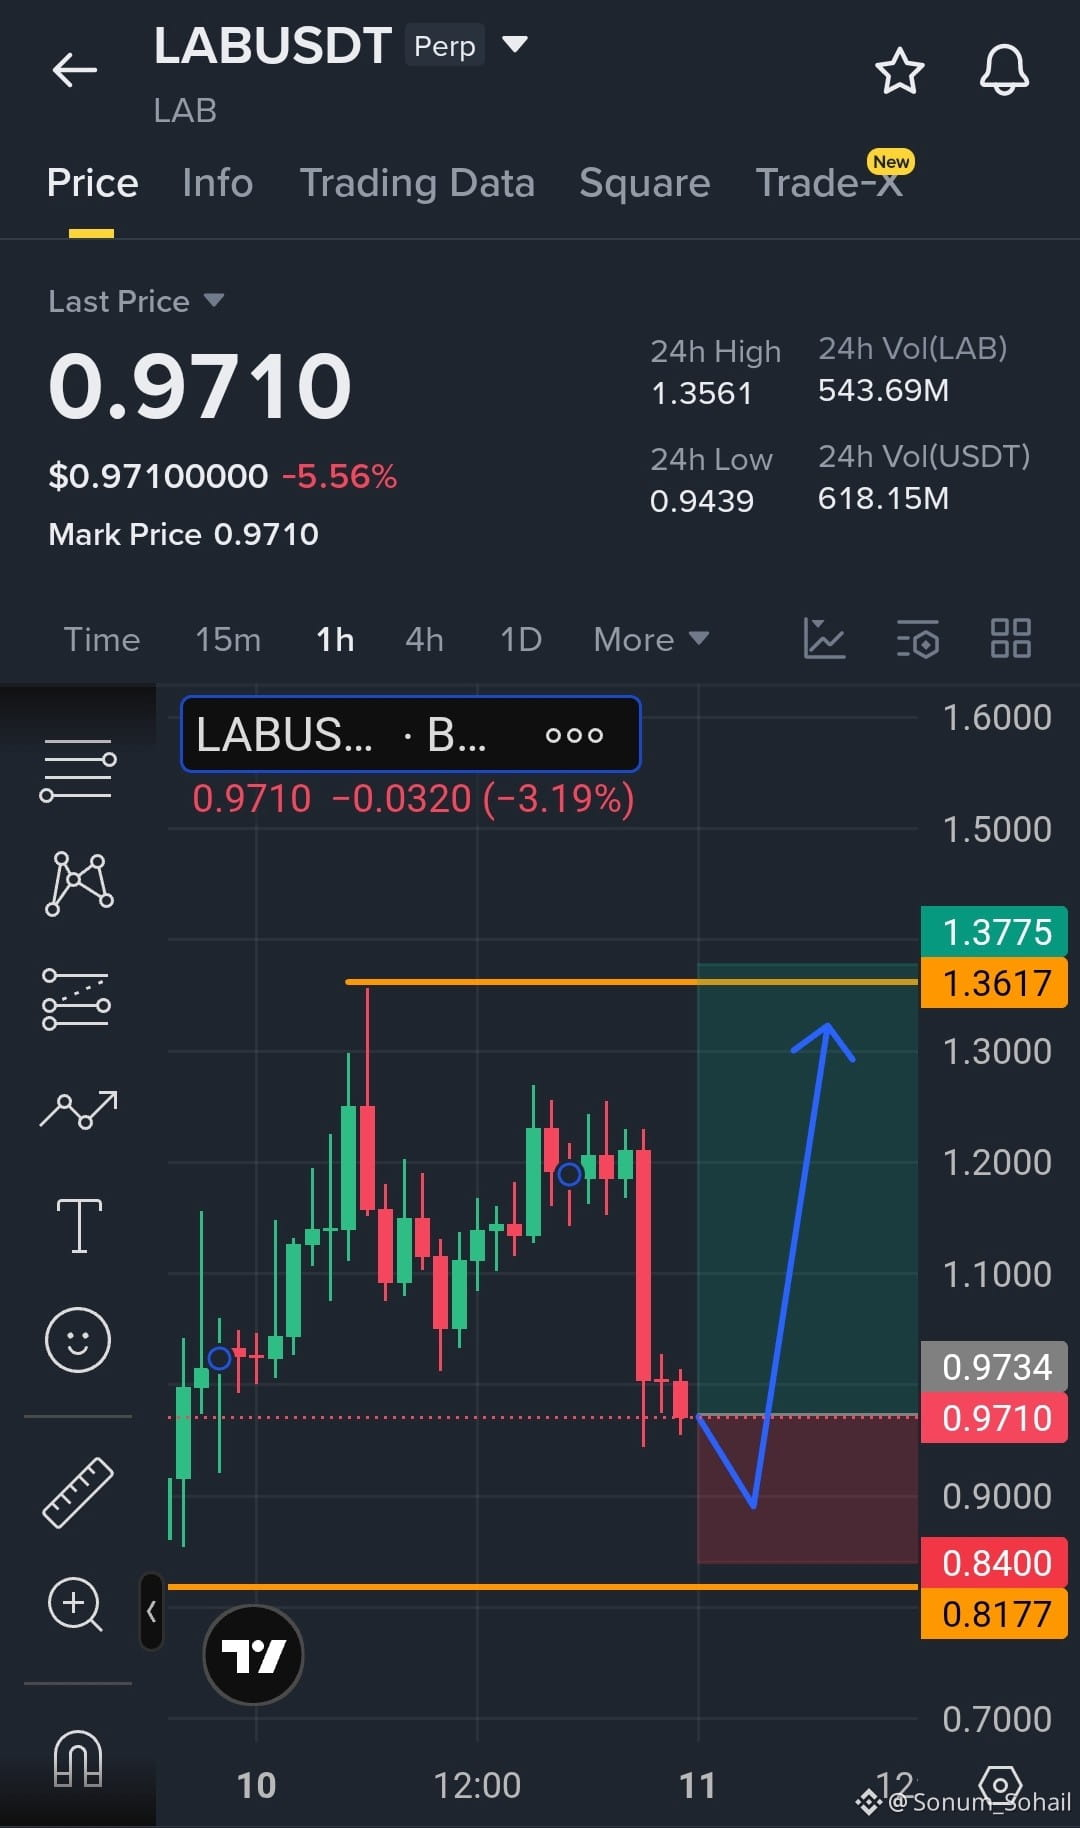
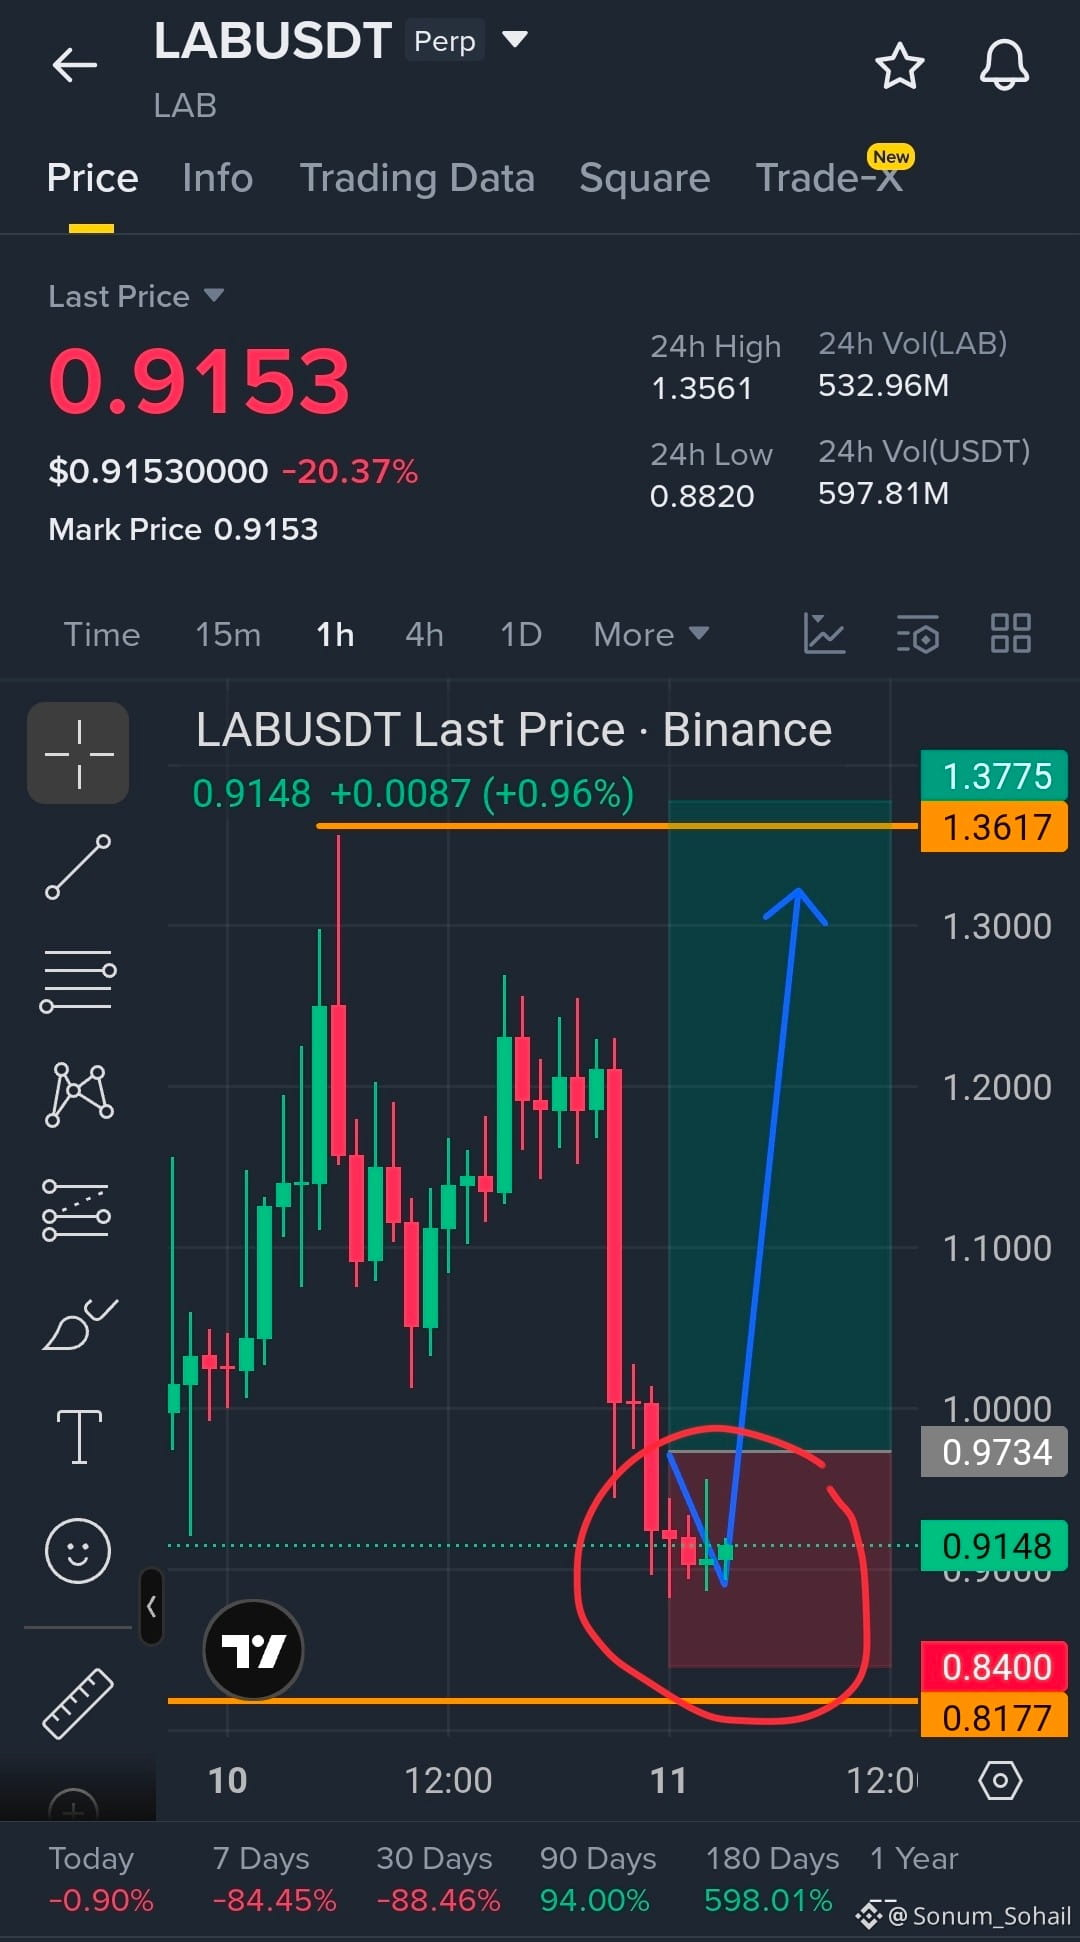
$LAB is still trading inside your original entry zone (0.960–0.980) and showing strong signs of defending the support zone.
Despite the recent volatility, buyers are stepping in around the original entry area. As long as support holds, the bullish setup remains valid. Stay patient and stick to your risk management plan. Move SL to Entry once the trade goes into profit.
Targets remain:
TP1: 1.120
TP2: 1.250
TP3: 1.360
If $LAB confirms a strong rebound from this level, the next move could be explosive. Don't let short-term fluctuations shake you out of a well-planned trade.
Trade Here On $LAB
{future}(LABUSDT)
$LAB is still trading inside your original entry zone (0.960–0.980) and showing strong signs of defending the support zone.
Despite the recent volatility, buyers are stepping in around the original entry area. As long as support holds, the bullish setup remains valid. Stay patient and stick to your risk management plan. Move SL to Entry once the trade goes into profit.
Targets remain:
TP1: 1.120
TP2: 1.250
TP3: 1.360
If $LAB confirms a strong rebound from this level, the next move could be explosive. Don't let short-term fluctuations shake you out of a well-planned trade.
Trade Here On $LAB
Despite the recent volatility, buyers are stepping in around the original entry area. As long as support holds, the bullish setup remains valid. Stay patient and stick to your risk management plan. Move SL to Entry once the trade goes into profit.
Targets remain:
TP1: 1.120
TP2: 1.250
TP3: 1.360
If $LAB confirms a strong rebound from this level, the next move could be explosive. Don't let short-term fluctuations shake you out of a well-planned trade.
Trade Here On $LAB
5
3
27
1.1k
·
--
Big Pumps.....Big Gains..... Trade Setups
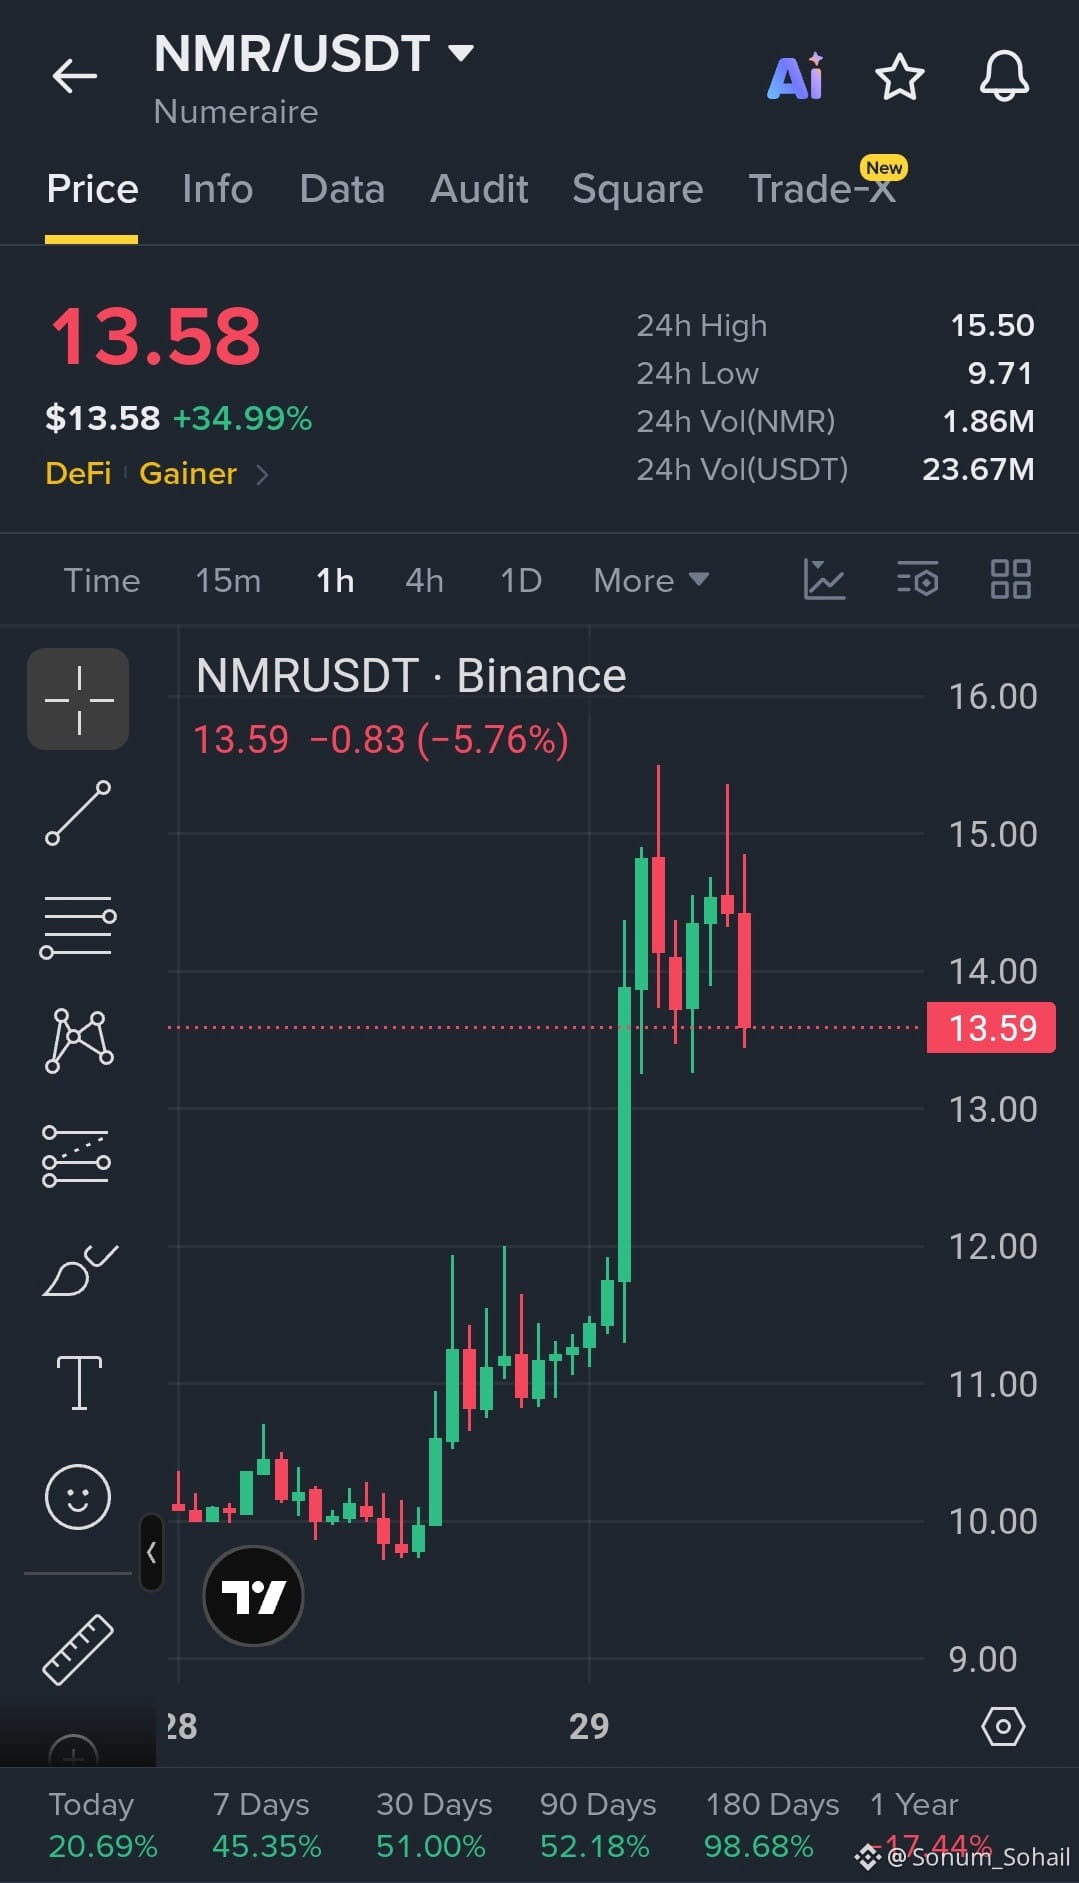
$NMR — LONG 🟢 | Entry: 13.50–13.70 | SL: 12.90 | TP1: 14.20 | TP2: 14.80 | TP3: 15.50
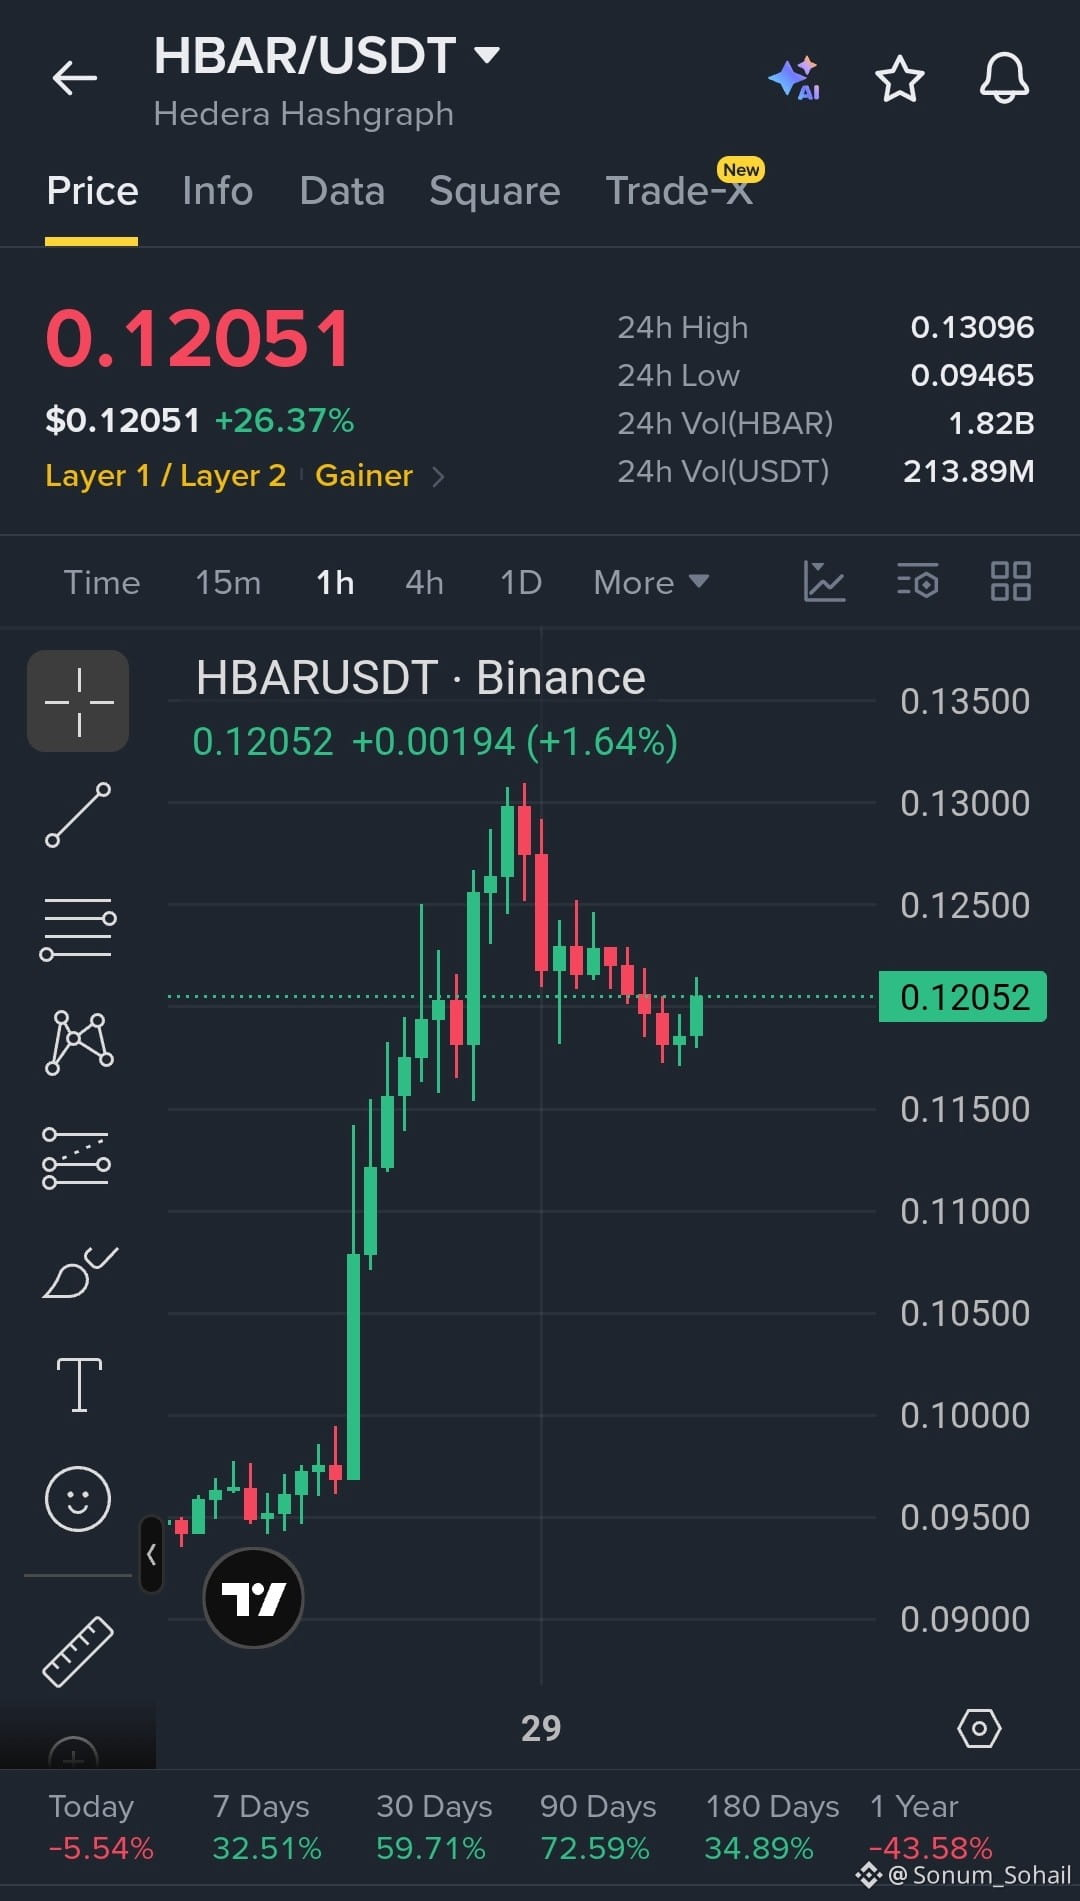
$HBAR — LONG 🟢 | Entry: 0.1190–0.1210 | SL: 0.1150 | TP1: 0.1250 | TP2: 0.1300 | TP3: 0.1350
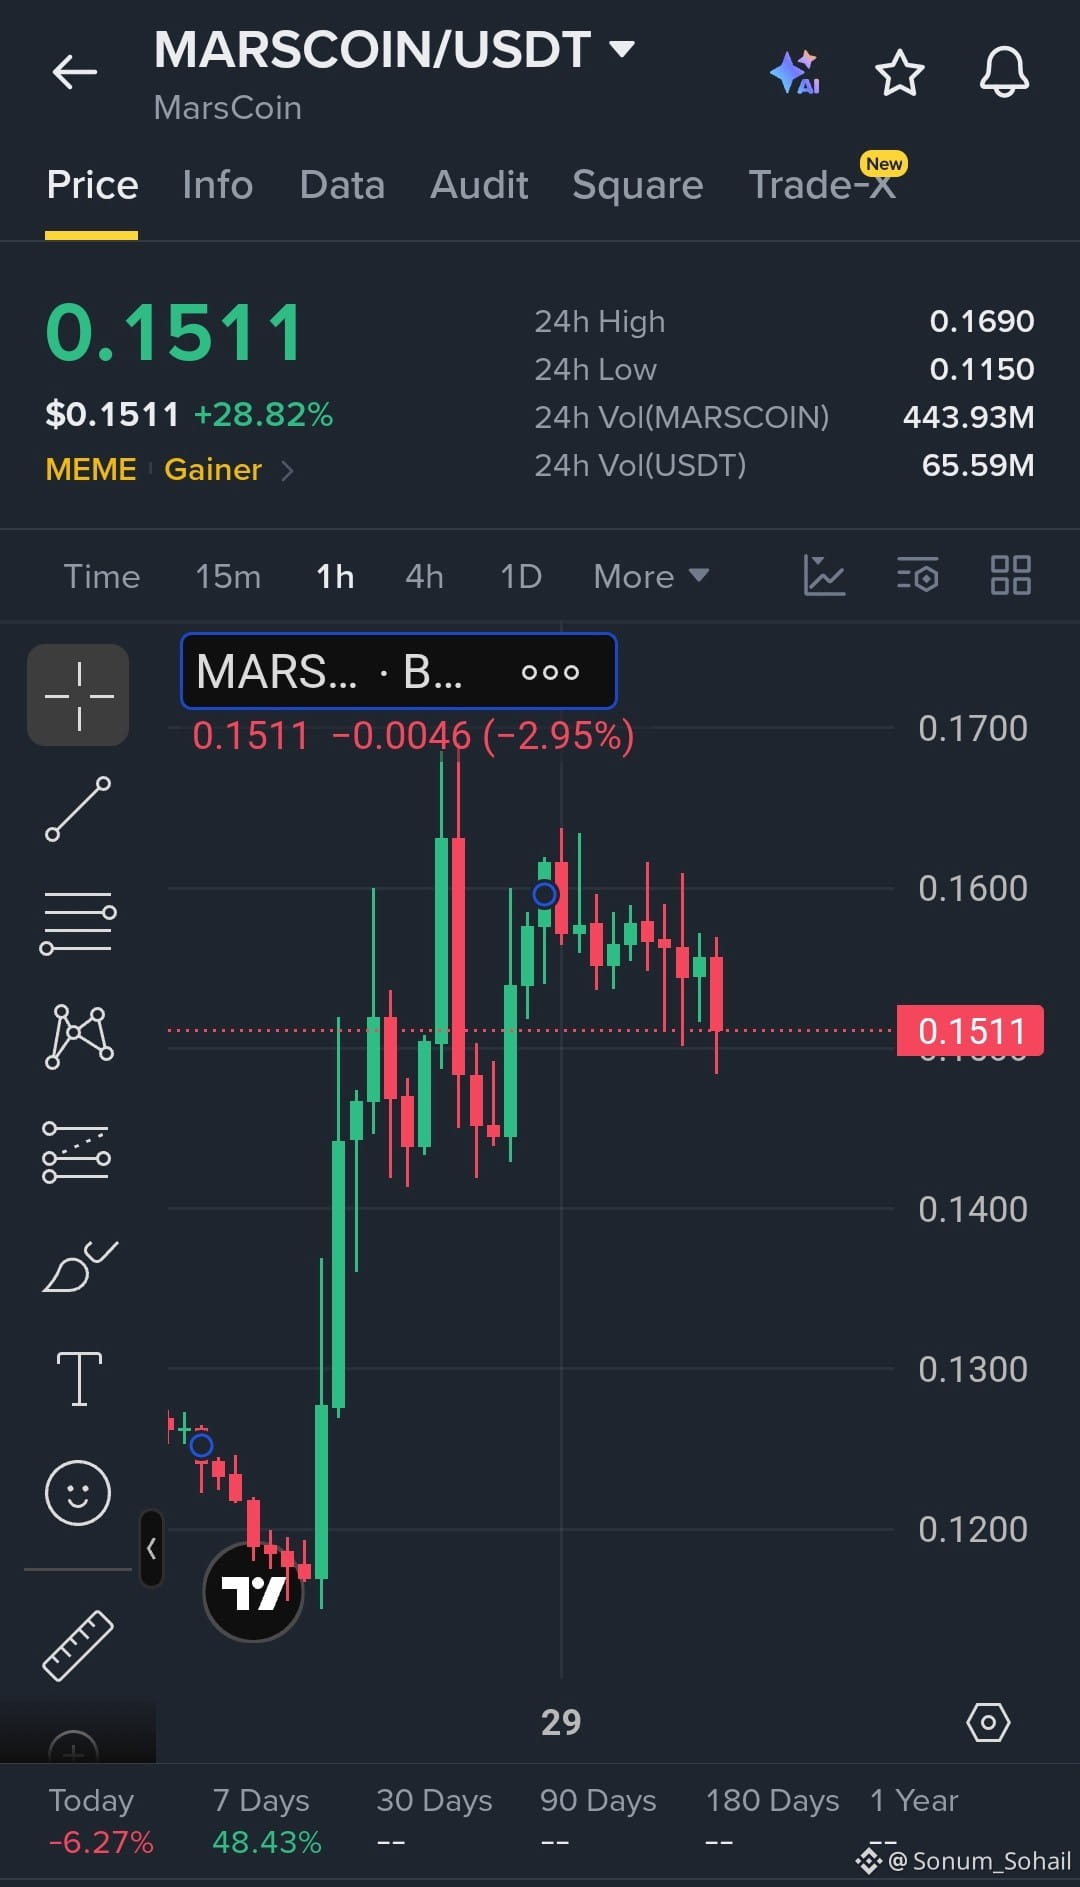
$MARSCOIN — SHORT 🔴 | Entry: 0.1510–0.1540 | SL: 0.1610 | TP1: 0.1470 | TP2: 0.1430 | TP3: 0.1380
{future}(NMRUSDT)
{future}(HBARUSDT)
{future}(MARSCOINUSDT)
Big Pumps.....Big Gains..... Trade Setups
$NMR — LONG 🟢 | Entry: 13.50–13.70 | SL: 12.90 | TP1: 14.20 | TP2: 14.80 | TP3: 15.50
$HBAR — LONG 🟢 | Entry: 0.1190–0.1210 | SL: 0.1150 | TP1: 0.1250 | TP2: 0.1300 | TP3: 0.1350
$MARSCOIN — SHORT 🔴 | Entry: 0.1510–0.1540 | SL: 0.1610 | TP1: 0.1470 | TP2: 0.1430 | TP3: 0.1380
$NMR — LONG 🟢 | Entry: 13.50–13.70 | SL: 12.90 | TP1: 14.20 | TP2: 14.80 | TP3: 15.50
$HBAR — LONG 🟢 | Entry: 0.1190–0.1210 | SL: 0.1150 | TP1: 0.1250 | TP2: 0.1300 | TP3: 0.1350
$MARSCOIN — SHORT 🔴 | Entry: 0.1510–0.1540 | SL: 0.1610 | TP1: 0.1470 | TP2: 0.1430 | TP3: 0.1380
1
141
·
--
$QNT — LONG SETUP.....Big Opportunity Thanks me later......
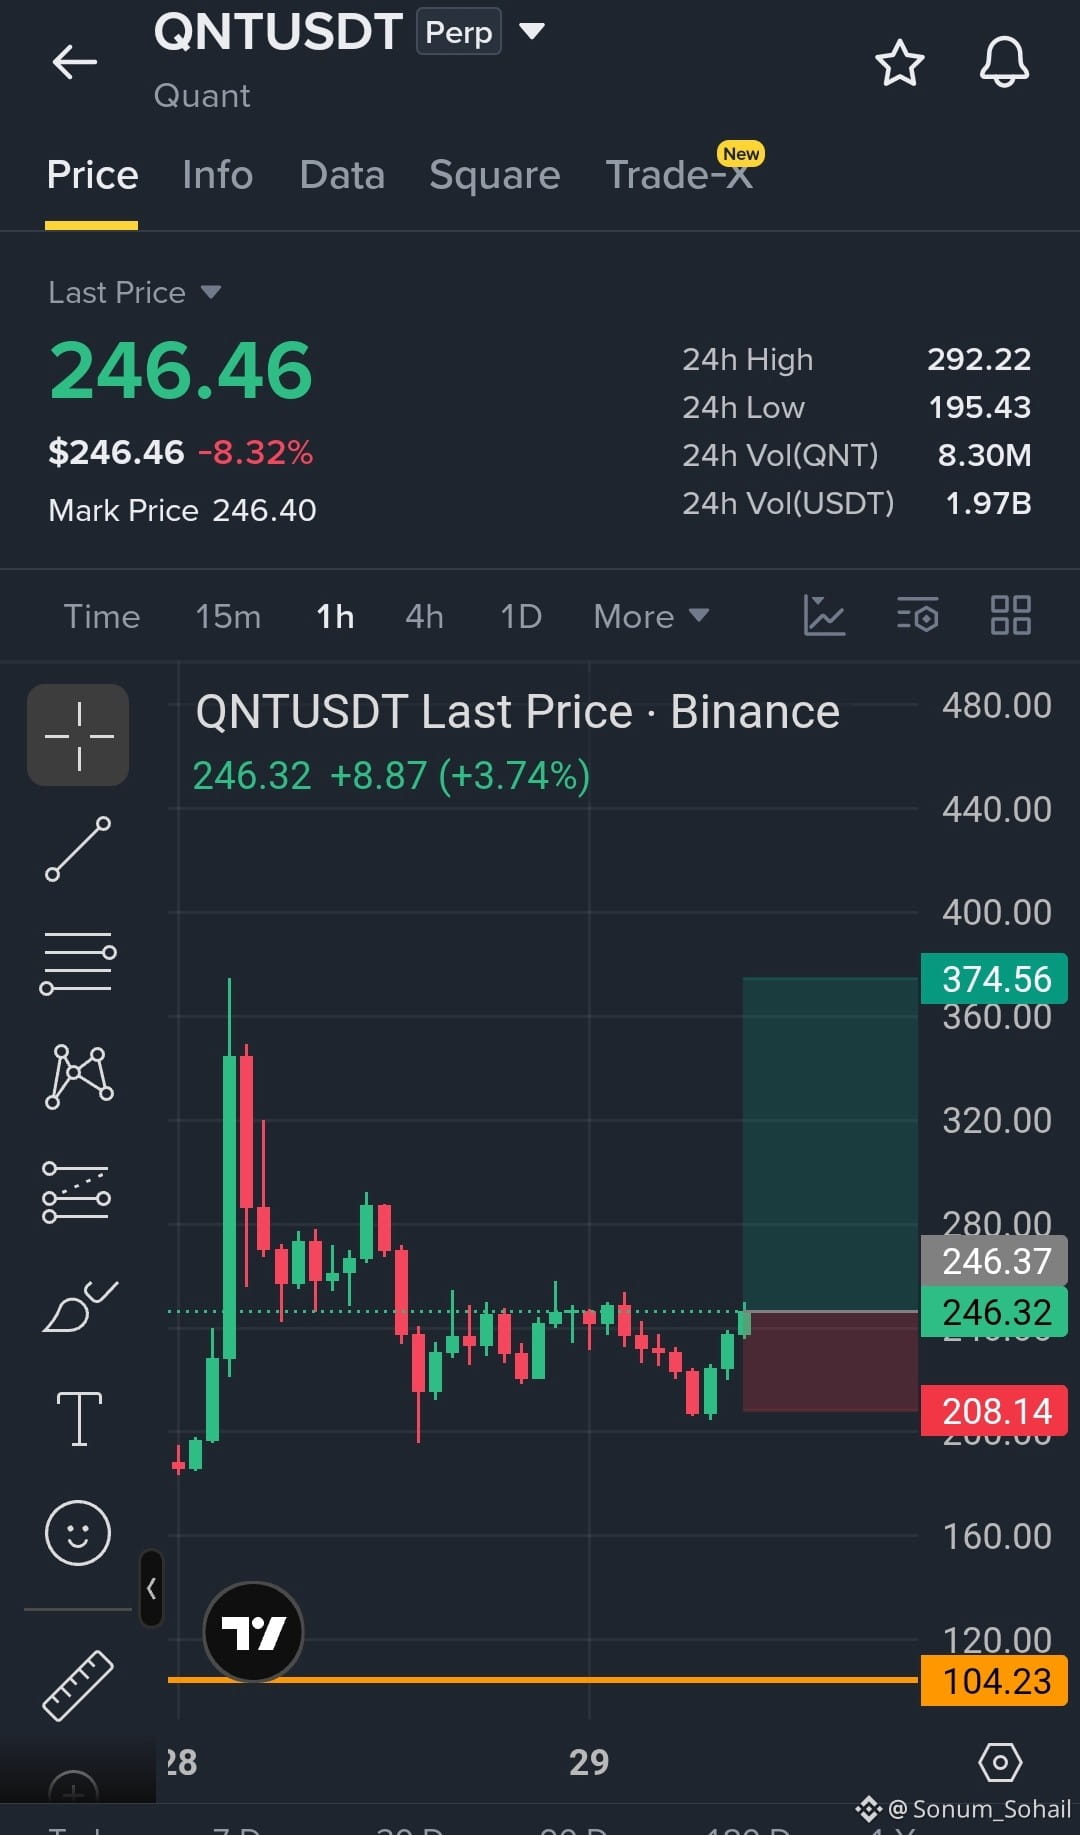
$QNT is holding around the $245–$246 zone after the recent pullback. The chart shows a clear recovery attempt from the $208 support, and if buyers maintain momentum above $245, the next major move could target the upper resistance zones.
Trade Setup: Long 🟢
Entry Zone: 244–248
SL: 208.14
TP1: 280
TP2: 320
TP3: 374.56
Trade here On $QNT
{future}(QNTUSDT)
$QNT — LONG SETUP.....Big Opportunity Thanks me later......
$QNT is holding around the $245–$246 zone after the recent pullback. The chart shows a clear recovery attempt from the $208 support, and if buyers maintain momentum above $245, the next major move could target the upper resistance zones.
Trade Setup: Long 🟢
Entry Zone: 244–248
SL: 208.14
TP1: 280
TP2: 320
TP3: 374.56
Trade here On $QNT
$QNT is holding around the $245–$246 zone after the recent pullback. The chart shows a clear recovery attempt from the $208 support, and if buyers maintain momentum above $245, the next major move could target the upper resistance zones.
Trade Setup: Long 🟢
Entry Zone: 244–248
SL: 208.14
TP1: 280
TP2: 320
TP3: 374.56
Trade here On $QNT
1
72
·
--
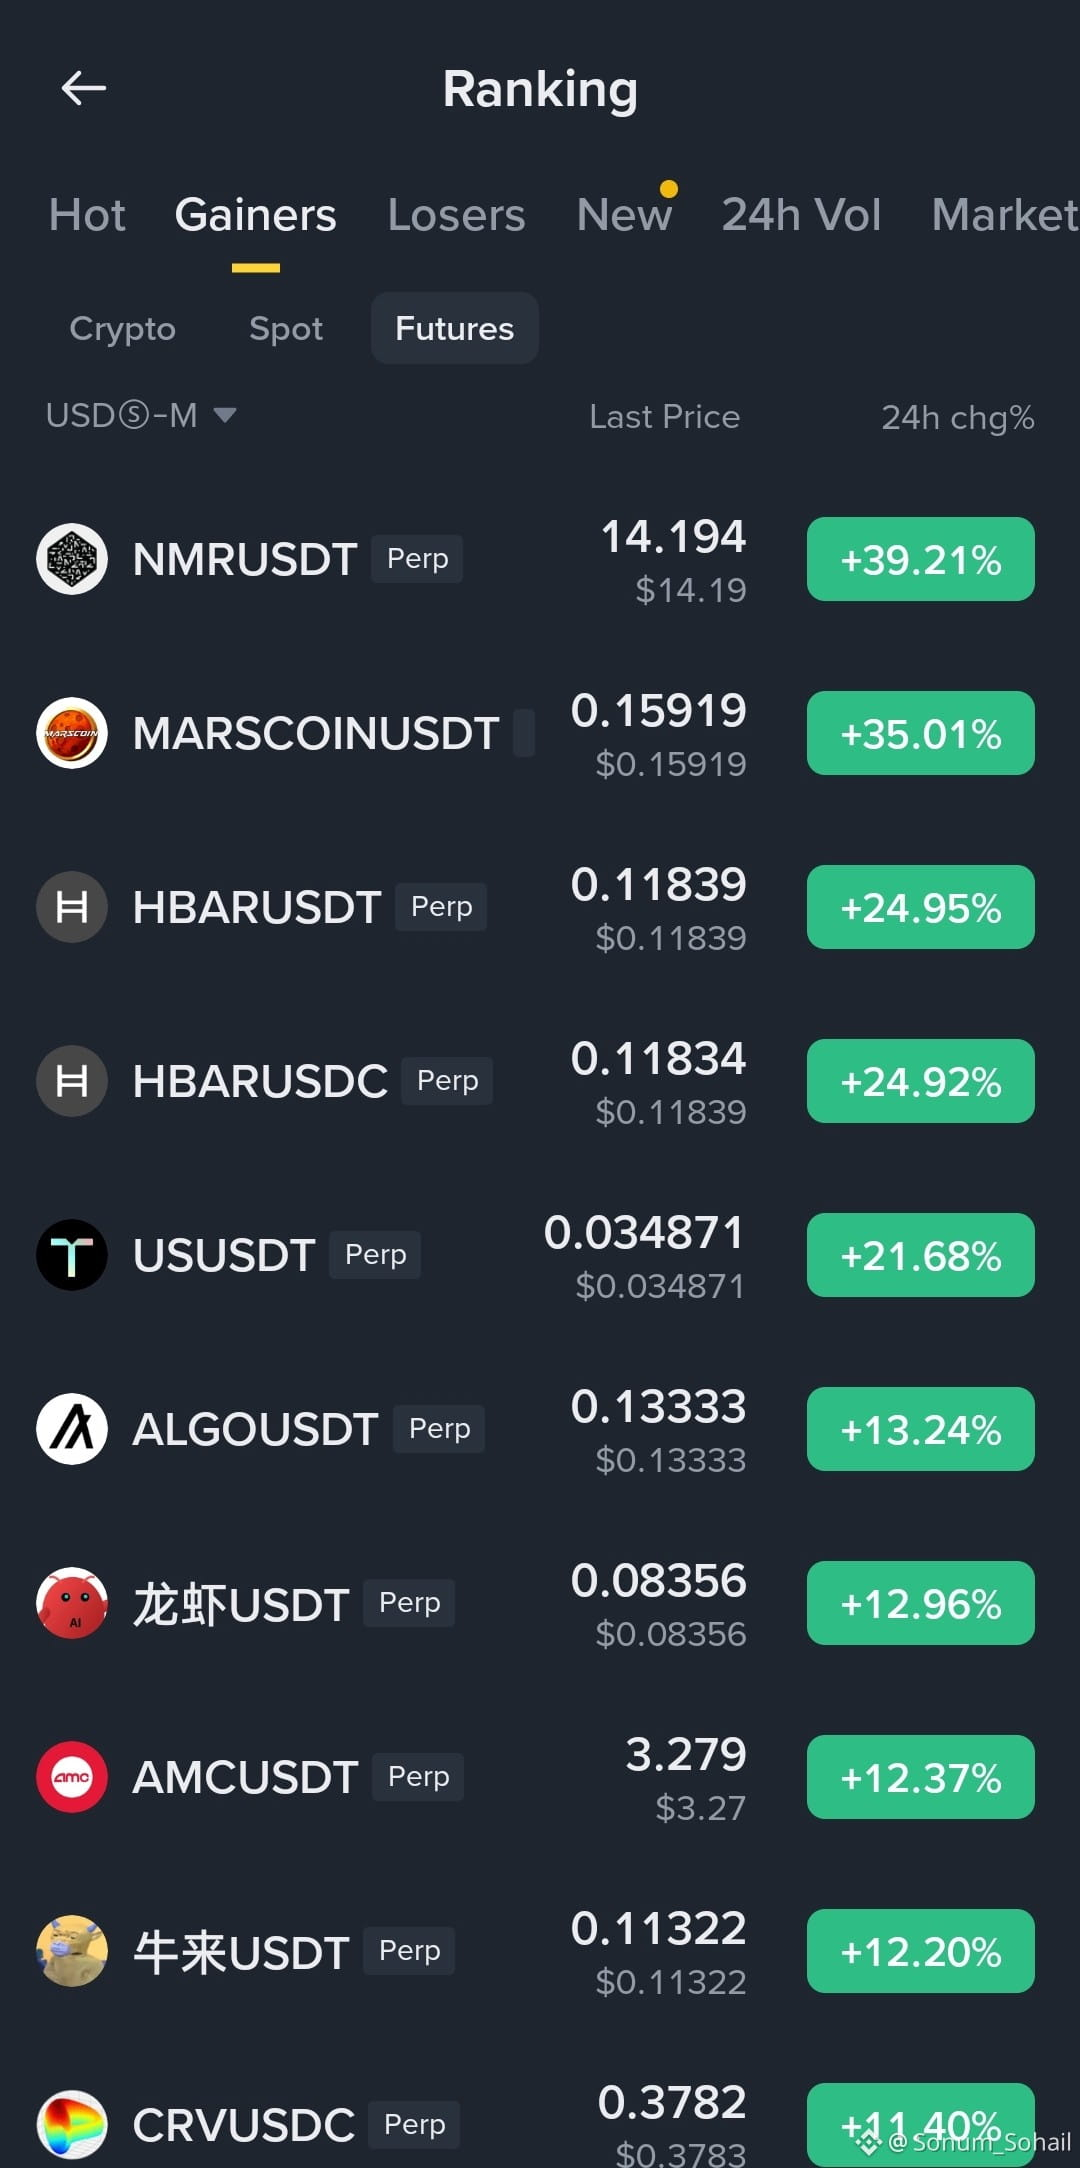
FUTURES GAINERS ARE MOVING!
The Futures board is heating up, and the momentum is clearly showing where traders are paying attention 👀📊
🔥 $NMR USDT → +39.21%
🔥 $MARSCOIN USDT → +35.01%
🔥 $HBARUSDT → +24.95%
🔥 $USUSDT → +21.68%
🔥 $ALGO USDT → +13.24%
🔥 $AMCUSDT → +12.37%
When future gainers start expanding this fast, I watch volume + price reaction + pullbacks rather than chasing the green candle.
My focus today: find the next clean setup, not the biggest candle.
Which Futures pair are you watching? 👇
FUTURES GAINERS ARE MOVING!
The Futures board is heating up, and the momentum is clearly showing where traders are paying attention 👀📊
🔥 $NMR USDT → +39.21%
🔥 $MARSCOIN USDT → +35.01%
🔥 $HBARUSDT → +24.95%
🔥 $USUSDT → +21.68%
🔥 $ALGO USDT → +13.24%
🔥 $AMCUSDT → +12.37%
When future gainers start expanding this fast, I watch volume + price reaction + pullbacks rather than chasing the green candle.
My focus today: find the next clean setup, not the biggest candle.
Which Futures pair are you watching? 👇
The Futures board is heating up, and the momentum is clearly showing where traders are paying attention 👀📊
🔥 $NMR USDT → +39.21%
🔥 $MARSCOIN USDT → +35.01%
🔥 $HBARUSDT → +24.95%
🔥 $USUSDT → +21.68%
🔥 $ALGO USDT → +13.24%
🔥 $AMCUSDT → +12.37%
When future gainers start expanding this fast, I watch volume + price reaction + pullbacks rather than chasing the green candle.
My focus today: find the next clean setup, not the biggest candle.
Which Futures pair are you watching? 👇
1
175
·
--
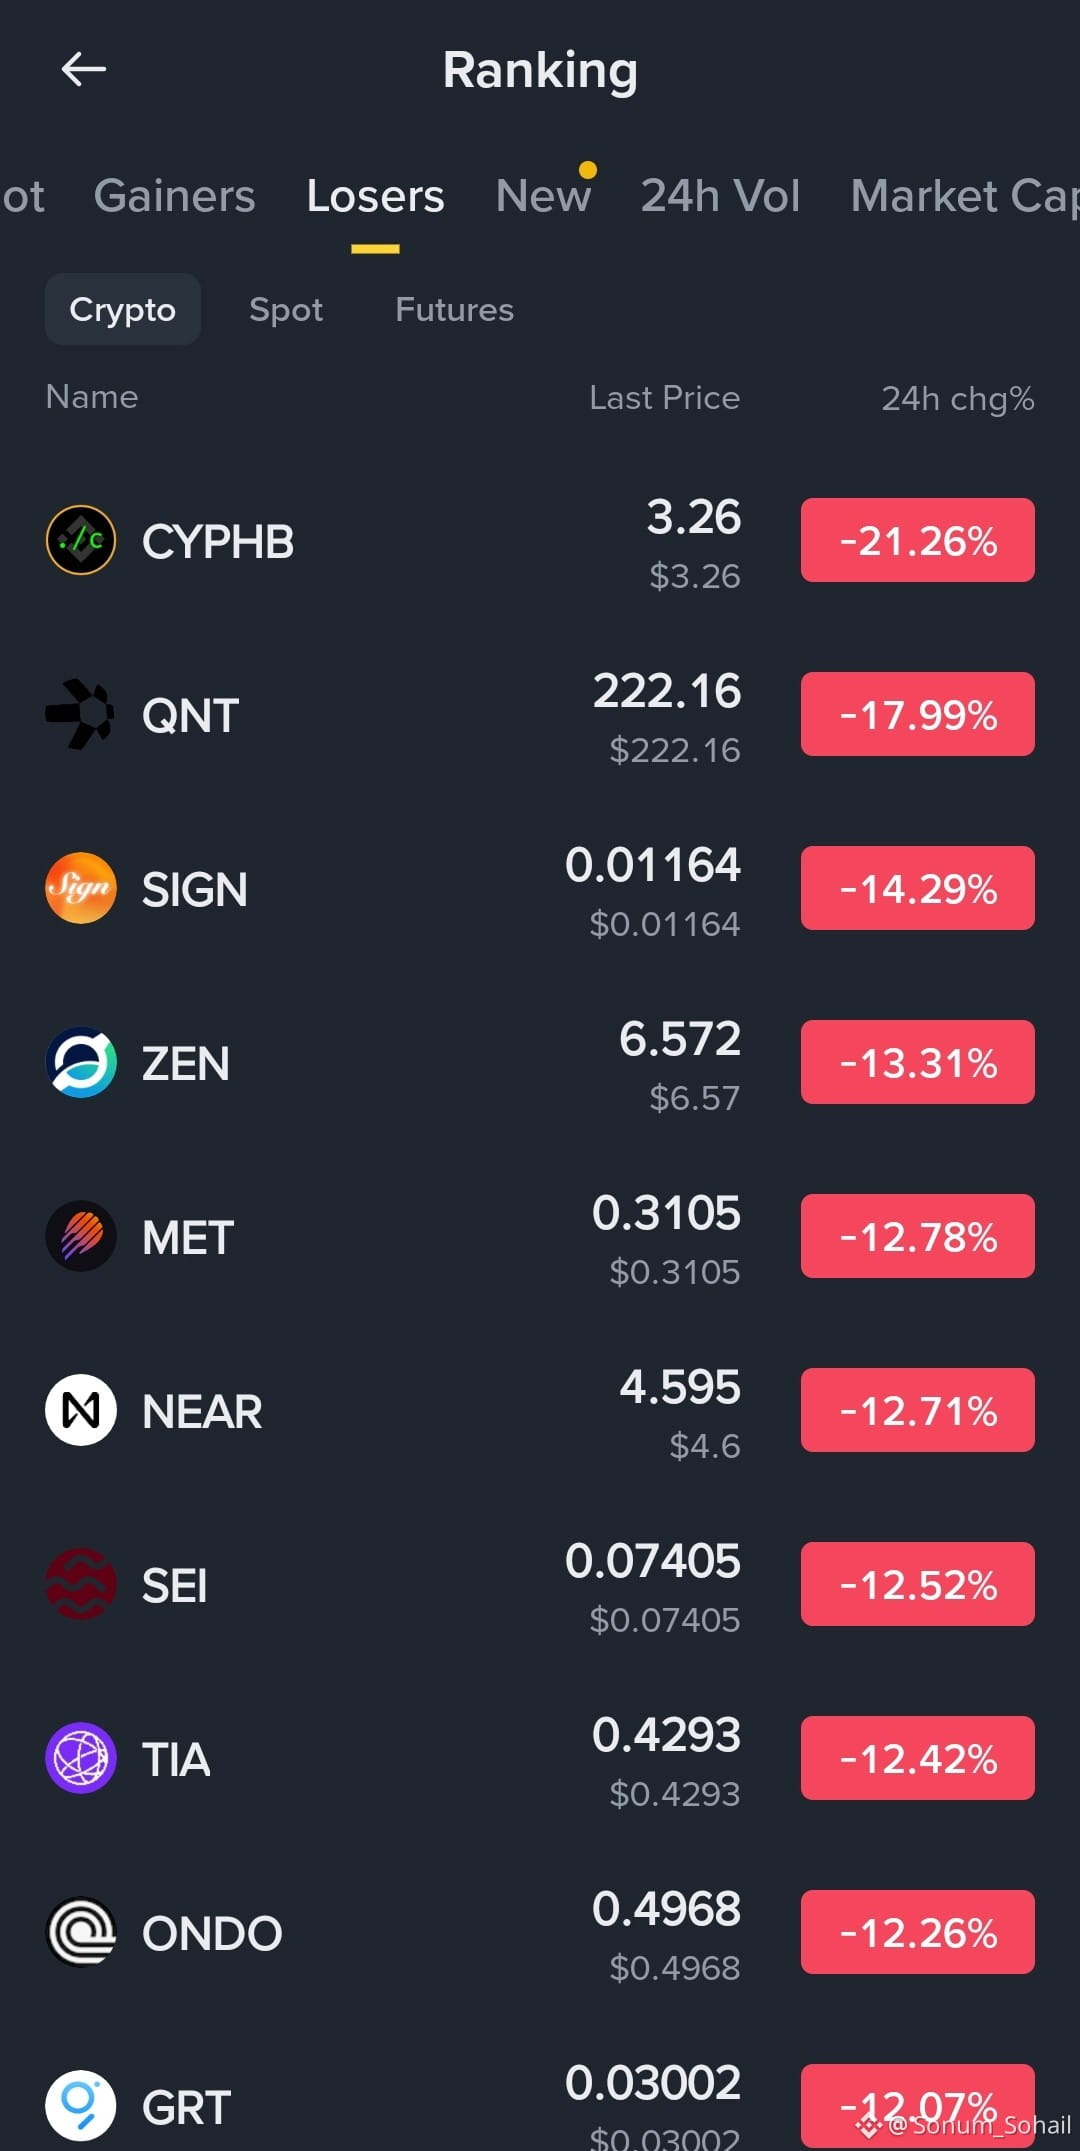
LOSERS ALERT — Short-Side Watchlist
The red board is getting heavy today, and some coins are showing double-digit 24H declines. That puts them on my radar for potential short setups — but only if price confirms the weakness. 👀
🔻 $CYPHB -21.26%
🔻 $QNT -17.99%
🔻 $SIGN -14.29%
🔻 $ZEN -13.31%
🔻 $MET -12.78%
🔻 $NEAR -12.71%
🔻 $SEI -12.52%
🔻 $TIA -12.42%
🔻 $ONDO -12.26%
🔻 $GRT -12.07%
The key names catching my attention: $CYPHB, $QNT, $SIGN and $ZEN.
But here’s my rule: I don't short just because a coin is red.
I want to see a weak bounce, rejection, and then a confirmed breakdown. That’s where the short-side setup becomes much more interesting.
Red candles show weakness. Confirmation shows the setup.
LOSERS ALERT — Short-Side Watchlist
The red board is getting heavy today, and some coins are showing double-digit 24H declines. That puts them on my radar for potential short setups — but only if price confirms the weakness. 👀
🔻 $CYPHB -21.26%
🔻 $QNT -17.99%
🔻 $SIGN -14.29%
🔻 $ZEN -13.31%
🔻 $MET -12.78%
🔻 $NEAR -12.71%
🔻 $SEI -12.52%
🔻 $TIA -12.42%
🔻 $ONDO -12.26%
🔻 $GRT -12.07%
The key names catching my attention: $CYPHB , $QNT , $SIGN and $ZEN.
But here’s my rule: I don't short just because a coin is red.
I want to see a weak bounce, rejection, and then a confirmed breakdown. That’s where the short-side setup becomes much more interesting.
Red candles show weakness. Confirmation shows the setup.
The red board is getting heavy today, and some coins are showing double-digit 24H declines. That puts them on my radar for potential short setups — but only if price confirms the weakness. 👀
🔻 $CYPHB -21.26%
🔻 $QNT -17.99%
🔻 $SIGN -14.29%
🔻 $ZEN -13.31%
🔻 $MET -12.78%
🔻 $NEAR -12.71%
🔻 $SEI -12.52%
🔻 $TIA -12.42%
🔻 $ONDO -12.26%
🔻 $GRT -12.07%
The key names catching my attention: $CYPHB , $QNT , $SIGN and $ZEN.
But here’s my rule: I don't short just because a coin is red.
I want to see a weak bounce, rejection, and then a confirmed breakdown. That’s where the short-side setup becomes much more interesting.
Red candles show weakness. Confirmation shows the setup.
1
303
·
--
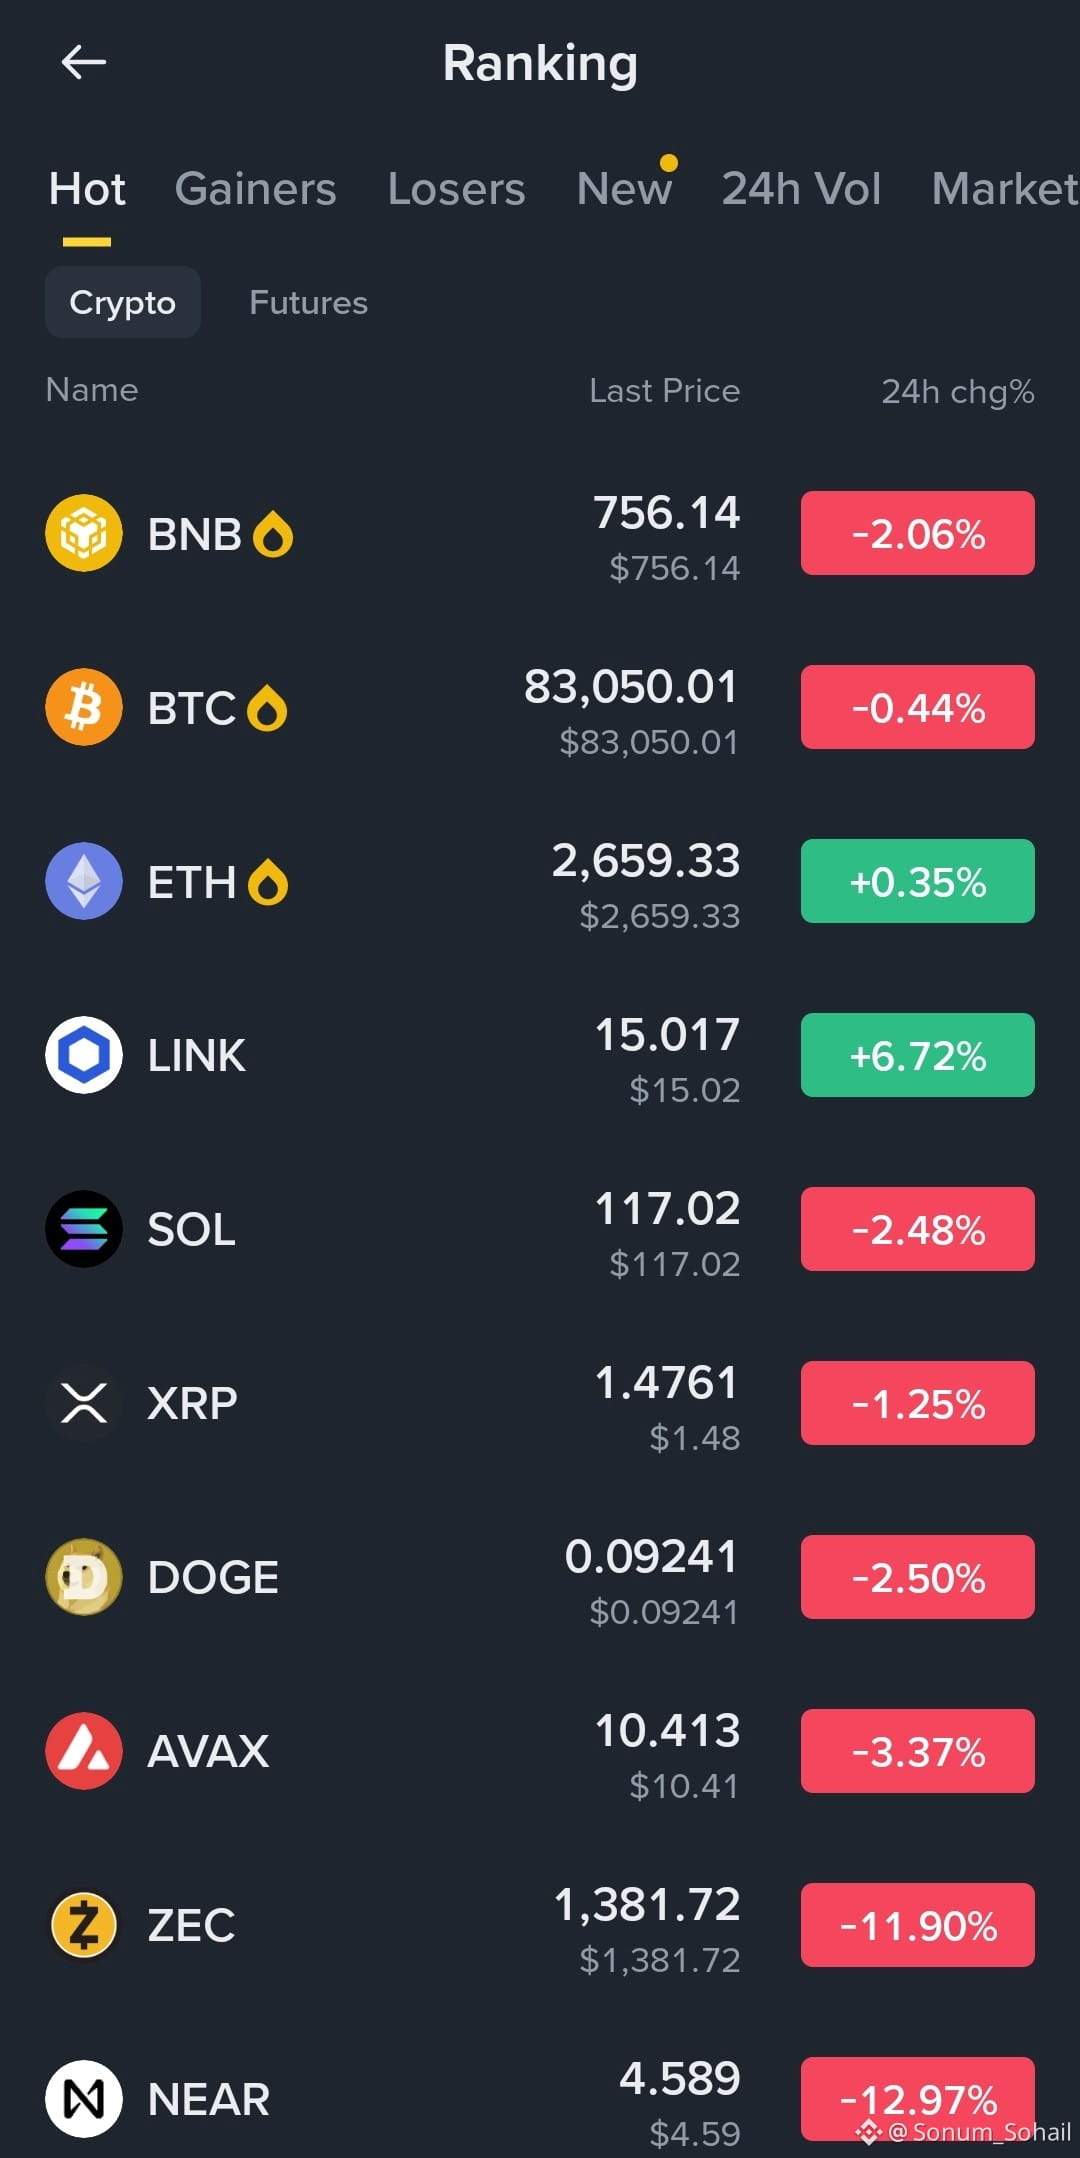
🔥 HOT COINS UPDATE — Momentum Is Shifting!
The Hot Coins board is showing a mixed market today — some major names are under pressure, while a few are still holding green.
🟢 $LINK +6.72%
🟢 $ETH +0.35%
Meanwhile, the red side is getting attention:
🔻 $NEAR -12.97%
🔻 $ZEC -11.90%
🔻 $AVAX -3.37%
🔻 $DOGE -2.50%
🔻 $SOL -2.48%
🔻 $BNB -2.06%
🔻 $XRP -1.25%
🔻 $BTC -0.44%
The interesting part?
$BTC and ETH are relatively close to flat compared with several altcoins, while NEAR and $ZEC are showing much deeper declines.
This is the kind of market where I’d rather watch the reaction at key levels than blindly chase a green or red candle.
Charts are moving. Volatility is awake. Stay sharp.
#QNTFallsOver40%FromMorningHigh #KospiFalls2.7%SamsungSKHynixDropOver5%
🔥 HOT COINS UPDATE — Momentum Is Shifting!
The Hot Coins board is showing a mixed market today — some major names are under pressure, while a few are still holding green.
🟢 $LINK +6.72%
🟢 $ETH +0.35%
Meanwhile, the red side is getting attention:
🔻 $NEAR -12.97%
🔻 $ZEC -11.90%
🔻 $AVAX -3.37%
🔻 $DOGE -2.50%
🔻 $SOL -2.48%
🔻 $BNB -2.06%
🔻 $XRP -1.25%
🔻 $BTC -0.44%
The interesting part?
$BTC and ETH are relatively close to flat compared with several altcoins, while NEAR and $ZEC are showing much deeper declines.
This is the kind of market where I’d rather watch the reaction at key levels than blindly chase a green or red candle.
Charts are moving. Volatility is awake. Stay sharp.
#QNTFallsOver40%FromMorningHigh #KospiFalls2.7%SamsungSKHynixDropOver5%
The Hot Coins board is showing a mixed market today — some major names are under pressure, while a few are still holding green.
🟢 $LINK +6.72%
🟢 $ETH +0.35%
Meanwhile, the red side is getting attention:
🔻 $NEAR -12.97%
🔻 $ZEC -11.90%
🔻 $AVAX -3.37%
🔻 $DOGE -2.50%
🔻 $SOL -2.48%
🔻 $BNB -2.06%
🔻 $XRP -1.25%
🔻 $BTC -0.44%
The interesting part?
$BTC and ETH are relatively close to flat compared with several altcoins, while NEAR and $ZEC are showing much deeper declines.
This is the kind of market where I’d rather watch the reaction at key levels than blindly chase a green or red candle.
Charts are moving. Volatility is awake. Stay sharp.
#QNTFallsOver40%FromMorningHigh #KospiFalls2.7%SamsungSKHynixDropOver5%
1
355
·
--
A Fresh Market Session Begins! ✨
Hello my dear Binancians 💛
Today I’m active and present in the market 👀📊
I’m watching the charts, tracking the momentum, and I’ll be sharing signals with you throughout the day.
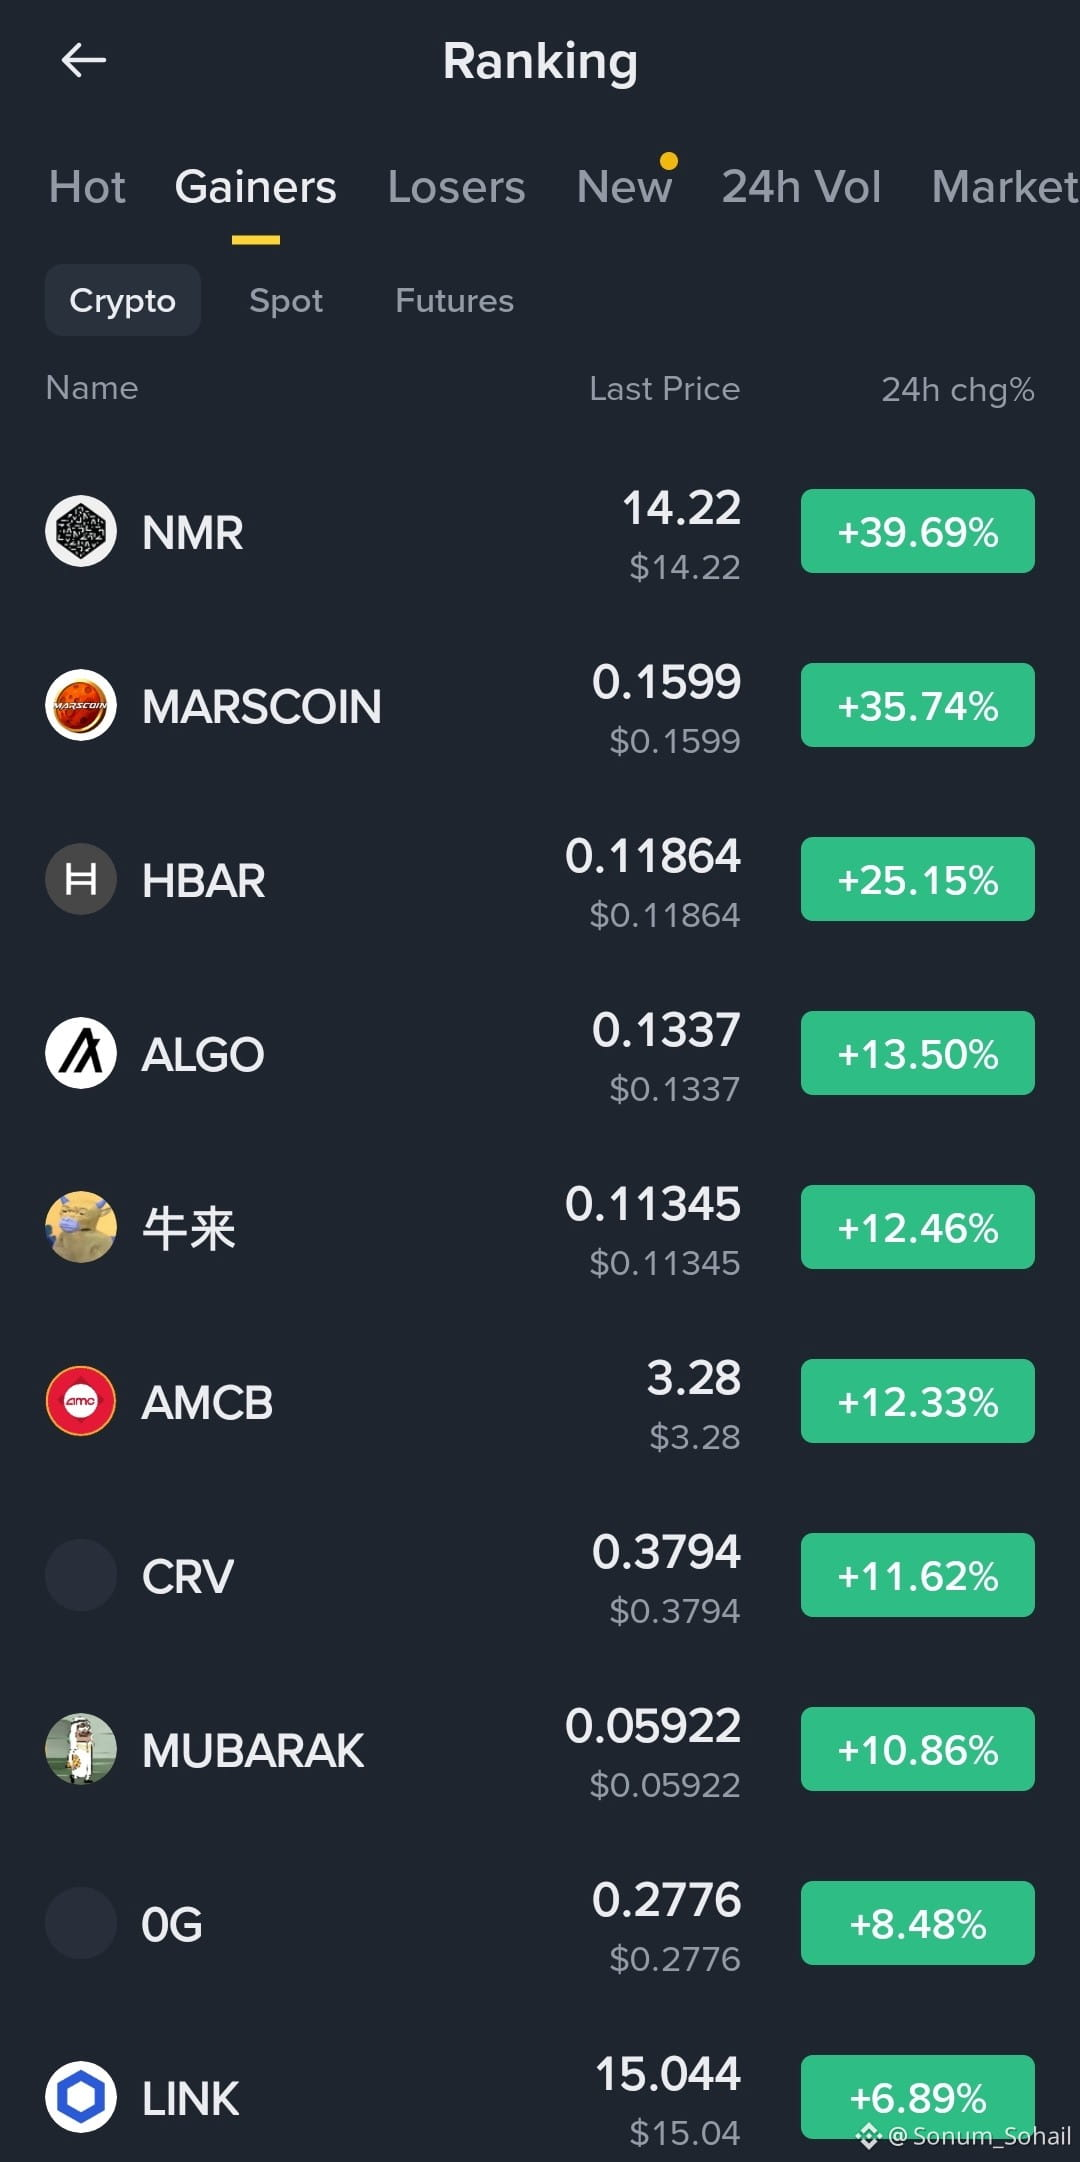
And look at today’s Gainers board
$NMR +39.69%
$MARSCOIN +35.74%
$HBAR +25.15%
$ALGO +13.50%
$牛来 +12.46%
$AMCB +12.33%
$CRV +11.62%
$MUBARAK +10.86%
$OG +8.48%
$LINK +6.89%
NMR and MARSCOIN are starting the session with the strongest moves, while HBAR is also holding impressive momentum. 👀
But remember — a green candle gets attention, confirmation gets conviction.
I’ll be watching the volume, structure and momentum before sharing any setup.
I’m here. Charts are open. Let’s see what the market brings today.
#USDTAdds845900HoldersInPast7Days #QNTFallsOver40%FromMorningHigh #HackersDrainOver12.4MXRPFromDCENTWallets
A Fresh Market Session Begins! ✨
Hello my dear Binancians 💛
Today I’m active and present in the market 👀📊
I’m watching the charts, tracking the momentum, and I’ll be sharing signals with you throughout the day.
And look at today’s Gainers board
$NMR +39.69%
$MARSCOIN +35.74%
$HBAR +25.15%
$ALGO +13.50%
$牛来 +12.46%
$AMCB +12.33%
$CRV +11.62%
$MUBARAK +10.86%
$OG +8.48%
$LINK +6.89%
NMR and MARSCOIN are starting the session with the strongest moves, while HBAR is also holding impressive momentum. 👀
But remember — a green candle gets attention, confirmation gets conviction.
I’ll be watching the volume, structure and momentum before sharing any setup.
I’m here. Charts are open. Let’s see what the market brings today.
#USDTAdds845900HoldersInPast7Days #QNTFallsOver40%FromMorningHigh #HackersDrainOver12.4MXRPFromDCENTWallets
Hello my dear Binancians 💛
Today I’m active and present in the market 👀📊
I’m watching the charts, tracking the momentum, and I’ll be sharing signals with you throughout the day.
And look at today’s Gainers board
$NMR +39.69%
$MARSCOIN +35.74%
$HBAR +25.15%
$ALGO +13.50%
$牛来 +12.46%
$AMCB +12.33%
$CRV +11.62%
$MUBARAK +10.86%
$OG +8.48%
$LINK +6.89%
NMR and MARSCOIN are starting the session with the strongest moves, while HBAR is also holding impressive momentum. 👀
But remember — a green candle gets attention, confirmation gets conviction.
I’ll be watching the volume, structure and momentum before sharing any setup.
I’m here. Charts are open. Let’s see what the market brings today.
#USDTAdds845900HoldersInPast7Days #QNTFallsOver40%FromMorningHigh #HackersDrainOver12.4MXRPFromDCENTWallets
2
325
·
--
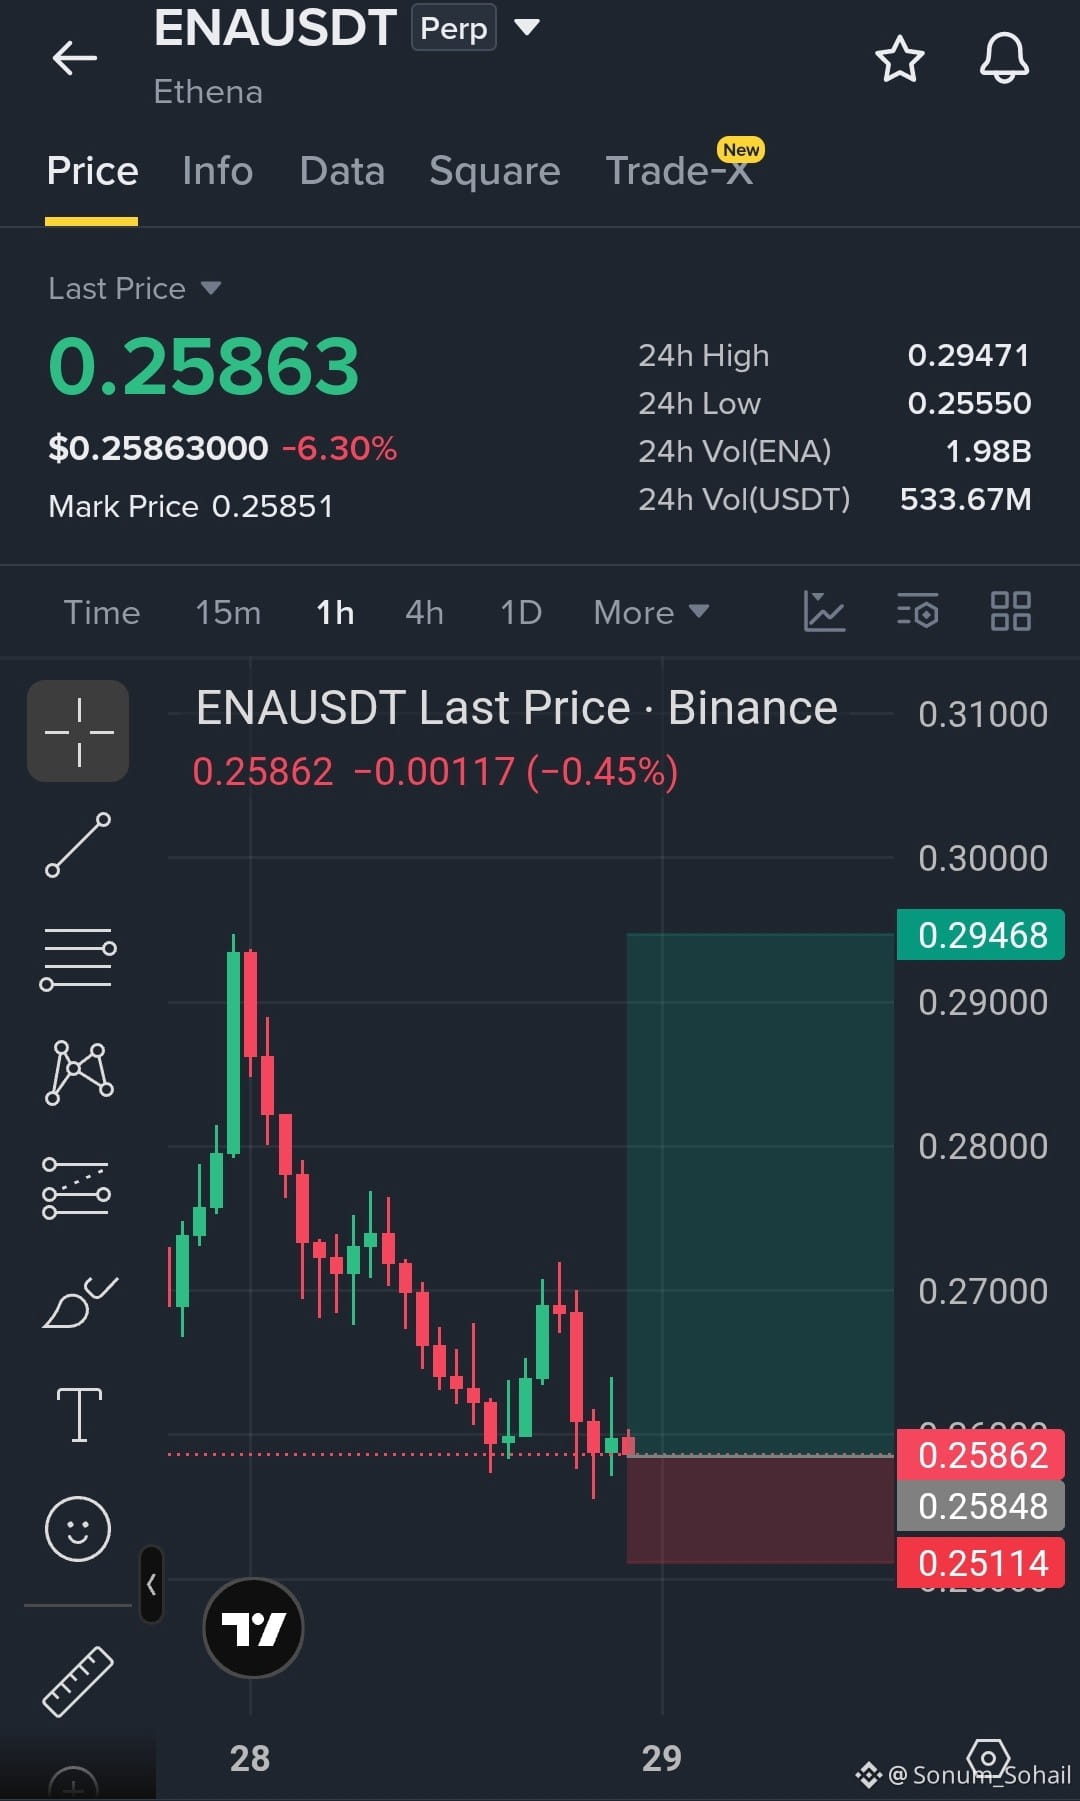
$ENA — LONG SETUP...BIG OPPORTUNITY — WAIT FOR THE SUPPORT TO HOLD BEFORE THE NEXT PUMP.
$ENA is holding the 0.258–0.260 zone after a sharp pullback from the 0.2947 high. On the 1H chart, this area is acting as a potential base. If buyers defend 0.255–0.258 and reclaim 0.265–0.270, the next move could target the previous high and potentially extend toward 0.295+. Recent market data also shows ENA has been trading with strong volume and elevated volatility.
Trade Setup: Long 🟢
Entry Zone: 0.2580–0.2610
SL: 0.2511
TP1: 0.2700
TP2: 0.2820
TP3: 0.2947
Trade here On $ENA
{future}(ENAUSDT)
$ENA — LONG SETUP...BIG OPPORTUNITY — WAIT FOR THE SUPPORT TO HOLD BEFORE THE NEXT PUMP.
$ENA is holding the 0.258–0.260 zone after a sharp pullback from the 0.2947 high. On the 1H chart, this area is acting as a potential base. If buyers defend 0.255–0.258 and reclaim 0.265–0.270, the next move could target the previous high and potentially extend toward 0.295+. Recent market data also shows ENA has been trading with strong volume and elevated volatility.
Trade Setup: Long 🟢
Entry Zone: 0.2580–0.2610
SL: 0.2511
TP1: 0.2700
TP2: 0.2820
TP3: 0.2947
Trade here On $ENA
$ENA is holding the 0.258–0.260 zone after a sharp pullback from the 0.2947 high. On the 1H chart, this area is acting as a potential base. If buyers defend 0.255–0.258 and reclaim 0.265–0.270, the next move could target the previous high and potentially extend toward 0.295+. Recent market data also shows ENA has been trading with strong volume and elevated volatility.
Trade Setup: Long 🟢
Entry Zone: 0.2580–0.2610
SL: 0.2511
TP1: 0.2700
TP2: 0.2820
TP3: 0.2947
Trade here On $ENA
1
97
·
--
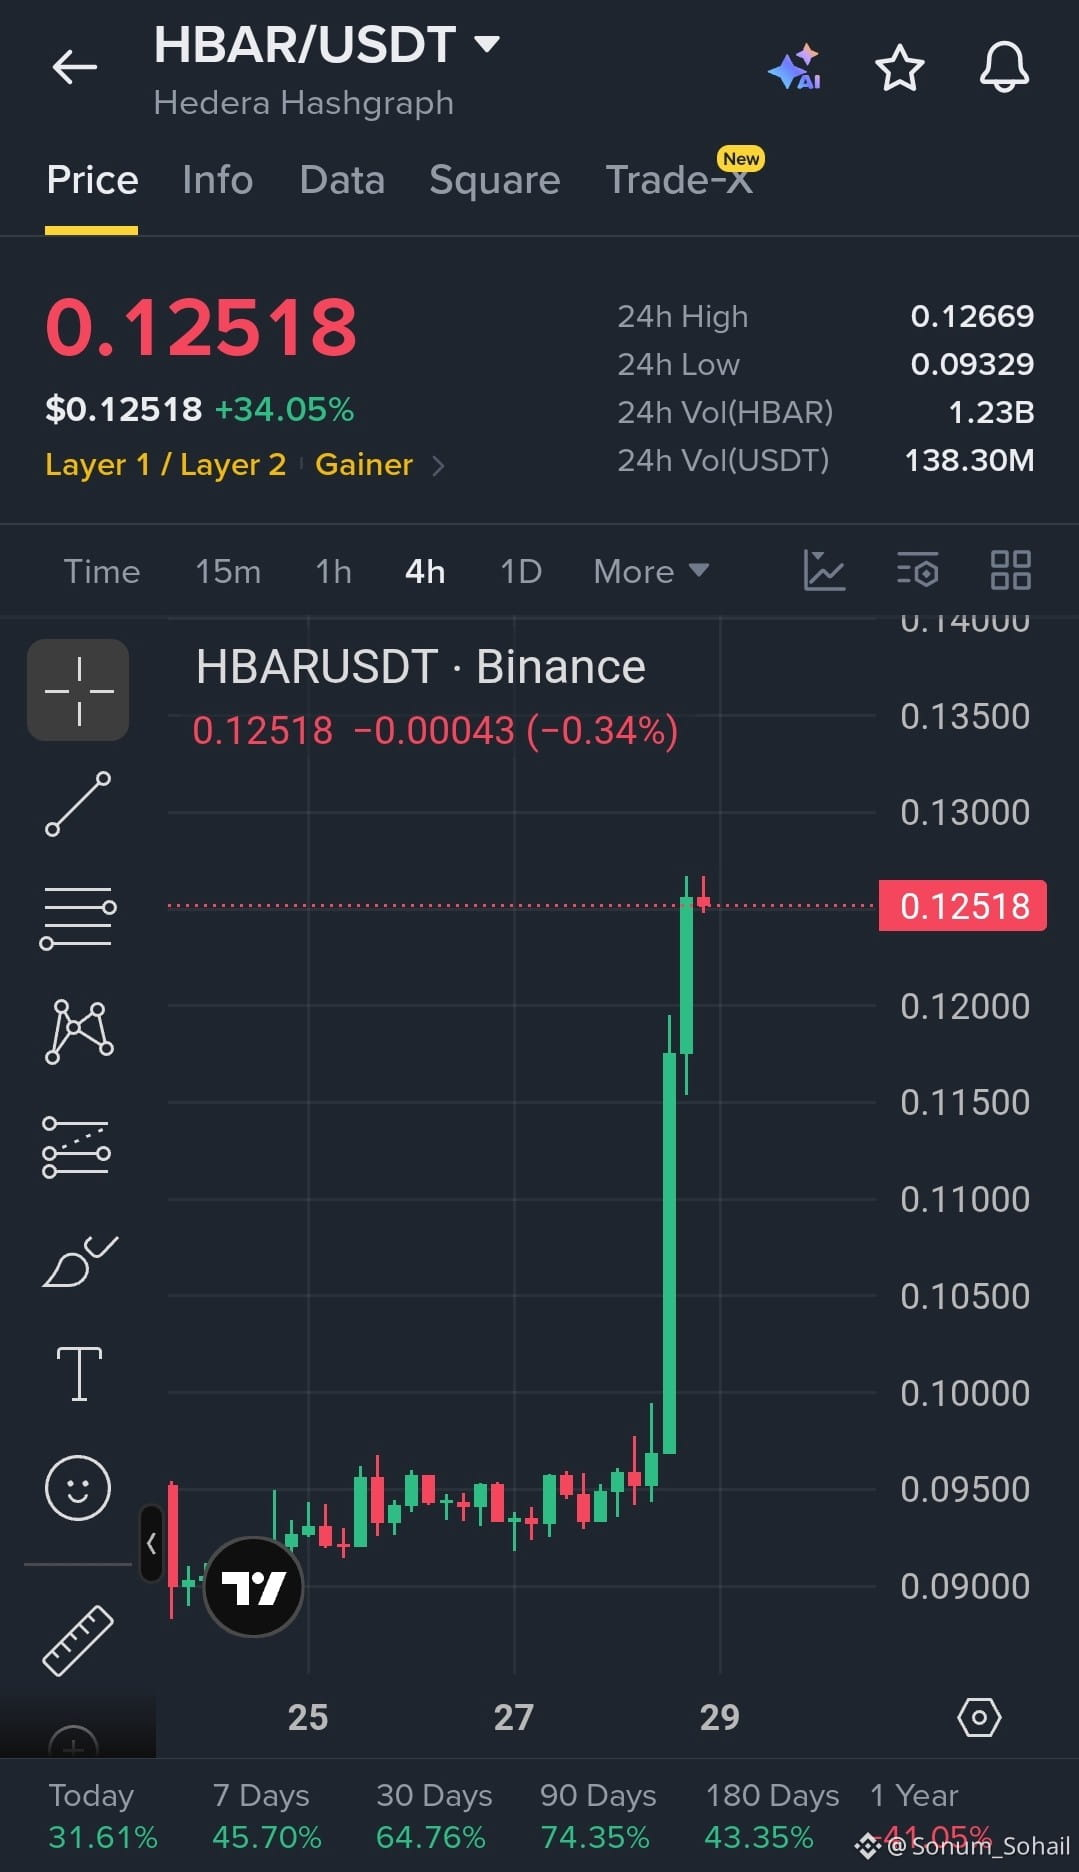
🔥 $HBAR — BIG OPPORTUNITY, BIG PUMP? 🚀
$HBAR has made a powerful move from the $0.09 area to $0.125, showing strong buyer momentum. On the 4H chart, price has now reached the highs after breaking out of a long consolidation zone. If $0.120–$0.122 holds as support and buyers step in again, the next move could target $0.13 and potentially $0.14+.
The key here is not to chase the pump. A healthy retest and confirmation around the breakout zone could provide a cleaner continuation setup.
Trade Setup: Long 🟢
Entry Zone: 0.1210–0.1240
SL: 0.1150
TP1: 0.1300
TP2: 0.1380
TP3: 0.1450
BIG OPPORTUNITIES — BIG PUMPS CAN START FROM THESE BREAKOUT ZONES.
Trade here On $HBAR
{future}(HBARUSDT)
🔥 $HBAR — BIG OPPORTUNITY, BIG PUMP? 🚀
$HBAR has made a powerful move from the $0.09 area to $0.125, showing strong buyer momentum. On the 4H chart, price has now reached the highs after breaking out of a long consolidation zone. If $0.120–$0.122 holds as support and buyers step in again, the next move could target $0.13 and potentially $0.14+.
The key here is not to chase the pump. A healthy retest and confirmation around the breakout zone could provide a cleaner continuation setup.
Trade Setup: Long 🟢
Entry Zone: 0.1210–0.1240
SL: 0.1150
TP1: 0.1300
TP2: 0.1380
TP3: 0.1450
BIG OPPORTUNITIES — BIG PUMPS CAN START FROM THESE BREAKOUT ZONES.
Trade here On $HBAR
$HBAR has made a powerful move from the $0.09 area to $0.125, showing strong buyer momentum. On the 4H chart, price has now reached the highs after breaking out of a long consolidation zone. If $0.120–$0.122 holds as support and buyers step in again, the next move could target $0.13 and potentially $0.14+.
The key here is not to chase the pump. A healthy retest and confirmation around the breakout zone could provide a cleaner continuation setup.
Trade Setup: Long 🟢
Entry Zone: 0.1210–0.1240
SL: 0.1150
TP1: 0.1300
TP2: 0.1380
TP3: 0.1450
BIG OPPORTUNITIES — BIG PUMPS CAN START FROM THESE BREAKOUT ZONES.
Trade here On $HBAR
1
107
·
--
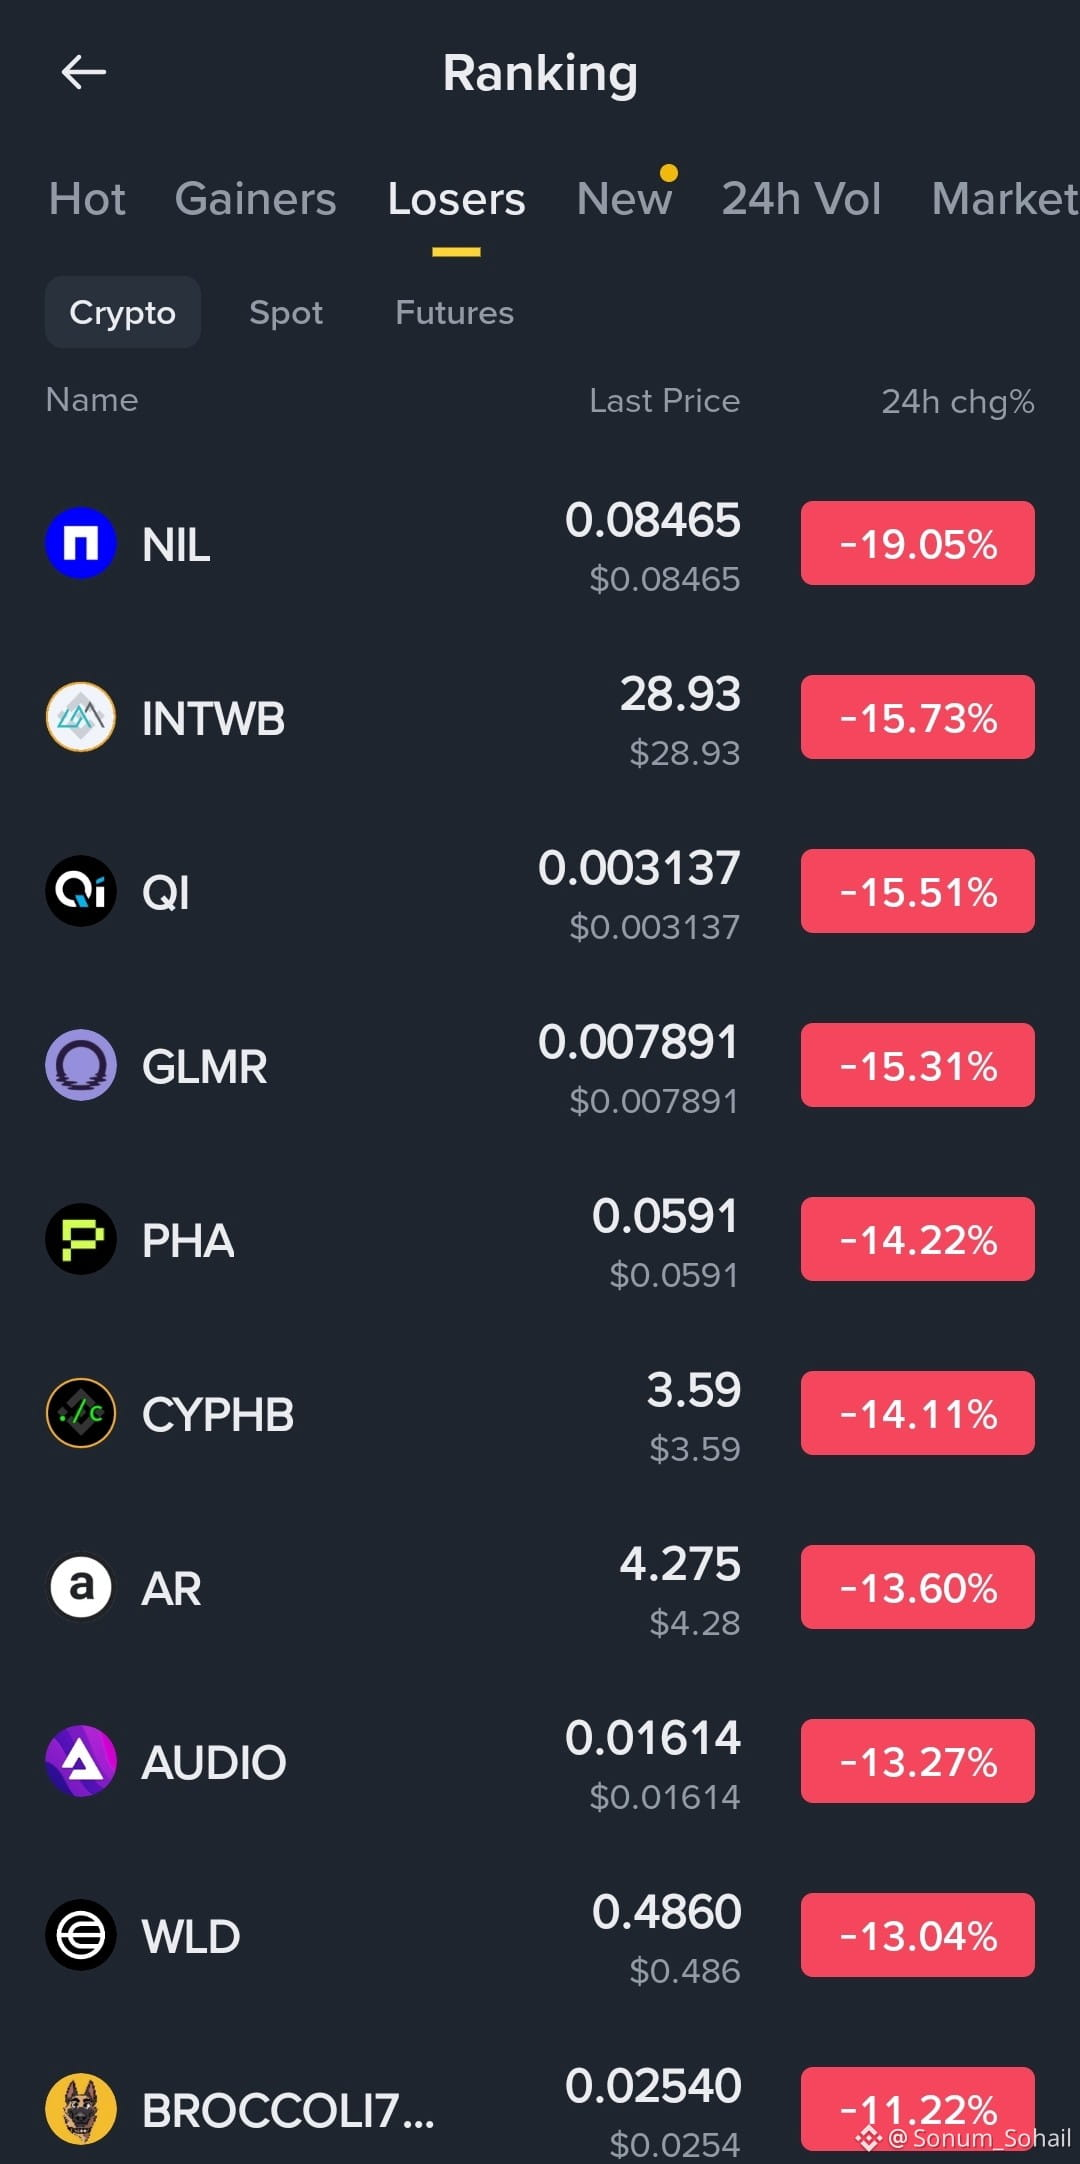
🔥 The Losers Board Is Flashing Short-Side Signals 👀📉
If gainers show where momentum is flowing, losers can show where selling pressure is building.
Today’s biggest 24H drops:
🔻 $NIL -19.05%
🔻 $INTWB -15.73%
🔻 $QI -15.51%
🔻 $GLMR -15.31%
🔻 $PHA -14.22%
🔻 $CYPHB -14.11%
🔻 $AR -13.60%
🔻 $AUDIO -13.27%
🔻 $WLD -13.04%
⚠️ But here’s the important part: a coin being down heavily doesn't automatically make it a good short. The interesting setups are the ones where the selling pressure continues after a weak bounce or a support breakdown.
My short-side watchlist from this board:
👀 $NIL| $INTWB | $QI| $GLMR| $PHA
Watch the confirmation, not just the red candle.
A clean rejection + volume + breakdown can create a much clearer short setup. 📉⚡
#ChainlinkLaunchesCCIP2WithEnterpriseVerification #USDTAdds845900HoldersInPast7Days #ShortSetup #ShortTrading #MarketAnalysis
🔥 The Losers Board Is Flashing Short-Side Signals 👀📉
If gainers show where momentum is flowing, losers can show where selling pressure is building.
Today’s biggest 24H drops:
🔻 $NIL -19.05%
🔻 $INTWB -15.73%
🔻 $QI -15.51%
🔻 $GLMR -15.31%
🔻 $PHA -14.22%
🔻 $CYPHB -14.11%
🔻 $AR -13.60%
🔻 $AUDIO -13.27%
🔻 $WLD -13.04%
⚠️ But here’s the important part: a coin being down heavily doesn't automatically make it a good short. The interesting setups are the ones where the selling pressure continues after a weak bounce or a support breakdown.
My short-side watchlist from this board:
👀 $NIL | $INTWB | $QI | $GLMR | $PHA
Watch the confirmation, not just the red candle.
A clean rejection + volume + breakdown can create a much clearer short setup. 📉⚡
#ChainlinkLaunchesCCIP2WithEnterpriseVerification #USDTAdds845900HoldersInPast7Days #ShortSetup #ShortTrading #MarketAnalysis
If gainers show where momentum is flowing, losers can show where selling pressure is building.
Today’s biggest 24H drops:
🔻 $NIL -19.05%
🔻 $INTWB -15.73%
🔻 $QI -15.51%
🔻 $GLMR -15.31%
🔻 $PHA -14.22%
🔻 $CYPHB -14.11%
🔻 $AR -13.60%
🔻 $AUDIO -13.27%
🔻 $WLD -13.04%
⚠️ But here’s the important part: a coin being down heavily doesn't automatically make it a good short. The interesting setups are the ones where the selling pressure continues after a weak bounce or a support breakdown.
My short-side watchlist from this board:
👀 $NIL | $INTWB | $QI | $GLMR | $PHA
Watch the confirmation, not just the red candle.
A clean rejection + volume + breakdown can create a much clearer short setup. 📉⚡
#ChainlinkLaunchesCCIP2WithEnterpriseVerification #USDTAdds845900HoldersInPast7Days #ShortSetup #ShortTrading #MarketAnalysis
1
181
·
--
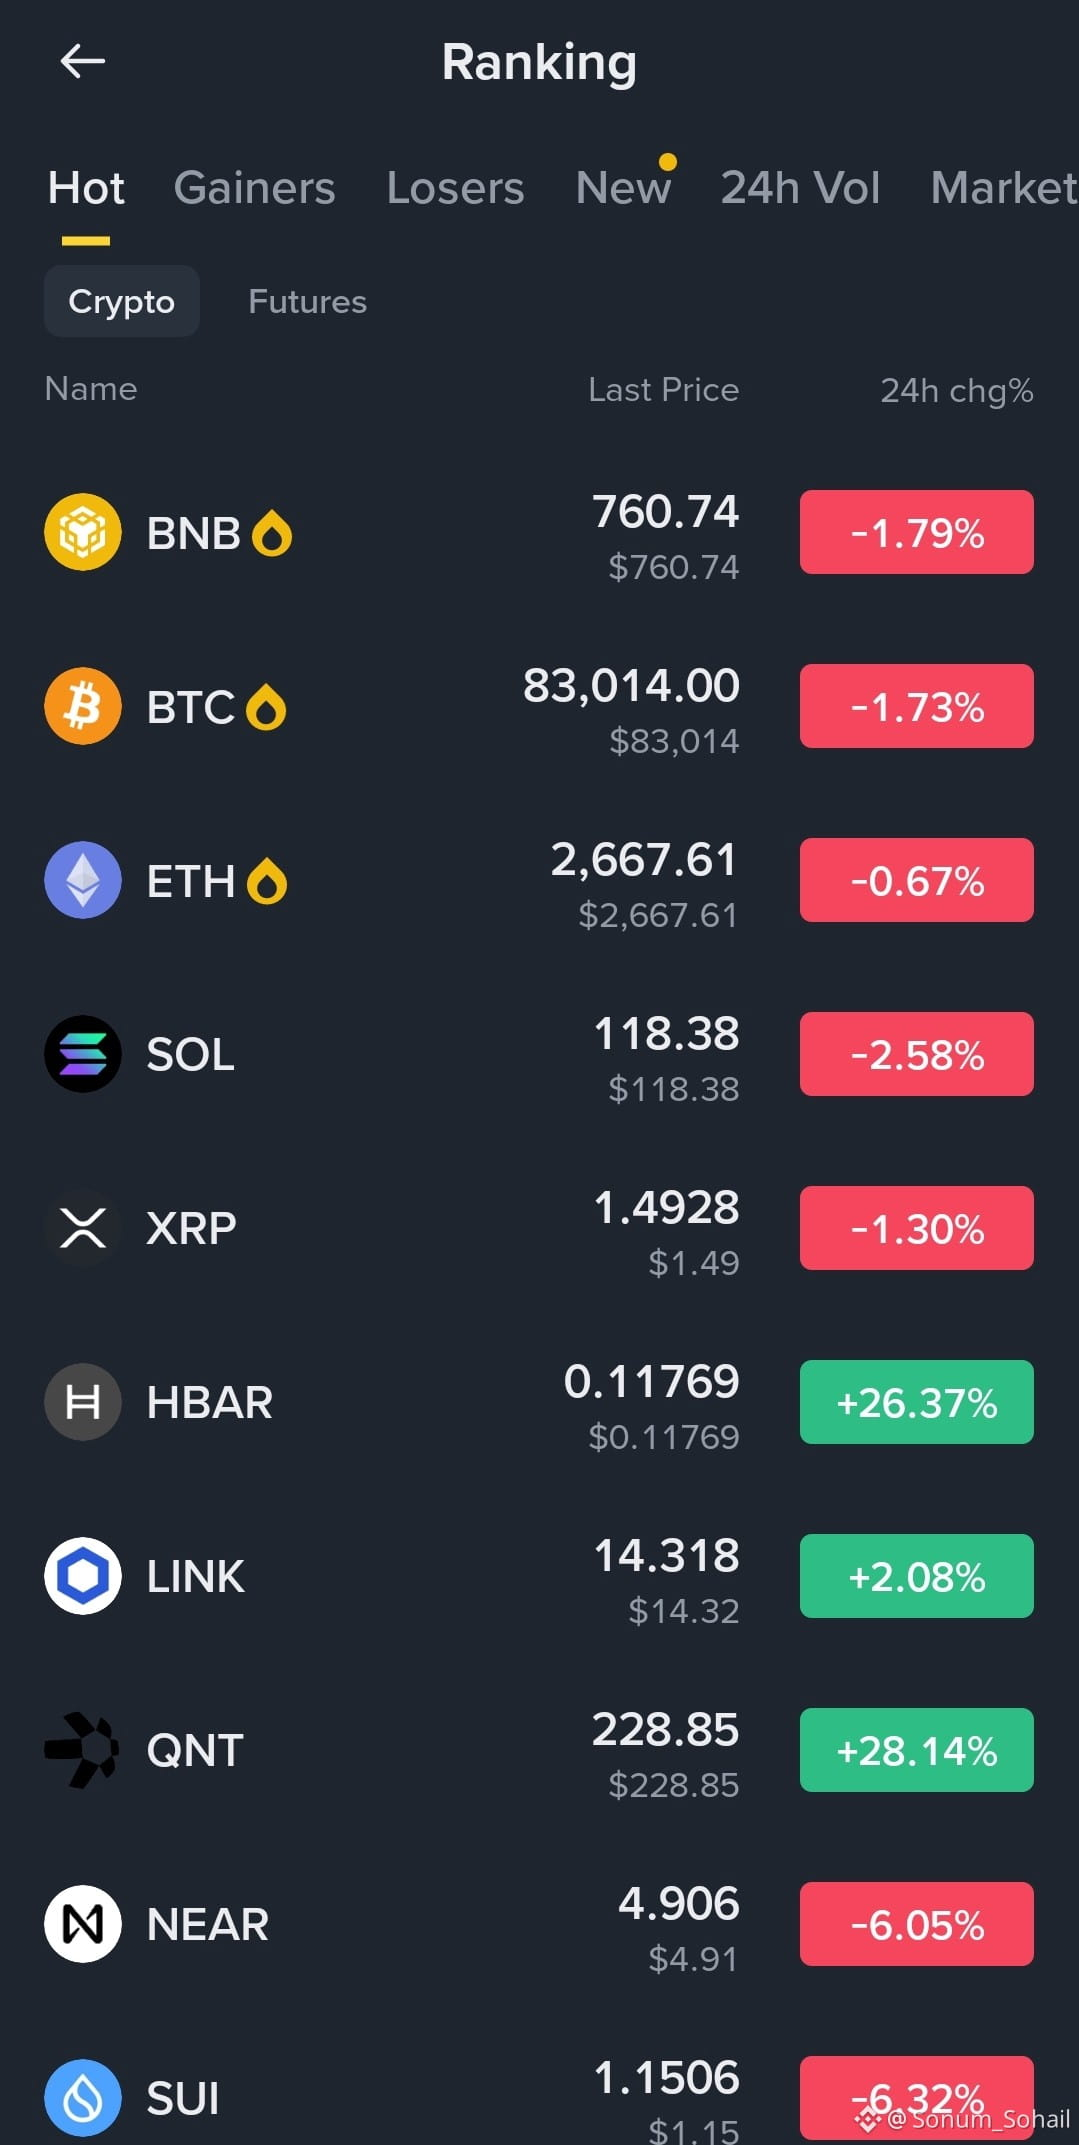
Not only just the gainers, but hot coins are also telling a story today. 🔥📊
I checked the Hot Coins board and there’s an interesting split in the market right now.
Major coins under pressure:
$BNB -1.79%
$BTC -1.73%
$ETH -0.67%
$SOL -2.58%
$XRP -1.30%
$NEAR -6.05%
$SUI -6.32%
But on the other side… 👀🔥
🟢 $QNT +28.14%
🟢 $HBAR +26.37%
🟢 $LINK +2.08%
What catches my attention is the divergence: while BTC, BNB and ETH are currently showing negative 24H moves, $QNT and $HBAR are holding strong green momentum.
This is why I don't look at only one corner of the market.
Sometimes the biggest clue isn't who is pumping — it's which coins are moving differently from the broader market. 🧠📈
Let’s see whether this strength can hold or whether the market brings another surprise. 👀⚡
#UKFCAWinsCourtOrderToRecover851400Pounds #QNTFallsOver40%FromMorningHigh #Altcoins #MarketAnalysis
Not only just the gainers, but hot coins are also telling a story today. 🔥📊
I checked the Hot Coins board and there’s an interesting split in the market right now.
Major coins under pressure:
$BNB -1.79%
$BTC -1.73%
$ETH -0.67%
$SOL -2.58%
$XRP -1.30%
$NEAR -6.05%
$SUI -6.32%
But on the other side… 👀🔥
🟢 $QNT +28.14%
🟢 $HBAR +26.37%
🟢 $LINK +2.08%
What catches my attention is the divergence: while BTC, BNB and ETH are currently showing negative 24H moves, $QNT and $HBAR are holding strong green momentum.
This is why I don't look at only one corner of the market.
Sometimes the biggest clue isn't who is pumping — it's which coins are moving differently from the broader market. 🧠📈
Let’s see whether this strength can hold or whether the market brings another surprise. 👀⚡
#UKFCAWinsCourtOrderToRecover851400Pounds #QNTFallsOver40%FromMorningHigh #Altcoins #MarketAnalysis
I checked the Hot Coins board and there’s an interesting split in the market right now.
Major coins under pressure:
$BNB -1.79%
$BTC -1.73%
$ETH -0.67%
$SOL -2.58%
$XRP -1.30%
$NEAR -6.05%
$SUI -6.32%
But on the other side… 👀🔥
🟢 $QNT +28.14%
🟢 $HBAR +26.37%
🟢 $LINK +2.08%
What catches my attention is the divergence: while BTC, BNB and ETH are currently showing negative 24H moves, $QNT and $HBAR are holding strong green momentum.
This is why I don't look at only one corner of the market.
Sometimes the biggest clue isn't who is pumping — it's which coins are moving differently from the broader market. 🧠📈
Let’s see whether this strength can hold or whether the market brings another surprise. 👀⚡
#UKFCAWinsCourtOrderToRecover851400Pounds #QNTFallsOver40%FromMorningHigh #Altcoins #MarketAnalysis
1
251
·
--
Hey My Dear Binancians 💛
Sorry, I was away today — busy the whole day with some personal work. But the moment I opened the market, one thing immediately caught my eye… 👀📊
The Gainers board is moving hard! 🔥 And this isn’t just one coin making noise — momentum is appearing across different names.
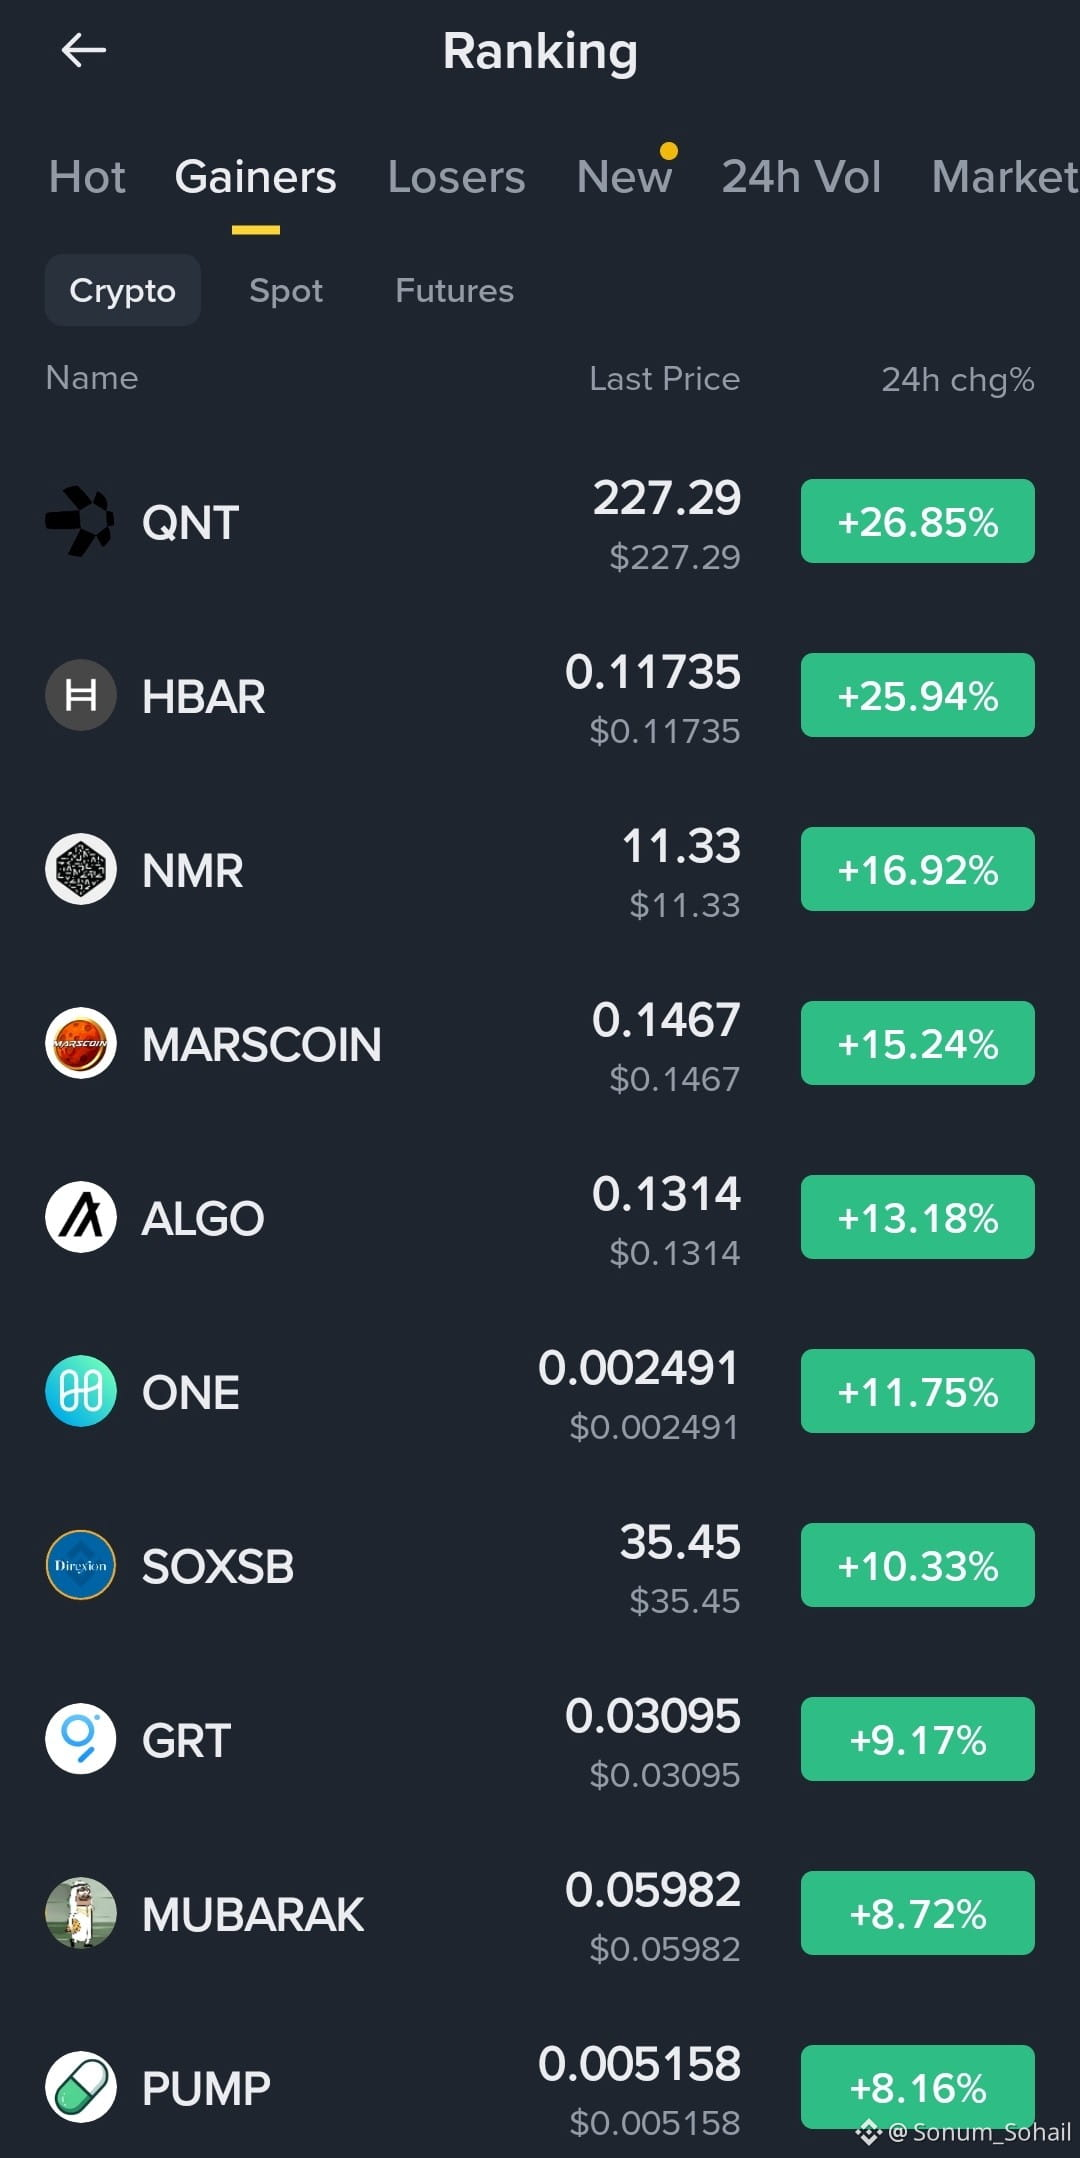
$QNT +26.85% — clearly leading the board
$HBAR +25.94% — almost matching QNT’s move
$NMR +16.92%
$MARSCOIN +15.24%
$ALGO +13.18%
$ONE +11.75%
$SOXSB +10.33%
And then we have $GRT, $MUBARAK & $PUMP also keeping the green side active.
What I found interesting:
The gainers aren’t moving in a single pattern. We’re seeing strong percentage moves spread across different coins — which makes this board worth watching closely rather than focusing on just the biggest candle.
I disappeared for a day…
but the market clearly didn’t wait for me. 😂🔥
Now I’m back, charts are open, and I’m watching to see which of these gainers can actually sustain the momentum instead of giving back the move. 👀
Who caught these moves before they appeared on the leaderboard? 👇
#UKFCAWinsCourtOrderToRecover851400Pounds #BinanceSquare #CryptoGainers #Altcoins #MarketUpdate
Hey My Dear Binancians 💛
Sorry, I was away today — busy the whole day with some personal work. But the moment I opened the market, one thing immediately caught my eye… 👀📊
The Gainers board is moving hard! 🔥 And this isn’t just one coin making noise — momentum is appearing across different names.
$QNT +26.85% — clearly leading the board
$HBAR +25.94% — almost matching QNT’s move
$NMR +16.92%
$MARSCOIN +15.24%
$ALGO +13.18%
$ONE +11.75%
$SOXSB +10.33%
And then we have $GRT, $MUBARAK & $PUMP also keeping the green side active.
What I found interesting:
The gainers aren’t moving in a single pattern. We’re seeing strong percentage moves spread across different coins — which makes this board worth watching closely rather than focusing on just the biggest candle.
I disappeared for a day…
but the market clearly didn’t wait for me. 😂🔥
Now I’m back, charts are open, and I’m watching to see which of these gainers can actually sustain the momentum instead of giving back the move. 👀
Who caught these moves before they appeared on the leaderboard? 👇
#UKFCAWinsCourtOrderToRecover851400Pounds #BinanceSquare #CryptoGainers #Altcoins #MarketUpdate
Sorry, I was away today — busy the whole day with some personal work. But the moment I opened the market, one thing immediately caught my eye… 👀📊
The Gainers board is moving hard! 🔥 And this isn’t just one coin making noise — momentum is appearing across different names.
$QNT +26.85% — clearly leading the board
$HBAR +25.94% — almost matching QNT’s move
$NMR +16.92%
$MARSCOIN +15.24%
$ALGO +13.18%
$ONE +11.75%
$SOXSB +10.33%
And then we have $GRT, $MUBARAK & $PUMP also keeping the green side active.
What I found interesting:
The gainers aren’t moving in a single pattern. We’re seeing strong percentage moves spread across different coins — which makes this board worth watching closely rather than focusing on just the biggest candle.
I disappeared for a day…
but the market clearly didn’t wait for me. 😂🔥
Now I’m back, charts are open, and I’m watching to see which of these gainers can actually sustain the momentum instead of giving back the move. 👀
Who caught these moves before they appeared on the leaderboard? 👇
#UKFCAWinsCourtOrderToRecover851400Pounds #BinanceSquare #CryptoGainers #Altcoins #MarketUpdate
1
338
·
--
Market Radar: 3 Coins I’m Watching 👀
The altcoin market is getting interesting again… and these 3 names have caught my attention lately.
$ENA — This one is definitely staying on my radar. ENA has been showing strong momentum recently, with increased trading activity following Ethena’s latest Binance-related developments. The key now is whether buyers can maintain that strength instead of turning the move into a quick profit-taking phase.
$SUI — Another coin showing serious momentum. It has recently been among the stronger-moving altcoins, so I’m watching how it behaves around its next breakout/retest zones. If volume stays healthy, the chart could remain interesting.
$QNT — This one has also grabbed traders’ attention after a strong recent move. But after a sharp pump, I’d rather watch for confirmation than chase the candle. Breakout → retest → volume is the structure I want to see.
Three different setups, one thing in common: momentum is back in the altcoin conversation.
I’m keeping these on my watchlist and waiting for clean confirmations rather than blindly chasing green candles.
#CircleMints500MUSDCOnSolana
#PolymarketBankFailureBetsDrawConcern
#BlackRockBuildsTokenizedPortfoliosForOndo
{future}(SUIUSDT)
{future}(QNTUSDT)
{future}(ENAUSDT)
Market Radar: 3 Coins I’m Watching 👀
The altcoin market is getting interesting again… and these 3 names have caught my attention lately.
$ENA — This one is definitely staying on my radar. ENA has been showing strong momentum recently, with increased trading activity following Ethena’s latest Binance-related developments. The key now is whether buyers can maintain that strength instead of turning the move into a quick profit-taking phase.
$SUI — Another coin showing serious momentum. It has recently been among the stronger-moving altcoins, so I’m watching how it behaves around its next breakout/retest zones. If volume stays healthy, the chart could remain interesting.
$QNT — This one has also grabbed traders’ attention after a strong recent move. But after a sharp pump, I’d rather watch for confirmation than chase the candle. Breakout → retest → volume is the structure I want to see.
Three different setups, one thing in common: momentum is back in the altcoin conversation.
I’m keeping these on my watchlist and waiting for clean confirmations rather than blindly chasing green candles.
#CircleMints500MUSDCOnSolana
#PolymarketBankFailureBetsDrawConcern
#BlackRockBuildsTokenizedPortfoliosForOndo
The altcoin market is getting interesting again… and these 3 names have caught my attention lately.
$ENA — This one is definitely staying on my radar. ENA has been showing strong momentum recently, with increased trading activity following Ethena’s latest Binance-related developments. The key now is whether buyers can maintain that strength instead of turning the move into a quick profit-taking phase.
$SUI — Another coin showing serious momentum. It has recently been among the stronger-moving altcoins, so I’m watching how it behaves around its next breakout/retest zones. If volume stays healthy, the chart could remain interesting.
$QNT — This one has also grabbed traders’ attention after a strong recent move. But after a sharp pump, I’d rather watch for confirmation than chase the candle. Breakout → retest → volume is the structure I want to see.
Three different setups, one thing in common: momentum is back in the altcoin conversation.
I’m keeping these on my watchlist and waiting for clean confirmations rather than blindly chasing green candles.
#CircleMints500MUSDCOnSolana
#PolymarketBankFailureBetsDrawConcern
#BlackRockBuildsTokenizedPortfoliosForOndo

1
191
·
--
BIG OPPORTUNITIES — BIG PUMPS AHEAD!
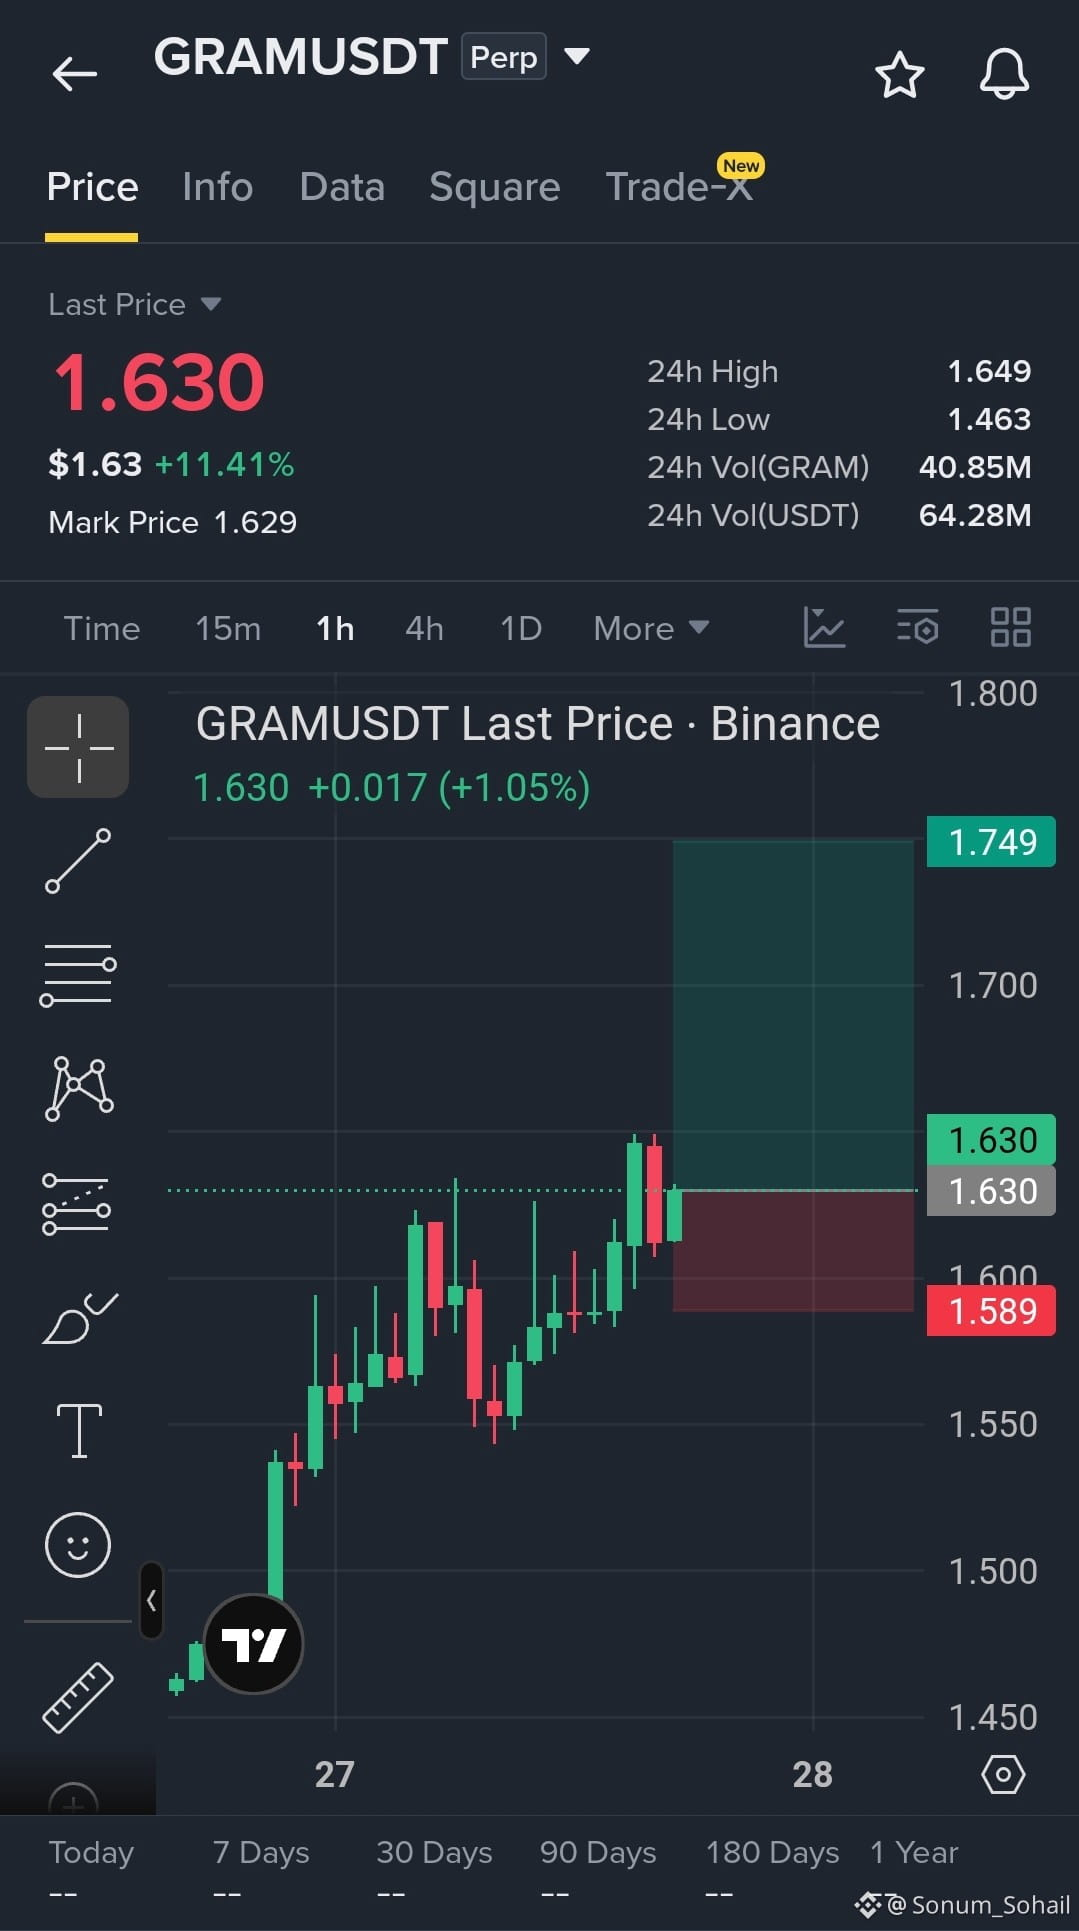
$GRAM — LONG 🟢 | Entry: 1.620–1.635 | TP1: 1.680 | TP2: 1.715 | TP3: 1.749 | SL: 1.589
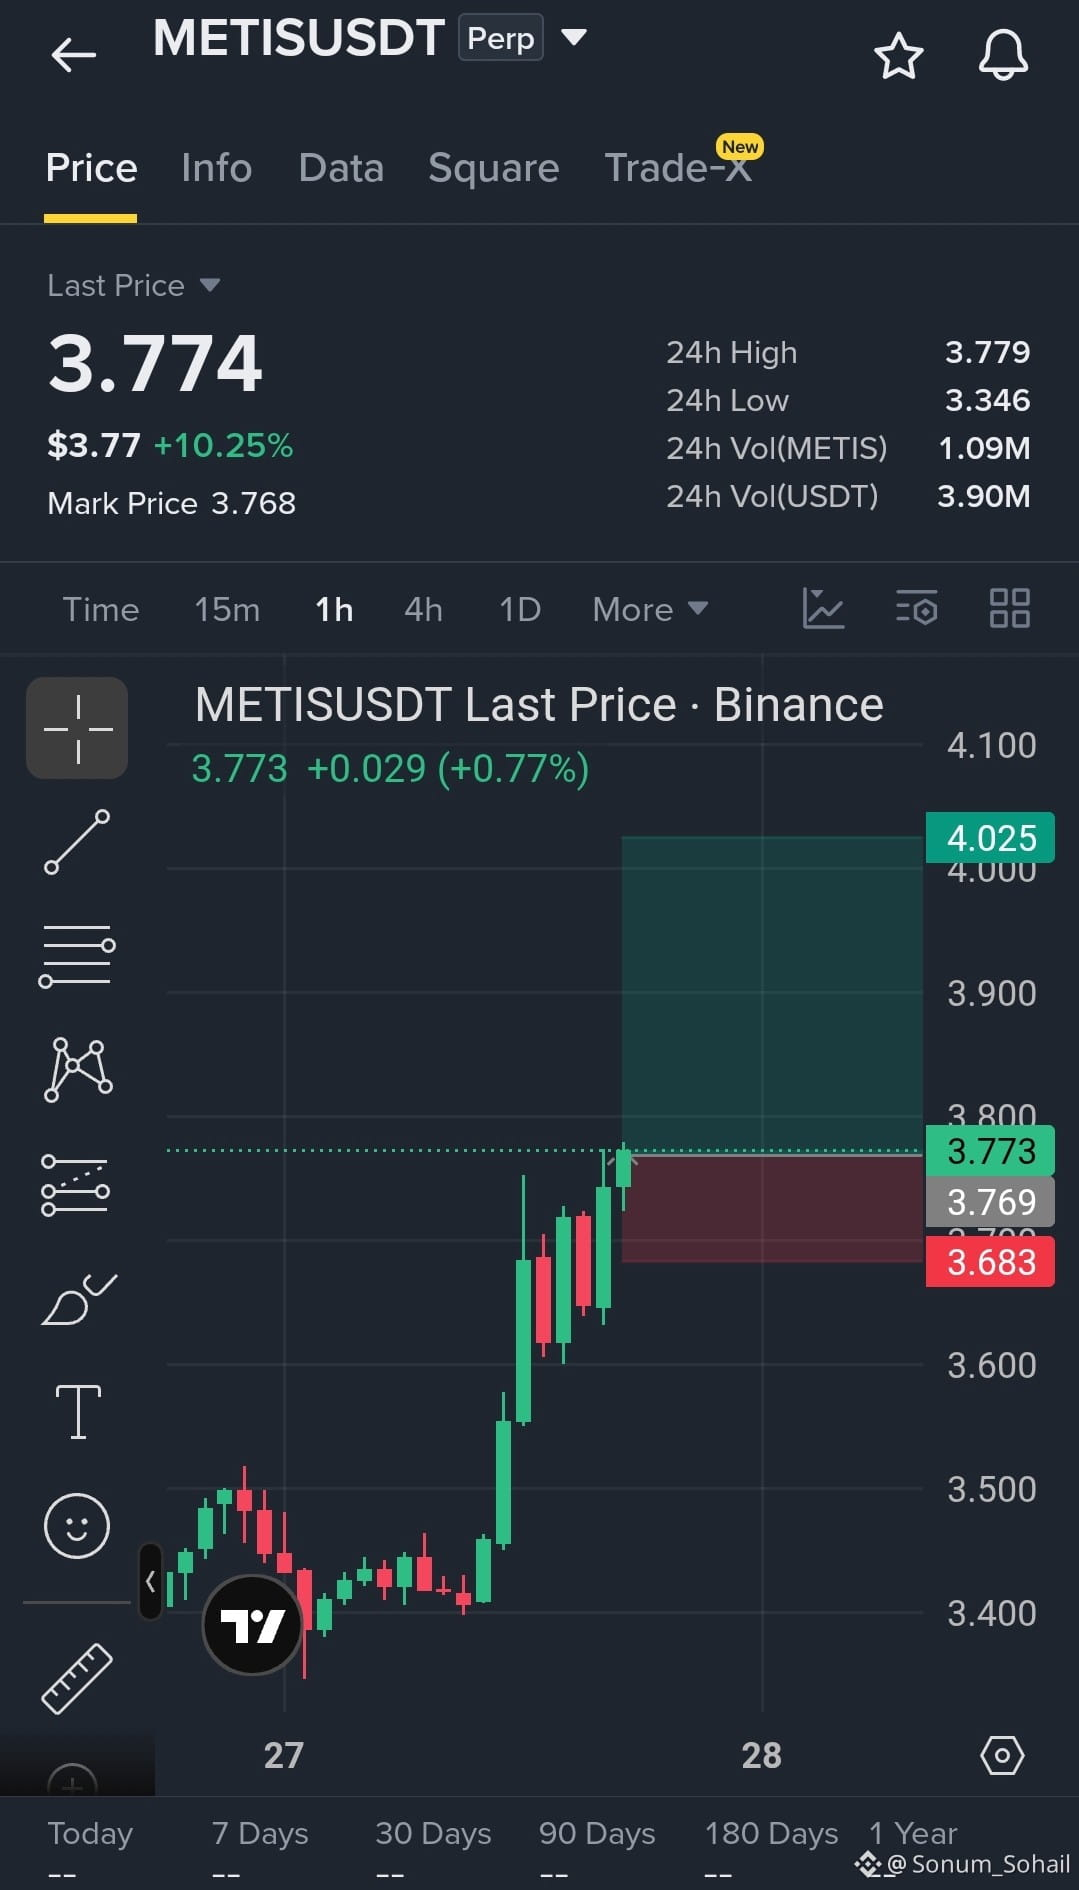
$METIS — LONG 🟢 | Entry: 3.75–3.78 | TP1: 3.85 | TP2: 3.95 | TP3: 4.025 | SL: 3.683
{future}(METISUSDT)
{future}(GRAMUSDT)
BIG OPPORTUNITIES — BIG PUMPS AHEAD!
$GRAM — LONG 🟢 | Entry: 1.620–1.635 | TP1: 1.680 | TP2: 1.715 | TP3: 1.749 | SL: 1.589
$METIS — LONG 🟢 | Entry: 3.75–3.78 | TP1: 3.85 | TP2: 3.95 | TP3: 4.025 | SL: 3.683
$GRAM — LONG 🟢 | Entry: 1.620–1.635 | TP1: 1.680 | TP2: 1.715 | TP3: 1.749 | SL: 1.589
$METIS — LONG 🟢 | Entry: 3.75–3.78 | TP1: 3.85 | TP2: 3.95 | TP3: 4.025 | SL: 3.683
2
65
·
--
$SOL — BULLISH CONTINUATION SETUP 🚀🔥
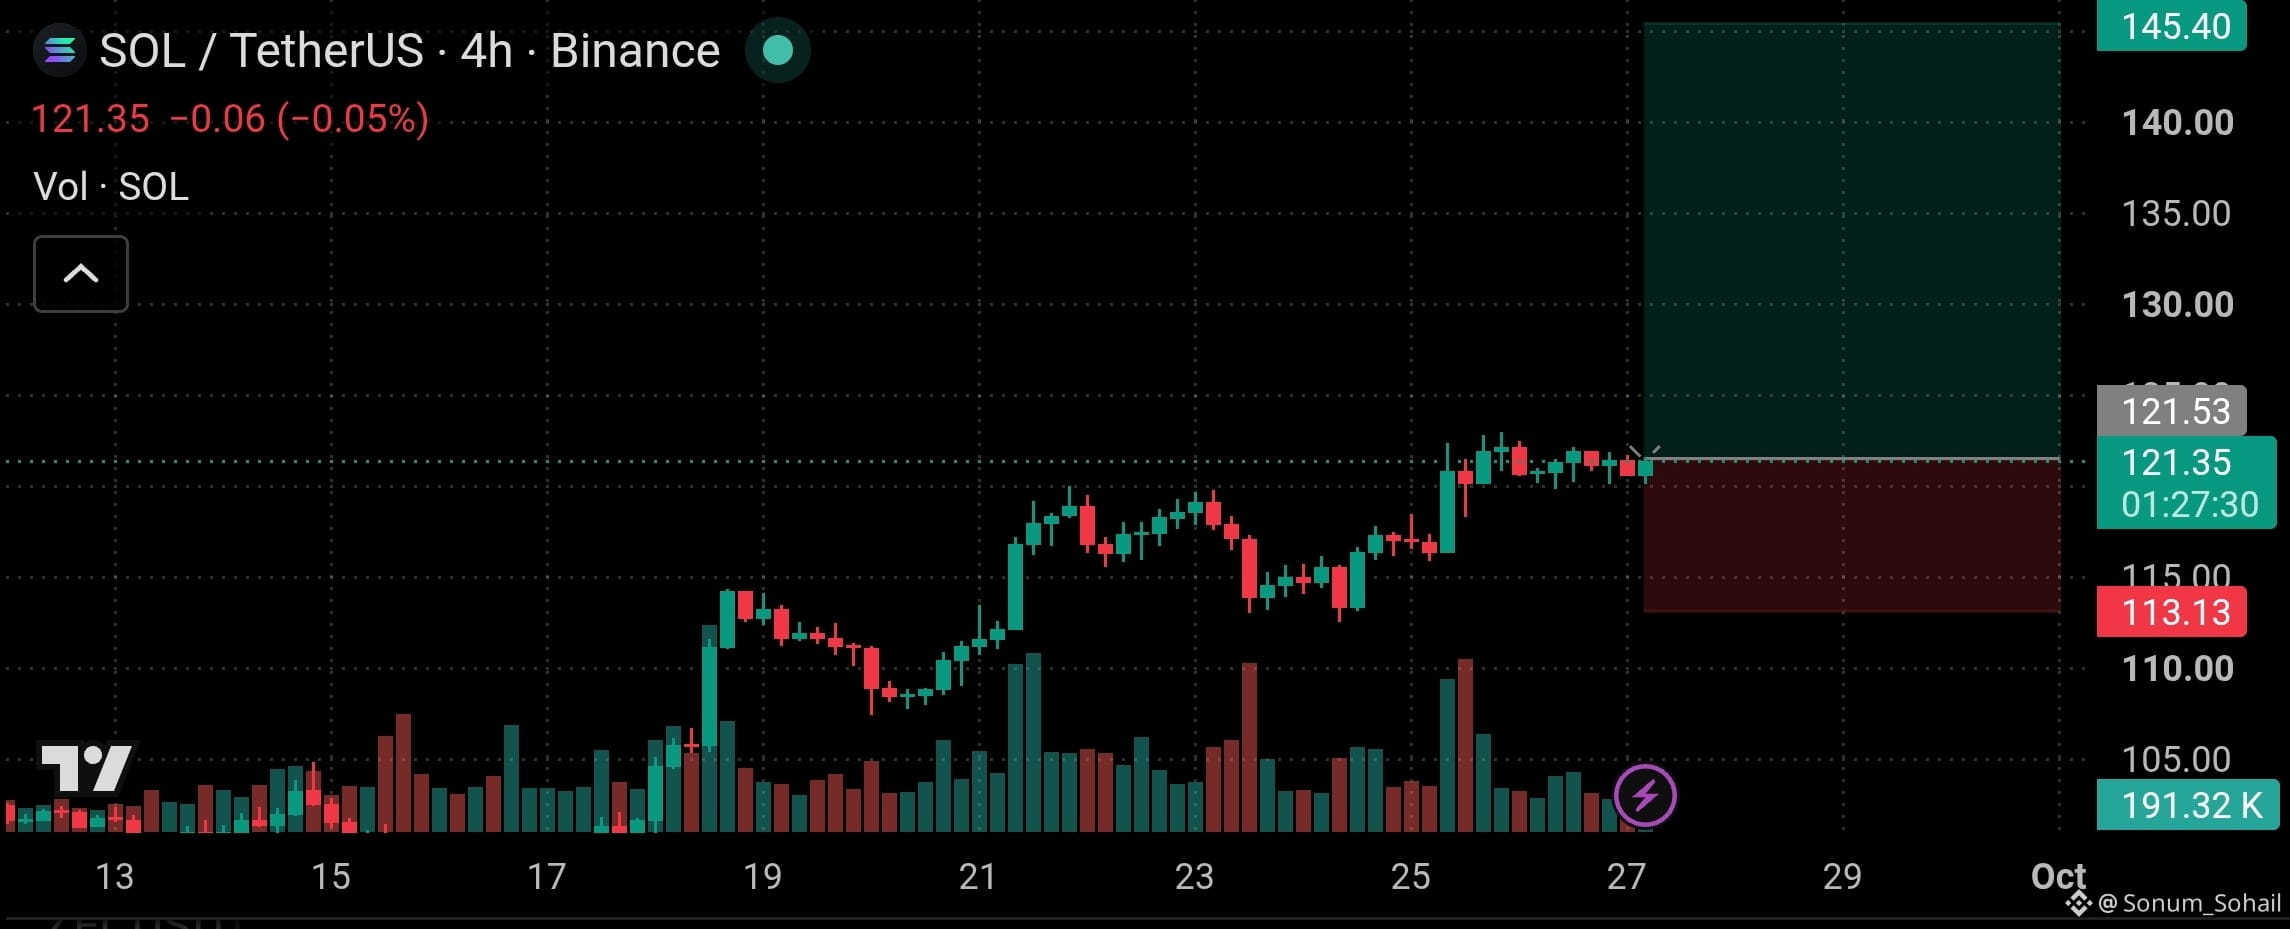
SOL is holding around the $121 zone after a strong 4H recovery. The chart is forming a higher-level consolidation, and the key level to defend is around $121–$120. A clean breakout above $122–$124 could open the next upside leg toward $130, followed by the $145 area. Current market analysis also places support near $115 and resistance around $124–$130, with the $144 area higher up.
Trade Setup: Long 🟢
Entry Zone: 121.30–121.55
SL: 113.13
TP1: 130.00
TP2: 138.00
TP3: 145.40
Trade here On $SOL
{future}(SOLUSDT)
$SOL — BULLISH CONTINUATION SETUP 🚀🔥
SOL is holding around the $121 zone after a strong 4H recovery. The chart is forming a higher-level consolidation, and the key level to defend is around $121–$120. A clean breakout above $122–$124 could open the next upside leg toward $130, followed by the $145 area. Current market analysis also places support near $115 and resistance around $124–$130, with the $144 area higher up.
Trade Setup: Long 🟢
Entry Zone: 121.30–121.55
SL: 113.13
TP1: 130.00
TP2: 138.00
TP3: 145.40
Trade here On $SOL
SOL is holding around the $121 zone after a strong 4H recovery. The chart is forming a higher-level consolidation, and the key level to defend is around $121–$120. A clean breakout above $122–$124 could open the next upside leg toward $130, followed by the $145 area. Current market analysis also places support near $115 and resistance around $124–$130, with the $144 area higher up.
Trade Setup: Long 🟢
Entry Zone: 121.30–121.55
SL: 113.13
TP1: 130.00
TP2: 138.00
TP3: 145.40
Trade here On $SOL
1
111
·
--
CAN $100 BECOME $1,000? — THE $SAGA EXPERIMENT
What if I start with just $100 and turn it into a hypothetical trading challenge? 👀
Right now, $SAGA is one of the altcoins catching serious attention, with a major momentum move and heavy trading activity showing up on Binance Square.
So here’s my hypothetical scenario:
Starting capital: $100
Dream target: $1,000
Strategy: Controlled leverage + multiple setups
📊 Focus: Volume + breakout + retest
Rule: Protect the $100 before chasing the $1,000
And there’s a personal reason behind this experiment…
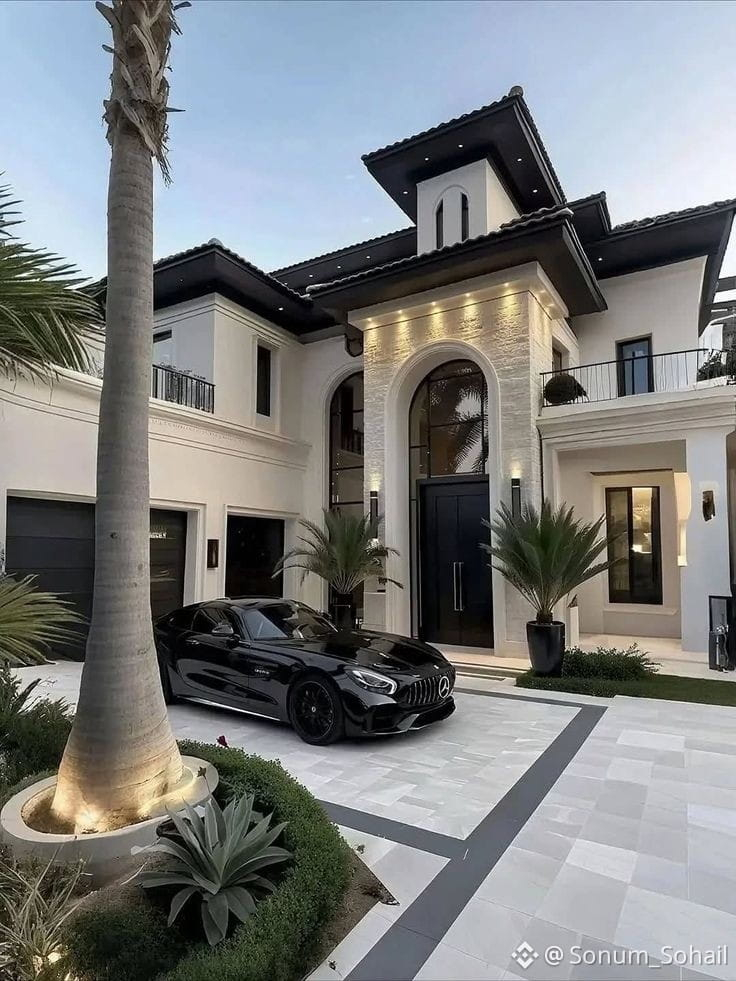
🏠 A home I can call mine.
🚗 A car I’ve dreamed of owning.
I know $100 → $1,000 isn't a promise.
It would require multiple successful trades, strict risk management, and a lot of discipline.
But imagine documenting the journey from $100 → $1,000 step by step…
Would you follow this experiment? 👀
👇 Comment “$100 CHALLENGE” if you want me to post the next hypothetical $SAGA setup.
{future}(SAGAUSDT)
CAN $100 BECOME $1,000? — THE $SAGA EXPERIMENT
What if I start with just $100 and turn it into a hypothetical trading challenge? 👀
Right now, $SAGA is one of the altcoins catching serious attention, with a major momentum move and heavy trading activity showing up on Binance Square.
So here’s my hypothetical scenario:
Starting capital: $100
Dream target: $1,000
Strategy: Controlled leverage + multiple setups
📊 Focus: Volume + breakout + retest
Rule: Protect the $100 before chasing the $1,000
And there’s a personal reason behind this experiment…
🏠 A home I can call mine.
🚗 A car I’ve dreamed of owning.
I know $100 → $1,000 isn't a promise.
It would require multiple successful trades, strict risk management, and a lot of discipline.
But imagine documenting the journey from $100 → $1,000 step by step…
Would you follow this experiment? 👀
👇 Comment “$100 CHALLENGE” if you want me to post the next hypothetical $SAGA setup.
What if I start with just $100 and turn it into a hypothetical trading challenge? 👀
Right now, $SAGA is one of the altcoins catching serious attention, with a major momentum move and heavy trading activity showing up on Binance Square.
So here’s my hypothetical scenario:
Starting capital: $100
Dream target: $1,000
Strategy: Controlled leverage + multiple setups
📊 Focus: Volume + breakout + retest
Rule: Protect the $100 before chasing the $1,000
And there’s a personal reason behind this experiment…
🏠 A home I can call mine.
🚗 A car I’ve dreamed of owning.
I know $100 → $1,000 isn't a promise.
It would require multiple successful trades, strict risk management, and a lot of discipline.
But imagine documenting the journey from $100 → $1,000 step by step…
Would you follow this experiment? 👀
👇 Comment “$100 CHALLENGE” if you want me to post the next hypothetical $SAGA setup.

1
216
·
--
Long TRADE SETUPS......Big Pumps
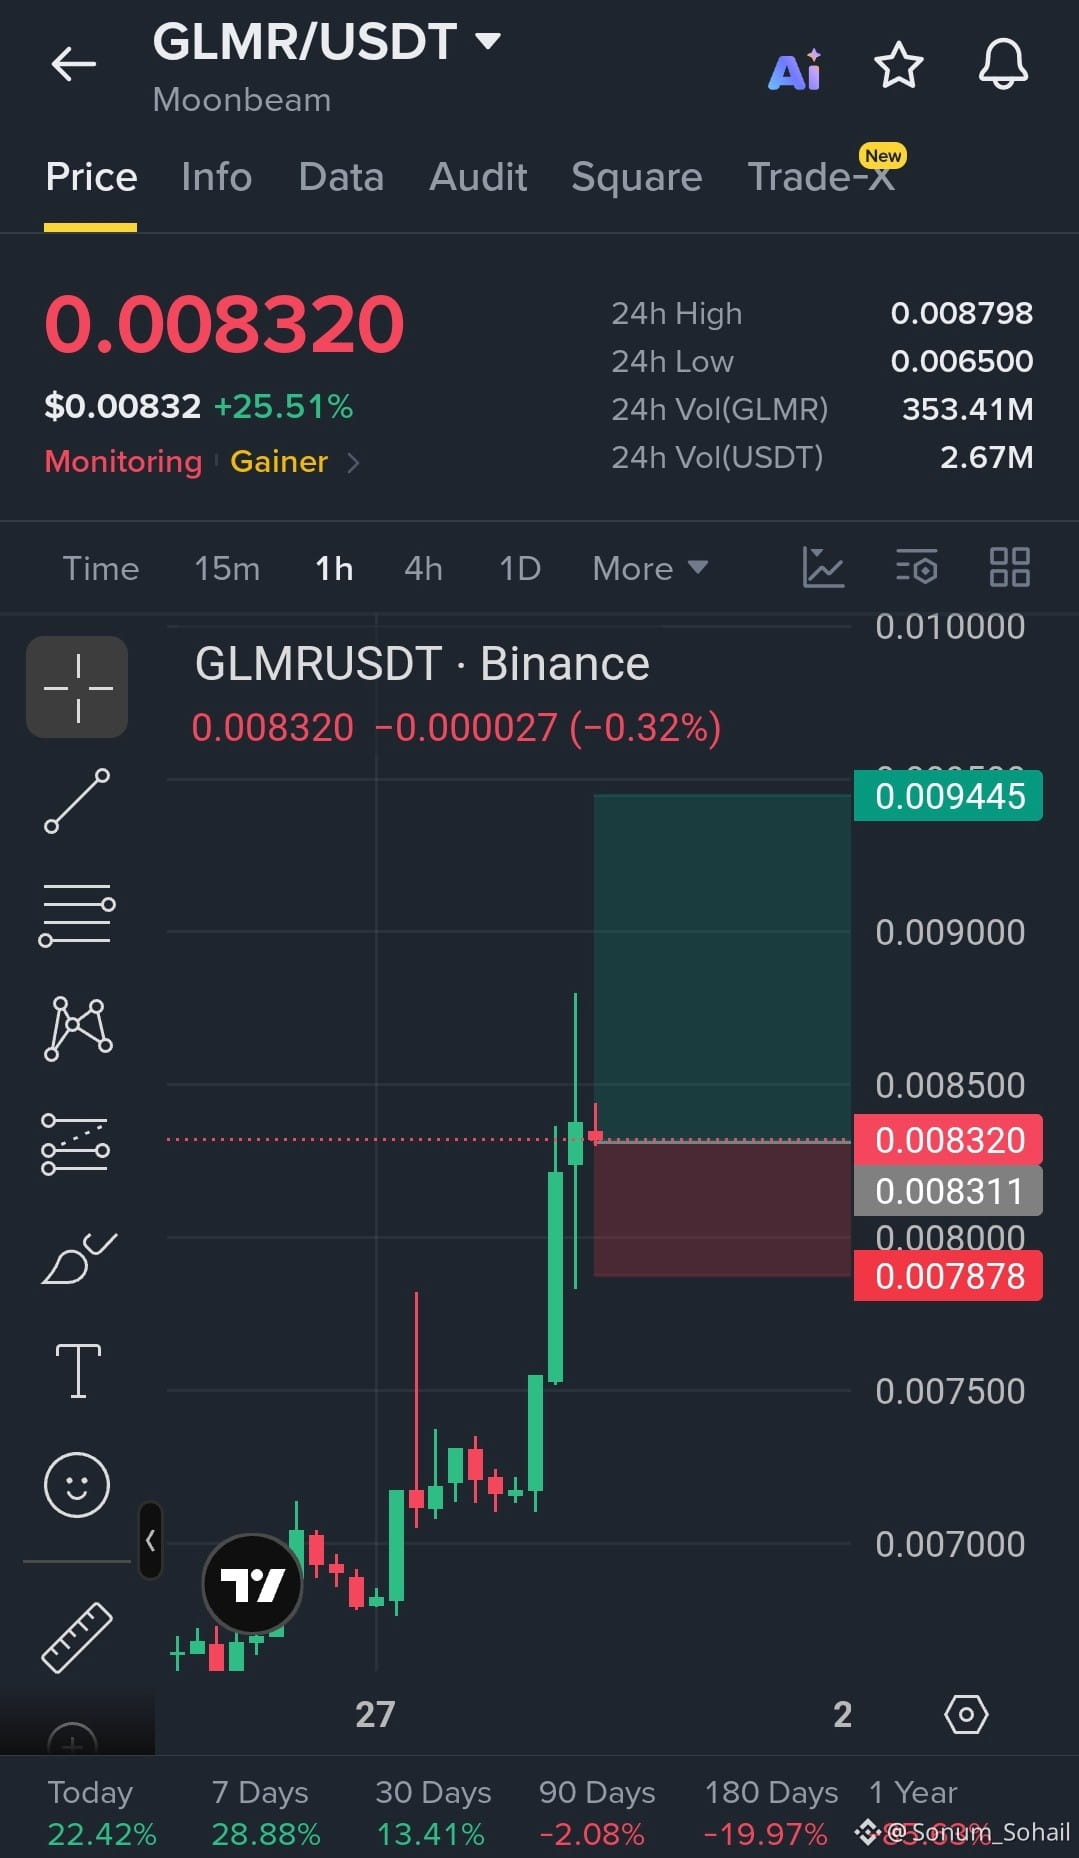
$GLMR — LONG 🟢 | Entry: 0.00830–0.00832 | TP1: 0.00870 | TP2: 0.00900 | TP3: 0.009445 | SL: 0.007878
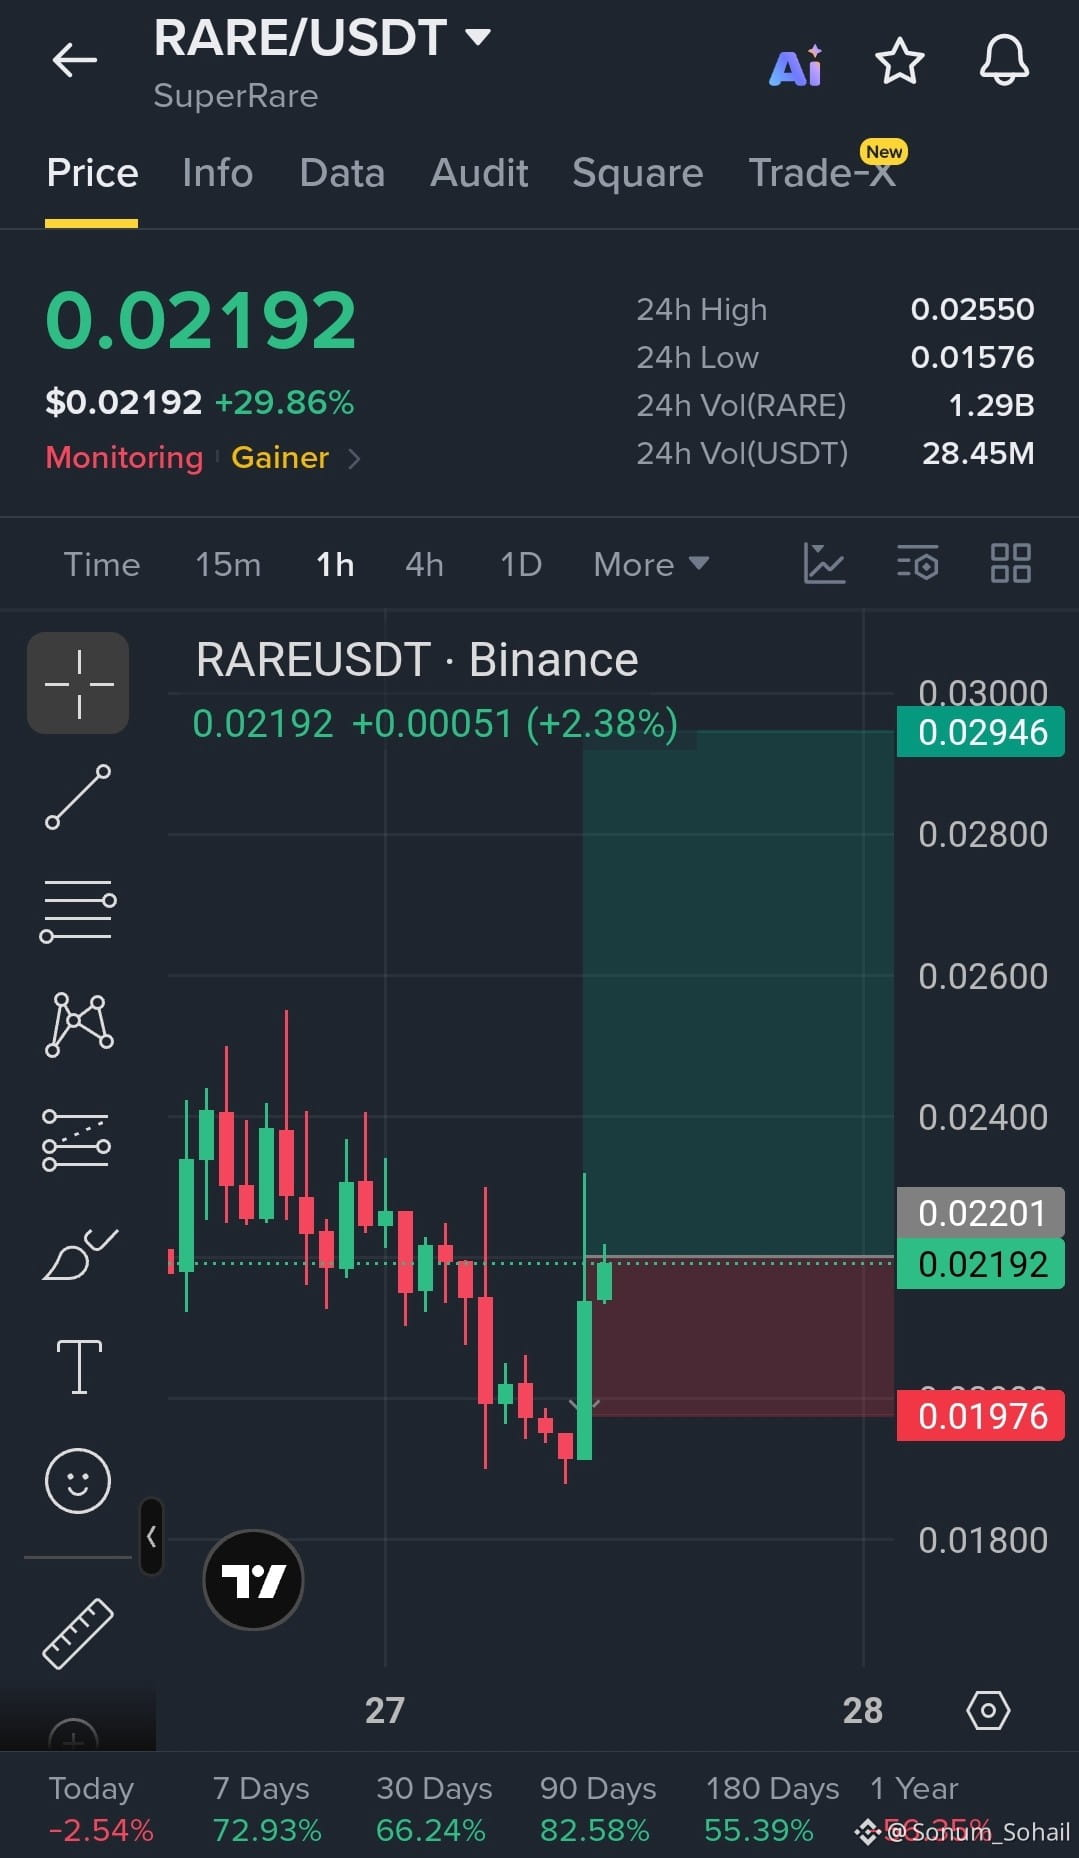
$RARE — LONG 🟢 | Entry: 0.02190–0.02205 | TP1: 0.02400 | TP2: 0.02700 | TP3: 0.02946 | SL: 0.01976
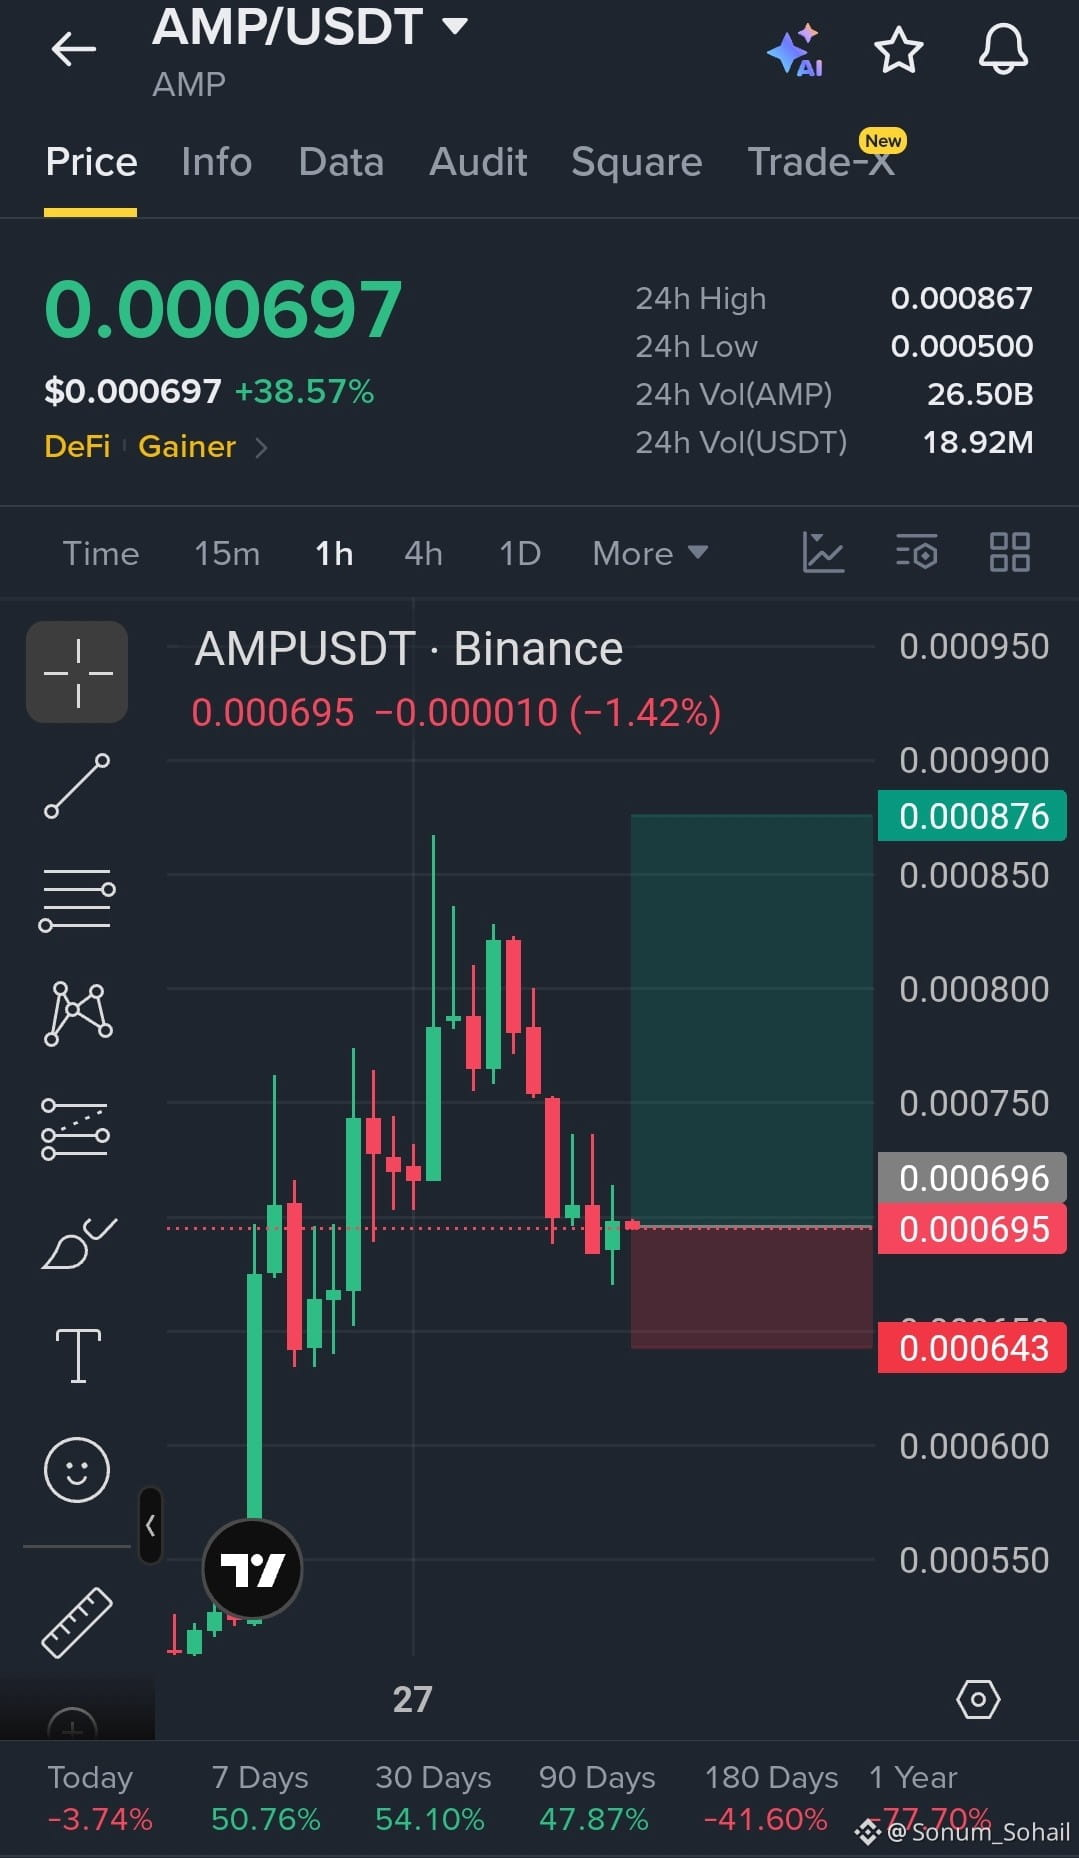
$AMP — LONG 🟢 | Entry: 0.000695–0.000700 | TP1: 0.000750 | TP2: 0.000820 | TP3: 0.000876 | SL: 0.000643
{spot}(GLMRUSDT)
{future}(RAREUSDT)
{spot}(AMPUSDT)
Long TRADE SETUPS......Big Pumps
$GLMR — LONG 🟢 | Entry: 0.00830–0.00832 | TP1: 0.00870 | TP2: 0.00900 | TP3: 0.009445 | SL: 0.007878
$RARE — LONG 🟢 | Entry: 0.02190–0.02205 | TP1: 0.02400 | TP2: 0.02700 | TP3: 0.02946 | SL: 0.01976
$AMP — LONG 🟢 | Entry: 0.000695–0.000700 | TP1: 0.000750 | TP2: 0.000820 | TP3: 0.000876 | SL: 0.000643
$GLMR — LONG 🟢 | Entry: 0.00830–0.00832 | TP1: 0.00870 | TP2: 0.00900 | TP3: 0.009445 | SL: 0.007878
$RARE — LONG 🟢 | Entry: 0.02190–0.02205 | TP1: 0.02400 | TP2: 0.02700 | TP3: 0.02946 | SL: 0.01976
$AMP — LONG 🟢 | Entry: 0.000695–0.000700 | TP1: 0.000750 | TP2: 0.000820 | TP3: 0.000876 | SL: 0.000643
1
235
·
--
$ZEC — BREAKOUT & NEXT HIGH POSSIBLE 🚀
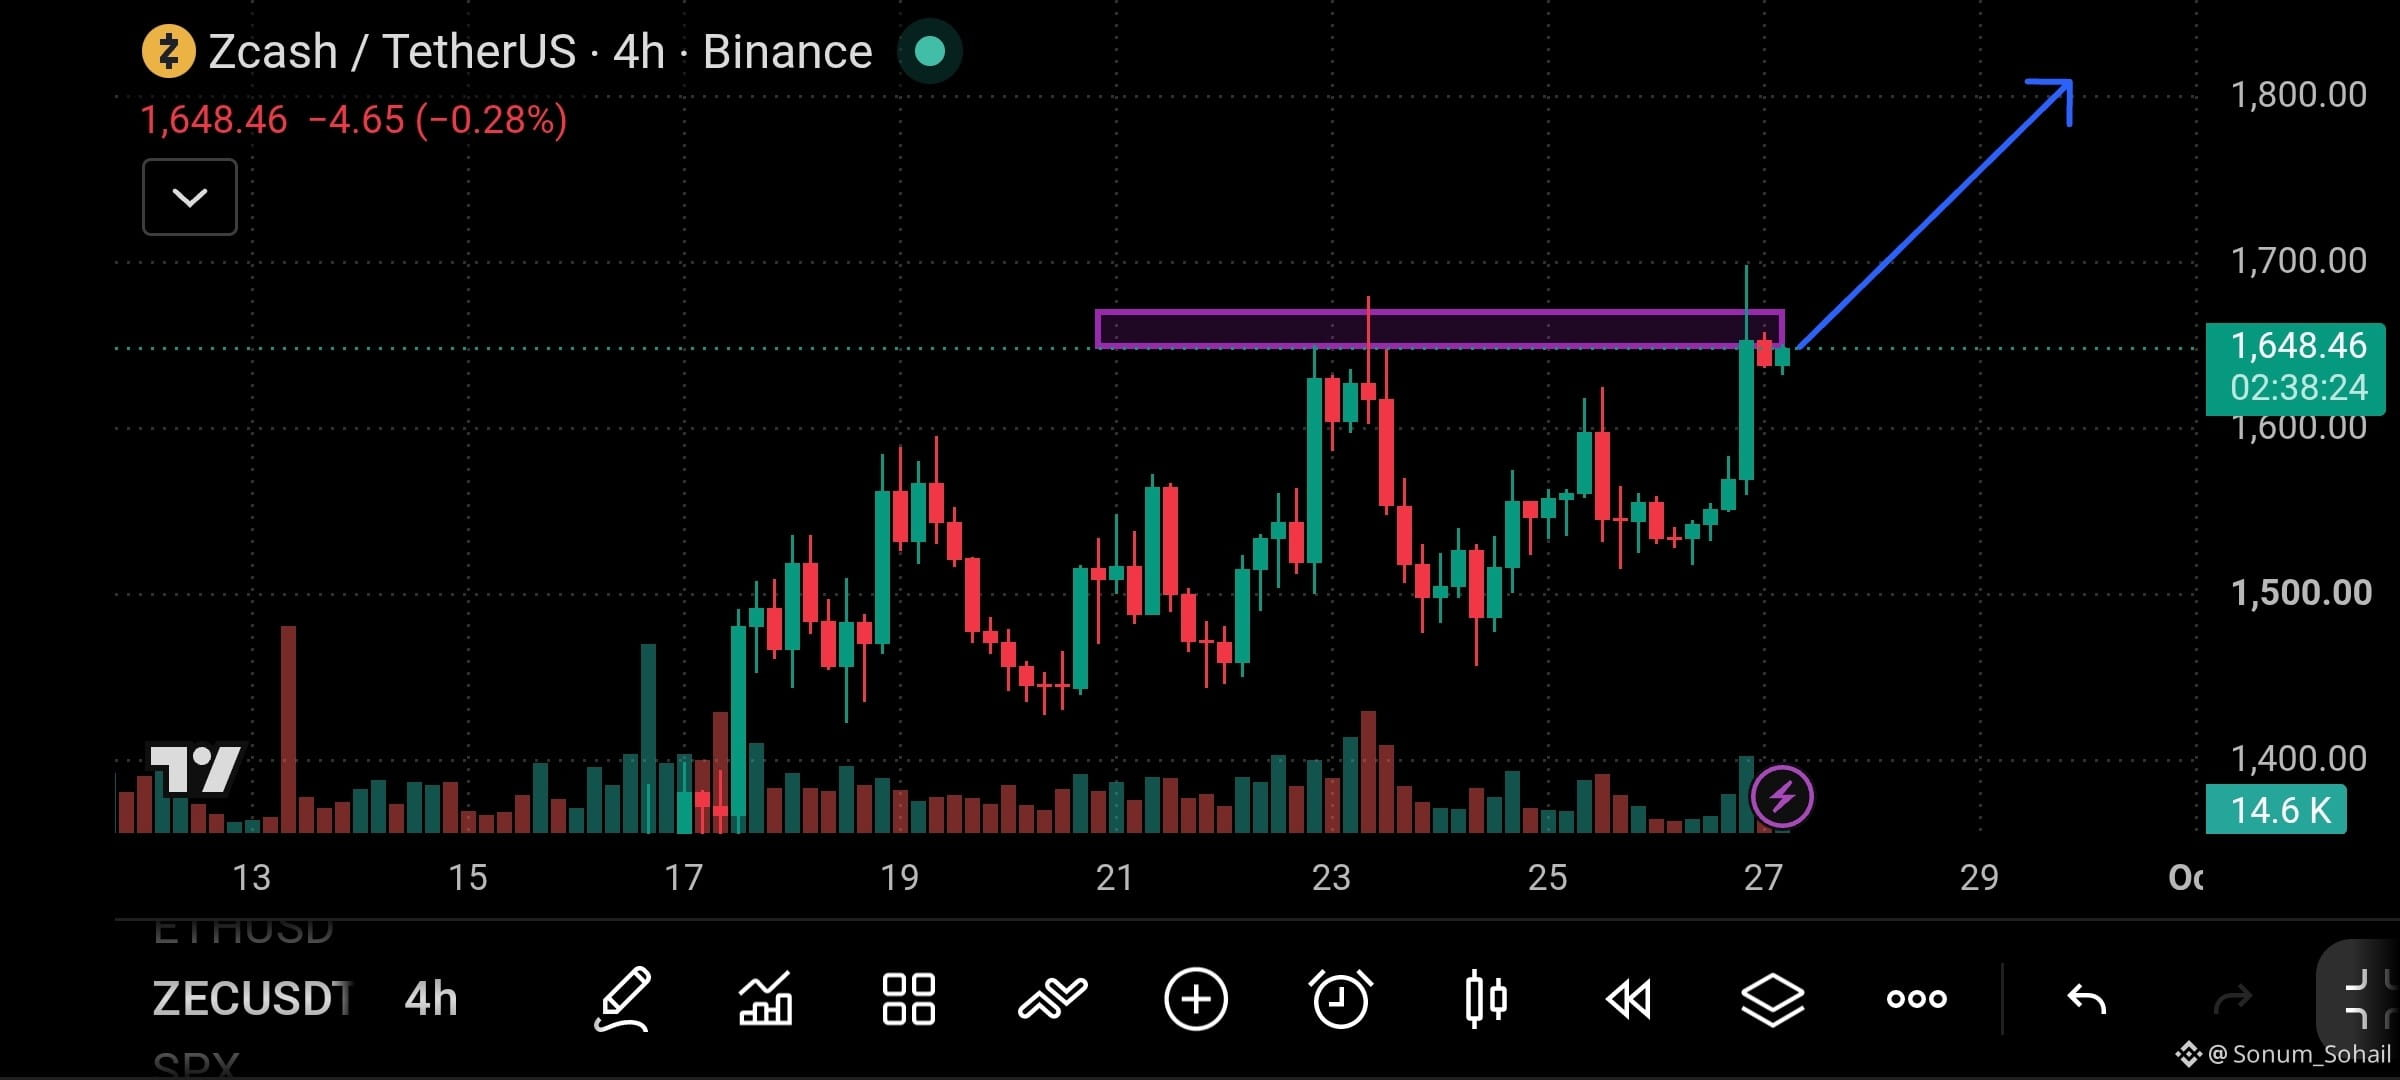
$ZEC is testing the $1,640–$1,670 resistance zone on the 4H chart. Price has broken above the previous range and is currently holding near the breakout area. If this zone turns into support, the move towards the $1,800 area next. Recent market analysis also identifies the $1,600 region as an important resistance area, while ZEC remains in a very high-volatility uptrend.
Trade Setup: Long 🟢
Entry Zone: 1,640–1,660
SL: 1,600
TP1: 1,700
TP2: 1,750
TP3: 1,800 🚀
4H hold above $1,640–$1,650 strengthens the continuation setup.
Trade here on $ZEC
{future}(ZECUSDT)
$ZEC — BREAKOUT & NEXT HIGH POSSIBLE 🚀
$ZEC is testing the $1,640–$1,670 resistance zone on the 4H chart. Price has broken above the previous range and is currently holding near the breakout area. If this zone turns into support, the move towards the $1,800 area next. Recent market analysis also identifies the $1,600 region as an important resistance area, while ZEC remains in a very high-volatility uptrend.
Trade Setup: Long 🟢
Entry Zone: 1,640–1,660
SL: 1,600
TP1: 1,700
TP2: 1,750
TP3: 1,800 🚀
4H hold above $1,640–$1,650 strengthens the continuation setup.
Trade here on $ZEC
$ZEC is testing the $1,640–$1,670 resistance zone on the 4H chart. Price has broken above the previous range and is currently holding near the breakout area. If this zone turns into support, the move towards the $1,800 area next. Recent market analysis also identifies the $1,600 region as an important resistance area, while ZEC remains in a very high-volatility uptrend.
Trade Setup: Long 🟢
Entry Zone: 1,640–1,660
SL: 1,600
TP1: 1,700
TP2: 1,750
TP3: 1,800 🚀
4H hold above $1,640–$1,650 strengthens the continuation setup.
Trade here on $ZEC
1
169
·
--
LONG SETUPS.Big Opportunities.Big Pums.
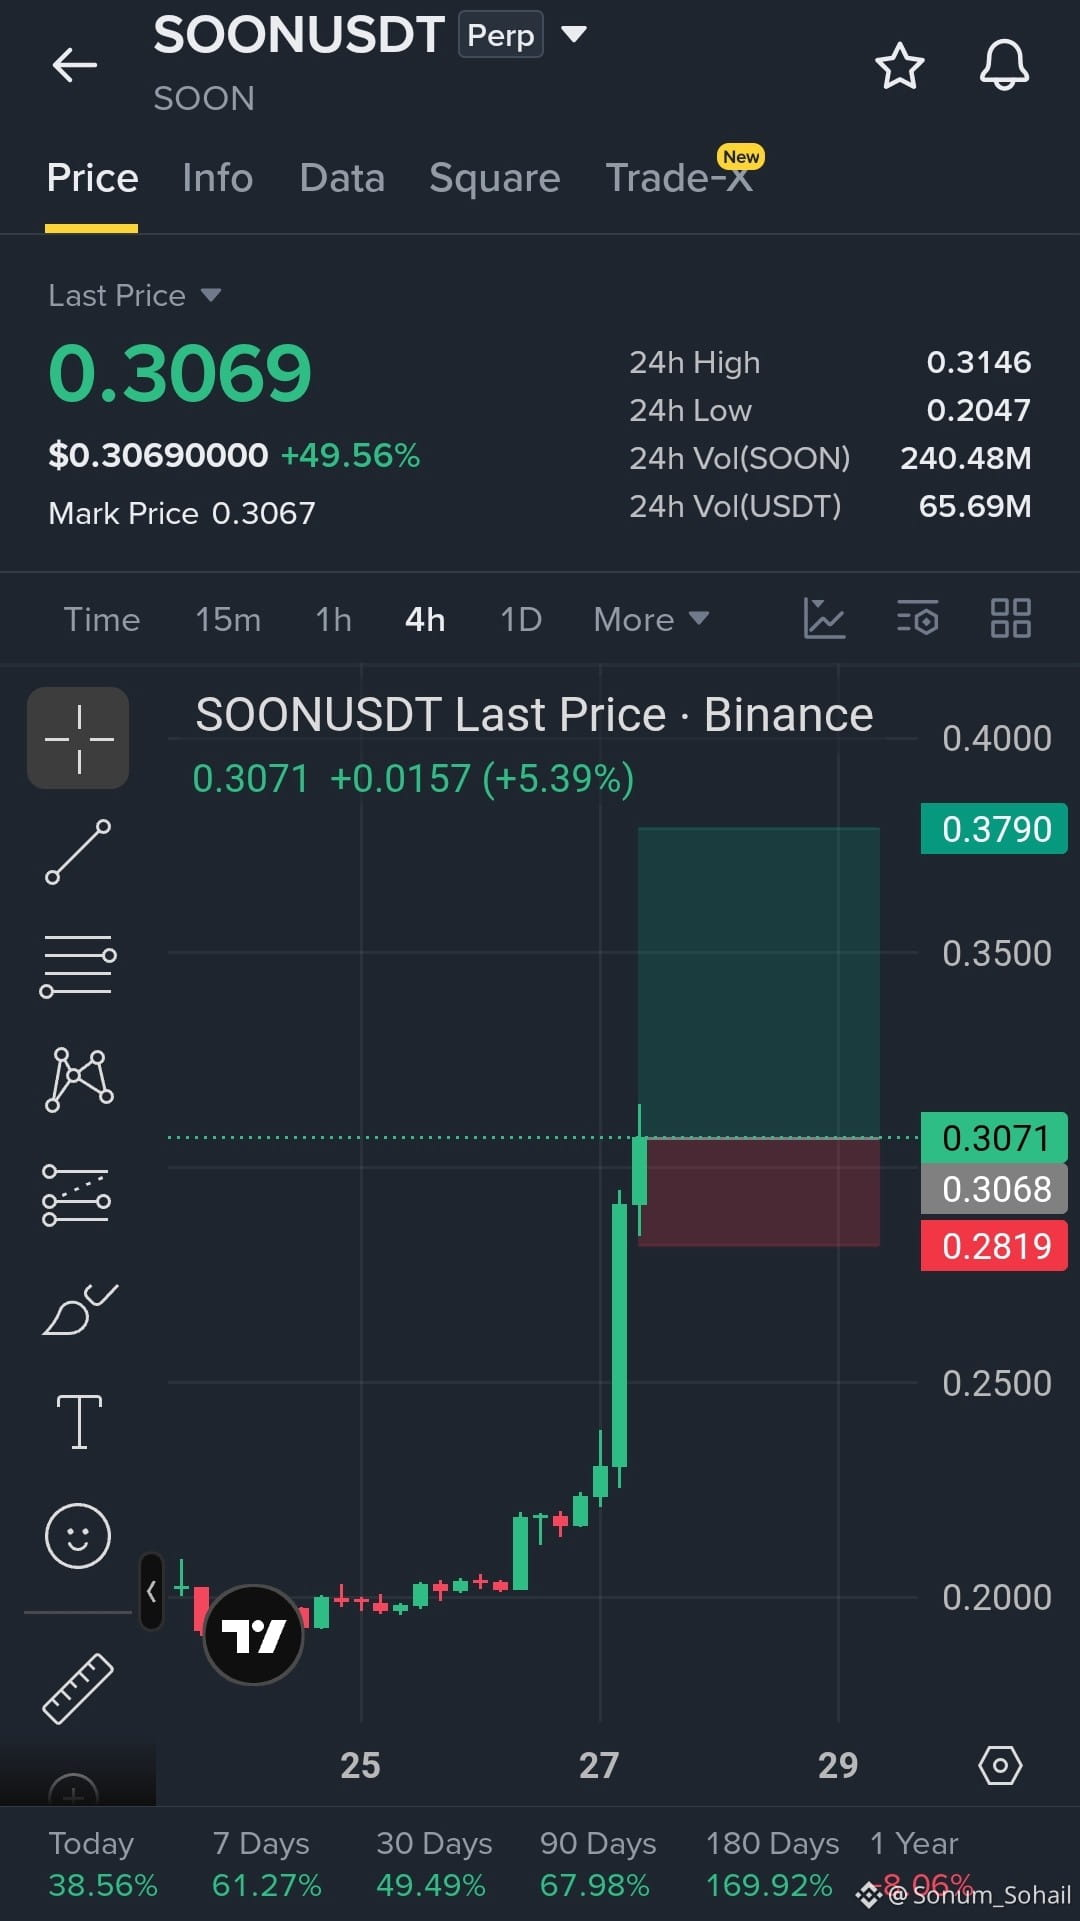
$SOON — LONG 🟢 | Entry: 0.3050–0.3090 | TP1: 0.3300 | TP2: 0.3550 | TP3: 0.3790 | SL: 0.2819
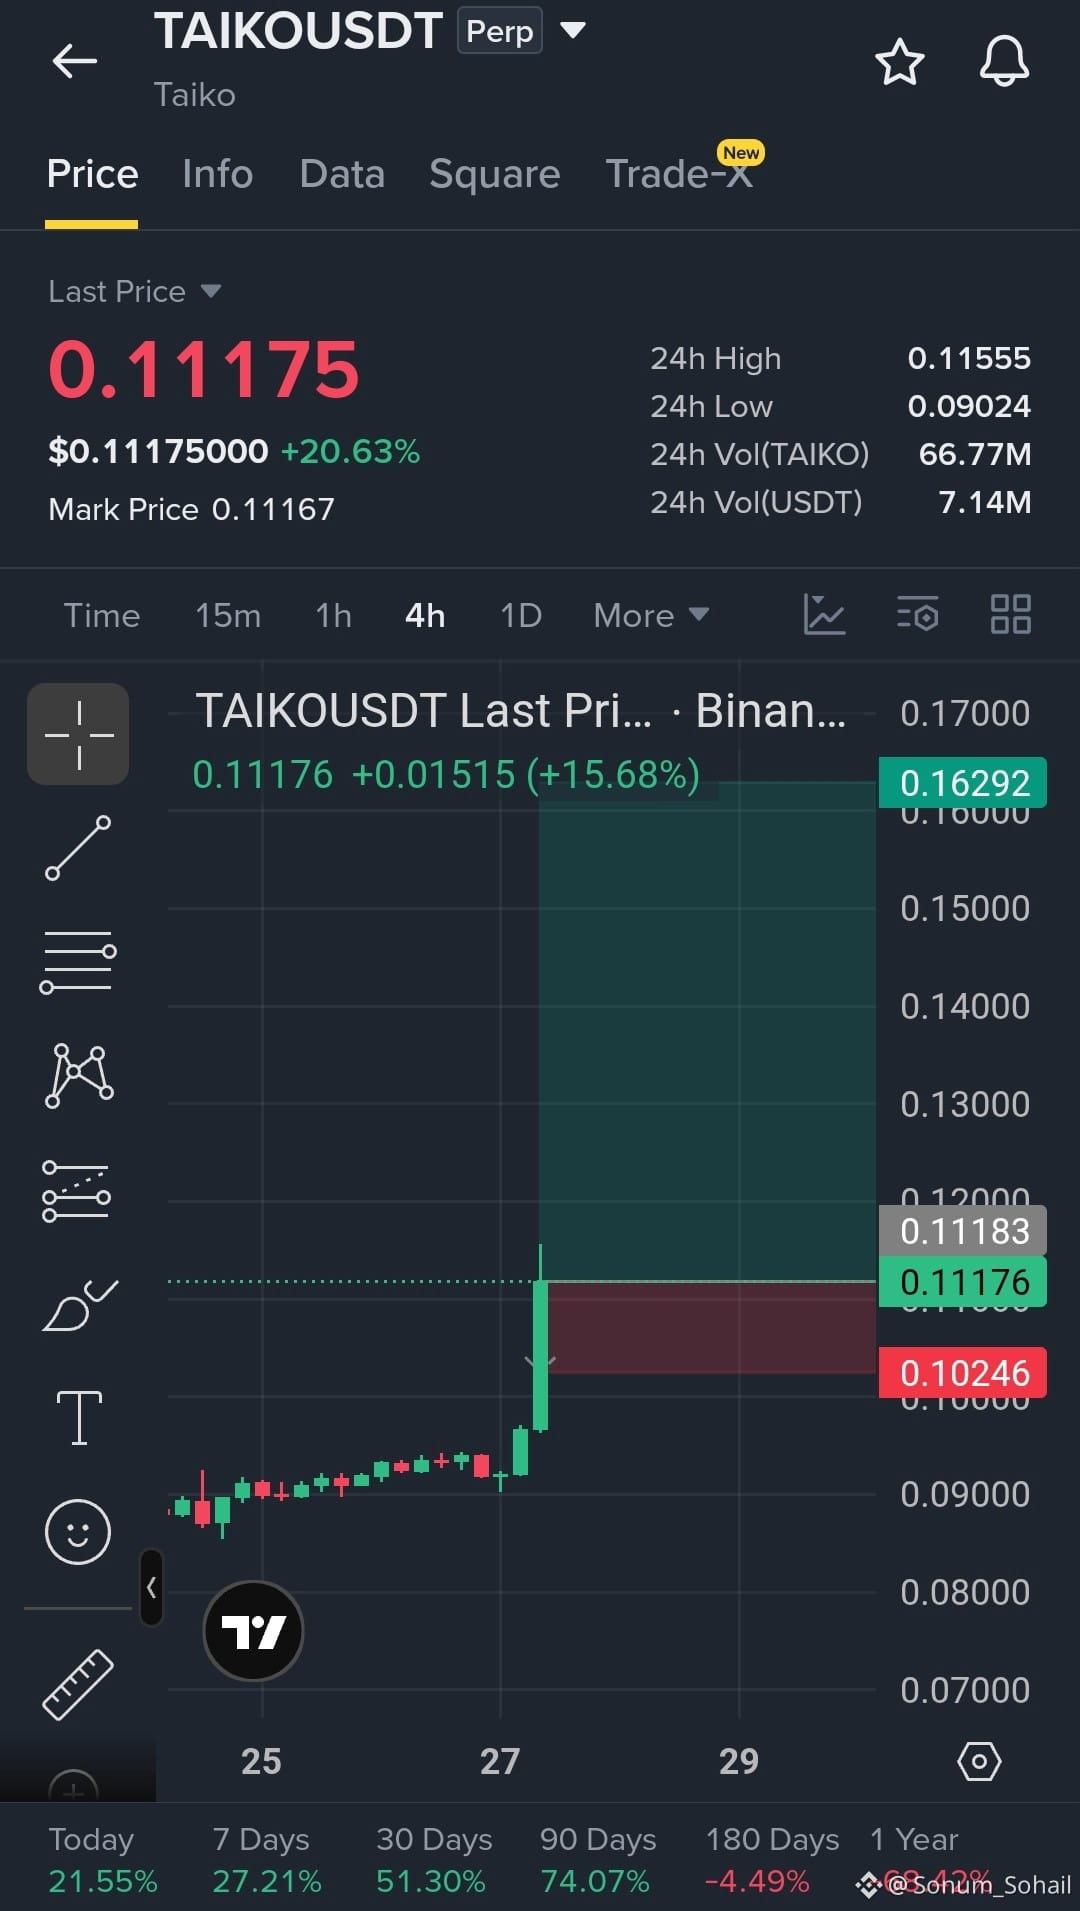
$TAIKO — LONG 🟢 | Entry: 0.1110–0.1130 | TP1: 0.1250 | TP2: 0.1450 | TP3: 0.16292 | SL: 0.10246
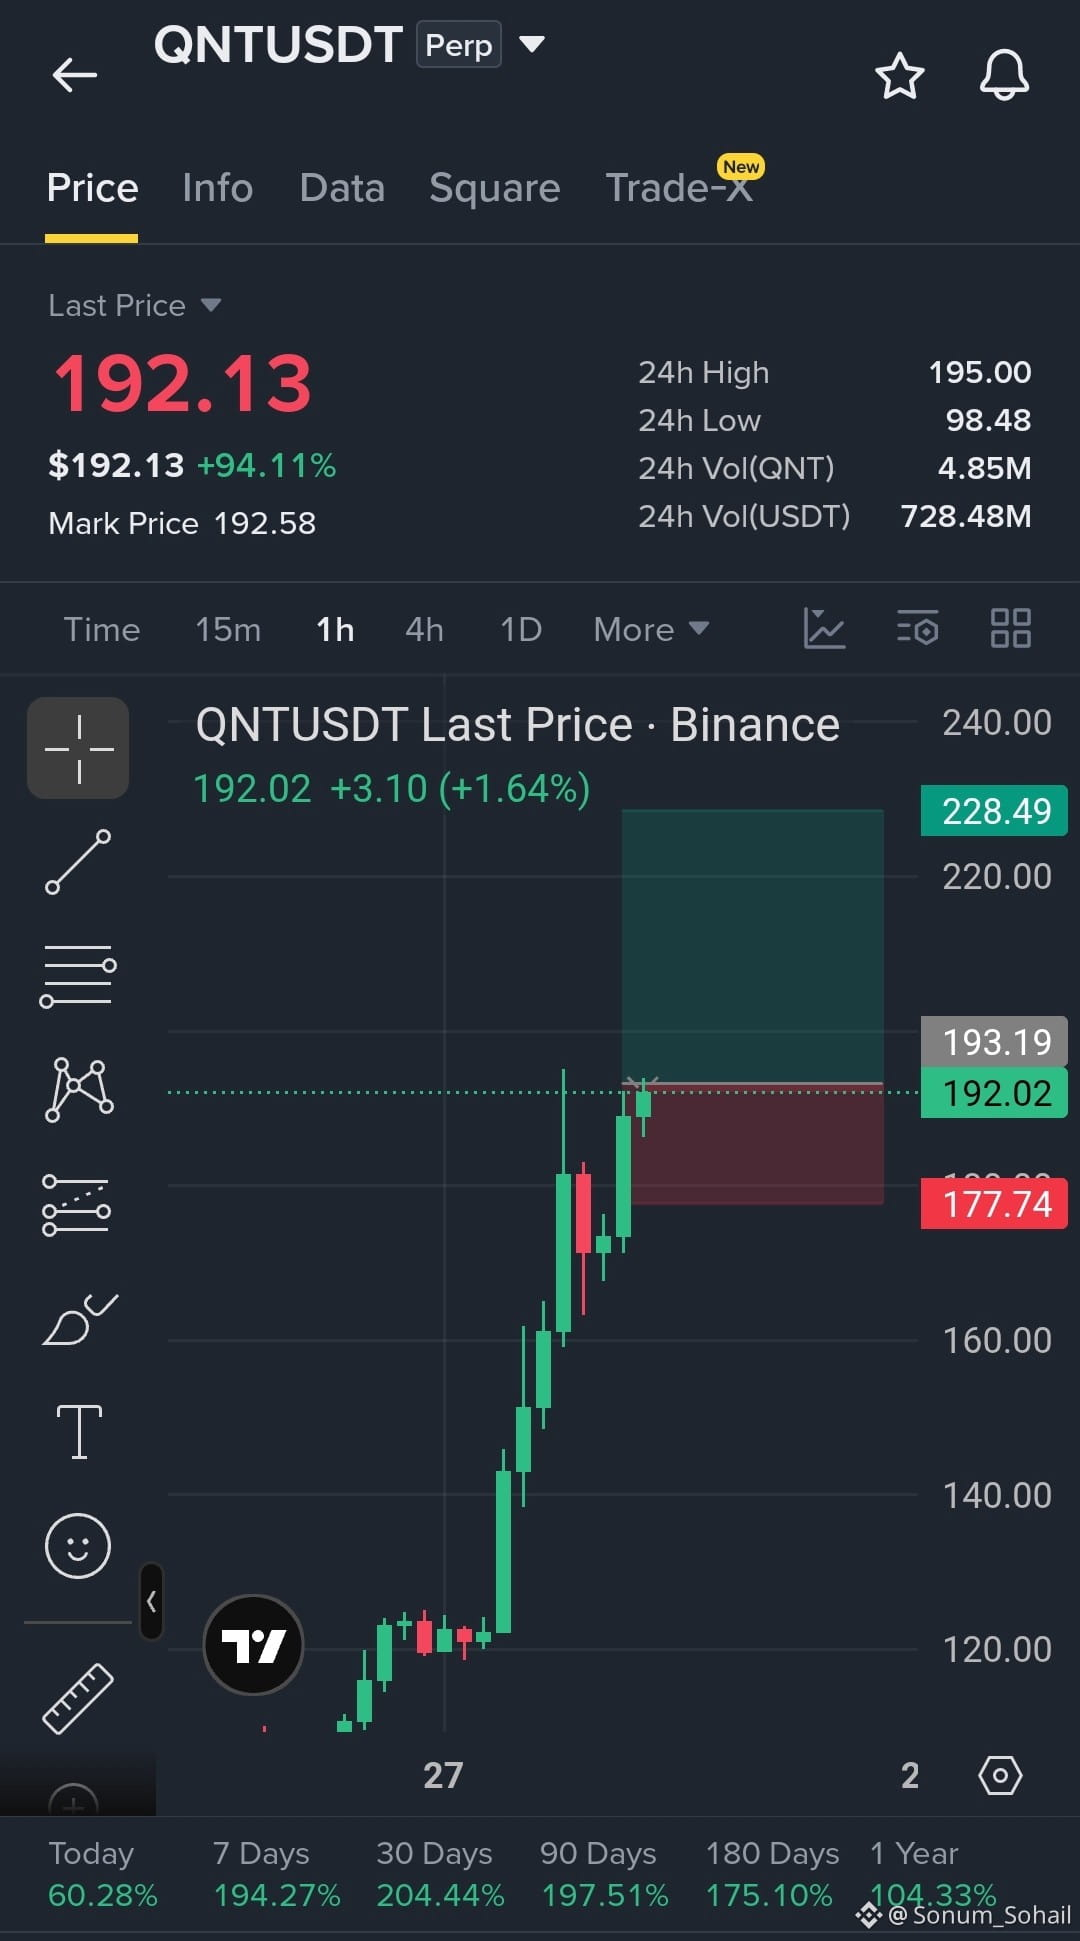
$QNT — LONG 🟢 | Entry: 190–194 | TP1: 205 | TP2: 218 | TP3: 228.49 | SL: 177.74
{future}(SOONUSDT)
{future}(TAIKOUSDT)
{future}(QNTUSDT)
LONG SETUPS.Big Opportunities.Big Pums.
$SOON — LONG 🟢 | Entry: 0.3050–0.3090 | TP1: 0.3300 | TP2: 0.3550 | TP3: 0.3790 | SL: 0.2819
$TAIKO — LONG 🟢 | Entry: 0.1110–0.1130 | TP1: 0.1250 | TP2: 0.1450 | TP3: 0.16292 | SL: 0.10246
$QNT — LONG 🟢 | Entry: 190–194 | TP1: 205 | TP2: 218 | TP3: 228.49 | SL: 177.74
$SOON — LONG 🟢 | Entry: 0.3050–0.3090 | TP1: 0.3300 | TP2: 0.3550 | TP3: 0.3790 | SL: 0.2819
$TAIKO — LONG 🟢 | Entry: 0.1110–0.1130 | TP1: 0.1250 | TP2: 0.1450 | TP3: 0.16292 | SL: 0.10246
$QNT — LONG 🟢 | Entry: 190–194 | TP1: 205 | TP2: 218 | TP3: 228.49 | SL: 177.74
1
419
Connectez-vous pour découvrir plus de contenu
Rejoignez la communauté mondiale des adeptes de cryptomonnaies sur Binance Square
⚡️ Suviez les dernières informations importantes sur les cryptomonnaies.
💬 Jugé digne de confiance par la plus grande plateforme d’échange de cryptomonnaies au monde.
👍 Découvrez les connaissances que partagent les créateurs vérifiés.
Adresse e-mail/Nº de téléphone
Sujets d’actualité
SECHaltsCryptoETFReviewsAmidFundingLapse
5,652 vues
142 mentions
#sechaltscryptoetfreviewsamidfundinglapse
SEC pauses new crypto ETF reviews amid funding lapse.
Not a rejection — just a temporary freeze while the funding issue continues.
Crypto ETF applicants may have to wait a little longer.
#Write2Earn
$ETH
The Ledger Mind
·2 mentions J’aime
·9.2k vues
ZcashETFPostsFirstWeeklyOutflow$93.6M
56,451 vues
173 mentions
GreekPoliceBustCryptoScamRingArrest17
169,358 vues
1,171 mentions