
CryptoPandaヅ
8.3k Publications

CryptoPandaヅ
 Compte Square Vérifié+
Signaler
Bloquer l’utilisateur
Been into contracts since I was 16.
Ouvert au trading
Trade fréquemment
4.3 an(s)
0 Suivis
38.6K+ Abonnés
25.7K+ J’aime
Publications
Portefeuille
Tous
Citations
Direct
·
--
Baissier
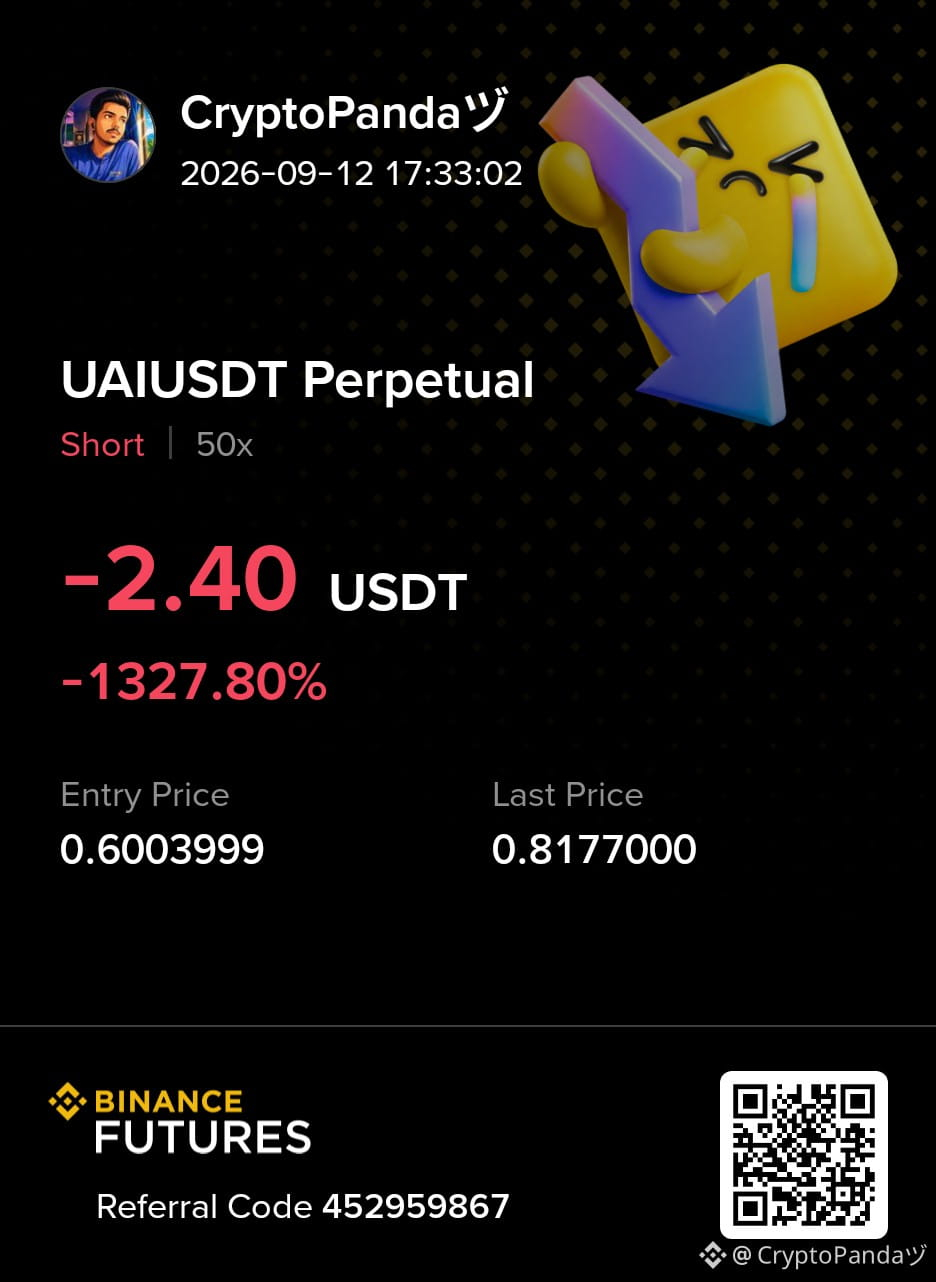
Trading sur 30 j de 1.1K USDT en $UAI
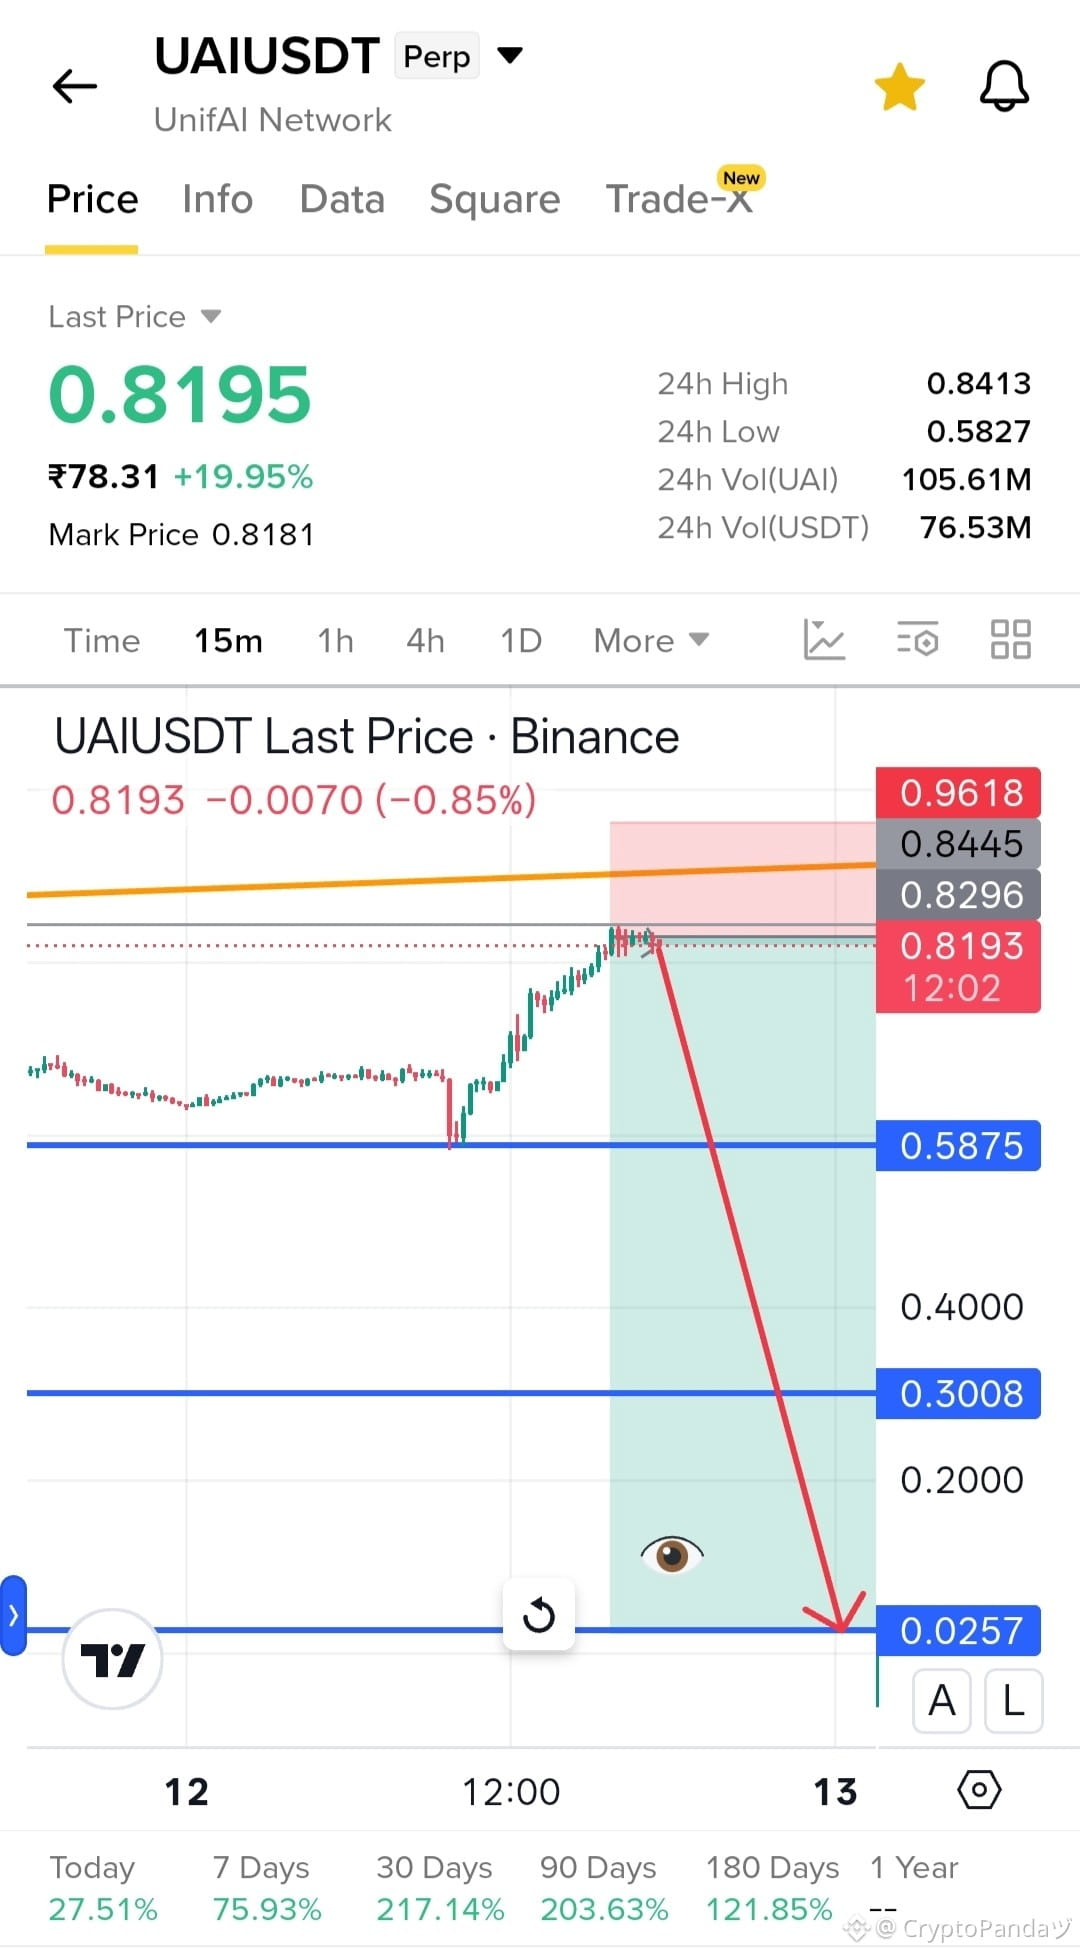
$UAI — L’épuisement se fait sentir en haut près de l’offre 0.8445. Un repli est probable....
Plan de trading : Vendre à découvert $UAI
Entrée : 0.80 - 0.85
SL : 0.9618
TP : 0.5875 | 0.3008 | 0.0257
Pourquoi cette configuration ?
L’épuisement s’installe près de la zone d’offre 0.8445, montrant un rejet après le mouvement haussier. Si les vendeurs prennent le contrôle à partir de cette zone, un repli plus profond pourrait le pousser vers 0.5875, 0.3008 et 0.0257. Tant que 0.9618 tient, la configuration baissière reste valable.
Cliquez ici pour Trader 👇 $UAI
{future}(UAIUSDT)
$UAI — L’épuisement se fait sentir en haut près de l’offre 0.8445. Un repli est probable....
Plan de trading : Vendre à découvert $UAI
Entrée : 0.80 - 0.85
SL : 0.9618
TP : 0.5875 | 0.3008 | 0.0257
Pourquoi cette configuration ?
L’épuisement s’installe près de la zone d’offre 0.8445, montrant un rejet après le mouvement haussier. Si les vendeurs prennent le contrôle à partir de cette zone, un repli plus profond pourrait le pousser vers 0.5875, 0.3008 et 0.0257. Tant que 0.9618 tient, la configuration baissière reste valable.
Cliquez ici pour Trader 👇 $UAI
Plan de trading : Vendre à découvert $UAI
Entrée : 0.80 - 0.85
SL : 0.9618
TP : 0.5875 | 0.3008 | 0.0257
Pourquoi cette configuration ?
L’épuisement s’installe près de la zone d’offre 0.8445, montrant un rejet après le mouvement haussier. Si les vendeurs prennent le contrôle à partir de cette zone, un repli plus profond pourrait le pousser vers 0.5875, 0.3008 et 0.0257. Tant que 0.9618 tient, la configuration baissière reste valable.
Cliquez ici pour Trader 👇 $UAI
1
3
293
·
--
Haussier
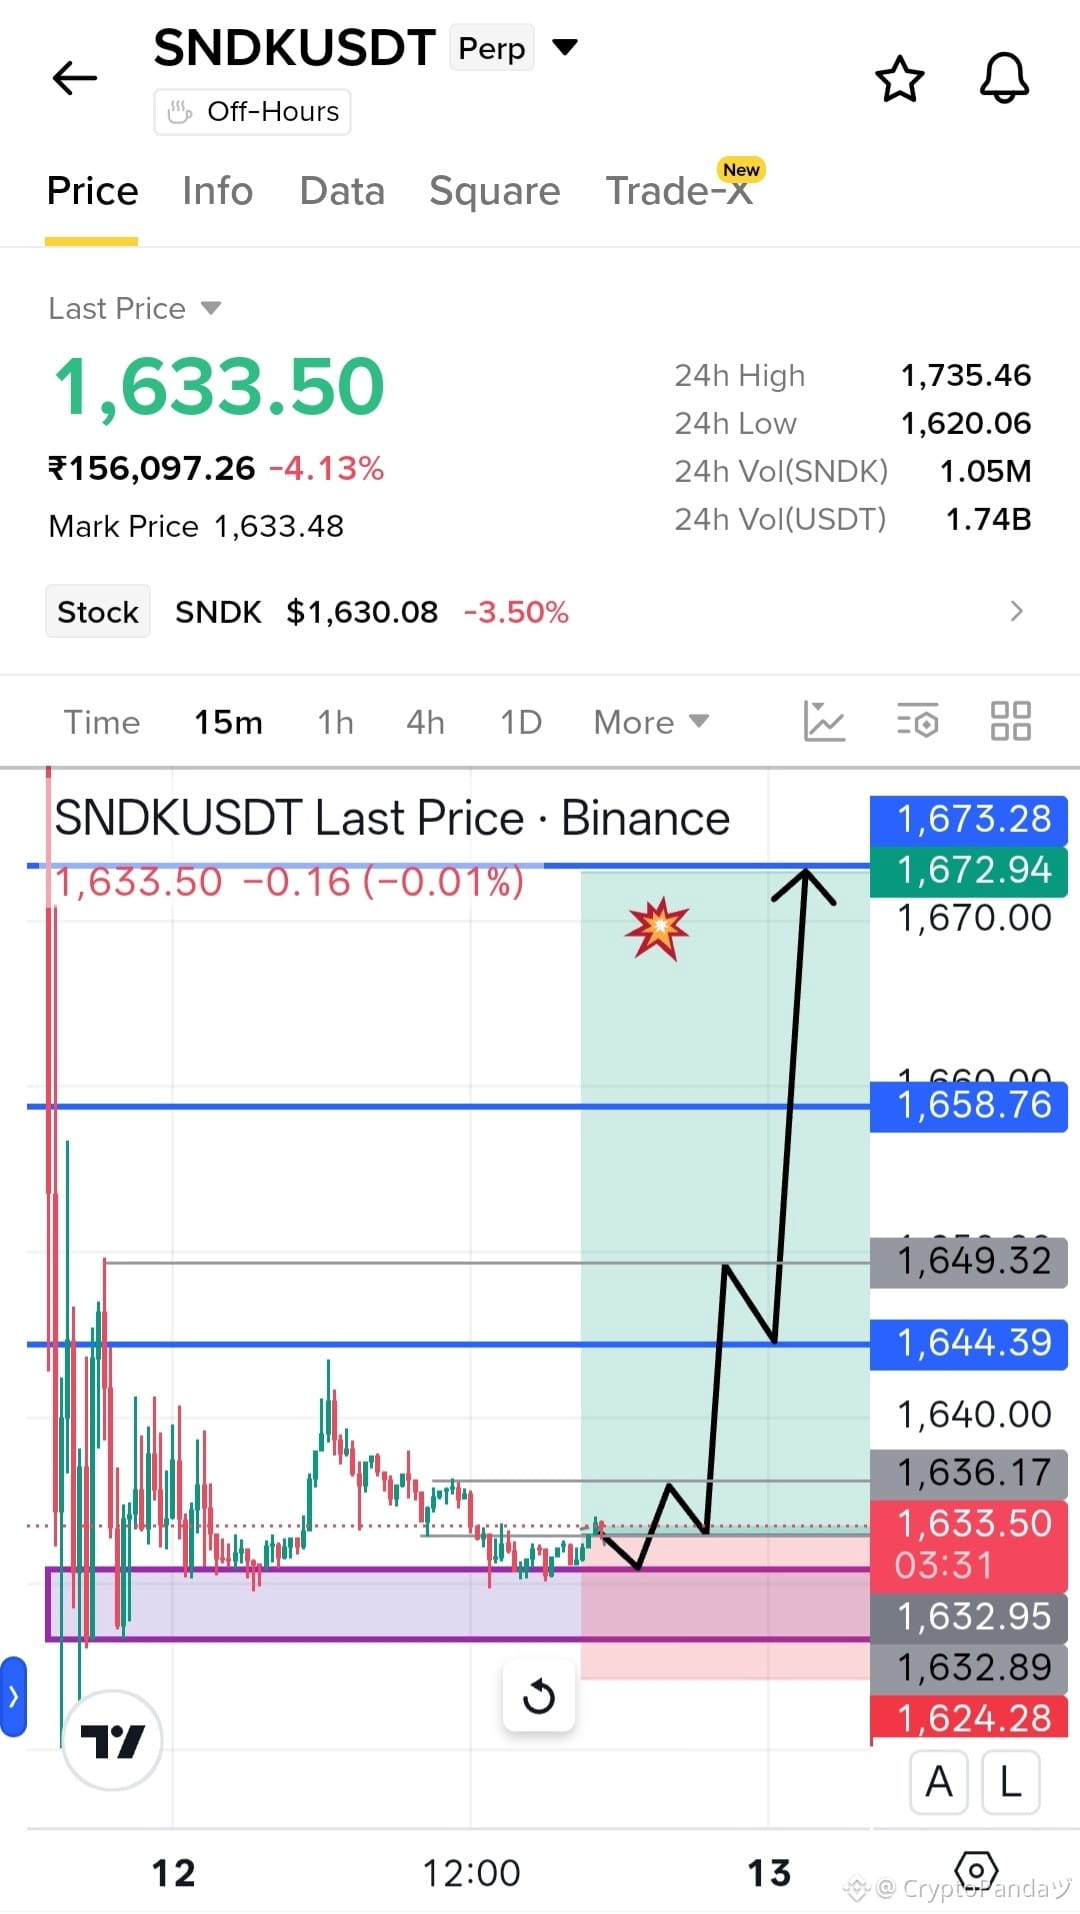
$SNDK — Prix enroulant au-dessus de la zone de remise 1630.07. Rupture imminente...
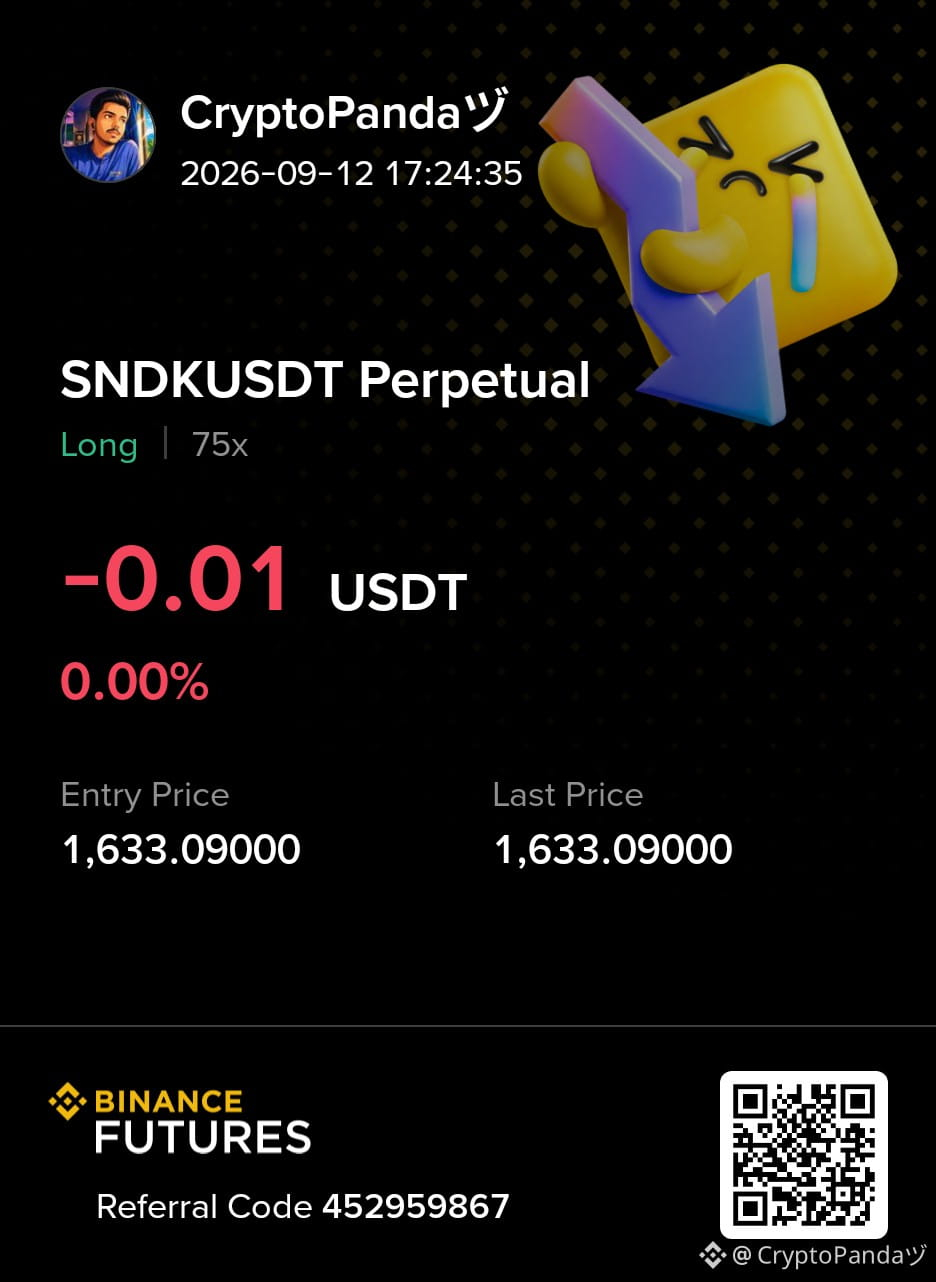
Plan de trade : Long $SNDK
Entrée : 1630 - 1635
SL : 1624.28
TP : 1644.39 | 1658.76 | 1673.28
Pourquoi cette configuration ?
Le prix se resserre juste au-dessus de la zone de remise 1630.07, montrant que les acheteurs défendent la zone et accumulent une pression pour le prochain mouvement haussier. Une cassure depuis cette consolidation pourrait le faire progresser vers 1644.39, 1658.76 et 1673.28. Tant que 1624.28 tient, la configuration haussière reste valide.
Cliquez ici pour trader 👇 $SNDK
{future}(SNDKUSDT)
$SNDK — Prix enroulant au-dessus de la zone de remise 1630.07. Rupture imminente...
Plan de trade : Long $SNDK
Entrée : 1630 - 1635
SL : 1624.28
TP : 1644.39 | 1658.76 | 1673.28
Pourquoi cette configuration ?
Le prix se resserre juste au-dessus de la zone de remise 1630.07, montrant que les acheteurs défendent la zone et accumulent une pression pour le prochain mouvement haussier. Une cassure depuis cette consolidation pourrait le faire progresser vers 1644.39, 1658.76 et 1673.28. Tant que 1624.28 tient, la configuration haussière reste valide.
Cliquez ici pour trader 👇 $SNDK
Plan de trade : Long $SNDK
Entrée : 1630 - 1635
SL : 1624.28
TP : 1644.39 | 1658.76 | 1673.28
Pourquoi cette configuration ?
Le prix se resserre juste au-dessus de la zone de remise 1630.07, montrant que les acheteurs défendent la zone et accumulent une pression pour le prochain mouvement haussier. Une cassure depuis cette consolidation pourrait le faire progresser vers 1644.39, 1658.76 et 1673.28. Tant que 1624.28 tient, la configuration haussière reste valide.
Cliquez ici pour trader 👇 $SNDK
2
274
·
--
Baissier
$龙虾 c'était risqué, ce n'était pas going all in encore, rapide entrée et sortie $龙虾
{future}(龙虾USDT)
$龙虾 c'était risqué, ce n'était pas going all in encore, rapide entrée et sortie $龙虾
2
554
·
--
Baissier
$MET - Nous sommes allés All In, avons eu une sortie sûre à la fin... $MET
{future}(METUSDT)
$MET - Nous sommes allés All In, avons eu une sortie sûre à la fin... $MET
4
637
·
--
Baissier
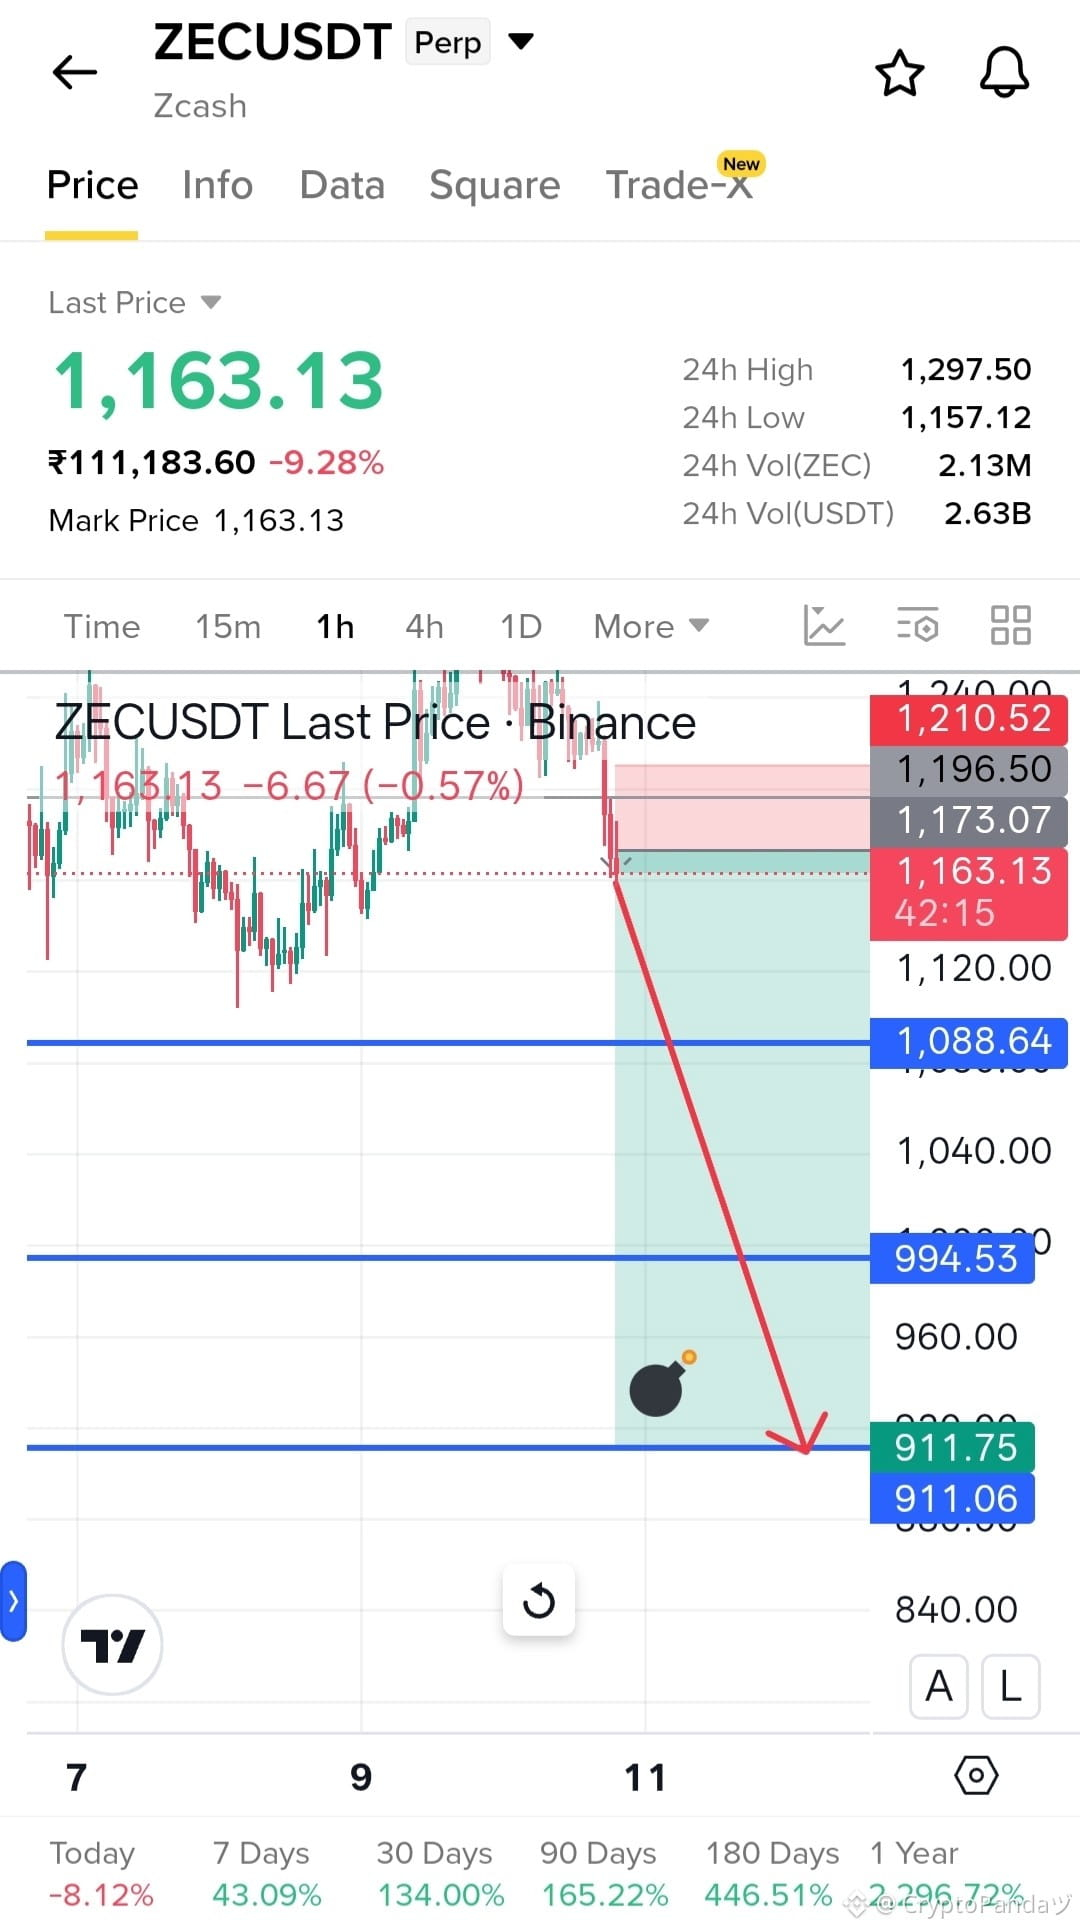
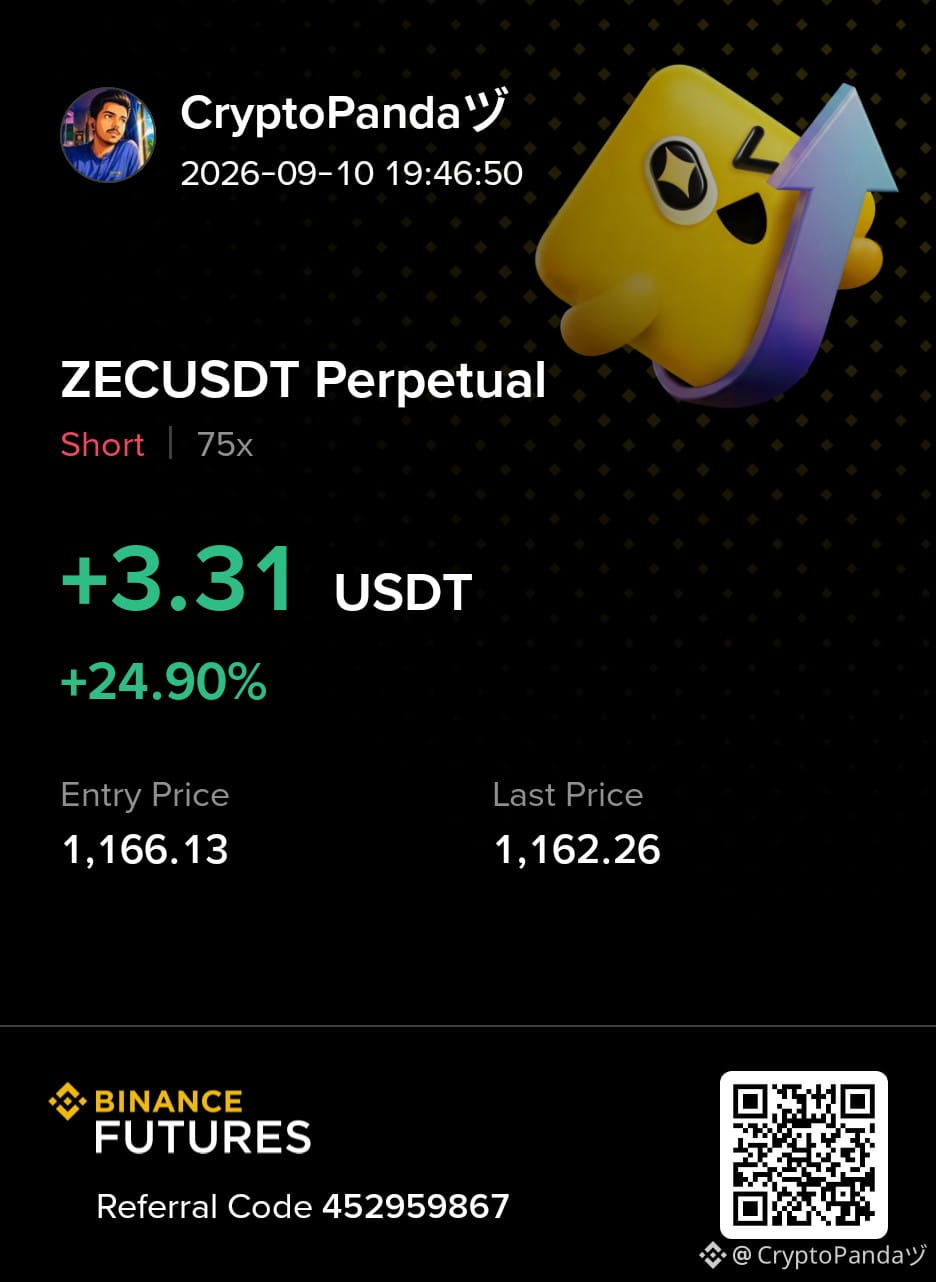
Short 997.4 USDT en $ZEC
$ZEC — Demande majeure 1173.07 Cassée sur les graphiques horaires. Balayage du bas en cours....
Plan de trading : Vendre $ZEC
Entrée : 1160 - 1180
SL : 1210.52
TP : 1088.64 | 994.53 | 911.75
Pourquoi ce setup ?
La zone de demande majeure à 1173.07 a été rompue sur le graphique horaire, déplaçant l’élan vers les vendeurs. Un rejet durable sous ce niveau pourrait ouvrir la voie à un mouvement baissier plus profond vers 1088.64, 994.53 et 911.75. Tant que 1210.52 tient, le setup baissier reste valide.
Cliquez ici pour Trader 👇 $ZEC
{future}(ZECUSDT)
$ZEC — Demande majeure 1173.07 Cassée sur les graphiques horaires. Balayage du bas en cours....
Plan de trading : Vendre $ZEC
Entrée : 1160 - 1180
SL : 1210.52
TP : 1088.64 | 994.53 | 911.75
Pourquoi ce setup ?
La zone de demande majeure à 1173.07 a été rompue sur le graphique horaire, déplaçant l’élan vers les vendeurs. Un rejet durable sous ce niveau pourrait ouvrir la voie à un mouvement baissier plus profond vers 1088.64, 994.53 et 911.75. Tant que 1210.52 tient, le setup baissier reste valide.
Cliquez ici pour Trader 👇 $ZEC
Plan de trading : Vendre $ZEC
Entrée : 1160 - 1180
SL : 1210.52
TP : 1088.64 | 994.53 | 911.75
Pourquoi ce setup ?
La zone de demande majeure à 1173.07 a été rompue sur le graphique horaire, déplaçant l’élan vers les vendeurs. Un rejet durable sous ce niveau pourrait ouvrir la voie à un mouvement baissier plus profond vers 1088.64, 994.53 et 911.75. Tant que 1210.52 tient, le setup baissier reste valide.
Cliquez ici pour Trader 👇 $ZEC
3
653
·
--
Baissier
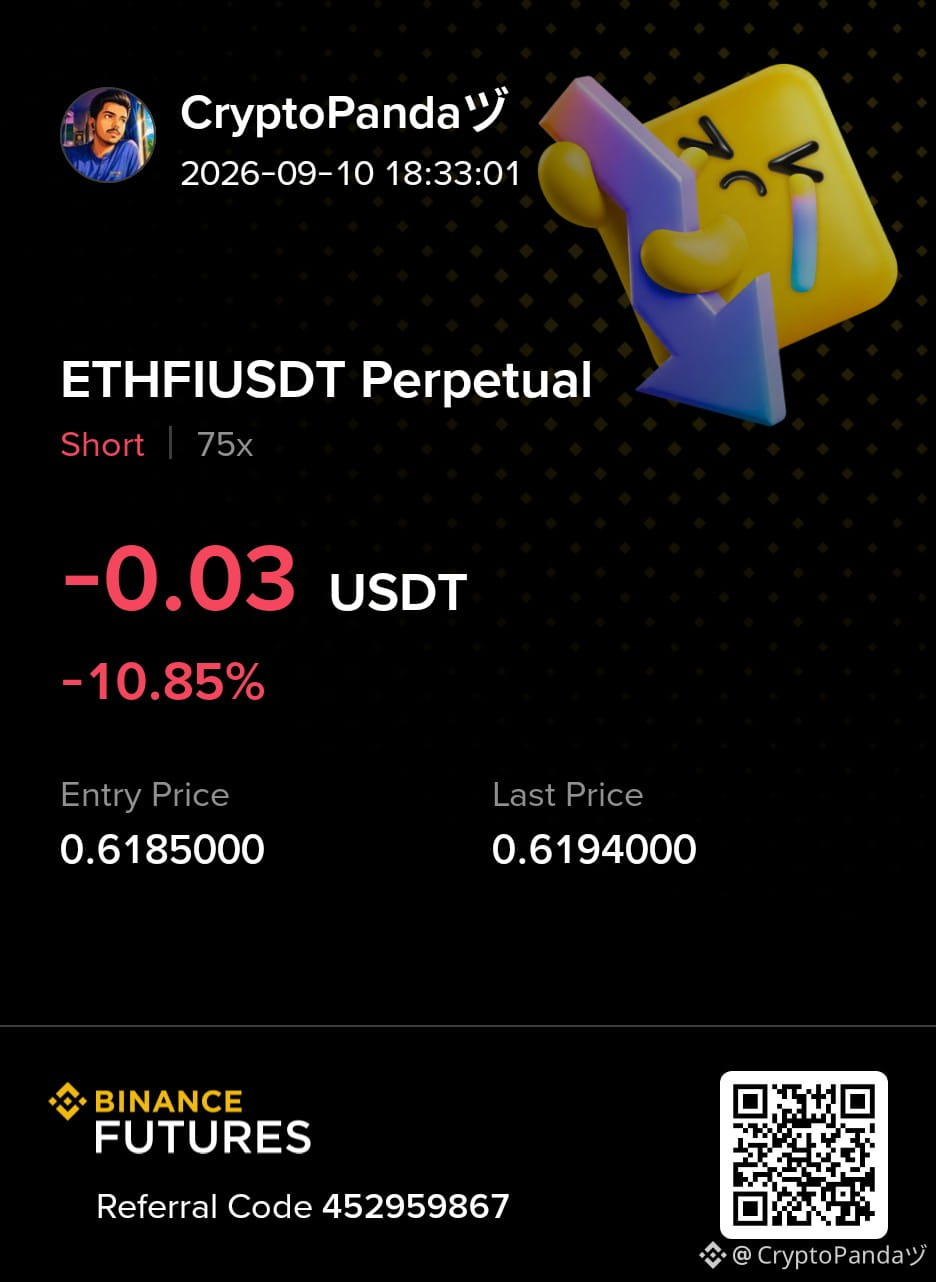
Trading sur 30 j de 65.6 USDT en $ETHFI
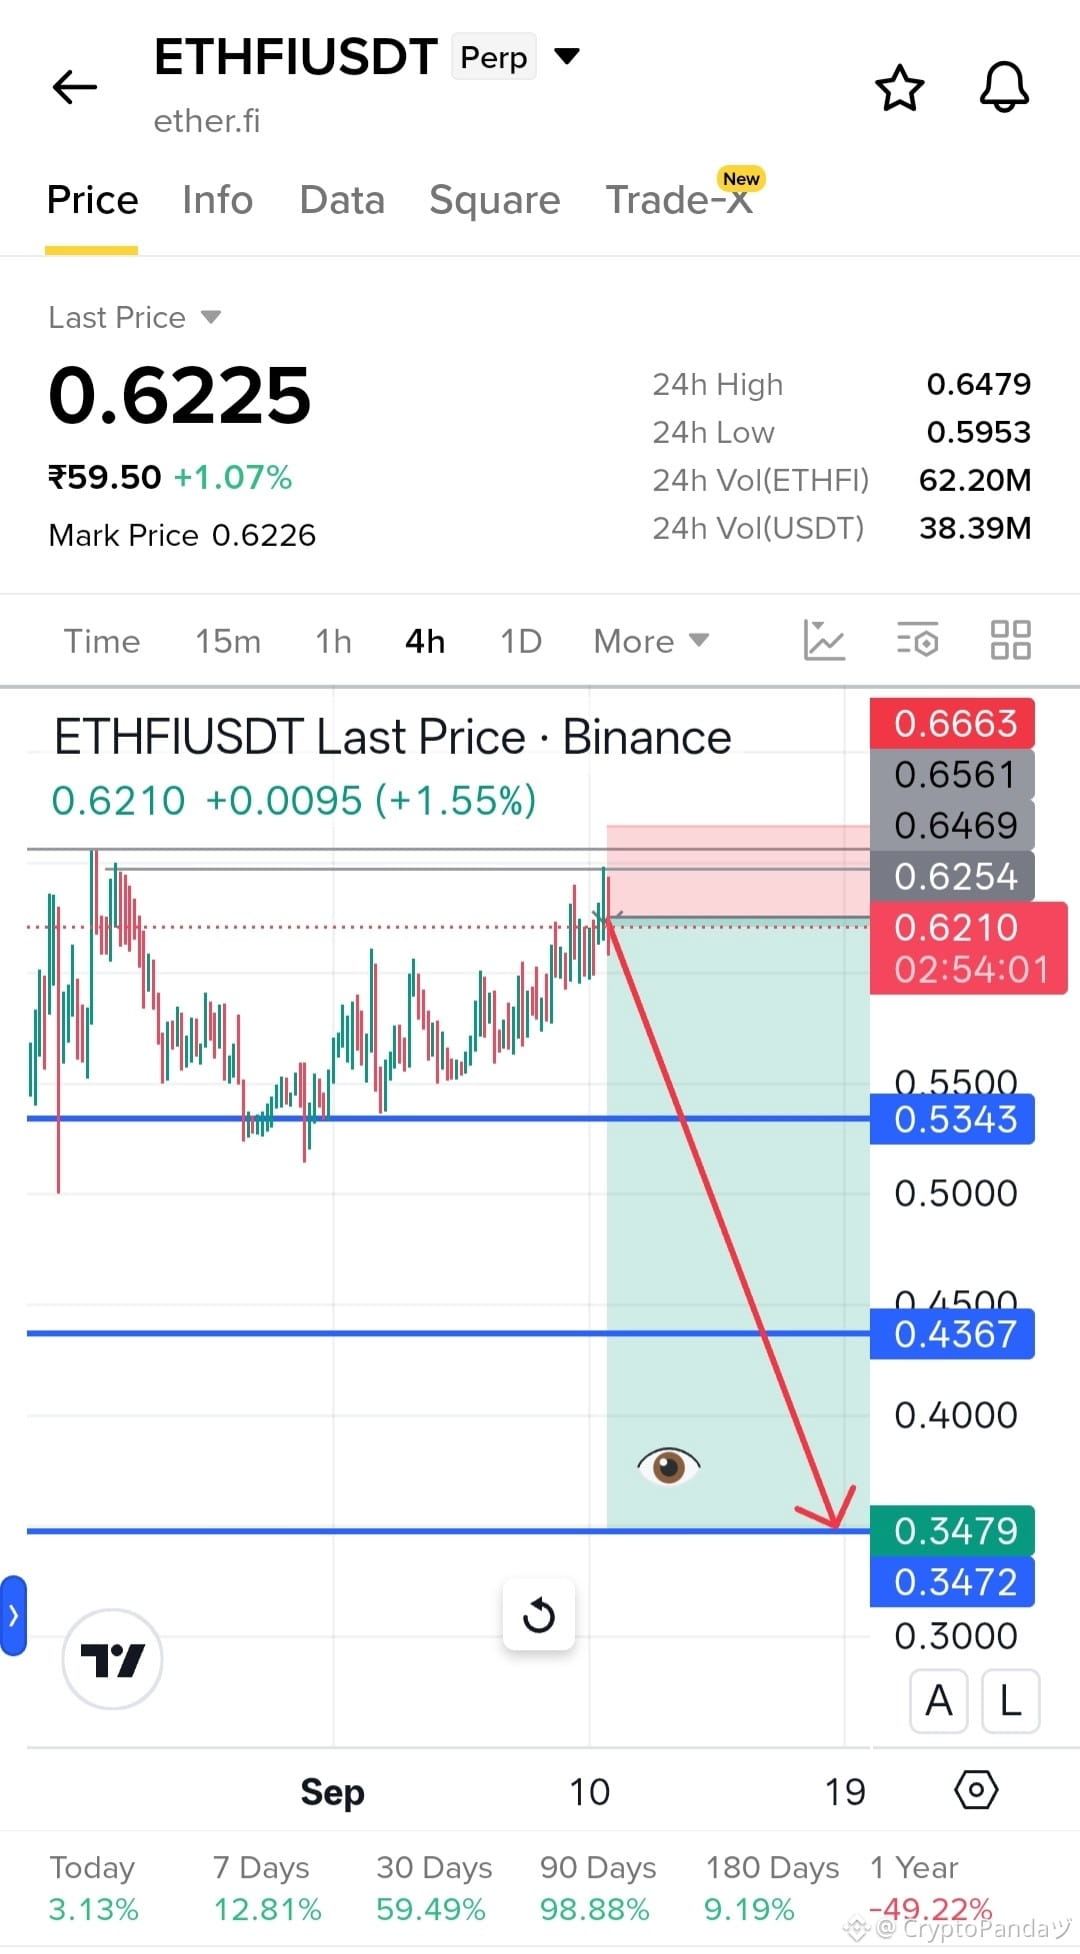
$ETHFI — Une mèche baissière a jailli directement depuis le CRT 0.6469. Un repli plus profond en préparation....
Plan de trading : Short $ETHFI
Entrée : 0.62 - 0.64
SL : 0.6663
TP : 0.5343 | 0.4367 | 0.3479
Pourquoi ce setup ?
Une mèche baissière est sortie directement depuis le CRT 0.6469, montrant un rejet solide depuis la zone de résistance. Si les vendeurs conservent le contrôle, le rejet pourrait se transformer en un repli plus profond vers 0.5343, 0.4367 et 0.3479. Tant que 0.6663 tient, le setup baissier reste valide.
Cliquez ici pour Trader 👇 $ETHFI
{future}(ETHFIUSDT)
$ETHFI — Une mèche baissière a jailli directement depuis le CRT 0.6469. Un repli plus profond en préparation....
Plan de trading : Short $ETHFI
Entrée : 0.62 - 0.64
SL : 0.6663
TP : 0.5343 | 0.4367 | 0.3479
Pourquoi ce setup ?
Une mèche baissière est sortie directement depuis le CRT 0.6469, montrant un rejet solide depuis la zone de résistance. Si les vendeurs conservent le contrôle, le rejet pourrait se transformer en un repli plus profond vers 0.5343, 0.4367 et 0.3479. Tant que 0.6663 tient, le setup baissier reste valide.
Cliquez ici pour Trader 👇 $ETHFI
Plan de trading : Short $ETHFI
Entrée : 0.62 - 0.64
SL : 0.6663
TP : 0.5343 | 0.4367 | 0.3479
Pourquoi ce setup ?
Une mèche baissière est sortie directement depuis le CRT 0.6469, montrant un rejet solide depuis la zone de résistance. Si les vendeurs conservent le contrôle, le rejet pourrait se transformer en un repli plus profond vers 0.5343, 0.4367 et 0.3479. Tant que 0.6663 tient, le setup baissier reste valide.
Cliquez ici pour Trader 👇 $ETHFI
2
391
·
--
Baissier
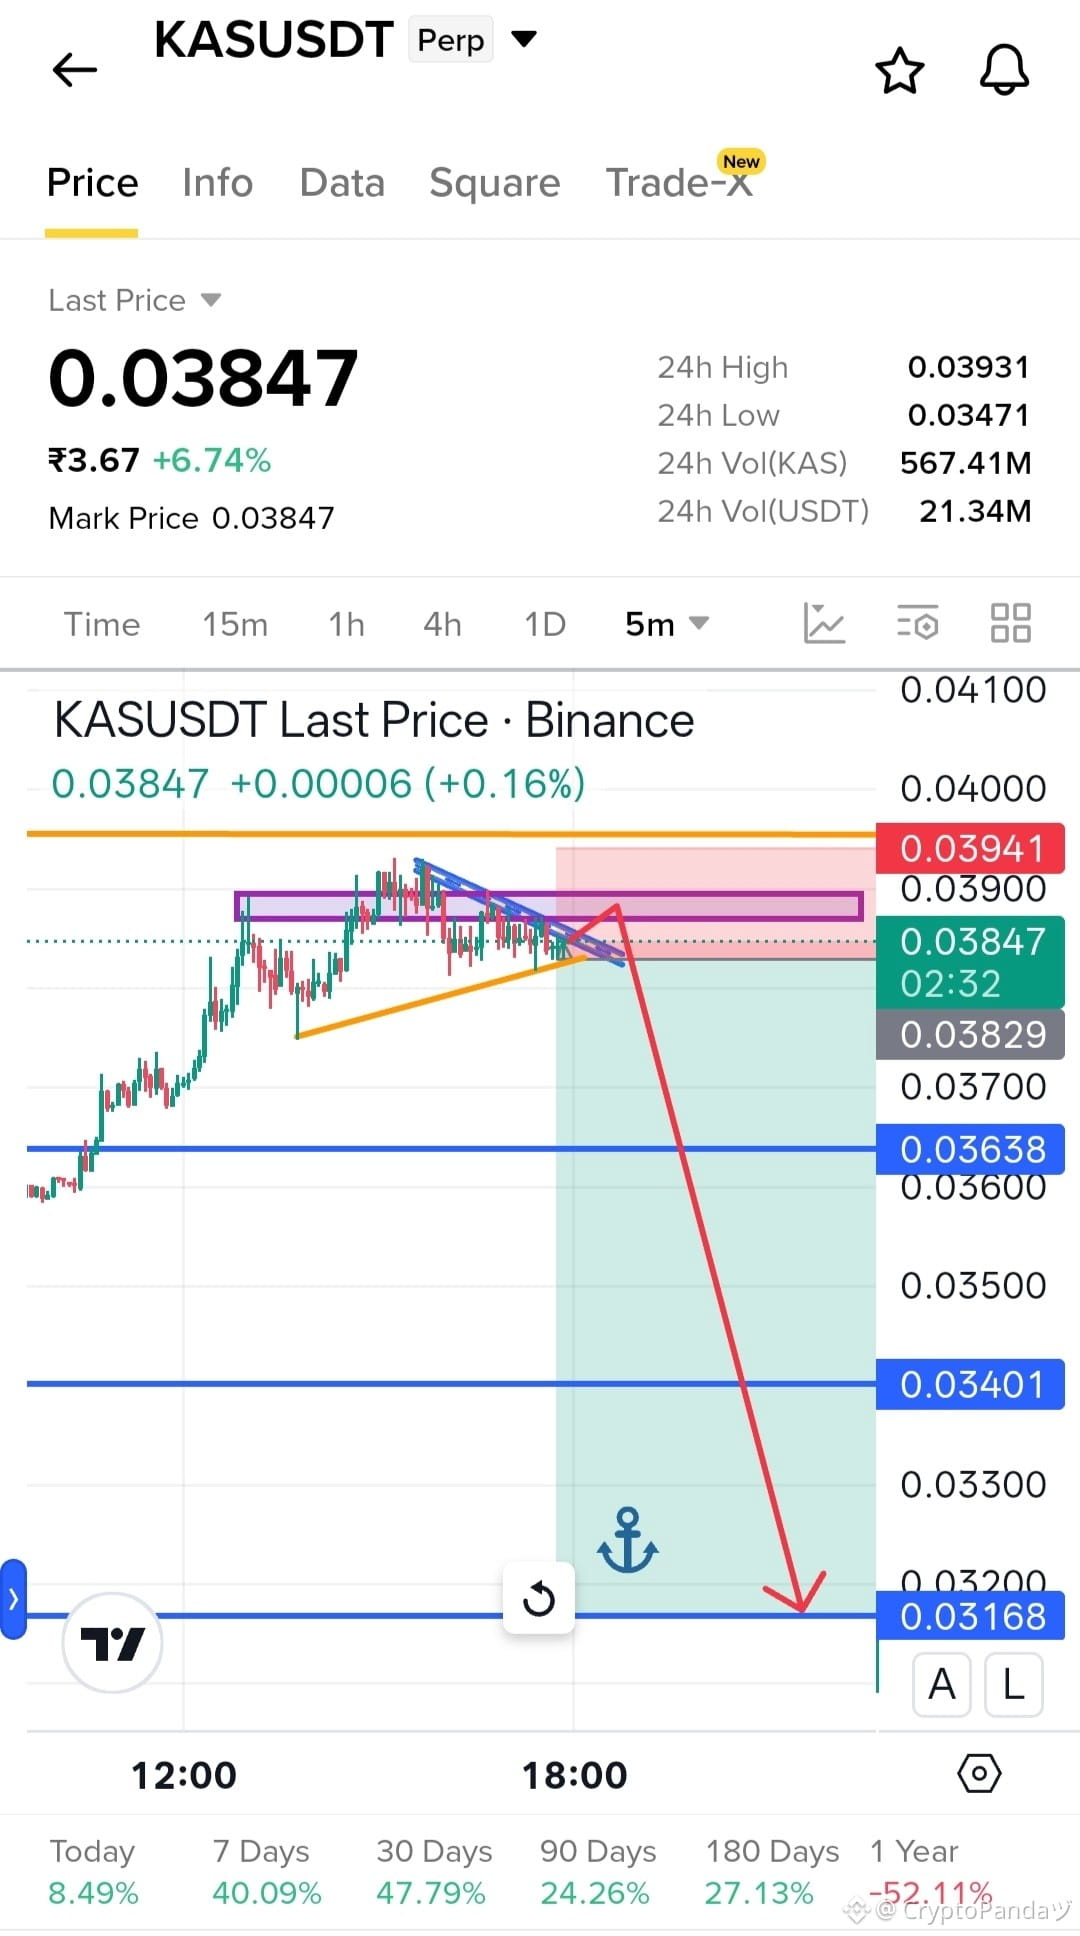
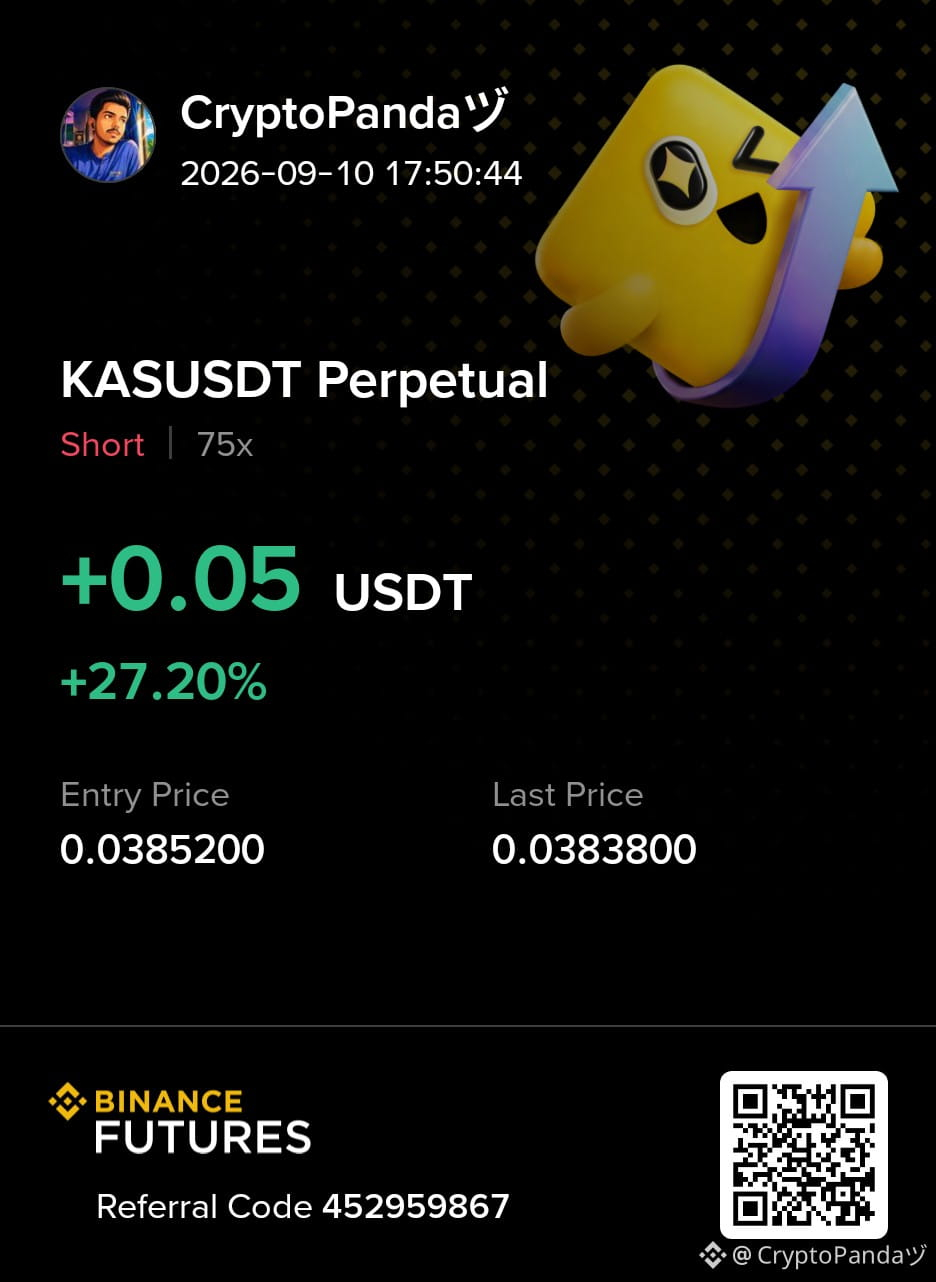
$KAS — Forte résolutions de refus depuis le bloc d’ordres de 0.039. Sur le point de se vider bientôt.....
Plan de trade : Short $KAS
Entrée : 0.038 - 0.039
SL : 0.03941
TP : 0.03638 | 0.03401 | 0.03168
Pourquoi ce setup ?
Le prix fait face à un fort rejet depuis le bloc d’ordres de 0.039, montrant que les vendeurs défendent la zone. Un échec pour reprendre cette résistance pourrait déclencher le prochain mouvement baissier vers 0.03638, 0.03401 et 0.03168. Tant que 0.03941 tient, le setup baissier reste valide.
Cliquez ici pour trader 👇 $KAS
{future}(KASUSDT)
$KAS — Forte résolutions de refus depuis le bloc d’ordres de 0.039. Sur le point de se vider bientôt.....
Plan de trade : Short $KAS
Entrée : 0.038 - 0.039
SL : 0.03941
TP : 0.03638 | 0.03401 | 0.03168
Pourquoi ce setup ?
Le prix fait face à un fort rejet depuis le bloc d’ordres de 0.039, montrant que les vendeurs défendent la zone. Un échec pour reprendre cette résistance pourrait déclencher le prochain mouvement baissier vers 0.03638, 0.03401 et 0.03168. Tant que 0.03941 tient, le setup baissier reste valide.
Cliquez ici pour trader 👇 $KAS
Plan de trade : Short $KAS
Entrée : 0.038 - 0.039
SL : 0.03941
TP : 0.03638 | 0.03401 | 0.03168
Pourquoi ce setup ?
Le prix fait face à un fort rejet depuis le bloc d’ordres de 0.039, montrant que les vendeurs défendent la zone. Un échec pour reprendre cette résistance pourrait déclencher le prochain mouvement baissier vers 0.03638, 0.03401 et 0.03168. Tant que 0.03941 tient, le setup baissier reste valide.
Cliquez ici pour trader 👇 $KAS
2
367
·
--
Haussier
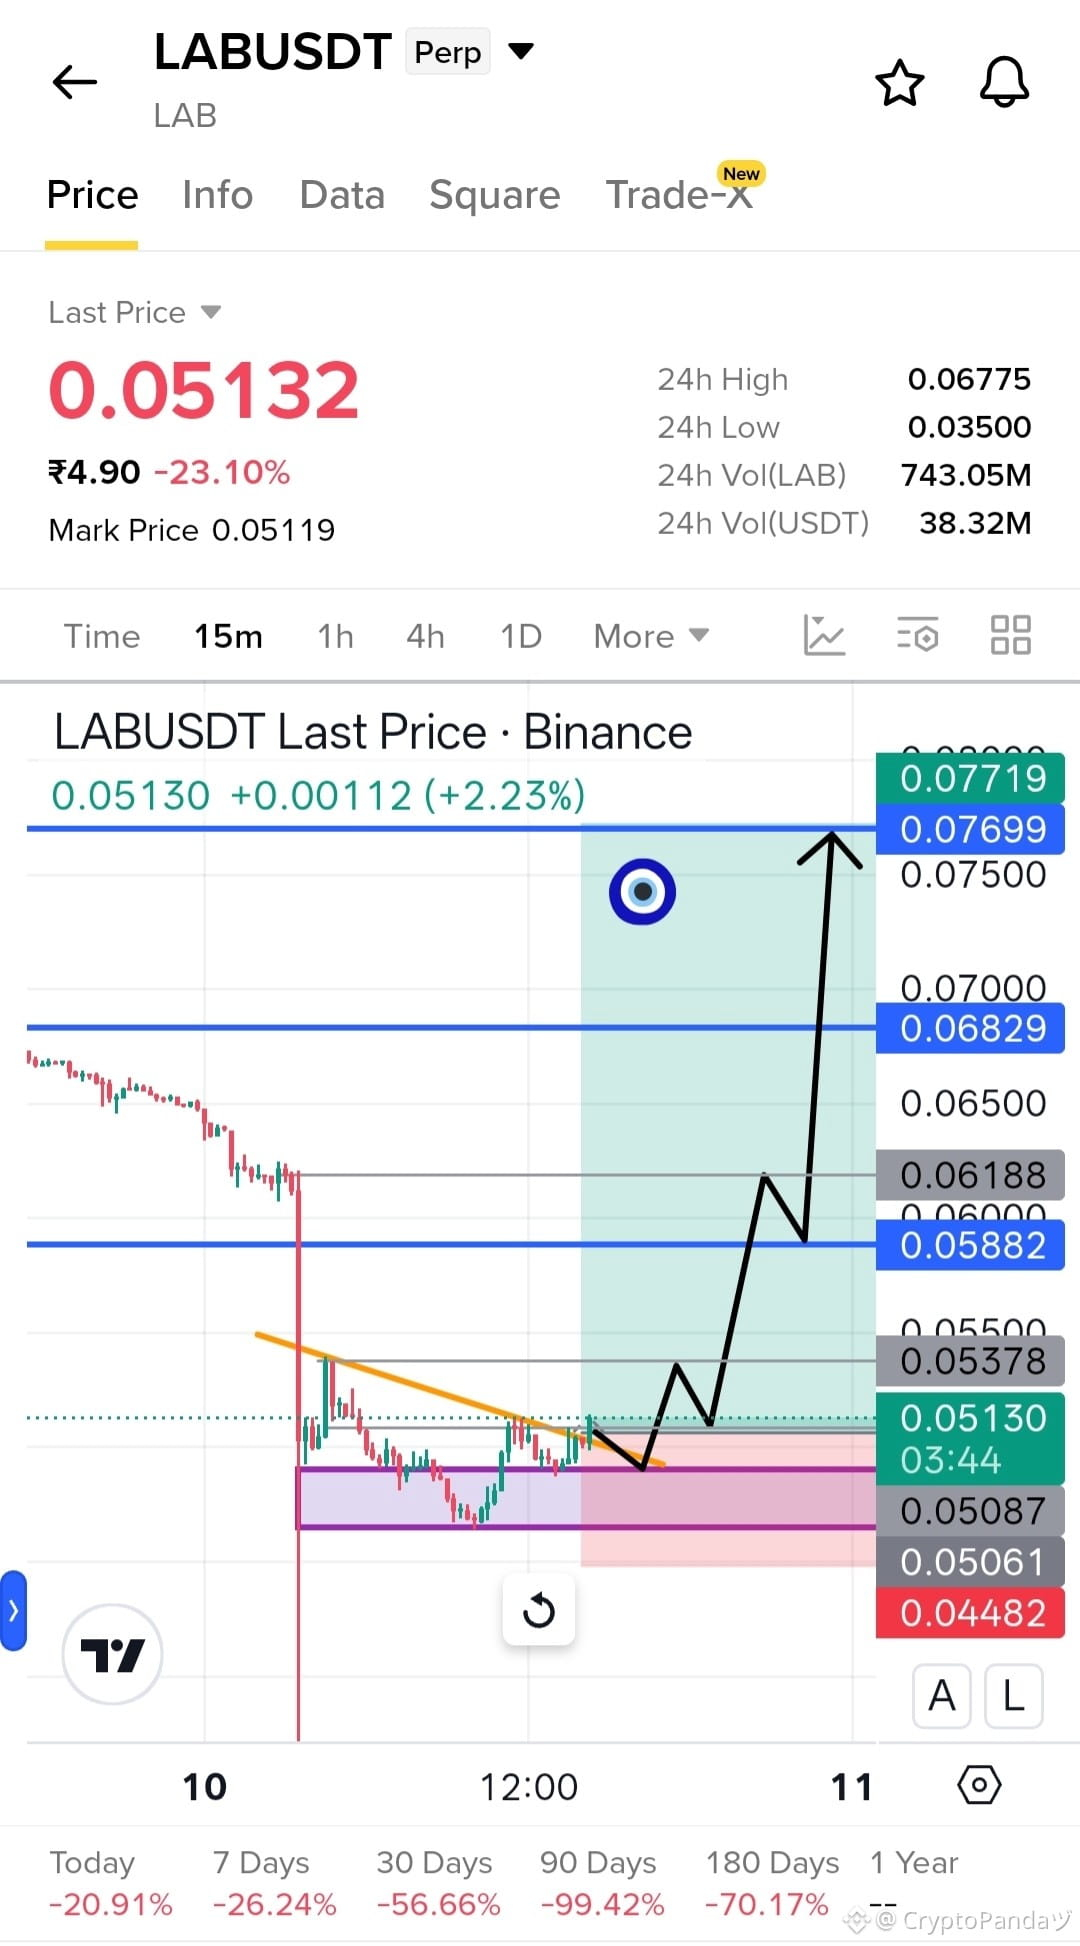
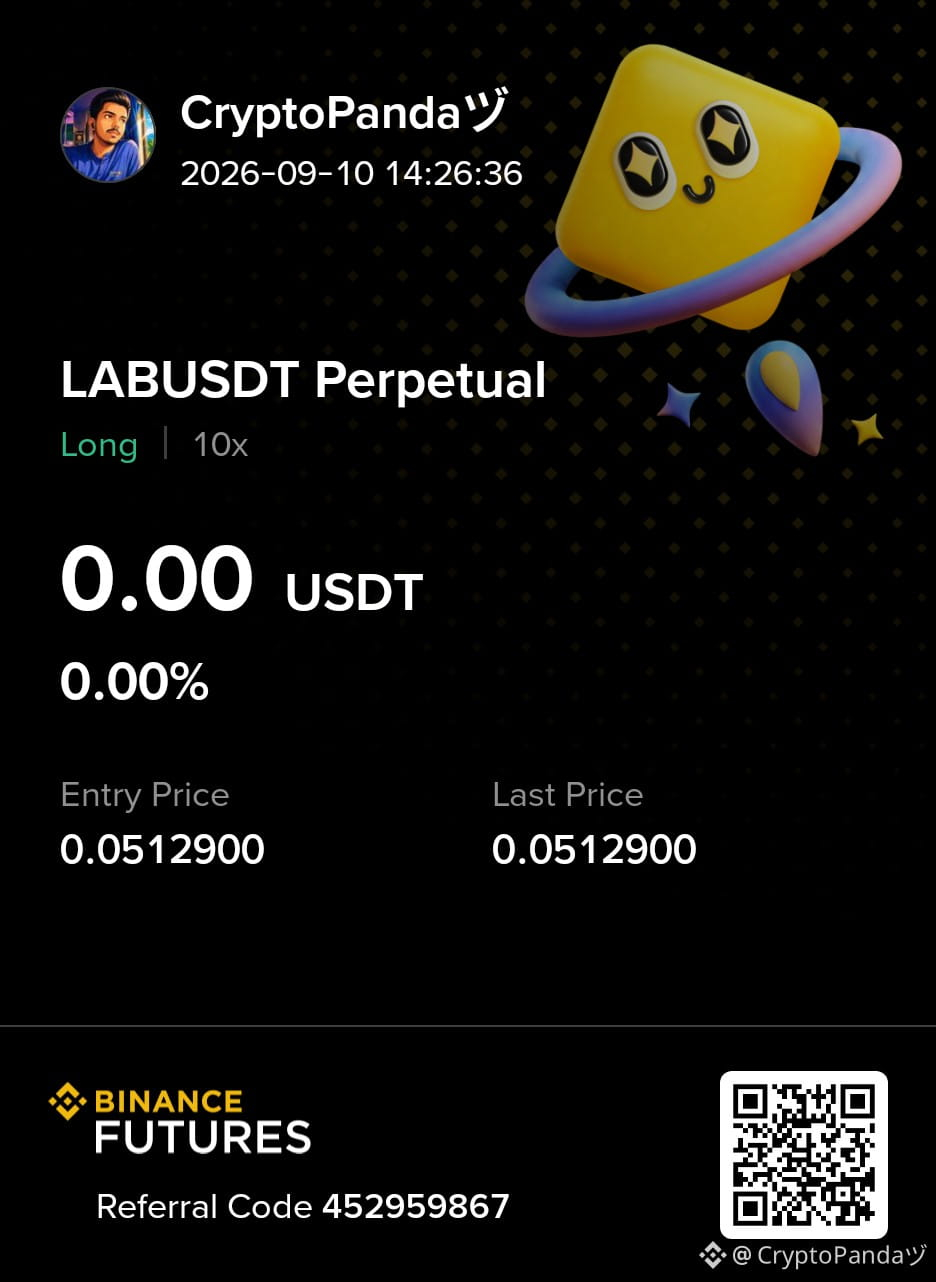
$LAB — Le prix stagne après le flush à 0.05061 OB. Forte cassure imminente.....
Plan de trading : Long $LAB
Entrée : 0.050 - 0.052
SL : 0.04482
TP : 0.05882 | 0.06829 | 0.07699
Pourquoi cette configuration ?
Le prix stagne après le flush autour du bloc d’ordres 0.05061, montrant que les acheteurs défendent la zone. Une tenue réussie ici pourrait alimenter une forte cassure vers 0.05882, 0.06829 et 0.07699. Tant que 0.04482 tient, la configuration haussière reste valide.
Cliquez ici pour Trader 👇 $LAB
{future}(LABUSDT)
$LAB — Le prix stagne après le flush à 0.05061 OB. Forte cassure imminente.....
Plan de trading : Long $LAB
Entrée : 0.050 - 0.052
SL : 0.04482
TP : 0.05882 | 0.06829 | 0.07699
Pourquoi cette configuration ?
Le prix stagne après le flush autour du bloc d’ordres 0.05061, montrant que les acheteurs défendent la zone. Une tenue réussie ici pourrait alimenter une forte cassure vers 0.05882, 0.06829 et 0.07699. Tant que 0.04482 tient, la configuration haussière reste valide.
Cliquez ici pour Trader 👇 $LAB
Plan de trading : Long $LAB
Entrée : 0.050 - 0.052
SL : 0.04482
TP : 0.05882 | 0.06829 | 0.07699
Pourquoi cette configuration ?
Le prix stagne après le flush autour du bloc d’ordres 0.05061, montrant que les acheteurs défendent la zone. Une tenue réussie ici pourrait alimenter une forte cassure vers 0.05882, 0.06829 et 0.07699. Tant que 0.04482 tient, la configuration haussière reste valide.
Cliquez ici pour Trader 👇 $LAB
3
765
·
--
Haussier
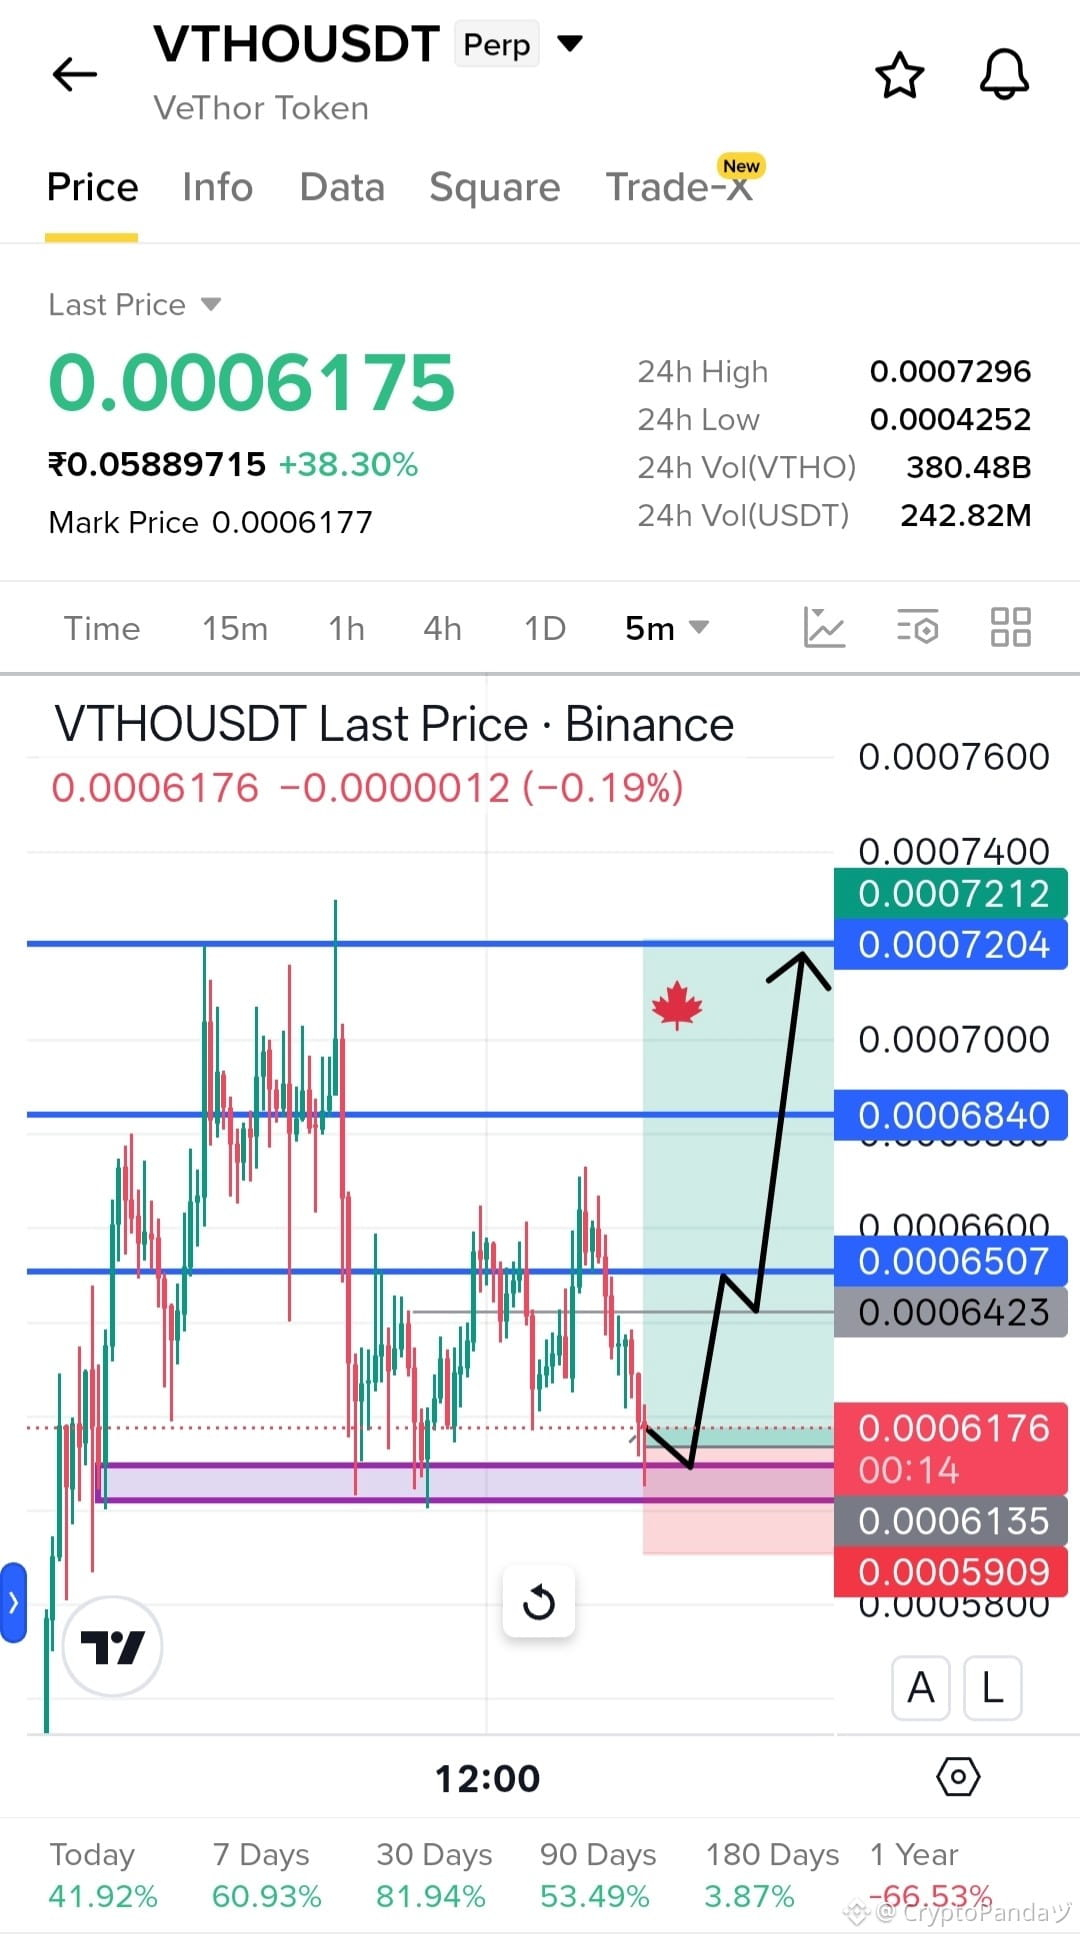
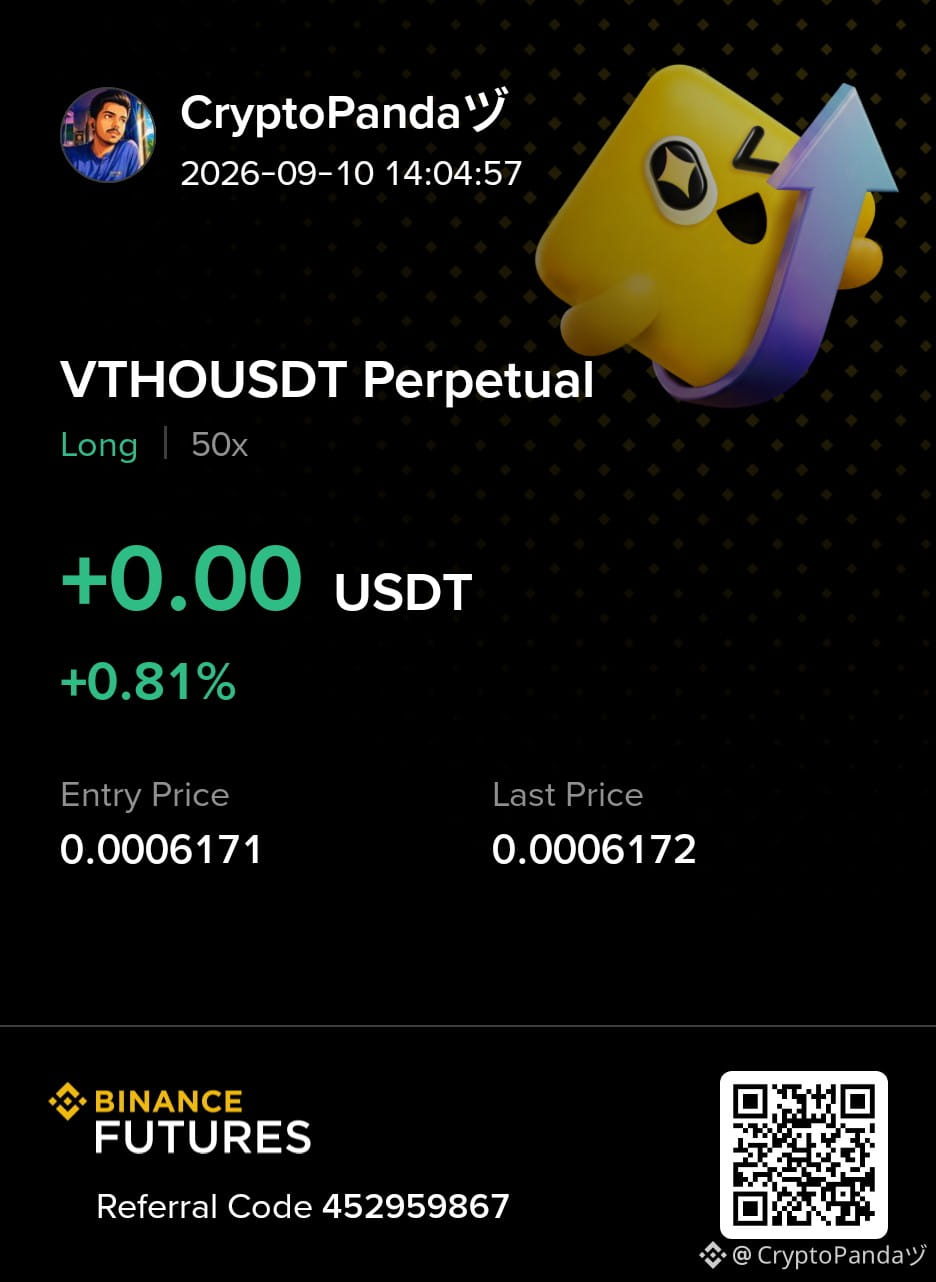
$VTHO — Approvisionnement absorbé à 0,00061 Demande OB. Forte impulsion à la hausse....
Plan de trading : Long $VTHO
Entrée : 0,00060 - 0,00062
SL : 0,0005909
TP : 0,0006507 | 0,0006840 | 0,0007204
Pourquoi cette configuration ?
L’offre a été absorbée autour du bloc d’ordre de la demande à 0,00061, montrant des acheteurs défendant la zone. Une tenue réussie au-dessus de cette zone pourrait déclencher la prochaine jambe haussière vers 0,0006507, 0,0006840 et 0,0007204. Tant que 0,0005909 tient, la configuration haussière reste valable.
Cliquez ici pour trader 👇 $VTHO
{future}(VTHOUSDT)
$VTHO — Approvisionnement absorbé à 0,00061 Demande OB. Forte impulsion à la hausse....
Plan de trading : Long $VTHO
Entrée : 0,00060 - 0,00062
SL : 0,0005909
TP : 0,0006507 | 0,0006840 | 0,0007204
Pourquoi cette configuration ?
L’offre a été absorbée autour du bloc d’ordre de la demande à 0,00061, montrant des acheteurs défendant la zone. Une tenue réussie au-dessus de cette zone pourrait déclencher la prochaine jambe haussière vers 0,0006507, 0,0006840 et 0,0007204. Tant que 0,0005909 tient, la configuration haussière reste valable.
Cliquez ici pour trader 👇 $VTHO
Plan de trading : Long $VTHO
Entrée : 0,00060 - 0,00062
SL : 0,0005909
TP : 0,0006507 | 0,0006840 | 0,0007204
Pourquoi cette configuration ?
L’offre a été absorbée autour du bloc d’ordre de la demande à 0,00061, montrant des acheteurs défendant la zone. Une tenue réussie au-dessus de cette zone pourrait déclencher la prochaine jambe haussière vers 0,0006507, 0,0006840 et 0,0007204. Tant que 0,0005909 tient, la configuration haussière reste valable.
Cliquez ici pour trader 👇 $VTHO
2
2
659
·
--
Baissier
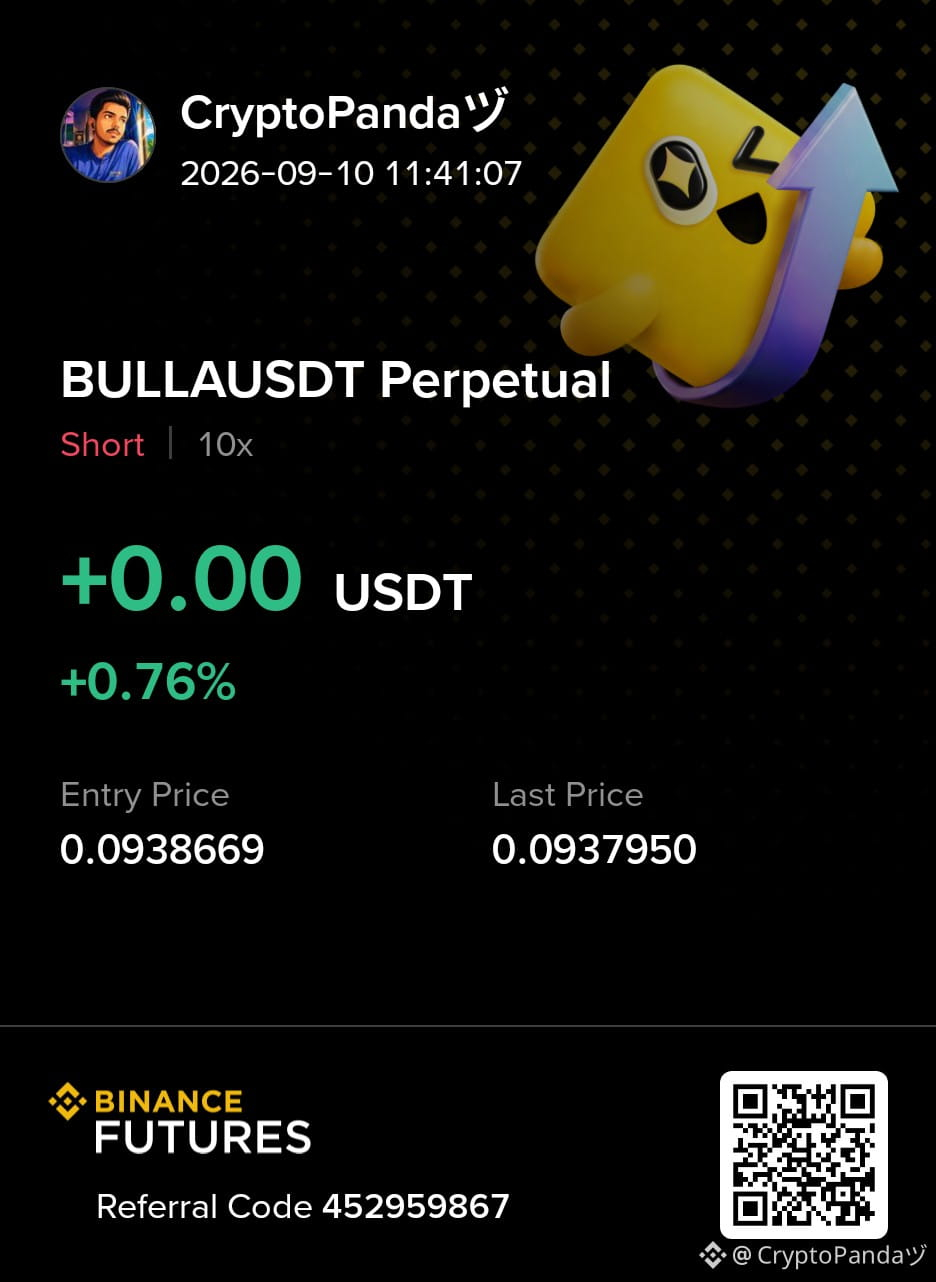
Trading sur 30 j de 386.7 USDT en $BULLA
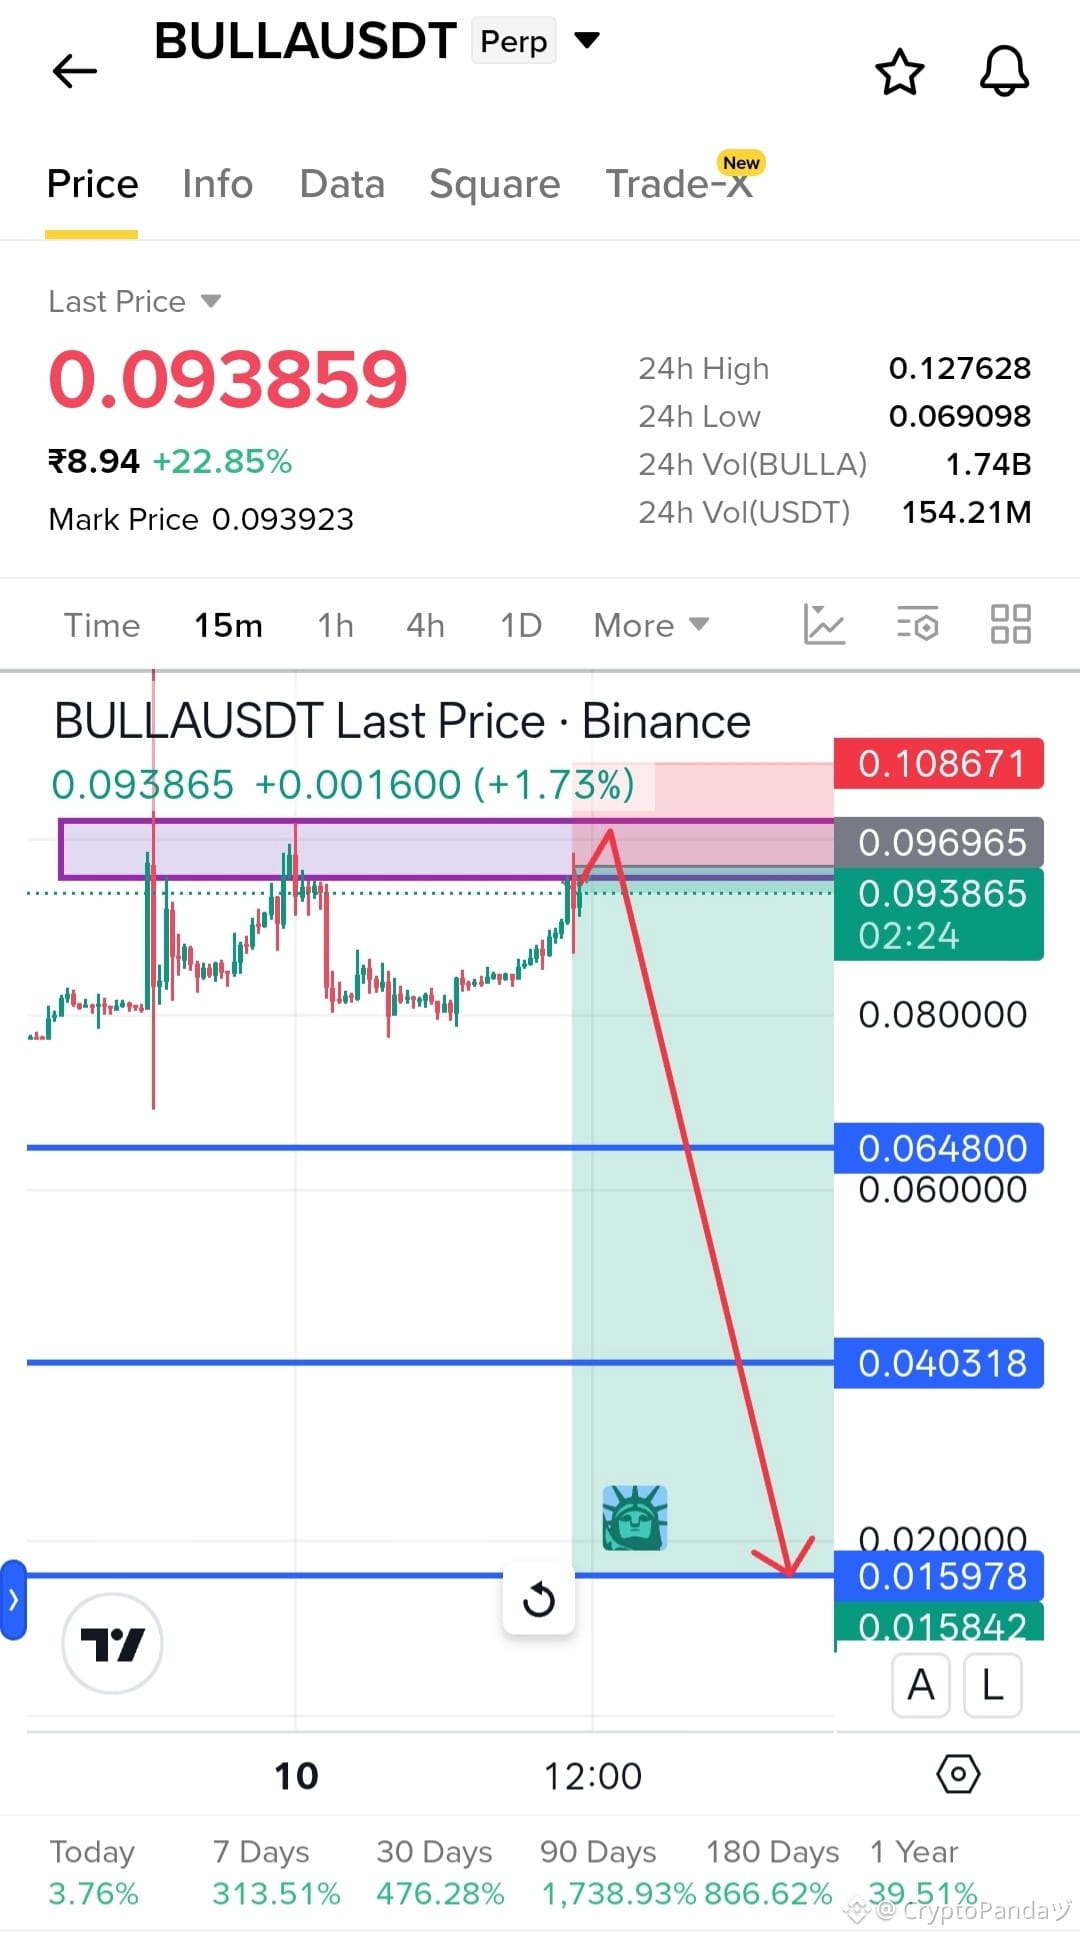
$BULLA — Forte pression à la vente près de 0.096. Balayage de liquidité à la baisse en attente....
Plan de trading : Short $BULLA
Entrée : 0.093 - 0.095
SL : 0.108671
TP : 0.064800 | 0.040318 | 0.015978
Pourquoi ce setup ?
Le prix a fortement percuté le mur vendeur près de 0.096, montrant une forte résistance tandis que les vendeurs défendent la zone supérieure. Un rejet depuis ici pourrait déclencher un balayage de liquidité à la baisse vers 0.064800, puis 0.040318 et potentiellement 0.015978. Tant que 0.108671 tient, le setup baissier reste valide.
Cliquez ici pour Trader 👇 $BULLA
{future}(BULLAUSDT)
$BULLA — Forte pression à la vente près de 0.096. Balayage de liquidité à la baisse en attente....
Plan de trading : Short $BULLA
Entrée : 0.093 - 0.095
SL : 0.108671
TP : 0.064800 | 0.040318 | 0.015978
Pourquoi ce setup ?
Le prix a fortement percuté le mur vendeur près de 0.096, montrant une forte résistance tandis que les vendeurs défendent la zone supérieure. Un rejet depuis ici pourrait déclencher un balayage de liquidité à la baisse vers 0.064800, puis 0.040318 et potentiellement 0.015978. Tant que 0.108671 tient, le setup baissier reste valide.
Cliquez ici pour Trader 👇 $BULLA
Plan de trading : Short $BULLA
Entrée : 0.093 - 0.095
SL : 0.108671
TP : 0.064800 | 0.040318 | 0.015978
Pourquoi ce setup ?
Le prix a fortement percuté le mur vendeur près de 0.096, montrant une forte résistance tandis que les vendeurs défendent la zone supérieure. Un rejet depuis ici pourrait déclencher un balayage de liquidité à la baisse vers 0.064800, puis 0.040318 et potentiellement 0.015978. Tant que 0.108671 tient, le setup baissier reste valide.
Cliquez ici pour Trader 👇 $BULLA
3
591
·
--
Baissier
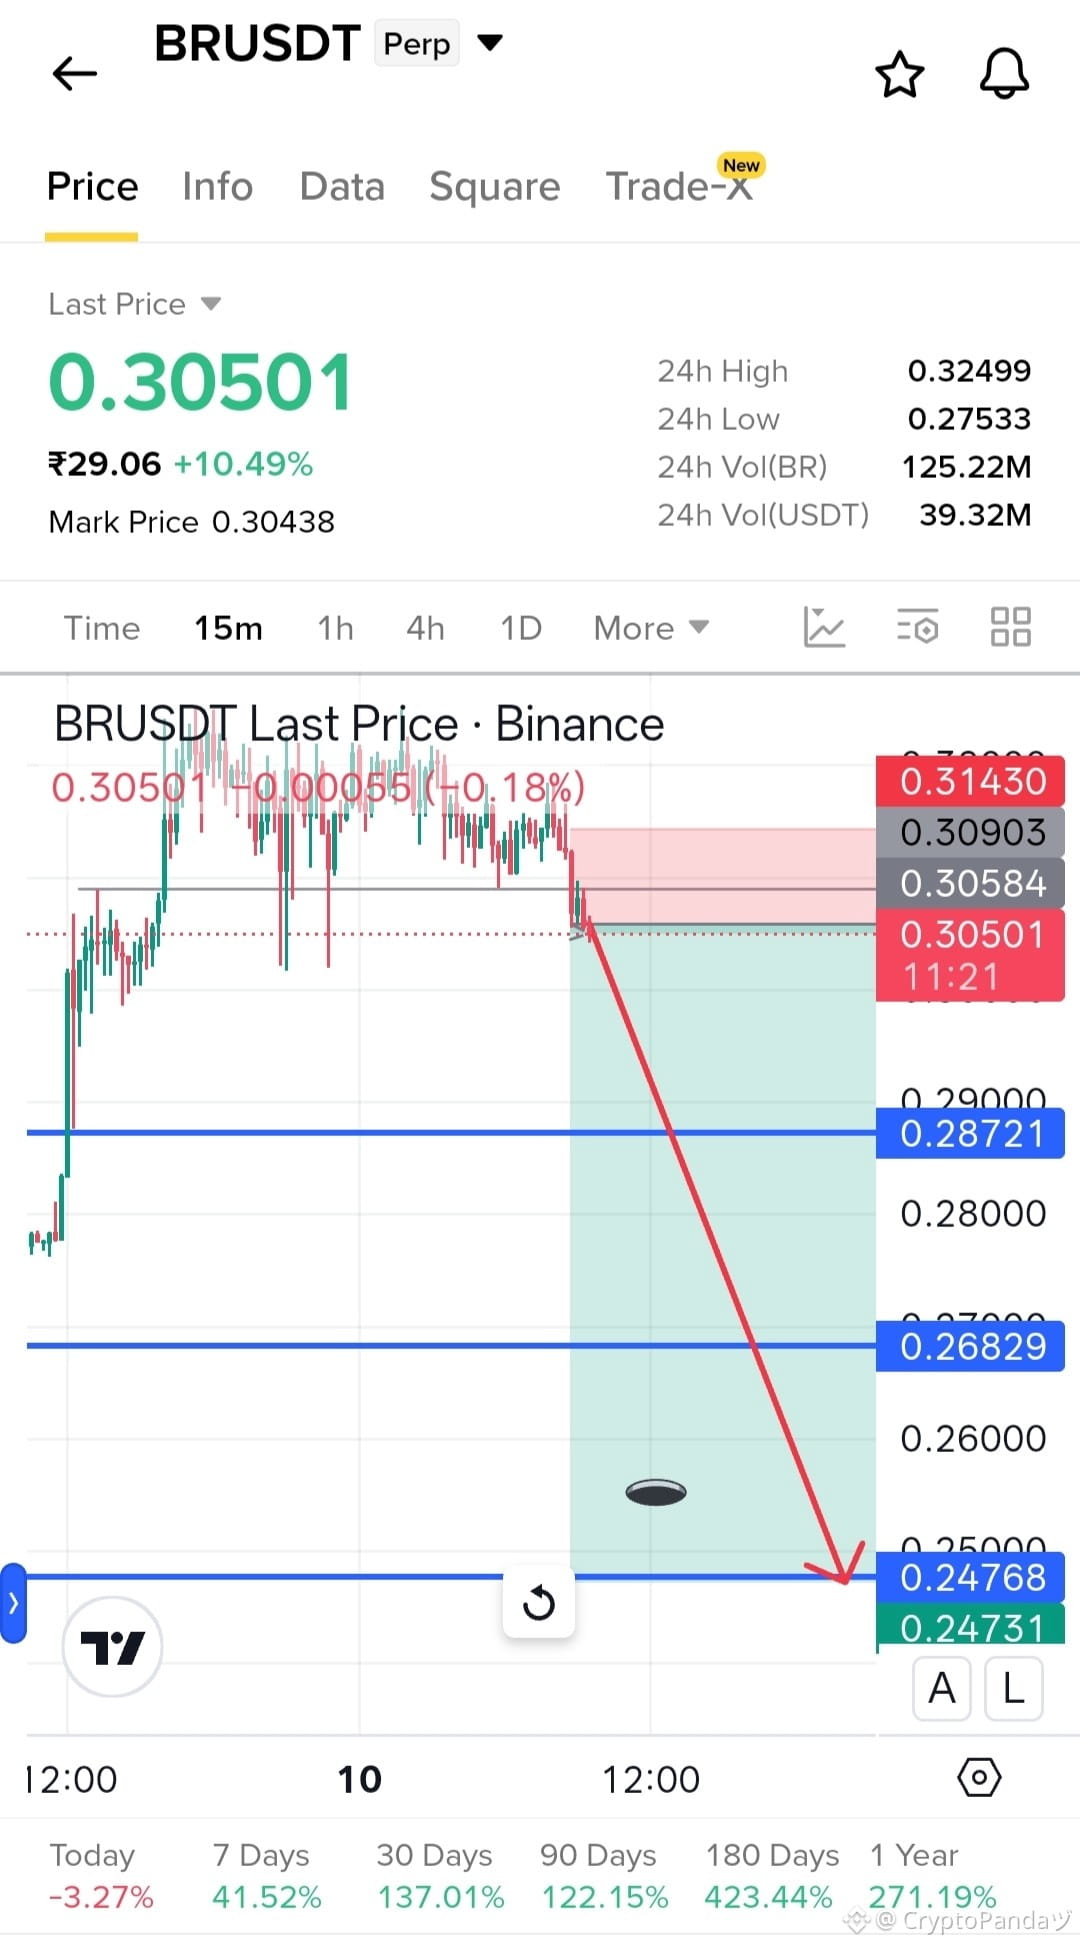
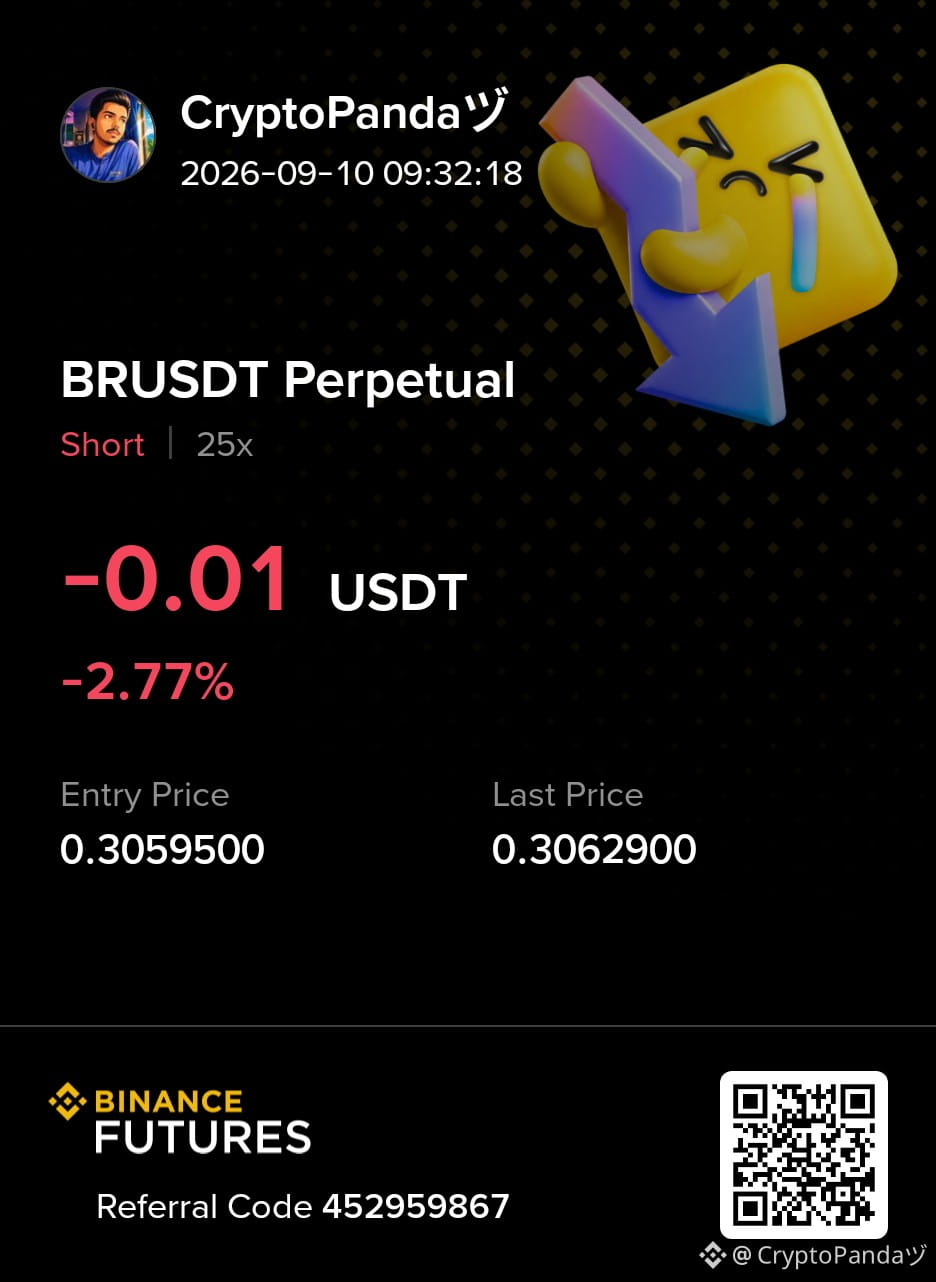
$BR — Forte demande à 0.30903 cassée. L’expansion à la baisse se construit....
Plan de trade : Vendre à découvert $BR
Entrée : 0.305 - 0.310
SL : 0.31430
TP : 0.28721 | 0.26829 | 0.24768
Pourquoi cette configuration ?
La zone de demande majeure à 0.30903 a été rompue, signalant que les vendeurs prennent le contrôle et ouvrent la voie à une baisse plus importante. Une continuation sous ce niveau pourrait étendre le mouvement vers 0.28721, puis 0.26829 et potentiellement 0.24768. Tant que 0.31430 tient, la configuration baissière reste valable.
Cliquez ici pour trader 👇 $BR
{future}(BRUSDT)
$BR — Forte demande à 0.30903 cassée. L’expansion à la baisse se construit....
Plan de trade : Vendre à découvert $BR
Entrée : 0.305 - 0.310
SL : 0.31430
TP : 0.28721 | 0.26829 | 0.24768
Pourquoi cette configuration ?
La zone de demande majeure à 0.30903 a été rompue, signalant que les vendeurs prennent le contrôle et ouvrent la voie à une baisse plus importante. Une continuation sous ce niveau pourrait étendre le mouvement vers 0.28721, puis 0.26829 et potentiellement 0.24768. Tant que 0.31430 tient, la configuration baissière reste valable.
Cliquez ici pour trader 👇 $BR
Plan de trade : Vendre à découvert $BR
Entrée : 0.305 - 0.310
SL : 0.31430
TP : 0.28721 | 0.26829 | 0.24768
Pourquoi cette configuration ?
La zone de demande majeure à 0.30903 a été rompue, signalant que les vendeurs prennent le contrôle et ouvrent la voie à une baisse plus importante. Une continuation sous ce niveau pourrait étendre le mouvement vers 0.28721, puis 0.26829 et potentiellement 0.24768. Tant que 0.31430 tient, la configuration baissière reste valable.
Cliquez ici pour trader 👇 $BR
1
3
649
·
--
Baissier
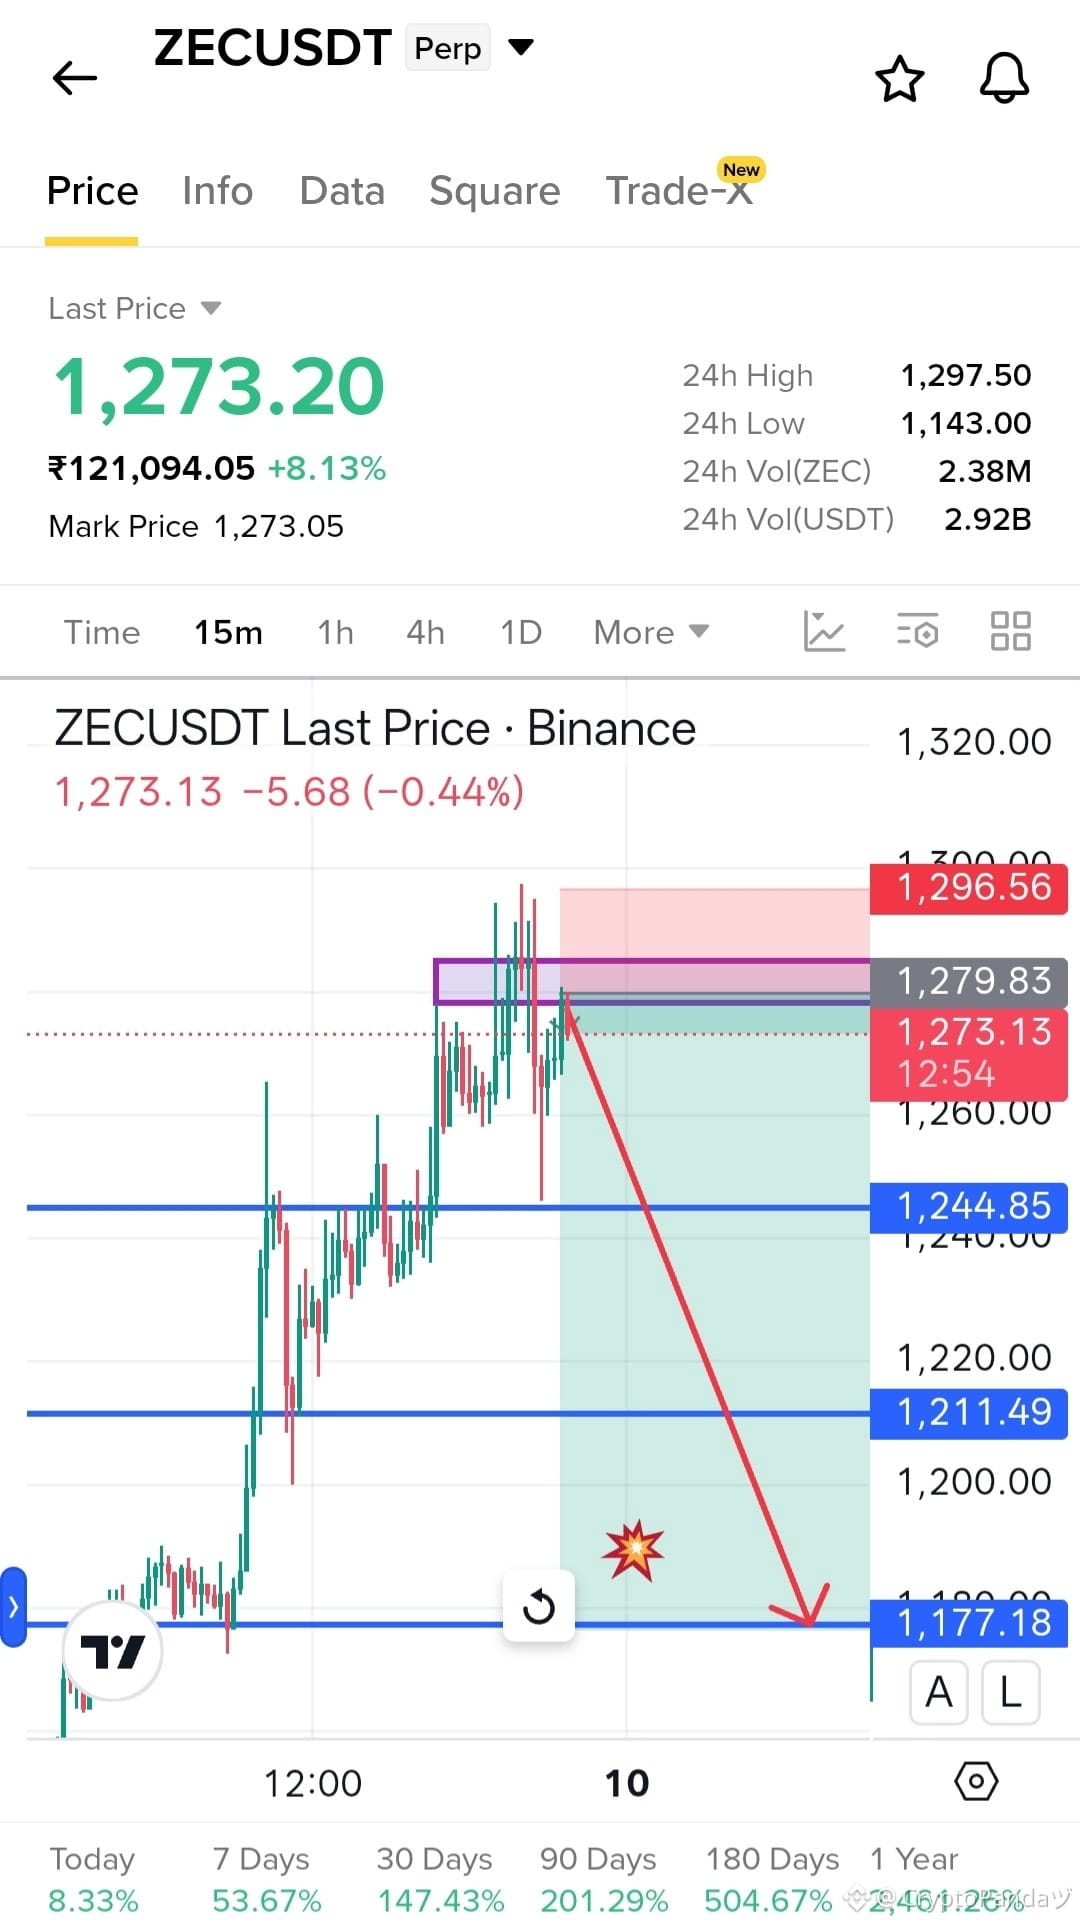
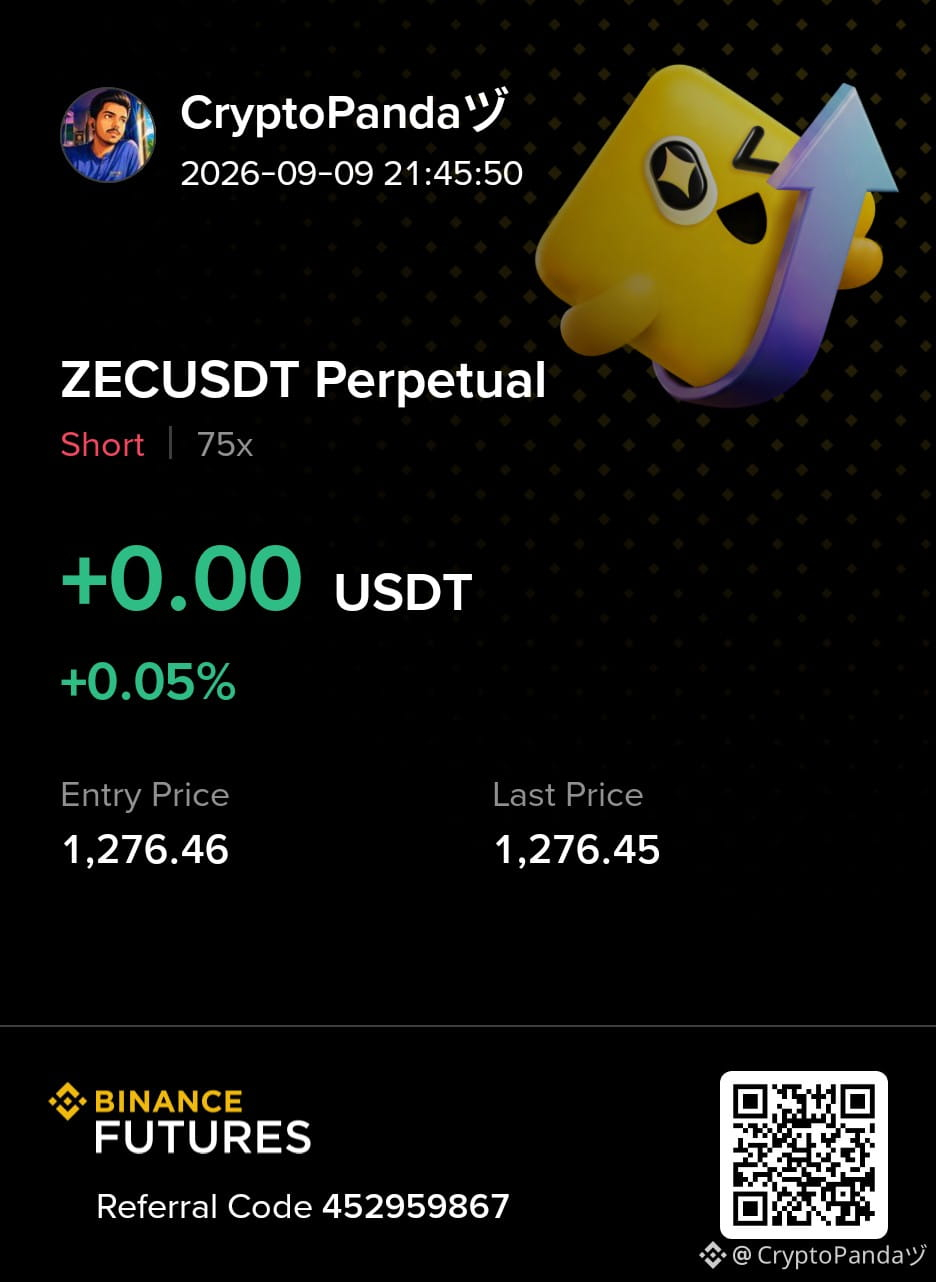
$ZEC — L’élan haussier s’estompe sous 1279.83 OB. Alerte cascade massive....
Plan de trading : Vendre $ZEC
Entrée : 1270 - 1280
SL : 1296.56
TP : 1244.85 | 1211.49 | 1177.18
Pourquoi ce setup ?
L’élan haussier faiblit sous le mur vendeur de 1279.83, montrant que les vendeurs défendent la zone supérieure. Un rejet ici pourrait déclencher une cascade vers 1244.85, puis 1211.49 et potentiellement 1177.18. Tant que 1296.56 tient, le setup baissier reste valable.
Cliquez ici pour Trader 👇 $ZEC
{future}(ZECUSDT)
$ZEC — L’élan haussier s’estompe sous 1279.83 OB. Alerte cascade massive....
Plan de trading : Vendre $ZEC
Entrée : 1270 - 1280
SL : 1296.56
TP : 1244.85 | 1211.49 | 1177.18
Pourquoi ce setup ?
L’élan haussier faiblit sous le mur vendeur de 1279.83, montrant que les vendeurs défendent la zone supérieure. Un rejet ici pourrait déclencher une cascade vers 1244.85, puis 1211.49 et potentiellement 1177.18. Tant que 1296.56 tient, le setup baissier reste valable.
Cliquez ici pour Trader 👇 $ZEC
Plan de trading : Vendre $ZEC
Entrée : 1270 - 1280
SL : 1296.56
TP : 1244.85 | 1211.49 | 1177.18
Pourquoi ce setup ?
L’élan haussier faiblit sous le mur vendeur de 1279.83, montrant que les vendeurs défendent la zone supérieure. Un rejet ici pourrait déclencher une cascade vers 1244.85, puis 1211.49 et potentiellement 1177.18. Tant que 1296.56 tient, le setup baissier reste valable.
Cliquez ici pour Trader 👇 $ZEC
2
526
·
--
Haussier
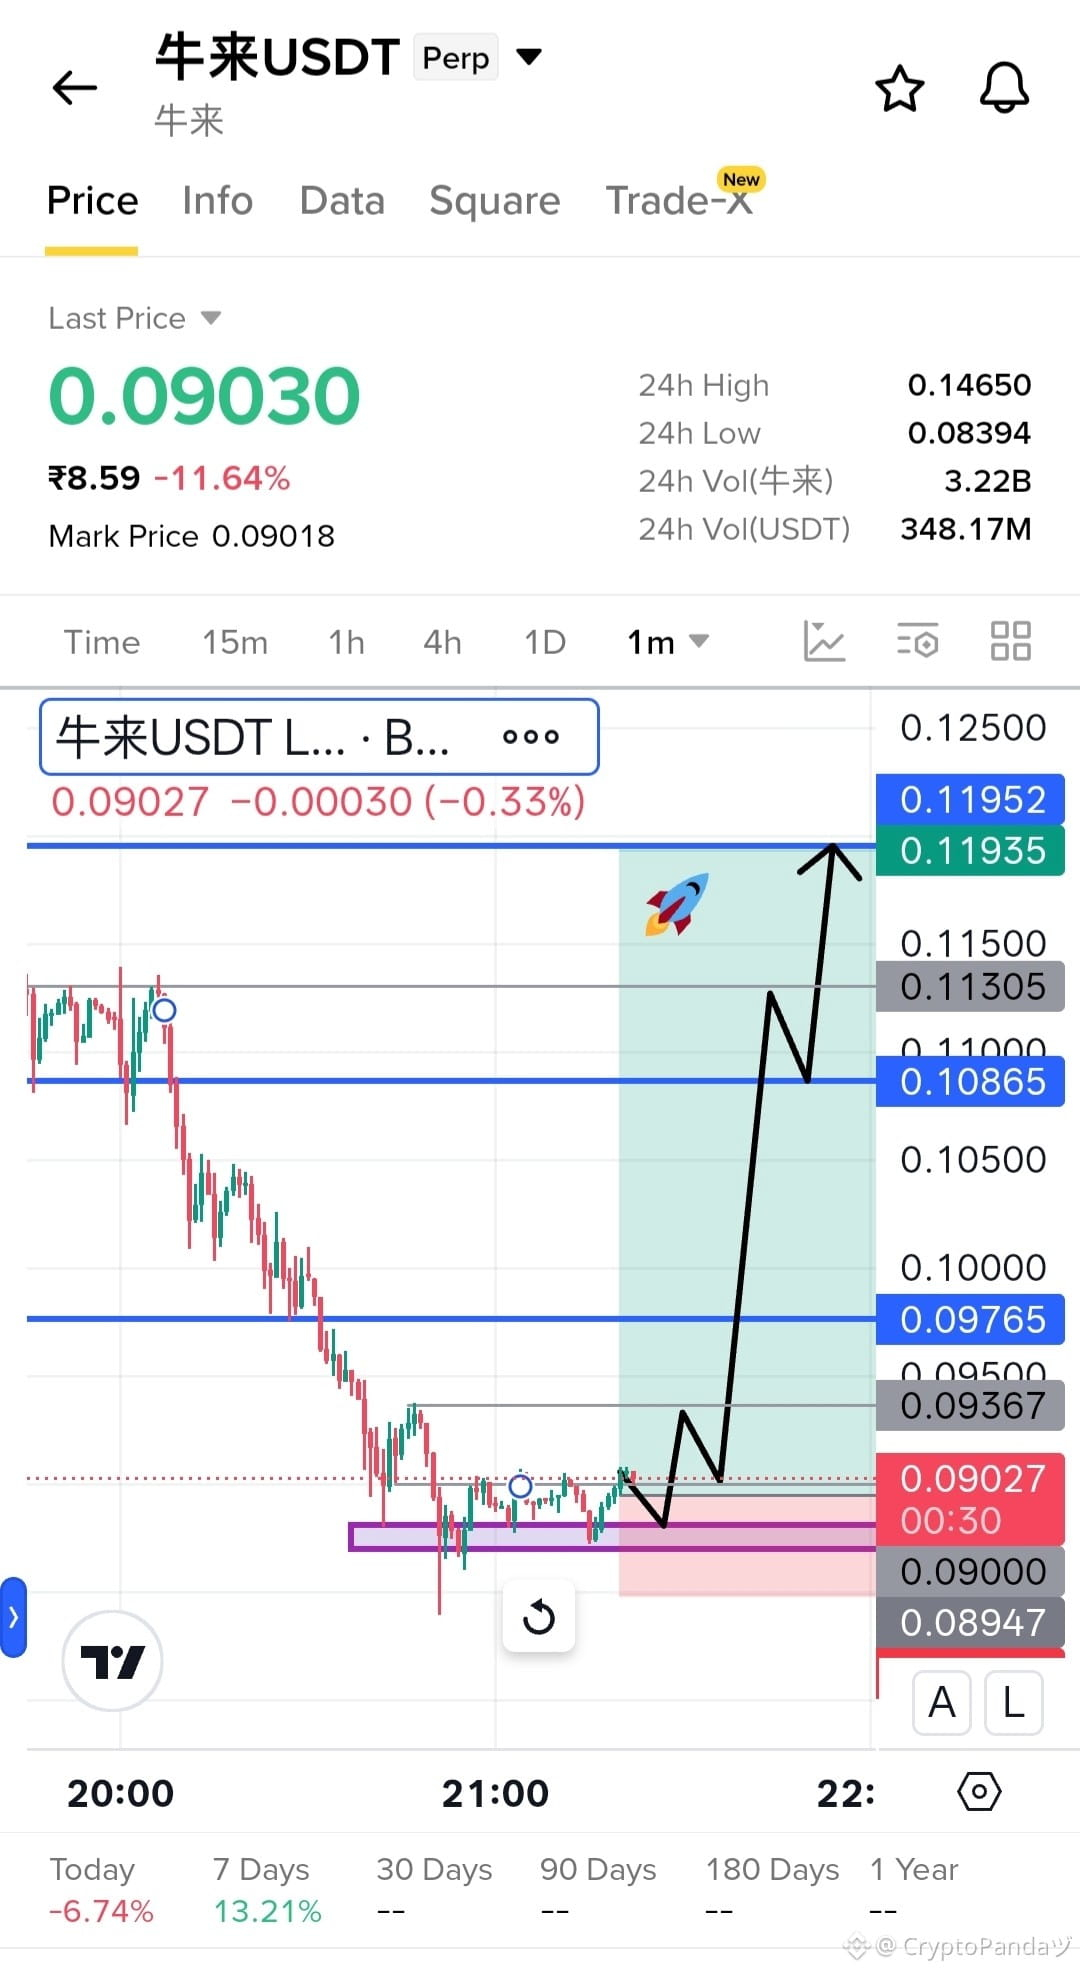
$牛来 — Le prix s’essouffle après le flush à la baisse au niveau de support 0.08947. Prochaine impulsion haussière bientôt....
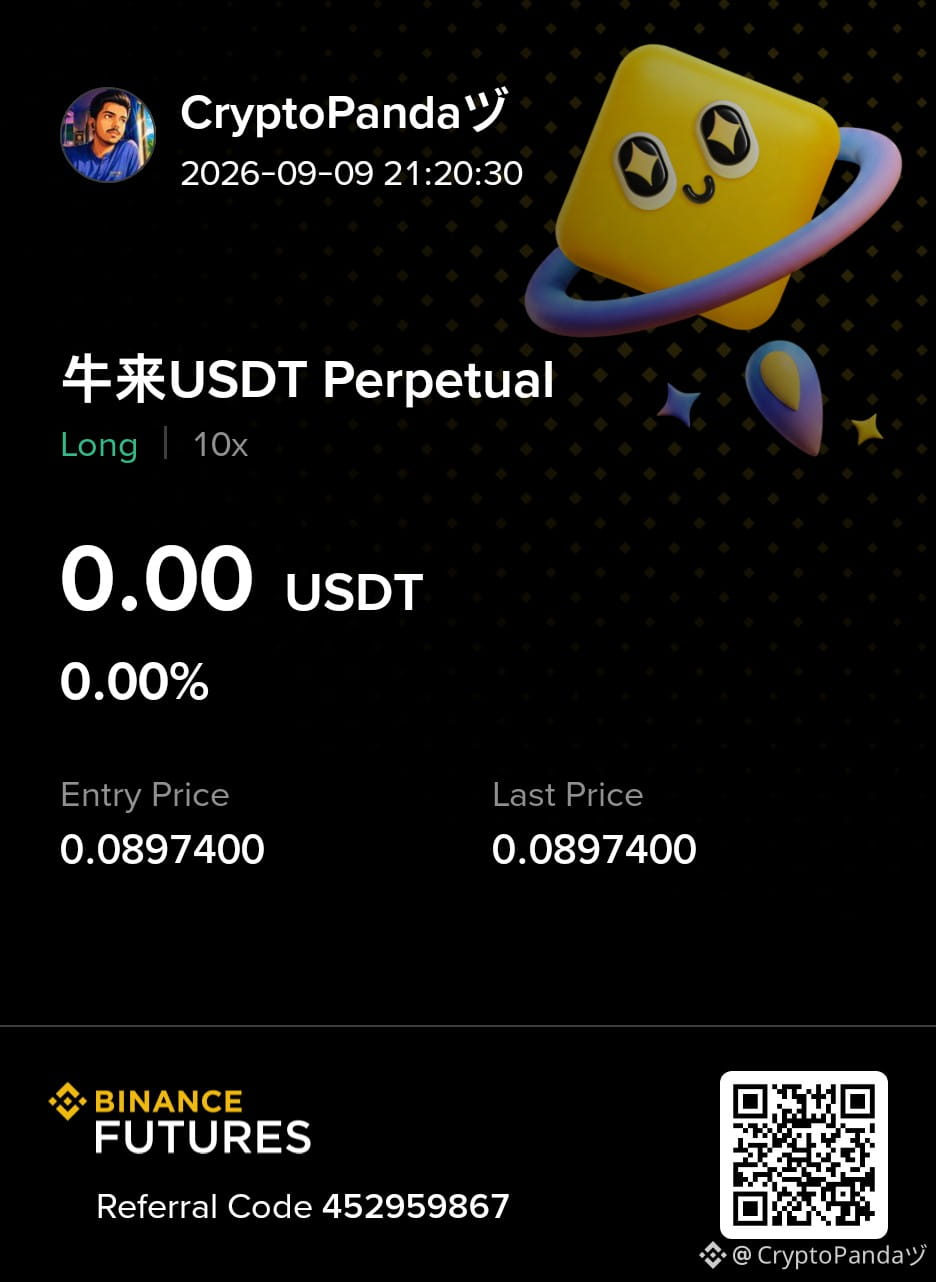
Plan de trading : Long $牛来
Entrée : 0.090 - 0.092
SL : 0.08484
TP : 0.09765 | 0.10865 | 0.11952
Pourquoi cette configuration ?
Le prix marque une pause après le récent flush vers la zone de support 0.08947, montrant que les acheteurs défendent ce niveau. Un rebond à partir de ce support pourrait déclencher la prochaine jambe haussière vers 0.09765, puis 0.10865 et potentiellement 0.11952. Tant que 0.08484 tient, la configuration haussière reste valide.
Cliquez ici pour Trader 👇 $牛来
{future}(牛来USDT)
$牛来 — Le prix s’essouffle après le flush à la baisse au niveau de support 0.08947. Prochaine impulsion haussière bientôt....
Plan de trading : Long $牛来
Entrée : 0.090 - 0.092
SL : 0.08484
TP : 0.09765 | 0.10865 | 0.11952
Pourquoi cette configuration ?
Le prix marque une pause après le récent flush vers la zone de support 0.08947, montrant que les acheteurs défendent ce niveau. Un rebond à partir de ce support pourrait déclencher la prochaine jambe haussière vers 0.09765, puis 0.10865 et potentiellement 0.11952. Tant que 0.08484 tient, la configuration haussière reste valide.
Cliquez ici pour Trader 👇 $牛来
Plan de trading : Long $牛来
Entrée : 0.090 - 0.092
SL : 0.08484
TP : 0.09765 | 0.10865 | 0.11952
Pourquoi cette configuration ?
Le prix marque une pause après le récent flush vers la zone de support 0.08947, montrant que les acheteurs défendent ce niveau. Un rebond à partir de ce support pourrait déclencher la prochaine jambe haussière vers 0.09765, puis 0.10865 et potentiellement 0.11952. Tant que 0.08484 tient, la configuration haussière reste valide.
Cliquez ici pour Trader 👇 $牛来
2
970
·
--
Baissier
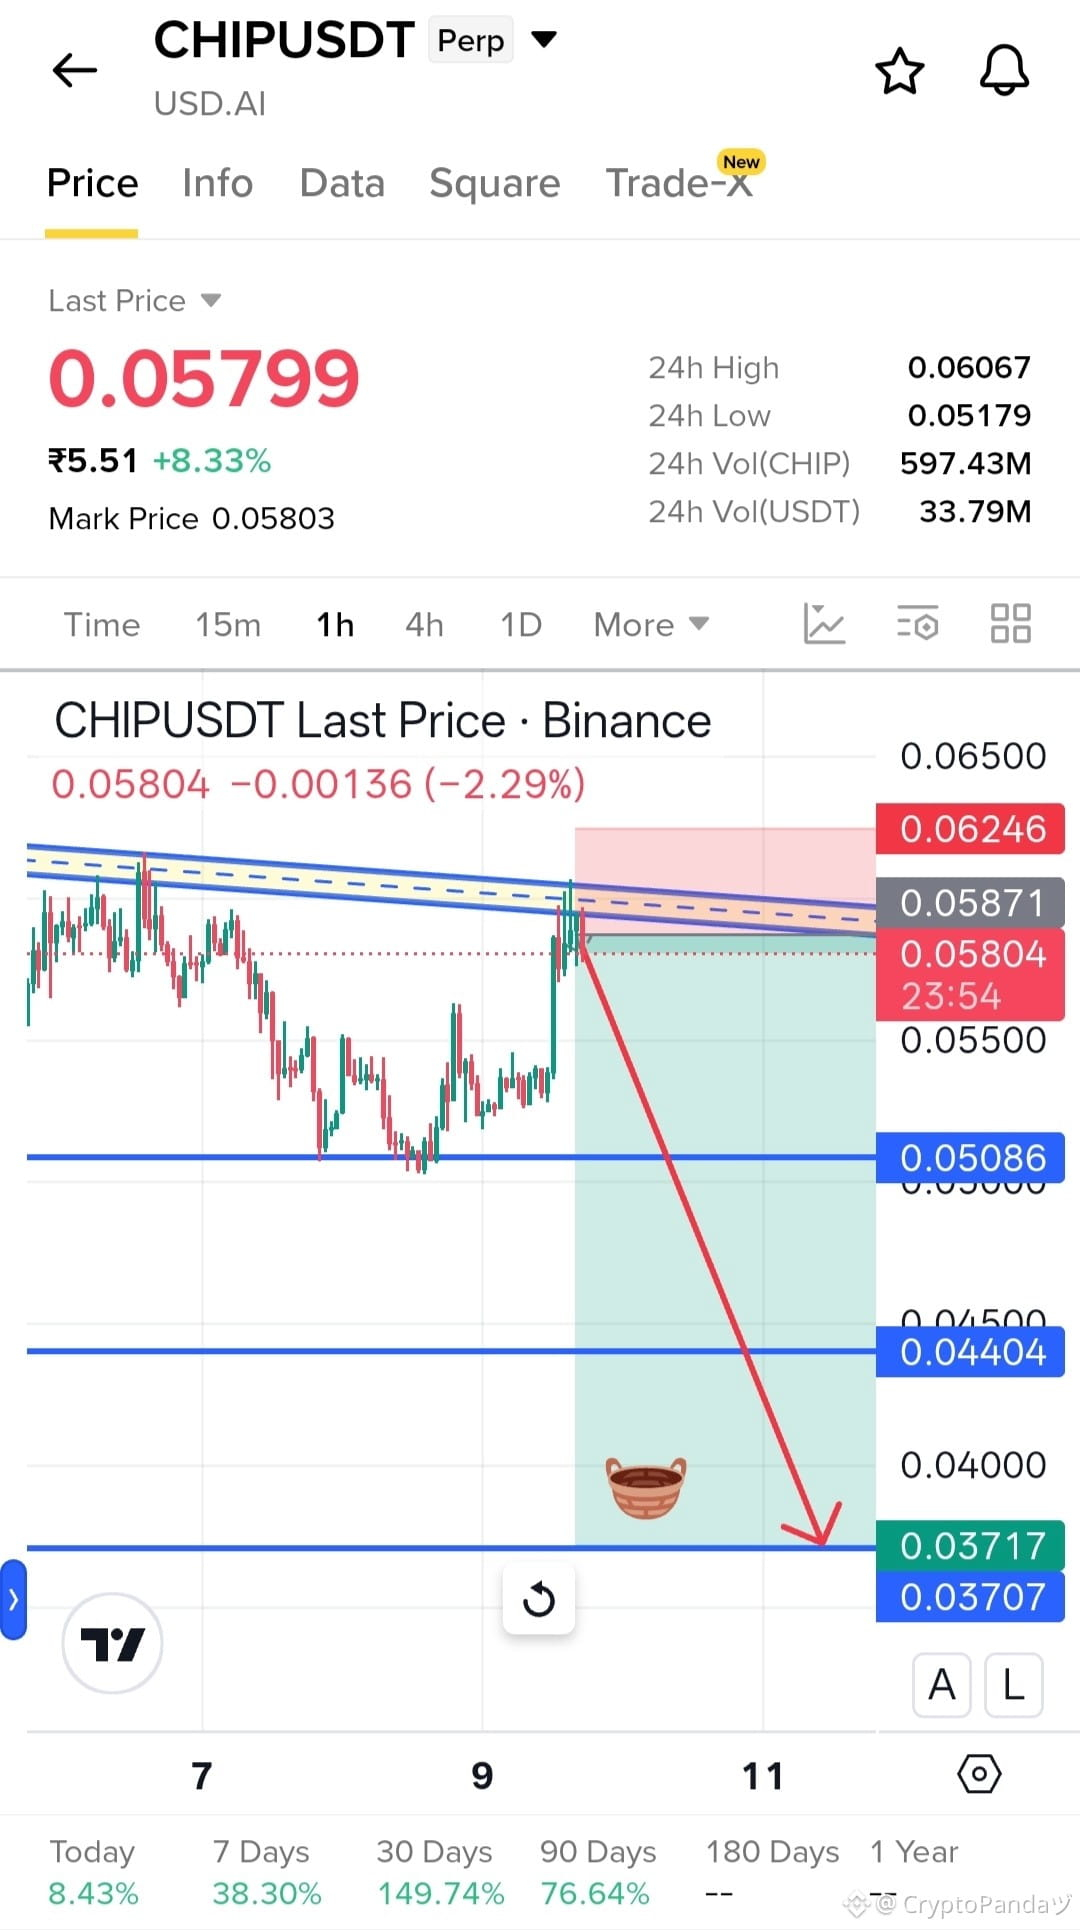
$CHIP — Des baleines déchargent le sommet à une offre de 0.05871. Retracement probablement bientôt...
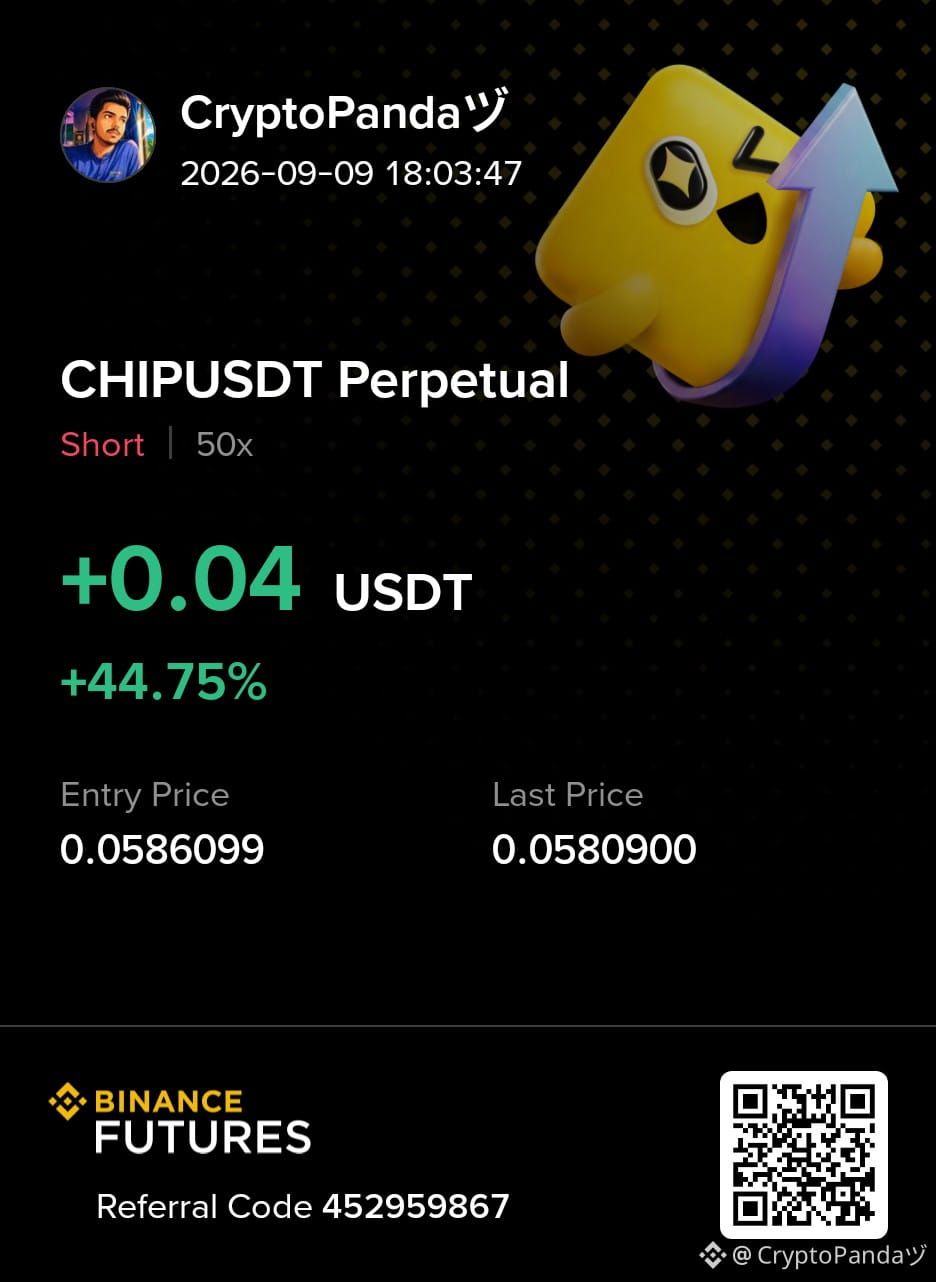
Plan de trading : Short $CHIP
Entrée : 0.057 - 0.059
SL : 0.06246
TP : 0.05086 | 0.04404 | 0.03717
Pourquoi ce setup ?
Les baleines déchargent près de la zone d’offre de 0.05871, signalant une exhaustion après le mouvement haussier. Un rejet depuis cette zone pourrait déclencher un retracement vers 0.05086, puis 0.04404 et éventuellement 0.03717. Tant que 0.06246 tient, le setup baissier reste valide.
Cliquez ici pour Trader 👇 $CHIP
{future}(CHIPUSDT)
$CHIP — Des baleines déchargent le sommet à une offre de 0.05871. Retracement probablement bientôt...
Plan de trading : Short $CHIP
Entrée : 0.057 - 0.059
SL : 0.06246
TP : 0.05086 | 0.04404 | 0.03717
Pourquoi ce setup ?
Les baleines déchargent près de la zone d’offre de 0.05871, signalant une exhaustion après le mouvement haussier. Un rejet depuis cette zone pourrait déclencher un retracement vers 0.05086, puis 0.04404 et éventuellement 0.03717. Tant que 0.06246 tient, le setup baissier reste valide.
Cliquez ici pour Trader 👇 $CHIP
Plan de trading : Short $CHIP
Entrée : 0.057 - 0.059
SL : 0.06246
TP : 0.05086 | 0.04404 | 0.03717
Pourquoi ce setup ?
Les baleines déchargent près de la zone d’offre de 0.05871, signalant une exhaustion après le mouvement haussier. Un rejet depuis cette zone pourrait déclencher un retracement vers 0.05086, puis 0.04404 et éventuellement 0.03717. Tant que 0.06246 tient, le setup baissier reste valide.
Cliquez ici pour Trader 👇 $CHIP
5
632
·
--
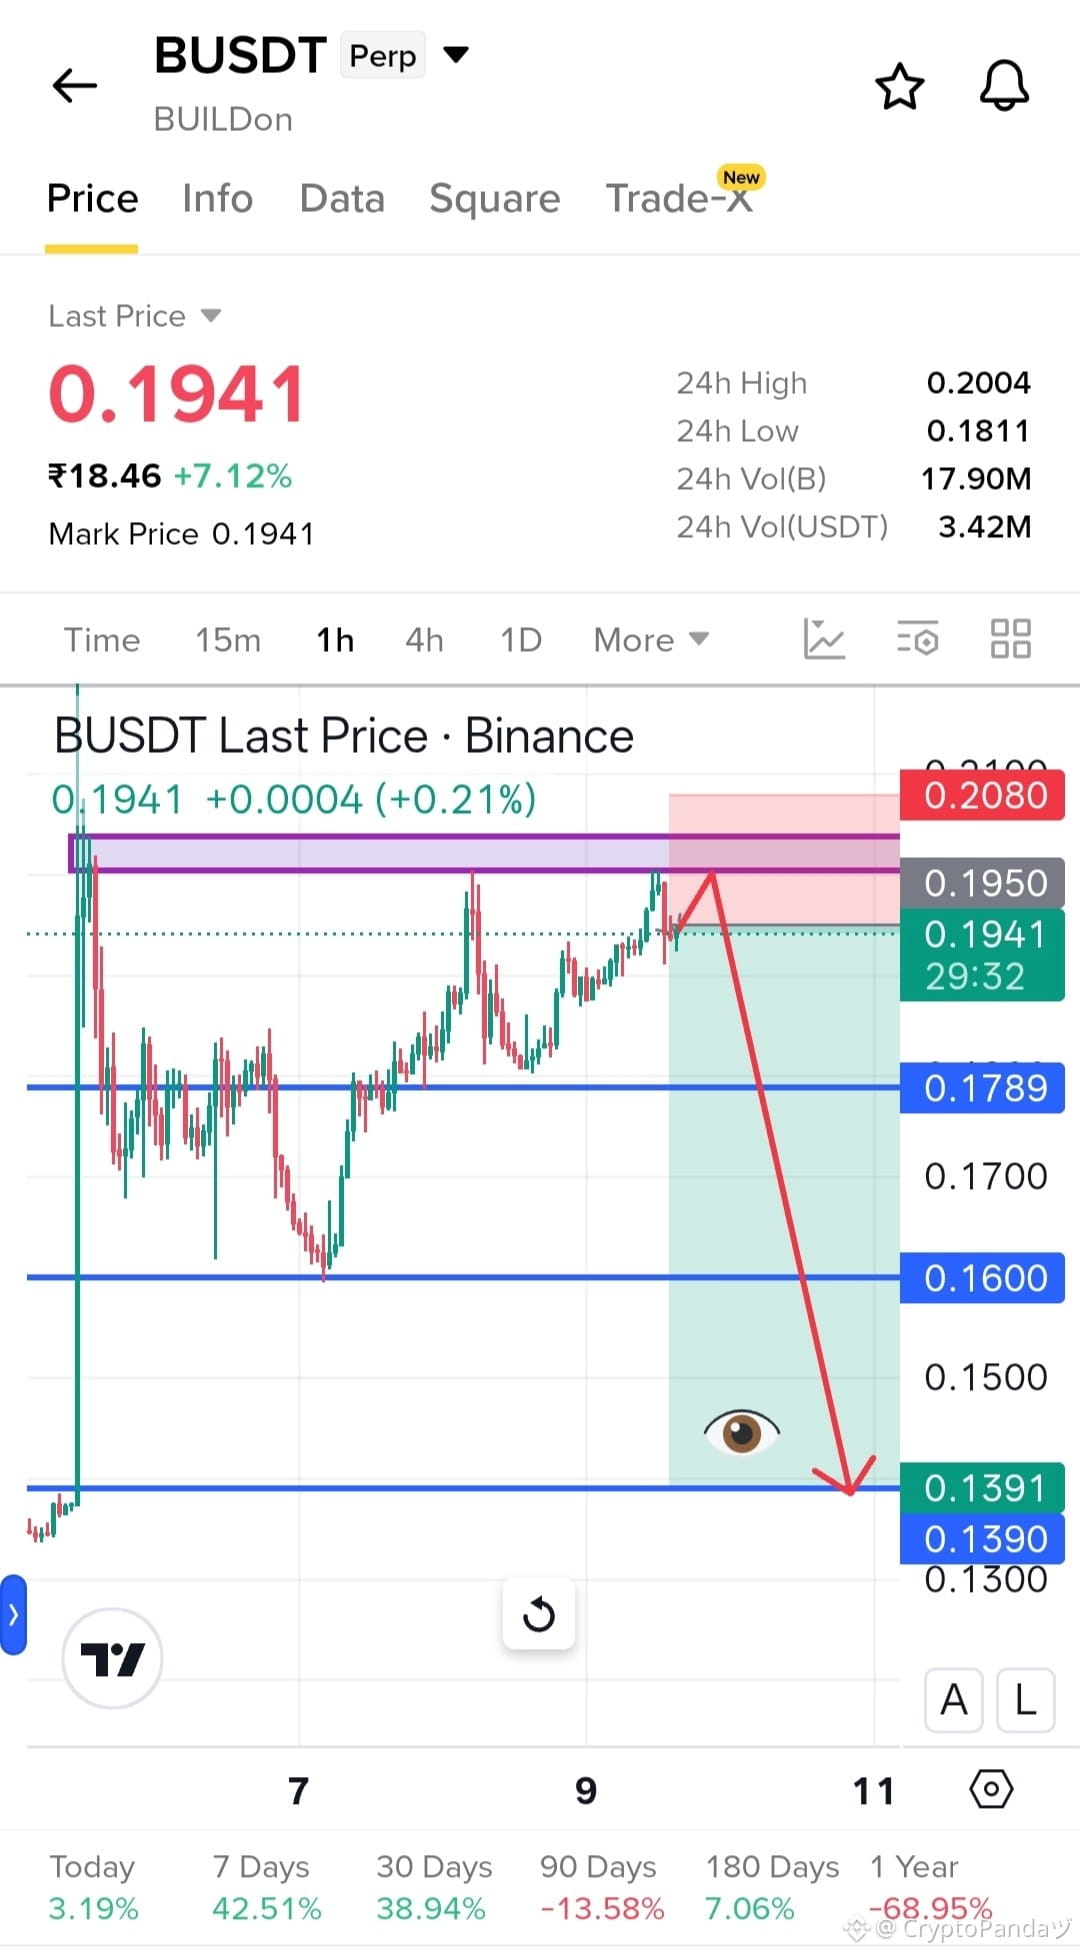
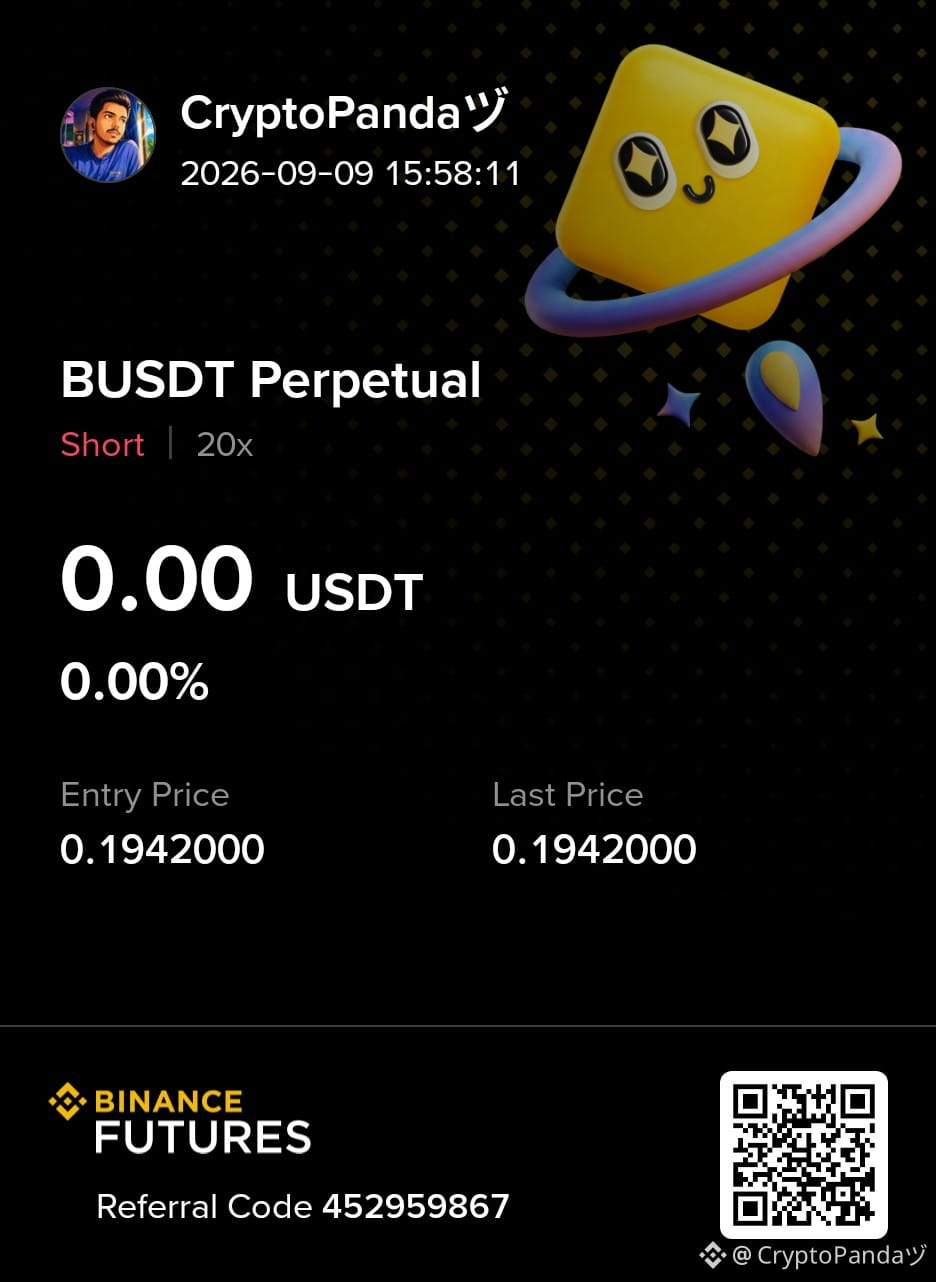
Baissier
$B — La liquidité à la hausse a été balayée au niveau OB de 0,20. Le repli baissier commence bientôt...
Plan de trading : Vendre $B
Entrée : 0,192 - 0,202
SL : 0,2080
TP : 0,1789 | 0,1600 | 0,1390
Pourquoi cette configuration ?
La liquidité à la hausse a été balayée autour du niveau OB de 0,20, créant une zone de rejet potentielle alors que les vendeurs interviennent. Un mouvement à la baisse depuis ici pourrait accélérer vers 0,1789, puis 0,1600 et potentiellement 0,1390. Tant que 0,2080 tient, la configuration baissière reste valide.
Cliquez ici pour Trader 👇 $B
{future}(BUSDT)
$B — La liquidité à la hausse a été balayée au niveau OB de 0,20. Le repli baissier commence bientôt...
Plan de trading : Vendre $B
Entrée : 0,192 - 0,202
SL : 0,2080
TP : 0,1789 | 0,1600 | 0,1390
Pourquoi cette configuration ?
La liquidité à la hausse a été balayée autour du niveau OB de 0,20, créant une zone de rejet potentielle alors que les vendeurs interviennent. Un mouvement à la baisse depuis ici pourrait accélérer vers 0,1789, puis 0,1600 et potentiellement 0,1390. Tant que 0,2080 tient, la configuration baissière reste valide.
Cliquez ici pour Trader 👇 $B
Plan de trading : Vendre $B
Entrée : 0,192 - 0,202
SL : 0,2080
TP : 0,1789 | 0,1600 | 0,1390
Pourquoi cette configuration ?
La liquidité à la hausse a été balayée autour du niveau OB de 0,20, créant une zone de rejet potentielle alors que les vendeurs interviennent. Un mouvement à la baisse depuis ici pourrait accélérer vers 0,1789, puis 0,1600 et potentiellement 0,1390. Tant que 0,2080 tient, la configuration baissière reste valide.
Cliquez ici pour Trader 👇 $B
3
524
·
--
Baissier
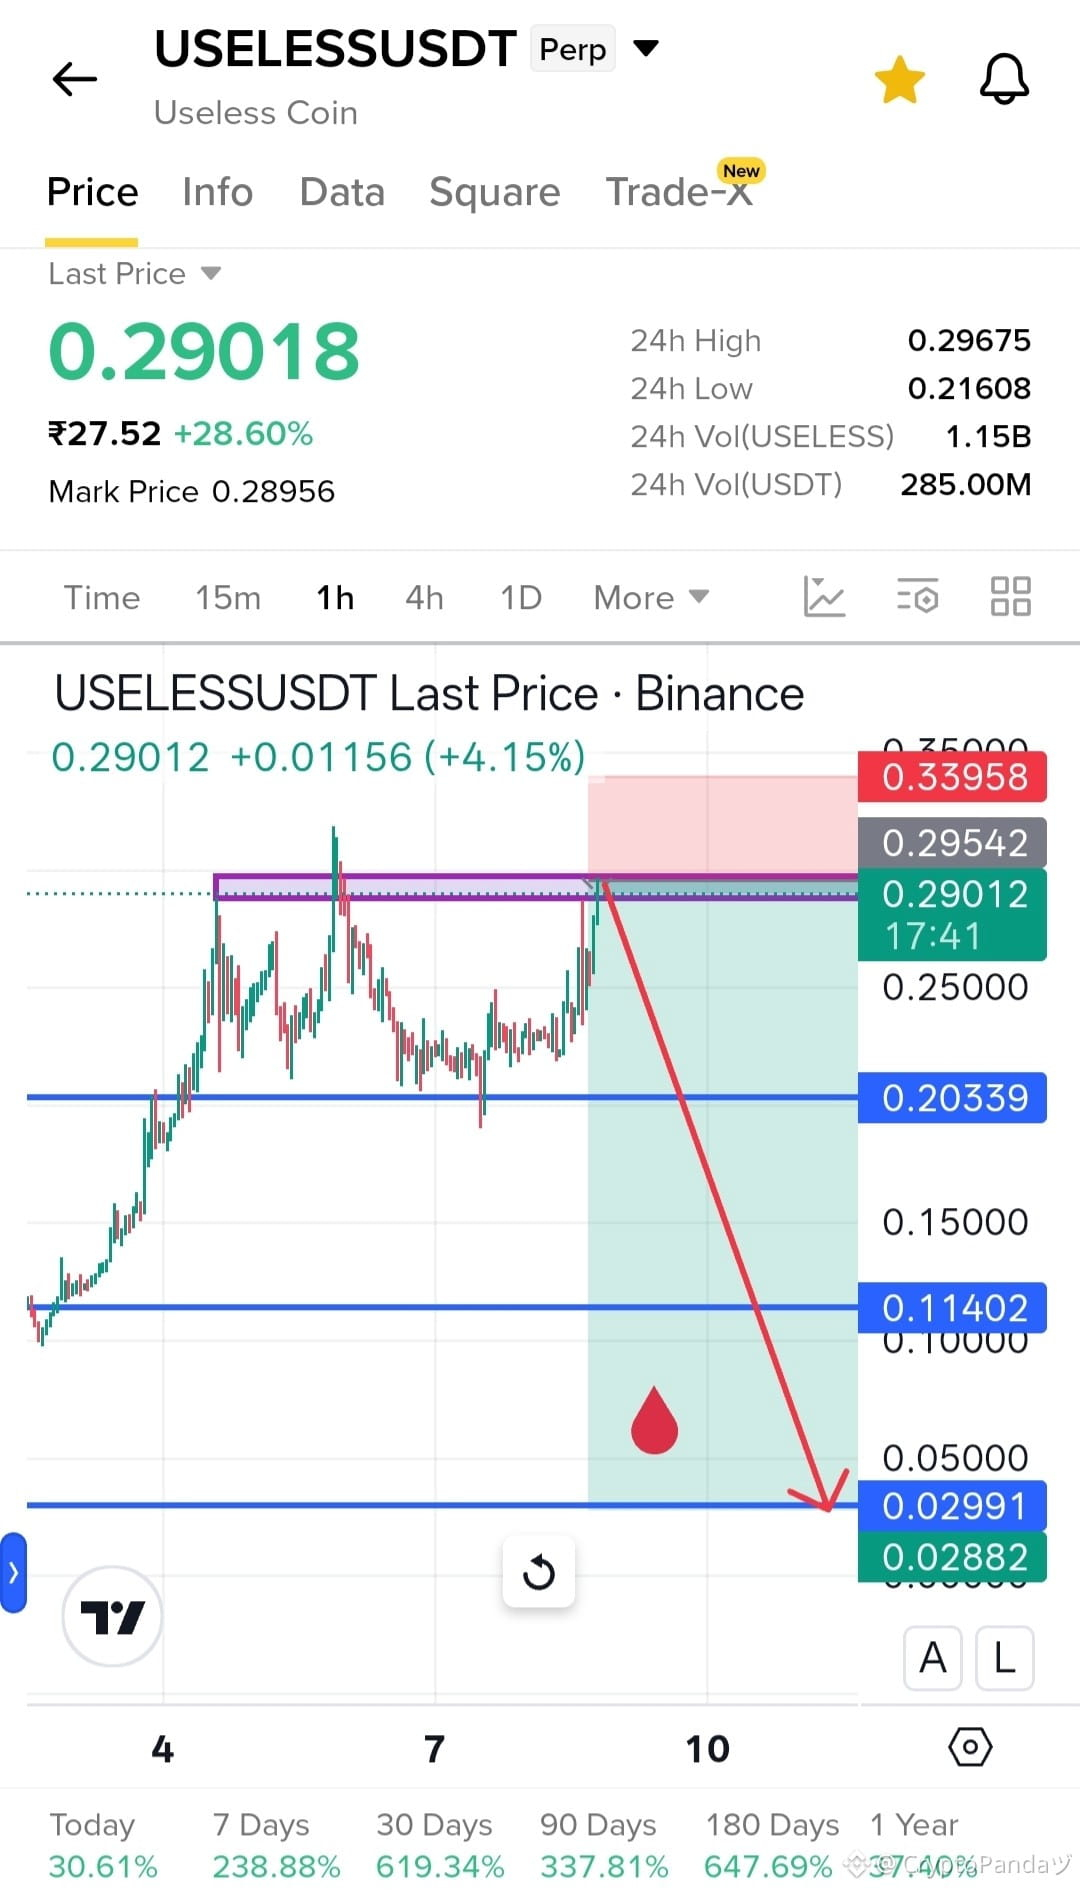
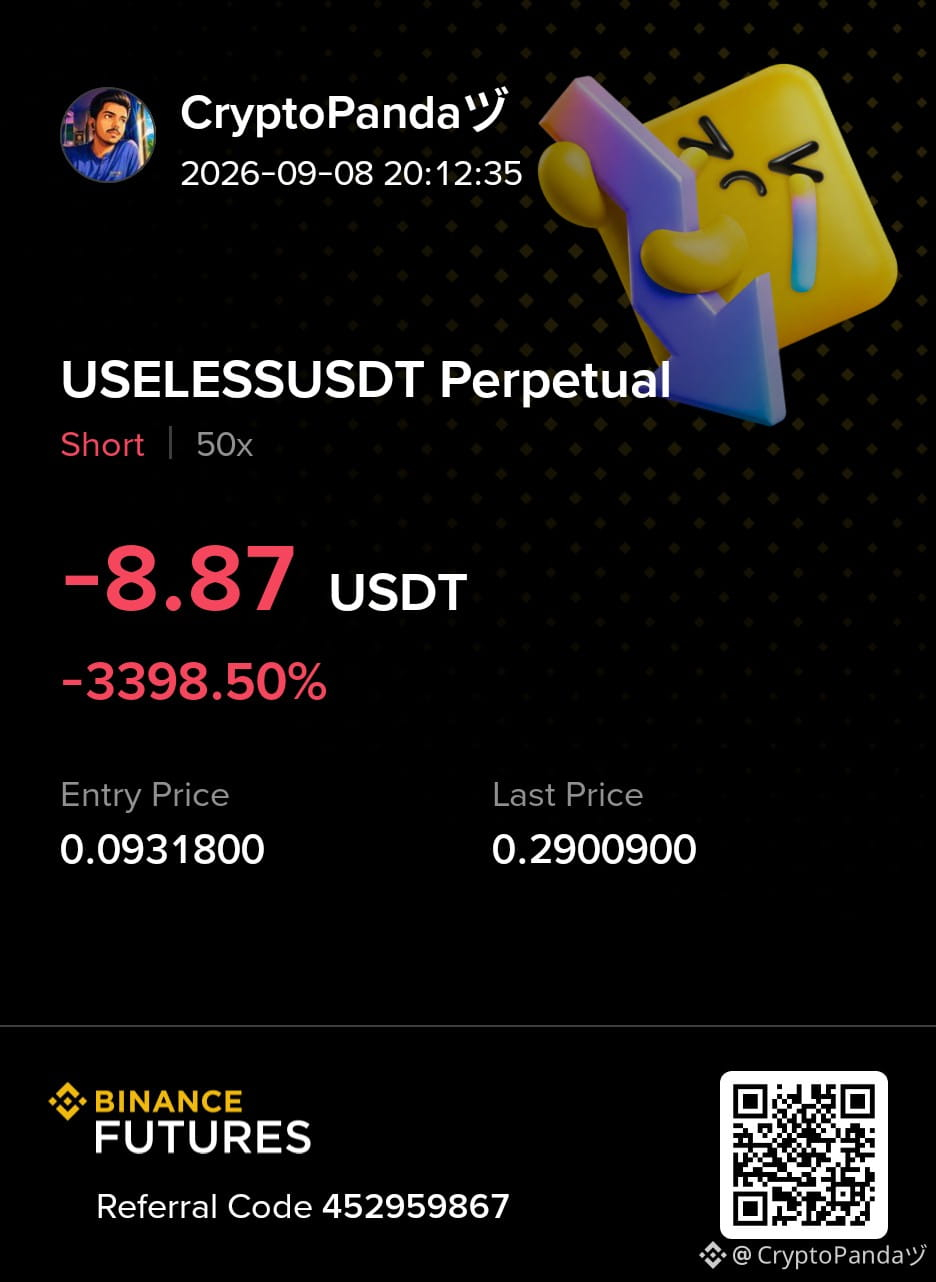
$USELESS - Bloc de vendeurs récupéré à 0.29542. Vague de liquidation en approche...
Plan de trading : Short $USELESS
Entrée : 0.29 - 0.30
SL : 0.33958
TP : 0.20339 | 0.11402 | 0.02991
Pourquoi cette configuration ?
Le prix a récupéré le même bloc de vendeurs autour de 0.29542, créant une nouvelle zone potentielle de rejet permettant aux ours de reprendre le contrôle. Un rejet ici pourrait déclencher une vague de liquidation vers 0.20339, puis 0.11402 et potentiellement 0.02991. Tant que 0.33958 tient, la configuration baissière reste valide.
Cliquez ici pour Trader 👇 $USELESS
{future}(USELESSUSDT)
$USELESS - Bloc de vendeurs récupéré à 0.29542. Vague de liquidation en approche...
Plan de trading : Short $USELESS
Entrée : 0.29 - 0.30
SL : 0.33958
TP : 0.20339 | 0.11402 | 0.02991
Pourquoi cette configuration ?
Le prix a récupéré le même bloc de vendeurs autour de 0.29542, créant une nouvelle zone potentielle de rejet permettant aux ours de reprendre le contrôle. Un rejet ici pourrait déclencher une vague de liquidation vers 0.20339, puis 0.11402 et potentiellement 0.02991. Tant que 0.33958 tient, la configuration baissière reste valide.
Cliquez ici pour Trader 👇 $USELESS
Plan de trading : Short $USELESS
Entrée : 0.29 - 0.30
SL : 0.33958
TP : 0.20339 | 0.11402 | 0.02991
Pourquoi cette configuration ?
Le prix a récupéré le même bloc de vendeurs autour de 0.29542, créant une nouvelle zone potentielle de rejet permettant aux ours de reprendre le contrôle. Un rejet ici pourrait déclencher une vague de liquidation vers 0.20339, puis 0.11402 et potentiellement 0.02991. Tant que 0.33958 tient, la configuration baissière reste valide.
Cliquez ici pour Trader 👇 $USELESS
1
2
753
·
--
Baissier
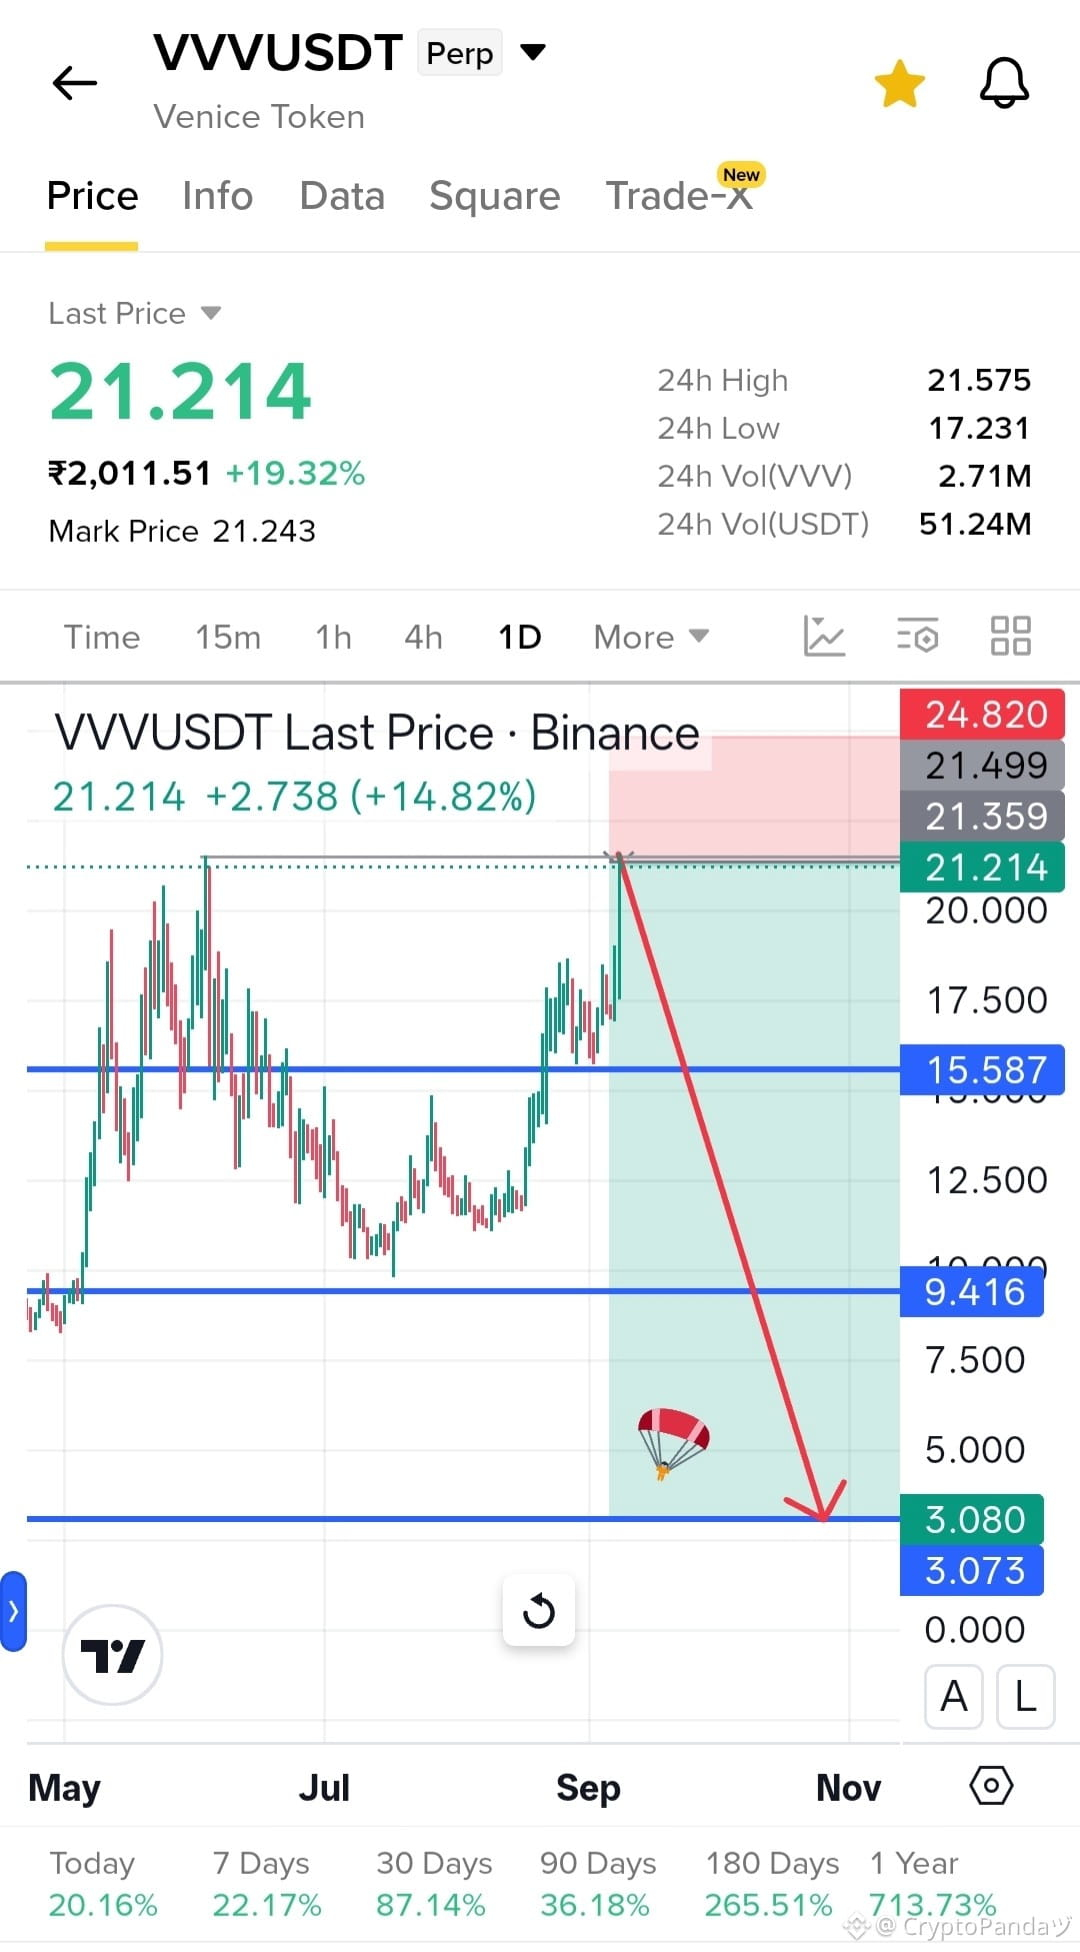
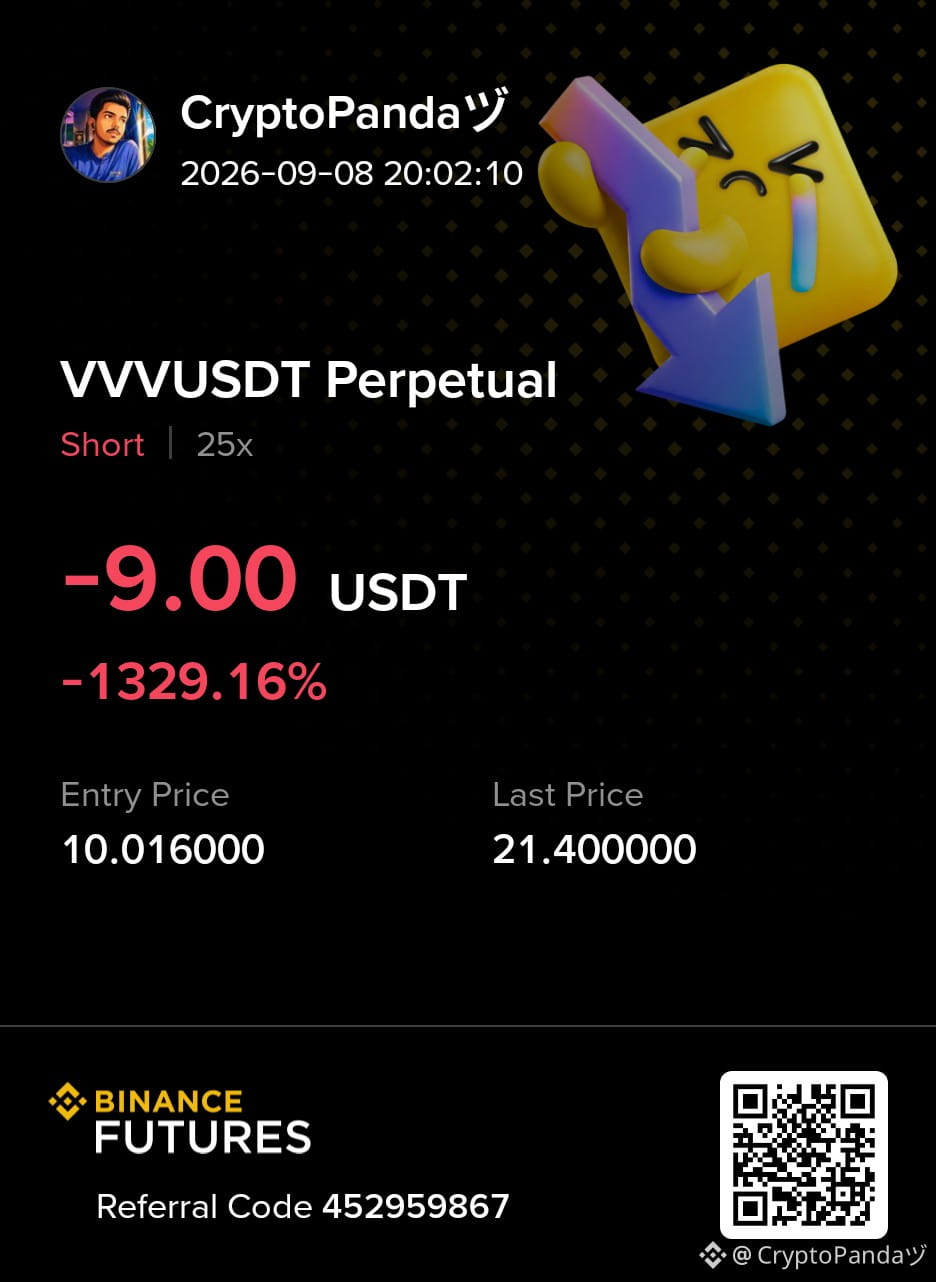
$VVV — Aiguille finale à la hausse qui se fait piquer dans la zone d’offre 23. Retracement probable....
Plan de trading : Vendre à découvert $VVV
Entrée : 21,00 - 22,00
SL : 24,820
TP : 15,587 | 9,416 | 3,080
Pourquoi ce setup ?
Le prix effectue une dernière impulsion à la hausse vers la zone d’offre 21,499, où des vendeurs pourraient intervenir et déclencher un rejet brusque. Un retracement depuis cette zone pourrait l’amener vers 15,587, puis 9,416 et potentiellement 3,080. Tant que 24,820 tient, le setup baissier reste valide.
Cliquez ici pour Trader 👇 $VVV
{future}(VVVUSDT)
$VVV — Aiguille finale à la hausse qui se fait piquer dans la zone d’offre 23. Retracement probable....
Plan de trading : Vendre à découvert $VVV
Entrée : 21,00 - 22,00
SL : 24,820
TP : 15,587 | 9,416 | 3,080
Pourquoi ce setup ?
Le prix effectue une dernière impulsion à la hausse vers la zone d’offre 21,499, où des vendeurs pourraient intervenir et déclencher un rejet brusque. Un retracement depuis cette zone pourrait l’amener vers 15,587, puis 9,416 et potentiellement 3,080. Tant que 24,820 tient, le setup baissier reste valide.
Cliquez ici pour Trader 👇 $VVV
Plan de trading : Vendre à découvert $VVV
Entrée : 21,00 - 22,00
SL : 24,820
TP : 15,587 | 9,416 | 3,080
Pourquoi ce setup ?
Le prix effectue une dernière impulsion à la hausse vers la zone d’offre 21,499, où des vendeurs pourraient intervenir et déclencher un rejet brusque. Un retracement depuis cette zone pourrait l’amener vers 15,587, puis 9,416 et potentiellement 3,080. Tant que 24,820 tient, le setup baissier reste valide.
Cliquez ici pour Trader 👇 $VVV
2
836
·
--
Baissier
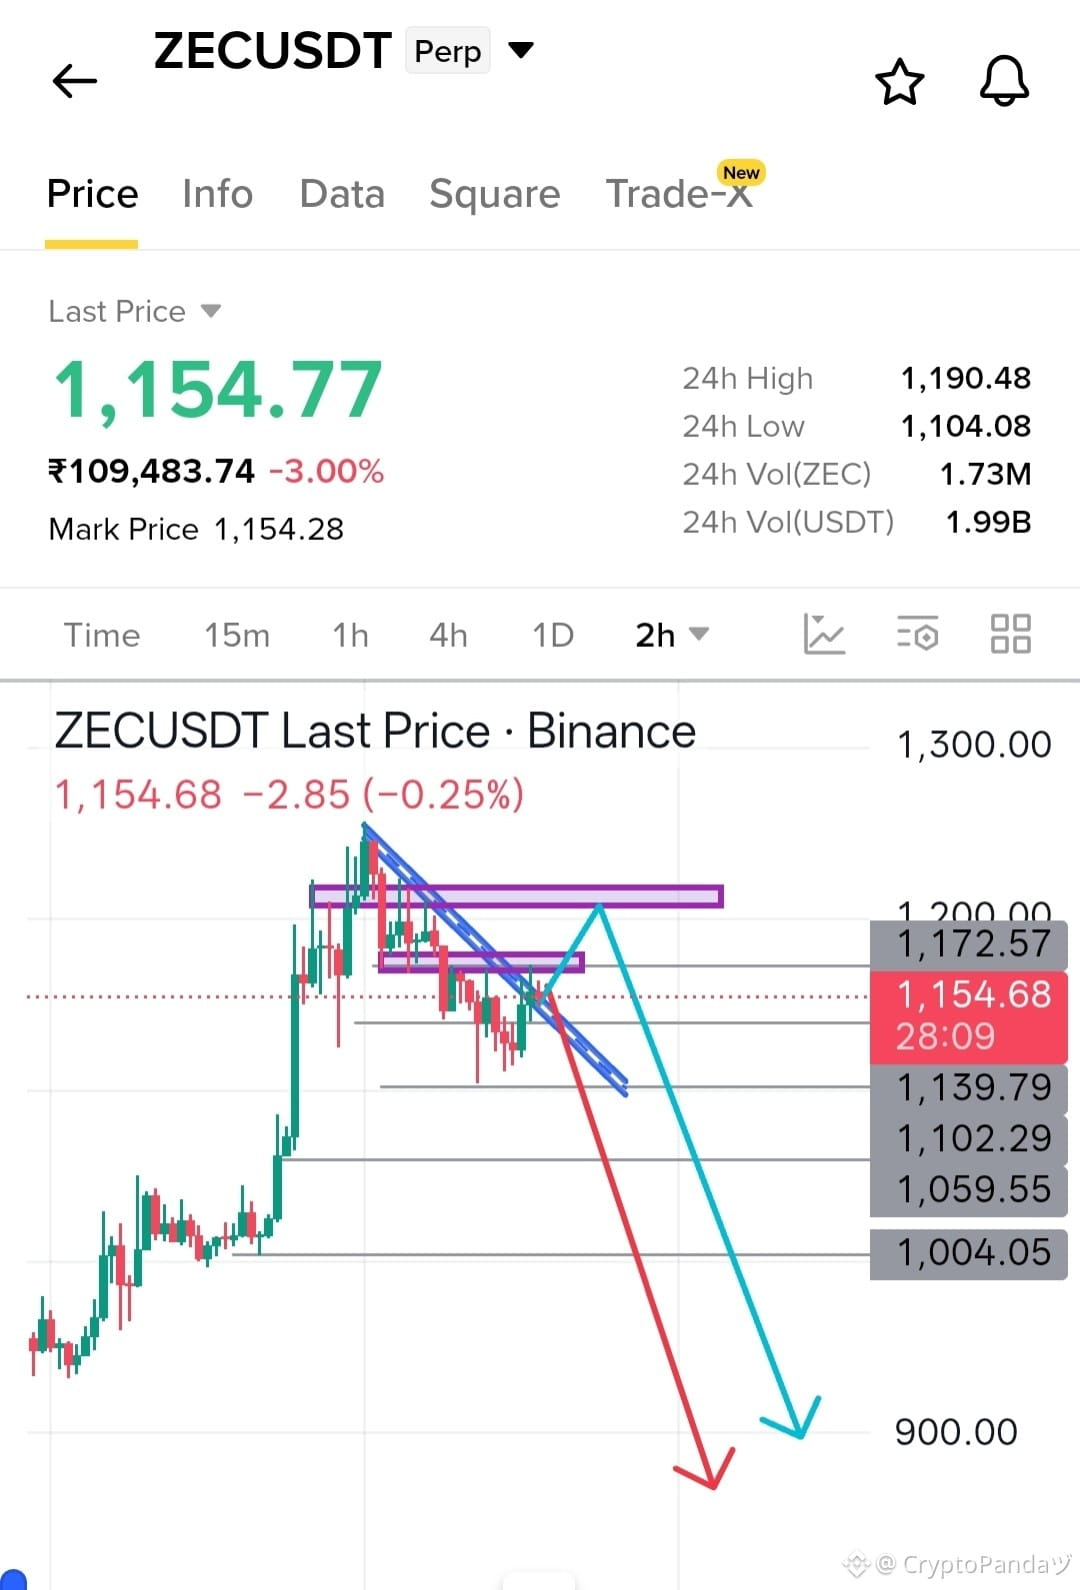
💬 Littéralement, tout le monde sur la place est en panique à propos de $ZEC Principalement les détenteurs de positions courtes. Alors, afin de réduire la panique, j’ai créé cette analyse (juste un point de vue) pour❗
Scénario 1️⃣ : S’il remonte, il y a un mur de vente au niveau 1172, et à partir de là, j’attends un énorme dump
Scénario 2️⃣ : Supposons qu’il soit encore prolongé davantage vers le haut : il y a un autre bloc d’ordres près du niveau 1200...
Au-dessus, je ne vois aucune liquidité saine. Donc, mon point de vue pour les prochains jours : on peut voir le ZEC passer sous 1000, et même vers 800....
Mon avis uniquement, pas un conseil financier (NFA) Faites vos propres recherches (Dyor)....
#ZcashRises45%WeeklyToHighestSince2016
Trade $ZEC ici 👇
{future}(ZECUSDT)
💬 Littéralement, tout le monde sur la place est en panique à propos de $ZEC Principalement les détenteurs de positions courtes. Alors, afin de réduire la panique, j’ai créé cette analyse (juste un point de vue) pour❗
Scénario 1️⃣ : S’il remonte, il y a un mur de vente au niveau 1172, et à partir de là, j’attends un énorme dump
Scénario 2️⃣ : Supposons qu’il soit encore prolongé davantage vers le haut : il y a un autre bloc d’ordres près du niveau 1200...
Au-dessus, je ne vois aucune liquidité saine. Donc, mon point de vue pour les prochains jours : on peut voir le ZEC passer sous 1000, et même vers 800....
Mon avis uniquement, pas un conseil financier (NFA) Faites vos propres recherches (Dyor)....
#ZcashRises45%WeeklyToHighestSince2016
Trade $ZEC ici 👇
Scénario 1️⃣ : S’il remonte, il y a un mur de vente au niveau 1172, et à partir de là, j’attends un énorme dump
Scénario 2️⃣ : Supposons qu’il soit encore prolongé davantage vers le haut : il y a un autre bloc d’ordres près du niveau 1200...
Au-dessus, je ne vois aucune liquidité saine. Donc, mon point de vue pour les prochains jours : on peut voir le ZEC passer sous 1000, et même vers 800....
Mon avis uniquement, pas un conseil financier (NFA) Faites vos propres recherches (Dyor)....
#ZcashRises45%WeeklyToHighestSince2016
Trade $ZEC ici 👇
2
394
·
--
Haussier
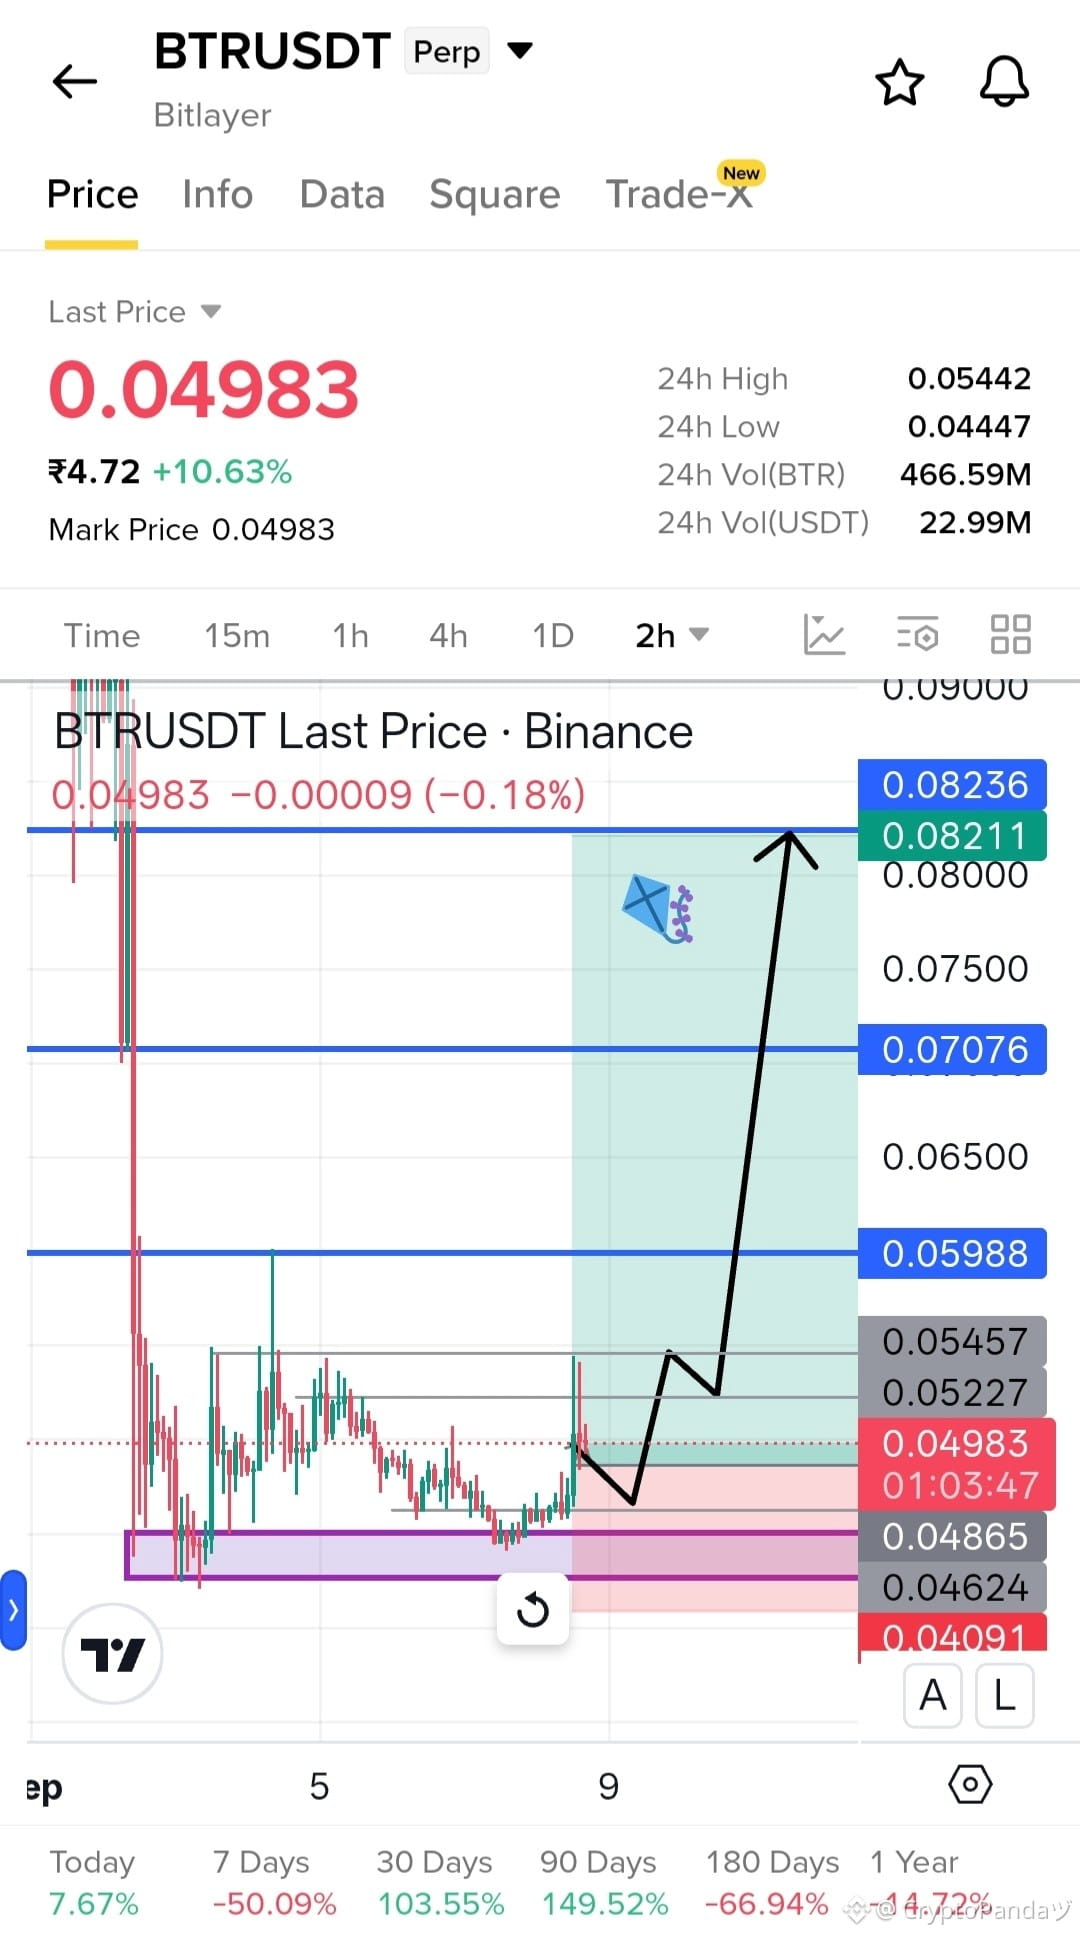
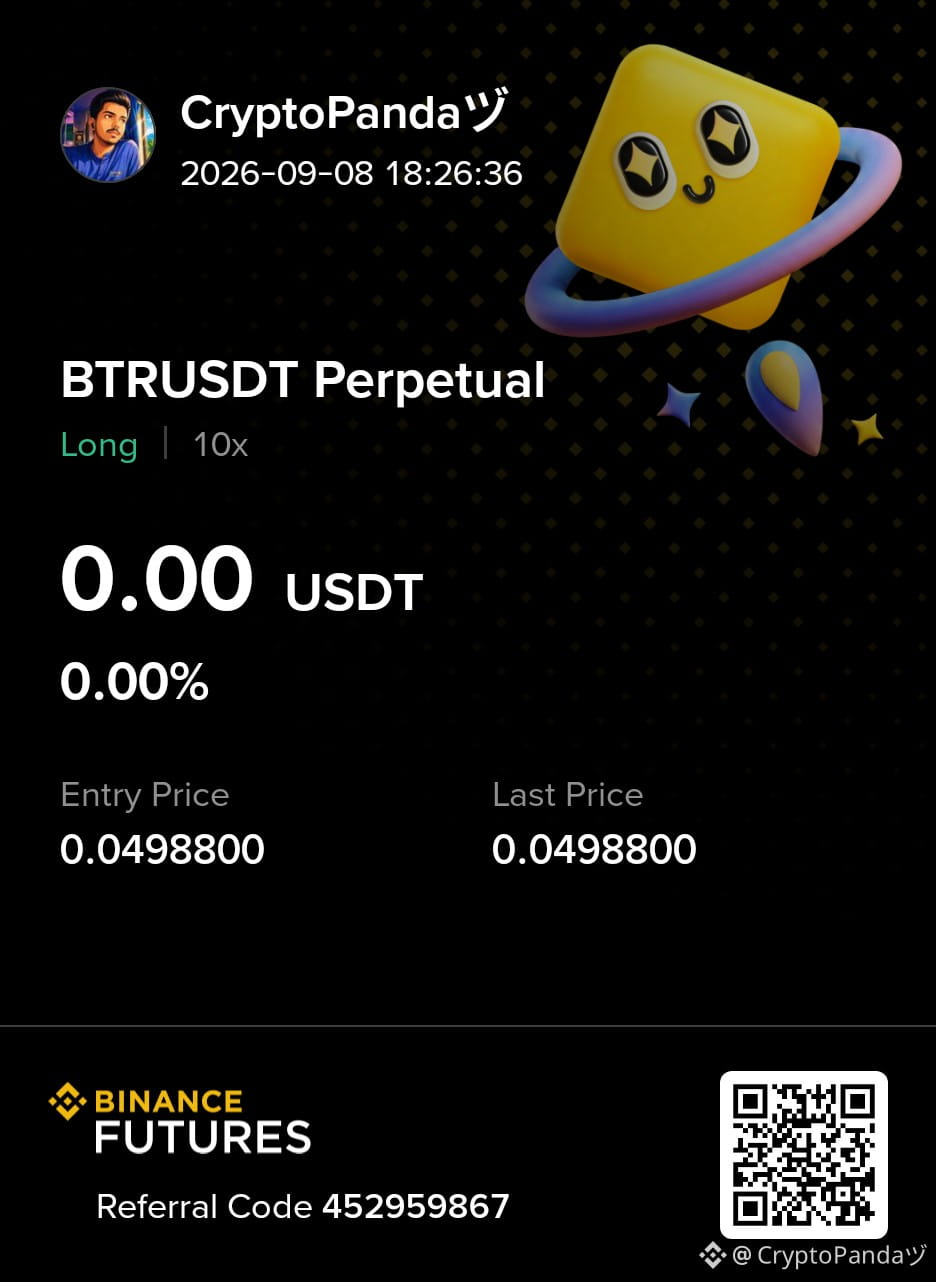
$BTR — Consolidation serrée au-dessus du support 0.04624 OB. Chargement d’une impulsion haussière....
Plan de trade : Long $BTR
Entrée : 0.048 - 0.050
SL : 0.04091
TP : 0.05988 | 0.07076 | 0.08236
Pourquoi ce setup ?
Le prix se resserre étroitement au-dessus du support 0.04624 OB, ce qui montre que les acheteurs défendent la zone tandis que la volatilité se comprime. Une cassure hors de cette zone d’accumulation pourrait déclencher une énorme impulsion haussière vers 0.05988, puis 0.07076 et potentiellement 0.08236. Tant que 0.04091 tient, le setup haussier reste valide.
Cliquez ici pour trader 👇 $BTR
{future}(BTRUSDT)
$BTR — Consolidation serrée au-dessus du support 0.04624 OB. Chargement d’une impulsion haussière....
Plan de trade : Long $BTR
Entrée : 0.048 - 0.050
SL : 0.04091
TP : 0.05988 | 0.07076 | 0.08236
Pourquoi ce setup ?
Le prix se resserre étroitement au-dessus du support 0.04624 OB, ce qui montre que les acheteurs défendent la zone tandis que la volatilité se comprime. Une cassure hors de cette zone d’accumulation pourrait déclencher une énorme impulsion haussière vers 0.05988, puis 0.07076 et potentiellement 0.08236. Tant que 0.04091 tient, le setup haussier reste valide.
Cliquez ici pour trader 👇 $BTR
Plan de trade : Long $BTR
Entrée : 0.048 - 0.050
SL : 0.04091
TP : 0.05988 | 0.07076 | 0.08236
Pourquoi ce setup ?
Le prix se resserre étroitement au-dessus du support 0.04624 OB, ce qui montre que les acheteurs défendent la zone tandis que la volatilité se comprime. Une cassure hors de cette zone d’accumulation pourrait déclencher une énorme impulsion haussière vers 0.05988, puis 0.07076 et potentiellement 0.08236. Tant que 0.04091 tient, le setup haussier reste valide.
Cliquez ici pour trader 👇 $BTR
2
290
·
--
Baissier
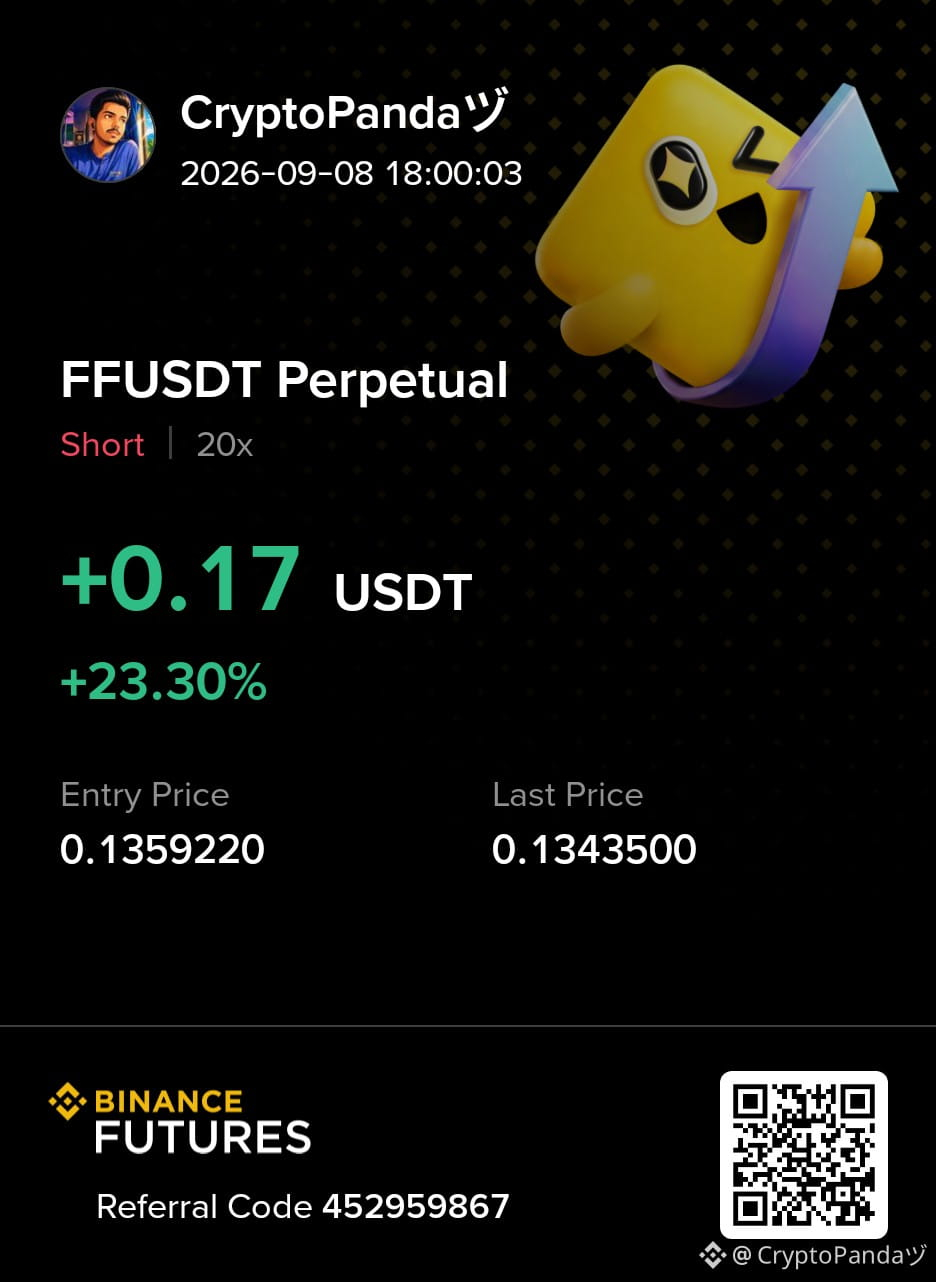
Trading sur 30 j de 68.5 USDT en $FF
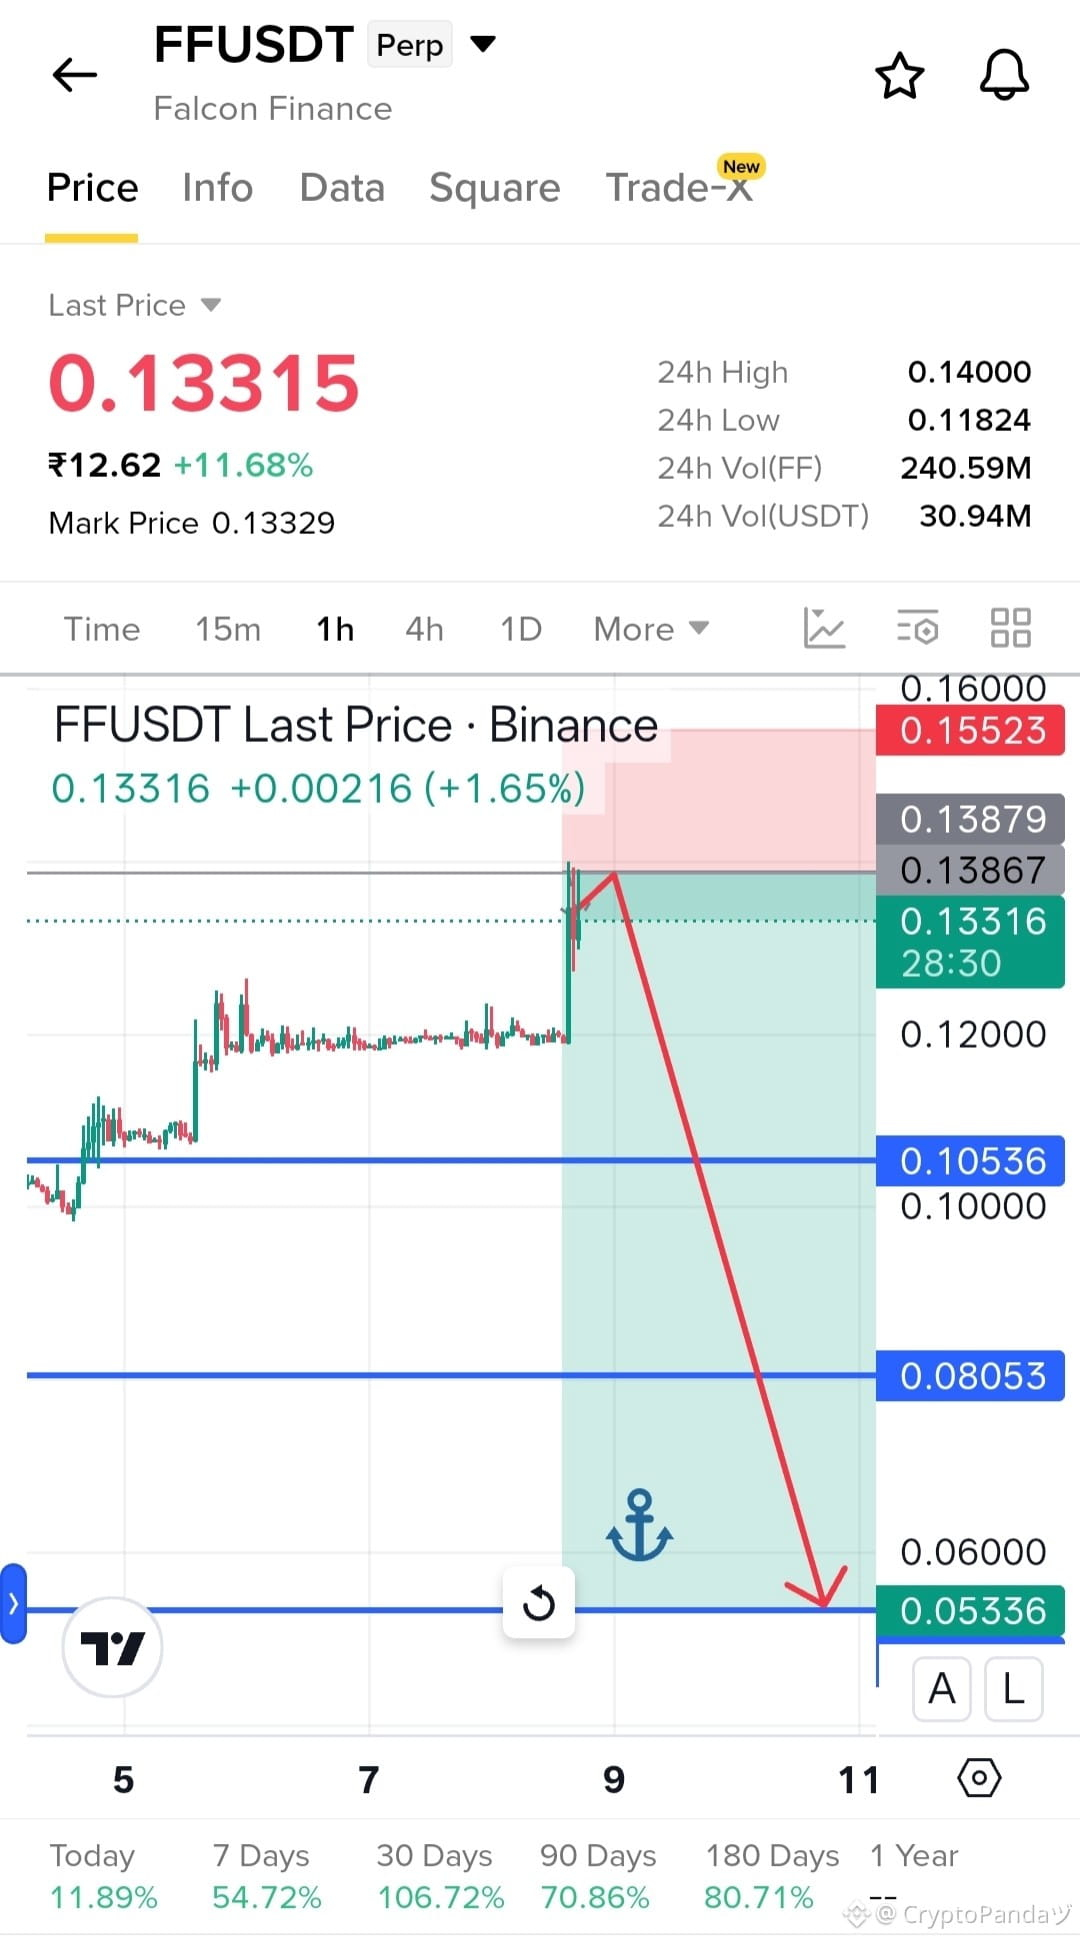
$FF — Double top en formation au niveau de l’offre/du plafond 0.13879. Rebond baissier bientôt....
Plan de trading : Short $FF
Entrée : 0.132 - 0.138
SL : 0.15523
TP : 0.10536 | 0.08053 | 0.05336
Pourquoi cette configuration ?
Un double top se forme sous le plafond de l’offre 0.13879, montrant un rejet répété alors que les acheteurs ont du mal à pousser plus haut. Une cassure depuis cette zone pourrait déclencher une impulsion baissière vers 0.10536, suivie de 0.08053 et potentiellement de 0.05336. Tant que 0.15523 tient, la configuration baissière reste valide.
Cliquez ici pour Trader 👇 $FF
{future}(FFUSDT)
$FF — Double top en formation au niveau de l’offre/du plafond 0.13879. Rebond baissier bientôt....
Plan de trading : Short $FF
Entrée : 0.132 - 0.138
SL : 0.15523
TP : 0.10536 | 0.08053 | 0.05336
Pourquoi cette configuration ?
Un double top se forme sous le plafond de l’offre 0.13879, montrant un rejet répété alors que les acheteurs ont du mal à pousser plus haut. Une cassure depuis cette zone pourrait déclencher une impulsion baissière vers 0.10536, suivie de 0.08053 et potentiellement de 0.05336. Tant que 0.15523 tient, la configuration baissière reste valide.
Cliquez ici pour Trader 👇 $FF
Plan de trading : Short $FF
Entrée : 0.132 - 0.138
SL : 0.15523
TP : 0.10536 | 0.08053 | 0.05336
Pourquoi cette configuration ?
Un double top se forme sous le plafond de l’offre 0.13879, montrant un rejet répété alors que les acheteurs ont du mal à pousser plus haut. Une cassure depuis cette zone pourrait déclencher une impulsion baissière vers 0.10536, suivie de 0.08053 et potentiellement de 0.05336. Tant que 0.15523 tient, la configuration baissière reste valide.
Cliquez ici pour Trader 👇 $FF
2
465
Connectez-vous pour découvrir plus de contenu
Rejoignez la communauté mondiale des adeptes de cryptomonnaies sur Binance Square
⚡️ Suviez les dernières informations importantes sur les cryptomonnaies.
💬 Jugé digne de confiance par la plus grande plateforme d’échange de cryptomonnaies au monde.
👍 Découvrez les connaissances que partagent les créateurs vérifiés.
Adresse e-mail/Nº de téléphone
Sujets d’actualité
CryptoLiquidations$674MIn24H
1,580 vues
36 mentions
#CryptoLiquidations$674MIn24H
La vague de liquidations de crypto de 674 millions de dollars a touché les deux côtés de la transaction.
Un rapport du 12 septembre de ChainCatcher, citant CoinGlass, indique que les liquidations s’élèvent à environ 674 millions de dollars sur les 24 heures précédentes :
Positions short : environ 381 millions de dollars.
Positions long : environ 292 millions de dollars.
Les shorts sur Ethereum représentaient environ 215 millions de dollars, constituant une part importante de ce panorama.
Les liquidations en short peuvent ajouter une pression à l’achat lorsque des positions baissières sont clôturées de force. Les liquidations en long peuvent ajouter une pression à la vente. Ces mécanismes peuvent amplifier les mouvements de prix dans les deux sens.
Mon analyse : le prochain mouvement nécessite une confirmation de la demande au comptant.
Avec des liquidations importantes des deux côtés, je ferais preuve de prudence avant de considérer une brusque hausse de prix comme une preuve que les acheteurs ont pris le contrôle.
Ce qui m’intéresse, c’est de savoir si les acheteurs continuent de soutenir le marché après le ralentissement des rachats forcés de shorts. Une reprise qui conserve ses gains, attire une activité spot durable et évite une reconstitution agressive du levier renforcerait ma confiance.
Si le open interest augmente rapidement tandis que le prix peine à avancer, je deviendrais plus prudent face à une nouvelle inversion.
Le chiffre des liquidations nous indique combien de positions ont été clôturées de force durant cette fenêtre. Pour évaluer le risque restant, il faut aussi examiner le positionnement actuel.
Qu’observez-vous le plus attentivement en ce moment : les achats spot, les taux de financement ou le open interest ?
#CryptoLiquidations #bitcoin #Ethereum #CryptoMarket
$LSK $VTHO $ETHFI
溪月 Xīyuè
·2 mentions J’aime
·271 vues
TokenizedStockHoldersUp619.1%
123 vues
29 mentions
RevolutConfirmsFakeGovEmailDataBreach
11,534 vues
329 mentions