
Max _ Hunter
14.7k Publications

Max _ Hunter
 Compte Square Vérifié+
Signaler
Bloquer l’utilisateur
Bull Market Hunter | Technical Analysis | AI Enthusiast
Ouvert au trading
Trade régulièrement
1.9 an(s)
318 Suivis
34.3K+ Abonnés
38.3K+ J’aime
Publications
Portefeuille
Tous
Citations
Vidéos
Direct
·
--
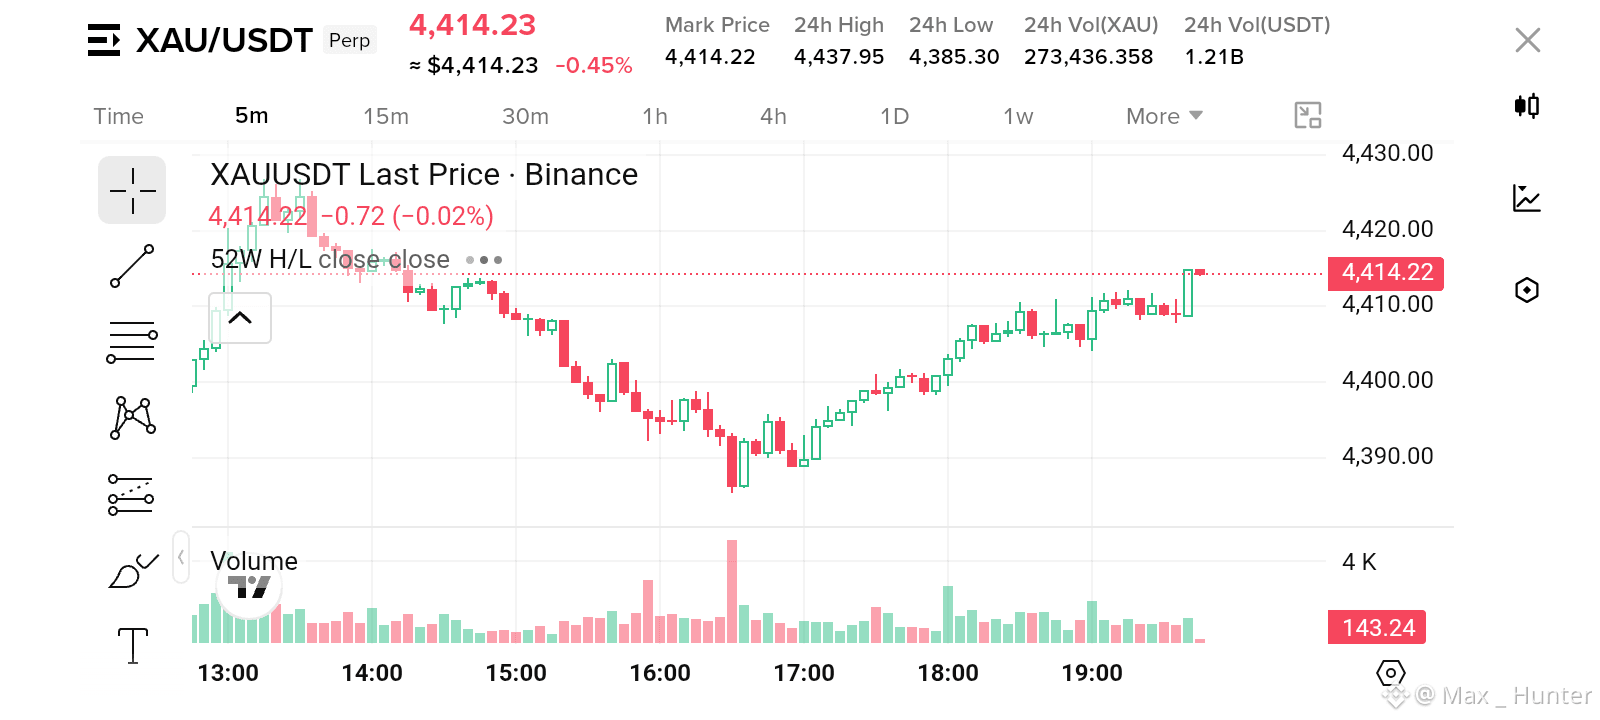
Rebond en V de Gold à partir du flush à 4390 : on dirait que les acheteurs sur repli ont remporté cette manche.
$XAUT USDT — LONG
Entrée : 4405.00 – 4414.00
SL : 4385.00
TP1 : 4420.00
TP2 : 4430.00
TP3 : 4437.95
⚠️ Analyse personnelle du marché uniquement. NFA — gérez le risque et faites votre propre recherche (DYOR). Contenu éducatif, pas un conseil en investissement ni une recommandation d’acheter, vendre, déposer ou retirer un quelconque actif. Pas de promotion payante, ni liens de parrainage/affiliation.
Je surveille l’or ici parce qu’après avoir touché le plus bas des dernières 24 h près de 4385, le prix a effectué une reprise en V nette, quasi ininterrompue, jusqu’à 4414 — ce type de reprise rapide indique généralement un achat agressif sur repli plutôt qu’un “dead-cat bounce” (rebond de mort). Sur le graphique 5m, le mouvement après le flush de 16:00 s’est accompagné d’une hausse de volume, et depuis, le prix progresse petit à petit avec des bougies maîtrisées, plutôt que de faire un spike puis de retomber. Le prix actuel de 4414 se situe juste au sommet de cette fourchette de reprise, juste sous les niveaux plus tôt dans la séance. Je ne prétends pas qu’une cassure propre vers de nouveaux plus hauts se produira immédiatement ; je constate surtout que le ratio risque/rendement ici — avec SL sous le plus bas à 4385 et TP2 proche de 4430 — favorise de rester long tant que le prix reste au-dessus de la zone médiane de la reprise, plutôt que de jouer un retour en arrière.
Penses-tu que l’or peut dépasser 4420+ et reprendre les plus hauts, ou doit-il d’abord retester la zone des 4400 avant le prochain mouvement ?
Rebond en V de Gold à partir du flush à 4390 : on dirait que les acheteurs sur repli ont remporté cette manche.
$XAUT USDT — LONG
Entrée : 4405.00 – 4414.00
SL : 4385.00
TP1 : 4420.00
TP2 : 4430.00
TP3 : 4437.95
⚠️ Analyse personnelle du marché uniquement. NFA — gérez le risque et faites votre propre recherche (DYOR). Contenu éducatif, pas un conseil en investissement ni une recommandation d’acheter, vendre, déposer ou retirer un quelconque actif. Pas de promotion payante, ni liens de parrainage/affiliation.
Je surveille l’or ici parce qu’après avoir touché le plus bas des dernières 24 h près de 4385, le prix a effectué une reprise en V nette, quasi ininterrompue, jusqu’à 4414 — ce type de reprise rapide indique généralement un achat agressif sur repli plutôt qu’un “dead-cat bounce” (rebond de mort). Sur le graphique 5m, le mouvement après le flush de 16:00 s’est accompagné d’une hausse de volume, et depuis, le prix progresse petit à petit avec des bougies maîtrisées, plutôt que de faire un spike puis de retomber. Le prix actuel de 4414 se situe juste au sommet de cette fourchette de reprise, juste sous les niveaux plus tôt dans la séance. Je ne prétends pas qu’une cassure propre vers de nouveaux plus hauts se produira immédiatement ; je constate surtout que le ratio risque/rendement ici — avec SL sous le plus bas à 4385 et TP2 proche de 4430 — favorise de rester long tant que le prix reste au-dessus de la zone médiane de la reprise, plutôt que de jouer un retour en arrière.
Penses-tu que l’or peut dépasser 4420+ et reprendre les plus hauts, ou doit-il d’abord retester la zone des 4400 avant le prochain mouvement ?
$XAUT USDT — LONG
Entrée : 4405.00 – 4414.00
SL : 4385.00
TP1 : 4420.00
TP2 : 4430.00
TP3 : 4437.95
⚠️ Analyse personnelle du marché uniquement. NFA — gérez le risque et faites votre propre recherche (DYOR). Contenu éducatif, pas un conseil en investissement ni une recommandation d’acheter, vendre, déposer ou retirer un quelconque actif. Pas de promotion payante, ni liens de parrainage/affiliation.
Je surveille l’or ici parce qu’après avoir touché le plus bas des dernières 24 h près de 4385, le prix a effectué une reprise en V nette, quasi ininterrompue, jusqu’à 4414 — ce type de reprise rapide indique généralement un achat agressif sur repli plutôt qu’un “dead-cat bounce” (rebond de mort). Sur le graphique 5m, le mouvement après le flush de 16:00 s’est accompagné d’une hausse de volume, et depuis, le prix progresse petit à petit avec des bougies maîtrisées, plutôt que de faire un spike puis de retomber. Le prix actuel de 4414 se situe juste au sommet de cette fourchette de reprise, juste sous les niveaux plus tôt dans la séance. Je ne prétends pas qu’une cassure propre vers de nouveaux plus hauts se produira immédiatement ; je constate surtout que le ratio risque/rendement ici — avec SL sous le plus bas à 4385 et TP2 proche de 4430 — favorise de rester long tant que le prix reste au-dessus de la zone médiane de la reprise, plutôt que de jouer un retour en arrière.
Penses-tu que l’or peut dépasser 4420+ et reprendre les plus hauts, ou doit-il d’abord retester la zone des 4400 avant le prochain mouvement ?
1
350
·
--
$ZEC affiche un momentum haussier après une liquidation de shorts de 1,7469 k$ autour de 1069,07 $.
Les acheteurs restent actifs tandis que les vendeurs tentent de stabiliser la zone de réaction actuelle.
EP
1062–1076 $
TP
TP1 1090 $
TP2 1115 $
TP3 1145 $
SL
1042 $
La liquidité reste exposée au-dessus de la structure actuelle tandis que les vendeurs restent sous pression.
À moins que le prix ne perde la zone de réaction inférieure, la poursuite haussière vers une liquidité plus élevée reste privilégiée.
Allons-y $ZEC 🟢
$ZEC affiche un momentum haussier après une liquidation de shorts de 1,7469 k$ autour de 1069,07 $.
Les acheteurs restent actifs tandis que les vendeurs tentent de stabiliser la zone de réaction actuelle.
EP
1062–1076 $
TP
TP1 1090 $
TP2 1115 $
TP3 1145 $
SL
1042 $
La liquidité reste exposée au-dessus de la structure actuelle tandis que les vendeurs restent sous pression.
À moins que le prix ne perde la zone de réaction inférieure, la poursuite haussière vers une liquidité plus élevée reste privilégiée.
Allons-y $ZEC 🟢
Les acheteurs restent actifs tandis que les vendeurs tentent de stabiliser la zone de réaction actuelle.
EP
1062–1076 $
TP
TP1 1090 $
TP2 1115 $
TP3 1145 $
SL
1042 $
La liquidité reste exposée au-dessus de la structure actuelle tandis que les vendeurs restent sous pression.
À moins que le prix ne perde la zone de réaction inférieure, la poursuite haussière vers une liquidité plus élevée reste privilégiée.
Allons-y $ZEC 🟢
232
·
--
$DEXE montre un momentum baissier après une liquidation longue de 4.9973K $ autour de 1.97222 $.
Les vendeurs restent actifs tandis que les acheteurs tentent de stabiliser la zone de réaction actuelle.
EP
1.955–1.985 $
TP
TP1 1.930 $
TP2 1.890 $
TP3 1.840 $
SL
2.025 $
La liquidité reste exposée sous la structure actuelle tandis que les acheteurs restent sous pression.
À moins que le prix ne regagne la zone de réaction supérieure, la poursuite baissière vers une liquidité inférieure reste privilégiée.
Allons-y $DEXE 🔻
$DEXE montre un momentum baissier après une liquidation longue de 4.9973K $ autour de 1.97222 $.
Les vendeurs restent actifs tandis que les acheteurs tentent de stabiliser la zone de réaction actuelle.
EP
1.955–1.985 $
TP
TP1 1.930 $
TP2 1.890 $
TP3 1.840 $
SL
2.025 $
La liquidité reste exposée sous la structure actuelle tandis que les acheteurs restent sous pression.
À moins que le prix ne regagne la zone de réaction supérieure, la poursuite baissière vers une liquidité inférieure reste privilégiée.
Allons-y $DEXE 🔻
Les vendeurs restent actifs tandis que les acheteurs tentent de stabiliser la zone de réaction actuelle.
EP
1.955–1.985 $
TP
TP1 1.930 $
TP2 1.890 $
TP3 1.840 $
SL
2.025 $
La liquidité reste exposée sous la structure actuelle tandis que les acheteurs restent sous pression.
À moins que le prix ne regagne la zone de réaction supérieure, la poursuite baissière vers une liquidité inférieure reste privilégiée.
Allons-y $DEXE 🔻
42
·
--
$NEAR affiche une dynamique baissière après une liquidation longue de 4.9662K $ autour de 2.182 $.
Les vendeurs restent actifs tandis que les acheteurs tentent de stabiliser la zone de réaction actuelle.
EP
2.165–2.195 $
TP
TP1 2.140 $
TP2 2.100 $
TP3 2.050 $
SL
2.230 $
La liquidité reste exposée sous la structure actuelle tandis que les acheteurs restent sous pression.
À moins que le prix ne reprenne la zone de réaction supérieure, la poursuite baissière vers une liquidité inférieure reste privilégiée.
Allons-y $NEAR 🔻
$NEAR affiche une dynamique baissière après une liquidation longue de 4.9662K $ autour de 2.182 $.
Les vendeurs restent actifs tandis que les acheteurs tentent de stabiliser la zone de réaction actuelle.
EP
2.165–2.195 $
TP
TP1 2.140 $
TP2 2.100 $
TP3 2.050 $
SL
2.230 $
La liquidité reste exposée sous la structure actuelle tandis que les acheteurs restent sous pression.
À moins que le prix ne reprenne la zone de réaction supérieure, la poursuite baissière vers une liquidité inférieure reste privilégiée.
Allons-y $NEAR 🔻
Les vendeurs restent actifs tandis que les acheteurs tentent de stabiliser la zone de réaction actuelle.
EP
2.165–2.195 $
TP
TP1 2.140 $
TP2 2.100 $
TP3 2.050 $
SL
2.230 $
La liquidité reste exposée sous la structure actuelle tandis que les acheteurs restent sous pression.
À moins que le prix ne reprenne la zone de réaction supérieure, la poursuite baissière vers une liquidité inférieure reste privilégiée.
Allons-y $NEAR 🔻
37
·
--
$ETH affiche une dynamique baissière après une liquidation longue de 2,0874 k$ autour de 2499,92 $.
Les vendeurs restent actifs tandis que les acheteurs tentent de stabiliser la zone de réaction actuelle.
EP
2488–2510 $
TP
TP1 2470 $
TP2 2445 $
TP3 2410 $
SL
2535 $
La liquidité reste exposée sous la structure actuelle tandis que les acheteurs restent sous pression.
À moins que le prix ne récupère la zone de réaction supérieure, la poursuite baissière vers une liquidité plus basse reste privilégiée.
Allons-y $ETH 🔻
$ETH affiche une dynamique baissière après une liquidation longue de 2,0874 k$ autour de 2499,92 $.
Les vendeurs restent actifs tandis que les acheteurs tentent de stabiliser la zone de réaction actuelle.
EP
2488–2510 $
TP
TP1 2470 $
TP2 2445 $
TP3 2410 $
SL
2535 $
La liquidité reste exposée sous la structure actuelle tandis que les acheteurs restent sous pression.
À moins que le prix ne récupère la zone de réaction supérieure, la poursuite baissière vers une liquidité plus basse reste privilégiée.
Allons-y $ETH 🔻
Les vendeurs restent actifs tandis que les acheteurs tentent de stabiliser la zone de réaction actuelle.
EP
2488–2510 $
TP
TP1 2470 $
TP2 2445 $
TP3 2410 $
SL
2535 $
La liquidité reste exposée sous la structure actuelle tandis que les acheteurs restent sous pression.
À moins que le prix ne récupère la zone de réaction supérieure, la poursuite baissière vers une liquidité plus basse reste privilégiée.
Allons-y $ETH 🔻
52
·
--
$XPL affiche une dynamique baissière après une liquidation longue de 3,6607 K $ autour de 0,0916 $.
Les vendeurs restent actifs tandis que les acheteurs tentent de stabiliser la zone de réaction actuelle.
EP
0,0912 $–0,0920 $
TP
TP1 0,0905 $
TP2 0,0895 $
TP3 0,0880 $
SL
0,0932 $
La liquidité reste exposée sous la structure actuelle tandis que les acheteurs restent sous pression.
À moins que le prix ne récupère la zone de réaction supérieure, la poursuite baissière vers une liquidité plus basse reste privilégiée.
Allons-y $XPL 🔻
$XPL affiche une dynamique baissière après une liquidation longue de 3,6607 K $ autour de 0,0916 $.
Les vendeurs restent actifs tandis que les acheteurs tentent de stabiliser la zone de réaction actuelle.
EP
0,0912 $–0,0920 $
TP
TP1 0,0905 $
TP2 0,0895 $
TP3 0,0880 $
SL
0,0932 $
La liquidité reste exposée sous la structure actuelle tandis que les acheteurs restent sous pression.
À moins que le prix ne récupère la zone de réaction supérieure, la poursuite baissière vers une liquidité plus basse reste privilégiée.
Allons-y $XPL 🔻
Les vendeurs restent actifs tandis que les acheteurs tentent de stabiliser la zone de réaction actuelle.
EP
0,0912 $–0,0920 $
TP
TP1 0,0905 $
TP2 0,0895 $
TP3 0,0880 $
SL
0,0932 $
La liquidité reste exposée sous la structure actuelle tandis que les acheteurs restent sous pression.
À moins que le prix ne récupère la zone de réaction supérieure, la poursuite baissière vers une liquidité plus basse reste privilégiée.
Allons-y $XPL 🔻
30
·
--
$ARC affiche une dynamique baissière après une liquidation longue de 1,5304 K $ autour de 0,18867 $.
Les vendeurs restent actifs tandis que les acheteurs tentent de stabiliser la zone de réaction actuelle.
EP
0,1870 $–0,1905 $
TP
TP1 0,1845 $
TP2 0,1810 $
TP3 0,1765 $
SL
0,1940 $
La liquidité reste exposée sous la structure actuelle tandis que les acheteurs restent sous pression.
À moins que le prix ne regagne la zone de réaction supérieure, la poursuite baissière vers une liquidité plus basse reste privilégiée.
C’est parti $ARC 🔻
$ARC affiche une dynamique baissière après une liquidation longue de 1,5304 K $ autour de 0,18867 $.
Les vendeurs restent actifs tandis que les acheteurs tentent de stabiliser la zone de réaction actuelle.
EP
0,1870 $–0,1905 $
TP
TP1 0,1845 $
TP2 0,1810 $
TP3 0,1765 $
SL
0,1940 $
La liquidité reste exposée sous la structure actuelle tandis que les acheteurs restent sous pression.
À moins que le prix ne regagne la zone de réaction supérieure, la poursuite baissière vers une liquidité plus basse reste privilégiée.
C’est parti $ARC 🔻
Les vendeurs restent actifs tandis que les acheteurs tentent de stabiliser la zone de réaction actuelle.
EP
0,1870 $–0,1905 $
TP
TP1 0,1845 $
TP2 0,1810 $
TP3 0,1765 $
SL
0,1940 $
La liquidité reste exposée sous la structure actuelle tandis que les acheteurs restent sous pression.
À moins que le prix ne regagne la zone de réaction supérieure, la poursuite baissière vers une liquidité plus basse reste privilégiée.
C’est parti $ARC 🔻
64
·
--
$ZK montre une dynamique baissière après une liquidation longue de $3.571K autour de $0.01003.
Les vendeurs restent actifs tandis que les acheteurs tentent de stabiliser la zone de réaction actuelle.
EP
$0.00995–$0.01010
TP
TP1 $0.00985
TP2 $0.00965
TP3 $0.00940
SL
$0.01025
La liquidité reste exposée sous la structure actuelle tandis que les acheteurs restent sous pression.
À moins que le prix ne récupère la zone de réaction supérieure, la poursuite baissière vers une liquidité plus basse reste privilégiée.
Allons-y $ZKC 🔻
$ZK montre une dynamique baissière après une liquidation longue de $3.571K autour de $0.01003.
Les vendeurs restent actifs tandis que les acheteurs tentent de stabiliser la zone de réaction actuelle.
EP
$0.00995–$0.01010
TP
TP1 $0.00985
TP2 $0.00965
TP3 $0.00940
SL
$0.01025
La liquidité reste exposée sous la structure actuelle tandis que les acheteurs restent sous pression.
À moins que le prix ne récupère la zone de réaction supérieure, la poursuite baissière vers une liquidité plus basse reste privilégiée.
Allons-y $ZKC 🔻
Les vendeurs restent actifs tandis que les acheteurs tentent de stabiliser la zone de réaction actuelle.
EP
$0.00995–$0.01010
TP
TP1 $0.00985
TP2 $0.00965
TP3 $0.00940
SL
$0.01025
La liquidité reste exposée sous la structure actuelle tandis que les acheteurs restent sous pression.
À moins que le prix ne récupère la zone de réaction supérieure, la poursuite baissière vers une liquidité plus basse reste privilégiée.
Allons-y $ZKC 🔻
109
·
--
$USELESS affiche une dynamique haussière après une liquidation short de 4,8218 k$ autour de 0,24676 $.
Les acheteurs restent actifs tandis que les vendeurs tentent de stabiliser la zone de réaction actuelle.
EP
0,244–0,249 $
TP
TP1 0,253 $
TP2 0,258 $
TP3 0,266 $
SL
0,239 $
La liquidité reste exposée au-dessus de la structure actuelle tandis que les vendeurs restent sous pression.
À moins que le prix ne perde la zone de réaction inférieure, la poursuite haussière vers une liquidité plus élevée reste privilégiée.
Allons-y $USELESS 🟢
$USELESS affiche une dynamique haussière après une liquidation short de 4,8218 k$ autour de 0,24676 $.
Les acheteurs restent actifs tandis que les vendeurs tentent de stabiliser la zone de réaction actuelle.
EP
0,244–0,249 $
TP
TP1 0,253 $
TP2 0,258 $
TP3 0,266 $
SL
0,239 $
La liquidité reste exposée au-dessus de la structure actuelle tandis que les vendeurs restent sous pression.
À moins que le prix ne perde la zone de réaction inférieure, la poursuite haussière vers une liquidité plus élevée reste privilégiée.
Allons-y $USELESS 🟢
Les acheteurs restent actifs tandis que les vendeurs tentent de stabiliser la zone de réaction actuelle.
EP
0,244–0,249 $
TP
TP1 0,253 $
TP2 0,258 $
TP3 0,266 $
SL
0,239 $
La liquidité reste exposée au-dessus de la structure actuelle tandis que les vendeurs restent sous pression.
À moins que le prix ne perde la zone de réaction inférieure, la poursuite haussière vers une liquidité plus élevée reste privilégiée.
Allons-y $USELESS 🟢
40
·
--
$BCH affiche un momentum baissier après une liquidation longue de 1,2212 K $ autour de 259,38 $.
Les vendeurs restent actifs tandis que les acheteurs tentent de stabiliser la zone de réaction actuelle.
EP
257–261 $
TP
TP1 255 $
TP2 252 $
TP3 248 $
SL
264 $
La liquidité reste exposée sous la structure actuelle tandis que les acheteurs restent sous pression.
À moins que le prix ne reprenne la zone de réaction supérieure, la poursuite baissière vers une liquidité plus basse reste privilégiée.
C’est parti $BCH 🔻
$BCH affiche un momentum baissier après une liquidation longue de 1,2212 K $ autour de 259,38 $.
Les vendeurs restent actifs tandis que les acheteurs tentent de stabiliser la zone de réaction actuelle.
EP
257–261 $
TP
TP1 255 $
TP2 252 $
TP3 248 $
SL
264 $
La liquidité reste exposée sous la structure actuelle tandis que les acheteurs restent sous pression.
À moins que le prix ne reprenne la zone de réaction supérieure, la poursuite baissière vers une liquidité plus basse reste privilégiée.
C’est parti $BCH 🔻
Les vendeurs restent actifs tandis que les acheteurs tentent de stabiliser la zone de réaction actuelle.
EP
257–261 $
TP
TP1 255 $
TP2 252 $
TP3 248 $
SL
264 $
La liquidité reste exposée sous la structure actuelle tandis que les acheteurs restent sous pression.
À moins que le prix ne reprenne la zone de réaction supérieure, la poursuite baissière vers une liquidité plus basse reste privilégiée.
C’est parti $BCH 🔻
36
·
--
$COLLECT montre une dynamique baissière après une liquidation longue de 2,6569K $ autour de 0,05314 $.
Les vendeurs restent actifs tandis que les acheteurs tentent de stabiliser la zone de réaction actuelle.
EP
0,0528 $–0,0535 $
TP
TP1 0,0520 $
TP2 0,0508 $
TP3 0,0495 $
SL
0,0545 $
La liquidité reste exposée sous la structure actuelle tandis que les acheteurs restent sous pression.
À moins que le prix ne récupère la zone de réaction supérieure, la poursuite baissière vers une liquidité plus basse reste privilégiée.
Allons-y $COLLECT 🔻
$COLLECT montre une dynamique baissière après une liquidation longue de 2,6569K $ autour de 0,05314 $.
Les vendeurs restent actifs tandis que les acheteurs tentent de stabiliser la zone de réaction actuelle.
EP
0,0528 $–0,0535 $
TP
TP1 0,0520 $
TP2 0,0508 $
TP3 0,0495 $
SL
0,0545 $
La liquidité reste exposée sous la structure actuelle tandis que les acheteurs restent sous pression.
À moins que le prix ne récupère la zone de réaction supérieure, la poursuite baissière vers une liquidité plus basse reste privilégiée.
Allons-y $COLLECT 🔻
Les vendeurs restent actifs tandis que les acheteurs tentent de stabiliser la zone de réaction actuelle.
EP
0,0528 $–0,0535 $
TP
TP1 0,0520 $
TP2 0,0508 $
TP3 0,0495 $
SL
0,0545 $
La liquidité reste exposée sous la structure actuelle tandis que les acheteurs restent sous pression.
À moins que le prix ne récupère la zone de réaction supérieure, la poursuite baissière vers une liquidité plus basse reste privilégiée.
Allons-y $COLLECT 🔻
33
·
--
$GRT affiche une dynamique baissière après une liquidation longue de 1,1583 k$ autour de 0,01861 $.
Les vendeurs restent actifs tandis que les acheteurs tentent de stabiliser la zone de réaction actuelle.
EP
0,01845 $–0,01875 $
TP
TP1 0,01825 $
TP2 0,01790 $
TP3 0,01745 $
SL
0,01910 $
La liquidité reste exposée sous la structure actuelle tandis que les acheteurs restent sous pression.
À moins que le prix ne reconquière la zone de réaction supérieure, la poursuite baissière vers une liquidité plus basse reste privilégiée.
Allons-y $GRT 🔻
$GRT affiche une dynamique baissière après une liquidation longue de 1,1583 k$ autour de 0,01861 $.
Les vendeurs restent actifs tandis que les acheteurs tentent de stabiliser la zone de réaction actuelle.
EP
0,01845 $–0,01875 $
TP
TP1 0,01825 $
TP2 0,01790 $
TP3 0,01745 $
SL
0,01910 $
La liquidité reste exposée sous la structure actuelle tandis que les acheteurs restent sous pression.
À moins que le prix ne reconquière la zone de réaction supérieure, la poursuite baissière vers une liquidité plus basse reste privilégiée.
Allons-y $GRT 🔻
Les vendeurs restent actifs tandis que les acheteurs tentent de stabiliser la zone de réaction actuelle.
EP
0,01845 $–0,01875 $
TP
TP1 0,01825 $
TP2 0,01790 $
TP3 0,01745 $
SL
0,01910 $
La liquidité reste exposée sous la structure actuelle tandis que les acheteurs restent sous pression.
À moins que le prix ne reconquière la zone de réaction supérieure, la poursuite baissière vers une liquidité plus basse reste privilégiée.
Allons-y $GRT 🔻
59
·
--
$TRIA affiche une dynamique baissière après une liquidation longue de 1,7582 k$ autour de 0,00445 $.
Les vendeurs restent actifs tandis que les acheteurs tentent de stabiliser la zone de réaction actuelle.
EP
0,00440 $–0,00450 $
TP
TP1 0,00432 $
TP2 0,00420 $
TP3 0,00405 $
SL
0,00462 $
La liquidité reste exposée sous la structure actuelle tandis que les acheteurs restent sous pression.
À moins que le prix ne reprenne la zone de réaction supérieure, la poursuite baissière vers une liquidité plus basse reste privilégiée.
Allons-y $TRIA 🔻
$TRIA affiche une dynamique baissière après une liquidation longue de 1,7582 k$ autour de 0,00445 $.
Les vendeurs restent actifs tandis que les acheteurs tentent de stabiliser la zone de réaction actuelle.
EP
0,00440 $–0,00450 $
TP
TP1 0,00432 $
TP2 0,00420 $
TP3 0,00405 $
SL
0,00462 $
La liquidité reste exposée sous la structure actuelle tandis que les acheteurs restent sous pression.
À moins que le prix ne reprenne la zone de réaction supérieure, la poursuite baissière vers une liquidité plus basse reste privilégiée.
Allons-y $TRIA 🔻
Les vendeurs restent actifs tandis que les acheteurs tentent de stabiliser la zone de réaction actuelle.
EP
0,00440 $–0,00450 $
TP
TP1 0,00432 $
TP2 0,00420 $
TP3 0,00405 $
SL
0,00462 $
La liquidité reste exposée sous la structure actuelle tandis que les acheteurs restent sous pression.
À moins que le prix ne reprenne la zone de réaction supérieure, la poursuite baissière vers une liquidité plus basse reste privilégiée.
Allons-y $TRIA 🔻
145
·
--
$UAI affiche une dynamique baissière après une liquidation longue de 1,2745K $ autour de 0,55681 $.
Les vendeurs restent actifs tandis que les acheteurs tentent de stabiliser la zone de réaction actuelle.
EP
0,553–0,561 $
TP
TP1 0,548 $
TP2 0,540 $
TP3 0,528 $
SL
0,570 $
La liquidité reste exposée sous la structure actuelle tandis que les acheteurs restent sous pression.
Tant que le prix ne reprend pas la zone de réaction supérieure, la poursuite baissière vers une liquidité plus basse reste privilégiée.
Allons-y $UAI 🔻
$UAI affiche une dynamique baissière après une liquidation longue de 1,2745K $ autour de 0,55681 $.
Les vendeurs restent actifs tandis que les acheteurs tentent de stabiliser la zone de réaction actuelle.
EP
0,553–0,561 $
TP
TP1 0,548 $
TP2 0,540 $
TP3 0,528 $
SL
0,570 $
La liquidité reste exposée sous la structure actuelle tandis que les acheteurs restent sous pression.
Tant que le prix ne reprend pas la zone de réaction supérieure, la poursuite baissière vers une liquidité plus basse reste privilégiée.
Allons-y $UAI 🔻
Les vendeurs restent actifs tandis que les acheteurs tentent de stabiliser la zone de réaction actuelle.
EP
0,553–0,561 $
TP
TP1 0,548 $
TP2 0,540 $
TP3 0,528 $
SL
0,570 $
La liquidité reste exposée sous la structure actuelle tandis que les acheteurs restent sous pression.
Tant que le prix ne reprend pas la zone de réaction supérieure, la poursuite baissière vers une liquidité plus basse reste privilégiée.
Allons-y $UAI 🔻
155
·
--
$RAYSOL affiche un momentum baissier après une liquidation longue de 1.3386K $ autour de 1.15192 $.
Les vendeurs restent actifs tandis que les acheteurs tentent de stabiliser la zone de réaction actuelle.
EP
1.145–1.160 $
TP
TP1 1.135 $
TP2 1.115 $
TP3 1.085 $
SL
1.185 $
La liquidité reste exposée sous la structure actuelle tandis que les acheteurs restent sous pression.
À moins que le prix ne récupère la zone de réaction supérieure, la poursuite baissière vers une liquidité plus basse reste privilégiée.
Allons-y $RAYSOL 🔻
$RAYSOL affiche un momentum baissier après une liquidation longue de 1.3386K $ autour de 1.15192 $.
Les vendeurs restent actifs tandis que les acheteurs tentent de stabiliser la zone de réaction actuelle.
EP
1.145–1.160 $
TP
TP1 1.135 $
TP2 1.115 $
TP3 1.085 $
SL
1.185 $
La liquidité reste exposée sous la structure actuelle tandis que les acheteurs restent sous pression.
À moins que le prix ne récupère la zone de réaction supérieure, la poursuite baissière vers une liquidité plus basse reste privilégiée.
Allons-y $RAYSOL 🔻
Les vendeurs restent actifs tandis que les acheteurs tentent de stabiliser la zone de réaction actuelle.
EP
1.145–1.160 $
TP
TP1 1.135 $
TP2 1.115 $
TP3 1.085 $
SL
1.185 $
La liquidité reste exposée sous la structure actuelle tandis que les acheteurs restent sous pression.
À moins que le prix ne récupère la zone de réaction supérieure, la poursuite baissière vers une liquidité plus basse reste privilégiée.
Allons-y $RAYSOL 🔻
108
·
--
$STAR montre une dynamique baissière après une liquidation longue de 2.5772K $ autour de 0.08741 $.
Les vendeurs restent actifs tandis que les acheteurs tentent de stabiliser la zone de réaction actuelle.
EP
0.0870 $–0.0878 $
TP
TP1 0.0864 $
TP2 0.0855 $
TP3 0.0840 $
SL
0.0888 $
La liquidité reste exposée sous la structure actuelle tandis que les acheteurs restent sous pression.
Tant que le prix ne reprend pas la zone de réaction supérieure, la poursuite baissière vers une liquidité plus basse reste privilégiée.
Allons-y $STAR 🔻
$STAR montre une dynamique baissière après une liquidation longue de 2.5772K $ autour de 0.08741 $.
Les vendeurs restent actifs tandis que les acheteurs tentent de stabiliser la zone de réaction actuelle.
EP
0.0870 $–0.0878 $
TP
TP1 0.0864 $
TP2 0.0855 $
TP3 0.0840 $
SL
0.0888 $
La liquidité reste exposée sous la structure actuelle tandis que les acheteurs restent sous pression.
Tant que le prix ne reprend pas la zone de réaction supérieure, la poursuite baissière vers une liquidité plus basse reste privilégiée.
Allons-y $STAR 🔻
Les vendeurs restent actifs tandis que les acheteurs tentent de stabiliser la zone de réaction actuelle.
EP
0.0870 $–0.0878 $
TP
TP1 0.0864 $
TP2 0.0855 $
TP3 0.0840 $
SL
0.0888 $
La liquidité reste exposée sous la structure actuelle tandis que les acheteurs restent sous pression.
Tant que le prix ne reprend pas la zone de réaction supérieure, la poursuite baissière vers une liquidité plus basse reste privilégiée.
Allons-y $STAR 🔻
147
·
--
$DASH montre une dynamique baissière après une liquidation longue de 1,3532 K $ autour de 68,41 $.
Les vendeurs restent actifs tandis que les acheteurs tentent de stabiliser la zone de réaction actuelle.
EP
68,00 $–68,80 $
TP
TP1 67,40 $
TP2 66,50 $
TP3 65,20 $
SL
69,60 $
La liquidité reste exposée sous la structure actuelle tandis que les acheteurs restent sous pression.
À moins que le prix ne regagne la zone de réaction supérieure, la poursuite baissière vers une liquidité plus basse reste privilégiée.
C’est parti pour $DASH 🔻
$DASH montre une dynamique baissière après une liquidation longue de 1,3532 K $ autour de 68,41 $.
Les vendeurs restent actifs tandis que les acheteurs tentent de stabiliser la zone de réaction actuelle.
EP
68,00 $–68,80 $
TP
TP1 67,40 $
TP2 66,50 $
TP3 65,20 $
SL
69,60 $
La liquidité reste exposée sous la structure actuelle tandis que les acheteurs restent sous pression.
À moins que le prix ne regagne la zone de réaction supérieure, la poursuite baissière vers une liquidité plus basse reste privilégiée.
C’est parti pour $DASH 🔻
Les vendeurs restent actifs tandis que les acheteurs tentent de stabiliser la zone de réaction actuelle.
EP
68,00 $–68,80 $
TP
TP1 67,40 $
TP2 66,50 $
TP3 65,20 $
SL
69,60 $
La liquidité reste exposée sous la structure actuelle tandis que les acheteurs restent sous pression.
À moins que le prix ne regagne la zone de réaction supérieure, la poursuite baissière vers une liquidité plus basse reste privilégiée.
C’est parti pour $DASH 🔻
61
·
--
$ZEN montre une dynamique baissière après une liquidation longue de 8.8661K $ autour de 6.985 $.
Les vendeurs restent actifs tandis que les acheteurs tentent de stabiliser la zone de réaction actuelle.
EP
6.94 $–7.03 $
TP
TP1 6.88 $
TP2 6.75 $
TP3 6.58 $
SL
7.18 $
La liquidité reste exposée sous la structure actuelle tandis que les acheteurs restent sous pression.
À moins que le prix ne reconquière la zone de réaction supérieure, la poursuite baissière vers une liquidité plus basse reste privilégiée.
Allons-y $ZEN 🔻
$ZEN montre une dynamique baissière après une liquidation longue de 8.8661K $ autour de 6.985 $.
Les vendeurs restent actifs tandis que les acheteurs tentent de stabiliser la zone de réaction actuelle.
EP
6.94 $–7.03 $
TP
TP1 6.88 $
TP2 6.75 $
TP3 6.58 $
SL
7.18 $
La liquidité reste exposée sous la structure actuelle tandis que les acheteurs restent sous pression.
À moins que le prix ne reconquière la zone de réaction supérieure, la poursuite baissière vers une liquidité plus basse reste privilégiée.
Allons-y $ZEN 🔻
Les vendeurs restent actifs tandis que les acheteurs tentent de stabiliser la zone de réaction actuelle.
EP
6.94 $–7.03 $
TP
TP1 6.88 $
TP2 6.75 $
TP3 6.58 $
SL
7.18 $
La liquidité reste exposée sous la structure actuelle tandis que les acheteurs restent sous pression.
À moins que le prix ne reconquière la zone de réaction supérieure, la poursuite baissière vers une liquidité plus basse reste privilégiée.
Allons-y $ZEN 🔻
71
·
--
$BOME montre une dynamique haussière après une liquidation courte de 4,7819 K$ autour de 0,001 $.
Les acheteurs restent actifs tandis que les vendeurs tentent de stabiliser la zone de réaction actuelle.
EP
0,000995–0,00101 $
TP
TP1 0,00103 $
TP2 0,00106 $
TP3 0,00110 $
SL
0,000975 $
La liquidité reste exposée au-dessus de la structure actuelle tandis que les vendeurs restent sous pression.
À moins que le prix ne perde la zone de réaction inférieure, la poursuite haussière vers une liquidité plus élevée reste privilégiée.
Allons-y $BOME 🟢
$BOME montre une dynamique haussière après une liquidation courte de 4,7819 K$ autour de 0,001 $.
Les acheteurs restent actifs tandis que les vendeurs tentent de stabiliser la zone de réaction actuelle.
EP
0,000995–0,00101 $
TP
TP1 0,00103 $
TP2 0,00106 $
TP3 0,00110 $
SL
0,000975 $
La liquidité reste exposée au-dessus de la structure actuelle tandis que les vendeurs restent sous pression.
À moins que le prix ne perde la zone de réaction inférieure, la poursuite haussière vers une liquidité plus élevée reste privilégiée.
Allons-y $BOME 🟢
Les acheteurs restent actifs tandis que les vendeurs tentent de stabiliser la zone de réaction actuelle.
EP
0,000995–0,00101 $
TP
TP1 0,00103 $
TP2 0,00106 $
TP3 0,00110 $
SL
0,000975 $
La liquidité reste exposée au-dessus de la structure actuelle tandis que les vendeurs restent sous pression.
À moins que le prix ne perde la zone de réaction inférieure, la poursuite haussière vers une liquidité plus élevée reste privilégiée.
Allons-y $BOME 🟢
115
·
--
$BOMEUSDC montre une dynamique haussière après une liquidation short de $4.7375K autour de $0.00101.
Les acheteurs restent actifs tandis que les vendeurs tentent de stabiliser la zone de réaction actuelle.
EP
$0.00100–$0.00102
TP
TP1 $0.00104
TP2 $0.00107
TP3 $0.00111
SL
$0.00098
La liquidité reste exposée au-dessus de la structure actuelle tandis que les vendeurs restent sous pression.
À moins que le prix ne perde la zone de réaction inférieure, la poursuite haussière vers une liquidité plus élevée reste privilégiée.
Allons-y $BOME USDC 🟢
$BOMEUSDC montre une dynamique haussière après une liquidation short de $4.7375K autour de $0.00101.
Les acheteurs restent actifs tandis que les vendeurs tentent de stabiliser la zone de réaction actuelle.
EP
$0.00100–$0.00102
TP
TP1 $0.00104
TP2 $0.00107
TP3 $0.00111
SL
$0.00098
La liquidité reste exposée au-dessus de la structure actuelle tandis que les vendeurs restent sous pression.
À moins que le prix ne perde la zone de réaction inférieure, la poursuite haussière vers une liquidité plus élevée reste privilégiée.
Allons-y $BOME USDC 🟢
Les acheteurs restent actifs tandis que les vendeurs tentent de stabiliser la zone de réaction actuelle.
EP
$0.00100–$0.00102
TP
TP1 $0.00104
TP2 $0.00107
TP3 $0.00111
SL
$0.00098
La liquidité reste exposée au-dessus de la structure actuelle tandis que les vendeurs restent sous pression.
À moins que le prix ne perde la zone de réaction inférieure, la poursuite haussière vers une liquidité plus élevée reste privilégiée.
Allons-y $BOME USDC 🟢
133
Connectez-vous pour découvrir plus de contenu
Rejoignez la communauté mondiale des adeptes de cryptomonnaies sur Binance Square
⚡️ Suviez les dernières informations importantes sur les cryptomonnaies.
💬 Jugé digne de confiance par la plus grande plateforme d’échange de cryptomonnaies au monde.
👍 Découvrez les connaissances que partagent les créateurs vérifiés.
Adresse e-mail/Nº de téléphone
Sujets d’actualité
SECReceivesGrayscaleLitecoinTrustETFFiling
1,544 vues
81 mentions
💎 L’attention institutionnelle atteint Litecoin
Le dépôt de l’ETF de Grayscale a placé le $LTC dans une conversation plus large. Pour les traders au comptant, des évolutions comme celle-ci sont un rappel d’étudier les actifs solides avant toute entrée.
#secreceivesgrayscalelitecointrustetffiling
CryptoMahibaloch
·1 mentions J’aime
·334 vues
ClarityActFacesProceduralVoteSept15
83,521 vues
1,051 mentions
US10YearTreasuryYieldNears5%
30,277 vues
541 mentions