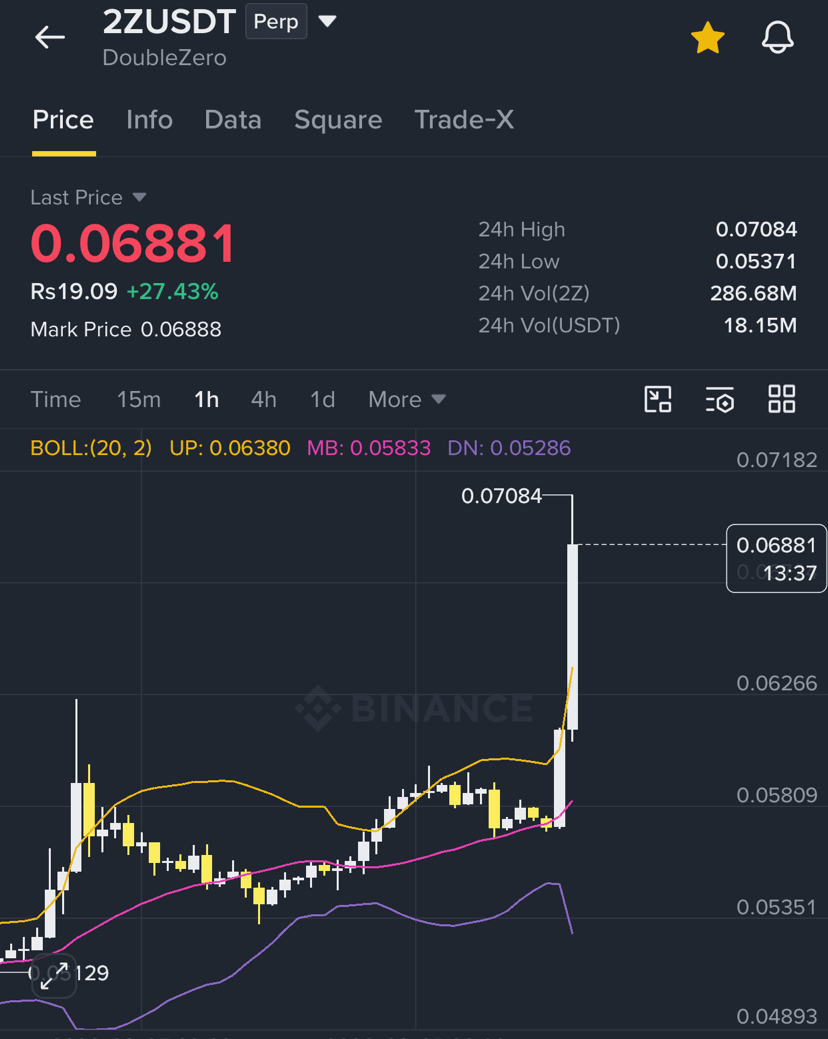
When trading a breakout scenario on $2Z /USDT around the key 0.070 resistance level, structural confirmation and strict risk management are critical.
Technical Breakout Framework: 2ZUSDT @ 0.070
A clean move above 0.070 shifts market structure from range consolidation to dynamic expansion.
TP3: 0.0910+ (Major Horizontal Resistance)
TP2: 0.0815
TP1: 0.0750
[BREAKOUT] 0.0700 (4H Candle Close + High Volume)
ENTRY: 0.0665 – 0.0705 (Retest / Breakout Zone)
│
STOP LOSS: 0.0619 (Below Local Reclaim Support)
2ZUSDT Trade Setup
Trigger Condition (Confirmation First):
Do not anticipate the breakout prematurely. Wait for a 4-hour candle close above 0.0700 accompanied by above-average volume.
Alternative Entry: Enter on a retest of the 0.0665 – 0.0700 zone as flipped support after the initial impulse.
Key Level Parameters:
Target 1 (TP1): 0.0750 (Quick 1st scale-out / risk reduction)
Target 2 (TP2): 0.0815 (Intermediate structural pivot)
Target 3 (TP3): 0.0910 (Major daily horizontal supply zone)
Stop Loss (SL): 0.0619 (Invalidation level tucked below local support structure)
TradingView
Risk Profile & Execution Rules:
Position Sizing: Risk no more than 1%–2% of your total account equity on this trade.
Take-Profit Strategy: Lock in partial profits (e.g., 30–50% of position) at TP1 and move your Stop Loss to entry (breakeven) to ensure a risk-free trade.
Invalidation: A daily closing candle below 0.0620 completely invalidates the bullish structure.
Technical Breakout Framework: 2ZUSDT @ 0.070
A clean move above 0.070 shifts market structure from range consolidation to dynamic expansion.
TP3: 0.0910+ (Major Horizontal Resistance)
TP2: 0.0815
TP1: 0.0750
[BREAKOUT] 0.0700 (4H Candle Close + High Volume)
ENTRY: 0.0665 – 0.0705 (Retest / Breakout Zone)
│
STOP LOSS: 0.0619 (Below Local Reclaim Support)
2ZUSDT Trade Setup
Trigger Condition (Confirmation First):
Do not anticipate the breakout prematurely. Wait for a 4-hour candle close above 0.0700 accompanied by above-average volume.
Alternative Entry: Enter on a retest of the 0.0665 – 0.0700 zone as flipped support after the initial impulse.
Key Level Parameters:
Target 1 (TP1): 0.0750 (Quick 1st scale-out / risk reduction)
Target 2 (TP2): 0.0815 (Intermediate structural pivot)
Target 3 (TP3): 0.0910 (Major daily horizontal supply zone)
Stop Loss (SL): 0.0619 (Invalidation level tucked below local support structure)
TradingView
Risk Profile & Execution Rules:
Position Sizing: Risk no more than 1%–2% of your total account equity on this trade.
Take-Profit Strategy: Lock in partial profits (e.g., 30–50% of position) at TP1 and move your Stop Loss to entry (breakeven) to ensure a risk-free trade.
Invalidation: A daily closing candle below 0.0620 completely invalidates the bullish structure.