
CryptoGuru12
35.6k Publicaciones

CryptoGuru12
 Verificado Plus de Binance Square
Denunciar
Bloquear usuario
Crypto Analyzer | Promoter | Trader | Crypto News | Marketer | x.com/Cryptoguruu_12
Abrir trade
Trader frecuente
4 año(s)
164 Siguiendo
144.4K+ Seguidores
170.7K+ Me gusta
Publicaciones
Cartera
Todo
Citas
Videos
Live
·
--
Alcista
$ACU Reclama Soporte ...Configuración de Rebote Fuerte Formándose
#ACU ha rebotado desde la zona de soporte de $0.117–$0.120 después de la fuerte caída, y las últimas velas muestran que los compradores vuelven a entrar. El precio ahora está recuperando la zona de $0.121, y si esta recuperación continúa, el gráfico tiene margen hacia los niveles de resistencia más altos.
CONFIGURACIÓN DE OPERACIÓN LARGA
Entrada: 0.1212 – 0.1240
TP1: 0.1280
TP2: 0.1350
TP3: 0.1450
TP final: 0.1540
SL: 0.1129
Invalidación: Movimiento sostenido por debajo de 0.1129.
Compra y Opera
{future}(ACUUSDT)
$ZEC
{future}(ZECUSDT)
$DOT
{future}(DOTUSDT)
$ACU Reclama Soporte ...Configuración de Rebote Fuerte Formándose
#ACU ha rebotado desde la zona de soporte de $0.117–$0.120 después de la fuerte caída, y las últimas velas muestran que los compradores vuelven a entrar. El precio ahora está recuperando la zona de $0.121, y si esta recuperación continúa, el gráfico tiene margen hacia los niveles de resistencia más altos.
CONFIGURACIÓN DE OPERACIÓN LARGA
Entrada: 0.1212 – 0.1240
TP1: 0.1280
TP2: 0.1350
TP3: 0.1450
TP final: 0.1540
SL: 0.1129
Invalidación: Movimiento sostenido por debajo de 0.1129.
Compra y Opera
$ZEC
$DOT
#ACU ha rebotado desde la zona de soporte de $0.117–$0.120 después de la fuerte caída, y las últimas velas muestran que los compradores vuelven a entrar. El precio ahora está recuperando la zona de $0.121, y si esta recuperación continúa, el gráfico tiene margen hacia los niveles de resistencia más altos.
CONFIGURACIÓN DE OPERACIÓN LARGA
Entrada: 0.1212 – 0.1240
TP1: 0.1280
TP2: 0.1350
TP3: 0.1450
TP final: 0.1540
SL: 0.1129
Invalidación: Movimiento sostenido por debajo de 0.1129.
Compra y Opera
$ZEC
$DOT


1
121
·
--
Bajista
$SOXS Rechazado desde la resistencia de $48 — Los vendedores toman el control
#SOXS ha enfrentado un fuerte rechazo desde la zona de resistencia de $47.80–$48.00, y la última vela 4H está volviéndose bajista. #SOXS Si el precio se mantiene por debajo de $46.20–$46.50, el rechazo actual podría extenderse hacia los niveles de soporte cercanos.
CONFIGURACIÓN DE OPERACIÓN CORTA
Entrada: 46.00 – 46.50
TP1: 45.40
TP2: 44.70
TP final: 44.00
SL: 47.80
Invalidación: Movimiento sostenido por encima de 47.80.
Vender y operar
{future}(SOXSUSDT)
$ZEC
{future}(ZECUSDT)
$DEXE
{future}(DEXEUSDT)
$SOXS Rechazado desde la resistencia de $48 — Los vendedores toman el control
#SOXS ha enfrentado un fuerte rechazo desde la zona de resistencia de $47.80–$48.00, y la última vela 4H está volviéndose bajista. #SOXS Si el precio se mantiene por debajo de $46.20–$46.50, el rechazo actual podría extenderse hacia los niveles de soporte cercanos.
CONFIGURACIÓN DE OPERACIÓN CORTA
Entrada: 46.00 – 46.50
TP1: 45.40
TP2: 44.70
TP final: 44.00
SL: 47.80
Invalidación: Movimiento sostenido por encima de 47.80.
Vender y operar
$ZEC
$DEXE
#SOXS ha enfrentado un fuerte rechazo desde la zona de resistencia de $47.80–$48.00, y la última vela 4H está volviéndose bajista. #SOXS Si el precio se mantiene por debajo de $46.20–$46.50, el rechazo actual podría extenderse hacia los niveles de soporte cercanos.
CONFIGURACIÓN DE OPERACIÓN CORTA
Entrada: 46.00 – 46.50
TP1: 45.40
TP2: 44.70
TP final: 44.00
SL: 47.80
Invalidación: Movimiento sostenido por encima de 47.80.
Vender y operar
$ZEC
$DEXE

2
135
·
--
Alcista
Chicos.....‼️ $SPORTFUN ha alcanzado una zona de reversión de alta probabilidad, y la estructura alcista está empezando a tomar forma. Después de analizar el gráfico de 4H, esta configuración LONG parece interesante porque los compradores reaccionaron con fuerza desde el área de $0.0172 y el precio ahora se está recuperando hacia $0.0183.
Como pueden ver, los compradores están defendiendo el mínimo reciente y construyendo una recuperación después de la fuerte caída. Si se recupera limpiamente el rango de $0.0185 - $0.0190, la continuación alcista puede empujar hacia $0.0200 y más. Esta configuración sigue siendo válida mientras se mantenga el soporte reciente alrededor de $0.0172.
El siguiente objetivo para
{future}(SPORTFUNUSDT)
InShaAllah, es $0.0200+.....‼️
$ZEC
{future}(ZECUSDT)
$BANK
{future}(BANKUSDT)
Chicos.....‼️ $SPORTFUN ha alcanzado una zona de reversión de alta probabilidad, y la estructura alcista está empezando a tomar forma. Después de analizar el gráfico de 4H, esta configuración LONG parece interesante porque los compradores reaccionaron con fuerza desde el área de $0.0172 y el precio ahora se está recuperando hacia $0.0183.
Como pueden ver, los compradores están defendiendo el mínimo reciente y construyendo una recuperación después de la fuerte caída. Si se recupera limpiamente el rango de $0.0185 - $0.0190, la continuación alcista puede empujar hacia $0.0200 y más. Esta configuración sigue siendo válida mientras se mantenga el soporte reciente alrededor de $0.0172.
El siguiente objetivo para
InShaAllah, es $0.0200+.....‼️
$ZEC
$BANK
Como pueden ver, los compradores están defendiendo el mínimo reciente y construyendo una recuperación después de la fuerte caída. Si se recupera limpiamente el rango de $0.0185 - $0.0190, la continuación alcista puede empujar hacia $0.0200 y más. Esta configuración sigue siendo válida mientras se mantenga el soporte reciente alrededor de $0.0172.
El siguiente objetivo para
InShaAllah, es $0.0200+.....‼️
$ZEC
$BANK

2
185
·
--
Alcista
$DOT En un punto de decisión clave ... La recuperación está probando la resistencia
#DOT se ha recuperado con fuerza desde la zona de $1.08 después de un largo período de presión vendedora
El precio ahora está de vuelta alrededor de $1.16 y probando el área de ruptura anterior
$1.16 - $1.18 es la principal zona de resistencia a vigilar
Una ruptura limpia por encima de $1.18 puede confirmar una recuperación alcista hacia $1.20 y $1.25
Pero un rechazo desde esta zona puede provocar un retroceso hacia $1.12 - $1.10
Así que este es un nivel importante antes del siguiente movimiento
Configuración de la operación
Entrada: Por encima de $1.18 (ruptura)
TP1: $1.20
TP2: $1.23
TP3: $1.25
SL: Por debajo de $1.12
Es imprescindible usar stop loss al operar
Operar en
{future}(DOTUSDT)
$ZEC
{future}(ZECUSDT)
$DEXE
{future}(DEXEUSDT)
$DOT En un punto de decisión clave ... La recuperación está probando la resistencia
#DOT se ha recuperado con fuerza desde la zona de $1.08 después de un largo período de presión vendedora
El precio ahora está de vuelta alrededor de $1.16 y probando el área de ruptura anterior
$1.16 - $1.18 es la principal zona de resistencia a vigilar
Una ruptura limpia por encima de $1.18 puede confirmar una recuperación alcista hacia $1.20 y $1.25
Pero un rechazo desde esta zona puede provocar un retroceso hacia $1.12 - $1.10
Así que este es un nivel importante antes del siguiente movimiento
Configuración de la operación
Entrada: Por encima de $1.18 (ruptura)
TP1: $1.20
TP2: $1.23
TP3: $1.25
SL: Por debajo de $1.12
Es imprescindible usar stop loss al operar
Operar en
$ZEC
$DEXE
#DOT se ha recuperado con fuerza desde la zona de $1.08 después de un largo período de presión vendedora
El precio ahora está de vuelta alrededor de $1.16 y probando el área de ruptura anterior
$1.16 - $1.18 es la principal zona de resistencia a vigilar
Una ruptura limpia por encima de $1.18 puede confirmar una recuperación alcista hacia $1.20 y $1.25
Pero un rechazo desde esta zona puede provocar un retroceso hacia $1.12 - $1.10
Así que este es un nivel importante antes del siguiente movimiento
Configuración de la operación
Entrada: Por encima de $1.18 (ruptura)
TP1: $1.20
TP2: $1.23
TP3: $1.25
SL: Por debajo de $1.12
Es imprescindible usar stop loss al operar
Operar en
$ZEC
$DEXE

2
240
·
--
Alcista
$XRP Rebote desde el soporte: los compradores están entrando
El XRP ha rebotado desde el área de soporte de $1.33 tras la reciente caída. #XRP Las últimas velas están girando al alza, mostrando señales tempranas de fuerza por parte de los compradores. Si este rebote se mantiene por encima de $1.35, el precio podría continuar hacia los niveles de resistencia cercanos.
CONFIGURACIÓN DE COMPRA
Entrada: 1.3450 – 1.3550
TP1: 1.3700
TP2: 1.3900
TP final: 1.4200
SL: 1.3250
Invalidación: movimiento sostenido por debajo de 1.3250.
Compra y opera $ZEC
{future}(ZECUSDT)
$DEXE
{future}(DEXEUSDT)
{future}(XRPUSDT)
$XRP Rebote desde el soporte: los compradores están entrando
El XRP ha rebotado desde el área de soporte de $1.33 tras la reciente caída. #XRP Las últimas velas están girando al alza, mostrando señales tempranas de fuerza por parte de los compradores. Si este rebote se mantiene por encima de $1.35, el precio podría continuar hacia los niveles de resistencia cercanos.
CONFIGURACIÓN DE COMPRA
Entrada: 1.3450 – 1.3550
TP1: 1.3700
TP2: 1.3900
TP final: 1.4200
SL: 1.3250
Invalidación: movimiento sostenido por debajo de 1.3250.
Compra y opera $ZEC
$DEXE
El XRP ha rebotado desde el área de soporte de $1.33 tras la reciente caída. #XRP Las últimas velas están girando al alza, mostrando señales tempranas de fuerza por parte de los compradores. Si este rebote se mantiene por encima de $1.35, el precio podría continuar hacia los niveles de resistencia cercanos.
CONFIGURACIÓN DE COMPRA
Entrada: 1.3450 – 1.3550
TP1: 1.3700
TP2: 1.3900
TP final: 1.4200
SL: 1.3250
Invalidación: movimiento sostenido por debajo de 1.3250.
Compra y opera $ZEC
$DEXE

2
298
·
--
Alcista
$LSK Impulso del Rupturista — Los Compradores Han Tomado el Control
#LSK ha roto con fuerza por encima de la zona de consolidación anterior, con una poderosa vela diaria que confirma una presión de compra agresiva. El precio ahora está cerca de $0.146, así que perseguir el impulso es riesgoso; un retroceso controlado hacia el área de la ruptura podría ofrecer una entrada larga más limpia.
CONFIGURACIÓN DE OPERACIÓN LARGA
Entrada: 0.1400 – 0.1430
TP1: 0.1470
TP2: 0.1500
TP final: 0.1540
SL: 0.1365
Invalidación: movimiento sostenido por debajo de 0.1365.
Compra y Operar
{future}(LSKUSDT)
$ZEC
{future}(ZECUSDT)
$DUSK
{future}(DUSKUSDT)
$LSK Impulso del Rupturista — Los Compradores Han Tomado el Control
#LSK ha roto con fuerza por encima de la zona de consolidación anterior, con una poderosa vela diaria que confirma una presión de compra agresiva. El precio ahora está cerca de $0.146, así que perseguir el impulso es riesgoso; un retroceso controlado hacia el área de la ruptura podría ofrecer una entrada larga más limpia.
CONFIGURACIÓN DE OPERACIÓN LARGA
Entrada: 0.1400 – 0.1430
TP1: 0.1470
TP2: 0.1500
TP final: 0.1540
SL: 0.1365
Invalidación: movimiento sostenido por debajo de 0.1365.
Compra y Operar
$ZEC
$DUSK
#LSK ha roto con fuerza por encima de la zona de consolidación anterior, con una poderosa vela diaria que confirma una presión de compra agresiva. El precio ahora está cerca de $0.146, así que perseguir el impulso es riesgoso; un retroceso controlado hacia el área de la ruptura podría ofrecer una entrada larga más limpia.
CONFIGURACIÓN DE OPERACIÓN LARGA
Entrada: 0.1400 – 0.1430
TP1: 0.1470
TP2: 0.1500
TP final: 0.1540
SL: 0.1365
Invalidación: movimiento sostenido por debajo de 0.1365.
Compra y Operar
$ZEC
$DUSK

1
199
·
--
Alcista
$UB Mira una Recuperación Fresca — Los Compradores Están Tomando el Control
UB está rebotando desde la zona de soporte de $0.122–$0.124 y las últimas velas están empujando hacia arriba con una presión de compra renovada. #UB El precio ahora se está acercando a la zona de resistencia de $0.130, así que mantener la posición por encima del área de entrada actual podría respaldar otro movimiento al alza.
CONFIGURACIÓN DE OPERACIÓN LARGA
Entrada: 0.1270 – 0.1285
TP1: 0.1295
TP2: 0.1310
TP final: 0.1330
SL: 0.1245
Invalidación: Movimiento sostenido por debajo de 0.1245.
Compra y opera
{future}(UBUSDT)
$SNDK
{future}(SNDKUSDT)
$KAITO
{future}(KAITOUSDT)
$UB Mira una Recuperación Fresca — Los Compradores Están Tomando el Control
UB está rebotando desde la zona de soporte de $0.122–$0.124 y las últimas velas están empujando hacia arriba con una presión de compra renovada. #UB El precio ahora se está acercando a la zona de resistencia de $0.130, así que mantener la posición por encima del área de entrada actual podría respaldar otro movimiento al alza.
CONFIGURACIÓN DE OPERACIÓN LARGA
Entrada: 0.1270 – 0.1285
TP1: 0.1295
TP2: 0.1310
TP final: 0.1330
SL: 0.1245
Invalidación: Movimiento sostenido por debajo de 0.1245.
Compra y opera
$SNDK
$KAITO
UB está rebotando desde la zona de soporte de $0.122–$0.124 y las últimas velas están empujando hacia arriba con una presión de compra renovada. #UB El precio ahora se está acercando a la zona de resistencia de $0.130, así que mantener la posición por encima del área de entrada actual podría respaldar otro movimiento al alza.
CONFIGURACIÓN DE OPERACIÓN LARGA
Entrada: 0.1270 – 0.1285
TP1: 0.1295
TP2: 0.1310
TP final: 0.1330
SL: 0.1245
Invalidación: Movimiento sostenido por debajo de 0.1245.
Compra y opera
$SNDK
$KAITO

3
331
·
--
Alcista
$KGEN Rompe la tendencia al alza: Compradores defendiendo la recuperación
KGEN ha rebotado con fuerza desde la zona de soporte inferior y ahora está empujando de regreso hacia el máximo reciente. #KGEN Las últimas velas muestran una presión compradora renovada, así que una retención limpia por encima de $0.1650 podría abrir el camino hacia los próximos niveles de resistencia cercanos.
CONFIGURACIÓN DE COMPRA
Entrada: 0.1640 – 0.1652
TP1: 0.1662
TP2: 0.1675
TP final: 0.1690
SL: 0.1620
Invalidación: movimiento sostenido por debajo de 0.1620.
Compra y opera
{future}(KGENUSDT)
$ZEC
{future}(ZECUSDT)
$BTR
{future}(BTRUSDT)
$KGEN Rompe la tendencia al alza: Compradores defendiendo la recuperación
KGEN ha rebotado con fuerza desde la zona de soporte inferior y ahora está empujando de regreso hacia el máximo reciente. #KGEN Las últimas velas muestran una presión compradora renovada, así que una retención limpia por encima de $0.1650 podría abrir el camino hacia los próximos niveles de resistencia cercanos.
CONFIGURACIÓN DE COMPRA
Entrada: 0.1640 – 0.1652
TP1: 0.1662
TP2: 0.1675
TP final: 0.1690
SL: 0.1620
Invalidación: movimiento sostenido por debajo de 0.1620.
Compra y opera
$ZEC
$BTR
KGEN ha rebotado con fuerza desde la zona de soporte inferior y ahora está empujando de regreso hacia el máximo reciente. #KGEN Las últimas velas muestran una presión compradora renovada, así que una retención limpia por encima de $0.1650 podría abrir el camino hacia los próximos niveles de resistencia cercanos.
CONFIGURACIÓN DE COMPRA
Entrada: 0.1640 – 0.1652
TP1: 0.1662
TP2: 0.1675
TP final: 0.1690
SL: 0.1620
Invalidación: movimiento sostenido por debajo de 0.1620.
Compra y opera
$ZEC
$BTR

2
254
·
--
Bajista
$CL está mostrando un rechazo marcado después del fuerte repunte hacia la zona de $102.
El precio empujó con agresividad desde alrededor de $94 hasta por encima de $102, pero los vendedores entraron y las últimas velas están retrocediendo hacia $98. La zona de $100–$102 es ahora el área clave de resistencia.
Si CL no logra recuperar $100, podría entrar en juego otro movimiento hacia $96.50–$95.00. Una ruptura limpia de regreso por encima de $102 invalidaría la idea de continuación bajista y señalaría una fortaleza alcista renovada.
Por ahora, el rechazo es la estructura clave a vigilar.
#CL Operar con $CL
{future}(CLUSDT)
$CL está mostrando un rechazo marcado después del fuerte repunte hacia la zona de $102.
El precio empujó con agresividad desde alrededor de $94 hasta por encima de $102, pero los vendedores entraron y las últimas velas están retrocediendo hacia $98. La zona de $100–$102 es ahora el área clave de resistencia.
Si CL no logra recuperar $100, podría entrar en juego otro movimiento hacia $96.50–$95.00. Una ruptura limpia de regreso por encima de $102 invalidaría la idea de continuación bajista y señalaría una fortaleza alcista renovada.
Por ahora, el rechazo es la estructura clave a vigilar.
#CL Operar con $CL
El precio empujó con agresividad desde alrededor de $94 hasta por encima de $102, pero los vendedores entraron y las últimas velas están retrocediendo hacia $98. La zona de $100–$102 es ahora el área clave de resistencia.
Si CL no logra recuperar $100, podría entrar en juego otro movimiento hacia $96.50–$95.00. Una ruptura limpia de regreso por encima de $102 invalidaría la idea de continuación bajista y señalaría una fortaleza alcista renovada.
Por ahora, el rechazo es la estructura clave a vigilar.
#CL Operar con $CL

2
267
·
--
Alcista
$BTC Recovery Bounce — Los compradores vuelven a entrar
#BTC está mostrando una recuperación a corto plazo desde el área de soporte de $76.4K–$76.7K, con las velas más recientes empujando al alza y los compradores defendiendo el rebote. Si el precio se mantiene por encima de la zona actual, se pueden apuntar los próximos niveles de resistencia cercanos.
CONFIGURACIÓN DE OPERACIÓN LARGA
Entrada: 77,050 – 77,200
TP1: 77,350
TP2: 77,650
TP final: 77,950
SL: 76,750
Invalidación: Movimiento sostenido por debajo de $76,750.
Comprar y operar
{future}(BTCUSDT)
$BULLA
{future}(BULLAUSDT)
$ZEC
{future}(ZECUSDT)
$BTC Recovery Bounce — Los compradores vuelven a entrar
#BTC está mostrando una recuperación a corto plazo desde el área de soporte de $76.4K–$76.7K, con las velas más recientes empujando al alza y los compradores defendiendo el rebote. Si el precio se mantiene por encima de la zona actual, se pueden apuntar los próximos niveles de resistencia cercanos.
CONFIGURACIÓN DE OPERACIÓN LARGA
Entrada: 77,050 – 77,200
TP1: 77,350
TP2: 77,650
TP final: 77,950
SL: 76,750
Invalidación: Movimiento sostenido por debajo de $76,750.
Comprar y operar
$BULLA
$ZEC
#BTC está mostrando una recuperación a corto plazo desde el área de soporte de $76.4K–$76.7K, con las velas más recientes empujando al alza y los compradores defendiendo el rebote. Si el precio se mantiene por encima de la zona actual, se pueden apuntar los próximos niveles de resistencia cercanos.
CONFIGURACIÓN DE OPERACIÓN LARGA
Entrada: 77,050 – 77,200
TP1: 77,350
TP2: 77,650
TP final: 77,950
SL: 76,750
Invalidación: Movimiento sostenido por debajo de $76,750.
Comprar y operar
$BULLA
$ZEC

1
149
·
--
Alcista
$KOMA Recupera el soporte y gana impulso
#KOMA ha rebotado con fuerza desde la zona de soporte de $0.0120 después de la fuerte venta. Las últimas velas muestran una presión compradora clara y una recuperación constante hacia la zona de $0.0140. Si los compradores mantienen el impulso por encima de la zona actual, los próximos niveles de resistencia podrían entrar en juego.
CONFIGURACIÓN DE COMPRA (LONG)
Entrada: 0.01355 – 0.01375
TP1: 0.01405
TP2: 0.01445
TP3: 0.01485
SL: 0.01305
Invalidación: Movimiento sostenido por debajo de 0.01305.
Compra y opera
{future}(KOMAUSDT)
$ZEC
{future}(ZECUSDT)
$DEXE
{future}(DEXEUSDT)
$KOMA Recupera el soporte y gana impulso
#KOMA ha rebotado con fuerza desde la zona de soporte de $0.0120 después de la fuerte venta. Las últimas velas muestran una presión compradora clara y una recuperación constante hacia la zona de $0.0140. Si los compradores mantienen el impulso por encima de la zona actual, los próximos niveles de resistencia podrían entrar en juego.
CONFIGURACIÓN DE COMPRA (LONG)
Entrada: 0.01355 – 0.01375
TP1: 0.01405
TP2: 0.01445
TP3: 0.01485
SL: 0.01305
Invalidación: Movimiento sostenido por debajo de 0.01305.
Compra y opera
$ZEC
$DEXE
#KOMA ha rebotado con fuerza desde la zona de soporte de $0.0120 después de la fuerte venta. Las últimas velas muestran una presión compradora clara y una recuperación constante hacia la zona de $0.0140. Si los compradores mantienen el impulso por encima de la zona actual, los próximos niveles de resistencia podrían entrar en juego.
CONFIGURACIÓN DE COMPRA (LONG)
Entrada: 0.01355 – 0.01375
TP1: 0.01405
TP2: 0.01445
TP3: 0.01485
SL: 0.01305
Invalidación: Movimiento sostenido por debajo de 0.01305.
Compra y opera
$ZEC
$DEXE

2
350
·
--
Alcista
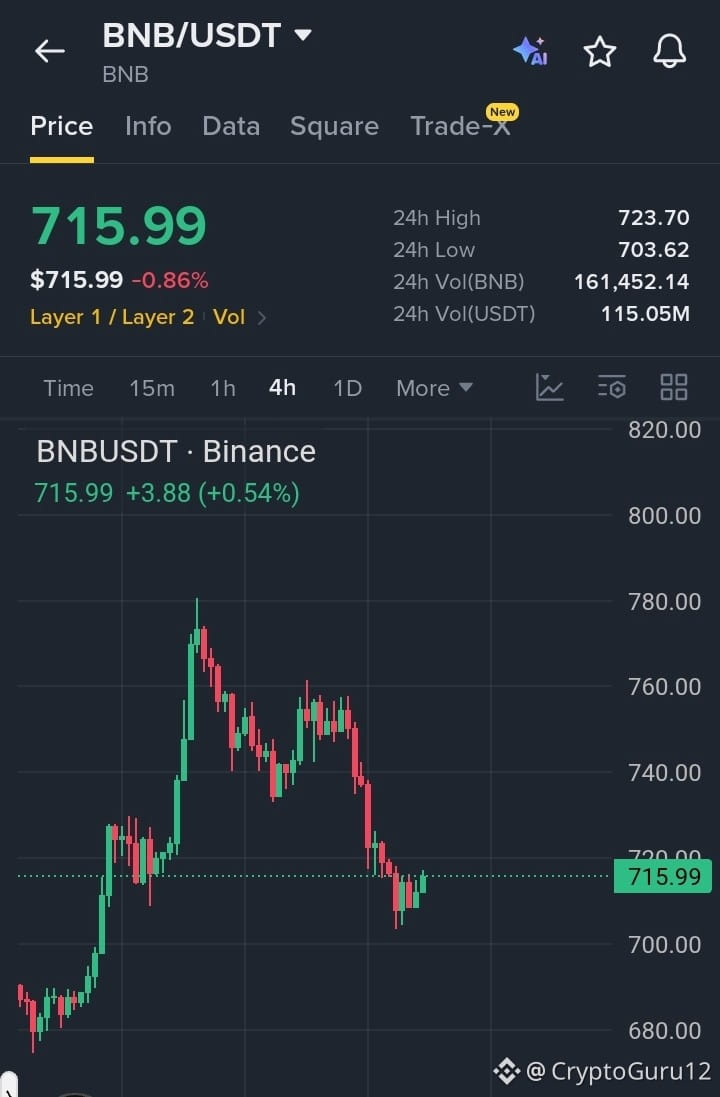
$BNB Recuperación Rebote Compradores Defendiendo el Soporte
#BNB ha rebotado desde la zona de soporte de $703–$710, con las velas más recientes mostrando que los compradores vuelven a entrar después de la caída brusca. Si esta recuperación se mantiene por encima de $714–$716, podría seguir un movimiento hacia los niveles de resistencia cercanos.
CONFIGURACIÓN DE COMPRA LARGO
Entrada: $713.50 – $716.50
TP1: $719.50
TP2: $723.00
TP final: $727.00
SL: $709.50
Invalidación: Movimiento sostenido por debajo de $709.50.
Compra y opera
{future}(BNBUSDT)
$ZEC
{future}(ZECUSDT)
$DEXE
{future}(DEXEUSDT)
$BNB Recuperación Rebote Compradores Defendiendo el Soporte
#BNB ha rebotado desde la zona de soporte de $703–$710, con las velas más recientes mostrando que los compradores vuelven a entrar después de la caída brusca. Si esta recuperación se mantiene por encima de $714–$716, podría seguir un movimiento hacia los niveles de resistencia cercanos.
CONFIGURACIÓN DE COMPRA LARGO
Entrada: $713.50 – $716.50
TP1: $719.50
TP2: $723.00
TP final: $727.00
SL: $709.50
Invalidación: Movimiento sostenido por debajo de $709.50.
Compra y opera
$ZEC
$DEXE
#BNB ha rebotado desde la zona de soporte de $703–$710, con las velas más recientes mostrando que los compradores vuelven a entrar después de la caída brusca. Si esta recuperación se mantiene por encima de $714–$716, podría seguir un movimiento hacia los niveles de resistencia cercanos.
CONFIGURACIÓN DE COMPRA LARGO
Entrada: $713.50 – $716.50
TP1: $719.50
TP2: $723.00
TP final: $727.00
SL: $709.50
Invalidación: Movimiento sostenido por debajo de $709.50.
Compra y opera
$ZEC
$DEXE
2
259
·
--
Bajista
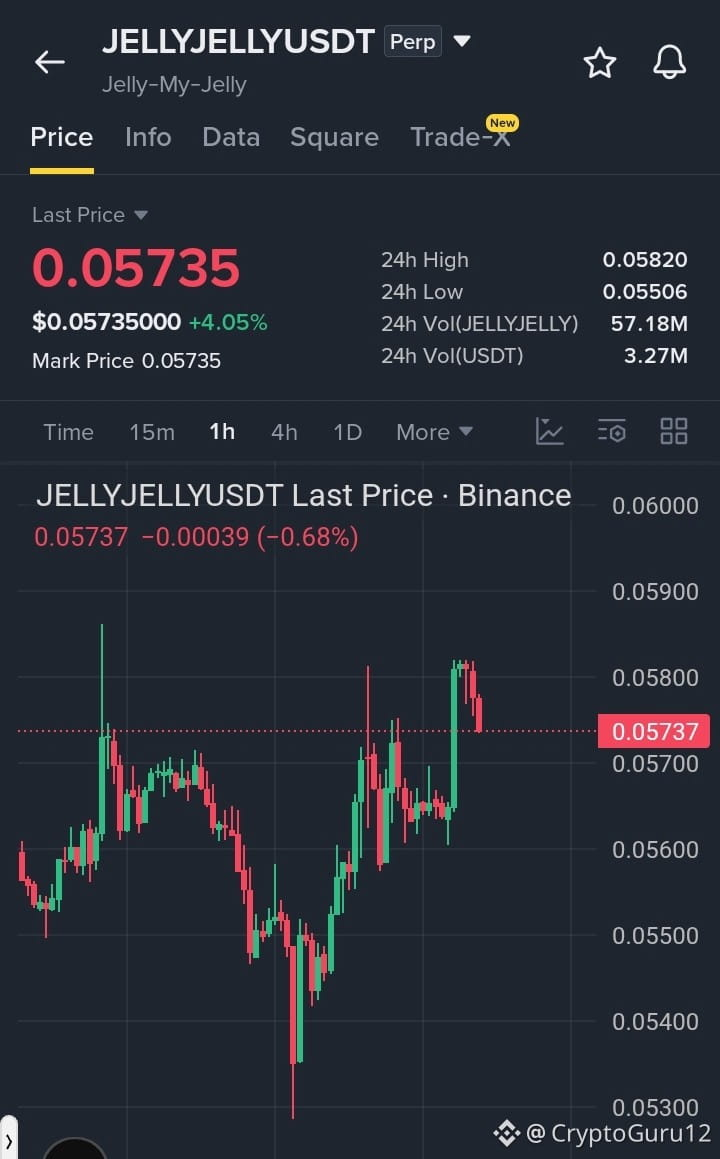
$JELLYJELLY RECHAZA LA RESISTENCIA
#JELLYJELLY muestra presión vendedora a corto plazo después de haber sido rechazado en la zona de resistencia de $0.0580–$0.0582. Las últimas velas se están volviendo bajistas desde el máximo local, por lo que una pérdida de $0.0570 podría abrir espacio hacia los niveles de soporte cercanos.
CONFIGURACIÓN PARA VENTA CORTA
Entrada: $0.0573 – $0.0578
TP1: $0.0568
TP2: $0.0562
TP final: $0.0555
SL: $0.0584
Invalidación: Ruptura fuerte y mantenimiento por encima de $0.0584.
Vende y opera
{future}(JELLYJELLYUSDT)
$ZEC
{future}(ZECUSDT)
$DEXE
{future}(DEXEUSDT)
$JELLYJELLY RECHAZA LA RESISTENCIA
#JELLYJELLY muestra presión vendedora a corto plazo después de haber sido rechazado en la zona de resistencia de $0.0580–$0.0582. Las últimas velas se están volviendo bajistas desde el máximo local, por lo que una pérdida de $0.0570 podría abrir espacio hacia los niveles de soporte cercanos.
CONFIGURACIÓN PARA VENTA CORTA
Entrada: $0.0573 – $0.0578
TP1: $0.0568
TP2: $0.0562
TP final: $0.0555
SL: $0.0584
Invalidación: Ruptura fuerte y mantenimiento por encima de $0.0584.
Vende y opera
$ZEC
$DEXE
#JELLYJELLY muestra presión vendedora a corto plazo después de haber sido rechazado en la zona de resistencia de $0.0580–$0.0582. Las últimas velas se están volviendo bajistas desde el máximo local, por lo que una pérdida de $0.0570 podría abrir espacio hacia los niveles de soporte cercanos.
CONFIGURACIÓN PARA VENTA CORTA
Entrada: $0.0573 – $0.0578
TP1: $0.0568
TP2: $0.0562
TP final: $0.0555
SL: $0.0584
Invalidación: Ruptura fuerte y mantenimiento por encima de $0.0584.
Vende y opera
$ZEC
$DEXE
2
284
·
--
Alcista
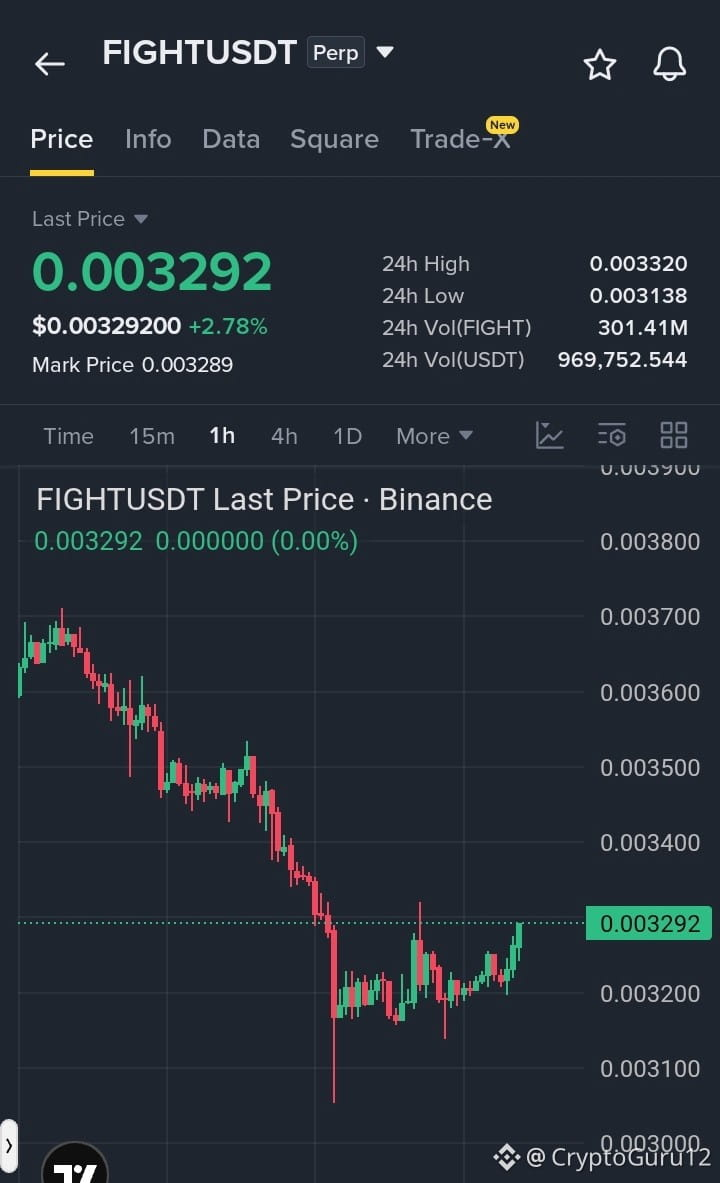
$FIGHT RECUPERACIÓN ESTÁ GANANDO IMPULSO
#FIGHT está mostrando una clara recuperación a corto plazo después de mantener el área de soporte $0.00315–$0.00320. Las velas más recientes están formando mínimos más altos, con compradores empujando el precio hacia la resistencia de $0.00330. Un movimiento sostenido por encima de esta zona podría respaldar una continuación hacia los próximos niveles cercanos.
CONFIGURACIÓN DE COMPRA (LONG)
Entrada: $0.00325 – $0.00329
TP1: $0.00334
TP2: $0.00342
TP final: $0.00350
SL: $0.00318
Invalidación: Ruptura fuerte por debajo de $0.00318.
Comprar y operar $DEXE
{future}(DEXEUSDT)
$ZEC
{future}(ZECUSDT)
{future}(FIGHTUSDT)
$FIGHT RECUPERACIÓN ESTÁ GANANDO IMPULSO
#FIGHT está mostrando una clara recuperación a corto plazo después de mantener el área de soporte $0.00315–$0.00320. Las velas más recientes están formando mínimos más altos, con compradores empujando el precio hacia la resistencia de $0.00330. Un movimiento sostenido por encima de esta zona podría respaldar una continuación hacia los próximos niveles cercanos.
CONFIGURACIÓN DE COMPRA (LONG)
Entrada: $0.00325 – $0.00329
TP1: $0.00334
TP2: $0.00342
TP final: $0.00350
SL: $0.00318
Invalidación: Ruptura fuerte por debajo de $0.00318.
Comprar y operar $DEXE
$ZEC
#FIGHT está mostrando una clara recuperación a corto plazo después de mantener el área de soporte $0.00315–$0.00320. Las velas más recientes están formando mínimos más altos, con compradores empujando el precio hacia la resistencia de $0.00330. Un movimiento sostenido por encima de esta zona podría respaldar una continuación hacia los próximos niveles cercanos.
CONFIGURACIÓN DE COMPRA (LONG)
Entrada: $0.00325 – $0.00329
TP1: $0.00334
TP2: $0.00342
TP final: $0.00350
SL: $0.00318
Invalidación: Ruptura fuerte por debajo de $0.00318.
Comprar y operar $DEXE
$ZEC
2
347
·
--
Alcista
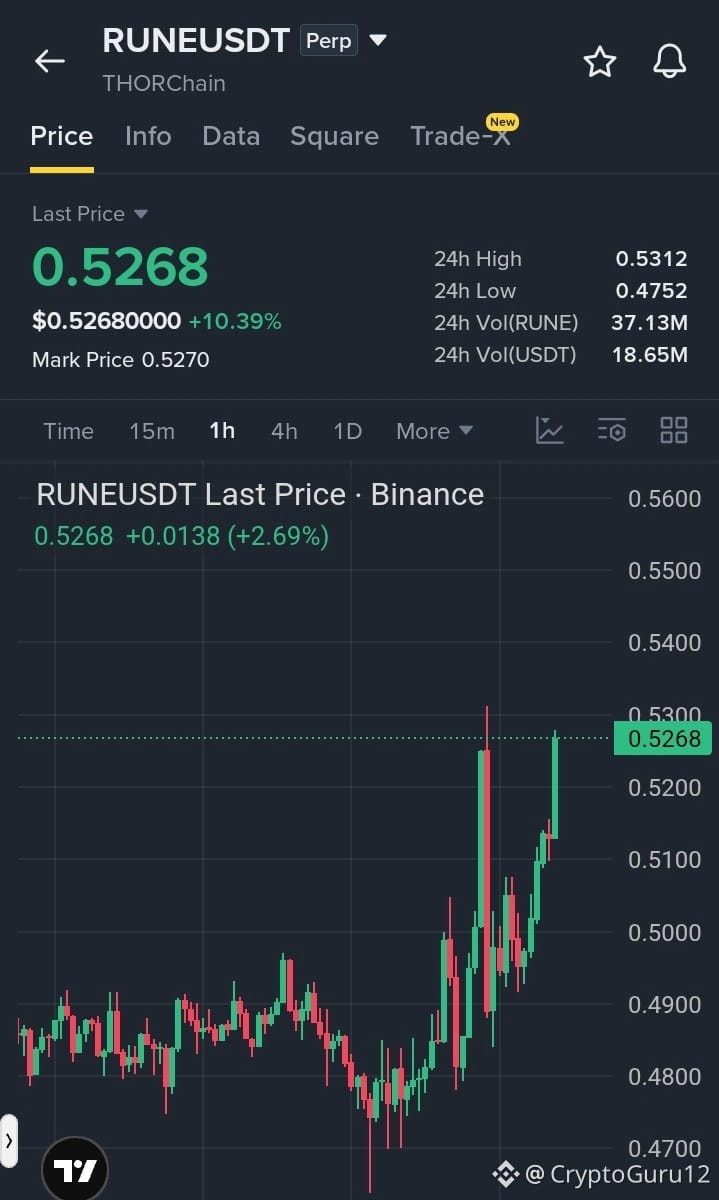
$RUNE EL BREAKOUT MUESTRA UNA FUERTE PRESIÓN COMPRADORA
#RUNE se ha recuperado con fuerza desde la zona $0.4750–$0.4900 y ahora está acercándose a la zona de resistencia $0.5300. Las últimas velas alcistas están formando máximos y mínimos más altos, manteniendo la estructura positiva a corto plazo. Una retención limpia por encima de $0.5200 podría respaldar otra subida.
CONFIGURACIÓN DE COMPRA (LONG)
Entrada: $0.5180 – $0.5250
TP1: $0.5320
TP2: $0.5400
TP final: $0.5480
SL: $0.5100
Invalidación: ruptura fuerte por debajo de $0.5100.
Compra y opera
{future}(RUNEUSDT)
$ZEC
{future}(ZECUSDT)
$DEXE
{future}(DEXEUSDT)
$RUNE EL BREAKOUT MUESTRA UNA FUERTE PRESIÓN COMPRADORA
#RUNE se ha recuperado con fuerza desde la zona $0.4750–$0.4900 y ahora está acercándose a la zona de resistencia $0.5300. Las últimas velas alcistas están formando máximos y mínimos más altos, manteniendo la estructura positiva a corto plazo. Una retención limpia por encima de $0.5200 podría respaldar otra subida.
CONFIGURACIÓN DE COMPRA (LONG)
Entrada: $0.5180 – $0.5250
TP1: $0.5320
TP2: $0.5400
TP final: $0.5480
SL: $0.5100
Invalidación: ruptura fuerte por debajo de $0.5100.
Compra y opera
$ZEC
$DEXE
#RUNE se ha recuperado con fuerza desde la zona $0.4750–$0.4900 y ahora está acercándose a la zona de resistencia $0.5300. Las últimas velas alcistas están formando máximos y mínimos más altos, manteniendo la estructura positiva a corto plazo. Una retención limpia por encima de $0.5200 podría respaldar otra subida.
CONFIGURACIÓN DE COMPRA (LONG)
Entrada: $0.5180 – $0.5250
TP1: $0.5320
TP2: $0.5400
TP final: $0.5480
SL: $0.5100
Invalidación: ruptura fuerte por debajo de $0.5100.
Compra y opera
$ZEC
$DEXE
1
317
·
--
Alcista
$MET MOMENTO DE ROTURA SE ESTÁ FORTALECIENDO
#MET está mostrando un fuerte impulso alcista después de formar mínimos más altos alrededor de la zona de $0.205–$0.210. La última vela verde fuerte ha empujado el precio hacia el área de resistencia de $0.2308, y una ruptura limpia con soporte por encima de este nivel podría impulsar el siguiente movimiento al alza.
CONFIGURACIÓN DE COMPRA (LONG)
Entrada: $0.2260 – $0.2300
TP1: $0.2340
TP2: $0.2380
TP Final: $0.2420
SL: $0.2220
Invalidación: Fuerte rechazo y ruptura por debajo de $0.2220.
Compra y opera
{future}(METUSDT)
$ZEC
{future}(ZECUSDT)
$DEXE
{future}(DEXEUSDT)
$MET MOMENTO DE ROTURA SE ESTÁ FORTALECIENDO
#MET está mostrando un fuerte impulso alcista después de formar mínimos más altos alrededor de la zona de $0.205–$0.210. La última vela verde fuerte ha empujado el precio hacia el área de resistencia de $0.2308, y una ruptura limpia con soporte por encima de este nivel podría impulsar el siguiente movimiento al alza.
CONFIGURACIÓN DE COMPRA (LONG)
Entrada: $0.2260 – $0.2300
TP1: $0.2340
TP2: $0.2380
TP Final: $0.2420
SL: $0.2220
Invalidación: Fuerte rechazo y ruptura por debajo de $0.2220.
Compra y opera
$ZEC
$DEXE
#MET está mostrando un fuerte impulso alcista después de formar mínimos más altos alrededor de la zona de $0.205–$0.210. La última vela verde fuerte ha empujado el precio hacia el área de resistencia de $0.2308, y una ruptura limpia con soporte por encima de este nivel podría impulsar el siguiente movimiento al alza.
CONFIGURACIÓN DE COMPRA (LONG)
Entrada: $0.2260 – $0.2300
TP1: $0.2340
TP2: $0.2380
TP Final: $0.2420
SL: $0.2220
Invalidación: Fuerte rechazo y ruptura por debajo de $0.2220.
Compra y opera
$ZEC
$DEXE

3
367
·
--
Alcista
$EIGEN RECUPERACIÓN ESTÁ GENERANDO MOMENTUM
#EIGEN ha rebotado con fuerza desde la zona de soporte $0.2120–$0.2140, y las últimas velas alcistas fuertes muestran que los compradores están regresando. El precio ahora está empujando hacia la resistencia de $0.2200, y una retención limpia por encima de esta zona podría respaldar un movimiento hacia los siguientes objetivos cercanos.
CONFIGURACIÓN DE COMPRA (LONG)
Entrada: $0.2185 – $0.2200
TP1: $0.2220
TP2: $0.2240
TP Final: $0.2260
SL: $0.2150
Invalidación: Ruptura fuerte por debajo de $0.2150.
Compra y opera
{future}(EIGENUSDT)
$ZEC
{future}(ZECUSDT)
$DEXE
{future}(DEXEUSDT)
$EIGEN RECUPERACIÓN ESTÁ GENERANDO MOMENTUM
#EIGEN ha rebotado con fuerza desde la zona de soporte $0.2120–$0.2140, y las últimas velas alcistas fuertes muestran que los compradores están regresando. El precio ahora está empujando hacia la resistencia de $0.2200, y una retención limpia por encima de esta zona podría respaldar un movimiento hacia los siguientes objetivos cercanos.
CONFIGURACIÓN DE COMPRA (LONG)
Entrada: $0.2185 – $0.2200
TP1: $0.2220
TP2: $0.2240
TP Final: $0.2260
SL: $0.2150
Invalidación: Ruptura fuerte por debajo de $0.2150.
Compra y opera
$ZEC
$DEXE
#EIGEN ha rebotado con fuerza desde la zona de soporte $0.2120–$0.2140, y las últimas velas alcistas fuertes muestran que los compradores están regresando. El precio ahora está empujando hacia la resistencia de $0.2200, y una retención limpia por encima de esta zona podría respaldar un movimiento hacia los siguientes objetivos cercanos.
CONFIGURACIÓN DE COMPRA (LONG)
Entrada: $0.2185 – $0.2200
TP1: $0.2220
TP2: $0.2240
TP Final: $0.2260
SL: $0.2150
Invalidación: Ruptura fuerte por debajo de $0.2150.
Compra y opera
$ZEC
$DEXE

3
319
·
--
Alcista
$MARSCOIN CONFIGURACIÓN LARGA ..... LOS COMPRADORES EMPUJAN HACIA ARRIBA
#MARSCOIN está mostrando un fuerte impulso de recuperación después de rebotar desde la zona de soporte de $0.100. El precio ha recuperado el área de $0.125 y ahora está probando la resistencia de $0.1295. Una ruptura limpia por encima de $0.1300 podría respaldar otro movimiento hacia los próximos niveles cercanos.
Configuración de Operación
Entrada: $0.1240–$0.1270
TP1: $0.1300
TP2: $0.1340
TP3: $0.1380
Stop Loss: $0.1190
Gestión del Riesgo: Espera confirmación por encima de $0.1300 o un re-test exitoso antes de entrar.
Compra y Operar
{future}(MARSCOINUSDT)
$BTR
{future}(BTRUSDT)
$TUT
{future}(TUTUSDT)
$MARSCOIN CONFIGURACIÓN LARGA ..... LOS COMPRADORES EMPUJAN HACIA ARRIBA
#MARSCOIN está mostrando un fuerte impulso de recuperación después de rebotar desde la zona de soporte de $0.100. El precio ha recuperado el área de $0.125 y ahora está probando la resistencia de $0.1295. Una ruptura limpia por encima de $0.1300 podría respaldar otro movimiento hacia los próximos niveles cercanos.
Configuración de Operación
Entrada: $0.1240–$0.1270
TP1: $0.1300
TP2: $0.1340
TP3: $0.1380
Stop Loss: $0.1190
Gestión del Riesgo: Espera confirmación por encima de $0.1300 o un re-test exitoso antes de entrar.
Compra y Operar
$BTR
$TUT
#MARSCOIN está mostrando un fuerte impulso de recuperación después de rebotar desde la zona de soporte de $0.100. El precio ha recuperado el área de $0.125 y ahora está probando la resistencia de $0.1295. Una ruptura limpia por encima de $0.1300 podría respaldar otro movimiento hacia los próximos niveles cercanos.
Configuración de Operación
Entrada: $0.1240–$0.1270
TP1: $0.1300
TP2: $0.1340
TP3: $0.1380
Stop Loss: $0.1190
Gestión del Riesgo: Espera confirmación por encima de $0.1300 o un re-test exitoso antes de entrar.
Compra y Operar
$BTR
$TUT

1
316
·
--
Alcista
$DOGS CONFIGURACIÓN LARGA ..... LOS COMPRADORES ESTÁN CONSTRUYENDO UNA RECUPERACIÓN SÓLIDA
#DOGS ha rebotado con fuerza desde el área de soporte de $0.0000445 y ahora está recuperando la zona de $0.0000490 con un impulso alcista en mejora. Los recientes mínimos más altos muestran que los compradores están entrando, y una ruptura limpia por encima de $0.0000495 podría abrir el camino hacia los próximos niveles de resistencia cercanos.
Configuración de Operación
Entrada: $0.0000488–$0.0000493
TP1: $0.0000500
TP2: $0.0000510
TP3: $0.0000520
Stop Loss: $0.0000475
Gestión del Riesgo: Espera confirmación por encima de $0.0000495 o un retesteo exitoso antes de entrar.
Compra y Operación
{future}(DOGSUSDT)
$IOST
{future}(IOSTUSDT)
$BTR
{future}(BTRUSDT)
$DOGS CONFIGURACIÓN LARGA ..... LOS COMPRADORES ESTÁN CONSTRUYENDO UNA RECUPERACIÓN SÓLIDA
#DOGS ha rebotado con fuerza desde el área de soporte de $0.0000445 y ahora está recuperando la zona de $0.0000490 con un impulso alcista en mejora. Los recientes mínimos más altos muestran que los compradores están entrando, y una ruptura limpia por encima de $0.0000495 podría abrir el camino hacia los próximos niveles de resistencia cercanos.
Configuración de Operación
Entrada: $0.0000488–$0.0000493
TP1: $0.0000500
TP2: $0.0000510
TP3: $0.0000520
Stop Loss: $0.0000475
Gestión del Riesgo: Espera confirmación por encima de $0.0000495 o un retesteo exitoso antes de entrar.
Compra y Operación
$IOST
$BTR
#DOGS ha rebotado con fuerza desde el área de soporte de $0.0000445 y ahora está recuperando la zona de $0.0000490 con un impulso alcista en mejora. Los recientes mínimos más altos muestran que los compradores están entrando, y una ruptura limpia por encima de $0.0000495 podría abrir el camino hacia los próximos niveles de resistencia cercanos.
Configuración de Operación
Entrada: $0.0000488–$0.0000493
TP1: $0.0000500
TP2: $0.0000510
TP3: $0.0000520
Stop Loss: $0.0000475
Gestión del Riesgo: Espera confirmación por encima de $0.0000495 o un retesteo exitoso antes de entrar.
Compra y Operación
$IOST
$BTR

1
318
·
--
Alcista
$BLUR LONG CONFIGURACIÓN ..... LOS COMPRADORES ESTÁN REBROTANDO CON FUERZA
#BLUR ha rebotado con fuerza desde la zona de soporte de $0.0160 y ha recuperado $0.0177 con una potente vela alcista. Los compradores están mostrando un nuevo impulso tras la corrección, y mantener por encima de $0.0175 podría respaldar un movimiento hacia los próximos niveles de resistencia cercanos.
Configuración de Operación
Entrada: $0.0175–$0.0178
TP1: $0.0182
TP2: $0.0186
TP3: $0.0190
Stop Loss: $0.0170
Gestión del Riesgo: Espera un retest exitoso de la zona $0.0175–$0.0177 antes de entrar.
Compra y Operar
{future}(BLURUSDT)
$ZEC
{future}(ZECUSDT)
$BULLA
{future}(BULLAUSDT)
$BLUR LONG CONFIGURACIÓN ..... LOS COMPRADORES ESTÁN REBROTANDO CON FUERZA
#BLUR ha rebotado con fuerza desde la zona de soporte de $0.0160 y ha recuperado $0.0177 con una potente vela alcista. Los compradores están mostrando un nuevo impulso tras la corrección, y mantener por encima de $0.0175 podría respaldar un movimiento hacia los próximos niveles de resistencia cercanos.
Configuración de Operación
Entrada: $0.0175–$0.0178
TP1: $0.0182
TP2: $0.0186
TP3: $0.0190
Stop Loss: $0.0170
Gestión del Riesgo: Espera un retest exitoso de la zona $0.0175–$0.0177 antes de entrar.
Compra y Operar
$ZEC
$BULLA
#BLUR ha rebotado con fuerza desde la zona de soporte de $0.0160 y ha recuperado $0.0177 con una potente vela alcista. Los compradores están mostrando un nuevo impulso tras la corrección, y mantener por encima de $0.0175 podría respaldar un movimiento hacia los próximos niveles de resistencia cercanos.
Configuración de Operación
Entrada: $0.0175–$0.0178
TP1: $0.0182
TP2: $0.0186
TP3: $0.0190
Stop Loss: $0.0170
Gestión del Riesgo: Espera un retest exitoso de la zona $0.0175–$0.0177 antes de entrar.
Compra y Operar
$ZEC
$BULLA

1
288
Inicia sesión para explorar más contenidos
Únete a usuarios globales de criptomonedas en Binance Square
⚡️ Obtén información útil y actualizada sobre criptos.
💬 Avalado por el mayor exchange de criptomonedas en el mundo.
👍 Descubre perspectivas reales de creadores verificados.
Email/número de teléfono
Temas populares
CPIWatch
86.1M vistas
499,041 están debatiendo
Comparte y gana recompensas de tráfico en nuestra campaña de hashtags en tendencia
✨Tema: ¿El CPI activará una subida de la tasa?
👉Cómo participar:
Publica una publicación corta o un artículo con el hashtag #CPIWatch
Crea contenido basado en los dos enfoques siguientes:
- Los datos de nóminas no agrícolas superan las expectativas y el CPI está a la vuelta de la esquina; ¿crees que la Fed subirá o mantendrá la tasa?
- ¿Alcista o bajista? Comparte tu opinión y muestra tus acciones o tu trading de oro/tenencias con nuestro widget de compartir operaciones.
🚀Periodo de la campaña:
- 2026-09-11 3:00 - 2026-09-12 9:00 UTC
🎁Recompensa:
- Las publicaciones que cumplan con las pautas anteriores y contengan más de 100 palabras se revisarán y pueden recibir un impulso aleatorio de tráfico de 500 a 3,000 vistas. Recibirás una notificación de tu secretaria de feed si tu publicación se selecciona.
- Obtén la oportunidad de que tu artículo aparezca destacado en Binance Square Official
¿Necesitas ideas para tu publicación? Visita la página del tema #CPIWatch o la Square Guide on How to Post for Better Reach.
Binance Square Official
·195 me gusta
·317.6k vistas
USToSanctionBigBankMonday
292 vistas
36 están debatiendo
TrumpDeclinesSaudiRequestToStrikeHouthis
6,454 vistas
171 están debatiendo