

MissBlockChain_01
54.5k Posts

MissBlockChain_01
 Square Verified+
Report
Block User
X/Twitter:@zoe_crypto_01 | Since 2019 | Trader Crypto analyst,Signals & Insights | #Kol Manager |
7 Following
44.0K+ Followers
191.7K+ Liked
Posts
All
Quotes
Live
PINNED
·
--
Bullish
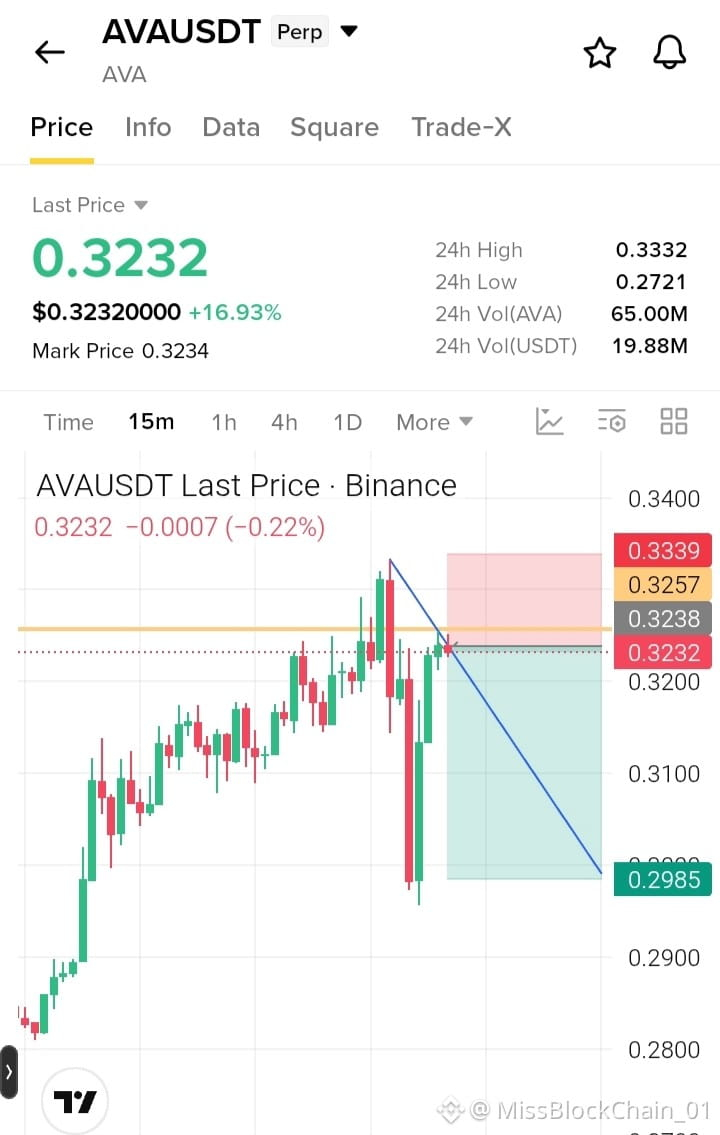
Guys, $AVA is facing rejection near the $0.3238 resistance zone. If sellers regain control, a move toward lower support could follow.
$AVA — SHORT
Entry: $0.3230–$0.3257
TP1: $0.3150
TP2: $0.3070
TP3: $0.2985
SL: $0.3339
{future}(AVAUSDT)
Will AVA break down from this resistance?
Guys, $AVA is facing rejection near the $0.3238 resistance zone. If sellers regain control, a move toward lower support could follow.
$AVA — SHORT
Entry: $0.3230–$0.3257
TP1: $0.3150
TP2: $0.3070
TP3: $0.2985
SL: $0.3339
Will AVA break down from this resistance?
$AVA — SHORT
Entry: $0.3230–$0.3257
TP1: $0.3150
TP2: $0.3070
TP3: $0.2985
SL: $0.3339
Will AVA break down from this resistance?
5
3
23
23.1k
·
--
Bearish
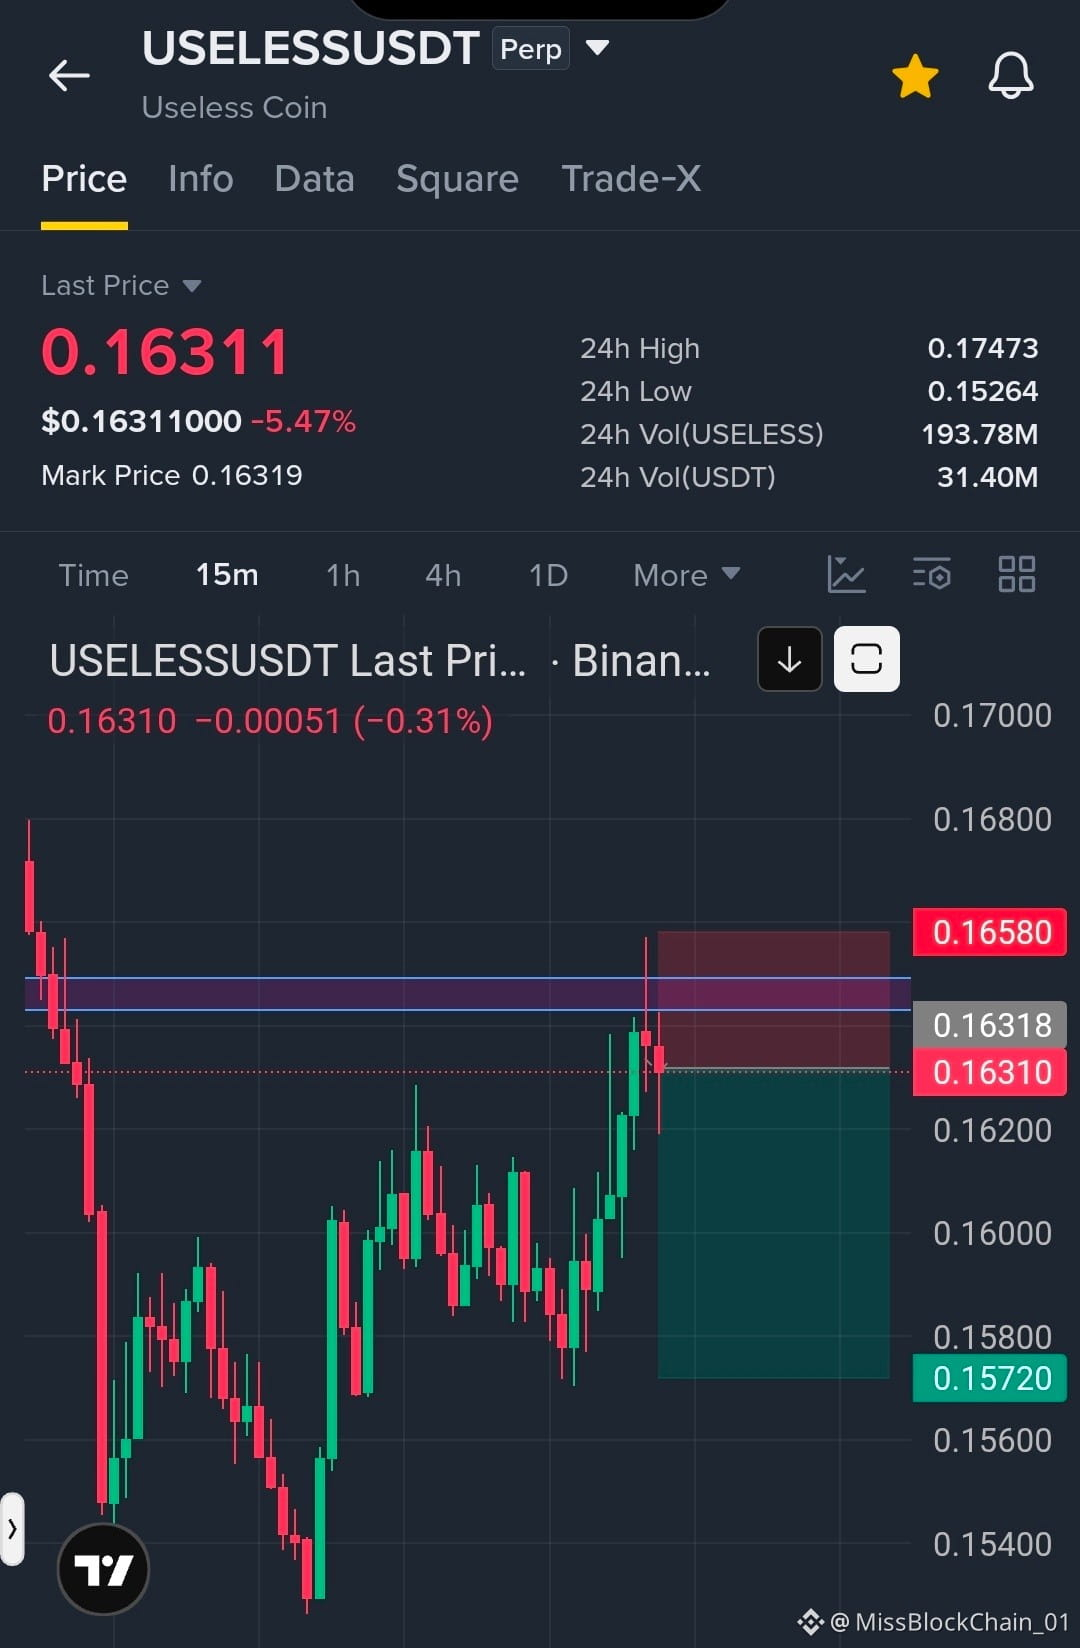
$USELESS USDT SHORT SETUP
Entry: $0.16310–$0.16380 TP1: $0.16150 TP2: $0.15950 TP3: $0.15720 SL: $0.16580
{future}(USELESSUSDT)
Price is facing resistance around $0.1638–$0.1640 after a recovery. Rejection from this zone could trigger another move down toward support. Wait for confirmation before entering.
$USELESS USDT SHORT SETUP
Entry: $0.16310–$0.16380 TP1: $0.16150 TP2: $0.15950 TP3: $0.15720 SL: $0.16580
Price is facing resistance around $0.1638–$0.1640 after a recovery. Rejection from this zone could trigger another move down toward support. Wait for confirmation before entering.
Entry: $0.16310–$0.16380 TP1: $0.16150 TP2: $0.15950 TP3: $0.15720 SL: $0.16580
Price is facing resistance around $0.1638–$0.1640 after a recovery. Rejection from this zone could trigger another move down toward support. Wait for confirmation before entering.
1
4
630
·
--
Bullish
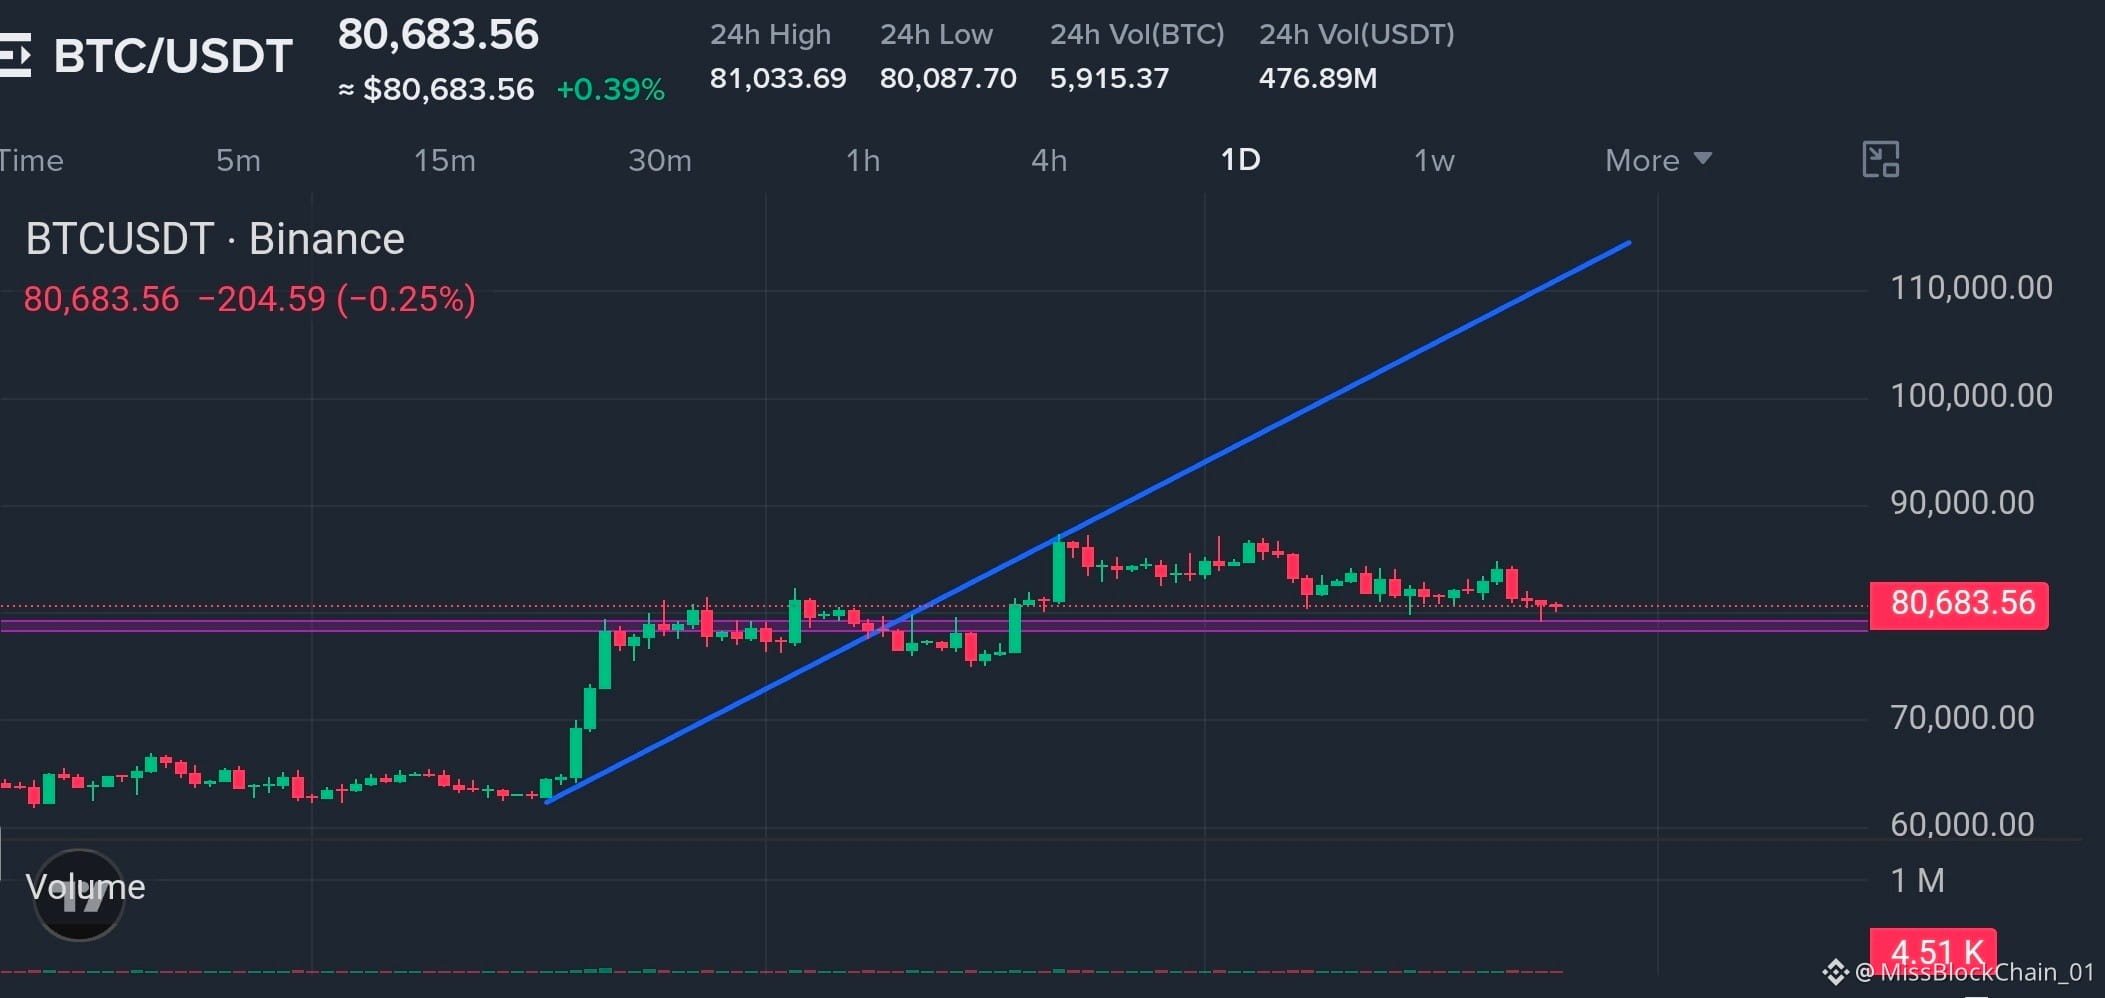
$BTC /USDT — LONG
Entry: $80,600–$80,685 TP1: $80,800 TP2: $81,000 TP3: $81,250 SL: $80,350
{future}(BTCUSDT)
BTC is holding above the $80,087 support zone. A breakout above $81,033 could support further upside. Wait for bullish confirmation and manage risk carefully.
$BTC /USDT — LONG
Entry: $80,600–$80,685 TP1: $80,800 TP2: $81,000 TP3: $81,250 SL: $80,350
BTC is holding above the $80,087 support zone. A breakout above $81,033 could support further upside. Wait for bullish confirmation and manage risk carefully.
Entry: $80,600–$80,685 TP1: $80,800 TP2: $81,000 TP3: $81,250 SL: $80,350
BTC is holding above the $80,087 support zone. A breakout above $81,033 could support further upside. Wait for bullish confirmation and manage risk carefully.
2
968
·
--
Bullish
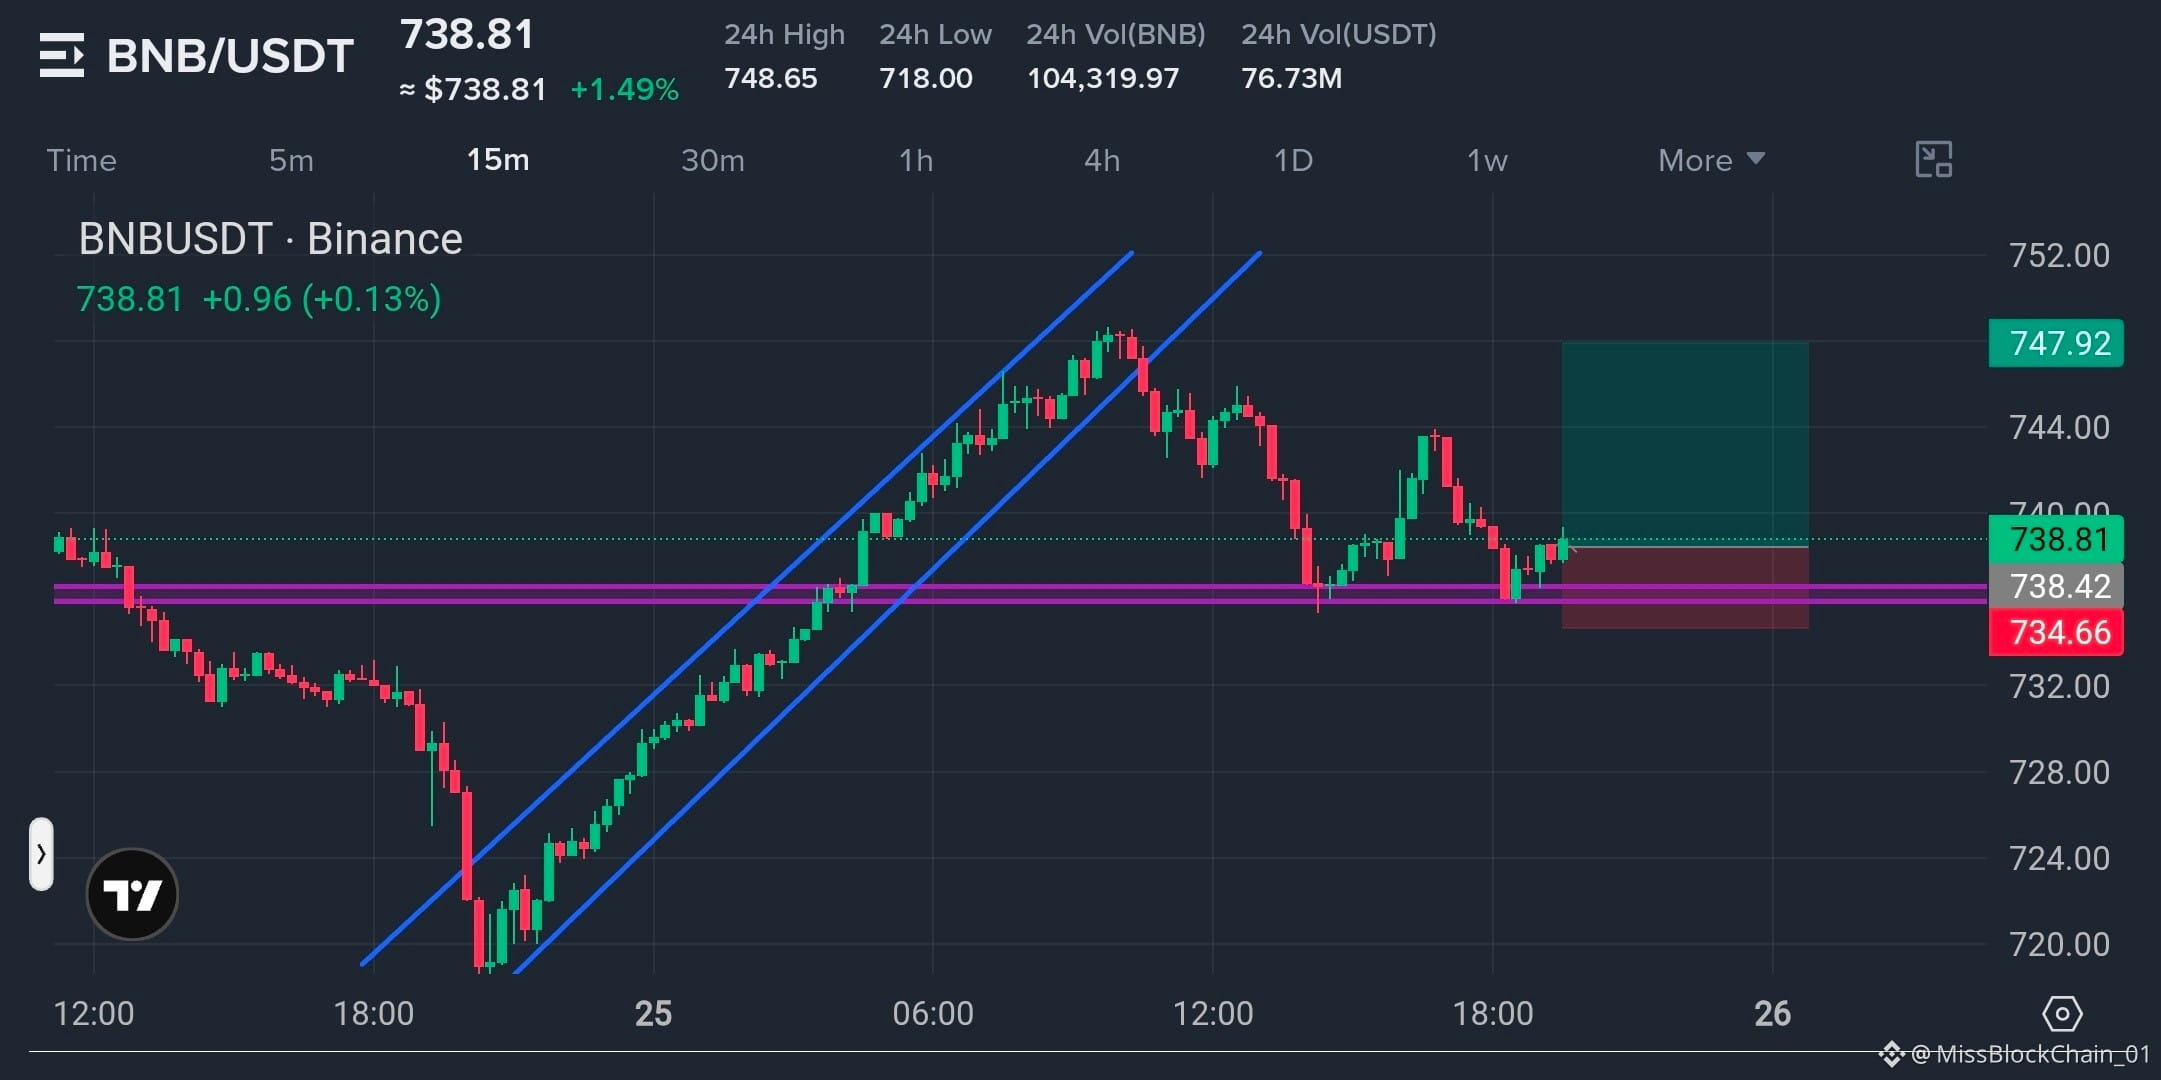
$BNB /USDT LONG ❤️❤️
Entry: $738.40–$739.00 TP1: $742.00 TP2: $747.00 TP3: $752.00 SL: $734.66
{future}(BNBUSDT)
BNB is holding above nearby support and attempting to move higher. A breakout above $747 could open the way toward $752. Wait for confirmation and manage risk carefully.
$BNB /USDT LONG ❤️❤️
Entry: $738.40–$739.00 TP1: $742.00 TP2: $747.00 TP3: $752.00 SL: $734.66
BNB is holding above nearby support and attempting to move higher. A breakout above $747 could open the way toward $752. Wait for confirmation and manage risk carefully.
Entry: $738.40–$739.00 TP1: $742.00 TP2: $747.00 TP3: $752.00 SL: $734.66
BNB is holding above nearby support and attempting to move higher. A breakout above $747 could open the way toward $752. Wait for confirmation and manage risk carefully.
5
1.2k
·
--
Bullish
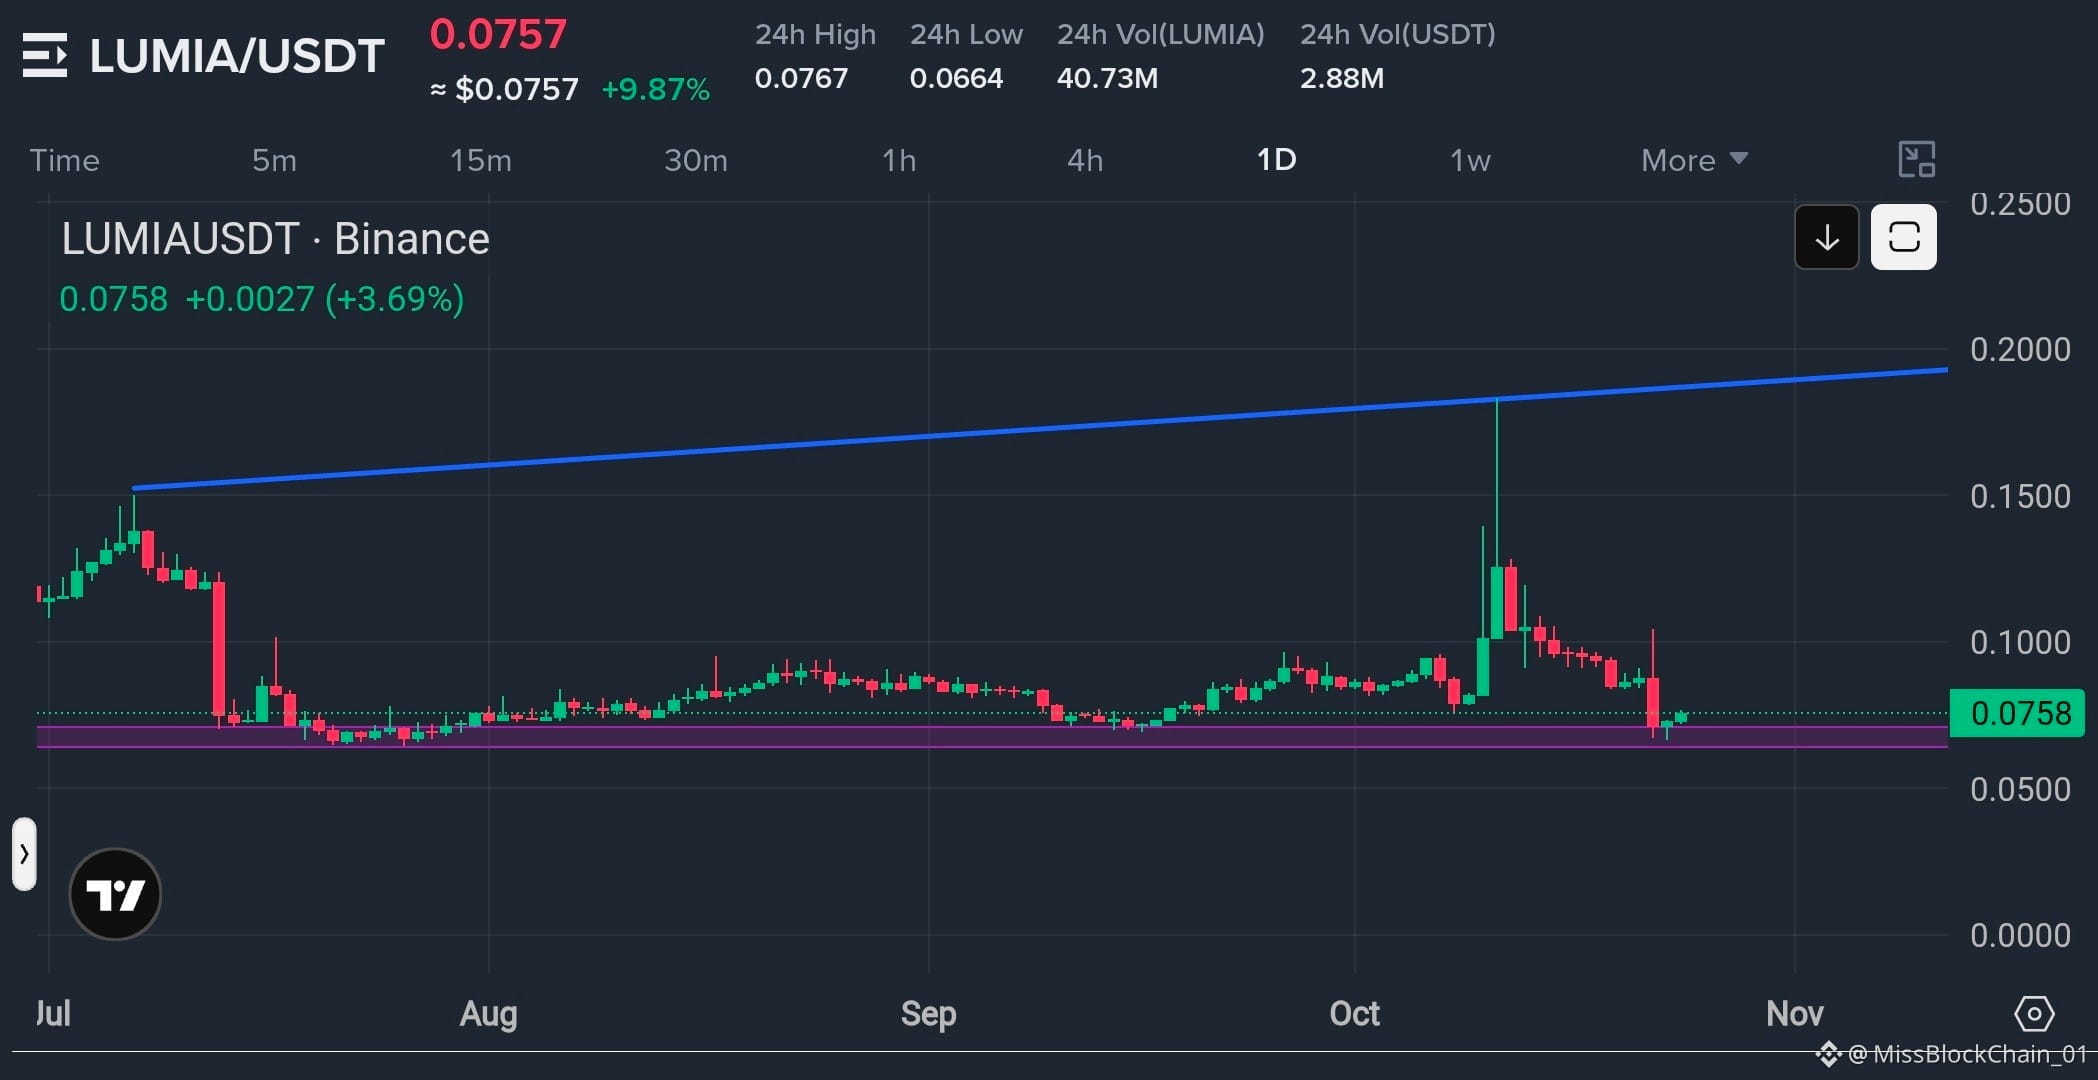
Guys, $LUMIA is testing a key support zone near $0.066–$0.070. If buyers defend this area, a recovery toward $0.090 and beyond could follow.
$LUMIA — LONG
Entry: $0.0750–$0.0700
TP1: $0.0820
TP2: $0.0900
TP3: $0.1000
SL: $0.0640
{future}(LUMIAUSDT)
Will buyers defend support and push LUMIA higher?
Guys, $LUMIA is testing a key support zone near $0.066–$0.070. If buyers defend this area, a recovery toward $0.090 and beyond could follow.
$LUMIA — LONG
Entry: $0.0750–$0.0700
TP1: $0.0820
TP2: $0.0900
TP3: $0.1000
SL: $0.0640
Will buyers defend support and push LUMIA higher?
$LUMIA — LONG
Entry: $0.0750–$0.0700
TP1: $0.0820
TP2: $0.0900
TP3: $0.1000
SL: $0.0640
Will buyers defend support and push LUMIA higher?
2
8
7.9k
·
--
Bearish
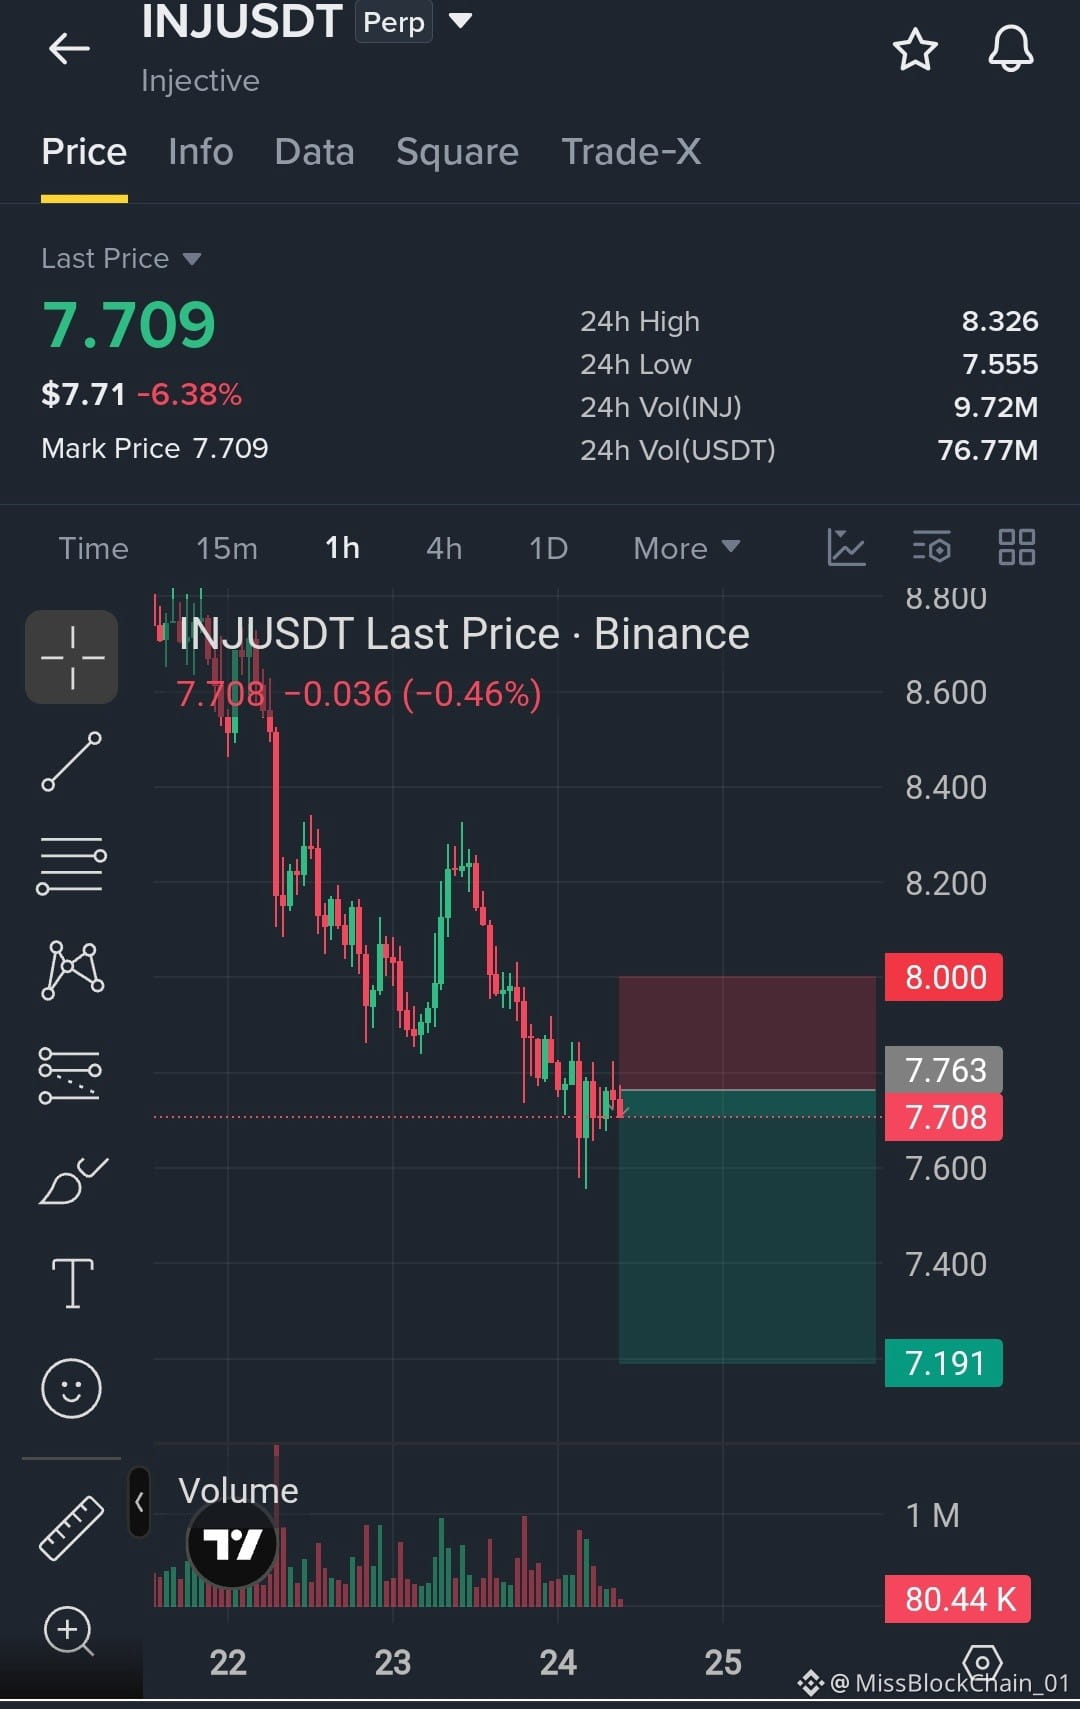
Guys, $INJ is maintaining a bearish structure on the 1H chart. If resistance holds, further downside toward $7.19 remains possible.
$INJ — SHORT
{future}(INJUSDT)
Entry: $7.70–$7.76
TP1: $7.55
TP2: $7.35
TP3: $7.19
SL: $8.00
Wait for confirmation and manage risk carefully.
Guys, $INJ is maintaining a bearish structure on the 1H chart. If resistance holds, further downside toward $7.19 remains possible.
$INJ — SHORT
Entry: $7.70–$7.76
TP1: $7.55
TP2: $7.35
TP3: $7.19
SL: $8.00
Wait for confirmation and manage risk carefully.
$INJ — SHORT
Entry: $7.70–$7.76
TP1: $7.55
TP2: $7.35
TP3: $7.19
SL: $8.00
Wait for confirmation and manage risk carefully.
5
898
·
--
Bearish
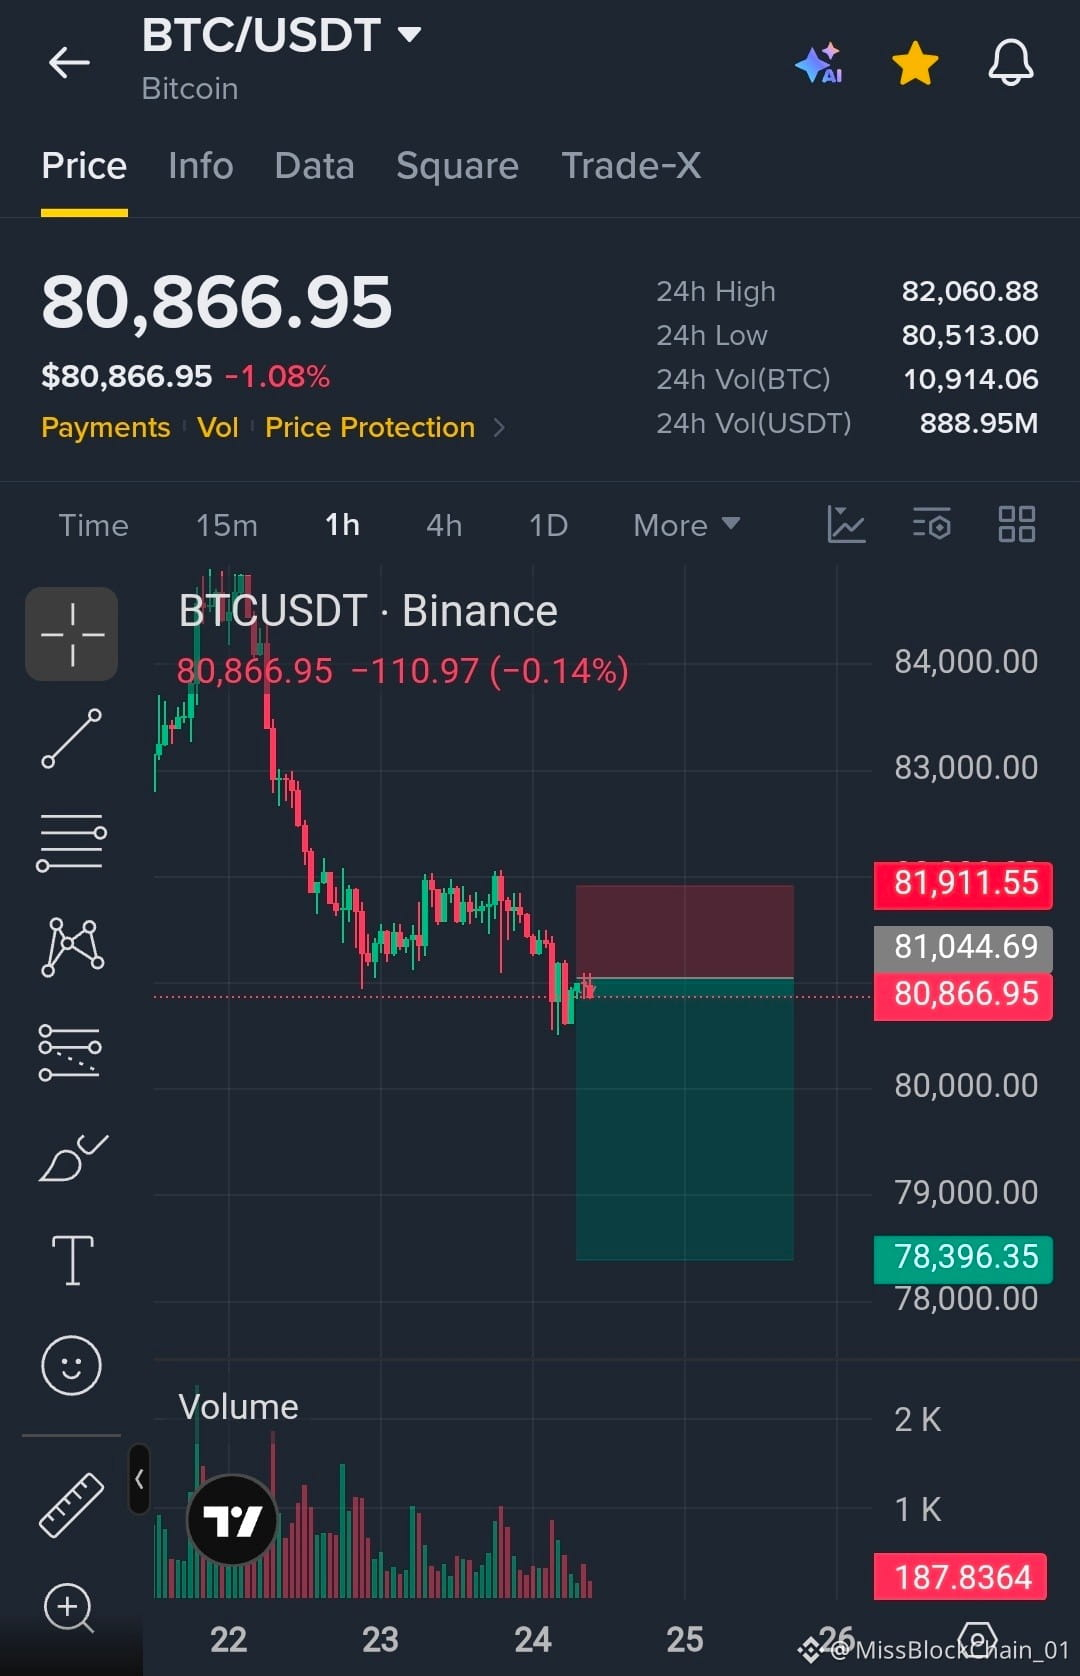
$BTC /USDT — SHORT 🔻
Bitcoin is showing bearish momentum on the 1H chart. If resistance holds near $81,000–$81,200, downside continuation remains possible.
{future}(BTCUSDT)
🎯 Entry: $80,850–$81,050
🥇 TP1: $80,000
🥈 TP2: $79,200
🥉 TP3: $78,396
🛑 SL: $81,912
Wait for confirmation before entering. BTC can reverse quickly, so manage your risk carefully.
$BTC /USDT — SHORT 🔻
Bitcoin is showing bearish momentum on the 1H chart. If resistance holds near $81,000–$81,200, downside continuation remains possible.
🎯 Entry: $80,850–$81,050
🥇 TP1: $80,000
🥈 TP2: $79,200
🥉 TP3: $78,396
🛑 SL: $81,912
Wait for confirmation before entering. BTC can reverse quickly, so manage your risk carefully.
Bitcoin is showing bearish momentum on the 1H chart. If resistance holds near $81,000–$81,200, downside continuation remains possible.
🎯 Entry: $80,850–$81,050
🥇 TP1: $80,000
🥈 TP2: $79,200
🥉 TP3: $78,396
🛑 SL: $81,912
Wait for confirmation before entering. BTC can reverse quickly, so manage your risk carefully.
6
933
·
--
Bearish
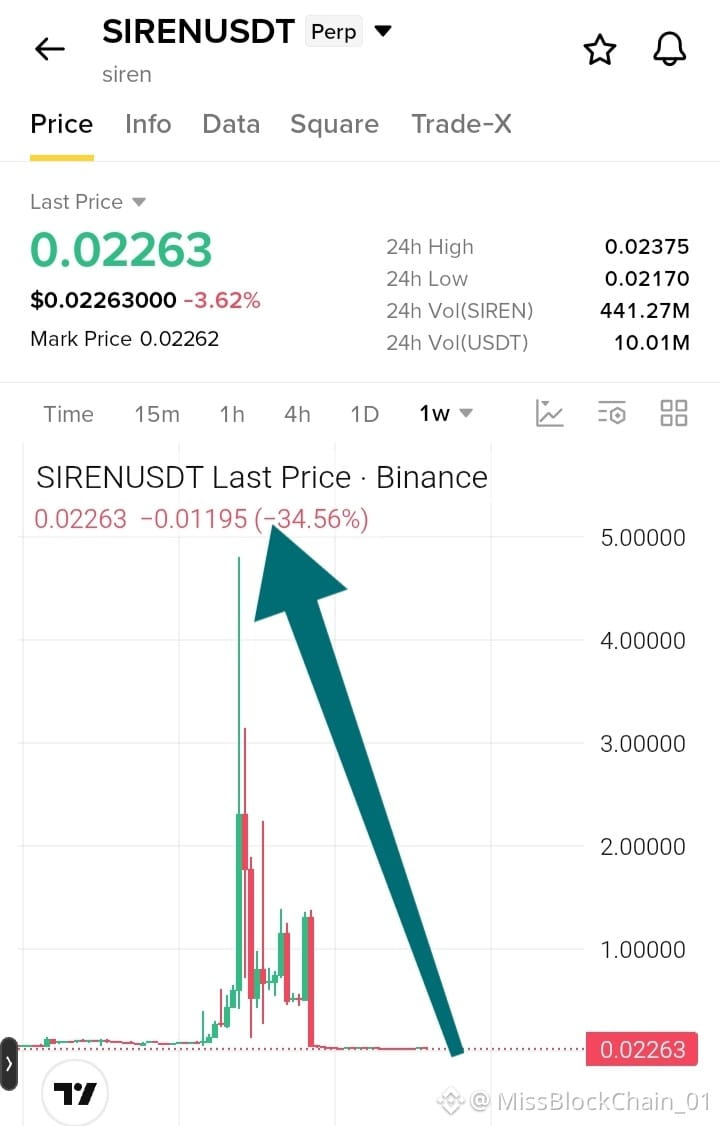
Guys, $SIREN is showing extreme weakness after its massive spike and sharp collapse. The bearish structure remains in focus, but volatility is high.
$SIREN — SHORT
{future}(SIRENUSDT)
Entry: $0.0228–$0.0235
TP1: $0.0220
TP2: $0.0217
TP3: $0.0200
SL: $0.0240
Will sellers push SIREN to new lows?
Guys, $SIREN is showing extreme weakness after its massive spike and sharp collapse. The bearish structure remains in focus, but volatility is high.
$SIREN — SHORT
Entry: $0.0228–$0.0235
TP1: $0.0220
TP2: $0.0217
TP3: $0.0200
SL: $0.0240
Will sellers push SIREN to new lows?
$SIREN — SHORT
Entry: $0.0228–$0.0235
TP1: $0.0220
TP2: $0.0217
TP3: $0.0200
SL: $0.0240
Will sellers push SIREN to new lows?
1
4
1k
·
--
Bearish
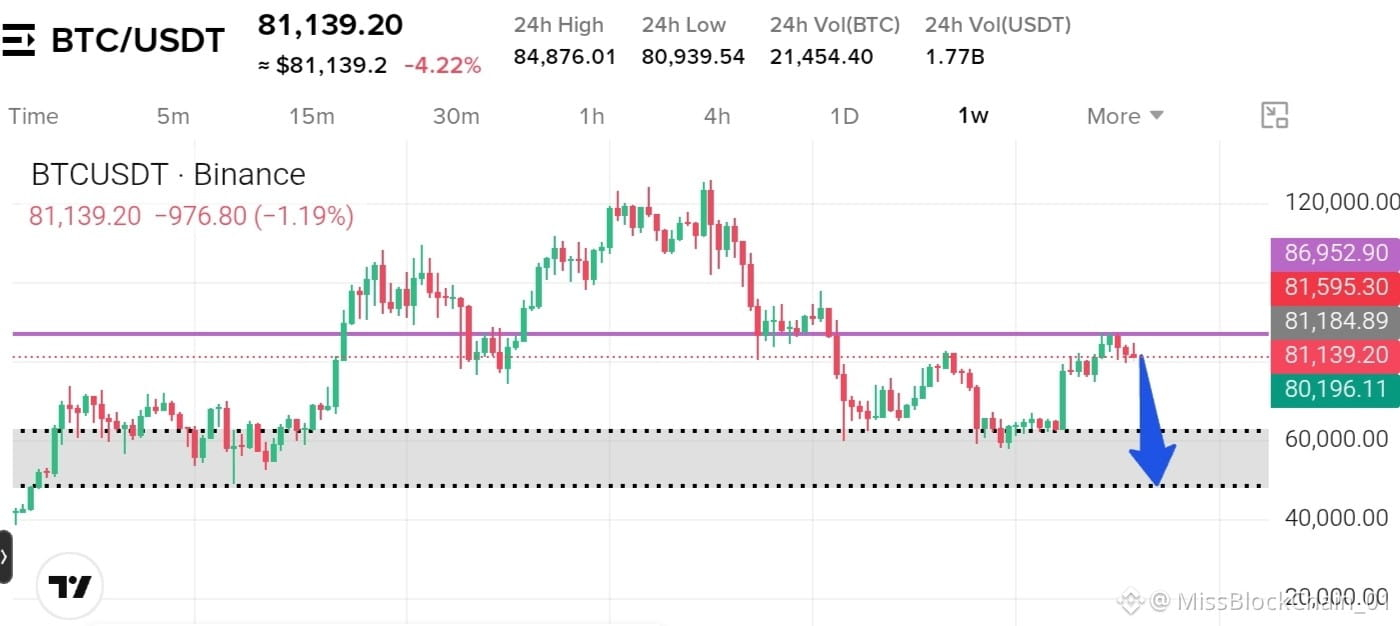
Guys, $BTC is facing strong resistance near $81,500. If this rejection continues, Bitcoin could revisit the $60,000 support zone, with $48,000 as a deeper downside target.
$BTC — SHORT
Entry: $81,500–$82,000
TP1: $75,000
TP2: $65,000
TP3: $60,000
SL: $86,952
{future}(BTCUSDT)
Will BTC break down toward support or reclaim resistance?
Guys, $BTC is facing strong resistance near $81,500. If this rejection continues, Bitcoin could revisit the $60,000 support zone, with $48,000 as a deeper downside target.
$BTC — SHORT
Entry: $81,500–$82,000
TP1: $75,000
TP2: $65,000
TP3: $60,000
SL: $86,952
Will BTC break down toward support or reclaim resistance?
$BTC — SHORT
Entry: $81,500–$82,000
TP1: $75,000
TP2: $65,000
TP3: $60,000
SL: $86,952
Will BTC break down toward support or reclaim resistance?
2
12
3.2k
·
--
Bullish
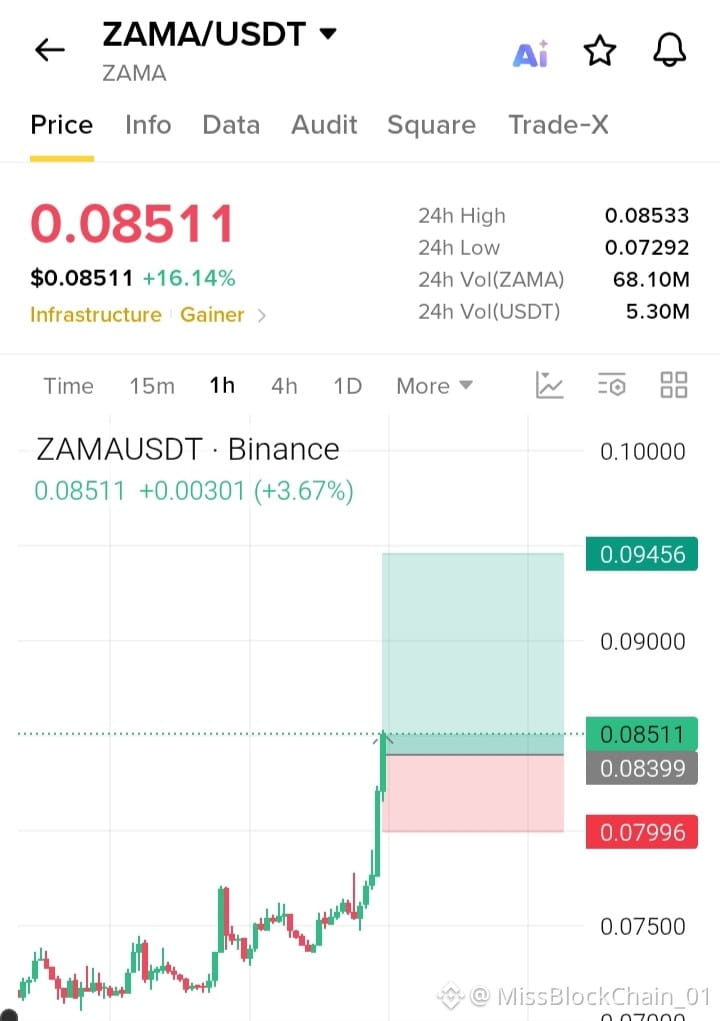
Guys, $ZAMA is breaking out with strong momentum. If buyers hold the $0.0830 area, the next move could target $0.0945.
$ZAMA — LONG
Entry: $0.0850–$0.0835
TP1: $0.0870
TP2: $0.0900
TP3: $0.0945
SL: $0.0799
{future}(ZAMAUSDT)
Can ZAMA keep pushing higher from here?
Guys, $ZAMA is breaking out with strong momentum. If buyers hold the $0.0830 area, the next move could target $0.0945.
$ZAMA — LONG
Entry: $0.0850–$0.0835
TP1: $0.0870
TP2: $0.0900
TP3: $0.0945
SL: $0.0799
Can ZAMA keep pushing higher from here?
$ZAMA — LONG
Entry: $0.0850–$0.0835
TP1: $0.0870
TP2: $0.0900
TP3: $0.0945
SL: $0.0799
Can ZAMA keep pushing higher from here?
4
413
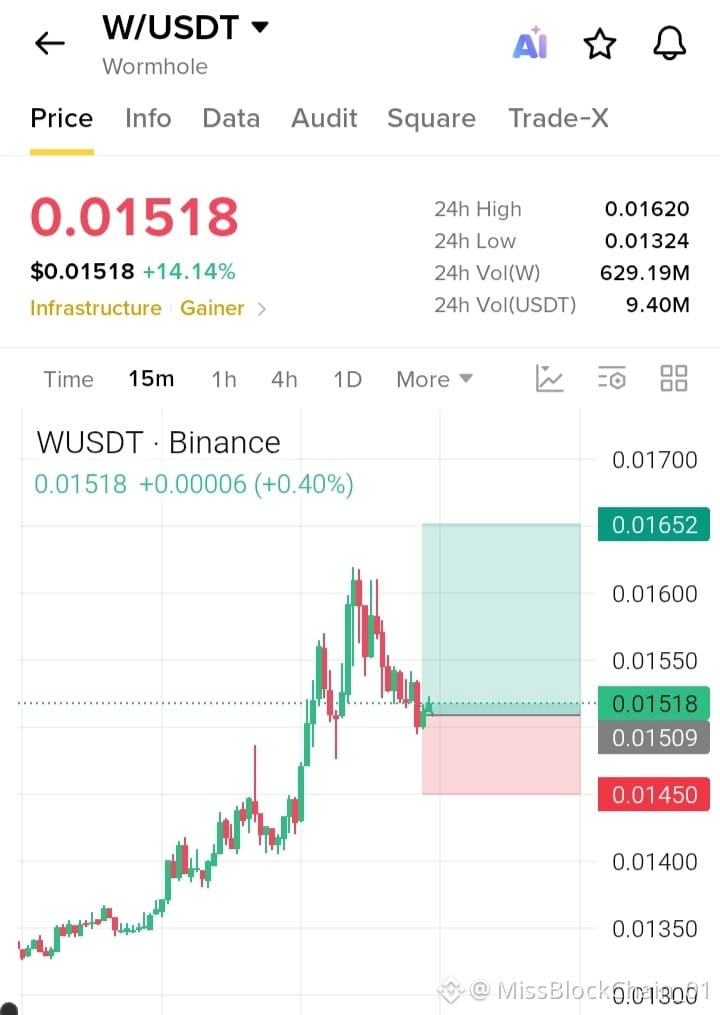
Guys, $W is holding near $0.0150 after a strong breakout. If buyers defend this support, the next move could target $0.0165.
$W — LONG
Entry: $0.0152–$0.0150
TP1: $0.0155
TP2: $0.0160
TP3: $0.0165
SL: $0.0145
Can $W reclaim $0.0160 and push higher?
Guys, $W is holding near $0.0150 after a strong breakout. If buyers defend this support, the next move could target $0.0165.
$W — LONG
Entry: $0.0152–$0.0150
TP1: $0.0155
TP2: $0.0160
TP3: $0.0165
SL: $0.0145
Can $W reclaim $0.0160 and push higher?
$W — LONG
Entry: $0.0152–$0.0150
TP1: $0.0155
TP2: $0.0160
TP3: $0.0165
SL: $0.0145
Can $W reclaim $0.0160 and push higher?
2
541
·
--
Bullish
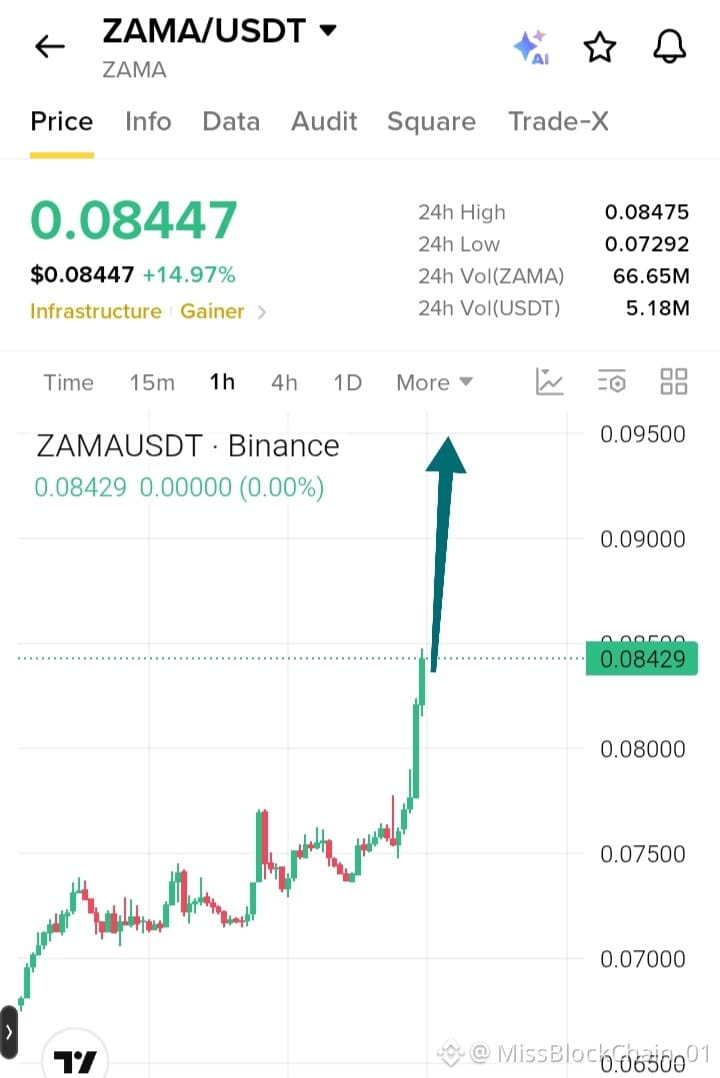
Guys, $ZAMA is breaking out with strong bullish momentum after consolidating near $0.075. Buyers are in control for now, and a move toward $0.095 is possible if the breakout holds.
$ZAMA — LONG
Entry: $0.0840–$0.0820
TP1: $0.0870
TP2: $0.0910
TP3: $0.0950
SL: $0.0780
{future}(ZAMAUSDT)
Can ZAMA extend this breakout toward $0.095?
Guys, $ZAMA is breaking out with strong bullish momentum after consolidating near $0.075. Buyers are in control for now, and a move toward $0.095 is possible if the breakout holds.
$ZAMA — LONG
Entry: $0.0840–$0.0820
TP1: $0.0870
TP2: $0.0910
TP3: $0.0950
SL: $0.0780
Can ZAMA extend this breakout toward $0.095?
$ZAMA — LONG
Entry: $0.0840–$0.0820
TP1: $0.0870
TP2: $0.0910
TP3: $0.0950
SL: $0.0780
Can ZAMA extend this breakout toward $0.095?
3
247
·
--
Bullish
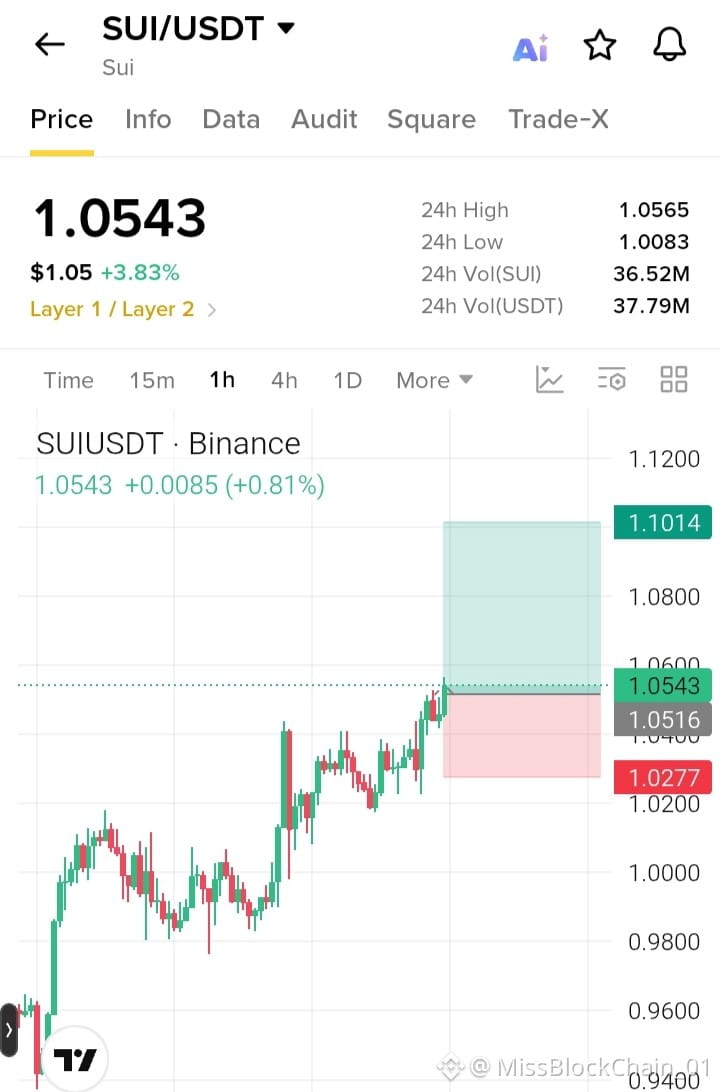
Guys, $SUI is building bullish momentum with higher lows and a push toward $1.06 resistance. If buyers hold the breakout zone, the next move could target $1.10.
$SUI — LONG
{future}(SUIUSDT)
Entry: $1.0540–$1.0510
TP1: $1.0700
TP2: $1.0850
TP3: $1.1010
SL: $1.0270
Can SUI break above $1.06 and continue higher?
Guys, $SUI is building bullish momentum with higher lows and a push toward $1.06 resistance. If buyers hold the breakout zone, the next move could target $1.10.
$SUI — LONG
Entry: $1.0540–$1.0510
TP1: $1.0700
TP2: $1.0850
TP3: $1.1010
SL: $1.0270
Can SUI break above $1.06 and continue higher?
$SUI — LONG
Entry: $1.0540–$1.0510
TP1: $1.0700
TP2: $1.0850
TP3: $1.1010
SL: $1.0270
Can SUI break above $1.06 and continue higher?
1
4
380
·
--
Bullish
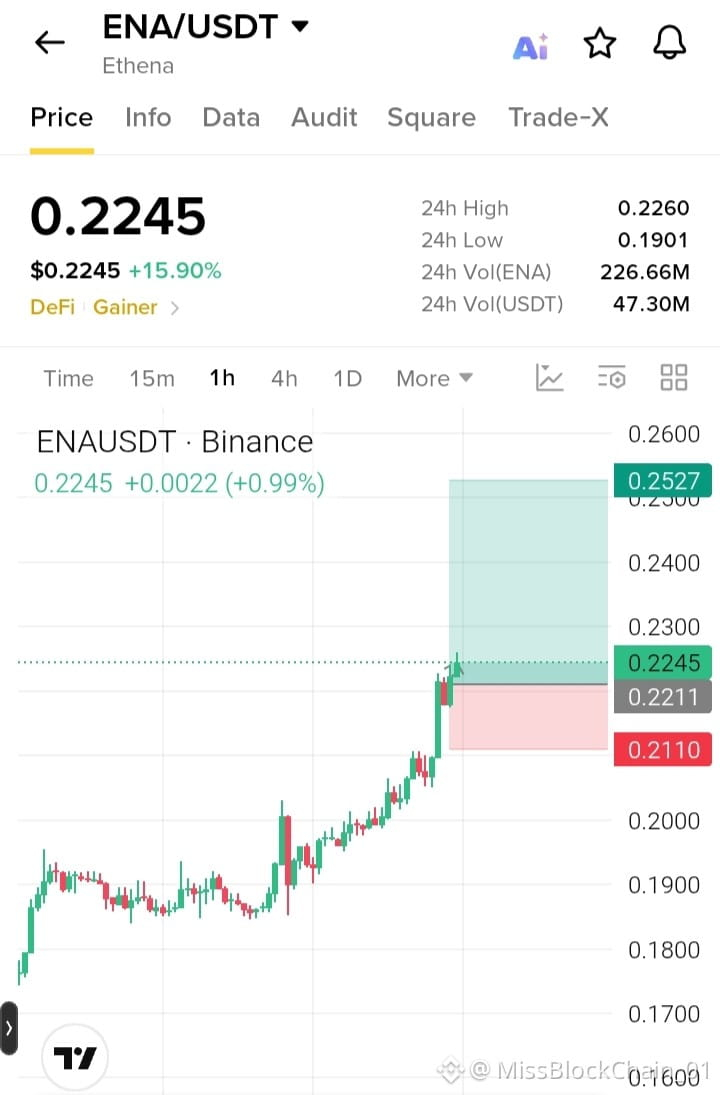
Guys, $ENA is pushing higher with strong bullish momentum after breaking above the $0.20 zone. If buyers defend the breakout, the next target could be $0.252.
$ENA — LONG
{future}(ENAUSDT)
Entry: $0.2240–$0.2210
TP1: $0.2320
TP2: $0.2420
TP3: $0.2520
SL: $0.2110
Can ENA extend this rally toward $0.25?
Guys, $ENA is pushing higher with strong bullish momentum after breaking above the $0.20 zone. If buyers defend the breakout, the next target could be $0.252.
$ENA — LONG
Entry: $0.2240–$0.2210
TP1: $0.2320
TP2: $0.2420
TP3: $0.2520
SL: $0.2110
Can ENA extend this rally toward $0.25?
$ENA — LONG
Entry: $0.2240–$0.2210
TP1: $0.2320
TP2: $0.2420
TP3: $0.2520
SL: $0.2110
Can ENA extend this rally toward $0.25?
1
546
·
--
Bullish
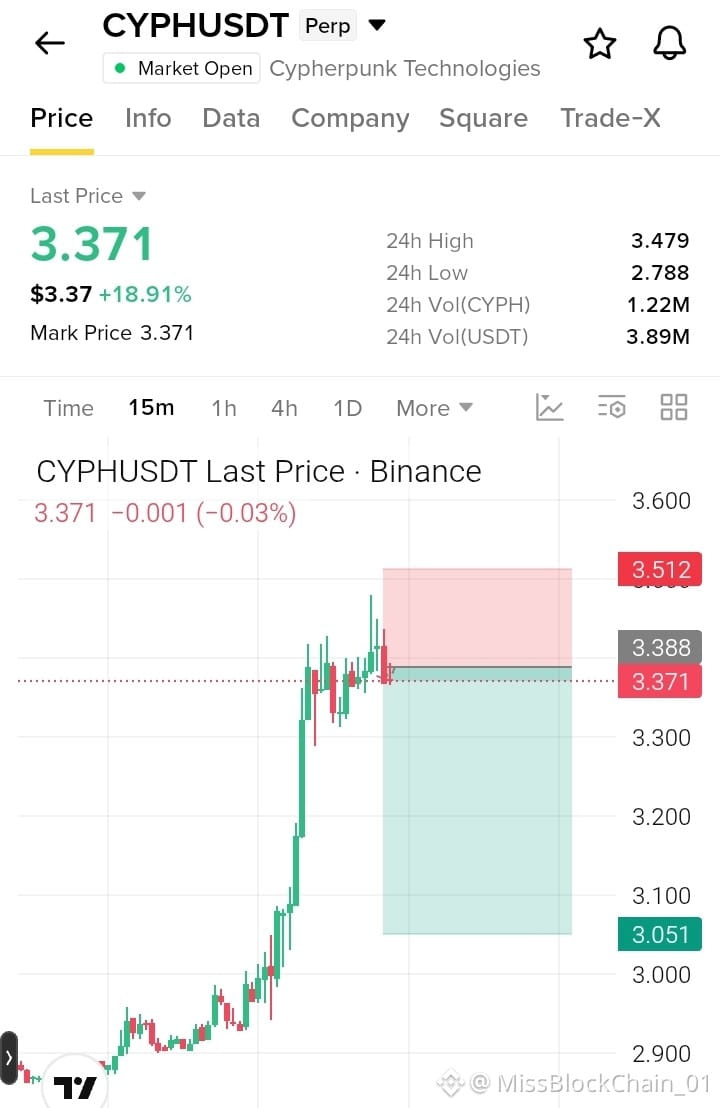
Guys, $CYPH is consolidating after a sharp rally, but the recent rejection near $3.48 suggests sellers may be stepping in. If resistance holds, a pullback toward $3.05 could follow.
$CYPH — SHORT
Entry: $3.38–$3.42
TP1: $3.30
TP2: $3.18
TP3: $3.05
SL: $3.51
{future}(CYPHUSDT)
Will sellers take control, or can CYPH break above resistance?
Guys, $CYPH is consolidating after a sharp rally, but the recent rejection near $3.48 suggests sellers may be stepping in. If resistance holds, a pullback toward $3.05 could follow.
$CYPH — SHORT
Entry: $3.38–$3.42
TP1: $3.30
TP2: $3.18
TP3: $3.05
SL: $3.51
Will sellers take control, or can CYPH break above resistance?
$CYPH — SHORT
Entry: $3.38–$3.42
TP1: $3.30
TP2: $3.18
TP3: $3.05
SL: $3.51
Will sellers take control, or can CYPH break above resistance?
2
295
·
--
Bullish
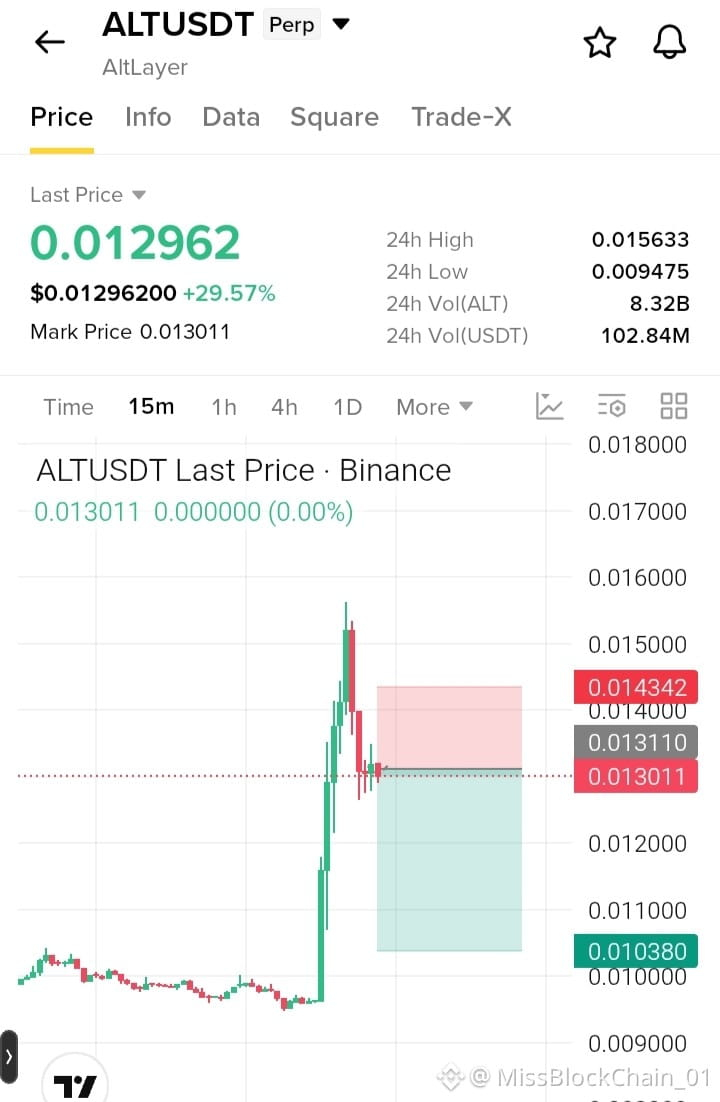
Guys, $ALT is showing weakness after a sharp pump and rejection near $0.0156. If sellers maintain control below $0.0131, a deeper pullback toward $0.0104 could follow.
$ALT — SHORT
{future}(ALTUSDT)
Entry: $0.01310–$0.01340
TP1: $0.01250
TP2: $0.01150
TP3: $0.01040
SL: $0.01435
Will ALT continue correcting or surprise sellers with another bounce?
Guys, $ALT is showing weakness after a sharp pump and rejection near $0.0156. If sellers maintain control below $0.0131, a deeper pullback toward $0.0104 could follow.
$ALT — SHORT
Entry: $0.01310–$0.01340
TP1: $0.01250
TP2: $0.01150
TP3: $0.01040
SL: $0.01435
Will ALT continue correcting or surprise sellers with another bounce?
$ALT — SHORT
Entry: $0.01310–$0.01340
TP1: $0.01250
TP2: $0.01150
TP3: $0.01040
SL: $0.01435
Will ALT continue correcting or surprise sellers with another bounce?
2
537
·
--
Bullish
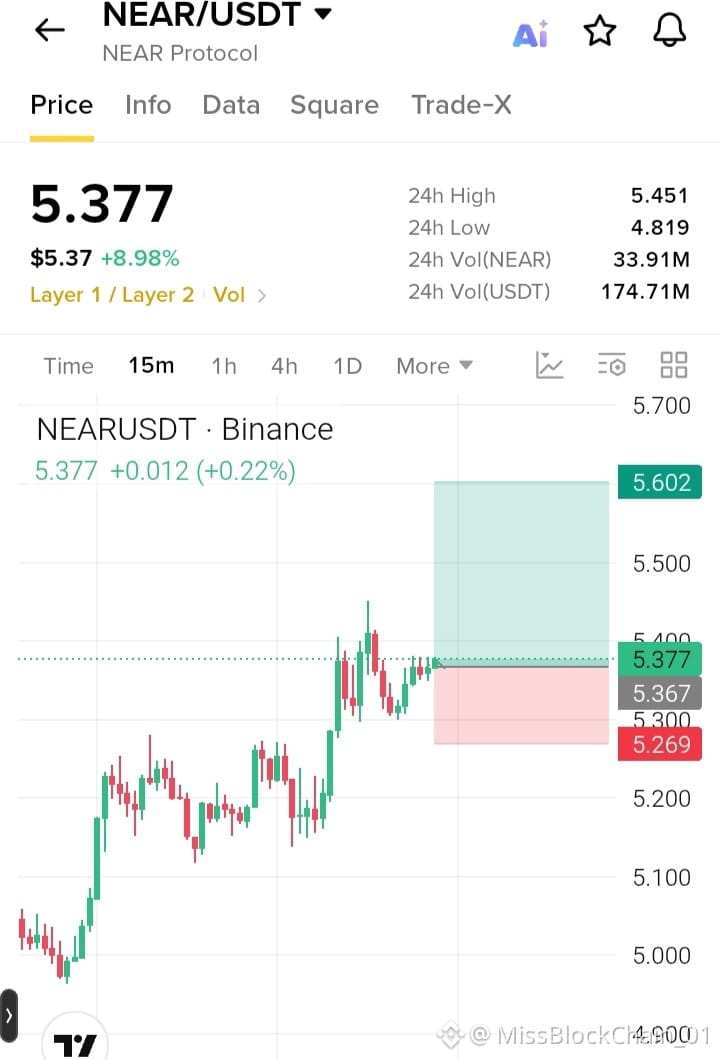
Guys, $NEAR is holding above the $5.36 support zone after a strong breakout. If buyers maintain momentum, the next targets could be $5.45 and $5.60.
$NEAR — LONG
{future}(NEARUSDT)
Entry: $5.38–$5.34
TP1: $5.45
TP2: $5.52
TP3: $5.60
SL: $5.26
Can NEAR break higher from this consolidation?
Guys, $NEAR is holding above the $5.36 support zone after a strong breakout. If buyers maintain momentum, the next targets could be $5.45 and $5.60.
$NEAR — LONG
Entry: $5.38–$5.34
TP1: $5.45
TP2: $5.52
TP3: $5.60
SL: $5.26
Can NEAR break higher from this consolidation?
$NEAR — LONG
Entry: $5.38–$5.34
TP1: $5.45
TP2: $5.52
TP3: $5.60
SL: $5.26
Can NEAR break higher from this consolidation?
1
433
·
--
Bullish
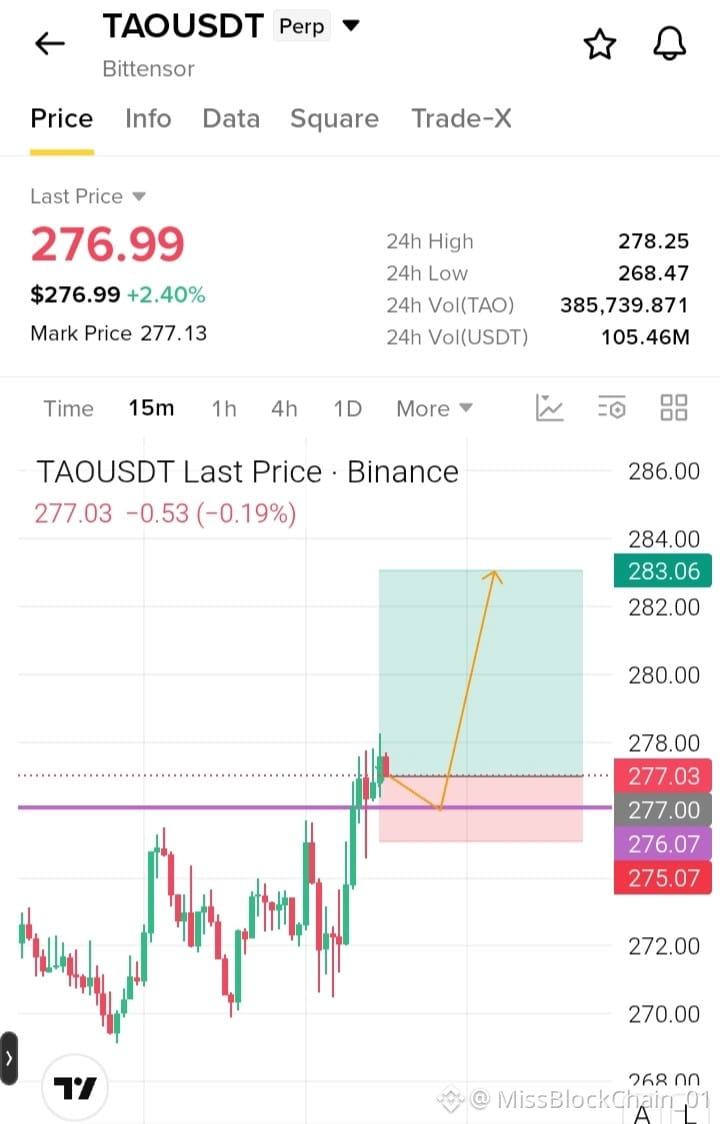
Guys, $TAO is holding above the $277 support zone after a strong breakout. If buyers defend this level, the next move could target $283.
$TAO — LONG
{future}(TAOUSDT)
Entry: $277.00–$276.00
TP1: $279.00
TP2: $281.00
TP3: $283.00
SL: $275.00
Can TAO push toward $283 from here?
Guys, $TAO is holding above the $277 support zone after a strong breakout. If buyers defend this level, the next move could target $283.
$TAO — LONG
Entry: $277.00–$276.00
TP1: $279.00
TP2: $281.00
TP3: $283.00
SL: $275.00
Can TAO push toward $283 from here?
$TAO — LONG
Entry: $277.00–$276.00
TP1: $279.00
TP2: $281.00
TP3: $283.00
SL: $275.00
Can TAO push toward $283 from here?
2
560
·
--
Bullish
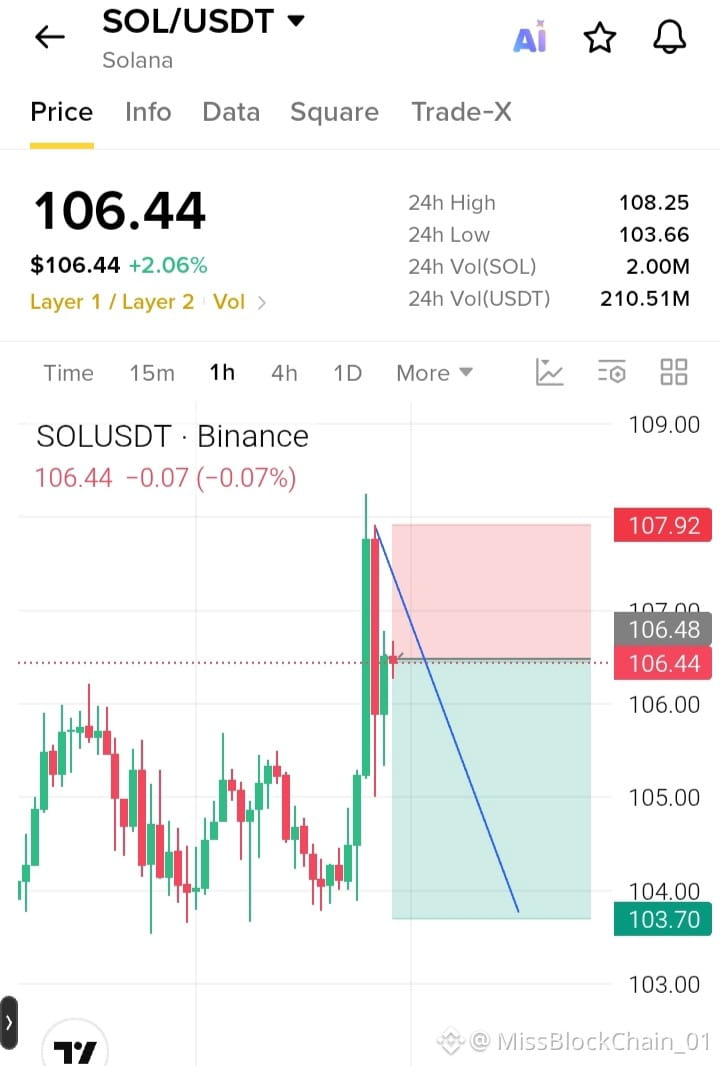
Guys, $SOL faced a sharp rejection near $107.8 after a sudden spike. If resistance holds and selling pressure builds, price could revisit the $104–$103.70 support zone.
#SOL — SHORT
{future}(SOLUSDT)
Entry: $106.44–$106.48
TP1: $105.50
TP2: $104.50
TP3: $103.70
SL: $107.92
Will SOL continue correcting or reclaim $107? Wait for bearish confirmation before entering.
Guys, $SOL faced a sharp rejection near $107.8 after a sudden spike. If resistance holds and selling pressure builds, price could revisit the $104–$103.70 support zone.
#SOL — SHORT
Entry: $106.44–$106.48
TP1: $105.50
TP2: $104.50
TP3: $103.70
SL: $107.92
Will SOL continue correcting or reclaim $107? Wait for bearish confirmation before entering.
#SOL — SHORT
Entry: $106.44–$106.48
TP1: $105.50
TP2: $104.50
TP3: $103.70
SL: $107.92
Will SOL continue correcting or reclaim $107? Wait for bearish confirmation before entering.
3
677
·
--
Bullish
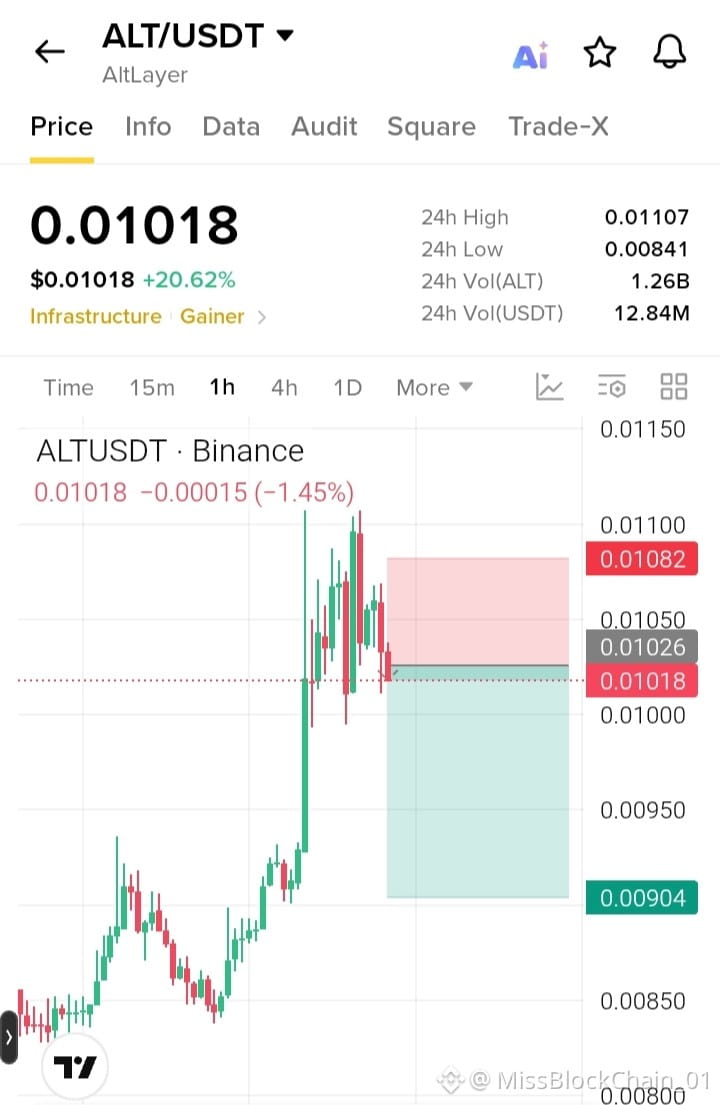
Guys, $ALT is showing rejection after a sharp breakout, with price slipping back toward $0.0100. If sellers maintain control, a deeper pullback could follow.
ALT — SHORT
Entry: $0.01018–$0.01026
TP1: $0.00980
TP2: $0.00940
TP3: $0.00904
SL: $0.01082
{future}(ALTUSDT)
Will ALT continue correcting or reclaim $0.0105? Wait for bearish confirmation before entering.
Guys, $ALT is showing rejection after a sharp breakout, with price slipping back toward $0.0100. If sellers maintain control, a deeper pullback could follow.
ALT — SHORT
Entry: $0.01018–$0.01026
TP1: $0.00980
TP2: $0.00940
TP3: $0.00904
SL: $0.01082
Will ALT continue correcting or reclaim $0.0105? Wait for bearish confirmation before entering.
ALT — SHORT
Entry: $0.01018–$0.01026
TP1: $0.00980
TP2: $0.00940
TP3: $0.00904
SL: $0.01082
Will ALT continue correcting or reclaim $0.0105? Wait for bearish confirmation before entering.
4
631
Log in to explore more content
Join global crypto users on Binance Square
⚡️ Get latest and useful information about crypto.
💬 Trusted by the world’s largest crypto exchange.
👍 Discover real insights from verified creators.
Email / Phone number